the column oven - umass amherst column... · 4 the column oven oven capabilities ... to create an...
TRANSCRIPT

102
4 The Column Oven
Oven capabilities
Oven safety
Configuring the ovenProcedure: Setting up an isothermal
run
Making a temperature-programmed runOven temperature programming
setpointsOven ramp rates
Procedure: Setting up a single-rampprogram
Procedure: Setting up a multiple-ramp program
Fast chromatographyFast-heating ovenConfiguring the oven
Using the oven insert for fastchromatographyTo install the oven insertRemoving the insert
Cryogenic operationCryogenic control setpoints

103103
The Column Oven
Oven capabilities
The oven holds two inlets and two detectors, up to four valves in a heated box on top of the oven and two valves inside the oven, and either capillary or packed columns.
Figure 13 Column oven
Capability Range
Temperature range –80°C (liquid N2) or –60°C (CO2) to the configured limit
Maximum temperature 450°C
Temperature programming Up to six ramps
Maximum run time 999.99 minutes
Temperature ramp rates 0 to 120°C/min, depending on instrument configuration
On/Offswitch Oven door
latch

104104
The Column OvenOven safety
Oven safety
For safety, opening the oven door turns off power to the oven heater, fan, and cryogenic valve (if installed) but maintains the setpoints in memory.
Closing the oven door returns the oven to normal operation.
If the oven cannot attain or maintain an entered setpoint temperature during normal above-ambient operation, a problem is assumed and the oven is switched off.
Possible problems include:
• The oven vent flaps not working• The oven fan, heater, or temperature sensor not working properly• An electronic problemWhen a shutdown occurs, the Off line in the oven control table blinks and the oven remains off until switched on again via [Oven] [On] or by editing the Tempsetpoint in the oven control table.
When the oven shuts itself off, the following display appears:
See “Shutdown” for more information on shutdowns.

105105
The Column OvenConfiguring the oven
Configuring the oven
Oven configuration sets maximum temperature, equilibration time, and the cryogenic setpoints, if cryo is installed.
Maximum temp Maximum allowable oven temperature setpoint. Some accessories, such as the valve box, valves and columns have specific temperature limits. When configuring Maximum temp, these limits should be considered so that the accessories are not damaged. Oven setpoints are verified as they are entered; a message is displayed when an entered setpoint is inconsistent with a previously defined maximum.
Equib time The time required for the oven temperature to equilibrate after temperature is modified. Equilibration time begins when the actual oven temperature comes within 1°C of the oven temperature setting. The Equibtime setpoint can be 0 to 999.99 minutes.
Press [Config] [Oven] Maximum temp setpoint range: 70 to 450°C

106106
The Column OvenConfiguring the oven
Procedure: Setting up an isothermal run
An isothermal run is one in which the oven is maintained at a constant temperature. To create an isothermal run, set Rate 1 to zero.
1. Press [Oven] to access the oven control table.
2. Enter the oven temperature for the isothermal run. Note that your actual and setpoint values will probably differ from the example.
3. Enter the number of minutes (Init time) that you want the oven to stay at this temperature. This time is the duration of the run.
4. If Rate 1 is not 0, enter zero for an isothermal run.

107107
The Column OvenMaking a temperature-programmed run
Making a temperature-programmed run
You can program the oven temperature from an initial temperature to a final temperature using up to six ramps during a run.
A single ramp temperature program raises the initial oven temperature to a specified final temperature at a specified rate and holds at the final temperature for a specified period of time.
Figure 14 Single ramp
The multiple-ramp temperature program is similar. You can program the oven from an initial temperature to a final temperature, but with various rates, times, and temperatures in between. Multiple ramps can also be programmed for temperature decreases as well as increases.
Figure 15 Multiple ramp
Temp(Init temp) Init time
Rate
Final time
Final temp
Temp
Final temp 2Final time 2
Rate 2
Final time 1Final temp 1
Init time
Rate 1

108108
The Column OvenMaking a temperature-programmed run
Oven temperature programming setpoints
Temp Starting temperature of a temperature programmed run. When the program begins, this value is copied into a temporary setpoint called Inittemp. At the end of the run, Temp is reset to the value in Init temp and the oven returns to its starting temperature.
Init temp Equal to Temp except during a programmed run (Init tempremains constant; Temp changes as directed by the program). Changing Init
temp changes the starting temperature for the next run. Changing Temp causes an immediate change but the value is not saved to the next run.
Init time Time in minutes that the oven will stay at the starting temperature after a programmed run has begun.
Rate The rate in °C/min at which the oven will be heated or cooled.
Final temp Temperature of the oven at the end of a heating or cooling rate.
Final time Time in minutes that the oven will be held at the final temperature of a temperature-programmed rate.
Total length of a run is determined by its oven temperature program. The maximum allowable time for a run is 999.99 minutes. If the program is still running at that time, the run terminates.

109109
The Column OvenMaking a temperature-programmed run
Oven ramp rates
To use the fast oven ramp rates (a 240 V power option is required), your electric service must be able to supply ≥ 200V at ≥ 15 Amp.
The highest rate that you can achieve depends on many factors, including the room temperature, temperatures of the inlets and detectors, the amount of material inside the oven (columns, valves, etc.), and whether or not this is the first run of the day. The optional oven insert for fast chromatography (see page 113), increases oven ramp rates for the back column. Table 10 lists typical oven ramp rates.
Table 10 Oven Ramp Rates
100/120 V oven ramp rate (°C/minute)
200/220/230/240 V oven ramp rate (°C/minute)
Temperature range (°C)
Without insert
With optional insert
Without insert
With optional insert
50 to 70 75 120 120 120
70 to 115 45 95 95 120
115 to 175 40 65 65 110
175 to 300 30 45 45 80
300 to 450 20 35 35 65

110110
The Column OvenMaking a temperature-programmed run
Procedure: Setting up a single-ramp program
This example increases the oven temperature from 50°C to 150°C at a rate of 10°C/minute.
1. Press [Oven] to access the oven control table.
2. Enter a starting temperature (Temp).
3. Enter the time (Init time) that you want the oven to stay at Temp.
4. Enter the rate (Rate 1) at which the oven temperature is to increase.
5. Enter the final temperature (Final temp 1).
6. Enter the time (Final time 1) the oven is to hold Final temp 1.

111111
The Column OvenMaking a temperature-programmed run
7. To end the oven ramp program after Ramp 1, set Rate 2 to zero.
Procedure: Setting up a multiple-ramp program
Set up the first oven ramp as described on the preceding page.
In a multiple-ramp temperature program, the Final time for one ramp is also the Init time for the next ramp. Thus, there is only one Init time(before Ramp 1).
1. Enter the rate (Rate 2) at which you want the oven temperature to increase for the second oven ramp.
2. Enter the final temperature (Final temp 2).
3. Enter the number of minutes (Final time 2) that you want the oven to hold the final temperature.
4. To end the temperature program after Ramp 2, set Rate 3 to zero.
To add additional oven ramps, repeat the steps described above.

112112
The Column OvenFast chromatography
Fast chromatography
The 6890 GC has several options for increasing throughput and cycle time. These are the fast heating oven (optional in some countries), the oven insert for fast chromatography (see page 113), and cryogenic cooling (see page 116).
Fast-heating oven
The fast-heating oven requires the following:
• A GC equipped with a fast-heating oven. A fast heating oven is standard with most 200–240 V power option GCs. A GC ordered for the United States, Canada, Switzerland, China, and Australia must be ordered with the fast heating oven option, or must be converted (contact Agilent service).
• The electric service must be capable of providing ≥ 200 V at ≥ 15 amperes.• In the United States, the electric service must be 240 V.
Configuring the oven
GCs ordered with the fast-heating oven will be properly configured from the factory. If you convert a regular oven to a fast-heating oven, and have the correct electric service installed, you will need to configure the GC to use the new oven heater properly.
WARNING Do not perform this procedure unless your GC meets all of the criteria listed under “Fast-heating oven” above. Conversion from a regular to fast-heating oven (and the reverse) requires replacement of the oven heater, internal fuses, and power circuitry by qualified Agilent personnel. Changing the oven configuration at the keypad without making the proper hardware changes can damage your instrument and may present a fire hazard.
1. Press [Config], scroll to [Instrument], and press [Enter].2. To change the oven type, press [.][.], then [Mode/Type].
3. Select the correct oven type (fast or regular), then press [Enter].

113113
The Column OvenUsing the oven insert for fast chromatography
Using the oven insert for fast chromatography
The 6890 Oven Insert for Fast Chromatography reduces the oven volume so that the column and sample heat more quickly, yielding faster separation and faster chromatography. Furthermore, the smaller volume oven cools faster than a full-sized oven, reducing the overall analytical cycle time.
Figure 16 Oven insert
The oven insert is used with any inlet, column, and detector mounted in the back position. It is not compatible with any accessory which obstructs access to the back of the oven or which requires the use of either the front inlet or the front part of the oven.
To install the oven insert
1. Turn off your GC oven and allow it to cool.
Caution The cutouts in the interior oven walls may have sharp edges that can damage the oven insert fabric.
Front Back
Carrying strap
Metal surfacesmay become hot
Warning!

114114
The Column OvenUsing the oven insert for fast chromatography
2. Orient the oven insert as shown in Figure 17 below. Tilt the upper edge away from you and insert it between the column fittings for the front inlet/detector and the back column hanger.
Figure 17 Installing the insert in front of the back column hanger
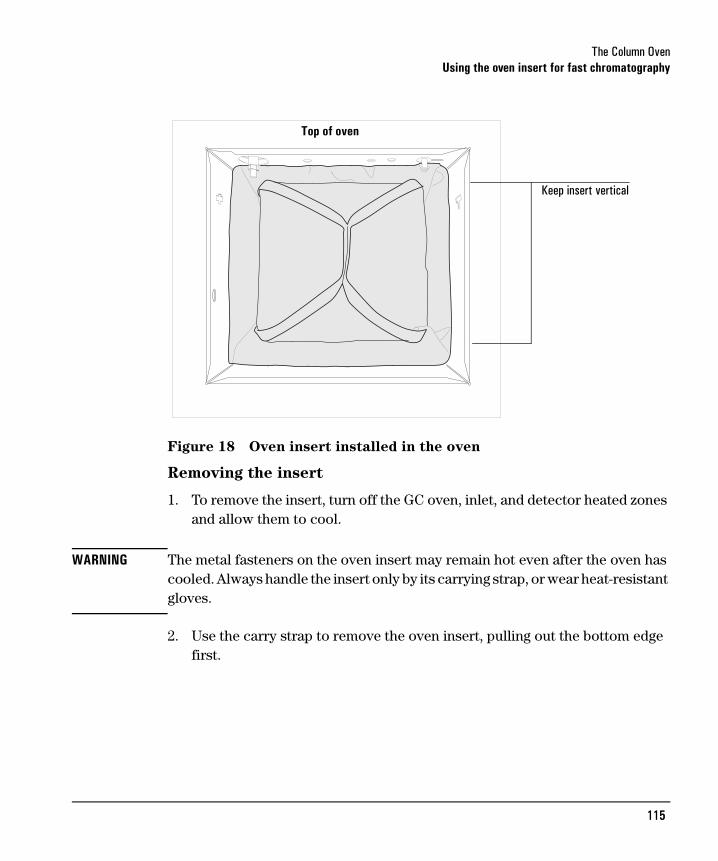
3. Push the bottom of the insert into place as shown in Figure 18. Keep the insert upright as shown.
4. If a TCD, µ–ECD, or NPD is installed in the front detector position, cap off the make-up adapter and establish a purge flow.
Align insert to restagainst front edgeof back column hanger
Carrying strap
Align behind frontinlet, if installed
is vertical
115115
The Column OvenUsing the oven insert for fast chromatography
Figure 18 Oven insert installed in the oven
Removing the insert
1. To remove the insert, turn off the GC oven, inlet, and detector heated zones and allow them to cool.
WARNING The metal fasteners on the oven insert may remain hot even after the oven has cooled. Always handle the insert only by its carrying strap, or wear heat-resistant gloves.
2. Use the carry strap to remove the oven insert, pulling out the bottom edge first.
Keep insert vertical
Top of oven

116116
The Column OvenCryogenic operation
Cryogenic operation
The cryogenic valve lets you operate the oven below ambient temperature. Minimum attainable oven temperature depends on the type of valve installed.
The GC senses the presence and type of cryogenic valve and disallows setpoints if no valve is installed. When cryogenic cooling is not needed or cryogenic coolant is not available, the cryogenic operation should be turned off. If this is not done, proper oven temperature control may not be possible, particularly at temperatures near ambient.
For information on installation and coolants see “Cryogenic cooling requirements”.
Cryogenic control setpoints
All cryogenic setpoints are in the [Config] [Oven] control table.
Cryo [ON] enables cryogenic cooling, [OFF] disables it.
Quick cryo cool This feature is separate from Cryo. Quick cryo cool makes the oven cool faster after a run than it would without assistance. This feature is useful when maximum sample throughput is necessary, however it does use more coolant. Quick cryo cool turns off soon after the oven reaches its setpoint and Cryo takes over, if needed.
Ambient temp The temperature in the laboratory. This setpoint determines the temperature at which cryogenic cooling is enabled:
If your instrument is not equippedwith the cryogenic option, part of the display will look like this
Cryo setpoints

117117
The Column OvenCryogenic operation
• Ambient temp + 25°C, for regular cryo operation• Ambient temp + 45°C, for Quick Cryo Cool.Cryo timeout Cryo timeout occurs, and the oven shuts off, when a run does not start within a specified time (10 to 120 minutes) after the oven equilibrates. Turning cryo timeout off disables this feature. We recommend that it be turned on because cryo timeout conserves coolant at the end of a sequence or if automation fails.
Cryo fault Shuts the oven down if it does not reach setpoint temperature after 16 minutes of continuous cryo operation. Note that this is the time to reach the setpoint, not the time to stabilize and become ready at the setpoint. For example, with a cool on-column inlet and cryo control in the oven track mode, it may take the oven 20 to 30 minutes to achieve readiness.
If the temperature goes below the minimum allowed temperature (–90°C for liquid nitrogen,–70°C for liquid CO2), the oven will shut down with the following
display: