the easy way to an affordable kitchen - timber and wood...
TRANSCRIPT

The easy way to an
All Insta-Cupboardcarcass units are supplied pre-assembled tosimplify installationChoose the colour of your doors and worktops from our extensive range and we’ll cut, edge and prepare these for you, plus supply handles, hinges, sinks, taps and more
In association with
affordablekitchen
quality, affordable, pre-assembled
Your Project Partner
70531-TC Insta-Cupboards Step By Step_B.indd 1 2015/07/20 12:50 PM

600 x 720 (520)* x 300
600 x 560 x 880 (650)*
for lab sink
600 x 720 x 300mm 600 x 600 x 720mm
Corner unit 900 x 900 x 880mm
300 x 560 x 880mm
300 x 300 x 720mm600 x 400 x 450mm
300 x 560 x 880mm and
450 x 560 x 880mm
Drawer unit450 x 560 x 880mm
Lab sink
Corner unit Wall unit
Altered wall unit
Altered floor unit Display unit
Floor unit
Floor units Grocery unit 450 x 600 x
Microwave shelf
How to builda country-style
kitchen
www.timbercity.co.za
Your Project Partner
Quick project guide
Hard labour 6/10
Skill level 6/10
Time needed 1-2 days
BEFORE WE STARTED
We altered the 600 x 560 x 880 mm floor unit (see plan at left), making it 230 mm shorter* from the top to allow for the lab sink. We also altered one of the 600 x 720 x 300 mm wall units (see plan at left), making it 200 mm shorter* to allow extra space for the microwave unit.
YOU WILL NEED
cordless drill/screwdriverchipboard screws(8 mm x 30 mm, 6 mm x 40 mm, 8 mm x 16 mm)jigsawhole sawspirit levelwood clampmeasuring tapepencilhacksaw3 mm pilot bit6 mm masonry bitmulti squarerubber mallet
Installation Instructions
*
*
70531-TC Insta-Cupboards Step By Step_B.indd 2 2015/07/20 12:50 PM
www.timbercity.co.za
Your Project Partner
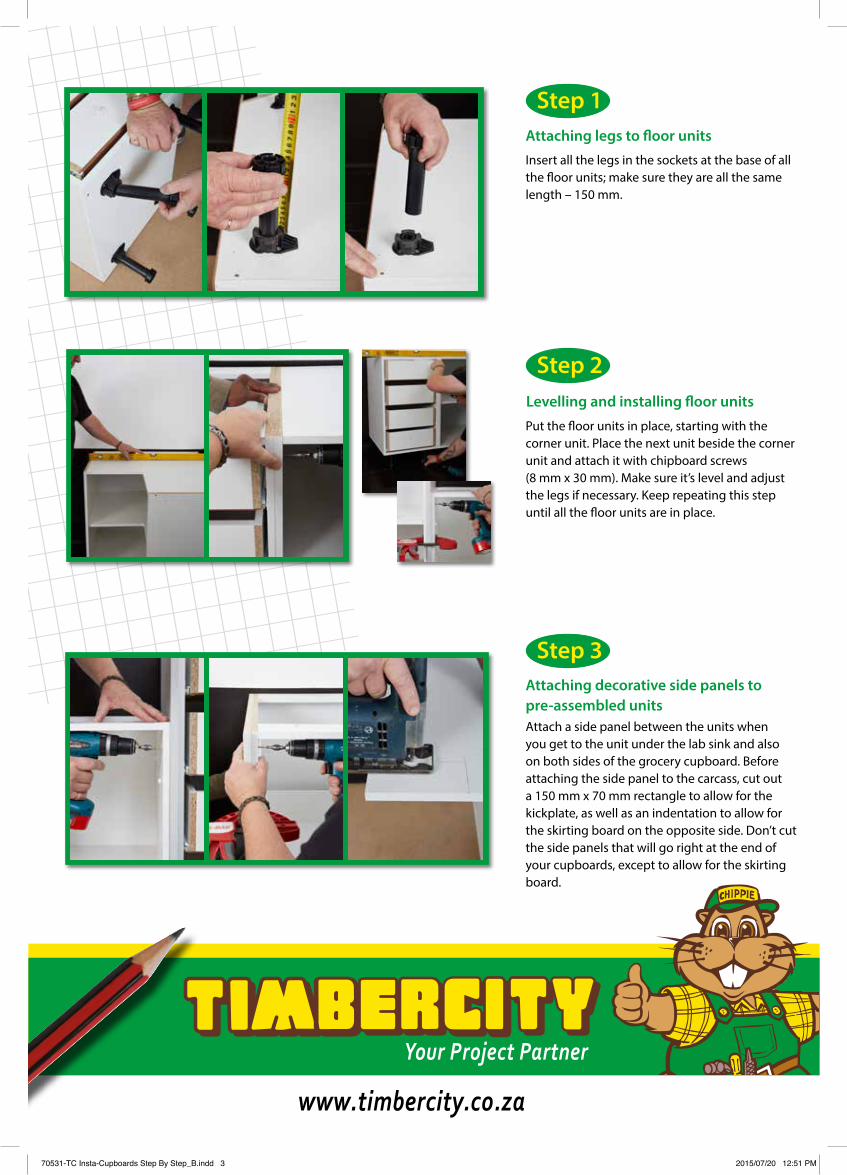
Step 1
Step 2
Step 3
Insert all the legs in the sockets at the base of all the floor units; make sure they are all the same length – 150 mm.
Attaching legs to floor units
Levelling and installing floor units
Attaching decorative side panels to pre-assembled unitsAttach a side panel between the units when you get to the unit under the lab sink and also on both sides of the grocery cupboard. Before attaching the side panel to the carcass, cut out a 150 mm x 70 mm rectangle to allow for the kickplate, as well as an indentation to allow for the skirting board on the opposite side. Don’t cut the side panels that will go right at the end of your cupboards, except to allow for the skirting board.
Put the floor units in place, starting with the corner unit. Place the next unit beside the corner unit and attach it with chipboard screws (8 mm x 30 mm). Make sure it’s level and adjust the legs if necessary. Keep repeating this step until all the floor units are in place.
70531-TC Insta-Cupboards Step By Step_B.indd 3 2015/07/20 12:51 PM
www.timbercity.co.za
Your Project Partner
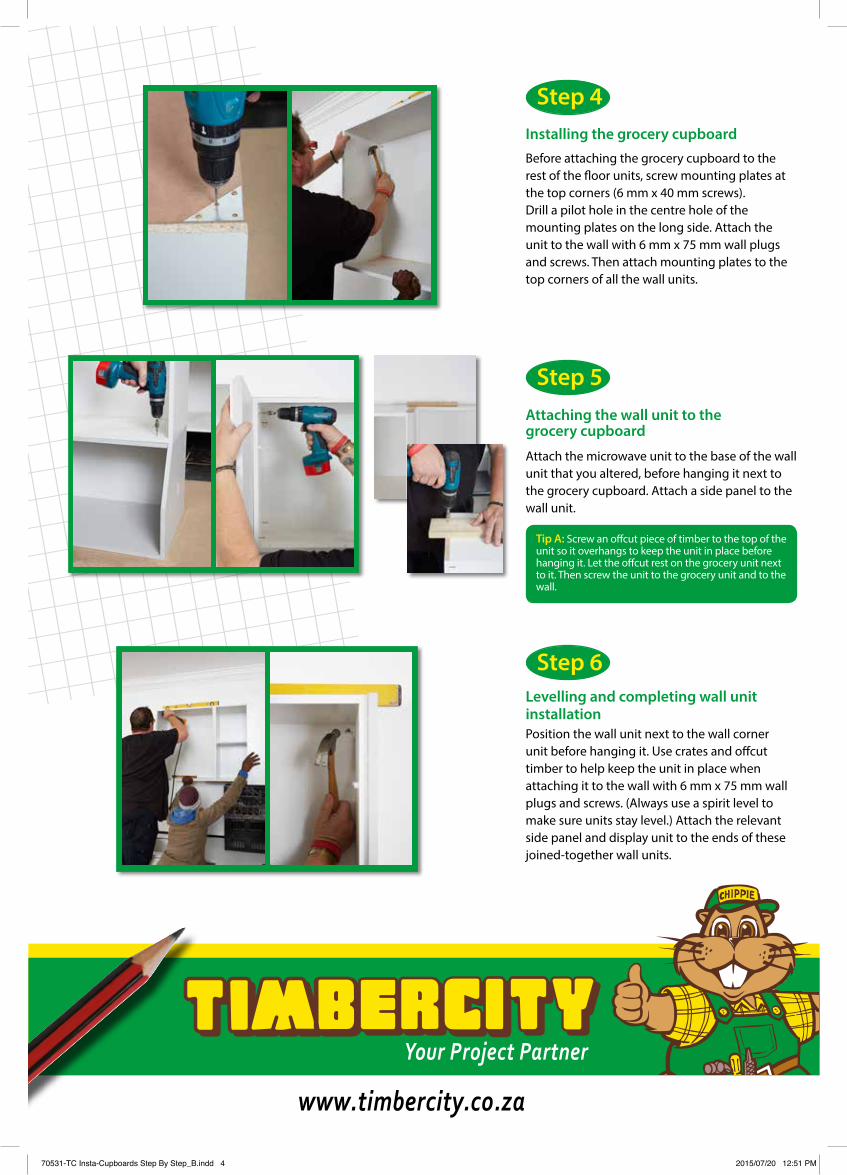
Step 4
Step 5
Step 6
Before attaching the grocery cupboard to the rest of the floor units, screw mounting plates at the top corners (6 mm x 40 mm screws). Drill a pilot hole in the centre hole of the mounting plates on the long side. Attach the unit to the wall with 6 mm x 75 mm wall plugs and screws. Then attach mounting plates to the top corners of all the wall units.
Attach the microwave unit to the base of the wall unit that you altered, before hanging it next to the grocery cupboard. Attach a side panel to the wall unit.
Tip A: Screw an offcut piece of timber to the top of the unit so it overhangs to keep the unit in place before hanging it. Let the offcut rest on the grocery unit next to it. Then screw the unit to the grocery unit and to the wall.
Position the wall unit next to the wall corner unit before hanging it. Use crates and offcut timber to help keep the unit in place when attaching it to the wall with 6 mm x 75 mm wall plugs and screws. (Always use a spirit level to make sure units stay level.) Attach the relevant side panel and display unit to the ends of these joined-together wall units.
Installing the grocery cupboard
Levelling and completing wall unit installation
Attaching the wall unit to the grocery cupboard
70531-TC Insta-Cupboards Step By Step_B.indd 4 2015/07/20 12:51 PM
www.timbercity.co.za
Your Project Partner
Step 7
Step 8
Step 9
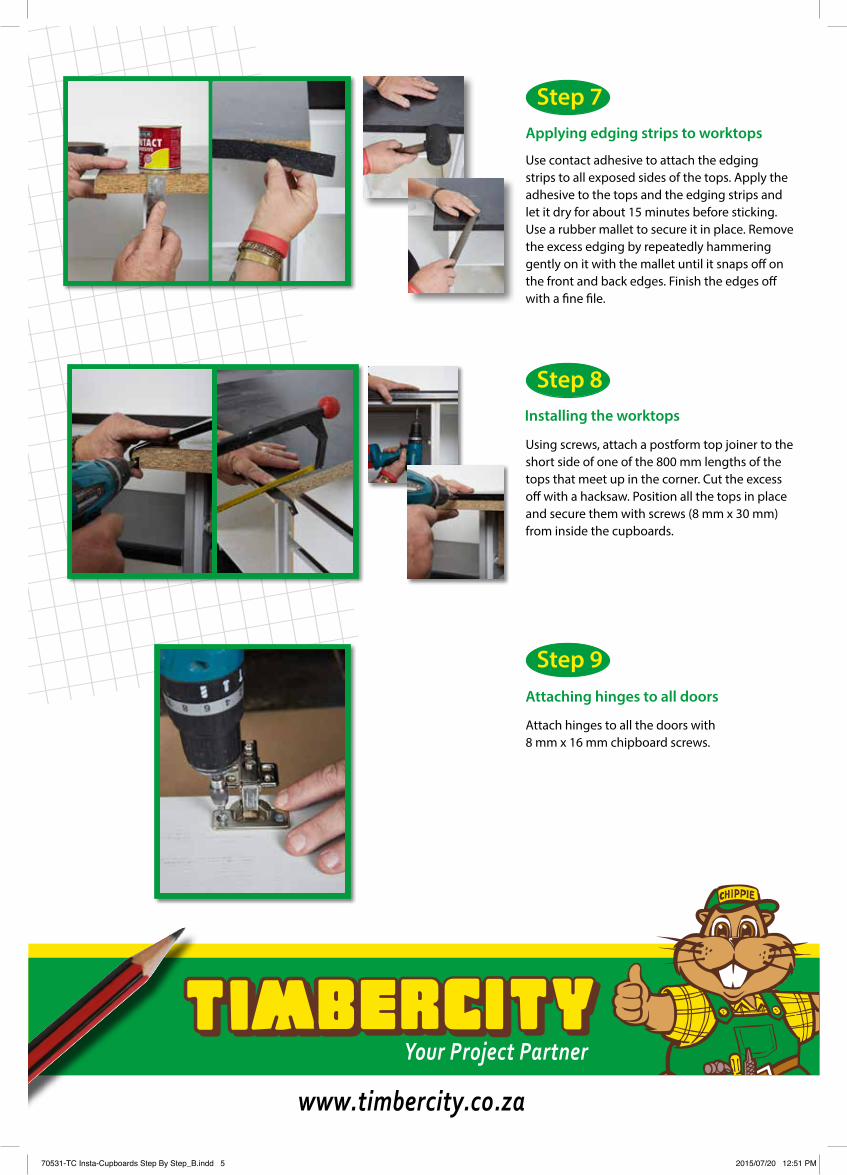
Use contact adhesive to attach the edging strips to all exposed sides of the tops. Apply the adhesive to the tops and the edging strips and let it dry for about 15 minutes before sticking. Use a rubber mallet to secure it in place. Remove the excess edging by repeatedly hammering gently on it with the mallet until it snaps off on the front and back edges. Finish the edges off with a fine file.
Using screws, attach a postform top joiner to the short side of one of the 800 mm lengths of the tops that meet up in the corner. Cut the excess off with a hacksaw. Position all the tops in place and secure them with screws (8 mm x 30 mm) from inside the cupboards.
Attach hinges to all the doors with 8 mm x 16 mm chipboard screws.
Applying edging strips to worktops
Installing the worktops
Attaching hinges to all doors
70531-TC Insta-Cupboards Step By Step_B.indd 5 2015/07/20 12:51 PM

www.timbercity.co.za
Your Project Partner
Step10
Step11
Step12
Now attach the door hinges to the inside of the cupboards.
Again using the offcut timber at the base of the cupboard (see Tip B), first attach the bottom drawer front. Then use the handle screws as spacers for the next drawer fronts before screwing them in place.
Drill holes for the handle screws and attach the handles with screws from the inside.
Hanging cupboard doors
Installing front panels on all drawers
Attaching all handles
Tip B: Clamp an offcut piece of timber to the base of the cupboard to make sure the doors are flush with the base of the cupboard.
Tip D: We made a template with offcut timber to make it easier to attach all the handles in the same position.
Tip C: Hold the door straight to the side of the cupboard with the adjustable mounting plate screw completely in. Then attach the hinge. Undo the mounting plate screw and open the door as wide as it can go, then screw it tight so the door sits perfectly.
70531-TC Insta-Cupboards Step By Step_B.indd 6 2015/07/20 12:51 PM
www.timbercity.co.za
Your Project Partner
Step13
to finish
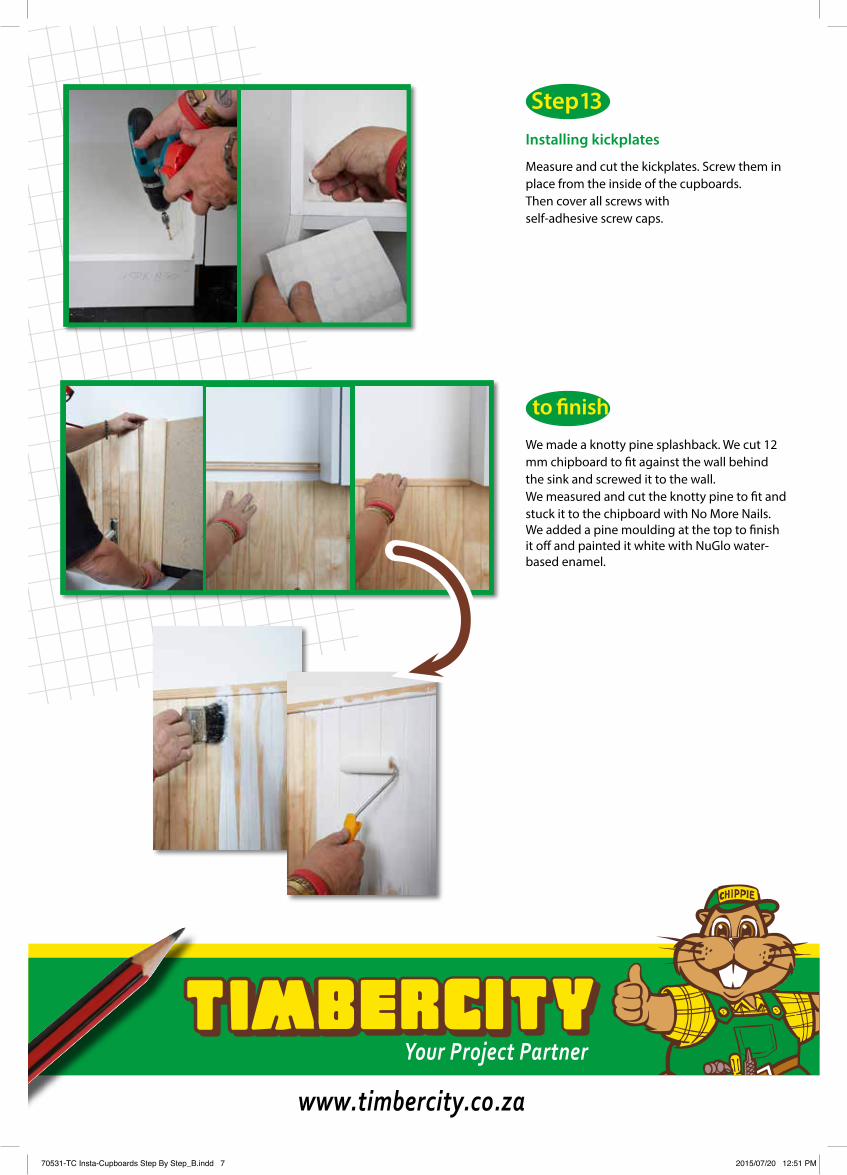
Measure and cut the kickplates. Screw them in place from the inside of the cupboards. Then cover all screws with self-adhesive screw caps.
We made a knotty pine splashback. We cut 12 mm chipboard to fit against the wall behind the sink and screwed it to the wall. We measured and cut the knotty pine to fit and stuck it to the chipboard with No More Nails. We added a pine moulding at the top to finish it off and painted it white with NuGlo water-based enamel.
Installing kickplates
70531-TC Insta-Cupboards Step By Step_B.indd 7 2015/07/20 12:51 PM