the express purchase order user manual the spectrum+ ... · pdf file1 | page the express...
TRANSCRIPT

1 | P a g e
The Express Purchase Order
User Manual
The Spectrum+ System
Georgia State University
PeopleSoft Financials
Version 8.9
(Revised 1/30/2012)
2 | P a g e
Table of Contents
1. INTRODUCTION……………………….………………………………………………………………………………………………………………………4
1.1 PURCHASING OVERVIEW……………………………………………………………………………………………………………………….4
1.2 USE OF EXPRESS POs……………………………………………………………………………………………………………………………..5
1.3 PRIMARY FUNCTIONS OF THE PO MODULE….………………………………………………………………………………………..6
2. CREATING A BASIC EXPRESS PO ……….………………………………………………………………………………………………………….…7
2.1 CREATING AN EXPRESS PO………………………………………………………………………………………………………………………7 2.1.1 ADD EXPRESS PO…………………………………………………………………………………………………………………………8 2.1.2 CHOOSE ORIGIN………………………………………………………………………………………………………………………….8 2.1.3 ENTER DEPARTMENT ID………………………………..…………………………..………………………………………………10
3. HEADER AREA…………………………..…………………………………………………..……………………………………………………………..11
3.1 SELECTING A VENDOR……………………………………………………………………………………………………………………………12 3.1.1 VENDOR SEARCH………………………………………………………………….……………………………………………………12
3.2 SELECTING A BUYER………………………………………………………………………..…………………………………………………….16 3.3 ENTERING PO DEFAULTS……………………………………………………………………………………………………………………….17 3.4 OTHER LINKS UNDER THE HEADER PANEL………….………………………………………………………………………………….21
4. LINES PANEL………………………………………………..………………………………………………….……………………………………………22
4.1 LINES………………………..…………………………………………………………………………………………………………………………..22 4.1.1 ENTERING LINE DESCRIPTION, QUANTITY, UOM AND LINE COMMENTS…………………..………………..22 4.1.2 Selecting Ship To Location…………………………………………………………………………………………………………24 4.1.3 Select a Due Date………………………………………………………………………………………………………………………27 4.1.4 Entering the Category and Price…………………………………………………………………………………………………27
4.2 DISTRIBUTIONS LINE………………..……………………………………………………………………………………………………………31
4.3 ADDING AND DELETING ROWS……………………………………..…………………………………………………………….……….31
5. EDIT/SAVE EXPRESS PO…………………………………………………...…………………………………………………………………………..35
6. BUDGET CHECKING THE EXPRESS PO………………………………………………………………….…………………………………………36
6.1 BUDGET CHECKING ERRORS IN THE EXPRESS PO…………………………..……………………………………………………….37
6.2 BUDGET CHECKING EXCEPTIONS………………………..………………………………………………………………………………….38
7. WORKFLOW APPROVAL……………………………………………………………………………………………………………………………….41
8. PO MAINTENANCE……………….………………………………………………………………………………………………………………………42

3 | P a g e
8.1 COPYING AN EXPRESS PO FROM ANOTHER EXPRESS PO……………………………….…………………………………….42
8.1.1 CREATING A TRAVEL PO/CONSULTANT PO……………………….……….………………………………………………..42
APPENDIX A: DOLLAR VALUE GRID………….…………………………………………………………………………………………………54
APPENDIX B: COMMODITY LISTING BY BUYER……………………………………………………………………………………………56

4 | P a g e
CHAPTER 1: INTRODUCTION
1.1 PURCHASING OVERVIEW
Purchasing is the business process of procuring goods and services from vendors in order to continue business operations.
Express Purchase Orders, also referred to as Express POs, are used at Georgia State University to purchase services, commodities, and equipment which have a value greater than $4,999.99 and for which competitive bidding is required by State law. The Purchasing Department will determine whether a contract, purchase order, request for quote, or request for proposal is required. There are some exceptions to this rule. If you have any questions, you should contact the Purchasing Department before entering the Express PO or refer to the Dollar Value Grid located in Appendix A of this document.
Express POs are also used for consultant agreements and blanket travel authorizations. See Consulting Contract Information and Travel Services training guides for details.
For additional information regarding purchasing polices, consult the Purchasing Department’s website at: http://www2.gsu.edu/~wwwpch/.
The training manual and policies for consultant services and travel can be found on the following websites:
http://www2.gsu.edu/~wwwfas/FinancialOperation/consultingcontract_new.html
http://www2.gsu.edu/~wwwfas/FinancialOperation/TravelServices.pdf

5 | P a g e
1.2 USE OF EXPRESS POs
The Express PO functionality provides a rapid‐entry version of the Purchase Order page. This page enables users to view Lines, Schedules, and Distributions on a single page.
Georgia State has made the decision not to use Requisitions and the eProcurement module.
Departmental requesters will use the Purchase Order as their point of entry for requesting goods or services.
Requesters will enter Express POs through the Express PO page. The Express PO will go through workflow appoval. After the Departmental approval, the Buyers in the Purchasing Department will be responsible for reviewing/updating and dispatching the final Purchase Order.
Upon completion of this manual, you will be able to enter an Express Purchase Order in the Spectrum 8.9 System, make corrections, and perform online inquiries and queries.

6 | P a g e
1.3 Primary Functions of the PO Module

7 | P a g e
Chapter 2: CREATING A BASIC EXPRESS PO: PO0020.770
Each step in the online process of entering an Express PO is described below. Compare your screen to the screen shots in the example for each step.
2.1 Creating an Express PO
Navigation:
Purchasing > Purchase Orders > Add/Update Express POs

8 | P a g e
2.1.1 Add Express PO
Click on the Add a New Value tab.
2.1.2. Choose the Origin
Click on the magnifying glass

9 | P a g e
The options you should choose are DRG (Department Regular) or PRJ (Project). ONL and FA are reserved for Central Admin areas. These options drive the workflow approval of your Express Voucher. Click on DRG or PRJ.

10 | P a g e
2.1.3. Enter Department ID
After choosing the origin, the system returns you to the main page. Under the Origin box, you will see there is now a box for the Department. Here, you will enter your 9‐digit DRG Department Number or 10‐digit PRJ Department Number for workflow approval.
You may also use the magnifying glass to search for your Department number.

11 | P a g e
When you choose the Department number from the Search list, you will be redirected to the main page.
Chapter 3: Header Area
3.1 Selecting a Vendor
In Spectrum 8.9, the vendor field is required and must be completed or you will receive an error message. There are two ways to search for a vendor; by using Vendor Search or searching for the Vendor ID.

12 | P a g e
3.1.1. Vendor Search
Click the Vendor Search link.
In the ShortName field, type the first few letters of the vendor name and click the Search button. Look for Dell Marketing Corporation in the list.

13 | P a g e
Notice there are three listings for Dell Marketing. These listings represent different addresses that are entered in the vendor database for Dell Marketing.
To determine which address you want, you can check the box next to one of the listings. Then click the Vendor Detail link to view the vendor address. Click Cancel.
You may also click the Address link to view the address information. Click Cancel. Click Cancel, again.

14 | P a g e
The system returns you to the main page. The most common way to select a vendor is to click on the magnifying glass next to the Vendor ID field to view the complete list of vendors.

15 | P a g e
Please note ‘GSU Default Vendor’ is an option. However, we recommend that you select a preferred vendor on the Express PO.
In the Short Vendor Name field, type the first few letters of the vendor name and click the Look Up button. Select the desired vendor and the system will return you to the main page.

16 | P a g e
3.2 Selecting a Buyer
Every Express PO will be assigned to a Buyer in the Purchasing Department. Next to the Buyer field, click the magnifying glass. You will be taken to a list of Buyers. Choose the appropriate Buyer for the commodity or service you would like to purchase. The ‘Default GSU Buyer’ option is only to be used when the Buyer cannot be readily identified. See Appendix B for the Commodity Listing by Buyer. As with the Vendor field, every effort should be made to choose a Buyer.
Caution: Submitting Express POs with Default Vendor AND Default Buyer information may delay PO processing.

17 | P a g e
3.3 Entering PO Defaults
The PO Defaults link allows you to enter information that will be defaulted or copied throughout the Express PO. This allows you to add lines to the Express PO without having to re‐enter the same information repeatedly.
Click the PO Defaults link.

18 | P a g e
The Default Options area defaults to Override to allow you to make changes to the Express PO. This should remain clicked. If you click Default, you will not be able to make any changes to the Express PO if an error is made.
The Line area of this screen will not be used.
The Schedule area of this screen will not be used.
The Distribution area of this screen is where you enter the SpeedChart, which will be defaulted throughout the Express PO. Enter your departmental SpeedChart in the SpeedChart field and click on the magnifying glass and select your item from the list (note that if you do not take this extra step your chartfields will be populated in the main P.O. but not in the defaults). You may also search for your SpeedChart by entering a few letters of the SpeedChart and then clicking the magnifying glass.

19 | P a g e
You will be taken to a list of values from which to choose. Click your selection from the list. Note that you will not see your selection in the SpeedChart field on the Defaults page but the chartfields will be populated throughout your Express P.O.
You will be brought back to the PO Defaults page and your information will populate the Distribution field. Scroll to the far right of the Purchase Order Defaults page to see the default Location Code. The location field determines where the goods you are requesting should be delivered to when the GSU Warehouse personnel receives them. If the location field is not changed, it defaults to the GSU Purchasing Office at 1 Park Place. Please change this field so that your goods will be delivered to the appropriate area.
NOTE: Updating the Location Code is required for the purchase of goods, where they will be received by GSU and delivered to a Department. If the Purchase Order is for Travel, Consulting Fees or other services, then changing the Location is not required.

20 | P a g e
Click on the Location look up icon to change it from the default value, PO_MAIN.
You can search for your Location Code either through the Location Code field or the Location Description field. Select the Location where you want the goods delivered to.
Scroll to the bottom of the page and click OK. You will be redirected to the main page of the Express PO.

21 | P a g e
3.4 Other Links under the Header Panel
a. Header Details contains template information that should not be changed by the requestor. Do not change any information in this link.
b. PO Activities will not be used by the end user under any circumstances. Do not change any information in this link.

22 | P a g e
c. Add Ship to Comments can be used by the requestor if there are special delivery instructions.
d. Add Comments will be used when the Travel or Consultant template is copied in an Express PO. This field may also be used by the requestor if there are comments to be relayed to the approver or if there are special comments that should be viewed by the Purchasing Department.
e. Unlike the Voucher Module, the Calculate button under the Header Panel will not be used by the end user under any circumstances. Do not click the Calculate button.
f. Georgia State has opted not to use the Purchasing Kit and Catalog links in the implementation of 8.9.
4. Lines Panel
As mentioned previously, the Express PO allows you to enter all of the required information on one page. The Lines area is where the Line Description, Quantity, Unit of Measure (UOM), Category and Price will be entered.
Click the Expand All link to view three areas: the Lines, Schedules and Distributions areas. The Collapse All link reduces the view back to Lines view only.
4.1 Lines
4.1.1 Entering Line Description, Quantity, UOM, and Line Comments
Enter a description of the item you are purchasing under Description and press Tab. Enter the Quantity or how many of the item you wish to purchase and press Tab. Enter the Unit of Measure (UOM) and press Tab

23 | P a g e
or use the magnifying glass to search the list of values available. To enter a
line comment, click the icon.
Please note you will not use the Copy Item Specs link. Also, the Attach button for attachments will not be used. Type your line comments in the Comment field and click OK.
24 | P a g e
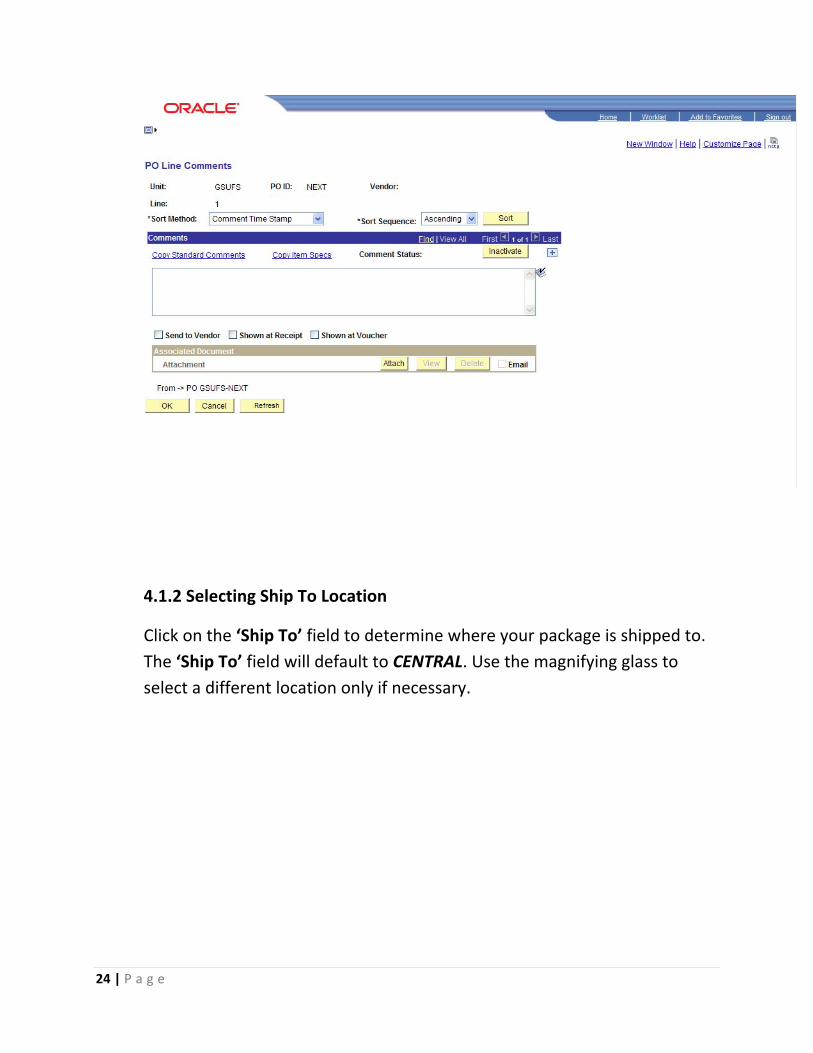
4.1.2 Selecting Ship To Location
Click on the ‘Ship To’ field to determine where your package is shipped to. The ‘Ship To’ field will default to CENTRAL. Use the magnifying glass to select a different location only if necessary.

25 | P a g e
Non‐inventory items or special items which have to be installed can be sent directly to a specific location by using the magnifying glass and selecting ‘GSU0000’.

26 | P a g e
Click the ‘Add Ship to Comments’ link. In the comments box add the address where the package should be sent. Type ‘Ship Directly to the following address:’ followed by the address where the package will be sent. Make sure that the ‘Send to Vendor’ and the ‘Shown at Receipt’ options are checked, and that GSU0000 is selected in the ‘Ship to’ drop‐down menu. Press OK.
27 | P a g e
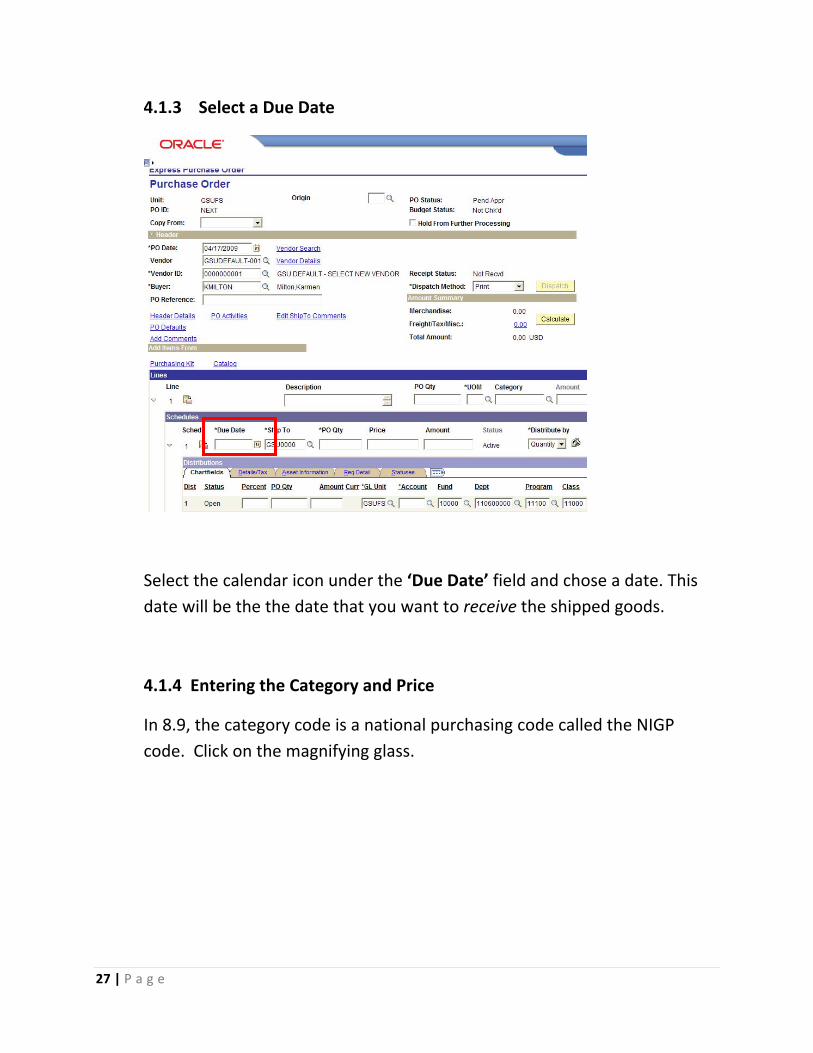
4.1.3 Select a Due Date
Select the calendar icon under the ‘Due Date’ field and chose a date. This date will be the the date that you want to receive the shipped goods.
4.1.4 Entering the Category and Price
In 8.9, the category code is a national purchasing code called the NIGP code. Click on the magnifying glass.

28 | P a g e
Notice that you have the ability to search for the correct category by the description or account, as well as by category or Alternate Description.
As you may be unfamiliar with the category codes, you may conduct your search by Description. The search offers operands to help you narrow your results. Click the drop down arrow next to Description.
29 | P a g e
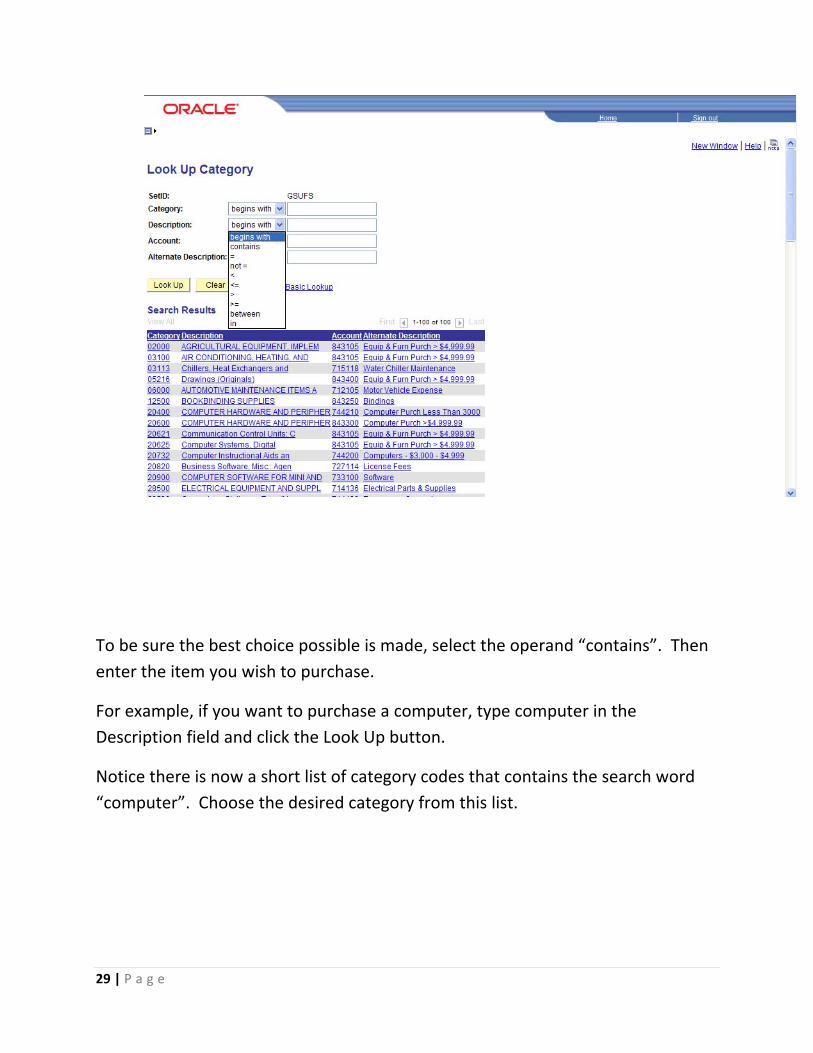
To be sure the best choice possible is made, select the operand “contains”. Then enter the item you wish to purchase.
For example, if you want to purchase a computer, type computer in the Description field and click the Look Up button.
Notice there is now a short list of category codes that contains the search word “computer”. Choose the desired category from this list.

30 | P a g e
You are now back at the main page of the Express PO. Go to the Schedules line and enter the price and press Tab.

31 | P a g e
4.2 Distributions Line
Note that the information has defaulted into the Express PO. This information was brought forward from the PO Defaults page.
4.3 Adding and Deleting Rows
To add or delete a line to the Express PO, you will click the plus or minus
sign at the end of the Lines, Schedules or Distributions lines. When you
click the plus sign a new window, called Explorer User Prompt, will pop‐up.

32 | P a g e
Note: If your computer has a pop‐up blocker, you will have to make sure to turn it off for the 8.9 site.
At this prompt you can enter the number of lines you wish to add to the Express PO. You can add as many as 100 lines at one time.
Click OK.
Now there is an additional line added to the Express PO:
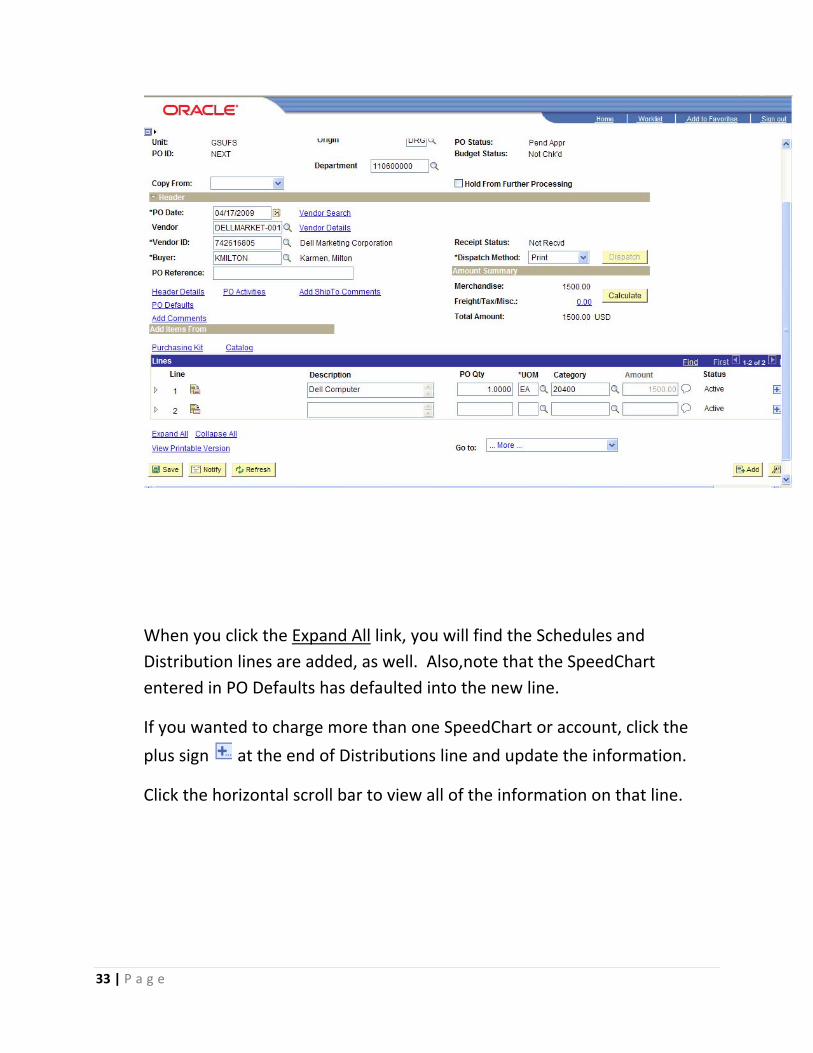
33 | P a g e
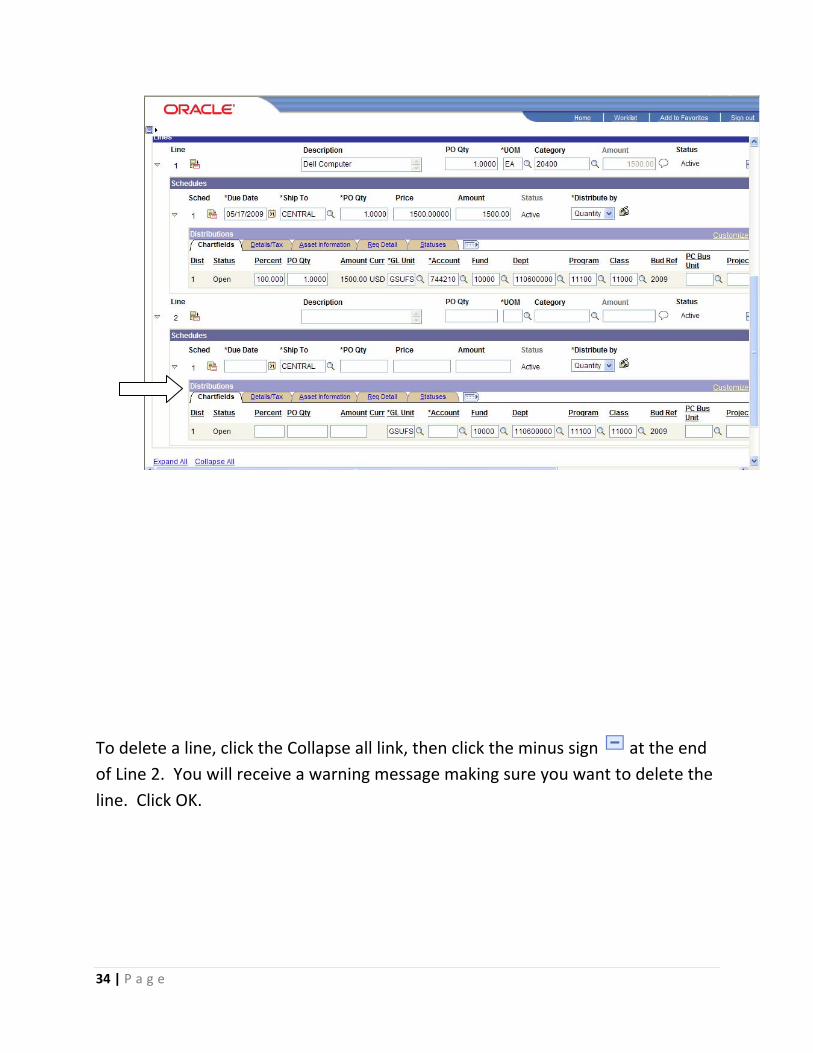
When you click the Expand All link, you will find the Schedules and Distribution lines are added, as well. Also,note that the SpeedChart entered in PO Defaults has defaulted into the new line.
If you wanted to charge more than one SpeedChart or account, click the
plus sign at the end of Distributions line and update the information.
Click the horizontal scroll bar to view all of the information on that line.
34 | P a g e
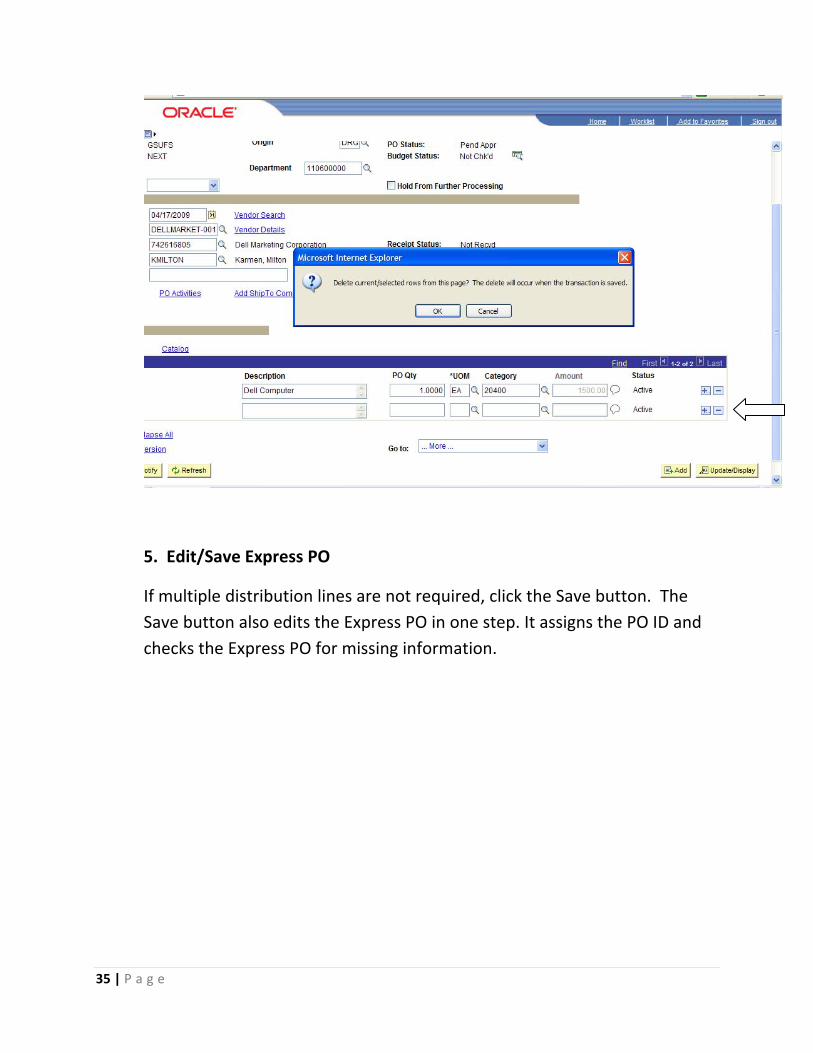
To delete a line, click the Collapse all link, then click the minus sign at the end of Line 2. You will receive a warning message making sure you want to delete the line. Click OK.
35 | P a g e
5. Edit/Save Express PO
If multiple distribution lines are not required, click the Save button. The Save button also edits the Express PO in one step. It assigns the PO ID and checks the Express PO for missing information.

36 | P a g e
6. Budget Checking the Express PO
Scroll to the top of the page. After you have saved the Express PO, notice that PO ID has been assigned.
Click the Budget Check icon .

37 | P a g e
The Express PO should have a PO Status of Pending Approval and a Budget Status of Valid.
6.1 Budget Checking Errors in the Express PO
Budget Checking will be initiated by the Requester on the Express PO on‐line page. This is done by clicking on the Budget Checking icon.
A valid Budget Check will create an encumbrance on the budget ledger.
• Budget Check process involves editing the Chartfield data, processing a document tolerance check, and creating an encumbrance for a single Purchase Order.
• After Budget Checking process is run, the system produces a “Valid”, “Warning” or “Error” status:
o Valid = Transaction passed with no warnings or errors; process updates the control budget

38 | P a g e
o Warning = Transaction passed, but with warnings; process updates the control budget
o Error = Transaction failed; process does not update the control budget
6.2 Budget Check Exceptions
If the Budget Check process results in an error, it must be resolved before the Purchase Order can be processed further.
PO Budget Check exceptions may be reviewed using the PO Budget Status Error hyperlink. Typically, budget exceptions result from the budgets not existing or exceeding the budget tolerance. To view the budget error in detail, click OK , then click on the Budget Status Error link.

39 | P a g e
You are now viewing the Purchase Order Exception and Line Exceptions page. Budgets with Exceptions shows the budget checking error. In this example, the Exception is “Exceeds Budget Tolerance”, which means the purchase order amount is more than the amount available in the budget. To view more detail about the budget and error, click on “Go To..” link, which is where you view related links.
On this page, choose the Go to Budget Inquiry link.

40 | P a g e
Now you are on the Commitment Control Budget Details page. This gives an overview of budget. Under Available Budget, you are able to view the balance available in the budget and make necessary adjustments to the Express PO.
You may resolve the budget checking error in three (3) ways:
Updating the distribution lines on a PO
Adjusting the PO amount
Requesting a budget amendment to transfer funds to the required distribution
The PO will have to be budget checked again. Once the PO has a Budget Check status of “Valid”, it can continue through the PO process.

41 | P a g e
7. Workflow Approval
GSU will use the Chartfield Approval workflow. Workflow routings will be based on the Origin and Department/Project that users select on the document header. The Origin and Department/Project selected on the transaction header will determine the workflow approval routing for the transaction. Users that are approvers will be assigned to an Approval Role (i.e – Approver 1 or Approver 2). In addition, users will be assigned to individual Departments and Project Id’s. These assignments will be maintained by the Workflow Administrator.
Security Roles will need to be established for the approvers. GSU should assign unique individuals to each of the workflow approval roles/levels.
The Origin that will have workflow approval enabled are as follows:
DRG – Department Regular
PRJ – Project Regular
GSU will use the following levels of workflow approval for each of the transactions:
Purchase Orders ‐ DRG Purchase Orders ‐ PRJ
Department Approver 1 Project Approver 1
Department Approver 2 Project Administrator
Project Approver 2
42 | P a g e
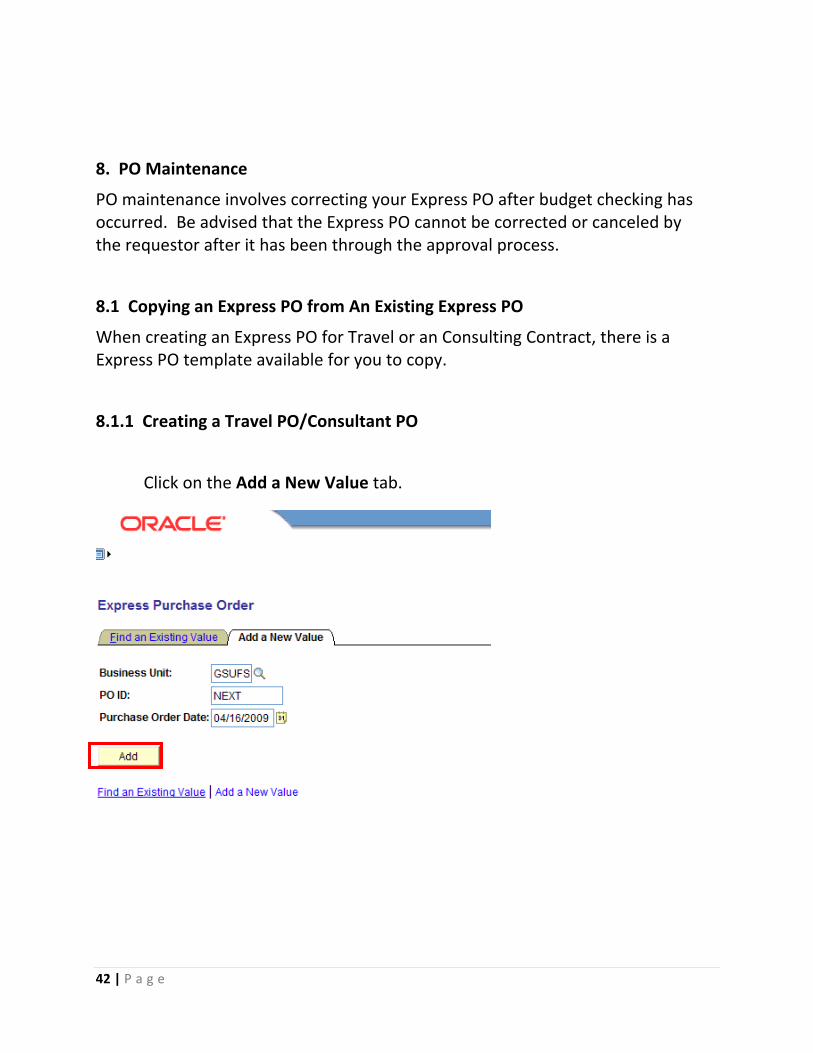
8. PO Maintenance
PO maintenance involves correcting your Express PO after budget checking has occurred. Be advised that the Express PO cannot be corrected or canceled by the requestor after it has been through the approval process.
8.1 Copying an Express PO from An Existing Express PO
When creating an Express PO for Travel or an Consulting Contract, there is a Express PO template available for you to copy.
8.1.1 Creating a Travel PO/Consultant PO
Click on the Add a New Value tab.

43 | P a g e
Click on the drop down arrow next to the Copy From field and select Purchase Order.
Type in the template name (ETRAVEL, STRAVEL, or CONSULTANT) in the PO ID field, click the magnifying glass, click the blue hyperlink, and click on Search. Then click the check box next to the template name and click OK.

44 | P a g e
The system will redirect you to the main page. There is now information copied into the Express PO.
Please note that when the template is copied to a new Express PO, the information must be changed to reflect the new information required for your department. Update the Origin by clicking on the magnifying glass. This will determine the workflow routing for approval. If these expenditures are charged to a project, select PRJ for Origin. In this example, select DRG (expenditures will not be charged to a project) from the Search list.

45 | P a g e
You will be redirected to the main page. Update the Department ID by clicking the magnifying glass.
Enter the first few digits of your department ID and click the Look Up button. Select your department ID.

46 | P a g e
When you choose the Department ID from the Search list, you will be redirected to the main page. Change the Vendor ID to the name of the traveler in your department or to the name of the consultant or consulting company. Begin by clicking on the magnifying glass next to the Vendor ID field.
In the Short Vendor Name field, enter the traveler’s last name, COMMA, first initial or if you are issuing a consultant PO, enter the first few letters of the company name and click the Look Up button. Click your selection from the Search list.

47 | P a g e
The Express Purchase Order Main Page is displayed.
Click on the PO Defaults link and update the Speedchart information and click the magnifying glass.

48 | P a g e
Select your Speedchart from the Search list.
The system returns you to the PO Defaults page and your information will populate the Distribution field. Scroll to the bottom of the page and click OK.

49 | P a g e
Any changes that you make on the PO Defaults page will cause the “Retrofit field changes” page to appear. Click on the ‘Select All’ link. You must click this Select All link to change the default chartfield values on the template to your speedchart values. Notice when you click on this link, all of the boxes in the ‘Apply’ column will be checked.

50 | P a g e
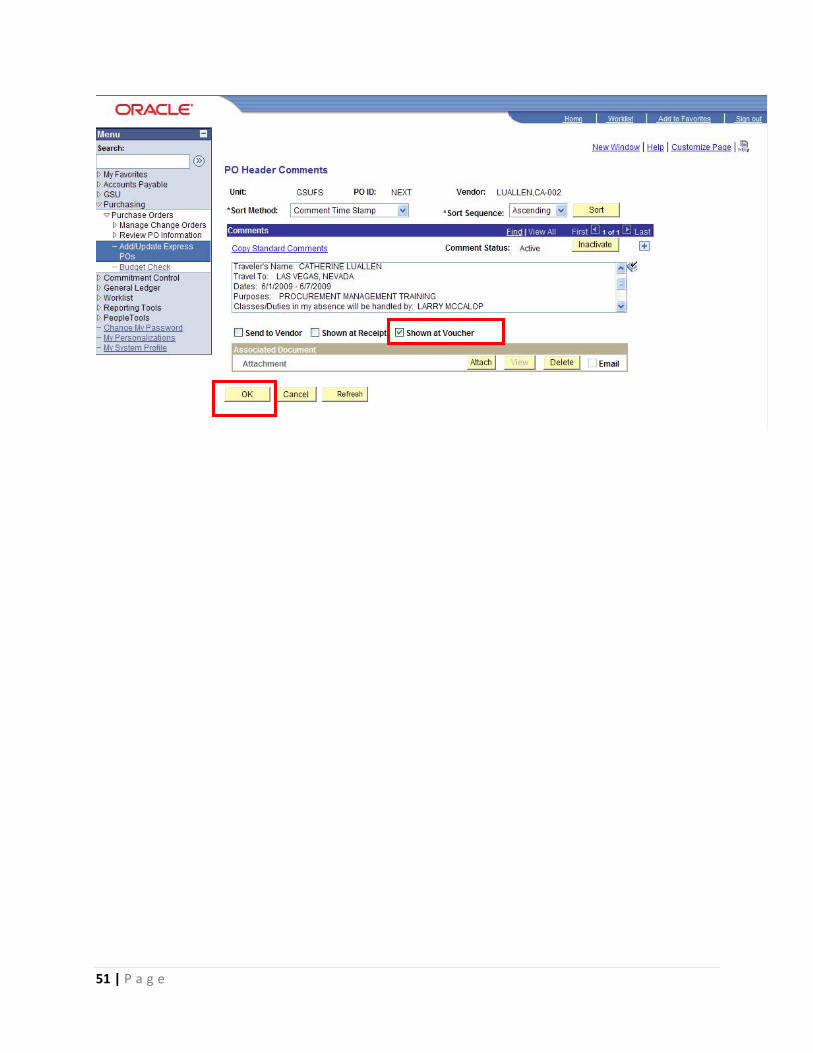
The system will return you to the main page of the Express PO. To access the template comments for the Travel PO and the Consultant PO, click the Edit Comments link.
For the Travel Template enter the Traveler’s Name, Travel To information, Dates, Purpose of Travel, and who will handle Classes/Duties in the traveler’s absence. On the Consultant Template, you will enter the SS# or FEI #, the address, and attach a copy of the Statement of Work or Payment Schedule. For each template, always check the Shown at Voucher box so the comments in this section are available for Disbursements to view. Click OK.
51 | P a g e
52 | P a g e
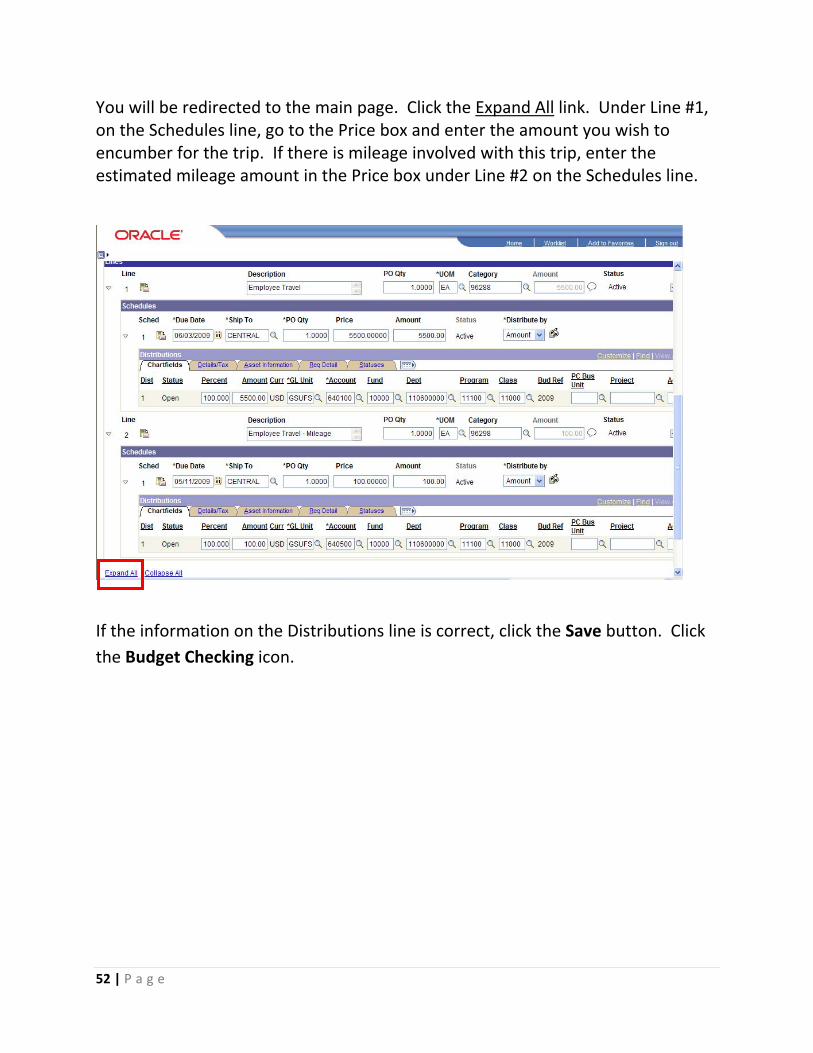
You will be redirected to the main page. Click the Expand All link. Under Line #1, on the Schedules line, go to the Price box and enter the amount you wish to encumber for the trip. If there is mileage involved with this trip, enter the estimated mileage amount in the Price box under Line #2 on the Schedules line.
If the information on the Distributions line is correct, click the Save button. Click the Budget Checking icon.

53 | P a g e
Note that you now have a PO ID assigned to your PO. The PO Status is Pending Approval and the Budget Status is Valid. You have successfully copied an Express PO from the Travel or Consultant PO template.
Your Travel or Consultant PO is ready to be processed. Please follow the appropriate guidelines for Travel and Consultant Services as described by the Office of Disbursements.
The training manual and policies for consultant services and travel can be found on the following websites:
http://www2.gsu.edu/~wwwfas/FinancialOperation/consultingcontract_new.html
http://www2.gsu.edu/~wwwfas/FinancialOperation/TravelServices.pdf

54 | P a g e
APPENDIX A
Dollar Value Grid (Effective 7/1/2009)
Choose Order Cost by column to right and Purchase Type by row below. Intersecting Square indicates Method(s) of Purchase.
$0.00 to $2,999.99
$3,000.00 to $4,999.99
$5,0000.00 or greater
Supplies (which include non‐ inventoried equipment with a cost of less than $3,000.00) not otherwise classified below.
P‐Card
Voucher
P‐Card
Voucher
Express PO
Equipment (which will be placed into inventory, i.e. which has a cost of $3,000.00 or more and useful life of 3 years or more) not otherwise classified below
N/A Express PO Express PO
Business Cards and Stationery
NOTE: Artwork must be approved by University Relations before being sent to University Printing
University Printing University Printing University Printing
Classified Ad(s)
NOTE: Non‐faculty recruitment ads require HR approval prior to being placed.
P‐Card
Voucher
P‐Card
Voucher
Express PO
Computer Hardware, Software and Peripherals and other technology purchases
NOTE: Certain purchases may require additional approvals and review before purchase. See IT Procurement Review Procedure for details.
P‐Card
Voucher
Express PO
P‐Card (non‐equipment only)
Voucher (non‐equipment only)
Express PO
Express PO
Construction
NOTE: All construction requires DCS approval prior to the beginning of work. This includes any equipment installation that involves changes or attachment to building structures.
DCS DCS DCS
Filing Cabinets / Furniture Contact Buyer before purchase
Contact Buyer before purchase
Express PO
HazMat Waste Removal Safety Safety Safety
Maintenance Contract(s) Express PO Express PO Express PO

55 | P a g e
Office Supplies ‐ General
P‐Card
Voucher
P‐Card
Voucher
Express PO
Printing University Printing
P‐Card
Voucher
University Printing
P‐Card
Voucher
Express PO
Renovations
NOTE: All renovations require DCS approval prior to the beginning of work. This includes any equipment installation that involves changes or attachment to building structures.
DCS DCS DCS

56 | P a g e
APPENDIX B ‐ Commodity Listing by Buyer
Commodity Buyer
Audio/Visual Equipment and Supplies Attlee Billings
Building Maintenance Rodney Holden
Building Supplies Rodney Holden
Bus Charters Attlee Billings
Computer Equipment Logan Allen
Computer Peripherals Logan Allen
Computer Software Logan Allen
Consultant Larry McCalop
Construction Rodney Holden
Copiers Sharee Willoughby
Elevator Maintenance Rodney Holden
Fax Machines Sharee Willoughby
Furniture Sharee Willoughby
Gas Cards Harrice Moore
Grounds Maintenance Contracts Attlee Billings
HVAC Rodney Holden
Industrial Supplies Rodney Holden
Janitorial Equipment and Supplies Rodney Holden
Laboratory Equipment and Supplies Logan Allen
Maintenance Contracts (equipment and hardware) Sharee Willoughby
Maintenance Contracts (software licenses) Logan Allen
Medical Equipment and Supplies Logan Allen
Miscellaneous Supplies Attlee Billings
Police Equipment and Supplies Attlee Billings
Printers Logan Allen
Printing Attlee Billings
Projectors Logan Allen
Public Works Projects Rodney Holden
Office Furniture Sharee Willoughby
Renovation Materials Rodney Holden
Research Equipment and Supplies Logan Allen
Scientific Equipment and Supplies Logan Allen
Travel Trennye Blackburn
Uniforms Attlee Billings
Vehicle Maintenance Harrice Moore
Vehicle Purchase Attlee Billings

57 | P a g e