the kickball tm - recordinghacksrecordinghacks.com/pdf/blue/kickball_manual.pdf · benjamin...
TRANSCRIPT

The KickballTM


You have just purchased the world’s most unique and innovative low-frequency dynamic
microphone — the Kickball. Here at Blue, we’re known for designing and building the finest
microphones available for studio, stage, film and broadcast use. Our microphones unite the
heritage of the world’s most respected classics with leading-edge technology, innovative engi-
neering and inimitable styling. The Kickball is the product of our unrestrained imagination
and our years of microphone manufacturing experience. There is simply nothing else like it.
But don’t just take our word for it — read what audiophiles around the world have been saying:
“I’ve kicked more homeruns on the playground with this thingthan any other microphone I’ve ever kicked”
— Lefty Foote, MVP, 2004 World Series of Kickball; member, Kickball Hall of Fame
“Finally, my kick drum sounds better than any other instrument on stage!”
— Ringo Peterson, drummer, The Toxic Waste Experience
“Thanks to the Kickball, I was a real standout at theBattle of Basses 2004 at the Hollywood Bowl.’”
— Betty Bottom, Honorable Mention, Battle of Basses 2004
“My tympani has never sounded better!”
— Timmy Schuster, 3rd chair tympanist,Benjamin Franklin Middle School, Park Rapids, MN
Congratulations.
TM

We know you hate to read manuals. So do we! But because the Kickball is such a unique recordingand sound-reinforcement tool, we really hope you take the time to familiarize yourself with its fea-tures. And be sure to try the suggested application tips that are designed to help you get the mostout of the Kickball. You might just learn something too. With proper care and feeding, the Kickballwill reward you with many years of recording and performance enjoyment. Now, let’s kick it, shall we?
Phantom-powered what?
The Kickball is the world’s second phantom-powered dynamic microphone. No, that is not a typo!Remember the Ball? You probably already know that as an electromagnetic transducer, the tradi-tional dynamic mic induces its own output voltage and does not require phantom power (pay attention— there will be a test on this at the end of class). While this principal has been used for years ineverything from guitar pickups to generators, and of course microphones, it exhibits some problemswhen it comes to accurate sound reproduction.
When you connect your dynamic microphone to a fixed-impedance console input or outboard micpreamp, you create a resistive load in the transducer that varies with frequency. That would be fineif you wanted a tone control on your microphone, but in a recent very unscientific poll conductedby the AAK (Association of Arcane Knowledge), most respondents indicated that they did not wantsuch a device — particularly one over which they had no control! Being the creative thinkers thatwe are, we solved this problem to give you the finest dynamic microphone ever made. But how?
Blue engineers updated the design of our acclaimed Ball microphone, which eliminates frequency-dependent variable resistance in a dynamic, and tuned it specifically for use on low frequencyinstruments like kick drums and bass guitars.
The Kickball delivers an acoustic balance far superior to conventional dynamic microphones. It ispunchy and detailed with a larger-than-life sound, particularly at low frequencies, yielding anextremely smooth performance that pleases even the most discerning listener. Like any good kick

0
20 50 100 1,000 10,000 20,000
+10
-10
-20
+20
+ setting – setting0 setting
drum microphone, the Kickball can withstand extremely high sound pressure levels that would sendeven the toughest condensers back to the showers. Plus, it looks really, really cool.
Ok, so how do I use the Kickball?
The Kickball was designed for both stage and studio use. Because of its rugged construction, car-dioid pickup pattern and high-spl specification, you can use the Kickball on virtually any instru-ment: kick drum, snare drum, tom toms, electric bass, bass cabinets, and anywhere else you needa rugged mic that sounds unlike anything you’ve ever heard before.
The Kickball features a unique swivel mount located on the bottom center of the mic body. Be sureto mount the Kickball on a standard-thread counter-weighted mic stand. Though the Kickball isextremely durable, we would hate to see it fall due to an inadequate stand (it doesn’t bounce well).Once mounted, you can gently pivot the Kickball back and forth for optimum positioning in frontof the sound source. For added isolation from low frequency-induced rumble, we recommend The Ringeruniversal shockmount, available from your Blue dealer.
Kickball Frequency ResponseThis frequency chart is only a start. It givesthe recordist a basis of the sound provided.How the microphone reacts in a particularapplication will differ greatly because ofmany variables. Room acoustics, distancefrom sound source (proximity), tuning of theinstrument and mic cabling are only a few ofthe interacting issues. For an artist or anengineer, how the microphones are usedcreates the basis of the sound.

The Kickball requires +48 volt phantom power which most FOH consoles, recording consoles andoutboard mic preamps supply. If your preamp does not have a phantom power facility, severalexternal power units are available from various manufacturers. It is important to note that someunits, though rated at +48 volts, may supply insufficient or unstable power which can result in dis-tortion or degraded performance when used with the Kickball.
To avoid damage to audio components when connecting phantom power, always follow this simpleprocedure:
1. Set mic preamp gain to its nominal position (“off”).
2. Mute console master, stage monitor and mains feeds, headphones or foldback sends,and studio monitors.
3. Connect the female end of your balanced XLR microphone cable to the Kickball’s outputjack located on the back of the mic body directly opposite the Blue logo. Connect the maleend to your balanced console input or balanced mic preamp input.
4. Switch on phantom power.
5. Un-mute all previously muted signal paths and adjust mic preamp gain as necessary.
To disconnect or reroute the Kickball, be sure to mute all audio signal paths before you disengagephantom power. Wait 30 seconds to allow all components in the signal path to discharge beforedisconnecting the mic.
Once the Kickball is on the stand and powered up, make sure that the active, on-axis side of thediaphragm (the side with the Blue logo) is facing the desired source, unless you’re recording yourAunt Hildy’s kazoo recital, in which case turn the logo away and cover your ears.
! HEADS UP!: Forceful positioning of the swivel mount canresult in damage not covered by the warranty, so there.
Great, so now I’m ready to go! How do I get the most out of my Kickball?
The following application hints are intended to give you a good starting point to get the most outof this unique audio tool both in the studio and on stage. As with all applications however, thereare no rules, only guidelines. Trust your gear and trust your ears. If it sounds good, it is good!
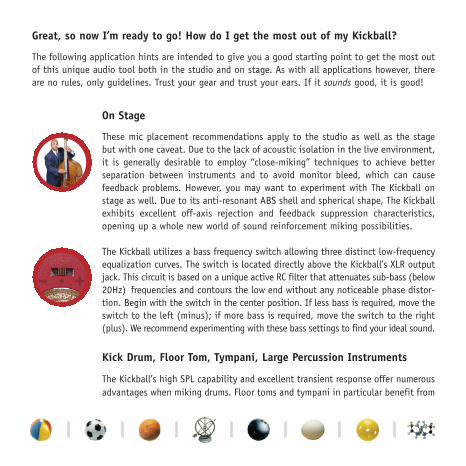
On Stage
These mic placement recommendations apply to the studio as well as the stagebut with one caveat. Due to the lack of acoustic isolation in the live environment,it is generally desirable to employ “close-miking” techniques to achieve betterseparation between instruments and to avoid monitor bleed, which can causefeedback problems. However, you may want to experiment with The Kickball onstage as well. Due to its anti-resonant ABS shell and spherical shape, The Kickballexhibits excellent off-axis rejection and feedback suppression characteristics,opening up a whole new world of sound reinforcement miking possibilities.
The Kickball utilizes a bass frequency switch allowing three distinct low-frequencyequalization curves. The switch is located directly above the Kickball’s XLR outputjack. This circuit is based on a unique active RC filter that attenuates sub-bass (below20Hz) frequencies and contours the low end without any noticeable phase distor-tion. Begin with the switch in the center position. If less bass is required, move theswitch to the left (minus); if more bass is required, move the switch to the right(plus). We recommend experimenting with these bass settings to find your ideal sound.
Kick Drum, Floor Tom, Tympani, Large Percussion Instruments
The Kickball’s high SPL capability and excellent transient response offer numerousadvantages when miking drums. Floor toms and tympani in particular benefit from

the Kickball’s extended low frequency response. Begin by placing the microphonetwo to four inches above the rim or hoop (where the head is secured to the shell).Angle the mic toward the player’s stick or hand to pick up more attack and defi-nition. Moving the microphone closer to a drum generally increases the low end,shell resonance, and separation from other sound sources, while more distantplacement emphasizes the interaction of the drum and the environment, produc-ing a blended, clearer sound.
Electric Bass
Because of its full and solid bottom end, the Kickball is an excellent mic for anybass guitar amp. Position the diaphragm toward the center of the speaker or dustcap to capture more highs, or toward the edge of the speaker cone for a fullersound with more low end. For overdriven or distorted tones, move the mic towardsthe outer edge of the speaker cone, or back it away from the amp a foot or moreto blend room tone with direct pickup and soften high frequencies.
Acoustic Bass
Large diaphragm mics require careful placement when used on acoustic bass. TheKickball’s rich tone is well-suited to this task. For a balanced and natural sound,position the diaphragm facing the neck where it joins the body. Initially, keep themic as close to the instrument as possible, tilting the diaphragm toward the f-holeon an upright, or soundhole on a dreadnaught-style acoustic to capture a blendof low frequencies finger articulation. If you need more low frequencies, move theKickball closer to the f-hole or soundhole. For more high frequency detail, movethe Kickball farther away from the instrument, either at the same neck position,or above the instrument near the bassist’s head.

While not optimal forplayground use, the Kickballpromises hours of playtime
on stage or in the studio

The Kickball’s in your court
We’re sure that you’ll be delighted with the results you get from the Kickball, whether it’s in the studioor on stage. At Blue we’re committed to bringing you the finest in technology and craftsmanship,along with an attention to detail that runs throughout our entire line of award-winning mics.
Now, go get the Kickball connected and be ready to hear how well-rounded it really is. It’ll evenmake cousin Lenny sound good.
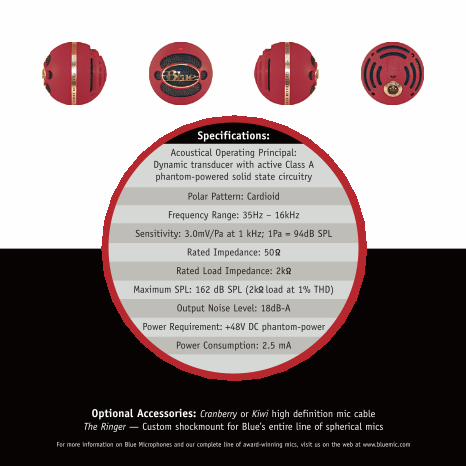
Optional Accessories: Cranberry or Kiwi high definition mic cableThe Ringer — Custom shockmount for Blue’s entire line of spherical mics
For more information on Blue Microphones and our complete line of award-winning mics, visit us on the web at www.bluemic.com
Specifications:Acoustical Operating Principal:
Dynamic transducer with active Class Aphantom-powered solid state circuitry
Polar Pattern: Cardioid
Frequency Range: 35Hz – 16kHz
Sensitivity: 3.0mV/Pa at 1 kHz; 1Pa = 94dB SPL
Rated Impedance: 50Ω
Rated Load Impedance: 2kΩ
Maximum SPL: 162 dB SPL (2kΩ load at 1% THD)
Output Noise Level: 18dB-A
Power Requirement: +48V DC phantom-power
Power Consumption: 2.5 mA

©2004 Blue Microphones5706 Corsa Avenue, Suite 102
Westlake Village, CA 91362
www.bluemic.com
In keeping with our policy of continued product improvement,Baltic Latvian Universal Electronics (BLUE) reserves the right
to alter specifications without prior notice.
Blue Microphones, Ball, 8-Ball, Kickball, Cranberry, Kiwi and The Ringer aretrademarks or registered trademarks of Blue Microphones, Inc. All other
trademarks contained herein are the property of their respective owners.
Optimum inflation pressure for the Kickball is 32psi.
Made in Latvia.
MicrophonesStep up to the mic.TM
TM