the languages of strings and arrows
TRANSCRIPT

L Strand
The Languagesof Strings
and Arrows


Introduction ..................................................................................... L-1 Classification: The Language of Strings ................................................... L-1 Relations: The Language of Arrows ................................................................. L-2
L-Lessons L1 Trees #1 ............................................................................................... L-3 L2 The Empty Set ....................................................................................... L-7 L3 A Valentine Story .................................................................................L-11 L4 String Game with A-Blocks #1 ...............................................................L-15 L5 Composition Games .............................................................................L-17 L6 Temperature Bar Graphs .......................................................................L-21 L7 Telling Stories with Arrows ................................................................... L-23 L8 Multiples #1 ........................................................................................ L-27 L9 Trees #2 ..............................................................................................L-31 L10 String Game with A-Blocks #2 .............................................................. L-35 L11 Two Dice ............................................................................................. L-39 L12 Two Lists ............................................................................................. L-43 L13 Multiples #2 ........................................................................................ L-47
L14 Sampling .............................................................................................L-51 L15 Odd and Even Cubes .......................................................................... L-53 L16 String Game With A-Blocks #3 ............................................................. L-55
LANGUAGES OF STRINGS & ARROWS TABLE OF CONTENTS


The language of strings is the nonverbal language of sets, that is, collections of objects put together in some way. The language of arrows is the nonverbal language of relations among objects. These languages permeate the CSMP strands and are used, separately or together, to present an unending variety of numerical and nonnumerical situations.
As the word implies, classifying means putting things into classes, or as the mathematician says, sets. The mathematics of sets can help students to understand and use the ideas of classification. The basic idea is simple: Given a set SThe basic idea is simple: Given a set SThe basic idea is simple: Given a set and any object S and any object S x, either x belongs to x belongs to x S (S (S x is in x is in x S) or x does x does xnot belong to S (S (S x is not in x is not in x S). We represent this simple act of sorting—in or out—by using pictures to illustrate in and out in a dramatic way. Objects to be sorted are represented by dots, and the sets into which they are sorted are represented by drawing strings around dots. A dot inside the region delineated by a set’s string is for an object in the set and a dot outside a set’s string is for an object not in the set.
This language of strings and dots provides a precise (and nonverbal) way of recording and communicating thoughts about classification. The ability to classify, to reason about classification, and to extract information from a classification are important skills for everyday life, for intellectual activity in general, and for the pursuit and understanding of mathematics in particular. The unique quality of the language of strings is that it provides a nonverbal language that is particularly suited to the mode of thinking involved in classification. It frees young minds to think logically and creatively about classes and to report their thinking long before they have extensive verbal skills.
In this strand we present situations and ask carefully phrased questions to continue to advance skills in classification, always remembering that the skills grow out of such experiences. To be able to draw strings and dots is not an objective in itself; to develop the mode of thinking involved is the objective. Thus it is important for us to construct the situations carefully. The sets into which we ask students to classify objects must be determined by well-defined attributes; otherwise, there is the added problem of deciding whether a certain object does or does not have a certain attribute. For this reason we make extensive use of A-blocks (attribute blocks) and sets of numbers in designing classification situations. Students can immediately say whether or not a block is red, whether or not it is a square, and so on. They know whether or not a given number is less than 15, whether or not it is odd, and so on.
One reason for classifying objects is to count the objects that have a certain attribute. Suppose, for example, there are eight red cars and six Buicks in a parking lot. If four cars in the lot are neither red nor Buicks, must there be 18 cars in the lot? Suppose we count the cars in the parking lot and find there are exactly 15. Is this possible? A string picture immediately settles this apparent paradox.
There are three red Buicks.
THE LANGUAGES OF STRINGS & ARROWS INTRODUCTION
L-1

Relations are interesting and important to us in our everyday lives, in our careers, in school, and in scientific pursuits. We are always trying to establish, explore, and understand relations. In mathematics it is the same; to study mathematics means to study the relations among mathematical objects like numbers or geometric shapes. The tools we use to understand the everyday world are useful to understand the world of mathematics. Conversely, the tools we develop to help us think about mathematical things often serve us in nonmathematical situations.
A serious study of anything requires a language for representing the things under investigation. The language of arrows provides an apt language for studying and talking about relations. Arrow diagrams are a handy graphic representation of a relation, somewhat the same way that a blueprint is a handy graphic representation of a house. By means of arrow diagrams, we can represent important facts about a given relation in a simple, suggestive, pictorial way—usually more conveniently than the same information could be presented in words. The convenience of arrow diagrams has important pedagogical consequences for introducing children to the study of relations in the early grades. A child can read—and also draw—an arrow diagram of a relation long before he or she can read or present the same information in words. The difficulty of presenting certain ideas to children lies not in their intellectual inability to grasp the ideas; rather, the limitations are often mechanical. For example, a second grader simply may not, as yet, have developed the motor skills of writing or reading necessary to communicate about the ideas in conventional systems. Arrow diagrams have all the virtues of a good notation: they present information in a clear, natural way; they are attractive, colorful things to look at; they are easy and fun for children to draw. Another educational bonus occurs when arrow diagrams are used imaginatively. A story or problem may be captured by an arrow diagram, and at the same time, the resulting arrow diagram may suggest other, similar situations. This allows students to call upon previous experience or to expand their creativity.
One of the purposes of this strand is to use the power of the language of arrows to help children think logically about relations. Again it must be remembered that our goals concern the thinking process and not the mechanism. The ability to draw prescribed arrows is not an objective in itself, nor is an arrow diagram just another format for drill problems in arithmetic.
The general aim of The Languages of Strings and Arrows strand is to suggest situations that are inherently interesting and thought provoking, and to give children modes of thinking and appropriate languages with which they can organize, classify, and analyze. In addition to a varied assortment of lessons concerning sets and relation, this strand includes lessons involving systematic methods for solving combinatorial (counting) problems; methods for collecting, recording and interpreting data in real life situations; probabilistic thinking; and networks.
THE LANGUAGES OF STRINGS & ARROWS INTRODUCTION
L-2

L-3
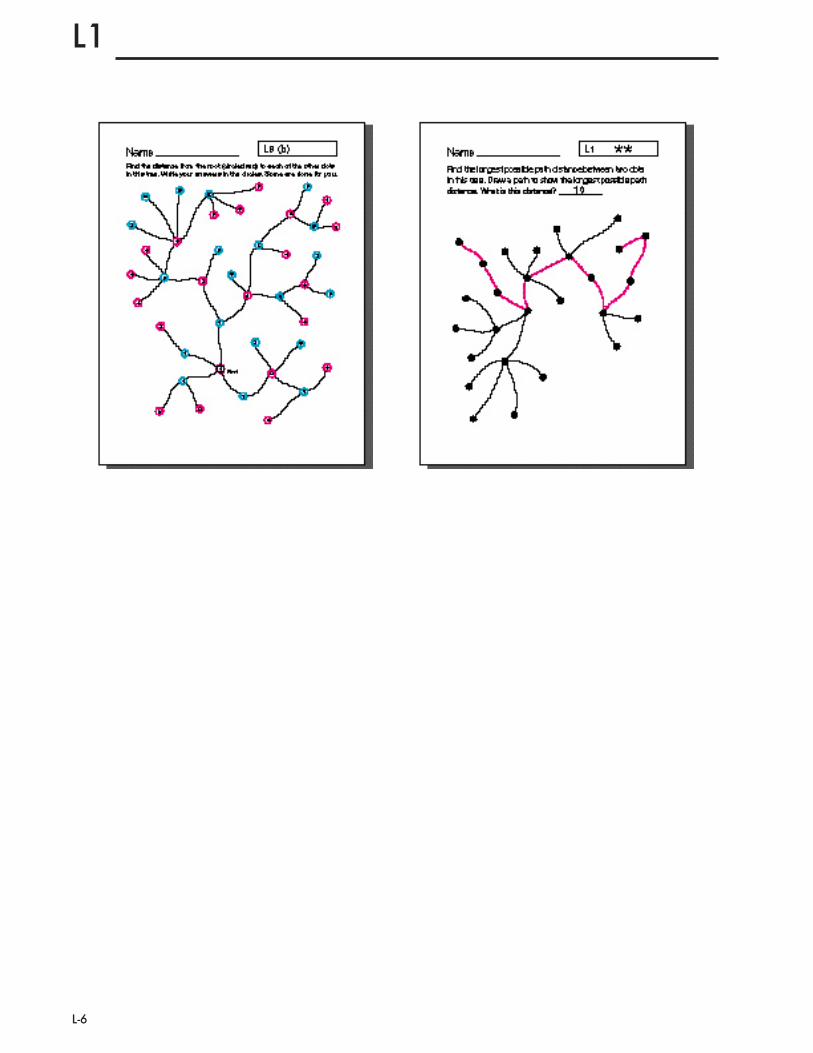
L1L1 TREES #1
Capsule Lesson Summary
Count the dots and edges in a tree. Observe that in a tree there is just one path between two dots. Choose one of the dots to be a root and direct all the edges away from the root. Choose a second dot to be a root and direct all the edges away from the new root. Observe which edges get the same direction for both roots and which get different directions. Find the path distance between two dots in the tree by counting the number of edges in a path between the dots. Decide which is the longest path distance between dots in the tree.
MaterialsTeacher • Colored chalk or markers • Overhead projector (optional)
Student • Worksheet L1 (no star), *, and ** • Colored pencils, pens, or crayons
Distribute copies of Worksheet L1(no star) to students and refer to the corresponding tree picture on the board.
T: We call this a tree. Why do you think it is called a tree?
Let students freely comment on this question, but do not insist on a definite answer. Point out a segment between two dots.
T: This is an edge or branch of our tree. How many edges are there in this tree?
S: 29.
T: And how many dots are there?
S: 30.
Exercise 1
Choose one of the dots and circle it in red.
T: Suppose this is the root of our tree. (Point to a dot other than the root.)
Can you find a path in this tree starting at the root and ending at this dot?
Let a student trace such a path. Then, with class discussion, observe that there is only one such path (as long as you do not backtrack). Repeat the question and observation for several other dots.
Advance Preparation: Put the tree pictures from Worksheet L1 (no star) on the board before the lesson begins. You may prefer to prepare an overhead transparency of the tree picture for use on the overhead projector.
Root

L-4
L1T: Now I would like to draw red arrow heads on all the edges to show the direction of paths
starting at the root and going to some other dots. The red arrows will show going away from the root.
Illustrate how to draw the arrowheads on one or two edges yourself, and then call on students to assist you. At first let students add the arrowheadsone at a time. After the idea has caught on, allow some students to draw several arrowheads at one time. All the students should participate in this activity. Students can draw red arrowheads on the front side of Worksheet L1(no star). A completed picture is shown here.
Choose a second dot and circle it in blue.
T: Let’s change the root in our tree.
Can you find a path starting at the new root (point to the blue circled dot) and ending at this dot, the old root (point to the red circled dot)?
Let a student trace the path and then, with class discussion, observe that the path goes against (opposite direction) the red arrowheads. Choose several other dots and invite students to find paths from the new root to those dots. Each time, lead a discussion observing that there is only one path and noting when the path goes with (same direction) the red arrowheads and when it goes against (opposite direction) the red arrowheads.
T: Now, let’s use this new root and draw blue arrowheads on all the edges to show the direction of paths starting at this root and going to other dots. The blue arrows will
show going away from this root.
Illustrate how to draw one or two blue arrowheads yourself, and then call on students to assist. Again, encourage all the students to participate in this activity. Students can draw blue arrowheads on their worksheets (front side). A completed picture is shown here.
Erase all the color (arrowheads and circles) from the picture on the board before going on to the next exercise. Instruct students to turn over their worksheets.
Root

L-5
Exercise 2
Choose two dots such as indicated here.
T: How many edges in a path between these two dots?
Call on a student to trace and count the edges in the path.
S: Three.
T: Yes, the path distance between these two dots is 3.
Repeat this question for another pair of dots. For example, the dots indicated here are a path distance of 5 from each other.
T: Try to find two dots a path distance of 4 from each other.
There are many possible correct responses. Invite several students to locate two such dots. Then repeat the problem for dots a path distance of 2, 3, 1, and 6 apart.
Note: A dot is a path distance of 0 from itself. This idea may be discussed briefly.
T: Now, try to find two dots the longest possible path distance apart. Find the longest path distance between dots in this tree.
Let students experiment with this problem. When a student suggests two dots, illustrate the path between them in color and indicate the length of the path in the same color. After several attempts by students, your picture might look like this.
The class should conclude that the longest path distance between dots is 9. Encourage the class to find more than one pair of dots at a distance 9 from each other, but only draw the path for one pair.
Worksheets L1* and ** are available for individual or partner work. Explain the instructions to the class and perhaps do an example collectively.
L1
�
��
L-6
L1

L-7
L2L2 THE EMPTY SET
Capsule Lesson Summary
Locate children, pets, and other objects in string pictures. Observe that in some situations there are empty regions and introduce the hatching convention to indicate an empty region. Find different ways of picturing the same situation so that there are no empty regions.
MaterialsTeacher • Colored chalk Student • Paper
• Colored pencils, pens, or crayons
Exercise 1
Draw this string picture on the board.
T: The red string is for girls and the blue string is for eight years old. Think about where you would put a dot for yourself in this picture.
Call on several students to put dots for themselves in the picture. Then draw dots in each of the four regions and ask what (or whom) each dot could be for.
Erase all the dots and change the label of the blue string as you say,
T: Now I’m going to change the label of the blue string. The red string is for girls and the blue string is for boys.
Point to each of the four regions in turn and ask what (or who) could be there. Consider the middle region last.
T: Who could be here?
After checking a few suggestions, the class should observe that nothing belongs in that part of the picture.
S: There is no one there because a person cannot be both a girl and a boy.
T: Very good. To show this we sometimes “hatch” the region. This means that it is empty; nothing goes here. Is there another way to draw the picture so that we get the same information without hatching a region?
Girls Eight years old
Girls Boys
Girls Boys

L-8
Perhaps students will suggest drawing two separate strings; otherwise, do so yourself but do not force the class to find this drawing.
Erase the string labels for the picture with overlapping strings and with the middle region hatched.
T: Who can suggest other labels these strings could have?
S: The red string could be for cats and the blue string could be for dogs.
S: The red string could be for vegetables and the blue string for meats.
S: The red string could be for even numbers and the blue string could be for odd numbers.
S: The red string could be for numbers less than 10 and the blue string could be for numbers more than 10.
Accept suggestions and let the class check each one. If students do not find some examples of their own, you can start them off by giving a label to one of the strings and asking what the other string could be for. This is a good opportunity to bring in classifications from science, social studies, or language arts. You may like to ask students to copy the picture on their papers and, with a partner, find labels for the strings.
Exercise 2
Draw this string picture on the board.
T: The red string is for dogs and the blue string is for poodles. Do you remember the story “Where’s My Nose?” Nick’s grandmother had a poodle. Who can draw a dot for her poodle?
Let a student draw a dot and ask for confirmation from the class. Encourage some of your students to put dots for their pets in the picture. Then point to the region inside the blue string but outside the red string.
T: What could be here?
S: Nothing. It would have to be a poodle and poodles are dogs so it must be in the middle.
S: That part of the picture is empty.
T: What should we do?
S: Hatch it.
L2Girls Boys
Dogs Poodles
Dogs Poodles
��������������
�������������������
��������������
��������������������������

L-9
Ask a student to show you where to put the hatching and then add it to your picture.
T: Do you know another way we could draw the picture?
If students suggest an alternative drawing, discuss it by putting the same things in the new picture. Again, do not press the class for this drawing.
Erase the board except for this picture.
T: Who can suggest other labels these strings could have?
S: The red string could be for cars and the blue string for Cadillacs.
S: The red string could be for numbers more than 5 and the blue string for numbers more than 10.
S: The red string could be for plants and the blue string for trees.
Accept suggestions and let the class check each one. With this situation, it may be difficult for students to find examples. If necessary, lead them by giving one string a label and asking them to supply the other. Use classifications from science, social studies, or language arts as appropriate for your class. Again, you may like to ask students to copy the picture on their papers and, with a partner, find labels for the strings.
Exercise 3
Draw this string picture on the board.
T: What could the red string and the blue string be for?
S: The red string could be for multiples of 2 and the blue string could be for even numbers. They are the same.
Lead the class to observe that the hatching in this picture indicates that the red string and the blue string are for the same things.
L2Dogs Poodles
��������������
�������������������
��������������
��������������������������
Dogs
��������������
�������������������
��������������
���������������� ����������
Poodles

L-10
T: How could we draw a string picture for the same story without hatching any region?
The students should remark that you only need to draw one string, or that you could draw the red and blue strings as shown.
Use string pictures occasionally to graph data about the class. For example, ask all the students to put themselves (names) in a string picture labeled with topics of current interest such as “went to the choir concert” and “wore boots to school.”
Suggest students write their own stories for a string picture.
L2

L-11
L3L3 A VALENTINE STORY
Capsule Lesson Summary
Tell a valentine detective story using information found in an arrow picture. Give clues about the people in the picture until you (the narrator) are located. Read another valentine story, The Magic Box.
MaterialsTeacher • UPG-II Language Poster #1 Student • Paper
• Colored pencils, pens, or crayons • The Magic Box Storybook
Before the lesson, tape UPG-II Language Poster #1 to the board. It is important that everyone in the class be able to see the entire poster because the picture is the basis for the detective story.
T: What do you think about my picture? What do you think the arrows could be for?
Allow a few minutes for the students to comment freely about the arrow picture. They will probably note such things as the “lonely” dot in the upper left corner, the loop in the upper right corner, the two-cycle in the lower right corner, and the fact that the picture is very complicated.
T: This picture is for a valentine story I want to tell you. What do people do on Valentine’s Day?
Let the students talk about sending and receiving valentines. If you arrange your schedule so that this lesson comes on or close to Valentine’s Day, the topic will be especially interesting.
T: The dots in my picture are for some of the people in my family. How many people from my family are in this picture? (15) What do you think the red arrows are for?
S: Sending valentines.
T: Yes, a red arrow is for “sent a valentine to.”
Draw and label a key arrow above the picture. Illustrate themeaning of the red arrows at a couple of places in your picture.Let the students comment on some of the situations described in your drawing. For example, a student may note that the red loop means a person sent a valentine to himself (or herself). The two-cycle shows two people who sent valentines to each other. Some people sent no valentines; some people received no valentines. There are many interesting situations about which the students will comment; try to limit this discussion to only a few minutes.
�����������
�����������
�������������������

L-12
T: I am in this picture. Do you know where I am?
The students will probably make several guesses. For each one say,
T: That could be me but you don’t know for sure.
Suggest to the class that to find you they need more information about the people in the picture.
T: I will tell you some things about the people in my family. If you are good detectives, you will be able to discover where I am in the picture. My grandmother received the most valentines. Where is my grandmother?
Call on a student to indicate which dot is for your grandmother. You and the class should check that, indeed, no one else in the picture received more valentines. Label the appropriate dot Grandmother.
T: How many valentines did Grandmother receive? (Six) I sent a valentine to my grandmother. Where could I be?
Let the students point to the dots that could be for you. Each time a student points to a dot, ask the class to check (by tracing an arrow) that the person indicated sent a valentine to Grandmother. If it is correct, put a check ✓ by the dot in pencil. (You will later erase some of the check marks.)
��������������������
�����������
�
�
�
�
�
�
T: The next thing I will tell you about my family is that my father sent the most valentines. Where is my father?
Call on a student to locate the dot for your father and encourage the class to check that it is correct. When there is agreement, erase the check mark by that dot noting that it cannot be for you, and label it Father. (See the next illustration.)
L3

L-13
L3T: How many valentines did my father send? (Six) My father sent a valentine to me. Now, where could I be?
Let students point to dots that could be for you. Each time there will be two things to note: that the dot has a check mark by it and that there is an arrow from the dot labeled Father going to the dot. You should encourage the students to notice that they must look for these two things. Erase the check marks by dots that now cannot be for you. Three dots will remain with checks.
�������������������
�����������
������
�
�
�
T: Now you know that one of these three dots (point to them) is for me. I will tell you something else. My mother received exactly five valentines. Where is my mother?
Call on a student to locate the dot for your mother; count that five arrows end at that dot, and then label it Mother. (See the next illustration.)
T: I sent a valentine to my mother. Where could I be?
The students should recognize that there are again two things to note: that the dot has a check mark by it, and that there is an arrow starting at the dot and pointing to the dot labeled Mother. With this clue, one check mark can be erased. Two dots remain that could be for you.
�������������������
�����������
������
������
�
�

L-14
L3T: I have just one more thing to tell you about my family. You should then be able to discover
for certain where I am, so listen carefully. I am the only person who sent a valentine to my Uncle George. Where am I and where is my Uncle George?
Call on a student to point to the correct dots and label them. Be sure to get class agreement.
�������������������
������������
��
�����������
������
������
Distribute unlined paper and colored pencils. Ask the students to tell a valentine story about their own family or about some of their friends by drawing an arrow picture. If students work with a partner, they can each do their own drawing and tell their stories to each other.
Students who finish quickly may be given the storybook The Magic Box to read. This is another valentine story. You may prefer to place this storybook in a reading center.

L-15
L4L4 STRING GAME WITH A-BLOCKS #1
Capsule Lesson Summary
Review the A-block pieces as to size, shape, and color by taking them out of a box, one at a time, as they are described. Play The String Game with A-blocks.
MaterialsTeacher • A-Block String Game kit • Colored chalk
Student • None
Advance Preparation: Before teaching this lesson, be sure you have prepared the materials from the A-Block String Game kit. See Appendix D on The String Game for a description of equipment and preparation for the game.
Put the A-block pieces in a box about the size of a shoe box. Sort them so that each one is easy to locate. Divide the class into teams, and try to arrange that the teams are roughly equal in ability. You may teach this lesson with two or more teams, and you may want to let teams choose their own team names. The lesson description has only two teams, A and B, but can be easily adapted.
Exercise 1
This first exercise serves only as a warm-up and should proceed at a brisk rate. Encourage students to think ahead and to respond quickly when it is their turn. Briefly review the different kinds of A-block pieces and post a list of attributes above the team board.
BIG LITTLE
GREEN BLUEYELLOWRED
Team A Team B
T: We are going to play a string game with these shapes. First you have to help me take the A-block pieces out of this box. We will take turns; someone on Team A will tell me a piece
to put on Team A’s side of the board, and then someone from Team B will tell me a piece to put on Team B’s side of the board. Remember, you must describe a piece that is still in the box so I know exactly which piece you want me to put on your side of the board.
Alternating between the teams, let students describe pieces to put on the team board. Insist that the description be complete. If the piece described is already on the board, point it out and ask for another. Decide on students to call on early so that there are many choices open to them. Encourage all the students to be thinking about a piece they will ask for when you call on them.

L-16
Exercise 2
Play one or two rounds of The String Game with A-blocks (two-string version) in the usual way with hidden string labels. The next illustration shows the starting situations and correct placement of all game pieces for two games. In the second game, there is one empty region. It would be appropriate at the end of the game to ask about this region and to review the idea of hatching to indicate an empty region.
GREEN BIG GREEN BIG
Game 2Starting situation Correct placement of pieces
Game 1Starting situation Correct placement of pieces
L4

L-17
L5L5 COMPOSITION GAMES
Capsule Lesson Summary
Review and play a composition game with this rule: yellow followed by blue is red. Introduce a new rule involving the red arrows: red followed by red is green. Composition is an important relation concept as often we must combine relations to get new relations. The first exercise provides an opportunity to experiment with composition, paying attention to direction and order without worrying about specific relations. The second exercise provides a numerical example.
MaterialsTeacher • Colored chalkTeacher • Colored chalkTeacher Student • Unlined paper
• Colored pencils, pens, or crayons
Exercise 1
Invite students to comment on this arrow picture.
T: Do you remember the game we played using yellow and blue arrows to draw red arrows? The rule was this: yellow followed by blue is red. We will use that rule again.
Use the upper left corner of the arrow picture to review the rule of the game. As you explain the rule, make the motions described in the right-hand column below.
T: Each time there is a yellow arrow … (Point and hold your left forefinger on a dot at which a yellow arrow starts. Follow the yellow arrow leading with your right forefinger in the direction of the arrow.)
T: …followed by a blue arrow … (Stop the motion of your right forefinger at the middle dot, tap the dot, and then follow the blue arrow. Hold your right forefinger at the ending dot of the blue arrow.)
Advance Preparation: Before the lesson begins, draw the arrow picture from Exercise 1 on the board or prepare it on a transparency. Give the picture plenty of space and draw arrows in colors that can be easily distinguished.

L-18
L5T: .…then we can draw a red arrow from (Tap this dot several times with your left the dot where the yellow arrow starts … forefinger.)
…to the dot where the blue arrow ends. (Tap this dot several times with your right forefinger.)
First trace and then draw the red arrow. Remind the class that your left forefinger marks the start of the red arrow and that your right forefinger is at the end of the red arrow.
T: Where can we draw other red arrows?
Invite students to show where red arrows can be drawn. Each time, ask the student to trace a yellow arrow followed by a blue arrow and then to trace how a red arrow can be drawn. Encourage the class to help you catch mistakes such as tracing against the direction of an arrow. Let a student draw a red arrow if it has been correctly traced.
Common mistakes and difficulties: The most common mistake at first will occur when students confuse the rule “yellow followed by blue” with “blue followed by yellow.”
Another mistake might occur when the directions of the arrows are not correctly followed.
Remind students making such mistakes that they must follow the direction of the arrows. The arrows are like one-way streets and they are not allowed to go the wrong way.
If it happens that a student proposes to draw a red arrow as indicated by the dotted arrow in this illustration …
…another student will probably remark that the red arrow has already been drawn. There is nothing wrong with the dotted arrow; it is merely redundant. That portion of the picture is complete without it.
The yellow and blue loops may cause difficulty. If no one discovers one of these red arrows, you can suggest one of them yourself.
It is important here to emphasize where you start and where you end.
When all the red arrows and loops have been drawn, your picture should look like this one.
Start
End
Start
End
Start End

L-19
T: Let’s introduce a new rule to our game.
Use the upper left corner of the arrow picture to introduce the new rule. Go through motions similar to those described for the first rule.
T: A red arrow (trace a red arrow) followed by a red arrow (trace another red arrow) is a green arrow (trace and then draw a green arrow.)
Repeat the rule and then invite students to use the rule to find other places in the picture where green arrows can be drawn. As before, encourage the class to help you catch mistakes. Let a student draw a green arrow if it has been correctly traced.
When all the green arrows have been drawn, your picture should look like this.
Exercise 2
You may like to let students work with a partner for this exercise. Erase the board and draw this arrow picture. Ask students to copy it on their papers.
T: Right now there are no dots labeled in this picture. I would like to find places for the numbers 10 and 12. Try to put 10 and 12 in the picture, but remember red arrows are for + 5 and blue arrows are for –3. After you find a place for 10 and 12, label all the dots and check the arrows.
L5
Start End
����

L-20
Let students experiment. You may want to remind them to consider the composition+ 5 followed by –3 or the composition of –3 followed by +5. Note that +2 arrows show compositions and help to locate 10 and 12. There are two possible solutions to this problem.
����
�����
��
�
��
����
����
�
�
������
����
Look for both solutions and ask students to put them on the board. Encourage students to explain how they found a solution. Discuss the compositions: + 5 followed by –3 is +2, and –3 followed by +5 is +2. Draw arrows for +2 and use the +2 arrows to help explain how to find solutions.
If there is time and students enjoyed this exercise, repeat Exercise 2 for the following problem.
T: Locate places for 10 and 20 in this picture. After you put 10 and 20 into the picture, label all the dots and check the arrows.
There are two possible solutions to this problem.
����
������
��
��
��
���
����
����
��
�
��
���
����
����
Make task cards similar to Exercise 2 to place in a center.
L5
����

L-21
L6L6 TEMPERATURE BAR GRAPHS
Capsule Lesson Summary
Make temperature bar graphs for given temperature data from two different cities. Compare these graphs to the temperature bar graph your class has been making during the past two months.
MaterialsTeacher • Class temperature bar graphTeacher • Class temperature bar graphTeacher • UPG-II Language Poster #2 • Blackline L6(a), (b), and (c)
Student • Temperature data and chart sheets
Organize the class into cooperative groups of two to four students. The groups will make temperature bar graphs for two different cities.
Begin the lesson by discussing the class temperature bar graph where you have been recording daily temperatures during the months of January and February. The bar graph for your data should be similar to those at the end of this lesson. Some questions you can ask during this discussion include the following:
• During the past two months, has the temperature usually been above or below 0°C?• What is the highest temperature we recorded?• What is the lowest temperature we recorded?• What is the difference between the highest and lowest temperature?• Is there any temperature between the high and the low which we did not record?• What temperature did we record most often?
Display two demonstration temperature charts (blank) from UPG-II Language Poster #2. Distribute copies of temperature charts and two months of temperature data each for St. Louis and New Orleans. Explain to the class that this is temperature data collected by other second grade students who live in those cities. Tell students they are going to use this data to make bar graphs similar to the one they made in January and February (point to the class temperature bar graph.)
Display a blank chart, and then record the first two or three temperatures in January for one city as a class. Then, instruct the groups to cooperatively make temperature bar graphs for both cities. Monitor the work so that groups having difficulty can get started correctly.
As the students are working on their own graphs, ask them, one at a time, to go to the demonstration charts and record some temperatures. For example, ask one student to record the temperatures in St. Louis for the first week in January. Then ask another student to record the temperatures in St. Louis for the second week in January; and so on.
Advance Preparation: See Lesson L14 in UPG-I for a description of a class temperature bar graph. Use UPG-I for a description of a class temperature bar graph. Use UPG-IBlacklines L6(a), (b), and (c) to make temperature data and chart sheets.

L-22
After about 20 or 25 minutes, most groups should have completed the two bar graphs, and the class should have completed bar graphs for both cities at the front of the classroom. Compare your class temperature bar graph (the one the class made during the months of January and February) with the ones made during this lesson. You can ask some of the same questions that you asked at the beginning of the lesson. In addition, try to include some of the following questions.
• Which city (your city, St. Louis, or New Orleans) had the warmest weather in January and February?
• Which city had the warmest day in January and February?• Which city had the coldest day in January and February?• Which city had the greatest variation in temperatures?
If your class has enjoyed this project, you may wish to continue taking and recording the temperature every day during March and April. In this case, you can then compare the January and February temperature graph in your classroom with the March and April temperature graph.
Suggest that students record morning (or evening) temperatures at home every day for the month of March.
20191817161514131211109876543210123456789
1011121314151617181920
Tem
pera
ture
Gra
ph fo
r St.
Loui
s, J
anua
ry a
nd F
ebru
ary
Temperature Chart20191817161514131211109876543210123456789
1011121314151617181920
Tem
pera
ture
Gra
ph fo
r New
Orle
ans,
Jan
uary
and
Feb
ruar
yTemperature Chart
L6

L-23
L7L7 TELLING STORIES WITH ARROWS
Capsule Lesson Summary
Present several different arrow pictures and, for each one, tell stories that the picture could be about. Observe some important details of the story as shown by the picture.
MaterialsTeacher • Colored chalkTeacher • Colored chalkTeacher Student • None
For each exercise present an arrow picture and invite students to invent stories that the arrow picture could be about. After a student tells a story, ask other class members to give their comments or opinions about whether the picture could be for that story. Direct the discussion by asking questions that will help students become more familiar with the language of arrows. If students are initially reluctant to tell their own stories or if their imaginations “run dry,” you may wish to present some stories yourself.
For each exercise, a sample story and dialogue are presented. These situations should not limit your discussions. Your students certainly will find different stories, and feel free to use the questions that come from the students. For each picture you present, encourage the class to discuss more than one story in order to reinforce the idea that one arrow picture can represent many different situations.
Exercise 1
Draw this arrow picture on the board.
T: What story could we tell about this picture? What could the dots and the red arrows be for?
Let the students comment and ask questions. Lead a discussion of your class’s ideas. For example:
S: The dots are for people and they are pointing to their mothers. The red arrows are for “You are my mother.”
Allow other students to comment before asking any specific questions.
T: How many people are there in this picture?
S: Twelve.
T: How many can we be sure are mothers?
S: Five.
T (pointing to one of the dots with red arrows ending at it): What do we know about this person?
S: She is a mother and one (or more) of her children is in the picture.
T (pointing to the dot at which no red arrow starts or ends): What about this person?

L-24
S: That person’s mother is not in the picture.
S: That person might be a man.
S: That person might be a woman but not a mother with children in this picture.
Some other stories that could be told about this picture are summarized below.
• The dots are for numbers and the red arrows are for “is more than.” For such a story, you might discuss possible ways to label dots or additional red arrows
that you are sure can be drawn.
• The dots are for people and the red arrows are for “I sent a message to you.” For such a story, you might discuss which people received just one message, no message,
or more than one message.
• The dots are for children and the red arrows are for “You are my brother.” For such a story, you might discuss which dots are for boys, where additional red arrows
certainly can be drawn, and how many families are represented in the picture.
Exercise 2
Draw this arrow picture on the board.
T: What story could we tell about this picture? What could the dots and the blue arrows be for?
Let students comment and ask questions. Lead a discussion of any suggestions; for example:
S: The dots are for numbers and they are pointing to their 10-friends. The blue arrows are for “You are my 10-friend.”
Note: Two numbers are 10-friends if and only if their sum is 10.
Allow other students to react before asking any specific questions.
T (pointing to two dots connected by blue arrows): What numbers could be here?
S: 7 and 3.
S: 0 and 10.
S: 11 and B1.
Let the students suggest several pairs of numbers that are 10-friends.
T (pointing to the dot with no arrow): What number could be here?
S: It could be 1 if 9 is not in the picture.
S: It could be 20 if N10 is not in the picture.
Let the class label the dots in the picture as they wish, but insist that they check the correctness of the labeling.
L7

L-25
Some other stories that could be told about this picture are summarized below.
• The dots are for children and the blue arrows are for “You are my best friend.” For such a story, you might discuss what the child at the loop is saying, what situation is
pictured by the four pairs of connected dots, and what knowledge we have about the child whose dot has no arrow starting or ending at it.
• The dots are for people and the blue arrows are for “I sent a letter to you.” For such a story, you might discuss how many letters were sent; what knowledge we have
about the person at the loop or the person whose dot has no arrow starting or ending at it, and what situation is pictured by the four pairs of connected dots.
Exercise 3
Draw this picture on the board.
T: What story could we tell about this picture? What could the dots and the green arrows (loops) be for?
S: The dots could be for numbers and the green arrows could be for +0. Then there would just be loops.
Let the class discuss this possibility before asking specific questions.
T: How many numbers are in the picture?
S: Eight.
T: Which numbers could be in the picture?
S: Any eight numbers. For any number, when you add zero you get that number.
Some other stories that could be told about this picture are summarized below.
• The dots are for children and the green arrows are for “I have the same birthday as you.” For such a story, you might discuss how to select eight children to put in the picture (so that
no two have the same birthday).
• The dots are for numbers and the green arrows are for 1x.
• The dots are for numbers and the green arrows are for “is equal to.”
Choose one of the exercises in this lesson to be a writing activity. Ask students, possibly with a partner, to write a story for the picture. The story should tell what the dots are for, what the arrows are for, and what you can observe.
L7
Exercise 3

L-26

L-27
L8L8 MULTIPLES #1
Capsule Lesson Summary
Play a type of Guess My Rule game where the players decide that a given string is for multiples of 3. Locate many integers, positive and negative, in the string picture. Label some dots in a double spiral arrow picture and find that the arrows could be for +3. Then observe that the numbers on the spiral are the same as those inside the string. Discuss other multiples, for example, multiples of 5 and of 2. Locate numbers in a two-string picture with one string for multiples of 2 and the other for multiples of 5.
MaterialsTeacher • Colored chalkTeacher • Colored chalkTeacher • Calculator
Student • Paper • Colored pencils, pens, or crayons • Calculator
Exercise 1
Draw a large string on the board.
Note: The string is for multiples of 3, but do not announce this or use the word multiples until later in the lesson.
Tell the class that you are not going to tell them yet what the string is for except that it is for some numbers. They may choose numbers and you will place them correctly in the picture, either inside the string or outside the string. When they think they know what the string is for, you will give them numbers to place to see if they are right.
Give each student a chance to choose a number for you to place or to try to place a given number in the string. That is, go around the room and ask each student, in turn, either to give you a number to put in the picture or to place a number in the string.
Note: For your information only, an integer is a multiple of 3 if and only if the sum of its digits is a multiple of 3.
After a short while your picture should have many numbers in it. For example,?
�
����
�����
�
��
�����
�
��
���
���
���

L-28
Some students may be very anxious to guess what the string is for and you may take some guesses. If students guess that the string is for even numbers, odd numbers, more than 10, less than 1,000, or something else that can easily be seen to be impossible, ask the class to say why the guess is incorrect. For example:
S: The blue string cannot be for even numbers, because 15 is inside and 15 is odd.
S: The blue string cannot be for less than 1,000 because 10 is outside and 10 is less than 1,000.
Although your students may be unfamiliar with the term multiples of 3, they should soon begin to notice that the numbers inside the string have something to do with counting by threes. When this occurs, invite students to predict where certain numbers will go in the picture. You may like to use a calculator to observe numbers you get counting by threes starting at 0. That is, start with 0 on the display and press å £ ≠ ≠ ≠ and so on.
T: Where should I put 30?
S: Inside the string, because you say 30 when you count by threes.
Invite students to count by threes starting at 0 and ending at 30.
T: Where should I put 37?
S: Outside the string, because from 30 we count next 33, 36, 39, and skip over 37.
T: Where should I put 300?
S: Inside the string, because if you count by threes 100 times you’ll get to 300.
If you already have some negative numbers in the picture, also discuss counting backward by threes and put some more negative numbers in the picture. Use the calculator to count backward by threes by pressing ß £ ≠ ≠ ≠ and so on. Otherwise, wait for the next exercise to discuss negative numbers.
T: There is a name for the numbers inside this string. They are called multiples of 3.
Write this term inside the label for the string. Leave your picture on the board; you will refer back to it in Exercise 2.
Exercise 2
Draw a double spiral arrow picture on the board and label the middle dot 0.
T: What do you think about this picture?
Let the class react. Perhaps they will mention its symmetry, that 0 is in the center, that it could go on and on in both directions, and so on. Allow a minute or two for such observations before continuing, but do not insist that all of these things are mentioned.
L8
�
��Exercise 2

L-29
T: Let’s put some more numbers in the picture.
Label dots for 9, B9, 15, and N15.
T: What could the red arrows be for?
Allow the students to experiment with some possibilities. For example, if a student suggests +9, observe that in that case 9 would be at the end of the arrow starting at 0, not where it is. Perhaps a student will suggest “is less than”; if so, observe that this is a possibility, but ask for another possibility. When a student suggests +3, check to find that indeed the red arrows could be for +3, and write the key near the picture. If no one has suggested +3, put in some more numbers, for example, 6 and B6, and ask the question again. After it is established that the red arrows are for +3, invite students to label the other dots.
��
����
��
��
��
�
��
�
�
� �
��
����
����
��
T: What do you notice about the numbers in this picture?
S: They are alike on both sides; 3 and B3, 6 and B6, 9 and B9, and so on.
S: They are the numbers we say when we count by threes, forward and backward.
S: They are the numbers we see on the calculator when we make it count by threes (forward or backward) starting at 0.
S: They are the numbers inside the string, the multiples of 3.
If this last observation is not made, call the class’s attention back to the string picture and ask specifically which numbers in the string picture would be in the arrow picture. (The numbers inside the string.)
Continue by asking students to predict whether certain numbers are multiples of 3; that is, whether they would be in the double spiral for + 3. Include some large numbers such as 300, 333, 900, 906, and 3,000. You may again like to use the calculator to follow the arrow picture and to check students’ predictions of multiples of 3.
At this point, if there are no negative numbers in the string picture, direct the class to observe that all the numbers in the arrow picture should be inside the string, including the negative numbers.
L8���
��
�
�
��
��

L-30
L8Exercise 3
Repeat Exercise 1 for multiples of 5. The students should quite quickly guess that your new string is for multiples of 5 and perhaps they will even use that expression.
After the class discovers that your string is for multiples of 5, let students put in some numbers themselves. Encourage them to include both positive and negative numbers, and some large numbers.
T: If I were to draw an arrow picture as before to include all the multiples of 5, what kind of arrows would I use?
S: +5.
While you erase the board and prepare for Exercise 4, ask students to make lists on their papers of the following:
• multiples of 2 from 0 to 20• multiples of 5 from 0 to 50• multiples of 3 from 0 to 30• multiples of 10 from 0 to 100
Exercise 4
During this exercise, allow students to work with a partner and use a calculator.
Draw this picture on the board and instruct students to draw the picture on their papers. Check with the class that everyone understands that multiples of 2 are even numbers. Then direct the students to put many numbers in the picture.
Multiples of 2Multiples of 5
Student pairs that are ready for a new problem can put numbers in the following picture.Multiples of 3
Multiples of 10
Suggest that parents/guardians find opportunities to count by twos, threes, fives, and tens with their child.
Exercise 4
Multiples of 5
����
�����
������
���
���
���
������
�����
�����
���
�����

L-31
L9L9 TREES #2
Capsule Lesson Summary
Review the notion of a tree, observing that in a tree there is just one path between two dots. Find the path distance between selected pairs of dots in a tree and decide which is the longest path distance between dots in the tree. Given three dots in a tree (labeled A, B, and C) find the length of a trip from A to B to C to A.
MaterialsTeacher • Colored chalk or markersTeacher • Colored chalk or markersTeacher • Overhead projector (optional)
Student • Worksheets L9(a) and (b) • Colored pencils, pens, or crayons
Advance Preparation: Before the lesson begins, draw the tree picture from Worksheet L9(a) on the board, or make a transparency.
Exercise 1
Distribute copies of Worksheet L9(a) to students and refer them to the tree picture on the board.
T: How many edges are there in this tree? How many dots?
S: 30 edges and 31 dots.
Briefly review the idea that in a tree there is exactly one path between two dots (if you do not backtrack).For each pair of dots, look also at the number of edges in the path between them and explain that this number is the path distance between these dots. Some examplesare shown here.
Next, ask the class to find a pair of dots at a specified path distance from each other; for example, two dots at a path distance of 4 (7, 3, 5, or 1) from each other. If you have drawn any paths on the tree in color, erase them, leaving just the original drawing of a tree.
T: Now, try to find two dots at the longest path distance apart in this tree.
After some trial and error, the class should find that the longest path distance between two dots is 10, asshown here.
If you have drawn any paths in color on the tree,erase them again, leaving just the original drawing.
��
�
��

L-32
Exercise 2
Label three dots A, B, and C as shown here.
T: Imagine that this tree is the map of a city. The edges are the streets. Anthony lives here (point to A). His mother sends him on an errand to the bookstore here (point to B). Then he may go to the candy store here (point to C) before he returns home (point to A). How long is the trip Anthony makes? Remember, he goes from A to B, then from B to C, and then from C to A.
First let students work out the solution (16) on their own. Then, invite students to trace the path from Ato B, the path from B to C, and the path from C to A. Draw these paths in color on the picture and find the length of each path. Add the three lengths to find the total length of Anthony’s trip.
Distance from Distance from Distance from Length A to B + B to C + C to A = of trip
5 + 5 + 6 = 16Repeat this exercise with another choice of three dots labeled D, E, and F. If the class enjoys such problems, you might wish to repeat the exercise several times. Each time, observe that the length of the trip is an even number. Challenge students to find three different points (say X, Y, and Z) that create the shortest or longest possible “round trip” (the distance from X to Y, Y to Z, and Z to X).
Distribute Worksheet L9(b). Explain to the class that a root has been marked (circled in red) on this tree. Instruct them to find the path distance from the root to each of the other dots, and write it inside the dot (some are done for them). You may wish to check these collectively.
T: Now take your red crayon and color all the dots that are an even distance from the root. Color those dots that are an odd distance from the root in blue.
Direct students to trade papers and check each other’s work.
L9
A
B
C
A
B
C
��
�

L-33
L9

L-34

L-35
L10L10 STRING GAME WITH A-BLOCKS #2
Capsule Lesson Summary
Introduce the not-cards as new possibilities for string labels in The String Game. Play a game, placing the pieces in a picture with visible labels, both involving “not.” Play The String Game in the usual way with hidden labels.
MaterialsTeacher • A-Block String Game kitTeacher • A-Block String Game kitTeacher • Colored chalk
Student • None
With the class, quickly review the attributes for the A-blocks: color, shape, and size.
Exercise 1
Draw one string on the board.
T: I’m going to show you some other possibilities for string labels.
Show the class the string card, and label the string NOT Q.
T: If this string is for all pieces that are not circles, what would be a piece that goes inside the string?
S: The small red square.
T (putting the piece inside the string): Yes, this piece is not a circle. What would be a piece that goes outside the string?
S: A large blue circle.
T (putting the piece outside the string): Yes, circles go outside the string.
Let several other students suggest pieces that go inside the string and pieces that go outside the string. Then clear the board of all game pieces and draw a second overlapping string labeled BIG.
BIG NOT
Call on students to place several A-block pieces of their choice in the picture. Discuss with the class why each placement is correct or incorrect, as the case may be. For your information, the following picture shows correct placement of all the A-block pieces.
Advance Preparation: Before teaching this lesson, be sure you have prepared the materials from the A-Block String Game kit. See Appendix D on The String Game for a description of equipment and preparation for the game.
NOT
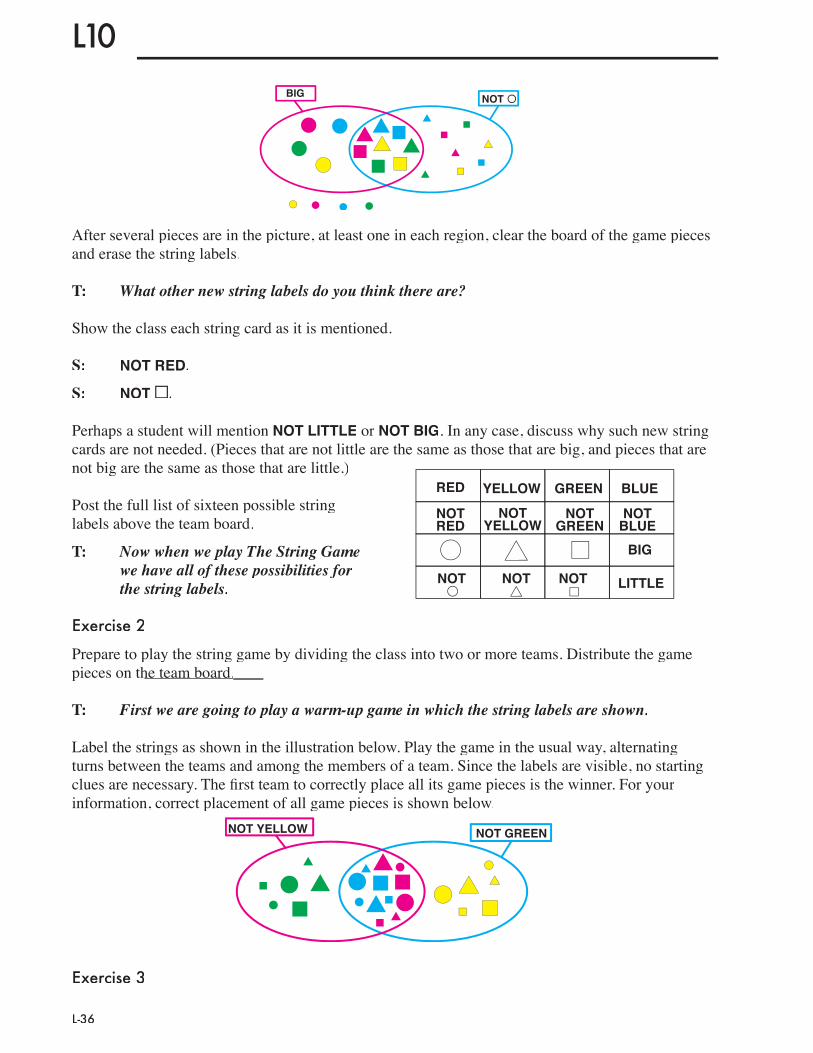
L-36
L10BIG NOT
After several pieces are in the picture, at least one in each region, clear the board of the game pieces and erase the string labels.
T: What other new string labels do you think there are?
Show the class each string card as it is mentioned.
S: NOT RED.
S: NOT Z.
Perhaps a student will mention NOT LITTLE or NOT BIG. In any case, discuss why such new string cards are not needed. (Pieces that are not little are the same as those that are big, and pieces that are not big are the same as those that are little.)
Post the full list of sixteen possible string labels above the team board.
T: Now when we play The String Game we have all of these possibilities for the string labels.
Exercise 2
Prepare to play the string game by dividing the class into two or more teams. Distribute the game pieces on the team board.
T: First we are going to play a warm-up game in which the string labels are shown.
Label the strings as shown in the illustration below. Play the game in the usual way, alternating turns between the teams and among the members of a team. Since the labels are visible, no starting clues are necessary. The first team to correctly place all its game pieces is the winner. For your information, correct placement of all game pieces is shown below.
NOT YELLOW NOT GREEN
Exercise 3
GREEN BLUEYELLOWRED
NOTGREEN
NOTBLUE
NOTYELLOW
NOTRED
BIG
LITTLENOTNOTNOT
pieces on the team board.
L-37
Prepare to play a two-string version of The String Game in the usual way with face-down string cards. Redistribute game pieces on the team board. Set up the playing board as shown below (the bubbles indicate what is hidden on the string cards). There are two starting clues.
NOT RED Starting Clues
The next picture shows correct placement for all the game pieces. Use this picture as a crib sheet while the game is being played.
NOT RED
Correct Placementof Game Pieces
L10Prepare to play a two-string version of The String Game in the usual way with face-down string

L-38

L-39
L11L11 TWO DICE
Capsule Lesson Summary
Examine a die noting that it is a cube, and what is on each of the six faces of the cube. Discuss the chances of getting various outcomes when tossing one die. Determine all the possible outcomes (sums) when tossing two dice and make a bar graph of the results (sums) from about 50 trials of the experiment of tossing two dice. Make some observations from reading the graph. Make a six by six array to picture all the ways the two dice can land and the resulting sum. Use this picture to discuss chances of getting various sums.
MaterialsTeacher • Two diceTeacher • Two diceTeacher • Cube and die cut-out • Overhead projector (optional) • Blacklines L11(a) and (b)
Student • Die • Die cut-out • Worksheets L11(a) and (b)
Advance Preparation: Use Blacklines L11(a) and (b) to make a cube cut-out and a die cut-out. For Exercises 2 and 3, prepare grids as on Worksheets L11(a) and (b) on the board, or make transparencies.
The dice provided in your classroom set of materials are red and white; however, any two different colors can be used.
Note: You may prefer to conduct this first exercise with students in groups, each group having a die to examine as well as a cube cut-out.
Exercise 1
Hold up the dice for the class to see.
T: What do we call these things?
S: Dice.
T: Yes; and one of them is a die. What shape is a die?
Perhaps students will say square, in which case you should point out that one side (or face) of a die is a square.
S: A cube.
Pass around the dice and instruct students to note what they see on a die when their turn comes to examine one of them.
T: Who can describe a die? How many faces (indicate a face on one die) does it have?
S: Six.
T: What are on the faces?
S: Dots—one, two, three, four, five, or six.
Exercise 1

L-40
Let students make other descriptive comments about a die; for example, someone may mention its symmetry, or that each number of dots from 1 to 6 is shown on a die. Another interesting fact is that 1 is opposite 6, 2 is opposite 5, and 3 is opposite 4. Do not insist on these observations, but let students notice what they wish about a die.
Hold up your paper cut-out of a cube.
T: Does this look like a die?
S: It’s like a die flattened out.
S: You can fold it to make a cube like the die.
S: But it doesn’t have dots.
Now is a good time to demonstrate how the paper cut-out folds to form a cube. You may like to invite students to put dots on your cube cut-out to make it a die cut-out. Otherwise, display the die cut-out as being just like the cube cut-out with dots.
Exercise 2
T (hold up one die): Suppose I toss one die on the desk. What could I get on the top face?
S: 1, 2, 3, 4, 5, or 6 (dots).
T: Do I have a better chance to get 1 or 6?
S: The same for both.
Lead a discussion in which the class observes that each outcome has the same chance (one out of six) because the six faces would be indistinguishable without dots; the cube is symmetric.
T: Do I have a better chance of getting an even number or an odd number?
S: The same, because you have three chances out of six to get an even number (2, 4, or 6) and three chances out of six to get an odd number (1, 3, or 5).
T: Do I have a better chance of getting a multiple of 2 or a multiple of 5?
S: A multiple of 2; three chances out of six to get a multiple of 2 (2, 4, or 6) and only one chance out of six to get a multiple of 5 (5).
T (holding up two dice): Many games use two dice. Suppose I tossed two dice at the same time. What could I get?
S: 1, 2, 3, 4, 5, or 6 on the red die and 1, 2, 3, 4, 5, or 6 on the white die.
S: 10; You could get 6 on the red die and 4 on the white die.
Explain that when you toss two dice you will add the number of dots on the top faces. Do this one or two times to be sure everyone understands. For example:
T: 3 on the red die and 2 on the white die; 3 + 2 = 5; so the result is 5. What other sums could we get?
L11

L-41
S: 6.
T: How could we get 6?
S: 3 on both dice.
S: 4 on the red die and 2 on the white die, or 4 on the white die and 2 on the red die.
Continue accepting possible outcomes until every whole number from 2 to 12 is mentioned. Ask that students mention at least one way to get each sum, but do not insist that they give several ways in cases where there are more than one. This idea occurs in a later part of the lesson.
Distribute Worksheet L11(a). Observe that all the possible sums are listed along the bottom edge of the grid on the worksheet, and put these numbers below your grid on the board.
T: Each of you is going to have two turns tossing the dice and noting the sum. We will all record the results on this grid by filling in a square above a number each time it is the sum.
Demonstrate by starting the activity yourself. Toss the two dice and note the sum. Then fill in a square above the number. For example,
���������
��������������
T: Before we go on, predict which number will have the highest tower of filled in squares after we all have had our turns. Circle your prediction at the bottom of the page.
Pass the two dice around the room letting each student take two turns. Encourage students to shake the dice in their hands before tossing and then to give them a good roll on the desk. Keep a record at the board of all the results and ask students to do likewise on their papers.
A possible graph for a class of 25 students is shown here.
At the end of this activity, ask the class which sum occurred most often (the one with the highest tower of filled in squares). Let students compare the result to their predictions. You might also ask some of the following questions about the graph.
• Which sum occurred least often?• How many times did we get a sum of 10? …5? …8?• How many times did we get sums more than 7? …less than 7?• How many times did we get an even number as the sum? …an odd number?
L11
��������������
L-42
Exercise 3
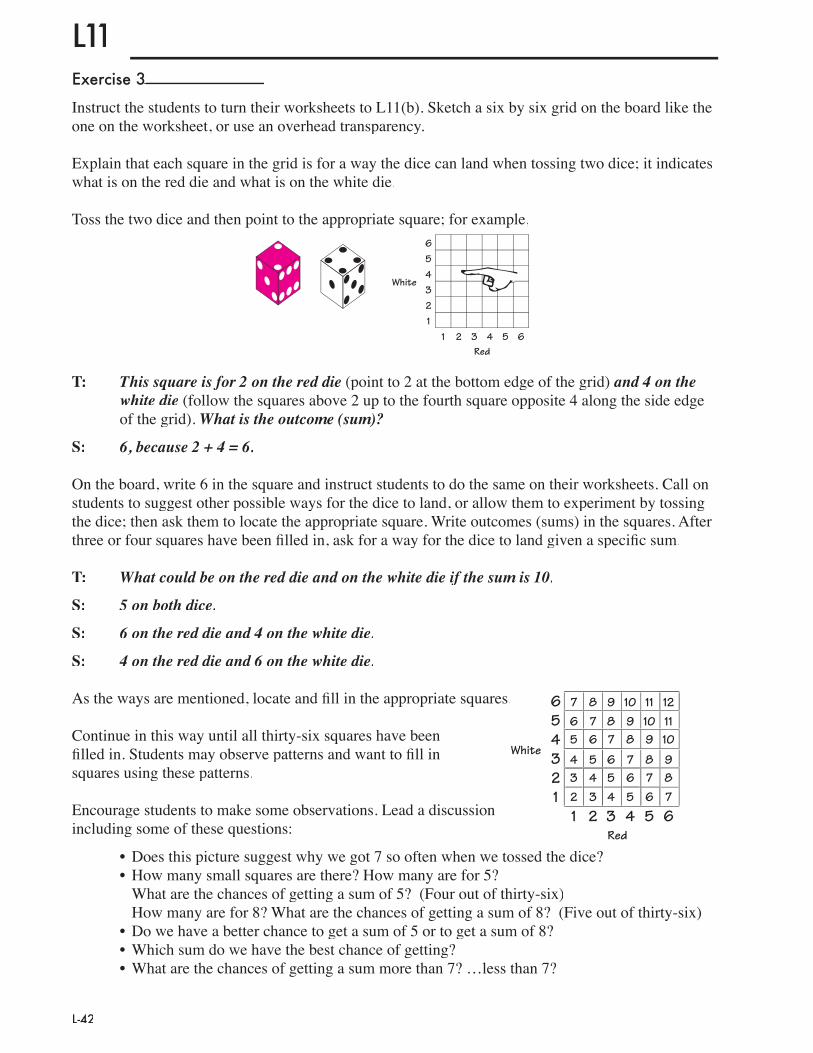
Instruct the students to turn their worksheets to L11(b). Sketch a six by six grid on the board like the one on the worksheet, or use an overhead transparency.
Explain that each square in the grid is for a way the dice can land when tossing two dice; it indicates what is on the red die and what is on the white die.
Toss the two dice and then point to the appropriate square; for example,
�����������
�
�����
���
T: This square is for 2 on the red die (point to 2 at the bottom edge of the grid) and 4 on the white die (follow the squares above 2 up to the fourth square opposite 4 along the side edge of the grid). What is the outcome (sum)?
S: 6, because 2 + 4 = 6.
On the board, write 6 in the square and instruct students to do the same on their worksheets. Call on students to suggest other possible ways for the dice to land, or allow them to experiment by tossing the dice; then ask them to locate the appropriate square. Write outcomes (sums) in the squares. After three or four squares have been filled in, ask for a way for the dice to land given a specific sum.
T: What could be on the red die and on the white die if the sum is 10.
S: 5 on both dice.
S: 6 on the red die and 4 on the white die.
S: 4 on the red die and 6 on the white die.
As the ways are mentioned, locate and fill in the appropriate squares.
Continue in this way until all thirty-six squares have been filled in. Students may observe patterns and want to fill in squares using these patterns.
Encourage students to make some observations. Lead a discussion including some of these questions:
• Does this picture suggest why we got 7 so often when we tossed the dice?• How many small squares are there? How many are for 5? What are the chances of getting a sum of 5? (Four out of thirty-six) How many are for 8? What are the chances of getting a sum of 8? (Five out of thirty-six)• Do we have a better chance to get a sum of 5 or to get a sum of 8?• Which sum do we have the best chance of getting?• What are the chances of getting a sum more than 7? …less than 7?
L11
�����������
�
�����
���
������������������������
������������������
Exercise 3

L-43
L12L12 TWO LISTS
Capsule Lesson Summary
Determine how many names are on two lists when the number on each list is known and where there is some duplication of names on the lists. Make up and solve other similar problems that involve a counting principle with overlapping sets.
MaterialsTeacher • Colored chalkTeacher • Colored chalkTeacher Student • Paper
• Colored pencils, pens, or crayons • Counters or checkers
You may like to let students work with a partner during this lesson.
Begin the lesson by asking each student or student pair to write the names of five to ten classmates on a piece of paper. Insist that this be done secretly. As the students complete their lists (with at least five but not more than ten names), collect the lists and look for two that have two or three names in common. You will need to adjust the following sample dialogue to fit your students’ lists.
T: I have chosen two of your lists; Shenna’s list has five names and Daniel’s list has seven names. For the moment, I won’t tell you whose names are on these lists. Shenna and Daniel must keep my secret too. Can you predict how many different names are on these lists?
It is likely that your students will respond by adding the number of names on the two lists. Perhaps some will observe that they are not sure because a name might be on both lists. Let students make their predictions without comment from you.
T: Let’s draw a picture to see if you are correct. I’ll draw a red string for the students whose names are on Shenna’s list.
Who can draw a blue string for the students on Daniel’s list?
Let a student draw a blue string on the board. There are several possible pictures that could result and you will have to adjust your next questions to the situation. You might get this picture; if so, initiate a discussion similar to the following.
Students onShenna’s list
Students onDaniel’s list
Shenna’s list Daniel’s list
Angela Shenna Juana Jason Kristy Angela Sonja Colin Lynn Gary Eric Kristy

L-44
T: I have a problem. Angela’s name is on both Shenna’s list and Daniel’s list. Where should the dot for Angela be?
A student might suggest that two dots be drawn, one in each string.
T: But Angela is just one person. There should be only one dot for Angela. How can we solve the problem?
Perhaps after a couple of attempts, a student will suggest overlapping the strings and putting a dot in the middle. Let the student (Angela in this case) whose dot is being discussed draw and label the dot.
Students onShenna’s list
Students onDaniel’s list
������
Note: If overlapping strings are drawn immediately in your class, go on with the lesson without mention of the previous problem.
T: Now I will read the names on Shenna’s list. The first one is Angela and we already have a dot for Angela in our picture. The next one is Juana. Juana, can you draw a dot for yourself in our picture?
The student may respond in different ways. Perhaps she will guess where to put the dot, or she might hesitate. If she guesses, ask the student to explain how she knows where to put the dot. Encourage the student to recognize that she cannot be sure where to put the dot.
T: You are right to think about the situation. Perhaps you can ask me a question so you will be sure where to put your dot.
S: Am I also on Daniel’s list?
T: That’s a very good question. No, you are only on Shenna’s list.
Let the student draw and label the dot and ask the class to check that it is correct. Continue in this way for all of the names on one list.
Students onShenna’s list
Students onDaniel’s list
������
������
�����
�����
����
At this point you can ask students whether they still think their predictions are correct. If some students wish to change their predictions, ask them to explain why. Again, do not comment on the correctness of their responses.
L12

L-45
T: Now I’ll look again at Daniel’s list. How many names are on his list?
S: Seven.
T: How many students from Daniel’s list are already in our picture?
S: Two, Angela and Kristy.
T: That’s right. So how many other students are on Daniel’s list?
S: Five.
T: Without knowing their names, who can put dots for these five students in our picture?
Let a student do it. Then read the other names on Daniel’s list one at a time and let the respective students label their dots.
T: Look at our picture. How many students are there altogether on the two lists?
S: Ten.
T: Many of you predicted twelve. Do you understand why it is ten and not twelve?
S: Angela and Kristy are on both lists; two people are in the middle.
Erase students’ names from the picture. Erase one of the dots in the middle, and place an additional dot in each string (as in the next illustration) as you say,
T: Suppose there were just one name on both lists, but there were still five names on one list and seven names on the other list. Then how many students would there be altogether on the lists?
S: Eleven.
Erase the dots from your picture.
T: Think about this problem and try to draw a picture. Suppose there were still five names on one list (point to the red string) and seven names on the other list (point to the blue string), but there were three names on both lists. How many students would there be altogether on the lists?
Let students work independently or in pairs for a few minutes. Suggest they draw the stringson their papers and use counters for dots. After many students have solved the problem, ask one of them to put the dots in the picture on the board.
T: How many dots? How many students altogether on the lists?
S: Nine.
L12
Students onShenna’s list
Students onDaniel’s list
������
������
�����
�����
����
�����������
���������
����

L-46
Erase the dots in the picture.
T: I am going to change the problem. This time I will tell you how many students there are on each list and how many students altogether. You have to try to draw a picture.
Write the numbers next to the respective strings as you mention them. Student (pairs) should copy the picture and have counters available for dots.
T: There are six people on this list (point to the red string) and nine people on this list (point to the blue string). Altogether there are ten people on the two lists.
Let students work independently or in pairs on the problem. This is a harder problem. Do not expect everyone to solve it quickly. Encourage students to use trial and error methods. Direct students to check their own work by counting the number of counters they have placed. After many students have found a solution, ask one of them to put the dots in the picture on the board.
Students who finish quickly can be challenged with other similar problems. For example:
�� ��
���������
Problem Solution
�� �
Problem Solution
���������
Direct students to ask two members of their families to each prepare a list of 5–10 names of friends or relatives. Instruct students to then take the lists and construct a string picture showing how many different names were written and how many names appear on both lists.
L12
� �
���������
L-47
L13L13 MULTIPLES #2
Capsule Lesson Summary
Draw a string picture in which one string is for multiples of 10 and the other is for multiples of 5. Discover that the picture could be drawn with one string inside of the other. Solve a detective story which involves coins, a string picture, and an arrow picture.
MaterialsTeacher • CalculatorTeacher • CalculatorTeacher • Coins (one quarter, one dime,
and one penny) • Colored chalk
Student • Paper • Colored pencils, pens, or crayons
Exercise 1
T: Write some numbers that are multiples of 2 on your paper.
Allow a few minutes and then ask for some multiples of 2 to be read aloud. Try to include some negative numbers (B2, B4, and so on), some numbers greater than 100 (102, 104, and so on), or some numbers between 70 and 80 (72, 74, 76, 78).
T: Could we use the calculator to view multiples of 2?
S: Start at 0 and press å ™ ≠ ≠ ≠ … or ß ™ ≠ ≠ ≠ ….
Continue by asking students to first write and then name following:
• some multiples of 5• some multiples of 10
Again, you can use the calculator to view multiples of 5 and multiples of 10.
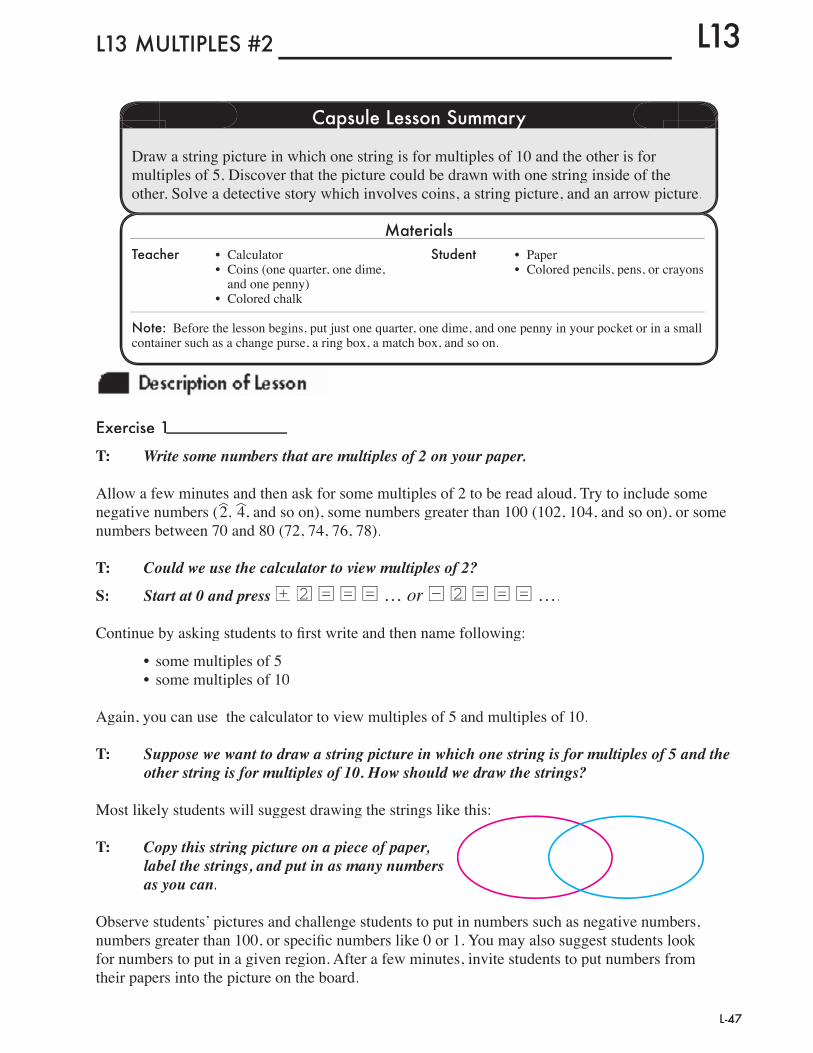
T: Suppose we want to draw a string picture in which one string is for multiples of 5 and the other string is for multiples of 10. How should we draw the strings?
Most likely students will suggest drawing the strings like this:
T: Copy this string picture on a piece of paper, label the strings, and put in as many numbers as you can.
Observe students’ pictures and challenge students to put in numbers such as negative numbers, numbers greater than 100, or specific numbers like 0 or 1. You may also suggest students look for numbers to put in a given region. After a few minutes, invite students to put numbers from their papers into the picture on the board.
Note: Before the lesson begins, put just one quarter, one dime, and one penny in your pocket or in a small container such as a change purse, a ring box, a match box, and so on.

L-48
Perhaps your picture will look like this:
T (pointing to the empty region): Are there any numbers that belong here?
S: No.
T: Why not?
S: Because every multiple of 10 is a multiple of 5.
T: How can I show in the picture that this region is empty?
S: Hatch it.
T: Since this region (indicate the hatched region) is empty, is there another way we could draw the stings?
If no one suggests drawing the strings as shown below, suggest it yourself.
Place some of the numbers from the first picture in this picture to associate regions in the first picture with regions in this picture.
Erase the board before going on to Exercise 2.
Exercise 2
T: I have some money in my pocket (or this small container). I will give you some clues. See if you can discover how much money I have.
T: My first clue is that I have three different coins. What kinds of coins could I have?
As students name the various kinds of coins, record them as headings in a chart on the board. Use real coins or pictures, if available.
Half-Dollars
50¢
Quarters
25¢
Dimes
10¢
Nickels
5¢
Pennies
1¢
Amount
T: How much money could be in my pocket?
S: 85¢. You could have a half-dollar, a quarter, and a dime.
S: 40¢. You could have a quarter, a dime and a nickel.
L13multiples of 10 multiples of 5
���
�
��
���
��� ��
����
��������
�����
�
������
���
�����
�����
���
��
multiples of 10 multiples of 5
�
��
���
��� ��
����
�����
���
�����
�
������
���
�� ���
�����
���
��
�� �
multiples of 5
multiples of 10

L-49
L13Note: You may like to have a collection of coins so that students can pick out three different coins and display the amount.
As students make suggestions, record them in the chart. Encourage the class to find all the possibilities. Each time an amount of money is suggested, be sure the student says which coins make that amount of money. Your completed chart should have ten possibilities listed, although most likely they will not be suggested in the systematic way shown below.
���������������
���������������
������
����
Half-Dollars
50¢
���
������
�
Quarters
25¢
�����
���
��
Dimes
10¢
��
��
���
���
Nickels
5¢
���
���
����
Pennies
1¢
Amount
Leave the chart on the board.
T: For the next clue, I’ll show you where the number of cents in my pocket (in this container) belongs in a string picture.
Draw this string picture on the board.
T: How much money could I have in my pocket? Remember, it must be one of these amounts
(point to the chart), and it is here in this string picture (point to s).
S: 76¢.
T: 76¢ is in the chart. Is 76 a multiple of 2? (Yes) Is 76 a multiple of 5? (No) So I could have 76¢.
Student pairs can check each number in the chart with calculator—one checking for multiples of 5 and the other checking for multiples of 2—and then locate the numbers in the string picture.
Continue in this manner until all the possibilities in the chart have been considered.
multiples of 5 multiples of 2
s

L-50
L13This clue leaves four possibilities.
���������������
���������������
������
����
Half-Dollars
50¢
���
�����
��
Quarters
25¢
�����
���
��
Dimes
10¢
��
��
���
���
Nickels
5¢
���
���
����
Pennies
1¢
Amount
T: Now you know that I have one of these four amounts of money in my pocket. I’ll give you one more clue. When you know for sure how much money is in my pocket (in this
container), write it on a piece of paper.
T: The amount of money in my pocket is in this picture.
Draw this arrow picture on the board and ask students to copy it. They then should put the secret number in the picture.
Check some of the students’ papers. After most students have discovered the correct amount, let one student announce that you have 36¢ in your pocket (container). Show the class the coins.
Suggest parents/guardians practice with their child making various sums of money up to $1.00, using half-dollars, quarters, dimes, nickels, and pennies. They can also use money to review counting by fives, tens, and twenty-fives.
is more than
is less than
��� ���
s

L-51
L14L14 SAMPLING
Capsule Lesson Summary
Draw pictures to represent what a collection of 100 objects distributed 50/50, 25/75, and 10/90 would look like. Count samples of beans from bags that contain those distributions of red and white beans; try to determine which bag the sample describes.
MaterialsTeacher • Red beans, white beansTeacher • Red beans, white beansTeacher • Paper bags, • Colored Chalk • Small cups (pill or condiment size)
Student • 10 cm strips of paper • Colored pencils, pens, or crayons
Advance Preparation: Prepare three bags of 100 beans each. In one put 50 red and 50 white beans; in the second put 25 red and 75 white beans; and in the third put 10 red and 90 white beans. You may want to mark the bags in some way that will tell you what is in each bag, but will not reveal the information to the students. Prepare approximately 30 strips of white paper 10 cm by 3cm.
Show the class your three bags and tell them a story about how these three bags were prepared by the seed store for three gardeners. Each gardener ordered 100 bean seeds so each bag has 100 beans in it. Record this information on the board as you announce it.
• Gardener A wants to plant 50 red and 50 white beans.• Gardener B wants to plant 25 red and 75 white beans.• Gardener C wants to plant 10 red and 90 white beans
Exercise 1
T: Let’s make a label for each gardener’s bag of beans that will show a picture as well as the numbers of red and white beans.
Display a 10 cm strip of paper.
S: How could I color this paper strip red and white to picture Gardener C’s bag of beans?
Perhaps someone will suggest coloring it a little bit red and a lot white because there are only 10 red beans and 90 white beans in Gardener C’s bag. Do not expect students to find a very precise picture. Eventually show the class how you can color 1 cm of the strip red for the 10 red beans and leave 9 cm white for the 90 white beans (count by tens from 10 to 90).
�� ��
Distribute 10 cm strips of paper to groups (pairs) of students and ask them to make labels for Gardener A’s and Gardener B’s bags. Most groups will make a label for Gardener A’s bag quite easily. The label for Gardener B’s bag will be more difficult. Encourage students to tell each other or ask the class how they decided to color the strips of paper.
A: 50 red/50 white
B: 25 red/75 white
Exercise 1

L-52
L14S: For Gardener A, we colored this strip one-half red and one-half white because there are
equal amounts of red and white beans (50-50).
S: For Gardener B, we guessed about how much to color red. We colored some red and left more white because there are more white beans than red beans.
S: For Gardener B, we divided the strip into four parts. One part we colored red (25 red beans) and three parts we left white (25 + 25 + 25 = 75 white beans).
Do not expect perfect labels for Gardener B’s bag, nor good explanations. Be happy with labels that look approximately one-fourth red and three-fourths white.
�� ���� �� �� ��
Save one label of each kind for the bags. Display the labels so everyone can see them.
Exercise 2
T: The problem is that the seed store forgot to label the bags so they are not sure which bag is for which gardener. Can you help them?
S: Dump out the bags and count the beans of each color.
S: Look in the bags and see which one looks about equal red and white.
T: Those are good ideas, but it is dark in the bags and the seed store workers don’t have too much time for counting.
Some students may suggest sampling from each bag, but if not, you should suggest this method.
T: We could take a small cupful of beans from each bag, count the red and white beans, and place the beans on a strip of paper to see if they look like the labels that we made to picture the gardeners’ bags. This is the idea of “sampling.”
Pair the students and assign each pair to one of the three bags. Instruct pairs of students to take a small cupful of beans from their bags, count the red and white beans, and arrange the beans on a strip of paper to look like a label. As one pair finishes with a sample, replace the beans in the bag before another pair samples from the same bag. In this way the students should see the results of several samples from each bag. Ask students to predict which bag belongs to which gardener. Suggest that they refer to the labels on display to compare with the sampling results.
You may like to group all the students who sampled from one bag together and ask this group to share its results with the rest of the class. In this way the class should be able to match bags to gardeners. Put labels on the bags.
Ask students to write about the process of sampling and how they were able to decide which bag belonged to which gardener.

L-53
L15L15 ODD AND EVEN CUBES
Capsule Lesson Summary
Introduce two kinds of number cubes, one with all even numbers and one with all odd numbers on the faces. Examine first what the results can be when you toss just one cube. Then explore the different results (sum of the two faces) when groups use two even cubes, or two odd cubes, or one even and one odd cube. Compare results and predict which combination of cubes give which results.
MaterialsTeacher • Number cubesTeacher • Number cubesTeacher • Recording grid • Blacklines L15(a) and (b)
Student • Cube cut-outs • Number cubes • Recording grid
Arrange the class into groups. Provide each group with an even number cube and an odd number cube. Allow a few minutes for groups to examine and play with the cubes. You may like to give each group two cube cut-outs to write numbers on, one for the odd cube, one for the even cube.
Exercise 1
Hold a class discussion about the cubes. Solicit as many observations about the number cubes as students want to make.
S: One cube has all even numbers and the other has all odd numbers.
S: The even numbers go from 0 to 10. The odd numbers go from 1 to 11.
S: Each number is on the face of a cube only once.
Show the class a number cube without letting them actually see the numbers on it.
T: This number cube is like one of yours. I’ll toss it once.
Announce the result and let the class tell you which kind of number cube it must be.
T: When I toss an even number cube, what is the chance I’ll get 0?
S: One out of six.
T: When I toss an odd number cube, what is the chance I’ll get 5.
S: One out of six.
Advance Preparation: Prepare approximately twenty cubes with numbers on their faces—ten with even numbers 0, 2, 4, 6, 8, and 10 and ten with odd numbers 1, 3, 5, 7, 9, and 11. Use Blackline L15(a) to make cube cut-outs and L15(b) to make recording grids.
Exercise 1

L-54
L15Exercise 2
Collect all the number cubes and redistribute them to the groups so that about one-third of the groups have two even cubes, one-third have two odd cubes, and one-third have one even and one odd cube. Tell the groups not to tell another group which cubes they have. Give each group a copy of the recording grid on Blackline L15(b).
Direct the groups to toss their two cubes and add the numbers on the top faces. Each group should make a list for themselves of all the possible sums they can get. As you observe the groups, note when a group has found all the possible sums (there are eleven) and instruct group members to write these sums in numerical order at the bottom of the recording grid.
�����������������
��������������
����
������������������
�������������
�����������������
����������������������
Then ask each group to perform twenty cube-tossing trials with their two number cubes. For each trial, they should record the result by coloring in a square above the sum in their recording chart. Within the groups, students should take turns tossing the cubes and recording the results. You may like to ask the students in a group to predict which outcome (sum) they think will occur most often or least often.
Some possible results are shown below.
�����������������
��������������
����
������������������
�������������
�����������������
����������������������
Invite each group to share its results with the entire class, and ask the class to predict which number cubes the group was using. At first this may be difficult and students will just guess. Perhaps after a few examples the class will begin to recognize that
• the sums are always even when the two cubes are both the same (two even or two odd);• the sums are always odd when there is one odd and one even cube; and• with two even cubes the sums go from 0 to 20 whereas with two odd cubes the sums go
from 2 to 22.
With the results from all the groups displayed, you might ask the class what they notice about the graphs. How are they alike and how are they different?
Ask students to write about the results that groups obtained when they did the cube-tossing experiment.
Exercise 2

L-55
L16L16 STRING GAME WITH A-BLOCKS #3
Capsule Lesson Summary
Play The String Game with A-blocks using sixteen possible string labels.
MaterialsTeacher • A-Block String Game kitTeacher • A-Block String Game kitTeacher • Colored chalk
Student • None
Advance Preparation: See Appendix D on The String Game for a description of equipment and preparation for the game.
Prepare to play The String Game with A-blocks in the usual way. Play several games as time allows. Two possible games, both using string labels from the Version B poster list, are suggested here; there are many other examples in the Appendix. Try to choose games that are challenging for most of your students but not overly difficult.
NOTBLUE
Starting CluesCorrect Placement
of Game Pieces
Starting CluesCorrect Placement
of Game Pieces
LITTLE
NOT BLUE LITTLE
NOT
NOT NOT GREEN
NOTGREEN

L-56