the leader in bag closing technology - haslo van … the leader in bag closing technology ref :...
TRANSCRIPT

FISCHBEINCOMPANY The Leader in Bag Closing Technology
REF : 14810F-GB ED.A10/2001
1
Manufactured and Assembled by: Fischbein Company 151 Walker Road – Statesville, NC 28687 USA
Imported and serviced by: Fischbein sa Paepsem Business Park Boulevard Paepsem,18b – 1070 Brussels

FISCHBEINCOMPANY The Leader in Bag Closing Technology
REF : 14810F-GB ED.A10/2001
2
FISCHBEIN Model F PORTABLE BAG CLOSER USERS MANUAL
SERIAL NUMBER : .................... WEIGHT :..........................5,8 kg NOISE LEVEL : ...... 79 dB VIBRATIONS : ..........18 m / sec² EDITION : ....................10 / 2001 Manufactured and assembled by : Fischbein Company 151 Walker Road Statesville , NC 28687 USA Imported and serviced by : Fischbein S.A. Paepsem Business Park Boulevard Paepsem,18b, B - 1070 Brussels - Belgium

FISCHBEINCOMPANY The Leader in Bag Closing Technology
REF : 14810F-GB ED.A10/2001
3
FOREWORD The contents of this manual are considered to be proprietary and confidential to FISCHBEIN and should not be reproduced without the prior written permission of FISCHBEIN . Nothing contained in this document is intended to extend any promise , warranty or representation , expressed or implied , regarding the FISCHBEIN products described herein . Any such warranties or other terms and conditions of products shall be in accordance with the standard terms and conditions of sale for such products , which are available upon request . FISCHBEIN reserves the right to make changes and improvements to products without notice and without incurring any obligation to make such changes or add such improvements to products sold previously . The use of repair parts other than those included within the FISCHBEIN approved parts list may create hazardous conditions over which FISCHBEIN has no control . Therefore FISCHBEIN cannot be held responsible for equipment in which non-approved repair parts are installed .
FISCHBEINCOMPANY The Leader in Bag Closing Technology
REF : 14810F-GB ED.A10/2001
4
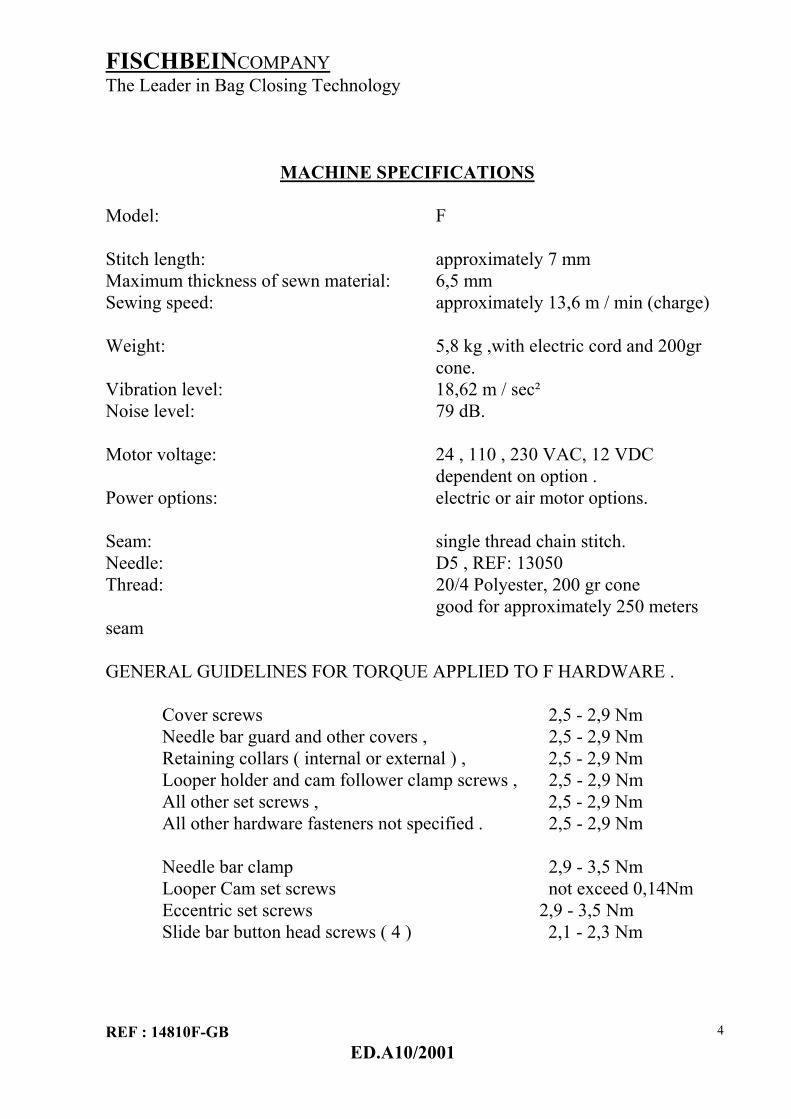
MACHINE SPECIFICATIONS Model: F Stitch length: approximately 7 mm Maximum thickness of sewn material: 6,5 mm Sewing speed: approximately 13,6 m / min (charge) Weight: 5,8 kg ,with electric cord and 200gr cone. Vibration level: 18,62 m / sec² Noise level: 79 dB. Motor voltage: 24 , 110 , 230 VAC, 12 VDC dependent on option . Power options: electric or air motor options. Seam: single thread chain stitch. Needle: D5 , REF: 13050 Thread: 20/4 Polyester, 200 gr cone good for approximately 250 meters seam GENERAL GUIDELINES FOR TORQUE APPLIED TO F HARDWARE . Cover screws 2,5 - 2,9 Nm Needle bar guard and other covers , 2,5 - 2,9 Nm Retaining collars ( internal or external ) , 2,5 - 2,9 Nm Looper holder and cam follower clamp screws , 2,5 - 2,9 Nm All other set screws , 2,5 - 2,9 Nm All other hardware fasteners not specified . 2,5 - 2,9 Nm Needle bar clamp 2,9 - 3,5 Nm Looper Cam set screws not exceed 0,14Nm Eccentric set screws 2,9 - 3,5 Nm Slide bar button head screws ( 4 ) 2,1 - 2,3 Nm
FISCHBEINCOMPANY The Leader in Bag Closing Technology
REF : 14810F-GB ED.A10/2001
5
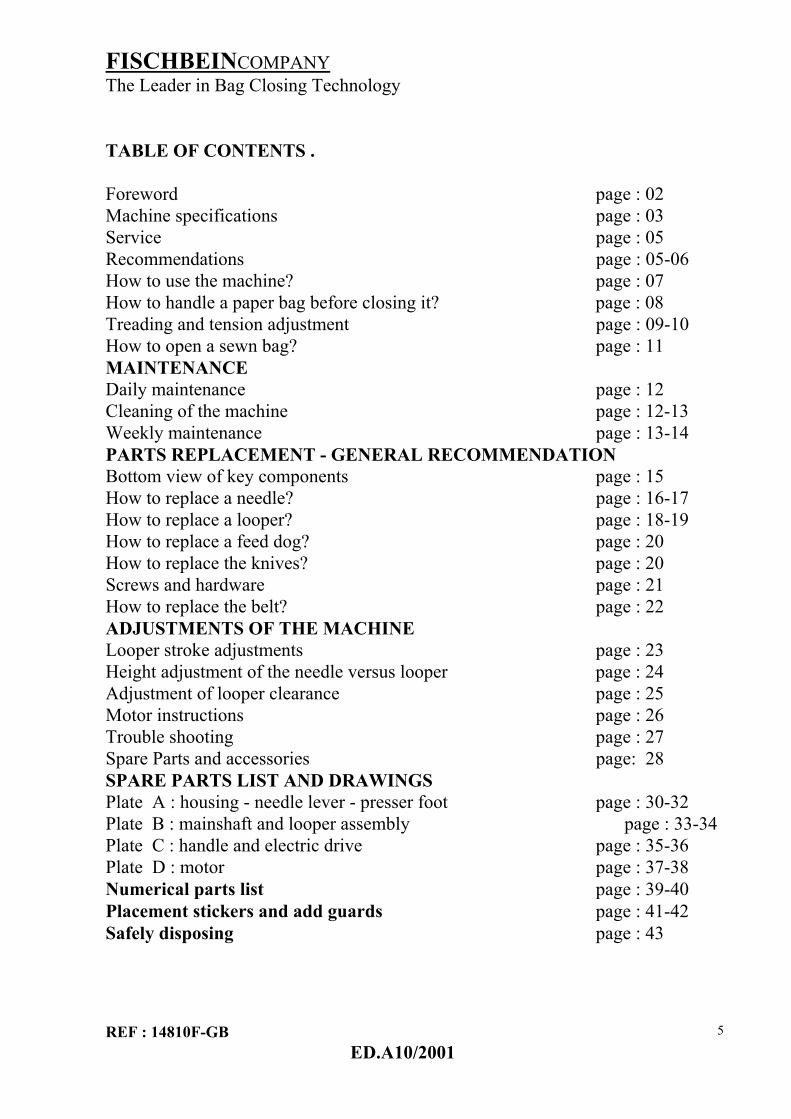
TABLE OF CONTENTS . Foreword page : 02 Machine specifications page : 03 Service page : 05 Recommendations page : 05-06 How to use the machine? page : 07 How to handle a paper bag before closing it? page : 08 Treading and tension adjustment page : 09-10 How to open a sewn bag? page : 11 MAINTENANCE Daily maintenance page : 12 Cleaning of the machine page : 12-13 Weekly maintenance page : 13-14 PARTS REPLACEMENT - GENERAL RECOMMENDATION Bottom view of key components page : 15 How to replace a needle? page : 16-17 How to replace a looper? page : 18-19 How to replace a feed dog? page : 20 How to replace the knives? page : 20 Screws and hardware page : 21 How to replace the belt? page : 22 ADJUSTMENTS OF THE MACHINE Looper stroke adjustments page : 23 Height adjustment of the needle versus looper page : 24 Adjustment of looper clearance page : 25 Motor instructions page : 26 Trouble shooting page : 27 Spare Parts and accessories page: 28 SPARE PARTS LIST AND DRAWINGS Plate A : housing - needle lever - presser foot page : 30-32 Plate B : mainshaft and looper assembly page : 33-34 Plate C : handle and electric drive page : 35-36 Plate D : motor page : 37-38 Numerical parts list page : 39-40 Placement stickers and add guards page : 41-42 Safely disposing page : 43

FISCHBEINCOMPANY The Leader in Bag Closing Technology
REF : 14810F-GB ED.A10/2001
6
SERVICE . Should your machine require factory service or maintenance please contact any of the Fischbein authorized distributors or
Fischbein Brussels . Return the warranty card with details concerning your problems for warranty justification .
They can also give you the best advice on utilization ,oil ,thread and spare parts . RECOMMENDATIONS FOR MAX. PERFORMANCE . Work area.
The MODEL F machine should be operated in an area that allows freedom of motion for the operator and the unit. The machine’s input end at the feed dog works quickly and the output end near the thread knife is very sharp. Other operators should keep out of arm’s reach from the area in which the machine works. Operators should always wear proper eye protection when operating the machine and not wear loose clothing or jewelry. Long hair should be pulled back and tied to avoid getting caught in the machine.
Before you start the machine .
1. Make sure your machine is well connected to an adequate power supply as indicated on the motor.
The motor is double insulated , so there is no grounding required . 2. Verify that all guards are in place . 3. No special installation is required , but we may recommend you to place something on the ground to set the machine on when not in use. 4. The machine is shipped to you with some examples of sewn test strips Examine these carefully to see how proper chain form should look. 5. Use of the Fischbein model 1550 suspension and balancing unit is recommended. This will allow the machine to be suspended at any convenient height , ready for use . 6. You may want to try the machine on some empty bags or pieces of paper to get a feel of how to use it , before you start with filled bags .

FISCHBEINCOMPANY The Leader in Bag Closing Technology
REF : 14810F-GB ED.A10/2001
7
As you sew with the Fischbein model F . 1. Do not use the machine in very humid environment. 2. Machine mechanism will carry the bag automatically through; therefore do not either pull , push , or turn the machine . 3. Keep hands and fingers away from the bag moving mechanisms. ( feed dog , presser foot ) 4. Only use the machine to close bags of specific thickness. It is not desined for clothing or very thin plastic bags , (see page 3 , machine specifications) . 5. A minimum of paper bag strength is required. For plastic bags, a minimal thickness of 120 µ ( microns ) is necessary , depending on quality of PE used . Maintenance . 1. Always use genuine Fischbein parts . 2. Do not use screws other than those indicated in the parts list . Hardware items on the Fischbein model F systems are not metric . 3. Always use original Fischbein D5 needles . 4. Use a 20 / 4 Fischbein 100 % polyester thread to get the best results . 5. Fischbein Premium Thread ( N° 25010.. ) is an excellent product ,and available in various colors . With a full 200 gr cone you will sew around 250 bags ( depending of bag widthness ) . 6. We also recommend that you use other Fischbein products such as : cleaning agents and crepe paper ( tape ) ; these products were selected to avoid problems and allow the for maximum efficiency of the machine . 7. Proper settings for all internal components are made at the factory ,
any change to these settings could cause damage to the machine mechanism .

FISCHBEINCOMPANY The Leader in Bag Closing Technology
REF : 14810F-GB ED.A10/2001
8
HOW TO USE THE FISCHBEIN PORTABLE BAG CLOSER ? 1. Take the machine in your right hand and place your finger over the start switch placed on the underside of the handle . 2. The switch engages and dis-engages with a positive “ click “ . Pressing and holding it in will start the machine running , releasing it will stop the machine . 3. It is recommended that bag top “ gussets “ be formed before sewing the bag . This will make a stronger and more durable closure . See fig : 1-3 . 4. Take the top of the bag in your left hand at the right side of the bag . 5. Feed the top of the bag between the presser foot and the throat plate . 6. Press on the switch so that the machine starts running . During the closing operation , the bag will carried through the sewing gap correctly by the action of the feeding mechanism . There is no need to push the machine or pull the bag . 7. When the bag is in the machine , it may be usefull to shift your left hand to the other end of the bag top to support the bag and achieve a straight seam . 8. When you reach the end of the bag , let the machine run for a little to form a short “ chain “ and then gently turn the machine to the left , enabling the knives to cut the thread . WARNING !!!! Keep always your hand away from the presser foot to avoid the danger that your hand could be caught by the feed dog . NOTE . Important to check is the free space available between the top of the bagged product and the sewing line . The free space must be sufficient the whole width of the bag to allow enough material to sew . When closing net bags or jute bags , a free space between the top of the product and the sewing line of 10 cm is recommended . For paper bags , not less than 5 cm is suitable . Experiment with each type of product and bag material to see how much space needs to be left , to avoid tearing of the bag .

FISCHBEINCOMPANY The Leader in Bag Closing Technology
REF : 14810F-GB ED.A10/2001
9
HOW TO HANDLE A BAG BEFORE CLOSING IT ?
Fig 1 : When the bag is filled in and ready to be closed , you must manually reform the bag top including the recommended gussets .
Fig 2 : After reforming operation , fold the bag top as close as possible to the product and than bring the bag in its original vertical position as shown on Fig : 2 and 3 .
Fig 3 : You can now start the closing operation remembering to leave sufficient free space between the top of the product and the sewing line .
Fig : 4 When handling a jute bag with thick bag edges , do not intro - duce this edge directly into the mechanism but shift the edge gently before introduction and starting the closing operation .

FISCHBEINCOMPANY The Leader in Bag Closing Technology
REF : 14810F-GB ED.A10/2001
10
METHOD OF THREADING , ADJUSTMENT AND TENSION . WARNING !!! Always disconnect the machine from it’s power source before threading or adjustment . Threading . To thread the machine follow the thread path indicated in Fig:5.1 &5.2 .
1. Pass the thread through the first and second eyelet ( 11109 ) . 2.Take the thread around the tensioner stud inserting it between the two tension discs (11114 ) . 3. Pass it through the thirth eyelet ( 11109 ) close to the needle bar guarding ( 11101 ) . 4. It should then be passed through the slotted opening in the needle bar guard , through the needle bar ( 11500 ) and finally through the opposite side of the needle bar guard . 5. Then push the thread through the eyelet ( 11109 ), to reach the needle front side . 6. Push the thread through the needle eye from the front side and pull it through for about 8 cm . 7. Take a bag or small test piece and introduce it between the throat plate and the presser foot , making sure that the needle is up . Start the machine and sew it through . This will provide a “ thread chain “ . 8. The machine is now ready to be used .

FISCHBEINCOMPANY The Leader in Bag Closing Technology
REF : 14810F-GB ED.A10/2001
11
Thread cone replacement . To install a new cone of thread : 1. Unscrew the wing nut (11805) at the base of the thread stand . 2. Remove the thread clamping bolt (11804) . 3. Take a new cone of thread , place it on the thread clamping bolt and put it on the thread stand (11815) .
4. Re - attaching the wing nut and tightening it sufficiently. The cone must not be able to rotate or wobble on the thread stand
Thread tension adjustment . It should not typically be necessary to change the thread tension unless you change to a much different thread or are sewing a special type of material . Consult your dealer or a Fischbein service representative for questions concerning special thread applications .
-The spring (11115) determines the tension on the thread when pulled through the two discs (11114) . -By turning the nuts of the tension discs clockwise , you will get more thread tension , by turning in the opposite direction you will reduce that tension .
-The first nut (11117) , close to the spring (11115) is there to adjust the tension, the second nut (11116) and the washer spring (11655) , serve to lock the adjustment .
- The screw (F64038) prevents eventual loss of the nuts (11116&11117) and has no adjustment purpose .
- Start with minimum tension initially and examine the stitch . If it appears too loose , gradually tighten the tensioning nut until a proper stitch is achieved . Be sure to tighten the locking nut when the proper setting is reached.

FISCHBEINCOMPANY The Leader in Bag Closing Technology
REF : 14810F-GB ED.A10/2001
12
HOW TO OPEN A SEWN BAG?
1.A: Thread chain along the front side of the bag . B: Thread chain along the rear side of the bag . C: Simply cut the thread chain . 2 . Remove the thread from the front side of the bag . 3 . Pull off that thread to open the bag .

FISCHBEINCOMPANY The Leader in Bag Closing Technology
REF : 14810F-GB ED.A10/2001
13
MAINTENANCE AND SMALL REPAIRS . WARNING !!!! Always unplug the machine before starting work . DAILY MAINTENANCE . Lubricating the machine in operation . 1. Before closing your first bag be certain to see that the lubrication mechanism is functioning properly . 2. To speed oil through the machine mechanism you must simply press the oil pump button 2 or 3 times in succession . You will see the oil flowing through the feeder tube as you do . This should be performed every 2 hours of
machine usage . The wicking inside the housing carries the dispensed oil to other moving parts near the looper and needle bar. Do not remove the wicking from the MODEL F. If the wicking (11508) becomes worn and thin, replace it immediately.
3. Check the level of the oil pump regularly . Always fill it genuine Fischbein machine oil (12800) .
4. Always replace the oil reservoir cap to avoid contaminating the lubricant.
This could cause the oil lines to plug and prevent lubrication of the machine parts .
5. We recommend pushing the oil pump while the machine is running to give better oil distribution inside the machine . Cleaning of the machine . Each day , clean the machine of any dust or accumulated debris . This can easily be done by blowing out the machine cavities with compressed air or by using a dry bristle brush .

FISCHBEINCOMPANY The Leader in Bag Closing Technology
REF : 14810F-GB ED.A10/2001
14
Sticking particles must be removed by using a small brush . Do not forget to clean arround the bottom of the machine , especially around the looper and the knives . If you are working in a very dusty environment , we recommend this cleaning operation twice a day . To do that , simply slide open the looper cover (11102) . Blow out the inside with compressed air . Close the looper cover and tighten the cover pivot screw (11108) if necessary . By doing these operations daily , you will increase the life of your machine . WEEKLY MAINTENANCE . WARNING!!!! Always disconnect the machine from the electrical power source before performing any maintenance or adjustment Clean the machine weekly , for a few minutes in a cleaning oil bath . How to proceed ? 1. Fill in a small tank with cleaning oil up to 6 cm maximum . 2. Remove looper cover located at the bottom of the machine and the belt - pulley cover and handle . 3. Plunge the machine vertically into the oil so that it is immersed to the level of the throat plate . 4. Turn the machine manually at the pulley so the moving parts are cleaned in the cleaning oil bath . 5. Remove the machine from the bath and drain any excess of oil from the mechanism . 6. Your machine is now free of dirt and parts are cleaned up . 7. If necessary you may want to loosen any stubborn dirt or grit with a small brush and rinse the machine again .
FISCHBEINCOMPANY The Leader in Bag Closing Technology
REF : 14810F-GB ED.A10/2001
15
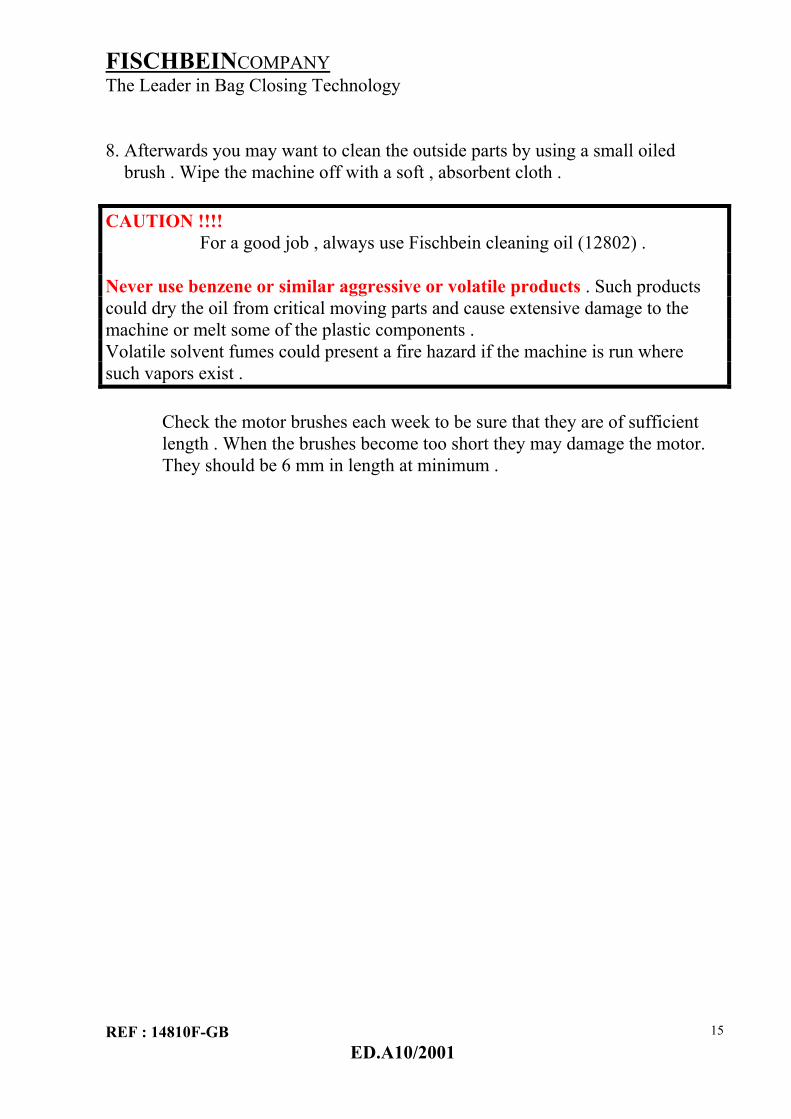
8. Afterwards you may want to clean the outside parts by using a small oiled brush . Wipe the machine off with a soft , absorbent cloth . CAUTION !!!! For a good job , always use Fischbein cleaning oil (12802) . Never use benzene or similar aggressive or volatile products . Such products could dry the oil from critical moving parts and cause extensive damage to the machine or melt some of the plastic components . Volatile solvent fumes could present a fire hazard if the machine is run where such vapors exist . Check the motor brushes each week to be sure that they are of sufficient length . When the brushes become too short they may damage the motor. They should be 6 mm in length at minimum .

FISCHBEINCOMPANY The Leader in Bag Closing Technology
REF : 14810F-GB ED.A10/2001
16
BOTTOM SIDE VIEW OF THE F PORTABLE BAG CLOSER . After removing needle bar guard (11101) , looper cover (11102) and knife guard (11125) .
.

FISCHBEINCOMPANY The Leader in Bag Closing Technology
REF : 14810F-GB ED.A10/2001
17
REPLACEMENT OF PARTS : HOW TO PROCEED ? Placement of the machine for parts replacement . Place the machine so that it rests on the motor and the machine handle is flat against the table . It should be sitting so that you are looking into the looper cavity and at the needle bar guard . How to replace a needle ? The needle is held in the needle bar by using the special nut (11501) . The nut should be adjusted with a 3/8 open end wrench or suitable adjustable tool (11645) . Be careful not to strip the threads or the hex surface . Do not use pliers .
1. Unplug the machine . 2. Remove the pulley guard (11801) . 3. Raise the presser foot to it’s detent position and rotate the machine manually until the needle bar is at it’s highest position . 4. Loosen the needle bar clamping screw (11501) with the wrench provided with the machine (11645) . 5. Remove the needle .(D5)
6. Place the new needle in the needle bar making sure that it is fully inserted and that the long grove faces you and the needle scarf is to the back . The groove lips should match the base of the machine as close as possible and the eye should be facing you .

FISCHBEINCOMPANY The Leader in Bag Closing Technology
REF : 14810F-GB ED.A10/2001
18
7. Tighten the screw to clamp the needle in place . The nut is designed so that it does not require excessive force to tighten , a firm torque will be sufficient . 8. Lower the presser foot . 9. Check to see if the needle is passing through the middle of the needle guard . (11883) See also Fig : 5A . 10.Replace the pulley guard . 11.Re - thread the machine . 12.Use always genuine Fischbein D5 needles . CAUTION !!! Keep always your fingers away from under the needle .

FISCHBEINCOMPANY The Leader in Bag Closing Technology
REF : 14810F-GB ED.A10/2001
19
How to replace the looper , 11300 ? 1. Unplug the machine . 2. Place the machine in the position described above . 3. Raise the presser foot to it’s detent position . See Fig : 6 . 4. Remove the pulley guard (11801) and rotate the machine manually until the feed dog is at it’s lowest position . 5. It’s advisable to remove the needle (D5) for safety purposes . 6. Remove the looper cover (11102) by unscrewing screw ( 11108) .
7. Remove the throat plate (11210) by unscrewing the 3 screws ( F64038) . 8. Remove the feed dog (11203) by removing screw (SC8321) and the washer ( WS8) . 9. Remove the looper (11300) from the looper holder (11301) by loos- ening the set screw (SS832316HD) . 10.Install the new looper (11300) into the looper holder (11301) . Make
sure that : the flat side of the looper is faces the set screw (SS832316HD) The looper is inserted completely to the bottom of the looper holder (11301) .This is very important for the adjustment of the machine .

FISCHBEINCOMPANY The Leader in Bag Closing Technology
REF : 14810F-GB ED.A10/2001
20
11. Tighten the looper set screw (SS832316HD) . 12. Replace the needle as per the previous procedure . 13. Now is a good time to check the machine timing (see timing procedure , page : 28 ) . 14. Replace the feed dog making sure that it is set correctly on the height adjustment screws . 15. Replace the throat plate . 16. Replace the looper cover and check to see that all screws are tight . 17. Replace the pulley guard.

FISCHBEINCOMPANY The Leader in Bag Closing Technology
REF : 14810F-GB ED.A10/2001
21
HOW TO REPLACE THE FEED DOG 11203 ? 1. Unplug the machine . 2. Place the machine in position described at the beginning of this chapter . 3. Get the presser foot up by getting the lever lifter presser foot (11654) down . 4. Remove the throat plate (11210) . 5. Remove the looper cover (11102) . 6. Remove the pulley guard (11801) and turn the machine until the needle reaches the highest point . 7. Unscrew both (SC8321) screw and (WS8) washer from carrier block (11437) to get feed dog (11203) out . 8. Set up a new (11203) feed dog on and set (SC8321+WS8) back again by secured screwing . 9. Reassemble other parts back . 10. Your machine is ready again for new jobs . HOW TO REPLACE THE KNIVES ? 1. Unplug the machine . 2. Remove knife guard (11125) . 3. Remove the pulley guard (11801) . 4. Rotate the machine until the knives are in closed position . This will prevent damage when you replace the blades . 5. Remove the moving knife (11702) from his holder (11007) by unscrewing the 2 screws (F348316) . 6. Now remove the stationary knife (11703) from the housing . 7. Replace the stationary knife (11703) on the housing orienting it so that the blade edge faces the moving knife bracket . For best results use only genuine Fischbein repair hardware , screw (F348516) . 8. Mount the moving knife (11702) onto its holder (11007) . 9. Check to see that the knive are flat to each other . 10. Replace the knives guard (11125) and pulley guard (11801) . 11. Your machine is ready again .

FISCHBEINCOMPANY The Leader in Bag Closing Technology
REF : 14810F-GB ED.A10/2001
22
SCREWS AND HARDWARE . All fasteners and hardware are assembled to Fischbein factory torque specifications , but because of the vibration inherent in any machine operation we recommend that periodic inspection and adjustment of the following hardware items be performed to ward off potential damage to the machine . To proceed : 1. Unplug the machine . 2. Remove the needle guard (11101) and the looper cover (11102) . 3. Check the set screws on the needle bar clamp (40502) , and tighten if necessary . 4. Check the set screw on the presser foot lifter (11652) , and tighten if necassary . 5. Replace the needle guard (11101) . 6. Remove the looper cover (11102) . 7. Check the set screw and the clamp screw on the looper holder (11301) , and tighten if necessary . 8. Check the socket cap screw holding the presser feet dog (11203) and tighten if necessary . 9. Check the hex head screw on the knife bracket (11007) , and tighten if necessary . 10. Replace the looper cover ( 11102) . 11. Remove the housing cover . 12. Check the set screws on the cam assembly (40310) , and tighten if necessary . 13. Check the set screws on the connecting rod assembly (11079) , and tighten if necessary . WARNING!!! Never remove these screws or change the orientation of either of these components . Never try to remove a broken screw or attempt to drill it out . Consult your repair center .

FISCHBEINCOMPANY The Leader in Bag Closing Technology
REF : 14810F-GB ED.A10/2001
23
Note : If this assembly moves the machine must be re - timed , tighten it if necessary . 14. Check the clamp screw on the cam follower assembly (40317) . 15. Check the hex head screw attaching the connecting rod assembly (11079) to the needle arm assembly (40099) , tighten it if necessary . 16. Replace the housing cover . 17. Finish by checking the throat plate screws and checking and adjusting the belt tension . 18. Reassemble the machine and it is ready to sew . REPLACING THE BELT . 1. Unplug the machine .
2. Remove the thread cone from the thread cone holder (11815) . 3. Remove the handle assembly by unscrewing two screws
(SC142034) 4. Loosen the two set screws (11908) on the hinged motor mount ,11906 5. Press the motor mount completely closed to allow slack for removal of the used belt and to allow the new belt to be installed . 6. Install a new belt (11909) around both pulleys . 7. Apply tension to the belt by opening the motor mount hinge and tightening the two set screws . The belt must remain slightly flexible . 8. Reattach the handle assembly , and the thread cone holder + thread cone back on the machine . 9. Your machine is now ready to use .
FISCHBEINCOMPANY The Leader in Bag Closing Technology
REF : 14810F-GB ED.A10/2001
24
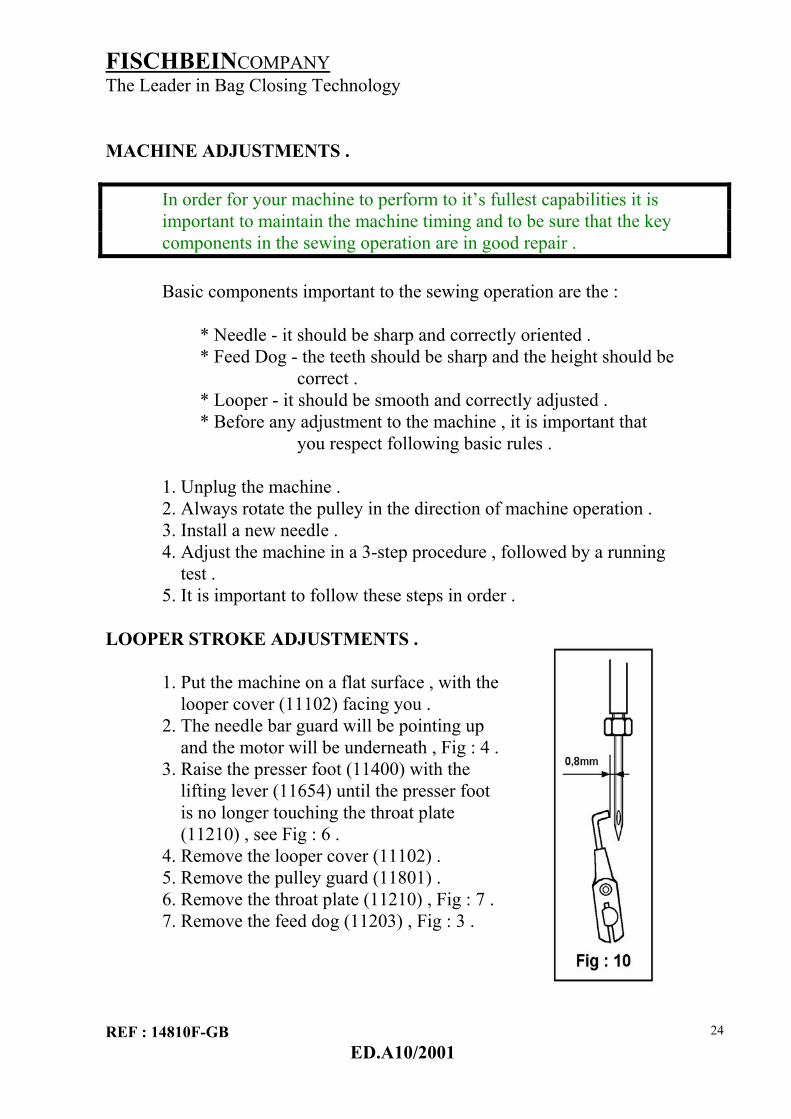
MACHINE ADJUSTMENTS . In order for your machine to perform to it’s fullest capabilities it is important to maintain the machine timing and to be sure that the key components in the sewing operation are in good repair . Basic components important to the sewing operation are the : * Needle - it should be sharp and correctly oriented . * Feed Dog - the teeth should be sharp and the height should be correct . * Looper - it should be smooth and correctly adjusted . * Before any adjustment to the machine , it is important that you respect following basic rules . 1. Unplug the machine . 2. Always rotate the pulley in the direction of machine operation . 3. Install a new needle . 4. Adjust the machine in a 3-step procedure , followed by a running test . 5. It is important to follow these steps in order . LOOPER STROKE ADJUSTMENTS . 1. Put the machine on a flat surface , with the looper cover (11102) facing you . 2. The needle bar guard will be pointing up and the motor will be underneath , Fig : 4 . 3. Raise the presser foot (11400) with the lifting lever (11654) until the presser foot is no longer touching the throat plate (11210) , see Fig : 6 . 4. Remove the looper cover (11102) . 5. Remove the pulley guard (11801) . 6. Remove the throat plate (11210) , Fig : 7 . 7. Remove the feed dog (11203) , Fig : 3 .

FISCHBEINCOMPANY The Leader in Bag Closing Technology
REF : 14810F-GB ED.A10/2001
25
8. Turn the machine pulley (11904) until the looper (11300) is at maximum back stroke position to left of needle . 9. At this moment , the distance between the point of the looper and the left side of the needle must be of 0,8 mm . Use gage , 11302 , to check that distance , Fig : 9 . 10. If that distance is not correct , take off the housing cover (11299) and 6 screws (SC83212) . 11. Loosen screws (SC63258) of the arm ,follower cam (40317) and turn the looper shaft (11303) up to reaching the distance of 0,8 mm Tighten te screw SC63258 . ADJUSTMENT OF THE NEEDLE HIGHT VERSUS THE LOOPER . 1. Always adjust the needle height after the looper stroke adjustment has been made . see previous procedure . 2. Remove the needle bar guard (11101) . 3. Turn the machine pulley (11904) in the direction of machine operation until the looper begins to come forward , toward the needle . 4. As the looper passes behind the needle the point of the looper should be visible past the right edge of the needle ( 0,2 mm max .) just before the bottom edge of the looper hook is seen in the eye of the needle , see Fig . If an adjustment is necessary . 1. Slightly loosen the screws (SC54012) on the needle bar clamp assembly (40502) . 2. Move the needle bar (11500) up or down until you reach an adjustment as per step 3 . 3. Be sure that you do not rotate the needle bar or the machine pulley as you are performing this step . 4. When the proper setting is reached , tighten the screws (SC54012) . 5. Rotate the machine trough one cycle to verify your adjustment .

FISCHBEINCOMPANY The Leader in Bag Closing Technology
REF : 14810F-GB ED.A10/2001
26
NOTE !!! As you rotate the machine for timing purposes , always move forward . If you pass the setting point , simply turn the machine trough the cycle , back to the point you require . LOOPER CLEARANCE ADJUSTMENT . To verify this adjustment , you have to look at the machine from the side. The aim of this adjustment is that the point of the looper passes behind the needle , as close to the “needle scarf “ as possible , without touching it . The needle scarf is the hollowed-out section of the needle on the un-grooved side just above the hole , see Fig : 11 . If an adjustment is necessary , please proceed as follows : 1. Rotate the machine until the looper is directly behind the needle . Do not forget to always rotate the pulley of the machine as the arrow indicates . 2. Loosen the socket cap screw (SC54038) on the looper holder . 3. Move the looper holder (11301) on the looper shaft (11303) until the looper is positioned as closely as possible to the needle without actually touching it . You should be able to pass a sheet of paper between the back of the needle and the looper edge . 4. When this is complete , tighten the socket cap screw on the looper holder . 5. Rotate the machine trough a complete cycle to be sure that the looper clears the needle both on the up stroke and the back stroke of the cycle . When you have made or verified all of the adjustments , you can replace the guards , covers , and parts removed when you began . 6. Replace the needle bar guard (11101) .

FISCHBEINCOMPANY The Leader in Bag Closing Technology
REF : 14810F-GB ED.A10/2001
27
7. Replace the feed dog (11203) on the feed dog carrier block (11437). 8. Replace the throat plate (11210) . 9. Replace the looper cover (11102) . 10. Rotate the lifter lever back to it’s initial position .This will replace the presser foot on the throat plate . 11. Cycle the machine until the feed dog is at the top of it’s stroke to verify the feed dog height . This should be approximately 2,4 mm . The trailing edge of the feed dog should be 0,25 mm higher than the leading edge. This adjustment is made at the factory and should not need changing , even when replacing the feed dog . 12. Your bag closer is now ready to use !!! MOTOR INSTRUCTIONS . The motors used on Fischbein bag closers are not designed for long-run periods without stops . They are produced specially for numerous starts and stops as is the case for bag closing operations . Little maintenance will be required but periodic inspection of the motor brushes will assure that your machine continues to operate at maximum efficiency . The brushes should be at least 6 mm in length in order for the motor to run properly . We recommend that the brush be checked after every 100 hours of use . To check and replace the brushes if necessary use the following procedure . 1. Unplug the machine . 2. Unscrew brush holders from the motor and take out the used brushes . 3. Check the length , if they are still useable , replace them and continue to use the machine . 4. If they are close to being expended , it may be time to order replacements . 5. If you are replacing your brushes , do so now . 6. Replace the brush holder caps . 7. The machine is now ready to use .
FISCHBEINCOMPANY The Leader in Bag Closing Technology
REF : 14810F-GB ED.A10/2001
28
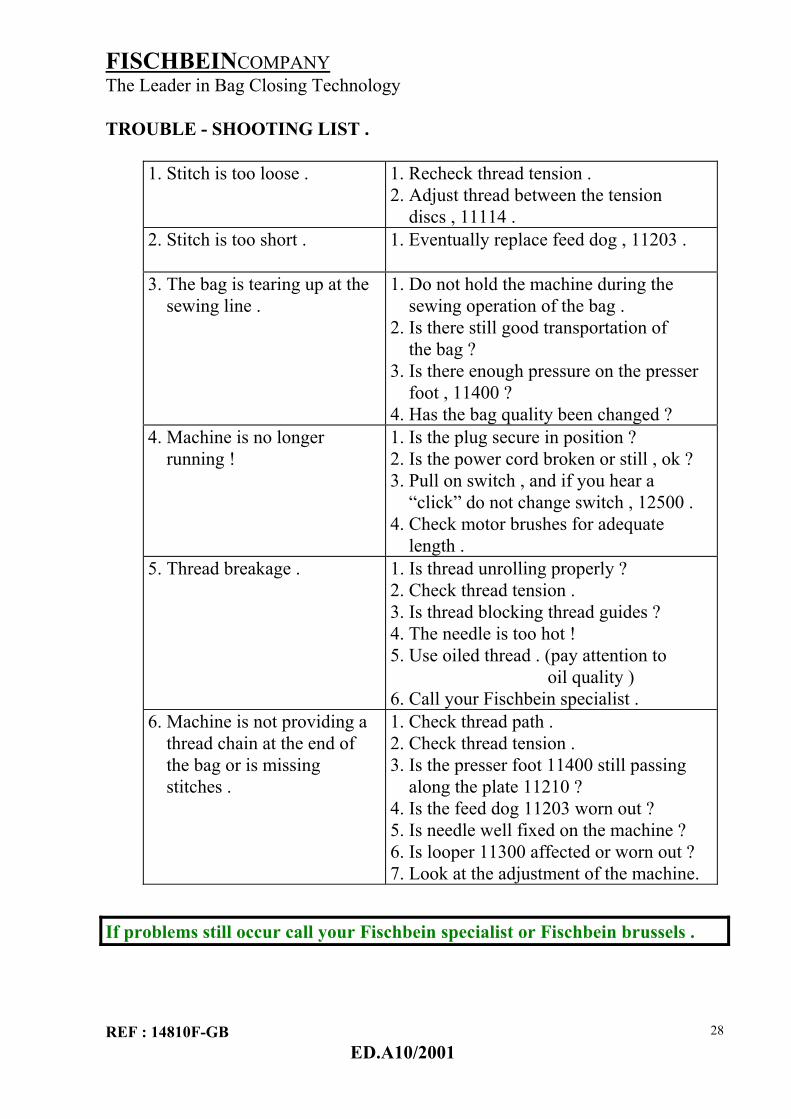
TROUBLE - SHOOTING LIST .
1. Stitch is too loose . 1. Recheck thread tension . 2. Adjust thread between the tension discs , 11114 .
2. Stitch is too short . 1. Eventually replace feed dog , 11203 .
3. The bag is tearing up at the sewing line .
1. Do not hold the machine during the sewing operation of the bag . 2. Is there still good transportation of the bag ? 3. Is there enough pressure on the presser foot , 11400 ? 4. Has the bag quality been changed ?
4. Machine is no longer running !
1. Is the plug secure in position ? 2. Is the power cord broken or still , ok ? 3. Pull on switch , and if you hear a “click” do not change switch , 12500 . 4. Check motor brushes for adequate length .
5. Thread breakage . 1. Is thread unrolling properly ? 2. Check thread tension . 3. Is thread blocking thread guides ? 4. The needle is too hot ! 5. Use oiled thread . (pay attention to oil quality ) 6. Call your Fischbein specialist .
6. Machine is not providing a thread chain at the end of the bag or is missing stitches .
1. Check thread path . 2. Check thread tension . 3. Is the presser foot 11400 still passing along the plate 11210 ? 4. Is the feed dog 11203 worn out ? 5. Is needle well fixed on the machine ? 6. Is looper 11300 affected or worn out ? 7. Look at the adjustment of the machine.
If problems still occur call your Fischbein specialist or Fischbein brussels .

FISCHBEINCOMPANY The Leader in Bag Closing Technology
REF : 14810F-GB ED.A10/2001
29
SPARE PARTS.
MODEL F SPARE PARTS AND ACCESSORIES Item Quantity Part No. Description
1 2 D5 (13050) Needles (25/package) 2 2 11300 Looper 3 2 11203 Feed Dog 4 1 11400 Assy Presser Foot 5 2 11702 Moving Knife 6 2 11703 Stationary Knife 7 1 11704 Knife Tension Spring 8 2 11909 Drive Belt 9 1 11210 Throat Plate
10 1 67753 230VAC Motor single ph 50/60Hz 11 4 67760 Screw, cap Brush Holder 230 Volt Motor 12 2 67761 Motor Brush 13 1 11302 Looper Gauge 14 1 13069 Lubricating Oil 15 1550 Model F Suspension Unit 16 11147 Model F Tool Kit

FISCHBEINCOMPANY The Leader in Bag Closing Technology
REF : 14810F-GB ED.A10/2001
30
FISCHBEIN BAG CLOSER MODEL F TYPE : F / ....... DRAWINGS AND PARTS LIST

FISCHBEINCOMPANY The Leader in Bag Closing Technology
REF : 14810F-GB ED.A10/2001
31
PLATE A - HOUSING, NEEDLE LEVER, PRESSER FOOT.

FISCHBEINCOMPANY The Leader in Bag Closing Technology
REF : 14810F-GB ED.A10/2001
32
PLATE A : HOUSING - NEEDLE , LEVER - PRESSER FOOT . PARTS LIST .
Item . Qty . Part number Description : 1 1 11448 Housing assembly
5 SS 832316HD Screw , bushings Soc , set # 8-32 x3/16 2 6 SC83212 Screw # 8-32 x 5/8 3 1 40004 Name plate 4 2 11010 Stud , feed dog , carrier slide . 5 4 SB 103214 Soc button screw # 10-32 x1/4 6 1 11102 Cover , looper 7 1 11108 Stud looper cover 8 3 F 64038 Flat sunk screw # 6-40 x 3/8 9 1 11210 Throat plate
12 1 11101 Guard needle bar . 12.1 1 11104 Guard needle bar , add.
13 4 B 83214 Binding screw # 8-32 x 1/4 14 1 11009 Plate , cover 16 1 11657 Cover slide pad 17 1 11656 Pad , slide 18 1 11651 Plate lever 19 2 PH 832516 Phillips Head Screw # 8-32 x 5/16 20 1 11654 Lever lifter , presser foot 21 2 11655 Washer spring 22 1 11653 Screw , pivot 23 1 11400 Assy. presser foot
1 11402 Bolt , hinging 1 11711 Nut 2 SS 832316HD Screw , bushings Soc , set # 8-32 x3/16
23.1 1 11883 Guide , needle presser foot 2 B 540316 Binding screw # 5-40 x 3/16
23.2 1 11882 Guard needle 24 1 11444 Bushing , lower 25 1 11652 Lifter presser foot
1 SC 64058 Soc. cap screw # 6-40 x 5/8 26 1 11414 Spring presser bar 27 1 11404 Presser bar 28 2 11442 Bushing , upper presser bar 29 1 13050 Needle D5 , round point 30 1 11501 Nut needle bar 31 1 11443 Bushing needle bar , lower 32 1 11500 Needle bar 33 1 11508 Wicking 34 1 40502 Assy. Clamp needle bar (double) 35 1 11268 Nut , lock (Nylock) 3/8-24NC 36 1 A 3934 Washer flat # Idler
FISCHBEINCOMPANY The Leader in Bag Closing Technology
REF : 14810F-GB ED.A10/2001
33
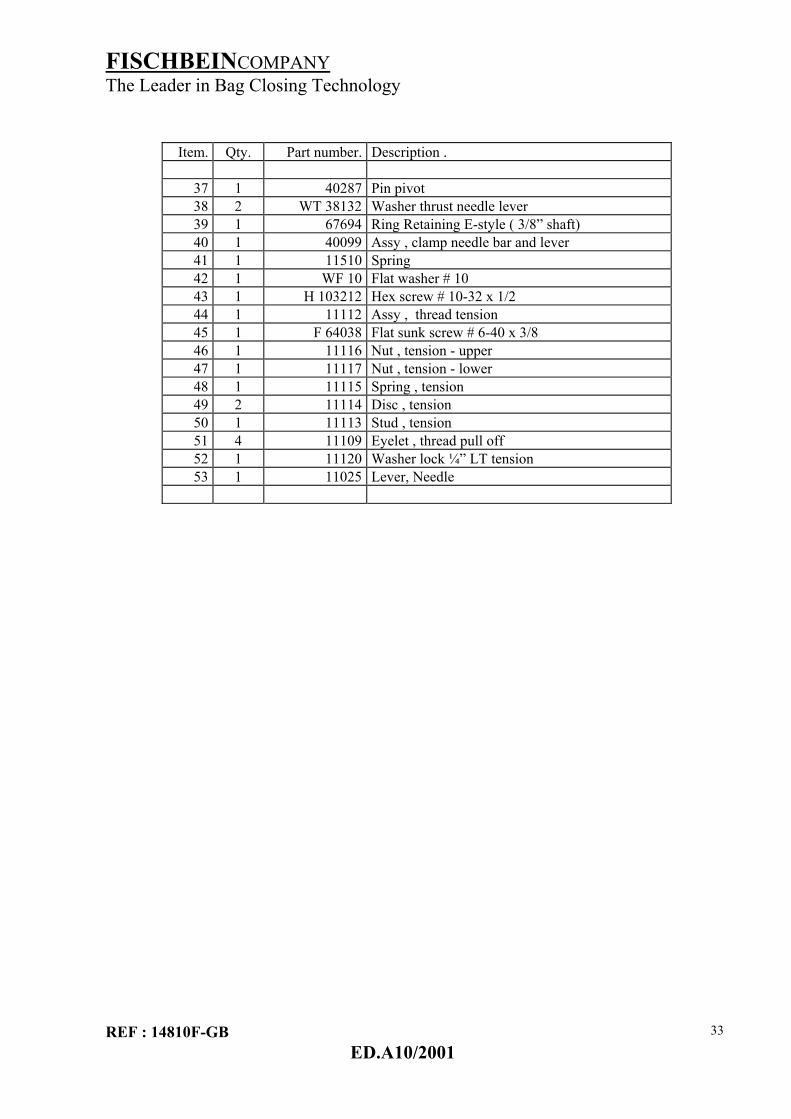
Item. Qty. Part number. Description .
37 1 40287 Pin pivot 38 2 WT 38132 Washer thrust needle lever 39 1 67694 Ring Retaining E-style ( 3/8” shaft) 40 1 40099 Assy , clamp needle bar and lever 41 1 11510 Spring 42 1 WF 10 Flat washer # 10 43 1 H 103212 Hex screw # 10-32 x 1/2 44 1 11112 Assy , thread tension 45 1 F 64038 Flat sunk screw # 6-40 x 3/8 46 1 11116 Nut , tension - upper 47 1 11117 Nut , tension - lower 48 1 11115 Spring , tension 49 2 11114 Disc , tension 50 1 11113 Stud , tension 51 4 11109 Eyelet , thread pull off 52 1 11120 Washer lock ¼” LT tension 53 1 11025 Lever, Needle

FISCHBEINCOMPANY The Leader in Bag Closing Technology
REF : 14810F-GB ED.A10/2001
34
PLATE B : MAIN SHAFT AND LOOPER ASSEMBLY.

FISCHBEINCOMPANY The Leader in Bag Closing Technology
REF : 14810F-GB ED.A10/2001
35
PLATE B : MAIN SHAFT AND LOOPER ASSEMBLY . Item . Qty. Part number . Description :
1 1 11600 Main shaft 1 11616 Collar , main shaft (only for model FB) 1 SC 54038 Soc. cap screw # 5-40 x 3/8
3 1 10420 Ring “O” 4 3 11006 Washer trust 5 1 11441 Bushing , main shaft rear 6 1 11079 Assembly connecting rod & eccentric (replacement) 7 1 40310 Assy. cam looper
1 SS 83212CP ** Soc.set screw # 8-32 x 1/2 cone point 1 SS 83212 ** Soc.set screw # 8-32 x 1/2
8 1 WIT 516 Washer , internal tooth 9 1 11608 Nut , hex special
10 1 11607 Bearing , rod end 11 1 40317 Assy , arm & stud cam follower 12 1 11308 Stud Cam follower 13 1 40307 Arm cam follower 14 2 SC 63258 Soc. cap screw # 6-32 x 5/8 15 2 40313 Washer flat 16 1 11309 Nut , hex special 17 1 67693 E-clips (1/4” shaft) 18 1 11303 Shaft looper 19 2 11445 Bushing , looper shaft 20 1 11301 Holder looper
1 SS 832316HD Soc.set screw # 8-32 x 3/16 HD 1 SC 54038 Soc.cap screw “ 5-40 x 3/8
21 1 11300 Looper 22 1 11447 Bushing main shaft , front 23 1 SB 83238 Soc .button screw # 8-32 x 3/8 24 1 WIT 8 Washer # 8 , internal tooth 25 1 11003 Clip angle 26 1 11437 Carrier block , feed dog
4 SS 64038FP Soc.set screw # 6-40 x 3/8 FP 27 1 11410 Washer felt 28 1 11446 Slide 29 1 11203 Feed dog 30 1 WS 8 Washer spring # 8 31 1 SC 8321 Soc. cap screw # 8-32 x 1 32 1 H 103238 Hex.screw # 10-32 x 3/8 33 1 WIT 10 Washer # 10 , internal tooth 34 1 11007 Bracket knife 35 1 11703 Knife , stationary 36 2 F 348516 Flat sunk screw # 3-48 x 5/16 37 1 11702 Knife , moving 38 2 F 348316 Flat sunk screw # 3-48 x 3/16 39 1 11016 Bushing , knife shaft 40 1 11707 Shaft knife 41 1 11704 Spring , knife tension 42 1 11125 Guard knife 43 1 SB 103214 Soc.button screw # 10-32 x 1/4 44 1 SB 83214 Soc. button screw # 8-32 x 1/4
** Max Torque: 0,14Nm
FISCHBEINCOMPANY The Leader in Bag Closing Technology
REF : 14810F-GB ED.A10/2001
36
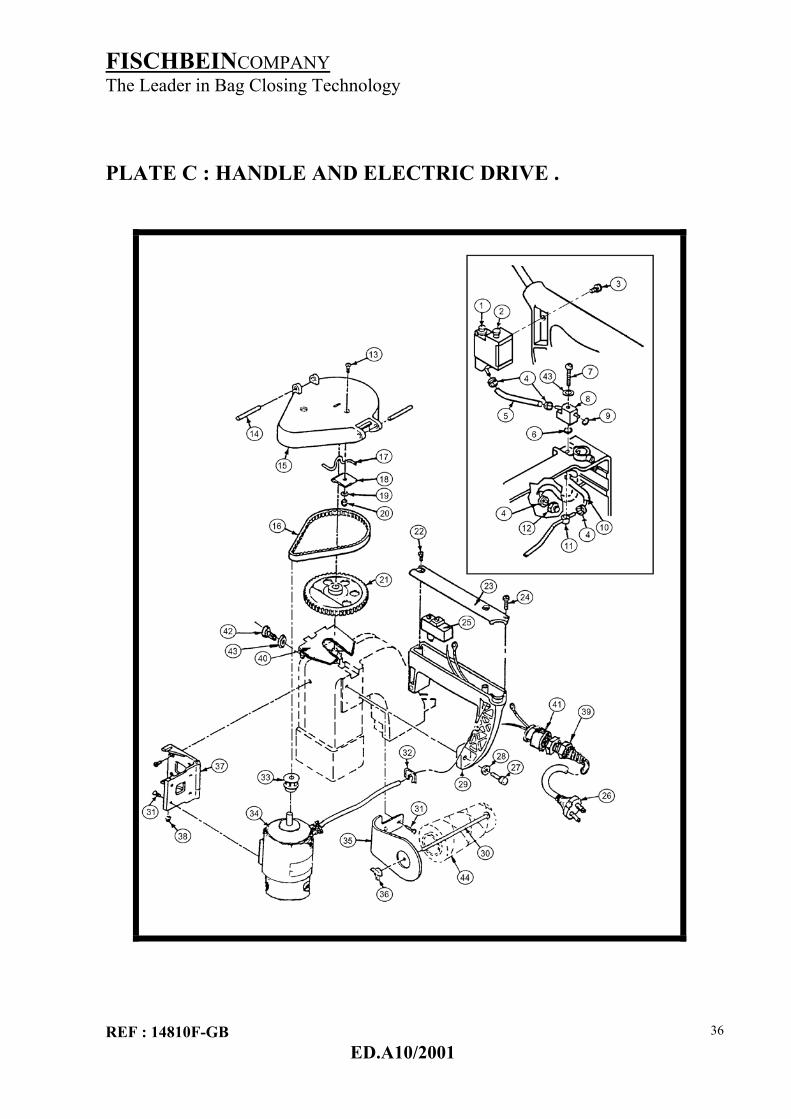
PLATE C : HANDLE AND ELECTRIC DRIVE .

FISCHBEINCOMPANY The Leader in Bag Closing Technology
REF : 14810F-GB ED.A10/2001
37
PLATE C: HANDLE AND ELECTRIC DRIVE
Item Qty. Part number Description . 1 1 11450 Assy. oil pump 2 1 11453 Plug , pump oil 3 1 SB 83212 Screw soc. Btn # 8-32 x 1/2 4 4 11472 Clamp , spring tubing 5 1 85128 Tubing oil pump Tygon ¼” OD (90mm long) 6 1 11479 Ring “ O “ 7 1 SB 832114 Screw soc. Btn # 8-32 x 11/4 8 1 11475 Assy , valve block manifold 9 1 11478 Ring “ O “
10 1 85128 Tubing oil pump Tygon ¼” OD (153mm long) 11 1 11485 Weldment , manifold inside 12 1 11490 Fitting 13 1 SF 832516 Screw Soc.Flat # 8-32 x 5/16 14 2 PS 6.6x40 Spring Pin ¼” ∅ x1.5” 15 1 11198 Assy , guard 16 1 11909 Belt 17 1 11012 Hanger 18 1 11017 Clip , hanger 19 1 WIT 8 Washer , internal tooth # 8 20 1 NH 832 Nut # 8-32 21 1 11904 Pulley , assy
2 SS 103212 Soc.set screw # 10-32 x 1/2 22 2 SB 103212 Soc.button screw # 10-32 x ½” 23 1 11011 Cover , handle 24 1 SC 44034 Screw Soc. Cap # 4-40 x 3/4 25 1 12500 Switch 26 1 12427 Cord set 27 2 SC 142034 Soc.cap screw # 1/4-20 x 3/4 28 2 WS 14 Washer spring # 1/4 29 1 11028 Handle 30 1 11804 Bolt , thread clamping 31 10 SF 103238 Flat soc.screw # 10-32 x 3/8 32 1 11073 Strain relief 33 1 11902 Pulley motor
2 SS 832316 Soc.set screw # 8-32 x 3/16 34 1 67753 Motor 230 volt
34.1 12400-110V Motor 110 volt 34.2 12400-24V Motor 24 volt 34.3 67342 Motor 12 volt DC
35 1 11815 Stand , thread 36 1 11805 Wing nut 37 1 11906 Assy , hinge motor mount 38 2 11908 Screw , hinge 39 1 12428 Cord set reinforcement 40 1 11801 Guard pulley drive 41 1 11784 Adapter 42 2 B 83214 Binding screw # 8-32 x 1/4 43 2 WN 8 Washer nylon # 8 44 1 25010.. Thread cone 45 1 11084 Assy , belt guard and handle (items ,13..15,17...20,22..24,29)

FISCHBEINCOMPANY The Leader in Bag Closing Technology
REF : 14810F-GB ED.A10/2001
38
PLATE : D – MOTOR – 230Volt Ref: 67753

FISCHBEINCOMPANY The Leader in Bag Closing Technology
REF : 14810F-GB ED.A10/2001
39
PLATE D : MOTOR –230 Volt Ref: 67753
Item. Qty . Part number Description
1 2 67753-1 Screw, Housing set 2 2 67753-2 Washer, Housing set 3 2 67760 Screw, Cap-Brush holder 4 2 67761 Carbon Brush 6x8x15 5 2 67753-5 Screw, stop 6 2 67753-6 Holder Brush 7 1 67753-7 Housing Rear. 8 1 67753-8 Capacitor 9 2 67753-9 Bearing , ball 608ZZ
10 1 67753-10 Armature 230 V 11 1 67753-11 Washer Rubber 12 1 67753-12 Ring Rubber 13 2 67753-13 Screw , stator set 14 1 67753-14 Stator assy.,230Volt 15 1 67753-15 Insulation sleeve 16 2 67753-16 Nut 17 1 67753-17 Holder front (#10-32 MTG holes) 18 1 67753-18 Sealing nut cord glands
18-1 1 67753-18-1 Claw cord glands 18-2 1 67753-18-2 Seal cord glands 18-3 1 67753-18-3 Body cord glands
19 1 67753-19 Cord , motor 230V Wire 1mm cross section cord length 407mm

FISCHBEINCOMPANY The Leader in Bag Closing Technology
REF : 14810F-GB ED.A10/2001
40
NUMERICAL PARTSLIST WITH PAGE INDICATION .
Part number Page . Part number Page . Part number Page . A3934 32 11410 34 11804 36 10420 34 11414 31 11805 36 11003 34 11437 34 11815 36 11006 34 11441 34 11882 31 11007 34 11442 31 11883 31 11009 31 11443 31 11902 36 11010 31 11444 31 11904 36 11011 36 11445 34 11906 36 11012 36 11446 34 11908 36 11016 34 11447 34 11909 36 11017 36 11448 31 12427 36 11025 32 11450 36 12428 36 11028 36 11453 36 12500 36 11073 36 11472 36 13050 31 11079 34 11475 36 14750 41 11084 36 11478 36 14752 41 11101 31 11479 36 14753 41 11102 31 11485 36 14774 41 11104 31 11490 36 14775 42 11108 31 11500 31 14776 42 11109 32 11501 31 25010D 36 11112 32 11508 31 40004 31 11113 32 11510 32 40099 32 11114 32 11600 34 40287 32 11115 32 11607 34 40307 34 11116 32 11608 34 40310 34 11117 32 11616 34 40502 32 11120 32 11651 31 67342 36 11125 34 11652 31 67693 34 11198 36 11653 31 67694 32 11203 34 11654 31 67753 36 11210 31 11655 31 67753-1 38 11268 32 11656 31 67753-2 38 11300 34 11657 31 67753-3 38 11301 34 11702 34 67753-4 38 11303 34 11703 34 67753-5 38 11309 34 11704 34 67753-6 38 11308 34 11707 34 67753-7 38 11400 31 11711 31 67753-8 38 11402 31 11784 36 67753-9 38 11404 31 11801 36 67753-10 38

FISCHBEINCOMPANY The Leader in Bag Closing Technology
REF : 14810F-GB ED.A10/2001
41
Part number Page . Screw num. Page . 67753-11 38 SF832516 36 67753-12 38 B540316 31 67753-13 38 B83214 36 67753-14 38 SB832114 36 67753-15 38 SF832516 36 67753-16 38 PH83214 31 67753-17 38 F348316 34 67753-18 38 F348516 34
67753-18-1 38 F64038 32 67753-18-2 38 F64058 31 67753-18-3 38 PH832516 31 67753-19 38 SC 83212 31
85128 36,43 SC44034 36 H103212 32 H103238 34 NH832 36 PS6.6x40 36 SB103214 31,34 SB103212 36 SB83214 34 SB83238 34 SB83212 36 SC142034 36 SC63258 34 SC54038 34 SC8321 34 SC64058 31 SF103238 36 SS103212 34,36 SS103258CP 34 SS64038FP 34 SS82316HD 31,34 SS832316 36 SS832316HD 31 WF10 32 WS8 34 WIT10 34 WIT516 34 WIT8 34,36 WN8 36 WS14 36 WT38132 32

FISCHBEINCOMPANY The Leader in Bag Closing Technology
REF : 14810F-GB ED.A10/2001
42
PLACEMENT STICKERS AND ADD GUARDS .
14752
11104
14753
14774
14750F25010D

FISCHBEINCOMPANY The Leader in Bag Closing Technology
REF : 14810F-GB ED.A10/2001
43
PLACEMENT STICKERS AND ADD GUARDS .
11125 11104
14775
14776

FISCHBEINCOMPANY The Leader in Bag Closing Technology
REF : 14810F-GB ED.A10/2001
44
SAFELY DISPOSING OF A MODEL F.
If a MODEL F sewing machine becomes damaged beyond repair of simply worn to a nonfunctional state after years of service, it should be put out of service only after it is safe to dispose of it. First, drain all the oil according to your appropriate local environmental regulations. After the oil is be drained and disposed of, bring the sewing head to a recycling center or metal scrap facility.