the montana democratic party vanual: a guide to the...
TRANSCRIPT

P a g e | 1
The Montana Democratic Party VANual:
A guide to the
Voter Activation Network (VAN)
For more information contact the Montana Democratic Party Headquarters
303 N. Ewing, Helena, MT - 406-442-9520
For Technical help please contact our Voter File Administrator,
Shannon Hanson, 406-261-6000 or [email protected]
Last updated: November 11th, 2011

P a g e | 2
Contents
Getting Voter Activation Network (VAN) access. ....................................................................................... 5
Logging In to the Online Voter File ............................................................................................................. 6
Help Wiki ..................................................................................................................................................... 7
Main Menu - Quick Look Up ....................................................................................................................... 8
Voter’s Profile Page 1 .................................................................................................................................. 9
Voter’s Profile Page 2 ................................................................................................................................ 10
Addresses .............................................................................................................................................. 10
Salutation .............................................................................................................................................. 10
Phones .................................................................................................................................................. 10
Email ..................................................................................................................................................... 10
Activist Codes ........................................................................................................................................ 10
Survey Questions .................................................................................................................................. 10
Contact History ..................................................................................................................................... 10
Voting History ....................................................................................................................................... 10
Absentee Voting.................................................................................................................................... 10
Notes ..................................................................................................................................................... 10
VAN ID ................................................................................................................................................... 11
Vital Stats .............................................................................................................................................. 11
Likely Party ............................................................................................................................................ 11
Party ...................................................................................................................................................... 11
Districts ................................................................................................................................................. 11
Scores .................................................................................................................................................... 11
Also in Household ................................................................................................................................. 11
Creating Activist Codes, Survey Questions and Scripts ............................................................................ 12
Activist Codes ........................................................................................................................................ 12
Survey Questions .................................................................................................................................. 13
Scripts.................................................................................................................................................... 14
Main Menu - Creating a List .................................................................................................................... 15
Search by Location ................................................................................................................................ 15
Search by Districts ................................................................................................................................. 16
Search by Age and/or Registration Date............................................................................................... 16

P a g e | 3
Search by Survey Questions .................................................................................................................. 16
Search by Activist Codes ....................................................................................................................... 17
Search by Notes .................................................................................................................................... 17
Search by Likely Party ........................................................................................................................... 17
Search by Party ..................................................................................................................................... 18
Search by Gender .................................................................................................................................. 18
Search by Phones and/or Emails........................................................................................................... 18
Search by Name .................................................................................................................................... 18
Search by Suppressions ........................................................................................................................ 18
Search by Voting History ....................................................................................................................... 18
Running the Search ............................................................................................................................... 20
Working with a List ................................................................................................................................... 21
Voters .................................................................................................................................................... 21
Doors & Mailboxes ................................................................................................................................ 21
Refining a Search ...................................................................................................................................... 21
Add Voters ............................................................................................................................................ 22
Remove Voters ...................................................................................................................................... 23
Narrow Voters ....................................................................................................................................... 24
Save List .................................................................................................................................................... 25
Sharing your Saved List with your Team. .............................................................................................. 26
Saved Searches ..................................................................................................................................... 27
Sample Feature ......................................................................................................................................... 29
Print Feature ............................................................................................................................................. 30
Pulling A Walk List ................................................................................................................................. 30
Pulling a Call List.................................................................................................................................... 33
Labels ........................................................................................................................................................ 34
Exporting Data .......................................................................................................................................... 35
Committing Data ....................................................................................................................................... 37
Data Collection ...................................................................................................................................... 37
Grid View............................................................................................................................................... 38
Script View ............................................................................................................................................ 39
Bar Code Data Entry .............................................................................................................................. 40

P a g e | 4
Bulk Uploads ......................................................................................................................................... 42
Handheld Devices Including iPhones/iPod Touches and Palm Pilots ................................................... 42
Use a Map to Cut Turf ............................................................................................................................... 43
Step 1: Create a List .............................................................................................................................. 43
Step 2: Click on “Cut Turf” to view your map ....................................................................................... 43
Step 3:Divide your voters into groups that make sense to walk .......................................................... 45
Step 4: When you are finished cutting turf, save your mapping region and lists................................. 46
Step 5: Go to “View My Folders” to find your folder with mapping region and lists ........................... 47

P a g e | 5
Getting Voter Activation Network (VAN) access.
To get VAN Access contact Trent Bolger, Party Operations Director at the Montana Democratic Party.
Trent’s Email is [email protected] at the Party Headquarters(406-442-9520). Note: You
will need an email address to get your VAN Access.
When your account is created you will receive an email from an email address that looks like
[email protected] or from Shannon Hanson. See Picture below.
Note: This process may take a few days and this email sometimes gets caught in your Spam Filter.
After you have talked with Trent please check your spam folder a few times over the next few days.
Once you have received the Email from VoteBuilder, open it up. Click the URL link and it will start you
on the process of setting up your password.
It will ask you to put in your new Password, twice. Put that in and click finish.
Hint: Use a Password that you will remember and add the Month and year numbers to it because the
VAN will make you change your password every month. For example, your Password should be
“ExamplePassword0710” for July 2010. Then you just have to remember what month you last logged
into the VAN.
For your reference, write your username below and a hint of what your VAN Password is.
VAN URL : http://mt.thevan.us
VAN Username:_______________________________________________________________________
VAN Password Hint:____________________________________________________________________

P a g e | 6
Logging In to the Online Voter File
Go to the Montana Democratic Party voter file website: http://mt.thevan.us Sign in with the username and password provided for you by the MDP Voter File
Manager. The first time you log in, the program will prompt you to change your password. Every 30 days, you will again be prompted to change your password. ***Do Not Share Your
Username and/or Password. It is important for maintaining security of the system*** After changing your password, you will be asked to provide your contact information (Name, address, telephone number, email address, etc.). Once saved, click on Main Menu to bring you to the Main Menu of the Voter File. This is the Main Menu. This is the screen from which you will base everything and the screen which you will navigate to in order to look up a voter’s information, create lists of voters, access your saved lists and enter data.
From here you can also change your personal information and password and send an email to the Voter File Manager if you are experiencing any difficulties. You can also create Activist Codes, Survey Questions, and or Scripts form here. Before you create new ones of either of these codes or scripts please contact Headquarters to ensure that there is not a code already set up for that function, group or trait.

P a g e | 7
Help Wiki
If at any time you need more information about the part of the VAN you are working on please click the Wiki function located in the top right hand corner of the screen.
This function is page based. If you click on it while on the “create a new list” screen it
will bring up more information on the “create a new list” screen
Note: From the Main Menu it will only display general information.
Note: Located at the top left hand part of the screen is a navigation bar. It will display
the path you have taken to get to the current page you are on. Click on the Main Menu
part of the bar to return to the Main Menu at any time.

P a g e | 8
Main Menu - Quick Look Up
This feature allows you to lookup an individual voter. You can search by name, phone, VAN ID, address, city, zip code, phone number, email and/or county.
This example is a quick look up for the name “Trent Bolger.” Type in the information you’d like to search on and click “search.” This search yields the following results. Note that if “Use SmartName search technology” is checked, the program will automatically return other possible variations of names (i.e. “Trent” will also return Trenton)
At this point, you can click on the “Trent Bolger” for which you were looking to bring you to the voter’s profile page. Or you can enter/change data to refine your search. If you’ve found who you are looking for, click on the name of that individual. You can also search using partial information. For instance, if you talked to a voter on Clancy Street and you remember just their first name, you can just put in those bits of information and the system will find all people that match those characteristics.

P a g e | 9
Voter’s Profile Page 1
This page shows you all the information we have on any given voter. Clicking the plus sign next to each section will expand the window to allow you to view that data. You may have multiple data fields open at one time. Once you are comfortable with what you are viewing, click “Save Page Layout.” Every time you open a voter’s profile, the page will load with these data fields automatically open for you.

P a g e | 10
Voter’s Profile Page 2
Addresses: You will see the voter’s address and have the ability to mark it as bad if you know that voter has moved. When marked bad, the old address of that voter is suppressed so that we no longer send mail to that address. Salutation: This is how a voter is addressed on envelopes. Changing the salutation is as simple as typing in the name by which that a voter would like to be addressed. As this is for mailing purposes to that voter, we must always be respectful of what a voter would like to be called! Phones: On the file we have the capability of adding multiple phone numbers. Just select from the drop down menu the type of number you want to enter from the following: Home, Work, Cell, Fax, or Main. Type in the number, and click “Save New.” Email: We can save multiple email addresses on the file. Simply type the address in the blank. Then click, “Save New.” Activist Codes: Activist Codes are yes/no questions that voters are assigned in the file. Voters are assigned these codes based on their party activities, issues/constituencies, and volunteerism. Examples include: Donor, Caucus, 2006 Volunteer, etc. These are important on the file because they give us the basis for our “Likely Party” rating (see below). Survey Questions: On the file we have access to voters’ responses on survey questions that they have been asked via phone banks, and canvasses. The questions concern issues, candidate support, party identification, etc. Responses to party identification questions feed into the Likely Party rating, as well as specific candidate support responses. For example, if a voter responded that they were strongly supporting John Kerry for President in 2004, we would enter their response to that question on the file, which assigns that voter 25 more Democratic points. Contact History: This is a way to keep track of the times committees have made contact with voters and is updated when Survey question responses are data entered to the file. Voting History: Provided by the Secretary of State’s data, this is a record of voter’s history. A designation of “P” means that the voter voted at the polls. An “A” designates an Absentee vote. An “M” indicates that the voter voted via mailed ballot. Absentee Voting: This allows us to track who has requested an absentee ballot and if that ballot has been mailed to the voter and returned by the voter. Notes: A note is information you can provide about a voter that is only seen by other members of your committee. In this way, campaigns can share information about voters
P a g e | 11
privately. Examples would be notes about a voter’s donor history with your candidate, or notes on accommodations that need to be made for a voter at events, best times to call voter, etc. VAN ID: “Voter Action Network ID” This number is assigned to every voter on the Voterfile and is unique to each individual voter. This will never change for a voter once they are on the file, and it is a consistent way of keeping track of registered voters on the Voter File. Vital Stats: Provided by the Secretary of State, this is the vital information we know about voters. Likely Party: This rating is the basis by which we are able to target voters by their party identification on the Voter File. The rating is based off of point values assigned to specific survey responses and the Activist Codes assigned to voters. It is a reflection of how likely someone is to be a Democrats, Republican, Etc. Based on the other information we have on them. Party: This rating is based on a voter’s response to the specific question of what party
they Identify with.
Districts: This information is entered automatically by the VAN program. It is geographically based from where a voter lives, or their “Voting Address.” It includes designations of County, Precinct, and Legislative District. Scores: Scores are a mathematical representation of a likely hood of a voter supporting or opposing a candidate or issue. These are about 70% accurate. They are based off of all information collected on a voter. For example, a voter is likely to vote for a Democrat if they live in a high Democratic voting district or if you singed the Healthy Montana Kids Initiative. Also in Household: This is the information we have on other household members of voters. This includes the information we have on file of any other registered voters within the same household. Clicking on the hyper link with a voter’s name will bring up that person’s Voter Profile page. Notice: Statistics like Ethnicity, Primary Ethnicity, Religion, and Sex are based on what it usual to variations of your name. These are not always accurate and it is suggested that they not be used.

P a g e | 12
Creating Activist Codes, Survey Questions and
Scripts
On the left hand side of the Main Menu below your Profile
information there is a column that says, “codes, questions,
scripts” Click on it to open up more options.
Please check with the State Headquarters before you
create a new Activist Code, Question, or Script.
Activist Codes
An Activist Code is an On/Off type of question. For example,
the voter either will allow a yard sign on their property in
2012 or not. A voter either has a hunting license or not.
Let’s walk through creating an Activist Code.
Click on the “Activist Code” selection.
A list of all activist
codes that you have
access to will come
up. In the top right
hand corner there
will be a button that
says “Add a New
Activist code.” Click
on it.
Select the Type of Code it is (this is
for organization purposes in the
Voterfile).
Create three names - the Long
name, the Medium name and the
Short name. Write a description…Be
descriptive so everyone can figure it
out in the future.
The Scope is where you can set it so
that either just you or everyone can
see the code.
The owner committee is who can
change this code.

P a g e | 13
A screen will appear
below where you
can give access to
your Activist Code
to other
committees. For
example you are
running for a House
district and you give
access to your Yard
Sign list to the
person running in
the Senate District
that includes your
House district.
Just add their committee to the list.
Survey Questions
Survey Questions are set up the same way as Activist Codes. Let’s set up the 2012 Party
Identification Survey Question.
Select the Cycle, the
type, and create a
long name, medium
name, and a short
name.
Then Write the
Question as you
would like it to
appear.
The Scope applies to
questions as well.
Select private if you
only want you to see
it or public if you
want others to see it.

P a g e | 14
A screen will appear
for you to create
responses to your
question. Type in the
long, medium, and
short name of them
and hit “add.”
Scripts
Click on the Scripts drop down item under Codes, Questions, and Scripts. A screen of all the Scripts you
have access to should appear. Click the “Add New Script” button on the top right hand corner.
Name your Script so
you can find it later and
add a description of
what it is for. Hit Next.
You can create
Text like a
greeting for
the person
answering.
You can put in
Pre-set up
Survey
Questions
You can add a
place to put
activist codes
like yard sign
locations.
Make sure to
hit “save” once
you are done.

P a g e | 15
Main Menu - Creating a List
Using this feature, a user is able to create lists of voters using any or all of the following criteria: location, canvass status, districts, age, gender, registration date, voter history, issues and candidate IDs, activist codes, with or without phone, etc. Again, to customize the page layout to open the same way every time you come to this page, open the fields you want open every time and click “Save Page Layout.” Detailed information for each of the sections on the Create a New List page can be found on the page itself by scrolling the mouse over the buttons. Generally speaking, search criteria is selected on the Create a New List page one of the following ways:
• Drop-Down Boxes – Many of the choices available when creating a list are available from a drop-down box, where the user can choose one particular option – one county, one zip code, one month, and so on. If a user initially selects one option and later wants to either change that choice or leave the box blank altogether, click on the drop down box and select the blank space at the top. •Pickers – In many cases, the VAN offers users the option of choosing multiple counties, legislative districts, and so on using a “picker.” When the user has the option of selecting multiple choices that choice is underlined and bold (e.g., County or Activist Code). •Additional Options – In many cases, when you choose one option, more options that are not initially visible appear. In this way, the VAN provides only relevant search options. For instance, initially you will not see a precinct option for the search, but once you choose a county, the screen refreshes and the precinct options appear for that county. •Free-form Text Box – In some cases, a user will have the option to input
unique text to search under. When this occurs, the VAN will search the database for words similar to the user entered criteria.
Search by Location
To create a list of voters based on location, a user may search by county, city, zip code, and/or any combination of these.

P a g e | 16
To select a single county, click on the arrow to view the drop- down box. Then use the scroll bar to find the county and click on it. To select one, multiple or all counties, click on County. This will open a screen that lists all the counties available to the user, where he or she could select any or all of the counties to include in the search by checking the box beside the name of the county. After making the desired selections, click save to return to the previous “Create a List” screen. After making a selection, the user has the option to continue narrowing the search by precinct, cities, street name or zip codes within the county selected. Again, the user may either make selections through the drop-down menu or by clicking on the blue, underlined word to open the page that lists all available choices.
Search by Districts
Lists may be created based on congressional, senate, legislative, and/or school district. The process is the same as searching by location.
Search by Age and/or Registration Date
Lists may be created based on age and/or registration date. For example, to create a list of voters that are 55 or older, the user would type 55 in the box after “Age From” and leave the box after “To” blank. To create a list of voters 18 to 34, type in “Age From 18 To 34”.
Search by Survey Questions
To create a list using responses to survey questions, select one (using the drop-down box) or multiple (by clicking on Question) survey questions. Now the user can build a list based on one or multiple survey responses by checking the boxes beside the responses.

P a g e | 17
Additionally, the user can narrow the list by input type (how the data was input into the file: barcode, bulk upload, palm pilot, purchased, etc.); contact type (call, walk,
bulk mail, paid ID, etc.); entered by (individuals on the user’s committee); date canvassed (when the response was received); date entered (when the response was entered into the system); and/or by committee (includes all the responses entered into the system by all the members of the chosen committee). “Include most recent response only” will exclude voters from your list that meet your criteria if they answered the same question at a later date with a different
response. This is useful when follow-up ID’s have been made for undecided voters.
Search by Activist Codes
Activist Codes are similar to Survey Questions, but are yes/no rather than multiple option responses. Voters are assigned to an Activist Code. (Examples include: Donors, Caucus,2004 Volunteer, 2004 Green Party ID, etc.)
Search by Notes
Users may search by and create lists based on Notes. Therefore, it is useful to develop standard ways to input notes within a particular committee.
Search by Likely Party
A voter is assigned Democratic, Republican, and Independent “Party Points” when he or she answers survey questions, attends a caucus, volunteers on a campaign, makes a donation, if he or she is an elected official, party officer, runs for office, etc. The amount of points assigned for each of these actions differs. For example, being an elected official party officer or a candidate earns far more points than someone who responds to a survey question and is ID’d as a Democrat. There are seven possible “Likely Party” types that a voter may be placed in – Strong Democrat, Leaning Democrat, Independent, Leaning Republican, Strong Republican, Unknown and No Data. Assignment to a group is determined using a point and percentage formula. Below is the outline of how the points would be
1. If a voter has 100 or more total points AND more than 80% are Democratic points, he or she is marked as a Strong Democrat. 2. If the voter has between 25 and 99 total points AND more than 60% are Democratic points, then they are Leaning Democrat. In addition, if a voter has 100 or more total points AND his or her Democratic percentage is between 60% and 80%, that voter is also Leaning Democrat. 3. If both the Republican and Democrat percentages are less than or equal to 60%, and the total points are greater than or equal to 25, the voter is marked as Independent.

P a g e | 18
4. The same tests are applied for the Republican points in order to calculate the Strong Republicans/Leaning Republicans. 5. If a voter has total points between 1 and 24, they are marked as Unknown. 6. If a voter has 0 points, they are marked as No Data. Note that this is different than Unknown, as Unknown indicates that we know something about that voter, just not enough to make a guess.
This is a model designed to help determine a voter’s likely preference. It should be used as a guide when creating lists of voters to target, and should be used in conjunction with other criteria to create the best list for a user’s goals.
Search by Party
In Montana, since people don’t register by Party, this section is only people that have told
someone that has put the information back into the VAN that they are a Democrat or
Republican. These are called hard IDs.
Search by Gender
The default for a search is men and women. To search for only men or women, select one or the other. NOTE: This is only based on the persons first name Shannon Hanson is listed as a female but is actually a male.
Search by Phones and/or Emails
To include ONLY those voters that match the criteria selected and have phones or email addresses on the file, select Phone Only and/or E-Mails Only.
Search by Name
Users can create lists by first name and/or last name. Note that the search will return possible variations of the name unless the user specifies not to by checking “Search for exact name.”
Search by Suppressions
“Include Deceased” and “Include Bad Addresses” are used very rarely. These include suppressed voters allowing you to find ALL of the registered voters in the file, instead of having deceased voters and voters with bad addresses disappear completely. This is especially beneficial if you are trying to track down "missing" voters.
Search by Voting History
Lists may be created using voter’s Voting History. In addition to whether a voter actually voted, lists can be created by whether a voter voted at the polls or by absentee. To search by specific elections, use “Include anyone who voted in ANY / ALL of the following,” then put a check mark beside the Elections you want to select.

P a g e | 19
To search on combinations of elections, use “Include anyone who voted in at least / exactly / no more than _enter a number_ of the following,” then put a check mark beside the Elections you want to select.

P a g e | 20
Running the Search
After the criteria has been selected, click “Search.”
When the search is finished, the list will appear.
P a g e | 21
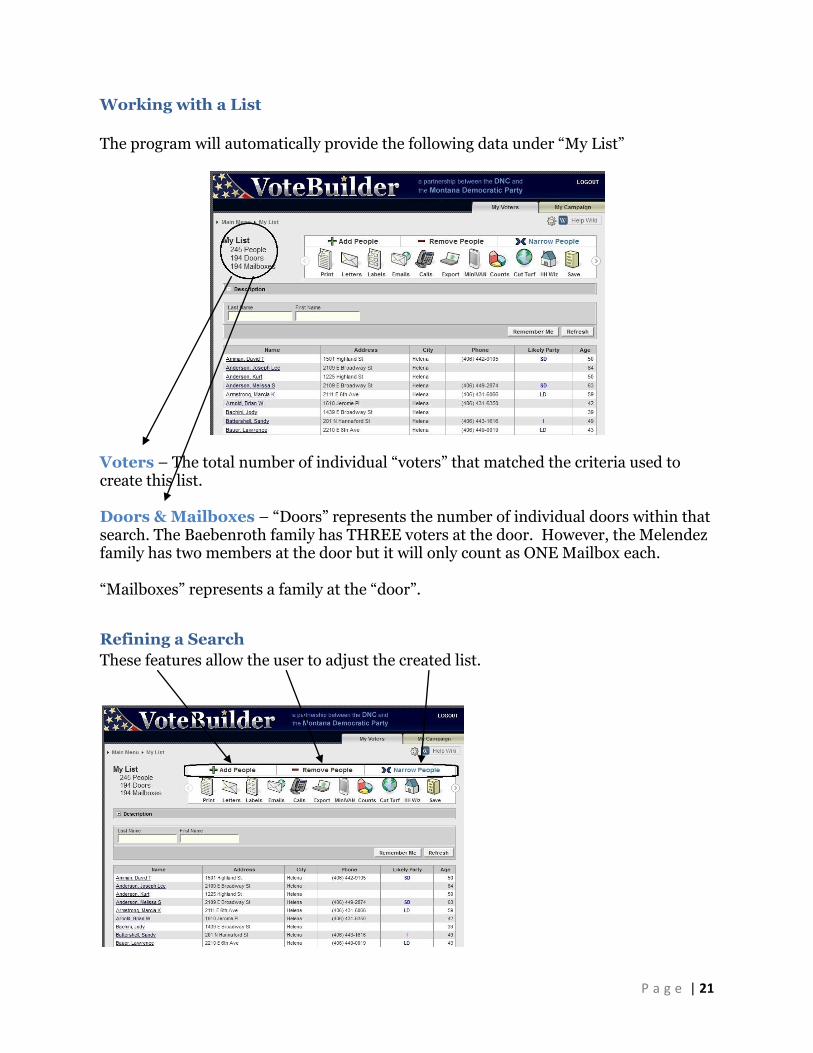
Working with a List
The program will automatically provide the following data under “My List”
Voters – The total number of individual “voters” that matched the criteria used to create this list. Doors & Mailboxes – “Doors” represents the number of individual doors within that search. The Baebenroth family has THREE voters at the door. However, the Melendez family has two members at the door but it will only count as ONE Mailbox each. “Mailboxes” represents a family at the “door”.
Refining a Search
These features allow the user to adjust the created list.

P a g e | 22
Add Voters – Running this search will add voters to the current list.
Remove Voters – this search removes specific voters from the current list.
Narrow Voters – this search focuses on a specific target based on the additional criteria.
Add Voters
We would like to add Leaning Dems in House District 79.
We have added over 1678 voters; 1484 doors; and 1492mailboxes

P a g e | 23
Remove Voters
Let’s remove people that said they would lean opposed or are opposed to the House Candidate in 2010.
We now have 1917 voter from 1923 voters…we have lost a few people that said they oppose the House candidate.
P a g e | 24
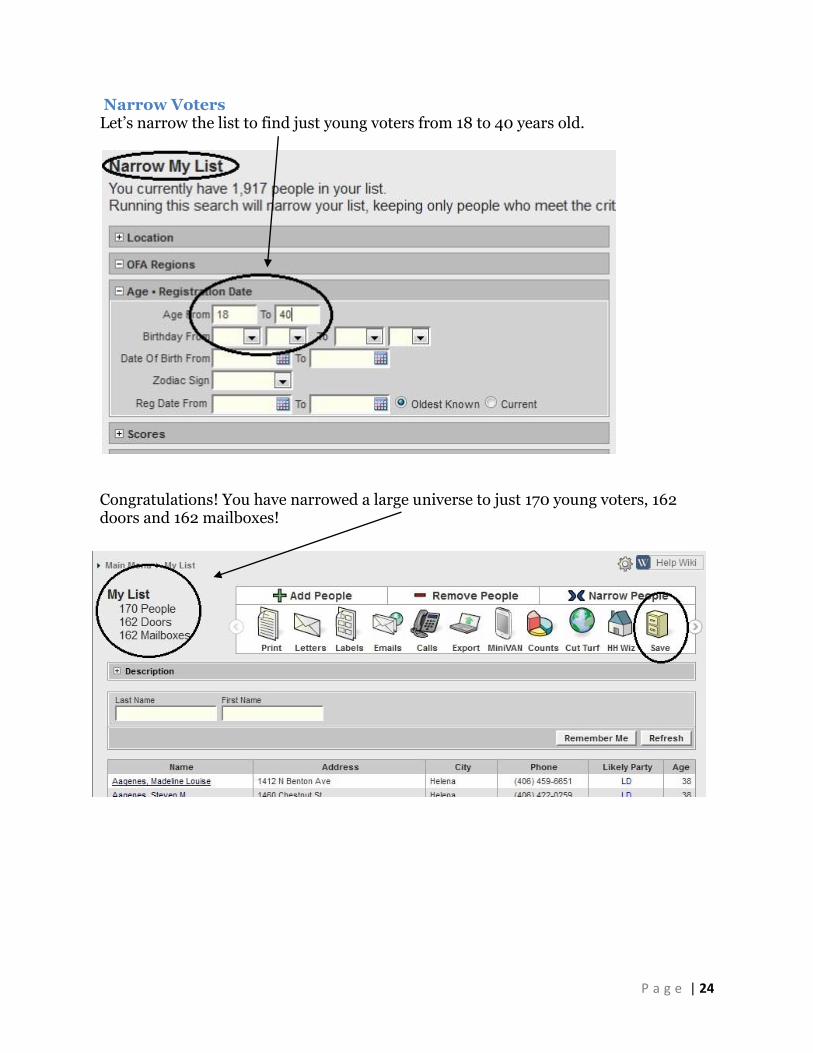
Narrow Voters Let’s narrow the list to find just young voters from 18 to 40 years old.
Congratulations! You have narrowed a large universe to just 170 young voters, 162 doors and 162 mailboxes!

P a g e | 25
Save List
Now let’s save the list for future use… The difference between saved list and Saved Search is with a Saved Search every time you look at this list in the Van it will be updated to all the search parameters and with saved list is just saves the list of voters that you came up with on one time search. Lets just save the list of Voters.

P a g e | 26
Sharing your Saved List with your Team.
First, Go to the Main Menu and select “View my Folders”
Select the correct folder…
Select “Edit folder” at the top right hand corner.
And assign your team to use that list!

P a g e | 27
Saved Searches
Users may also “save searches” (the search criteria chosen to create a list of voters). This is useful for regular searches and or very complex searches. For example, you can create a list to run to take out everyone who has sent in their absentee ballot during absentee chase. Every time you run the search it will take out the latest folks that have voted. First, select your universe
Select save
Select “Saved Search (Dynamic set of Criteria)

P a g e | 28
Create a new file folder and name
Edit your Search. You may go back and edit this search later.
This allows us to add step a missed step or improve the search without recreating the search.

P a g e | 29
Example… Let’s get rid of voters that are 18-30 years old.
Sample Feature
This gives you a quick snapshot at the universe you have selected.
The sample feature is useful to pull a random sample of a larger list. Each time you pull a sample you receive a randomized sample from your larger list.

P a g e | 30
Print Feature
The Print feature allows users to print the lists they create as calling or walking lists. Users may also create customized reports.
Pulling A Walk List
1.Select the Reports Function from your list screen.
2. Select Walking List from the 1st drop down menu. 3. Select the script that you will be canvassing from in this drop down box.
4. There are several options on how to sort your list. If you are door knocking, select the pre-sorted “Walking” on the drop down menu, or for phone banking, select “Phoning.” You may also use the drop down menu options to over-ride any sort of criteria, to get a more personalized walk route sort. For a custom list, select the appropriate settings for your project from the sort order. Ascending will sort the information in order from top to bottom, Descending will sort bottom to top, and selecting “page breaks” will start a new page each time the category changes. It is useful to insert a page break for a new street when door knocking, for example, or by precinct when preparing phone lists for precinct chairs to call within their neighborhood. Source: “Walking,” in source order, will send you down one side of the street to knock on doors, then cross the street to contact voters on that side of the street in the direction you came from initially. The end of the route will put you back at your vehicle! This is ideal for a single canvasser. NOTE: This option is only available if you cut turf using the mapping feature. (see pg 45. for details on mapping.) At any point choosing “Clear Order” will clear the pre-defined sort orders.

P a g e | 31
You can customize whether you want your report packet to include a map with dots indicating the location of voters or not. You can also choose to have a code that identifies the list you have created in case you have a loose page and aren’t sure which packet it is from, and can choose to have page numbers or extra coversheet instructions for a pair of doorknockers.
The option to “Split Report” is meant for giant reports, to break them into manageable sections. When you have selected your criteria, click “Next” You have now successfully pulled a Walk List!

P a g e | 32
You will then see a screen that tells you how your page needs to be set up. This will vary by internet browser. Sometimes Firefox and other alternatives to Internet Explorer encounter formatting difficulties when printing reports. If you have trouble, try Internet Explorer, which is the default for VoteBuilder.
Simply click “File” and “Page Set Up” to verify that your page is set up like the example page on the Voter File. Then click, “Finish”.

P a g e | 33
Pulling a Call List
This is similar to pulling a Walk List. Simply click on the “Reports” feature after you have pulled your list. 1. Select “Calling List” from the Report Type drop down menu. 2. Select the script you will be calling from. 3. Type in a title for your call list. 4. Select your sorts, either by Call Order, or your own criteria. 5. Again, you can designate households by matching phone numbers, or by Matching addresses. 6. Click “Next” 7. You will again see this screen that tells you how your page needs to be set up. Simply click “File” and “Page Set Up” to verify that your page is set up like the example page on the Voter File. 8. Then click, “Finish” You now have successfully pulled a Call List!

P a g e | 34
Labels
This feature allows users to print labels for the lists they create directly from the online system. From your list page select the labels icon.
Pick the settings you need according to the style of your mailing, and the type of labels your using, you can then sort the order of your labels in the same way as your Reports. Click, “Next.”
Like your reports, make sure the printer settings are correct, and click “Next.” You now have labels you can print.

P a g e | 35
Exporting Data
From the Main Menu, select the list you wish to export. From your list screen click on the Export Icon.
There are different ways to export, and the first page explains the options. Choose the option best for your needs, and click, “Next.”

P a g e | 36
The next page will offer different file types, and lets you select the fields you need to export. Pay special attention to the “Voting Address” field, as you can choose to divide every field of the address, including street number, street name and so forth, or to condense them into one field. Choose your preferences and click, “Finish.” The following page will give you instructions on where to find your exported file. Go to the Main Menu and click on the link that says, “My Export Files.” Some very large exports may take require you to wait.
Click on Download File.” That should allow you to save
your Excel document for future use. You have just Exported!
P a g e | 37
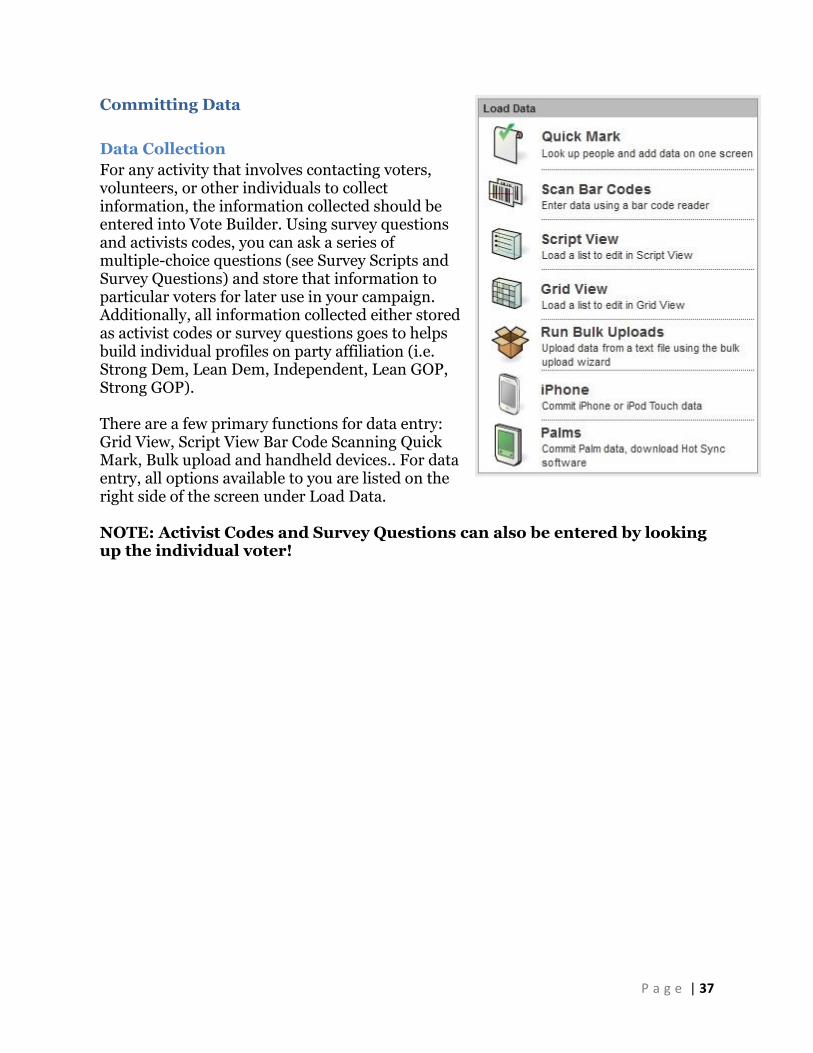
Committing Data
Data Collection
For any activity that involves contacting voters, volunteers, or other individuals to collect information, the information collected should be entered into Vote Builder. Using survey questions and activists codes, you can ask a series of multiple-choice questions (see Survey Scripts and Survey Questions) and store that information to particular voters for later use in your campaign. Additionally, all information collected either stored as activist codes or survey questions goes to helps build individual profiles on party affiliation (i.e. Strong Dem, Lean Dem, Independent, Lean GOP, Strong GOP). There are a few primary functions for data entry: Grid View, Script View Bar Code Scanning Quick Mark, Bulk upload and handheld devices.. For data entry, all options available to you are listed on the right side of the screen under Load Data. NOTE: Activist Codes and Survey Questions can also be entered by looking up the individual voter!

P a g e | 38
Grid View
Grid View Data entry is a way to enter data from canvassers and phone banks on to the VAN directly without use of a barcode scanner.
Step 1: Click on “Grid View” from the VAN main menu.
Step 2: Enter in your list number/Report, or select the current list in your queue. (all lists produced in a report format generate a list number in the bottom left corner of the printout).
Step 3: Select your script, canvasser, source and sort order (the same sort order you used when you printed your original report) and click “Next.”
Step 4: Enter in the results of the calls/knocks via the drop down menus provided. Be sure the script used during canvassing corresponds to the script questions used in the grid view entry.
Step 5: Toggle the appropriate responses and click “Save”.

P a g e | 39
Script View
Data Entry using Script View is identical to Grid View except, Script View only allows data on one individual at a time. Where Grid View and Barcode Scanning are ideal for entering information on a large number of individuals after canvassing or phoning is complete, Script View enables a user to enter data while phoning without having to print off call lists.
Step 1: Open a unique list from your “Saved Lists.”
Step 2: Click on Script View from the Main Menu or under the “More” option after opening your saved list.
Step 3: Under the “Change Settings” link adjust the script you are using, and the name of the canvasser, if necessary.
Step 4: Enter in the results of the canvass and click next.

P a g e | 40
Bar Code Data Entry
In order to do Bar Code Data Entry you will require a Bar Code Scanner that hooks up to a PC or lap top computer, usually via USB connection. Using Bar Code Data Entry is the most efficient method of uploading data into Vote Builder. Additionally, unlike Grid View or Script View you do not need to select specific saved lists for data entry, all you need is the canvass pages and a scanner.
Step 1: Click on “Scan Bar Codes” from the main menu
Step 2: Select the script, canvasser, and the source (calling or walking sheets), and entry order click Next.
Note: Entry Order determines if you scan a voter’s name first and then the canvass result second or if you will scan the canvass result first and then apply that result to all subsequent voters with the same result. If you have a large list to input it is typically fastest to first choose “Result First, then Names” and enter all “not home” and “refused” voters first then go back and using “Names First, then Results” enter your survey results for the individuals that were canvassed.
Step 3: A list of canvass responses, and the corresponding bar codes will appear. You must first print this page to uses for scanning in results. (Note: Laser jet printers print much better barcodes and will save you considerable time and difficulty having the barcode scanner read the barcode.

P a g e | 41
Step 4: After you have printed the Bar Code Report, click Finish.
Step 5: Begin scanning. If you selected “Names First, then Results” during step 2 scan the Voter’s barcode on the walk/call list. Then on the Bar Code Report scan all applicable codes listed on the walk/call list. When you are ready to move on to the next voter scan a new voter and repeat.
Step 6: Continue scanning until complete. Information is sent directly to the
VAN database.

P a g e | 42
Bulk Uploads
If you are interested in doing a bulk upload please contact Shannon Hanson to help make sure that
VAN IDs and the Secretary of State IDs line up.
Bulk uploads can be helpful with uploading information from paid phone calls. It is a process that is
only really worth looking into if you have data set of 1000+ pieces of information.
Handheld Devices Including iPhones/iPod Touches and Palm Pilots
Please Contact Shannon Hanson for assistance in setting this feature up.
This allows a canvasser to input information about a voter while canvassing.

P a g e | 43
Use a Map to Cut Turf
The “Cut Turf” feature in the VoteBuilder allows the user to divide a list up into groups of voters in a geographic area that make sense to door knock. This tool can also be used for other functions, such as lawn sign placement. This process breaks down into a few steps. Step 1:Create a list Step 2:Click on “Cut Turf” to view your map Step 3:Divide your voters into groups that make sense to walk Step 4:When you are finished cutting turf, save your mapping region and lists Step 5:Go to “View My Folders” to find your folder with mapping region and lists Sounds simple, right? Now for the nitty gritty…
Step 1: Create a List
Create a list of voters or other activists that you wish to canvass. The list must be less than 2000 people total, and for the sake of simplicity, it may be easier to limit your list to 1000 or one precinct at a time. Helpful Hint: When you are creating your list, be sure to narrow your list to “walkable voters only”. These are the addresses that are actually geo-coded to appear on the map.
Step 2: Click on “Cut Turf” to view your map
Once you have the list you want and you are looking at the My List page, click on the “Cut Turf” button near the top of the page. This will produce a map, like the one below. This is a Google map, and the dots you see represent the voters in that area.

P a g e | 44
Using the Map This map is produced by Google, and the tools used to navigate are similar to the ones you will see on maps on the Google website. The arrows on the left hand side of the map will help you to adjust the image to the left, right, up or down by clicking on one of the directional arrows. Adjust your map so that your cluster of voters is near the center of the map. To zoom in, click on the plus sign (+); to zoom out, use the minus (-) button. In the upper right hand corner of the map, there is a legend to help you keep track of assigned and unassigned voters. As you assign voters to a particular group or “walk” the number of unassigned doors will drop. Several more tools are located on the left side of the screen. The first set includes 3 choices:
1. Browse Map: Choose this tool if you want to click on the map and move it around on your screen instead of using the Google tools. 2. Draw Turf: This is the tool that you will use to select groups of voters. 3. Select Individuals: Click on an individual dot to select specific voters to add to your walk list.
The second set, Show Counts By, affects the numbers displayed in the legend. 1. Doors: The legend will show the number of doors or houses that you have selected.

P a g e | 45
2. Voters: The legend will show the number of voters that you have selected. 3. Both: The legend will show both numbers of doors and voters in a (10/22) format. The first number indicates doors.
The other tools will be used to cut the turf and save your walk lists.
Step 3:Divide your voters into groups that make sense to walk
Make sure that the Draw Turf box is checked on the left hand side of the screen. Turf cutting works by using line segments to connect the dots around a group of voters to select them. Begin by moving your mouse to where you would like to begin drawing, and then click to create your first marker. Click again to
create your second marker and your line. Continue to draw a line around the voters and when you have included all that you want in the first walk, click on the first marker to close the box or shape. The voters will turn a different color and they will be counted as selected in the legend.

P a g e | 46
To save this group of voters, pull down the menu on the left hand side of the screen, select “Turf 1” and click the Save button. If you wish to add more voters, simply select them and save them as “Turf 1” as well. Turf 1 will be assigned a color. Select another group of un-colored voters for your second walk group. Save these as “Turf 2”; they will also be assigned a unique color. Continue this way cutting Turf 3-4-5, and so on until all the voters are selected. When you are finished, click on the button near the bottom left of the screen that says Finish.
Step 4: When you are finished cutting turf, save your mapping region and
lists
After you click “Finish”, you will be directed to “Save My Map Region” page. From here you can save your turf in either a new folder, or an existing folder. Name the folder, and then name the Mapping Region. This is the neighborhood, precinct or region where you were cutting turf. You may also further describe the area if you wish.

P a g e | 47
Click Save. This will bring you back to your original My List page.
Step 5: Go to “View My Folders” to find your folder with mapping region
and lists
Return to the Main Menu, and click “View My Folders”. Click on the folder where you saved your Mapping Region. The folder will contain the map you have been working with and each of the walks you cut, identified as Turf 1, Turf 2, and so on. Load each turf to My List to print your walk lists or other reports.