the operating procedures of ap connect to cloud ac · * nft 2ac firmware version...
TRANSCRIPT
Copyright © 2018 LigoWave
The Operating Procedures of
AP Connect to Cloud AC

Copyright © 2018 LigoWave
Process Overview
• Step1 Look Over the Device label
• Step2 Connect to POE Power
• Step3 Computer Connect to AP
• Step4 Login AP’s IP Address
• Step5 Confirm the Firmware Version
• Step6 Set Up AP’s AC IP and Org ID
• Step7 Login Cloud AC
• Step8 Audit AP Authorization
• Step9 Set Up SSID
• Step10 Set Up Wireless
• Step11 Delivery Configuration
• Step12 Set Up Portal Template
• Step13 Switch to Billing System
• Step14 Set Up Data Plan
• Step15 Set Up Account
• Step16 Test Portal and Login
Copyright © 2018 LigoWave
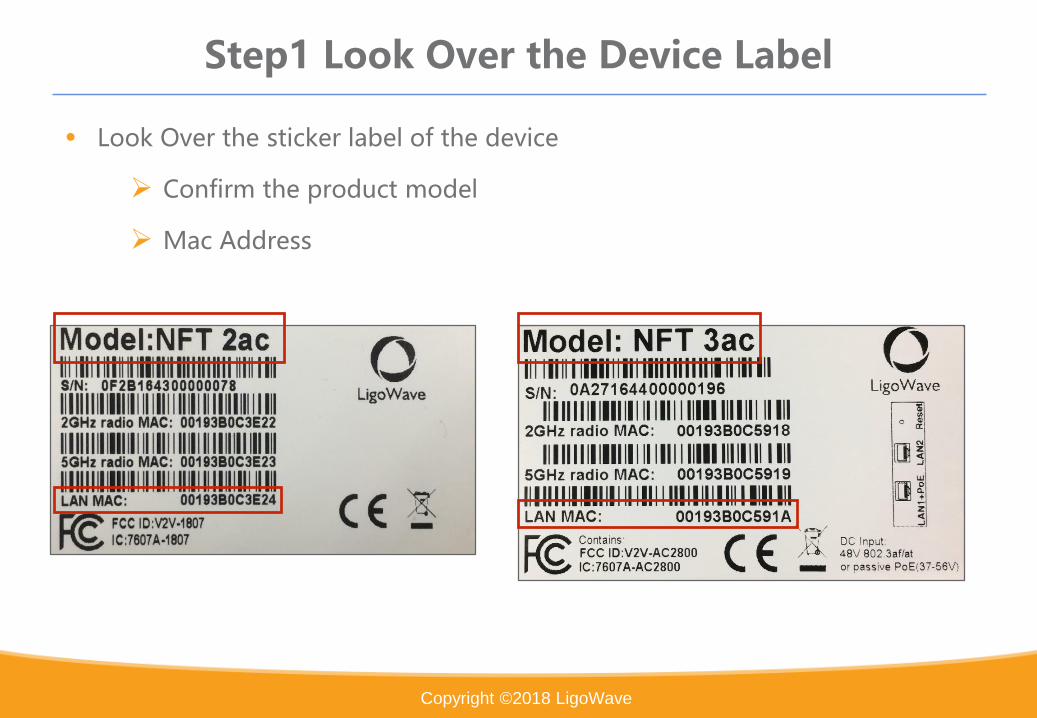
• Look Over the sticker label of the device
Confirm the product model
Mac Address
Step1 Look Over the Device Label
Copyright © 2018 LigoWave
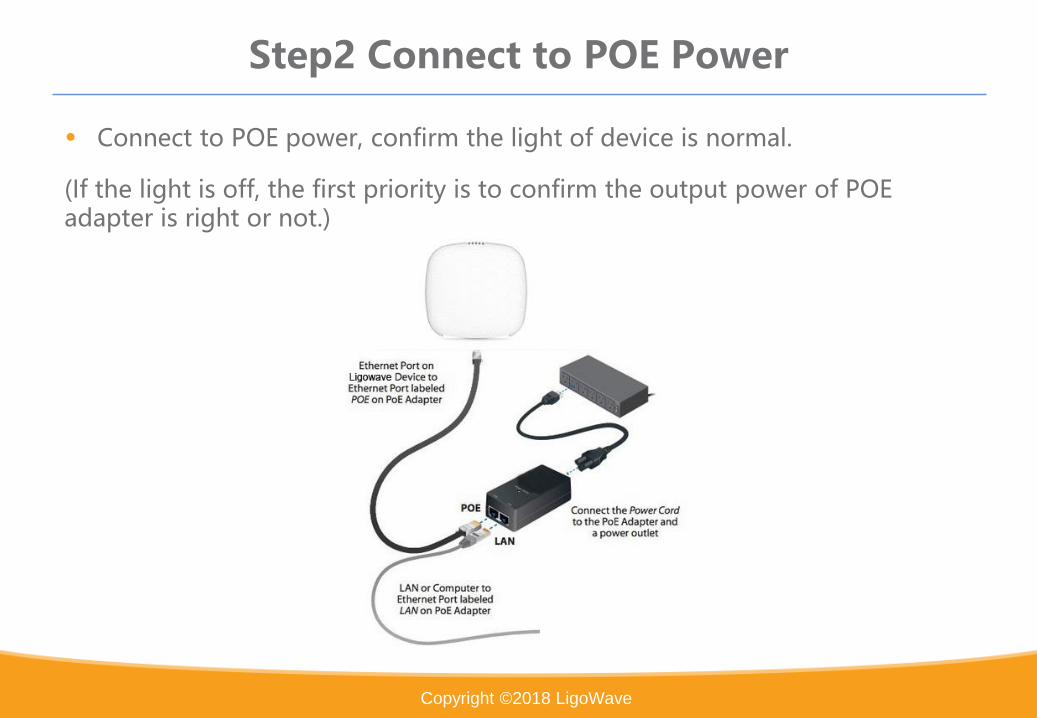
• Connect to POE power, confirm the light of device is normal.
(If the light is off, the first priority is to confirm the output power of POE adapter is right or not.)
Step2 Connect to POE Power

Copyright © 2018 LigoWave
• Utilize a network cable to connect with the both sides of laptop/ computer and the LAN port of AP POE adapter..(As shown on the right)
• Modify the laptop/ computer's Internet Protocol (TCP / IPv4) content.
• In case the laptop has been set to DHCP mode, then got to switch to the fixed IP mode. The relevant settings are as follows:
- IP Address : 192.168.2.100- Subnet mask : 255.255.255.0- Gateway : 192.168.2.254
Step3 Computer Connect to AP
Copyright © 2018 LigoWave
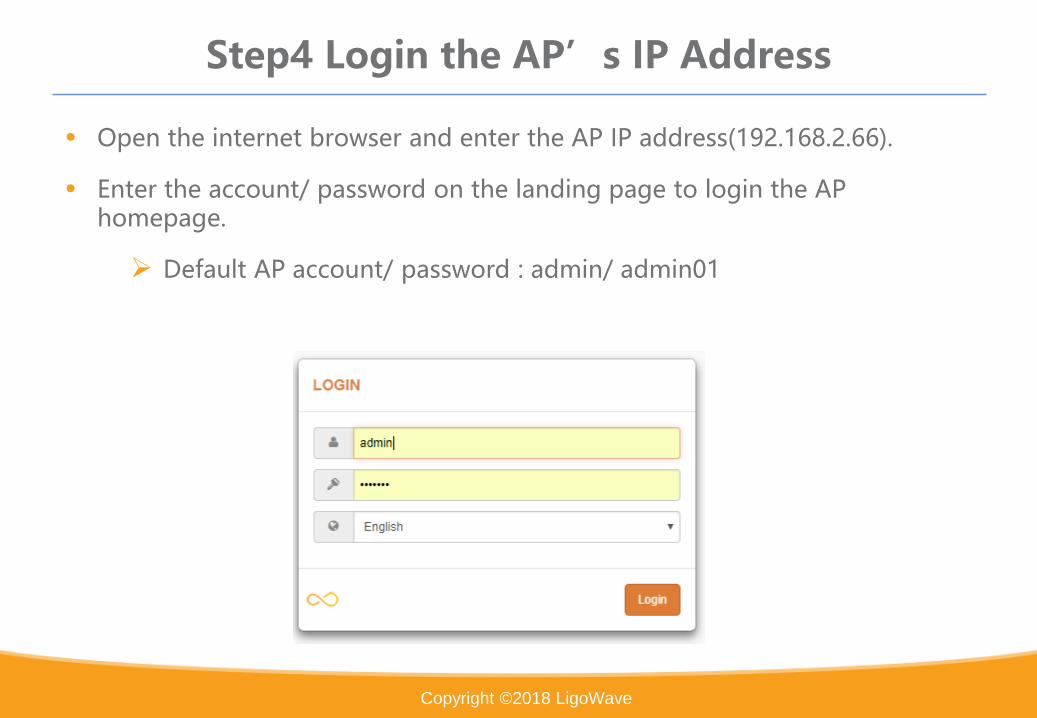
• Open the internet browser and enter the AP IP address(192.168.2.66).
• Enter the account/ password on the landing page to login the AP homepage.
Default AP account/ password : admin/ admin01
Step4 Login the AP’s IP Address
Copyright © 2018 LigoWave
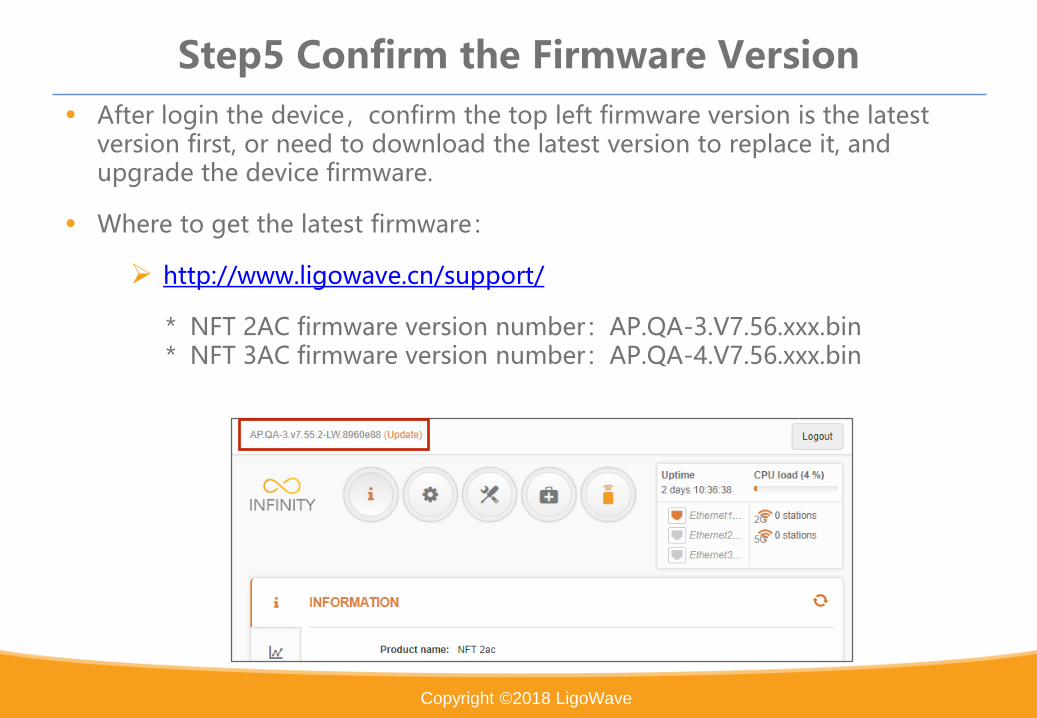
• After login the device,confirm the top left firmware version is the latest version first, or need to download the latest version to replace it, and upgrade the device firmware.
• Where to get the latest firmware:
http://www.ligowave.cn/support/
* NFT 2AC firmware version number:AP.QA-3.V7.56.xxx.bin* NFT 3AC firmware version number:AP.QA-4.V7.56.xxx.bin
Step5 Confirm the Firmware Version
Copyright © 2018 LigoWave
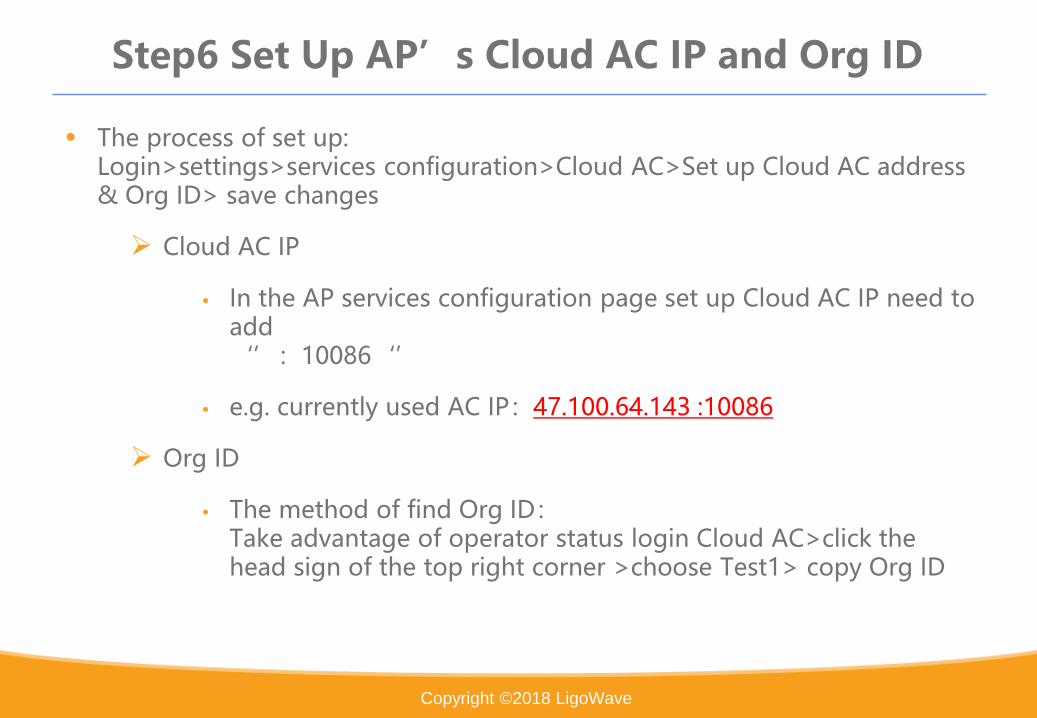
• The process of set up:Login>settings>services configuration>Cloud AC>Set up Cloud AC address & Org ID> save changes
Cloud AC IP
• In the AP services configuration page set up Cloud AC IP need to add ‘’:10086‘’
• e.g. currently used AC IP:47.100.64.143 :10086
Org ID
• The method of find Org ID:Take advantage of operator status login Cloud AC>click the head sign of the top right corner >choose Test1> copy Org ID
Step6 Set Up AP’s Cloud AC IP and Org ID

Copyright © 2018 LigoWave
1.
2.
3. 4.
5.
6.
Copyright © 2018 LigoWave
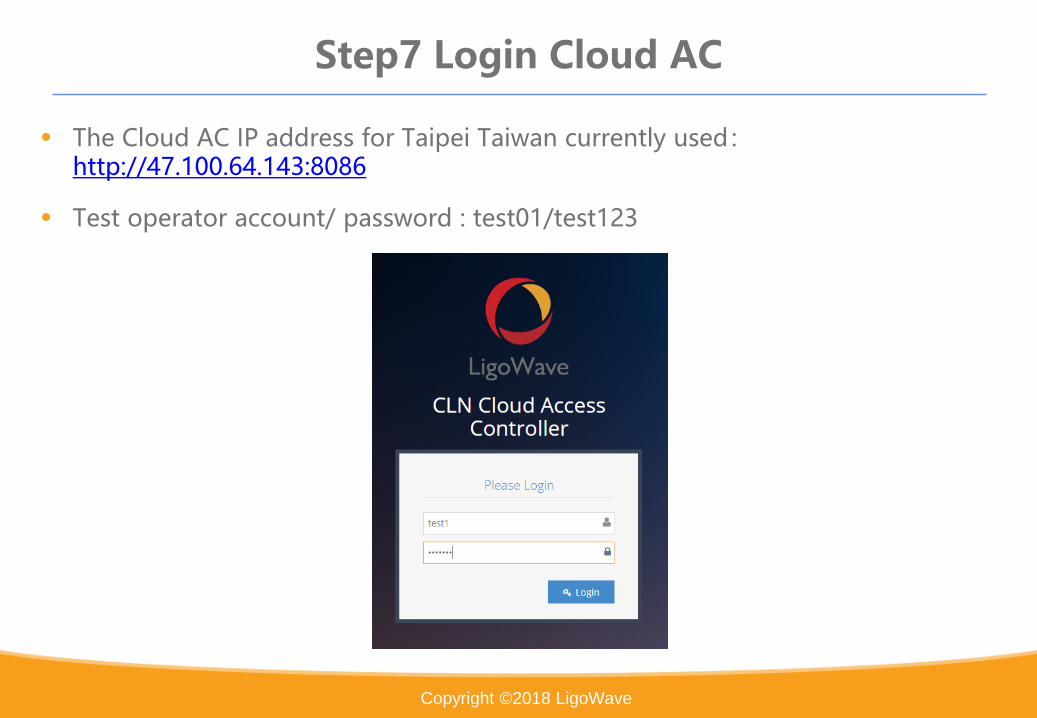
• The Cloud AC IP address for Taipei Taiwan currently used:http://47.100.64.143:8086
• Test operator account/ password : test01/test123
Step7 Login Cloud AC
Copyright © 2018 LigoWave
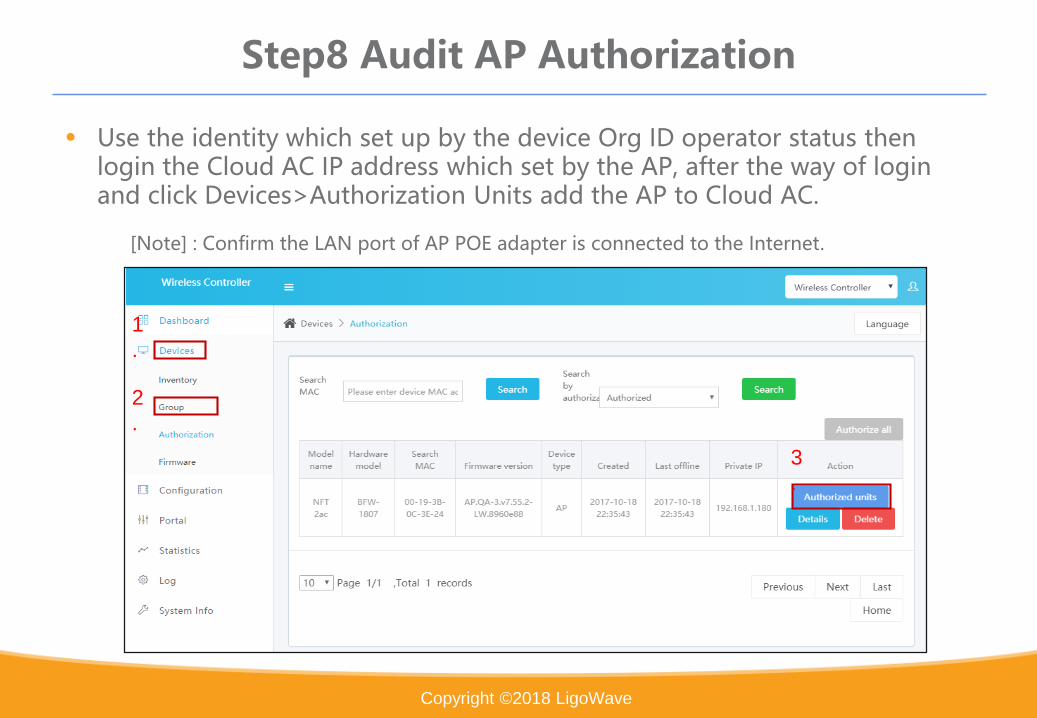
• Use the identity which set up by the device Org ID operator status then login the Cloud AC IP address which set by the AP, after the way of login and click Devices>Authorization Units add the AP to Cloud AC.
[Note] : Confirm the LAN port of AP POE adapter is connected to the Internet.
Step8 Audit AP Authorization
2
.
1
.
3
.
Copyright © 2018 LigoWave
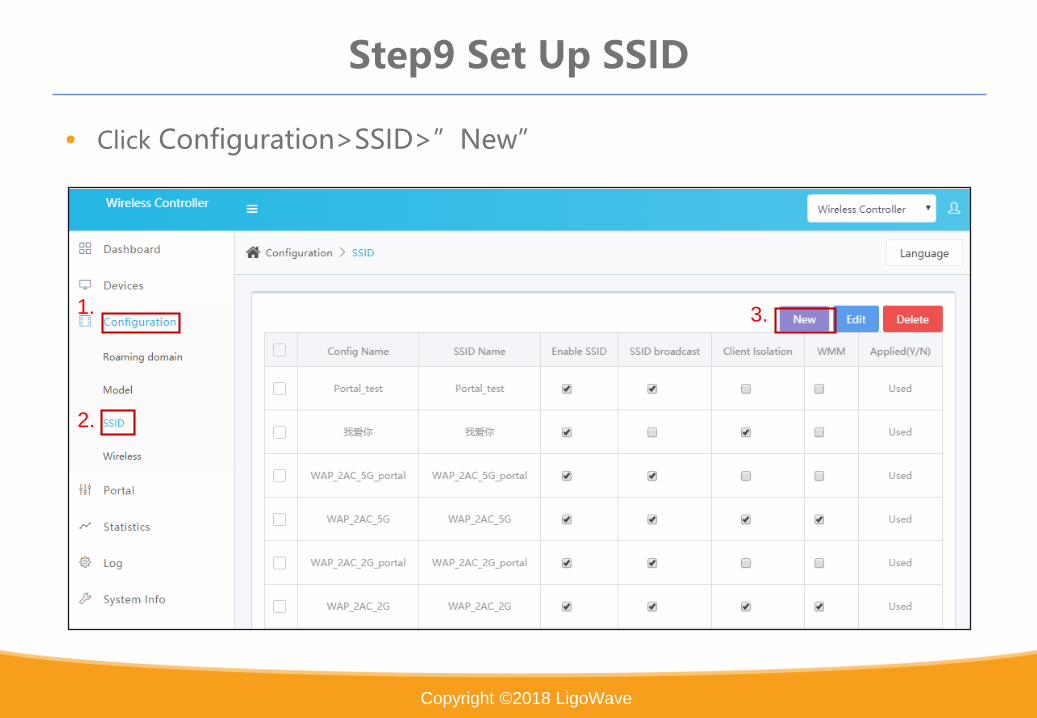
• Click Configuration>SSID>”New”
Step9 Set Up SSID
1.
2.
3.

Copyright © 2018 LigoWave
• If there is a need to let SSID use Portal function, the way must to open “Portaland Radius” switch to accomplish the goal.

Copyright © 2018 LigoWave
• After turn on the switch of Portal, need to take note the following fields:
1. PORTAL:Click on the drop-down menu, and choose the portal host which has already been set up.
2. Redirect URL:The filed need to enter the host’s URL address and add ”:8088”。E.g.: http://106.15.60.12:8088
3. Portal IP Type:The field can specified Portal’s IP is real IP or virtual IP。
1.
2.
3.

Copyright © 2018 LigoWave
• After turn on the switch Radius, need to take note the following fields:
1. RADIUS : Click on the drop-down menu, and choose the Radius host which has already been set up.
2. Roaming domain configuration:choose to open the function of ‘’Roaming domain’’.
3. Roaming domain:Choose the roaming domain which has been established.
(Will appear the options when turn on “roaming domain”function)
1.
2.
3.

Copyright © 2018 LigoWave
• Click Configuration>Wireless>”New”
Step10 Set Up Wireless
1.
2.
3.

Copyright © 2018 LigoWave
• The way while set up Wireless, there are some fields need to pay attention:
1. Model field must be correctly.
2. Pay attention to the setting of each page, e.g.:2.4G、5.8G、Planning Tasks.
3. WLAN field specified SSID.
1.
2.
3.

Copyright © 2018 LigoWave
• Click Devices>Inventory>choose AP>”Edit”
Step11 Delivery Configuration
1.
2.
4.
3.
Copyright © 2018 LigoWave
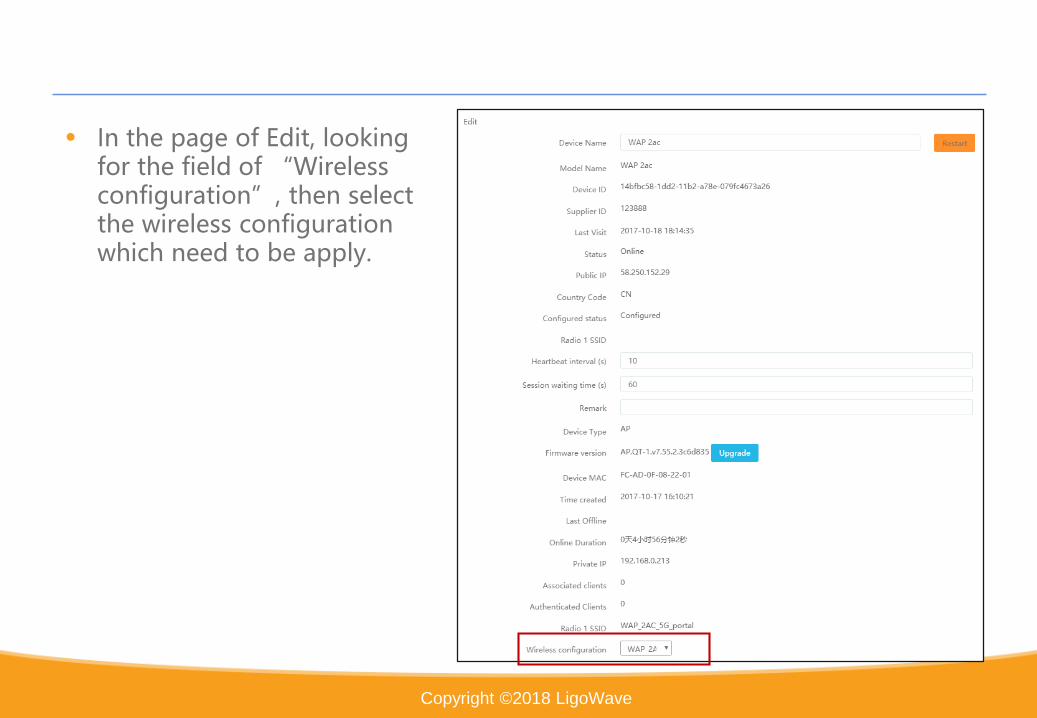
• In the page of Edit, looking for the field of “Wireless configuration”, then select the wireless configuration which need to be apply.
Copyright © 2018 LigoWave
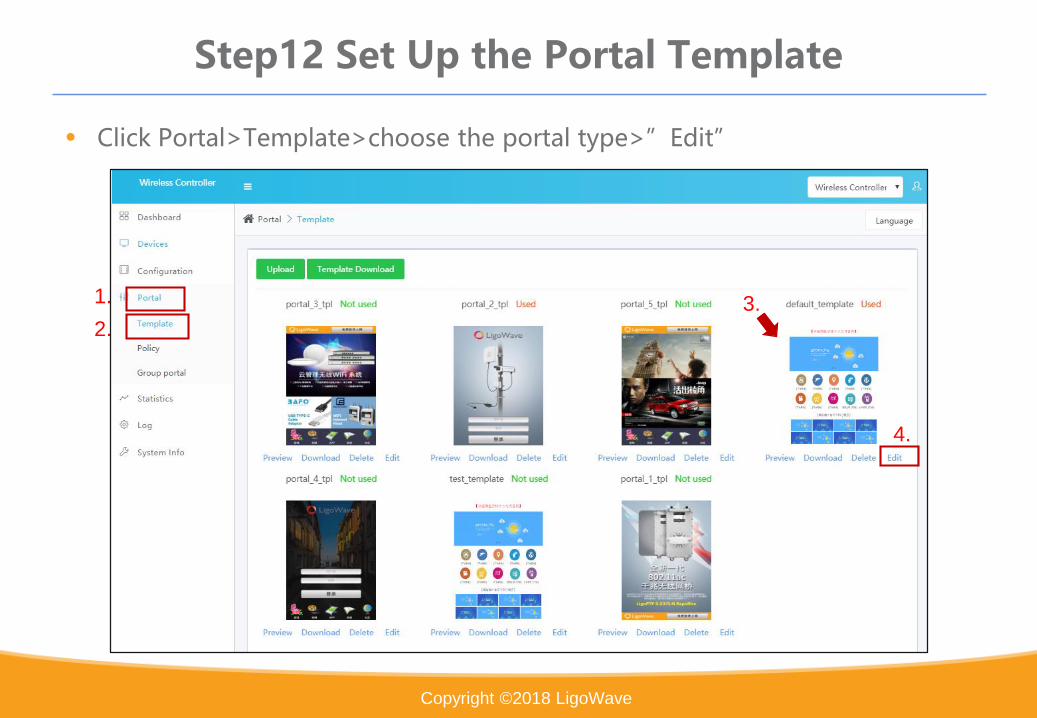
• Click Portal>Template>choose the portal type>”Edit”
Step12 Set Up the Portal Template
1.
2.
4.
3.
Copyright © 2018 LigoWave
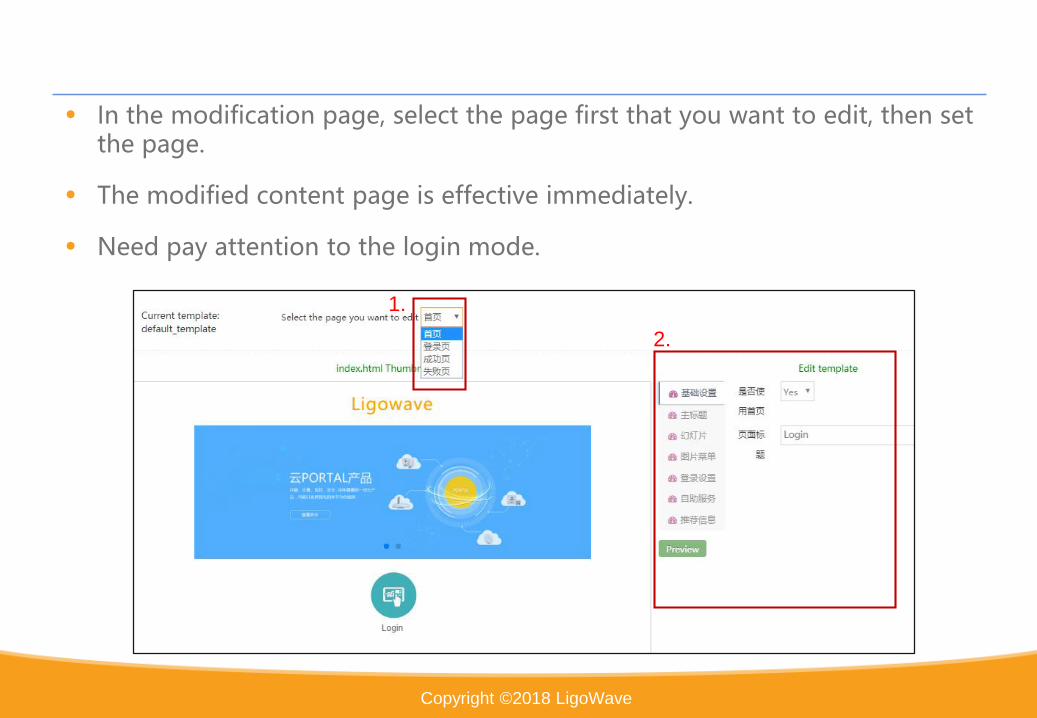
• In the modification page, select the page first that you want to edit, then set the page.
• The modified content page is effective immediately.
• Need pay attention to the login mode.
2.
1.
Copyright © 2018 LigoWave
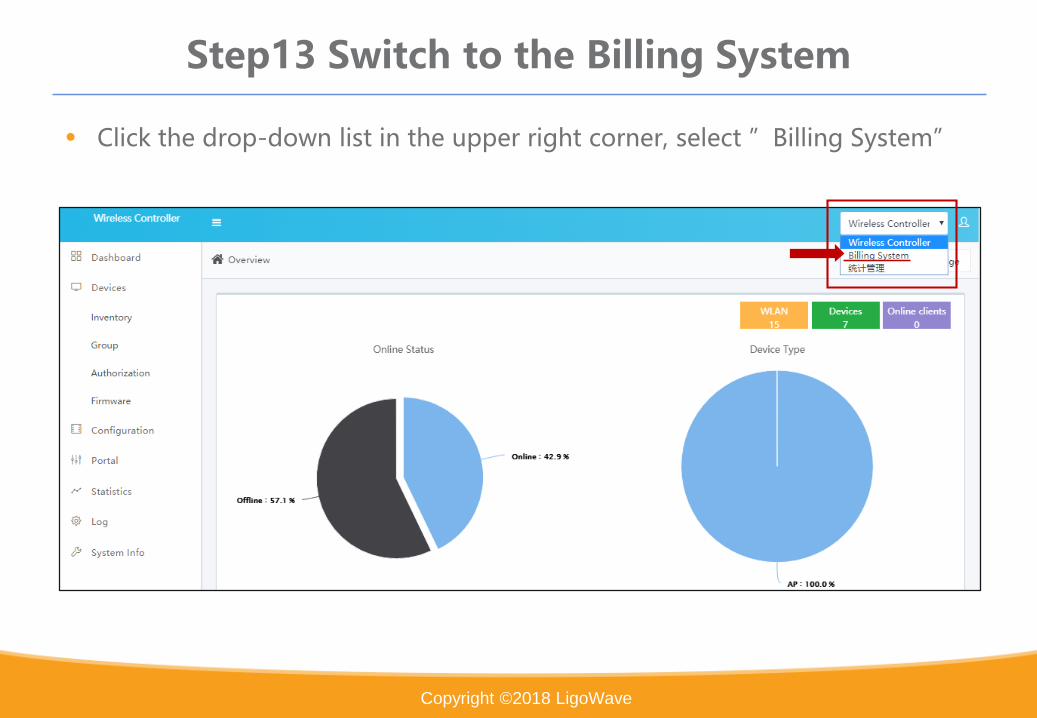
• Click the drop-down list in the upper right corner, select ”Billing System”
Step13 Switch to the Billing System
Copyright © 2018 LigoWave
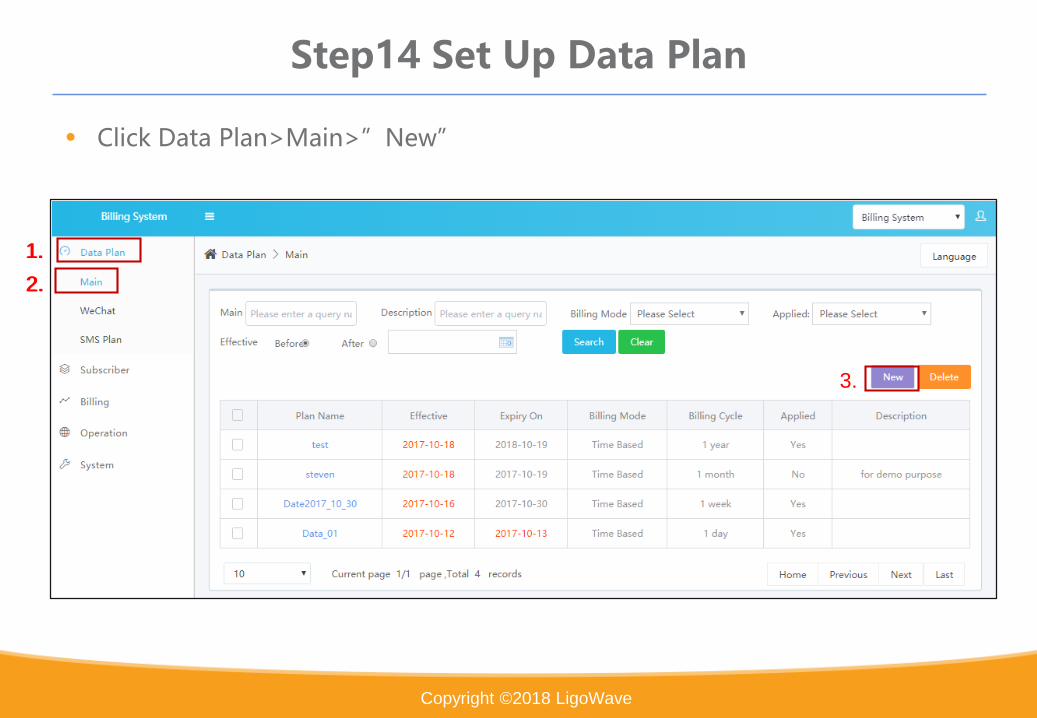
• Click Data Plan>Main>”New”
Step14 Set Up Data Plan
1.
2.
3.
1.
2.
3.
Copyright © 2018 LigoWave
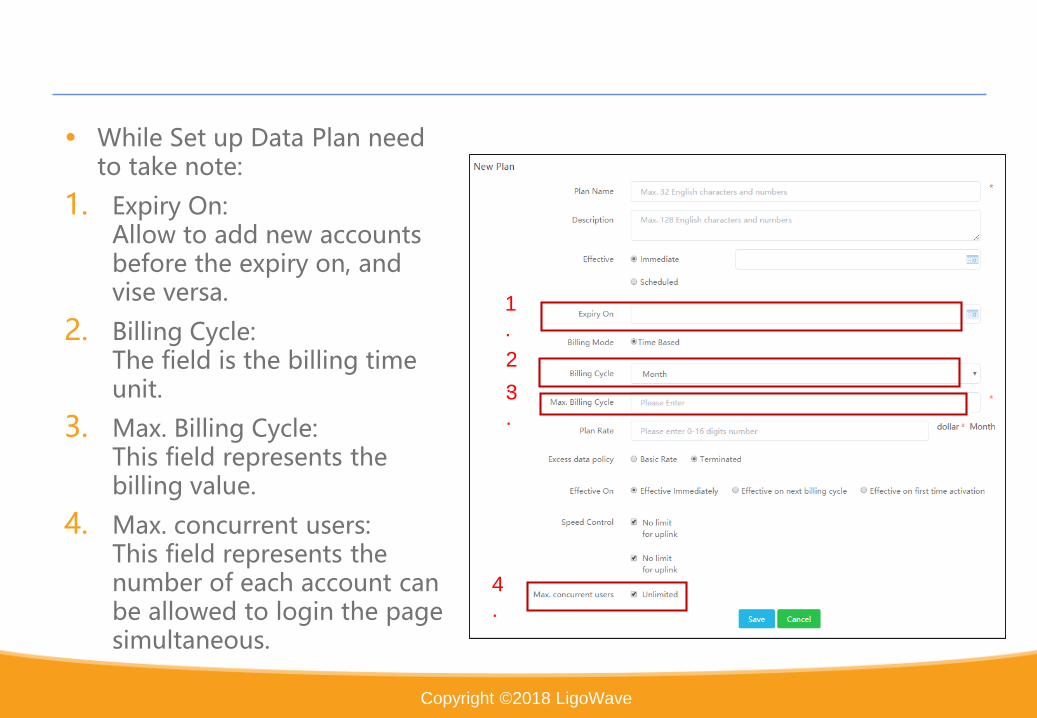
• While Set up Data Plan need to take note:
1. Expiry On:Allow to add new accounts before the expiry on, and vise versa.
2. Billing Cycle:The field is the billing time unit.
3. Max. Billing Cycle:This field represents the billing value.
4. Max. concurrent users:This field represents the number of each account can be allowed to login the page simultaneous.
1
.
2
.3
.
4
.

Copyright © 2018 LigoWave
• Click Subscriber>Manager>”New”
Step15 Set Up Account
1.
2.
3.

Copyright © 2018 LigoWave
• While set up the accountneed to take note:
1. Plan Name:Select the data plan.
2. Plan Rate:The amount of the data plan.
3. Top Up Amount:Pre-stored the amount of the money for the account.
4. As long as the data plan expired, the account will become “terminated status”, the account can be able to renew or repurchase new data plan.
1.
2.
3.

Copyright © 2018 LigoWave
• The process of test portal:
1. Utilize the client, e.g. cell phone, laptop, tablet. Connect to the SSID which have the Portal
2. Utilize the account established over Billing System to login the Radius System.
3. Confirm the terminal devices/ end user devices are able to access the internet.
Step16 Test Portal and Login

Copyright © 2018 LigoWave
Thanks