the scream: interactive screaming painting · when edvard munch painted his most famous painting,...
TRANSCRIPT

The Scream: Interactive Screaming PaintingCreated by John Park
Last updated on 2018-08-22 04:10:47 PM UTC

2334
57
101416172021
232323232525252626
28
Guide Contents
Guide ContentsOverview
Parts & MaterialsOptional
Build the Interactive PaintingCreate the Moving HeadPrepare the BackgroundMount the ServoMount and Frame BackingMount and Wire the CrickitAdd Frame StandoffsWood Blocks
Code with CircuitPythonCircuitPython SetupPlaying AudioCodeHelper ProceeduresMicrophoneServo SetupAudio Wave File PlaybackMain Loop
Scream at The Scream
© Adafruit Industries https://learn.adafruit.com/the-scream-munch-screaming-interactive-scream-painting Page 2 of 28

OverviewWhen Edvard Munch painted his most famous painting, The Scream, in 1893 he perfectly captured the existential angstof modern humanity. He did not, however, have access to a microcontroller board with built-in sound sensingconnected to a servo motor and speaker, so he failed to make his masterpiece interactive.
Today, we’ll change all of that! By using the Crickit with Circuit Playground Express, and a bit of code in CircuitPython,we can make The Scream scream back at you when you scream at it!
Parts & Materials
1 x Adafruit CRICKITfor Circuit Playground Express
© Adafruit Industries https://learn.adafruit.com/the-scream-munch-screaming-interactive-scream-painting Page 3 of 28

OUT OF STOCK
1 x Circuit Playground ExpressRound, Awesome Microcontroller Board
ADD TO CART
1 x Micro Servo180 degree rotation servo
ADD TO CART
1 x Mini Metal Speaker w/ Wires8 ohm 0.5W
ADD TO CART
1 x 3 x AA Battery Holderwith 2.1mm Plug
ADD TO CART
1 x Alkaline AA batteries3 pack
ADD TO CART
Optional
1 x 5V 2A switching power supplyUL listed
ADD TO CART
In addition to the parts above, you’ll need:
Two copies of the painting printed on a color printerCorrugated cardboardCardstockChipboard (thin cardboard)Frame and mat with cardboard backingScrap wood for standoffsGlue stick for paperHigh temp hot melt glue and glue gun, or wood glue and clampsFrame hanging hooks and hardwareHobby knifeStraight edge
© Adafruit Industries https://learn.adafruit.com/the-scream-munch-screaming-interactive-scream-painting Page 4 of 28

Build the Interactive Painting
© Adafruit Industries https://learn.adafruit.com/the-scream-munch-screaming-interactive-scream-painting Page 5 of 28

Let's build the interactive painting! First, download the image below and print two copies of it on a color printer.
© Adafruit Industries https://learn.adafruit.com/the-scream-munch-screaming-interactive-scream-painting Page 6 of 28

Create the Moving Head
Use a hobby knife or scissors to cut out the head
from one of the prints
To strengthen the head, we'll glue it to a piece of
cardstock. Trace the head onto a piece of
cardstock and cut it out
Glue the head to the cardstock
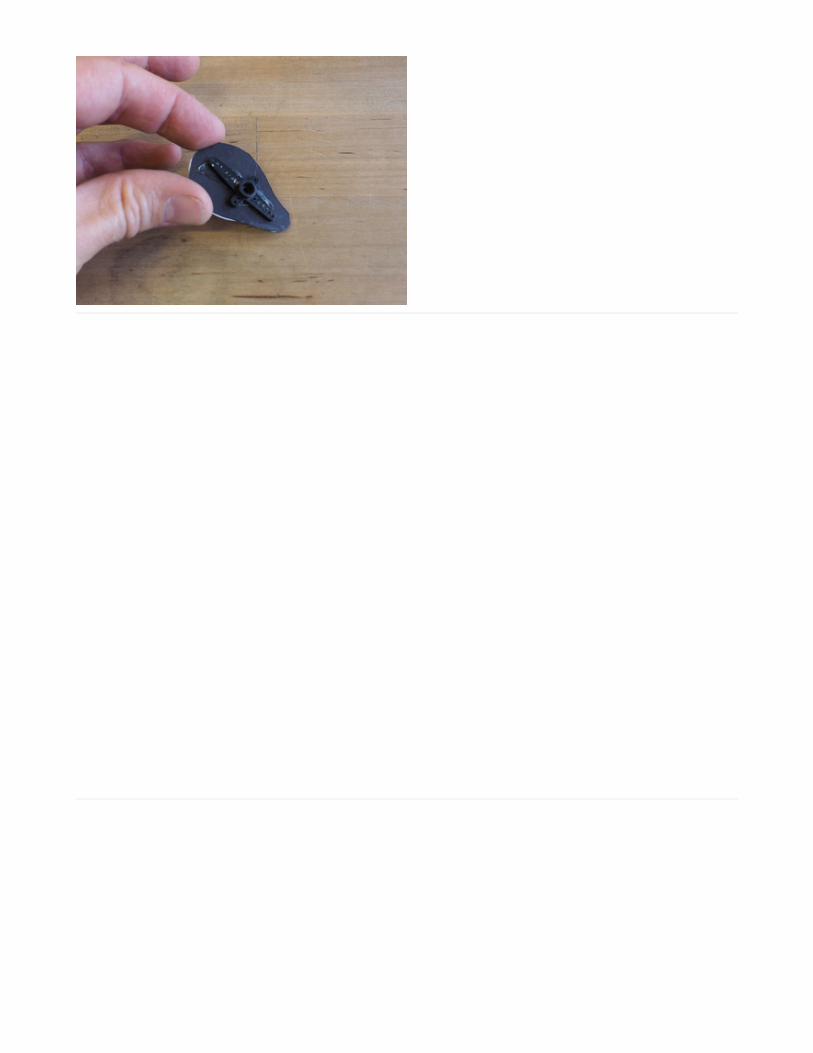
Use hot melt glue to attach a servo horn to the
back of the head
© Adafruit Industries https://learn.adafruit.com/the-scream-munch-screaming-interactive-scream-painting Page 7 of 28

© Adafruit Industries https://learn.adafruit.com/the-scream-munch-screaming-interactive-scream-painting Page 8 of 28

© Adafruit Industries https://learn.adafruit.com/the-scream-munch-screaming-interactive-scream-painting Page 9 of 28
Prepare the Background
The second print will be the background of our interactive painting. Let's prep it for use.
Measure and mark the print's dimensions onto a
piece of thin cardboard, a.k.a. chipboard, using a
straight edge and pencil
Cut out the cardboard with a hobby knife and
straight edge or scissors
Use a glue stick to adhere the backside of the
print to the chipboard
Smooth out the print to avoid any bubbles
© Adafruit Industries https://learn.adafruit.com/the-scream-munch-screaming-interactive-scream-painting Page 10 of 28

Center the print on the cardboard backing that
came with the frame, then affix it with a strip of
tape at the top (the mat will hide this)
Center the head and servo horn over the
background head, then press down a bit to make
an impression -- you'll use this mark as a guide for
cutting out a hole to allow the horn to fit. The
servo will be on the other side of the cardboard
Cut out the hole using a hobby knife or awl so that
the collar of the servo horn fits in place. Make sure
the hole goes all the way through so we can
connect the servo on the other side
© Adafruit Industries https://learn.adafruit.com/the-scream-munch-screaming-interactive-scream-painting Page 11 of 28

© Adafruit Industries https://learn.adafruit.com/the-scream-munch-screaming-interactive-scream-painting Page 12 of 28

© Adafruit Industries https://learn.adafruit.com/the-scream-munch-screaming-interactive-scream-painting Page 13 of 28

Mount the Servo
Now, we'll attach the servo to the cardboard frame backing.
© Adafruit Industries https://learn.adafruit.com/the-scream-munch-screaming-interactive-scream-painting Page 14 of 28

Increase the size of the hole a bit so the servo's
keyed circular portion fits. The flat housing will lie
flush with the cardboard
Put the servo in place
Use hot glue to secure the servo
© Adafruit Industries https://learn.adafruit.com/the-scream-munch-screaming-interactive-scream-painting Page 15 of 28

Mount and Frame Backing
Now that the servo is mounted to the frame backing, with the print on the front, we can place it all inside the frame. Laythe mat into the frame, and then place the cardboard.
You can then fold down the metal tabs and get ready to mount the rest of the hardware.
© Adafruit Industries https://learn.adafruit.com/the-scream-munch-screaming-interactive-scream-painting Page 16 of 28

Mount and Wire the Crickit
© Adafruit Industries https://learn.adafruit.com/the-scream-munch-screaming-interactive-scream-painting Page 17 of 28

Use four nylon M2.5 standoffs to mount the
Crickit. You can attach four of them to the Crickit's
mounting holes with four nylon M2.5 screws to get
the position right, then glue them in place with hot
glue
You can leave the Crickit attached -- it is shown
here detached so you can see the mounted
standoffs
© Adafruit Industries https://learn.adafruit.com/the-scream-munch-screaming-interactive-scream-painting Page 18 of 28

For the remaining parts:
Use hot glue to affix the battery pack in place next to the Crickit so it can plug into the power jackConnect the two speaker wires to the Crickit's speaker port and screw them in place, then tape the speaker tothe cardboard as shown. This provides good resonance for the sound and it will be plenty loud!Plug the micro servo into the Crickit's Servo 1 port with the yellow signal wire nearest the outside edge of theboard
© Adafruit Industries https://learn.adafruit.com/the-scream-munch-screaming-interactive-scream-painting Page 19 of 28

The circuit is complete!
Add Frame Standoffs
You'll notice that the parts on the back of our painting will prevent the frame from hanging normally. So, we'll attachsome scrap wood to push the frame out away from the wall a bit and provide clearance.
© Adafruit Industries https://learn.adafruit.com/the-scream-munch-screaming-interactive-scream-painting Page 20 of 28

Wood Blocks
I used a couple of piece of scrap 1/2" thick plywood
roughly 1-1/2" x 6". The 1-1/2" height is enough to allow
all of the parts to clear the wall when hung
I glued them in place with high temperature hot melt
glue, which works well -- an even stronger method
would be to use wood glue and clamps.
I also added a small block of wood for extra support at
the top as I used the top piece for hanging.
© Adafruit Industries https://learn.adafruit.com/the-scream-munch-screaming-interactive-scream-painting Page 21 of 28

While the glue cures, let's program the Circuit Playground Express using CircuitPython!
© Adafruit Industries https://learn.adafruit.com/the-scream-munch-screaming-interactive-scream-painting Page 22 of 28

Code with CircuitPythonThe key to the painting's interactivity will be sound sensing. When you scream, the microphone built into the CircuitPlayground Express will detect it and then instruct a wave file we load on the board to play over the amp and speaker,as well as run the servo back and forth.
CircuitPython Setup
To get started, you'll want to set up the CPX for use with CircuitPython by following this guide (https://adafru.it/AFI).When you're ready, and can upload code to the board return here.
To use the Crickit with the CPX, follow the steps listed here (https://adafru.it/Bfh) to install the special build ofCircuitPython, as well as the latest library bundle.
Adafruit really likes using the Mu editor to edit the CircuitPython code. See this guide on loading and usingMu (https://adafru.it/ANO).
Playing Audio
The Circuit Playground Express plays back .wav files. If you would like to prepare your own files, follow the instructionsin this guide (https://adafru.it/BFI). Download the following files and then uncompress the .zip file. Copy the .wav files toyour CPX, which shows up as CPLAYBOOT on your computer.
https://adafru.it/BY8
https://adafru.it/BY8
Code
You can copy the code here and then paste it into Mu. Save it to your Circuit Playground Express as code.py
import timeimport mathimport arrayimport audiobusioimport audioioimport boardfrom adafruit_crickit import crickit
# Number of samples to read at once.NUM_SAMPLES = 160
# Remove DC bias before computing RMS.def normalized_rms(values): minbuf = int(mean(values)) samples_sum = sum( float(sample - minbuf) * (sample - minbuf) for sample in values )
return math.sqrt(samples_sum / len(values))
def mean(values): return sum(values) / len(values)
© Adafruit Industries https://learn.adafruit.com/the-scream-munch-screaming-interactive-scream-painting Page 23 of 28

Here's how the code works. First, we'll import some libraries that add capabilities to our CircuitPython code.
Then, we'll create a variable NUM_SAMPLES to represent the number of samples we'll use when testing themicrophone for loud sounds.
mic = audiobusio.PDMIn(board.MICROPHONE_CLOCK, board.MICROPHONE_DATA, sample_rate=16000, bit_depth=16)
# Record an initial sample to calibrate. Assume it's quiet when we start.samples = array.array('H', [0] * NUM_SAMPLES)mic.record(samples, len(samples))
head_servo = crickit.servo_1head_servo.set_pulse_width_range(min_pulse=500, max_pulse=2500)head_servo.angle = 90 # center the head.
# Set audio out on speaker.a = audioio.AudioOut(board.A0)
# Start playing the file (in the background).def play_file(wavfile): print("Playing scream!") with open(wavfile, "rb") as f: wav = audioio.WaveFile(f) a.play(wav) while a.playing: head_servo.angle = 60 time.sleep(.01) head_servo.angle = 120 time.sleep(.01)
while True: mic.record(samples, len(samples)) magnitude = normalized_rms(samples) print(((magnitude),)) # formatting is for the Mu plotter.
if magnitude < 1000: # it's quiet, do nothing. pass else: print("LOUD") head_servo.angle = 60 time.sleep(.05) head_servo.angle = 120 time.sleep(.05) head_servo.angle = 90 time.sleep(.02) play_file("scream_low.wav") head_servo.angle = 90 time.sleep(2)
© Adafruit Industries https://learn.adafruit.com/the-scream-munch-screaming-interactive-scream-painting Page 24 of 28

Helper Proceedures
Next, we define a procedure named normalized_rms that will be used for removing DC bias from our mic readingsbefore computing the root mean square (a type of average).
The mean procedure is also defined -- this is used to calculate the mean of our sampled values.
Microphone
Now we'll set up the microphone object to use the Circuit Playground Express's microphone at a sample rate of 16,000and a bit depth of 16.
And, we'll immediately take a sample of the room's ambient sound to provide a baseline.
Servo Setup
Here we'll instantiate a servo object named head_servo on the Crickit's Servo 1 port with pulse width ranging from 500to 2500 microseconds. We'll then set the servo to its center position of 90° (the servo rotational range is from 0° to180°).
import timeimport mathimport arrayimport audiobusioimport audioioimport boardfrom adafruit_crickit import crickit
# Number of samples to read at once.NUM_SAMPLES = 160
def normalized_rms(values): minbuf = int(mean(values)) samples_sum = sum( float(sample - minbuf) * (sample - minbuf) for sample in values )
return math.sqrt(samples_sum / len(values))
def mean(values): return sum(values) / len(values)
mic = audiobusio.PDMIn(board.MICROPHONE_CLOCK, board.MICROPHONE_DATA, sample_rate=16000, bit_depth=16)
# Record an initial sample to calibrate. Assume it's quiet when we start.samples = array.array('H', [0] * NUM_SAMPLES)mic.record(samples, len(samples))
© Adafruit Industries https://learn.adafruit.com/the-scream-munch-screaming-interactive-scream-painting Page 25 of 28

Audio Wave File Playback
We'll prepare for our audio wave file playback by setting the audio output on the speaker connected to the Crickit'ssound port -- this is driven by the Circuit Playground Express board's A0 pad.
Then, we define a procedure named play_file that will have two key jobs -- it will play back wave files stored on theCircuit Playground Express and, while playing, it will turn the head servo back and forth 30° in either direction with avery, very short pause in between.
Main Loop
Now we are at the main loop of the program, the part that runs over and over and over again endlessly.
Here, the microphone is sampled, and the normalized root mean square is calculated and assigned to a variablenamed magnitude.
Then, the magnitude value is printed to the serial port (it is formatted funny with lots of parenthesis so that it is a tupleand can be graphed in the Mu plotter). This is useful to watch when you first are setting it up.
Try yelling at the painting and watch the values change. You want a number that is below the yelling magnitude thatyou can use in the next section.
If the yelling volume caused a magnitude reading of 2000, say, and normal room noise is below 400, then 1000 is agood magnitude to use as your scream threshold.
This if statement checks to see if the current magnitude is below 1000. If it is, nothing happens. Else , if the reading ishigher, the serial monitor will print "LOUD" and then the head will wiggle a couple of times and then play back the
head_servo = crickit.servo_1head_servo.set_pulse_width_range(min_pulse=500, max_pulse=2500)head_servo.angle = 90 # center the head.
# Set audio out on speaker.a = audioio.AudioOut(board.A0)
# Start playing the file (in the background).def play_file(wavfile): print("Playing scream!") with open(wavfile, "rb") as f: wav = audioio.WaveFile(f) a.play(wav) while a.playing: head_servo.angle = 60 time.sleep(.01) head_servo.angle = 120time.sleep(.01)
while True: mic.record(samples, len(samples)) magnitude = normalized_rms(samples) print(((magnitude),)) # formatting is for the Mu plotter.
© Adafruit Industries https://learn.adafruit.com/the-scream-munch-screaming-interactive-scream-painting Page 26 of 28

wave file!
After this is done, the head returns to resting position, and the system waits a couple of seconds before the main loopruns again -- this helps prevent any self screaming feedback loops, and people who think they can just get The Screamto scream constantly!
if magnitude < 1000: # it's quiet, do nothing. passelse: print("LOUD") head_servo.angle = 60 time.sleep(.05) head_servo.angle = 120 time.sleep(.05) head_servo.angle = 90 time.sleep(.02) play_file("scream_low.wav") head_servo.angle = 90 time.sleep(2)
© Adafruit Industries https://learn.adafruit.com/the-scream-munch-screaming-interactive-scream-painting Page 27 of 28

Scream at The Scream
Now, you can hang you painting, turn on the Crickit, and invite your guests to give The Scream a good scream!
© Adafruit Industries Last Updated: 2018-08-22 04:10:41 PM UTC Page 28 of 28