the slr camera content... · always have a lense or body cap in place. the dslr camera basic parts...
TRANSCRIPT


THE
DSLR
CAMERA
Before we Begin
For those of you who have studied photography the chances are that in most cases you have been using a digital compact camera. This has probably involved you turning the camera on and then going off to take photographs.
This has given you a good introduction to the world of photography, however there are other important and fundamental camera functions and skills that you must learn if you hope to reach your full potential as a photographer.

A sound understanding of how and what the camera functions do combined with the knowledge of what to use and when, plus an understanding about image composition will result in you producing very powerful and eye catching images.
There are no short cuts so lets start at the beginning.
The Digital SLR (DSLR) Camera
DSLR’s are generally not as robust as traditional film based cameras and for this reason alone you need to take additional care.
They should never be handled roughly and all care should be taken to prevent them from being dropped.
So – 1.Where possible carry the camera in its bag.
2.When using the camera have the strap around you neck.
3.When using a tripod make sure the legs are secure and set up so that the camera is as level as possible.

Sensor Care
The sensor is one of the most fragile components of the camera and is also the most expensive component to replace.
It is important to know how to care for the sensor to prevent an expensive repair bill.
1. Don’t go looking for it unless you really need to.
2. Avoid poking fingers or other objects in and around the front of the camera.

Sensor Care
1. Air born dust is the major cause for maintenance to be carried out to the sensor.
2. Sensors tend to build up a static charge and attract small dust particles. To remove them the sensor needs to be carefully cleaned. This is not a simple task and requires knowledge, care and specialized cleaning equipment.

Sensor Care
To reduce the amount of dust
that can enter the camera
1. Limit the amount of times that you need to change lenses.
2. When changing lenses face the camera down towards the ground.
3. Never leave the camera body uncapped. Always have a lense or body cap in place.

The DSLR Camera
Basic Parts

Shutter Release Button/ On/Off
Button
Lens Zoom Adjustment
Focus Adjustment
Lens Release Button
Mode Dial
Flash Hot Shoe
View Finder
Depth of Field Preview Button
Exposure Compensation and Aperture Value Button
Popup Flash

Manual Focus /Auto Focus Switch
Raw Button – Changes the file format temporarily to Raw and saves both Jpeg and RAW files
Mode Dial

Shutter
View Finder
Menu Button
Function Button
Shutter Speed Dial
E-dial – Adjusts
Shutter Speed, Aperture and Exposure Value Compensation
Shake Reduction Button
Diopter Adjustment Lever
Play Back Button

Before We Begin Taking
Photographs Before you even consider taking photographs
you need to setup the camera by setting up the –
a. ISO
b. White Balance
c. Motor Drive Options
d. Popup flash Options
e. Image Quality Setting
f. Install the batteries and the SD media card
You may also need to format the SD card to
make sure you have room for your images
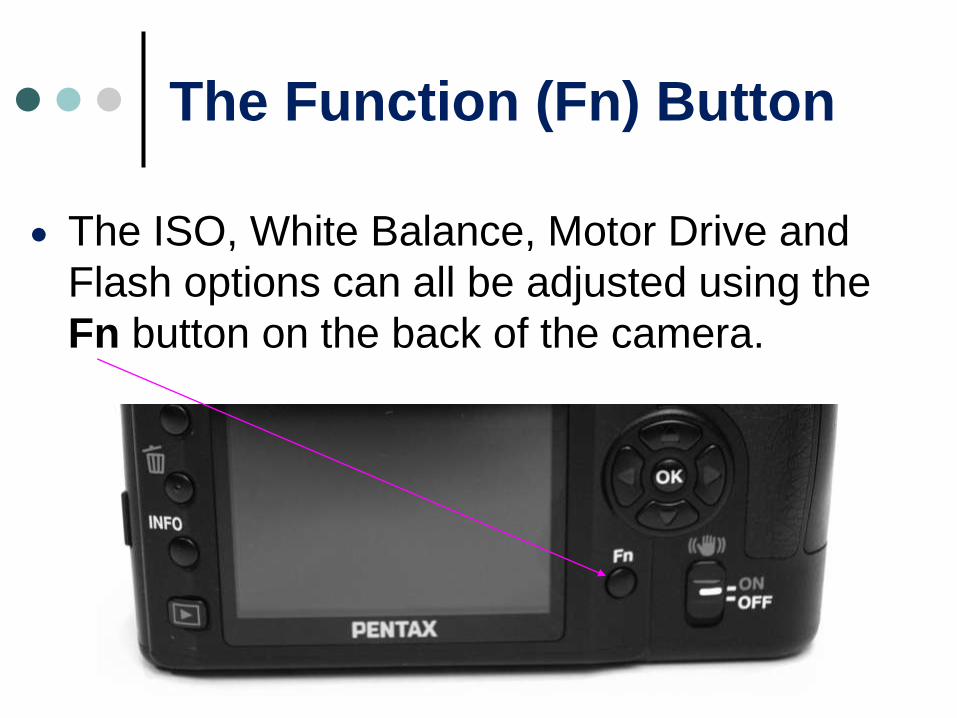
The Function (Fn) Button
The ISO, White Balance, Motor Drive and
Flash options can all be adjusted using the
Fn button on the back of the camera.

The Function (Fn) Button
To adjust press the Fn button, select your
options using the arrow keys and once you
are happy with your choices press OK
Fn
Arrow Keys

ISO (International Standards Organisation)
The DSLR has the ability to have the sensitivity of the image sensor adjusted.
The major advantage is that you can adjust it as often as you need to depending on the lighting conditions etc. This is a great feature to be aware of and make use of.
ISO settings on most digital cameras range from 200iso to 1600 or 3400iso.
ISO
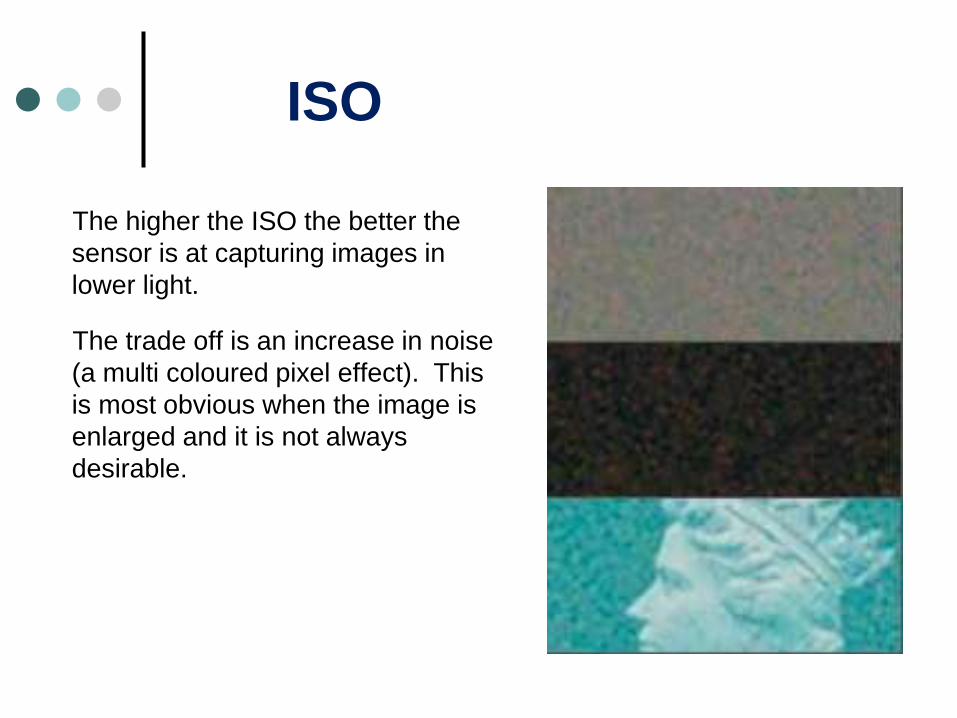
The higher the ISO the better the
sensor is at capturing images in
lower light.
The trade off is an increase in noise
(a multi coloured pixel effect). This
is most obvious when the image is
enlarged and it is not always
desirable.
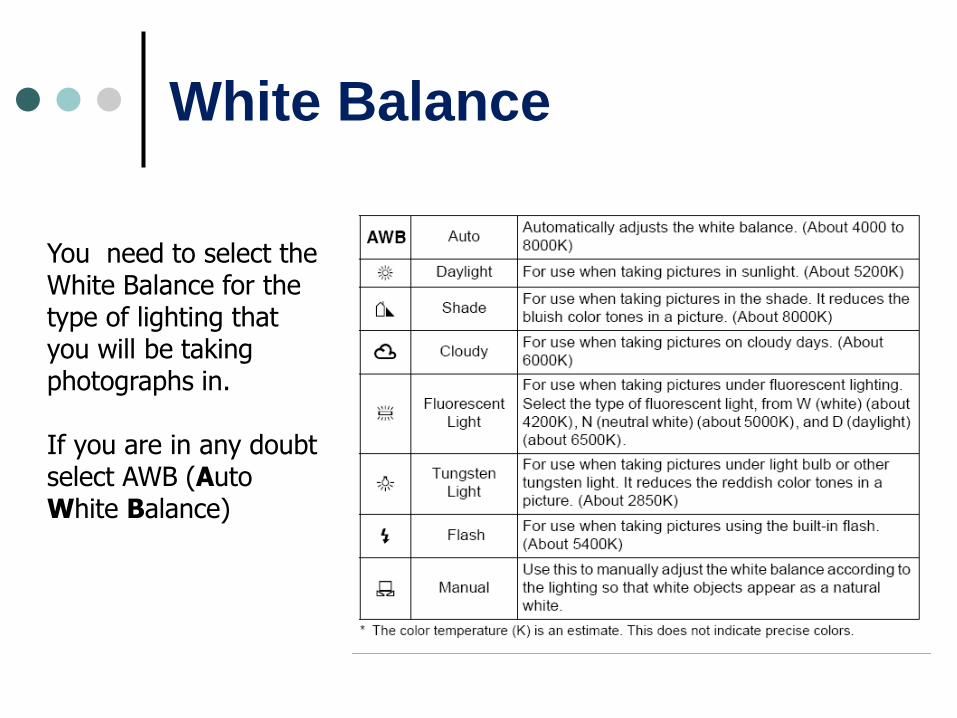
White Balance
You need to select the White Balance for the type of lighting that you will be taking photographs in. If you are in any doubt select AWB (Auto White Balance)

Motor Drive
Motor Drive options range from single frame, continuous shooting, time exposures, bracketed exposures and more. In most cases the single frame option will be most desirable

Flash Options
There are a number of flash options that control the popup flash and accessory flashes. My preference is to turn off the auto flash option and make the decision to use the flash myself and manually raise the flash.
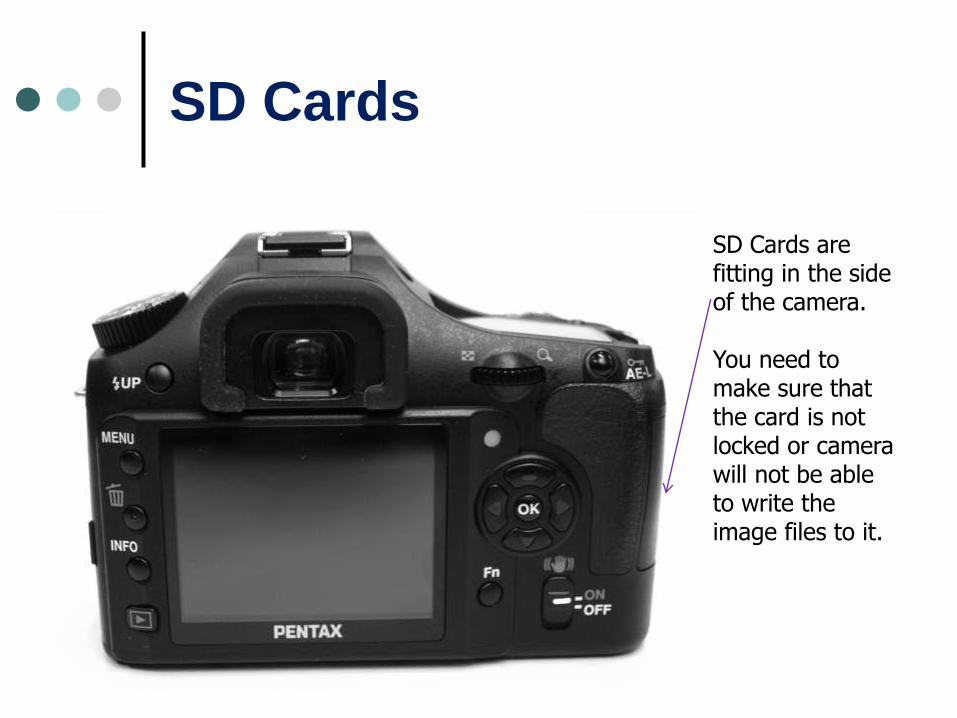
SD Cards
SD Cards are fitting in the side of the camera. You need to make sure that the card is not locked or camera will not be able to write the image files to it.
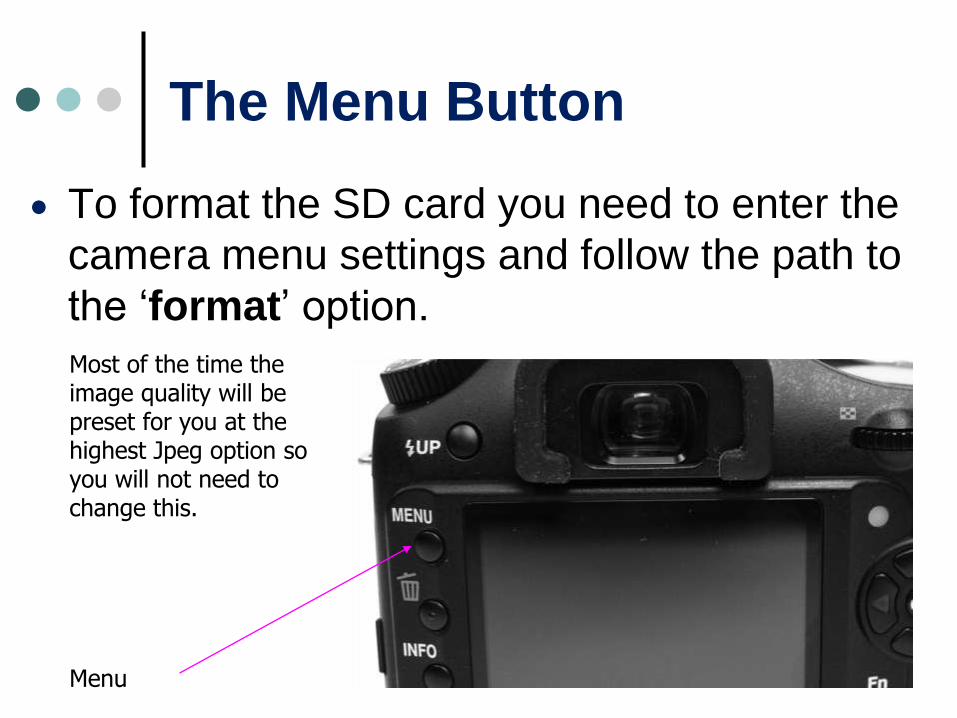
The Menu Button
To format the SD card you need to enter the
camera menu settings and follow the path to
the ‘format’ option.
Menu
Most of the time the image quality will be preset for you at the highest Jpeg option so you will not need to change this.

What Comes Next
Now that the camera is setup we can move
on and look at the important parts of the
camera that control image exposure, depth
of field, focus and the overall way that your
image will look.

So what happens when you
take a photograph?
At the moment that you press the shutter
release button a series of events occur inside
of the camera that ultimately result in an
image being recorded.
The mirror lifts, the aperture closes to the
chosen settings and the shutter opens. At
the end of the exposure time the actions take
place in reverse.
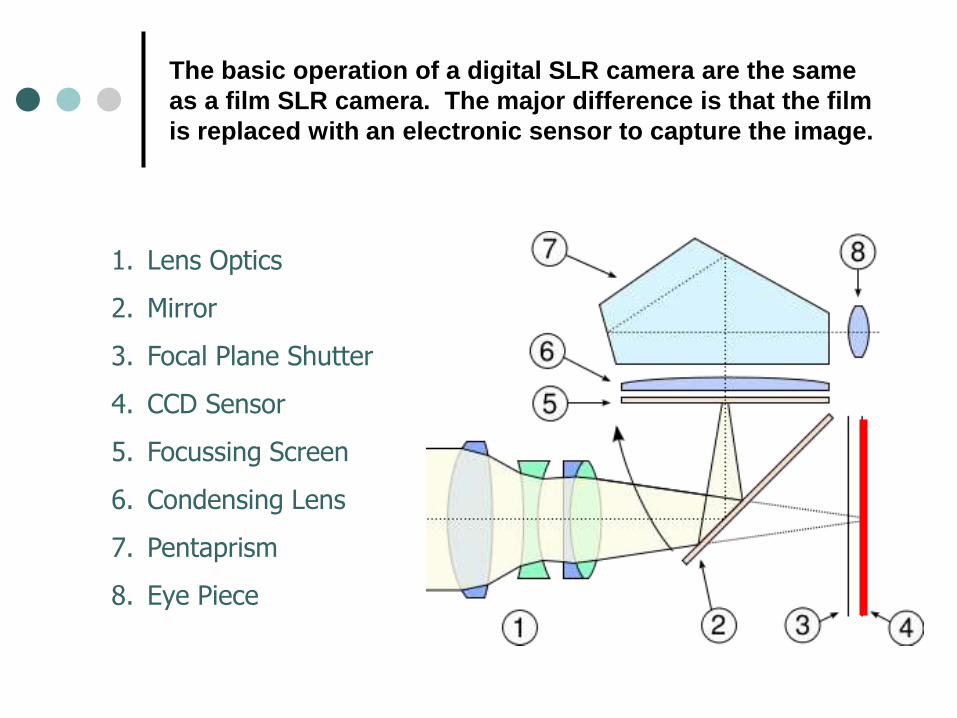
The basic operation of a digital SLR camera are the same
as a film SLR camera. The major difference is that the film
is replaced with an electronic sensor to capture the image.
1. Lens Optics
2. Mirror
3. Focal Plane Shutter
4. CCD Sensor
5. Focussing Screen
6. Condensing Lens
7. Pentaprism
8. Eye Piece

How Much Light Does the image
sensor (CCD) Need?
To produce a correctly exposed image, a measured
amount of light is required to reach the cameras CCD
sensor.
Modern day cameras are designed to help us achieve
this, by telling us when the settings we have chosen
will create the correct exposure.
However they do not take into account what we are
photographing or when we are photographing.
The information may be correct to expose the image
properly but it may be the wrong information for what
we are trying to photograph.
Now Lets begin to look at
how these controls work
with one another to let us
take photographs

Iris Diaphragm
The iris diaphragm is located inside of the lens and
it is made up of a series of overlapping metal or
plastic leaves that together create an opening called
an aperture.
The aperture controls the volume of light that is
allowed to reach the CCD / film.

Iris Diaphragm
On older style lenses the size of the aperture can be
adjusted by turning the aperture control ring to let more
or less light pass through, in a similar way to the pupil in
the human eye.
Most modern cameras have control wheels on the
camera body that can adjust the aperture settings,
making the process a little easier and as a result new
lenses no longer are fitted with aperture control rings.

Iris Diaphragm
Controls the size of the aperture opening

Iris Diaphragm
To assist the photographer a universal series of numbers is used to define the size of the aperture opening. These are known as ‘f’ numbers or f-
stops.
The number sequence runs as follows –
2, 2.8, 4, 5.6, 8, 11, 16, 22, 32 It will be important that you become familiar with the
number sequence and understand what the relationship between the number and the size of
the aperture opening.

Iris Diaphragm and Aperture So how do they work and what do they do?
The bigger the aperture opening the lower the
f-number and the smaller the aperture opening the
greater the f-number.
The bigger the aperture opening, the greater the amount of light that can pass through.
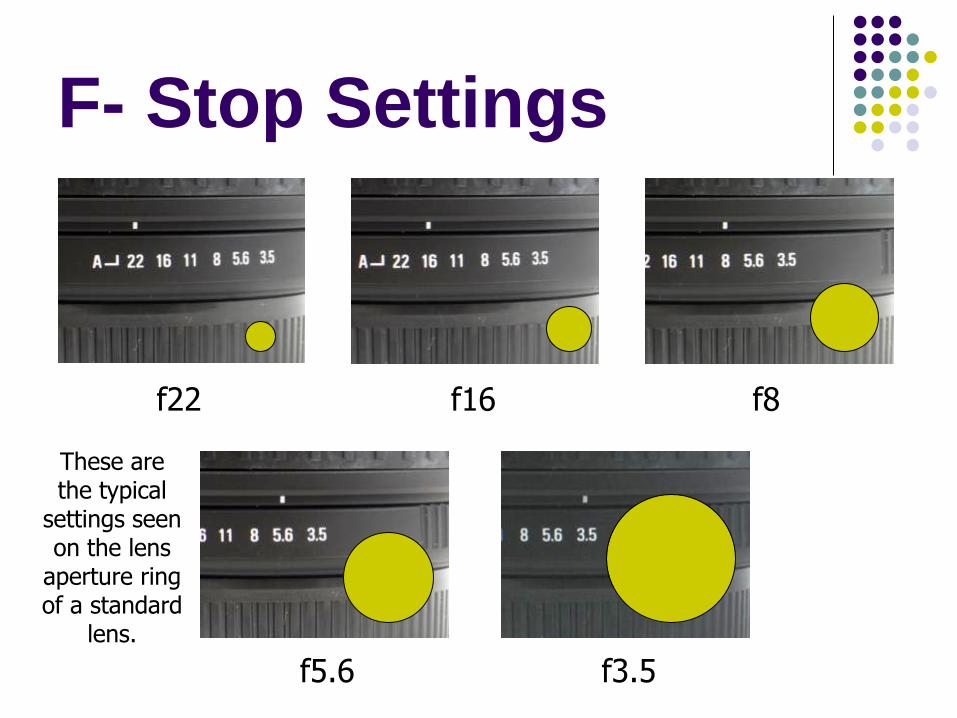
F- Stop Settings
f22 f16 f8
f3.5 f5.6
These are the typical
settings seen on the lens
aperture ring of a standard
lens.

Note the difference between the standard lens (on the right) and the newer lense design (on the left) – No aperture ring on the newer lense. Rather than manually adjust the aperture we can now use the camera controls.
Note that the aperture ring needs to be locked into the A position when using it on a DSLR
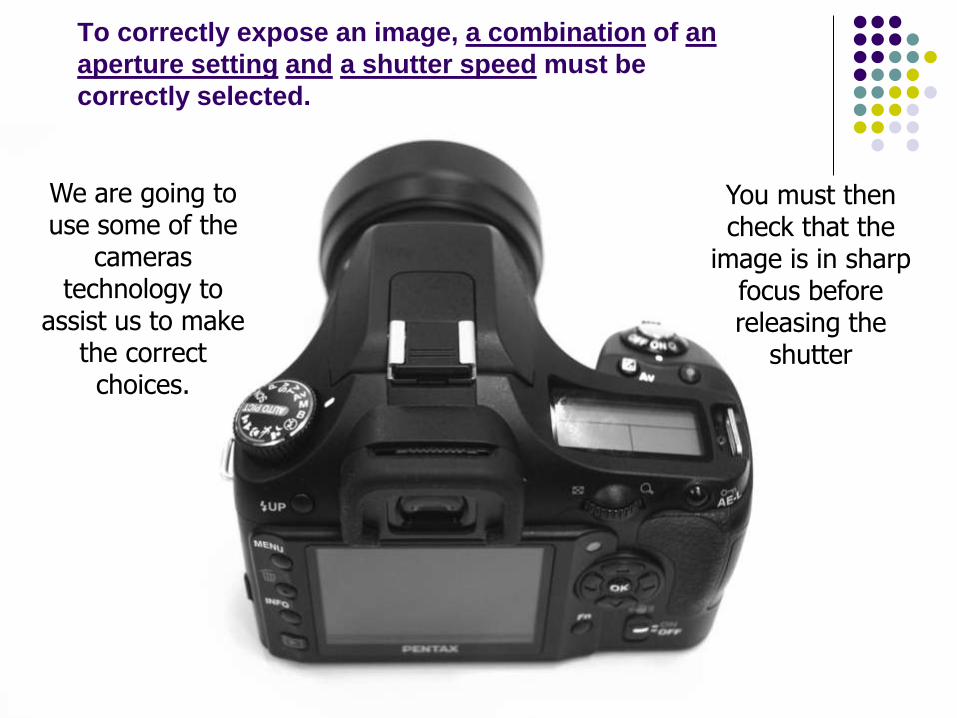
We are going to use some of the
cameras technology to
assist us to make the correct choices.
You must then check that the
image is in sharp focus before releasing the
shutter
To correctly expose an image, a combination of an
aperture setting and a shutter speed must be
correctly selected.
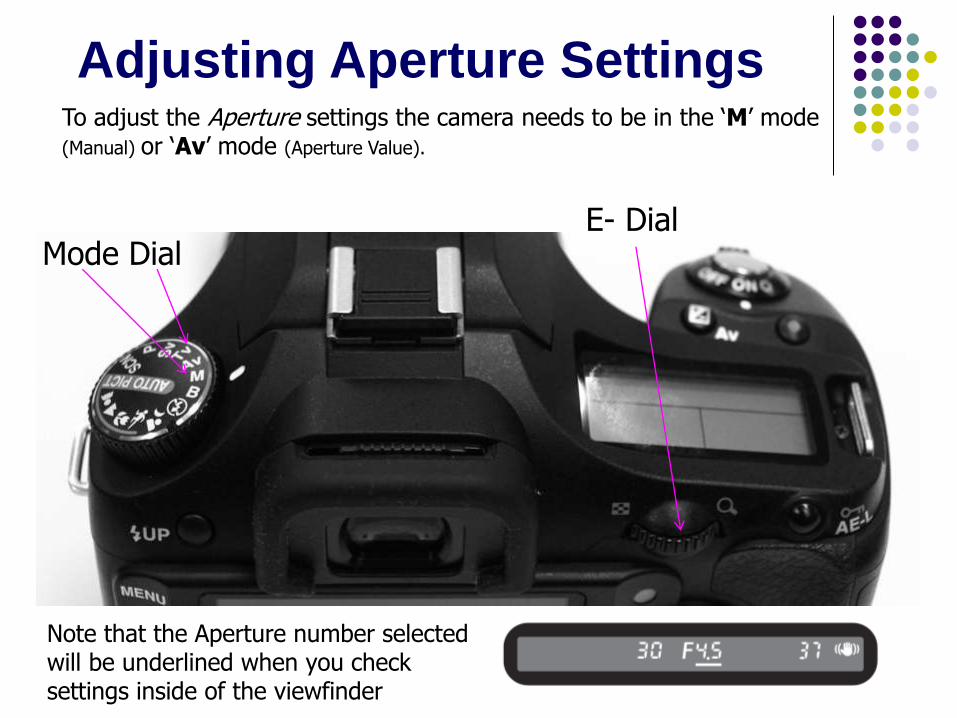
To adjust the Aperture settings the camera needs to be in the ‘M’ mode (Manual) or ‘Av’ mode (Aperture Value).
E- Dial Mode Dial
Adjusting Aperture Settings
Note that the Aperture number selected will be underlined when you check settings inside of the viewfinder

To adjust the Aperture settings when the camera is in ‘M’ mode (Manual) press the ‘Av’ button near the shutter release hold it down whilst turning the ‘E-Dial’. The light meter will need to be set in this mode to achieve a correct exposure.
E- Dial
Set to ‘M’
Adjusting Aperture Settings
in ‘M’ (Manual) Mode
Note that the Aperture number selected will be underlined when you check settings inside of the viewfinder
‘Av’ Button

To adjust the Aperture settings when the camera is in ‘Av’ mode (Aperture Value)
turn the mode dial to ‘Av’ and then adjust the settings by turning the ‘E-Dial’. The camera will automatically set the light meter to produce a correct exposure.
E- Dial
Set to ‘Av’
Adjusting Aperture Settings
in ‘Av’ (Aperture Value) Mode
Note that the Aperture number selected will be underlined when you check settings inside of the viewfinder

Shutter Speed
The Shutter Speed indicates the amount of time that the camera
shutter will be allowed to stay open.
The shutter works like a blind. When it is shut no light can reach the
digital sensor (also known as the Charge-Coupled Device or CCD ).
The shutter is a timing device that controls the amount of time that light is allowed to reach the CCD

The Shutter Speed
The Shutter Speed Numbers are also a universal
sequence and measure time in seconds or fractions
of seconds.
The sequence is as follows –
B(bulb), 1sec, ½, ¼, 1/8, 1/15, 1/30, 1/60,
1/125, 1/250, 1/500, 1/1000, 1/2000, 1/4000
So if the camera was set to 1/1000 (one thousandths of a second) you would need to take
1000 photographs to capture 1 second of time.
This is also a sequence of number that you will need to
become familiar with.

To adjust the Shutter Speed settings the camera needs to be in the ‘M’ mode (Manual) or ‘Tv’ mode (Time Value). You can then use the e-dial to make your shutter speed adjustments.
E- Dial
Set to ‘M’ or ‘TV’
Adjusting Shutter Speed
settings
Note that the Shutter Speed number selected will be underlined when you check settings inside of the viewfinder
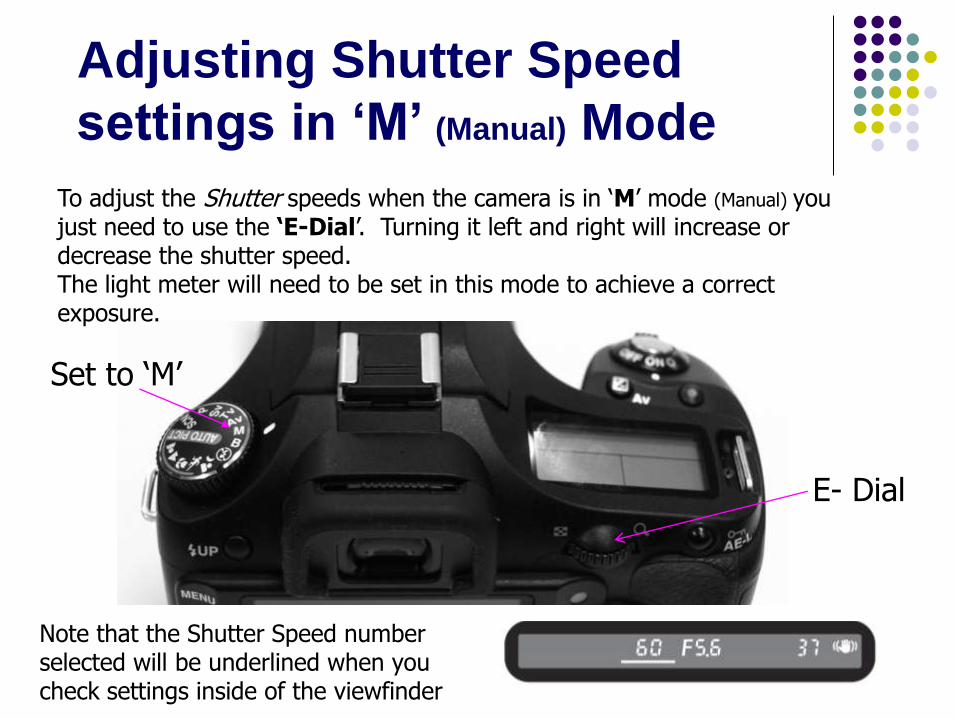
To adjust the Shutter speeds when the camera is in ‘M’ mode (Manual) you just need to use the ‘E-Dial’. Turning it left and right will increase or decrease the shutter speed. The light meter will need to be set in this mode to achieve a correct exposure.
E- Dial
Set to ‘M’
Adjusting Shutter Speed
settings in ‘M’ (Manual) Mode
Note that the Shutter Speed number selected will be underlined when you check settings inside of the viewfinder
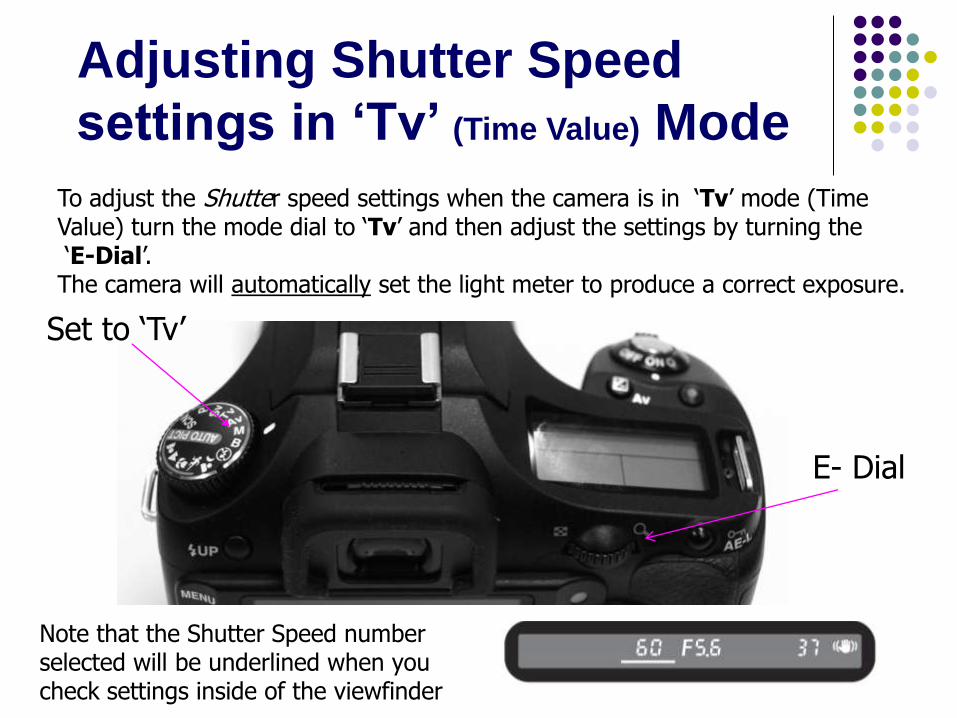
To adjust the Shutter speed settings when the camera is in ‘Tv’ mode (Time Value) turn the mode dial to ‘Tv’ and then adjust the settings by turning the ‘E-Dial’. The camera will automatically set the light meter to produce a correct exposure.
E- Dial
Set to ‘Tv’
Adjusting Shutter Speed
settings in ‘Tv’ (Time Value) Mode
Note that the Shutter Speed number selected will be underlined when you check settings inside of the viewfinder

End of Part 1

Part 2
In part 1 we looked at the major camera parts,
setting up the camera, aperture and shutter
speed settings.
We then explored some of the different modes
on the camera and learnt how to use them.
During part 2 we need to spent some time
making some sense of the aperture and shutter
speed settings, learn how and what to use and
then practice.

How much light does the CCD
(Charge-Coupled Device) need?
There are many combinations of shutter speed and aperture setting that can be used that will produce a correct exposure.
When one is found the camera light meter will let you know, or if you use the Av or Tv modes the camera will make some of the selections for you and try to automatically set the light meter.

This all sounds wonderful
BUT!! Shhhhhhh!! Cameras are quite Dumb
A Camera is just a machine.
It does not have a logically thinking
brain, therefore it is dumb.
It is up to the photographer to interpret the
information that the camera gives us and know
what is right and wrong.
Teaching you this is one of my key goals.

Lets look at this concept using an everyday set of
objects. A Tap, a hose and a bucket.
How much light does the CCD
need? - continued
CCD / Film

How much light does the CCD
need? - continued
The tap represents our timing device (the shutter).
The various sized hoses, our apertures
The bucket is the CCD / film.
The aim is to fill the bucket exactly to the top.
CCD / Film

So back to the question! How much light does CCD / film need? - continued
Connect a big hose and it only takes a short time to
fill the bucket.
Connect a small hose and it takes much longer.
It works the same way
with any digital camera,
or film camera.
CCD / Film
How do we know when
we get it right?
Modern day cameras are fitted with a light
measuring device called a light meter. There
are various configurations but they all do the
same job.
The light meter indicates when your camera
settings would achieve the correct exposure
for the CCD / film.
They also indicate when it would be incorrect.
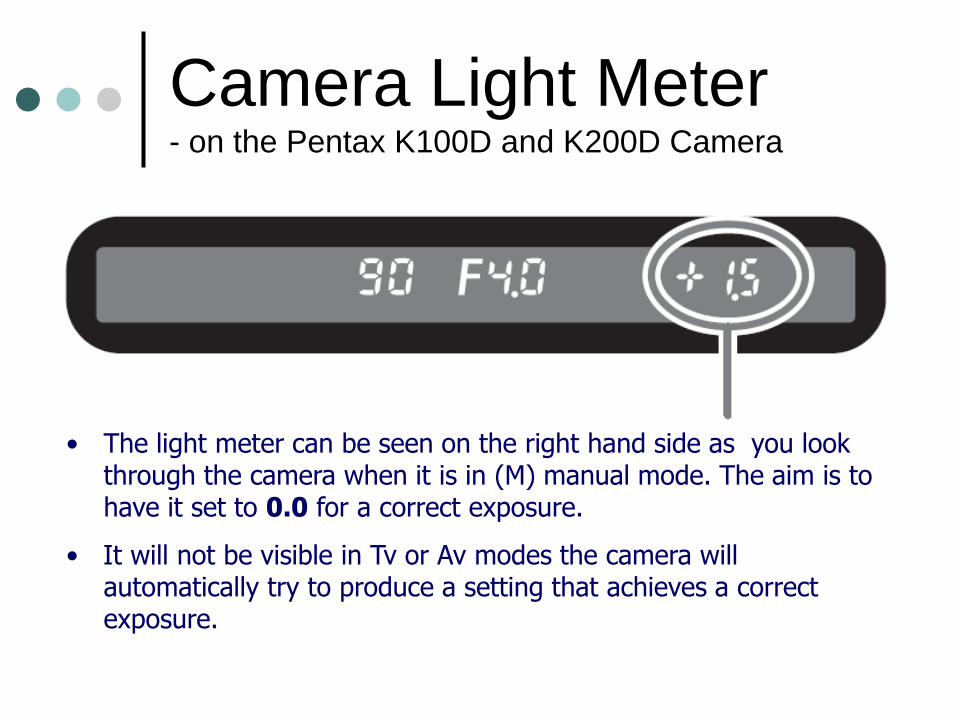
Camera Light Meter - on the Pentax K100D and K200D Camera
• The light meter can be seen on the right hand side as you look through the camera when it is in (M) manual mode. The aim is to have it set to 0.0 for a correct exposure.
• It will not be visible in Tv or Av modes the camera will automatically try to produce a setting that achieves a correct exposure.
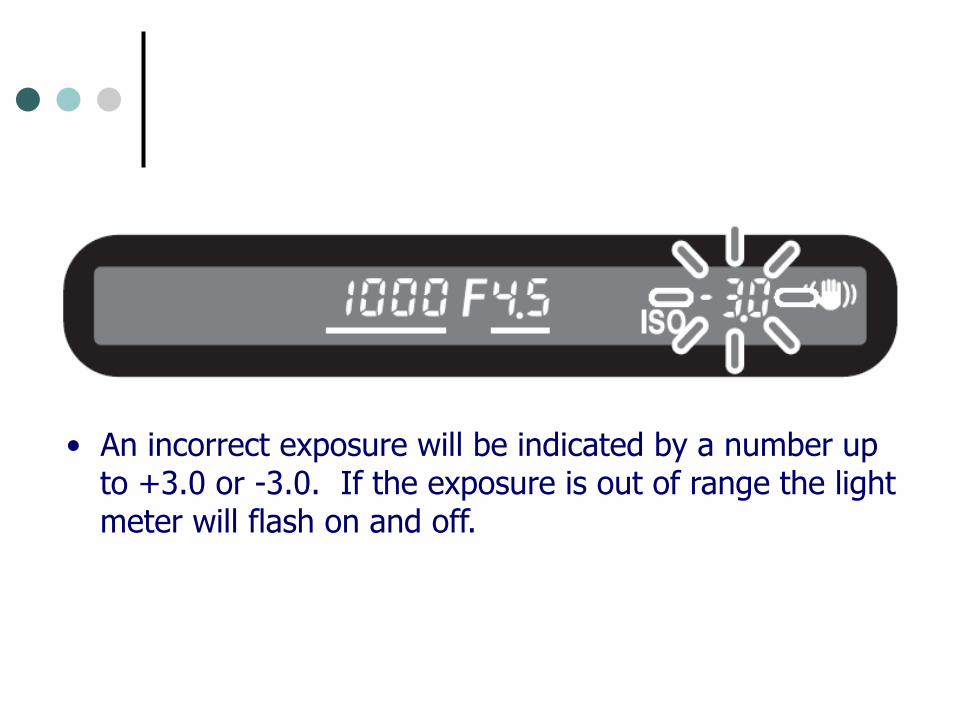
• An incorrect exposure will be indicated by a number up to +3.0 or -3.0. If the exposure is out of range the light meter will flash on and off.
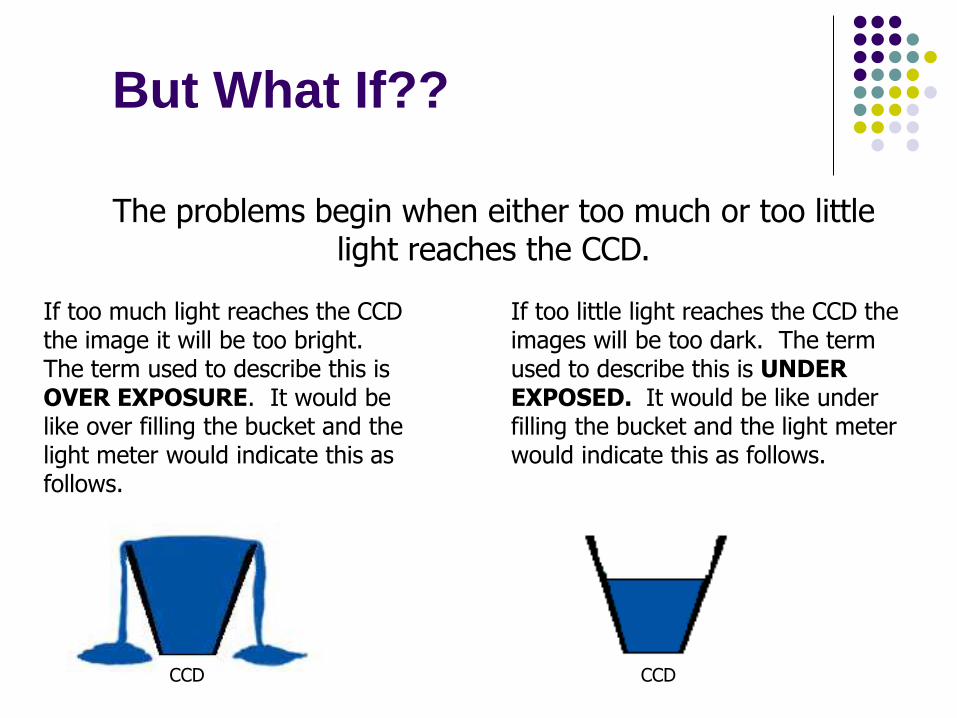
But What If??
The problems begin when either too much or too little light reaches the CCD.
If too much light reaches the CCD the image it will be too bright. The term used to describe this is OVER EXPOSURE. It would be like over filling the bucket and the light meter would indicate this as follows.
If too little light reaches the CCD the images will be too dark. The term used to describe this is UNDER EXPOSED. It would be like under filling the bucket and the light meter would indicate this as follows.
CCD CCD

Getting It Right
Getting the combination of Shutter Speed and Aperture Correct will allow you to produce the best results. The image will be neither too light or too dark and this makes the printing process much easier. Correctly exposed images are very desirable.
CCD

It’s Time to Practice
Now lets practice using some combinations of Shutter Speeds and Aperture Settings to get a better understanding about what we have covered.
Multiple Combinations
It is important to realize that there can be
many combinations that will produce a
correct exposure.
Lets see how this works
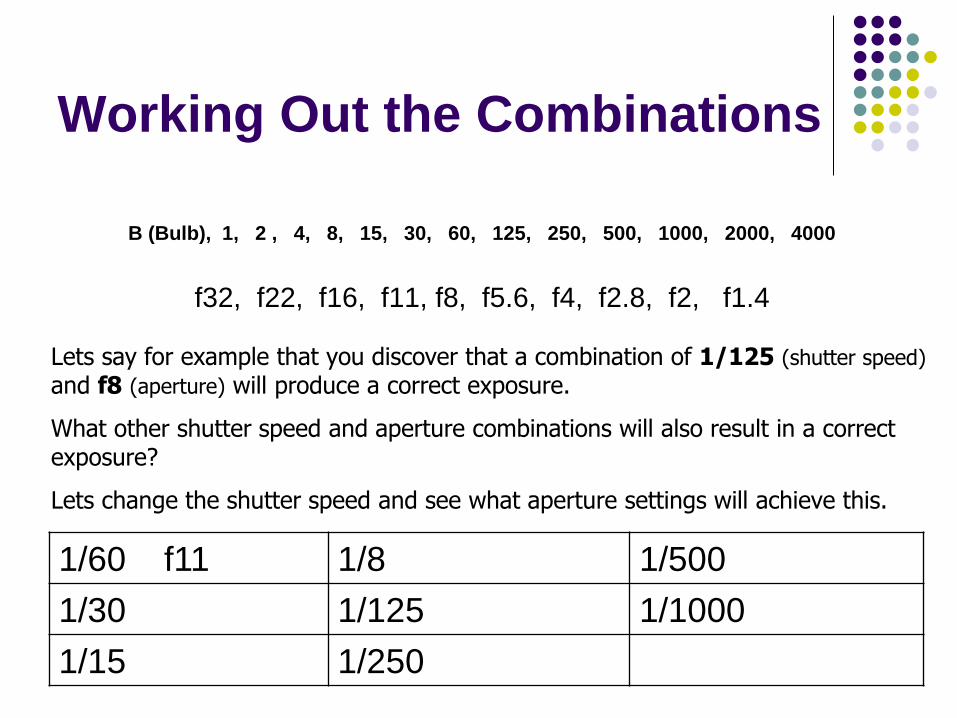
Working Out the Combinations
B (Bulb), 1, 2 , 4, 8, 15, 30, 60, 125, 250, 500, 1000, 2000, 4000
f32, f22, f16, f11, f8, f5.6, f4, f2.8, f2, f1.4
Lets say for example that you discover that a combination of 1/125 (shutter speed) and f8 (aperture) will produce a correct exposure.
What other shutter speed and aperture combinations will also result in a correct exposure?
Lets change the shutter speed and see what aperture settings will achieve this.
1/60 f11 1/8 1/500
1/30 1/125 1/1000
1/15 1/250
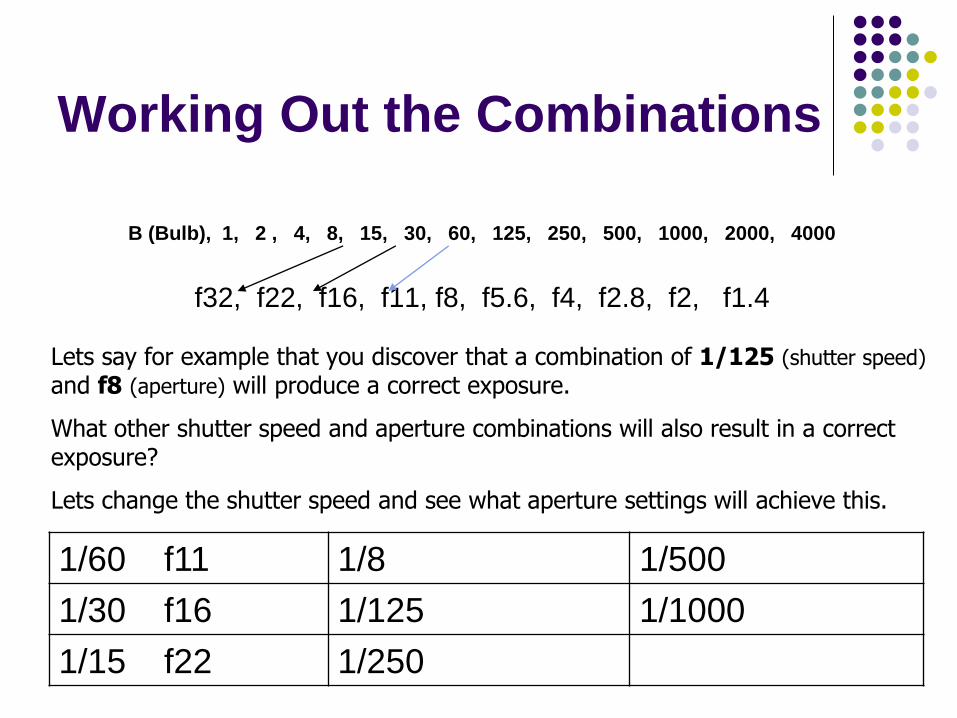
Working Out the Combinations
B (Bulb), 1, 2 , 4, 8, 15, 30, 60, 125, 250, 500, 1000, 2000, 4000
f32, f22, f16, f11, f8, f5.6, f4, f2.8, f2, f1.4
Lets say for example that you discover that a combination of 1/125 (shutter speed) and f8 (aperture) will produce a correct exposure.
What other shutter speed and aperture combinations will also result in a correct exposure?
Lets change the shutter speed and see what aperture settings will achieve this.
1/60 f11 1/8 1/500
1/30 f16 1/125 1/1000
1/15 f22 1/250

Working Out the Combinations
B (Bulb), 1, 2 , 4, 8, 15, 30, 60, 125, 250, 500, 1000, 2000, 4000
f32, f22, f16, f11, f8, f5.6, f4, f2.8, f2, f1.4
Lets say for example that you discover that a combination of 1/125 (shutter speed) and f8 (aperture) will produce a correct exposure.
What other shutter speed and aperture combinations will also result in a correct exposure?
Lets change the shutter speed and see what aperture settings will achieve this.
1/60 f11 1/8 f32 1/500 f4
1/30 f16 1/125 f8 1/1000 f2.8
1/15 f22 1/250 f5.6
Knowing What to Use
Although there can be many
combinations of Aperture and Shutter
Speed that will produce a correct
exposure, some will not be suitable to
use.
Getting it wrong can ruin your great
photographs.
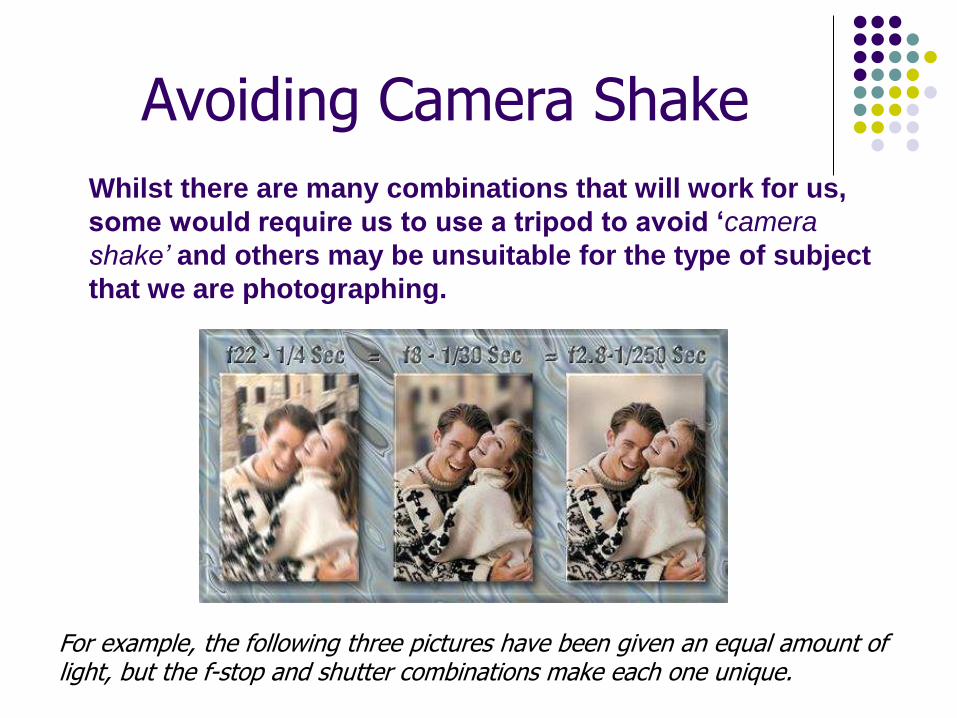
Whilst there are many combinations that will work for us,
some would require us to use a tripod to avoid ‘camera
shake’ and others may be unsuitable for the type of subject
that we are photographing.
For example, the following three pictures have been given an equal amount of light, but the f-stop and shutter combinations make each one unique.
Avoiding Camera Shake

A Safe Shutter Speed Guide
As a guide never use a shutter speed below
1/60 if you hand holding the camera.
Where possible use Shutter Speeds higher
than 1/60.
1/125 – 1/500 are ideal.

• If you need to use shutter speeds below 1/60 always set the camera up on a tripod.
A Safe Shutter Speed Guide
The ideal settings

So Now What
This isn’t the end but it is now your turn to
practice and begin to understand how to get the
best from the camera.
It is absolutely vital that you have a good
working knowledge about how to use the
camera using the –
‘M’ (manual) mode, the
‘Tv’ (Time Value) mode and the
‘Av’ (Aperture Value) mode.

Reviewing This Power Point
You can review this power point at any time
by visiting our web page and following the
link on the first task sheet.
It is located under -
task 1 – Camera and Printing Basics
GOOD LUCK