the tamiya mini beginner's companion€¦ · web viewthe m03-r includes no body, no motor, 20t...
TRANSCRIPT
The Tamiya Mini Companionby Mark Brown1
revised 2 December 2009
IntroductionDavid Beale’s article, “Built to Win – BMW Mini Building and Setup Guide” ( http://www.tamiyausa.com/articles/feature.php?article-id=12 ) is a great source of information on racing the Tamiya Mini. Beale writes for the experienced racer who is new to the Mini and wants to compete in Tamiya Championship Series (TCS) races.
This article is meant to make David Beale’s article useful to any racer, whether new to racing or just new to the Mini. Read this article first, then read David Beale’s and more of what Beale says will make sense to you. You’ll have an easier time getting your Mini to run reliably and fast. As Stan Ng says, “Have fun and drive with a smile!”
David Beale’s article is specific to front-wheel-drive M03 chassis Minis, and so is this one. The new M05 Mini is similar in many ways to the M03, but there are differences, and I have no first-hand experience with the M05.
Why Mini?The Tamiya Mini is the ideal first R/C race car:
Minis are fun to drive! Even top-flight Seattle racer Kody Knudson says that Mini is one of the most fun classes he’s ever raced. It might have something to do with the tippy feeling of the Mini; it keeps you on your toes.
Minis are fun to watch! The BMW Mini Cooper is immediately recognizable by nearly anyone, unlike most R/C cars. How many Americans would recognize an NSX if they saw one on the street?
Minis are great for learning to drive! Front-wheel drive makes the Mini forgiving of excessive throttle inputs. The fixed gearing on the Mini gives a top speed that’s a bit lower than other Tamiya race cars like the TA-05, so the turns don’t arrive quite so fast and when you crash you are less likely to break.
Minis are great for learning to wrench! The Mini has a fully sealed drive train (no gears or belts exposed) so it doesn’t get gummed up even running on dirty surfaces. Minis are simpler than any four-wheel drive car: fewer parts, fewer setup options, easier to work on.
Minis are cheap! The initial cost is lower than other classes, and the ongoing cost is much lower because the Mini you buy today will still be state-of-the-art years from now. The same Mini I built in the summer of 2003 remains competitive today.
1 Copyright 2009 Mark Robbin Brown. This document may be copied freely for any use as long as it is copied as a whole without alteration.
1
Which Mini?Tamiya gives you lots of choices when it comes to the M03 Mini. The choices seem complicated at first, but simplify once you understand them. Tamiya makes these M03 Mini kits:
TAM 58211 (Rover Mini Cooper Racing) [short 210mm, old]
TAM 58295 (BMW New Mini Cooper) [long 239mm, old]
TAM 58368 (Suzuki Swift Super 1600) [medium 225mm, new]
TAM 58400 (Mini Cooper S 2006) [long 239mm, new]
TAM 84023 “(M03-R Chassis Kit – Blue Plated Version) [*, new]
In this list of kits, the designations short/medium/long refer to the wheelbase of the Mini’s M03 chassis; Tamiya calls the long M03 the “M03L” and the medium M03 the “M03M.” Since Tamiya extends the wheelbase using an inexpensive plastic spacer (no spacer for short), you can easily convert any chassis from one wheelbase to another. The M03-R and Mini Cooper S 2006 kits contain spacers for both medium and long wheelbase.
In the list of kits, the designations old/new refer to certain suspension parts that have been revised in the new version. These parts can be fitted to the old version by purchasing TAM 51238 (M03M F Parts). Another difference between old and new kits is that the wheels in the new kits are less prone to rim-cracking than the old ones. (Each kit contains a wheel style that’s specific to its body type, except the M03-R which comes with black Suzuki Swift wheels.)
All kits except the M03-R include a body, a 540J (“silver can”) motor, metal or plastic bushings for all shafts, plastic front and rear uprights, plastic servo mounts, plastic “friction” (not oil-filled) shocks, and a single set of springs. The M03-R includes no body, no motor, 20T pinion gear, ball bearings for all shafts, aluminum front and rear uprights, aluminum “heat sink” (a mounting plate for the motor screws), aluminum servo mounts, plastic oil-filled shocks, and three sets of springs in varying stiffnesses for tuning.
So, given this flood of details, which kit should you buy? Excluding the M03-R, there’s no strong cost or performance reason to prefer one kit over another. The improved parts in the new kits cost approximately the same as the price premium of the new kits, and all of the wheelbase options handle well. So buy the kit with the body style you like best.
The M03-R costs about $75 more than one of the new kits. You’ll spend another $55 on a body and motor, but if you buy one of the new kits you’ll spend that money on ball bearings. The aluminum front uprights and the springs are parts you’ll surely need, and would cost you about $75. So the M03-R is a bargain if you would otherwise make more than $75 worth of upgrades, for instance the aluminum front uprights and the springs, to another kit, and are willing to spend the money up front rather than spending it as you go. The remainder of this document will give you a sense of the upgrades you are likely to make.
2
All of the complete (non-“R”) kits are available as ready-to-runs, and the Rover Mini is available in two paint schemes:
TAM 57736 (RTR Mini Cooper Monte Carlo) [Rover]
TAM 57742 (RTR Mini Cooper) [Rover]
TAM 57744 (RTR Mini Cooper 2002) [BMW]
TAM 57754 (RTR Suzuki Swift Super 1600)
TAM 57773 (RTR Mini Cooper S 2006)
In each case the RTR costs about $70 more than the kit. RTRs include a painted body, a pistol-grip AM transmitter, a steering servo, a receiver, and a speed control. They require transmitter batteries, and a battery and charger for the car.
If you race for any length of time you’ll replace the AM transmitter and receiver with something better, but an RTR is certainly the simplest way to start racing, especially because of the painted body. If you buy a ready-to-run you will soon want to upgrade it to ball bearings for racing, giving you an opportunity to disassemble and reassemble the car. That is a good way to familiarize yourself with how the car works. If you get into any trouble, an experienced racer can help you out of it. The down time between qualifiers during a club race is an especially good time for getting help.
Battery and ChargerThe Team Orion Experience 2400 LiPo (ORI 14007), at about $35, is the least expensive battery you should consider buying for your Mini. The Orion Carbon Edition 3400 LiPo (ORI 14008) will perform slightly better at about twice the price. The CORE 3250 LiPo is in between the two Orion LiPos in both price and performance. The Orion packs use bullet connectors and include an adapter for the connector used on RTR Minis; the CORE LiPo uses a Deans connector.
The DuraTrax Onyx 230 charger, at about $80, is the least expensive LiPo-capable charger that operates from AC and is fully adjustable to charge at the correct rate for whatever pack you have.
Because the Mini was originally designed for use with NiCd and NiMh batteries, you must add ballast when running the Mini with a much-lighter LiPo battery. The minimum weight of the car for racing is 1300 grams. Even for just playing around, you want to ballast the car to this level because it will handle better that way.
Lead is commonly used as ballast; you can get it at hobby shops or sometimes at tire shops. Lead is toxic and children must minimize their exposure to it. A non-toxic and very dense alternative is tungsten: http://www.pinewoodextreme.com/detail.asp?item_number=418072 makes great ballast for the Mini. You can cut tungsten plate to size using a Dremel cut-off wheel if you are patient.
To get the full benefit of the ballast you must install it as low as possible in the Mini, to lower the Mini’s center of gravity (CG) as much as possible. Each of the recommended LiPos has a hard case with bumps on one side and an indentation on the other. Attach your ballast into the indentation (with double-stick tape), then cover with a layer of thin
3
packing tape, and install the pack with the ballast side facing down toward the track. On an Orion pack you will have to drill through the bullet sockets to make holes in the bumpy side of the case, so you can insert the connectors from that side. Wrap your drill bit with tape to avoid scratching the connector sockets. Use an XActo knife to open up the holes enough so the connectors fit.
When using LiPo you must avoid deeply discharging the pack: anything below 6 volts invites damage. The ideal is not to run the pack down beyond half-charged. If you keep your runs to 6 minutes you won’t have any problems. If you want to run longer, first do a 6 minute run starting with a full pack, then recharge your LiPo. Any good LiPo charger (e.g. the Onyx 230) will tell you how much charge the pack has accepted. From this you can gauge how long a run is safe. If you feel the car starting to slow down, it is past time to stop! Another option is to use an ESC with a built-in LiPo cut-off, or to add a LiPo cut-off device such as the Novak 5470 to your ESC.
Upgrade prioritiesAs a beginning racer it is a mistake to try to improve everything at once. You need to have priorities in upgrading your car. Here are the priorities I suggest:
1. Be reliable – don’t break. As a beginning racer you will be crashing a lot. And breaking is not fun.
2. Keep maintenance low. Most people don’t enjoy maintenance. But deferring it leads to breakage and lost performance. If the required maintenance is minimal you are more likely to do it, and you’ll have more fun.
3. Go fast. You are racing, after all! Going fast is definitely fun.
Within these priorities, you want to keep the spending at a level proportional to your advancing racing skills.
Upgrade sequenceTo build and run a Mini you need either a Tamiya Mini RTR or a Tamiya Mini kit, some paint, a transmitter, a receiver, a servo, and an electronic speed control. In addition you need one LiPo battery pack, a LiPo-compatible charger, and necessary tools. That’s the minimum to get started. Suppose you want to go beyond the minimum. What upgrades should you add?
The following upgrades are listed in the order I recommend that you perform them. You could do all of these as you build your Mini the first time, or you could do them one at a time after you finish building, or anything in between.
1) Aluminum steering blocksThe Mini steers by rotating the left and right steering blocks through the action of the tie rods driven by the steering servo. Upper and lower kingpins screw into each steering block to allow the rotation.
The weak link in this chain is the plastic steering block. This part will break very soon if you do not upgrade it first. You can’t drive the car with a broken steering block.
4
Tamiya offers two aluminum upgrade parts:
TAM 53523 (Aluminum front upright set M03,M04). The David Beale article explains the correct use of this part on the Mini.
A newer upgrade part is TAM 49441 (M03R Alum Front Upright – Blue). This part does not fit the front suspension of the older Minis, but it fits the Swift, Cooper S, and M03R. To fit this part to old Minis, buy TAM 51238 as well.
The new Minis have stronger plastic steering blocks than the old Minis. TAM 51238 (M03M F Parts) upgrades from old to new for under $10. So if you can’t afford a set of aluminum steering blocks, get the new plastic ones.
2) Ball bearingsIf you don’t maintain bushings they will seize up. And even if you maintain them, they will make your Mini very slow.
Many different grades of ball bearings are available. TAM 53348 (M03 ball bearing set) is one good choice.
Contrary to the advice given by David Beale, do not degrease your bearings if they come grease-packed. The performance loss from the grease is slight, while the extra maintenance from degreasing is considerable because the excess grease forms a dirt trap inside the bearing. Only degrease your bearings when you near the top levels of competition and are ready to do extra maintenance.
3) Quality pinion gearThe Tamiya pinion gear that comes with all of the Mini kits is made of soft aluminum without any coating to reduce wear. So the gear wears very quickly. One sign of wear is that your Mini gets noisy.
The Mini requires a 20T 0.6 modulus (“metric 48 pitch”) pinion. If you install a regular 48 pitch pinion by mistake your car will be very noisy and the spur gear will wear out quickly.
The two options I’m aware of for this pinion:
Robinson Racing 1120 (Metric steel alloy 48 pitch pinion 20 teeth)
TAM 53509 (Hard fluorine coated 0.6M 20T pinion)
The Tamiya part is made of soft aluminum and it is very easy to strip the set screw on this pinion. I recommend the Robinson Racing part.
4) Quality battery connectorThe Tamiya connector that comes wired to the Tamiya speed control on RTR Minis is a common source of problems. These connectors work fine when new, but eventually they loosen up inside. When this happens, the connector either fails to make contact, or its resistance increases and the car slows down. If the resistance is high enough the connector can melt. I am not making this up.
5
Replace the Tamiya battery connector with the Dean’s Ultra Plug (part numbers 1300, 1301, 1302, and 1303). You’ll need one male Dean’s Plug for the electronic speed control, and one female Dean’s Plug for each battery.
If you are using the “bullet” connectors to your motor, eliminate them entirely and solder wires directly from the speed control to the motor. Leave the motor wires long enough so you can remove the motor from the car without unsoldering the wires.
This is a very inexpensive upgrade. If you don’t have the soldering skills to handle this upgrade, get help from someone at the track.
5) Front universal shaftsThe Mini drives by rotating the left and right slotted outdrives, each of which rotates a dogbone and thereby rotates a slotted front axle.
Unfortunately, dogbones are prone to fall out. They are not easy to find when they do fall out. Dogbones also reduce performance because they drive the front wheels in a jerky fashion when the wheels are steering.
Tamiya offers two upgrade parts. Both of them replace both the dogbones and the front axles:
TAM 53205 (M-Chassis universal shaft set). These universal shafts are factory assembled and cannot be disassembled.
TAM 53597 (M03 Assembly Universal Shaft set). These shafts require assembly, and can come apart if incorrectly assembled. They also require periodic lubrication. In principle they should help the Mini turn better, but I have no idea whether or not they actually do.
If you can’t afford this upgrade yet, there are two things you can do: (1) paint your dogbone shafts white, so when the dogbones fall out you are more likely to find them, (2) walk around the pits at a Mini race and see if you can buy dogbones from people who have done the upgrade already. As soon as you’ve got the money, get the upgrade.
6) Tires and insertsTires have a huge effect on the performance of your Mini. Without the correct tires, you will spend more time going sideways than the other cars on the track do. They will leave you behind.
Three tire options for a carpet track:
TAM 53340 (M-chassis 60D Reinforced Tires Type A). These are belted slick tires in a soft compound. Run them front and rear; you’ll need two packages to get four tires. The double inserts described in David Beale’s article work well in these tires. These tires are great on low-grip carpet, but as the traction rises they give inconsistent handling.
TAM 53254 (M Chassis 60D Super Grip Radial Tires, also called S-Grips). These are non-belted treaded tires in a soft compound. Run them front and rear; you’ll need two packages to get four tires. Inserts for these tires are similar to those
6
described in David Beale’s article, except it is generally not good to “overstuff” these tires. The tread surface should be supported by the insert (no air gap) but the insert should not crown the tread. You may need to improvise the sponge foam layer, or even thin down a Tamiya sponge (such as TAM 50686).
TAM 50684 (M Chassis 60D M-Grip Radial Tires). These are non-belted treaded tires in a medium compound. On carpet these are often run in front with S-Grips or M-Grips in the rear. Compared to running S-Grips on the front, the harder compound of the M-Grips allows you to overstuff them as described in David Beale’s article without generating too much side-bite. The overstuffing gives more stop speed than with S-Grips.
On medium- or high-grip carpet, it may be necessary to run a bead of CA glue around the outside shoulder of each front tire to reduce traction-rolling. On treaded tires this glue typically covers at least the outside half of the outer tread block as well as running a couple of millimeters down the sidewall. On slicks the glue is 2-3 millimeters wide and stops at the molded rib on the sidewall. Experiment to find what works for you. If you put on too much, you can scrape the glue off by scraping an XActo blade across it sideways. The glue will wear down with use and need to be renewed after a few race days.
On asphalt, run slicks as described in David Beale’s article.
If you can afford these tires right from the start, and you got a new kit that came with good strong wheels, don’t even bother to mount the hard kit tires on the wheels that come with your kit – mount the upgrade tires on the kit wheels. Then you won’t need to buy more wheels until you wear out these tires. Tires last a long time on carpet.
You’ll need some of whatever tire sauce is legal at your track. You’ll generally sauce the front tires near-fully, stopping just a bit inside the outer edge. Running slicks on carpet you’ll sometimes sauce the fronts less since they have so much inherent grip. Sauce the rears fully to start with, but experiment with saucing only the inner 50% or 75% and see if that helps your Mini’s handling.
7) Shocks and springsThe stock shocks are very simple and they can’t leak (they contain no oil), but they don’t help the Mini’s handling much. The stock springs don’t allow any tuning. If you want to save your money and not buy new shocks, follow the instructions in the article http://www.rc-mini.net/joomla/index.php?option=com_content&view=article&id=44&Itemid=60 (the stock shock build is around the middle of the page, search for “no money” and you’ll find it) and your stock shocks will work as well as is possible.
There are several upgrade choices available. David Beale gives one choice in his document, but the particular shocks he recommends have been discontinued by Tamiya. Here are the two main choices available:
TAM 50746 (CVA Super Mini Shock Unit). These shocks are inexpensive, have plastic bodies, and work OK; they aren’t as consistent as aluminum shocks and they use spacers instead of threaded collars for adjusting ride height.
7
TAM 54000 (M Chassis Aluminum Damper Set). These shocks are beautiful, very easy to build and use, but more expensive than plastic shocks.
The upgraded shocks mount with ball joints top and bottom, rather than the shoulder screws used for the stock shocks. When you need to remove the upgraded shocks you snap them off; installation is snap-on. The David Beale article mentions another option: TAM 53488 (Adjustable Ball Connectors); you rarely see these at the track. A third option is to use what Tamiya calls a “ball nut”: a ball joint with 3mm internal threads and a hex on the mounting end. You screw a long 3mm set screw into the shock mount, then screw the ball nut onto the set screw. This way you can unscrew the shocks instead of snapping them off, if you don’t like snapping them off. TAM 53599 (Flourine Coated 5mm Aluminum Ball Nut) is one example of a suitable ball nut; you don’t want a “short” ball nut for mounting shocks.
8) Rear toe-in hubsTAM 53345 (TL01/M03 Toe-in Rear Upright) is a very inexpensive upgrade that adds stability to the rear end of your Mini, allowing you to drive more consistently. It gives 2 degrees of rear toe-in. Tamiya no longer makes this part but you can still find them on the Internet.
An alternative upgrade, much more expensive, is TAM 49442 (M03R Alum Rear Upright – Blue) which gives 1.5 degrees of rear toe-in and allows the rear camber to be adjusted.
9) Personal transponderYou may be surprised to find this “luxury item” on this short list of upgrades. Think of it this way. Having a personal transponder frees up time after each run, time you can use to check over your car. If you do this checking, your car will be more reliable. The personal transponder frees up time before each race, time you can use to get in a few extra practice laps, helping your driving. And a personal transponder lowers the CG of your Mini a lot more than titanium screws would.
A personal transponder is expensive, but it has very high resale value (80% or more) so you can think of this expense as a “deposit” that you’ll get back if you ever sell the transponder.
Upgrades to avoidDavid Beale’s article contains many more upgrades than in the list above. Two of them are not good for beginners:
1. Swaybars are a tuning aid for the Mini. But swaybars are fiddly, not what you want as a beginner. And swaybars are seldom used on the Mini, even by experts.
2. TAM 50473 (Hi-torque servo saver) is stiffer than the stock servo saver, so it is meant for use with strong, metal-geared servos. I found that when assembled according to directions, this servo saver does not center reliably. This means you can adjust your steering trim before a race so your car tracks perfectly straight, but during the race your car will start to drift to the left or right on the straights.
8
Not what you want! When the time comes to upgrade the stock servo saver, I recommend the Kimbrough #124 large black servo saver, which requires no assembly, is stiff, and centers perfectly. This upgrade is TCS legal.
Assembly ideasHere are some ideas to help you build a Mini that’s more reliable and easier to work on.
If you’ve bought an “expert built” RTR Mini, take it apart and rebuild it, both to learn how it works and to improve how it is built. Soon you will be more of an expert than the expert who built it!
1) Tire gluingYou’ve probably heard that you must glue the tires to the wheels. You also need to glue your foam insert strips into rings. (David Beale mentions using tape but I don’t know what kind of tape works for this.) Use contact cement for the foam insert strips and use medium or thin CA glue for the tires. Clean the mating surfaces of the wheels and tires with motor spray before gluing.
2) Receiver mountDavid Beale recommends that you mount your receiver inside the rear part of the chassis. Use self-stick Velcro to mount the receiver. The slight looseness of the Velcro mount is good because it reduces shock to the receiver.
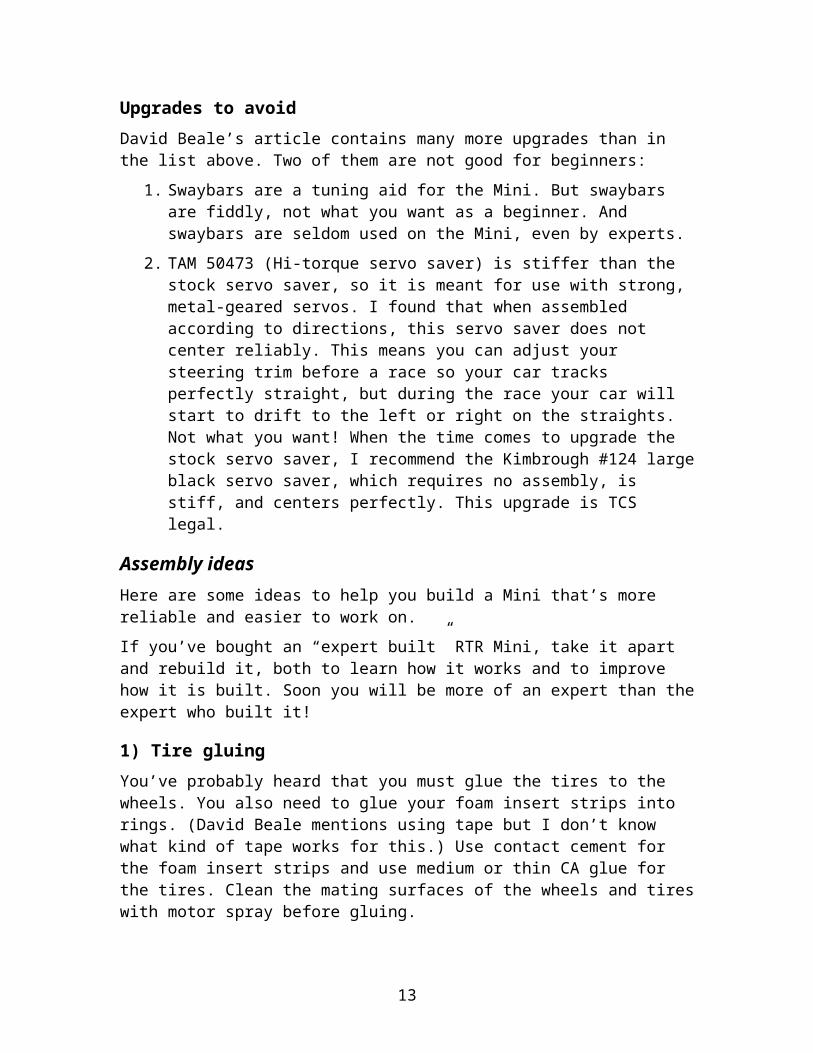
3) Personal transponder mountAMB specifies several rules to follow when mounting their personal transponders onto an R/C car. The transponder should be mounted horizontally, far from the receiver, with a minimum of graphite or metal below or above. The mounting location must also be well protected against crashes.
The best place I found on the Mini for the personal transponder is immediately in front of the servo saver, behind the arms of the front shock tower, roughly on top of the drive cups. There is some metal below the transponder (in the differential), but I’ve never experienced a lap counting or radio interference problem with the transponder in this location. The actual mounting is done with servo tape (double-stick foam-core tape) and Shoe Goo. Shoe Goo (also known under the brand name “Amazing Goop”) is widely available; for instance, Fred Meyer has it.
9
Personal transponder mounted behind shock tower and in front of servo saver
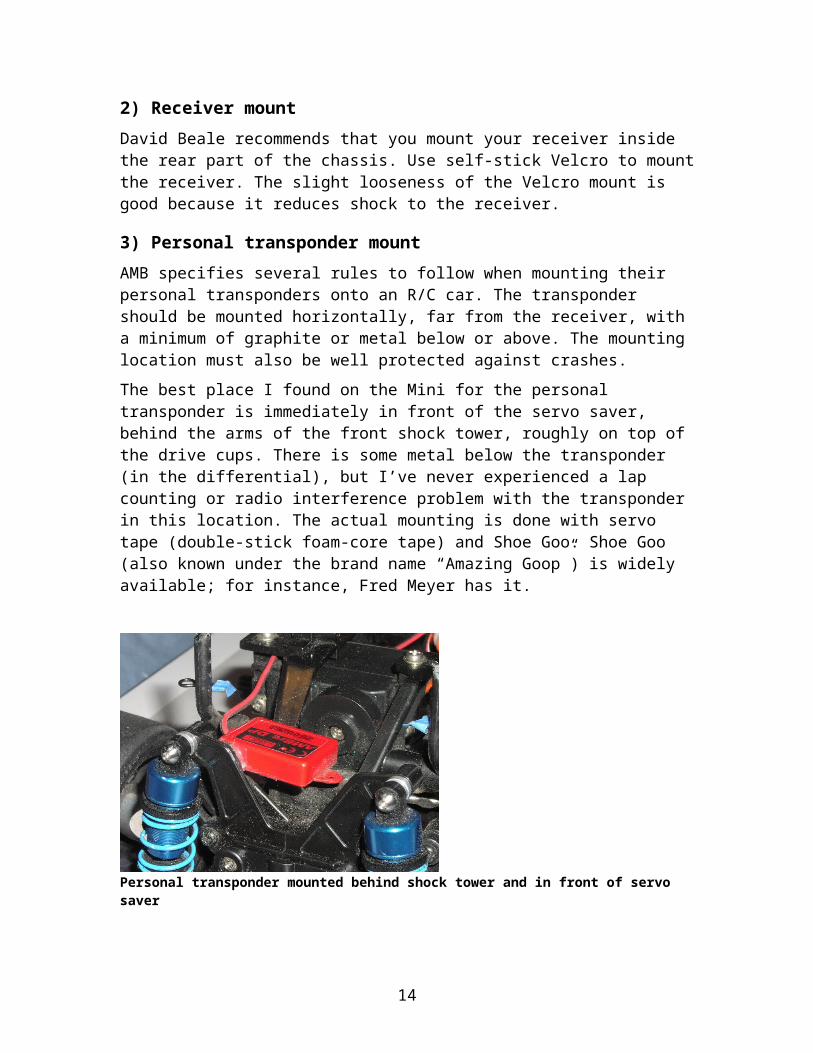
To mount the personal transponder this far forward with the receiver in the rear of the car you’ll need to extend the transponder’s power wire.
To keep that long power wire (and the nearly-as-long servo wire) from dragging on the ground or getting wrapped around an axle, go to Radio Shack and get part number 278-1668 (Mini Wire Clips). One clip on top of the middle of the chassis should do it.
Rear view of Mini showing Radio Shack mini wire clip, Velcro receiver mount, and Dean's Plug
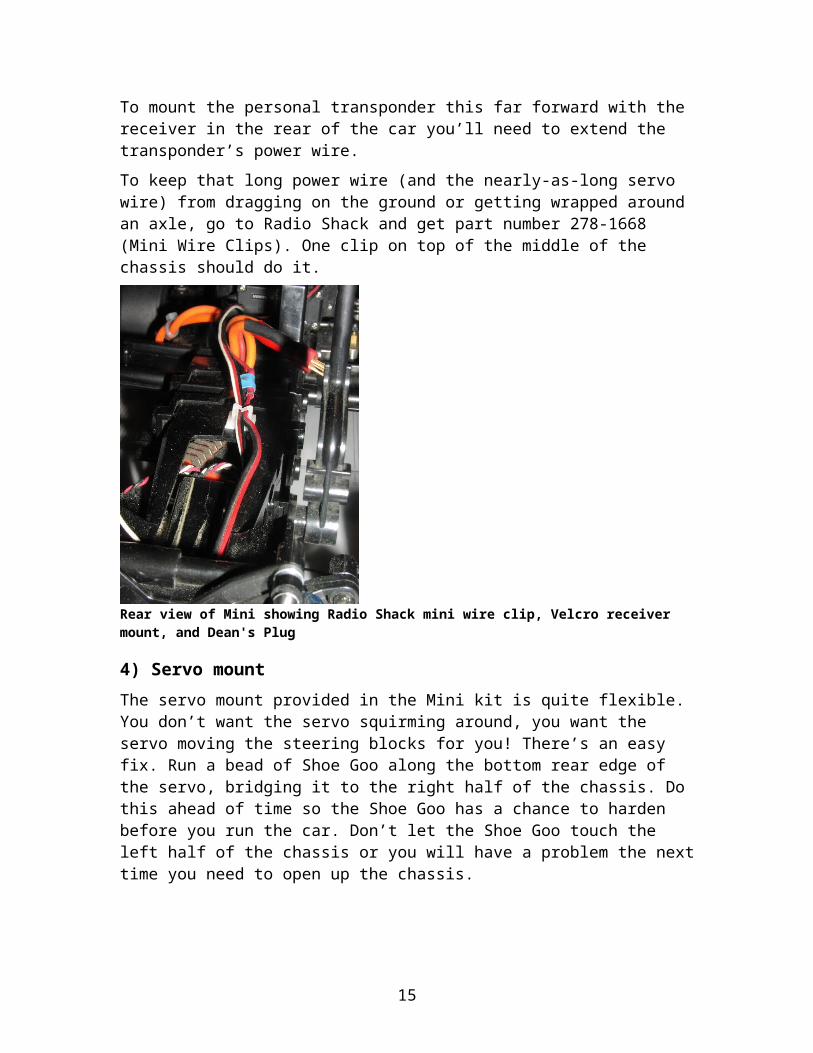
4) Servo mountThe servo mount provided in the Mini kit is quite flexible. You don’t want the servo squirming around, you want the servo moving the steering blocks for you! There’s an easy fix. Run a bead of Shoe Goo along the bottom rear edge of the servo, bridging it to the right half of the chassis. Do this ahead of time so the Shoe Goo has a chance to
10
harden before you run the car. Don’t let the Shoe Goo touch the left half of the chassis or you will have a problem the next time you need to open up the chassis.
Servo mount showing Shoe Goo
5) Motor mount and gear meshThe kit includes a fiber shim to place between the motor and the motor mount on the chassis. It is tempting to think this fussy shim is not needed, but it really is needed. The function of this shim is to keep dirt from working through the motor and into the gearbox, and it works. You will save lots of maintenance by running with this shim in place.
Mounting the motor is easier if you taper the ends of the motor mounting screws slightly: a 45 degree taper reducing the diameter of the end of the screw by half. Make the taper carefully with a file or Dremel tool. The pointedness of the motor screws helps the screws find the mounting holes in the shim and in the motor.
Once you get the motor mounting screws started, screw them in all the way and then back both screws off half a turn. Hold the chassis nose-up and move the motor down, away from the spur gear, making the gear mesh as loose as possible. Still holding the chassis nose-up, tighten both motor screws fully – snug, not a dying strain.
6) Drive cup lubricationApply grease to both ends of your dogbones if you use dogbones. If you have front axles with universals, apply grease to the end that fits in the drive cup. TAM 53439 (Anti-Wear grease) is great for this, but expensive. Team Associated 6588 black grease is cheaper and would work. Don’t run your drive cups dry or they will wear out very quickly.
7) Camber link screwsThe camber links are the upper suspension links, one per wheel. On the Mini the camber links are attached at each end (one end to the chassis, the other end to a front or rear hub) using shoulder screws – screws that have a smooth portion that pivots inside a hole that’s sized to fit.
This is a great system except that some of the screws have a strong tendency to work loose. Two runs can do it. You can either retighten these screws constantly or you can
11
glue them. To glue one, first clean the threads of the screw. Then apply a small amount of CA glue to the hole the screw threads into – not the hole the shoulder pivots in. Thread in the screw, and some of the glue will come out the other side, where you can wipe it off. Let the glue set before doing the other end of that link.
8) Kingpin screwsWhen you run aluminum front uprights, the kingpin screws are prone to coming loose. Use a small amount of blue Loctite on the threads of the kingpin screws before assembly. By “small amount” I mean: lightly wipe off the Loctite after you apply it, so the compound remains only within the threads of the screw. This is plenty. You want the screws to come out when you need them to.
9) Self-tapping screwsThe Mini is held together with a large number of small self-tapping Phillips-head screws. It is very important not to over-tighten these screws. Just tighten until snug – do not give it “a bit more to be sure” or you will end up with stripped parts. The way to “be sure” is to apply a tiny dab of Shoe Goo under the screw head before tightening it.
10) Wheel nutsCheck your wheel nuts before each run. If you ever notice a wheel nut coming loose, do not tighten it; throw it away and use a new one.
MaintenanceOne of the Mini’s strengths is low maintenance. Here’s what you need to do.
1) Battery careBattery care was a big deal with NiCd and NiMh batteries, but not so much with LiPo. After a race day, leave your battery with at least 50% charge. Most chargers will tell you how much charge you put in, and you can use this to judge the state of charge after a normal race. If you need to add a little charge to get back to 50%, use your charger.
If you don’t plan to race again for several weeks, it is a good idea to run your battery down to 50% charge. If your charger has a discharge function, use it. If you skip this step it is not a big deal – your battery will still last a long time.
2) Motor maintenanceAt least once per race day it is a good idea to remove the motor from the chassis to clean it with motor spray. I use a 4-cell battery pack (made from old rechargeable cells) and alligator clip leads to power the motor during the cleaning. None of the speed controls I’ve used require removing the speed control’s power leads from the motor when attaching the 4-cell pack, which makes cleaning much easier. Check this with the manufacturer of your speed control.
When spraying the motor, spray directly onto the commutator and onto each bushing. Let the spray dry off, then lubricate the bushings with a light oil.
12
Even if you don’t have time and skip the cleaning, at least lubricate the bushings once each race day.
3) Tire maintenanceThe tire-wheel glue joints on the Mini are under a lot of stress due to flexing of the tall sidewalls. Check the integrity of the glue joints before each race day and repair with CA glue as needed. Your Mini will handle better and you won’t have to retire from a race because a tire has come off of its wheel.
4) Quick checksAfter each run, work the suspension in each corner of the car and inspect for correct operation. Sometimes a spring gets cocked on its retainer which tweaks that corner of the car. The top and bottom front shock attachments are vulnerable and can bend in a bad crash, resulting in a tweak. Keep spares of these if you can.
Indoor SetupThe David Beale article gives a setup that’s a great starting point for running outdoors on asphalt. But you’ll do better with a slightly different starting point for indoor racing on carpet.
Any of the three tire options given above might be best, depending upon the situation. Each option has a different feel and you should experiment with all three if you can, borrowing a set of tires from a fellow racer if needed. Tires are by far the most important part of your setup.
If you run your Mini outdoors for fun between indoor races, it is best not to use your indoor racing tires for outdoor running.
Indoors, I run TAM 53632 (TRF Short Damper Spring, Hard, Blue) springs on the front and TAM 53631 (TRF Short Damper Spring, Medium, Yellow) springs on the rear. The rest of my shock setup follows the David Beale article.
Since the Mini has fixed-length upper suspension links, setting the ride height also sets the camber and vice-versa. Lowering the ride height increases the camber.
On most cars, if the rear end needs more side-traction you run the rear end lower than the front to help hook up the rear. On the Mini this is even more tempting because of the extra camber you get by lowering the rear. However there is a gotcha when you lower the rear. The rear suspension of the Mini has limited up-travel, because the rear body mounts get in the way. (It is not legal to grind material off of these body mounts to increase the suspension up-travel.) Even on a smooth track the Mini needs up-travel to allow it to lean while cornering. Running soft springs in the rear increases the lean. If the rear suspension runs out of up-travel while cornering, weight will transfer suddenly across the rear, causing an immediate loss of traction. The car will “hook” uncontrollably during corner entry, especially when entering a turn at high speed. To prevent this from happening you must run plenty of rear ride height, which gives the necessary up-travel. A 6mm rear ride height seems to give enough up-travel.
13
Using TAM 49442 rear hubs eliminates the limited up-travel problem and allows you to run the rear of the Mini lower. I have not experimented with this option, which is fairly expensive and arrived long after I’d built my Mini.
Having set the rear ride height, you set the front to balance the car. Running a low ride height (and lots of front camber) as is commonly done outdoors can give too much front side-traction indoors. The extra front camber will also decrease forward traction. Experiment with front ride height and see what works for you.
The final thing I tune on the Mini is the front toe. Outdoors I run a little front toe-out, but indoors the toe-out can make the car turn-in too hard, and it reduces on-power steering. So I usually run zero front toe. Be sure to experiment with this adjustment to see what suits your driving style, and don’t forget that changing the front ride height will change the front toe.
Keep in mind that track conditions indoors vary from week to week. Your car that was working perfectly last week might be a little off this week. You may need to make small setup changes each week to balance the car.
DrivingHere are a few ideas on learning to drive your Mini.
There is no substitute for “stick time.” Play with your Mini in a cul-de-sac or in an empty parking lot. Show up early for club races and get track time. Having two LiPos will allow you to get more track time because you can run one while charging the other.
When you are practicing on your own, set up a track layout to improve your car control. Start with an oval, then progress to a figure-eight before trying more elaborate layouts. Run your layout in one direction, then the opposite direction. You can make a corner marker by duct-taping a sheet of white copy paper to the ground. Or use a garden hose to define the inside radius of a turn. When driving, don’t look directly at the corner marker: Look where you want your car to go, perhaps three feet outside the marker. If you drive over or inside of the marker, that would be a crash in a race. See if you can go five minutes with no crashes.
When you roll the Mini it will often land on its side. Try to flip your Mini back up off its side by steering toward the side that’s on the track and using some throttle. If this works, it will save a lot of time waiting for turn marshals during a race. If your Mini can’t do this trick you must be running a loose gear differential, which is OK but can prevent this trick from working.
Find a comfortable position for your fingers on the steering wheel and leave them there as you drive. Do not remove your fingers from the wheel. When you want the Mini go straight, steer the wheel back to the neutral position. Keeping your fingers on the wheel accomplishes two things. First, you control the wheel movement and don’t overshoot the neutral position. Second, if you need to make a steering correction you can make it immediately.
Experiment with “loose” and “tight” feeling setups on your Mini. The simplest way to do this is by playing with the tires. Try applying Paragon to your front tires but not the rears. This should give you an extreme “loose” feeling car – the rear end wants to swing out as
14
the front pulls through turns, so you have to slow down. Later, apply traction compound just to your rear tires but not the fronts. This should give you a “tight” feeling car – the front end of the car tries to turn but the rear end does not drift out at all, so you have to slow down. In both cases try running in an oval or figure-eight with medium diameter turns to get a feel for how the car transitions and turns when it is loose or tight.
Try driving a faster driver’s Mini. You will probably find that it is looser and feels more twitchy than yours. Practice with looser setups to develop your driving skills, but race with a setup you are comfortable with.
ConclusionThe Tamiya Mini is a great race car. With a few upgrades and a little attention to detail in the assembly, you will find it reliable, low-maintenance, and fast. Have fun with it!
Revision history11 June 2005. Initial version.
27 September 2005. Added information about tires for indoor racing at Issaquah Community Center.
29 April 2006. Added section on setup for indoor racing.
9 April 2009. Updated with information on more recent Tamiya kits and option parts. Removed Issaquah-specific information, and added Hangar 30 information. Added material to the section on assembly (kingpin screws, self-tapping screws, wheel nuts), extracted from the enduro doc.
13 April 2009. Added information about how to avoid LiPo over-discharging.
2 December 2009. Added information about M-Grip tires.
15