the world war iii tank skirmish game · lance matthew, shana matthew, brody mazuirck, ludmila...
TRANSCRIPT

THE WORLD WAR III TANK SKIRMISH GAME

COLD WAR
EUROPE
U S S R
FRANCE
ITALY
GERMANY
DENMARK
SWITZ.AUSTRIA
CZECHOSLOVAKIA
HUNGARYROMANIA
BULGARIA
ALBANIA
YUGOSLAVIA
GREECE
TURKEY
EGYPTLIBYA
TUNISIAALGERIAMOROCCO
KEYNATO
WARSAW PACT
NEUTRAL
N O R T HS E A
A T L A N T I CO C E A N
B L A C K S E A
M E D I T E R R A N E A NS E A
SPAIN
SICILY
UNITED KINGDOM
ICELAND
IRELA
ND
NORWAY
PO
RT
UG
AL
SWEDEN
FINLAND
POLAND
(UNION OF SOVIET SOCIALIST REPUBLICS)
In 1945, at the end of the Second World War, Germany was divided into a Communist East Germany and a Capitalist West Germany. The divide between East and West intensified in 1949 when France, the United Kingdom, the United States, and other minor states formed NATO (North Atlantic Treaty Organisation) for mutual defence, and then intensified further when the Soviet Union responded with the creation of the Warsaw Pact, uniting all of the Soviet-aligned states, in 1955. Now, the world holds its breath as tensions in divided Europe reach a boiling point .
NATO AND THE WARSAW PACT

1
The attack came quickly after news of the Soviet advance reached you. Your men have been preparing for this battle, but the reality of it actually happening is still hard to comprehend. But they’ve really started it -World War III.Your orders are to hold the ridge, no matter what, and that’s what you plan to do. Scanning the battlefield you see your ITVs open fire on the advancing Soviet tanks as they pour out of the distant treeline and into the valley. Now is the time to act.They may have started this war, but you’re going to end it!
What is TANKS: The Modern Age?TANKS: The Modern Age is an easy-to-learn, quick-play, small-scale game, where you take command of a Tank Platoon, seeking to destroy your opponent’s tanks and secure victory. TANKS is a flexible game with lots of ways to create a finely-tuned platoon that fits your play style.The game is fast and furious, do-or-die. In an hour, you can pick your tanks and crew, upgrade them to your specifications, defeat your enemy (or die trying), and be ready for the rematch!
Written by:Andrew Haught, Chris Townley
Editors:Peter Simunovich, John-Paul Brisigotti
Graphic Design:Sean Goodison
Additional Writing:Michael Haught, Aaron Te Hira-Mathie, Phil Yates
Miniatures Design:Evan Allen, Tim Adcock, Will Jayne
Artwork:Vincent Wai
Playtesters: Morgan Cannon, Casey Davies, Rob Duchesne, Andrew Duncan, Steve Eyles, Luke Glover, Kit Goldsbury, Ryan Jeffares, Peter Katelaan, Daniel Linder, Greg Lockton, Lance Matthew, Shana Matthew, Brody Mazuirck, Ludmila Miranda-Dukoski, Jonathan Peace, Jace Pipin, Charlie Roberts, Gavin Van Rossum, Rob Sadler, Jeff Stehr, Kyle Stevens, Lorne Sveinbjornson, Wayne Turner
Proof-readers:David Adlam, Tom Culpepper, Marc Dodinot, Carsten MacLean, Michael McSwiney, Gregg Siter, Stephen Smith
CONTENTSForces of WWIII 2
Components 4
Playing the Game 7Turn Sequence 7Game Set Up 8Movement Phase 9Moving Through Terrain 10Shooting Phase 12Command Phase 19
Special Rules 20
Building your Platoon 21
Missions 22
Your First Game 24
Last Battle of Alpha 66 25
Quick Reference back cover
All rights reserved. No part of this publication may be reproduced, stored in a retrieval system, or transmitted, in any form or by any means without the prior written permission of the publisher, nor be otherwise circulated in any form of binding or cover other than
that in which it is published and without a similar condition being imposed on the subsequent purchaser.
© Copyright Battlefront Miniatures Ltd. All rights reserved. ISBN: 978-1-98-855804-2

2
This is not a war we wanted, but we are prepared to fight it. Our men have been drilled
over and over again. They are ready for this, but war is war. We must be careful and we must maximize our tactical
advantage. Hit them where it will hurt the most, hit them hard and fast and don’t give them a chance to regroup and continue their assault. We need to hold them back until we can gather our forces and form a strong counterattack.
The war has become inevitable, we can see that. The Western Allies talk about peace, but
they don’t really mean it. They want this war and if we don’t strike them first, we will be the ones being attacked. The orders have been sent out, the plans have been created, reviewed, and found
to be sound. We will press the attack, never relenting in our constant advance. NATO will not be an easy foe to defeat, but with our numbers and superior technology we will crush the capitalists and free the rest of Europe from their oppression.
FORCES OF WWIIIAMERICAN
SOVIET
IPM1 Abrams M901 ITV
T-64 BMP-2

3
Once again the world is at war. Our men are some of the best fighters on the battlefield. We
will use our brains and clever tactics to turn the shortcomings of our equipment
into advantages. We need to be quick on our feet, outflank the enemy, and aim for their weak side armour. If we strike true, the enemy will never know what hit them.
They may have divided our homeland, ripped it apart after World War II, but now
we are once again called to defend Germany. This war will be fought in
our hometowns. We will be fighting not only for our lives, but for our families. We will not back down. We will fight until the last to defend everything we hold dear.
Listen up, men! We have prepared the best defence we could. We need to hold them
off. The Soviets will most likely come at us sooner than later, so let’s keep them
guessing. Don’t give away your position until you have good shots and can take them unawares. Keep to our defensive plan and buy our forces the time they need to counterattack.
FRENCH
WEST GERMAN
BRITISH
Chieftain
Leopard 2
Swingfire
Leopard 1
AMX-30 AMX-10P

4
Base StatsThese four numbers represent the basic fighting capabilities of the tank.
Initiative . This determines the order in which Models move and shoot during the turn.
Attack . This shows how many dice you roll each turn when shooting.
Defence . This helps determine how many defence dice you roll when shot at.
Damage Capacity / . This shows how much damage this Model can sustain. This is shown as a number and with Damage Points that can be crossed off with a dry-erase marker.
Tank/Helicopter Symbol / .The symbol shown next to a Model’s damage capacity determines whether it is a Tank (like the US M1 Abrams above) or a Helicopter (like the Soviet Hind shown here).
Point ValueThis is how much the card costs to add to your army.
KeywordsThese keywords tell you what special rules apply to your Model.
CountryThis symbol identifies the country that fielded this tank.Model Name
This is the name of the Model.
Special RulesThis text gives more detail on the Model’s special rules.Flavour TextThis italic text provides interesting information about the Model that is not related to the game.
Ammo SlotsUnlike Tanks, some Helicopters may be upgraded with multiple Ammo cards, one for each Ammo Slot on their card.
Crew SlotsYou can add one Crew card to your Model for each Crew Slot.
MODEL CARDS
HELICOPTER CARDS
MODELS
CREW AND UPGRADES
COMPONENTSModelsModel is the term used for any individual miniature in the game. When the rules talk about a Model, they refer to both Tanks and Helicopters.
Model CardsThese reference cards can be used to keep track of your various Models’ stats as well as any damage they have taken.
These are split into two types: Tank cards marked with a , and Helicopter cards marked with a .
Crew and Upgrade cards represent the extraordinary soldiers or additional equipment that separates an individual tank from the factory standard, they are used to modify a Model’s Base Stats or give them extra abilities.

These cards are used when a Model scores a Critical Hit.
TANKS makes use of several six-sided dice. Throughout the game these will be used to determine the effectiveness of your shooting and defence, and to resolve other uncertain events.
5
Flavour TextThis italic text has no mechanical effect in the game.
CREW AND UPGRADES
CRITICAL CARDS DICE
CountryThis symbol identifies which country can use this card.
Card Type /Some cards are restricted to Tanks or Helicopters, and are marked with an appropriate symbol.
Card NameThis is the name of the Upgrade or Crew card.
Card EffectThis tells you what the card does during the game.
Nation SpecificThe dice included in the TANKS starter set are marked with a national symbol in place of the 6.
Card TypeA Model is limited to one Upgrade or Crew card of each type.
Point CostThis is how much the card costs to add it to your army. This is printed on the back of the upgrade card as well.
HeroHero cards are marked with a medal. You may not have multiple copies of a Hero card in your Platoon.
CRITICAL CARDS
DICE
Card NameThis is the name of the Critical card.
Special Effect Some Critical cards have additional and lasting effects on the target.
Tank or Helicopter Icons / Some Critical cards have two effects listed, the first applies only to Tanks , the second only to Helicopters .
Damage EffectSome Critical cards do damage.
RepairableSome Critical cards with Special effects are Repairable, these can be repaired during the Command Phase.
Hidden CardsUpgrade and Crew cards are hidden at the start of the game by placing them face-down next to their Model’s card. When you want to use the ability on a card you must Reveal it. When Revealing a card, flip it face-up for the rest of the game. You may Reveal a card at any time.
Hidden cards still have their card types while hidden. For example, if a card like Ammo Explosion requires you to discard all Ammo cards on your Model, this will include face down Ammo cards.
Eye Icon Crew and Upgrade cards with a large Eye icon on the back must start the game Revealed.

The player with advantage
wins initiative ties
Platoon cards represent some of the training, fighting style and even orders that have been given to the troops in
your Platoon. This card will grant Special Rules that apply to all the Models in the Platoon.
6
SpeedThese numbered tokens indicate how many times a Model moved this turn.
ElevationHelicopters can fly Low to the ground or High in the sky. This token can be flipped to indicate what elevation your Helicopter is using and also helps determine its Forward Firing arc.
AdvantageThis token is given to the player who currently has Advantage. The player with Advantage wins all Initiative ties.
Damage or DestroyedThese tokens can be placed next to Models to indicate whether they have been damaged or destroyed.
ObjectivesThese tokens are used during certain Missions (see page 22).
Tank IdentificationThese paired tokens can be used in bigger games to keep track of which card belongs to which Model.
CountryThis identifies the country that can field this platoon.
AlliesPlatoons will be marked with either a NATO or Warsaw Pact symbol. Other cards or special rules will reference this.
Platoon NameThis is the name of the Platoon.
Special RulesThis text gives more detail on the Platoon’s special rules.
PLATOON CARDS
TOKENS
Flavour TextThis italic text provides interesting information about the Platoon that is not related to the game.
PLATOON CARDS

7
PLAYING THE GAME
TURN SEQUENCE
GENERAL RULES
During a game of TANKS, players will play through a number of turns until one player achieves victory. Each turn consists of three phases:
1. Movement PhaseIn this phase players will move each of their Models in Initiative order, from lowest to highest.
2. Shooting Phase In this phase players have a chance to shoot with each of their Models in Initiative order, this time starting with the highest and moving on to the lowest.
3. Command Phase In this phase players will mark destroyed Models, repair special damage, check for victory conditions, shuffle the Critical card deck, and clear all Speed tokens from the table.
Throughout this booklet you’ll find sample text written into this sidebar. These examples will give you a step-by-step account of a game of TANKS and will help you to understand the rules in the context of an actual game.
Rules ReferencesThroughout the rules you will find boxes like this one. They contain additional information, usually pointing you to other sections of the rules that are relevant to the current section.
you may upgrade a Critical Hit into two normal Hits. If you also had a Crew card that let you upgrade a Hit to a Critical Hit, you would not be able to modify the dice affected by the Sharpshooter rule.
TANKS has a core set of simple rules that makes the game easy to learn. If you want to get straight into the action, you can turn to page 24 and start playing Your First Game with a Soviet T-64 versus an American M1 Abrams.You can also read through the complete rules before playing the Last Battle Of Alpha 66 on page 25. This scenario includes the added depth of Crew and Upgrade cards.
Crew and Upgrade cards represent special equipment or unique individuals that may contradict the rules on this book. Where this may happen the specific rule rule on the card overrides the general one in this book.
Re-Rolling And Modifying DiceDuring the game, some rules will let you Re-roll or Modify a die result. A die that has been Re-rolled once cannot be Re-rolled a second time and a die that has been Modified may not be Modified again. For example, if you have an American Tank with the Sharpshooter rule, then
MEASURING ARROW
FLIGHT STAND
The Measuring Arrow is used for many tasks in TANKS, including Terrain and mission set up, movement, and checking
Each Helicopter in the game uses a flight stand made up of two parts, the Base and the Stem. Different game measurements are made from these two components, such as movement and Line of Sight.
The Head
The Stem
The Base
The Tailfor Close Range.
The tail shows how far a Tank can move. The whole template is used for other measurements like Helicopter movement.

8
GAME SETUPTABLE SETUP
DEPLOYMENT
TANKS is played on a 3’ x 3’ or 90cm x 90cm table.Both players start the game by rolling a die. The player with the higher roll places the first piece of terrain, a Forest. Players then alternate placing terrain, starting with the other Forest and moving on to the four Buildings, until all six terrain pieces have been placed.Terrain pieces may not be placed within a Measuring Arrow of another piece of terrain or any table edge.
Attacker or DefenderAfter the terrain is set up, each player rolls another die. The player with the higher result may choose whether to be the Attacker or Defender. The Attacker starts with Advantage while the Defender chooses which side of the table they want to deploy on.
Initiative Ties and AdvantageIn some cases multiple Models may have the same Initiative value, in this case the player who has Advantage counts as having the higher Initiative value in ties.
Trading AdvantageIt is unlikely that the Attacker will retain Advantage for the entire game. During the Command Phase, there is a chance it will change sides.See page 19.
The Defender now chooses a table edge to deploy from. The Attacker will deploy on the opposite table edge. The players place their Models on the table in Initiative order. The Model with the lowest Initiative is placed first, before moving up through higher Initiative values. To deploy a Tank, place the Measuring Arrow so that it is touching your edge of the table. Place the Tank square against the tail of the Measuring Arrow.To deploy a Helicopter, place the Measuring Arrow so that it is touching your edge of the table. Place the Helicopter so that its base is touching any point on the Measuring Arrow.
Because the Soviet player is the Attacker, and starts the game with Advantage, the US player must place their M60 tank (6 ) before the Soviet T-64 tanks (6 ). The player with Advantage wins Initiative ties.
Once all the T-64 tanks are placed the US player deploys their M1 Abrams tanks (8 ).
DEPLOYMENT
M1 AbramsM60
Alexei and Bannon are getting ready to play a
game of TANKS. Each rolls a die. Alexei rolls high with a 5, beating Bannon’s
3, so he places the first piece of terrain, a forest. Bannon then places the
other Forest. They continue to take alternating turns to
place the four Buildings.
Next, they roll dice to determine who is the
Attacker and the Defender. Bannon wins this roll and
elects to defend. Alexei will start the game with Advantage, letting him win Initiative ties, but
Bannon will get to choose where he wants to deploy.
After choosing a table edge, Bannon deploys his M60 tank there. Even though
it has the same Initiative as Alexei’s T-64 tanks,
Bannon has to deploy it first because Alexei has the Advantage. Moving up the
Initiative order, Alexei’s tanks are placed next, followed by Bannon’s
M1 Abrams tanks.
If you have Initiative ties between Models in the same Platoon, the owning player chooses the order in which those Models take their actions.

9
THE MOVEMENT PHASEIn the Movement Phase, both players have a chance to move all of their Models, maneuvering for cover or lining up shots.
Tanks FirstIn this phase, the players will move all of their Tanks first and then all of their Helicopters.
Initiative In the Movement Phase, players will move Models with the lowest Initiative first and proceed up through the Initiative order to the Model with the highest Initiative until all Tanks have moved, then repeating for Helicopters.
Staying StationaryYour Model does not have to move. If you leave the Model where it is, you do not gain a Speed token. Instead, your shooting becomes more effective. Any Model that does not have a Speed token is considered to be Stationary.
SpeedAll Models can make multiple moves per turn, with a maximum number of moves limited by their Speed.Tanks have a Speed of 2, while Helicopters have a Speed of 3.
T-64 tank
Alexei and Bannon are both fielding a mixed force of both Tanks and Helicopters.
Just like at Deployment, Bannon’s M60 tank must move first, before Alexei’s T-64 tanks, since Alexei has the Advantage.
This allows higher initiative models to react to the movements of others and can try to out-maneuver them.
Afterwards, Alexei will move all of his T-64 tanks, followed by Bannon’s M1 Abrams tanks.
Moving a TankTo move a Tank, place the Measuring Arrow touching any part of the Tank and pointing in any direction. Then pick up the Tank and place it anywhere along the Measuring Arrow, so that the hull is square against the Tail.
Moving a HelicopterTo move a Helicopter, place the Measuring Arrow touching any part of the Helicopters Base and pointing in any direction. Then pick up the Helicopter and place it anywhere along the Measuring Arrow so that its base is touching any part of it.
Models Moving Through Helicopter BasesA Model may move through a Helicopter base, but not end its movement in a position where any part of it or its Base is overlapping a Helicopter’s Base.
Helicopters Moving Through TanksHelicopters moving over Tanks must end the move in such a way that no part of its Base is touching the Tank.
Tanks cannot move past the Tail of the Measuring Arrow.
Tanks can rotate using the Measuring Arrow.
TANK MOVEMENT
Tanks must end their move square against the Tail of the Measuring Arrow.

10
Changing ElevationOnce per turn a Helicopter can change its Elevation when it moves, if it is flying Low it can change to High or vice versa.A Helicopter can also choose to stay still and change its Elevation. To do so place a Speed 1 token next to the Helicopter and flip over its Elevation token.
Place Speed TokenAfter moving a Model, place a Speed token next to it to show how many times it moved. The faster your speed, the harder you will be to hit, but the harder it will be for you to hit the enemy.
Defensive MeasuresInstead of moving a Model, you may add Speed tokens up to its Speed even if you don’t change its physical placement. This is to indicate Helicopters taking evasive action or Tanks discharging their onboard smoke grenades.
HELICOPTER MOVEMENT
Helicopters must end their move touching the Measuring Arrow, but unlike Tanks they don’t have to line up with the Measuring Arrow Tail.
Before moving, determine whether the helicopter will be flying High or Low. Once it has moved, place an Elevation token against the base.
After all their Tanks have moved, Alexei and Bannon
take turns to move their Helicopters.
Both Alexei’s Hind and Bannon’s Cobra both have Initiative 7. Once again,
the Models are tied for Initiative, so the Soviet
player having Advantage forces the Cobra to
move first.
MOVING THROUGH TERRAINImpassable TerrainTerrain that is Impassable may not be entered and Models cannot end their movement on that piece of terrain. When moving a Model you cannot place the Measuring Arrow in such a way that it would make the Model move through Impassable Terrain. Some types of terrain are Impassable to some Models and not others.
ForestsForests are Impassable Terrain to Low Flying Helicopters.
BuildingsBuildings are Impassable Terrain to Low Flying Helicopters and Tanks.
High-fliersWhile flying High, Helicopters can move through any terrain.
The TANKS Starter Set comes with two Forests and four Buildings.
Shooting on the MoveStationary Models and Models moving at various speeds will be affected differently when it comes time to start shooting.See page 16-17.

11
FORESTS
BUILDINGS
HIGH FLIERS
While flying High, Helicopters can move through any terrain.
Impassable
Models must stop where the Measuring Arrow crosses Impassable terrain.
Models may not end their movement in Impassable terrain.

12
THE SHOOTING PHASEIn the Shooting Phase, both players have a chance to shoot with all of their Models. Unlike the Movement Phase, both Tanks and Helicopters fire together in the same Initiative order.
The first thing to do when shooting with a Model is pick a target. There are no range limits, so your choice of target is only limited by Line of Sight, and in some cases, the Model’s Firing Arc.
TanksA Tank has Line of Sight to its target if you can draw a straight line from the Tank’s turret to any part of a target Tank or a Low-flying Helicopter’s Base without passing through any other Tank or Blocking Terrain.
Forward FiringTanks with the Forward Firing keyword draw Line of Sight from the center of the front of their hull rather than from the turret.
Low-flying HelicoptersA Helicopter has Line of Sight to its target if you can draw a straight line from the Helicopter’s Stem to any part of a target Tank or a Low-flying Helicopter’s Base.
High in the SkyA High-flying Helicopter has Line of Sight to every Model in the game, and likewise every Model has Line of Sight to a High-flying Helicopter.
LINE OF SIGHT
DRAWING LINE OF SIGHT
Most Tanks draw Line of Sight from the center of their turret.
Tanks with Forward Firing draw Line of Sight from the center of the front of their hull.
All Helicopters draw Line of Sight from the Stem of their Flight Stand.
Having charged one of his M1 Abrams tanks into
position, Bannon checks his Line of Sight and finds
that an enemy T-64 is a viable target. The time for
maneuvering has passed and the M1 Abrams can
now open fire!
Initiative The Shooting Phase starts with the Model with the highest Initiative and proceeds down through the Initiative order to the Model with the lowest Initiative. The player with the Advantage gets to act first in the case of Initiative Ties.
13
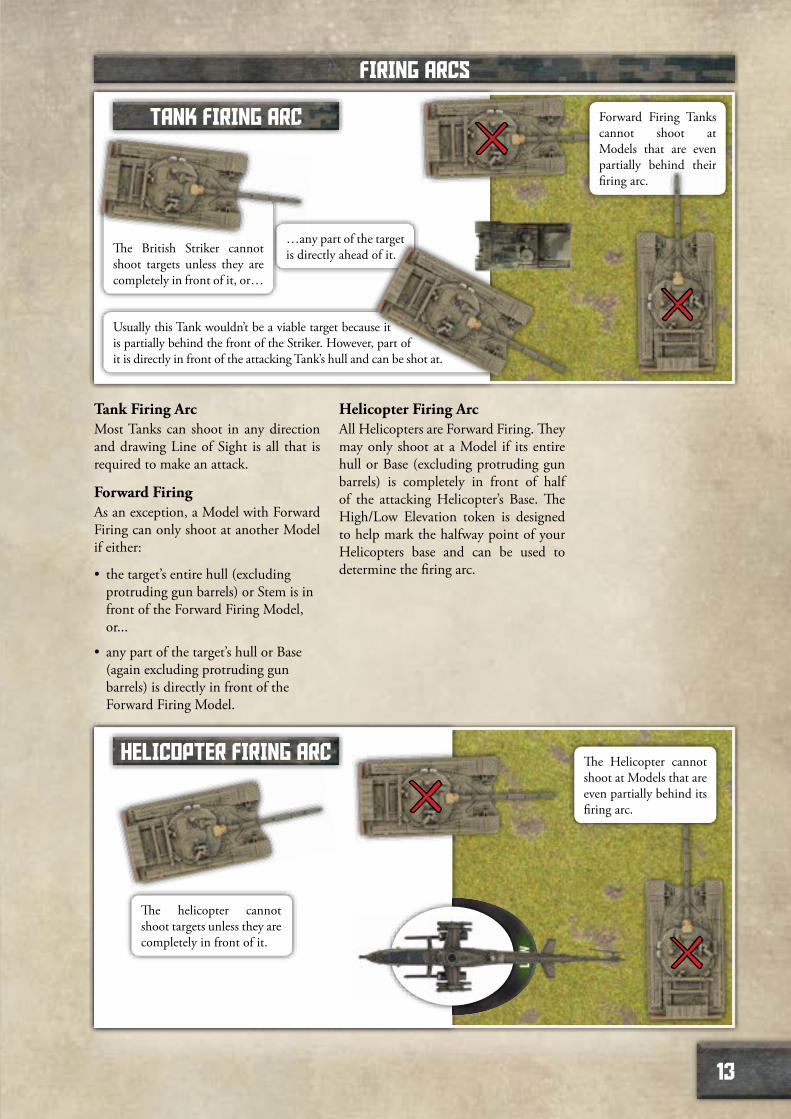
FIRING ARCS
…any part of the target is directly ahead of it.
Usually this Tank wouldn’t be a viable target because it is partially behind the front of the Striker. However, part of it is directly in front of the attacking Tank’s hull and can be shot at.
The Helicopter cannot shoot at Models that are even partially behind its firing arc.
Forward Firing Tanks cannot shoot at Models that are even partially behind their firing arc.
HELICOPTER FIRING ARC
TANK FIRING ARC
The helicopter cannot shoot targets unless they are completely in front of it.
The British Striker cannot shoot targets unless they are completely in front of it, or…
Tank Firing ArcMost Tanks can shoot in any direction and drawing Line of Sight is all that is required to make an attack.
Forward FiringAs an exception, a Model with Forward Firing can only shoot at another Model if either:
• the target’s entire hull (excluding protruding gun barrels) or Stem is in front of the Forward Firing Model, or...
• any part of the target’s hull or Base (again excluding protruding gun barrels) is directly in front of the Forward Firing Model.
Helicopter Firing ArcAll Helicopters are Forward Firing. They may only shoot at a Model if its entire hull or Base (excluding protruding gun barrels) is completely in front of half of the attacking Helicopter’s Base. The High/Low Elevation token is designed to help mark the halfway point of your Helicopters base and can be used to determine the firing arc.

14
BLOCKING TERRAIN
Draw a line from the turret to check if you have Line of Sight to a target.
There is an Unblocked Line of Sight to this tank, so it is a valid target.
All Lines of Sight to this tank are Blocked by the Building.
The left tank is in Line of Sight, but is Blocking Line of Sight to the tank on the right.
SHOOTING AROUND TERRAINBlocking TerrainLine of Sight cannot be drawn through a piece of Blocking Terrain. Because of this, Models can use this terrain to safely approach the enemy or retreat away from a possible attack.
Concealing TerrainConcealing Terrain gives Cover to any Model being shot through it, granting it improved defence.
ForestForests are Blocking Terrain to Low-flying Helicopters and Tanks drawing Line of Sight through them from one side to the other. Forests are Concealing Terrain for Tanks inside them and High-flying Helicopters.
BuildingsBuildings are Blocking Terrain to Low-flying Helicopters and Tanks drawing Line of Sight through them.
TanksTanks, both destroyed and functional, are Blocking Terrain to other Tanks.
CoverSticking to Concealing Terrain and granting your Models Cover will let them roll extra Defence Dice any time they come under fire.See page 17.

15
This Tank does not have Cover as the shooting model can draw lines to three corners without passing through Concealing or Blocking Terrain.
COVER
HIGH-FLYING COVER
Targets have Cover if two or more corners are hidden.
This target has Cover since two corners are in the woods.
This target has Cover since two of its corners are blocked by terrain. One corner is Blocked by the Building and the other by the Forest the M1 Abrams is within.
Tanks in CoverTanks gain Cover if the shooting Model cannot draw Line of Sight to three of its four corners without passing through Concealing or Blocking Terrain.
Helicopters in CoverHelicopters gain Cover if the shooting Model cannot draw Line of Sight to the Helicopter’s Stem without going through Concealing or Blocking Terrain.
COVER
This Tank can draw Line of Sight to either High-flying Helicopter and they both have Cover.
Shooting from Concealing TerrainWhile shooting, Models in Concealing Terrain ignore the terrain directly underneath their Model or Base when drawing Line of Sight to their target.

16
ROLL ATTACK DICEOnce a Model has determined a valid target, it can attempt to Shoot it by rolling its Attack Dice. The number of dice you roll is your Model’s Base Attack number.Each result of 4 or 5 scores a Hit and each 6 scores a Critical Hit.
Shooting While StationaryStationary Models may re-roll any Attack Dice that fail to score a Hit or Critical Hit.
Anti-Air Machine Guns (AAMG)When shooting at Helicopters, Tanks must rely on their Anti-aircraft Machine-guns (AAMG) instead of their main guns. Tanks roll 3 Attack Dice when shooting at Helicopters regardless of their Base Attack number. This attack can’t be modified by Crew or Upgrade cards that affect a Tank’s Base Attack .
Special Anti-Air WeaponsSome models have Special Rules such as Missiles or Rapid Fire, that change the number of Attack dice they can use against Helicopters.See page 20.
Stationary ModelsIf a Model has no Speed token, it is Stationary.See page 9.
ATTACK DICE
The M1 Abrams tank has Attack of 4, so rolls four dice.
If the M1 Abrams was Stationary, it could re-roll any of its failed Attack Dice. In this case, the American player could choose to re-roll the 2 to try and achieve a fourth hit.
With a target in his sights, Bannon rolls the attack
dice for his M1 Abrams. It has a Base Attack of 4, so
Bannon rolls 4 dice.
The results are a 2, a 5, and two 6s. A great roll.
Alexei will have to defend against one regular Hit and two Critical Hits!

17
and two dice for the target Model’s current Speed of 2.
Add one die to the Pool for the shooting Model’s Speed of 1...
ROLL DEFENCE DICEAfter the shooting player has made their Attack roll (and any re-rolls), the target player assembles a pool of Defence dice.
1. Create the PoolThe starting number of dice in the Pool is a Model’s Base Defence number. This is then modified by any bonuses or penalties for Movement, Cover, Close Range, and Side Shots.
2. Shooting Model’s MovementAdd one Defence die for each move that the shooting Model made (as shown by the Speed token beside it).
3. Target Model’s MovementAdd one Defence die for each move that the target Model made (as shown by the Speed token beside it).
4. CoverAdd one Defence die if the target Model has Cover.
THE DEFENCE DICE POOL
By positioning itself in the Forest the T-64 tank gains Cover. This adds a fifth die to the Pool.
However, by firing while in Close Range, the M1 Abrams reduces the Pool by one.
5. Close RangeSubtract one Defence die if the shooting Model is within one Measuring Arrow (including the head) of the target Model. For Tanks you measure this from any part of the Tank’s hull, for a Helicopter you measure this from any part of the Helicopters Base.
6. Side ShotSubtract one Defence die if any part of the shooting Tank’s hull (excluding protruding gun barrels), or Helicopter’s Stem, is behind the front of the target Model.
7. The 6-Dice MaximumA Model can never roll more than six Defence dice. If the dice Pool exceeds this number, reduce it to six before rolling. Alexei has been cautiously
creeping his tank forward through the woods.
In order to mitigate the T-64 tank’s Cover bonus Bannon has moved his M1 Abrams to Close Range.
THE DICE POOL The T-64 tank starts with a dice Pool of one die thanks to its Defence stat.
1.
2.
4.
5.
3.

18
DEFENCE CANCELS HITS
Successful Hits: Defence dice roll:
With a 6, the Soviet player gets to choose a Hit or Critical Hit to cancel. Typically, they will cancel a Critical Hit.
With a 4 or 5, the American player gets to choose a Hit or Critical Hit to cancel. Typically, they will cancel a regular Hit.
After comparing the Attack and Defence rolls, any uncancelled Hits or Critical Hits are applied to the target Model.
SIDE SHOT
In this situation the T-64 tank has moved around the building to shoot at the M1 Abrams.
The M1 Abrams has a Defence of 2, is in Cover, and the T-64 moved once, so it currently has four Defence dice.
However, the hull of the shooting T-64 is partially behind the front of the M1 Abrams, so it has a Side Shot.
This reduces the M1 Abrams tank’s pool of Defence dice by one, leaving it with a total of three dice.
ASSESS DAMAGE
HitsEach Hit that is not cancelled after the Defence roll causes one point of Damage to the target Model. Mark the number against the Damage Capacity / on the Model’s card with a dry erase marker, or place a Damage token next to the Model or on the Model’s card.
Critical HitsThe target player draws a Critical card for each Critical Hit that is not cancelled after the Defence roll.If the card has a Damage Effect, immediately mark that much Damage just as you would for a Hit. Then apply any special effect listed on the card.
Alexei rolls his Defence dice and scores a 1, 2, 4, and 6. Since many of the Critical card effects will hinder his Tank’s return
fire, Alexei chooses to cancel out as many of the
Critical Hits as he can.
Bannon, on the other hand, wants the opposite.
Alexei cancels one Critical Hit with the 6 that he
rolled, and Bannon cancels the regular Hit with
Alexei’s 4.
DEFENCE CANCELS HITSAfter modifying the dice pool, the defending player rolls those dice to try and cancel the attacker’s Hits and Critical Hits.Each result of 4 or 5 cancels a Hit or Critical Hit chosen by the shooting player, and each 6 cancels a Hit or a Critical Hit chosen by the target player.

19
If the card is Repairable (marked with a ), place the Critical card on the Model’s card to remind the players of its effect.Critical cards that aren’t Repairable are placed on the discard pile once they have been resolved.
Helicopter CriticalSome Critical cards have their special effects marked with the Tank and Helicopter symbols.When you draw one of these cards, apply the upper special effect (marked ) if the effect would be applied to a Tank and the lower special effect (marked ) if the effect would be applied to a Helicopter.
Destroyed TanksTanks are only marked as Destroyed during the Command Phase.See below.
Final FuryEven if a Tank has reached its Damage Capacity , and will be destroyed at the end of the turn, it can still shoot when its turn in the Initiative order comes around.
Crash LandingHelicopters are immediately removed from the game when their Damage matches or exceeds their Damage Capacity .
THE COMMAND PHASEThe Command Phase has five steps that clean up the battlefield, preparing it for the next turn.
1. Destroy TanksDuring this step you Destroy any Tanks whose Damage matches or exceeds their Damage Capacity . Tanks with a Base Defence of 0 are removed from the game when destroyed, while all other Tanks get marked with a Destroyed marker.Destroyed Tanks are Blocking and Impassable Terrain for Tanks and Low-flying Helicopters.
2. Check For VictoryIf a mission has unique victory conditions check whether they have been met now.Regardless of any other victory conditions, if at any point your opponent has no Tanks in play (they are all Destroyed or removed from the game), you win.If at any point you and your opponent both have no Tanks in play (they are all Destroyed), you end the game in a draw.
3. Repair DamageEach Model may attempt to repair one Critical card with the Repairable keyword. On a roll of 4, 5, or 6, discard the Critical card.When you repair a Critical card you only remove the card and its special effect. Any Damage taken from a Critical card remains.
4. Roll for Advantage Both sides roll a die, the side with the highest result will have Advantage and will win all Initiative ties for the next turn. If the roll results in a tie, the Attacker has Advantage for the next turn.
5. Reset the fieldRemove all Speed Tokens and shuffle discarded Critical cards back into the Critical deck, ready for the next turn.

20
SPECIAL RULESEach Model card in the game will have a list of Keywords that indicates what Special Rules that Model uses.
Advanced Stabiliser When shooting, this Model may re-roll up to two Attack dice.
Artillery When this Tank shoots, it may draw Line of Sight through other Tanks.
Brutal After rolling Attack dice, upgrade one Hit to a Critical Hit.
FastThis Tank’s Speed is 3.
Forward FiringThis Model has a limited field of fire, see page 13.
Hammerhead The Cover bonus grants this Model +3 instead of +1 .PredatorThis Model must move each turn.When shooting, this Model may re-roll up to two Attack dice and ignores the Shooting on the Move rule for Missiles.
Missiles (X)When shooting, this Model can choose to roll X against Tanks or Helicopters, with the following rules.
Arming DistanceMissiles may not target a Model of the same type that is within Close Range.
MISSILES
Example: a Tank that is within Close Range of both a Low-flying Helicopter and another Tank may only target the Helicopter with its missiles.
Some special rules will have (X) in their name. Where these rules appear on a card, the X is replaced by a number specific to that card. For example, the American Cobra Helicopter has the following rule:Rapid Fire (5): This Model has 5 when shooting at Helicopters or at Models with 0 Base .
Slow FiringMissiles don’t benefit from the Final Fury rule.
Shooting On The MoveA Model with Missiles has a reduced chance of hitting based on its Speed Token:
StationarySpeed
SHOOTING ON THE MOVE
can shoot as normal.This Model...
Speed 1 only scores a Hit on a 5 and a Critical hit on a 6.
Speed 2only scores a regular Hit on a 6 and cannot score Critical hits.
Speed 3 cannot shoot.
Rapid Fire (X)This Model has X when shooting at Helicopters or targets with 0 Base .
Scout The Cover bonus grants this Model +2 instead of +1 .
Spearhead After this Model is deployed, it can make a number of moves up to its Speed.
StabiliserWhen shooting, this Model may re-roll up to one Attack dice.
WheeledWhen moving into or from terrain, this Tank may only make a single move.

21
BUILDING YOUR PLATOONPoint LimitBefore a game, players agree on a set point limit for their Platoons. Try playing your first few games at 50 points and build up to 100 points. Once you get the hang of the game you can play at bigger or smaller point limits. Your Platoon will consist of four different types of cards: Platoon cards, Model cards, Crew cards and Upgrade cards. Most cards have a points cost marked in the upper right corner. Add cards to your Platoon until their total point cost reaches the agreed upon point limit.
Picking Your Country And Your Platoon Special Rule Each player picks a Country and can only select Platoon, Model, Crew and Upgrade cards available to that CountryPlayers then pick a Platoon card that matches their chosen Country. This card will grant Special Rules that apply to all the Models in the Platoon.
Shared CardsIf a Platoon card is marked with the NATO or Warsaw Pact symbol, that Platoon can field Crew and Upgrade cards marked with the same symbol ( or ). These cards represent resources that were widely available to either NATO or Warsaw Pact forces.Global cards (marked with the symbol) can be taken by any Platoon from any Country. These represent
the more common types of Crew and Upgrades that every Country had access to.
Model Cards Your Platoon may contain any mix of Tanks and Helicopters as long as they are from the same Country. When playing a game, these cards are kept face-up so that all players can reference them.
Upgrade and Crew CardsEach Crew and Upgrade card has a Type such as Commander or Ammo
. These cards are each assigned to a particular Model card in your Platoon and you can only assign one of each Type of Upgrade or Crew card to a single Model.
Crew SlotsThe Crew Slots on Model cards indicate how many Crew they can have. For example, a Model with three Crew slots can have a Commander , Gunner , and Loader , but then would not be able to add a Driver since it would already have three Crew members. Likewise, it could not have two cards of the same type, such as two Commanders . Place Crew cards face-down next to the Model card, taking up one Crew Slot each.
Hero Crew Cards Hero cards are special Crew cards marked with a medal . These represent extraordinary heroes that fought during the war. Players can only field one of each Hero Crew card in their Platoon.

22
MISSIONS
TANK ACE
KING OF THE HILL
There are a number of ways to play TANKS beyond the basics. This section describes four different styles of game.
This is the basic game as described in the rules. You win by being the last player with operational Tanks on the battlefield. If you run out of time (or play to a set time limit, say 30 minutes or an hour), the player that Destroyed the most points worth of Models at that time wins the game. Include the points values of any Crew and Upgrade cards that Destroyed Models started the game with.
Attacker Deploys Here
Defender Deploys Here
Attacker Deploys Here
Place an Objective here
Defender Deploys Here
You win this mission either by destroying all of the enemy Tanks, or by holding the centre of the battlefield against all comers.
Table Set UpAfter placing the terrain, place an Objective token in the centre of the board.
Check for VictoryWhen checking for victory in the Command Phase, you gain one Victory Point if you have a Tank within a Measuring Arrow of the centre of the Objective token and your opponent does not. You cannot claim a Victory Point in the first turn.When you score three Victory Points, you win the game.If you run out of time, the player that has the most Victory Points at that time wins the game. In the case of a tie, the player that Destroyed the most points worth of Models wins.

23
FREE-FOR-ALL
NO RETREAT
Defender Places an Objective within a Measuring Arrow of Attacker’s Edge
Attacker Places an Objective within a Measuring Arrow of Defender’s Edge
Attacker Places Two Objectives within a Measuring Arrow of Defender’s Edge
Attacker Deploys Here
Attacker Deploys Here
Defender Deploys Here
Defender Deploys Here
You win this mission by penetrating your opponent’s lines to take your objective, or by just wiping them out.
Table Set UpAfter placing the terrain, each player (starting with the Attacker) places an Objective token within a Measuring Arrow of the opponent’s side of the board.
Check for VictoryWhen checking for victory in the Command Phase, you gain one Victory Point if you have a Tank within a Measuring Arrow of the centre of the Objective token that you placed and your opponent does not. You cannot claim a Victory Point in the first turn.When you score at least two Victory Points and have more Victory Points than your opponent, you win the game.If you run out of time, the player that has the most Victory Points at that time wins the game. In the case of a tie, the player that Destroyed the most points worth of Models wins.
The attacker wins this mission by defeating the defender on their home ground.
Table Set UpAfter placing the terrain, the Attacker places two Objective tokens within a Measuring Arrow of the Defender’s side of the board.
Check for VictoryWhen checking for victory in the Command Phase, the Attacker gains one Victory Point if they have a Tank within a Measuring Arrow of the centre of an Objective token and the Defender does not.The game ends after eight turns. If the Attacker scores two Victory Points before this point, they win the game. Otherwise, the Defender wins the game.
OBJECTIVES
The T-64 tank is within a Measuring Arrow of the Objective.
Since the M-60 tank is not within a Measuring Arrow of the Objective, the Soviet player gains one Victory Point in the Command Phase.

24
YOUR FIRST GAME1. What You Need. You will need the following components to play your first game,• M1 Abrams Tank Card and Model• T-64 Tank Card and Model• Damage Deck• Damage Tokens• Movement Arrow• A space to play (ideally a 3’ x 3’ or 90cm to 90cm)
2. SetupSet up the terrain and Tanks as shown on the scenario map, using the Measuring Arrow.
3. Play The Game
Players move though three Phases each turn.
After building your tanks you are ready to play your first game. For this game we are just using one Soviet T-64 tank and one M1 Abrams tanks.
ForestHouse
A. Movement Phase (page 9)The T-64 has the lowest Initiative so it will move first.To move a Tank, place the Measuring Arrow touching the hull and facing in any direction. Then place the T-64 square against the stem of the Measuring Arrow. Tanks can move up to two times each turn.Place a Speed token showing how many times the T-64 tank moved.After the T-64 has moved it is now the M1 Abrams tank’s turn to move. Once both Tanks have moved (or chosen to stay Stationary) it is time to start shooting.
B. Shooting Phase (page 12)Since the M1 Abrams has the highest Initiative it gets to shoot first. To shoot, the M1 Abrams must have Line of Sight to the T-64. If you can draw a line from the M1 Abrams turret to the T-64 without going completely through a piece of terrain then it is in Line of Sight.After determining if you can see the T-64 you create an Attack dice Pool. Grab a number of dice equal to the Attack value on your Tank card, in the case of the M1 Abrams that is 4. Roll the dice. Each result of 4 or 5 scores a Hit, and each 6 scores a Critical Hit. If your M1 Abrams has no Speed token next to it, it is considered to be Stationary and you may re-roll any of its Attack dice that failed to Hit.The T-64 now gets a chance to stop the M1 Abrams attack. Create a pool of Defence dice, based on the Tank’s Defence
value. The T-64 has a Defence of 1, so starts with 1 die.Add another die for each time the M1 Abrams and T-64 moved this turn.
Add an additional die if the T-64 is in Cover. The T-64 will gain Cover if the M1 Abrams can see it but cannot draw Line of Sight to three of its four corners without passing through a Forest or House.Remove one Defence die if the M1 Abrams is within Close Range of the T-64. To be in Close Range, the Tanks need to be within one Measuring Arrow of each other.Remove one Defence die if any part of the M1 Abrams hull is behind the front of the T-64 tank’s hull.A Model can never roll more than six Defence dice.Each result of 4 or 5 cancels a Hit or Critical Hit chosen by the shooting player, and each 6 cancels a Hit or a Critical Hit chosen by the target player.Each uncancelled Hit deals one point of Damage.For each uncancelled Critical Hit draw a Critical card and apply all effects to the Model. This may include damage.After the M1 Abrams has shot it is then the turn of the T-64 to return fire following the same steps.Once both Tanks have shot, it is time to move on to the Command Phase.
C. Command Phase (page 19)If either Tank has Damage equal to its Damage Capacity then the Tank is destroyed and their opponent wins the game.If both Tanks are destroyed in the same Command Phase the game ends in a draw.If neither tank is destroyed you may attempt to repair Critical cards assigned to your tank, choose one Damage card and roll a die, on a result of 4, 5 or 6 remove the chosen Critical card from your tank.Remove all Speed tokens from the tanks and shuffle discarded Critical cards back into the Critical deck. Then start a new turn beginning with the Movement Phase.
Soviet Deployment
House
American Deployment
Forest
House

25
LAST BATTLE OF ALPHA 66It was only as he was climbing back into the commander’s cupola that Bannon noticed Alpha 66 had lost its antennas. That, he realized, explained why the other four tanks had not stopped when he had called them. The last order the Team had heard from him was to keep moving. Apparently they had thought he wanted them to keep going all the way to Hill 214.This unwelcomed thought was interrupted by the sight of three Soviet tanks off to his right. All were moving north and on an intersecting course with Alpha 66, causing Bannon to guess they had been headed to hit the tanks on Hill 214 in the rear before they had spotted Alpha 66. Grabbing the TC’s override, he jerked it over as far as he could, swinging the turret toward this new threat.
“Gunner, SABOT, 3 tanks!” Kelp dropped down and yelled, “HEAT LOADED, UP!”The last round Kelp had put in the chamber had been a HEAT round. Not as good as a SABOT round when fighting a tank, but it would have to do. There was no time to switch ammunition.“IDENTIFIED!” Folk yelled, letting Bannon know he was ready to take over.Bannon let the override go at the same instant the lead Soviet tank began to traverse its turret toward Alpha 66.“FIRE HEAT, LOAD SABOT!” At least the next round would be right.“ON THE WAAAY!” With that, Folk fired.
In this mission players re-enact the last stand of Alpha 66, from the novel Team Yankee by H.W. Coyle.Out on its own, Alpha 66 faces a platoon of Soviet tanks.
Bannon’s Orders We are cut off and our radio is down. We must stop these Soviet tanks before they reach Hill 214. Folk’s shooting took out the lead tank, but the other two T-64s are moving to engage, we need to eliminate them and regroup with Team Yankee.
Soviet OrdersOur artillery battery on Hill 214 has gone quiet, your task is to find out why, and eliminate any American units you find on your way.
Alpha 66 Deployment
Forest
Forest
Houses
Houses
Soviet Deployment
Scenario platoonsIn this scenario, players field the following platoons:
The Soviet Player’s PlatoonRed Banner Platoon RuleT-64T-64
The American Player’s PlatoonTeam Yankee Platoon RuleM1 Abrams (Alpha 66) with the following upgrades and crew cards,• Alpha 66• Sean Bannon• Robert Folk• Richard Kelp• Joseph Ortelli
Setting Up The ScenarioSet up the terrain as shown on the scenario map. In this scenario, the Americans are the Attacker and Soviets are the Defender.
DeploymentThe Soviet player deploys within a Measuring Arrow of their table edge. Then, the American player deploys within a Measuring Arrow of their table edge.
Determining Who WinsThe Soviets win if the M1 Abrams (Alpha 66) is destroyed and there is at least one T-64 Tank still alive. The Americans win if at any time both the Soviet T-64 Tanks are destroyed.If all three Tanks are destroyed the Americans win.
Alternative Scenario Platoon Scenarios are played with preset platoons. For a bit of fun, you can replace Alpha 66 with your own 40 point platoon, using a single Tank to fight against two T-64 tanks.
26
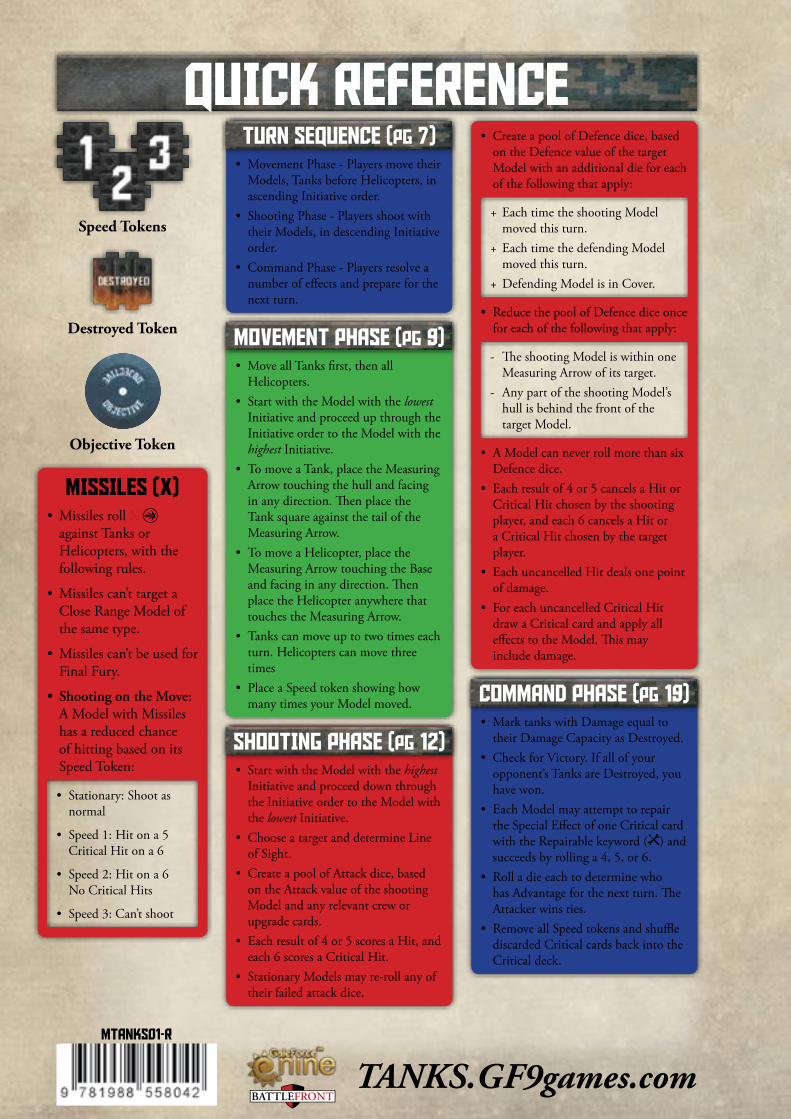
QUICK REFERENCETURN SEQUENCE (pg 7)
COMMAND PHASE (pg 19)
MOVEMENT PHASE (pg 9)
SHOOTING PHASE (pg 12)
• Movement Phase - Players move their Models, Tanks before Helicopters, in ascending Initiative order.
• Shooting Phase - Players shoot with their Models, in descending Initiative order.
• Command Phase - Players resolve a number of effects and prepare for the next turn.
• Mark tanks with Damage equal to their Damage Capacity as Destroyed.
• Check for Victory. If all of your opponent’s Tanks are Destroyed, you have won.
• Each Model may attempt to repair the Special Effect of one Critical card with the Repairable keyword ( ) and succeeds by rolling a 4, 5, or 6.
• Roll a die each to determine who has Advantage for the next turn. The Attacker wins ties.
• Remove all Speed tokens and shuffle discarded Critical cards back into the Critical deck.
• Move all Tanks first, then all Helicopters.
• Start with the Model with the lowest Initiative and proceed up through the Initiative order to the Model with the highest Initiative.
• To move a Tank, place the Measuring Arrow touching the hull and facing in any direction. Then place the Tank square against the tail of the Measuring Arrow.
• To move a Helicopter, place the Measuring Arrow touching the Base and facing in any direction. Then place the Helicopter anywhere that touches the Measuring Arrow.
• Tanks can move up to two times each turn. Helicopters can move three times
• Place a Speed token showing how many times your Model moved.
• Start with the Model with the highest Initiative and proceed down through the Initiative order to the Model with the lowest Initiative.
• Choose a target and determine Line of Sight.
• Create a pool of Attack dice, based on the Attack value of the shooting Model and any relevant crew or upgrade cards.
• Each result of 4 or 5 scores a Hit, and each 6 scores a Critical Hit.
• Stationary Models may re-roll any of their failed attack dice.
+ Each time the shooting Model moved this turn.
+ Each time the defending Model moved this turn.
+ Defending Model is in Cover.
• Stationary: Shoot as normal
• Speed 1: Hit on a 5 Critical Hit on a 6
• Speed 2: Hit on a 6 No Critical Hits
• Speed 3: Can’t shoot
- The shooting Model is within one Measuring Arrow of its target.
- Any part of the shooting Model’s hull is behind the front of the target Model.
• Reduce the pool of Defence dice once for each of the following that apply:
• A Model can never roll more than six Defence dice.
• Each result of 4 or 5 cancels a Hit or Critical Hit chosen by the shooting player, and each 6 cancels a Hit or a Critical Hit chosen by the target player.
• Each uncancelled Hit deals one point of damage.
• For each uncancelled Critical Hit draw a Critical card and apply all effects to the Model. This may include damage.
• Create a pool of Defence dice, based on the Defence value of the target Model with an additional die for each of the following that apply:
TANKS.GF9games.comMTANKS01-R
Speed Tokens
Destroyed Token
Objective Token
MISSILES (X)• Missiles roll X
against Tanks or Helicopters, with the following rules.
• Missiles can’t target a Close Range Model of the same type.
• Missiles can’t be used for Final Fury.
• Shooting on the Move: A Model with Missiles has a reduced chance of hitting based on its Speed Token: