theory and problemsinis.jinr.ru/sl/s_software manuals/gottfried b.s. schaum's outline... ·...
TRANSCRIPT
SCHAUM'S OUTLINE OF
THEORY AND PROBLEMS
OF
PROGRAMMING
WITH
VISUAL BASIC
BYRON S. GOTTFRIED, Ph.D. Professor Emeritus
University of Pittsburgh
SCHAUM'S OUTLINE SERIES MCGRAW-HILL, INC.
New York Chicago San Francisco Lisbon London
Madrid Mexico City Milan New Delhi San Juan
Seoul Singapore Sydney Toronto
Copyright © 2001 by The McGraw-Hill Companies, Inc. All rights reserved. Manufactured in the United States of America. Except as per-mitted under the United States Copyright Act of 1976, no part of this publication may be reproduced or distributed in any form or by anymeans, or stored in a database or retrieval system, without the prior written permission of the publisher.
0-07-138924-5
The material in this eBook also appears in the print version of this title: 0-07-135671-1.
All trademarks are trademarks of their respective owners. Rather than put a trademark symbol after every occurrence of a trademarkedname, we use names in an editorial fashion only, and to the benefit of the trademark owner, with no intention of infringement of thetrademark. Where such designations appear in this book, they have been printed with initial caps.
McGraw-Hill eBooks are available at special quantity discounts to use as premiums and sales promotions, or for use in corporate train-ing programs. For more information, please contact George Hoare, Special Sales, at [email protected] or (212) 904-4069.
TERMS OF USEThis is a copyrighted work and The McGraw-Hill Companies, Inc. (“McGraw-Hill”) and its licensors reserve all rights in and to thework. Use of this work is subject to these terms. Except as permitted under the Copyright Act of 1976 and the right to store and retrieveone copy of the work, you may not decompile, disassemble, reverse engineer, reproduce, modify, create derivative works based upon,transmit, distribute, disseminate, sell, publish or sublicense the work or any part of it without McGraw-Hill’s prior consent. You mayuse the work for your own noncommercial and personal use; any other use of the work is strictly prohibited. Your right to use the workmay be terminated if you fail to comply with these terms.
THE WORK IS PROVIDED “AS IS”. McGRAW-HILL AND ITS LICENSORS MAKE NO GUARANTEES OR WARRANTIES ASTO THE ACCURACY, ADEQUACY OR COMPLETENESS OF OR RESULTS TO BE OBTAINED FROM USING THE WORK,INCLUDING ANY INFORMATION THAT CAN BE ACCESSED THROUGH THE WORK VIA HYPERLINK OR OTHERWISE,AND EXPRESSLY DISCLAIM ANY WARRANTY, EXPRESS OR IMPLIED, INCLUDING BUT NOT LIMITED TO IMPLIEDWARRANTIES OF MERCHANTABILITY OR FITNESS FOR A PARTICULAR PURPOSE. McGraw-Hill and its licensors do notwarrant or guarantee that the functions contained in the work will meet your requirements or that its operation will be uninterrupted orerror free. Neither McGraw-Hill nor its licensors shall be liable to you or anyone else for any inaccuracy, error or omission, regardlessof cause, in the work or for any damages resulting therefrom. McGraw-Hill has no responsibility for the content of any informationaccessed through the work. Under no circumstances shall McGraw-Hill and/or its licensors be liable for any indirect, incidental, spe-cial, punitive, consequential or similar damages that result from the use of or inability to use the work, even if any of them has beenadvised of the possibility of such damages. This limitation of liability shall apply to any claim or cause whatsoever whether such claimor cause arises in contract, tort or otherwise.
DOI: 10.1036/[0071389245
iii
Preface
Visual Basic is an event-driven programming language for creating applications that run under Microsoft's
Windows operating systems. The language appeals to two distinctly different groups: beginning programming
students, who love the immediate visual gratification of creating simple, professional-looking programs that
include graphics, dialog boxes and drop-down menus; and experienced programmers, who are able to create
complex Windows-based applications with a minimum amount of effort. Most Visual Basic textbooks typically
focus on one or the other of these two groups.
This book is intended for beginners. The book follows the style of other programming texts in the
Schaum's Outline Series (the first of which, published in 1975, was my own Programming with Basic). As
such, it is written in a manner that can easily be understood by advanced secondary or beginning college-level
students. Hence, it can be used as a textbook for an introductory programming course, as a supplementary text
in a programming course or as an effective self-study guide. For the most part, the required mathematical level
does not go beyond high school algebra.
The material is organized in such a manner that the reader can write complete, though elementary, Visual
Basic programs as soon as possible. It is very important that the reader write such programs and execute them
on a computer concurrently with reading the text. This greatly enhances the beginning programmer’s self-
confidence and stimulates his or her interest in the subject. (Learning to program a computer is like learning to
play the piano; it cannot be learned simply by studying a textbook!)
The text contains many examples. These include both simple illustrations that focus on specific program-
ming constructs and comprehensive programming problems. In addition, sets of review questions, drill prob-
lems and programming problems are included at the end of each chapter. The review questions enable readers
to test their recall of the material presented within the chapter. They also provide an effective chapter summary.
Most of the drill problems and programming problems require no special mathematical or technological
background. The student should solve as many of these problems as possible. (Answers to the drill problems
are provided at the end of the text.) When using this book as a text in a programming course, the instructor may
wish to supplement the programming problems with additional assignments that reflect particular disciplinary
interests.
Visual Basic has been modified several times since it was first introduced. This book is based upon Visual
Basic Version 6 and is largely compatible with recent earlier versions of the language. However, Microsoft’s
preliminary description of the next version of Visual Basic, to be named Visual Basic.NET, indicates a number
of incompatibilities with previous versions. An overview of the more significant incompatibilities, based upon
Microsoft’s preliminary description, is included as an appendix to this book. (Readers may expect a new edi-
tion of this book, focusing on Visual Basic.NET, in the near future.)
Last but not least, readers who complete this book will have learned a great deal about event-driven pro-
gramming concepts in general as well as the specific rules of Visual Basic. Hopefully, most will be convinced
that programming with Visual Basic is not only easy, but also fun.
BYRON S. GOTTFRIED
Copyright 2001 by McGraw-Hill, Inc. Click Here for Terms of Use.
v
Contents
Chapter 1 INTRODUCING VISUAL BASIC ...................................................................................... 1
1.1 What is Visual Basic? .................................................................................................... 1
1.2 Events and Event Procedures ........................................................................................ 1
1.3 Object-Related Concepts ............................................................................................... 1
1.4 The Visual Basic Program Development Process ......................................................... 2
1.5 Required Computer Skills ............................................................................................. 3
1.6 Logical Program Organization ...................................................................................... 3
1.7 Visual Basic Program Components ............................................................................... 3
1.8 The Visual Basic Environment ...................................................................................... 4
1.9 Opening an Existing Visual Basic Project ..................................................................... 8
1.10 Saving a Visual Basic Project ........................................................................................ 8
1.11 Running a Visual Basic Project ..................................................................................... 8
1.12 Getting Help .................................................................................................................. 9
1.13 A Sample Visual Basic Project ...................................................................................... 9
Chapter 2 VISUAL BASIC FUNDAMENTALS ................................................................................ 18
2.1 Numeric Constants ...................................................................................................... 18
2.2 String Constants ........................................................................................................... 19
2.3 Variables ..................................................................................................................... 19
2.4 Data Types and Data Declarations ............................................................................... 20
2.5 Operators and Expressions .......................................................................................... 22
2.6 Hierarchy of Operations .............................................................................................. 24
2.7 Inserting Parentheses ................................................................................................... 24
2.8 Special Rules Concerning Numeric Expressions ......................................................... 25
2.9 String Expressions ....................................................................................................... 26
2.10 Assigning Values to Variables ..................................................................................... 26
2.11 Displaying Output – The Print Statement .................................................................... 28
2.12 Library Functions ........................................................................................................ 29
2.13 Program Comments ..................................................................................................... 31
Chapter 3 BRANCHING AND LOOPING ........................................................................................ 38
3.1 Relational Operators and Logical Expressions ............................................................ 38
3.2 Logical Operators ........................................................................................................ 39
3.3 Branching with the If-Then Block ............................................................................... 41
3.4 Branching with If-Then-Else Blocks ........................................................................... 41
3.5 Selection: Select Case .................................................................................................. 44
3.6 Looping with For-Next ................................................................................................ 47
3.7 Looping with Do-Loop ................................................................................................ 49
3.8 Looping with While-Wend .......................................................................................... 51
3.9 The Stop Statement ..................................................................................................... 52
Chapter 4 VISUAL BASIC CONTROL FUNDAMENTALS ........................................................... 58
4.1 Visual Basic Control Tools ......................................................................................... 58
4.2 Control Tool Categories .............................................................................................. 61
4.3 Working with Controls ................................................................................................ 61
4.4 Naming Forms and Controls ........................................................................................ 61
For more information about this title, click here.
Copyright 2001 by McGraw-Hill, Inc. Click Here for Terms of Use.
vi CONTENTS
4.5 Assigning Property Values to Forms and Controls ...................................................... 62
4.6 Executing Commands (Event Procedures and Command Buttons) ............................. 63
4.7 Displaying Output Data (Labels and Text Boxes) ....................................................... 64
4.8 Entering Input Data (Text Boxes) ............................................................................... 68
4.9 Selecting Multiple Features (Check Boxes) ................................................................ 74
4.10 Selecting Exclusive Alternatives (Option Buttons and Frames) .................................. 77
4.11 Selecting from a List (List Boxes and Combo Boxes) ................................................. 85
4.12 Assigning Properties Collectively (The With Block) ................................................... 90
4.13 Generating Error Messages (The MsgBox Function) .................................................. 92
4.14 Creating Timed Events (The Timer Control) .............................................................. 96
4.15 Scroll Bars ................................................................................................................... 98
Chapter 5 MENUS AND DIALOG BOXES ..................................................................................... 109
5.1 Building Drop-Down Menus ..................................................................................... 109
5.2 Accessing a Menu from the Keyboard ....................................................................... 112
5.3 Menu Enhancements .................................................................................................. 117
5.4 Submenus .................................................................................................................. 119
5.5 Pop-Up Menus ........................................................................................................... 121
5.6 Dialog Boxes ............................................................................................................. 125
5.7 More about the MsgBox Function ............................................................................. 133
5.8 The InputBox Function .............................................................................................. 134
Chapter 6 EXECUTING AND DEBUGGING A NEW PROJECT ............................................... 143
6.1 Syntactic Errors ......................................................................................................... 143
6.2 Logical Errors ............................................................................................................ 144
6.3 Setting Breakpoints ................................................................................................... 145
6.4 Defining Watch Values ............................................................................................. 146
6.5 Stepping through a Program ...................................................................................... 152
6.6 User-Induced Errors .................................................................................................. 155
6.7 Error Handlers ........................................................................................................... 155
6.8 Generating a Stand-Alone Executable Program ........................................................ 161
Chapter 7 PROCEDURES ................................................................................................................. 168
7.1 Modules and Procedures ........................................................................................... 168
7.2 Sub Procedures (Subroutines) ................................................................................... 168
7.3 Event Procedures ....................................................................................................... 175
7.4 Function Procedures .................................................................................................. 177
7.5 Scope ......................................................................................................................... 184
7.6 Optional Arguments .................................................................................................. 195
Chapter 8 ARRAYS ............................................................................................................................ 204
8.1 Array Characteristics ................................................................................................. 204
8.2 Array Declarations ..................................................................................................... 205
8.3 Processing Array Elements (Subscripted Variables) ................................................. 207
8.4 Passing Arrays to Procedures .................................................................................... 211
8.5 Dynamic Arrays ......................................................................................................... 221
8.6 Array-Related Functions ............................................................................................ 225
8.7 Control Arrays ........................................................................................................... 226
8.8 Looping with For Each-Next ..................................................................................... 236
CONTENTS vii
Chapter 9 DATA FILES ..................................................................................................................... 247
9.1 Data File Characteristics ............................................................................................ 247
9.2 Accessing and Saving a File in Visual Basic: The Common Dialog Control ............ 247
9.3 Processing a Data File ............................................................................................... 251
9.4 Sequential Data Files (Text Files) ............................................................................. 252
9.5 Random Access (Direct) Data Files .......................................................................... 274
9.6 Binary Files ............................................................................................................... 290
Appendix A The ASCII Character Set ................................................................................................. 300
Appendix B Incompatibilities with Visual Basic.NET ........................................................................ 301
Answers to Selected Problems ...................................................................................................................... 303
Index ............................................................................................................................................................... 319
viii
Complete Programming Examples
The projects are listed in the order in which they first appear within the text. The examples vary from simple to
moderately complex.
1. Example 1.1 – Area of a Circle
2. Example 4.3 – Current Data and Time
3. Example 4.4 – Entering and Displaying Text
4. Example 4.5 – Entering and Displaying Numerical and Graphical Data (A Piggy Bank)
5. Example 4.6 – Selecting Multiple Features (Multilingual Hello)
6. Example 4.7 – Selecting Exclusive Alternatives (Temperature Conversion)
7. Example 4.8 – Selecting Multiple Alternatives (Temperature Conversion Revisited)
8. Example 4.9 – Selecting from a List (Multilingual Hello Revisited)
9. Example 4.10 – Assigning Properties Using With Blocks
10. Example 4.11 – Calculating Factorials
11. Example 4.12 – Timed Events (A Metronome)
12. Example 4.13 – Using Scroll Bars (The Metronome Revisited)
13. Example 5.2 – Using Drop-Down Menus (Geography)
14. Example 5.3 – Using Menu Enhancements (Geography Revisited)
15. Example 5.4 – More Menu Enhancements (Geography Revisited)
16. Example 5.5 – Using Submenus (Geography Revisited)
17. Example 5.6 – Using a Pop-Up Menu
18. Example 5.7 – Using Dialog Boxes (Multilingual Hello Revisited)
19. Example 5.9 – Using Input Boxes
20. Example 6.2 – Stepping through a Program
21. Example 6.3 – An Error Handler
22. Example 6.4 – Generating a Stand-Alone Executable Program
23. Example 7.2 – Accessing a Sub Procedure (Smallest of Two Numbers)
24. Example 7.3 – Smallest of Three Numbers
25. Example 7.6 – Accessing a Function Procedure
26. Example 7.7 – Calculating the Sine of an Angle
27. Example 7.10 – Shooting Craps
28. Example 8.6 – Multilingual Hello Using an Array
29. Example 8.9 – Smallest of Two Numbers
30. Example 8.10 – Sorting a List of Numbers
31. Example 8.11 – Deviations about an Average
32. Example 8.14 – Deviations about an Average Using Dynamic Arrays
33. Example 8.18 – Selecting Multiple Features Using Control Arrays
34. Example 8.19 – Adding and Deleting Control Array Elements at Run Time
35. Example 9.2 – Text File Fundamentals
36. Example 9.4 – Creating a Sequential Data File: Daily High Temperatures
Copyright 2001 by McGraw-Hill, Inc. Click Here for Terms of Use.
COMPLETE PROGRAMMING EXAMPLES ix
37. Example 9.5 – Appending a Sequential Data File: More Daily Temperatures
38. Example 9.6 – Processing a Sequential Data File: Averaging Daily Temperatures
39. Example 9.7 – Modifying a Sequential Data File: Recording Daily High and Low Temperatures
40. Example 9.9 – Creating a Random-Access Data File: States and their Capitals
41. Example 9.10 – Reading a Random-Access Data File: Locating State Capitals via Binary Search
42. Example 9.11 – Updating a Random-Access Data File: Baseball Team Records
43. Example 9.12 – Reading from and Writing to a Binary File

1
Chapter 1 ________________________________________________________________________________________________________________
Introducing Visual Basic
1.1 WHAT IS VISUAL BASIC?
Visual Basic is an object-oriented programming development system for creating applications that run under
any of the Microsoft Windows environments. It has the following two major components:
1. An extensive collection of prewritten tools, called controls. These controls are accessible as icons within a
graphical programming environment for creating customized windows components (e.g., menus, dialog
boxes, text boxes, slide bars, etc.).
2. A complete set of program commands, derived from Microsoft’s implementation of the classical Basic pro-
gramming language. The command set includes features that embrace contemporary programming prac-
tices.
The overall approach to Visual Basic programming is twofold:
1. Create a user interface that is appropriate to the particular application at hand.
2. Add a group of Basic instructions to carry out the actions associated with each of the controls.
1.2 EVENTS AND EVENT PROCEDURES
In traditional computer programs, the actions are carried out in a prescribed order. This order may be sequen-
tial, corresponding to the order in which the instructions are written, or it may depend on the outcome of one or
more logical tests. In either case, the order of execution is determined internally within the program.
Visual Basic, on the other hand, is based upon an event-driven paradigm, in which each feature included
within the program is activated only when the user responds to a corresponding object (i.e., an icon, a check
box, an option button, a menu selection, etc.) within the user interface. The program’s response to an action
taken by the user is referred to as an event. Note that the user initiates the event, but it is the program’s re-
sponse that actually defines the event. The group of Basic commands that brings about this response is called
an event procedure.
1.3 OBJECT-RELATED CONCEPTS
In addition to events and event procedures, you must understand the meaning of each of the following terms:
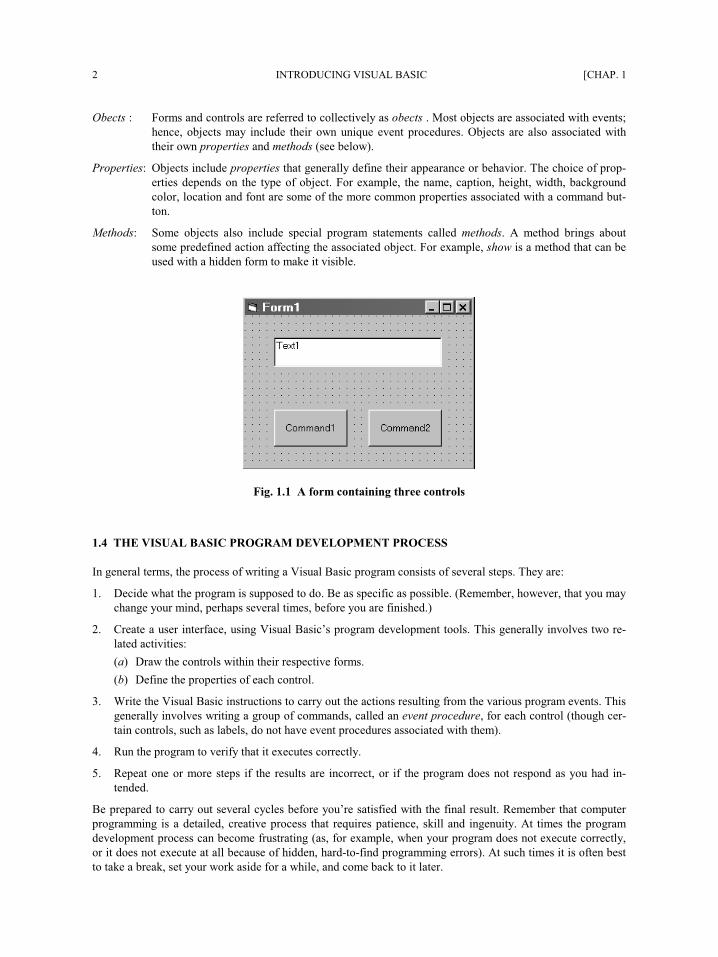
Forms: In Visual Basic, a window is called a form. Each form includes a title bar at the top. A form may
also include a menu bar, a status bar, one or more toolbars, slide bars, etc. A user area (called a
client area) occupies the remaining space within the form. Some applications are based upon a
single form, while others require two or more forms. Fig. 1.1 shows a simple form containing two
command button controls and a text box control (see below).
Controls: The icons with which the user interacts are called controls. Commonly used controls include com-
mand buttons, option buttons, check boxes, labels, text boxes, picture boxes and menus. The user
will typically activate a control (e.g., click on a command button) to produce an event.
Copyright 2001 by McGraw-Hill, Inc. Click Here for Terms of Use.
2 INTRODUCING VISUAL BASIC [CHAP. 1
Objects: Forms and controls are referred to collectively as objects. Most objects are associated with events;
hence, objects may include their own unique event procedures. Objects are also associated with
their own properties and methods (see below).
Properties: Objects include properties that generally define their appearance or behavior. The choice of prop-
erties depends on the type of object. For example, the name, caption, height, width, background
color, location and font are some of the more common properties associated with a command but-
ton.
Methods: Some objects also include special program statements called methods. A method brings about
some predefined action affecting the associated object. For example, show is a method that can be
used with a hidden form to make it visible.
Fig. 1.1 A form containing three controls
1.4 THE VISUAL BASIC PROGRAM DEVELOPMENT PROCESS
In general terms, the process of writing a Visual Basic program consists of several steps. They are:
1. Decide what the program is supposed to do. Be as specific as possible. (Remember, however, that you may
change your mind, perhaps several times, before you are finished.)
2. Create a user interface, using Visual Basic’s program development tools. This generally involves two re-
lated activities:
(a) Draw the controls within their respective forms.
(b) Define the properties of each control.
3. Write the Visual Basic instructions to carry out the actions resulting from the various program events. This
generally involves writing a group of commands, called an event procedure, for each control (though cer-
tain controls, such as labels, do not have event procedures associated with them).
4. Run the program to verify that it executes correctly.
5. Repeat one or more steps if the results are incorrect, or if the program does not respond as you had in-
tended.
Be prepared to carry out several cycles before you’re satisfied with the final result. Remember that computer
programming is a detailed, creative process that requires patience, skill and ingenuity. At times the program
development process can become frustrating (as, for example, when your program does not execute correctly,
or it does not execute at all because of hidden, hard-to-find programming errors). At such times it is often best
to take a break, set your work aside for a while, and come back to it later.
CHAP. 1] INTRODUCING VISUAL BASIC 3
1.5 REQUIRED COMPUTER SKILLS
In order to use Visual Basic and derive some benefit from this book, you should have some proficiency in all of
the following:
1. Familiarity with one of the Microsoft Windows operating systems (e.g., Windows 2000/98/95/NT, etc.). In
particular:
(a) Entering windows.
(b) Using a mouse.
(c) Accessing an application (specifically, Visual Basic).
(d) Leaving windows.
(e) Getting on-line help.
2. Managing files within Windows (locating files, opening files, editing files, saving files, copying files, mov-
ing files, deleting files, etc.).
3. Installing new applications (in case Visual Basic has not already been installed, or needs to be reinstalled).
We will not discuss these issues further – it is assumed that you already have the requisite skills. We will, how-
ever, discuss file management within Visual Basic later in this book, as the need arises.
1.6 LOGICAL PROGRAM ORGANIZATION
Virtually all nontrivial computer programs involve three major tasks. They are:
1. Entering input data (supplying information to be processed).
2. Computing the desired results (processing the input data).
3. Displaying the results (displaying the results of the computation.
Each step may be complex; its implementation may therefore require considerable time and effort.
In Visual Basic, the first and last steps (data input and data output) are accomplished through the user in-
terface. Thus, it is important to design a user interface that will accept input data and display output in a man-
ner that is logical and straightforward for the particular application at hand. In many applications, the design of
the user interface is the most complicated part of the entire program development process, though the controls
built into Visual Basic simplify this process considerably.
The second step (computation) is usually carried out by a series of Visual Basic instructions, embedded in
one or more independent event procedures. The selection and order of these Visual Basic instructions are de-
termined by an appropriate algorithm, i.e., a logical and orderly computational strategy for transforming the
given input data into the desired output data. In many realistic applications, this step (i.e., the implementation
of the algorithm) can be very complicated, challenging the abilities of very skilled programmers.
1.7 VISUAL BASIC PROGRAM COMPONENTS
In Visual Basic, a program is referred to as a project. Every Visual Basic project consists of at least two sepa-
rate files – a project file (whose extension is .vbp), and a form file (with extension .frm). Some projects include
multiple form files and other types of files, such as class module (.cls) files, standard module (bas) files, re-
source (.res) files, and ActiveX control (.ocx) files. Thus, the development of a Visual Basic project involves
keeping track of several different files, and accessing these files individually within the Visual Basic environ-
ment, as needed.
4 INTRODUCING VISUAL BASIC [CHAP. 1
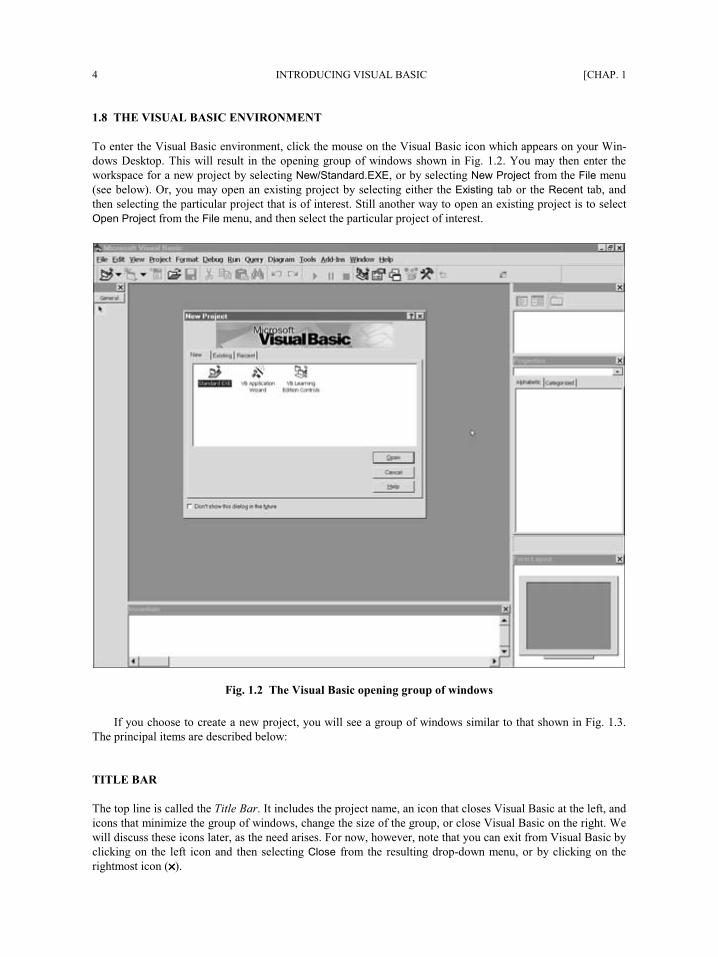
1.8 THE VISUAL BASIC ENVIRONMENT
To enter the Visual Basic environment, click the mouse on the Visual Basic icon which appears on your Win-
dows Desktop. This will result in the opening group of windows shown in Fig. 1.2. You may then enter the
workspace for a new project by selecting New/Standard.EXE, or by selecting New Project from the File menu
(see below). Or, you may open an existing project by selecting either the Existing tab or the Recent tab, and
then selecting the particular project that is of interest. Still another way to open an existing project is to select
Open Project from the File menu, and then select the particular project of interest.
Fig. 1.2 The Visual Basic opening group of windows
If you choose to create a new project, you will see a group of windows similar to that shown in Fig. 1.3.
The principal items are described below:
TITLE BAR
The top line is called the Title Bar. It includes the project name, an icon that closes Visual Basic at the left, and
icons that minimize the group of windows, change the size of the group, or close Visual Basic on the right. We
will discuss these icons later, as the need arises. For now, however, note that you can exit from Visual Basic by
clicking on the left icon and then selecting Close from the resulting drop-down menu, or by clicking on the
rightmost icon (××××).
CHAP. 1] INTRODUCING VISUAL BASIC 5
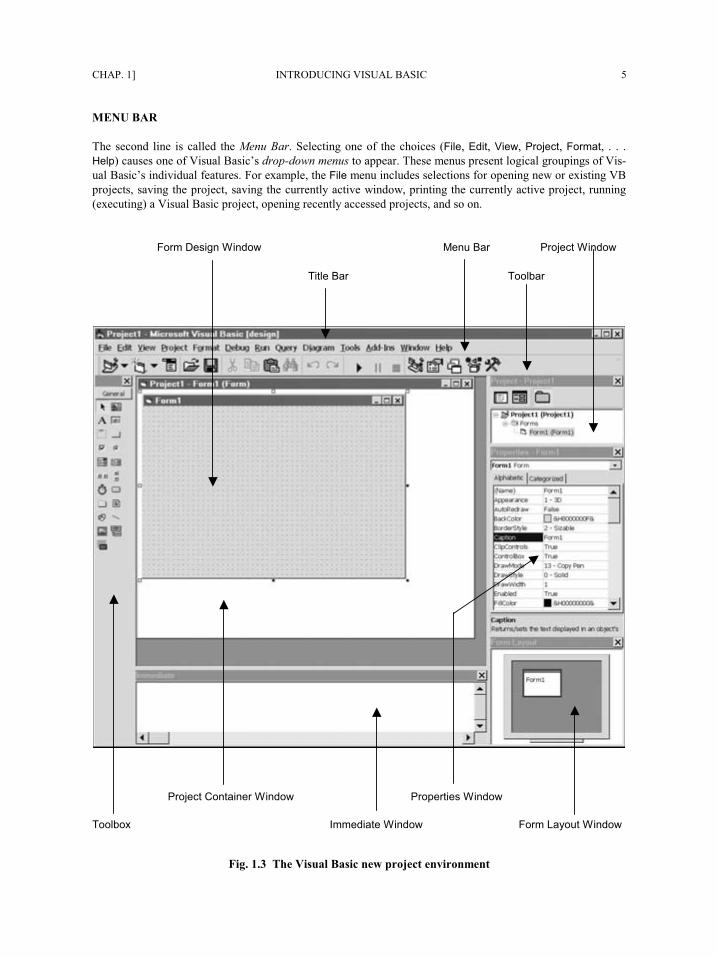
MENU BAR
The second line is called the Menu Bar. Selecting one of the choices (File, Edit, View, Project, Format, . . .
Help) causes one of Visual Basic’s drop-down menus to appear. These menus present logical groupings of Vis-
ual Basic’s individual features. For example, the File menu includes selections for opening new or existing VB
projects, saving the project, saving the currently active window, printing the currently active project, running
(executing) a Visual Basic project, opening recently accessed projects, and so on.
Form Design Window Menu Bar Project Window
Title Bar Toolbar
Project Container Window Properties Window
Toolbox Immediate Window Form Layout Window
Fig. 1.3 The Visual Basic new project environment
6 INTRODUCING VISUAL BASIC [CHAP. 1
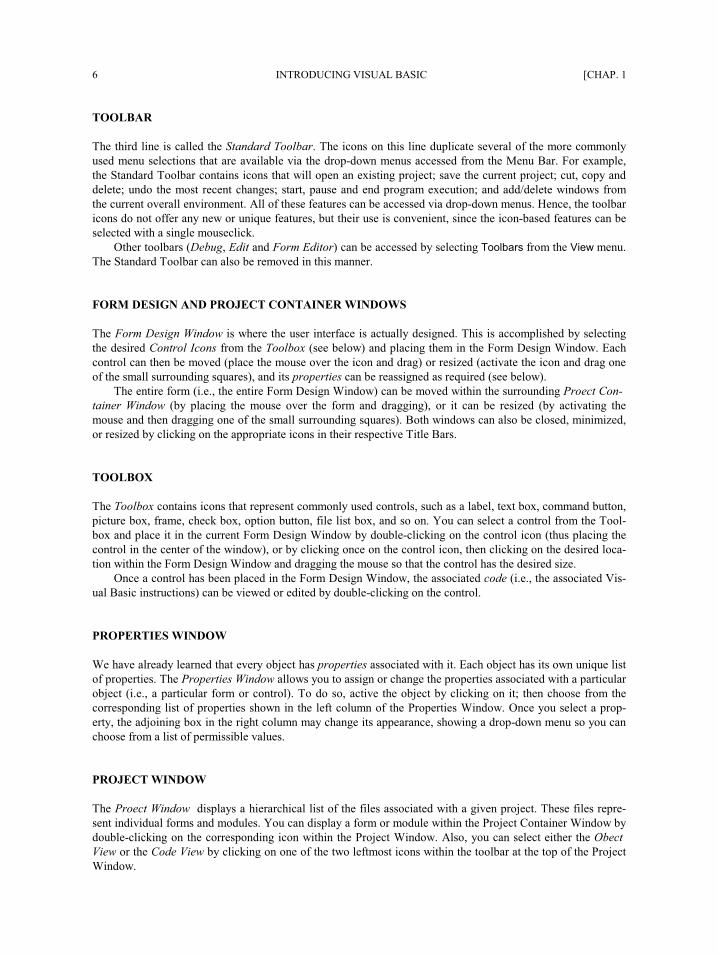
TOOLBAR
The third line is called the Standard Toolbar. The icons on this line duplicate several of the more commonly
used menu selections that are available via the drop-down menus accessed from the Menu Bar. For example,
the Standard Toolbar contains icons that will open an existing project; save the current project; cut, copy and
delete; undo the most recent changes; start, pause and end program execution; and add/delete windows from
the current overall environment. All of these features can be accessed via drop-down menus. Hence, the toolbar
icons do not offer any new or unique features, but their use is convenient, since the icon-based features can be
selected with a single mouseclick.
Other toolbars (Debug, Edit and Form Editor) can be accessed by selecting Toolbars from the View menu.
The Standard Toolbar can also be removed in this manner.
FORM DESIGN AND PROJECT CONTAINER WINDOWS
The Form Design Window is where the user interface is actually designed. This is accomplished by selecting
the desired Control Icons from the Toolbox (see below) and placing them in the Form Design Window. Each
control can then be moved (place the mouse over the icon and drag) or resized (activate the icon and drag one
of the small surrounding squares), and its properties can be reassigned as required (see below).
The entire form (i.e., the entire Form Design Window) can be moved within the surrounding Project Con-
tainer Window (by placing the mouse over the form and dragging), or it can be resized (by activating the
mouse and then dragging one of the small surrounding squares). Both windows can also be closed, minimized,
or resized by clicking on the appropriate icons in their respective Title Bars.
TOOLBOX
The Toolbox contains icons that represent commonly used controls, such as a label, text box, command button,
picture box, frame, check box, option button, file list box, and so on. You can select a control from the Tool-
box and place it in the current Form Design Window by double-clicking on the control icon (thus placing the
control in the center of the window), or by clicking once on the control icon, then clicking on the desired loca-
tion within the Form Design Window and dragging the mouse so that the control has the desired size.
Once a control has been placed in the Form Design Window, the associated code (i.e., the associated Vis-
ual Basic instructions) can be viewed or edited by double-clicking on the control.
PROPERTIES WINDOW
We have already learned that every object has properties associated with it. Each object has its own unique list
of properties. The Properties Window allows you to assign or change the properties associated with a particular
object (i.e., a particular form or control). To do so, active the object by clicking on it; then choose from the
corresponding list of properties shown in the left column of the Properties Window. Once you select a prop-
erty, the adjoining box in the right column may change its appearance, showing a drop-down menu so you can
choose from a list of permissible values.
PROJECT WINDOW
The Project Window displays a hierarchical list of the files associated with a given project. These files repre-
sent individual forms and modules. You can display a form or module within the Project Container Window by
double-clicking on the corresponding icon within the Project Window. Also, you can select either the Object
View or the Code View by clicking on one of the two leftmost icons within the toolbar at the top of the Project
Window.
CHAP. 1] INTRODUCING VISUAL BASIC 7
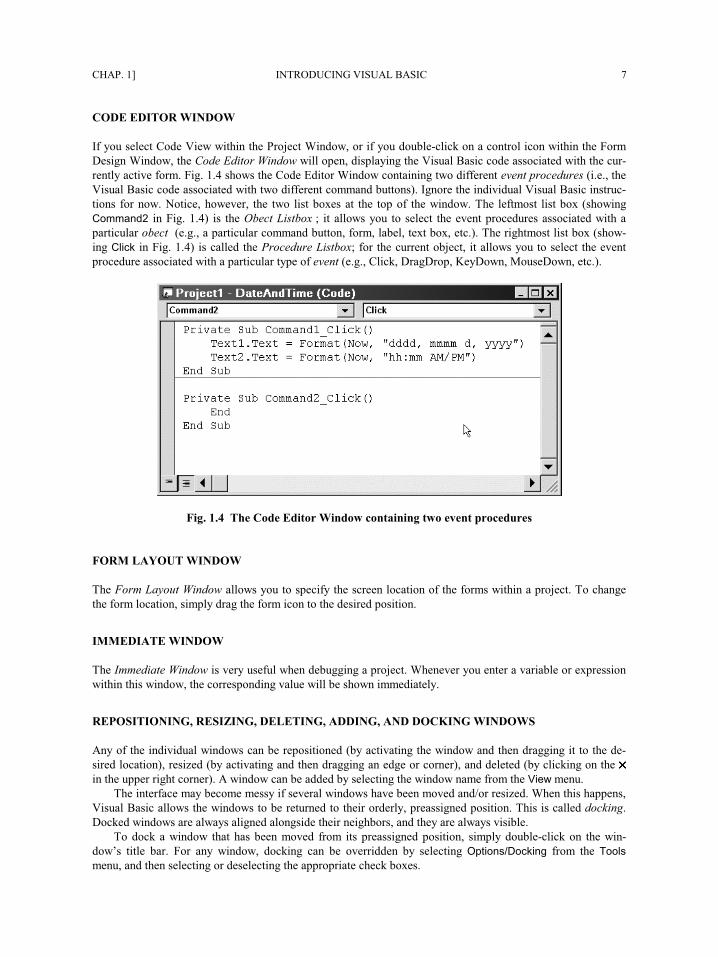
CODE EDITOR WINDOW
If you select Code View within the Project Window, or if you double-click on a control icon within the Form
Design Window, the Code Editor Window will open, displaying the Visual Basic code associated with the cur-
rently active form. Fig. 1.4 shows the Code Editor Window containing two different event procedures (i.e., the
Visual Basic code associated with two different command buttons). Ignore the individual Visual Basic instruc-
tions for now. Notice, however, the two list boxes at the top of the window. The leftmost list box (showing
Command2 in Fig. 1.4) is the Object Listbox; it allows you to select the event procedures associated with a
particular object (e.g., a particular command button, form, label, text box, etc.). The rightmost list box (show-
ing Click in Fig. 1.4) is called the Procedure Listbox; for the current object, it allows you to select the event
procedure associated with a particular type of event (e.g., Click, DragDrop, KeyDown, MouseDown, etc.).
Fig. 1.4 The Code Editor Window containing two event procedures
FORM LAYOUT WINDOW
The Form Layout Window allows you to specify the screen location of the forms within a project. To change
the form location, simply drag the form icon to the desired position.
IMMEDIATE WINDOW
The Immediate Window is very useful when debugging a project. Whenever you enter a variable or expression
within this window, the corresponding value will be shown immediately.
REPOSITIONING, RESIZING, DELETING, ADDING, AND DOCKING WINDOWS
Any of the individual windows can be repositioned (by activating the window and then dragging it to the de-
sired location), resized (by activating and then dragging an edge or corner), and deleted (by clicking on the ××××
in the upper right corner). A window can be added by selecting the window name from the View menu.
The interface may become messy if several windows have been moved and/or resized. When this happens,
Visual Basic allows the windows to be returned to their orderly, preassigned position. This is called docking.
Docked windows are always aligned alongside their neighbors, and they are always visible.
To dock a window that has been moved from its preassigned position, simply double-click on the win-
dow’s title bar. For any window, docking can be overridden by selecting Options/Docking from the Tools
menu, and then selecting or deselecting the appropriate check boxes.
8 INTRODUCING VISUAL BASIC [CHAP. 1
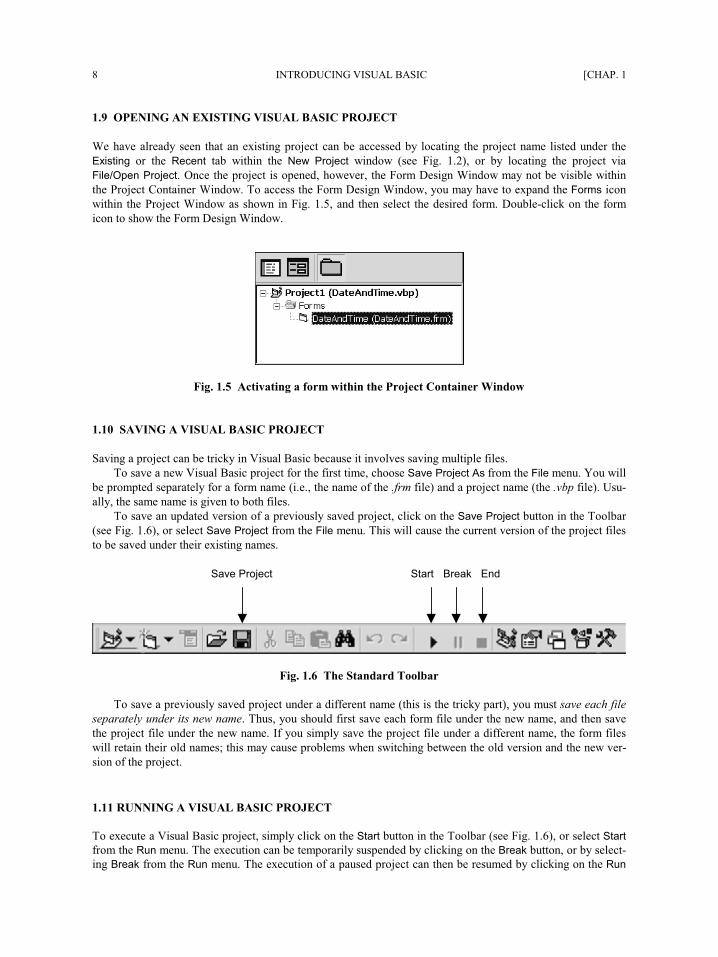
1.9 OPENING AN EXISTING VISUAL BASIC PROJECT
We have already seen that an existing project can be accessed by locating the project name listed under the
Existing or the Recent tab within the New Project window (see Fig. 1.2), or by locating the project via
File/Open Project. Once the project is opened, however, the Form Design Window may not be visible within
the Project Container Window. To access the Form Design Window, you may have to expand the Forms icon
within the Project Window as shown in Fig. 1.5, and then select the desired form. Double-click on the form
icon to show the Form Design Window.
Fig. 1.5 Activating a form within the Project Container Window
1.10 SAVING A VISUAL BASIC PROJECT
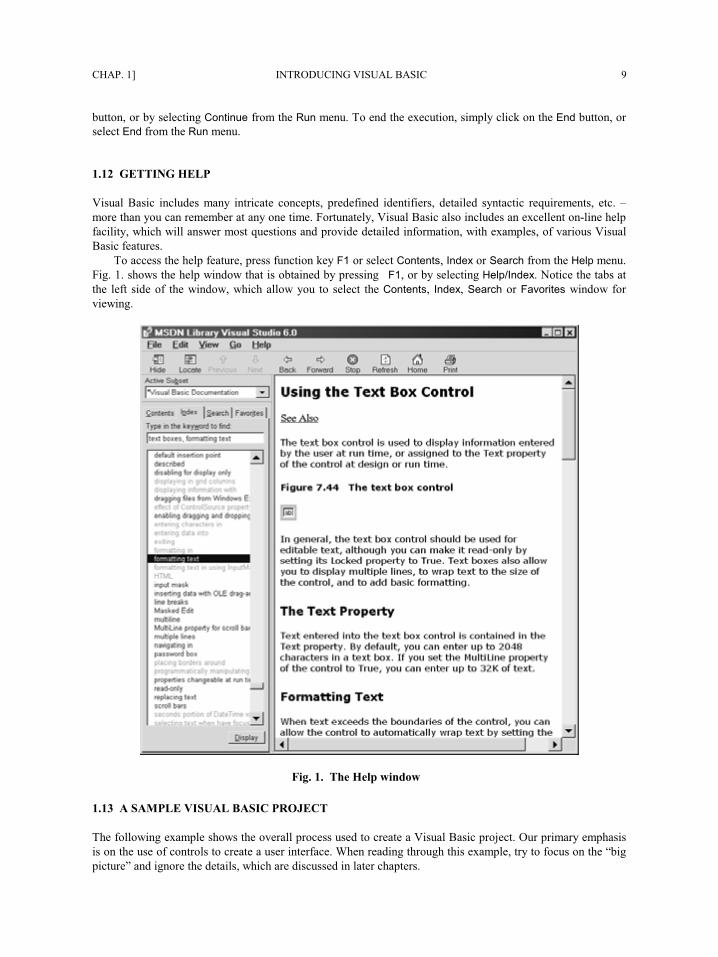
Saving a project can be tricky in Visual Basic because it involves saving multiple files.
To save a new Visual Basic project for the first time, choose Save Project As from the File menu. You will
be prompted separately for a form name (i.e., the name of the .frm file) and a project name (the .vbp file). Usu-
ally, the same name is given to both files.
To save an updated version of a previously saved project, click on the Save Project button in the Toolbar
(see Fig. 1.6), or select Save Project from the File menu. This will cause the current version of the project files
to be saved under their existing names.
Save Project Start Break End
Fig. 1.6 The Standard Toolbar
To save a previously saved project under a different name (this is the tricky part), you must save each file
separately under its new name. Thus, you should first save each form file under the new name, and then save
the project file under the new name. If you simply save the project file under a different name, the form files
will retain their old names; this may cause problems when switching between the old version and the new ver-
sion of the project.
1.11 RUNNING A VISUAL BASIC PROJECT
To execute a Visual Basic project, simply click on the Start button in the Toolbar (see Fig. 1.6), or select Start
from the Run menu. The execution can be temporarily suspended by clicking on the Break button, or by select-
ing Break from the Run menu. The execution of a paused project can then be resumed by clicking on the Run
CHAP. 1] INTRODUCING VISUAL BASIC 9
button, or by selecting Continue from the Run menu. To end the execution, simply click on the End button, or
select End from the Run menu.
1.12 GETTING HELP
Visual Basic includes many intricate concepts, predefined identifiers, detailed syntactic requirements, etc. –
more than you can remember at any one time. Fortunately, Visual Basic also includes an excellent on-line help
facility, which will answer most questions and provide detailed information, with examples, of various Visual
Basic features.
To access the help feature, press function key F1 or select Contents, Index or Search from the Help menu.
Fig. 1.7 shows the help window that is obtained by pressing F1, or by selecting Help/Index. Notice the tabs at
the left side of the window, which allow you to select the Contents, Index, Search or Favorites window for
viewing.
Fig. 1.7 The Help window
1.13 A SAMPLE VISUAL BASIC PROJECT
The following example shows the overall process used to create a Visual Basic project. Our primary emphasis
is on the use of controls to create a user interface. When reading through this example, try to focus on the “big
picture” and ignore the details, which are discussed in later chapters.
10 INTRODUCING VISUAL BASIC [CHAP. 1
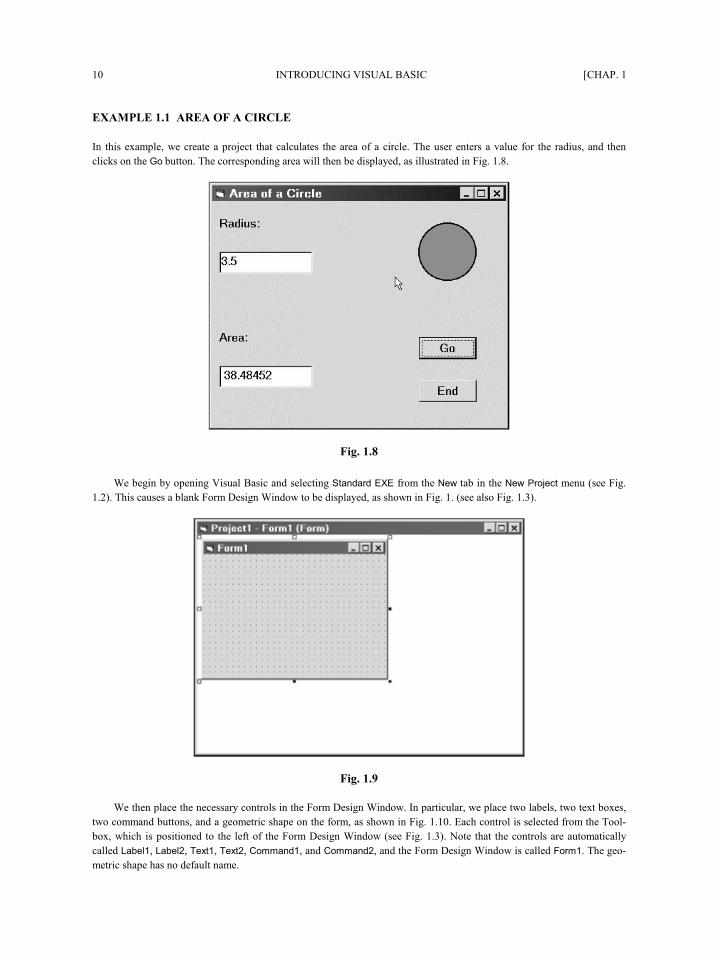
EXAMPLE 1.1 AREA OF A CIRCLE
In this example, we create a project that calculates the area of a circle. The user enters a value for the radius, and then
clicks on the Go button. The corresponding area will then be displayed, as illustrated in Fig. 1.8.
Fig. 1.8
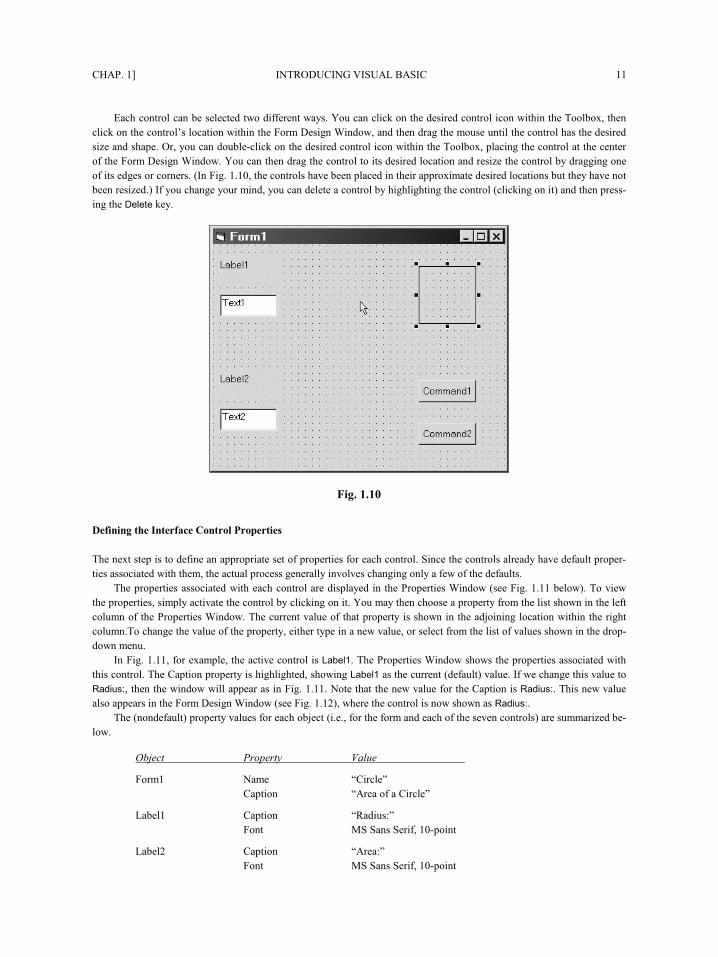
We begin by opening Visual Basic and selecting Standard EXE from the New tab in the New Project menu (see Fig.
1.2). This causes a blank Form Design Window to be displayed, as shown in Fig. 1.9 (see also Fig. 1.3).
Fig. 1.9
We then place the necessary controls in the Form Design Window. In particular, we place two labels, two text boxes,
two command buttons, and a geometric shape on the form, as shown in Fig. 1.10. Each control is selected from the Tool-
box, which is positioned to the left of the Form Design Window (see Fig. 1.3). Note that the controls are automatically
called Label1, Label2, Text1, Text2, Command1, and Command2, and the Form Design Window is called Form1. The geo-
metric shape has no default name.
CHAP. 1] INTRODUCING VISUAL BASIC 11
Each control can be selected two different ways. You can click on the desired control icon within the Toolbox, then
click on the control’s location within the Form Design Window, and then drag the mouse until the control has the desired
size and shape. Or, you can double-click on the desired control icon within the Toolbox, placing the control at the center
of the Form Design Window. You can then drag the control to its desired location and resize the control by dragging one
of its edges or corners. (In Fig. 1.10, the controls have been placed in their approximate desired locations but they have not
been resized.) If you change your mind, you can delete a control by highlighting the control (clicking on it) and then press-
ing the Delete key.
Fig. 1.10
Defining the Interface Control Properties
The next step is to define an appropriate set of properties for each control. Since the controls already have default proper-
ties associated with them, the actual process generally involves changing only a few of the defaults.
The properties associated with each control are displayed in the Properties Window (see Fig. 1.11 below). To view
the properties, simply activate the control by clicking on it. You may then choose a property from the list shown in the left
column of the Properties Window. The current value of that property is shown in the adjoining location within the right
column.To change the value of the property, either type in a new value, or select from the list of values shown in the drop-
down menu.
In Fig. 1.11, for example, the active control is Label1. The Properties Window shows the properties associated with
this control. The Caption property is highlighted, showing Label1 as the current (default) value. If we change this value to
Radius:, then the window will appear as in Fig. 1.11. Note that the new value for the Caption is Radius:. This new value
also appears in the Form Design Window (see Fig. 1.12), where the control is now shown as Radius:.
The (nondefault) property values for each object (i.e., for the form and each of the seven controls) are summarized be-
low.
Object Property Value
Form1 Name “Circle”
Caption “Area of a Circle”
Label1 Caption “Radius:”
Font MS Sans Serif, 10-point
Label2 Caption “Area:”
Font MS Sans Serif, 10-point
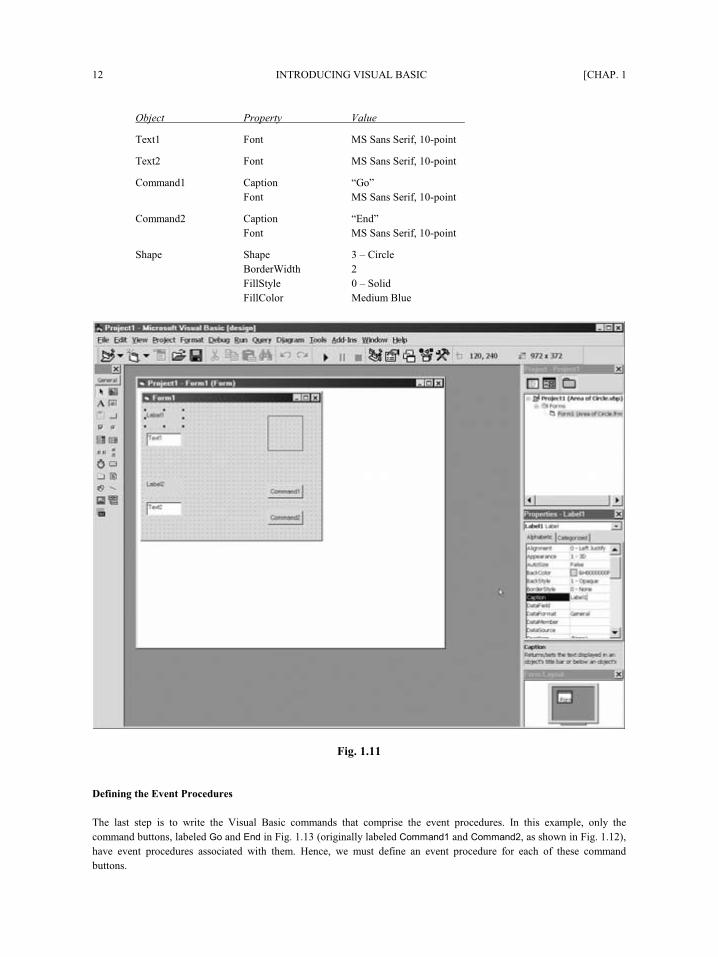
12 INTRODUCING VISUAL BASIC [CHAP. 1
Object Property Value
Text1 Font MS Sans Serif, 10-point
Text2 Font MS Sans Serif, 10-point
Command1 Caption “Go”
Font MS Sans Serif, 10-point
Command2 Caption “End”
Font MS Sans Serif, 10-point
Shape Shape 3 – Circle
BorderWidth 2
FillStyle 0 – Solid
FillColor Medium Blue
Fig. 1.11
Defining the Event Procedures
The last step is to write the Visual Basic commands that comprise the event procedures. In this example, only the
command buttons, labeled Go and End in Fig. 1.13 (originally labeled Command1 and Command2, as shown in Fig. 1.12),
have event procedures associated with them. Hence, we must define an event procedure for each of these command
buttons.
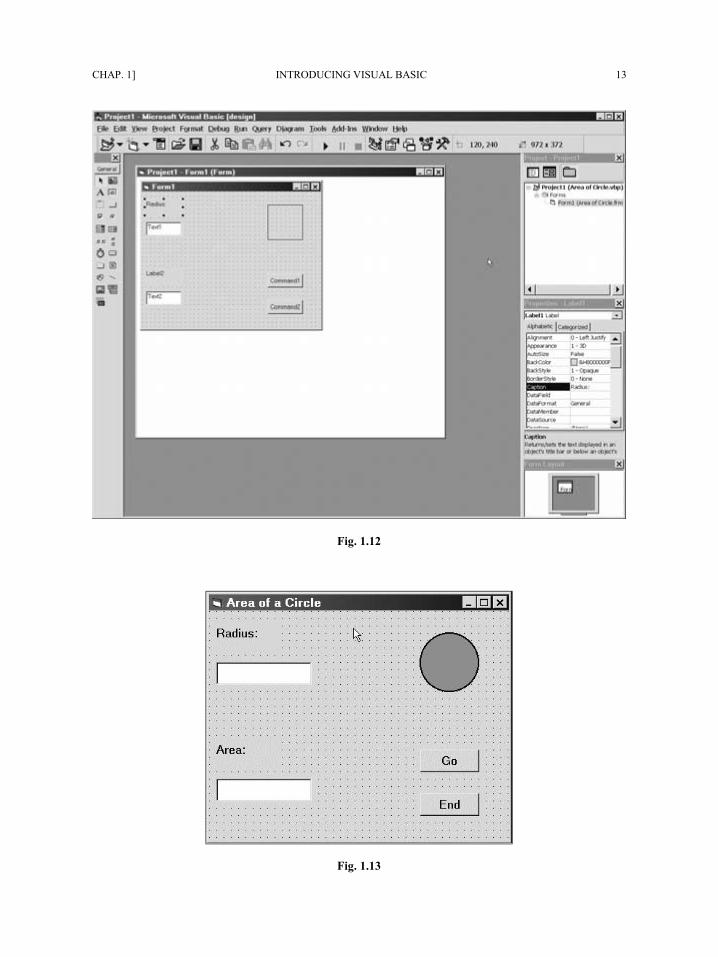
CHAP. 1] INTRODUCING VISUAL BASIC 13
Fig. 1.12
Fig. 1.13
14 INTRODUCING VISUAL BASIC [CHAP. 1
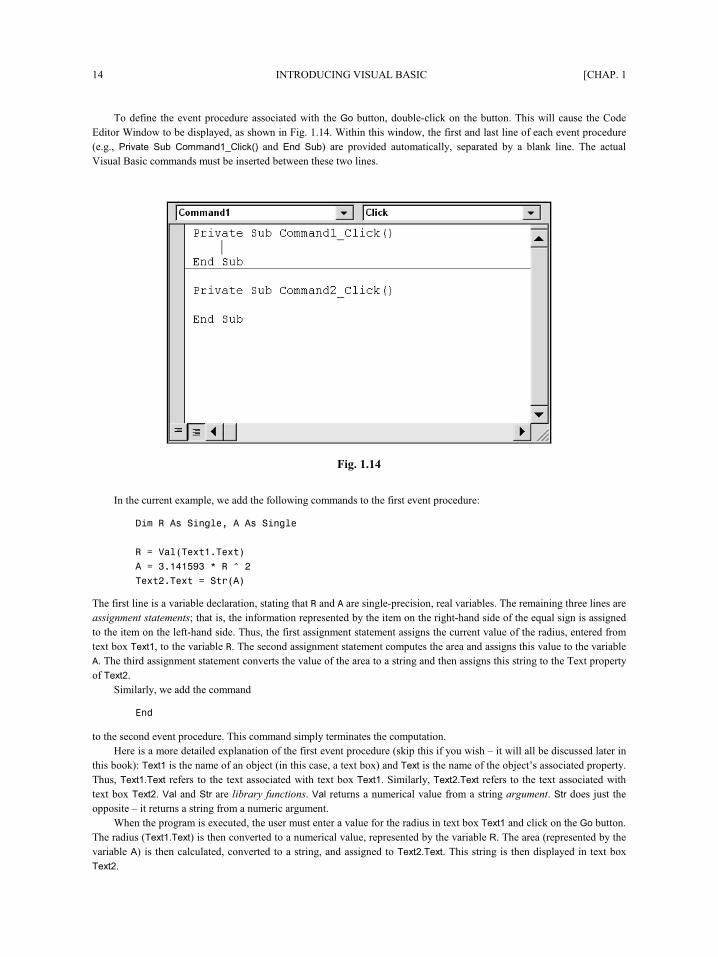
To define the event procedure associated with the Go button, double-click on the button. This will cause the Code
Editor Window to be displayed, as shown in Fig. 1.14. Within this window, the first and last line of each event procedure
(e.g., Private Sub Command1_Click() and End Sub) are provided automatically, separated by a blank line. The actual
Visual Basic commands must be inserted between these two lines.
Fig. 1.14
In the current example, we add the following commands to the first event procedure:
Dim R As Single, A As Single
R = Val(Text1.Text)
A = 3.141593 * R ^ 2
Text2.Text = Str(A)
The first line is a variable declaration, stating that R and A are single-precision, real variables. The remaining three lines are
assignment statements; that is, the information represented by the item on the right-hand side of the equal sign is assigned
to the item on the left-hand side. Thus, the first assignment statement assigns the current value of the radius, entered from
text box Text1, to the variable R. The second assignment statement computes the area and assigns this value to the variable
A. The third assignment statement converts the value of the area to a string and then assigns this string to the Text property
of Text2.
Similarly, we add the command
End
to the second event procedure. This command simply terminates the computation.
Here is a more detailed explanation of the first event procedure (skip this if you wish – it will all be discussed later in
this book): Text1 is the name of an object (in this case, a text box) and Text is the name of the object’s associated property.
Thus, Text1.Text refers to the text associated with text box Text1. Similarly, Text2.Text refers to the text associated with
text box Text2. Val and Str are library functions. Val returns a numerical value from a string argument. Str does just the
opposite – it returns a string from a numeric argument.
When the program is executed, the user must enter a value for the radius in text box Text1 and click on the Go button.
The radius (Text1.Text) is then converted to a numerical value, represented by the variable R. The area (represented by the
variable A) is then calculated, converted to a string, and assigned to Text2.Text. This string is then displayed in text box
Text2.
CHAP. 1] INTRODUCING VISUAL BASIC 15
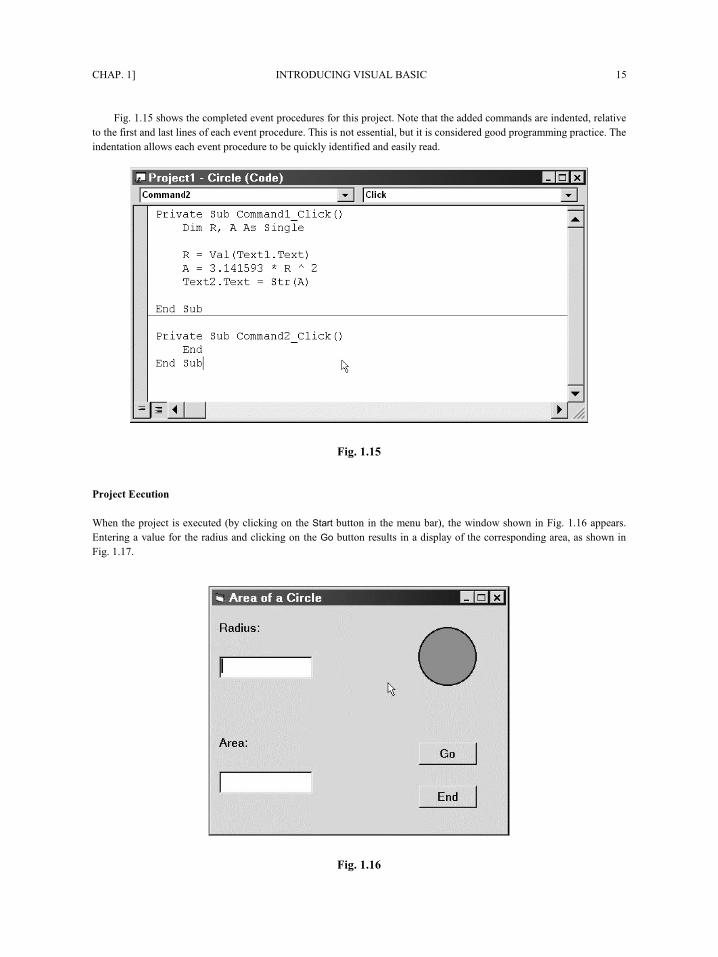
Fig. 1.15 shows the completed event procedures for this project. Note that the added commands are indented, relative
to the first and last lines of each event procedure. This is not essential, but it is considered good programming practice. The
indentation allows each event procedure to be quickly identified and easily read.
Fig. 1.15
Project Execution
When the project is executed (by clicking on the Start button in the menu bar), the window shown in Fig. 1.16 appears.
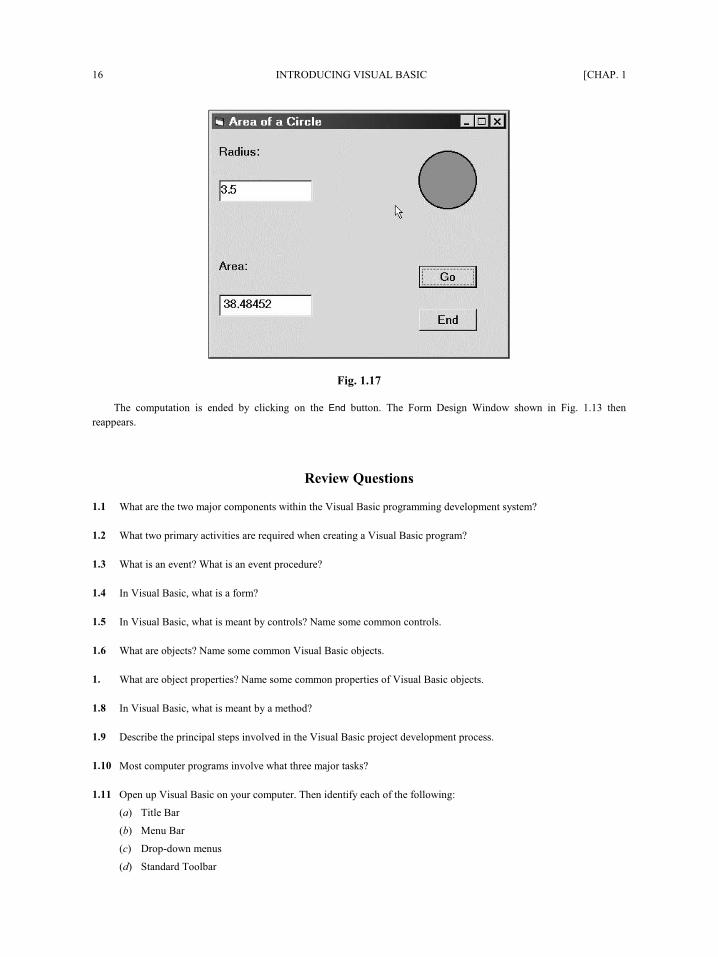
Entering a value for the radius and clicking on the Go button results in a display of the corresponding area, as shown in
Fig. 1.17.
Fig. 1.16
16 INTRODUCING VISUAL BASIC [CHAP. 1
Fig. 1.17
The computation is ended by clicking on the End button. The Form Design Window shown in Fig. 1.13 then
reappears.
Review Questions
1.1 What are the two major components within the Visual Basic programming development system?
1.2 What two primary activities are required when creating a Visual Basic program?
1.3 What is an event? What is an event procedure?
1.4 In Visual Basic, what is a form?
1.5 In Visual Basic, what is meant by controls? Name some common controls.
1.6 What are objects? Name some common Visual Basic objects.
1.7 What are object properties? Name some common properties of Visual Basic objects.
1.8 In Visual Basic, what is meant by a method?
1.9 Describe the principal steps involved in the Visual Basic project development process.
1.10 Most computer programs involve what three major tasks?
1.11 Open up Visual Basic on your computer. Then identify each of the following:
(a) Title Bar
(b) Menu Bar
(c) Drop-down menus
(d) Standard Toolbar
CHAP. 1] INTRODUCING VISUAL BASIC 17
(e) Form Design Window
(f) Project Container Window
(g) Toolbox
(h) Properties Window
(i) Project Window
(j) Code Editor Window
(k) Form Layout Window
(l) Immediate Window
1.12 Summarize how each of the following operations is carried out:
(a) Repositioning (relocating) a window
(b) Resizing a window
(c) Deleting (closing) a window
(d) Adding a new window
1.13 What is meant by “docking” a window? How is window docking is carried out?
1.14 How is an existing Visual Basic project opened?
1.15 How is a Visual Basic project saved?
1.16 How is a Visual Basic project executed? How is the project paused during execution? How is it resumed? How is the
execution ended?
1.17 How is the on-line help feature accessed?
Programming Problems
1.18 Re-create the project given in Example 1.1 using your own version of Visual Basic. Verify that the pro-
ject executes correctly. Then change the project in the following ways:
(a) Change the label captions to Enter the radius below: and The area is:.
(b) Change the background colors of the form and the text boxes. (Choose your own colors.)
(c) Change the command button captions to Execute and Quit.
(d) Raise the lower label and the lower text box so that they are closer to the upper label and text box.
(e) Move the command buttons to the bottom of the form and align them horizontally.
(f) Resize the form and rearrange the controls relative to one another so that the form has an overall
pleasing appearance.
(g) Access the on-line help for the Val function (select Index/Val function from the Help menu). Then
do the same with the Str function.
1.19 Modify the project given in Example 1.1 so that it calculates both the area and the circumference of a
circle from the given value of the radius. Display each calculated value in a separate text box. Experiment
with the project so that it runs correctly and has a pleasing appearance. Access the on-line help feature to
obtain assistance with programming details.
18
Chapter 2 _____________________________
Visual Basic Fundamentals
In this chapter we will consider several fundamental features of Visual Basic, such as numbers, strings, data
types and variables. We will then consider some fundamental Visual Basic features that will allow us to form
numerical expressions, manipulate strings, assign data to variables and add remarks to a program. We will also
discuss the use of library functions, which simplify various numerical and string manipulation operations.
After completing this chapter, you will be able to write a variety of Visual Basic commands (also referred
to as statements) for simple problem situations.
2.1 NUMERIC CONSTANTS
Numbers are referred to as numeric constants in Visual Basic. Most numeric constants are expressed as inte-
gers (whole numbers that do not contain a decimal point or an exponent), long integers (similar to integers
with an extended range), single-precision real quantities (numbers that include a decimal point, an exponent,
or both), or double-precision real quantities (similar to single-precision real quantities with an extended range
and greater precision). The following rules apply to numeric constants:
1. Commas cannot appear anywhere in a numeric constant.
2. A numeric constant may be preceded by a + or a − sign. The constant is understood to be positive if a sign
does not appear.
3. An integer constant occupies two bytes. It must fall within the range −32,768 to 32,767. It cannot contain
either a decimal point or an exponent.
4. A long integer constant occupies four bytes. It must fall within the range −2,147,483,648 to
2,147,483,647. It cannot contain either a decimal point or an exponent.
5. A single-precision real constant occupies four bytes. It can include a decimal point and as many as seven
significant figures. However, its magnitude cannot exceed approximately 3.4 × 1038.
A single-precision real constant can include an exponent if desired. Exponential notation is similar to
scientific notation, except that the base 10 is replaced by the letter E. Thus, the quantity 1.2 × 10⁻³ could
be written as 1.2E−3. The exponent itself can be either positive or negative, but it must be a whole num-
ber; i.e., it cannot contain a decimal point.
6. A double-precision real constant occupies eight bytes. It can include a decimal point and as many as fif-
teen significant figures. However, its magnitude cannot exceed approximately 1.8 × 10308.
A double-precision real constant can include an exponent if desired. Double-precision exponential no-
tation is similar to scientific notation, except that the base 10 is replaced by the letter D. Thus, the quantity
1.6667 × 10⁻³ could be written as 1.6667D−3. The exponent itself can be either positive or negative, but
it must be a whole number; i.e., it cannot contain a decimal point.
All of the numeric constants discussed above are based upon the decimal (base 10) numbering system.
Visual Basic also supports octal (base 8) and hexadecimal (base 16) numeric constants, though octal and hexa-
decimal constants are rarely used by beginning programmers. Hence, we will not work with octal or hexadeci-
mal constants in this book.
Copyright 2001 by McGraw-Hill, Inc. Click Here for Terms of Use.
CHAP. 2] VISUAL BASIC FUNDAMENTALS 19
EXAMPLE 2.1
Several Visual Basic numeric constants are shown below. Note that each quantity (each row) can be written in several
different ways.
0 +0 −0
1 +1 0.1E+1 10E−1
−5280 −5.28E+3 −.528E4 −52.8E2
1492 0.1492D+4 1.492D+3 +14.92D2
−.0000613 −6.13E−5 −613E−7 −0.613E−4
3000000 3D6 3D+6 0.3D7
2.2 STRING CONSTANTS
A string constant is a sequence of characters (i.e., letters, numbers and certain special characters, such as +, −,
/, *, =, $, ., etc.), enclosed in quotation marks. Blank spaces can be included within a string. A quotation mark
can also be placed within a string, but it must be written as two adjacent quotation marks (see the last line in
the example below).
String constants are used to represent nonnumeric information, such as names, addresses, etc. There is no
practical restriction on the maximum number of characters that can be included within a string constant. Thus,
the maximum length of a string constant can be considered infinite.
EXAMPLE 2.2
Several string constants are shown below.
"SANTA CLAUS" "Please type a value for C:"
"$19.95" "Welcome to the 21st Century"
"X1 = " "3730425"
"The answer is " "Do you wish to try again?"
"The professor said, ""Please don't snore in class"" "
2.3 VARIABLES
A variable is a name that represents a numerical quantity, a string, or some other basic data item (e.g., a date,
true/false condition, etc.). The following rules apply to the naming of variables:
1. A variable name must begin with a letter. Additional characters may be letters or digits. Certain other char-
acters may also be included, though the period and special data-typing characters (e.g., %, &, !, #, and $)
are not permitted. In general, it is good programming practice to avoid the use of characters other than
letters and digits.
2. A variable name cannot exceed 255 characters. As a practical matter, however, variable names rarely ap-
proach this size.
3. Visual Basic does not distinguish between uppercase and lowercase letters. Many programmers use upper-
case letters as word separators within a single variable name (e.g., FreezingPoint, TaxRate, etc.)
4. Visual Basic includes a number of reserved words (e.g., Dim, If, Else, Select, Case, Do, etc.). These
reserved words represent commands, function names, etc. They cannot be used as variable names.
20 VISUAL BASIC FUNDAMENTALS [CHAP. 2
EXAMPLE 2.3
Several variable names are shown below.
Area Radius X xmax C3
Counter CustomerName Account_Number UnpaidBalance
2.4 DATA TYPES AND DATA DECLARATIONS
Visual Basic supports all common data types, including Integer, Long (i.e., long integer), Single, Double and
String. The language also supports other data types, such as Boolean, Byte, Currency and Date data, as well as
Variant-type data (see below) and user-defined data types.
The Dim statement is used to associate variables with specific data types. This process, which is common
to all modern programming languages, is known as data declaration, or simply declaration. In general terms,
the Dim statement is written as Dim variable name 1 As data type 1, variable name 2 As data type 2, etc.
EXAMPLE 2.4
Several variable declarations are shown below.
Dim Counter As Integer
Dim Area As Single
Dim StudentName As String
Dim StudentName As String * 30
Dim TaxRate As Single, Income As Double, Taxes As Double, Dependents As Integer
The first line declares Counter to be an integer-type variable, and the second line declares that Area is a single-
precision real variable. The third line declares StudentName to be a string variable of unspecified length; in the fourth
line, however, StudentName is declared to be a string variable of fixed length, not exceeding 30 characters. Finally, the
last line declares TaxRate to be a single-precision real variable, Income and Taxes as double-precision real variables, and
Dependents as an integer variable.
Variants
Visual Basic allows variables to be undeclared if the programmer so chooses. In such cases, the data type of
the variable is determined implicitly by the value that is assigned to the variable. Such variables are referred to
as Variant-type variables, or simply as variants.
On the surface, the use of variants appears to simplify the program development process. This is a false
perception, however, as the use of variants is computationally inefficient, and it compromises the clarity of a
program. Good programming practice suggests that the use of variants be avoided. Use explicitly declared
variables instead.
Named Constants
It is also possible to define named constants in Visual Basic. Named constants are similar to variables. How-
ever, variables can be reassigned different values within a program, whereas named constants remain un-
changed throughout a program.
CHAP. 2] VISUAL BASIC FUNDAMENTALS 21
The Const statement is used to declare a named constant. This statement has the general form
Const constant name As data type = value
EXAMPLE 2.5
Here are some typical named constant declarations:
Const TaxRate As Single = 0.28
Const Avogadro As Double = 6.0225D+23
Const MaxCount As Integer = 100
The first line declares TaxRate to be a single-precision real constant whose value is 0.28. The second line defines
Avogadro’s number as a double-precision real constant whose value is 6.0225 × 10²³. The last line declares MaxCount as
an integer constant whose value is 100.
Note that the values assigned to TaxRate, Avogadro and MaxCount will remain unchanged throughout the program.
Suffixes
Rather than declaring a data type explicitly (using a Dim or Const statement), a variable or named constant can
be associated with a data type by adding a single-character suffix to the end of the variable/constant name. Sev-
eral of the more commonly used suffixes are listed below.
Suffix Data Type
% integer
& long integer
! single
# double
$ string
EXAMPLE 2.6
Shown below are several variables whose data types are defined by suffixes.
Variable Data Type
Index% integer
Counter& long integer
TaxRate! single
Ratio# double
CustomerName$ string
The use of suffixes is derived from earlier versions of the Basic language, and is included in Visual Basic
largely for purposes of consistency and backward compatibility. Modern programming practice encourages the
use of explicit data type declarations rather than suffixes. Hence, we will not make use of suffixes elsewhere in
this book.
22 VISUAL BASIC FUNDAMENTALS [CHAP. 2
User-Defined Data Types
It is sometimes convenient to define a multicomponent data type whose individual components are standard
data items (i.e., integers, single-precision reals, strings, etc.). Visual Basic allows such data types to be defined,
and it permits variables to be associated with these data types. Moreover, the components (called members)
within such variables can easily be accessed individually.
In general terms, the data type definition is written as Type data type name
member name 1 As data type 1
member name 2 As data type 2
. . . . .
End Type
To associate a variable with a user-defined data type, we simply write
Dim variable name As user-defined data type The components (members) of a user-defined variable can be accessed individually as
variable name.member name
These components can be used in the same manner as ordinary variables. Thus, they can appear within expres-
sions, and they can be assigned values (see Secs. 2.5 and 2.10).
EXAMPLE 2.7
Here is a typical user-defined data type. This data type might be useful in a customer billing application.
Type Customer
CustomerName As String
AcctNo As Integer
Balance As Single
End Type
Once the data type has been defined, we can declare one or more variables of this data type, as follows.
Dim OldCustomer As Customer, NewCustomer As Customer
We can then refer to the individual variable members as
OldCustomer.CustomerName NewCustomer.CustomerName
OldCustomer.AcctNo NewCustomer.AcctNo
OldCustomer.Balance NewCustomer.Balance
and so on.
2.5 OPERATORS AND EXPRESSIONS
Special symbols, called arithmetic operators, are used to indicate arithmetic operations such as addition, sub-
traction, multiplication, division and exponentiation. These operators are used to connect numeric constants
and numeric variables, thus forming arithmetic expressions.
CHAP. 2] VISUAL BASIC FUNDAMENTALS 23
The standard arithmetic operators are
Addition: + (plus sign)
Subtraction: − (minus sign)
Multiplication: * (asterisk)
Division: / (slash)
Exponentiation: ^ (caret, or upward-pointing arrow)
When arithmetic operators appear within an arithmetic expression, the indicated operations are carried out
on the individual terms within the expression, resulting in a single numerical value. Thus, an arithmetic expres-
sion represents a specific numerical quantity.
EXAMPLE 2.8
Several arithmetic expressions are presented below.
2 * j + k − 1 2 * (j + k – 1)
first + second − third (a ^ 2 + b ^ 2) ^ 0.5
4 * Pi * Radius ^ 3 / 3 (5 / 9) * (F – 32)
b ^ 2 − (4 * a * c) (2 * x − 3 * y) / (u + v)
Each expression represents a numerical quantity. Thus, if the variables a, b and c represent the quantities 2, 5 and 3, re-
spectively, the expression a + b - c will represent the quantity 4.
Visual Basic also includes two additional arithmetic operators:
Integer division \ (backward slash)
Integer remainder Mod
In integer division, each of the two given numbers is first rounded to an integer; the division is then carried out
on the rounded values and the resulting quotient is truncated to an integer. The integer remainder operation
(Mod) provides the remainder resulting from an integer division.
EXAMPLE 2.9
The results of several ordinary division, integer division and integer remainder operations are shown below.
13/5 = 2.6 13\5 = 2 13 Mod 5 = 3
8.6/2.7 = 3.185185 8.6\2.7 = 3 8.6 Mod 2.7 = 0
8.3/2.7 = 3.074074 8.3\2.7 = 2 8.3 Mod 2.7 = 2
8.3/2.2 = 3.772727 8.3\2.2 = 4 8.3 Mod 2.2 = 0 An arithmetic expression can be composed of a single numerical constant or a single numerical variable as
well as some combination of constants, variables and operators. In any event, every numerical variable that
appears in an arithmetic expression must be assigned a specific value before it can appear in the expression.
Otherwise, the expression could not be evaluated to yield a specific numerical result.
24 VISUAL BASIC FUNDAMENTALS [CHAP. 2
2.6 HIERARCHY OF OPERATIONS
Questions in meaning may arise when several operators appear in an expression. For example, does the expres-
sion 2 * x − 3 * y correspond to the algebraic term (2x) − (3y) or to 2 (x − 3y)? Similarly, does the expression
a / b * c correspond to a/(bc) or to (a/b)c? These questions are answered by the hierarchy of operations and
the order of execution within each hierarchical group.
The hierarchy of operations is
1. Exponentiation. All exponentiation operations are performed first.
2. Multiplication and division. These operations are carried out after all exponentiation operations have
been performed. Multiplication does not necessarily precede division.
3. Integer division. Integer division operations are carried out after all multiplication and (ordinary) divi-
sion operations.
4. Integer remainder. Integer remainder operations are carried out after all integer divisions operations.
5. Addition and subtraction. These operations are the last to be carried out. Addition does not necessar-
ily precede subtraction.
Within a given hierarchical group, the operations are carried out from left to right.
EXAMPLE 2.10
The arithmetic expression
a / b * c
is equivalent to the mathematical expression (a/b) c, since the operations are carried out from left to right.
Similarly, the arithmetic expression b ^ 2 − 4 * a * c
is equivalent to the mathematical expression b2 − (4ac). In this case, the quantity b ^ 2 is formed initially, followed by
the product 4 * a * c [first 4 * a, then (4 * a) * c]. The subtraction is performed last, resulting in the final numeri-
cal quantity (b ^ 2) − (4 * a * c).
A more extensive listing of the Visual Basic operators and their respective hierarchical ordering is given in
Chapter 3.
2.7 INSERTING PARENTHESES
We may wish to alter the normal hierarchy of operations in a numeric expression. This is easily accomplished
by inserting pairs of parentheses at the proper places within the expression. Then the operations within the in-
nermost pair of parentheses will be performed first, followed by the operations within the second innermost
pair, and so on. Within a given pair of parentheses, the natural hierarchy of operations will apply unless spe-
cifically altered by other pairs of parentheses embedded inside the given pair.
Remember to use pairs of parentheses. A careless imbalance of right and left parentheses is a common er-
ror among beginning programmers.
EXAMPLE 2.11
Suppose we want to evaluate the algebraic term
CHAP. 2] VISUAL BASIC FUNDAMENTALS 25
[ 2(a + b)2 + (3c)2 ] m / (n+1)
A Visual Basic expression corresponding to this algebraic term is
(2 * (a + b) ^ 2 + (3 * c) ^ 2) ^ (m / (n + 1))
If there is some uncertainty in the order in which the operations are carried out, we can introduce additional pairs of
parentheses, giving
((2 * ((a + b) ^ 2)) + ((3 * c) ^ 2)) ^ (m / (n + 1))
Both expressions are correct. The first expression is preferable, however, since it is less cluttered with parentheses and
therefore easier to read.
2.8 SPECIAL RULES CONCERNING ARITHMETIC EXPRESSIONS
Special problems can arise if an arithmetic expression is not correctly written. Such problems can be avoided
by remembering the following rules.
1. Preceding a variable by a minus sign is equivalent to multiplication by −1.
EXAMPLE 2.12
The arithmetic expression
−x ^ n
is equivalent to −(x ^ n) or −1 * (x ^ n), since exponentiation has precedence over multiplication. Hence, if x and n
are assigned values of 3 and 2, respectively, then −x ^ n will yield a value of −9.
2. Except for the condition just described, operations cannot be implied.
EXAMPLE 2.13
The algebraic expression 2 (x1 + 3x2) must be written in Visual Basic as
2 * (x1 + 3 * x2)
Note that the multiplication operators must be shown explicitly. Thus, the arithmetic expressions 2 (x1 + 3 * x2) and
2 * (x1 + 3 x2) are incorrect.
3. In an expression involving exponentiation, a negative quantity can be raised to a power only if the expo-
nent is an integer. (Do not confuse the exponent in an arithmetic expression with the exponent that is a
part of a single- or double-precision real constant.) To understand this restriction, we must see how expo-
nentiation is carried out. If the exponent is an integer quantity, the quantity to be exponentiated is multi-
plied by itself an appropriate number of times. But if the exponent is not an integer quantity, Visual Basic
computes the logarithm of the quantity being exponentiated, multiplies this logarithm by the exponent, and
then computes the antilog. Since the logarithm of a negative number is not defined, we see that the opera-
tion is invalid if the quantity being exponentiated is negative.
26 VISUAL BASIC FUNDAMENTALS [CHAP. 2
EXAMPLE 2.14
Consider the arithmetic expression
(c1 + c2) ^ 3
The quantity represented by (c1 + c2) is multiplied by itself twice, thus forming the cubic expression. It does not matter
whether the quantity (c1 + c2) is positive or negative.
On the other hand, the arithmetic expression
(b ^ 2 − 4 * a * c) ^ .5
will be valid only if (b ^ 2 − 4 * a * c) represents a positive quantity.
Finally, consider what happens in the arithmetic expression a ^ n when either a or n is zero. If n has a value of zero,
then a ^ n will be assigned a value of 1, regardless of the value of a. If a has a value of zero and n is nonzero, however,
then a ^ n will be evaluated as zero.
2.9 STRING EXPRESSIONS
Numerical operations cannot be performed on string constants or string variables. However, strings and string
variables can be concatenated (i.e., combined, one behind the other). In Visual Basic we use either the amper-
sand (&) or the plus sign (+) as a string concatenation operator (the ampersand is favored).
EXAMPLE 2.15
Suppose the string variables str1 and str2 have been assigned the following values:
Str1 = "TEN"
Str2 = "THOUSAND"
Then the string expression
Str1 & " " & str2 & " DOLLARS"
will cause the three individual strings to be concatenated, resulting in the single string
TEN THOUSAND DOLLARS
Note that we could also have written the string expression as
Str1 + " " + str2 + " DOLLARS"
2.10 ASSIGNING VALUES TO VARIABLES
The equal sign (=) is used to assign a numeric or string value to a variable. The general form is
Variable = Expression
where the value of the expression on the right is assigned to the variable on the left. Note that the expression
can consist of a constant, a single variable, or a more complex expression.
CHAP. 2] VISUAL BASIC FUNDAMENTALS 27
EXAMPLE 2.16
Shown below are several unrelated assignment statements.
X = 12.5
Cmax = X
Area = 3.141593 * Radius ^ 2
Label = "Name: "
Str = FirstStr + LastStr
In each statement, the value of the expression on the right of the equal sign is assigned to the variable on the left.
If the variable on the left of the equal sign and the expression on the right differ in their respective data
types, Visual Basic will attempt to convert from the data type of the expression to the data type of the variable.
Note that this may result in a data loss in some situations. For example, if the expression on the right is a real
quantity and the variable on the left is an integer, the fractional part of the expression will be dropped when it
is assigned to the integer variable. Moreover, some types of mixed-data-type assignments are incompatible and
therefore not allowed. For example, a string expression cannot be assigned to a numeric variable.
EXAMPLE 2.17
Consider the Visual Basic statements shown below.
Dim Radius As Single, Area As Single, Counter As Integer, CircleID as String
Radius = 3
CircleID = "Red"
Area = 3.141593 * Radius ^ 2
Counter = Area
Area = CircleID
The first assignment statement (Area = 3.141593 * Radius ^ 2) does not present any problems, since we are as-
signing a single-precision real quantity to a single-precision real variable. However, the second assignment statement re-
sults in a data loss, because the single-precision value of Area (in this case, 28.27434) is assigned to the integer variable
Counter. The decimal portion of Area is dropped, and Counter takes on the integer value 28.
The last assignment statement attempts to assign a string to a numeric variable. This operation is not permitted.
Hence, the last assignment statement will result in a runtime error.
It is important to understand the difference between an assignment statement and an algebraic equation.
Many assignment statements look like algebraic equations. On the other hand, there are certain kinds of as-
signments that would make no sense if viewed as algebraic equations.
EXAMPLE 2.18
Consider the following assignment statement.
J = J + 1
The assignment term J = J + 1 obviously does not correspond to an algebraic equation, since the equation j = j + 1
makes no sense. What we are doing here is to increase the value of the numeric variable J by one unit. Thus, the assign-
ment term is entirely logical if we interpret it as follows: add 1 to the value originally represented by the variable J, and
assign this new value to J. Thus, the new value of J will replace the old value. This operation is known as incrementing.
28 VISUAL BASIC FUNDAMENTALS [CHAP. 2
2.11 DISPLAYING OUTPUT – THE Print STATEMENT
The Print statement is used to display information within the currently active form, beginning in the upper
left corner. This statement is not used often in Visual Basic projects. However, it is very convenient for dis-
playing the results of very simple programs, and it provides a way to view the results of small program seg-
ments during the development of a large project.
The Print statement consists of the keyword Print, followed by a list of output items. The output items
can be numeric constants, string constants, or expressions. Successive items must be separated either by com-
mas or semicolons. Commas result in wide separation between data items; semicolons result in less separation.
Each new Print statement will begin a new line of output. An empty Print statement will result in a blank
line.
EXAMPLE 2.19
A Visual Basic program contains the following statements.
Dim Student As String, X As Integer, C1 As Single, C2 As Single
. . . . .
Student = "Aaron"
X = 39
C1 = 7
C2 = 11
. . . . .
Print "Name:", Student, X, (C1 + C2) / 2
The Print statement will generate the following line of output:
Name: Aaron 39 9
If the Print statement had been written with semicolons separating the data items, e.g.,
Print "Name:"; Student; X; (C1 + C2) / 2
then the output data would be spaced more closely together, as shown below.
Name: Aaron 39 9
Now suppose the original Print statement had been replaced by the following three successive Print statements:
Print "Name:"; Student
Print X,, (C1 + C2) / 2
Notice the repeated comma in the last Print statement.
The output would appear as
Name: Aaron
39 9
The empty Print statement would produce the blank line separating the first and second lines of output. Also, the re-
peated comma in the last Print statement would increase the separation between the two data items.
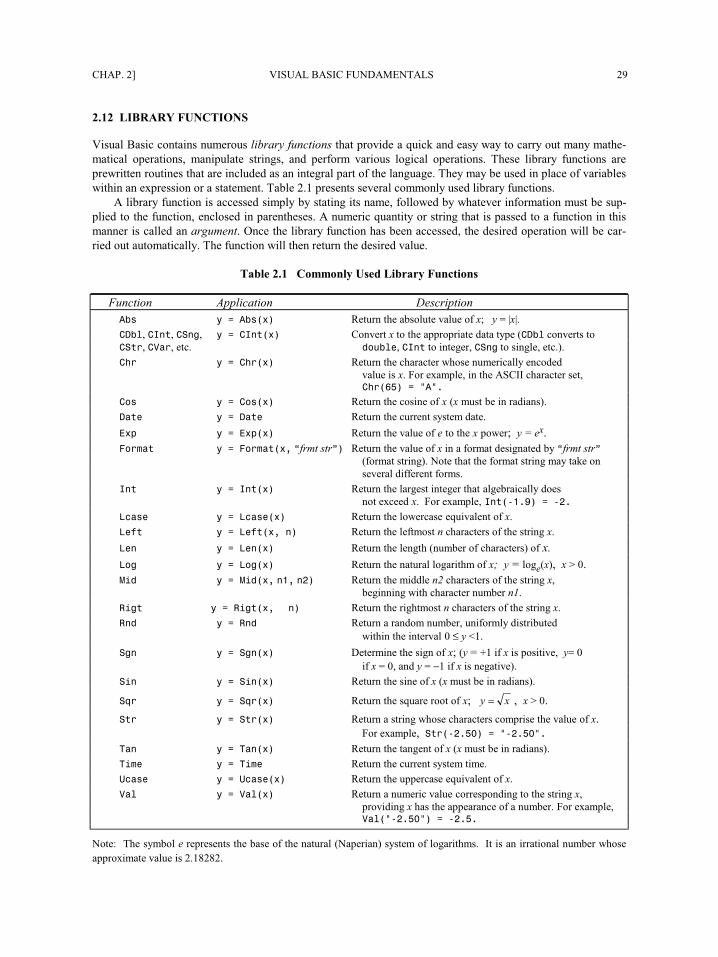
CHAP. 2] VISUAL BASIC FUNDAMENTALS 29
2.12 LIBRARY FUNCTIONS
Visual Basic contains numerous library functions that provide a quick and easy way to carry out many mathe-
matical operations, manipulate strings, and perform various logical operations. These library functions are
prewritten routines that are included as an integral part of the language. They may be used in place of variables
within an expression or a statement. Table 2.1 presents several commonly used library functions.
A library function is accessed simply by stating its name, followed by whatever information must be sup-
plied to the function, enclosed in parentheses. A numeric quantity or string that is passed to a function in this
manner is called an argument. Once the library function has been accessed, the desired operation will be car-
ried out automatically. The function will then return the desired value.
Table 2.1 Commonly Used Library Functions
Function Application Description
Abs y = Abs(x) Return the absolute value of x; y = |x|.
CDbl, CInt, CSng, y = CInt(x) Convert x to the appropriate data type (CDbl converts to
CStr, CVar, etc. double, CInt to integer, CSng to single, etc.).
Chr y = Chr(x) Return the character whose numerically encoded
value is x. For example, in the ASCII character set, Chr(65) = "A".
Cos y = Cos(x) Return the cosine of x (x must be in radians).
Date y = Date Return the current system date.
Exp y = Exp(x) Return the value of e to the x power; y = ex.
Format y = Format(x, “frmt str”) Return the value of x in a format designated by “frmt str”
(format string). Note that the format string may take on
several different forms. Int y = Int(x) Return the largest integer that algebraically does not exceed x. For example, Int(-1.9) = -2.
Lcase y = Lcase(x) Return the lowercase equivalent of x.
Left y = Left(x, n) Return the leftmost n characters of the string x.
Len y = Len(x) Return the length (number of characters) of x.
Log y = Log(x) Return the natural logarithm of x; y = loge(x), x > 0.
Mid y = Mid(x, n1, n2) Return the middle n2 characters of the string x,
beginning with character number n1.
Right y = Right(x, n) Return the rightmost n characters of the string x.
Rnd y = Rnd Return a random number, uniformly distributed
within the interval 0 ≤ y <1.
Sgn y = Sgn(x) Determine the sign of x; (y = +1 if x is positive, y= 0
if x = 0, and y = −1 if x is negative).
Sin y = Sin(x) Return the sine of x (x must be in radians).
Sqr y = Sqr(x) Return the square root of x; xy = , x > 0.
Str y = Str(x) Return a string whose characters comprise the value of x.
For example, Str(-2.50) = "-2.50".
Tan y = Tan(x) Return the tangent of x (x must be in radians).
Time y = Time Return the current system time.
Ucase y = Ucase(x) Return the uppercase equivalent of x.
Val y = Val(x) Return a numeric value corresponding to the string x,
providing x has the appearance of a number. For example, Val("-2.50") = -2.5.
Note: The symbol e represents the base of the natural (Naperian) system of logarithms. It is an irrational number whose
approximate value is 2.718282.
30 VISUAL BASIC FUNDAMENTALS [CHAP. 2
EXAMPLE 2.20
Suppose we wanted to calculate the square root of the value represented by the expression Area / 3.141593, using the
library function Sqr. To do so, we could write
Radius = Sqr(Area / 3.141593)
Notice that the argument of Sqr is the numeric expression (Area / 3.141593).
Of course, we could also have written
Radius = (Area / 3.141593) ^ 0.5
The library function is not required in this situation – it is merely used for convenience. In many situations, however (such
as calculating the log of a number, or calculating the length of a string), the use of library functions may be the only
straightforward way to carry out the calculation.
Most of the functions listed in Table 2.1 have a straightforward interpretation. A few, however, require
some additional explanation. The next several examples should clarify any confusion.
EXAMPLE 2.21
The Int function can be confusing, particularly with negative arguments. The values resulting from several typical func-
tion calls are shown below.
Int(2.3) = 2 Int(−2.3) = −3
Int(2.7) = 2 Int(−2.7) = −3
Remember that Int produces a value whose magnitude is equal to or smaller than its argument if the argument is
positive, and equal to or larger (in magnitude) than its argument if the argument is negative.
Some functions, such as Log and Sqr, require positive arguments. If a negative argument is supplied, an
error message will be generated when an attempt is made to evaluate the function.
EXAMPLE 2.22
A Visual Basic program contains the statements
x = −2.7 . . . . .
y = Sqr(x) (Notice the negative value assigned to x.)
When the program is executed, the following error message will be displayed:
Run-time error '5':
Invalid procedure call or argument
The execution will then cease.
Similarly, the statement
y Log(x)
will produce the same error message when the program is executed.
CHAP. 2] VISUAL BASIC FUNDAMENTALS 31
EXAMPLE 2.23
The Format function allows a data item to be displayed in many different forms. Several possibilities are shown below.
Many other variations are possible.
Expression Result
Print Format(17.66698, “##.##”) 17.67
Print Format(7.66698, “##.##”) 7.67 (note the leading blank space)
Print Format(0.66667, “##.###”) .667 (note the leading blank spaces)
Print Format(0.66667, “#0.###”) 0.667 (note the leading blank space)
Print Format(12345, “##,###”) 12,345
Print Format(12345, “##,###.00”) 12,345.00
Print Format(“Basic”, “&&&&&&&&”) Basic
Print Format(“Basic”, “@@@@@@@@”) Basic (note the leading blank spaces)
Print Format(Now, “mm-dd-yyyy”) 1-20-2001
Print Format(Now, “mm/dd/yy”) 1/20/01
Print Format(Now, “hh:mm:ss am/pm”) 04:47:51 pm
Note that Now is a predefined Visual Basic variable that represents the current date and time, as determined by the
computer’s real-time clock.
The use of library functions is not confined to assignment statements – a library function may appear any-
where in an expression in place of a constant or a variable. Moreover, the arguments need not be constants or
simple variables – expressions (which may include references to other functions) can be used as valid function
arguments, provided they are of the proper data type.
We will encounter additional library functions elsewhere in this book, in conjunction with features to be
discussed in later chapters.
2.13 PROGRAM COMMENTS
Comments provide a convenient means to document a program (i.e., to provide a program heading, to identify
important variables, to distinguish between major logical segments of a program, to explain complicated logic,
etc.). A comment consists of a single apostrophe ('), followed by a textual message. Comments can be inserted
anywhere in a Visual Basic program. They have no effect on the program execution.
EXAMPLE 2.24
A Visual Basic program includes the following statements:
'Program to Calculate the Roots of a Quadratic Equation
. . . . .
X1 = (−b + root) / (2 * a) 'calculate the first root X2 = (−b − root) / (2 * a) 'calculate the second root Print X1, X2
The entire first line is a comment, which serves as a program heading. On the other hand, the last two lines each have
a comment attached at the end of an executable statement. Note that each comment begins with a single apostrophe.
32 VISUAL BASIC FUNDAMENTALS [CHAP. 2
Review Questions
2.1 How do integer and long-integer constants differ from one another?
2.2 How do integer and single-precision real constants differ from one another?
2.3 How do single-precision and double-precision real constants differ from one another?
2.4 Summarize the rules that apply to numeric constants.
2.5 Present a detailed comparison between a number written in scientific notation and a number written in Visual Basic
as a floating-point constant.
2.6 What is a string constant? How are string constants written?
2.7 What is the maximum permissible length of a string constant?
2.8 Summarize the rules for naming numeric and string variables.
2.9 What is the maximum permissible length of a variable name?
2.10 What are reserved words? Can a reserved word be used as a variable name?
2.11 Is Visual Basic case-sensitive (i.e., does it distinguish between uppercase and lowercase letters)?
2.12 What common data types are supported by Visual Basic?
2.13 What is the purpose of the Dim statement? How is a Dim statement written?
2.14 What is a variant? What are the advantages and disadvantages associated with the use of variants?
2.15 What is the purpose of the Const statement? How does it differ from a Dim statement? How is a Const statement
written?
2.16 In Visual Basic, how does a named constant differ from a variable?
2.17 What are the commonly used variable-name suffixes in Visual Basic? What does each suffix represent?
2.18 Summarize the syntax for defining a multicomponent user-defined data type. How are variables of this data type
declared?
2.19 Within a multicomponent user-defined data type, what is a member?
2.20 What arithmetic operators are available in Visual Basic? What is their natural hierarchy? In what order are opera-
tions carried out within a hierarchical group?
2.21 What is a numeric expression? What does a numeric expression represent?
2.22 How can the natural hierarchy of operations be altered within a numeric expression?
2.23 Describe a particular problem that can arise in exponentiation operations. Give a reason for the problem and describe
how the problem can be avoided.
2.24 What is a string expression? How do string expressions differ from numeric expressions?
CHAP. 2] VISUAL BASIC FUNDAMENTALS 33
2.25 What operations can be carried out on strings?
2.26 How is a numerical or string value assigned to a variable?
2.27 Summarize the rules for writing an assignment statement.
2.28 What happens if the variable on the left-hand side of an assignment statement and the expression on the right-hand
side differ in their respective data types? Describe all possible situations.
2.29 Discuss the similarities and differences between an assignment statement and an algebraic equation.
2.30 Describe the customary use of the Print statement in Visual Basic.
2.31 What is the purpose of an empty Print statement?
2.32 Suppose a Print statement includes five output items, separated by commas. How can the statement be rewritten so
that the output items appear on the same line, with minimum spacing between them?
2.33 Suppose a Print statement includes five output items. How can the statement be rewritten so that the first three data
items appear on one line and the remaining two data items appear on a second line?
2.34 What are library functions? What useful purpose do they serve?
2.35 Name several of the more common library functions. State the purpose of each.
2.36 What is an argument? Must an argument have the same data type as the quantity returned by the function?
2.37 What is the purpose of the Int function? What does the Int function return if it receives a negative argument?
2.38 What happens if a negative value is supplied to a library function that requires a positive argument?
2.39 What is the purpose of the Format function? What type of arguments does this function require?
2.40 Can a library function accept an expression as an argument? Can it accept a reference to another library function as
an argument?
2.41 What is the purpose of a comment within a Visual Basic program? How are comments written?
2.42 Can a comment be included on a line containing a program statement?
Problems
2.43 Express each of the following quantities as a numeric constant.
(a) 7,350 (e) 0.00008291
(b) −12 (f) 9.563 × 10¹²
(c) 106 (g) 1/6
(d) −2,053.18 × 103
2.44 Each of the following numeric constants is written incorrectly. Identify the errors.
(a) 7,104 (d) 0.333333333333
(b) −+4920 (e) 4.63D−0.8
(c) 2.665E+42
34 VISUAL BASIC FUNDAMENTALS [CHAP. 2
2.45 Each of the following items represents a string constant. Identify which, if any, are written incorrectly.
(a) "July 4, 1776" (e) "Divide "X" by 100"
(b) "2 + 5 = 7" (f) "One hundred twenty-nine and 73/100 dollars"
(c) Another game? (g) "Programming with Visual Basic is lots of fun
(d) "75.50"
2.46 Identify which of the following variable names are written incorrectly.
(a) xmax (f) x.3
(b) Qbar$ (g) Answer?
(c) Big C (h) root1
(d) Big_C (i) Str1
(e) #space (j) input3
2.47 Write a single (one-line) declaration for each of the following situations:
(a) Declare x1 and x2 as single-precision real variables.
(b) Declare CustomerName and Address as string variables.
(c) Declare Counter as an integer variable, and Sum and Variance as double-precision real vari-
ables.
(d) Declare Factor as a named single-precision constant whose value is 0.80.
(e) Declare City as a named string constant whose value is “New York”.
2.48 Repeat Prob. 2.47 using variable-name suffixes rather than explicit declarations.
2.49 Define a multicomponent data type called MachinePart having the following components:
Color (string)
PartNo (long integer)
Length (single-precision real)
Cost (single-precision real)
Then declare a variable called EnginePart of this data type. Assign the following values to the com-
ponents of EnginePart: color: black; part number: 64,389; length: 88.042; cost: 22,515.87.
2.50 Write an arithmetic expression that corresponds to each of the following algebraic formulas.
(a) 3x + 5 (e) (u + v)k−1
(b) i + j − 2 (f) (4 t)1/6
(c) x2 + y2 (g) t (n + 1)
(d) (x + y)2 (h) (x + 3)1/k
2.51 Determine the value of each of the following expressions.
(a) 17 / 3 (e) 7.8 \ 1.8 (i) 7.1 Mod 1.3
(b) 17 \ 3 (f) 7.8 Mod 1.8 (j) 7.1 / 1.8
(c) 17 Mod 3 (g) 7.1 / 1.3 (k) 7.1 \ 1.8
(d) 7.8 / 1.8 (h) 7.1 \ 1.3 (l) 7.1 Mod 1.8
CHAP. 2] VISUAL BASIC FUNDAMENTALS 35
2.52 Write a string concatenation expression to join each of the following groups of string variables and con-
stants.
(a) StrA, StrB and StrC
(b) Client, Street and City, with a blank space between each string
(c) "Hello, " and StudentName
2.53 Write an assignment statement for each of the following situations.
(a) Assign a value of 2.54 to the variable C.
(b) Assign a value of 12 to the variable xmin.
(c) Assign the value represented by the variable N to the variable Nstar.
(d) Assign the string "January 31" to the variable Date.
(e) Assign the string represented by the variable Str1 to the variable Tag.
(f) Assign the value represented by the expression (A ^ 2 + B ^ 2 + C ^ 2) to the variable squares.
(g) Increase the value assigned to the variable count by 0.01.
(h) Assign the value represented by the expression (I + J) to the variable I.
(i) Assign the string "PITTSBURGH, PA." to the variable City.
(j) Assign the value of the expression X / (A + B − C) to the variable Ratio.
(k) Decrease the value assigned to the variable K by 2.
(l) Double the value assigned to the variable Prize.
2.54 Write an assignment statement that corresponds to each of the following algebraic equations.
(a) z = (x / y) + 3
(b) z = x / (y + 3)
(c) w = (u + v) / (s + t)
(d) f = [2ab / (c + 1) − t / (3(p + q))] 1/3
(e) y = (a1 − a2x + a3x 2 − a4x 3 + a5x 4) / (c1 − c2x + c3x 2 − c4x 3)
(f) P = Ai (1 + i)n / [ (1 + i)n − 1 ]
2.55 What particular difficulty might be experienced in executing the statement
x = (y − z) ^ 0.25
2.56 Consider the statement
P = −Q ^ 4
If Q = 2, what value will be assigned to P?
2.57 Consider the statement
P = Q ^ 4
If Q = −2, what value will be assigned to P? (Compare with the answer to the previous problem.)

36 VISUAL BASIC FUNDAMENTALS [CHAP. 2
2.58 Write an appropriate statement, or group of statements, for each situation described below.
(a) Display the values of C1, C2, C3, C4 and C5 all on one line.
(b) Display the values of A, B and C on one line and the values of X, Y and Z on another line, with a
blank line separating them.
(c) Display the values of A, B, C, X, Y and Z all on one line, spaced as closely as possible.
(d) Display the values of X, Y and Z on one line. Precede each numeric value with an appropriate la-
bel.
(e) Display the values of N$ and N next to one another, followed by the value of the following expres-
sion: A ^ 2 + B ^ 2.
2.59 Show how the output will appear in each of the following situations.
(a) Print "Name: ", employee, pay, tax, net
where employee = George Smith pay = 7000 tax = 1500 net = 5500
(b) Print "Name: "; employee; pay; tax; net
where the variables have the same values as in part (a).
(c) Print A1, B1, C1, D1
Print A2, B2, C2, D2
where A1 = 3 A2 = 5 B1 = 6 B2 = 10 C1 = 9 C2 = 15 D1 = 12 D2 = 20
(d) Print A1; B1; C1; D1;
Print A2; B2; C2; D2
where the variables have the same values as in part (c).
(e) Print A1 + B1; D2 / C2; (A1 * B2) / (B2 * C2)
where the variables have the same values as in part (c).
2.60 Using appropriate library functions, write assignment statements that correspond to each of the follow-
ing algebraic equations.
(a) w = loge (v) (d) r = (p + q) 1/2
(b) p = qe−qt (e) y = aebx sin cx
(c) w = | | u − v | − | u + v | | (f) y = ( | sin x − cos x | ) 1/2
2.61 Using appropriate library functions, write a Visual Basic statement for each of the following situations.
(a) Determine the sign of the quantity (ab − cd) / (f + g).
(b) Determine if the value of the integer variable N is even or odd, assuming that N has a positive
value. (Hint: Compare the value of N / 2 with the truncated value of N / 2.)
(c) In problem (b) above, what will happen if N has a negative value?
(d) Determine the largest integer that algebraically does not exceed z, where z = x2 − y2. Assign this
value to the integer variable IZ.
(e) In problem (d) above, if x = 2.5 and y = 6.3, what value will be assigned to IZ?
CHAP. 2] VISUAL BASIC FUNDAMENTALS 37
2.62 Determine the result of each of the following expressions. Assume that the variable Address has been
assigned the string "1600 Pennsylvania Avenue".
(a) Len(Address) (d) Mid(Address, 5, 8)
(b) UCase(Address) (e) Str(1/5)
(c) Right(Address, 5) (f) Val("1.25")
2.63 In each of the following cases, show how the comment (or remark) can be placed in a Visual Basic pro-
gram.
(a) Add the program heading Area and Circumference of a Circle
(b) Add the program heading Averaging of Air Pollution Data
(c) Add the comments Area and Circumference to the statements
Area = Pi * Radius ^ 2
Circumference = 2 * Pi * Radius
(d) Insert the full-line comment Loop to Calculate Cumulative Sum
(e) Add the comment Calculate an Average Value to the statement
Avg = Sum / n
38
Chapter 3 _____________________________
Branching and Looping
Visual Basic includes a number of features that allow us to select among alternative pathways, or to repeat the
execution of a particular block of statements. For example, we can choose to execute one of several different
blocks of statements, depending on the value of an expression. This process is known as selection. Or, we can
choose one of two different paths, depending on the outcome of a logical test (i.e., depending whether a logical
expression is true or false). This process is known as branching.
Many programs require that a group of instructions be executed repeatedly, until some particular condition
has been satisfied. This process is known as looping. Sometimes the number of passes through the loop will be
known in advance (unconditional looping). In other situations the looping action will continue indefinitely,
until some logical condition has been satisfied (conditional looping).
In this chapter we will see how Visual Basic allows us to carry out selection, branching and looping
operations.
3.1 RELATIONAL OPERATORS AND LOGICAL EXPRESSIONS
In order to carry out branching operations in Visual Basic, we must be able to express conditions of equality
and inequality. To do so, we make use of the following relational operators (also called comparison
operators):
Equal: =
Not equal: <>
Less than: <
Less than or equal to: <=
Greater than: >
Greater than or equal to: >=
These operators are used to compare numeric quantities (i.e., constants, numeric variables or numeric
expressions) or strings, thus forming logical expressions that are either true or false. The operands within a
logical expression must be of the same type; i.e., both must be numeric or both must be strings.
EXAMPLE 3.1
Several logical expressions involving numeric quantities are shown below. Each logical expression will be either true or
false, depending on the value assigned to the numeric variables.
X = 27
Error <= Abs(x1 - x2)
C < Sqr(A + B)
Profit > (Gross - Taxes)
FLAG <> CUTOFF
Copyright 2001 by McGraw-Hill, Inc. Click Here for Terms of Use.
CHAP. 3] BRANCHING AND LOOPING 39
The first expression will be true if X has been assigned a value of 27; otherwise, the expression will be false.
Similarly, the second expression will be true if the value assigned to error does not exceed the absolute value of the
numeric expression x1 - x2, and so on. Notice that the second and third expressions involve the use of library functions.
Strings can be tested for equality or inequality, in much the same manner as numeric quantities. However,
string expressions involving operators <, <=, > and >= refer to alphabetical ordering; that is, these operators are
interpreted as "comes before" or "comes after" rather than "less than" or "greater than." The actual alphabetic
ordering is determined by the system used to encode the characters (as, for example, the ASCII character set).
String comparisons are carried out on a character-by-character basis, from left to right. Uppercase
characters precede lowercase characters, and blank spaces precede nonblank characters. If one string is shorter
than the other and all of its characters are the same as the corresponding characters in the longer string, the
shorter string is considered to precede the longer string. Thus, car precedes far, Dog precedes dog, cat
precedes cats, and so on.
EXAMPLE 3.2
Several logical expressions involving strings are presented below. All variables represent strings. Each logical expression
will be either true or false, depending on the particular strings that are assigned to the string variables.
Student = "Smith"
char <> "w"
Target < City
The first expression will be true if the string assigned to Student is "Smith"; otherwise, the expression will be false.
Similarly, the second expression will be true if the string assigned to char is not "w", and the last expression will be true if
the string assigned to Target comes earlier in the alphabet than the string assigned to City. Thus, if Target represents
"Philadelphia" and City represents "Pittsburgh", the expression will be true.
3.2 LOGICAL OPERATORS
In addition to the relational operators, Visual Basic contains several logical operators. They are And, Or, Xor
(exclusive Or), Not, Eqv (equivalent) and Imp (implies). The first three operators (And, Or and Xor) are used
to combine logical expressions, thus forming more complex logical expressions. And will result in a condition
that is true if both expressions are true. Or will result in a condition that is true if either expression is true, or if
they are both true; Xor, however, will result in a condition that is true only if one of the expressions is true and
the other is false. Not is used to reverse (negate) the value of a logical expression (e.g., from true to false, or
false to true). Eqv will result in a condition that is true if both expressions have the same logical value (either
both true or both false); and Imp will always result in a true condition unless the first expression is true and the
second is false.
EXAMPLE 3.3
Shown below are several logical expressions that make use of logical operators.
X = 27 And Student = "Smith"
X > 0 And Student <= "Smith"
C < Sqr(A + B) Or FLAG <> CUTOFF
C < Sqr(A + B) Xor FLAG <> CUTOFF
40 BRANCHING AND LOOPING [CHAP. 3
Not(Student = "Smith") And (Account = "CURRENT")
(Student = "Smith") Eqv (Account = "CURRENT")
(Student = "Smith") Imp (Account = "CURRENT")
The first two logical expressions will be true only if both logical operands are true. Thus, the first logical expression
will be true if the numeric value assigned to X is 27 and the string assigned to Student is "Smith". (Note that the first
logical operand involves numeric quantities whereas the second involves strings.) Similarly, the second logical expression
will be true if the numeric value assigned to X exceeds zero and the string assigned to Student is "Smith", or it precedes
"Smith".
The third logical expression will be true if either logical operand is true; i.e., if the numeric value assigned to C is less
than the square root of (A + B), or the value assigned to FLAG differs from the value assigned to CUTOFF. The expression
will also be true if both logical operands are true. However, the fourth logical expression will be true only if one of the
logical operands is true and the other is false.
The fifth logical expression involves both Not and And. In this case, the logical expression will be true only if the
string assigned to Student is not "Smith", and the string assigned to Account is "CURRENT". Notice that the Not
operator has reversed (negated) the condition for which the first operand will be true.
The second-last logical expression will be true if both logical operands are true ("Smith" has been assigned to
Student and "CURRENT" has been assigned to Account), or if both logical operands are false. And finally, the last logical
expression will be true unless the first logical operand is true ("Smith" has been assigned to Student) and the second is
false ("CURRENT" has not been assigned to Account).
The complete hierarchy of arithmetic, relational and logical operators is as follows:
Operation Operator
1. Exponentiation ^
2. Negation (i.e., preceding a numeric −
quantity with a minus sign)
3. Multiplication and division * /
4. Integer division \
5. Integer remainder Mod
6. Addition and subtraction + −
7. Relationals = <> < <= > >=
8. Logical Not Not
9. Logical And And
10. Logical Or Or
11. Logical Xor Xor
12. Logical Eqv Eqv
13. Logical Imp Imp
Within a given hierarchical group, the operations are carried out from left to right. The natural hierarchy
can be altered, however, by using parentheses, as described in Sec. 2.6. In particular, note that parentheses can
be used with logical expressions, just as they are used with arithmetic expressions.
EXAMPLE 3.4
Consider the logical expression
CHAP. 3] BRANCHING AND LOOPING 41
Balance > 0 Or Flag = 1 And Account = "Regular"
This expression is equivalent to
Balance > 0 Or (Flag = 1 And Account = "Regular")
Thus, the expression will be true if either Balance has been assigned a value greater than 0, or Flag has been assigned a
value of 1 and Account has been assigned the string "Regular".
On the other hand, the logical expression
(Balance > 0 OR Flag = 1) And Account = "Regular"
has a different interpretation. Now the expression will be true only if either Balance has been assigned a value greater
than 0 and/or Flag has been assigned a value of 1, and in addition, Account has been assigned the string "Regular".
Note that the first logical expression can be satisfied simply if Balance > 0 is true. However, the second logical
expression requires that two conditions be true; Account = "Regular" must be true, and one or both of the remaining
conditions must also be true (either Balance > 0 or Flag = 1).
3.3 BRANCHING WITH THE If-Then BLOCK
An If-Then block is used to execute a single statement or a block of statements on a conditional basis. There
are two different forms. The simplest is the single-line, single-statement If-Then, which is written as
If logical expression Then executable statement
The executable statement will be executed only if the logical expression is true. Otherwise, the statement
following If-Then will be executed next. Note that the executable statement must appear on the same line as
the logical expression; otherwise, an End If statement will be required (see below).
EXAMPLE 3.5
A typical situation utilizing an If-Then statement is shown below.
If x < 0 Then x = 0
Sum = Sum + x
This example causes negative values of x to be set to zero before adding the current value of x to Sum. Note that the
adjustment is executed only if the logical expression x < 0 is true. However, the second assignment statement (Sum =
Sum + x) is always executed, regardless of the outcome of the logical test.
Here is a more general form of an If-Then block:
If logical expression Then
. . . . . . .
executable statements
. . . . . . .
End If
The block of statements included between If-Then and End If will be executed if the logical expression is
true. Otherwise, this block of statements will be bypassed, and the statement following End If will be executed
next.

42 BRANCHING AND LOOPING [CHAP. 3
EXAMPLE 3.6
The following If-Then block permits a single group of statements to be executed conditionally.
IF income <= 14000 THEN
tax = 0.2 * pay
net = pay - tax
END IF
The assignment statements will be executed only if the logical expression income <= 14000 is true.
3.4 BRANCHING WITH If-Then-Else BLOCKS
An If-Then-Else block permits one of two different groups of executable statements to be executed,
depending on the outcome of a logical test. Thus, it permits a broader form of branching than is available with
a single If-Then block.
In general terms, an If-Then-Else block is written as
If logical expression Then . . . . . . . .
executable statements
. . . . . . . .
Else . . . . . . . .
executable statements
. . . . . . . .
End If
If the logical expression is true, the first group of executable statements will be executed. Otherwise, the
second group of executable statements will be executed. Thus, one group of executable statements will always
be executed. Note that If-Then, Else and End If are separate statements that are used together to create a
complete If-Then-Else block.
The executable statements are usually indented with respect to the If-Then, Else and End If statements
so that the structure of the block is readily identifiable. This is not a rigid syntactical requirement, but it is
considered to be good programming practice and is strongly encouraged.
EXAMPLE 3.7
A typical If-Then-Else sequence is shown below. This sequence allows us to calculate either the area and circumference
of a circle or the area and circumference of a rectangle, depending on the string that is assigned to the variable form.
pi = 3.141593
If (form = "circle") THEN 'circle
area = pi * radius ^ 2
circumference = 2 * pi * r
Else 'rectangle
area = length * width
circumference = 2 * (length + width)
End If
CHAP. 3] BRANCHING AND LOOPING 43
If the logical expression form = "circle" is true, then the first group of executable statements (the first two indented
lines) will be executed. If the logical expression is false, however, the second group of executable statements (the indented
lines that follow Else) will be executed.
Note that the indentation of the executable statements causes the entire If-Then-Else structure to be readily
discernable. Thus, it is easy to identify which group of statements corresponds to If-Then and which corresponds to
Else.
Though If-Then-Else blocks often include several executable statements after the If-Then and the
Else statements, the appearance of a single executable statement is also common. The following example
illustrates a typical application.
EXAMPLE 3.8
Consider the following If-Then-Else block.
IF (status = "single") THEN
tax = 0.2 * pay
Else
tax = 0.14 * pay
END IF
If the logical expression status = "single" is true, then the first assignment statement will be executed. If the logical
expression is false, however, the second assignment statement will be executed.
A more general form of the If-Then-Else block can be written as
If logical expression 1 Then
. . . . . . . .
executable statements
. . . . . . . .
ElseIf logical expression 2 Then . . . . . . . .
executable statements
. . . . . . . .
repeated ElseIf clauses . . . . . . . .
Else . . . . . . . .
executable statements
. . . . . . . .
End If
In this form, If-Then clauses are embedded within prior Else clauses. Hence, we can construct conditional
execution blocks that involve complex logical conditions.
EXAMPLE 3.9 ROOTS OF A QUADRATIC EQUATION
The roots of the quadratic equation ax2 + bx + c = 0 can be determined using the well-known formulas
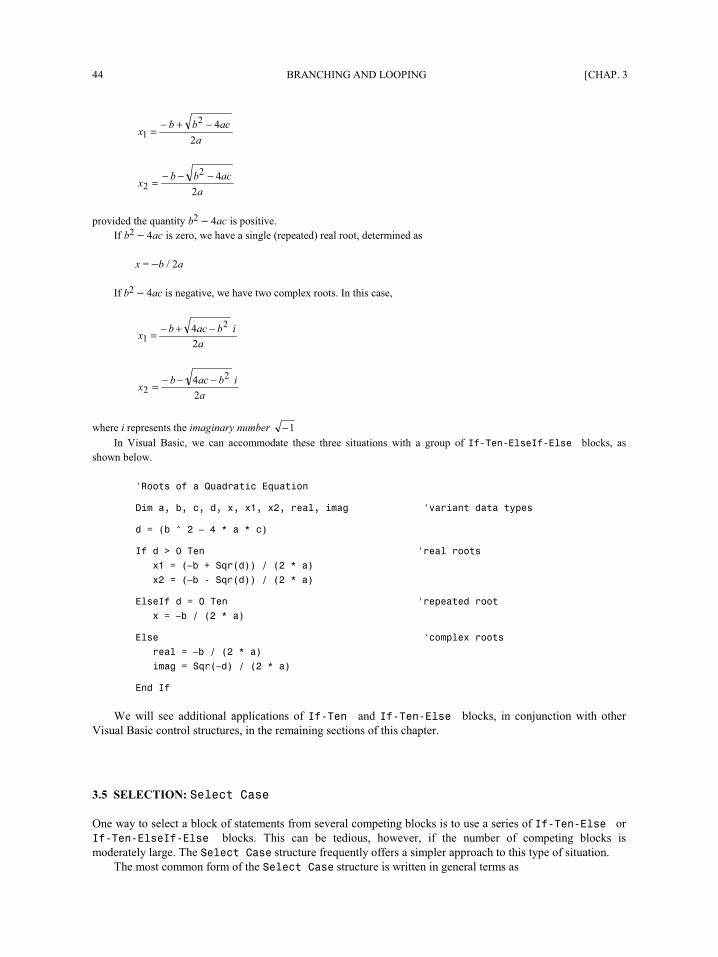
44 BRANCHING AND LOOPING [CHAP. 3
a
acbbx
2
42
1−+−
=
a
acbbx
2
42
2−−−
=
provided the quantity b2 − 4ac is positive.
If b2 − 4ac is zero, we have a single (repeated) real root, determined as
x = −b / 2a
If b2 − 4ac is negative, we have two complex roots. In this case,
a
ibacbx
2
4 2
1−+−=
a
ibacbx
2
4 2
2−−−=
where i represents the imaginary number 1−
In Visual Basic, we can accommodate these three situations with a group of If-Then-ElseIf-Else blocks, as
shown below.
'Roots of a Quadratic Equation
Dim a, b, c, d, x, x1, x2, real, imag 'variant data types
d = (b ^ 2 − 4 * a * c)
If d > 0 Then 'real roots
x1 = (−b + Sqr(d)) / (2 * a) x2 = (−b - Sqr(d)) / (2 * a)
ElseIf d = 0 Then 'repeated root
x = −b / (2 * a)
Else 'complex roots
real = −b / (2 * a) imag = Sqr(−d) / (2 * a)
End If
We will see additional applications of If-Then and If-Then-Else blocks, in conjunction with other
Visual Basic control structures, in the remaining sections of this chapter.
3.5 SELECTION: Select Case
One way to select a block of statements from several competing blocks is to use a series of If-Then-Else or
If-Then-ElseIf-Else blocks. This can be tedious, however, if the number of competing blocks is
moderately large. The Select Case structure frequently offers a simpler approach to this type of situation.
The most common form of the Select Case structure is written in general terms as
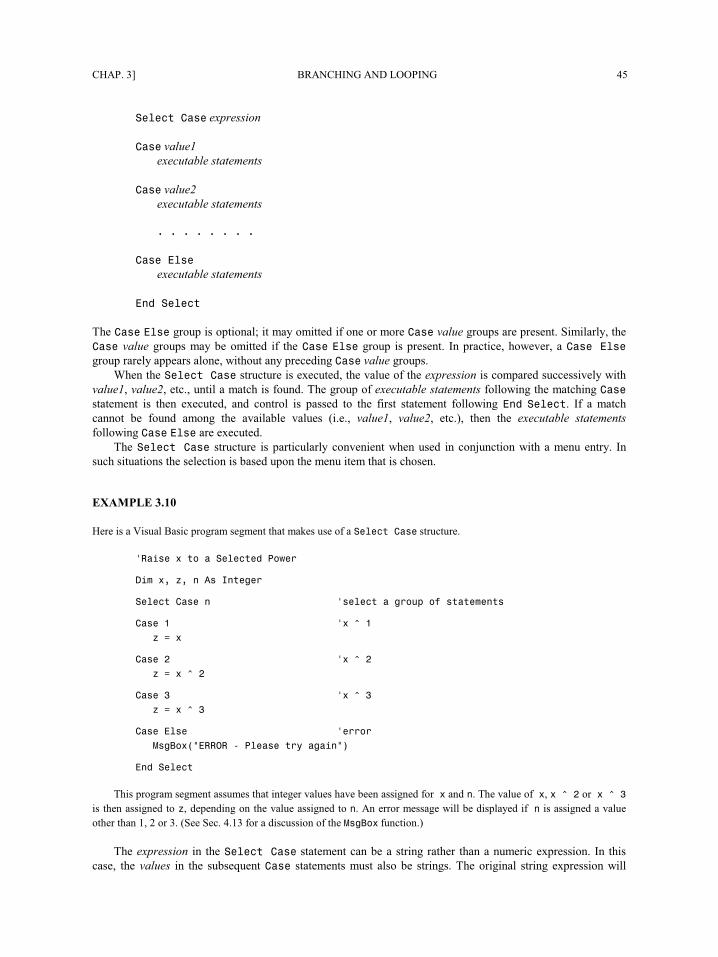
CHAP. 3] BRANCHING AND LOOPING 45
Select Case expression
Case value1
executable statements
Case value2
executable statements
. . . . . . . .
Case Else
executable statements
End Select
The Case Else group is optional; it may omitted if one or more Case value groups are present. Similarly, the
Case value groups may be omitted if the Case Else group is present. In practice, however, a Case Else
group rarely appears alone, without any preceding Case value groups.
When the Select Case structure is executed, the value of the expression is compared successively with
value1, value2, etc., until a match is found. The group of executable statements following the matching Case
statement is then executed, and control is passed to the first statement following End Select. If a match
cannot be found among the available values (i.e., value1, value2, etc.), then the executable statements
following Case Else are executed.
The Select Case structure is particularly convenient when used in conjunction with a menu entry. In
such situations the selection is based upon the menu item that is chosen.
EXAMPLE 3.10
Here is a Visual Basic program segment that makes use of a Select Case structure.
'Raise x to a Selected Power
Dim x, z, n As Integer
Select Case n 'select a group of statements
Case 1 'x ^ 1
z = x
Case 2 'x ^ 2
z = x ^ 2
Case 3 'x ^ 3
z = x ^ 3
Case Else 'error
MsgBox("ERROR - Please try again")
End Select
This program segment assumes that integer values have been assigned for x and n. The value of x, x ^ 2 or x ^ 3
is then assigned to z, depending on the value assigned to n. An error message will be displayed if n is assigned a value
other than 1, 2 or 3. (See Sec. 4.13 for a discussion of the MsgBox function.)
The expression in the Select Case statement can be a string rather than a numeric expression. In this
case, the values in the subsequent Case statements must also be strings. The original string expression will

46 BRANCHING AND LOOPING [CHAP. 3
then be compared with the string values in the subsequent Case statements until a match is found. As before,
Case Else provides a default in the event that a match cannot be found.
EXAMPLE 3.11
The following program segment is similar to that shown in Example 3.10, except that the selection is based upon a string
rather than the value of a numeric expression. The program segment assumes that a string has been assigned to Status. If
the string is Single, Married or Retired (in either uppercase or lowercase), an appropriate value will be assigned to
TaxRate. If any other string is entered, an error message will be displayed.
'Tax rate based upon marital status
Dim Status As String, TaxRate as Single
Status = UCase(Status)
Select Case Status
Case "SINGLE"
TaxRate = 0.20
Case "MARRIED"
TaxRate = 0.14
Case "RETIRED"
TaxRate = 0.12
Case Else
MsgBox("ERROR - Please try again")
End Select
Some additional options are available when writing Select Case statements. For example, if the value of
the expression in the Select Case statement is numeric, then a numeric expression may appear in a
succeeding Case statement. A logical expression may also appear, provided the expression is preceded by the
keyword Is. Moreover, multiple values, separated by commas, may appear in a single Case statement. Also, a
range of values, connected by the keyword To, may appear in a single Case statement. All of these options are
illustrated in the following example.
EXAMPLE 3.12
The following program segment shows a selection based upon the value of a numeric constant.
Dim Flag As Integer, Label As String
Select Case Flag
Case 1, 3, 5
Label = "Odd digit between 1 and 5"
Case 2, 4, 6
Label = "Even digit between 2 and 6"
Case 7 To 9
Label = "Any digit between 7 and 9"
Case Is >= 10
Label = "Too big"
Case Else
Label = "Nonpositive number"
End Select
CHAP. 3] BRANCHING AND LOOPING 47
The first two Case statements each contain multiple values separated by commas. The third Case statement contains a
range of values connected by the keyword To (i.e., Case 7 To 9). And finally, the fourth Case statement contains a
logical expression preceded by the keyword Is (i.e., Case Is >= 10).
Similar options are also available if the expression in the Select Case statement is a string. A
succeeding Case statement may contain a logical expression, preceded by the keyword Is. A Case statement
may also contain multiple strings, separated by commas. Or, a Case statement may contain a range of strings,
connected by the keyword To. The following example illustrates these options.
EXAMPLE 3.13
The following program segment presents a selection based upon a single-character string.
Dim Char As String, Label As String
Select Case Char
Case "A" To "Z", "a" To "z"
Label = "Character is a LETTER"
Case "0" To "9"
Label = "Character is a DIGIT"
Case Is < " ", Is > "~"
Label = "Character is NONPRINTING"
Case Else
Label = "Character is NOT ALPHANUMERIC"
End Select
The first Case statement contains two string ranges. Each range includes the keyword To. The individual ranges are
separated by a comma.
The second Case statement includes a single range of strings. (Note that the digits 0 and 9 are written as strings, not
numerical values.) Again, note the use of the keyword To.
Finally, the third Case statement includes two logical expressions. Each logical expression is preceded by the
keyword Is. The individual expressions are separated by a comma.
3.6 LOOPING WITH For-Next
The For-Next structure is a block of statements that is used to carry out a looping operation; that is, to
execute a sequence of statements some predetermined number of times. The structure begins with a For-To
statement and ends with a Next statement. In between are the statements to be executed.
In its simplest form, a For-Next structure is written as
For index = value1 To value2 . . . . . . . .
executable statements . . . . . . . .
Next index
The For-To statement specifies the number of passes through the loop. Within this statement, index is a
variable whose value begins with value1, increases by 1 each time the loop is executed, until it reaches value2.
Note that the value of index will be value2 during the last pass through the loop.

48 BRANCHING AND LOOPING [CHAP. 3
The Next statement identifies the end of the loop. It consists simply of the keyword Next, followed by the
index. The index appearing in the For-To and the Next statements must be the same. (Visual Basic allows the
index to be omitted from the Next statement in single For-Next loops, though this is considered poor
programming practice.)
The executable statements refer to one or more consecutive statements that are executed during each pass
through the loop. These statements are usually indented, so that the structure can easily be identified. The
indentation is not required, though it is considered good programming practice.
EXAMPLE 3.14
A typical For-To loop structure is shown below.
sum = 0
For i = 1 To 10
sum = sum + i
Next i
This structure will result in 10 passes through the loop. During the first pass, i will be assigned a value of 1; i will
then increase by 1 during each successive pass through the loop, until it has reached its final value of 10 in the last pass.
Within each pass, the current value of i is added to sum. Hence, the net effect of this program segment is to determine the
sum of the first 10 integers (i.e., 1 + 2 + . . . + 10).
Note the indentation of the assignment statement within the loop structure.
A more general form of the For-Next structure can be written as
For index = value1 To value2 Step value3 . . . . . . . .
executable statements . . . . . . . .
Next index
Within the For-To statement, value3 determines the amount by which value1 changes from one pass to the
next. This quantity need not be restricted to an integer, and it can be either positive or negative. If value3 is
negative, then value1 must be greater than value2 (because the value assigned to index will decrease during
each successive pass through the loop). Note that value3 is understood to equal 1 if it is not shown explicitly
(i.e., if the Step clause is omitted).
EXAMPLE 3.15
The loop structure
sum = 0
For count = 2.5 To -1 STEP -0.5
sum = sum + count
Next count
will cause count to take on the values 2.5, 2.0, 1.5, . . ., 0.0, -0.5, -1.0. Hence, the final value of sum
will be 6.0 (because 2.5 + 2.0 + 1.5 + 1.0 + 0.5 + 0.0 – 0.5 – 1.0 = 6.0). Note that this structure will generate a total of
eight passes through the loop.
The For-Next structure is one of the most widely used features in Visual Basic. It is most often used
when the number of passes through the loop is known in advance.
CHAP. 3] BRANCHING AND LOOPING 49
The following rules apply to For-Next loops.
1. The index variable can appear within a statement inside the loop, but its value cannot be altered.
2. If value1 and value2 are equal and value3 is nonzero, the loop will be executed once.
3. The loop will not be executed at all under any of the following conditions:
(a) value1 and value2 are equal, and value3 is zero.
(b) value1 is greater than value2, and value3 is positive.
(c) value1 is less than value2, and value3 is negative.
4. Control can be transferred out of a loop, but not in (see below).
Visual Basic includes an Exit For statement. This statement permits a transfer out of a For-Next loop if
some particular condition is satisfied. For example, we may wish to jump out of a loop if an error or a stopping
condition is detected during the execution of the loop.
The Exit For statement is generally embedded in an If-Then structure that is included within the loop.
When the Exit For statement is encountered during program execution, control is immediately transferred out
of the For-Next loop, to the first executable statement following Next.
EXAMPLE 3.16
Here is a variation of Example 3.14, illustrating the use of a typical Exit For statement.
sum = 0
For i = 1 To 10
sum = sum + i
If sum >= 10 Then
Exit For
Next i
This loop is set up to execute 10 times, but the execution will be terminated if the current value of sum equals or exceeds
10. In this particular case, the execution will terminate within the fourth pass (because 1 + 2 + 3 + 4 = 10).
3.7 LOOPING WITH Do-Loop
In addition to For-Next structures, Visual Basic also includes Do-Loop structures, which are convenient
when the number of passes through a loop is not known in advance (as, for example, when a loop is required to
continue until some logical condition has been satisfied).
A Do-Loop structure always begins with a Do statement and ends with a Loop statement. However, there
are four different ways to write a Do-Loop structure. Two of the forms require that a logical expression appear
in the Do statement (i.e., at the beginning of the block); the other two forms require that the logical expression
appear in the Loop statement (at the end of the block).
The general forms of the Do-Loop structure are shown below.
First form: Second form:
Do While logical expression Do Until logical expression . . . . . . . . . . . . . . . . executable statements executable statements
. . . . . . . . . . . . . . . .
Loop Loop
50 BRANCHING AND LOOPING [CHAP. 3
Third form: Fourth form:
Do Do
. . . . . . . . . . . . . . . .
executable statements executable statements
. . . . . . . . . . . . . . . .
Loop While logical expression Loop Until logical expression
The first form continues to loop as long as the logical expression is true, whereas the second form
continues to loop as long as the logical expression is not true (until the logical expression becomes true).
Similarly, the third form continues to loop as long as the logical expression is true, whereas the fourth form
continues to loop as long as the logical expression is not true.
Note that there is a fundamental difference between the first two forms and the last two forms of the Do-
Loop block. In the first two forms, the logical test is made at the beginning of each pass through the loop;
hence, it is possible that there will not be any passes made through the loop, if the indicated logical condition is
not satisfied. In the last two forms, however, the logical test is not made until the end of each pass; therefore, at
least one pass through the loop will always be carried out.
EXAMPLE 3.17
Consider the following two Do-Loop structures.
flag = "False" flag = "False"
. . . . . . . . . . . . . . . .
Do While flag = "True" Do
. . . . . . . . . . . . . . . .
Loop Loop While flag = "True"
The left loop will not execute at all, because the logical test at the beginning of the loop structure is false. The right loop
will execute once, however, because the logical test is not carried out until the end of the first pass through the loop.
Moreover, if the string "True" is assigned to flag during this first pass through the right loop, then the execution will
continue indefinitely, until flag is reassigned.
Note that a Do-Loop structure does not involve a formal index. Thus, the programmer must provide the
logic for altering the value of the logical expression within the loop. Typically, an initial assignment is made
before entering the loop structure. The logical expression is then altered at some point within the loop.
EXAMPLE 3.18
Here is a Do-While loop that is comparable to the For-Next loop in Example 3.14.
sum = 0
count = 1
Do While count <= 10
sum = sum + count
count = count + 1
Loop
This structure will result in 10 passes through the loop. Note that count is assigned a value of 1 before entering the loop.
The value of count is then incremented by 1 during each pass through the loop. Once the value of count exceeds 10, the
execution will cease.
CHAP. 3] BRANCHING AND LOOPING 51
Here is another way to accomplish the same thing.
sum = 0
count = 1
Do
sum = sum + count
count = count + 1
Loop While count <= 10
If we choose to use an Until clause rather than a While clause, we can write the control structure in either of the
following ways.
sum = 0 sum = 0
count = 1 count = 1
Do Until count > 10 Do
sum = sum + count sum = sum + count
count = count + 1 count = count + 1
Loop Loop Until count > 10
Note that the logical expression in these two structures (count > 10) is the opposite of the logical expression in the first
two structures (count <= 10).
Control can be transferred out of a Do-Loop block using the Exit Do statement. This statement is
analogous to Exit For, which is used with For-Next blocks. Thus, when an Exit Do statement is
encountered during program execution, control is transferred out of the Do-Loop block to the first executable
statement following Loop.
EXAMPLE 3.19
Here is a variation of Example 3.16, illustrating the use of a typical Exit Do statement.
sum = 0
count = 1
Do While count <= 10
sum = sum + count
If sum >= 10 Then
Exit Do
count = count + 1
Loop
3.8 LOOPING WITH While-Wend
Visual Basic supports While-Wend structures in addition to Do-Loop structures. This structure also permits
conditional looping. The structure begins with the While statement (analogous to Do While), and ends with
the Wend statement (analogous to Loop).
The general form of a While-Wend structure is
While logical expression
. . . . . . . .
executable statements
. . . . . . . .
Wend
52 BRANCHING AND LOOPING [CHAP. 3
The loop created by the While-Wend structure continues to execute as long as the logical expression is true.
Thus, While-Wend is analogous to a Do While-Loop structure. Note that the logical expression is tested at
the beginning of each pass through the loop.
The While-Wend structure, like the Do-While structure, does not involve a formal index. Therefore, you
must assign an initial value to the logical expression before entering the loop. This value will then be altered
within the loop, in accordance with the program logic.
EXAMPLE 3.20
Here is a While-Wend loop that is comparable to the Do-While loop in Example 3.18.
sum = 0
count = 1
While count <= 10
sum = sum + count
count = count + 1
Wend
3.9 THE Stop STATEMENT
The Stop statement is used to terminate the execution at any point in the program. The statement consists
simply of the keyword Stop. This statement may appear anywhere in a Visual Basic program except at the
very end. Multiple Stop statements may appear in the same program, as dictated by the program logic.
However, modern programming practice tends to avoid the use of the Stop statement.
Review Questions
3.1 What is meant by selection?
3.2 What is branching? How does branching differ from selection?
3.3 What is looping? What is the difference between unconditional looping and conditional looping?
3.4 Name the six relational operators used in Visual Basic. What is the purpose of each?
3.5 What is a logical expression? What values can a logical expression take on?
3.6 What are operands within a logical expression?
3.7 What is the interpretation of the relational operators <, <=, > and >= when applied to string operands?
3.8 Name the three commonly used logical operators in Visual Basic. What is the purpose of each? What other logical
operators are available in Visual Basic?
3.9 What is the purpose of the If-Then statement?
3.10 What is the purpose of an If-Then-Else block? Compare with the If-Then statement.
3.11 How is an If-Then-Else block ended?
CHAP. 3] BRANCHING AND LOOPING 53
3.12 Describe how one If-Then-Else block can be embedded within another.
3.13 What is the purpose of the Select Case structure?
3.14 Summarize the principal components of the Select Case structure. Which are required and which are optional?
3.15 For what type of application is the Select Case structure well-suited?
3.16 Can the expression in a Select Case structure be based upon a string rather than a numeric value?
3.17 How are multiple data items handled in a single Case statement?
3.18 How is a range of data items handled in a Case statement?
3.19 How is a logical expression handled in a Case statement?
3.20 What is the purpose of the For-Next structure? What is the purpose of the Step clause within this structure?
3.21 How is a For-Next structure ended?
3.22 What is the index in a For-Next structure? In what way must the index appearing in the For-To statement be
related to the index appearing in the Next statement?
3.23 Can the index in a For-Next structure take on fractional values? Can it decrease in value from one pass to
another?
3.24 Summarize the rules that apply to For-Next structures.
3.25 What is the purpose of the Exit For statement? How is Exit For used within a For-Next structure?
3.26 Describe the four variations of a Do-Loop structure. What is the purpose of each?
3.27 What is the principal difference between Do While and Do Until (or Loop While and Loop Until)?
3.28 What is the principal difference between Do While-Loop and Do-Loop While (or Do Until-Loop and Do-
Loop Until)?
3.29 How can a Do-Loop structure be written so that at least one pass through the loop will always be executed?
3.30 Write a skeletal outline of a Do-Loop structure, illustrating the manner in which the logical expression is assigned
its initial value and its subsequent values within the loop. Compare with a For-Next structure.
3.31 What is the purpose of the Exit Do statement? How is Exit Do used within a Do-Loop structure? Compare with
a For-Next structure.
3.32 What is the purpose of the While-Wend structure? Compare with the Do-Loop structure.
Problems
3.33 Write an appropriate If-Then statement or an If-Then-Else block for each of the following
situations.
54 BRANCHING AND LOOPING [CHAP. 3
(a) Test the value of the variable sum. If sum exceeds 100, then adjust its value so that it equals 100.
(b) Test the value of the variable sum. If sum exceeds 100, then display its value, adjust its value so
that it equals 100 and assign the string "Maximum Amount Exceeded" to the string variable Flag.
(c) Test the value of the variable sum. If sum is less than or equal to 100, add the value of the variable
v to sum. If sum exceeds 100, however, adjust its value so that it equals 100 and assign a value of
0 to v.
3.34 Write an appropriate If-Then statement or an If-Then-Else block for each of the following
situations.
(a) Suppose the variable pay has been assigned a value of 6.00. Test the value of the variable hours.
If hours exceeds 40, assign the value of 9.50 to pay.
(b) Test the value of the variable hours. If hours is less than or equal to 40, assign 6.00 to pay and
assign "Regular" to the string variable Status. If pay exceeds 40, assign 9.50 to pay and
assign "Overtime" to Status.
3.35 Write an appropriate If-Then-Else block for the following situation:
Test the string variable Flag. If Flag = "True", set count equal to 0 and assign the message
"Resetting the Counter" to the string variable Msg1. Then test the value of the single-precision
real variable Z.
If Z exceeds Zmax, assign the message "Maximum Value Exceeded" to the string variable
Msg2, and assign the value of Zmin to Z.
Otherwise, add the value of W to Z.
If Flag = "False", increase the value of count by 1, then test the string variable Type.
If Type equals "A", add the value of U to Z.
If Type equals "B", add the value of V to Z.
Otherwise, add the value of W to Z.
Finally, reset the value of Flag to "True".
3.36 Write a Select Case structure that will examine the value of a numeric variable called Flag and
assign one of the following messages to the string variable Message, depending on the value assigned
to Flag.
(a) "Hot", if Flag has a value of 1
(b) "Luke Warm", if Flag has a value of 2
(c) "Cold", if Flag has a value of 3
(d) "Out of Range", if Flag has any other value
3.37 Write a Select Case structure that will examine the value of a string variable called Color and
assign one of the following messages to the string variable Message, depending on the value assigned
to Color.
(a) "Red", if either r or R is assigned to Color
(b) "Green", if either g or G is assigned to Color
(c) "Blue", if either b or B is assigned to Color
(d) "Black", if Color is assigned any other string
CHAP. 3] BRANCHING AND LOOPING 55
3.38 Write an appropriate block of statements that will examine the value of a single-precision variable
called Temperature and display one of the following messages, depending on the value assigned to
Temperature.
(a) "Ice", if the value of Temperature is less than 0
(b) "Water", if the value of Temperature lies between 0 and 100
(c) "Steam", if the value of Temperature exceeds 100
Can a Select Case structure be used in this instance?
3.39 Write a loop that will calculate the sum of every third integer, beginning with i = 2 (i.e., calculate the
sum 2 + 5 + 8 + 11 + . . .) for all values of i that are less than 100. Write the loop in each of the
following ways:
(a) Using a For-Next structure
(b) Using a Do While-Loop structure
(c) Using a Do Until-Loop structure
(d) Using a Do-Loop While structure
(e) Using a Do-Loop Until structure
3.40 Repeat Problem 3.39, calculating the sum of every nth integer, beginning with nstart (i.e., nstart,
nstart+n, nstart+(2*n), nstart+(3*n), etc.). Continue the looping process for all values of i
that do not exceed nstop.
3.41 Modify Problem 3.40 by transferring out of the loop if sum exceeds some specified value represented
by maxsum.
3.42 Generalize Problem 3.39 by generating a series of loops, each loop generating the sum of every jth
integer, where j ranges from 2 to 13. Begin each loop with a value of i = 2 and increase i by j, until i
takes on the largest possible value that is less than 100. (In other words, the first loop will calculate the
sum 2 + 4 + 6 + . . . + 98; the second loop will calculate the sum 2 + 5 + 8 + . . . + 98; the third loop
will calculate the sum 2 + 6 + 10 + . . . + 98; and so on. The last loop will calculate the sum 2 + 15 + 28
+ . . . + 93.
Use a nested loop structure to solve this problem, with one loop embedded within another.
Calculate each sum with the inner loop, and let the outer loop control the value of j.
3.43 Write a loop that will generate every third integer, beginning with i = 2 and continuing for all integers
that are less than 100. Calculate the sum of those integers that are evenly divisible by 5.
3.44 Repeat Problem 3.43, calculating the sum of every nth integer, beginning with nstart (i.e., nstart,
nstart+n, nstart+(2*n), nstart+(3*n), etc.). Continue the looping process for all values of i
that do not exceed nstop. Calculate the sum of those integers that are evenly divisible by k, where k
represents some positive integer.
3.45 Write a loop that will examine each character in a string called Text and determine how many of the
characters are letters, how many are digits, how many are blank spaces, and how many are other kinds
of characters (e.g., punctuation characters). Hint: Use the Len library function to determine the length
of the string; then use the Mid library function within a loop to extract the individual characters, one at a
time.
56 BRANCHING AND LOOPING [CHAP. 3
3.46 Write a loop that will examine each character in a string called Text and determine how many of the
characters are vowels and how many are consonants. Hint: First determine whether or not a character is
a letter; if so, determine the type of letter. Also, see the suggestion given at the end of Problem 3.45.
3.47 Write a loop that will display the characters in a string in reverse order (so that the string will appear
backwards). Hint: See the suggestion at the end of Problem 3.45.
3.48 Describe the final value of x that is generated by each of the following Visual Basic program segments.
(a) i = 0
x = 0
Do While (i < 20)
If (i Mod 5 = 0) Then x = x + i
i = i + 1
Loop
(b) i = 0
x = 0
Do
If (i Mod 5 = 0) Then x = x + 1
i = i + 1
Loop While (i < 20)
(c) x = 0
For i = 1 To 10 Step 2
x = x + 1
Next i
(d) x = 0
For i = 1 To 10 Step 2
x = x + i
Next i
(e) x = 0
For i = 1 To 10
IF (i Mod 2 = 1) Then
x = x + i
Else
x = x − 1 End If
Next i
(f) x = 0
For i = 1 To 10
If (i Mod 2 = 1) Then
x = x + i
Else
x = x − 1 End If
Exit For
Next i
CHAP. 3] BRANCHING AND LOOPING 57
(g) x = 0
For i = 0 To 4
For j = 0 To i − 1 x = x + (i + j − 1) Next j
Next i
(h) x = 0 For i = 0 To 4
For j = 0 To i − 1 x = x + (i + j − 1) Exit For
Next j
Next i
(i) x = 0
For i = 0 To 4
For j = 0 To i
x = x + j
Next j
Exit For
Next i
(j) x = 0
For i = 0 To 4
For j = 0 To i − 1 k = (i + j − 1) If (k Mod 2 = 0) Then
x = x + k
ElseIF (k Mod 3 = 0) Then
x = x + k − 2 End If
Next j
Next i
(k) x = 0
For i = 0 To 4
For j = 0 To i − 1 Select Case (i + j − 1) Case -1, 0
x = x + 1
Case 1, 2, 3
x = x + 2
Case Else
x = x + 3
End Select
Next j
Next i
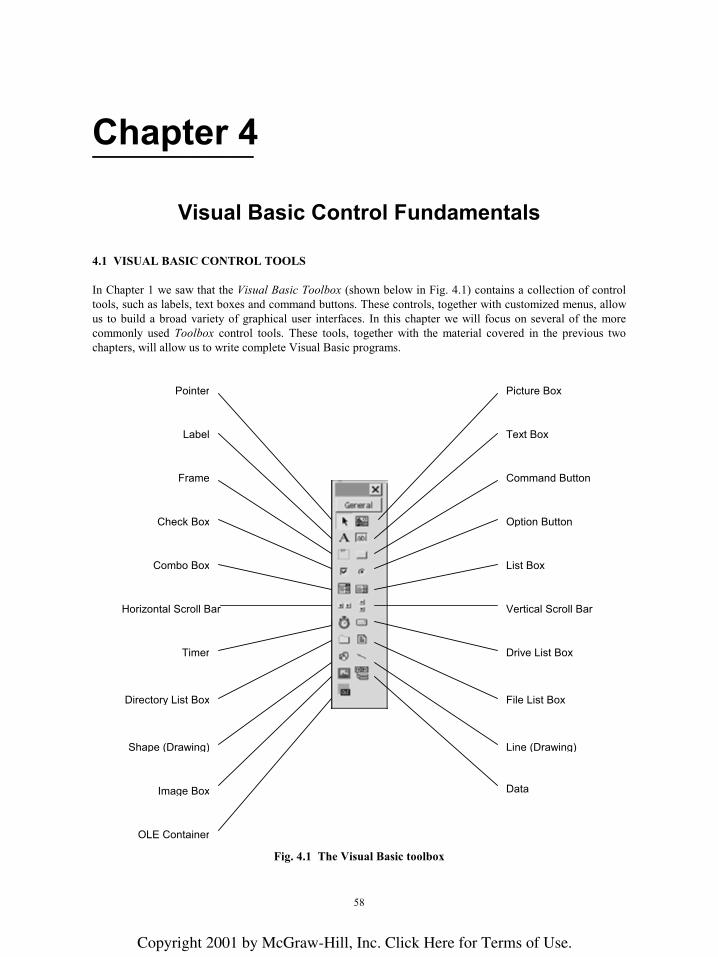
58
Chapter 4 ________________________________________________________________________________________________________________
Visual Basic Control Fundamentals
4.1 VISUAL BASIC CONTROL TOOLS
In Chapter 1 we saw that the Visual Basic Toolbox (shown below in Fig. 4.1) contains a collection of control
tools, such as labels, text boxes and command buttons. These controls, together with customized menus, allow
us to build a broad variety of graphical user interfaces. In this chapter we will focus on several of the more
commonly used Toolbox control tools. These tools, together with the material covered in the previous two
chapters, will allow us to write complete Visual Basic programs.
Fig. 4.1 The Visual Basic toolbox
OLE Container
Shape (Drawing)
Image Box
Directory List Box
Timer
Horizontal Scroll Bar
Combo Box
Check Box
Frame
Label Text Box
Command Button
List Box
Option Button
Vertical Scroll Bar
Drive List Box
File List Box
Line (Drawing)
Data
Picture Box Pointer
Copyright 2001 by McGraw-Hill, Inc. Click Here for Terms of Use.
CHAP. 4] VISUAL BASIC CONTROL FUNDAMENTALS 59
Here, in alphabetical order, is a brief description of each control tool:
Check Box Provides a means of specifying a Yes/No response. Within a group of check boxes, any number of boxes can
be checked, including none. (See also the Option Box description.)
Combo Box Combines the capabilities of a text box and a list box. Thus, it provides a collection of text items, one of which
may be selected from the list at any time during program execution. Text items can be assigned initially, or
they can be assigned during program execution. In addition, the user can enter a text item at any time during
program execution.
Command Button Provides a means of initiating an event action by the user clicking on the button.
Data Provides a means of displaying information from an existing database.
Directory List Box Provides a means of selecting paths and directories (folders) within the current drive.
Drive List Box Provides a means of selecting among existing drives.
File List Box Provides a means of selecting files within the current directory.
Frame Provides a container for other controls. It is usually used to contain a group of option buttons, check boxes or
graphical shapes.
Horizontal Scroll Bar Allows a horizontal scroll bar to be added to a control (if a horizontal scroll bar is not included automatically).
Image Box Used to display graphical objects, and to initiate event actions. (Note that an Image Box is similar to a Picture
Box. It redraws faster and can be stretched, though it has fewer properties than a Picture Box.)
Label Used to display text on a form. The text cannot be reassigned during program execution, though it can be hid-
den from view and its appearance can be altered. (See also the Text Box description.)

60 VISUAL BASIC CONTROL FUNDAMENTALS [CHAP. 4
Line Used to draw straight-line segments within forms. (See also the Shape tool description.)
List Box Provides a collection of text items. One text item may be selected from the list at any time during program exe-
cution. Text items can be assigned initially, or they can be assigned during program execution. However, in
contrast to a text box, the user cannot enter text items to a list box during program execution. (Note that a
combo box combines the features of a list box and a text box).
OLE Container Allows a data object to be transferred from another Windows application and embedded within the Visual Ba-
sic application.
Option Button Provides a means of selecting one of several different options. Within a group of option buttons, one and only
one can be selected. (See also the Check Box description.)
Picture Box Used to display graphical objects or text, and to initiate event actions. (Note that a Picture Box is similar to an
Image Box. It has more properties than an Image Box, though it redraws slower and cannot be stretched.)
Pointer The pointer is not really a control tool, in the true sense of the word. When the pointer is active, the mouse can
be used to position and resize other controls on the design form, and to double-click on the controls, resulting
in a display of the associated Visual Basic code.
Shape Used to draw circles, ellipses, squares and rectangles within forms, frames or picture boxes. (See also the Line
tool description.)
Text Box Provides a means of entering and displaying text. The text can be assigned initially, it can be reassigned during
program execution, or it can be entered by the user during program execution. (See also the Label Box and the
Combo Box descriptions.)
Timer Allows events to occur repeatedly at specified time intervals.
Vertical Scroll Bar Allows a vertical scroll bar to be added to a control (if a vertical scroll bar is not included automatically).

CHAP. 4] VISUAL BASIC CONTROL FUNDAMENTALS 61
4.2 CONTROL TOOL CATEGORIES
The control tools can be grouped into the following overall categories: (Keep in mind that some control tools
have multiple uses and are not restricted to the categories listed below.)
Entering Text Drawing
Text Box Line Button
Combo Box Shape Button
Displaying Text Selecting Among Alternatives
Label Check Box
Text Box Option Button
List Box Frame
Combo Box List Box
Displaying Graphics Viewing Windows
Image Box Frame
Picture Box Horizontal Scroll Bar
Frame Vertical Scroll Bar
Managing Files Accessing Existing Data
File List Box Data
Drive List Box
Directory List Box
Initiating Events Linking with Other Objects
Command Button OLE
Executing Timed Events
Timer
4.3 WORKING WITH CONTROLS
A control can be added to the Form Design Window two different ways:
1. By clicking on the desired control tool within the Toolbox, then clicking on the control’s location within
the Form Design Window.
2. By double-clicking on the desired control tool within the Toolbox, automatically placing the control at the
center of the Form Design Window.
A control can be relocated within the Form Design Window by dragging the control to its desired location
(hold down the left mouse button and drag).
A control can be resized within the Form Design Window by dragging one of its edges or corners.
A control can be removed from the Form Design Window by highlighting the control (i.e., by clicking on
it) and then pressing the Delete key.
4.4 NAMING FORMS AND CONTROLS
When an object (i.e., a form or control) is added to the Form Design Window, a generic default name (e.g.,
Form1, List1, List2, Text1, etc.) is automatically assigned to that object. Each name includes a generic identifier
62 VISUAL BASIC CONTROL FUNDAMENTALS [CHAP. 4
(Form, List, Text, etc.) that identifies the type of object, followed by a number that identifies the order in which
that particular object type has been added to the Form Design Window. Thus, List1 is the name of the first list
box added to the Form Design Window, List2 is the name of the second list box, and so on.
The default names work well for simple applications. For more complicated applications, however, it may
be preferable to assign different names that suggest the purpose of each object. Thus, Students and Addresses
may be preferable to List1 and List2.
Microsoft suggests that such programmer-assigned names include a three-letter prefix suggesting the type
of object. Hence, we might use lstStudents and lstAddresses rather than Students and Addresses, if each ob-
ject is a list box. (The use of prefixes is unnecessary when the default names are used, since the names them-
selves indicate the object type.)
Microsoft recommends the following prefixes for programmer-defined object names:
Object Prefix Object Prefix
Combo Box cbo Label lbl
Check Box chk Line lin
Command Button cmd List Box lst
Data dat Menu mnu
Directory List Box dir OLE ole
Drive List Box drv Option Button opt
File List Box fil Picture Box pic
Frame fra Shape shp
Form frm Text Box txt
Horizontal Scroll Bar hsb Timer tmr
Image Box img Vertical Scroll Bar vsb
4.5 ASSIGNING PROPERTY VALUES TO FORMS AND CONTROLS
The properties associated with each object type are unique, though some, such as Name, BackColor (i.e., back-
ground color), Height and Width, are common to many different object types. The meaning of most properties
is readily apparent. Some, however, require further explanation, particularly certain unique properties that are
required for an object’s special behavior. For information about such properties, you should consult the on-line
help (press F1 or click on the Help menu), related example projects, or printed reference material.
Moreover, each object will have a unique set of values assigned to its properties. These values may be as-
signed at design time (i.e., when the object is first defined, before the application is executed), or at run time
(i.e., while the application is executing).
Design-time assignments are made by selecting a property from the list of properties shown in the Proper-
ties Window (see Fig. 1.3), and then either choosing an appropriate value from the adjoining list of values or
entering a value from the keyboard. These property values will apply when the application first begins to run.
Run-time assignments are carried out using Visual Basic assignment commands, as described in Chap. 2.
In general terms, a property assignment is written as
object_name.property = value
where object_name refers to the name of the form or control, property refers to the associated property name,
and value refers to an assignable item, such as a number or a string. The net effect is to assign the value on the
right-hand side of the equal sign to the property on the left. Such assignments can provide initial values to
properties that were formerly undefined, or they may replace previous assignments.
CHAP. 4] VISUAL BASIC CONTROL FUNDAMENTALS 63
EXAMPLE 4.1 ASSIGNING VALUES TO PROPERTIES
Each of the following commands assigns a run-time value to a text box property.
Text1.Text = "Welcome to Visual Basic"
txtMessage.Text = "Welcome to Visual Basic"
txtMessage.Height = 300
The first line assigns the string “Welcome to Visual Basic” to the Text property associated with text box Text1 (default
name). The second line assigns this same string to the Text property associated with text box txtMessage (programmer-
assigned name). The last line assigns a numerical value to the Height property associated with txtMessage.
Each of these commands either assigns a new value during program execution, or replaces a previously assigned ini-
tial value (i.e., a value assigned during design time).
4.6 EXECUTING COMMANDS (EVENT PROCEDURES AND COMMAND BUTTONS)
An event procedure is an independent group of commands that is executed whenever an “event” occurs during
program execution. Typically, an event occurs when the user takes some action, such as clicking on a control
icon, or dragging an icon to another location. Many (though not all) Visual Basic controls have event proce-
dures associated with them.
Each event procedure begins with a Sub statement, such as Private Sub Command1_Click(), and
ends with an End Sub statement. Between the Sub and End Sub statements is a group of instructions, such as
those discussed in the last two chapters, that are executed when the user initiates the corresponding event. The
parentheses in the Sub statement may contain arguments – special variables that are used to transfer informa-
tion between the event procedure and the “calling” routine (see Chap. 7 for more information on this topic).
Command buttons are often used to execute Visual Basic event procedures. Thus, when the user clicks on
a command button during program execution, the statements within the corresponding event procedure are car-
ried out. The statements within the event procedure may involve the properties of controls other than the com-
mand button. For example, a command-button event procedure may result in new values being assigned to the
properties of a label or a text box.
EXAMPLE 4.2 A SAMPLE EVENT PROCEDURE
A typical event procedure is shown below:
Private Sub Command1_Click()
Label1.Caption = "Hello, " & Text1.Text & "! Welcome to Visual Basic."
Label1.BorderStyle = 1
Label1.Visible = True
End Sub
From the first line (i.e., the Sub statement), we see that this event procedure is associated with command button Com-
mand1, and it is a response to a click-type event. The three assignment statements within the event procedure will be exe-
cuted whenever the user clicks the mouse on command button Command1 during program execution.
To enter an event procedure, double-click on the appropriate command button within the Form Design
Window (see Fig. 1.3), or click once on the command button (to activate it), and then select the Code Editor by
clicking on the leftmost button within the Project Window toolbar (see Fig. 4.2). You may then enter the re-
quired Visual Basic commands within the corresponding event procedure (see Fig. 1.4 or Fig. 4.6).
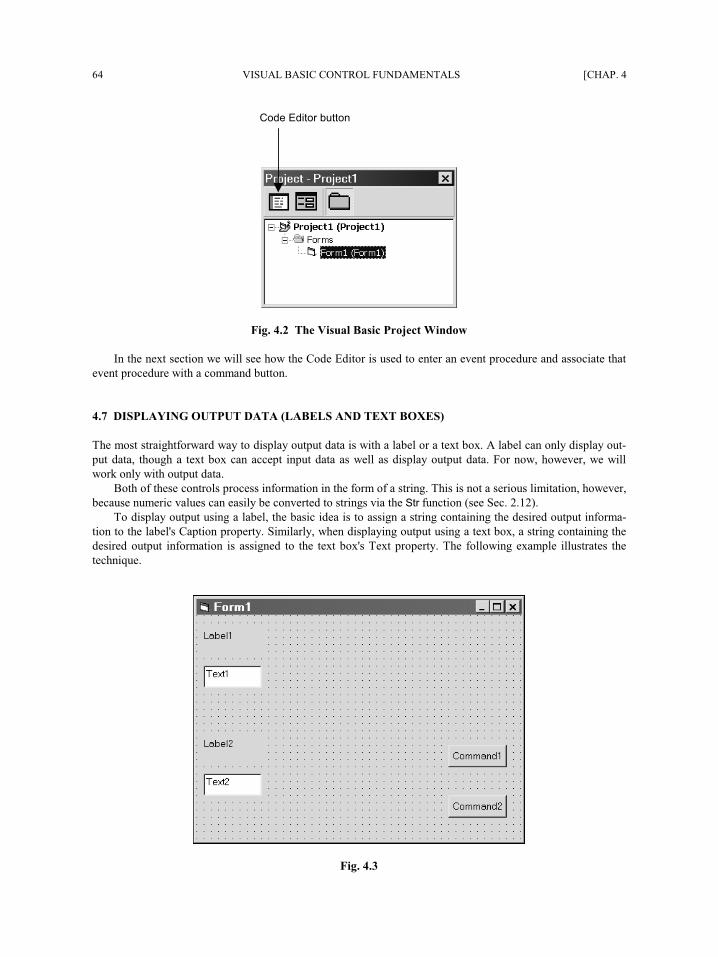
64 VISUAL BASIC CONTROL FUNDAMENTALS [CHAP. 4
Code Editor button
Fig. 4.2 The Visual Basic Project Window
In the next section we will see how the Code Editor is used to enter an event procedure and associate that
event procedure with a command button.
4.7 DISPLAYING OUTPUT DATA (LABELS AND TEXT BOXES)
The most straightforward way to display output data is with a label or a text box. A label can only display out-
put data, though a text box can accept input data as well as display output data. For now, however, we will
work only with output data.
Both of these controls process information in the form of a string. This is not a serious limitation, however,
because numeric values can easily be converted to strings via the Str function (see Sec. 2.12).
To display output using a label, the basic idea is to assign a string containing the desired output informa-
tion to the label's Caption property. Similarly, when displaying output using a text box, a string containing the
desired output information is assigned to the text box's Text property. The following example illustrates the
technique.
Fig. 4.3
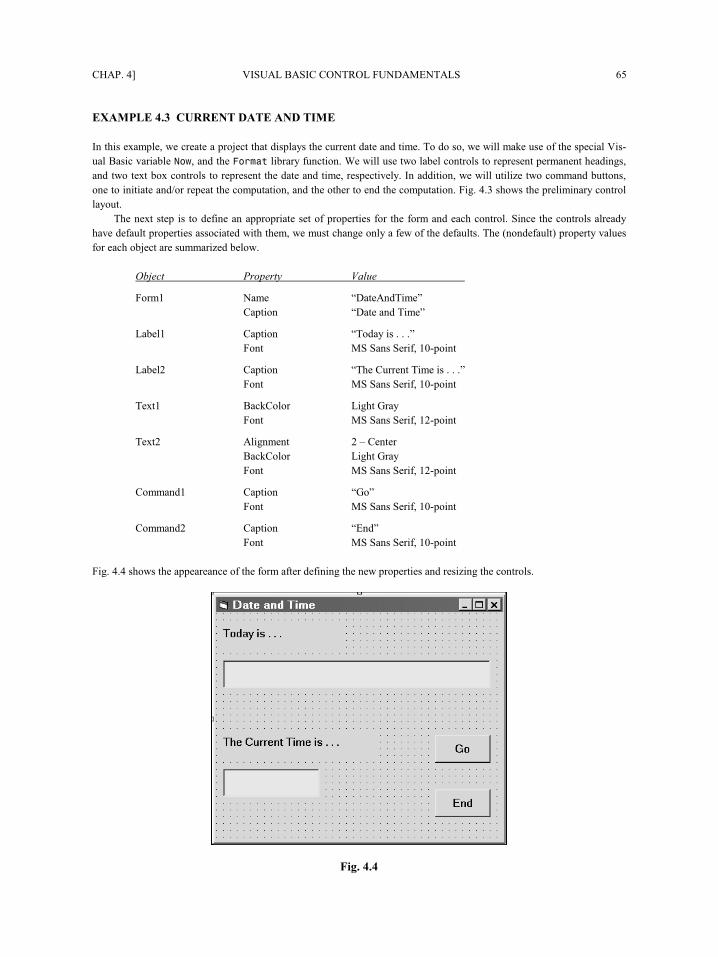
CHAP. 4] VISUAL BASIC CONTROL FUNDAMENTALS 65
EXAMPLE 4.3 CURRENT DATE AND TIME
In this example, we create a project that displays the current date and time. To do so, we will make use of the special Vis-
ual Basic variable Now, and the Format library function. We will use two label controls to represent permanent headings,
and two text box controls to represent the date and time, respectively. In addition, we will utilize two command buttons,
one to initiate and/or repeat the computation, and the other to end the computation. Fig. 4.3 shows the preliminary control
layout.
The next step is to define an appropriate set of properties for the form and each control. Since the controls already
have default properties associated with them, we must change only a few of the defaults. The (nondefault) property values
for each object are summarized below.
Object Property Value
Form1 Name “DateAndTime”
Caption “Date and Time”
Label1 Caption “Today is . . .”
Font MS Sans Serif, 10-point
Label2 Caption “The Current Time is . . .”
Font MS Sans Serif, 10-point
Text1 BackColor Light Gray
Font MS Sans Serif, 12-point
Text2 Alignment 2 – Center
BackColor Light Gray
Font MS Sans Serif, 12-point
Command1 Caption “Go”
Font MS Sans Serif, 10-point
Command2 Caption “End”
Font MS Sans Serif, 10-point
Fig. 4.4 shows the appeareance of the form after defining the new properties and resizing the controls.
Fig. 4.4
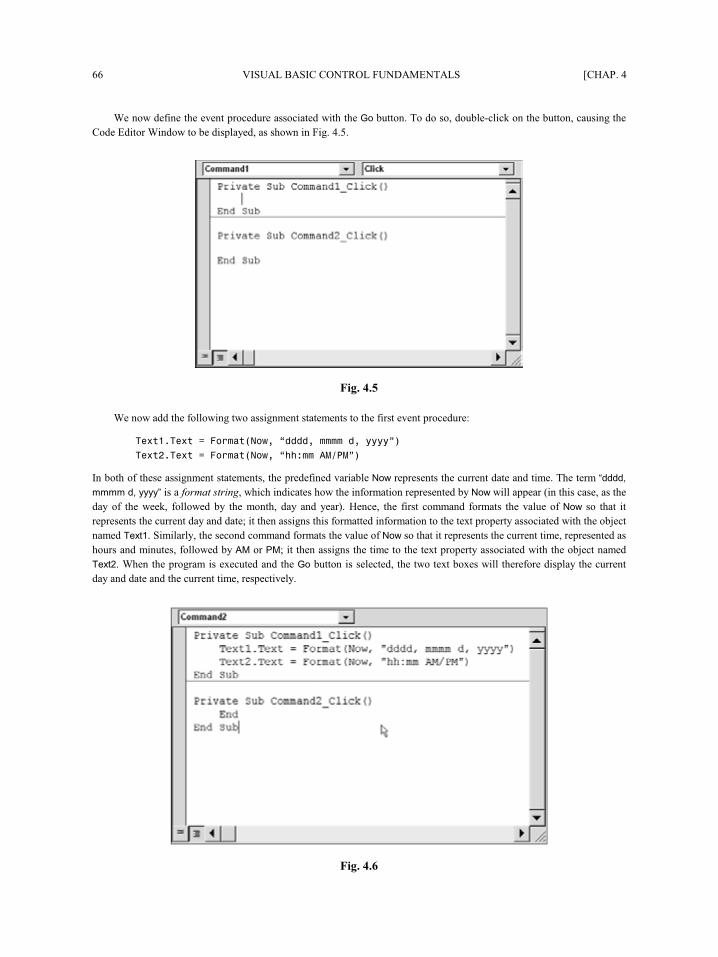
66 VISUAL BASIC CONTROL FUNDAMENTALS [CHAP. 4
We now define the event procedure associated with the Go button. To do so, double-click on the button, causing the
Code Editor Window to be displayed, as shown in Fig. 4.5.
Fig. 4.5
We now add the following two assignment statements to the first event procedure:
Text1.Text = Format(Now, “dddd, mmmm d, yyyy”)
Text2.Text = Format(Now, “hh:mm AM/PM”)
In both of these assignment statements, the predefined variable Now represents the current date and time. The term “dddd,
mmmm d, yyyy” is a format string, which indicates how the information represented by Now will appear (in this case, as the
day of the week, followed by the month, day and year). Hence, the first command formats the value of Now so that it
represents the current day and date; it then assigns this formatted information to the text property associated with the object
named Text1. Similarly, the second command formats the value of Now so that it represents the current time, represented as
hours and minutes, followed by AM or PM; it then assigns the time to the text property associated with the object named
Text2. When the program is executed and the Go button is selected, the two text boxes will therefore display the current
day and date and the current time, respectively.
Fig. 4.6
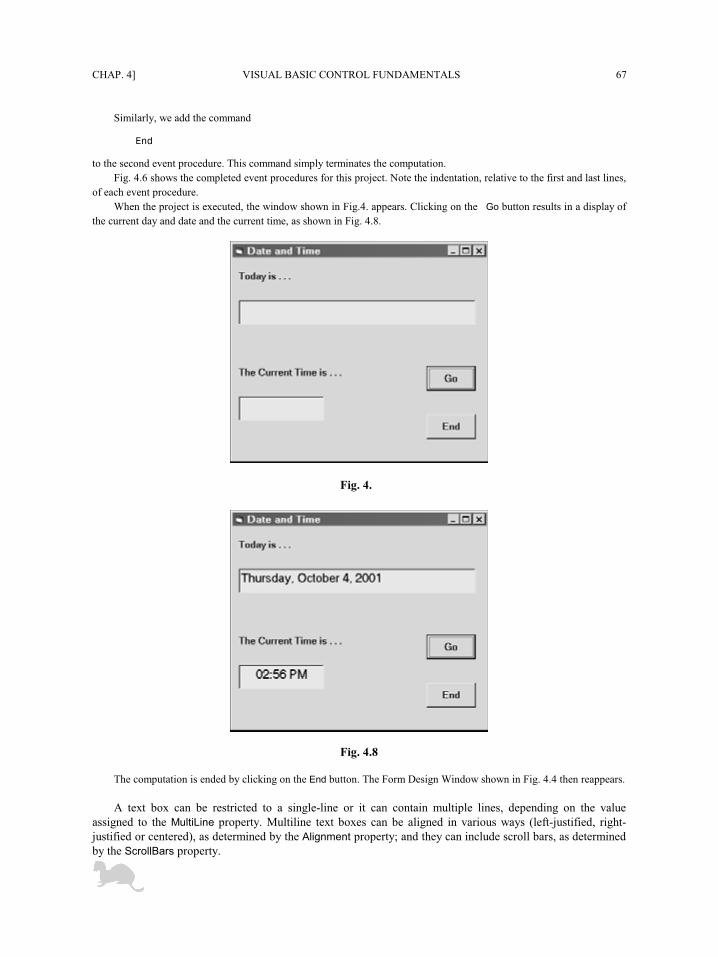
CHAP. 4] VISUAL BASIC CONTROL FUNDAMENTALS 67
Similarly, we add the command
End
to the second event procedure. This command simply terminates the computation.
Fig. 4.6 shows the completed event procedures for this project. Note the indentation, relative to the first and last lines,
of each event procedure.
When the project is executed, the window shown in Fig.4.7 appears. Clicking on the Go button results in a display of
the current day and date and the current time, as shown in Fig. 4.8.
Fig. 4.7
Fig. 4.8
The computation is ended by clicking on the End button. The Form Design Window shown in Fig. 4.4 then reappears.
A text box can be restricted to a single-line or it can contain multiple lines, depending on the value
assigned to the MultiLine property. Multiline text boxes can be aligned in various ways (left-justified, right-
justified or centered), as determined by the Alignment property; and they can include scroll bars, as determined
by the ScrollBars property.
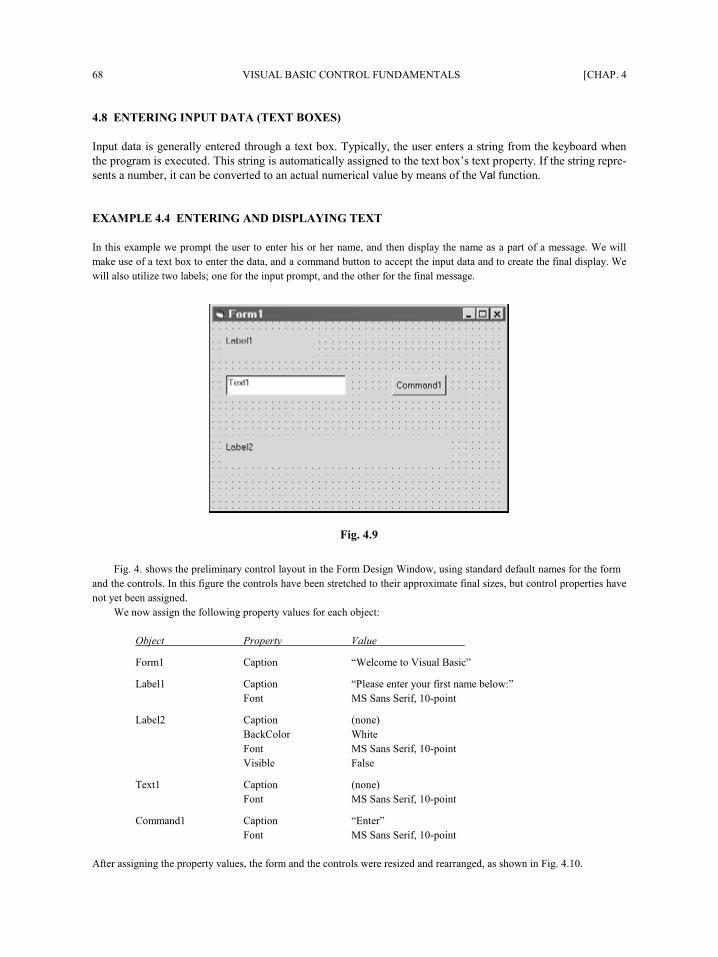
68 VISUAL BASIC CONTROL FUNDAMENTALS [CHAP. 4
4.8 ENTERING INPUT DATA (TEXT BOXES)
Input data is generally entered through a text box. Typically, the user enters a string from the keyboard when
the program is executed. This string is automatically assigned to the text box’s text property. If the string repre-
sents a number, it can be converted to an actual numerical value by means of the Val function.
EXAMPLE 4.4 ENTERING AND DISPLAYING TEXT
In this example we prompt the user to enter his or her name, and then display the name as a part of a message. We will
make use of a text box to enter the data, and a command button to accept the input data and to create the final display. We
will also utilize two labels; one for the input prompt, and the other for the final message.
Fig. 4.9
Fig. 4.9 shows the preliminary control layout in the Form Design Window, using standard default names for the form
and the controls. In this figure the controls have been stretched to their approximate final sizes, but control properties have
not yet been assigned.
We now assign the following property values for each object:
Object Property Value
Form1 Caption “Welcome to Visual Basic”
Label1 Caption “Please enter your first name below:”
Font MS Sans Serif, 10-point
Label2 Caption (none)
BackColor White
Font MS Sans Serif, 10-point
Visible False
Text1 Caption (none)
Font MS Sans Serif, 10-point
Command1 Caption “Enter”
Font MS Sans Serif, 10-point
After assigning the property values, the form and the controls were resized and rearranged, as shown in Fig. 4.10.
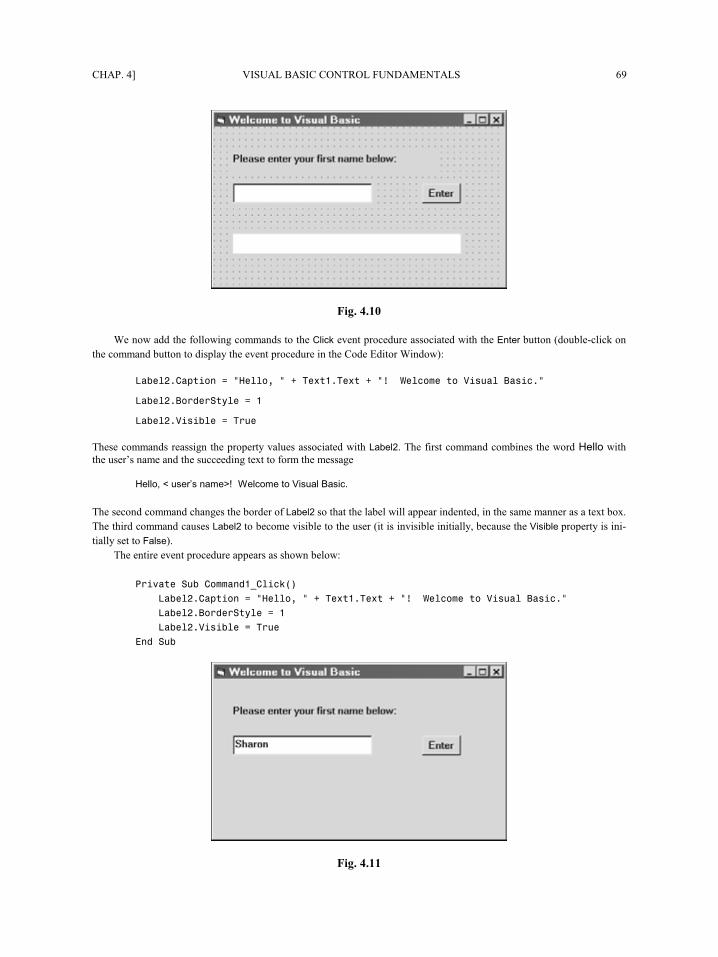
CHAP. 4] VISUAL BASIC CONTROL FUNDAMENTALS 69
Fig. 4.10
We now add the following commands to the Click event procedure associated with the Enter button (double-click on
the command button to display the event procedure in the Code Editor Window):
Label2.Caption = "Hello, " + Text1.Text + "! Welcome to Visual Basic."
Label2.BorderStyle = 1
Label2.Visible = True
These commands reassign the property values associated with Label2. The first command combines the word Hello with
the user’s name and the succeeding text to form the message
Hello, < user’s name>! Welcome to Visual Basic.
The second command changes the border of Label2 so that the label will appear indented, in the same manner as a text box.
The third command causes Label2 to become visible to the user (it is invisible initially, because the Visible property is ini-
tially set to False).
The entire event procedure appears as shown below:
Private Sub Command1_Click()
Label2.Caption = "Hello, " + Text1.Text + "! Welcome to Visual Basic."
Label2.BorderStyle = 1
Label2.Visible = True
End Sub
Fig. 4.11
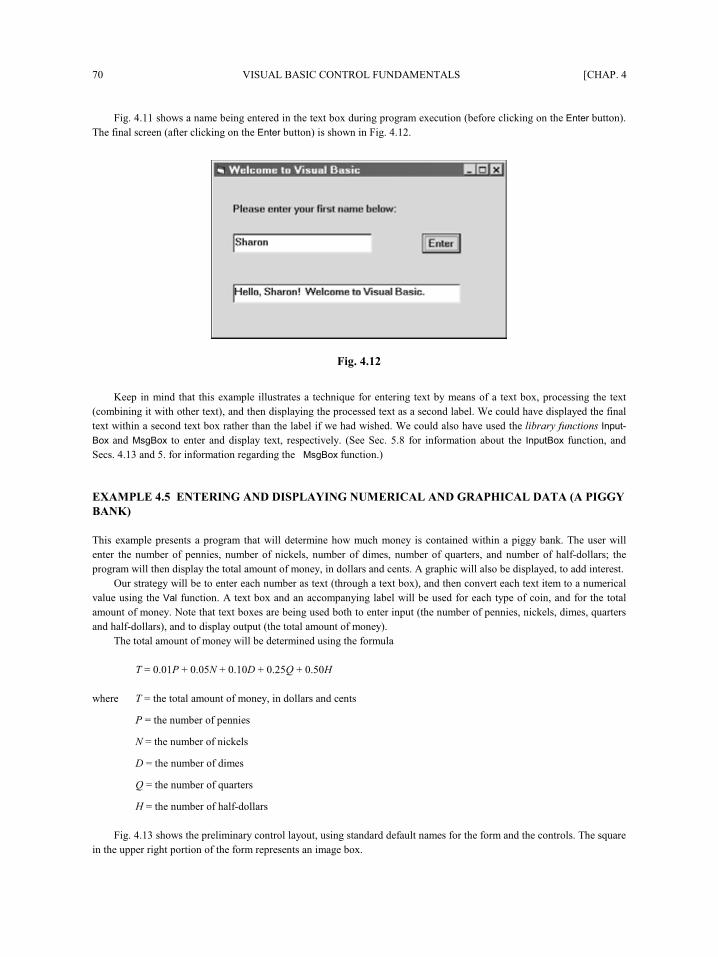
70 VISUAL BASIC CONTROL FUNDAMENTALS [CHAP. 4
Fig. 4.11 shows a name being entered in the text box during program execution (before clicking on the Enter button).
The final screen (after clicking on the Enter button) is shown in Fig. 4.12.
Fig. 4.12
Keep in mind that this example illustrates a technique for entering text by means of a text box, processing the text
(combining it with other text), and then displaying the processed text as a second label. We could have displayed the final
text within a second text box rather than the label if we had wished. We could also have used the library functions Input-
Box and MsgBox to enter and display text, respectively. (See Sec. 5.8 for information about the InputBox function, and
Secs. 4.13 and 5.7 for information regarding the MsgBox function.)
EXAMPLE 4.5 ENTERING AND DISPLAYING NUMERICAL AND GRAPHICAL DATA (A PIGGY
BANK)
This example presents a program that will determine how much money is contained within a piggy bank. The user will
enter the number of pennies, number of nickels, number of dimes, number of quarters, and number of half-dollars; the
program will then display the total amount of money, in dollars and cents. A graphic will also be displayed, to add interest.
Our strategy will be to enter each number as text (through a text box), and then convert each text item to a numerical
value using the Val function. A text box and an accompanying label will be used for each type of coin, and for the total
amount of money. Note that text boxes are being used both to enter input (the number of pennies, nickels, dimes, quarters
and half-dollars), and to display output (the total amount of money).
The total amount of money will be determined using the formula
T = 0.01P + 0.05N + 0.10D + 0.25Q + 0.50H
where T = the total amount of money, in dollars and cents
P = the number of pennies
N = the number of nickels
D = the number of dimes
Q = the number of quarters
H = the number of half-dollars
Fig. 4.13 shows the preliminary control layout, using standard default names for the form and the controls. The square
in the upper right portion of the form represents an image box.
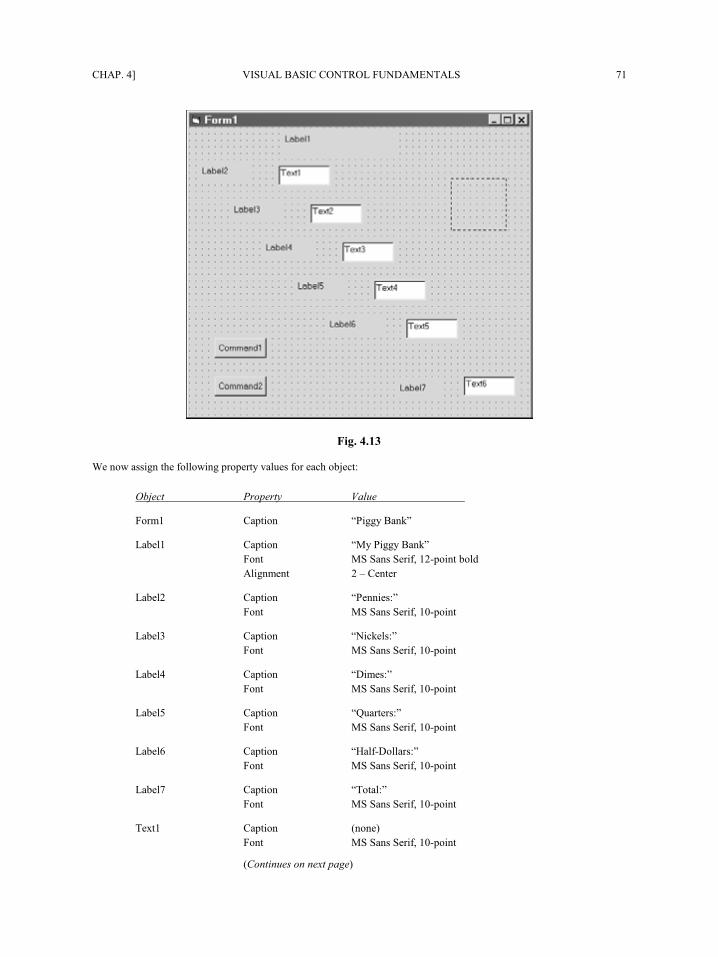
CHAP. 4] VISUAL BASIC CONTROL FUNDAMENTALS 71
Fig. 4.13
We now assign the following property values for each object:
Object Property Value
Form1 Caption “Piggy Bank”
Label1 Caption “My Piggy Bank”
Font MS Sans Serif, 12-point bold
Alignment 2 – Center
Label2 Caption “Pennies:”
Font MS Sans Serif, 10-point
Label3 Caption “Nickels:”
Font MS Sans Serif, 10-point
Label4 Caption “Dimes:”
Font MS Sans Serif, 10-point
Label5 Caption “Quarters:”
Font MS Sans Serif, 10-point
Label6 Caption “Half-Dollars:”
Font MS Sans Serif, 10-point
Label7 Caption “Total:”
Font MS Sans Serif, 10-point
Text1 Caption (none)
Font MS Sans Serif, 10-point
(Continues on next page)
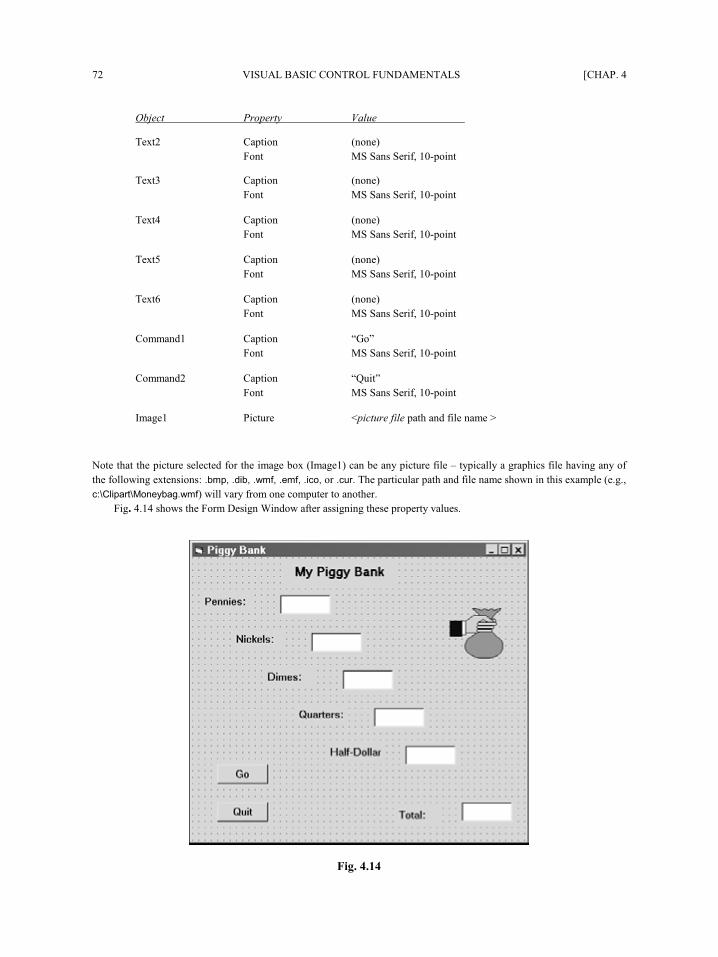
72 VISUAL BASIC CONTROL FUNDAMENTALS [CHAP. 4
Object Property Value
Text2 Caption (none)
Font MS Sans Serif, 10-point
Text3 Caption (none)
Font MS Sans Serif, 10-point
Text4 Caption (none)
Font MS Sans Serif, 10-point
Text5 Caption (none)
Font MS Sans Serif, 10-point
Text6 Caption (none)
Font MS Sans Serif, 10-point
Command1 Caption “Go”
Font MS Sans Serif, 10-point
Command2 Caption “Quit”
Font MS Sans Serif, 10-point
Image1 Picture <picture file path and file name >
Note that the picture selected for the image box (Image1) can be any picture file – typically a graphics file having any of
the following extensions: .bmp, .dib, .wmf, .emf, .ico, or .cur. The particular path and file name shown in this example (e.g.,
c:\Clipart\Moneybag.wmf) will vary from one computer to another.
Fig. 4.14 shows the Form Design Window after assigning these property values.
Fig. 4.14
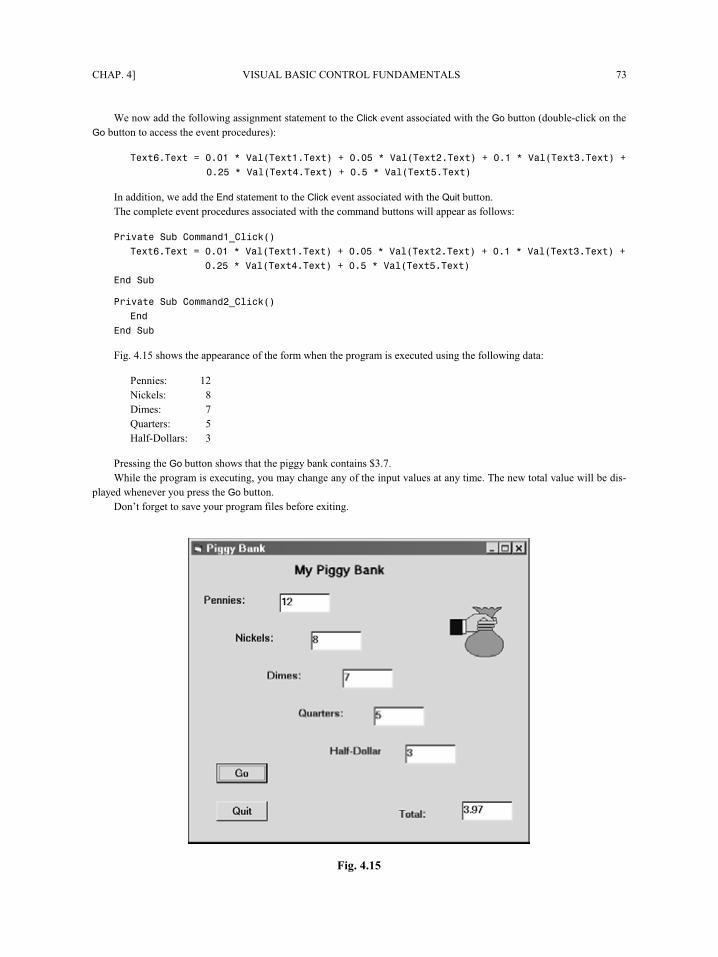
CHAP. 4] VISUAL BASIC CONTROL FUNDAMENTALS 73
We now add the following assignment statement to the Click event associated with the Go button (double-click on the
Go button to access the event procedures):
Text6.Text = 0.01 * Val(Text1.Text) + 0.05 * Val(Text2.Text) + 0.1 * Val(Text3.Text) +
0.25 * Val(Text4.Text) + 0.5 * Val(Text5.Text) In addition, we add the End statement to the Click event associated with the Quit button.
The complete event procedures associated with the command buttons will appear as follows: Private Sub Command1_Click()
Text6.Text = 0.01 * Val(Text1.Text) + 0.05 * Val(Text2.Text) + 0.1 * Val(Text3.Text) +
0.25 * Val(Text4.Text) + 0.5 * Val(Text5.Text)
End Sub Private Sub Command2_Click()
End
End Sub Fig. 4.15 shows the appearance of the form when the program is executed using the following data:
Pennies: 12
Nickels: 8
Dimes: 7
Quarters: 5
Half-Dollars: 3 Pressing the Go button shows that the piggy bank contains $3.97.
While the program is executing, you may change any of the input values at any time. The new total value will be dis-
played whenever you press the Go button.
Don’t forget to save your program files before exiting.
Fig. 4.15
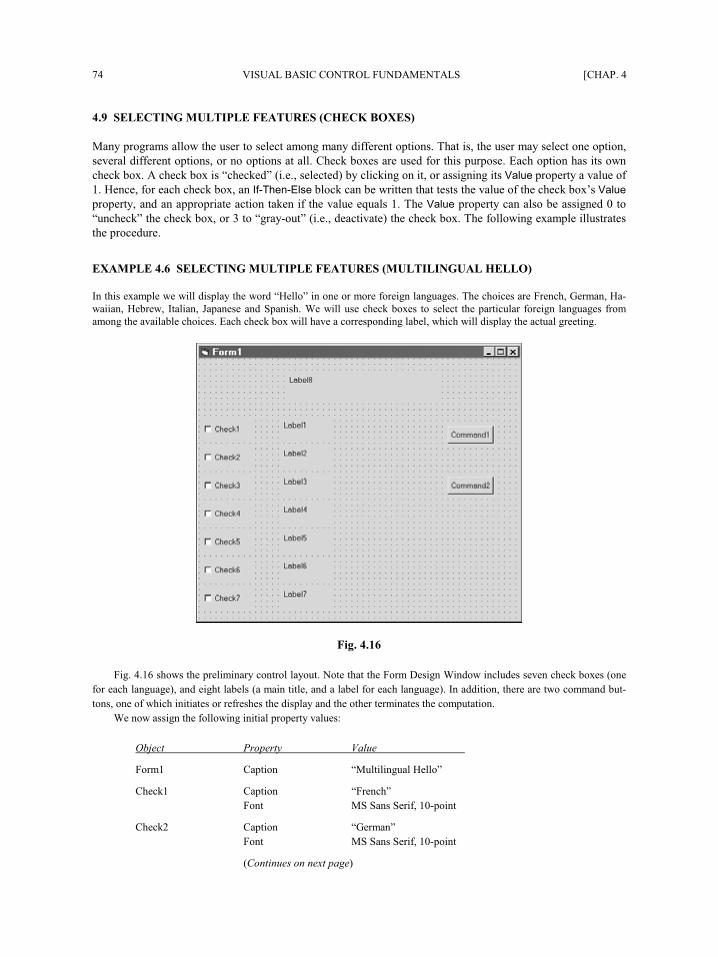
74 VISUAL BASIC CONTROL FUNDAMENTALS [CHAP. 4
4.9 SELECTING MULTIPLE FEATURES (CHECK BOXES)
Many programs allow the user to select among many different options. That is, the user may select one option,
several different options, or no options at all. Check boxes are used for this purpose. Each option has its own
check box. A check box is “checked” (i.e., selected) by clicking on it, or assigning its Value property a value of
1. Hence, for each check box, an If-Then-Else block can be written that tests the value of the check box’s Value
property, and an appropriate action taken if the value equals 1. The Value property can also be assigned 0 to
“uncheck” the check box, or 3 to “gray-out” (i.e., deactivate) the check box. The following example illustrates
the procedure.
EXAMPLE 4.6 SELECTING MULTIPLE FEATURES (MULTILINGUAL HELLO)
In this example we will display the word “Hello” in one or more foreign languages. The choices are French, German, Ha-
waiian, Hebrew, Italian, Japanese and Spanish. We will use check boxes to select the particular foreign languages from
among the available choices. Each check box will have a corresponding label, which will display the actual greeting.
Fig. 4.16
Fig. 4.16 shows the preliminary control layout. Note that the Form Design Window includes seven check boxes (one
for each language), and eight labels (a main title, and a label for each language). In addition, there are two command but-
tons, one of which initiates or refreshes the display and the other terminates the computation.
We now assign the following initial property values:
Object Property Value
Form1 Caption “Multilingual Hello”
Check1 Caption “French”
Font MS Sans Serif, 10-point
Check2 Caption “German”
Font MS Sans Serif, 10-point
(Continues on next page)
CHAP. 4] VISUAL BASIC CONTROL FUNDAMENTALS 75
Object Property Value
Check3 Caption “Hawaiian”
Font MS Sans Serif, 10-point
Check4 Caption “Hebrew”
Font MS Sans Serif, 10-point
Check5 Caption “Italian”
Font MS Sans Serif, 10-point
Check6 Caption “Japanese”
Font MS Sans Serif, 10-point
Check7 Caption “Spanish”
Font MS Sans Serif, 10-point
Label1 Caption “Bonjour”
Font MS Sans Serif, 14-point bold
Visible False
Label2 Caption “Guten Tag”
Font MS Sans Serif, 14-point bold
Visible False
Label3 Caption “Aloha”
Font MS Sans Serif, 14-point bold
Visible False
Label4 Caption “Shalom”
Font MS Sans Serif, 14-point bold
Visible False
Label5 Caption “Buon Giorno”
Font MS Sans Serif, 14-point bold
Visible False
Label6 Caption “Konichihua”
Font MS Sans Serif, 14-point bold
Visible False
Label7 Caption “Buenos Dias”
Font MS Sans Serif, 14-point bold
Visible False
Label8 Caption “Say Hello, in . . .”
Font MS Sans Serif, 14-point bold
Alignment 2 – Center
Command1 Caption “Go”
Font MS Sans Serif, 10-point
Command2 Caption “Quit”
Font MS Sans Serif, 10-point
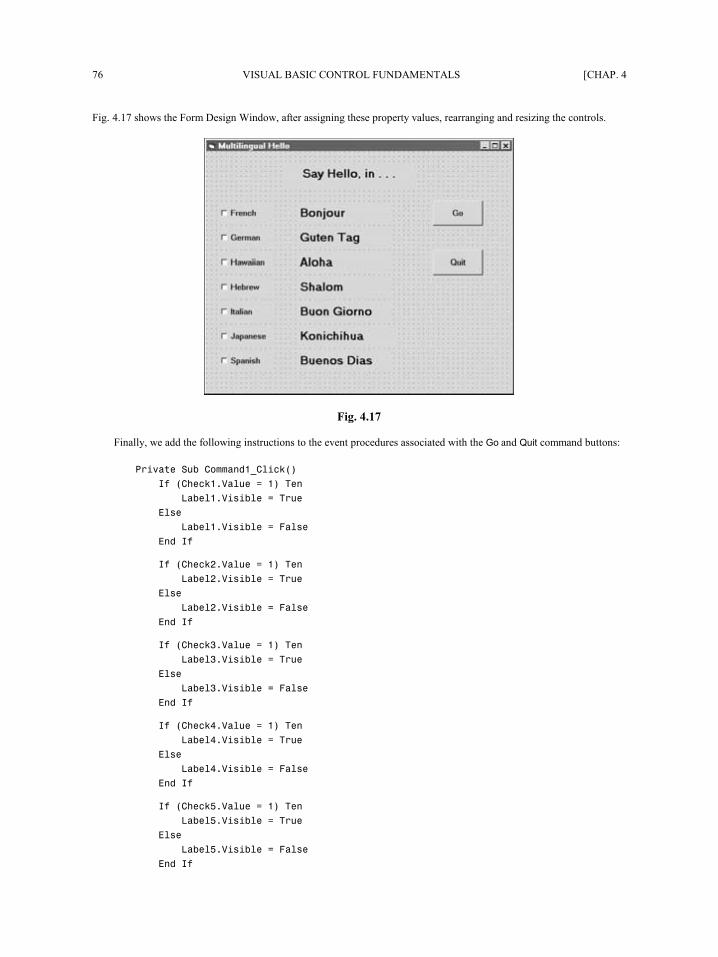
76 VISUAL BASIC CONTROL FUNDAMENTALS [CHAP. 4
Fig. 4.17 shows the Form Design Window, after assigning these property values, rearranging and resizing the controls.
Fig. 4.17
Finally, we add the following instructions to the event procedures associated with the Go and Quit command buttons:
Private Sub Command1_Click()
If (Check1.Value = 1) Then
Label1.Visible = True
Else
Label1.Visible = False
End If
If (Check2.Value = 1) Then
Label2.Visible = True
Else
Label2.Visible = False
End If
If (Check3.Value = 1) Then
Label3.Visible = True
Else
Label3.Visible = False
End If
If (Check4.Value = 1) Then
Label4.Visible = True
Else
Label4.Visible = False
End If
If (Check5.Value = 1) Then
Label5.Visible = True
Else
Label5.Visible = False
End If
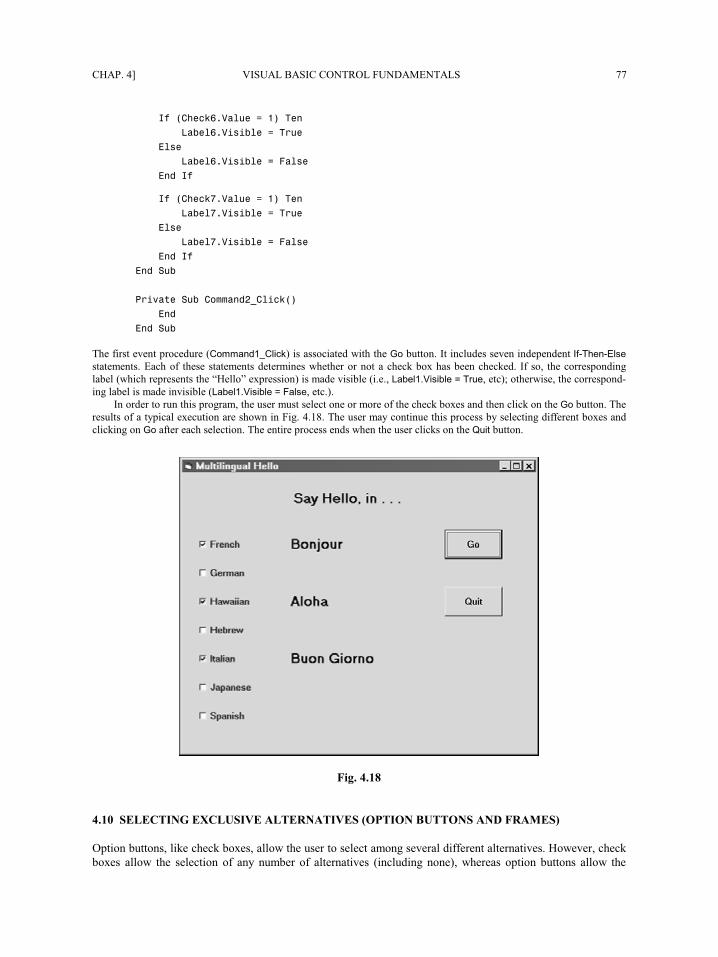
CHAP. 4] VISUAL BASIC CONTROL FUNDAMENTALS 77
If (Check6.Value = 1) Then
Label6.Visible = True
Else
Label6.Visible = False
End If
If (Check7.Value = 1) Then
Label7.Visible = True
Else
Label7.Visible = False
End If
End Sub
Private Sub Command2_Click()
End
End Sub
The first event procedure (Command1_Click) is associated with the Go button. It includes seven independent If-Then-Else
statements. Each of these statements determines whether or not a check box has been checked. If so, the corresponding
label (which represents the “Hello” expression) is made visible (i.e., Label1.Visible = True, etc); otherwise, the correspond-
ing label is made invisible (Label1.Visible = False, etc.).
In order to run this program, the user must select one or more of the check boxes and then click on the Go button. The
results of a typical execution are shown in Fig. 4.18. The user may continue this process by selecting different boxes and
clicking on Go after each selection. The entire process ends when the user clicks on the Quit button.
Fig. 4.18
4.10 SELECTING EXCLUSIVE ALTERNATIVES (OPTION BUTTONS AND FRAMES)
Option buttons, like check boxes, allow the user to select among several different alternatives. However, check
boxes allow the selection of any number of alternatives (including none), whereas option buttons allow the
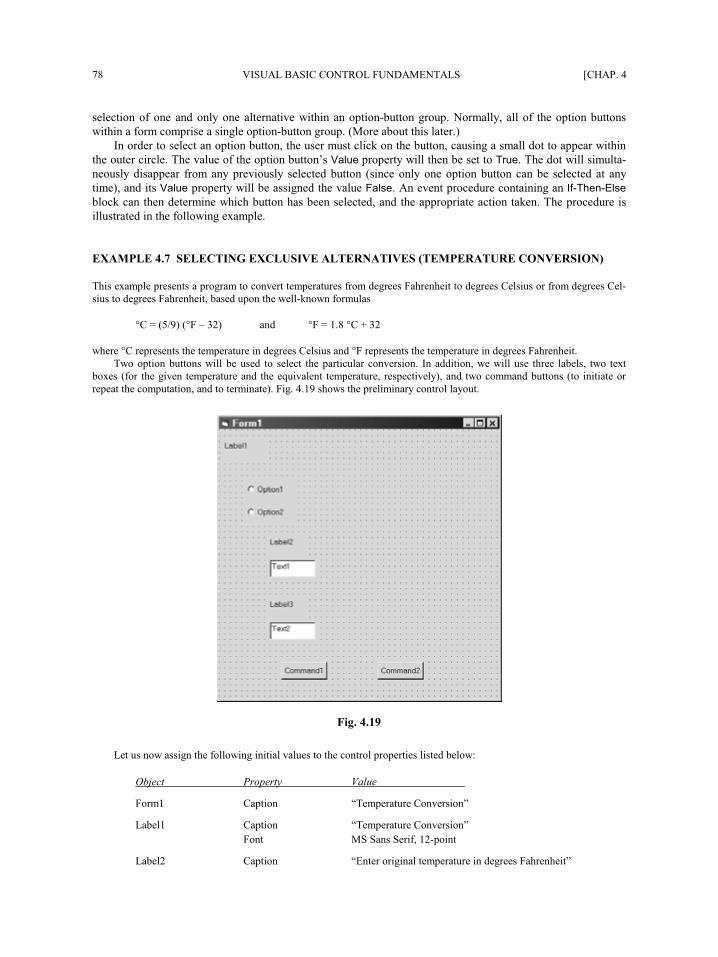
78 VISUAL BASIC CONTROL FUNDAMENTALS [CHAP. 4
selection of one and only one alternative within an option-button group. Normally, all of the option buttons
within a form comprise a single option-button group. (More about this later.)
In order to select an option button, the user must click on the button, causing a small dot to appear within
the outer circle. The value of the option button’s Value property will then be set to True. The dot will simulta-
neously disappear from any previously selected button (since only one option button can be selected at any
time), and its Value property will be assigned the value False. An event procedure containing an If-Then-Else
block can then determine which button has been selected, and the appropriate action taken. The procedure is
illustrated in the following example.
EXAMPLE 4.7 SELECTING EXCLUSIVE ALTERNATIVES (TEMPERATURE CONVERSION)
This example presents a program to convert temperatures from degrees Fahrenheit to degrees Celsius or from degrees Cel-
sius to degrees Fahrenheit, based upon the well-known formulas
°C = (5/9) (°F – 32) and °F = 1.8 °C + 32
where °C represents the temperature in degrees Celsius and °F represents the temperature in degrees Fahrenheit.
Two option buttons will be used to select the particular conversion. In addition, we will use three labels, two text
boxes (for the given temperature and the equivalent temperature, respectively), and two command buttons (to initiate or
repeat the computation, and to terminate). Fig. 4.19 shows the preliminary control layout.
Fig. 4.19
Let us now assign the following initial values to the control properties listed below:
Object Property Value
Form1 Caption “Temperature Conversion”
Label1 Caption “Temperature Conversion”
Font MS Sans Serif, 12-point
Label2 Caption “Enter original temperature in degrees Fahrenheit”
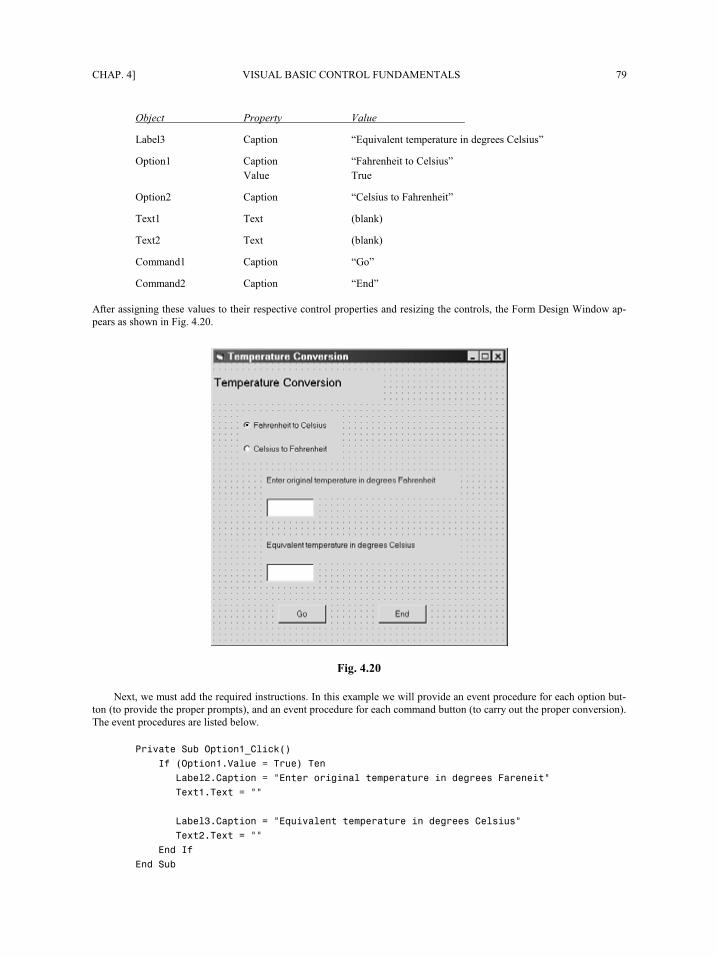
CHAP. 4] VISUAL BASIC CONTROL FUNDAMENTALS 79
Object Property Value
Label3 Caption “Equivalent temperature in degrees Celsius”
Option1 Caption “Fahrenheit to Celsius”
Value True
Option2 Caption “Celsius to Fahrenheit”
Text1 Text (blank)
Text2 Text (blank)
Command1 Caption “Go”
Command2 Caption “End”
After assigning these values to their respective control properties and resizing the controls, the Form Design Window ap-
pears as shown in Fig. 4.20.
Fig. 4.20
Next, we must add the required instructions. In this example we will provide an event procedure for each option but-
ton (to provide the proper prompts), and an event procedure for each command button (to carry out the proper conversion).
The event procedures are listed below.
Private Sub Option1_Click()
If (Option1.Value = True) Then
Label2.Caption = "Enter original temperature in degrees Fahrenheit"
Text1.Text = ""
Label3.Caption = "Equivalent temperature in degrees Celsius"
Text2.Text = ""
End If
End Sub
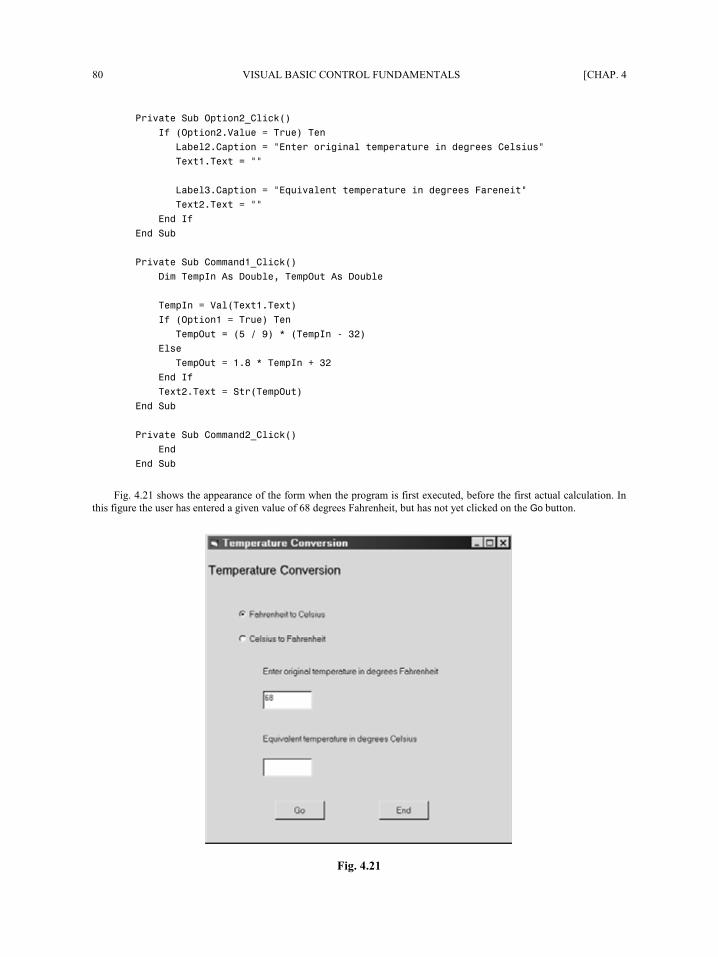
80 VISUAL BASIC CONTROL FUNDAMENTALS [CHAP. 4
Private Sub Option2_Click()
If (Option2.Value = True) Then
Label2.Caption = "Enter original temperature in degrees Celsius"
Text1.Text = ""
Label3.Caption = "Equivalent temperature in degrees Fahrenheit"
Text2.Text = ""
End If
End Sub
Private Sub Command1_Click()
Dim TempIn As Double, TempOut As Double
TempIn = Val(Text1.Text)
If (Option1 = True) Then
TempOut = (5 / 9) * (TempIn - 32)
Else
TempOut = 1.8 * TempIn + 32
End If
Text2.Text = Str(TempOut)
End Sub
Private Sub Command2_Click()
End
End Sub
Fig. 4.21 shows the appearance of the form when the program is first executed, before the first actual calculation. In
this figure the user has entered a given value of 68 degrees Fahrenheit, but has not yet clicked on the Go button.
Fig. 4.21
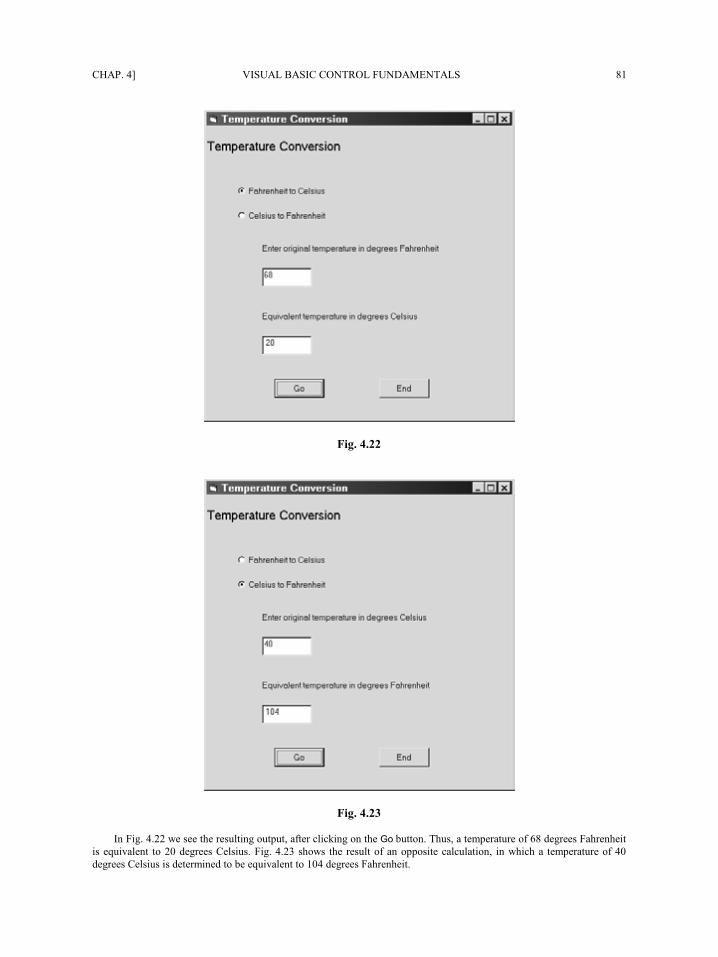
CHAP. 4] VISUAL BASIC CONTROL FUNDAMENTALS 81
Fig. 4.22
Fig. 4.23
In Fig. 4.22 we see the resulting output, after clicking on the Go button. Thus, a temperature of 68 degrees Fahrenheit
is equivalent to 20 degrees Celsius. Fig. 4.23 shows the result of an opposite calculation, in which a temperature of 40
degrees Celsius is determined to be equivalent to 104 degrees Fahrenheit.
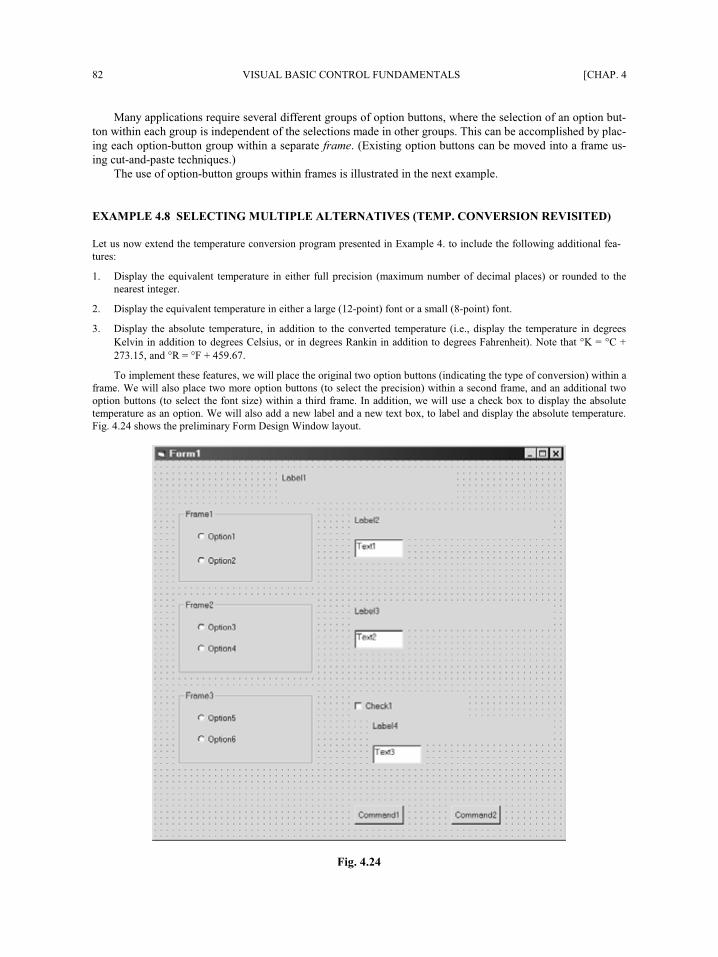
82 VISUAL BASIC CONTROL FUNDAMENTALS [CHAP. 4
Many applications require several different groups of option buttons, where the selection of an option but-
ton within each group is independent of the selections made in other groups. This can be accomplished by plac-
ing each option-button group within a separate frame. (Existing option buttons can be moved into a frame us-
ing cut-and-paste techniques.)
The use of option-button groups within frames is illustrated in the next example.
EXAMPLE 4.8 SELECTING MULTIPLE ALTERNATIVES (TEMP. CONVERSION REVISITED)
Let us now extend the temperature conversion program presented in Example 4.7 to include the following additional fea-
tures:
1. Display the equivalent temperature in either full precision (maximum number of decimal places) or rounded to the
nearest integer.
2. Display the equivalent temperature in either a large (12-point) font or a small (8-point) font.
3. Display the absolute temperature, in addition to the converted temperature (i.e., display the temperature in degrees
Kelvin in addition to degrees Celsius, or in degrees Rankin in addition to degrees Fahrenheit). Note that °K = °C +
273.15, and °R = °F + 459.67.
To implement these features, we will place the original two option buttons (indicating the type of conversion) within a
frame. We will also place two more option buttons (to select the precision) within a second frame, and an additional two
option buttons (to select the font size) within a third frame. In addition, we will use a check box to display the absolute
temperature as an option. We will also add a new label and a new text box, to label and display the absolute temperature.
Fig. 4.24 shows the preliminary Form Design Window layout.
Fig. 4.24
CHAP. 4] VISUAL BASIC CONTROL FUNDAMENTALS 83
We now assign the following initial values to the control properties listed below. (Note that some of these assign-
ments are repeated from the previous example. The new assignments are italicized.)
Object Property Value
Form1 Caption “Temperature Conversion”
Label1 Caption “Temperature Conversion”
Font MS Sans Serif, 12-point
Label2 Caption “Enter original temperature in degrees Fahrenheit”
Label3 Caption “Equivalent temperature in degrees Celsius”
Label4 Caption “Absolute temperature in degrees Kelvin”
Option1 Caption “Fahrenheit to Celsius”
Value True
Option2 Caption “Celsius to Fahrenheit”
Option3 Caption “Full precision”
Value True
Option4 Caption “Nearest integer”
Option5 Caption “Large font”
Value True
Option6 Caption “Small font”
Frame1 Caption “Conversion type”
Frame2 Caption “Precision”
Frame3 Caption “Font size”
Check1 Caption “Display absolute temperature”
Text1 Text (blank)
Text2 Text (blank)
Text3 Text (blank)
Command1 Caption “Go”
Command2 Caption “End”
Fig. 4.25 shows the resulting appearance of the Form Design Window.
We now add the event procedures. Each of the first two option buttons (Fahrenheit to Celsius and Celsius to Fahren-
heit) will have an event procedure associated with it, as in the previous example. Now, however, each event procedure will
specify three labels rather than two – the additional label indicating the units for the absolute temperature (degrees Kelvin
or degrees Rankine).
The event procedure associated with the first command button (Go) calculates and formats the equivalent temperature
and the corresponding absolute temperature. Note that the absolute temperature is assigned to the temporary string variable
T. Then at the end of the event procedure, Text3.Text (which is actually displayed) is either assigned the string represented
by T, or an empty (blank) string, depending on whether or not the absolute temperature is displayed. In other words, if the
check box has been checked, so that Check1.Value = 1, then the string represented by T is assigned to Text3.Text, and the
absolute temperature (along with its accompanying label, Label4.Caption) will appear on the form. If the check box has not
been checked, however, then Check1.Value will equal 0, and an empty (blank) string will be assigned to Text3.Text. In this
case, the accompanying label (Label4.Caption) also will not appear.
The event procedures are shown beneath Fig. 4.25.
84 VISUAL BASIC CONTROL FUNDAMENTALS [CHAP. 4
Fig. 4.25
Private Sub Option1_Click()
If (Option1.Value = True) Then
Label2.Caption = "Enter original temperature in degrees Fahrenheit"
Text1.Text = ""
Label3.Caption = "Equivalent temperature in degrees Celsius"
Text2.Text = ""
Label4.Caption = "Absolute temperature in degrees Kelvin"
Text3.Text = ""
End If
End Sub
Private Sub Option2_Click()
If (Option2.Value = True) Then
Label2.Caption = "Enter original temperature in degrees Celsius"
Text1.Text = ""
Label3.Caption = "Equivalent temperature in degrees Fahrenheit"
Text2.Text = ""
Label4.Caption = "Absolute temperature in degrees Rankine"
Text3.Text = ""
End If
End Sub
CHAP. 4] VISUAL BASIC CONTROL FUNDAMENTALS 85
Private Sub Command1_Click()
Dim TempIn As Double, TempOut As Double, AbsTemp As Double, T As String
TempIn = Val(Text1.Text)
If (Option1 = True) Then
TempOut = (5 / 9) * (TempIn - 32)
AbsTemp = TempOut + 273.15
Else
TempOut = 1.8 * TempIn + 32
AbsTemp = TempOut + 459.67
End If
Text2.Text = Str(TempOut)
T = Str(AbsTemp)
If (Option4.Value = True) Then
Text2.Text = Str(Format(TempOut, "#."))
T = Str(Format(AbsTemp, "#."))
End If
Text2.FontSize = 8
Text3.FontSize = 8
If (Option5.Value = True) Then
Text2.FontSize = 12
Text3.FontSize = 12
End If
If (Check1.Value = 1) Then
Label4.Visible = True
Text3.Text = T
ElseIf (Check1.Value = 0) Then
Label4.Visible = False
Text3.Text = ""
End If
End Sub
Private Sub Command2_Click()
End
End Sub
Fig. 4.26 shows a conversion of 40 degrees Fahrenheit to 4.4444 degrees Celsius and 277.59 degrees Kelvin (abso-
lute). Note that the results are displayed in full precision, using large (12-point) fonts.
In Fig. 4.27, we see the result of converting 28 degrees Celsius to 82 degrees Fahrenheit. In this case, the absolute
temperature is not requested (the check box is unselected, the text box is blank, and the accompanying label is not shown).
Also, the converted temperature is shown in a small (8-point) font, rounded to the nearest integer.
4.11 SELECTING FROM A LIST (LIST BOXES AND COMBO BOXES)
A list box offers another approach to selecting among several different alternatives. Each alternative can be
identified as a single entry within the list. When the program is executed, clicking on a list entry will cause the
value of the list index to be assigned to the ListIndex property. (The list index is an integer whose value ranges
from 0 to n− 1, where n is the number of entries within the list. Thus, the first item will correspond to index
number 0, the second will correspond to index number 1, and so on.) An If-Then-Else block or a Select Case
structure can then be used to carry out the desired action.
86 VISUAL BASIC CONTROL FUNDAMENTALS [CHAP. 4
Fig. 4.26
Fig. 4.27
CHAP. 4] VISUAL BASIC CONTROL FUNDAMENTALS 87
Closely associated with a list box is the combo box, which is a single control combining a text box and a
list box. The list box component behaves as any other list box (see below). The text box component can be
used either to enter an input string or to display an output string (e.g., a label or a heading for the list box), as
described in Sec. 4.7.
Initial list entries can be entered as strings in the same manner as other control properties. (Press Ctrl-Enter
at the end of each list entry, in order to drop down to the next line.) In addition, list entries can be changed (i.e.,
reassigned) or added during program execution using the AddItem method or the List function; e.g.,
List1.AddItem("Red")
List1.AddItem("White")
List1.AddItem("Blue")
etc.
or
List1.List(0) = "Red"
List1.List(1) = "White"
List1.List(2) = "Blue"
etc.
Typically, these list modification instructions will appear within a Form_Load() event procedure.
The ListCount and ListIndex properties are also useful in many situations. ListCount represents the number
of entries within the list (beginning with 1, not 0). It is often used as a stopping condition for a looping struc-
ture; e.g.,
For Count = 0 To (ListCount – 1) . . . . . Next Count
ListIndex represents the index value of the most recently selected list entry (The value corresponding to the
first entry is 0, not 1). The use of ListIndex often provides a convenient expression for a Select Case structure;
e.g.,
Select Case ListIndex
Case 0 'First entry . . . . .
Case 1 'Second entry . . . . .
. . . . . 'Last entry
End Select
Neither ListCount nor ListIndex can be assigned an initial value. Hence, neither property appears in the
Properties Window during the initial program design.
EXAMPLE 4.9 SELECTING FROM A LIST (MULTILINGUAL HELLO REVISITED)
Let us return to the situation described in Example 4.6, in which we display the greeting “Hello” in one of several different
languages. In this example, we will use a combo box to display the choice of languages, and a text box to display the ap-
propriate greeting. (There are other ways to accomplish the same thing; for example, a text box to display the choice of
languages, and a label to display the greeting.) Since the selection will be made from a combo box (or from a text box, if
we had so chosen), only one greeting will be displayed at any one time. Fig. 4.28 shows the preliminary Form Design
Window layout.
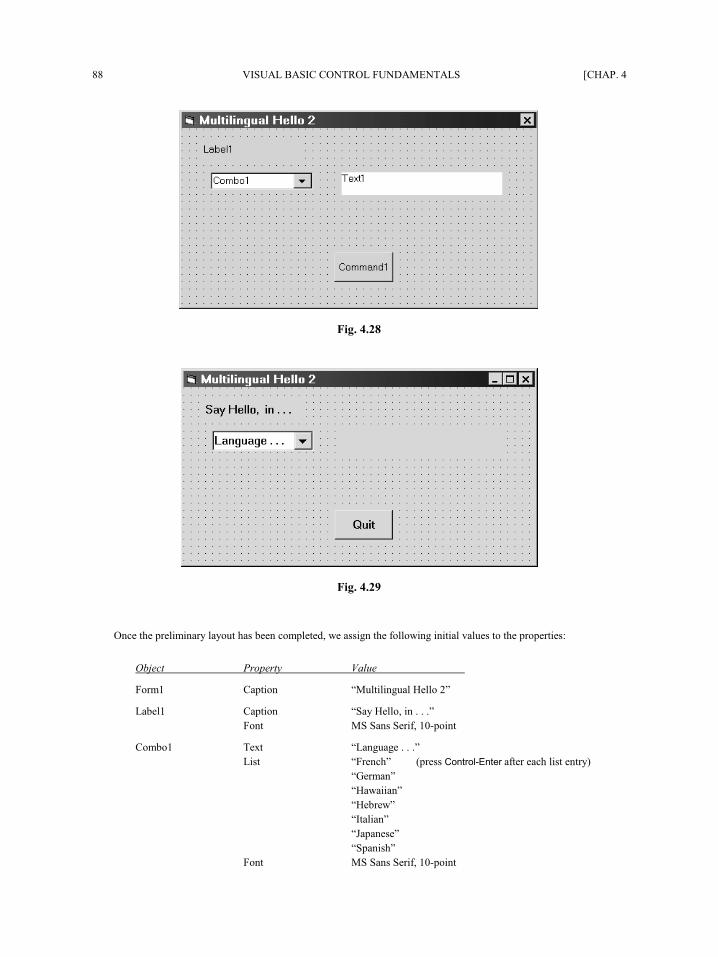
88 VISUAL BASIC CONTROL FUNDAMENTALS [CHAP. 4
Fig. 4.28
Fig. 4.29
Once the preliminary layout has been completed, we assign the following initial values to the properties:
Object Property Value
Form1 Caption “Multilingual Hello 2”
Label1 Caption “Say Hello, in . . .”
Font MS Sans Serif, 10-point
Combo1 Text “Language . . .”
List “French” (press Control-Enter after each list entry)
“German”
“Hawaiian”
“Hebrew”
“Italian”
“Japanese”
“Spanish”
Font MS Sans Serif, 10-point
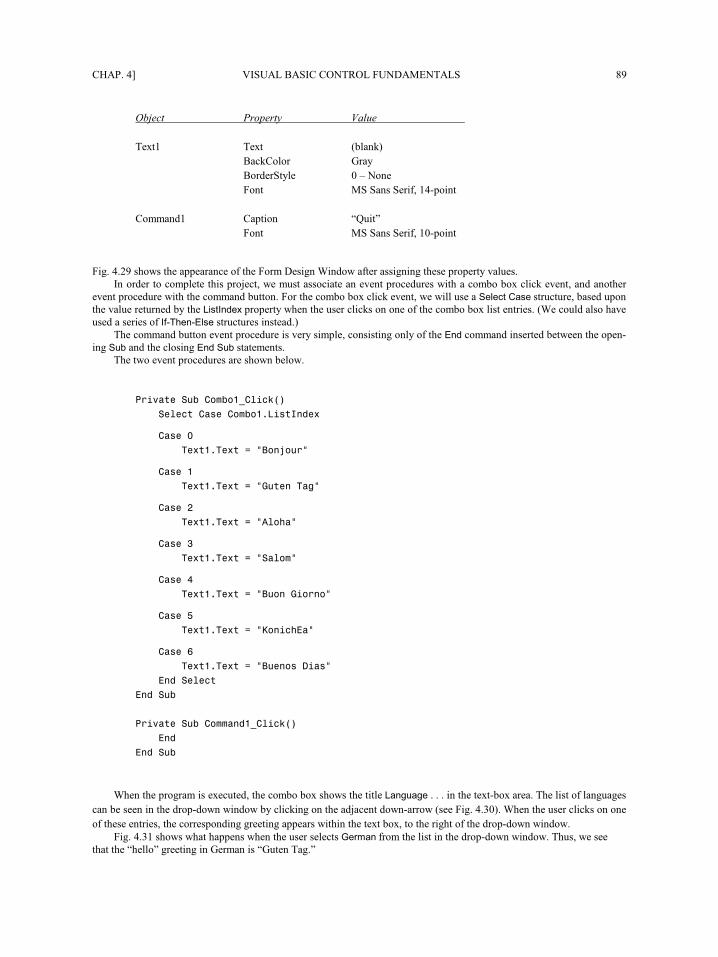
CHAP. 4] VISUAL BASIC CONTROL FUNDAMENTALS 89
Object Property Value
Text1 Text (blank)
BackColor Gray
BorderStyle 0 – None
Font MS Sans Serif, 14-point
Command1 Caption “Quit”
Font MS Sans Serif, 10-point
Fig. 4.29 shows the appearance of the Form Design Window after assigning these property values.
In order to complete this project, we must associate an event procedures with a combo box click event, and another
event procedure with the command button. For the combo box click event, we will use a Select Case structure, based upon
the value returned by the ListIndex property when the user clicks on one of the combo box list entries. (We could also have
used a series of If-Then-Else structures instead.)
The command button event procedure is very simple, consisting only of the End command inserted between the open-
ing Sub and the closing End Sub statements.
The two event procedures are shown below.
Private Sub Combo1_Click()
Select Case Combo1.ListIndex
Case 0
Text1.Text = "Bonjour"
Case 1
Text1.Text = "Guten Tag"
Case 2
Text1.Text = "Aloha"
Case 3
Text1.Text = "Shalom"
Case 4
Text1.Text = "Buon Giorno"
Case 5
Text1.Text = "Konichihua"
Case 6
Text1.Text = "Buenos Dias"
End Select
End Sub
Private Sub Command1_Click()
End
End Sub
When the program is executed, the combo box shows the title Language . . . in the text-box area. The list of languages
can be seen in the drop-down window by clicking on the adjacent down-arrow (see Fig. 4.30). When the user clicks on one
of these entries, the corresponding greeting appears within the text box, to the right of the drop-down window.
Fig. 4.31 shows what happens when the user selects German from the list in the drop-down window. Thus, we see
that the “hello” greeting in German is “Guten Tag.”
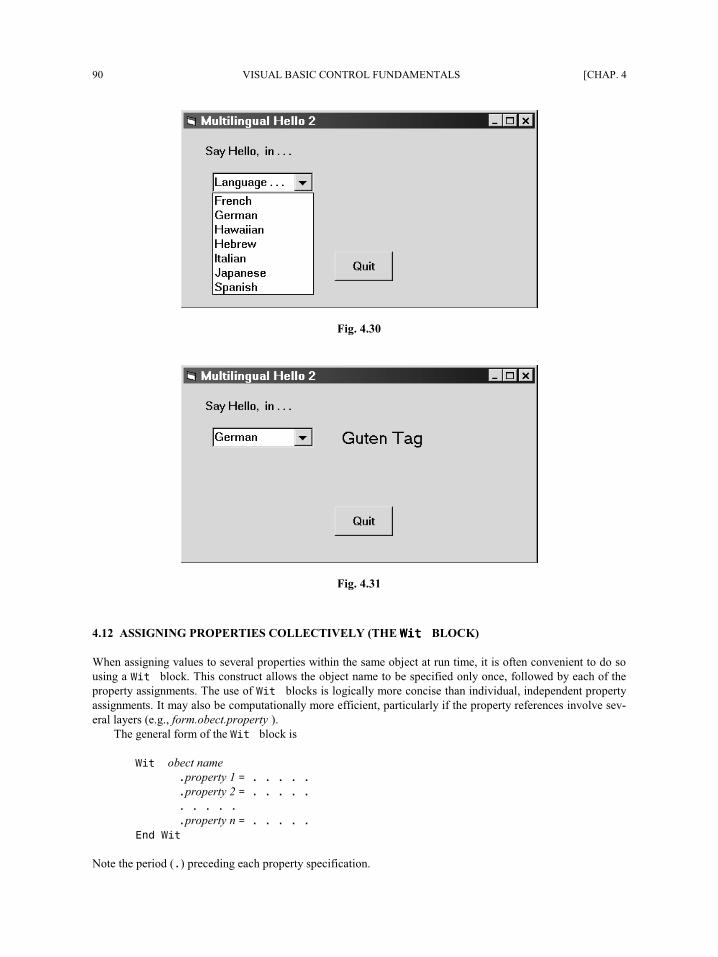
90 VISUAL BASIC CONTROL FUNDAMENTALS [CHAP. 4
Fig. 4.30
Fig. 4.31
4.12 ASSIGNING PROPERTIES COLLECTIVELY (THE WWWWithithithith BLOCK)
When assigning values to several properties within the same object at run time, it is often convenient to do so
using a With block. This construct allows the object name to be specified only once, followed by each of the
property assignments. The use of With blocks is logically more concise than individual, independent property
assignments. It may also be computationally more efficient, particularly if the property references involve sev-
eral layers (e.g., form.object.property).
The general form of the With block is
With object name
.property 1 = . . . . .
.property 2 = . . . . .
. . . . .
.property n = . . . . .
End With
Note the period (.) preceding each property specification.
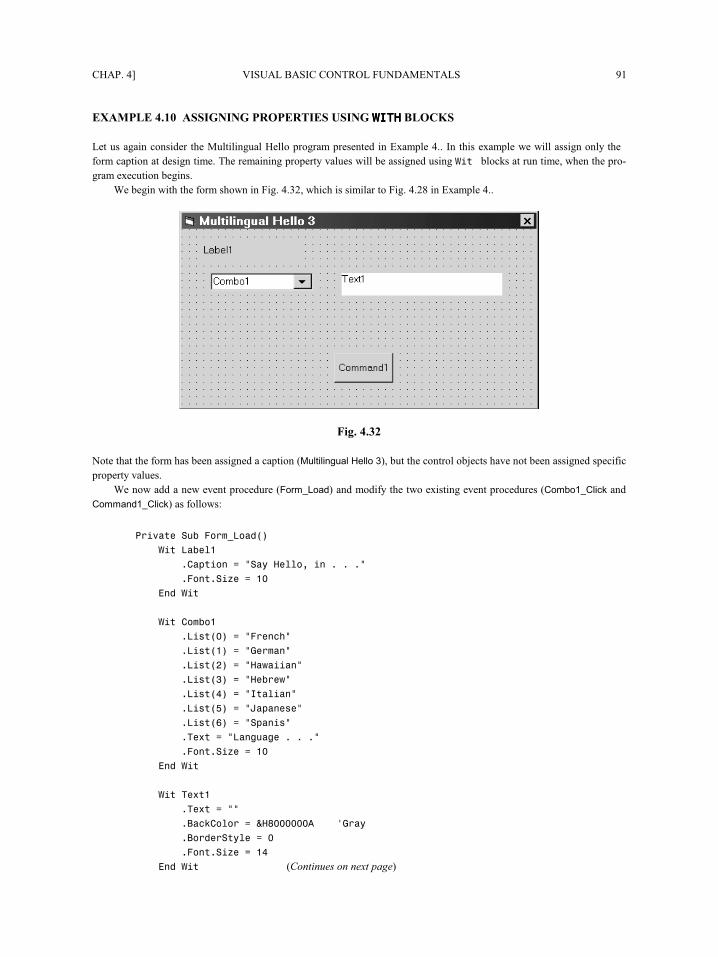
CHAP. 4] VISUAL BASIC CONTROL FUNDAMENTALS 91
EXAMPLE 4.10 ASSIGNING PROPERTIES USING WITHWITHWITHWITH BLOCKS
Let us again consider the Multilingual Hello program presented in Example 4.9. In this example we will assign only the
form caption at design time. The remaining property values will be assigned using With blocks at run time, when the pro-
gram execution begins.
We begin with the form shown in Fig. 4.32, which is similar to Fig. 4.28 in Example 4.9.
Fig. 4.32
Note that the form has been assigned a caption (Multilingual Hello 3), but the control objects have not been assigned specific
property values.
We now add a new event procedure (Form_Load) and modify the two existing event procedures (Combo1_Click and
Command1_Click) as follows:
Private Sub Form_Load()
With Label1
.Caption = "Say Hello, in . . ."
.Font.Size = 10
End With
With Combo1
.List(0) = "French"
.List(1) = "German"
.List(2) = "Hawaiian"
.List(3) = "Hebrew"
.List(4) = "Italian"
.List(5) = "Japanese"
.List(6) = "Spanish"
.Text = "Language . . ."
.Font.Size = 10
End With
With Text1
.Text = ""
.BackColor = &H8000000A 'Gray
.BorderStyle = 0
.Font.Size = 14
End With (Continues on next page)
92 VISUAL BASIC CONTROL FUNDAMENTALS [CHAP. 4
With Command1
.Caption = "Quit"
.Font.Size = 10
End With
End Sub
Private Sub Combo1_Click()
With Text1
Select Case Combo1.ListIndex
Case 0
.Text = "Bonjour"
Case 1
.Text = "Guten Tag"
Case 2
.Text = "Aloha"
Case 3
.Text = "Shalom"
Case 4
.Text = "Buon Giorno"
Case 5
.Text = "Konichihua"
Case 6
.Text = "Buenos Dias"
End Select
End With
End Sub
Private Sub Command1_Click()
End
End Sub
Note that the objects Label1, Combo1, Text1 and Command1 are assigned their initial property values within event proce-
dure Form_Load. A separate With block is used for each object; hence, Form_Load contains four different With blocks.
Note the embedded Select Case structure within the With block.
The text within the text box control is then reassigned the proper string (the actual greeting) within Combo1_Click.
This occurs at run time, when the user clicks on an entry within the combo box.
Execution of the program results in the same behavior as shown in Example 4.9 (see Figs. 4.30 and 4.31).
4.13 GENERATING ERROR MESSAGES (THE MsgBoxMsgBoxMsgBoxMsgBox FUNCTION)
Most comprehensive projects include error traps, which detect inappropriate input data or improper conditions
that arise during the course of the computation. Some examples are detecting a negative value for an input pa-
rameter that is required to be positive, and trapping an attempt to calculate the square root of a negative num-
ber. Such conditions can usually be detected using If-Then or If-Then-Else. When an error of this type has been
detected, an error message is usually displayed and the computation is either suspended or terminated. The
error message informs the user that an error has occurred, and may suggest that the user take corrective action.
The MsgBox function offers a convenient way to display error messages, as well as other types of informa-
tion that may be useful during the course of the computation. This function is written as a single executable
statement; i.e.,
MsgBox(string)
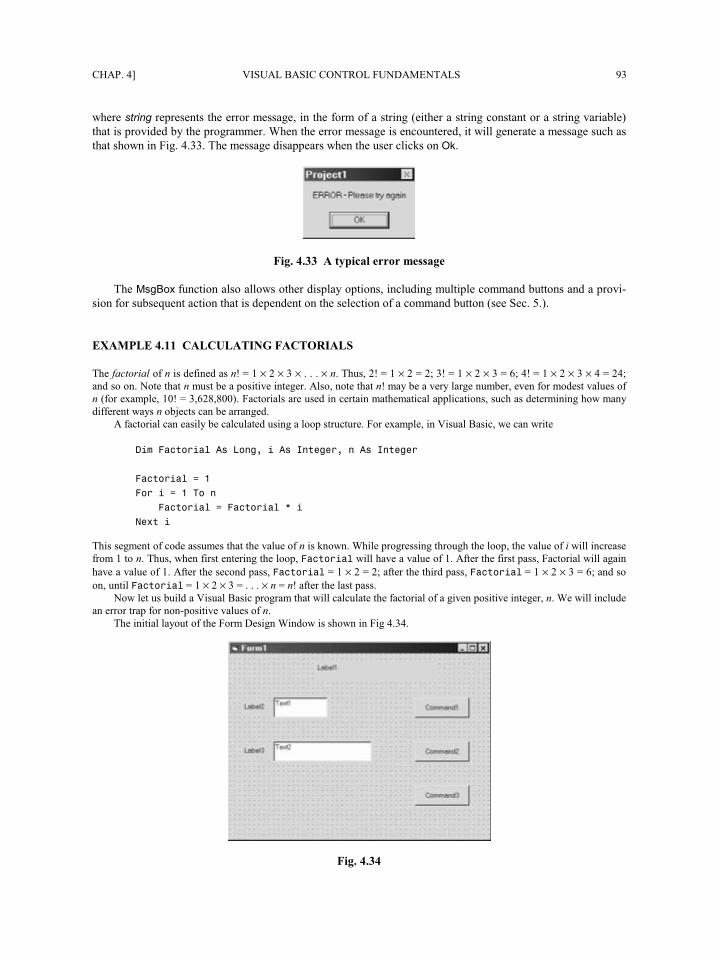
CHAP. 4] VISUAL BASIC CONTROL FUNDAMENTALS 93
where string represents the error message, in the form of a string (either a string constant or a string variable)
that is provided by the programmer. When the error message is encountered, it will generate a message such as
that shown in Fig. 4.33. The message disappears when the user clicks on Ok.
Fig. 4.33 A typical error message
The MsgBox function also allows other display options, including multiple command buttons and a provi-
sion for subsequent action that is dependent on the selection of a command button (see Sec. 5.7).
EXAMPLE 4.11 CALCULATING FACTORIALS
The factorial of n is defined as n! = 1 × 2 × 3 × . . . × n. Thus, 2! = 1 × 2 = 2; 3! = 1 × 2 × 3 = 6; 4! = 1 × 2 × 3 × 4 = 24;
and so on. Note that n must be a positive integer. Also, note that n! may be a very large number, even for modest values of
n (for example, 10! = 3,628,800). Factorials are used in certain mathematical applications, such as determining how many
different ways n objects can be arranged.
A factorial can easily be calculated using a loop structure. For example, in Visual Basic, we can write
Dim Factorial As Long, i As Integer, n As Integer
Factorial = 1
For i = 1 To n
Factorial = Factorial * i
Next i
This segment of code assumes that the value of n is known. While progressing through the loop, the value of i will increase
from 1 to n. Thus, when first entering the loop, Factorial will have a value of 1. After the first pass, Factorial will again
have a value of 1. After the second pass, Factorial = 1 × 2 = 2; after the third pass, Factorial = 1 × 2 × 3 = 6; and so
on, until Factorial = 1 × 2 × 3 = . . . × n = n! after the last pass.
Now let us build a Visual Basic program that will calculate the factorial of a given positive integer, n. We will include
an error trap for non-positive values of n.
The initial layout of the Form Design Window is shown in Fig 4.34.
Fig. 4.34
94 VISUAL BASIC CONTROL FUNDAMENTALS [CHAP. 4
To customize this window, we assign the following initial values to the control properties:
Object Property Value
Form1 Caption “Factorials”
Label1 Caption “Calculate the factorial of n”
Font MS Sans Serif, 12-point
Label2 Caption “n = ”
Font MS Sans Serif, 10-point
Label3 Caption “n! = ”
Font MS Sans Serif, 10-point
Text1 Text (blank)
Font MS Sans Serif, 10-point
Text2 Text (blank)
Font MS Sans Serif, 10-point
Command1 Caption “Go”
Font MS Sans Serif, 10-point
Command2 Caption “Clear”
Font MS Sans Serif, 10-point
Command3 Caption “Quit”
Font MS Sans Serif, 10-point
Here are the event procedures corresponding to the command buttons.
Private Sub Command1_Click()
Dim Factorial As Long, i As Integer, n As Integer
n = Val(Text1.Text)
If n < 1 Then
Beep
MsgBox ("ERROR - Please try again")
Else
Factorial = 1
For i = 1 To n
Factorial = Factorial * i
Next i
Text2.Text = Str(Factorial)
End If
End Sub
Private Sub Command2_Click()
Text1.Text = ""
Text2.Text = ""
End Sub
Private Sub Command3_Click()
End
End Sub
Note that the value of n is entered in the first text box and then converted to an integer. We then encounter an error trap in
the form of an If-Then-Else block, to determine if n is a positive integer, as required. If n is not a positive integer, the com-
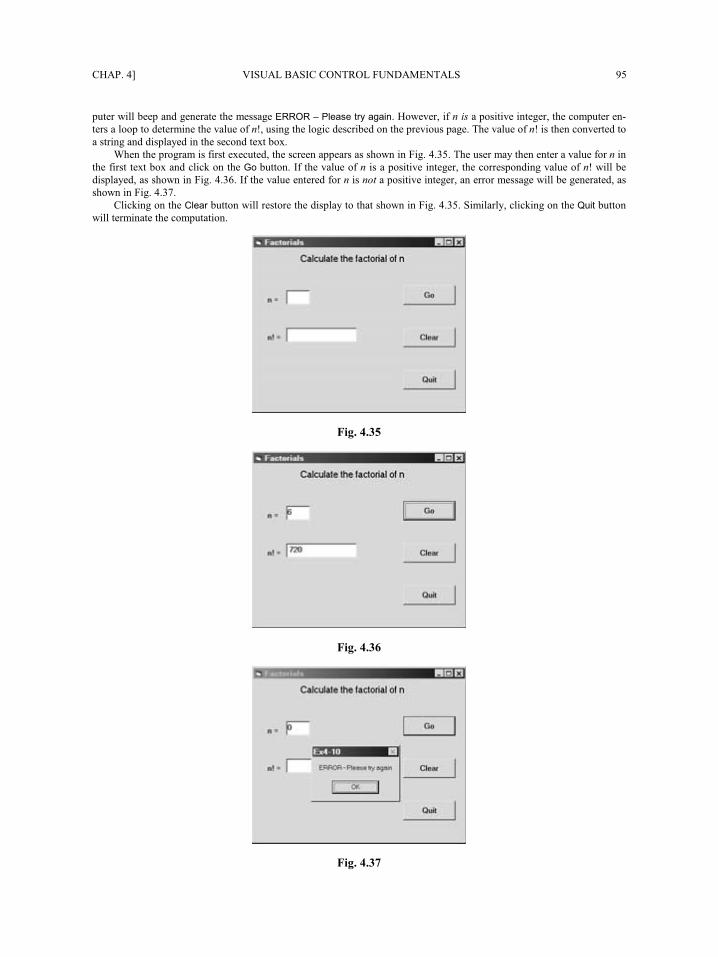
CHAP. 4] VISUAL BASIC CONTROL FUNDAMENTALS 95
puter will beep and generate the message ERROR – Please try again. However, if n is a positive integer, the computer en-
ters a loop to determine the value of n!, using the logic described on the previous page. The value of n! is then converted to
a string and displayed in the second text box.
When the program is first executed, the screen appears as shown in Fig. 4.35. The user may then enter a value for n in
the first text box and click on the Go button. If the value of n is a positive integer, the corresponding value of n! will be
displayed, as shown in Fig. 4.36. If the value entered for n is not a positive integer, an error message will be generated, as
shown in Fig. 4.37.
Clicking on the Clear button will restore the display to that shown in Fig. 4.35. Similarly, clicking on the Quit button
will terminate the computation.
Fig. 4.35
Fig. 4.36
Fig. 4.37
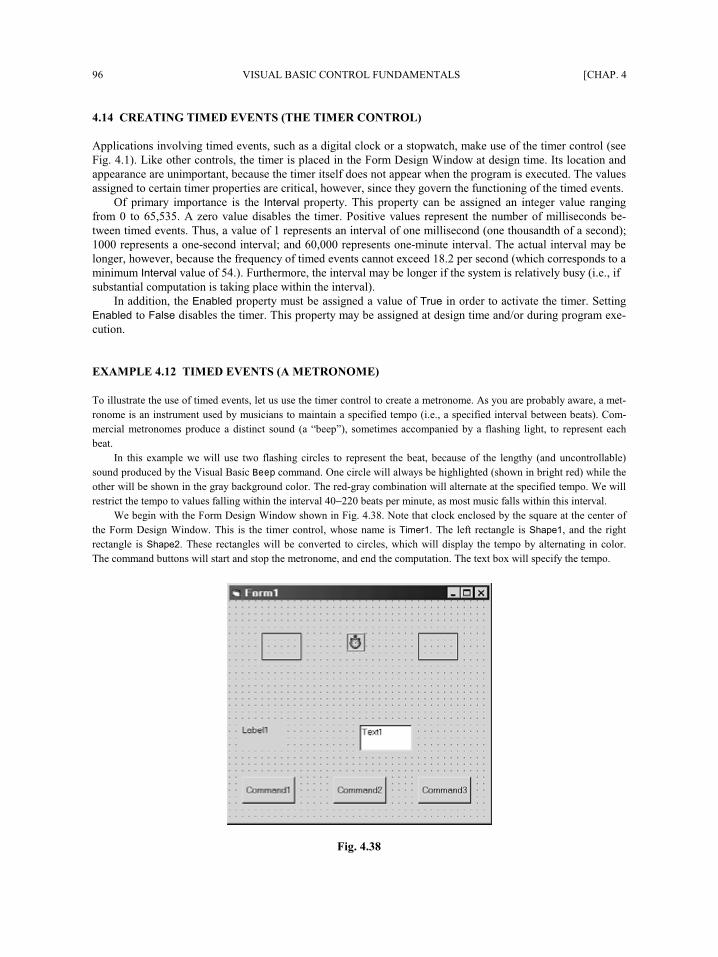
96 VISUAL BASIC CONTROL FUNDAMENTALS [CHAP. 4
4.14 CREATING TIMED EVENTS (THE TIMER CONTROL)
Applications involving timed events, such as a digital clock or a stopwatch, make use of the timer control (see
Fig. 4.1). Like other controls, the timer is placed in the Form Design Window at design time. Its location and
appearance are unimportant, because the timer itself does not appear when the program is executed. The values
assigned to certain timer properties are critical, however, since they govern the functioning of the timed events.
Of primary importance is the Interval property. This property can be assigned an integer value ranging
from 0 to 65,535. A zero value disables the timer. Positive values represent the number of milliseconds be-
tween timed events. Thus, a value of 1 represents an interval of one millisecond (one thousandth of a second);
1000 represents a one-second interval; and 60,000 represents one-minute interval. The actual interval may be
longer, however, because the frequency of timed events cannot exceed 18.2 per second (which corresponds to a
minimum Interval value of 54.9). Furthermore, the interval may be longer if the system is relatively busy (i.e., if
substantial computation is taking place within the interval).
In addition, the Enabled property must be assigned a value of True in order to activate the timer. Setting
Enabled to False disables the timer. This property may be assigned at design time and/or during program exe-
cution.
EXAMPLE 4.12 TIMED EVENTS (A METRONOME)
To illustrate the use of timed events, let us use the timer control to create a metronome. As you are probably aware, a met-
ronome is an instrument used by musicians to maintain a specified tempo (i.e., a specified interval between beats). Com-
mercial metronomes produce a distinct sound (a “beep”), sometimes accompanied by a flashing light, to represent each
beat.
In this example we will use two flashing circles to represent the beat, because of the lengthy (and uncontrollable)
sound produced by the Visual Basic Beep command. One circle will always be highlighted (shown in bright red) while the
other will be shown in the gray background color. The red-gray combination will alternate at the specified tempo. We will
restrict the tempo to values falling within the interval 40−220 beats per minute, as most music falls within this interval.
We begin with the Form Design Window shown in Fig. 4.38. Note that clock enclosed by the square at the center of
the Form Design Window. This is the timer control, whose name is Timer1. The left rectangle is Shape1, and the right
rectangle is Shape2. These rectangles will be converted to circles, which will display the tempo by alternating in color.
The command buttons will start and stop the metronome, and end the computation. The text box will specify the tempo.
Fig. 4.38
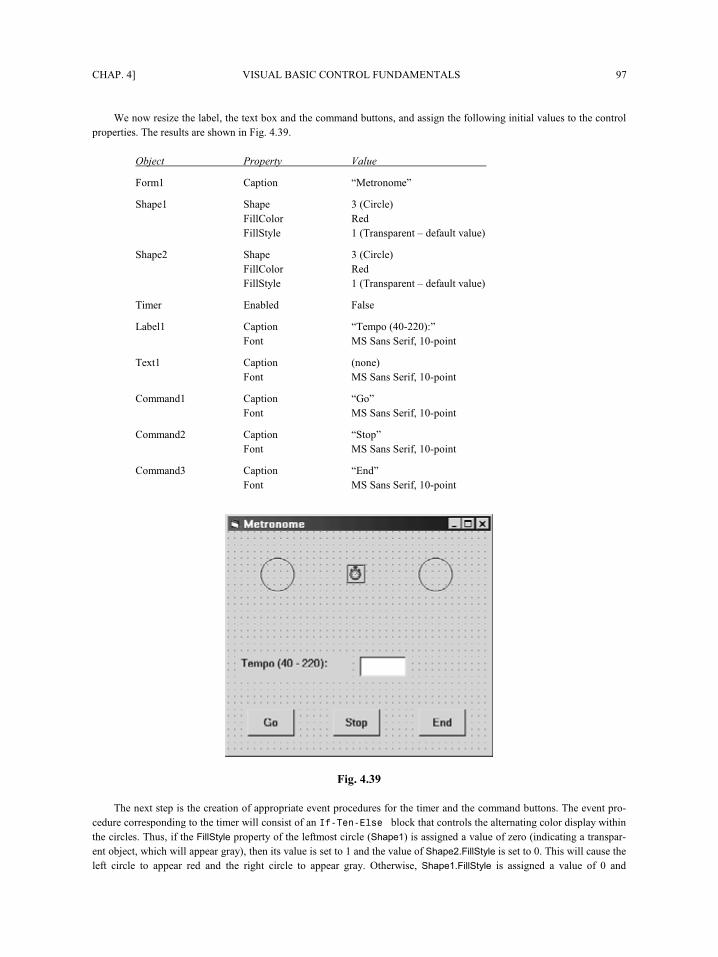
CHAP. 4] VISUAL BASIC CONTROL FUNDAMENTALS 97
We now resize the label, the text box and the command buttons, and assign the following initial values to the control
properties. The results are shown in Fig. 4.39.
Object Property Value
Form1 Caption “Metronome”
Shape1 Shape 3 (Circle)
FillColor Red
FillStyle 1 (Transparent – default value)
Shape2 Shape 3 (Circle)
FillColor Red
FillStyle 1 (Transparent – default value)
Timer Enabled False
Label1 Caption “Tempo (40-220):”
Font MS Sans Serif, 10-point
Text1 Caption (none)
Font MS Sans Serif, 10-point
Command1 Caption “Go”
Font MS Sans Serif, 10-point
Command2 Caption “Stop”
Font MS Sans Serif, 10-point
Command3 Caption “End”
Font MS Sans Serif, 10-point
Fig. 4.39
The next step is the creation of appropriate event procedures for the timer and the command buttons. The event pro-
cedure corresponding to the timer will consist of an If-Then-Else block that controls the alternating color display within
the circles. Thus, if the FillStyle property of the leftmost circle (Shape1) is assigned a value of zero (indicating a transpar-
ent object, which will appear gray), then its value is set to 1 and the value of Shape2.FillStyle is set to 0. This will cause the
left circle to appear red and the right circle to appear gray. Otherwise, Shape1.FillStyle is assigned a value of 0 and
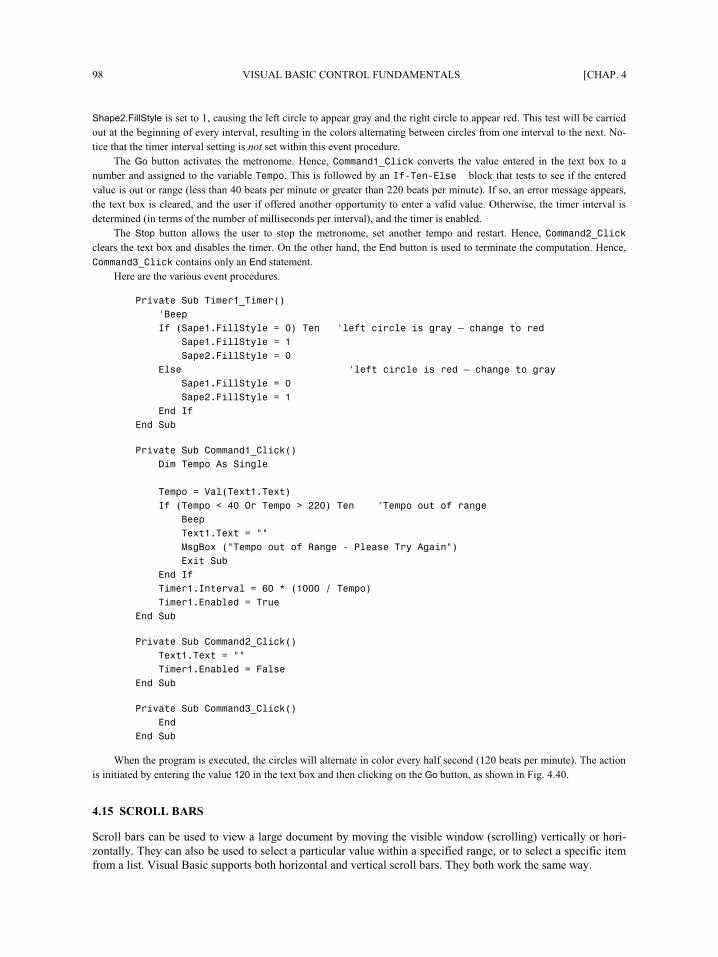
98 VISUAL BASIC CONTROL FUNDAMENTALS [CHAP. 4
Shape2.FillStyle is set to 1, causing the left circle to appear gray and the right circle to appear red. This test will be carried
out at the beginning of every interval, resulting in the colors alternating between circles from one interval to the next. No-
tice that the timer interval setting is not set within this event procedure.
The Go button activates the metronome. Hence, Command1_Click converts the value entered in the text box to a
number and assigned to the variable Tempo. This is followed by an If-Then-Else block that tests to see if the entered
value is out or range (less than 40 beats per minute or greater than 220 beats per minute). If so, an error message appears,
the text box is cleared, and the user if offered another opportunity to enter a valid value. Otherwise, the timer interval is
determined (in terms of the number of milliseconds per interval), and the timer is enabled.
The Stop button allows the user to stop the metronome, set another tempo and restart. Hence, Command2_Click
clears the text box and disables the timer. On the other hand, the End button is used to terminate the computation. Hence,
Command3_Click contains only an End statement.
Here are the various event procedures.
Private Sub Timer1_Timer()
'Beep
If (Shape1.FillStyle = 0) Then 'left circle is gray – change to red
Shape1.FillStyle = 1
Shape2.FillStyle = 0
Else 'left circle is red – change to gray
Shape1.FillStyle = 0
Shape2.FillStyle = 1
End If
End Sub
Private Sub Command1_Click()
Dim Tempo As Single
Tempo = Val(Text1.Text)
If (Tempo < 40 Or Tempo > 220) Then 'Tempo out of range
Beep
Text1.Text = ""
MsgBox ("Tempo out of Range - Please Try Again")
Exit Sub
End If
Timer1.Interval = 60 * (1000 / Tempo)
Timer1.Enabled = True
End Sub
Private Sub Command2_Click()
Text1.Text = ""
Timer1.Enabled = False
End Sub
Private Sub Command3_Click()
End
End Sub
When the program is executed, the circles will alternate in color every half second (120 beats per minute). The action
is initiated by entering the value 120 in the text box and then clicking on the Go button, as shown in Fig. 4.40.
4.15 SCROLL BARS
Scroll bars can be used to view a large document by moving the visible window (scrolling) vertically or hori-
zontally. They can also be used to select a particular value within a specified range, or to select a specific item
from a list. Visual Basic supports both horizontal and vertical scroll bars. They both work the same way.
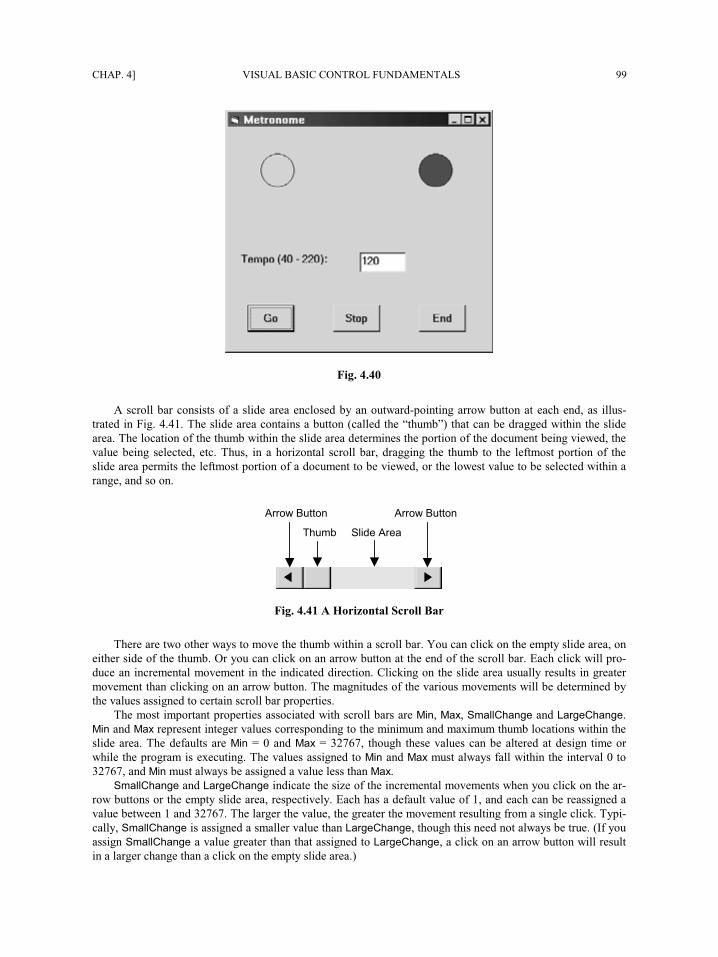
CHAP. 4] VISUAL BASIC CONTROL FUNDAMENTALS 99
Fig. 4.40
A scroll bar consists of a slide area enclosed by an outward-pointing arrow button at each end, as illus-
trated in Fig. 4.41. The slide area contains a button (called the “thumb”) that can be dragged within the slide
area. The location of the thumb within the slide area determines the portion of the document being viewed, the
value being selected, etc. Thus, in a horizontal scroll bar, dragging the thumb to the leftmost portion of the
slide area permits the leftmost portion of a document to be viewed, or the lowest value to be selected within a
range, and so on.
Arrow Button Arrow Button
Thumb Slide Area
Fig. 4.41 A Horizontal Scroll Bar
There are two other ways to move the thumb within a scroll bar. You can click on the empty slide area, on
either side of the thumb. Or you can click on an arrow button at the end of the scroll bar. Each click will pro-
duce an incremental movement in the indicated direction. Clicking on the slide area usually results in greater
movement than clicking on an arrow button. The magnitudes of the various movements will be determined by
the values assigned to certain scroll bar properties.
The most important properties associated with scroll bars are Min, Max, SmallChange and LargeChange.
Min and Max represent integer values corresponding to the minimum and maximum thumb locations within the
slide area. The defaults are Min = 0 and Max = 32767, though these values can be altered at design time or
while the program is executing. The values assigned to Min and Max must always fall within the interval 0 to
32767, and Min must always be assigned a value less than Max.
SmallChange and LargeChange indicate the size of the incremental movements when you click on the ar-
row buttons or the empty slide area, respectively. Each has a default value of 1, and each can be reassigned a
value between 1 and 32767. The larger the value, the greater the movement resulting from a single click. Typi-
cally, SmallChange is assigned a smaller value than LargeChange, though this need not always be true. (If you
assign SmallChange a value greater than that assigned to LargeChange, a click on an arrow button will result
in a larger change than a click on the empty slide area.)
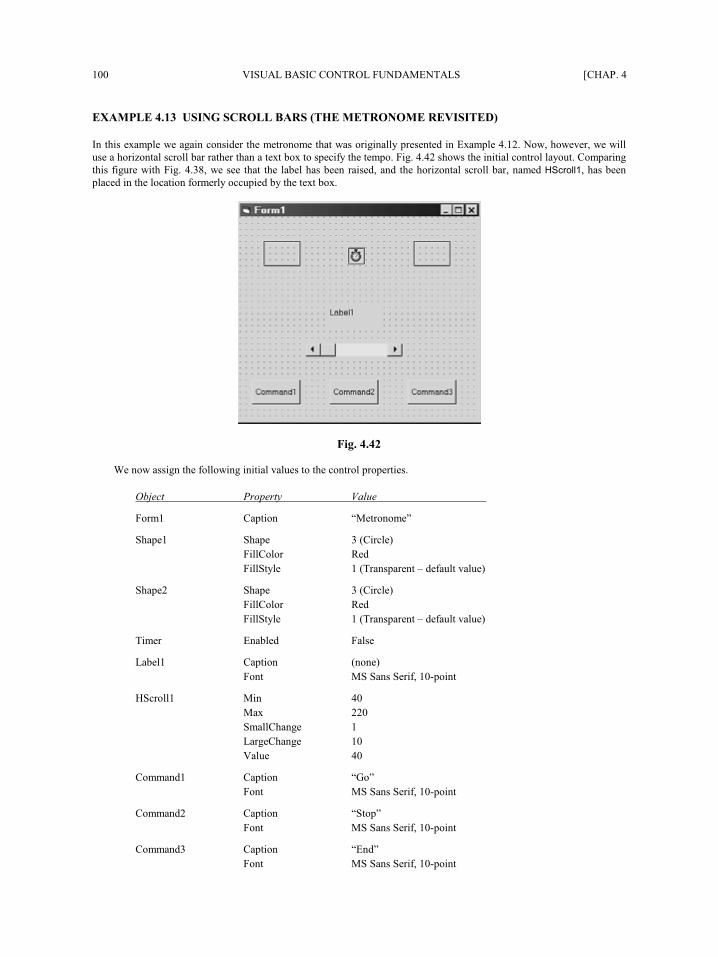
100 VISUAL BASIC CONTROL FUNDAMENTALS [CHAP. 4
EXAMPLE 4.13 USING SCROLL BARS (THE METRONOME REVISITED)
In this example we again consider the metronome that was originally presented in Example 4.12. Now, however, we will
use a horizontal scroll bar rather than a text box to specify the tempo. Fig. 4.42 shows the initial control layout. Comparing
this figure with Fig. 4.38, we see that the label has been raised, and the horizontal scroll bar, named HScroll1, has been
placed in the location formerly occupied by the text box.
Fig. 4.42
We now assign the following initial values to the control properties.
Object Property Value
Form1 Caption “Metronome”
Shape1 Shape 3 (Circle)
FillColor Red
FillStyle 1 (Transparent – default value)
Shape2 Shape 3 (Circle)
FillColor Red
FillStyle 1 (Transparent – default value)
Timer Enabled False
Label1 Caption (none)
Font MS Sans Serif, 10-point
HScroll1 Min 40
Max 220
SmallChange 1
LargeChange 10
Value 40
Command1 Caption “Go”
Font MS Sans Serif, 10-point
Command2 Caption “Stop”
Font MS Sans Serif, 10-point
Command3 Caption “End”
Font MS Sans Serif, 10-point
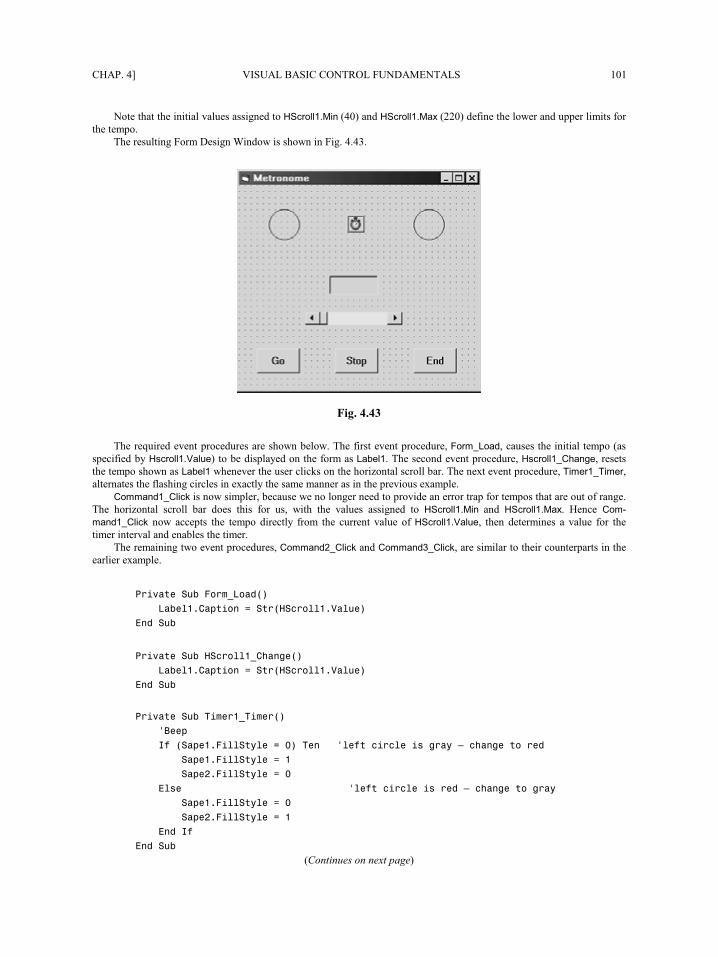
CHAP. 4] VISUAL BASIC CONTROL FUNDAMENTALS 101
Note that the initial values assigned to HScroll1.Min (40) and HScroll1.Max (220) define the lower and upper limits for
the tempo.
The resulting Form Design Window is shown in Fig. 4.43.
Fig. 4.43
The required event procedures are shown below. The first event procedure, Form_Load, causes the initial tempo (as
specified by Hscroll1.Value) to be displayed on the form as Label1. The second event procedure, Hscroll1_Change, resets
the tempo shown as Label1 whenever the user clicks on the horizontal scroll bar. The next event procedure, Timer1_Timer,
alternates the flashing circles in exactly the same manner as in the previous example.
Command1_Click is now simpler, because we no longer need to provide an error trap for tempos that are out of range.
The horizontal scroll bar does this for us, with the values assigned to HScroll1.Min and HScroll1.Max. Hence Com-
mand1_Click now accepts the tempo directly from the current value of HScroll1.Value, then determines a value for the
timer interval and enables the timer.
The remaining two event procedures, Command2_Click and Command3_Click, are similar to their counterparts in the
earlier example.
Private Sub Form_Load()
Label1.Caption = Str(HScroll1.Value)
End Sub
Private Sub HScroll1_Change()
Label1.Caption = Str(HScroll1.Value)
End Sub
Private Sub Timer1_Timer()
'Beep
If (Shape1.FillStyle = 0) Then 'left circle is gray – change to red
Shape1.FillStyle = 1
Shape2.FillStyle = 0
Else 'left circle is red – change to gray
Shape1.FillStyle = 0
Shape2.FillStyle = 1
End If
End Sub
(Continues on next page)
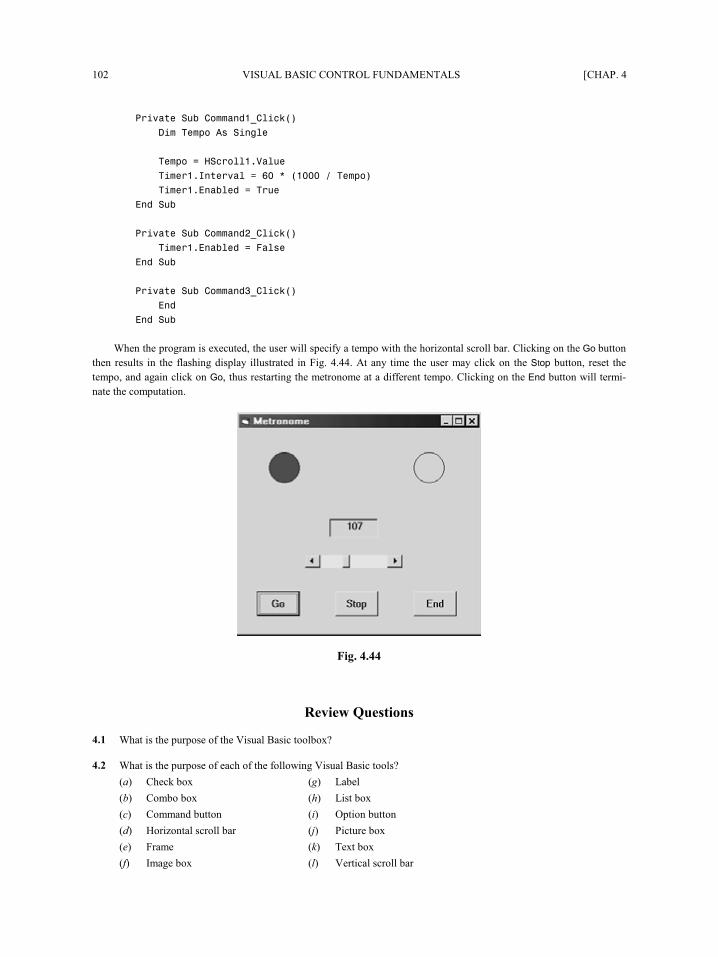
102 VISUAL BASIC CONTROL FUNDAMENTALS [CHAP. 4
Private Sub Command1_Click()
Dim Tempo As Single
Tempo = HScroll1.Value
Timer1.Interval = 60 * (1000 / Tempo)
Timer1.Enabled = True
End Sub
Private Sub Command2_Click()
Timer1.Enabled = False
End Sub
Private Sub Command3_Click()
End
End Sub
When the program is executed, the user will specify a tempo with the horizontal scroll bar. Clicking on the Go button
then results in the flashing display illustrated in Fig. 4.44. At any time the user may click on the Stop button, reset the
tempo, and again click on Go, thus restarting the metronome at a different tempo. Clicking on the End button will termi-
nate the computation.
Fig. 4.44
Review Questions
4.1 What is the purpose of the Visual Basic toolbox?
4.2 What is the purpose of each of the following Visual Basic tools?
(a) Check box (g) Label
(b) Combo box (h) List box
(c) Command button (i) Option button
(d) Horizontal scroll bar (j) Picture box
(e) Frame (k) Text box
(f) Image box (l) Vertical scroll bar
CHAP. 4] VISUAL BASIC CONTROL FUNDAMENTALS 103
4.3 Describe two different methods for adding a control to the Form Design Window.
4.4 How is a control relocated within the Form Design Window?
4.5 How is a control resized within the Form Design Window?
4.6 How is a control removed from the Form Design Window?
4.7 Describe, in general terms, the default naming system used with Visual Basic controls within a Form Design Win-
dow.
4.8 What is the recommended procedure for overriding the default naming system used with Visual Basic controls?
4.9 Under what conditions is it generally advisable to override the default naming system used with Visual Basic con-
trols?
4.10 How are values assigned to Visual Basic control properties at design time?
4.11 How are values assigned to Visual Basic control properties during run time?
4.12 What is an event procedure? How does an event procedure begin and end?
4.13 What is the relationship between an event procedure and a command button?
4.14 Can event procedures be associated with Visual Basic controls other than command buttons?
4.15 How is an event procedure created, viewed or edited?
4.16 How do labels and text boxes differ from each other?
4.17 How are numerical values entered and displayed in text boxes?
4.18 How do check boxes and option buttons differ from each other?
4.19 How is a check box disabled (i.e., “grayed out”)?
4.20 Can an option button be disabled (i.e., “grayed out”)?
4.21 What is the purpose of a frame? How does the inclusion of frames affect groups of option buttons?
4.22 Can check boxes be placed in a frame?
4.23 How do list boxes and combo boxes differ from each other?
4.24 How are new items added to a list or combo box?
4.25 What is the purpose of the ListIndex property? Which controls support this property? How might it be used?
4.26 What is the purpose of the ListCount property? How might it be used?
4.27 What is the purpose of the With block? What advantages are provided by its use?
4.28 What is the purpose of the MsgBox function? How is this function used within a Visual Basic program?
4.29 For what types of applications is the timer control intended?
4.30 When using a timer control, what is the purpose of the Interval property? What restrictions apply to its use?
4.31 When using a timer control, how is the Enabled property used to start and stop the timer?

104 VISUAL BASIC CONTROL FUNDAMENTALS [CHAP. 4
4.32 Suggest three different uses for a scroll bar.
4.33 Describe the components of a scroll bar. How can each component be used to make a selection?
4.34 When using a scroll bar, what is the purpose of the Min and Max properties?
4.35 When using a scroll bar, what is the purpose of the SmallChange and the LargeChange properties? To which scroll
bar component does each property apply?
Programming Problems
4.36 Re-create the project shown in Example 4.3 on your own computer. Verify that the program executes
correctly. Then change the project in the following ways:
(a) Change the label captions to Current Date: and Current Time:.
(b) Change the background colors of the form and the text boxes. (Choose your own colors).
(c) Change the command button captions to Execute and Quit.
(d) Raise the lower label and the lower text box so that they are closer to the upper label and text box.
(e) Move the command buttons to the bottom of the form and align them horizontally.
(f) Resize the form and rearrange the controls relative to one another so that the form has an overall
pleasing appearance.
(g) Access the on-line help for the format function (select Index/Format function from the Help menu).
Then experiment with other date and time formats, in order to display the date and time differently.
4.37 Modify the project shown in Example 4.3 so that it uses four labels, rather than two labels and two text
boxes. Hint: Assign appropriate string values to Label2.Caption and Label4.Caption during program exe-
cution. In addition, change the appearance of the output data (i.e., change the format of the current date
and time) as you see fit.
4.38 Modify the project shown in Example 4.3 so that either the day and date or the time are shown (but not
both). Hint: Use two option buttons.
4.39 Modify the project shown in Example 4.3 so that the day and date are always shown, but the time is dis-
played only as a user-selected option. Hint: Use a check box to select the time display.
4.40 Modify the project shown in Example 4.3 so that it displays your name, street address and city instead of
the current day and date, and time. Hint: Replace the assignment statements that access the format func-
tion with string assignments. For example, if you are Santa Claus and a third text box has been introduced
to display the city, you might write
Text1.Text = “Santa Claus”
Text2.Text = “One Main Street”
Text3.Text = “North Pole”
Experiment with the project so that it runs correctly and has a pleasing appearance.
4.41 Alter the project shown in Example 4.4 so that the user enters the the date in the form mm/dd/yy (see Ex-
ample 2.21), and the computer displays the date in the day/date format used in Example 4.3.
4.42 Modify the project shown in Example 4.5 so that the coins are entered in reverse-order (i.e., first half-
dollars, then quarters, etc., with pennies last). Execute the program to assure that it runs correctly.
CHAP. 4] VISUAL BASIC CONTROL FUNDAMENTALS 105
4.43 Modify the project shown in Example 4.5 so that it adds up the money spent in the several different ex-
pense categories (in dollars) rather than adding up the number of pennies, nickels, dimes, etc. The per-
missible expense categories are:
(a) Food (d) Car payment
(b) Rent (e) Entertainment
(c) Transportation (f) Savings
Enter the amount of money spent for each category as a separate input item. Display the total for the first
three categories and the total for all six categories as separate items. Label each input and output quantity
appropriately. Execute the program to assure that it runs correctly, using values of your own choosing.
4.44 Modify the project shown in Example 4.6 so that a separate command button is used for each language.
(In other words, use a command button in place of each check box.) In addition, include a command but-
ton to clear the display, and another command button to quit (hence, a total of nine command buttons –
one for each of the seven languages, plus the Clear and Quit buttons).
4.45 Modify the project shown in Example 4.6 so that the two option buttons are replaced by command but-
tons (hence, a total of four command buttons – one for each conversion type, plus Go and End).
4.46 Create a Visual Basic project that will allow the user to enter a positive integer and determine whether it
is even or odd. In addition, include an option that will determine whether or not the given integer is a
prime number. Display a message indicating whether the number is even or odd, and another message (in
the event the prime-number option is selected) that indicates whether or not the number is a prime.
Note that an integer is even if it can be divided by 2 without any remainder. This can be determined
by evaluating the expression n/Mod(2), where n represents the given integer.
Furthermore, an integer n is a prime number if it cannot be evenly divided (leaving no fractional re-
mainder) by any integer ranging from 2 to n . In other words, an integer is a prime number only if all of
the quotients n/2, n/3, . . ., Int(Sqr(n)) include a fractional remainder. This can be deter-
mined by evaluating the expression n/Mod(d) within a loop, where the divisor d varies from 2 to
Int(Sqr(n)). (Note that d = 2 during the first pass through the loop, d = 3 during the second pass, and
so on, until d = Int(Sqr(n)) during the last pass.)
4.47 Create a Visual Basic project to determine the sum of the first n positive integers (that is, determine the
sum 1 + 2 + 3 + . . . + n). Specify n as an input parameter, via an appropriately labeled text box. Use a
loop structure to calculate the sum. Display the sum in a separate text box, with an appropriate label.
4.48 Modify the Visual Basic project created in Prob. 4.47 to compute the sum of the integers ranging from n1
to n2, where n1 < n2. Include provisions for carrying out the computation in any of the following ways:
(a) Sum all of the integers ranging from n1 to n2.
(b) Sum only the even integers within the interval defined by n1 and n2.
(c) Sum only the odd integers within the interval defined by n1 and n2.
Enter the values of n1 and n2 in separate text boxes. Generate an error message if the condition n1 < n2 is
not satisfied. Use option buttons to accommodate the three different choices. In each case, use an appro-
priate loop to calculate the sum. Display the sum in its own text box. Label all input and output.
4.49 The mean (or arithmetic average) of a list of n numbers is defined as
nxxxx n /)( 21 +++=
where x represents the mean.
Create a Visual Basic project to determine x , where the values of n and x1, x2, etc., are entered as
input parameters. Use a single looping structure to enter the x-values and to determine x (remember that
x is a cumulative sum, not a cumulative product).
106 VISUAL BASIC CONTROL FUNDAMENTALS [CHAP. 4
4.50 A pizza shop is planning to offer on-line purchasing. Pizzas can be purchased in three different sizes. The
cost is $10 for a small pizza (plain, with cheese and tomato sauce), $12 for medium and $15 for large.
The following toppings are available: mushrooms, pepperoni, sausage, onions, green peppers, black ol-
ives, and shrimp. Each topping is an additional $1 for a small pizza, $1.50 for a medium pizza and $2.25
for a large pizza. In addition, customers can order a “supreme,” with everything on it, for $15 (small),
$20 (medium), and $27 (large).
Create a Visual Basic project for this purpose. Allow the customer to specify the size, and the choice
of individual toppings. In addition, include an option to order a “supreme” for each of the three sizes.
(Disable the individual topping selections if a “supreme” is chosen.) Display the cost of the pizza, the
state tax (assuming a rate of 6 percent), and the total cost as separate data items. Test the project, using
numerical values of your own choosing.
4.51 Create a Visual Basic project that will allow the user to select the name of a country from a list and then
display the corresponding capital, and vice versa. For simplicity, restrict the project to the following
countries and their corresponding capitals.
Canada Ottawa
England London
France Paris
Germany Berlin
India New Delhi
Italy Rome
Japan Tokyo
Mexico Mexico City
People’s Republic of China Beijing
Russia Moscow
Spain Madrid
United States Washington, D.C.
4.52 Create a Visual Basic project that will either convert U.S. dollars into a foreign currency, or convert a
foreign currency into U.S. dollars. The foreign currencies and their U.S. dollar equivalents are:
1 U.S. dollar = 0.6 British pounds
1.4 Canadian dollars
2.3 Dutch guilders
6.8 French francs
2.0 German marks
2000 Italian lira
100 Japanese yen
9.5 Mexican pesos
1.6 Swiss francs
Your project should include two option buttons within a frame, to select either U.S. to foreign conversion
or foreign to U.S. conversion. Nine additional option buttons should be placed within another frame, to
select the particular foreign currency. Use a text box to specify a given amount of money in the source
currency, and another text box to display the equivalent amount of money in the target currency. Include
an appropriate set of labels for each conversion type.
4.53 Extend the project written for Prob. 4.52 so that any currency can be converted to any other currency. For
simplicity, restrict the currencies to the ten countries (including the U.S.) listed in Prob. 4.52.
CHAP. 4] VISUAL BASIC CONTROL FUNDAMENTALS 107
4.54 Create a Visual Basic project to solve for the real roots of the quadratic equation
ax2 + bx + c = 0
using the well-known quadratic formulas
a
acbbx
2
42
1−+−=
a
acbbx
2
42
2−−−=
where x1 and x2 represent the desired real roots. (Recall that these formulas are valid only if b2 > 4ac).
Design the program so that the values of a, b and c are entered into separate (labeled) text boxes.
Then test to determine if b2 > 4ac, as required. If so, calculate the values of x1 and x2, and display them in
separate (labeled) text boxes. If b2 does not exceed 4ac, display an error message, instructing the user to
enter new values for a, b and c.
4.55 Suppose you deposit P dollars in a savings account for n years. If the money earns interest at the rate of i
percent per year, compounded annually, then after n years, the original sum of money will have increased
to
niPF )01.01( +=
where F represents the final accumulation.
Usually, however, the interest is compounded more often than once a year, even though the interest
rate (i) is stated on an annual basis. Thus, if the interest is compounded quarterly, then
niPF 4)4/01.01( +=
where i is the annual interest rate (expressed as a percentage), and n is still the number of years (not the
number of quarters).
Similarly, if the interest is compounded monthly, then
niPF 12)12/01.01( +=
Moreover, if the interest is compounded daily, then
niPF 365)365/01.01( +=
These results can be generalized into the following single equation:
cnciPF )/01.01( +=
where c takes on the following values:
Annual compounding: c = 1
Quarterly compounding: c = 4
Monthly compounding: c = 12
Daily compounding: c = 365
Create a Visual Basic project to determine the future value of a deposit (F), given P, i and n as input
values. Enter each of the input values via a text box (with an accompanying label). Include four option
buttons to specify the frequency of compounding. Display the final result in a separate text box.
108 VISUAL BASIC CONTROL FUNDAMENTALS [CHAP. 4
4.56 Create a Visual Basic project that utilizes the timer control to display a digital clock. To do so, you may
use either of the following two strategies:
(a) Assign the Format function with the Now argument (see Example 4.3) to a label caption within the
timer event procedure.
(b) Assign the Time function to the label caption within the timer event procedure.
4.57 Create a Visual Basic stop watch that utilizes the timer control. Include command buttons to start and
stop the timing. Hint: Assign the current value of Now to the user-defined variable StartTime at the be-
ginning of the process. Then display the difference between Now and StartTime at the end of the proc-
ess.
4.58 Create a Visual Basic alarm clock that utilizes the timer control. Use option buttons to turn the alarm on
and off. Specify the wake-up time using one of the following two controls:
(a) A text box
(b) A scroll bar
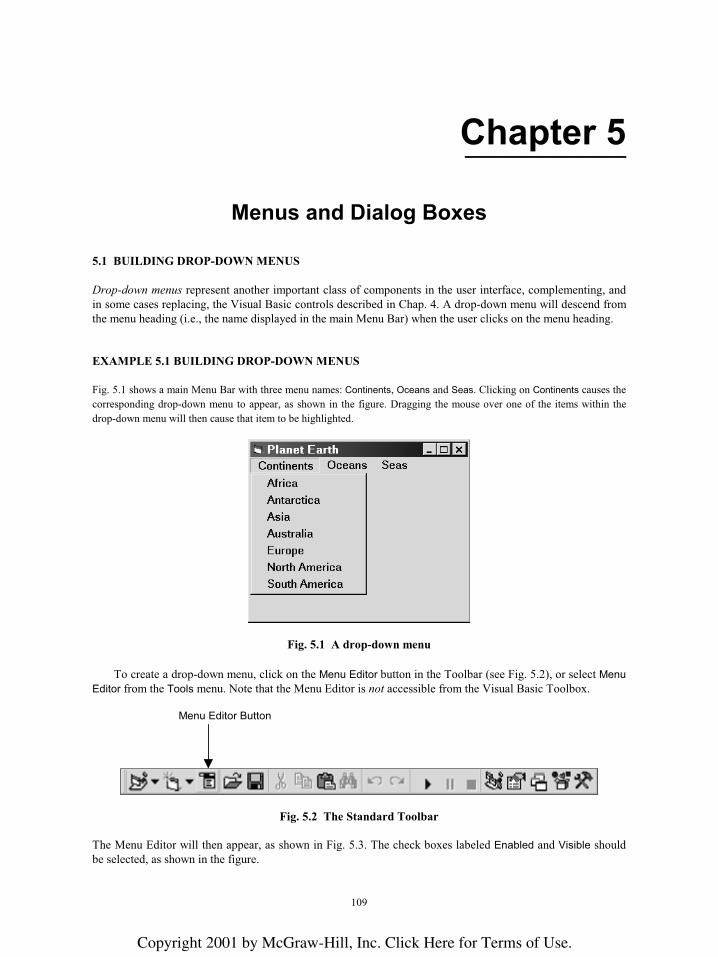
109
Chapter 5 ________________________________________________________________________________________________________________
Menus and Dialog Boxes
5.1 BUILDING DROP-DOWN MENUS
Drop-down menus represent another important class of components in the user interface, complementing, and
in some cases replacing, the Visual Basic controls described in Chap. 4. A drop-down menu will descend from
the menu heading (i.e., the name displayed in the main Menu Bar) when the user clicks on the menu heading.
EXAMPLE 5.1 BUILDING DROP-DOWN MENUS
Fig. 5.1 shows a main Menu Bar with three menu names: Continents, Oceans and Seas. Clicking on Continents causes the
corresponding drop-down menu to appear, as shown in the figure. Dragging the mouse over one of the items within the
drop-down menu will then cause that item to be highlighted.
Fig. 5.1 A drop-down menu
To create a drop-down menu, click on the Menu Editor button in the Toolbar (see Fig. 5.2), or select Menu
Editor from the Tools menu. Note that the Menu Editor is not accessible from the Visual Basic Toolbox.
Menu Editor Button
Fig. 5.2 The Standard Toolbar
The Menu Editor will then appear, as shown in Fig. 5.3. The check boxes labeled Enabled and Visible should
be selected, as shown in the figure.
Copyright 2001 by McGraw-Hill, Inc. Click Here for Terms of Use.
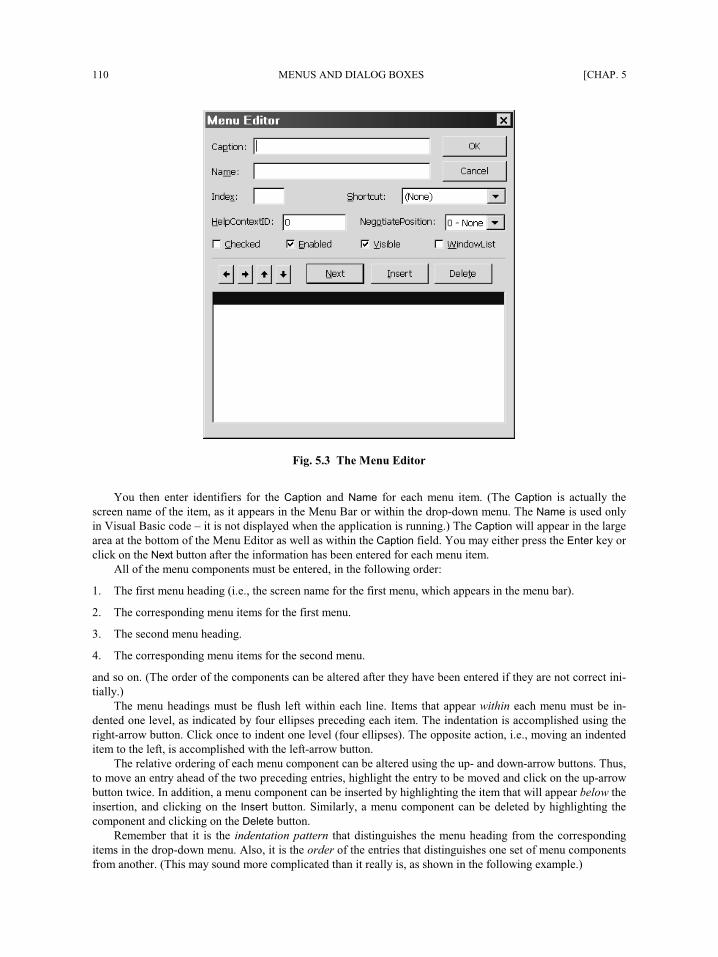
110 MENUS AND DIALOG BOXES [CHAP. 5
Fig. 5.3 The Menu Editor
You then enter identifiers for the Caption and Name for each menu item. (The Caption is actually the
screen name of the item, as it appears in the Menu Bar or within the drop-down menu. The Name is used only
in Visual Basic code – it is not displayed when the application is running.) The Caption will appear in the large
area at the bottom of the Menu Editor as well as within the Caption field. You may either press the Enter key or
click on the Next button after the information has been entered for each menu item.
All of the menu components must be entered, in the following order:
1. The first menu heading (i.e., the screen name for the first menu, which appears in the menu bar).
2. The corresponding menu items for the first menu.
3. The second menu heading.
4. The corresponding menu items for the second menu.
and so on. (The order of the components can be altered after they have been entered if they are not correct ini-
tially.)
The menu headings must be flush left within each line. Items that appear within each menu must be in-
dented one level, as indicated by four ellipses preceding each item. The indentation is accomplished using the
right-arrow button. Click once to indent one level (four ellipses). The opposite action, i.e., moving an indented
item to the left, is accomplished with the left-arrow button.
The relative ordering of each menu component can be altered using the up- and down-arrow buttons. Thus,
to move an entry ahead of the two preceding entries, highlight the entry to be moved and click on the up-arrow
button twice. In addition, a menu component can be inserted by highlighting the item that will appear below the
insertion, and clicking on the Insert button. Similarly, a menu component can be deleted by highlighting the
component and clicking on the Delete button.
Remember that it is the indentation pattern that distinguishes the menu heading from the corresponding
items in the drop-down menu. Also, it is the order of the entries that distinguishes one set of menu components
from another. (This may sound more complicated than it really is, as shown in the following example.)
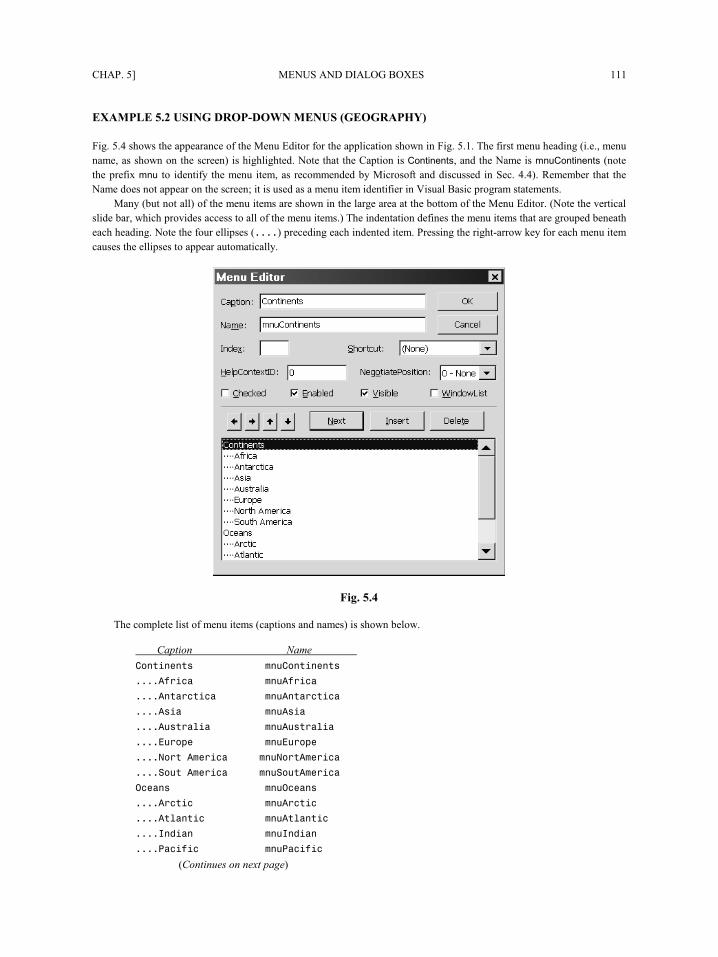
CHAP. 5] MENUS AND DIALOG BOXES 111
EXAMPLE 5.2 USING DROP-DOWN MENUS (GEOGRAPHY)
Fig. 5.4 shows the appearance of the Menu Editor for the application shown in Fig. 5.1. The first menu heading (i.e., menu
name, as shown on the screen) is highlighted. Note that the Caption is Continents, and the Name is mnuContinents (note
the prefix mnu to identify the menu item, as recommended by Microsoft and discussed in Sec. 4.4). Remember that the
Name does not appear on the screen; it is used as a menu item identifier in Visual Basic program statements.
Many (but not all) of the menu items are shown in the large area at the bottom of the Menu Editor. (Note the vertical
slide bar, which provides access to all of the menu items.) The indentation defines the menu items that are grouped beneath
each heading. Note the four ellipses (....) preceding each indented item. Pressing the right-arrow key for each menu item
causes the ellipses to appear automatically.
Fig. 5.4
The complete list of menu items (captions and names) is shown below.
Caption Name
Continents mnuContinents
....Africa mnuAfrica
....Antarctica mnuAntarctica
....Asia mnuAsia
....Australia mnuAustralia
....Europe mnuEurope
....North America mnuNorthAmerica
....South America mnuSouthAmerica
Oceans mnuOceans
....Arctic mnuArctic
....Atlantic mnuAtlantic
....Indian mnuIndian
....Pacific mnuPacific
(Continues on next page)

112 MENUS AND DIALOG BOXES [CHAP. 5
Caption Name
Seas mnuSeas
....Baltic mnuBaltic
....Bering mnuBering
....Black mnuBlack
....Caribbean mnuCaribbean
....Mediterranean mnuMediterranean
....Persian Gulf mnuPersianGulf
....Red mnuRed
....South China mnuSouthChina
Execution of this program results in the availability of three drop-down menus. The first drop-down menu is shown in
Fig. 5.1. Figs. 5.5(a) and (b) show the second and third drop-down menus.
Fig. 5.5(a) Fig. 5.5(b)
Event procedures can be defined for each of the drop-down menu items. Typically, a click-type event pro-
cedure is associated with each menu item (but not the menu headings). To do so, simply double-click on each
menu item within the Form Design Window, thus accessing the Code Editor Window. Then enter the appropri-
ate instructions between the first (Sub) and last (End Sub) statements, as explained in Chap. 4.
5.2 ACCESSING A MENU FROM THE KEYBOARD
A keyboard access character can be defined for each menu item. This allows the user to view a drop-down
menu by pressing Alt and the access key for the menu heading, rather than clicking on the menu heading. In
addition, once the drop-down menu is shown, the user may select a menu item by pressing its access key (with-
out Alt) rather than clicking on the menu item.
To define an access character, use the Menu Editor to place an ampersand (&) in front of the desired char-
acter within each menu item caption (i.e., within each screen name). The access character will then be under-
lined when the associated menu item is shown. Note that a drop-down menu must actually be visible on the
screen for its access characters to be active.
The first letter within the caption is often selected as the access character, but this need not be the case,
particularly if the use of first letters would result in duplicate access characters among the labels or within a
menu. In other words, each of the menu headings must have a unique access character. Similarly, each menu
item within a menu must have a unique access character, though the same access character may be used (once)
in each of two or more menus.
In addition to access characters, we can also define keyboard shortcuts for some or all of the menu items
within a drop-down menu. A keyboard shortcut is typically a function key, or a Ctrl-key combination or a Shift-

CHAP. 5] MENUS AND DIALOG BOXES 113
key combination. Unlike an access character, which requires that a drop-down menu be displayed before it can
be used, a keyboard shortcut can access a menu item directly without first activating the drop-down menu.
Thus, a keyboard shortcut can be used to select a menu item directly from a window, saving several keystrokes
or mouse clicks.
Keyboard shortcuts are selected directly from the Shortcut field within the Menu Editor. Clicking on the
down-arrow within this field displays the available choices. The keyboard shortcuts must be unique; that is, if a
menu item (including menu headings) has an associated keyboard shortcut, it must be different from all other
keyboard shortcuts. Remember, however, that keyboard shortcuts are not required; typically, they are defined
only for the more commonly used menu items.
EXAMPLE 5.3 USING MENU ENHANCEMENTS (GEOGRAPHY REVISITED)
Let us now enhance the project shown in the last two examples by adding some additional controls, and by defining event
procedures for the menu items. In addition, we will define an access character for each menu item, and, for illustrative
purposes, a keyboard shortcut for some of the menu items.
Specifically, we will add a label and a text box to the form, and we will display the area of a geographical feature (a
continent, ocean or sea) within the text box if the feature is selected from a menu. In addition, we will add two command
buttons, one to clear the text box, and the other to terminate the computation.
The form design window is shown in Fig. 5.6. Note that the first letter of each menu heading is now underlined, indi-
cating that it is a menu access character. Also, note the label Area (square miles): corresponding to Label1, the empty text
box for Text1, and the command buttons labeled Clear (Command1) and Quit (Command2).
Fig. 5.6
The menu items have been modified to add access characters, as shown below (note the added ampersands).
&Continents
....&Africa
....An&tarctica
....As&ia
....A&ustralia
....&Europe
....&North America
....&South America
(Continues on next page)
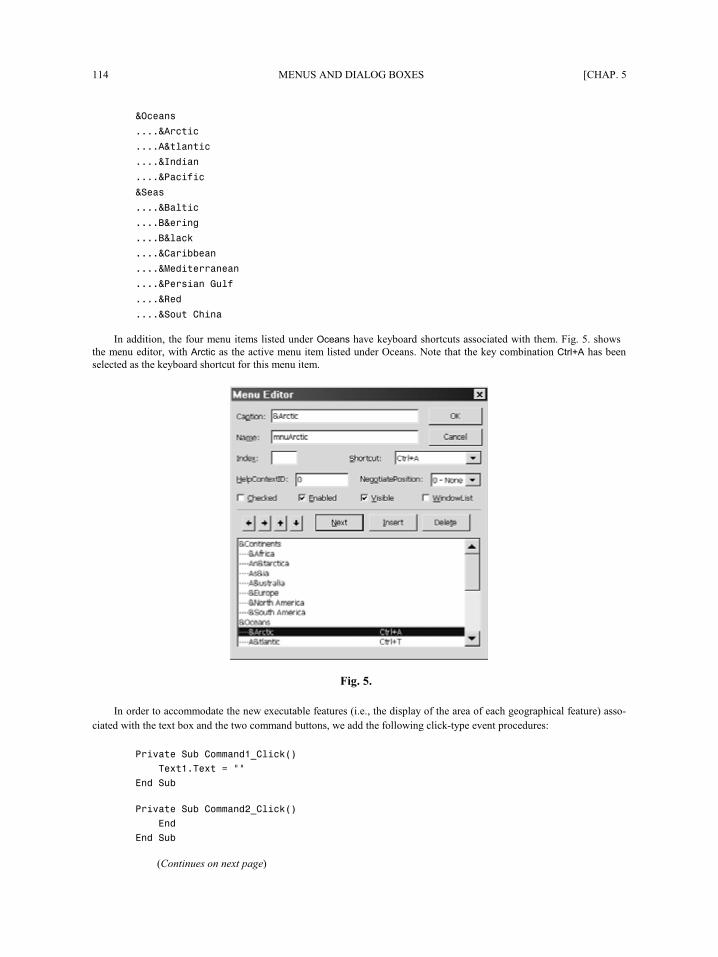
114 MENUS AND DIALOG BOXES [CHAP. 5
&Oceans
....&Arctic
....A&tlantic
....&Indian
....&Pacific
&Seas
....&Baltic
....B&ering
....B&lack
....&Caribbean
....&Mediterranean
....&Persian Gulf
....&Red
....&South China
In addition, the four menu items listed under Oceans have keyboard shortcuts associated with them. Fig. 5.7 shows
the menu editor, with Arctic as the active menu item listed under Oceans. Note that the key combination Ctrl+A has been
selected as the keyboard shortcut for this menu item.
Fig. 5.7
In order to accommodate the new executable features (i.e., the display of the area of each geographical feature) asso-
ciated with the text box and the two command buttons, we add the following click-type event procedures:
Private Sub Command1_Click()
Text1.Text = ""
End Sub
Private Sub Command2_Click()
End
End Sub
(Continues on next page)
CHAP. 5] MENUS AND DIALOG BOXES 115
Private Sub mnuAfrica_Click()
Text1.Text = "11,700,000"
End Sub
Private Sub mnuAntarctica_Click()
Text1.Text = "5,400,000"
End Sub
Private Sub mnuArctic_Click()
Text1 = "5,100,000"
End Sub
Private Sub mnuAsia_Click()
Text1 = "17,300,000"
End Sub
Private Sub mnuAtlantic_Click()
Text1.Text = "33,400,000"
End Sub
Private Sub mnuAustralia_Click()
Text1.Text = "2,900,000"
End Sub
Private Sub mnuBaltic_Click()
Text1.Text = "148,000"
End Sub
Private Sub mnuBering_Click()
Text1.Text = "873,000"
End Sub
Private Sub mnuBlack_Click()
Text1.Text = "196,000"
End Sub
Private Sub mnuCaribbean_Click()
Text1.Text = "971,000"
End Sub
Private Sub mnuEurope_Click()
Text1.Text = "3,800,000"
End Sub
Private Sub mnuIndian_Click()
Text1.Text = "28,400,000"
End Sub
Private Sub mnuMediterranean_Click()
Text1.Text = "969,000"
End Sub
Private Sub mnuNorthAmerica_Click()
Text1.Text = "9,400,000"
End Sub
(Continues on next page)
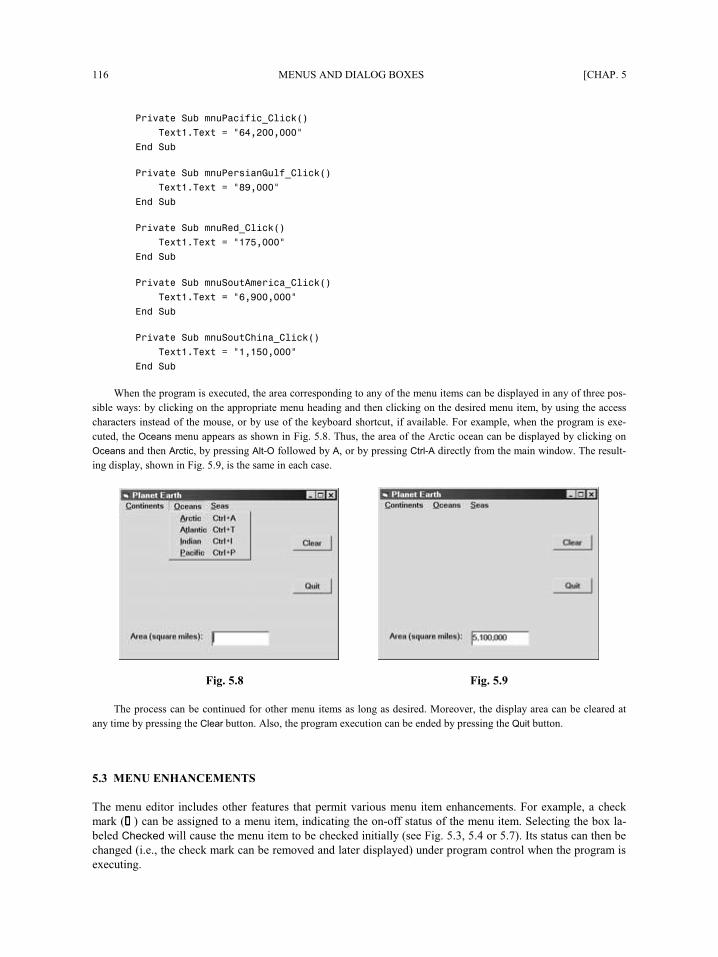
116 MENUS AND DIALOG BOXES [CHAP. 5
Private Sub mnuPacific_Click()
Text1.Text = "64,200,000"
End Sub
Private Sub mnuPersianGulf_Click()
Text1.Text = "89,000"
End Sub
Private Sub mnuRed_Click()
Text1.Text = "175,000"
End Sub
Private Sub mnuSouthAmerica_Click()
Text1.Text = "6,900,000"
End Sub
Private Sub mnuSouthChina_Click()
Text1.Text = "1,150,000"
End Sub
When the program is executed, the area corresponding to any of the menu items can be displayed in any of three pos-
sible ways: by clicking on the appropriate menu heading and then clicking on the desired menu item, by using the access
characters instead of the mouse, or by use of the keyboard shortcut, if available. For example, when the program is exe-
cuted, the Oceans menu appears as shown in Fig. 5.8. Thus, the area of the Arctic ocean can be displayed by clicking on
Oceans and then Arctic, by pressing Alt-O followed by A, or by pressing Ctrl-A directly from the main window. The result-
ing display, shown in Fig. 5.9, is the same in each case.
Fig. 5.8 Fig. 5.9
The process can be continued for other menu items as long as desired. Moreover, the display area can be cleared at
any time by pressing the Clear button. Also, the program execution can be ended by pressing the Quit button.
5.3 MENU ENHANCEMENTS
The menu editor includes other features that permit various menu item enhancements. For example, a check
mark ( ) can be assigned to a menu item, indicating the on-off status of the menu item. Selecting the box la-
beled Checked will cause the menu item to be checked initially (see Fig. 5.3, 5.4 or 5.7). Its status can then be
changed (i.e., the check mark can be removed and later displayed) under program control when the program is
executing.
CHAP. 5] MENUS AND DIALOG BOXES 117
Another useful feature is the ability to deactivate a menu item by deselecting the Enabled box (see Fig.
5.3). The menu item will then appear “grayed out” within the menu, and it will not respond to mouse clicks,
keyboard access characters or keyboard shortcuts. In addition, a menu item may be made invisible (and inac-
tive) by deselecting the Visible box (see Fig. 5.3). Both of these features can later be changed under program
control.
Finally, the items within a menu can be grouped together by introducing separators at various locations
within a menu. Each separator is a menu item consisting only of a single dash (minus sign). Note that each
separator must follow the same rules of indentation as its surrounding menu items.
EXAMPLE 5.4 MORE MENU ENHANCEMENTS (GEOGRAPHY REVISITED)
Returning to the Geography project shown in Examples 5.2 and 5.3, suppose we rearrange the list of continents into geo-
graphical groupings, with separators between each group. We will also disable Oceans, make Seas invisible, and place a
check mark next to Africa (listed under Continents). In addition, we will add check boxes to the main window so that
Oceans can be enabled and Seas can be made visible. Finally, we will add the Visual Basic code required by the check
boxes, and to toggle the Africa check mark on and off.
In order to rearrange the list of continents and introduce separators, the Continents menu items in the Menu Editor
must appear as shown below. Note the separators following Europe, South America and Australia.
&Continents
....&Africa
....As&ia
....&Europe
-
....&North America
....&South America
-
....A&ustralia
-
....An&tarctica
The remaining menu items will appear in the same order as in Example 5.3.
Figures 5.10(a), (b) and (c) show the Menu Editor settings for the three menu items. Note the status of the check
boxes in each figure (for each of the menu items).
Fig. 5.11 shows the form design window after the new controls (Check1 and Check2) have been added. Notice that
Oceans now appears “grayed out,” and Seas does not appear on the menu bar at all.
We must now add the following two event procedures so that the check box controls will function properly.
Private Sub Check1_Click() Private Sub Check2_Click()
If Check1.Value = 1 Then If Check2.Value = 1 Then
mnuOceans.Enabled = True mnuSeas.Visible = True
Else Else
mnuOceans.Enabled = False mnuSeas.Visible = False
End If End If
End Sub End Sub
Notice the reference to the menu item properties mnuOceans.Enabled and mnuSeas.Visible in the above event procedures.
In addition, we must modify the event procedure mnuAfrica_Click() to toggle the check mark on and off. Here is the
modified event procedure.
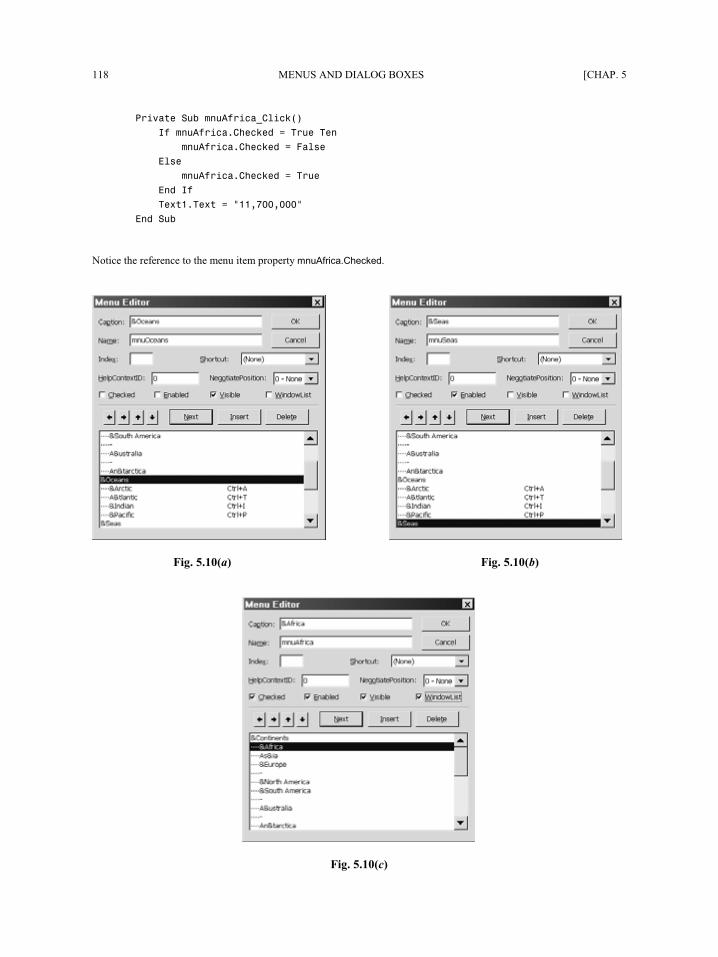
118 MENUS AND DIALOG BOXES [CHAP. 5
Private Sub mnuAfrica_Click()
If mnuAfrica.Checked = True Then
mnuAfrica.Checked = False
Else
mnuAfrica.Checked = True
End If
Text1.Text = "11,700,000"
End Sub
Notice the reference to the menu item property mnuAfrica.Checked.
Fig. 5.10(a) Fig. 5.10(b)
Fig. 5.10(c)
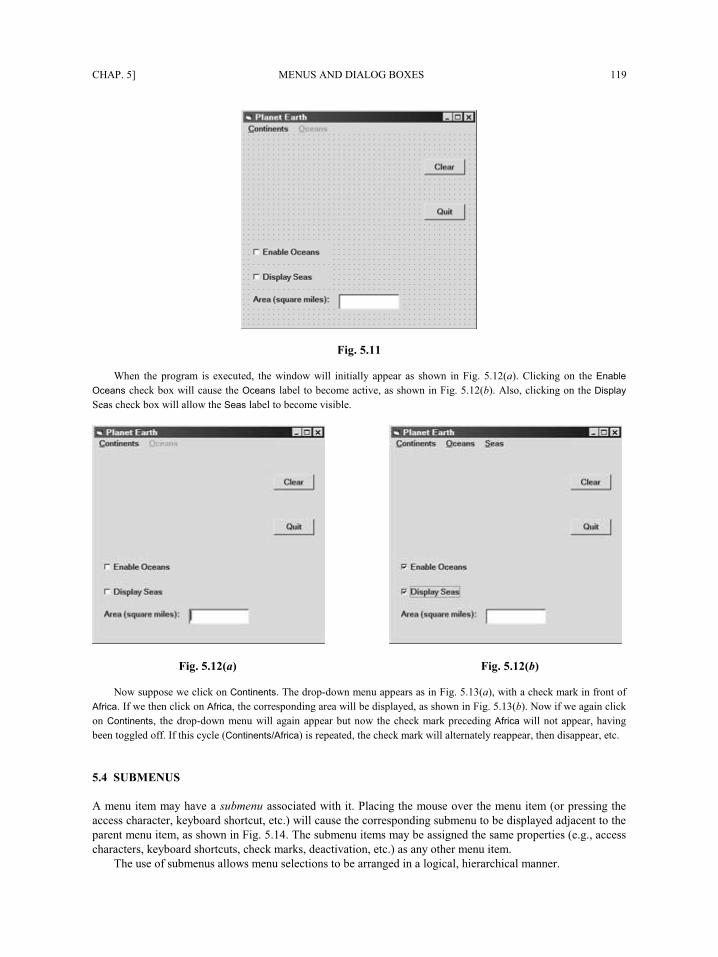
CHAP. 5] MENUS AND DIALOG BOXES 119
Fig. 5.11
When the program is executed, the window will initially appear as shown in Fig. 5.12(a). Clicking on the Enable
Oceans check box will cause the Oceans label to become active, as shown in Fig. 5.12(b). Also, clicking on the Display
Seas check box will allow the Seas label to become visible.
Fig. 5.12(a) Fig. 5.12(b)
Now suppose we click on Continents. The drop-down menu appears as in Fig. 5.13(a), with a check mark in front of
Africa. If we then click on Africa, the corresponding area will be displayed, as shown in Fig. 5.13(b). Now if we again click
on Continents, the drop-down menu will again appear but now the check mark preceding Africa will not appear, having
been toggled off. If this cycle (Continents/Africa) is repeated, the check mark will alternately reappear, then disappear, etc.
5.4 SUBMENUS
A menu item may have a submenu associated with it. Placing the mouse over the menu item (or pressing the
access character, keyboard shortcut, etc.) will cause the corresponding submenu to be displayed adjacent to the
parent menu item, as shown in Fig. 5.14. The submenu items may be assigned the same properties (e.g., access
characters, keyboard shortcuts, check marks, deactivation, etc.) as any other menu item.
The use of submenus allows menu selections to be arranged in a logical, hierarchical manner.
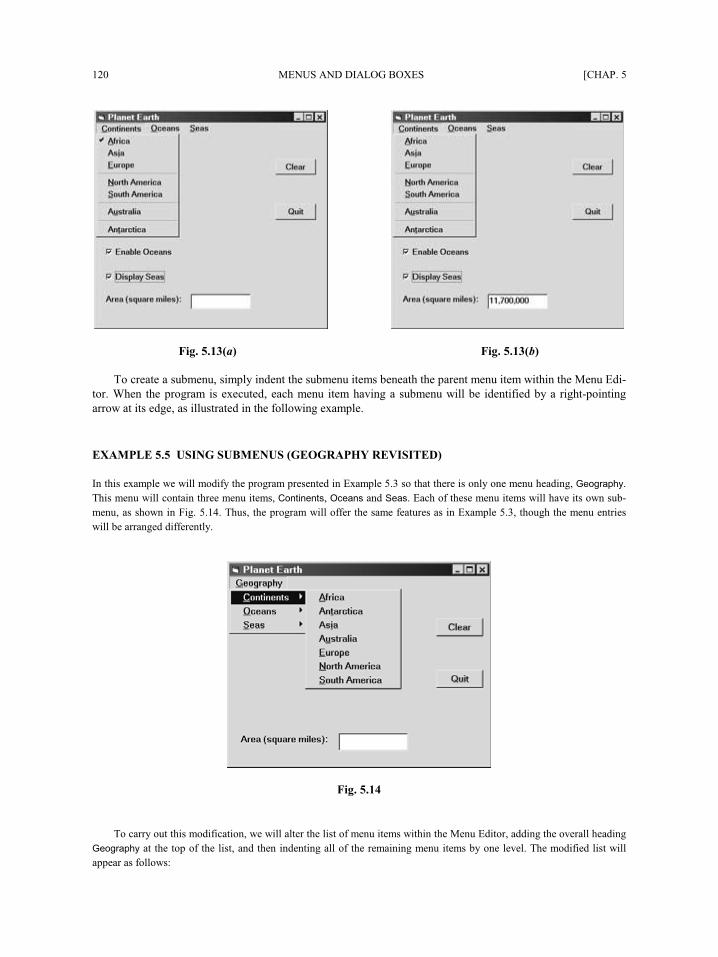
120 MENUS AND DIALOG BOXES [CHAP. 5
Fig. 5.13(a) Fig. 5.13(b)
To create a submenu, simply indent the submenu items beneath the parent menu item within the Menu Edi-
tor. When the program is executed, each menu item having a submenu will be identified by a right-pointing
arrow at its edge, as illustrated in the following example.
EXAMPLE 5.5 USING SUBMENUS (GEOGRAPHY REVISITED)
In this example we will modify the program presented in Example 5.3 so that there is only one menu heading, Geography.
This menu will contain three menu items, Continents, Oceans and Seas. Each of these menu items will have its own sub-
menu, as shown in Fig. 5.14. Thus, the program will offer the same features as in Example 5.3, though the menu entries
will be arranged differently.
Fig. 5.14
To carry out this modification, we will alter the list of menu items within the Menu Editor, adding the overall heading
Geography at the top of the list, and then indenting all of the remaining menu items by one level. The modified list will
appear as follows:
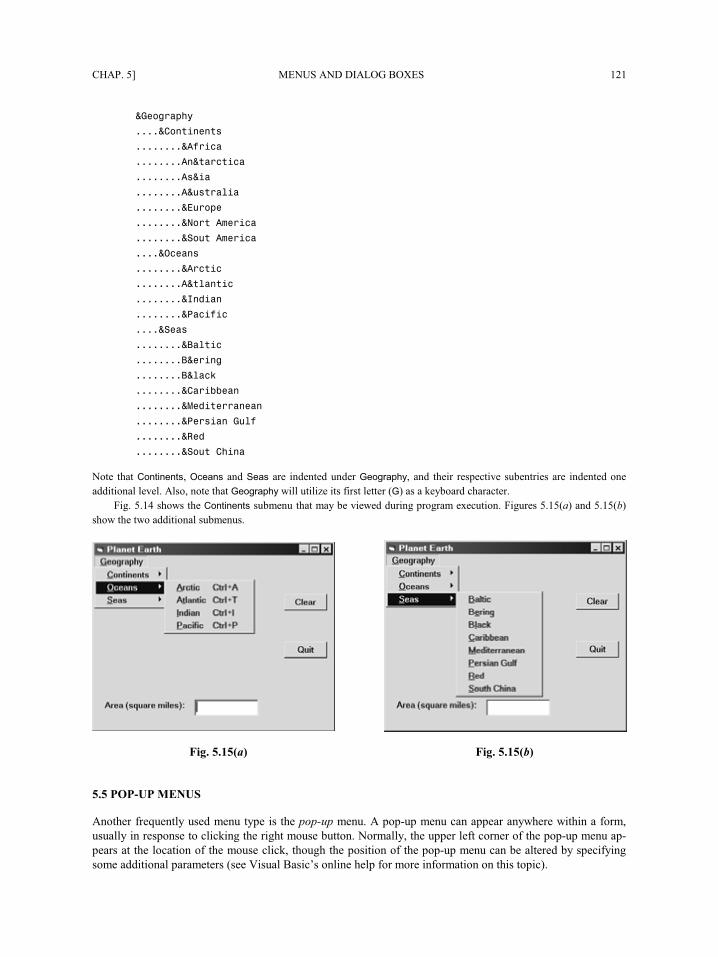
CHAP. 5] MENUS AND DIALOG BOXES 121
&Geography
....&Continents
........&Africa
........An&tarctica
........As&ia
........A&ustralia
........&Europe
........&North America
........&South America
....&Oceans
........&Arctic
........A&tlantic
........&Indian
........&Pacific
....&Seas
........&Baltic
........B&ering
........B&lack
........&Caribbean
........&Mediterranean
........&Persian Gulf
........&Red
........&South China
Note that Continents, Oceans and Seas are indented under Geography, and their respective subentries are indented one
additional level. Also, note that Geography will utilize its first letter (G) as a keyboard character.
Fig. 5.14 shows the Continents submenu that may be viewed during program execution. Figures 5.15(a) and 5.15(b)
show the two additional submenus.
Fig. 5.15(a) Fig. 5.15(b)
5.5 POP-UP MENUS
Another frequently used menu type is the pop-up menu. A pop-up menu can appear anywhere within a form,
usually in response to clicking the right mouse button. Normally, the upper left corner of the pop-up menu ap-
pears at the location of the mouse click, though the position of the pop-up menu can be altered by specifying
some additional parameters (see Visual Basic’s online help for more information on this topic).
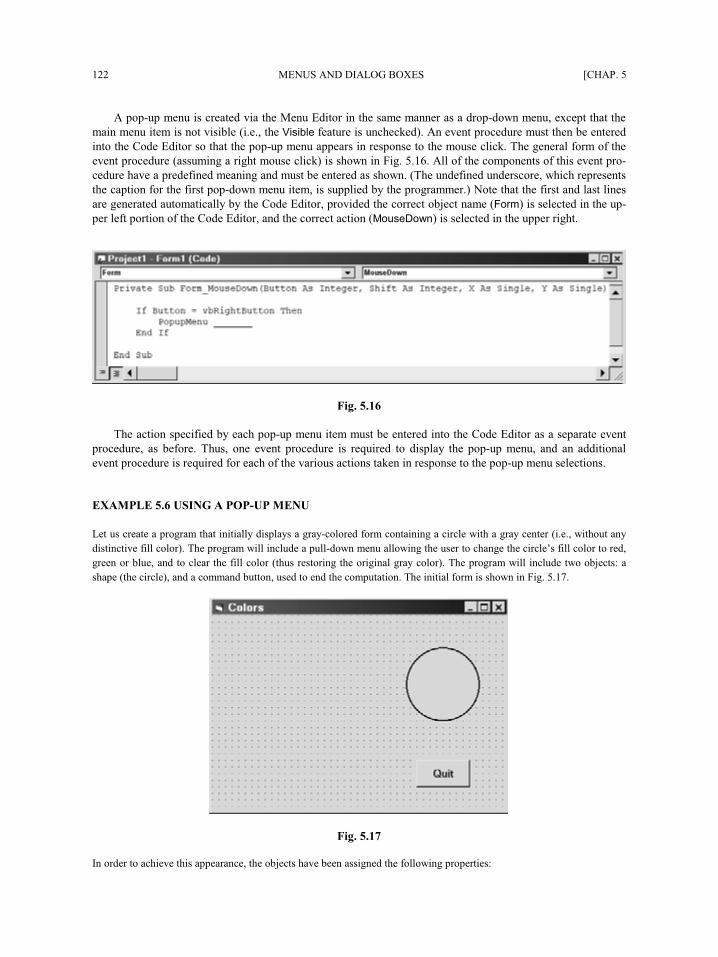
122 MENUS AND DIALOG BOXES [CHAP. 5
A pop-up menu is created via the Menu Editor in the same manner as a drop-down menu, except that the
main menu item is not visible (i.e., the Visible feature is unchecked). An event procedure must then be entered
into the Code Editor so that the pop-up menu appears in response to the mouse click. The general form of the
event procedure (assuming a right mouse click) is shown in Fig. 5.16. All of the components of this event pro-
cedure have a predefined meaning and must be entered as shown. (The undefined underscore, which represents
the caption for the first pop-down menu item, is supplied by the programmer.) Note that the first and last lines
are generated automatically by the Code Editor, provided the correct object name (Form) is selected in the up-
per left portion of the Code Editor, and the correct action (MouseDown) is selected in the upper right.
Fig. 5.16
The action specified by each pop-up menu item must be entered into the Code Editor as a separate event
procedure, as before. Thus, one event procedure is required to display the pop-up menu, and an additional
event procedure is required for each of the various actions taken in response to the pop-up menu selections.
EXAMPLE 5.6 USING A POP-UP MENU
Let us create a program that initially displays a gray-colored form containing a circle with a gray center (i.e., without any
distinctive fill color). The program will include a pull-down menu allowing the user to change the circle’s fill color to red,
green or blue, and to clear the fill color (thus restoring the original gray color). The program will include two objects: a
shape (the circle), and a command button, used to end the computation. The initial form is shown in Fig. 5.17.
Fig. 5.17
In order to achieve this appearance, the objects have been assigned the following properties:
CHAP. 5] MENUS AND DIALOG BOXES 123
Object Property Value
Form1 Caption “Colors”
Command1 Caption “Quit”
Font MS Sans Serif, 10-point
Shape Shape 3 – Circle
BorderWidth 2
FillStyle 0 – Solid
FillColor Gray
Fig. 5.18 shows the Menu Editor, with the entries required to change the color within the circle. Notice the caption
(Colors) and the name (mnuColor) assigned to the first menu item. Also, note the use of separators between the menu items.
Fig. 5.18
In order to display the menu and bring about the desired color changes in response to the menu selections, we must
add the following event procedures via the Code Editor Window.
Private Sub Form_MouseDown(Button As Integer, Shift As Integer, X As Single, Y As
Single)
If Button = vbRightButton Then
PopupMenu mnuColor
End If
End Sub
Private Sub RedColor_Click()
Shape1.FillColor = vbRed
End Sub
Private Sub GreenColor_Click()
Shape1.FillColor = vbGreen
End Sub
Private Sub BlueColor_Click()
Shape1.FillColor = vbBlue
End Sub
(Continues on next page)
124 MENUS AND DIALOG BOXES [CHAP. 5
Private Sub ClearColor_Click()
Shape1.FillColor = vbMenuBar 'Gray
End Sub
Private Sub Command1_Click()
End
End Sub
We have already explained that the first of these event procedures causes the pop-up menu to appear in response to
clicking the right mouse button. All of the components in this event procedure are reserved words with a predefined mean-
ing, except for mnuColor, which is the name of the first menu item (see Fig. 5.18).
The next four event procedures (RedColor, GreenColor, Blue Color, and ClearColor) assign the desired fill colors to
the circle (Shape1.FillColor). Within these event procedures, the identifiers vbRed, vbGreen, vbBlue and vbMenuBar are
predefined Visual Basic constants that represent the colors red, green, blue and medium gray, respectively. When the program is executed, the form originally appears as shown in Fig. 5.19.
Fig. 5.19
Clicking the right mouse button then causes the pop-up menu to appear, as in Fig. 5.20.
Fig. 5.20
CHAP. 5] MENUS AND DIALOG BOXES 125
Selecting one of the menu items then alters the fill color of the circle, as shown in Fig. 5.21. Note that the original gray
color can be restored by selecting Clear.
Fig. 5.21
5.6 DIALOG BOXES
A dialog box is used to exchange information between the program and the user. It is a separate form that is
generally accessed in response to a selection from a menu or a list. Dialog boxes typically contain common
controls (e.g., labels, text boxes, option buttons, check boxes, and command buttons) to enter or display infor-
mation. In addition, the dialog box features must be accessible from other forms (i.e., from “primary” or “par-
ent” forms), and the information entered into the dialog box by the user must be recognizable within these
forms.
A “secondary” form (e.g., a dialog box) can be added to an active project via the Load command; i.e.,
Load form
For example, the command
Load Form2
will cause the form named Form2 to be loaded into the currently active project.
Similarly, a form can be removed from an active project, thus freeing up memory, via the Unload com-
mand; i.e.,
Unload form
For example,
Unload Form2
Thus, the form named Form2 will be unloaded (removed) from the currently active project. As a result, refer-
ences to the object named Form2 will no longer be recognized within the currently active project.
Loading a form into an active project does not in itself cause the form to be visible. To make the form
visible, we use the Show method; i.e.,
form.Show
(Recall that a method is similar to a property. Whereas properties represent values associated with objects,
however, methods carry out actions on objects.) For example,
Form2.Show

126 MENUS AND DIALOG BOXES [CHAP. 5
This causes the form named Form2 to become visible within the currently active project. Moreover, Form2 will
be the currently active form, and it will be displayed on top of any other visible forms.
If the form.Show method is followed by a 1; e.g., Form2.Show 1
the new form will be displayed as a modal form. That is, the form will remain in place, preventing the activa-
tion of any other forms, until the user disposes of the form by accepting it (e.g., by clicking OK), or rejecting it
(e.g., by clicking Cancel).
The Hide method is directly analogous but opposite to the Show method. Thus, the command Form2.Hide
causes Form2 to no longer be visible within the currently active project. This command does not cause Form2
to be unloaded from the project.
Recall that we refer to a property (or method) associated with an object in a single-form project as object name.property
For example, Text1.Text
When working with multiform projects, however, it is often necessary to refer to a property (or method) of
an object in a different form. To do so, we precede the object name with the form name; i.e., form name.object name.property
For example, Form2.Text1.Text
Of course, the placement of these references is determined by the program logic.
EXAMPLE 5.7 USING DIALOG BOXES (MULTILINGUAL HELLO REVISITED)
We now present a version of the Multilingual Hello program, originally shown in Examples 4.6 and 4.9. The current ver-
sion will make use of drop-down menus and dialog boxes, and will require four different forms (a primary form, two dia-
log boxes that accept input from the user, and a dialog box showing the results).
Fig. 5.22(a) Fig. 5.22(b)
CHAP. 5] MENUS AND DIALOG BOXES 127
When the program is executed, the primary form will show a menu bar with two entries: Languages and Display. The
primary form and the accompanying Languages menu is shown in Fig. 5.22(a). Fig. 5.22(b) shows the primary form and
the accompanying Display menu.
The ellipses (three dots) following the menu items Color... and Font... in the Display menu indicate that the user must
provide additional information within a dialog box before each of the menu items can complete its task. The ellipses are
not added automatically; rather, they are typed by the programmer at the end of the menu item’s caption.
When the user clicks on one of the language selections, a dialog box (i.e., a secondary form) will appear showing the
appropriate “Hello” greeting. For example, Fig. 5.23(a) shows the dialog box resulting from the selection of French within
the Languages menu.
Fig. 5.23(a) Fig. 5.23(b)
The Display menu results in two different dialog boxes that allow the user to alter the appearance of the greeting. The
first dialog box (Color...) allows the user to change the color of the text and the background, as shown in Fig. 5.24(a). The
second dialog box (Font...), shown in Fig. 5.24(b), allows the user to change the size of the text in the “Hello” greeting.
For example, Fig. 5.23(b) shows the appearance of the greeting when the text is shown in a blue, 12-point font against a
gray background. (Unfortunately, the printed page does not show the blue color convincingly, though it really is there.)
Fig. 5.24(a) Fig. 5.24(b)
Now let’s see how this project is created. Fig. 5.25 shows the Form Design Window for the primary form, which has
the caption International Hello and is named Form1.
The Menu Editor accompanying Form1 is shown in Fig. 5.26. Note that the window in the bottom portion of the
Menu Editor lists the menu items in both menus shown in Form1. Each menu item has an associated event procedure.
These event procedures control the entire project; they are the key to understanding how the project works.
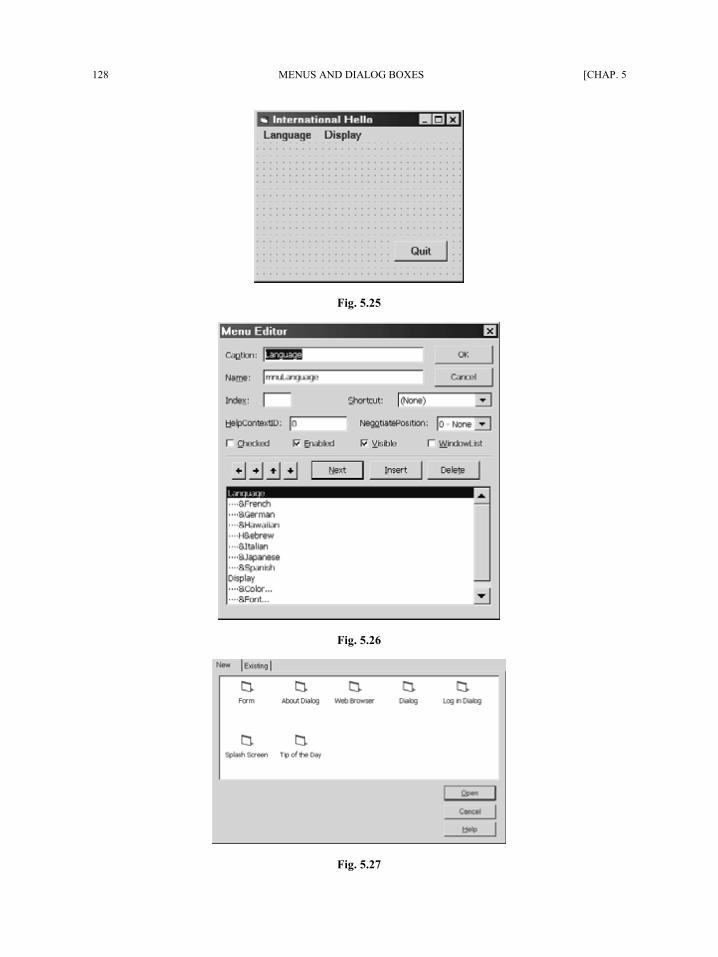
128 MENUS AND DIALOG BOXES [CHAP. 5
Fig. 5.25
Fig. 5.26
Fig. 5.27
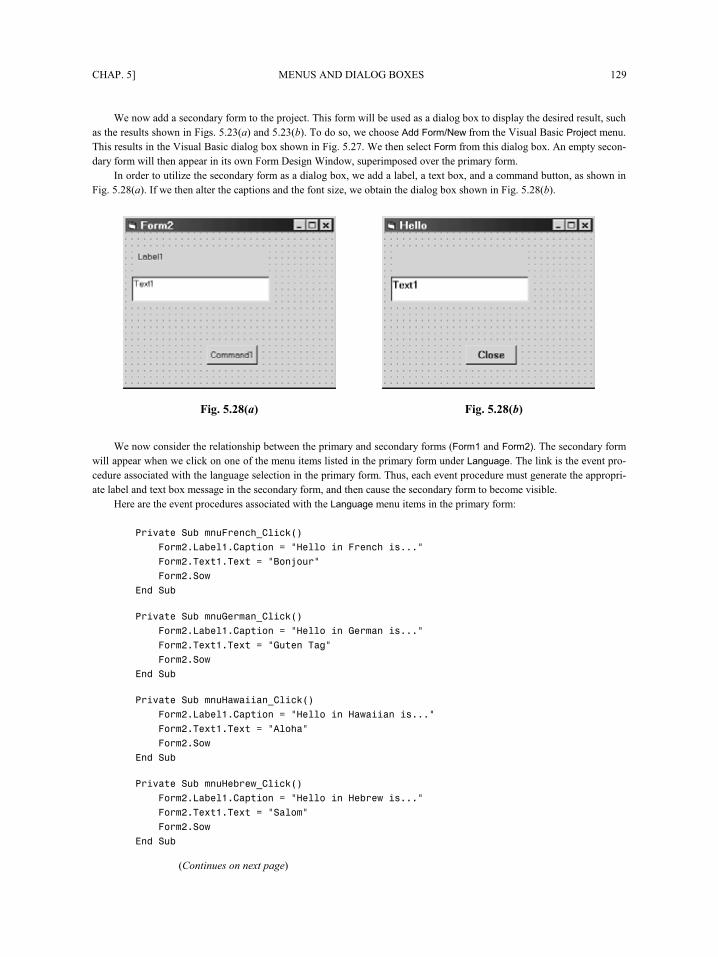
CHAP. 5] MENUS AND DIALOG BOXES 129
We now add a secondary form to the project. This form will be used as a dialog box to display the desired result, such
as the results shown in Figs. 5.23(a) and 5.23(b). To do so, we choose Add Form/New from the Visual Basic Project menu.
This results in the Visual Basic dialog box shown in Fig. 5.27. We then select Form from this dialog box. An empty secon-
dary form will then appear in its own Form Design Window, superimposed over the primary form.
In order to utilize the secondary form as a dialog box, we add a label, a text box, and a command button, as shown in
Fig. 5.28(a). If we then alter the captions and the font size, we obtain the dialog box shown in Fig. 5.28(b).
Fig. 5.28(a) Fig. 5.28(b)
We now consider the relationship between the primary and secondary forms (Form1 and Form2). The secondary form
will appear when we click on one of the menu items listed in the primary form under Language. The link is the event pro-
cedure associated with the language selection in the primary form. Thus, each event procedure must generate the appropri-
ate label and text box message in the secondary form, and then cause the secondary form to become visible.
Here are the event procedures associated with the Language menu items in the primary form:
Private Sub mnuFrench_Click()
Form2.Label1.Caption = "Hello in French is..."
Form2.Text1.Text = "Bonjour"
Form2.Show
End Sub
Private Sub mnuGerman_Click()
Form2.Label1.Caption = "Hello in German is..."
Form2.Text1.Text = "Guten Tag"
Form2.Show
End Sub
Private Sub mnuHawaiian_Click()
Form2.Label1.Caption = "Hello in Hawaiian is..."
Form2.Text1.Text = "Aloha"
Form2.Show
End Sub
Private Sub mnuHebrew_Click()
Form2.Label1.Caption = "Hello in Hebrew is..."
Form2.Text1.Text = "Shalom"
Form2.Show
End Sub
(Continues on next page)
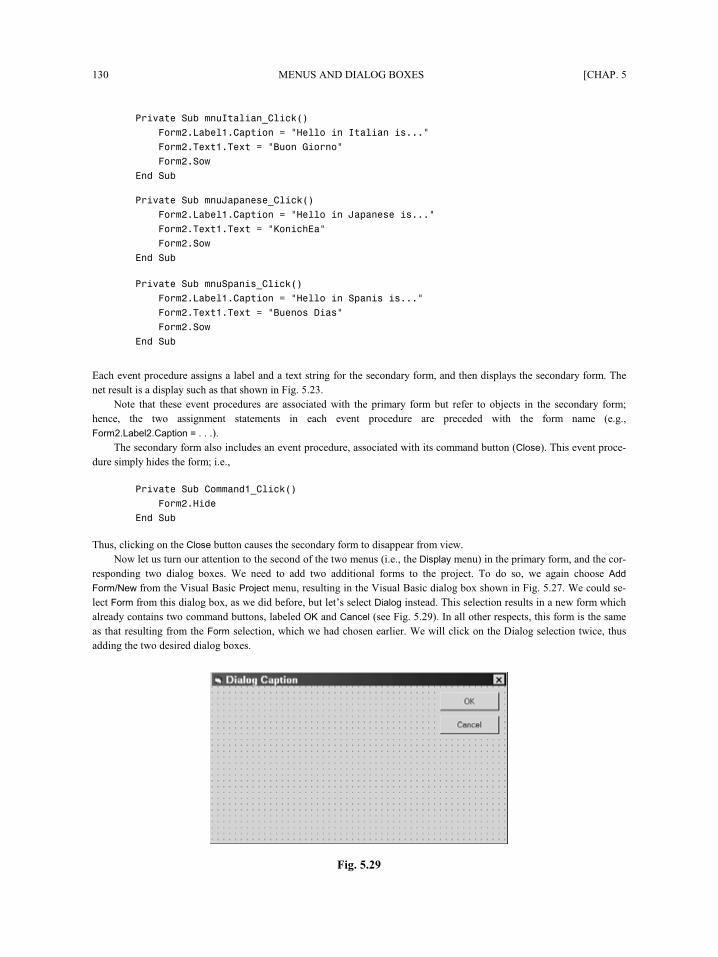
130 MENUS AND DIALOG BOXES [CHAP. 5
Private Sub mnuItalian_Click()
Form2.Label1.Caption = "Hello in Italian is..."
Form2.Text1.Text = "Buon Giorno"
Form2.Show
End Sub
Private Sub mnuJapanese_Click()
Form2.Label1.Caption = "Hello in Japanese is..."
Form2.Text1.Text = "Konichihua"
Form2.Show
End Sub
Private Sub mnuSpanish_Click()
Form2.Label1.Caption = "Hello in Spanish is..."
Form2.Text1.Text = "Buenos Dias"
Form2.Show
End Sub
Each event procedure assigns a label and a text string for the secondary form, and then displays the secondary form. The
net result is a display such as that shown in Fig. 5.23.
Note that these event procedures are associated with the primary form but refer to objects in the secondary form;
hence, the two assignment statements in each event procedure are preceded with the form name (e.g.,
Form2.Label2.Caption = . . .).
The secondary form also includes an event procedure, associated with its command button (Close). This event proce-
dure simply hides the form; i.e.,
Private Sub Command1_Click()
Form2.Hide
End Sub
Thus, clicking on the Close button causes the secondary form to disappear from view.
Now let us turn our attention to the second of the two menus (i.e., the Display menu) in the primary form, and the cor-
responding two dialog boxes. We need to add two additional forms to the project. To do so, we again choose Add
Form/New from the Visual Basic Project menu, resulting in the Visual Basic dialog box shown in Fig. 5.27. We could se-
lect Form from this dialog box, as we did before, but let’s select Dialog instead. This selection results in a new form which
already contains two command buttons, labeled OK and Cancel (see Fig. 5.29). In all other respects, this form is the same
as that resulting from the Form selection, which we had chosen earlier. We will click on the Dialog selection twice, thus
adding the two desired dialog boxes.
Fig. 5.29
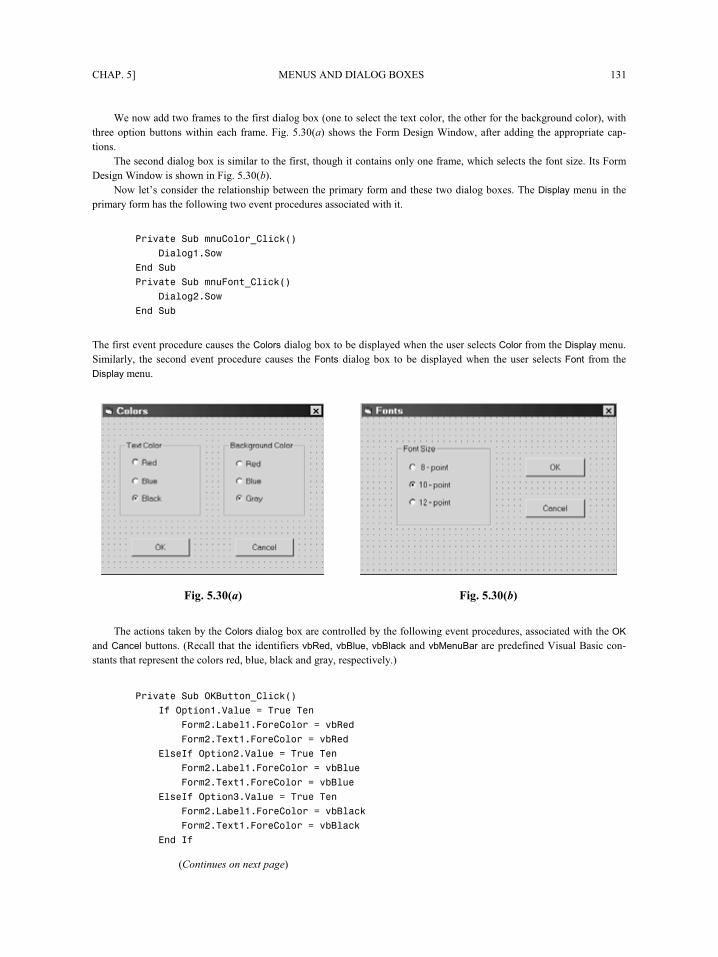
CHAP. 5] MENUS AND DIALOG BOXES 131
We now add two frames to the first dialog box (one to select the text color, the other for the background color), with
three option buttons within each frame. Fig. 5.30(a) shows the Form Design Window, after adding the appropriate cap-
tions.
The second dialog box is similar to the first, though it contains only one frame, which selects the font size. Its Form
Design Window is shown in Fig. 5.30(b).
Now let’s consider the relationship between the primary form and these two dialog boxes. The Display menu in the
primary form has the following two event procedures associated with it.
Private Sub mnuColor_Click()
Dialog1.Show
End Sub
Private Sub mnuFont_Click()
Dialog2.Show
End Sub
The first event procedure causes the Colors dialog box to be displayed when the user selects Color from the Display menu.
Similarly, the second event procedure causes the Fonts dialog box to be displayed when the user selects Font from the
Display menu.
Fig. 5.30(a) Fig. 5.30(b)
The actions taken by the Colors dialog box are controlled by the following event procedures, associated with the OK
and Cancel buttons. (Recall that the identifiers vbRed, vbBlue, vbBlack and vbMenuBar are predefined Visual Basic con-
stants that represent the colors red, blue, black and gray, respectively.)
Private Sub OKButton_Click()
If Option1.Value = True Then
Form2.Label1.ForeColor = vbRed
Form2.Text1.ForeColor = vbRed
ElseIf Option2.Value = True Then
Form2.Label1.ForeColor = vbBlue
Form2.Text1.ForeColor = vbBlue
ElseIf Option3.Value = True Then
Form2.Label1.ForeColor = vbBlack
Form2.Text1.ForeColor = vbBlack
End If
(Continues on next page)
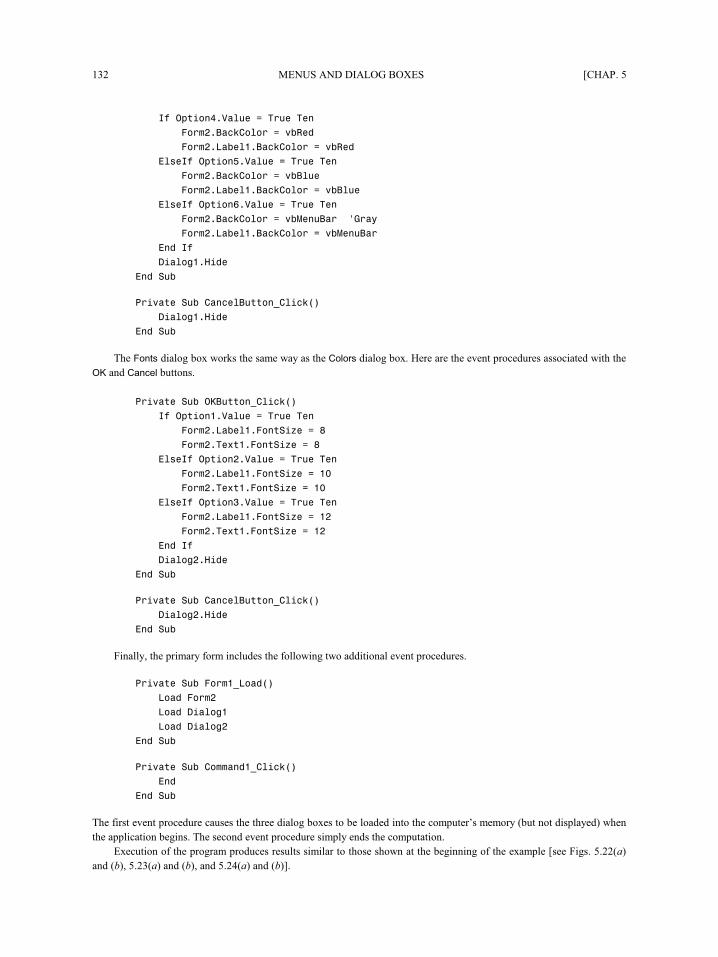
132 MENUS AND DIALOG BOXES [CHAP. 5
If Option4.Value = True Then
Form2.BackColor = vbRed
Form2.Label1.BackColor = vbRed
ElseIf Option5.Value = True Then
Form2.BackColor = vbBlue
Form2.Label1.BackColor = vbBlue
ElseIf Option6.Value = True Then
Form2.BackColor = vbMenuBar 'Gray
Form2.Label1.BackColor = vbMenuBar
End If
Dialog1.Hide
End Sub
Private Sub CancelButton_Click()
Dialog1.Hide
End Sub
The Fonts dialog box works the same way as the Colors dialog box. Here are the event procedures associated with the
OK and Cancel buttons.
Private Sub OKButton_Click()
If Option1.Value = True Then
Form2.Label1.FontSize = 8
Form2.Text1.FontSize = 8
ElseIf Option2.Value = True Then
Form2.Label1.FontSize = 10
Form2.Text1.FontSize = 10
ElseIf Option3.Value = True Then
Form2.Label1.FontSize = 12
Form2.Text1.FontSize = 12
End If
Dialog2.Hide
End Sub
Private Sub CancelButton_Click()
Dialog2.Hide
End Sub
Finally, the primary form includes the following two additional event procedures.
Private Sub Form1_Load()
Load Form2
Load Dialog1
Load Dialog2
End Sub
Private Sub Command1_Click()
End
End Sub
The first event procedure causes the three dialog boxes to be loaded into the computer’s memory (but not displayed) when
the application begins. The second event procedure simply ends the computation.
Execution of the program produces results similar to those shown at the beginning of the example [see Figs. 5.22(a)
and (b), 5.23(a) and (b), and 5.24(a) and (b)].
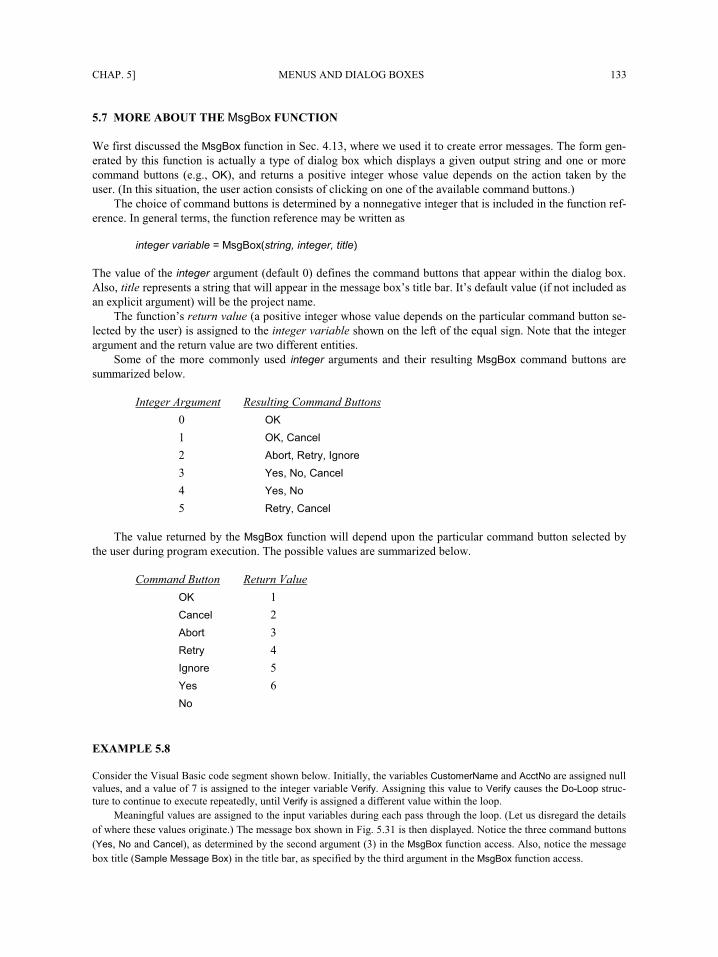
CHAP. 5] MENUS AND DIALOG BOXES 133
5.7 MORE ABOUT THE MsgBox FUNCTION
We first discussed the MsgBox function in Sec. 4.13, where we used it to create error messages. The form gen-
erated by this function is actually a type of dialog box which displays a given output string and one or more
command buttons (e.g., OK), and returns a positive integer whose value depends on the action taken by the
user. (In this situation, the user action consists of clicking on one of the available command buttons.)
The choice of command buttons is determined by a nonnegative integer that is included in the function ref-
erence. In general terms, the function reference may be written as
integer variable = MsgBox(string, integer, title)
The value of the integer argument (default 0) defines the command buttons that appear within the dialog box.
Also, title represents a string that will appear in the message box’s title bar. It’s default value (if not included as
an explicit argument) will be the project name.
The function’s return value (a positive integer whose value depends on the particular command button se-
lected by the user) is assigned to the integer variable shown on the left of the equal sign. Note that the integer
argument and the return value are two different entities.
Some of the more commonly used integer arguments and their resulting MsgBox command buttons are
summarized below.
Integer Argument Resulting Command Buttons
0 OK
1 OK, Cancel
2 Abort, Retry, Ignore
3 Yes, No, Cancel
4 Yes, No
5 Retry, Cancel
The value returned by the MsgBox function will depend upon the particular command button selected by
the user during program execution. The possible values are summarized below.
Command Button Return Value
OK 1
Cancel 2
Abort 3
Retry 4
Ignore 5
Yes 6
No 7
EXAMPLE 5.8
Consider the Visual Basic code segment shown below. Initially, the variables CustomerName and AcctNo are assigned null
values, and a value of 7 is assigned to the integer variable Verify. Assigning this value to Verify causes the Do-Loop struc-
ture to continue to execute repeatedly, until Verify is assigned a different value within the loop.
Meaningful values are assigned to the input variables during each pass through the loop. (Let us disregard the details
of where these values originate.) The message box shown in Fig. 5.31 is then displayed. Notice the three command buttons
(Yes, No and Cancel), as determined by the second argument (3) in the MsgBox function access. Also, notice the message
box title (Sample Message Box) in the title bar, as specified by the third argument in the MsgBox function access.
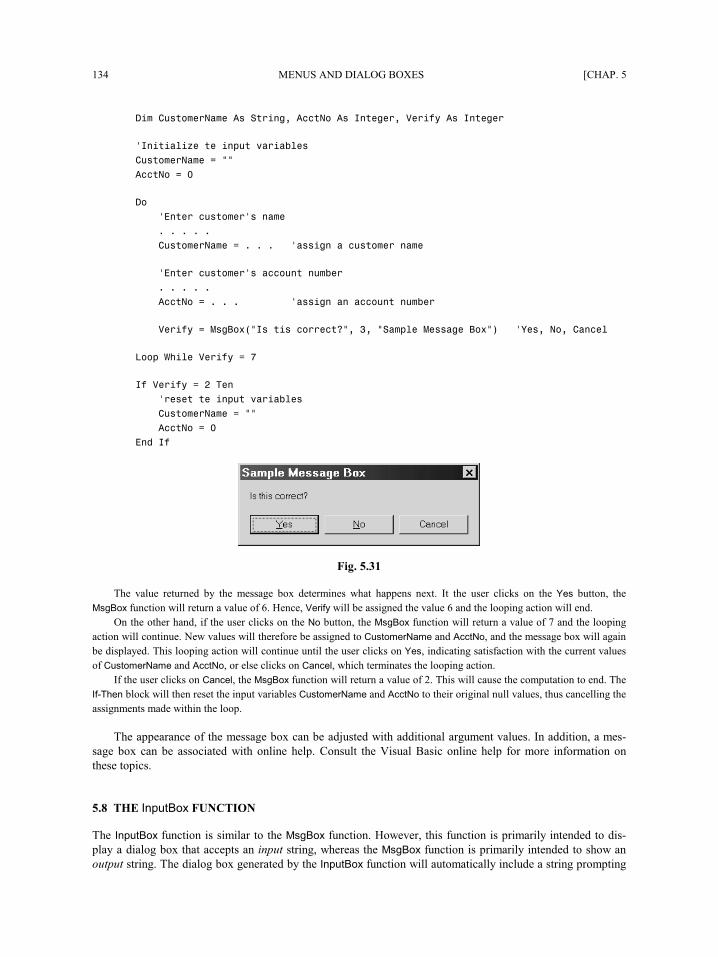
134 MENUS AND DIALOG BOXES [CHAP. 5
Dim CustomerName As String, AcctNo As Integer, Verify As Integer
'Initialize the input variables
CustomerName = ""
AcctNo = 0
Do
'Enter customer's name
. . . . .
CustomerName = . . . 'assign a customer name
'Enter customer's account number
. . . . .
AcctNo = . . . 'assign an account number
Verify = MsgBox("Is this correct?", 3, "Sample Message Box") 'Yes, No, Cancel
Loop While Verify = 7
If Verify = 2 Then
'reset the input variables
CustomerName = ""
AcctNo = 0
End If
Fig. 5.31
The value returned by the message box determines what happens next. It the user clicks on the Yes button, the
MsgBox function will return a value of 6. Hence, Verify will be assigned the value 6 and the looping action will end.
On the other hand, if the user clicks on the No button, the MsgBox function will return a value of 7 and the looping
action will continue. New values will therefore be assigned to CustomerName and AcctNo, and the message box will again
be displayed. This looping action will continue until the user clicks on Yes, indicating satisfaction with the current values
of CustomerName and AcctNo, or else clicks on Cancel, which terminates the looping action.
If the user clicks on Cancel, the MsgBox function will return a value of 2. This will cause the computation to end. The
If-Then block will then reset the input variables CustomerName and AcctNo to their original null values, thus cancelling the
assignments made within the loop.
The appearance of the message box can be adjusted with additional argument values. In addition, a mes-
sage box can be associated with online help. Consult the Visual Basic online help for more information on
these topics.
5.8 THE InputBox FUNCTION
The InputBox function is similar to the MsgBox function. However, this function is primarily intended to dis-
play a dialog box that accepts an input string, whereas the MsgBox function is primarily intended to show an
output string. The dialog box generated by the InputBox function will automatically include a string prompting
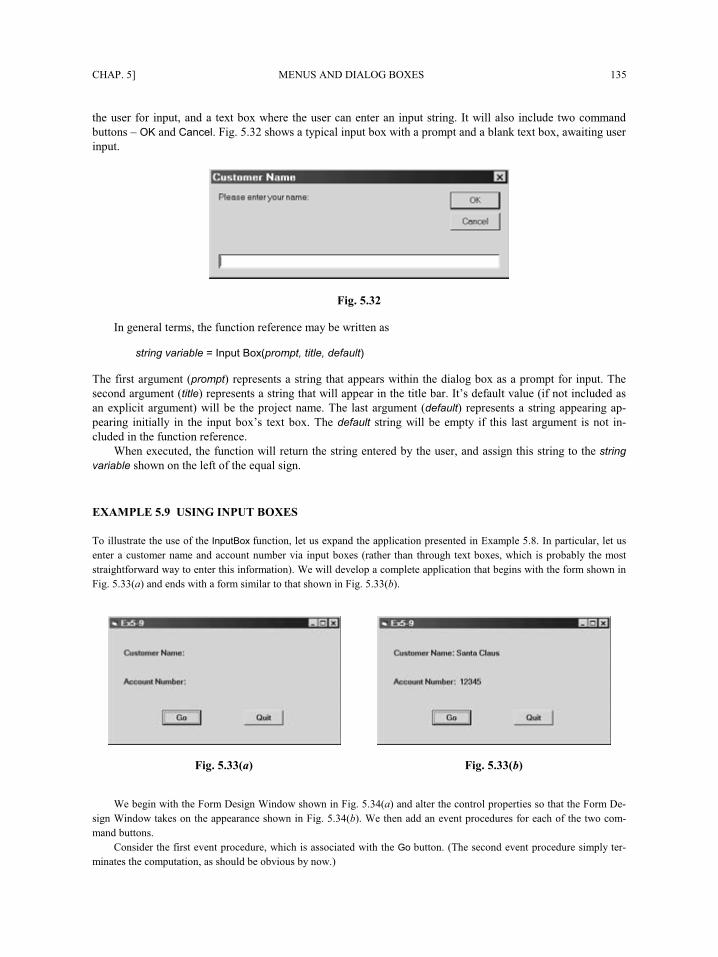
CHAP. 5] MENUS AND DIALOG BOXES 135
the user for input, and a text box where the user can enter an input string. It will also include two command
buttons – OK and Cancel. Fig. 5.32 shows a typical input box with a prompt and a blank text box, awaiting user
input.
Fig. 5.32
In general terms, the function reference may be written as string variable = Input Box(prompt, title, default)
The first argument (prompt) represents a string that appears within the dialog box as a prompt for input. The
second argument (title) represents a string that will appear in the title bar. It’s default value (if not included as
an explicit argument) will be the project name. The last argument (default) represents a string appearing ap-
pearing initially in the input box’s text box. The default string will be empty if this last argument is not in-
cluded in the function reference.
When executed, the function will return the string entered by the user, and assign this string to the string
variable shown on the left of the equal sign.
EXAMPLE 5.9 USING INPUT BOXES
To illustrate the use of the InputBox function, let us expand the application presented in Example 5.8. In particular, let us
enter a customer name and account number via input boxes (rather than through text boxes, which is probably the most
straightforward way to enter this information). We will develop a complete application that begins with the form shown in
Fig. 5.33(a) and ends with a form similar to that shown in Fig. 5.33(b).
Fig. 5.33(a) Fig. 5.33(b)
We begin with the Form Design Window shown in Fig. 5.34(a) and alter the control properties so that the Form De-
sign Window takes on the appearance shown in Fig. 5.34(b). We then add an event procedures for each of the two com-
mand buttons.
Consider the first event procedure, which is associated with the Go button. (The second event procedure simply ter-
minates the computation, as should be obvious by now.)
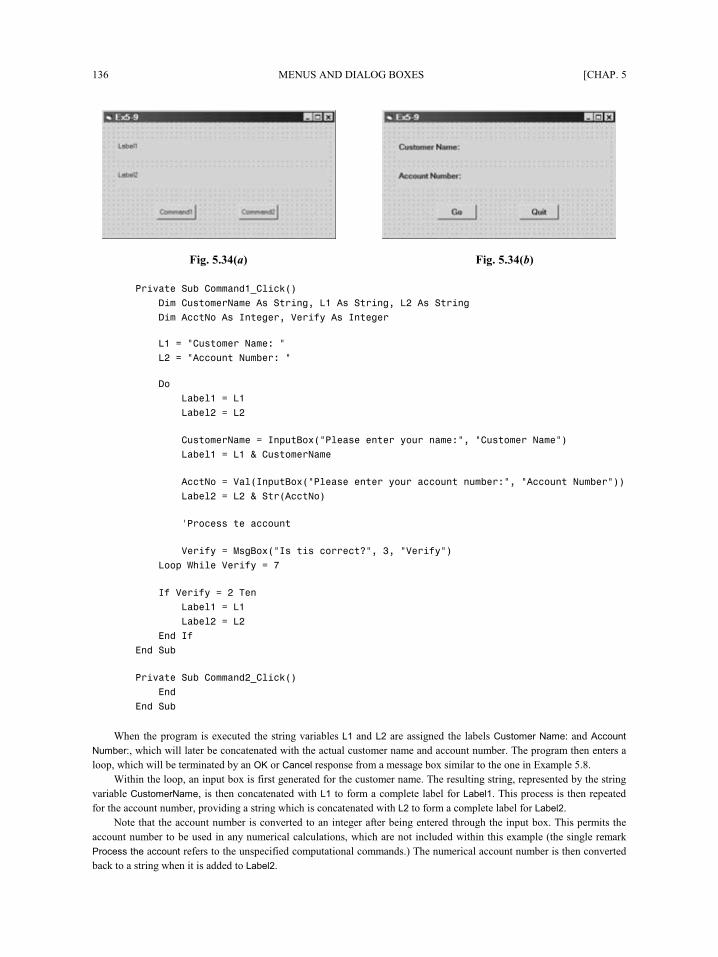
136 MENUS AND DIALOG BOXES [CHAP. 5
Fig. 5.34(a) Fig. 5.34(b)
Private Sub Command1_Click()
Dim CustomerName As String, L1 As String, L2 As String
Dim AcctNo As Integer, Verify As Integer
L1 = "Customer Name: "
L2 = "Account Number: "
Do
Label1 = L1
Label2 = L2
CustomerName = InputBox("Please enter your name:", "Customer Name")
Label1 = L1 & CustomerName
AcctNo = Val(InputBox("Please enter your account number:", "Account Number"))
Label2 = L2 & Str(AcctNo)
'Process the account
Verify = MsgBox("Is this correct?", 3, "Verify")
Loop While Verify = 7
If Verify = 2 Then
Label1 = L1
Label2 = L2
End If
End Sub
Private Sub Command2_Click()
End
End Sub
When the program is executed the string variables L1 and L2 are assigned the labels Customer Name: and Account
Number:, which will later be concatenated with the actual customer name and account number. The program then enters a
loop, which will be terminated by an OK or Cancel response from a message box similar to the one in Example 5.8.
Within the loop, an input box is first generated for the customer name. The resulting string, represented by the string
variable CustomerName, is then concatenated with L1 to form a complete label for Label1. This process is then repeated
for the account number, providing a string which is concatenated with L2 to form a complete label for Label2.
Note that the account number is converted to an integer after being entered through the input box. This permits the
account number to be used in any numerical calculations, which are not included within this example (the single remark
Process the account refers to the unspecified computational commands.) The numerical account number is then converted
back to a string when it is added to Label2.
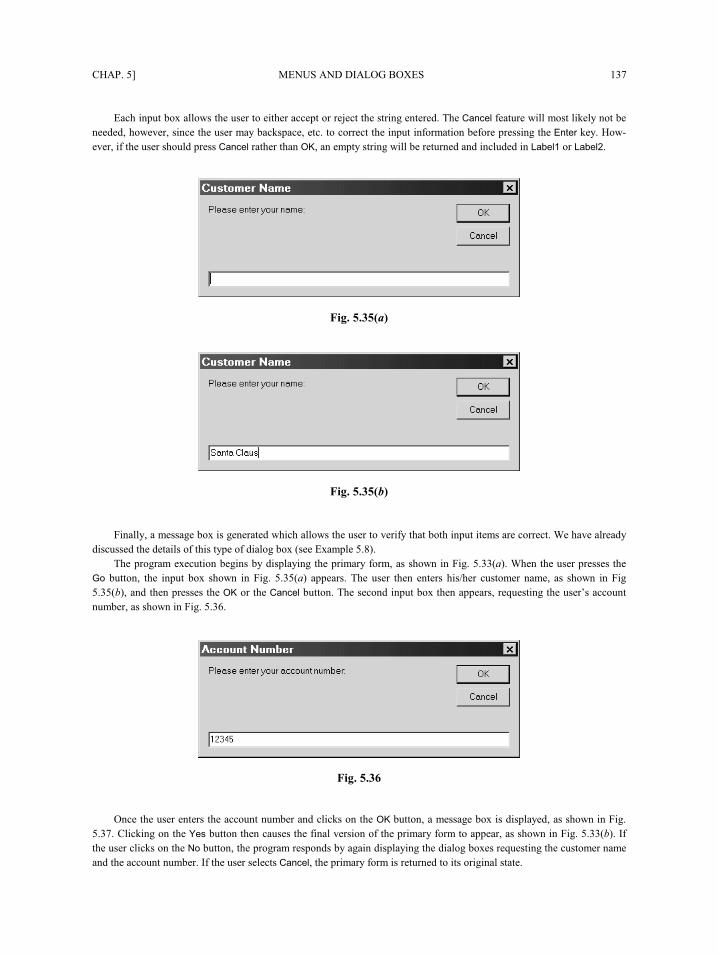
CHAP. 5] MENUS AND DIALOG BOXES 137
Each input box allows the user to either accept or reject the string entered. The Cancel feature will most likely not be
needed, however, since the user may backspace, etc. to correct the input information before pressing the Enter key. How-
ever, if the user should press Cancel rather than OK, an empty string will be returned and included in Label1 or Label2.
Fig. 5.35(a)
Fig. 5.35(b)
Finally, a message box is generated which allows the user to verify that both input items are correct. We have already
discussed the details of this type of dialog box (see Example 5.8).
The program execution begins by displaying the primary form, as shown in Fig. 5.33(a). When the user presses the
Go button, the input box shown in Fig. 5.35(a) appears. The user then enters his/her customer name, as shown in Fig
5.35(b), and then presses the OK or the Cancel button. The second input box then appears, requesting the user’s account
number, as shown in Fig. 5.36.
Fig. 5.36
Once the user enters the account number and clicks on the OK button, a message box is displayed, as shown in Fig.
5.37. Clicking on the Yes button then causes the final version of the primary form to appear, as shown in Fig. 5.33(b). If
the user clicks on the No button, the program responds by again displaying the dialog boxes requesting the customer name
and the account number. If the user selects Cancel, the primary form is returned to its original state.
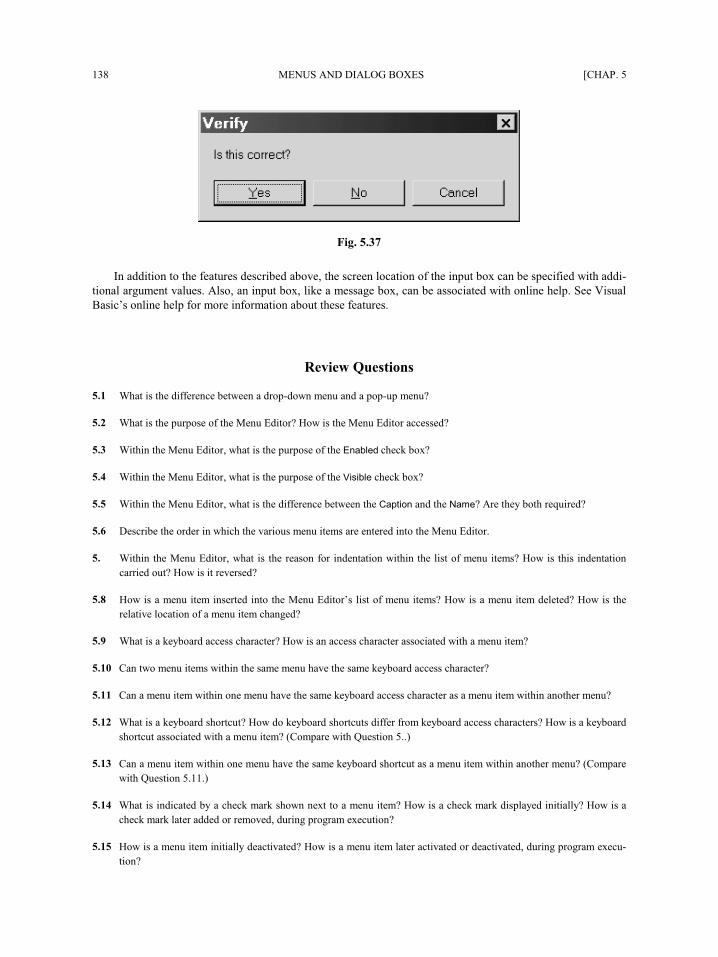
138 MENUS AND DIALOG BOXES [CHAP. 5
Fig. 5.37
In addition to the features described above, the screen location of the input box can be specified with addi-
tional argument values. Also, an input box, like a message box, can be associated with online help. See Visual
Basic’s online help for more information about these features.
Review Questions
5.1 What is the difference between a drop-down menu and a pop-up menu?
5.2 What is the purpose of the Menu Editor? How is the Menu Editor accessed?
5.3 Within the Menu Editor, what is the purpose of the Enabled check box?
5.4 Within the Menu Editor, what is the purpose of the Visible check box?
5.5 Within the Menu Editor, what is the difference between the Caption and the Name? Are they both required?
5.6 Describe the order in which the various menu items are entered into the Menu Editor.
5.7 Within the Menu Editor, what is the reason for indentation within the list of menu items? How is this indentation
carried out? How is it reversed?
5.8 How is a menu item inserted into the Menu Editor’s list of menu items? How is a menu item deleted? How is the
relative location of a menu item changed?
5.9 What is a keyboard access character? How is an access character associated with a menu item?
5.10 Can two menu items within the same menu have the same keyboard access character?
5.11 Can a menu item within one menu have the same keyboard access character as a menu item within another menu?
5.12 What is a keyboard shortcut? How do keyboard shortcuts differ from keyboard access characters? How is a keyboard
shortcut associated with a menu item? (Compare with Question 5.9.)
5.13 Can a menu item within one menu have the same keyboard shortcut as a menu item within another menu? (Compare
with Question 5.11.)
5.14 What is indicated by a check mark shown next to a menu item? How is a check mark displayed initially? How is a
check mark later added or removed, during program execution?
5.15 How is a menu item initially deactivated? How is a menu item later activated or deactivated, during program execu-
tion?
CHAP. 5] MENUS AND DIALOG BOXES 139
5.16 How is a separator included within a list of menu items? Must separators be indented? How are separators moved
relative to surrounding menu items?
5.17 What is the purpose of a submenu? How is a submenu created within the Menu Editor? How is the presence of a
submenu identified during program execution?
5.18 How is a pop-up menu created? How is it activated?
5.19 How can a pop-up menu be made to appear in response to some action other than a right mouse click?
5.20 What is the purpose of a dialog box?
5.21 How is a secondary form added to an active project? How is it removed?
5.22 How is a secondary form made visible once it has been loaded? How is it hidden?
5.23 What is a modal form? How can a form be displayed as a modal form once it has been loaded?
5.24 When writing Visual Basic code, how do you refer to the property of an object that resides within a different form?
5.25 What is the purpose of the MsgBox function? What is the general form of a MsgBox function access?
5.26 A message box generated by the MsgBox function may have various command buttons, depending on how the func-
tion is accessed. How is the choice of command buttons specified in the function access?
5.27 When the user clicks on a command button within a message box, how is the particular command button selection
identified? In what way is this information useful?
5.28 What is the purpose of the title argument in a MsgBox function access? How does the title argument differ from the
string argument?
5.29 What is the purpose of the InputBox function? How does the InputBox function differ from the MsgBox function?
5.30 What is the general form of an InputBox function access?
5.31 What additional arguments may be included in a MsgBox function access? What additional arguments may be in-
cluded in an InputBox function access? What do these additional arguments represent?
Programming Problems
5.32 Re-create the Geography project shown in Example 5.5 using a pop-up menu. Retain the listing of Conti-
nents, Oceans and Seas as primary menu items, as in Example 5.5. Add a keyboard shortcut for each of
the primary menu items.
5.33 Re-create the Geography project shown in Example 5.5 using a pop-up menu, as in Prob. 5.32. Now,
however, create dialog boxes containing options buttons in place of the submenus. Thus, you should cre-
ate one dialog box allowing the user to select a continent, another to select an ocean, and a third to select
a sea. Be sure to include appropriate command buttons within each dialog box.
5.34 Expand Prob. 5.33 so that multiple objects can be selected from each dialog box. In other words, allow
the user to select two or more continents, two or more oceans, etc. To do so, use check boxes rather than
option buttons for each group of objects. Display the corresponding area for each object selected. (Sug-
gestion: Place a combo box within each dialog box.)
140 MENUS AND DIALOG BOXES [CHAP. 5
5.35 Re-create the project shown in Example 4.3 (current date and time) using a drop-down menu. Label the
main menu selection View. Within this menu, label the individual menu items Date and Time. Include
keyboard access characters and keyboard shortcuts for each menu item.
5.36 Repeat Prob. 5.35 using a pop-up menu instead of a drop-down menu.
5.37 Re-create the “piggy bank” problem shown in Example 4.5 so that it uses a menu and dialog boxes. Label
the main menu selection Money, and include the following two menu items: Number of Coins, and Dollar
Amount. For the first menu selection (Number of Coins), create a dialog box that allows the user to enter
the number of pennies, nickels, dimes, etc., as in Example 4.5. Provide a check box for each type of coin.
Include a Go button, but omit the Clear button.
For the second menu selection (Dollar Amount), create a separate dialog box that allows the user to en-
ter the dollar amount in pennies, in nickels, in dimes, etc. Again, provide a check box for each type of
coin, and include a Go button.
The Go button within each dialog box should display a new dialog box containing the appropriate text
boxes, so that the user may enter data. The user should then press a command button labeled Total within
this dialog box, to display the total amount of money (see Prob. 4.43). Use a message box to display the
actual total amount.
5.38 Modify the “multilingual hello” program in Example 4.6 so that a menu labeled Languages is displayed
when the program is executed. Within Languages, each menu item will correspond to a different lan-
guage. Clicking on a menu item will then display a message box containing the appropriate greeting in
the chosen language. Include an appropriate title that identifies the language.
5.39 Expand the temperature conversion program shown in Example 4.7 so that it can convert between Cel-
sius, Fahrenheit, Kelvin and Rankin degrees (i.e., from any one temperature to any other). Let us refer to
the given temperature (i.e., the given system of units) as the “source” temperature, and the desired tem-
perature (i.e., the desired system of units) as the “target” temperature.
The program should include a main menu, labeled Temperature, which includes four menu items –
one for each system of units. Each of these menu items will represent a source unit. Hence, it should have
its own submenu, which shows the three possible target units for that source unit. For example, the first
menu item under Temperature might be Celsius, and the corresponding submenu items might be To
Fahrenheit, To Kelvin, and To Rankine. Selection of a submenu item should then result in a dialog box
that accepts the source temperature and, after clicking on a Go button, displays the resulting target tem-
perature.
Recall that °F = 1.8°C, °K = °C + 273.15, and °R = °F + 459.67.
5.40 Create a Visual Basic project to determine the sum of the integers ranging from n1 to n2, where n1 < n2.
Specify n1 and n2 as input parameters. Allow the computation to be carried out in any of the following
ways:
(a) Sum all of the integers ranging from n1 to n2.
(b) Sum only the even integers within the interval defined by n1 and n2.
(c) Sum only the odd integers within the interval defined by n1 and n2.
Use a menu to determine which integers will be summed. In each case, use an appropriate loop to calcu-
late the sum. Display the sum in a separate text box, with an appropriate label. (see Probs. 4.47 and 4.48).
Generate an error message if the condition n1 < n2 is not satisfied.
5.41 Create a Visual Basic project that will allow the user to select the name of a country from a list and then
display the corresponding capital, and vice versa. Use a menu to determine which task will be carried out
(i.e., select the country and display the capital, or select the capital and display the country). Attach an a
appropriate dialog box to each of the menu items.
CHAP. 5] MENUS AND DIALOG BOXES 141
Restrict the project to the following countries and their corresponding capitals, as in Prob. 4.51.
Canada Ottawa
England London
France Paris
Germany Berlin
India New Delhi
Italy Rome
Japan Tokyo
Mexico Mexico City
People’s Republic of China Beijing
Russia Moscow
Spain Madrid
United States Washington, D.C.
5.42 Create a Visual Basic project that will either convert U.S. dollars into a foreign currency or convert a
foreign currency into U.S. dollars, as in Prob. 4.52. Use a menu to determine which type of conversion
will be carried out (i.e., U.S. to foreign, or foreign to U.S.). Attach an appropriate dialog box to each of
the menu selections.
The foreign currencies and their U.S. dollar equivalents are:
1 U.S. dollar = 0.6 British pounds
1.4 Canadian dollars
2.3 Dutch guilders
6.8 French francs
2.0 German marks
2000 Italian lira
100 Japanese yen
9.5 Mexican pesos
1.6 Swiss francs
Your project should include two option buttons within a frame, to select either U.S. to foreign conversion
or foreign to U.S. conversion. Nine additional option buttons should be placed within another frame to
select the particular foreign currency. Use a text box to specify a given amount of money in the source
currency, and another text box to display the equivalent amount of money in the target currency. Include
an appropriate set of labels for each conversion type.
5.43 In Prob. 4.55 we considered the following problem: Deposit P dollars in a savings account for n years. If
the money earns interest at the rate of i percent per year, compounded annually, then after n years, the
original sum of money will have increased to F, where
niPF )01.01( += for annual compounding
niPF 4)4/01.01( += for quarterly compounding
niPF 12)12/01.01( += for monthly compounding
niPF 365)365/01.01( += for daily compounding
(Note: In all of these expressions, i is the annual interest rate, expressed as a percentage, and n is the
number of years.)
142 MENUS AND DIALOG BOXES [CHAP. 5
Recall that these results can be generalized into the following single equation:
cnciPF )/01.01( +=
where c takes on the following values:
Annual compounding: c = 1
Quarterly compounding: c = 4
Monthly compounding: c = 12
Daily compounding: c = 365
Create a Visual Basic project to determine the future value of a deposit (F), given P, r and n as input
values, using a menu to select the frequency of compounding. Enter each of the input values into an ap-
propriate dialog box. Display the final result in a separate message box. Test the program using input val-
ues of your own choosing.
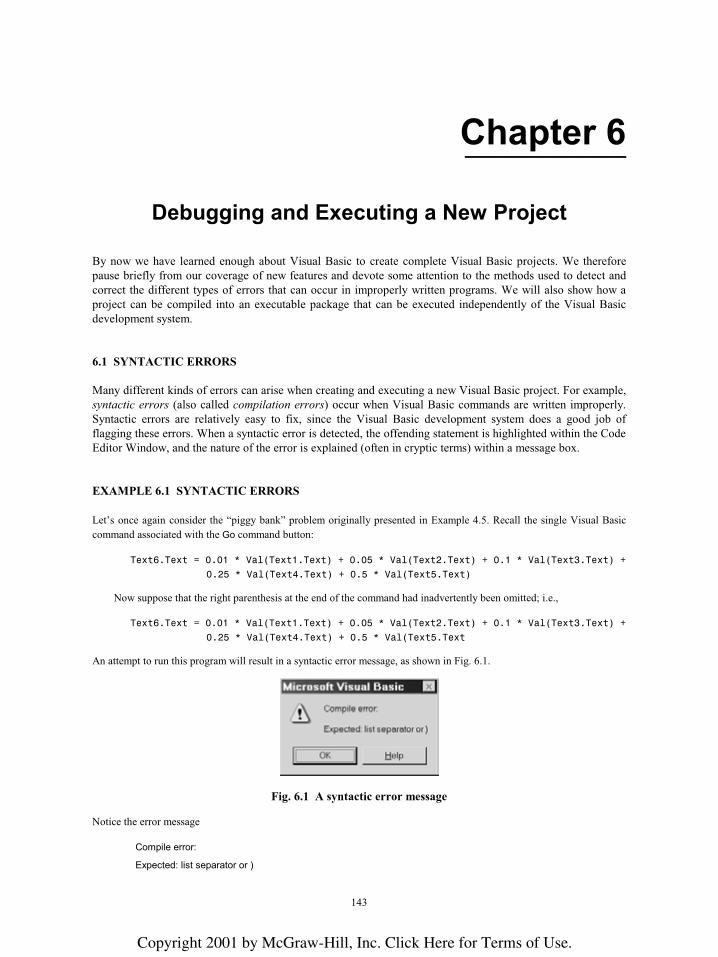
143
Chapter 6 ________________________________________________________________________________________________________________
Debugging and Executing a New Project
By now we have learned enough about Visual Basic to create complete Visual Basic projects. We therefore
pause briefly from our coverage of new features and devote some attention to the methods used to detect and
correct the different types of errors that can occur in improperly written programs. We will also show how a
project can be compiled into an executable package that can be executed independently of the Visual Basic
development system.
6.1 SYNTACTIC ERRORS
Many different kinds of errors can arise when creating and executing a new Visual Basic project. For example,
syntactic errors (also called compilation errors) occur when Visual Basic commands are written improperly.
Syntactic errors are relatively easy to fix, since the Visual Basic development system does a good job of
flagging these errors. When a syntactic error is detected, the offending statement is highlighted within the Code
Editor Window, and the nature of the error is explained (often in cryptic terms) within a message box.
EXAMPLE 6.1 SYNTACTIC ERRORS
Let’s once again consider the “piggy bank” problem originally presented in Example 4.5. Recall the single Visual Basic
command associated with the Go command button:
Text6.Text = 0.01 * Val(Text1.Text) + 0.05 * Val(Text2.Text) + 0.1 * Val(Text3.Text) +
0.25 * Val(Text4.Text) + 0.5 * Val(Text5.Text)
Now suppose that the right parenthesis at the end of the command had inadvertently been omitted; i.e.,
Text6.Text = 0.01 * Val(Text1.Text) + 0.05 * Val(Text2.Text) + 0.1 * Val(Text3.Text) +
0.25 * Val(Text4.Text) + 0.5 * Val(Text5.Text An attempt to run this program will result in a syntactic error message, as shown in Fig. 6.1.
Fig. 6.1 A syntactic error message
Notice the error message
Compile error:
Expected: list separator or )
Copyright 2001 by McGraw-Hill, Inc. Click Here for Terms of Use.
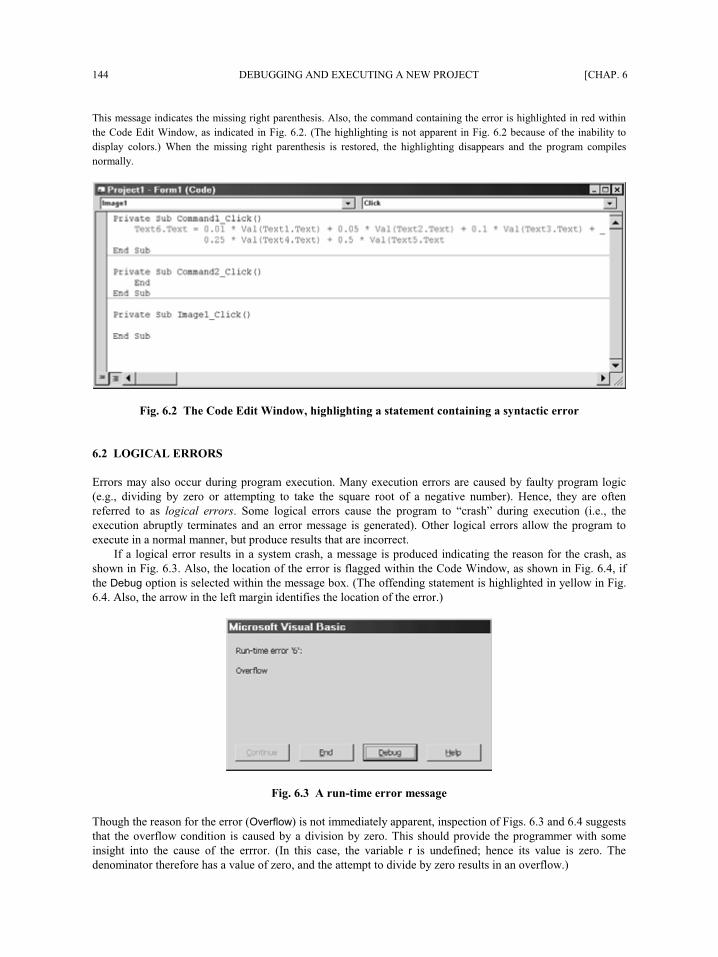
144 DEBUGGING AND EXECUTING A NEW PROJECT [CHAP. 6
This message indicates the missing right parenthesis. Also, the command containing the error is highlighted in red within
the Code Edit Window, as indicated in Fig. 6.2. (The highlighting is not apparent in Fig. 6.2 because of the inability to
display colors.) When the missing right parenthesis is restored, the highlighting disappears and the program compiles
normally.
Fig. 6.2 The Code Edit Window, highlighting a statement containing a syntactic error
6.2 LOGICAL ERRORS
Errors may also occur during program execution. Many execution errors are caused by faulty program logic
(e.g., dividing by zero or attempting to take the square root of a negative number). Hence, they are often
referred to as logical errors. Some logical errors cause the program to “crash” during execution (i.e., the
execution abruptly terminates and an error message is generated). Other logical errors allow the program to
execute in a normal manner, but produce results that are incorrect.
If a logical error results in a system crash, a message is produced indicating the reason for the crash, as
shown in Fig. 6.3. Also, the location of the error is flagged within the Code Window, as shown in Fig. 6.4, if
the Debug option is selected within the message box. (The offending statement is highlighted in yellow in Fig.
6.4. Also, the arrow in the left margin identifies the location of the error.)
Fig. 6.3 A run-time error message
Though the reason for the error (Overflow) is not immediately apparent, inspection of Figs. 6.3 and 6.4 suggests
that the overflow condition is caused by a division by zero. This should provide the programmer with some
insight into the cause of the errror. (In this case, the variable r is undefined; hence its value is zero. The
denominator therefore has a value of zero, and the attempt to divide by zero results in an overflow.)
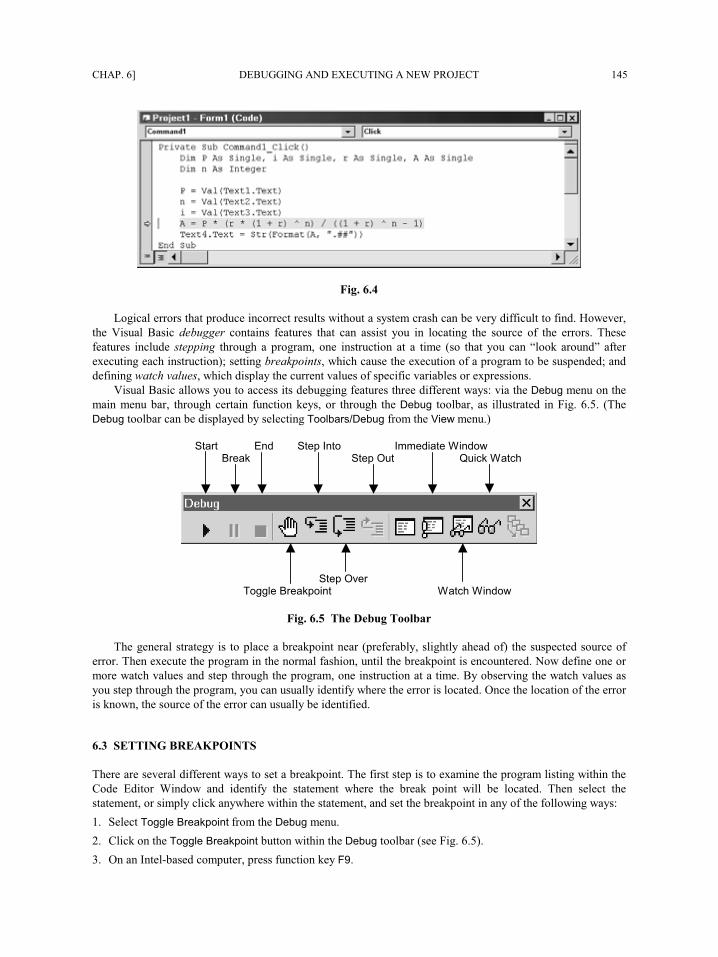
CHAP. 6] DEBUGGING AND EXECUTING A NEW PROJECT 145
Fig. 6.4
Logical errors that produce incorrect results without a system crash can be very difficult to find. However,
the Visual Basic debugger contains features that can assist you in locating the source of the errors. These
features include stepping through a program, one instruction at a time (so that you can “look around” after
executing each instruction); setting breakpoints, which cause the execution of a program to be suspended; and
defining watch values, which display the current values of specific variables or expressions.
Visual Basic allows you to access its debugging features three different ways: via the Debug menu on the
main menu bar, through certain function keys, or through the Debug toolbar, as illustrated in Fig. 6.5. (The
Debug toolbar can be displayed by selecting Toolbars/Debug from the View menu.)
Start End Step Into Immediate Window
Break Step Out Quick Watch
Step Over
Toggle Breakpoint Watch Window
Fig. 6.5 The Debug Toolbar
The general strategy is to place a breakpoint near (preferably, slightly ahead of) the suspected source of
error. Then execute the program in the normal fashion, until the breakpoint is encountered. Now define one or
more watch values and step through the program, one instruction at a time. By observing the watch values as
you step through the program, you can usually identify where the error is located. Once the location of the error
is known, the source of the error can usually be identified.
6.3 SETTING BREAKPOINTS
There are several different ways to set a breakpoint. The first step is to examine the program listing within the
Code Editor Window and identify the statement where the break point will be located. Then select the
statement, or simply click anywhere within the statement, and set the breakpoint in any of the following ways:
1. Select Toggle Breakpoint from the Debug menu.
2. Click on the Toggle Breakpoint button within the Debug toolbar (see Fig. 6.5).
3. On an Intel-based computer, press function key F9.
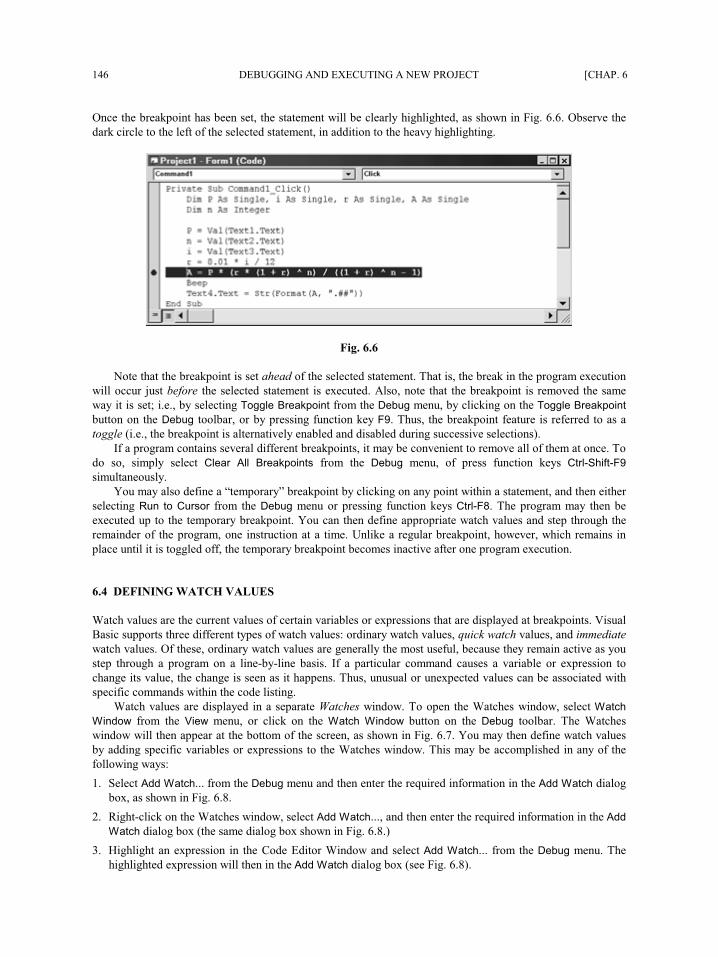
146 DEBUGGING AND EXECUTING A NEW PROJECT [CHAP. 6
Once the breakpoint has been set, the statement will be clearly highlighted, as shown in Fig. 6.6. Observe the
dark circle to the left of the selected statement, in addition to the heavy highlighting.
Fig. 6.6
Note that the breakpoint is set ahead of the selected statement. That is, the break in the program execution
will occur just before the selected statement is executed. Also, note that the breakpoint is removed the same
way it is set; i.e., by selecting Toggle Breakpoint from the Debug menu, by clicking on the Toggle Breakpoint
button on the Debug toolbar, or by pressing function key F9. Thus, the breakpoint feature is referred to as a
toggle (i.e., the breakpoint is alternatively enabled and disabled during successive selections).
If a program contains several different breakpoints, it may be convenient to remove all of them at once. To
do so, simply select Clear All Breakpoints from the Debug menu, of press function keys Ctrl-Shift-F9
simultaneously.
You may also define a “temporary” breakpoint by clicking on any point within a statement, and then either
selecting Run to Cursor from the Debug menu or pressing function keys Ctrl-F8. The program may then be
executed up to the temporary breakpoint. You can then define appropriate watch values and step through the
remainder of the program, one instruction at a time. Unlike a regular breakpoint, however, which remains in
place until it is toggled off, the temporary breakpoint becomes inactive after one program execution.
6.4 DEFINING WATCH VALUES
Watch values are the current values of certain variables or expressions that are displayed at breakpoints. Visual
Basic supports three different types of watch values: ordinary watch values, quick watch values, and immediate
watch values. Of these, ordinary watch values are generally the most useful, because they remain active as you
step through a program on a line-by-line basis. If a particular command causes a variable or expression to
change its value, the change is seen as it happens. Thus, unusual or unexpected values can be associated with
specific commands within the code listing.
Watch values are displayed in a separate Watches window. To open the Watches window, select Watch
Window from the View menu, or click on the Watch Window button on the Debug toolbar. The Watches
window will then appear at the bottom of the screen, as shown in Fig. 6.7. You may then define watch values
by adding specific variables or expressions to the Watches window. This may be accomplished in any of the
following ways:
1. Select Add Watch... from the Debug menu and then enter the required information in the Add Watch dialog
box, as shown in Fig. 6.8.
2. Right-click on the Watches window, select Add Watch..., and then enter the required information in the Add
Watch dialog box (the same dialog box shown in Fig. 6.8.)
3. Highlight an expression in the Code Editor Window and select Add Watch... from the Debug menu. The
highlighted expression will then in the Add Watch dialog box (see Fig. 6.8).
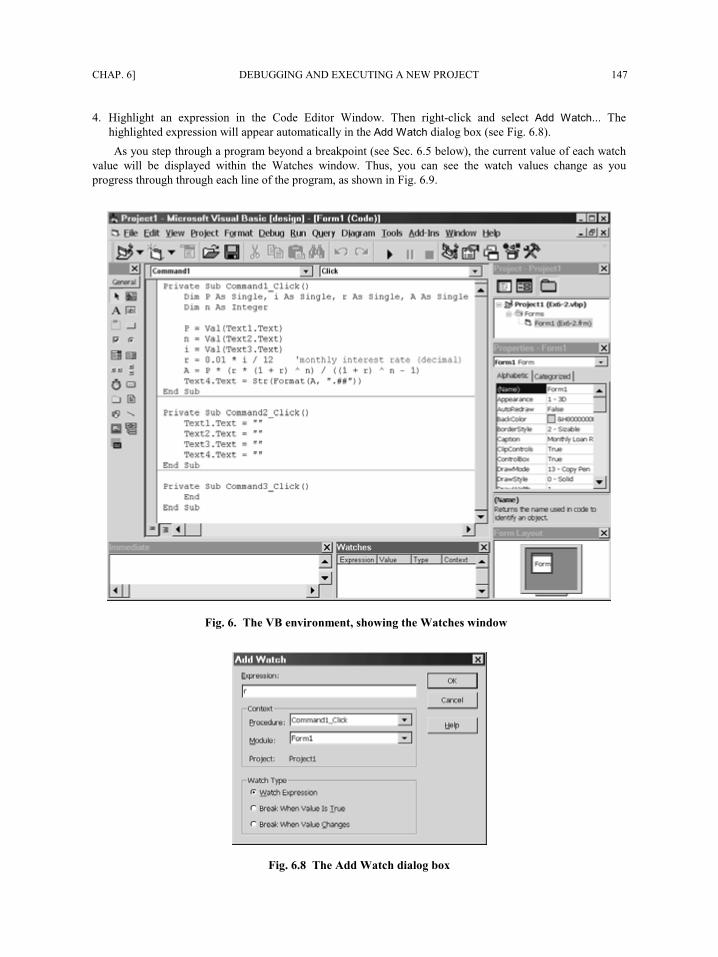
CHAP. 6] DEBUGGING AND EXECUTING A NEW PROJECT 147
4. Highlight an expression in the Code Editor Window. Then right-click and select Add Watch... The
highlighted expression will appear automatically in the Add Watch dialog box (see Fig. 6.8).
As you step through a program beyond a breakpoint (see Sec. 6.5 below), the current value of each watch
value will be displayed within the Watches window. Thus, you can see the watch values change as you
progress through through each line of the program, as shown in Fig. 6.9.
Fig. 6.7 The VB environment, showing the Watches window
Fig. 6.8 The Add Watch dialog box
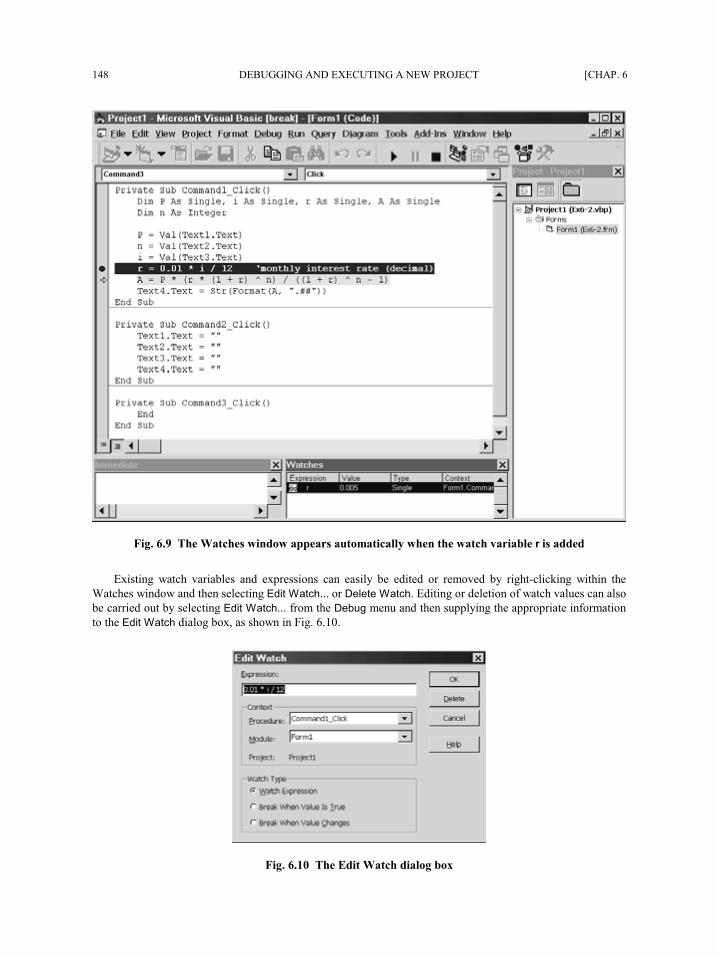
148 DEBUGGING AND EXECUTING A NEW PROJECT [CHAP. 6
Fig. 6.9 The Watches window appears automatically when the watch variable r is added
Existing watch variables and expressions can easily be edited or removed by right-clicking within the
Watches window and then selecting Edit Watch... or Delete Watch. Editing or deletion of watch values can also
be carried out by selecting Edit Watch... from the Debug menu and then supplying the appropriate information
to the Edit Watch dialog box, as shown in Fig. 6.10.
Fig. 6.10 The Edit Watch dialog box
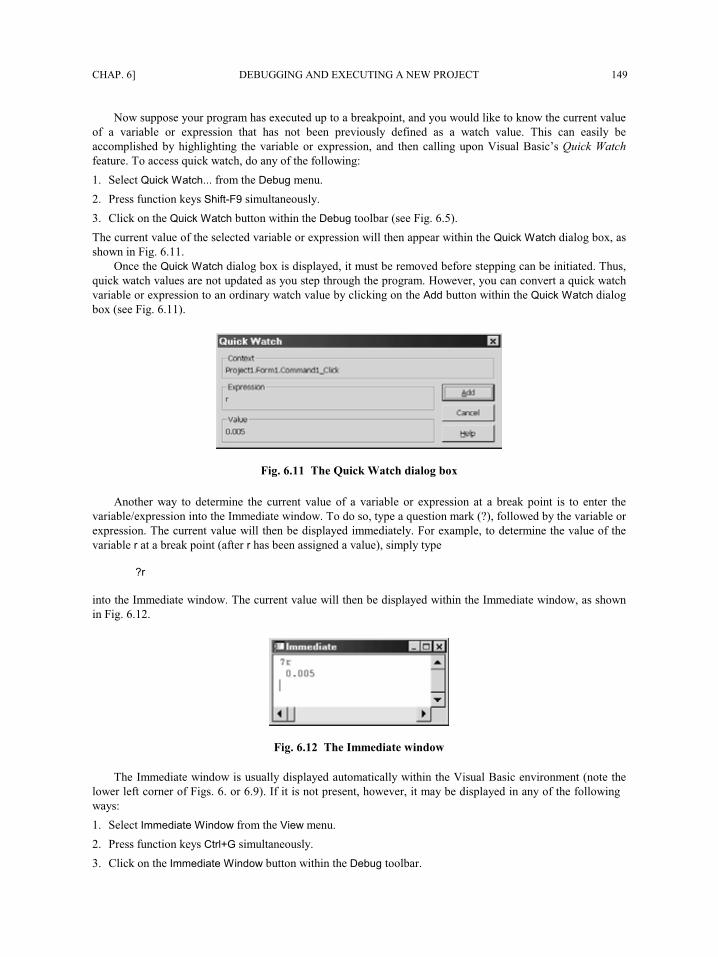
CHAP. 6] DEBUGGING AND EXECUTING A NEW PROJECT 149
Now suppose your program has executed up to a breakpoint, and you would like to know the current value
of a variable or expression that has not been previously defined as a watch value. This can easily be
accomplished by highlighting the variable or expression, and then calling upon Visual Basic’s Quick Watch
feature. To access quick watch, do any of the following:
1. Select Quick Watch... from the Debug menu.
2. Press function keys Shift-F9 simultaneously.
3. Click on the Quick Watch button within the Debug toolbar (see Fig. 6.5).
The current value of the selected variable or expression will then appear within the Quick Watch dialog box, as
shown in Fig. 6.11.
Once the Quick Watch dialog box is displayed, it must be removed before stepping can be initiated. Thus,
quick watch values are not updated as you step through the program. However, you can convert a quick watch
variable or expression to an ordinary watch value by clicking on the Add button within the Quick Watch dialog
box (see Fig. 6.11).
Fig. 6.11 The Quick Watch dialog box
Another way to determine the current value of a variable or expression at a break point is to enter the
variable/expression into the Immediate window. To do so, type a question mark (?), followed by the variable or
expression. The current value will then be displayed immediately. For example, to determine the value of the
variable r at a break point (after r has been assigned a value), simply type
?r
into the Immediate window. The current value will then be displayed within the Immediate window, as shown
in Fig. 6.12.
Fig. 6.12 The Immediate window
The Immediate window is usually displayed automatically within the Visual Basic environment (note the
lower left corner of Figs. 6.7 or 6.9). If it is not present, however, it may be displayed in any of the following
ways:
1. Select Immediate Window from the View menu.
2. Press function keys Ctrl+G simultaneously.
3. Click on the Immediate Window button within the Debug toolbar.
150 DEBUGGING AND EXECUTING A NEW PROJECT [CHAP. 6
Note that immediate values, like quick watch values, are not updated as you progress through the program
on a step-by-step basis. The Immediate window remains visible, however, showing the value of the variable or
expression when the variable/expression was last typed into the Immediate window.
6.5 STEPPING THROUGH A PROGRAM
The line-by-line stepping can be initiated either from the beginning of the program or from a breakpoint. There
are actually three different types of stepping: Step Into, Step Over, and Step Out. Each is discussed below.
1. Step Into results in line-by-line stepping within the current procedure, and any subordinate procedures that
are accessed by the current procedure (see Chap. 7 for more information about procedures). This is the
most common choice for simple programs.
2. Step Over results in line-by-line stepping within the current procedure, but it bypasses stepping through any
subordinate procedures that are accessed along the way (see Chap. 7). The subordinate procedures are
executed, however, so that any final values resulting from the subordinate procedures are in effect as the
stepping continues beyond the procedure access. Step Over may be selected instead of Step Into if a
subordinate procedure is very lengthy (e.g., includes loops), or is believed to produce no useful debugging
information.
3. Step Out results in execution of all remaining statements within the current procedure, and then pauses at
the first statement following the procedure access in the parent routine.
To carry out the actual line-by-line (statement-by-statement) stepping, do any of the following for each
desired step:
1. Select Step Into (or Step Over, Step Out) from the Debug menu.
2. Press function key F8 to Step Into (or Shift+F8 to Step Over, Ctrl+Shift+F8 to Step Out).
3. Click on the Step Into button (or the Step Over or Step Out button) on the Debug toolbar (see Fig. 6.5).
Whenever a step is taken, the statement to be executed next will be highlighted within the Code Edit window,
with a right-pointing arrow in the left margin, as shown in Fig. 6.9.
EXAMPLE 6.2 STEPPING THROUGH A PROGRAM
Suppose we wish to determine the monthly cost of a loan, given the amount of the loan, the annual interest rate (expressed
as a percentage), and the length of the loan (i.e., the number of months to repay the loan). Calculations of this type are used
to determine the cost of car loans, home mortgages, etc. To do so, we must evaluate the formula
1)1(
)1(
−+
+=n
n
r
rrPA
where A = the amount of each monthly payment
P = the amount of money originally borrowed (i.e., the principal)
r = the monthly interest rate, expressed as a decimal
n = the number of monthly payments to repay the loan (i.e., the length of the loan)
The monthly interest rate, r, is determined from the annual interest rate, i, as
r = 0.01i / 12
Note that this equation involves both a conversion from an annual interest rate to a monthly interest rate (hence, the
division by 12), and a conversion from a percentage to a decimal value (hence, the factor 0.01).
The formula can be simplified somewhat by writing
)1(/ −= ffrPA
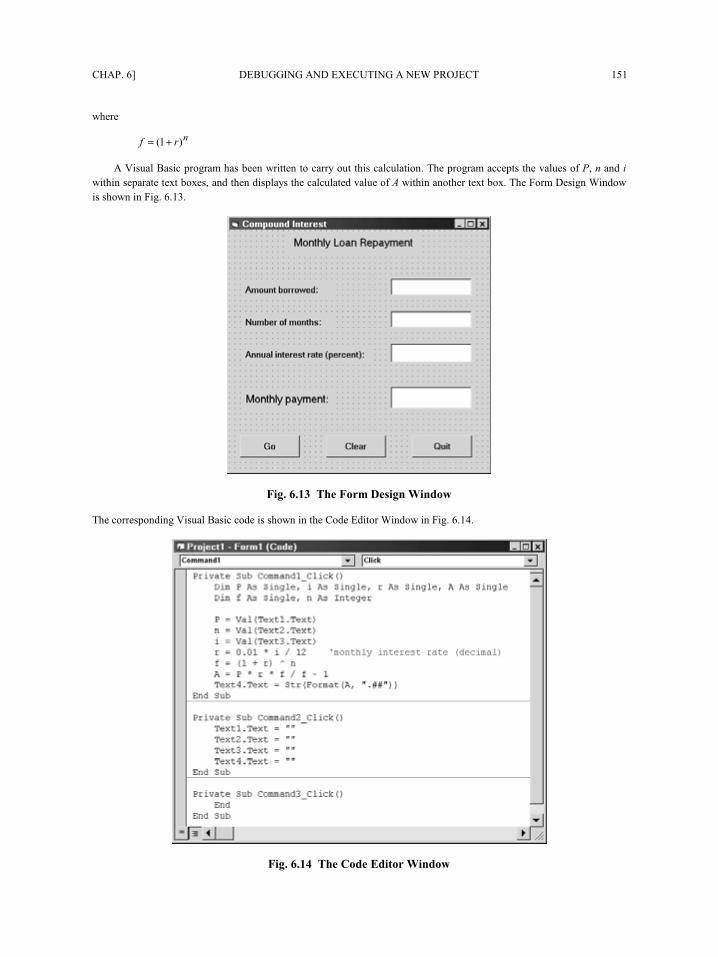
CHAP. 6] DEBUGGING AND EXECUTING A NEW PROJECT 151
where
nrf )1( +=
A Visual Basic program has been written to carry out this calculation. The program accepts the values of P, n and i
within separate text boxes, and then displays the calculated value of A within another text box. The Form Design Window
is shown in Fig. 6.13.
Fig. 6.13 The Form Design Window
The corresponding Visual Basic code is shown in the Code Editor Window in Fig. 6.14.
Fig. 6.14 The Code Editor Window
152 DEBUGGING AND EXECUTING A NEW PROJECT [CHAP. 6
Now suppose we want to borrow $10,000 for 48 months at an annual interest rate of 9.5 percent, compounded
monthly. Hence, P = 10,000, n = 48 and i = 9.5. Entering these values into their respective text boxes and clicking on the
Go button, we obtain a monthly payment of $78.17, as shown in Fig. 6.15. This result is clearly incorrect, since 48
payments of $78.17 each returns only $3752.16 to the lender – obviously much less than the original $10,000 loan, not to
mention the interest that is also due.
Fig. 6.15
This error appears to be the result of faulty program logic. Hence, we will use the Visual Basic debugger to assist us
in locating the source of the error. We first set a breakpoint at the statement
r = 0.01 * i / 12
as shown in Fig. 6.16. Note that the location of this breakpoint has been selected carefully so that it follows the entry of all
input data, but precedes any internal calculations.
Next, we select the variables P, n, i, r, f and A as watch values. These variables are listed (in alphabetical order)
within the Watches window at the bottom of Fig. 6.16. Initially, we see the message <out of context> for the value of each
variable, since the program has not been executed.
We are now ready to run the program and initiate the debugging process. Hence, we enter the three given values (i.e.,
P = 10000, n = 48 and i = 9.5), as shown in Fig. 6.16, and then click on the Go button. The program then executes up to
the breakpoint, as shown in Fig. 6.17. By examining the values in the Watches window, we verify that the input data have
been entered correctly, but the calculated values of A, f and r are zero (because they have not been assigned values within
the program). Note that the location of the breakpoint and the highlight indicating the location of the next executable
statement coincide. (The location of the next executable statement can be identified in this case by the right-pointing arrow
in the left margin, and the lighter color highlight.)
We now take one step forward, by pressing function key F8 (to initiate Step Into). The result can be seen in Fig. 6.18.
Now the watch value for r has changed from 0 to approximately 0.00792 (more precisely, 0.007916667). This value can
easily be verified as being correct, since 0.01 × 9.5 / 12 = 0.007916667. The two remaining values for A and f are still
zero, since these variables have not been assigned any values. Note that the location of the breakpoint is unchanged, as it
should be, but the highlight indicating the next executable statement has moved down one line as a result of the step.
Let us now step forward once more. Fig. 6.19 shows the results of this step. The watch value for f has now changed
from 0 to 1.460098, and the remaining watch values are unchanged. A simple hand calculation (using a calculator)
indicates that the value assigned to f is correct. Notice that the highlight indicating the next executable statement has again
moved down one line, as a result of this latest step.
Another step forward results in the watch value 78.17 being assigned to the variable A, as shown in Fig. 6.20. We
have already noted that this value is incorrect. Since all of the previously calculated watch values are correct, however, we
conclude that the error must be in the calculation of A. Closer inspection of this statement reveals a missing pair of
parentheses in the denominator.
CHAP. 6] DEBUGGING AND EXECUTING A NEW PROJECT 153
Fig. 6.16
Fig. 6.17
154 DEBUGGING AND EXECUTING A NEW PROJECT [CHAP. 6
Fig. 6.18
Fig. 6.19
CHAP. 6] DEBUGGING AND EXECUTING A NEW PROJECT 155
Fig. 6.20
The successive watch values leads us to conclude that the assignment statement for A should be written
A = P * r * f / (f – 1)
rather than
A = P * r * f / f – 1
as it is currently written. After making this correction and rerunning this problem, we obtain a correct value of A = 251.23
as a final result. In other words, a loan of $10,000 at 9.5 percent annual interest requires a repayment schedule of $251.23
per month for 48 months.
Note that we were able to identify the location and then the source of this error through the use of stepping and watch
values within the Visual Basic debugger.
6.6 USER-INDUCED ERRORS
User-induced errors are the result of mistakes made by the user when the program is executing (e.g., entering
numbers that are out of range, or entering nonnumerical characters when a numerical value is expected). Errors
of this type can usually be anticipated and “trapped” by one or more If-Then-Else blocks. However, it may
be more convenient to use an error handler routine to trap the error and then take appropriate remedial action.
The use of error handlers is described in the next section.
6.7 ERROR HANDLERS
An error handler is a series of Visual Basic statements that is intended to recognize an error when it occurs
(i.e., to “trap” an error) and then provide appropriate corrective action. The nature of the corrective action
156 DEBUGGING AND EXECUTING A NEW PROJECT [CHAP. 6
depends on the type of error encountered. In some situations, the user can re-enter input data that will prevent
the error from occurring. In other situations, the error can simply be bypassed, or the source of the error can be
corrected automatically.
When writing an error handler, we must be able to recognize an error when it occurs and then redirect the
program logic to a special part of the program that is written specifically to deal with the error. This is
accomplished with the On Error-GoTo statement, which redirects the program logic to to a remote statement
when an error occurs. The remote statement includes a label that is specified within the On Error-GoTo
statement, thus providing a target for the continuing flow of program logic.
The following skeletal outline illustrates a typical error trap within an event procedure.
Private Sub procedure name
On Error GoTo label
. . . . .
Exit Sub
label:
remote statement 'Begin error trap
. . . . .
Resume
End Sub
The On Error-GoTo statement directs the program logic to the remote statement with the specified label (the
first statement in the error trap routine) in the event that an error is detected during the program execution. This
statement and the succeeding statements, through and including Resume, are then executed. (Presumably, these
statements will provide whatever actions are required to correct the error.)
The Resume statement can be written in several different ways. If it is written simply as Resume, as in the
above skeletal outline, it returns the program logic to the statement that originally caused the error. This works
well if the source of the error has been corrected within the error trap. You can also write the Resume statement
as Resume Next or Resume return label. Resume Next causes the program logic to be returned to the
statement immediately following the one that caused the error. Resume return label causes the program logic
to be returned to the remote statement with the specified return label. (Note that this labeled statement is not
the beginning of the error trap. Thus, there are two different labeled statements – one to initiate the error trap,
and the other to serve as a return point once the error-trap routine has been completed.)
Error trapping within a program can be disabled by a special form of the On Error-GoTo statement;
namely,
On Error GoTo 0
This feature is useful if you want to activate error trapping in one part of a program, and then disable it in
another part.
Returning to the previous skeletal outline, now suppose that an error is not detected during program
execution. The program logic will then continue sequentially, as usual, until the Exit Sub statement is
encountered. The Exit Sub statement directs the program logic out of the event procedure, thus avoiding the
error trap.
Note that the Resume and Exit Sub statements are not always needed within an error handler. Or one may
be required, but not the other. The program logic will dictate whether or not these statements will be included.
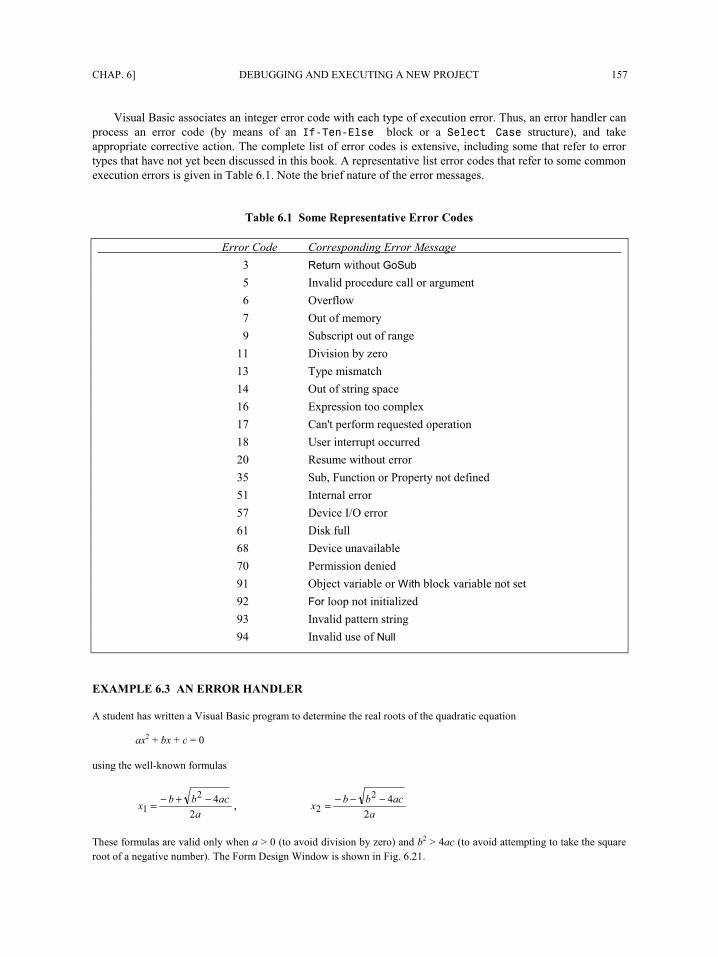
CHAP. 6] DEBUGGING AND EXECUTING A NEW PROJECT 157
Visual Basic associates an integer error code with each type of execution error. Thus, an error handler can
process an error code (by means of an If-Then-Else block or a Select Case structure), and take
appropriate corrective action. The complete list of error codes is extensive, including some that refer to error
types that have not yet been discussed in this book. A representative list error codes that refer to some common
execution errors is given in Table 6.1. Note the brief nature of the error messages.
Table 6.1 Some Representative Error Codes
Error Code Corresponding Error Message
3 Return without GoSub
5 Invalid procedure call or argument
6 Overflow
7 Out of memory
9 Subscript out of range
11 Division by zero
13 Type mismatch
14 Out of string space
16 Expression too complex
17 Can't perform requested operation
18 User interrupt occurred
20 Resume without error
35 Sub, Function or Property not defined
51 Internal error
57 Device I/O error
61 Disk full
68 Device unavailable
70 Permission denied
91 Object variable or With block variable not set
92 For loop not initialized
93 Invalid pattern string
94 Invalid use of Null
EXAMPLE 6.3 AN ERROR HANDLER
A student has written a Visual Basic program to determine the real roots of the quadratic equation
ax2 + bx + c = 0
using the well-known formulas
a
acbbx
2
42
1−+−= ,
a
acbbx
2
42
2−−−=
These formulas are valid only when a > 0 (to avoid division by zero) and b2 > 4ac (to avoid attempting to take the square
root of a negative number). The Form Design Window is shown in Fig. 6.21.
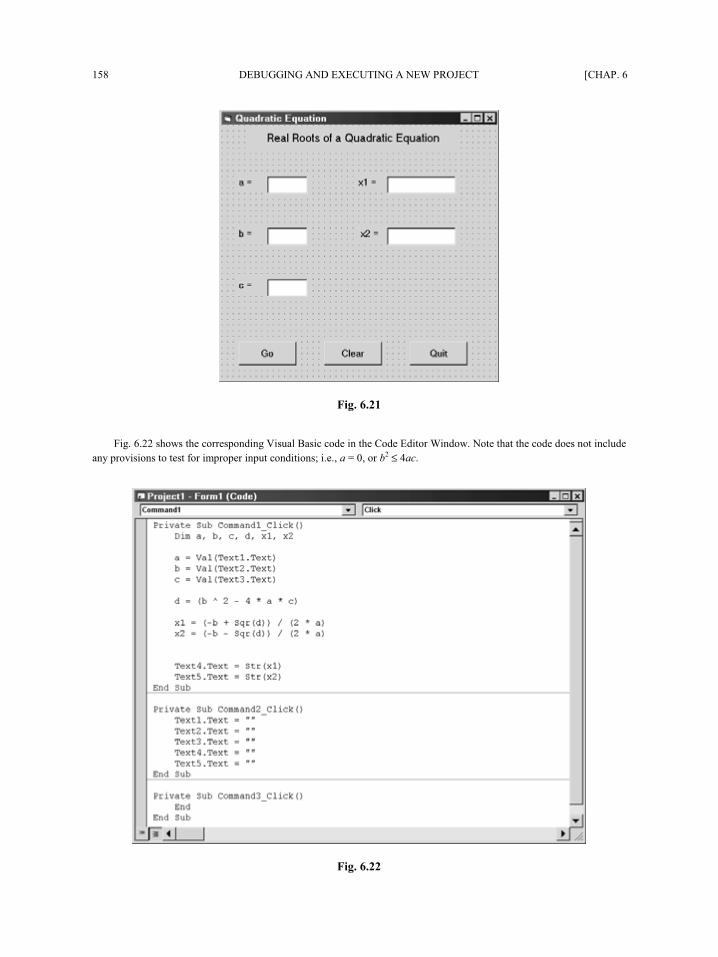
158 DEBUGGING AND EXECUTING A NEW PROJECT [CHAP. 6
Fig. 6.21
Fig. 6.22 shows the corresponding Visual Basic code in the Code Editor Window. Note that the code does not include
any provisions to test for improper input conditions; i.e., a = 0, or b2 ≤ 4ac.
Fig. 6.22
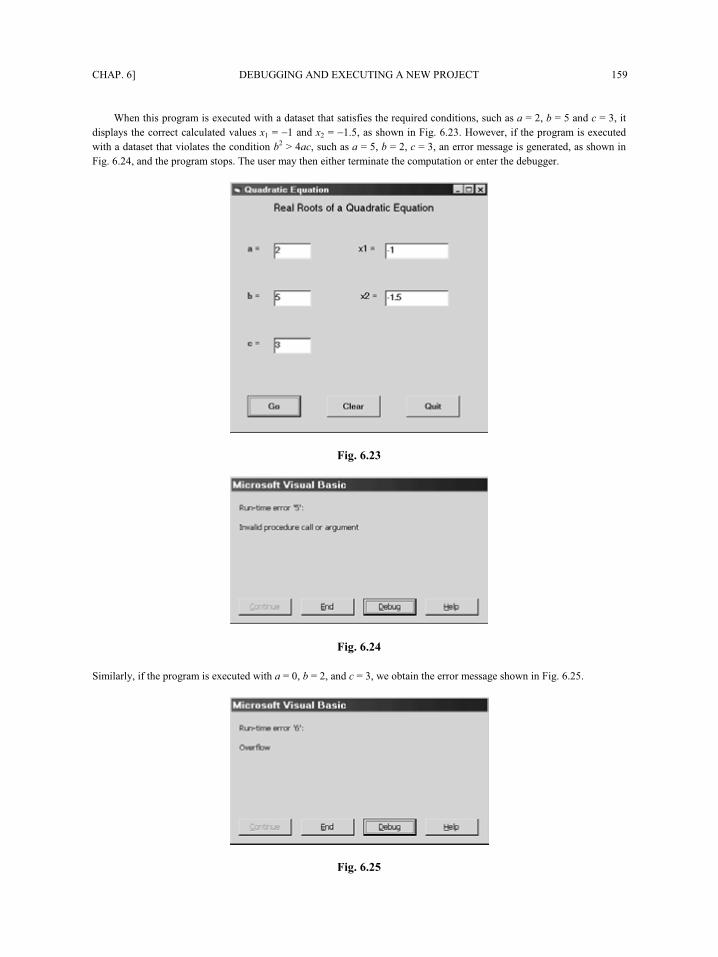
CHAP. 6] DEBUGGING AND EXECUTING A NEW PROJECT 159
When this program is executed with a dataset that satisfies the required conditions, such as a = 2, b = 5 and c = 3, it
displays the correct calculated values x1 = −1 and x2 = −1.5, as shown in Fig. 6.23. However, if the program is executed
with a dataset that violates the condition b2 > 4ac, such as a = 5, b = 2, c = 3, an error message is generated, as shown in
Fig. 6.24, and the program stops. The user may then either terminate the computation or enter the debugger.
Fig. 6.23
Fig. 6.24
Similarly, if the program is executed with a = 0, b = 2, and c = 3, we obtain the error message shown in Fig. 6.25.
Fig. 6.25
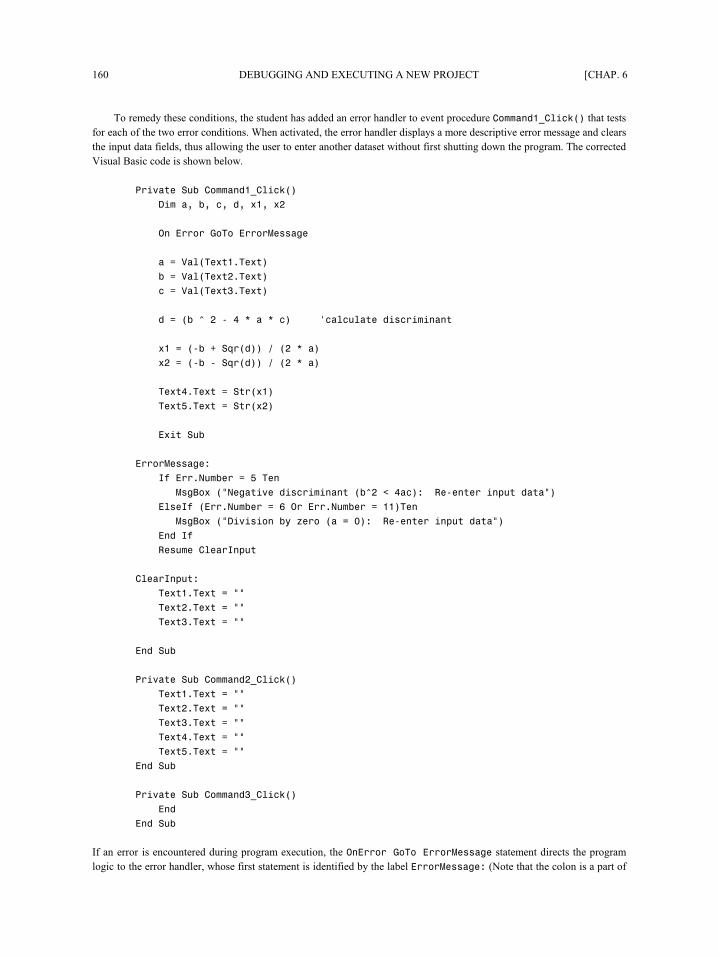
160 DEBUGGING AND EXECUTING A NEW PROJECT [CHAP. 6
To remedy these conditions, the student has added an error handler to event procedure Command1_Click() that tests
for each of the two error conditions. When activated, the error handler displays a more descriptive error message and clears
the input data fields, thus allowing the user to enter another dataset without first shutting down the program. The corrected
Visual Basic code is shown below.
Private Sub Command1_Click()
Dim a, b, c, d, x1, x2
On Error GoTo ErrorMessage
a = Val(Text1.Text)
b = Val(Text2.Text)
c = Val(Text3.Text)
d = (b ^ 2 - 4 * a * c) 'calculate discriminant
x1 = (-b + Sqr(d)) / (2 * a)
x2 = (-b - Sqr(d)) / (2 * a)
Text4.Text = Str(x1)
Text5.Text = Str(x2)
Exit Sub
ErrorMessage:
If Err.Number = 5 Then
MsgBox ("Negative discriminant (b^2 < 4ac): Re-enter input data")
ElseIf (Err.Number = 6 Or Err.Number = 11)Then
MsgBox ("Division by zero (a = 0): Re-enter input data")
End If
Resume ClearInput
ClearInput:
Text1.Text = ""
Text2.Text = ""
Text3.Text = ""
End Sub
Private Sub Command2_Click()
Text1.Text = ""
Text2.Text = ""
Text3.Text = ""
Text4.Text = ""
Text5.Text = ""
End Sub
Private Sub Command3_Click()
End
End Sub
If an error is encountered during program execution, the OnError GoTo ErrorMessage statement directs the program
logic to the error handler, whose first statement is identified by the label ErrorMessage: (Note that the colon is a part of
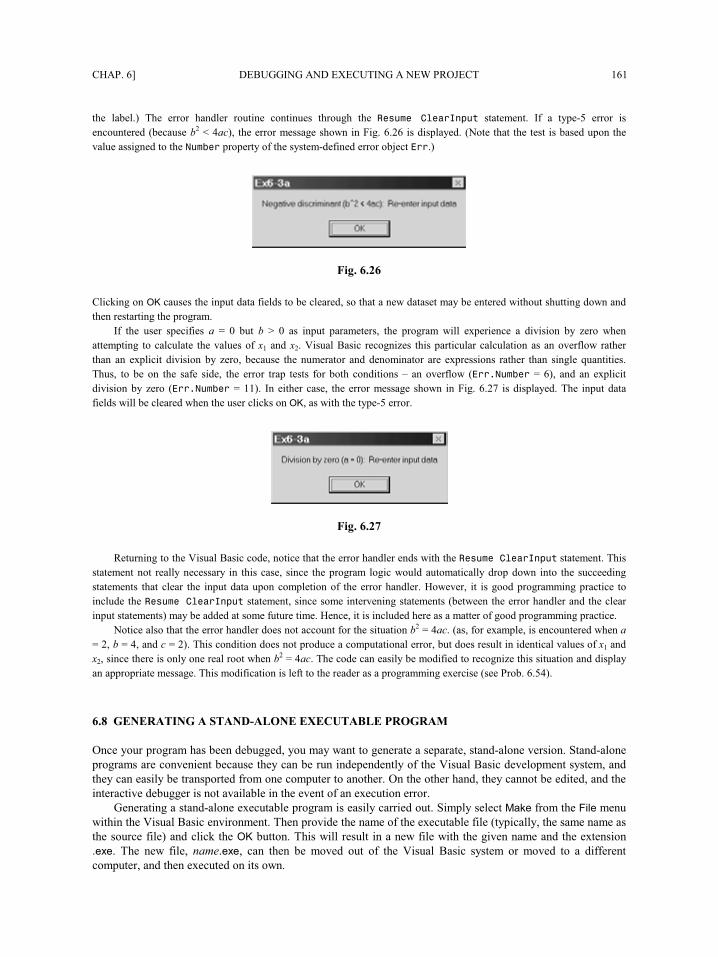
CHAP. 6] DEBUGGING AND EXECUTING A NEW PROJECT 161
the label.) The error handler routine continues through the Resume ClearInput statement. If a type-5 error is
encountered (because b2 < 4ac), the error message shown in Fig. 6.26 is displayed. (Note that the test is based upon the
value assigned to the Number property of the system-defined error object Err.)
Fig. 6.26
Clicking on OK causes the input data fields to be cleared, so that a new dataset may be entered without shutting down and
then restarting the program.
If the user specifies a = 0 but b > 0 as input parameters, the program will experience a division by zero when
attempting to calculate the values of x1 and x2. Visual Basic recognizes this particular calculation as an overflow rather
than an explicit division by zero, because the numerator and denominator are expressions rather than single quantities.
Thus, to be on the safe side, the error trap tests for both conditions – an overflow (Err.Number = 6), and an explicit
division by zero (Err.Number = 11). In either case, the error message shown in Fig. 6.27 is displayed. The input data
fields will be cleared when the user clicks on OK, as with the type-5 error.
Fig. 6.27
Returning to the Visual Basic code, notice that the error handler ends with the Resume ClearInput statement. This
statement not really necessary in this case, since the program logic would automatically drop down into the succeeding
statements that clear the input data upon completion of the error handler. However, it is good programming practice to
include the Resume ClearInput statement, since some intervening statements (between the error handler and the clear
input statements) may be added at some future time. Hence, it is included here as a matter of good programming practice.
Notice also that the error handler does not account for the situation b2 = 4ac. (as, for example, is encountered when a
= 2, b = 4, and c = 2). This condition does not produce a computational error, but does result in identical values of x1 and
x2, since there is only one real root when b2 = 4ac. The code can easily be modified to recognize this situation and display
an appropriate message. This modification is left to the reader as a programming exercise (see Prob. 6.54).
6.8 GENERATING A STAND-ALONE EXECUTABLE PROGRAM
Once your program has been debugged, you may want to generate a separate, stand-alone version. Stand-alone
programs are convenient because they can be run independently of the Visual Basic development system, and
they can easily be transported from one computer to another. On the other hand, they cannot be edited, and the
interactive debugger is not available in the event of an execution error.
Generating a stand-alone executable program is easily carried out. Simply select Make from the File menu
within the Visual Basic environment. Then provide the name of the executable file (typically, the same name as
the source file) and click the OK button. This will result in a new file with the given name and the extension
.exe. The new file, name.exe, can then be moved out of the Visual Basic system or moved to a different
computer, and then executed on its own.
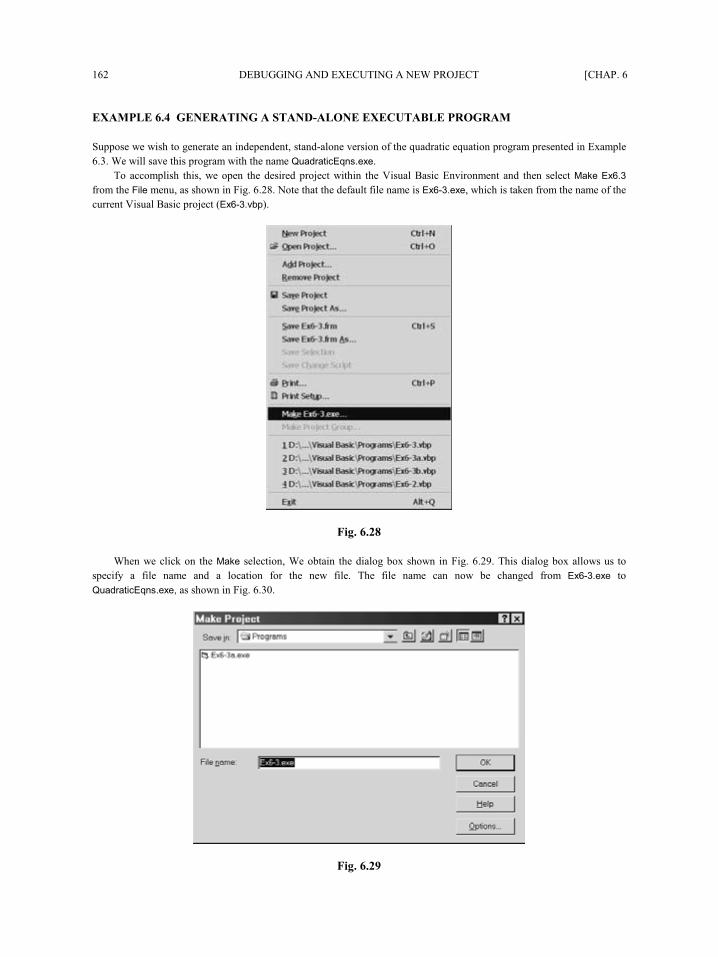
162 DEBUGGING AND EXECUTING A NEW PROJECT [CHAP. 6
EXAMPLE 6.4 GENERATING A STAND-ALONE EXECUTABLE PROGRAM
Suppose we wish to generate an independent, stand-alone version of the quadratic equation program presented in Example
6.3. We will save this program with the name QuadraticEqns.exe.
To accomplish this, we open the desired project within the Visual Basic Environment and then select Make Ex6.3
from the File menu, as shown in Fig. 6.28. Note that the default file name is Ex6-3.exe, which is taken from the name of the
current Visual Basic project (Ex6-3.vbp).
Fig. 6.28
When we click on the Make selection, We obtain the dialog box shown in Fig. 6.29. This dialog box allows us to
specify a file name and a location for the new file. The file name can now be changed from Ex6-3.exe to
QuadraticEqns.exe, as shown in Fig. 6.30.
Fig. 6.29
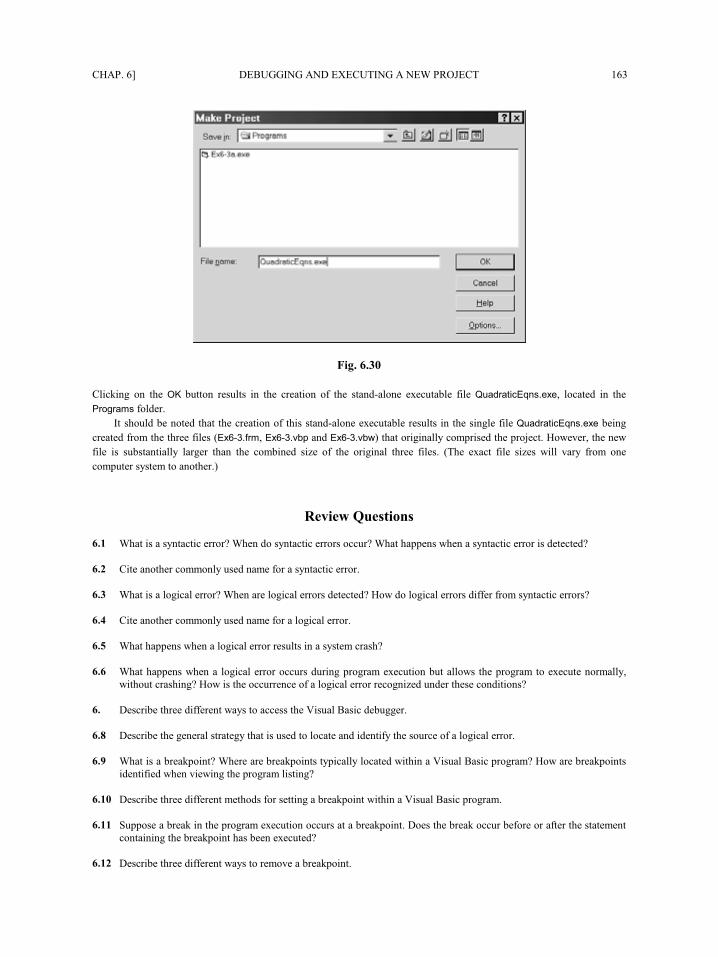
CHAP. 6] DEBUGGING AND EXECUTING A NEW PROJECT 163
Fig. 6.30
Clicking on the OK button results in the creation of the stand-alone executable file QuadraticEqns.exe, located in the
Programs folder.
It should be noted that the creation of this stand-alone executable results in the single file QuadraticEqns.exe being
created from the three files (Ex6-3.frm, Ex6-3.vbp and Ex6-3.vbw) that originally comprised the project. However, the new
file is substantially larger than the combined size of the original three files. (The exact file sizes will vary from one
computer system to another.)
Review Questions
6.1 What is a syntactic error? When do syntactic errors occur? What happens when a syntactic error is detected?
6.2 Cite another commonly used name for a syntactic error.
6.3 What is a logical error? When are logical errors detected? How do logical errors differ from syntactic errors?
6.4 Cite another commonly used name for a logical error.
6.5 What happens when a logical error results in a system crash?
6.6 What happens when a logical error occurs during program execution but allows the program to execute normally,
without crashing? How is the occurrence of a logical error recognized under these conditions?
6.7 Describe three different ways to access the Visual Basic debugger.
6.8 Describe the general strategy that is used to locate and identify the source of a logical error.
6.9 What is a breakpoint? Where are breakpoints typically located within a Visual Basic program? How are breakpoints
identified when viewing the program listing?
6.10 Describe three different methods for setting a breakpoint within a Visual Basic program.
6.11 Suppose a break in the program execution occurs at a breakpoint. Does the break occur before or after the statement
containing the breakpoint has been executed?
6.12 Describe three different ways to remove a breakpoint.

164 DEBUGGING AND EXECUTING A NEW PROJECT [CHAP. 6
6.13 Suppose a program contains several different breakpoints. How can all of the breakpoints be removed at once?
6.14 What is a “temporary” breakpoint? How is a temporary breakpoint set? How does a temporary breakpoint differ from
an ordinary breakpoint?
6.15 What is a watch value?
6.16 What is the difference between an ordinary watch value, a quick watch value, and an immediate watch value? Where
does each type of watch value appear?
6.17 How is the Watches window opened within the Visual Basic environment?
6.18 Describe four different ways to add a variable or expression to the Watches window.
6.19 What happens to the existing watch values as you step through a program?
6.20 How is a watch value edited? How is a watch value removed?
6.21 In what way is the quick watch feature useful when debugging a program that already has sevearal watch values
defined?
6.22 Describe three different ways to access the quick watch feature.
6.23 How does a quick watch value differ from an ordinary watch value?
6.24 How is a quick watch value converted to an ordinary watch value? Why might you want to do this?
6.25 What type of information can be obtained from the Immediate window at a break point? How is this information
obtained?
6.26 Describe three different ways to display the Immediate window if it is not already shown.
6.27 What is the difference between Step Into, Step Over, and Step Out? When would each be used?
6.28 Describe three different ways to step through a program beyond a breakpoint using Step Into.
6.29 Describe three different ways to step through a program beyond a breakpoint using Step Over.
6.30 Describe three different ways to step through a program beyond a breakpoint using Step Out.
6.31 When stepping through a program, how can you tell which statement is about to be executed?
6.32 What is a user-induced error? How do user-induced errors differ from syntactic errors and logical errors?
6.33 What is an error handler?
6.34 What is the purpose of the On Error-GoTo statement?
6.35 What is a label? Within a given statement, how can a label be identified?
6.36 What is the purpose of the Resume statement?
6.37 Describe three different forms of the Resume statement. What is the purpose of each?
6.38 What is the purpose of the On Error GoTo 0 statement?
6.39 What is the purpose of the Exit Sub statement?
6.40 Are Resume and Exit Sub required in all programs that include an error handler? Explain.
CHAP. 6] DEBUGGING AND EXECUTING A NEW PROJECT 165
6.41 What are error codes? How can error codes be used within an error handler?
6.42 What are the advantages to a stand-alone executable program? What are the disadvantages?
6.43 Describe the process used to generate a stand-alone executable program from Visual Basic source files.
6.44 How are the name and location of a stand-alone executable program specified?
Programming Problems
6.45 Re-create the project shown in Example 6.2 on your own computer. Experiment with the choice of
breakpoints and watch values. Request quick watch and immediate watch values at breakpoints. Then
step through the program and observe what happens as you move from one instruction to another.
6.46 Add an error handler to the project created in the preceding problem. Include tests for overflows and
division by zero.
6.47 Suppose you save A dollars a month for n years. If the annual interest rate (expressed as a percentage) is
i and the interest is compounded monthly, how much money will you accumulate at the end of the n
years?
This question can be answered by direct evaluation of the following formula:
r
rAF
n 1)1( 12 −+=
where r represents the monthly interest rate, expressed as a decimal. Hence,
r = 0.01i / 12
as in Example 6.2.
Using Example 6.2 as a guide, create a Visual Basic project to solve this problem. Include an error
handler that tests for overflows and division by zero. Test the program with the following test values:
(a) A = $100, i = 6 percent per year, n = 10 years.
(b) A = $100, i = 0 percent per year, n = 10 years.
Use the debugger to set breakpoints and watch values. Then step through the program to observe what
happens when using data set (b).
6.48 Modify the Visual Basic project shown in Example 4.8 (extended temperature conversion) so that the
input temperatures are confined to the following intervals:
(a) Given temperature in Fahrenheit degrees: °F ≥ −459.67
(b) Given temperature in Celsius degrees: °C ≥ −273.15
Add an error handler that utilizes If-Then blocks to trap inappropriate input temperatures. Test the
error handler by entering data that fall outside of the acceptable ranges. In addition, verify that the
program is working correctly by stepping through the program with valid input temperatures.
6.49 Modify the Visual Basic project shown in Example 4.11 (calculating factorials) in the following ways:
(a) Declare factorial to be an integer variable rather than a long integer variable.
(b) Step through the program for the case n = 10.
166 DEBUGGING AND EXECUTING A NEW PROJECT [CHAP. 6
(c) Add an error handler that utilizes an On Error-GoTo statement to test for an overflow condition.
(d) Restore factorial to be a long integer variable, as in the given example.
(e) Step through the program for the case n = 10. Compare with the results obtained in part (b).
6.50 Repeat Prob. 4.46 (even/odd/prime numbers) with the following modifications:
(a) Add an error handler for nonpositive values of n (i.e., for n ≤ 0).
(b) Step through the prime-number part of the program, to gain insight into the program logic. Test the
program for each of the following input values:
(i) n = 10 (not a prime number)
(ii) n = 13 (prime number)
6.51 Repeat Prob. 4.48 (sum of integers from n1 to n2, where n2 > n1). Add an error handler to prevent the
user from entering a value of n2 that does not exceed n1. Step through the program to verify that the
program executes correctly for all three options.
6.52 Create a Visual Basic project to evaluate the polynomial
y = [(x − 1) / x] + [(x − 1) / x] 2 / 2 + [(x − 1) / x] 3 / 3 + [(x − 1) / x] 4 / 4 + [(x − 1) / x] 5 / 5
for positive values of x (i.e., x > 0). Include an error handler to prevent inappropriate values of x from
being entered. Step through the program to verify that it is working correctly.
6.53 Create a complete Visual Basic project for each of the following problems. Be sure that all of the
calculated results are labeled clearly. Include provisions for clearing the input data and repeating the
calculations. In addition, include error traps to prevent execution errors and inappropriate input data.
(a) Calculate the volume and area of a sphere using the expressions
V = 4π r 3 / 3, A = 4π r 2
where r > 0 is the radius of the sphere.
(b) The pressure, volume and temperature of a mass of air are related by the expression
PV = 0.37m(T + 460)
where P = pressure, pounds per square inch
V = volume, cubic feet
m = mass of air, pounds
T = temperature, oF
Determine the mass of air when the pressure, volume and temperature are given. Note that P, V
and m must exceed zero. In addition, restrict T to values that are not less than –50°F.
Test the project by determining the answer to the following problem: An automobile tire
contains 2 cubic feet of air. If the tire is inflated to 28 pounds per square inch at room temperature
(68°F), how much air is in the tire?
(c) If a, b and c represent the three sides of a triangle (a > 0, b > 0 and c > 0), then the area of the
triangle is
CHAP. 6] DEBUGGING AND EXECUTING A NEW PROJECT 167
A = [ s (s − a) (s − b) (s − c) ] 1/2
where s = (a + b + c) / 2. Also, the radius of the largest inscribed circle is given by
ri = A/s
and the radius of the smallest circumscribed circle is
rc = abc / (4A)
Calculate the area of the triangle, the area of the largest inscribed circle and the area of the
smallest circumscribed circle for each of the following sets of data:
a: 11.88 5.55 10.00 13.75 12.00 20.42 7.17 173.67
b: 8.06 4.54 10.00 9.89 8.00 27.24 2.97 87.38
c: 12.75 7.56 10.00 11.42 12.00 31.59 6.66 139.01
(d) The increase in population of a bacteria culture with time is directly proportional to the size of the
population. Thus the larger the population, the faster the bacteria will increase in number.
Mathematically the population at any time can be expressed as
P = P0[1 + ct + (ct)2/2 + (ct)3/6 + . . . + (ct)n/n!]
where t = time in hours beyond a reference time
P0 = bacteria population at the reference time
P = bacteria population at time t
c = an experimental constant
n = indicates the number of terms in the series (specifically, n is one less than the
number of terms in the series; e.g., if n = 2, there will be three terms in the series.)
(i) Calculate the population multiplication factor (P/P0) at 2, 5, 10, 20 and 50 hours beyond the
reference time, assuming c=0.0289. Include the first 5 terms of the series (i.e., let n = 4).
Based upon these calculations, describe, in general terms, how the the population
multiplication factor varies with time. Hint: To avoid unnecessary calculations, make use of
the relationship n! = n × (n – 1)!
(ii) Calculate the population multiplication factor (P/P0) at 50 hours beyond the reference time,
assuming c = 0.0289 and n = 10.
(iii) Calculate the population multiplication factor (P/P0) at 50 hours beyond the reference time,
assuming c = 0.0289 and n = 20.
Based upon the results of parts (i), (ii) and (iii), describe, in general terms, the sensitivity of the
population multiplication factor to n.
6.54 Modify the program shown in Example 6.3 to accommodate the special situation that occurs when b2 =
4ac, resulting in a single real root for the quadratic equation
ax2 + bx + c = 0
Display a message indicating that there is only one real root, along with the value of the root.
168
Chapter 7 ______________________________
Procedures
7.1 MODULES AND PROCEDURES
Large projects are much more manageable if they broken up into modules, each of which contains portions of
the code comprising the entire project. Visual Basic supports several types of modules, each of which is stored
as a separate file. Form modules contain declarations, event procedures and various support information for
their respective forms and controls. Form modules are stored as files identified by the extension .frm.
Whenever you add a new form to a project and then save the form, a separate form module (i.e., a new .frm
file) is created. A new form can be created by selecting Add Form from Visual Basic’s Project menu. This
results in a new form design window, within you may add the required code.
A project may also include a standard module. Standard modules contain declarations and procedures that
can be accessed by other modules. Standard modules are stored as files with the extension .bas. A standard
module can be created by selecting Add Module from Visual Basic’s Project menu. This results in a new code
editor window, within which you may add the necessary declarations and procedures.
Visual Basic also supports other types of modules, including class modules (extension .cls), whose
characteristics are beyond the scope of our present discussion.
A procedure (including an event procedure) is a self-contained group of Visual Basic commands that can
be accessed from a remote location within a Visual Basic program. The procedure then carries out some
specific action. Information can be freely transferred between the “calling” location (i.e., the command which
accesses the procedure) and the procedure itself. Thus, it is possible to transfer information to a procedure,
process that information within the procedure, and then transfer a result back to the calling location. Note,
however, that not all procedures require an information transfer – some merely carry out an action without any
information interchange.
Large modules are customarily decomposed into multiple procedures, for several reasons. First, the use of
procedures eliminates redundancy (that is, the repeated programming of the same group of instructions at
different places within a program). Secondly, it enhances the clarity of a program by allowing the program to
be broken down into relatively small, logically concise components. And finally, the use of independent
procedures allows programmers to develop their own libraries of frequently used routines.
Visual Basic supports three types of procedures – Sub procedures (sometimes referred to simply as
subroutines), Function procedures (also called functions), and Property procedures. Sub and function
procedures are commonly used in beginning and intermediate level programs. Hence, our focus in this chapter
will be on sub and function procedures. The shell (beginning and ending statements) for a new sub or function
procedure can be added to a project by selecting Add Procedure... from the Tools menu.
7.2 SUB PROCEDURES (SUBROUTINES)
In its simplest form, a sub procedure is written as
Sub procedure name (arguments)
. . . . .
statements
. . . . .
End Sub
Copyright 2001 by McGraw-Hill, Inc. Click Here for Terms of Use.
CHAP. 7] PROCEDURES 169
The procedure name must follow the same naming convention used with variables (see Sec. 2.3). In addition, a
procedure name cannot be identical to a constant or variable name within the same module.
The list of arguments is optional. Arguments represent information that is transferred into the procedure
from the calling statement. Each argument is written as a variable declaration; i.e.,
argument name As data type
The data type can be omitted if the argument is a variant.
Multiple arguments must be separated by commas. If arguments are not present, an empty pair of
parentheses must appear in the Sub statement.
EXAMPLE 7.1 DEFINING A SUB PROCEDURE
Here is a sub procedure that determines the smallest of two numbers.
Sub Smallest(a, b)
Dim Min
If (a < b) Then
Min = a
MsgBox "a is smaller (a = " & Str(Min) & ")"
ElseIf (a > b) Then
Min = b
MsgBox "b is smaller (b = " & Str(Min) & ")"
Else
Min = a
MsgBox "Both values are equal (a, b = " & Str(Min) & ")"
End If
End Sub
This procedure has two arguments, a and b. Both are variants. The procedure compares the values of the arguments,
determines which is smaller, and then displays the value of the smaller argument in a message box.
Note that the variable Min is a variant that is defined locally within the procedure. It represents the smallest value
among the arguments. This variable is not required in this example (we could simply use a or b instead). However, it is a
good idea to include this variable, in case the procedure should be expanded to process the minimum value in some
manner without altering the given values of the arguments.
Also, note that we could also have included explicit data typing in the first two lines; i.e.,
Sub Smallest(a As Variant, b As Variant)
Dim Min As Variant
or, if we choose a different data type,
Sub Smallest(a As Single, b As Single)
Dim Min As Single
etc., if we wished.
A sub procedure can be accessed from elsewhere within the module via the Call statement. The Call
statement is written
Call procedure name (arguments)
The list of arguments in the Call statement must agree with the argument list in the procedure definition.
The arguments must agree in number, in order, and in data type. However, the respective names may be
170 PROCEDURES [CHAP. 7
different. Thus, if the procedure definition includes three arguments whose data types are single, integer, and
string, the Call statement must also contain three arguments whose data types are single, integer, and string,
respectively. The names of the arguments within the procedure definition need not, however, be the same as the
names of the arguments in the Call statement. For example, the arguments within the procedure definition
might be named a, b and c, whereas the corresponding arguments within the Call statement might be called x,
y and z.
Here is another way to access a sub procedure.
procedure name arguments
Note the absence of the keyword Call, and the absence of parentheses.
When the procedure is accessed, the values of the arguments within the calling portion of the program
become available to the arguments within the procedure itself. Thus, the values of the arguments are transferred
from the calling portion of the program to the procedure. Moreover, if the value of an argument is altered
within the procedure, the change will be recognized within the calling portion of the program. (Actually, it is
the addresses of the arguments that are shared; hence, the contents of those addresses can be accessed from
either the calling portion of the program or from within the procedure itself.) This type of transfer is called
passing by reference.
EXAMPLE 7.2 ACCESSING A SUB PROCEDURE (SMALLEST OF TWO NUMBERS)
Here is a complete Visual Basic program that makes use of the sub procedure given in Example 7.1. The program
determines the smallest of two numbers and then displays the result. Fig. 7.1 shows the preliminary control layout.
Fig. 7.1
We now assign the following initial values to the form and control properties.
Object Property Value
Form1 Caption “Min of Two Numbers”
Label1 Caption “a = ”
Font MS Sans Serif, 10-point
CHAP. 7] PROCEDURES 171
Object Property Value
Label2 Caption “b = ”
Font MS Sans Serif, 10-point
Label3 Caption “Determine the Smallest of Two Numbers”
Font MS Sans Serif, 12-point
Text1 Caption (none)
Font MS Sans Serif, 10-point
Text2 Caption (none)
Font MS Sans Serif, 10-point
Command1 Caption “Go”
Font MS Sans Serif, 10-point
Command2 Caption “Quit”
Font MS Sans Serif, 10-point
These property assignments result in the form shown in Fig. 7.2.
Fig. 7.2
The required procedures (a sub procedure and two event procedures) are shown below.
Sub Smallest(a, b)
Dim Min
If (a < b) Then
Min = a
MsgBox "a is smaller (a = " & Str(Min) & ")"
ElseIf (a > b) Then
Min = b
MsgBox "b is smaller (b = " & Str(Min) & ")"
Else
Min = a
MsgBox "Both values are equal (a, b = " & Str(Min) & ")"
End If
End Sub

172 PROCEDURES [CHAP. 7
Private Sub Command1_Click()
Dim x As Variant, y As Variant
x = Val(Text1.Text)
y = Val(Text2.Text)
Call Smallest(x, y)
‘or:
‘Smallest x, y
End Sub
Private Sub Command2_Click()
End
End Sub
The sub procedure (Smallest) is the same as that shown in Example 7.1.
When the user clicks on the Go button, event procedure Command1_Click() is activated. This causes the two values
entered in the text boxes to be converted to numerical values and assigned to the variants x and y, respectively. These
values are then transferred to the sub procedure Smallest when the sub procedure is accessed via the Call statement.
Within Smallest, the arguments (i.e., the values of x and y within the event procedure) are referred to as a and b. The sub
procedure then determines which argument represents the smallest value and displays an appropriate message indicating
the result.
Fig. 7.3 shows what happens when the program is executed. Here the user has entered the values 5 and 3 for a and b,
respectively. The message shown in Fig. 7.4 is generated when the user clicks on the Go button.
Fig. 7.3
Fig. 7.4
CHAP. 7] PROCEDURES 173
When passing an argument by reference, the argument name may be preceded by the reserved word ByRef
within the procedure definition; i.e.,
ByRef argument name As data type
The ByRef designation is not essential, however, because this is the default mode of transfer in Visual Basic.
An argument passed by reference is usually written as a single variable within the calling statement. It may
be possible, however, to write an argument as an expression within the calling statement and still pass its value
to a procedure by reference (most programming languages do not allow expressions to be passed by reference).
This works because the expression is assigned its own address, which is accessible from within the procedure.
Note, however, that information cannot be transferred back to the calling portion of the program when the
calling argument is written as an expression (see below).
Arguments can also be passed to a procedure by value. In this case, the value assigned to each argument in
the calling statement (rather than the argument’s address) is passed directly to the corresponding argument
within the procedure. This is strictly a one-way transfer; that is, the argument values are transferred from the
calling statement to the procedure. If any of these values is altered within the procedure, the new value will not
be transferred back to the calling statement. Passing arguments by value can be useful, however, since the
arguments in the calling statement can always be written as expressions rather than single variables.
In order to pass an argument by value, the argument name within the procedure must be preceded by the
reserved word ByVal; i.e.,
ByVal argument name As data type
If a procedure includes multiple arguments, some may be passed by reference and others by value.
EXAMPLE 7.3 SMALLEST OF THREE NUMBERS
Let us now modify the program presented in Example 7.3 to find the smallest of three numbers by repeatedly using a
variation of the sub procedure Smallest introduced earlier. Our strategy will be to enter three numbers, a, b and c, via
text boxes, then call Smallest to determine the smaller of the first two values (a and b). This value (called min) will be
returned to the calling portion of the program. Then Smallest will be called again, this time receiving the values for c
and min, and returning the lesser of these. The returned value will again be called min, overwriting the previous value.
This example further illustrates the manner in which information is passed back and forth between a calling program
and a sub procedure. Each time the procedure is accessed, it will accept two numbers from the calling statement and return
one (the smaller value) via a transfer by reference. The two input values can be transferred either by value or by reference;
we will transfer by value, simply to illustrate the technique. The preliminary control layout is shown in Fig. 7.5.
We now assign the following initial values to the form and control properties.
Object Property Value
Form1 Caption “Min of Three Numbers”
Label1 Caption “a = ”
Font MS Sans Serif, 10-point
Label2 Caption “b = ”
Font MS Sans Serif, 10-point
Label3 Caption “c = ”
Font MS Sans Serif, 10-point
Label4 Caption “Min = ”
Font MS Sans Serif, 10-point
(Continues on next page)
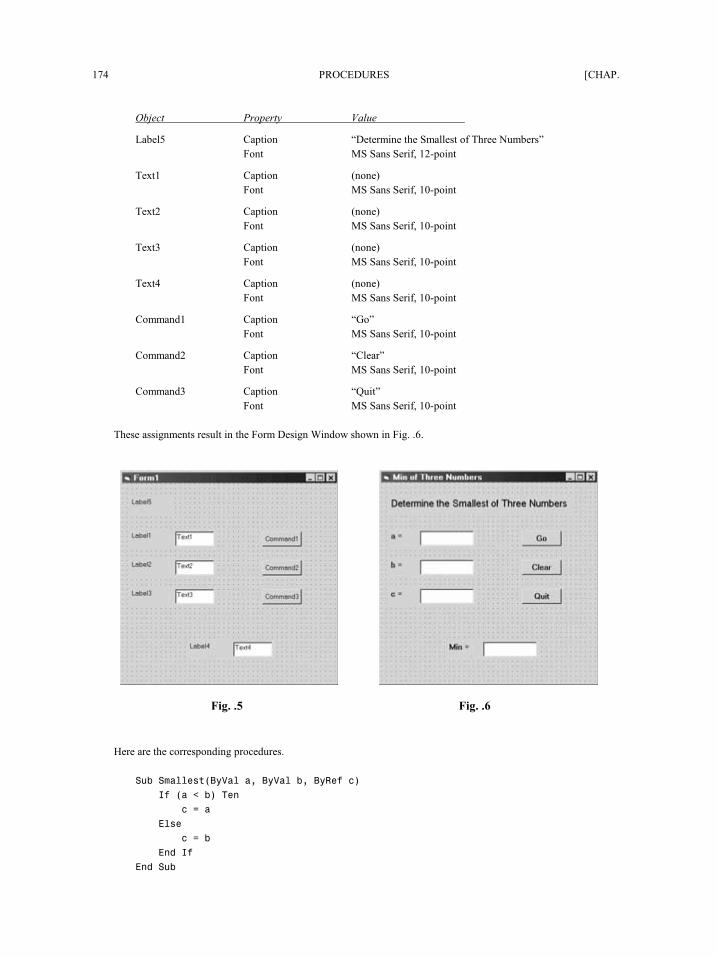
174 PROCEDURES [CHAP. 7
Object Property Value
Label5 Caption “Determine the Smallest of Three Numbers”
Font MS Sans Serif, 12-point
Text1 Caption (none)
Font MS Sans Serif, 10-point
Text2 Caption (none)
Font MS Sans Serif, 10-point
Text3 Caption (none)
Font MS Sans Serif, 10-point
Text4 Caption (none)
Font MS Sans Serif, 10-point
Command1 Caption “Go”
Font MS Sans Serif, 10-point
Command2 Caption “Clear”
Font MS Sans Serif, 10-point
Command3 Caption “Quit”
Font MS Sans Serif, 10-point
These assignments result in the Form Design Window shown in Fig. 7.6.
Fig. 7.5 Fig. 7.6
Here are the corresponding procedures.
Sub Smallest(ByVal a, ByVal b, ByRef c)
If (a < b) Then
c = a
Else
c = b
End If
End Sub
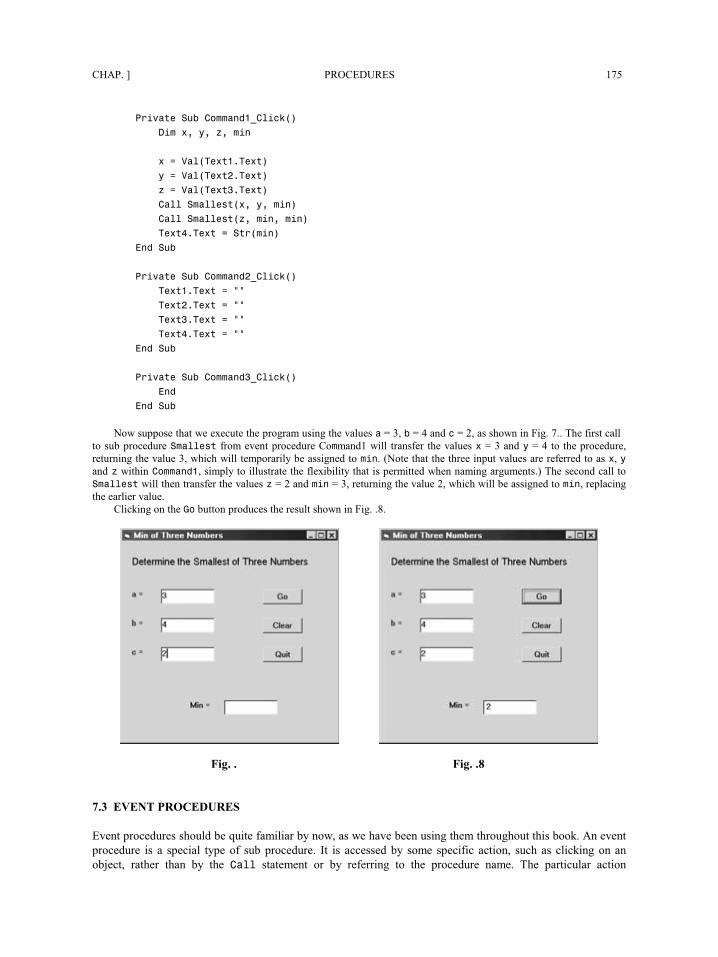
CHAP. 7] PROCEDURES 175
Private Sub Command1_Click()
Dim x, y, z, min
x = Val(Text1.Text)
y = Val(Text2.Text)
z = Val(Text3.Text)
Call Smallest(x, y, min)
Call Smallest(z, min, min)
Text4.Text = Str(min)
End Sub
Private Sub Command2_Click()
Text1.Text = ""
Text2.Text = ""
Text3.Text = ""
Text4.Text = ""
End Sub
Private Sub Command3_Click()
End
End Sub
Now suppose that we execute the program using the values a = 3, b = 4 and c = 2, as shown in Fig. 7.7. The first call
to sub procedure Smallest from event procedure Command1 will transfer the values x = 3 and y = 4 to the procedure,
returning the value 3, which will temporarily be assigned to min. (Note that the three input values are referred to as x, y
and z within Command1, simply to illustrate the flexibility that is permitted when naming arguments.) The second call to Smallest will then transfer the values z = 2 and min = 3, returning the value 2, which will be assigned to min, replacing
the earlier value.
Clicking on the Go button produces the result shown in Fig. 7.8.
Fig. 7.7 Fig. 7.8
7.3 EVENT PROCEDURES
Event procedures should be quite familiar by now, as we have been using them throughout this book. An event
procedure is a special type of sub procedure. It is accessed by some specific action, such as clicking on an
object, rather than by the Call statement or by referring to the procedure name. The particular action
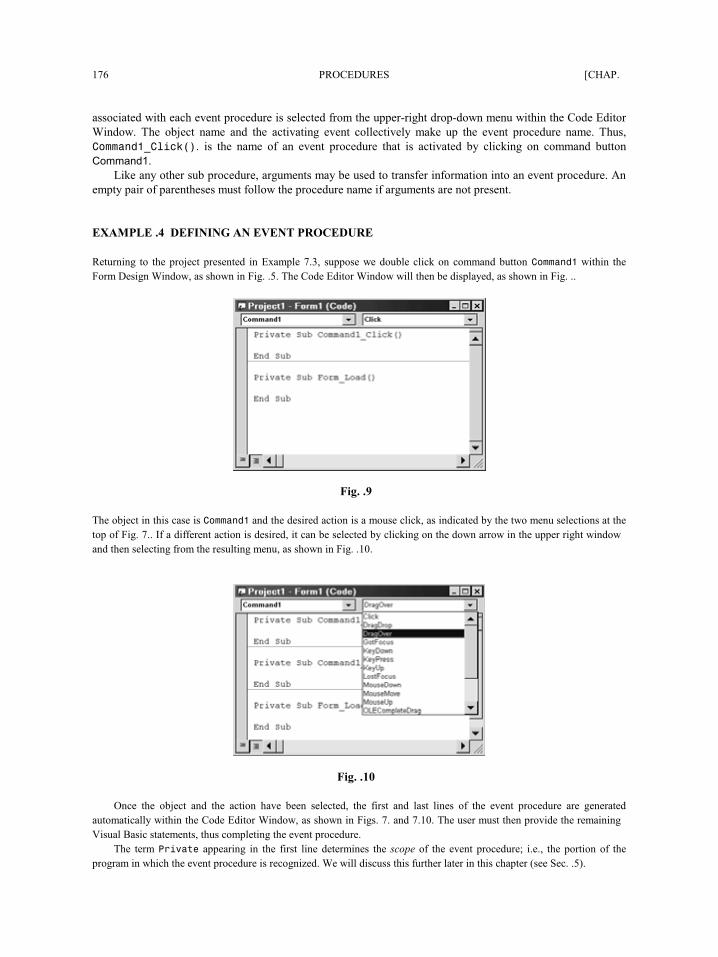
176 PROCEDURES [CHAP. 7
associated with each event procedure is selected from the upper-right drop-down menu within the Code Editor
Window. The object name and the activating event collectively make up the event procedure name. Thus,
Command1_Click(). is the name of an event procedure that is activated by clicking on command button
Command1.
Like any other sub procedure, arguments may be used to transfer information into an event procedure. An
empty pair of parentheses must follow the procedure name if arguments are not present.
EXAMPLE 7.4 DEFINING AN EVENT PROCEDURE
Returning to the project presented in Example 7.3, suppose we double click on command button Command1 within the
Form Design Window, as shown in Fig. 7.5. The Code Editor Window will then be displayed, as shown in Fig. 7.9.
Fig. 7.9
The object in this case is Command1 and the desired action is a mouse click, as indicated by the two menu selections at the
top of Fig. 7.9. If a different action is desired, it can be selected by clicking on the down arrow in the upper right window
and then selecting from the resulting menu, as shown in Fig. 7.10.
Fig. 7.10
Once the object and the action have been selected, the first and last lines of the event procedure are generated
automatically within the Code Editor Window, as shown in Figs. 7.9 and 7.10. The user must then provide the remaining
Visual Basic statements, thus completing the event procedure.
The term Private appearing in the first line determines the scope of the event procedure; i.e., the portion of the
program in which the event procedure is recognized. We will discuss this further later in this chapter (see Sec. 7.5).
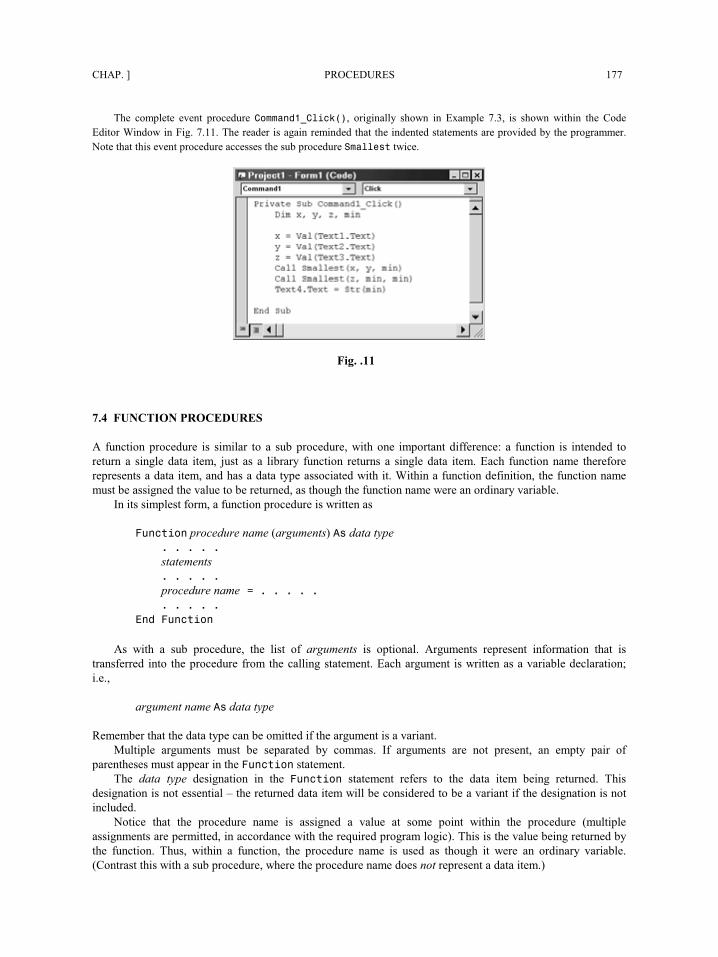
CHAP. 7] PROCEDURES 177
The complete event procedure Command1_Click(), originally shown in Example 7.3, is shown within the Code
Editor Window in Fig. 7.11. The reader is again reminded that the indented statements are provided by the programmer.
Note that this event procedure accesses the sub procedure Smallest twice.
Fig. 7.11
7.4 FUNCTION PROCEDURES
A function procedure is similar to a sub procedure, with one important difference: a function is intended to
return a single data item, just as a library function returns a single data item. Each function name therefore
represents a data item, and has a data type associated with it. Within a function definition, the function name
must be assigned the value to be returned, as though the function name were an ordinary variable.
In its simplest form, a function procedure is written as
Function procedure name (arguments) As data type
. . . . .
statements
. . . . .
procedure name = . . . . . . . . . .
End Function
As with a sub procedure, the list of arguments is optional. Arguments represent information that is
transferred into the procedure from the calling statement. Each argument is written as a variable declaration;
i.e.,
argument name As data type
Remember that the data type can be omitted if the argument is a variant.
Multiple arguments must be separated by commas. If arguments are not present, an empty pair of
parentheses must appear in the Function statement.
The data type designation in the Function statement refers to the data item being returned. This
designation is not essential – the returned data item will be considered to be a variant if the designation is not
included.
Notice that the procedure name is assigned a value at some point within the procedure (multiple
assignments are permitted, in accordance with the required program logic). This is the value being returned by
the function. Thus, within a function, the procedure name is used as though it were an ordinary variable.
(Contrast this with a sub procedure, where the procedure name does not represent a data item.)
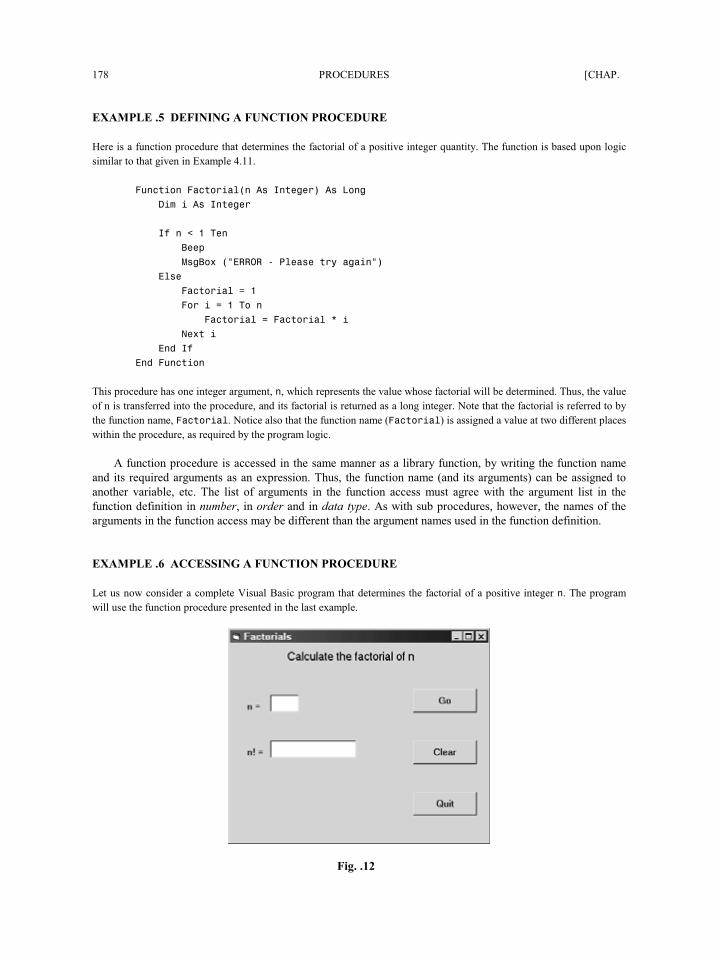
178 PROCEDURES [CHAP. 7
EXAMPLE 7.5 DEFINING A FUNCTION PROCEDURE
Here is a function procedure that determines the factorial of a positive integer quantity. The function is based upon logic
similar to that given in Example 4.11.
Function Factorial(n As Integer) As Long
Dim i As Integer
If n < 1 Then
Beep
MsgBox ("ERROR - Please try again")
Else
Factorial = 1
For i = 1 To n
Factorial = Factorial * i
Next i
End If
End Function
This procedure has one integer argument, n, which represents the value whose factorial will be determined. Thus, the value
of n is transferred into the procedure, and its factorial is returned as a long integer. Note that the factorial is referred to by
the function name, Factorial. Notice also that the function name (Factorial) is assigned a value at two different places
within the procedure, as required by the program logic.
A function procedure is accessed in the same manner as a library function, by writing the function name
and its required arguments as an expression. Thus, the function name (and its arguments) can be assigned to
another variable, etc. The list of arguments in the function access must agree with the argument list in the
function definition in number, in order and in data type. As with sub procedures, however, the names of the
arguments in the function access may be different than the argument names used in the function definition.
EXAMPLE 7.6 ACCESSING A FUNCTION PROCEDURE
Let us now consider a complete Visual Basic program that determines the factorial of a positive integer n. The program
will use the function procedure presented in the last example.
Fig. 7.12
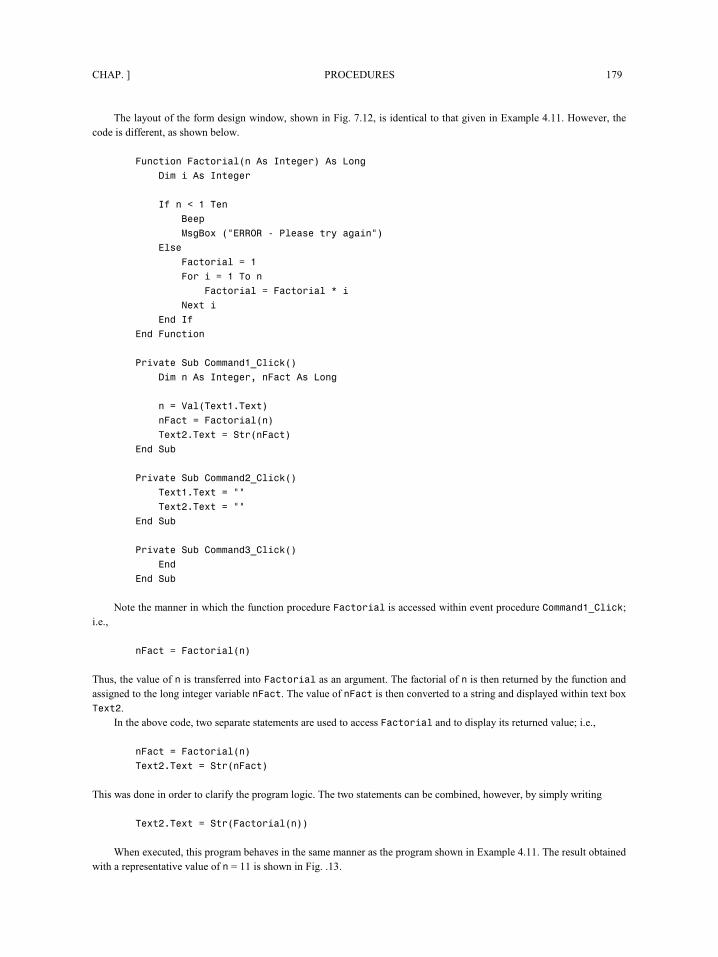
CHAP. 7] PROCEDURES 179
The layout of the form design window, shown in Fig. 7.12, is identical to that given in Example 4.11. However, the
code is different, as shown below.
Function Factorial(n As Integer) As Long
Dim i As Integer
If n < 1 Then
Beep
MsgBox ("ERROR - Please try again")
Else
Factorial = 1
For i = 1 To n
Factorial = Factorial * i
Next i
End If
End Function
Private Sub Command1_Click()
Dim n As Integer, nFact As Long
n = Val(Text1.Text)
nFact = Factorial(n)
Text2.Text = Str(nFact)
End Sub
Private Sub Command2_Click()
Text1.Text = ""
Text2.Text = ""
End Sub
Private Sub Command3_Click()
End
End Sub
Note the manner in which the function procedure Factorial is accessed within event procedure Command1_Click;
i.e.,
nFact = Factorial(n)
Thus, the value of n is transferred into Factorial as an argument. The factorial of n is then returned by the function and
assigned to the long integer variable nFact. The value of nFact is then converted to a string and displayed within text box
Text2.
In the above code, two separate statements are used to access Factorial and to display its returned value; i.e.,
nFact = Factorial(n)
Text2.Text = Str(nFact)
This was done in order to clarify the program logic. The two statements can be combined, however, by simply writing
Text2.Text = Str(Factorial(n))
When executed, this program behaves in the same manner as the program shown in Example 4.11. The result obtained
with a representative value of n = 11 is shown in Fig. 7.13.
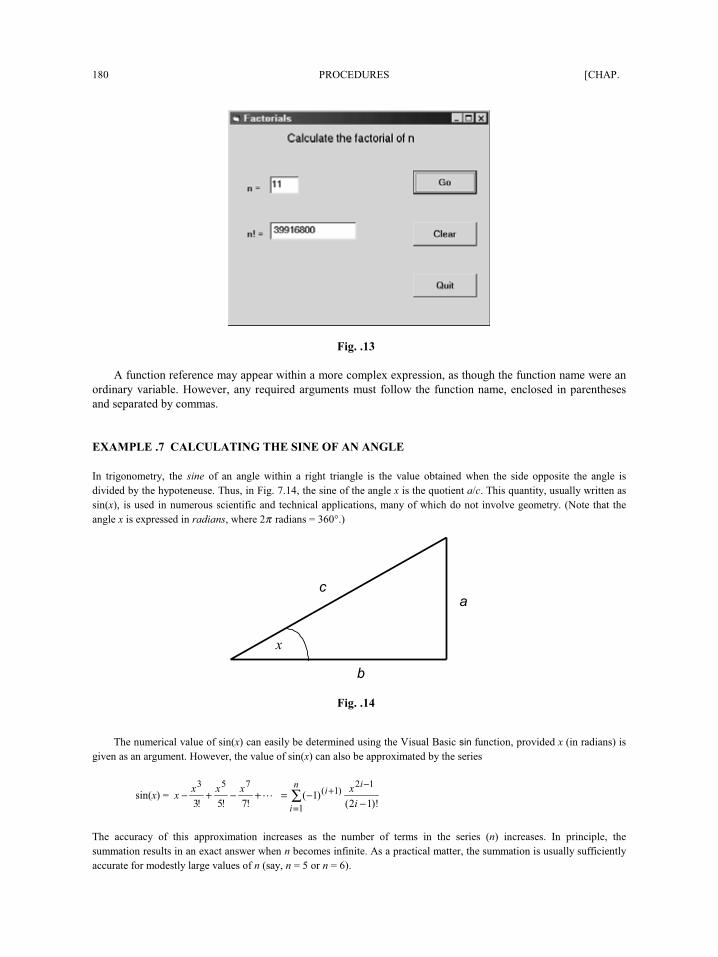
180 PROCEDURES [CHAP. 7
Fig. 7.13
A function reference may appear within a more complex expression, as though the function name were an
ordinary variable. However, any required arguments must follow the function name, enclosed in parentheses
and separated by commas.
EXAMPLE 7.7 CALCULATING THE SINE OF AN ANGLE
In trigonometry, the sine of an angle within a right triangle is the value obtained when the side opposite the angle is
divided by the hypoteneuse. Thus, in Fig. 7.14, the sine of the angle x is the quotient a/c. This quantity, usually written as
sin(x), is used in numerous scientific and technical applications, many of which do not involve geometry. (Note that the
angle x is expressed in radians, where 2π radians = 360°.)
c a
x
b
Fig. 7.14
The numerical value of sin(x) can easily be determined using the Visual Basic sin function, provided x (in radians) is
given as an argument. However, the value of sin(x) can also be approximated by the series
sin(x) = ∑=
−+
−−=+−+−
n
i
ii
i
xxxxx
1
12)1(
753
)!12()1(
!7!5!3
The accuracy of this approximation increases as the number of terms in the series (n) increases. In principle, the
summation results in an exact answer when n becomes infinite. As a practical matter, the summation is usually sufficiently
accurate for modestly large values of n (say, n = 5 or n = 6).
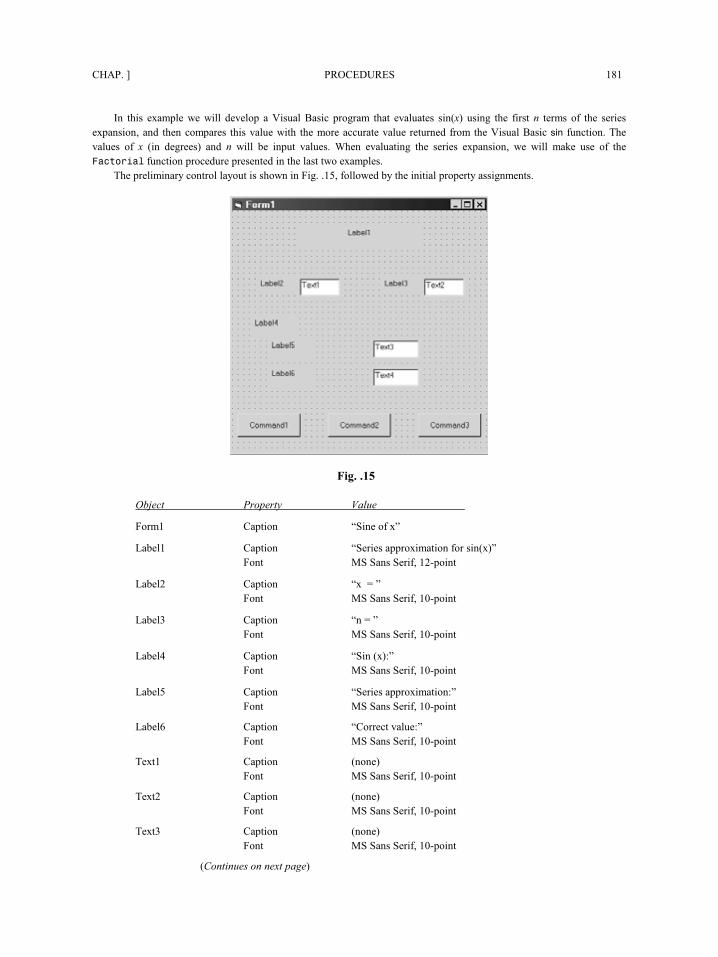
CHAP. 7] PROCEDURES 181
In this example we will develop a Visual Basic program that evaluates sin(x) using the first n terms of the series
expansion, and then compares this value with the more accurate value returned from the Visual Basic sin function. The
values of x (in degrees) and n will be input values. When evaluating the series expansion, we will make use of the
Factorial function procedure presented in the last two examples.
The preliminary control layout is shown in Fig. 7.15, followed by the initial property assignments.
Fig. 7.15
Object Property Value
Form1 Caption “Sine of x”
Label1 Caption “Series approximation for sin(x)”
Font MS Sans Serif, 12-point
Label2 Caption “x = ”
Font MS Sans Serif, 10-point
Label3 Caption “n = ”
Font MS Sans Serif, 10-point
Label4 Caption “Sin (x):”
Font MS Sans Serif, 10-point
Label5 Caption “Series approximation:”
Font MS Sans Serif, 10-point
Label6 Caption “Correct value:”
Font MS Sans Serif, 10-point
Text1 Caption (none)
Font MS Sans Serif, 10-point
Text2 Caption (none)
Font MS Sans Serif, 10-point
Text3 Caption (none)
Font MS Sans Serif, 10-point
(Continues on next page)
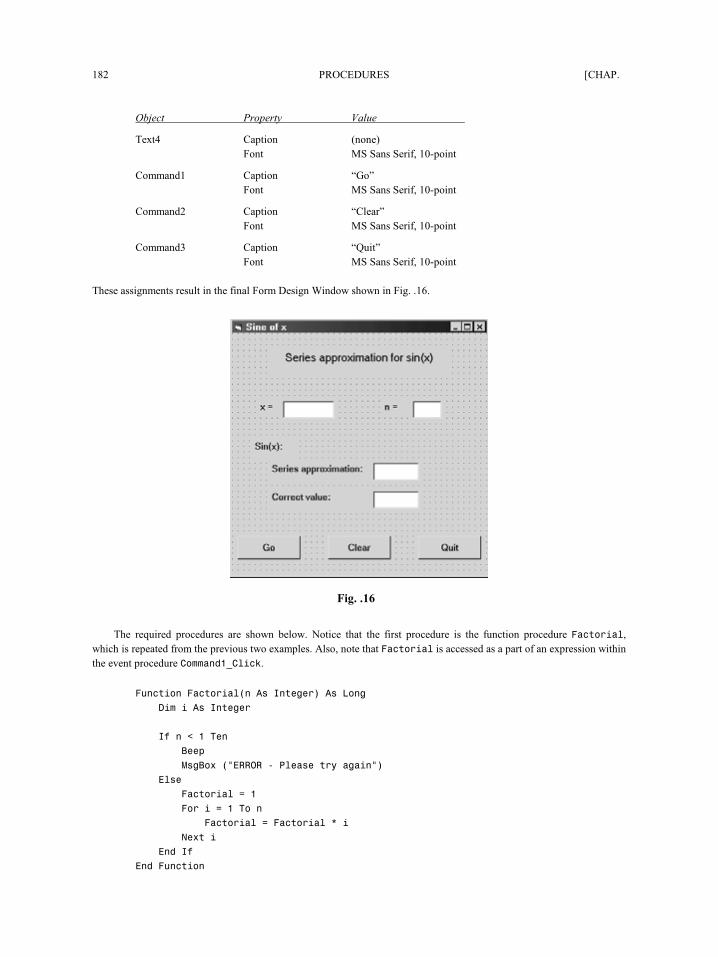
182 PROCEDURES [CHAP. 7
Object Property Value
Text4 Caption (none)
Font MS Sans Serif, 10-point
Command1 Caption “Go”
Font MS Sans Serif, 10-point
Command2 Caption “Clear”
Font MS Sans Serif, 10-point
Command3 Caption “Quit”
Font MS Sans Serif, 10-point
These assignments result in the final Form Design Window shown in Fig. 7.16.
Fig. 7.16
The required procedures are shown below. Notice that the first procedure is the function procedure Factorial,
which is repeated from the previous two examples. Also, note that Factorial is accessed as a part of an expression within
the event procedure Command1_Click.
Function Factorial(n As Integer) As Long
Dim i As Integer
If n < 1 Then
Beep
MsgBox ("ERROR - Please try again")
Else
Factorial = 1
For i = 1 To n
Factorial = Factorial * i
Next i
End If
End Function
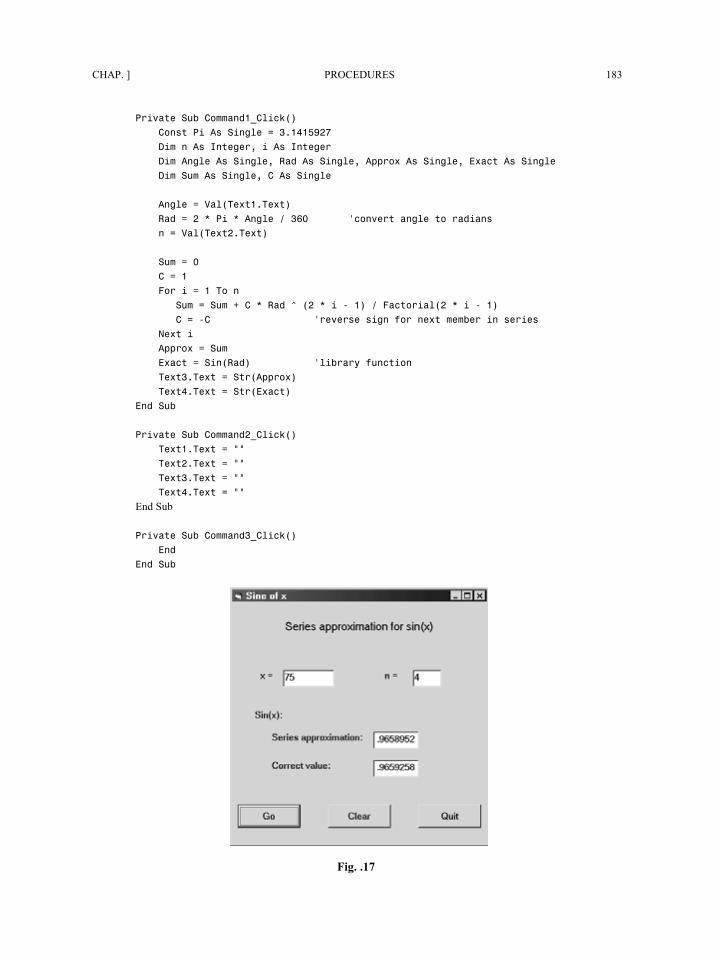
CHAP. 7] PROCEDURES 183
Private Sub Command1_Click()
Const Pi As Single = 3.1415927
Dim n As Integer, i As Integer
Dim Angle As Single, Rad As Single, Approx As Single, Exact As Single
Dim Sum As Single, C As Single
Angle = Val(Text1.Text)
Rad = 2 * Pi * Angle / 360 'convert angle to radians
n = Val(Text2.Text)
Sum = 0
C = 1
For i = 1 To n
Sum = Sum + C * Rad ^ (2 * i - 1) / Factorial(2 * i - 1)
C = -C 'reverse sign for next member in series
Next i
Approx = Sum
Exact = Sin(Rad) 'library function
Text3.Text = Str(Approx)
Text4.Text = Str(Exact)
End Sub
Private Sub Command2_Click()
Text1.Text = ""
Text2.Text = ""
Text3.Text = ""
Text4.Text = ""
End Sub
Private Sub Command3_Click()
End
End Sub
Fig. 7.17
184 PROCEDURES [CHAP. 7
When event procedure Command1_Click is first entered, the angle is changed from degrees to radians using the
formula
r = 2πd/360
where r = the angle in radians
d = the angle in degrees
The evaluation of the series expansion is then carried out in a For–Next loop. Note that the series includes a
coefficient C whose value alternates between +1 and –1. This computational shortcut has the same effect as raising –1 to
various powers within the loop (as shown in the series expansion), thus avoiding some unnecessary multiplication.
When the program is executed, it displays the value of sin(x) as determined by the first n terms of the series, and the
correct value of sin(x) as determined by the Visual Basic library function. Some representative results are shown in Fig.
7.17, where sin(75°) is determined as 0.9658952 using the first four terms of the series expansion, and 0.9659258 using
the Visual Basic library function. Note that the results agree to four significant figures; i.e., sin(75°) = 0.9659 using either
method.
You may wish to experiment with this program by specifying the same angle and trying different values of n. Or, by
investigating the accuracy of the approximation for a given value of n when the angle is varied.
7.5 SCOPE
Scope refers to the portion of a program within which a procedure definition (or a variable or named constant
definition) is recognized. The scope of a sub procedure is determined by the identifier Public or Private,
which precedes the procedure name; e.g.,
Public Sub procedure name (arguments)
or
Private Sub procedure name (arguments)
Similarly, the scope of a function procedure is determined as
Public Function procedure name (arguments) As data type
or
Private Function procedure name (arguments) As data type
A Public procedure can be accessed from any module or form within a program, whereas a Private
procedure will be recognized only within the module or form within which it is defined. The default is Public.
Hence, if a programmer-defined procedure does not include a Public/Private specification (as in the
examples presented earlier in this chapter), it is assumed to be Public. Note, however, that event procedures
automatically include the designation Private when they are created.
When a Public procedure is accessed from a module or form other than the module or form containing
the module definition, the procedure name must be preceded by the form name containing the definition; e.g.,
Call form name.procedure name (arguments)
for a sub procedure access. Function procedures are accessed similarly, with the form name containing the
function definition preceding the function name; e.g.,
variable = form name. function name (arguments)
CHAP. 7] PROCEDURES 185
Variables and named constants that are defined within a procedure are local to that procedure. However,
variables and named constants can also be declared within a module, external to any procedures defined within
the module. Such variables (or named constants) can be declared Public or Private; e.g.,
Private variable name As data type
or
Public variable name As data type
In the first example (Private), the variable will be recognized anywhere within the module in which it is
declared, but not in other modules. If a different (local) variable with the same name is declared within a
procedure, then the local variable can be referenced within the procedure simply by its name. The (global)
variable declared outside of the procedure can also be referenced within the procedure, by prefixing its name
with the form name; e.g.,
form name.variable name
EXAMPLE 7.8
Here is a skeletal outline of a module containing both a global and a local variable having the same name.
Private Factor As Integer
Private Sub Sample()
Dim Factor As Integer
. . . . .
Form1.Factor = 3 ‘assign 3 to the global variable
Form2 = 6 ‘assign 6 to the local variable
. . . . .
End Sub
Note that the use of multiple variables having the same name is generally not recommended.
If a variable is declared to be Public within a module, then the variable will be recognized anywhere
within the entire project. The variable can be referenced within the module in which it is declared simply by its
name (unless it is referenced within a procedure containing a local variable with the same name, as described
previously). To reference the variable within other modules, it must be preceded by its form name.
EXAMPLE 7.9
Now consider two different modules that contain public variables. The following skeletal outline illustrates how these
variables can be utilized within each module.
Form Module 1 Form Module 2
Public Red Public Green
Private Sub FirstSub() Private Sub SecondSub()
. . . . . . . . . .
Red = 3 Form1.Red = 7
‘or Form1.Red = 3 Green = 2
Form2.Green = 6 ‘or Form2.Green = 2
End Sub End Sub
186 PROCEDURES [CHAP. 7
Once the actions defined within a procedure have been completed and control is returned to the remote
access point, the values assigned to the local variables within the procedure are not retained. There are
situations, however, in which it may be desirable for a local variable to retain its value between procedure calls.
This can be accomplished by declaring the variable to be Static; e.g.,
Static variable name As data type
Note that Static is used in place of Dim.
All of the variables within a procedure can be made to retain their values by declaring the entire procedure
to be Static; for example,
Private Static Sub procedure name (arguments)
Public Static Function procedure name (arguments) As data type
and so on. In these examples, note that Static appears in addition to Private or Public.
Sometimes the program logic requires that a procedure be exited if some logical condition is satisfied,
without executing all of the instructions within the procedure. This can be accomplished with an Exit Sub or
Exit Function statement; e.g.,
Private Sub procedure name (arguments)
. . . . .
If (logical condition) Then
Exit Sub
Else
. . . . .
End If
End Sub
Function procedures operate in the same manner, except that Exit Function replaces Exit Sub.
EXAMPLE 7.10 SHOOTING CRAPS
Craps is a popular dice game in which you throw a pair of dice one or more times until you either win or lose. The game
can be simulated on a computer by substituting the generation of random numbers for the actual throwing of the dice.
There are two ways to win in craps. You can throw the dice once and obtain a score of either 7 or 11; or you can
obtain a 4, 5, 6, 8, 9 or 10 on the first throw and then repeat the same score on a subsequent throw before obtaining a 7.
Similarly, there are two ways to lose. You can throw the dice once and obtain a 2, 3 or 12; or you can obtain a 4, 5, 6, 8, 9
or 10 on the first throw and then obtain a 7 on a subsequent throw before repeating your original score.
We will develop the game interactively in Visual Basic, so that one throw of the dice will be simulated each time you
click on a command button. A text box will indicate the outcome of each throw. At the end of each game, the cumulative
number of wins and losses will be displayed. A command button will allow you to play again if you wish.
Our program will require a random number generator that produces uniformly distributed integers between 1 and 6.
(By uniformly distributed, we mean that any integer between 1 and 6 is just as likely to occur as any other integer within
this range.) To do so, we will make use of the Rnd library function, which generates fractional random numbers that are
uniformly distributed between 0 and 1. We will also utilize the Randomize function, which is used to initialize the random
number generator.
Now let us see how we can convert these random numbers into something that simulates throwing a pair of dice. We
can generate a random integer, uniformly distributed between 0 and 5, by writing Int(6 * Rnd). Hence, to obtain a
random integer that is uniformly distributed between 1 and 6, we simply add 1 to this expression; that is, we write 1 +
Int(6 * Rnd). The value returned by this expression will represent the result of throwing a single die. To simulate
throwing a pair of dice, we repeat the random number generation; that is, we evaluate the above expression twice, once for
CHAP. 7] PROCEDURES 187
each die. (Remember that each reference to Rnd will return a different random value.) The strategy fits very naturally into
the Visual Basic function procedure ThrowDice presented below.
Public Function ThrowDice() As Integer
Dim d1 As Integer, d2 As Integer
d1 = 1 + Int(6 * Rnd) ‘first die
d2 = 1 + Int(6 * Rnd) ‘second die
ThrowDice = d1 + d2
End Function
This function will return a randomly generated integer quantity whose value varies between 2 and 12 each time it is
accessed. (Note that the sum of the two random integers will not be uniformly distributed, even though the values assigned
to d1 and d2 are.)
In order to incorporate this function into an interactive game, we will utilize two different forms – one that shows the
cumulative number of wins and losses and initiates a new game or terminates the computation, and a second form that
shows the history of each individual game (see Fig. 7.18. The preliminary control layouts are shown in Figs. 7.18(a) and
7.18(b).
Fig. 7.18(a) Fig. 7.18(b)
Our goal will be to transform the appearance of these forms into the forms shown in Figs. 7.19(a) and (b).
Fig. 7.19(a) Fig. 7.19(b)
To do so, we will assign the following initial values to the control and form properties.
188 PROCEDURES [CHAP. 7
Object Property Value
Form1 Caption “Craps”
Form1.Label1 Caption “Welcome to the Game of Craps”
Font MS Sans Serif, 12-point
Alignment 2 - Center
Form1.Label2 Caption “Wins:”
Font MS Sans Serif, 10-point
Alignment 2 - Center
Form1.Label3 Caption “Losses:”
Font MS Sans Serif, 10-point
Alignment 2 - Center
Form1.Text1 Caption (none)
Font MS Sans Serif, 10-point
Alignment 2 - Center
Form1.Text2 Caption (none)
Font MS Sans Serif, 10-point
Alignment 2 - Center
Form1.Command1 Caption “New Game”
Font MS Sans Serif, 10-point
Form1.Command2 Caption “End”
Font MS Sans Serif, 10-point
Alignment 2 - Center
Form2 Caption “Current Game”
Form2.Label1 Caption “First Roll:”
Font MS Sans Serif, 10-point
Alignment 2 - Center
Form2.Label2 Caption “Last Roll:”
Font MS Sans Serif, 10-point
Alignment 2 - Center
Form2.Label3 Caption (none)
Font MS Sans Serif, 12-point
Alignment 2 - Center
Form2.Text1 Caption (none)
Font MS Sans Serif, 10-point
Alignment 2 - Center
Form2.Text2 Caption (none)
Font MS Sans Serif, 10-point
Alignment 2 - Center
Form2.Command1 Caption “OK”
Font MS Sans Serif, 10-point
Form2.Command2 Caption “Return”
Font MS Sans Serif, 10-point
Alignment 2 - Center
The required declarations and procedures for Form1 are shown next.
CHAP. 7] PROCEDURES 189
Public FirstScore As Integer, NextScore As Integer
Public Wins As Integer, Losses As Integer
Public Function ThrowDice() As Integer
Dim d1 As Integer, d2 As Integer
d1 = 1 + Int(6 * Rnd) ‘first die
d2 = 1 + Int(6 * Rnd) ‘second die
ThrowDice = d1 + d2
End Function
Private Sub Form_Load()
Wins = 0
Losses = 0
Text1.Text = "0"
Text2.Text = "0"
Randomize
End Sub
Private Sub Command1_Click()
FirstScore = ThrowDice()
Form2.Label2.Enabled = False
Form2.Text2.Enabled = False
Form2.Command1.Enabled = False
Form2.Command2.Enabled = True
Form2.Text1.Text = Str(FirstScore)
Form2.Text2.Text = ""
If (FirstScore = 7 Or FirstScore = 11) Then
Form2.Label3.Caption = "Congratulations! You Win on the First Throw"
Wins = Wins + 1
ElseIf (FirstScore = 2 Or FirstScore = 3 Or FirstScore = 12) Then
Form2.Label3.Caption = "Sorry, You Lose on the First Throw"
Losses = Losses + 1
Else
Form2.Label3.Caption = "Please Throw the Dice Again"
Form2.Label2.Enabled = True
Form2.Text2.Enabled = True
Form2.Command1.Enabled = True
Form2.Command2.Enabled = False
End If
Form2.Show
End Sub
Private Sub Command2_Click()
End
End Sub
The code begins by declaring FirstScore, NextScore, Wins and Losses as public integer variables. Hence, these
variables can be accessed anywhere within the project. Following the declarations, we see the definition of function
ThrowDice, which we already discussed.
The remaining code comprises three event procedures – Form1_Load, Command1_Click and Command2_Click. The
first of these, Form1_Load, simply sets the initial number of wins and losses to zero, and initializes the random number
generator.
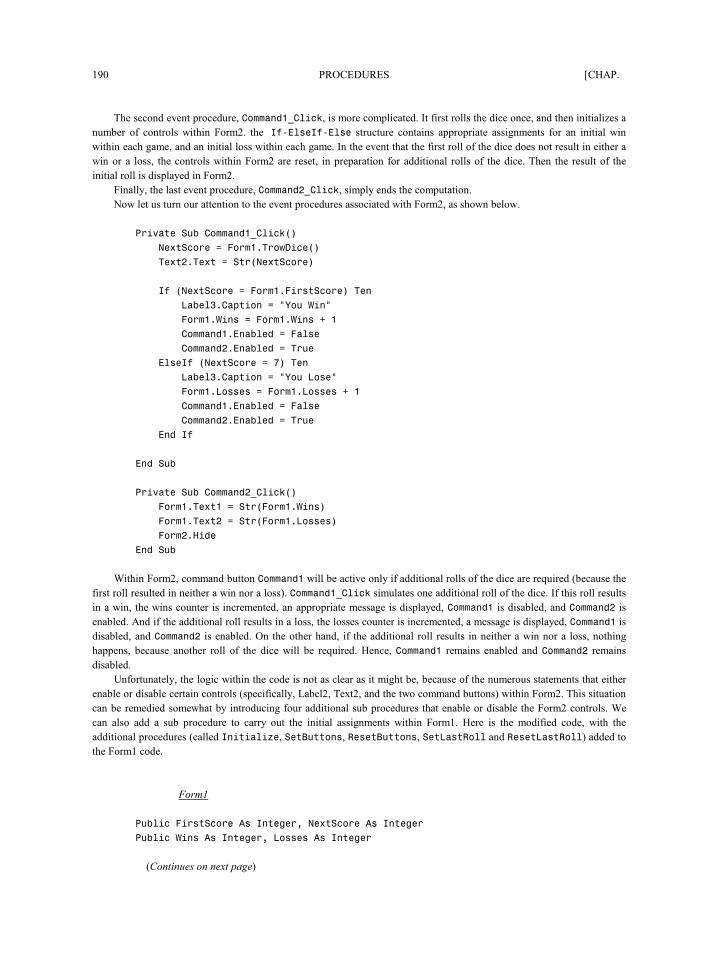
190 PROCEDURES [CHAP. 7
The second event procedure, Command1_Click, is more complicated. It first rolls the dice once, and then initializes a
number of controls within Form2. the If-ElseIf-Else structure contains appropriate assignments for an initial win
within each game, and an initial loss within each game. In the event that the first roll of the dice does not result in either a
win or a loss, the controls within Form2 are reset, in preparation for additional rolls of the dice. Then the result of the
initial roll is displayed in Form2.
Finally, the last event procedure, Command2_Click, simply ends the computation.
Now let us turn our attention to the event procedures associated with Form2, as shown below.
Private Sub Command1_Click()
NextScore = Form1.ThrowDice()
Text2.Text = Str(NextScore)
If (NextScore = Form1.FirstScore) Then
Label3.Caption = "You Win"
Form1.Wins = Form1.Wins + 1
Command1.Enabled = False
Command2.Enabled = True
ElseIf (NextScore = 7) Then
Label3.Caption = "You Lose"
Form1.Losses = Form1.Losses + 1
Command1.Enabled = False
Command2.Enabled = True
End If
End Sub
Private Sub Command2_Click()
Form1.Text1 = Str(Form1.Wins)
Form1.Text2 = Str(Form1.Losses)
Form2.Hide
End Sub
Within Form2, command button Command1 will be active only if additional rolls of the dice are required (because the
first roll resulted in neither a win nor a loss). Command1_Click simulates one additional roll of the dice. If this roll results
in a win, the wins counter is incremented, an appropriate message is displayed, Command1 is disabled, and Command2 is
enabled. And if the additional roll results in a loss, the losses counter is incremented, a message is displayed, Command1 is
disabled, and Command2 is enabled. On the other hand, if the additional roll results in neither a win nor a loss, nothing
happens, because another roll of the dice will be required. Hence, Command1 remains enabled and Command2 remains
disabled.
Unfortunately, the logic within the code is not as clear as it might be, because of the numerous statements that either
enable or disable certain controls (specifically, Label2, Text2, and the two command buttons) within Form2. This situation
can be remedied somewhat by introducing four additional sub procedures that enable or disable the Form2 controls. We
can also add a sub procedure to carry out the initial assignments within Form1. Here is the modified code, with the
additional procedures (called Initialize, SetButtons, ResetButtons, SetLastRoll and ResetLastRoll) added to
the Form1 code.
Form1
Public FirstScore As Integer, NextScore As Integer
Public Wins As Integer, Losses As Integer
(Continues on next page)
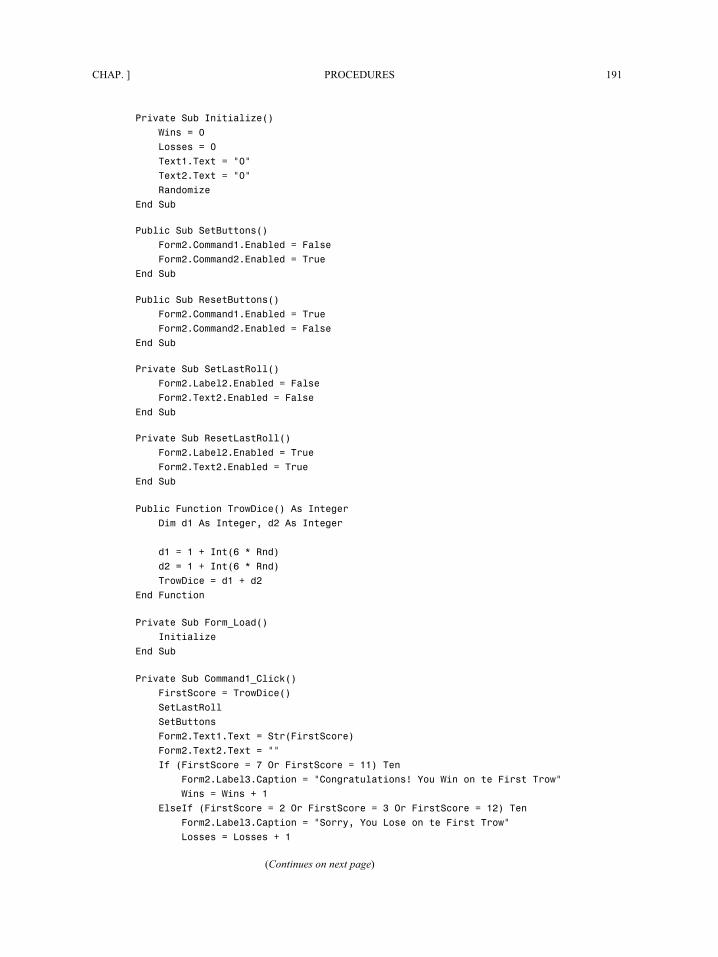
CHAP. 7] PROCEDURES 191
Private Sub Initialize()
Wins = 0
Losses = 0
Text1.Text = "0"
Text2.Text = "0"
Randomize
End Sub
Public Sub SetButtons()
Form2.Command1.Enabled = False
Form2.Command2.Enabled = True
End Sub
Public Sub ResetButtons()
Form2.Command1.Enabled = True
Form2.Command2.Enabled = False
End Sub
Private Sub SetLastRoll()
Form2.Label2.Enabled = False
Form2.Text2.Enabled = False
End Sub
Private Sub ResetLastRoll()
Form2.Label2.Enabled = True
Form2.Text2.Enabled = True
End Sub
Public Function ThrowDice() As Integer
Dim d1 As Integer, d2 As Integer
d1 = 1 + Int(6 * Rnd)
d2 = 1 + Int(6 * Rnd)
ThrowDice = d1 + d2
End Function
Private Sub Form_Load()
Initialize
End Sub
Private Sub Command1_Click()
FirstScore = ThrowDice()
SetLastRoll
SetButtons
Form2.Text1.Text = Str(FirstScore)
Form2.Text2.Text = ""
If (FirstScore = 7 Or FirstScore = 11) Then
Form2.Label3.Caption = "Congratulations! You Win on the First Throw"
Wins = Wins + 1
ElseIf (FirstScore = 2 Or FirstScore = 3 Or FirstScore = 12) Then
Form2.Label3.Caption = "Sorry, You Lose on the First Throw"
Losses = Losses + 1
(Continues on next page)
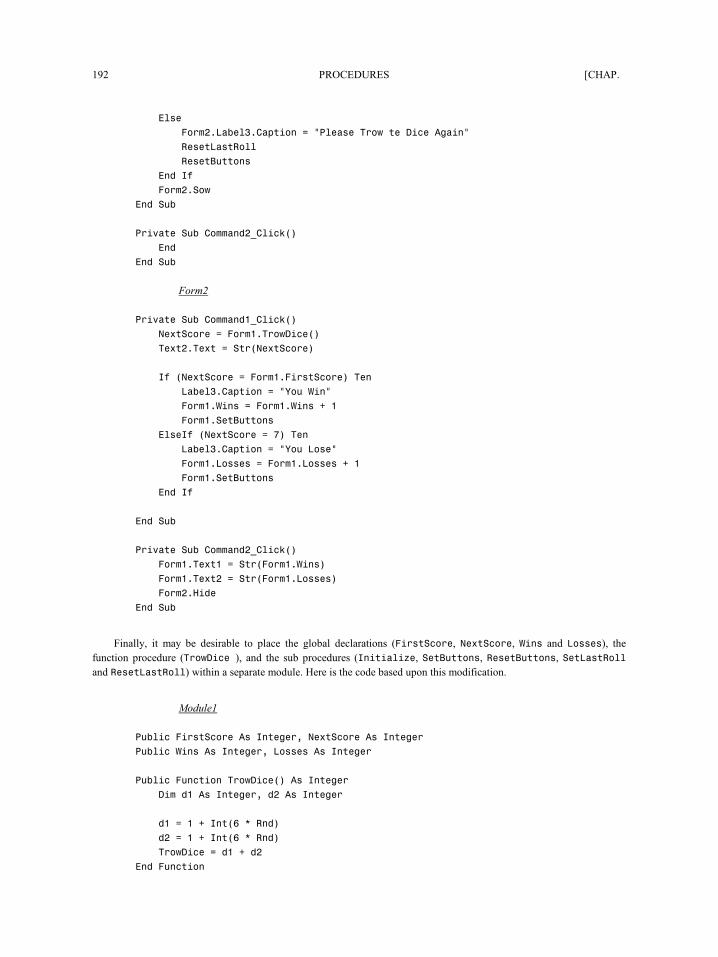
192 PROCEDURES [CHAP. 7
Else
Form2.Label3.Caption = "Please Throw the Dice Again"
ResetLastRoll
ResetButtons
End If
Form2.Show
End Sub
Private Sub Command2_Click()
End
End Sub
Form2
Private Sub Command1_Click()
NextScore = Form1.ThrowDice()
Text2.Text = Str(NextScore)
If (NextScore = Form1.FirstScore) Then
Label3.Caption = "You Win"
Form1.Wins = Form1.Wins + 1
Form1.SetButtons
ElseIf (NextScore = 7) Then
Label3.Caption = "You Lose"
Form1.Losses = Form1.Losses + 1
Form1.SetButtons
End If
End Sub
Private Sub Command2_Click()
Form1.Text1 = Str(Form1.Wins)
Form1.Text2 = Str(Form1.Losses)
Form2.Hide
End Sub
Finally, it may be desirable to place the global declarations (FirstScore, NextScore, Wins and Losses), the
function procedure (ThrowDice), and the sub procedures (Initialize, SetButtons, ResetButtons, SetLastRoll
and ResetLastRoll) within a separate module. Here is the code based upon this modification.
Module1
Public FirstScore As Integer, NextScore As Integer
Public Wins As Integer, Losses As Integer
Public Function ThrowDice() As Integer
Dim d1 As Integer, d2 As Integer
d1 = 1 + Int(6 * Rnd)
d2 = 1 + Int(6 * Rnd)
ThrowDice = d1 + d2
End Function
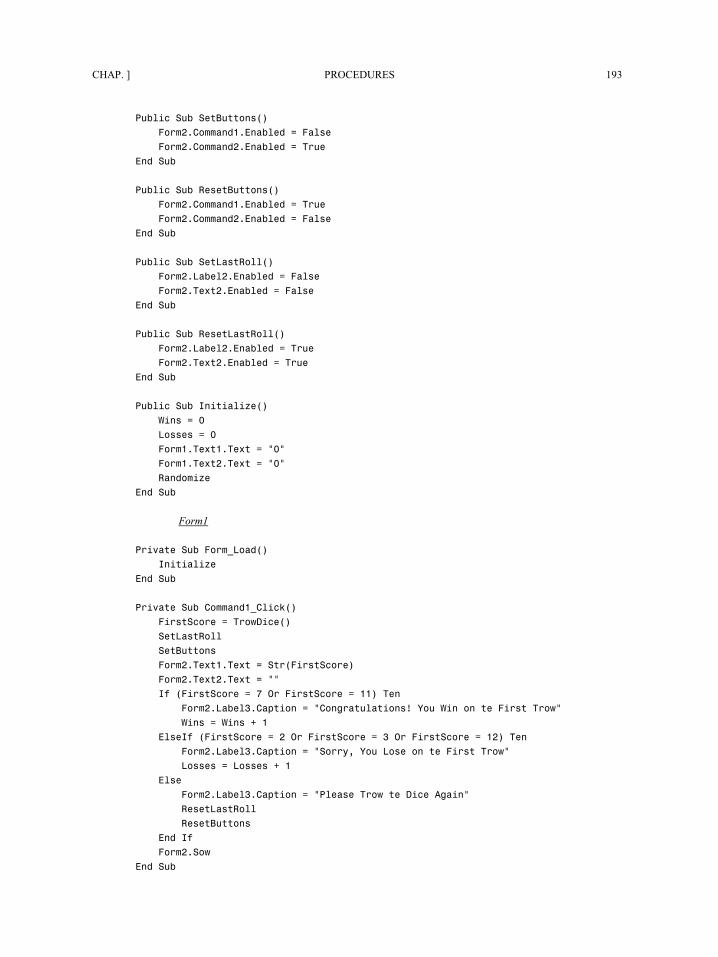
CHAP. 7] PROCEDURES 193
Public Sub SetButtons()
Form2.Command1.Enabled = False
Form2.Command2.Enabled = True
End Sub
Public Sub ResetButtons()
Form2.Command1.Enabled = True
Form2.Command2.Enabled = False
End Sub
Public Sub SetLastRoll()
Form2.Label2.Enabled = False
Form2.Text2.Enabled = False
End Sub
Public Sub ResetLastRoll()
Form2.Label2.Enabled = True
Form2.Text2.Enabled = True
End Sub
Public Sub Initialize()
Wins = 0
Losses = 0
Form1.Text1.Text = "0"
Form1.Text2.Text = "0"
Randomize
End Sub
Form1
Private Sub Form_Load()
Initialize
End Sub
Private Sub Command1_Click()
FirstScore = ThrowDice()
SetLastRoll
SetButtons
Form2.Text1.Text = Str(FirstScore)
Form2.Text2.Text = ""
If (FirstScore = 7 Or FirstScore = 11) Then
Form2.Label3.Caption = "Congratulations! You Win on the First Throw"
Wins = Wins + 1
ElseIf (FirstScore = 2 Or FirstScore = 3 Or FirstScore = 12) Then
Form2.Label3.Caption = "Sorry, You Lose on the First Throw"
Losses = Losses + 1
Else
Form2.Label3.Caption = "Please Throw the Dice Again"
ResetLastRoll
ResetButtons
End If
Form2.Show
End Sub
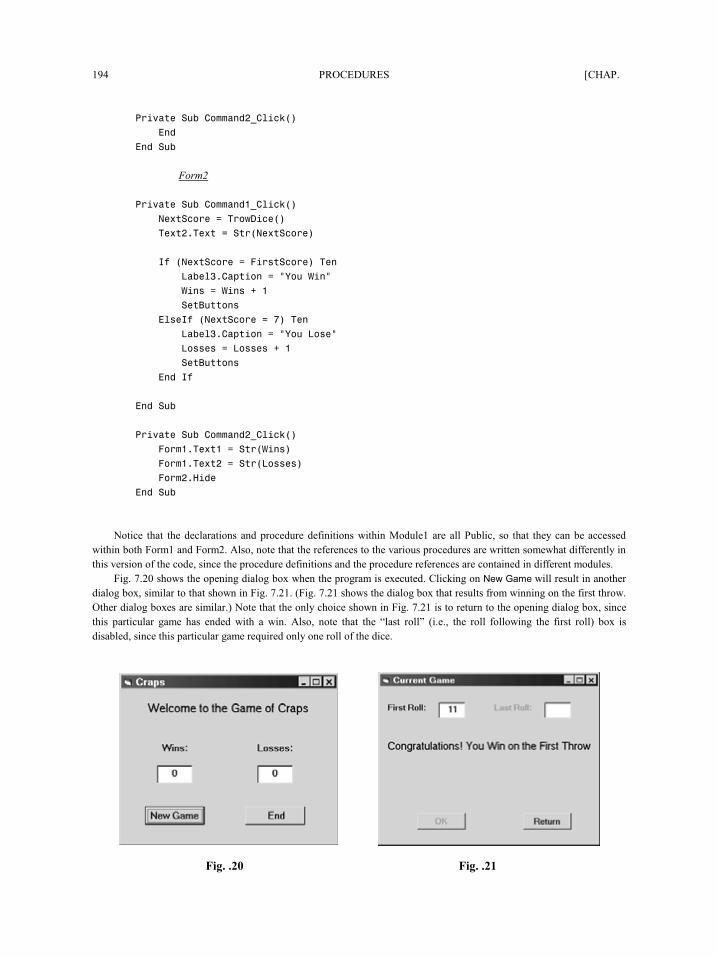
194 PROCEDURES [CHAP. 7
Private Sub Command2_Click()
End
End Sub
Form2
Private Sub Command1_Click()
NextScore = ThrowDice()
Text2.Text = Str(NextScore)
If (NextScore = FirstScore) Then
Label3.Caption = "You Win"
Wins = Wins + 1
SetButtons
ElseIf (NextScore = 7) Then
Label3.Caption = "You Lose"
Losses = Losses + 1
SetButtons
End If
End Sub
Private Sub Command2_Click()
Form1.Text1 = Str(Wins)
Form1.Text2 = Str(Losses)
Form2.Hide
End Sub
Notice that the declarations and procedure definitions within Module1 are all Public, so that they can be accessed
within both Form1 and Form2. Also, note that the references to the various procedures are written somewhat differently in
this version of the code, since the procedure definitions and the procedure references are contained in different modules.
Fig. 7.20 shows the opening dialog box when the program is executed. Clicking on New Game will result in another
dialog box, similar to that shown in Fig. 7.21. (Fig. 7.21 shows the dialog box that results from winning on the first throw.
Other dialog boxes are similar.) Note that the only choice shown in Fig. 7.21 is to return to the opening dialog box, since
this particular game has ended with a win. Also, note that the “last roll” (i.e., the roll following the first roll) box is
disabled, since this particular game required only one roll of the dice.
Fig. 7.20 Fig. 7.21
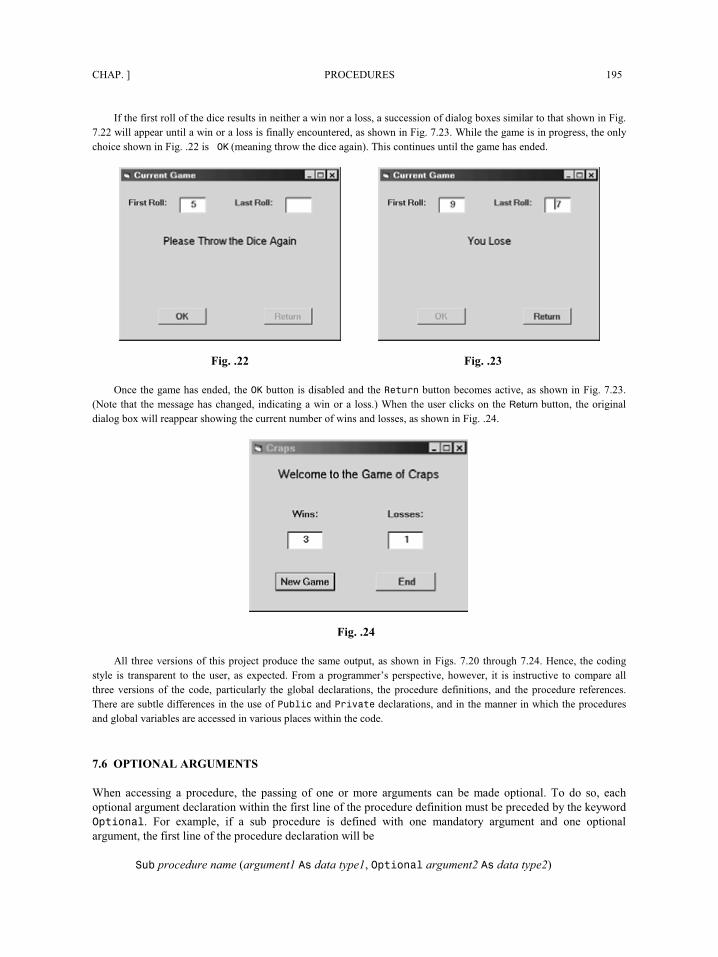
CHAP. 7] PROCEDURES 195
If the first roll of the dice results in neither a win nor a loss, a succession of dialog boxes similar to that shown in Fig.
7.22 will appear until a win or a loss is finally encountered, as shown in Fig. 7.23. While the game is in progress, the only
choice shown in Fig. 7.22 is OK (meaning throw the dice again). This continues until the game has ended.
Fig. 7.22 Fig. 7.23
Once the game has ended, the OK button is disabled and the Return button becomes active, as shown in Fig. 7.23.
(Note that the message has changed, indicating a win or a loss.) When the user clicks on the Return button, the original
dialog box will reappear showing the current number of wins and losses, as shown in Fig. 7.24.
Fig. 7.24
All three versions of this project produce the same output, as shown in Figs. 7.20 through 7.24. Hence, the coding
style is transparent to the user, as expected. From a programmer’s perspective, however, it is instructive to compare all
three versions of the code, particularly the global declarations, the procedure definitions, and the procedure references.
There are subtle differences in the use of Public and Private declarations, and in the manner in which the procedures
and global variables are accessed in various places within the code.
7.6 OPTIONAL ARGUMENTS
When accessing a procedure, the passing of one or more arguments can be made optional. To do so, each
optional argument declaration within the first line of the procedure definition must be preceded by the keyword
Optional. For example, if a sub procedure is defined with one mandatory argument and one optional
argument, the first line of the procedure declaration will be
Sub procedure name (argument1 As data type1, Optional argument2 As data type2)
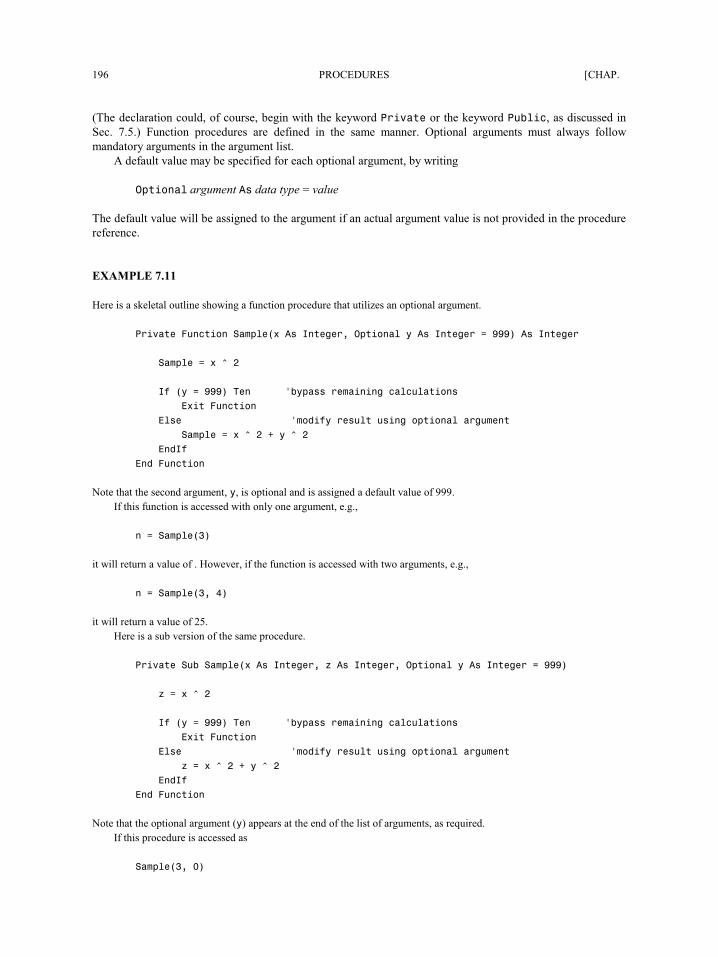
196 PROCEDURES [CHAP. 7
(The declaration could, of course, begin with the keyword Private or the keyword Public, as discussed in
Sec. 7.5.) Function procedures are defined in the same manner. Optional arguments must always follow
mandatory arguments in the argument list.
A default value may be specified for each optional argument, by writing
Optional argument As data type = value
The default value will be assigned to the argument if an actual argument value is not provided in the procedure
reference.
EXAMPLE 7.11
Here is a skeletal outline showing a function procedure that utilizes an optional argument.
Private Function Sample(x As Integer, Optional y As Integer = 999) As Integer
Sample = x ^ 2
If (y = 999) Then 'bypass remaining calculations
Exit Function
Else 'modify result using optional argument
Sample = x ^ 2 + y ^ 2
EndIf
End Function
Note that the second argument, y, is optional and is assigned a default value of 999.
If this function is accessed with only one argument, e.g.,
n = Sample(3)
it will return a value of 9. However, if the function is accessed with two arguments, e.g.,
n = Sample(3, 4)
it will return a value of 25.
Here is a sub version of the same procedure.
Private Sub Sample(x As Integer, z As Integer, Optional y As Integer = 999)
z = x ^ 2
If (y = 999) Then 'bypass remaining calculations
Exit Function
Else 'modify result using optional argument
z = x ^ 2 + y ^ 2
EndIf
End Function
Note that the optional argument (y) appears at the end of the list of arguments, as required.
If this procedure is accessed as
Sample(3, 0)
CHAP. 7] PROCEDURES 197
it will assign a value of 9 to the second argument (z). But if the procedure access is written as
Sample(3, 0, 4)
then the second argument will be assigned a value of 25.
Review Questions
7.1 What is a module in Visual Basic? How do form modules differ from general modules?
7.2 What is the difference between a module and a procedure?
7.3 Name three significant advantages to the use of procedures.
7.4 What is the difference between a sub procedure and an event procedure?
7.5 What is the difference between a sub procedure and a function procedure?
7.6 How are sub procedures named? Does a sub procedure name represent a data item?
7.7 What is the purpose of arguments? Are arguments required in every procedure?
7.8 How are arguments written within the first line of a procedure definition?
7.9 Summarize the rules for writing the first and last lines of a sub procedure.
7.10 Cite two different ways to access a sub procedure.
7.11 Describe the correspondence that is required between the arguments in a procedure access and the arguments that
appear in a procedure definition.
7.12 What is meant by passing an argument by reference?
7.13 What is meant by passing an argument by value? How does this differ from passing an argument by reference?
7.14 What type of argument passing (i.e., by reference or by value) does Visual Basic employ as a default?
7.15 Within the first line of a procedure definition, how can you specify that an argument will be passed by reference?
How can you specify that it will be passed by value?
7.16 Can a single procedure include some arguments that are passed by reference and other arguments that are passed by
value?
7.17 Can arguments be utilized within an event procedure?
7.18 When defining an event procedure, how can the event type be associated with the procedure code?
7.19 How are function procedures named? Does a function procedure name represent a data item? Compare with the rules
that apply to the naming of sub procedures.
198 PROCEDURES [CHAP. 7
7.20 Summarize the rules for writing the first and last lines of a function procedure. Compare with the rules that apply to
sub procedures.
7.21 Why would a function procedure name be assigned a value? Can a sub procedure name be assigned a value?
7.22 Can a function procedure name be assigned a value at more than one location within a function procedure?
7.23 How is a function procedure accessed? Compare with the methods used to access a sub procedure.
7.24 What is meant by the scope of a procedure? How is the scope of a procedure affected by use of the keywords
Public and Private in the first line of the procedure definition?
7.25 What is meant by the scope of a variable? How is the scope of a variable affected by use of the keywords Public and
Private in the variable declaration?
7.26 How can a variable within a procedure be made to retain its assigned value after the procedure has been executed
and control is returned to the calling portion of the program?
7.27 How can all varibles within a procedure be made to retain their assigned values after the procedure has been
executed and control is returned to the calling portion of the program? Compare with the answer to the preceding
question.
7.28 How can control be transferred out of a procedure without executing all of the instructions within the procedure?
7.29 When accessing a procedure, how can the passing of one or more arguments be made optional?
7.30 Where must optional arguments be placed within a procedure definition, relative to required arguments?
7.31 How is an optional argument assigned a default value within a procedure definition?
Problems
7.32 Write a function procedure for each of the situations described below.
(a) Evaluate the algebraic formula
p = log (t2 − a) if t2 > a
p = log (t2) if t2 ≤ a
(b) Suppose that L1 and L2 each represent a single letter. Construct a single string containing the two
letters, arranged in alphabetical order.
(c) Calculate the average of two random numbers, each having a value between a and b.
(d) Examine the sign of the number represented by the variable X. If the value of X is negative, return
the string Negative; if the value of X is positive, return the string Positive; and if the value of X
is zero, return the string Zero.
(e) Suppose Word represents a string that is a multiletter word. Examine each of the letters and return
the letter that comes first in the alphabet. Hint: Use the Len function to determine the word length,
and the Mid function to examine each individual character.
CHAP. 7] PROCEDURES 199
7.33 Each of the situations described below requires a reference to one of the functions defined in Prob.
7.32. Write an appropriate statement, or a sequence of statements, in each case.
(a) Assign a value to q, where q is evaluated as
log [(a + b)2 − c] if (a + b)2 > c,
and
log [(a + b)2] if (a + b)2 ≤ c [see Prob. 7.32(a)].
(b) Suppose LC1 and LC2 each represent a lowercase letter. Form an uppercase string consisting of the
two letters, arranged in alphabetical order [see Prob. 7.32(b)].
(c) Determine the average of two random numbers, each having a value between 1 and 10. Assign this
result to V1. Then determine the average of two additional random numbers, each bounded
between 1 and 10. Assign this result to V2. Then determine the average of V1 and V2 [see Prob.
7.32(c)].
(d) Repeat problem (c) using only one expression to obtain the final average. (Note: In this case, the
variables V1 and V2 will not be required.)
(e) Determine the average of two random numbers, each having a value between –1 and 1. Then
determine whether the resulting average is positive, negative, or zero. Display an appropriate
message box indicating the result [see Probs. 7.32(c) and (d)].
7.34 Write a sub procedure for each of the situations described below.
(a) Examine the sign of the number represented by the variable X. If the value of X is negative, return
the string Negative; if the value is positive, return the string Positive; and if the value is zero,
return the string Zero [compare with Prob. 7.32(d)].
(b) Suppose a, b, c and d all represent integer arguments. If d is assigned a value of 1, rearrange the
values of a, b and c into ascending order. If d = 2, rearrange a, b and c in descending order. And
if d is assigned any other value, return values of 0 for a, b and c.
(c) Suppose a, b, c and d all represent real, single-precision arguments. Evaluate each of the
following formulas:
22 bac += , abd =
7.35 Each of the situations described below requires a reference to one of the procedures defined in Prob.
7.34. Write an appropriate statement, or a sequence of statements, in each case.
(a) Generate a random value bounded between –1 and 1, and determine its sign. Then display a
message box indicating Negative, Positive or Zero [see Prob. 7.34(a)].
(b) Access the sub procedure written in Prob. 7.34(b) two different ways.
(c) Assign two positive, single-precision values to a and b, and access the sub procedure written in
Prob. 7.34(c), returning values for c and d. Then access the procedure again, supplying these
values of c and d. (This will return two new values for c and d.)
200 PROCEDURES [CHAP. 7
7.36 Determine the result of each of the following program segments.
(a) Function Fix(Message As String) As String
Fix = "'" + Message + "'"
End Function
. . . . .
Message = "Hello, There!"
Text = Fix(Message)
(b) Function Square(y As Single) As Single
Square = y ^ 2 + 2 * y + 3
End Function
. . . . .
x = 2
z = Square(x)
(c) Function Square(y As Single) As Single
Square = y ^ 2 + 2 * y + 3
End Function
. . . . .
x = 2
z = Square(Square(x))
. . . . .
(d) Function frm(a As Single, b As Single, c As Single, y As Single)As Single
If (a < 2) Then
Formula = a * y ^ 3 – b * y + c / y
Else
Formula = a * y ^ 2 + b * y + c
End If
End Function
. . . . .
z = frm(3, 4, 5, 2)
. . . . .
(e) Function Scramble(Message As String) As String
Dim NewStr As String, c As String, i As Integer, n As Integer
NewStr = ""
n = Len(Message)
For i = 1 To n
c = Mid(Message, i, 1)
NewStr = NewStr & Chr(Asc(c) + 1)
Next i
Scramble = NewStr
End Function
. . . . .
Message = "Hello, There!"
Message = Scramble(Message)
. . . . .
CHAP. 7] PROCEDURES 201
(f) Sub Change(Message As String)
Dim a As String, b As String, n As Integer, i As Integer
n = Len(Message)
a = ""
For i = 1 To n
b = Mid(Message, i, 1)
If (b >= "A" And b <= "Z") Then
a = a + Lcase(b)
ElseIf (b >= "a" And b <= "z") Then
a = a + Ucase(b)
Else
a = a + b
End If
Next i
Message = a
End Sub
Dim Str1 As String, Str2 As String, Str3 As String
. . . . .
Str1 = "1600 Pennsylvania Avenue NW, Washington, DC 20500"
Call Change(Str1)
Str2 = Str1
Call change(Str1)
Str3 = Str1
. . . . .
(g) Sub Sum(Total As Integer, n2 As Integer, Optional n1 As Integer = 1)
Dim i As Integer
Total = 0
For i = n1 to n2
Total = Total + i
Next i
End Sub
Dim First As Integer, Second As Integer, Total As Integer
. . . . .
Call Sum(Total, 6)
First = Total
. . . . .
Sum Total, 6, 3
Second = Total
. . . . .
Programming Problems
7.37 Rewrite the program shown in Example 7.3 so that it utilizes a function procedure rather than a sub
procedure. Execute the program to verify that it is written correctly.
7.38 Rewrite the program shown in Example 7.6 so that it utilizes a sub procedure rather than a function
procedure to determine the factorial. Which type of procedure is best suited to this particular problem?
202 PROCEDURES [CHAP. 7
7.39 Rewrite the program shown in Example 7.7 so that it utilizes the sub procedure written for Prob. 7.38.
Execute the program to verify that it is written correctly.
7.40 Modify the program shown in Example 7.10 (shooting craps) so that the function procedure
ThrowDice is replaced by a sub procedure.
7.41 Redesign the program shown in Example 7.10 so that a sequence of craps games will be simulated
automatically and noninteractively. Enter the total number of games as an input quantity. Execute the
program to simulate 1000 successive craps games. Use the results to estimate the probability of coming
out ahead when playing multiple games of craps. (This value, expressed as a decimal, is the total
number of wins divided by the total number of games played. If the probability exceeds 0.5, it favors
the player; otherwise, it favors the house.)
7.42 Modify each of the following examples presented in previous chapters so that it utilizes one or more
programmer-defined sub or function procedures.
(a) The piggy bank program shown in Example 4.5.
(b) The multilingual “hello” program shown in Example 4.6.
(c) The temperature conversion program shown in Example 4.7.
(d) The modified temperature conversion program shown in Example 4.8.
(e) The metronome program shown in Example 4.12.
(f) The geography program shown in Example 5.4.
(g) The modified multilingual “hello” program shown in Example 5.7.
(h) The loan program shown in Example 6.2 (using the corrected version of the code).
(i) The program to determine the real roots of a quadratic equation shown in Example 6.3.
7.43 Write a complete Visual Basic program for each of the following problems that were originally
described in earlier chapters. Include one or more sub procedures and/or function procedures in each
program.
(a) Enter a positive integer and determine whether it is even or odd, and whether or not it is a prime
number (see Prob. 4.46).
(b) Calculate the arithmetic average of a list of n numbers (see Prob. 4.49).
(c) Determine the capital of a country, or select a capital and determine the corresponding country
(see Prob. 4.51).
(d) Convert between U.S. and foreign currencies (see Prob. 4.52).
(e) Calculate the amount of money that accumulates in a savings account after n years (see Prob.
4.55).
(f) Repeat Prob. 7.43(e) using the single, generalized compound interest formula discussed in Prob.
5.43.
CHAP. 7] PROCEDURES 203
(g) Solve the compound interest problem described in Prob. 6.47 (accumulating monthly deposits).
Include a provision for either of the following features:
(i) Determine the accumulation (F) resulting from fixed monthly payments (A) for n years.
(ii) Determine the monthly payment (A) required to accumulate a specified amount (F) after n
years.
(h) Evaluate the polynomial given in Prob. 6.52. Generalize the polynomial so that it can be evaluated
using the first n terms, where n is a specified input parameter.
(i) Evaluate the area of a triangle, the radius of the largest inscribed circle, and the radius of the
smallest circumscribed circle, using the formulas provided in Prob. 6.53(c).
(j) Determine the increase in the population of a bacterial culture, using the series expansion given in
Prob. 6.53(d). Express the population increase in terms of the ratio P/P0. Enter the values for c, n
and t as input parameters.
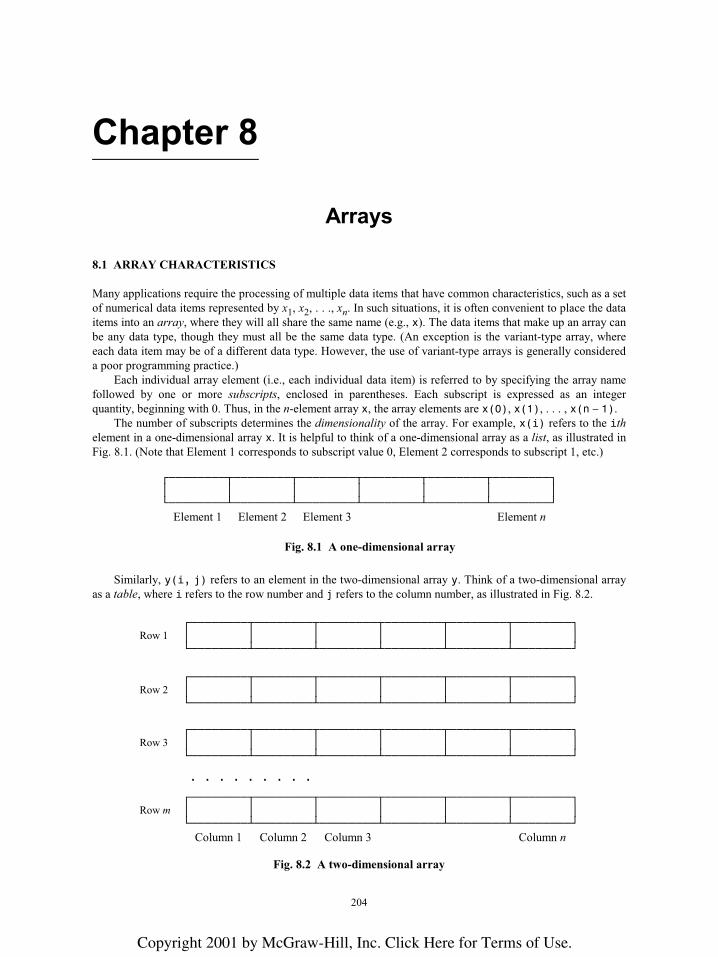
204
Chapter 8 __________________________________
Arrays
8.1 ARRAY CHARACTERISTICS
Many applications require the processing of multiple data items that have common characteristics, such as a set
of numerical data items represented by x1, x2, . . ., xn. In such situations, it is often convenient to place the data
items into an array, where they will all share the same name (e.g., x). The data items that make up an array can
be any data type, though they must all be the same data type. (An exception is the variant-type array, where
each data item may be of a different data type. However, the use of variant-type arrays is generally considered
a poor programming practice.)
Each individual array element (i.e., each individual data item) is referred to by specifying the array name
followed by one or more subscripts, enclosed in parentheses. Each subscript is expressed as an integer
quantity, beginning with 0. Thus, in the n-element array x, the array elements are x(0), x(1), . . . , x(n − 1).
The number of subscripts determines the dimensionality of the array. For example, x(i) refers to the ith
element in a one-dimensional array x. It is helpful to think of a one-dimensional array as a list, as illustrated in
Fig. 8.1. (Note that Element 1 corresponds to subscript value 0, Element 2 corresponds to subscript 1, etc.)
Element 1 Element 2 Element 3 Element n
Fig. 8.1 A one-dimensional array
Similarly, y(i, j) refers to an element in the two-dimensional array y. Think of a two-dimensional array
as a table, where i refers to the row number and j refers to the column number, as illustrated in Fig. 8.2.
Row 1
Row 2
Row 3
. . . . . . . . .
Row m
Column 1 Column 2 Column 3 Column n
Fig. 8.2 A two-dimensional array
Copyright 2001 by McGraw-Hill, Inc. Click Here for Terms of Use.
CHAP. 8] ARRAYS 205
Higher-dimensional arrays, such as the three-dimensional array z(i, j, k), are formed by specifying
additional subscripts in the same manner. Note, however, that multidimensional arrays can quickly become
very large, and hence require vast amounts of storage. You should therefore avoid the temptation to define
multidimensional arrays that are unnecessarily large.
8.2 ARRAY DECLARATIONS
An array must be declared before it can appear within an executable statement. The Dim statement is used for
this purpose. This statement defines the dimensionality (i.e., the number of subscripts), the size (range of each
subscript), the data type and the scope of an array (see Chap. 7). Within the Dim statement, each array name
must be followed by one or more integer constants, enclosed in parentheses. If several integer constants are
present (indicating a multidimensional array), they must be separated by commas.
To declare an array within a procedure, the Dim statement is generally written as
Dim array name (subscript 1 upper limit, subscript 2 upper limit, etc.) As data type
Within a module (but outside of a procedure), array declarations are written as
Private array name (subscript 1 upper limit, subscript 2 upper limit, etc.) As data type
or
Public array name (subscript 1 upper limit, subscript 2 upper limit, etc.) As data type
as discussed in Chap. 7 (see Sec. 7.5).
Each subscript normally ranges from 0 to the specified upper limit. Thus, the Dim statement
Dim c(10) As Integer
defines an eleven-element integer array consisting of the data items c(0), c(1), c(2), . . ., c(10). However,
the specification of a different lower limit can also be included within a Dim statement (or a Public or
Private statement). In this case, the general form of the Dim statement is
Dim array name ( subscript 1 lower limit To subscript 1 upper limit,
subscript 2 lower limit To subscript 2 upper limit, etc.) As data type
Public and Private statements are written in the same manner.
EXAMPLE 8.1
A Visual Basic module includes the following array declarations.
DIM Customers(200) As String, Net(100) As Single, Sales(1 To 50, 1 To 100) As Single
This statement defines Customers to be a one-dimensional string array containing 201 elements, ranging from
Customers(0) to Customers(200). Similarly, Net is a one-dimensional, single-precision array containing 101
elements, and Sales is a two-dimensional, single-precision array containing 5,000 elements (i.e., 50 rows and 100
columns; 50 × 100 = 5,000).
In some applications, it is more natural to use arrays whose subscripts begin at 1 rather than 0. Thus, a
one-dimensional, n-element array will range from 1 to n rather than 0 to n a more natural selection for many
206 ARRAYS [CHAP. 8
programmers. The Option Base statement allows the lower limit for all arrays within a module to be changed
to 1. This statement is written simply as
Option Base 1
Option Base must appear at the module level (not within a procedure), and it must precede any array
declarations within the module.
EXAMPLE 8.2
A Visual Basic module includes the following array declarations.
Option Base 1
DIM Customers(200) As String, Net(100) As Single, Sales(50, 100) As Single
This statement defines Customers to be a one-dimensional string array containing 200 elements, ranging from
Customers(1) to Customers(200). Similarly, Net is a one-dimensional, single-precision array containing 100
elements, and Sales is a two-dimensional, single-precision array containing 5,000 elements. (Compare with Example 8.1.)
In Visual Basic, the elements of a numeric array are initialized to 0 when the array is declared. The
elements of a string array are initialized as empty strings.
The elements of an array may be a user-defined data type rather than a standard data type. This is handled
in the same manner as ordinary variables, as explained in Chap. 2 (see Sec. 2.4).
In general terms, the data type definition is written as
Type data type name
member name 1 As data type 1
member name 2 As data type 2
. . . . .
End Type
The array declarations can then be written as
Dim array name ( subscript 1 lower limit To subscript 1 upper limit,
subscript 2 lower limit To subscript 2 upper limit, etc.) As user-defined data type
EXAMPLE 8.3
Here is a typical user-defined data type, similar to that shown in Example 2.7. Now, however, we will declare two arrays
whose elements are of this type. Arrays of this type might be useful in a customer billing application.
Type Customer
CustomerName As String
AcctNo As Integer
Balance As Single
End Type
Once the data type has been defined, we can declare one or more variables of this data type, as follows.
Dim OldCustomer(100) As Customer, NewCustomer(100) As Customer
CHAP. 8] ARRAYS 207
8.3 PROCESSING ARRAY ELEMENTS (SUBSCRIPTED VARIABLES)
The individual elements within an array are called subscripted variables. Subscripted variables can be utilized
within a program in the same manner as ordinary variables.
A subscripted variable can be accessed by writing the array name, followed by the value of the subscript
enclosed in parentheses. Multidimensional array elements require the specification of multiple subscripts,
separated by commas. The subscripts must be integer valued and they must fall within the range specified by
the corresponding array declaration.
A subscript can be written as a constant, a variable or a numeric expression. Noninteger values will
automatically be rounded, as required. If the value of a subscript is out of range (i.e., too large or too small),
execution of the program will be suspended and an error message will appear.
EXAMPLE 8.4
All of the subscripted variable assignments shown below are written correctly.
Dim Names(10) As String, Values(10, 20) As Single, k(10) As Integer
Dim a As Single, b As Single, m As Integer, n As Integer
. . . . .
Names(3) = "Aaron" values(8, 5) = 5.5
Names(i) = "Susan" values(m, n) = -3.2
Names(k(i)) = "Martin" values(m - 1, n + 3) = m + n
Names(2 * a - b) = "Gail" values(a + b, a - b) = 3 * a
Names(sqr(a ^ 2 + b ^ 2)) = "Sharon" values(abs(a + b), abs(a - b)) = a + b
Some of the subscripts may not be integer valued as written. In such cases, the noninteger values will automatically be
rounded. Suppose, for example, the numeric expression (2 * a - b) has a value of 4.2. Then the subscripted variable
Names(2 * a - b) will be interpreted as Names(4). Similarly, if (2 * a - b) has a value of 4.7, then the subscripted
variable Names(2 * a - b) will be interpreted as Names(5).
Within a user-defined array, the individual components (members) of a subscripted variable can be
accessed as
array name (subscript).member name
These components can be used in the same manner as ordinary variables. Thus, they can appear within
expressions, and they can be assigned values (see Secs. 2.5 and 2.10).
EXAMPLE 8.5
Consider the user-defined data type and the accompanying arrays, first introduced in Example 8.3; i.e.,
Type Customer
CustomerName As String
AcctNo As Integer
Balance As Single
End Type
Dim OldCustomer(100) As Customer, NewCustomer(100) As Customer
Dim i As Integer, j As Integer
We can assign values to the members of the subscripted variables in the following manner.
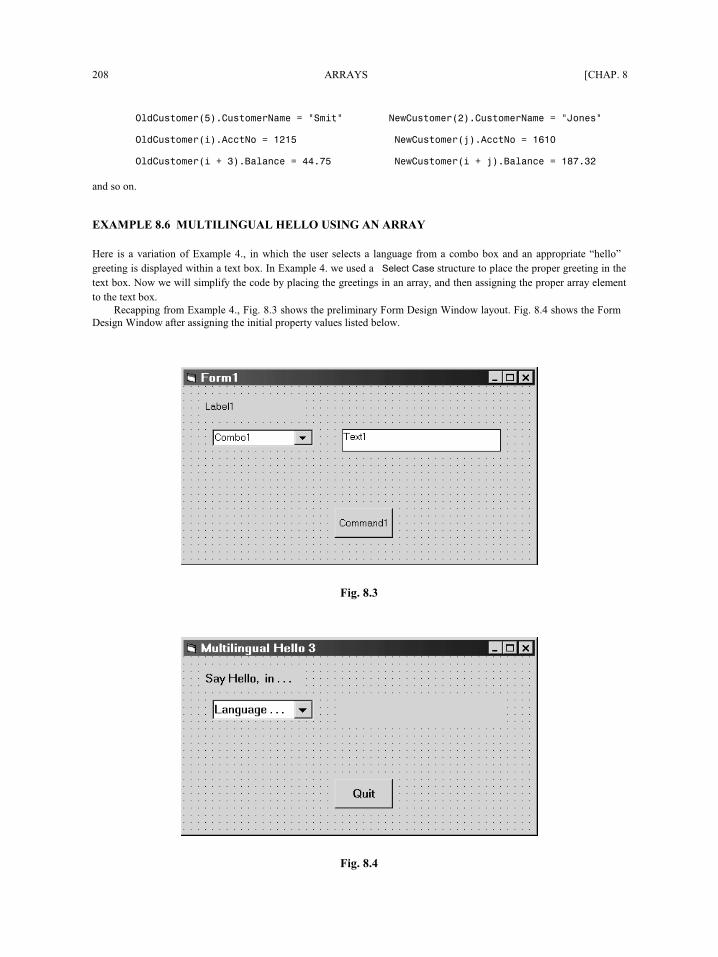
208 ARRAYS [CHAP. 8
OldCustomer(5).CustomerName = "Smith" NewCustomer(2).CustomerName = "Jones"
OldCustomer(i).AcctNo = 1215 NewCustomer(j).AcctNo = 1610
OldCustomer(i + 3).Balance = 44.75 NewCustomer(i + j).Balance = 187.32
and so on.
EXAMPLE 8.6 MULTILINGUAL HELLO USING AN ARRAY
Here is a variation of Example 4.9, in which the user selects a language from a combo box and an appropriate “hello”
greeting is displayed within a text box. In Example 4.9 we used a Select Case structure to place the proper greeting in the
text box. Now we will simplify the code by placing the greetings in an array, and then assigning the proper array element
to the text box.
Recapping from Example 4.9, Fig. 8.3 shows the preliminary Form Design Window layout. Fig. 8.4 shows the Form
Design Window after assigning the initial property values listed below.
Fig. 8.3
Fig. 8.4
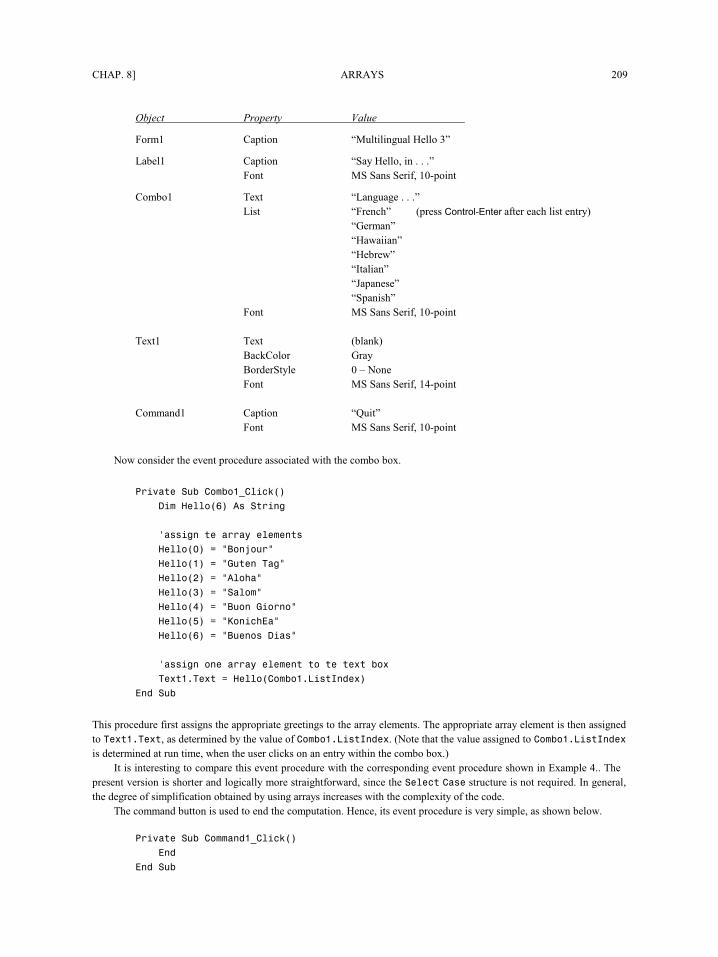
CHAP. 8] ARRAYS 209
Object Property Value
Form1 Caption “Multilingual Hello 3”
Label1 Caption “Say Hello, in . . .”
Font MS Sans Serif, 10-point
Combo1 Text “Language . . .”
List “French” (press Control-Enter after each list entry)
“German”
“Hawaiian”
“Hebrew”
“Italian”
“Japanese”
“Spanish”
Font MS Sans Serif, 10-point
Text1 Text (blank)
BackColor Gray
BorderStyle 0 – None
Font MS Sans Serif, 14-point
Command1 Caption “Quit”
Font MS Sans Serif, 10-point
Now consider the event procedure associated with the combo box.
Private Sub Combo1_Click()
Dim Hello(6) As String
'assign the array elements
Hello(0) = "Bonjour"
Hello(1) = "Guten Tag"
Hello(2) = "Aloha"
Hello(3) = "Shalom"
Hello(4) = "Buon Giorno"
Hello(5) = "Konichihua"
Hello(6) = "Buenos Dias"
'assign one array element to the text box
Text1.Text = Hello(Combo1.ListIndex)
End Sub
This procedure first assigns the appropriate greetings to the array elements. The appropriate array element is then assigned
to Text1.Text, as determined by the value of Combo1.ListIndex. (Note that the value assigned to Combo1.ListIndex
is determined at run time, when the user clicks on an entry within the combo box.)
It is interesting to compare this event procedure with the corresponding event procedure shown in Example 4.9. The
present version is shorter and logically more straightforward, since the Select Case structure is not required. In general,
the degree of simplification obtained by using arrays increases with the complexity of the code.
The command button is used to end the computation. Hence, its event procedure is very simple, as shown below.
Private Sub Command1_Click()
End
End Sub
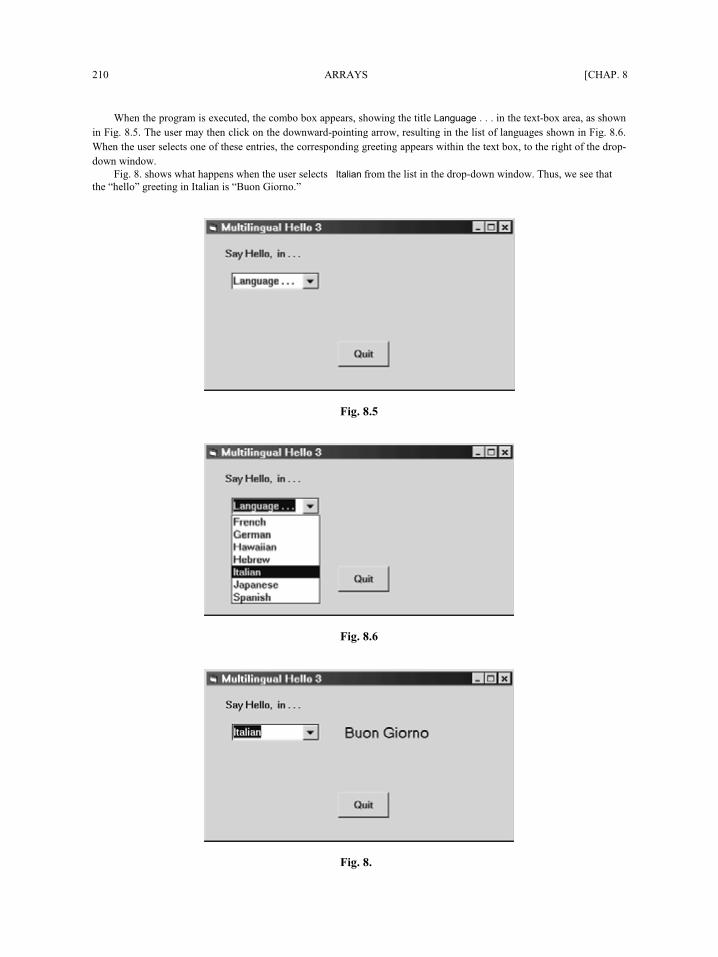
210 ARRAYS [CHAP. 8
When the program is executed, the combo box appears, showing the title Language . . . in the text-box area, as shown
in Fig. 8.5. The user may then click on the downward-pointing arrow, resulting in the list of languages shown in Fig. 8.6.
When the user selects one of these entries, the corresponding greeting appears within the text box, to the right of the drop-
down window.
Fig. 8.7 shows what happens when the user selects Italian from the list in the drop-down window. Thus, we see that
the “hello” greeting in Italian is “Buon Giorno.”
Fig. 8.5
Fig. 8.6
Fig. 8.7
CHAP. 8] ARRAYS 211
Before leaving this example, we present another way to write the event procedures. In principle, this method is more
efficient, since the array elements are assigned their string values only once, when the form is loaded. As a practical matter,
however, either version of the code will behave in the same manner.
Dim Hello(6) As String
Private Sub Form_Load()
'initialize the array elements
Hello(0) = "Bonjour"
Hello(1) = "Guten Tag"
Hello(2) = "Aloha"
Hello(3) = "Shalom"
Hello(4) = "Buon Giorno"
Hello(5) = "Konichihua"
Hello(6) = "Buenos Dias"
End Sub
Private Sub Combo1_Click()
Text1.Text = Hello(Combo1.ListIndex)
End Sub
Private Sub Command1_Click()
End
End Sub
8.4 PASSING ARRAYS TO PROCEDURES
Arrays can be passed to procedures as arguments, in much the same manner as ordinary variables are passed as
arguments. If an argument is an array, however, an empty pair of parentheses must follow the array name. This
requirement must be satisfied in both the procedure access and the first line of the procedure definition, as
illustrated in the following example.
EXAMPLE 8.7 PASSING AN ENTIRE ARRAY TO A PROCEDURE
Here is a skeletal structure of a Visual Basic program that passes an entire array to a sub procedure. The first n elements
are then assigned numerical values within the procedure.
Note that the array is called x in the calling portion of the program, and v within the procedure. This is permissible, as
long as the array arguments are of the same size and the same data type, and they appear in the same relative location
within each argument list.
Dim x(10) As Integer, n As Integer
. . . . .
n = . . . . .
Call Setup(x(), n) 'procedure reference
'or Setup x(), n
Private Sub Setup(v() As Integer, n As Integer) 'procedure definition
Dim i As Integer
For i = 0 to n
v(i) = i ^ 2
Next i
End Sub
212 ARRAYS [CHAP. 8
Since the array elements are passed by reference, the values assigned to the array elements within the procedure will
be recognized elsewhere within the program (e.g., in the calling portion of the program).
Individual array elements (i.e., subscripted variables) may also be passed to procedures as arguments.
Subscripted variables are written in the normal manner when they appear as arguments within a procedure
reference. The corresponding arguments in the first line of the procedure definition may be either subscripted
variables or ordinary variables, depending on the program logic.
EXAMPLE 8.8 PASSING ARRAY ELEMENTS TO A PROCEDURE
This example illustrates how subscripted variables are passed to a procedure as arguments. In this case, we will assign
single-precision values to the array elements 1 through 100 within the calling portion of the program. We then pass two
consecutive array elements to the procedure, which returns the square root of the sum of their squares. This value is
assigned to the first array element (i.e., array element x(0) ).
Dim x(100) As Single, i As Integer, n As Integer
For i = 1 To 100
x(i) = i 'assign values to the array elements
Next i
. . . . .
n = . . . . . 'assign a value to n
x(0) = Hypotenuse(x(n), x(n + 1)) 'function reference
. . . . .
Private Function Hypotenuse(a As Single, b As Single) As Single 'function definition
Hypotenuse = Sqr(a ^ 2 + b ^ 2)
End Function
If n is assigned a value of 3, what value will be assigned to x(0)?
In the next example we see a complete Visual Basic project that passes both an entire array and a single
array element as arguments.
EXAMPLE 8.9 SMALLEST OF TWO NUMBERS
In Example 7.2 we saw a complete Visual Basic program allowing the user to enter two numbers. The program determined
the smaller of the two and displayed the result within a message box. Here is a variation of that program in which we
utilize a three-element, one-dimensional array x to hold the numbers. We will place the two input values in elements x(1)
and x(2), and then “tag” the smaller value by placing it in x(0), which we will then send to a message box.
The user interface will be unchanged from Example 7.2. Hence, the control layout will be identical to that shown in
Figs. 7.1 and 7.2. Here is the new source code.
Dim x(2) As Single
Private Sub Command1_Click()
x(1) = Val(Text1.Text)
x(2) = Val(Text2.Text)
Call Smallest(x())
End Sub
(Continues on next page)
CHAP. 8] ARRAYS 213
Private Sub Command2_Click()
End
End Sub
Sub Smallest(x() As Single)
Dim Text As String
If (x(1) < x(2)) Then
x(0) = x(1)
Text = "a is smaller (a = "
ElseIf (x(1) > x(2)) Then
x(0) = x(2)
Text = "b is smaller (b = "
Else
x(0) = x(1)
Text = "Both values are equal (a, b = "
End If
Call Message(Text, x(0))
End Sub
Sub Message(Text As String, Value As Single)
Dim LineOut As String
LineOut = Text & Str(Value) & ")"
MsgBox LineOut
End Sub
Note that the entire array x is passed to the sub procedure Smallest from Command1_Click. Within Smallest, the
smaller of the two values is determined and assigned to x(0). Finally, the value of x(0), together with an appropriate
message, are passed to sub procedure Message.
Within Message, the message and the value of x(0) are combined into a single string. This string is then displayed
within a message box.
When the program is executed, it behaves in exactly the same manner as the earlier program shown in Example 7.2.
Fig.s 7.3 and 7.4 show representative output.
EXAMPLE 8.10 SORTING A LIST OF NUMBERS
Here is a more comprehensive example, based upon the well-known problem of sorting a list of numbers into ascending
(or descending) order. Let us generate ten random numbers (using the RND library function, as explained in Example 7.10)
and store them in a single-precision array, x. We will then rearrange the array so that the elements are sorted from smallest
to largest. The program will be written so that unnecessary storage is not required. Therefore, the program will contain
only one array, and the rearrangement will be carried out one element at a time.
The rearrangement will begin by scanning the first n elements of x for the smallest number. This value will then be
interchanged with the first number in x, thus placing the smallest number at the top of the list. Next the remaining (n – 1)
numbers will be scanned for the smallest, which will be exchanged with the second number. Then the remaining (n – 2)
numbers will be scanned for the smallest, which will be interchanged with the third number, and so on, until the entire
array has been rearranged. Note that a complete rearrangement will require a total of (n – 1) passes through the array,
though the length of each scan will become progressively smaller with each successive pass.
In order to find the smallest number within each pass (i.e., within the ith pass), we sequentially compare the starting
number x(i), with each successive number in the array, x(j), where j > i. If x(j) is smaller than x(i), we interchange
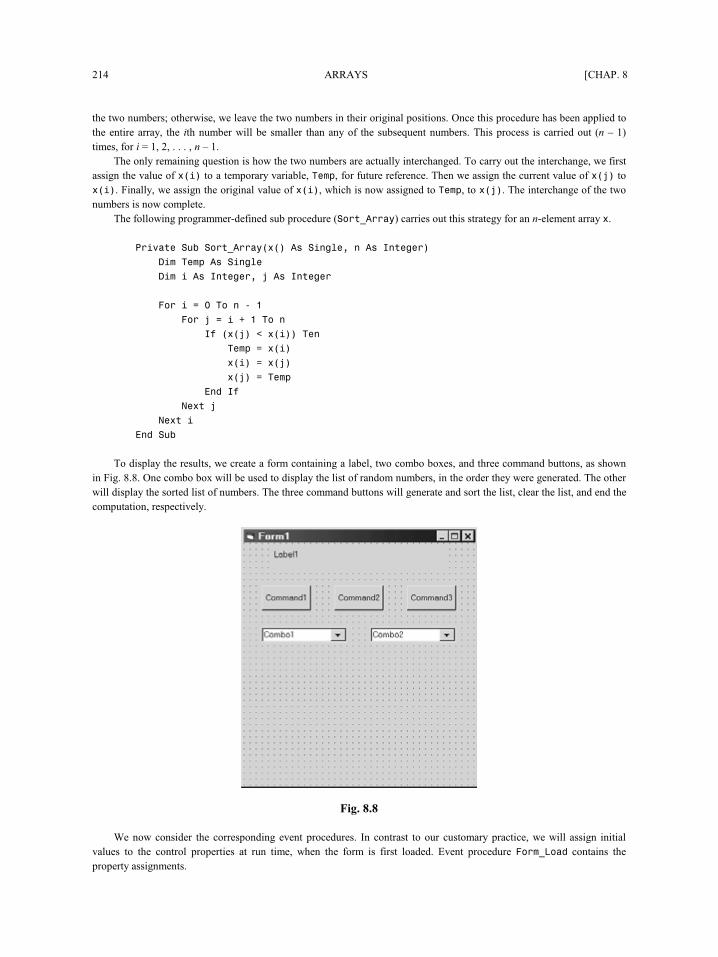
214 ARRAYS [CHAP. 8
the two numbers; otherwise, we leave the two numbers in their original positions. Once this procedure has been applied to
the entire array, the ith number will be smaller than any of the subsequent numbers. This process is carried out (n – 1)
times, for i = 1, 2, . . . , n – 1.
The only remaining question is how the two numbers are actually interchanged. To carry out the interchange, we first
assign the value of x(i) to a temporary variable, Temp, for future reference. Then we assign the current value of x(j) to
x(i). Finally, we assign the original value of x(i), which is now assigned to Temp, to x(j). The interchange of the two
numbers is now complete.
The following programmer-defined sub procedure (Sort_Array) carries out this strategy for an n-element array x.
Private Sub Sort_Array(x() As Single, n As Integer)
Dim Temp As Single
Dim i As Integer, j As Integer
For i = 0 To n - 1
For j = i + 1 To n
If (x(j) < x(i)) Then
Temp = x(i)
x(i) = x(j)
x(j) = Temp
End If
Next j
Next i
End Sub
To display the results, we create a form containing a label, two combo boxes, and three command buttons, as shown
in Fig. 8.8. One combo box will be used to display the list of random numbers, in the order they were generated. The other
will display the sorted list of numbers. The three command buttons will generate and sort the list, clear the list, and end the
computation, respectively.
Fig. 8.8
We now consider the corresponding event procedures. In contrast to our customary practice, we will assign initial
values to the control properties at run time, when the form is first loaded. Event procedure Form_Load contains the
property assignments.
CHAP. 8] ARRAYS 215
Private Sub Form_Load()
Form1.Caption = "Random Number Sort"
Label1.Caption = "Sorting Random Numbers"
Label1.FontSize = 12
Label1.Alignment = 2 'Center
Command1.Caption = "Go"
Command1.FontSize = 10
Command2.Caption = "Clear"
Command2.FontSize = 10
Command3.Caption = "End"
Command3.FontSize = 10
Combo1.FontSize = 10
Combo1.Visible = False
Combo2.FontSize = 10
Combo2.Visible = False
End Sub
Event procedure Command1_Click does most of the actual computation. In particular, this procedure initializes the
random number generator, generates the random numbers, assigns them to the array elements and copies the array elements
to Combo1, carries out the sort, and then copies the sorted array elements to Combo2.
Command2_Click clears the combo boxes by assigning empty strings to the list elements, and Command3_Click
ends the computation. Here are the remaining event procedures.
Private Sub Command1_Click()
Dim x(10) As Single, Temp As Single
Dim Index As Integer, SubIndex As Integer
Randomize
'Generate the random array elements and copy into Combo1
For Index = 0 To 9
x(Index) = Rnd
Combo1.List(Index) = Str(x(Index))
Next Index
Combo1.Text = "Random List"
'Sort the array
Call Sort_Array(x(), 9)
'Copy the sorted array elements into Combo2
For Index = 0 To 9
Combo2.List(Index) = Str(x(Index))
Next Index
Combo2.Text = "Sorted List"
Combo1.Visible = True
Combo2.Visible = True
End Sub
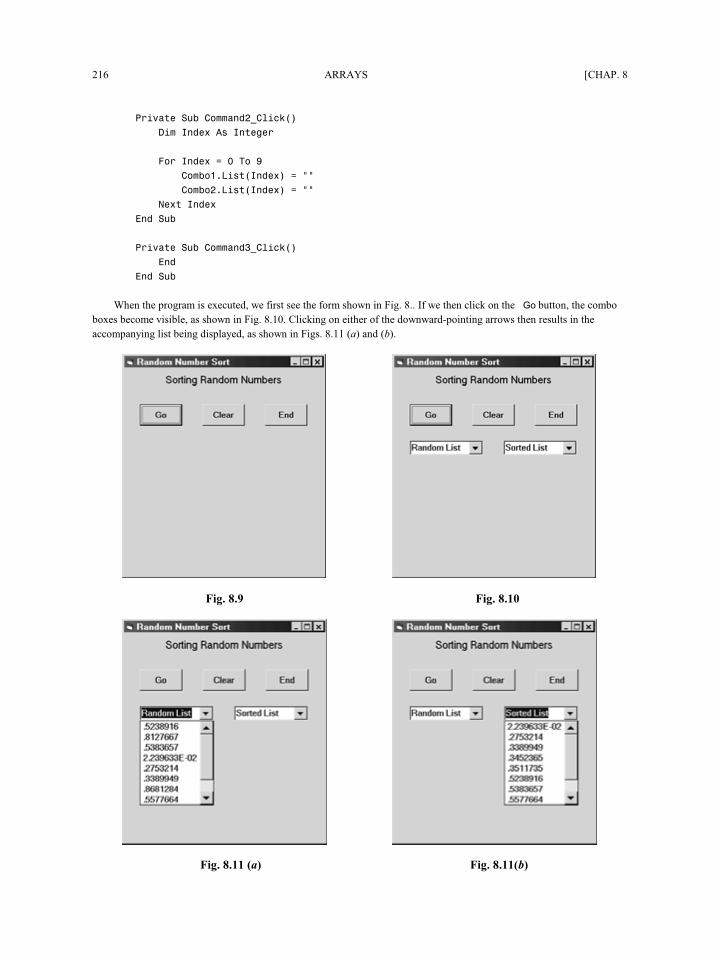
216 ARRAYS [CHAP. 8
Private Sub Command2_Click()
Dim Index As Integer
For Index = 0 To 9
Combo1.List(Index) = ""
Combo2.List(Index) = ""
Next Index
End Sub
Private Sub Command3_Click()
End
End Sub
When the program is executed, we first see the form shown in Fig. 8.9. If we then click on the Go button, the combo
boxes become visible, as shown in Fig. 8.10. Clicking on either of the downward-pointing arrows then results in the
accompanying list being displayed, as shown in Figs. 8.11 (a) and (b).
Fig. 8.9 Fig. 8.10
Fig. 8.11 (a) Fig. 8.11(b)