thermo centra w cell washing centrifuge instructional manual
TRANSCRIPT
OM2392 -11 December 2010
Thermo Scientific
Centra W Cell Washing Centrifuge
Instruction Manual

IMPORTANT! Please reference this page for the most up-to-date information on the
following* • web site addresses • contact information
• copyright and trademark information
*All subsequent pages in this manual may have incorrect web site addresses and contact information.
©2013 Thermo Fisher Scientific Inc. All rights reserved. Delrin, TEFLON, and Viton are registered trademarks of DuPont. Noryl is a registered trademark of SABIC. POLYCLEAR is a registered trademark of Hongye CO., Ltd. Hypaque is a registered trademark of Amersham Health As. RULON A and Tygon are registered trademarks of Saint-Gobain Performance Plastics. Alconox is a registered trademark of Alconox. Ficoll is a registered trademark of GE Healthcare. Haemo-Sol is a registered trademark of Haemo-Sol. Triton X-100 is a registered trademark of Sigma-Aldrich Co. LLC. All other trademarks are the property of Thermo Fisher Scientific Inc. and its subsidiaries. Manufacturer Thermo Fisher Scientific Robert-Bosch-Straße 1 D - 63505 Langenselbold Germany Thermo Fisher Scientific Inc. provides this document to its customers with a product purchase to use in the product operation. This document is copyright protected and any reproduction of the whole or any part of this document is strictly prohibited, except with the written authorization of Thermo Fisher Scientific Inc. The contents of this document are subject to change without notice. All technical information in this document is for reference purposes only. System configurations and specifications in this document supersede all previous information received by the purchaser. Thermo Fisher Scientific Inc. makes no representations that this document is complete, accurate or error-free and assumes no responsibility and will not be liable for any errors, omissions, damage or loss that might result from any use of this document, even if the information in the document is followed properly. This document is not part of any sales contract between Thermo Fisher Scientific Inc. and a purchaser. This document shall in no way govern or modify any Terms and Conditions of Sale, which Terms and Conditions of Sale shall govern all conflicting information between the two documents

WEEE ConformityThis product is subject to the regulations of the EU Waste Electrical & Electronic Equipment (WEEE) Directive 2002/96). It is marked by the following symbol:
Thermo Fisher Scientific has entered into agreements with recycling and disposal companies in all EU Member States for the recycling and disposal of this device. For information on recycling and disposal companies in Germany and on the products of Thermo Fisher Scientific, which fall under the RoHS Directive (Restriction of the use of certain hazardous substances in electrical and electronic equipment), please visit the website www.thermo.com/WEEERoHS
Thermo Scientific Centra W CW2+ i
C
Contents
Introduction ............................................................................1-1
Installation..............................................................................2-1Receive the Unit ............................................................2-2Prepare the Installation Site ...........................................2-2Set Power Configuration ................................................2-2Install fuses .....................................................................2-3Attach the Correct Power Cord .....................................2-3Rotor Removal ..............................................................2-3Tube Installation ...........................................................2-4
Operation ................................................................................3-1Warnings and Cautions .................................................3-2Control Panel .................................................................3-2Description of Operation ...............................................3-4Operational Precautions .................................................3-4Saline Solution - Priming and Volume Calibration .......3-5Wash Mode....................................................................3-6Spin Mode......................................................................3-8Agitate Mode..................................................................3-8Operating Procedure ......................................................3-8Anti-Human Globulin....................................................3-9
Maintenance ..........................................................................4-1Preventive Maintenance .................................................4-2Replacement Parts .........................................................4-3Guard Bowl Removal ....................................................4-3Pump Tubing Replacement ...........................................4-4 Decontamination .........................................................4-6Cover Interlock Bypass ..................................................4-6Condition of Returned Equipment ................................4-7
Specifications........................................................................5-1

Thermo Scientific Centra W CW2+ 1-1
1
Introduction
The Centra W Cell Washing Centrifuge is a benchtop cell washer that automatically performs the washing phase of the anti-globulin procedure in tests using up to six drops of blood sample.
The unit will accommodate either twelve 1 2 x 75 mm tubes, or twelve 10 x 75 mm tubes. It is registered as a device in accordance with FDA regulations governing the distribution and use of such products.
The unit incorporates a power entry module which permits you to select operation with 100, 120, 220, 230 or 240 VAC, 50Hz or 60 Hz power.
The unit contains a microprocessor-controlled centrifuge and a peristaltic pump for dispensing saline solution.
A cabinet supports a centrifugation chamber which is a removable plastic guard bowl. A drive assembly is mounted to the cabinet base. An induction motor is mounted to the drive assembly providing brushless operation. The motor has permanently-sealed self-lubricating ball bearings. The motor shaft projects through the center of the guard bowl. A solenoid plunger and a rotor is set on the motor shaft. A cover assembly forms the top section of the chamber. The aluminum cover assembly consists of a feed-dispensing nozzle for inserting saline solution into the tubes in the rotor, a cylindrical splash guard for directing the decanted waste into the drain hole in the chamber, a latch, and a viewport for easy speed verification.
When the cover is closed and latched, an interlock prevents the cover from opening when the rotor is in motion. The interlock also prevents operation when the cover is not closed and latched except in the CALIBRATE MODE. The remaining electrical and electronic components, along with the saline solution peristaltic pump and the rotor drive assembly, are located on the base section of the cabinet.

Thermo Scientific Centra W CW2+ 2-1
2
Installation
Contents
• “Receive the Unit ” on page 2-2
• “Prepare the Installation Site ” on page 2-2
• “Set Power Configuration” on page 2-2
• “Install fuses” on page 2-3
• “Attach the Correct Power Cord ” on page 2-3
• “Rotor Removal ” on page 2-3
• “Tube Installation ” on page 2-4

2 InstallationReceive the Unit
2-2 Centra W CW2+ Thermo Scientific
Receive the Unit All units are shipped in protective packaging.
1. Follow the unpacking instructions on the carton.
2. Inspect the unit upon receipt and immediately file any damage claims with the shipper/carrier.
3. Complete and return the postage-paid warranty card.
Prepare the Installation Site The unit normally resides on a bench top.
1. Place the unit on a clean, dry surface, to make certain that the suction feet at the bottom grip the surface firmly. Keep the area beneath the unit free of debris and loose materials.
2. The bottom of the Cell Washer must be high enough so that the drain hose is pitched downward from the unit to the drain, with no restriction to gravity flow. The drain hose may not be extended or constricted. Reduction of the drain flow can cause saline back up resulting in serious corrosion damage.
3. Locate the unit to allow a clearance of 12 cm (5 inches) on each side of the unit for ventilation. Provide clearance sufficient clearance above the unit to open the cover.
4. DO NOT plug in the power cord at this time! See Power configuration below.
Set Power ConfigurationVerify that the correct power cord and connector is provided for your installation.
CAUTION The resting surface must be level, to ensure quiet, vibration-free operation. A rigid and stable location is important. An improperly loaded centrifuge may vibrate or move.
WARNING International Electrotechnical Commission standard 1010 part 2-20 limits the permitted movement of a laboratory centrifuge to 12” (300 mm) in the unlikely event of a disruption. Laboratory management procedures should require that no person or any hazardous materials enter within this boundary while the centrifuge operates.

2 InstallationInstall fuses
Thermo Scientific Centra W CW2+ 2-3
Install fuses
1. Locate the power entry module on the back side of the unit. The removable fuse drawer is located in the module. A small latch holds the drawer in place. Press this latch, then slide the drawer out.
2. Select the correct fuses and insert two fuses in the fuse drawer.
3. Ensure that the fuses are securely in place and reinstall the entire drawer into the power entry module
Attach the Correct Power Cord 1. The unit requires a grounded power supply (3-outlet). If your facility does not have grounded
power outlets, arrange for proper grounding.
2. The unit is provided with two power cords. One is suitable for North America and Japan. The other is a “Continental Europe” type. Attach the appropriate power cord to the power entry module receptacle on the Cell Washer. DO NOT connect to AC outlet at this time.
Rotor Removal The rotor is packed inside the machine. Unpacking the rotor is necessary to avoid damage to the rotor and the machine.
Voltage Fuse Part. No.
100V/120V 250V 5A T 49946
220V/230V/ 240 250V 2.5A T 49937
Power Entry Module
Latch
Fuse Drawer
Voltage Selection Window
Remove and Rotate for Proper Voltage
Fuse
Fuse Drawer
WARNING ELECTRICAL HAZARD! Do not remove the grounding pin from the centrifuge power cord. Do not use the bare wired power cord to attach a power plug that does not have a grounding pin. The power cord provided with the unit is correctly rated for the highest current demand. This power cord should not be interchanged with cords from equipment with lower current demand. Exchange of power cords between equipment may create a fire hazard.

2 InstallationTube Installation
2-4 Centra W CW2+ Thermo Scientific
1. Plug the machine into an AC Power outlet after completing the proper power configuration as described in the previous section.
2. Turn ON the power switch.
3. Press the Cover Open Switch.
4. Remove the rotor and foam packing material.
5. Inspect the rotor.
Tube Installation The Cell Washer is shipped with the pump tubing already installed in the peristaltic pump at the rear of the Cell Washer. The saline supply tubing (including volume control flow valve and supply adapter) is also connected (by a 90° elbow) to the pump tubing which extends from the pump.
1. Connect the saline supply tubing to a saline solution supply container using the adapter.
For best results, locate the Cell Washer next to a sink for draining purposes. Periodically inspect the drain tubing to ensure its proper operation. If the drain line becomes kinked or restricted, drained liquid can back up the drain hose and into the motor compartment causing motor failure.
Note The Cell Washer has a gravity drain. Therefore be sure the drain tubing flows downward and that it is not restricted in any way

Thermo Scientific Centra W CW2+ 3-1
3
Operation
Contents
• “Warnings and Cautions” on page 3-2
• “Control Panel” on page 3-2
• “Description of Operation” on page 3-4
• “Operational Precautions” on page 3-4
• “Saline Solution - Priming and Volume Calibration” on page 3-5
• “Wash Mode” on page 3-6
• “Spin Mode” on page 3-8
• “Agitate Mode” on page 3-8
• “Operating Procedure” on page 3-8
• “Anti-Human Globulin” on page 3-9

3 OperationWarnings and Cautions
3-2 Centra W CW2+ Thermo Scientific
Warnings and Cautions
Control Panel
WARNING To Avoid Electric Shock: Plug the power cord into a grounded outlet.Never remove the grounding prong from the power plug, or use any adapter which does not complete the grounding circuit.Always unplug the power cord before attempting to clean or service the centrifuge.
CAUTION Ensure that loads are properly balanced around the rotor to minimize vibration. All Thermo Fisher Scientific accessories are stamped with their weight for easy balancing.Do not block the vents, otherwise, airflow will be restricted.Be sure the rotor and accessories are properly installed before attempting to start a run.
This digital display will show the total time of the spin, or wash, cycle(s) at the start and the remaining time while running. Time shows a maximum of 999 seconds, or 000 for HOLD.
This key is used with the appropriate number (0 through 9) key(s) to use the Cell Washer as a centrifuge at 2800 rpm (50 Hz) or 3400 rpm (60 Hz) in a timed (from 1 to 999 seconds) run or in an untimed run using the HOLD key. The indicator to the left of this key lights when the SPIN key is pressed indicating that the unit is in the spin mode.
This key is used with the 1, 2, 3, or 4 number keys to enter the desired wash cycle(s). The indicator to the left of this key will light when the WASH key is pressed, indicating that the instrument is in the wash mode. A beep will sound at the end of the wash cycle.
This key is used to select a six-second agitation for resuspension of the cell button.

3 OperationControl Panel
Thermo Scientific Centra W CW2+ 3-3
This key is used to select the calibrate mode in order to set the correct volume of saline solution dispensed for each test tube. It is also used in priming the peristaltic pump.
This key is used to start the wash or spin run. The indicator to the left of this key will light when the RUN key is pressed, indicating that the instrument is in the run mode.
This key may be used at any time and in any mode to stop a run. The indicator to the left of this key will light when the stop key is pressed, indicating that the unit is in the brake mode.
Note No changes can be made during a run. All keys are disabled except for the STOP and CHECK keys
This key is used to temporarily interrupt a wash cycle at the end of its current phase (i.e. at the end of fill, spin, decant, or agitate). The cover may be opened (by pressing the OPEN COVER key once the OPEN COVER LED lights) for access to the rotor. Closing the cover and pressing the RUN key will resume the wash cycle run where it was interrupted. The check function can only be used in the wash mode. The indicator to the left of this key lights when the CHECK key is pressed to signal that the unit is in the check mode.
This key is used to power the cover solenoid and open the cover. The indicator to the left of this key will light whenever the Power Switch is in the On position and the rotor is stopped. Press the OPEN COVER key to release the cover.
This key is used to select an indefinitely timed spin run.
Clear: This key is used to clear the current displayed TIME or CYCLE numbers.
This indicator lights when the saline solution reservoir is depleted. An alarm also sounds. The Cell Washer defaults to the check mode, allowing you to hand- fill the tubes, and to prime the pump system. Pressing the RUN key will resume the run.
This digital display will show the number of wash cycles initially selected. During a run it displays the number of remaining wash cycles.
On-Off rocker switchWhen the Power Switch is pushed to the ON position, the STOP and the OPEN COVER LED on the control panel will light and zeroes will appear in the TIME and CYCLE digital displays.

3 OperationDescription of Operation
3-4 Centra W CW2+ Thermo Scientific
Description of Operation The Cell Washer can be programmed to run up to four wash cycles. Each basic 80-second wash cycle run is stored in the Cell Washer system memory until the CLEAR key is pressed, the power switch is pushed, the power is interrupted or the wash mode parameters are changed. The user programs the required number of wash cycles. The system automatically eliminates the “agitate” step from a single, or, the final wash cycle so that the clean pellet is well defined at the completion of the run. Each wash cycle consists of four steps:
1. FILL-Low Speed
Saline wash solution is drawn from the reservoir by the peristaltic pump up through the flow control valve, the flow switch and the cover saline dispensing nozzle. The nozzle feeds the saline into the inlet porthole in the rotor distributor. There the filler tubes feed the saline into the test tubes in a directed stream for maximum resuspension of cells.
2. SPIN-High Speed
The system rapidly accelerates to full speed to pellet the red blood cells. Automatic dynamic braking at the end of this step provides rapid deceleration to prevent resuspension or dislodging of the cell button.
3. DECANT-Low Speed
The rotor holds the tubes at a slight negative angle and spent saline is expelled from the test tubes by low centrifugal force. This action retains virtually all cells in the tubes while effectively removing almost all residual saline. Decanted waste solution is directed, by the splash guard in the cover, into the drain-hole in the chamber (guard bowl) and into the drain tubing which carries the waste out of the Cell Washer and into a waste container or drain.
4. AGITATE
(except in a single or final wash cycle) This phase is included on all but the final, or a single, wash cycle. By a rapid “stepping” motion of the rotor, cell pellets are disrupted (broken up) for resuspension of the cells during subsequent wash cycles. If desired, the agitation sequence may be manually added at the end of the run.
Operational Precautions To guarantee accurate test results, the proper use of the Cell Washer as detailed in this manual and in the testing procedure provided by the reagent manufacturers must be followed.
HIGH-SPEED SPIN
Fill DECANT
AGIATETIME (seconds)
SPEE
D (R
PM)
80 70 60 50 40 30 20 10 0

3 OperationSaline Solution - Priming and Volume Calibration
Thermo Scientific Centra W CW2+ 3-5
Make sure that test materials are used within the manufacturers’ recommended dates.
Erroneous antiglobulin readings can result from any of the following:
• The sample serum/cell ratio is improper.
• The red cells were not sufficiently washed.
• The saline solution was improperly decanted.
• The volume calibration has shifted due to change in the saline level or restriction in the feed tube.
• The antiglobulin serum is inactive or outdated.
• The antiglobulin serum was not added to a tube(s).
• The final centrifugation (spin) was improper.
• The reading or recording of results is inaccurate.
This Cell Washer provides accurate washing, decanting, and a proper speed for the final spin. However, the Cell Washer and the procedures outlined in this manual will not eliminate all potential errors. To minimize errors, proper laboratory procedures require adequate control of all tests performed.
Saline Solution - Priming and Volume Calibration
Long-term exposure to certain preservatives found in azidefree saline solutions may adversely effect certain plastic components within the Cell Washer. Routine housekeeping and cleaning practices will help to remove salt deposits in, and prolong the life of, these components.
Priming
Priming is required whenever a new saline supply is connected. To prime the instrument:
1. Connect the saline reservoir to the cube adapter of the pump tubing.
2. Open the cover and place a receptacle under the saline dispenser nozzle in the cover.
3. Press the CALIBRATE key.
WARNING When handling and disposing of blood and blood components follow standard laboratory procedures. Observe all safety precautions and standard laboratory practices.
WARNING Some saline solution contains a sodium azide preservative which may react with the drain plumbing to form dangerous explosive azide salts. Check with the saline solution supplier before discharging waste solutions directly into normal drains.
Note When priming or calibrating the pump with the cover open always put a container in front of the nozzle before pressing the calibrate key. (Otherwise, you will get wet!)

3 OperationWash Mode
3-6 Centra W CW2+ Thermo Scientific
Saline will enter the lines. If saline does not reach the receptacle, press the CALIBRATE key again until the lines are full of saline solution and free of air bubbles.
Volume Calibration
This procedure provides the correct volume of saline solution to be distributed to each test tube. Calibration is required daily. Calibration is also required if the saline reservoir has been replaced or pump tubing replaced.
1. Push the Power Switch to the on position.
2. The OPEN COVER LED lights.
3. Press the OPEN COVER key.
4. The cover will open.
5. Hold a 100 ml graduated cylinder directly under the saline dispenser in the cover.
6. Press the CALIBRATE key.
A volume of saline will dispense into the cylinder. This volume should be:
If the volume is not correct, turn the flow valve on the saline supply tubing clockwise (CW) to decrease volume flow or counter clockwise (CCW) to increase volume flow. Recheck by following this procedure starting at step 5. Repeat this procedure as necessary.
The Cell Washer must be Calibrated for a 1 2 tube load even though fewer tubes may be used.
Wash Mode
Wash Cycle
The wash mode can consist of 1, 2, 3 or 4 wash cycles. To perform an automatic wash:
1. Push the POWER SWITCH to the ON position. The TIME and the CYCLE displays will show zeroes. The STOP LED and OPEN COVER LED will light.
2. Press the OPEN COVER key and raise the cover.
3. Install the solenoid plunger onto the drive assembly shaft.
4. Turn the solenoid plunger counterclockwise (CCW) until the slot in its underside completely engages the pin in the drive assembly shaft.
The solenoid plunger is correctly seated when it cannot be turned independently of the motor shaft.
Note When priming or calibrating the pump with the cover open always put a container in front of the nozzle before pressing the calibrate key. (Otherwise, you will get wet!)
VOLUME TOTAL TUBE SIZE 54 ml 1 2x75 mm tubes 40 ml 10x75 mm tubes

3 OperationWash Mode
Thermo Scientific Centra W CW2+ 3-7
5. Carefully install and seat the rotor onto the drive assembly shaft.
6. Turn the rotor counterclockwise (CCW) until it rests on the drive assembly shaft and engages the slot at the top of the drive assembly shaft. The rotor is properly seated when it cannot be turned independently of the solenoid plunger.
7. Install tubes symmetrically in the rotor.
8. Close the cover and press the WASH key.
9. Press the appropriate number key 1, 2, 3 or 4 for the desired wash cycle(s).
The selected cycle number will appear on the CYCLE display. Also, the TIME display will show 80,160, 240 or 320 seconds for the respective 1, 2, 3 or 4 wash cycles.
10. Press the RUN key.
The RUN LED will light, and the TIME display will show the run time remaining.
11. You may stop the run by pressing the STOP key for immediate braking or pressing the CHECK key to pause after the current step (Fill, Spin, Decant or Agitate). If the STOP key was used, then the wash cycle will start from the beginning when restarted.
The CHECK key is operable only in the WASH mode. Pressing the CHECK key stops the run between two steps. The run will continue from there when the cover is closed and the RUN key is pressed.
CAUTION The rotor must be run with a balanced load or damage to the rotor and instrument can occur.
Note If saline flow is interrupted or depleted, the run stops, an alarm sounds and the ADD SALINE LED lights.

3 OperationSpin Mode
3-8 Centra W CW2+ Thermo Scientific
12. At the end of the run the OPEN COVER LED will light, and an alarm will sound. Press the OPEN COVER key and raise the cover.
Spin Mode In this mode the Cell Washer can be operated at high speed as a centrifuge in a timed run or in an untimed (HOLD) run.
Timed
1. Press the SPIN key and enter the desired centrifugation run time from I through 999 seconds. The selected time will appear on the TIME display.
2. Press the RUN key. In the timed mode the rotor will accelerate to, and spin at high speed for the designated time. The remaining time to spin will be displayed continuously in the TIME display and then the unit will shut off automatically.
Untimed (Hold)
1. Press the SPIN key and then press the HOLD key.
2. Press the RUN key.
The rotor will accelerate to, and spin at, high speed until the STOP key is pressed.
Agitate Mode
Press the AGITATE key to obtain a six-second agitation.
Operating Procedure 1. Press the POWER switch to the ON position.
The STOP LED and the OPEN COVER LED will light and the TIME and CYCLE displays will show zeroes.
2. Press the OPEN COVER key and raise the cover.
Note If agitation is desired prior to spin: press the SPIN Key; press the AGITATE key, then press the appropriate run time keys. Now the instrument is programmed for a six-second agitation prior to centrifugation.
Note Agitation can only be performed with the cover closed.
CAUTION An agitate can be added to the spin cycle by pressing the SPIN and AGITATE keys.

3 OperationAnti-Human Globulin
Thermo Scientific Centra W CW2+ 3-9
3. Install the tubes symmetrically in the rotor.
4. Close the cover.
5. Press the WASH Key.
6. Press the desired number of washes (1-4).
7. Press the RUN Key to initiate the wash cycle.
8. The STOP LED, and the OPEN COVER LED will light when the wash cycle(s) is complete.
9. Press the OPEN COVER key and raise the cover.
10. Add the appropriate amount of anti-human serum to the tubes.
11. Close the cover.
12. Press the SPIN key and, if desired, the AGITATE key. (If AGITATE key is pressed the tubes will be agitated for six-seconds and then spun).
13. ENTER the number of seconds for the desired cycle time.
14. Press the RUN key to begin the spin cycle.
15. At the end of the entered time the STOP LED and the OPEN COVER LED will light. When the spin cycle(s) is complete; press the OPEN COVER key and raise the cover. Remove the tubes and read the results.
16. Add lgG-sensitized control cells to all negative reactions and replace the tubes in the rotor. Be sure the load is symmetrically balanced.
17. Repeat steps 14 and 15.
Anti-Human Globulin The following Anti-Human Globulin Test protocol can be used as a check of proper Cell Washer operation.
Perform the operational tests with a full rotor of twelve (12) either the 10 mm x 75 mm tubes or the 12 m x 75 mm tubes as described below:
1. Add up to six (6) drops of AB serum and one (1) drop of a 2-5% red cell suspension in each tube.
2. Run the tubes through three (3) wash cycles with tubes at least 80% filled [approximately 40 ml total for twelve (12)10 x 75 mm tubes and 54 ml total for twelve 12 x 75 mm tubes for each wash].
CAUTION The rotor must be run with a balanced load or damage to the rotor and instrument can occur.
Note Once the preceding programmed wash and spin cycles have been entered, they remain in the memory unless the CLEAR key is pressed, the Power Switch is pushed, the wash mode parameters are changed or the power is interrupted. Therefore, simply press the WASH key or SPIN key. Then press the RUN key. The run cycle will include all the previously entered number of wash cycles or spin time, and agitate, if programmed.

3 OperationAnti-Human Globulin
3-10 Centra W CW2+ Thermo Scientific
3. Add two (2) drops of anti-human serum to each tube.
4. Agitate tubes and spin for 1 5-20 seconds. Examine for agglutination. All tubes should give negative reactions.
5. Add one (1) drop of Coombs control cells to each negative tube.
6. Agitate tubes and spin for 1 5 seconds. Examine for agglutination. All tubes should give positive reactions.

Thermo Scientific Centra W CW2+ 4-1
4
Maintenance
Contents
• “Preventive Maintenance ” on page 4-2
• “Replacement Parts ” on page 4-3
• “Guard Bowl Removal ” on page 4-3
• “Pump Tubing Replacement ” on page 4-4
• “ Decontamination ” on page 4-6
• “Cover Interlock Bypass ” on page 4-6
• “Condition of Returned Equipment ” on page 4-7

4 MaintenancePreventive Maintenance
4-2 Centra W CW2+ Thermo Scientific
Preventive Maintenance
Interval Action
Daily 1. Inspect tubing and connections.
Make sure all tubing is securely connected and free from obstructions. Make certain that drain tubing is not restricted and that saline waste can flow through freely by gravity.
2. Inspect interior bowl (Remove guard bowl).
Make certain that the bowl is clean and free of dried saline crystals and other debris. It is important to wipe out the bowl daily with a damp sponge or cloth.
3. Check saline fill volume.
Using the CALIBRATE key and a graduated cylinder, make certain the unit delivers 40 mL of saline if using 10 x 75 mm tubes or 54 mL if using 12 x 75 mm tubes. It the volume delivered is below the required amount adjust the saline flow valve (clockwise to decrease the amount of saline and counterclockwise to increase the flow).
Weekly 1. Flush tubing with a 1:10 solution of household bleach (0.5% Sodium Hypochlorite).
Prepare enough diluted bleach to run through four wash cycles (approximately 200 ml). Install the rotor and plunger.
CAUTION Do not run wash cycles without the rotor and plunger installed. Damage to the bearing may result. Remove the saline supply tube from the saline reservoir. Press the CALIBRATE key until all saline is pumped out of the line.
Connect the saline supply line to the bleach solution and program the unit to Wash 4 (four) times. Remove the saline supply line from the bleach solution and again empty the line by pressing the CALIBRATE key. Then connect the saline supply tubing to at least one liter of distilled water and fill the line by pressing the CALIBRATE key. Run the unit through enough
Wash cycles to use all of the distilled water. Again clear the line using the CALIBRATE key.
Reconnect the saline supply line to the saline reservoir and prime the unit using the CALIBRATE key. Make certain that the inner bowl is wiped out to remove any excess moisture before resuming use of the Cell Washer.
2. Clean the rotor and solenoid plunger.
Remove the solenoid plunger and wash with plenty of warm water and a mild detergent (paying particular attention to the bore.) Rinse thoroughly under warm water. Take a damp cloth and wipe any saline residue from the well that the plunger sits in.
Replace the solenoid plunger.
Remove rotor from the unit and wash with warm water and a mild detergent. Direct running water into the hole in the top of the rotor for several minutes and make sure water is flowing freely out of all filler tubes. Direct water into the slot of each tube holder and the shaft hole in the bottom. Install and spin the rotor in the Cell Washer for approximately 20 seconds to remove excess water.
4 MaintenanceReplacement Parts
Thermo Scientific Centra W CW2+ 4-3
Replacement Parts The following parts may be replaced by the user.
Guard Bowl Removal 1. Set the POWER switch to the ON position and open the cover.
2. Set the POWER switch to the OFF position.
3. Unplug the power cord.
4. Remove the rotor and solenoid plunger.
5. Wipe the inside of the guard bowl completely dry.
6. Pull up the three white guard bowl retainers approximately 1/4 inch.
7. Carefully lift the guard bowl out of the cabinet. Do not allow saline solution on the guard bowl drain to drip into the motor shaft area.
Three Months 1. Check motor speed.
Set the power switch to ON. Press the SPIN key. Press the HOLD key. Press the START key. Allow the motor to accelerate to speed. Shine a stroboscope or tachometer through the viewport in the cover to verify the speed as indicated below.
If the motor is not spinning at the correct speed, you should notify your Service Representative. Press the STOP key. Set the power switch to OFF. Replace the solenoid plunger and rotor.
Power Frequency RPM
50 Hz 2800-3000
60 Hz 3400-3600
2. Check spin time.
Press the SPIN key and enter the length of spin time. Press RUN. As soon as the spin cycle starts (start of spin can be determined by listening for hum), start the stopwatch. Stop the stopwatch when the time display reads 000. Verify that spin time is correct.
Interval Action
Description Cat. No.
Guard Bowl 50402
Pump Head Tubing Kit 50019
Valve 65450
Fuse - 100/120 VAC, 5A, 5 x 20 mm 49946
Fuse - 220/230/240 VAC, 2.5A, 5 x 20 mm 49937
Solenoid Plunger 44919
Rotor 477
Cover Splash Guard 50247
4 MaintenancePump Tubing Replacement
4-4 Centra W CW2+ Thermo Scientific
8. Examine the interior and exterior surfaces of the guard bowl for cracks or holes. If damaged, or if the surfaces are sticky to the touch, replace it with a new one, otherwise wash it with warm water and mild detergent.
Guard Bowl Replacement:
1. Place the guard bowl in the cabinet opening; orient the guard bowl so that the drain faces the rear of the unit and fits into the drain hole of the inner splash guard.
2. Insert the lower portion of the three retainers into the holes in the cabinet before locking in place with the thumb buttons.
3. Replace the solenoid plunger; turn it counterclockwise (CCW) until it is properly seated.
4. Replace the rotor; turn it counterclockwise (CCW) until it is properly seated.
Pump Tubing Replacement Refer to the figure on the next page when replacing pump tubing.
1. Unplug line cord from power source.
2. At the rear of the unit, remove the two thumbscrews that hold the pump head in place. Pull out the front half of the pump head and the roller assembly to free up the tubing.
3. Disconnect the tubing attached to the bottom of the flow sensor and remove the tubing from the saline supply. Discard the entire tubing set.
4. Attach the new tubing set (already assembled) by connecting the pump tubing end to the flow sensor (short tubing end). Be sure that it is pushed all the way up.
5. Insert the pump rollers into the pump head (long end of shaft outward). Turn the pump shaft by hand to verify that the pump motor is coupled.
6. Wrap the pump tubing portion around the rollers with the elbow at the bottom.
7. With one hand, place both ends of the pump tubing into the channels and gently pull the ends (stretching the tubing). With the other hand, attach the pump head front half over the back half (pump halves should be flush against each other). Insert the thumbscrews and fasten them. Take care to avoid pinching the tubing (turning the pump shaft during alignment/fastening may help).

4 MaintenancePump Tubing Replacement
Thermo Scientific Centra W CW2+ 4-5
8. Gently pull on the drain tubing (to unkink it), and slide its clamp up the tubing as close to the cabinet assembly as possible. Tighten it in place to prevent kinking.
9. Visually inspect all tubing to ensure that none is kinked. Turn the pump shaft by hand to ensure proper operation. Connect the cube adapter to saline cube nozzle (or insert entire tube end into any saline container). Slide the flow valve to a convenient location along the inlet tubing. Plug the line cord back in, and calibrate.
The supplied silicone tubing is specially manufactured for use in the peristaltic pump. Do not use any other tubing. Improper installation of peristaltic pump silicone tubing may significantly shorten its life. Failure to hold a slight tension of the pump tubing during installation may cause binding of the pump tube to the roller and possible damage to the pump.
Flow Sensor
Outlet(upper)
Inlet(lower)
coupler
DrainTubing
PumpHead
Thumbscrew
FlowValve
CubeAdapter
elbowRollerAssy
clamp
CAUTION Do not use a sharp object to fit the tubing in place as this may damage the tubing.
CAUTION Failure to ensure this proper seating before operating the pump, may result in damage to the drive unit.
4 Maintenance Decontamination
4-6 Centra W CW2+ Thermo Scientific
Decontamination
1. Always wear protective gloves when handling blood, blood component or blood contaminated materials.
2. Clean blood spills according to your institution’s recommended procedure for decontamination or that described in the latest revision of the National Committee for Clinical Laboratory Standards (NCCLS) guidelines for the protection of laboratory workers from instrument biohazards.
3. Wipe instrument with a damp towel (water only) and thoroughly dry.
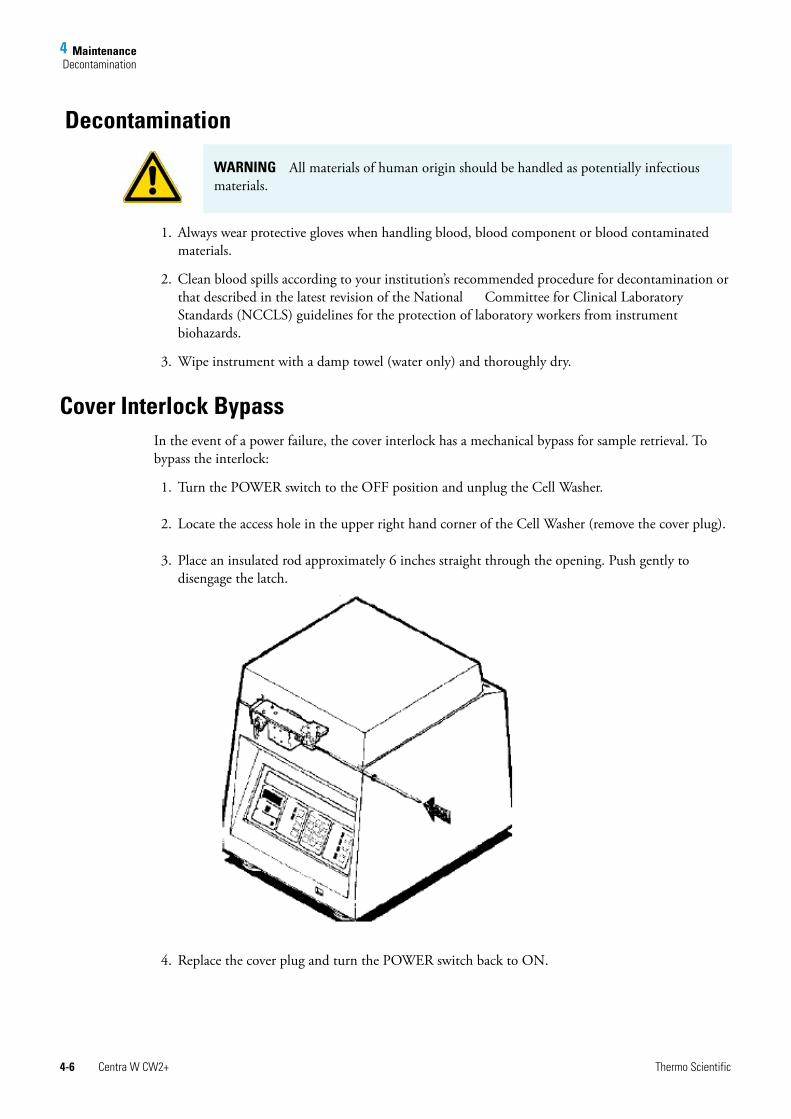
Cover Interlock Bypass In the event of a power failure, the cover interlock has a mechanical bypass for sample retrieval. To bypass the interlock:
1. Turn the POWER switch to the OFF position and unplug the Cell Washer.
2. Locate the access hole in the upper right hand corner of the Cell Washer (remove the cover plug).
3. Place an insulated rod approximately 6 inches straight through the opening. Push gently to disengage the latch.
4. Replace the cover plug and turn the POWER switch back to ON.
WARNING All materials of human origin should be handled as potentially infectious materials.

4 MaintenanceCondition of Returned Equipment
Thermo Scientific Centra W CW2+ 4-7
Condition of Returned Equipment Obtain a return goods authorization (RGA) before returning equipment to the manufacturer. The RGA paperwork includes a Certificate of Decontamination for you to sign. It indicates that you have performed the proper steps for decontaminating the unit.
All return equipment shipments will be refused until the signed certificate is received. You must prepay transportation to the service depot.
WARNING All returned units must be decontaminated, free of radioactivity, and free of hazardous, infectious, pathogenic, or toxic materials.

Thermo Scientific Centra W CW2+ 5-1
5
Specifications
Electrical Requirements 100, 120, 220, 230, or 240 VAC, +/- 10%,50 Hz or 60 Hz
Motor Type 2 speed induction High Speed Spin (50Hz) 2800-3000 rpm1
1 No LoadSpecifications subject to change without notice.
High Speed Spin (60Hz) 3400-3600 rpm1 Low Speed Decant (50Hz or 60Hz) 550-600 rpm1
Length of Modes: Automatic total cycle time 80 seconds Manual timed to 999 seconds, or indefinite in hold mode
TUBE TOLERANCES: Diameter 10 mm or 12 mm +/-0.09 mm Length 75 mm +/- 2 mm CELL WASHER DIMENSIONS: Depth 16 3/8 inches (41.6 cm) Width 12 5/8 inches (32.1 cm) Height: Cover closed 15 3/16 inches (38.6 cm) Cover open 25 inches (63.3 cm) Mass (weight): Net 45 lbs. (20.4 kg) PACKING CASE DIMENSIONS: Depth 17 1/4 inches (43.8 cm) Width 20 1/8 inches (51.1 cm) Height 28 inches (71.1 cm) AMBIENT TEMPERATURE: Operation 10° C to 35° C Storage 20° C to 70° C RELATIVE HUMIDITY: Operation 20 to 90% Non-Operation 5 to 95%Storage

Thermo Scientific Centra W CW2+ A-1
A
Chemical Compatibility Chart
CHEMICAL
MAT
ERIA
LAL
UMIN
UM
ANOD
IC C
OATI
NG
for A
LUM
INUM
BUN
A N
CELL
ULOS
E AC
ETAT
E BU
TYRA
TE
POLY
URET
HAN
E RO
TOR
PAIN
T
COM
POSI
TE C
arbo
n Fi
ber/
Epox
y
DELR
IN®
ETHY
LEN
E PR
OPYL
ENE
GLAS
S
NEO
PREN
E
NOR
YL®
NYL
ON
PET1 , P
OLYC
LEAR
®,C
LEAR
CRIM
P®CC
CLEA
RCRI
MP®
POLY
ALLO
MER
POLY
CARB
ONAT
E
POLY
ESTE
R, G
LASS
THE
RMOS
ET
POLY
THER
MID
E
POLY
RTHY
LEN
E
POLY
PROP
YLEN
E
POLY
SULF
ONE
POLY
VIN
YL C
HLOR
IDE
RULO
N A
®, T
EFLO
N®
SILI
CON
E RU
BBER
STAI
NLE
SS S
TEEL
TITA
NIU
M
TYGO
N®
VITO
N®
2-mercaptoethanol S S U - S M S - S U S S U S S - S S S S U S S S S S S
Acetaldehyde S - U U - - - M - U - - - M U U U M M - M S U - S - U
Acetone M S U U S U M S S U U S U S U U U S S U U S M M S U U
Acetonitrile S S U - S M S - S S U S U M U U - S M U U S S S S U U
Alconox® U U S - S S S - S S S S S S M S S S S S S S S S S S U
Allyl Alcohol - - - U - - S - - - - S - S S M S S S - M S - - S - -
Aluminum Chloride U U S S S S U S S S S M S S S S - S S S S S M U U S S
Formic Acid (100%) - S M U - - U - - - - U - S M U U S S - U S - U S - U
Ammonium Acetate S S U - S S S - S S S S S S S U - S S S S S S S S S S
Ammonium Carbonate M S U S S S S S S S S S S S U U - S S S S S S M S S S
Ammonium Hydroxide (10%) U U S U S S M S S S S S - S U M S S S S S S S S S M S
Ammonium Hydroxide (28%) U U S U S U M S S S S S U S U M S S S S S S S S S M S
Ammonium Hydroxide (conc.) U U U U S U M S - S - S U S U U S S S - M S S S S - U
Ammonium Phosphate U - S - S S S S S S S S - S S M - S S S S S S M S S S
Ammonium Sulfate U M S - S S U S S S S S S S S S - S S S S S S U S S U
Amyl Alcohol S - M U - - S S - M - S - M S S S S M - - - U - S - M
Aniline S S U U S U S M S U U U U U U U - S M U U S S S S U S
Sodium Hydroxide (<1%) U - M S S S - - S M S S - S M M S S S S S S M S S - U
Sodium Hydroxide (10%) U - M U - - U - M M S S U S U U S S S S S S M S S - U
Barium Salts M U S - S S S S S S S S S S S M - S S S S S S M S S S
Benzene S S U U S U M U S U U S U U U M U M U U U S U U S U S
Benzyl Alcohol S - U U - - M M - M - S U U U U U U U - M S M - S - S
Boric Acid U S S M S S U S S S S S S S S S U S S S S S S S S S S

A Chemical Compatibility Chart
A-2 Centra W CW2+ Thermo Scientific
Cesium Acetate M - S - S S S - S S S S - S S - - S S S S S S M S S S
Cesium Bromide M S S - S S S - S S S S S S S - - S S S S S S M S S S
Cesium Chloride M S S U S S S - S S S S S S S - - S S S S S S M S S S
Cesium Formate M S S - S S S - S S S S S S S - - S S S S S S M S S S
Cesium Iodide M S S - S S S - S S S S S S S - - S S S S S S M S S S
Cesium Sulfate M S S - S S S - S S S S S S S - - S S S S S S M S S S
Chloroform U U U U S S M U S U U M U M U U U M M U U S U U U M S
Chromic Acid (10%) U - U U S U U - S S S U S S M U M S S U M S M U S S S
Chromic Acid (50%) U - U U - U U - - - S U U S M U M S S U M S - U M - S
Cresol Mixture S S U - - - S - S U U U U U U - - U U - U S S S S U S
Cyclohexane S S S - S S S U S U S S U U U M S M U M M S U M M U S
Deoxycholate S S S - S S S - S S S S S S S - - S S S S S S S S S S
Distilled Water S S S S S S S S S S S S S S S S S S S S S S S S S S S
Dextran M S S S S S S - S S S S S S S S S S S S S S S M S S S
Diethyl Ether S S U U S S S U S U U S U U U U U U U U U S S S S M U
Diethyl Ketone S - U U - - M - S U - S - M U U U M M - U S - - S U U
Diethylpyrocarbonate S S U - S S S - S S U S U S U - - S S S M S S S S S S
Dimethylsulfoxide S S U U S S S - S U S S U S U U - S S U U S S S S U U
Dioxane M S U U S S M M S U U S U M U U - M M M U S S S S U U
Ferric Chloride U U S - - - M S - M - S - S - - - S S - - - M U S - S
Acetic Acid (Glacial) S S U U S S U M S U S U U U U U M S U M U S U U S - U
Acetic Acid (5%) S S M S S S M S S S S S M S S S S S S S M S S M S S M
Acetic Acid (60%) S S U U S S U - S M S U U M U S M S M S M S M U S M U
Ethyl Acetate M M U U S S M M S S U S U M U U - S S U U S M M S U U
Ethyl Alcohol (50%) S S S S S S M S S S S S U S U S S S S S S S S M S M U
Ethyl Alcohol (95%) S S S U S S M S S S S S U S U - S S S M S S S U S M U
Ethylene Dichloride S - U U - - S M - U U S U U U U U U U - U S U - S - S
Ethylene Glycol S S S S S S S S S S S S - S U S S S S S S S S M S M S
Ethylene Oxide Vapor S - U - - U - - S U - S - S M - - S S S U S U S S S U
Ficoll-Hypaque® M S S - S S S - S S S S - S S - S S S S S S S M S S S
CHEMICAL
MAT
ERIA
LAL
UMIN
UM
ANOD
IC C
OATI
NG
for A
LUM
INUM
BUN
A N
CELL
ULOS
E AC
ETAT
E BU
TYRA
TE
POLY
URET
HAN
E RO
TOR
PAIN
T
COM
POSI
TE C
arbo
n Fi
ber/
Epox
y
DELR
IN®
ETHY
LEN
E PR
OPYL
ENE
GLAS
S
NEO
PREN
E
NOR
YL®
NYL
ON
PET1 , P
OLYC
LEAR
®,C
LEAR
CRIM
P®CC
CLEA
RCRI
MP®
POLY
ALLO
MER
POLY
CARB
ONAT
E
POLY
ESTE
R, G
LASS
THE
RMOS
ET
POLY
THER
MID
E
POLY
RTHY
LEN
E
POLY
PROP
YLEN
E
POLY
SULF
ONE
POLY
VIN
YL C
HLOR
IDE
RULO
N A
®, T
EFLO
N®
SILI
CON
E RU
BBER
STAI
NLE
SS S
TEEL
TITA
NIU
M
TYGO
N®
VITO
N®

A Chemical Compatibility Chart
Thermo Scientific Centra W CW2+ A-3
Hydrofluoric Acid (10%) U U U M - - U - - U U S - S M U S S S S M S U U U - -
Hydrofluoric Acid (50%) U U U U - - U - - U U U U S U U U S S M M S U U U - M
Hydrochloric Acid (conc.) U U U U - U U M - U M U U M U U U - S - U S U U U - -
Formaldehyde (40%) M M M S S S S M S S S S M S S S U S S M S S S M S M U
Glutaraldehyde S S S S - - S - S S S S S S S - - S S S - - S S S - -
Glycerol M S S - S S S S S S S S S S S S - S S S S S S S S S S
Guanidine Hydrochloride U U S - S S S - S S S S S S S - - S S S S S S U S S S
Haemo-Sol® S S S - - - S - S S S S S S S - - S S S S S S S S S S
Hexane S S S - S S S - S S U S U M U S S U S S M S U S S U S
Isobutyl Alcohol - - M U - - S S - U - S U S S M S S S - S S S - S - S
Isopropyl Alcohol M M M U S S S S S U S S U S U M S S S S S S S M M M S
Iodoacetic Acid S S M - S S S - S M S S M S S - M S S S S S M S S M M
Potassium Bromide U S S - S S S - S S S S S S S S S S S - S S S M S S S
Potassium Carbonate M U S S S S S - S S S S S S U S S S S S S S S S S S S
Potassium Chloride U S S - S S S S S S S S S S S - S S S S S S S U S S S
Potassium Hydroxide (5%) U U S S S S M - S S S S - S U S S S S S S S M U M S U
Potassium Hydroxide (conc.) U U M U - - M - M S S - U M U U U S M - M U - U U - U
Potassium Permanganate S S S - S S S - S S S U S S S M - S M S U S S M S U S
Calcium Chloride M U S S S S S S S S S S S S M S - S S S S S S M S S S
Calcium Hypochlorite M - U - S M M S - M - S - S M S - S S S M S M U S - S
Kerosene S S S - S S S U S M U S U M M S - M M M S S U S S U S
Sodium Chloride (10%) S - S S S S S S - - - S S S S S - S S S S - S S M - S
Sodium Chloride (sat'd) U - S U S S S - - - - S S S S S - S S - S - S S M - S
Carbon Tetrachloride U U M S S U M U S U U S U M U S S M M S M M M M U S S
Aqua Regia U - U U - - U - - - - - U U U U U U U - - - - - S - M
Solution 555 (20%) S S S - - - S - S S S S S S S - - S S S - S S S S S S
Magnesium Chloride M S S - S S S S S S S S S S S S S S S S S S S M S S S
Mercaptoacetic Acid U S U - S M S - S M S U U U U - S U U S M S U S S S S
Methyl Alcohol S S S U S S M S S S S S U S U M S S S S S S S M S M U
Methylene Chloride U U U U M S S U S U U S U U U U U M U U U S S M U S U
CHEMICAL
MAT
ERIA
LAL
UMIN
UM
ANOD
IC C
OATI
NG
for A
LUM
INUM
BUN
A N
CELL
ULOS
E AC
ETAT
E BU
TYRA
TE
POLY
URET
HAN
E RO
TOR
PAIN
T
COM
POSI
TE C
arbo
n Fi
ber/
Epox
y
DELR
IN®
ETHY
LEN
E PR
OPYL
ENE
GLAS
S
NEO
PREN
E
NOR
YL®
NYL
ON
PET1 , P
OLYC
LEAR
®,C
LEAR
CRIM
P®CC
CLEA
RCRI
MP®
POLY
ALLO
MER
POLY
CARB
ONAT
E
POLY
ESTE
R, G
LASS
THE
RMOS
ET
POLY
THER
MID
E
POLY
RTHY
LEN
E
POLY
PROP
YLEN
E
POLY
SULF
ONE
POLY
VIN
YL C
HLOR
IDE
RULO
N A
®, T
EFLO
N®
SILI
CON
E RU
BBER
STAI
NLE
SS S
TEEL
TITA
NIU
M
TYGO
N®
VITO
N®

A Chemical Compatibility Chart
A-4 Centra W CW2+ Thermo Scientific
Methyl Ethyl Ketone S S U U S S M S S U U S U S U U U S S U U S S S S U U
Metrizamide® M S S - S S S - S S S S - S S - - S S S S S S M S S S
Lactic Acid (100%) - - S - - - - - - M S U - S S S M S S - M S M S S - S
Lactic Acid (20%) - - S S - - - - - M S M - S S S S S S S M S M S S - S
N-Butyl Alcohol S - S U - - S - - S M - U S M S S S S M M S M - S - S
N-Butyl Phthalate S S U - S S S - S U U S U U U M - U U S U S M M S U S
N, N-Dimethylformamide S S S U S M S - S S U S U S U U - S S U U S M S S S U
Sodium Borate M S S S S S S S S S S U S S S S - S S S S S S M S S S
Sodium Bromide U S S - S S S - S S S S S S S S - S S S S S S M S S S
Sodium Carbonate (2%) M U S S S S S S S S S S S S U S S S S S S S S S S S S
Sodium Dodecyl Sulfate S S S - S S S - S S S S S S S - S S S S S S S S S S S
Sodium Hypochlorite (5%) U U M S S M U S S M S S S M S S S S M S S S M U S M S
Sodium Iodide M S S - S S S - S S S S S S S - - S S S S S S M S S S
Sodium Nitrate S S S - S S S S S S S S S S S S - S S S S S U S S S S
Sodium Sulfate U S S - S S S S S S S S S S S S S S S S S S S M S S S
Sodium Sulfide S - S S - - - S - - - S S S U U - - S - - - S S M - S
Sodium Sulfite S S S - S S S S M S S S S S S M - S S S S S S S S S S
Nickel Salts U S S S S S - S S S - - S S S S - S S S S S S M S S S
Oils (Petroleum) S S S - - - S U S S S S U U M S M U U S S S U S S S S
Oils (Other) S - S - - - S M S S S S U S S S S U S S S S - S S M S
Oleic Acid S - U S S S U U S U S S M S S S S S S S S S M U S M M
Oxalic Acid U U M S S S U S S S S S U S U S S S S S S S S U M S S
Perchloric Acid (10%) U - U - S U U - S M M - - M U M S M M - M S U - S - S
Perchloric Acid (70%) U U U - - U U - S U M U U M U U U M M U M S U U S U S
Phenol (5%) U S U - S M M - S U M U U S U M S M S U U S U M M M S
Phenol (50%) U S U - S U M - S U M U U U U U S U M U U S U U U M S
Phosphoric Acid (10%) U U M S S S U S S S S U - S S S S S S S S S U M U S S
Phosphoric Acid (conc.) U U M M - - U S - M S U U M M S S S M S M S U M U - S
Physiologic Media (Serum, Urine) M S S S - - S - S S S S S S S S S S S S S S S S S S S
Picric Acid S S U - S M S S S M S U S S S U S S S S U S U M S M S
CHEMICAL
MAT
ERIA
LAL
UMIN
UM
ANOD
IC C
OATI
NG
for A
LUM
INUM
BUN
A N
CELL
ULOS
E AC
ETAT
E BU
TYRA
TE
POLY
URET
HAN
E RO
TOR
PAIN
T
COM
POSI
TE C
arbo
n Fi
ber/
Epox
y
DELR
IN®
ETHY
LEN
E PR
OPYL
ENE
GLAS
S
NEO
PREN
E
NOR
YL®
NYL
ON
PET1 , P
OLYC
LEAR
®,C
LEAR
CRIM
P®CC
CLEA
RCRI
MP®
POLY
ALLO
MER
POLY
CARB
ONAT
E
POLY
ESTE
R, G
LASS
THE
RMOS
ET
POLY
THER
MID
E
POLY
RTHY
LEN
E
POLY
PROP
YLEN
E
POLY
SULF
ONE
POLY
VIN
YL C
HLOR
IDE
RULO
N A
®, T
EFLO
N®
SILI
CON
E RU
BBER
STAI
NLE
SS S
TEEL
TITA
NIU
M
TYGO
N®
VITO
N®

A Chemical Compatibility Chart
Thermo Scientific Centra W CW2+ A-5
Pyridine (50%) U S U U S U U - U S S U U M U U - U S M U S S U U U U
Rubidium Bromide M S S - S S S - S S S S S S S - - S S S S S S M S S S
Rubidium Chloride M S S - S S S - S S S S S S S - - S S S S S S M S S S
Sucrose M S S - S S S S S S S S S S S S S S S S S S S S S S S
Sucrose, Alkaline M S S - S S S - S S S S S S U S S S S S S S S M S S S
Sulfosalicylic Acid U U S S S S S - S S S U S S S - S S S - S S S U S S S
Nitric Acid (10%) U S U S S U U - S U S U - S S S S S S S S S M S S S S
Nitric Acid (50%) U S U M S U U - S U S U U M M U M M M S S S U S S M S
Nitric Acid (95%) U - U U - U U - - U U U U M U U U U M U U S U S S - S
Hydrochloric Acid (10%) U U M S S S U - S S S U U S U S S S S S S S S U M S S
Hydrochloric Acid (50%) U U U U S U U - S M S U U M U U S S S S M S M U U M M
Sulfuric Acid (10%) M U U S S U U - S S M U S S S S S S S S S S U U U S S
Sulfuric Acid (50%) M U U U S U U - S S M U U S U U M S S S S S U U U M S
Sulfuric Acid (conc.) M U U U - U U M - - M U U S U U U M S U M S U U U - S
Stearic Acid S - S - - - S M S S S S - S S S S S S S S S M M S S S
Tetrahydrofuran S S U U S U U M S U U S U U U - M U U U U S U S S U U
Toluene S S U U S S M U S U U S U U U S U M U U U S U S U U M
Trichloroacetic Acid U U U - S S U M S U S U U S M - M S S U U S U U U M U
Trichloroethane S - U - - - M U - U - S U U U U U U U U U S U - S - S
Trichloroethylene - - U U - - - U - U - S U U U U U U U U U S U - U - S
Trisodium Phosphate - - - S - - M - - - - - - S - - S S S - - S - - S - S
Tris Buffer (neutral pH) U S S S S S S - S S S S S S S S S S S S S S S S S S S
Triton X-100® S S S - S S S - S S S S S S S S S S S S S S S S S S S
Urea S - U S S S S - - - - S S S M S S S S - S S S M S - S
Hydrogen Peroxide (10%) U U M S S U U - S S S U S S S M U S S S S S S M S U S
Hydrogen Peroxide (3%) S M S S S - S - S S S S S S S S M S S S S S S S S S S
Xylene S S U S S S M U S U U U U U U M U M U U U S U M S U S
Zinc Chloride U U S S S S U S S S S S S S S S S S S S S S S U S S S
Zinc Sulfate U S S - S S S S S S S S S S S S S S S S S S S S S S S
Citric Acid (10%) M S S M S S M S S S S S S S S S M S S S S S S S S S S
CHEMICAL
MAT
ERIA
LAL
UMIN
UM
ANOD
IC C
OATI
NG
for A
LUM
INUM
BUN
A N
CELL
ULOS
E AC
ETAT
E BU
TYRA
TE
POLY
URET
HAN
E RO
TOR
PAIN
T
COM
POSI
TE C
arbo
n Fi
ber/
Epox
y
DELR
IN®
ETHY
LEN
E PR
OPYL
ENE
GLAS
S
NEO
PREN
E
NOR
YL®
NYL
ON
PET1 , P
OLYC
LEAR
®,C
LEAR
CRIM
P®CC
CLEA
RCRI
MP®
POLY
ALLO
MER
POLY
CARB
ONAT
E
POLY
ESTE
R, G
LASS
THE
RMOS
ET
POLY
THER
MID
E
POLY
RTHY
LEN
E
POLY
PROP
YLEN
E
POLY
SULF
ONE
POLY
VIN
YL C
HLOR
IDE
RULO
N A
®, T
EFLO
N®
SILI
CON
E RU
BBER
STAI
NLE
SS S
TEEL
TITA
NIU
M
TYGO
N®
VITO
N®

A Chemical Compatibility Chart
A-6 Centra W CW2+ Thermo Scientific
Chemical resistance data is included only as a guide to product use. Because no organized chemical resistance data exists for materials under the stress of centrifugation, when in doubt we recommend pretesting sample lots.
1Polyethyleneterephthalate
Key
S Satisfactory
M M = Moderate attack, may be satisfactory for use in centrifuge depending on length of exposure, speed involved, etc.; suggest testing under actual conditions of use.
U U = Unsatisfactory, not recommended.
-- Performance unknown; suggest testing, using sample to avoid loss of valuable material.

Thermo Scientific Centra W CW2+ 1-i
1
Warranty
Thermo Fisher Scientific warrants that the Products will operate substantially in conformance with Thermo Fisher Scientific’s Specifications applicable to such Products, when subjected to normal, proper and intended usage by properly trained personnel, for a period of twenty-four (24) months from the date of installation, not to exceed thirty (30) months from date of ship-ment from Thermo (the “Warranty Period”). Thermo Fisher Scientific agrees during the applicable Warranty Period, provided it is promptly notified in writing upon the discovery of any defect and further provided that all costs of returning the defective Products to Thermo Fisher Scientific are pre-paid by Purchaser, to repair or replace, at Thermo Fisher Scientific's option, non-conforming Products so as to cause the same to operate in substantial confor-mance with said Specifications. Such repair shall include parts only during the final twelve (12) months of the Warranty Period. Replacement parts may be new or refurbished, at the election of Thermo Fisher Scientific. All replaced parts shall become the property of Thermo Fisher Scientific. Lamps, fuses, bulbs and other expendable items are expressly excluded from the warranty. Thermo Fisher Scientific's sole liability with respect to equipment, materials, parts or software furnished to Thermo Fisher Scientific by third party suppliers shall be lim-ited to the assignment by Thermo Fisher Scientific to Purchaser of any such third party sup-plier's warranty, to the extent the same is assignable. In no event shall Thermo Fisher Scientific have any obligation to make repairs, replacements or corrections required, in whole or in part, as the result of (i) normal wear and tear, (ii) accident, disaster or event of force majeure, (iii) misuse, fault or negligence of or by Purchaser, (iv) use of the Products in a manner for which they were not designed, (v) causes external to the Products such as, but not limited to, power failure or electrical power surges, (vi) improper storage of the Products or (vii) use of the Prod-ucts in combination with equipment or software not supplied by Thermo Fisher Scientific. If Thermo Fisher Scientific determines that Products for which Purchaser has requested war-ranty services are not covered by the warranty hereunder, Purchaser shall pay or reimburse Thermo Fisher Scientific for all costs of investigating and responding to such request at Thermo Fisher Scientific's then prevailing time and materials rates. If Thermo Fisher Scien-tific provides repair services or replacement parts that are not covered by the warranty, Pur-chaser shall pay Thermo Fisher Scientific therefore at Thermo Fisher Scientific's then prevailing time and materials rates. ANY INSTALLATION, MAINTENANCE, REPAIR, SERVICE, RELOCATION OR ALTERATION TO OR OF, OR OTHER TAMPERING WITH, THE PRODUCTS PERFORMED BY ANY PERSON OR ENTITY OTHER THAN Thermo Fisher Scientific WITHOUT Thermo Fisher Scientific'S PRIOR WRIT-TEN APPROVAL, OR ANY USE OF REPLACEMENT PARTS NOT SUPPLIED BY THERMO, SHALL IMMEDIATELY VOID AND CANCEL ALL WARRANTIES WITH RESPECT TO THE AFFECTED PRODUCTS. THE OBLIGATIONS CREATED BY THIS SECTION TO REPAIR OR REPLACE A NON-CONFORMING PRODUCT SHALL BE THE SOLE REMEDY OF PURCHASER

1 Warranty
1-ii Centra W CW2+ Thermo Scientific
IN THE EVENT OF A NON-CONFORMING PRODUCT. EXCEPT AS EXPRESSLY PROVIDED IN THIS WARRANTY, THERMO DISCLAIMS ALL WARRANTIES, WHETHER EXPRESS OR IMPLIED, ORAL OR WRITTEN, WITH RESPECT TO THE PRODUCTS, DELIVERABLES AND SERVICES, INCLUDING WITHOUT LIM-ITATION ALL IMPLIED WARRANTIES OF NON-INFRINGEMENT, MERCHANT-ABILITY OR FITNESS FOR ANY PARTICULAR PURPOSE. Thermo Fisher Scientific DOES NOT WARRANT THAT THE PRODUCTS, DELIVERABLES AND SERVICES, ARE ERROR-FREE, OR WILL ACCOMPLISH ANY PARTICULAR RESULT. FUR-THER, WITH RESPECT TO ANY SOFTWARE PRODUCT OR LICENCED SOFT-WARE, PROVIDED TO PURCHASER HEREUNDER, THERMO MAKES NO REPRESENTATIONS OR WARRANTY THAT ALL ERRORS HAVE BEEN OR CAN BE ELIMINATED FROM THE SOFTWARE, THAT IT WILL OPERATE WITHOUT INTERRUPTION OR THAT IT WILL OPERATE WITH OTHER PRODUCTS. Thermo Fisher Scientific EXPRESSLY DISCLAIMS ANY WARRANTY WHATSOEVER WITH RESPECT TO ANY OTHER THIRD PARTY PRODUCTS WHETHER LICENSED OR SOLD TO PURCHASER DIRECTLY BY A THIRD PARTY VENDOR OR SUBLICENSED OR RESOLD TO PURCHASER BY Thermo Fisher Scientific. Thermo Fisher Scientific warrants that the Services provided hereunder will comply with the requirements expressly set forth in the terms and conditions set forth in this warranty hereto and will otherwise be performed in accordance with generally accepted industry practice by competent personnel. In the event that any Services fail to comply with the foregoing stan-dard, Thermo Fisher Scientific will, at its option, provided it is promptly notified in writing upon discovery of such failure, either repeat such non-complying Services at no additional charge or refund to Purchaser all fees theretofore paid by Purchaser with respect to such non-complying Services. Notwithstanding the foregoing, the cost of any such repeat of Ser-vices which generates results consistent with the original results will be at Purchaser’s expense. THE FOREGOING WARRANTY IS THE SOLE AND EXCLUSIVE WARRANTY GIVEN BY THERMO IN CONNECTION WITH THE SERVICES PERFORMED HEREUNDER, AND IS IN LIEU OF ALL OTHER WARRANTIES OF ANY KIND, WHETHER EXPRESS OR IMPLIED, ORAL OR WRITTEN.”

Thermo Scientific Centra W CW2+ B-1
B
Contact Information
United States 866-9-THERMO
+1 866 984 3766
Canada +1 866 984 3766
Austria +43 1 801 400
Belgium +32 2 482 30 30
Germany 08001 536 376
+49 6184 90 6940
France +33 2 2803 2180
Italy +39 02 02 95059 434-254-375
Netherlands +31 76 571 4440
Nordic / Baltic Countries +35 89 329 100
Russia/CIS +7 (812) 703 42 15

B Contact Information
B-2 Centra W CW2+ Thermo Scientific
Spain +34 932 23 09 18
Portugal +34 932 23 09 18
Switzerland +41 44 454 12 12
UK / Ireland +44 870 609 9203
China +86 21 6865 4588
+86 10 8419 3588
India 1800 22 8374
+91 22 6716 2200
Japan +81 45 453 9220
Other Asian Countries +852 2885 4613
Other Countries +49 6184 90 6940
+33 2 2803 2180