this application will allow you to create, store, maintain ... · the character sheets ... –...
TRANSCRIPT
i
Documentation Last Updated: 7/12/2016
Version 1.7.0.0
This application will allow you to create, store, maintain, and print out characters, adversaries, vehicles, and
encounters for use with Star Wars® Roleplaying, produced by Fantasy Flight Games™. You must first purchase at
least one of the Core Rulebooks (the Edge of the Empire™ Core Rulebook, the Age of Rebellion™ Core Rulebook,
or the Force and Destiny™ Core Rulebook) before you begin, and optionally any other adventure module or
source book that you wish to use. Copyright law dictates that this application cannot include descriptive text as
it appears in any of the published books; you will need the books for reference during the character generation
process.
Notice: Some screenshots, below, contain text found in the published books. These are only examples, covered under fair use laws,
which show what the product can look like if modified for someone’s personal use only. The actual product does not contain this
verbose information and only refers to page numbers in the books.
Star Wars and the Star Wars logo are registered trademarks of LucasFilm, Ltd., and The Walt Disney Co. Edge of the Empire, Age of Rebellion, Force and
Destiny, and Fantasy Flight Games are copyrighted by Fantasy Flight Publishing, Inc. Ionic’s Zip Library is copyright 2006-2011 by Dino Chiesa.

ii
TABLE OF CONTENTS
INTRODUCTION ................................................................................................................................... 1
REQUIREMENTS ........................................................................................................................................... 1
WHAT YOU GET ............................................................................................................................................ 1
INSTALLATION ............................................................................................................................................. 5
MANUAL INSTALLATION ........................................................................................................................................ 5
WEB INSTALLATION ............................................................................................................................................... 5
UPDATING PREVIOUS INSTALLS ................................................................................................................ 5
MANUAL UPDATE ................................................................................................................................................... 5
WEB UPDATE .......................................................................................................................................................... 5
INSTALLING ADVERSARIES AND ADVENTURE FILES .............................................................................. 5
BACKING UP DATA ...................................................................................................................................... 6
LAUNCHING THE SOFTWARE ..................................................................................................................... 7
LAUNCH AN APPLICATION ..................................................................................................................................... 7
SKIN STYLE ............................................................................................................................................................. 7
VIEW THE DOCUMENTATION OR THE FAQ ........................................................................................................... 7
FORUM ..................................................................................................................................................................... 7
OPEN FOLDERS ...................................................................................................................................................... 7
MORE OPTIONS ....................................................................................................................................................... 8
DATA INFO ..............................................................................................................................................................................................8
DATA PATH .............................................................................................................................................................................................8
TRANSFER DATA ...................................................................................................................................................................................9
CLEAR CACHE........................................................................................................................................................................................9
LANGUAGE ...........................................................................................................................................................................................10
EDIT TRANSLATIONS ..........................................................................................................................................................................10
THE CHARACTER GENERATOR ...................................................................................................... 12
THE MAIN SCREEN..................................................................................................................................... 12
TOP BUTTONS ....................................................................................................................................................... 12
THE PANES ................................................................................................................................................. 13
CHARACTERS ....................................................................................................................................................... 13
DESCRIPTION ........................................................................................................................................................ 13
AWARD ..................................................................................................................................................................................................14
GM GRANTS ..........................................................................................................................................................................................14
BACKGROUND ...................................................................................................................................................... 15
OBLIGATIONS/DUTIES .......................................................................................................................................... 15
OBLIGATION AND DUTY OPTIONS ...................................................................................................................................................15
MORALITY ............................................................................................................................................................. 16

iii
MORALITY OPTIONS............................................................................................................................................................................16
SPECIES ................................................................................................................................................................ 16
SUB-SPECIES .......................................................................................................................................................................................17
CAREER ................................................................................................................................................................. 17
CHARACTERISTICS ............................................................................................................................................... 17
INJURIES ...............................................................................................................................................................................................18
SPECIALIZATIONS AND TALENTS........................................................................................................................ 18
TALENT OPTIONS ................................................................................................................................................................................18
ACQUIRING NEW SPECIALIZATIONS ...............................................................................................................................................20
MOTIVATIONS........................................................................................................................................................ 20
SKILLS ................................................................................................................................................................... 20
NON-CAREER SKILLS AND XP ..........................................................................................................................................................20
DICE POOL SYMBOLS .........................................................................................................................................................................21
EQUIPMENT ........................................................................................................................................................... 22
ADDING EQUIPMENT ...........................................................................................................................................................................22
REMOVING EQUIPMENT .....................................................................................................................................................................22
RENAMING EQUIPMENT .....................................................................................................................................................................22
ITEM NOTES ..........................................................................................................................................................................................23
BUYING OR SELLING EQUIPMENT ...................................................................................................................................................23
EQUIPPED, CARRIED, AND SHOWN .................................................................................................................................................23
TWO-WEAPON SETS ...........................................................................................................................................................................24
ADD HARD POINTS ..............................................................................................................................................................................24
ITEM ATTACHMENTS ..........................................................................................................................................................................25
TRANSFER ............................................................................................................................................................................................26
SPECIAL “JURY RIGGED” ATTACHMENT........................................................................................................................................26
FORCE POWERS ................................................................................................................................................... 26
SIGNATURE ABILITIES .......................................................................................................................................... 27
VEHICLES .............................................................................................................................................................. 28
ADD A VEHICLE ....................................................................................................................................................................................28
REMOVE OR SELL A VEHICLE ...........................................................................................................................................................28
ATTACHMENTS ....................................................................................................................................................................................28
UPGRADE WEAPONS ..........................................................................................................................................................................28
IMPORT, EXPORT, AND COPY ...........................................................................................................................................................29
STOCK VEHICLE...................................................................................................................................................................................30
STAT BLOCK .........................................................................................................................................................................................30
ORDNANCE ...........................................................................................................................................................................................30
PRINTING YOUR VEHICLE ..................................................................................................................................................................31
PORTRAITS ...........................................................................................................................................................................................31
THE CHARACTER SHEETS ........................................................................................................................ 32
PRINT OPTIONS ..................................................................................................................................................... 32

iv
STANDARD CHARACTER SHEET ......................................................................................................................... 32
STATS, SKILLS, AND WEAPONS .......................................................................................................................................................32
DESCRIPTION AND SOCIAL ...............................................................................................................................................................33
FEATURES, XP, AND ABILITIES.........................................................................................................................................................33
MONEY AND EQUIPMENT ...................................................................................................................................................................33
OPTIONAL SHEETS..............................................................................................................................................................................34
THE “NOTES” SECTION ......................................................................................................................................................................34
SHEET STYLES .....................................................................................................................................................................................34
COMPACT CHARACTER SHEETS ......................................................................................................................... 34
COMPACT SHEET OPTIONS ...............................................................................................................................................................35
DATA EDITOR .................................................................................................................................... 36
THE MAIN SCREEN..................................................................................................................................... 36
DATA SETS ............................................................................................................................................................ 36
ADDING A DATA SET ...........................................................................................................................................................................37
SELECTING A DATA SET ....................................................................................................................................................................37
REMOVING A DATA SET .....................................................................................................................................................................37
EXPORTING DATA SETS .....................................................................................................................................................................37
IMPORTING DATA SETS......................................................................................................................................................................38
MOVE/COPY MODE ..............................................................................................................................................................................38
ALL AND NONE.....................................................................................................................................................................................38
CONFLICTING ITEMS IN DATA SETS ................................................................................................................................................39
BACKUP AND RESTORE ....................................................................................................................................... 39
FOLDERS NEEDING BACK-UP ...........................................................................................................................................................39
BACKING UP YOUR DATA ..................................................................................................................................................................39
RESTORING YOUR DATA ...................................................................................................................................................................40
DATA ITEM LIST .................................................................................................................................................... 40
CUSTOMIZING DATA ...........................................................................................................................................................................40
COMMON PROPERTIES ........................................................................................................................................ 41
THE SOURCES DROPDOWN ..............................................................................................................................................................41
EQUIPMENT AND VEHICLE PROPERTIES........................................................................................................................................42
THE DIALOGS ............................................................................................................................................. 42
ARMOR .................................................................................................................................................................. 42
INNATE OR BUILT-IN WEAPONS .......................................................................................................................................................42
ATTITUDES ............................................................................................................................................................ 43
BASES ................................................................................................................................................................... 43
BASE FOCI ............................................................................................................................................................. 43
BASE UPGRADES ................................................................................................................................................. 44
CAREERS............................................................................................................................................................... 44
CLASS .................................................................................................................................................................... 45

v
DUTY ...................................................................................................................................................................... 45
FORCE ABILITIES .................................................................................................................................................. 45
FORCE POWERS ................................................................................................................................................... 45
ABILITIES ...............................................................................................................................................................................................45
CONNECTING LINES ............................................................................................................................................................................46
GEAR ..................................................................................................................................................................... 46
HOOKS ................................................................................................................................................................... 46
ITEM ATTACHMENTS ............................................................................................................................................ 47
MOD EDITOR .........................................................................................................................................................................................48
INNATE SKILLS.....................................................................................................................................................................................48
SPECIAL DICE FOR SKILLS................................................................................................................................................................48
MORALITY ............................................................................................................................................................. 49
MOTIVATIONS........................................................................................................................................................ 50
MOTIVATIONS (SPECIFIC)..................................................................................................................................... 50
OBLIGATIONS........................................................................................................................................................ 50
SIGNATURE ABILITIES .......................................................................................................................................... 50
SIGNATURE ABILITY NODES ................................................................................................................................ 51
SKILLS ................................................................................................................................................................... 51
SPECIALIZATIONS................................................................................................................................................. 52
TALENTS ...............................................................................................................................................................................................52
CONNECTING LINES ............................................................................................................................................................................52
SPECIES ................................................................................................................................................................ 52
OPTION CHOICES ................................................................................................................................................................................53
OPTIONS ................................................................................................................................................................................................53
SUB-SPECIES .......................................................................................................................................................................................54
TALENTS ............................................................................................................................................................... 55
DAMAGE BONUS ..................................................................................................................................................................................55
ATTRIBUTE BONUS .............................................................................................................................................................................55
CHOOSE SKILLS ..................................................................................................................................................................................56
CAREER SKILLS ...................................................................................................................................................................................56
SPECIAL DICE FOR SKILLS................................................................................................................................................................56
CHANGE SKILL CHARACTERISTIC ...................................................................................................................................................56
VEHICLES .............................................................................................................................................................. 57
BUILT-IN ATTACHMENTS....................................................................................................................................................................57
BUILT-IN MODS.....................................................................................................................................................................................57
USING VEHICLES AND MINIONS .......................................................................................................................................................57
VEHICLE WEAPONS ............................................................................................................................................................................57
VEHICLE ACTIONS ................................................................................................................................................ 58
VEHICLE POSITIONS ............................................................................................................................................. 58

vi
WEAPONS.............................................................................................................................................................. 59
TAGS ........................................................................................................................................................... 60
EQUIPMENT IMAGES ................................................................................................................................. 60
SIZES ..................................................................................................................................................................... 60
LOCATION ............................................................................................................................................................. 61
SPECIES IMAGES ....................................................................................................................................... 61
SIZES ..................................................................................................................................................................... 61
LOCATION ............................................................................................................................................................. 61
VEHICLE IMAGES ....................................................................................................................................... 61
SIZES ..................................................................................................................................................................... 62
LOCATION ............................................................................................................................................................. 62
VEHICLE SILHOUETTES ............................................................................................................................ 62
LOCATION ............................................................................................................................................................. 62
GM TOOLS ......................................................................................................................................... 63
THE LOAD WINDOW ................................................................................................................................... 63
THE MAIN SCREEN..................................................................................................................................... 63
ADVERSARIES ............................................................................................................................................ 63
ADD/MODIFY ADVERSARY DIALOG ..................................................................................................................... 64
DESCRIPTION .......................................................................................................................................................................................64
CHARACTERISTICS .............................................................................................................................................................................64
SKILLS/TALENTS/FORCE ...................................................................................................................................................................65
SPECIAL ABILITIES..............................................................................................................................................................................65
EQUIPMENT...........................................................................................................................................................................................65
CUSTOM ARMOR .................................................................................................................................................................................66
CUSTOM ITEMS ....................................................................................................................................................................................66
CUSTOM WEAPONS ............................................................................................................................................................................66
ATTRIBUTES .........................................................................................................................................................................................67
STAT BLOCK DIALOG ........................................................................................................................................... 67
FORMAT .................................................................................................................................................................................................67
STYLE .....................................................................................................................................................................................................68
DISPLAY.................................................................................................................................................................................................68
COLORS .................................................................................................................................................................................................68
BACKGROUND .....................................................................................................................................................................................68
BUTTONS ...............................................................................................................................................................................................69
PCS AS ADVERSARIES ......................................................................................................................................... 69
INQUISITORS ......................................................................................................................................................... 69
STEP 1: NAME AND CHARACTERISTICS ........................................................................................................................................70
STEP 2: SKILLS ...................................................................................................................................................................................70
vii
STEP 3: TALENTS AND ABILITIES ...................................................................................................................................................70
STEP 4: EQUIPMENT ..........................................................................................................................................................................71
FINISH UP AND SAVE ..........................................................................................................................................................................71
ENCOUNTERS ............................................................................................................................................ 72
ENCOUNTER DIALOG ........................................................................................................................................... 72
DESCRIPTION .......................................................................................................................................................................................72
ADVERSARIES ......................................................................................................................................................................................73
VEHICLES ..............................................................................................................................................................................................73
ROSTERS ...............................................................................................................................................................................................74
MINION VEHICLES AND ROSTERS ....................................................................................................................................................74
ENCOUNTER TRACKER ........................................................................................................................................ 75
PRINT DIALOG ......................................................................................................................................................................................75
BASIC FEATURES ................................................................................................................................................................................75
ADVERSARY GROUP FEATURES ......................................................................................................................................................76
BASIC TRACKING OPTIONS ...............................................................................................................................................................76
MINIONS .................................................................................................................................................................................................77
RIVALS ...................................................................................................................................................................................................77
NEMESES ..............................................................................................................................................................................................77
STANDARD ROSTER ...........................................................................................................................................................................78
MINION ROSTER ...................................................................................................................................................................................78
SIMPLIFIED TRACKERS ......................................................................................................................................................................79
FULL COLOR, NO BACKGROUND .....................................................................................................................................................79
GROUPS ...................................................................................................................................................... 80
GROUP DIALOG .................................................................................................................................................... 80
DESCRIPTION .......................................................................................................................................................................................80
CHARACTERS .......................................................................................................................................................................................81
RESOURCES .........................................................................................................................................................................................81
OBLIGATION/DUTY ..............................................................................................................................................................................82
INVENTORY ...........................................................................................................................................................................................83
VEHICLES ..............................................................................................................................................................................................83
BASES ....................................................................................................................................................................................................83
MODIFY BASE DIALOG ......................................................................................................................................... 84
DESCRIPTION .......................................................................................................................................................................................84
UPGRADES............................................................................................................................................................................................85
NPCS ......................................................................................................................................................................................................85
INVENTORY ...........................................................................................................................................................................................86
GROUP SHEET ...................................................................................................................................................... 86
STOCK VEHICLES ...................................................................................................................................... 87
PRINT TREES .............................................................................................................................................. 88
SPECIALIZATION (TALENT) TREES ...................................................................................................................... 88

viii
SIGNATURE ABILITIES ........................................................................................................................................................................88
FORCE POWER TREES ......................................................................................................................................... 89
PRINTING SELECTED TREES ............................................................................................................................... 89
REPORTS .................................................................................................................................................... 90
THE REPORTS DIALOG ......................................................................................................................................... 90
STEP 1 – SELECT COLLECTION TYPE .............................................................................................................................................90
STEP 2 – DEFINE COLUMNS ..............................................................................................................................................................91
STEP 3 – DEFINE FILTER ....................................................................................................................................................................92
STEP 4 – GROUPS ................................................................................................................................................................................94
STEP 5 – NAME AND TITLE ................................................................................................................................................................94
CONCLUSION..................................................................................................................................... 95
DISCLAIMER ............................................................................................................................................... 95

1
INTRODUCTION
Welcome to OggDude’s Star Wars® Character Generator and GM Tools for use with the Star Wars® Role Playing
game by Fantasy Flight Games™! This software will allow you to create and maintain characters, encounters,
and adventuring groups, as well as allow you to add new items, attachments, vehicles, and just about everything
else that will, hopefully, make your enjoyment of Star Wars® Role Playing that much better. Using this software,
you can easily create SWRP characters, print out full character sheets, as well as maintain your starships and
print encounter sheets for play.
REQUIREMENTS
This software requires Windows XP or greater. To run this software, you will need to install the .NET 4.0
Framework in your computer. You may already have this installed; just check your “Programs and Features”
control panel. Note that you’ll need the complete or “Extended” version of this framework, not the “Client”
version. You can download this for free from Microsoft at the following URL:
http://www.microsoft.com/en-us/download/details.aspx?id=17851
This software currently supports English, French, German, and Spanish languages. For instructions on how to
change languages, or create your own language translations, see Language, below.
WHAT YOU GET
Launcher Application (SWCharGenLauncher.exe) – The launcher makes it easier to access the other
three applications, and also gives you access to this document and the FAQ document. This should be
the first application you launch. If you’re using the web install, this will launch automatically.
SW Character Generator (SWCharGen.exe) – The actual SW Character Generator application, described
below.
SW Data Editor (SWCharGenDataEditor.exe) – A utility application that allows you to add and customize
your own data. In its basic form, you can use the SW Data Editor to replace the generic descriptions
(which I was forced to use due to copyright restrictions) with your own descriptions, or with descriptions
from the rule books, which you can use for your own personal use.
SW GM Tools (SWCharGenGMTools.exe) – This application allows GM’s to create and manage
adversaries, encounters, adventuring groups, and stock vehicles. You can print out tracker sheets for
any of these features to aid you in running SW Roleplaying games.
Documents (Documents) – This folder contains a copy of this documentation, as well the FAQ and the
version history file:
o Documentation (SWCharGen Documentation.pdf) – This document. It contains complete
instructions on how to use all of the various features from all the applications. If you still have
questions, refer to the FAQ. If your question still isn’t answered, you can post it on the FFG
forum, or send me an email at [email protected].
o FAQ (SWCharGen FAQ.pdf) – A collection of Frequently Asked Questions that should, hopefully,
answer some of the questions you may have about the applications.

2
o Version Information (Version Info.txt) – A text file that lists all past and present releases and the
changes made to the applications for those releases.
Library Files (SWCharGenCtlLib.dll, SWCharGenLib.dll, Iconic.Zip.dll) – These libraries contain common
code used by the applications. They must be present for the applications to function.
The Data (Found in the “Data” folder) – The software comes with a number of XML files used by the
application for character generation.
Imports – The software comes with a folder called “Imports” that contains other folders with collections
of adversaries, encounters, and other files that can be imported using the SW GM Tools and SW Data
Editor applications. These collections are as follows:
o Age of Rebellion Core– All adversaries from the Age of Rebellion Core Rulebook.
o Beyond the Rim – All adversaries and encounters from the “Beyond the Rim” Adventure Module
o Chronicles of the Gatekeeper – All adversaries and encounters from the “Chronicles of the
Gatekeeper” Adventure Module
o Crates of Krayts – Contains adversaries and encounters for use with the “Crates of Krayts”
adventure found in the Edge of the Empire beta rule book.
o Dead in the Water – Contains adversaries, encounters, and more from the “Dead in the Water”
adventure included with the Age of Rebellion GM’s Kit.
o Debts to Pay – Contains adversaries and encounters from the “Debts to Pay” adventure
included with the Edge of the Empire GM’s Kit.
o Desperate Allies – Includes new droids rivals found in the “Desperate Allies” Diplomat Career
Sourcebook.
o Edge of the Empire Core– This includes all adversaries from the Edge of the Empire Core
Rulebook (NOTE: These came stock and already installed with older releases of the product.
Newer releases will no longer have these adversaries installed by default. They can be installed
using the GM Tool’s Import feature)
o Enter the Unknown – Includes the new droid rivals found in the “Enter the Unknown” Explorer
Career Sourcebook
o Escape from Mos Shuuta – Contains all adversaries and stock vehicles for use with the “Escape
from Mos Shuuta” adventure found in the Adventure Book of the Edge of the Empire Beginner
Game. The files have been updated to use core rules.
o Far Horizons – Includes the new droid rivals found in the “Far Horizons” Colonist Career
Sourcebook
o Force and Destiny Beta–Adversaries from the Force and Destiny Beta Rulebook that did not
make it into the Core Rulebook, organized by category.
o Force and Destiny Core– All adversaries from the Force and Destiny Core Rulebook, organized
by category.
o Hidden Depths – Contains adversaries and encounters for use with the “Hidden Depths”
adventure included with the Force and Destiny GM’s Kit.
o The Jewel of Yavin – Contains all of the adversaries, encounters, and a data set for use with
“The Jewel of Yavin” Adventure Module.
o Keeping the Peace – Contains new droid adversaries found in the “Keeping the Peace” Guardian
Career Sourcebook.

3
o Language Data Sets – This directory contains importable language data sets. These data sets
contain customized data for a particular language and culture. Not every item, or every part of
an item, will necessarily be translated, but most common items will have at least the name
translated, plus the base description. Currently, this directory contains a language data set for
the neutral German language. This language data set may be imported using the Data Editor.
o Lessons from the Past – Contains adversaries and encounters for use with the “Lessons from the
Past” adventure, found in the back of the Force and Destiny Core Rulebook.
o Long Arm of the Hutt – Contains all of the adversaries and stock vehicles for use with the “Long
Arm of the Hutt” bonus adventure, available for download from Fantasy Flight Games.
o Lords of Nal Hutta – Contains all adversaries and modular encounters from the Lords of Nal
Hutta Source Book. Adversaries are organized by planet or location. Please see the READ
ME.txt file for details.
o Lost Knowledge – Contains all of the adversaries, encounters, and a data set for use with the
“Lost Knowledge” adventure found in the Force and Destiny Beta Rulebook.
o Lure of the Lost – Contains all of the adversaries and encounters for use with the “Lure of the
Lost” bonus adventure, available for download from Fantasy Flight Games.
o Mask of the Pirate Queen – All adversaries and encounters from the “Mask of the Pirate
Queen” Adventure Module
o Mountaintop Rescue – Contains adversaries and encounters for use with the “Mountaintop
Rescue” adventure included with the Force and Destiny Beginners Game.
o Onslaught at Arda I – Contains all of the adversaries, encounters, stock vehicles, and a data set
for use with the “Onslaught at Arda I” Adventure Module.
o Operation: Shadowpoint – Contains adversaries, encounters, and a data set with custom
vehicles for use with the “Operation: Shadowpoint” bonus adventure for the Age of Rebellion
Beginner Game. The data set should be imported using the SW Data Editor application.
o Operation: Shell Game – Contains encounters, a data set, and a stock vehicle for use with the
“Operation: Shell Game” adventure found in the Age of Rebellion beta rule book. The data set
should be imported using the SW Data Editor application.
o Perlemian Haul – Contains all of the adversaries and encounters you can add to your custom
data for use with the “Perlemian Haul” adventure, found in the back of the Age of Rebellion
Core Rulebook.
o Report Samples – Contains a number of sample reports that can be imported using the Reports
feature of the SW GM Tools application.
o Spark of Rebellion – Contains adversaries, encounters, and a dataset with new species,
weapons, vehicles, and more, to support the “Spark of Rebellion” fan-made supplement, based
on the popular “Star Wars: Rebels” television show.
o Stay on Target – Contains all of the droid and riding beast adversaries found in the “Stay on
Target” Ace Career Source Book.
o Strongholds of Resistance – Contains all of the adversaries and modular encounters found in
the “Strongholds of Resistance” Source Book. The “Adversaries” directory is organized by
planetary system, base, or location, while each modular encounter can be found in the
“Modular Encounters” directory.

4
o Suns of Fortune – Contains all of the adversaries, modular encounters, and custom vehicles
found in the “Suns of Fortune” Source Book. The import directory is organized by planetary
system and by modular encounter (including a directory for the two new droid adversaries).
o Takeover at Whisper Base – Contains all of the adversaries, encounters, and vehicles for use
with the “Takeover at Whisper Base” adventure, found in the Age of Rebellion Beginner Game
Adventure Book.
o Trouble Brewing – Contains all of the adversaries and two vehicles you can add to your custom
data for use with the “Trouble Brewing” adventure, found in the back of the Edge of the Empire
Core Rulebook.
o Under a Black Sun – Includes adversaries, encounters, and sample stock characters that came
with the “Under a Black Sun” adventure download.
Sample Graphics (Sample Graphics) – This folder contains a few backgrounds used in the application
that can optionally be used when creating adversary stat blocks. This is explained under SW GM Tools,
later in this documentation. It also contains a blank gear background image you can use when creating
your own equipment images.

5
INSTALLATION
The software has two methods for installation: manual and web.
MANUAL INSTALLATION
To install the software manually, download the ZIP archive for the current version, and then extract all of the
files into a created directory. Then run the launcher application. That’s it! The latest version of the ZIP file can
be found here.
WEB INSTALLATION
The web install provides a simple and automated way of installing the software. It will also automatically check
for updates each time the launcher is run. Updates are incremental, so only the files that have changed will be
downloaded. The web installation is the preferred method of installing the software.
To install via the web, download and run the setup executable from here. The installation program will
automatically download the software, install it, and create a short cut for the launcher.
UPDATING PREVIOUS INSTALLS
How you upgrade depends, once again, on how you installed the software:
MANUAL UPDATE
If you’ve already installed the application and want to update it with the latest version, just delete all files in
your current installation directory, and then extract all of the files from the latest ZIP archive into that directory.
There’s one caveat to this: make sure that your user data is NOT installed in the installation directory. Your user
data should reside either in the default data folder, or a SEPARATE folder of your choice. If your user data
(DataCustom, Characters, Adversaries, etc) is in your installation directory, now would be a good time to move it
somewhere else. See the documentation on the launcher, below, for details on how to specify your data folder
location.
WEB UPDATE
If you have installed the software via the web install, you don’t have to worry about upgrading. The launcher
will automatically check for updates each time it is run. If it finds updates, you will be prompted to download
them. They will automatically be installed and the main launcher will be run when completed.
INSTALLING ADVERSARIES AND ADVENTURE FILES
The installation comes with a number of importable files found under the “Imports” folder. Here you will find
additional adversaries, encounters, stock vehicles, and custom data sets that can be imported for use with the
product. A list of the various core rulebook adversaries, adventures, and source books that are included may be
found in the What You Get section.

6
If a set of imports contains a “read me” text file, please refer to this file for instructions on how to import that
set of files. In general, adversaries are imported using the “Import” button in the “Adversaries” pane,
encounters are imported using the “Import” button in the “Encounters” pane, and stock vehicles are imported
using the “Import” button of the “Stock Vehicles” pane, all from the SW GM Tools application. Data sets may be
imported from the SW Data Editor and should be the first thing that you import, if any exist for that set of files.
Note: The stock installation no longer contains any adversaries. Older versions of the software had the Edge of
the Empire Core Rulebook adversaries already in the Adversaries folder, but this is no longer the case. All
adversaries for the core rulebooks may be found under the “Imports” folder.
BACKING UP DATA
It is probably a good idea to occasionally backup data that you’ve changed in the program. This will ensure that
any items you’ve customized, characters you’ve created, etc., are safe from harm or corruption. The following
folders inside your installation directory should be backed up:
DataCustom – This folder contains all changes and customizations that you’ve made to the main data,
including descriptions, new or modified items, data sets, etc.
Characters – This folder contains all of your characters.
Adversaries – This folder contains all of the adversaries you’ve either imported from other sources (such
as the import folders that came with the product), or have created or modified yourself.
Encounters – This folder contains all of the encounters you’ve either imported from other sources (such
as the import folders that came with the product), or have created or modified yourself.
Groups – This folder contains the adventuring groups that you’ve created.
StockVehicles – This folder contains all of the stock vehicles that you’ve created or imported.
Languages – This folder contains any custom language files that you’ve created or imported.
You can now use the SW Data Editor to perform back-ups and restores of your data. See Backup and Restore for
more details on how to perform these actions.

7
LAUNCHING THE SOFTWARE
To launch the software, either run the launcher application
(SWCharGenLauncher.exe), if you installed via the ZIP archive, or use
the link provided by the web install. Either way, you’ll bring up the
launcher.
From the launcher, you can do a variety of things:
LAUNCH AN APPLICATION
Three buttons in the main part of the window allow you to launch the
three main applications that come with the software: the SW Character
Generator, the SW GM Tools, and the SW Data Editor. The launcher will
stay in memory when you run these programs, so you can go back to it
if you want to launch another one.
SKIN STYLE
The original applications had their graphical interface designed to
resemble the layout and colors in the original Edge of the Empire Core
Rulebook. With the release of the Age of Rebellion Core Rulebook and
the Force and Destiny Core Rulebook, you may now select different
graphical “skins” to resemble the layout in each of the books. Selecting
“Edge of the Empire” will use the original graphics, while selecting “Age
of Rebellion” will update the graphics and color scheme to resemble
the Age of Rebellion Core Rulebook, and selecting “Force and Destiny”
will update the graphics and color scheme to resemble the Force and
Destiny Core Rulebook. The selected skin will be used in all three of
the main applications.
VIEW THE DOCUMENTATION OR THE FAQ
Clicking the “Instructions” or “FAQ” buttons will launch the PDF files to either view this file, or the FAQ file. Note
that you need to have a PDF viewer, such as Acrobat Reader, installed to see these files. Of course, if you didn’t
have it installed, you wouldn’t be reading this
FORUM
Most of the discussion about the software can be found on the Fantasy Flight Games forums. Click the “Forum
Page” to be brought directly to the forum topic for the software.
OPEN FOLDERS
There’s two buttons that will open Explorer windows for two common folders: the application folder and the
data folder. In previous versions of the software, these were one in the same. Starting with release 1.1.0.10,
8
the data folder now resides in an application data directory for the Windows user currently logged in. This
means that signing onto different Windows accounts will allow you to have different data.
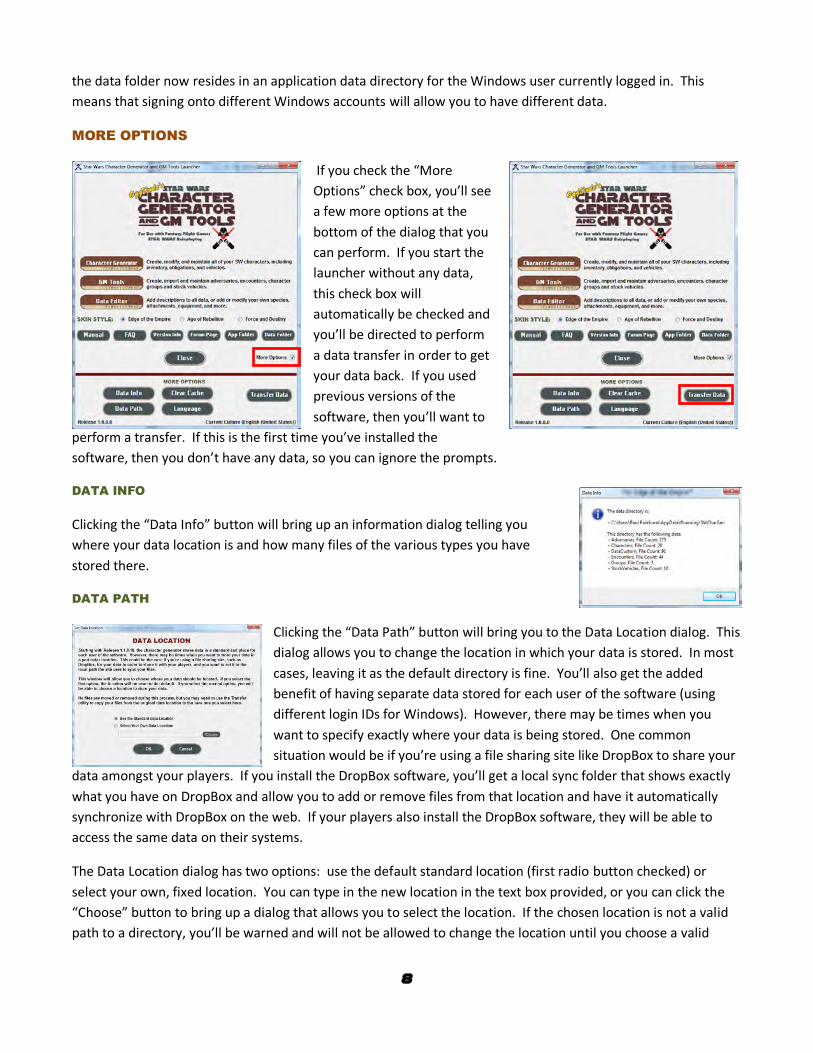
MORE OPTIONS
If you check the “More
Options” check box, you’ll see
a few more options at the
bottom of the dialog that you
can perform. If you start the
launcher without any data,
this check box will
automatically be checked and
you’ll be directed to perform
a data transfer in order to get
your data back. If you used
previous versions of the
software, then you’ll want to
perform a transfer. If this is the first time you’ve installed the
software, then you don’t have any data, so you can ignore the prompts.
DATA INFO
Clicking the “Data Info” button will bring up an information dialog telling you
where your data location is and how many files of the various types you have
stored there.
DATA PATH
Clicking the “Data Path” button will bring you to the Data Location dialog. This
dialog allows you to change the location in which your data is stored. In most
cases, leaving it as the default directory is fine. You’ll also get the added
benefit of having separate data stored for each user of the software (using
different login IDs for Windows). However, there may be times when you
want to specify exactly where your data is being stored. One common
situation would be if you’re using a file sharing site like DropBox to share your
data amongst your players. If you install the DropBox software, you’ll get a local sync folder that shows exactly
what you have on DropBox and allow you to add or remove files from that location and have it automatically
synchronize with DropBox on the web. If your players also install the DropBox software, they will be able to
access the same data on their systems.
The Data Location dialog has two options: use the default standard location (first radio button checked) or
select your own, fixed location. You can type in the new location in the text box provided, or you can click the
“Choose” button to bring up a dialog that allows you to select the location. If the chosen location is not a valid
path to a directory, you’ll be warned and will not be allowed to change the location until you choose a valid

9
path. When you have a valid path selected, or have chosen to use the default location, click “OK”, or click
“Cancel” to cancel changing your data location.
TRANSFER DATA
Because of the change in the data directory, you will need to transfer your
existing data to the new location if you used versions of the software prior to
1.1.0.10, or if you’ve chosen to select a different location for your data. To
perform a transfer, click the “Transfer Data” button under “More Options” in
the launcher screen.
The transfer dialog explains what you need to do and why you need to do it.
You do, however, have two options during the transfer: Archive existing data (the data at the old location) and
archive current data (the data at your new location). Checking the first option will save your existing (old) data
in a ZIP archive for safe keeping. At a future time, this archive can be used with the SW Data Editor’s Restore
feature. Checking the second option will save your current (new) data in a ZIP archive. The current data is the
data found in the new location. So, if you ran the software and created new data, it can be saved in a ZIP file
which can also be used by the Restore feature. The transfer process removes your current data before
transferring your old data to the new location, so if you don’t use this option, any current data will be lost.
Click the “Transfer” button to perform the transfer. You will first be prompted to select the location for the
installation directory that contains your data. This is the folder where the software was originally installed and
which contain the old DataCustom, Characters, Adversaries, etc., directories that contain your data. You will
then be prompted to select the location for your back up ZIP files if you chose those options. You will only be
prompted for this if the location actually contains files. The transfer process will then remove your current data
(giving you a warning first), and copy your original data to the new data folder. The transfer dialog will then be
closed and all of your data will be where it should be the next time you run any of the apps.
CLEAR CACHE
Starting with release 1.1.1.0, the applications will now cache adversaries,
encounters, groups, characters, and stock vehicles in a database for
quick retrieval. There may be times, however, when you want to clear
out the cache and re-cache those items in a new database. To do that,
click the “Clear Cache” button. This will bring up the Clear Cache dialog.
You’ll see how many items of each type you have cached, and be
allowed to remove the database by clicking “Clear Cache”, or return to
the launcher by clicking “Cancel”. If the cache doesn’t exist, or if it
exists, but is empty, a message box will be displayed instead, informing
you of this. If the cache is empty, you’ll still be given the option to remove it, if you so desire.
A cleared cache will be re-created the next time you run the SW Character Generator or the SW GM Tools.

10
LANGUAGE
Clicking the “Language” button will allow you to select a language for the tools.
Note that the language used effects the text displayed in the various forms and
controls, as well as the text of the printed pages. It does not include master
data items, such as species, vehicles, careers, etc. There are three exceptions
to this: characteristics, skills, and item descriptors are translated to the
selected language. If you have made custom changes to these items using the
Data Editor, then those changes will take precedence over the text found in
language translation.
The first choice from this dialog is to use the closest language found for the current culture. This is the culture
selected for your installation of Windows. If a language is not found that matches the language for your culture,
then the default translation (US English) will be selected.
To use an existing translation, select the second choice (“Use the
following Language”). This will allow you to select a language file that
already exists on your system. Besides US English, three other
languages come stock with the tools: French, German, and Spanish.
Again, if you have already made custom versions of your characteristics
and skills, those will be used by default. If you would rather use the
version found in the translation files, check the “Use characteristics and
skills from translations” check box.
Click “OK” to save your selection, or “Cancel” to keep the old settings.
This will return you to the Launcher. The image shows the Launcher
using the built-in German translation. To edit an existing language, or
create a new language translation, click the “Edit” button.
EDIT TRANSLATIONS
Clicking the “Edit” button from the language select
dialog will bring up the Edit Translations dialog.
From this dialog, you can edit existing translations,
create new translations, or import and export your
translation files.
To edit an existing language, select the language
from the drop-down list on the left. Note that the
built-in language files will not be modified. Instead,
new custom language files will be created that will override the built-in ones.
There are over 3,700 phrases for all of the tools. For convenience, these are organized by a “Source”. A source
is a form, control, enumeration, or some other set of related translations. To select a particular source to
translate, select the source from the drop-down list on the right.
11
To edit a translation, click the phrase under “New Text” in the phrase grid. You can enter the new translation
there. For convenience, the original text is shown to the left. If the original phrase contains a number in curly
brackets (such as “{0}” or “{1}”), those MUST remain somewhere in the phrase. These are used to substitute
some other text, which should be obvious by looking at the original text. They can be placed anywhere in the
new phrase text, and don’t even have to be in numerical order (depending on the grammar of the language), but
they must continue to exist in the new phrase. Likewise, if the original phrase contains a special tag, such as
“[BO]” for a boost die symbol, or “[TR]” for a triumph symbol, those should also be included, with the proper
grammar, in the new phrase.
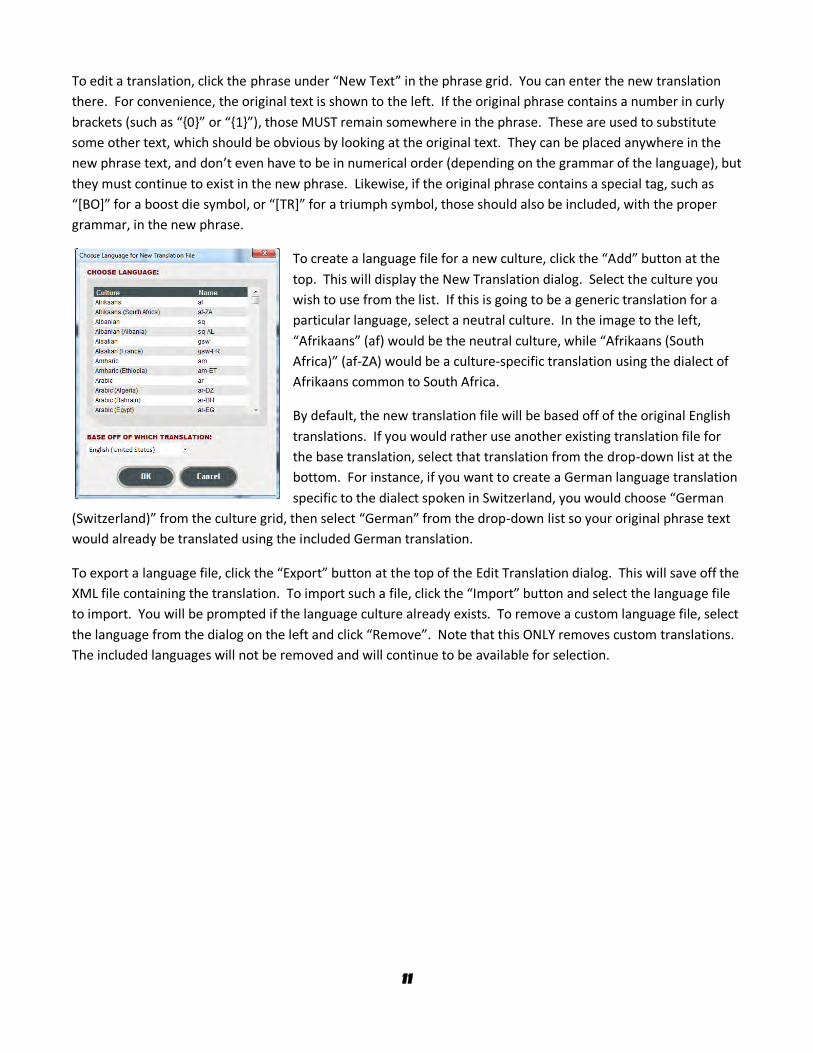
To create a language file for a new culture, click the “Add” button at the
top. This will display the New Translation dialog. Select the culture you
wish to use from the list. If this is going to be a generic translation for a
particular language, select a neutral culture. In the image to the left,
“Afrikaans” (af) would be the neutral culture, while “Afrikaans (South
Africa)” (af-ZA) would be a culture-specific translation using the dialect of
Afrikaans common to South Africa.
By default, the new translation file will be based off of the original English
translations. If you would rather use another existing translation file for
the base translation, select that translation from the drop-down list at the
bottom. For instance, if you want to create a German language translation
specific to the dialect spoken in Switzerland, you would choose “German
(Switzerland)” from the culture grid, then select “German” from the drop-down list so your original phrase text
would already be translated using the included German translation.
To export a language file, click the “Export” button at the top of the Edit Translation dialog. This will save off the
XML file containing the translation. To import such a file, click the “Import” button and select the language file
to import. You will be prompted if the language culture already exists. To remove a custom language file, select
the language from the dialog on the left and click “Remove”. Note that this ONLY removes custom translations.
The included languages will not be removed and will continue to be available for selection.

12
THE CHARACTER GENERATOR
The primary application you’ll use in creating your Star Wars® Role Playing characters is the SW Character
Generator app. Using this application, you can create and maintain all of the player characters that are played in
your campaign. To create and maintain adversaries, you should use the SW GM Tools, described later in this
documentation.
THE MAIN SCREEN
The screen is divided into a number of sections. To
the left is a column of buttons (A) that allow you to
select the various information panes that can be
displayed. The currently-displayed pane will have its
button in a lighter state. At the top (B) is an
information bar specifying the current pane,
information about XP, plus some buttons that provide
general functionality, described below. The main part
of the screen (C) constitutes the various panes. One
pane will be displayed at any one time, depending on
which has been selected. Finally, at the bottom right
(D) is a summary of your character so far, including name, species, specialization, attributes, including soak and
wounds, and his current characteristics. You may see this information change on-the-fly as you modify your
character.
TOP BUTTONS
At the top of the generator screen, you’ll find four buttons:
Donate – This button describes how to support my programming efforts for
this generator through PayPal. The generator, including the SW GM Tools and
SW Data Editor, are freeware, but if you find them useful, I’d appreciate any
support I can get.
Options – This button brings up the Options dialog. The main part of the dialog
consists of the source list. All of the data contained in the generator comes
from various source materials, as well as from the core rulebooks. Core
rulebook sources are displayed at the top of the list. At least one “Core” source MUST be selected in
order for the SW Character Generator to have a usable set of data (you will not be allowed to deselect
all “Core” sources). You can select or deselect any of the other sources you want displayed. Doing so
will not affect your current character, but it will affect what information is displayed in the generator.
You can also change various print settings for your character sheet (these same settings are also
available in the character sheet print dialog), ignore the rule limiting your obligation options only to
extra obligation under the starting value, allow Morality for non-Force users, and to show the GM
Grants button on the Description pane.
A B
C
D
13
Print – This button will print your character sheet. More details for this are described below under
Character Sheets.
Save – This button will save your current character.
THE PANES
The main part of the SW Character Generator screen (C) is dedicated to displaying the various information
panes, each allowing you to modify and customize a different part of the character generation and maintenance
process.
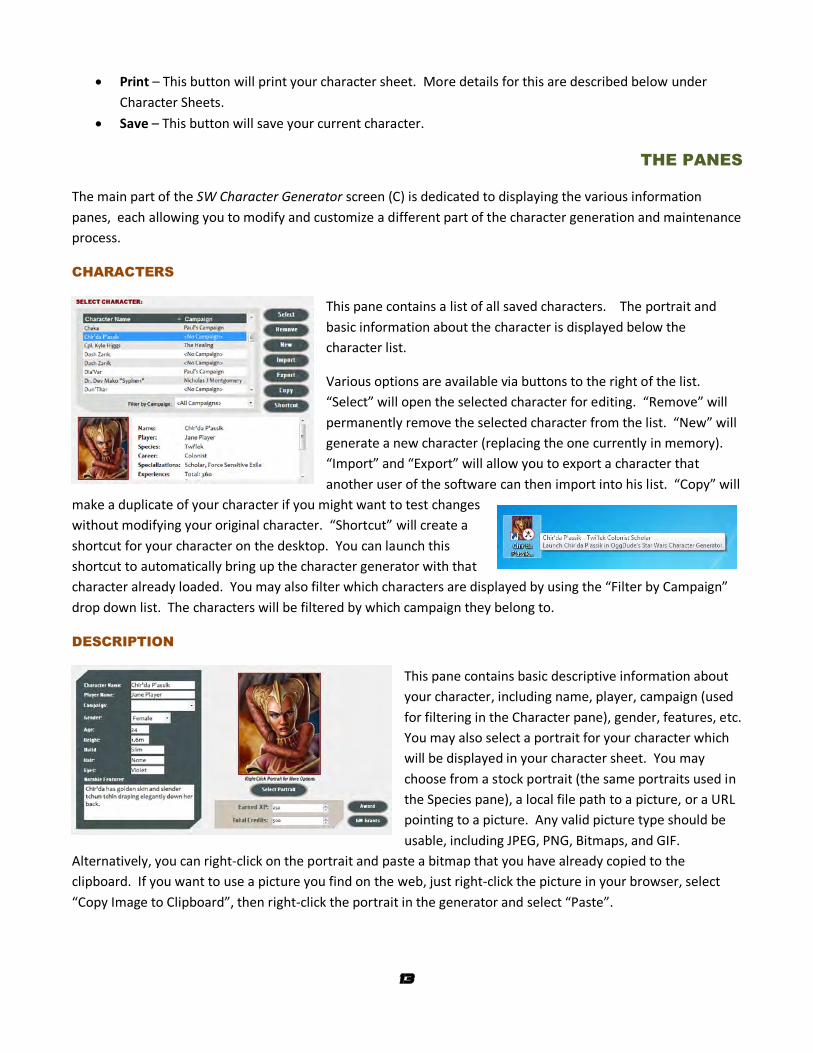
CHARACTERS
This pane contains a list of all saved characters. The portrait and
basic information about the character is displayed below the
character list.
Various options are available via buttons to the right of the list.
“Select” will open the selected character for editing. “Remove” will
permanently remove the selected character from the list. “New” will
generate a new character (replacing the one currently in memory).
“Import” and “Export” will allow you to export a character that
another user of the software can then import into his list. “Copy” will
make a duplicate of your character if you might want to test changes
without modifying your original character. “Shortcut” will create a
shortcut for your character on the desktop. You can launch this
shortcut to automatically bring up the character generator with that
character already loaded. You may also filter which characters are displayed by using the “Filter by Campaign”
drop down list. The characters will be filtered by which campaign they belong to.
DESCRIPTION
This pane contains basic descriptive information about
your character, including name, player, campaign (used
for filtering in the Character pane), gender, features, etc.
You may also select a portrait for your character which
will be displayed in your character sheet. You may
choose from a stock portrait (the same portraits used in
the Species pane), a local file path to a picture, or a URL
pointing to a picture. Any valid picture type should be
usable, including JPEG, PNG, Bitmaps, and GIF.
Alternatively, you can right-click on the portrait and paste a bitmap that you have already copied to the
clipboard. If you want to use a picture you find on the web, just right-click the picture in your browser, select
“Copy Image to Clipboard”, then right-click the portrait in the generator and select “Paste”.
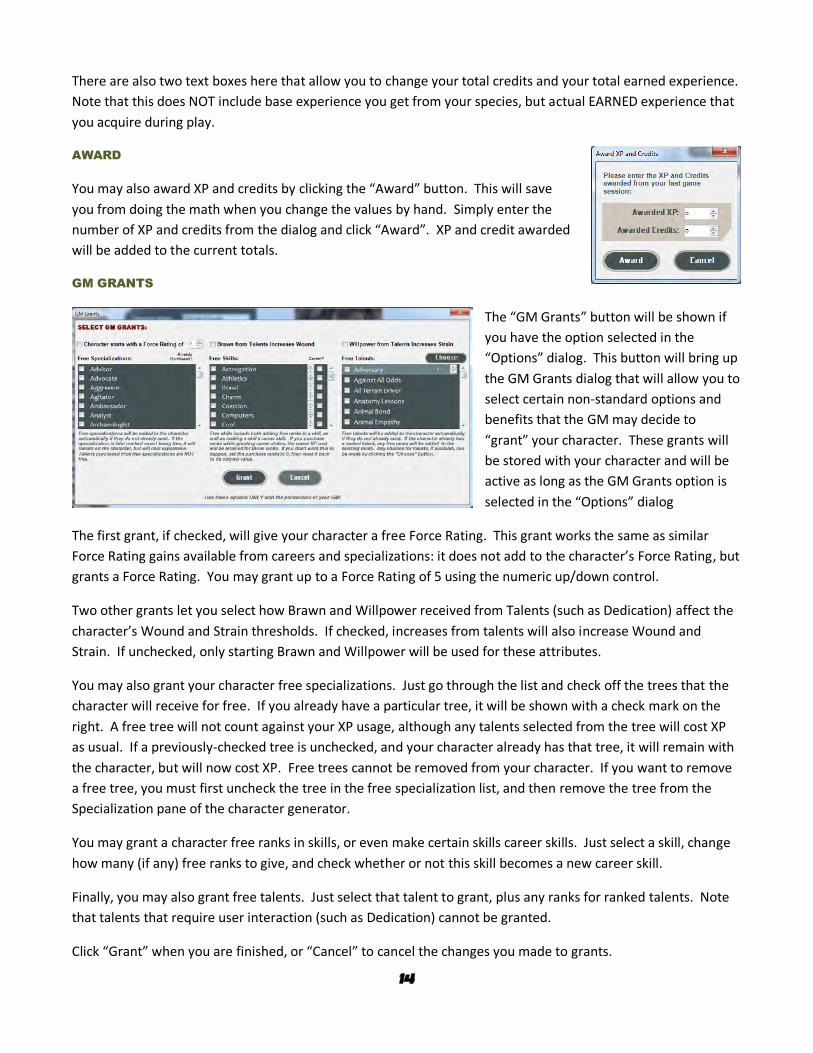
14
There are also two text boxes here that allow you to change your total credits and your total earned experience.
Note that this does NOT include base experience you get from your species, but actual EARNED experience that
you acquire during play.
AWARD
You may also award XP and credits by clicking the “Award” button. This will save
you from doing the math when you change the values by hand. Simply enter the
number of XP and credits from the dialog and click “Award”. XP and credit awarded
will be added to the current totals.
GM GRANTS
The “GM Grants” button will be shown if
you have the option selected in the
“Options” dialog. This button will bring up
the GM Grants dialog that will allow you to
select certain non-standard options and
benefits that the GM may decide to
“grant” your character. These grants will
be stored with your character and will be
active as long as the GM Grants option is
selected in the “Options” dialog
The first grant, if checked, will give your character a free Force Rating. This grant works the same as similar
Force Rating gains available from careers and specializations: it does not add to the character’s Force Rating, but
grants a Force Rating. You may grant up to a Force Rating of 5 using the numeric up/down control.
Two other grants let you select how Brawn and Willpower received from Talents (such as Dedication) affect the
character’s Wound and Strain thresholds. If checked, increases from talents will also increase Wound and
Strain. If unchecked, only starting Brawn and Willpower will be used for these attributes.
You may also grant your character free specializations. Just go through the list and check off the trees that the
character will receive for free. If you already have a particular tree, it will be shown with a check mark on the
right. A free tree will not count against your XP usage, although any talents selected from the tree will cost XP
as usual. If a previously-checked tree is unchecked, and your character already has that tree, it will remain with
the character, but will now cost XP. Free trees cannot be removed from your character. If you want to remove
a free tree, you must first uncheck the tree in the free specialization list, and then remove the tree from the
Specialization pane of the character generator.
You may grant a character free ranks in skills, or even make certain skills career skills. Just select a skill, change
how many (if any) free ranks to give, and check whether or not this skill becomes a new career skill.
Finally, you may also grant free talents. Just select that talent to grant, plus any ranks for ranked talents. Note
that talents that require user interaction (such as Dedication) cannot be granted.
Click “Grant” when you are finished, or “Cancel” to cancel the changes you made to grants.

15
BACKGROUND
Here you can generate a background for your
character. There are three standard aspects to this:
Beginnings (where your character came from), Attitude
Toward the Force (how your character views the Force;
may be eliminated if not appropriate for the character),
and Reason for Adventure (why your character decided
on a life of adventure and travel). A description of
these selections is displayed below the drop down lists.
To the right is a section where you can write a short story about your character’s history or origin. This is only
intended as a summary of your character’s life. More in-depth stories should be created elsewhere, such as in a
word processor.
OBLIGATIONS/DUTIES
Here you can add, select, change, and remove various
obligations (from Edge of the Empire) and duties (from Age of
Rebellion) for your character. Each obligation and duty has a
size, as well as a section for adding notes describing the
particulars of that obligation or duty. All of this information
will be displayed in your character sheet. To switch between
obligations and duties, just select the one you want from the
drop down list at the top of the pane.
The “Random” button will choose a random obligation or duty with the same size as your starting size. Any
existing obligation or duty will first be removed. If two are randomly picked, the starting size will be divided
between them.
OBLIGATION AND DUTY OPTIONS
As per the rulebooks, you can choose a number of options for obligations and duties when you create your
character. These options can give you extra starting XP and credits.
To use the options, first select the starting obligation or duty size, based on the size of your adventuring group
and the instructions of your GM. The generator will then figure out which options, if any, are available for you
to select. For obligations, options will be made available when you’ve selected enough additional obligations
above the starting size. For duties, options will be made available when you’re removed enough duty below the
starting size.
Once you’ve selected your options, they’ll remain selected, even if your obligation or duty changes in the future.
However, if you deselect an option and that option is no longer available due to the current size of your
obligation or duty, you will not be able to select it again until there is a change in size that will allow it.

16
MORALITY
In Force and Destiny, your character may have a value
called Morality. By default, each Force-sensitive
character will have Morality, assuming you’ve selected
the Force and Destiny Core Rulebook source. However,
you may select an option to allow any character to use
the Morality mechanic.
Morality consists of a single value (A) which determines
how far into the light or dark sides of the Force you
have moved, a title (B) determined from the morality value, and one or more Strength and Weakness pairs (C).
When you add a morality pair, you will first choose the Strength. This will automatically choose the
corresponding Weakness for that Strength. You can, however, choose your own Weakness if you so desire. You
may also have more than one morality pair.
The Force and Destiny Core Rulebook contains standard strength/weakness morality pairings. When you add a
New morality, or a Random morality, the strength will be added with its paired weakness. Some source books
(such as the “Keeping the Peace” source book for Guardian characters) may contain alternate pairings that can
be used instead of the default found in the Core Rulebook, including possible omissions or additions of different
strengths. To select one of these alternate pairing, use the “Alternate Pairs” (E) drop down list. This list has no
effect on your currently selected strengths and weaknesses and is only used when adding a New or Random
strength.
MORALITY OPTIONS
As with Obligation and Duty, you have the option of starting out with more XP or credits, and you can also start
with your morality value at a higher or lower value. You may select an option from the “Morality Options” drop
down (D), or just select “None”.
SPECIES
This pane allows you to select your species, including
any options that might be available for your species.
Some species have a number of different options to
choose from. These will be shown as buttons (A) in the
“Species Option” panel. If only one option is available,
it will be the only one present in the dropdown list.
Humans can also select non-career skills to gain ranks
in. To the right you’ll see a summary of the species (B),
including starting stats, starting values and experience,
a portrait showing a typical example of the species,
plus any informative text that has been entered in by you (as in this example), or a page number reference to
the species.
A B
A B
C
D
E

17
SUB-SPECIES
Some species, such as droids and Aqualish, can be
further divided into sub-species. When such a species
is selected, you’ll see the sub-species drop down
which lists the available sub-species from which to
choose. Different sub-species can give you different
options to select from, including different skill
selections, non-career skills, and different special
abilities. When your species is displayed, either on
the screen or on your character sheet, your sub-
species, if one exists, will be included next to it.
CAREER
This pane allows you to select your career, starting
specialization, plus choose which career and/or
specialization skills will have starting ranks. A
description of the career and starting specialization
appears below the drop down lists. The starting ranks
for career skills and specialization career skills are
displayed to the right. Normally, you can choose four
career skills and two specialization career skills, but
more choices may be available depending on your
species selection.
CHARACTERISTICS
This pane allows you to purchase extra characteristics.
According to the rulebook, this should only be done when first
creating your character, but there’s nothing in the program
that prevents you from changing your starting characteristics
later on. To the left (A), you’ll see all of the base values of
each characteristic from whichever source they come from
(species, talents, attachments, items, or cybernetics). Hit the
plus and minus buttons (B) to add or subtract from the
characteristic to get the final value. Note that your XP will be modified as you buy or sell characteristic points.
The summary pane below will also be updated as characteristic values change. To the right (C), you can select a
dropdown of each of the six characteristics to get more information about them. By default, only a page
number for the rulebook is displayed, but you can add more descriptive text to this by using the SW Data Editor
(as in this example).
A B C
D

18
INJURIES
Certain critical injuries or other actions during play may,
unfortunately, lower one or more of your characteristics. To
lower a characteristic, check the box next to “Allow adding or
removing injuries” (D). This will display the Injury column in
the characteristics pane. Note: Do NOT click the minus buttons
under “Buy” to lower a characteristic after character
generation is completed. Doing so may refund XP, and will not
allow a characteristic to be lowered more than its base value
before purchases. Characteristics lowered by injury do not refund XP and should be signified by using the Injury
column.
Adding injuries works the same as adding characteristics, except adding an injury with the plus button will lower
the characteristic by one point, to a minimum of 1. Characteristics that have been lowered due to injuries will
be shown in red in the character generator, but will look normal in the printed character sheet. If the injury is
later healed or is removed, clicking the minus button will lower the injury.
SPECIALIZATIONS AND TALENTS
This pane will display all of your currently-
purchased specialization trees. When a talent is
brightly colored (A), it may be selected by clicking
in the empty square at the top left. When a
talent is dimmed (B), it cannot be selected until a
talent that connects to it is first selected. If you
deselect a talent farther up the tree, all
dependent talents will automatically become
deselected and any XP returned. Bonus career skills for this specialization (E) are listed at the top.
TALENT OPTIONS
Most talents will only give some circumstantial in-game benefit. Others will immediately add to a skill or
attribute. Still others allow you to choose special options. These talents will have a white “play” button to the
right in the “cost” panel. Clicking on this button will bring up a dialog that will allow you to make the specific
choice. For instance, the Well-Rounded talent (C) allows you to choose two skills to become career skills. By
clicking on the play button for this talent, a dialog will appear allowing you to select the desired career skills.
Similar dialogs will allow you to select skills, characteristics, or items, depending on the talent.
A
B
C
E
D

19
There are currently six types of talent options:
Characteristic (e.g., Dedication) – Selects a characteristic to raise.
Career Skills (e.g., Well Rounded) – Select additional career skills.
Skill Choice (e.g., Knowledge Specialization) – Select skills for a particular purpose.
Skill Characteristic (e.g., lightsaber techniques) – Select a different characteristic to be used for a skill.
Item Modification (e.g., Tinkerer) – Select an item to modify in some way.
Signature Vehicle (e.g., Signature Vehicle) – Select a signature vehicle for your Rigger specialization.

20
ACQUIRING NEW SPECIALIZATIONS
You may purchase additional specialization trees by clicking on the
“Purchase” button at the top (D). This displays the Add New
Specialization dialog. The specializations that appear in the drop down
list are based on the filter selected below it. There are four filter options:
career specializations, non-career specializations, universal
specializations, or all specializations. Depending on the specialization
selected and previous specializations that you have already purchased, the cost of the new purchase will appear
at the bottom of the dialog. Click “Purchase” to purchase the selected specialization, or close the window if you
change your mind.
MOTIVATIONS
This pane allows you to add, select, and remove your character’s
motivations. The character sheet will display up to three different
motivations. Each motivation has two parts, the type and the specific
motivation. Changing the type will automatically update the list of specific
motivations as well. Each motivation also has a “Notes” section where you
can explain exactly how this motivation affects your character. Again, keep
in mind that the space for each motivation’s notes on the character sheet is limited.
Clicking the “Random” button will select a motivation for you, as per the CRB. Any existing motivations will first
be removed. If two motivations are randomly selected, they will both be different.
SKILLS
This pane contains a list of all available skills that
you may choose for your character. A checkbox (A)
will appear next to any career skills (which cost less
experience). The ranks you have obtained for each
skill (B) will be displayed depending upon the source for those ranks (species, career, talent, attachment, item,
or cybernetics), including how many you have purchased, to give the total number of ranks for that skill. The
dice pool will also be displayed next to this total. A dropdown list is available for each skill which allows you to
change the number of purchased skill ranks for each skill. Keep in mind that no skill rank can ever get above 5,
so this dropdown will have a varying number of possible ranks to choose from. Also, changes in skill ranks from
other parts of the generator may affect the number of ranks you can buy, which might cause you to suddenly
get an increase in experience points if a purchased skill rank needs to be eliminated in order to keep a skill down
to 5 ranks or less.
NON-CAREER SKILLS AND XP
When you buy ranks in a non-career skill, it costs 5XP more per rank. However, if you later purchase a
specialization, base, talent, etc., that turns a non-career skill into a career skill, the ranks that you’ve already
bought should still cost the same XP as they did before. New ranks, however, will be at the new, lower cost.
B A

21
This is not how the generator always worked. A known issue was that non-career skill ranks that became career
skill ranks would refund XP. Now, however, the generator will keep track of how many non-career ranks you
purchased in any skill and charge you the correct XP.
In the Skills pane of the generator, under the “Non-Career” column, a drop-down will appear if 1) the skill is a
career skill, and 2) ranks have been purchased in that skill (the ranks need to actually be purchased, i.e., cost XP;
free ranks don’t count for this). The drop-down will allow you to set how many purchased ranks should be
considered non-career ranks.
Under normal circumstances, you shouldn’t need to use this drop-down, since the character generator will keep
track of all of this for you. However, characters made before the fix for this problem was implemented may
need some of their skills adjusted to reflect non-career purchases before they purchased a specialization. Also,
if a skill becomes a career skill, and you lower the “Buy” ranks, then set them back again, this may cause the skill
to lose non-career ranks, which means you’ll need to add them back using this drop-down.
DICE POOL SYMBOLS
The following symbols may be displayed in the dice pool for your skills:
Ability
Each ability die symbol represents the number of ability dice you may roll for a skill check.
Proficiency Each proficiency die symbol represents the number of proficiency dice you may roll for a skill check. You will see proficiency dice when you have ranks in a skill.
Boost Certain abilities, equipment, and talents allow you to add boosts to particular skill checks. Each boost die symbol represents the number of boost dice you may roll for a skill check.
Remove Setback
Certain abilities, equipment, and talents allow you to remove setback from particular skill checks. Each remove setback symbol represents the number of setback dice that may be removed when you make a skill check. If there are more remove setback symbols than you have setback dice for your check, the remainder is ignored.
Add Setback
Certain abilities and equipment might require you to add setback to particular skill checks. Each setback symbol represents the number of setback dice that must be added when you make a skill check. If you have both added setback and removed setback for the skill, they will cancel out and the remainder of the higher count will be applied.
Add Success
Certain abilities, equipment, and talents may allow you to add automatic success to the result of particular skill checks. Each success symbol represents the number of successes you may add to a skill check.
Add Advantage
Certain abilities, equipment, and talents allow you to add advantage to result of particular skill checks. Each advantage symbol represents the number of advantage you may add to a skill check.
Add Threat
Certain abilities, equipment, and talents might require you to add threat to result of particular skill checks. Each threat symbol represents the number of threat you must add to a skill check.
Force
Certain Force power abilities allow you to augment particular skills with a Force power check. Force power checks consist of one Force die for each point of Force Rating the Force-sensitive character possesses. When such an ability applies to a skill, you will see one Force die symbol for each point of Force Rating. This indicates that you may use up to that number of Force dice to augment a skill check. If you have Force dice committed to other ongoing effects, or have used Force dice to activate some other power, you may not be able to roll all of the indicated dice, if any.

22
EQUIPMENT
Equipment comes in three different types:
weapons, armor, and gear. The currently-displayed
type of equipment (A) will show up on a dimmed
button at the top. All the equipment of that type
will be displayed in the grid below (G). You can filter
this equipment by the category drop-down, the type
drop-down, the source drop-down, and a typed-in
name filter, and by selecting restricted, unrestricted,
and all equipment using the radio buttons
(restricted equipment must be obtained on the
black market). Below the list of available equipment
(G) is a section (B) containing a picture of the equipment (if available), stats for the equipment, and a description
of the equipment (or a page number, if the descriptions haven’t been edited). The list to the right (C) shows all
purchased equipment of the currently-displayed type.
ADDING EQUIPMENT
Two different buttons (D) allow you to add equipment to your character: “Add” and “Purchase”. “Add” will just
add the equipment to your character. Use this if your GM tells you that you have acquired this item for free or
as part of your starting items. “Purchase” will subtract the cost of the equipment from your credit total. This is
the normal way of acquiring equipment.
REMOVING EQUIPMENT
Likewise, owned equipment can be eliminated by clicking on the “Remove” or “Sell” buttons (E). “Remove” will
just delete the item from your inventory. “Sell” will allow you to sell the item and receive credits in return.
RENAMING EQUIPMENT
You may click the “Rename” button to rename the selected owned equipment.
This name will show up instead of the base name in all sheets and panes. To
revert back to the original name, just click “Reset” in the rename dialog.
A
B
C
F
D E
G
G

23
ITEM NOTES
Each item or set of items in your inventory can have a note attached to it.
This note might mention a special feature, from where you obtained the
item, or anything else you might like to remember. To change notes, click
the “Notes” button (E). This will bring up the Modify Item Notes dialog.
Type your note in the top text box. The preview box below it will show you
what your note will look like. You can add
tags to your note, including special symbols and dice. Click “Change” when you’re
done, or “Cancel” to cancel the change. An item’s note will be displayed in the
“Special” column in the respective grid on the printed sheet, along with any other
information (qualities, attachments, etc).
BUYING OR SELLING EQUIPMENT
When you buy or sell an item, a dialog will appear that allows you to select the
price you will buy or sell the item for. This is always based on the listed price for the item. You may choose
which standard percentage of this price to use, a custom percentage that you can select (between 1% and
500%), or you can just enter the end price yourself.
EQUIPPED, CARRIED, AND SHOWN
Owned equipment also can have three different check boxes associated with it: “Equip,” “Carry,” and “Show.”
“Equip” indicates that the item is currently equipped by the character and is providing soak, defense, and any
benefits from attachments and mods. Items that are equipped are also automatically carried. Two pieces of
armor may be equipped at a time, and only a maximum of two weapons. Any number of gear items may be
equipped at the same time. The app doesn’t differentiate between one- and two-handed weapons, so do not
equip more than one two-handed weapon at a time, unless your GM allows it.
“Carry” means that a piece of equipment is carried with the character wherever he goes (as opposed to items
owned by the character but, say, stored in his ship or at his base), but is not being actively utilized. This means
that it contributes to encumbrance, but does not provide benefits, such as soak, defense, or any benefits from
attachments and mods that might apply to the final character calculations. Any number of items (weapons,
armor, or gear) may be carried. However, the encumbrance will add up and may eventually penalize the
character.
“Show” only applies to weapons and indicates that such weapons will be shown on page one of the character
sheet. You should check the “Show” box if this is a standard weapon that you always use. Weapons shown on
the first page will already have any added damage, range, and dice pool enhancements pre-calculated for
convenience. Keep in mind that a limited number of weapons will fit at the bottom of page one, so choose
which ones will be displayed wisely.

24
TWO-WEAPON SETS
If the character dual-wields two weapons, you can create two-weapon sets to
display on the first page of the character sheet by selecting the primary weapon
and clicking the “Two-Weapon Sets” button (G). This
will bring up the Two-Weapon Sets dialog. From
there, you can click “New” to add one or more of any
weapon in your inventory to act as a secondary
weapon. The Secondary Weapon dialog will appear that will list all other weapons in
your inventory that are not currently selected for the primary weapon (the exception
to this is the Unarmed “weapon”. Unarmed by be used with itself to create a two-
weapon set). Choose one, and click “OK”. That weapon will now appear in the Two-
Weapon Sets dialog as a secondary weapon. If you want this set to be shown on the
first page of the character sheet, click the “Show” check box next to the listed secondary weapon. Clicking
“Modify” will allow you to change the secondary weapon, while clicking “Remove” will remove the secondary
weapon from the list.
When you’re finished configuring your sets, click “OK” to return to the
equipment pane. Any weapon in your inventory that is a primary weapon of a
two-weapon set will have the two pistol icon displayed next to it.
On the first page of the character sheet, two-weapon sets will be displayed showing the primary and secondary
weapon’s names, both skills used (if different), both ranges (if different), both damage ratings, and both critical
(again, if different). The dice pool will be configured using the two-weapon rules from the core rulebook and
will include any boosts, setbacks, advantages, or threats for the primary weapon, plus any advantages or threats
added by the secondary weapon’s activation, if any, following a slash. The “Special” column will list the qualities
possessed by both weapons.
ADD HARD POINTS
If a character possesses a talent that allows adding hard points to items (such as
Intuitive Improvements), the “Add HP” button will appear below the owned
equipment grid. Clicking this button will allow you to add one hard point at a
time (to a maximum defined by the talent) to any piece of equipment.
Remember that you would normally have to make a skill check to do this, and
as always, you should ask your GM’s permission before adding hard points to
items in this manner.
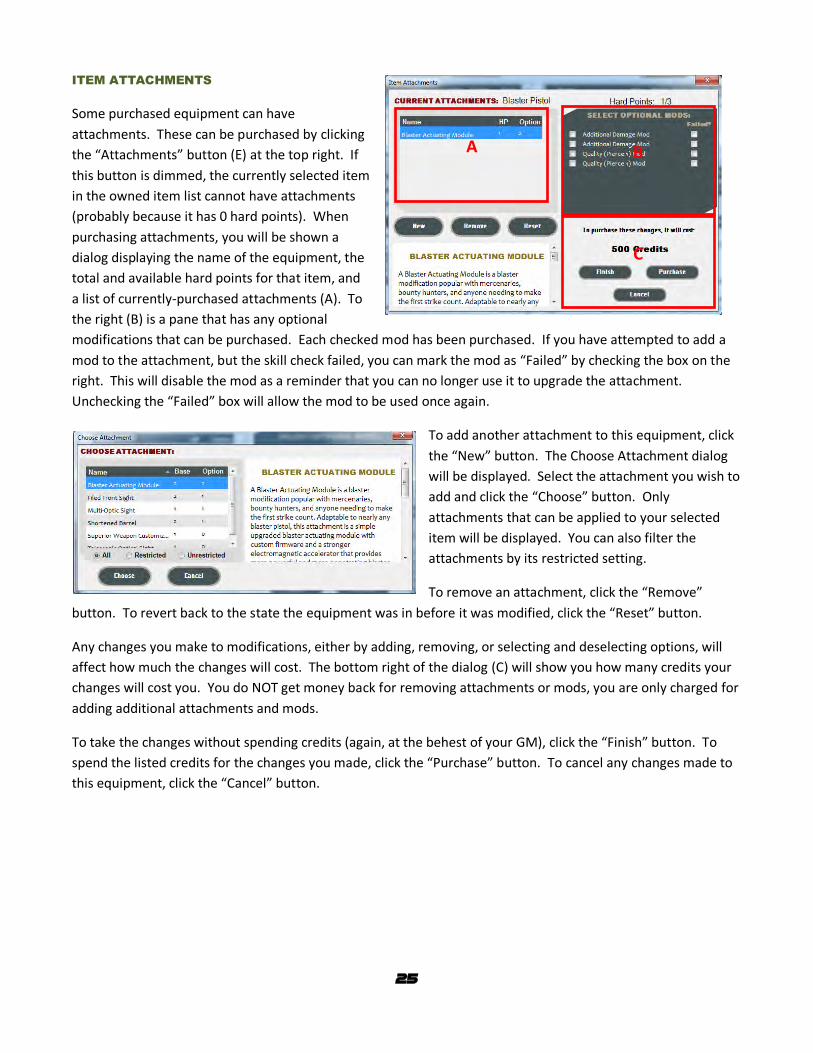
25
ITEM ATTACHMENTS
Some purchased equipment can have
attachments. These can be purchased by clicking
the “Attachments” button (E) at the top right. If
this button is dimmed, the currently selected item
in the owned item list cannot have attachments
(probably because it has 0 hard points). When
purchasing attachments, you will be shown a
dialog displaying the name of the equipment, the
total and available hard points for that item, and
a list of currently-purchased attachments (A). To
the right (B) is a pane that has any optional
modifications that can be purchased. Each checked mod has been purchased. If you have attempted to add a
mod to the attachment, but the skill check failed, you can mark the mod as “Failed” by checking the box on the
right. This will disable the mod as a reminder that you can no longer use it to upgrade the attachment.
Unchecking the “Failed” box will allow the mod to be used once again.
To add another attachment to this equipment, click
the “New” button. The Choose Attachment dialog
will be displayed. Select the attachment you wish to
add and click the “Choose” button. Only
attachments that can be applied to your selected
item will be displayed. You can also filter the
attachments by its restricted setting.
To remove an attachment, click the “Remove”
button. To revert back to the state the equipment was in before it was modified, click the “Reset” button.
Any changes you make to modifications, either by adding, removing, or selecting and deselecting options, will
affect how much the changes will cost. The bottom right of the dialog (C) will show you how many credits your
changes will cost you. You do NOT get money back for removing attachments or mods, you are only charged for
adding additional attachments and mods.
To take the changes without spending credits (again, at the behest of your GM), click the “Finish” button. To
spend the listed credits for the changes you made, click the “Purchase” button. To cancel any changes made to
this equipment, click the “Cancel” button.
A B
C

26
TRANSFER
You may also transfer any owned equipment to and
from a vehicle owned by the character, a group a
character belongs to, or a vehicle owned by any group
the character belongs to. To do this, click the
“Transfer” button (E) at the top right. This will bring up
the transfer dialog. From here, you may select an
equipment source available to the character under
“Transfer From”. Clicking on “Weapons”, “Armor”, or “Gear” will filter by that type of equipment.
If one of the equipment sources happens to be a group, you will also have the option of transferring credits to
and from the character and the group. Once the transfer is completed, you will be asked to save the character
before the transfer can be completed.
SPECIAL “JURY RIGGED” ATTACHMENT
If you have selected the Jury Rigged talent, the Jury Rigged “attachment” will become available. As stated in the
rules, you can have one of these attachments per rank of Jury Rigged you purchased. This attachment costs no
credits and can be applied to either weapons or armor. If you remove a Jury Rigged attachment from one piece
of equipment, it becomes available for another piece. If you eliminate the talent that gives this benefit, the
attachment will automatically be removed from your equipment.
FORCE POWERS
If you have purchased any specialization,
career, or ability that gives your character a
Force rating, a new pane button will become
available named “Force Power”. This will
bring you to a pane that looks very similar to
the specialization pane that contains tree
layouts for the various Force powers you can
buy. Like specializations, each displayed
power upgrade, just as with talents, are
displayed either full color for an upgrade that
you can select, or dimmed if there is no
selected upgrade that is connected to it. Your current Force rating (A) is displayed in a panel on the left. A
combo box (B) contains all of the Force powers available to the character, based on the minimum Force rating
requirement listed below the combo box. Each power is listed with the number of abilities purchased in the
tree, so you can know at a glance which Force power trees have purchased abilities. To the right is a checkbox
(C) that can apply the mentor -5 XP discount to purchasing a power’s basic ability, as described in Force and
Destiny Beta Update #2. This discount is applied to individual powers, so if your group loses its mentor,
subsequent Force power purchases can be made without the discount.
A B C

27
Unlike specializations, you do not have to purchase Force power “trees”, only the individual upgrades on those
trees. So, if Force powers become available by purchasing “Force Sensitive Exile”, “Force Sensitive Emergent”,
or some other talent or ability that gives you a Force rating, all of the powers will be available to choose from.
Some species, such as droids, cannot possess a force rating, and therefore can never have Force powers. Other
species may have an innate Force rating, and so will always have access to Force powers.
SIGNATURE ABILITIES
A new concept called “Signature Abilities”
became available in the “Enter the Unknown”
sourcebook, release at the end of 2013.
Signature abilities are career-specific abilities
that can be attached to career specialization
trees that have had enough talents purchased
to make them signature ability-ready. At the
time of this documentation’s writing, two
signature abilities are available for Explorers
only. You can, of course, create your own signature abilities and assign them to any career that you like.
Like Force Power, the Signature Ability button will only become available if you have or may purchase a
signature ability for your character. That means a signature ability must be available for your career, and you
must have the proper talents selected on one or more of your career-specific specialization trees.
The signature ability pane works similarly to the specialization or force power pane. After selecting the base
ability at the top, you may traverse the ability tree and select any other node that becomes available. The
benefits of these nodes are explained in the “Enter the Unknown” sourcebook.
To add a new signature ability, click the “Attach” button. This
button will “attach” a signature ability to a career-specific
specialization tree that you already posses. Only one
signature ability may be attached to a particular
specialization. From the attach dialog, select the available
signature ability on the left, and the specialization tree to
attach this ability to on the right. Click “Attach” to gain the signature ability.

28
VEHICLES
The Vehicle pane allows you to add or
purchase vehicles for your character,
including starships. The pane includes a list
of your currently-purchased vehicles, plus a
stat block, descriptions, and places to add a
name for your vehicle, update your vehicle’s
portrait, and add brief notes about your
vehicle. If you currently do not have any
vehicles, these areas are hidden.
ADD A VEHICLE
To add a vehicle, click the “New” button. This will bring up the
Vehicle purchase window. This window lists all of the available
vehicle models, including, again, a stat block, vehicle summary, and
buttons that allow you to add or purchase a vehicle. You can filter
the vehicle selections by its restricted (availability) setting, by
starship or non-starship vehicles, plus vehicle categories, types,
sources (the book or adventure in which the vehicle can be found),
or a typed-in model filter. You can also sort by model, category,
type, and price. Once you add or purchase a vehicle, it will appear
in your vehicle list and you will be able to edit the name,
description, and the vehicle’s portrait.
REMOVE OR SELL A VEHICLE
Just like inventory items, vehicles can be sold for credits, or can be removed if your GM just had an Imperial Star
Destroyer blast it out of the cosmos. When you sell a vehicle, the standard discounts will be displayed, just like
for selling other items.
ATTACHMENTS
Vehicles can have vehicle-specific attachments, just like weapons and armor. To add or purchase attachments,
click the “Attachments” button. This will bring up the same Attachments dialog that you see for weapons and
armor, although different attachments will be displayed.
UPGRADE WEAPONS
To upgrade your vehicle’s weapons, click the “Upgrade
Weapons” button. This will bring up the Weapon Upgrade
dialog.
In the grid, you’ll see a list of the vehicle’s current weapon
systems. If this is a new vehicle, you will see a list of the

29
stock weapons that come with the vehicle.
A count of the weapon systems will be on the left, followed by the firing arc, a description of the weapon
system, the number of individual weapons included in this system via the Linked quality, and the weapon’s
upgrade status. At the bottom, you will
see how much it will cost to save your
changes, plus any hard point cost.
To upgrade an existing stock weapon,
click “Upgrade”. To add a new weapon
system, click “Add”. To remove an
upgraded weapon (which will then revert
to its stock weapon system), click
“Downgrade”. To remove a new added
weapon, click “Remove”. You cannot modify an upgraded weapon once it’s been upgraded; the weapon can
only be downgraded. However, after it is downgraded, it can, once again, be upgraded. New weapons cannot
be upgraded, they can only be removed and added again.
When you upgrade or add a weapon system, the Upgrade Weapon dialog will appear. This dialog allows you to
choose your weapon system, plus various customization options. You will see a list of available weapons to the
left, which are already filtered based upon silhouette minimums. After you choose your weapon, you may select
one or more firing arcs that the weapon can reach. If a weapon is turret-mounted, or retractable, check those
boxes. You can specify a location for the weapon, or just keep it as “Unspecified”. Finally, if you want to
purchase multiple weapons and link them together into a single weapon system, you may choose up to 4 such
weapons to do this with. Note, however, that the number here represents the total number of weapons and
NOT the “Linked” quality number. That is, “1” means just purchase a single weapon, “2” means purchase two
weapons and link them together with the “Linked 1” quality, “3” means purchase three weapons and link them
together with the “Linked 2” quality, etc.
There’s no added cost for firing arcs or for turret-mounted, retractable weapons, or location. When linking
weapons, you will be charged for each weapon in the weapon system, plus half again the price for the linking.
The total charges will show up on the Weapon Upgrade dialog as soon as you click “OK”. Any sort of linking will
cost a hard point (that is, replacing an existing weapon system with 2 or more linked weapons will cost 1 hard
point). To avoid linking charges and hard point costs, just purchase separate single weapon upgrades. Adding
weapon systems always costs a hard point, so if you have the cash, squeeze in as many linked weapons as you
can afford so the hard point isn’t wasted!
IMPORT, EXPORT, AND COPY
These buttons allow you to transfer your vehicles between installations of the generator, and to make copies of
existing vehicles. “Import” will add a previously-exported vehicle to your character, while “Export” will export a
copy of that vehicle to another file. Clicking “Copy” will duplicate the current vehicle in the list.

30
STOCK VEHICLE
This button will bring up a dialog that will allow you to add or
purchase a pre-made vehicle for your character. These stock
vehicles can be created in the SW GM Tools application and
may already have names, descriptions, attachments, upgraded
weapons, etc. Having the capability of adding pre-made
vehicles can save time in creating the same, or similar
vehicles, multiple times for different characters.
When you select a stock vehicle for your character, a copy of the vehicle is made for your character. The stock
vehicle remains in SW GM Tools. Subsequent modifications to the vehicle in your character will have no effect
on the vehicle stored in SW GM Tools.
STAT BLOCK
The stat block feature allows you to export a description of the
vehicle as a PNG file, which can then be used in your own
publications. Clicking “Stat Block” will show the Stat Block Dialog, as
described in detail under SW GM Tools for adversaries. The “Display”
pane has two different options for vehicles, however. “All Details”
will include all information for the vehicle, including hull type,
hyperdrive, cost, rarity, etc. “Weap/Attach Only” will only include
weapons and any attachments the vehicle has. Use the second
option for a more condensed stat block for the vehicle.
ORDNANCE
Some weapon systems on vehicles can fire various types of
ordnance, such as missiles or rockets. These weapons
generally have a profile that does not include weapon
damage, critical rating, and qualities. This is because you
purchase the ordnance separately. To do this, click the
“Ordnance” button. This will bring up an equipment dialog
that will allow you to add or purchase whatever types of
ordnance you have in data. This ordnance will show up on
the vehicle sheet under the weapons in order for you to
know what types and how many missiles you have on your
ship.

31
PRINTING YOUR VEHICLE
Click the “Print” button (the one next to the
vehicle portrait, not the one on top) to print your
currently-selected vehicle. Like for character
sheets and encounter trackers, this will bring up
the standard Print Preview dialog where you can
make any printer changes, or select full-color or
simplified versions of the vehicle sheet to print. All
pertinent information you’ll need to use the
vehicle during play is listed on the single-page
vehicle sheet, including weapons, attachments,
plus any innate talents supplied by attachments.
PORTRAITS
Each vehicle comes with its own portrait.
However, if you don’t like the default portrait, you
can always add your own. To do this, click “Select Portrait” button. This will bring up the same dialog you see
for character portraits, except instead of stock character portraits, you’ll see stock vehicle portraits. You can
load a portrait from disk or from a URL off the internet. You can right-click on the portrait to both copy and
cut/paste a portrait. For instance, you can find a portrait off the internet, right-click and copy the portrait, then
go to the SW Character Generator, right-click the portrait, and paste it.
Portraits can be any size, but to avoid scaling issues, please make sure that they are square in size. That is, the
height and width should be the same, or close to it.

32
THE CHARACTER SHEETS
The main point of this program is, of course, to generate a character sheet for
you. You can generate a character sheet at any time during the character
generation process. To do so, click the “Print” button at the top left of the main
screen. This will bring up a dialog that allows you to choose some print options,
as well as choose which type of character sheet to print.
PRINT OPTIONS
The four print options (which can also be selected from the
Options dialog, described above) give you the option to include
four additional types sheets with your standard character
sheet. By checking the option, you may choose to include any
vehicle your character owns, all of his talent trees for each
purchased specialization, all purchased Force powers, and all purchased Signature Abilities.
STANDARD CHARACTER SHEET
Clicking “Print Standard” will bring up the Print Preview dialog with a standard multi-page character sheet. This
dialog also gives you the ability to print your character sheet, change page setup options, zoom the preview,
select which page to preview, or close the dialog.
The character sheet is split into four different types of pages, although
the actually number of pages in a character sheet depends upon the
amount of data being presented. Each page contains an identical
header that has general information such as character name, species,
career, and specializations, plus a footer that contains the page
number.
STATS, SKILLS, AND WEAPONS
The first page contains all of the character’s characteristics and attributes,
plus a section for keeping track of wound/strain and critical injuries. It
also contains all of the character’s skills, including the dice pool, and a list
of commonly-used weapons with all damage, range, and dice pool pre-
calculated. These displayed weapons are the ones with the “Shown”
checkbox checked in the Equipment pane.
A

33
DESCRIPTION AND SOCIAL
The second page contains the character’s portrait and all descriptive
information, such as gender, age, height, build, hair, and eyes, and a
section for notable features. It will also display motivations, obligations,
duties, morality, and background, including the character’s story. This
information may be continued on multiple pages, depending on the
number of items being printed. The story can start on a new page, but
cannot be split between pages, and must fit onto a single page (this is a
summary, not a novel).
FEATURES, XP, AND ABILITIES
After the description and social pages come the features and ability
section. This starts with any special or optional species powers and how
XP is currently being used (including a space for writing XP earned during
an adventure). A list of all talents, force powers, and signature abilities
follows, and may continue on multiple pages. For talents, this is a
summary of all of the various talents that you know from any source,
including specialization talents, talents from your species, or talents from
items and attachments. Ranks in these talents, including any descriptive
text that you might have entered, will show up here.
Force upgrades and signature abilities are displayed in a similar manner,
with multiple purchases showing up under “Purchased”. The Force Power
section will also have your current Force Rating, which will normally be 1,
unless you buy the single upgrade in the Force Sensitive Exile tree.
MONEY AND EQUIPMENT
The last section of the character sheet shows the character’s current
encumbrance, his current money (plus a section to record credits earned
through adventuring), and a complete list of all equipment owned, including
weapons, armor, gear, and vehicles.
Along with the equipment are designations as to whether the equipment is
equipped and/or held, the quantity of all equipment, plus a complete list of
all special abilities and upgrades contained in this equipment, including any
options selected. This section can span multiple pages if your character has
acquired a lot of equipment.

34
OPTIONAL SHEETS
You may optionally include vehicle sheets at the end of your character
sheet for any vehicle owned by your character. You may also optionally
include sheets that show trees for your specializations, force powers, and
signature abilities. You may select these options from the “Options”
button at the top of the generator window.
THE “NOTES” SECTION
Some pages of the character sheet might have a “Notes” section at the
bottom, while others do not. Because the character sheet is split into
four sections, plus optional tree sheets, some sheets can end up with
extra space at the bottom. Rather than just keeping those sections
blank, the generator will add a “Notes” section to allow you to at least
make some good use out of the empty space.
SHEET STYLES
Three different character sheet styles are available in the SW
Character Generator: full color, full color no background, and
simplified. All of the examples above are full color. The simplified style is basically black and white and doesn’t
use as much printer ink, while the full color sheet with no background removes the datapad background graphic,
and also uses the same margins as the simplified sheet, while retaining full color in all graphics.
You can specify which sheet style to use by selecting the sheet style combo box at the top of the form.
COMPACT CHARACTER SHEETS
Compact character sheets are one-sheet versions of the standard
character sheet. Basically, all relevant information about the character
is summarized into a single sheet. In order to do this, not all
information about a character may be included. For instance, not all
talents might be displayed, or all Force powers, or equipment.
Compact sheets are handy for making pre-generated characters for
either convention runs, or for running one-shot adventures for your
friends. They may also be used as a quick-reference summary of a
character that has all required information on a single sheet at a
glance.
Basic information for the character is displayed at the top, including a
stat block, attributes, portrait, plus a list of all skills that currently have
ranks. As space permits, you may also find lists of talents, Force
abilities, obligation, duty, morality, weapons and equipment, plus the
character’s story, if there’s left over room. Many of these items can be found in either column, since the sheet
attempts to dynamically place the different parts into the layout.

35
At the bottom, you’ll find a key panel containing all symbols and dice used in the game. This can be handy for
new players, or players not as yet proficient with the dice mechanic. You may control whether or not this panel
is displayed in the Compact Sheet Options dialog.
Compact sheets use the same print preview dialog as standard character sheets (and all other printed sheets).
COMPACT SHEET OPTIONS
This dialog allows you to select which items to prioritize when creating
compact character sheets. Since space is limited on a single sheet, many
items that are printed on the standard character sheet must be
removed in order for at least some items to be shown. In order to
somewhat control this process, you may choose “priority” items from
the different categories. Basically, these selected few items will be
removed last, if at all, when the compact sheet decides which items to
include, and which to leave out. You may select up to five talents, five
Force powers, two each of obligations and duties, and four pieces of
gear (including armor). Weapons are automatically prioritized by
whether or not they’ve been selected to be shown on the front of the
standard character sheet.
Finally, there’s a check box that allows you to select whether or not to include the symbol and dice key at the
bottom of the page. If creating compact sheets for use in convention runs, or when the players are new to the
game, it might be handy to have a reference to dice mechanic. If the sheets are to be used by experienced
players, unchecking this selection will add a bit more room to the bottom of the sheet to fit in more information.

36
DATA EDITOR
Due to copyright and other legal constraints concerning the intellectual property rights of Fantasy Flight Games
and LucasArts/Disney (who own the rights to the Star Wars® franchise), actual descriptive text as found in the
core rulebooks and various supplements cannot be included in this application. Owning at least one the core
rulebooks is a prerequisite to using this application. The only descriptive text that this application comes with is
page number references where you can read the proper descriptive text in the appropriate core rulebook.
This does not mean that you can’t have all the copyrighted descriptive text in your own personal copy of this
character generator. It just means that you have to enter it yourself from your legally-purchased copy of a core
rulebook.
In order to facilitate this, the SW Data Editor allows you to enter in your own descriptions for all parts of the
generator’s data. This includes descriptive text for everything from characteristics, motivations, obligations, and
skills, to talents, careers, and specializations.
THE MAIN SCREEN
The main screen of the SW Data Editor has a
similar look and feel as the main generator
app. To the left (A) is a column of buttons to
choose which type of data to edit. The type of
data currently being edited will have its button
dimmed (“Armor” is being edited in this
example).
The right portion of the window (B) has a help
window containing, amongst other things, a
list of the various special tags supported by
the descriptions. This is gone over in more
details later on in this document. At the top is
the “Language” button that will bring up the
Select Language dialog, as described in the
Language section of the documentation.
The middle part of the screen (C) contains the actual data, plus various backup, restore, and organizational tools.
Next comes a list of items that can be edited. In this example, it contains all of the different types of armor
available in the game.
DATA SETS
At the top of the middle section is a dropdown list containing all of your currently defined data sets, as well as
some buttons used to manipulate those data sets. A data set is just a group of custom data that is stored in its
own folder under “DataCustom”. The default selection for this is the actual “DataCustom” directory which was
used in earlier versions of the software exclusively.
A B C

37
ADDING A DATA SET
To add a new data set, click the “New” button. The New Data Set dialog will be
displayed. Type in the name of the new data set. This will create the required
directory under “DataCustom” and allow you to start adding custom items to the data
set. For instance, adding a data set called “My Mods” will create a folder under
“DataCustom” called “DataSet_My Mods”. If this data set is selected, all changes you
make will appear in that folder and not in “DataCustom”.
To create a language data set, check the “Create Language Data Set” box. This will
make your data set a language data set. Select the culture to use for this new
language data set. Using the example above, if you selected the neutral “Spanish”
culture, the name of the folder will be “DataSet_MyMods-Lang-es”. A language file
for the culture you select does not need to actually exist in the tools. However, if you want to only create a
language data set that corresponds to an available language file (selected by either the Launcher or the Data
Editor), just check the box for “Show only existing languages”. The drop-down list will then only show you
languages that already have translations.
Language data sets differ from standard data sets in that they are only loaded if your current culture is the same
as the data set’s culture. If an exact match can’t be made for your current culture, then language data sets that
are compatible with your culture (uses the same language) will be loaded. Exact matches take precedence, so
compatible language data sets will not be loaded if at least one language data set with an exact culture match is
found.
SELECTING A DATA SET
To select a data set, use the dropdown at the top to choose which data set you want to edit. While this data set
is selected, any data that you add, remove, or change will be done so from that data set. For instance, if you
select the “My Mods” data set, any changes you make will be made to that data set.
Once you select a data set, the item list will change to reflect what items you have in that data set. You may see
different items, or different descriptions for existing items, depending on what you’ve changed.
REMOVING A DATA SET
Clicking the “Remove” button at the top will remove your current data set. This is a permanent deletion, so
before you do so, you should have the data set backed up (see below) if you want to have access to it again.
Removing a data set will remove all changes you’ve made under that data set and remove it from the dropdown.
If you want that data set back again, you’ll need to either create it again or import it back into the system.
EXPORTING DATA SETS
Clicking the “Export” button at the top will allow you to export a copy of the current data set to a ZIP file,
including all directories, XML files, and images. This ZIP file can be given to someone else using the software to
import to his own data, or you can just keep it as an archive. Exporting a data set is a good way to share custom
data without having to write over someone else’s custom data stored in “DataCustom”.

38
IMPORTING DATA SETS
Clicking the “Import” button at the top will allow you to import a previously-exported data set. This ZIP archive
must contain a valid data set in the proper format, or the system will be unable to import it. Before the import
is performed, the SW Data Editor will check the current data with the data from the import to make sure all
references are still valid. For instance, if you exported your data set, then added a new skill, then used that skill
in a career from the default data set, or another data set, this career will now require that skill to be present. If
you try to replace your current data set with an exported one, and it doesn’t contain that skill, you will be
warned and told which items have a conflict (including the data set, if any, they belong to) and the import will
not take place. This prevents you from corrupting the data by importing old data.
MOVE/COPY MODE
By checking the “Move/Copy Mode” checkbox, the SW Data Editor will be put into a move/copy mode. The list
will show all custom data from all data sets, including the default custom data. All add, modify, and remove
functionality (including changing the description) will be disabled while in this mode. A check box will also
appear next to all custom items in the list.
When in move/copy mode, you can either move or copy items from one data set into another. To do this, select
the data set you wish to copy to. Then, in the list, check each item that you want to copy to the selected data
set. When you’re done, click either “Move to Current” or “Copy to Current”. “Move to Current” will move all
checked items from their current data set into the selected data set. Because these items will need to be
removed from their current data set, this function will automatically save all changes (you will be warned of this
fact before the operation occurs). When finished, the items will no longer be in their old data set, but will reside
in the selected data set, and all changes will be saved.
“Copy to Current” will make a copy of the checked items in the selected data set, but will also keep the item in
its current data set. When finished, the custom item will reside in both places. This operation does not
automatically save, so you will need to click the “Save” button when you’re ready.
Under most circumstances, you will want to use the “Move to Current” button to, for instance, move your
original custom data into one of the new named data sets to help better organize your data, or to prepare for it
to be given to someone else to import. However, if someone wants some of your data, but you really don’t care
about having it in its own data set, you could always create a temporary data set, copy (not move) the custom
items you want to give away, export the temporary data set to a ZIP file, then just remove the temporary data
set from your data. Because you performed a Copy, rather than a Move, your original custom data will still be
there.
ALL AND NONE
While in Move/Copy mode, these two buttons will either check all current items in the list (“All”), or uncheck all
current items in the list (“None”).

39
CONFLICTING ITEMS IN DATA SETS
It is possible to have the same item of custom data existing in two or more data sets. This will not cause a
problem for the system, but it might cause confusion as to which data set the system is actually using. If an item
exists in both the default data set (“DataCustom”), as well as an added data set, the item in the added data set
will taken precedence, since it is merged with the main data after “DataCustom” is merged. If the same data
exists in two different added data sets, which one is used depends on which one is loaded last.
Again, having the same item in two different data sets won’t cause an issue, but if you want to make sure the
proper item is used, all other instances of it in other data sets should be removed.
BACKUP AND RESTORE
The SW Data Editor will now automate a task you’ve probably been performing by hand up until now: backing
up all of your data. As stated in the introduction, you should periodically perform a back up of all the data
you’ve entered into the system. The SW Data Editor will now perform this function for you.
FOLDERS NEEDING BACK-UP
The following folders will be backed up using the SW Data Editor’s back up functionality:
DataCustom – This folder contains all changes and customizations that you’ve made to the main data,
including descriptions, new items, new talents, etc., plus all data sets.
Characters – This folder contains all of your characters.
Adversaries – This folder contains all of the adversaries you’ve either imported from other sources (such
as the import folders that came with the product), or have created or modified yourself.
Groups – This folder contains the adventuring groups that you’ve created.
StockVehicles – This folder contains all of the stock vehicles that you’ve created.
Languages – This folder contains any customized language files that you’ve created.
BACKING UP YOUR DATA
To back up your data, click the “Back Up” button above the data item list. This
button will show you a dialog allowing you to choose which folders should be backed
up. The default is for all folders to be backed up.
Check the box next to the folder to select that folder for back up. When you’re
finished, click the “Back Up” button. You will be prompted for a name for your
backup, though it is suggested that you use the default name. The SW Data Editor
will then create a ZIP archive with your backed up data and display the archive for
you to verify that it is correct.

40
RESTORING YOUR DATA
You can restore your data using a previously-saved backup ZIP archive. To restore your
data, click the “Restore” button above the data item list. You will be prompted to
select a ZIP archive to restore. This archive must be in the proper format, and must
contain the various folders from a previous back up.
Once you’ve selected the back-up archive to restore, you will, again, be shown a
restore dialog that will allow you to choose which elements contained in the ZIP file to
restore. Only items that were backed up to the ZIP file will be shown.
After selecting which folders to restore, click the “Restore” button. Note that restoring from a back up will
remove all existing items in the restored folder. It is recommended that you perform a back up of your existing
data before restoring from another back up, just to make sure you don’t lose any information.
Once the restore is complete, the new data will be available for use, including information in your restored
custom data folder. Restoring custom data in this fashion will restore all of your custom data, including all data
sets, and will remove all previous custom data.
DATA ITEM LIST
The main part of the center section of the SW Data Editor is taken up by the data item list and the description
editor. The descriptions are actually edited in a text box. This contains straight text, plus any special tags that
are included with the text. In order to be sure that what you’re doing will look good in the generator, a preview
pane can be found below the text box that will display exactly what the text will look like.
Below the list are buttons that control how the data is being manipulated. When changes have been made, the
“Save” button will save the currently edited data back to disk. “Reset” will eliminate all changes that have not
been saved and revert the descriptions back to the original state. “Copy” will duplicate an existing entry.
CUSTOMIZING DATA
The remaining buttons allow you to customize the application’s data. “Add” will bring up a dialog that lets you
add a new item to the currently selected data type. In the example above, “Add” will add a new piece of armor.
“Modify” will allow you to modify any items (other than stock skills), including stock items. “Remove” will
remove an item, but only a custom item that you’ve previously entered. It will not remove stock items.
There are three types of custom data:
AddedItem – An item that has been added to the existing data.
CustomItem – An item that has replaced an existing item.
DescOnly – Like CustomItem, but only the description and/or name has been replaced.
If you add a new item by clicking the “Add” button, “AddedItem” will be displayed in the “Cust?” column. If you
click “Modify” on a stock piece of data and modify it, “CustomItem” will be displayed in the “Cust?” column. If
you modify an added item, it will remain as “AddedItem”. If you start typing in the description or name text
boxes, but don’t modify the item in any other way, “DescOnly” will be displayed in the “Cust?” column. If you

41
delete the text from the name or description text boxes for base or “DescOnly” items, it will be replaced by the
base value. If both the name and description are the same as the base value, the “DescOnly” flag will be
removed and the item will revert to its base.
All custom data is stored in the “DataCustom” directory. All stock data installed with the application remains
untouched. If you remove a “CustomItem”, it will actually revert back to the original item (after first asking if
you want to keep the description intact).
COMMON PROPERTIES
All items have a name, a key, and a source. The name is the short text name that will be displayed for the item.
The key is the internal key used by the generator to uniquely identify the item and to relate that item to other
parts of the applications. Keys can only be altered when you add an item, and any key entered must be unique
for that type of item. If an item is later modified, the key cannot be changed.
The source of an item is a short description of where the item came from. Sources are used in the generator to
limit displayed data to just particular GM-approved sources. Data from the core rulebook will always be
available no matter what. Some common sources will be will be “Age of Rebellion Beta”, “Enter the Unknown”,
and “Custom Data”. As more official sources become available, more sources will be created. You can, of
course, add your own source to any data that you add yourself (existing stock data cannot have its source
altered).
THE SOURCES DROPDOWN
The Sources dropdown is common on all add/edit dialogs and allows you to select
which sources an item belongs to. Any item can belong to one or more sources, or to
no source at all. If no source is selected, the item will always appear no matter which
core source is selected.
The text portion of the Sources dropdown will display a list of all currently selected
sources. When you click the dropdown, you will see a list of sources with
checkboxes. To select a source, check the box next to it.
If you select the “No Source” option at the top, you cannot have any other sources
selected. Likewise, if you select another source, the “No Source” option will become
unselected. A “No Source” item is always included with the data, no matter what sources have been selected
from the Options dialog.
To add a new source, click the “Add” button. The source will then appear in the list selected.
For new items, the default source is “User Data”. Whenever another source has been selected, “User Data” will
automatically become unselected.

42
EQUIPMENT AND VEHICLE PROPERTIES
Armor, gear, vehicles, and weapons all have the following additional properties that are available from the
add/modify dialogs:
Encumbrance – How much encumbrance the item contributes if it is being held by the character.
Hard Points – The number of hard points available for attachments.
Price – The number of credits that this item costs.
Rarity – The rarity of this item, on a scale from 0 to 10.
Restricted – Whether or not the item’s availability is restricted.
Categories – All items can belong to one or more categories. These categories are used for organizing
item attachments, as well as filtering items for purchase.
THE DIALOGS
ARMOR
You can add your own armor types by clicking “Add” while editing
armor descriptions. Armor has the following unique characteristics:
Soak – The soak value that the armor gives you
Defense – How much melee and ranged defense the armor
contributes
Built-In Mods – In some cases, armor can have special case
mods, including ad hoc mods. Adding mods to armor
functions identically to adding mods to attachments (see
Attachments, below).
Built-In Weapons – A piece of armor might be able to
generate its own ad-hoc weapon that is only usable when the armor is equipped. Or, it may give
bonuses to Brawl, Melee, or other combat checks. This could be anything from shoulder-mounted
missile launchers, to power gauntlets that punch extra hard.
INNATE OR BUILT-IN WEAPONS
Armor, we well as several other editors, support the creation of special ad-hoc
weapons, or enhancements to existing weapons or attacks, when the items
are equipped and being used. For Armor, these weapons or attack
enhancements may be created using the “Built-In Weapons” control.
To create a built-in, or innate, weapon, click the “New” button. To modify an
existing weapon, click “Modify”. To remove an existing weapon, click
“Remove”.
When a weapon is modified or created, the “Add or Modify Built-In Weapons”
dialog is displayed. The weapon can be given a name, a combat skill is
selected for the weapon, plus any base damage, bonus damage, base and bonus critical value, and weapon
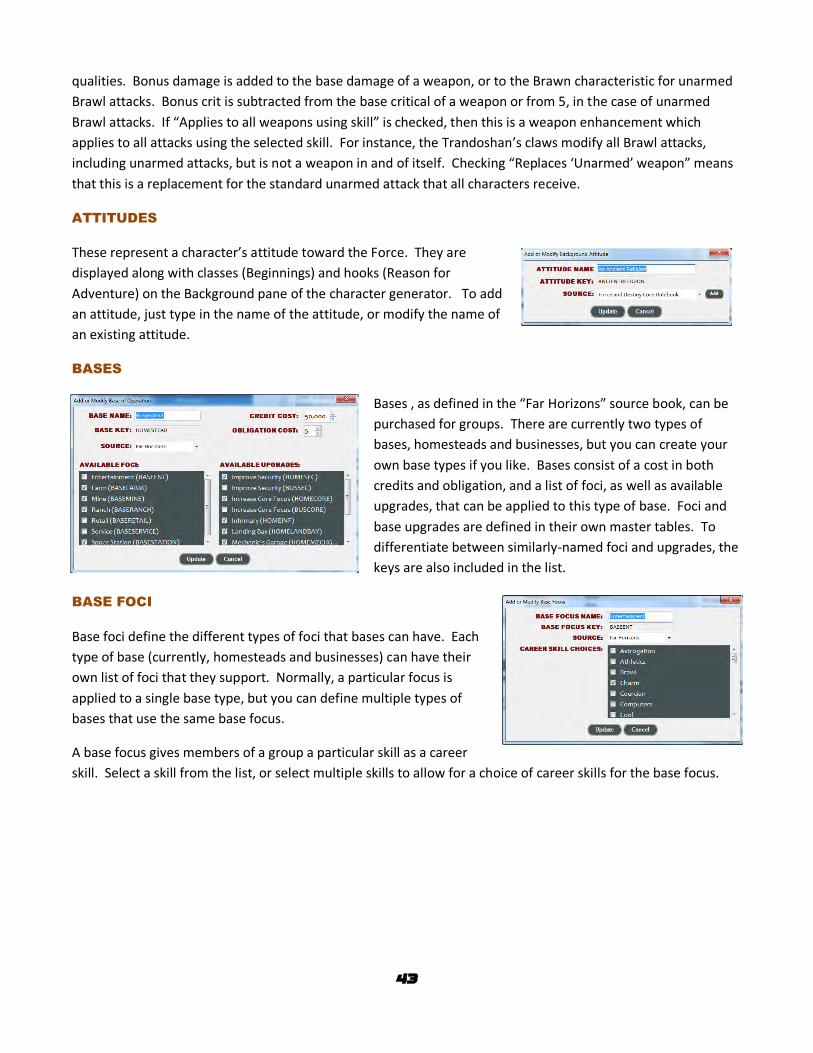
43
qualities. Bonus damage is added to the base damage of a weapon, or to the Brawn characteristic for unarmed
Brawl attacks. Bonus crit is subtracted from the base critical of a weapon or from 5, in the case of unarmed
Brawl attacks. If “Applies to all weapons using skill” is checked, then this is a weapon enhancement which
applies to all attacks using the selected skill. For instance, the Trandoshan’s claws modify all Brawl attacks,
including unarmed attacks, but is not a weapon in and of itself. Checking “Replaces ‘Unarmed’ weapon” means
that this is a replacement for the standard unarmed attack that all characters receive.
ATTITUDES
These represent a character’s attitude toward the Force. They are
displayed along with classes (Beginnings) and hooks (Reason for
Adventure) on the Background pane of the character generator. To add
an attitude, just type in the name of the attitude, or modify the name of
an existing attitude.
BASES
Bases , as defined in the “Far Horizons” source book, can be
purchased for groups. There are currently two types of
bases, homesteads and businesses, but you can create your
own base types if you like. Bases consist of a cost in both
credits and obligation, and a list of foci, as well as available
upgrades, that can be applied to this type of base. Foci and
base upgrades are defined in their own master tables. To
differentiate between similarly-named foci and upgrades, the
keys are also included in the list.
BASE FOCI
Base foci define the different types of foci that bases can have. Each
type of base (currently, homesteads and businesses) can have their
own list of foci that they support. Normally, a particular focus is
applied to a single base type, but you can define multiple types of
bases that use the same base focus.
A base focus gives members of a group a particular skill as a career
skill. Select a skill from the list, or select multiple skills to allow for a choice of career skills for the base focus.

44
BASE UPGRADES
Purchased bases have a selection of upgrades available
that add more to the base. Each base type has a list of
upgrades that are supported by that type of base. A base
upgrade has a cost in either credits or obligation (the
group selects which one when purchased; Rebel base
upgrades never cost obligation), a maximum number of
times an upgrade can be purchased, and optionally, any
monthly profits associated with the upgrade. If profit is
on a per-PC basis, check the option. If not, only this
amount of profit will be applied. For Rebel bases, an upgrade can
also give the PCs a reduced rarity once per month on purchased
items. If this upgrade has this benefit, enter the number of times
rarity is decreased for each time the upgrade is purchase.
Upgrades can also have multiple options to choose from. These will
be listed in the options list. Options can just consist of a name and
description, and optionally a count of the maximum number of
times the upgrade can be purchased with this option. Options can
also have NPCs associated with them. NPCs can be added just like
adding adversaries to GM Tools. When a group purchases a
particular upgrade with an NPC option, a copy of that NPC will be
added to the base’s NPC list. For more information on adding NPCs,
please see Adversaries.
Finally, a base upgrade can have a selection of career skills that are automatically granted to any PC in a group
that owns a base. Select any skills that will be available for career skills when the upgrade is purchased.
CAREERS
Careers consist of a list of selectable career skills, and a list of
selectable specializations. Normally, each career consists of 8 career
skills and 3 specializations. However, you can select as many as you
want. The only limit is that a career MUST have at least one selected
specialization.
A career can also give attribute bonuses. The value for Force rating is
static. That is, a Force rating of 2 means the character will start out
with a Force rating of 2. For the others, the values are added to the existing character values.
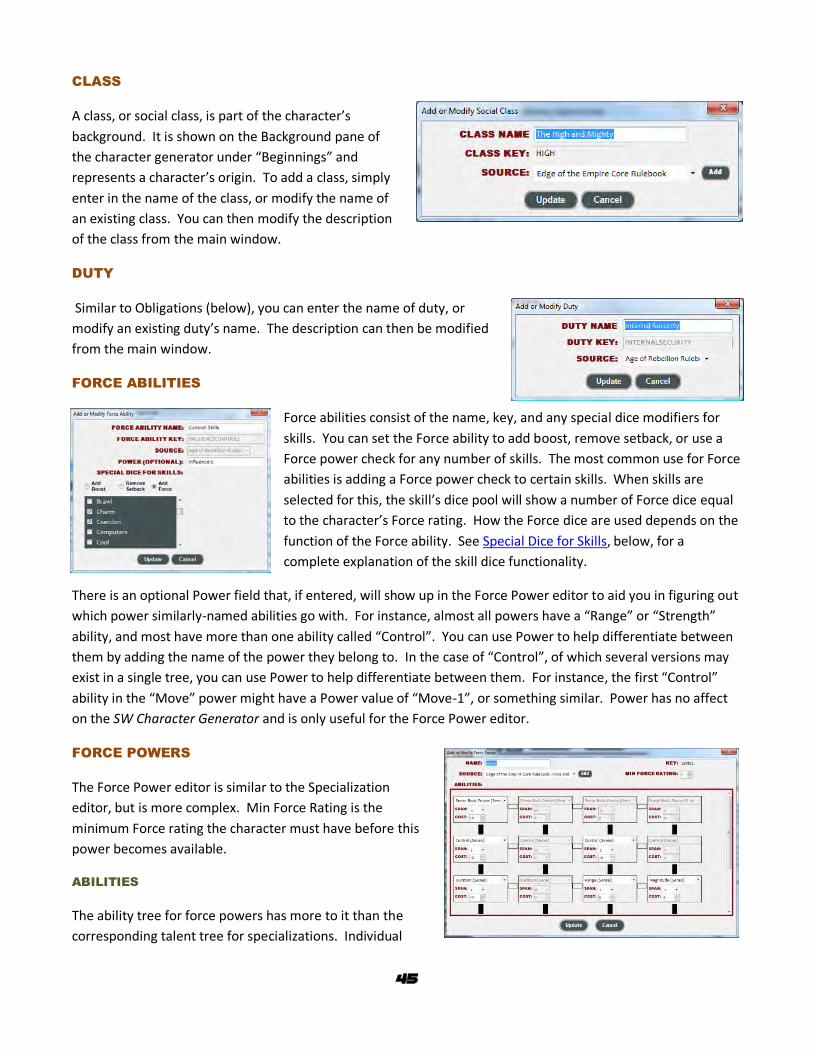
45
CLASS
A class, or social class, is part of the character’s
background. It is shown on the Background pane of
the character generator under “Beginnings” and
represents a character’s origin. To add a class, simply
enter in the name of the class, or modify the name of
an existing class. You can then modify the description
of the class from the main window.
DUTY
Similar to Obligations (below), you can enter the name of duty, or
modify an existing duty’s name. The description can then be modified
from the main window.
FORCE ABILITIES
Force abilities consist of the name, key, and any special dice modifiers for
skills. You can set the Force ability to add boost, remove setback, or use a
Force power check for any number of skills. The most common use for Force
abilities is adding a Force power check to certain skills. When skills are
selected for this, the skill’s dice pool will show a number of Force dice equal
to the character’s Force rating. How the Force dice are used depends on the
function of the Force ability. See Special Dice for Skills, below, for a
complete explanation of the skill dice functionality.
There is an optional Power field that, if entered, will show up in the Force Power editor to aid you in figuring out
which power similarly-named abilities go with. For instance, almost all powers have a “Range” or “Strength”
ability, and most have more than one ability called “Control”. You can use Power to help differentiate between
them by adding the name of the power they belong to. In the case of “Control”, of which several versions may
exist in a single tree, you can use Power to help differentiate between them. For instance, the first “Control”
ability in the “Move” power might have a Power value of “Move-1”, or something similar. Power has no affect
on the SW Character Generator and is only useful for the Force Power editor.
FORCE POWERS
The Force Power editor is similar to the Specialization
editor, but is more complex. Min Force Rating is the
minimum Force rating the character must have before this
power becomes available.
ABILITIES
The ability tree for force powers has more to it than the
corresponding talent tree for specializations. Individual

46
abilities can actually span multiple columns in a force power. If you set the span on a particular node of the tree
to more than one, nodes to the right will become disabled. They will also have their abilities, spans, and costs
preset to the proper values for the force power to work correctly in the SW Character Generator. You can also
set the cost of each ability individually, since costs are not row-dependent as they are in specialization trees.
CONNECTING LINES
Clicking the connecting lines will toggle them on or off. However, the lines work slightly different depending on
the span of an ability. For instance, to connect a spanned ability to another ability next to it, you must enable
the line after the spanned node, not after the last disabled node. As an example, say the first node on a row has
span 2. The second node will be disabled, and the third and fourth are available. To connect the first spanned
ability to the third node, you would actually enable the line after the first ability, not the second. This is because
the second node isn’t used by the generator in this situation, so any connecting line to the right of it will be
ignored.
GEAR
General gear has three special piece of information:
Type – Which type of gear this is (Communications, Poisons,
Cybernetics, etc).
Built-In Mods – Any special type of modification that the item
contributes to the character. Common mods are for decreased, or
increased, encumbrance, increased soak or defense, or additional
characteristics, skill bonuses, or talents. See Attachments, below, for
details.
Built-In Weapons – These are any ad-hoc weapons that the gear
creates for the user, or enhancements to existing weapon attacks. Please
see Innate or Built-In Weapons for details.
HOOKS
Hooks, or background hooks, are part of a character’s background and are
displayed in the Background pane of the character generator under
“Reason For Adventure”. To add a background hook, simply enter in the
name of the hook, or modify the name of an existing hook. You can then
modify the description of the hook from the main window.

47
ITEM ATTACHMENTS
The Item Attachment editor is one of the more complex
editors in the SW Data Editor tool. This editor allows you
to add or modify an item attachment. Item attachments
can be applied to any equipment and vehicles. They
augment the function of those items in some way, adding
benefits to the character, as well as possible limitations.
Item attachments have the following special information:
Attachment For – Item attachments must be configured for use with a particular type of equipment, or
vehicles. Select the equipment type that the attachment applies to here (Armor, Gear, Weapons, or
Vehicles). Changing this value will remove all category, skill, item type, and item limits, as well as mods,
as these are defined for each type of equipment.
Hard Points – This is the number of hard points required to install this attachment. The specified type of
equipment must have at least this number of hard points available before this attachment can be
applied to it.
Mod Price Override – Each optional mod (described in the “Base and Added Mods” point below)
generally has a fixed cost to apply its functionality to the attachment. For standard gear, this is 100
credits for the first, 200 for the second, etc. Vehicles cost 10 times that amount. However, if you’re
creating a special type of attachment, you can override that standard pricing structure by entering a
non-zero value here. For instance, the modular backpack allows for the attachment of special pouches
that add more encumbrance threshold to the backpack. As this is not a standard attachment, the
override value for this attachment is 15, which is the cost of each additional pouch.
Vehicle-Only Options – If the “Attachment For” drop down is set to
Vehicle, these options will become available. Check each option as they
apply for this attachment. If one of the “Multiply Price by” options is
checked, the base price of the attachment is multiplied by the silhouette or
passenger capacity to get the actual price. If the attachment works only on
a range of encumbrance capacities, set the minimum and maximum
allowed (zero for these values indicates no limit).
Jury Rigged Checkbox – If this box is checked, this attachment becomes a “Jury Rigged” attachment,
available only if ranks in the “Jury Rigged” talent have been selected. You will then have the option to
apply the standard “Jury Rigged” mods to the item, or to apply the mods from this attachment.
Lightsaber Crystal Checkbox – If this attachment is meant to be a lightsaber crystal, make sure to check
this check box. Lightsaber crystals are handled a bit differently from other attachments.
Built-In Weapons – These are any ad-hoc weapons that the item attachment creates for the user, or
enhancements to existing weapon attacks. Please see Innate or Built-In Weapons for details.
Limits – Attachments support four types of limitations for where this attachment can be applied. Each
limit type uses “or” logic. That is, if the item meets the requirement of any of the limitations, then the

48
attachment can be used. “Category Limits” limits the item to one that belongs to the specified
categories. “Skill Limits” only apply to weapons, and limits the weapon to those that uses the specified
skills. “Item Type Limits” limits the attachment to items of the specified types (such as “Energy
Weapons”). Finally, “Item Limits” allows you to limit the attachment to particular items.
Base and Added Mods – This is the meat of the attachment editor. These lists contain the actual mods
that apply when you use the attachment. Base mods are active once you install the attachment. Added
mods can be optionally applied after the attachment is installed. Added mods will appear as check
boxes in the item customization window.
MOD EDITOR
When you add or modify a mod, a dialog appears that allows you to
select a particular mod and the mod’s count. You can filter on which type
of mod to display by checking one or more of the six check boxes below
the drop down. If the mod adds a skill, you may also choose whether to
make the skill a career skill, or to add to the skill only if it is already
ranked.
If you enter something into the ad-hoc description, the selected mod will
not be used and the mod becomes ad-hoc, only displaying the effect’s
description and optionally applying special dice modifiers. The ad-hoc
description can contain substitution items, such as [BOOST], and can even contain HTML. The preview panel will
show what the final display will look like. Ad-hoc mods always have a count of 1, so the count is not displayed.
INNATE SKILLS
Some attachments will supply an entity, such as a droid brain, that has its own innate skills. These skills can be
used for a number of tasks, such as piloting or astrogation. If an attachment supplies one of these innate skills,
choose the skill(s) from the list, then choose the rank for that skill, and the ability score used for that skill.
Similar innate skills are added up from the various mods on an attachment to come up with the final dice pool
for that skill. In other words, multiple mods can contribute to an innate skill on an attachment.
SPECIAL DICE FOR SKILLS
The Mod Editor, as well as several other editors such as Force Abilities and
Species Options, can also modify the dice pool of skills with special dice and
symbols. These include adding boost or setback dice, adding advantage or threat
symbols, removing setback dice, adding success, allowing a skill to benefit from a
Force power check, and upgrading skills. These modifications can be seen in the
dice pool of the skill in question either in the generator or on the character sheet
as a number of boost die symbols , setback die symbols , remove setback symbols , advantage symbols ,
threat symbols , success symbols , or Force die symbols . You can select which option is being configured
by clicking on the drop-down and selecting which type of die or symbol to add.
For “Add Boost”, “Add Setback”, “Add Advantage”, “Add Threat”, “Add Success”, “Remove Setback”, or
“Upgrade Ability”, you can check a skill or skill category, then use the up/down arrows to select the number of

49
dice or symbols to add or remove, or the number of times to upgrade a skill. When selecting a category, the
dice will be configured for all skills in that category. The count for these fields will be applied for each instance
of the mod that is selected. In other words, if you select two boost dice for a particular skill in this mod, and the
mod is applied three different times, that would produce six total boost dice. Checking the last column indicates
that the skill must be ranked in order to gain benefits from the particular dice modifier.
For “Add Force”, you select the skill or category of skills to apply a Force check to. There is no count for Force
dice, since you can always apply up to your Force rating in dice to the skill check, but there is still a “Ranked”
checkbox, indicating that the Force dice can only be applied if the skill is ranked. The number of Force dice that
will appear in the skill’s dice pool will be equal to your Force rating. The actual number of dice that you can
apply to the skill follows the standard rules for making a Force power check. That is, any Force die that you have
committed to an ongoing effect cannot be applied, nor can any dice that you have already used for another
Force power check. The actual use of the light and dark pips should be defined in the description for the mod or
Force ability that these dice are configured for.
MORALITY
Morality consists of a required name and key, a source, and whether or not
the morality is a Strength or a Weakness. If Strength is selected, a default
Weakness pair must be selected as well. For this reason, it is better to add
custom Weaknesses first, then add custom Strengths.
The selected paired weakness of a strength is the default weakness for this
strength. However, alternate strength/weakness pairs can be specified. For
instance, various Force and Destiny source books could have a
strength/weakness chart that differs from the chart found in the Force and
Destiny Core Rulebook. When a morality strength is added to a character, a
different weakness would be paired with it, other than the default weakness.
To support this feature, a list of alternate pairings may be added to a strength. These
pairings consist of an identifier (generally, the name of a source book) and a
reference to the weakness. To add an alternate pair, click the Add button. To modify
an existing alternate pair, click the Modify button. The Morality Pair dialog will be
displayed, allowing you to select the identifier (or type in a new one), and the
alternate weakness. Some alternate pairing charts might remove an inappropriate
strength/weakness pair. If this is the case, select “<None>” as the weakness and the pair will not show up when
adding a new morality pair in the character generator.

50
MOTIVATIONS
Motivations are entered in by name. Additionally, each motivation can
have a more specific motivation that further defines it. To choose a
specific motivation to associate with this motivation, click the checkbox
next to it in the list.
MOTIVATIONS (SPECIFIC)
Specific motivations
consist of a name, a key,
and a source. You can
optionally enter in the
name of the parent Motivation, which would be the Motivation
that the Specific Motivation is meant for. This does not associate it with the Motivation (you do that using the
Motivation editor), but will group the Specific Motivation with others of the same value in the list displayed in
the Motivation editor.
OBLIGATIONS
To add an obligation, simply enter in the name of the obligation, or
modify the name of an existing obligation. You can then modify the
description of the obligation from the main window.
SIGNATURE ABILITIES
The Signature Abilities editor functions similarly
to the Force Powers editor, except signature
abilities only have three node rows. For each
node, select the ability node to use, the span of
the column, and the cost. Currently, the top
row only contains the basic ability, which has a
span of 4, so this is automatically selected
when you create a new ability. Like Force Powers and Specializations, you can turn on or off the lines
connecting the nodes to show purchase flow. See Force Powers, above, for more details.
Additionally, each signature ability can only be applied to career specializations that have had certain bottom-
row talents purchases. The required talents are specified by checking the appropriate column checkbox. For
instance, if a signature ability can only be applied to a specialization where the talents on the bottom row in the
second and fourth columns have been purchased, then check “Col 1” and “Col 4”.
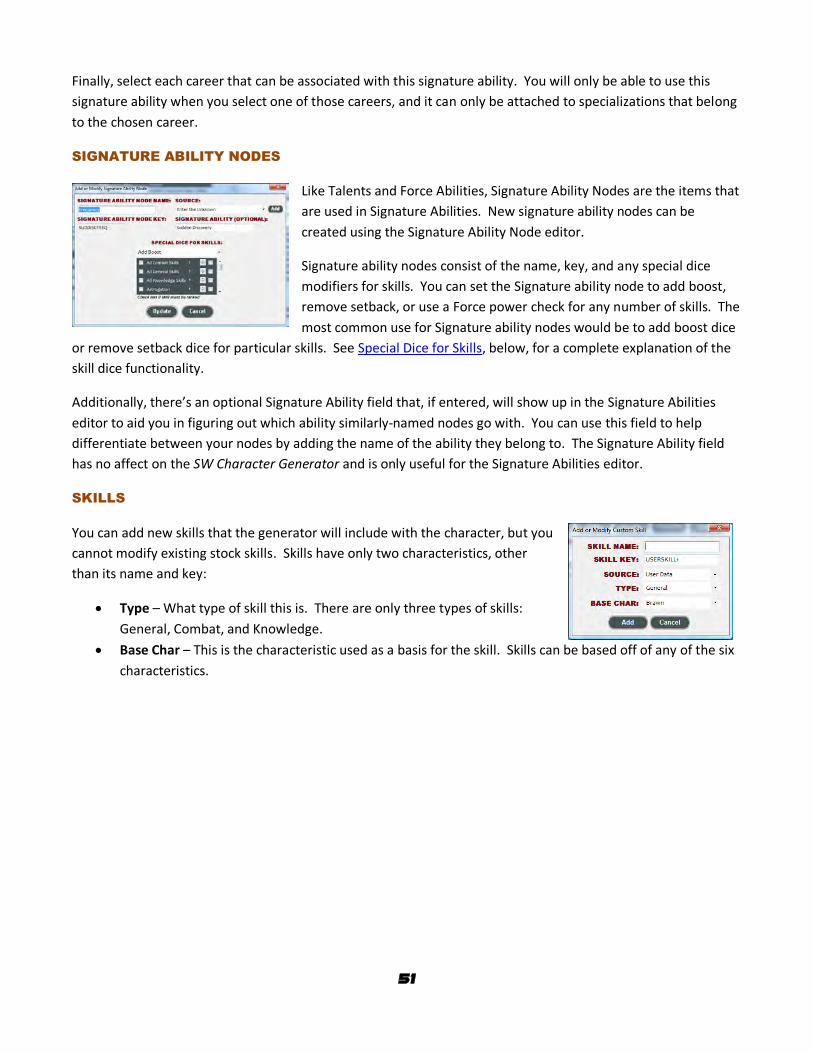
51
Finally, select each career that can be associated with this signature ability. You will only be able to use this
signature ability when you select one of those careers, and it can only be attached to specializations that belong
to the chosen career.
SIGNATURE ABILITY NODES
Like Talents and Force Abilities, Signature Ability Nodes are the items that
are used in Signature Abilities. New signature ability nodes can be
created using the Signature Ability Node editor.
Signature ability nodes consist of the name, key, and any special dice
modifiers for skills. You can set the Signature ability node to add boost,
remove setback, or use a Force power check for any number of skills. The
most common use for Signature ability nodes would be to add boost dice
or remove setback dice for particular skills. See Special Dice for Skills, below, for a complete explanation of the
skill dice functionality.
Additionally, there’s an optional Signature Ability field that, if entered, will show up in the Signature Abilities
editor to aid you in figuring out which ability similarly-named nodes go with. You can use this field to help
differentiate between your nodes by adding the name of the ability they belong to. The Signature Ability field
has no affect on the SW Character Generator and is only useful for the Signature Abilities editor.
SKILLS
You can add new skills that the generator will include with the character, but you
cannot modify existing stock skills. Skills have only two characteristics, other
than its name and key:
Type – What type of skill this is. There are only three types of skills:
General, Combat, and Knowledge.
Base Char – This is the characteristic used as a basis for the skill. Skills can be based off of any of the six
characteristics.

52
SPECIALIZATIONS
Specializations consist of a name, a list of skills that you can choose for specialization career skills (normally, four
skills are chosen here, but any number or none can be selected), a check box to make this specialization
universal (like Force-Sensitive Exile; it’s not a career specialization, but costs the same as one), and a grid work
of talents.
TALENTS
The bottom half of the dialog consists of five rows of four
dropdown lists containing talent names. These rows and
talents correspond to the rows and talents in the
specialization’s talent tree, as displayed in the generator.
Just select the talent you want for each location.
CONNECTING LINES
Additionally, you’ll notice black lines attaching each location
in the grid to the ones next to it. These correspond to the
direction you need to go to get access to those talents. The top row of talents is automatically accessible, but all
other rows must have a line leading to it from a previously-selected talent in order to be able to select it.
When the line is black, that means a direction is configured and is connecting the two talents. If the line is an
outline, that means no direction exists between those two talents. You can toggle between having a direction
line and removing a direction line by clicking on the line in the panel. Be careful when selecting direction lines;
it’s possible to cut a talent off so that you can never access it, depending on which lines you choose.
SPECIES
Species can be rather complex to add, since they have a
lot of different options. The main Species edit window has
places to enter starting characteristics and attributes,
including starting XP, starting Force rating, and an
adjustment to the number of cybernetics the species can
use (currently used by the Gank species). You can also
select any skills or talents the species always starts with.
Skills have a “Career?” checkbox. When this is checked,
this skill becomes a career skill. If you just want to add a
skill as a career skill, but with no starting rank, check the
“Careers?” checkbox and set the rank to 0.
Some species cannot use force powers, such as Droids. If
this species cannot use force powers, check to “cannot use force powers” check box. If a species has innate
weapons, or weapon enhancements, such as the Trandoshan claw attack, or the Ithorian bellow attack, they can
be added using the “Innate Weapons” feature. Please see Innate or Built-In Weapons for details on how to use
this feature.

53
OPTION CHOICES
Species also have optional, or special, features that can be added
using the “Option Choice” feature. All option choices are displayed
in a grid.
Option choices can add a variety of features to a species. They can
be just a textual description of some feature or some new rule for a
species. They can also optionally add skills or talents to a species.
Or, they can add additional skill training. Option choices can have a
number of options to choose from, or it can contain just a single
option. Single options are always available to the species.
When you add an option choice, another dialog will appear
allowing you to name the choice and to add options. The name of the option choice will appear in the option
buttons on the species pane of the generator, so keep it short. Since there are only three such buttons, you are
limited to adding three option choices.
OPTIONS
From the Option Choice dialog, you may add options to your choice. The options dialog allows you to give a
name for the option (which will appear in the dropdown list in the species pane), define skills and talents for this
option, enter a description for this option, including a preview panel (you can add special icons and formatting
options to the description, the same way you do it on the main window), give bonus starting XP or remove
starting XP, add special dice for skills, and specify any skill training. Skill ranks added from here will show up
under “Species” in the skill pane. Talents gained through such
options will appear on page 3 of the character sheet, just like
regular species talents. The “Acquisition” column will show
that it came from a species option, rather than just being
innate to the species itself.
Skill training allows you to add the option of receiving
additional ranks in career, non-career, or specialization skills
when creating your character. Non-career training works the
same as for humans; a grid allowing you to choose non-career
skills will appear in the options panel on the species pane.
Career and Specialization training works the same way it does
for droids; instead of 4 career and 2 specialization skill ranks,
you can add additional ranks for these two features and the
new count will appear on the career pane.
Some option choices might change the starting XP of the species, such as the Dressellian’s ability to understand
technology. If an option choice adds starting XP to the species, enter a positive value for “XP Bonus/Cost”. If an
option choice removes starting XP from the species, enter a negative value for “XP Bonus/Cost”.

54
You also have the option to add boost dice, remove setback dice, or use a Force power check for any number of
skills. The most common use for species options would be to add boost dice or remove setback dice for
particular skills. See Special Dice for Skills, below, for a complete explanation of the skill dice functionality.
If you want to add a special feature with just a text description, add the description and do not check any skills
or talents, special skill dice, or create any training entries.
SUB-SPECIES
Some species, such as Droids and Niktos, have sub-
species. Sub-species are exactly like species, except that
you can select certain aspects of a sub-species to be
added to the primary species to create a final, complete
species. For instance, you may want all members of a
species to have Brawn 2 and Intellect 3, but only one sub-
species to have Cunning 3 and a talent bonus.
The Sub-Species dialog is almost identical to the main
species dialog, and performs much of the same function.
Any skills, talents, option choices, and innate weapons
included here will be added to any existing items in the
main species. To replace any characteristics in the main
species with changes in the sub-species, just check the check box under “Override” and next to the characteristic
or attribute you wish to use and this value will override the value on the main species. Characteristics and
attribute that do not have this box checked will not be used and will retain the value from the main species.

55
TALENTS
Talents can be very complex to add, but normally, each talent
just has a game play effect, rather than a character effect.
That means most will only consist of descriptive text.
However, various character-modifying conditions can be
applied to talents as well.
Under the name, you can choose what the activation is for
the talent. This is basically what sort of action it takes to use,
or whether or not it’s passive (the effect is always available).
Next, you can check the Ranked check box if you can
purchase multiple ranks of the talent to get additional affect
from it.
Under most circumstances, that’s where you can stop entering talent information. However, to support all
talents in the Core Rulebook, there are additional capabilities you can configure. These capabilities are
organized into six different panes on the talents dialog.
DAMAGE BONUS
On the first pane, if you want to have the talent give a damage bonus in combat (such
as for Feral Strength), you enter the amount of the bonus, plus check which skills the
damage is applied to. Only combat skills are listed here.
ATTRIBUTE BONUS
Talents can also add to your attributes (Grit and Toughened, as two
examples). In the second pane, choose how much to add of each attribute.
You can also select from two requirements: whether or not the character
needs to have armor equipped (like the Armor Master talent), and whether
that armor’s soak value is a certain amount (Improved Armor Master). If the
requirements are met, the attribute bonuses are applied. You can also
choose to raise a user-selectable characteristic (similar to the Dedication
talent). You will be prompted with a dialog box to choose the characteristic when you select this talent. You
may also mimic the Tinkerer talent and add hard points to an item by selecting the next check box. The last
check box will display a button on the equipment pane to that will allow you to add an HP to an item after
making a skill check (make sure you get your GM’s permission before using this ability). The maximum number
of HPs you can add to the item is selected from the numeric up/down control. Intuitive Improvements uses this
feature.

56
CHOOSE SKILLS
In the third pane over, you can choose skills. What you do with the skills that have
been selected is up to the individual talent. Enter the number of skills that may be
chosen under Skill Count. Then, either select a category of skill to choose from, or
check however many skills you want to form a list to choose from. An example of
the former is Deadly Accuracy, where you select a combat skill to add damage to.
Smooth Talker is an example of the latter, where you choose one skill from a pre-
defined selection of social skills. In either case, this talent will cause you to be
prompted to choose skills whenever the talent is selected, or whenever you click on the “Play” button in the
corner of the talent’s panel in the generator. You may also have the talent add damage to weapons that use the
selected skill. This option will add damage to any weapon that uses the selected skill equal to the basic ranks in
the skill. Finally, you can have the user select a number of skills to be applied to the talent equal to the ranks
you have in this talent. The Deadly Accuracy talent uses both of these options.
CAREER SKILLS
A talent can also add to career skills, in the fourth pane. There’s two ways of doing
this. Either the talent allows the selection of a number of non-career skills that will
become career skills (the top option, such as for the Well Rounded talent), or you
may specify individual skills that will become career skills, if they are not already
(such as for the Insight talent). In the first case, selecting the talent will display a
dialog box allowing you to choose your new career skills.
SPECIAL DICE FOR SKILLS
This pane uses the same method for applying special dice to skill checks as
does the Mod Editor, Species option editor, and Force Ability editor. From
here, you can add boost dice to, remove setback dice from, or apply Force
power checks to the dice pool of the selected skills or skill categories. In the
example above, the Researcher talent allows you to remove a setback die from
all knowledge skills. For more information on this functionality, see Special
Dice for Skills under the Mod Editor, above.
CHANGE SKILL CHARACTERISTIC
Finally, the last pane gives the talent the ability to change which characteristic you
use as the basis for a particular skill. This is used in the various Force technique
talents found in Force and Destiny. Select a skill, and then select one of the six
characteristics. When you have selected such a talent, a new button will appear on
the specialization pane that will allow you to choose which characteristic to use for
an affected skill. The same skill may be configured multiple times with different
characteristics.

57
VEHICLES
Vehicles have quite a number of properties, which are
explained in the rule book. Not all fields need to be filled
out. For instance, “Max Altitude” is only relevant for
airspeeders or other atmospheric craft, while
“Starfighters” would only come in place on large ships
with fighter bays. Such fields, if left blank, will not show
up on the vehicle sheets. The two hyperdrive classes can
be in increments of 0.1, though the up/down controls will
change them 1 class at a time. You can, however, click
the number and type in a decimal value if, say, your
starship has a hyperdrive class of .5 or 1.2.
BUILT-IN ATTACHMENTS
Vehicles can come standard with certain attachments.
Choose which attachments will be included standard with
the vehicle by checking the box next to the name in the list. Built-in attachments cannot have optional mods;
only attachments with just base mods are included in the list. Normal requirements for the attachment are
ignored in the editor to allow the GM to override certain constraints.
BUILT-IN MODS
You may add mods to a vehicle just like for a piece of gear. Any vehicle-specific mod can be added, as well as
ad-hoc mods. Generally, mods that directly modify a vehicle characteristic, such as adding system strain or hull
trauma, should not be added here, since you can just adjust the property directly. However, some vehicles have
additional rules associated with it due to some special ability. In those instances, adding an ad-hoc mod can
describe how this ability works. Mods will be displayed as “Vehicle Features” on the vehicle sheet.
USING VEHICLES AND MINIONS
Smaller vehicles can be used in encounters as minions, with an approprite minion adversary, as described on
page 238 of the CRB. Such vehicles only have one crew member (the pilot/driver) and are normally limited to
starfighters, swoops, and speeder. To designate a vehicle as a small, one-pilot vehicle usable as a minion in
encounters, check the “Single-Pilot Craft” checkbox.
VEHICLE WEAPONS
Vehicles can also have stock weapons. These weapons are configured very
similarly to the way vehicle weapons are upgraded in the SW Character
Generator. You choose the type of vehicle weapon, which firing arcs it
supports, mount type, if any, and the number of weapon systems of this
type.
You can also choose any weapon quality overrides. These overrides are
added onto or replace any existing weapon qualities. The most common use

58
for quality overrides is for adding the Linked quality, and Limited Ammo quality, if linking a weapon with limited
ammo. Giving a weapon a Linked 1 quality will turn it into a “Twin” weapon, Linked 2 into a “Triple”, Linked 3
into a “Quad”, and anything above that into a “Multi”. When linking weapons that already have limited ammo
(such as a concussion missile launcher), override the Limited Ammo quality by doubling the stock value for each
level of Linked. The Linked and Limited Ammo qualities at shown at the top of the list for convenience.
VEHICLE ACTIONS
Vehicle Actions are maneuvers and actions that can be
performed during vehicle combat. The editor comes with all
standard vehicle combat actions as defined in the core rulebook
and in the Age of Rebellion rulebook. However, you can always
add your own actions.
Actions are used in encounters when you include a vehicle and
want to populate various positions on a ship. Vehicle Positions (below) consist of one or more actions that the
position can fulfill.
A Vehicle action consists of the name of the action, the type of action (action or maneuver), whether or not the
action can only be performed by the pilot, and any associated skills that can be used to perform the action. Not
all actions will have associated skills.
You can also limit the availability of an action be entering in silhouette and speed limits. Only vehicles that meet
those requirements will have the action available in any defined position the action belongs to. If the limitation
is open-ended either on the high or low limit, just select “Unlimited”. For instance, if an action can be
performed only for ships with a silhouette of 5 or greater, enter “5” for the low limit, and “Unlimited” for the
high limit. If an action can be performed only for ships with a speed of 2 or under, enter “Unlimited” for the low
limit and “2” for the high limit.
Checking the “Stays active” check box means that this action puts the vehicle into a particular “mode” that can
stay active over the course of a round or multiple rounds. As such, these actions are displayed in the “Vehicle
Actions” section of the vehicle sheet so that they can be kept track of easily. “Stay on Target” is an example of
such an action.
VEHICLE POSITIONS
Vehicle Positions are position titles that can be assigned to adversaries in
an encounter. They represent the job that the adversary performs during
combat. Each position includes at least one vehicle action. On the
encounter sheet, each assigned position will be displayed along with the
adversary assigned, and a list of actions that the adversary can perform,
along with the appropriate skill check dice.
Enter a name for the position, and check all actions that the position
would normally fulfill. You can re-use actions in multiple positions.
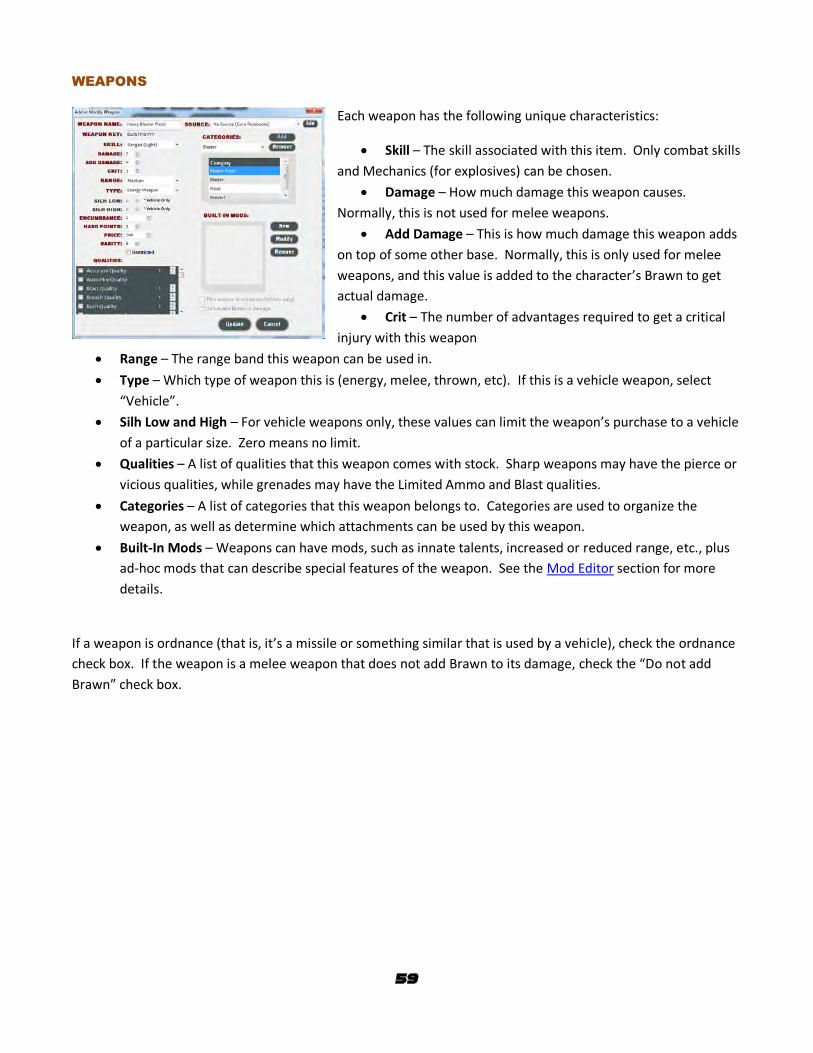
59
WEAPONS
Each weapon has the following unique characteristics:
Skill – The skill associated with this item. Only combat skills
and Mechanics (for explosives) can be chosen.
Damage – How much damage this weapon causes.
Normally, this is not used for melee weapons.
Add Damage – This is how much damage this weapon adds
on top of some other base. Normally, this is only used for melee
weapons, and this value is added to the character’s Brawn to get
actual damage.
Crit – The number of advantages required to get a critical
injury with this weapon
Range – The range band this weapon can be used in.
Type – Which type of weapon this is (energy, melee, thrown, etc). If this is a vehicle weapon, select
“Vehicle”.
Silh Low and High – For vehicle weapons only, these values can limit the weapon’s purchase to a vehicle
of a particular size. Zero means no limit.
Qualities – A list of qualities that this weapon comes with stock. Sharp weapons may have the pierce or
vicious qualities, while grenades may have the Limited Ammo and Blast qualities.
Categories – A list of categories that this weapon belongs to. Categories are used to organize the
weapon, as well as determine which attachments can be used by this weapon.
Built-In Mods – Weapons can have mods, such as innate talents, increased or reduced range, etc., plus
ad-hoc mods that can describe special features of the weapon. See the Mod Editor section for more
details.
If a weapon is ordnance (that is, it’s a missile or something similar that is used by a vehicle), check the ordnance
check box. If the weapon is a melee weapon that does not add Brawn to its damage, check the “Do not add
Brawn” check box.

60
TAGS
As you know, descriptive text in the various core and sourcebooks has a particular look and feel. This includes
standard formatting, such as bold and italic text, but also includes special symbols for dice and dice pips, such as
success, advantage, ability, boost, etc. The descriptive text just wouldn’t be the same if you couldn’t include
these symbols.
In order to include these symbols, you may add special “tags” to
your descriptive text. A list of these tags is located in the help
section of the editor window. Tags are entered as normal text
surrounded by square bracket characters [ ]. You’ll see the final
outcome of these tags by looking at the preview pane.
For instance, consider the displayed descriptive text. It contains
a skill check description. All skill check descriptions in the
rulebook are in bold and contain the difficulty of the check,
including the difficulty dice required for this check. So, the text
that describes the check is surrounded by bold tags [B] and [b],
and contain three tags to add the difficulty die [DIFFICULTY].
The preview will show the final outcome of this text after it is
processed.
EQUIPMENT IMAGES
One item not covered in the SW Data Editor is item images. Each item that can be purchased through the
Equipment pane can have its own image. These images can be found in the “EquipmentImages” directory under
“Data”, “DataCustom”, and any Data Set directory. I’ve only included images that I added myself from various
web sources. Images from the rulebook are not included for copyright reasons.
The format for equipment images must be PNG, as the generator looks for that extension when it loads the
image. The file name of the image reflects which item the image is for. The file name is in the following format:
[type][key].png
Where [type] is either “Weapon”, “Armor”, or “Gear”, and [key] is the key value of the item. This value can be
seen when the descriptions are being edited, or you can get them directly from the XML file. As an example, an
image for the Light Blaster Pistol would be called “WeaponBLASTLT.png”.
SIZES
The size of all equipment images should be 252 pixels wide by 132 pixels high (don’t ask, it’s just what it came
out to be). The generator archive should include a file called “BlankGearPanel.png” which can be used as a basis
for all equipment images. I would recommend using black-and-white line drawings with an alpha channel so
that the background can be deleted. Then, resize the image so that it can fit into the above size. If you don’t
have a decent paint program, I recommend downloading GIMP. It’s free, very powerful, and works on a variety
of platforms.

61
LOCATION
When adding your own custom equipment images, copy them to the “DataCustom\EquipmentImages” directory
if working with the default Data Set, or in the “DataCustom\DataSet_[Data Set Name]\EquipmentImages”
directory if you want to include this image in a Data Set. If the directory doesn’t exist, just create it. Equipment
images in these directories take precedence over images found in “Data\EquipmentImages”, so you can even
replace existing images with your own.
SPECIES IMAGES
Another item not covered in the SW Data Editor is species images. Each species that you can choose from the
Species pane has an associated image that is displayed. These images are also available on the Description pane
under “Stock Images”. These images can be found in the “SpeciesImages” directory under “Data” and
“DataCustom”.
The format for species images must be PNG, as the generator looks for that extension when it loads the image.
The file name of the image reflects which species the image is for. The file name is in the following format:
[key].png
Where [key] is the key value of the species. This value can be seen when the descriptions are being edited, or
you can get them directly from the XML file. As an example, an image for humans would be called
“HUMAN.png”.
SIZES
The size for species images can vary, but they should be no more than 125 pixels high, and no more than 125
pixels in width. The image is centered in the picture box, so if your portrait doesn’t fit, the edges will be cut off.
You can do a web search to get a portrait of your species (Star Wars is very popular and you can find lots of
pictures of Star Wars characters just about everywhere). A white background works best, but you can use any
picture you like. Once you have your picture, resize it to fit the requirements and save it as a PNG file.
LOCATION
When adding your own custom species images, copy them to the “DataCustom\SpeciesImages” directory if
working with the default Data Set, or in the “DataCustom\DataSet_[Data Set Name]\SpeciesImages” directory if
you want to include this image in a Data Set. If the directory doesn’t exist, just create it. Species images in these
directories take precedence over images found in “Data\ SpeciesImages”, so you can even replace existing
images with your own.
VEHICLE IMAGES
Each vehicle that you can purchase also has an associated image that becomes the stock portrait for that
vehicle. These images can be found in the “VehicleImages” directory off of “Data” and “DataCustom”.

62
The format for vehicle images must be PNG. The file name is in the following format:
[key].png
Where [key] is the key value for the vehicle.
SIZES
Vehicle images can be of any size, but they should be square. That is, the width and height should be the same.
LOCATION
When adding your own custom vehicle images, copy them to the “DataCustom\VehicleImages” directory if
working with the default Data Set, or in the “DataCustom\DataSet_[Data Set Name]\VehicleImages” directory if
you want to include this image in a Data Set. If the directory doesn’t exist, just create it. Vehicle images in these
directories take precedence over images found in “Data\ VehicleImages”, so you can even replace existing
images with your own.
VEHICLE SILHOUETTES
Vehicles also have an associated silhouette picture stored in “VehicleSilhouettes” under “Data” and
“DataCustom”, also using the vehicle key as a name. This is a gray top-down outline of the vehicle and is used to
represent the ship in the defense shield arc diagram. These images are generally 500x500, but can be smaller.
The ship fill color is RGB 112,112,112 with a 10 pixel-wide white border, feathered by 5 pixels. The border and
feathering is based on a 500x500 image, so if you make it smaller, you’ll need to adjust the border by the same
ratio.
LOCATION
When adding your own custom vehicle silhouette images, copy them to the “DataCustom\VehicleSilhouettes”
directory if working with the default Data Set, or in the “DataCustom\DataSet_[Data Set
Name]\VehicleSilhouettes” directory if you want to include this image in a Data Set. If the directory doesn’t
exist, just create it. Vehicle silhouette images in these directories take precedence over images found in “Data\
VehicleSilhouettes”, so you can even replace existing images with your own.

63
GM TOOLS
The SW GM Tools executable contains a collection of tools that the GM may find useful. You can bring up the
SW GM Tools by clicking the “GM Tools” button from the launcher, or by running the “SWCharGenGMTools”
executable.
THE LOAD WINDOW
The first thing you’ll see when you run SW GM Tools is the load window.
The load window will show you which type of item (adversary, encounter,
etc) is being loaded, along with a progress bar showing how far along the
load is.
The first time through, this may take awhile, depending on how many
adversaries, encounters, etc., you currently have defined in SW GM Tools. However, subsequent loads will be
much quicker due to the caching mechanism used by the apps. For instance, when you first run SW GM Tools,
you’ll see “Caching Item…” above the progress bar. The next time you run the program, you’ll only see this if
something new happened between the last time you ran SW GM Tools, such as adding or modifying a character.
Loading the cached data will probably take 1/10th or less time than loading uncached data. So, if it seems like
it’s taking forever to load, fear not; the next load will be much quicker!
THE MAIN SCREEN
The main screen is designed the same way as the SW Character Generator and the SW Data Editor. It currently
contains five main buttons on the left, one for Adversaries, one for Encounters, one for Groups, another for
Stock Vehicles, and a final one for Print Trees. Like the SW Character Generator, the SW GM Tools is divided into
different panes, accessible by clicking the buttons on the left side of the window.
ADVERSARIES
The Adversaries pane displays a list of all current
adversaries. The list can be sorted on either adversary
name or category, or you can filter the list by adversary
type (minion, rival, or nemesis), by category, or by typing
in a name filter. Below the list is a summary of the
selected adversary. To the right is a column of buttons
used to manipulate the adversaries.
To modify the current adversary, click “Modify”, or
double-click on the adversary. This will bring up the
Add/Modify Adversary dialog (below). “Remove” will delete the current adversary, “New” will create a new
adversary (bringing up the Add/Modify Adversary window yet again), while “Import” and “Export” can be used
to save copies of adversaries to share with others. If you want to copy an adversary, click the “Copy” button and
the currently-selected adversary will be duplicated in the list. “Stat Block” will bring up another dialog that will
allow you to create a graphical stat block for an adversary, which can then be imported into your own document

64
(see Stat Block Dialog, below, for details). This is extremely useful if you are creating your own adventures.
Finally, the “Inquisitor” button will bring up another dialog that will allow you to create Inquisitor nemesis
adversaries in a manner similar to what is found in the Force and Destiny Core Rulebook.
ADD/MODIFY ADVERSARY DIALOG
The Add/Modify Adversary dialog allows you to make any changes to or add new adversaries. Like the main
window, this dialog also has a row of buttons to the left that selects individual panes in the main window. You
can access this dialog by clicking on either “New” or “Modify” in the “Adversaries” pane of the main tools
window.
The Adversary dialog looks very similar to the SW Character Generator, which makes sense considering
adversaries are nothing but simplified characters. On the bottom, you’ll see a familiar stat block with the
adversary’s current stats, along with a summary list of the adversary’s abilities and equipment.
One item of interest is “Power Level”, as displayed in the box above the stat block. This is nothing more than a
rough estimate of the amount of XP it would take to build a character similar to the adversary. Of course,
adversaries have different rules, so some license has
been used in creating the final “power level” value.
However, you can still use “Power Level” as a basic
gauge for determining how powerful an enemy is, with
the higher the number, the more deadly the adversary
will be.
DESCRIPTION
From this pane, you can enter in the name of the
adversary, the type of adversary it is (minion, rival, or
nemesis), and a category. A list of current categories
can be selected, or you can type in your own new
category. You can also enter a description for this adversary here. This follows the same rules as description
editing in the SW Data Editor, and all special tags apply. The preview box will show how the description will
show up later.
CHARACTERISTICS
The characteristics pane is, once again, very similar to the
same pane in the SW Character Generator. Because
there are less sources of characteristics in adversaries,
the characteristic window is a bit smaller.
Character rules do not necessarily apply to adversaries, so
you can add as many characteristic points to the
adversary as is required. You can even remove points
past zero-purchased if need be, as long as the final
characteristic is at least 1.

65
SKILLS/TALENTS/FORCE
This pane allows you to pick skills, talents, and force
powers for the adversary. They are the same skills,
talents, and force powers that you select for your
characters, but with some different rules. First, while
characters have ALL skills (even if they don’t necessarily
have ranks in them), adversaries only have a select
number of skills. These are selected by checking the skill.
Skills that are not checked will not show up with the rival.
Second, while you can select starting rank in skills for rivals
and nemeses, minions do not have ranks in skills, so you
can only pick the skill and not the rank. Also, the force
power pane will only show up if you’ve given the adversary a force rating, either through talents or through the
Attribute pane.
To make selection of skills, talents, and Force abilities easier, you can type a filter for each one. Only items
containing the text you typed in their names will be displayed.
SPECIAL ABILITIES
Some adversaries have special abilities that are not skills,
talents, or force powers. These are generally just
descriptive text that explains any special behavior of the
adversary. From here, you can enter the name of such an
ability, plus descriptive text for that ability. You can have
as many of these special abilities as you like.
Special abilities can also apply special dice to skill rolls for
the adversary. You have the option of adding boost dice,
removing setback dice, and applying a Force power check
to any number of skills or skill categories. Please see the
Special Dice for Skills section in the SW Data Editor documentation for details.
EQUIPMENT
The Equipment pane is very similar to the Equipment
pane in the SW Character Generator. Adversaries do not
have credits to spend, so all equipment can only be
added and not purchased. Other than that, this pane
works identically to the Equipment pane in the SW
Character Generator.

66
CUSTOM ARMOR
Many adversaries have armor, or some sort of protective
items, that are not part of the stock equipment list. For
these cases, you can create your own armor for the
adversary. To create custom armor for your adversary, just
click the “New” button, then give a name, a soak value,
and a defense value for the armor. The soak and defense
will automatically be applied to the soak, melee defense,
and ranged defense value for the adversary.
CUSTOM ITEMS
Adversaries can sometimes have weird stuff that isn’t part
of the standard equipment list. You can enter items like
that in the Custom Items pane. Custom items are just a
name, although they do support tags and HTML.
CUSTOM WEAPONS
Adversaries can also have strange weapons that are not
available for the characters. These weapons can be
created in the Custom Weapons pane. This pane looks
very similar to the Edit Weapon dialog from the SW Data
Editor, and basically the same information can be
entered. The only real difference is that more than just
standard weapon qualities can be selected from the
Qualities list. Other item descriptors also show up, since
some adversaries have special abilities, or attachment-
like attributes added onto their weapons. These are
some of the descriptors that are used by attachments, so
you can get the same basic benefit from attachments by just creating a custom weapon for the adversary.
You can filter the qualities list by typing in part of a quality’s name in the filter text box.

67
ATTRIBUTES
This pane looks similar to the Characteristics pane, except it
allows you to edit the adversary’s attributes. This includes
wound, strain, soak, defense, and force rating. Just like the
SW Character Generator, the SW GM Tools will keep track
of various sources for adversary attributes, as displayed on
this pane. However, sometimes you just want a particular
attribute to be a particular value for the bad guys. That’s
why you can edit attribute values, instead of just
accumulating them in the proper way, as characters do.
Like characteristics, you can actually negatively “purchase”
attribute points in order to lower an attribute that the generator has correctly figured, but you feel may be too
high. Similarly, if your characteristics and equipment just aren’t raising your adversary’s soak value to where
you want it, just raise it here and don’t worry about the armor.
STAT BLOCK DIALOG
From the Adversary pane of the main window is a button called
“Stat Block.” This button brings up the Stat Block dialog that
allows you to export an adversary as a graphical formatted
image. You might want to do this is you are creating your own
adventure and would like an easy way to include various NPC’s
without having to type them all in. Inserting adversaries as a
graphic image is simple, and the images generated are large
enough to print properly, if resized down in a word processor.
The Stat Block dialog has a sample image to the left, and customization features to the right. The sample image
is a shrunken copy of the graphic that will eventually be created, and is there to show you what it will look like.
Again, the final image will be much larger than the one being displayed.
Five different options determine what the final stat block graphic will look like.
FORMAT
The Stat block generator includes two different formats for the created stat blocks.
“Graphical” uses the standard graphics for characteristics and attributes. “All Text”
replaces them with just text, similar to the way adversaries were presented in the
“Long Arm of the Hutt” adventure.
You may also change text size from this panel. This is the size of the main body of
text located under the stats at the top. Text size ranges from tiny to extra large. If
your adversary (or vehicle) is complex and takes up a lot of vertical space, try setting
the text size smaller in order to have it display in a more compact fashion. Likewise,
simpler adversaries and vehicles might look better with larger text.

68
STYLE
Like the final printed character sheet and encounter tracker, you can use both full
color and simplified graphics for creating a stat block. This option only really
comes into play when “Graphical” is chosen as a format. Using simplified style, the
graphics are there, but become basic black and white and shades of gray. When
using full color, you can also choose the style of the stat block to match the format
used by the three SW games. Each game has slightly different coloring for their
stat blocks.
DISPLAY
The Core Rulebook gives you an option of keeping track of strain or not for minions
and rivals. By checking “With Strain”, you’ll force the stat block generator to show
strain, regardless of the adversary’s type.
COLORS
Here you can change the “Fore” color (color for all of the text on the page, except for
text that’s part of any graphic element), the “back” color (background color for the
stat block), and the fore color for the adversary’s name, since it can be a different
color from the rest of the text. Note that background color only comes into play if
you do not have a background image selected.
BACKGROUND
Here’s where you can include a background graphic on your stat block. This can be
any image file. “Layout” let’s you set how the image is transferred to the stat block.
Layout can be “None” (image is used as-is and is might be cropped if it’s bigger than
the stat block), “Title” (image will constantly repeat itself if it is smaller than the stat
block), “Center” (image will be centered on the stat block), “Zoom” (image will be
enlarged within the stat block), or “Stretch” (image will be stretched to exactly fit
within the stat block). When a background image is selected, the background color of
the adversary summary becomes a “transparent” color so that you can see through
to the background. Because of this, if you make the background and foreground colors the same, the summary
text will disappear. Several common stat block background images have been included in the “Stat Block
Sample Backgrounds” directory.

69
BUTTONS
Clicking “Copy” will copy the completed stat block image to the clipboard. You can then paste it into a
document or paint program. “Save” will save the image in any standard format, including PNG, bitmap, JPEG,
etc. “Close” will close the dialog and return to the main tools application.
PCS AS ADVERSARIES
In addition to any created or imported adversaries, the
adversary list will also contain special “adversaries”
based upon the characters you currently have defined
in the SW Character Generator. These PC adversaries
are generated automatically when you start the SW
GM Tools and are based off of what each character
would look like if it were created as an adversary.
These PC adversaries all have a category of “Player
Characters” so they may be easily filtered.
You can use a PC adversary in your encounters just like any other adversary, or you can create stat blocks for
them. You just cannot modify or remove these adversaries. If a PC is changed in the SW Character Generator,
those changes will automatically show up in their adversary counterparts. That means if you make a change,
you can reprint an encounter to which a PC adversary belongs, and automatically get the latest and correct stats.
INQUISITORS
Clicking the “Inquisitors” button will bring up the Create Inquisitor dialog. Creating Inquisitors is detailed in the
Force and Destiny Core Rulebook. The same steps found in the rulebook are used here to help you generate an
Inquisitor nemesis for your games.
The Create Inquisitor dialog is broken down into four steps. You can go to the next step by clicking the “Next”
button, or to a previous step by clicking the “Previous” button. Click “Cancel” to cancel the Inquisitor creation
process.
When you are finished, click the “Finished” button. This will add a new nemesis adversary to your adversary list
for the Inquisitor you just created. The created Inquisitor is a normal nemesis-level adversary and can be
modified, removed, copied, and used in encounters.

70
STEP 1: NAME AND CHARACTERISTICS
The first step to creating an Inquisitor is to give it a name and
set its characteristics. Nemeses have a standard set of
characteristic values that can be assigned to whatever
characteristics you like. Each value can be used only once, so if
you want to add more to a particular characteristic, you can do
it after the creation process by editing the created Inquisitor
adversary.
To assign one of the pre-determined values to a characteristic, use the combo box for that characteristic and
select the value you want. If the value is used by another characteristic, then that other characteristic will
automatically be assigned another unused value.
Once you have the name and characteristic values of your Inquisitor, hit the “Next” button.
STEP 2: SKILLS
The next step allows you to choose skills for your Inquisitor.
There are two sections: one for combat skills, and the other
for skill packages.
Each Inquisitor is allowed three different combat skills: a
primary, which has a rank of 4, a secondary, with a rank of 3,
and a tertiary skill with a rank of 2. Assign which combat skills
go with which skill level.
Inquisitors also get a range of general and knowledge skills based around archetypes known as “packages”. Each
package has its own set of skills and skill ranks. Selecting the package from the dropdown will display all of the
skills received, including what the pool for those skills will look like for the selected characteristic values.
Once you have selected your Inquisitor’s skills, click the “Next” button.
STEP 3: TALENTS AND ABILITIES
The next step allows you to choose talents and special abilities
for your Inquisitor. You can select talents from a pre-selected
list which includes appropriate ranks. Up to two talents may
be selected for your Inquisitor.
Up to two abilities may also be selected for your Inquisitor.
These are a combination of special abilities and Force powers.
Selecting a Force power will automatically give your Inquisitor
a Force rating of 3. Once you have selected your Inquisitor’s talents and abilities, click the “Next” button.

71
STEP 4: EQUIPMENT
The final step is to select appropriate equipment for your
Inquisitor. Again, a limited amount of equipment is made
available for this step. If you selected Lightsaber as a combat
skill, you may want to give your Inquisitor a lightsaber or two,
or possibly a double-bladed lightsaber. If you selected more
conventional combat skills, you could give him a blaster, or
maybe an electrostaff. Armored robes or clothing may also be
given to round our your Inquisitor’s defenses. Any amount of
equipment from this list may be given to your Inquisitor. And, again, more may be added later using the
Adversary editor.
FINISH UP AND SAVE
Once your Inquisitor is the way you want him to be, just click the “Finished” button. This will generate your
Inquisitor using the information you provided, and save him into the Adversary list. He is now regular nemesis-
level adversary that can be changed just like any other adversary in your list (other than PC adversaries, of
course).
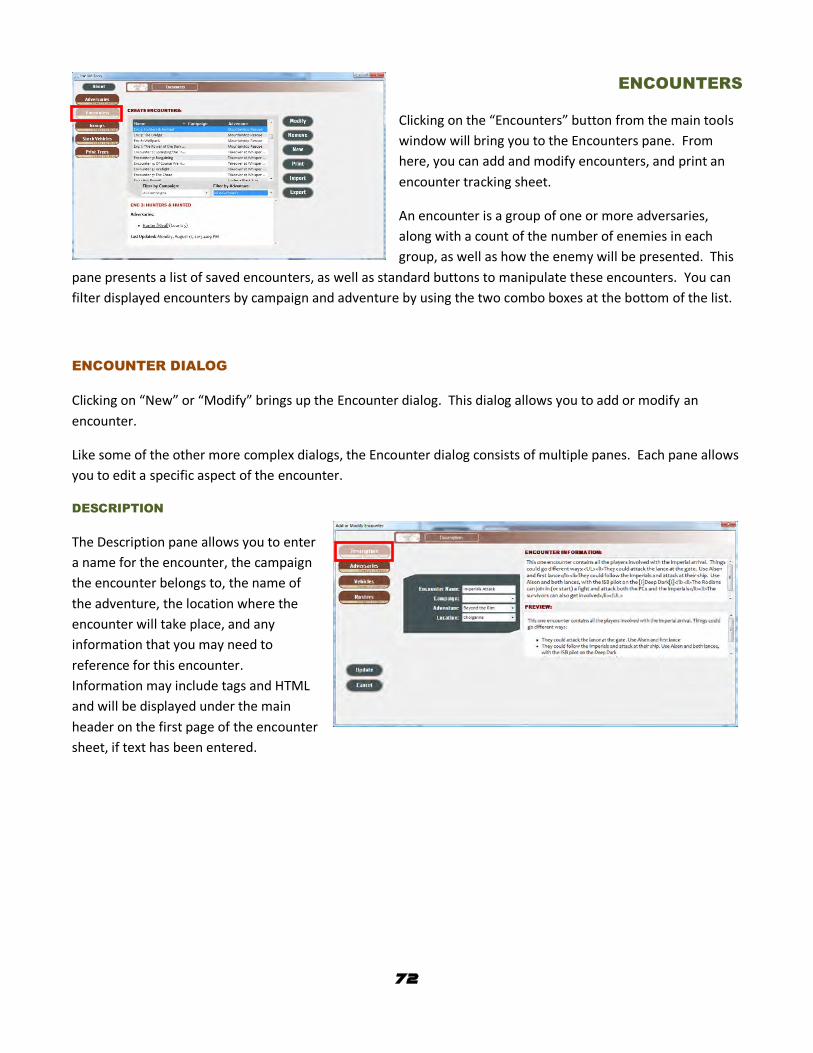
72
ENCOUNTERS
Clicking on the “Encounters” button from the main tools
window will bring you to the Encounters pane. From
here, you can add and modify encounters, and print an
encounter tracking sheet.
An encounter is a group of one or more adversaries,
along with a count of the number of enemies in each
group, as well as how the enemy will be presented. This
pane presents a list of saved encounters, as well as standard buttons to manipulate these encounters. You can
filter displayed encounters by campaign and adventure by using the two combo boxes at the bottom of the list.
ENCOUNTER DIALOG
Clicking on “New” or “Modify” brings up the Encounter dialog. This dialog allows you to add or modify an
encounter.
Like some of the other more complex dialogs, the Encounter dialog consists of multiple panes. Each pane allows
you to edit a specific aspect of the encounter.
DESCRIPTION
The Description pane allows you to enter
a name for the encounter, the campaign
the encounter belongs to, the name of
the adventure, the location where the
encounter will take place, and any
information that you may need to
reference for this encounter.
Information may include tags and HTML
and will be displayed under the main
header on the first page of the encounter
sheet, if text has been entered.

73
ADVERSARIES
This pane allows you to select the
adversary groups that will be part of this
encounter. To the left, you’ll see a list of
adversaries. To the right, you’ll see a list
containing the adversaries that are
currently part of your encounter. Clicking
the “Add >>” button will add an adversary
from the left list to the right list. The “<<
Remove” button will remove an adversary
from the right list.
At the bottom of the adversary list is a text box titled “Alternate Name”. This is a short name or description of
the adversary currently selected in the right-hand grid. If you give an adversary an alternate name, it will
appear, in parentheses, at the front of the adversary’s name on the encounter sheet. For instance, if you gave a
group of bark rats the alternate name of “Group A”, the name would appear as “(Group A) Bark Rat [Minion]” on
the encounter sheet.
Additionally, the right list contains a checkbox and a count. The checkbox is only for minions and determines
whether or not the minion group should be treated as a group (checked), or individually as rivals (unchecked).
The count displays a numeric up/down control allowing you to change the number of enemies in the group.
Nemeses only ever come one to a group, so if you want more than one of the same type of nemesis in the
encounter, they’ll need to be in a separate group.
VEHICLES
The Vehicles pane allows you to add
any number of vehicles to the
encounter. The Vehicles pane works
identically to the Vehicles pane in the
generator. You may add new vehicles
or stock vehicles, and then customize
them as you see fit. For a full
description of this feature, see the
Vehicles pane description for the SW
Character Generator.
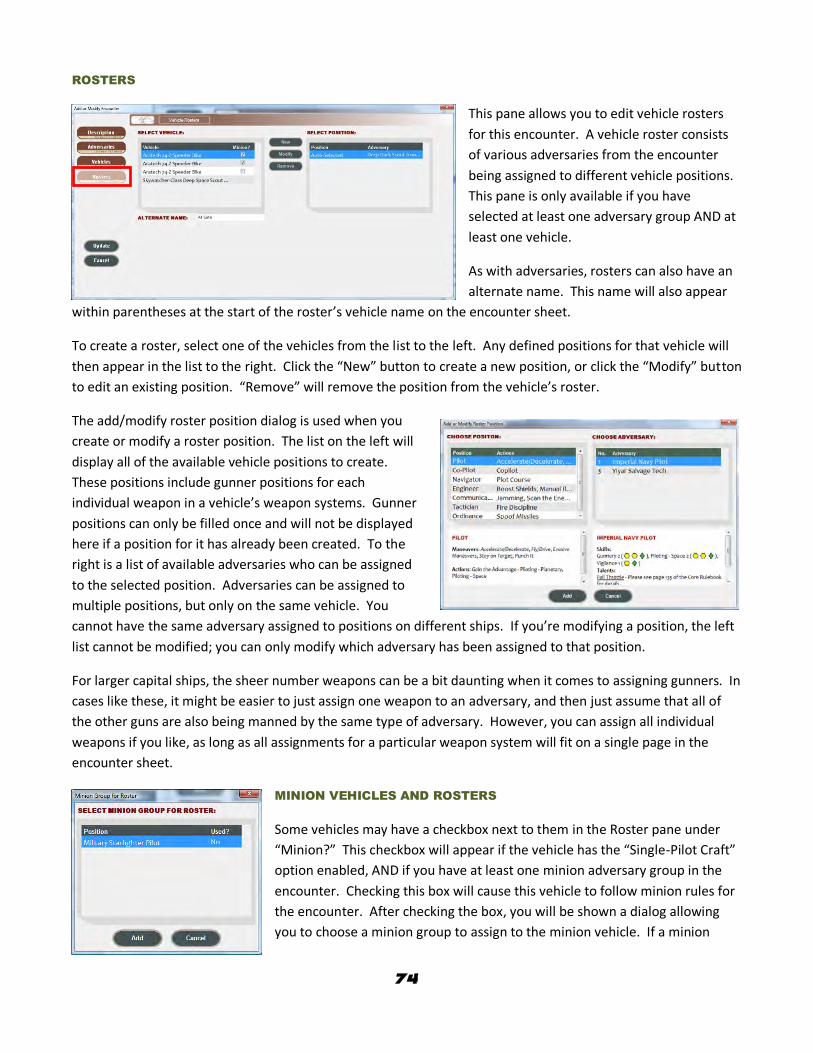
74
ROSTERS
This pane allows you to edit vehicle rosters
for this encounter. A vehicle roster consists
of various adversaries from the encounter
being assigned to different vehicle positions.
This pane is only available if you have
selected at least one adversary group AND at
least one vehicle.
As with adversaries, rosters can also have an
alternate name. This name will also appear
within parentheses at the start of the roster’s vehicle name on the encounter sheet.
To create a roster, select one of the vehicles from the list to the left. Any defined positions for that vehicle will
then appear in the list to the right. Click the “New” button to create a new position, or click the “Modify” button
to edit an existing position. “Remove” will remove the position from the vehicle’s roster.
The add/modify roster position dialog is used when you
create or modify a roster position. The list on the left will
display all of the available vehicle positions to create.
These positions include gunner positions for each
individual weapon in a vehicle’s weapon systems. Gunner
positions can only be filled once and will not be displayed
here if a position for it has already been created. To the
right is a list of available adversaries who can be assigned
to the selected position. Adversaries can be assigned to
multiple positions, but only on the same vehicle. You
cannot have the same adversary assigned to positions on different ships. If you’re modifying a position, the left
list cannot be modified; you can only modify which adversary has been assigned to that position.
For larger capital ships, the sheer number weapons can be a bit daunting when it comes to assigning gunners. In
cases like these, it might be easier to just assign one weapon to an adversary, and then just assume that all of
the other guns are also being manned by the same type of adversary. However, you can assign all individual
weapons if you like, as long as all assignments for a particular weapon system will fit on a single page in the
encounter sheet.
MINION VEHICLES AND ROSTERS
Some vehicles may have a checkbox next to them in the Roster pane under
“Minion?” This checkbox will appear if the vehicle has the “Single-Pilot Craft”
option enabled, AND if you have at least one minion adversary group in the
encounter. Checking this box will cause this vehicle to follow minion rules for
the encounter. After checking the box, you will be shown a dialog allowing
you to choose a minion group to assign to the minion vehicle. If a minion

75
group is being used by other roster positions in other vehicles, it will be indicated next to the group. Select the
minion group you want to assign to this vehicle and click “Add”. If the minion group is being used by other
roster positions, you will be warned of this; selecting such a minion group will cause any other positions that
include this minion group to be removed from all other rosters. Once you have assigned a minion group to a
minion vehicle, that group becomes unavailable for assignments to any other roster positions.
You cannot assign positions to minion vehicles; the “New”, “Modify”, and “Remove” buttons will be disabled.
Positions are assigned automatically to minion vehicles, each using the minion adversary. The automatic
positions include pilot, plus one gunner position for each weapon system.
ENCOUNTER TRACKER
Clicking on “Print” from the encounter pane of the main tools window will bring up the encounter tracker
preview dialog. Encounter trackers are a simply way of keeping track of enemies in a combat situation and will
hopefully make combat go smoother. Normally, a tracker sheet is printed and the GM can use it to mark on or
off wounds, conditions, and other bits of information as the encounter progresses. Putting the encounter
tracker into a plastic sheet protector and using a wet- or dry-erase marker facilitates reuse of the sheet.
PRINT DIALOG
When you print an encounter, you will be presented with a dialog to
allow you to select which features of the encounter to print. You may
include a list of adversaries, along with their tracker information, a
roster list for the various vehicles in the encounter, include printed
copies of the vehicles so you don’t have to print them separately, and
select wether or not to include an initiative tracker. The initiative
tracker will include slots for each encounter group, plus whatever you select under “PC Slots” (this should have
the number of PCs that will in the encounter). At least one option must be selected. Selecting “Include
Adversary Description” will include an adversary’s description whenever it is displayed. Leaving this unchecked
(the default setting) will not show the adversary’s description.
BASIC FEATURES
All encounter pages will have an encounter summary at the top. This
includes basic information such as the encounter name, campaign,
adventure, and location. Below this, on the first page, will be a section
for encounter information, if you entered any. If not, this section will
not be shown.
Next comes the initiative tracker, assuming you have it enabled from
the print dialog. This will be displayed on the first sheet only. The
initiative tracker allows you to track both player and adversary initiative for the encounter. It contains room
enough for all adversary groups, plus whatever extra “PC Slots” you selected in the print dialog. In the first
panel, write down the number of triumphs, successes, and advantages that both you and the players roll for
their characters at the start of the encounter. Then, using the order of precedence, check off which slots belong
to which groups, starting with the roll with the highest number of triumphs, then successes, then advantages.

76
During the encounter, you can also put a tick under “Next” when a slot is used so you can keep track of which
slot you’re on, plus put other ticks below the panels to keep track of your current round.
Additionally, some pages will not be completely filled with
adversary or roster information. This is because some adversaries
or rosters may not fit on the current page, and the items that are
on the page don’t fill it completely. In cases like these, a “Notes”
section will be displayed, if room allows. You can use the “Notes”
sections to make notes during an encounter.
ADVERSARY GROUP FEATURES
Adversary group pages display the various adversary groups that you have selected for this encounter. Each
type of adversary (minion, rival, or nemesis) is displayed in a slightly different format, but do have common
features.
BASIC TRACKING OPTIONS
All three types of adversaries, while having slightly different trackers, all have common features to their
trackers. They all have similar areas for keeping track of wound, strain, and various conditions during combat.
Each box represents a single wound or strain. As the adversary takes damage or strain, these can be marked off.
When the last one is marked off, the adversary is dead or incapacitated. “Enemy” and “Others” represent
additional dice that are added to combat checks (blue boosts, black setbacks, and purple difficulties). Each
check box represents a die of that type to add. The section under “Enemy” represents dice that are added to
the actual adversary. For instance, if a blue boost check box is checked, it means that the enemy gets a boost
added to his rolls. The section under “Others” contains die rolls that apply to those that are attacking this
enemy (in general, the PC’s). For instance, if a purple difficulty is checked, it means that an attacker will have an
increase in difficulty when they attack this adversary. This would be the case if the adversary has the Adversary
talent.
The “Effects” section contains check boxes for various conditions and effects that apply to this enemy. The icons
represent one of six different effects, as described in the key at the bottom of the sheet. Similarly, “Crits”
contains an area to keep track of critical hits. Just write in the d100 roll in the space provided, and check off the
severity of the critical hit by selecting the proper lozenge.
The icons represent the following different conditions and effects:

77
MINIONS
Minions are unique amongst adversaries
because an entire minion group can be
treated as a single enemy in order to simplify
combat. Minion groups contain only a single
tracker row that contains no columns for
wound or strain. Instead, a separate panel
exists that keeps track of group wound. For
every multiple of the minion’s wound, a
circle check box replaces the square. When
a circle is checked, it means that one minion
has been killed. You can keep track of the current number of minions by using the next section of the panel.
Just check the circle on the right side whenever you check a circle on the wound section. When the last circle
has been checked, the group has been defeated.
RIVALS
Rivals don’t have a separate wound panel because each
rival is treated individually. One tracker row exists for
each rival in the group, including a number to keep track
of the individual rival. Rival tracker rows also do not
contain strain, as rivals do not suffer strain (they suffer
wound instead).
If a rival group is too large to fit all of its individual
trackers on the current page, the tracker will continue
on the next page, headed by the name and stat block.
NEMESES
Nemeses are always treated
individually, so only one tracker row
exists per group. Tracker rows also
contain both wound and strain, as
nemeses are basically NPC
characters.

78
STANDARD ROSTER
Roster pages consist of the rosters created
for each vehicle in the encounter. Roster
entries consist of the name or type of the
vehicle, and a summarized stat block for
the vehicle for quick reference, similar to
adversaries, including trackers for hull
trauma, system strain, component hits, and
critical hits. Following the vehicle summary
is a position roster. This roster consists of a
list of ship positions, along with adversaries
assigned, actions that are part of the
position, and any skill pools that can be used to perform those actions.
Following the position roster is the gunner roster. This section is organized by weapon systems on the vehicle,
along with which adversary has been assigned to each individual weapon in the weapon system. Weapons are
organized two across. If a weapon system cannot fit on the current page, the roster will be continued on the
following pages.
MINION ROSTER
If a vehicle has been defined as a
minion, its roster’s stat block will
change. System strain is removed and
a minion tracker for hull trauma,
similar to the wound tracker for
minion adversaries, will be used. Also,
positions and gunners will be assigned
to the minion adversary as a whole,
rather than to individual adversaries.

79
SIMPLIFIED TRACKERS
Like the character sheet, there is also a simplified version of
the encounter tracker (accessible through the “Sheet Style”
combo at the top of the print preview dialog). This sheet
contains all of the same information as the full color sheet,
but uses much less ink. Simplified encounter trackers also
have more room for encounter groups and rosters, since
they don’t have background images and more of the sheet
can be used. As such, they may print using fewer pieces of
paper, since more groups and rosters may be able to fit
onto a single sheet.
FULL COLOR, NO BACKGROUND
A compromise between the Full Color style and the
Simplified style is the Full Color, No Background style. This
style prints the same color information as Full Color, but
does not include the datapad background. Because of this,
it can print more information per sheet, and since the
datapad graphic uses most of the color ink, it is still fairly
kind when it comes to ink usage. Some people may prefer this style to either of the other two styles, as it’s
visually-appealing, is more efficient with space than Full Color, and uses much less color ink than Full Color
(though a bit more than Simplified style).

80
GROUPS
The third feature of the SW GM Tools is the group editor, accessible by clicking the “Group” button. Groups are
adventuring groups. They are a collection of characters, equipment, vehicles, plus some other information.
Characters can belong to multiple groups. The Group pane displays any groups you have assembled, plus a
summary of its members and an emblem for the group, if any.
Click on New to add a new group, Modify to modify an existing group, Remove to remove a group, or Print to
print a group sheet.
GROUP DIALOG
The Group dialog allows you to add or modify all of the attributes of a group. It consists of three panes,
Description, Characters, and Obligation. At the bottom is a summary of the group, including members and the
emblem, if any. Clicking Add or Update will save the changes you’ve made, and Cancel will cancel any changes.
DESCRIPTION
The Description pane allows you to enter a name for the
group (Rosco’s Roughriders, Death Squad, Saturday
Night Gang, whatever), add or select a campaign for the
group, enter a base of operations (planet, town, building,
ship, anything you like), the number of credits owned by
the group, manage contribution ranks to the Rebellion,
and a short note about the group. Contribution ranks
may be automatically applied if the Group dialog sees
that group duty exceeds 100 by clicking the “Advance”
button, or may be changed manually. If the group owns
any bases, such as homesteads or businesses, that earn a
monthly income, you can add a number of months-worth of income by setting the months, then clicking the
“Add Income” button. Likewise, if a group owns a Rebel base that lowers the rarity of purchased items (once
per PC, per month), the amount lowered is shown here. If the group has an emblem, check the checkbox. You
can select any image as an emblem for your group. Like other portraits, right-clicking on the emblem will allow
you to copy and paste an image from the clipboard, or you can click the Select Emblem button for more
flexibility. The SW GM Tools comes with a generic set of stock emblems you can choose from, or you can load
an emblem from disk or the web.
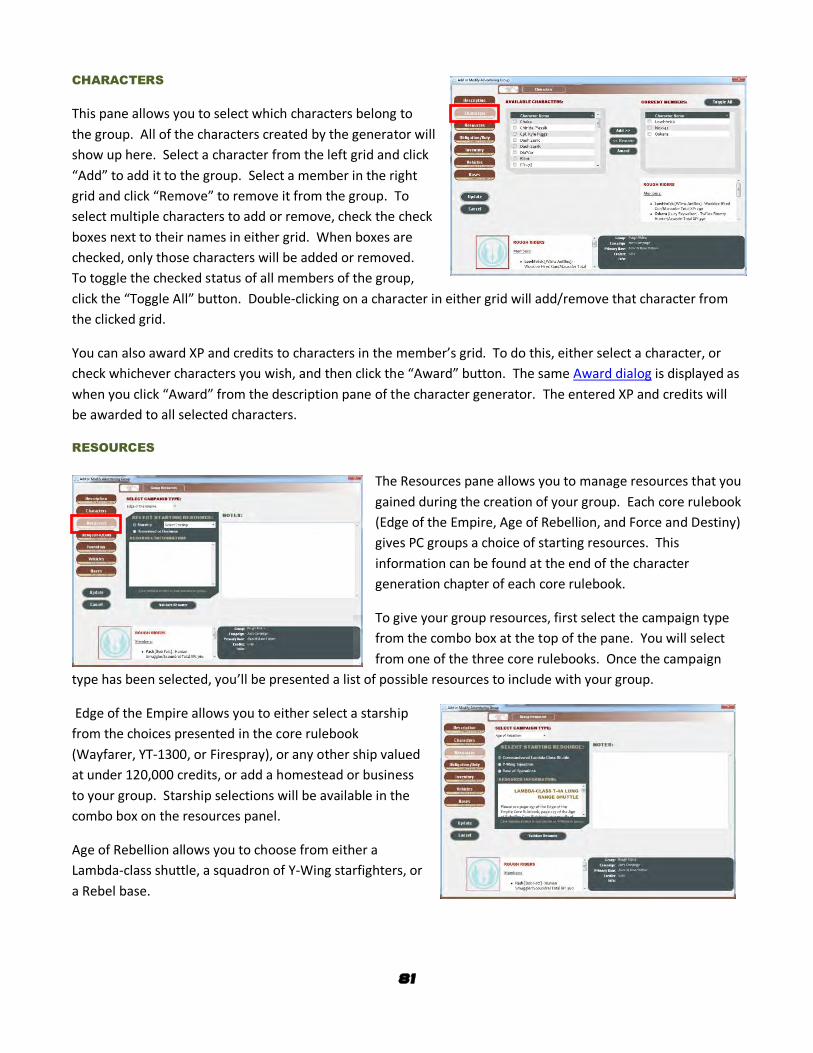
81
CHARACTERS
This pane allows you to select which characters belong to
the group. All of the characters created by the generator will
show up here. Select a character from the left grid and click
“Add” to add it to the group. Select a member in the right
grid and click “Remove” to remove it from the group. To
select multiple characters to add or remove, check the check
boxes next to their names in either grid. When boxes are
checked, only those characters will be added or removed.
To toggle the checked status of all members of the group,
click the “Toggle All” button. Double-clicking on a character in either grid will add/remove that character from
the clicked grid.
You can also award XP and credits to characters in the member’s grid. To do this, either select a character, or
check whichever characters you wish, and then click the “Award” button. The same Award dialog is displayed as
when you click “Award” from the description pane of the character generator. The entered XP and credits will
be awarded to all selected characters.
RESOURCES
The Resources pane allows you to manage resources that you
gained during the creation of your group. Each core rulebook
(Edge of the Empire, Age of Rebellion, and Force and Destiny)
gives PC groups a choice of starting resources. This
information can be found at the end of the character
generation chapter of each core rulebook.
To give your group resources, first select the campaign type
from the combo box at the top of the pane. You will select
from one of the three core rulebooks. Once the campaign
type has been selected, you’ll be presented a list of possible resources to include with your group.
Edge of the Empire allows you to either select a starship
from the choices presented in the core rulebook
(Wayfarer, YT-1300, or Firespray), or any other ship valued
at under 120,000 credits, or add a homestead or business
to your group. Starship selections will be available in the
combo box on the resources panel.
Age of Rebellion allows you to choose from either a
Lambda-class shuttle, a squadron of Y-Wing starfighters, or
a Rebel base.

82
Finally, Force and Destiny allows you to choose between
a starship (a G9 Rigger, or any other starship valued at
under 60,000 credits), a holocron, or a mentor.
Information on the chosen resource is displayed under
“Resource Information” on the resource panel. In
addition, you can describe your resource in the Notes
section to the right.
After selecting your resource, you can click the “Validate
Resource” button make sure you’re group is taking
advantage of the selected resource. If you’ve selected a starship, and the starship is not currently part of the
group’s vehicles, you’ll be given the option of adding it. If you’ve selected a squadron of Y-Wings, you’ll be given
the option of adding a Y-Wing starfighter for each of your group members, if they do not currently exist in your
group’s vehicles. If you’ve selected a base from Edge of the Empire, and your group currently doesn’t have a
base, you’ll be presented with the base creation dialog and then be allowed to edit your homestead or business.
If you’ve selected Rebel base from Age of Rebellion, and your group currently doesn’t have a Rebel base (though
it may have a business or homestead), you’ll be presented with the base creation dialog and then be allowed to
edit your new Rebel base. Finally, you can have the selected holocron be added to your group’s inventory, if it
does not already exist. Other resources, such as the mentor or the base, are narrative only and are
automatically validated.
OBLIGATION/DUTY
This pane allows you to create obligation and duty for
the group. Like characters, groups can have their own
collective obligation and duty. This pane works the
same as the corresponding pane in the SW Character
Generator, except groups do not have obligation or
duty options. Select obligation or duty from the drop
down at the top. Add a new obligation or duty with
the New button, select the type of obligation or duty
from the drop down in the list, and enter any notes
specific to the obligation or duty.

83
INVENTORY
The Inventory pane allows you to add or purchase group
equipment. This pane works identically to the same
pane in the SW Character Generator. You can even
purchase attachments for the group’s inventory items.
Clicking the “Transfer” button allows the group to
transfer inventory to and from characters that belong to
the group, as well as vehicles owned by the group.
VEHICLES
Again, the Vehicles pane works identically to the
same pane in the SW Character Generator. You can
add or purchase vehicles that belong to the group as
a whole. You can select a stock vehicle, or create
and customize your own. If you selected a starship
as your starting resource, and then validated it, the
starship will appear here.
BASES
The Bases pane allows you to create and manage
homesteads and businesses, as defined in the Far
Horizons sourcebook, as well as Rebel bases, as
described in the Desperate Allies sourcebook. Bases
can provide a “home base” for the group, as well as
provide income and services, and give the group access
to a variety of NPC characters that can use their various
expertises to the group’s advantage. A group can have
as many bases as they can afford, and can start with a
base using resources from Edge of the Empire and Age
of Rebellion.

84
To create a new base, click the “New” button. This will bring you
to the base creation dialog and allow you to select the base type
(currently homestead, business, or Rebel base), plus a focus for
the base, which depends on the base type. Once the type and
focus are selected, they cannot be changed later. Click “Purchase”
to purchase the base using your group’s credits, or click “Add” to
add a base, if your GM allows. Besides costing credits, bases may
add obligation to the group due to upkeep and the responsibility
of running the base, as well as dealing with the bases various
NPCs. Obligation incurred by a base will appear in the group’s obligation list.
Once you have a base, you can click the “Modify” button to make changes to the
base using the Modify Base dialog, including describing it, adding upgrades and
NPCs, and maintaining inventory. “Remove” will remove a base from the group,
and “Print” will print up a base sheet for use during
play. When printing a base, you can optionally
include inventory (weapons, armor, and gear) and
NPC stat blocks. There is also an option to include an
NPC’s description, when NPCs are included on the sheet.
To select a portrait for your base, click the “Select Portrait” button to bring up a dialog to select a portrait, or
right-click the portrait and select “Paste” if you have saved an image to your clipboard. Click “Use Default” to
use the default image for the base type and focus.
MODIFY BASE DIALOG
The Modify Base dialog allows you to customize your base
with various descriptive text, base upgrades, NPCs, and
inventory. The Modify Base dialog will automatically be
displayed when you create your base. You can also select the
base from the grid and either click the “Modify” button, or
double-click on the grid entry, to bring up the Modify Base
dialog. Like other editing dialogs, the Modify Base dialog has
various panes that can be selected to make changes to your
base. A summary of your base is displayed at the bottom of
the Modify Base dialog.
DESCRIPTION
The Description pane allows you to enter a name for your base, the location for your base, and select a career
skill. Each base type and focus gives all group members access to a different career skill, and sometimes allows
you to choose from a list of career skills that can be used to run your homestead or business. You can also enter
a description of your business, which will be displayed on the base sheet.

85
UPGRADES
Bases can be upgraded, as per the rules outlined in Far
Horizons and Desperate Allies. Each base can have a number
upgrades that give added benefits to owning the base.
Additionally, some upgrades can be purchased more than
once, and can have different options associated with them.
The number of times a particular upgrade is purchased, along
with the maximum number of upgrades of that type that can
be purchased, is listed right above the upgrade grid. To
remove an existing upgrade, click the “Remove” button. To
add an upgrade, click the “New” button. This will bring up a
dialog allowing you to select which upgrade to add to your
base, and allow you to select an option, if options are available. Only
one option can be selected for an upgrade, if multiple options are
available, and an option must be selected. Options cannot be
selected twice for the same type of upgrade; if you have already
selected an upgrade with a particular option, adding another upgrade
of the same type will not allow you to select the option again. Once
you’ve selected the upgrade and option, click “Purchase” to buy the
upgrade using either your group’s credits, or by accruing group
obligation (depending on the option selected by the radio buttons), or
click “Add” to add the upgrade, if your GM allows.
NPCS
Bases can employ a number of NPC workers. Certain
upgrades will provide such NPCs, but you can also add
your own NPCs if your GM allows. The NPC pane allows
you to manage these NPCs.
The NPC pane functions almost identically to the
Adversary pane in the main GM Tools window. The list
will display all NPC adversaries that you have either
created, or have been assigned due to the purchase of an
upgrade. NPCs assigned by an upgrade can be modified,
but cannot be removed. NPCs that you add yourself can
be modified and removed as needed. See Adversaries for
details on creating NPC adversaries.
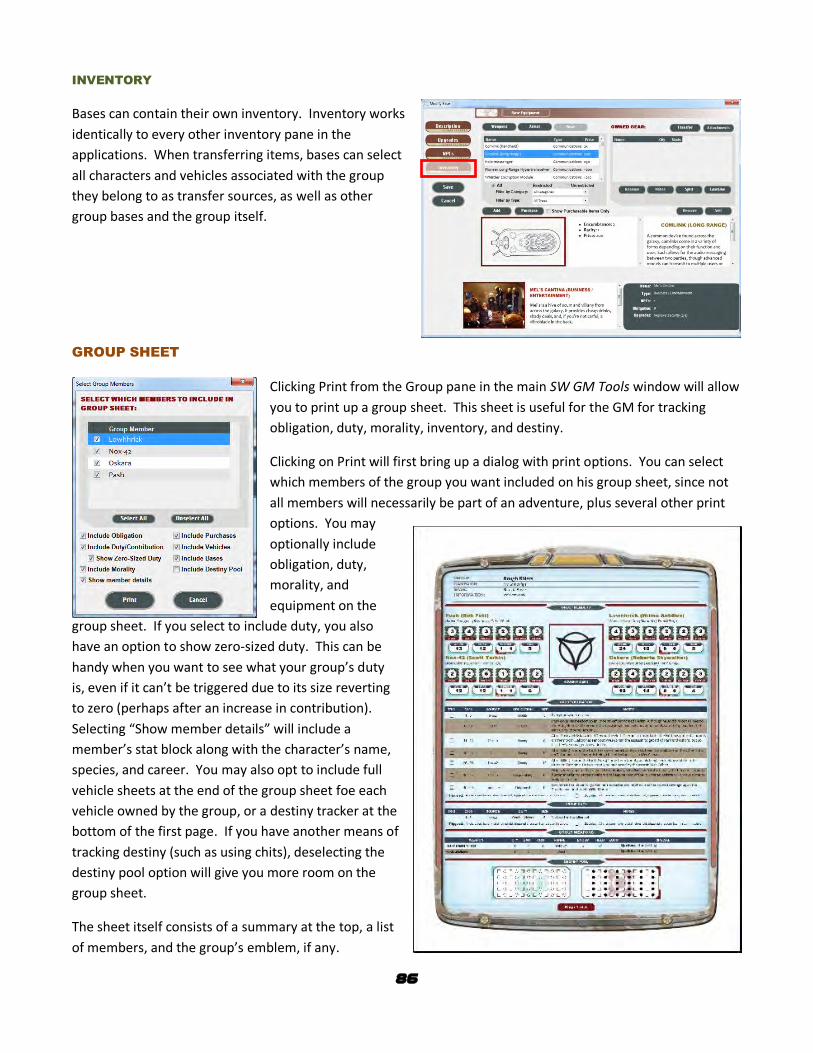
86
INVENTORY
Bases can contain their own inventory. Inventory works
identically to every other inventory pane in the
applications. When transferring items, bases can select
all characters and vehicles associated with the group
they belong to as transfer sources, as well as other
group bases and the group itself.
GROUP SHEET
Clicking Print from the Group pane in the main SW GM Tools window will allow
you to print up a group sheet. This sheet is useful for the GM for tracking
obligation, duty, morality, inventory, and destiny.
Clicking on Print will first bring up a dialog with print options. You can select
which members of the group you want included on his group sheet, since not
all members will necessarily be part of an adventure, plus several other print
options. You may
optionally include
obligation, duty,
morality, and
equipment on the
group sheet. If you select to include duty, you also
have an option to show zero-sized duty. This can be
handy when you want to see what your group’s duty
is, even if it can’t be triggered due to its size reverting
to zero (perhaps after an increase in contribution).
Selecting “Show member details” will include a
member’s stat block along with the character’s name,
species, and career. You may also opt to include full
vehicle sheets at the end of the group sheet foe each
vehicle owned by the group, or a destiny tracker at the
bottom of the first page. If you have another means of
tracking destiny (such as using chits), deselecting the
destiny pool option will give you more room on the
group sheet.
The sheet itself consists of a summary at the top, a list
of members, and the group’s emblem, if any.
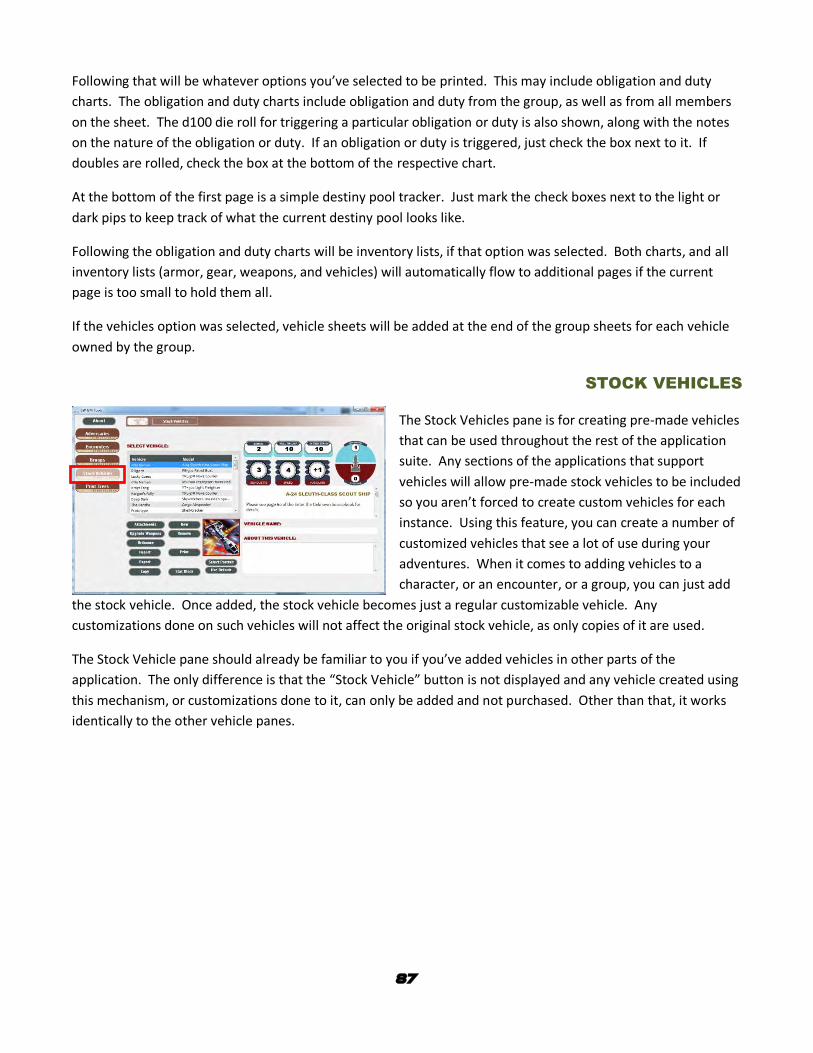
87
Following that will be whatever options you’ve selected to be printed. This may include obligation and duty
charts. The obligation and duty charts include obligation and duty from the group, as well as from all members
on the sheet. The d100 die roll for triggering a particular obligation or duty is also shown, along with the notes
on the nature of the obligation or duty. If an obligation or duty is triggered, just check the box next to it. If
doubles are rolled, check the box at the bottom of the respective chart.
At the bottom of the first page is a simple destiny pool tracker. Just mark the check boxes next to the light or
dark pips to keep track of what the current destiny pool looks like.
Following the obligation and duty charts will be inventory lists, if that option was selected. Both charts, and all
inventory lists (armor, gear, weapons, and vehicles) will automatically flow to additional pages if the current
page is too small to hold them all.
If the vehicles option was selected, vehicle sheets will be added at the end of the group sheets for each vehicle
owned by the group.
STOCK VEHICLES
The Stock Vehicles pane is for creating pre-made vehicles
that can be used throughout the rest of the application
suite. Any sections of the applications that support
vehicles will allow pre-made stock vehicles to be included
so you aren’t forced to create custom vehicles for each
instance. Using this feature, you can create a number of
customized vehicles that see a lot of use during your
adventures. When it comes to adding vehicles to a
character, or an encounter, or a group, you can just add
the stock vehicle. Once added, the stock vehicle becomes just a regular customizable vehicle. Any
customizations done on such vehicles will not affect the original stock vehicle, as only copies of it are used.
The Stock Vehicle pane should already be familiar to you if you’ve added vehicles in other parts of the
application. The only difference is that the “Stock Vehicle” button is not displayed and any vehicle created using
this mechanism, or customizations done to it, can only be added and not purchased. Other than that, it works
identically to the other vehicle panes.
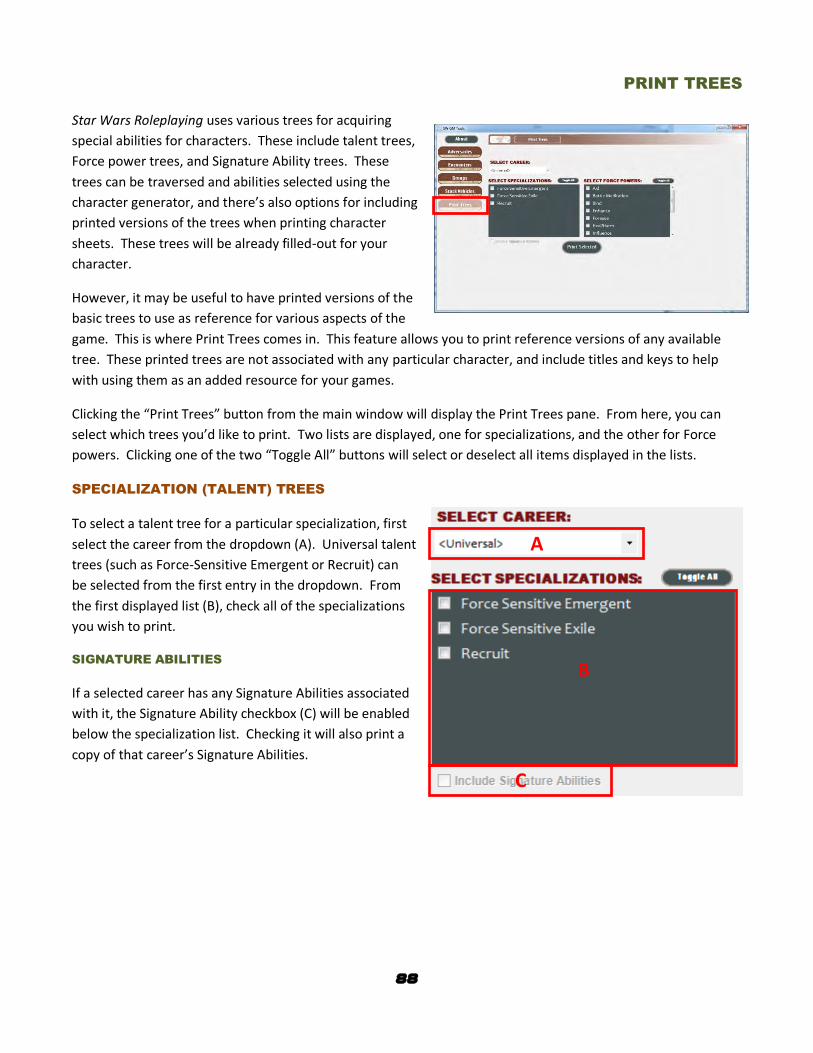
88
PRINT TREES
Star Wars Roleplaying uses various trees for acquiring
special abilities for characters. These include talent trees,
Force power trees, and Signature Ability trees. These
trees can be traversed and abilities selected using the
character generator, and there’s also options for including
printed versions of the trees when printing character
sheets. These trees will be already filled-out for your
character.
However, it may be useful to have printed versions of the
basic trees to use as reference for various aspects of the
game. This is where Print Trees comes in. This feature allows you to print reference versions of any available
tree. These printed trees are not associated with any particular character, and include titles and keys to help
with using them as an added resource for your games.
Clicking the “Print Trees” button from the main window will display the Print Trees pane. From here, you can
select which trees you’d like to print. Two lists are displayed, one for specializations, and the other for Force
powers. Clicking one of the two “Toggle All” buttons will select or deselect all items displayed in the lists.
SPECIALIZATION (TALENT) TREES
To select a talent tree for a particular specialization, first
select the career from the dropdown (A). Universal talent
trees (such as Force-Sensitive Emergent or Recruit) can
be selected from the first entry in the dropdown. From
the first displayed list (B), check all of the specializations
you wish to print.
SIGNATURE ABILITIES
If a selected career has any Signature Abilities associated
with it, the Signature Ability checkbox (C) will be enabled
below the specialization list. Checking it will also print a
copy of that career’s Signature Abilities.
A
B
C

89
FORCE POWER TREES
The second list (D) contains all available Force powers.
Checking a box will select that power for printing.
PRINTING SELECTED TREES
To print all of the selected trees, click the “Print Selected”
button. This will bring up a standard print preview dialog
with all appropriate features. Each tree will be on a separate
page, except for Signature Abilities. Both Signature Abilities
will be displayed on the same page.
D

90
REPORTS
The Star Wars Character Generator contains hundreds of
items of data that is used when generating characters.
This data includes species, careers, specializations,
motivations, weapons, armor, and a lot more. The
Reports pane allows you to generate reports on this data.
The reports are user-defined and can include any type of
data, including custom items.
Clicking the “Reports” button will bring up the Reports
pane. From this pane, you can print reports, or create
new reports. A few sample reports exist in the “Imports/Report Samples” directory that comes with the
generator. The displayed reports can be filtered on a data collection that is uses, or you can filter by part of the
name of the report. Existing reports can be edited by clicking “Modify” (or double-clicking on the desired report
in the list). “Remove” will remove the selected report. “New” will create a new report. “Print” will print a
report. “Import” and “Export” can be used to share reports with other users. “Copy” will make a copy of a
report and allow you to make changes to the new report.
THE REPORTS DIALOG
Clicking “New” or “Modify” (or double-clicking an existing report in
the list) will bring up the Reports dialog. This dialog allows you to
edit an existing report, or create a new report. The Report dialog is a
“wizard” that goes through a five-step process to define the type of
report you wish to create. You may navigate through these steps by
using the “Previous” and “Next” buttons. Clicking “Finish” will save
the report and exit the dialog, while “Cancel” will cancel any changes
you’ve made to the report. The “Previous”, “Next”, and “Finish”
buttons will only be available if you’ve properly configured the report
so that you may go to the next or previous step, or if the report is
ready to use.
STEP 1 – SELECT COLLECTION TYPE
The first thing you need to do when creating a report is to select the type of collection you wish to use. There
are three types of collections you can report on:
An Individual Collection – You may select an individual data collection from the list to the right. All
properties of this collection will be available for your report.
Basic Data – This type of collection uses just the basic properties of a data collection, including name,
description, and source. Because all collections are based on these properties, you can select more than
one collection to report on.
Inventory Items – Certain collections, including weapons, armor, gear, and vehicles, use a standard set
of properties just for inventory items. Because these properties are the same for all inventory

91
collections, they can be used to generate a report based upon generic inventory properties, such as
type, category, price, hard points, mods, etc.
To select or unselect all available collections (except in the case of an individual collection; only one of those
may be selected), click the “Select All” or “Unselect All” buttons.
When you’ve selected how you want to use collections, click the “Next” button to go to step 2.
STEP 2 – DEFINE COLUMNS
Step 2 allows you to configure how your report will look when it’s
printed. A report consists of a grid containing a number of
columns for displaying various properties of the report. Each
column has a number of settings that determine how they will
look in the final report.
A sample grid is displayed below the column list. This is what the
grid will look like when you generate the report. Clicking “As
Portrait” or “As Landscape” will display the grid proportional to
the page orientation chosen. This page orientation will also be the
default orientation when you go to print the report.
To include a column in the report, click the “Add” button. The property may be selected from the “Property
Name” drop-down list. Other settings may be made for this property:
Column Header – The name displayed in the header for this column.
Column Width – The width of the column, as a percentage of the total width of the grid. The unused
percentage of space is displayed to the right. Clicking the “<>” button will automatically adjust the
current column to use whatever remains of the grid width, or will shrink the current column so that the
total used percentage for all columns is 100%.
Column Justification – You may display a column either left-, center-, or right-justified.
Column Text Font – This is the font used for the actual displayed data of a column. Click the “Change”
button to change the font.
Column Header Font – This is the font used to display the header text at the top of the column. Click
the “Change” button to change the font.
Column Text Format – This is for applying simple formatting to the displayed column information. For
instance, to display a numeric field using the “x,xxx” format, you can use “N0”.
Column Sort – A column may be set to sort itself either ascending or descending. For text columns, the
sort is alphabetical (A to Z for ascending, or Z to A for descending). For numeric columns, the sort will be
numeric.
Clicking the “Remove” button on the left will remove the currently-selected column. Clicking the up and down
buttons to the left of the list will change the order in which the columns are displayed.

92
Alternatively, you can use the displayed sample grid the reorder columns by clicking the column and dragging it
to another position. You can also visually change the width of a column by moving the mouse to a column
boundary on the sample grid and dragging it left or right when the double-arrow icon is displayed.
When the columns are arranged to your liking, click the “Next” button to go to step 3.
STEP 3 – DEFINE FILTER
When you create a report, many times you will wish to only
include certain data items based upon a filter. This step allows you
to define the filter to use. To include all data items, select the “No
Filtering” radio button. To define a filter for your report, select the
“Use the following filter” radio button.
The filtering system uses an English-like syntax to apply a “true or
false” result to a particular data item. If the filter result is “true”,
the item is included in the report. If the result is “false”, the item
is not included.
Filters are binary expressions, starting with a property or expression as the first operand, followed by an
operator, and concluded with another property or expression as a second operand. The operators that are
available are based upon the properties or expressions used.
To make creating filters as easy as possible, three lists are included below the filter string. The first is a list of all
available properties (or combinations of properties) that can be used as the first operand. The second list will be
the suggested operators that can be used with this operand. The third list contains sample results that can be
used for the expression. Double-clicking on any of the list will automatically insert the selection into the filter
string. Of course, you can also type the filter by hand, once you get used to the syntax.
Numeric Expressions – Numeric expressions can be used with numeric operands. To test if two operands are
equal, use the “Equal” operator. To test if they are not equal, use the “NotEqual” operand. Likewise,
“LessThan”, “GreaterThan”, “LessThanOrEqual”, or “GreaterThanOrEqual” can be used. For example, to include
items with a Critical rating less than 3:
Crit LessThan 3
String Expressions – String expressions can use “Equal” or “NotEqual” to do string comparisons. They can also
use the “Contains” operator to test whether or not a string contains a sub-string, or the “StartsWith” and
“EndsWith” operators to test if the string starts with or ends with another string. String literals that contain
more than one word must be surrounded by quotations. For example, to test whether or not a weapon is a
vehicle weapon:
Type Equal Vehicle
To test whether or not a vehicle is a light freighter, you could use the following filter:
Type Contains “Light Freighter”

93
List Expressions – Some properties are lists of other properties. For instance, “WeaponModifiers” for inventory
items contains a list of innate weapons that are created when the item is equipped. Say, you want to include an
item that contains a weapon modifier with an innate weapon that does 2 or more damage. You could use
something like this:
WeaponModifiers Any Damage GreaterThan 2
The “Any” operator will test if any item in that list tests true for the expression defined in the right operand
(“Damage GreaterThan 2”). In this case, the “Damage” property belongs to a “WeaponModifier” item that is
contained in the “WeaponModifiers” list, rather than a property of the data item itself. You can also use the
“TrueForAll” operator to test whether or not a particular condition is true for all items in the list.
Logical Operators – Filters can also combine expressions using logical operators, such as “Or” and “And”. For
instance, to combine the last two examples:
Name Contains “Freighter” And WeaponModifiers Any Damage GreaterThan 2
To force precedence in the expression, you can use parentheses to group expressions together. For instance:
(Name Contains “Freighter”) And (WeaponModifiers Any Damage GreaterThan 2)
This forces the first expression operand and last expression operand to be evaluated before applying the “And”
operator. Note that the filter expressions use a standard precedence for various operators, so unless you want
to override the precedence, or to make a filter clearer to understand, you don’t need to include parentheses.
Operator Precedence – Below is order of precedence, from greatest to least, of the standard operators:
Parentheses
Multiply, Divide
Add, Subtract
LessThan, LessThanOrEqual, GreaterThan, GreaterThanOrEqual
Equal
NotEqual
Any, Contains, TrueForAll, StartsWith, EndsWith
And
Or
Any other operator has lowest precedence
Filters can be as simple or as complex as you want them to be. To test whether the syntax of your filter is
correct, click the “Validate” button. To perform an actual test on the filter, click the “Test” button. The “Test”
button will validate the filter, and return the number of items in the currently-selected collections that match
the criteria of your filter.
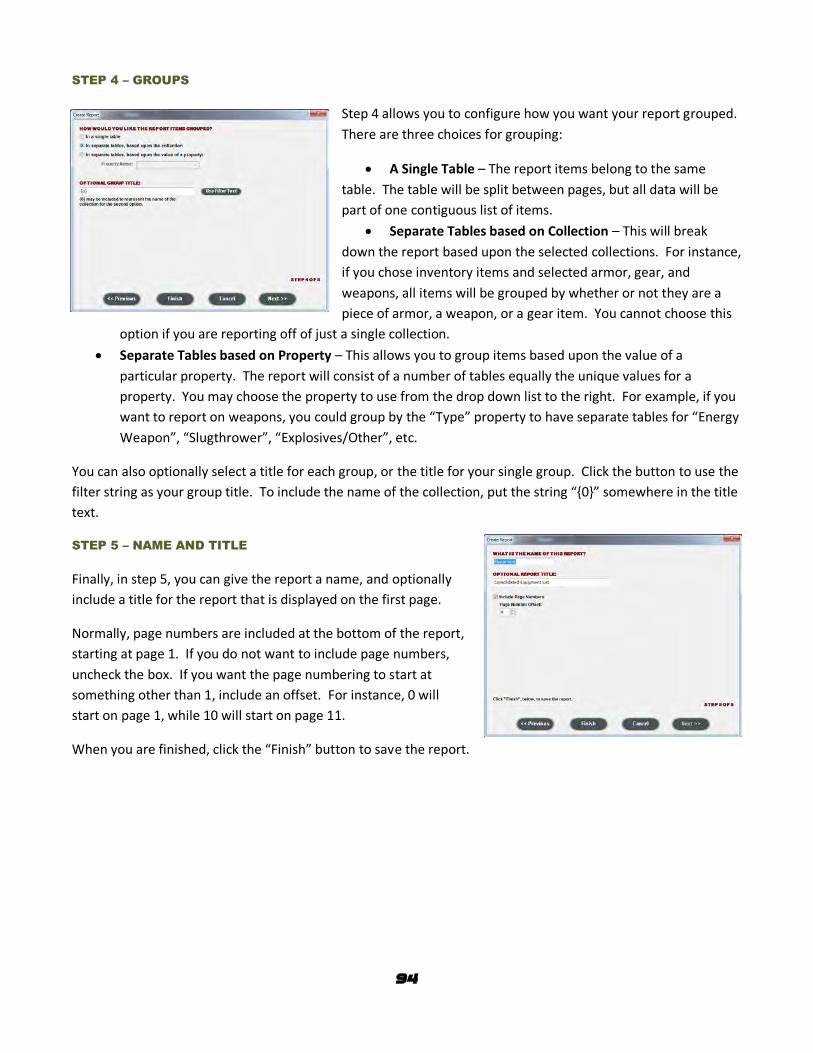
94
STEP 4 – GROUPS
Step 4 allows you to configure how you want your report grouped.
There are three choices for grouping:
A Single Table – The report items belong to the same
table. The table will be split between pages, but all data will be
part of one contiguous list of items.
Separate Tables based on Collection – This will break
down the report based upon the selected collections. For instance,
if you chose inventory items and selected armor, gear, and
weapons, all items will be grouped by whether or not they are a
piece of armor, a weapon, or a gear item. You cannot choose this
option if you are reporting off of just a single collection.
Separate Tables based on Property – This allows you to group items based upon the value of a
particular property. The report will consist of a number of tables equally the unique values for a
property. You may choose the property to use from the drop down list to the right. For example, if you
want to report on weapons, you could group by the “Type” property to have separate tables for “Energy
Weapon”, “Slugthrower”, “Explosives/Other”, etc.
You can also optionally select a title for each group, or the title for your single group. Click the button to use the
filter string as your group title. To include the name of the collection, put the string “{0}” somewhere in the title
text.
STEP 5 – NAME AND TITLE
Finally, in step 5, you can give the report a name, and optionally
include a title for the report that is displayed on the first page.
Normally, page numbers are included at the bottom of the report,
starting at page 1. If you do not want to include page numbers,
uncheck the box. If you want the page numbering to start at
something other than 1, include an offset. For instance, 0 will
start on page 1, while 10 will start on page 11.
When you are finished, click the “Finish” button to save the report.

95
CONCLUSION
That about wraps up this documentation file. If you have any questions, I should be able to be found on the
Fantasy Flight Games Community Forum. Or, you can email me at [email protected].
DISCLAIMER
I make no claims, promises, or guarantees about the absolute accuracy, completeness, or adequacy of the
contents of these applications, or the applications’ data, and expressly disclaim liability for errors and omissions
in the contents of these applications, or their data. No warranty of any kind, implied, expressed, or statutory,
including but not limited to the warranties of non-infringement of third party rights, title, merchantability, and
fitness for a particular purpose, is given with respect to the contents of these applications, or their data.