three cell lead-acid/agm batteries from 1.2 – 200ah h) use
TRANSCRIPT
1
IMPORTANT SAFETY INSTRUCTIONS 1) SAVE THESE INSTRUCTIONS – This manual contains important safety and operating
instructions for battery charger model P/N 022-0200 & P/N 022-0209. 2) Do not expose charger to rain or snow. 3) Use of an attachment not recommended or sold by the battery charger manufacturer may
result in a risk of fire, electric shock, or injury to persons. 4) To reduce risk of damage to electric plug and cord, pull by plug rather than cord when
disconnecting charger. 5) An extension cord should not be used unless absolutely necessary. Use of improper
extension cord could result in a risk of fire and electric shock. If an extension cord must be used, make sure: a) That pins on plug of extension cord are the same number, size, and shape as those of
plug on charger; b) That extension cord is properly wired and in good electrical condition; and c) That wire size is large enough for ac ampere rating of charger as specified in Table 1
6) Do not operate charger with damaged cord or plug – replace the cord or plug immediately.
7) Do not operate charger if it has received a sharp blow, been dropped, or otherwise damaged in any way; take it to a qualified serviceman.
8) Do not disassemble charger; take it to a qualified serviceman when service or repair is required. Incorrect reassembly may result in a risk of electric shock or fire.
9) To reduce risk of electric shock, unplug charger from outlet before attempting any maintenance or cleaning. Turning off controls will not reduce this risk.
10) WARNING – RISK OF EXPLOSIVE GASES. a) WORKING IN VICINITY OF A BATTERY IS DANGEROUS. BATTERIES
GENERATE EXPLOSIVE GASES DURING NORMAL BATTERY OPERATION. FOR THIS REASON, IT IS OF UTMOST IMPORTANCE THAT YOU FOLLOW THE INSTRUCTIONS EACH TIME YOU USE THE CHARGER.
b) To reduce risk of battery explosion, follow these instructions and those published by battery manufacturer and manufacturer of any equipment you intend to use in vicinity of battery. Review cautionary marking on these products and on engine.
11) PERSONAL PRECAUTIONS a) Consider having someone close enough by to come to your aid when you work near
a battery. b) Have plenty of fresh water and soap nearby in case battery acid contacts skin,
clothing, or eyes.
Deltran Battery TenderSelectable NORTH AMERICAN MODELS ONLY
Designed for Six cell Lead-Acid/AGM/Lithium Iron Phosphate (LiFePO4) Batteries &
Three cell Lead-Acid/AGM Batteries
For FOREIGN COMPLIANCE Designed for Six cell Lead-Acid/AGM/Lithium Iron Phosphate
(LiFePO4) Batteries from 1.2 – 200Ah & Three cell Lead-Acid/AGM Batteries from 1.2 – 200Ah
TABLE 1
Length of Cord, Feet 25 50 100 150 AWG Size of Cord 18 18 18 16
P/N 392-0327-RA 2
c) Wear complete eye protection and clothing protection. Avoid touching eyes while working near battery.
d) If battery acid contacts skin or clothing, wash immediately with soap and water. If acid enters eye, immediately flood eye with running cold water for at least 10 minutes and get medical attention immediately.
e) NEVER smoke or allow a spark or flame in vicinity of battery or engine. f) Be extra cautious to reduce risk of dropping a metal tool onto battery. It might spark
or short-circuit battery or other electrical part that may cause explosion. g) Remove personal metal items such as rings, bracelets, necklaces, and watches
when working with a battery. A battery can produce a short-circuit current high enough to weld a ring or the like to metal, causing a severe burn.
h) Use charger for charging a Lead-Acid/AGM/Lithium Iron Phosphate (LiFePO4) battery only. It is not intended to supply power to a low voltage electrical system. Do not use battery charger for charging dry-cell batteries that are commonly used with home appliances. These batteries may burst and cause injury to persons and damage to property.
i) NEVER charge a frozen battery. 12) PREPARING TO CHARGE
a) If necessary to remove battery from vehicle to charge, always remove grounded terminal from battery first. Make sure all accessories in the vehicle are off, so as not to cause an arc.
b) Be sure area around battery is well ventilated while battery is being charged. c) Clean battery terminals. Be careful to keep corrosion from coming in contact with
eyes. d) Add distilled water in each cell until battery acid reaches level specified by battery
manufacturer. Do not overfill. For a battery without removable cell caps, such as valve regulated lead acid batteries, carefully follow manufacturer’s recharging instructions.
e) Study all battery manufacturers specific precautions such as removing or not removing cell caps while charging and recommended rates of charge.
f) Determine voltage of battery by referring to car owner’s manual and make sure that output voltage selector switch is set at correct voltage. Do not use the battery charger unless battery voltage matches the output voltage rating of the charger.
13) CHARGER LOCATION a) Locate charger as far away from battery as dc cables permit. b) Never place charger directly above battery being charged; gases from battery will
corrode and damage charger. c) Never allow battery acid to drip on charger when reading electrolyte specific gravity
or filling battery. d) Do not operate charger in a closed-in area or restrict ventilation in any way. e) Do not set a battery on top of charger.
14) DC CONNECTION PRECAUTIONS a) Connect and disconnect dc output clips only after setting any charger switches to
offposition and removing ac cord from electric outlet. Never allow clips to touch each other.
b) Attach clips to battery and chassis as indicated in 15(e), 15(f), and 16(b) through 16(d).
15) FOLLOW THESE STEPS WHEN BATTERY IS INSTALLED IN VEHICLE. A SPARK NEAR BATTERY MAY CAUSE BATTERY EXPLOSION. TO REDUCE RISK OF A SPARK NEAR BATTERY: a) Position ac and dc cords to reduce risk of damage by hood, door, or moving engine
part. b) Stay clear of fan blades, belts, pulleys, and other parts that can cause injury to
persons. c) Check polarity of battery posts. POSITIVE (POS, P, +) battery post usually has
larger diameter than NEGATIVE (NEG, N,–) post.

3
d) Determine which post of battery is grounded (connected) to the chassis. If negative post is grounded to chassis (as in most vehicles), see (e). If positive post is grounded to the chassis, see (f).
e) For negative-grounded vehicle, connect POSITIVE (RED) clip from battery charger to POSITIVE (POS, P, +) ungrounded post of battery. Connect NEGATIVE (BLACK) clip to vehicle chassis or engine block away from battery. Do not connect clip to carburetor, fuel lines, or sheet-metal body parts. Connect to a heavy gage metal part of the frame or engine block.
f) For positive-grounded vehicle, connect NEGATIVE (BLACK) clip from battery charger to NEGATIVE (NEG, N, –) ungrounded post of battery. Connect POSITIVE (RED) clip to vehicle chassis or engine block away from battery. Do not connect clip to carburetor, fuel lines, or sheet-metal body parts. Connect to a heavy gage metal part of the frame or engine block.
g) When disconnecting charger, turn switches to off, disconnect AC cord, remove clip from vehicle chassis, and then remove clip from battery terminal.
h) See operating instructions for length of charge information. 16) FOLLOW THESE STEPS WHEN BATTERY IS OUTSIDE VEHICLE. A SPARK NEAR
THE BATTERY MAY CAUSE BATTERY EXPLOSION. TO REDUCE RISK OF A SPARK NEAR BATTERY: a) Check polarity of battery posts. POSITIVE (POS, P, +) battery post usually has a
larger diameter than NEGATIVE (NEG, N, –) post. b) Attach at least a 24-inch-long 6-gauge (AWG) insulated battery cable to NEGATIVE
(NEG, N, –) battery post. c) Connect POSITIVE (RED) charger clip to POSITIVE (POS, P, +) post of battery. d) Position yourself and free end of cable as far away from battery as possible – then
connect NEGATIVE (BLACK) charger clip to free end of cable. e) Do not face battery when making final connection. f) When disconnecting charger, always do so in reverse sequence of connecting
procedure and break first connection while as far away from battery as practical. g) A marine (boat) battery must be removed and charged on shore. To charge it on
board requires equipment specially designed for marine use.
This appliance can be used by children aged from 8 years and above and persons with reduced physical, sensory or mental capabilities or lack of experience and knowledge if they have been given supervision or instruction concerning use of the appliance in a safe way and understand the hazard involved.Children shall not play with the appliance. Cleaning and user maintenance shall not be mad by children without supervision.
- Persons (including children) whose
• Physical, sensory or mental capabilities: or
• Lack of experience and knowledge
Prevents them from using the appliance safely without supervision or instruction:
- Children playing with the appliance.
The supply cord cannot be replaced. If the cord is damaged the appliance
should be scrapped.
Examine the battery charger regularly for damage, especially the cord, plug and enclosure, if the battery charger is damaged, it must not be used until it has been repaired.
This symbol indicates separate collection for electrical and electronic equipment
4
USER INSTRUCTIONS AUTOMATIC CHARGING AND BATTERY STATUS MONITORING: Battery Tender® chargers are completely automatic and may be left connected to both AC power and to the battery that it is charging for long periods of time. The charger output power, voltage, and current depends on the condition of the battery it is charging. Battery Tender® chargers have several status LED indicators that provide a visual means to determine the operating mode of the charger and hence the condition of the battery connected to the charger.
When AC power is first applied to the charger all of the LED’s will illuminate for two to three seconds before starting the charge sequence listed below. The two battery level status LED indicator lights (Amber LED 1, Green LED 5) are available to determine whether the charger is operating in one of the four primary charge modes:
1) Qualification/Initialization mode: The Monitor Circuit verifies appropriate battery voltage levels and good electrical continuity between the battery and the charger DC output.
2) Bulk mode (full charge, constant current, battery is 0% to 80% charged)
3) Absorption mode (high constant voltage, battery is 80% to 100% charged).
4) Storage/float maintenance mode (low constant voltage, battery is 100% to 103% charged).
When the battery is fully charged, the battery level status Green LED (5) indicator will turn solid green and the charger will switch to a storage/float maintenance charge mode. The Battery Tender® charger will automatically monitor and maintain the battery at full charge.
5
BATTERY VOLTAGE SELECT BUTTON The Battery Tender® charger has a “SELECT” button which allows you to switch between charging a 12 volt AGM/Flooded, 12 volt Lithium Iron Phosphate (LiFePO4) battery or a 6 volt AGM/Flooded battery. The battery voltage can be selected once the charger has AC power applied and before the charger is connected to the battery. Once the charger has AC power and is also connected to the battery the voltage (12V or 6V) selection cannot be changed. To change the mode, disconnect the battery from the charger. If the AC power is interrupted the charger will resume charging at the last battery voltage setting used. The charger can also detect if the incorrect battery voltage has been selected or if the battery is defective once the connection has been made to the battery. One of the Green LED’s (LED 1 or 2) located next the 12V or 6V symbol will flash preventing the charge cycle from starting. In order to begin a new charge cycle, reset the charger by disconnecting it from the AC supply as well as the wrong or defective battery for 7-10 seconds. Reconnect the AC supply and the charger will be ready for a new charge cycle. BATTERY TYPE SELECT BUTTON The Battery Tender® charger has a “SELECT” button which allows you to switch between charging a AGM/Flooded battery or a Lithium Iron (12 Volt only) Phosphate battery (LiFePO4). The battery type must be selected once the charger has AC power applied and before the charger is connected to the battery. Once the charger has AC power and is also connected to the battery the battery type selection cannot be changed. In order to begin a new charge cycle, reset the charger by disconnecting it from the AC supply as well as the wrong or defective battery for 7-10 seconds. Reconnect the AC supply and the charger will be ready for a new charge cycle. If the AC power is interrupted the charger will resume charging at the last settings used. AUTOMATIC LITHIUM IRON PHOSPHATE (LiFePO4) RECOVERY MODE If you try to charge a dead 12 volt Lithium Iron Phosphate battery (LiFePO4) with a very low voltage, 4 to 8 Volts, the charger will automatically switch into the Recovery Mode. When in this mode the green LED (4) will flash, the 12V LED (1) and the amber LED will be solid. If successful and once complete the charger will automatically switch back to the normal charge cycle.
6
There is a three (3) hour time limit for this recovery process. If not successful the amber LED (1) and the green LED (5) will toggle back and forth. It will continue this sequence until the charger is disconnected from the AC source. If this happens there is a good chance that the battery has already been damaged due to the low voltage and cannot be recovered. ATTENTION: The Battery Tender® CHARGER HAS A SPARK FREE CIRCUITRY. The output alligator clips or ring terminals will not spark when they are touched together. The Battery Tender® charger will not produce an output voltage until it senses at least 2 volts from a Flooded/AGM battery or 4 volts from a Lithium Iron Phosphate battery. It must be connected to a battery with the correct polarity before it will start charging a battery. Therefore, if you plug the AC power cord into an AC power outlet, and if the output alligator clips or ring terminals are not connected to a battery, and if you touch the alligator clips or ring terminals together, there will be no electrical spark.
NOTE: THE OUTPUT CLIPS OR RING TERMINALS MUST BE CONNECTED TO A BATTERY BEFORE THE CHARGER CAN PRODUCE AN OUTPUT VOLTAGE. TIME REQUIRED TO CHARGE A BATTERY: The Battery Tender® part number 022-0200 charges at a rate of 1.25 Amps or 1.25 Amp-hours per hour. Therefore, a fully discharged 15 Amp-Hour battery will take approximately 9½ hours to recharge to 80% capacity. The Battery Tender® part number 022-0209 charges at a rate of 4 Amps or 4.0 Amp-hours per hour. Therefore, a fully discharged 15 Amp-Hour battery will take approximately 3 hours to recharge to 80% capacity. WORKING WITH A DEAD BATTERY OR A BATTERY WITH A VERY LOW VOLTAGE: If you try to charge a dead battery having a voltage below 2 volts from a Flooded/AGM battery or 4 volts from a Lithium Iron Phosphate battery, the Battery Tender® charger will not start. An internal safety circuit prevents the charger from generating any output voltage unless it senses at least 2 volts from a Flooded/AGM battery or 4 volts from a Lithium Iron Phosphate battery at the charger output. In this situation, the amber LED will continue to flash, indicating that a charge has not been initiated.
NOTE: If a 12 Volt, Lead-Acid battery has an output voltage of less than 9 volts when it is at rest, when it is neither being charged nor supplying electrical current to an external load, there is a good chance that the battery is defective. As a frame of reference, a fully charged 12-Volt, Lead-Acid battery will have a rest-state, no-load voltage of approximately 12.9 volts. A fully discharged 12-Volt, Lead-Acid battery will have a rest-state, no-load voltage of approximately 11.4 volts. That means that a voltage change of only 1.5 volts represents the full range of charge 0% to 100% on a 12-Volt, Lead-Acid battery. Depending on the manufacturer, and the age of the battery, the specific voltages will vary by a few tenths of a volt, but the 1.5-volt range will still be a good indicator of the battery charge %.
7
STATUS INDICATING LIGHT: If the light is not lit, then the battery is not properly connected and/or the charger is not plugged into AC power. The following describes light operation:
AMBER LIGHT FLASHING (Amber LED 1) – The amber LED flashing indicates that the battery charger has AC power available and that the microprocessor is functioning properly. If the amber LED continues to flash, then either the battery voltage is too low (less than 2 volts for a Flooded/AGM battery or 4 volts for a Lithium Iron Phosphate battery) or the output alligator clips or ring terminals are not connected correctly.
ALTERNATING GREEN/AMBER (Amber LED 1 & Green LED 5)
This indicates the battery charger has gone over the time limit while in the Battery Recovery Mode (see page 5 for complete explanation). Also Reverse polarity connection to the battery.
AMBER LIGHT ON STEADY (Amber LED 1) – Whenever the
amber LED is on steady, a battery is connected properly and the charger is charging the battery. The amber LED will remain on until the charger completes the charging stage.
GREEN LIGHT FLASHING (Green LED 5) – When the green LED is flashing and the amber LED (Amber LED 1) is solid the battery is greater than 80% charged and may be removed from the charger and used if necessary. Whenever possible, leave the battery on charge until the green light is solid.
GREEN LIGHT ON STEADY (Green LED 5) – When the green LED burns steady, the charge is complete and the battery can be returned to service if necessary. It can also stay connected to maintain the battery for an indefinite period of time.
FCC Warning Title 47 Subpart, 15.105(b) Note: This equipment has been tested and found to comply with the limits for a class B digital device, pursuant to part 15 of the FCC Rules. These limits are designed to provide reasonable protection against harmful interference in residential installation. This equipment generates, uses and can radiate radio frequency energy and, if not installed and used in accordance with the instructions, may cause harmful interference to radio television reception, which can be determined by tuning the equipment off and on, the user is encouraged to try to correct the interference by one or more of the following measures:
- Reorient or relocate the receiving antenna. - Increase the separation between the equipment and receiver. - Connect the equipment into an outlet on a circuit different from that to
which the receiver is connected. - Consult the dealer or an experienced radio/TV technician for help.
8
TROUBLESHOOTING
1) If the charger does not turn on and none of the LED’s illuminate.
a. Check to make sure the AC outlet is supplying power by plugging in a lamp, an appliance, or a voltage meter.
2) The green (fully charged) LED (5) comes on immediately when charging a
discharged battery. a. The battery is probably defective, take the battery to the dealer to
be tested.
3) When charging a battery the green (fully charged) LED (5) never comes on.
a. The battery may be defective, take the battery to the dealer to be tested.
b. The battery has an excessive current draw, remove or disconnect the battery from the equipment.
4) The amber LED continues to flash even with a connection to the battery:
a. Check the fuse in the accessory cable. b. The battery voltage is too low.
5) 12V green LED (1) is flashing.
a. The battery is damaged or the incorrect battery voltage has been selected.
6) 6V green LED (2) is flashing.
a. The battery is damaged or the incorrect battery voltage has been selected.
7) Amber & Green (fully charged) LED (5) are toggling.
a. Reverse polarity connection to the battery. b. The chargers safety timer has activated due the battery not
reaching its optimal voltage. The battery may be defective, take the battery to the dealer to be tested.
ICES-001: Industrial, Scientific, and Medical (ISM) Radio
Frequency Generators This product has been tested with the listed standards and found to be compliant with the Code of Industry Canada ES-001 and the measurement Procedure according to CISPR 11.
CAN ICES-1/NMB-1
9
Chargeur sélectionnable Deltran Battery Tender
Conçu pour six cellules de batteries d'accumulateurs au plomb/AGM/Lithium Phosphate de fer (LiFePO4)
de 1,2 à 200 Ah et Trois cellules de batteries d’accumulateurs au plomb/
AGM de 1,2 – 200 Ah
CONSIGNES DE SÉCURITÉ IMPORTANTES 1) SAUVEGARDEZ CES INSTRUCTIONS – Ce manuel contient des consignes
importantes de sécurité et le mode d’emploi pour le chargeur de batterie modèle P/N 022-0200 et P/N 022-0209.
2) Ne pas exposer le chargeur à la pluie ou la neige. 3) L'utilisation d'un accessoire non recommandé ou non vendu par le fabricant du chargeur
de batterie peut entraîner un risque d'incendie, de choc électrique ou des blessures. 4) Afin de réduire le risque de dommages à la fiche et au cordon, tirez sur la fiche plutôt
que sur le cordon pour débrancher le chargeur. 5) Ne pas utiliser de rallonge, sauf si cela est absolument nécessaire. L'utilisation d'une
rallonge inadéquate peut entraîner un risque d'incendie ou de choc électrique. Si une rallonge est nécessaire, s'assurer que : a) Les broches de la prise de la rallonge sont du même nombre, de la même taille et de la
même forme que celles de la fiche du chargeur; b) Que la rallonge est correctement câblée et en bon état électrique; et c) Que la taille du fil est suffisante pour les ampères nominaux en CA du chargeur comme,
spécifié dans le Tableau 1
TABLEAU 1 Longueur du cordon d'alimentation, Pieds 25 50 100 150 Taille moyenne du cordon 18 18 18 16
6) Ne pas utiliser le chargeur avec un cordon ou une fiche endommagés - remplacez le cordon ou la fiche immédiatement.
7) Ne pas utiliser le chargeur s'il a reçu un choc, est tombé ou endommagé de toute autre manière; amenez-le à un technicien qualifié.
8) Ne pas démonter le chargeur; amenez-le à un technicien qualifié si une réparation est nécessaire. Un remontage incorrect peut entraîner un risque de choc électrique ou d'incendie.
9) Afin de réduire les risques de choc électrique, déconnectez le chargeur de la prise électrique avant de tenter tout entretien ou nettoyage. La désactivation des contrôles ne réduira pas ce risque.
10) AVERTISSEMENT – RISQUE DE GAZ EXPLOSIFS. a) TRAVAILLER À PROXIMITÉ D’UNE BATTERIE EST DANGEREUX. LES
BATTERIES PRODUISENT DES GAZ EXPLOSIFS PENDANT LEUR FONCTIONNEMENT NORMAL. POUR CETTE RAISON, IL EST EXTRÊMEMENT IMPORTANT QUE VOUS SUIVIEZ LES INSTRUCTIONS À CHAQUE FOIS QUE VOUS UTILISEZ LE CHARGEUR.
b) Pour réduire le risque d'explosion de la batterie, suivez ces instructions et celles publiées par le fabricant de batterie et le fabricant de tout équipement que vous avez l'intention d'utiliser à proximité de la batterie. Examinez le marquage de mise en garde sur ces produits et sur le moteur.
10
11) PRÉCAUTIONS PERSONNELLES a) Ayez quelqu’un assez près de vous pour venir à votre aide lorsque vous travaillez
près d’une batterie . b) Disposez d'eau fraîche et de savon à proximité au cas où l'acide de la batterie
viendrait en contact avec la peau, les vêtements ou les yeux. c) Portez des lunettes et de vêtements de protection. Évitez de toucher vos yeux tout
en travaillant près de la batterie. d) Si l'acide de la batterie vient en contact avec la peau ou les vêtements, nettoyez
immédiatement avec de l'eau et du savon. Si l'acide pénètre dans l'œil, rincez immédiatement l'œil avec de l'eau courante froide pendant au moins 10 minutes et consultez immédiatement un médecin.
e) Ne fumez JAMAIS ou ne permettez JAMAIS d'avoir une étincelle à proximité de la batterie ou du moteur.
f) Veillez surtout à réduire le risque de laisser tomber un objet métallique sur la batterie. Ceci pourrait causer une étincelle ou un court-circuit de la batterie ou avec une autre pièce électrique, toutes choses qui peuvent provoquer une explosion.
g) Retirez les éléments métalliques personnels, tels que des bagues, bracelets, colliers et montres, lorsque vous travaillez avec une batterie. Une batterie peut produire un courant de court-circuit suffisamment élevé pour souder une bague ou similaire au métal, provoquant une brûlure grave.
h) Utilisez le chargeur pour charger une batterie au plomb/AGM/Lithium Phosphate de fer (LiFePO4) uniquement. Il n'est pas destiné à alimenter un système électrique basse tension autre que dans une application de démarreur-moteur. N'utilisez pas le chargeur de batterie pour charger des batteries de piles sèches qui sont couramment utilisés avec des appareils domestiques. Ces batteries peuvent éclater et causer des blessures aux personnes et des dégâts matériels.
i) Ne chargez JAMAIS une batterie gelée. 12) PRÉPARATION POUR CHARGER
a) S'il est nécessaire de retirer la batterie du véhicule pour la charger, retirez toujours en premier la borne de terre de la batterie. Assurez-vous que tous les accessoires dans le véhicule sont éteints, afin de ne pas provoquer un arc.
b) Assurez-vous que la zone autour de la batterie est bien ventilée pendant que la batterie est en cours de chargement.
c) Nettoyez les bornes de la batterie. Faites attention à ce que la corrosion n'entre pas contact avec les yeux.
d) Ajoutez de l'eau distillée dans chaque cellule jusqu'à ce que l'acide atteigne le niveau indiqué par le fabricant de la batterie. Ne remplissez pas trop. Pour une batterie sans bouchon de cellule amovible, comme les batteries d'accumulateurs au plomb avec des vannes de régulation, suivez attentivement les instructions du fabricant pour la recharge.
e) Étudiez toutes les précautions spécifiques du fabricant de batterie, telles que l'enlèvement ou non des bouchons de cellules pendant la charge et le taux de charge recommandé.
f) Déterminez la tension de la batterie en vous référant au manuel de l'utilisateur de la voiture et assurez-vous que ce sélecteur de tension de sortie est fixé à la tension correcte. N'utilisez pas le chargeur de batterie à moins que la tension de la batterie corresponde à la tension nominale de sortie du chargeur.
13) EMPLACEMENT DU CHARGEUR a) Placez le chargeur aussi loin de la batterie que les câbles le permettent. b) Ne placez jamais le chargeur directement au-dessus de la batterie en cours de
chargement; les gaz de la batterie peuvent corroder et endommager le chargeur. c) Ne laissez jamais à l'acide de la batterie s'égoutter sur le chargeur lors de la lecture
de la gravité spécifique de l'électrolyte ou du remplissage de la batterie. d) Ne faites en aucune façon fonctionner le chargeur dans un endroit fermé ou mal
ventilé. e) Ne placez pas la batterie sur le chargeur.
11
14) PRÉCAUTIONS POUR LA CONNEXION CC a) Connectez et déconnectez les pinces de sortie CC seulement après avoir mis tous
les interrupteurs du chargeur à la position off (arrêt) et retiré le cordon de prise électrique. Ne laissez jamais les pinces se toucher mutuellement.
b) Fixez les pinces sur la batterie et le châssis comme indiqué dans 15(e), 15(f) et 16(b) à 16(d).
15) SUIVEZ CES ÉTAPES LORSQUE LA BATTERIE EST INSTALLÉE DANS LE VÉHICULE. UNE ÉTINCELLE À PROXIMITÉ DE LA BATTERIE PEUT PROVOQUER UNE EXPLOSION DE LA BATTERIE. POUR RÉDUIRE LE RISQUE D'UNE ÉTINCELLE À PROXIMITÉ DE LA BATTERIE : a) Positionnez les cordons CA et CC afin de réduire les risques de dommages par le
capot, par les portes ou par les parties du moteur en mouvement. b) Restez à l'écart des pales de ventilateur, des courroies, des poulies et des autres
pièces qui peuvent causer des blessures. c) Vérifiez la polarité des bornes de la batterie. La borne de la batterie POSITIVE
(POS, P, +) a généralement un diamètre plus grand que la borne NÉGATIVE (NÉG, N, –).
d) Déterminez quelle borne de la batterie est à la terre, connectée au châssis. Si la borne négative est connectée au châssis (comme dans la plupart des véhicules), voir (e). Si la borne positive est connectée au châssis, voir (f).
e) Pour les véhicules à la terre négative, connectez d'abord la pince POSITIVE (ROUGE) depuis le chargeur à la borne POSITIVE (POS, P, +) non mise à la terre de la batterie. Connectez la pince NÉGATIVE (NOIRE) au châssis du véhicule ou au bloc moteur à l'écart de la batterie. Ne raccordez pas les pinces du chargeur à un carburateur, à une durite ou à des corps en tôle. Connectez à une pièce métallique de forte épaisseur du châssis ou du bloc moteur.
f) Pour les véhicules à la terre positive, connectez d'abord la pince NÉGATIVE (NOIRE) depuis le chargeur à la borne NÉGATIVE (NEG, N, –) non mise à la terre de la batterie. Connectez la pince POSITIVE (ROUGE) au châssis du véhicule ou au bloc moteur à l'écart de la batterie. Ne raccordez pas les pinces du chargeur à un carburateur, à une durite ou à des corps en tôle. Connectez à une pièce métallique de forte épaisseur du châssis ou du bloc moteur.
g) Lors de la déconnexion du chargeur, placez les interrupteurs sur off (éteint), déconnectez le cordon secteur, retirer la pince du châssis du véhicule et ensuite retirez la pince de la cosse de la batterie.
h) Voir les instructions de fonctionnement pour obtenir des informations au sujet de la durée de la charge.
16) SUIVEZ CES ÉTAPES LORSQUE LA BATTERIE EST HORS DU VÉHICULE. UNE ÉTINCELLE À PROXIMITÉ DE LA BATTERIE PEUT PROVOQUER UNE EXPLOSION DE LA BATTERIE. POUR RÉDUIRE LE RISQUE D'UNE ÉTINCELLE À PROXIMITÉ DE LA BATTERIE : a) Vérifiez la polarité des bornes de la batterie. La borne de la batterie POSITIVE
(POS, P, +) a généralement un diamètre plus grand que la borne NÉGATIVE (NÉG, N, –).
b) Fixez un câble de batterie d'au moins 24 pouces de calibre 6 (AWG) isolé à la borne de la batterie NÉGATIVE (NÉG, N, –).
c) Connectez la pince POSITIVE (ROUGE) du chargeur à la borne POSITIVE (POS, P, +) de la batterie.
d) Placez-vous et tenez l'extrémité libre du câble aussi loin de la batterie que possible - puis connectez la pince NÉGATIVE (NOIRE) à l'extrémité libre du câble.
e) Ne faites pas face à la batterie lors de la connexion finale. f) Pour déconnecter le chargeur, procédez toujours dans l'ordre inverse de la
procédure de connexion et rompez la première connexion aussi loin que possible de la batterie dans la limite pratique.
g) Une batterie marine (bateau) doit être retirée et chargée à terre. Pour la charger à bord, un équipement spécialement conçu pour une utilisation marine est nécessaire.
12
Cet appareil peut être utilisé par les enfants de 8 ans et au-dessus et par des personnes à capacités physiques, sensorielles ou intellectuelles réduites ou qui manquent d'expérience et de connaissances, si elles ont reçu des instructions quant à l'utilisation de l'appareil d'une façon sûre et si elles comprennent les dangers impliqués.
Les enfants ne doivent pas jouer avec l'appareil. Le nettoyage et l'entretien ne doivent pas être faits par des enfants sans surveillance.
Le cordon d'alimentation ne peut pas être remplacé. Si le cordon est endommagé l'appareil doit être mis au rebut.
Examinez le chargeur de batterie régulièrement pour les dommages éventuels, en particulier le cordon, la fiche et le boîtier, si le chargeur de la batterie est endommagé, il ne doit pas être utilisé jusqu'à ce qu'il soit réparé.
Ce symbole indique une collecte séparée pour les équipements électriques et électroniques
Avertissement de la FCC Titre 47 Sous-partie, 15.105(b) Remarque : Cet équipement a été testé et déclaré conforme aux limites d'un appareil numérique de classe B, selon la partie 15 des règles FCC. Ces limites sont conçues pour fournir une protection raisonnable contre les interférences nuisibles dans une installation résidentielle. Cet équipement génère, utilise et peut émettre de l'énergie radio fréquence et, s'il n'est pas installé et utilisé conformément aux instructions, peut provoquer des interférences nuisibles à la réception de la radio ou de la télévision, ce qui peut être déterminé par l'arrêt et la marche de l'appareil, l'utilisateur est encouragé à essayer de corriger les interférences avec une ou plusieurs des mesures suivantes :
- Réorientez/déplacez l'antenne de réception. - Augmentez la distance entre l'équipement et le récepteur. - Connectez l'équipement à une sortie sur un circuit différent de celui sur
lequel le récepteur est branché. Consultez le revendeur ou un technicien radio/télévision pour obtenir de l'aide.
ICES-001 : Générateurs de fréquence radio industriels,
scientifiques et médicaux (ISM) Ce produit a été testé par rapport aux normes indiquées et jugé conforme au Code de l'Industrie Canada ES-001 et la procédure de mesure selon la norme CISPR 11.
CAN ICES-1/NMB-1
13
MANUEL UTILISATEUR
CHARGEMENT AUTOMATIQUE ET SURVEILLANCE DE L'ÉTAT DE LA BATTERIE : Les chargeurs Battery Tender® sont entièrement automatiques et peuvent être laissés connectés à la fois au courant alternatif et à la batterie qui est en charge pendant de longues périodes de temps. La puissance de sortie, la tension et le courant dépendent de l'état de la batterie qui est en charge. Les chargeurs Battery Tender®plusieurs indicateurs DEL d'état, qui fournissent un moyen visuel afin de déterminer le mode de fonctionnement du chargeur et donc l'état de la batterie connectée au chargeur.
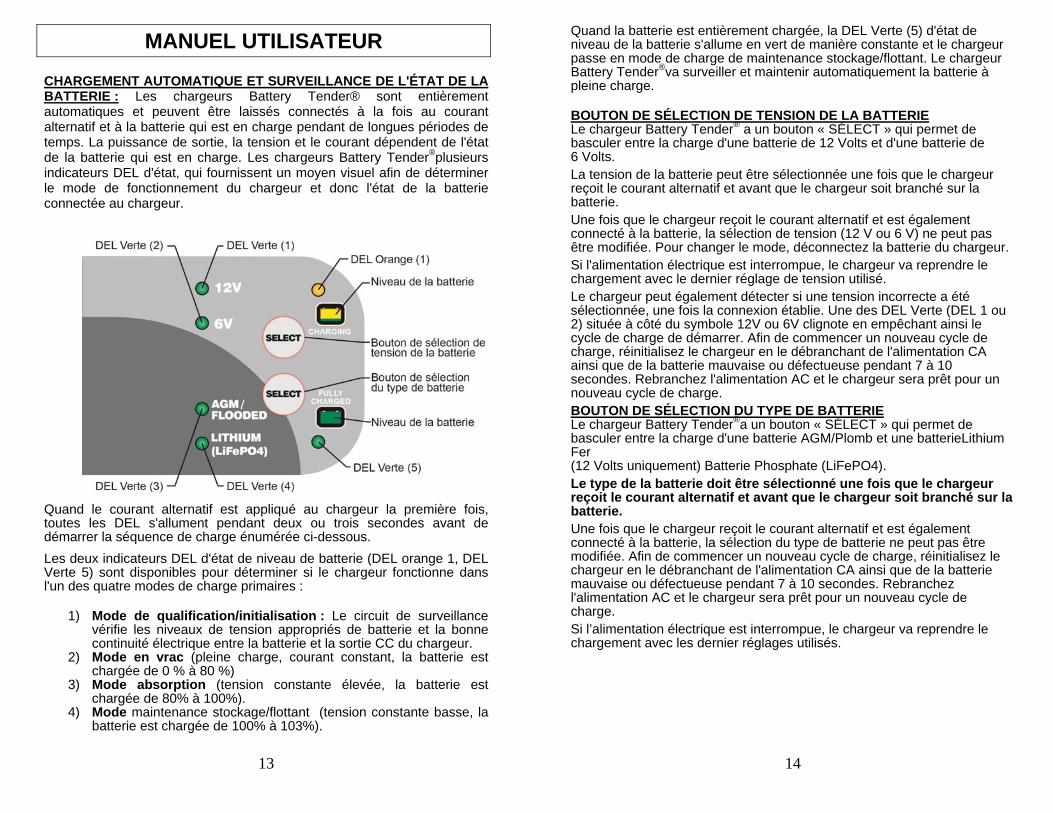
Quand le courant alternatif est appliqué au chargeur la première fois, toutes les DEL s'allument pendant deux ou trois secondes avant de démarrer la séquence de charge énumérée ci-dessous. Les deux indicateurs DEL d'état de niveau de batterie (DEL orange 1, DEL Verte 5) sont disponibles pour déterminer si le chargeur fonctionne dans l'un des quatre modes de charge primaires :
1) Mode de qualification/initialisation : Le circuit de surveillance vérifie les niveaux de tension appropriés de batterie et la bonne continuité électrique entre la batterie et la sortie CC du chargeur.
2) Mode en vrac (pleine charge, courant constant, la batterie est chargée de 0 % à 80 %)
3) Mode absorption (tension constante élevée, la batterie est chargée de 80% à 100%).
4) Mode maintenance stockage/flottant (tension constante basse, la batterie est chargée de 100% à 103%).
14
Quand la batterie est entièrement chargée, la DEL Verte (5) d'état de niveau de la batterie s'allume en vert de manière constante et le chargeur passe en mode de charge de maintenance stockage/flottant. Le chargeur Battery Tender®va surveiller et maintenir automatiquement la batterie à pleine charge.
BOUTON DE SÉLECTION DE TENSION DE LA BATTERIE Le chargeur Battery Tender® a un bouton « SÉLECT » qui permet de basculer entre la charge d'une batterie de 12 Volts et d'une batterie de 6 Volts. La tension de la batterie peut être sélectionnée une fois que le chargeur reçoit le courant alternatif et avant que le chargeur soit branché sur la batterie. Une fois que le chargeur reçoit le courant alternatif et est également connecté à la batterie, la sélection de tension (12 V ou 6 V) ne peut pas être modifiée. Pour changer le mode, déconnectez la batterie du chargeur. Si l'alimentation électrique est interrompue, le chargeur va reprendre le chargement avec le dernier réglage de tension utilisé. Le chargeur peut également détecter si une tension incorrecte a été sélectionnée, une fois la connexion établie. Une des DEL Verte (DEL 1 ou 2) située à côté du symbole 12V ou 6V clignote en empêchant ainsi le cycle de charge de démarrer. Afin de commencer un nouveau cycle de charge, réinitialisez le chargeur en le débranchant de l'alimentation CA ainsi que de la batterie mauvaise ou défectueuse pendant 7 à 10 secondes. Rebranchez l'alimentation AC et le chargeur sera prêt pour un nouveau cycle de charge. BOUTON DE SÉLECTION DU TYPE DE BATTERIE Le chargeur Battery Tender®a un bouton « SÉLECT » qui permet de basculer entre la charge d'une batterie AGM/Plomb et une batterieLithium Fer (12 Volts uniquement) Batterie Phosphate (LiFePO4). Le type de la batterie doit être sélectionné une fois que le chargeur reçoit le courant alternatif et avant que le chargeur soit branché sur la batterie. Une fois que le chargeur reçoit le courant alternatif et est également connecté à la batterie, la sélection du type de batterie ne peut pas être modifiée. Afin de commencer un nouveau cycle de charge, réinitialisez le chargeur en le débranchant de l'alimentation CA ainsi que de la batterie mauvaise ou défectueuse pendant 7 à 10 secondes. Rebranchez l'alimentation AC et le chargeur sera prêt pour un nouveau cycle de charge. Si l’alimentation électrique est interrompue, le chargeur va reprendre le chargement avec les dernier réglages utilisés.
15
MODE DE RÉCUPÉRATION AUTOMATIQUE DU LITHIUM PHOSPHATE DE FER ( LIFEPO4) Si vous essayez de charger une batterie à plat 12 V Lithium-Phosphate de fer (LiFePO4) avec une très basse tension, 4 à 8 volts, le chargeur bascule automatiquement en mode de récupération. Dans ce mode, la DEL vert (4) clignote, la DEL de 12V (1) et la DEL orange seront fixes. En cas de réussite et une fois terminé le chargeur revient automatiquement à la charge normale de cycle. Il y a une limite de trois (3) heures fixée pour ce processus de récupération. Si l'on ne réussit pas la DEL orange (1) et la DEL verte (5) vont basculer en avant et en arrière. Il continuera cette séquence jusqu'à ce que le chargeur soit déconnecté de la source de courant AC. Si cela se produit il y a de bonnes chances que la batterie ait déjà été endommagé en raison de la basse tension et ne puisse pas être récupérée. ATTENTION : LE CHARGEUR Battery Tender® A UN CIRCUIT SANS ÉTINCELLE. Les pinces crocodiles de sortie ou les cosses ne produiront pas d'étincelles quand elles se touchent. Le chargeur Battery Tender® ne produira pas une tension de sortie jusqu'à ce qu'il détecte au moins 2 Volts de la batterie au Plomb/AGM ou 4 Volts de la batterie Lithium Phosphate de fer. Il doit être raccordé à une batterie en respectant la bonne polarité avant qu'il commence à charger une batterie. Ainsi, si vous branchez le cordon d'alimentation sur une prise électrique CA, et si les pinces crocodiles de sortie ou les cosses ne sont pas connectées à une batterie, et si vous faites se toucher les pinces crocodiles ou cosses, il y n'aura aucune étincelle électrique.
REMARQUE : LES PINCES DE SORTIE OU LES COSSES DOIVENT ÊTRE RACCORDÉES À UNE BATTERIE AVANT QUE LE CHARGEUR PUISSE PRODUIRE UNE TENSION DE SORTIE.
TEMPS REQUIS POUR CHARGER UNE BATTERIE : Le chargeur Battery Tender® numéro de pièce 022-0200 charge à raison de 1,25 ampères-heures ou 1,25 Amps. Ainsi, une batterie entièrement déchargée de 15 Ah prendra environ 9 heures½pour se recharger à 80 % de sa capacité. Le chargeur Battery Tender® numéro de pièce 022-0209 charge à raison de 4 ampères-heures ou 4,0 Amps. Ainsi, une batterie entièrement déchargée de 15 Ah prendra environ 3 heures pour se recharger à 80 % de sa capacité. TRAVAILLER AVEC UNE BATTERIE À PLAT OU UNE BATTERIE AVEC UNE TRÈS BASSE TENSION : Si vous essayez de charger une batterie à plat ayant une tension inférieure à 2 Volts pour une batterie Plomb/AGM ou 4 Volts pour une batterie Lithium Phosphate de fer, le chargeur Battery Tender® ne démarrera pas. Un circuit interne de sécurité empêche le chargeur de générer n'importe quelle tension de sortie à moins qu'il détecte au moins 2 Volts pour une batterie Plomb/AGM ou 4 Volts pour une batterie Lithium Phosphate de fer, à la sortie du chargeur. Dans cette situation, la DEL orange va continuer à clignoter, indiquant qu'aucune charge n'a été initiée.
16
REMARQUE : Si une batterie d'accumulateurs au plomb de 12 Volts a une tension de sortie de moins de 9 Volts lorsqu'elle est au repos, quand elle n'est pas en charge ni ne fournit du courant électrique à une charge extérieure, il y a de bonnes chances pour que la batterie soit défectueuse. Comme cadre de référence, une batterie à accumulateur au plomb de 12 Volts complètement chargée aura un état de repos, tension sans charge d'environ 12,9 Volts. Une batterie d'accumulateurs au plomb de 12 Volts complètement déchargée aura un état de repos, tension sans charge d'environ 11,4 Volts. Cela signifie qu'un changement de tension de seulement 1,5 Volts représente l'ensemble de la charge de 0 % à 100 % sur une batterie d'accumulateur au plomb de 12 Volts. Selon le fabricant et l'âge de la batterie, les tensions spécifiques peuvent varier de quelques dixièmes de volt, mais la gamme de 1,5 Volts sera toujours un bon indicateur du % de charge de la batterie.
TÉMOIN LUMINEUX D'ÉTAT : Si le voyant ne s'allume pas, alors la batterie n'est pas correctement connectée et/ou le chargeur n'est pas relié au secteur. Ce qui suit décrit le fonctionnement des témoins lumineux :
CLIGNOTEMENT TÉMOIN ORANGE (DEL orange 1) – Le clignotement de la DEL orange indique que le chargeur de batterie dispose de courant alternatif et que le microprocesseur fonctionne correctement. Si la DEL orange continue de clignoter, alors soit la tension de la batterie est trop faible (moins de 2 Volts pour une batterie Plomb/AGM ou 4 Volts pour une batterie Lithium Phosphate de fer soit les pinces crocodile ou les cosses ne sont pas connectées correctement.
UNE ALTERNANCE VERT/ORANGE (DEL orange 1 et DEL verte 5) Ceci indique le chargeur de batterie a dépassé la limite de temps dans le mode de récupération de la batterie (voir page 5 pour obtenir des explications complètes). Inversez la polarité de la connexion à la batterie.
TÉMOIN ORANGE ALLUMÉ CONSTANT (DEL orange 1) – Quand la DEL orange est allumée en permanence, une batterie est correctement connectée et le chargeur est en train de charger la batterie. La DEL orange restera allumée jusqu'à ce que le chargeur termine la phase de chargement.
CLIGNOTEMENT TÉMOIN VERT (DEL Verte 5) – Lorsque la DEL verte clignote et que la DEL orange (DEL orange 1) est allumée de manière constante, la batterie est chargée à plus de 80 % et peut être enlevée du chargeur et utilisée si nécessaire. Quand cela est possible, laissez la batterie en charge jusqu'à ce que le témoin vert soit allumé de manière constante.
TÉMOIN VERT CONSTANT (DEL Verte 5) – Quand le témoin vert est allumé de manière constante, la charge est terminée et la batterie peut être remise en service si nécessaire. Elle peut également rester connectée pour maintenir la batterie pour une durée indéterminée.
17
DÉPANNAGE 1) Si le chargeur ne s'allume pas et qu'aucune DEL ne s'illumine.
a. Vérifiez que la prise secteur transmet le courant en branchant une lampe, un appareil ou un voltmètre.
2) La DEL verte (chargement complet)(5) s'allume immédiatement lors de la charge d'une batterie déchargée.
a. La batterie est probablement défectueuse, amenez-la au concessionnaire pour la faire tester.
3) Lors de la charge d’une batterie, la DEL verte (chargement complet) ne s'allume jamais.
a. La batterie peut être défectueuse, amenez-la au concessionnaire pour la faire tester.
b. La batterie a un appel de courant excessif, retirez ou débranchez la batterie de l'équipement.
4) La DEL orange continue de clignoter même avec une connexion à la batterie :
a. Vérifiez le fusible dans le câble accessoire. b. La tension de la batterie est trop faible.
5) La DEL verte (1) 12V clignote.
a. La batterie est endommagée ou la tension de la batterie qui a été sélectionnée n'est pas correcte.
6) La DEL verte (2) 6V clignote.
a. La batterie est endommagée ou la tension de la batterie qui a été sélectionnée n'est pas correcte.
7) Les DEL orange et verte basculent.
a. Inversez la polarité de la connexion à la batterie. b. La minuterie de sécurité des chargeurs s'est activée du fait que la
batterie n'atteint pas sa tension optimale. La batterie peut être défectueuse, amenez-la au concessionnaire pour la faire tester.
18
INFORMACIÓN IMPORTANTE DE SEGURIDAD 1) GUARDE ESTAS INSTRUCCIONES – Este manual contiene instrucciones de seguridad
y funcionamiento importantes para el modelo de cargador de batería N/P 022-0200 y N/P 022-0209.
2) No exponga el cargador a lluvia ni nieve. 3) El uso de un accesorio no recomendado o vendido por el fabricante del cargador de
baterías puede resultar en un riesgo de incendio, descarga eléctrica o lesiones a las personas.
4) Para reducir el riesgo de dañar el enchufe y el cable, tire del enchufe y no del cable al desconectar el cargador.
5) No debe utilizarse una extensión de cable a menos que sea absolutamente necesario. El uso incorrecto de una extensión puede resultar en un riesgo de incendio y descarga eléctrica. Si un cable de extensión debe ser utilizado, asegúrese de lo siguiente: a) Las clavijas del enchufe del cable de extensión sean del mismo número, tamaño y
forma que las del enchufe del cargador; b) El cable de extensión esté conectado correctamente y en buenas condiciones
eléctricas; y c) El calibre del cable sea suficiente para el amperaje de CA de carga como se
especifica en la Tabla 1
6) No utilice el cargador con un cable o enchufe dañado - reemplace el cable o el enchufe de inmediato.
7) No utilice el cargador si ha recibido un golpe fuerte, se ha caído o se ha dañado de alguna forma, llévelo a un técnico calificado.
8) No desarme el cargador, llévelo a un técnico de servicio calificado cuando se requiera mantenimiento o reparación. Un montaje incorrecto puede resultar en un riesgo de descarga eléctrica o un incendio.
9) Para reducir el riesgo de descarga eléctrica, desenchufe el cargador del tomacorriente antes de intentar cualquier mantenimiento o limpieza. Desactivar los controles no reducirá este riesgo.
10) ADVERTENCIA - RIESGO DE GASES EXPLOSIVOS. a) TRABAJAR CERCA DE UNA BATERÍA ES PELIGROSO. LAS BATERÍAS
GENERAN GASES EXPLOSIVOS DURANTE SU FUNCIONAMIENTO NORMAL. POR ESTA RAZÓN, ES DE SUMA IMPORTANCIA QUE SIGA LAS INSTRUCCIONES CADA VEZ QUE UTILICE EL CARGADOR.
b) Para reducir el riesgo de explosión de la batería, siga estas instrucciones y las publicadas por el fabricante de la batería y el fabricante de cualquier equipo que vaya a utilizar cerca de la batería. Revise con cuidado las marcas en estos productos y en el motor.
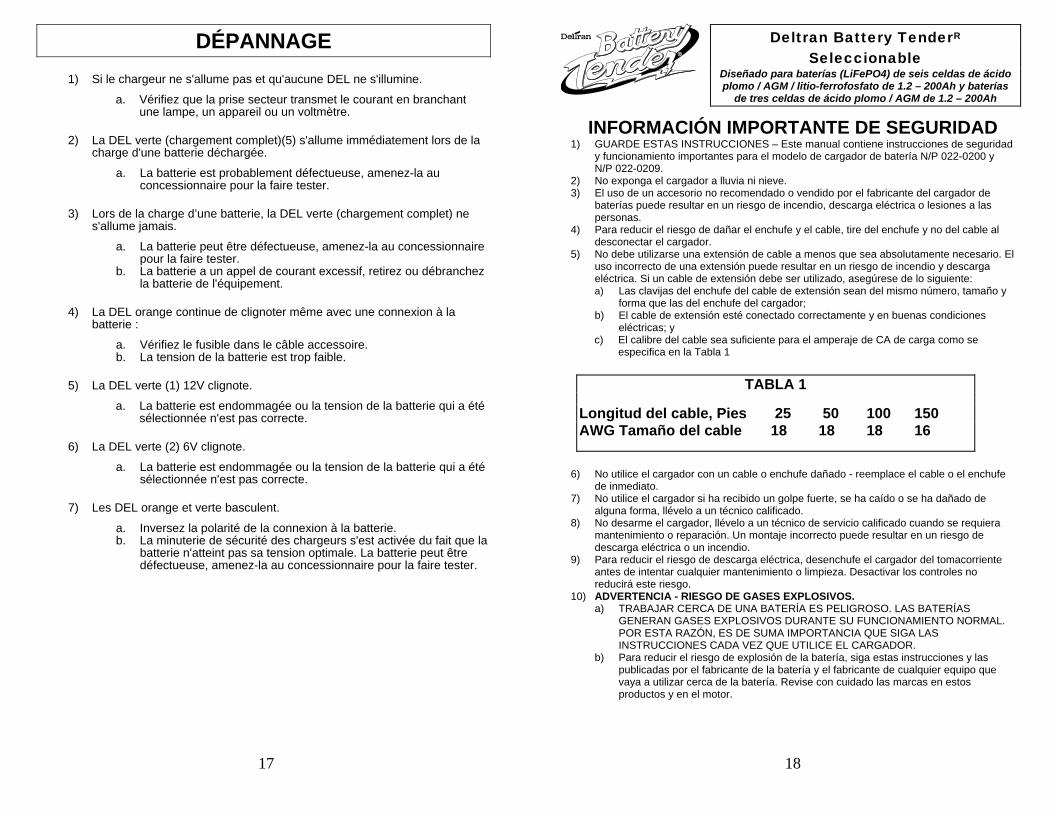
Deltran Battery TenderR Seleccionable
Diseñado para baterías (LiFePO4) de seis celdas de ácido plomo / AGM / litio-ferrofosfato de 1.2 – 200Ah y baterías
de tres celdas de ácido plomo / AGM de 1.2 – 200Ah
TABLA 1
Longitud del cable, Pies 25 50 100 150 AWG Tamaño del cable 18 18 18 16
19
11) PRECAUCIONES PERSONALES a) Considere la posibilidad de tener a alguien lo suficientemente cerca para acudir en
su ayuda cuando trabaje cerca de una batería. b) Tenga mucha agua fresca y jabón en caso de que el ácido de la batería entre en
contacto con su piel, ropa u ojos. c) Use protección ocular y ropa protectora. Evite tocarse los ojos cuando trabaje cerca
de la batería. d) Si el ácido de la batería entra en contacto con su piel o ropa, lave inmediatamente
con agua y jabón. Si el ácido entra en sus ojos, inunde inmediatamente sus ojos con agua corriente fría durante al menos 10 minutos y busque atención médica de inmediato.
e) NUNCA fume ni permita chispas o llamas cerca de la batería o del motor. f) Tenga especial cuidado para reducir el riesgo de dejar caer una herramienta de
metal sobre la batería. Podría causar una chispa o un cortocircuito en la batería u otra parte eléctrica que pueda provocar una explosión.
g) Quítese los elementos metálicos personales como anillos, pulseras, collares y relojes al trabajar con una batería. Una batería puede producir una corriente de cortocircuito lo suficientemente alta como para soldar un anillo o similar al metal, causando una quemadura grave.
h) Solo utilice el cargador para cargar una batería de ácido plomo / AGM / litio-ferrofosfato (LiFePO4). No está diseñada para suministrar energía a un sistema eléctrico de bajo voltaje que no sea en una aplicación de arranque de motor. No utilice el cargador de la batería para cargar pilas secas que se utilizan comúnmente con electrodomésticos. Estas baterías pueden explotar y causar lesiones a las personas y daños a la propiedad.
i) NUNCA cargue una batería congelada. 12) PREPARACIÓN PARA CARGAR
a) Si es necesario quite la batería del vehículo para cargarla, siempre retire la terminal con conexión a tierra de la batería primero. Asegúrese de que todos los accesorios del vehículo estén apagados, para no generar un arco.
b) Asegúrese de que la zona alrededor de la batería esté bien ventilada mientras la batería se está cargando.
c) Limpie las terminales de la batería. Tenga cuidado de evitar que la corrosión entre en contacto con los ojos.
d) Agregue agua destilada en cada celda hasta que el ácido de la batería alcance el nivel especificado por el fabricante de la batería. No sobrellene. Para una batería sin tapas de las celdas extraíbles, tal como las baterías de ácido plomo reguladas por válvula, siga cuidadosamente las instrucciones de recarga del fabricante.
e) Estudie todas las precauciones específicas de los fabricantes de baterías, tales como quitar o no quitar las tapas de las celdas mientras se carga y los índices de carga recomendados.
f) Determine el voltaje de la batería al referirse al manual del propietario del vehículo y asegúrese de que el interruptor selector de voltaje de salida se ajuste a la tensión correcta. No utilice el cargador de baterías a menos que la tensión de la batería coincida con el voltaje de salida del cargador.
13) UBICACIÓN DEL CARGADOR a) Coloque el cargador tan lejos de la batería como los cables de corriente lo
permiten. b) Nunca coloque el cargador directamente sobre la batería que se está cargando, los
gases de la batería corroerán y dañarán el cargador. c) Nunca permita que el ácido de la batería gotee sobre el cargador al leer la
gravedad específica del electrolito o llenar la batería. d) No utilice el cargador en un área cerrada a la ventilación ni la restrinja de ninguna
manera. e) No coloque una batería encima del cargador.
20
14) PRECAUCIONES DE CONEXIÓN DE CC
a) Conecte y desconecte los clips de salida de CC solo después de establecer cualquier cargador en la posición “off” (apagado) y quitar el cable de CA de la toma eléctrica. Nunca permita que los clips se toquen entre sí.
b) Coloque los clips en la batería y el chasis como se indica en 15(e), 15(f), y 16(b) a través de 16(d).
15) SIGA ESTOS PASOS CUANDO LA BATERÍA SE INSTALE EN EL VEHÍCULO. UNA CHISPA CERCA DE LA BATERÍA PUEDE CAUSAR EXPLOSIÓN DE LA BATERÍA. PARA REDUCIR EL RIESGO DE UNA CHISPA CERCA DE LA BATERÍA: a) Coloque los cables CA y CC para reducir el riesgo de daños por el cofre, puerta o
parte móvil del motor. b) Manténgase alejado de las aspas del ventilador, correas, poleas y otras partes que
puedan causar lesiones a las personas. c) Compruebe la polaridad de los bornes de la batería. El borne POSITIVO (POS, P,
+) de la batería por lo general tiene un diámetro mayor que el borne NEGATIVO (NEG, N, –).
d) Determine qué borne de la batería tiene conexión a tierra mediante el chasis. Si el borne negativo está conectado al chasis (como en la mayoría de los vehículos), vea (e). Si el borne positivo está conectado al chasis, vea (f).
e) Para un vehículo con conexión a tierra por el negativo, conecte el clip del cargador de la batería POSITIVO (ROJO) al borne POSITIVO (POS, P, +) de la batería con conexión a tierra. Conecte el clip NEGATIVO (NEGRO) al chasis del vehículo o al bloque del motor lejos de la batería. No conecte el clip al carburador, las líneas de combustible, o partes del cuerpo de hoja de metal. Conecte a una pieza metálica de calibre pesado del bastidor o bloque del motor.
f) Para un vehículo con conexión a tierra por el positivo, conecte el clip del cargador de la batería NEGATIVO (NEGRO) al borne NEGATIVO (NEG, N, –) de la batería con conexión a tierra. Conecte el clip POSITIVO (ROJO) al chasis del vehículo o al bloque del motor lejos de la batería. No conecte el clip al carburador, las líneas de combustible, o partes del cuerpo de hoja de metal. Conecte a una pieza metálica de calibre pesado del bastidor o bloque del motor.
g) Al desconectar el cargador, apague los interruptores de apagado, desconecte el cable de CA, retire el clip del chasis del vehículo, y luego retire el clip de la terminal de la batería.
h) Consulte las instrucciones de funcionamiento de duración de la carga. 16) SIGA ESTOS PASOS CUANDO LA BATERÍA ESTÁ AFUERA DEL VEHÍCULO. UNA
CHISPA CERCA DE LA BATERÍA PUEDE CAUSAR LA EXPLOSIÓN DE LA MISMA. PARA REDUCIR EL RIESGO DE UNA CHISPA CERCA DE LA BATERÍA: a) Compruebe la polaridad de los bornes de la batería. El borne POSITIVO (POS, P,
+) de la batería por lo general tiene un diámetro mayor que el borne NEGATIVO (NEG, N, –).
b) Coloque un cable para batería aislado de al menos 24 pulgadas de largo calibre 6 (AWG) al borne NEGATIVO (NEG, N, -) de la batería.
c) Conecte el clip del cargador POSITIVO (ROJO) al borne POSITIVO (POS, P, +) de la batería.
d) Colóquese usted y el extremo libre del cable lo más lejos posible de la batería, luego conecte el clip NEGATIVO (NEGRO) del cargador al extremo libre del cable.
e) No se coloque frente a la batería al hacer la conexión final. f) Al desconectar el cargador, hágalo siempre en la secuencia inversa al
procedimiento de conexión y rompa primero la conexión tan lejos de la batería como sea posible.
g) Una batería marina (barco) debe ser removida y cargarse en tierra. Para cargarla a bordo se requiere un equipo especialmente diseñado para uso marino.
21
Este aparato puede ser utilizado por niños de 8 años y mayores y las personas con capacidades físicas, sensoriales o mentales reducidas o falta de experiencia y conocimiento si han sido supervisados o instruidos acerca del uso del aparato de forma segura y comprender el peligro implicado.
Los niños no deben jugar con el aparato. La limpieza y mantenimiento del
usuario no deberá ser realizado por niños sin supervisión.
El cable de alimentación no puede ser reemplazado. Si el cable está dañado el aparato debe ser desechado.
Examine el cargador de baterías con regularidad en busca de daños, especialmente el cable, el enchufe y el recinto, si el cargador de la batería está dañada, no debe ser utilizado hasta que haya sido reparado.
Este símbolo indica la recolección selectiva de aparatos eléctricos y electrónicos
22
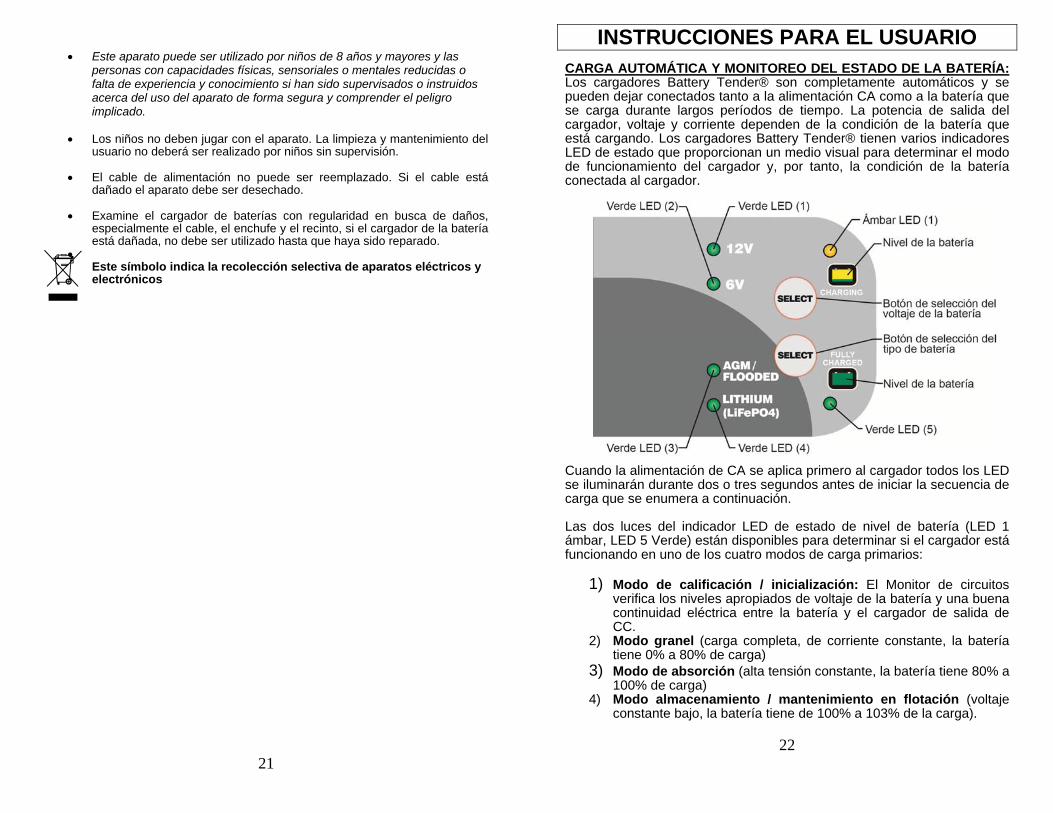
INSTRUCCIONES PARA EL USUARIO CARGA AUTOMÁTICA Y MONITOREO DEL ESTADO DE LA BATERÍA: Los cargadores Battery Tender® son completamente automáticos y se pueden dejar conectados tanto a la alimentación CA como a la batería que se carga durante largos períodos de tiempo. La potencia de salida del cargador, voltaje y corriente dependen de la condición de la batería que está cargando. Los cargadores Battery Tender® tienen varios indicadores LED de estado que proporcionan un medio visual para determinar el modo de funcionamiento del cargador y, por tanto, la condición de la batería conectada al cargador.
Cuando la alimentación de CA se aplica primero al cargador todos los LED se iluminarán durante dos o tres segundos antes de iniciar la secuencia de carga que se enumera a continuación. Las dos luces del indicador LED de estado de nivel de batería (LED 1 ámbar, LED 5 Verde) están disponibles para determinar si el cargador está funcionando en uno de los cuatro modos de carga primarios:
1) Modo de calificación / inicialización: El Monitor de circuitos verifica los niveles apropiados de voltaje de la batería y una buena continuidad eléctrica entre la batería y el cargador de salida de CC.
2) Modo granel (carga completa, de corriente constante, la batería tiene 0% a 80% de carga)
3) Modo de absorción (alta tensión constante, la batería tiene 80% a 100% de carga)
4) Modo almacenamiento / mantenimiento en flotación (voltaje constante bajo, la batería tiene de 100% a 103% de la carga).
23
Cuando la batería está completamente cargada, el indicador del estado de carga de la batería LED (5) verde se encenderá en sólido verde y el cargador cambiará a un modo de carga de almacenamiento / mantenimiento en flotación. El cargador Battery Tender® monitoreará automáticamente y mantendrá la batería con la caga completa. BOTÓN DE SELECCIÓN DE VOLTAJE DE LA BATERIA El cargador The Battery Tender ® tiene un botón "SELECT", que le permite cambiar entre cargar una batería AGM/Inundada de 12 voltios, una batería de litio-ferrofosfato (LiFePO4) de 12 voltios o una batería AGM/Inundada de 6 voltios. El voltaje de la batería se puede seleccionar una vez que el cargador ha aplicado la alimentación de CA y antes de que el cargador sea conectado a la batería. Una vez que el cargador tiene alimentación de CA y también está conectado a la batería el voltaje (12V o 6V) la selección no puede ser cambiada. Para cambiar el modo, desconecte la batería del cargador. Si se interrumpe la alimentación de CA del cargador se reanudará la carga en el último ajuste de voltaje de la batería utilizada. El cargador también puede detectar si se ha seleccionado el voltaje incorrecto de la batería o si la batería está defectuosa una vez que la conexión se ha hecho a la batería. Uno de los LED verde (LED 1 o 2) situados junto al símbolo 12V o 6V parpadeará evitando que el ciclo de carga se inicie. Con el fin de iniciar un nuevo ciclo de carga, reinicie el cargador mediante desconectarlo de la alimentación de CA, así como la batería incorrecta o defectuosa durante 7-10 segundos. Vuelva a conectar la alimentación de CA y el cargador estará listo para un nuevo ciclo de carga. BOTÓN DE SELECCIÓN DEL TIPO DE BATERÍA El cargador Battery Tender ® tiene un botón “SELECT” que le permite cambiar entre cargar una batería AGM /Inundada o una de (solo 12 voltios) de litio-ferrofosfato (LiFePO4). El tipo de batería debe seleccionarse una vez que el cargador ha aplicado alimentación CA y antes de que el cargador sea conectado a la batería. Una vez que el cargador tenga alimentación CA y también sea conectado a la batería, la selección del tipo de batería no puede ser cambiado. Con el fin de iniciar un nuevo ciclo de carga, reinicie el cargador mediante desconectarlo de la alimentación de CA, así como la batería incorrecta o defectuosa durante 7-10 segundos. Vuelva a conectar la alimentación de CA y el cargador estará listo para un nuevo ciclo de carga. Si se interrumpe la alimentación CA del cargador se reanudará la carga en el último ajuste utilizado. MODO DE RECUPERACIÓN AUTOMÁTICO DE LITIO-FERROFISFATI LiFePO4)
24
Si intenta cargar una batería muerta de litio-ferrofosfato de 12 voltios (LiFePO4) con un voltaje muy bajo, 4-8 voltios, el cargador se cambiará automáticamente al modo de Recuperación. En este modo el LED verde (4) parpadea, el LED (1) de 12V y el LED ámbar estarán encendidos sin parpadear. Si tiene éxito y una vez que se complete la carga cambiarán automáticamente de nuevo al ciclo de carga normal. Hay un límite de tiempo de tres (3) horas para este proceso de recuperación. Si no tiene éxito el LED (1) ámbar y el LED (5) verde cambiará de ida y vuelta. Continuará esta secuencia hasta que el cargador se desconecte de la fuente de CA. Si esto ocurre hay una buena probabilidad de que la batería haya sido dañada debido a la baja tensión y no puede ser recuperada. ATENCIÓN: El cargador Battery Tender ® TIENE UN CIRCUITO LIBRE DE CHISPA. Los clips de caimán o terminales de anillo de salida no hacen chispa cuando se tocan juntos. El cargador Battery Tender ® no producirá un voltaje de salida hasta que se detecten al menos 2 voltios de una batería Inundada / AGM o 4 voltios de una batería de litio-ferrofosfato. Debe ser conectado a una batería con la polaridad correcta antes de que comience la carga de una batería. Por lo tanto, si se conecta el cable de alimentación de CA en una toma de corriente de CA, y si los clips de caimán o terminales de anillo de salida no están conectados a una batería, y si toca los clips de caimán o terminales de anillo juntos, no habrá chispa eléctrica.
NOTA: LOS CLIPS O LAS TERMINALES DE ANILLOS DE SALIDA DEBEN SER CONECTADOS A LA BATERÍA ANTES DE QUE EL CARGADOR PUEDA PRODUCIR UN VOLTAJE DE SALIDA. TIEMPO NECESARIO PARA CARGAR LA BATERÍA: El número de pieza 022-0200 de Battery Tender® carga a razón de 1.25 amperios o 1.25 amperios-hora por hora. Por lo tanto, una batería completamente descargada de 15 Amp-Hora se llevará aproximadamente 9 ½ horas en recargar al 80% de capacidad. El número de pieza 022-0209 de Battery Tender® carga a razón de 4 amperios o 4.0 amperios-hora por hora. Por lo tanto, una batería completamente descargada de 15 Amp-Hora se llevará aproximadamente 3 horas en recargar al 80% de capacidad. TRABAJAR CON UNA BATERÍA MUERTA O UNA BATERIA CON UN VOLTAJE MUY BAJO: Si intenta cargar una batería muerta que tiene un voltaje por debajo de 2 voltios de una batería Inundada / AGM o de una batería de 4 voltios de litio-ferrofosfato, el cargador Battery Tender ® no arrancará. Un circuito interno de seguridad impide que el cargador genere cualquier tensión de salida a menos que se detecten al menos 2 voltios de una batería Inundada / AGM o una batería de 4 voltios de litio-ferrofosfato en la salida del cargador. En esta situación, el LED ámbar continuará parpadeando, indicando que la carga no se ha iniciado.
25
NOTA: Si una batería de ácido plomo de 12 voltios tiene un voltaje de salida de menos de 9 voltios cuando está en reposo, cuando no se esté cargada ni suministrando corriente eléctrica a una carga externa, hay una buena probabilidad de que la batería sea defectuosa. Como marco de referencia, una batería cargada totalmente de 12 voltios, una batería de ácido plomo tendrá un estado de reposo, sin carga de voltaje de aproximadamente 12.9 voltios. Una batería descargada totalmente de 12 voltios, de ácido plomo tendrá un estado de reposo, sin carga de voltaje de aproximadamente 11.4 voltios. Eso significa que un cambio de tensión de solo 1.5 voltios representa toda la gama de carga de 0% a 100% en una batería de 12 voltios, de ácido plomo. Dependiendo del fabricante, y la edad de la batería, los voltajes específicos variarán por unas pocas décimas de un voltio, pero el rango de 1.5 voltios todavía será un buen indicador del % de la carga de la batería. LUZ INDICADORA DE ESTADO: Si la luz no se enciende, entonces la batería no está correctamente conectada y / o el cargador no está conectado a la alimentación de CA. A continuación se describe la operación de luz:
LUZ ÁMBAR INTERMITENTE (LED 1 Ámbar) – El LED ámbar intermitente indica que el cargador de baterías tiene alimentación de CA disponible y que el microprocesador está funcionando correctamente. Si el LED ámbar sigue parpadeando, entonces o bien la tensión de la batería es demasiado baja (menos de 2 voltios para una batería Inundada/AGM o 4 voltios para una batería de litio-ferrofosfato) o los clips de caimán o terminales de anillo de salida no están correctamente conectados.
VERDE/ÁMBER ALTERNANDO (LED 1 ámbar y LED 5 verde)
Esto indica que el cargador de la batería se ha pasado del límite de tiempo, mientras que en el modo de Recuperación de la batería (vea la página 5 para la explicación completa). También invierta la polaridad de la conexión para la batería.
LUZ ÁMBAR ESTABLE (LED 1 ámbar) – Cada vez que el LED
ámbar está en estable, indica que una batería está conectada correctamente y que el cargador está cargando la batería. El LED ámbar permanecerá encendido hasta que el cargador complete la fase de carga.
LUZ VERDE PARPADEANDO (LED 5 verde) – Cuando el LED verde parpadea y el LED ámbar (LED 1 ámbar) está encendido la batería es mayor que el 80% de la carga y se puede retirar del cargador y utilizar, si es necesario. Siempre que sea posible, deje la batería en carga hasta que la luz verde no parpadee.
LUZ VERDE ENCENDIDA ESTABLE (LED 5 verde) – Cuando el LED verde se enciende estable, la carga se ha completado y la batería puede ser devuelta al servicio si es necesario. También puede dejar conectada para mantener la batería durante un período de tiempo indefinido.
26
SOLUCIÓN DE PROBLEMAS
1) Si el cargador no se enciende y ninguno LED se ilumina.
a. Asegúrese de que la toma de CA está suministrando energía mediante enchufar una lámpara, un aparato o un medidor de voltaje.
2) El LED (5) verde (carga completa) se enciende inmediatamente cuando
se carga una batería descargada. a. La batería probablemente está defectuosa, lleve la batería al
distribuidor para ser probada.
3) Al cargar una batería del LED (5) verde (carga completa) no se enciende. a. La batería probablemente está defectuosa, lleve la batería al
distribuidor para ser probada. b. La batería tiene un consumo de corriente excesivo, retire o
desconecte la batería del equipo.
4) El LED ámbar sigue parpadeando incluso con una conexión a la batería: a. Revise el fusible en el cable accesorio. b. El voltaje de la batería es demasiado bajo.
5) El LED (1) verde de 12V está parpadeando.
a. La batería está dañada o el voltaje de la batería incorrecta ha sido seleccionado.
6) El LED (2) verde de 6V está parpadeando.
a. La batería está dañada o el voltaje de la batería incorrecta ha sido seleccionado.
7) El LED (5) ámbar y verde (carga completa) están alternando.
a. Invierta la conexión de la polaridad a la batería. b. El temporizador de seguridad de los cargadores se han activado
debido a que la batería no alcanza su voltaje óptimo. La batería probablemente está defectuosa, lleve la batería al distribuidor para ser probada.
27
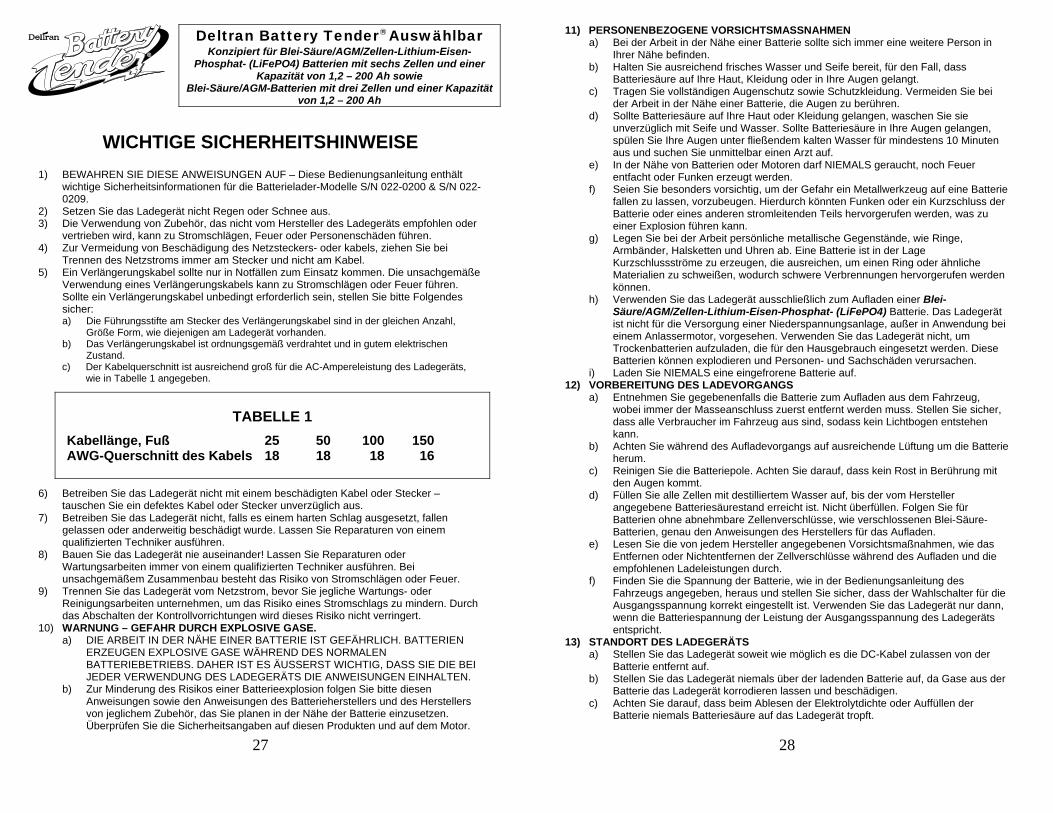
Deltran Battery TenderAuswählbar Konzipiert für Blei-Säure/AGM/Zellen-Lithium-Eisen-
Phosphat- (LiFePO4) Batterien mit sechs Zellen und einer Kapazität von 1,2 – 200 Ah sowie
Blei-Säure/AGM-Batterien mit drei Zellen und einer Kapazität von 1,2 – 200 Ah
WICHTIGE SICHERHEITSHINWEISE 1) BEWAHREN SIE DIESE ANWEISUNGEN AUF – Diese Bedienungsanleitung enthält
wichtige Sicherheitsinformationen für die Batterielader-Modelle S/N 022-0200 & S/N 022-0209.
2) Setzen Sie das Ladegerät nicht Regen oder Schnee aus. 3) Die Verwendung von Zubehör, das nicht vom Hersteller des Ladegeräts empfohlen oder
vertrieben wird, kann zu Stromschlägen, Feuer oder Personenschäden führen. 4) Zur Vermeidung von Beschädigung des Netzsteckers- oder kabels, ziehen Sie bei
Trennen des Netzstroms immer am Stecker und nicht am Kabel. 5) Ein Verlängerungskabel sollte nur in Notfällen zum Einsatz kommen. Die unsachgemäße
Verwendung eines Verlängerungskabels kann zu Stromschlägen oder Feuer führen. Sollte ein Verlängerungskabel unbedingt erforderlich sein, stellen Sie bitte Folgendes sicher: a) Die Führungsstifte am Stecker des Verlängerungskabel sind in der gleichen Anzahl,
Größe Form, wie diejenigen am Ladegerät vorhanden. b) Das Verlängerungskabel ist ordnungsgemäß verdrahtet und in gutem elektrischen
Zustand. c) Der Kabelquerschnitt ist ausreichend groß für die AC-Ampereleistung des Ladegeräts,
wie in Tabelle 1 angegeben.
TABELLE 1 Kabellänge, Fuß 25 50 100 150 AWG-Querschnitt des Kabels 18 18 18 16
6) Betreiben Sie das Ladegerät nicht mit einem beschädigten Kabel oder Stecker – tauschen Sie ein defektes Kabel oder Stecker unverzüglich aus.
7) Betreiben Sie das Ladegerät nicht, falls es einem harten Schlag ausgesetzt, fallen gelassen oder anderweitig beschädigt wurde. Lassen Sie Reparaturen von einem qualifizierten Techniker ausführen.
8) Bauen Sie das Ladegerät nie auseinander! Lassen Sie Reparaturen oder Wartungsarbeiten immer von einem qualifizierten Techniker ausführen. Bei unsachgemäßem Zusammenbau besteht das Risiko von Stromschlägen oder Feuer.
9) Trennen Sie das Ladegerät vom Netzstrom, bevor Sie jegliche Wartungs- oder Reinigungsarbeiten unternehmen, um das Risiko eines Stromschlags zu mindern. Durch das Abschalten der Kontrollvorrichtungen wird dieses Risiko nicht verringert.
10) WARNUNG – GEFAHR DURCH EXPLOSIVE GASE. a) DIE ARBEIT IN DER NÄHE EINER BATTERIE IST GEFÄHRLICH. BATTERIEN
ERZEUGEN EXPLOSIVE GASE WÄHREND DES NORMALEN BATTERIEBETRIEBS. DAHER IST ES ÄUSSERST WICHTIG, DASS SIE DIE BEI JEDER VERWENDUNG DES LADEGERÄTS DIE ANWEISUNGEN EINHALTEN.
b) Zur Minderung des Risikos einer Batterieexplosion folgen Sie bitte diesen Anweisungen sowie den Anweisungen des Batterieherstellers und des Herstellers von jeglichem Zubehör, das Sie planen in der Nähe der Batterie einzusetzen. Überprüfen Sie die Sicherheitsangaben auf diesen Produkten und auf dem Motor.
28
11) PERSONENBEZOGENE VORSICHTSMASSNAHMEN a) Bei der Arbeit in der Nähe einer Batterie sollte sich immer eine weitere Person in
Ihrer Nähe befinden. b) Halten Sie ausreichend frisches Wasser und Seife bereit, für den Fall, dass
Batteriesäure auf Ihre Haut, Kleidung oder in Ihre Augen gelangt. c) Tragen Sie vollständigen Augenschutz sowie Schutzkleidung. Vermeiden Sie bei
der Arbeit in der Nähe einer Batterie, die Augen zu berühren. d) Sollte Batteriesäure auf Ihre Haut oder Kleidung gelangen, waschen Sie sie
unverzüglich mit Seife und Wasser. Sollte Batteriesäure in Ihre Augen gelangen, spülen Sie Ihre Augen unter fließendem kalten Wasser für mindestens 10 Minuten aus und suchen Sie unmittelbar einen Arzt auf.
e) In der Nähe von Batterien oder Motoren darf NIEMALS geraucht, noch Feuer entfacht oder Funken erzeugt werden.
f) Seien Sie besonders vorsichtig, um der Gefahr ein Metallwerkzeug auf eine Batterie fallen zu lassen, vorzubeugen. Hierdurch könnten Funken oder ein Kurzschluss der Batterie oder eines anderen stromleitenden Teils hervorgerufen werden, was zu einer Explosion führen kann.
g) Legen Sie bei der Arbeit persönliche metallische Gegenstände, wie Ringe, Armbänder, Halsketten und Uhren ab. Eine Batterie ist in der Lage Kurzschlussströme zu erzeugen, die ausreichen, um einen Ring oder ähnliche Materialien zu schweißen, wodurch schwere Verbrennungen hervorgerufen werden können.
h) Verwenden Sie das Ladegerät ausschließlich zum Aufladen einer Blei-Säure/AGM/Zellen-Lithium-Eisen-Phosphat- (LiFePO4) Batterie. Das Ladegerät ist nicht für die Versorgung einer Niederspannungsanlage, außer in Anwendung bei einem Anlassermotor, vorgesehen. Verwenden Sie das Ladegerät nicht, um Trockenbatterien aufzuladen, die für den Hausgebrauch eingesetzt werden. Diese Batterien können explodieren und Personen- und Sachschäden verursachen.
i) Laden Sie NIEMALS eine eingefrorene Batterie auf. 12) VORBEREITUNG DES LADEVORGANGS
a) Entnehmen Sie gegebenenfalls die Batterie zum Aufladen aus dem Fahrzeug, wobei immer der Masseanschluss zuerst entfernt werden muss. Stellen Sie sicher, dass alle Verbraucher im Fahrzeug aus sind, sodass kein Lichtbogen entstehen kann.
b) Achten Sie während des Aufladevorgangs auf ausreichende Lüftung um die Batterie herum.
c) Reinigen Sie die Batteriepole. Achten Sie darauf, dass kein Rost in Berührung mit den Augen kommt.
d) Füllen Sie alle Zellen mit destilliertem Wasser auf, bis der vom Hersteller angegebene Batteriesäurestand erreicht ist. Nicht überfüllen. Folgen Sie für Batterien ohne abnehmbare Zellenverschlüsse, wie verschlossenen Blei-Säure-Batterien, genau den Anweisungen des Herstellers für das Aufladen.
e) Lesen Sie die von jedem Hersteller angegebenen Vorsichtsmaßnahmen, wie das Entfernen oder Nichtentfernen der Zellverschlüsse während des Aufladen und die empfohlenen Ladeleistungen durch.
f) Finden Sie die Spannung der Batterie, wie in der Bedienungsanleitung des Fahrzeugs angegeben, heraus und stellen Sie sicher, dass der Wahlschalter für die Ausgangsspannung korrekt eingestellt ist. Verwenden Sie das Ladegerät nur dann, wenn die Batteriespannung der Leistung der Ausgangsspannung des Ladegeräts entspricht.
13) STANDORT DES LADEGERÄTS a) Stellen Sie das Ladegerät soweit wie möglich es die DC-Kabel zulassen von der
Batterie entfernt auf. b) Stellen Sie das Ladegerät niemals über der ladenden Batterie auf, da Gase aus der
Batterie das Ladegerät korrodieren lassen und beschädigen. c) Achten Sie darauf, dass beim Ablesen der Elektrolytdichte oder Auffüllen der
Batterie niemals Batteriesäure auf das Ladegerät tropft.
29
d) Betreiben Sie das Ladegerät nicht in einem geschlossenen Bereich oder bei bei auf irgendeiner Weise beschränkten Lüftung.
e) Platzieren Sie niemals eine Batterie auf dem Ladegerät. 14) VORSICHTSMASSNAHMEN FÜR DEN GLEICHSTROMANSCHLUSS
a) Verbinden und Trennen Sie die Gleichstromklemmen nur dann, wenn alle Ladegerätschalter in der Position Aussind, trennen Sie das Netzkabel von der Stromversorgung auf die gleiche Weise. Achten Sie darauf, dass die Klemmen niemals miteinander in Berührung kommen.
b) Befestigen Sie Klemmen an der Batterie und der Karosserie wie in 15(e), 15(f), und 16(b) bis hin zu 16(d) angegeben.
15) FOLGEN SIE DIESEN SCHRITTEN, FALLS SICH DIE BATTERIE IM FAHRZEUG BEFINDET. EIN FUNKEN IN DER NÄHE DER BATTERIE KANN ZU EINER EXPLOSION FÜHREN. ZUR MINDERUNG DER FUNKENGEFAHR IN DER NÄHE DER BATTERIE: a) Positionieren Sie die Gleichstrom- und Wechselstromkabel an der Haube, Tür oder
bewegten Motorteilen. b) Bleiben Sie fern von Lüfterflügeln, Riemen, Scheiben und anderen Teilen, die
Personenschäden hervorrufen können. c) Prüfen Sie die Polarität der Batteriepole. Der PLUSPOL (POS, P, +) der Batterie
verfügt gewöhnlich über einen größeren Durchmesser als der MINUSPOL (NEG, N, –).
d) Bestimmen Sie den Massepol der Batterie, der mit der Karosserie verbunden ist. Siehe (e), falls der Minuspol mit der Karosserie geerdet sein sollte (wie bei den meisten Fahrzeugen). Siehe (f), falls der Pluspol mit der Karosserie geerdet sein sollte.
e) Verbinden Sie bei negativ-geerdeten Fahrzeugen die PLUSKLEMME (ROT) des Ladegeräts mit dem PLUSPOL (POS, P, +) des ungeerdeten Batteriepols. Verbinden Sie die MINUSKLEMME (SCHWARZ) mit der Fahrzeugkarosserie oder dem Motorblock, weg von der Batterie. Verbinden Sie die Klemme auf keinen Fall mit dem Vergaser, den Kraftstoffleitungen oder Karosserieblechteilen. Verbinden Sie die Klemme mit schweren metallischen Teilen des Rahmens oder dem Motorblock.
f) Verbinden Sie bei positiv-geerdeten Fahrzeugen die MINUSKLEMME (SCHWARZ) des Ladegeräts mit dem MINUSPOL (NEG, N, –) des ungeerdeten Batteriepols. Verbinden Sie die PLUSKLEMME (ROT) mit der Fahrzeugkarosserie oder dem Motorblock, weg von der Batterie. Verbinden Sie die Klemme auf keinen Fall mit dem Vergaser, den Kraftstoffleitungen oder Karosserieblechteilen. Verbinden Sie die Klemme mit schweren metallischen Teilen des Rahmens oder dem Motorblock.
g) Schalten Sie beim Trennen des Ladegeräts die Schalter in die Position „Aus“, trennen Sie das Netzkabel, entfernen Sie die Klemme von der Fahrzeugkarosserie und entfernen Sie anschließend die Klemme vom Batteriepol.
h) Für Informationen bezüglich der Ladedauer beziehen Sie sich bitte auf die Bedienungsanleitung.
16) FOLGEN SIE DIESEN SCHRITTEN, FALLS SICH DIE BATTERIE AUSSERHALB DES FAHRZEUGS BEFINDET. EIN FUNKEN IN DER NÄHE DER BATTERIE KANN ZU EINER EXPLOSION FÜHREN. ZUR MINDERUNG DER FUNKENGEFAHR IN DER NÄHE DER BATTERIE: a) Prüfen Sie die Polarität der Batteriepole. Der PLUSPOL (POS, P, +) der Batterie
verfügt gewöhnlich über einen größeren Durchmesser als der MINUSPOL (NEG, N, –).
b) Befestigen Sie mindestens einen 24-Zoll-langes isoliertes Batteriekabel mit 6er Kabelquerschnitt nach American Wire Gauge (AWG) am MINUSPOL (NEG, N, –).
c) Befestigen Sie die PLUSKLEMME (ROT) des Ladegeräts mit dem PLUSPOL (POS, P, +) der Batterie.
d) Positionieren Sie sich mit dem freien Kabelende soweit wie möglich von der Batterie entfernt – befestigen Sie anschließend die MINUSKLEMME (SCHWARZ) mit dem freien Kabelende.
e) Setzen Sie sich beim Herstellen der endgültigen Verbindung nicht der Batterie aus.
30
f) Achten Sie beim Trennen des Ladegeräts darauf, die Reihenfolge zur Verbindung in umgekehrter Reihenfolge einzuhalten und unterbrechen Sie die erste Verbindung mit möglichst viel Abstand von der Batterie.
g) Eine Marine-Batterie (Boot) muss ausgebaut und an Land aufgeladen werden. Um eine Batterie an Bord aufzuladen, muss speziell für den Marineeinsatz vorgesehene Ausrüstung eingesetzt werden.
Dieses Gerät kann von Kindern ab 8 Jahren sowie von Personen mit eingeschränkten körperlichen, sensorischen oder geistigen Fähigkeiten oder Personen mit mangelnder Erfahrung und mangelnden Kenntnissen verwendet werden, sofern diese beaufsichtigt oder für die sichere Anwendung des Geräts instruiert wurden und die mit der Benutzung verbundenen Gefahren verstehen.
Kinder dürfen mit dem Gerät nicht spielen. Reinigung und Wartung darf nicht von Kindern ohne Aufsicht durchgeführt werden.
Das Netzkabel kann nicht ersetzt werden. Ein Gerät mit beschädigtem Netzkabel sollte ausrangiert werden.
Untersuchen Sie das Ladegerät, insbesondere das Kabel, den Stecker und das Gehäuse, regelmäßig auf Schäden. Sollte das Ladegerät beschädigt sein, darf es solange nicht verwendet werden, bis eine Reparatur erfolgt ist.
Dieses Symbol zeigt die getrennte Sammlung von Elektro- und Elektronikgeräten an
31
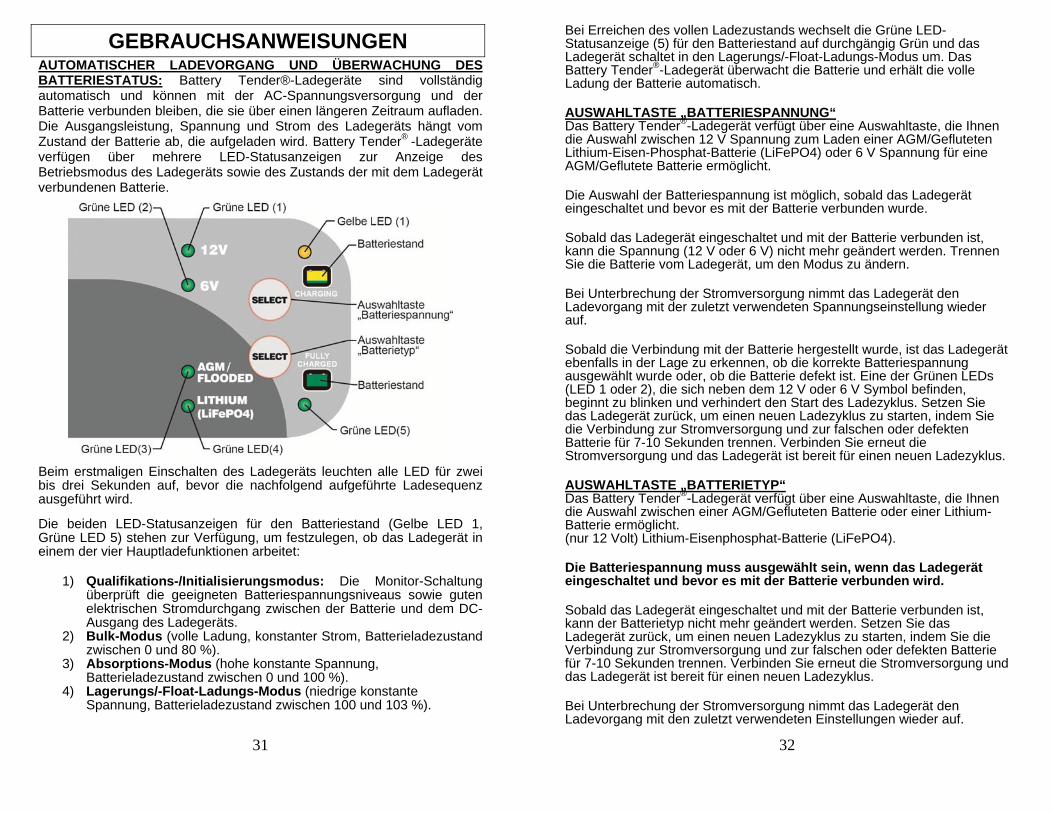
GEBRAUCHSANWEISUNGEN AUTOMATISCHER LADEVORGANG UND ÜBERWACHUNG DES BATTERIESTATUS: Battery Tender®-Ladegeräte sind vollständig automatisch und können mit der AC-Spannungsversorgung und der Batterie verbunden bleiben, die sie über einen längeren Zeitraum aufladen. Die Ausgangsleistung, Spannung und Strom des Ladegeräts hängt vom Zustand der Batterie ab, die aufgeladen wird. Battery Tender® -Ladegeräte verfügen über mehrere LED-Statusanzeigen zur Anzeige des Betriebsmodus des Ladegeräts sowie des Zustands der mit dem Ladegerät verbundenen Batterie.
Beim erstmaligen Einschalten des Ladegeräts leuchten alle LED für zwei bis drei Sekunden auf, bevor die nachfolgend aufgeführte Ladesequenz ausgeführt wird. Die beiden LED-Statusanzeigen für den Batteriestand (Gelbe LED 1, Grüne LED 5) stehen zur Verfügung, um festzulegen, ob das Ladegerät in einem der vier Hauptladefunktionen arbeitet:
1) Qualifikations-/Initialisierungsmodus: Die Monitor-Schaltung überprüft die geeigneten Batteriespannungsniveaus sowie guten elektrischen Stromdurchgang zwischen der Batterie und dem DC-Ausgang des Ladegeräts.
2) Bulk-Modus (volle Ladung, konstanter Strom, Batterieladezustand zwischen 0 und 80 %).
3) Absorptions-Modus (hohe konstante Spannung, Batterieladezustand zwischen 0 und 100 %).
4) Lagerungs/-Float-Ladungs-Modus (niedrige konstante Spannung, Batterieladezustand zwischen 100 und 103 %).
32
Bei Erreichen des vollen Ladezustands wechselt die Grüne LED-Statusanzeige (5) für den Batteriestand auf durchgängig Grün und das Ladegerät schaltet in den Lagerungs/-Float-Ladungs-Modus um. Das Battery Tender®-Ladegerät überwacht die Batterie und erhält die volle Ladung der Batterie automatisch.
AUSWAHLTASTE „BATTERIESPANNUNG“ Das Battery Tender®-Ladegerät verfügt über eine Auswahltaste, die Ihnen die Auswahl zwischen 12 V Spannung zum Laden einer AGM/Gefluteten Lithium-Eisen-Phosphat-Batterie (LiFePO4) oder 6 V Spannung für eine AGM/Geflutete Batterie ermöglicht.
Die Auswahl der Batteriespannung ist möglich, sobald das Ladegerät eingeschaltet und bevor es mit der Batterie verbunden wurde.
Sobald das Ladegerät eingeschaltet und mit der Batterie verbunden ist, kann die Spannung (12 V oder 6 V) nicht mehr geändert werden. Trennen Sie die Batterie vom Ladegerät, um den Modus zu ändern.
Bei Unterbrechung der Stromversorgung nimmt das Ladegerät den Ladevorgang mit der zuletzt verwendeten Spannungseinstellung wieder auf.
Sobald die Verbindung mit der Batterie hergestellt wurde, ist das Ladegerät ebenfalls in der Lage zu erkennen, ob die korrekte Batteriespannung ausgewählt wurde oder, ob die Batterie defekt ist. Eine der Grünen LEDs (LED 1 oder 2), die sich neben dem 12 V oder 6 V Symbol befinden, beginnt zu blinken und verhindert den Start des Ladezyklus. Setzen Sie das Ladegerät zurück, um einen neuen Ladezyklus zu starten, indem Sie die Verbindung zur Stromversorgung und zur falschen oder defekten Batterie für 7-10 Sekunden trennen. Verbinden Sie erneut die Stromversorgung und das Ladegerät ist bereit für einen neuen Ladezyklus.
AUSWAHLTASTE „BATTERIETYP“ Das Battery Tender®-Ladegerät verfügt über eine Auswahltaste, die Ihnen die Auswahl zwischen einer AGM/Gefluteten Batterie oder einer Lithium-Batterie ermöglicht. (nur 12 Volt) Lithium-Eisenphosphat-Batterie (LiFePO4).
Die Batteriespannung muss ausgewählt sein, wenn das Ladegerät eingeschaltet und bevor es mit der Batterie verbunden wird.
Sobald das Ladegerät eingeschaltet und mit der Batterie verbunden ist, kann der Batterietyp nicht mehr geändert werden. Setzen Sie das Ladegerät zurück, um einen neuen Ladezyklus zu starten, indem Sie die Verbindung zur Stromversorgung und zur falschen oder defekten Batterie für 7-10 Sekunden trennen. Verbinden Sie erneut die Stromversorgung und das Ladegerät ist bereit für einen neuen Ladezyklus.
Bei Unterbrechung der Stromversorgung nimmt das Ladegerät den Ladevorgang mit den zuletzt verwendeten Einstellungen wieder auf.
33
AUTOMATISCHER RECOVERY-MODUS FÜR LITHIUM-EISEN-PHOSPHAT-BATTERIEN (LiFePO4) Falls Sie versuchen sollten, eine entladene 12 Volt Lithium-Eisen-Phosphat-Batterie (LiFePO4) mit sehr geringer Spannung zu laden, wird das Ladegerät automatisch in den Recovery-Modus schalten. In diesem Modus blinkt die grüne LED (4), die 12 V LED (1) und gelbe LED leuchten durchgängig. Bei erfolgreichem und abgeschlossenem Ladevorgang schaltet das Ladegerät automatisch zurück in den normalen Ladezyklus. Das Zeitlimit für den Recovery-Modus beträgt drei (3) Stunden. Bei gescheitertem Recovery-Modus blinken die gelbe LED (1) und grüne LED (5) abwechselnd. Dies wird solange fortgesetzt, bis das Ladegerät von der Stromquelle getrennt wird. Sollte dies auftreten, besteht die Wahrscheinlichkeit, das die Batterie bereits aufgrund der niedrigen Spannung beschädigt war. Dies kann nicht wieder rückgängig gemacht werden. ACHTUNG: Das Battery Tender®-LADEGERÄT VERFÜGT ÜBER EINE FUNKENFREIE SCHALTUNG. Die abgehenden Krokodil- oder Ringklemmen entwickeln keine Funken, wenn sie sich berühren. Das Battery Tender® -Ladegerät erzeugt solange keine Ausgangsspannung, bis es mindestens 2 Volt einer Gefluteten-/AGM-Batterie oder 4 Volt von einer Lithium-Eisen-Phosphat-Batterie wahrnimmt. Es muss korrekt gepolt mit einer Batterie verbunden sein, bevor der Ladevorgang gestartet wird. Daher entsteht kein Funke, wenn das Netzkabel des Ladegeräts mit einer Stromquelle verbunden ist, keine Verbindung der Krokodil- oder Ringklemmen mit einer Batterie besteht und sich die Klemmen berühren.
HINWEIS: DIE ABGEHENDEN KLEMMEN ODER RINGKLEMMEN MÜSSEN MIT EINER BATTERIE VERBUNDEN SEIN, BEVOR DAS LADEGERÄT AUSGANGSSPANNUNG PRODUZIEREN KANN. DAUER DES LADEVORGANGS: Das Battery Tender® Artikelnummer 022-0200 lädt mit einer Laderate von 1,25 Ampere oder 1,25 Amperestunden. Daher beträgt die Ladedauer einer Batterie mit 15 Amperestunden in etwa 9½Stunden, um auf 80 % Kapazität aufgeladen zu werden.
Das Battery Tender® Artikelnummer 022-0209 lädt mit einer Laderate von 4 Ampere oder 4,0 Amperestunden. Daher beträgt die Ladedauer einer Batterie mit 15 Amperestunden in etwa 3 Stunden, um auf 80 % Kapazität aufgeladen zu werden. LADEN EINER LEEREN BATTERIE ODER EINER BATTERIE MIT SEHR GERINGER SPANNUNG: Sollten Sie versuchen, eine Geflutete/AGM-Batterie mit einer Spannung von weniger als 2 Volt oder eine Lithium-Eisen-Phosphat-Batterie mit weniger als 4 Volt aufzuladen, wird das Battery Tender®-Ladegerät nicht den Ladevorgang starten. Ein interner Sicherheitskreis sorgt dafür, dass das Ladegerät solange keine Ausgangsspannung erzeugt, bis es mindestens 2 Volt einer Gefluteten-/AGM-Batterie oder 4 Volt von einer Lithium-Eisen-Phosphat-Batterie wahrnimmt. In dieser Situation wird die gelbe LED weiterhin blinken, dies bedeutet, dass der Ladevorgang nicht eingeleitet wurde.
34
HINWEIS: Wenn eine 12-Volt-Blei-Säure-Batterie über eine Ausgangsspannung von weniger als 9 V im Ruhezustand verfügt, und weder geladen wird, noch einer externen Last Strom bereitstellt, ist die Batterie mit hoher Wahrscheinlichkeit defekt. Als Bezugsrahmen verfügt eine vollständig aufgeladene 12-Volt-Blei-Säure-Batterie im Ruhezustand ohne Last über eine Spannung von ungefähr 12,9 Volt. Eine vollständig entladene 12-Volt-Blei-Säure-Batterie im Ruhezustand ohne Last verfügt über eine Spannung von ungefähr 11,4 Volt. Das bedeutet, dass eine Spannungsänderung von lediglich 1,5 Volt den vollständigen Ladungsbereich einer Blei-Säure-Batterie zwischen 0 % und 100 % darstellt. Abhängig von Hersteller und Alter der Batterie variieren die jeweiligen Spannungen um einige Zehntelvolt. Der 1,5-Volt-Bereich ist dennoch ein guter Indikator für den prozentualen Ladezustand der Batterie.
STATUSLEUCHTE: Wenn die Statusleuchte nicht leuchtet, ist die Batterie nicht korrekt verbunden und/oder das Ladegerät nicht mit der Stromquelle verbunden. Nachfolgend der Betrieb der Statusleuchte:
GELBE LED BLINKT (Gelbe LED 1) – Eine blinkende gelbe LED zeigt an, dass das Ladegerät über Netzspannung verfügt und der Mikroprozessor ordnungsgemäß funktioniert. Falls die gelbe LED weiterhin blinkt, ist entweder die Batteriespannung zu gering (weniger als 2 Volt für eine Geflutete-/AGM-Batterie oder 4 Volt für eine Lithium-Eisen-Phosphat-Batterie) oder die abgehenden Krokodil- oder Ringklemmen sind nicht korrekt angeschlossen.
GRÜNE/GELBE LED BLINKT ABWECHSELND(Gelbe LED1 & Grüne LED 5) Dies bedeutet, dass das Ladegerät das Zeitlimit während des Recovery-Modus überschritten hat (siehe Seite 5 für eine vollständige Beschreibung). Bedeutet auch eine falsche Polung der Batterie.
GELBE LED LEUCHTET KONSTANT (Gelbe LED 1) – Bei korrekter Batterieverbindung und bei laufendem Ladevorgang leuchtet die gelbe LED konstant. Die gelbe LED leuchtet solange, bis das Ladegerät den Ladevorgang abgeschlossen hat.
GRÜNE LED BLINKT (Grüne LED 5) – Eine leuchtende grüne LED und konstant leuchtende gelbe LED (Gelbe LED 1) bedeutet, dass die Batterie zu mehr als 80 % geladen ist, die Batterie vom Ladegerät getrennt und gegebenenfalls verwendet werden kann. Falls möglich lassen Sie die Batterie solange laden, bis die grüne LED konstant leuchtet.
GRÜNE LED LEUCHTET KONSTANT (Grüne LED 5) – Der Ladevorgang ist abgeschlossen, sobald die grüne LED konstant leuchtet. Die Batterie ist vollständig geladen und kann gegebenenfalls in Betrieb genommen werden. Die Batterie kann ebenfalls auf unbestimmte Zeit zur Aufrechterhaltung der Batterieladung verbunden bleiben.
35
FEHLERBEHEBUNG 1) Falls sich das Ladegerät nicht einschalten lässt und keine der LED
aufleuchtet.
a. Stellen Sie sicher, dass die Stromquelle unter Spannung steht, indem Sie eine Lampe, ein anderes Gerät oder einen Spannungsmesser anschließen.
2) Die grüne LED (5) (vollständig geladen) leuchtet sofort auf, wenn eine Batterie geladen oder entladen wird.
a. Die Batterie ist aller Wahrscheinlichkeit nach defekt, lassen Sie die Batterie von einem Händler testen.
3) Die grüne LED (5) (vollständig geladen) leuchtet niemals auf.
a. Die Batterie ist möglicherweise defekt, lassen Sie die Batterie von einem Händler testen.
b. Die Batterie zieht übermäßig viel Strom, entfernen und trennen Sie die Batterie von der Ausrüstung.
4) Die gelbe LED blinkt weiterhin, selbst bei bestehender Batterieverbindung:
a. Überprüfen Sie die Sicherung im Anschlusskabel. b. Die Batteriespannung ist zu gering.
5) 12 V grüne LED (1) blinkt.
a. Die Batterie ist defekt oder es wurde die falsche Batteriespannung ausgewählt.
6) 6V grüne LED (2) blinkt.
a. Die Batterie ist defekt oder es wurde die falsche Batteriespannung ausgewählt.
7) Die gelbe und grüne LED (5) blinken abwechselnd.
a. Es wurde eine falsche Polung der Batterie erkannt. b. Der Sicherheitstimer des Ladegeräts wurde aktiviert, da die
Batterie nicht ihre optimale Spannung erreichte. Die Batterie ist möglicherweise defekt, lassen Sie die Batterie von einem Händler testen.
36
Deltran Battery TenderSelezionabile Progettato per sei batterie al litio-ferro-fosfato/AGM/piombo
acido (LiFePO4) da 1,2 – 200 Ah & Batterie al piombo-acido/AGM a tre celle da 1,2 - 200 Ah
IMPORTANTI ISTRUZIONI DI SICUREZZA 1) CONSERVARE QUESTE ISTRUZIONI – Il presente manuale contiene importanti
istruzioni per l'uso e la sicurezza del modello di caricabatterie con P/N 022-0200 e P/N 022-0209.
2) Non esporre il caricabatterie a pioggia o neve. 3) L'utilizzo di adattatori diversi da quelli raccomandati o forniti dal produttore del
caricabatterie può comportare il rischio di incendio, scossa elettrica o lesioni a persone. 4) Quando si scollega il caricabatterie dalla rete elettrica, afferrarlo in corrispondenza dello
spinotto anziché del cavo, per ridurre il rischio di danneggiamento dei due componenti. 5) Evitare di utilizzare prolunghe se non sono strettamente necessarie. L'uso di prolunghe
non appropriate potrebbe comportare il rischio di incendio o scossa elettrica. Se si rende necessario l'utilizzo di una prolunga, verificare che: a) I pin sullo spinotto della prolunga siano uguali per numero, dimensioni e forma a
quelli dello spinotto del caricabatterie. b) La prolunga sia collegata correttamente e sia in buone condizioni. c) Il cavo sia di dimensioni sufficienti per l'amperaggio CA del caricabatterie specificato
nella Tabella 1.
TABELLA 1 Lunghezza del cavo (in piedi) 25 50 100 150 Dimensione del cavo (AWG) 18 18 18 16
6) Non utilizzare il caricabatterie in caso di danneggiamento del cavo o dello spinotto. Se necessario, sostituire immediatamente il cavo o lo spinotto.
7) Non utilizzare il caricabatterie se ha subito un urto violento o danni di altro tipo o se è caduto accidentalmente. Contattare un tecnico qualificato.
8) Non smontare il caricabatterie autonomamente, ma rivolgersi a un tecnico qualificato per gli interventi di manutenzione e riparazione. Il riassemblaggio non corretto può comportare il rischio di scossa elettrica o incendio.
9) Per ridurre il rischio di scossa elettrica, scollegare il caricabatterie dalla presa di corrente prima di eseguire qualsiasi intervento di manutenzione o pulizia. La disattivazione dei comandi non riduce tale rischio.
10) AVVERTENZA – RISCHIO DOVUTO A GAS ESPLOSIVI. a) LAVORARE IN PROSSIMITÀ DI BATTERIE È PERICOLOSO. LE BATTERIE
GENERANO GAS ESPLOSIVI DURANTE IL LORO NORMALE FUNZIONAMENTO. PER QUESTO MOTIVO, È ESTREMAMENTE IMPORTANTE ATTENERSI ALLE ISTRUZIONI OGNI VOLTA CHE SI UTILIZZA IL CARICABATTERIE.
b) Per ridurre il rischio di esplosione della batteria, seguire le presenti istruzioni e quelle pubblicate dai produttori della batteria e di tutte le apparecchiature che si intendono utilizzare nelle sue vicinanze. Controllare le avvertenze sulla sicurezza collocate sulle suddette apparecchiature e sui rispettivi motori.
37
11) PRECAUZIONI PERSONALI a) Quando si lavora in prossimità di una batteria, chiedere a un secondo operatore di
rimanere nelle vicinanze per poter eventualmente intervenire. b) Tenere a disposizione abbondante acqua e sapone in caso di contatto dell'acido
della batteria con pelle, occhi o abiti. c) Indossare occhiali di protezione integrali e indumenti protettivi. Evitare di toccarsi gli
occhi mentre si opera in prossimità della batteria. d) Se l'acido della batteria entra in contatto con la pelle o gli indumenti, lavare
immediatamente con acqua e sapone. Se l'acido entra in un occhio, sciacquarlo immediatamente con acqua corrente fredda per almeno 10 minuti e consultare immediatamente un medico.
e) NON fumare, né accendere fiamme o provocare scintille, in prossimità della batteria o del motore.
f) Prestare la massima attenzione a non far cadere oggetti di metallo sulla batteria. Potrebbero causare l'innesco di scintille o un cortocircuito sulla batteria o su altri componenti elettrici che possono essere causa di esplosioni.
g) Non indossare oggetti metallici, come anelli, braccialetti, catenine e orologi, quando si utilizza una batteria. Una batteria può produrre una corrente di cortocircuito sufficientemente elevata per saldare un anello, o un oggetto simile, a un'altra superficie metallica, provocando gravi ustioni.
h) Utilizzare un caricabatterie solo per caricare una batteria al litio-ferro-fosfato/AGM/piombo acido (LiFePO4). Il caricabatterie non è stato progettato per alimentare impianti elettrici a basso voltaggio diversi da quelli utilizzati dai motorini di avviamento. Non utilizzare il caricabatterie per ricaricare le batterie a secco comunemente utilizzate negli elettrodomestici. Queste batterie possono esplodere e provocare lesioni a persone e danni materiali.
i) NON ricaricare una batteria congelata. 12) OPERAZIONI PRELIMINARI ALLA RICARICA
a) Se è necessario rimuovere la batteria dal veicolo per la ricarica, scollegare sempre per primo dalla batteria il terminale a massa. Assicurarsi che tutti gli accessori nel veicolo siano spenti per evitare che si generi un arco elettrico.
b) Verificare che l'area circostante la batteria sia ben ventilata mentre la batteria è in carica.
c) Pulire i terminali della batteria. Fare in modo che le sostanze corrosive non entrino in contatto con gli occhi.
d) Aggiungere acqua distillata a ciascuna cella fino a quando l'acido della batteria non raggiunge il livello specificato dal produttore. Non riempire eccessivamente. Per una batteria dotata di celle con tappi non rimovibili, come le batterie al piombo/acido regolate da valvole, seguire attentamente le istruzioni di ricarica del produttore.
e) Consultare tutte le precauzioni specifiche fornite dal produttore della batteria, come la rimozione o la non rimozione dei tappi delle celle durante la ricarica, e le indicazioni sulla sua velocità di ricarica.
f) Determinare la tensione della batteria facendo riferimento al manuale utente dell'auto e assicurarsi che il commutatore della tensione di uscita sia impostato sulla tensione corretta. Non utilizzare il caricabatterie a meno che la tensione della batteria non corrisponda alla tensione di uscita del caricatore.
13) POSIZIONE DEL CARICABATTERIE a) Posizionare il caricabatterie il più lontano possibile dalla batteria, per quanto
consentito dai cavi CC. b) Non posizionare mai il caricabatterie direttamente sopra la batteria in carica; i gas
della batteria possono corrodere e danneggiare il caricabatterie. c) Impedire che l'acido della batteria goccioli sul caricabatterie quando viene letto il
peso specifico dell'elettrolito o quando si riempie la batteria. d) Non utilizzare il caricabatterie in ambienti chiusi e non limitare in alcun modo la
ventilazione. e) Non posizionare la batteria sulla parte superiore del caricabatterie.
P/N 392-0327-R0
38
14) PRECAUZIONI PER I COLLEGAMENTI CC a) Collegare e scollegare i morsetti di uscita CC della batteria solo dopo aver
impostato gli interruttori del caricabatterie su off e scollegato il cavo CA dalla presa elettrica. Non consentire mai ai morsetti di toccarsi tra di loro.
b) Collegare i morsetti alla batteria e al telaio come descritto in 15(e), 15(f), e da 16(b) a 16(d).
15) ATTENERSI A QUESTA PROCEDURA SE LA BATTERIA È INSTALLATA NEL VEICOLO. LA BATTERIA PUÒ ESPLODERE SE SI FORMA UNA SCINTILLA NELLE SUE VICINANZE. PER RIDURRE IL RISCHIO DI FORMAZIONE DI SCINTILLE IN PROSSIMITÀ DELLA BATTERIA: a) Posizionare i cavi CA e CC in modo da ridurre il rischio di danneggiamento dovuto
al cofano, alla portiera o a componenti in moto del motore. b) Mantenere una distanza adeguata dalle pale della ventola, dalle cinghie, dalle
pulegge e da altri componenti pericolosi. c) Controllare la polarità dei poli della batteria. In genere il diametro del polo
POSITIVO (POS, P, +) è maggiore rispetto a quello del polo NEGATIVO (NEG, N, –).
d) Determinare quale polo della batteria deve essere collegato a massa con il telaio. Se il polo negativo è collegato a massa sul telaio (come nella maggior parte dei veicoli), vedere (e). Se il polo positivo è collegato a massa sul telaio, vedere (f).
e) Per i veicoli collegati a massa sul polo negativo, collegare il morsetto di carica POSITIVO (ROSSO) del caricabatterie al polo POSITIVO (POS, P, +) non a massa della batteria. Collegare il morsetto NEGATIVO (NERO) al telaio o al blocco motore a una distanza adeguata rispetto alla batteria. Non collegare il morsetto a carburatore, tubazioni del carburante o altre parti in lamiera. Collegarlo a una parte metallica del telaio o del blocco motore di adeguato spessore.
f) Per i veicoli collegati a massa sul polo positivo, collegare il morsetto di carica NEGATIVO (NERO) del caricabatterie al polo NEGATIVO (NEG, N, –) non a massa della batteria. Collegare il morsetto POSITIVO (ROSSO) al telaio o al blocco motore a una distanza adeguata rispetto alla batteria. Non collegare il morsetto a carburatore, tubazioni del carburante o altre parti in lamiera. Collegarlo a una parte metallica del telaio o del blocco motore di adeguato spessore.
g) Per scollegare il caricabatterie, posizionare gli interruttori su OFF, scollegare il cavo CA, quindi rimuovere il morsetto dal telaio e dai terminali della batteria.
h) Consultare il manuale d'istruzioni per informazioni sulla durata della ricarica. 16) ATTENERSI A QUESTA PROCEDURA SE LA BATTERIA NON È INSTALLATA
ALL'INTERNO DEL VEICOLO. LA BATTERIA PUÒ ESPLODERE SE SI FORMA UNA SCINTILLA NELLE SUE VICINANZE. PER RIDURRE IL RISCHIO DI FORMAZIONE DI SCINTILLE IN PROSSIMITÀ DELLA BATTERIA: a) Controllare la polarità dei poli della batteria. In genere il diametro del polo
POSITIVO (POS, P, +) è maggiore rispetto a quello del polo NEGATIVO (NEG, N, –).
b) Collegare un cavo isolato lungo almeno 24 pollici (AWG 6) al polo NEGATIVO (NEG, N, –).
c) Collegare il morsetto di carica POSITIVO (ROSSO) al polo POSITIVO (POS, P, +) della batteria.
d) Posizionarsi e sistemare l’estremità libera del cavo il più lontano possibile dalla batteria, quindi collegare il morsetto di carica NEGATIVO (NERO) all'estremità libera del cavo.
e) Non avvicinarsi troppo alla batteria mentre si realizza l'ultimo collegamento. f) Per scollegare il caricabatterie, procedere sempre in ordine inverso rispetto
all’operazione di collegamento e interrompere il primo collegamento mantenendo una distanza di sicurezza adeguata rispetto alla batteria.
g) Le batterie per uso nautico (barche) devono essere smontate e ricaricate a riva. Per poter ricaricare le batterie a bordo occorre disporre di strumenti progettati specificatamente per l'uso nautico.
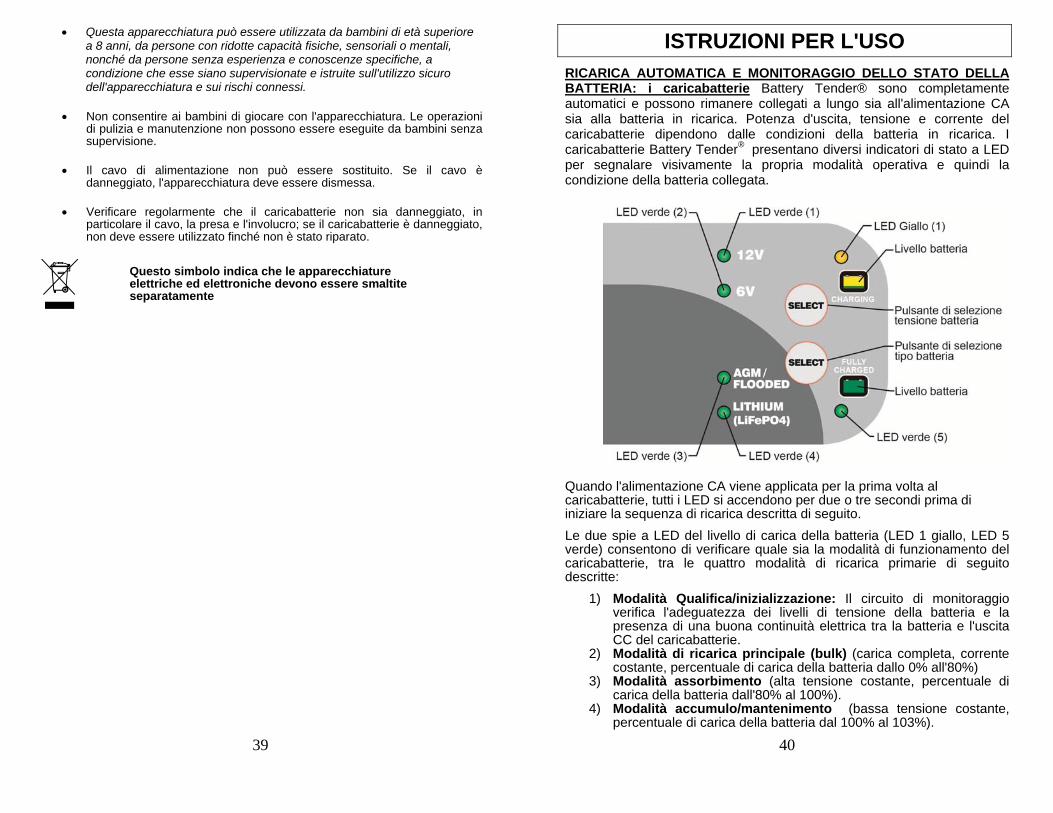
39
Questa apparecchiatura può essere utilizzata da bambini di età superiore a 8 anni, da persone con ridotte capacità fisiche, sensoriali o mentali, nonché da persone senza esperienza e conoscenze specifiche, a condizione che esse siano supervisionate e istruite sull'utilizzo sicuro dell'apparecchiatura e sui rischi connessi.
Non consentire ai bambini di giocare con l'apparecchiatura. Le operazioni di pulizia e manutenzione non possono essere eseguite da bambini senza supervisione.
Il cavo di alimentazione non può essere sostituito. Se il cavo è danneggiato, l'apparecchiatura deve essere dismessa.
Verificare regolarmente che il caricabatterie non sia danneggiato, in particolare il cavo, la presa e l'involucro; se il caricabatterie è danneggiato, non deve essere utilizzato finché non è stato riparato.
Questo simbolo indica che le apparecchiature elettriche ed elettroniche devono essere smaltite separatamente
40
ISTRUZIONI PER L'USO RICARICA AUTOMATICA E MONITORAGGIO DELLO STATO DELLA BATTERIA: i caricabatterie Battery Tender® sono completamente automatici e possono rimanere collegati a lungo sia all'alimentazione CA sia alla batteria in ricarica. Potenza d'uscita, tensione e corrente del caricabatterie dipendono dalle condizioni della batteria in ricarica. I caricabatterie Battery Tender® presentano diversi indicatori di stato a LED per segnalare visivamente la propria modalità operativa e quindi la condizione della batteria collegata.
Quando l'alimentazione CA viene applicata per la prima volta al caricabatterie, tutti i LED si accendono per due o tre secondi prima di iniziare la sequenza di ricarica descritta di seguito. Le due spie a LED del livello di carica della batteria (LED 1 giallo, LED 5 verde) consentono di verificare quale sia la modalità di funzionamento del caricabatterie, tra le quattro modalità di ricarica primarie di seguito descritte:
1) Modalità Qualifica/inizializzazione: Il circuito di monitoraggio verifica l'adeguatezza dei livelli di tensione della batteria e la presenza di una buona continuità elettrica tra la batteria e l'uscita CC del caricabatterie.
2) Modalità di ricarica principale (bulk) (carica completa, corrente costante, percentuale di carica della batteria dallo 0% all'80%)
3) Modalità assorbimento (alta tensione costante, percentuale di carica della batteria dall'80% al 100%).
4) Modalità accumulo/mantenimento (bassa tensione costante, percentuale di carica della batteria dal 100% al 103%).
41
Quando la batteria è completamente carica, il LED verde (5) indicante il livello di carica della batteria si accende a luce fissa e il caricabatterie passa in modalità di ricarica accumulo/mantenimento. Il caricabatterie Battery Tender® monitorerà e manterrà la batteria in regime di carica completa.
PULSANTE DI SELEZIONE TENSIONE BATTERIA Il caricabatterie Battery Tender® è dotato del pulsante "SELECT (SELEZIONE)" che permette di scegliere se ricaricare una batteria da 12 V AGM/flooded, una da 12 V al litio-ferro-fosfato (LiFePO4) o una da 6 V tipo AGM/flooded. La tensione della batteria può essere selezionata una volta data alimentazione CA al caricabatterie e prima che quest'ultimo sia collegato alla batteria. Quando il caricabatterie è alimentato con corrente alternata ed è collegato alla batteria, la tensione (12 V o 6 V) non può essere modificata. Per cambiare la modalità, scollegare la batteria dal caricabatterie. Se l'alimentazione CA si interrompe, il caricabatterie riprenderà la ricarica all'ultima tensione della batteria impostata. Quando viene collegato alla batteria, il caricabatterie può anche rilevare se è stata selezionata la tensione della batteria non corretta una volta effettuato il collegamento alla batteria stessa. Uno dei LED verdi (LED 1 o 2) vicino al simbolo 12 V o 6 V lampeggerà impedendo l'avvio del ciclo di carica. Per avviare un nuovo ciclo di carica, resettare il caricabatterie scollegandolo dall'alimentazione CA e dalla batteria difettosa o non corretta per 7-10 secondi. Ricollegare l'alimentazione CA e il caricabatterie sarà pronto per un nuovo ciclo di carica.
PULSANTE DI SELEZIONE TIPO BATTERIA Il caricabatterie Battery Tender® è dotato del pulsante "SELECT" (SELEZIONE) che permette di scegliere se ricaricare una batteria AGM/Flooded o una batteria al litio-ferro fosfato (solamente 12 V) (LiFePO4). Il tipo della batteria può essere selezionato una volta data alimentazione CA al caricabatterie e prima che quest'ultimo sia collegato alla batteria. Quando il caricabatterie è alimentato con corrente alternata ed è collegato alla batteria, la selezione del tipo non può essere modificata. Per avviare un nuovo ciclo di carica, resettare il caricabatterie scollegandolo dall'alimentazione CA e dalla batteria difettosa o non corretta per 7-10 secondi. Ricollegare l'alimentazione CA e il caricabatterie sarà pronto per un nuovo ciclo di carica. Se l'alimentazione CA si interrompe, il caricabatterie riprenderà la ricarica alle ultime impostazioni utilizzate.
42
MODALITÀ DI RECUPERO AUTOMATICO PER BATTERIA AL LITIO-FERRO-FOSFATO (LiFePO4) Se si cerca di caricare una batteria da 12 V al litio-ferro-fosfato (LiFePO4) quando è completamente scarica utilizzando una tensione molto bassa, da 4 a 8 V, il caricatore commuta automaticamente in modalità recupero. In questa modalità, il LED verde (4) lampeggia mentre il LED (1) a 12 V ed il LED giallo sono accesi fissi. Al termine dell'operazione con esito positivo, il caricabatterie commuta automaticamente al ciclo di carica normale. Questo processo di recupero ha un limite di tempo di tre (3) ore. Se non si ottengono risultati, il LED giallo (1) e il LED verde (5) commutano reciprocamente. Questa sequenza continua fino a quando il caricabatterie non viene staccato dall'alimentazione CA. In questo caso è probabile che la batteria sia già stata danneggiata a causa della bassa tensione e non possa essere recuperata. ATTENZIONE: il CARICABATTERIE Battery Tender® DISPONE DI UN SISTEMA DI CIRCUITI CHE NON PRODUCE SCINTILLE. I morsetti a coccodrillo o i terminali ad anello di uscita non emettono scintille in caso di contatto. Il caricabatterie Battery Tender® non genera una tensione di uscita fino a quando non rileva almeno 2 V da una batteria AGM/flooded o 4 V da una batteria al litio-ferro-fosfato. Il caricabatterie deve essere collegato a una batteria con la corretta polarità per poter avviare la carica. Pertanto, qualora si collegasse il cavo di alimentazione CA ad una presa CA con i morsetti a coccodrillo o i terminali ad anello di uscita non collegati ad una batteria, questi non produrrebbero scintille in caso di contatto.
NOTA: PRIMA CHE IL CARICABATTERIE POSSA GENERARE UNA TENSIONE DI USCITA, I MORSETTI A COCCODRILLO O I MORSETTI AD ANELLO DEVONO ESSERE COLLEGATI ALLA BATTERIA.
TEMPO NECESSARIO PER RICARICARE LA BATTERIA:
Il Battery Tender® con P/N 022-0200 ricarica ad una velocità di 1,25 A oppure 1,25 Amp/h per ora. Pertanto, una batteria da 15 Ah completamente scarica impiegherà circa 9½ ore per ricaricarsi all'80%.
Il Battery Tender® con P/N 022-0209 ricarica ad una velocità di 4 A oppure 4,0 Amp/h per ora. Pertanto, una batteria da 15 Ah completamente scarica impiegherà circa 3 ore per ricaricarsi all'80%.
OPERAZIONI CON UNA BATTERIA SCARICA O CON UNA BATTERIA A TENSIONE BASSISSIMA:
Se si cerca di caricare una batteria scarica con tensione inferiore a 2 V da una batteria AGM/flooded o 4 V da una batteria al litio-ferro-fosfato, il caricabatterie Battery Tender® non si attiva. Un circuito interno di sicurezza evita che il caricabatterie generi una tensione di uscita fino a quando non rileva 2 V da una batteria AGM/flooded o 4 V da un batteria al litio-ferro-fosfato all'uscita del caricatore. In questa situazione, il LED giallo continuerà a lampeggiare per indicare che la ricarica non è stata avviata.
43
NOTA: Se una batteria al piombo-acido da 12 V presenta una tensione d'uscita inferiore a 9 V a riposo, vale a dire quando non è in carica o non sta alimentando un carico esterno, è molto probabile che sia difettosa. Come riferimento, una batteria al piombo-acido da 12 V completamente carica avrà una tensione a vuoto e a riposo di circa 12,9 V. Una batteria al piombo-acido da 12 V completamente scarica avrà una tensione a vuoto e a riposo di circa 11,4 V. Ciò significa che una variazione di tensione di soli 1,5 V rappresenta l'intero range di ricarica da 0% a 100% di una batteria al piombo-acido da 12 V. A seconda del produttore e dell'età della batteria, le tensioni specifiche varieranno di pochi decimi di volt, ma il range di 1,5 V sarà comunque un buon indicatore della percentuale di carica della batteria.
SPIA DI STATO: se la spia è spenta, la batteria non è collegata correttamente e/o il caricabatterie non è collegato all'alimentazione CA. Di seguito è descritto il funzionamento della spia:
SPIA GIALLA LAMPEGGIANTE (LED 1 giallo) – Il LED giallo lampeggiante indica che l'alimentazione CA del caricabatterie è disponibile e che il microprocessore funziona correttamente. Se il LED giallo continua a lampeggiare, è possibile che la tensione della batteria sia troppo bassa (meno di 2 V nel caso di batteria AGM/flooded o 4 V per una batteria al litio-ferro-fosfato) o che i morsetti a coccodrillo o i terminali ad anello di uscita non siano collegati correttamente.
ALTERNANZA DI LUCE VERDE/GIALLA (LED 1 giallo e LED 5 verde) Questo indica che il caricabatterie ha superato l'intervallo di tempo in modalità recupero batteria (vedere pagina 5 per una spiegazione completa). Invertire la polarità dei collegamenti alla batteria.
SPIA GIALLA FISSA (LED 1 giallo) – Il LED giallo fisso indica che la batteria è collegata correttamente e che il caricabatterie la sta caricando. Il LED giallo resterà acceso fino alla fine del ciclo di ricarica.
SPIA VERDE LAMPEGGIANTE (LED 5 verde) – Il LED verde lampeggiante e il LED giallo (LED 1 giallo) fisso indicano che la percentuale di carica della batteria supera l'80%; la batteria può pertanto essere scollegata dal caricabatterie e, se necessario, essere rimessa in funzione. Se possibile, lasciare la batteria sotto carica fino a quando la spia verde non diventerà fissa.
SPIA VERDE FISSA (LED 5 verde) – Il LED verde fisso indica che la ricarica è completa e, se necessario, la batteria può essere rimessa in funzione. La batteria può anche rimanere collegata per un certo periodo di tempo mantenendo la percentuale di carica.
44
RISOLUZIONE DEI PROBLEMI 1) Se il caricabatterie non si accende e nessuno dei LED si accende.
a. Verificare che la presa CA fornisca alimentazione, provando a collegare una lampada, un apparecchio o un misuratore di tensione.
2) Il LED verde (5) (carica completa) si accende immediatamente quando si ricarica una batteria scarica.
a. La batteria potrebbe essere difettosa; riconsegnarla al rivenditore affinché possa essere testata.
3) Quando si ricarica una batteria il LED verde (5) (carica completa) non si accende mai.
a. La batteria potrebbe essere difettosa; riconsegnarla al rivenditore affinché possa essere testata.
b. La batteria assorbe troppa corrente; rimuoverla o scollegarla dal caricabatterie.
4) Il LED giallo continua a lampeggiare anche se la batteria è collegata:
a. Controllare il fusibile nel cavo ausiliario. b. La tensione della batteria è troppo bassa.
5) Il LED verde (1) da 12 V lampeggia.
a. La batteria è danneggiata o è stata selezionata la tensione della batteria non corretta.
6) Il LED verde (2) da 6 V lampeggia.
a. La batteria è danneggiata o è stata selezionata la tensione della batteria non corretta.
7) I LED giallo e verde (5) (carica completa) commutano reciprocamente.
a. Invertire la polarità dei collegamenti alla batteria. b. Il timer di sicurezza del caricabatterie si è attivato poiché la
batteria non raggiunge la sua tensione ottimale. La batteria potrebbe essere difettosa; riconsegnarla al rivenditore affinché possa essere testata.
45
Deltran Battery TenderSelectable Ontworpen voor zes loodzuur-/AGM-/lithium-
ijzerfosfaataccu's (LiFePO4) van 1,2 – 200 Ah en drie loodzuur-/AGM-accu's van 1,2 tot 200 Ah.
BELANGRIJKE VEILIGHEIDSINSTRUCTIES 1) BEWAAR DEZE VEILIGHEIDSINSTRUCTIES - Deze handleiding bevat belangrijke
veiligheids- en bedieningsinstructies voor de accu-oplader met onderdeelnummers 022-0200 en 022-0209.
2) Stel de oplader niet bloot aan regen of sneeuw. 3) Wanneer u onderdelen gebruikt die niet door de fabrikant van de acculader worden
aanbevolen of verkocht, kan dat leiden tot brand, een elektrische schok of persoonlijk letsel.
4) Verwijder de oplader door aan de stekker trekken in plaats van aan het snoer: zo voorkomt u schade aan stekker en snoer.
5) Gebruik verlengsnoeren uitsluitend bij uiterste noodzaak. Het gebruik van een verkeerd verlengsnoer kan brand of een elektrische schok tot gevolg hebben. Moet toch een verlengsnoer worden gebruikt, let dan op het volgende: a) De stekker van het verlengsnoer moet net zoveel pennen hebben als de stekker
van de adapter. De maat en vorm van de pennen moet gelijk zijn; b) Het verlengsnoer moet naar behoren zijn aangesloten en in goede staat verkeren; c) Het snoer moet aders hebben met een diameter die groot genoeg is voor de door
de adapter afgenomen stroom (zie Tabel 1).
TABEL 1 Lengte van het snoer, in voet 25 50 100 150 AWG-waarde van het snoer 18 18 18 16
6) Gebruik de oplader niet wanneer het snoer of de stekker beschadigd is. Vervang het snoer of de stekker in dat geval onmiddellijk.
7) Gebruik de oplader niet als deze een harde klap heeft gehad, is gevallen of op een andere manier is beschadigd. Ga er in dat geval mee naar een erkend servicebedrijf.
8) Demonteer de adapter niet. Ga ermee naar een erkend servicebedrijf als service of reparatie nodig is. Een verkeerde hermontage kan resulteren in een elektrische schok of brand.
9) Trek de stekker uit het stopcontact voordat u werkzaamheden aan de adapter uitvoert (onderhoud, reinigen) om het risico van een elektrische schok te verkleinen. Dit risico wordt niet weggenomen door de adapter alleen met de bedieningsknoppen uit te zetten.
10) WAARSCHUWING – GEVAAR VAN EXPLOSIEVE GASSEN. a) WERKEN IN DE BUURT VAN ACCU'S IS GEVAARLIJK. BIJ NORMAAL BEDRIJF
PRODUCEREN DEZE ACCU'S EXPLOSIEVE GASSEN. DAAROM IS HET ESSENTIEEL DAT U, TELKENS WANNEER U DE ADAPTER GEBRUIKT, DE INSTRUCTIES NAUWGEZET OPVOLGT.
b) Om het risico van een exploderende accu te voorkomen, moet u zowel deze instructies opvolgen, als die van de accufabrikant en de fabrikant van de apparatuur die in de buurt van de accu wordt gebruikt. Bekijk de waarschuwingen op deze producten en op de motor.
46
11) PERSOONLIJKE VOORZORGSMAATREGELEN a) Het is verstandig om iemand in de buurt te hebben die hulp kan verlenen wanneer u
bij een accu werkt. b) Zorg dat er voldoende schoon water en zeep binnen handbereik is, voor het geval u
accuzuur op uw huid of kleding of in uw ogen krijgt. c) Draag een veiligheidsbril die de ogen volledig afschermt en beschermende kleding.
Raak uw ogen niet aan terwijl u bij een accu werkt. d) Komt er accuzuur op uw huid of kleding, was deze dan direct met water en zeep.
Krijgt u zuur in uw ogen, spoel dan de ogen direct en gedurende ten minste 10 minuten uit met koud stromend water en neem onmiddellijk contact op met een arts.
e) Rook NOOIT in de buurt van een accu of motor en houd vonken en open vuur bij de accu of de motor weg.
f) Wees extra voorzichtig om te voorkomen dat metalen gereedschap op de accu valt. Dit kan vonken veroorzaken of tot kortsluiting in de accu of andere elektrische onderdelen leiden, met explosiegevaar tot gevolg.
g) Verwijder op het lichaam gedragen metalen voorwerpen, zoals ringen, armbanden, halskettingen en horloges, als u met een accu werkt. Een accu kan bij kortsluiting een stroom opwekken die sterk genoeg is om een ring of iets dergelijks aan metaal vast te lassen. Daardoor kunnen ernstige brandwonden ontstaan.
h) Gebruik de lader alleen voor het opladen van loodzuur-/AGM-/lithium-ijzerfosfaataccu's(LiFePO4). De oplader is uitsluitend bedoeld voor toepassingen met een startmotor en mag voor geen enkele andere laagspanningstoepassing gebruikt worden. Gebruik de oplader niet voor het opladen van drogecelaccu's die normaal voor huishoudelijke apparaten worden gebruikt. Dergelijke accu's kunnen barsten en persoonlijk letsel en beschadigde eigendommen tot gevolg hebben.
i) Laad NOOIT een bevroren accu op. 12) VOORBEREIDING VOOR HET OPLADEN
a) Wanneer u de accu uit het op te laden voertuig moet verwijderen, moet u altijd eerst de massaklem van de accu halen. Zorg dat alle accessoires in het voertuig zijn uitgeschakeld, zodat geen vonkboog kan ontstaan.
b) Zorg dat de omgeving rondom de accu goed is geventileerd terwijl de accu wordt opgeladen.
c) Reinig de accupolen. Pas op dat u geen roest in uw ogen krijgt. d) Vul elke cel bij met gedestilleerd water tot de zuuroplossing van de accu op het door
de accufabrikant voorgeschreven peil is. Vul nooit teveel bij. Wanneer u een accu zonder verwijderbare celdoppen gebruikt, zoals loodzuuraccu's met kleppen, dient u de instructies van de fabrikant voor het opladen zorgvuldig te volgen.
e) Raadpleeg alle specifieke voorzorgsmaatregelen van de accuproducten, zoals maatregelen voor het al dan niet verwijderen van de celdoppen tijdens het opladen en de aanbevolen laadspanning.
f) Stel de spanning van de accu vast aan de hand van de gegevens in het handboek van uw auto. Zorg dat de keuzeschakelaar voor de uitgangsspanning op de juiste stand staat. Gebruik de acculader alleen als de accuspanning overeenkomt met de uitgangsspanning van de lader.
13) PLAATS VAN DE OPLADER a) Plaats de oplader zo ver mogelijk bij de accu vandaan. b) Plaats de oplader nooit recht boven de accu die wordt opgeladen: de gassen die
vrijkomen zullen leiden tot corrosie en beschadiging van de oplader. c) Voorkom dat het accuzuur op de oplader kan druppelen terwijl u het soortelijk
gewicht van het elektrolyt leest of de accu oplaadt. d) Gebruik de oplader niet in een gesloten ruimte en hinder nooit de ventilatie. e) Plaats een accu nooit bovenop een lader.
14) VOORZORGSMAATREGELEN VOOR LAADAANSLUITINGEN a) Zorg dat de schakelaars van de oplader in de stand offstaan en dat het netsnoer
niet in het stopcontact zit voor u de aansluitklemmen van de laadsnoeren aansluit. De klemmen mogen elkaar nooit raken.
b) Bevestig de klemmen aan de accu en het chassis. Raadpleeg de rubrieken 15(e), 15(f) en 16(b) tot en met 16(d) voor meer informatie.
47
15) VOLG DEZE STAPPEN ALS DE ACCU IN HET VOERTUIG IS GEÏNSTALLEERD. DE ACCU KAN EXPLODEREN WANNEER ER VONKEN IN DE BUURT VRIJKOMEN. REDUCEER HET RISICO VAN VONKEN BIJ DE ACCU ALS VOLGT: a) Plaats de laadsnoeren en het netsnoer zo dat er zo min mogelijk risico op
beschadiging bestaat door de motorkap, portieren of bewegende motoronderdelen. b) Blijf uit de buurt van ventilatorschoepen, riemen, poelies en andere onderdelen die
persoonlijk letsel kunnen veroorzaken. c) Controleer de polariteit van de accupolen. De PLUS-pool (POS, P, +) heeft meestal
een grotere diameter dan de MIN-pool (NEG, N, -). d) Ga na welke accupool met het chassis verbonden is (massa). Raadpleeg (e)
wanneer de minpool de massapool is. Dit is bij de meeste voertuigen het geval. Is de pluspool de massapool, zie (f).
e) Bij een voertuig met min aan massa moet de PLUS-klem (ROOD) van de acculader worden verbonden met de PLUS-pool (POS, P, +) van de accu. Verbind de MIN-klem (ZWART) met het voertuigchassis of het motorblok, op enige afstand van de accu. Verbind de klem niet met de carburateur, brandstofleidingen of carrosserieonderdelen van plaatstaal. Verbind deze met een dik metalen deel van het chassis of motorblok.
f) Bij een voertuig met plus aan massa moet de MIN-klem (ZWART) van de acculader worden verbonden met de MIN-pool (NEG, N, –) van de accu. Verbind de PLUS-klem (ROOD) met het voertuigchassis of het motorblok, op enige afstand van de accu. Verbind de klem niet met de carburateur, brandstofleidingen of carrosserieonderdelen van plaatstaal. Verbind deze met een dik metalen deel van het chassis of motorblok.
g) Koppel de lader als volgt los: zet de schakelaars van de lader op "off" en haal het netsnoer uit het stopcontact. Maak daarna de klem van het voertuigchassis los en ontkoppel tenslotte de klem van de accupool.
h) Zie de gebruiksinstructies voor informatie over de laadduur. 16) VOLG DEZE STAPPEN ALS DE ACCU ZICH BUITEN HET VOERTUIG BEVINDT.
DOOR VONKEN NABIJ DE ACCU KAN DIE EXPLODEREN. REDUCEER HET RISICO VAN VONKEN BIJ DE ACCU ALS VOLGT: a) Controleer de polariteit van de accupolen. De PLUS-pool (POS, P, +) heeft meestal
een grotere diameter dan de MIN-pool (NEG, N, -). b) Sluit een geïsoleerde accukabel van minimaal 60 cm en een aderdiameter van 16
mm2 aan op de MIN-pool (NEG, N, –) van de accu. c) Verbind de PLUS-klem (ROOD) van de lader met de PLUS-pool (POS, P, +) van de
accu. d) Neem het vrije uiteinde van de kabel en plaats deze zo ver mogelijk van de accu.
Verbind vervolgens de MIN-klem (ZWART) van de lader met het vrije uiteinde van de kabel.
e) Keer uzelf niet naar de accu toe wanneer u de definitieve verbinding maakt. f) Ontkoppel de lader altijd in de omgekeerde volgorde en onderbreek de eerste
verbinding terwijl u zich zo ver mogelijk van de accu bevindt. g) Accu's voor scheepvaarttoepassingen moeten worden verwijderd en aan de wal
worden opgeladen. Om accu's aan boord op te laden, is speciale, voor scheepvaarttoepassingen ontworpen apparatuur nodig.
48
Dit apparaat kan worden gebruikt door kinderen vanaf 8 jaar oud en personen met verminderde lichamelijke, zintuigelijke of verstandelijke mogelijkheden of zonder ervaring en kennis, mits er sprake is van toezicht of instructies over het veilige gebruik van het apparaat en mits ze de mogelijke gevaren van het gebruik ervan hebben begrepen.
Laat kinderen niet met het apparaat spelen. Laat kinderen het apparaat niet zonder toezicht reinigen en onderhouden.
Het netsnoer kan niet worden vervangen. Als het netsnoer beschadigd is, dan moet het apparaat worden weggegooid.
Controleer de oplader regelmatig op beschadigingen. Kijk daarbij vooral naar het snoer, de stekker en de behuizing. Gebruik beschadigde opladers niet voor ze volledig zijn gerepareerd.
Dit symbool geeft aan dat elektrische en elektronische apparatuur gescheiden moet worden ingezameld.
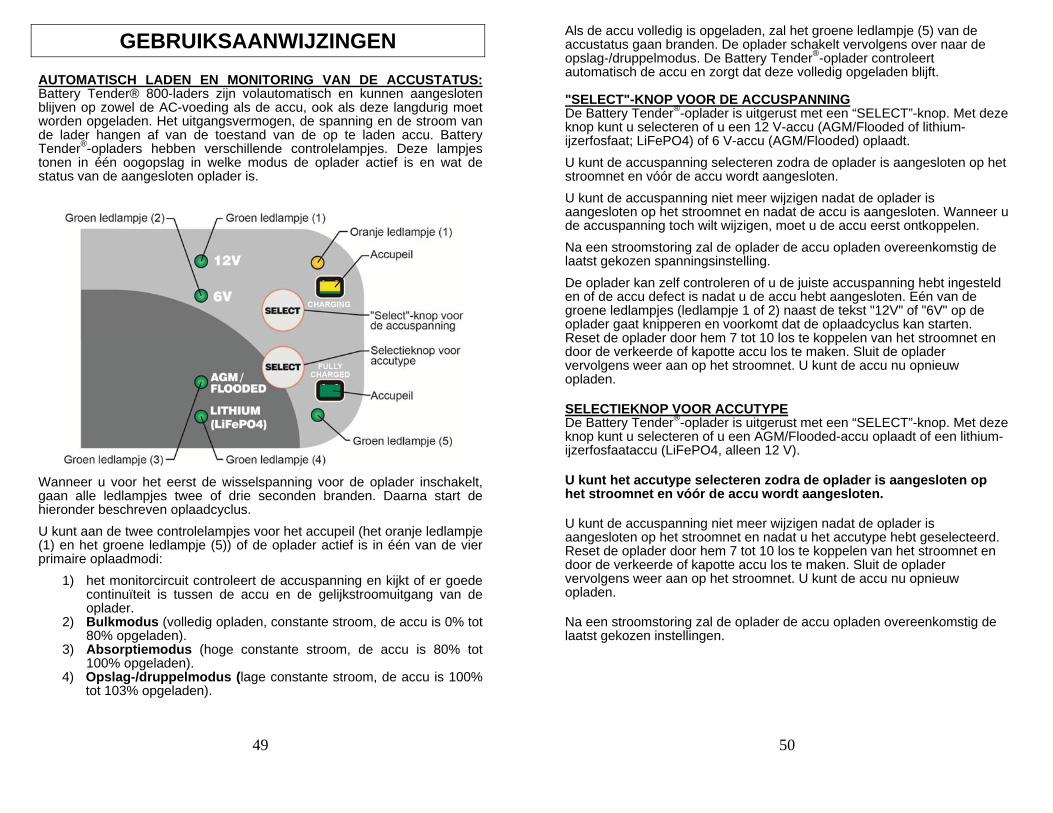
49
GEBRUIKSAANWIJZINGEN AUTOMATISCH LADEN EN MONITORING VAN DE ACCUSTATUS: Battery Tender® 800-laders zijn volautomatisch en kunnen aangesloten blijven op zowel de AC-voeding als de accu, ook als deze langdurig moet worden opgeladen. Het uitgangsvermogen, de spanning en de stroom van de lader hangen af van de toestand van de op te laden accu. Battery Tender®-opladers hebben verschillende controlelampjes. Deze lampjes tonen in één oogopslag in welke modus de oplader actief is en wat de status van de aangesloten oplader is.
Wanneer u voor het eerst de wisselspanning voor de oplader inschakelt, gaan alle ledlampjes twee of drie seconden branden. Daarna start de hieronder beschreven oplaadcyclus. U kunt aan de twee controlelampjes voor het accupeil (het oranje ledlampje (1) en het groene ledlampje (5)) of de oplader actief is in één van de vier primaire oplaadmodi:
1) het monitorcircuit controleert de accuspanning en kijkt of er goede continuïteit is tussen de accu en de gelijkstroomuitgang van de oplader.
2) Bulkmodus (volledig opladen, constante stroom, de accu is 0% tot 80% opgeladen).
3) Absorptiemodus (hoge constante stroom, de accu is 80% tot 100% opgeladen).
4) Opslag-/druppelmodus (lage constante stroom, de accu is 100% tot 103% opgeladen).
50
Als de accu volledig is opgeladen, zal het groene ledlampje (5) van de accustatus gaan branden. De oplader schakelt vervolgens over naar de opslag-/druppelmodus. De Battery Tender®-oplader controleert automatisch de accu en zorgt dat deze volledig opgeladen blijft. "SELECT"-KNOP VOOR DE ACCUSPANNING De Battery Tender®-oplader is uitgerust met een “SELECT”-knop. Met deze knop kunt u selecteren of u een 12 V-accu (AGM/Flooded of lithium-ijzerfosfaat; LiFePO4) of 6 V-accu (AGM/Flooded) oplaadt. U kunt de accuspanning selecteren zodra de oplader is aangesloten op het stroomnet en vóór de accu wordt aangesloten. U kunt de accuspanning niet meer wijzigen nadat de oplader is aangesloten op het stroomnet en nadat de accu is aangesloten. Wanneer u de accuspanning toch wilt wijzigen, moet u de accu eerst ontkoppelen. Na een stroomstoring zal de oplader de accu opladen overeenkomstig de laatst gekozen spanningsinstelling. De oplader kan zelf controleren of u de juiste accuspanning hebt ingesteld en of de accu defect is nadat u de accu hebt aangesloten. Eén van de groene ledlampjes (ledlampje 1 of 2) naast de tekst "12V" of "6V" op de oplader gaat knipperen en voorkomt dat de oplaadcyclus kan starten. Reset de oplader door hem 7 tot 10 los te koppelen van het stroomnet en door de verkeerde of kapotte accu los te maken. Sluit de oplader vervolgens weer aan op het stroomnet. U kunt de accu nu opnieuw opladen.
SELECTIEKNOP VOOR ACCUTYPE De Battery Tender®-oplader is uitgerust met een “SELECT”-knop. Met deze knop kunt u selecteren of u een AGM/Flooded-accu oplaadt of een lithium-ijzerfosfaataccu (LiFePO4, alleen 12 V).
U kunt het accutype selecteren zodra de oplader is aangesloten op het stroomnet en vóór de accu wordt aangesloten.
U kunt de accuspanning niet meer wijzigen nadat de oplader is aangesloten op het stroomnet en nadat u het accutype hebt geselecteerd. Reset de oplader door hem 7 tot 10 los te koppelen van het stroomnet en door de verkeerde of kapotte accu los te maken. Sluit de oplader vervolgens weer aan op het stroomnet. U kunt de accu nu opnieuw opladen.
Na een stroomstoring zal de oplader de accu opladen overeenkomstig de laatst gekozen instellingen.

51
AUTOMATISCHE TERUGWINMODUS VOOR LITHIUM-IJZERFOSFAAT (LiFePO4) Wanneer u een lege lithium-ijzerfosfaataccu (LiFePO4) van 12 V met een zeer lage spanning van 4 tot 8 volt probeert op te laden, zal de opladerautomatisch overschakelen naar de terugwinmodus. In deze modus zal het groene ledlampje (4) knipperen. Het ledlampje voor "12V" (1) en het oranje ledlampje branden stabiel. Wanneer de actie met succes en volledig is uitgevoerd, schakelt de oplader automatisch over naar de normale modus. Voor deze herstelprocedure staat maximaal drie (3) uur. Wanneer de actie niet met succes wordt uitgevoerd, knipperen het oranje (1) en groene (5) ledlampje voortdurend. Dat blijft zo tot de oplader wordt losgemaakt van het stroomnet. Er bestaat in dat geval een gerede kans dat de accu al onherstelbaar is beschadigd door laagspanning.
ATTENTIE: De Battery Tender®-LADER HEEFT EEN VONKVRIJ SCHAKELCIRCUIT. De uitgaande krokodillenklemmen of contactringen zullen niet vonken als zij elkaar raken. De Battery Tender®-lader zal geen uitgangsspanning genereren tot hij ten minste 2 volt van een AGM-/Flooded-accu of 4 volt van een lithium-ijzerfosfaataccu krijgt. De lader moet met de juiste polariteit op een accu worden aangesloten voordat een accu kan worden opgeladen. Er ontstaat dus geen elektrische vonk wanneer u het netsnoer in een stopcontact stopt en de uitgaande krokodillenklemmen of contactringen tegen elkaar houdt terwijl ze niet op een accu zijn aangesloten.
NB: DE UITGANGSKLEMMEN OF CONTACTRINGEN MOETEN OP EEN ACCU WORDEN AANGESLOTEN VOORDAT DE LADER EEN UITGANGSSPANNING KAN GENEREREN. ACCUOPLAADTIJD: De Battery Tender® met onderdeelnummer 022-0200 laadt accu's op met een snelheid van 1,25 ampère of 1,25 ampère-uur. Een volledig ontladen accu van 15 ampère-uur heeft dus circa 9½ uur nodig om tot 80% van zijn capaciteit te worden opgeladen. De Battery Tender® met onderdeelnummer 022-0209 laadt accu's op met een snelheid van 4 ampère of 4,0 ampère-uur. Een volledig ontladen accu van 15 ampère-uur heeft dus circa 3 uur nodig om tot 80% van zijn capaciteit te worden opgeladen.
WERKEN MET EEN LEGE ACCU OF EEN ACCU MET EEN ZEER LAGE SPANNING: De Battery Tender®-oplader zal niet worden ingeschakeld wanneer u een lege AGM-/Flooded-accu met een spanning van minder dan 2 volt of een lithium-ijzerfosfaataccu met een spanning van minder dan 4 volt probeert op te laden. Een intern veiligheidscircuit voorkomt dat de oplader een uitgangsspanning genereert tot hij ten minste 2 volt van een AGM-/Flooded-accu of 4 volt van een lithium-ijzerfosfaataccu waarneemt. Wanneer de lege accu niet kan worden opgeladen, zal het oranje ledlampje blijven knipperen.
52
NB: Heeft een 12 volt loodaccu een uitgangsspanning van minder dan 9 volt als die in de ruststand staat, niet wordt opgeladen en geen stroom levert aan een externe verbruiker, dan is het aannemelijk dat de accu defect is. Ter referentie: een volledig opgeladen loodzuuraccu van 12 volt heeft een rusttoestand/nullastspanning van circa 12,9 volt. Een volledig ontladen loodzuuraccu van 12 volt heeft een rusttoestand/nullastspanning van circa 11,4 volt. Dit betekent dat een spanningsverschil van slechts 1,5 volt het gehele oplaadbereik van 0% tot 100% dekt bij 12 volt loodaccu's. Afhankelijk van de fabrikant en de leeftijd van de accu, zullen de specifieke voltwaarden met enkele tienden variëren, maar het bereik van 1,5 volt is desondanks een goede indicator voor de mate waarin de accu is opgeladen.
STATUSLAMPJE: Als dit lampje niet brandt, dan is de accu niet goed aangesloten en/of ontvangt de lader geen AC-stroom. Het lampje werkt als volgt:
HET ORANJE LAMPJE KNIPPERT (oranje ledlampje 1) – Wanneer het oranje ledlampje knippert, is de acculader op netvoeding aangesloten en werkt de microprocessor naar behoren. Blijft het oranje ledlampje langdurig knipperen, dan is de accuspanning te laag (minder dan 2 volt voor een AGM-/Flooded-accu of 4 volt voor een lithium-ijzerfosfaataccu) of zijn de uitgaande krokodillenklemmen of contactringen niet goed aangesloten.
HET LAMPJE KNIPPERT GROEN/ORANJE(oranje ledlampje 1 en groene ledlampje 5) De oplader heeft de tijdslimiet in de terugwinningsmodus overschreden(zie pagina 5 voor uitgebreide uitleg). De lampjes knipperen ook op deze manier wanneer u de accupolen verkeerd hebt aangesloten.
HET ORANJE LAMPJE BRANDT CONTINU (oranje ledlampje 1) – Als het ORANJE lampje continu brandt, is een accu op de juiste wijze aangesloten en laadt de oplader de accu op. Het oranje lampje blijft branden tot de accu helemaal is opgeladen.
HET GROENE LAMPJE KNIPPERT (groen ledlampje 5) – Als het groene lampje knippert en het oranje ledlampje (1) brandt, is de accu voor meer dan 80% opgeladen en kan hij van de lader worden losgemaakt en worden gebruikt. Indien mogelijk moet worden doorgegaan met het opladen van de accu tot het groene lampje continu brandt.
HET GROENE LAMPJE BRANDT CONTINU (groen ledlampje 5) – Als het groene lampje continu brandt, is het opladen voltooid en kan de accu eventueel weer in gebruik worden genomen. De lader kan ook aangesloten blijven om het laadniveau van de accu langdurig op peil te houden.

53
PROBLEMEN OPLOSSEN 1) De oplader kan niet worden ingeschakeld en de ledlampjes branden niet.
a. Controleer of het stopcontact goed werkt door een lamp, een elektrisch apparaat of een spanningsmeter aan te sluiten.
2) Het groene ledlampje (5) dat aangeeft of de accu helemaal is opgeladen, gaat direct branden wanneer u een lege accu aansluit.
a. De accu kan defect zijn. Laat de accu door de dealer testen.
3) Het groene ledlampje (5) dat aangeeft of de accu helemaal is opgeladen, gaat niet branden wanneer u de accu oplaadt.
a. De accu kan defect zijn. Laat de accu door de dealer testen. b. De accu trekt teveel stroom. Verwijder de accu uit de oplader.
4) Het oranje ledlampje blijft knipperen, ook als de accu is aangesloten:
a. Controleer de zekering in de hulpkabel. b. De accuspanning is te laag.
5) Het groene ledlampje voor "12V" (1) knippert.
a. De accu is beschadigd of u hebt de verkeerde accuspanning geselecteerd.
6) Het groene ledlampje voor "6V" (2) knippert.
a. De accu is beschadigd of u hebt de verkeerde accuspanning geselecteerd.
7) De groene (volledig opgeladen) en oranje ledlampjes (5) branden om de beurt.
a. U hebt de accupolen verkeerd aangesloten. b. De veiligheidstimer van de oplader is geactiveerd omdat de
optimale accuspanning niet wordt bereikt. De accu kan defect zijn. Laat de accu door de dealer testen.
54
Deltran Battery TenderSelecionável Concebido para baterias de chumbo-ácido/AGM/lítio-fosfato de ferro
(LiFePO4) de seis células, de 1.2 – 200Ah e para baterias de chumbo-ácido/AGM de três células, de 1.2 – 200Ah
INSTRUÇÕES IMPORTANTES DE SEGURANÇA 1) GUARDE ESTAS INSTRUÇÕES – Este manual contém informações importantes de
segurança e de funcionamento para o Carregador de Baterias modelo P/N 022-0200 e P/N 022-0209.
2) Não exponha o carregador à chuva ou à neve. 3) O uso de acessórios que não sejam recomendados ou vendidos pelo fabricante do
carregador de baterias pode resultar num risco de incêndio, de choque elétrico ou em ferimentos.
4) Para reduzir o risco de danos à ficha e ao cabo elétrico, puxar pela ficha em vez do cabo quando se desliga o carregador.
5) Não devem ser usadas extensões a menos que seja absolutamente necessário. O uso inadequado de uma extensão pode resultar num risco de incêndio ou de choque elétrico. Se for necessário usar uma extensão, certifique-se de que: a) A tomada da extensão tem o mesmo número de pinos e que são da mesma
dimensão e formato dos da ficha no cabo do carregador; b) A extensão está devidamente ligada e em bom estado; e c) A medida dos condutores tem capacidade suficiente para a amperagem CA do
carregador, conforme especificado na Tabela 1
TABELA 1 Comprimento do cabo, 25 50 100 150 Medida AWG do cabo 18 18 18 16
6) Não ligue o carregador com o cabo de alimentação ou a ficha danificados - substitua-os de imediato.
7) Não use o carregador se este tiver sofrido uma pancada forte, caído ou estiver danificado; leve-o a um técnico qualificado.
8) Não desmonte o carregador; leve-o a um técnico qualificado quando for necessária uma revisão ou reparação. Uma montagem incorreta pode resultar no risco de choque elétrico ou num incêndio.
9) Para reduzir o risco de choque elétrico, desligue o carregador da tomada antes de efetuar qualquer trabalho de manutenção ou limpeza. Desligar os interruptores não reduz esse risco.
10) AVISO – RISCO DE GASES EXPLOSIVOS. a) TRABALHAR NAS PROXIMIDADES DE UMA BATERIA É PERIGOSO. AS
BATERIAS PRODUZEM GASES EXPLOSIVOS DURANTE O SEU NORMAL FUNCIONAMENTO. POR ISSO, É DA EXTREMA IMPORTÃNCIA QUE SIGA AS INSTRUÇÕES SEMPRE QUE UTILIZAR O CARREGADOR.
b) Para reduzir o risco de explosão da bateria, siga estas instruções assim como as instruções do fabricante da bateria e do fabricante de qualquer equipamento que tencione usar próximo da bateria. Leia as etiquetas de cuidados que existem nestes produtos e no motor.
55
11) CUIDADOS PESSOAIS a) Considere ter alguém por perto o suficiente para vir em seu auxílio quando
trabalhar perto de uma bateria. b) Tenha bastante água fria e sabão por perto para o caso de o ácido entrar em
contacto com a pele, a roupa ou os olhos. c) Use proteção ocular total e roupa de proteção. Evite mexer nos olhos enquanto
trabalha próximo de uma bateria. d) Se o ácido da bateria entrar em contacto com a pele ou a roupa, lave
imediatamente com água e sabão. Se o ácido saltar para os olhos, lave imediatamente com água fria corrente durante pelo menos 10 minutos e procure imediatamente assistência médica;
e) NUNCA fume nem permita faíscas ou chamas próximo da bateria ou do motor. f) Tenha um cuidado extra para reduzir o risco de deixar cair ferramentas metálicas
na bateria. Podem provocar uma faísca ou criar um curto-circuito na bateria ou noutra parte metálica, o que pode provocar uma explosão.
g) Retire todos os artigos pessoais metálicos tais como: anéis, pulseiras, fios e relógios quando trabalhar com baterias. Uma bateria pode criar uma corrente de curto-circuito suficientemente elevada para soldar um anel, ou um objeto semelhante, ao metal, provocando queimaduras graves.
h) Use o carregador só para carregar baterias de chumbo-ácido/AGM/lítio-fosfato de ferro (LiFePO4) . Não se destina a fornecer alimentação a um sistema elétrico de baixa tensão, para além da aplicação num motor de arranque. Não use o carregador para carregar as pilhas secas que são normalmente usadas nos aparelhos domésticos. Estas pilhas podem rebentar e provocar ferimentos em pessoas ou danos na propriedade.
i) NUNCA carregue uma bateria congelada. 12) PREPARAÇÃO PARA CARREGAR
a) Se for necessário tirar a bateria do veículo para carregar, desligue sempre o cabo da massa primeiro. Certifique-se de que todos os acessórios no veículo estão desligados, para não provocar um arco.
b) Certifique-se de que a zona circundante está bem ventilada enquanto a bateria estiver a carregar.
c) Limpe os bornes da bateria. Tenha cuidado para evitar que a corrosão entre em contacto com os olhos.
d) Adicione água destilada a cada célula até a solução de ácido atingir o nível especificado pelo fabricante da bateria. Não encha demasiado. Para uma bateria sem tampas removíveis das células, como as baterias de chumbo-ácido regulada por válvula, siga atentamente as instruções de recarga do fabricante.
e) Consulte todas as precauções específicas do fabricante tais como: remoção ou não remoção das tampas removíveis das células durante a recarga e as amperagens recomendadas de carregamento.
f) Verifique a tensão da bateria consultando o manual do utilizador e certifique-se de que o interruptor seletor de tensão de saída tenha tensão correta. Não use o carregador de baterias a não ser que a tensão da bateria seja compatível com a tensão de saída do carregador.
13) LOCALIZAÇÃO DO CARREGADOR a) Coloque o carregador o mais longe possível da bateria que os cabos de ligação CC
permitam. b) Nunca coloque o carregador diretamente em cima da bateria que está a carregar;
os gases provenientes da bateria podem causar danos e corrosão no carregador. c) Nunca permita que o ácido da bateria escorra por cima do carregador ao fazer a
leitura da gravidade específica ou ao encher a bateria. d) Nunca use o carregador numa zona fechada ou com pouca ventilação. e) Não coloque a bateria em cima do carregador.
56
14) CUIDADOS COM AS LIGAÇÕES DE CORRENTE CONTÍNUA (CC) a) Ligue e desligue as pinças de ligação ca à bateria só depois de desligartodos os
interruptores no carregador e retirar a ficha da tomada. Nunca permita que as pinças se toquem.
b) Ligue as pinças à bateria e ao chassis como indicado em 15(e), 15(f), e 16(b) fino al 16(d).
15) SIGA ESTES PASSOS QUANDO A BATERIA ESTIVER INSTALADA NUM VEÍCULO. UMA FAÍSCA PRÓXIMA DA BATERIA PODE PROVOCAR A SUA EXPLOSÃO. PARA REDUZIR O RISCO DE FAÍSCAS PRÓXIMO DA BATERIA: a) Coloque os cabos de alimentação cc e de saída de forma a reduzir o risco de
serem danificados pelo capô, as portas ou peças em movimento no motor. b) Mantenha-se afastado de ventoinhas, correias, polias e de outras peças que
possam provocar ferimentos. c) Verifique a polaridade dos bornes da bateria. Normalmente, o borne POSITIVO
(POS, P, +) da bateria tem um diâmetro superior ao do borne NEGATIVO (NEG, N, –).
d) Verifique qual é o borne da bateria que está ligado ao chassis (massa). Se o borne negativo estiver ligado à massa do chassis (como na maioria dos veículos), consulte (e). Se o borne positivo estiver ligado à massa do chassis, consulte (f).
e) Para veículos com o negativo à massa, ligue a pinça POSITIVA (VERMELHA) do carregador ao borne POSITIVO (POS, P, +) da bateria. Ligue a pinça NEGATIVA (PRETA) ao chassis ou à cabeça do motor, longe da bateria. Não ligue a pinça ao carburador, às linhas de combustível nem a peças de chapa fina. Faça a ligação à cabeça do motor ou numa parte maciça do quadro.
f) Para veículos com o positivo à massa, ligue a pinça NEGATIVA (PRETA) do carregador ao borne NEGATIVO (NEG, N, –) da bateria. Ligue a pinça POSITIVA (VERMELHA) ao chassis ou à cabeça do motor, longe da bateria. Não ligue a pinça ao carburador, às linhas de combustível nem a peças de chapa fina. Faça a ligação à cabeça do motor ou numa parte maciça do quadro.
g) Ao desligar o carregador, desligue todos os interruptores CA, desligue a ficha da tomada, retire a pinça do chassis do veículo e depois retire a pinça do borne da bateria.
h) Consulte as instruções para informações sobre o tempo de carregamento. 16) SIGA ESTES PASSOS QUANDO A BATERIA ESTIVER FORA DO VEÍCULO. UMA
FAÍSCA PRÓXIMO DA BATERIA PODE PROVOCAR A SUA EXPLOSÃO. PARA REDUZIR O RISCO DE FAÍSCAS PRÓXIMO DA BATERIA: a) Verifique a polaridade dos bornes da bateria. Normalmente, o borne POSITIVO
(POS, P, +) da bateria tem um diâmetro superior ao do borne NEGATIVO (NEG, N, –).
b) Ligue um cabo de bateria isolado, de 6 (AWG) com pelo menos 60 centímetros de comprimento, ao borne NEGATIVO (NEG, N, –) da bateria.
c) Ligue a pinça POSITIVA (VERMELHA) do carregador ao borne POSITIVO (POS, P, +) da bateria.
d) Coloque-se ao pé da ponta livre do cabo, o mais afastado possível da bateria, e ligue a pinça NEGATIVA (NEG, N, –) à ponta do cabo.
e) Não esteja de frente para a bateria ao executar esta ligação final. f) Ao desligar o carregador, faça-o sempre na ordem inversa ao procedimento de ligar
e desligue a primeira ligação enquanto estiver o mais afastado possível da bateria. g) Uma bateria marítima (de barco) tem de ser retirada e carregada em terra. O
carregamento a bordo requer equipamento especialmente concebido para uso marítimo.
Este aparelho pode ser utilizado por crianças com idade superior a 8 anos e por pessoas com capacidades físicas, sensoriais ou mentais reduzidas, ou com falta de experiência, desde que lhes tenham sido dadas instruções sob supervisão em relação à utilização segura do aparelho e que compreendam o risco envolvido.
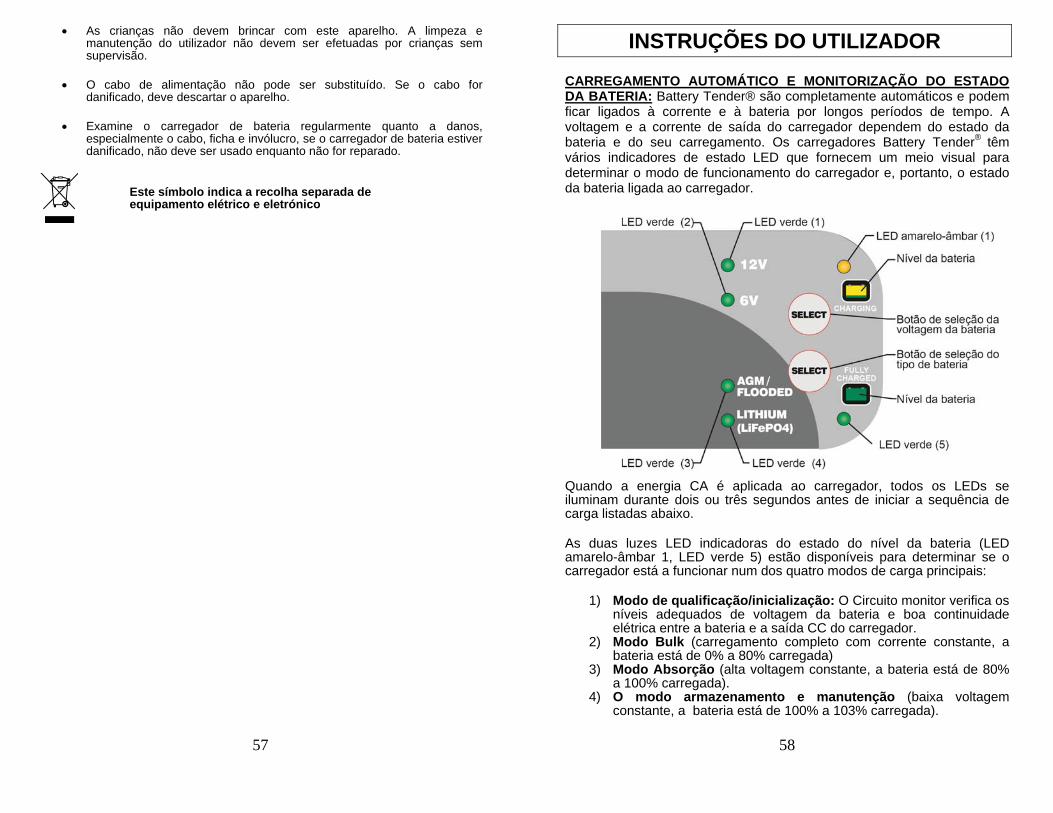
57
As crianças não devem brincar com este aparelho. A limpeza e manutenção do utilizador não devem ser efetuadas por crianças sem supervisão.
O cabo de alimentação não pode ser substituído. Se o cabo for danificado, deve descartar o aparelho.
Examine o carregador de bateria regularmente quanto a danos, especialmente o cabo, ficha e invólucro, se o carregador de bateria estiver danificado, não deve ser usado enquanto não for reparado.
Este símbolo indica a recolha separada de equipamento elétrico e eletrónico
58
INSTRUÇÕES DO UTILIZADOR
CARREGAMENTO AUTOMÁTICO E MONITORIZAÇÃO DO ESTADO DA BATERIA: Battery Tender® são completamente automáticos e podem ficar ligados à corrente e à bateria por longos períodos de tempo. A voltagem e a corrente de saída do carregador dependem do estado da bateria e do seu carregamento. Os carregadores Battery Tender® têm vários indicadores de estado LED que fornecem um meio visual para determinar o modo de funcionamento do carregador e, portanto, o estado da bateria ligada ao carregador.
Quando a energia CA é aplicada ao carregador, todos os LEDs se iluminam durante dois ou três segundos antes de iniciar a sequência de carga listadas abaixo.
As duas luzes LED indicadoras do estado do nível da bateria (LED amarelo-âmbar 1, LED verde 5) estão disponíveis para determinar se o carregador está a funcionar num dos quatro modos de carga principais:
1) Modo de qualificação/inicialização: O Circuito monitor verifica os níveis adequados de voltagem da bateria e boa continuidade elétrica entre a bateria e a saída CC do carregador.
2) Modo Bulk (carregamento completo com corrente constante, a bateria está de 0% a 80% carregada)
3) Modo Absorção (alta voltagem constante, a bateria está de 80% a 100% carregada).
4) O modo armazenamento e manutenção (baixa voltagem constante, a bateria está de 100% a 103% carregada).
59
Quando a bateria estiver totalmente carregada, o LED verde (5) indicador do estado do nível da bateria ficará verde constante e o carregador mudará para o modo carga de armazenamento/manutenção. O carregador Battery Tender® monitorizará e manterá automaticamente a bateria com a carga total. BOTÃO DE SELEÇÃO DA VOLTAGEM DA BATERIA O carregador Battery Tender® tem um botão de “SELEÇÃO” que lhe permite comutar de carga de uma bateria AGM/Inundada de 12 volts, para uma bateria de Lítio fosfato de ferro (LiFePO4) ou para uma bateria AGM/Inundada de 6 volts.
A voltagem da bateria pode ser selecionada depois de ser aplicada a alimentação CA ao carregador e antes de o carregador ser ligado à bateria.
Quando o carregador estiver ligado à alimentação CA e também à bateria, a seleção da voltagem (12V ou 6V) não pode ser alterada. Para mudar o modo de funcionamento, desligue a bateria do carregador.
Se a alimentação CA for interrompida, o carregador retomará o carregamento com base na última seleção de voltagem da bateria utilizada.
O carregador também pode detetar se foi selecionada uma voltagem incorreta da bateria ou se a bateria é defeituosa depois de ter efetuado a ligação à bateria. Um dos LED’s verdes (LED 1 ou 2) localizado ao lado do símbolo 12V ou 6V pisca para avisar que vai iniciar o ciclo de carregamento. Para iniciar um novo ciclo de carregamento, reiniciar o carregador desligando-o da alimentação CA, assim como a bateria errada ou defeituosa, por 7-10 segundos. Volte a ligar a alimentação CA e o carregador estará pronto para um novo ciclo de carregamento.
BOTÃO DE SELEÇÃO DO TIPO DE BATERIA O carregador Battery Tender® tem um botão de “SELEÇÃO” que lhe permite comutar de carga de uma bateria AGM/Inundada para uma bateria de Lítio(só 12 Volts) Fosfato de Ferro (LiFePO4).
O tipo de bateria deve ser selecionado depois de ter aplicado a alimentação CA ao carregador e antes de o carregador ser ligado à bateria.
Quando o carregador estiver ligado à alimentação CA e também à bateria, a seleção do tipo de bateria não pode ser alterada. Para iniciar um novo ciclo de carregamento, reiniciar o carregador desligando-o da alimentação CA, assim como a bateria errada ou defeituosa, por 7-10 segundos. Volte a ligar a alimentação CA e o carregador estará pronto para um novo ciclo de carga.
Se a alimentação CA for interrompida, o carregador retomará o carregamento com base nas últimas definições utilizadas.
60
MODO DE RECUPERAÇÃO AUTOMÁTICO LÍTIO FOSFATO DE FERRO (LiFePO4) Se tentar carregar uma bateria de Lítio 12 volts Fosfato de Ferro (LiFePO4) completamente descarregada que tenha uma tensão muito baixa, de 4 a 8 V, o carregador comutará automaticamente para o Modo de Recuperação. Quando está neste modo, o LED verde (4) pisca, o LED (1) 12V e o LED amarelo-âmbar ficam constantes. Se tiver êxito e depois de ter terminado, o carregador regressará ao ciclo normal de carregamento. Existe um limite de três (3) horas para este processo de recuperação. Se não tiver êxito, o LED amarelo o LED verde (5) alternarnam-se entre si. Continuará esta sequência até o carregador ser desligado da alimentação CA. Se isto acontecer, existem grandes probabilidades de a bateria já estar danificada, devido à baixa tensão, e não ter recuperação. ATENÇÃO: O CARREGADOR Battery Tender® TEM UM CIRCUITO ISENTO DE FAÍSCAS. Nem as pinças de crocodilo nem os terminais provocarão faísca se tocarem um no outro. O carregador Battery Tender®
não produzirá qualquer tensão à saída enquanto não detetar, pelo menos, 2 volts na bateria Inundada/AGM ou 4 volts na bateria de Lítio Fosfato de Ferro. É necessário estar corretamente ligado a uma bateria, com a polaridade correta, antes de começar a carregar a bateria. Portanto, se ligar o cabo de alimentação CA a uma tomada de energia CA, e se as pinças de crocodilo de saída ou terminais de anel não estiverem ligados a uma bateria, e se tocar as pinças de cocodilo ou terminais de anel, não haverá faísca elétrica.
NOTA: AS PINÇAS OU OS TERMINAIS TÊM DE ESTAR LIGADOS À BATERIA ANTES QUE O CARREGADOR POSSA GERAR QUALQUER TENSÃO DE SAÍDA. TEMPO NECESSÁRIO PARA CARREGAR UMA BATERIA: O carregador Battery Tender® ref.ª N.º 022-0200 carrega à taxa de 1.25 Amperes ou 1.25 Amperes-horas por hora. Assim, uma bateria de 15 Ah-Hora totalmente descarregada demorará cerca de 9½ horas a carregar até 80% da sua capacidade.
O carregador Battery Tender® ref.ª N.º 022-0209 carrega à taxa de 4 Amperes ou 4.0 Amperes-horas por hora. Assim, uma bateria de 15 Ah-Hora totalmente descarregada demorará cerca de 3 horas a carregar até 80% da sua capacidade.
TRABALHAR COM UMA BATERIA COMPLETAMENTE DESCARREGADA OU COM UMA VOLTAGEM MUITO BAIXA:
Se tentar carregar uma bateria totalmente descarregada com uma tensão inferior a 12 V numa bateria Inundada/AGM ou 4 volts numa bateria de Lítio Fosfato de Ferro, o carregador Battery Tender® não iniciará a trabalhar. Um circuito de segurança interno impede o carregador de gerar qualquer tensão de saída a não ser que detete pelo menos 2 volts numa bateria Inundada/AGM ou 4 volts numa bateria de Lítio Fosfato de Ferro na saída do carregador. Nesta situação, o LED amarelo-âmbar continuará a piscar para indicar que o carregamento não foi iniciado.
61
NOTA: Se uma bateria de chumbo-ácido de 12 V tiver uma voltagem de saída inferior a 9 V quando estiver em repouso, quando nem está a ser carregada nem a fornecer corrente elétrica a uma carga externa, existe uma grande hipótese de a bateria ser defeituosa. Como ponto de referência, uma bateria de chumbo-ácido de 12 V totalmente carregada terá, no seu estado de repouso, uma voltagem de cerca de 12,9 V não estando em carga. Uma bateria de chumbo-ácido de 12 V totalmente descarregada terá, no seu estado de repouso, uma voltagem de cerca de 11,4 V não estando em carga. Isto significa que uma alteração de voltagem de apenas 1,5 V representa a gama total de carga de 0% a 100% numa bateria de chumbo-ácido de 12 V. Dependendo do fabricante e da idade da bateria, as voltagens específicas variarão em poucas décimas de Volt mas, a gama de 1,5 V continuará a ser um bom indicador da percentagem de carga da bateria. LUZ INDICADORA DO ESTADO: Se a luz estiver apagada, a bateria não está bem ligada e/ou o carregador não está bem ligado à alimentação elétrica. Segue-se a descrição do funcionamento da luz:
LUZ AMARELO-ÂMBAR INTERMITENTE (LED 1 Amarelo-Âmbar) – O LED amarelo-Âmbar intermitente indica que o carregador tem a alimentação elétrica ligada e que o microprocessador está a funcionar corretamente. Se o LED continuar a piscar, ou a tensão da bateria for demasiado baixa (inferior a 2 volts para uma bateria Inundada/AGM ou 4 volts para uma bateria de Lítio Fosfato de Ferro) ou as pinças de crocodilo ou os terminais não estiverem corretamente ligados à bateria.
VERDE/AMARELO-ÂMBAR ALTERNADOS (LED 1 amarelo-âmbar e LED 5 verde) Isto indica que o carregador de bateria ultrapassou o tempo limite no modo de Recuperação (ver página 5 para uma mais completa explicação). Troque também a ligação da polaridade na bateria.
LUZ AMARELO-ÂMBAR SEMPRE ACESA LED 1 amarelo-âmbar – Sempre que o LED amarelo-âmbar estiver continuamente ligado, uma bateria está ligada corretamente e o carregador está a carregá-la. O LED amarelo-âmbar manter-se-á ligado até o carregador terminar a fase de carregamento.
LUZ VERDE INTERMITENTE (LED verde 5) – Quando o LED verde está a piscar e o LED amarelo--âmbar (LED 1 amarelo-âmbar) está constante, a bateria tem uma carga superior a 80% e, se necessário, pode ser desligada do carregador e usada. Sempre que possível, deixe a bateria a carregar até a luz verde se manter acesa no modo constante.
LUZ VERDE SEMPRE ACESA (LED 5 verde) – Quando o LED verde está continuamente acesa, o carregamento está completo e, se necessário, a bateria pode regressar ao serviço. Também pode continuar ligada para manter a bateria por um período de tempo indeterminado.
62
SOLUÇÃO DE PROBLEMAS 1) Se o carregador não liga e nenhum dos LEDs se ilumina.
a. Verifique se a tomada da alimentação CA tem tensão ligando-a a um candeeiro, um eletrodoméstico ou um voltímetro.
2) O LED verde (5) (totalmente carregada) aparece imediatamente quando está a carregar uma bateria descarregada.
a. A bateria tem provavelmente um defeito, leve-a a um revendedor para ser testada.
3) Quando está a carregar uma bateria, o LED verde (5) (totalmente carregada) nunca aparece.
a. A bateria pode ter um defeito, leve-a a um revendedor para ser testada.
b. A bateria tem uma corrente de carga excessiva, remova ou desligue a bateria do equipamento.
4) O LED amarelo-âmbar continua a piscar mesmo com a ligação à bateria:
a. Verifique o fusível no cabo acessório. b. A voltagem da bateria é demasiado baixa.
5) O LED verde (1) de 12V está a piscar.
a. A bateria está danificada ou foi selecionada uma voltagem incorreta da bateria.
6) O LED verde (2) de 6V está a piscar.
a. A bateria está danificada ou foi selecionada uma voltagem incorreta da bateria.
7) Os LEDs (5) amarelo-âmbar e Verde (carga completa) LED (5) alternam-se.
a. Troque a ligação da polaridade na bateria. b. O temporizador de segurança dos carregadores está ativado
porque a bateria não atinge a voltagem ideal. A bateria pode ter um defeito, leve-a a um revendedor para ser testada.