tibco activematrix businessworks rest reference...tibco activematrix businessworks ... creating xml...
TRANSCRIPT

TIBCO ActiveMatrix BusinessWorks™ RESTReferenceSoftware Release 6.3.3August 2016
Two-Second Advantage®

Important Information
SOME TIBCO SOFTWARE EMBEDS OR BUNDLES OTHER TIBCO SOFTWARE. USE OF SUCHEMBEDDED OR BUNDLED TIBCO SOFTWARE IS SOLELY TO ENABLE THE FUNCTIONALITY (ORPROVIDE LIMITED ADD-ON FUNCTIONALITY) OF THE LICENSED TIBCO SOFTWARE. THEEMBEDDED OR BUNDLED SOFTWARE IS NOT LICENSED TO BE USED OR ACCESSED BY ANYOTHER TIBCO SOFTWARE OR FOR ANY OTHER PURPOSE.
USE OF TIBCO SOFTWARE AND THIS DOCUMENT IS SUBJECT TO THE TERMS ANDCONDITIONS OF A LICENSE AGREEMENT FOUND IN EITHER A SEPARATELY EXECUTEDSOFTWARE LICENSE AGREEMENT, OR, IF THERE IS NO SUCH SEPARATE AGREEMENT, THECLICKWRAP END USER LICENSE AGREEMENT WHICH IS DISPLAYED DURING DOWNLOADOR INSTALLATION OF THE SOFTWARE (AND WHICH IS DUPLICATED IN THE LICENSE FILE)OR IF THERE IS NO SUCH SOFTWARE LICENSE AGREEMENT OR CLICKWRAP END USERLICENSE AGREEMENT, THE LICENSE(S) LOCATED IN THE “LICENSE” FILE(S) OF THESOFTWARE. USE OF THIS DOCUMENT IS SUBJECT TO THOSE TERMS AND CONDITIONS, ANDYOUR USE HEREOF SHALL CONSTITUTE ACCEPTANCE OF AND AN AGREEMENT TO BEBOUND BY THE SAME.
This document contains confidential information that is subject to U.S. and international copyright lawsand treaties. No part of this document may be reproduced in any form without the writtenauthorization of TIBCO Software Inc.
TIBCO, TIBCO ActiveMatrix BusinessWorks, TIBCO Rendezvous, TIBCO Enterprise Message Service,TIBCO Business Studio, TIBCO Enterprise Administrator, TIBCO ActiveSpaces, TIBCO Runtime Agent,TIBCO Designer, and Two-Second Advantage are either registered trademarks or trademarks of TIBCOSoftware Inc. in the United States and/or other countries.
Enterprise Java Beans (EJB), Java Platform Enterprise Edition (Java EE), Java 2 Platform EnterpriseEdition (J2EE), and all Java-based trademarks and logos are trademarks or registered trademarks ofOracle Corporation in the U.S. and other countries.
All other product and company names and marks mentioned in this document are the property of theirrespective owners and are mentioned for identification purposes only.
THIS SOFTWARE MAY BE AVAILABLE ON MULTIPLE OPERATING SYSTEMS. HOWEVER, NOTALL OPERATING SYSTEM PLATFORMS FOR A SPECIFIC SOFTWARE VERSION ARE RELEASEDAT THE SAME TIME. SEE THE README FILE FOR THE AVAILABILITY OF THIS SOFTWAREVERSION ON A SPECIFIC OPERATING SYSTEM PLATFORM.
THIS DOCUMENT IS PROVIDED “AS IS” WITHOUT WARRANTY OF ANY KIND, EITHER EXPRESSOR IMPLIED, INCLUDING, BUT NOT LIMITED TO, THE IMPLIED WARRANTIES OFMERCHANTABILITY, FITNESS FOR A PARTICULAR PURPOSE, OR NON-INFRINGEMENT.
THIS DOCUMENT COULD INCLUDE TECHNICAL INACCURACIES OR TYPOGRAPHICALERRORS. CHANGES ARE PERIODICALLY ADDED TO THE INFORMATION HEREIN; THESECHANGES WILL BE INCORPORATED IN NEW EDITIONS OF THIS DOCUMENT. TIBCOSOFTWARE INC. MAY MAKE IMPROVEMENTS AND/OR CHANGES IN THE PRODUCT(S)AND/OR THE PROGRAM(S) DESCRIBED IN THIS DOCUMENT AT ANY TIME.
THE CONTENTS OF THIS DOCUMENT MAY BE MODIFIED AND/OR QUALIFIED, DIRECTLY ORINDIRECTLY, BY OTHER DOCUMENTATION WHICH ACCOMPANIES THIS SOFTWARE,INCLUDING BUT NOT LIMITED TO ANY RELEASE NOTES AND "READ ME" FILES.
Copyright © 2001-2016 TIBCO Software Inc. All rights reserved.
TIBCO Software Inc. Confidential Information
2
TIBCO ActiveMatrix BusinessWorks™ REST Reference

Contents
Figures . . . . . . . . . . . . . . . . . . . . . . . . . . . . . . . . . . . . . . . . . . . . . . . . . . . . . . . . . . . . . . . . . . . . . . . . . . . . . . . . . . . . . . . . . . . . 6
TIBCO Documentation and Support Services . . . . . . . . . . . . . . . . . . . . . . . . . . . . . . . . . . . . . . . . . . . . . . . . . . . . . . . . .7
What is REST? . . . . . . . . . . . . . . . . . . . . . . . . . . . . . . . . . . . . . . . . . . . . . . . . . . . . . . . . . . . . . . . . . . . . . . . . . . . . . . . . . . . . . 8
What is a Resource? . . . . . . . . . . . . . . . . . . . . . . . . . . . . . . . . . . . . . . . . . . . . . . . . . . . . . . . . . . . . . . . . . . . . . . . . . . . . . . . . . . . . . . . . . . . . . . . . . . 8
What are Operations? . . . . . . . . . . . . . . . . . . . . . . . . . . . . . . . . . . . . . . . . . . . . . . . . . . . . . . . . . . . . . . . . . . . . . . . . . . . . . . . . . . . . . . . . . . . . . . . . . 8
What is an Endpoint? . . . . . . . . . . . . . . . . . . . . . . . . . . . . . . . . . . . . . . . . . . . . . . . . . . . . . . . . . . . . . . . . . . . . . . . . . . . . . . . . . . . . . . . . . . . . . . . . . . 8
What is Swagger? . . . . . . . . . . . . . . . . . . . . . . . . . . . . . . . . . . . . . . . . . . . . . . . . . . . . . . . . . . . . . . . . . . . . . . . . . . . . . . . . . 10
The Swagger UI . . . . . . . . . . . . . . . . . . . . . . . . . . . . . . . . . . . . . . . . . . . . . . . . . . . . . . . . . . . . . . . . . . . . . . . . . . . . . . . . . . . . . . . . . . . . . . . . . . . . . . 10
Viewing Multiple REST Services in Swagger UI . . . . . . . . . . . . . . . . . . . . . . . . . . . . . . . . . . . . . . . . . . . . . . . . . . . . . . . . . . . . . . . . . . .10
Parameter Support . . . . . . . . . . . . . . . . . . . . . . . . . . . . . . . . . . . . . . . . . . . . . . . . . . . . . . . . . . . . . . . . . . . . . . . . . . . . . . . . 11
Conversion Between Swagger and XML in TIBCO Business Studio . . . . . . . . . . . . . . . . . . . . . . . . . . . . . . . . . . . . . . . . . . . . . . . . . . . .11
Working with Path and Query Parameters . . . . . . . . . . . . . . . . . . . . . . . . . . . . . . . . . . . . . . . . . . . . . . . . . . . . . . . . . . . . . . . . . . . . . . . . . . . . .18
Adding or Editing Path Parameters . . . . . . . . . . . . . . . . . . . . . . . . . . . . . . . . . . . . . . . . . . . . . . . . . . . . . . . . . . . . . . . . . . . . . . . . . . . . . . . 19
Adding or Editing Query Parameters . . . . . . . . . . . . . . . . . . . . . . . . . . . . . . . . . . . . . . . . . . . . . . . . . . . . . . . . . . . . . . . . . . . . . . . . . . . . . .20
Working with Arrays . . . . . . . . . . . . . . . . . . . . . . . . . . . . . . . . . . . . . . . . . . . . . . . . . . . . . . . . . . . . . . . . . . . . . . . . . . . . . . . . . . . . . . . . . . . . . . . . . . 20
Working with Form Parameters . . . . . . . . . . . . . . . . . . . . . . . . . . . . . . . . . . . . . . . . . . . . . . . . . . . . . . . . . . . . . . . . . . . . . . . . . . . . . . . . . . . . . . . 23
Creating Form Parameters . . . . . . . . . . . . . . . . . . . . . . . . . . . . . . . . . . . . . . . . . . . . . . . . . . . . . . . . . . . . . . . . . . . . . . . . . . . . . . . . . . . . . . . 23
Working with Header Parameters . . . . . . . . . . . . . . . . . . . . . . . . . . . . . . . . . . . . . . . . . . . . . . . . . . . . . . . . . . . . . . . . . . . . . . . . . . . . . . . . . . . . . 24
About REST Services and References . . . . . . . . . . . . . . . . . . . . . . . . . . . . . . . . . . . . . . . . . . . . . . . . . . . . . . . . . . . . . . 26
Supported Message Formats . . . . . . . . . . . . . . . . . . . . . . . . . . . . . . . . . . . . . . . . . . . . . . . . . . . . . . . . . . . . . . . . . . . . . . 27
Restrictions . . . . . . . . . . . . . . . . . . . . . . . . . . . . . . . . . . . . . . . . . . . . . . . . . . . . . . . . . . . . . . . . . . . . . . . . . . . . . . . . . . . . . . 28
Restrictions on JSON . . . . . . . . . . . . . . . . . . . . . . . . . . . . . . . . . . . . . . . . . . . . . . . . . . . . . . . . . . . . . . . . . . . . . . . . . . . . . . . . . . . . . . . . . . . . . . . . .28
Restrictions on XML Schema . . . . . . . . . . . . . . . . . . . . . . . . . . . . . . . . . . . . . . . . . . . . . . . . . . . . . . . . . . . . . . . . . . . . . . . . . . . . . . . . . . . . . . . . . 28
Using Swagger 1.2 Files . . . . . . . . . . . . . . . . . . . . . . . . . . . . . . . . . . . . . . . . . . . . . . . . . . . . . . . . . . . . . . . . . . . . . . . . . . . 29
REST Schema Utilities . . . . . . . . . . . . . . . . . . . . . . . . . . . . . . . . . . . . . . . . . . . . . . . . . . . . . . . . . . . . . . . . . . . . . . . . . . . . .30
Creating a New XML Schema File . . . . . . . . . . . . . . . . . . . . . . . . . . . . . . . . . . . . . . . . . . . . . . . . . . . . . . . . . . . . . . . . . . . . . . . . . . . . . . . . . . . . 30
Creating XML Schema From a JSON Payload . . . . . . . . . . . . . . . . . . . . . . . . . . . . . . . . . . . . . . . . . . . . . . . . . . . . . . . . . . . . . . . . . . . . . . . . .30
Generating an XML Schema from a Swagger File . . . . . . . . . . . . . . . . . . . . . . . . . . . . . . . . . . . . . . . . . . . . . . . . . . . . . . . . . . . . . . . . . . . . . 31
REST Service . . . . . . . . . . . . . . . . . . . . . . . . . . . . . . . . . . . . . . . . . . . . . . . . . . . . . . . . . . . . . . . . . . . . . . . . . . . . . . . . . . . . . 32
REST Service Binding . . . . . . . . . . . . . . . . . . . . . . . . . . . . . . . . . . . . . . . . . . . . . . . . . . . . . . . . . . . . . . . . . . . . . . . . . . . . . . . . . . . . . . . . . . . . . . . .32
Creating a REST Service . . . . . . . . . . . . . . . . . . . . . . . . . . . . . . . . . . . . . . . . . . . . . . . . . . . . . . . . . . . . . . . . . . . . . . . . . . . . . . . . . . . . . . . . . . . . . 35
Using Swagger to Create a REST Service . . . . . . . . . . . . . . . . . . . . . . . . . . . . . . . . . . . . . . . . . . . . . . . . . . . . . . . . . . . . . . . . . . . . . . . . 35
Using the Wizard to Create a REST Service . . . . . . . . . . . . . . . . . . . . . . . . . . . . . . . . . . . . . . . . . . . . . . . . . . . . . . . . . . . . . . . . . . . . . . 35
Rest Service Wizard . . . . . . . . . . . . . . . . . . . . . . . . . . . . . . . . . . . . . . . . . . . . . . . . . . . . . . . . . . . . . . . . . . . . . . . . . . . . . . . . . . . . . . . . .39
Using JSON Payload or an Existing XSD File . . . . . . . . . . . . . . . . . . . . . . . . . . . . . . . . . . . . . . . . . . . . . . . . . . . . . . . . . . . . . . . . . . . . . . . . . 40
REST Service Tutorial . . . . . . . . . . . . . . . . . . . . . . . . . . . . . . . . . . . . . . . . . . . . . . . . . . . . . . . . . . . . . . . . . . . . . . . . . . . . . . . . . . . . . . . . . . . . . . . . 40
3
TIBCO ActiveMatrix BusinessWorks™ REST Reference

Installing PostgreSQL . . . . . . . . . . . . . . . . . . . . . . . . . . . . . . . . . . . . . . . . . . . . . . . . . . . . . . . . . . . . . . . . . . . . . . . . . . . . . . . . . . . . . . . . . . . . 41
Creating a New Process . . . . . . . . . . . . . . . . . . . . . . . . . . . . . . . . . . . . . . . . . . . . . . . . . . . . . . . . . . . . . . . . . . . . . . . . . . . . . . . . . . . . . . . . . 41
Building a REST Service . . . . . . . . . . . . . . . . . . . . . . . . . . . . . . . . . . . . . . . . . . . . . . . . . . . . . . . . . . . . . . . . . . . . . . . . . . . . . . . . . . . . . . . . . 44
Testing the REST Service . . . . . . . . . . . . . . . . . . . . . . . . . . . . . . . . . . . . . . . . . . . . . . . . . . . . . . . . . . . . . . . . . . . . . . . . . . . . . . . . . . . . . . . . 48
Testing the POST and GET Operations . . . . . . . . . . . . . . . . . . . . . . . . . . . . . . . . . . . . . . . . . . . . . . . . . . . . . . . . . . . . . . . . . . . . . . 51
Troubleshooting . . . . . . . . . . . . . . . . . . . . . . . . . . . . . . . . . . . . . . . . . . . . . . . . . . . . . . . . . . . . . . . . . . . . . . . . . . . . . . . . . . . . . . . . . . . . . 52
REST Reference . . . . . . . . . . . . . . . . . . . . . . . . . . . . . . . . . . . . . . . . . . . . . . . . . . . . . . . . . . . . . . . . . . . . . . . . . . . . . . . . . . 54
REST Reference Binding . . . . . . . . . . . . . . . . . . . . . . . . . . . . . . . . . . . . . . . . . . . . . . . . . . . . . . . . . . . . . . . . . . . . . . . . . . . . . . . . . . . . . . . . . . . . . 54
Creating a REST Reference . . . . . . . . . . . . . . . . . . . . . . . . . . . . . . . . . . . . . . . . . . . . . . . . . . . . . . . . . . . . . . . . . . . . . . . . . . . . . . . . . . . . . . . . . . 57
Using Swagger to Create a REST Reference . . . . . . . . . . . . . . . . . . . . . . . . . . . . . . . . . . . . . . . . . . . . . . . . . . . . . . . . . . . . . . . . . . . . . 57
Using the Wizard to Create a REST Reference . . . . . . . . . . . . . . . . . . . . . . . . . . . . . . . . . . . . . . . . . . . . . . . . . . . . . . . . . . . . . . . . . . . 58
REST Reference Wizard . . . . . . . . . . . . . . . . . . . . . . . . . . . . . . . . . . . . . . . . . . . . . . . . . . . . . . . . . . . . . . . . . . . . . . . . . . . . . . . . . . . . .60
Using the Debug Engine in ActiveMatrix BusinessWorks . . . . . . . . . . . . . . . . . . . . . . . . . . . . . . . . . . . . . . . . . . . . . . . . . . . . . . . . . . 61
Creating the Reference . . . . . . . . . . . . . . . . . . . . . . . . . . . . . . . . . . . . . . . . . . . . . . . . . . . . . . . . . . . . . . . . . . . . . . . . . . . . . . . . . . . . . . 62
To make your reference application portable . . . . . . . . . . . . . . . . . . . . . . . . . . . . . . . . . . . . . . . . . . . . . . . . . . . . . . . . . . . . . . . . . 63
REST Reference Tutorial . . . . . . . . . . . . . . . . . . . . . . . . . . . . . . . . . . . . . . . . . . . . . . . . . . . . . . . . . . . . . . . . . . . . . . . . . . . . . . . . . . . . . . . . . . . . . 63
Refactoring a REST Service or Reference . . . . . . . . . . . . . . . . . . . . . . . . . . . . . . . . . . . . . . . . . . . . . . . . . . . . . . . . . . . 67
Updating a service created from an imported Swagger file . . . . . . . . . . . . . . . . . . . . . . . . . . . . . . . . . . . . . . . . . . . . . . . . . . . . . . . . . . . . .67
Updating a service that was created ground up in Studio . . . . . . . . . . . . . . . . . . . . . . . . . . . . . . . . . . . . . . . . . . . . . . . . . . . . . . . . . . . . . . 67
Changing the Request and Response Schemas . . . . . . . . . . . . . . . . . . . . . . . . . . . . . . . . . . . . . . . . . . . . . . . . . . . . . . . . . . . . . . . . . . . . . . .67
Updating Configuration . . . . . . . . . . . . . . . . . . . . . . . . . . . . . . . . . . . . . . . . . . . . . . . . . . . . . . . . . . . . . . . . . . . . . . . . . . . . . . . . . . . . . . . . . . . . . . . 67
Adding an Operation . . . . . . . . . . . . . . . . . . . . . . . . . . . . . . . . . . . . . . . . . . . . . . . . . . . . . . . . . . . . . . . . . . . . . . . . . . . . . . . . . . . . . . . . . . . . . . . . . .68
. . . . . . . . . . . . . . . . . . . . . . . . . . . . . . . . . . . . . . . . . . . . . . . . . . . . . . . . . . . . . . . . . . . . . . . . . . . . . . . . . . . . . . . . . . . . . . . . . . . . . . . . . . . . . . . . . .68
Adding or Deleting Parameters . . . . . . . . . . . . . . . . . . . . . . . . . . . . . . . . . . . . . . . . . . . . . . . . . . . . . . . . . . . . . . . . . . . . . . . . . . . . . . . . . . . . . . . 69
OSGI Commands to List REST URLs . . . . . . . . . . . . . . . . . . . . . . . . . . . . . . . . . . . . . . . . . . . . . . . . . . . . . . . . . . . . . . . 70
Exception Handling . . . . . . . . . . . . . . . . . . . . . . . . . . . . . . . . . . . . . . . . . . . . . . . . . . . . . . . . . . . . . . . . . . . . . . . . . . . . . . . 71
Creating Faults . . . . . . . . . . . . . . . . . . . . . . . . . . . . . . . . . . . . . . . . . . . . . . . . . . . . . . . . . . . . . . . . . . . . . . . . . . . . . . . . . . . . . . . . . . . . . . . . . . . . . . . 71
Using the Catch and Rethrow Activities . . . . . . . . . . . . . . . . . . . . . . . . . . . . . . . . . . . . . . . . . . . . . . . . . . . . . . . . . . . . . . . . . . . . . . . . . . .72
Adding Details to Error Code Descriptions . . . . . . . . . . . . . . . . . . . . . . . . . . . . . . . . . . . . . . . . . . . . . . . . . . . . . . . . . . . . . . . . . . . . . . . . . . . . 73
Using Swagger-Provided Faults . . . . . . . . . . . . . . . . . . . . . . . . . . . . . . . . . . . . . . . . . . . . . . . . . . . . . . . . . . . . . . . . . . . . . . . . . . . . . . . . . . . . . . .74
Standard HTTP Status Codes . . . . . . . . . . . . . . . . . . . . . . . . . . . . . . . . . . . . . . . . . . . . . . . . . . . . . . . . . . . . . . . . . . . . . . . . . . . . . . . . . . . . . . . . 75
Security . . . . . . . . . . . . . . . . . . . . . . . . . . . . . . . . . . . . . . . . . . . . . . . . . . . . . . . . . . . . . . . . . . . . . . . . . . . . . . . . . . . . . . . . . . 77
Overview of Policies . . . . . . . . . . . . . . . . . . . . . . . . . . . . . . . . . . . . . . . . . . . . . . . . . . . . . . . . . . . . . . . . . . . . . . . . . . . . . . . . . . . . . . . . . . . . . . . . . 77
Managing Policy Resources . . . . . . . . . . . . . . . . . . . . . . . . . . . . . . . . . . . . . . . . . . . . . . . . . . . . . . . . . . . . . . . . . . . . . . . . . . . . . . . . . . . . . 77
Creating a Folder for Policies . . . . . . . . . . . . . . . . . . . . . . . . . . . . . . . . . . . . . . . . . . . . . . . . . . . . . . . . . . . . . . . . . . . . . . . . . . . . . . . .77
Creating an Authentication Resource . . . . . . . . . . . . . . . . . . . . . . . . . . . . . . . . . . . . . . . . . . . . . . . . . . . . . . . . . . . . . . . . . . . . . . . .78
Associating Policies . . . . . . . . . . . . . . . . . . . . . . . . . . . . . . . . . . . . . . . . . . . . . . . . . . . . . . . . . . . . . . . . . . . . . . . . . . . . . . . . . . . . . . . . . 78
Removing a Policy . . . . . . . . . . . . . . . . . . . . . . . . . . . . . . . . . . . . . . . . . . . . . . . . . . . . . . . . . . . . . . . . . . . . . . . . . . . . . . . . . . . . . . . . . . 79
HTTP Security . . . . . . . . . . . . . . . . . . . . . . . . . . . . . . . . . . . . . . . . . . . . . . . . . . . . . . . . . . . . . . . . . . . . . . . . . . . . . . . . . . . . . . . . . . . . . . . . . . . 79
4
TIBCO ActiveMatrix BusinessWorks™ REST Reference

Enforcing Basic Authentication . . . . . . . . . . . . . . . . . . . . . . . . . . . . . . . . . . . . . . . . . . . . . . . . . . . . . . . . . . . . . . . . . . . . . . . . . . . . . . .80
Enforcing Basic Credential Mapping . . . . . . . . . . . . . . . . . . . . . . . . . . . . . . . . . . . . . . . . . . . . . . . . . . . . . . . . . . . . . . . . . . . . . . . . .83
The REST and JSON Palette in Studio . . . . . . . . . . . . . . . . . . . . . . . . . . . . . . . . . . . . . . . . . . . . . . . . . . . . . . . . . . . . . . 86
5
TIBCO ActiveMatrix BusinessWorks™ REST Reference

Figures
REST Service Wizard . . . . . . . . . . . . . . . . . . . . . . . . . . . . . . . . . . . . . . . . . . . . . . . . . . . . . . . . . . . . . . . . . . . . . . . . . . . . . . . . . . . . . . . . . . . . . . . . . . .37
Fault Handler Attached to an Inner Scope . . . . . . . . . . . . . . . . . . . . . . . . . . . . . . . . . . . . . . . . . . . . . . . . . . . . . . . . . . . . . . . . . . . . . . . . . . . . 71
Example of using the Catch block . . . . . . . . . . . . . . . . . . . . . . . . . . . . . . . . . . . . . . . . . . . . . . . . . . . . . . . . . . . . . . . . . . . . . . . . . . . . . . . . . . . . . .73
6
TIBCO ActiveMatrix BusinessWorks™ REST Reference

TIBCO Documentation and Support Services
Documentation for this and other TIBCO products is available on the TIBCO Documentation site. Thissite is updated more frequently than any documentation that might be included with the product. Toensure that you are accessing the latest available help topics, please visit:
https://docs.tibco.com
Product-Specific Documentation
Documentation for TIBCO products is not bundled with the software. Instead, it is available on theTIBCO Documentation site. To directly access documentation for this product, double-click thefollowing file:
TIBCO_HOME/release_notes/TIB_BW_version_docinfo.html
The following documents for this product can be found on the TIBCO Documentation site:
● Concepts
● Installation
● Getting Started
● Application Development
● Administration
● Bindings and Palettes Reference
● Samples
● Error Codes
● API Reference
● Migration
How to Contact TIBCO Support
For comments or problems with this manual or the software it addresses, contact TIBCO Support:
● For an overview of TIBCO Support, and information about getting started with TIBCO Support,visit this site:
http://www.tibco.com/services/support
● If you already have a valid maintenance or support contract, visit this site:
https://support.tibco.com
Entry to this site requires a user name and password. If you do not have a user name, you canrequest one.
How to Join TIBCO Community
TIBCO Community is an online destination for TIBCO customers, partners, and resident experts. It is aplace to share and access the collective experience of the TIBCO community. TIBCO Community offersforums, blogs, and access to a variety of resources. To register, go to the following web address:
https://community.tibco.com
7
TIBCO ActiveMatrix BusinessWorks™ REST Reference

What is REST?
Representational State Transfer (REST) is a platform-and-language-independent architectural styleused in building services for distributed systems and networked applications. REST ignores the detailsof component implementation and protocol syntax. It uses HTTP to make calls between theapplications.
REST is primarily used to expose resources across the networks allowing applications to share data.REST APIs are used for machine-to-machine communications. REST calls (requests) and responses aresent over the HTTP protocol, hence REST requests are in the form of URLs that point to the resource(s)on the server. Required parameters are attached to the end of the URL. For example, in the resourceURL http://<some-name>.com/person/1234, person is the resource and 1234 is the parameter that ispassed to the URL of the resource. You can use any REST client to make REST calls.
The key features of REST architectural style are:
● Client-server architecture: Provides a separation of implementation details between clients andservers.
● Stateless communication: During a client-server communication, the server does not store anysession information, making the client-server communication stateless. Every request is complete initself and must include all the information required to complete the request.
● Cacheability: Provides an option to the client to cache response data and reuse it later for equivalentrequests; thus partially eliminating some client-server interactions. This results in improvedscalability and performance.
What is a Resource?REST APIs operate on resources that are defined within a REST interface file such as a Swaggerspecification. A resource is a representation of a thing (a noun) on which the REST APIs (verbs) operate.Some examples of a resource are a user, a book, or a pet. The REST operations, POST, GET, PUT, andDELETE operate on a resource. Individual instances of a resource are identified by a unique identifierwithin the resource such as an ID or name.
A resource can be thought of as an entity which is expressed by a well-formed URI. In many ways it issimilar to an instance of a class in the Java language. A resource has a type, one or more parameters,and some standard operations that allow you to manipulate or retrieve it from a remote location if youknow its endpoint URL. The operations allowed on a resource are POST, GET, PUT, and DELETE thatcorrespond to the CRUD operations. A resource can exist independently or it can be a part of ahomogeneous collection. All the information that is relevant to a resource is contained within theresource itself.
A resource is represented by an XML object in TIBCO Business Studio™ and a JSON object in aSwagger file.
What are Operations?Operations define the action that can be performed on the resource. REST supports POST, GET, PUT,and DELETE operations that correspond to the CRUD operations.
In TIBCO Business Studio, a process implements an operation on that resource and acts to receive,manipulate, and return resources. You pass information to an operation by attaching path or queryparameters to the URL of the resource. In addition you can use header parameters to pass or receiveinformation in the HTTP envelope containing the message body.
What is an Endpoint?The REST API is exposed through an endpoint. It is the access point of a resource which a REST serviceexposes and a REST reference invokes. An endpoint uses the REST operations to provide access to the
8
TIBCO ActiveMatrix BusinessWorks™ REST Reference

resource. An endpoint has a name and is represented by a path within the resource. It resides at alocation specified by the URL of the resource.
9
TIBCO ActiveMatrix BusinessWorks™ REST Reference

What is Swagger?
Swagger is an specification which is used to define a REST interface that has operations andparameters. Documents used by the REST API to send requests and receive responses are often writtenaccording to the Swagger specification.
For more details on Swagger, see http://swagger.io/.
supports the import of Swagger-compliant files that were created outside of Studio as well as allowsyou to generate a Swagger-compliant JSON file when you create a service from an XSD within Studio.
The Swagger UIUsing the Swagger UI you can visualize and test RESTful services defined by the Swagger specification.It specifies the format (URL, method, and representation) to describe the REST web services.
Viewing Multiple REST Services in Swagger UIIf there are multiple REST services using different HTTP Connectors, you can the select the requiredHTTP Connector to receive responses for all the REST services using that connector. From the SwaggerUI, select the connector from the options in the drop down list Select HTTP Connector.
At runtime, in the Swagger UI, the REST service lists down all the REST services that are using theselected HTTP Connector.
10
TIBCO ActiveMatrix BusinessWorks™ REST Reference

Parameter Support
REST operations support path, query, form, and header parameters. You can pass path and queryparameters to an operation by appending them to the request URL. Header parameters are used to passand receive information in the HTTP envelope containing the message body.
Path parameters can be applied only at the root level. They apply to all operations and cannot bedefined per operation.
Query parameters can be applied both at the root level when they apply to all operations or they can bedefined per operation too.
Header parameters are defined per operation and per direction. Request headers are separate fromresponse headers.
Form parameters can be defined per operation.
Conversion Between Swagger and XML in TIBCO Business StudioWhen you create a service using a Swagger file, TIBCO Business Studio converts the Swaggerdefinitions into XML schema elements. You use the schema elements to configure your RESToperations.
You have the option to create a REST service or reference using a Swagger file or you can create themfrom scratch in the Studio by creating your XML schema using the Schema Editor in Studio. When youcreate a REST service or reference from a Swagger file, a corresponding XSD file is automaticallygenerated in the Schemas folder of your project. When you create a REST service or reference fromscratch using their respective wizard, then a corresponding Swagger file gets generated in the ServiceDescriptors folder of your project.
A Swagger file is a contract that must be followed. Only the originator of the Swagger file can modify itin Studio. If Studio originated the Swagger file then Studio can modify it.
Studio maintains a link between the Swagger file and its generated .xsd file. Multiple XSD files may belinked to one Swagger file. Do not edit a Studio-generated .xsd file. Its contents will be replaced thenext time the file is generated.
Not all artifacts in JSON have a direct equivalent in XML. For example, Studio handles Swagger to XMLconversion of arrays differently than single elements. This sections explains how TIBCO BusinessStudio models the conversion of elements from Swagger to XML and vice versa.
Basic type elements
The following table shows the conversion of elements of basic types between XML and Swagger inTIBCO Business Studio :
XSD type Corresponding type in Swagger
long integer
short, int, integer integer
double number
float number
string string
11
TIBCO ActiveMatrix BusinessWorks™ REST Reference

XSD type Corresponding type in Swagger
base64Binary string
decimal number
boolean boolean
byte string
date string
dateTime string
binary string
Objects
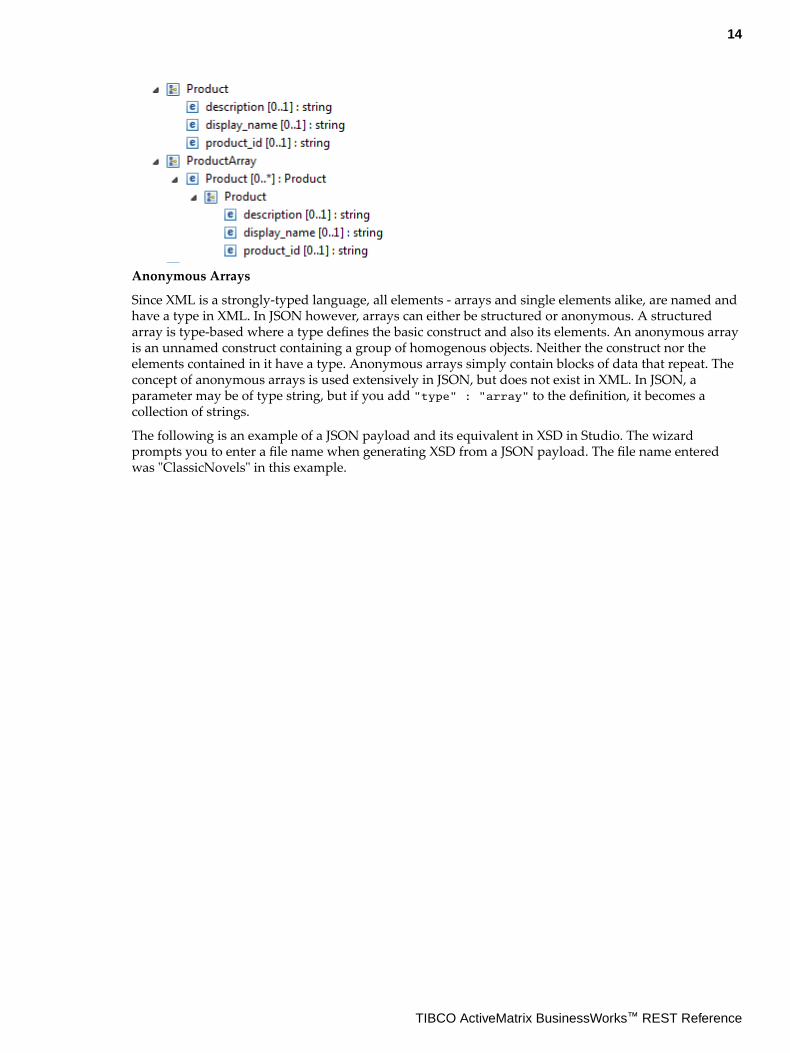
The following table shows how an object in JSON is converted into an XML schema element in TIBCOBusiness Studio . In this example, Product is an object that has three attributes called 'product_id','description' and 'dispaly_name' all of which are of type string.
Since the object has multiple attributes, it is a complex type element in XSD. The minOccurs="0"indicates that specifying a value for the attribute is optional.
This object in JSON... ...is converted to the following in XSD
"Product": { "type": "object", "properties": { "product_id": { "type": "string", }, "description": { "type": "string", }, "display_name": { "type": "string", } } }
<xs:element name="Product" type="tns:Product"/> <xs:complexType name="Product"> <xs:sequence> <xs:element minOccurs="0" name="product_id" type="xs:string"/> <xs:element minOccurs="0" name="description" type="xs:string"/> <xs:element minOccurs="0" name="display_name" type="xs:string"/> </xs:sequence> </xs:complexType>
Arrays
An array is a collection of identically typed elements. The type can be primitive or complex. For themost part, when Studio converts from JSON to XSD, you can see a one-to-one correspondence for theobjects in Swagger and elements in the corresponding XSD file. The only exception lies in the handlingof arrays.
The word "Array" is a key word in Studio. Do not use the "array" suffix in an XSD element name.
Swagger array representation in Studio
12
TIBCO ActiveMatrix BusinessWorks™ REST Reference

When TIBCO Business Studio encounters an array in the Swagger file, while generating a schema for it,TIBCO Business Studio models the array by generating two separate but related elements in the .xsdfile for each array:
● a wrapper element (with an "Array" suffix) that acts as a definition for a container that holds thearray elements. In addition to other attributes, this wrapper element contains the type of the elementthat the array contains. The wrapper element is a Studio-generated artifact solely to comply with theXML requirement of having a container for a collection. It does not exist in the .json file. The arrayelement is created with a boundary of 0..* (0 indicates that it is optional and * indicates that the arrayis unbounded).
● a definition of the element itself.
Do not edit a Studio-generated .xsd file. Its contents will be replaced the next time the file is generated.
The example below shows the definition of an array called Products in Swagger and its correspondingXSD.
Array in JSON... represented in XSD
"Products": { "type": "array", "items": { "$ref": "Product" } }
<xs:element name="Products" type="tns:Products"/> <xs:complexType name="Products"> <xs:sequence> <xs:element maxOccurs="unbounded" minOccurs="0" name="Products" type="tns:Product"/> </xs:sequence> </xs:complexType>
In the example above, Products is an array in JSON (denoted by "type": "array") that containsmultiple Product objects (denoted by "items":{ "$ref": Product). The object, Product, itself isdefined in another location in the Swagger file. (see the "Objects" section above for the definition ofProduct).
The following shows how the Products array defined above is used as a path parameter:
The following in JSON schema... ...gets converted to the following in XSD
"schema": { "type": "array", "items": { "$ref": "Product" } }
<xs:element name="ProductArray" type="tns:ProductArray"/> <xs:complexType name="ProductArray"> <xs:sequence> <xs:element maxOccurs="unbounded" minOccurs="0" name="Product" type="tns:Product"/> </xs:sequence> </xs:complexType>
The example above appear as follows in the Schemas folder of Studio:
13
TIBCO ActiveMatrix BusinessWorks™ REST Reference
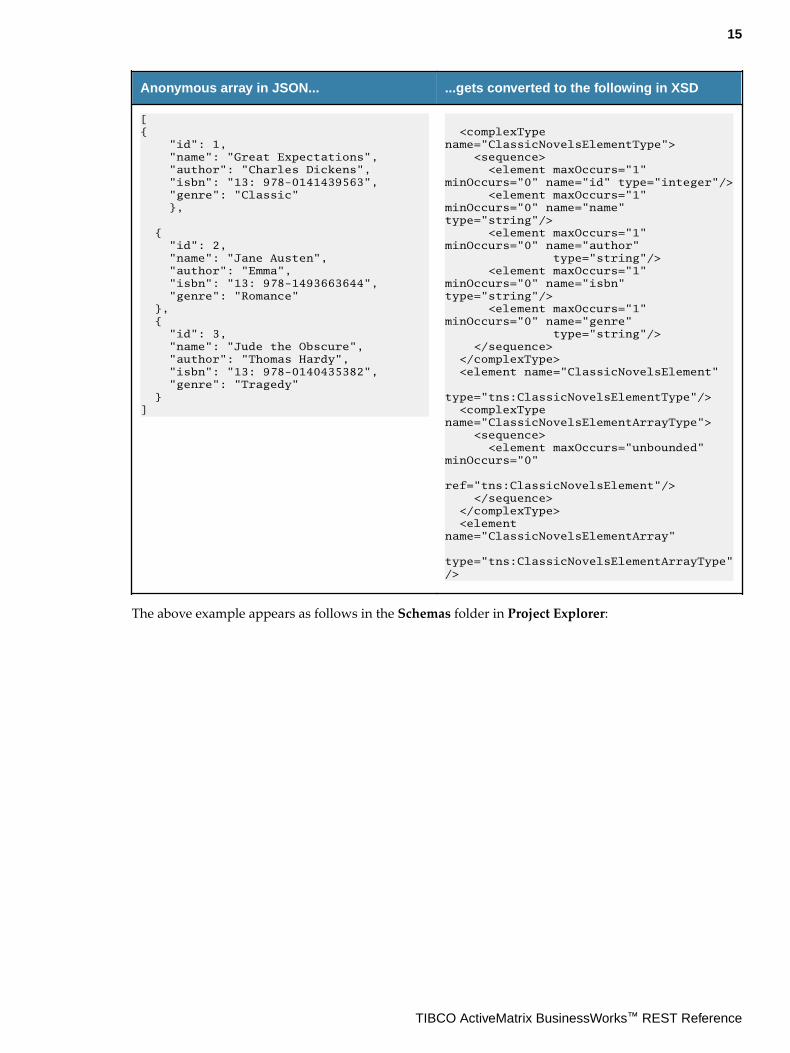
Anonymous Arrays
Since XML is a strongly-typed language, all elements - arrays and single elements alike, are named andhave a type in XML. In JSON however, arrays can either be structured or anonymous. A structuredarray is type-based where a type defines the basic construct and also its elements. An anonymous arrayis an unnamed construct containing a group of homogenous objects. Neither the construct nor theelements contained in it have a type. Anonymous arrays simply contain blocks of data that repeat. Theconcept of anonymous arrays is used extensively in JSON, but does not exist in XML. In JSON, aparameter may be of type string, but if you add "type" : "array" to the definition, it becomes acollection of strings.
The following is an example of a JSON payload and its equivalent in XSD in Studio. The wizardprompts you to enter a file name when generating XSD from a JSON payload. The file name enteredwas "ClassicNovels" in this example.
14
TIBCO ActiveMatrix BusinessWorks™ REST Reference
Anonymous array in JSON... ...gets converted to the following in XSD
[{ "id": 1, "name": "Great Expectations", "author": "Charles Dickens", "isbn": "13: 978-0141439563", "genre": "Classic" }, { "id": 2, "name": "Jane Austen", "author": "Emma", "isbn": "13: 978-1493663644", "genre": "Romance" }, { "id": 3, "name": "Jude the Obscure", "author": "Thomas Hardy", "isbn": "13: 978-0140435382", "genre": "Tragedy" }]
<complexType name="ClassicNovelsElementType"> <sequence> <element maxOccurs="1" minOccurs="0" name="id" type="integer"/> <element maxOccurs="1" minOccurs="0" name="name" type="string"/> <element maxOccurs="1" minOccurs="0" name="author" type="string"/> <element maxOccurs="1" minOccurs="0" name="isbn" type="string"/> <element maxOccurs="1" minOccurs="0" name="genre" type="string"/> </sequence> </complexType> <element name="ClassicNovelsElement" type="tns:ClassicNovelsElementType"/> <complexType name="ClassicNovelsElementArrayType"> <sequence> <element maxOccurs="unbounded" minOccurs="0" ref="tns:ClassicNovelsElement"/> </sequence> </complexType> <element name="ClassicNovelsElementArray" type="tns:ClassicNovelsElementArrayType"/>
The above example appears as follows in the Schemas folder in Project Explorer:
15
TIBCO ActiveMatrix BusinessWorks™ REST Reference

Forms
TIBCO Business Studio supports the use of form parameters as the media type in REST requests. This isthe only media type that can be used to transmit binary data and files. Form parameters can be createdat both the root level when they apply to all operations or they can be defined per operation.
An operation in a REST API has one of the following encoding:
● Tag/Value (application/x-www-form-urlencoded - used when you use form data which is of aprimitive data type. You cannot send or receive binary data or files using this encoding.
● Multipart (application/form-data) - is superset of urlencoded encoding. Besides primitivedata types, multipart encoding also supports binary and file data types. When the data type of aform parameter is either binary or file, two elements get created in Studio:
— name - used to store the name of the file— content - used to store the actual data within the file
The following illustrates how form parameters are represented in JSON and XSD:
16
TIBCO ActiveMatrix BusinessWorks™ REST Reference

Datatypes JSON XSD
primitive datatypes
{ "/person" : { "post" : { "description" : "", "operationId" : "post-person", "consumes" : [ "application/x-www-form-urlencoded" ], "produces" : [ "application/json" ], "parameters" : [ { "name" : "name", "in" : "formData", "description" : "", "type" : "string", "required" : true, "allowMultiple" : false } ]
<xs:element name="personPostForm"> <xs:complexType> <xs:sequence> <xs:element maxOccurs="1" minOccurs="1" name="name" type="xs:string"/> </xs:sequence> </xs:complexType> </xs:element>
binaryor filetype
{ "/person" : { "post" : { "description" : "", "operationId" : "post-person", "consumes" : [ "multipart/form-data" ], "produces" : [ "application/json" ], "parameters" : [ { "name" : "photo", "in" : "formData", "description" : "", "type" : "file", "required" : false, "allowMultiple" : false } ]
<xs:element name="personPostForm"> <xs:complexType> <xs:sequence> <xs:element maxOccurs="1" minOccurs="0" name="photo"> <xs:complexType> <xs:sequence> <xs:element maxOccurs="1" minOccurs="0" name="filename" type="xs:string"/> <xs:element maxOccurs="1" minOccurs="0" name="content" type="xs:base64Binary"/> </xs:sequence> </xs:complexType> </xs:element> </xs:sequence> </xs:complexType> </xs:element>
The above examples appear as follows in the Studio:
Primitive type:
17
TIBCO ActiveMatrix BusinessWorks™ REST Reference

Binary or File type:
Working with Path and Query ParametersPath and query parameters are supported in TIBCO ActiveMatrix Businessworks REST APIs. Pathparameters can be applied only at the root level when they apply to all operations. They cannot bedefined for individual operations only. Query parameters can be applied at root as well as at individualoperation level.
Define parameters in the resource service path by enclosing each parameter in { } brackets . Forexample, to define the path parameter isbn for a book resource, specify the resource path as follows:
/book/{isbn}
In this example, the client would invoke this service using the URL http:/<host>:<port>/book/<isbn>.
Insert a question mark (?) after a parameter to add query parameters to a resource. In the followingexample, isbn is defined as a query parameter, instead of the path parameter, in the resource servicepath:
/book?{isbn}
Insert (&) to use it as a delimiter when defining multiple query parameters. In the following example,the query parameters isbn and authorName are defined in the resource service path:
/book?{isbn}&{authorName}
18
TIBCO ActiveMatrix BusinessWorks™ REST Reference

All the parameters defined in the resource service path are made available to the user as an Input forevery operation. See the following image for the /book/{isbn} example to see the Input for the GEToperation.
Path parameter names and query parameter names must be unique in a resource service path. Forexample, the following path and query parameters is not supported:
/books/{isbn}?{isbn}
If the Request Format for a REST Binding is Form, the parameter name must be different from allelement names in the referenced schema. For example if a Books schema contains the element isbn,isbn can not be used as query or path parameter name.
Do not use the word "fields" as the name of a query parameter. The word "fields" is a reserved keywordfor internal use by BusinessWorks. For example, to extract the author, isbn, and price fields from aninstance of a book object with name Emma:
use: /books/Emma?author,isbn,price
not: /books/Emma?fields=author,isbn,price
Adding or Editing Path ParametersYou can create or modify path parameters for REST services that were created in the Studio using anXSD. For REST services that were created using a Swagger file that was imported from an externalsource, you can only view the parameters that its operations support. You cannot create or modify theparameters for such services.
To create a path parameter, do the following:
Procedure
1. Click Components under the Module Descriptors to open the Component Configurations page.
2. Expand the Component<application_name> node.
3. Double-click the process name (with the green chevron next to it) to open its properties.
4. Click the Bindings tab.
5. Append the path parameter to the Resource Service Path. For example, to define the pathparameter isbn for a book resource, specify the resource path as /book/{isbn}.
6. Click the green check mark button at the end of the text box to save your edit.The newly created path parameter appears in the Path Parameters table. You can change the nameof the parameter by clicking on it. You can change its type by clicking on it and selecting a new typefrom its drop-down menu. Be aware that these buttons will be disabled if you are viewingoperations for an API that was created outside the Studio and imported into the Studio.
19
TIBCO ActiveMatrix BusinessWorks™ REST Reference
Adding or Editing Query ParametersYou can create or modify query parameters for REST services that were created in the Studio using anXSD. For REST services that were created using a Swagger file that was imported from an externalsource you can only view the parameters that its operation supports. You cannot create or modify theparameters in such services.
To create a query parameter, do the following:
Procedure
1. Click Components under the Module Descriptors to open the Component Configurations page.
2. Expand the Component<application_name> node.
3. Double-click the process name (with the green chevron next to it) to open its properties in theProperties view.
4. Click the Bindings tab.
5. Click an operation name in the Operations section.
6. Click the Request tab in the Operation Details section.
7. Click the green icon ( ) to add a query parameter. To edit the parameter name click on the newlycreated parameter's default name and type in a new name. Be aware that these buttons will bedisabled if you are viewing operations in an API that was created outside the Studio and importedinto the Studio.
8. You can also edit the existing query parameter to make it required or optional by clicking in the cellthat corresponds to the parameter in the Required column. The value toggles from Yes to No or viceversa.
Working with ArraysSwagger provides an interface description that could return JSON objects. An operation may return asingle object, or if the "type":"array" attribute is added to the configuration then it returns an array ofthat object type. TIBCO Business Studio supports sending and receiving arrays in REST requests andresponses.
In TIBCO Business Studio , you can create a REST API by starting with a Swagger-compliant JSON fileor you can start create the API from scratch using the wizards in the Studio. If you use JSON as yourstarting point, TIBCO Business Studio generates an XSD file when the API gets created. Whengenerating the XSD for an array, Studio creates a wrapper element with an "Array" suffix and anothersingle element containing the definition for the element type contained in the array. Refer to the Arrayssection in the topic Conversion Between JSON and XML in TIBCO Business Studio™ for a detailedexplanation of how the TIBCO Business Studio™ handles arrays.
Do not edit the Studio-generated .xsd file.
The word "Array" is a key word in Studio. Do not use the "array" suffix in an XSD element name.
Configuring an array in a REST binding in Studio
For projects that were created with a Swagger file that was imported from an external source into theStudio, you can only view and use the elements. You cannot modify them.
A JSON file is like a contract that must not be broken. Since it is an imported file, its contents cannot bemodified and must be followed exactly.
An array appears as follows:
20
TIBCO ActiveMatrix BusinessWorks™ REST Reference

To configure a REST request to get an array, do the following:
1. In Project Explorer, under Module Descriptors, double-click Components to open its propertypage.
2. Click on the resource to open its properties view.
3. Click the Bindings tab to open it.
21
TIBCO ActiveMatrix BusinessWorks™ REST Reference

4. In the Operations Details box, click the Response tab.
5. Select the JSON checkbox in the Format options.
6. Select Anonymous Array from the JSON Response Style drop-down menu.
7. Select the array element type in the Resource Schema dropdown menu.
8. Save your project.
9. Verify that the array is available for use in the Input tab for your postOut activity.
22
TIBCO ActiveMatrix BusinessWorks™ REST Reference

Working with Form ParametersTIBCO Business Studio supports the use of form parameters as the media type in REST requests. This isthe only media type that can be used to transmit files. Refer to the Forms section in the
Refer to the Conversion Between JSON and XML in TIBCO Business Studio section for details on howForm parameters are represented in JSON and XSD.
Form parameters can be created at the operation level where you can define different form parametersfor different operations.
An operation can have one of the following encodings. Both encodings have Tag/Value:
● Tag/Value (application/x-www-form-urlencoded - Select this encoding for an operation, if youwant to use form parameters of primitive data type of String, Integer, or Boolean in your operation.You cannot use this encoding to transmit files.
● Multipart (application/form-data) - Select this encoding for an operation, if you want to useform parameters of type String, Integer, Boolean, File/Binary, or File/Text in your operation. You cansend or receive both text and binary files.
When you transmit a file using a form parameter, two elements get created in Studio:
— name - used to store the name of the file
— content - used to store the actual data within the file
Creating Form ParametersYou can create form parameters in POST and PUT operations only. You can create or modifyparameters for REST services that were created ground up in the Studio without a Swagger file. ForREST services that were created using a Swagger file that was imported into Studio from an externalsource you can only view the parameters. You cannot create or modify the parameters in such services.
To create a form parameter, do the following:
Procedure
1. Click Components under the Module Descriptors of your project to open the ComponentConfigurations page.
2. Expand the Component<application_name> node.
3. Double-click the process name (with the green chevron next to it) to open its properties in theProperties view.
4. Click the Bindings tab.
5. Click the post operation under Operations in the left tree.
6. Click the Request tab.
7. Select an encoding for the operation from the Request drop-down menu.Select either Form Data - Tag/Value (application/x-www-form-urlencoded) or Form Data -Multipart (application/form-data). The Form Parameters table is displayed.
8. Click the blue icon ( ) on the right of the Form Parameters table to create a new form parameter.
9. Click the name and edit it. To change the type, click the type in the Type column and select a typefrom the drop-down list. Similarly you can specify if this parameter is required or not by clicking inthe Required column.
23
TIBCO ActiveMatrix BusinessWorks™ REST Reference

Working with Header ParametersHeader parameters are used to define user-defined custom HTTP headers for a request, for example,the APIKey could be a HTTP Header parameter. Unlike query and path parameters, header parametersdo not appear in the URL of the request, but if they exist in your API specification, they get passed intothe request but are not visible to the user.
Header parameters can be defined per operation which means that each operation in the API can haveits own header parameters.
If you created your REST API from an imported Swagger file , the parameters will not be editable inTIBCO Business Studio . You cannot modify existing parameters or create new ones. You can only viewthe parameters. Any custom header parameters you create, will be visible in the Data Source tab of theTIBCO Business Studio as follows:
You can view or add header parameters in the TIBCO Business Studio if the Swagger file for yourproject was auto-generated in the Studio by implementing a REST service from XSD. To add a customheader parameter, follow these steps:
1. Click Components under the Module Descriptors to open the Component Configurations page.
2. Double-click the process name (with the green chevron next to it) to open its properties in theProperties view.
3. Click the Bindings tab.
4. Click an operation name in the Operations section.
5. Click the Request tab in the Operation Details section.
6. Click the red icon ( ) to add a header parameter. To edit the parameter name click on the newlycreated parameter's default name and type in a new name. Be aware that these buttons will bedisabled if you are viewing operations for an API that was created outside the Studio and importedinto the Studio.
24
TIBCO ActiveMatrix BusinessWorks™ REST Reference

7. You can also edit an existing header parameter to make it required or optional by clicking in the cellthat corresponds to the parameter in the Required column. The value toggles from Yes to No or viceversa.
8. To add a header parameter to the operation response, do so in the Response tab.
25
TIBCO ActiveMatrix BusinessWorks™ REST Reference

About REST Services and References
A REST service or a reference is created from a process within a project. The content of the processresides in an XSD file in the Schemas folder of the project.
The Schemas folder and the Service Descriptors folder in a project are tightly coupled. If you want tocreate a service using a Swagger file, you must first import that Swagger file into the ServiceDescriptors folder of your project. While creating the project, TIBCO Business Studio automaticallygenerates a schema (.xsd) for the definitions in your Swagger file in the Schemas folder of your project.
Service Descriptors folder
The Service Descriptors folder in a project stores the interface description files, such as the .jsonSwagger file specific to the activator process. These files describe the service and the list of operationsand parameters that the service supports. The Service Descriptors folder provides a good way to viewthe structure of the API. You can use these files to create a service or create a reference to invoke theservice.
Schemas folder
The Schemas folder is used to store the XSD definitions that were either generated by Studio orimported into the Studio from an external source.
Approaches to Creating a Service or Reference
Use one of the following approaches to create a REST service or reference:
● Using a Swagger file
● Starting from ground up without a Swagger file
26
TIBCO ActiveMatrix BusinessWorks™ REST Reference

Supported Message Formats
ActiveMatrix BusinessWorks supports the following message formats: JSON, XML
27
TIBCO ActiveMatrix BusinessWorks™ REST Reference

Restrictions
There are certain rules to follow when working with JSON and XML Schema.
Restrictions on JSONJSON files used to create REST services and references have some restrictions.
● Arrays must have homogeneous content.
● Arrays cannot directly contain arrays ( [ [ ... ], [ ... ] ] )
Not currently supported
Binary content in JSON as a special case
Restrictions on XML SchemaThis topic lists the restrictions on XML Schema.
Schema Restrictions
● No wildcards or attribute wildcards. For example, any element and any attribute is not supported.
● No foreign-namespace elements or attributes (single namespace).
● Complex types may not contain both an attribute and a child element with the same local name.
● Complex types may not be of the pattern "simple type plus attributes".
● Complex types may not contain mixed content.
● Attributes that are not part of the default(empty) namespace, cannot be used for Complex Elements.
● The 'choice' and 'sequence' compositors may not have maxOccurs > 1 (same as the restriction on'all' in the schema specification).
● Substitution groups are not allowed.
● Element of simple type with an attribute is not allowed.
● The elementFormDefault can only be qualified for schemas used by REST binding and JSONactivities.
Restrictions on JSON
● Arrays must have homogeneous content.
● Arrays cannot directly contain arrays ( [ [ ... ], [ ... ] ] )
Not currently supported
● Binary content in JSON as a special case
28
TIBCO ActiveMatrix BusinessWorks™ REST Reference

Using Swagger 1.2 Files
You can use Swagger 1.2 API declaration files.The Swagger 1.2 files were not exposed in previous versions of BusinessWorks. To consume theinterfaces created using Swagger 1.2 in the current version, import the projects, and click the RESTmodule under the Processes folder in the Project Explorer and select Refactor -> Expose RESTResource to extract the hidden resource files. These Swagger 1.2 files appear in the Service Descriptorsfolder and can be used in the same manner as the Swagger 2.0 files.
29
TIBCO ActiveMatrix BusinessWorks™ REST Reference
REST Schema Utilities
TIBCO Business Studio provides utilities that allow you to convert objects from JSON to XSD elements.
Creating a New XML Schema FileTIBCO Business Studio allows you to create a new XML schema file in your project.
Prerequisites
A project must exist in the Project Explorer.
Procedure
1. Right-click the Schemas folder in your project in the Project Explorer.
2. Select New > XML Schema File.
3. Enter a file name and click Finish.The file opens in the XML Schema Editor.
4. Right-click anywhere in this editor and click Add Element to add a new element.
Creating XML Schema From a JSON PayloadTIBCO Business Studio provides a utility that allows you to generate an XML schema from a JSONpayload.To generate an XML schema from a JSON payload, do the following:
Procedure
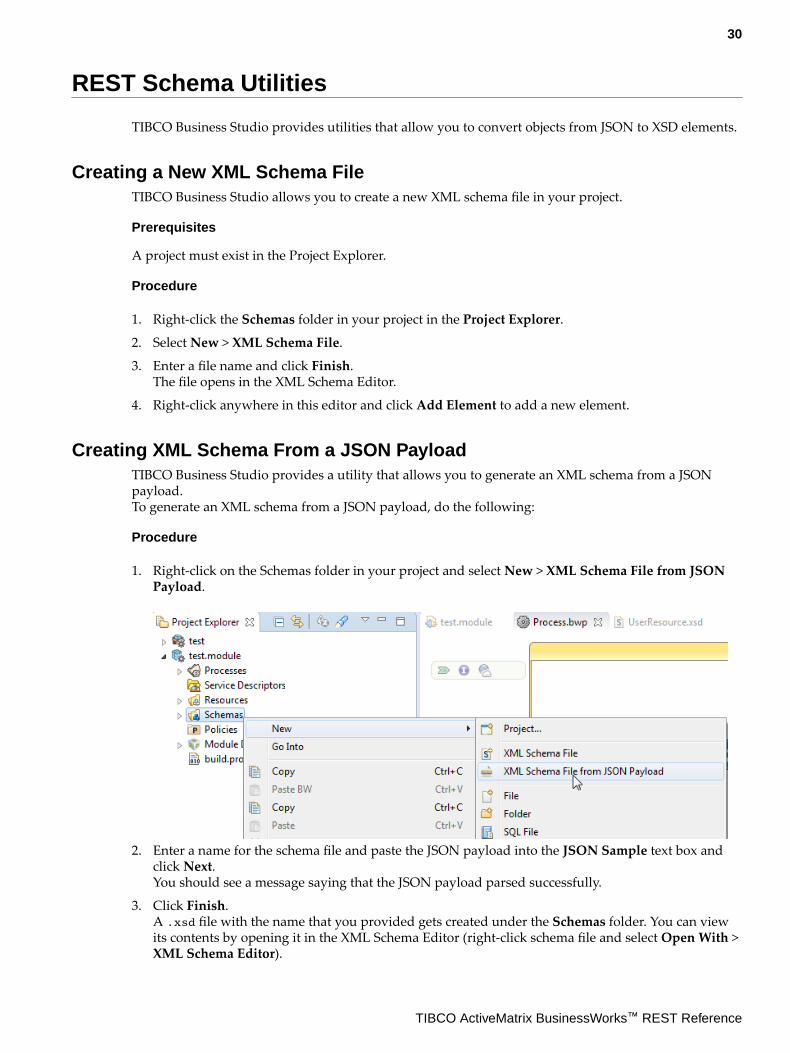
1. Right-click on the Schemas folder in your project and select New > XML Schema File from JSONPayload.
2. Enter a name for the schema file and paste the JSON payload into the JSON Sample text box andclick Next.You should see a message saying that the JSON payload parsed successfully.
3. Click Finish.A .xsd file with the name that you provided gets created under the Schemas folder. You can viewits contents by opening it in the XML Schema Editor (right-click schema file and select Open With >XML Schema Editor).
30
TIBCO ActiveMatrix BusinessWorks™ REST Reference

4. Save the project.
Generating an XML Schema from a Swagger FileTIBCO Business Studio automatically generates a Swagger file when you create a REST service from anXML schema. It also allows you to generate an XML schema from a Swagger 1.0 or 2.0 file using themenu options without creating a service.
This option is enabled only when the JSON file is a Swagger 1.0 file or Swagger 2.0 file and containsSwagger Definition. For Swagger files that do not contain Swagger Definition, the Generate XSDSchema menu option is disabled.
Prerequisites
The Swagger 2.0 file should exist in the Service Descriptors folder of the project. Be sure to import theSwagger file into the Service Descriptors folder before you follow the steps to create its XML schema.
Procedure
1. Right-click the JSON file in the Service Descriptors folder in your project and select Refactor >Generate XSD Schema.A .json file gets created in the Service Descriptors folder of your project.
2. Save the project.
● To find out which XML schema is related to the Swagger file, right-click the Swaggerfile and select Refactor -> Open XSD Schema.
● If you have multiple Swagger files all of which contain a definition for the same object,the definition for the object in all the Swagger files must be identical.
● If you have multiple Swagger files with one file (a master file) containing a super set ofdefinitions contained in the other files, generate an XSD file from the master Swaggerfile that contains the super set, and create links to the other files in the master Swaggerfile. If you create a link to the super set file in one of the subset files and then create anXSD from the subset file, then the XSD will contain only those elements that arecommon to both files. It will not contain elements for definitions that exist only in thesuper set file.
31
TIBCO ActiveMatrix BusinessWorks™ REST Reference

REST Service
The REST service is a server process. When running, it can be invoked by a REST reference.
REST Service BindingREST Binding provides external connectivity for REST over HTTP. You can specify custom HTTPheaders and parameters using REST binding. It supports GET, PUT, POST, and DELETE HTTPmethods. It also supports JSON, XML, and plain text message types.
Binding
This section has the following fields.
Field Description
Resource The name of the resource.
Resource ServicePath
Specify the path of the Service Resource.
If an application contains multiple REST bindings, ensure that the location ofthe path parameters is unique for each REST binding.
For example, one REST binding is using the paths /book/{isbn} andanother REST binding is using the path /book/{authorid}. Since {isbn}and {authorid} are defined at the same location in the URI , one of theseservices will not function correctly.
HTTP ConnectorName
The name of the HTTP Connector.
Click on the HTTP Connector Name field to display details aboutthe HTTP Connector resource.
Reply Client Format The type of reply message format.
The two available reply message format options are: JSON and XML.
Imported projects display the Authenticate check box under the Binding section if the check box wasselected in a previous version TIBCO ActiveMatrix BusinessWorks 6.x. Authentication also remainsenabled on the REST Service Binding if you do not deselect the check box. Deselecting theAuthenticate check box causes a warning message to display prompting you for confirmation. ClickingOK causes the Authenticate check box to no longer display and removes authentication from RESTService Binding. Click Cancel to retain the Authenticate check box, and to continue enforcingauthentication on the binding.
To enforce authentication on the REST Service Binding, associate the binding with a BasicAuthentication policy. For additional details, refer to the sections "Enforcing Basic Authentication" inthe TIBCO ActiveMatrix BusinessWorks Application Development guide.
Operations
This section shows the following details.
Field Description
Name The name of the HTTP method used, for example, GET, PUT, POST, andDELETE.
32
TIBCO ActiveMatrix BusinessWorks™ REST Reference

Field Description
Nickname The specified name of the service, for example, getBooks.
Operation Details
This section shows the following details.
Field Description
Summary This tab has the following available options:
● Summary: The summary of the REST resource
● HTTP Method: Displays the HTTP Method specified in the Operationssection. These are the available HTTP methods:
— POST
— GET
— PUT
— DELETE
Request Specifies the resource created, using the POST or PUT method. Parameterssupported are body, form, query, and header parameters.
Response This tab has the following available options:
● Use HTTP Headers: Selecting this check box includes the responseheaders element. Response headers are not commonly used, so select thischeckbox only when you need to include response headers.
● Use Custom Status Line: You can specify a custom status line (statuscode and reason phrase) to the outgoing message. The codes used mustbe defined in the configuration under the Response Status tab.
● Response with Status Code Only: The operation returns a status code asresponse, when this check box is selected. Message body is not required.For example, using a POST operation returns a 201 status code whichmeans "Created" and responds with the resource URL.
● Resource Schema: Displays the schema selected. This option is notavailable when the Use Custom Status Line and Response with StatusCode Only check boxes are selected. These are the available options:
— String
— Integer
— Boolean
— XSD element: Selecting this option to either select the XSD schemaelement available under the Schemas folder of your project or acreate new XML schema resource. Click Create New Schema to acreate new XML schema resource using the Simplified Schema Editorwizard.
33
TIBCO ActiveMatrix BusinessWorks™ REST Reference

Field Description
Response Status Specifies the response code for the operation and the code message. Forexample, code 201 means Created or code 503 means Service Unavailable.
You can also add your own custom code and reason phrase.
Path Parameters
This section shows the following details.
Parameter Name Type
Parameter name of the operationused
The parameter type. It can be any one of the following:
● String
● Integer
● Boolean
● Long
● Float
● Double
● Byte
● Binary
● Date
● DateTime
● Password
Policies
To associate a new or existing policy with the REST binding, click Policies node under the RestService
tree, then click the Add Policy button to create a new policy. To edit an existing policy details,click the policy name and edit any of the following fields.
Field Description
Policy Name The name of the policy.
Policy Type The type of policy associated with the binding. The REST binding can supportthe Basic Authentication policy.
Description A description of the policy.
34
TIBCO ActiveMatrix BusinessWorks™ REST Reference

Creating a REST ServiceA service is created from a process. You expose the process and describe the content that is sent andreceived by the process in an XSD. The XSD defines the data that you send and receive. The process isthe actual implementation of what you do with the data.The key abstraction of information in REST is a resource. REST ignores the details of componentimplementation and protocol details. ActiveMatrix BusinessWorks currently allows the followingHTTP methods to be performed on resources: GET, PUT, DELETE, and POST. Both XML and JSON aresupported as data serialization formats along with support for definition of custom status codes,path(URL) parameters, key-value parameters, query parameters, form parameters, and custom HTTPheaders.
You can create a REST service in TIBCO Business Studio in one of the following ways:
● Using a Swagger file
● Without a Swagger file by creating a process and adding a REST resource to it using the RESTService wizard
Using Swagger to Create a REST ServiceYou can drag and drop a path from the Swagger file on to the left boundary of the Process Editor tocreate a REST service or drag it to the center and select Create Service from the resulting menu.
When you create a REST service, make sure to edit the Default Host field in the HTTP ConnectionResource to reflect the actual host name. By default, the Default Host field is set to localhost usingBW.HOST.NAME module property.
When you use Swagger to create a REST service, the fields in the Bindings tab of the service propertiesdisplay as read-only. Swagger is like a contract that must be followed exactly, so the service you createwith the Swagger file cannot be modified.
To create a REST service from a Swagger file, do the following:
Procedure
1. Create an empty project if you do not already have one. Refer to the topic "Developing a BasicProcess" in the Application Developemnt Guide.
2. Import the Swagger JSON file into the Service Descriptors folder of your project by dragging anddropping it from the File Explorer view.
3. Expand the .json node that you just created under the Service Descriptors folder to view theavailable paths.
4. Drag and drop a path from the Service Descriptors folder to the left side of the process editor tocreate a service or to the right side of the process editor to create a reference.TIBCO Business Studio automatically generates a corresponding XSD schema for the Swagger file inthe Schemas folder.
Using the Wizard to Create a REST ServiceA REST service provider exposes the resources in a process definition that can be invoked by clientsusing one of the following operations- POST, GET, PUT, and DELETE.
Prerequisites
If a schema definition does not exist, create (or import) a schema definition in the process to which youwant to add the REST service. To import an existing XSD file, drag and drop the .xsd file from the FileExplorer to the Schemas folder of your project.
35
TIBCO ActiveMatrix BusinessWorks™ REST Reference

To create a new schema file in Studio, right-click the Schemas folder in Project Explorer, and select New> XML Schema File. This opens the Schema Editor in Studio. Right-click in the respective box in theSchema Editor to add a directive, element, type, attribute, or group.
When you create a REST service, make sure to edit the Default Host field in the HTTP ConnectionResource to reflect the actual host name. By default, the Default Host field is set to localhost.
Procedure
1. In the Project Explorer, select the process to which you want to add the REST service. There aremultiple ways to invoke the wizard to create a REST service.
● From the main menu, select File > New > BusinessWorks Resources > BusinessWorks RESTResource.
● Right-click the menu, select New > BusinessWorks REST Resource.
● Click on Create REST Service in the process editor area. (Note that REST services can only becreated in stateless BusinessWorks processes.)
For more information, see the REST Binding in the Binding and Palettes Reference guide.
2. In the REST Service Wizard window, configure the REST service implementation by specifying thevalues for Resource Service Path, Type of Resource, Operations, and Implementation Data.
36
TIBCO ActiveMatrix BusinessWorks™ REST Reference

REST Service Wizard
● Resource Name a name for the new REST service
● Summary about the new REST service.
● Resource Service Path: Specifies the URI that is used to access the REST service.
● Resource Definition: Select a resource schema for the REST service, if needed.
● Operations: By default, the POST operation is selected. Select or deselect the operations asneeded.
● Implementation Data: Choose between structured and opaque implementation data.
3. Optionally, click Next to configure the selected operations individually to specify the nickname forthe operation (default nickname is of the format <operation><resource_name>), summary, and therequest and response elements and their data types.
4. Click Finish.The wizard adds the REST service and the selected operations, and also creates a process definitionwith the multiple operations. It generates a .json file in the Service Descriptors folder of yourproject when it creates the service.
The REST service always implements the constructor operator.
37
TIBCO ActiveMatrix BusinessWorks™ REST Reference

5. Add activities to the process and configure them appropriately. For example, update the POSTprocess to add a Log activity to log the requests and connect the postOut activity to Log activity.
6. Configure the input and output properties for the activities. For example, select postOut activityand then select Properties > Input. Expand the data tree in the Data Source tab and map the postelement from the left to the post Response element on the right to echo the element. Similarly, forLog activity, map the post element on the left to the ActivityInput message element on the right.
7. You can optionally add an operation to the service using the Create REST Operation wizard. Toopen this wizard, click on the down arrow and click Creat REST Operation to open the wizard.
8. Save your changes.
Result
The REST service is built and can be tested using the built-in tester Swagger UI. For more informationon Swagger UI, see Testing the REST Service in the Getting Started guide.
38
TIBCO ActiveMatrix BusinessWorks™ REST Reference

Rest Service Wizard
Rest Service Wizard is used to create a new Rest Resource or add Rest Services to an existing resourcein TIBCO Business Studio.
The Rest Service Wizard has the following fields:
Field Description
Resource Name The name of the REST Resource.
Summary The summary or description of the REST Resource.
Resource ServicePath
The relative path for this REST Service.
Resource Definition The XSD schema element to be used for creating the REST resource.
You can also use this to create the input and output of each operationdefined. You can override this on the next screen if required, for eachoperation.
Operations These are the HTTP methods implemented by this REST Service.
Currently only POST, GET , PUT and DELETE methods are supported forusers to implement.
39
TIBCO ActiveMatrix BusinessWorks™ REST Reference

Field Description
Implementation Data The implementation data field can be Structured or Opaque.
● Structured: The XSD element structure is preserved for the input andoutput of every operation. You need not manually parse the payload togenerate the actual element to be used in the process.
● Opaque: Use this mode to apply the pass through mechanism. A usergets a messageBody element in the input or output of every operationand needs to use either Parse activities for JSON or XML to get aStructured output for the payload.
To add additional services to a process, click the Create A Rest Service icon on the top left of theprocess canvas.
Re-creating a component containing a REST Binding after deleting the component is not supported. Toadd the REST Binding, in the process editor, right click on the service without a binding. Go toComponents > [componentware] > Create REST Binding. A binding is created for the service. Thebinding will have to be re-configured as the previous configurations will be lost.
Using JSON Payload or an Existing XSD FileIf you would like to use an existing JSON Payload or XSD file to create a service, you can do so byimporting them into the TIBCO Business Studio.
To use an existing XSD file, drag and drop the XSD file from the File Explorer into the Schemas folder ofyour project. Then use the REST Service Wizard to create a service by following the instructions in Using the Wizard to Create a REST Service section.
To use a JSON payload, create an XSD schema with the JSON payload. See Creating XML Schema Froma JSON Payload for details on it. Then use the REST Service Wizard to create a service by following theinstructions in Using the Wizard to Create a REST Service section.do the following:
REST Service TutorialThe REST Bookstore sample lets you explore the REST tooling in TIBCO Business Studio ™. You canimport this sample into TIBCO Business Studio ™ through File Explorer and examine the project andthe solution implemented by it.
The processes in the sample implement different aspects of a bookstore, such as adding books, deletinga book, and getting a list of books or a single book by ISBN. For more information about the sample, seethe topic called "Using REST to Manage Books for a Bookstore" in the Samples guide. This tutorial walksyou through the steps to build an additional REST service for the sample and test it in the debugger.You can use the Swagger UI to invoke the operations for the REST resource.
Prerequisites
Before starting the tutorial, you must have PostgreSQL installed on your machine, with the requireddatabase and tables created. See the topic called Installing PostgresSQL for information.
Install the latest version of Google Chrome.
40
TIBCO ActiveMatrix BusinessWorks™ REST Reference

Installing PostgreSQLThis topic explains how to install the PostgreSQL database and create the database and tables requiredfor the Bookstore tutorial.
Procedure
1. Download and install PostgreSQL from http://www.postgresql.org/download/
Note the superuser password that you create as part of the installation process.
If installing on Windows, do not install or run as Administrator.
2. Open a terminal window and navigate to the root folder of the PostgreSQL installation. Open pg-env.bat and verify the path settings. Save the file if you make changes.
3. Start the server. Navigate to the bin folder of the install directory and type: pg-ctrl startEnter the password you created for the superuser.
4. Open another terminal window and navigate to the BW_HOME\samples\binding\rest\BookStore\scripts folder. Open readme.txt. For Unix systems, use the first command in the readme to startthe script from the psql window. On a Windows machine, copy the second command to start thescript from the command line.
5. Navigate to the PostgreSQL bin folder and paste the command line into the terminal window.Modify the command as needed. For Windows, use forward slashes in the command.Run the command to create the database, the database tables, and populates the database.
6. Open the PostgreSQL pgAdmin UI utility to see the database and tables.
Creating a New ProcessThese steps show how to create a new process.
Procedure
1. Open TIBCO Business Studio™ .
2. Open the Design perspective by clicking the icon in the upper right.3. Click the File Explorer tab. If the tab is not visible, click Window > Show View > Other >
FileSystem > File Explorer and click OK.4. Click File > Switch Workspace and select or open a clean new workspace.5. In the samples directory, select binding > rest > Bookstore and double-click
tibco.bw.sample.binding.rest.BookStore.zip.This opens the project in the Project Explorer.
6. In the Project Explorer, expand the tibco.bw.sample.binding.rest.BookStore project.7. You can also import the sample using the File > Import > General > Existing Studio Projects into
Workspace > Select Archive File > Browse option.8. The project is displayed in the Project Explorer panel on the left.
9. Expand the folders in the project to see all the project processes and resources. Refer to theApplication Development guide for information about the folder structure.
41
TIBCO ActiveMatrix BusinessWorks™ REST Reference

10. Expand Processes and then expand tibco.bw.sample.binding.rest.bookstore.db.You will see BooksDB.bwp.
bwp is a TIBCO ActiveMatrix BusinessWorks ™ process.
11. Double-click BooksDB.bwp.The TIBCO ActiveMatrix BusinessWorks ™process comprises:
● Green chevron on the left indicates the service details.
● addBooks, getAllBooks, and so on indicate the operations implemented by this process.
● Each operation is implemented separately.
42
TIBCO ActiveMatrix BusinessWorks™ REST Reference

12. Double-click an operation to display the process for example, BooksPersist > addBooks.a) In the addBooks operation, you can see a JDBC activity.b) The activity is repeated using a ForEach group.c) addBooksOut represents the Reponse to the web service request.
13. To add a new process package named tibco.bw.sample.rest, right-click on Processes in theProject Explorer and select New > BusinessWorks Package.
14. In the BusinessWorks Package screen, specify tibco.bw.sample.rest in the Name field.
43
TIBCO ActiveMatrix BusinessWorks™ REST Reference

15. Click Finish and verify that the new package tibco.bw.sample.rest has been added in the ProjectExplorer.
Building a REST ServiceThis section details how to build a REST service.
Procedure
1. To define a REST Resource named MyBooks, select tibco.bw.sample.rest > New > BusinessWorksREST Resource.
The REST Service Wizard window opens.
2. Specify the following values in the REST Service Wizard window.a) Resource Name: MyBooksb) Summary: Summary about the new REST service. (default)c) Resource Service Path: Auto-filledd) Resource Definition: Select Browse > Schemas > Books.xsd > Books in the Select Schema
Element Declaration window.e) Operations: Select POST and GET check boxes.f) Implementation Data: Accept the default value of Structured.
3. Click Finish.This creates a new process MyBooks.bwp process is opened in the Process Editor.
44
TIBCO ActiveMatrix BusinessWorks™ REST Reference

4. Open the tibco.bw.sample.binding.rest.bookstore.db process in the Project Explorer and select theBooksDB.bwp process. Drag it to the Process Editor and drop it on the implemented POSToperation.A menu is displayed with two options: Create Invoke Activity and Create Reference andWire Process.
5. Select Create References and Wire Process.The references are added to the process. The purple chevron indicates the service and its operationsthat can be referenced by the process.
6. To update the POST process to invoke the appropriate external service operation:a) Click the addBooks operation.
45
TIBCO ActiveMatrix BusinessWorks™ REST Reference

b) Select and drag the operation to the left of the postOut activity and drop it. An Invoke processactivity is created.
7. Click the newly added activity. Select the icon and connect addBooks to postOut.
8. Click the getAllBooks operation and select, drag, and drop the operation to the left of the getOutactivity in the OUT process.
9. Connect getAllBooks to getOut.
10. Save your changes.
11. Click the addBooks activity and select Properties > Input.
12. Expand the data tree in the Data Source pane to locate the Book element.
46
TIBCO ActiveMatrix BusinessWorks™ REST Reference

13. Drag the Book element from the left to the Book* element on the right.
14. In the pop-up window, select Make a Copy of each " Book" and click Finish.
The Input tab will look like this:
15. Save your changes.
16. Click the postOut activity and open the Properties > Input tab. Expand the post activity and dragthe Book* element from left to right.
17. In the pop-up window, select the For each option and click Next. Click Finish on the Auto-Mapwindow. The Properties > Input tab will look similar to this:
18. Click getAllBooks and select Properties > Input.
19. In the XPath Expression pane, add a dummy value to the input element, such as, "Get All Books".The input must be in quotes.
20. Click the getOut activity in the Process Editor, and select the Properties > Input tab. Expand thegetAllBooks activity and choose Book* to map the Book* element from left to right. In the pop-upwindow, choose Make a Copy of each " Book" and click Finish. The tab will look similar to this:
47
TIBCO ActiveMatrix BusinessWorks™ REST Reference

Result
Your project is complete without any errors.
Testing the REST ServiceYou can now test the REST service using the built-in tester and the Swagger UI.
Procedure
1. In the Project Explorer, expand the tibco.bw.sample.binding.rest.BookStore.application processand expand the Package Unit > Properties folder.
2. In the Properties window, open the tibco.bw.sample.binding.rest.BookStore process and set thedefault ApplicationProfile to match the operating system you are running on. The bracketed profilein the column head is the one that is selected:
3. Provide valid values for the application properties including a valid user name, password, anddatabase URL to connect to your PostgreSQL database if different from the default setting.
4. Verify your JDBC connection.a) Expand the Resources folder in the Project Explorer for the
tibco.bw.sample.binding.rest.BookStore process.b) Double-click JDBCConnectionResource.jdbsResource.c) In the JDBC Driver section of the window, click Test Connection to verify the connection. If you
change the JDBC driver folder from the default, click Click Here to Set Preferences and set theJDBC driver folder to the folder where you downloaded PostgreSQL JDBC Driver.
48
TIBCO ActiveMatrix BusinessWorks™ REST Reference
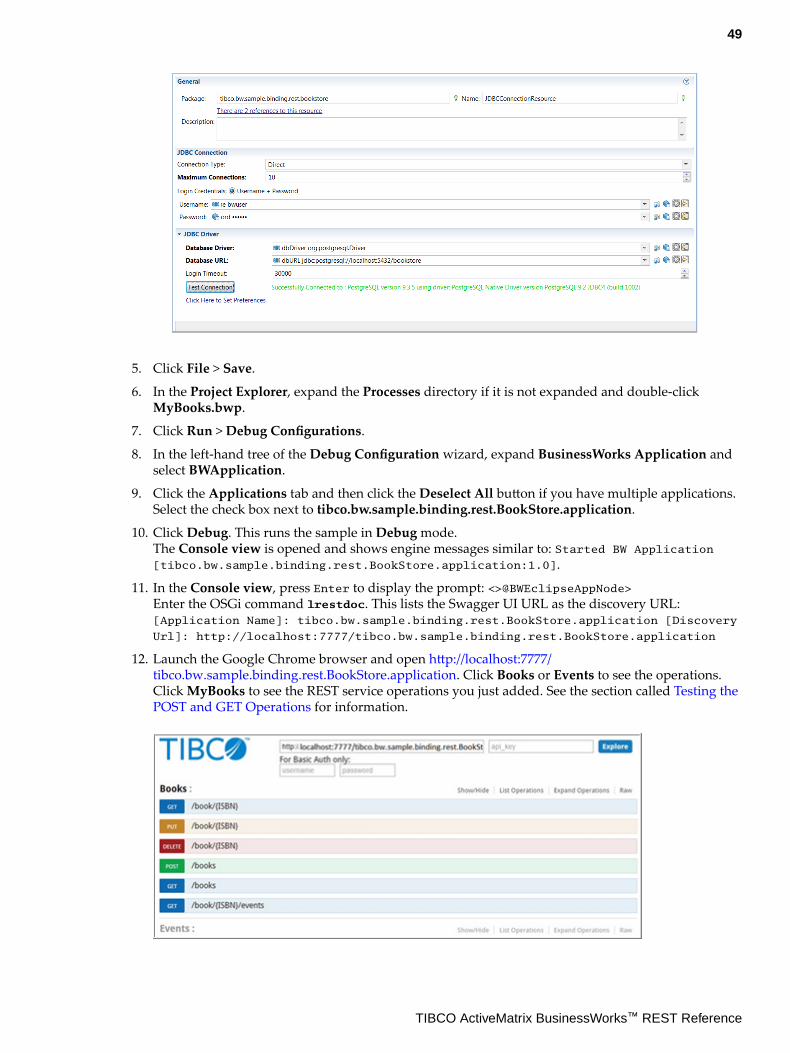
5. Click File > Save.
6. In the Project Explorer, expand the Processes directory if it is not expanded and double-clickMyBooks.bwp.
7. Click Run > Debug Configurations.
8. In the left-hand tree of the Debug Configuration wizard, expand BusinessWorks Application andselect BWApplication.
9. Click the Applications tab and then click the Deselect All button if you have multiple applications.Select the check box next to tibco.bw.sample.binding.rest.BookStore.application.
10. Click Debug. This runs the sample in Debug mode.The Console view is opened and shows engine messages similar to: Started BW Application[tibco.bw.sample.binding.rest.BookStore.application:1.0].
11. In the Console view, press Enter to display the prompt: <>@BWEclipseAppNode>Enter the OSGi command lrestdoc. This lists the Swagger UI URL as the discovery URL:[Application Name]: tibco.bw.sample.binding.rest.BookStore.application [Discovery
Url]: http://localhost:7777/tibco.bw.sample.binding.rest.BookStore.application
12. Launch the Google Chrome browser and open http://localhost:7777/tibco.bw.sample.binding.rest.BookStore.application. Click Books or Events to see the operations.Click MyBooks to see the REST service operations you just added. See the section called Testing thePOST and GET Operations for information.
49
TIBCO ActiveMatrix BusinessWorks™ REST Reference

13. Expand the Books and Events headers, and test out the operations as listed below.
Result
Click Books or Events in the Swagger UI to view the following operations for Books and Events:
Books
● Post books
● GET books
● GET book by ISBN
● PUT book by ISBN
● DELETE book by ISBN
Events
● POST Events
● GET Events
● GET Event by EventID
● PUT Event by EventID
● DELETE Event by EventID
GET books returns an output similar to the following:{ "Book": [ { "isbn": "0061122416", "name": "The Alchemist", "description": "Every few decades a book is published that changes the lives of its readers forever. The Alchemist is such a book", "authorName": "Paul Coelho", "releaseDate": "2006-04-25", "vintage": true, "signed": true, "price": 11.9 }, { "isbn": "0071450149", "name": "The Power to Predict", "description": "How Real Time Businesses Anticipate Customer Needs, Create Opportunities, and Beat the Competition", "authorName": "Vivek Ranadive", "releaseDate": "2006-01-26", "vintage": false, "signed": true, "price": 15.999 } ] }
GET books by ISBN returns an output similar to the following for ISBN 0061122416: { "isbn": "0061122416", "name": "The Alchemist", "description": "Every few decades a book is published that changes the lives of its readers forever. The Alchemist is such a book", "authorName": "Paul Coelho", "releaseDate": "2006-04-25", "vintage": true, "signed": true, "price": 11.9 }
50
TIBCO ActiveMatrix BusinessWorks™ REST Reference

The books.log file is generated with the following information:POST Books------->{"Book":[{"isbn":"1451648537","name":"Steve Jobs","description":"Biography of Apple Co-Founder Steve Jobs","authorName":"Walter Isaacson","releaseDate":"2012-10-24","vintage":false,"signed":false,"price":21},{"isbn":"0385537859","name":"Inferno","description":"Robert Langdon returns in Dan Brown's latest fast paced action thirller","authorName":"Dan Brown","releaseDate":"2013-05-14","vintage":false,"signed":true,"price":14.09},{"isbn":"0399103421","name":"The Godfather","description":"The Godfather is an epic story of a New York's top mafia family, loyalty, and how men of honor live in their own world, and die by their own laws.","authorName":"Mario Puzo","releaseDate":"1969-03-10","vintage":true,"signed":true,"price":50}]}**************************************************************
GET Books------->{"Book":[{"isbn":"1451648537","name":"Steve Jobs","description":"Biography of Apple Co-Founder Steve Jobs","authorName":"Walter Isaacson","releaseDate":"2012-10-24+05:30","vintage":false,"signed":false,"price":21},{"isbn":"0385537859","name":"Inferno","description":"Robert Langdon returns in Dan Brown's latest fast paced action thirller","authorName":"Dan Brown","releaseDate":"2013-05-14+05:30","vintage":false,"signed":true,"price":14.09},{"isbn":"0399103421","name":"The Godfather","description":"The Godfather is an epic story of a New York's top mafia family, loyalty, and how men of honor live in their own world, and die by their own laws.","authorName":"Mario Puzo","releaseDate":"1969-03-10+05:30","vintage":true,"signed":true,"price":50}]}**************************************************************
GET Book By ISBN------->{"isbn":"1451648537","name":"Steve Jobs","description":"Biography of Apple Co-Founder Steve Jobs","authorName":"Walter Isaacson","releaseDate":"2012-10-24+05:30","vintage":false,"signed":false,"price":21}**************************************************************
DELETE Book By ISBN-------->"Deleted book with ISBN - 1451648537"**************************************************************
GET Events By ISBN---->{}**************************************************************
Testing the POST and GET Operations
An available RESTful service displays the GET operation in the Swagger UI. The POST operation istested using the JSON service. It is important to test these operations by doing some simple tasks. Thissection explains how to test the POST and GET operations you just added.
Procedure
1. Click MyBooks. It expands and displays the POST and GET operations.
2. Click the POST icon to display its details.
3. Provide values to the Books parameter. You can use the JSON payload in BW_HOME\samples\binding\rest\BookStore\samplejson folder.
4. Click the Try it out! button.
5. Now click the GET icon to display its details.
6. Click the Try it out! button.
51
TIBCO ActiveMatrix BusinessWorks™ REST Reference

The response displays a list of books returned by the REST service from the database.
7. After you have finished, go back to TIBCO Business Studio ™ and click the Terminate icon in theConsole view to stop the process.
Troubleshooting
Your may encounter some errors while executing or running the process. The following are some of thepossible errors you may encounter and their resolutions.
Error Encountered Resolution
Unable to insert rows into thedatabase using the dbsetup.sqlscript in the scripts folder.
Use the sample JSON payload from the sample json folderto post the data.
The REST Swagger UI page is notvisible.
Verify that the application has started and that you areaccessing the correct URL. Use the lrestdoc command inthe Console view to get the Swagger UI URL.
Problem markers are visible in theproject.
Clean the project by invoking Project > Clean or byswitching to a clean new workspace.
Getting the File was not foundexception.
Ensure that the books.json and book_put.json files arepresent at the location described in the Input_File andInput_File_1 module properties.
The PostgreSQL server does not start. Make sure you are not running as Administrator.
The database and database tables arenot created.
Open the readme.txt file for the sample, located in theBW_HOME\samples\binding\rest\BookStore\scripts
folder. Run the dbsetup.sql script from a command line,not the psql window.
52
TIBCO ActiveMatrix BusinessWorks™ REST Reference

Error Encountered Resolution
Getting an unregistered user errormessage while running the process.
Select all the check boxes in the Role Privileges tab in thepgAdmin UI and run the process again. See the imagebelow.
53
TIBCO ActiveMatrix BusinessWorks™ REST Reference
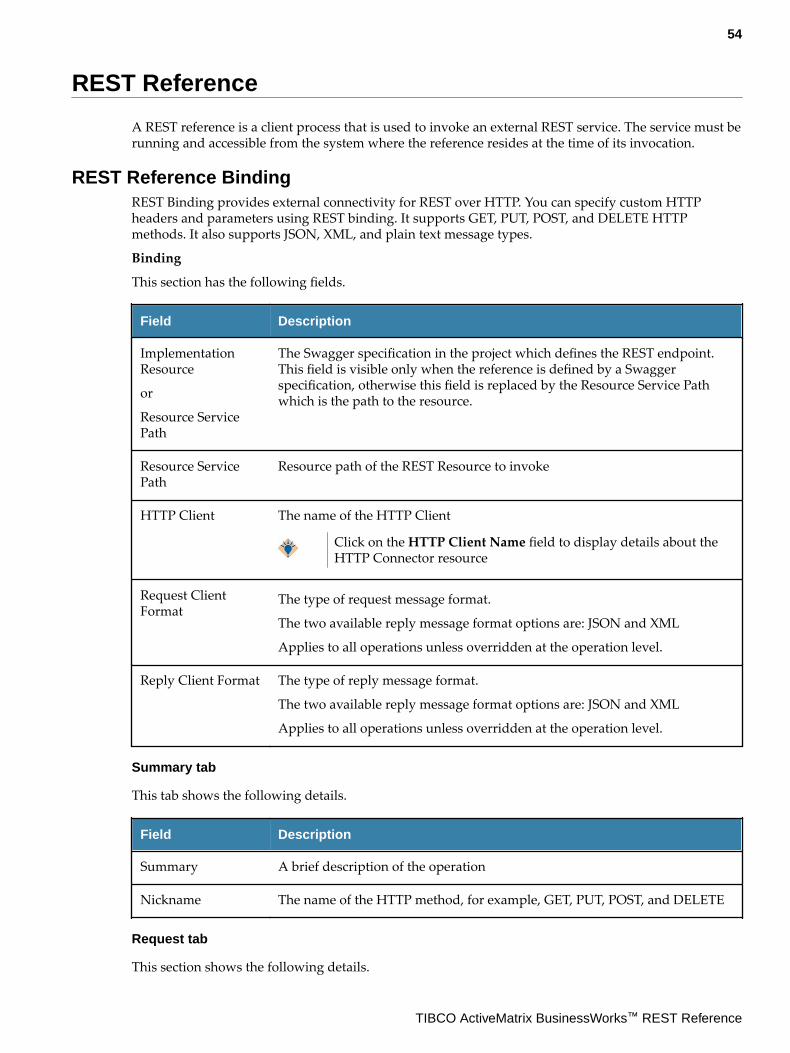
REST Reference
A REST reference is a client process that is used to invoke an external REST service. The service must berunning and accessible from the system where the reference resides at the time of its invocation.
REST Reference BindingREST Binding provides external connectivity for REST over HTTP. You can specify custom HTTPheaders and parameters using REST binding. It supports GET, PUT, POST, and DELETE HTTPmethods. It also supports JSON, XML, and plain text message types.
Binding
This section has the following fields.
Field Description
ImplementationResource
or
Resource ServicePath
The Swagger specification in the project which defines the REST endpoint.This field is visible only when the reference is defined by a Swaggerspecification, otherwise this field is replaced by the Resource Service Pathwhich is the path to the resource.
Resource ServicePath
Resource path of the REST Resource to invoke
HTTP Client The name of the HTTP Client
Click on the HTTP Client Name field to display details about theHTTP Connector resource
Request ClientFormat
The type of request message format.
The two available reply message format options are: JSON and XML
Applies to all operations unless overridden at the operation level.
Reply Client Format The type of reply message format.
The two available reply message format options are: JSON and XML
Applies to all operations unless overridden at the operation level.
Summary tab
This tab shows the following details.
Field Description
Summary A brief description of the operation
Nickname The name of the HTTP method, for example, GET, PUT, POST, and DELETE
Request tab
This section shows the following details.
54
TIBCO ActiveMatrix BusinessWorks™ REST Reference

Field Description
Format Client request format, either JSON or XML
JSON DefinitionStyle
Specifies whether the request item is a single element or an anonymous array
Request Data type of the payload, ca be primitive data type or complex data type
Query and HeaderParameters
Click the parameter name to edit it.These are the available options:
● String
● Integer
● Boolean
● Long
● Float
● Double
● Byte
● Binary
● Date
● Date Time
● Password
Repeating and Required values can be toggled.
Response tab
This tab shows the following details.
Field Description
Use HTTP Headers Select this checkbox only if you require a service to send back a customheader or value or if you need to see the response headers. This checkbox ischecked by default if custom headers are used.
Format Response format requested by the client , can be either JSON or XML or both.The service must support the format(s) that the client requests for thisoperation
JSON DefinitionStyle
Specifies whether the response item is a single element or an anonymousarray
Resource Schema Data type of the response being sent back, can be either primitive or complexdata type
55
TIBCO ActiveMatrix BusinessWorks™ REST Reference

Field Description
Header Parameters Click the parameter name to edit it.
These are the available types:
● String
● Integer
● Boolean
● Long
● Float
● Double
● Byte
● Binary
● Date
● Date Time
● Password
Repeating and Required values can be toggled.
Response Status tab
This tab shows the following details.
Field Description
Code The response code returned
Type These are the available options:
● String
● Integer
● Boolean
● XSD element: Select this option to either select the XSD schema elementavailable under the Schemas folder of your project or create a new XMLschema resource.
Reason Phrase A brief description of what the code indicates
Policies
To associate a new or existing policy with the REST Binding, click Policies node under the Rest
Reference tree, then click the Add Policy button to create a new policy. To edit an existing policydetails, click the policy name and edit any of the following fields.
56
TIBCO ActiveMatrix BusinessWorks™ REST Reference

Field Description
Policy Name The name of the policy.
Policy Type The type of policy associated with the binding. The REST Binding supportsthe Basic Credential Mapping policy.
Description A description of the policy.
Creating a REST ReferenceThe REST reference is used to consume a REST service. The REST client has a reference which it uses toinvoke a REST service. You can have multiple REST references to one REST service. References that arecreated using a Swagger file, cannot be modified in Studio. You can only view the details of such areference. References that are created using the REST Reference Wizard can be modified in Studio sincesuch references are not associated with a Swagger file which they have to adhere to.You can create a REST reference in one of the following ways:
● Using a Swagger file
● Using the REST reference wizard
● Using the Debug engine in your Studio
Using Swagger to Create a REST ReferenceIf you have the Swagger file, you can import it into TIBCO Business Studio and create a REST referencefrom it. At the time of the reference creation the service created using that Swagger file may or may notbe running or even exist. But when the reference actually invokes the service, at the time of theinvocation of the service by the reference, the service must be running and accessible to the referenceprocess. References that are created using an imported Swagger file, cannot be modified in Studio. Youcan only view the details of such a reference.
Prerequisites
The Swagger file must be imported into the Service Descriptors folder of the project. For Swagger fileson your local machine you can import them by pointing the File Explorer to the location of the Swaggerfile, then dragging and dropping the file from the File Explorer into the Service Descriptors folder ofyour project. topic for details.
To create a REST reference from a Swagger file:
1. Expand the .json file in the Service Descriptors folder in Project Explorer.
2. Drag and drop an endpoint in the API from the Service Descriptors folder to the right boundary ofthe Process Editor.
57
TIBCO ActiveMatrix BusinessWorks™ REST Reference

Using the Wizard to Create a REST ReferenceTIBCO Business Studio allows you to invoke a REST service without a Swagger file. As long as youhave the URL for the endpoint in a running service, you can use the REST Reference Wizard in TIBCOBusiness Studio to create a REST reference to invoke the service. A reference created using a wizard canbe modified since it does not have a Swagger contract to adhere to.The wizard allows you to choose which operation(s) to implement in the reference as well as set up thedata elements used for the request and the response of each operation. You can add additionaloperations to the reference after the reference has been created too.
Prerequisites
● You must have the endpoint URL
● You must know which operations are supported by the service
To create a REST reference, do the following.
Obtain the URL for the service endpoint
Typically, the URL for an endpoint can be obtained from the API web page or some otherdocumentation where the service is described. This documentation should list the details of the servicesuch as operations that the service supports, the parameters used and the data definitions for therequests and responses.
Verify the service is running
You can verify that the service is running by invoking it using a testing tool such as Postman or SoapUI.
Create a new application and open the REST Reference Wizard
1. Create a new application if you do not already have one. Refer to the section "Creating anApplication" in the Application Development Guide.
2. Click the Create REST Reference icon to open the REST Reference wizard.
3. Enter the URL for the service in the Service URL text box.
4. Select the operations that you want to implement in your reference by clicking their checkbox(s) andclick Next.
5. Configure the request and response type for your operations in the Configuring the Operationscreen by selecting the request and response type from their respective drop-down menus. ClickFinish. The wizard creates a REST reference. You should see it on the extreme right of your ProcessEditor.
6. Open the Reference properties view by clicking on the reference name.
58
TIBCO ActiveMatrix BusinessWorks™ REST Reference

7. Click the HTTP Client link to open the HTTP Client Shared Resource configuration page and verifythat the Default Host has been set to the host where the service resides.
8. Make sure that the port number is correct.
Do not use port 7777. It is reserved for internal use by ActiveMatrix BusinessWorks.
9. You can optionally do the following in the Reference properties view:
● Add parameters for your operations
● Configure operation details, such as Request and Response for an operation by clicking on theoperation in the Operations table, then configuring the Response and/or Request details in theirrespective tabs. See Parameter Support section for more details on how to add parameters.
● Optionally, you can add an operation using the Create REST Operation wizard. To open thiswizard, hover your mouse next to the REST reference name until you see the Create RESTOperation icon and click the icon to open the wizard:
On the Create new REST Operations page, select the operation you want to create and clickNext. Configure the Request and Response for the operation if need be and click Finish. You
59
TIBCO ActiveMatrix BusinessWorks™ REST Reference

have the option to configure your request and response for the operation at a later time too fromthe Reference properties view.
You can now invoke any operation by dragging and dropping it in the process editor.
REST Reference Wizard
Rest Reference Wizard is used to create a Rest Reference in TIBCO Business Studio which a REST clientcan use to invoke a running service.
The Rest Reference Wizard has the following fields:
Field Description
Service URL The URL to the REST Service.
Operations These are the HTTP methods implemented by the REST Reference processto access the REST service.
Currently only POST, GET , PUT and DELETE methods are supported.
60
TIBCO ActiveMatrix BusinessWorks™ REST Reference

To add additional operations to an existing REST reference process, click the Create Rest Operation
icon . This icon appears when you hover over the reference in the Process Editor as follows:
Using the Debug Engine in ActiveMatrix BusinessWorksYou can create a reference for a service that is running on your local machine.
Procedure
1. Run the service using the Run BusinessWorks Application from the right-click context menu.
2. Type lrestdoc in the Console once the service is running.
3. You can use the Try it out! button to verify that the service is running.
4. Copy the Discovery URL and paste it into a browser address bar and press Enter. The Swagger pagein the browser will display the path to the Swagger file of the running service.
5. Copy the Swagger file URL and paste it into another browser tab address bar and press Enter. Thebrowser displays the contents of the Swagger file.
61
TIBCO ActiveMatrix BusinessWorks™ REST Reference

Now that you have the Swagger file for the service you can create a reference using it. The referencecan reside on a machine other than the machine where the service is running. The Swagger file thatyou just obtained from the running service will contain all the information such as the hostname orthe machine where the service is running, the port number and the basepath for the service. Thereference you create will reach out to the service using this information from the Swagger file.
Creating the Reference
To create a reference using the Swagger code that you retrieved from the service, you must first create aSwagger file in the Service Descriptors folder of your process.
Create a process for the reference if you do not already have one. You will need to create a .json file inits Service Descriptors folder.
Procedure
1. Right-click the Service Descriptors folder of the process and select New > File.
2. Enter a name for the .json file and click Finish.
3. Right-click the newly created .json file in the Service Descriptors folder and select Open With >Text Editor.
4. Paste the JSON code that you copied from the Swagger file into the Text Editor and save the project.
5. Expand the .json file in the Service Descriptors folder to expose the paths.
6. Drag and drop a path from the Service Descriptors folder to the right boundary of the ProcessEditor to create a reference.
62
TIBCO ActiveMatrix BusinessWorks™ REST Reference

To make your reference application portable
The reference that you created above can only access a service that is running on a reachable networkaddress. You can modify the reference to use a hostname and port that is configurable even after thisapplication is deployed. Using a Module Property for the hostname and/or port will allow thatproperty value to be provided by an administrator that is running the application. The value may alsoneed to be changed if the service is physically moved to another host or port.
Follow these steps to modify the reference such that it can invoke a service from a location determinedeven after this application is deployed:
Procedure
1. Click on the reference name in the Process Editor to open its properties.
2. Click the Bindings tab.
3. Click the HTTP Client link in the Bindings tab.
4. In the HTTP Client section, click the Choose the field value type button next to the Default Hostfield text box and select Module Property.
5. Enter host <IP address of machine on which the service is running> in the Default Host
text box and click ( ) button.It creates a module property called host and gives it the value of the service machine hostname thatyou provided.
6. Open the module properties for the reference application by double-clicking on <ApplicationName> > Package Unit > Properties
7. Expand the Application module tree to see the newly created module property.
8. Click the up arrow button to promote the module property to Application property.Now the IP address becomes available to be accessed from outside the firewall.
REST Reference TutorialThe REST reference tutorial shows you how to create a simple REST Invoke to an existing REST Servicedefined by a Swagger specification.
You cannot convert REST reference to SOAP or vice versa.
Prerequisites
The REST service which you want to invoke must be accessible from the reference process at the time ofits invocation.
Creating a New Application
1. Open TIBCO ActiveMatrix BusinessWorks™.
2. Open the Design perspective by clicking the Design icon in the upper right corner.
3. Click File > New > Other > BusinessWorks > BusinessWorks Application Module and click Next.
4. Enter tibco.bw.sample.binding.rest in the Project Name text box. Do not change the remainingdefault settings. Click Finish. This will create a new application module with an empty process.
5. Obtain the Swagger file from the Swagger UI of the running service.
6. Copy the content and create a new file and call it Books.json.
63
TIBCO ActiveMatrix BusinessWorks™ REST Reference

Importing the JSON File into your Project
1. In the Project Explorer, expand tibco.bw.sample.binding.rest application module.
2. Right-click Service Descriptors and select Import > Import... > General > File System and clickNext.
3. In the File system dialog, click the Browse button and browse to the location of the Books.json file.
4. Select the check box next to Books.json in the left pane and click Finish..
Creating the REST Reference
1. In the Project Explorer, expand the tibco.bw.sample.binding.rest Service Descriptors foldercompletely .
2. Select the /books under Books.json and drag and drop it to the right side of the process in theProcess Editor. The references are added to the process. The purple chevron indicates the serviceand its operations.
3. In the Process Editor, right-click Add Activity > General Activities > Timer. Optionally, you canconfigure the Sleep activity with IntervalInMillisec as 3000 in a similar manner and connect theTimer with Sleep.
4. Drag the get operation under the purple chevron and drop it on the right of Timer acitivity (orSleep if configured) and connect the Timer activity with the get activity.
5. Drag the post operation under the purple chevron and drop it on the right of the get activity ,connect the get activity with the post activity .
6. Right-click the get acitivity select Show Properties View.
7. In the Properties view, select the Input tab and click Show Check and Repair icon in the icon bar onthe upper right corner of the Properties view.
8. Select the check box under Fix and click OK.
9. Click Show Check and Repair icon again. Select the check box under Fix and click OK.
10. Select the post activity and right click and select Show Properties View. In the Properties View,select the Input tab and select Data Source tab.
11. Expand $get in the Data Source tab completely.
12. In the XPath Expression pane, expand the post-input completely.
13. Drag and drop Book* from the Data Source tab to the Book* under post-input in the XPathExpression pane.
14. In the Drop dialog, select Make a copy of each "book" radio button and click Finish.
15. Click Show Check and Repair icon in the icon bar on the upper right corner of the Properties view.
16. Select the check box under Fix and click OK.
17. Click Show Check and Repair icon again. Select the check box under Fix and click OK.
18. In the Project Explorer, select Books.json under Service Descriptors oftibco.bw.sample.binding.rest.basic application module, and right click Open With > Text Editorand locate the "host" attribute. Make a note of the host name and port number.
64
TIBCO ActiveMatrix BusinessWorks™ REST Reference

19. Expand the Resources folder under the tibco.bw.sample.binding.rest.basic application modulecompletely.
20. Double-click HttpClientResource.httpClientResource.
21. In the HTTP Client section, change the Default Host and Default Port to the values in theBooks.json file and check the Default Confidentiality check box.
22. Click File > Save All.
Testing the REST Reference
You can now test the REST service using the built-in tester and the Swagger UI. To do so follow thesesteps:
1. Click Run > Debug Configuration.
2. In the left pane of the Debug Configuration wizard, expand BusinessWorks Application and selectBWApplication.
3. Click the Applications tab and then click Deselect All if you have multiple applications. Select thecheck boxes next to tibco.bw.sample.binding.rest.basic.application andtibco.bw.sample.binding.restapp.
65
TIBCO ActiveMatrix BusinessWorks™ REST Reference

4. Click Debug.. This runs the sample in debug mode. The Console view is opened and shows enginemessages similar to: Started BW Application[ tibco.bw.sample.binding.rest.Basic.application:1.0]
5. In the Debug view, expand BWApplication [BusinessWorks Application] > <launched>BWEclipseAppNode > tibco.bw.sample.binding.rest.Process and select get.
6. In the JobData view, you can see the job data of the get activity.
66
TIBCO ActiveMatrix BusinessWorks™ REST Reference

Refactoring a REST Service or Reference
TIBCO Business Studio allows you to change the configuration of your REST service even after it iscreated.The way you update a service configuration depends on whether the service was created from animported Swagger file or whether the service was created ground up in Studio.
Updating a service created from an imported Swagger fileYou can use a Swagger file to either create a service by implementing the contract in it or you can use itto call a service that implements the Swagger file. If the Swagger file you used to create your service orreference gets updated by its provider, you may need to update your implementation of that file inorder to avail the changes.
The icon to the left of the Swagger file in the Project Explorer in the TIBCO Business Studio displays anindication that the file has been modified in its original location and the local copy of the file is not insynchronization with it source. You can compare the differences between the two and update your localcopy if need be. To do so, follow these steps:
Procedure
1. Right-click the Swagger file under Service Descriptors in the Project Explorer.
2. Select Remote Interface.Check for Differences checks for differences between the imported copy and its original.
Compare Differences first checks for differences between the imported copy of the Swagger file andits original. If there is a difference, the file will appear in the Synchronize tab and if you double clickit there it displays the two files side by side with the differences highlighted.
Update Local Copy updates the copy of the file in your workspace to match the source. It alsoregenerates the schema. It updates it in both the service and reference.
No changes are performed for processes that have already been created.
Updating a service that was created ground up in StudioAs you change your implementation of the service or reference, TIBCO Business Studio automaticallygenerates the Swagger file to match your changes.
Changing the Request and Response SchemasYou can make changes to the schema for only those APIs that were created from ground up by youwithout using a Swagger file. A Swagger file is like a contract that must not be broken. An API createdusing a Swagger file must implement the Swagger contract exactly and cannot be modified. Hence, forAPIs that were created using a Swagger file, you can only view the schemas, but cannot modify them.
If you make schema changes to the APIs that were created ground up by you in TIBCO BusinessStudio, the Swagger for such APIs automatically gets updated by the Studio.
Updating ConfigurationYou can edit the configuration for a REST service or a reference that was created from scratch without aSwagger file. You cannot edit the configuration for a service or reference that was created using aSwagger file.View or edit the configuration for a REST service or reference by following these steps:
67
TIBCO ActiveMatrix BusinessWorks™ REST Reference

Procedure
1. Click the service or reference in the Process Editor.
2. In the General tab of the Properties view, click the link for the service or reference binding.
3. In the Components properties, click the Bindings tab.
4. Click an operation under Operations in the RestService or RestReference tree to edit theconfiguration of the operation.The Summary page for that operation opens on the right. To edit the request, response or responsestatus for the operation, click the respective tabs.
Adding an OperationFor REST services and references that were created without a Swagger file, you can edit theirconfiguration to add or delete operations.To add an operation after a REST service was created, do the following:
Procedure
1. Click the down arrow to the right of the service and select Create REST Operation.
2. In the REST Service Wizard, select a schema for the operation using the Browse button for ResourceDefinition.
3. Select an operation you want to add by checking its check box.
4. Optionally, click Next to configure the operation. You can configure the operation after you haveadded it from the Components page. See Updating Configuration for details.
5. Click Finish.
To add an operation after a REST reference was created, do the following:
Procedure
1. Hover your mouse next to the reference name.
2. Click the Create REST Operation icon.
68
TIBCO ActiveMatrix BusinessWorks™ REST Reference

3. In the REST Reference Wizard, select an operation you want to add by checking its check box.
4. Optionally, click Next to configure the operation. You can configure the operation after you haveadded it from the Components page. See Updating Configuration for details.
5. Click Finish.
Adding or Deleting ParametersYou can add or edit a parameter for an operation in a REST service or a reference that was created fromscratch without a Swagger file. You cannot edit the configuration for a service or reference that wascreated using a Swagger file.To add or delete parameters for an operation, do the following:
Procedure
1. Click the service or reference in the Process Editor.
2. In the General tab of the Properties view, click the link for the service or reference binding.
3. In the Components properties, click the Bindings tab.
4. Click an operation under Operations in the RestService or RestReference tree to edit theconfiguration of the operation.The Summary page for that operation opens on the right. To edit a parameter in the request orresponse for the operation, click the respective tabs.
69
TIBCO ActiveMatrix BusinessWorks™ REST Reference

OSGI Commands to List REST URLs
Use the OSGi command, lrestdoc, to list REST and Swagger URLs.
The lrestdoc command lists the following discovery URL:
<>@BWEclipseAppNode> lrestdoc
[Application Name]: tibco.bw.sample.binding.rest.BookStore.application
[Discovery Url]
The following are the commands to list endpoints.
<>@BWEclipseAppNode> lendpoints
[Application Name] : tibco.bw.sample.binding.rest.BookStore.application
[Endpoint Type] : REST
[Endpoint URL] : http://localhost:8123
[CLIENT FORMAT ] : JSON
[RESOURCE PATH ] : /book/{ISBN}
[HTTP METHODS] : GET, PUT, DELETE
[Endpoint Type] : REST
[Endpoint URL] : http://localhost:8123
[CLIENT FORMAT ] : JSON
[RESOURCE PATH ] : /books
[HTTP METHODS] : POST, GET
[Endpoint Type] : REST
[Endpoint URL] : http://localhost:8123
[CLIENT FORMAT ] : JSON
[RESOURCE PATH ] : /book/{ISBN}/events
[HTTP METHODS] : GET
[Endpoint Type] : REST
[Endpoint URL] : http://localhost:8123
[CLIENT FORMAT ] : JSON
[RESOURCE PATH ] : /event/{EventID}
[HTTP METHODS] : GET, PUT, DELETE
[Endpoint Type] : REST
[Endpoint URL] : http://localhost:8123
[CLIENT FORMAT ] : JSON
[RESOURCE PATH ] : /events
[HTTP METHODS] : POST, GET
70
TIBCO ActiveMatrix BusinessWorks™ REST Reference
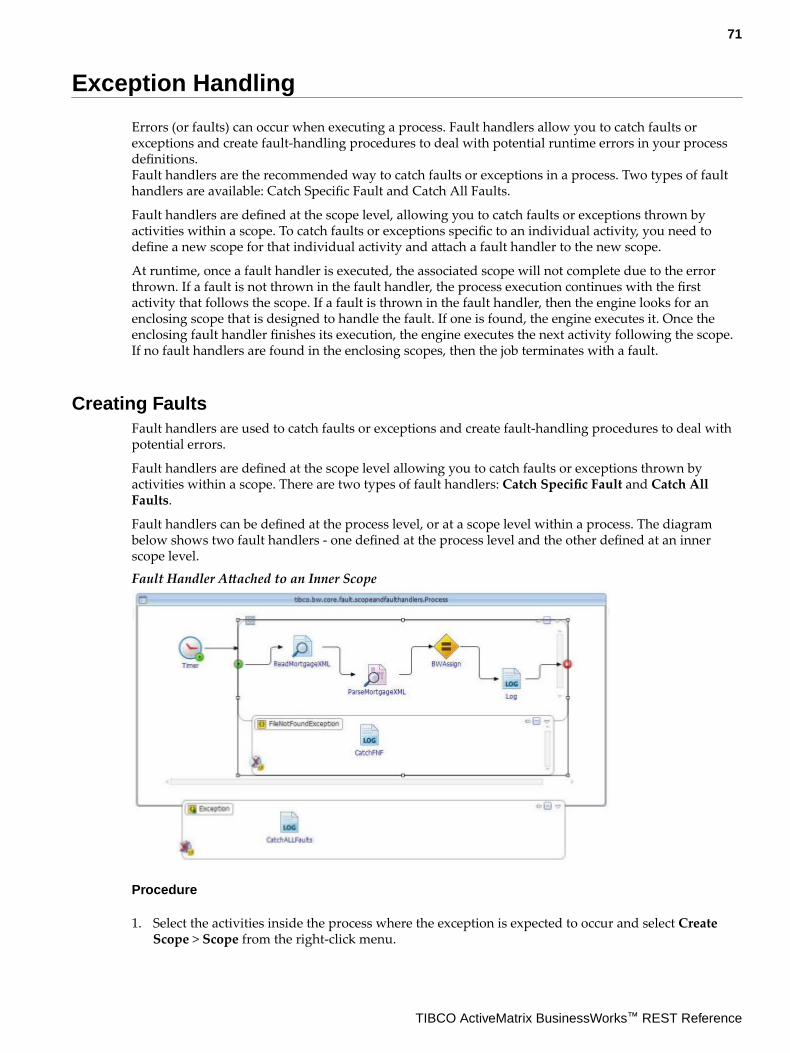
Exception Handling
Errors (or faults) can occur when executing a process. Fault handlers allow you to catch faults orexceptions and create fault-handling procedures to deal with potential runtime errors in your processdefinitions.Fault handlers are the recommended way to catch faults or exceptions in a process. Two types of faulthandlers are available: Catch Specific Fault and Catch All Faults.
Fault handlers are defined at the scope level, allowing you to catch faults or exceptions thrown byactivities within a scope. To catch faults or exceptions specific to an individual activity, you need todefine a new scope for that individual activity and attach a fault handler to the new scope.
At runtime, once a fault handler is executed, the associated scope will not complete due to the errorthrown. If a fault is not thrown in the fault handler, the process execution continues with the firstactivity that follows the scope. If a fault is thrown in the fault handler, then the engine looks for anenclosing scope that is designed to handle the fault. If one is found, the engine executes it. Once theenclosing fault handler finishes its execution, the engine executes the next activity following the scope.If no fault handlers are found in the enclosing scopes, then the job terminates with a fault.
Creating FaultsFault handlers are used to catch faults or exceptions and create fault-handling procedures to deal withpotential errors.
Fault handlers are defined at the scope level allowing you to catch faults or exceptions thrown byactivities within a scope. There are two types of fault handlers: Catch Specific Fault and Catch AllFaults.
Fault handlers can be defined at the process level, or at a scope level within a process. The diagrambelow shows two fault handlers - one defined at the process level and the other defined at an innerscope level.
Fault Handler Attached to an Inner Scope
Procedure
1. Select the activities inside the process where the exception is expected to occur and select CreateScope > Scope from the right-click menu.
71
TIBCO ActiveMatrix BusinessWorks™ REST Reference

2. Move the cursor right underneath the scope's lower border to view the icons to create faulthandlers.
3. Click on one the following:
● Create Catch to create a fault handler for a specific exception.
● Create Catch All to create a fault handler to catch all exceptions.
A new fault handler is added under the scope.
4. Add activities and configure the fault handling procedure inside the fault handler area. Forexample, add a Log activity inside the fault handler area to record messages from the exception.
Using the Catch and Rethrow ActivitiesYou can place a Catch block in your process to deal with unhandled exceptions. The Catch block allowsyou to create a track that handles the exception and proceeds to the end of the current scope; either theend of the process or the end of a group.
You can use the Catch block as an alternative to individually handling exceptions for each activity, oryou can use error transitions to handle some exceptions and the Catch block to handle others.
The following figure illustrates the Catch block. The process waits for incoming orders sent by way ofHTTP requests. When an order arrives, each line item is checked for availability in theForEveryLineItem group. If an error occurs while checking the inventory, execution transfers to theCheckInventory activity. A log file entry is written, and then the transition is taken to the end of thegroup. If the inventory is available, the order is processed, a confirmation email is sent, and theresponse is sent back to the HTTP client. If the inventory is not available, a response is sent back to theHTTP client stating that one or more items are not available. If an error occurs outside of theForEveryLineItem group, execution transfers to the CatchAllOthers activity
72
TIBCO ActiveMatrix BusinessWorks™ REST Reference

Example of using the Catch block
The Catch block can specify the type of exception that should be caught. A list of exceptions that can beraised in the current scope are available on the General tab of the Catch block. Rethrow activityrethrows an exception but to catch it your second catch block, Rethrow activity should be in a group.Any exceptions that are not already handled by an error transition or Catch block can be handled by aCatch block that specifies the Catch All option on the General tab.
The Rethrow activity allows you to throw the exception currently being handled by a Catch path. Thisis useful if you wish to perform some error processing, but then propagate the error up to the nextlevel.
See TIBCO ActiveMatrix BusinessWorks Bindings and Palettes Reference for more information about theCatch activityand Rethrow activities.
Adding Details to Error Code DescriptionsError codes are defined in HTTP protocol. Each error code has a certain use that is predefined in theHTTP protocol specification. TIBCO Business Studio allows you to add more details to the descriptionof an error code that might help in debugging the error.Error codes are defined per operation. So, if the same error code is defined in multiple operations, youcan define the error details that are specific to the operation within each operation.
You can edit error codes only in projects that were created ground up in the TIBCO Business Studio. Inprojects that were created using an imported Swagger file, you can only view the error code details.
To add an error code to an operation or to edit the error code description, follow these steps:
Procedure
1. In the Bindings tab of the process, expand the Operations tree in the left pane.
2. Click the operation for which you want to add an error code or modify an existing error codedescription.
3. Click the Response Status tab in the right pane.
73
TIBCO ActiveMatrix BusinessWorks™ REST Reference

4. Click the Add Response Status button ( ) to add an error code.The Reason Phrase that appears by default is the default description for that error code. You canclick on it to add more details to the error description.
5. Click the code, type, or reason phrase to edit the field.
Result
The newly added error code will be available for you to select.
Using Swagger-Provided FaultsFault codes that are defined in a Swagger file that is used in Studio can be viewed from the ResponseStatus tab.View the fault codes used in a REST service or reference follow these steps:
74
TIBCO ActiveMatrix BusinessWorks™ REST Reference

Procedure
1. Click the service or reference in the Process Editor.
2. In the General tab of the Properties view, click the link for the service or reference binding.
3. In the Components properties, click the Bindings tab.
4. Click an operation under Operations in the RestService or RestReference tree to edit theconfiguration of the operation.The Summary page for that operation opens on the right. To view the error codes, click theResponse Status for the operation.
Standard HTTP Status CodesThe official registry of HTTP response status codes are maintained by Internet Assigned NumbersAuthority (IANA).
You can find a general description of the codes at https://www.w3.org/Protocols/rfc2616/rfc2616-sec10.html
The following are the most commonly used response codes:
"200", // OK
"201", // Created
"202", // Accepted
"204", // No Content
"301", // Moved Permanently
"303", // See Other
"304", // Not Modified
"307", // Temporary Redirect
"400", // Bad Request
"401", // Unauthorized
"403", // Forbidden
"404", // Not Found
"406", // Not Acceptable
"409", // Conflict
"410", // Gone
75
TIBCO ActiveMatrix BusinessWorks™ REST Reference

"412", // Precondition Failed
"415", // Unsupported Media Type
"500", // Internal Server Error
"503" // Service Unavailable
76
TIBCO ActiveMatrix BusinessWorks™ REST Reference

Security
Currently ActiveMatrix BusinessWorks provides basic authentication and HTTPS support on RESTservices.
The Basic Authentication policy secures the HTTP layer of REST, SOAP, and pure HTTP services byvalidating user name and password credentials stored in HTTP headers. User name and passwordcredentials can be authenticated against an XML File Authentication provider.
Overview of PoliciesPolicies are categorized under the following policy types:
HTTP Security
● Basic Authentication
The Basic Authentication policy secures the HTTP layer of REST, SOAP, and pure HTTP services byvalidating user name and password credentials stored in HTTP headers. User name and passwordcredentials can be authenticated against an XML File Authentication provider or an LDAPAuthentication provider.
● Basic Credential Mapping
The Basic Credential Mapping policy enables authentication for specified users by automaticallyattaching appropriate credentials to request messages before they reach services. You can choose toenforce Fixed or Conditional credential mapping.
SOAP Security
● WSS Provider
Configure the WSS Provider policy to enforce authentication, confidentiality, integrity, and timestamping of service-side messages.
● WSS Consumer
Configure the WSS Consumer policy to enforce confidentiality, integrity, time stamping, andcredential mapping of response messages.
Managing Policy ResourcesManage policies and policy resources from the ActiveMatrix BusinessWorks Studio.
Creating a Folder for Policies
Policies are always contained in the Policies folder. The folder might not exist in projects you haveimported from previous versions of ActiveMatrix BusinessWorks 6.x. If you create a new policy to addto an activity or binding, the Policies folder is automatically created. You can also create a special folderto contain policies.
To create a special folder for policies, follow these steps:
Procedure
1. In the Project Explorer pane, right-click on the application module and select New > Folder tolaunch the BusinessWorks Application Folder wizard.The Folder wizard opens.
2. Specify the following values in the New Folder window:
77
TIBCO ActiveMatrix BusinessWorks™ REST Reference

● Enter or select the parent folder: Type the name of the parent folder, or select an existingfolder to be the parent folder.
● Folder name: Type Policies.
3. Click Finish to create the Policies folder.The new folder displays in the Project Explorer pane.
4. Right-click on the Policies folder, and select Special Folders > Use as Policies Folder.
Result
The folder can now contain policies.
Creating an Authentication Resource
Policies use authentication resources to verify credentials and provide appropriate credentials for users.Follow these steps to create a policy authentication resource.
Procedure
1. In the Project Explorer, right-click on the Resources Folder, and select a new shared resource. Forexample, select New > XML Authentication .
2. Edit the following fields:
● Resource Folder: Name of the folder where the resource will be located.
● Package: Name of the package in the module where the new resource is added. Accept thedefault package, or browse to select a different package name.
● Resource Name: Name of the resource. Accept the default name, or type a new name.
3. Click Finish.
Result
The authentication resource displays under the Resources folder in the Project Explorer.
Associating a Policy
Enforce security on your BusinessWorks application, by associating a policy with an existing activity orbinding.
Associating a Policy with an Activity
1. In the Process Editor, select the activity to associate the policy with. Activities that support policiesdisplay the Policy tab under the Properties tab.
2. From the Properties tab, select the Policy tab.
3. Click the Add Policy to Activity icon.
4. From the Select Policy window, perform one of the following actions:
● Click Create a New Policy to set up a new policy with resources. Policies you can add to theactivity are listed under Select the type of policy. For more information about setting uppolicies and resources from the policy wizard, refer to the appropriate sections under HTTPSecurity and SOAP Security. Click Finish to create the new policy.
78
TIBCO ActiveMatrix BusinessWorks™ REST Reference

● Select an existing policy under Matching Items and click OK.
The policy is associated with the activity.
Associating a Policy with a Binding
1. In the Process Editor, select the binding to associate the policy with.
2. From the Properties tab, select the Bindings tab.
3. Click the name of the binding under the Binding section.
4. Click the Bindings tab, and select the Policy field from the tree.
5. Click the Add Policy icon.
6. From the Select Policy window, perform one of the following actions:
● Click Create a New Policy to set up a new policy with resources. Policies you can add to theactivity are listed under Select the type of policy. For more information about setting uppolicies and resources from the policy wizard, refer to the appropriate sections under HTTPSecurity and SOAP Security. Click Finish to create the new policy.
● Select an existing policy under Matching Items and click OK.
The policy is associated with the binding.
Removing a Policy
Follow these steps to remove a policy from an activity or a binding.
Removing a Policy From an Activity
1. Select the activity associated with the policy.
2. From the Properties tab, select the Policy tab.
3. Select the policy to remove, and click the Delete the selected policy icon.
The policy is no longer associated with the activity.
Removing a Policy From a Binding
1. Select the binding associated with the policy.
2. From the Properties tab, select the Binding tab.
3. Under the Policies field, select the policy to remove, and click the Delete the selected policyicon.
The policy is no longer associated with the binding.
HTTP SecurityApply security to the HTTP layer of REST, SOAP, and pure HTTP services.
79
TIBCO ActiveMatrix BusinessWorks™ REST Reference

Enforcing Basic Authentication
Implement the Basic Authentication policy to ensure user credentials in request messages areauthenticated.
First, set up a new Basic Authentication policy by creating and configuring the policy and its resources.Next, associate the policy with an activity or binding in your application.
Setting Up a Policy with Resources
Follow these steps to set a new Basic Authentication policy with resources:
1. In the Project Explorer, right-click the Policies folder and select New > Policy.
The Policy Wizard opens.
80
TIBCO ActiveMatrix BusinessWorks™ REST Reference

2. Specify the following values in the Create New Policy Window:
● Policy Folder: Name of the folder where policies will be located. defualt
● Package: Name of the package in the module where the new policy is added. Accept the defaultpackage, or browse to select a different package name.
● Policy Name: Name of the new policy. By default, the policy name is configured to match thesecurity policy you choose. For example, if you select the Basic Authentication policy, thedefault name of the policy is Basic Authentication.
3. Under Select the type of Policy, click Basic Authentication.
4. From the Policy Defaults drop-down menu, select one of the following options:
The Policy Defaults menu offers a list of commonly used policy configurations to choosefrom. After you select a Policy Default, a policy with preconfigured settings and relatedresources is created. If resources already exist in the module, the newly created policyautomatically refers them. However, if no resources exist, new resources with defaultsettings are created and referred to by the policy. Refer to the Default description at thebottom of the Policy Wizard to view policy configurations and new resources that mightbe created.
● Username/Password in workspace XML file: Select this option to verify user credentialsthrough an XML Authentication resource stored in your workspace. A new Basic
81
TIBCO ActiveMatrix BusinessWorks™ REST Reference
Authentication policy configured for XML authentication and the following resources areproduced in your workspace:
— A sample XML File containing user name and password credentials with the default filename XMLUsers.xml
— A new XML Authentication resource with the default file nameBasicAuthentication_AuthenticationProvider.authxml
● Username/Password in filesystem XML file: Select this option to verify user credentialsthrough an XML Authentication resource stored in your local file system. A new BasicAuthentication policy configured for XML authentication is produced in your workspace:
— A sample filesystem XML File the default file nameBasicAuthentication_AuthenticationProvider.authxml
● Username/Password in LDAP: Select this option to verify user credentials through an LDAPAuthentication resource. A new Basic Authentication policy configured for LDAPauthentication and the following resource is produced in your workspace:
— A new LDAP Authentication resource with the default file nameBasicAuthentication_AuthenticationProvider.ldapResource.
● Empty Policy (No Default) : Select this option to create a new Basic Authentication policy withno preselected options and no resources.
5. Optional. Select Always create new shared resources to ensure new resources are generated for thepolicy and referred to by the policy.
6. Optional. Select Create module properties for common fields to override default properties innewly created resources with module properties. Resources with module properties for commonfields are generated after you select this option.
7. Select Finish to create the policy.
Configuring Resources and the Policy
For resource configurations, refer to the following topics under the "Shared Resources" topic in theTIBCO ActiveMatrix BusinessWorks Bindings and Palettes Reference guide.
● XML Authentication
● LDAP Authentication
For policy configuration details, refer to the topic "Basic Authentication", under "Policy Resources" inthe TIBCO ActiveMatrix BusinessWorks Bindings and Palettes Reference guide.
Associating the Policy with an Activity or a Binding
You can associate the Basic Authentication policy with the following activities and bindings:
● HTTP Receiver Activity
● Wait for HTTP Request Activity
Credentials authenticated on this activity are not used for propagation during credentialmapping.
● SOAP Service Binding
● REST Service Binding
Refer to Associating Policies for instructions on how to enforce a policy on an activity or a binding inyour application.
82
TIBCO ActiveMatrix BusinessWorks™ REST Reference

Enforcing Basic Credential Mapping
Map credentials for different types of users by enforcing the Basic Credential Mapping Policy.
First, create and configure new policy. Next, associate the policy, with an activity or a binding in yourapplication.
Setting Up a Policy with Resources
Follow these steps to set up a new Basic Credential Mapping policy with resources:
1. In the Project Explorer, right-click the Policies folder and select New > Policy.
The Policy Wizard opens.
83
TIBCO ActiveMatrix BusinessWorks™ REST Reference
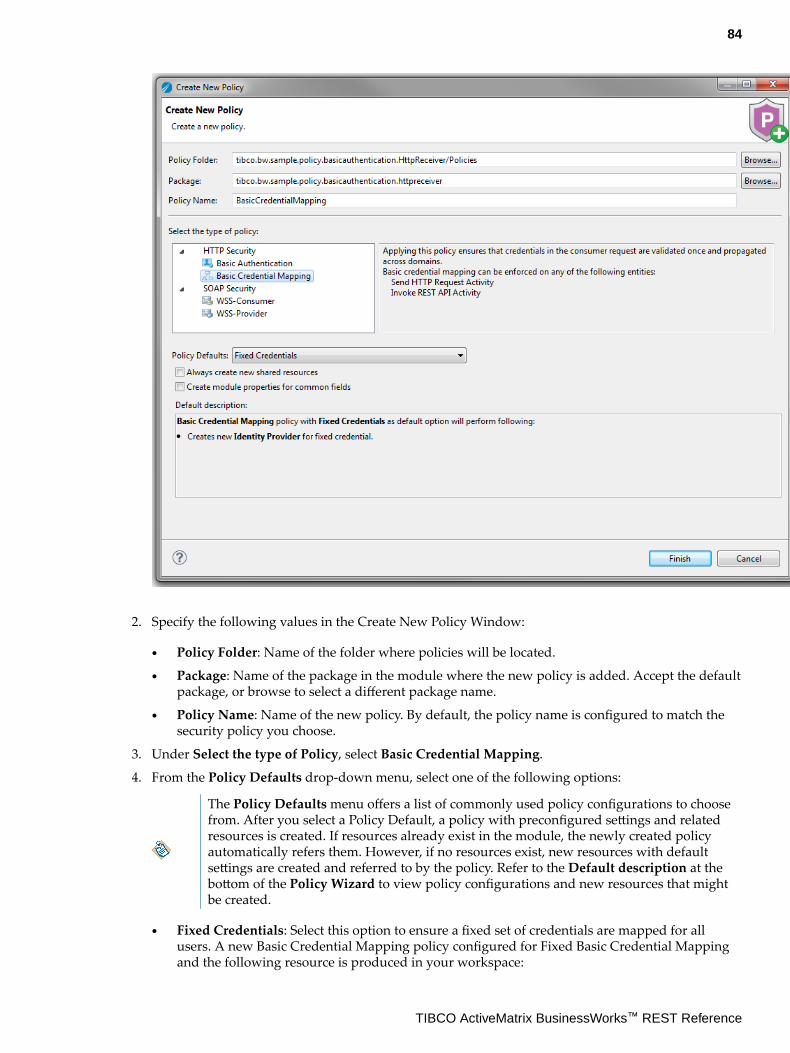
2. Specify the following values in the Create New Policy Window:
● Policy Folder: Name of the folder where policies will be located.
● Package: Name of the package in the module where the new policy is added. Accept the defaultpackage, or browse to select a different package name.
● Policy Name: Name of the new policy. By default, the policy name is configured to match thesecurity policy you choose.
3. Under Select the type of Policy, select Basic Credential Mapping.
4. From the Policy Defaults drop-down menu, select one of the following options:
The Policy Defaults menu offers a list of commonly used policy configurations to choosefrom. After you select a Policy Default, a policy with preconfigured settings and relatedresources is created. If resources already exist in the module, the newly created policyautomatically refers them. However, if no resources exist, new resources with defaultsettings are created and referred to by the policy. Refer to the Default description at thebottom of the Policy Wizard to view policy configurations and new resources that mightbe created.
● Fixed Credentials: Select this option to ensure a fixed set of credentials are mapped for allusers. A new Basic Credential Mapping policy configured for Fixed Basic Credential Mappingand the following resource is produced in your workspace:
84
TIBCO ActiveMatrix BusinessWorks™ REST Reference

— An Identity Provider resource with the default file nameBasicCredentialMapping_FixedIdentityProvider.userIdResource
● Authenticated & Anonymous Users : Select this option to enforce Basic Credential Mapping forauthenticated users and anonymous users. A new Basic Credential Mapping policy configuredfor conditional basic credential mapping and the following resources are produced in yourworkspace:
— An Identity Provider resource for authenticated users with the default file nameBasicCredentialMapping_AuthIdentityProvider.userIdResource
— An Identity Provider resource for anonymous users with the default file nameBasicCredentialMapping_AnonIdentityProvider.userIdResource
● Role Based Credentials: Select this option to enforce basic credential mapping for authenticatedusers with roles. A new Basic Credential Mapping policy configured for conditional basiccredential mapping and the following resources are produced in your workspace:
— An Identity Provider resource for authenticated users with the default file nameBasicCredentialMapping_AuthIdentityProvider.userIdResource
— Two separate Identity Provider resources for authenticated users with roles. The defaultfile names of the resources areBasicCredentialMapping_RoleIdentityProvider.userIdResource andBasicCredentialMapping_RoleIdentityProvider1.userIdResource
● Empty Policy (No Default) : Select this option to create a new Basic Authentication policy withno preselected options and no resources.
5. Optional. Select Always create new shared resources to ensure new resources are generated for thepolicy and referred to by the policy.
6. Optional. Select Create module properties for common fields to override default properties innewly created resources with module properties. Resources with module properties for commonfields are generated after you select this option.
7. Select Finish to create the policy.
Configuring Resources and the Policy
For resource configurations, refer to the following topics under the "Shared Resources" topics in theTIBCO ActiveMatrix BusinessWorks Bindings and Palettes guide:
● Identity Provider
Refer to the topic "Basic Credential Mapping", under "Policy Resources" in the TIBCO ActiveMatrixBusinessWorks Bindings and Palettes guide for policy configuration details.
Associating the Policy with an Activity or a Binding
You can associate the Basic Credential Mapping policy with the following activities and bindings:
● SEND HTTP Request Activity
● Invoke REST API Activity
Basic Credential Mapping is not supported on SOAP references. To enforce credential mapping on aSOAP reference, apply the WSS Consumer policy and select either SAML Token based CredentialMapping or Username Token based Credential Mapping.
Refer to Associating Policies for instructions on how to enforce a policy on an activity or a binding inyour application.
85
TIBCO ActiveMatrix BusinessWorks™ REST Reference

The REST and JSON Palette in Studio
The REST and JSON palette in TIBCO Business Studio provides activities that you can use whencreating a REST service or reference.
For details on these activities, see the "REST and JSON" palette topics in the Bindings and PalettesReference section.
86
TIBCO ActiveMatrix BusinessWorks™ REST Reference