tibco businessconnect edi protocol powered by … 5 x12 operations ... translation map tab ... tibco...
TRANSCRIPT
TIBCO BusinessConnect™ EDI Protocol powered by Instream®
X12 ConfigurationSoftware Release 6.6October 2014
Two-Second Advantage®
Important Information
SOME TIBCO SOFTWARE EMBEDS OR BUNDLES OTHER TIBCO SOFTWARE. USE OF SUCH EMBEDDED OR BUNDLED TIBCO SOFTWARE IS SOLELY TO ENABLE THE FUNCTIONALITY (OR PROVIDE LIMITED ADD-ON FUNCTIONALITY) OF THE LICENSED TIBCO SOFTWARE. THE EMBEDDED OR BUNDLED SOFTWARE IS NOT LICENSED TO BE USED OR ACCESSED BY ANY OTHER TIBCO SOFTWARE OR FOR ANY OTHER PURPOSE.USE OF TIBCO SOFTWARE AND THIS DOCUMENT IS SUBJECT TO THE TERMS AND CONDITIONS OF A LICENSE AGREEMENT FOUND IN EITHER A SEPARATELY EXECUTED SOFTWARE LICENSE AGREEMENT, OR, IF THERE IS NO SUCH SEPARATE AGREEMENT, THE CLICKWRAP END USER LICENSE AGREEMENT WHICH IS DISPLAYED DURING DOWNLOAD OR INSTALLATION OF THE SOFTWARE (AND WHICH IS DUPLICATED IN THE LICENSE FILE) OR IF THERE IS NO SUCH SOFTWARE LICENSE AGREEMENT OR CLICKWRAP END USER LICENSE AGREEMENT, THE LICENSE(S) LOCATED IN THE “LICENSE” FILE(S) OF THE SOFTWARE. USE OF THIS DOCUMENT IS SUBJECT TO THOSE TERMS AND CONDITIONS, AND YOUR USE HEREOF SHALL CONSTITUTE ACCEPTANCE OF AND AN AGREEMENT TO BE BOUND BY THE SAME.This document contains confidential information that is subject to U.S. and international copyright laws and treaties. No part of this document may be reproduced in any form without the written authorization of TIBCO Software Inc.TIBCO, Two-Second Advantage, TIBCO Hawk, TIBCO Rendezvous, TIBCO Runtime Agent, TIBCO ActiveMatrix BusinessWorks, TIBCO Administrator, TIBCO Designer, TIBCO Business Studio, TIBCO BusinessConnect, TIBCO BusinessConnect Palette, TIBCO ActiveMatrix BusinessWorks Plug-in for BusinessConnect, TIBCO BusinessConnect Services Plug-in, and TIBCO EDISIM are either registered trademarks or trademarks of TIBCO Software Inc. in the United States and/or other countries.Enterprise Java Beans (EJB), Java Platform Enterprise Edition (Java EE), Java 2 Platform Enterprise Edition (J2EE), and all Java-based trademarks and logos are trademarks or registered trademarks of Oracle Corporation in the U.S. and other countries.All other product and company names and marks mentioned in this document are the property of their respective owners and are mentioned for identification purposes only.THIS SOFTWARE MAY BE AVAILABLE ON MULTIPLE OPERATING SYSTEMS. HOWEVER, NOT ALL OPERATING SYSTEM PLATFORMS FOR A SPECIFIC SOFTWARE VERSION ARE RELEASED AT THE SAME TIME. SEE THE README FILE FOR THE AVAILABILITY OF THIS SOFTWARE VERSION ON A SPECIFIC OPERATING SYSTEM PLATFORM.THIS DOCUMENT IS PROVIDED “AS IS” WITHOUT WARRANTY OF ANY KIND, EITHER EXPRESS OR IMPLIED, INCLUDING, BUT NOT LIMITED TO, THE IMPLIED WARRANTIES OF MERCHANTABILITY, FITNESS FOR A PARTICULAR PURPOSE, OR NON-INFRINGEMENT.THIS DOCUMENT COULD INCLUDE TECHNICAL INACCURACIES OR TYPOGRAPHICAL ERRORS. CHANGES ARE PERIODICALLY ADDED TO THE INFORMATION HEREIN; THESE CHANGES WILL BE INCORPORATED IN NEW EDITIONS OF THIS DOCUMENT. TIBCO SOFTWARE INC. MAY MAKE IMPROVEMENTS AND/OR CHANGES IN THE PRODUCT(S) AND/OR THE PROGRAM(S) DESCRIBED IN THIS DOCUMENT AT ANY TIME.THE CONTENTS OF THIS DOCUMENT MAY BE MODIFIED AND/OR QUALIFIED, DIRECTLY OR INDIRECTLY, BY OTHER DOCUMENTATION WHICH ACCOMPANIES THIS SOFTWARE, INCLUDING BUT NOT LIMITED TO ANY RELEASE NOTES AND "READ ME" FILES.Copyright © 1999-2014 TIBCO Software Inc. ALL RIGHTS RESERVED.TIBCO Software Inc. Confidential Information

TIBCO BusinessConnect EDI Protocol powered by Instream X12 Configuration
| iii
Contents
Figures . . . . . . . . . . . . . . . . . . . . . . . . . . . . . . . . . . . . . . . . . . . . . . . . . . . . . . . . . . . . . . . . . . . . . . . .vii
Tables . . . . . . . . . . . . . . . . . . . . . . . . . . . . . . . . . . . . . . . . . . . . . . . . . . . . . . . . . . . . . . . . . . . . . . . . . ix
Preface . . . . . . . . . . . . . . . . . . . . . . . . . . . . . . . . . . . . . . . . . . . . . . . . . . . . . . . . . . . . . . . . . . . . . . . . xi
Related Documentation . . . . . . . . . . . . . . . . . . . . . . . . . . . . . . . . . . . . . . . . . . . . . . . . . . . . . . . . . . . . . . . . . . . . . xiiTIBCO BusinessConnect EDI Protocol powered by Instream Documentation. . . . . . . . . . . . . . . . . . . . . . . . xiiOther TIBCO Product Documentation . . . . . . . . . . . . . . . . . . . . . . . . . . . . . . . . . . . . . . . . . . . . . . . . . . . . . .xiii
Typographical Conventions . . . . . . . . . . . . . . . . . . . . . . . . . . . . . . . . . . . . . . . . . . . . . . . . . . . . . . . . . . . . . . . . . .xiv
Connecting with TIBCO Resources . . . . . . . . . . . . . . . . . . . . . . . . . . . . . . . . . . . . . . . . . . . . . . . . . . . . . . . . . . . .xviHow to Join TIBCOmmunity . . . . . . . . . . . . . . . . . . . . . . . . . . . . . . . . . . . . . . . . . . . . . . . . . . . . . . . . . . . . . .xviHow to Access TIBCO Documentation. . . . . . . . . . . . . . . . . . . . . . . . . . . . . . . . . . . . . . . . . . . . . . . . . . . . . .xviHow to Contact TIBCO Support . . . . . . . . . . . . . . . . . . . . . . . . . . . . . . . . . . . . . . . . . . . . . . . . . . . . . . . . . . .xvi
Chapter 1 X12 Overview . . . . . . . . . . . . . . . . . . . . . . . . . . . . . . . . . . . . . . . . . . . . . . . . . . . . . . . . . .1
Product Overview. . . . . . . . . . . . . . . . . . . . . . . . . . . . . . . . . . . . . . . . . . . . . . . . . . . . . . . . . . . . . . . . . . . . . . . . . . . 2
Document Structure. . . . . . . . . . . . . . . . . . . . . . . . . . . . . . . . . . . . . . . . . . . . . . . . . . . . . . . . . . . . . . . . . . . . . . . . . 3Interchange. . . . . . . . . . . . . . . . . . . . . . . . . . . . . . . . . . . . . . . . . . . . . . . . . . . . . . . . . . . . . . . . . . . . . . . . . . . . 3Functional Group . . . . . . . . . . . . . . . . . . . . . . . . . . . . . . . . . . . . . . . . . . . . . . . . . . . . . . . . . . . . . . . . . . . . . . . 4Transaction Set . . . . . . . . . . . . . . . . . . . . . . . . . . . . . . . . . . . . . . . . . . . . . . . . . . . . . . . . . . . . . . . . . . . . . . . . . 5
Delimiters. . . . . . . . . . . . . . . . . . . . . . . . . . . . . . . . . . . . . . . . . . . . . . . . . . . . . . . . . . . . . . . . . . . . . . . . . . . . . . . . . 6
Acknowledgements . . . . . . . . . . . . . . . . . . . . . . . . . . . . . . . . . . . . . . . . . . . . . . . . . . . . . . . . . . . . . . . . . . . . . . . . . 7Delivery Acknowledgements. . . . . . . . . . . . . . . . . . . . . . . . . . . . . . . . . . . . . . . . . . . . . . . . . . . . . . . . . . . . . . . 7Syntactic Response Acknowledgements . . . . . . . . . . . . . . . . . . . . . . . . . . . . . . . . . . . . . . . . . . . . . . . . . . . . . 7Business Application Acknowledgements . . . . . . . . . . . . . . . . . . . . . . . . . . . . . . . . . . . . . . . . . . . . . . . . . . . . 8
Support for File Conversion . . . . . . . . . . . . . . . . . . . . . . . . . . . . . . . . . . . . . . . . . . . . . . . . . . . . . . . . . . . . . . . . . . . 9
HIPAA Acknowledgement Properties. . . . . . . . . . . . . . . . . . . . . . . . . . . . . . . . . . . . . . . . . . . . . . . . . . . . . . . . . . . 10Business Application Acknowledgements . . . . . . . . . . . . . . . . . . . . . . . . . . . . . . . . . . . . . . . . . . . . . . . . . . . 10
Chapter 2 Tutorials — Getting Started . . . . . . . . . . . . . . . . . . . . . . . . . . . . . . . . . . . . . . . . . . . . . .13
Prerequisites . . . . . . . . . . . . . . . . . . . . . . . . . . . . . . . . . . . . . . . . . . . . . . . . . . . . . . . . . . . . . . . . . . . . . . . . . . . . . 14
Using EDI Guidelines. . . . . . . . . . . . . . . . . . . . . . . . . . . . . . . . . . . . . . . . . . . . . . . . . . . . . . . . . . . . . . . . . . . . . . . 15View a Guideline. . . . . . . . . . . . . . . . . . . . . . . . . . . . . . . . . . . . . . . . . . . . . . . . . . . . . . . . . . . . . . . . . . . . . . . 15Load Guidelines to the X12 Protocol . . . . . . . . . . . . . . . . . . . . . . . . . . . . . . . . . . . . . . . . . . . . . . . . . . . . . . . 17
TIBCO BusinessConnect EDI Protocol powered by Instream X12 Configuration
iv | Contents
Review the Guidelines . . . . . . . . . . . . . . . . . . . . . . . . . . . . . . . . . . . . . . . . . . . . . . . . . . . . . . . . . . . . . . . . . . 18
Configuring the Initiator. . . . . . . . . . . . . . . . . . . . . . . . . . . . . . . . . . . . . . . . . . . . . . . . . . . . . . . . . . . . . . . . . . . . . 19Set Up a Host . . . . . . . . . . . . . . . . . . . . . . . . . . . . . . . . . . . . . . . . . . . . . . . . . . . . . . . . . . . . . . . . . . . . . . . . 19Set Up a Partner . . . . . . . . . . . . . . . . . . . . . . . . . . . . . . . . . . . . . . . . . . . . . . . . . . . . . . . . . . . . . . . . . . . . . . 21Configure the Business Agreement . . . . . . . . . . . . . . . . . . . . . . . . . . . . . . . . . . . . . . . . . . . . . . . . . . . . . . . . 23Deploy the Initiator Server . . . . . . . . . . . . . . . . . . . . . . . . . . . . . . . . . . . . . . . . . . . . . . . . . . . . . . . . . . . . . . . 23
Configuring Private Processes . . . . . . . . . . . . . . . . . . . . . . . . . . . . . . . . . . . . . . . . . . . . . . . . . . . . . . . . . . . . . . . 24Configuring Private Processes in TIBCO Designer . . . . . . . . . . . . . . . . . . . . . . . . . . . . . . . . . . . . . . . . . . . . 24Configuring Private Processes in TIBCO Business Studio . . . . . . . . . . . . . . . . . . . . . . . . . . . . . . . . . . . . . . 26
Send 850 Txn To BC. . . . . . . . . . . . . . . . . . . . . . . . . . . . . . . . . . . . . . . . . . . . . . . . . . . . . . . . . . . . . . . . . . . . . . . 29Processes Overview . . . . . . . . . . . . . . . . . . . . . . . . . . . . . . . . . . . . . . . . . . . . . . . . . . . . . . . . . . . . . . . . . . . 30Running the Tutorial . . . . . . . . . . . . . . . . . . . . . . . . . . . . . . . . . . . . . . . . . . . . . . . . . . . . . . . . . . . . . . . . . . . . 32
Receive 850 TEXT Process . . . . . . . . . . . . . . . . . . . . . . . . . . . . . . . . . . . . . . . . . . . . . . . . . . . . . . . . . . . . . . . . . 37Prerequisites . . . . . . . . . . . . . . . . . . . . . . . . . . . . . . . . . . . . . . . . . . . . . . . . . . . . . . . . . . . . . . . . . . . . . . . . . 37Running the Tutorial . . . . . . . . . . . . . . . . . . . . . . . . . . . . . . . . . . . . . . . . . . . . . . . . . . . . . . . . . . . . . . . . . . . . 38
Chapter 3 Managing X12 Interchanges, Functional Groups, and Transactions . . . . . . . . . . . . 41
Overview . . . . . . . . . . . . . . . . . . . . . . . . . . . . . . . . . . . . . . . . . . . . . . . . . . . . . . . . . . . . . . . . . . . . . . . . . . . . . . . . 42
Adding an Interchange Version . . . . . . . . . . . . . . . . . . . . . . . . . . . . . . . . . . . . . . . . . . . . . . . . . . . . . . . . . . . . . . . 43
Adding a Group Version to an Interchange Version . . . . . . . . . . . . . . . . . . . . . . . . . . . . . . . . . . . . . . . . . . . . . . . 44
Adding a Transaction to a Group Version . . . . . . . . . . . . . . . . . . . . . . . . . . . . . . . . . . . . . . . . . . . . . . . . . . . . . . . 45
Notification Transaction . . . . . . . . . . . . . . . . . . . . . . . . . . . . . . . . . . . . . . . . . . . . . . . . . . . . . . . . . . . . . . . . . . . . . 46Notification Transaction Tab . . . . . . . . . . . . . . . . . . . . . . . . . . . . . . . . . . . . . . . . . . . . . . . . . . . . . . . . . . . . . . 46Outbound Action Tab . . . . . . . . . . . . . . . . . . . . . . . . . . . . . . . . . . . . . . . . . . . . . . . . . . . . . . . . . . . . . . . . . . . 49
Synchronous Request Response Transaction . . . . . . . . . . . . . . . . . . . . . . . . . . . . . . . . . . . . . . . . . . . . . . . . . . . 52Synchronous Request and Notify Operations . . . . . . . . . . . . . . . . . . . . . . . . . . . . . . . . . . . . . . . . . . . . . . . . 52Configure the Synchronous Request Response Transaction . . . . . . . . . . . . . . . . . . . . . . . . . . . . . . . . . . . . 53Request Action Tab . . . . . . . . . . . . . . . . . . . . . . . . . . . . . . . . . . . . . . . . . . . . . . . . . . . . . . . . . . . . . . . . . . . . 59Response Action Tab. . . . . . . . . . . . . . . . . . . . . . . . . . . . . . . . . . . . . . . . . . . . . . . . . . . . . . . . . . . . . . . . . . . 61
Configuring Acknowledgements . . . . . . . . . . . . . . . . . . . . . . . . . . . . . . . . . . . . . . . . . . . . . . . . . . . . . . . . . . . . . . 64Configure 997 Functional Acknowledgements. . . . . . . . . . . . . . . . . . . . . . . . . . . . . . . . . . . . . . . . . . . . . . . . 64Configure the 999 Implementation Acknowledgements. . . . . . . . . . . . . . . . . . . . . . . . . . . . . . . . . . . . . . . . . 64Configure TA1 Interchange Acknowledgement Segments. . . . . . . . . . . . . . . . . . . . . . . . . . . . . . . . . . . . . . . 65Multiple Configurations for the Same Transaction Type . . . . . . . . . . . . . . . . . . . . . . . . . . . . . . . . . . . . . . . . . 66
Configuring Validation Profile (.apf) Files . . . . . . . . . . . . . . . . . . . . . . . . . . . . . . . . . . . . . . . . . . . . . . . . . . . . . . . 68Severity Level. . . . . . . . . . . . . . . . . . . . . . . . . . . . . . . . . . . . . . . . . . . . . . . . . . . . . . . . . . . . . . . . . . . . . . . . . 68Severity Scope. . . . . . . . . . . . . . . . . . . . . . . . . . . . . . . . . . . . . . . . . . . . . . . . . . . . . . . . . . . . . . . . . . . . . . . . 70Validate Severity Levels . . . . . . . . . . . . . . . . . . . . . . . . . . . . . . . . . . . . . . . . . . . . . . . . . . . . . . . . . . . . . . . . . 70
Exporting Interchanges, Groups, and Transactions . . . . . . . . . . . . . . . . . . . . . . . . . . . . . . . . . . . . . . . . . . . . . . . 74
Importing an Interchange Version . . . . . . . . . . . . . . . . . . . . . . . . . . . . . . . . . . . . . . . . . . . . . . . . . . . . . . . . . . . . . 75
TIBCO BusinessConnect EDI Protocol powered by Instream X12 Configuration
Contents | v
Chapter 4 Setting Up Trading Hosts. . . . . . . . . . . . . . . . . . . . . . . . . . . . . . . . . . . . . . . . . . . . . . . .77
Configuring the X12 Protocol . . . . . . . . . . . . . . . . . . . . . . . . . . . . . . . . . . . . . . . . . . . . . . . . . . . . . . . . . . . . . . . . . 78
General Tab . . . . . . . . . . . . . . . . . . . . . . . . . . . . . . . . . . . . . . . . . . . . . . . . . . . . . . . . . . . . . . . . . . . . . . . . . . . . . . 79
Preprocessing Tab . . . . . . . . . . . . . . . . . . . . . . . . . . . . . . . . . . . . . . . . . . . . . . . . . . . . . . . . . . . . . . . . . . . . . . . . . 82
Logging Tab . . . . . . . . . . . . . . . . . . . . . . . . . . . . . . . . . . . . . . . . . . . . . . . . . . . . . . . . . . . . . . . . . . . . . . . . . . . . . . 83
Advanced Tab . . . . . . . . . . . . . . . . . . . . . . . . . . . . . . . . . . . . . . . . . . . . . . . . . . . . . . . . . . . . . . . . . . . . . . . . . . . . 84
Chapter 5 Setting Up Trading Partners . . . . . . . . . . . . . . . . . . . . . . . . . . . . . . . . . . . . . . . . . . . . .87
Configuring the X12 Protocol . . . . . . . . . . . . . . . . . . . . . . . . . . . . . . . . . . . . . . . . . . . . . . . . . . . . . . . . . . . . . . . . . 88
General Tab . . . . . . . . . . . . . . . . . . . . . . . . . . . . . . . . . . . . . . . . . . . . . . . . . . . . . . . . . . . . . . . . . . . . . . . . . . . . . . 89
Logging Tab . . . . . . . . . . . . . . . . . . . . . . . . . . . . . . . . . . . . . . . . . . . . . . . . . . . . . . . . . . . . . . . . . . . . . . . . . . . . . . 95
Batching Tab . . . . . . . . . . . . . . . . . . . . . . . . . . . . . . . . . . . . . . . . . . . . . . . . . . . . . . . . . . . . . . . . . . . . . . . . . . . . . 96
Interchange Header Tab . . . . . . . . . . . . . . . . . . . . . . . . . . . . . . . . . . . . . . . . . . . . . . . . . . . . . . . . . . . . . . . . . . . . 98
Group Header Tab . . . . . . . . . . . . . . . . . . . . . . . . . . . . . . . . . . . . . . . . . . . . . . . . . . . . . . . . . . . . . . . . . . . . . . . . 100
Acknowledgement Tab. . . . . . . . . . . . . . . . . . . . . . . . . . . . . . . . . . . . . . . . . . . . . . . . . . . . . . . . . . . . . . . . . . . . . 101
Control Numbers Tab . . . . . . . . . . . . . . . . . . . . . . . . . . . . . . . . . . . . . . . . . . . . . . . . . . . . . . . . . . . . . . . . . . . . . . 104
Delimiters Tab . . . . . . . . . . . . . . . . . . . . . . . . . . . . . . . . . . . . . . . . . . . . . . . . . . . . . . . . . . . . . . . . . . . . . . . . . . . 107
Transports Tab . . . . . . . . . . . . . . . . . . . . . . . . . . . . . . . . . . . . . . . . . . . . . . . . . . . . . . . . . . . . . . . . . . . . . . . . . . . 108NAESB . . . . . . . . . . . . . . . . . . . . . . . . . . . . . . . . . . . . . . . . . . . . . . . . . . . . . . . . . . . . . . . . . . . . . . . . . . . . . 109CAQH Packaging . . . . . . . . . . . . . . . . . . . . . . . . . . . . . . . . . . . . . . . . . . . . . . . . . . . . . . . . . . . . . . . . . . . . . 109Configure HTTP/S for NAESB Internet ET and CAQH. . . . . . . . . . . . . . . . . . . . . . . . . . . . . . . . . . . . . . . . . 110
Chapter 6 Configuring Agreement Protocol Bindings . . . . . . . . . . . . . . . . . . . . . . . . . . . . . . . .115
Overview . . . . . . . . . . . . . . . . . . . . . . . . . . . . . . . . . . . . . . . . . . . . . . . . . . . . . . . . . . . . . . . . . . . . . . . . . . . . . . . 116Add Protocol Binding . . . . . . . . . . . . . . . . . . . . . . . . . . . . . . . . . . . . . . . . . . . . . . . . . . . . . . . . . . . . . . . . . . 116
Operation Bindings Tab . . . . . . . . . . . . . . . . . . . . . . . . . . . . . . . . . . . . . . . . . . . . . . . . . . . . . . . . . . . . . . . . . . . . 117Add Operation Binding . . . . . . . . . . . . . . . . . . . . . . . . . . . . . . . . . . . . . . . . . . . . . . . . . . . . . . . . . . . . . . . . . 117
Override Outbound Settings for Notify . . . . . . . . . . . . . . . . . . . . . . . . . . . . . . . . . . . . . . . . . . . . . . . . . . . . . . . . . 118Operation Settings Tab . . . . . . . . . . . . . . . . . . . . . . . . . . . . . . . . . . . . . . . . . . . . . . . . . . . . . . . . . . . . . . . . . 118Action Settings Tab. . . . . . . . . . . . . . . . . . . . . . . . . . . . . . . . . . . . . . . . . . . . . . . . . . . . . . . . . . . . . . . . . . . . 122Transports Tab . . . . . . . . . . . . . . . . . . . . . . . . . . . . . . . . . . . . . . . . . . . . . . . . . . . . . . . . . . . . . . . . . . . . . . . 123Document Security Tab . . . . . . . . . . . . . . . . . . . . . . . . . . . . . . . . . . . . . . . . . . . . . . . . . . . . . . . . . . . . . . . . 123
Override Outbound Settings for Synchronous Response Request . . . . . . . . . . . . . . . . . . . . . . . . . . . . . . . . . . . 124Operation Settings Tab . . . . . . . . . . . . . . . . . . . . . . . . . . . . . . . . . . . . . . . . . . . . . . . . . . . . . . . . . . . . . . . . . 124Action Settings Tab. . . . . . . . . . . . . . . . . . . . . . . . . . . . . . . . . . . . . . . . . . . . . . . . . . . . . . . . . . . . . . . . . . . . 131Transports Tab . . . . . . . . . . . . . . . . . . . . . . . . . . . . . . . . . . . . . . . . . . . . . . . . . . . . . . . . . . . . . . . . . . . . . . . 132Document Security Tab . . . . . . . . . . . . . . . . . . . . . . . . . . . . . . . . . . . . . . . . . . . . . . . . . . . . . . . . . . . . . . . . 133
Document Security Tab . . . . . . . . . . . . . . . . . . . . . . . . . . . . . . . . . . . . . . . . . . . . . . . . . . . . . . . . . . . . . . . . . . . . 134
Transports Tab . . . . . . . . . . . . . . . . . . . . . . . . . . . . . . . . . . . . . . . . . . . . . . . . . . . . . . . . . . . . . . . . . . . . . . . . . . . 136
TIBCO BusinessConnect EDI Protocol powered by Instream X12 Configuration
vi | Contents
Set the Outbound Transport for the Host . . . . . . . . . . . . . . . . . . . . . . . . . . . . . . . . . . . . . . . . . . . . . . . . . . . 136Set the Inbound Transport for the Host . . . . . . . . . . . . . . . . . . . . . . . . . . . . . . . . . . . . . . . . . . . . . . . . . . . . 138
Scheduled Transmission Tab . . . . . . . . . . . . . . . . . . . . . . . . . . . . . . . . . . . . . . . . . . . . . . . . . . . . . . . . . . . . . . . 139
Overriding Participant Settings . . . . . . . . . . . . . . . . . . . . . . . . . . . . . . . . . . . . . . . . . . . . . . . . . . . . . . . . . . . . . . 141Hide Advanced. . . . . . . . . . . . . . . . . . . . . . . . . . . . . . . . . . . . . . . . . . . . . . . . . . . . . . . . . . . . . . . . . . . . . . . 141Show Advanced . . . . . . . . . . . . . . . . . . . . . . . . . . . . . . . . . . . . . . . . . . . . . . . . . . . . . . . . . . . . . . . . . . . . . . 141
Index . . . . . . . . . . . . . . . . . . . . . . . . . . . . . . . . . . . . . . . . . . . . . . . . . . . . . . . . . . . . . . . . . . . . . . . . 143
TIBCO BusinessConnect EDI Protocol powered by Instream X12 Configuration
Figures | vii
Figures
Figure 1 Structure of X12 Interchange . . . . . . . . . . . . . . . . . . . . . . . . . . . . . . . . . . . . . . . . . . . . . . . . . . . . . . . 3
Figure 2 Import a Standard . . . . . . . . . . . . . . . . . . . . . . . . . . . . . . . . . . . . . . . . . . . . . . . . . . . . . . . . . . . . . . 15
Figure 3 Elements of the Purchase Order . . . . . . . . . . . . . . . . . . . . . . . . . . . . . . . . . . . . . . . . . . . . . . . . . . . 16
Figure 4 The Details View Panel . . . . . . . . . . . . . . . . . . . . . . . . . . . . . . . . . . . . . . . . . . . . . . . . . . . . . . . . . . 16
Figure 5 X12 Operations . . . . . . . . . . . . . . . . . . . . . . . . . . . . . . . . . . . . . . . . . . . . . . . . . . . . . . . . . . . . . . . . 18
Figure 6 TIBCO ActiveMatrix BusinessWorks Project . . . . . . . . . . . . . . . . . . . . . . . . . . . . . . . . . . . . . . . . . . 25
Figure 7 BCServerConfig: Configuration . . . . . . . . . . . . . . . . . . . . . . . . . . . . . . . . . . . . . . . . . . . . . . . . . . . . 26
Figure 8 Send 850 Txn to BC. . . . . . . . . . . . . . . . . . . . . . . . . . . . . . . . . . . . . . . . . . . . . . . . . . . . . . . . . . . . . 32
Figure 9 Select Process to Load . . . . . . . . . . . . . . . . . . . . . . . . . . . . . . . . . . . . . . . . . . . . . . . . . . . . . . . . . . 33
Figure 10 XML 850 Transaction Read from a File . . . . . . . . . . . . . . . . . . . . . . . . . . . . . . . . . . . . . . . . . . . . . . 33
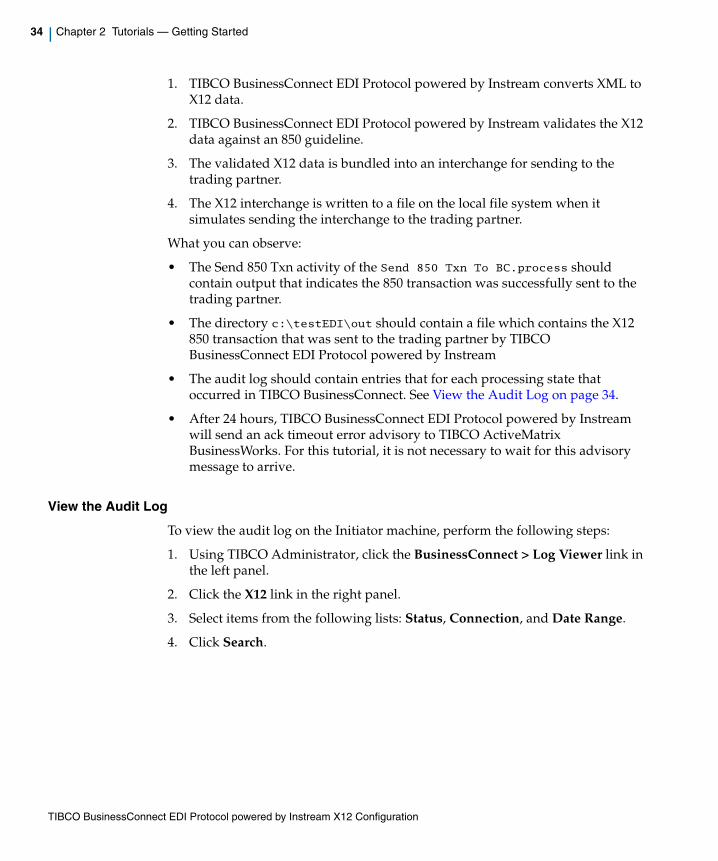
Figure 11 Send 850 Txn To BC Audit Log . . . . . . . . . . . . . . . . . . . . . . . . . . . . . . . . . . . . . . . . . . . . . . . . . . . . 35
Figure 12 Transaction Details for the Send 850 Txn To BC Audit Log. . . . . . . . . . . . . . . . . . . . . . . . . . . . . . . 35
Figure 13 RECEIVED_FROM_PP . . . . . . . . . . . . . . . . . . . . . . . . . . . . . . . . . . . . . . . . . . . . . . . . . . . . . . . . . . 36
Figure 14 Receive 850 TEXT Process . . . . . . . . . . . . . . . . . . . . . . . . . . . . . . . . . . . . . . . . . . . . . . . . . . . . . . . 38
Figure 15 Select Process to Load . . . . . . . . . . . . . . . . . . . . . . . . . . . . . . . . . . . . . . . . . . . . . . . . . . . . . . . . . . 39
Figure 16 Receive 850 TEXT Process Audit Log. . . . . . . . . . . . . . . . . . . . . . . . . . . . . . . . . . . . . . . . . . . . . . . 40
Figure 17 Receive 850 TEXT Audit Log: Transaction Details . . . . . . . . . . . . . . . . . . . . . . . . . . . . . . . . . . . . . 40
Figure 18 Select Standard Dialog . . . . . . . . . . . . . . . . . . . . . . . . . . . . . . . . . . . . . . . . . . . . . . . . . . . . . . . . . . 71
Figure 19 EDI Compliance Check . . . . . . . . . . . . . . . . . . . . . . . . . . . . . . . . . . . . . . . . . . . . . . . . . . . . . . . . . . 71
Figure 20 Edit Notification . . . . . . . . . . . . . . . . . . . . . . . . . . . . . . . . . . . . . . . . . . . . . . . . . . . . . . . . . . . . . . . . 72
Figure 21 Validator Profile File Downloaded . . . . . . . . . . . . . . . . . . . . . . . . . . . . . . . . . . . . . . . . . . . . . . . . . . 73

TIBCO BusinessConnect EDI Protocol powered by Instream X12 Configuration
viii | Figures

TIBCO BusinessConnect EDI Protocol powered by Instream X12 Configuration
Tables | ix
Tables
Table 1 General Typographical Conventions . . . . . . . . . . . . . . . . . . . . . . . . . . . . . . . . . . . . . . . . . . . . . . . xiv
Table 2 HIPAA Acknowledgement Fields . . . . . . . . . . . . . . . . . . . . . . . . . . . . . . . . . . . . . . . . . . . . . . . . . . 11
Table 3 Group Version Fields . . . . . . . . . . . . . . . . . . . . . . . . . . . . . . . . . . . . . . . . . . . . . . . . . . . . . . . . . . . 44
Table 4 Notification Transaction: General Tab . . . . . . . . . . . . . . . . . . . . . . . . . . . . . . . . . . . . . . . . . . . . . . 47
Table 5 Notification Transaction: Guideline Tab . . . . . . . . . . . . . . . . . . . . . . . . . . . . . . . . . . . . . . . . . . . . . 47
Table 6 Notification Transaction: Schema Tab . . . . . . . . . . . . . . . . . . . . . . . . . . . . . . . . . . . . . . . . . . . . . . 49
Table 7 Outbound Action: General Tab . . . . . . . . . . . . . . . . . . . . . . . . . . . . . . . . . . . . . . . . . . . . . . . . . . . 50
Table 8 Outbound Action: Batching Tab . . . . . . . . . . . . . . . . . . . . . . . . . . . . . . . . . . . . . . . . . . . . . . . . . . . 50
Table 9 Outbound Action: Acknowledgement Tab . . . . . . . . . . . . . . . . . . . . . . . . . . . . . . . . . . . . . . . . . . . 51
Table 10 Synchronous Request Response Transaction: General tab . . . . . . . . . . . . . . . . . . . . . . . . . . . . . 54
Table 11 Synchronous Request Response Transaction: Guideline Tab. . . . . . . . . . . . . . . . . . . . . . . . . . . . 54
Table 12 Synchronous Request Response Transaction: Schema Tab. . . . . . . . . . . . . . . . . . . . . . . . . . . . . 59
Table 13 Request Action: General Tab. . . . . . . . . . . . . . . . . . . . . . . . . . . . . . . . . . . . . . . . . . . . . . . . . . . . . 60
Table 14 Request Action: Translation Map Tab . . . . . . . . . . . . . . . . . . . . . . . . . . . . . . . . . . . . . . . . . . . . . . 61
Table 15 Response Action: General Tab . . . . . . . . . . . . . . . . . . . . . . . . . . . . . . . . . . . . . . . . . . . . . . . . . . . 62
Table 16 Response Action: Translation Map Tab . . . . . . . . . . . . . . . . . . . . . . . . . . . . . . . . . . . . . . . . . . . . . 62
Table 17 General Fields . . . . . . . . . . . . . . . . . . . . . . . . . . . . . . . . . . . . . . . . . . . . . . . . . . . . . . . . . . . . . . . . 79
Table 18 Preprocessing Fields . . . . . . . . . . . . . . . . . . . . . . . . . . . . . . . . . . . . . . . . . . . . . . . . . . . . . . . . . . . 82
Table 19 Logging Fields . . . . . . . . . . . . . . . . . . . . . . . . . . . . . . . . . . . . . . . . . . . . . . . . . . . . . . . . . . . . . . . . 83
Table 20 Host Record Advanced Fields . . . . . . . . . . . . . . . . . . . . . . . . . . . . . . . . . . . . . . . . . . . . . . . . . . . . 84
Table 21 General Fields . . . . . . . . . . . . . . . . . . . . . . . . . . . . . . . . . . . . . . . . . . . . . . . . . . . . . . . . . . . . . . . . 89
Table 22 Logging Fields . . . . . . . . . . . . . . . . . . . . . . . . . . . . . . . . . . . . . . . . . . . . . . . . . . . . . . . . . . . . . . . . 95
Table 23 Batching Fields. . . . . . . . . . . . . . . . . . . . . . . . . . . . . . . . . . . . . . . . . . . . . . . . . . . . . . . . . . . . . . . . 96
Table 24 Interchange Header Fields. . . . . . . . . . . . . . . . . . . . . . . . . . . . . . . . . . . . . . . . . . . . . . . . . . . . . . . 98
Table 25 Group Header Fields . . . . . . . . . . . . . . . . . . . . . . . . . . . . . . . . . . . . . . . . . . . . . . . . . . . . . . . . . . 100
Table 26 Acknowledgement Fields . . . . . . . . . . . . . . . . . . . . . . . . . . . . . . . . . . . . . . . . . . . . . . . . . . . . . . . 101
Table 27 Control Numbers Fields . . . . . . . . . . . . . . . . . . . . . . . . . . . . . . . . . . . . . . . . . . . . . . . . . . . . . . . . 104
Table 28 Delimiters Fields. . . . . . . . . . . . . . . . . . . . . . . . . . . . . . . . . . . . . . . . . . . . . . . . . . . . . . . . . . . . . . 107

TIBCO BusinessConnect EDI Protocol powered by Instream X12 Configuration
x | Tables
Table 29 Configuring NAESB Internet ET . . . . . . . . . . . . . . . . . . . . . . . . . . . . . . . . . . . . . . . . . . . . . . . . . . 110
Table 30 Override Settings for Notify: General. . . . . . . . . . . . . . . . . . . . . . . . . . . . . . . . . . . . . . . . . . . . . . . 119
Table 31 Override Settings for Notify: Guideline . . . . . . . . . . . . . . . . . . . . . . . . . . . . . . . . . . . . . . . . . . . . . 120
Table 32 Override Settings for Notify: Schema . . . . . . . . . . . . . . . . . . . . . . . . . . . . . . . . . . . . . . . . . . . . . . 122
Table 33 Override Settings for Synchronous Request Response: General . . . . . . . . . . . . . . . . . . . . . . . . . 125
Table 34 Override Settings for Synchronous Request Response: Guideline. . . . . . . . . . . . . . . . . . . . . . . . 127
Table 35 Override Settings for Synchronous Request Response: Translation Map Option. . . . . . . . . . . . . 132
Table 36 Document Security Fields . . . . . . . . . . . . . . . . . . . . . . . . . . . . . . . . . . . . . . . . . . . . . . . . . . . . . . . 134
Table 37 Outbound Transport for the Host. . . . . . . . . . . . . . . . . . . . . . . . . . . . . . . . . . . . . . . . . . . . . . . . . . 136
Table 38 Inbound Transport Fields . . . . . . . . . . . . . . . . . . . . . . . . . . . . . . . . . . . . . . . . . . . . . . . . . . . . . . . 138
Table 39 Scheduled Transmission Fields. . . . . . . . . . . . . . . . . . . . . . . . . . . . . . . . . . . . . . . . . . . . . . . . . . . 139

TIBCO BusinessConnect EDI Protocol powered by Instream X12 Configuration
| xi
Preface
This manual describes how to use the X12 protocol.
Topics
• Related Documentation, page xii
• Typographical Conventions, page xiv
• Connecting with TIBCO Resources, page xvi
TIBCO BusinessConnect EDI Protocol powered by Instream X12 Configuration
xii | Related Documentation
Related Documentation
This section lists documentation resources you may find useful.
TIBCO BusinessConnect EDI Protocol powered by Instream DocumentationThe following documents form the TIBCO BusinessConnect EDI Protocol powered by Instream documentation set:
• TIBCO BusinessConnect EDI Protocol powered by Instream Installation Read this manual to learn about installing and deploying TIBCO BusinessConnect EDI Protocol powered by Instream.
• TIBCO BusinessConnect EDI Protocol powered by Instream User’s Guide Read this manual for instructions on using the product to configure all the EDI protocols.
• TIBCO BusinessConnect EDI Protocol powered by Instream EDIFACT Configuration Read this manual for instructions on configuring the EDIFACT protocol.
• TIBCO BusinessConnect EDI Protocol powered by Instream Gateway Configuration Read this manual for instructions on configuring the Gateway protocol.
• TIBCO BusinessConnect EDI Protocol powered by Instream Service Configuration Read this manual for instructions on configuring the Service protocol.
• TIBCO BusinessConnect EDI Protocol powered by Instream TEXT Configuration Read this manual for instructions on configuring the TEXT protocol.
• TIBCO BusinessConnect EDI Protocol powered by Instream TRADACOMS Configuration Read this manual for instructions on configuring the TRADACOMS protocol.
• TIBCO BusinessConnect EDI Protocol powered by Instream X12 Configuration Read this manual for instructions on configuring the X12 protocol.
• TIBCO BusinessConnect EDI Protocol powered by Instream Release Notes Read the release notes for a list of new and changed features. This document also contains lists of known issues and closed issues for this release.
TIBCO BusinessConnect EDI Protocol powered by Instream X12 Configuration
Preface | xiii
Other TIBCO Product DocumentationYou may find it useful to read the documentation for the following TIBCO products:
• TIBCO BusinessConnect™
• TIBCO BusinessConnect™ Services Plug-in
• TIBCO Administrator™
• TIBCO ActiveMatrix BusinessWorks™
• TIBCO Designer™
• TIBCO Business Studio™
• TIBCO BusinessConnect™ Palette
• TIBCO ActiveMatrix BusinessWorks™ Plug-in for BusinessConnect
TIBCO BusinessConnect EDI Protocol powered by Instream X12 Configuration
xiv | Typographical Conventions
Typographical Conventions
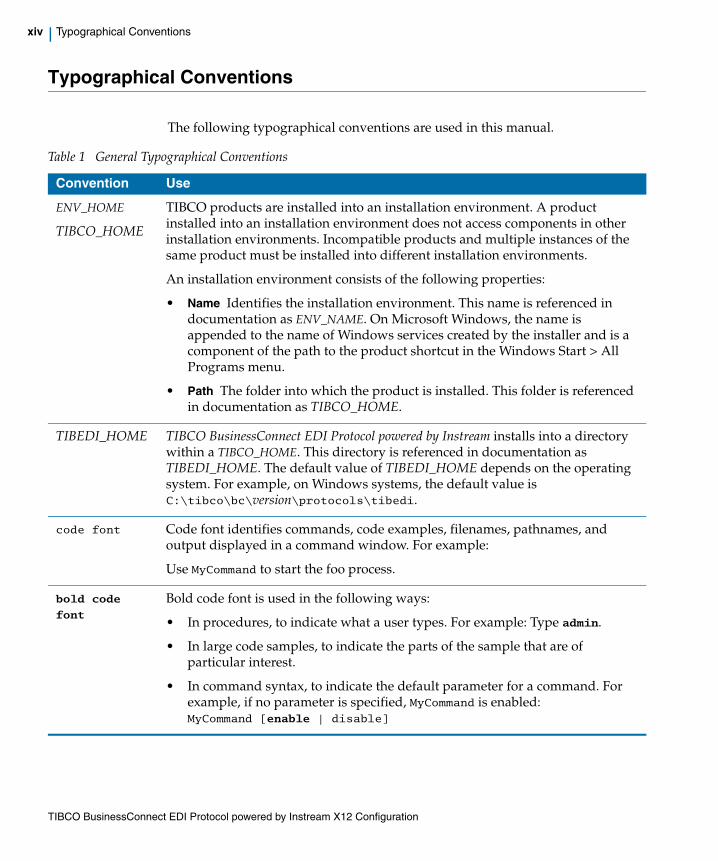
The following typographical conventions are used in this manual.
Table 1 General Typographical Conventions
Convention Use
ENV_HOME
TIBCO_HOME
TIBCO products are installed into an installation environment. A product installed into an installation environment does not access components in other installation environments. Incompatible products and multiple instances of the same product must be installed into different installation environments.
An installation environment consists of the following properties:
• Name Identifies the installation environment. This name is referenced in documentation as ENV_NAME. On Microsoft Windows, the name is appended to the name of Windows services created by the installer and is a component of the path to the product shortcut in the Windows Start > All Programs menu.
• Path The folder into which the product is installed. This folder is referenced in documentation as TIBCO_HOME.
TIBEDI_HOME TIBCO BusinessConnect EDI Protocol powered by Instream installs into a directory within a TIBCO_HOME. This directory is referenced in documentation as TIBEDI_HOME. The default value of TIBEDI_HOME depends on the operating system. For example, on Windows systems, the default value is C:\tibco\bc\version\protocols\tibedi.
code font Code font identifies commands, code examples, filenames, pathnames, and output displayed in a command window. For example:
Use MyCommand to start the foo process.
bold code
font Bold code font is used in the following ways:
• In procedures, to indicate what a user types. For example: Type admin.
• In large code samples, to indicate the parts of the sample that are of particular interest.
• In command syntax, to indicate the default parameter for a command. For example, if no parameter is specified, MyCommand is enabled: MyCommand [enable | disable]
TIBCO BusinessConnect EDI Protocol powered by Instream X12 Configuration
Preface | xv
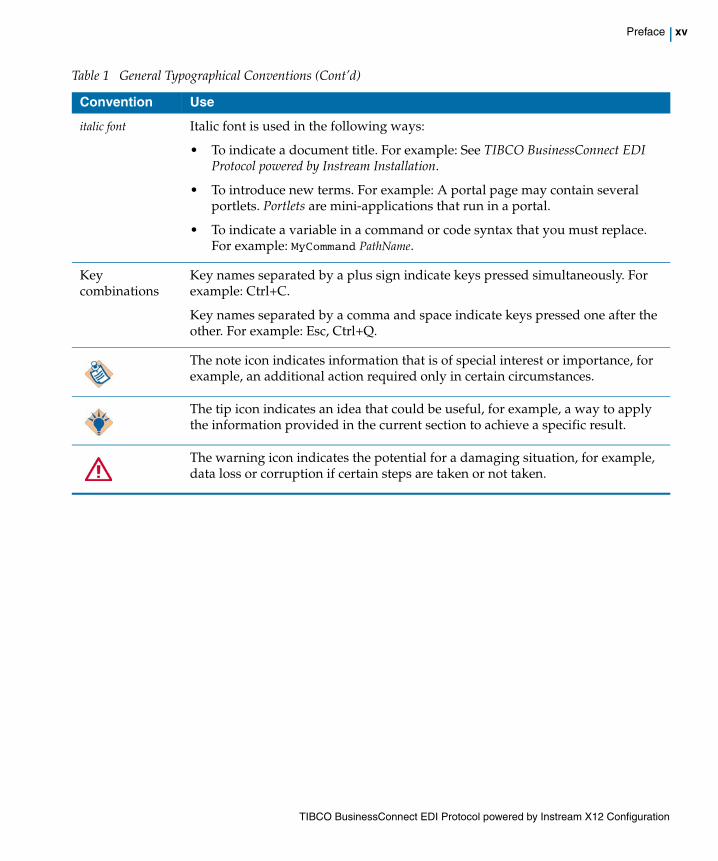
italic font Italic font is used in the following ways:
• To indicate a document title. For example: See TIBCO BusinessConnect EDI Protocol powered by Instream Installation.
• To introduce new terms. For example: A portal page may contain several portlets. Portlets are mini-applications that run in a portal.
• To indicate a variable in a command or code syntax that you must replace. For example: MyCommand PathName.
Key combinations
Key names separated by a plus sign indicate keys pressed simultaneously. For example: Ctrl+C.
Key names separated by a comma and space indicate keys pressed one after the other. For example: Esc, Ctrl+Q.
The note icon indicates information that is of special interest or importance, for example, an additional action required only in certain circumstances.
The tip icon indicates an idea that could be useful, for example, a way to apply the information provided in the current section to achieve a specific result.
The warning icon indicates the potential for a damaging situation, for example, data loss or corruption if certain steps are taken or not taken.
Table 1 General Typographical Conventions (Cont’d)
Convention Use
TIBCO BusinessConnect EDI Protocol powered by Instream X12 Configuration
xvi | Connecting with TIBCO Resources
Connecting with TIBCO Resources
How to Join TIBCOmmunityTIBCOmmunity is an online destination for TIBCO customers, partners, and resident experts. It is a place to share and access the collective experience of the TIBCO community. TIBCOmmunity offers forums, blogs, and access to a variety of resources. To register, go to http://www.tibcommunity.com.
How to Access TIBCO DocumentationYou can access TIBCO documentation here:
http://docs.tibco.com
How to Contact TIBCO SupportFor comments or problems with this manual or the software it addresses, contact TIBCO Support as follows:
• For an overview of TIBCO Support, and information about getting started with TIBCO Support, visit this site:
http://www.tibco.com/services/support
• If you already have a valid maintenance or support contract, visit this site:
https://support.tibco.com
Entry to this site requires a user name and password. If you do not have a user name, you can request one.
TIBCO BusinessConnect EDI Protocol powered by Instream X12 Configuration
| 1
Chapter 1 X12 Overview
This chapter briefly describes the X12 standard and its use for Electronic Data Interchange (EDI). For a more complete description of the X12 standard, refer to the standard itself which can be found at the Data Interchange Standards Association (DISA) website: http://www.disa.org
Topics
• Product Overview, page 2
• Document Structure, page 3
• Delimiters, page 6
• Acknowledgements, page 7
TIBCO BusinessConnect EDI Protocol powered by Instream X12 Configuration
2 | Chapter 1 X12 Overview
Product Overview
EDI (Electronic Data Interchange) is the exchange of information between trading partners in which the information is formatted according to a set of common data format standards developed in the U.S. and Western Europe during the late 1970th. EDI standards define the vocabulary, syntax rules, and structure of electronic documents.
X12 is an EDI standard from the American National Standards Institute (ANSI). The Accredited Standards Committee (ASC) X12 develops and maintains the X12 standards. In the X12 standard, a transaction set contains the data for a well defined business function (for example, a purchase order). Today, there are more than three hundred X12 transaction sets used by more than thirty thousand organizations for nearly every facet of business-to-business operations.
TIBCO BusinessConnect EDI Protocol powered by Instream X12 Configuration
Document Structure | 3
Document Structure
An X12 document is a file containing EDI data to be exchanged between trading partners.
There are three basic structures in an X12 document. They are:
• Interchange, page 3
• Functional Group, page 4
• Transaction Set, page 5
The following sections provide a basic description of each of these structures. For more detailed information on each of these structures, please refer to the X12 standard.
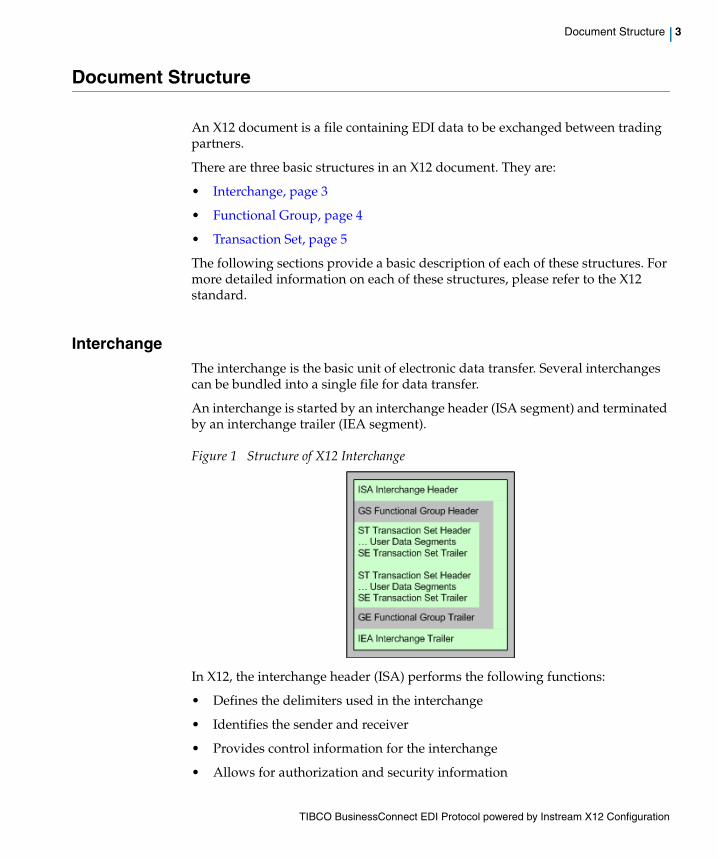
InterchangeThe interchange is the basic unit of electronic data transfer. Several interchanges can be bundled into a single file for data transfer.
An interchange is started by an interchange header (ISA segment) and terminated by an interchange trailer (IEA segment).
Figure 1 Structure of X12 Interchange
In X12, the interchange header (ISA) performs the following functions:
• Defines the delimiters used in the interchange
• Identifies the sender and receiver
• Provides control information for the interchange
• Allows for authorization and security information
TIBCO BusinessConnect EDI Protocol powered by Instream X12 Configuration
4 | Chapter 1 X12 Overview
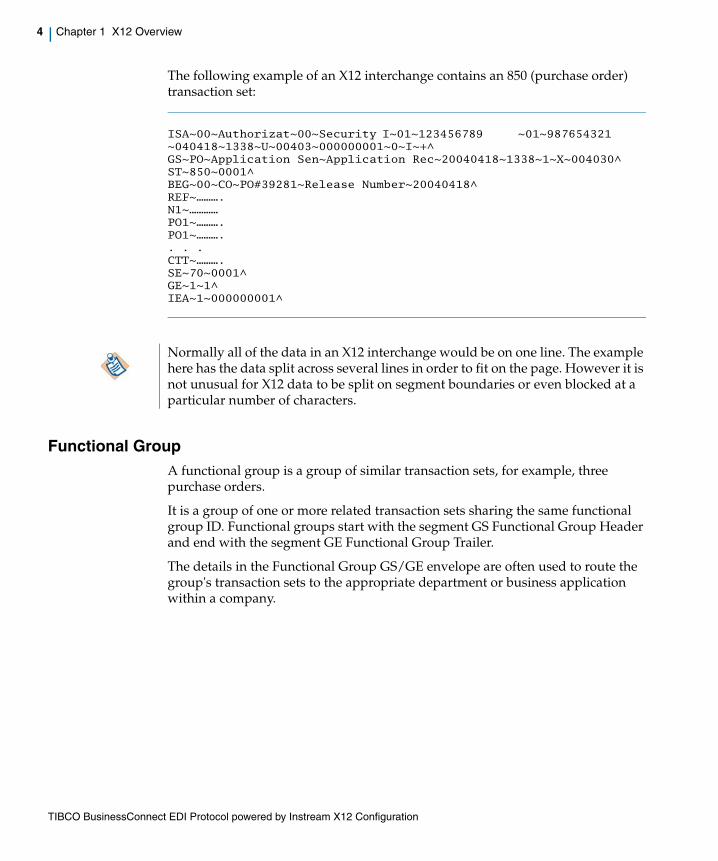
The following example of an X12 interchange contains an 850 (purchase order) transaction set:
ISA~00~Authorizat~00~Security I~01~123456789 ~01~987654321 ~040418~1338~U~00403~000000001~0~I~+^GS~PO~Application Sen~Application Rec~20040418~1338~1~X~004030^ST~850~0001^BEG~00~CO~PO#39281~Release Number~20040418^REF~……….N1~…………PO1~……….PO1~……….. . .CTT~……….SE~70~0001^GE~1~1^IEA~1~000000001^
Functional GroupA functional group is a group of similar transaction sets, for example, three purchase orders.
It is a group of one or more related transaction sets sharing the same functional group ID. Functional groups start with the segment GS Functional Group Header and end with the segment GE Functional Group Trailer.
The details in the Functional Group GS/GE envelope are often used to route the group's transaction sets to the appropriate department or business application within a company.
Normally all of the data in an X12 interchange would be on one line. The example here has the data split across several lines in order to fit on the page. However it is not unusual for X12 data to be split on segment boundaries or even blocked at a particular number of characters.
TIBCO BusinessConnect EDI Protocol powered by Instream X12 Configuration
Document Structure | 5
Transaction SetA transaction set contains the data for a well defined business function. For example, there are X12 transaction sets for purchase orders, invoices, and financial statements.
A business transaction is defined by a transaction set composed of a number of segments of variable lengths. Each segment is in turn composed of a number of data elements of variable lengths. A transaction set is analogous to a business document, such as a purchase order; a segment is analogous to a line of information in that purchase order; and a data element is analogous to a unit of information in the item line. For example, in the purchase order for a book, the number of copies requested or the unit price would be represented by data elements.
Transaction Set Header and Transaction Set Trailer
Each transaction set starts with a transaction set header (ST), followed by a beginning segment that uniquely identifies the type of transaction set. The transaction set header contains the transaction set identification and transaction set control number. This is followed by other segments (which may also be found in other transaction sets) and concluded by a transaction set trailer.
The transaction set trailer (SE) is the last element in the transaction set. It defines the end of the transaction set and contains the number of segments included and the transaction set control number.
TIBCO BusinessConnect EDI Protocol powered by Instream X12 Configuration
6 | Chapter 1 X12 Overview
Delimiters
Delimiters separate various syntax structures of an X12 document.
Delimiters consist of three separators and a terminator. Each interchange in an X12 document specifies the set of delimiters to use for that interchange.
The delimiters to be used in the interchange are defined in the interchange header segment (ISA). The delimiters are:
• Data element separator
• Component element separator
• Replacement character
• Segment terminator
The delimiter characters defined in the ISA segment must not be used in a data element value elsewhere in the interchange. However, defined delimiter characters can appear within a binary data element.
Only one character per delimiter can be used for X12 Protocol.
TIBCO BusinessConnect EDI Protocol powered by Instream X12 Configuration
Acknowledgements | 7
Acknowledgements
Acknowledgements for X12 documents fall into three categories:
• Delivery Acknowledgements, page 7
• Syntactic Response Acknowledgements, page 7
• Business Application Acknowledgements, page 8
You must have an agreement with your trading partner in order to use acknowledgements.
Delivery AcknowledgementsThere are two interchange delivery acknowledgements:
• Interchange acknowledgement segment (TA1)
An interchange acknowledge segment (TA1) reports the receipt of the contents of one interchange control header and trailer envelope in which the envelope surrounds one or more functional groups. The TA1 reports the results of the syntactical analysis of the interchange control header and trailer. Each interchange exchanged between trading partners may contain interchange-level control segments (TA1s) related to prior interchanges.
• Interchange delivery notice segment (TA3)
An interchange delivery notice (TA3) reports the delivery status of a document, when an intermediary is used to transfer documents between an interchange sender and interchange receiver.
Syntactic Response AcknowledgementsThere are two syntactic response acknowledgements:
• Functional acknowledgement (997)
The functional acknowledgement (997) describes the syntax-level acknowledgement of the receipt of an X12 functional group.
• Implementation acknowledgement (999)
The implementation acknowledgement (999) is first available in the X12 004061 subrelease. It is used for reporting the status of implementation guide syntax edits.
TIBCO BusinessConnect EDI Protocol powered by Instream X12 Configuration
8 | Chapter 1 X12 Overview
Business Application AcknowledgementsThere are two types of business application acknowledgements:
• Application advice (824)
The application advice (824) reports the results of an application system's data content edits on a transaction set. The results of editing transaction sets can be reported at the functional group and transaction set level, in either coded or free-form format.
The 824 is designed to report the following for a transaction set:
— Acceptance
— Rejection
— Acceptance with change
• Specific response transaction (Example, 271 response to a 270)
The status of a transaction set can also be reported by using a specific response transaction set as a response to the original transaction set.
The following are examples of transaction set pairs where the status of the original transaction set is indicated in the response transaction set:
— 271 response to a 270
— 855 response to an 850
— 870 response to an 869
TIBCO BusinessConnect EDI Protocol powered by Instream X12 Configuration
Support for File Conversion | 9
Support for File Conversion
The X12 protocol supports these conversions:
• Validation of X12 documents and their conversion to TEXT files, either delimited or positional, based on the TEXT guidelines developed in TIBCO EDISIM and mapped using the Translator tool.
• Conversion of the TEXT files to EDI for the Notify operation, where TEXT files are converted to X12 protocol. To perform this conversion, the trading partner must enable both the TEXT and X12 protocol.
• TEXT data can also be converted to X12 using the synchronous request response transactions.
To learn more about TEXT to EDI conversion, see TIBCO BusinessConnect EDI Protocol powered by Instream, User’s Guide, TEXT to EDI Conversion.
TIBCO BusinessConnect EDI Protocol powered by Instream X12 Configuration
10 | Chapter 1 X12 Overview
HIPAA Acknowledgement Properties
Business Application AcknowledgementsThe following is a list of the versions of business application acknowledgements that are supported by TIBCO BusinessConnect EDI Protocol powered by Instream:
• 00405/004050X166/824 - generated for 4010 HIPAA transactions
• 00501/005010X186A1/824 - generated for 5010 HIPAA transactions
• 00307/003070X070A1/277 - generated for 4010 HIPAA transactions
• 00404/004040X167/277 - generated for 4010 HIPAA transactions
• 00501/005010X214/277 - generated for 5010 HIPAA transactions
TIBCO BusinessConnect EDI Protocol powered by Instream can automatically generate the following business application acknowledgements:
• Application advice (824)
• Unsolicited Health Care Claim Status Notification (277U)
• Health Care Claim Acknowledgement (277CA)
The 824 application advice reports the results of an application system's data content edits on a transaction set. The results of editing transaction sets can be reported at the functional group and transaction set level, in either coded or free-form format.
The 824 is designed to report the following for a transaction set:
• Acceptance
• Rejection
• Acceptance with change
The unsolicited health care claim status notification (277U) reports the results of an application system's data content edits on the claims in a transaction set.
The 277 Claim Acknowledgement (277CA) has replaced usage of the 277U Unsolicited Health Care Claim Status Notification. The 277 Claim Acknowledgement reports the results of an application system's data content edits on the claims in a HIPAA 837 transaction.
TIBCO BusinessConnect EDI Protocol powered by Instream X12 Configuration
HIPAA Acknowledgement Properties | 11
Use the HIPAA Acknowledgement tab to specify settings to use in composing these business application acknowledgements for documents sent by this trading partner. These settings will only take effect if transaction level acknowledgements have been enabled in the Acknowledgement tab.
The 997 or 999 that will be generated, when 824 application advice acknowledgements are also generated, will only contain the results of the X12 and HIPAA syntax validation edits for the transaction.
999 Acknowledgements
In accordance with the 5010 transaction TR3s, TIBCO BusinessConnect EDI Protocol HIPAA Edition powered by Instream can be configured to generate version 005010X231A1 999s for all HIPAA 5010 transactions.
Use the HIPAA Acknowledgement tab to enable the option for generating version 005010X231A1 999s. This setting overrides any other 997 or 999 acknowledgement generation settings for 00501 interchanges which contain HIPAA 5010 transactions.
See Table 2 for details.
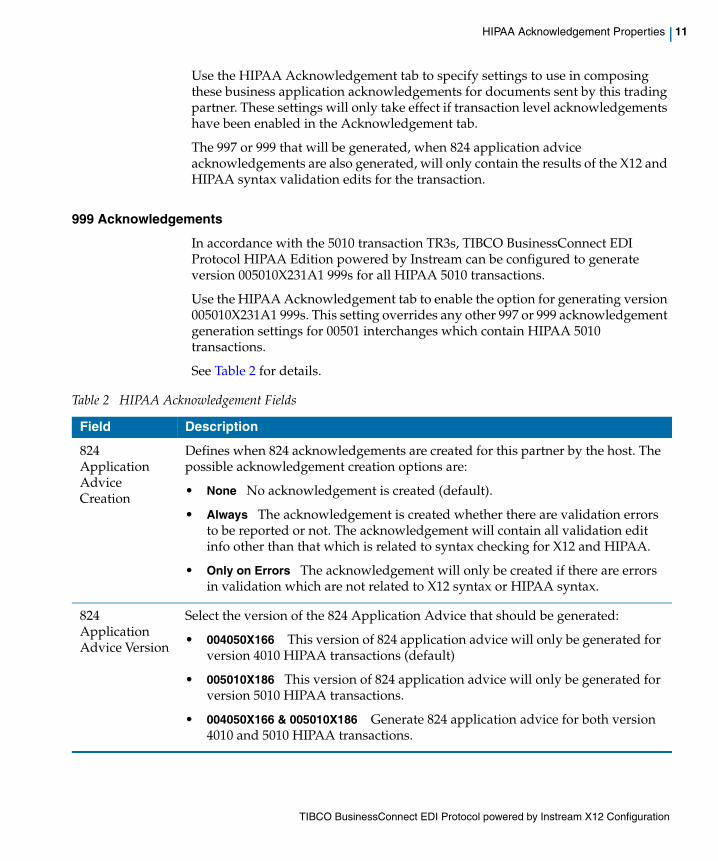
Table 2 HIPAA Acknowledgement Fields
Field Description
824 Application Advice Creation
Defines when 824 acknowledgements are created for this partner by the host. The possible acknowledgement creation options are:
• None No acknowledgement is created (default).
• Always The acknowledgement is created whether there are validation errors to be reported or not. The acknowledgement will contain all validation edit info other than that which is related to syntax checking for X12 and HIPAA.
• Only on Errors The acknowledgement will only be created if there are errors in validation which are not related to X12 syntax or HIPAA syntax.
824 Application Advice Version
Select the version of the 824 Application Advice that should be generated:
• 004050X166 This version of 824 application advice will only be generated for version 4010 HIPAA transactions (default)
• 005010X186 This version of 824 application advice will only be generated for version 5010 HIPAA transactions.
• 004050X166 & 005010X186 Generate 824 application advice for both version 4010 and 5010 HIPAA transactions.
TIBCO BusinessConnect EDI Protocol powered by Instream X12 Configuration
12 | Chapter 1 X12 Overview
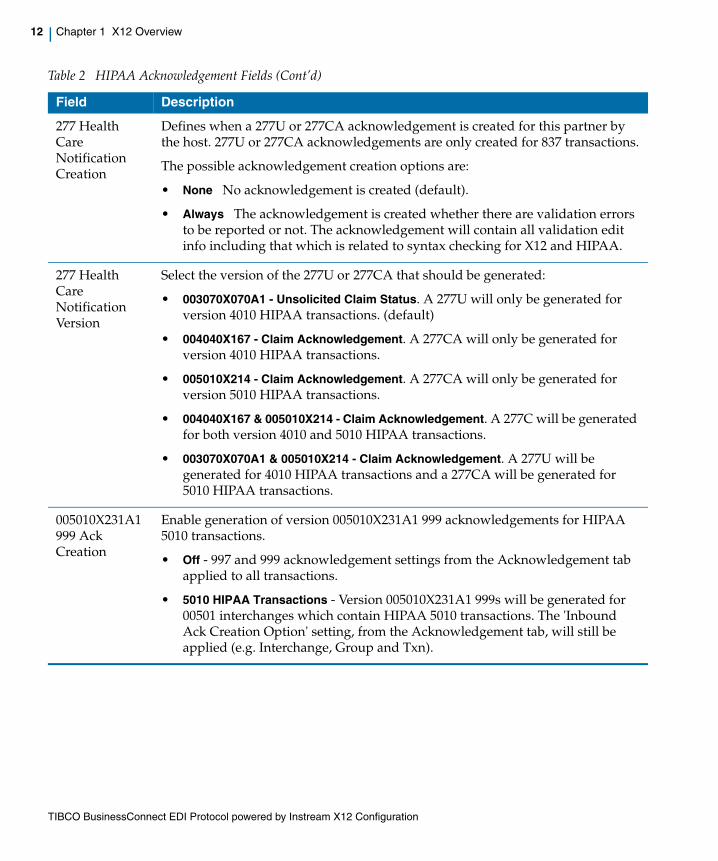
277 Health Care Notification Creation
Defines when a 277U or 277CA acknowledgement is created for this partner by the host. 277U or 277CA acknowledgements are only created for 837 transactions.
The possible acknowledgement creation options are:
• None No acknowledgement is created (default).
• Always The acknowledgement is created whether there are validation errors to be reported or not. The acknowledgement will contain all validation edit info including that which is related to syntax checking for X12 and HIPAA.
277 Health Care Notification Version
Select the version of the 277U or 277CA that should be generated:
• 003070X070A1 - Unsolicited Claim Status. A 277U will only be generated for version 4010 HIPAA transactions. (default)
• 004040X167 - Claim Acknowledgement. A 277CA will only be generated for version 4010 HIPAA transactions.
• 005010X214 - Claim Acknowledgement. A 277CA will only be generated for version 5010 HIPAA transactions.
• 004040X167 & 005010X214 - Claim Acknowledgement. A 277C will be generated for both version 4010 and 5010 HIPAA transactions.
• 003070X070A1 & 005010X214 - Claim Acknowledgement. A 277U will be generated for 4010 HIPAA transactions and a 277CA will be generated for 5010 HIPAA transactions.
005010X231A1 999 Ack Creation
Enable generation of version 005010X231A1 999 acknowledgements for HIPAA 5010 transactions.
• Off - 997 and 999 acknowledgement settings from the Acknowledgement tab applied to all transactions.
• 5010 HIPAA Transactions - Version 005010X231A1 999s will be generated for 00501 interchanges which contain HIPAA 5010 transactions. The 'Inbound Ack Creation Option' setting, from the Acknowledgement tab, will still be applied (e.g. Interchange, Group and Txn).
Table 2 HIPAA Acknowledgement Fields (Cont’d)
Field Description
TIBCO BusinessConnect EDI Protocol powered by Instream X12 Configuration
| 13
Chapter 2 Tutorials — Getting Started
This chapter gives an overview of how to use TIBCO ActiveMatrix BusinessWorks with TIBCO BusinessConnect EDI Protocol powered by Instream.
You will configure trading partner information, configure a private process to communicate with TIBCO BusinessConnect EDI Protocol powered by Instream, and run the tutorials.
Topics
• Prerequisites, page 14
• Using EDI Guidelines, page 15
• Configuring the Initiator, page 19
• Configuring Private Processes, page 24
• Send 850 Txn To BC, page 29
• Receive 850 TEXT Process, page 37
TIBCO BusinessConnect EDI Protocol powered by Instream X12 Configuration
14 | Chapter 2 Tutorials — Getting Started
Prerequisites
Before starting the tutorial, perform the following steps:
1. Install the following software packages:
a. TIBCO BusinessConnect (Server)
b. TIBCO BusinessConnect™ Palette or TIBCO ActiveMatrix BusinessWorks™ Plug-in for BusinessConnect
c. TIBCO Foresight™ Instream® Standard Edition
d. TIBCO Foresight™ Translator
e. TIBCO BusinessConnect EDI Protocol powered by Instream®
2. If you are unfamiliar with the X12 standard, read Chapter 1, X12 Overview, on page 1.
3. See TIBCO BusinessConnect Interior Server Administration and TIBCO BusinessConnect Trading Partner Administration for complete information on setting up and running TIBCO BusinessConnect.
4. Review Setting Up Trading Partners in TIBCO BusinessConnect EDI Protocol powered by Instream, User’s Guide.
5. Activate TIBCO BusinessConnect EDI Protocol powered by Instream.
TIBCO BusinessConnect EDI Protocol powered by Instream X12 Configuration
Using EDI Guidelines | 15
Using EDI Guidelines
The guidelines used for this tutorial can be found in the directory BC_HOME\protocols\tibedi\samples\sampleDocs\guidelines. The guideline file names are: X12_4030_850.std, X12_5010_850.sef, X12_5010_997.sef, X12_5010_999.sef, and X12_TA1.sef
View a GuidelineThis section explains how to view the guideline used in the tutorial.
To import a guideline:
1. Select EDISIM> Standards Editor.
2. Select File > Import > Import Single.SEF and Open...
3. Go to BC_HOME\protocols\tibedi\samples\sampleDocs\guidelines and select the file X12_5010_850.sef.
4. Click Open.
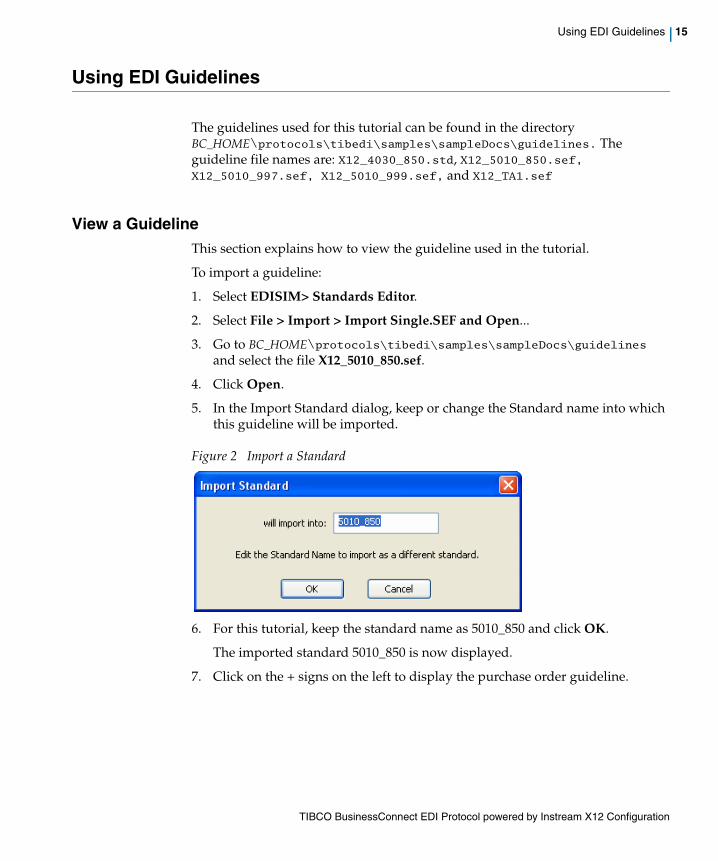
5. In the Import Standard dialog, keep or change the Standard name into which this guideline will be imported.
Figure 2 Import a Standard
6. For this tutorial, keep the standard name as 5010_850 and click OK.
The imported standard 5010_850 is now displayed.
7. Click on the + signs on the left to display the purchase order guideline.

TIBCO BusinessConnect EDI Protocol powered by Instream X12 Configuration
16 | Chapter 2 Tutorials — Getting Started
Figure 3 Elements of the Purchase Order
8. As you expand and highlight elements in the Guideline panel, the properties of each element display in the Details View panel.
Figure 4 The Details View Panel
TIBCO BusinessConnect EDI Protocol powered by Instream X12 Configuration
Using EDI Guidelines | 17
Load Guidelines to the X12 ProtocolThis section describes how to load the guidelines and XSDs for the X12 messages. TIBCO BusinessConnect EDI Protocol powered by Instream contains a sample configuration file for this tutorial.
Import the configuration file into the Operations Editor as follows:
1. Using TIBCO Administrator, select BusinessConnect > Operations Editor.
2. Click the Import button.
3. Click change next to Upload Configuration Data File.
4. Click Browse.
5. Select
— For the first tutorial: BC_HOME\protocols\tibedi\samples\interfaces\X12-00403.csx.
— For the second tutorial: BC_HOME\protocols\tibedi\samples\interfaces\ X12-850_PO_Positional.csx
6. Click Open.
7. Click OK.
8. Supply your password (optional) and click Import.
TIBCO BusinessConnect EDI Protocol powered by Instream X12 Configuration
18 | Chapter 2 Tutorials — Getting Started
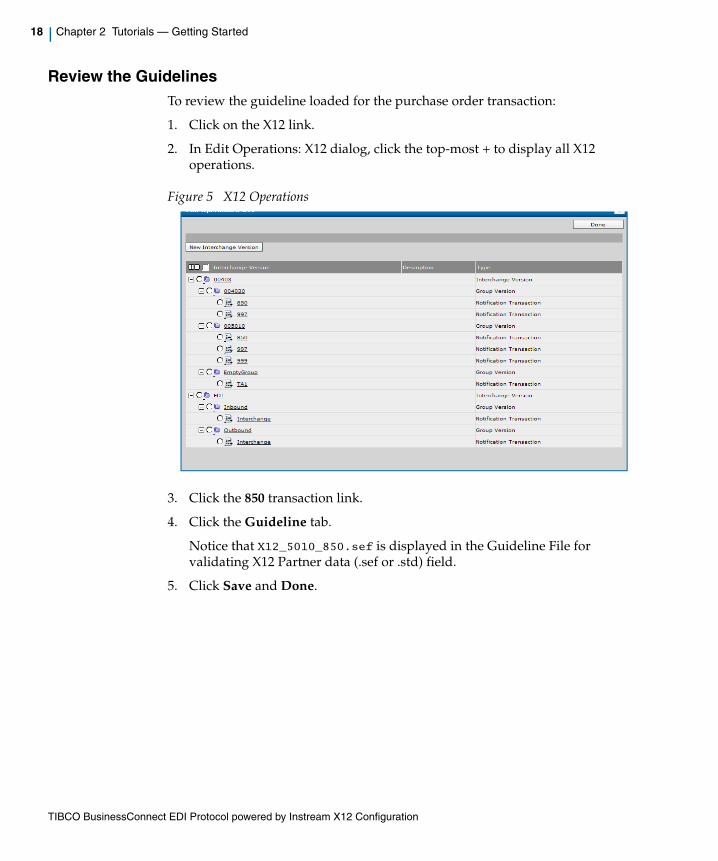
Review the GuidelinesTo review the guideline loaded for the purchase order transaction:
1. Click on the X12 link.
2. In Edit Operations: X12 dialog, click the top-most + to display all X12 operations.
Figure 5 X12 Operations
3. Click the 850 transaction link.
4. Click the Guideline tab.
Notice that X12_5010_850.sef is displayed in the Guideline File for validating X12 Partner data (.sef or .std) field.
5. Click Save and Done.
TIBCO BusinessConnect EDI Protocol powered by Instream X12 Configuration
Configuring the Initiator | 19
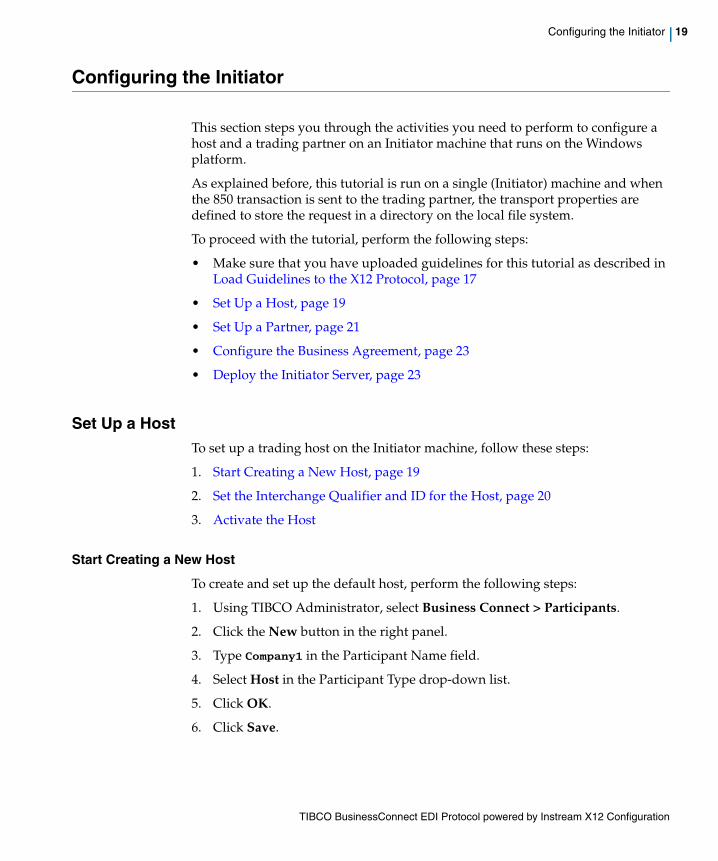
Configuring the Initiator
This section steps you through the activities you need to perform to configure a host and a trading partner on an Initiator machine that runs on the Windows platform.
As explained before, this tutorial is run on a single (Initiator) machine and when the 850 transaction is sent to the trading partner, the transport properties are defined to store the request in a directory on the local file system.
To proceed with the tutorial, perform the following steps:
• Make sure that you have uploaded guidelines for this tutorial as described in Load Guidelines to the X12 Protocol, page 17
• Set Up a Host, page 19
• Set Up a Partner, page 21
• Configure the Business Agreement, page 23
• Deploy the Initiator Server, page 23
Set Up a HostTo set up a trading host on the Initiator machine, follow these steps:
1. Start Creating a New Host, page 19
2. Set the Interchange Qualifier and ID for the Host, page 20
3. Activate the Host
Start Creating a New Host
To create and set up the default host, perform the following steps:
1. Using TIBCO Administrator, select Business Connect > Participants.
2. Click the New button in the right panel.
3. Type Company1 in the Participant Name field.
4. Select Host in the Participant Type drop-down list.
5. Click OK.
6. Click Save.
TIBCO BusinessConnect EDI Protocol powered by Instream X12 Configuration
20 | Chapter 2 Tutorials — Getting Started
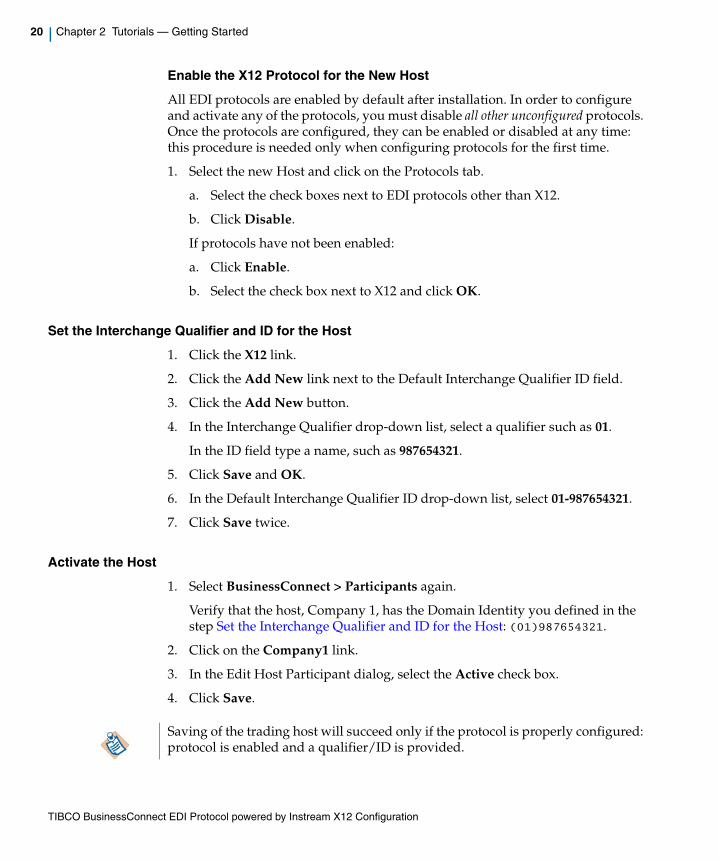
Enable the X12 Protocol for the New Host
All EDI protocols are enabled by default after installation. In order to configure and activate any of the protocols, you must disable all other unconfigured protocols. Once the protocols are configured, they can be enabled or disabled at any time: this procedure is needed only when configuring protocols for the first time.
1. Select the new Host and click on the Protocols tab.
a. Select the check boxes next to EDI protocols other than X12.
b. Click Disable.
If protocols have not been enabled:
a. Click Enable.
b. Select the check box next to X12 and click OK.
Set the Interchange Qualifier and ID for the Host
1. Click the X12 link.
2. Click the Add New link next to the Default Interchange Qualifier ID field.
3. Click the Add New button.
4. In the Interchange Qualifier drop-down list, select a qualifier such as 01.
In the ID field type a name, such as 987654321.
5. Click Save and OK.
6. In the Default Interchange Qualifier ID drop-down list, select 01-987654321.
7. Click Save twice.
Activate the Host
1. Select BusinessConnect > Participants again.
Verify that the host, Company 1, has the Domain Identity you defined in the step Set the Interchange Qualifier and ID for the Host: (01)987654321.
2. Click on the Company1 link.
3. In the Edit Host Participant dialog, select the Active check box.
4. Click Save.
Saving of the trading host will succeed only if the protocol is properly configured: protocol is enabled and a qualifier/ID is provided.
TIBCO BusinessConnect EDI Protocol powered by Instream X12 Configuration
Configuring the Initiator | 21
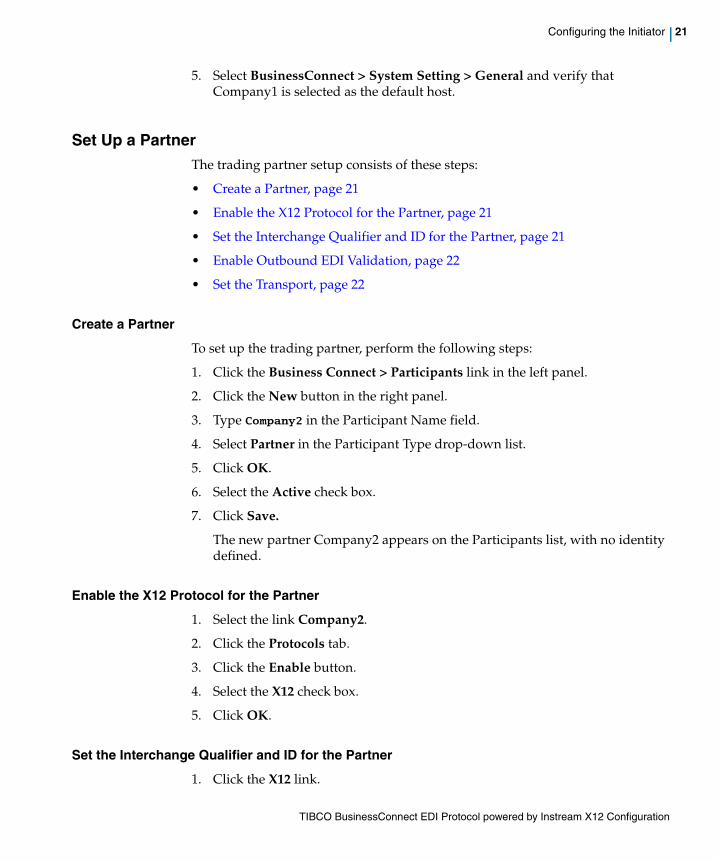
5. Select BusinessConnect > System Setting > General and verify that Company1 is selected as the default host.
Set Up a PartnerThe trading partner setup consists of these steps:
• Create a Partner, page 21
• Enable the X12 Protocol for the Partner, page 21
• Set the Interchange Qualifier and ID for the Partner, page 21
• Enable Outbound EDI Validation, page 22
• Set the Transport, page 22
Create a Partner
To set up the trading partner, perform the following steps:
1. Click the Business Connect > Participants link in the left panel.
2. Click the New button in the right panel.
3. Type Company2 in the Participant Name field.
4. Select Partner in the Participant Type drop-down list.
5. Click OK.
6. Select the Active check box.
7. Click Save.
The new partner Company2 appears on the Participants list, with no identity defined.
Enable the X12 Protocol for the Partner
1. Select the link Company2.
2. Click the Protocols tab.
3. Click the Enable button.
4. Select the X12 check box.
5. Click OK.
Set the Interchange Qualifier and ID for the Partner
1. Click the X12 link.
TIBCO BusinessConnect EDI Protocol powered by Instream X12 Configuration
22 | Chapter 2 Tutorials — Getting Started
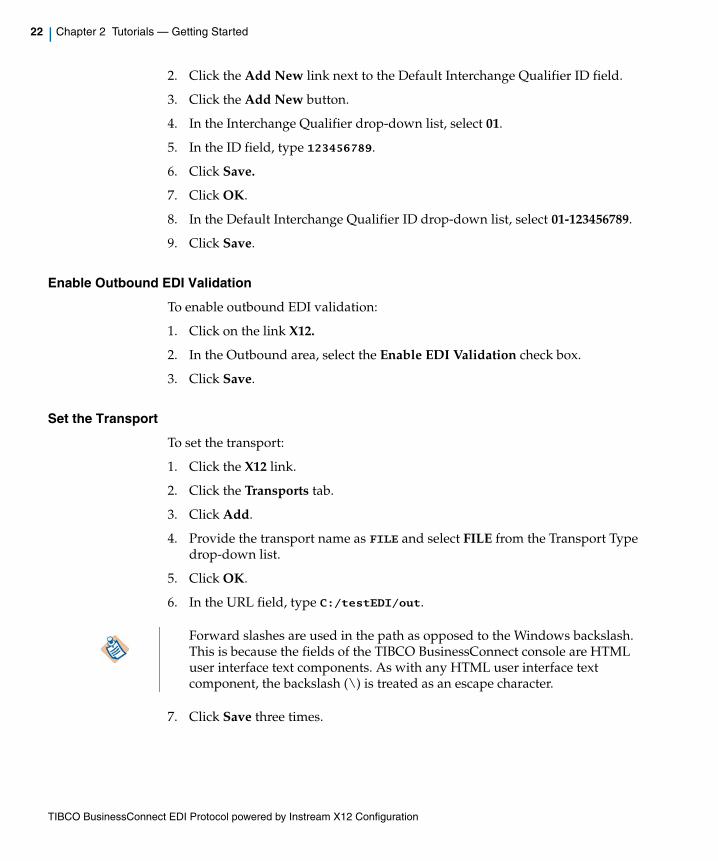
2. Click the Add New link next to the Default Interchange Qualifier ID field.
3. Click the Add New button.
4. In the Interchange Qualifier drop-down list, select 01.
5. In the ID field, type 123456789.
6. Click Save.
7. Click OK.
8. In the Default Interchange Qualifier ID drop-down list, select 01-123456789.
9. Click Save.
Enable Outbound EDI Validation
To enable outbound EDI validation:
1. Click on the link X12.
2. In the Outbound area, select the Enable EDI Validation check box.
3. Click Save.
Set the Transport
To set the transport:
1. Click the X12 link.
2. Click the Transports tab.
3. Click Add.
4. Provide the transport name as FILE and select FILE from the Transport Type drop-down list.
5. Click OK.
6. In the URL field, type C:/testEDI/out.
7. Click Save three times.
Forward slashes are used in the path as opposed to the Windows backslash. This is because the fields of the TIBCO BusinessConnect console are HTML user interface text components. As with any HTML user interface text component, the backslash (\) is treated as an escape character.
TIBCO BusinessConnect EDI Protocol powered by Instream X12 Configuration
Configuring the Initiator | 23
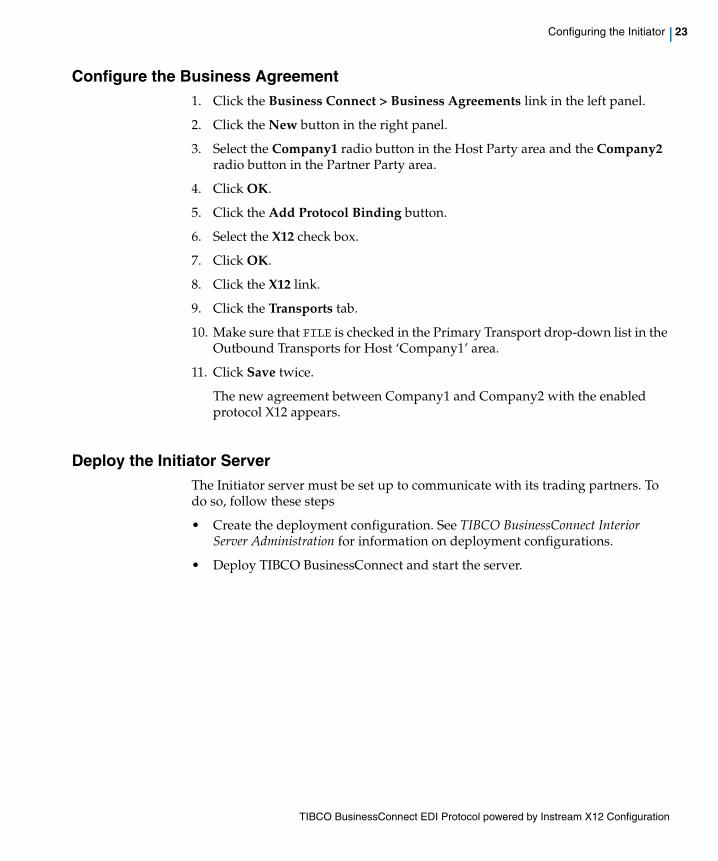
Configure the Business Agreement1. Click the Business Connect > Business Agreements link in the left panel.
2. Click the New button in the right panel.
3. Select the Company1 radio button in the Host Party area and the Company2 radio button in the Partner Party area.
4. Click OK.
5. Click the Add Protocol Binding button.
6. Select the X12 check box.
7. Click OK.
8. Click the X12 link.
9. Click the Transports tab.
10. Make sure that FILE is checked in the Primary Transport drop-down list in the Outbound Transports for Host ‘Company1’ area.
11. Click Save twice.
The new agreement between Company1 and Company2 with the enabled protocol X12 appears.
Deploy the Initiator ServerThe Initiator server must be set up to communicate with its trading partners. To do so, follow these steps
• Create the deployment configuration. See TIBCO BusinessConnect Interior Server Administration for information on deployment configurations.
• Deploy TIBCO BusinessConnect and start the server.
TIBCO BusinessConnect EDI Protocol powered by Instream X12 Configuration
24 | Chapter 2 Tutorials — Getting Started
Configuring Private Processes
TIBCO BusinessConnect EDI Protocol powered by Instream contains a sample TIBCO ActiveMatrix BusinessWorks project that sends an X12 850 transaction to TIBCO BusinessConnect.
This section describes how to configure private processes in the following ways:
• Configuring Private Processes in TIBCO Designer, page 24
• Configuring Private Processes in TIBCO Business Studio, page 26
Configuring Private Processes in TIBCO DesignerTo configure private processes in TIBCO Designer:
1. Opening the TIBCO ActiveMatrix BusinessWorks Project, page 24
2. Configuring Connections to BusinessConnect, page 25
Opening the TIBCO ActiveMatrix BusinessWorks Project
To open the sample project:
1. Start TIBCO Designer and select New empty project.
2. In the Save Project dialog, click Cancel.
3. Select Project > Import Full Project.
4. Click the ZIP Archive tab.
5. Navigate to BC_HOME\protocols\tibedi\samples\bw\X12_850\X12_850.zip.
6. Select X12_850.zip and click Open.
7. Click OK.
The Import - Options dialog appears.
8. In the Options tab, select the Try rename in case of name conflict radio button.
9. Click Apply.
10. Select Project > Save As.
11. In the Project Directory file chooser, navigate to BC_HOME\protocols\tibedi\samples\bw\X12_850.
12. Click OK.

TIBCO BusinessConnect EDI Protocol powered by Instream X12 Configuration
Configuring Private Processes | 25
13. When a dialog appears asking to use the directory as a project directory, click Yes. The zip archive file is deleted.
14. The window shown in Figure 6 is displayed.
Figure 6 TIBCO ActiveMatrix BusinessWorks Project
15. Click the Global Variables tab.
16. Set BCHome to your TIBCO BusinessConnect installation directory and make sure that the TPName variable is defined as “Company2”.
17. If you made any changes, save the project but do not exit TIBCO Designer.
Configuring Connections to BusinessConnect
To configure connections to BusinessConnect, perform the following steps:
1. Click the Project tab.
2. In the BCServerConnection folder, double-click BCServerConfig.
TIBCO BusinessConnect EDI Protocol powered by Instream X12 Configuration
26 | Chapter 2 Tutorials — Getting Started
3. Select the BusinessConnect Server Access tab.
a. Select the JDBC driver you use to communicate with the BusinessConnect configuration store from the JDBC Driver drop-down list.
b. Type the URL for the configuration store in the JDBC URL field.
c. Type the configuration store user name and password in the DB User and Password fields.
d. Click the Apply button.
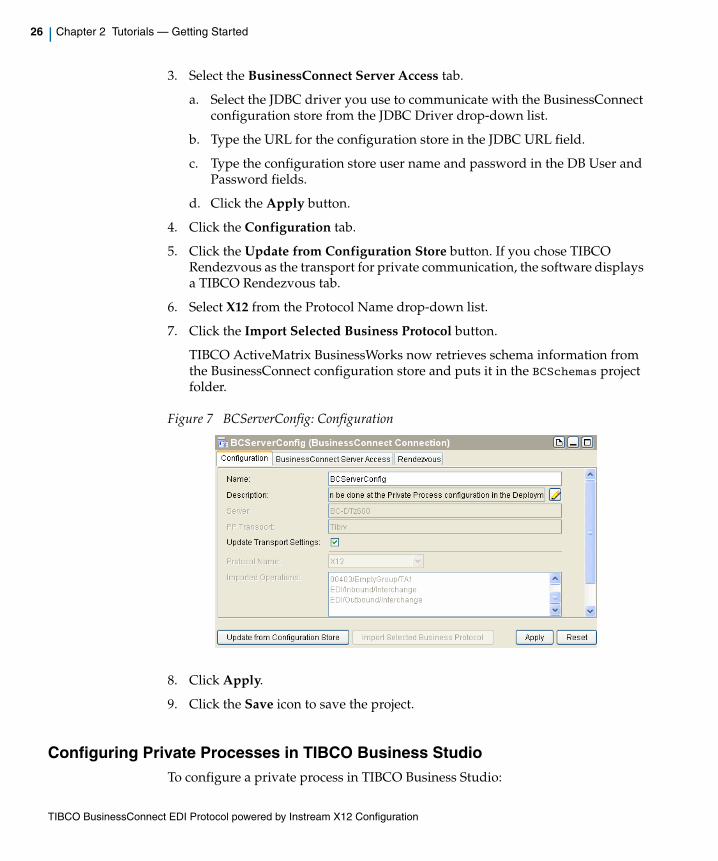
4. Click the Configuration tab.
5. Click the Update from Configuration Store button. If you chose TIBCO Rendezvous as the transport for private communication, the software displays a TIBCO Rendezvous tab.
6. Select X12 from the Protocol Name drop-down list.
7. Click the Import Selected Business Protocol button.
TIBCO ActiveMatrix BusinessWorks now retrieves schema information from the BusinessConnect configuration store and puts it in the BCSchemas project folder.
Figure 7 BCServerConfig: Configuration
8. Click Apply.
9. Click the Save icon to save the project.
Configuring Private Processes in TIBCO Business StudioTo configure a private process in TIBCO Business Studio:
TIBCO BusinessConnect EDI Protocol powered by Instream X12 Configuration
Configuring Private Processes | 27
1. Opening the TIBCO ActiveMatrix BusinessWorks Project, page 27
2. Configuring Connections to TIBCO BusinessConnect, page 27
Opening the TIBCO ActiveMatrix BusinessWorks Project
To open the TIBCO ActiveMatrix BusinessWorks project in TIBCO Business Studio:
1. Start TIBCO Business Studio.
2. Click File > Import.
3. On the Import page, expand the General folder and select Existing Studio Projects into Workspace. Click Next.
4. Click Browse next to the Select archive file field to navigate to the BC_HOME/protocols/tibedi/samples/bw/X12_850 directory, and select the X12_850_for_bw6.zip file. Click Open.
5. Click Finish.
After importing the sample, you also need to perform the following steps:
1. Expand X12_850 > Module Descriptors in the Project Explorer view.
2. Double-click Module Properties.
3. Change the default values of the BCHome, and TPName properties according to your environment.
Configuring Connections to TIBCO BusinessConnect
To configure connections to TIBCO BusinessConnect:
1. In the Project Explorer view, expand Resources and double-click BCConnection.bcResource.
2. Click the Server Access tab.
3. Enter information as explained in step 3.
4. Click the Configuration tab, and click Update from Configuration Store.
5. Select X12 from the Protocol Name list.
If you select the Select Operations check box, you can select any of the configured/imported operations. For this tutorial, select all operations and click OK.
6. Click Import Selected Business Protocol.

TIBCO BusinessConnect EDI Protocol powered by Instream X12 Configuration
28 | Chapter 2 Tutorials — Getting Started
When you import the protocol, TIBCO ActiveMatrix BusinessWorks retrieves information from the TIBCO BusinessConnect configuration store and puts them in the project folder.
7. Click Save.
TIBCO BusinessConnect EDI Protocol powered by Instream X12 Configuration
Send 850 Txn To BC | 29
Send 850 Txn To BC
In this tutorial you will use TIBCO ActiveMatrix BusinessWorks and TIBCO BusinessConnect EDI Protocol powered by Instream running on one machine to send an X12 850 purchase order transaction to a trading partner.
Normally the trading partner is represented by another B2B engine running on another machine. However, this tutorial is run on a single machine and when the 850 transaction is sent to the trading partner, the transport properties are defined to store the request in a directory on the local file system.
The transaction set identifier information is as follows:
• Transaction set - 850
• Group version - 005010
• Interchange version - 00403
When you run the tutorial, the following steps occur:
1. TIBCO Designer/TIBCO Business Studio reads an XML file which contains the data for an 850 transaction.
TIBCO Designer/TIBCO Business Studio parses the XML and sends the XML data to TIBCO BusinessConnect EDI Protocol powered by Instream.
TIBCO BusinessConnect EDI Protocol powered by Instream converts the XML to X12 data.
2. TIBCO BusinessConnect EDI Protocol powered by Instream validates the X12 data against an 850 guideline.
3. The validated X12 data is bundled into an interchange for sending to the trading partner.
4. FILE transport is used to simulate sending the interchange to the trading partner. By using FILE transport, the X12 interchange is written to a file on the local file system when it is sent to the trading partner.
The following sections describe how to set up and run the tutorial:
• EDI Guideline Authoring
• Trading Partner Setup
• TIBCO ActiveMatrix BusinessWorks Process Assembly
TIBCO BusinessConnect EDI Protocol powered by Instream X12 Configuration
30 | Chapter 2 Tutorials — Getting Started
Processes Overview
The X12_850 project contains several processes in two folders: X12 Message Processes and Error Advisory Processes.
The X12 Message Processes folder contains the following processes:
• Send 850 Txn to BC Reads a file containing the XML equivalent of an 850 transaction and sends the XML data to TIBCO BusinessConnect.
• Receive 997 Acknowledgement If we were actually communicating with a trading partner in this tutorial, when the trading partner received our interchange containing the 850 transaction, it would return a 997 acknowledgment.
• Receive TA1 Acknowledgment If we were actually communicating with a trading partner in this tutorial, when the trading partner received our interchange containing the 850 transaction, it would return a TA1 to acknowledge receipt of the interchange.
• Receive Txn Ack Advisory If we were actually communicating with a trading partner in this tutorial, when the Initiator receives the TA1 and 997 without any errors, it would send an acknowledgement to the private process to indicate the successful completion of the transaction.
The Error Advisory Processes folder contains processes which would be activated if TIBCO BusinessConnect were to send any advisory messages during the processing of the 850 transaction.
The Error Advisory Processes folder contains the following processes:
• Ack Timeout Error Advisory Received Activated when TIBCO BusinessConnect sends a timeout advisory due to not receiving a 997 acknowledgement for the original 850 transaction within the default timeout period of 1440 minutes (24 hours).
• General Error Advisory Received Activated when TIBCO BusinessConnect sends a general error advisory. There are several conditions which could cause this advisory to be sent. For example, it would be sent when an invalid message was sent from TIBCO ActiveMatrix BusinessWorks to TIBCO BusinessConnect.
Process names are different in TIBCO Designer and TIBCO Business Studio. For example, the Send 850 Txn to BC process in TIBCO Designer equals the Send_850_Txn_to_BC process in TIBCO Business Studio. The following description takes processes in TIBCO Designer as an example.

TIBCO BusinessConnect EDI Protocol powered by Instream X12 Configuration
Send 850 Txn To BC | 31
For more information on when TIBCO BusinessConnect would send a general error advisory, refer to the TIBCO BusinessConnect EDI Protocol powered by Instream, User’s Guide.
• Validation Error Advisory Received Activated when TIBCO BusinessConnect sends an advisory indicating that there was a validation error on the original 850 Transaction.
TIBCO BusinessConnect EDI Protocol powered by Instream X12 Configuration
32 | Chapter 2 Tutorials — Getting Started
Running the TutorialTo run the tutorial, follow these steps:
1. Send the transaction from TIBCO Designer.
See Send the 850 Transaction.
2. Check the results of sending the message.
See Expected Results on page 33 and View the Audit Log on page 34.
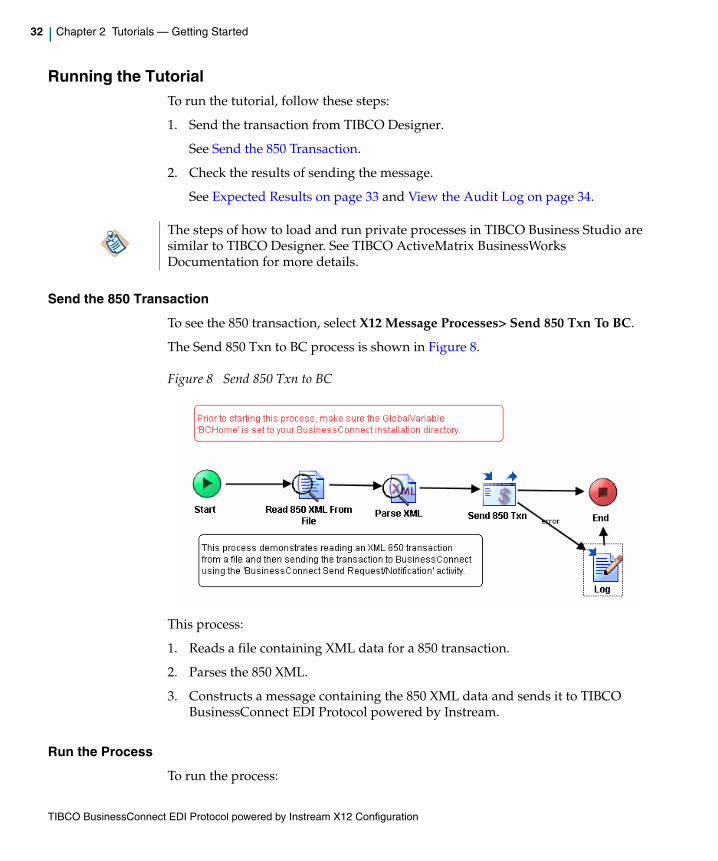
Send the 850 Transaction
To see the 850 transaction, select X12 Message Processes> Send 850 Txn To BC.
The Send 850 Txn to BC process is shown in Figure 8.
Figure 8 Send 850 Txn to BC
This process:
1. Reads a file containing XML data for a 850 transaction.
2. Parses the 850 XML.
3. Constructs a message containing the 850 XML data and sends it to TIBCO BusinessConnect EDI Protocol powered by Instream.
Run the Process
To run the process:
The steps of how to load and run private processes in TIBCO Business Studio are similar to TIBCO Designer. See TIBCO ActiveMatrix BusinessWorks Documentation for more details.
TIBCO BusinessConnect EDI Protocol powered by Instream X12 Configuration
Send 850 Txn To BC | 33
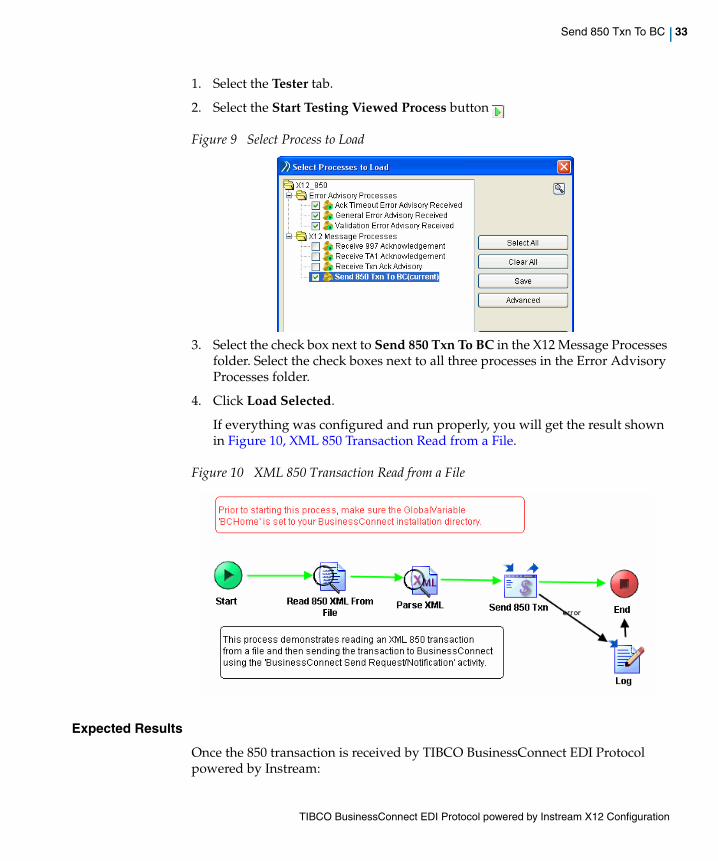
1. Select the Tester tab.
2. Select the Start Testing Viewed Process button
Figure 9 Select Process to Load
3. Select the check box next to Send 850 Txn To BC in the X12 Message Processes folder. Select the check boxes next to all three processes in the Error Advisory Processes folder.
4. Click Load Selected.
If everything was configured and run properly, you will get the result shown in Figure 10, XML 850 Transaction Read from a File.
Figure 10 XML 850 Transaction Read from a File
Expected Results
Once the 850 transaction is received by TIBCO BusinessConnect EDI Protocol powered by Instream:
TIBCO BusinessConnect EDI Protocol powered by Instream X12 Configuration
34 | Chapter 2 Tutorials — Getting Started
1. TIBCO BusinessConnect EDI Protocol powered by Instream converts XML to X12 data.
2. TIBCO BusinessConnect EDI Protocol powered by Instream validates the X12 data against an 850 guideline.
3. The validated X12 data is bundled into an interchange for sending to the trading partner.
4. The X12 interchange is written to a file on the local file system when it simulates sending the interchange to the trading partner.
What you can observe:
• The Send 850 Txn activity of the Send 850 Txn To BC.process should contain output that indicates the 850 transaction was successfully sent to the trading partner.
• The directory c:\testEDI\out should contain a file which contains the X12 850 transaction that was sent to the trading partner by TIBCO BusinessConnect EDI Protocol powered by Instream
• The audit log should contain entries that for each processing state that occurred in TIBCO BusinessConnect. See View the Audit Log on page 34.
• After 24 hours, TIBCO BusinessConnect EDI Protocol powered by Instream will send an ack timeout error advisory to TIBCO ActiveMatrix BusinessWorks. For this tutorial, it is not necessary to wait for this advisory message to arrive.
View the Audit Log
To view the audit log on the Initiator machine, perform the following steps:
1. Using TIBCO Administrator, click the BusinessConnect > Log Viewer link in the left panel.
2. Click the X12 link in the right panel.
3. Select items from the following lists: Status, Connection, and Date Range.
4. Click Search.
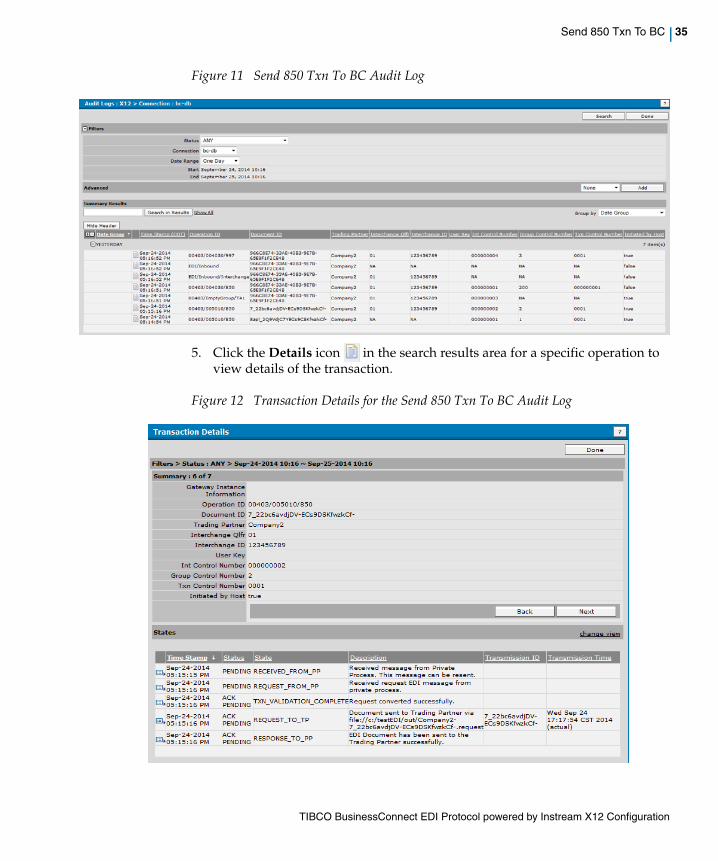
TIBCO BusinessConnect EDI Protocol powered by Instream X12 Configuration
Send 850 Txn To BC | 35
Figure 11 Send 850 Txn To BC Audit Log
5. Click the Details icon in the search results area for a specific operation to view details of the transaction.
Figure 12 Transaction Details for the Send 850 Txn To BC Audit Log
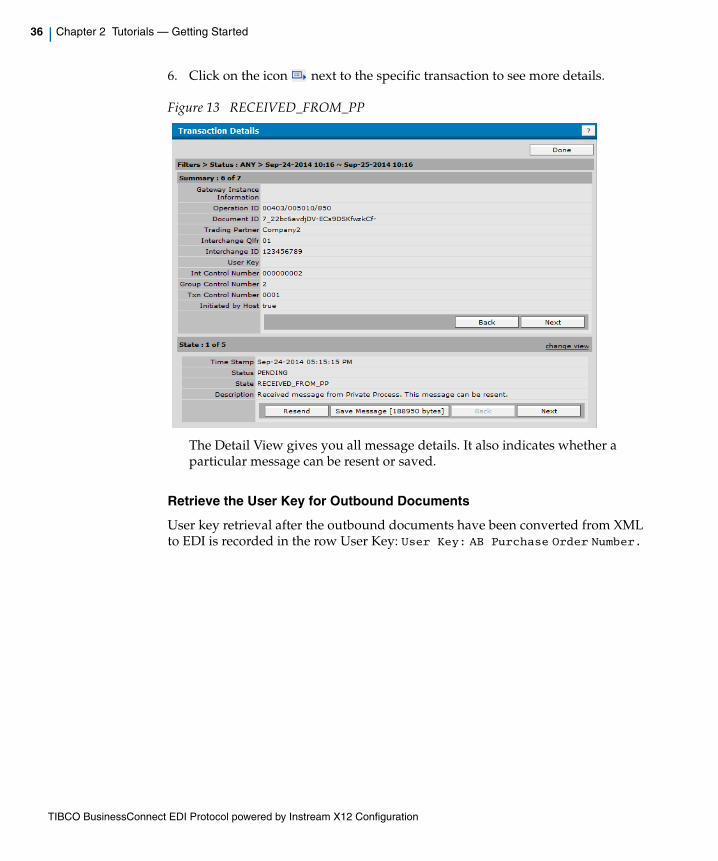
TIBCO BusinessConnect EDI Protocol powered by Instream X12 Configuration
36 | Chapter 2 Tutorials — Getting Started
6. Click on the icon next to the specific transaction to see more details.
Figure 13 RECEIVED_FROM_PP
The Detail View gives you all message details. It also indicates whether a particular message can be resent or saved.
Retrieve the User Key for Outbound Documents
User key retrieval after the outbound documents have been converted from XML to EDI is recorded in the row User Key: User Key: AB Purchase Order Number.
TIBCO BusinessConnect EDI Protocol powered by Instream X12 Configuration
Receive 850 TEXT Process | 37
Receive 850 TEXT Process
In this tutorial you will work with the other process located in the folder X12 Message Processes called Receive 850 TEXT Process.
This process receives a flat TEXT document for TIBCO BusinessConnect EDI Protocol powered by Instream based on the translation map that converts an X12 850 purchase order document into a TEXT document. You must make sure that the option "Parse XML output" is disabled during the EDI to TEXT conversion received by TIBCO ActiveMatrix BusinessWorks.
Prerequisites
Enabling Inbound File Poller
For this tutorial the Inbound File Poller must be configured and enabled. For more details, see TIBCO BusinessConnect Trading Partner Administration, Chapter 14, File Transport, Inbound File Poller.
To enable and configure an inbound File poller on the TIBCO BusinessConnect server, perform these steps:
1. Using TIBCO Administrator, select BusinessConnect>System Settings> Inbound Public Transport Types.
2. Select the check box next to the File transport.
3. Click Enable.
The enabled protocol will now appear with a red checkmark in the Enabled column.
Setting Up the Monitor Directory
To set up this directory, see TIBCO BusinessConnect Gateway Server Administration, Chapter 4, Gateway Services, Poller Tab.
The directory to be monitored by the File Poller has to be set up. It must start with '/' or '\' or '//' or '[a-zA-Z]:' and must end with '/' or '\'
Example: C:\tibco\bc\version\monitorFiles
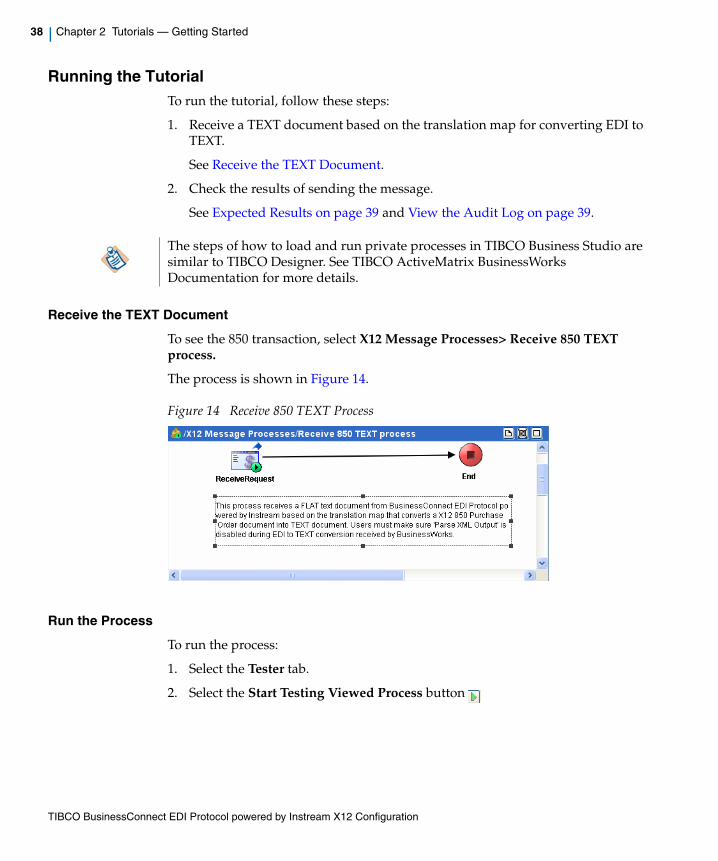
TIBCO BusinessConnect EDI Protocol powered by Instream X12 Configuration
38 | Chapter 2 Tutorials — Getting Started
Running the TutorialTo run the tutorial, follow these steps:
1. Receive a TEXT document based on the translation map for converting EDI to TEXT.
See Receive the TEXT Document.
2. Check the results of sending the message.
See Expected Results on page 39 and View the Audit Log on page 39.
Receive the TEXT Document
To see the 850 transaction, select X12 Message Processes> Receive 850 TEXT process.
The process is shown in Figure 14.
Figure 14 Receive 850 TEXT Process
Run the Process
To run the process:
1. Select the Tester tab.
2. Select the Start Testing Viewed Process button
The steps of how to load and run private processes in TIBCO Business Studio are similar to TIBCO Designer. See TIBCO ActiveMatrix BusinessWorks Documentation for more details.
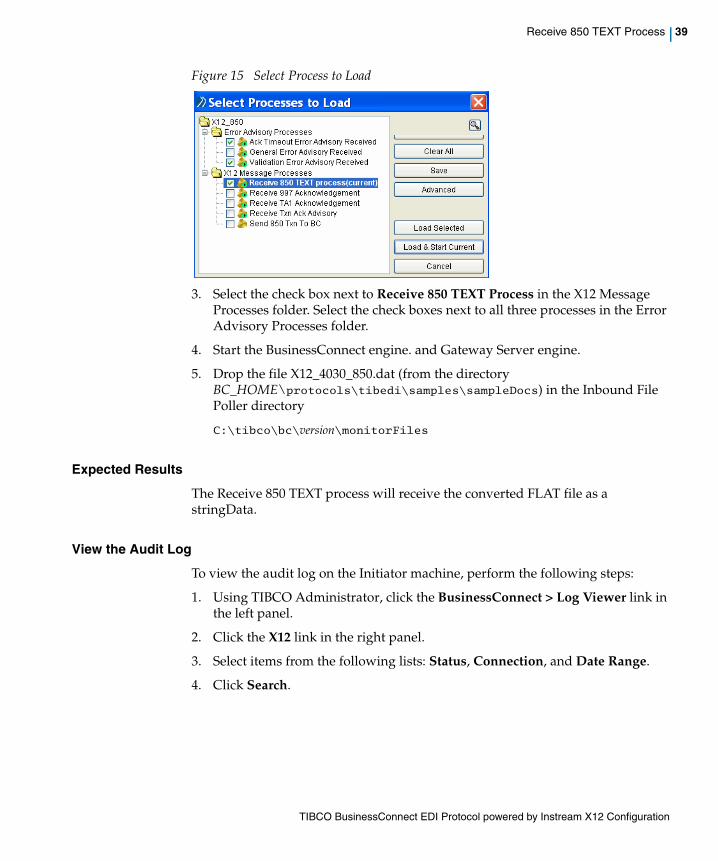
TIBCO BusinessConnect EDI Protocol powered by Instream X12 Configuration
Receive 850 TEXT Process | 39
Figure 15 Select Process to Load
3. Select the check box next to Receive 850 TEXT Process in the X12 Message Processes folder. Select the check boxes next to all three processes in the Error Advisory Processes folder.
4. Start the BusinessConnect engine. and Gateway Server engine.
5. Drop the file X12_4030_850.dat (from the directory BC_HOME\protocols\tibedi\samples\sampleDocs) in the Inbound File Poller directory
C:\tibco\bc\version\monitorFiles
Expected Results
The Receive 850 TEXT process will receive the converted FLAT file as a stringData.
View the Audit Log
To view the audit log on the Initiator machine, perform the following steps:
1. Using TIBCO Administrator, click the BusinessConnect > Log Viewer link in the left panel.
2. Click the X12 link in the right panel.
3. Select items from the following lists: Status, Connection, and Date Range.
4. Click Search.
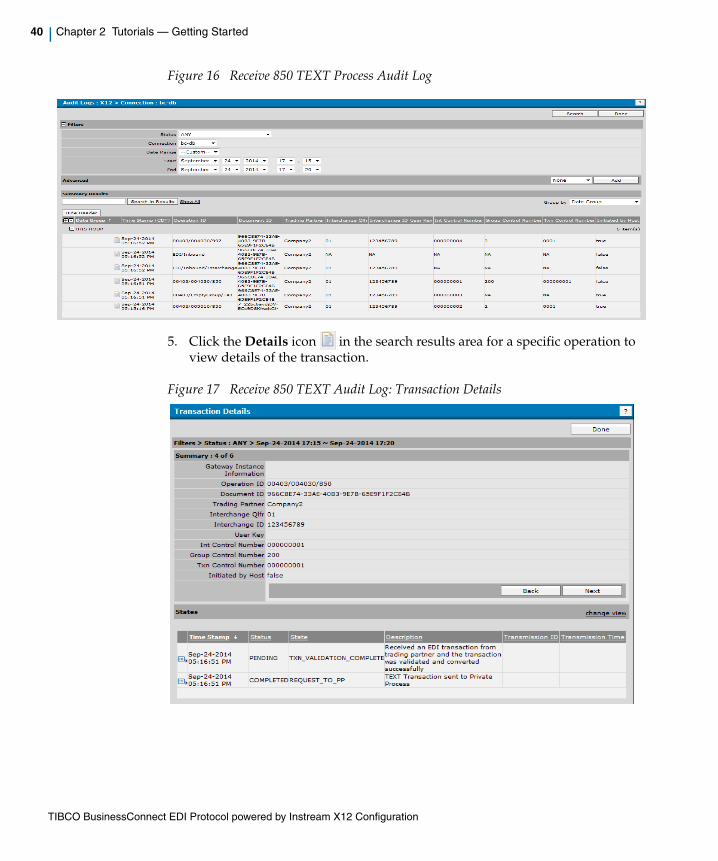
TIBCO BusinessConnect EDI Protocol powered by Instream X12 Configuration
40 | Chapter 2 Tutorials — Getting Started
Figure 16 Receive 850 TEXT Process Audit Log
5. Click the Details icon in the search results area for a specific operation to view details of the transaction.
Figure 17 Receive 850 TEXT Audit Log: Transaction Details

TIBCO BusinessConnect EDI Protocol powered by Instream X12 Configuration
| 41
Chapter 3 Managing X12 Interchanges, Functional Groups, and Transactions
This chapter describes how to manage X12 interchanges, functional groups, and transactions.
Topics
• Overview, page 42
• Adding an Interchange Version, page 43
• Adding a Group Version to an Interchange Version, page 44
• Adding a Transaction to a Group Version, page 45
• Notification Transaction, page 46
• Synchronous Request Response Transaction, page 52
• Configuring Acknowledgements, page 64
• Configuring Validation Profile (.apf) Files, page 68
• Importing an Interchange Version, page 75
• Exporting Interchanges, Groups, and Transactions, page 74
TIBCO BusinessConnect EDI Protocol powered by Instream X12 Configuration
42 | Chapter 3 Managing X12 Interchanges, Functional Groups, and Transactions
Overview
There are three basic structures in a X12 document. These structures are:
• Interchange
• Functional group
• Transaction
These structures are described in Chapter 1, X12 Overview, page 1.
You use the TIBCO BusinessConnect console to configure the guidelines. Once you have configured transactions in the Operations Editor, the transactions can be seen during the configuration of your trading partners. The transactions can be allowed or disallowed, or the guideline itself can be overridden for a particular trading partner, if necessary.
See Operation Bindings Tab on page 117 for more information.
T To properly mark the ISA, GS, and ST segments with a DSR mark, as required for proper acknowledgements generation, refer to the documentation provided with the EDISIM Standards Editor.
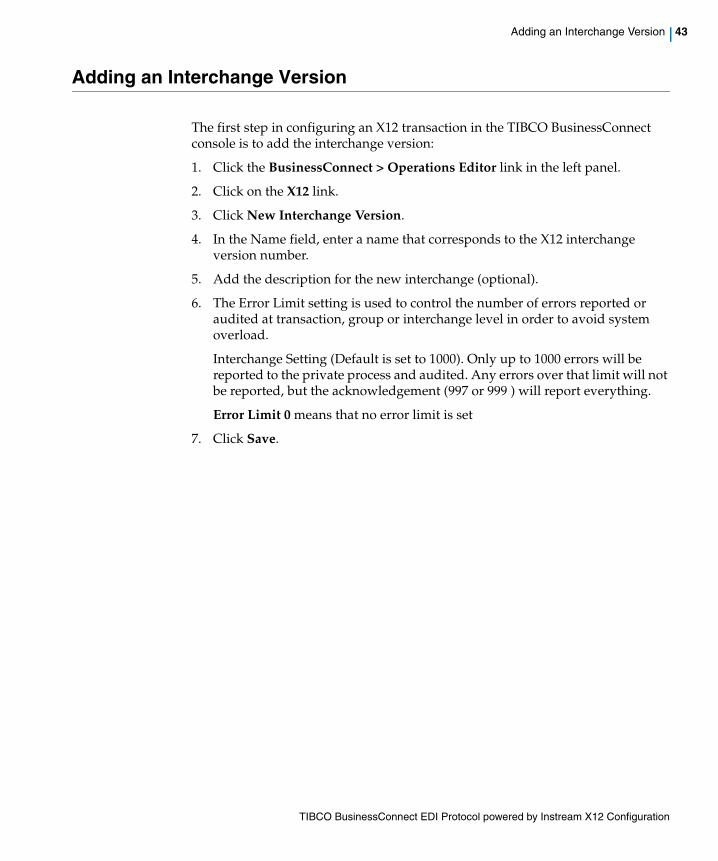
TIBCO BusinessConnect EDI Protocol powered by Instream X12 Configuration
Adding an Interchange Version | 43
Adding an Interchange Version
The first step in configuring an X12 transaction in the TIBCO BusinessConnect console is to add the interchange version:
1. Click the BusinessConnect > Operations Editor link in the left panel.
2. Click on the X12 link.
3. Click New Interchange Version.
4. In the Name field, enter a name that corresponds to the X12 interchange version number.
5. Add the description for the new interchange (optional).
6. The Error Limit setting is used to control the number of errors reported or audited at transaction, group or interchange level in order to avoid system overload.
Interchange Setting (Default is set to 1000). Only up to 1000 errors will be reported to the private process and audited. Any errors over that limit will not be reported, but the acknowledgement (997 or 999 ) will report everything.
Error Limit 0 means that no error limit is set
7. Click Save.

TIBCO BusinessConnect EDI Protocol powered by Instream X12 Configuration
44 | Chapter 3 Managing X12 Interchanges, Functional Groups, and Transactions
Adding a Group Version to an Interchange Version
To add a group version to an interchange version, perform the following steps:
1. Click an interchange version radio button.
2. Click New Group Version.
3. Configure the options listed in Table 3.
4. Click Save.
Table 3 Group Version Fields
Field Descriptions
Name A name that corresponds to the X12 standard version, release and subrelease which would be designated in the functional group header (GS) segment. For example, 004010 or 004030.
If you are configuring an interchange acknowledgement segment (TA1), enter EmptyGroup and then proceed to the steps in Adding a Transaction to a Group Version on page 45. Refer to the sample interchange BC_HOME\protocols\tibedi\samples\interfaces\X12-00403.csx
Description Add a description for this group version (optional).
Error Limit The Error Limit setting is used to control the number of errors reported or audited at transaction, group or interchange level in order to avoid system overload. If Error Limit is set as 0, it means there is no limit at this level.
Group Setting (997 and 999 will report all the errors though the default is set to 100) Only 100 errors will be reported to the private process and audit logged.
Application Code
GS02 Sender The application sender's code in the GS segment of an X12 document. This code identifies the party sending the X12 group. Codes are agreed upon between trading partners.
GS03 Receiver The application receiver’s code in the GS segment of an X12 document. This code identifies the party sending the X12 group. Codes are agreed upon between trading partners.
GS07 Responsible Agency Code
Accept or change the GS07 Responsible Agency Code.

TIBCO BusinessConnect EDI Protocol powered by Instream X12 Configuration
Adding a Transaction to a Group Version | 45
Adding a Transaction to a Group Version
Once you have configured your interchange and group versions, you can add your X12 transaction. To add a transaction, perform the following steps:
1. Click a group version radio button.
2. Click New Transaction.
3. Choose one of the following from the Transaction Type drop-down list:
— Notification Continue with Notification Transaction on page 46.
or
— Sync RequestResponse Continue with Synchronous Request Response Transaction on page 52.
4. Click OK.
TIBCO BusinessConnect EDI Protocol powered by Instream X12 Configuration
46 | Chapter 3 Managing X12 Interchanges, Functional Groups, and Transactions
Notification Transaction
Notification transactions are asynchronous in nature: a transaction is sent to the trading partner and the response from the trading partner is expected at some later time. Only Notify transactions are currently supported for NAESB (there is no support for the Synchronous Request Response transactions). See also NAESB, page 109.
• Notification Transaction Tab, page 46
• Outbound Action Tab, page 49
Notification Transaction TabThis tab contains three subtabs:
• General Tab, page 47
• Guideline Tab, page 47
• Schema Tab, page 49

TIBCO BusinessConnect EDI Protocol powered by Instream X12 Configuration
Notification Transaction | 47
General Tab
Guideline Tab
Table 4 Notification Transaction: General Tab
Field Description
Name A name for the transaction.
Description Description for the transaction (optional)
Inbound Raw EDI Segments
Include in Private Process Request
This check box is available to include raw EDI message in the private process (RESPONDER.REQUEST) for this operation. This check box is unselected by default.
Include in Validation Error Advisory
This check box is available to include raw EDI messages in the Validation Error advisory.This check box is selected (enabled) by default.
Extra Transaction Info
This text field is used to send any information to the private process at transaction level of RESPONDER.REQUEST message.It can also be included in RESPONDER.INTERCHANGE and ValidationAlert advisory.
Table 5 Notification Transaction: Guideline Tab
Field Description
GS01 Functional Identifier Code
The mandatory code of the message. Example: PO.
Entering the GS01 functional identifier that would normally be indicated in the Functional Group Header is needed by the EDI conversion engine.
Validation Guideline
Guideline File for validating X12 Partner data (.sef or .std)
The guideline file associated with this message type. It is used to validate the EDI document that is received from a trading partner, or that is sent to the trading partner.
Click change to select the guideline file associated with this message type. Then, follow the procedure described in the section File Specification Dialog in TIBCO BusinessConnect Trading Partner Administration Guide.
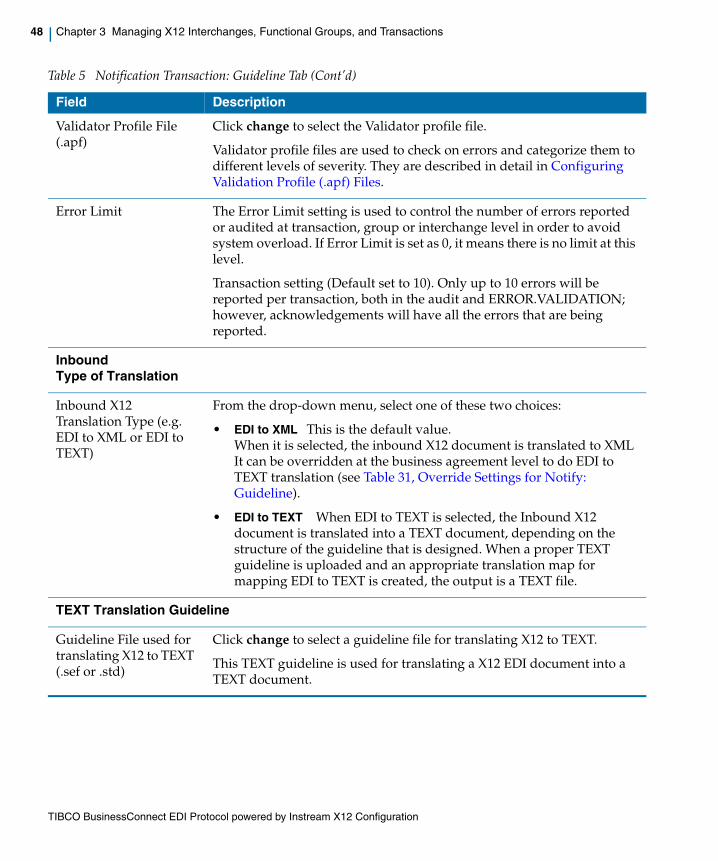
TIBCO BusinessConnect EDI Protocol powered by Instream X12 Configuration
48 | Chapter 3 Managing X12 Interchanges, Functional Groups, and Transactions
Validator Profile File (.apf)
Click change to select the Validator profile file.
Validator profile files are used to check on errors and categorize them to different levels of severity. They are described in detail in Configuring Validation Profile (.apf) Files.
Error Limit The Error Limit setting is used to control the number of errors reported or audited at transaction, group or interchange level in order to avoid system overload. If Error Limit is set as 0, it means there is no limit at this level.
Transaction setting (Default set to 10). Only up to 10 errors will be reported per transaction, both in the audit and ERROR.VALIDATION; however, acknowledgements will have all the errors that are being reported.
InboundType of Translation
Inbound X12 Translation Type (e.g. EDI to XML or EDI to TEXT)
From the drop-down menu, select one of these two choices:
• EDI to XML This is the default value. When it is selected, the inbound X12 document is translated to XML It can be overridden at the business agreement level to do EDI to TEXT translation (see Table 31, Override Settings for Notify: Guideline).
• EDI to TEXT When EDI to TEXT is selected, the Inbound X12 document is translated into a TEXT document, depending on the structure of the guideline that is designed. When a proper TEXT guideline is uploaded and an appropriate translation map for mapping EDI to TEXT is created, the output is a TEXT file.
TEXT Translation Guideline
Guideline File used for translating X12 to TEXT (.sef or .std)
Click change to select a guideline file for translating X12 to TEXT.
This TEXT guideline is used for translating a X12 EDI document into a TEXT document.
Table 5 Notification Transaction: Guideline Tab (Cont’d)
Field Description
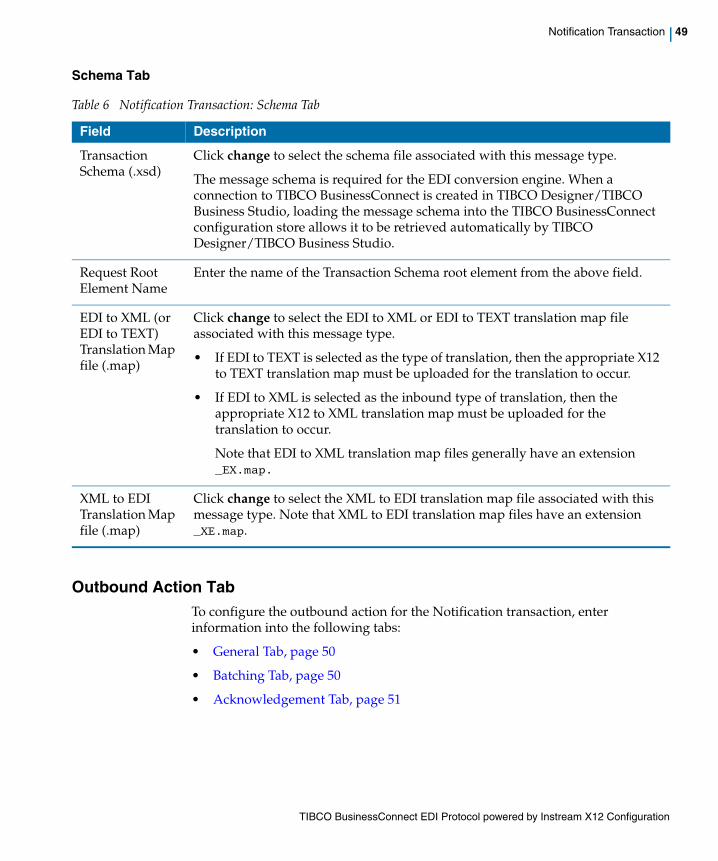
TIBCO BusinessConnect EDI Protocol powered by Instream X12 Configuration
Notification Transaction | 49
Schema Tab
Outbound Action TabTo configure the outbound action for the Notification transaction, enter information into the following tabs:
• General Tab, page 50
• Batching Tab, page 50
• Acknowledgement Tab, page 51
Table 6 Notification Transaction: Schema Tab
Field Description
Transaction Schema (.xsd)
Click change to select the schema file associated with this message type.
The message schema is required for the EDI conversion engine. When a connection to TIBCO BusinessConnect is created in TIBCO Designer/TIBCO Business Studio, loading the message schema into the TIBCO BusinessConnect configuration store allows it to be retrieved automatically by TIBCO Designer/TIBCO Business Studio.
Request Root Element Name
Enter the name of the Transaction Schema root element from the above field.
EDI to XML (or EDI to TEXT) Translation Map file (.map)
Click change to select the EDI to XML or EDI to TEXT translation map file associated with this message type.
• If EDI to TEXT is selected as the type of translation, then the appropriate X12 to TEXT translation map must be uploaded for the translation to occur.
• If EDI to XML is selected as the inbound type of translation, then the appropriate X12 to XML translation map must be uploaded for the translation to occur.
Note that EDI to XML translation map files generally have an extension _EX.map.
XML to EDI Translation Map file (.map)
Click change to select the XML to EDI translation map file associated with this message type. Note that XML to EDI translation map files have an extension _XE.map.
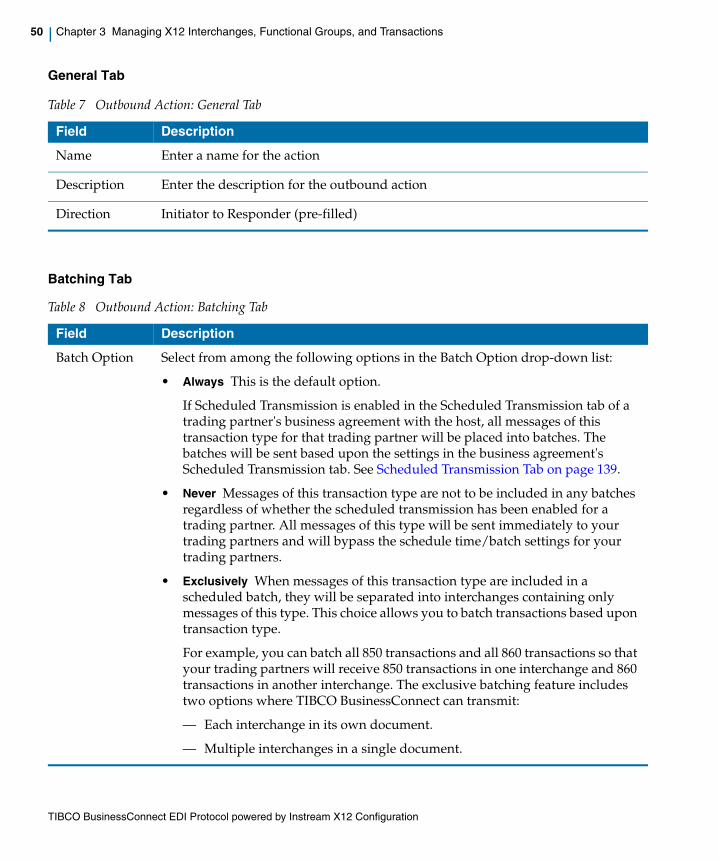
TIBCO BusinessConnect EDI Protocol powered by Instream X12 Configuration
50 | Chapter 3 Managing X12 Interchanges, Functional Groups, and Transactions
General Tab
Table 7 Outbound Action: General Tab
Field Description
Name Enter a name for the action
Description Enter the description for the outbound action
Direction Initiator to Responder (pre-filled)
Batching Tab
Table 8 Outbound Action: Batching Tab
Field Description
Batch Option Select from among the following options in the Batch Option drop-down list:
• Always This is the default option.
If Scheduled Transmission is enabled in the Scheduled Transmission tab of a trading partner's business agreement with the host, all messages of this transaction type for that trading partner will be placed into batches. The batches will be sent based upon the settings in the business agreement's Scheduled Transmission tab. See Scheduled Transmission Tab on page 139.
• Never Messages of this transaction type are not to be included in any batches regardless of whether the scheduled transmission has been enabled for a trading partner. All messages of this type will be sent immediately to your trading partners and will bypass the schedule time/batch settings for your trading partners.
• Exclusively When messages of this transaction type are included in a scheduled batch, they will be separated into interchanges containing only messages of this type. This choice allows you to batch transactions based upon transaction type.
For example, you can batch all 850 transactions and all 860 transactions so that your trading partners will receive 850 transactions in one interchange and 860 transactions in another interchange. The exclusive batching feature includes two options where TIBCO BusinessConnect can transmit:
— Each interchange in its own document.
— Multiple interchanges in a single document.
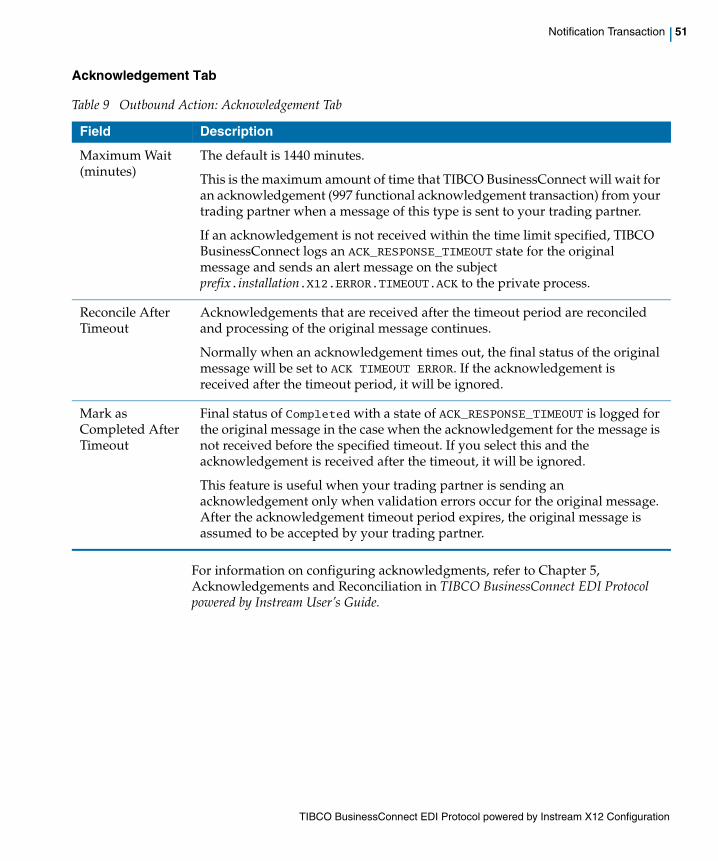
TIBCO BusinessConnect EDI Protocol powered by Instream X12 Configuration
Notification Transaction | 51
Acknowledgement Tab
For information on configuring acknowledgments, refer to Chapter 5, Acknowledgements and Reconciliation in TIBCO BusinessConnect EDI Protocol powered by Instream User’s Guide.
Table 9 Outbound Action: Acknowledgement Tab
Field Description
Maximum Wait (minutes)
The default is 1440 minutes.
This is the maximum amount of time that TIBCO BusinessConnect will wait for an acknowledgement (997 functional acknowledgement transaction) from your trading partner when a message of this type is sent to your trading partner.
If an acknowledgement is not received within the time limit specified, TIBCO BusinessConnect logs an ACK_RESPONSE_TIMEOUT state for the original message and sends an alert message on the subject prefix.installation.X12.ERROR.TIMEOUT.ACK to the private process.
Reconcile After Timeout
Acknowledgements that are received after the timeout period are reconciled and processing of the original message continues.
Normally when an acknowledgement times out, the final status of the original message will be set to ACK TIMEOUT ERROR. If the acknowledgement is received after the timeout period, it will be ignored.
Mark as Completed After Timeout
Final status of Completed with a state of ACK_RESPONSE_TIMEOUT is logged for the original message in the case when the acknowledgement for the message is not received before the specified timeout. If you select this and the acknowledgement is received after the timeout, it will be ignored.
This feature is useful when your trading partner is sending an acknowledgement only when validation errors occur for the original message. After the acknowledgement timeout period expires, the original message is assumed to be accepted by your trading partner.
TIBCO BusinessConnect EDI Protocol powered by Instream X12 Configuration
52 | Chapter 3 Managing X12 Interchanges, Functional Groups, and Transactions
Synchronous Request Response Transaction
Synchronous request-response transactions are transactions where a response transaction is expected to be returned quickly and using the same transport connection as the request transaction. In case of validation errors, the normal response would not be returned but another transaction (for example, 997, or TA1) would be returned indicating there were validation errors.
For example, you could agree with your trading partner that each 850 purchase order transaction you send should have an 855 purchase order acknowledgement transaction returned as a response on the same transport connection. If a validation error occurred in the 850 purchase order transaction, an 855 response would not be returned. Instead, a 997 response would be returned, indicating the 850 was rejected. You would not usually choose to keep a transport connection open for more than a minute or two. So the time frame within which the response should be expected should be fairly short. Synchronous request-response transactions are only supported on those transports for which a response transaction can be returned on the same connection used for sending the request transaction.
Synchronous Request and Notify OperationsUsers receiving a synchronous request from their trading partner can also receive a notify operation of the same transaction type under the same group and interchange. This can be achieved by having a mandatory business agreement with the trading partner and configuring the following:
• Naming the synchronous request operation of the transaction 101, so that it ends with “R” (101R).
• Configuring the trading partner to send the GS02 Sender Application ending with “R”. This enables the receiving BusinessConnect to detect the operation as a synchronous transaction and to trade synchronously with their partner. If either one of the above two configuration is missing and there are two different operation types configured, namely synchronous (101R) and notify operations (101) for the same transaction type, then the receiver will always receive the transaction as a notify transaction even though the initiator might have sent it in synchronous mode.
Synchronous Request-Response transactions are applicable only for the HTTP transport.
TIBCO BusinessConnect EDI Protocol powered by Instream X12 Configuration
Synchronous Request Response Transaction | 53
Default Response for a Synchronous Request
You can send a default response for a synchronous request in case the response from the private process on the responder side fails due to validation error. To configure, upload this response file to the following location:
BusinessAgreement>X12>Partner can initiate>operation>Action
Settings> Default response
The Default Response field is available only in the "Partner can initiate" field of the operation binding. It is configurable to send a templated response to the trading partner if the synchronous response sent from the private process contained any validation errors or error in the response XML. In such case, this templated response is sent back to the trading partner with no validation or syntax check. Users should make sure that the Default Response is a valid response.
For more information on synchronous request-response transactions, see Chapter 8, Private Messages, in TIBCO BusinessConnect EDI Protocol powered by Instream, User’s Guide.
Configure the Synchronous Request Response TransactionTo configure the Synchronous Request Response transaction, enter information into the following tabs, and then click Save:
• General Tab, page 54
• Request Action Tab, page 59
• Response Action Tab, page 61

TIBCO BusinessConnect EDI Protocol powered by Instream X12 Configuration
54 | Chapter 3 Managing X12 Interchanges, Functional Groups, and Transactions
General Tab
Guideline Tab
Table 10 Synchronous Request Response Transaction: General tab
Field Description
Name A name for the transaction. Example: 850.
Description Description for the transaction (optional)
Transaction Type
Acceptance Response An acceptance response transaction type. This is the type of transaction expected as a response from your trading partner. For example, if 850 is the request transaction, the acceptance response transaction type is 855.
Rejection Ack The rejection acknowledgement transaction type. This field indicates the type of transaction that would be expected to be returned as a response if the original request transaction had validation errors.
The default is 997.
Inbound Raw EDI Segments
Include in Private Process Request
This check box is available to include raw EDI message in the private process (RESPONDER.REQUEST) for this operation.
This check box is unselected by default.
Include in Validation Error Advisory
This check box is available to include raw EDI messages in the Validation Error advisory.
This check box is selected (enabled) by default.
Table 11 Synchronous Request Response Transaction: Guideline Tab (Sheet 1 of 5)
Field Description
Request

TIBCO BusinessConnect EDI Protocol powered by Instream X12 Configuration
Synchronous Request Response Transaction | 55
GS01 Functional Identifier Code (for Request)
The mandatory functional identifier code of the transaction. Entering the GS01 functional identifier that would normally be indicated in the Functional Group Header is needed by the EDI conversion engine.
Examples:
• Request PO for an 850 purchase order transaction.
• Acceptance Response PR for an 855 purchase order acknowledgement transaction.
• Rejection Acknowledgement FA for a 997 functional acknowledgement transaction.
Type of Translation
Inbound Translation Type (e.g. EDI to XML or EDI to TEXT)
From the drop-down menu, select one of these two choices:
• EDI to XML This is the default value.
When EDI to XML is selected here, the inbound Synchronous X12 document would be translated to XML. It can be overridden at the business agreement level to do EDI to TEXT translation (see Table 31, Override Settings for Notify: Guideline).
• EDI to TEXT When EDI to TEXT is selected, then the appropriate synchronous X12 document is translated to TEXT.
When a proper TEXT guideline is uploaded and an appropriate translation map for mapping EDI to TEXT is created, the output is a TEXT file.
X12 Validation Guideline for Request
Request Guidelines File (.sef or .std)
Provide the path to the inbound synchronous request guidelines file. You can override this field at the business agreement level. This guideline file is used to validate the EDI document that is received from a trading partner, or that is sent to a trading partner.
Click change to select the Guidelines File (.sef or .std).
Table 11 Synchronous Request Response Transaction: Guideline Tab (Sheet 2 of 5)
Field Description
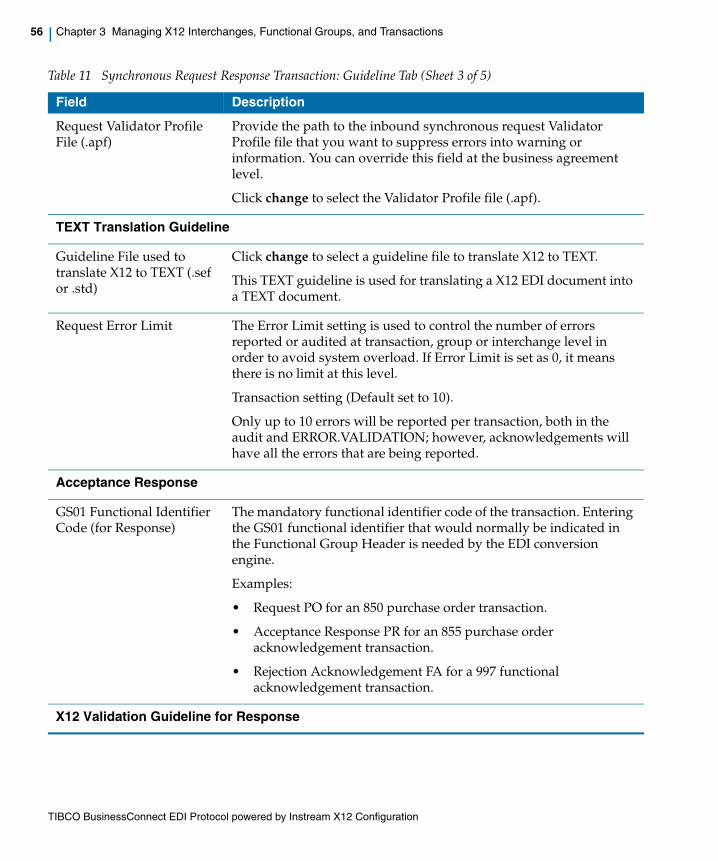
TIBCO BusinessConnect EDI Protocol powered by Instream X12 Configuration
56 | Chapter 3 Managing X12 Interchanges, Functional Groups, and Transactions
Request Validator Profile File (.apf)
Provide the path to the inbound synchronous request Validator Profile file that you want to suppress errors into warning or information. You can override this field at the business agreement level.
Click change to select the Validator Profile file (.apf).
TEXT Translation Guideline
Guideline File used to translate X12 to TEXT (.sef or .std)
Click change to select a guideline file to translate X12 to TEXT.
This TEXT guideline is used for translating a X12 EDI document into a TEXT document.
Request Error Limit The Error Limit setting is used to control the number of errors reported or audited at transaction, group or interchange level in order to avoid system overload. If Error Limit is set as 0, it means there is no limit at this level.
Transaction setting (Default set to 10).
Only up to 10 errors will be reported per transaction, both in the audit and ERROR.VALIDATION; however, acknowledgements will have all the errors that are being reported.
Acceptance Response
GS01 Functional Identifier Code (for Response)
The mandatory functional identifier code of the transaction. Entering the GS01 functional identifier that would normally be indicated in the Functional Group Header is needed by the EDI conversion engine.
Examples:
• Request PO for an 850 purchase order transaction.
• Acceptance Response PR for an 855 purchase order acknowledgement transaction.
• Rejection Acknowledgement FA for a 997 functional acknowledgement transaction.
X12 Validation Guideline for Response
Table 11 Synchronous Request Response Transaction: Guideline Tab (Sheet 3 of 5)
Field Description

TIBCO BusinessConnect EDI Protocol powered by Instream X12 Configuration
Synchronous Request Response Transaction | 57
Response Guidelines File (.sef or .std)
Provide the path to the outbound synchronous response Guidelines file. You can override this field at the business agreement level.
This guideline file is used to validate the synchronous response EDI document that is received from a trading partner, or that is sent to a trading partner.
Click change to select the Guidelines File (.sef or .std).
Response Validator Profile File (.apf)
Provide the path to the outbound synchronous response Validator Profile file that you wanted to suppress errors into warning or informational if the responses have errors. You can override this field at the business agreement level.
Click change to select the Validator Profile File (.apf).
TEXT Translation Guideline
Guideline File used to translate EDI response to TEXT (.sef or .std)
This TEXT guideline is used to translate a synchronous X12 response EDI document into a TEXT document.
Click change to select a guideline file for translating EDI to TEXT.
Type of Translation
Backend to Partner Translation type for Response (e.g. XML to EDI or TEXT to EDI)
• XML to EDI
• TEXT to EDI TEXT data can be sent from the private process, converted to the EDI data and sent back to the Initiator.
For more information, see TIBCO BusinessConnect EDI Protocol powered by Instream User’s Guide, TEXT to EDI Conversion.
TEXT Translation Guideline
Guideline File used to translate TEXT to EDI response (.sef or .std)
This TEXT guideline is used for translating a TEXT document into synchronous X12 response EDI document.
Click change to select a guideline file for translating TEXT to EDI.
Table 11 Synchronous Request Response Transaction: Guideline Tab (Sheet 4 of 5)
Field Description
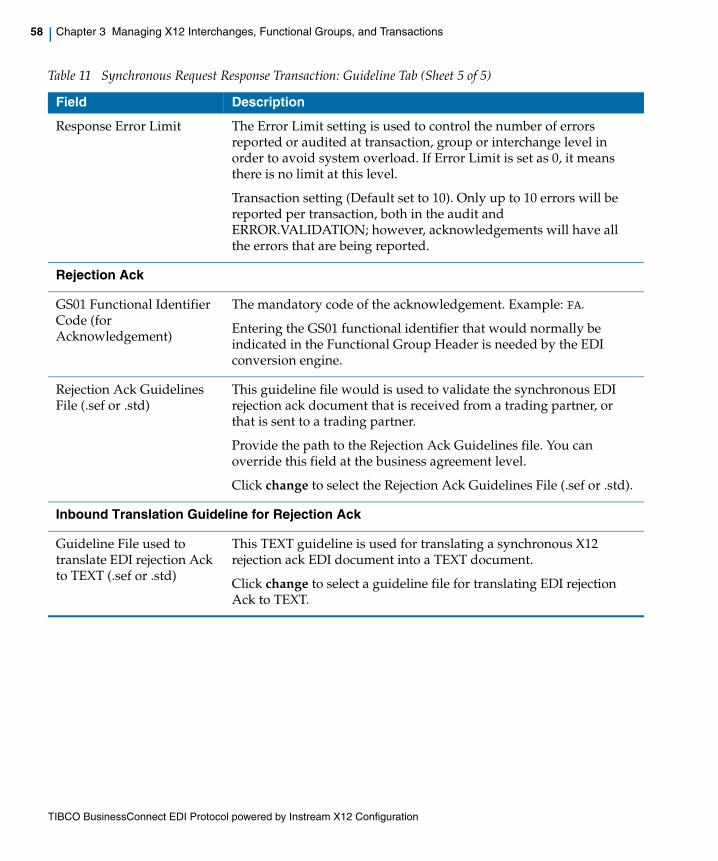
TIBCO BusinessConnect EDI Protocol powered by Instream X12 Configuration
58 | Chapter 3 Managing X12 Interchanges, Functional Groups, and Transactions
Response Error Limit The Error Limit setting is used to control the number of errors reported or audited at transaction, group or interchange level in order to avoid system overload. If Error Limit is set as 0, it means there is no limit at this level.
Transaction setting (Default set to 10). Only up to 10 errors will be reported per transaction, both in the audit and ERROR.VALIDATION; however, acknowledgements will have all the errors that are being reported.
Rejection Ack
GS01 Functional Identifier Code (for Acknowledgement)
The mandatory code of the acknowledgement. Example: FA.
Entering the GS01 functional identifier that would normally be indicated in the Functional Group Header is needed by the EDI conversion engine.
Rejection Ack Guidelines File (.sef or .std)
This guideline file would is used to validate the synchronous EDI rejection ack document that is received from a trading partner, or that is sent to a trading partner.
Provide the path to the Rejection Ack Guidelines file. You can override this field at the business agreement level.
Click change to select the Rejection Ack Guidelines File (.sef or .std).
Inbound Translation Guideline for Rejection Ack
Guideline File used to translate EDI rejection Ack to TEXT (.sef or .std)
This TEXT guideline is used for translating a synchronous X12 rejection ack EDI document into a TEXT document.
Click change to select a guideline file for translating EDI rejection Ack to TEXT.
Table 11 Synchronous Request Response Transaction: Guideline Tab (Sheet 5 of 5)
Field Description
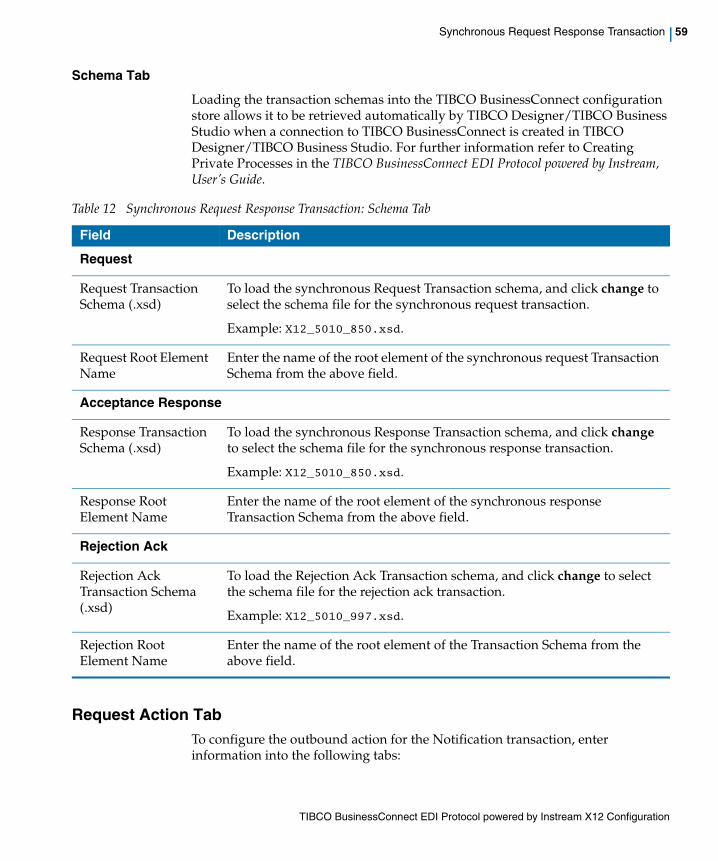
TIBCO BusinessConnect EDI Protocol powered by Instream X12 Configuration
Synchronous Request Response Transaction | 59
Schema Tab
Loading the transaction schemas into the TIBCO BusinessConnect configuration store allows it to be retrieved automatically by TIBCO Designer/TIBCO Business Studio when a connection to TIBCO BusinessConnect is created in TIBCO Designer/TIBCO Business Studio. For further information refer to Creating Private Processes in the TIBCO BusinessConnect EDI Protocol powered by Instream, User’s Guide.
Request Action TabTo configure the outbound action for the Notification transaction, enter information into the following tabs:
Table 12 Synchronous Request Response Transaction: Schema Tab
Field Description
Request
Request Transaction Schema (.xsd)
To load the synchronous Request Transaction schema, and click change to select the schema file for the synchronous request transaction.
Example: X12_5010_850.xsd.
Request Root Element Name
Enter the name of the root element of the synchronous request Transaction Schema from the above field.
Acceptance Response
Response Transaction Schema (.xsd)
To load the synchronous Response Transaction schema, and click change to select the schema file for the synchronous response transaction.
Example: X12_5010_850.xsd.
Response Root Element Name
Enter the name of the root element of the synchronous response Transaction Schema from the above field.
Rejection Ack
Rejection Ack Transaction Schema (.xsd)
To load the Rejection Ack Transaction schema, and click change to select the schema file for the rejection ack transaction.
Example: X12_5010_997.xsd.
Rejection Root Element Name
Enter the name of the root element of the Transaction Schema from the above field.
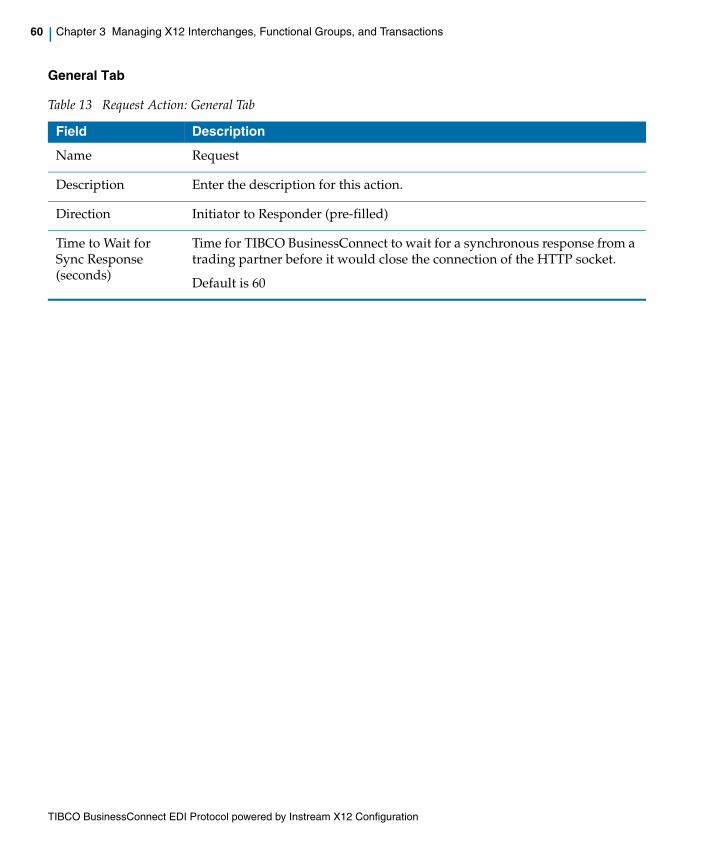
TIBCO BusinessConnect EDI Protocol powered by Instream X12 Configuration
60 | Chapter 3 Managing X12 Interchanges, Functional Groups, and Transactions
General Tab
Table 13 Request Action: General Tab
Field Description
Name Request
Description Enter the description for this action.
Direction Initiator to Responder (pre-filled)
Time to Wait for Sync Response (seconds)
Time for TIBCO BusinessConnect to wait for a synchronous response from a trading partner before it would close the connection of the HTTP socket.
Default is 60
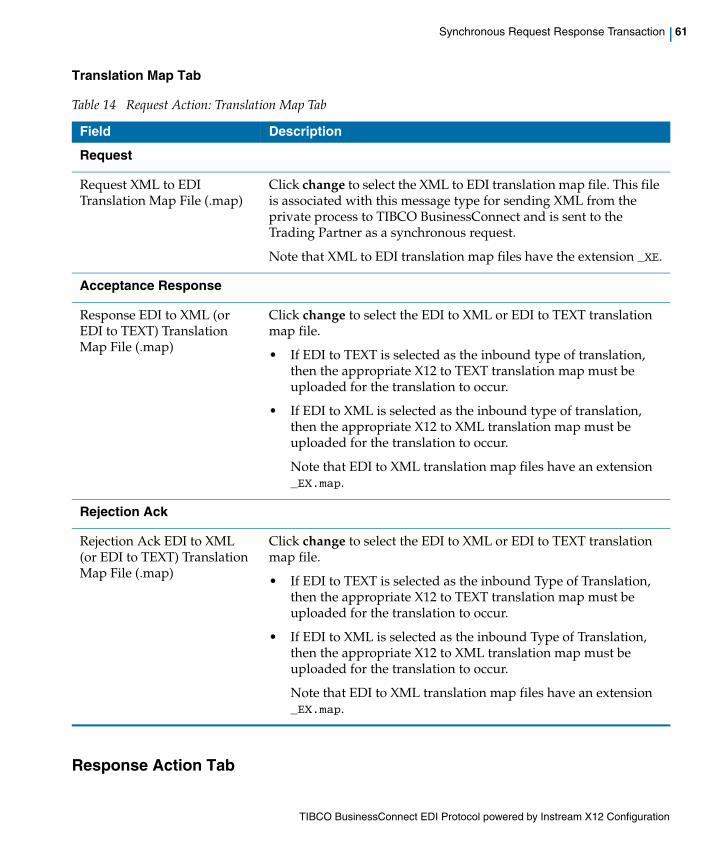
TIBCO BusinessConnect EDI Protocol powered by Instream X12 Configuration
Synchronous Request Response Transaction | 61
Translation Map Tab
Response Action Tab
Table 14 Request Action: Translation Map Tab
Field Description
Request
Request XML to EDI Translation Map File (.map)
Click change to select the XML to EDI translation map file. This file is associated with this message type for sending XML from the private process to TIBCO BusinessConnect and is sent to the Trading Partner as a synchronous request.
Note that XML to EDI translation map files have the extension _XE.
Acceptance Response
Response EDI to XML (or EDI to TEXT) Translation Map File (.map)
Click change to select the EDI to XML or EDI to TEXT translation map file.
• If EDI to TEXT is selected as the inbound type of translation, then the appropriate X12 to TEXT translation map must be uploaded for the translation to occur.
• If EDI to XML is selected as the inbound type of translation, then the appropriate X12 to XML translation map must be uploaded for the translation to occur.
Note that EDI to XML translation map files have an extension _EX.map.
Rejection Ack
Rejection Ack EDI to XML (or EDI to TEXT) Translation Map File (.map)
Click change to select the EDI to XML or EDI to TEXT translation map file.
• If EDI to TEXT is selected as the inbound Type of Translation, then the appropriate X12 to TEXT translation map must be uploaded for the translation to occur.
• If EDI to XML is selected as the inbound Type of Translation, then the appropriate X12 to XML translation map must be uploaded for the translation to occur.
Note that EDI to XML translation map files have an extension _EX.map.
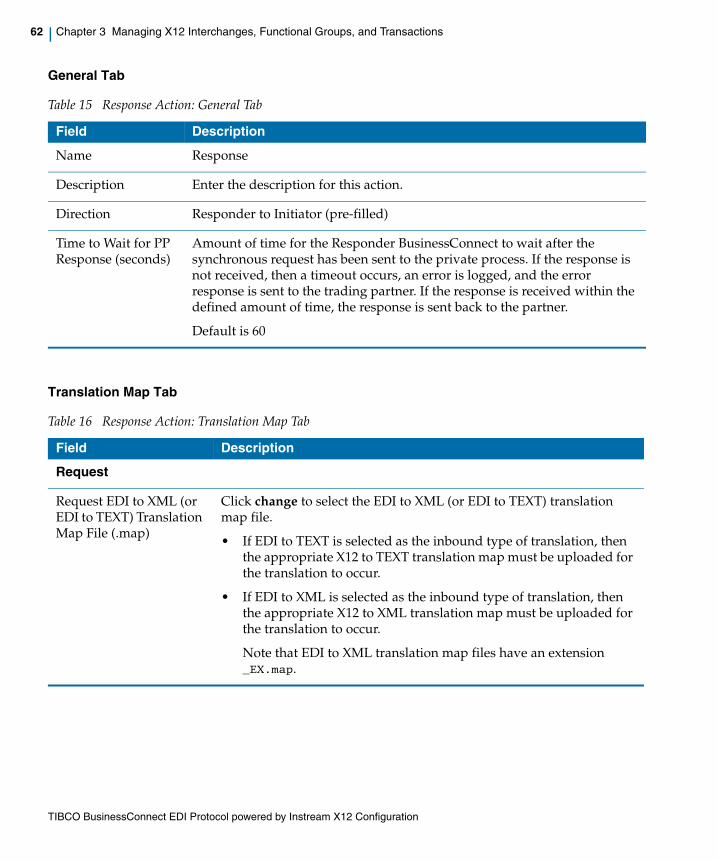
TIBCO BusinessConnect EDI Protocol powered by Instream X12 Configuration
62 | Chapter 3 Managing X12 Interchanges, Functional Groups, and Transactions
General Tab
Translation Map Tab
Table 15 Response Action: General Tab
Field Description
Name Response
Description Enter the description for this action.
Direction Responder to Initiator (pre-filled)
Time to Wait for PP Response (seconds)
Amount of time for the Responder BusinessConnect to wait after the synchronous request has been sent to the private process. If the response is not received, then a timeout occurs, an error is logged, and the error response is sent to the trading partner. If the response is received within the defined amount of time, the response is sent back to the partner.
Default is 60
Table 16 Response Action: Translation Map Tab
Field Description
Request
Request EDI to XML (or EDI to TEXT) Translation Map File (.map)
Click change to select the EDI to XML (or EDI to TEXT) translation map file.
• If EDI to TEXT is selected as the inbound type of translation, then the appropriate X12 to TEXT translation map must be uploaded for the translation to occur.
• If EDI to XML is selected as the inbound type of translation, then the appropriate X12 to XML translation map must be uploaded for the translation to occur.
Note that EDI to XML translation map files have an extension _EX.map.
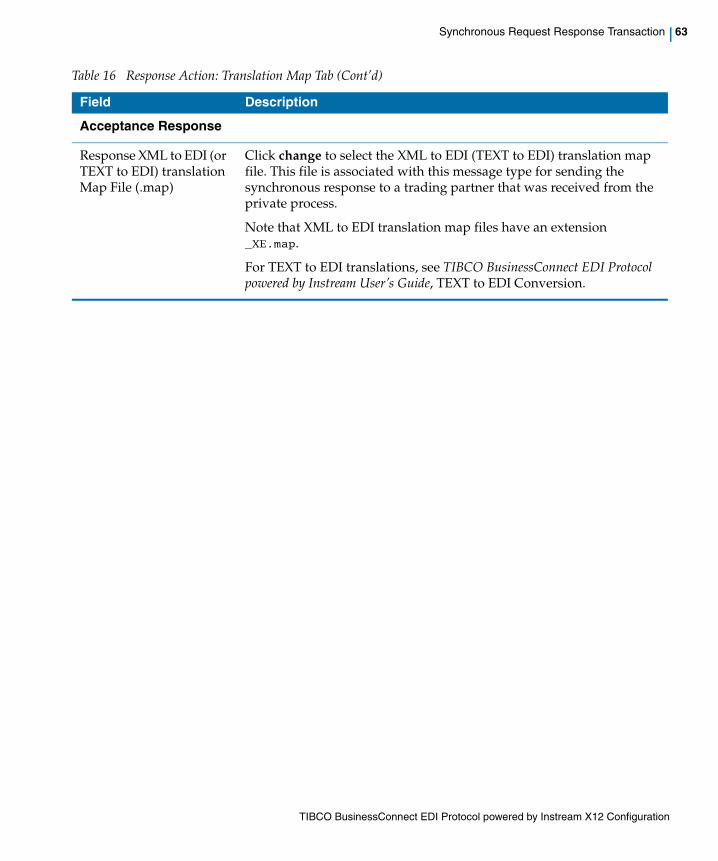
TIBCO BusinessConnect EDI Protocol powered by Instream X12 Configuration
Synchronous Request Response Transaction | 63
Acceptance Response
Response XML to EDI (or TEXT to EDI) translation Map File (.map)
Click change to select the XML to EDI (TEXT to EDI) translation map file. This file is associated with this message type for sending the synchronous response to a trading partner that was received from the private process.
Note that XML to EDI translation map files have an extension _XE.map.
For TEXT to EDI translations, see TIBCO BusinessConnect EDI Protocol powered by Instream User’s Guide, TEXT to EDI Conversion.
Table 16 Response Action: Translation Map Tab (Cont’d)
Field Description
TIBCO BusinessConnect EDI Protocol powered by Instream X12 Configuration
64 | Chapter 3 Managing X12 Interchanges, Functional Groups, and Transactions
Configuring Acknowledgements
Configure 997 Functional AcknowledgementsThe 997 transaction set is also called a functional acknowledgement. It is used to indicate the results of the syntactical analysis of a same type transaction group, such as all 850 transactions contained in the same functional group inside an interchange. If functional acknowledgements (997s) are to be sent or received for X12 transaction sets, you must configure a 997 transaction for each functional group containing the transaction sets.
For example, the sample interchange X12-00403.csx contains the following:
00403 interchange version005010 group version
850 transaction set997 transaction set
You will configure the 997 transaction set in the Operations Editor just as you would configure any other X12 transaction set. However, for the 997 transaction set it is not necessary to upload the guideline to use for validation.
TIBCO BusinessConnect EDI Protocol powered by Instream contains a generic 997 guideline, which is used by default. The generic 997 guideline X12_5010_997.sef can be found in the directory: BC_HOME\protocols\tibedi\samples\sampleDocs\guidelines.
Configure the 999 Implementation AcknowledgementsThe 999 implementation acknowledgements are used to report the status of implementation guide syntax edits. Automatic generation of the 999 acknowledgement is available for transactions in group 004061 and higher.
Configuration of the 999 implementation acknowledgement is similar to configuring a 997 acknowledgement: you will configure the 999 as a transaction set in the operations editor just as you would configure a 997.
T To properly mark the ISA, GS, and ST segments with a DSR mark, as required for proper acknowledgements generation, refer to the documentation provided with the EDISIM Standards Editor.
The 997 transactions are not sent as acknowledgements for other 997 transactions.
TIBCO BusinessConnect EDI Protocol powered by Instream X12 Configuration
Configuring Acknowledgements | 65
For example, to use a 999 acknowledgement instead of a 997 acknowledgement in the X12-00403.csx example interface, you will replace the configuration of the 997 acknowledgement with a configuration for the 999 acknowledgement as follows:
00403 interchange version005010 group version850 transaction set999 transaction set
When configuring the 999 transaction set in the Operations Editor, it is not necessary to upload the guideline for 999. TIBCO BusinessConnect EDI Protocol powered by Instream contains a generic 999 guideline which will be used whenever the configuration of a 999 transaction set does not have a guideline uploaded. The generic 999 guideline for the example above is X12_5010_999.sef and can be found in the directory: BC_HOME/protocols/tibedi/samples/sampleDocs/guidelines.
Configure TA1 Interchange Acknowledgement SegmentsThe interchange acknowledgement segment (TA1) is used to indicate the receipt of the contents of one interchange control header and trailer envelope in which the envelope surrounds one or more functional groups. If the interchange contained only TA1 segments, a TA1 would not be returned for the interchange.
If interchange acknowledgement segments are sent or received for interchanges containing X12 transaction sets, you must configure a TA1 interchange segment for each interchange. You will configure the TA1 interchange segment with a guideline just as you would configure any other X12 transaction set. However, since the TA1 is not really a transaction set and is never contained inside of a functional group, the TA1 interchange segment is configured inside of a group version named EmptyGroup.
For example, the sample interchange X12-00403.csx contains the following:
00403 interchange version005010 group version
850 transaction set997 transaction set
EmptyGroup group versionTA1 interchange segment
The EmptyGroup group version is not configured with a guideline.
Similar to the 997, TIBCO BusinessConnect EDI Protocol powered by Instream contains a generic TA1 guideline, which it will use by default. Therefore it is not necessary to upload a guideline for the TA1. The generic TA1 guideline, X12_TA1.sef can be found in the directory: BC_HOME\protocols\tibedi\samples\sampleDocs\guidelines.
TIBCO BusinessConnect EDI Protocol powered by Instream X12 Configuration
66 | Chapter 3 Managing X12 Interchanges, Functional Groups, and Transactions
Multiple Configurations for the Same Transaction TypeTIBCO BusinessConnect EDI Protocol powered by Instream provides a name modifiers feature that you may need to use to provide multiple configurations for your message. This feature is called Transaction Name Modifiers.
Transaction Name Modifiers
The Transaction Name Modifiers are used to configure multiple guidelines for the same transaction type in cases when only certain trading partners will be allowed to use the alternate message configurations. They allow you to create multiple operation bindings for a single operation set, which then allows them to target otherwise identical transactions, such as a purchase order, to a specific departments belonging to a trading partner. The trading partner departments are allowed to do the same when sending transactions to your departments.
You may need different guidelines for the same transaction type to satisfy the transaction exchange requirements for all of your trading partners. For example, the 850 guideline used for the trading partner A may include additional data elements which may not be suitable for other trading partners. These additional data elements may also generate an XSD for the guideline that is different from the XSD generated for the 850 guidelines that are used otherwise. To handle this situation, you can configure multiple versions of the same transaction type by using message name modifiers when configuring the transaction.
To use a Transaction Name Modifier:
1. Select Notification Transaction > General tab and enter the name of the transaction type in the Name field.
2. Append a colon(:) to the name.
3. Enter a short description after the colon to differentiate the transaction type configurations.
For example, you can configure two versions of a 00403 850 transaction as:
00403/005010/850
00403/005010/850:TPA
You must configure the generic 00403/005010/850 version in order to exchange any 850 purchase order transactions with your trading partners, including transaction for the trading partner for which you are using the modified version. In the example above, this is Trading Partner A, using the version 00403/005010/850:TPA.
One business agreement can have only one Transaction Name Modifier of the same transaction or message type.
TIBCO BusinessConnect EDI Protocol powered by Instream X12 Configuration
Configuring Acknowledgements | 67
For the name modified version 00403/005010/850:TPA to be used for the trading partner A, you must bind the name modified version 00403/005010/850:TPA to the trading partner A.
For more information, see Operation Bindings Tab on page 117.
When an inbound 850 transaction is received for the trading partner A, the guideline associated with the named modified version 00403/005010/850:TPA will be used for validation of the message.
The operationID field of the ResponderRequest message to the private process will contain the modified message name 00403/005010/850:TPA. This transaction name allows the private process to filter and handle this non-generic 850 message from the trading partner A.
If the Transaction Name Modifier operation is not bound, then the default operation without the modifier will be picked by TIBCO BusinessConnect to validate transactions.
TIBCO BusinessConnect EDI Protocol powered by Instream X12 Configuration
68 | Chapter 3 Managing X12 Interchanges, Functional Groups, and Transactions
Configuring Validation Profile (.apf) Files
By default, any validation error that occurs will cause a transaction to be rejected. When a transaction is rejected, the 997 generated will contain an AK5 segment with a Transaction Set Acknowledgement Code of 'R' for the transaction. When validating EDI transactions, it is desirable to be able to control whether a validation error should cause the rejection of the entire transaction or not.
Sometimes we may want the error reported and the transaction rejected. At other times, we may want to report the error in the 997 but to accept the transaction anyway (for example, the generated 997 would have a Transaction Set Acknowledgment Code of 'E' for accepted with errors). We might want validation errors ignored altogether, or we might want only some validation errors ignored.
In conjunction with EDISIM Validator, TIBCO BusinessConnect EDI Protocol powered by Instream now provides the ability to configure the severity errors which occur in EDI transactions.
Severity LevelWhen a transaction is rejected, the segments in the generated 997 acknowledgement will look something like the following:
ST~997~0001'AK1~HC~000000001'AK2~837~000000001'AK3~CLM~36~2300~8'AK4~11+3~1362~1~AP'AK5~R'AK9~R~1~1~0'SE~9~0001'
The AK2 segment identifies the transaction which was rejected. The AK3 and AK4 segments give information about where the error(s) occurred in the transaction. The AK5 segment indicates the transaction was rejected and contains a transaction status code of 'R'.
The AK9 segment indicates that the group was rejected, 'R', since there was only one transaction in the group and that transaction was rejected. If some of the transactions in the group were accepted while others were rejected, the status of the group in the AK9 segment would be 'P', which indicates that at least one transaction in the group was rejected.
When a transaction type is rejected, error information is also sent to the private process on the subject AX.BC.BC instance name.X12.ERROR.VALIDATION. This error information contains the transaction ID of the transaction which had validation errors and descriptive information about the validation errors.

TIBCO BusinessConnect EDI Protocol powered by Instream X12 Configuration
Configuring Validation Profile (.apf) Files | 69
Setting different severity levels to validation errors will affect the information about the validation errors that is contained in 997 acknowledgements and the error information reported to the private process. It will also affect whether the given transaction is converted from EDI to XML or from XML to EDI. When a transaction is rejected, no conversion takes place.
The following table describes the four levels of severity which can be configured for validation errors and their affect on how error information is reported:
Severity Level 997 Acknowledgement Error Information to Private
Process
Data Conversion Occurs?
Ignore AK5 segment reports transaction status of 'A' for accepted. AK3 and AK4 segments are not present.
Does not cause the generation of an error report to the private process.
Yes
Informational AK5 segment reports transaction status of 'A' for accepted. AK3 and AK4 segments are not present.
The cause of the error will be reported in the message to the private process with the error code and a description of the error. The error description begins with Information.
Yes
Warning AK5 segment reports transaction status of 'E' for accepted with errors. AK3 and AK4 segments contain information about the location of the error in the transaction as appropriate.
The cause of the error will be reported in the message to the private process with the error code and a description of the error. The error description begins with Warning.
Yes
Error AK5 segment reports transaction status of 'R' for rejected. AK3 and AK4 segments contain information about the location of the error in the transaction as appropriate.
The cause of the errors is reported in the message to the private process with the error code and a description of the error.
No
Fatal Similar in behavior to the 'Error' type but is used for system errors.
No
User Type 1 and User Type 2 severity types are not currently supported.
TIBCO BusinessConnect EDI Protocol powered by Instream X12 Configuration
70 | Chapter 3 Managing X12 Interchanges, Functional Groups, and Transactions
Severity ScopeThe scope of error severity setting is a transaction level. Normally an error severity setting is applied to all validation errors of the specified type within the entire transaction.
Validate Severity LevelsThe steps for validating the error severity settings for a transaction are similar to configuring the guideline for the transaction. First create a Validator Profile file for a transaction using EDISIM Validator, and then upload this file in the Protocol Editor of the TIBCO BusinessConnect configuration GUI.
Task A Create a Validator Profile (.apf) File
The Validator Profile file is created using the EDISIM Validator.
1. Start EDISIM>Validator.
2. Click Options>Validator Profile.
3. Select a message in the Message tab. Select one of the severity types:
— Ignore
— Informational
— Warning
— Error
— Fatal
and save it.
4. In the Save Profile As dialog, save the changed profile to a new profile of the type Validator Profile (*.apf).
5. Select File> Open.
This step opens an EDI data file, such as sample data X12_5010_850.dat.
6. Click Open.
Changing the normal error severity of type 1, EDI syntax integrity, validation errors should be approached with caution as it could lead to invalid EDI or XML data. The converted EDI data could have errors that your trading partner may not accept. The converted XML data may not match the XSD used by the private process. Data elements could be shifted resulting in invalid data that might not be detected during validation.
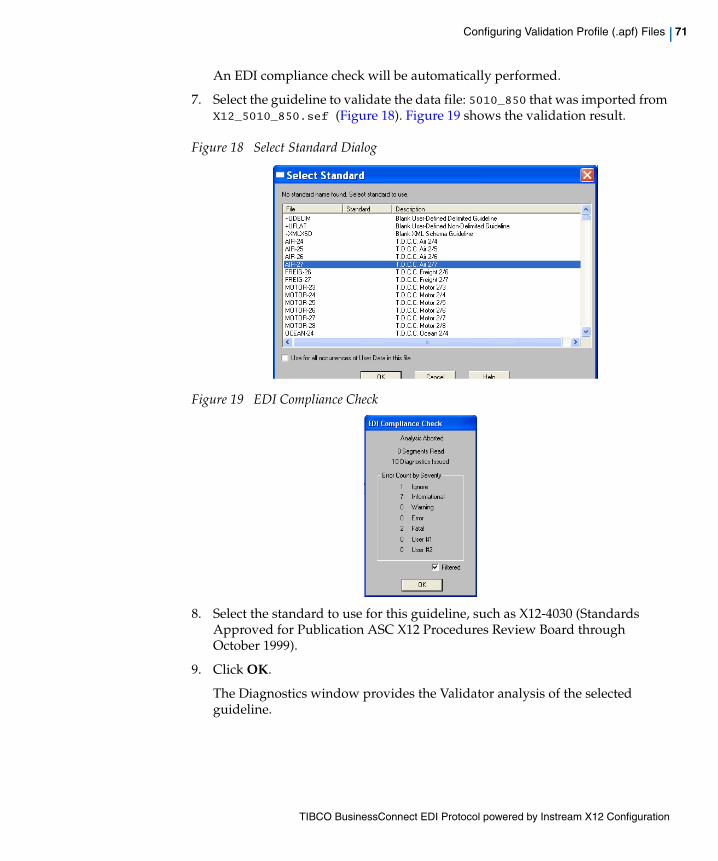
TIBCO BusinessConnect EDI Protocol powered by Instream X12 Configuration
Configuring Validation Profile (.apf) Files | 71
An EDI compliance check will be automatically performed.
7. Select the guideline to validate the data file: 5010_850 that was imported from X12_5010_850.sef (Figure 18). Figure 19 shows the validation result.
Figure 18 Select Standard Dialog
Figure 19 EDI Compliance Check
8. Select the standard to use for this guideline, such as X12-4030 (Standards Approved for Publication ASC X12 Procedures Review Board through October 1999).
9. Click OK.
The Diagnostics window provides the Validator analysis of the selected guideline.

TIBCO BusinessConnect EDI Protocol powered by Instream X12 Configuration
72 | Chapter 3 Managing X12 Interchanges, Functional Groups, and Transactions
Task B Apply the Validator Profile File (.apf) for a Transaction
To associate a transaction with a Validator Profile in X12, perform the following steps:
1. Using TIBCO Administrator, select BusinessConnect> Operations Editor.
2. Select the X12 link.
3. Expand the operations tree and select the transaction with which you want to configure the .apf file for. Select the Guideline tab.
Figure 20 Edit Notification
4. Click change to upload the Validator Profile file (.apf).
5. Select the file type:
— File Reference When you select this option, enter the path to the file reference you want to use.
— Uploaded File When you select this option, browse to the location of the file you want to upload. In this case, look for the file you saved in Task A.
6. Click OK.
To apply a Validator Profile file to a transaction for a particular operation in a business agreement, bind the transaction and then override the transaction settings as described in Operation Bindings Tab on page 117.
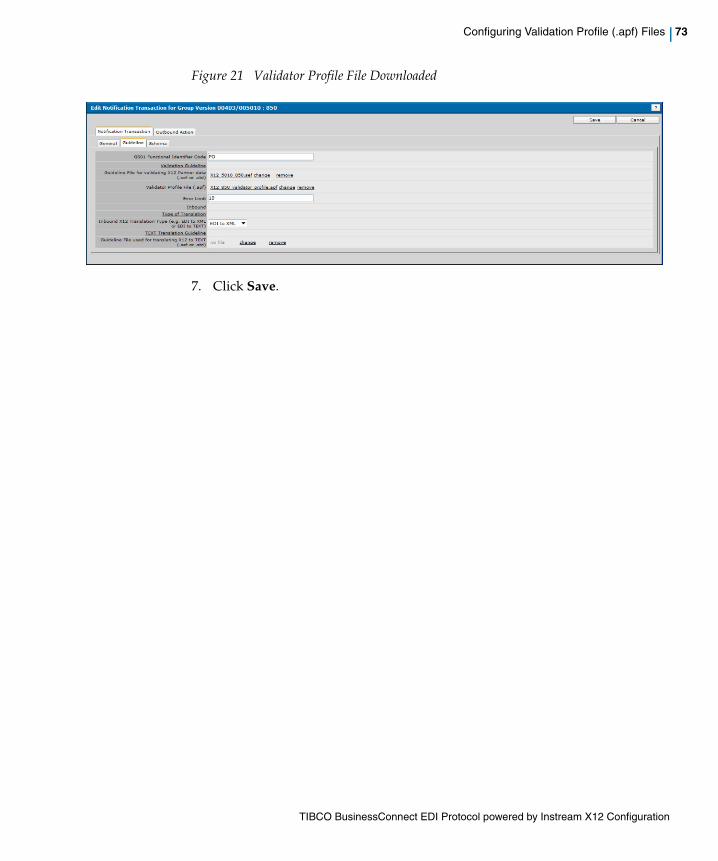
TIBCO BusinessConnect EDI Protocol powered by Instream X12 Configuration
Configuring Validation Profile (.apf) Files | 73
Figure 21 Validator Profile File Downloaded
7. Click Save.
TIBCO BusinessConnect EDI Protocol powered by Instream X12 Configuration
74 | Chapter 3 Managing X12 Interchanges, Functional Groups, and Transactions
Exporting Interchanges, Groups, and Transactions
To export interchanges, groups, and transactions, perform the following steps:
1. Click the BusinessConnect > Operations Editor link in the left panel.
2. Select the X12 link.
3. In the Edit Operations : X12 dialog, click on the topmost Plus (+) sign to show all existing transactions associated with the X12 protocol.
4. Click the radio button next to the interchange, group, or transaction you wish to export.
5. Click ExportXXX, where XXX is empty, Interchange, Group, or Transaction, depending on what you selected in step 4.
6. Set a password (optional) and click Export Data.
7. The Save As dialog displays with operations.csx as the suggested file name.
8. Click Save.
TIBCO BusinessConnect EDI Protocol powered by Instream X12 Configuration
Importing an Interchange Version | 75
Importing an Interchange Version
To import a previously exported interchange version into the Operations Editor, perform the following steps:
1. Click the BusinessConnect > Operations Editor link in the left panel.
2. Select Group by None in the right corner.
3. Click the Import button.
4. Next to the Upload Configuration Data File field, click change.
5. Click Browse.
6. Navigate to a directory containing an interchange and select the file (.csx).
7. Click Open.
8. Click OK.
9. Enter a password in needed.
10. Click Import.
Sample Interchange Versions
TIBCO BusinessConnect EDI Protocol powered by Instream provides a sample X12 interchange version 00403 that can be imported into the TIBCO BusinessConnect configuration store.
The sample interchange version is located in BC_HOME\protocols\tibedi\samples\interfaces\X12-00403.csx

TIBCO BusinessConnect EDI Protocol powered by Instream X12 Configuration
76 | Chapter 3 Managing X12 Interchanges, Functional Groups, and Transactions
TIBCO BusinessConnect EDI Protocol powered by Instream X12 Configuration
| 77
Chapter 4 Setting Up Trading Hosts
This chapter describes how to set up trading hosts in TIBCO BusinessConnect EDI Protocol powered by Instream when using X12.
Topics
• Configuring the X12 Protocol, page 78
• General Tab, page 79
• Preprocessing Tab, page 82
• Logging Tab, page 83
• Advanced Tab, page 84

TIBCO BusinessConnect EDI Protocol powered by Instream X12 Configuration
78 | Chapter 4 Setting Up Trading Hosts
Configuring the X12 Protocol
Before you can enable the X12 protocol, the trading host has to be configured. To do that, see Set Up a Host, page 19.
To enable the X12 protocol:
1. Click the BusinessConnect > Participants link in the left panel.
2. Click a host participant link in the right panel.
3. Click the Protocols tab.
4. If X12 does not appear in the list of protocols:
a. Click Enable Protocol.
b. Select the X12 check box.
c. Click OK.
5. Click the X12 link. The following configuration options are available:
— General Tab See General Tab, page 79.
— Preprocessing Tab Configure how to preprocess inbound and outbound X12 documents. Preprocessing is necessary if the X12 documents you exchange with your trading partner are formatted in any way. For example, preprocessing is necessary if the X12 document is blocked at 80 characters per line. See Preprocessing Tab, page 82.
— Logging Tab Set up logging properties for inbound and outbound documents. These logging properties will only apply to X12 documents being exchanged with your trading partner.
See Logging Tab, page 83.
— Advanced Tab Specify that inbound X12 messages that have been converted to XML should be published as a file reference when communicating with private processes. You can also use this panel to specify that the converted XML message should be in UTF-8 encoding.
See Advanced Tab, page 84.
6. Click Save after you finish with the configuration.
TIBCO BusinessConnect EDI Protocol powered by Instream X12 Configuration
General Tab | 79
General Tab
Use the General tab to set host general properties for X12.
Table 17 General Fields (Sheet 1 of 3)
Field Description
Default Interchange Qualifier ID
The interchange qualifier and ID to use for this trading host.
• For outbound documents, the qualifier and ID will be specified as the interchange sender qualifier and ID in the interchange header.
• For inbound documents, the interchange recipient qualifier and ID will be matched against the values of this field to ensure that the inbound document was intended for this host.
Adding a Default Interchange Qualifier and ID
To add a default interchange qualifier ID:
1. Click the Add New link.
2. Click the Add New button.
3. Select a qualifier from the Interchange Qualifier drop-down list. This is mapped to the Interchange Qualifier used by the host. For outbound documents, the interchange qualifier is not validated for the sender of a document.
4. Enter the mandatory identity for the local host in the ID field. This is mapped to the host’s Interchange ID. For example, 987654321 is the fictitious DUNS number used in the tutorial. For outbound documents, the interchange ID is not validated for the sender of a document.
5. Click Save and then OK.
AS2 Identifier An identifier to use in the AS2-From header field of the HTTP message. This identifier should be mutually agreed upon between trading partners.
This identifier can be an interchange ID. This only applies when using AS2 Transport.
Add New To use a new AS2 identifier:
1. Click on the Add New link and then on the Add New button.
2. Enter a name of the AS2 identity.
3. Click the new AS2 identifier in the dropdown list.

TIBCO BusinessConnect EDI Protocol powered by Instream X12 Configuration
80 | Chapter 4 Setting Up Trading Hosts
Common Code Identifier (used only for HTTP/S transport when NAESB/GISB packaging is selected )
Adding a Common Code Identifier
A Common Code Identifier is used in the "from" data element of the outbound NAESB packaged HTTP message. It should also be identical to the "to" data element of the inbound NAESB packaged HTTP message. This identifier should be mutually agreed upon between trading partners who use NAESB packaging.
DUNS numbers are used for Common Code Identifiers.
To add a Common Code identifier:
1. Click the Add New link.
2. Click the Add New button.
3. Enter a DUNS number of the DUNS identity (here it is 987654321)
4. Click Save and then OK.
Valid Email Address List
The identifier to use in the From header field of the SMTP MIME message. This email address list can be a list of email addresses.
• For an outbound document sent to the trading partner through SMTP transport, the first email address is used in the From header.
• For incoming email from the mail server, the To email address from the email is matched to one of the email addresses in this list. This only applies when using AS1 or AS2 transport.
Outbound CAQH CORE2 Username/Password Configurations
CAQH UserName to authenticate at Partner
The username a CORE-certified host uses to authenticate against a partner’s external authentication. For example, the username may be the email address a partner has registered with the host’s authentication system. The values for the username and password fields populate the appropriate envelope element of either the SOAP or Multipart MIME message sent to a partner.
This authentication mechanism is used for transactions involving messages that have been packaged according to the CAQH CORE Phase II Connectivity Rule. See Chapter 2, HIPAA Transaction Configuration, of TIBCO BusinessConnect EDI Protocol HIPAA Edition powered by Instream Configuration for more information about CAQH Phase II CORE connectivity standards.
Table 17 General Fields (Sheet 2 of 3)
Field Description
TIBCO BusinessConnect EDI Protocol powered by Instream X12 Configuration
General Tab | 81
• Click the Preprocessing tab.
CAQH Password to authenticate at Partner
The password a CORE-certified host uses to authenticate against a partner’s external authentication. The values for the username and password fields populate the appropriate envelope element of either the SOAP or Multipart MIME message sent to a partner.
This authentication mechanism is used for transactions involving messages that have been packaged according to the CAQH CORE Phase II Connectivity Rule. See Chapter 2, HIPAA Transaction Configuration, of TIBCO BusinessConnect EDI Protocol HIPAA Edition powered by Instream Configuration for more information about CAQH Phase II CORE connectivity standards.
Table 17 General Fields (Sheet 3 of 3)
Field Description
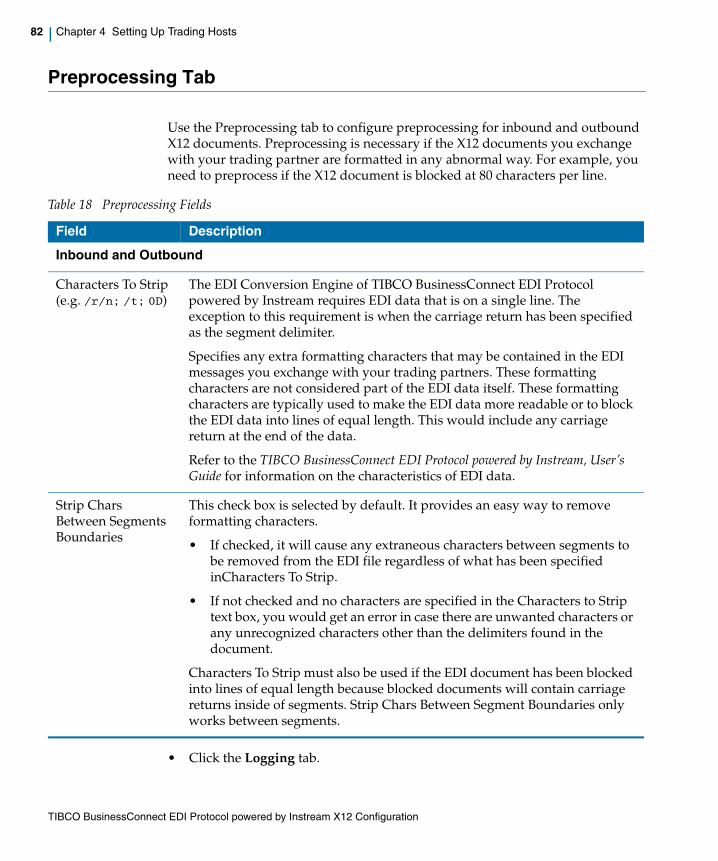
TIBCO BusinessConnect EDI Protocol powered by Instream X12 Configuration
82 | Chapter 4 Setting Up Trading Hosts
Preprocessing Tab
Use the Preprocessing tab to configure preprocessing for inbound and outbound X12 documents. Preprocessing is necessary if the X12 documents you exchange with your trading partner are formatted in any abnormal way. For example, you need to preprocess if the X12 document is blocked at 80 characters per line.
• Click the Logging tab.
Table 18 Preprocessing Fields
Field Description
Inbound and Outbound
Characters To Strip (e.g. /r/n; /t; 0D)
The EDI Conversion Engine of TIBCO BusinessConnect EDI Protocol powered by Instream requires EDI data that is on a single line. The exception to this requirement is when the carriage return has been specified as the segment delimiter.
Specifies any extra formatting characters that may be contained in the EDI messages you exchange with your trading partners. These formatting characters are not considered part of the EDI data itself. These formatting characters are typically used to make the EDI data more readable or to block the EDI data into lines of equal length. This would include any carriage return at the end of the data.
Refer to the TIBCO BusinessConnect EDI Protocol powered by Instream, User’s Guide for information on the characteristics of EDI data.
Strip Chars Between Segments Boundaries
This check box is selected by default. It provides an easy way to remove formatting characters.
• If checked, it will cause any extraneous characters between segments to be removed from the EDI file regardless of what has been specified inCharacters To Strip.
• If not checked and no characters are specified in the Characters to Strip text box, you would get an error in case there are unwanted characters or any unrecognized characters other than the delimiters found in the document.
Characters To Strip must also be used if the EDI document has been blocked into lines of equal length because blocked documents will contain carriage returns inside of segments. Strip Chars Between Segment Boundaries only works between segments.

TIBCO BusinessConnect EDI Protocol powered by Instream X12 Configuration
Logging Tab | 83
Logging Tab
Use the Logging tab to configure EDI-specific logging options available with TIBCO BusinessConnect EDI Protocol powered by Instream. For further information, see Document Archiving in TIBCO BusinessConnect EDI Protocol powered by Instream, User’s Guide.
• Click the Advanced tab.
Table 19 Logging Fields
Field Description
Inbound
Log Raw EDI Request to File
For inbound, log the original, intact, and unconverted inbound EDI document.
Store Location The original inbound EDI documents are stored in a directory whose name is derived from the specified location.
For information on how the files are named, see TIBCO BusinessConnect EDI Protocol powered by Instream, User’s Guide, Document Archiving.
Include Date Folder
Creates a file reference in a folder created based on the current date.
Outbound
Log Raw EDI Request to File
For outbound, log the raw EDI document sent to the trading partner.
If the option "Publish Information to Insight Reporting" is checked for Outbound, then this option is used to publish the ediDataFile element.
Store Location The original outbound EDI documents are archived in a directory whose name is derived from the specified location. For information on how the files are named, see TIBCO BusinessConnect EDI Protocol powered by Instream, User’s Guide, Document Archiving.
Include Date Folder
Creates a file reference in a folder created based on the current date.
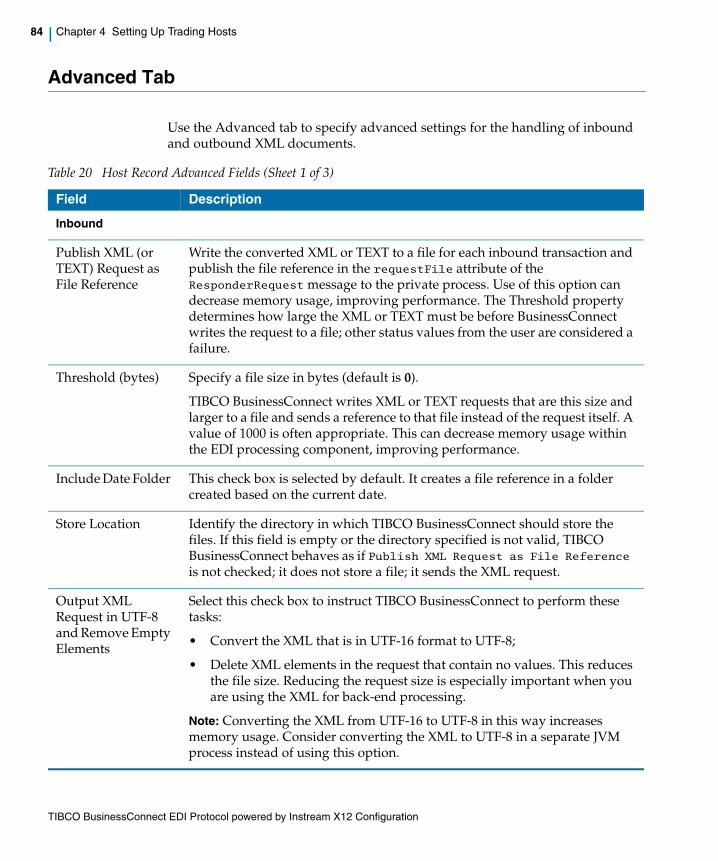
TIBCO BusinessConnect EDI Protocol powered by Instream X12 Configuration
84 | Chapter 4 Setting Up Trading Hosts
Advanced Tab
Use the Advanced tab to specify advanced settings for the handling of inbound and outbound XML documents.
Table 20 Host Record Advanced Fields (Sheet 1 of 3)
Field Description
Inbound
Publish XML (or TEXT) Request as File Reference
Write the converted XML or TEXT to a file for each inbound transaction and publish the file reference in the requestFile attribute of the ResponderRequest message to the private process. Use of this option can decrease memory usage, improving performance. The Threshold property determines how large the XML or TEXT must be before BusinessConnect writes the request to a file; other status values from the user are considered a failure.
Threshold (bytes) Specify a file size in bytes (default is 0).
TIBCO BusinessConnect writes XML or TEXT requests that are this size and larger to a file and sends a reference to that file instead of the request itself. A value of 1000 is often appropriate. This can decrease memory usage within the EDI processing component, improving performance.
Include Date Folder This check box is selected by default. It creates a file reference in a folder created based on the current date.
Store Location Identify the directory in which TIBCO BusinessConnect should store the files. If this field is empty or the directory specified is not valid, TIBCO BusinessConnect behaves as if Publish XML Request as File Reference is not checked; it does not store a file; it sends the XML request.
Output XML Request in UTF-8 and Remove Empty Elements
Select this check box to instruct TIBCO BusinessConnect to perform these tasks:
• Convert the XML that is in UTF-16 format to UTF-8;
• Delete XML elements in the request that contain no values. This reduces the file size. Reducing the request size is especially important when you are using the XML for back-end processing.
Note: Converting the XML from UTF-16 to UTF-8 in this way increases memory usage. Consider converting the XML to UTF-8 in a separate JVM process instead of using this option.

TIBCO BusinessConnect EDI Protocol powered by Instream X12 Configuration
Advanced Tab | 85
Use In-memory Compression During EDI to XML (or EDI to TEXT) Conversion
By default this check box is unselected.
Selecting this check box instructs TIBCO BusinessConnect to compress information stored in memory during the EDI to XML or TEXT conversion process. Although compressing and uncompressing data increases the processing time of the conversion process, it can greatly reduce memory usage. This option is useful when processing interchanges that contain a large number of messages.
Threshold to Use File-based Storage During EDI to XML (or EDI to TEXT) Conversion (bytes)
This threshold has a default value of 20,000,000 bytes (20MB).
This threshold is triggered only when an inbound message comes in from a trading partner and the threshold is applied on Interchange basis: if the size of the interchange is above the threshold, the BusinessConnect EDI engine will make the conversion engine in-built to validate and process all the transactions in that interchange, including errors on the disk. Only one currently processed transaction will be loaded into memory and discarded after processing in chunks, saving memory and keeping it low. This also allows the interchange to process a lots of errors without loading them into memory.
Frequent use of this threshold feature for very small sized files will slow the performance (depending on the network and I/O performance). It should be used only for fairly large interchanges, or for interchanges with lots of errors.
Inbound and Outbound
Threshold to Use File-based Storage Prior to EDI Processing (bytes)
This threshold has a default value of 1,000,000 bytes (1MB).
This threshold is triggered for both outbound and inbound messages and applies on an interchange basis. If the interchange or XML (in case of outbound) is larger than the threshold, it makes sure to be written to a temporary local file and given to the conversion engine (instead of passing it as a blob to the engine). This reduces the memory consumption prior to EDI processing.
This threshold does not resolve large number of smaller transaction details that will be in memory, or the number of errors that can still accumulate during processing by the conversion engine.
Table 20 Host Record Advanced Fields (Sheet 2 of 3)
Field Description
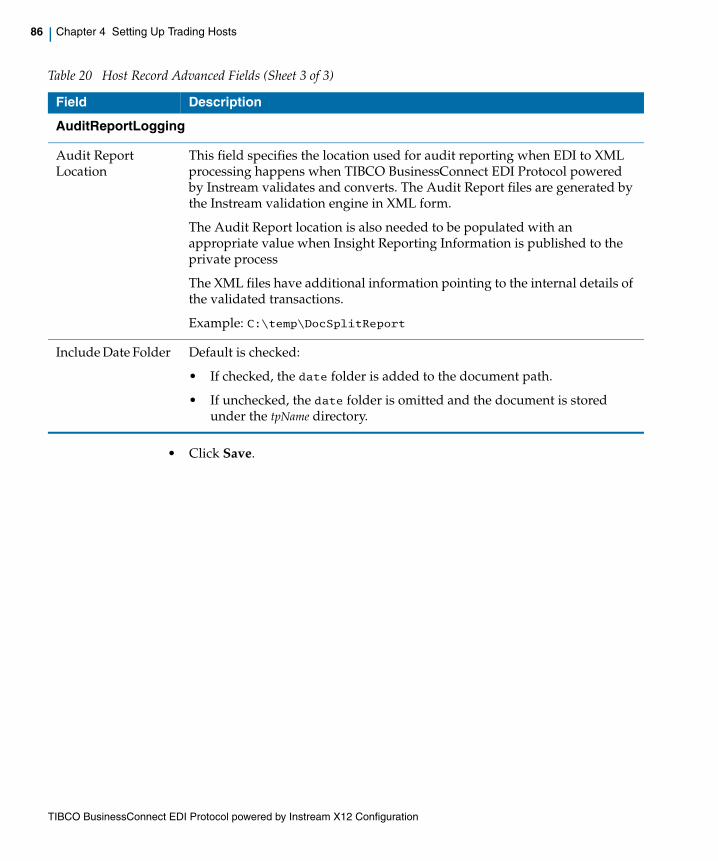
TIBCO BusinessConnect EDI Protocol powered by Instream X12 Configuration
86 | Chapter 4 Setting Up Trading Hosts
• Click Save.
AuditReportLogging
Audit Report Location
This field specifies the location used for audit reporting when EDI to XML processing happens when TIBCO BusinessConnect EDI Protocol powered by Instream validates and converts. The Audit Report files are generated by the Instream validation engine in XML form.
The Audit Report location is also needed to be populated with an appropriate value when Insight Reporting Information is published to the private process
The XML files have additional information pointing to the internal details of the validated transactions.
Example: C:\temp\DocSplitReport
Include Date Folder Default is checked:
• If checked, the date folder is added to the document path.
• If unchecked, the date folder is omitted and the document is stored under the tpName directory.
Table 20 Host Record Advanced Fields (Sheet 3 of 3)
Field Description

TIBCO BusinessConnect EDI Protocol powered by Instream X12 Configuration
Setting | 87
Setting
Chapter 5 Setting Up Trading Partners
This chapter describes setting up your trading partners in TIBCO BusinessConnect EDI Protocol powered by Instream when using X12.
Topics
• Configuring the X12 Protocol, page 88
• General Tab, page 89
• Logging Tab, page 95
• Batching Tab, page 96
• Interchange Header Tab, page 98
• Group Header Tab, page 100
• Acknowledgement Tab, page 101
• Control Numbers Tab, page 104
• Delimiters Tab, page 107
• Transports Tab, page 108

TIBCO BusinessConnect EDI Protocol powered by Instream X12 Configuration
88 | Chapter 5 Setting Up Trading Partners
Configuring the X12 Protocol
Before you can enable the X12 protocol, the trading partner has to be configured. To do that, see Set Up a Partner, page 21.
To enable the X12 protocol:
1. Click the BusinessConnect > Participants link in the left panel.
2. Click a partner participant link in the right panel.
3. Click the Protocols tab.
4. If X12 does not appear in the list of protocols:
a. Click Enable Protocol.
b. Select the X12 check box.
c. Click OK.
5. Click the X12 link. The following configuration options are available:
— General Tab, page 89.
— Logging Tab, page 95.
— Batching Tab, page 96.
— Interchange Header Tab, page 98.
— Group Header Tab, page 100.
— Acknowledgement Tab, page 101.
— Control Numbers Tab, page 104.
— Delimiters Tab, page 107.
— Transports Tab, page 108
6. After you finish configuring all tabs, click Save.
T To properly mark the ISA, GS, and ST segments with a DSR mark, as required for proper acknowledgements generation, refer to the documentation provided with the EDISIM Standards Editor.
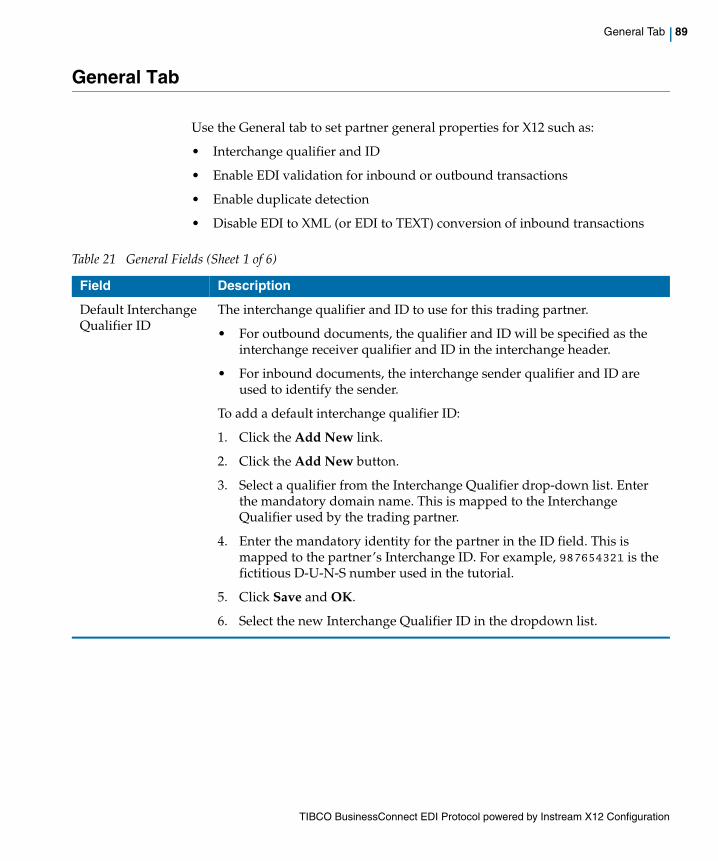
TIBCO BusinessConnect EDI Protocol powered by Instream X12 Configuration
General Tab | 89
General Tab
Use the General tab to set partner general properties for X12 such as:
• Interchange qualifier and ID
• Enable EDI validation for inbound or outbound transactions
• Enable duplicate detection
• Disable EDI to XML (or EDI to TEXT) conversion of inbound transactions
Table 21 General Fields (Sheet 1 of 6)
Field Description
Default Interchange Qualifier ID
The interchange qualifier and ID to use for this trading partner.
• For outbound documents, the qualifier and ID will be specified as the interchange receiver qualifier and ID in the interchange header.
• For inbound documents, the interchange sender qualifier and ID are used to identify the sender.
To add a default interchange qualifier ID:
1. Click the Add New link.
2. Click the Add New button.
3. Select a qualifier from the Interchange Qualifier drop-down list. Enter the mandatory domain name. This is mapped to the Interchange Qualifier used by the trading partner.
4. Enter the mandatory identity for the partner in the ID field. This is mapped to the partner’s Interchange ID. For example, 987654321 is the fictitious D-U-N-S number used in the tutorial.
5. Click Save and OK.
6. Select the new Interchange Qualifier ID in the dropdown list.

TIBCO BusinessConnect EDI Protocol powered by Instream X12 Configuration
90 | Chapter 5 Setting Up Trading Partners
AS2 Identifier An identifier to use in the AS2-To header field of the HTTP message. This identifier should be mutually agreed upon between trading partners.
This identifier can be an interchange ID. This only applies when using AS2 Transport.
Add New To use a new AS2 identifier:
1. Click on the Add New link and then on the Add New button.
2. Enter a name of the AS2 identity.
3. Click the new AS2 identifier in the dropdown list.
Common Code Identifier (used only for HTTP/S transport when NAESB/GISB packaging is selected )
A Common Code Identifier is used in the "to" data element of the outbound NAESB packaged HTTP message. It should also be identical to the "from" data element of the inbound NAESB packaged HTTP message from this partner. This identifier should be mutually agreed upon between trading partners who use NAESB packaging. DUNS numbers are used for Common Code Identifiers.
DUNS numbers are used for Common Code Identifiers.
To add a Common Code identifier:
1. Click the Add New link.
2. Click the Add New button.
3. Enter a DUNS number of the DUNS identity.
4. Click Save and then OK.
Valid Email Address List
The email address that is used to match against incoming email from the mail server. If the incoming email From address matches to any email address in this list, then this trading partner is recognized as the sender.
This only applies when using AS1 or AS2 transport.
Inbound
Enable EDI Validation
Default is checked.
Validate inbound EDI documents before TIBCO BusinessConnect converts and forwards them to the private process. This involves using the guidelines configured in the configuration store to validate inbound EDI data. For "Publish Information to Insight Reporting" option to take effect, this option must be enabled.
Table 21 General Fields (Sheet 2 of 6)
Field Description
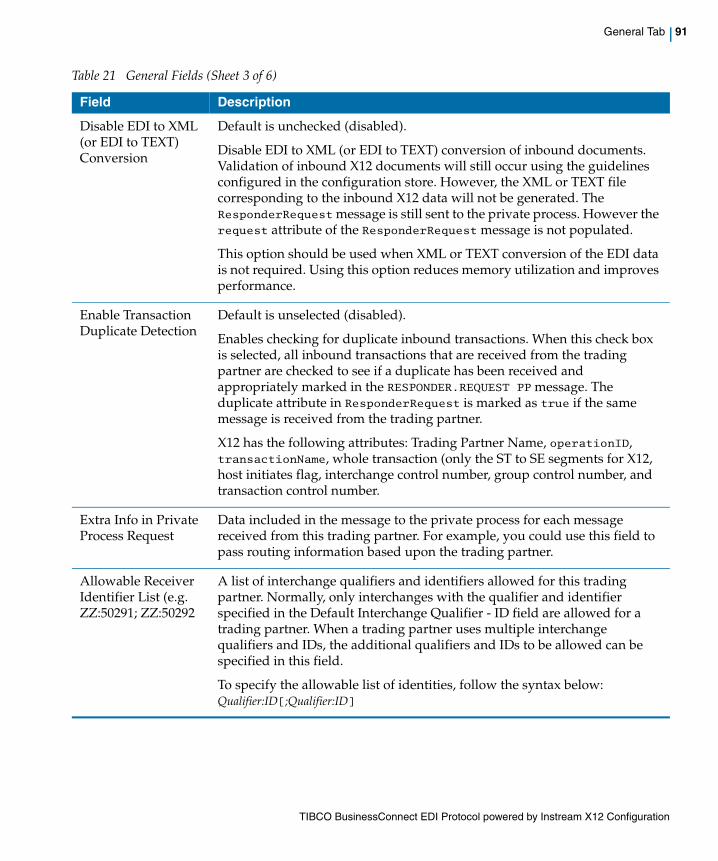
TIBCO BusinessConnect EDI Protocol powered by Instream X12 Configuration
General Tab | 91
Disable EDI to XML (or EDI to TEXT) Conversion
Default is unchecked (disabled).
Disable EDI to XML (or EDI to TEXT) conversion of inbound documents. Validation of inbound X12 documents will still occur using the guidelines configured in the configuration store. However, the XML or TEXT file corresponding to the inbound X12 data will not be generated. The ResponderRequest message is still sent to the private process. However the request attribute of the ResponderRequest message is not populated.
This option should be used when XML or TEXT conversion of the EDI data is not required. Using this option reduces memory utilization and improves performance.
Enable Transaction Duplicate Detection
Default is unselected (disabled).
Enables checking for duplicate inbound transactions. When this check box is selected, all inbound transactions that are received from the trading partner are checked to see if a duplicate has been received and appropriately marked in the RESPONDER.REQUEST PP message. The duplicate attribute in ResponderRequest is marked as true if the same message is received from the trading partner.
X12 has the following attributes: Trading Partner Name, operationID, transactionName, whole transaction (only the ST to SE segments for X12, host initiates flag, interchange control number, group control number, and transaction control number.
Extra Info in Private Process Request
Data included in the message to the private process for each message received from this trading partner. For example, you could use this field to pass routing information based upon the trading partner.
Allowable Receiver Identifier List (e.g. ZZ:50291; ZZ:50292
A list of interchange qualifiers and identifiers allowed for this trading partner. Normally, only interchanges with the qualifier and identifier specified in the Default Interchange Qualifier - ID field are allowed for a trading partner. When a trading partner uses multiple interchange qualifiers and IDs, the additional qualifiers and IDs to be allowed can be specified in this field.
To specify the allowable list of identities, follow the syntax below: Qualifier:ID[;Qualifier:ID]
Table 21 General Fields (Sheet 3 of 6)
Field Description
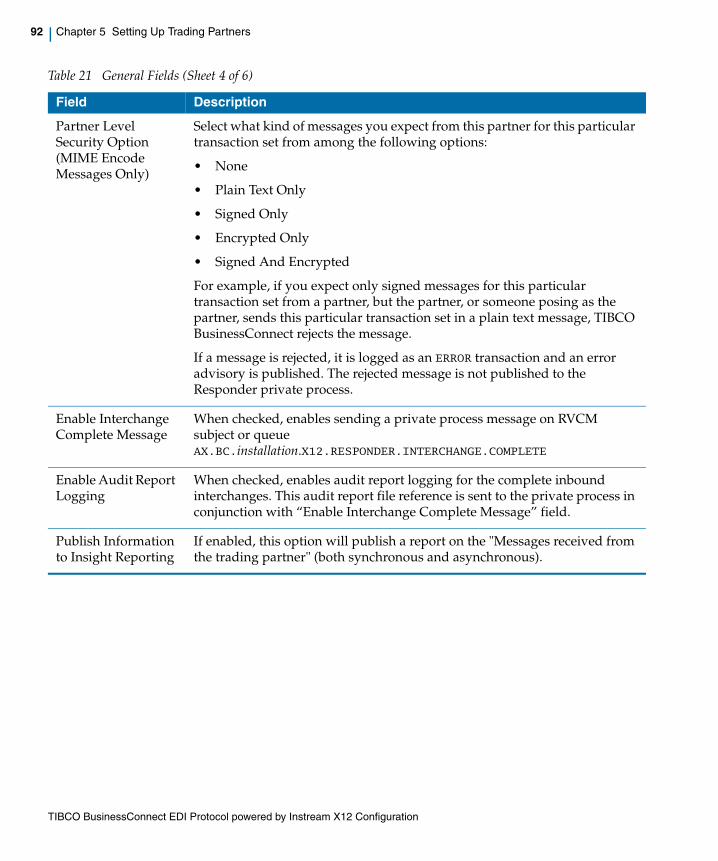
TIBCO BusinessConnect EDI Protocol powered by Instream X12 Configuration
92 | Chapter 5 Setting Up Trading Partners
Partner Level Security Option (MIME Encode Messages Only)
Select what kind of messages you expect from this partner for this particular transaction set from among the following options:
• None
• Plain Text Only
• Signed Only
• Encrypted Only
• Signed And Encrypted
For example, if you expect only signed messages for this particular transaction set from a partner, but the partner, or someone posing as the partner, sends this particular transaction set in a plain text message, TIBCO BusinessConnect rejects the message.
If a message is rejected, it is logged as an ERROR transaction and an error advisory is published. The rejected message is not published to the Responder private process.
Enable Interchange Complete Message
When checked, enables sending a private process message on RVCM subject or queue AX.BC.installation.X12.RESPONDER.INTERCHANGE.COMPLETE
Enable Audit Report Logging
When checked, enables audit report logging for the complete inbound interchanges. This audit report file reference is sent to the private process in conjunction with “Enable Interchange Complete Message” field.
Publish Information to Insight Reporting
If enabled, this option will publish a report on the "Messages received from the trading partner" (both synchronous and asynchronous).
Table 21 General Fields (Sheet 4 of 6)
Field Description
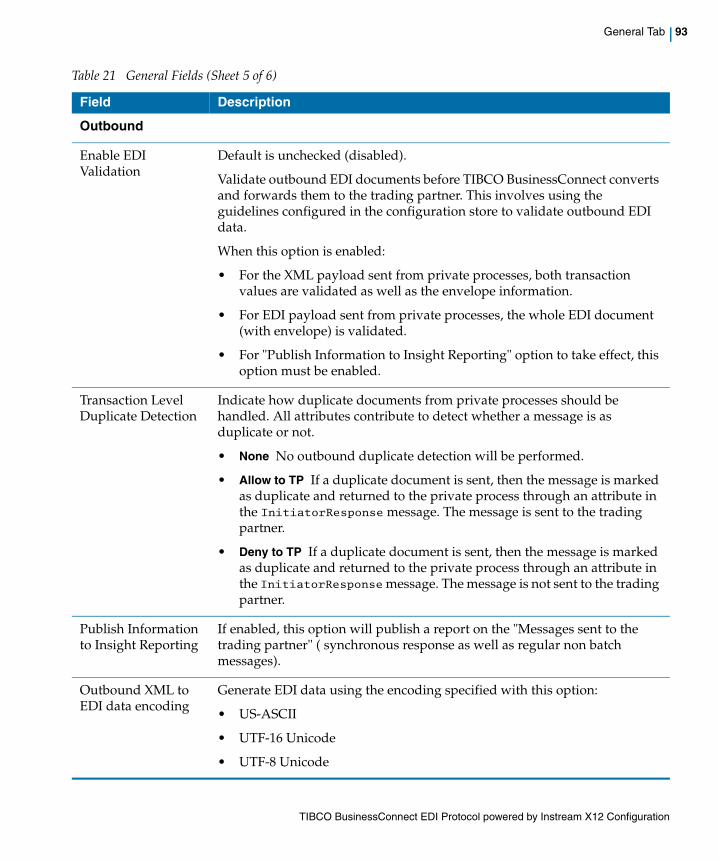
TIBCO BusinessConnect EDI Protocol powered by Instream X12 Configuration
General Tab | 93
Outbound
Enable EDI Validation
Default is unchecked (disabled).
Validate outbound EDI documents before TIBCO BusinessConnect converts and forwards them to the trading partner. This involves using the guidelines configured in the configuration store to validate outbound EDI data.
When this option is enabled:
• For the XML payload sent from private processes, both transaction values are validated as well as the envelope information.
• For EDI payload sent from private processes, the whole EDI document (with envelope) is validated.
• For "Publish Information to Insight Reporting" option to take effect, this option must be enabled.
Transaction Level Duplicate Detection
Indicate how duplicate documents from private processes should be handled. All attributes contribute to detect whether a message is as duplicate or not.
• None No outbound duplicate detection will be performed.
• Allow to TP If a duplicate document is sent, then the message is marked as duplicate and returned to the private process through an attribute in the InitiatorResponse message. The message is sent to the trading partner.
• Deny to TP If a duplicate document is sent, then the message is marked as duplicate and returned to the private process through an attribute in the InitiatorResponse message. The message is not sent to the trading partner.
Publish Information to Insight Reporting
If enabled, this option will publish a report on the "Messages sent to the trading partner" ( synchronous response as well as regular non batch messages).
Outbound XML to EDI data encoding
Generate EDI data using the encoding specified with this option:
• US-ASCII
• UTF-16 Unicode
• UTF-8 Unicode
Table 21 General Fields (Sheet 5 of 6)
Field Description
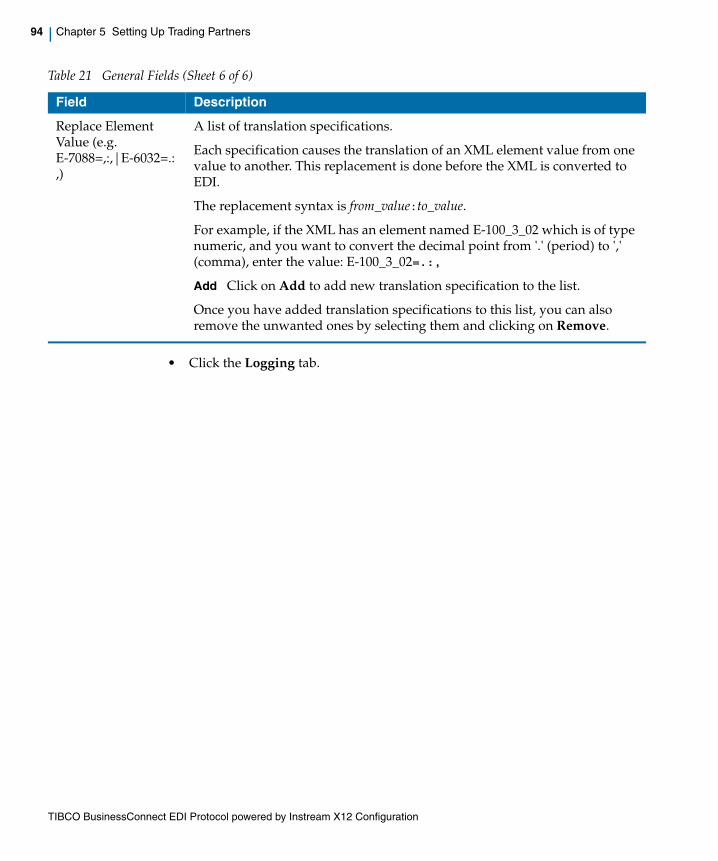
TIBCO BusinessConnect EDI Protocol powered by Instream X12 Configuration
94 | Chapter 5 Setting Up Trading Partners
• Click the Logging tab.
Replace Element Value (e.g. E-7088=,:,|E-6032=.:,)
A list of translation specifications.
Each specification causes the translation of an XML element value from one value to another. This replacement is done before the XML is converted to EDI.
The replacement syntax is from_value:to_value.
For example, if the XML has an element named E-100_3_02 which is of type numeric, and you want to convert the decimal point from '.' (period) to ',' (comma), enter the value: E-100_3_02=.:,
Add Click on Add to add new translation specification to the list.
Once you have added translation specifications to this list, you can also remove the unwanted ones by selecting them and clicking on Remove.
Table 21 General Fields (Sheet 6 of 6)
Field Description
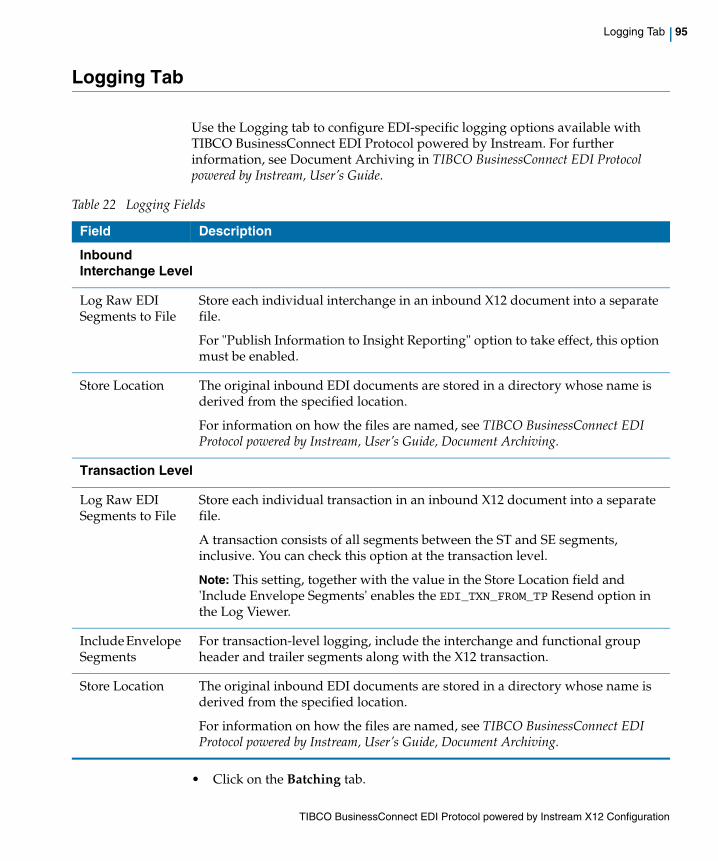
TIBCO BusinessConnect EDI Protocol powered by Instream X12 Configuration
Logging Tab | 95
Logging Tab
Use the Logging tab to configure EDI-specific logging options available with TIBCO BusinessConnect EDI Protocol powered by Instream. For further information, see Document Archiving in TIBCO BusinessConnect EDI Protocol powered by Instream, User’s Guide.
• Click on the Batching tab.
Table 22 Logging Fields
Field Description
InboundInterchange Level
Log Raw EDI Segments to File
Store each individual interchange in an inbound X12 document into a separate file.
For "Publish Information to Insight Reporting" option to take effect, this option must be enabled.
Store Location The original inbound EDI documents are stored in a directory whose name is derived from the specified location.
For information on how the files are named, see TIBCO BusinessConnect EDI Protocol powered by Instream, User’s Guide, Document Archiving.
Transaction Level
Log Raw EDI Segments to File
Store each individual transaction in an inbound X12 document into a separate file.
A transaction consists of all segments between the ST and SE segments, inclusive. You can check this option at the transaction level.
Note: This setting, together with the value in the Store Location field and 'Include Envelope Segments' enables the EDI_TXN_FROM_TP Resend option in the Log Viewer.
Include Envelope Segments
For transaction-level logging, include the interchange and functional group header and trailer segments along with the X12 transaction.
Store Location The original inbound EDI documents are stored in a directory whose name is derived from the specified location.
For information on how the files are named, see TIBCO BusinessConnect EDI Protocol powered by Instream, User’s Guide, Document Archiving.
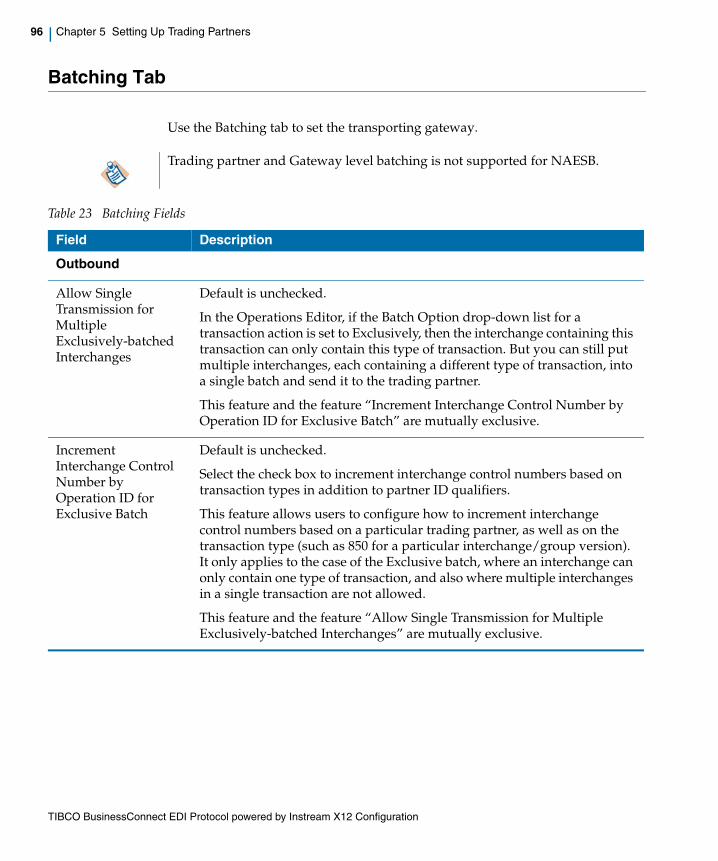
TIBCO BusinessConnect EDI Protocol powered by Instream X12 Configuration
96 | Chapter 5 Setting Up Trading Partners
Batching Tab
Use the Batching tab to set the transporting gateway.
Trading partner and Gateway level batching is not supported for NAESB.
Table 23 Batching Fields
Field Description
Outbound
Allow Single Transmission for Multiple Exclusively-batched Interchanges
Default is unchecked.
In the Operations Editor, if the Batch Option drop-down list for a transaction action is set to Exclusively, then the interchange containing this transaction can only contain this type of transaction. But you can still put multiple interchanges, each containing a different type of transaction, into a single batch and send it to the trading partner.
This feature and the feature “Increment Interchange Control Number by Operation ID for Exclusive Batch” are mutually exclusive.
Increment Interchange Control Number by Operation ID for Exclusive Batch
Default is unchecked.
Select the check box to increment interchange control numbers based on transaction types in addition to partner ID qualifiers.
This feature allows users to configure how to increment interchange control numbers based on a particular trading partner, as well as on the transaction type (such as 850 for a particular interchange/group version). It only applies to the case of the Exclusive batch, where an interchange can only contain one type of transaction, and also where multiple interchanges in a single transaction are not allowed.
This feature and the feature “Allow Single Transmission for Multiple Exclusively-batched Interchanges” are mutually exclusive.
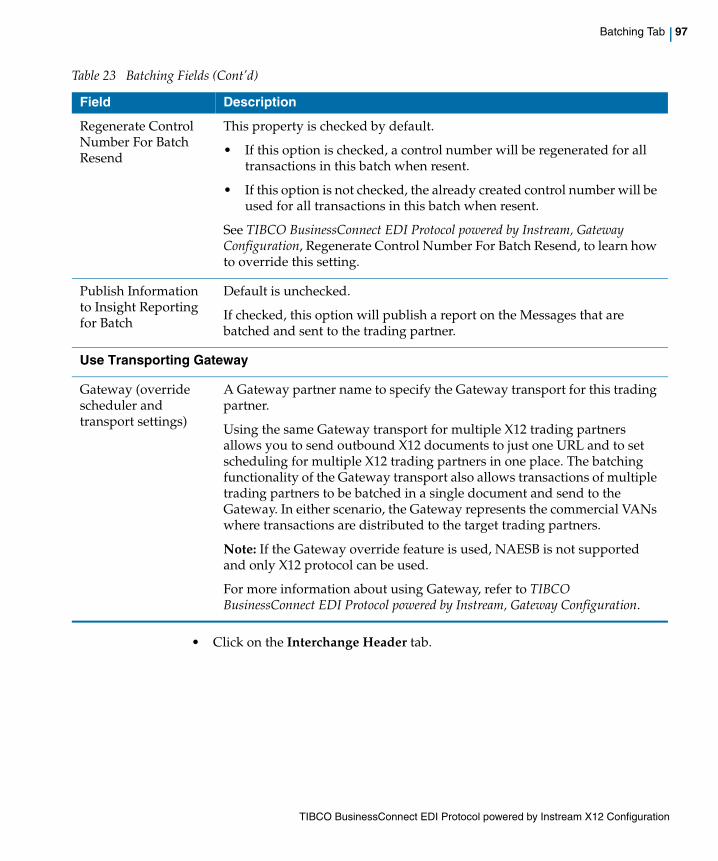
TIBCO BusinessConnect EDI Protocol powered by Instream X12 Configuration
Batching Tab | 97
• Click on the Interchange Header tab.
Regenerate Control Number For Batch Resend
This property is checked by default.
• If this option is checked, a control number will be regenerated for all transactions in this batch when resent.
• If this option is not checked, the already created control number will be used for all transactions in this batch when resent.
See TIBCO BusinessConnect EDI Protocol powered by Instream, Gateway Configuration, Regenerate Control Number For Batch Resend, to learn how to override this setting.
Publish Information to Insight Reporting for Batch
Default is unchecked.
If checked, this option will publish a report on the Messages that are batched and sent to the trading partner.
Use Transporting Gateway
Gateway (override scheduler and transport settings)
A Gateway partner name to specify the Gateway transport for this trading partner.
Using the same Gateway transport for multiple X12 trading partners allows you to send outbound X12 documents to just one URL and to set scheduling for multiple X12 trading partners in one place. The batching functionality of the Gateway transport also allows transactions of multiple trading partners to be batched in a single document and send to the Gateway. In either scenario, the Gateway represents the commercial VANs where transactions are distributed to the target trading partners.
Note: If the Gateway override feature is used, NAESB is not supported and only X12 protocol can be used.
For more information about using Gateway, refer to TIBCO BusinessConnect EDI Protocol powered by Instream, Gateway Configuration.
Table 23 Batching Fields (Cont’d)
Field Description
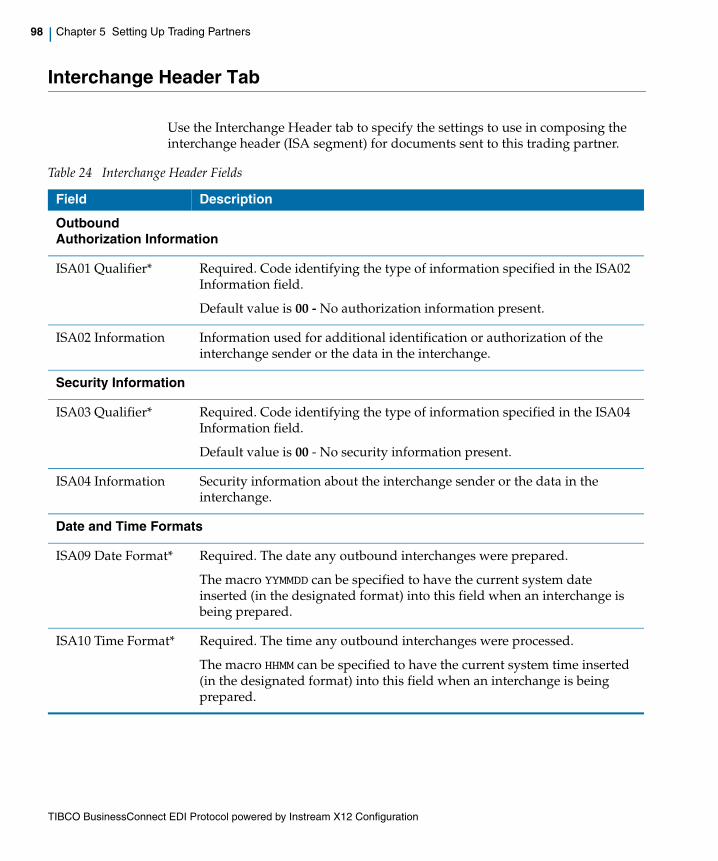
TIBCO BusinessConnect EDI Protocol powered by Instream X12 Configuration
98 | Chapter 5 Setting Up Trading Partners
Interchange Header Tab
Use the Interchange Header tab to specify the settings to use in composing the interchange header (ISA segment) for documents sent to this trading partner.
Table 24 Interchange Header Fields
Field Description
OutboundAuthorization Information
ISA01 Qualifier* Required. Code identifying the type of information specified in the ISA02 Information field.
Default value is 00 - No authorization information present.
ISA02 Information Information used for additional identification or authorization of the interchange sender or the data in the interchange.
Security Information
ISA03 Qualifier* Required. Code identifying the type of information specified in the ISA04 Information field.
Default value is 00 - No security information present.
ISA04 Information Security information about the interchange sender or the data in the interchange.
Date and Time Formats
ISA09 Date Format* Required. The date any outbound interchanges were prepared.
The macro YYMMDD can be specified to have the current system date inserted (in the designated format) into this field when an interchange is being prepared.
ISA10 Time Format* Required. The time any outbound interchanges were processed.
The macro HHMM can be specified to have the current system time inserted (in the designated format) into this field when an interchange is being prepared.
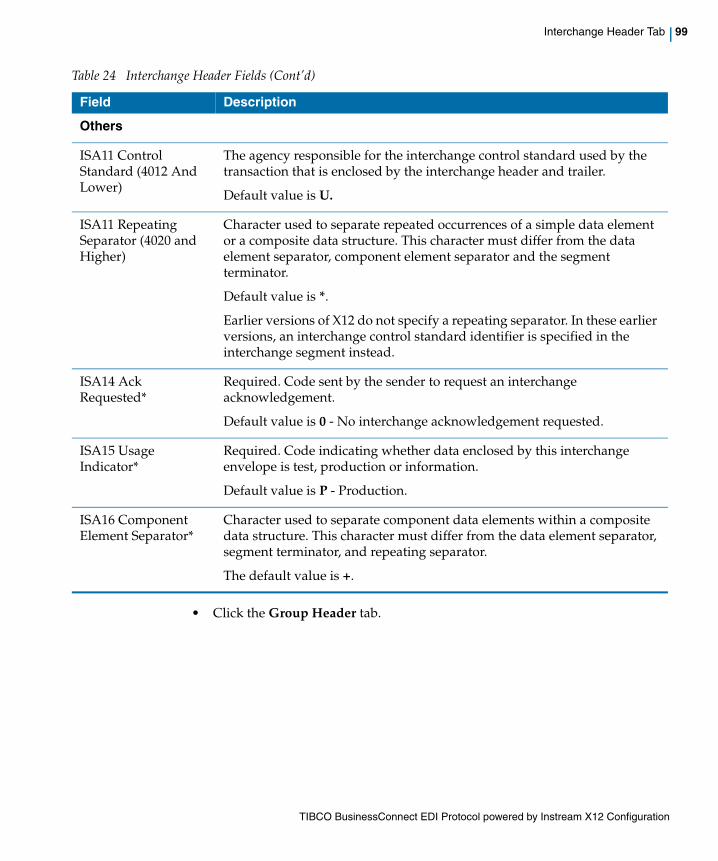
TIBCO BusinessConnect EDI Protocol powered by Instream X12 Configuration
Interchange Header Tab | 99
• Click the Group Header tab.
Others
ISA11 Control Standard (4012 And Lower)
The agency responsible for the interchange control standard used by the transaction that is enclosed by the interchange header and trailer.
Default value is U.
ISA11 Repeating Separator (4020 and Higher)
Character used to separate repeated occurrences of a simple data element or a composite data structure. This character must differ from the data element separator, component element separator and the segment terminator.
Default value is *.
Earlier versions of X12 do not specify a repeating separator. In these earlier versions, an interchange control standard identifier is specified in the interchange segment instead.
ISA14 Ack Requested*
Required. Code sent by the sender to request an interchange acknowledgement.
Default value is 0 - No interchange acknowledgement requested.
ISA15 Usage Indicator*
Required. Code indicating whether data enclosed by this interchange envelope is test, production or information.
Default value is P - Production.
ISA16 Component Element Separator*
Character used to separate component data elements within a composite data structure. This character must differ from the data element separator, segment terminator, and repeating separator.
The default value is +.
Table 24 Interchange Header Fields (Cont’d)
Field Description
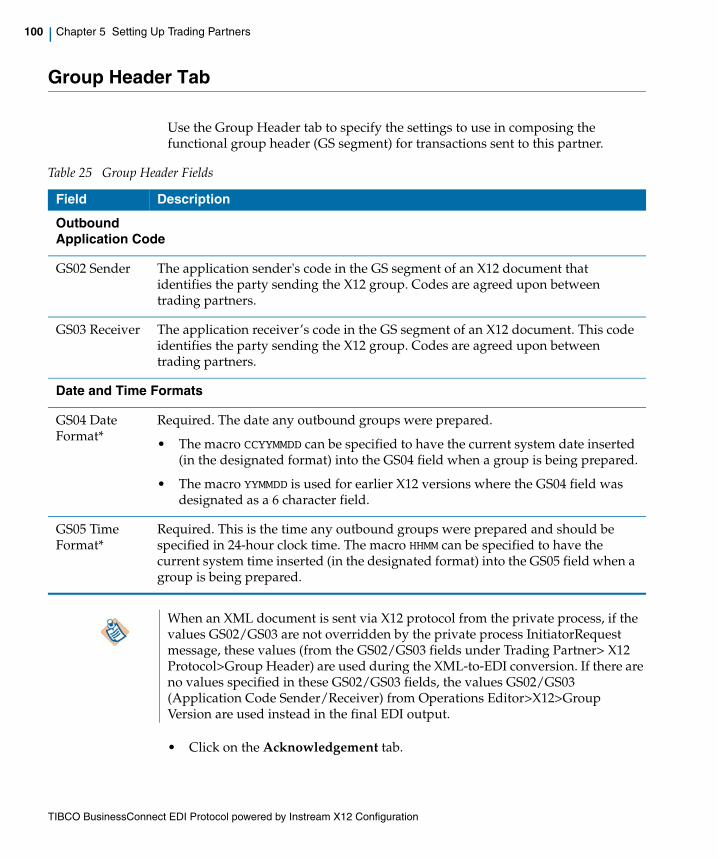
TIBCO BusinessConnect EDI Protocol powered by Instream X12 Configuration
100 | Chapter 5 Setting Up Trading Partners
Group Header Tab
Use the Group Header tab to specify the settings to use in composing the functional group header (GS segment) for transactions sent to this partner.
• Click on the Acknowledgement tab.
Table 25 Group Header Fields
Field Description
OutboundApplication Code
GS02 Sender The application sender's code in the GS segment of an X12 document that identifies the party sending the X12 group. Codes are agreed upon between trading partners.
GS03 Receiver The application receiver’s code in the GS segment of an X12 document. This code identifies the party sending the X12 group. Codes are agreed upon between trading partners.
Date and Time Formats
GS04 Date Format*
Required. The date any outbound groups were prepared.
• The macro CCYYMMDD can be specified to have the current system date inserted (in the designated format) into the GS04 field when a group is being prepared.
• The macro YYMMDD is used for earlier X12 versions where the GS04 field was designated as a 6 character field.
GS05 Time Format*
Required. This is the time any outbound groups were prepared and should be specified in 24-hour clock time. The macro HHMM can be specified to have the current system time inserted (in the designated format) into the GS05 field when a group is being prepared.
When an XML document is sent via X12 protocol from the private process, if the values GS02/GS03 are not overridden by the private process InitiatorRequest message, these values (from the GS02/GS03 fields under Trading Partner> X12 Protocol>Group Header) are used during the XML-to-EDI conversion. If there are no values specified in these GS02/GS03 fields, the values GS02/GS03 (Application Code Sender/Receiver) from Operations Editor>X12>Group Version are used instead in the final EDI output.
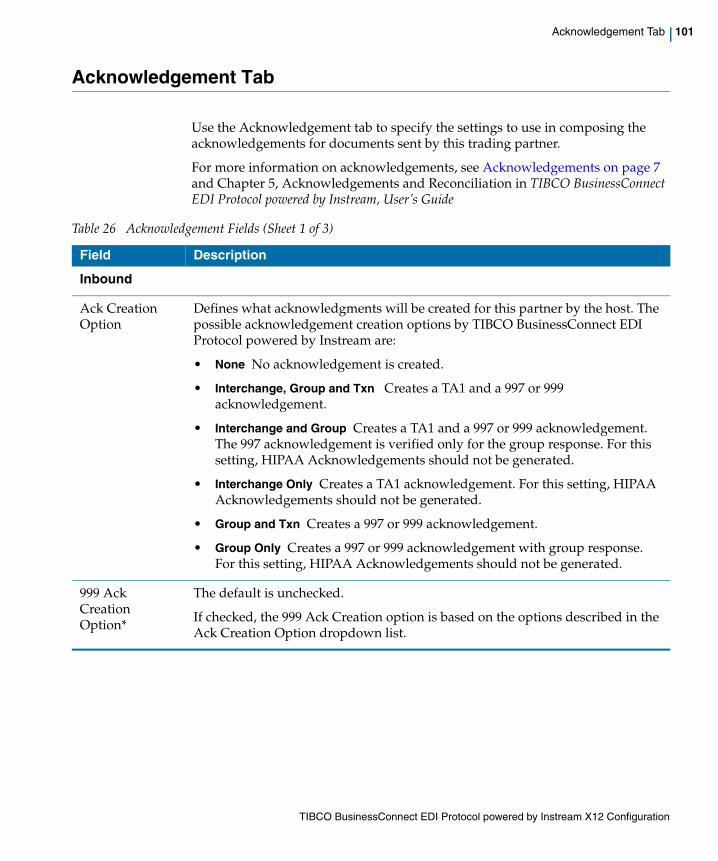
TIBCO BusinessConnect EDI Protocol powered by Instream X12 Configuration
Acknowledgement Tab | 101
Acknowledgement Tab
Use the Acknowledgement tab to specify the settings to use in composing the acknowledgements for documents sent by this trading partner.
For more information on acknowledgements, see Acknowledgements on page 7 and Chapter 5, Acknowledgements and Reconciliation in TIBCO BusinessConnect EDI Protocol powered by Instream, User’s Guide
Table 26 Acknowledgement Fields (Sheet 1 of 3)
Field Description
Inbound
Ack Creation Option
Defines what acknowledgments will be created for this partner by the host. The possible acknowledgement creation options by TIBCO BusinessConnect EDI Protocol powered by Instream are:
• None No acknowledgement is created.
• Interchange, Group and Txn Creates a TA1 and a 997 or 999 acknowledgement.
• Interchange and Group Creates a TA1 and a 997 or 999 acknowledgement. The 997 acknowledgement is verified only for the group response. For this setting, HIPAA Acknowledgements should not be generated.
• Interchange Only Creates a TA1 acknowledgement. For this setting, HIPAA Acknowledgements should not be generated.
• Group and Txn Creates a 997 or 999 acknowledgement.
• Group Only Creates a 997 or 999 acknowledgement with group response. For this setting, HIPAA Acknowledgements should not be generated.
999 Ack Creation Option*
The default is unchecked.
If checked, the 999 Ack Creation option is based on the options described in the Ack Creation Option dropdown list.
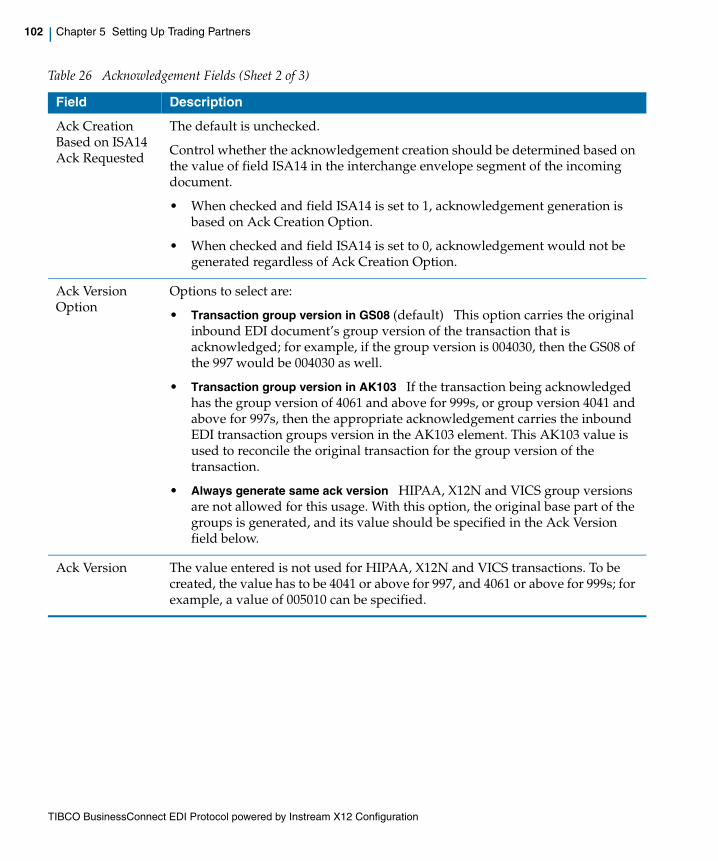
TIBCO BusinessConnect EDI Protocol powered by Instream X12 Configuration
102 | Chapter 5 Setting Up Trading Partners
Ack Creation Based on ISA14 Ack Requested
The default is unchecked.
Control whether the acknowledgement creation should be determined based on the value of field ISA14 in the interchange envelope segment of the incoming document.
• When checked and field ISA14 is set to 1, acknowledgement generation is based on Ack Creation Option.
• When checked and field ISA14 is set to 0, acknowledgement would not be generated regardless of Ack Creation Option.
Ack Version Option
Options to select are:
• Transaction group version in GS08 (default) This option carries the original inbound EDI document’s group version of the transaction that is acknowledged; for example, if the group version is 004030, then the GS08 of the 997 would be 004030 as well.
• Transaction group version in AK103 If the transaction being acknowledged has the group version of 4061 and above for 999s, or group version 4041 and above for 997s, then the appropriate acknowledgement carries the inbound EDI transaction groups version in the AK103 element. This AK103 value is used to reconcile the original transaction for the group version of the transaction.
• Always generate same ack version HIPAA, X12N and VICS group versions are not allowed for this usage. With this option, the original base part of the groups is generated, and its value should be specified in the Ack Version field below.
Ack Version The value entered is not used for HIPAA, X12N and VICS transactions. To be created, the value has to be 4041 or above for 997, and 4061 or above for 999s; for example, a value of 005010 can be specified.
Table 26 Acknowledgement Fields (Sheet 2 of 3)
Field Description
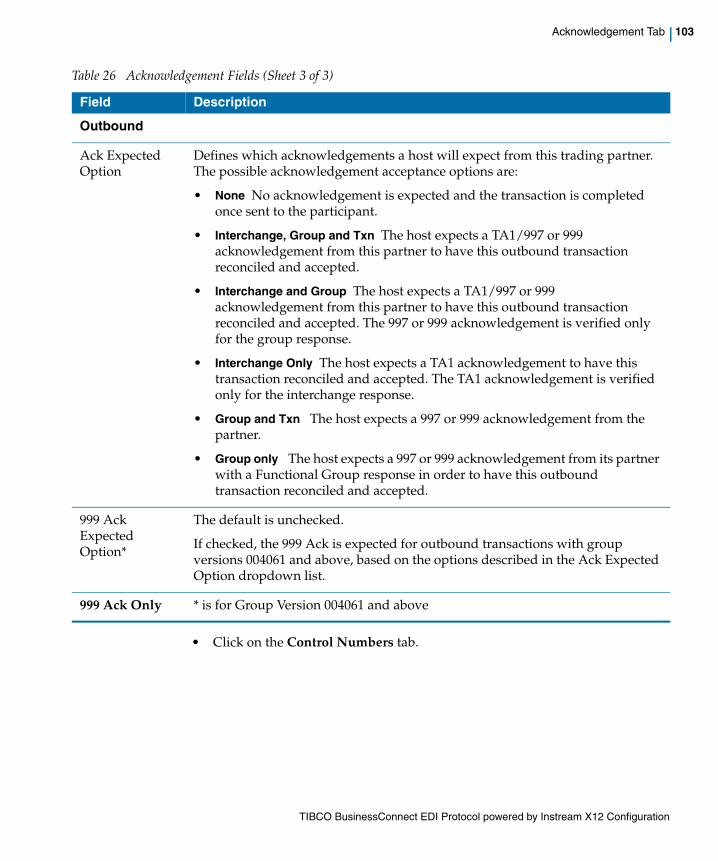
TIBCO BusinessConnect EDI Protocol powered by Instream X12 Configuration
Acknowledgement Tab | 103
• Click on the Control Numbers tab.
Outbound
Ack Expected Option
Defines which acknowledgements a host will expect from this trading partner. The possible acknowledgement acceptance options are:
• None No acknowledgement is expected and the transaction is completed once sent to the participant.
• Interchange, Group and Txn The host expects a TA1/997 or 999 acknowledgement from this partner to have this outbound transaction reconciled and accepted.
• Interchange and Group The host expects a TA1/997 or 999 acknowledgement from this partner to have this outbound transaction reconciled and accepted. The 997 or 999 acknowledgement is verified only for the group response.
• Interchange Only The host expects a TA1 acknowledgement to have this transaction reconciled and accepted. The TA1 acknowledgement is verified only for the interchange response.
• Group and Txn The host expects a 997 or 999 acknowledgement from the partner.
• Group only The host expects a 997 or 999 acknowledgement from its partner with a Functional Group response in order to have this outbound transaction reconciled and accepted.
999 Ack Expected Option*
The default is unchecked.
If checked, the 999 Ack is expected for outbound transactions with group versions 004061 and above, based on the options described in the Ack Expected Option dropdown list.
999 Ack Only * is for Group Version 004061 and above
Table 26 Acknowledgement Fields (Sheet 3 of 3)
Field Description

TIBCO BusinessConnect EDI Protocol powered by Instream X12 Configuration
104 | Chapter 5 Setting Up Trading Partners
Control Numbers Tab
Use the Control Numbers tab to specify settings which affect the validation or generation of control numbers for this trading partner. The inbound settings affect the validation of control numbers in documents received from this trading partner. The outbound settings affect the generation of control numbers to be included in documents sent to this trading partner.
For more information on control numbers, see Control Number Management in TIBCO BusinessConnect EDI Protocol powered by Instream, User’s Guide.
Table 27 Control Numbers Fields (Sheet 1 of 3)
Field Description
Inbound
Group Control Number Increment Across Interchanges
Indicates whether to validate that group control numbers increment across interchanges.
Selections are True and False.
Interchange Control Number Sequence Check
Specifies how interchange control numbers are validated across a sequence of transactions:
• None No validation is performed.
• Incremental Successive interchange control numbers must increase by 1.
• Chronological Successive interchange control numbers must increase by >= 1.
Group Control Number Sequence Check
Specifies how group control numbers are validated across a sequence of interchanges or transmissions:
• None No validation is performed.
• Incremental Successive group control numbers must increase by 1.
• Chronological Successive group control numbers must increase by >= 1.
If you select Incremental, you must avoid some possible problems. Refer to Senders and Receivers Falling out of Sync with Incremental Control Numbers in TIBCO BusinessConnect EDI Protocol powered by Instream, User’s Guide.

TIBCO BusinessConnect EDI Protocol powered by Instream X12 Configuration
Control Numbers Tab | 105
Transaction Control Number Sequence Check
Specifies how transaction control numbers are validated within a group or an interchange:
• None No validation is performed.
• Incremental Successive transaction control numbers must increase by 1.
• Chronological Successive transaction control numbers must increase by >= 1.
Reset on Save The default is unchecked.
If checked, it forces recycling of control numbers on demand. This applies to control numbers for inbound. On inbound documents, the resetting of the control numbers would reset the inbound trading partner control numbers, which are used in control number validation. As a result, the validation would start again based on the next incoming document from the trading partner.
Outbound
Increment Group Control Number across Interchanges
Indicates whether to increment group control numbers across interchanges.
Select True (default) or False.
Increment Transaction Control Number Sequentially across Interchanges
Indicated whether to increment transaction control numbers sequentially.
Select True or False (default).
Interchange Control Number Seed
The interchange control number starting point.
Default is 0.
Interchange Control Number End
The interchange control number ending point. The next interchange after the ending point is numbered with the seed.
Default is 999999999
Group Control Number Seed
The group control number starting point.
Default is 0.
Table 27 Control Numbers Fields (Sheet 2 of 3)
Field Description
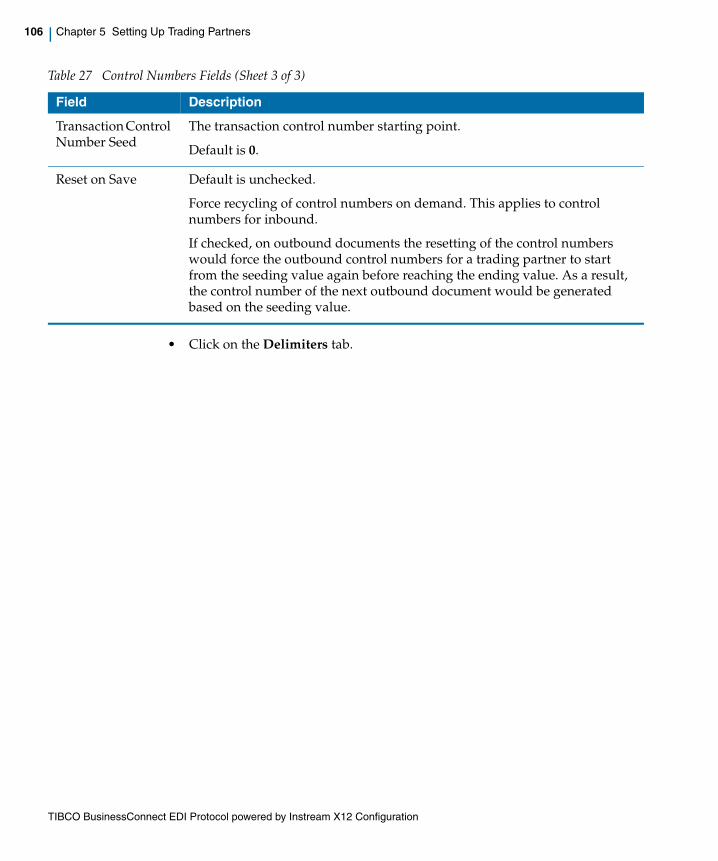
TIBCO BusinessConnect EDI Protocol powered by Instream X12 Configuration
106 | Chapter 5 Setting Up Trading Partners
• Click on the Delimiters tab.
Transaction Control Number Seed
The transaction control number starting point.
Default is 0.
Reset on Save Default is unchecked.
Force recycling of control numbers on demand. This applies to control numbers for inbound.
If checked, on outbound documents the resetting of the control numbers would force the outbound control numbers for a trading partner to start from the seeding value again before reaching the ending value. As a result, the control number of the next outbound document would be generated based on the seeding value.
Table 27 Control Numbers Fields (Sheet 3 of 3)
Field Description
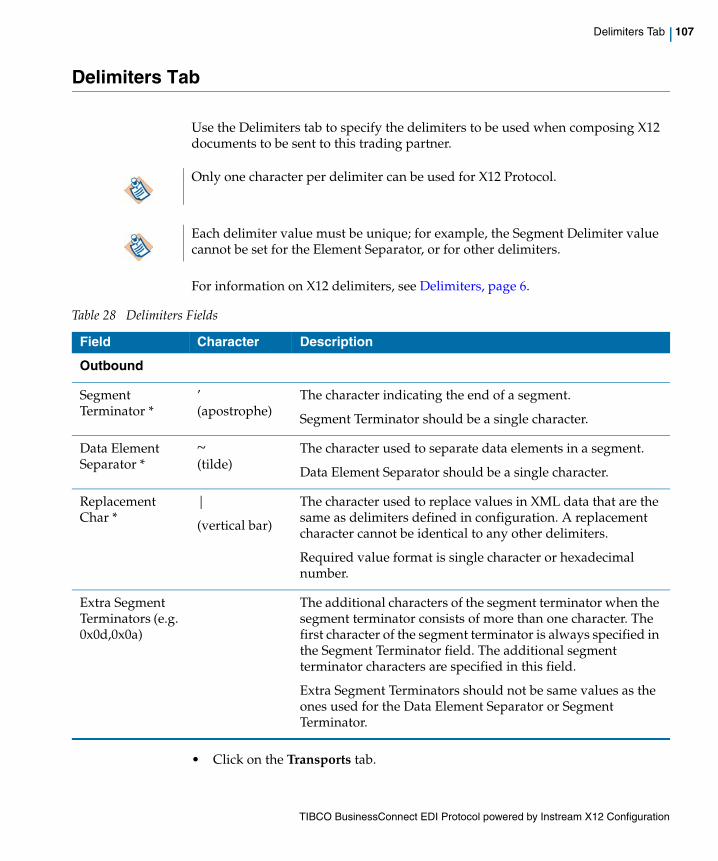
TIBCO BusinessConnect EDI Protocol powered by Instream X12 Configuration
Delimiters Tab | 107
Delimiters Tab
Use the Delimiters tab to specify the delimiters to be used when composing X12 documents to be sent to this trading partner.
For information on X12 delimiters, see Delimiters, page 6.
• Click on the Transports tab.
Only one character per delimiter can be used for X12 Protocol.
Each delimiter value must be unique; for example, the Segment Delimiter value cannot be set for the Element Separator, or for other delimiters.
Table 28 Delimiters Fields
Field Character Description
Outbound
Segment Terminator *
’(apostrophe)
The character indicating the end of a segment.
Segment Terminator should be a single character.
Data Element Separator *
~(tilde)
The character used to separate data elements in a segment.
Data Element Separator should be a single character.
Replacement Char *
|
(vertical bar)
The character used to replace values in XML data that are the same as delimiters defined in configuration. A replacement character cannot be identical to any other delimiters.
Required value format is single character or hexadecimal number.
Extra Segment Terminators (e.g. 0x0d,0x0a)
The additional characters of the segment terminator when the segment terminator consists of more than one character. The first character of the segment terminator is always specified in the Segment Terminator field. The additional segment terminator characters are specified in this field.
Extra Segment Terminators should not be same values as the ones used for the Data Element Separator or Segment Terminator.
TIBCO BusinessConnect EDI Protocol powered by Instream X12 Configuration
108 | Chapter 5 Setting Up Trading Partners
Transports Tab
Use the Transports tab to configure outbound transport settings for this trading partner. To add an outbound transport, click Add in the Transports tab.
The following transports are available for use with this protocol:
• HTTP/S
If the GISB/NAESB Package check box is selected, the outbound message is packaged in the NAESB Internet ET format. For more details about the NAESB Internet ET package standard, see NAESB, page 109 and Configure HTTP/S for NAESB Internet ET and CAQH, page 110.
If the CAQH Message Envelope Package check box is selected, the outbound message is packaged according to the CAQH Phase II CORE (Committee on Operating Rules for Information Exchange): 270 Connectivity Rule Message Envelope Standards for Multipart MIME and SOAP messages. CAQH packaging is supported only for the HTTPS transport. CAQH standards apply to both real-time and batch transactions. See Chapter 2, HIPAA Transaction Configuration, of TIBCO BusinessConnect EDI Protocol HIPAA Edition powered by Instream Configuration for more information about CAQH Phase II CORE connectivity standards.
• FTP/S
• FILE
• AS2-HTTP/S
• AS1-EMAIL
• SSHFTP
• Inbox
Inbox option is available in order to allow for document exchange between partners running TIBCO BusinessConnect EDI Protocol powered by Instream and one of these products:
— TIBCO BusinessConnect Plug-in for SSH Server
— TIBCO BusinessConnect Plug-in for FTP Server
— TIBCO PartnerExpress
NAESB packaging is supported only for the HTTP and HTTPS transports. It is currently not supported for the HTTPSCA transport.
TIBCO BusinessConnect EDI Protocol powered by Instream X12 Configuration
Transports Tab | 109
For more information, see TIBCO BusinessConnect EDI Protocol powered by Instream, User’s Guide, Set Up Trading Partner Transport via Inbox
The steps required for configuring transports are essentially the same for all protocols. Refer to the transports chapters in TIBCO BusinessConnect Trading Partner Administration Guide. For EDI-specific transport configuration, see Chapter 6, File Masks in TIBCO BusinessConnect EDI Protocol powered by Instream, User’s Guide.
The transports you configure serve as the default transports for all business agreements associated with this partner. You can override the default transport settings as part of the business agreement.
NAESB NAESB Internet ET stands for North American Energy Standards Board Internet Electronic Transport. Its earlier version, GISB EDM - GISB (Gas Industry Standards Board) electronic Delivery Mechanism standard was an EDI transport mechanism to support reliable and secure transactions over the Internet.
NAESB Internet ET is designed to transfer all data types: text, EDI, or XML; it is used by the energy industry to transmit X12 EDI messages. It has the following characteristics:
• It can use a regular internet transport such as HTTP/S or even a Web browser on the client side.
• Supports any payload, such as EDI, flat files or XML.
• Standardizes only how packages are exchanged, regardless of the business process.
• For security, it supports HTTP/S, HTTP Basic Authentication, PGP encryption, and signature to payloads.
• Standardizes error codes and how errors are returned back to the sender: synchronously or asynchronously.
CAQH Packaging The Committee on Operating Rules for Information Exchange (CORE®) Connectivity & Security Subgroup of the Council for Affordable Quality Healthcare (CAQH) has defined envelope and submitter authentication standards to improve interoperability and utilization between healthcare providers, clearinghouses, healthplans as part of its Phase II Connectivity Rule. TIBCO BusinessConnect packages outbound messages according to these standards if the
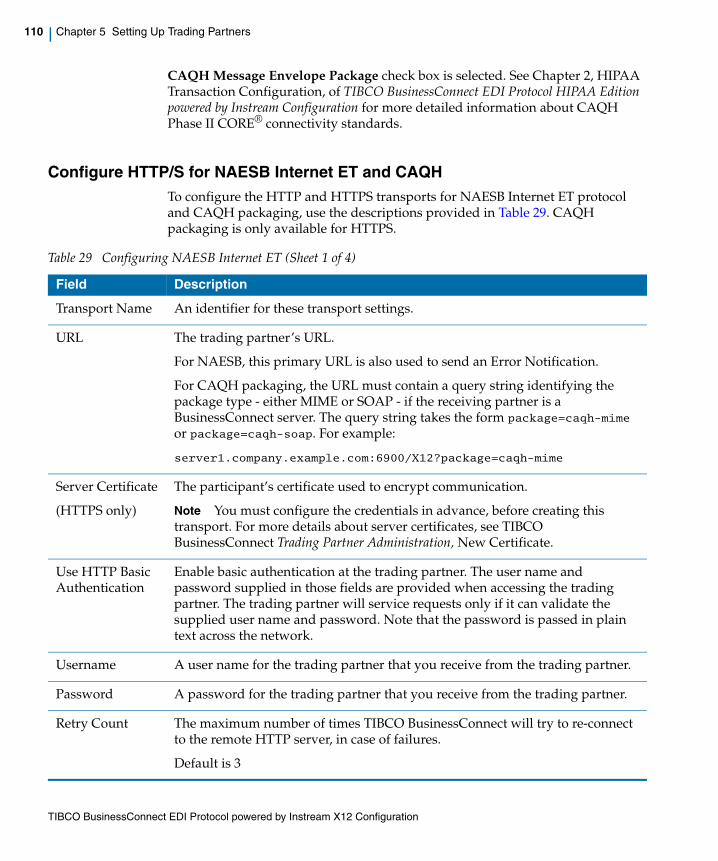
TIBCO BusinessConnect EDI Protocol powered by Instream X12 Configuration
110 | Chapter 5 Setting Up Trading Partners
CAQH Message Envelope Package check box is selected. See Chapter 2, HIPAA Transaction Configuration, of TIBCO BusinessConnect EDI Protocol HIPAA Edition powered by Instream Configuration for more detailed information about CAQH Phase II CORE® connectivity standards.
Configure HTTP/S for NAESB Internet ET and CAQHTo configure the HTTP and HTTPS transports for NAESB Internet ET protocol and CAQH packaging, use the descriptions provided in Table 29. CAQH packaging is only available for HTTPS.
Table 29 Configuring NAESB Internet ET (Sheet 1 of 4)
Field Description
Transport Name An identifier for these transport settings.
URL The trading partner’s URL.
For NAESB, this primary URL is also used to send an Error Notification.
For CAQH packaging, the URL must contain a query string identifying the package type - either MIME or SOAP - if the receiving partner is a BusinessConnect server. The query string takes the form package=caqh-mime or package=caqh-soap. For example:
server1.company.example.com:6900/X12?package=caqh-mime
Server Certificate
(HTTPS only)
The participant’s certificate used to encrypt communication.
Note You must configure the credentials in advance, before creating this transport. For more details about server certificates, see TIBCO BusinessConnect Trading Partner Administration, New Certificate.
Use HTTP Basic Authentication
Enable basic authentication at the trading partner. The user name and password supplied in those fields are provided when accessing the trading partner. The trading partner will service requests only if it can validate the supplied user name and password. Note that the password is passed in plain text across the network.
Username A user name for the trading partner that you receive from the trading partner.
Password A password for the trading partner that you receive from the trading partner.
Retry Count The maximum number of times TIBCO BusinessConnect will try to re-connect to the remote HTTP server, in case of failures.
Default is 3
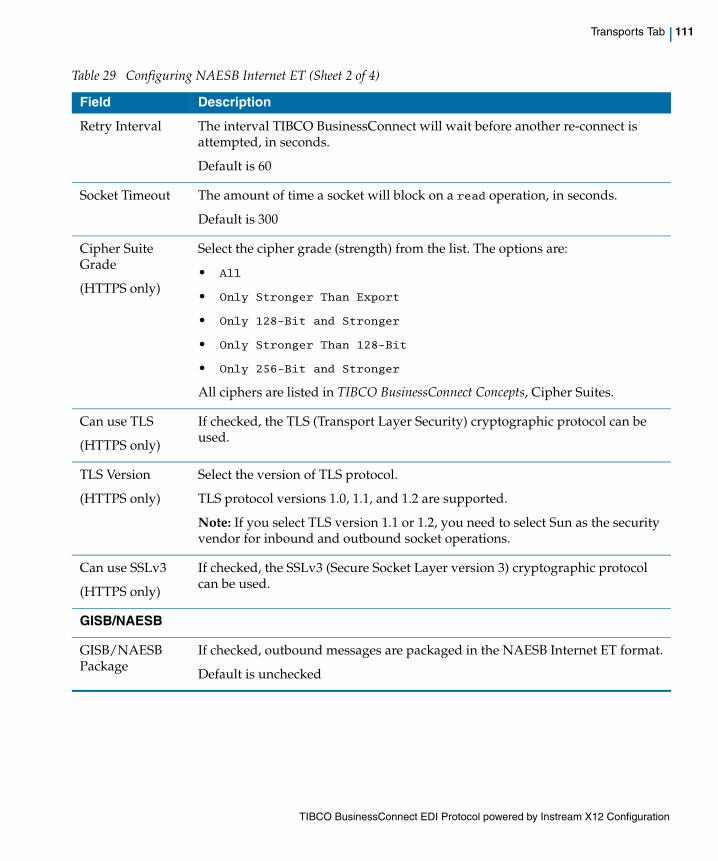
TIBCO BusinessConnect EDI Protocol powered by Instream X12 Configuration
Transports Tab | 111
Retry Interval The interval TIBCO BusinessConnect will wait before another re-connect is attempted, in seconds.
Default is 60
Socket Timeout The amount of time a socket will block on a read operation, in seconds.
Default is 300
Cipher Suite Grade
(HTTPS only)
Select the cipher grade (strength) from the list. The options are:
• All
• Only Stronger Than Export
• Only 128-Bit and Stronger
• Only Stronger Than 128-Bit
• Only 256-Bit and Stronger
All ciphers are listed in TIBCO BusinessConnect Concepts, Cipher Suites.
Can use TLS
(HTTPS only)
If checked, the TLS (Transport Layer Security) cryptographic protocol can be used.
TLS Version
(HTTPS only)
Select the version of TLS protocol.
TLS protocol versions 1.0, 1.1, and 1.2 are supported.
Note: If you select TLS version 1.1 or 1.2, you need to select Sun as the security vendor for inbound and outbound socket operations.
Can use SSLv3
(HTTPS only)
If checked, the SSLv3 (Secure Socket Layer version 3) cryptographic protocol can be used.
GISB/NAESB
GISB/NAESB Package
If checked, outbound messages are packaged in the NAESB Internet ET format.
Default is unchecked
Table 29 Configuring NAESB Internet ET (Sheet 2 of 4)
Field Description
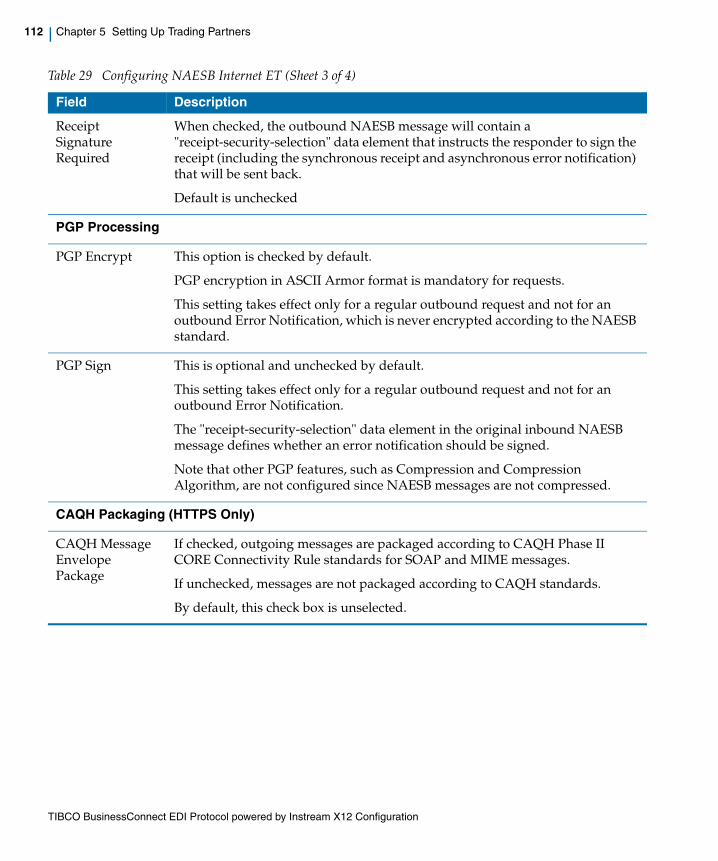
TIBCO BusinessConnect EDI Protocol powered by Instream X12 Configuration
112 | Chapter 5 Setting Up Trading Partners
Receipt Signature Required
When checked, the outbound NAESB message will contain a "receipt-security-selection" data element that instructs the responder to sign the receipt (including the synchronous receipt and asynchronous error notification) that will be sent back.
Default is unchecked
PGP Processing
PGP Encrypt This option is checked by default.
PGP encryption in ASCII Armor format is mandatory for requests.
This setting takes effect only for a regular outbound request and not for an outbound Error Notification, which is never encrypted according to the NAESB standard.
PGP Sign This is optional and unchecked by default.
This setting takes effect only for a regular outbound request and not for an outbound Error Notification.
The "receipt-security-selection" data element in the original inbound NAESB message defines whether an error notification should be signed.
Note that other PGP features, such as Compression and Compression Algorithm, are not configured since NAESB messages are not compressed.
CAQH Packaging (HTTPS Only)
CAQH Message Envelope Package
If checked, outgoing messages are packaged according to CAQH Phase II CORE Connectivity Rule standards for SOAP and MIME messages.
If unchecked, messages are not packaged according to CAQH standards.
By default, this check box is unselected.
Table 29 Configuring NAESB Internet ET (Sheet 3 of 4)
Field Description
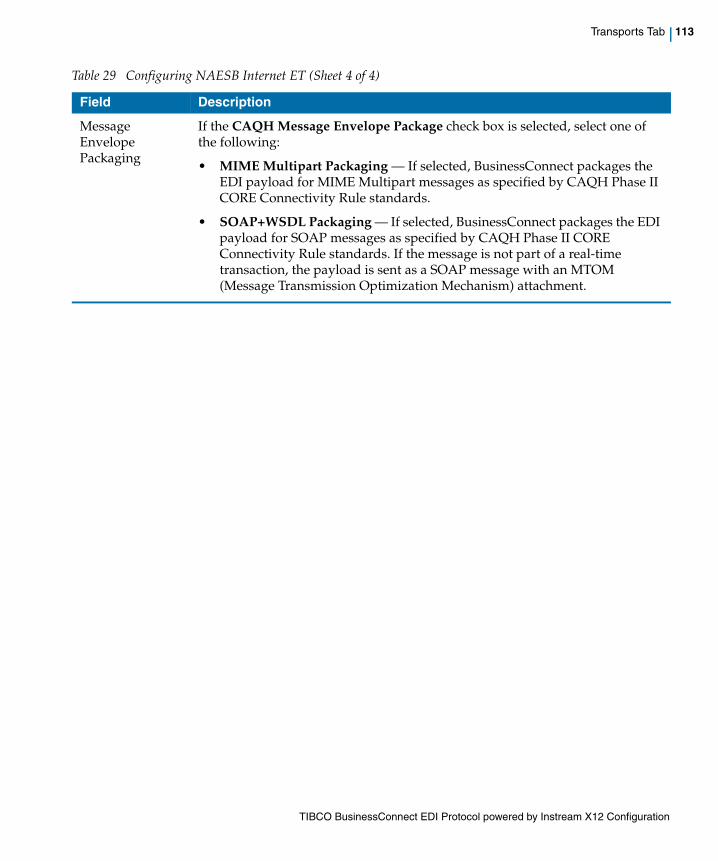
TIBCO BusinessConnect EDI Protocol powered by Instream X12 Configuration
Transports Tab | 113
Message Envelope Packaging
If the CAQH Message Envelope Package check box is selected, select one of the following:
• MIME Multipart Packaging — If selected, BusinessConnect packages the EDI payload for MIME Multipart messages as specified by CAQH Phase II CORE Connectivity Rule standards.
• SOAP+WSDL Packaging — If selected, BusinessConnect packages the EDI payload for SOAP messages as specified by CAQH Phase II CORE Connectivity Rule standards. If the message is not part of a real-time transaction, the payload is sent as a SOAP message with an MTOM (Message Transmission Optimization Mechanism) attachment.
Table 29 Configuring NAESB Internet ET (Sheet 4 of 4)
Field Description

TIBCO BusinessConnect EDI Protocol powered by Instream X12 Configuration
114 | Chapter 5 Setting Up Trading Partners
TIBCO BusinessConnect EDI Protocol powered by Instream X12 Configuration
| 115
Chapter 6 Configuring Agreement Protocol Bindings
This chapter explains how to configure protocol bindings for business agreements.
Topics
• Overview, page 116
• Operation Bindings Tab, page 117
• Override Outbound Settings for Notify, page 118
• Override Outbound Settings for Synchronous Response Request, page 124
• Document Security Tab, page 134
• Transports Tab, page 136
• Scheduled Transmission Tab, page 139
• Overriding Participant Settings, page 141
TIBCO BusinessConnect EDI Protocol powered by Instream X12 Configuration
116 | Chapter 6 Configuring Agreement Protocol Bindings
Overview
An agreement protocol binding is contained within a business agreement. For information on business agreements, see TIBCO BusinessConnect Trading Partner Administration.
Add Protocol BindingTo configure an agreement protocol binding:
1. Click the BusinessConnect > Business Agreements link in the left panel.
2. Click a business agreement link in the right panel.
3. Click the Add Protocol Binding button.
4. Select the X12 check box.
5. Click OK.
6. Click the X12 agreement protocol binding link. The following configuration options are available:
— Operation Bindings Tab, page 117
— Document Security Tab, page 134
— Transports Tab, page 136
— Scheduled Transmission Tab, page 139
— Overriding Participant Settings, page 141
TIBCO BusinessConnect EDI Protocol powered by Instream X12 Configuration
Operation Bindings Tab | 117
Operation Bindings Tab
Use the Operation Bindings tab to configure the X12 transactions that each participant in a business agreement can initiate and respond to. The following properties apply to all the transactions that you import in the Operations Editor:
• Allow All Operations Enables participants to initiate all operations configured in BusinessConnect. You can modify the behavior of one or more operations by binding the operations in the Hosts’ Can Initiate and Partners’ Can Initiate areas.
• Non Repudiation Logging Enables logging of all operations in the non-repudiation log.
Add Operation BindingThe Host ’X’ Can Initiate area (where X is the host participant in the business agreement) lists the transactions that the host can initiate and the partner can respond to. The Partner ’Y’ Can Initiate area (where Y is the partner participant in the business agreement) lists the transactions that the partner can initiate and the host can respond to.
To bind a transaction in either area, perform the following steps:
1. Click Add Operation Bindings.
2. Click the topmost + to expand the transaction tree.
Check the transaction.
3. Click OK.
The selected message is added to the Operation Name list.
You can continue by editing this operation binding.
For synchronous request response transactions: when this check box is unselected, the following will happen:
• Both the acknowledgement creation at the Responder side and the synchronous response received at the Initiator side will be allowed, regardless whether a binding is available.
• Initiator’s synchronous request will be checked for binding availability.
TIBCO BusinessConnect EDI Protocol powered by Instream X12 Configuration
118 | Chapter 6 Configuring Agreement Protocol Bindings
Override Outbound Settings for Notify
To override the outbound settings for a Notify operation binding, select it first.
• Operation Settings Override the default settings for this operation. See Operation Settings Tab, page 118.
• Action Settings To override the action settings for a transaction, check the Override Action Settings check box. Options in this tab override configuration set using the Action Settings Tab, page 122.
• Transports To override the transports for a transaction, check the Override Transports check box. Options in this tab override configurations set using the Transports Tab, page 136.
• Document Security To override the document security for a transaction, check the Override Document Security check box. Options in this tab override configurations set using the Document Security Tab, page 134.
Operation Settings Tab
To override outbound settings for a Notify operation, select the Override Operation Settings check box. If you selected to override operation settings, continue by selecting one of the following from the drop-down list:
• General Option, page 119
• Guideline Option, page 120
• Schema Option, page 122
When no guidelines are given for the operation binding with the Override Operation Settings enabled and with Allow all Operation check box selected, the guideline in the operations editor will take effect.
If transactions of this operation are batched, then the override settings in this operation binding take effect only when these transactions are not transmitted in the same outbound transmission with other operation transactions. In addition, these overridings cannot take effect when the batch transmission is performed through a gateway.

TIBCO BusinessConnect EDI Protocol powered by Instream X12 Configuration
Override Outbound Settings for Notify | 119
General Option
The following options are available when overriding the settings:
Table 30 Override Settings for Notify: General
Field Description
GS02 Sender/GS03 Receiver (for example, Application Sen: Application Rec)
The values that are entered for GS02/GS03 are used for outbound and inbound messages to restrict or allow transactions.
When GS02/GS03 values are given under operation binding with the Allow All Operations check box unselected, only transactions containing the GS02/GS03 pair given under the operation binding are allowed to be sent or received. If this condition is not met, transactions are restricted and they are neither sent nor received.
InboundRaw EDI Segments
Include in Private Process Request
This check box is available to include raw EDI message in the private process (RESPONDER.REQUEST) for this operation.
This check box is unselected by default.
Include in Validation Error Advisory
This check box is available to include raw EDI messages in the Validation Error advisory.
This check box is selected (enabled) by default.
Extra Transaction Info This text field is used to send any information to the private process at transaction level of RESPONDER.REQUEST message.
It can also be included in RESPONDER.INTERCHANGE and ValidationAlert advisory.
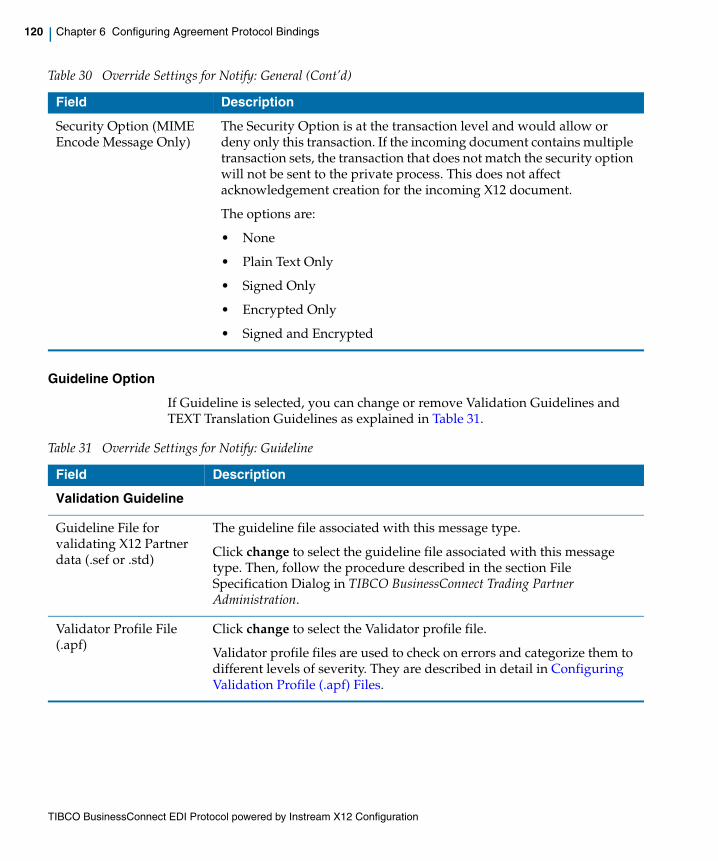
TIBCO BusinessConnect EDI Protocol powered by Instream X12 Configuration
120 | Chapter 6 Configuring Agreement Protocol Bindings
Guideline Option
If Guideline is selected, you can change or remove Validation Guidelines and TEXT Translation Guidelines as explained in Table 31.
Security Option (MIME Encode Message Only)
The Security Option is at the transaction level and would allow or deny only this transaction. If the incoming document contains multiple transaction sets, the transaction that does not match the security option will not be sent to the private process. This does not affect acknowledgement creation for the incoming X12 document.
The options are:
• None
• Plain Text Only
• Signed Only
• Encrypted Only
• Signed and Encrypted
Table 30 Override Settings for Notify: General (Cont’d)
Field Description
Table 31 Override Settings for Notify: Guideline
Field Description
Validation Guideline
Guideline File for validating X12 Partner data (.sef or .std)
The guideline file associated with this message type.
Click change to select the guideline file associated with this message type. Then, follow the procedure described in the section File Specification Dialog in TIBCO BusinessConnect Trading Partner Administration.
Validator Profile File (.apf)
Click change to select the Validator profile file.
Validator profile files are used to check on errors and categorize them to different levels of severity. They are described in detail in Configuring Validation Profile (.apf) Files.

TIBCO BusinessConnect EDI Protocol powered by Instream X12 Configuration
Override Outbound Settings for Notify | 121
Allow Dynamic Guideline Loading based on GS02 Sender/GS03 Receiver
If selected, the guideline associated with this message type is determined by the GS02 and GS03 value in the message, and loaded from file system, rather than using the default guidelines specified in Guideline File for validating X12 Partner data.
You can use the GS0203_guidelines.map file in the TIBCO_HOME/bc/version_number/protocols/tibedi/config directory to pre-define the guideline file name for each GS02/GS03 pair. The format of each line of the file is: Key = full path of guideline file. See this file for more details.
The original guideline file name defined in Guideline File for validating X12 Partner data and GS02 Sender/GS03 Receiver Group Headers in the message are used to form the Key to search in this file.
Search is conducted in the following order:
1. Original file name_GS02 Sender_GS03 Receiver
If a key that matches the original guideline name as well as both the GS02 and GS03 values, and the file path in this line is used for loading the specific guideline file.
2. Original file name_GS02 Sender
If the key in step 1 is not found, then the key that matches the original name as well as the GS02 value is picked up and the file path in this line is used.
3. Original file name_GS03 Receiver
If the key in step 2 is not found, then the key with the original name and the GS03 value is picked up and the file path in this line is used.
Note:
• Duplicate Keys are not supported in the map file.
• If no key matches, the default guidelines specified in Guideline File for validating X12 Partner data are used.
• If there is any character in GS02 and GS03 that is not permitted for file path, such as / \\ : ? * \ < > |, and spaces, these characters are all replaced by "_" to form the search key.
InboundType of Translation
Table 31 Override Settings for Notify: Guideline (Cont’d)
Field Description

TIBCO BusinessConnect EDI Protocol powered by Instream X12 Configuration
122 | Chapter 6 Configuring Agreement Protocol Bindings
Schema Option
If Schema is selected, you can change or remove the Map file as explained in Table 32.
Action Settings TabThis configuration tab is available only for the Host. It provides the following options:
• Override Action Settings If selected, this option overrides the action settings selected using BusinessConnect> Participants> Partner> Protocols> X12> Batching tab and BusinessConnect> Participants> Partner> Protocols> X12> Acknowledgement tab.
Inbound X12 Translation Type (e.g. EDI to XML or EDI to TEXT)
From the drop-down menu, select one of these two choices:
• EDI to XML When EDI to XML is selected here, it allows EDI to XML translation; an appropriate translation map has to be uploaded so that the output is XML.
• EDI to TEXT When EDI to TEXT is selected here, with proper TEXT guideline and appropriate translation map for mapping EDI to TEXT, the output will be translated to TEXT.
TEXT Translation Guideline
Guideline File used for translating X12 to TEXT (.sef or .std)
Click change to select a guideline file for X12 to TEXT translation.
Table 31 Override Settings for Notify: Guideline (Cont’d)
Field Description
Table 32 Override Settings for Notify: Schema
Field Description
EDI to XML (or EDI to TEXT) Translation Map file (.map)
Click change to select the EDI to XML or EDI to TEXT translation map file associated with this message type.
Note that EDI to XML translation map files have an extension _EX.map.
XML to EDI translation Map file (.map)
Click change to select the XML to EDI translation map file associated with this message type.
Note that XML to EDI translation map files have an extension _XE.map.
TIBCO BusinessConnect EDI Protocol powered by Instream X12 Configuration
Override Outbound Settings for Notify | 123
• Batching Option To override outbound action settings for batching, see Table 8, Outbound Action: Batching Tab, page 50.
• Acknowledgement Option To override outbound action settings for acknowledgements, see Table 9, Outbound Action: Acknowledgement Tab, page 51.
Transports TabThis configuration tab is available only for the Host. It provides the following options:
• Override Transports If selected, this option overrides the transports as explained in Transports Tab, page 136.
• Override Outbound Transports You can override these transports by selecting which one is the Primary and which one is the Backup transport, or by selecting None (no changes).
— Primary Transport Select one of the existing configured transports, or None.
— Backup Transport Select one of the existing configured transports, or None.
Document Security Tab This configuration tab is available both for the Host and for the Partner. It provides the following options:
• Override Document Security If selected, this option overrides the transports.
• Outbound Doc Exchange See Document Security Tab, page 134.
TIBCO BusinessConnect EDI Protocol powered by Instream X12 Configuration
124 | Chapter 6 Configuring Agreement Protocol Bindings
Override Outbound Settings for Synchronous Response Request
To override the outbound settings for a Synchronous Response Request operation binding, select it first.
• Operation Settings Override the default settings for this operation. See Operation Settings Tab, page 124.
• Action Settings To override the action settings for a transaction, check the Override Action Settings check box. Options in this tab override configuration set using the Action Settings Tab, page 131.
• Transports To override the transports for a transaction, check the Override Transports check box. Options in this tab override configurations set using the Transports Tab, page 136.
• Document Security To override the document security for a transaction, check the Override Document Security check box. Options in this tab override configurations set using the Document Security Tab, page 134.
Operation Settings Tab
To override outbound settings for a Synchronous Response Request, select the Override Operation Settings check box. If you selected to override operation settings, continue by selecting one of the following from the drop-down list:
• General Option, page 125
• Guideline Option, page 126
When no guidelines are given for the operation binding with the Override Operation Settings enabled and with Allow all Operation check box selected, the guideline in the operations editor will take effect.
If transactions of this operation are batched, then the override settings in this operation binding take effect only when these transactions are not transmitted in the same outbound transmission with other operation transactions. In addition, these overridings cannot take effect when the batch transmission is performed through a gateway.
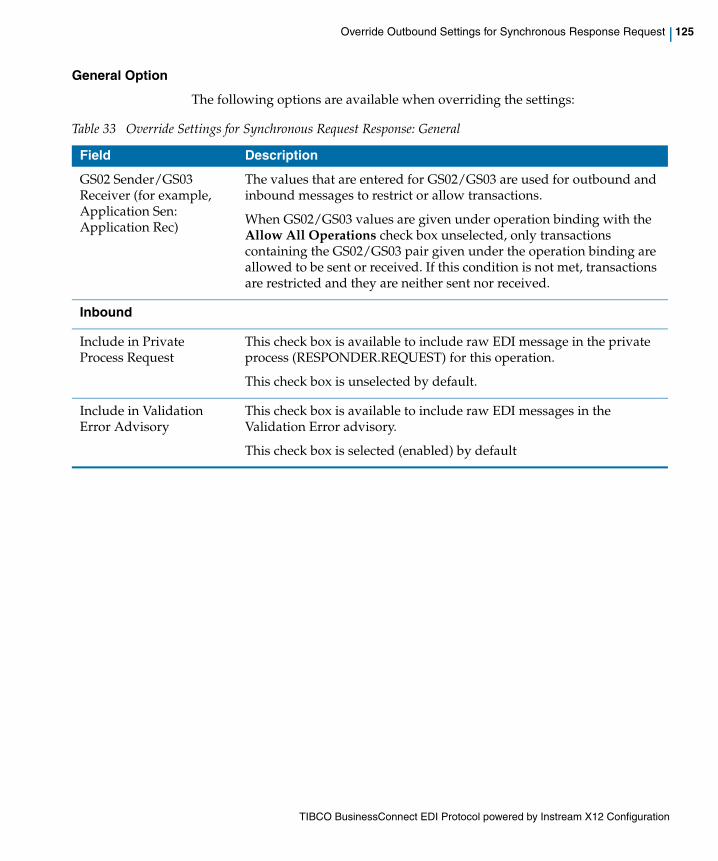
TIBCO BusinessConnect EDI Protocol powered by Instream X12 Configuration
Override Outbound Settings for Synchronous Response Request | 125
General Option
The following options are available when overriding the settings:
Table 33 Override Settings for Synchronous Request Response: General
Field Description
GS02 Sender/GS03 Receiver (for example, Application Sen: Application Rec)
The values that are entered for GS02/GS03 are used for outbound and inbound messages to restrict or allow transactions.
When GS02/GS03 values are given under operation binding with the Allow All Operations check box unselected, only transactions containing the GS02/GS03 pair given under the operation binding are allowed to be sent or received. If this condition is not met, transactions are restricted and they are neither sent nor received.
Inbound
Include in Private Process Request
This check box is available to include raw EDI message in the private process (RESPONDER.REQUEST) for this operation.
This check box is unselected by default.
Include in Validation Error Advisory
This check box is available to include raw EDI messages in the Validation Error advisory.
This check box is selected (enabled) by default
TIBCO BusinessConnect EDI Protocol powered by Instream X12 Configuration
126 | Chapter 6 Configuring Agreement Protocol Bindings
Guideline Option
If Guideline is selected, you can change or remove Validation Guidelines and TEXT Translation Guidelines as explained in Table 31.
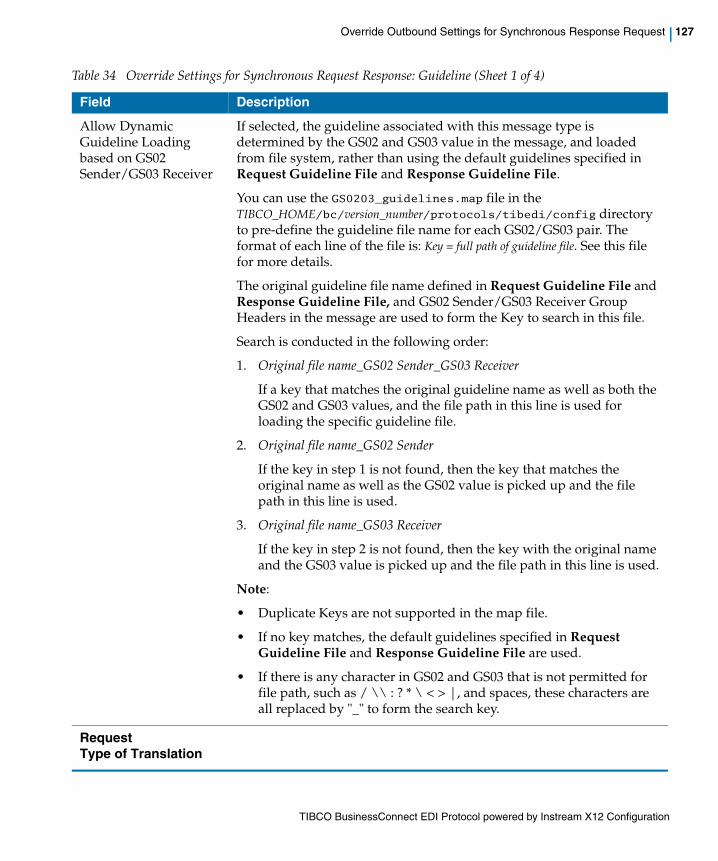
TIBCO BusinessConnect EDI Protocol powered by Instream X12 Configuration
Override Outbound Settings for Synchronous Response Request | 127
Table 34 Override Settings for Synchronous Request Response: Guideline (Sheet 1 of 4)
Field Description
Allow Dynamic Guideline Loading based on GS02 Sender/GS03 Receiver
If selected, the guideline associated with this message type is determined by the GS02 and GS03 value in the message, and loaded from file system, rather than using the default guidelines specified in Request Guideline File and Response Guideline File.
You can use the GS0203_guidelines.map file in the TIBCO_HOME/bc/version_number/protocols/tibedi/config directory to pre-define the guideline file name for each GS02/GS03 pair. The format of each line of the file is: Key = full path of guideline file. See this file for more details.
The original guideline file name defined in Request Guideline File and Response Guideline File, and GS02 Sender/GS03 Receiver Group Headers in the message are used to form the Key to search in this file.
Search is conducted in the following order:
1. Original file name_GS02 Sender_GS03 Receiver
If a key that matches the original guideline name as well as both the GS02 and GS03 values, and the file path in this line is used for loading the specific guideline file.
2. Original file name_GS02 Sender
If the key in step 1 is not found, then the key that matches the original name as well as the GS02 value is picked up and the file path in this line is used.
3. Original file name_GS03 Receiver
If the key in step 2 is not found, then the key with the original name and the GS03 value is picked up and the file path in this line is used.
Note:
• Duplicate Keys are not supported in the map file.
• If no key matches, the default guidelines specified in Request Guideline File and Response Guideline File are used.
• If there is any character in GS02 and GS03 that is not permitted for file path, such as / \\ : ? * \ < > |, and spaces, these characters are all replaced by "_" to form the search key.
RequestType of Translation

TIBCO BusinessConnect EDI Protocol powered by Instream X12 Configuration
128 | Chapter 6 Configuring Agreement Protocol Bindings
Inbound Translation Type (e.g. EDI to XML or EDI to TEXT)
From the drop-down menu, select one of these two choices:
• EDI to XML This is the default value.
When EDI to XML is selected here, the inbound Synchronous X12 document would be translated to XML. It can be overridden at the business agreement level to do EDI to TEXT translation (see Table 31, Override Settings for Notify: Guideline).
• EDI to TEXT When EDI to TEXT is selected, then the appropriate synchronous X12 document is translated to TEXT.
When a proper TEXT guideline is uploaded and an appropriate translation map for mapping EDI to TEXT is created, the output is a TEXT file.
Table 34 Override Settings for Synchronous Request Response: Guideline (Sheet 2 of 4)
Field Description

TIBCO BusinessConnect EDI Protocol powered by Instream X12 Configuration
Override Outbound Settings for Synchronous Response Request | 129
X12 Validation Guideline for Request
Request Guidelines File (.sef or .std)
Provide the path to the inbound synchronous request guidelines file. You can override this field at the business agreement level. This guideline file is used to validate the EDI document that is received from a trading partner, or that is sent to a trading partner.
Click change to select the Guidelines File (.sef or .std).
Request Validator Profile File (.apf)
Provide the path to the inbound synchronous request Validator Profile file that you want to suppress errors into warning or information. You can override this field at the business agreement level.
Click change to select the Validator Profile file (.apf).
TEXT Translation Guideline
Guideline File used for translating X12 to TEXT (.sef or .std)
Click change to select a guideline file for translating X12 to TEXT.
This TEXT guideline is used for translating a X12 EDI document into a TEXT document.
Acceptance ResponseX12 Validation Guideline for Response
Response Guidelines File (.sef or .std)
Provide the path to the outbound synchronous response Guidelines file. You can override this field at the business agreement level.
This guideline file is used to validate the synchronous response EDI document that is received from a trading partner, or that is sent to a trading partner.
Click change to select the Guidelines File (.sef or .std).
Response Validator Profile File (.apf)
Provide the path to the outbound synchronous response Validator Profile file that you wanted to suppress errors into warning or informational if the responses have errors. You can override this field at the business agreement level.
Click change to select the Validator Profile File (.apf).
Table 34 Override Settings for Synchronous Request Response: Guideline (Sheet 3 of 4)
Field Description
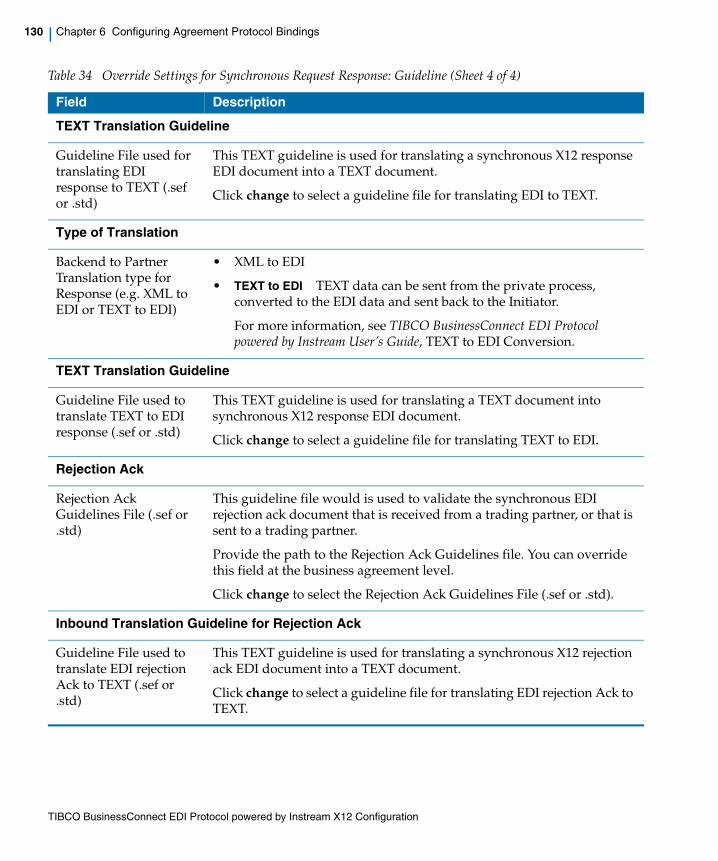
TIBCO BusinessConnect EDI Protocol powered by Instream X12 Configuration
130 | Chapter 6 Configuring Agreement Protocol Bindings
TEXT Translation Guideline
Guideline File used for translating EDI response to TEXT (.sef or .std)
This TEXT guideline is used for translating a synchronous X12 response EDI document into a TEXT document.
Click change to select a guideline file for translating EDI to TEXT.
Type of Translation
Backend to Partner Translation type for Response (e.g. XML to EDI or TEXT to EDI)
• XML to EDI
• TEXT to EDI TEXT data can be sent from the private process, converted to the EDI data and sent back to the Initiator.
For more information, see TIBCO BusinessConnect EDI Protocol powered by Instream User’s Guide, TEXT to EDI Conversion.
TEXT Translation Guideline
Guideline File used to translate TEXT to EDI response (.sef or .std)
This TEXT guideline is used for translating a TEXT document into synchronous X12 response EDI document.
Click change to select a guideline file for translating TEXT to EDI.
Rejection Ack
Rejection Ack Guidelines File (.sef or .std)
This guideline file would is used to validate the synchronous EDI rejection ack document that is received from a trading partner, or that is sent to a trading partner.
Provide the path to the Rejection Ack Guidelines file. You can override this field at the business agreement level.
Click change to select the Rejection Ack Guidelines File (.sef or .std).
Inbound Translation Guideline for Rejection Ack
Guideline File used to translate EDI rejection Ack to TEXT (.sef or .std)
This TEXT guideline is used for translating a synchronous X12 rejection ack EDI document into a TEXT document.
Click change to select a guideline file for translating EDI rejection Ack to TEXT.
Table 34 Override Settings for Synchronous Request Response: Guideline (Sheet 4 of 4)
Field Description
TIBCO BusinessConnect EDI Protocol powered by Instream X12 Configuration
Override Outbound Settings for Synchronous Response Request | 131
Action Settings TabThis configuration tab is available only for the Host. It provides the following options:
• Override Action Settings If selected, this option overrides the action settings selected using BusinessConnect> Participants> Partner> Protocols> X12> Batching tab and BusinessConnect> Participants> Partner> Protocols> X12> Acknowledgement tab.
General Option
This option allows you to change the value for Time to Wait for Sync Response (seconds).
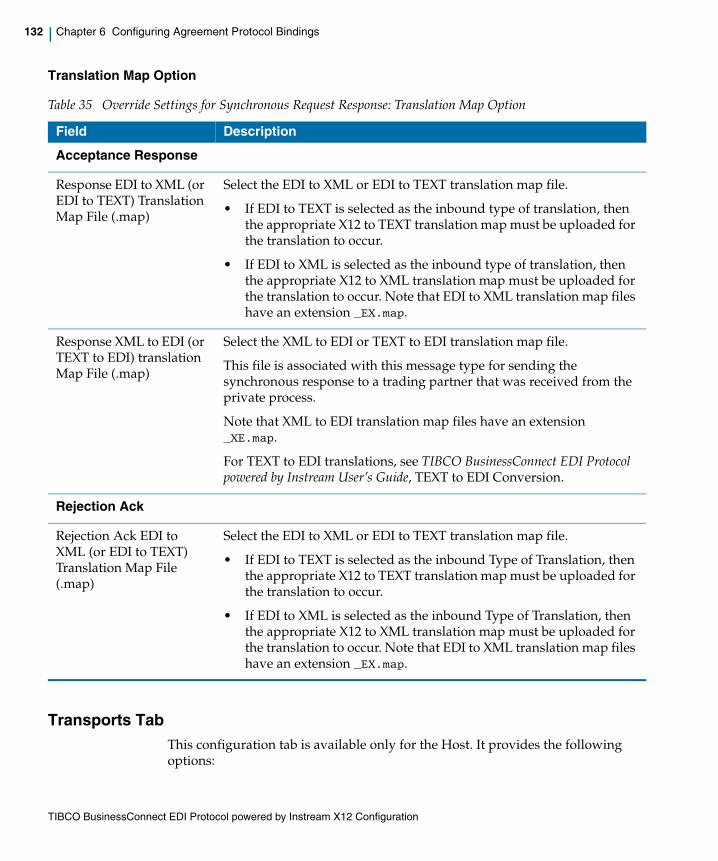
TIBCO BusinessConnect EDI Protocol powered by Instream X12 Configuration
132 | Chapter 6 Configuring Agreement Protocol Bindings
Translation Map Option
Transports TabThis configuration tab is available only for the Host. It provides the following options:
Table 35 Override Settings for Synchronous Request Response: Translation Map Option
Field Description
Acceptance Response
Response EDI to XML (or EDI to TEXT) Translation Map File (.map)
Select the EDI to XML or EDI to TEXT translation map file.
• If EDI to TEXT is selected as the inbound type of translation, then the appropriate X12 to TEXT translation map must be uploaded for the translation to occur.
• If EDI to XML is selected as the inbound type of translation, then the appropriate X12 to XML translation map must be uploaded for the translation to occur. Note that EDI to XML translation map files have an extension _EX.map.
Response XML to EDI (or TEXT to EDI) translation Map File (.map)
Select the XML to EDI or TEXT to EDI translation map file.
This file is associated with this message type for sending the synchronous response to a trading partner that was received from the private process.
Note that XML to EDI translation map files have an extension _XE.map.
For TEXT to EDI translations, see TIBCO BusinessConnect EDI Protocol powered by Instream User’s Guide, TEXT to EDI Conversion.
Rejection Ack
Rejection Ack EDI to XML (or EDI to TEXT) Translation Map File (.map)
Select the EDI to XML or EDI to TEXT translation map file.
• If EDI to TEXT is selected as the inbound Type of Translation, then the appropriate X12 to TEXT translation map must be uploaded for the translation to occur.
• If EDI to XML is selected as the inbound Type of Translation, then the appropriate X12 to XML translation map must be uploaded for the translation to occur. Note that EDI to XML translation map files have an extension _EX.map.
TIBCO BusinessConnect EDI Protocol powered by Instream X12 Configuration
Override Outbound Settings for Synchronous Response Request | 133
• Override Transports If selected, this option overrides the transports as explained in Transports Tab, page 136.
• Override Outbound Transports You can override these transports by selecting which one is the Primary and which one is the Backup transport, or by selecting None (no changes).
— Primary Transport Select one of the existing configured transports, or None.
— Backup Transport Select one of the existing configured transports, or None.
Document Security Tab This configuration tab is available both for the Host and for the Partner. It provides the following options:
• Override Document Security If selected, this option overrides the transports as explained in Table 36, Document Security Fields.
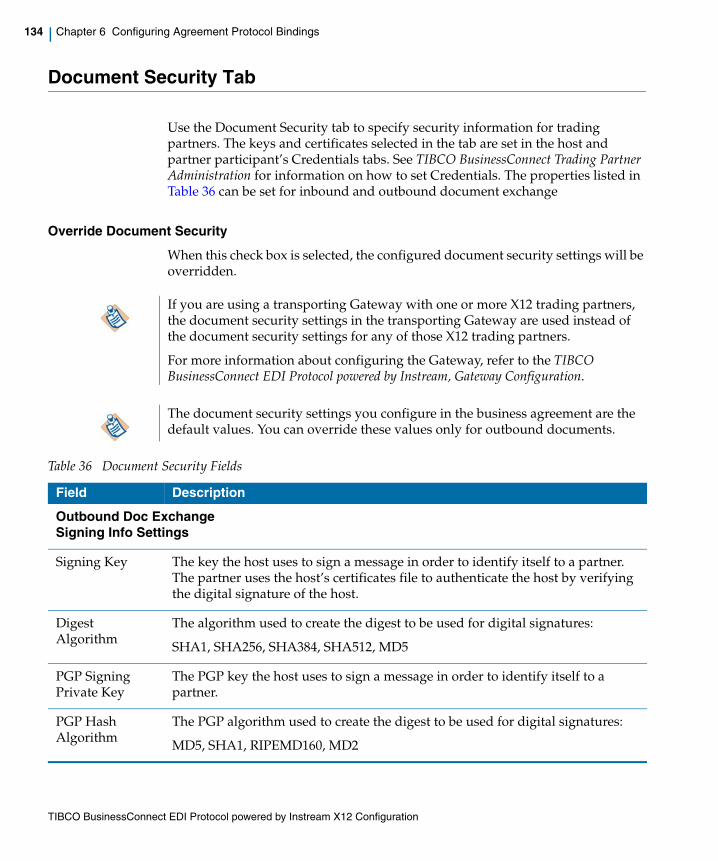
TIBCO BusinessConnect EDI Protocol powered by Instream X12 Configuration
134 | Chapter 6 Configuring Agreement Protocol Bindings
Document Security Tab
Use the Document Security tab to specify security information for trading partners. The keys and certificates selected in the tab are set in the host and partner participant’s Credentials tabs. See TIBCO BusinessConnect Trading Partner Administration for information on how to set Credentials. The properties listed in Table 36 can be set for inbound and outbound document exchange
Override Document Security
When this check box is selected, the configured document security settings will be overridden.
If you are using a transporting Gateway with one or more X12 trading partners, the document security settings in the transporting Gateway are used instead of the document security settings for any of those X12 trading partners.
For more information about configuring the Gateway, refer to the TIBCO BusinessConnect EDI Protocol powered by Instream, Gateway Configuration.
The document security settings you configure in the business agreement are the default values. You can override these values only for outbound documents.
Table 36 Document Security Fields
Field Description
Outbound Doc ExchangeSigning Info Settings
Signing Key The key the host uses to sign a message in order to identify itself to a partner. The partner uses the host’s certificates file to authenticate the host by verifying the digital signature of the host.
Digest Algorithm
The algorithm used to create the digest to be used for digital signatures:
SHA1, SHA256, SHA384, SHA512, MD5
PGP Signing Private Key
The PGP key the host uses to sign a message in order to identify itself to a partner.
PGP Hash Algorithm
The PGP algorithm used to create the digest to be used for digital signatures:
MD5, SHA1, RIPEMD160, MD2
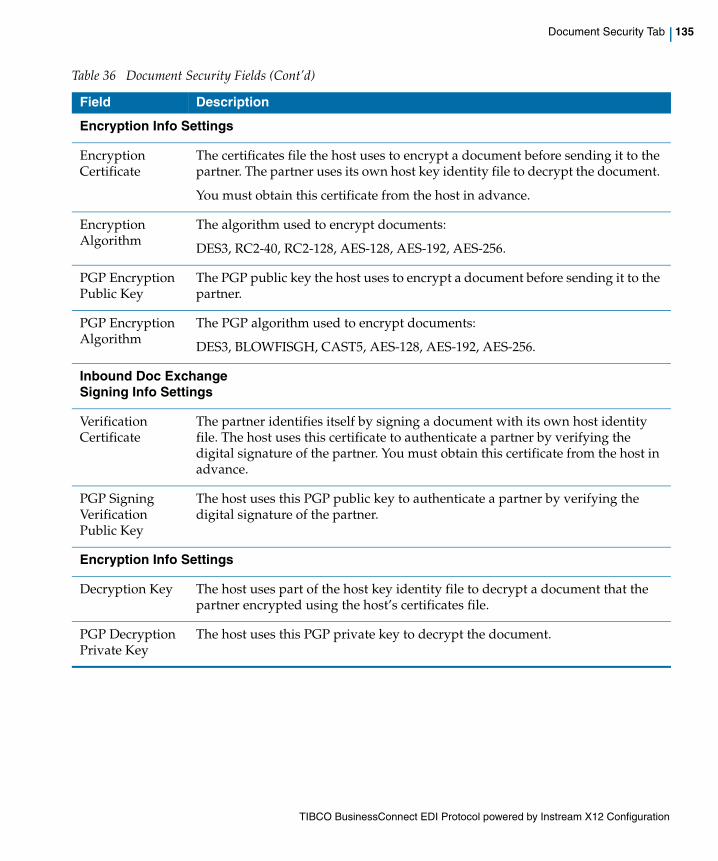
TIBCO BusinessConnect EDI Protocol powered by Instream X12 Configuration
Document Security Tab | 135
Encryption Info Settings
Encryption Certificate
The certificates file the host uses to encrypt a document before sending it to the partner. The partner uses its own host key identity file to decrypt the document.
You must obtain this certificate from the host in advance.
Encryption Algorithm
The algorithm used to encrypt documents:
DES3, RC2-40, RC2-128, AES-128, AES-192, AES-256.
PGP Encryption Public Key
The PGP public key the host uses to encrypt a document before sending it to the partner.
PGP Encryption Algorithm
The PGP algorithm used to encrypt documents:
DES3, BLOWFISGH, CAST5, AES-128, AES-192, AES-256.
Inbound Doc ExchangeSigning Info Settings
Verification Certificate
The partner identifies itself by signing a document with its own host identity file. The host uses this certificate to authenticate a partner by verifying the digital signature of the partner. You must obtain this certificate from the host in advance.
PGP Signing Verification Public Key
The host uses this PGP public key to authenticate a partner by verifying the digital signature of the partner.
Encryption Info Settings
Decryption Key The host uses part of the host key identity file to decrypt a document that the partner encrypted using the host’s certificates file.
PGP Decryption Private Key
The host uses this PGP private key to decrypt the document.
Table 36 Document Security Fields (Cont’d)
Field Description
TIBCO BusinessConnect EDI Protocol powered by Instream X12 Configuration
136 | Chapter 6 Configuring Agreement Protocol Bindings
Transports Tab
Use this tab to configure the allowed outbound and inbound transport for the host and the partner participant in the business agreement.
The top section of the tab is used for selecting transports for the outbound, or host to trading partner, direction. The bottom section of the tab is used for selecting and configuring transports for the inbound, or trading partner to host, direction.
Set the Outbound Transport for the HostSelect an outbound primary and backup transport. The transports are configured in a trading partner’s Protocols > Transports tab.
See Transports Tab, page 108.
Table 37 Outbound Transport for the Host
Field Description
Primary Transport See the Transports chapters in the TIBCO BusinessConnect Trading Partner Administration.
Backup Transport TIBCO BusinessConnect EDI Protocol powered by Instream supports a backup outbound transport for sending XML files to the trading partner. This backup transport is used if the file could not be sent via the primary transport configured in the business agreement. Such situation may happen if the trading partner’s server is not available or has a wrong URL during the time the file is being sent: the file still needs to reach the server via some other means even after the primary transport retry was exhausted.
Backup transports are configured at the business agreement level and can be one of the supported BusinessConnect transports. The same rules apply for choosing a backup transport as for a primary transport.
Note Backup transport currently does not support NAESB packaging.
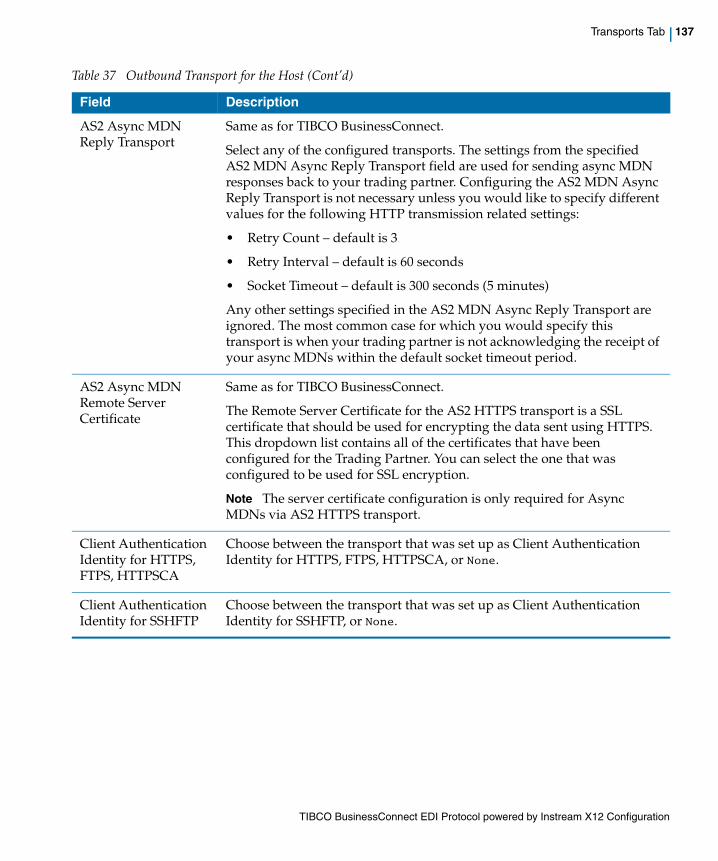
TIBCO BusinessConnect EDI Protocol powered by Instream X12 Configuration
Transports Tab | 137
AS2 Async MDN Reply Transport
Same as for TIBCO BusinessConnect.
Select any of the configured transports. The settings from the specified AS2 MDN Async Reply Transport field are used for sending async MDN responses back to your trading partner. Configuring the AS2 MDN Async Reply Transport is not necessary unless you would like to specify different values for the following HTTP transmission related settings:
• Retry Count – default is 3
• Retry Interval – default is 60 seconds
• Socket Timeout – default is 300 seconds (5 minutes)
Any other settings specified in the AS2 MDN Async Reply Transport are ignored. The most common case for which you would specify this transport is when your trading partner is not acknowledging the receipt of your async MDNs within the default socket timeout period.
AS2 Async MDN Remote Server Certificate
Same as for TIBCO BusinessConnect.
The Remote Server Certificate for the AS2 HTTPS transport is a SSL certificate that should be used for encrypting the data sent using HTTPS. This dropdown list contains all of the certificates that have been configured for the Trading Partner. You can select the one that was configured to be used for SSL encryption.
Note The server certificate configuration is only required for Async MDNs via AS2 HTTPS transport.
Client Authentication Identity for HTTPS, FTPS, HTTPSCA
Choose between the transport that was set up as Client Authentication Identity for HTTPS, FTPS, HTTPSCA, or None.
Client Authentication Identity for SSHFTP
Choose between the transport that was set up as Client Authentication Identity for SSHFTP, or None.
Table 37 Outbound Transport for the Host (Cont’d)
Field Description
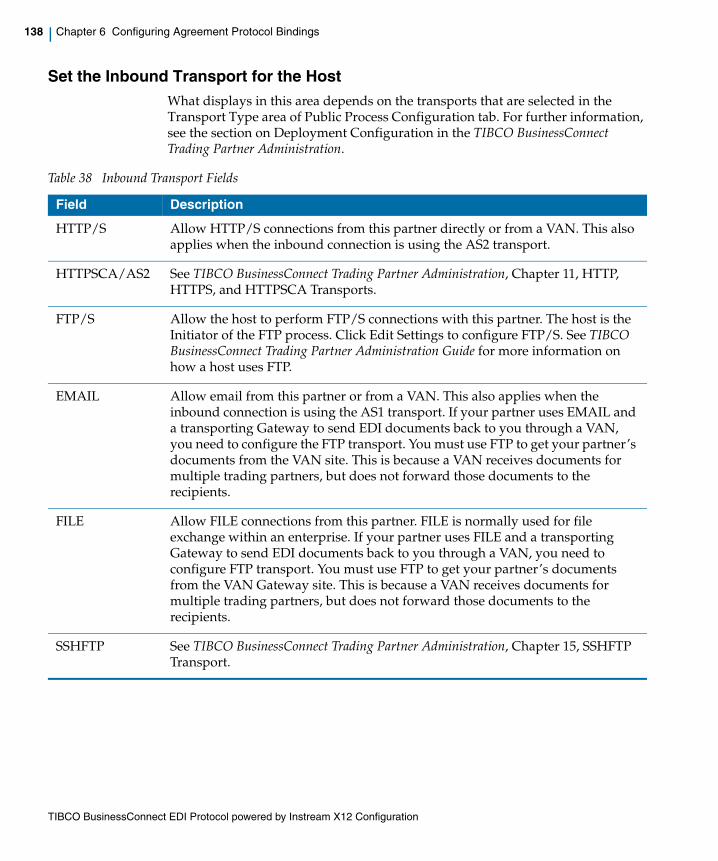
TIBCO BusinessConnect EDI Protocol powered by Instream X12 Configuration
138 | Chapter 6 Configuring Agreement Protocol Bindings
Set the Inbound Transport for the HostWhat displays in this area depends on the transports that are selected in the Transport Type area of Public Process Configuration tab. For further information, see the section on Deployment Configuration in the TIBCO BusinessConnect Trading Partner Administration.
Table 38 Inbound Transport Fields
Field Description
HTTP/S Allow HTTP/S connections from this partner directly or from a VAN. This also applies when the inbound connection is using the AS2 transport.
HTTPSCA/AS2 See TIBCO BusinessConnect Trading Partner Administration, Chapter 11, HTTP, HTTPS, and HTTPSCA Transports.
FTP/S Allow the host to perform FTP/S connections with this partner. The host is the Initiator of the FTP process. Click Edit Settings to configure FTP/S. See TIBCO BusinessConnect Trading Partner Administration Guide for more information on how a host uses FTP.
EMAIL Allow email from this partner or from a VAN. This also applies when the inbound connection is using the AS1 transport. If your partner uses EMAIL and a transporting Gateway to send EDI documents back to you through a VAN, you need to configure the FTP transport. You must use FTP to get your partner’s documents from the VAN site. This is because a VAN receives documents for multiple trading partners, but does not forward those documents to the recipients.
FILE Allow FILE connections from this partner. FILE is normally used for file exchange within an enterprise. If your partner uses FILE and a transporting Gateway to send EDI documents back to you through a VAN, you need to configure FTP transport. You must use FTP to get your partner’s documents from the VAN Gateway site. This is because a VAN receives documents for multiple trading partners, but does not forward those documents to the recipients.
SSHFTP See TIBCO BusinessConnect Trading Partner Administration, Chapter 15, SSHFTP Transport.
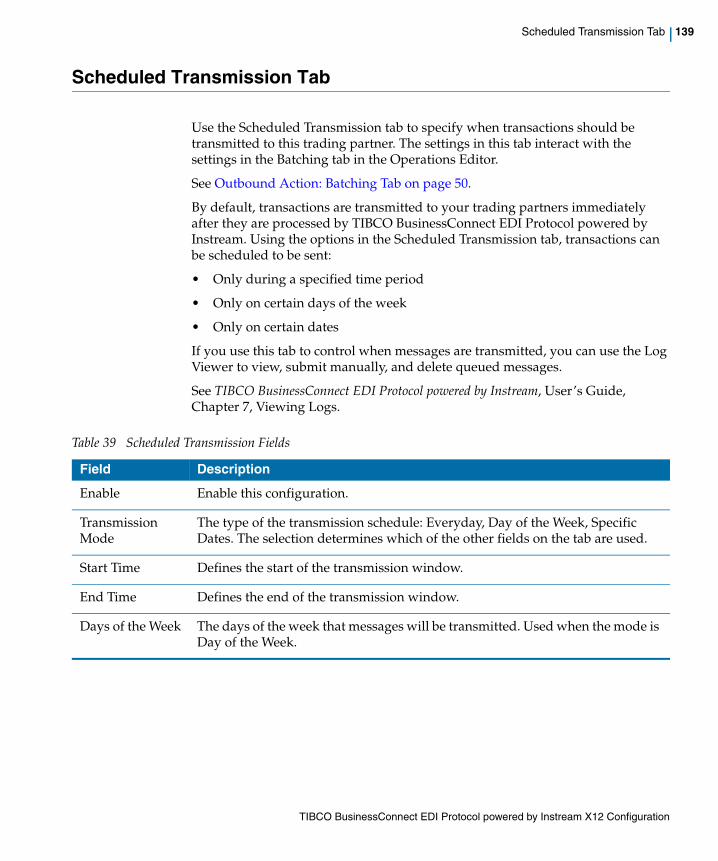
TIBCO BusinessConnect EDI Protocol powered by Instream X12 Configuration
Scheduled Transmission Tab | 139
Scheduled Transmission Tab
Use the Scheduled Transmission tab to specify when transactions should be transmitted to this trading partner. The settings in this tab interact with the settings in the Batching tab in the Operations Editor.
See Outbound Action: Batching Tab on page 50.
By default, transactions are transmitted to your trading partners immediately after they are processed by TIBCO BusinessConnect EDI Protocol powered by Instream. Using the options in the Scheduled Transmission tab, transactions can be scheduled to be sent:
• Only during a specified time period
• Only on certain days of the week
• Only on certain dates
If you use this tab to control when messages are transmitted, you can use the Log Viewer to view, submit manually, and delete queued messages.
See TIBCO BusinessConnect EDI Protocol powered by Instream, User’s Guide, Chapter 7, Viewing Logs.
Table 39 Scheduled Transmission Fields
Field Description
Enable Enable this configuration.
Transmission Mode
The type of the transmission schedule: Everyday, Day of the Week, Specific Dates. The selection determines which of the other fields on the tab are used.
Start Time Defines the start of the transmission window.
End Time Defines the end of the transmission window.
Days of the Week The days of the week that messages will be transmitted. Used when the mode is Day of the Week.
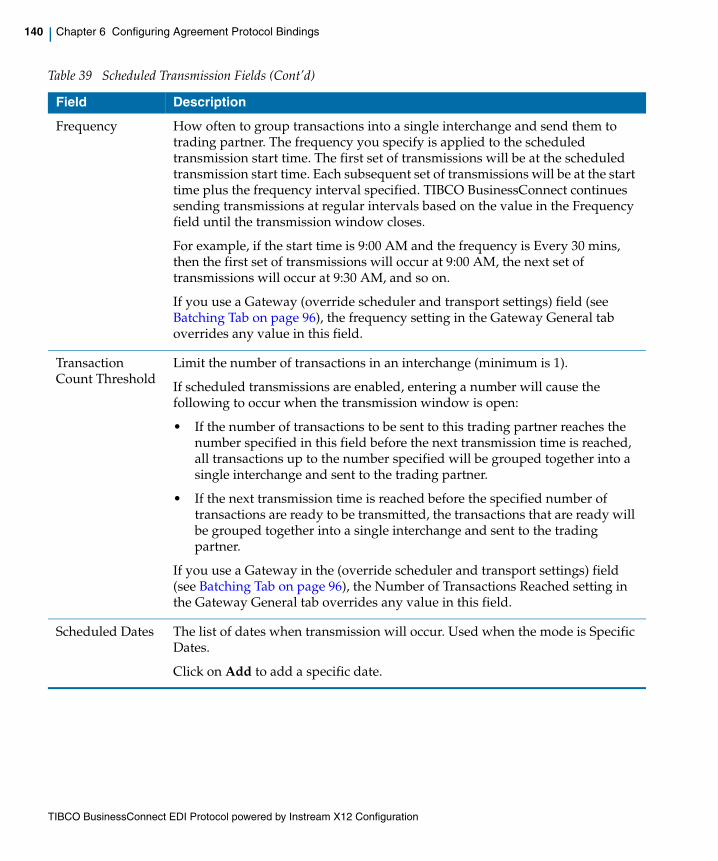
TIBCO BusinessConnect EDI Protocol powered by Instream X12 Configuration
140 | Chapter 6 Configuring Agreement Protocol Bindings
Frequency How often to group transactions into a single interchange and send them to trading partner. The frequency you specify is applied to the scheduled transmission start time. The first set of transmissions will be at the scheduled transmission start time. Each subsequent set of transmissions will be at the start time plus the frequency interval specified. TIBCO BusinessConnect continues sending transmissions at regular intervals based on the value in the Frequency field until the transmission window closes.
For example, if the start time is 9:00 AM and the frequency is Every 30 mins, then the first set of transmissions will occur at 9:00 AM, the next set of transmissions will occur at 9:30 AM, and so on.
If you use a Gateway (override scheduler and transport settings) field (see Batching Tab on page 96), the frequency setting in the Gateway General tab overrides any value in this field.
Transaction Count Threshold
Limit the number of transactions in an interchange (minimum is 1).
If scheduled transmissions are enabled, entering a number will cause the following to occur when the transmission window is open:
• If the number of transactions to be sent to this trading partner reaches the number specified in this field before the next transmission time is reached, all transactions up to the number specified will be grouped together into a single interchange and sent to the trading partner.
• If the next transmission time is reached before the specified number of transactions are ready to be transmitted, the transactions that are ready will be grouped together into a single interchange and sent to the trading partner.
If you use a Gateway in the (override scheduler and transport settings) field (see Batching Tab on page 96), the Number of Transactions Reached setting in the Gateway General tab overrides any value in this field.
Scheduled Dates The list of dates when transmission will occur. Used when the mode is Specific Dates.
Click on Add to add a specific date.
Table 39 Scheduled Transmission Fields (Cont’d)
Field Description
TIBCO BusinessConnect EDI Protocol powered by Instream X12 Configuration
Overriding Participant Settings | 141
Overriding Participant Settings
Use the participant configuration tabs to override the general settings for a participant per agreement protocol binding.
Hide AdvancedTo hide the participant configuration tabs and skip overriding the participant settings, click the Hide Advanced button.
Show AdvancedTo use the participant configuration tabs, click the Show Advanced button. Configuration GUI displays two tabs labeled ParticipantA’s Configuration and ParticipantB’s Configuration, where ParticipantA and ParticipantB are the participants in the business agreement for which you are overriding the settings.
Override General Settings
To override a general setting, perform the following steps:
1. Click the participant’s configuration tab.
2. Select the Override Settings check box.
3. Default Interchange Qualifier ID Select an Interchange Qualifier ID from the dropdown list.
Choices for the Host are fully explained in the General Tab, page 79.
Choices for the Trading Partner are fully explained in General Tab, page 89.
4. AS2 Identifier Select an AS2 Identifier from the dropdown list.
Choices for the Host are fully explained in the General Tab, page 79.
Choices for the Trading Partner are fully explained in General Tab, page 89
5. Common Code Identifier Select the Common Code Identity from the dropdown list.
Choices for the Host are fully explained in the General Tab, page 79.
Choices for the Trading Partner are fully explained in General Tab, page 89
When the Default Interchange Qualifier is changed, no CSUPDATE advisory will be published.

TIBCO BusinessConnect EDI Protocol powered by Instream X12 Configuration
142 | Chapter 6 Configuring Agreement Protocol Bindings
6. Click Save.
TIBCO BusinessConnect EDI Protocol powered by Instream X12 Configuration
| 143
Index
Numerics
824 application advice 11999 Ack Creation 12
A
acknowledgements 7add operation binding 117adding a default interchange qualifier and ID for the
host 79adding a group version to an interchange version 44adding a transaction to a group version 45adding an interchange version 43advanced properties, host record 84
B
business application acknowledgements 8
C
configure the business agreement 23configuring 997 functional acknowledgements 64configuring 999 implementation
acknowledgements 64configuring acknowledgements 64configuring BusinessWorks private processes 24configuring connections to BusinessConnect 25configuring TA1 interchange acknowledgement
segments 65configuring the initiator 19
configuring the outbound actionAcknowledgement tab 51Batching tab 50General tab 50, 60, 62
configuring the transactionGeneral tab 47, 54Guideline tab 47, 54Schema tab 49, 59
configuring the X12 Protocol 78configuring the X12 protocol for the partner 88creating the trading partner 21customer support xvi
D
delimiters 6delivery acknowledgements 7document structure 3dynamic guideline 121, 127
E
enable outbound EDI validation for the partner 22enable X12 protocol for the partner 21ENV_HOME xivexporting interchanges, groups, and transactions 74
H
health care notification 12host properties, advanced 84
TIBCO BusinessConnect EDI Protocol powered by Instream X12 Configuration
144 | Index
I
importing an interchange version 75importing guidelines 15interchange 3
L
loading guidelines and XSDs 17
M
multiple configurations for the same transaction type 66
N
notification transaction 46Notify
Action Settings tab 122Document Security tab 123Operation Settings tab 118Operation Settings tab, general option 119Operation Settings tab, guideline option 120Operation Settings tab, schema option 122Transports tab 123
O
override Outbound Settings for Notify 118override outbound settings for Synchronous Response
Request 124
P
prerequisites for the tutorial 14properties
advanced host 84
R
replacement char 107reviewing the guidelines 18
S
sample interchange versions 75scheduled transmission tab 139scheduling a transmission to a trading partner 139set interchange qualifier and ID for the partner 21set the transport for the partner 22set up a host 19set up the initiator server 23setting document security properties 134setting general properties for the host 79setting logging properties for the host 83setting operation bindings 117setting preprocessing properties for the host 82setting the outbound transport 136setting transports 136support, contacting xviSync Response Request
Action Settings 131Action Settings, Translation Map option 132Document Security tab 133Operation Settings 124Operation Settings, General option 125Operation Settings, guideline option 126
syntactic response acknowledgements 7
TIBCO BusinessConnect EDI Protocol powered by Instream X12 Configuration
Index | 145
T
technical support xviTIBCO_HOME xivTransaction Name Modifiers 66transaction set 5Transaction Set Header and Transaction Set Trailer 5
U
unsolicited health care claim status notification 12