tibco spotfire server 5 -...
TRANSCRIPT
TIBCO Spotfire® Server 5.5
Quick Start Guide

Important Information SOME TIBCO SOFTWARE EMBEDS OR BUNDLES OTHER TIBCO SOFTWARE. USE OF SUCH
EMBEDDED OR BUNDLED TIBCO SOFTWARE IS SOLELY TO ENABLE THE FUNCTIONALITY
(OR PROVIDE LIMITED ADD-ON FUNCTIONALITY) OF THE LICENSED TIBCO SOFTWARE.
THE EMBEDDED OR BUNDLED SOFTWARE IS NOT LICENSED TO BE USED OR ACCESSED BY ANY OTHER TIBCO SOFTWARE OR FOR ANY OTHER PURPOSE.
USE OF TIBCO SOFTWARE AND THIS DOCUMENT IS SUBJECT TO THE TERMS AND
CONDITIONS OF A LICENSE AGREEMENT FOUND IN EITHER A SEPARATELY EXECUTED
SOFTWARE LICENSE AGREEMENT, OR, IF THERE IS NO SUCH SEPARATE AGREEMENT,
THE CLICKWRAP END USER LICENSE AGREEMENT WHICH IS DISPLAYED DURING
DOWNLOAD OR INSTALLATION OF THE SOFTWARE (AND WHICH IS DUPLICATED IN
LICENSE_TIBCOSPOTFIRESERVER.PDF) OR IF THERE IS NO SUCH SOFTWARE LICENSE
AGREEMENT OR CLICKWRAP END USER LICENSE AGREEMENT, THE LICENSE(S) LOCATED
IN THE "LICENSE" FILE(S) OF THE SOFTWARE. USE OF THIS DOCUMENT IS SUBJECT TO
THOSE TERMS AND CONDITIONS, AND YOUR USE HEREOF SHALL CONSTITUTE ACCEPTANCE OF AND AN AGREEMENT TO BE BOUND BY THE SAME.
This document contains confidential information that is subject to U.S. and international copyright laws
and treaties. No part of this document may be reproduced in any form without the written authorization of TIBCO Software Inc.
TIBCO and Spotfire are either registered trademarks or trademarks of TIBCO Software Inc. and/or
subsidiaries of TIBCO Software Inc. in the United States and/or other countries. All other product and
company names and marks mentioned in this document are the property of their respective owners and are
mentioned for identification purposes only. This software may be available on multiple operating systems.
However, not all operating system platforms for a specific software version are released at the same time.
Please see the readme.txt file for the availability of this software version on a specific operating system
platform.
THIS DOCUMENT IS PROVIDED “AS IS” WITHOUT WARRANTY OF ANY KIND, EITHER
EXPRESS OR IMPLIED, INCLUDING, BUT NOT LIMITED TO, THE IMPLIED WARRANTIES OF
MERCHANTABILITY, FITNESS FOR A PARTICULAR PURPOSE, OR NON-INFRINGEMENT.
THIS DOCUMENT COULD INCLUDE TECHNICAL INACCURACIES OR TYPOGRAPHICAL
ERRORS. CHANGES ARE PERIODICALLY ADDED TO THE INFORMATION HEREIN; THESE
CHANGES WILL BE INCORPORATED IN NEW EDITIONS OF THIS DOCUMENT. TIBCO
SOFTWARE INC. MAY MAKE IMPROVEMENTS AND/OR CHANGES IN THE PRODUCT(S) AND/OR THE PROGRAM(S) DESCRIBED IN THIS DOCUMENT AT ANY TIME.
Copyright © 1996 - 2013 TIBCO Software Inc. ALL RIGHTS RESERVED.
THE CONTENTS OF THIS DOCUMENT MAY BE MODIFIED AND/OR QUALIFIED, DIRECTLY
OR INDIRECTLY, BY OTHER DOCUMENTATION WHICH ACCOMPANIES THIS SOFTWARE, INCLUDING BUT NOT LIMITED TO ANY RELEASE NOTES AND "READ ME" FILES.
TIBCO Spotfire is covered by U.S. Patent No. 6,014,661 and U.S. Patent No. 7, 216,116.
Other patent(s) pending.
TIBCO Software Inc. Confidential Information

Table of Contents Steps to get TIBCO Spotfire® Server up and running ............................................................ 4
Spotfire Database ...................................................................................................................... 5
1 Set up the Spotfire Database on Windows ........................................................................................... 5 1 Set up the Spotfire Database on Linux ................................................................................................. 8
TIBCO Spotfire Server on Windows® operating system ...................................................... 10
2 Run TIBCO Spotfire Server Installer on Windows .............................................................................. 10 3 Create the bootstrap.xml file on Windows .......................................................................................... 15 4 Create and Save a Basic TIBCO Spotfire Server configuration on Windows .................................... 18 5 Create and Promote a user to Administrator on Windows ................................................................. 20 6 Deploy client packages to TIBCO Spotfire Server .............................................................................. 21 7 Start the TIBCO Spotfire Server on Windows .................................................................................... 21
TIBCO Spotfire Server on Linux® operating system ............................................................ 22
2 Run the TIBCO Spotfire Server Installer on Linux .............................................................................. 22 3 Create the bootstrap.xml file on Linux ................................................................................................ 26 4 Create and Save a Basic TIBCO Spotfire Server Configuration on Linux .......................................... 29 5 Create and Promote a User to Administrator on Linux ....................................................................... 33 6 Deploy client packages to TIBCO Spotfire Server .............................................................................. 36 7 Start the TIBCO Spotfire Server on Linux .......................................................................................... 37
Reference: How to Check if Your Linux Server has a GUI .................................................... 38
Spotfire System Overview The TIBCO Spotfire® Server is used by TIBCO Spotfire®, TIBCO Spotfire® Web Player, and
TIBCO Spotfire® Automation Services to identify users, assign privileges, and it serves as a
central storage for settings, preferences, updates, and analyses.

Overview
4 (38)
Steps to get TIBCO Spotfire® Server up and running The purpose of this document is to outline the steps necessary to install and configure
the TIBCO Spotfire Server (TSS) on a Windows or Linux operating system.
This configuration gets the TIBCO Spotfire Server up and running but no integration
with other systems is set up. In many cases additional configuration may be required.
For instructions on additional configuration, review the TIBCO Spotfire Server
Installation and Configuration Manual.
Note: Prior to installing TIBCO Spotfire Server, verify that your system complies with
the latest system requirements at http://support.spotfire.com/sr.asp.
Installation
Supported: Oracle® and Microsoft® SQL Server® database engines.
32bit or 64bit.
The bootstrap file provides the database connection information.
Save configuration is the default minimum action.
Administration
1. Set up the Spotfire Database
2. Run the TIBCO Spotfire Server Installer
3. Create the bootstrap.xml file
4. Create and save a basic TIBCO Spotfire Server configuration
5. Create a user and Promote to Administrator
6. Deploy client packages to TIBCO Spotfire Server
7. Start TIBCO Spotfire Server

Spotfire Database
5 (38)
Spotfire Database
1 Set up the Spotfire Database on Windows Assistance from your database administrator may be required to copy the install folder
to the database and to provide information about the database variables. Note: Make
sure to provide all information indicated in the installation scripts.
1.1 Oracle on Windows
1. Copy the oracle_install folder from <Spotfire Server Installation Kit>\scripts folder
to the Database Server.
2. Edit the create_databases.bat file and provide the appropriate database server details
for the section: “Set these variables to reflect the local environment”.
Before modifications:
rem Set these variables to reflect the local environment:
set ROOTFOLDER=<ROOTFOLDER>
set CONNECTIDENTIFIER=<SID>
set ADMINNAME=system
set ADMINPASSWORD=<ADMINPASSWORD>
set SERVERDB_USER=<SERVERDB_USER>
set SERVERDB_PASSWORD=<SERVERDB_PASSWORD>
set SERVER_DATA_TABLESPACE=SPOTFIRE_DATA
set SERVER_TEMP_TABLESPACE=SPOTFIRE_TEMP
Example of how it could look after modifications:
rem Set these variables to reflect the local environment:
set ROOTFOLDER=C:\oracle\app\orcl
set CONNECTIDENTIFIER=orcl
set ADMINNAME=system
set ADMINPASSWORD=admin123
set SERVERDB_USER=spotfire_db
set SERVERDB_PASSWORD=spotfire_db123
set SERVER_DATA_TABLESPACE=SPOTFIRE_DATA
set SERVER_TEMP_TABLESPACE=SPOTFIRE_TEMP
ROOTFOLDER The location where the tablespaces will be created. It
must be a directory that is writable for the Oracle
instance, usually <oracle install dir>/oradata/<SID>.
Note: Do not add a slash or backslash after the
<SID>.
CONNECTIDENTIFIER The Oracle TNS (Transparent Network Substrate)
name of the database. Usually the same as the SID.
ADMINNAME The name of a user with database administrator
privileges, usually “system”. If not set, the default is
system account.
ADMINPASSWORD The password of the above user.
SERVERDB_USER The user that will be created and used to set up the
Spotfire database.
SERVERDB_PASSWORD The password of the above user.
Spotfire Database
6 (38)
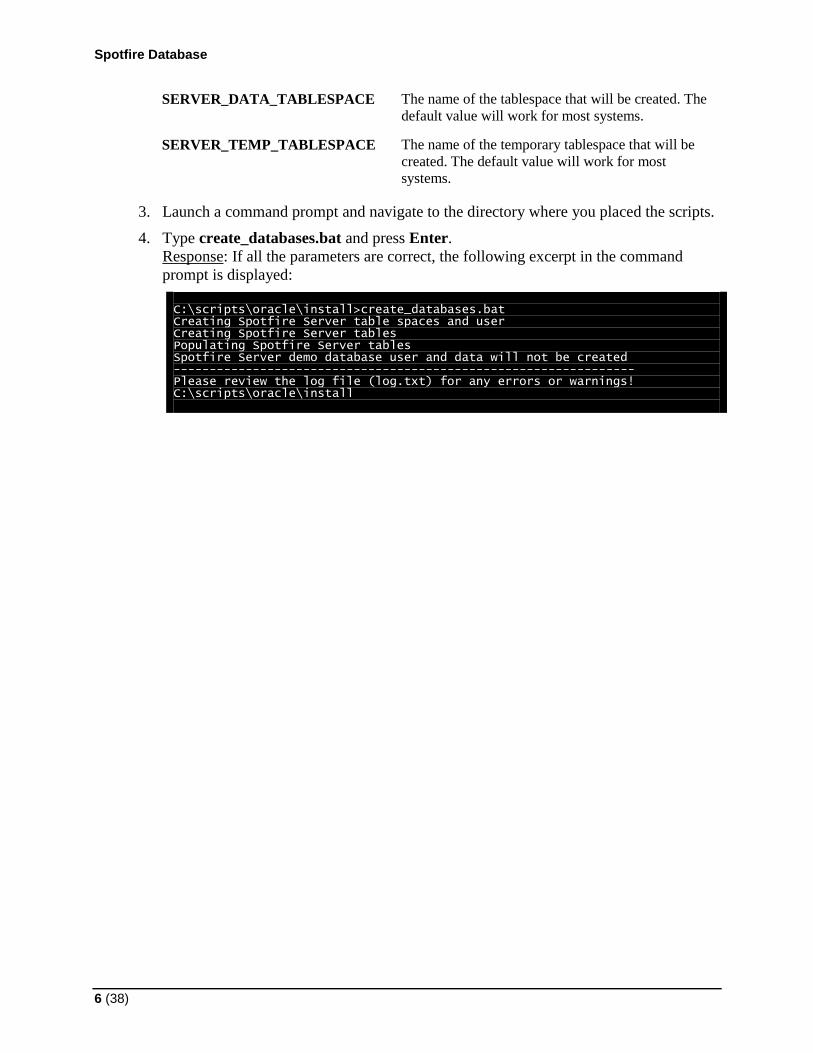
SERVER_DATA_TABLESPACE The name of the tablespace that will be created. The
default value will work for most systems.
SERVER_TEMP_TABLESPACE The name of the temporary tablespace that will be
created. The default value will work for most
systems.
3. Launch a command prompt and navigate to the directory where you placed the scripts.
4. Type create_databases.bat and press Enter.
Response: If all the parameters are correct, the following excerpt in the command
prompt is displayed:
C:\scripts\oracle\install>create_databases.bat Creating Spotfire Server table spaces and user Creating Spotfire Server tables Populating Spotfire Server tables Spotfire Server demo database user and data will not be created ---------------------------------------------------------------- Please review the log file (log.txt) for any errors or warnings! C:\scripts\oracle\install

Spotfire Database
7 (38)
1.2 Microsoft SQL Server on Windows
1. Copy the mssql_install folder from <Spotfire Server Installation Kit>\scripts folder
to the Database server.
2. Edit the create_databases.bat file by providing the appropriate database server details
for the section: “Set these variables to reflect the local environment”:
Before modifications: rem Set these variables to reflect the local environment: set CONNECTIDENTIFIER=<SERVER>\<MSSQL_INSTANCENAME> set ADMINNAME=sa set ADMINPASSWORD=<ADMINPASSWORD> set SERVERDB_NAME=spotfire_server_550 set SERVERDB_USER=<SERVERDB_USER> set SERVERDB_PASSWORD=<SERVERDB_PASSWORD>
Example of how it could look after modifications:
rem Set these variables to reflect the local environment: set CONNECTIDENTIFIER=DBSERVER\MSSQL set ADMINNAME=sa set ADMINPASSWORD=admin123 set SERVERDB_NAME=spotfire_server_550 set SERVERDB_USER=spotfire_db set SERVERDB_PASSWORD=spotfire_db123
CONNECTIDENTIFIER Replace <SERVER> with the name of the server running the
SQL Server instance, and replace
<MSSQL_INSTANCENAME> with the name of the SQL
Server instance.brass.
ADMINNAME The name of a user with admin privileges on the database,
usually “sa”.
ADMINPASSWORD The password of the above user.
SERVERDB_NAME The name of the database that will be created.
SERVERDB_USER The user that you wish to create and use for this database.
SERVERDB_PASSWORD The password for the above user.
3. Launch a command prompt and navigate to the directory where you placed the scripts.
4. Type create_databases.bat and press Enter.
Response: If all the parameters are correct, the following excerpt in the command
prompt is displayed:
C:\scripts\mssql_install>create_databases.bat Creating Spotfire Server tables Populating Spotfire Server tables Creating Spotfire Server database user Spotfire Server demo database user and data will not be created ---------------------------------------------------------------- Please review the log file (log.txt) for any errors or warnings! C:\scripts\mssql_install>

Spotfire Database
8 (38)
1 Set up the Spotfire Database on Linux Assistance from your Database Administrator (DBA) may be required for this step.
Note: Make sure to provide all information indicated in the installation scripts.
1.1 Oracle on Linux
1. Copy the oracle_install directory from <Spotfire_Server_Installation_Kit>/scripts
to the Oracle Database Server running on a Linux OS.
2. Edit the create_databases.sh file by providing the appropriate database server details
for the section: “Set these variables to reflect the local environment”.
Before modifications: # Set these variable to reflect the local environment:
ROOTFOLDER=<ROOTFOLDER>
CONNECTIDENTIFIER=<SID>
ADMINNAME=system
ADMINPASSWORD=<ADMINPASSWORD>
SERVERDB_USER=<SERVERDB_USER>
SERVERDB_PASSWORD=<SERVERDB_PASSWORD>
SERVER_DATA_TABLESPACE=SPOTFIRE_DATA
SERVER_TEMP_TABLESPACE=SPOTFIRE_TEMP
Example of how it could look after modifications:
# Set these variable to reflect the local environment:
ROOTFOLDER=/opt/app/oracle/oradata/orcl
CONNECTIDENTIFIER=orcl
ADMINNAME=system
ADMINPASSWORD=admin123
SERVERDB_USER=spotfire_db
SERVERDB_PASSWORD=spotfire_db123
SERVER_DATA_TABLESPACE=SPOTFIRE_DATA
SERVER_TEMP_TABLESPACE=SPOTFIRE_TEMP
ROOTFOLDER The location where the tablespaces will be created. It must
be a directory that is writable for the Oracle instance,
usually <oracle install dir>/oradata/<SID>.
Note: Do not add a slash or backslash after the <SID>.
CONNECTIDENTIFIER The Oracle TNS (Transparent Network Substrate) name of
the database. Usually the same as the SID.
ADMINNAME The name of a user with database administrator privileges,
usually “system”. If not set, the default is system account.
ADMINPASSWORD The password of the above user.
SERVERDB_USER The user that will be created and used to set up the Spotfire
database.
SERVERDB_PASSWORD The password of the above user.
SERVER_DATA_TABLE
SPACE
The name of the tablespace that will be created. The default
value will work for most systems.
SERVER_TEMP_TABLE
SPACE
The name of the temporary tablespace that will be created.
The default value will work for most systems.
Spotfire Database
9 (38)
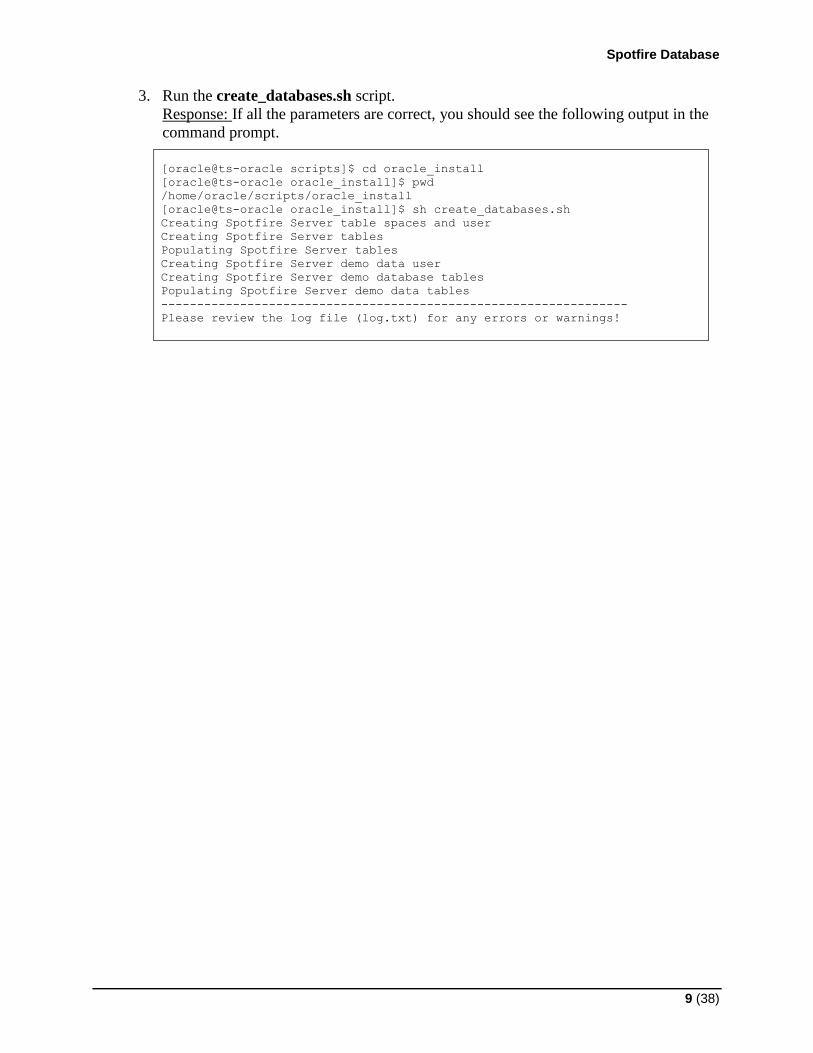
3. Run the create_databases.sh script.
Response: If all the parameters are correct, you should see the following output in the
command prompt.
[oracle@ts-oracle scripts]$ cd oracle_install
[oracle@ts-oracle oracle_install]$ pwd
/home/oracle/scripts/oracle_install
[oracle@ts-oracle oracle_install]$ sh create_databases.sh
Creating Spotfire Server table spaces and user
Creating Spotfire Server tables
Populating Spotfire Server tables
Creating Spotfire Server demo data user
Creating Spotfire Server demo database tables
Populating Spotfire Server demo data tables
-----------------------------------------------------------------
Please review the log file (log.txt) for any errors or warnings!

TIBCO Spotfire Server Installation Windows operating system
10 (38)
TIBCO Spotfire Server on Windows® operating system
2 Run TIBCO Spotfire Server Installer on Windows 1. Depending on the architecture of the server machine (32bit or 64bit), run the setup-
win32.exe or setup-win64.exe installer from the server installation kit.
2. The installation Wizard Welcome Dialog is displayed.
Click Next.
Windows Operating System TIBCO Spotfire Server Installation
11 (38)
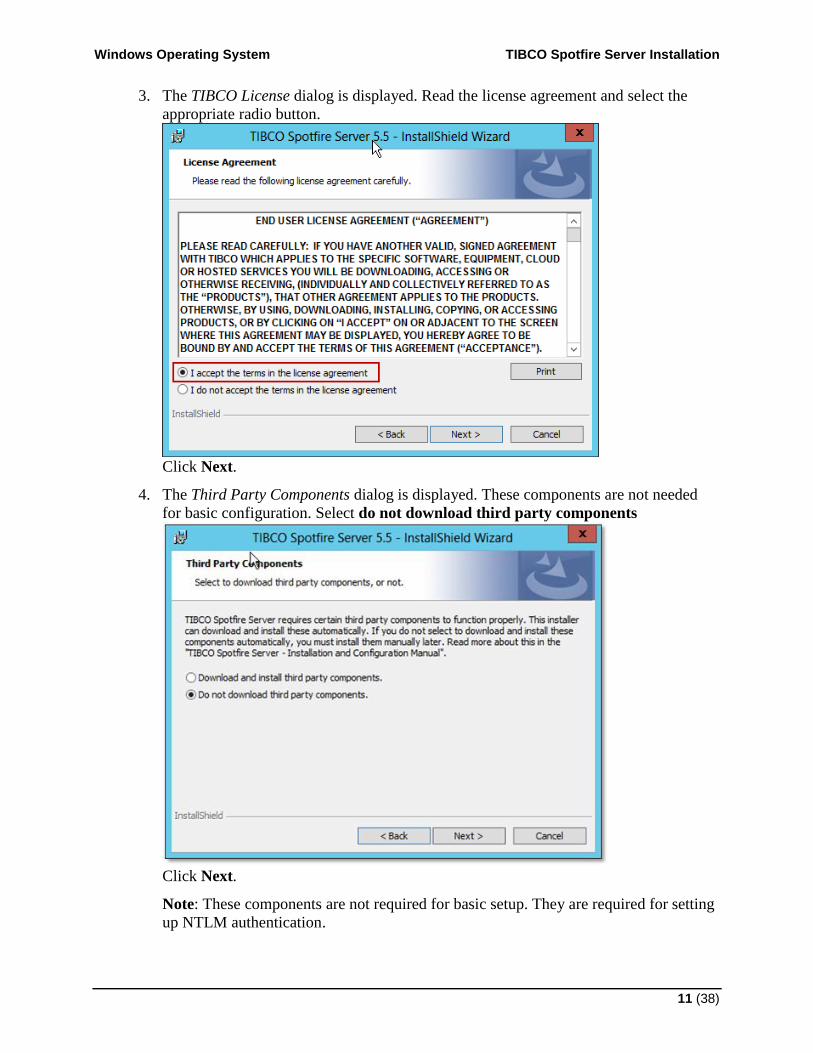
3. The TIBCO License dialog is displayed. Read the license agreement and select the
appropriate radio button.
Click Next.
4. The Third Party Components dialog is displayed. These components are not needed
for basic configuration. Select do not download third party components
Click Next.
Note: These components are not required for basic setup. They are required for setting
up NTLM authentication.

TIBCO Spotfire Server Installation Windows operating system
12 (38)
5. The Destination Folder dialog is displayed. You can change the path to a different
location by clicking Change. Specify where to install the TIBCO Spotfire Server.
Click Next.
6. The Windows Service dialog is displayed. Select Create Windows Service.
Click Next.

Windows Operating System TIBCO Spotfire Server Installation
13 (38)
7. The Spotfire Server Port dialog is displayed. Specify the Spotfire Server port. The
default port is port 80. It is the default port for web servers such as IIS and Apache.
Make sure the port you choose is not used by any other application or service. You can
use the netstat –a in a command prompt to check if a port is in use.
Click Next.
8. The Ready to Install the Program dialog is displayed.
Click Install.

TIBCO Spotfire Server Installation Windows operating system
14 (38)
Response: The installation starts.
9. The Completed dialog is displayed, select Launch the configuration tool
Click Finish.
Note: Check for hotfixes of TIBCO Spotfire Server at
http://support.spotfire.com/patches_spotfireserver.asp. Download and apply the
latest collection.

Windows Operating System TIBCO Spotfire Server Installation
15 (38)
3 Create the bootstrap.xml file on Windows The bootstrap.xml file configures the database connection and is created using the
Configuration Tool. Chapters 3, 4, 5 and 6 in the Windows section of this document
are performed in this tool.
The Configuration Tool was launched in the last step of the installation wizard and can
be opened at any time from the start menu (Start > TIBCO Spotfire Server 5.5 >
Configure TIBCO Spotfire Server), or by running uiconfig.bat (located in the
<installation dir>\tomcat\bin folder).
1. On the System Status tab, click Create new Bootstrap.

TIBCO Spotfire Server Installation Windows operating system
16 (38)
Response: The Bootstrap tab is displayed.
2. Enter information in the fields:
Path Specify where the bootstrap file will be located.
Database server Select from the drop-down menu.
JDBC driver Select from drop-down menu.
Driver class Enter the name of the JDBC driver class. This field is pre-
populated from selections made, and can not be edited. To be able
to select Oracle or jTDS you must also download the JDBC
driver.
Database username The name of the database account used by the TIBCO Spotfire
Server to connect to the Spotfire database. Enter correct database
login details, as specified in chapter 1.
Database password The password of the database account. Enter correct database
login details, as specified in chapter 1.
Hostname Enter the database host name.
Port The Spotfire Database port.
SID (for Oracle) Enter Server ID.
Database name (for MS
SQL)
Enter the database name, as specified in chapter 1.
Windows Operating System TIBCO Spotfire Server Installation
17 (38)
Database URL The JDBC connection URL. This field is pre-populated from
selections made and can be edited.
Configuration Tool
Password
Enter a Configuration Tool password of your own choice. This
will be used to protect the server configuration from un-
authorized access.
Note: The Configuration Tool password will be required when
running the Configuration Tool now and later.
Server Name Enter a unique name for the TIBCO Spotfire Server of your own
choice.
Encryption Password
(optional)
Enter an encryption password of your own choice. This will be
used for encrypting other passwords stored in the database. Note
that the passwords are encrypted with a static key if no encryption
password is specified here.
3. Click Create bootstrap
Response: The Configuration Tool checks that database drivers are installed and that
the database is running. It also checks that the database accepts the given credentials.
A dialog is displayed showing successful or unsuccessful creation of the bootstrap file.
On successful creation of the bootstrap file, the System Status tab of the Configuration
Tool is displayed.

TIBCO Spotfire Server Installation Windows operating system
18 (38)
4 Create and Save a Basic TIBCO Spotfire Server configuration on Windows
1. Click the Configuration tab in the Configuration Tool.
2. Review the configuration. Verify that BASIC Database is selected in the
Authentication drop-down menu and that Database is selected in the User Directory
drop-down menu.
3. Scroll to the bottom of the window and click Save configuration.
Response: The Save Configuration wizard is displayed.
4. Database is pre-selected in the Choose Destination dialog.

Windows Operating System TIBCO Spotfire Server Installation
19 (38)
5. Click Next.
Response: The To import the configuration you must provide a comment… dialog is
displayed.
6. Enter a comment, for instance “Initial configuration”.
Click Finish.

TIBCO Spotfire Server Administration Windows operating system
20 (38)
5 Create and Promote a user to Administrator on Windows
1. Go to the Administration tab in the Configuration Tool.
2. In the Create new user section, type in the username and password that you would like
to use for your Spotfire Administrator account and click Create.
Response: The Created new user window will open.
Click OK.
3. Select the new username from the Users column and click Promote to add that user to
the Administrators group.

Windows operating system TIBCO Spotfire Server Administration
21 (38)
6 Deploy client packages to TIBCO Spotfire Server Note: Before proceeding, if applicable, download and apply the latest collection of
TIBCO Spotfire Server hotfixes before proceeding. Go to
http://support.spotfire.com/patches_spotfireserver.asp
1. Unzip the TIBCO Spotfire Deployment, for example TIB_spotdeploy_5.5.0_win.zip
from TIBCO Spotfire Client Deployment Kit installation media, provided with the
TIBCO Spotfire Client installation.
2. Go to the System Status tab in the Configuration Tool.
3. Click the Deploy Client Packages link.
Response: The Deploy Client Packages dialog is displayed.
4. Click Browse and go to the deployment kit folder
\TIB_spotdeploy_5.5.0_win\Products\TIBCO Spotfire Distribution, select the
Spotfire.Dxp.sdn file.
Click OK.
5. Select to which deployment area you wish to deploy in the drop-down list.
6. Click Deploy.
7 Start the TIBCO Spotfire Server on Windows 1. Log onto the Spotfire Server machine as an administrator.
2. Select Start > Control Panel > Administrative Tools > Services. Locate the service
called TIBCO Spotfire Server 5.5.
3. Select Start.
Verify that the TIBCO Spotfire Server is up and running by connecting a TIBCO
Spotfire Client.

TIBCO Spotfire Server Installation Linux operating system
22 (38)
TIBCO Spotfire Server on Linux® operating system
2 Run the TIBCO Spotfire Server Installer on Linux This section will walk you through the installation of the TIBCO Spotfire Server
software on your Linux OS.
The installation is described for using a Graphical User Interface (GUI) or using a
Command Line Interface (CLI). See reference How to Check if Your Linux Server has
a GUI on page 38.
Select the appropriate installer for the architecture of the intended Spotfire Server
machine (32 or 64 bit).
Note: You will either need to know the root user’s password or have sudo privileges to
install the RPM.
Note: It is recommended to use the 64-bit installer on a 64-bit server.
2.1 Install TIBCO Spotfire Server on Linux Using a Graphical User Interface
1. On a Linux server with a Graphical User Interface (GUI), you can double click on the
RPM package to install TIBCO Spotfire Server.
Response: The Do you want to install this file? dialog is displayed.

Linux operating system TIBCO Spotfire Server Installation
23 (38)
2. Click Install.
Response: The Authenticate dialog is displayed.
3. Type the root user’s password to continue.
Click Authenticate.
Response: The Testing Changes dialog is displayed. The progress bar moves until the
dialog window disappears.
4. Verify the installation by navigating to /usr/local/bin/tibco/tss/5.5.0/ in a window
manager. You should see three directories and a shell script named configure.
Note: If applicable, download and apply the latest collection of TIBCO Spotfire Server
hotfixes before proceeding: http://support.spotfire.com/patches_spotfireserver.asp
5. Proceed to section 3 Create the bootstrap.xml file on Linux.

TIBCO Spotfire Server Installation Linux operating system
24 (38)
2.2 Install TIBCO Spotfire Server on Linux Using a Command Line Interface
On a Linux server without a Graphical User Interface (GUI), you will need to use a
Command Line Interface (CLI) to install TIBCO Spotfire Server.
Note: If you attempt to install the RPM without using sudo or not as the root user, you
will see the following output in the terminal:
$ rpm -ivh tss-5.5.0.x86_64.rpm
error: can't create transaction lock on /var/lib/rpm/.rpm.lock (Permission
denied)
1. Navigate to the directory where you extracted the Spotfire Installer Tape Archive
(TAR) file TIB_ss_5.5.0_linux.tar and list the contents of that directory.
For example:
$ cd /Installers/TIBCO-Spotfire/Servers/5.5.0/TIB_ss_5.5.0_linux
$ ls -l
total 246312
drwxr-xr-x. 2 support support 4096 Feb 26 11:30 datafunctions
drwxr-xr-x. 4 support support 4096 Feb 26 11:30 demodata
drwxr-xr-x. 2 support support 4096 Feb 26 11:30 documentation
drwxr-xr-x. 3 support support 4096 Feb 26 11:30 migration
drwxr-xr-x. 4 support support 4096 Feb 26 11:30 scripts
-rw-r--r--. 1 support support 126763253 Feb 1 07:52 tss-5.5.0.x86_32.rpm
-rw-r--r--. 1 support support 125420907 Feb 1 07:52 tss-5.5.0.x86_64.rpm
2. Verify the RPM package by typing the following in a command prompt:
rpm –K tss-5.5.0.x86_32.rpm or
rpm –K tss-5.5.0.x86_64.rpm.
$ rpm -K tss-5.5.0.x86_64.rpm
tss-5.5.0.x86_64.rpm: sha1 md5
3. Install the RPM package by typing the following in a command prompt:
rpm –ivh tss-5.5.0.x86_32.rpm or
rpm –ivh tss-5.5.0.x86_64.rpm.
$ sudo rpm -ivh tss-5.5.0.x86_64.rpm
Preparing... ###########################################
[100%]
1:tss-5.5.0 ###########################################
[100%]
You must now execute /usr/local/bin/tibco/tss/5.5.0/configure to complete
the configuration.
4. At the end of the RPM installation it tells you that “You must now execute
/usr/local/bin/tibco/tss/5.5.0/configure to complete the configuration.” Navigate to
the newly installed TIBCO Spotfire Installation root directory as follows:
Linux operating system TIBCO Spotfire Server Installation
25 (38)
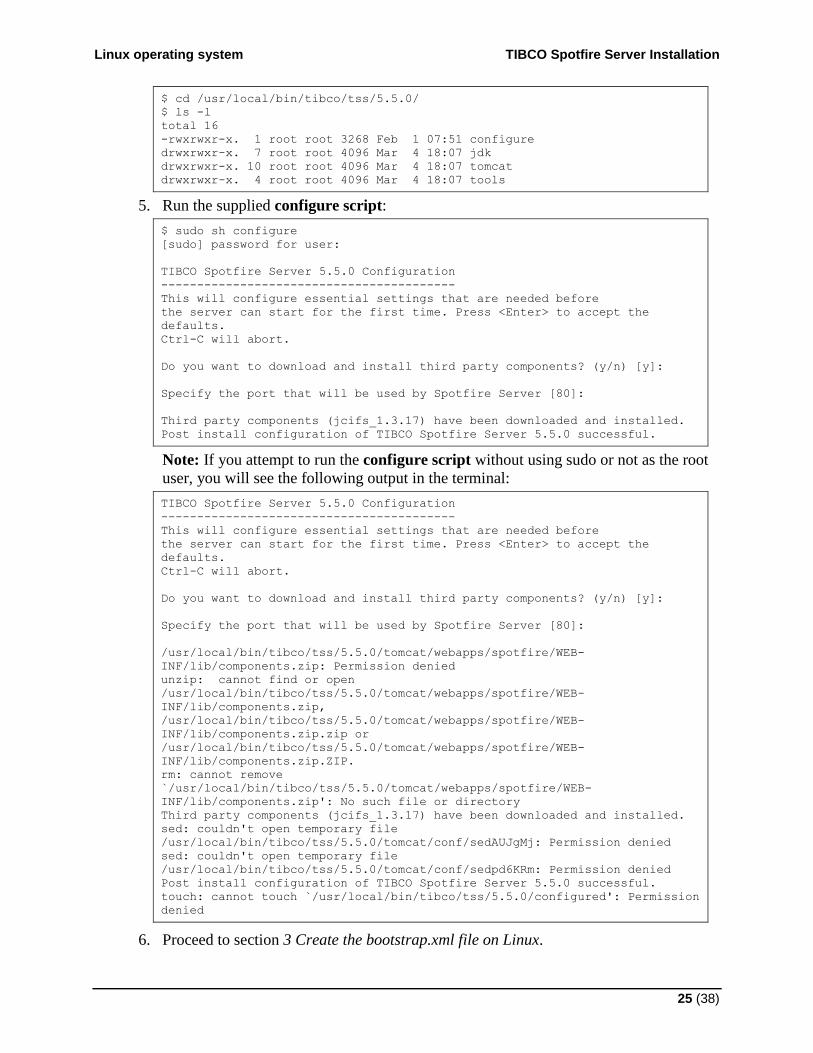
$ cd /usr/local/bin/tibco/tss/5.5.0/
$ ls -l
total 16
-rwxrwxr-x. 1 root root 3268 Feb 1 07:51 configure
drwxrwxr-x. 7 root root 4096 Mar 4 18:07 jdk
drwxrwxr-x. 10 root root 4096 Mar 4 18:07 tomcat
drwxrwxr-x. 4 root root 4096 Mar 4 18:07 tools
5. Run the supplied configure script:
$ sudo sh configure
[sudo] password for user:
TIBCO Spotfire Server 5.5.0 Configuration
-----------------------------------------
This will configure essential settings that are needed before
the server can start for the first time. Press <Enter> to accept the
defaults.
Ctrl-C will abort.
Do you want to download and install third party components? (y/n) [y]:
Specify the port that will be used by Spotfire Server [80]:
Third party components (jcifs_1.3.17) have been downloaded and installed.
Post install configuration of TIBCO Spotfire Server 5.5.0 successful.
Note: If you attempt to run the configure script without using sudo or not as the root
user, you will see the following output in the terminal:
TIBCO Spotfire Server 5.5.0 Configuration
-----------------------------------------
This will configure essential settings that are needed before
the server can start for the first time. Press <Enter> to accept the
defaults.
Ctrl-C will abort.
Do you want to download and install third party components? (y/n) [y]:
Specify the port that will be used by Spotfire Server [80]:
/usr/local/bin/tibco/tss/5.5.0/tomcat/webapps/spotfire/WEB-
INF/lib/components.zip: Permission denied
unzip: cannot find or open
/usr/local/bin/tibco/tss/5.5.0/tomcat/webapps/spotfire/WEB-
INF/lib/components.zip,
/usr/local/bin/tibco/tss/5.5.0/tomcat/webapps/spotfire/WEB-
INF/lib/components.zip.zip or
/usr/local/bin/tibco/tss/5.5.0/tomcat/webapps/spotfire/WEB-
INF/lib/components.zip.ZIP.
rm: cannot remove
`/usr/local/bin/tibco/tss/5.5.0/tomcat/webapps/spotfire/WEB-
INF/lib/components.zip': No such file or directory
Third party components (jcifs_1.3.17) have been downloaded and installed.
sed: couldn't open temporary file
/usr/local/bin/tibco/tss/5.5.0/tomcat/conf/sedAUJgMj: Permission denied
sed: couldn't open temporary file
/usr/local/bin/tibco/tss/5.5.0/tomcat/conf/sedpd6KRm: Permission denied
Post install configuration of TIBCO Spotfire Server 5.5.0 successful.
touch: cannot touch `/usr/local/bin/tibco/tss/5.5.0/configured': Permission
denied
6. Proceed to section 3 Create the bootstrap.xml file on Linux.

TIBCO Spotfire Server Installation Linux operating system
26 (38)
3 Create the bootstrap.xml file on Linux The bootstrap.xml file configures the database connection and is created using the
Configuration Tool or the Configuration Command Line Tool. This section will walk
you through creating the bootstrap.xml file using either the GUI or the CLI on Linux.
See reference How to Check if Your Linux Server has a GUI on page 38
3.1 Create the bootstrap.xml File on Linux Using a Graphical User Interface
1. Open a command prompt and navigate to /usr/local/bin/tibco/tss/5.5.0/tomcat/bin
2. Type ./uiconfig.sh in a command prompt:
Response: The TIBCO Spotfire Server Configuration window will open.
3. On the System Status tab, click the Create new bootstrap file… link.

Linux operating system TIBCO Spotfire Server Installation
27 (38)
Response: The Bootstrap tab is displayed.
4. Enter information in the fields:
Path Specify where the bootstrap file will be located.
Database server Select from the drop-down menu.
JDBC driver Select from drop-down menu.
Driver class Enter the name of the JDBC driver class. This field is pre-
populated from selections made. To be able to select Oracle or
jTDS you must also download the JDBD driver.
Database username The name of the database account used by the TIBCO Spotfire
Server to connect to the Spotfire database. Enter correct database
login details.
Database password The password of the database account. Enter correct database
login details.
Hostname Enter the database host name.
Port The Spotfire Database port.
SID (for Oracle) Enter Server ID.
Database name (for MS
SQL)
Enter the database name.
Database URL The JDBC connection URL. This field is pre-populated from
selections made.
Configuration Tool
Password
Specify a password that will be used to protect the server
configuration from unauthorized access.
Note: The configuration tool password will be required when
running the configuration tool now and later. Choose a
configuration tool password.

TIBCO Spotfire Server Installation Linux operating system
28 (38)
Server Name Choose and enter a unique name for the TIBCO Spotfire Server.
Encryption Password
(optional)
Will be used for encrypting other passwords stored in the
database.
5. Click Create bootstrap
Response: The Configuration Tool checks that database drivers are installed and that
the database is running. It also checks that the database accepts the given credentials.
A dialog is displayed showing successful or unsuccessful creation of the bootstrap file.
The System Status tab of the Configuration Tool is displayed if successful.
3.2 Create the bootstrap.xml File on Linux Using a Command Line Interface
On a Linux server without a Graphical User Interface (GUI), you will need to use a
Command Line Interface (CLI) to install TIBCO Spotfire Server.
1. Open a command prompt and navigate to /usr/local/bin/tibco/tss/5.5.0/tomcat/bin
2. Run a specific command using the Command Line Configuration Tool config.sh to
create the bootstrap.xml file. The basic syntax of the command is as follows:
sh $CONFIG bootstrap --force --driver-class $DB_DRIVER --database-url
"$DB_URL" --username $DB_USER --password $DB_PASSWORD --tool-password
$CONFIG_TOOL_PASSWORD $BOOTSTRAP_FILE
Here is an example using the supplied TIBCO DataDirect Driver for Oracle:
sh /usr/local/bin/tibco/tss/5.5.0/tomcat/bin/config.sh bootstrap --force --
driver-class tibcosoftwareinc.jdbc.oracle.OracleDriver --database-url
jdbc:tibcospotfireinc:oracle://dbsrv.example.com:1521;SID=orcl --username
spotfire_db --password spotfire_db123 --tool-password admin123 --
encryption-password
/usr/local/bin/tibco/tss/5.5.0/tomcat/webapps/spotfire/WEB-
INF/bootstrap.xml

Linux operating system TIBCO Spotfire Server Installation
29 (38)
You can also use the following script to create the bootstrap.xml file. Create a text
file on your Linux machine, name it create-bootstrap.sh and paste the following text:
#!/bin/bash
#title :create-bootstrap.sh
#description :Create bootstrap.xml file on a newly installed 5.5.0
Spotfire Server
#author :TIBCO Software, Inc.
#date :20130318
#version :5.5.0
#usage :./create-bootstrap.sh
#===============================================================
export CATALINA_HOME=/usr/local/bin/tibco/tss/5.5.0/tomcat
export CONFIG=$CATALINA_HOME/bin/config.sh
export CONFIG_FILE=$CATALINA_HOME/bin/configuration.xml
export BOOTSTRAP_FILE=$CATALINA_HOME/webapps/spotfire/WEB-INF/bootstrap.xml
export DB_DRIVER=tibcosoftwareinc.jdbc.oracle.OracleDriver
export
DB_URL="jdbc:tibcospotfireinc:oracle://dbsrv.example.com:1521;SID=orcl"
export DB_USER=spotfire_db
export DB_PASSWORD=spotfire_db123
export CONFIG_TOOL_PASSWORD=admin123
## Create bootstrap.xml
echo "Creating the database connection configuration..."
sh $CONFIG bootstrap --force --driver-class $DB_DRIVER --database-url
"$DB_URL" --username $DB_USER --password $DB_PASSWORD --tool-password
$CONFIG_TOOL_PASSWORD --encryption-password $BOOTSTRAP_FILE
Note: Remember to make the appropriate changes to the supplied variables, save the
script and run it.
Note: You will either need to know the root user’s password or have sudo privileges to
run the script
4 Create and Save a Basic TIBCO Spotfire Server Configuration on Linux This section will walk you through creating and importing a new configuration on your
Linux OS. A new configuration is created and imported using the Configuration Tool
or the Command Line Configuration Tool.
This section will walk you through creating and importing a new configuration using
either the GUI or the CLI on Linux. See reference How to Check if Your Linux Server
has a GUI on page 38
4.1 Create and Save a Basic TIBCO Spotfire Server Configuration on Linux Using a Graphical User Interface
This section will walk you through creating and importing a new configuration using
Configuration Tool uiconfig.sh.
1. In a command prompt, navigate to /usr/local/bin/tibco/tss/5.5.0/tomcat/bin
2. Type ./uiconfig.sh in a command prompt:
Response: The TIBCO Spotfire Server Configuration window will open.

TIBCO Spotfire Server Installation Linux operating system
30 (38)
3. Click the Configuration tab
4. Review the configuration, verify that BASIC Database is selected in the
Authentication drop-down menu and that Database is selected in the User Directory
drop-down menu.
5. Click Save configuration… in the bottom right-hand corner of the window.
Response: The Save Configuration wizard is displayed.
6. Database (recommended) is pre-selected in the Choose Destination dialog.
Click Next.
Response: The To import the configuration you must provide a comment… dialog is
displayed.
7. Enter a comment for instance “Initial configuration”.
Click Finish.

Linux operating system TIBCO Spotfire Server Installation
31 (38)
4.2 Create and Save a Basic TIBCO Spotfire Server Configuration on Linux Using a Command Line Interface
On a Linux server without a Graphical User Interface (GUI), you will need to use a
Command Line Interface (CLI) to install TIBCO Spotfire Server.
1. In a command prompt, navigate to /usr/local/bin/tibco/tss/5.5.0/tomcat/bin
2. Run two specific commands using the Configuration Command Line Configuration
tool config.sh to create and import a new default configuration. The basic syntax of
the commands are as follows:
sh $CONFIG create-default-config --force $CONFIG_FILE
sh $CONFIG import-config --bootstrap-config $BOOTSTRAP_FILE --tool-password
$CONFIG_TOOL_PASSWORD --comment="TIBCO Spotfire $SPOTFIRE_VERSION Basic
Configuration" $CONFIG_FILE
Here is an example of the two commands:
sh /usr/local/bin/tibco/tss/5.5.0/tomcat/bin/config.sh create-default-
config –force /usr/local/bin/tibco/tss/5.5.0/tomcat/bin/configuration.xml
sh /usr/local/bin/tibco/tss/5.5.0/tomcat/bin/config.sh import-config --
bootstrap-config
/usr/local/bin/tibco/tss/5.5.0/tomcat/webapps/spotfire/WEB-
INF/bootstrap.xml --tool-password admin123 --comment="TIBCO Spotfire
$SPOTFIRE_VERSION Basic Configuration"
/usr/local/bin/tibco/tss/5.5.0/tomcat/bin/configuration.xml

TIBCO Spotfire Server Installation Linux operating system
32 (38)
You can also use the following script to create and import the basic configuration.
Create a text file on your Linux machine, name it create-import-basic-config.sh and
paste the following text.
#!/bin/bash
#title :create-import-basic-config.sh
#description :Create+import a basic config on newly installed 5.5.0
Spotfire Server
#author :TIBCO Software, Inc.
#date :20130318
#version :5.5.0
#usage :./create-import-basic-config.sh
#============================================================================
export CATALINA_HOME=/usr/local/bin/tibco/tss/5.5.0/tomcat
export CONFIG=$CATALINA_HOME/bin/config.sh
export CONFIG_FILE=$CATALINA_HOME/bin/configuration.xml
export BOOTSTRAP_FILE=$CATALINA_HOME/webapps/spotfire/WEB-INF/bootstrap.xml
export CONFIG_TOOL_PASSWORD=admin123
# Create default config
echo "Creating the default configuration..."
sh $CONFIG create-default-config --force $CONFIG_FILE
# Import Basic Config
echo "Importing the configuration..."
sh $CONFIG import-config --bootstrap-config $BOOTSTRAP_FILE --tool-password
$CONFIG_TOOL_PASSWORD --comment="TIBCO Spotfire $SPOTFIRE_VERSION Basic
Configuration" $CONFIG_FILE
Note: Remember to make the appropriate changes to the supplied variables, save the
script and run it.
Note: You will either need to know the root user’s password or have sudo privileges to
run the script
Linux operating system TIBCO Spotfire Server Administration
33 (38)
5 Create and Promote a User to Administrator on Linux Every Spotfire Server must have at least one Administrator user. This section will
walk you through creating a new user and promoting that new user to Administrator.
This section will walk you through creating a new user and promoting that new user to
Administrator using either the GUI or the CLI on Linux. See reference How to Check
if Your Linux Server has a GUI on page 38
5.1 Create and Promote a User to Administrator on Linux Using a Graphical User Interface
This section will walk you through creating and promoting a new user to
Administrator using the TIBCO Spotfire Server Configuration Tool uiconfig.sh.
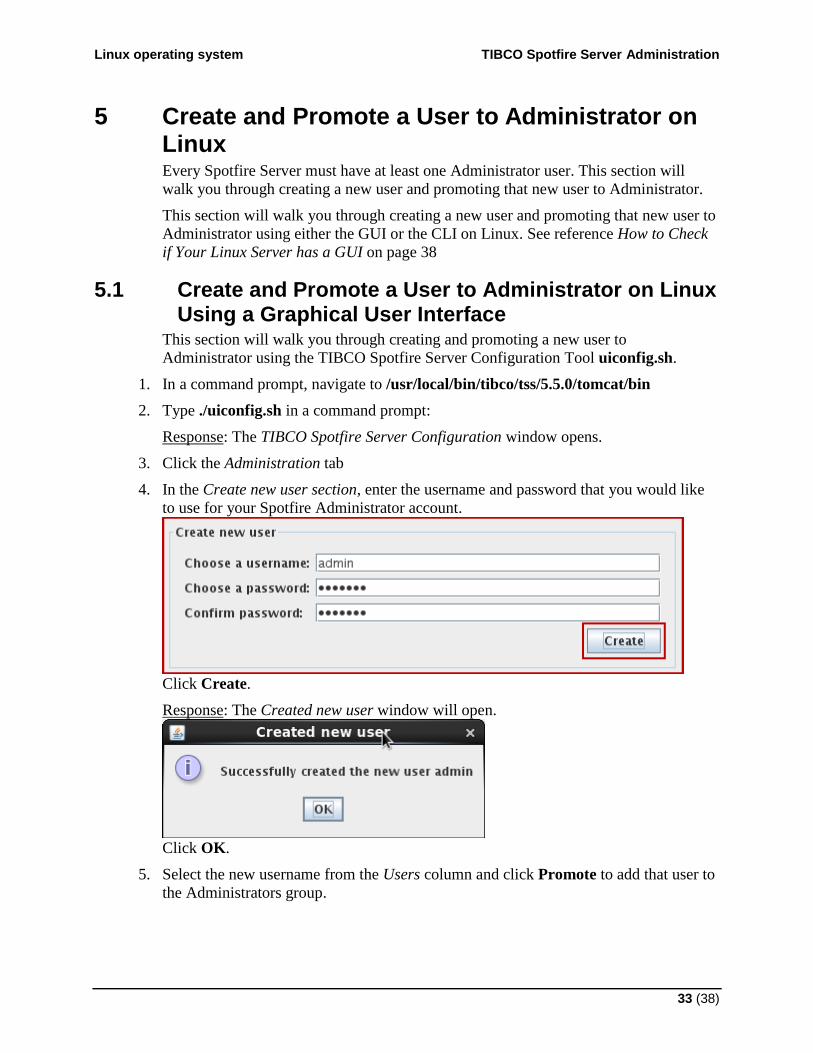
1. In a command prompt, navigate to /usr/local/bin/tibco/tss/5.5.0/tomcat/bin
2. Type ./uiconfig.sh in a command prompt:
Response: The TIBCO Spotfire Server Configuration window opens.
3. Click the Administration tab
4. In the Create new user section, enter the username and password that you would like
to use for your Spotfire Administrator account.
Click Create.
Response: The Created new user window will open.
Click OK.
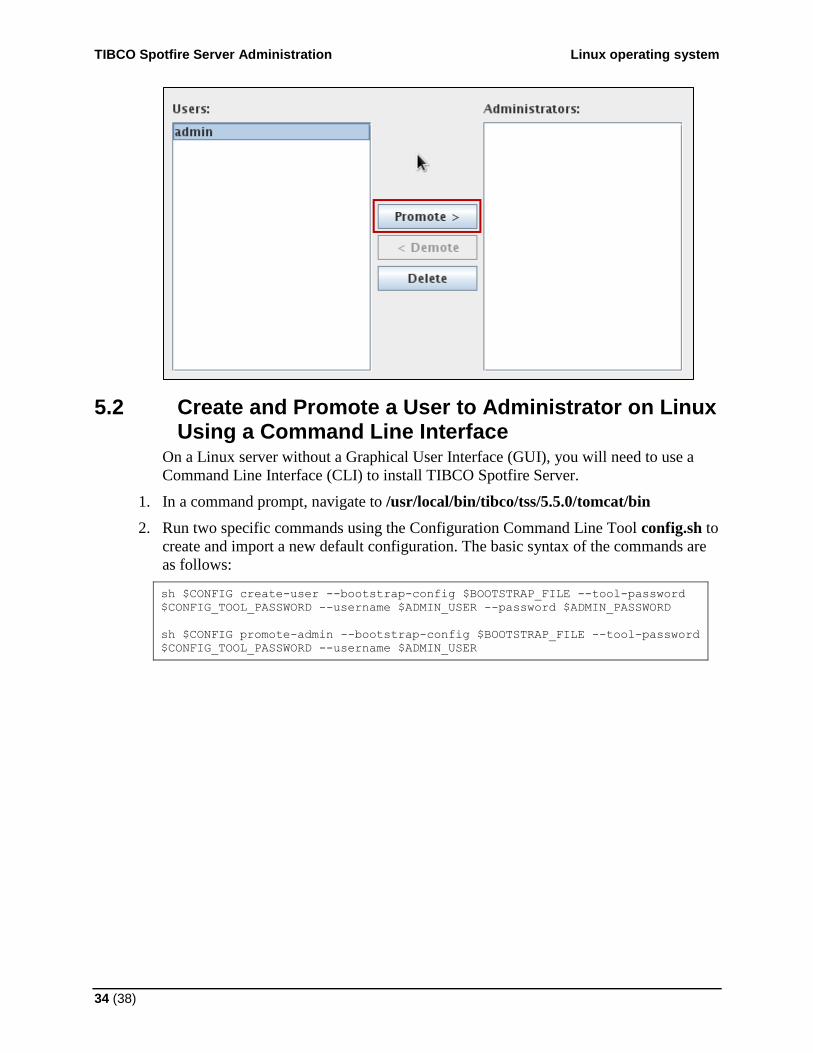
5. Select the new username from the Users column and click Promote to add that user to
the Administrators group.
TIBCO Spotfire Server Administration Linux operating system
34 (38)
5.2 Create and Promote a User to Administrator on Linux Using a Command Line Interface
On a Linux server without a Graphical User Interface (GUI), you will need to use a
Command Line Interface (CLI) to install TIBCO Spotfire Server.
1. In a command prompt, navigate to /usr/local/bin/tibco/tss/5.5.0/tomcat/bin
2. Run two specific commands using the Configuration Command Line Tool config.sh to
create and import a new default configuration. The basic syntax of the commands are
as follows:
sh $CONFIG create-user --bootstrap-config $BOOTSTRAP_FILE --tool-password
$CONFIG_TOOL_PASSWORD --username $ADMIN_USER --password $ADMIN_PASSWORD
sh $CONFIG promote-admin --bootstrap-config $BOOTSTRAP_FILE --tool-password
$CONFIG_TOOL_PASSWORD --username $ADMIN_USER

Linux operating system TIBCO Spotfire Server Administration
35 (38)
Here is an example of the two commands:
sh /usr/local/bin/tibco/tss/5.5.0/tomcat/bin/config.sh create-user --
bootstrap-config
/usr/local/bin/tibco/tss/5.5.0/tomcat/webapps/spotfire/WEB-
INF/bootstrap.xml --tool-password admin123 --username admin --password
admin123
sh /usr/local/bin/tibco/tss/5.5.0/tomcat/bin/config.sh promote-admin --
bootstrap-config
/usr/local/bin/tibco/tss/5.5.0/tomcat/webapps/spotfire/WEB-
INF/bootstrap.xml --tool-password admin123 --username admin
You can also use the following script to create and promote a new user to
Administrator. Create a text file on your Linux machine, name it create-promote-
admin.sh and paste the following text.
#!/bin/bash
#title :create-promote-admin.sh
#description :Create+promote new user to Administrator on newly installed
5.5.0 Spotfire Server
#author :TIBCO Software, Inc.
#date :20130318
#version :5.5.0
#usage :./create-promote-admin.sh
#============================================================================
export CATALINA_HOME="/usr/local/bin/tibco/tss/5.5.0/tomcat"
export CONFIG="$CATALINA_HOME/bin/config.sh"
export BOOTSTRAP_FILE="$CATALINA_HOME/webapps/spotfire/WEB-INF/bootstrap.xml"
export CONFIG_TOOL_PASSWORD="admin123"
export ADMIN_USER="admin"
export ADMIN_PASSWORD="admin123"
# Create $ADMIN_USER
echo "Creating the user '$ADMIN_USER' to become Administrator..."
sh $CONFIG create-user --bootstrap-config $BOOTSTRAP_FILE --tool-password
$CONFIG_TOOL_PASSWORD --username $ADMIN_USER --password $ADMIN_PASSWORD
# Promote $ADMIN_USER to Administrator
echo "Making the created user '$ADMIN_USER' an Administrator..."
sh $CONFIG promote-admin --bootstrap-config $BOOTSTRAP_FILE --tool-password
$CONFIG_TOOL_PASSWORD --username $ADMIN_USER
Note: Remember to make the appropriate changes to the supplied variables, save the
script and run it.
Note: You will either need to know the root user’s password or have sudo privileges to
run the script.

TIBCO Spotfire Server Administration Linux operating system
36 (38)
6 Deploy client packages to TIBCO Spotfire Server Note: Before proceeding, if applicable, download and apply the latest collection of
TIBCO Spotfire Server hotfixes before proceeding. Go to
http://support.spotfire.com/patches_spotfireserver.asp
6.1 Deploy client packages to TIBCO Spotfire Server on Linux using a Graphical User Interface
1. Unzip the TIBCO Spotfire Deployment, for example TIB_spotdeploy_5.5.0_win.zip
from TIBCO Spotfire Client Deployment Kit installation media, provided with the
TIBCO Spotfire Client installation.
2. Type ./uiconfig.sh in a command prompt.
Response: The TIBCO Spotfire Server Configuration window will open.
3. Go to the System Status tab in the Configuration Tool.
4. Click the Deploy Client Packages link.
Response: The Deploy Client Packages dialog is displayed.
5. Click Browse and go to the deployment kit folder
\TIB_spotdeploy_5.5.0_win\Products\TIBCO Spotfire Distribution, select the
Spotfire.Dxp.sdn file.
Click OK.
6. Select to which deployment area you wish to deploy in the drop-down list.
7. Click Deploy.
6.2 Deploy client packages to TIBCO Spotfire Server This section will walk you through deploying the TIBCO Spotfire Client Packages to
the TIBCO Spotfire Server. Each browser acts differently on different operating
systems, but for as long as you’re running one of the supported browsers it should
behave the same.
1. Unzip the TIBCO Spotfire Deployment, for example TIB_spotdeploy_5.5.0_win.zip
from TIBCO Spotfire Client Deployment Kit installation media, provided with the
TIBCO Spotfire Client installation.
2. Browse to the deployment kit folder \TIB_spotdeploy_5.5.0_win\Products\TIBCO
Spotfire Distribution, note the path to the Spotfire.Dxp.sdn file.
3. Run the command update deployment and insert the path from the previous step.
sh /usr/local/bin/tibco/tss/5.5.0/tomcat/bin/config.sh update-deployment --
bootstrap-config
/usr/local/bin/tibco/tss/5.5.0/tomcat/webapps/spotfire/WEB-
INF/bootstrap.xml --tool-password admin123 –files
"/TIB_spotdeploy_5.5.0_win/Products/TIBCO Spotfire
Distribution/Spotfire.Dxp.sdn"

Linux operating system TIBCO Spotfire Server Administration
37 (38)
7 Start the TIBCO Spotfire Server on Linux This section will walk you starting the Spotfire Server on Linux.
Note: If you used the supplied TIBCO-Spotfire-Setup.sh script your TIBCO Spotfire
Server should already be running at this point and you can skip to step Linux chapter 6
Deploy client packages to TIBCO Spotfire Server.
1. In a command prompt, run the following command:
$ sudo service tss-5.5.0 start
You should see the following output:
$ sudo service tss-5.5.0 start
[sudo] password for support:
Starting tss-5.5.0: Using CATALINA_BASE:
/usr/local/bin/tibco/tss/5.5.0/tomcat
Using CATALINA_HOME: /usr/local/bin/tibco/tss/5.5.0/tomcat
Using CATALINA_TMPDIR: /usr/local/bin/tibco/tss/5.5.0/tomcat/temp
Using JRE_HOME: /usr/local/bin/tibco/tss/5.5.0/jdk/jre
Using CLASSPATH:
/usr/local/bin/tibco/tss/5.5.0/tomcat/bin/bootstrap.jar:/usr/local/bin/tibco/
tss/5.5.0/tomcat/bin/tomcat-juli.jar
Using CATALINA_PID: /usr/local/bin/tibco/tss/5.5.0/tomcat/bin/catalina.pid
Note: On SuSE® Linux you will need to start the daemon directly using the following
command: sudo /etc/init.d/tss-5.5.0 start
Verify that the TIBCO Spotfire Server is up and running by connecting a TIBCO
Spotfire Client.
Reference Tips & Tricks
38 (38)
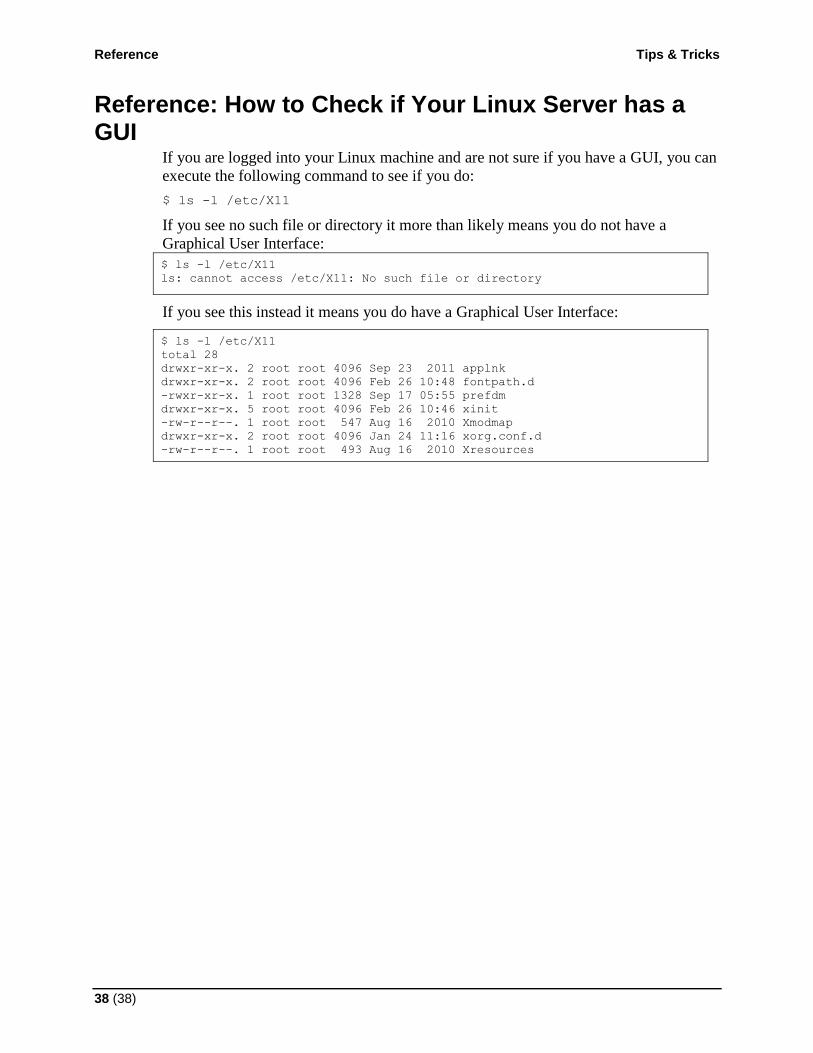
Reference: How to Check if Your Linux Server has a GUI
If you are logged into your Linux machine and are not sure if you have a GUI, you can
execute the following command to see if you do:
$ ls -l /etc/X11
If you see no such file or directory it more than likely means you do not have a
Graphical User Interface:
$ ls -l /etc/X11
ls: cannot access /etc/X11: No such file or directory
If you see this instead it means you do have a Graphical User Interface:
$ ls -l /etc/X11
total 28
drwxr-xr-x. 2 root root 4096 Sep 23 2011 applnk
drwxr-xr-x. 2 root root 4096 Feb 26 10:48 fontpath.d
-rwxr-xr-x. 1 root root 1328 Sep 17 05:55 prefdm
drwxr-xr-x. 5 root root 4096 Feb 26 10:46 xinit
-rw-r--r--. 1 root root 547 Aug 16 2010 Xmodmap
drwxr-xr-x. 2 root root 4096 Jan 24 11:16 xorg.conf.d
-rw-r--r--. 1 root root 493 Aug 16 2010 Xresources