time-saving techniques for junos software confi …...control of your router can reconfigure the...
TRANSCRIPT

Time-saving techniques for JUNOS software confi guration
Aviva Garrett
JUNOSCookbook TM

This is the Title of the Book, eMatter EditionCopyright © 2006 O’Reilly & Associates, Inc. All rights reserved.
72
Chapter 2 CHAPTER 2
Basic Router Security and Access Control
2.0 IntroductionIn the last few years, routers have increasingly become targets of malicious hackersattempting to launch distributed denial-of-service (DDoS) and other attacks acrossthe Internet. Having control of a router, especially one with high-speed links, pro-vides an even greater opportunity for mischief than just controlling PCs. A hacker incontrol of your router can reconfigure the system and take over your entire autono-mous system (AS). Hackers are often able to log in to and take over routers simplybecause of negligence on the part of a router administrator who doesn’t implementbasic security precautions, such as setting a password for the root account or using apassword that can easily be discovered, such as juniper, cisco, root, or admin. Giventhe increasing number of malicious attacks occurring on the Internet, it is vital foryou to secure your router.
This chapter talks about how to configure router access, including setting up loginaccounts, and other basic security measures you should take to control access to therouter and to protect your router from undesired access.
There is nothing complicated about what you need to do to protect your router.Basic router security consists of three components. Two of these—limiting physicalaccess to your router and configuring the JUNOS software to minimize the vulnera-bility of your router—are under your control. Properly configuring the router to beas secure as possible, while at the same time ensuring that you don’t misconfigurethe router to increase its vulnerability to attack, is often called hardening the configu-ration. The third component of security is some of the default behaviors of theJUNOS software that help protect the router.
To limit physical access to your router, we strongly recommend keeping your routerin an area that has restricted access, such as a room that is locked or has badgeaccess, and then limiting the number of people who have access to that area. Any-one who can physically get to a router can do a lot of damage, from removing hard-ware or cables from the router to connecting a PC to the router’s console port, which
,ch02.1488 Page 72 Friday, March 10, 2006 8:30 AM

This is the Title of the Book, eMatter EditionCopyright © 2006 O’Reilly & Associates, Inc. All rights reserved.
Introduction | 73
lets them gain access to the router as root and gives full access to and control of therouter’s configuration and files. You should also never leave a modem connected tothe router’s console port to ensure that no one can gain access this way.
In the basic router configuration that you set up (described in Recipe 1.1), the fol-lowing default software behaviors are in place to protect the security of your router:
• Only console access to the router is enabled by default. Remote managementaccess to the router and all management access protocols, including Telnet, FTP,and SSH (secure shell), are disabled. When you initially configure the router,you connect a terminal to the router’s console port. After this, you want to keepthe router in an area that has limited physical access, so you need to enable away to remotely log in to the router. For the best security, you should enableonly SSH access.
• The JUNOS software does not support the SNMP Set capability for editing con-figuration data, although it does support this capability for monitoring and trou-bleshooting the network. There are no known security issues associated withthis. (You can configure the software to disable this SNMP Set capability.)
• The JUNOS software does not forward directed broadcast messages. (Directedbroadcasts are datagrams with a destination address of an IP subnetwork broad-cast address.) Directed broadcasts are open to spoofing, which is used in DoSattacks.
• The JUNOS software ignores martian addresses that contain the following pre-fixes: 0.0.0.0/8, 127.0.0.0/8, 128.0.0.0/16, 191.255.0.0/16, 192.0.0.0/24,223.255.55.0/24, and 240.0.0.0/4. (Martian addresses are reserved host or net-work addresses about which all routing information should be ignored.) Youmay want to add other prefixes to the martian list, such as RFC 1918 addressspace and bogon prefixes (see Recipe 9.5).
A key to router security is controlling who can log in to the router and what they cando once they are logged in. For each user who is allowed to work on the router, youshould create a login account that defines the user’s login name and password andthe class of operations that they can perform on the router.
Strategies for Choosing PasswordsPasswords for the root account and for user accounts are often the weakest links inrouter security. For root and for any user who can log in to the router, you shouldalways set a password, and the password you should choose should be a strong pass-word, one that is hard to crack, not a weak one. You want to make it impossible fora person with malicious intentions to be able to gain login access to your router,especially as root or any user who has root permission or who has permission tomodify the router’s configuration or any files on the router, or to shut down orreboot the router.
,ch02.1488 Page 73 Friday, March 10, 2006 8:30 AM

This is the Title of the Book, eMatter EditionCopyright © 2006 O’Reilly & Associates, Inc. All rights reserved.
74 | Chapter 2: Basic Router Security and Access Control
All JUNOS passwords are encrypted, but this means only that the password storedon the router or in a configuration file is stored in an encrypted form. Someone read-ing the configuration on the router won’t be able to see the plain-text password, andif you copy the file over the network and someone sniffs the session, they won’t seethe passwords in the file. Even though the passwords are encrypted in the configura-tion, you should take care not to let them circulate. It’s still possible to use programssuch as crack to guess clear-text passwords, encrypt them, and compare them to alist of encrypted strings (although this is not the case with, for example, SSH publickeys). For this reason you always need to use strong passwords and prevent evenencrypted versions of your passwords from falling into the wrong hands.
To understand what a strong password is, we should look first at what constitutes aweak password. It should go without saying, but bears repeating anyway, that theweakest password is no password at all. A number of groups that monitor networksecurity still find routers that have no passwords set on them. Other weak pass-words are those that are easy to guess and include common words such as the nameof your router vendor (such as juniper), the string admin, using the username as thepassword (for example, username root, password root, or admin/admin), and usingthe string password or Password. Other guessable passwords are words or strings likeyour birthday, spouse’s name, or the name of any person. Weak passwords are alsothose that are vulnerable to brute force attacks, in which an automated program triesa large number of possible passwords, and to dictionary attacks, which are auto-mated programs that try all words in a dictionary in an attempt to crack an account’spassword. Keep in mind that dictionaries for all languages are now available on theInternet, as are dictionaries specific to technical and other fields, so all words thatmight be present in them are weak passwords, even derivations that substitute num-bers for letters.
A strong password is everything a weak password is not, and then some. It shouldinclude numbers, symbols, and a mix of uppercase and lowercase characters. Othersuggestions are to pick a couple of letters from a phrase you know well or to picksome unrelated words and connect them into a single string with punctuation marksor other symbols. Remember that a strong password is a good password only if youcan remember it without writing it down.
User AuthenticationEach user must have a login account and password to be able to log in to the router.The JUNOS software supports three methods of user authentication: local passwordauthentication, Remote Authentication Dial-In User Service (RADIUS), and Termi-nal Access Controller Access Control System Plus (TACACS+). With local passwordauthentication, you set a password for each user in the router’s configuration file.RADIUS and TACACS+ are centralized authentication databases for validating userswho attempt to access the router using any access method. They are both distrib-
,ch02.1488 Page 74 Friday, March 10, 2006 8:30 AM

This is the Title of the Book, eMatter EditionCopyright © 2006 O’Reilly & Associates, Inc. All rights reserved.
Introduction | 75
uted client-server systems—the RADIUS and TACACS+ clients run on the router,and the server runs on a remote network system.
You can configure the router to be both a RADIUS and TACACS+ client, and youcan also configure authentication passwords in the JUNOS configuration file. If youuse multiple authentication methods, you can set the order in which the router triesthe different authentication methods when verifying user access. If you do not set theorder, the router uses the local password first.
Password EncryptionAll passwords that you enter in a JUNOS configuration are encrypted. The JUNOSsoftware supports several methods for securing passwords using encryption andhashing algorithms (encryption is a one-to-one mapping, so it’s possible to decrypt,while hashing is a many-to-many mapping, so it’s impossible to unhash):
SHA1Secure Hash Algorithm 1 is the newest algorithm, developed in 1995. It is asecure hashing algorithm that produces a 160-bit message digest that is used as asignature for a message and that must be verified by the recipient. SHA1 is con-sidered secure because it is computationally infeasible to find a message that cor-responds to a given message digest or to find two different messages thatproduce the same message digest. Any change to a message in transit results in adifferent message digest, so the signature fails to verify. However, SHA1 hasrecently been proven not to be as strong as originally thought.
MD5Message Digest 5, developed in 1991, is a message hashing algorithm that takesa message of arbitrary length and produces a 128-bit hash function. When devel-oped, it was thought to be computationally infeasible to produce two messageswith the same message digest. The use of MD5 has recently been deprecated bythe U.S. Department of Defense.
DESData Encryption Standard, an encryption algorithm developed in 1976, uses a56-bit key. Many people never thought DES was very strong in the first place.
SSHSecure shell, Version 1 (RSA) and Version 2 (DSA), is a security protocol thatwas originally developed with the Unix BSD software.
Even when you configure a plain-text password, the JUNOS software encrypts itimmediately after you type it. Also, the software forces you to use a somewhat strongpassword, because the password must be at least six characters long and mustinclude either a change of case or a special character.
,ch02.1488 Page 75 Friday, March 10, 2006 8:30 AM

This is the Title of the Book, eMatter EditionCopyright © 2006 O’Reilly & Associates, Inc. All rights reserved.
76 | Chapter 2: Basic Router Security and Access Control
2.1 Allowing Access to the Router
ProblemYou just installed your router and can log in to it only through the console port. Youwant to allow administrators to securely log in to it over the network.
SolutionYou should use SSH to provide secure encrypted sessions to the router:
aviva@router1# set system services ssh
DiscussionWith SSH, both the password you type and the connection itself are encrypted usinga well-tested industry-standard protocol, so both are protected. The systems that youuse to connect to the router must have SSH client software. For greater security, youshould use SSH keys on the client. You can find information about obtaining SSHsoftware at http://www.ssh.com and http://www.openssh.com.
When you log in to the router with SSH, you are prompted for your password:
aviva-server1% 122: ssh router1The authenticity of host 'router1-mycompany.com (192.168.71.246)' can't beestablished.DSA key fingerprint is 2c:a9:35:c5:2a:db:12:5b:b6:6e:0b:17:ae:ec:d4:55.Are you sure you want to continue connecting (yes/no)? yesWarning: Permanently added 'router1-mycompany.com' (DSA) to the list of known [email protected]'s password:--- JUNOS 7.4R1.7 built 2005-10-24 08:10:28 UTCaviva@router1>
You can also allow users to connect to the router with Telnet, but if security is yourhighest priority, you should not use Telnet. Telnet connections and passwords arenot encrypted so they can be intercepted. However, if your network itself is well pro-tected with firewalls, you can enable Telnet to let users access the router:
aviva@router1# set system services telnet
The only user who can never log in using Telnet is root. To log in as root, you mustuse SSH or the console.
SSH and Telnet provide terminal sessions to the router so you can log in to therouter. The commands in the JUNOS software that copy files to and from the routeruse SSH, but they can also use FTP. Because FTP is not secure in and of itself, if youwant to use it to copy files, the best thing to do is to enable FTP just before you needto copy the files:
aviva@router1# set system services ftpaviva@router1# commit
,ch02.1488 Page 76 Friday, March 10, 2006 8:30 AM

This is the Title of the Book, eMatter EditionCopyright © 2006 O’Reilly & Associates, Inc. All rights reserved.
Controlling Root Authentication | 77
You need to enable FTP only if you want to FTP something to the router—that is,when the router is the FTP server. If the router is the FTP client and you are fetchinga file from an FTP server, you do not need to enable FTP on the router. The FTP cli-ent on the router is always present and running.
Then disable FTP after you have copied the files:
aviva@router1# delete system services ftpaviva@router1# commit
One way to secure FTP is to create a firewall filter that uses source address filters tolimit access to the FTP port, particularly if the source addresses are forced to comethrough an encrypted tunnel. Recipe 9.8 discusses how to create firewall filters.
If you are using a router that supports the J-Web browser for configuring and moni-toring the router, you can enable secure HTTP on the router:
[edit system]aviva@router1# set services web-mangement https
See AlsoRecipes 2.14 and 9.8
2.2 Controlling Root Authentication
ProblemWhen you first installed your router, you created a password for the root user (seeRecipe 1.1).With this initial configuration, anyone who knows the root passwordcan log in to the router using Telnet. You want to make the root login more secure.
SolutionThere are two solutions, depending on the desired level of security. One solution isto use SSH for the root password. You can specify the root password in plain text asyou are configuring the router:
[edit]root@router1# set system root-authentication ssh $1991poppI
You can also load an SSH key file from a server:
[edit]aviva@router1# set system root-authentication load-key-file server1:/homes/aviva/.ssh/id_dsa.pub.file.19692 | 0 KB | 0.3 kB/s | ETA: 00:00:00 | 100%aviva@router1# showsystem {
root-authentication {
,ch02.1488 Page 77 Friday, March 10, 2006 8:30 AM

This is the Title of the Book, eMatter EditionCopyright © 2006 O’Reilly & Associates, Inc. All rights reserved.
78 | Chapter 2: Basic Router Security and Access Control
ssh-rsa "1024 3597276382040842510554682267572498642416303222074049625283903820386901415845349641700196106083587229615634757849182736033612764418742659468932077391083448101268312595772262546166799927831612350043866091586628382248974673260566119218148953981396556156378621194032768780653816960202749164163735913269396344008443 [email protected]"; # SECRET-DATA
}}
The second solution for providing root authentication forces the root user to log inusing the router’s console port:
[edit system]aviva@router1# set services ssh root-login deny
DiscussionThere are two schools of thought about root access to the router. One suggests usingSSH for the root password because SSH is more secure than using just the passwordyou initially configured on the router. SSH provides inband access to the router,meaning that the root user can log in from anywhere in the network, especially if therouter is part of a service provider network. A second school of thought suggests dis-abling SSH access for root altogether, forcing the root user to log in on the router’sconsole port. Access using the console port is assumed to be secure in that you mustbe on the company’s internal network to even have access to the console port.
Generally, there’s very little reason to provide access to the root login inband, sounless you really need this on your network, for strict security you should not pro-vide root SSH access.
If you use SSH to authenticate the root password, you need to first enable SSH ser-vices on the router and be running SSH on your server.
This first command in this recipe sets the root’s SSH password by entering it directlyin plain text in the router’s configuration file. When you use the show command toview the configuration, you see only an encrypted version of the password. The sec-ond command copies an SSH key file from a server. After you type the command, thecontents of the key file are immediately copied into the configuration file.
Any SSH password you set is in addition to the plain-text password. You shouldleave a local root password on the router so you can log in using the console port.
The second command in this recipe disables SSH for the root user altogether. Any-one needing to log in to the router as root must log in through the router’s console.The reason for doing this is not so much that you want the root user to come in tothe router through the console, but rather that you want them to log in using an indi-vidual account and then exit to the shell and use the su command to become rootonly if they need to. There are two reasons for this. First, you want to avoid habitualuse of the root account. Logging in with root is like running with scissors: there arelots of ways to hurt yourself. It’s much better to get in the habit of using a non-root
,ch02.1488 Page 78 Friday, March 10, 2006 8:30 AM

This is the Title of the Book, eMatter EditionCopyright © 2006 O’Reilly & Associates, Inc. All rights reserved.
Logging In to the Router’s Console | 79
account and su only when required. Second, and more importantly, you want tomaintain accountability. If you log in to a router, su to root and then do somethinghorrible, there will be an audit trail to trace the source of the problem. However, ifyou had logged in as root in the first place, the action wouldn’t be traceable to anindividual router user.
See AlsoRecipe 2.3
2.3 Logging In to the Router’s Console
ProblemYou have lost access to the router through other means and you need a way to log in.
SolutionLog in to the router using the console port:
aviva@server1% telnet router1-conTrying 172.19.121.19...Connected to router1-con.mycompany.com.Escape character is '^]'.router1 (ttyd0)login:
DiscussionThe console port on JUNOS routers is enabled by default. If you ever lose access tothe router through normal login means, you can log in to using the console port.While it is possible to disable the console port, it is really not recommended.
Use of the console port is not really required other than when you are initially install-ing the router. However, many people use the console port as the access of lastresort. You can set up a terminal server with console connections to a number ofdevices in the event that the network fails. Also, if someone accidentally misconfig-ures the router and locks themselves out, or if routing has failed, you can still get into the router remotely using the console port.
Access over the console port is the only method that allows you to remain connectedto the router during a reboot. A reboot logs you out of the session on the router, butyou will still be connected and will be able to halt the reboot or watch the messagesas the router reboots.
,ch02.1488 Page 79 Friday, March 10, 2006 8:30 AM

This is the Title of the Book, eMatter EditionCopyright © 2006 O’Reilly & Associates, Inc. All rights reserved.
80 | Chapter 2: Basic Router Security and Access Control
2.4 Setting the Login Authentication Methods
ProblemYou want to use a RADIUS or TACACS+ server to authenticate user logins to therouter, and you want to specify a backup login authentication method in case theprimary method is unavailable.
SolutionUse the following command to set RADIUS as the primary authentication methodand to set the backup method to be the user accounts configured on the local router:
[edit]aviva@router1> set system authentication-order [ radius password ]
If you are using TACACS+, you can set up something similar:
[edit]aviva@router1# set system authentication-order [ tacacs password ]
DiscussionWhen users log in to the router, the JUNOS software can authenticate the usernameand password against an account that is configured locally in the router configura-tion file or against an account that is configured on a remote RADIUS or TACACS+server.
There are a number of methods to authenticate users attempting to log in to therouter. The default method is to use the username and password configured on therouter and to try no other method if the authentication fails. This method is theequivalent of using the set system authentication-order password command. Youshould always configure passwords in the configuration file for at least a few users sosomeone can always log in to the router (see Recipe 2.8).
To have the router use a RADIUS or TACACS+ server as the primary user authenti-cation method, you must change the order in which the JUNOS software tries differ-ent authentication methods. The first command in the recipe configures RADIUS tobe the primary user authentication method, and the second command configuresTACACS+ as the primary method. Both commands set the user account configuredon the router (password) as the backup authentication method. Providing a backupmethod means that users will always be able to log in to the router if there are prob-lems with the RADIUS or TACACS+ server. (Recipes 2.12 and 2.13 describe how toconfigure RADIUS and TACACS+ user authentication.)
With the configuration in this recipe, when a user tries to log in to the router, therouter first checks the username and password against the RADIUS or TACACS+server. If they match, the user is authenticated and the router logs them in. If theremote authentication fails, the router checks its local configuration. If the user has a
,ch02.1488 Page 80 Friday, March 10, 2006 8:30 AM
This is the Title of the Book, eMatter EditionCopyright © 2006 O’Reilly & Associates, Inc. All rights reserved.
Setting Up Login Accounts on the Router | 81
local account and the password matches, the user is logged in. If there is no match ineither place, the user is denied access to the router.
A slight twist to this recipe is to use only a single authentication, specifying a remotemethod. The following command uses only RADIUS authentication:
[edit]aviva@router1> set system authentication-order radius
This configuration allows users to log in to the router only if the RADIUS server hasan account for them and only if the RADIUS server is up. This means that as long asthe RADIUS server is up, users not listed in the RADIUS database won’t be able tolog in to the router even if there is a configured account for them on the router. How-ever, if the RADIUS server fails or becomes unreachable, the JUNOS softwareauthenticates the user locally. If you configure multiple RADIUS servers, the soft-ware checks for locally configured user accounts only after all the servers fail.
Make sure you configure user accounts and assign passwords in the JUNOS configu-ration for some users (see Recipe 2.5) so that login access to the router will be possi-ble if the RADIUS or TACACS+ servers fail.
See AlsoRecipes 2.5, 2.8, 2.12, and 2.13
2.5 Setting Up Login Accounts on the Router
ProblemYou want a number of people to be able to work on the router to monitor and con-figure it.
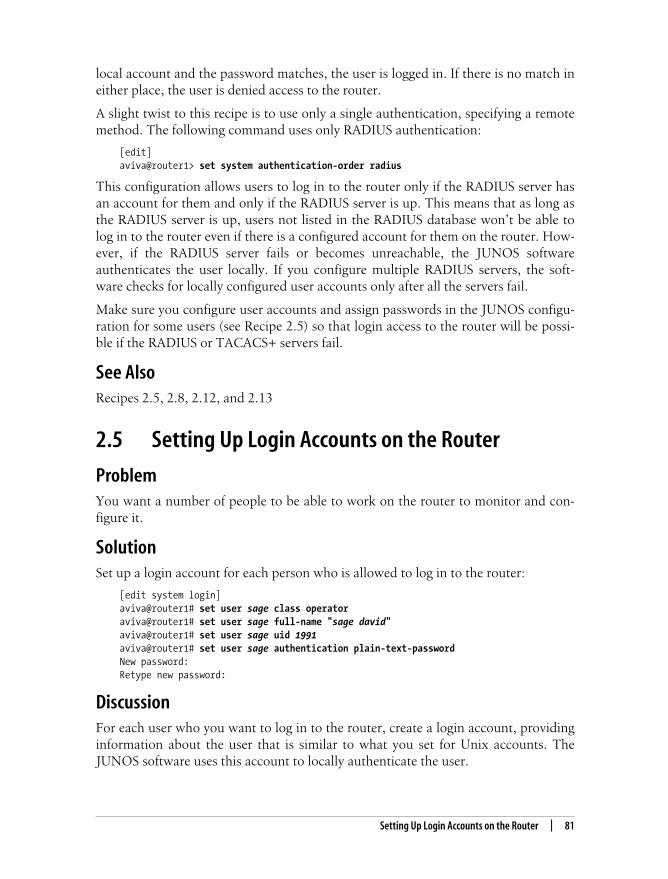
SolutionSet up a login account for each person who is allowed to log in to the router:
[edit system login]aviva@router1# set user sage class operatoraviva@router1# set user sage full-name "sage david"aviva@router1# set user sage uid 1991aviva@router1# set user sage authentication plain-text-passwordNew password:Retype new password:
DiscussionFor each user who you want to log in to the router, create a login account, providinginformation about the user that is similar to what you set for Unix accounts. TheJUNOS software uses this account to locally authenticate the user.
,ch02.1488 Page 81 Friday, March 10, 2006 8:30 AM

This is the Title of the Book, eMatter EditionCopyright © 2006 O’Reilly & Associates, Inc. All rights reserved.
82 | Chapter 2: Basic Router Security and Access Control
Each account requires two pieces of information: a login name (configured with theuser statement) and a login class (configured with the class statement), which asso-ciates a set of privileges with the user, defining the scope of operations that can beperformed on the router. As with Unix account names, the username must be uniqueon the network and cannot contain spaces, colons, or commas.
This recipe configures an account for the username sage, who has a privilege leveloperator, which allows her to perform most operational commands but not enterconfiguration mode. operator is one of the predefined privilege classes. Recipe 2.10explains the other predefined classes and how to create custom privilege classes.
The set user sage full-name command configures the user’s complete name. Settingthis is optional, but you may find it convenient or easier to read the person’s givenname rather than their account name when checking the configuration to see whohas access to a router. Enclose the full name in quotation marks if it contains spaces.
The third command, set user sage uid, assigns a user ID (UID) of 1991. The UID isbasically the same as the Unix UID. It’s included in the JUNOS configuration prima-rily because UIDs are integral to Unix systems and the JUNOS software runs onFreeBSD. As with Unix, the JUNOS software uses the UID when establishing andenforcing file permissions and file access. Configuring the UID is optional. If you donot configure it, the JUNOS software assigns one, generally using the lowest avail-able UID number, starting at 2000. Here’s an example of automatic assignment:
[edit system login]aviva@router1# set user sage class operatoraviva@router1# commit checkconfiguration check succeedsaviva@router1# showuser sage {
uid 2006;class operator;
}
You see that UID 2006 has been assigned to the user sage. You might want to explic-itly configure the UID if users will be transferring files to Unix systems to ensure thatusers have the same UID on both JUNOS and Unix systems so that there are no fileownership issues.
The last command in this recipe establishes a plain-text password for the loginaccount. You are prompted for the password, and nothing is displayed when youtype and retype it.
To set up a user account, only the username and privilege class are required, but thepassword and other information are optional. If you omit the class, the CLI displaysa warning:
[edit system login]aviva@router1# set user sage full-name "sage david"aviva@router1# show
,ch02.1488 Page 82 Friday, March 10, 2006 8:30 AM

This is the Title of the Book, eMatter EditionCopyright © 2006 O’Reilly & Associates, Inc. All rights reserved.
Setting Up Login Accounts on the Router | 83
user sage {full-name "sage david";## Warning: missing mandatory statement(s): 'class'
}
Also you will not be able to commit a configuration if you forget to assign a class:
[edit system login]aviva@router1# commit check[edit system login] 'user sage' Missing mandatory statement: 'class'error: configuration check-out failed: daemon file propagation failed
If you configure a password with a user’s login account, the software authenticatesthe user against this password during the login process. This is the default authenti-cation method. You should always configure passwords in the configuration file forat least a few users so there is always someone who can log in to the router.
If you configure a password with the user’s login account, but want the router tohave a RADIUS or TACACS+ database authenticate the user before checking againstthe password configured on the router, you must change the authentication order sothat the RADIUS or TACACS+ server is checked before the local user account (seeRecipe 2.4). You must also configure RADIUS or TACACS+ user authentication (seeRecipes 2.12 and 2.13). In this situation, users will be able to log in to the router ifthe remote authentication server fails.
If you do not configure a password with the user’s login account, authentication isdone remotely only, using a centralized RADIUS or TACACS+ authentication data-base, instead of locally based on the router configuration file. This type of account isanalogous to a Unix account that has a * in the password field, which does not allowlogins based on the password file, but can allow logins based on other valid means ofauthentication, such as RADIUS. For this to work, you must change the authentica-tion order so that RADIUS or TACACS+ is checked first (see Recipe 2.4), and youmust configure the RADIUS or TACACS+ user authentication (see Recipes 2.12 and2.13). Users with this type of account will not be able to log in to the router if theauthentication server is down or if there are network problems accessing the server.
You can also create a generic login account (see Recipe 2.8) or a group login account(see Recipe 2.9) instead of configuring individual accounts for each user. These typesof accounts authenticate against the RADIUS or TACACS+ database. Here, too, youmust change the authentication order so that RADIUS or TACACS+ is checked first(see Recipe 2.4), and you must configure the RADIUS or TACACS+ user authentica-tion (see Recipes 2.12 and 2.13). Users with this type of account will not be able tolog in to the router if the authentication server is not available.
This recipe configures a plain-text password for the user’s authentication. The pass-word must be at least six characters long and must contain at least one case or oneletter-to-number change. (Recipe 2.6 explains how to modify the default password
,ch02.1488 Page 83 Friday, March 10, 2006 8:30 AM

This is the Title of the Book, eMatter EditionCopyright © 2006 O’Reilly & Associates, Inc. All rights reserved.
84 | Chapter 2: Basic Router Security and Access Control
format.) Here you type the plain-text-password keyword slightly differently than forsome other JUNOS configuration statements. After you type plain-text-password,press Enter. The software then prompts you to type and then retype the password.Type the password in plain text, and the JUNOS management process, MGD, imme-diately encrypts it using SHA1 encryption by default. (To change the default encryp-tion, see Recipe 2.7.) You then see only the encrypted version of the password.Notice that the keyword plain-text-password has changed to reflect the fact that thepassword is now encrypted:
encrypted-password "$1$bO1I/WUw$bfaYF0LHxHxVCm7XyS7eG."; ## SECRET-DATA
To insert a previously encrypted DES, MD5, SHA1, SSH Version 1 (RSA), or SSHVersion 2 (DSA) password, cut and paste (or type) the encrypted password into theconfiguration statement, enclosing it in quotation marks. Here is an example of anencrypted MD5 password:
aviva@router1# set user sage authentication encrypted-password"$1$EpZ4gDEb$52KHLKA2QuqfJ83tFUvWd1"
You can define both encrypted and SSH passwords for a single user:
aviva@router1# showuser sage {
authentication {encrypted-password "$1$kfpFHEom$wrWWtk69gvdbWInzsoI0b."; ## SECRET-DATAssh-rsa "1024 35 1463306454911004878538350206193424119843602248584695395
55532106068887517531015448370922784460860638276095178917479848571459866004412524446711844977304609342397809664712560933848182196633506888762637901118322717052955626463615373998667141293694923793146038913887279044783915716803766094158264840766391853943503 [email protected]"; ## SECRET-DATA }}
For basic router security considerations, you should limit access to the router to onlythose people who really need access, and you should carefully consider which privi-leges each person is given, so that a person can perform their job function andresponsibilities, and nothing more.
See AlsoRecipes 2.4, 2.6, 2.7, 2.8, 2.9, 2.10, 2.12, and 2.13
2.6 Changing the Format of Plain-Text Passwords
ProblemYou want to require the passwords for user accounts to be longer than six charactersand to have more than one case change.
,ch02.1488 Page 84 Friday, March 10, 2006 8:30 AM

This is the Title of the Book, eMatter EditionCopyright © 2006 O’Reilly & Associates, Inc. All rights reserved.
Changing the Plain-Text Password Encryption Method | 85
SolutionSet all plain-text passwords to be from 8 to 20 characters long and to contain at leasttwo case changes:
[edit system login]aviva@router1# set password maximum-length 20aviva@router1# set password minimum-length 8aviva@router1# set password minimum-changes 2
DiscussionBy default, plain-text passwords must be at least six characters long and must con-tain one change from either letters to numbers (or vice versa) or from lowercase touppercase (or vice versa). You can harden the router’s security even more by increas-ing the minimum password length and the minimum number of case and letter-to-number changes.
The commands in this recipe require that all plain-text passwords be from 8 to 20characters long and contain at least 2 case changes. The changes take effect whenyou next configure a plain-text password for a user:
[edit system login]aviva@router1# set user sage authentication plain-text-passwordNew password:T91912error: minimum password length is 8error: require 2 changes of case, digits or punctuation
This password is not acceptable because it is shorter than eight characters and hasonly one change from a letter to a number. An example of a valid password withthese conditions is $1991poppI.
When you change the requirements for plain-text passwords, the new parametersaffect only newly created passwords, so already existing passwords may not be assecure as your new password policy.
See AlsoRecipe 2.5
2.7 Changing the Plain-Text Password EncryptionMethod
ProblemWhen setting up passwords for login accounts on the router, if you assigned plain-text passwords, the default encryption is SHA1. You want to change this to eitherDES or MD5.
,ch02.1488 Page 85 Friday, March 10, 2006 8:30 AM

This is the Title of the Book, eMatter EditionCopyright © 2006 O’Reilly & Associates, Inc. All rights reserved.
86 | Chapter 2: Basic Router Security and Access Control
SolutionUse the following command to change the encryption used for plain-text passwordsto DES:
[edit]aviva@router1> set system login password format des
For MD5 encryption, use the following command:
[edit]aviva@router1> set system login password format md5
DiscussionAll passwords that you enter in a JUNOS configuration are encrypted. For plain-textpasswords, you can use one of three types of encryption: SHA1 (the default and thestrongest), MD5, or DES. The encryption type that you configure is used for allplain-text passwords. You cannot specify different encryption types for differentusers.
See AlsoRecipe 2.5
2.8 Creating a Login Account for RemoteAuthentication
ProblemYou want to use a RADIUS or TACACS+ database to authenticate users instead ofsetting up individual login accounts for them on the router.
SolutionCreate a login account that has the username remote:
[edit system]aviva@router1# set login user remote class operatoraviva@router1# set login user remote full-name "remote account"aviva@router1# set login user remote uid 9999
Then set the authentication order so that the remote authentication server is checkedbefore the router’s configuration file. The following command uses a RADIUS server:
[edit system]aviva@router1> set authentication-order [ radius password ]
Use the following command for TACACS+:
[edit system]aviva@router1# set authentication-order [ tacacs password ]
,ch02.1488 Page 86 Friday, March 10, 2006 8:30 AM

This is the Title of the Book, eMatter EditionCopyright © 2006 O’Reilly & Associates, Inc. All rights reserved.
Creating a Group Login Account | 87
DiscussionWhen you want users to be able to log in to and work on the router, but always wantto use a central authentication server, you can set up a placeholder account namedremote instead of creating login accounts on the router for these users. When a userwith no account in the local configuration files tries to log in to the router using herregular username, the authentication is handled by the remote account, which que-ries the RADIUS or TACACS+ server to authenticate the user. If the user’s name andpassword match what is on the server, the user is authenticated and the router logsher in. (Recipes 2.12 and 2.13 explain how to configure the RADIUS and TACACS+server information.)
As with an individual user account (see Recipe 2.5), you configure a privilege levelwith the set user remote class command and a user ID with the set user remote uidcommand. This recipe sets the privilege level to operator, which allows these users toperform most operational commands but not enter configuration mode. (Recipe 2.10discusses privilege classes.)
This recipe includes the set user remote full-name command to provide a descrip-tion of this account. This command is not required.
Users who are authenticated only by the remote account will not be able to log in tothe router if the authentication server is down. You should always configure someindividual user accounts with passwords on the router so someone can always log into the router (see Recipe 2.5).
You can create only one remote account on the router. This means that all users whodon’t have an individual user account on the router and who are authenticated byRADIUS or TACACS+ share the same privilege level, which is configured in the setuser remote class command. Recipe 2.9 describes how to set up remote accountsthat have different privilege levels.
See AlsoRecipes 2.5, 2.9, 2.10, 2.12, and 2.13
2.9 Creating a Group Login Account
ProblemYou want to use a RADIUS or TACACS+ database to authenticate a group of userswho perform similar job functions and tasks on the router, instead of setting up indi-vidual login accounts for them on the router.
,ch02.1488 Page 87 Friday, March 10, 2006 8:30 AM

This is the Title of the Book, eMatter EditionCopyright © 2006 O’Reilly & Associates, Inc. All rights reserved.
88 | Chapter 2: Basic Router Security and Access Control
SolutionCreate a group account on the router to allow multiple users to be authenticated bythe same RADIUS or TACACS+ server account:
[edit system login]aviva@router1# set user noc class operatoraviva@router1# set user noc full-name "NOC team"
Then set the authentication order so that the remote server is checked before therouter’s configuration file. The following command uses TACACS+:
[edit system]aviva@router1# set authentication-order [ tacacs password ]
Finally, map the users on the server to the account name configured on the router.The following is the map on a TACACS+ server:
user = mike {service = junos-exec {
local-user-name = noc}
}user = sage {
service = junos-exec {local-user-name = noc
}}
DiscussionWhen you want a group of users to be able to log in to and work on the router, butalways want to use a central authentication server, you can set up a common accountinstead of creating login accounts on the router for these users. Then in the RADIUSor TACACS+ database, you map the username to the common account name.
The first command in this recipe creates the group account noc that has operatorprivileges and can perform most operational commands but cannot enter configura-tion mode. This second command, set user remote full-name, provides a descriptionof the account. This command is optional, but is suggested so that the meaning ofthe account is clear. The third command sets TACACS+ as the primary authentica-tion method.
The TACACS+ database in this recipe has two usernames, mike and sage. Whenthese two users try to log in to the router using their regular login names mike andsage, the login request is authenticated by the TACACS+ server, which sees thattheir local username (their login account name on the router) is noc. The serverreturns this information to the router, which logs them in using the noc account andgives them operator privileges.
Users who are authenticated only by a group account will not be able to log in to therouter if the authentication server is down. You should always configure some indi-
,ch02.1488 Page 88 Friday, March 10, 2006 8:30 AM

This is the Title of the Book, eMatter EditionCopyright © 2006 O’Reilly & Associates, Inc. All rights reserved.
Customizing Account Privileges | 89
vidual user accounts with passwords on the router so someone can always log in tothe router (see Recipe 2.5).
See AlsoRecipes 2.4, 2.5, 2.10, and 2.13
2.10 Customizing Account Privileges
ProblemYou want to create a custom privilege class to define the operations and actions auser can perform while logged in to the router.
SolutionCreate a privilege class that allows users to read but not modify the configuration,and then let them perform all operational mode commands:
[edit system login]aviva@router1# set class operator-plus-read-config permissions [ admin clearconfigure floppy interface network reset routing shell snmp system trace viewmaintenance firewall rollback security ]
DiscussionWhen you set up login accounts on the router (see Recipe 2.5), each account musthave a privilege level, or class, which defines the operations and actions the user canand cannot perform on the router. Each privilege level consists of a collection of per-mission bits that specifies what a user is allowed to do. Table 2-1 lists all the permis-sion bits.
Table 2-1. Login class permissions
Permission Bit name
All (superuser) all (can perform all actions)
Delete data from system log, tracing,and other files
clear (using the clear commands)
All control-level operations (bits end-ing in -control)
control (can view and change all portions of the configuration)
Configure the router configure (using the configure and commit commands)
Access removable media floppy
Halt and reboot the router; start ashell and become superuser
maintenance (using the request system commands, and using the CLIstart shell command and the su root command)
Access the network network (using the ping, ssh, telnet, and traceroute commands)
Start and stop software processes reset (using the restart command, and configure at [edit systemprocesses])
,ch02.1488 Page 89 Friday, March 10, 2006 8:30 AM

This is the Title of the Book, eMatter EditionCopyright © 2006 O’Reilly & Associates, Inc. All rights reserved.
90 | Chapter 2: Basic Router Security and Access Control
Notice that some bits have two forms, a “simple” form, which gives read-only per-mission, and a -control form, which gives read and write permission. Except for theall bit (which grants all permissions) and the control bit (which grants read-writepermission to the entire configuration), the permission bits are not cumulative, sowhen you create a custom privilege class, you must list all the bits that apply. Alwaysinclude the view bit so users can use the show commands in operational mode. If youwant users to be able to modify the configuration, include the configure bit.
The JUNOS software has four built-in privilege levels:
superuser or super-userCan perform any operations on the router (equivalent to the all permission bit).This is similar to the Unix superuser.
operatorCan perform all actions in operational mode available with the clear, network,reset, trace, and view permission bits. Cannot display or alter the configurationand cannot shut down or reboot the router.
Return to previous configuration rollback (using the rollback command)
Start a local shell shell (using the start shell command)
Display router, routing table, andprotocol values
view (using the show commands)
User account information (loginclasses, user IDs)
admin (read only, using the show configuration command)admin-control (read, and configure at [edit system login])
Firewall filters firewall (read only, using the show configuration command)firewall-control (read, and configure at [edit firewall])
Interfaces, chassis, class of service,forwarding options
interface (read only, using the show configuration command)interface-control (read, and configure at [edit interfaces], [editchassis], [edit ???], [edit forwarding-options])
Routing, routing protocols, routingpolicy
routing (read only, using the show configuration command)routing-control (read, and configure at [edit routing], [editrouting-options], [edit policy-options])
Passwords and authentication keys secret (read only, using the show configuration command)secret-control (read and configure)
IPSec security security (read only, using the show configuration command)security-control (read, and configure at [edit security])
SNMP snmp (read only, using the show configuration command)snmp-control (read, and configure at [edit snmp])
Router name, RADIUS, TACACS+, NTP,and other systemwide information
system (read only, using the show configuration command)system-control (read, and configure at [edit system])
Tracing and trace files trace (read tracing files and configuration using the show configurationcommand)trace-control (read and configure)
Table 2-1. Login class permissions (continued)
Permission Bit name
,ch02.1488 Page 90 Friday, March 10, 2006 8:30 AM

This is the Title of the Book, eMatter EditionCopyright © 2006 O’Reilly & Associates, Inc. All rights reserved.
Customizing Account Privileges | 91
read-onlyCan perform all actions in operational mode available with the view permissionbit, to show information about the router or network. Cannot perform any oper-ations that delete or change files or file contents, that clear statistics, or thatchange the information on the router.
unauthorizedCan log in to the router but cannot perform any operations on the router exceptto log out.
The default privilege levels are not explicitly defined in the configuration, but if youdid configure them, the first three would look like this:
[edit system login]aviva@router1# set class superuser permissions allaviva@router1# set class read-only permissions viewaviva@router1# set class operator permissions [clear network reset trace view]
There is no way to explicitly configure the unauthorized level.
The command in this recipe defines a custom privilege class that allows users to per-form all operational mode commands and to read but not modify the configuration.The clear, network, reset, trace, and view permission bits allow this class to use alloperational mode commands. The configure bit allows this class to issue theconfigure command to enter configuration. The remaining bits are all the read-onlybits that allow this class to use the show command in configuration mode. Users inthis class can view all the contents of the configuration file except for passwords andkeys (we have omitted the secret bit). Because this class has no -control bits, userscan’t change the configuration, even though the configure bit allows them to issuethe commit command:
[edit]aviva@router1# setunknown command
To find out what privileges you have, use the show cli authorization command. Hereis a user with superuser privileges:
aviva@router1> show cli authorizationCurrent user: 'aviva' class 'superuser'Permissions: admin -- Can view user accounts admin-control-- Can modify user accounts clear -- Can clear learned network information configure -- Can enter configuration mode control -- Can modify any configuration edit -- Can edit full files field -- Special for field (debug) support floppy -- Can read and write from the floppy interface -- Can view interface configuration interface-control-- Can modify interface configuration network -- Can access the network
,ch02.1488 Page 91 Friday, March 10, 2006 8:30 AM
This is the Title of the Book, eMatter EditionCopyright © 2006 O’Reilly & Associates, Inc. All rights reserved.
92 | Chapter 2: Basic Router Security and Access Control
reset -- Can reset/restart interfaces and daemons routing -- Can view routing configuration routing-control-- Can modify routing configuration shell -- Can start a local shell snmp -- Can view SNMP configuration snmp-control-- Can modify SNMP configuration system -- Can view system configuration system-control-- Can modify system configuration trace -- Can view trace file settings trace-control-- Can modify trace file settings view -- Can view current values and statistics maintenance -- Can become the super-user firewall -- Can view firewall configuration firewall-control-- Can modify firewall configuration secret -- Can view secret configuration secret-control-- Can modify secret configuration rollback -- Can rollback to previous configurations security -- Can view security configuration security-control-- Can modify security configuration access -- Can view access configuration access-control-- Can modify access configuration view-configuration-- Can view all configuration (not including secrets)Individual command authorization: Allow regular expression: none Deny regular expression: none Allow configuration regular expression: none Deny configuration regular expression: none
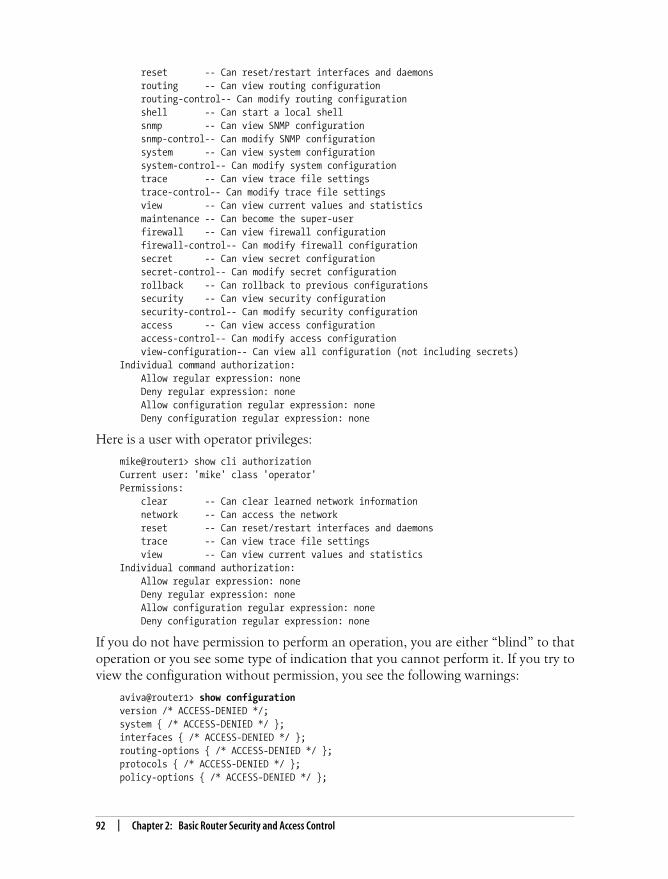
Here is a user with operator privileges:
mike@router1> show cli authorizationCurrent user: 'mike' class 'operator'Permissions: clear -- Can clear learned network information network -- Can access the network reset -- Can reset/restart interfaces and daemons trace -- Can view trace file settings view -- Can view current values and statisticsIndividual command authorization: Allow regular expression: none Deny regular expression: none Allow configuration regular expression: none Deny configuration regular expression: none
If you do not have permission to perform an operation, you are either “blind” to thatoperation or you see some type of indication that you cannot perform it. If you try toview the configuration without permission, you see the following warnings:
aviva@router1> show configurationversion /* ACCESS-DENIED */;system { /* ACCESS-DENIED */ };interfaces { /* ACCESS-DENIED */ };routing-options { /* ACCESS-DENIED */ };protocols { /* ACCESS-DENIED */ };policy-options { /* ACCESS-DENIED */ };
,ch02.1488 Page 92 Friday, March 10, 2006 8:30 AM

This is the Title of the Book, eMatter EditionCopyright © 2006 O’Reilly & Associates, Inc. All rights reserved.
Customizing Account Privileges | 93
If you try to enter a command that you don’t have permission to use, the CLI acts asif that command doesn’t exist:
aviva@router1> clearunknown command.
You should keep these permission levels in mind when trying to use the commandsdiscussed in this book. If you cannot enter the command or do not see it with theCLI help, review your authorization level and check with your system administratorif you need additional permission.
If a user who has a login account but no login class tries to log in, she can get as faras the operational mode prompt, but she can’t do anything except log out:
warning: user "aviva" does not have a valid login classaviva@router1> exit
How do you find out which permissions are associated with each command andstatement? On the router, you can use the help reference command to see the per-missions for the configuration statements:
aviva@router1> help reference interface address...Required Privilege Levelinterface--To view this statement in the configuration.interface-control--To add this statement to the configuration.
For a configuration that already exists on the router, you can see the permissions forthe statements in the configuration. Use this command from operational mode:
aviva@router1> show configuration system | display detail
and use this command in configuration mode:
[edit system]aviva@router1# show | display detail
Both show the same output:
#### system: System parameters## require: admin system## domain-name: Domain name for this router## match (regex): ^[[:alnum:]._-]+$## require: system##domain-name mynetwork.com;#### name-server: DNS name servers## require: system##name-server { ## ## DNS name server address ## 192.168.15.2;
,ch02.1488 Page 93 Friday, March 10, 2006 8:30 AM

This is the Title of the Book, eMatter EditionCopyright © 2006 O’Reilly & Associates, Inc. All rights reserved.
94 | Chapter 2: Basic Router Security and Access Control
}#### login: Names, login classes, and passwords for users## require: admin##login { ## ## Login class name ## match (regex): ^[[:alnum:]_-]+$ ##
The only way to find out the permissions for operational mode commands is to lookin the JUNOS product documentation.
Login classes have one more feature to help with basic router security. You can set atime after which all users in that class are automatically logged out if they have nottyped anything at the keyboard. (By default, a user can remain logged in indefinitely.)Here, the users in the class we created will be automatically logged out if the key-board is idle for five minutes:
[edit system login]aviva@router1# set class operator-plus-read-config permissions idle-timeout 5
Warning messages are displayed beforehand:
aviva@router1> show system users 9:56PM up 18:48, 2 users, load averages: 0.16, 0.09, 0.04USER TTY FROM LOGIN@ IDLE WHATaviva p0 server.juniper.net 9:42PM 4 cli
aviva@router1> Warning: session will be closed in 1 minute if there is no activityWarning: session will be closed in 10 seconds if there is no activityIdle timeout exceeded: closing sessionConnection closed by foreign host.
As if all this control weren’t enough, you can also control, down to the specific com-mand and configuration hierarchy level, what commands users in a particular loginclass can and cannot issue and what portions of the configuration they can view andmodify. For example, you can create a class that has the standard operator permis-sions but also can issue the request system support command to collect informationto send when reporting a problem with the router:
[edit system login]aviva@router1# set class operator-plus-support permissions [ clear network resettrace view ]aviva@router1# set class operator-plus-support allow-commands "request supportinformation"
Or you can take the basic operator class and modify it so users can issue all clearcommands except clear system commit (which clears pending configuration commitoperations) and clear system reboot (which clears pending router reboots):
[edit system login]
,ch02.1488 Page 94 Friday, March 10, 2006 8:30 AM

This is the Title of the Book, eMatter EditionCopyright © 2006 O’Reilly & Associates, Inc. All rights reserved.
Creating a Privilege Class that Hides Encrypted Passwords | 95
aviva@router1# set class operator-plus-support permissions [ clear network resettrace view ]aviva@router1# set class operator-plus-support deny-commands "clear system"
Parallel statements allow you to finetune what portions of the configuration can beedited or viewed in configuration mode. This is a way to lock portions of the config-uration. The following command does not allow users to modify the protocols por-tion of the configuration:
[edit system login]aviva@router1# set class all-but-protocols permissions [ all ]aviva@router1# set class all-but-protocols deny-configuration "protocols"
A user in this permission class can edit all portions of the configuration except forthe [edit protocols] section:
[edit]aviva2@router1# edit protocols ^syntax error, expecting <statement> or <identifier>.
2.11 Creating a Privilege Class that Hides EncryptedPasswords
ProblemYou need to have all permissions on the router, but you don’t want to have all of theencrypted passwords displayed.
SolutionCreate a new class that explicitly includes all the permission bits except for controland secret:
[edit system login]aviva@router1# set class power-user permissions [ admin admin-control clear configurefield floppy interface interface-control network reset routing routing-control shellsnmp snmp-control system system-control trace trace-control view maintenance firewallfirewall-control secret-control rollback security security-control access access-control view-configuration ]
DiscussionMany network operators like to trim shared secrets and other encrypted data out oftheir configurations before sharing the configurations with others. The JUNOS soft-ware uses the secret permission bit to control viewing access to the passwords, andthe secret-control permission bit to control setting them. This recipe still allowsshared secrets and passwords to be set on the router, but the values are not shown,copied, or saved (using the configuration mode save command) by the user duringnormal operations.
,ch02.1488 Page 95 Friday, March 10, 2006 8:30 AM

This is the Title of the Book, eMatter EditionCopyright © 2006 O’Reilly & Associates, Inc. All rights reserved.
96 | Chapter 2: Basic Router Security and Access Control
Password and secret settings are, of course, still preserved with the commit opera-tion, however, and the full configuration with secret data included is still accessibleto the user by virtue of the maintenance permissions.
2.12 Setting Up RADIUS User Authentication
ProblemYou use RADIUS for user authentication in your network, and you want to set upthe router to authenticate against the RADIUS server.
SolutionConfigure information about your RADIUS server:
[edit system]aviva@router1# set radius-server 192.168.63.10 secret $1991poppIaviva@router1# showradius-server {
192.168.63.10 secret "$9$90m6AO1EcyKWLhcYgaZji"; ## SECRET-DATA}
DiscussionThe Remote Authentication Dial-In User Service (RADIUS) provides a centralizedmethod for authenticating users on the router. RADIUS uses a client-server model. ARADIUS server receives user connection requests, authenticates the user, and returnsall configuration information necessary for the client—in this case, the router—todeliver service to the user. All transactions between the server and the client areauthenticated by a password called a shared secret.
To configure the router as a RADIUS client, you set the IP address of your RADIUSserver and the password (secret) that the router should use to access the server. Thesecret on the router and the RADIUS server must be the same. After you type thesecret, the CLI never displays it, but shows it in a pseudo-encrypted format. The showoutput is a simple obfuscation to prevent someone from reading the password overyour shoulder.
By default, the JUNOS software sends authentication requests to UDP port 1812 onthe RADIUS server, as defined in RFC 2865. Also by default, the router waits threeseconds to receive a response from the RADIUS server and, if it doesn’t hear from theserver, tries three more times to connect. You can modify these values if necessary.Here, we allow just 1 retry and wait 10 seconds to receive a response from the server:
[edit system]aviva@router1# set radius-server 192.168.63.10 retry 1aviva@router1# set radius-server 192.168.63.10 timeout 10
,ch02.1488 Page 96 Friday, March 10, 2006 8:30 AM
This is the Title of the Book, eMatter EditionCopyright © 2006 O’Reilly & Associates, Inc. All rights reserved.
Setting Up RADIUS User Authentication | 97
If you use a centralized server, it represents a single point of failure if it should godown. To provide redundancy, you can configure several servers:
[edit system]aviva@router1# set radius-server 192.168.0.23 secret 2lip123aviva@router1# set radius-server 10.0.16.1 secret 883roZe
When you configure more than one server, initially the primary server is the one youconfigured first. After that, the primary server is the one that last responded. If therouter cannot reach this server, it tries the remaining ones in the order configured.Use the show command to see the order in which the router tries the servers:
[edit system]aviva@router1# showradius-server {
192.168.63.10 secret "$9$vs0W7-oJGiqm24fzF3AtKvWL7V"; ## SECRET-DATA10.0.16.1 secret "$9$4DojHQFnCp0TzIcrKXxbs2"; ## SECRET-DATA192.168.0.23 secret "$9$7edYgq.5QF/iktuB1hcwY2"; ## SECRET-DATA
}
Notice that this example specifies different secrets for each server to improve net-work security. If you suspect that the password of the primary server has been com-promised, you can switch to one of the secondary servers.
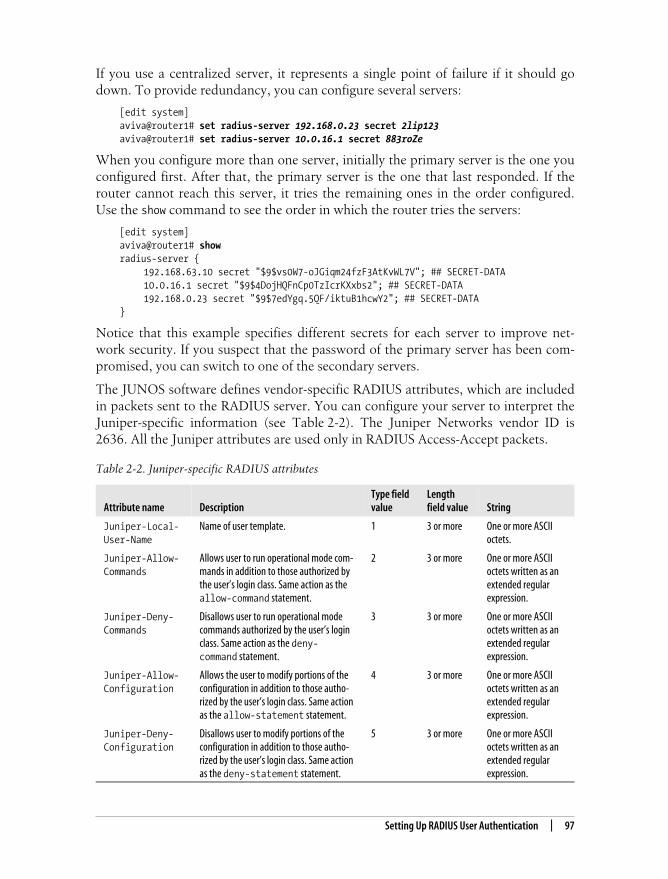
The JUNOS software defines vendor-specific RADIUS attributes, which are includedin packets sent to the RADIUS server. You can configure your server to interpret theJuniper-specific information (see Table 2-2). The Juniper Networks vendor ID is2636. All the Juniper attributes are used only in RADIUS Access-Accept packets.
Table 2-2. Juniper-specific RADIUS attributes
Attribute name DescriptionType fieldvalue
Lengthfield value String
Juniper-Local-User-Name
Name of user template. 1 3 or more One or more ASCIIoctets.
Juniper-Allow-Commands
Allows user to run operational mode com-mands in addition to those authorized bythe user’s login class. Same action as theallow-command statement.
2 3 or more One or more ASCIIoctets written as anextended regularexpression.
Juniper-Deny-Commands
Disallows user to run operational modecommands authorized by the user’s loginclass. Same action as the deny-command statement.
3 3 or more One or more ASCIIoctets written as anextended regularexpression.
Juniper-Allow-Configuration
Allows the user to modify portions of theconfiguration in addition to those autho-rized by the user’s login class. Same actionas the allow-statement statement.
4 3 or more One or more ASCIIoctets written as anextended regularexpression.
Juniper-Deny-Configuration
Disallows user to modify portions of theconfiguration in addition to those autho-rized by the user’s login class. Same actionas the deny-statement statement.
5 3 or more One or more ASCIIoctets written as anextended regularexpression.
,ch02.1488 Page 97 Friday, March 10, 2006 8:30 AM

This is the Title of the Book, eMatter EditionCopyright © 2006 O’Reilly & Associates, Inc. All rights reserved.
98 | Chapter 2: Basic Router Security and Access Control
See AlsoRFC 2865, Remote Authentication Dial In User Service (RADIUS)
2.13 Setting Up TACACS+ User Authentication
ProblemYou want to use a TACACS+ server to authenticate people who log in to the router.
SolutionConfigure information about your TACACS+ server:
[edit system]aviva@router1# set tacacs-server 192.168.62.10 secret $1991poppIaviva@router1# showtacacs-server {
192.168.62.10 secret "$9$90m6AO1EcyKWLhcYgaZji"; ## SECRET-DATA}
DiscussionTACACS+ is a newer version of the older TACACS authentication software. LikeRADIUS, TACACS+ uses a client-server model, with the router being the client. Alltransactions between the server and the client are authenticated by a shared secret.
The JUNOS configuration for TACACS+ is almost identical to that for RADIUS.You set the IP address of your TACACS+ server and the password (secret) that therouter should use to access the server. The secrets on the router and the server mustmatch. For redundancy, you can configure multiple servers.
There are also JUNOS-specific TACACS+ attributes that you can configure on theTACACS+ server. These attributes are named local-user-name, allow-commands,deny-commands, allow-configuration, and deny-configuration, and have the samedescription, length, and string as the parallel RADIUS attributes (see Table 2-2).
2.14 Restricting Inbound SSH and Telnet Access
ProblemYou want to allow SSH and Telnet access to the router, but you want to restrict theaccess to make the router more secure.
SolutionAdd a term to an existing firewall filter that restricts SSH and Telnet access:
[edit firewall filter protect-RE]
,ch02.1488 Page 98 Friday, March 10, 2006 8:30 AM

This is the Title of the Book, eMatter EditionCopyright © 2006 O’Reilly & Associates, Inc. All rights reserved.
Restricting Inbound SSH and Telnet Access | 99
aviva@RouterF# set term ssh-telnet from source-address 10.0.8.0/24aviva@routerF# set term ssh-telnet from destination-port [ ssh telnet ]aviva@RouterF# set then accept
Also include a term at the end of the filter to reject access attempts from any othersubnets:
[edit firewall filter protect-RE]aviva@RouterF# set term allow-nothing-else then count reject-counteraviva@RouterF# set term allow-nothing-else then logaviva@RouterF# set term allow-nothing-else then syslogaviva@RouterF# set term allow-nothing-else then reject
For the filter to affect incoming traffic, apply it to the desired interfaces:
[edit interfaces]aviva@RouterF# set lo0 unit 0 family inet filter input protect-RE
DiscussionSSH and Telnet are two very common ways to access the router. However, SSHbrute-force attempts to guess passwords are a very common way to try to compro-mise routers, and Telnet connections are not very secure. To protect the router, youshould restrict the systems from which people can use SSH and Telnet to the router.Even though Telnet is not a secure access method, you may want to allow it becauseyour network management tools use Telnet to access routers, and it is more of a has-sle to change the access method than to just allow restricted access. As much as pos-sible, you should lock down access to all management services on the routers and onany other systems in your network to maintain tight security. You can never be surethat people are not using passwords that are easy to guess, and Telnet sends pass-words over the network in clear text so they could easily be sniffed. Restrictinginbound access to the router also protects against potentially unknown vulnerabili-ties with SSH and Telnet.
You restrict Telnet access using a firewall filter. This recipe shows a single term in afirewall filter that acts on all TCP traffic whose destination port is the Telnet port(port 23), and it accepts Telnet connections only from the 10.0.0.0/8 subnet andrejects all other connection attempts. Each interface can have one inbound firewallfilter, so you include the term shown in this recipe in the complete firewall filter thatyou apply on an incoming interface.
It’s important to note that if you use the term in the recipe as the only filter on aninterface, it will block all traffic to the Routing Engine except for Telnet from subnet10.0.0.0/8. This means that SNMP, OSPF, IS-IS, PIM, and BGP will all be blocked.Make sure you include this term as part of a longer firewall filter.
You have to decide where in the filter to place the term. Because the terms in the fire-wall filter are evaluated in the order in which they appear, the placement affects theefficiency of the filter. Generally, terms for operations that need to be performedquickly, such as BGP peering, and IGP and DNS traffic, are at the beginning of the
,ch02.1488 Page 99 Friday, March 10, 2006 8:30 AM

This is the Title of the Book, eMatter EditionCopyright © 2006 O’Reilly & Associates, Inc. All rights reserved.
100 | Chapter 2: Basic Router Security and Access Control
filter. For operations that are less time-critical, including processing Telnet connec-tions, place the term toward the end of the filter. In the incoming firewall filterincoming-to-me shown in Recipe 9.11, you might place the Telnet term almost at theend, just before the allow-nothing-else term.
Then apply the filter to the desired interfaces. Here we apply the filter to the lo0interface because we want it to apply to all traffic destined to the router’s manage-ment addresses, even traffic that is coming to the address of one of the network (PIC)interfaces.
The term in this recipe is just one of several terms in a single firewall filter. As a gen-eral point, you rarely just reject a firewall term without also either logging, syslog-ging, or running a counter on the rejections (which gives you data that you cangraph). Tracking the rejections is useful for showing abuse of your router, attacks onthe router, or even misconfigurations. For example, if you forget about an auto-mated process that uses Telnet to read configuration information on your router thatcomes from 192.168.0.0/16 and you only permit 10.0.0.0/8, then the then syslogaction (and appropriate syslog configuration statements) can be very handy forresolving issues.
See AlsoRecipes 9.8, 9.11, 9.12, and 9.13
2.15 Setting the Source Address for TelnetConnections
ProblemYou want to force Telnet to use a specific IP address when connecting from therouter to another system.
SolutionInclude the source address in the Telnet command:
aviva@RouterA> telnet source 172.19.121.15 server1Trying 172.19.121.246...Connected to server1.mycompany.com.Escape character is '^]'.server1 (ttyp0)login:
DiscussionBy default, the source address included in locally generated Telnet and other TCP/IPpackets is the address of the interface on which the Telnet request is sent. This
,ch02.1488 Page 100 Friday, March 10, 2006 8:30 AM

This is the Title of the Book, eMatter EditionCopyright © 2006 O’Reilly & Associates, Inc. All rights reserved.
Creating a Login Banner | 101
means the source address may change from connection to connection. If multipleequal-cost next hops are present for a destination, the lo0 loopback interface addressis used as the source address. If you configure the system default-address-selectionstatement in the configuration, which uses the lo0 interface address as the router’ssystem address, this address is used as the source for most Telnet connections (seeRecipe 7.4).
The result of this behavior is that the default Telnet source address is not always thesame and not always deterministic. If the source address matters when using Telnetto access another system, include it in the telnet command. One instance to do so iswhen filtering the source address on incoming connections, which may block pack-ets coming to the default source address. Another instance is when using Telnet as ageneric way to check and troubleshoot other TCP ports (such as connecting to aserver on port 25 to see if it is listening for SNMP mail connections). The sourceaddress that you specify must be an address that’s configured on the router.
See AlsoRecipes 7.4 and 7.12
2.16 Creating a Login Banner
ProblemYou want to display a banner during login that indicates that the router is for autho-rized users only.
SolutionYou define a login banner:
[edit system login]aviva@router1# set message "\n\n==========================================================\n\nAccess to this deviceis limited to authorized users only.\n\n WARNING: All unauthorized access isprohibited.\n\n==========================================================\n\n"
DiscussionA login banner is displayed each time anyone logs in to the router, before the loginprompt:
aviva-server> telnet router1==========================================================Access to this device is limited to authorized users only. WARNING: All unauthorized access is prohibited.==========================================================router1 (ttyp0)
,ch02.1488 Page 101 Friday, March 10, 2006 8:30 AM

This is the Title of the Book, eMatter EditionCopyright © 2006 O’Reilly & Associates, Inc. All rights reserved.
102 | Chapter 2: Basic Router Security and Access Control
login:
It may seem rather trivial to set a login banner, and you may wonder what this hasto do with router security because it doesn’t do anything to restrict access to therouter. Although this is true, having a login banner is good practice for legal protec-tion of your router. From a legal point of view, you want to warn unauthorized usersthat they are not permitted to use the router, and you want to do so with a stronglyworded message, as we’ve shown here. While you might think that you want to wel-come users to the router, you should not use the word “welcome” or any similarwords in the login banner.
You can also have a login message that is displayed after users log in to the router:
[edit system]aviva@router1# set announcement "Reminder: maintenance window schedule at 0200 UTC"
These messages are a way to remind authorized users of network or router issues:
aviva-server1%> telnet router1router1 (ttyp0)login: avivapassword: ********--- JUNOS 7.4R1.7 built by builder on 2005-10-23 02:03:58 UTCReminder: maintenance window schedule at 0200 UTCaviva@router1>
2.17 Finding Out Who Is Logged in to the Router
ProblemYou are logged in to the router and you want to see who else is logged in.
SolutionUse the show system users command to see who is logged in to the router:
aviva@router1> show system users 9:10PM up 11 hrs, 2 users, load averages: 0.00, 0.00, 0.00USER TTY FROM LOGIN@ IDLE WHATmike p0 server1.juniper.net 9:09PM - -tcsh (csh)aviva p1 server1.juniper.net 8:42PM - cli
DiscussionMore than one person can log in to the router at one time. Each person can performvarious operations, from viewing router statistics, to rebooting the router and chang-ing the router’s configuration. Once you access the router, you might also want tosee who else is working on the router. You display who is logged in using the showsystem users command, which is basically the same as the Unix w command. Thiscommand shows the username, the terminal number through which they are con-nected, the server they have logged in from, when they logged in, how long they have
,ch02.1488 Page 102 Friday, March 10, 2006 8:30 AM

This is the Title of the Book, eMatter EditionCopyright © 2006 O’Reilly & Associates, Inc. All rights reserved.
Logging Out of the Router | 103
been idle, and what they are doing. The output in this recipe shows that the usermike is working in the Unix shell on the router and the user aviva is working in theCLI.
As you are logging in to the router, if others are logged in, the CLI does not displayany messages. However, when you enter configuration mode, the CLI indicates thatanother user is also configuring the router:
aviva@router1> configureEntering configuration modeUsers currently editing the configuration: mike terminal p2 (pid 5465) on since 2005-04-06 21:30:42 UTC [edit class-of-service scheduler-maps]The configuration has been changed but not committed
Here you see that the user mike is also working in configuration mode and has madechanges to the class of service portion of the configuration.
See AlsoRecipe 2.19
2.18 Logging Out of the Router
ProblemYou are done using the router and want to log out so that no one can sit down atyour terminal and access the router.
SolutionLog out of the router:
aviva@router1> exit[server1.mycompany.com] aviva%
DiscussionOne of the simplest and most obvious ways to protect the security of the router is tolog out when you have no reason to be logged in or when you have to step awayfrom your terminal for a few minutes. You must be in operational mode to log out. Ifyou are in configuration mode, exit from it first:
[edit]aviva@router1# exitaviva@router1> exitaviva@server1%
When you are not at the top level of configuration mode, you can go there beforeexiting:
[edit snmp v3 vacm]
,ch02.1488 Page 103 Friday, March 10, 2006 8:30 AM

This is the Title of the Book, eMatter EditionCopyright © 2006 O’Reilly & Associates, Inc. All rights reserved.
104 | Chapter 2: Basic Router Security and Access Control
aviva@router1# top[edit]aviva@router1# exitaviva@router1> exitaviva@server1%
You can also exit directly from a lower level in the hierarchy:
[edit snmp v3 vacm]aviva@router1# exit configuration-modeaviva@router1> exitaviva@server1%
By default, a user can remain logged in to the router for an unlimited amount of timewhen your login session is idle. You can limit the time by setting an idle timeoutvalue for each login privilege class (see Recipe 2.10).
2.19 Forcibly Logging a User Out
ProblemSomeone is logged in to the router who shouldn’t be and you need to log them out.
SolutionForcibly log the user out:
aviva@router1> request system logout user mike
DiscussionThere are a number of situations when someone is logged in to the router and theyshouldn’t be. A user may have walked away from the terminal or may be in configu-ration mode when you must change the configuration to deal with a problem situation.
Use the show system users command to list who is logged in to the router:
aviva@router1> show system users 5:20AM up 81 days, 6:41, 1 user, load averages: 0.00, 0.00, 0.00USER TTY FROM LOGIN@ IDLE WHATmike p0 172.10.28.108 5:20AM 4:07 -cli (cli)aviva p1 172.10.28.107 2:06AM - -cli (cli)
If another user is in configuration mode, you see their username in the message dis-played when you enter configuration mode.
If you are logged in as root or have root privileges, you can forcibly log a user out ofthe router:
aviva@router1> request system logout user mike
Mike would be logged out:
mike@router1> Connection closed by foreign host.
,ch02.1488 Page 104 Friday, March 10, 2006 8:30 AM

This is the Title of the Book, eMatter EditionCopyright © 2006 O’Reilly & Associates, Inc. All rights reserved.
Forcibly Logging a User Out | 105
[server1.mycompany.com] mike%
You can send the user a message beforehand using a command similar to the Unixwrite utility:
aviva@router1> request message user mike message "log out immediately"
You can send the message to a particular user, as we’ve done here, or to all logged-inusers (similar to the Unix wall utility):
aviva@router1> request message all message "log out immediately"
You can also specify the terminal (TTY) to forcibly log out a user:
aviva@router1> request system logout terminal p0
,ch02.1488 Page 105 Friday, March 10, 2006 8:30 AM