timelink electronic time and attendance guide - central michigan
TRANSCRIPT

1
Central Michigan University
TIMELINK ENTERPRISE 6
Electronic Time & Attendance Guide
- For Department’s Payroll Processor and Approver-
Updated 01/31/13
Payroll and Travel Services 774-3481

2
Contents The Time Clock .............................................................................................................................................. 4
Punching In ............................................................................................................................................... 4 Punching Out ............................................................................................................................................. 4
Navigation ..................................................................................................................................................... 6
Logging On To Timelink ............................................................................................................................ 6 Getting Around Inside TimeLink ................................................................................................................ 7
Using Search on Transaction Screens ................................................................................................... 8
Clearing Out Search Criteria .................................................................................................................. 8
Searching Using Wildcards .................................................................................................................... 9
Closing the Find Section ........................................................................................................................ 9
My User Account ......................................................................................................................................... 10
Working with User Accounts ................................................................................................................... 10 Setting User Preferences (SEC133) ..................................................................................................... 10
Setting Up “My Favorites” (SYS140) - OPTIONAL................................................................................ 11
Payroll Processor and Supervisor Responsibilities...................................................................................... 12
Students and Temporary Employees ...................................................................................................... 12 Exception Time Reporting Employees .................................................................................................... 12
Time and Labor ........................................................................................................................................... 12
Timecards: Reviewing and Editing (TA135 or TA185) ........................................................................... 12 Reviewing a time record ..................................................................................................................... 13
Adding or modifying a time record ..................................................................................................... 14
Cost Center Override .......................................................................................................................... 16
Timecard Adjustments (after payroll has already been processed) ................................................... 17
Errors on Time Card (Exceptions) ....................................................................................................... 17
Manipulating Time Records .................................................................................................................... 18 Approving Timecards (TA185) ................................................................................................................ 20
To approve timecards ......................................................................................................................... 20
Viewing Approval Details .................................................................................................................... 21
Reviewing Time Exceptions/Errors (TA184) ........................................................................................... 21 Viewing Workforce Status (TA125) ......................................................................................................... 23
Reporting .................................................................................................................................................... 24
Running a Report .................................................................................................................................... 24 To run a report .................................................................................................................................... 25

3
Hide the Group Tree ........................................................................................................................... 25
Increase the View Size ........................................................................................................................ 25
Using Search in Reports to Find Information in a Report ................................................................... 26
Exporting a Report .............................................................................................................................. 26
Printing a Report ................................................................................................................................. 27
Attachments ................................................................................................................................................ 28
Timecards Field ....................................................................................................................................... 28 Time Record Fields ................................................................................................................................. 28 Timecard Tab Information ....................................................................................................................... 29 All Time Codes ........................................................................................................................................ 34 Time Codes for Exception Time Reporting Employees (including examples of when to use them) ...... 35 Exceptions/Errors .................................................................................................................................... 38 Glossary of Terms ................................................................................................................................... 39

4
The Time Clock
There are over 75 time clocks in buildings across campus. Each student/temporary employee should be instructed by their supervisor which clock to use and where it is located in the building. Students and temporary employees must have their campus ID card to punch into the clock; campus ID numbers cannot be entered by hand.
Punching In
1. Push “In Student” button (even temporary employees should use “In Student”) 2. Swipe campus ID card through swipe slot at bottom of clock with magnetic strip down
and top of card in slot. 3. Clock will beep and prompt student to choose a task. 4. Use the scan gun to scan the correct task bar code that is either included on a list of
bar codes near the clock or on the key fob, by pointing at the bar code and squeezing the trigger.
The student/temporary employee must punch in with a task code or the punch will not populate the time card and the employee will not be paid.
5. If the student/temporary employee does not have a task bar code available to scan,
the task can be entered by hand after punching “In Student” and swiping. Use the key pad to enter task number and punch “E” (for enter) button.
Punching Out
When punching out, either for lunch or for the day, push “Out” button and swipe campus
ID card. When returning from lunch repeat “Punching In” instructions from above.

5
Time Clock Template
Employee must first select their action, then swipe their card
← Welcome to CMU ↑
→ ↓
In
Staff
In
StudentOSCH
Work
Order
Special
Events
1 2 3
Out 0HHC Call Back CrewHoliday
Worked
4 5 6
Lunch
Out/Return
to Work
PP
SP
VP
In Student
w/WOUE
Balance
Review
7 8 9
Change CC
Service HrsC
HS
MTG
ULE Admin
0
Punches considered as 'In' Punches
for Staff for Students
In In Student
Change Cost Center RG_CC Change Cost Center RG_CC
Outside Schedule OSCH Special Events (Used by UREC) SE
Outside Schedule on a Work Order OSCHWO University Events (Used by Univ Events) UE
Call Back CB Service Hours (Used by Res Life) SH
Holiday Earned HE
Lunch Out LN In Student on a Work Order RG
Work Order RG Univ Events on a Work Order RG
Crew CR
Crew on a Work Order CR
Meeting MTG
Personal PP
Sick SP Notes:
Vacation VP
Higher Class 0HHC
Higher Class on a Work Order 0HHC
Union Leave UL
Holiday Worked HS
Holiday Earned on Work Order HE
Punches considered as 'segment' punches and require a Return to Work punch,
another work order punch, or an out punch.
OSCH, 0HHC, Crew and Holiday
Worked all have selections for with or
without a work order.
Change cost center has selections for
both students and staff

6
Navigation
Logging On To Timelink
Use the following procedure to log into TimeLink Enterprise. You must use Internet Explorer to access Timelink. You will only be able to access the system if you have requested security.
1. Go to the following website to launch TimeLink. https://timelink.cmich.edu/timelink/login
TIMELINK LOGIN SCREEN
2. Complete the fields as shown in the following table.
In Enter/Select
User Name The user name is your CMU Global ID.
Password Your Central Domain password. You will not be able to see the characters as you type them (this is a security precaution).
3. Click Login. The TimeLink Menu Tree and your designated home page will appear.
Note
After 15 minutes of inactivity, you will be logged off the system.
If you are having trouble logging in, contact the CMU Helpdesk at 989-774-3662.
When you are finished using Timelink, click Logout in the upper right hand corner.

7
Getting Around Inside TimeLink TimeLink Enterprise has an easy-to-use, intuitive user interface. This section describes how to use it.
1 - Quick Launch
2 - Favorites
3 - Menu Tree
4 - Hide/Show Menu Tree
5 - Close All Tabs
6 - Window Tabs
7 - Close Window Tabs
8 - Transaction Name and Number
9 - User Homepage Options
10 - Logout
2-Favorites
1-Quick Launch 4-Hide/Show Menu Tree
5-Close All
Tabs
6-Window Tabs
7-Close Window Tab
8-Transaction Name and Number 10-Logout
3-Menu Tree
9-User Homepage Options

8
Using Search on Transaction Screens
Some TimeLink Enterprise screens contain long lists of information, and a search capability makes it easy to find the particular information you want to see.
If you see the Toggle Find Section icon ( ), then the screen has the search capability available. Not all screens have the search capability.
If you click the Toggle Find Section icon, you either open the Find section if it is closed, or you close it if it is opened.
The search capability will be different on each screen, giving you the options that are appropriate for that screen. On the Timecard Screen, for example, you can search by Last Name, Person ID, or Group.
FIND SECTION VISIBLE ON PERSON LIST SCREEN
If you search by Last Name, enter the last name you want to search for in the box to the right of the Person Search Dropdown box, and then click Apply.
Tip
If you frequently use one particular search, such as a search by a particular group, click Save Search, and that search will automatically run each time you access this screen.
Tip
If you are going to search using Person ID, you will need to enter the preceding zeroes or you will need to put an asterisk before the Person ID number. For example use 00012345 or *12345.
Clearing Out Search Criteria
If you perform a search by last name, and then you want to return to all persons, delete the text in the search box and click Apply. You’ll see the full person list screen appear.
Note
Don’t confuse searching with sorting. The primary sort is Person ID number. If you want to sort by last name, click the sort icon in the Person Name column header.

9
Searching Using Wildcards
You can search using a wildcard (the asterisk or “*” character).
For example, to find “Lukens, William” you can use a wildcard. In this case, let’s use “Luk*” which searches for the letters “L”, “U” and “K” and the asterisk wildcard indicates any last name with this character string should be found. When you click apply, you would see the following:
WILDCARD SEARCH RESULTS
You’ve narrowed down your list, but to get an exact match, you need to enter more characters, in this case, a “K”.
Closing the Find Section
To close the find section, click the Toggle Find Section icon -- .

10
My User Account
Working with User Accounts
Setting User Preferences (SEC133)
Use the following procedure to set user preferences.
1. From the TimeLink Menu Tree, select My User Account\Maintain Preferences. The Maintain Preferences Screen appears.
MAINTAIN PREFERENCES SCREEN
2. Make a selection from the following table.
Select This To Do This
It is highly recommended that you leave the majority of the settings as it with the exception of the following...
DURATION_FORMAT The default duration time is HH:MM, if you prefer to see time as decimals, change this to HH.DD.
*This is a system wide setting. If you also log into the ESS system, the duration format will be the same as what you choose here.
HOME_PAGE Change your home page to a different TimeLink transaction (e.g., from SYS127 to TA135).
TIME_FORMAT The default time format is military time (24 Hour w/o seconds). If you want to use regular time change this to 12 Hour w/o seconds.
3. Change the value in Item to the setting you’d like.
4. Click User Preferences\Save User Preference. You must log off and log on again for User Preference changes to take effect.

11
Setting Up “My Favorites” (SYS140) - OPTIONAL
My Favorites is an easily accessible list you can setup of your commonly used transaction screens. You can access your Favorites faster than drilling through the Menu Tree. You can also access Favorites from “Maintain Favorites” on the homepage.
Use the following procedure to set up “My Favorites”.
1. From the TimeLink Menu Tree, select My User Account/Maintain Favorites. The Maintain Favorites Screen appears.
MAINTAIN FAVORITES SCREEN
2. Make a choice from the following table.
Note
You can only effectively work with a maximum of 10 favorites. Although you may set more than ten transactions as favorites, you can only view the first ten.
Select This To Do This
Click >> Add all available transactions to your list of favorites.
Select a Transaction & Click >
Add the selected transaction to your list of favorites.
Select a Transaction from the Right & Click <
Remove the selected transaction from your list of favorites.
Click << Remove all transactions from your list of favorites.
3. To change the order of your favorites, click the transaction you want to move in the list and click Move Up or Move Down.
4. When you have finished making changes, click File\Save.
To Access your Favorites click on the Yellow Star on the top left side of your screen.
Favorites

12
Payroll Processor and Supervisor Responsibilities
Students and Temporary Employees
Students and temporary employees are paid on a bi-weekly basis according to the Pay Schedule Calendar. Timecards for students and temporary employees can be reviewed and edited by the supervisor on a daily, weekly or bi-weekly basis. Each pay period ends on a Saturday. Timecards must be approved after the end of the pay period. The deadline is typically 5pm on Tuesday. Please visit the Payroll website for approval deadlines. Payroll is then locked for processing. If a time card is approved before the period end date, any punches after this approval will result in the timecard becoming unapproved.
It is the supervisor’s responsibility to review, edit and approve all time cards for his/her students and temporary employees. If there are errors on the time card after it has been approved the student or temporary employee may not be paid correctly or at all, depending on the type of error. Critical errors will prevent Payroll from running the payroll. Warning errors will allow payroll to run but employees will not be paid correctly.
Exception Time Reporting Employees
Generally regular employees that are paid biweekly or semimonthly, work a set schedule on a recurring basis. Time entry is required for anything that deviates from the regularly scheduled hours. Exception time is when you are not working your regular scheduled hours. If an exception is not entered on a day, the employee will be paid their regular time for that day. The regular hours are taken care of automatically by the system, only exception time needs to be recorded in Timelink.
It is the responsibility of the employees or the department payroll processor to log into Timelink and input any exception time (sick, vacation, funeral, etc.) that was taken during the pay period. Timelink ESS deadlines can be viewed on the Payroll website. Either the employee or the department’s payroll processor will input the exception time into Timelink. If an employee enters their exception time in ESS, they will submit the on-line timesheet. The department’s payroll processor will review timecards for errors. It is the designated approver’s responsibility to review and approve all timecards for his/her employees.
IMPORTANT INFORMATION for Departments with Part-time Employees
Part-time employees are hired for a set schedule in SAP although it is our understanding that employees do not always work these schedules. If the employee is scheduled to work 20 hours a week, they are set up to work 4 hours a day. If they are scheduled to work 32 hours a week, they are set up to work 6.4 hours a day. When entering time into Timelink, you will need to be aware of the employee’s schedule so you can record their time using the correct increments. Please call Payroll and Travel Services 774-3481 with questions.
Time and Labor
Timecards: Reviewing and Editing (TA135 or TA185)

13
The following section describes working with timecard records. After making a selection in the Find Timecard screen, Manage Timecards and Approve Timecards allow you to review and edit timecards for the selected period.
A timecard includes workforce data for all dates in the associated time period for the selected person.
Note
You will not be able to input time for an employee unless the timecard has been generated. Timecards are generated 2 days before the pay period starts.
Time records that are future dated will not be calculated and will not appear in the totals until an overnight process runs.
Reviewing a time record
1. From the TimeLink Menu Tree, select Time and Labor\Manage Timecards or Approve Timecards. (These screens are very similar. The only difference is that the Approve Timecards screen TA185, provides you the ability to approve.) The Timecards Screen appears.
*You may need to adjust your search criteria. Click on the Find icon. See page 8 for more information using the find feature. It is highly recommended that you use the Custom search and enter the dates for the appropriate pay period. You should then click Save Search so that you do not have to enter the dates every time you log in.
Tip
To bring up a select group of employees (such as Only Students/Temporary Employees, Only Bi-Weekly Hourly and Exception or Only Semimonthly), use the Payroll Dropdown option and click Apply.
2. Based on the search criteria you inputted your employees timecards will appear. See page 28 for timecard field descriptions.
3. Select the person you want to review or add a time record for and click Actions/Edit Timecard. The Time Records Screen appears. For more information on the time record fields and the information found in the Additional Information Section, go to page 28.
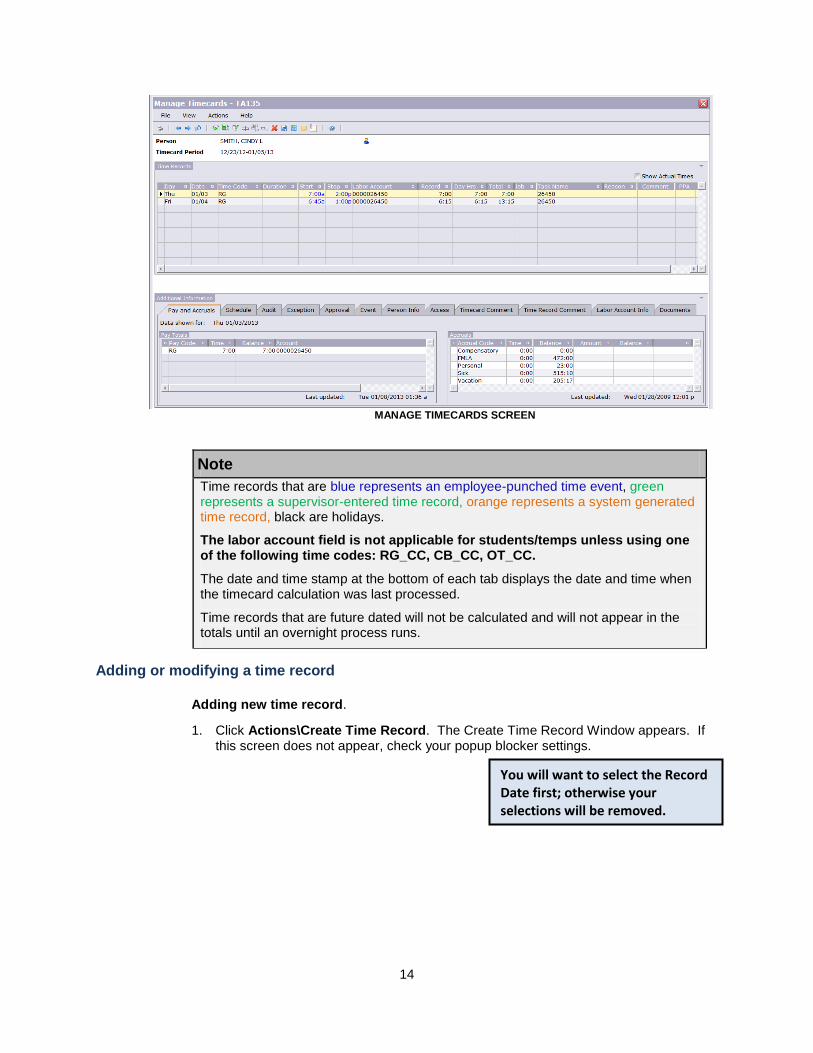
14
MANAGE TIMECARDS SCREEN
Note
Time records that are blue represents an employee-punched time event, green represents a supervisor-entered time record, orange represents a system generated time record, black are holidays.
The labor account field is not applicable for students/temps unless using one of the following time codes: RG_CC, CB_CC, OT_CC.
The date and time stamp at the bottom of each tab displays the date and time when the timecard calculation was last processed.
Time records that are future dated will not be calculated and will not appear in the totals until an overnight process runs.
Adding or modifying a time record
Adding new time record.
1. Click Actions\Create Time Record. The Create Time Record Window appears. If this screen does not appear, check your popup blocker settings.
You will want to select the Record Date first; otherwise your selections will be removed.

15
CREATE TIME RECORD WINDOW
2. Complete the fields as shown in the following table. (ENTER THE RECORD DATE FIRST).
In View/Enter/Select
Record Date The date where the time record should fall.
Time Code The time code designation for this time record. See page 34 for a list of time codes.
Shift Name The name of the shift for this time record should display if employee is scheduled to work. Not applicable for all employees. If an employee is hired for a shift, it will appear in the dropdown.
Record Type
Time Based
Similar to punches - Enter a start time and end time for the time record. Generally used for students, temporary employees and service maintenance employees NOT regular employees recording exception time. For time based records, time records must have a start time and stop time in order for the employee’s time to calculate correctly.
Duration Based
This record type should be used for regular employees recording exception time for blocks of vacation, personal, sick, regular, etc. Enter the number of hours and minutes.
Apply Punch Rules
Select to apply punch rules to this record. This should be selected.
Override Lunch Rules
Select to override lunch rules for this record. This option will be used when an employee works through their lunch.
3. Click on More (if it is not already selected). Three tabs appear; Labor Account, Work
Information and Other.
a. Labor Account – A labor account must be listed. This can be used to change the cost center that the time is charged to. See page 16 for an explanation of how to do this.
IMPORTANT - A labor account is equivalent to a Cost Center. For full time employees this is the cost center their time will be charged to. For students and temporary staff, the labor account that appears on the time record is their home cost center (the cost center from the very first job they held on campus). The only time labor account applies to students or temporary employees is when using the Regular Cost Center Override (RG_CC) time code.

16
b. Work Information
i. Job Code - These are either work orders or internal order numbers. This field is primarily used by Service Maintenance.
ii. Task Code - This field is only used for students and temporary employees and it is required. You can either type it in or select it from the list. Students and Temporary employees must be hired for the task in order to be paid correctly.
1. To add or modify a job code or task code, click on the radio button next to the field.
2. The table will populate with valid codes. Double click the code you want.
3. Click Save.
c. Other - You can add a comment to the time record. Comments are required when using FL, PA or a prior period adjustment (page 17).
4. Click Save.
*You also have the ability to create multiple time records at one time. After bringing up
your employees timecard, click on Actions and then Create Multiple Time Records.
Select the dates you want to add time to as well as the start and stop time (or change it to
duration based and put the number of hours). Input any additional information that is
needed and select Save. The timecard will then display the time.
Modifying a Time Record
1. Highlight the time record that needs to be updated and then click on Actions/Edit Time Record.
2. Make the necessary changes to the time record. You are highly encouraged to include a comment stating why you made a change.
3. Click Save.
Cost Center Override
A cost center override should be used when you need to charge am employees time to a different cost center than what they are hired for. If a student or temporary employee’s time is continuously being charged to a different cost center, then they should be hired for that cost center.
1. Either create a new record or open the time record that needs to be updated.
2. You need to the change Time Code to one of the designated cost center override codes (ex. CB_CC, RG_CC, OT_CC)
3. Click on More (if the three tabs are not already showing). Three tabs appear; Labor Account, Work Information and Other.
4. Go to the Labor Account tab and click on the radio button next to Cost Center.

17
5. Type in the 10 digit cost center or double click on the cost center you want from the list.
6. Click Save.
Timecard Adjustments (after payroll has already been processed)
Recording time for a prior pay period If you have exception time that needs to be recorded for a prior pay period and the payroll has already been processed, you will need to record it in the current pay period.
1. Select Actions/Create Time Record.
2. Select a day in the pay period (not a Saturday or Sunday) that does not already have time on it and enter the number of hours and minutes and enter this date in the Record Date field.
3. Select the Time Code that you need using the magnifying glass.
4. Go to the Other Tab (you may have to select More) and in the Comment field, enter the following statement while filling in the blanks…
“[number of hours] hours entered on [date] were actually taken on [date].” Example. ”8 hours entered on 10/16/2012 were actually taken on 10/11/2012”.
5. Use the Time Reason dropdown to select “Prior Pay period Adjustment”.
6. Hit Save.
Important - FMLA must be recorded on the actual day. If you need to record FMLA on a prior pay period, you will need to send an email to the Payroll Office to have the time recorded on the actual date. The email needs to come from the supervisor/designated approver or if it comes from the employee, the supervisor/designated approver must be made aware by copying them in on the email.
Removing time recorded in a prior pay period
If you incorrectly recorded exception time for a prior pay period and the payroll has already been processed, an email will need to be sent to the Payroll Office to have the time record corrected. The email needs to come from the supervisor/designated approver or if it comes from the employee, the supervisor/designated approver must be made aware by copying them in on the email.
Errors on Time Card (Exceptions)
Once all time records are recorded, it is important to make sure there are no exceptions/errors. Depending on the error, the timecard may need to be adjusted. Errors can be viewed in multiple locations. You will be made aware of errors on the Timecard list screen. The number of errors will appear in the Excp column and an icon will appear in the Sev column indicating the type of error. If you are on an employee’s timecard, you can check the Exception Tab to verify there are no errors.
Critical errors will prevent Payroll from running the payroll. Warning errors will allow payroll to run but employees will not be paid correctly. If there is an information error, no action is necessary. It is just a way to bring your attention to a unique situation.

18
The most critical severity level on the timecard (1-3, 3 being the highest), indicated
visually by as 3 (Critical), as 2 (Warning) as 1 (Information).
For a list of Exceptions/Error, go to page 38.
If the error is for a future dated time record, it may take the overnight process to clear the error once it has been fixed.
Manipulating Time Records
You can perform several specialized operations against time records to meet special needs. These specialized operations are described below.
1. Open the timecard you want to work with.
2. Select the time record you want to manipulate, go to Actions and choose one of the options listed above.
3. A popup screen will appear. Follow the instructions given.
Attached a Document to the Timecard
Use the following procedure to attach a document to an employee’s timecard.
1. Once you have the employee’s timecard up, click on “Actions” and then “Manage
Documents”.
2. Click on “Attach Document”.
Option Description
Create Multiple Time Records
You can create multiple time records.
Merge Records You merge two time records with opposite missing events into a single time record containing the available start time and available end times of the respective time records into one complete time record.
Divide Record Add a time event to split a time record in two. For instance, there may be a time event at 7am and 5pm, but by using the Divide button; you can divide the record with a 12pm punch. As a result, two records will be created: a record from 7am to 12pm and a record for 12pm to 5pm
Split Record Split a time record with two events into two open time records
Remove Record Remove a time record. We highly discourage deleting any time records unless erroneously entered manually.
Add Timecard Comment
Add a comment to the timecard (this is different than adding a comment to a time record). This comment can be viewed on the Timecard Comment Tab.
Manage Documents
You are able to attach and manage documents at the timecard level. Detailed instructions are below.

19
3. Then click on “Upload”.
4. Select “Browse…” to locate the document. Once you have the document, click on
“upload”.
5. Give the Document a description (optional), select a Type (required) and enter a
Comment (optional). Click on “Ok”.
6. The document will appear on your Manage Documents Screen.

20
7. You can also see the list of documents under the Documents tab.
8. To view your documents, you will need to go to “Actions” and then “Manage
Documents”.
Approving Timecards (TA185)
Approve Timecards allows you to review timecards (everything you can do in Manage Timecards, you can do in this screen) and complete the approval process. Timecards MUST be approved in Timelink in order to be able to process the payroll. Please visit the Payroll website for approval deadlines.
If you are unable to approve your timecards at the end of the pay period and there is no one else that can do it, you need to add a comment to the last punch for that pay period stating that you have reviewed the time up until that point. When you come back, you need to add a comment to the first punch of the new pay period, stating that you reviewed the remaining punches on the prior pay period. Example “Approved prior period timecard – 08/00/12”. You will need to do this for each of your students/temporary employees.
To approve timecards
1. From the TimeLink Menu Tree, select Time and Labor\Approve Timecards. The Timecards Screen appears.

21
TIMECARDS SCREEN
2. Click on Actions and then Find.
3. Change your criteria accordingly. Under Timecard Period, select Custom and enter the appropriate dates. In the Payroll Dropdown select the payroll you need to review/approve.
i. If your exception time reporting employees are inputting their own time, the User Submitted field will show “Submitted” when they are done inputting their time.
4. If you haven’t already done so, verify the employee’s timecard by double clicking on each employee to bring up their individual timecard.
5. Once you confirmed their time as correct and there are no errors, you can click on the curved arrow to come back to the list of employees or select the right or left blue arrow to go to the next or previous employee.
6. Once the timecard is correct and you are on the screen that lists all of the employees, you need to approve the timecards.
7. Select an employee by clicking on their name. You can select multiple employees by pushing and holding down the Ctrl key on your keyboard and then clicking employee’s names simultaneously.
8. Make a choice from the following table.
To Do This Do This
Approve/Unapprove/Reject Shift+Alt+T
Select a Timecard and click Actions\Approve or Unapprove.
Approve All Approve all timecards in the selection at one time – click Actions\Approval All.
Unapprove All Click Actions\Unapprove All to change selected timecards back to unapproved.
9. A popup screen will appear. Select an Approval Status from the dropdown and click
on OK.
Viewing Approval Details
You can view approval details by clicking on the timecard whose approval details you want to view – the approval details will appear in the bottom portion of the Approve Timecards screen.
Reviewing Time Exceptions/Errors (TA184)

22
Review Time Exceptions allows you to review outstanding exceptions at a glance for the selected period.
The summary displayed on the screen includes the timecard date, name of the exception, and associated severity. For further details and editing, you can open any specific timecard from this screen.
To review time exceptions
1. From the TimeLink Menu Tree, select Time and Labor\Review Time Exceptions. The Review Time Exceptions Screen appears.
REVIEW TIME EXCEPTIONS SCREEN
2. Select a Severity Level (or select All) using the drop down menu and review the fields as described in the following table.
In You’ll See…
Person Name The name of the employee.
ID The ID of the employee.
Timecard Date The dates of the corresponding timecard.
Code The exception code.
Message A message about the exception.
Description A description of the exception.
Severity The severity of the exception. Note: If any critical errors, Payroll will not run.
Created Date The date that the exception occurred.

23
3. If you need to view the full detail of a timecard, select the timecard and click Actions\Edit Timecard.
4. Depending on the error, the time record may need to be modified. See page 17 for more information on Errors/Exceptions.
Viewing Workforce Status (TA125)
Viewing Workforce Status allows supervisors to easily see who is punched in to work.
To view workforce status
1. From the TimeLink Menu Tree, select Time and Labor\View Workforce Status. The Workforce Status screen appears. If necessary, use the Find icon to limit your search (see page 8 for more information using the find feature).
2. Employees will either have a green or red dot. Green indicates working (punched in). Red indicates no working (not punched in).You can click on the column heading to change the way the information is sorted.
3. You can open the timecards for the persons appearing on this screen and edit them by double clicking on the person.

24
Reporting
Running a Report
Prior to running reports, you need to make the following changes to your Internet Explorer Options. This change only needs to be made once. 1. In Internet Explorer menu bar, go to Tools followed by Internet Options. Click on
the Security tab followed by “Custom level….
2. Scroll down to the Miscellaneous section and locate Display mixed content. Click
on Enable.

25
3. Click OK and then OK again. Restart Internet Explorer.
To run a report
Reports are located in 2 sections. From the TimeLink Menu Tree, select Reporting or Customer Specific (reports made specifically for CMU). Some reports automatically run as soon as you click on it utilizing the last saved criteria from a prior run. It may take a few minutes for the report to appear.
Timecard by Task and Hours by Task are helpful reports for supervisors of students and temporary employees. 1. Select the report you want to run. If search criteria are available for the report, you’ll
see dropdown lists at the top of the screen, as shown in the figure below.
REPORT WITH SEARCH CRITERIA
2. Select the search criteria for the information you want returned in your report (which will vary based on the report you select) and click Apply.
Hide the Group Tree
The group tree is a toggle for turning on or off a high level categorization feature. The group tree is hidden by default, but you may still turn it on. With the group tree visible, the amount of screen space available for viewing your report is significantly reduced, but you do get to see how the information has been categorized. If you want to work without this categorization, hide the group tree.
Click this icon to hide the group tree (or to unhide it if hidden):
BEFORE HIDING THE GROUP TREE
Increase the View Size
Increasing the view size makes the text in your report larger and therefore easier to read.

26
Click on this icon to increase the view size: A lower percentage shrinks the text:
Using Search in Reports to Find Information in a Report
1. Run the report.
2. Enter a search term in and click .
Exporting a Report
1. Run the report you want to export.
2. Click . The Export Options Screen appears.
EXPORT OPTIONS SCREEN
3. Choose from the options in the following table.
Select This To Do This
Formats Select the export format for your report. Choices include the following:
Crystal Reports (RPT)
Acrobat Format (PDF)
MS Word
MS Excel 97-2000
MS Excel 97-2000 (Data only)
Rich Text Format
All Include all pages in the report.
Pages
From/To
The pages you want to include. Enter a start point and an end point. If you leave either From or To blank, the report will include pages from the beginning or to the end, respectively (e.g., if From is blank and To is 3, pages 1-3 will print).
4. Click OK.
Note
If you are getting kicked out of the system when trying to export a report please try the following…In Internet Explorer click on “Tools” and then “Internet Options”. Click on the “Security” Tab, then “Custom Level”. Scroll down until you see “Downloads” section. Change the all of the download settings to “Enable”. Hit “OK” and then “OK” again.

27
Printing a Report
1. Run the report you want to print.
2. Click . The Print Options Screen appears.
PRINT OPTIONS SCREEN
3. Make a choice from the following table.
Select This To Do This
All Print all pages in the report.
Pages
From/To
The pages you want to print. Enter a start point and an end point. If you leave either From or To blank, the report will print from the beginning or to the end, respectively (e.g., if From is blank and To is 3, pages 1-3 will print).
4. Click OK. The File Download window appears.
FILE DOWNLOAD WINDOW
5. Click Open. The report appears in your Adobe Acrobat Viewer.
Tip
Do not use your browser’s print button – use the Adobe Viewer print button for more predictable results.
6. Click , the Adobe Viewer Print Option. The Print Screen appears.
7. Click OK.

28
Attachments
Timecards Field
In This Field You’ll Find This Information
Person Name The name of the person.
ID The ID of the person.
Dates The dates of the corresponding pay period.
Total The total hours worked (based upon the pay category type assignment).
OT The total overtime hours (can include 1.5 OT, double-time, etc.) (Based upon the pay category type assignment).
PTO The total paid time off hours (vacation, sick, jury duty, etc.) (Based upon the pay category type assignment).
Excp The number of outstanding exceptions.
Sev The most critical severity level on the timecard (1-3, 3 being the
highest), indicated visually by as 3 (Critical), as 2 (Warning) as 1 (Information).
Last Record The last record date recorded by the person in the period.
User Submitted A check mark will appear if the timecard has been submitted.
Approval Status The status of the timecard, i.e., approved, unapproved, rejected.
Timecard Status The timecard status states if the record is closed, open, or locked.
Payroll The payroll that the individual is included in.
Payroll Status The payroll status states if the record is paid or pending.
Time Record Fields
In You’ll See…
Day The day of the week.
Date The date of the time record.
Time Code The absence or attendance code (i.e., sick pay, regular time, etc.). A list of Time Codes can be found on page 37.
Duration The duration amount of duration-based time records (blue represents an employee-punched time event, green represents a supervisor-entered time record, orange represents a system generated time record, black are holidays).
Start The start time of a time-based time record.
Stop The stop time of a time-based time record.

29
Timecard Tab Information
Timecards contain many tabs of information at the bottom of the screen. Here is an explanation of what you will find in each tab.
Note
The date and time stamp at the bottom of each tab displays the date and time when the timecard calculation was last processed.
Pay and Accruals – This tab shows a list of balances associated with the corresponding time codes that will interface to payroll in SAP. The Accrual section is not applicable for students or temporary employees.
PAY AND ACCRUALS TAB
Note
Labor Acct Not applicable for students/temps unless using one of the following time code: RG_CC, CB_CC, OT_CC.
Record The number of worked hours associated with the time record.
Day Hrs The total number of worked hours for the day.
Total The total number of worked hours booked to the pay period as of the scheduled time record’s date/time.
Job Code Not applicable for students or temps. The work orders or internal order number associated with the time record.
Task Name The task code associated with the time record.
Reason The reason associated with the Comment that is linked to a time entry.
Comment Selected if a note has been stored for the time record.
PPA Selected if a prior period adjustment has been made.
ALD Selected if you are automatically deducting for lunch (Automatic Lunch Deduct).

30
Pay code totals are generated based on the record you have highlighted. Totals will appear for the highlighted record and all records above it. If you want to see the overall total, you need to highlight the last time record listed.
If the Pay Totals and Accruals do not seem to be generating correctly, you possibly have an incorrect time record that needs to be corrected or the record is future dated.
In You’ll See (For the Time Record)…
Pay Code The pay code of the record.
Time The total time for that pay code for the day that is highlighted above.
Balance (Time)
The total time for that pay code for the week as of the day of the record highlighted above in the time card.
Account Not applicable to students or temps unless using time code RG_CC. If using RG_CC, the labor account (Cost Center) charged for the record will appear. Otherwise it will show the students/temps home cost center.
In You’ll See (For the Time Record)… (not applicable for students or temps)
Accrual Code Name of the accrual bucket/category.
Time The time deducted or credited on the corresponding time record for the current pay period.
Balance The time balance for the accrual code as of the date of the corresponding time record highlighted above.
Amount Not Applicable.
Balance Not Applicable.
Schedule – This tab shows the employees schedule for the pay period that was selected. If a schedule was not implemented for this employee, this area will be blank.
SCHEDULE TAB
In You’ll See (For the Time Record)…
Day The day of the week.
Date The day of the week and date of the schedule.
Start The start time of the schedule.

31
In You’ll See (For the Time Record)…
Stop The stop time of the schedule.
Time Code The absence or attendance code associated with the schedule.
Duration The time duration of the schedule.
Job Not Applicable
Audit – This tab shows any changes made to the employee’s time record.
AUDIT TAB
In You’ll See (For the Time Record)…
Date Changed The date the time record changed.
User The user who changed the record. Punches from the clock will be listed as System_TEP.
Field The field that has been updated.
Old Value The initial information in the listed field.
New Value The new information found in the listed field.
Exception – This tab shows the list of Exceptions for the selected employee.
EXCEPTION TAB
In You’ll See (For the Time Record)…
Day The day of the week.
Date The date that the change took place.
Code The exception code.

32
In You’ll See (For the Time Record)…
Severity The severity level of the exception.
Payroll cannot be run until (Critical) Error Exceptions are corrected.
Message The detailed description of the exception.
Approval - This tab displays approval information about the timecard including who has made the approval, the status of the approval, and the dates that are approved. This can be used to show if multiple persons have made approvals on a single timecard, or if a single person has multiple approvals.
APPROVAL TAB
In Enter/Select
User Name The user who made the approval.
ID The ID number of the user who made the approval.
Approval Status The status of the timecard, i.e., approved, unapproved, rejected.
Approval Date The date and time the approval was made.
Comment A Comment entered by the Approver.
Event - This tab displays all punches from the clock that occurred during the time period with details regarding the source time and date of the event.
Note
The Event tab only shows punches from the clock not manual entries.
EVENT TAB
In You’ll See (For the Time Record)…

33
In You’ll See (For the Time Record)…
Day The day on which the event took place.
Date The date on which the event took place.
Type The event type, i.e., IN, OUT, WO, PP, etc.
Time The time of the event.
Transfer Not Applicable.
Time Code The time code associated with the event.
Source The source or clock location from which the event was entered.
Status Indicates whether the punch was processed successfully.
Person Info – Basic information about the employee.
PERSON INFO TAB
Access – not applicable.
Timecard Comment – Comments available for the timecard.
Time Record Comment – This tab shows any comments available for the time record.
COMMENT TAB
Labor Account Info – A labor account is equivalent to a Cost Center. For full time employees this is the cost center their time will be charged to. For students and temporary staff, the labor account that appears on the time record is their home cost center (the cost center from the very first job they held on campus). The only time labor account applies to students or temporary employees is when using the Regular Cost Center Override (RG_CC) time code.
Documents – This tab shows any documents attached to the timecard.

34
All Time Codes
Time Codes
30OT - Temp Overtime
30SE - Special Event Time
30SS - Temp Second Shift Time
30TS - Temp Third Shift Time
CB - Call Back
CB_CC - Call back Cost Center Override
CBWO - Call Back w/ Work Order
CREW - CREW Time
CS - Jury Duty/Court Service
CT - Compensatory Time Accrued
CU - Using Compensatory Time
DT - Double Time
FL - Funeral
HE - Non Legal Holiday Time
HN - Not a Holiday Time
HO - Holiday w/out overtime
HP - Holiday Pay
HS - Holiday Earn Time
HW - Holiday Worked
LD - FMLA Time for Dependent
LS - FMLA Time for Self
LUN - Lunch Time
MTG - MTG Time
O2 - Second Shift OverTime
O3 - Third Shift OverTime
Time Codes
OHHC - Higher Class Pay
OR - Rotating shift OverTime
OS - Straight Shift Overtime
OSCH - OSCH Time
OT - Overtime
OT_CC - Overtime Cost Center Override
OV - Varied Shift OverTime
PA - Paid Absence
PP - Personal Time
REG1 - Regular Pay
RG - Regular
RG_CC - Regular Cost Center Overrride
RS - Rotating shift Time
SE - Special Events Pay
SF - Sick Family
SH - Service Hours
SP - Sick Pay
SS - Second Shift Differential
TS - Third Shift Differential
UA - Unpaid Time with Accrual
UE - University Event Time
UL - Union Leave
UP - Unpaid Time (without Accruals)
VP - Vacation Time
VS - Varied Shift Time

35
Time Codes for Exception Time Reporting Employees (including examples of when to use them)
*Requires a Comment when using this time code.
Below are examples on how to use the time codes. Please refer to your employee group contracts for information on the allowable increments.
Time Code
Situation Directions on how to enter
CB Also called Call-In Pay. An employee reporting for duty at the employer’s request for work which is outside of and not continuous with the employee’s regular work period, shall be granted at a designated number of hours at the rate of time and one-half.
Enter CB and the granted number of hours owed or CB and the actual hours worked if longer than the granted hours.
CB_CC Same as above but you want this time charged to a different cost center than normal.
Select CB_CC and change the labor account field to the cost center you want to charge your hours and enter the number of hours owed or the actual hours worked if longer than the granted hours.
CS You were gone for 4 hours at jury duty Select CS and enter 04:00 on the day you were absent
CT You work more than 40 hours but instead of overtime pay, you (and with approval of your supervisor) choose to accrue compensatory time.
Select CT and enter the number of comp hours you want to accrue. This can be entered in 0:15 increments.
CU You have accrued some compensatory time and would like to use 4 hours of it.
Select CU and enter the number of hours you are using ex 04:00.
DT You work a legal holiday. On the day of the legal holiday, select DT and enter 08:00.
FL You are out of the office for 3 days because your father passed away.
Select FL and enter your daily scheduled number of hours on each day you were gone. (For most people this will be 08:00). When entering funeral leave you are required to indicate in the Comments section your relationship to the deceased.
HE You are required to work on what would be an additional holiday and you receive an
Select HE and enter the number of hours you worked. You will also have 8 HP on your
Time Codes
CB - Call Back OT – Overtime
CB_CC -Call Back Cost Center Override OT_CC – Overtime Cost Center Override
CS - Jury Duty/Court Services PA - Paid Absence Time *
CT - Compensatory Time Accrued PP - Personal Time
CU - Using Compensatory Time RG – Regular
DT - Double Time RG_CC
FL – Funeral * SF - Sick Family Time
HN - Not a Holiday Time SP - Sick Pay
HW - Holiday Worked SS - Second Shift Differential
LD - FMLA Time for Dependent TS - Third Shift Differential
LS - FMLA Time for Self UA - Unpaid Time With Accruals
O2 - Second Shift Overtime UP - Unpaid Time (Without Accruals)
O3 - Third Shift Overtime VP - Vacation Time

36
Below are examples on how to use the time codes. Please refer to your employee group contracts for information on the allowable increments.
Time Code
Situation Directions on how to enter
additional day off during the fiscal year. timecard which will pay you regular pay.
HN You previously worked on a day that was considered an additional holiday and you are taking that time off now.
When you use this day, you will select HN and enter the number of hours you are taking.
HW Not applicable at this time. For future use.
LD Your child has been sick for an extended amount of time and you qualify FMLA.
Select LD and enter your hours as well as SF and enter your hours.
LS You recently had surgery and qualify for FMLA or you recently gave birth and are on maternity leave.
Select LS and enter your hours as well as SP and enter your hours. If you are out of SP, you can use VP, CU, UP, etc.
O2 If you are employed as a second shift employee and you worked more than 40 hours in one week.
Select OT and enter the number of OT hours you worked as well as select O2 and enter the number of second shift OT hours you worked.
O3 If you are employed as a third shift employee and you worked more than 40 hours in one week.
Select OT and enter the number of OT hours you worked as well as select O3 and enter the number of second shift OT hours you worked.
OT You worked more than 40 hours in one week. Enter OT and the number of hours of OT you worked.
OT_CC You worked more than 40 hours in one week and want to charge the hours to a different cost center.
Enter OT_CC and change the labor account field to the cost center you want to charge your hours. Enter the number of hours of OT you worked.
PA You are missing work because of a union conference you are attending for 3 days. OR You have been granted leave using the Family Illness Fund – you will be off for 3 days.
Select PA and input 08:00 on the 3 days that you are not at work. When using PA you are required to indicate in the Comments section the reason for your paid absence. If you are using the Family Illness Fund – indicate this in the comment section.
PP You need to leave 2 hours early to run some personal errands and want to use your personal time.
Select PP and input 02:00 on the day that you left early.
RG If you are hired to work 32 hours a week and you end up working 2 extra hours.
Select RG and input actual number of hours worked that day (example – 8:67 which would be 2 hours longer than your scheduled hours).
RG_CC If you are hired to work 32 hours a week and any additional hours must be charged to a different cost center than normal.
Select RG_CC and change the labor account field to the cost center you want to charge your hours. Enter the number of hours.
SF You stayed home with a sick child. Select SF and enter 08:00
SP You did not come to work today because you were sick.
Select SP and enter 08:00
SS You are working second shift as described in your contract.
Select SS and enter the number of hours you worked.
TS You are working third shift as described in your contract.
Select TS and enter the number of hours you worked.
UA You are working on day that has been designated as an additional holiday.
Select UA and enter 08:00 and then select RG and enter 08:00.
UP You need to take 8 hours off, but you do not Select UP and enter 08:00 on the day that

37
Below are examples on how to use the time codes. Please refer to your employee group contracts for information on the allowable increments.
Time Code
Situation Directions on how to enter
have any vacation time available. You are given permission to go unpaid.
you were not at work.
VP You are gone for a week on vacation. Select VP and input 08:00 on every day that you are gone.

38
Exceptions/Errors
Rule Rule
Description
Employee Eligibility /
Condition
Comment /
Examples Manual Steps
SWT Student Clocked
without Task
IF student employee or
temporary employee failed to
enter task
Error
You will need to manually add the task
code to the time record (see 14 for
instructions).
CPO Compensatory
Overallocated
IF employee tries to use
comp time they do not have Error Time record needs to be adjusted
PSO Personal
Overallocated
IF employee tries to use
personal time they do not
have
Error Time record needs to be adjusted
SCKO Sick
Overallocated
IF employee tries to use sick
time they do not have Error Time record needs to be adjusted
VCO Vacation
Overallocated
IF employee tries to use
vacation time they do not
have
Error Time record needs to be adjusted
FMLAO FMLA
Overallocated
IF employee tries to use
FMLA time they do not have Error Time record needs to be adjusted
FP Failed to Punch IF employee failed to punch Warning You will need to manually add a punch
(see page 14 for instructions).
MP Missing a Punch IF employee is missing a punch for a day
Warning You will need to manually add a punch (see page 14 for instructions).
UB Unassigned
Badge
IF employee punched prior to
hire date Warning
Employee needs to be hired for dates
being punched.
FLOCC
Funeral
Occurrence, 3
days
IF employee has 4
consecutive days of FL time
records
Warning
Employee is over funeral allotment. Adjust
time record with other eligible paid time off
or unpaid time.
SFACC Family Sick If employee has accumulated
16 hours of SF since Jan 1 Warning
Employee is over family sick allotment.
Adjust time record with other eligible paid
time off or unpaid time.
SHO Service Hours
Over balance
If employee SH accrual
account reaches zero Warning
Employee is over service hour’s allotment.
Adjust time record with other eligible paid
time off or unpaid time.
EE Early Entry, 15
minutes
IF employee clock in prior to
15 mins before shift start Information Information Only
EX Early Exit, 5
minutes
IF employee clocks out prior
to 5 minutes before shift end Information Information Only
LE Late Entry, 5
minutes
IF employee clocks in after 5
minutes after shift start Information Information Only
LX Late Exit, 8
minutes
IF employee clocks out after
8 minutes after shift end Information Information Only

39
Glossary of Terms
Accrual Account An accrual account is a collection of time credit and debit records that determine a person's accrual account balance (e.g., amount of vacation time remaining) for a specified period of time, known as an accrual account period. An accrual account maintains a person's benefit time balance. A person may have many accrual accounts in support of the various benefit time options available to him/her (vacation, paid time off, sick leave, etc.).
Balances Displays the number of hours remaining for particular leave time category.
Labor Account
A labor account is equivalent to a Cost Center. For full time employees this is the cost center their time will be charged to. For students and temporary staff, the labor account that appears on the time record is their home cost center (the cost center from the very first job they held on campus). The only time labor account applies to students or temporary employees is when using the Regular Cost Center Override (RG_CC) time code.
Shift The smallest complete unit of the work schedule is the shift, or a daily work schedule. A shift consists of either a scheduled start/end time or a scheduled duration of time for a particular day. It may also be associated with a daily break schedule(s). Shifts can have multiple components, such as a 9:00 to 12:00 period of work, a 12:00-12:30 lunch break, and a 12:30 to 5 period of work. A daily break schedule is used to determine the authorized breaks (meal, rest, etc.) that are applicable to this shift.
Task Code/Number For students and temporary employees. A number used along with the student/temp employee’s campus ID number to determine the rate of pay, wage type and cost center for the particular job for that employee.
Time Code A time code is an attribute of a time record. The time code is used to determine whether the associated time is to be considered an absence or an attendance, and, more importantly, how this time should be treated for pay consideration.
Time Exception An error with the time entered has been detected. Typical scenarios that create an exception include absences, missing punches, overtime, tardiness, missing task number, etc.
Transaction Number Each screen within Timelink is assigned a Transaction Number (ex. TA135 Managing Timecards). You can enter this number in the Quick Launch feature to bring up a screen quicker.