tips tricks and techniques for efficient labview development
TRANSCRIPT

Tips Tricks and Techniques for Efficient LabVIEW
Development
Presented by Nick Golas
Telephonics Corp.
IEEE I&M Society LI Section &
Long Island LabVIEW Users Group (LILUG)
Thursday 12/06/2007
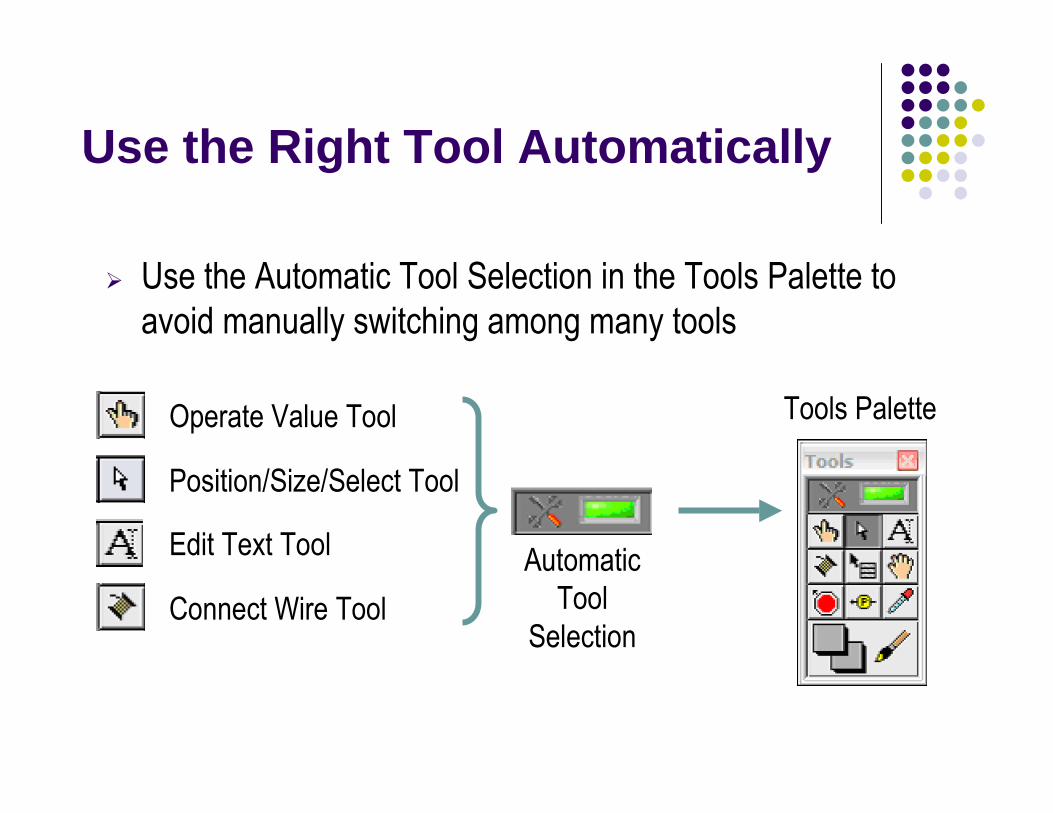
Use the Right Tool Automatically
� Use the Automatic Tool Selection in the Tools Palette to
avoid manually switching among many tools
Operate Value Tool
Position/Size/Select Tool
Edit Text Tool
Connect Wire Tool
Automatic
Tool
Selection
Tools Palette
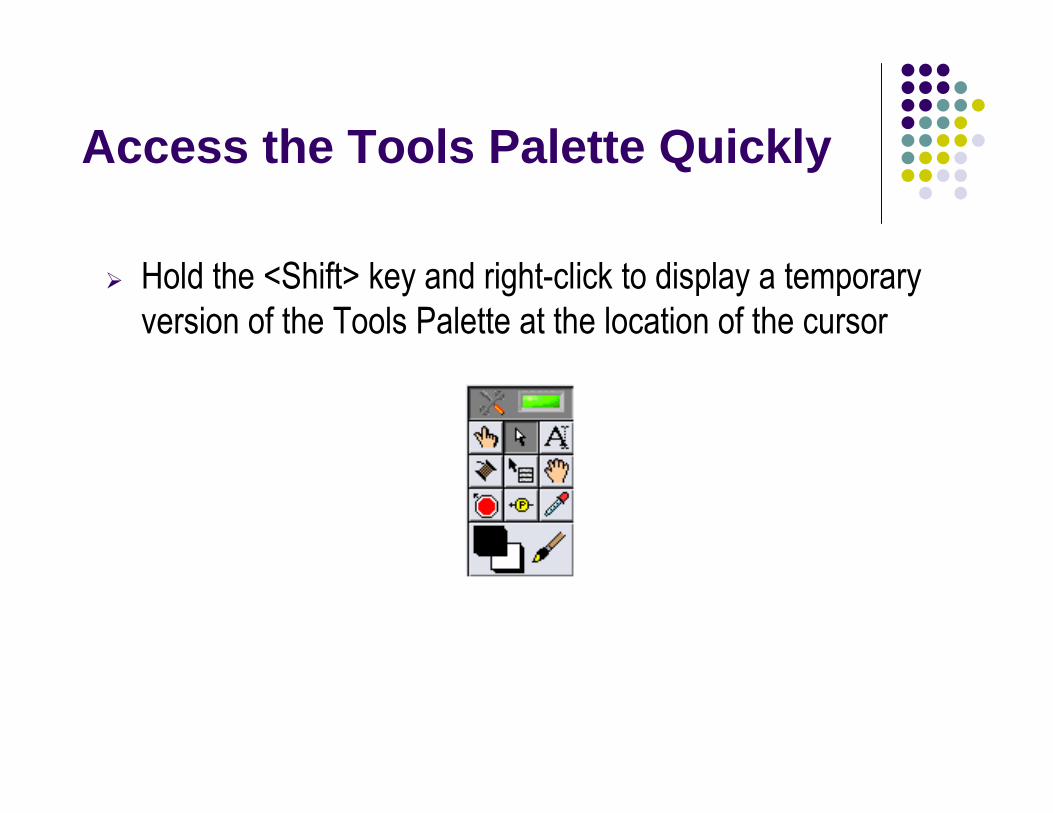
Access the Tools Palette Quickly
� Hold the <Shift> key and right-click to display a temporary
version of the Tools Palette at the location of the cursor

Easily Scroll Through Structures
� You can use Ctrl + Mouse Scroll to scroll through:� Case Structures
� Event Structures
� Stacked Sequence Structures
� Diagram Disable Structures
Ctrl + Mouse Scroll Wheel
Filename: Easily Scroll Through Structures LV8.5.vi
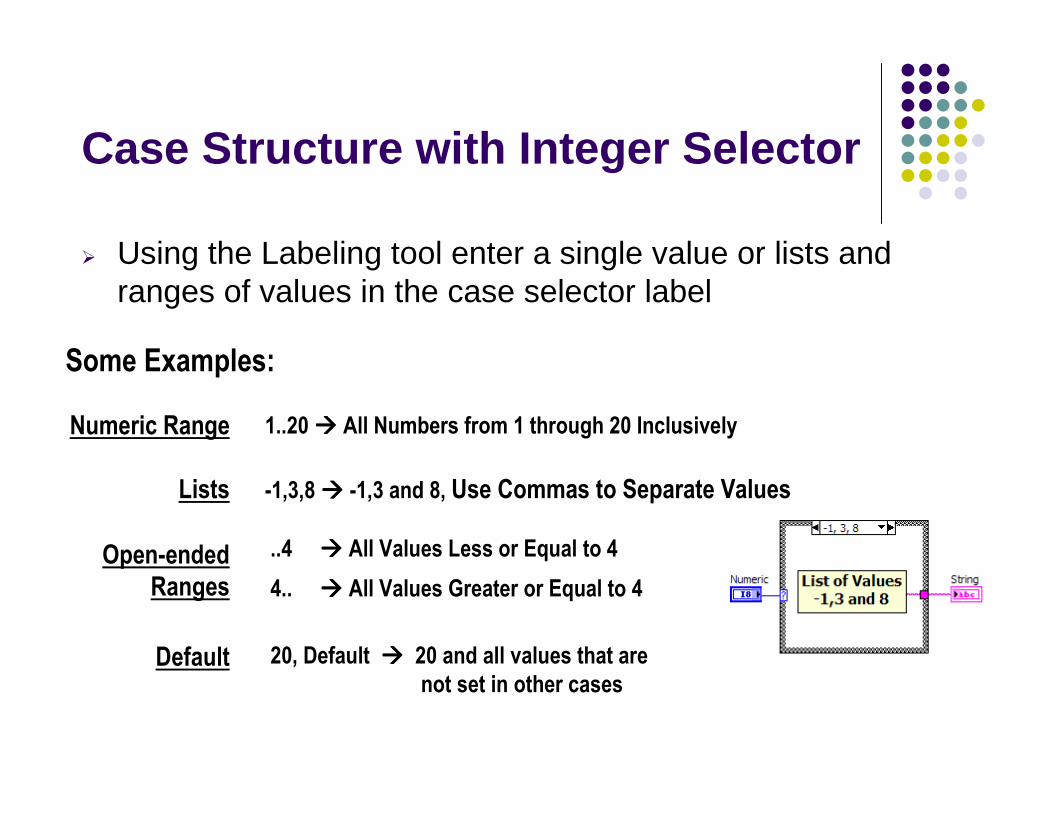
Case Structure with Integer Selector
� Using the Labeling tool enter a single value or lists and ranges of values in the case selector label
Some Examples:
Numeric Range
Lists
Open-ended
Ranges
1..20 ���� All Numbers from 1 through 20 Inclusively
-1,3,8 ���� -1,3 and 8, Use Commas to Separate Values
..4 ���� All Values Less or Equal to 4
4.. ���� All Values Greater or Equal to 4
Default 20, Default ���� 20 and all values that are
not set in other cases
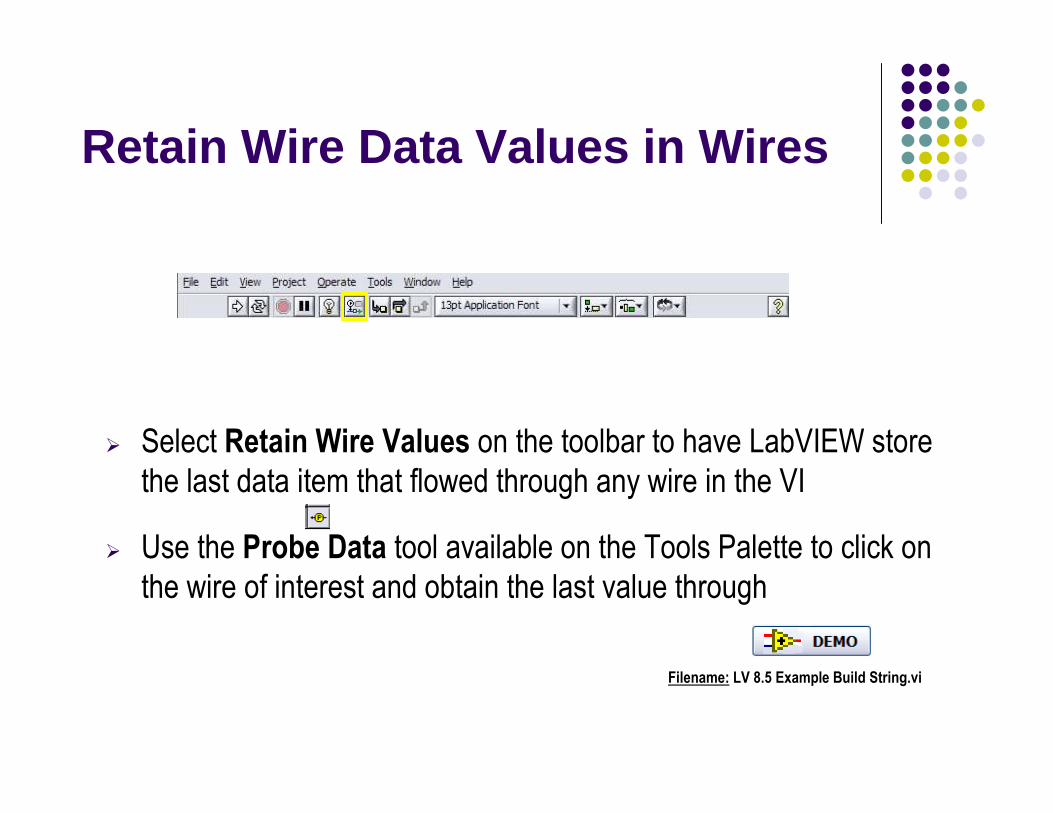
Retain Wire Data Values in Wires
� Select Retain Wire Values on the toolbar to have LabVIEW store
the last data item that flowed through any wire in the VI
� Use the Probe Data tool available on the Tools Palette to click on
the wire of interest and obtain the last value through
Filename: LV 8.5 Example Build String.vi
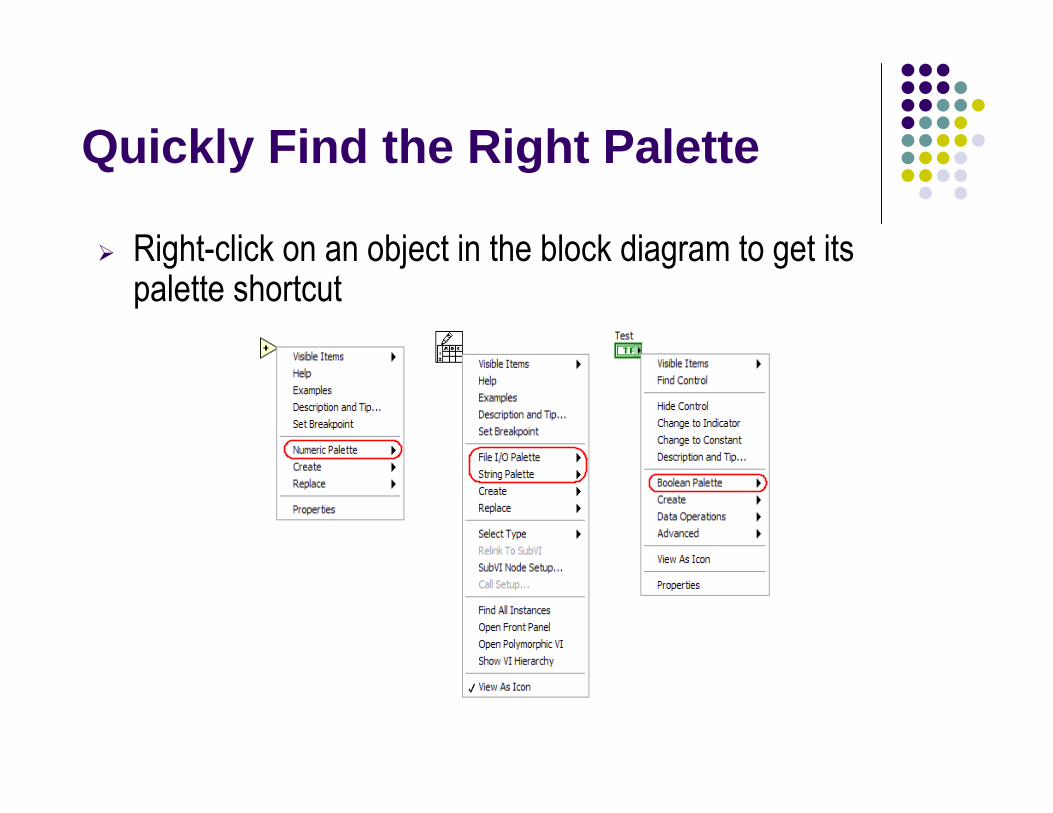
Quickly Find the Right Palette
� Right-click on an object in the block diagram to get its palette shortcut

Navigate Large Arrays Easily
� Right-click on an array and select Visible Items >> Horizontal
Scrollbar
� To view last element, select Advanced >> Show Last Element
� Both horizontal and vertical scrollbars available (depending on view)
Filename: Navigate Arrays LV8.5.vi
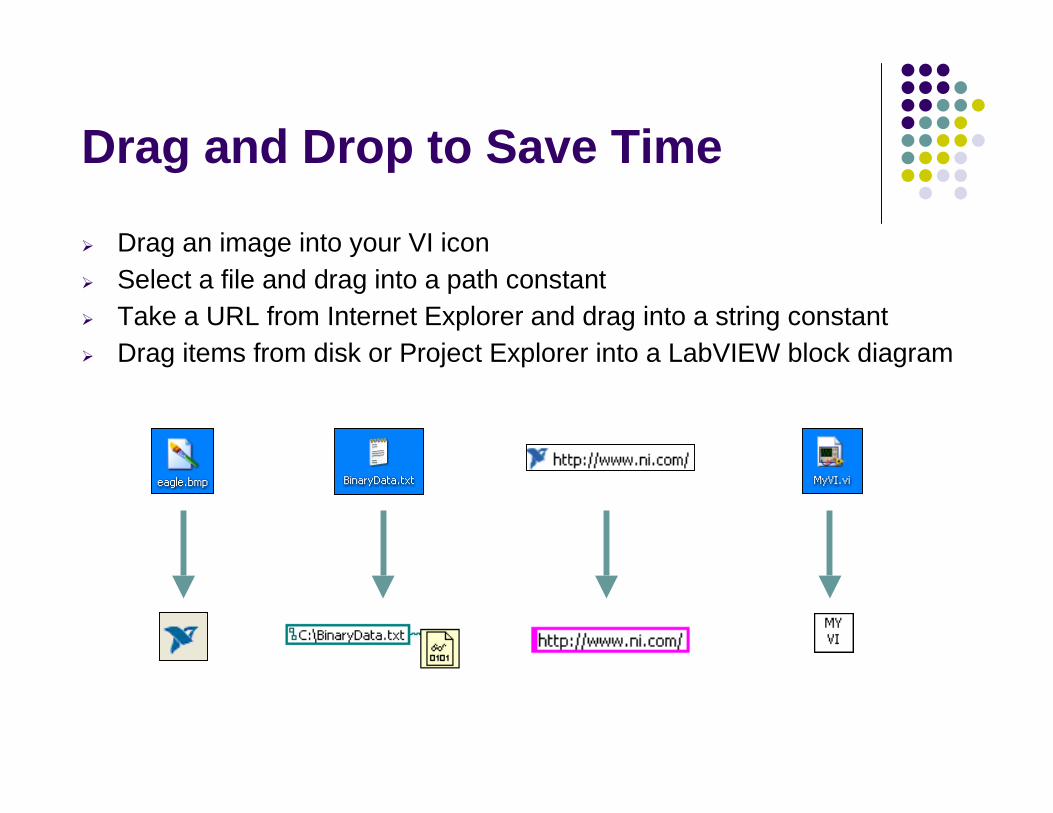
Drag and Drop to Save Time
� Drag an image into your VI icon� Select a file and drag into a path constant� Take a URL from Internet Explorer and drag into a string constant� Drag items from disk or Project Explorer into a LabVIEW block diagram
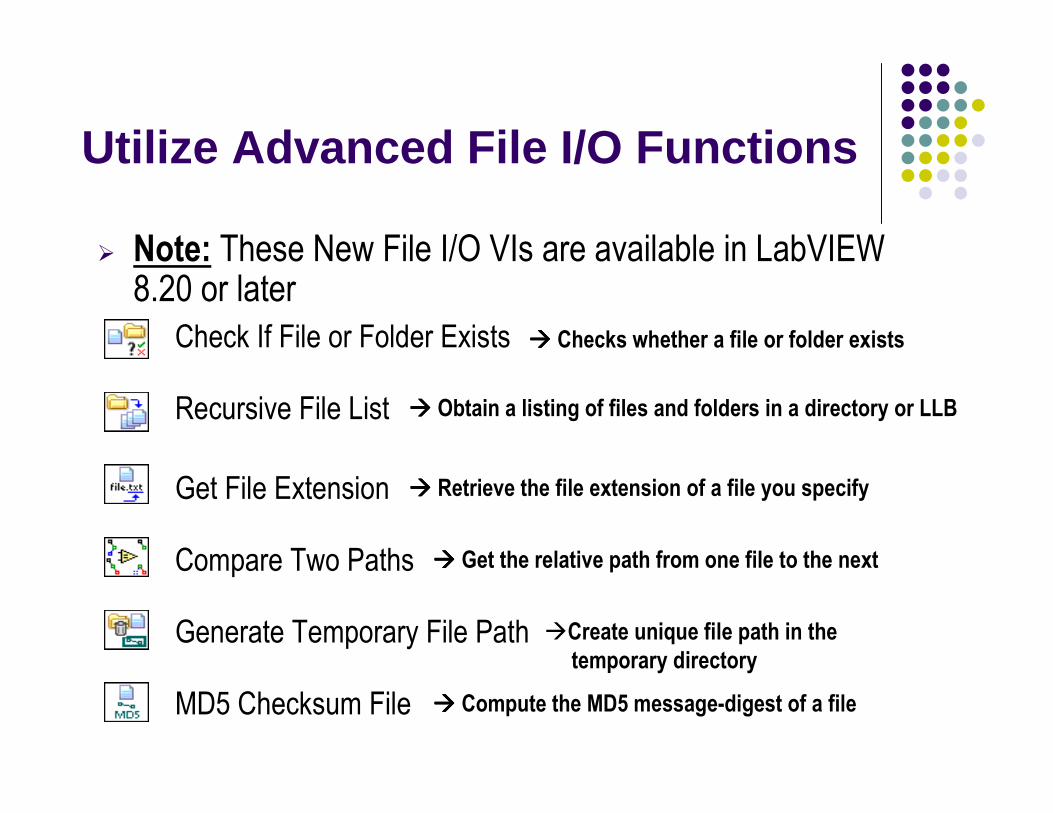
Utilize Advanced File I/O Functions
Check If File or Folder Exists
Recursive File List
Compare Two Paths
Get File Extension
MD5 Checksum File
Generate Temporary File Path
� Note: These New File I/O VIs are available in LabVIEW 8.20 or later
���� Obtain a listing of files and folders in a directory or LLB
���� Get the relative path from one file to the next
�Create unique file path in the
temporary directory
���� Compute the MD5 message-digest of a file
���� Checks whether a file or folder exists
���� Retrieve the file extension of a file you specify
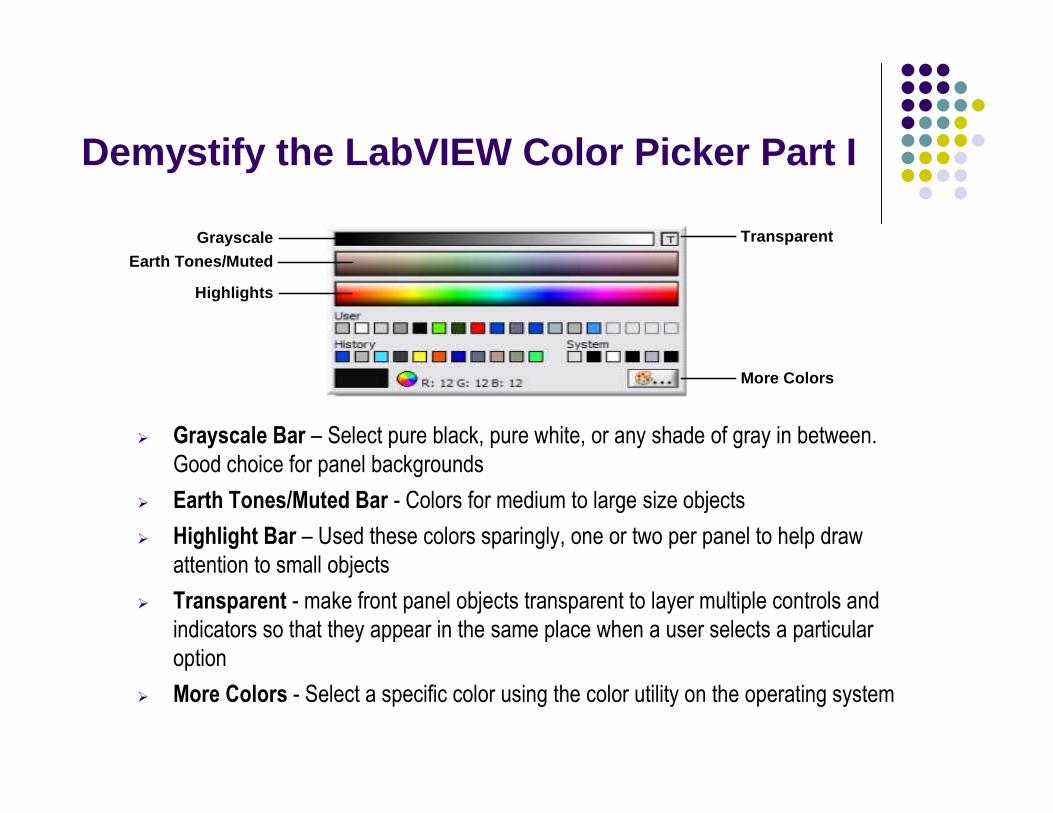
Demystify the LabVIEW Color Picker Part I
� Grayscale Bar – Select pure black, pure white, or any shade of gray in between.
Good choice for panel backgrounds
� Earth Tones/Muted Bar - Colors for medium to large size objects
� Highlight Bar – Used these colors sparingly, one or two per panel to help draw
attention to small objects
� Transparent - make front panel objects transparent to layer multiple controls and
indicators so that they appear in the same place when a user selects a particular
option
� More Colors - Select a specific color using the color utility on the operating system
Grayscale
Earth Tones/Muted
Highlights
Transparent
More Colors

Demystify the LabVIEW Color Picker Part II
� User Row – Contains colors that you can define in Tools>>Options. Handy if you want to use the same RGB colors frequently
� History Row – Helps you re-use colors that you selected recently
� System Colors – Allows you to set the appearance of a front panel to match the system colors of any computer that runs the VI
� Currently Selected Color – Displays the currently selected color. Objects that have foreground and background colors display the foreground color in the left half of this box and the background color in the right half
� RGB Color Wheel - To the right of that it either displays the RGB value or the name for User colors and System colors that is the Currently Selected Color
System Colors
User Row
History Row
Currently Selected Color RGB Color
Wheel

Be Precise: Resize Objects Dialog Box
� On the Front Panel select all objects you want to resize using the position/size/select tool or
use <Ctrl-A> in LabVIEW 8.0 or later. On the Resize Objects ring choose the "Set Width
and Height..." on the VI's toolbar. The Resize Objects dialog box appears, which allows you
to change the width and height or both of the selected objects
� On the Distribute Objects ring select the Vertical Centers option to distribute the objects
evenly on the Front Panel
Filename: Resize LV8.5.vi

Design/Architecture – Main & SubVIs
� Code should not use more than one screen
� Arrange controls to resemble the connector assignments
� Use the 4x2x2x4 connector to pass data between VIs (default
connector pane starting with LabVIEW 8.0)
� Apply consistent fonts and capitalization
� Maximize the contrast between text color and background color

Switch Terminal Wires Easily Using the ‘Switcheroo’ Tool
Hold Down Ctrl
and Left-Click on Input Terminal
Note: This works only for functions with two inputs when both
inputs have already been wired and when using the Auto Tool or
Wiring Tool
Filename: Switcheroo LV7.1.vi
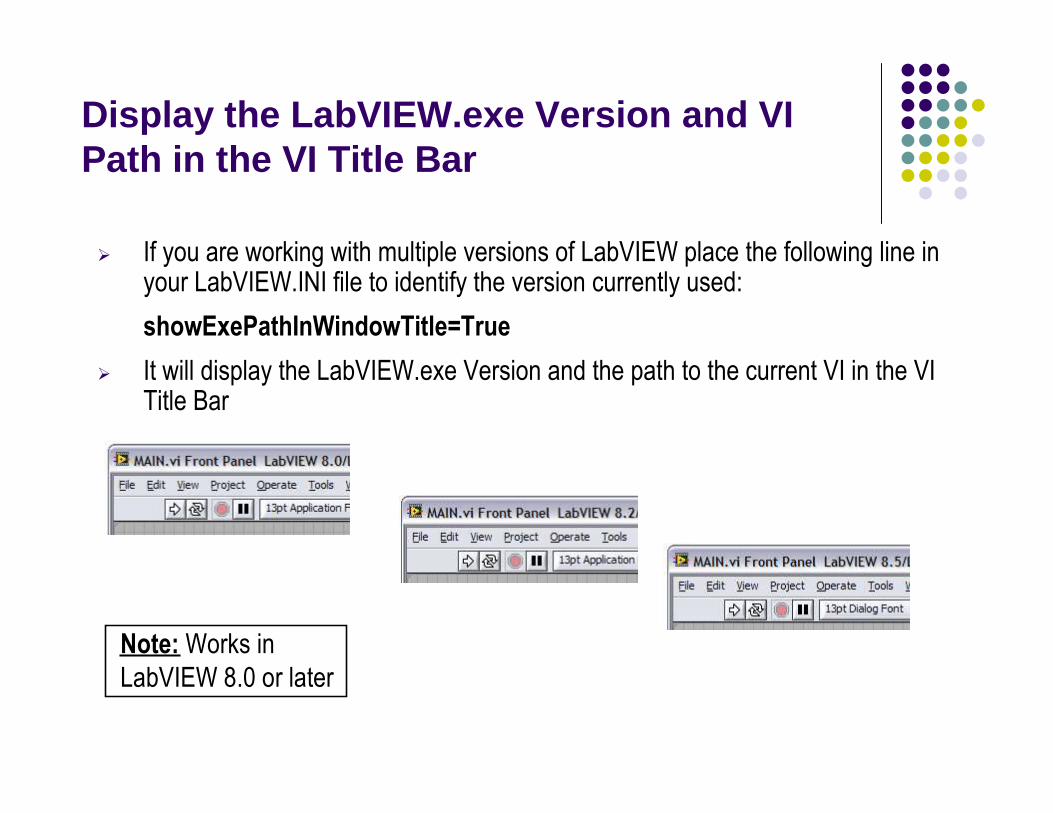
Display the LabVIEW.exe Version and VI Path in the VI Title Bar
� If you are working with multiple versions of LabVIEW place the following line in your LabVIEW.INI file to identify the version currently used:
showExePathInWindowTitle=True
� It will display the LabVIEW.exe Version and the path to the current VI in the VI Title Bar
Note: Works in
LabVIEW 8.0 or later
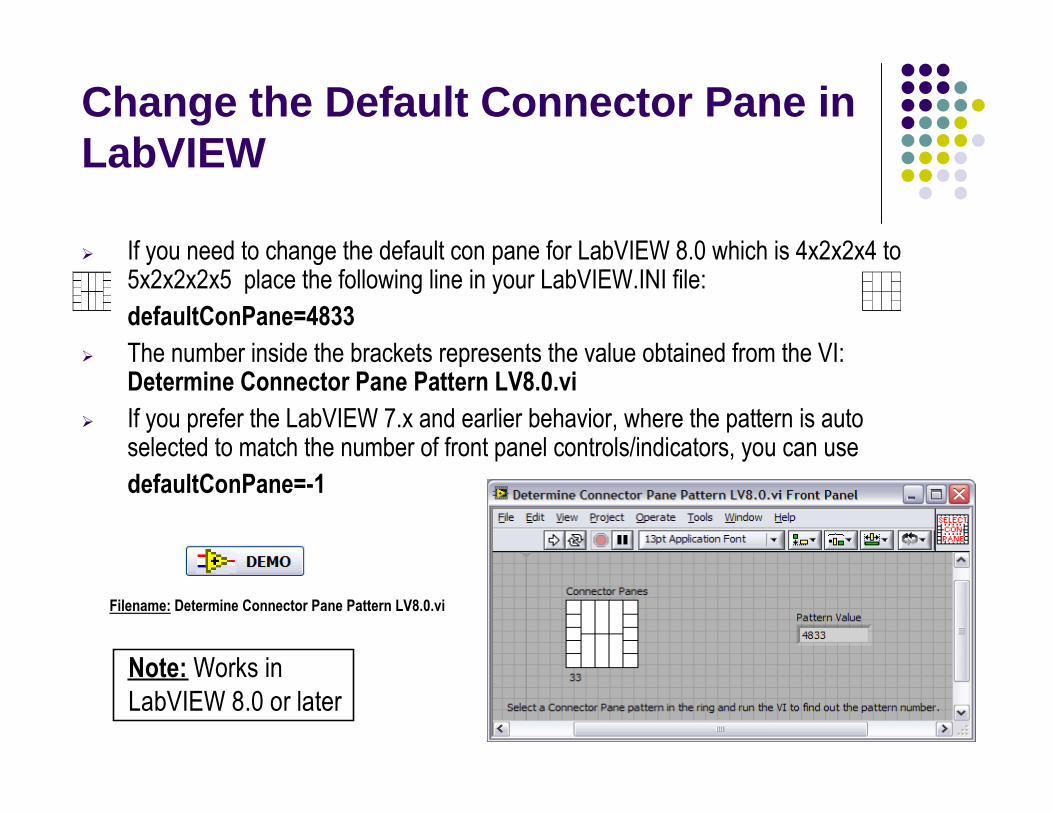
Change the Default Connector Pane in LabVIEW
� If you need to change the default con pane for LabVIEW 8.0 which is 4x2x2x4 to 5x2x2x2x5 place the following line in your LabVIEW.INI file:
defaultConPane=4833
� The number inside the brackets represents the value obtained from the VI: Determine Connector Pane Pattern LV8.0.vi
� If you prefer the LabVIEW 7.x and earlier behavior, where the pattern is auto selected to match the number of front panel controls/indicators, you can use
defaultConPane=-1
Note: Works in
LabVIEW 8.0 or later
Filename: Determine Connector Pane Pattern LV8.0.vi
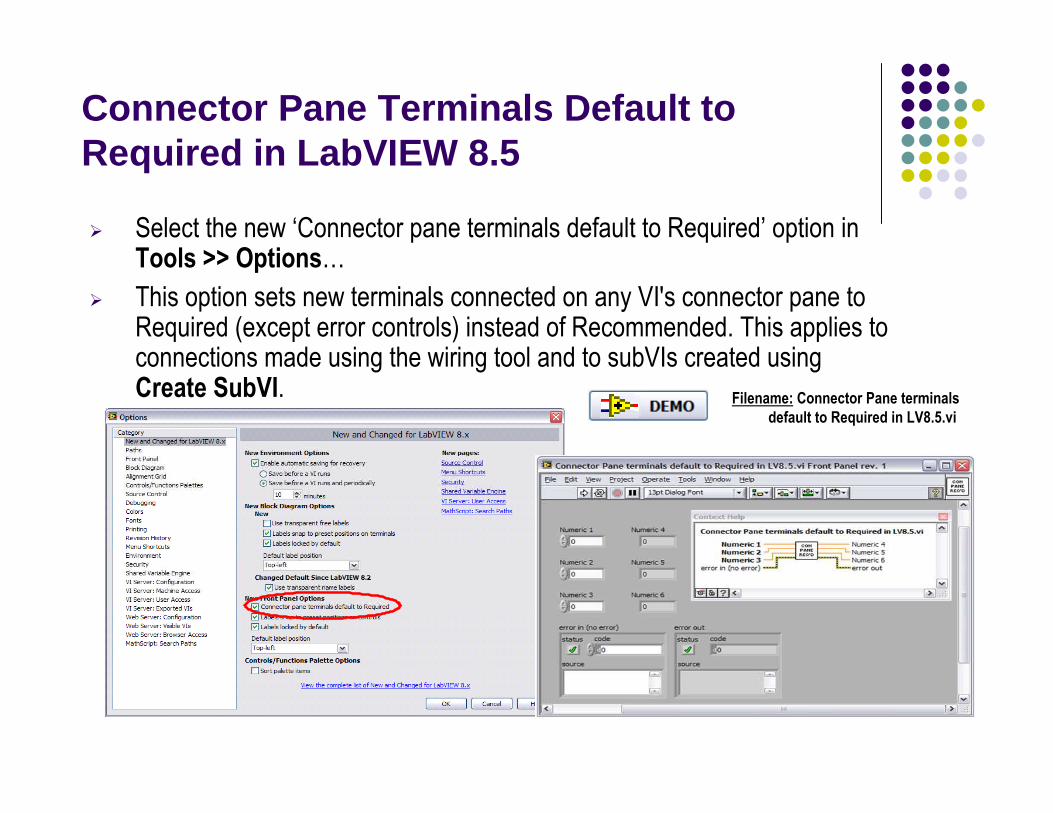
Connector Pane Terminals Default to Required in LabVIEW 8.5
� Select the new ‘Connector pane terminals default to Required’ option in Tools >> Options…
� This option sets new terminals connected on any VI's connector pane to Required (except error controls) instead of Recommended. This applies to connections made using the wiring tool and to subVIs created using Create SubVI. Filename: Connector Pane terminals
default to Required in LV8.5.vi

Remove Many Breakpoints
� Select Edit >> Remove Breakpoints from Hierarchy
� A Breakpoint Removal Summary will display all breakpoints removed
� Great tool for removing all breakpoints after debugging a section of code
Note: Works in
LabVIEW 8.2 or later
Filename: Write-Read Text File LV8.5.vi

Add Enumeration Items Easily
� Press Ctrl while over Enum and click inside in order to use the Edit
Text Tool
� Use Shift + Enter to repeatedly add items
� This convenient trick also works for Rings
Shift + Enter

Change the Windows File Dialog(to contain recently used folders in LabVIEW)
� Add the following line in your LabVIEW.INI file to identify the version currently
used:
MRUFolders=True
� Access to the last 5 directories used in LabVIEW conveniently
Note 1: Works in
LabVIEW 8.2 or later
Note 2: Overrides
TweakUI settings

Quickly Open a VI Reference(next to current VI on disk)
Good
Better
Best
Note: This method requires a path constant.
Call Setup
� LabVIEW automatically looks in the current directory
� Right-click on VI and select Call Setup to call it dynamically
Note: Works in
LabVIEW 8.0 or later

Implement a For Loop Progress Bar
� Place Progress Bar VI inside a For Loop
� Opens automatically after a specified amount of time
� Filename: For Loop Progress Bar LV7.0.vi

Close LabVIEW Programmatically if EXE
� Use Filename: Close LabVIEW ONLY When EXE LV7.1.vi

Icon Tips Part I
Pencil — Draws and erases pixel by pixel. TIP: To draw horizontal or vertical lines, press the <Shift> key while you use this tool to drag the cursor.
Line — Draws straight lines. TIP: To draw horizontal, vertical, and diagonal lines, press the <Shift> key while you use this tool to drag the cursor
Color Copy — Copies the foreground color from an element in the icon. Automatically returns to the tool you were using before you selected the Color Copy tool.
Fill — Fills an outlined area with the foreground color
Rectangle — Draws a rectangular border in the foreground color. TIP: Double-click this tool to frame the icon in the foreground color
Filled Rectangle — Draws a rectangle with a foreground color frame and filled with the background color. TIP: Double-click this tool to frame the icon in the foreground color and fill it with the background color
Select — Selects an area of the icon to cut, copy, move, or make other changes. TIP: Double-click this tool and press the <Delete> key to delete the entire icon
Text — Enters text into the icon. TIP: Double-click this tool to select a different font. TIP: While still typing and before selecting another tool you can move the text around pixel by pixelby pressing the arrow keys
Foreground/Background — Displays the current foreground and background colors. Click each rectangle to access a color picker from which you can select new colors to use
� Icon Editor Tools

Icon Tips Part II
� Select the SMALL FONTS font & use CAPS with size 8. Fit up to 4 lines of text
� After selecting a rectangle area on the icon paste anything from the clipboard (image, text, control) into the Icon Editor and have it automatically resized to fit area set
� Holding down the <Ctrl> key will switch to the Color Copy (Eyedropper) selection tool
� Copy an image to a VI icon by dragging the image file and place it on the icon located in the upper right corner of the Front Panel or Block Diagram

Icon Tips Part III� National Instruments Icon Library
http://www.ni.com/devzone/idnet/library/icon_art_glossary.htm
This resource offers you a selection of over 500 pre-made icons that you can download and use for free in your own VIs, toolbars, and applications
Sample Icons from NI’s Icon Library Collection

Abide by Universal Conventions for Green, Yellow, and Red
� Red indicates alarm or emergency
� Yellow indicates caution or warning
� Green indicates normal operating conditions
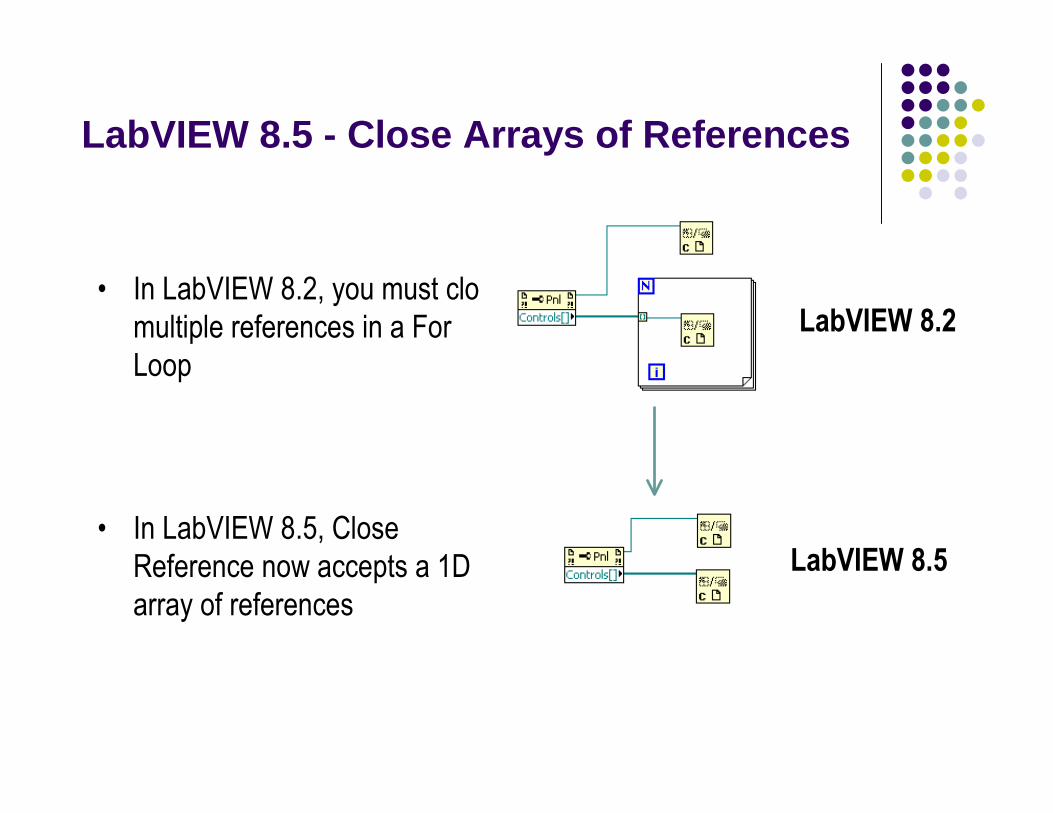
LabVIEW 8.5 - Close Arrays of References
• In LabVIEW 8.2, you must close
multiple references in a For
Loop
LabVIEW 8.2
LabVIEW 8.5• In LabVIEW 8.5, Close
Reference now accepts a 1D
array of references
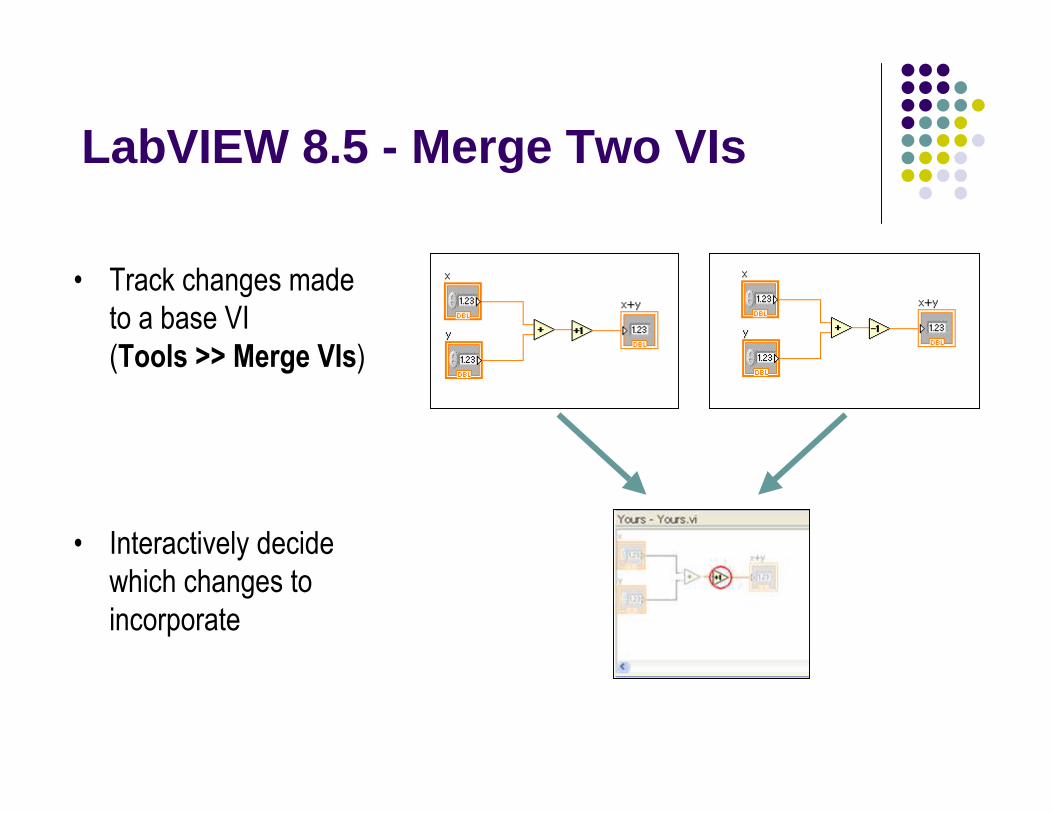
LabVIEW 8.5 - Merge Two VIs
• Track changes made
to a base VI
(Tools >> Merge VIs)
• Interactively decide
which changes to
incorporate

LabVIEW 8.5 - For Loop with Break
LabVIEW 8.2
LabVIEW 8.5
Run a fixed
number of times
or
until a condition is
met

LabVIEW Keyboard Shortcuts
Object/Movement Execution
Shift-click Selects multiple objects; adds object to current selection.
Arrow keys Moves selected objects one pixel at a time.
Shift-Arrow keys Moves selected objects several pixels at a time.
Shift-click (drag) Moves selected objects in one axis.
Ctrl-click (drag) Duplicates selected object.
Ctrl-Shift-click (drag) Duplicates selected object and moves it in one axis.
Shift-resize Resizes selected object while maintaining aspect ratio.
Ctrl-resize Resizes selected object while maintaining center point.
Ctrl-Shift-resize Resizes selected object while maintaining center point and aspect ratio.
Ctrl-drag a rectangle Adds more working space to the front panel or block diagram.
Ctrl-A Selects all front panel or block diagram items.
Ctrl-Shift-A Performs last alignment operation on objects.
Ctrl-D Performs last distribution operation on objects.
Double-click open space
Adds a free label to the front panel or block diagram if automatic tool selection is enabled.
Ctrl-mouse wheel Scrolls through subdiagrams of a Case, Event, or Stacked Sequence structure.
Spacebar (drag) Disables preset alignment positions when moving object labels or captions.

LabVIEW Keyboard Shortcuts
Navigating the LabVIEW Environment
Ctrl-F Finds objects or text.
Ctrl-Shift-F Displays Search Results window or the Find Project Items dialog box with the previous search results.
Ctrl-G Searches for next instance of object or text.
Ctrl-Shift-G Searches for previous instance of VIs, object, or text.
Ctrl-Tab Cycles through LabVIEW windows in the order the windows appear onscreen.
Ctrl-Shift-Tab Cycles the opposite direction through LabVIEW windows.
Ctrl-L Displays the Error List window.
Ctrl-Shift-W Displays the All Windows dialog box.
Ctrl-E Displays block diagram or front panel window.
Ctrl-# Enables or disables grid alignment.
Ctrl-/ Maximizes and restores window.
Ctrl-T Tiles front panel and block diagram windows.
Ctrl-Shift-N Displays the Navigation window.
Ctrl-I Displays the VI Properties dialog box.
Ctrl-Y Displays the History window.
Navigating Front Panels and Block DiagramsNavigating Front Panels and Block DiagramsNavigating Front Panels and Block DiagramsNavigating Front Panels and Block Diagrams
Ctrl-D Redraws the VI Hierarchy window.
Ctrl-A Shows all VIs in the VI Hierarchy window.
Ctrl-click VI Displays the subVIs and other nodes that make up
the VI you select in the VI Hierarchy window.
Enter Finds the next node that matches the search
string after initiating a search by typing in the VI Hierarchy window.
Shift-Enter Finds the previous node that matches the search
string after initiating a search by typing in the VI Hierarchy window.
Navigating the VI Hierarchy WindowNavigating the VI Hierarchy WindowNavigating the VI Hierarchy WindowNavigating the VI Hierarchy Window
DebugDebugDebugDebug
Ctrl-���� Steps into node.
Ctrl-���� Steps over node.
Ctrl-���� Steps out of node.
File OperationsFile OperationsFile OperationsFile Operations
Ctrl-N Opens a new, blank VI.
Ctrl-O Opens an existing VI.
Ctrl-W Closes the VI.
Ctrl-S Saves the VI.
Ctrl-Shift-S Saves all open files.
Ctrl-P Prints the window.
Ctrl-Q Quits LabVIEW.
LabVIEW Keyboard Shortcuts
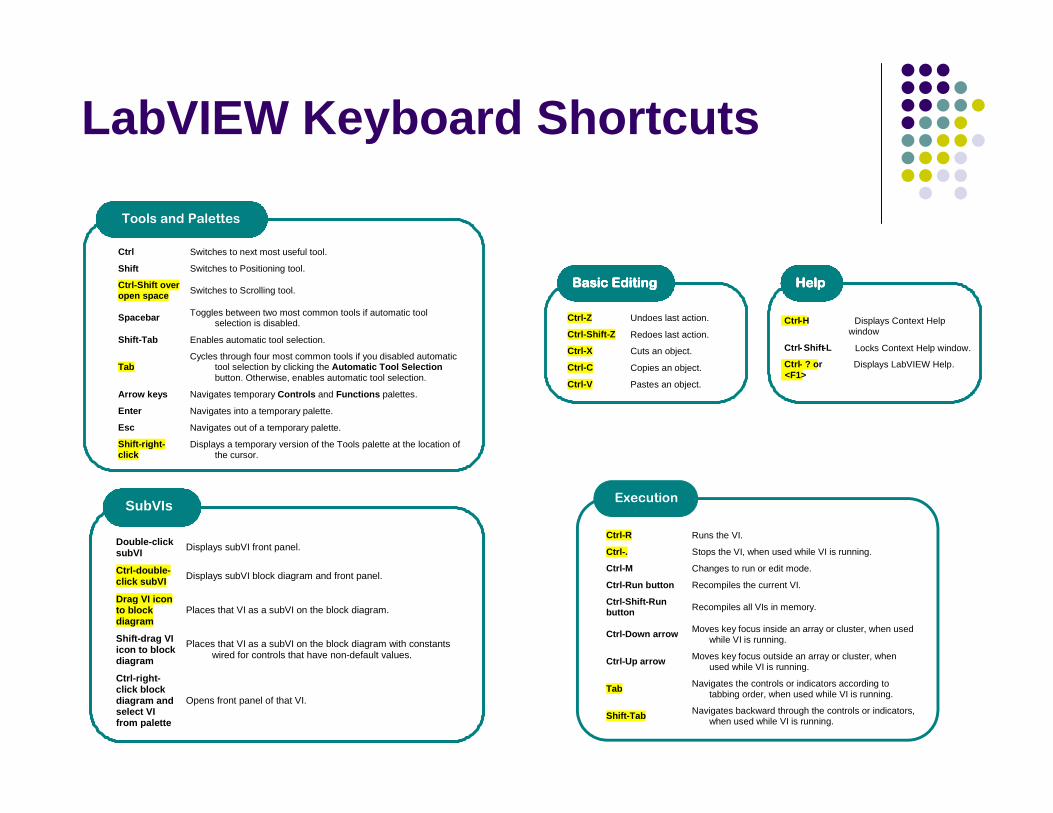
Tools and Palettes
Ctrl Switches to next most useful tool.
Shift Switches to Positioning tool.
Ctrl-Shift over open space Switches to Scrolling tool.
Spacebar Toggles between two most common tools if automatic tool selection is disabled.
Shift-Tab Enables automatic tool selection.
Tab Cycles through four most common tools if you disabled automatic
tool selection by clicking the Automatic Tool Selection button. Otherwise, enables automatic tool selection.
Arrow keys Navigates temporary Controls and Functions palettes.
Enter Navigates into a temporary palette.
Esc Navigates out of a temporary palette.
Shift-right-click
Displays a temporary version of the Tools palette at the location of the cursor.
Double-click subVI Displays subVI front panel.
Ctrl-double-click subVI Displays subVI block diagram and front panel.
Drag VI icon to block diagram
Places that VI as a subVI on the block diagram.
Shift-drag VI icon to block diagram
Places that VI as a subVI on the block diagram with constants wired for controls that have non-default values.
Ctrl-right-click block diagram and select VI from palette
Opens front panel of that VI.
SubVIs
Basic EditingBasic EditingBasic EditingBasic Editing
Ctrl-Z Undoes last action.
Ctrl-Shift-Z Redoes last action.
Ctrl-X Cuts an object.
Ctrl-C Copies an object.
Ctrl-V Pastes an object.
HelpHelpHelpHelp
Ctrl-H Displays Context Help window
Ctrl- Shift-L Locks Context Help window.
Ctrl- ? or <F1>
Displays LabVIEW Help.
Execution
Ctrl-R Runs the VI.
Ctrl-. Stops the VI, when used while VI is running.
Ctrl-M Changes to run or edit mode.
Ctrl-Run button Recompiles the current VI.
Ctrl-Shift-Run button Recompiles all VIs in memory.
Ctrl-Down arrow Moves key focus inside an array or cluster, when used while VI is running.
Ctrl-Up arrow Moves key focus outside an array or cluster, when used while VI is running.
Tab Navigates the controls or indicators according to tabbing order, when used while VI is running.
Shift-Tab Navigates backward through the controls or indicators, when used while VI is running.

LabVIEW Keyboard Shortcuts
Wiring
Ctrl-B Deletes all broken wires in a VI.
Esc, right-click, or click terminal
Cancels a wire you started.
Single-click wire Selects one segment.
Double-click wire Selects a branch.
Triple-click wire Selects entire wire.
A While wiring, disables automatic wire routing temporarily.
Double-click (while wiring)
Tacks down wire without connecting it.
Spacebar Toggles automatic wiring while moving objects.
Shift-click Undoes last point where you set a wire.
Ctrl-click input on function with two inputs
Switches the two input wires [‘Switcheroo’ Function].
Spacebar Switches the direction of a wire between horizontal and vertical.
Text
Double-click Selects a single word in a string.
Triple-click Selects an entire string.
Ctrl-Right arrow
Moves forward in string by one word when using text that has characters that use single bytes, such as Western character sets. Moves forward in string by one character when using text that has characters that use multiple bytes, such as Asian character sets.
Ctrl-Left arrow
Moves backward in string by one word when using text that has characters that use single bytes, such as Western character sets. Moves backward in string by one character when using text that has characters that use multiple bytes, such as Asian character sets.
Home Moves to beginning of current line in string.
End Moves to end of current line in string.
Ctrl-Home Moves to beginning of entire string.
Ctrl-End Moves to end of entire string.
Shift-Enter
Adds new items when entering items in enumerated type controls and constants, ring controls and constants, or Case structures. In string constants, press the <Shift-Enter> keys on the keyboard to disable autosizing if it is enabled. If autosizing is disabled, press the <Shift-Enter> keys on the keyboard to display a scroll bar in the constant.
Esc Cancels current edit in a string.
Ctrl-Enter Ends text entry.
FontsFontsFontsFonts
Ctrl-= Increases the current font size.
Ctrl-- Decreases the current font size.
Ctrl-0 Displays the Font dialog box.
Ctrl-1 Changes to the Application font in Font dialog box.
Ctrl-2 Changes to the System font in the Font dialog box.
Ctrl-3 Changes to the Dialog font in the Font dialog box.
Ctrl-4 Changes to the current font in the Font dialog box.
LabVIEW Resources & Bibliography
� Weekly LabVIEW Nuggetshttp://ni.com/forums
and search for “nuggets”
� LAVA: Favorite Tips and Shortcutshttp://forums.lavag.org
� LabVIEW Style Guidehttp://zone.ni.com/devzone/cda/tut/p/id/4434
LabVIEW Resources & Bibliography
� Christina's Eyes on VIs Blog
http://eyesonvis.blogspot.com/
� BetterVIEW - Interface Designer's Workshop
http://www.bettervi.com/Pages/designer.html
� G'ossip in G'enerality Blog
http://forums.lavag.org/blog/pjm_labview/index.php
� LabVIEW Wiki
http://wiki.lavag.org
LabVIEW Resources & Bibliography
Title: The LabVIEW Style BookAuthor: Peter A. BlumePublisher: Prentice Hall PTR; 1st ed. (2007)ISBN: 0131458353
Buy the PDF eBook its in COLOR the book is NOT
Title: LabVIEW for Everyone: Graphical Programming Made Easy and Fun
Author: Jeffrey Travis, Jim KringPublisher: Prentice Hall PTR; 3rd ed. (2006)
ISBN: 0131856723
Viewgraphs & Examples
� IEEE Long Island Section website, Instrumentation & Measurement Society page
www.ieee.li
� ALE System Integration website User Group page
www.aleconsultants.com
The Viewgraphs and Examples of the presentation
will be available in a few days at: