tivoli identity manager -...
TRANSCRIPT

Tivoli® Identity Manager
Directory Integrator-Based Siebel Adapter Installation and Configuration
Guide
Version 4.6
SC32-1573-00
���


Tivoli® Identity Manager
Directory Integrator-Based Siebel Adapter Installation and Configuration
Guide
Version 4.6
SC32-1573-00
���

Note:
Before using this information and the product it supports, read the information in Appendix C, “Notices,” on page 41.
First Edition (August 2006)
This edition applies to version 4, release 6, modification 0 of this adapter and to all subsequent releases and
modifications until otherwise indicated in new editions.
© Copyright International Business Machines Corporation 2006. All rights reserved.
US Government Users Restricted Rights – Use, duplication or disclosure restricted by GSA ADP Schedule Contract
with IBM Corp.

Contents
Preface . . . . . . . . . . . . . . . v
Who should read this book . . . . . . . . . v
Publications and related information . . . . . . v
Tivoli Identity Manager library . . . . . . . v
Prerequisite product publications . . . . . . vii
Related publications . . . . . . . . . . viii
Accessing publications online . . . . . . . viii
Accessibility . . . . . . . . . . . . . . viii
Support information . . . . . . . . . . . viii
Conventions used in this book . . . . . . . . ix
Typeface conventions . . . . . . . . . . ix
Operating system differences . . . . . . . . ix
Definitions for HOME and other directory
variables . . . . . . . . . . . . . . ix
Chapter 1. Overview of the Siebel
adapter . . . . . . . . . . . . . . . 1
Features of the Siebel adapter . . . . . . . . . 1
Architecture of the adapter . . . . . . . . . 1
Supported configurations . . . . . . . . . . 2
Chapter 2. Installing the Siebel adapter 3
Prerequisites . . . . . . . . . . . . . . 3
Installing the Siebel adapter . . . . . . . . . 3
Installing the adapter . . . . . . . . . . 3
Installing on other operating systems . . . . . 4
Importing the adapter profile into the IBM Tivoli
Identity Manager server . . . . . . . . . . 4
Creating a service . . . . . . . . . . . . . 5
Creating an adapter user account . . . . . . . 6
Starting and stopping the adapter service . . . . . 7
Chapter 3. Configuring the Siebel
adapter . . . . . . . . . . . . . . . 9
Configuring the Siebel Employee Business Service . . 9
Creating required WSDL and JAR files . . . . . 9
Creating the WSDL file . . . . . . . . . . 9
Creating the SiebelAccount.jar file . . . . . . 11
Additional JAR files . . . . . . . . . . 12
Using Siebel with DB2 authentication . . . . . . 12
Configuring the adapter to support Web services
using SSL . . . . . . . . . . . . . . . 13
Customizing the Siebel Adapter profile . . . . . 13
Configuration properties of the adapter . . . . . 13
Changing the port number for the RMI Dispatcher 14
Configuring logging for the adapter . . . . . . 15
Naming the log file . . . . . . . . . . . 15
Sizing the log file . . . . . . . . . . . 15
Configuring logging levels . . . . . . . . 15
Displaying logs in the user interface . . . . . 16
Appending information to an existing log file . . 16
Managing passwords when restoring accounts . . . 16
Chapter 4. Configuring SSL
authentication between Tivoli Identity
Manager server and IBM Tivoli
Directory Integrator . . . . . . . . . 17
Overview of SSL and digital certificates . . . . . 17
Private keys, public keys, and digital certificates 18
Self-signed certificates . . . . . . . . . . 18
The use of SSL authentication . . . . . . . . 19
Configuring certificates for SSL authentication . . . 20
Configuring certificates for one-way SSL
authentication . . . . . . . . . . . . 20
Configuring certificates for two-way SSL
authentication . . . . . . . . . . . . 22
Chapter 5. Verifying the Siebel adapter
profile installation . . . . . . . . . . 25
Chapter 6. Troubleshooting the Siebel
adapter . . . . . . . . . . . . . . 27
Warning and error messages . . . . . . . . . 27
Logging information format . . . . . . . . . 29
Chapter 7. Uninstalling the Siebel
adapter . . . . . . . . . . . . . . 31
Appendix A. Adapter attributes . . . . 33
Attribute descriptions . . . . . . . . . . . 33
Attributes by Siebel adapter actions . . . . . . 34
System Login Add . . . . . . . . . . . 34
System Login Change . . . . . . . . . . 34
System Login Delete . . . . . . . . . . 34
System Login Suspend . . . . . . . . . 34
System Login Restore . . . . . . . . . . 34
System Change Password . . . . . . . . 35
Test . . . . . . . . . . . . . . . . 35
Reconciliation . . . . . . . . . . . . 35
Appendix B. Support information . . . 37
Searching knowledge bases . . . . . . . . . 37
Search the information center on your local
system or network . . . . . . . . . . . 37
Search the Internet . . . . . . . . . . . 37
Contacting IBM Software Support . . . . . . . 37
Determine the business impact of your problem 38
Describe your problem and gather background
information . . . . . . . . . . . . . 39
Submit your problem to IBM Software Support 39
Appendix C. Notices . . . . . . . . . 41
Trademarks . . . . . . . . . . . . . . 42
Index . . . . . . . . . . . . . . . 45
© Copyright IBM Corp. 2006 iii

iv IBM Tivoli Identity Manager: Directory Integrator-Based Siebel Adapter Installation and Configuration Guide

Preface
This installation guide provides the basic information that you need to install and
configure the IBM® Tivoli® Identity Manager Siebel Adapter (Siebel adapter). The
Siebel adapter enables connectivity between the IBM Tivoli Identity Manager
server and a Siebel Server. The IBM Tivoli Identity Manager server is the server for
your Tivoli Identity Manager product.
Who should read this book
This book is intended for operating system security administrators responsible for
installing software on their site’s computer systems. Readers are expected to
understand operating system concepts. The person completing the Siebel adapter
installation procedure must also be familiar with their site’s system standards.
Readers should be able to perform routine security administration tasks.
Publications and related information
Read the descriptions of the IBM Tivoli Identity Manager library. To determine
which additional publications you might find helpful, read the “Prerequisite
product publications” on page vii and the “Related publications” on page viii.
After you determine the publications you need, refer to the instructions in
“Accessing publications online” on page viii.
Tivoli Identity Manager library
The publications in the technical documentation library for your product are
organized into the following categories:
v Release information
v Online user assistance
v Server installation and configuration
v Problem determination
v Technical supplements
v Adapter installation and configuration
Release Information:
v Release Notes
Provides software and hardware requirements for the product, and additional
fix, patch, and other support information.
v Read This First card
Lists the publications for the product.
Online user assistance:
Provides online help topics and an information center for administrative tasks.
Server installation and configuration:
Provides installation and configuration information for the product server.
Problem determination:
© Copyright IBM Corp. 2006 v

Provides problem determination, logging, and message information for the
product.
Technical supplements:
The following technical supplements are provided by developers or by other
groups who are interested in this product:
v Performance and tuning information
Provides information needed to tune your production environment, available on
the Web at:
http://publib.boulder.ibm.com/tividd/td/tdprodlist.html
Click the I character in the A-Z product list to locate IBM Tivoli Identity
Manager products. Click the link for your product, and then browse the
information center for the Technical Supplements section.
v Redbooks™ and white papers are available on the Web at:
http://www.ibm.com/software/sysmgmt/products/support/IBMTivoliIdentityManager.html
Browse to the Self Help section, in the Learn category, and click the Redbooks
link.
v Technotes are available on the Web at:
http://www.redbooks.ibm.com/redbooks.nsf/tips/
v Field guides are available on the Web at:
http://www.ibm.com/software/sysmgmt/products/support/Field_Guides.html
v For an extended list of other Tivoli Identity Manager resources, search the
following IBM developerWorks® Web address:
http://www.ibm.com/developerworks/
Adapter installation and configuration:
The technical documentation library also includes a set of platform-specific
installation documents for the adapter components of the product. Adapter
information is available on the Web at:
http://www.lotus.com/services/passport.nsf/WebDocs/Passport_Advantage_Home
Click Support & downloads. Browse to the Downloads and drivers. Click the link
for the adapter.
Skills and training:
The following additional skills and technical training information were available at
the time that this manual was published:
v Virtual Skills Center for Tivoli Software on the Web at:
http://www.cgselearning.com/tivoliskills/
v Tivoli Education Software Training Roadmaps on the Web at:
http://www.ibm.com/software/tivoli/education/eduroad_prod.html
v Tivoli Technical Exchange on the Web at:
http://www.ibm.com/software/sysmgmt/products/support/supp_tech_exch.html
vi IBM Tivoli Identity Manager: Directory Integrator-Based Siebel Adapter Installation and Configuration Guide

Prerequisite product publications
To use the information in this book effectively, you must have knowledge of the
products that are prerequisites for your product. Publications are available from
the following locations:
v Operating systems
– IBM AIX
http://publib16.boulder.ibm.com/pseries/Ja_JP/infocenter/base/index.htm
– Solaris
http://docs.sun.com/app/docs/prod/solaris
– Red Hat Linux
http://www.redhat.com/docs/
– Microsoft® Windows® Server 2003
http://www.microsoft.com/windowsserver2003/proddoc/default.mspxv Database servers
– IBM DB2 Universal Database
- Support: http://www.ibm.com/software/data/db2/udb/support.html
- Information center: http://publib.boulder.ibm.com/infocenter/db2help/index.jsp
- Documentation: http://www.ibm.com/cgi-bin/db2www/data/db2/udb/winos2unix/support/v8pubs.d2w/en_main
- DB2® product family: http://www.ibm.com/software/data/db2
- Fix packs: http://www.ibm.com/software/data/db2/udb/support/downloadv8.html
- System requirements: http://www.ibm.com/software/data/db2/udb/sysreqs.html
– Oracle
http://www.oracle.com/technology/documentation/index.html
http://otn.oracle.com/tech/index.html
http://otn.oracle.com/tech/linux/index.html
– Microsoft SQL Server
http://www.msdn.com/library/
http://www.microsoft.com/sql/v Directory server applications
– IBM Directory Server http://publib.boulder.ibm.com/tividd/td/IBMDS/IDSapinst52/en_US/HTML/ldapinst.htm http://www.ibm.com/software/network/directory
– Sun ONE Directory Server
http://docs.sun.com/app/docs/coll/S1_DirectoryServer_52v WebSphere Application Server
Additional information is available in the product directory or Web sites. http://publib.boulder.ibm.com/infocenter/ws51help/index.jsp http://www.redbooks.ibm.com/
v WebSphere embedded messaging
http://www.ibm.com/software/integration/wmq/
v IBM HTTP Server
Preface vii

http://www.ibm.com/software/webservers/httpservers/library.html
Related publications
Information that is related to your product is available in the following
publications:
v The Tivoli Software Library provides a variety of Tivoli publications such as
white papers, datasheets, demonstrations, Redbooks, and announcement letters.
The Tivoli Software Library is available on the Web at:
http://www.ibm.com/software/tivoli/literature/
v The Tivoli Software Glossary includes definitions for many of the technical terms
related to Tivoli software. The Tivoli Software Glossary is available from the
Glossary link of the Tivoli Software Library Web page at:
http://publib.boulder.ibm.com/tividd/glossary/tivoliglossarymst.htm
Accessing publications online
IBM posts publications for this and all other Tivoli products, as they become
available and whenever they are updated, to the Tivoli software information center
Web site. Access the Tivoli software information center at the following Web
address:
http://publib.boulder.ibm.com/tividd/td/tdprodlist.html
Click the I character in the A-Z list, and then click the link for your product to
access the product library.
Note: If you print PDF documents on other than letter-sized paper, set the option
in the File → Print window that allows Adobe Reader to print letter-sized
pages on your paper.
Accessibility
The product documentation includes the following features to aid accessibility:
v Documentation is available in convertible PDF format to give the maximum
opportunity for users to apply screen-reader software.
v All images in the documentation are provided with alternative text so that users
with vision impairments can understand the contents of the images.
Support information
If you have a problem with your IBM software, you want to resolve it quickly. IBM
provides the following ways for you to obtain the support you need:
v Searching knowledge bases: You can search across a large collection of known
problems and workarounds, Technotes, and other information.
v Contacting IBM Software Support: If you still cannot solve your problem, and
you need to work with someone from IBM, you can use a variety of ways to
contact IBM Software Support.
For more information about these ways to resolve problems, see Appendix B,
“Support information,” on page 37.
viii IBM Tivoli Identity Manager: Directory Integrator-Based Siebel Adapter Installation and Configuration Guide

Conventions used in this book
This reference uses several conventions for special terms and actions and for
operating system-dependent commands and paths.
Typeface conventions
This guide uses the following typeface conventions:
Bold
v Lowercase commands and mixed case commands that are otherwise
difficult to distinguish from surrounding text
v Interface controls (check boxes, push buttons, radio buttons, spin
buttons, fields, folders, icons, list boxes, items inside list boxes,
multicolumn lists, containers, menu choices, menu names, tabs, property
sheets), labels (such as Tip:, and Operating system considerations:)
v Keywords and parameters in text
Italic
v Words defined in text
v Emphasis of words (words as words)
v New terms in text (except in a definition list)
v Variables and values you must provide
Monospace
v Examples and code examples
v File names, programming keywords, and other elements that are difficult
to distinguish from surrounding text
v Message text and prompts addressed to the user
v Text that the user must type
v Values for arguments or command options
Operating system differences
This guide uses theWindows convention for specifying environment variables and
for directory notation.
When using the UNIX® command line, replace %variable% with $variable for
environment variables and replace each backslash (\) with a forward slash (/) in
directory paths. The names of environment variables are not always the same in
Windows and UNIX. For example, %TEMP% in the Windows operating system is
equivalent to $tmp in a UNIX operating system.
Note: If you are using the bash shell on a Windows system, you can use the UNIX
conventions.
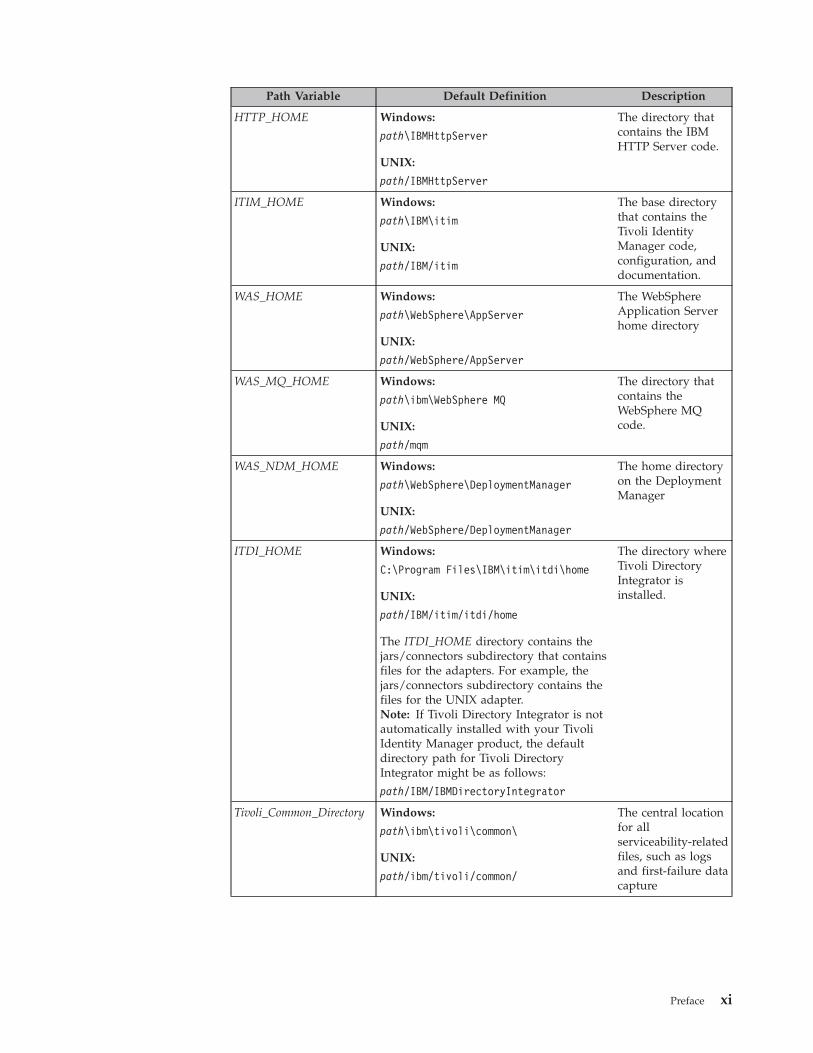
Definitions for HOME and other directory variables
The following table contains the default definitions that are used in this guide to
represent the HOME directory level for various product installation paths. You can
customize the installation directory and HOME directory for your specific
implementation. If this is the case, you need to make the appropriate substitution
for the definition of each variable represented in this table.
The value of path varies for these operating systems:
v Windows: drive:\Program Files
Preface ix

v AIX: /usr
v Other UNIX: /opt
Path Variable Default Definition Description
DB_INSTANCE_HOME Windows:
path\IBM\SQLLIB
UNIX:
v AIX®, Linux®: /home/dbinstancename
v Solaris: /export/home/dbinstancename
The directory that
contains the
database for your
Tivoli Identity
Manager product.
LDAP_HOME v For IBM Directory Server Version 5.2
Windows:
path\IBM\LDAP
UNIX:
path/IBM/LDAP
– AIX, Linux: path/ldap
– Solaris: path/IBMldaps
v For IBM Directory Server Version 6.0
Windows:
path\IBM\LDAP
UNIX:
/opt/IBM/ldap/
– AIX, Solaris: /opt/IBM/ldap/
– Linux: /opt/ibm/ldap/
v For Sun ONE Directory Server
Windows:
path\Sun\MPS
UNIX:
/var/Sun/mps
The directory that
contains the
directory server
code.
IDS_instance_HOME For IBM Directory Server Version 6.0
Windows:
drive\
idsslapd-instance_owner_name
The value of drive might be C:\. An
example of instance_owner_name might be
ldapdb2. For example, the log file might
be C:\idsslapd-ldapdb2\logs\ibmslapd.log.
UNIX:
INSTANCE_HOME/idsslapd-instance_name
On Linux and AIX systems, the default
home directory is the
/home/instance_name/idsslapd-instance_name directory. On Solaris
systems, for example, the directory is the
/export/home/ldapdb2/idsslapd-ldapdb2. directory.
The directory that
contains the IBM
Directory Server
Version 6.0 instance.
x IBM Tivoli Identity Manager: Directory Integrator-Based Siebel Adapter Installation and Configuration Guide
Path Variable Default Definition Description
HTTP_HOME Windows:
path\IBMHttpServer
UNIX:
path/IBMHttpServer
The directory that
contains the IBM
HTTP Server code.
ITIM_HOME Windows:
path\IBM\itim
UNIX:
path/IBM/itim
The base directory
that contains the
Tivoli Identity
Manager code,
configuration, and
documentation.
WAS_HOME Windows:
path\WebSphere\AppServer
UNIX:
path/WebSphere/AppServer
The WebSphere
Application Server
home directory
WAS_MQ_HOME Windows:
path\ibm\WebSphere MQ
UNIX:
path/mqm
The directory that
contains the
WebSphere MQ
code.
WAS_NDM_HOME Windows:
path\WebSphere\DeploymentManager
UNIX:
path/WebSphere/DeploymentManager
The home directory
on the Deployment
Manager
ITDI_HOME Windows:
C:\Program Files\IBM\itim\itdi\home
UNIX:
path/IBM/itim/itdi/home
The ITDI_HOME directory contains the
jars/connectors subdirectory that contains
files for the adapters. For example, the
jars/connectors subdirectory contains the
files for the UNIX adapter.
Note: If Tivoli Directory Integrator is not
automatically installed with your Tivoli
Identity Manager product, the default
directory path for Tivoli Directory
Integrator might be as follows:
path/IBM/IBMDirectoryIntegrator
The directory where
Tivoli Directory
Integrator is
installed.
Tivoli_Common_Directory Windows:
path\ibm\tivoli\common\
UNIX:
path/ibm/tivoli/common/
The central location
for all
serviceability-related
files, such as logs
and first-failure data
capture
Preface xi

xii IBM Tivoli Identity Manager: Directory Integrator-Based Siebel Adapter Installation and Configuration Guide

Chapter 1. Overview of the Siebel adapter
An adapter is a program that provides an interface between a managed resource
and theTivoli Identity Manager server. Adapters can reside on the managed
resource or elsewhere. The Tivoli Identity Manager server manages access to the
resource by using your security system. Adapters function as trusted virtual
administrators on the target platform, performing such tasks as creating login IDs,
suspending IDs, and other functions that administrators perform manually. The
adapter runs as a service, independent of whether a user is logged on to the Tivoli
Identity Manager server.
The Siebel adapter enables communication between the Tivoli Identity Manager
server and the Siebel server.
The adapter runs on a machine on which Tivoli Directory Integrator has been
installed. The adapter also needs the ITIM-RMI Dispatcher installed on the same
machine as the Tivoli Directory Integrator instance. IBM Tivoli Identity Manager
communicates with the dispatcher using Remote Method Invocation (RMI) calls.
The dispatcher uses the installed Tivoli Directory Integrator to run the adapter.
The current version of the adapter supports management of only Siebel Employee
Users. Contact Users are not supported in this release.
Features of the Siebel adapter
You can use the Siebel adapter to automate the following administrative tasks:
v Adding new employee users on the resource
v Modifying existing employee users attributes
v Changing the employee user account password
v Suspending, restoring, and deleting existing employee users
v Reconciling employee user and other support data
See Chapter 3, “Configuring the Siebel adapter,” on page 9 for more information
on the supported functionality and configuration of the Siebel adapter.
Architecture of the adapter
IBM Tivoli Identity Manager communicates with the Siebel adapter to administer
employee users on the Siebel resource.
The adapter uses Siebel Web services to perform user management. It uses Java™
Data Beans to retrieve support data and uses JDBC connections to the underlying
database to manage passwords and account status.
The adapter consists of a set of AssemblyLines. When the first request from the
Tivoli Identity Manager server is initiated to the adapter, the corresponding
AssemblyLine is loaded into the Tivoli Directory Integrator server.
The AssemblyLines utilize the Tivoli Directory Integrator Siebel User Connector to
perform user management related tasks on the Siebel server.
© Copyright IBM Corp. 2006 1

Figure 1 shows the various components that work together to complete user
management tasks in a IBM Tivoli Directory Integrator environment.
Supported configurations
The Siebel adapter supports different configurations. The fundamental components
in each environment are a Tivoli Identity Manager server, a Tivoli Directory
Integrator server, a Siebel Server and the Siebel adapter. In each configuration, the
Siebel adapter must reside directly on the server running the Tivoli Directory
Integrator server.
For a single server configuration, you must install the IBM Tivoli Identity Manager
server, the IBM Tivoli Directory Integrator Server, and the Siebel adapter on one
server. The server communicates with a Siebel Server, which is installed on a
different server. Refer to Figure 2.
Figure 1. The architecture of the Siebel adapter
TivoliIdentity Manager Server
TivoliDirectory Integrator Server
Adapter
Managedresource
Figure 2. Example of a single server configuration
2 IBM Tivoli Identity Manager: Directory Integrator-Based Siebel Adapter Installation and Configuration Guide

Chapter 2. Installing the Siebel adapter
Some adapters might be installed automatically with your IBM Tivoli Identity
Manager product. If your adapter is automatically installed with the product, you
do not need to install the adapter. The following sections provide information for
installing and configuring the adapter.
Before installing the Siebel adapter ensure that the following prerequisites are
installed.
Prerequisites
This table lists the software requirements that are required by the Siebel adapter.
Table 1. Software prerequisites for the Siebel adapter
Software Version
IBM Tivoli Directory Integrator 6.0 Fix Pack 3.0 or higher fix pack levels
IBM Tivoli Identity Manager Enterprise
server or IBM Tivoli Identity Manager
Express server
4.6
Siebel server 7.7.X or 7.8.X
You can install Siebel Adapters on all platforms that are supported by IBM Tivoli
Directory Integrator 6.0. The Siebel adapter must be installed on the same system
as the Tivoli Directory Integrator server. For information on the prerequisites and
supported operating systems for IBM Tivoli Directory Integrator, see the IBM Tivoli
Directory Integrator 6.0: Administrator Guide.
Installing the Siebel adapter
If the Siebel adapter is not automatically installed with your IBM Tivoli Identity
Manager product, use the adapter installer to manually install the adapter.
The Siebel Adapter has several different types of installer binaries. Select the one
appropriate for your operating system:
v For AIX operating systems - SiebelAdapterInstall_aix.bin
v For HPUX operating systems - SiebelAdapterInstall_hpux11i.bin
v For Linux operating systems - SiebelAdapterInstall_linux.bin
v For Solaris operating systems - SiebelAdapterInstall_solaris_sparc.bin
v For Windows operating systems - SiebelAdapterInstall_win.exe
v For other operating systems - SiebelAdapterInstall.jar
Installing the adapter
To manually install the adapter, first ensure that the installer is run on the same
system as the Tivoli Directory Integrator server. Then complete these steps.
Note: All directory paths apply to Windows operating systems. Change the
directory paths as needed for UNIX operating systems.
© Copyright IBM Corp. 2006 3

1. Download the Siebel adapter compressed file from the IBM Web site. Contact
your IBM account representative for the Web address and download
instructions.
2. Extract the contents of the compressed file into a temporary directory and
navigate to that directory.
3. Start the installation program using the SiebelAdapterInstall file in the
temporary directory. For example, select Run... from the Start menu and type
C:\Temp\SiebelAdapterInstall_win.exe in the Open field.
4. On the Welcome window, click Next.
5. On the License Agreement window, review the license agreement and decide if
you accept the terms of the license. If you do, click Accept, and then click Next.
6. On the Tivoli Directory Integrator Based Siebel Adapter window, specify the
location where IBM Tivoli Directory Integrator is installed. You can accept the
default location or click Browse to specify a different directory. Then, click
Next.
7. On the Installation Summary window, review the installation settings. Click
Back to change any of these settings. Otherwise, click Next.
8. On the confirmation window that displays the components to be installed and
the upgrades to be completed, click Next to begin the installation. Otherwise,
click Back to make changes.
9. On the Installation Completed window, click Finish to exit the program. The
installer log is generated in the current working directory.
Installing on other operating systems
The Siebel adapter provides an additional installation program that is a Java-based
installer. If you are running the IBM Tivoli Directory Integrator on operating
systems that do not provide installer binaries, use the Java-based installation to
install the Siebel adapter.
Note: The SiebelAdapterInstall.jar is a Java-based installer. Ensure that Java is
installed and correctly configured for your system.
Run this installation program on the server in which Tivoli Directory Integrator is
installed. Launch the installation with the following command:
Java -jar SiebelAdapterInstall.jar
Importing the adapter profile into the IBM Tivoli Identity Manager
server
An adapter profile defines the types of resources that the Tivoli Identity Manager
server can manage. The profile is used to create a service on the Tivoli Identity
Manager server. You must import the Siebel Adapter profile, SiebelProfile.jar, into
the Tivoli Identity Manager server before using the Siebel adapter.
Before you import the adapter profile, verify that the following conditions are met:
v The Tivoli Identity Manager server is installed and running.
v You have root or Administrator authority on the Tivoli Identity Manager server.
The adapter profile is included in the JAR file for the adapter. To import the
adapter profile, complete these steps:
1. Log in to the Tivoli Identity Manager server using an account that has the
authority to perform administrative tasks.
4 IBM Tivoli Identity Manager: Directory Integrator-Based Siebel Adapter Installation and Configuration Guide

2. Import the adapter profile using the import feature for your IBM Tivoli Identity
Manager product. Refer to the information center or the online help for specific
instructions about importing the adapter profile.
When you import the adapter profile, if you receive an error related to the schema,
refer to the trace.log file for information about the error. The trace.log file location
is specified using the handler.file.fileDir property defined in the IBM Tivoli
Identity Manager enRoleLogging.properties file. The enRoleLogging.properties file
is installed in the IBM Tivoli Identity Manager \data directory.
Creating a service
You must create a service for the Siebel adapter before the Tivoli Identity Manager
Server can use the adapter to communicate with the managed resource. You must
use the service profile for your operating system to create a service for that
operating system. The Siebel adapter profile name is Siebel Profile.
When adding a service, you must complete the Add New Service form. This form
is accessed through the Tivoli Identity Manager server GUI. To add a service:
1. Log in to the Tivoli Identity Manager server using an account that has the
authority to perform administrative tasks.
2. Create the service using the information for your Tivoli Identity Manager
product. See the information center or the online help for specific instructions
about creating a service.
3. On the Select Type of Service window, select the service type (Siebel Profile)
from the Service Type drop-down menu.
To create or change a service, you must use the service form to provide
information for the service. Service forms might vary depending on the adapter.
The Siebel adapter service form contains the following fields:
ITIM Siebel service
Service name
Specify a name that defines this service on the Tivoli Identity
Manager Server.
Description
Optional: Specify a description for this service.
Tivoli Directory Integrator location
Optional: Specify the URL for the IBM Tivoli Directory Integrator
instance. Valid syntax is rmi://ip-address:port/ITDIDispatcher,
where ip-address is the Tivoli Directory Integrator host and port is
the port number for the RMI Dispatcher. The default URL is
rmi://localhost:16231/ITDIDispatcher. See “Changing the port
number for the RMI Dispatcher” on page 14 for information about
changing the port number.
Owner
Optional: Specify a IBM Tivoli Identity Manager user as a service
owner.
Service prerequisite
Optional: Specify a IBM Tivoli Identity Manager service that is a
prerequisite to this service.
Siebel Web connection
Chapter 2. Installing the Siebel adapter 5

WSDL file path
Specify the absolute path for the WSDL file on the Tivoli Directory
Integrator.
Connect string
Specify the Web address that contains the information needed to
connect to any Siebel server component. It can be found in Siebel
installation home\ SWEApp\BIN\eapps.cfg, under the heading
[eai_lang].
Administrator name
Specify the Siebel administrator ID.
Password
Specify the password of the Siebel administrator.
Language
Specify the language that the Siebel server uses as the default
language.
Siebel database connection
Database type
Specify the type of database that the Siebel adapter uses. For
example, MS-SQL, Oracle, or DB2.
JDBC URL For Database
Specify the Web address of the JDBC.
JDBC driver
Specify the driver to use to connect to the database.
Database name
If you are using an MS_SQL database, specify the name of the
database.
Database user name
Specify the database user ID.
Database user password
Specify the password for the database user.
After the service is created, the provisioning policy has to be created to enable user
management related operations on the resource.
Table 2. Service form attributes used in IBM Tivoli Identity Manager operations
Siebel service form attributes IBM Tivoli Identity Manager operations
WSDL file path Login, add, delete, modify, test
Connect string Recon support data, test
Administrator name, password, langauge Recon support data, recon users, login, add,
delete, modify, test
Siebel database connection attributes Change password, suspend, restore, test
Creating an adapter user account
You must create a user account for the Siebel adapter on the managed resource.
Account information is provided when you create a service. In addition, the
adapter requires an account on the underline Siebel RDBMS.
6 IBM Tivoli Identity Manager: Directory Integrator-Based Siebel Adapter Installation and Configuration Guide

The accounts must be able to remotely connect to the Siebel Server and the
associated RDBMS and have sufficient privileges to administer Siebel users.
The account information must be supplied on the Siebel adapter service form. See
“Creating a service” on page 5 for information about creating a service.
Starting and stopping the adapter service
After the installation of the Siebel adapter, the adapter service is started
automatically. If you later edit the properties file for the adapter, you must stop
and restart the adapter service in order for the changes to take effect. The method
used to stop and restart the adapter depends on the operating system:
AIX The adapter installer creates a subsystem called ITIMAd when the adapter
is first installed. ITIM_RMI.xml is the configuration file. Use these
commands to start and stop the adapter service.
startsrc —s ITIMAd
stopsrc —c —s ITIMAd
The adapter service runs the ibmdisrv.bat command. The bat file starts a
Java process that does not stop when the adapter service is stopped. To
stop this process, obtain the process ID (PID) and then end the process.
v To obtain the PID of the process, type this command: ps -ef|grep
ITDI_HOME_DIR/_jvm/jre/bin/, where ITDI_HOME_DIR is the directory
where IBM Tivoli Directory Integrator is installed.
v To end the process, type this command: kill -9 pid.
HP-UX
From the IBM Tivoli Directory Integrator Solution Directory, type these
commands to start, stop, and restart the adapter service.
ITIMAd start
ITIMAd stop
ITIMAd restart
Linux or Solaris
The adapter installer automatically copies the ITIMAd script file to the
/etc/init.d/ directory when the adapter is installed. From the /etc/init.d/
directory, type these commands to start, stop, and restart the adapter
service.
ITIMAd start
ITIMAd stop
ITIMAd restart
Windows
From the Control Panel, select Administrative Tools > Services. From the
Services menu, you can start and stop the adapter service. The service
name is IBM Tivoli Directory IntegratorAdapter.
Chapter 2. Installing the Siebel adapter 7

8 IBM Tivoli Identity Manager: Directory Integrator-Based Siebel Adapter Installation and Configuration Guide

Chapter 3. Configuring the Siebel adapter
After the adapter is installed, you need to perform the following configuration
task.
Configuring the Siebel Employee Business Service
For the Siebel Adapter to operate correctly, you must configure the Employee
Business Services as a Web service. For additional information, see the Siebel
Adapter Customization White Paper provided with the adapter's distribution.
1. From the Siebel Tools software, open the Inbound Web Service Applet:
2. From the application-level menu, select View -> Site Map -> Web Services
Administration -> Inbound Web Services.
3. Select the Siebel Employee Web service and change its status to active.
4. For the Service ports information, type the following value Address :
http[s]://Webserver:port/eai_lang/start.swe?SWEExtSource=WebService&SWEExtCmd= Execute&UserName=username&Password=password
Where:
Webserver
is the IP address of the host on which the Siebel Web server is running.
port is the port on which the web server is listening.
lang is the language to be used.
username
is the administrator of the Siebel server used by the Adapter.
password
is the password of the administrator of the Siebel server. For example:
http://ps2118:81/eai_enu/start.swe?SWEExtSource=
WebService&SWEExtCmd=Execute&UserName=SADMIN&Password=SADMIN
or for SSL:
https://ps2118:443/eai_enu/start.swe?SWEExtSource=
WebService&SWEExtCmd=Execute&UserName=SADMIN&Password=SADMIN
5. Click Menu -> Save Record.
6. Click Generate WSDL at the top of the screen and then click Save when
prompted.
Creating required WSDL and JAR files
The Siebel Adapter requires two files, a Web Services Description Language
(WSDL) file and a Java archive (JAR) file, to be able to run correctly.
Creating the WSDL file
The WSDL file describes the Web services that the connector uses to perform user
management related functions on the resource. Copy the file to a location on the
machine where IBM Tivoli Directory Integrator is running. The actual path of this
file on the IBM Tivoli Directory Integrator instance has to be specified on the
service form for the Siebel Adapter.
© Copyright IBM Corp. 2006 9

From the Siebel employee business service configuration view in Siebel Tools:
1. Click Generate WSDL to generate the WSDL file for the Siebel Adapter
Inbound Web Service.
2. Click Save to save the WSDL to a file.
3. Open the WSDL file in an XML editor.
4. Identify the definition of complex type “ListOfEmployeeInterface”.
-<xsd:complexType name="ListOfEmployeeInterface">
-<xsd:sequence>
<xsd:element name="Employee"
maxOccurs="unbounded" minOccurs="1"
type="xsdLocal0:Employee" />
</xsd:sequence>
</xsd:complexType>
5. Verify that the maxOccurs value is set to unbound. If this value is not set to
unbound, edit the file and change the value to unbounded. See the "Changes to
the Integration Object and Business Component" section of the Siebel Adapter
Customization White Paper for detailed steps.
Note: If the WSDL file has simple attributes like stringnn defined, these need
to be replaced by type String. Also remove all definitions of these simple
types from the WSDL file because IBM Tivoli Directory Integrator is not
able to get data corresponding to these types. See “WSDL file samples”
for information about modifying these attributes.
6. Copy the generated WSDL file to the machine where the Tivoli Directory
Integrator is installed. Copying of WSDL file on IBM Tivoli Directory Integrator
machine is required, because the Siebel Adapter needs to refer to the WSDL file
and needs a complete path of WSDL file at runtime. It can be copied to any
location on the machine where Tivoli Directory Integrator is running. The full
file path was specified on the service form when you created the service. See
“Creating a service” on page 5 for more information about the path name.
Note: Store the WSDL file in a private secure directory, as the WSDL file
contains the clear-text password.
WSDL file samples
The following is a sample of a generated WSDL file that has stringnn attributes
(highlighted in bold):
- <xsd:complexType name="Employee">
- <xsd:sequence>
<xsd:element name="Id"
maxOccurs="1" minOccurs="0" type="xsdLocal1:string30" />
<xsd:element name="Alias"
maxOccurs="1" minOccurs="0" type="xsdLocal1:string50" />
<xsd:element name="AvailabilityStatus"
maxOccurs="1" minOccurs="0" type="xsdLocal1:string30" />
<xsd:element name="AvailabilityStatusUntil"
maxOccurs="1" minOccurs="0" type="xsd:string" />
<xsd:element name="BuildingNumber"
maxOccurs="1" minOccurs="0" type="xsdLocal1:string30" />
<xsd:element name="CPRegion"
maxOccurs="1" minOccurs="0" type="xsdLocal1:string50" />
<xsd:element name="CPRegionId"
maxOccurs="1" minOccurs="0" type="xsd:string" />
<xsd:element name="CPRegionIntegrationId"
maxOccurs="1" minOccurs="0" type="xsdLocal1:string30" />
<xsd:element name="CellPhone"
maxOccurs="1" minOccurs="0" type="xsd:string" />
<xsd:element name="CostCurrencyCode"
maxOccurs="1" minOccurs="0" type="xsdLocal1:string30" />
10 IBM Tivoli Identity Manager: Directory Integrator-Based Siebel Adapter Installation and Configuration Guide

<xsd:element name="CostPerHour"
maxOccurs="1" minOccurs="0" type="xsd:string" />
<xsd:element name="CubicleNumber"
maxOccurs="1" minOccurs="0" type="xsdLocal1:string20" />
<xsd:element name="EMailAddr"
maxOccurs="1" minOccurs="0" type="xsdLocal1:string50" />
All of the stringnn values need to be replaced as follows:
- <xsd:complexType name="Employee">
- <xsd:sequence>
<xsd:element name="Id"
maxOccurs="1" minOccurs="0" type="xsd:string" />
<xsd:element name="Alias"
maxOccurs="1" minOccurs="0" type="xsd:string" />
<xsd:element name="AvailabilityStatus"
maxOccurs="1" minOccurs="0" type="xsd:string" />
<xsd:element name="AvailabilityStatusUntil"
maxOccurs="1" minOccurs="0" type="xsd:string" />
<xsd:element name="BuildingNumber"
maxOccurs="1" minOccurs="0" type="xsd:string" />
<xsd:element name="CPRegion"
maxOccurs="1" minOccurs="0" type="xsd:string" />
<xsd:element name="CPRegionId"
maxOccurs="1" minOccurs="0" type="xsd:string" />
<xsd:element name="CPRegionIntegrationId"
maxOccurs="1" minOccurs="0" type="xsd:string" />
<xsd:element name="CellPhone"
maxOccurs="1" minOccurs="0" type="xsd:string" />
<xsd:element name="CostCurrencyCode"
maxOccurs="1" minOccurs="0" type="xsd:string" />
<xsd:element name="CostPerHour"
maxOccurs="1" minOccurs="0" type="xsd:string" />
<xsd:element name="CubicleNumber"
maxOccurs="1" minOccurs="0" type="xsd:string" />
<xsd:element name="EMailAddr"
maxOccurs="1" minOccurs="0" type="xsd:string" />
The original generated WSDL file also contains definitions of stringnn classes that
need to bedeleted
- <xsd:simpleType name="string250">
- <xsd:restriction base="xsd:string">
<xsd:maxLength value="250" />
</xsd:restriction>
</xsd:simpleType>
- <xsd:simpleType name="string50">
- <xsd:restriction base="xsd:string">
<xsd:maxLength value="50" />
</xsd:restriction>
</xsd:simpleType>
....
Creating the SiebelAccount.jar file
The SiebelAccount.jar contains the definition of the proxy JAVA classes
corresponding to the WSDL. This JAR file is created using WSDL file as input. It
contains the Set() and Get() functions for all the attributes defined in the WSDL
file. The AXISEasyInvokeSOAPWS function component of the IBM Tivoli Directory
Integrator needs, as an input, an object of a class that is defined in this jar file.
The IBM Tivoli Directory Integrator Web services component provides a function
component to create Java class files from a WSDL file. The Siebel Adapter provides
Chapter 3. Configuring the Siebel adapter 11

either a WSDLtoJAR.BAT or a WSDLtoJAR.sh file (depending on your operating
system) that uses this functional component and generates the required
SiebelAccount.jar file
1. On the Tivoli Directory Integrator Server machine run the .bat or the .sh file
with the following parameter settings:
WSDLtoJAR.BAT -w WSDL_file_path -j JAVA_home -d dest_dir
-I ITDI_home
where:
WSDL_file_path
is the complete path to WSDL file, including WSDL file name.
JAVA_home
is the directory where Java is installed, for example D:\j2sdk1.4.0_03. It
is needed by IBM Tivoli Directory Integrator classes to generate the
required class files.
dest_dir
is the directory where the .jar file is created.
ITDI_home
is the directory where IBM Tivoli Directory Integrator is installed, for
example: C:\Program Files\IBM\IBMDirectoryIntegrator2. Copy the new SiebelAccount.jar file to the jars subfolder in IBM Tivoli
Directory Integrator home directory.
Additional JAR files
The Siebel adapter uses Java data beans (one more way provided by Siebel
resource for retrieving the Siebel data) to get the Support data. (For example:
Responsibility.) The Java Data bean code in Siebel adapter has a dependency on
the following Siebel Server JAR files:
v SiebelJI.jar
v SiebelJI_lang.jar where lang is the installed language pack. (For example,
SiebelJI_enu.jar for English or SiebelJI_jpn.jar for Japanese.)
These JAR files must be copied from SiebelInstall\siebsrvr\CLASSES on the Siebel
Resource to ITDI_home\jars folder on IBM Tivoli Directory Integrator machine, so
that the adapter can access them.
JAR files corresponding to the JDBC driver that is used for communicating with
the database also must be copied to the JAR file folder. For example: if you are
using the Microsoft SQL Server driver to connect to MS-SQL, then copy the
following driver JAR files to the ITDI_home\jars directory:
v Msbase.jar
v Msutil.jar
v Mssqlserver.jar
These JAR files are available as part of the Microsoft SQL Server driver for JDBC.
Using Siebel with DB2 authentication
DB2 authentication requires that the user be present on the underlying operating
system. For a user to be able to login to Siebel with DB2 authentication, the user
account must already exist in the underlying operating system. The Siebel Adapter
only manages Siebel users.
12 IBM Tivoli Identity Manager: Directory Integrator-Based Siebel Adapter Installation and Configuration Guide

Note: When using DB2 authentication, the Siebel Adapter does not support
password management.
Configuring the adapter to support Web services using SSL
The Siebel certificate has to be added to the JKS keystore used by Tivoli Directory
Integrator to support Web Services using SSL. See Chapter 4, “Configuring SSL
authentication between Tivoli Identity Manager server and IBM Tivoli Directory
Integrator,” on page 17 for information about adding new certificates in Tivoli
Directory Integrator JKS keystore.
Customizing the Siebel Adapter profile
The Siebel adapterr supports a set of ready-to-use attributes. To customize the set
of attributes supported by the Siebel adapter, see the Siebel Adapter Customization
White Paper.
Configuration properties of the adapter
The global.properties and the itim_listener.properties files contain the configuration
properties for the adapters. To configure the properties for an adapter, you must
change one of these files. Table 3 lists the properties contained in the properties
files.
Table 3. Configuration properties for the adapter
Property Properties file Description
ALShutdownTimeout itim_listener.properties Specifies the amount of time, in
milliseconds, before the RMI
Dispatcher should shutdown
when a shutdown request is sent
to the dispatcher. All assembly
lines that are being maintained are
terminated when the dispatcher
shuts down. The default value is
300,000 (milliseconds), which is
five minutes.
com.ibm.di.dispatcher.bindName global.properties Specifies the RMI bind name to be
used. The default value is
ITDIDispatcher.
com.ibm.di.dispatcher.disableConntectorCache global.properties Specifies whether or not the RMI
Dispatcher should cache the
connection to the managed
resource so that no new
connections are established upon
subsequent calls. In this case, the
same connection is used for all
calls. The default value is true.
com.ibm.di.dispatcher.registryPort global.properties Specifies the port on which the
RMI Dispatcher listens for
provisioning requests from IBM
Tivoli Identity Manager. The
default value is 16231.
Chapter 3. Configuring the Siebel adapter 13

Table 3. Configuration properties for the adapter (continued)
Property Properties file Description
ConnectorSleepTimeOut itim_listener.properties Specifies the amount of time, in
milliseconds, to wait before
deleting connectors that have not
been used. The default value is
120,000 (milliseconds), which is
two minutes.
MaximumConnectorsPerResource itim_listener.properties Specifies the maximum number of
connectors that exist for a
particular resource. The default
value is 10.
ReaperThreadTimeOut itim_listener.properties Specifies the amount of time, in
milliseconds, to wait between
successive runs of the connector
reaper thread. The default value is
300,000 (milliseconds), which is
five minutes.
SearchALUnusedTimeout itim_listener.properties Specifies the amount of time, in
milliseconds, to wait before
deleting assembly lines that have
not been used. The default value
is 600,000 (milliseconds), which is
10 minutes.
SearchReaperThreadTimeOut itim_listener.properties Specifies the amount of time, in
milliseconds, to release data from
memory. This property is used
during a reconciliation response.
The default value is 300,000
(milliseconds), which is five
minutes.
SearchResultSetSize itim_listener.properties Specifies the number of records,
per response, returned during a
reconciliation between IBM Tivoli
Identity Manager and the adapter.
The default value is 100.
Changing the port number for the RMI Dispatcher
If the Remote Method Invocation (RMI) Dispatcher is run as a service, by default,
the port number is 16231. The installer automatically sets this parameter in the
global.properties file.
If the IBM Tivoli Directory Integrator home directory is the same directory as the
IBM Solutions directory, change the port number in the global.properties file.
Otherwise, change the port number in the solutions.properties file in the IBM
Solutions directory. To change the port number for the dispatcher, complete these
steps.
1. Stop the service that is used to run the adapter. Refer to “Starting and stopping
the adapter service” on page 7 for information about stopping and starting the
Siebel adapter service.
2. Change the global.properties file or the solutions.properties file to use the
correct port number.
com.ibm.di.dispatcher.registryPort=16231
14 IBM Tivoli Identity Manager: Directory Integrator-Based Siebel Adapter Installation and Configuration Guide

3. Start the service again.
Configuring logging for the adapter
Log files might provide information that is helpful for diagnosing and
troubleshooting problems with the adapter. The type of information collected in
the log file is determined by the settings in the log4j.properties file. To configure
logging for the adapter, you must update this file. This file is located in the Tivoli
Directory Integrator Solutions directory.
When multiple adapters are running on the same server where IBM Tivoli
Directory Integrator is installed, logging information for the adapters is stored in
the same log file. The RMI Dispatcher logs are also stored in this log file. You
cannot configure logging to store information about the different components in
different log files.
After you complete the changes to the log4j.properties file, you must stop and
restart the service for the adapter to view the configuration changes.
The following sections contain information about configuring logging for the
adapter.
Naming the log file
The following entry in the log4j.properties file is used to configure the name of the
log file: log4j.appender.Default.file. To change the name of the log file, change the
value of the following entry in the log4j.properties file: log4j.appender.Default.file.
In the example below, the log file generated is ibmdi.log.
log4j.appender.Default.file=ibmdi.log
Sizing the log file
The following entry in the log4j.properties file is used to configure the maximum
size of the log file: log4j.appender.Default.MaxFileSize. For example,
log4j.appender.Default.MaxFileSize=8MB
The number of log files generated is determined by the
log4j.appender.Default.MaxBackupIndex entry. In the example below, the number
of log files generated is 10.
log4j.appender.Default.MaxBackupIndex=10
Configuring logging levels
The logging level is determined by the log4j.rootCategory attribute in the log file.
The four levels for logging information are ERROR, WARN, INFO, and DEBUG.
By default the logging level is set to INFO.
ERROR
The ERROR level logs only error conditions. The ERROR level provides the
smallest amount of logging information.
INFO The INFO level logs information about workflow. It generally explains how
an operation occurs.
WARN
The WARNING level logs information when an operation completes
successfully but there are issues with the operation. See Chapter 6,
“Troubleshooting the Siebel adapter,” on page 27 for more information.
Chapter 3. Configuring the Siebel adapter 15

DEBUG
The DEBUG level logs all of the details related to a specific operation. This
is the highest level of logging. If logging is set to DEBUG, all other levels
of logging information are displayed in the log file.
Displaying logs in the user interface
If the RMI Dispatcher was started from the command prompt by calling
ibmdisrv.bat (Windows only), the logs can be displayed in the user interface. To
display the logs in the user interface, change the value of the following entry in
the log4j.properties file: log4j.appender.Default. For example,
log4j.appender.Default=org.apache.log4j.ConsoleAppender
Appending information to an existing log file
By default, log file information is deleted and created again each time the RMI
Dispatcher starts. To append information to an existing log file before or after the
dispatcher starts, change the value of the following entry from false to true in the
log4j.properties file: log4jappender.Default.append. For example,
log4j.appender.Default.append=true
Managing passwords when restoring accounts
When an account is restored from being previously suspended, you are prompted
to supply a new password for the reinstated account. However, in some cases you
might not want to be prompted for a password. The password requirement to
restore an account falls into two categories: allowed and required.
How each restore action interacts with its corresponding managed resource
depends on either the managed resource, or the business processes that you
implement. Certain resources reject a password when a request is made to restore
an account. In this case, you can configure IBM Tivoli Identity Manager to forego
the new password requirement. You can set the Siebel adapter to require a new
password when the account is restored, if your company has a business process in
place that dictates that the account restoration process must be accompanied by
resetting the password.
In the service.def file, you can define whether a password is required as a new
protocol option. When you import the adapter profile, if an option is not specified,
the adapter profile importer determines the correct restoration password behavior
from the schema.dsml file. Adapter profile components also enable remote services
to determine if you discard a password that is entered by the user in a situation
where multiple accounts on disparate resources are being restored. In this scenario,
only some of the accounts being restored might require a password. Remote
services will discard the password from the restore action for those managed
resources that do not require them.
Edit the service.def file to add the new protocol options, for example:
<Property Name = "com.ibm.itim.remoteservices.ResourceProperties.
PASSWORD_NOT_REQUIRED_ON_RESTORE"<value>true</value>
</property>
<Property Name = "com.ibm.itim.remoteservices.ResourceProperties.
PASSWORD_NOT_ALLOWED_ON_RESTORE"<value>false</value>
</property>
By adding the two options in the example above, you are ensuring that you will
not be prompted for a password when an account is restored.
16 IBM Tivoli Identity Manager: Directory Integrator-Based Siebel Adapter Installation and Configuration Guide

Chapter 4. Configuring SSL authentication between Tivoli
Identity Manager server and IBM Tivoli Directory Integrator
In order to establish a secure connection between the adapter and the Tivoli
Identity Manager server, you must configure the Tivoli Directory Integrator and
the Tivoli Identity Manager server to use the Secure Sockets Layer (SSL)
authentication. SSL authentication provides encryption of the data exchanged
between two applications. Encryption makes data transmitted over the network
intelligible only to the intended recipient.
Note: If you are using a single server configuration, you do not need to use SSL
authentication. For information about using a single server configuration,
refer to “Supported configurations” on page 2.
By configuring the Tivoli Directory Integrator for SSL, you ensure that the Tivoli
Identity Manager server verifies the identity of the adapter before a secure
connection is established. You can configure SSL authentication for connections that
originate from the Tivoli Identity Manager server. The Tivoli Identity Manager
server initiates a connection to the adapter in order to set or retrieve the value of a
managed attribute on the adapter.
In a production environment, you must enable SSL security; however, for testing
purposes you might want to disable SSL. If an external application that
communicates with the adapter (such as the Tivoli Identity Manager server) is set
to use server authentication, you must enable SSL for the Tivoli Directory
Integrator to verify the certificate that the application presents.
This chapter contains an overview of SSL authentication, certificates, and how to
enable SSL authentication using the iKeyman command.
Overview of SSL and digital certificates
When you deploy IBM Tivoli Identity Manager in an enterprise network, you must
secure communication between the Tivoli Identity Manager server and the
software products and components with which the server communicates. The
industry-standard SSL protocol uses signed digital certificates from a certificate
authority (CA) to secure communication in a IBM Tivoli Identity Manager
deployment.
A signed digital certificate is an industry-standard method of verifying the
authenticity of an entity, such as a server, client, or application. Signed certificates
are issued by a third-party certificate authority for a fee. Some utilities, such as the
iKeyman utility, can also issue signed certificates.
Signed digital certificates enable two applications connecting in a network to
authenticate each other’s identity. For example, an application acting as an SSL
server presents its credentials in a signed digital certificate to verify to an SSL
client that it is the entity it claims to be. An application acting as an SSL server can
also be configured to require the application acting as an SSL client to present its
credentials in a certificate, thereby completing a two-way exchange of certificates.
© Copyright IBM Corp. 2006 17

A CA certificate must be installed to verify the origin of a signed digital certificate.
When an application receives another application’s signed certificate, it uses a CA
certificate to verify the originator of the certificate. Many applications, such as Web
browsers, are configured with the CA certificates of well−known certificate
authorities to eliminate or reduce the task of distributing CA certificates
throughout the security zones in a network.
Private keys, public keys, and digital certificates
Keys, digital certificates, and trusted certificate authorities are used to establish and
verify the identities of applications. SSL uses public key encryption technology for
authentication.
Public key encryption requires that a public key and a private key be generated for
an application. Data encrypted with the public key can only be decrypted using
the corresponding private key. Data encrypted with the private key can only be
decrypted using the corresponding public key. The private key is stored in a key
database file that is password-protected. Only the owner of the private key can
access the private key to decrypt messages that are encrypted using the
corresponding public key.
In order to ensure maximum security, a certificate is issued by a third-party
certificate authority. A certificate contains the following information to verify the
identity of an entity:
Organizational information
This section of the certificate contains information that uniquely identifies
the owner of the certificate, such as organizational name and address. You
supply this information when you generate a certificate using a certificate
management utility.
Public key
The receiver of the certificate uses the public key to decipher encrypted
text sent by the certificate owner to verify its identity. A public key has a
corresponding private key that encrypts the text.
Certificate authority’s distinguished name
The issuer of the certificate identifies itself with this information.
Digital signature
The issuer of the certificate signs it with a digital signature to verify its
authenticity. This signature is compared to the signature on the
corresponding CA certificate to verify that the certificate originated from a
trusted certificate authority.
Web browsers, servers, and other SSL-enabled applications generally accept as
genuine any digital certificate that is signed by a trusted certificate authority and is
otherwise valid. For example, a digital certificate can be invalidated because it has
expired or the CA certificate used to verify it has expired, or because the
distinguished name in the digital certificate of the server does not match the
distinguished name specified by the client.
Self-signed certificates
You can use self-signed certificates to test an SSL configuration before you create
and install a signed certificate issued by a certificate authority. A self-signed
certificate contains a public key, information about the owner of the certificate, and
the owner’s signature. It has an associated private key, but it does not verify the
origin of the certificate through a third-party certificate authority. Once you
18 IBM Tivoli Identity Manager: Directory Integrator-Based Siebel Adapter Installation and Configuration Guide

generate a self-signed certificate on an SSL server application, you must extract it
and add it to the certificate registry of the SSL client application.
This procedure is the equivalent of installing a CA certificate that corresponds to a
server certificate. However, you do not include the private key in the file when
you extract a self-signed certificate to use as the equivalent of a CA certificate.
Use a key management utility, such as the iKeyman utility, to generate a
self-signed certificate and a private key, to extract a self-signed certificate, and to
add a self-signed certificate.
Where and how you choose to use self-signed certificates depends on your security
requirements. In order to achieve the highest level of authentication between
critical software components, do not use self-signed certificates, or use them
selectively. For example, you can choose to authenticate applications that protect
server data with signed digital certificates, and use self-signed certificates to
authenticate Web browsers or IBM Tivoli Identity Manager adapters.
If you are using self-signed certificates, in the following procedures you can
substitute a self-signed certificate for a certificate and CA certificate pair.
The use of SSL authentication
When a Tivoli Directory Integrator component is used as a server, SSL mandates
that a keystore be defined for and used by the Tivoli Directory Integrator. When a
Tivoli Directory Integrator component is used as a client, SSL mandates that a
truststore be defined for and used by the Tivoli Directory Integrator.
A keystore is a database of private keys and the associated certificates needed to
authenticate the corresponding public keys. Digital certificates are stored in a
keystore file. A keystore also manages certificates from trusted entities.
A truststore is a database of public keys for target servers. A truststore file is a key
database file that contains the public keys for target servers. The public key is
stored as a signer certificate. If the target uses a self-signed certificate, you must
extract the public certificate from the server keystore file.
The global.properties file or the solutions.properties file specifies the properties for
the Tivoli Directory Integrator server and the Tivoli Directory Integrator
components running on the Tivoli Directory Integrator server. If the solutions
directory does not exist, these properties are defined in the global.properties file. If
the solutions directory exists, the properties are defined in the solutions.properties
file in the Tivoli Directory Integrator Solutions directory.
To use SSL authentication for the Tivoli Directory Integrator, complete these steps:
1. From the ITDI_HOME directory, edit the global.properties file. The example
below includes the values that must be changed. Substitute the actual keystore
for the keystore provided in the example.
v javax.net.ssl.keyStore= C:\itdicertkeys\idiserver.jks
v javax.net.ssl.keyStorePassword=secret
v javax.net.ssl.keyStoreType=JKS
v javax.net.ssl.trustStore= C:\itdicertkeys\idiserver.jks
v javax.net.ssl.trustStorePassword=secret
v javax.net.ssl.trustStoreType=JKS
Chapter 4. Configuring SSL authentication between Tivoli Identity Manager server and IBM Tivoli Directory Integrator 19

v api.remote.on=false
v javax.net.debug=ssl
v com.ibm.di.dispatcher.ssl=true2. From the ITDI_HOME\_jvm\jre\lib\security\ directory (for example,
C:\Program Files\IBM\itim\itdi\home\_jvm\jre\lib\security\), make these
changes to the java.security file:
v security.provider.1=com.ibm.jsse.IBMJSSEProvider
v security.provider.2=com.ibm.crypto.provider.IBMJCE
v security.provider.3=com.ibm.security.jgss.IBMJGSSProvider
v security.provider.4=com.ibm.security.cert.IBMCertPath
v ## SSLServerSocketFactory Provider
v ssl.ServerSocketFactory.provider=com.ibm.jsse.JSSEServerSocketFactory3. Restart the service you created for the adapter. In the imdi.log file, ensure that
the value for ssl is true (for example, ssl=true), and the RMI Dispatcher is
using the SecureRMIServerFactory.
Configuring certificates for SSL authentication
Use the following procedures to configure the Tivoli Directory Integrator for
one-way or two-way SSL authentication using signed certificates. In order to
perform these procedures, use a key management tool.
Configuring certificates for one-way SSL authentication
In this scenario, the Tivoli Identity Manager server and the Tivoli Directory
Integrator are set to use SSL. Client authentication is not set on either application.
The Tivoli Identity Manager server operates as the SSL client and initiates the
connection. The Tivoli Directory Integrator operates as the SSL server and responds
by sending its signed certificate to the Tivoli Identity Manager server. The Tivoli
Identity Manager server uses the CA certificate that is installed to validate the
certificate sent by the Tivoli Directory Integrator.
In Figure 3, the first application operates as the Tivoli Identity Manager server, and
the second application operates as the Tivoli Directory Integrator.
In order to configure one-way SSL, complete these tasks for each application. The
tasks use the iKeyman key management utility. Read the documentation for the
iKeyman utility for additional information about using the utility.
Hello
Tivoli Identity ManagerServer (SSL client)
KeystoreCA
CertificateA
1
Send Certificate B
Tivoli Directory Integrator(SSL server)
CertificateA
Verify
Figure 3. One-way SSL authentication (server authentication)
20 IBM Tivoli Identity Manager: Directory Integrator-Based Siebel Adapter Installation and Configuration Guide

For the Tivoli Directory Integrator, complete these tasks:
1. Create a new keystore file. (A keystore file is a key database file that contains
both public keys and private keys.)
a. Start the key management utility (iKeyman) if it is not already running.
b. Open a new key database file by clicking Key Database File > New from
the menu bar.
c. Select the default Key Database Type: JKS (default), PKCS12, and JCEKS.
This is the key file format (or the value of com.ibm.ssl.keyStoreType
property in the sas.client.props file) when you configure the SSL setting for
your application.
d. Type the Key Database File Name and Location.
The full path of this key database file is used as the key file name (or the
value of the com.ibm.ssl.keyStore property in the sas.client.props file) when
you configure the SSL setting for your application.
e. Click OK to continue.
f. Type a password to restrict access to the file.
This password is used as the key file password (or the value of
com.ibm.ssl.keyStorePassword property in the sas.client.props file) when you
configure the SSL setting for your application.
Note: Do not set an expiration date on the password or save the password
to a file; you must then reset the password when it expires or protect
the password file. This password is used only to release the
information stored by the key management utility during run time.
g. Click OK to create the keystore file.
The tool displays all of the available default signer certificates. These
certificates are the public keys of the most common certificate authorities
(CAs). You can add, view or delete signer certificates from this panel.2. Create a self-signed personal certificate by completing these steps.
Note: In order to create a self-signed certificate for a keystore, you must have
already created the keystore file.
a. Start the key management utility (iKeyman), if it is not already running.
b. From the menu bar, select Create > New Self-Signed Certificate.
c. Select the version and the key size for your application
d. Type the appropriate information for your self-signed certificate:
Key label
In the Key Label field type: itdiserver. The key label is used to
uniquely identify the certificate within the keystore file. If you have
only one certificate in each keystore file, you can assign any value
to the label. However, it is good practice to use a unique label
related to the server name.
Common name
In the Common Name field type the name of your system. This
name is the primary, universal identity for the certificate; it should
uniquely identify the principal that it represents. For example, for
WebSphere® Application Server, certificates frequently represent
server principals, and the common convention is to use common
names of the form host_name and server_name. The common name
must be valid in the configured user registry for the secured
WebSphere environment.
Chapter 4. Configuring SSL authentication between Tivoli Identity Manager server and IBM Tivoli Directory Integrator 21

Organization
Type the name of your organization in the Organization field.e. Click OK to create the self-signed personal certificate.
Your key database file now contains a self-signed personal certificate.3. Extract the server certificate by completing these steps:
a. Start the key management utility (iKeyman), if it is not already running.
b. Open the keystore file from which the public certificate will be extracted.
c. Click Personal Certificates.
d. Click Extract Certificate.
e. Click Binary DER as the Data type.
f. In the Certificate File Name field type: itdiserver.der.
g. In the Location field type: C:\itdicertkeys.
h. Click OK to extract the server certificate into the specified file.4. Copy the itdiserver.der file to the same directory where IBM Tivoli Identity
Manager is installed (for example, C:\itdicertkeys).
For the Tivoli Identity Manager server, complete one of these tasks:
v If you are configuring the use of a signed certificate issued by a well-known CA,
ensure that the Tivoli Identity Manager server has stored the root certificate of
the CA (CA certificate) in its keystore. If the keystore does not contain the CA
certificate, extract the CA certificate from the adapter and add it to the keystore
of the server.
v If you are configuring the use of self-signed certificates:
– If you generated the self-signed certificate on the Tivoli Identity Manager
server, the certificate is already installed in its keystore.
– If you generated the self-signed certificate using the key management utility
of another application, extract the certificate from that application’s keystore
and add it to the keystore of the Tivoli Identity Manager server.
Configuring certificates for two-way SSL authentication
In this scenario, the Tivoli Identity Manager server and the Tivoli Directory
Integrator are set to use SSL and the adapter is set to use client authentication.
After sending its certificate to the Tivoli Identity Manager server, the Tivoli
Directory Integrator requests identity verification from the server, which sends its
signed certificate to Tivoli Directory Integrator. Both applications are configured
with signed certificates and corresponding CA certificates.
In Figure 4 on page 23, the Tivoli Identity Manager server operates as the first
application, and the Tivoli Directory Integrator operates as the second application.
22 IBM Tivoli Identity Manager: Directory Integrator-Based Siebel Adapter Installation and Configuration Guide

The following procedure assumes that you have already configured Tivoli
Directory Integrator and the Tivoli Identity Manager server for one-way SSL
authentication using the procedure described in “Configuring certificates for
one-way SSL authentication” on page 20. Therefore, if you are using signed
certificates from a CA:
v The Tivoli Directory Integrator is configured with a private key and a signed
certificate that was issued by a CA.
v The Tivoli Identity Manager server is configured with the CA certificate of the
CA that issued the signed certificate of the Tivoli Directory Integrator.
In order to complete the certificate configuration for two-way SSL, perform the
following tasks:
1. On the Tivoli Identity Manager server, create a Certificate Signing Request
(CSR) and private key, obtain a certificate from a CA, install the CA certificate,
install the newly signed certificate, and extract the CA certificate to a temporary
file.
2. On the Tivoli Directory Integrator, add the CA certificate that was extracted
from the keystore of the Tivoli Identity Manager server to the Tivoli Directory
Integrator.
When you have finished the two-way certificate configuration, each application has
its own certificate and private key and the CA certificate of the CA that issued the
certificates for each application.
CHello
KeystoreCA
CertificateA
CertificateB
CertificateA
CACertificate
B
Send Certificate A
Tivoli Directory Integrator(SSL server) C
Tivoli Identity ManagerServer (SSL client)
Send Certificate AVerify
Verify
Send Certificate B
Figure 4. Two-way SSL authentication (client authentication)
Chapter 4. Configuring SSL authentication between Tivoli Identity Manager server and IBM Tivoli Directory Integrator 23

24 IBM Tivoli Identity Manager: Directory Integrator-Based Siebel Adapter Installation and Configuration Guide

Chapter 5. Verifying the Siebel adapter profile installation
If the Siebel adapter profile is not already installed on your system, you must
import the adapter profile. See “Importing the adapter profile into the IBM Tivoli
Identity Manager server” on page 4 for information about importing the adapter
profile.
After you install the adapter profile, verify that the adapter profile was
successfully installed. If the adapter profile is not installed correctly, the adapter
might not function as it is intended to function.
To verify that the adapter profile was successfully installed, complete these steps.
v Create a service using the Siebel adapter profile. See “Creating a service” on
page 5 for information about this task.
v Open an account on the service. See “Creating an adapter user account” on page
6 for information about this task.
If you are unable to create a service using the Siebel adapter profile or open an
account on the service, the adapter profile is not installed correctly. You might need
to import the adapter profile again.
© Copyright IBM Corp. 2006 25

26 IBM Tivoli Identity Manager: Directory Integrator-Based Siebel Adapter Installation and Configuration Guide

Chapter 6. Troubleshooting the Siebel adapter
Troubleshooting is the process of determining why a product does not function as
it is designed to function. This chapter provides information and techniques for
identifying and resolving problems related to the Siebel adapter. It also provides
information about troubleshooting errors that might occur during installation.
Warning and error messages
A warning or error might be displayed in the user interface to provide information
that the user needs to know about the adapter or when an error occurs. Table 4
contains warnings or errors which might be displayed in the user interface when
the Siebel adapter is installed on your system.
Table 4. Messages and actions
Message
number Message Action
CTGIMT600E An error occurred while
establishing communication
with the IBM Tivoli
Directory Integrator server.
v Verify that the Tivoli Directory
Integrator-Based Adapter Service is
running.
v Verify that the URL specified on the
service form for Tivoli Directory
Integrator is correct.
CTGIMT001E The following error
occurred.
Error: [error message]
v Verify that the Siebel Server is running.
v Verify that the Database used by Siebel is
running.
v Verify that the required parameter
specified in the error message is given
correctly.
v Verify that the connect string specified is
same as the one in the eapps.cfg file on
the Siebel Server.
v Verify that the Siebel Administrator name
and password are correct.
CTGIMT003E The account already exists. The user has already been added to the
resource. This error might occur if you are
attempting to add a user to the managed
resource and Tivoli Identity Manager is not
synchronized with the resource. To fix this
problem, schedule a reconciliation between
Tivoli Identity Manager and the resource.
See the online help for information about
scheduling a reconciliation.
© Copyright IBM Corp. 2006 27

Table 4. Messages and actions (continued)
Message
number Message Action
CTGIMT015E An error occurred while
deleting the username
account because the account
does not exist.
This error might occur when you attempt to
delete a user. This error might also occur if
you attempt to change the password for a
user. To fix the problem, ensure that:
v The location specified for the managed
resource is correct.
v The user was created on the resource.
v The user was not deleted from the
resource.
v If the user does not exist on the resource,
create the user on the resource and then
schedule a reconciliation. See the online
help for information about scheduling a
reconciliation.
CTGIMT009E The account username
cannot be modified because
it does not exist.
This error might occur when you attempt to
modify a user. This error might also occur if
you attempt to change the password for a
user. To fix the problem, ensure that:
v The location specified for the managed
resource is correct.
v The user was created on the resource.
v The user was not deleted from the
resource.
v If the user does not exist on the resource,
create the user on the resource and then
schedule a reconciliation. See the online
help for information about scheduling a
reconciliation.
CTGIMT222W The account is already
suspended.
This error might occur if you attempt to
suspend an account that was already
suspended.
CTGIMT224W The account is already
restored.
This error might occur if you attempt to
restore an account that was already
restored.
Deserializer error/ Invalid
top element error.
v Add the xmltagnamespace and
xsdtypenamespace properties to the
integration object.
v The Siebel .srf file for server and the
client generating the wsdl is not the
same. Compile the changed Siebel object
to both the .srf file in the
client\objects\lang\ and the
server\objects\lang\ directories.
Cannot reauthenticate
operation.
The definition of the method for the
corresponding port in the Web services
section has authentication type set to
Username/password-cleartext. Change it to
None.
28 IBM Tivoli Identity Manager: Directory Integrator-Based Siebel Adapter Installation and Configuration Guide

Table 4. Messages and actions (continued)
Message
number Message Action
Method ’FieldValue’ of
business component ’xxx’
(integration component ’xxx’
) returned the following
error:″Field ’xxx’ does not
exist in definition for
business component ’xxx’".
Ensure that the corresponding field in the
business component is not inactive.
Typically, for an employee interface, remove
the inactive flag for the following business
components:
v Bonus Target %
v Compensation Currency
v Salary
v Salary Grade Id
v Salary Grade Integration Id
v Salary Grade Name
v Salary Plan Id
v Salary Plan Integration Id
v Salary Plan Name
v Salary Range Percentile
Ensure that all fields that have single-value
links are active.
Note: Fields with multi-value links can be
active or inactive.
Logging information format
Logs added to the log file for the adapter or the RMI Dispatcher have the
following format:
<Log Level> [<AssemblyLine_ProfileName>_<Request Id>]_
[<Connector Name>] - <message>
Log level
Specifies the logging level that you configured for the adapter. The options
are DEBUG, ERROR, INFO, and WARN. See“Configuring logging for the
adapter” on page 15 for information about using the log4j.properties file to
configure logging.
AssemblyLine
Specifies the name of the AssemblyLine that is logging the information.
ProfileName
Specifies the name of the profile. Profile names might vary based on the
adapter that is running or the operating system.
Request ID
Specifies the number of the request. Request number is used to uniquely
identify a specific request.
Connector name
Specifies the connector for the adapter.
message
Specifies the actual message information.
The following examples are messages that might be displayed in a log file:
Chapter 6. Troubleshooting the Siebel adapter 29

2006-08-01 16:55:49,894 DEBUG [AssemblyLine.AssemblyLines/siebelModify_Siebel
on ps2381_5293613167697466639_a1200ba4-2851-11b2-4109-00000a4d455f.1313359690]
- [SiebelConn] Load Attribute Map
2006-08-01 17:02:30,832 DEBUG [AssemblyLine.AssemblyLines/siebelModify_Siebel
on ps2381_5296720968570807009_a15d23ea-2851-11b2-4109-00000a4d455f.1324205898]
- Operation is restore
30 IBM Tivoli Identity Manager: Directory Integrator-Based Siebel Adapter Installation and Configuration Guide
Chapter 7. Uninstalling the Siebel adapter
Before you remove the adapter, inform your users that the Siebel adapter will be
unavailable. If the server is taken offline, adapter requests that were completed
might not be recovered when the server is back online.
The jar file needed to uninstall the Siebel adapter was created in the
ITDI_HOME_DIR\SiebelAdapterUninstall directory when the adapter was
installed.
To remove the Siebel adapter, complete these steps:
1. Stop the adapter service.
2. Run the SiebelAdapterUninstall.jar file. To run the jar file, double click on the
executable file or enter the following command at the command prompt:
java −cp SiebelAdapterUninstall.jar run
3. A prompt displays to ask if you want to uninstall the RMI Dispatcher. If you
want to delete the dispatcher, enter Yes at the command prompt. If you do not
want to delete the dispatcher, enter No at the command prompt.
The RMI Dispatcher component must be installed on your system in order for
adapters to function correctly in a Tivoli Directory Integrator environment. If
you uninstall the Siebel adapter, you do not have to delete the RMI Dispatcher.
The log file is generated in the directory where you uninstalled the adapter. For
example, ITDI_HOME_DIR\SiebelAdapterUninstall directory.
After uninstalling the adapter, manually remove the following files from the
ITDI_HOME/jars directory.
v Siebel.jar
v SiebelJI_lang.jar where lang is the installed language pack. (For example,
SiebelJI_enu.jar for English or SiebelJI_jpn.jar for Japanese.)
Also remove any jar files corresponding to the JDBC Driver that had been copied
to the ITDI_HOME/jars directory as well.
© Copyright IBM Corp. 2006 31

32 IBM Tivoli Identity Manager: Directory Integrator-Based Siebel Adapter Installation and Configuration Guide

Appendix A. Adapter attributes
Attribute descriptions
This list describes the attributes used by the Siebel adapter and the corresponding
counterparts in Employee Business Component on Siebel.
Table 5. Attributes, descriptions and corresponding Siebel attributes
Attribute name Description Required Siebel attribute
ErUid User ID Yes Login Name
ErPassword Password for the user
ID
No <In database>
ErAccountStatus Status of the account
(suspended/restored)
No <In database>
ErTDISblFirstName First name Yes First Name
ErTDISblLastName Last name Yes Last Name
ErTDISblMiddleName Middle name No Middle Name
ErTDISblJobTitle Job title No Job Title
ErTDISblAlias Alias No Alias
ErTDISblTimeZone Time zone No Time Zone Name
ErTDISblWorkPhone Work telephone
number
No Work Phone
ErTDISblWorkPhone Home telephone
number
No Home Phone
ErTDISblFaxNo Fax number No Fax Number
ErTDISblFaxNo E-mail address No Email Addr
ErTDISblEmpNo Employee number No EMP #
ErTDISblCellPhone Cell telephone number No Cell Phone #
ErTDISblShortName Short name No Nick Name
ErTDISblPagerNo Pager number No Pager Phone #
ErTDISblPagerPin Pager PIN No Pager PIN
ErTDISblBldgNo Office building number No Building Number
ErTDISblEmergencyNtfy Emergency notification No Emergency Notification
ErTDISblStndNotify Standard notification No Standard Notification
ErTDISblAvail Availability No Availability Status
ErTDISblAvailUntil Overtime availability No Availability Status Until
ErTDISblEmpTypeCode Employee type No Employee Type Code
ErTDISblRelPositions Positions No Position
ErTDISblRelResponsibility Responsibilities Yes Responsibility
ErTDISblPersonalTitle Name title (Mr./Mrs.) No Personal Title
ErTDISblBUnits Other organizations Yes Organization
© Copyright IBM Corp. 2006 33

Attributes by Siebel adapter actions
The following lists are typical Siebel adapter actions by their functional transaction
group. The lists include more information about required and optional attributes
sent to the Siebel adapterr to complete that action.
System Login Add
A System Login Add is a request to create a new user account with the specified
attributes.
Table 6. Add request attributes for AIX, HPUX, Linux, and Solaris
Required attribute Optional attribute
erUid
ErTDISblFirstName
ErTDISblLastName
ErTDISblRelPositions
All other supported attributes
System Login Change
A System Login Change is a request to change one or more attributes for the
specified users.
Table 7. Change request attributes
Required attribute Optional attribute
erUid All other supported attributes
System Login Delete
A System Login Delete is a request to remove the specified user from the directory.
Table 8. Delete request attributes
Required attribute Optional attribute
erUid None
System Login Suspend
A System Login Suspend is a request to disable a user account. The user is neither
removed nor are their attributes modified.
Table 9. Suspend request attributes
Required attribute Optional attribute
erUid
erAccountStatus
None
System Login Restore
A System Login Restore is a request to activate a user account that was previously
suspended. Once an account is restored, the user can access the system with the
same attributes as those before the Suspend function was called.
34 IBM Tivoli Identity Manager: Directory Integrator-Based Siebel Adapter Installation and Configuration Guide

Table 10. Restore request attributes
Required attribute Optional attribute
erUid
erAccountStatus
erPassword
None
System Change Password
A System Change Password is a request to change the password of a user.
Table 11. System change password request attributes
Required attribute Optional attribute
erUid
erPassword
None
Test
The following table identifies attributes needed to test the connection.
Table 12. Test attributes
Required attribute Optional attribute
None None
Reconciliation
The Reconciliation request synchronizes user account information between Tivoli
Identity Manager and the adapter.
Table 13. Reconciliation request attributes
Required attribute Optional attribute
None All other supported attributes
Appendix A. Adapter attributes 35

36 IBM Tivoli Identity Manager: Directory Integrator-Based Siebel Adapter Installation and Configuration Guide

Appendix B. Support information
This section describes the following options for obtaining support for IBM
products:
v “Searching knowledge bases”
v “Contacting IBM Software Support”
Searching knowledge bases
If you have a problem with your IBM software, you want it resolved quickly. Begin
by searching the available knowledge bases to determine whether the resolution to
your problem is already documented.
Search the information center on your local system or
network
IBM provides extensive documentation that can be installed on your local
computer or on an intranet server. You can use the search function of this
information center to query conceptual information, instructions for completing
tasks, reference information, and support documents.
Search the Internet
If you cannot find an answer to your question in the information center, search the
Internet for the latest, most complete information that might help you resolve your
problem. To locate Internet resources for your product, open one of the following
Web sites:
v Performance and tuning information
Provides information needed to tune your production environment, available on
the Web at:
http://publib.boulder.ibm.com/tividd/td/tdprodlist.html
Click the I character in the A-Z product list to locate IBM Tivoli Identity
Manager products. Click the link for your product, and then browse the
information center for the Technical Supplements section.
v Redbooks and white papers are available on the Web at:
http://www.ibm.com/software/sysmgmt/products/support/IBMTivoliIdentityManager.html
Browse to the Self Help section, in the Learn category, and click the Redbooks
link.
v Technotes are available on the Web at:
http://www.redbooks.ibm.com/redbooks.nsf/tips/
v Field guides are available on the Web at:
http://www.ibm.com/software/sysmgmt/products/support/Field_Guides.html
v For an extended list of other Tivoli Identity Manager resources, search the
following IBM developerWorks Web address:
http://www.ibm.com/developerworks/
Contacting IBM Software Support
IBM Software Support provides assistance with product defects.
© Copyright IBM Corp. 2006 37

Before contacting IBM Software Support, your company must have an active IBM
software maintenance contract, and you must be authorized to submit problems to
IBM. The type of software maintenance contract that you need depends on the
type of product you have:
v For IBM distributed software products (including, but not limited to, Tivoli,
Lotus, and Rational products, as well as DB2 and WebSphere products that run
on Windows or UNIX operating systems), enroll in Passport Advantage in one
of the following ways:
– Online: Go to the Passport Advantage Web page (http://www.lotus.com/services/passport.nsf/WebDocs/ Passport_Advantage_Home) and click How
to Enroll
– By phone: For the phone number to call in your country, go to the IBM
Software Support Web site (http://techsupport.services.ibm.com/guides/contacts.html) and click the name of your geographic region.
v For IBM eServer software products (including, but not limited to, DB2 and
WebSphere products that run in zSeries, pSeries, and iSeries environments), you
can purchase a software maintenance agreement by working directly with an
IBM sales representative or an IBM Business Partner. For more information
about support for eServer software products, go to the IBM Technical Support
Advantage Web page (http://www.ibm.com/servers/eserver/techsupport.html).
If you are not sure what type of software maintenance contract you need, call
1-800-IBMSERV (1-800-426-7378) in the United States or, from other countries, go to
the contacts page of the IBM Software Support Handbook on the Web
(http://techsupport.services.ibm.com/guides/contacts.html) and click the name of
your geographic region for phone numbers of people who provide support for
your location.
Follow the steps in this topic to contact IBM Software Support:
1. Determine the business impact of your problem.
2. Describe your problem and gather background information.
3. Submit your problem to IBM Software Support.
Determine the business impact of your problem
When you report a problem to IBM, you are asked to supply a severity level.
Therefore, you need to understand and assess the business impact of the problem
you are reporting. Use the following criteria:
Severity 1 Critical business impact: You are unable to use the program,
resulting in a critical impact on operations. This condition
requires an immediate solution.
Severity 2 Significant business impact: The program is usable but is
severely limited.
Severity 3 Some business impact: The program is usable with less
significant features (not critical to operations) unavailable.
Severity 4 Minimal business impact: The problem causes little impact on
operations, or a reasonable circumvention to the problem has
been implemented.
38 IBM Tivoli Identity Manager: Directory Integrator-Based Siebel Adapter Installation and Configuration Guide

Describe your problem and gather background information
When explaining a problem to IBM, be as specific as possible. Include all relevant
background information so that IBM Software Support specialists can help you
solve the problem efficiently. To save time, know the answers to these questions:
v What software versions were you running when the problem occurred?
v Do you have logs, traces, and messages that are related to the problem
symptoms? IBM Software Support is likely to ask for this information.
v Can the problem be re-created? If so, what steps led to the failure?
v Have any changes been made to the system? (For example, hardware, operating
system, networking software, and so on.)
v Are you currently using a workaround for this problem? If so, please be
prepared to explain it when you report the problem.
Submit your problem to IBM Software Support
You can submit your problem in one of two ways:
v Online: Go to the ″Submit and track problems″ page on the IBM Software
Support site (http://www.ibm.com/software/support/probsub.html). Enter
your information into the appropriate problem submission tool.
v By phone: For the phone number to call in your country, go to the contacts page
of the IBM Software Support Handbook on the Web (http://techsupport.services.ibm.com/guides/contacts.html) and click the name of your
geographic region.
If the problem you submit is for a software defect or for missing or inaccurate
documentation, IBM Software Support creates an Authorized Program Analysis
Report (APAR). The APAR describes the problem in detail. Whenever possible,
IBM Software Support provides a workaround for you to implement until the
APAR is resolved and a fix is delivered. IBM publishes resolved APARs on the
IBM product support Web pages daily, so that other users who experience the
same problem can benefit from the same resolutions.
For more information about problem resolution, see Searching knowledge bases.
Appendix B. Support information 39

40 IBM Tivoli Identity Manager: Directory Integrator-Based Siebel Adapter Installation and Configuration Guide

Appendix C. Notices
This information was developed for products and services offered in the U.S.A.
IBM may not offer the products, services, or features discussed in this document in
other countries. Consult your local IBM representative for information on the
products and services currently available in your area. Any reference to an IBM
product, program, or service is not intended to state or imply that only that IBM
product, program, or service may be used. Any functionally equivalent product,
program, or service that does not infringe any IBM intellectual property right may
be used instead. However, it is the user’s responsibility to evaluate and verify the
operation of any non-IBM product, program, or service.
IBM may have patents or pending patent applications covering subject matter
described in this document. The furnishing of this document does not give you
any license to these patents. You can send license inquiries, in writing, to:
IBM Director of Licensing
IBM Corporation
North Castle Drive
Armonk, NY 10504-1785
U.S.A.
For license inquiries regarding double-byte (DBCS) information, contact the IBM
Intellectual Property Department in your country or send inquiries, in writing, to:
IBM World Trade Asia Corporation
Licensing
2-31 Roppongi 3-chome, Minato-ku
Tokyo 106-0032, Japan
The following paragraph does not apply to the United Kingdom or any other
country where such provisions are inconsistent with local law:
INTERNATIONAL BUSINESS MACHINES CORPORATION PROVIDES THIS
PUBLICATION “AS IS” WITHOUT WARRANTY OF ANY KIND, EITHER
EXPRESS OR IMPLIED, INCLUDING, BUT NOT LIMITED TO, THE IMPLIED
WARRANTIES OF NON-INFRINGEMENT, MERCHANTABILITY OR FITNESS
FOR A PARTICULAR PURPOSE. Some states do not allow disclaimer of express or
implied warranties in certain transactions, therefore, this statement may not apply
to you.
This information could include technical inaccuracies or typographical errors.
Changes are periodically made to the information herein; these changes will be
incorporated in new editions of the publication. IBM may make improvements
and/or changes in the product(s) and/or the program(s) described in this
publication at any time without notice.
Any references in this information to non-IBM Web sites are provided for
convenience only and do not in any manner serve as an endorsement of those Web
sites. The materials at those Web sites are not part of the materials for this IBM
product and use of those Web sites is at your own risk.
IBM may use or distribute any of the information you supply in any way it
believes appropriate without incurring any obligation to you.
© Copyright IBM Corp. 2006 41

Licensees of this program who wish to have information about it for the purpose
of enabling: (i) the exchange of information between independently created
programs and other programs (including this one) and (ii) the mutual use of the
information which has been exchanged should contact:
IBM Corporation
2ZA4/101
11400 Burnet Road
Austin, TX 78758
U.S.A.
Such information may be available, subject to appropriate terms and conditions,
including in some cases, payment of a fee.
The licensed program described in this information and all licensed material
available for it are provided by IBM under terms of the IBM Customer Agreement,
IBM International Program License Agreement, or any equivalent agreement
between us.
Any performance data contained herein was determined in a controlled
environment. Therefore, the results obtained in other operating environments may
vary significantly. Some measurements may have been made on development-level
systems and there is no guarantee that these measurements will be the same on
generally available systems. Furthermore, some measurements may have been
estimated through extrapolation. Actual results may vary. Users of this document
should verify the applicable data for their specific environment.
Information concerning non-IBM products was obtained from the suppliers of
those products, their published announcements or other publicly available sources.
IBM has not tested those products and cannot confirm the accuracy of
performance, compatibility or any other claims related to non-IBM products.
Questions on the capabilities of non-IBM products should be addressed to the
suppliers of those products.
Trademarks
The following terms are trademarks or registered trademarks of International
Business Machines Corporation in the United States, other countries, or both:
AIX
DB2
developerWorks
eServer
IBM
iSeries
Lotus
Passport Advantage
pSeries
RACF
Rational
Redbooks
Tivoli
WebSphere
zSeries
Microsoft, Windows, Windows NT®, and the Windows logo are trademarks of
Microsoft Corporation in the United States, other countries, or both.
42 IBM Tivoli Identity Manager: Directory Integrator-Based Siebel Adapter Installation and Configuration Guide

Intel®, Intel Inside® (logos), MMX and Pentium® are trademarks of Intel
Corporation in the United States, other countries, or both.
UNIX is a registered trademark of The Open Group in the United States and other
countries.
Linux is a trademark of Linus Torvalds in the U.S., other countries, or both.
Java and all Java-based trademarks are trademarks of Sun
Microsystems, Inc. in the United States, other countries, or
both.
Other company, product, and service names may be trademarks or service marks
of others.
Appendix C. Notices 43

44 IBM Tivoli Identity Manager: Directory Integrator-Based Siebel Adapter Installation and Configuration Guide

Index
Special charactersITDI_HOME
Tivoli Directory Integrator server installation directory xi
Aaccessibility
pdf format, for screen-reader software viii
statement for documentation viii
text, alternative for document images viii
adapterinstallation 3
supported configurations 2
uninstall 31
adapter installation 3
adapter profileverifying installation 25
architectural overviewsupported configurations 2
Bbooks
see publications viii
Ccertificate authority
definition 17
certificatescertificate management tools 19
definition 17
overview 17
private keys and digital certificates 18
self-signed 18
client authentication 20, 22
configurationSSL 20
supported 2
conventionsHOME directory
ITDI_HOME xi
Tivoli_Common_Directory xi
DB_INSTANCE_HOME x
HTTP_HOME xi
ITIM_HOME xi
LDAP_HOME x
WAS_HOME xi
WAS_MQ_HOME xi
WAS_NDM_HOME xi
typeface ix
UNIX variable, directory notation ix
used in this document ix
customer supportsee Software Support 37
DDB_INSTANCE_HOME
DB2 UDB installation directory x
definition x
directoryITDI_HOME xi
DB_INSTANCE_HOME x
HTTP_HOME xi
installationDB2 UDB x
IBM Directory Server x
IBM HTTP Server xi
Tivoli Directory Integrator server xi
WebSphere Application Server base product xi
WebSphere Application Server Network Deployment
product xi
WebSphere MQ xi
installation for Sun ONE Directory Server x
ITIM_HOME xi
LDAP_HOME x
names, UNIX notation ix
WAS_HOME xi
WAS_MQ_HOME xi
WAS_NDM_HOME xi
disabilities, using documentation viii
documentsIBM Tivoli Identity Manager library v
related viii
Eencryption
SSL 17, 18
environment variableUNIX notation ix
Hhome directories
ITDI_HOME xi
DB_INSTANCE_HOME x
HTTP_HOME xi
ITIM_HOME xi
LDAP_HOME x
WAS_HOME xi
WAS_MQ_HOME xi
WAS_NDM_HOME xi
HTTP_HOMEdefinition xi
IBM HTTP Server installation directory xi
IIBM Tivoli Identity Manager server
communication with IBM Tivoli Directory Integrator 22
SSL communication 22
iKeyman utility 17
importadapter profile 4
© Copyright IBM Corp. 2006 45

information centers, searching to find software problem
resolution 37
installationadapter 3
directoryDB2 UDB x
IBM Directory Server x
IBM HTTP Server xi
Sun ONE Directory Server x
Tivoli Directory Integrator server xi
WebSphere Application Server base product xi
WebSphere Application Server Network Deployment
product xi
WebSphere MQ xi
profile 4
troubleshooting 27
uninstall 31
Internet, searching to find software problem resolution 37
ITDI_HOMEdefinition xi
ITIM_HOMEdefinition xi
directory xi
Kkey management utility
iKeyman 17
knowledge bases, searching to find software problem
resolution 37
LLDAP_HOME
definition x
IBM Directory Server installation directory x
Sun ONE Directory Server installation directory x
logstrace.log file 5
Mmanuals
see publications viii
Oone-way configuration
SSLclient 20
online publicationsaccessing viii
Ppath names, notation ix
pdf format, for screen-reader software viii
private keydefinition 17
problem determinationdescribing problem for IBM Software Support 39
determining business impact for IBM Software Support 38
submitting problem to IBM Software Support 39
profile installationverification 25
protocolSSL
one-way configuration 20
overview 17
two-way configuration 22
public key 18
publicationsaccessing online viii
IBM Tivoli Identity Manager library v
related viii
Rrestoring accounts
password requirements 16
Sself-signed certificate 18
Software Supportcontacting 37
describing problem for IBM Software Support 39
determining business impact for IBM Software Support 38
submitting problem to IBM Software Support 39
SSLcertificate installation 17
encryption 17
one-way configuration 20
overview 17
private keys and digital certificates 18
self-signed certificates 18
two-way configuration 22
SSL authentication 19
supported configurations 2
Ttext, alternative for document images viii
Tivoli Identity Manager Servercommunication with Tivoli Directory Integrator 20
importing adapter profile 4
SSL communication 20
Tivoli software information center viii
Tivoli_Common_Directorydefinition xi
trace.log file 5
troubleshooting adapter installation 27
two-way configurationSSL
client 22
typeface conventions ix
Uuninstallation 31
upgradeadapter profile 4
Vverification
adapter profile install 25
46 IBM Tivoli Identity Manager: Directory Integrator-Based Siebel Adapter Installation and Configuration Guide

WWAS_HOME
definition xi
WebSphere Application Server base installation
directory xi
WAS_MQ_HOMEdefinition xi
WebSphere MQ installation directory xi
WAS_NDM_HOMEdefinition xi
WebSphere Application Server Network Deployment
installation directory xi
Index 47

48 IBM Tivoli Identity Manager: Directory Integrator-Based Siebel Adapter Installation and Configuration Guide


����
Printed in USA
SC32-1573-00