tivoli storage manager for windows: administrator s guide
TRANSCRIPT

Tivoli Storage Managerfor Windows
Administrator’s GuideVersion 5 Release 1
GC32-0782-00


Tivoli Storage Managerfor Windows
Administrator’s GuideVersion 5 Release 1
GC32-0782-00

Note!Before using this information and the product it supports, be sure to read the general information under “Appendix C.Notices” on page 657.
First Edition (March 2002)
This edition applies to Version 5 Release 1 of the Tivoli Storage Manager for Windows® (product numbers5698-ISM, 5698-ISE) and to any subsequent releases until otherwise indicated in new editions or technicalnewsletters.
Order publications through your sales representative or the branch office serving your locality.
Your feedback is important in helping to provide the most accurate and high-quality information. If you havecomments about this book or any other Tivoli Storage Manager documentation, please see “Contacting CustomerSupport” on page xv.
© Copyright International Business Machines Corporation 1994, 2002. All rights reserved.US Government Users Restricted Rights – Use, duplication or disclosure restricted by GSA ADP Schedule Contractwith IBM Corp.

Contents
Preface . . . . . . . . . . . . . . xiiiWho Should Read This Publication . . . . . . xiiiWhat You Should Know before Reading ThisPublication . . . . . . . . . . . . . . xiiiTivoli Storage Manager Web Site . . . . . . . xiiiConventions Used in This Book . . . . . . . xiiiTivoli Storage Manager Publications . . . . . . xivRelated IBM® Hardware Products Publications . . xvIBM International Technical Support CenterPublications (Redbooks™) . . . . . . . . . xvContacting Customer Support . . . . . . . . xv
Reporting a Problem . . . . . . . . . . xviTranslations . . . . . . . . . . . . . . xvii
Summary of Changes for TivoliStorage Manager Version 5. . . . . . xixTechnical Changes for Version 5 Release 1—March2002 . . . . . . . . . . . . . . . . xix
Part 1. Tivoli Storage ManagerBasics . . . . . . . . . . . . . . . 1
Chapter 1. Introducing Tivoli StorageManager . . . . . . . . . . . . . . 3How Tivoli Storage Manager Stores Client Data . . 5
Options for Data Protection . . . . . . . . 7How Data Moves to Server Storage . . . . . 13Consolidating Backed-up Data for Clients . . . 14
How the Server Manages Storage . . . . . . . 14Tivoli Storage Manager Device Support . . . . 15Migrating Data through the Storage Hierarchy . 15Removing Expired Data . . . . . . . . . 16
Configuring and Maintaining the Server . . . . . 16Interfaces to Tivoli Storage Manager . . . . . 17Customizing the Server with the Server OptionsFile . . . . . . . . . . . . . . . . 17Configuring and Managing Server Storage . . . 18Managing Client Operations . . . . . . . . 21Maintaining the Server . . . . . . . . . 24Protecting the Server . . . . . . . . . . 27
Part 2. Configuring and ManagingServer Storage . . . . . . . . . . 29
Chapter 2. Introducing Storage Devices 31How to Use the Server Storage Chapters . . . . 31Tivoli Storage Manager Storage Devices . . . . . 31
Disk Devices . . . . . . . . . . . . . 32Drives . . . . . . . . . . . . . . . 32Libraries . . . . . . . . . . . . . . 32Data Movers . . . . . . . . . . . . . 33Files on Disk as Sequential Volumes . . . . . 33
Sequential Volumes on Another Tivoli StorageManager Server . . . . . . . . . . . . 34
Selecting a Device Configuration . . . . . . . 34Local Area Network Configuration . . . . . 35Network-Attached Storage . . . . . . . . 35Multiple Tivoli Storage Manager Servers SharingLibraries . . . . . . . . . . . . . . 37LAN-Free Data Movement . . . . . . . . 38Server-Free Data Movement . . . . . . . . 40Planning for Server Storage . . . . . . . . 42
How Tivoli Storage Manager Uses and ReusesRemovable Media . . . . . . . . . . . . 43Tivoli Storage Manager Volumes . . . . . . . 46
The Volume Inventory for an Automated Library 46Tivoli Storage Manager Storage Objects . . . . . 47
Library, Drive, and Device Class . . . . . . 47Storage Pool and Storage Pool Volume . . . . 49Data Mover . . . . . . . . . . . . . 50Path . . . . . . . . . . . . . . . . 50Server . . . . . . . . . . . . . . . 51How Tivoli Storage Manager Mounts andDismounts Removable Media . . . . . . . 51
Configuring Devices . . . . . . . . . . . 52Mapping Devices to Device Classes . . . . . 52Mapping Storage Pools to Device Classes andDevices . . . . . . . . . . . . . . . 53
Chapter 3. Using Magnetic DiskDevices . . . . . . . . . . . . . . 55Configuring Disk Devices . . . . . . . . . 55
Configuring Random Access Volumes on DiskDevices . . . . . . . . . . . . . . . 56Configuring FILE Sequential Volumes on DiskDevices . . . . . . . . . . . . . . . 56
Varying Disk Volumes Online or Offline . . . . . 57Using Cache . . . . . . . . . . . . . . 57Freeing Space on Disk . . . . . . . . . . . 57Specifying Scratch FILE Volumes . . . . . . . 58Using FILE Volumes for Database Backups andExport Operations . . . . . . . . . . . . 58
Chapter 4. Attaching Devices to theServer System . . . . . . . . . . . 59Devices Supported by Tivoli Storage Manager . . . 59Attaching a Manual Drive . . . . . . . . . 59Attaching an Automated Library Device . . . . . 60
Setting the Library Mode . . . . . . . . . 61Using Device Alias Names . . . . . . . . . 61
Obtaining Device Alias Names . . . . . . . 62Selecting a Device Driver . . . . . . . . . . 62
Windows Device Drivers . . . . . . . . . 64Requirements for Using Windows Device Driverswith Tivoli Storage Manager. . . . . . . . 64Controlling All Devices With the Tivoli StorageManager Device Driver . . . . . . . . . 65
© Copyright IBM Corp. 1994, 2002 iii

Controlling Some Devices with the Tivoli StorageManager Device Driver and Others withWindows Device Drivers . . . . . . . . . 66Controlling a Device with the Tivoli StorageManager Device Driver and the Windows DeviceDriver . . . . . . . . . . . . . . . 67Controlling All Devices with Windows DeviceDrivers . . . . . . . . . . . . . . . 68
Chapter 5. Configuring Storage Devices 71Device Configuration Overview . . . . . . . 72Planning for Devices . . . . . . . . . . . 72Server Storage Options . . . . . . . . . . 73Configuring Devices . . . . . . . . . . . 74
Configuring Manual Devices . . . . . . . 74Configuring Automated Library Devices. . . . 74Configuring 3494 Automated Library Devices . . 75Obtaining Element Numbers for AutomatedLibrary Devices . . . . . . . . . . . . 76Configuring Optical Devices . . . . . . . . 77Configuring Devices Not Supported by the TivoliStorage Manager Device Driver. . . . . . . 77Configuring Removable Media Devices . . . . 78
Configuring Devices Using Tivoli Storage ManagerCommands . . . . . . . . . . . . . . 80
Using Commands to Define Tivoli StorageManager Storage Objects . . . . . . . . . 80Determine Backup Strategy . . . . . . . . 82Determine the Media and Device Type for ClientBackups . . . . . . . . . . . . . . 82
Configuring Tivoli Storage Manager Servers toShare SAN-Connected Devices . . . . . . . . 83
Setting up Server Communications . . . . . 83Setting up the Library Manager Server . . . . 83Setting up the Library Client Servers . . . . . 84Server Operations . . . . . . . . . . . 85
Configuring Tivoli Storage Manager for LAN-freeData Movement . . . . . . . . . . . . . 87Configuring Tivoli Storage Manager for use withTivoli Data Protection for NDMP . . . . . . . 87Configuring Tivoli Storage Manager for Server-freeData Movement . . . . . . . . . . . . . 88Troubleshooting Device Configuration . . . . . 88
Displaying Device Information . . . . . . . 88Displaying the Event Log to Find Device Errors 88
Defining Devices and Paths . . . . . . . . . 89Defining Libraries . . . . . . . . . . . 89Defining Drives . . . . . . . . . . . . 89Defining Data Movers . . . . . . . . . . 90Defining Disks . . . . . . . . . . . . 91Defining Paths . . . . . . . . . . . . 91
Chapter 6. Setting Up Tivoli DataProtection for NDMP . . . . . . . . . 93Requirements. . . . . . . . . . . . . . 93Interfaces Used for Tivoli Data Protection for NDMP 94Data Formats for Tivoli Data Protection for NDMP 95Planning for Tivoli Data Protection for NDMP. . . 95
Planning for Tape Libraries and Drives used inNDMP Operations . . . . . . . . . . . 95
Determining Where to Attach the Tape LibraryRobotics . . . . . . . . . . . . . . 95Determining How to Use the Drives in theLibrary . . . . . . . . . . . . . . . 98
Configuring Tivoli Data Protection for NDMP . . . 99Step 1. Setting Up Tape Libraries for NDMPOperations . . . . . . . . . . . . . 100Step 2. Configuring Tivoli Storage ManagerPolicy for NDMP Operations . . . . . . . 101Step 3. Registering NAS Nodes with the TivoliStorage Manager Server . . . . . . . . . 102Step 4. Defining a Data Mover for the NAS FileServer . . . . . . . . . . . . . . . 102Step 5. Defining a Path to a Library . . . . . 103Step 6. Defining Tape Drives and Paths forNDMP Operations. . . . . . . . . . . 103Step 7. Labeling Tapes and Checking Tapes intothe Library . . . . . . . . . . . . . 104Step 8. Scheduling Tivoli Data Protection forNDMP Operations. . . . . . . . . . . 104
Backing Up and Restoring NAS File Servers UsingTivoli Data Protection for NDMP . . . . . . . 104Managing Tivoli Data Protection for NDMP . . . 105
Managing NAS File Server Nodes . . . . . 105Managing Data Movers Used in NDMPOperations . . . . . . . . . . . . . 106Dedicating a Tivoli Storage Manager Drive toNDMP Operations. . . . . . . . . . . 106Managing Storage Pools Containing Tivoli DataProtection for NDMP Media . . . . . . . 107
Chapter 7. Setting Up Server-FreeData Movement . . . . . . . . . . 109Requirements . . . . . . . . . . . . . 109Data Format for Server-Free Data Movement . . . 110Types of Configurations for Server-Free DataMovement . . . . . . . . . . . . . . 111Configuring Tivoli Storage Manager for Server-FreeData Movement . . . . . . . . . . . . 111
Step 1. Connect Devices to the Server . . . . 112Step 2. Determine World Wide Name, SerialNumber and LUN . . . . . . . . . . . 112Step 3. Obtaining and Correlating the DiskInformation . . . . . . . . . . . . . 113Step 4. Configuring Tivoli Storage Manager forServer-Free Data Movement . . . . . . . 114
Backing Up and Restoring Data Using Server-FreeData Movement . . . . . . . . . . . . 117
Client Control Options . . . . . . . . . 117Performing Backups and Restores . . . . . 118
Managing Server-Free Data Movement . . . . . 118Managing the Size of Data Movements . . . . 119Managing Data Movers Used in Server-FreeData Movement . . . . . . . . . . . 119Managing Tape Libraries and Drives Used inServer-Free Data Movement . . . . . . . 120Managing Disks Used in Server-Free DataMovement . . . . . . . . . . . . . 121Managing Paths for Server-Free Data Movement 121
iv Tivoli Storage Manager for Windows: Administrator’s Guide

Chapter 8. Managing RemovableMedia Operations . . . . . . . . . 123Defining Volumes . . . . . . . . . . . . 123Managing Volumes . . . . . . . . . . . 124
Managing Partially-Written Volumes . . . . 124Managing the Volume Inventory for anAutomated Library Device . . . . . . . . 124Managing Database Backup and DatabaseExport Volumes . . . . . . . . . . . 125
Preparing Media for Automated Libraries . . . . 125Labeling Media. . . . . . . . . . . . 125Checking Media into Automated LibraryDevices . . . . . . . . . . . . . . 126
Managing Media in Automated Libraries . . . . 128Changing the Status of Automated LibraryVolumes . . . . . . . . . . . . . . 129Removing Volumes from Automated LibraryDevices . . . . . . . . . . . . . . 129Returning Partially-Written Volumes toAutomated Library Devices . . . . . . . 129Returning Reclaimed Volumes to a Library . . 129Auditing a Library’s Volume Inventory. . . . 130Adding Scratch Volumes to an AutomatedLibrary Device . . . . . . . . . . . . 130Setting Up and Managing a Volume OverflowLocation for an Automated Library Device . . 130Modifying the Access Mode for Volumes . . . 131Managing Category Numbers for IBM 3494Libraries . . . . . . . . . . . . . . 132Reusing Media in Automated Libraries . . . . 132
Labeling Media for Manual Libraries . . . . . 132Managing Media in Manual Libraries . . . . . 133Managing Server Requests . . . . . . . . . 134
Starting the Administrative Client as a ServerConsole Monitor . . . . . . . . . . . 134Displaying Information About Volumes that areCurrently Mounted . . . . . . . . . . 135Displaying Information about Pending MountRequests . . . . . . . . . . . . . . 135Replying to Mount Requests . . . . . . . 135Canceling Mount Requests . . . . . . . . 135Responding to Requests for Volume Check-in 136Dismounting Idle Volumes . . . . . . . . 136Dismounting Volumes from REMOVABLEFILEDevices . . . . . . . . . . . . . . 136
Setting Up a Tape Rotation . . . . . . . . . 136Labeling Volumes Using Commands . . . . . 138Using Removable Media Managers With TivoliStorage Manager . . . . . . . . . . . . 138
Overview of TSM Media Manager Support . . 139Setting Up TSM to Use RSM . . . . . . . 139Using an External Media Manager to ControlYour Media . . . . . . . . . . . . . 142Removing Tivoli Storage Manager Devices fromMedia Manager Control . . . . . . . . . 143Troubleshooting Database Errors . . . . . . 143
Managing Libraries . . . . . . . . . . . 143Requesting Information about Libraries. . . . 143Updating Libraries . . . . . . . . . . 143Deleting Libraries . . . . . . . . . . . 144
Managing Drives . . . . . . . . . . . . 145
Requesting Information about Drives . . . . 145Updating Drives . . . . . . . . . . . 145Replacing Tape or Optical Drives . . . . . . 146Cleaning Drives . . . . . . . . . . . 150Deleting Drives. . . . . . . . . . . . 154
Managing Paths . . . . . . . . . . . . 154Requesting Information About Paths . . . . 154Updating Paths. . . . . . . . . . . . 154Deleting Paths . . . . . . . . . . . . 155
Managing Data Movers . . . . . . . . . . 155Requesting Information About Data Movers . . 155Updating Data Movers . . . . . . . . . 155Deleting Data Movers . . . . . . . . . 155
Managing Disks . . . . . . . . . . . . 156Requesting Information About Disks . . . . 156Updating Disks. . . . . . . . . . . . 156Deleting Disks . . . . . . . . . . . . 156
Chapter 9. Defining Device Classes 157Defining and Updating Device Classes forSequential Media . . . . . . . . . . . . 157
Defining and Updating Device Classes for TapeDevices . . . . . . . . . . . . . . 158Defining and Updating Device Classes forGeneric Tape Devices. . . . . . . . . . 161Defining and Updating Device Classes forOptical Devices. . . . . . . . . . . . 162Defining and Updating Device Classes forRemovable File System Devices . . . . . . 163Defining and Updating FILE Device Classes . . 163Defining and Updating SERVER Device Classes 165
Requesting Information about a Device Class. . . 166Deleting a Device Class . . . . . . . . . . 167How TSM Fills Volumes. . . . . . . . . . 167
Using Data Compression . . . . . . . . 168Tape Volume Capacity and Data Compression 168
Chapter 10. Managing Storage Poolsand Volumes. . . . . . . . . . . . 171Overview: Storage Pools. . . . . . . . . . 172
Primary Storage Pool . . . . . . . . . . 172Copy Storage Pool. . . . . . . . . . . 172An Example of Server Storage . . . . . . . 173Defining or Updating Primary Storage Pools 174Task Tips for Storage Pools . . . . . . . . 178Simultaneous Write to a Primary Storage Pooland Copy Storage Pools . . . . . . . . . 179
Overview: Volumes in Storage Pools . . . . . 180Random Access Storage Pool Volumes . . . . 180Sequential Access Storage Pool Volumes . . . 180Preparing Volumes for Random Access StoragePools . . . . . . . . . . . . . . . 181Preparing Volumes for Sequential AccessStorage Pools . . . . . . . . . . . . 182Updating Storage Pool Volumes . . . . . . 183Access Modes for Storage Pool Volumes . . . 184
Overview: The Storage Pool Hierarchy . . . . . 185Setting Up a Storage Pool Hierarchy. . . . . 186How the Server Groups Files before Storing . . 188Where the Files Are Stored . . . . . . . . 188
Contents v

How the Server Stores Files in a StorageHierarchy . . . . . . . . . . . . . 189Using Copy Storage Pools to Back Up a StorageHierarchy . . . . . . . . . . . . . 190Using the Hierarchy to Stage Client Data fromDisk to Tape. . . . . . . . . . . . . 190
Migration of Files in a Storage Pool Hierarchy . . 191Migration for Disk Storage Pools . . . . . . 192Migration for Sequential Access Storage Pools 197Migration and Copy Storage Pools . . . . . 199
Using Cache on Disk Storage Pools . . . . . . 199How the Server Removes Cached Files . . . . 200Effect of Caching on Storage Pool Statistics . . 200
Keeping a Client’s Files Together: Collocation . . 200The Effects of Collocation on Operations . . . 202How the Server Selects Volumes withCollocation Enabled . . . . . . . . . . 202How the Server Selects Volumes withCollocation Disabled . . . . . . . . . . 203Turning Collocation On or Off. . . . . . . 204Collocation on Copy Storage Pools . . . . . 204
Reclaiming Space in Sequential Access StoragePools . . . . . . . . . . . . . . . . 205
How Tivoli Storage Manager ReclamationWorks . . . . . . . . . . . . . . . 205Choosing a Reclamation Threshold . . . . . 207Reclaiming Volumes in a Storage Pool with OneDrive . . . . . . . . . . . . . . . 208Reclamation for WORM Optical Media . . . . 208Reclamation of Volumes with the Device Typeof SERVER . . . . . . . . . . . . . 209Reclamation for Copy Storage Pools . . . . . 209How Collocation Affects Reclamation . . . . 211
Estimating Space Needs for Storage Pools . . . . 212Estimating Space Needs in Random AccessStorage Pools . . . . . . . . . . . . 212Estimating Space Needs in Sequential AccessStorage Pools . . . . . . . . . . . . 213
Monitoring Storage Pools and Volumes. . . . . 214Monitoring Space Available in a Storage Pool 214Monitoring the Use of Storage Pool Volumes 216Monitoring Migration Processes . . . . . . 222Monitoring the Use of Cache Space on DiskStorage . . . . . . . . . . . . . . 224Requesting Information on the Use of StorageSpace . . . . . . . . . . . . . . . 225
Moving Files from One Volume to Another Volume 228Moving Data to Other Volumes in the SameStorage Pool . . . . . . . . . . . . . 229Moving Data to Another Storage Pool . . . . 229Moving Data from an Offsite Volume in a CopyStorage Pool . . . . . . . . . . . . . 230Procedure for Moving Data. . . . . . . . 230
Moving Data by Node . . . . . . . . . . 232Moving Data for All File Spaces for One orMore Nodes . . . . . . . . . . . . . 233Moving Data for Selected File Spaces for OneNode . . . . . . . . . . . . . . . 233Requesting Information about the DataMovement Process . . . . . . . . . . 234
Preventing Incomplete MOVE NODEDATAOperations . . . . . . . . . . . . . 234
Renaming a Storage Pool . . . . . . . . . 235Defining a Copy Storage Pool . . . . . . . . 235
Example: Defining a Copy Storage Pool . . . 236Comparing Primary and Copy Storage Pools 237
Deleting a Storage Pool . . . . . . . . . . 238Deleting Storage Pool Volumes . . . . . . . 239
Deleting an Empty Storage Pool Volume . . . 239Deleting a Storage Pool Volume with Data . . 239
Chapter 11. Configuring and ManagingClusters. . . . . . . . . . . . . . 241Cluster Components . . . . . . . . . . . 241
Understanding Nodes in a Cluster . . . . . 241SCSI Tape Failover . . . . . . . . . . . 245
Failover Setup . . . . . . . . . . . . 246Terminating the Shared SCSI Bus . . . . . . 246Configuration Considerations . . . . . . . 247
Administrator’s Tasks . . . . . . . . . . 248Adding a Node to an Existing Cluster . . . . 248Migrating an Existing TSM Server into a Cluster 248Backup and Restore . . . . . . . . . . 249
Managing TSM on a Cluster . . . . . . . . 249Using the Cluster Log on Windows . . . . . 250
Managing SCSI Tape Failover . . . . . . . . 250
Part 3. Managing ClientOperations . . . . . . . . . . . . 251
Chapter 12. Adding Client Nodes . . . 253Overview of Clients and Servers as Nodes . . . 254Installing Client Node Software . . . . . . . 254Registering Nodes with the Server . . . . . . 254
Accepting Default Closed Registration orEnabling Open Registration . . . . . . . 254Registering Nodes with the Tivoli StorageManager Client Node Configuration Wizard . . 256Registering Nodes with Client Options Sets . . 256Registering a Network-attached Storage FileServer as a Node . . . . . . . . . . . 256Registering a Source Server as a Node on aTarget Server . . . . . . . . . . . . 257Registering an Application ProgrammingInterface to the Server . . . . . . . . . 257
Connecting Nodes with the Server . . . . . . 258Required Client Options . . . . . . . . . 258Non–Required Client Options . . . . . . . 258UNIX Client Options . . . . . . . . . . 258
Updating the Password for Scheduling Operations 259Methods for Creating or Updating a Client OptionsFile . . . . . . . . . . . . . . . . . 259
Using a Text Editor . . . . . . . . . . 259Using the Client Configuration Wizard . . . . 259Using the Client Options File Wizard (Windows32-bit Clients) . . . . . . . . . . . . 259Using the Remote Client Configuration Wizard(Networked Windows 32-bit Clients) . . . . 260
vi Tivoli Storage Manager for Windows: Administrator’s Guide

Comparing Network-Attached Nodes to LocalNodes . . . . . . . . . . . . . . . . 261Adding Clients from the Administrative CommandLine Client . . . . . . . . . . . . . . 261
Enabling Open Registration . . . . . . . 262Configuring the Client Options File to Connectwith the Server . . . . . . . . . . . . 262Example: Register Three Client Nodes Using theAdministrative Command Line . . . . . . 262
Chapter 13. Managing Client Nodes 263Managing Client Node Registration Techniques . . 263Managing Nodes . . . . . . . . . . . . 264
Updating Client Node Information . . . . . 264Renaming Client Nodes . . . . . . . . . 264Locking and Unlocking Client Nodes . . . . 264Deleting Client Nodes . . . . . . . . . 265Displaying Information about Client Nodes . . 265Overview of Remote Access to WebBackup-Archive Clients . . . . . . . . . 266Managing Client Access Authority Levels . . . 268
Managing File Spaces . . . . . . . . . . 270Overview of Client Nodes and File Spaces . . 270Supporting Unicode-Enabled Clients . . . . 271Displaying Information about File Spaces . . . 279Moving Data by Node . . . . . . . . . 280Deleting File Spaces and Client Nodes . . . . 280
Modifying Client Option Files . . . . . . . . 281All Nodes . . . . . . . . . . . . . 281Windows 32-bit Clients . . . . . . . . . 281
Creating Client Option Sets from the Server . . . 281Creating a Client Option Set . . . . . . . 282Adding Client Options in an Option Set . . . 282Registering Client Nodes and Assigning Themto an Option Set . . . . . . . . . . . 283
Managing Client Options from the Server UsingClient Option Sets . . . . . . . . . . . . 283
Updating the Sequence Number for a ClientOption . . . . . . . . . . . . . . 283Deleting an Option from a Client Option Set 283Copying a Client Option Set . . . . . . . 283Requesting Information about a Client OptionSet . . . . . . . . . . . . . . . . 284Updating the Description for a Client OptionSet . . . . . . . . . . . . . . . . 284Deleting a Client Option Set . . . . . . . 284
Managing Tivoli Storage Manager Sessions . . . 284Displaying Information about Tivoli StorageManager Sessions . . . . . . . . . . . 284Canceling a Tivoli Storage Manager Session . . 285When a Client Session is AutomaticallyCanceled . . . . . . . . . . . . . . 286Disabling or Enabling Access to the Server . . 287Managing Client Restartable Restore Sessions 287
Managing Tivoli Storage Manager Security . . . 288Managing Tivoli Storage ManagerAdministrators . . . . . . . . . . . . 289Managing Levels of Administrative Authority 292Managing Access to the Server and Clients . . 294Managing Passwords and Login Procedures . . 294
Chapter 14. Implementing Policies forClient Data . . . . . . . . . . . . 299Basic Policy Planning. . . . . . . . . . . 300
The Standard Policy . . . . . . . . . . 301Getting Users Started. . . . . . . . . . 302Changing Policy . . . . . . . . . . . 302File Expiration and Expiration Processing . . . 303
Client Operations Controlled by Policy . . . . . 303Backup and Restore . . . . . . . . . . 304Archive and Retrieve . . . . . . . . . . 304Client Migration and Recall . . . . . . . 304
The Parts of a Policy . . . . . . . . . . . 305Relationships among Clients, Storage, andPolicy . . . . . . . . . . . . . . . 307
More on Management Classes . . . . . . . . 309Contents of a Management Class . . . . . . 309Default Management Classes . . . . . . . 310The Include-Exclude List . . . . . . . . 310How Files and Directories Are Associated witha Management Class . . . . . . . . . . 312
How Tivoli Storage Manager Selects Files forPolicy Operations . . . . . . . . . . . . 314
Incremental Backup . . . . . . . . . . 314Selective Backup . . . . . . . . . . . 316Logical Volume Backup . . . . . . . . . 316Archive . . . . . . . . . . . . . . 317Automatic Migration from a Client Node . . . 317
How Client Migration Works with Backup andArchive . . . . . . . . . . . . . . . 318Creating Your Own Policies . . . . . . . . 318
Example: Sample Policy Objects . . . . . . 319Defining and Updating a Policy Domain . . . 320Defining and Updating a Policy Set . . . . . 321Defining and Updating a Management Class 322Defining and Updating a Backup Copy Group 323Defining and Updating an Archive Copy Group 328Assigning a Default Management Class . . . 330Validating and Activating a Policy Set . . . . 330
Assigning Client Nodes to a Policy Domain . . . 332Running Expiration Processing to Delete ExpiredFiles . . . . . . . . . . . . . . . . 333
Running Expiration Processing Automatically 334Using Commands and Scheduling to ControlExpiration Processing. . . . . . . . . . 334Additional Expiration Processing with TivoliDisaster Recovery Manager. . . . . . . . 334
Configuring Policy for Specific Cases . . . . . 335Configuring Policy for Direct-to-Tape Backups 335Configuring Policy for Tivoli Data ProtectionApplication Clients . . . . . . . . . . 336Policy for Logical Volume Backups . . . . . 336Configuring Policy for Tivoli Data Protection forNDMP . . . . . . . . . . . . . . 337Configuring Policy for Managed System forSAN . . . . . . . . . . . . . . . 338Policy for Tivoli Storage Manager Servers asClients . . . . . . . . . . . . . . 340Setting Policy to Enable Point-in-Time Restorefor Clients . . . . . . . . . . . . . 340
Distributing Policy Using Enterprise Configuration 341Querying Policy . . . . . . . . . . . . 341
Contents vii

Querying Copy Groups . . . . . . . . . 341Querying Management Classes . . . . . . 342Querying Policy Sets . . . . . . . . . . 342Querying Policy Domains . . . . . . . . 343
Deleting Policy . . . . . . . . . . . . . 343Deleting Copy Groups . . . . . . . . . 344Deleting Management Classes . . . . . . . 344Deleting Policy Sets . . . . . . . . . . 344Deleting Policy Domains . . . . . . . . 344
Chapter 15. Managing Data for ClientNodes . . . . . . . . . . . . . . 347Validating a Node’s Data . . . . . . . . . 347
Performance Considerations . . . . . . . 348Validating a Node’s Data During a ClientSession . . . . . . . . . . . . . . 348
Creating and Using Client Backup Sets . . . . . 348Generating Client Backup Sets on the Server 349Restoring Backup Sets from a Backup-ArchiveClient . . . . . . . . . . . . . . . 350Moving Backup Sets to Other Servers . . . . 351Managing Client Backup Sets . . . . . . . 351
Enabling Clients to Use Subfile Backup. . . . . 354Example of Subfile Backups . . . . . . . 354Setting Up Clients to Use Subfile Backup . . . 355Managing Subfile Backups . . . . . . . . 355
Chapter 16. Scheduling Operations forClient Nodes. . . . . . . . . . . . 357Prerequisites to Scheduling Operations . . . . . 358Scheduling a Client Operation. . . . . . . . 358
Creating Tivoli Storage Manager Schedules . . 358Associating Client Nodes with Schedules . . . 359Starting the Scheduler on the Clients . . . . 360Displaying Schedule Information . . . . . . 361
Creating Schedules for Running Command Files 362Updating the Client Options File to AutomaticallyGenerate a New Password . . . . . . . . . 362Configuring the Scheduler to Run Under theSite-Server Account . . . . . . . . . . . 363Comparing Tivoli Storage Manager SchedulingAcross Operating Systems and Components . . . 363Overview of the Tivoli Storage Manager SchedulerRunning as a Windows Service . . . . . . . 364Commands for Scheduling Client Operations . . . 365
Chapter 17. Managing Schedules forClient Nodes. . . . . . . . . . . . 367Managing Tivoli Storage Manager Schedules . . . 367
Verifying that the Schedule Ran . . . . . . 367Adding New Schedules . . . . . . . . . 368Copying Existing Schedules . . . . . . . 368Modifying Schedules . . . . . . . . . . 368Deleting Schedules . . . . . . . . . . 369Displaying Information about Schedules . . . 369
Managing Node Associations with Schedules. . . 369Adding New Nodes to Existing Schedules. . . 370Moving Nodes from One Schedule to Another 370Displaying Nodes Associated with Schedules 370Removing Nodes from Schedules. . . . . . 370
Managing Event Records . . . . . . . . . 371Displaying Information about Scheduled Events 371Managing Event Records in the Server Database 372
Managing the Throughput of ScheduledOperations . . . . . . . . . . . . . . 372
Modifying the Default Scheduling Mode . . . 373Specifying the Schedule Period for IncrementalBackup Operations . . . . . . . . . . 374Balancing the Scheduled Workload for theServer . . . . . . . . . . . . . . . 375Controlling How Often Client Nodes Contactthe Server . . . . . . . . . . . . . 377
Specifying One-Time Actions for Client Nodes . . 378Determining How Long the One-Time ScheduleRemains Active. . . . . . . . . . . . 379
Part 4. Maintaining the Server . . . 381
Chapter 18. Managing ServerOperations . . . . . . . . . . . . 383Licensing Tivoli Storage Manager. . . . . . . 383
Registering Licensed Features . . . . . . . 384Saving Your Licenses . . . . . . . . . . 386Monitoring Licenses . . . . . . . . . . 386
Working with The Tivoli Storage Manager Serverand Active Directory . . . . . . . . . . . 387
Configuring the Active Directory Schema . . . 388Starting and Halting the Server . . . . . . . 389
Starting the Server. . . . . . . . . . . 390Halting the Server . . . . . . . . . . . 392
Moving the Tivoli Storage Manager Server . . . 393Changing the Date and Time on the Server . . . 393Starting and Stopping the Tivoli Storage ManagerDevice Driver (ADSMSCSI). . . . . . . . . 394
Starting the Tivoli Storage Manager DeviceDriver . . . . . . . . . . . . . . . 394Stopping the Tivoli Storage Manager DeviceDriver . . . . . . . . . . . . . . . 394
Managing Server Processes . . . . . . . . . 394Requesting Information about Server Processes 395Canceling Server Processes . . . . . . . . 396Preemption of Client or Server Operations . . 396
Setting the Server Name. . . . . . . . . . 397Adding or Updating Server Options. . . . . . 397
Adding or Updating a Server Option withoutRestarting the Server . . . . . . . . . . 397
Automatic Tuning of Server Options . . . . . 398Getting Help on Commands and Error Messages 398
Chapter 19. Automating ServerOperations . . . . . . . . . . . . 401Automating a Basic Administrative CommandSchedule . . . . . . . . . . . . . . . 401
Defining the Schedule . . . . . . . . . 402Verifying the Schedule . . . . . . . . . 402
Tailoring Schedules . . . . . . . . . . . 403Example: Defining and Updating anAdministrative Command Schedule . . . . . 404
Copying Schedules . . . . . . . . . . . 405Deleting Schedules . . . . . . . . . . . 405
viii Tivoli Storage Manager for Windows: Administrator’s Guide

Managing Scheduled Event Records . . . . . . 405Querying Events . . . . . . . . . . . 405Removing Event Records from the Database . . 406
Tivoli Storage Manager Server Scripts . . . . . 406Defining a Server Script . . . . . . . . . 407Managing Server Scripts. . . . . . . . . 410Running a Server Script . . . . . . . . . 412
Using Macros . . . . . . . . . . . . . 413Writing Commands in a Macro . . . . . . 413Writing Comments in a Macro. . . . . . . 414Using Continuation Characters . . . . . . 414Using Substitution Variables in a Macro . . . 415Running a Macro . . . . . . . . . . . 415Controlling Command Processing in a Macro 416
Chapter 20. Managing the Databaseand Recovery Log . . . . . . . . . 417How Tivoli Storage Manager ProcessesTransactions . . . . . . . . . . . . . . 418How Tivoli Storage Manager Manages Space . . . 418
Available Space. . . . . . . . . . . . 418Assigned Capacity. . . . . . . . . . . 419Utilization . . . . . . . . . . . . . 419
Estimating and Monitoring Database and RecoveryLog Space Requirements. . . . . . . . . . 420
Monitoring the Database and Recovery Log . . 421Increasing the Size of the Database or RecoveryLog. . . . . . . . . . . . . . . . . 422
Automating the Increase of the Database orRecovery Log . . . . . . . . . . . . 422Recovering When the Recovery Log Runs Outof Space . . . . . . . . . . . . . . 423Manually Increasing the Database or RecoveryLog. . . . . . . . . . . . . . . . 424
Decreasing the Size of the Database or RecoveryLog. . . . . . . . . . . . . . . . . 426
Step 1: Determining If Volumes Can Be Deleted 427Step 2: Reducing the Capacity of the Databaseor Recovery Log . . . . . . . . . . . 427Step 3: Deleting a Volume from the Database orRecovery Log . . . . . . . . . . . . 428
Optimizing Database and Recovery LogPerformance. . . . . . . . . . . . . . 428
Adjusting the Database Buffer Pool Size . . . 429Manually Adjusting the Database Buffer PoolSize . . . . . . . . . . . . . . . 429Adjusting the Recovery Log Buffer Pool Size 430Reorganizing the Database . . . . . . . . 431
Chapter 21. Monitoring the TivoliStorage Manager Server. . . . . . . 433Using Tivoli Storage Manager Queries to DisplayInformation . . . . . . . . . . . . . . 433
Requesting Information about Tivoli StorageManager Definitions . . . . . . . . . . 433Requesting Information about Client Sessions 434Requesting Information about Server Processes 435Requesting Information about Server Settings 436Querying Server Options . . . . . . . . 436Querying the System . . . . . . . . . . 437
Using SQL to Query the Tivoli Storage ManagerDatabase . . . . . . . . . . . . . . . 438
Using the ODBC Driver . . . . . . . . . 438Issuing SELECT Commands . . . . . . . 438Using SELECT Commands in Tivoli StorageManager Scripts . . . . . . . . . . . 441Canceling a SELECT Command . . . . . . 442Controlling the Format of SELECT Results . . 442Querying the SQL Activity Summary Table . . 442Creating Output for Use by Another Application 443
Using the Tivoli Storage Manager Activity Log . . 443Requesting Information from the Activity Log 444Setting the Activity Log Retention Period . . . 444Changing the Size of the Activity Log . . . . 444
Logging Tivoli Storage Manager Events toReceivers . . . . . . . . . . . . . . . 445
Controlling Event Logging . . . . . . . . 446Logging Events to the Tivoli Storage ManagerServer Console and Activity Log . . . . . . 447Logging Events to a File Exit and a User Exit 447Logging Events to the Tivoli/Enterprise Console 449Logging Events to an SNMP Manager . . . . 450Logging Events to the Windows Event Log . . 455Enterprise Event Logging: Logging Events toAnother Server . . . . . . . . . . . . 455Querying Event Logging . . . . . . . . 457
Using Tivoli Decision Support . . . . . . . . 458Scheduling the Decision Support Loader withTivoli Storage Manager . . . . . . . . . 458
Monitoring Errors and Diagnosing Problems . . . 459Monitoring Tivoli Storage Manager AccountingRecords . . . . . . . . . . . . . . . 459Daily Monitoring Scenario . . . . . . . . . 460
Chapter 22. Working with a Networkof Tivoli Storage Manager Servers . . 463Concepts for Working with a Network of Servers 463
Configuring and Managing Servers: EnterpriseConfiguration . . . . . . . . . . . . 464Performing Tasks on Multiple Servers . . . . 465Central Monitoring . . . . . . . . . . 465Storing Data on Another Server . . . . . . 466Example Scenarios. . . . . . . . . . . 466
Planning for Enterprise Administration . . . . . 467Setting Up Communications Among Servers . . . 468
Setting Up Communications for EnterpriseConfiguration and Enterprise Event Logging . . 468Setting Up Communications for CommandRouting . . . . . . . . . . . . . . 471Updating and Deleting Servers . . . . . . 474
Setting Up an Enterprise Configuration. . . . . 475Enterprise Configuration Scenario . . . . . 476Creating the Default Profile on a ConfigurationManager . . . . . . . . . . . . . . 479Creating and Changing Configuration Profiles 480Getting Information about Profiles . . . . . 487Subscribing to a Profile . . . . . . . . . 489Refreshing Configuration Information . . . . 493Returning Managed Objects to Local Control 494Setting Up Administrators for the Servers . . . 494
Contents ix

Handling Problems with Synchronization ofProfiles . . . . . . . . . . . . . . 495Switching a Managed Server to a DifferentConfiguration Manager . . . . . . . . . 495Deleting Subscribers from a ConfigurationManager . . . . . . . . . . . . . . 496Renaming a Managed Server . . . . . . . 496
Performing Tasks on Multiple Servers . . . . . 496Using Tivoli Storage Manager Enterprise Logon 496Routing Commands . . . . . . . . . . 497Setting Up Server Groups . . . . . . . . 499Querying Server Availability . . . . . . . 501
Using Virtual Volumes to Store Data on AnotherServer . . . . . . . . . . . . . . . . 501
Setting Up Source and Target Servers for VirtualVolumes . . . . . . . . . . . . . . 503Performing Operations at the Source Server . . 504Reconciling Virtual Volumes and Archive Files 506
Chapter 23. Exporting and ImportingData . . . . . . . . . . . . . . . 509Data That Can Be Exported and Imported . . . . 509Preparing to Export or Import Data . . . . . . 510
Using Preview before Exporting or ImportingData . . . . . . . . . . . . . . . 510Planning for Sequential Media Used to ExportData . . . . . . . . . . . . . . . 511
Monitoring Export and Import Processes . . . . 512Requesting Information about an Export orImport Process . . . . . . . . . . . . 512Viewing Information from the Server Console 512Viewing Information from an AdministrativeClient . . . . . . . . . . . . . . . 513Querying the Activity Log for Export or ImportInformation . . . . . . . . . . . . . 514
Exporting Data to Sequential Media Volumes. . . 515Deciding When to Export Data . . . . . . 515Exporting Server Data . . . . . . . . . 516Exporting Administrator Information . . . . 517Exporting Client Node Information . . . . . 517Exporting Policy Information . . . . . . . 518
Importing Data from Sequential Media Volumes 518Step 1: Previewing Information before YouImport Data . . . . . . . . . . . . . 519Step 2: Importing Definitions . . . . . . . 521Step 3: Tailoring Server Storage Definitions onthe Target Server . . . . . . . . . . . 523Step 4: Importing File Data Information . . . 524Considerations When Importing Data . . . . 526Recovering from Errors during the ImportProcess . . . . . . . . . . . . . . 526
Exporting and Importing Data from VirtualVolumes . . . . . . . . . . . . . . . 527
Part 5. Protecting the Server . . . 529
Chapter 24. Protecting andRecovering Your Server . . . . . . . 531Levels of Protection . . . . . . . . . . . 532Storage Pool Protection: An Overview . . . . . 532
How Restore Processing Works . . . . . . 532How the Destroyed Volume Access Mode Works 533
Database and Recovery Log Protection: AnOverview. . . . . . . . . . . . . . . 533
Mirroring. . . . . . . . . . . . . . 534Database and Recovery Log Protection . . . . 534
Snapshot Database Protection . . . . . . . . 536Mirroring the Database and Recovery Log. . . . 536
Separating Disk Volume Copies On SeparatePhysical Disks When Mirroring the Databaseand Recovery Log . . . . . . . . . . . 537Defining Database or Recovery Log MirroredVolume Copies . . . . . . . . . . . . 537Specifying Mirroring and Database PageShadowing Server Options . . . . . . . . 538Requesting Information about MirroredVolumes . . . . . . . . . . . . . . 539
Backing Up Storage Pools . . . . . . . . . 539Delaying Reuse of Sequential Access Volumes 541
Using Copy Storage Pools to Improve DataAvailability . . . . . . . . . . . . . . 542
Example: Simple Hierarchy with One CopyStorage Pool . . . . . . . . . . . . . 542
Backing Up the Database . . . . . . . . . 542Defining Device Classes for Backups . . . . 543Setting the Recovery Log Mode . . . . . . 543Estimating the Size of the Recovery Log . . . 543Scheduling Database Backups . . . . . . . 544Automating Database Backups . . . . . . 545Saving the Volume History File . . . . . . 546Saving the Device Configuration File . . . . 548Saving the Server Options . . . . . . . . 551Saving the Database and Recovery LogInformation . . . . . . . . . . . . . 551Doing Full and Incremental Backups . . . . 551Doing Snapshot Database Backups . . . . . 551
Recovering Your Server Using Database andStorage Pool Backups. . . . . . . . . . . 552
Restoring a Database to a Point-in-Time . . . 553Restoring a Database to its Most Current State 556Restoring Storage Pools . . . . . . . . . 557
Restoring Your Server Using Mirrored Volumes 559Restoring Storage Pool Volumes . . . . . . . 559
What Happens When a Volume Is Restored . . 560When a Volume Restoration Is Incomplete. . . 561
Auditing a Storage Pool Volume . . . . . . . 561What Happens When You Audit Storage PoolVolumes . . . . . . . . . . . . . . 562Data Validation During Audit VolumeProcessing . . . . . . . . . . . . . 563Auditing a Volume in a Disk Storage Pool. . . 567Auditing Multiple Volumes in a SequentialAccess Storage Pool . . . . . . . . . . 567Auditing a Single Volume in a Sequential AccessStorage Pool . . . . . . . . . . . . . 568Auditing Volumes by Date Written . . . . . 568Auditing Volumes in a Specific Storage Pool . . 569Defining a Schedule to Audit Volumes on aRegular Basis . . . . . . . . . . . . 569
Correcting Damaged Files . . . . . . . . . 569Maintaining the Integrity of Files . . . . . . 569
x Tivoli Storage Manager for Windows: Administrator’s Guide

Restoring Damaged Files . . . . . . . . 570Backup and Recovery Scenarios . . . . . . . 571
Protecting Your Database and Storage Pool . . 571Recovering to a Point-in-Time from a Disaster 572Recovering a Lost or Damaged Storage PoolVolume . . . . . . . . . . . . . . 575
Chapter 25. Using Tivoli DisasterRecovery Manager . . . . . . . . . 577Specifying Defaults for Tivoli Disaster RecoveryManager . . . . . . . . . . . . . . . 578
Specifying Defaults for the Disaster RecoveryPlan File . . . . . . . . . . . . . . 578Specifying Defaults for Offsite Recovery MediaManagement . . . . . . . . . . . . 580
Specifying Recovery Instructions for Your Site . . 582Specifying Information About Your Server andClient Node Machines . . . . . . . . . . 584Specifying Recovery Media for Client Machines 588Creating and Storing the Disaster Recovery Plan 589
Storing the Disaster Recovery Plan Locally . . 590Storing the Disaster Recovery Plan on a TargetServer . . . . . . . . . . . . . . . 590Disaster Recovery Plan EnvironmentalConsiderations . . . . . . . . . . . . 590
Managing Disaster Recovery Plan Files Stored onTarget Servers . . . . . . . . . . . . . 592
Displaying Information about Recovery PlanFiles . . . . . . . . . . . . . . . 592Displaying the Contents of a Recovery Plan File 593Restoring a Recovery Plan File . . . . . . 593Expiring Recovery Plan Files Automatically . . 594Deleting Recovery Plan Files Manually . . . . 594
Moving Backup Media . . . . . . . . . . 594Moving Backup Volumes Offsite . . . . . . 596Moving Backup Volumes Onsite . . . . . . 597
Summary of Tivoli Disaster Recovery ManagerDaily Tasks . . . . . . . . . . . . . . 599Staying Prepared for a Disaster . . . . . . . 600Recovering From a Disaster . . . . . . . . 601
Server Recovery Scenario . . . . . . . . 601Client Recovery Scenario . . . . . . . . 604
Recovering When Using Different Hardware at theRecovery Site . . . . . . . . . . . . . 606
Automated SCSI Library at the Original Site anda Manual SCSI Library at the Recovery Site . . 606
Automated SCSI Library at the Original andRecovery Sites . . . . . . . . . . . . 607Managing Copy Storage Pool Volumes at theRecovery Site . . . . . . . . . . . . 608
Tivoli Disaster Recovery Manager Checklist . . . 608The Disaster Recovery Plan File . . . . . . . 611
Breaking Out a Disaster Recovery Plan File . . 611Structure of the Disaster Recovery Plan File . . 615Example Disaster Recovery Plan File . . . . 618
Part 6. Appendixes . . . . . . . . 639
Appendix A. External MediaManagement Interface Description . . 641CreateProcess Call . . . . . . . . . . . . 641Processing during Server Initialization . . . . . 642Processing for Mount Requests . . . . . . . 642Processing for Release Requests . . . . . . . 642Processing for Batch Requests . . . . . . . . 643Error Handling . . . . . . . . . . . . . 643Begin Batch Request . . . . . . . . . . . 644End Batch Request . . . . . . . . . . . 644Volume Query Request . . . . . . . . . . 644Initialization Requests . . . . . . . . . . 645Volume Eject Request. . . . . . . . . . . 646Volume Release Request . . . . . . . . . . 646Volume Mount Request . . . . . . . . . . 647Volume Dismount Request . . . . . . . . . 650
Appendix B. User Exit and File ExitReceivers . . . . . . . . . . . . . 651Sample User Exit Declarations. . . . . . . . 651Sample User Exit Program . . . . . . . . . 654Readable Text File Exit (FILETEXTEXIT) Format 655
Appendix C. Notices . . . . . . . . 657Programming Interface . . . . . . . . . . 658Trademarks . . . . . . . . . . . . . . 659
Glossary . . . . . . . . . . . . . 661
Index . . . . . . . . . . . . . . . 671
Contents xi

xii Tivoli Storage Manager for Windows: Administrator’s Guide

Preface
Tivoli® Storage Manager is a client/server program that provides storagemanagement solutions to customers in a multivendor computer environment.Tivoli Storage Manager provides an automated, centrally scheduled,policy-managed backup, archive, and space-management facility for file serversand workstations.
Who Should Read This PublicationThis reference is intended for anyone who is registered as an administrator. Asingle administrator can manage Tivoli Storage Manager; however, several peoplecan share administrative responsibilities.
You can invoke all of the administrator commands that you need to operate andmaintain Tivoli Storage Manager from:v A workstation connected to the serverv A workstation with a Web browser that meets the requirements specified in the
Tivoli Storage Manager Quick Start
What You Should Know before Reading This PublicationYou should be familiar with the operating system on which the server resides andthe communication protocols required for the client/server environment.
For information on installing Tivoli Storage Manager, see the Tivoli Storage ManagerQuick Start.
You also need to understand the storage management practices of yourorganization, such as how you are currently backing up your workstation files andhow you are using storage devices.
Tivoli Storage Manager Web SiteTechnical support information and publications are available at the followingaddress:
http://www.tivoli.com/support/storage_mgr/tivolimain.html
Conventions Used in This BookTo help you recognize where example commands are to be entered, this book usesthe following conventions:v Command to be entered on the Windows command line:
> dsmadmc
v Command to be entered on the command line of an administrative client:query devclass
© Copyright IBM Corp. 1994, 2002 xiii

Tivoli Storage Manager PublicationsThe following table lists Tivoli Storage Manager server publications.
Publication Title Order Number
Tivoli Storage Management Products License Information GH09-4572
Tivoli Storage Manager Messages GC32-0767
Tivoli Storage Manager for Windows Administrator’s Guide GC32-0782
Tivoli Storage Manager for Windows Administrator’s Reference GC32-0783
Tivoli Storage Manager for Windows Quick Start GC32-0784
The following table lists Tivoli Storage Manager storage agent publications.
Publication Title Order Number
Tivoli Storage Manager for AIX Managed System for SAN Storage AgentUser’s Guide
GC32-0771
Tivoli Storage Manager for HP-UX Managed System for SAN StorageAgent User’s Guide
GC32-0727
Tivoli Storage Manager for Sun Solaris Managed System for SAN StorageAgent User’s Guide
GC32-0781
Tivoli Storage Manager for Windows Managed System for SAN StorageAgent User’s Guide
GC32-0785
The following table lists the Tivoli Storage Manager client publications.
Publication Title Order Number
Tivoli Space Manager for UNIX: Using the Hierarchical StorageManagement Clients
GC32-0794
Tivoli Storage Manager for Macintosh: Backup-Archive Installation andUser’s Guide
GC32-0787
Tivoli Storage Manager for NetWare: Backup-Archive Installation andUser’s Guide
GC32-0786
Tivoli Storage Manager for UNIX: Backup-Archive Installation and User’sGuide
GC32-0789
Tivoli Storage Manager for Windows: Backup-Archive Installation andUser’s Guide
GC32-0788
Tivoli Storage Manager Trace Facility Guide GC32-0792
Tivoli Storage Manager Using the Application Program Interface GC32-0793
The following table lists Tivoli Data Protection publications.
Publication TitleOrderNumber
Tivoli Data Protection for EMC Symmetrix for R/3 Installation and User’s Guide SC33-6386
Tivoli Data Protection for IBM ESS for Oracle Databases DB2 UDB Installationand User’s Guide
SH26-4125
Tivoli Data Protection for IBM ESS for R/3 Installation and User’s Guide SC33-6387
Tivoli Data Protection for Informix Installation and User’s Guide SH26-4095
xiv Tivoli Storage Manager for Windows: Administrator’s Guide

Publication TitleOrderNumber
Tivoli Data Protection for Lotus Domino for UNIX Installation and User’s Guide SH26-4088
Tivoli Data Protection for Lotus Domino for Windows Installation GC26-7320
Tivoli Data Protection for Lotus Domino, S/390 Edition Licensed ProgramSpecifications
GC26-7305
Tivoli Data Protection for Lotus Notes on AIX Installation and User’s Guide SH26-4067
Tivoli Data Protection for Lotus Notes on Windows NT Installation and User’sGuide
SH26-4065
Tivoli Data Protection for Microsoft Exchange Server Installation and User’s Guide SH26-4110
Tivoli Data Protection for Microsoft SQL Server Installation and User’s Guide SH26-4111
Tivoli Data Protection for Oracle for UNIX Installation and User’s Guide SH26-4112
Tivoli Data Protection for Oracle for Windows Installation and User’s Guide SH26-4113
Tivoli Data Protection for R/3 Installation and User’s Guide for Oracle SC33-6340
Tivoli Data Protection for R/3 Installation and User’s Guide for DB2 UDB SC33-6341
Tivoli Data Protection for R/3 Installation and User’s Guide SC33-6389
Tivoli Data Protection for WebSphere Application Server Installation and User’sGuide
SC33-6399
Tivoli Data Protection for Workgroups for NetWare User’s Guide GC32-0444
Related IBM® Hardware Products PublicationsThe following table lists related IBM hardware products publications.
Title Order Number
IBM Magstar 3494 Tape Library Introduction and Planning Guide GA32-0279
IBM Magstar MP 3570 Tape Subsystem Operator’s Guide GA32-0345
IBM TotalStorage Enterprise Tape System 3590 Operator Guide GA32-0330
IBM Magstar 3494 Tape Library Dataserver Operator Guide GA32-0280
IBM International Technical Support Center Publications (Redbooks™)The International Technical Support Center (ITSC) publishes Redbooks, which arebooks on specialized topics such as using Tivoli Storage Manager to back updatabases. You can order publications through your IBM representative or the IBMbranch office serving your locality. You can also search for and order books ofinterest to you at the IBM Redbooks Web site at this address:
http://www.redbooks.ibm.com/redbooks
Contacting Customer SupportFor support for this or any Tivoli product, you can contact Tivoli CustomerSupport in one of the following ways:v Visit the Tivoli Storage Manager technical support Web site at
http://www.tivoli.com/support/storage_mgr/tivolimain.html.v Submit a problem management record (PMR) electronically at
IBMSERV/IBMLINK. You can access IBMLINK athttp://www2.ibmlink.ibm.com.
Preface xv

v Submit a problem management record (PMR) electronically athttp://www.tivoli.com/support. See “Reporting a Problem” for details.
v Send e-mail to [email protected].
Customers in the United States can also call 1-800-TIVOLI8 (1-800-848-6548). Forproduct numbers 5697-TS9, 5697-DRS or 5697-DPM call 1-800-237-5511.
International customers should consult the Web site for customer supporttelephone numbers.
You can also review the Customer Support Handbook, which is available on our Website at http://www.tivoli.com/support/handbook/.
When you contact Tivoli Customer Support, be prepared to provide identificationinformation for your company so that support personnel can readily assist you.Company identification information may also be needed to access various onlineservices available on the Web site.
The support Web site offers extensive information, including a guide to supportservices (the Customer Support Handbook); frequently asked questions (FAQs);and documentation for all Tivoli products, including Release Notes, Redbooks, andWhitepapers. The documentation for some product releases is available in bothPDF and HTML formats. Translated documents are also available for some productreleases.
You can order documentation by e-mail at [email protected]. Please provide thepublication number, part number, or order number of the desired document.Alternatively, you can provide the document title, version number, and date ofpublication.
We are very interested in hearing about your experience with Tivoli products anddocumentation. We also welcome your suggestions for improvements. If you havecomments or suggestions about our documentation, please contact us in one of thefollowing ways:v Send e-mail to [email protected] Complete our customer feedback survey at
http://www.tivoli.com/support/feedback/.
Reporting a ProblemPlease have the following information ready when you report a problem:v The Tivoli Storage Manager server version, release, modification, and service
level number. You can get this information by entering the QUERY STATUScommand at the TSM command line.
v The Tivoli Storage Manager client version, release, modification, and servicelevel number. You can get this information by entering dsmc at the commandline.
v The communication protocol (for example, TCP/IP), version, and release numberyou are using.
v The activity you were doing when the problem occurred, listing the steps youfollowed before the problem occurred.
v The exact text of any error messages.
xvi Tivoli Storage Manager for Windows: Administrator’s Guide

TranslationsSelected Tivoli Storage Manager publications have been translated into languagesother than American English. Contact your sales representative for moreinformation about the translated publications and whether these translations areavailable in your country.
Preface xvii

xviii Tivoli Storage Manager for Windows: Administrator’s Guide

Summary of Changes for Tivoli Storage Manager Version 5
This section summarizes changes that have been made to the Tivoli StorageManager product and this publication.
Technical Changes for Version 5 Release 1—March 2002The following changes have been made to the product for this edition:
Server-Free Data MovementServer-free data movement uses the SCSI-3 extended copy command to dofull-volume backup and restore. It provides the following advantages:v Reduces Tivoli Storage Manager client and server CPU utilization.v Eliminates data movement on the LAN.v Improves performance by taking advantage of high-speed fibre channel
devices, avoiding slower network connections and costly copyoperations within the client and server.
v Allows the server to handle more concurrent client connections andserver operations.
See “Server-Free Data Movement” on page 40 and “Chapter 7. Setting UpServer-Free Data Movement” on page 109.
Changes in Defining Drives and Libraries
Device special file names and external library managers are now specifiedin the DEFINE PATH and UPDATE PATH commands, rather than in theDEFINE DRIVE, UPDATE DRIVE, DEFINE LIBRARY, and UPDATELIBRARY commands.
See “Chapter 5. Configuring Storage Devices” on page 71. Also see TivoliStorage Manager Administrator’s Reference.
Moving Data by NodeYou can use the MOVE NODEDATA command to move data in asequential-access storage pool for one or more nodes, or move selected filespaces for a single node. You can also use MOVE NODEDATA to movedata to another storage pool.
See “Chapter 10. Managing Storage Pools and Volumes” on page 171.
Support for Simultaneous Writes to Primary and Copy Storage PoolsYou can specify copy storage pools in a primary storage pool definition.When a client backs up, archives, or migrates a file, the file is written tothe primary storage pool and is simultaneously stored into each copystorage pool.
See “Chapter 10. Managing Storage Pools and Volumes” on page 171.
Data Validation with Cyclic Redundancy CheckingTivoli Storage Manager provides the option of specifying whether a cyclicredundancy check (CRC) is performed during a client session with theserver, or for storage pools. The server validates the data by using a cyclicredundancy check which can help identify data corruption. Data validationcan be enabled for one or all of the following:
© Copyright IBM Corp. 1994, 2002 xix

v Tivoli Storage Manager client nodes at Version 5.1. See “Validating aNode’s Data” on page 347.
v Tivoli Storage Manager storage agents at Version 5.1. See Tivoli StorageManager Managed System for SAN Storage Agent User’s Guide for moreinformation.
v Storage pools. See “Data Validation During Audit Volume Processing” onpage 563 and “Chapter 10. Managing Storage Pools and Volumes” onpage 171.
New Licensing MethodThe new licensing method enables you to register the exact number oflicenses that are required, rather than in increments of 1, 5, 10, and 50.
See “Registering Licensed Features” on page 384.
Support for Windows XP and Windows.NET Tivoli Storage ManagerBackup-Archive Clients
Support is now added for Windows XP Tivoli Storage Managerbackup-archive clients that run in 64-bit mode. New support is providedfor Windows.NET Tivoli Storage Manager backup-archive clients that runin 32- and 64-bit mode. These two Windows platforms are a Unicode-onlyversion of the client.
See Tivoli Storage Manager for Windows Using the Backup-Archive Clients.
Communication MethodTivoli Storage Manager for Windows no longer supports the InternetworkPacket Exchange (IPX)/SPX and NETBIOS communication methods. TheCOMMMETHOD server option is updated to reflect this change.
See Tivoli Storage Manager Administrator’s Reference.
xx Tivoli Storage Manager for Windows: Administrator’s Guide

Part 1. Tivoli Storage Manager Basics
© Copyright IBM Corp. 1994, 2002 1

2 Tivoli Storage Manager for Windows: Administrator’s Guide
Chapter 1. Introducing Tivoli Storage Manager
Tivoli Storage Manager is an enterprise-wide storage management application. Itprovides automated storage management services to workstations, personalcomputers, and file servers from a variety of vendors, with a variety of operatingsystems. Tivoli Storage Manager includes the following components:
Server
Server programThe server program provides backup, archive, and space managementservices to the clients.
You can set up multiple servers in your enterprise network to balancestorage, processor, and network resources.
Administrative interfaceThe administrative interface allows administrators to control and monitorserver activities, define management policies for clients, and set upschedules to provide services to clients at regular intervals. Administrativeinterfaces available include a command-line administrative client and aWeb browser interface. Tivoli Storage Manager allows you to manage andcontrol multiple servers from a single interface that runs in a Webbrowser.
The Tivoli Storage Manager server for Windows also includes the TSMManagement Console (TSM Console), which is a Microsoft® ManagementConsole (MMC) snap-in. The TSM Console includes wizards for taskssuch as configuring devices.
Server database and recovery logThe Tivoli Storage Manager server uses a database to track informationabout server storage, clients, client data, policy, and schedules. The serveruses the recovery log as a scratch pad for the database, recordinginformation about client and server actions while the actions are beingperformed.
Server storageThe server can write data to hard disk drives, disk arrays and subsystems,stand-alone tape drives, tape libraries, and other forms of random- andsequential-access storage. The media that the server uses are grouped intostorage pools. The storage devices can be connected directly to the server,or connected via local area network (LAN) or storage area network (SAN).
Client NodesA client node can be a workstation, a personal computer, a file server, anetwork-attached storage (NAS) file server, or even another Tivoli StorageManager server. The client node has Tivoli Storage Manager client softwareinstalled (except for NAS file servers using NDMP). A client node is registeredwith the server.
Backup-archive clientThe backup-archive client allows users to maintain backup versions offiles, which they can restore if the original files are lost or damaged. Userscan also archive files for long-term storage and retrieve the archived files
© Copyright IBM Corp. 1994, 2002 3

when necessary. Users themselves or administrators can registerworkstations and file servers as client nodes with a Tivoli StorageManager server.
The storage agent is an optional component that may also be installed ona system that is a client node. The storage agent enables LAN-free datamovement for client operations.
Application program interface (API)The API allows you to enhance existing applications to use the backup,archive, restore, and retrieve services that Tivoli Storage Managerprovides. Tivoli Storage Manager API clients can register as client nodeswith a Tivoli Storage Manager server.
Tivoli Storage Manager supports separately licensed, optional products. Theseinclude:
Tivoli Data Protection for applications (application clients)Application clients allow users to perform online backups of data forapplications such as database programs. After the application programinitiates a backup or restore, the application client acts as the interface toTivoli Storage Manager. The Tivoli Storage Manager server then applies itsstorage management functions to the data. The application client canperform its functions while application users are working, with minimaldisruption.
Tivoli Data Protection for NDMPThe Tivoli Data Protection for NDMP product allows you to use TivoliStorage Manager with the Network Data Management Protocol (NDMP)to back up and restore file systems stored on a network-attached storage(NAS) file server. The data on the NAS file server is backed up to a tapelibrary. See “Chapter 6. Setting Up Tivoli Data Protection for NDMP” onpage 93 for more information.
Tivoli Space ManagerTivoli Space Manager provides space management services forworkstations on some platforms. Tivoli Space Manager automaticallymigrates files that are less frequently used to server storage, freeing spaceon the workstation. The migrated files are also called space-managed files.Users can recall space-managed files automatically simply by accessingthem as they normally would from the workstation. Tivoli Space Manageris also known as the hierarchical storage management (HSM) client.
For information about supported operating systems for clients, see the TivoliStorage Manager Web site:
http://www.tivoli.com/support/storage_mgr/tivolimain.html
Client programs such as the backup-archive client and the HSM client (spacemanager) are installed on systems that are connected through a LAN and areregistered as client nodes. From these client nodes, users can back up, archive, ormigrate files to the server.
The following sections present key concepts and information about Tivoli StorageManager. The sections describe how Tivoli Storage Manager manages client filesbased on information provided in administrator-defined policies, and managesdevices and media based on information provided in administrator-defined TivoliStorage Manager storage objects.
4 Tivoli Storage Manager for Windows: Administrator’s Guide
The final section gives an overview of tasks for the administrator of the server,including options for configuring the server and how to maintain the server.
Concepts:
“How Tivoli Storage Manager Stores Client Data”
“How the Server Manages Storage” on page 14
“Configuring and Maintaining the Server” on page 16
How Tivoli Storage Manager Stores Client DataTivoli Storage Manager policies are rules that determine how the client data isstored and managed. The rules include where the data is initially stored, howmany backup versions are kept, how long archive copies are kept, and so on. Youcan have multiple policies and assign the different policies as needed to specificclients, or even to specific files.
Policy assigns a location in server storage where data is initially stored. Serverstorage is divided into storage pools that are groups of storage volumes. Serverstorage can include hard disk, optical, and tape volumes.
When you install Tivoli Storage Manager, you have a default policy that you canuse. For details about this default policy, see “The Standard Policy” on page 301.You can modify this policy and define other policies.
Clients use Tivoli Storage Manager to store data for any of the following purposes:
Backup and restoreThe backup process copies data from client workstations to server storage toensure against loss of data that is regularly changed. The server retainsversions of a file according to policy, and replaces older versions of the filewith newer versions. Policy includes the number of versions and the retentiontime for versions.
A client can restore the most recent version of a file, or can restore earlierversions.
Archive and retrieveThe archive process copies data from client workstations to server storage forlong-term storage. The process can optionally delete the archived files from theclient workstations. The server retains archive copies according to the policyfor archive retention time. A client can retrieve an archived copy of a file.
Instant archive and rapid recoveryInstant archive is the creation of a complete set of backed-up files for a client.The set of files is called a backup set. A backup set is created on the server fromthe most recently backed-up files that are already stored in server storage forthe client. Policy for the backup set consists of the retention time that youchoose when you create the backup set.
You can copy a backup set onto compatible portable media, which can then betaken directly to the client for rapid recovery without the use of a networkand without having to communicate with the Tivoli Storage Manager server.
Migration and recallMigration, a function of the Tivoli Space Manager program, frees up clientstorage space by copying files from workstations to server storage. On the
Chapter 1. Introducing Tivoli Storage Manager 5

client, the Tivoli Space Manager program replaces the original file with a stubfile that points to the original in server storage. Files are recalled to theworkstations when needed.
This process is also called hierarchical storage management (HSM). Onceconfigured, the process is transparent to the users. Files are migrated andrecalled automatically.
Policy determines when files are considered for automatic migration. On theUNIX systems that support the Tivoli Space Manager program, policiesdetermine whether files must be backed up to the server before beingmigrated. Space management is also integrated with backup. If the file to bebacked up is already migrated to server storage, the file is backed up fromthere.
Figure 1 shows how policy is part of the Tivoli Storage Manager process for storingclient data.
The steps in the process are as follows:�1� A client initiates a backup, archive, or migration operation. The fileinvolved in the operation is bound to a management class. The managementclass is either the default or one specified for the file in client options (theclient’s include-exclude list).
Figure 1. How Tivoli Storage Manager Controls Backup, Archive, and Migration Processes
6 Tivoli Storage Manager for Windows: Administrator’s Guide

�2� If the file is a candidate for backup, archive, or migration based oninformation in the management class, the client sends the file and fileinformation to the server.�3� The server checks the management class that is bound to the file todetermine the destination, the name of the Tivoli Storage Manager storage poolwhere the server initially stores the file. For backed-up and archived files,destinations are assigned in the backup and archive copy groups, which arewithin management classes. For space-managed files, destinations are assignedin the management class itself.The storage pool can be a group of disk volumes, tape volumes, or opticalvolumes.�4� The server stores the file in the storage pool that is identified as the storagedestination.The Tivoli Storage Manager server saves information in its database about eachfile that it backs up, archives, or migrates.If you set up server storage in a hierarchy, Tivoli Storage Manager can latermigrate the file to a storage pool different from the one where the file wasinitially stored. For example, you may want to set up server storage so thatTivoli Storage Manager migrates files from a disk storage pool to tape volumesin a tape storage pool.
Files remain in server storage until they expire and expiration processing occurs, oruntil they are deleted from server storage. A file expires because of criteria that areset in policy. For example, the criteria include the number of versions allowed for afile and the number of days that have elapsed since a file was deleted from theclient’s file system.
For information on assigning storage destinations in copy groups and managementclasses, and on binding management classes to client files, see “Chapter 14.Implementing Policies for Client Data” on page 299.
For information on managing the database, see “Chapter 20. Managing theDatabase and Recovery Log” on page 417.
For information about storage pools and storage pool volumes, see “Chapter 10.Managing Storage Pools and Volumes” on page 171.
Options for Data ProtectionTivoli Storage Manager provides a variety of backup and archive operations,allowing you to select the right protection for the situation. Table 1 shows someexamples of the protection options.
Table 1. Examples of Meeting Your Goals with Tivoli Storage Manager
For this goal... Do this...
Back up files that are on a user’sworkstation, and have the ability to restoreindividual files.
Use the backup-archive client to performincremental backups or selective backups.
Back up a file server, and have the ability torestore individual files.
Use the backup-archive client to performincremental backups or selective backups.
If the file server is a network-attachedstorage file server that is supported, you canuse Tivoli Data Protection for NDMP toperform image backups.
Chapter 1. Introducing Tivoli Storage Manager 7

Table 1. Examples of Meeting Your Goals with Tivoli Storage Manager (continued)
For this goal... Do this...
Make restore media portable, or makerestores easier to perform remotely.
Use the backup-archive client to performincremental backups, and then generatebackup sets by using the Tivoli StorageManager server.
Provide the ability to more easily restore theentire contents of a single logical volume,instead of restoring individual files.
Use the backup-archive client to performlogical volume backups (also called imagebackups).
Set up records retention to meet legal orother long-term storage needs.
Use the backup-archive client to occasionallyperform archiving. To ensure that thearchiving occurs at the required intervals, usecentral scheduling.
Create an archive for a backup-archive client,from data that is already stored for backup.
Use the backup-archive client to performincremental backups, and then generate abackup set by using the Tivoli StorageManager server. This is also called instantarchive.
Provide the ability to restore data to a pointin time.
Use the backup-archive client to regularlyperform incremental backups (eithermanually or automatically throughschedules). Then do one of the following:
v Set up policy to ensure that data ispreserved in server storage long enough toprovide the required service level. See“Setting Policy to Enable Point-in-TimeRestore for Clients” on page 340 for details.
v Create backup sets for the backup-archiveclient on a regular basis. Set the retentiontime to provide the required service level.See “Creating and Using Client BackupSets” on page 348 for details.
Save a set of files and directories beforemaking significant changes to them.
Use the backup-archive client to archive theset of files and directories.
If this kind of protection is needed regularly,consider creating backup sets from backupdata already stored for the client. Usingbackup sets instead of frequent archiveoperations can reduce the amount ofmetadata that must be stored in the server’sdatabase.
Back up data for an application that runscontinuously, such as a database application(for example, DB2® or Oracle) or a mailapplication (Lotus® Domino™).
Use the appropriate application client. Forexample, use Tivoli Data Protection for LotusDomino.
Exploit disk hardware capable of datasnapshots.
Use the appropriate component that supportsthe hardware, such as Tivoli Data Protectionfor IBM Enterprise Storage Server™.
Make backups transparent to end users. Use the backup-archive client with centrallyscheduled backups that run during off-shifthours. Monitor the schedule results.
8 Tivoli Storage Manager for Windows: Administrator’s Guide

Table 1. Examples of Meeting Your Goals with Tivoli Storage Manager (continued)
For this goal... Do this...
Reduce the load on the LAN by movingbackup data over your SAN.
Use LAN-free data movement, server-freedata movement, or, for supportednetwork-attached storage (NAS) file servers,use Tivoli Data Protection for NDMP.
Schedule the backups of client data to help enforce the data management policythat you establish. If you schedule the backups, rather than rely on the clients toperform the backups, the policy that you establish is followed more consistently.See “Chapter 16. Scheduling Operations for Client Nodes” on page 357.
The standard backup method that Tivoli Storage Manager uses is called progressiveincremental backup. It is a unique and efficient method for backup. See “ProgressiveIncremental Backup Compared with Other Backup Types” on page 13.
Table 2 on page 10 summarizes the client operations that are available. In all cases,the server tracks the location of the backup data in its database. Policy that you setdetermines how the backup data is managed.
Chapter 1. Introducing Tivoli Storage Manager 9

Tabl
e2.
Sum
mar
yof
Clie
ntO
pera
tions
Typ
eof
oper
atio
nD
escr
ipti
onU
sage
Res
tore
opti
ons
For
mor
ein
form
atio
n
Prog
ress
ive
incr
emen
tal
back
up
The
stan
dar
dm
etho
dof
back
upus
edby
Tivo
liSt
orag
eM
anag
er.A
fter
the
firs
t,fu
llba
ckup
ofa
clie
ntsy
stem
,in
crem
enta
lba
ckup
sar
ed
one.
Incr
emen
tal
back
upby
dat
eis
also
avai
labl
e.
No
add
itio
nal
full
back
ups
ofa
clie
ntar
ere
quir
edaf
ter
the
firs
tba
ckup
.
Hel
psen
sure
com
plet
e,ef
fect
ive,
polic
y-ba
sed
back
upof
dat
a.E
limin
ates
the
need
tore
tran
smit
back
upd
ata
that
has
not
been
chan
ged
dur
ing
succ
essi
veba
ckup
oper
atio
ns.
The
user
can
rest
ore
just
the
vers
ion
ofth
efi
leth
atis
need
ed.
Tivo
liSt
orag
eM
anag
erd
oes
not
need
tore
stor
ea
base
file
follo
wed
byin
crem
enta
lba
ckup
s.T
his
mea
nsre
duc
edti
me
and
few
erta
pem
ount
s,as
wel
las
less
dat
atr
ansm
itte
dov
erth
ene
twor
k.
See
“Inc
rem
enta
lB
acku
p”on
page
314
and
Bac
kup-
Arc
hive
Inst
alla
tion
and
Use
r’s
Gui
de.
Sele
ctiv
eba
ckup
Bac
kup
offi
les
that
are
sele
cted
byth
eus
er,r
egar
dle
ssof
whe
ther
the
file
sha
vech
ange
dsi
nce
the
last
back
up.
Allo
ws
user
sto
prot
ect
asu
bset
ofth
eir
dat
ain
dep
end
ent
ofth
eno
rmal
incr
emen
tal
back
uppr
oces
s.
The
user
can
rest
ore
just
the
vers
ion
ofth
efi
leth
atis
need
ed.
Tivo
liSt
orag
eM
anag
erd
oes
not
need
tore
stor
ea
base
file
follo
wed
byin
crem
enta
lba
ckup
s.T
his
mea
nsre
duc
edti
me
and
few
erta
pem
ount
s,as
wel
las
less
dat
atr
ansm
itte
dov
erth
ene
twor
k.
See
“Sel
ecti
veB
acku
p”on
page
316
and
Bac
kup-
Arc
hive
Inst
alla
tion
and
Use
r’s
Gui
de.
Ad
apti
vesu
bfile
back
upA
back
upm
etho
dth
atba
cks
upon
lyth
epa
rts
ofa
file
that
have
chan
ged
sinc
eth
ela
stba
ckup
.The
serv
erst
ores
the
base
file
(the
com
plet
ein
itia
lba
ckup
ofth
efi
le)
and
subs
eque
ntsu
bfile
s(t
hech
ange
dpa
rts)
that
dep
end
onth
eba
sefi
le.
The
proc
ess
wor
ksw
ith
eith
erth
est
and
ard
prog
ress
ive
incr
emen
tal
back
upor
wit
hse
lect
ive
back
up.
App
licab
leto
clie
nts
onW
ind
ows
syst
ems.
Mai
ntai
nsba
ckup
sof
dat
aw
hile
min
imiz
ing
conn
ect
tim
ean
dd
ata
tran
smis
sion
for
the
back
upof
mob
ilean
dre
mot
eus
ers.
The
base
file
plus
am
axim
umof
one
subf
ileis
rest
ored
toth
ecl
ient
.Se
e“E
nabl
ing
Clie
nts
toU
seSu
bfile
Bac
kup”
onpa
ge35
4an
dB
acku
p-A
rchi
veIn
stal
lati
onan
dU
ser’
sG
uide
.
10 Tivoli Storage Manager for Windows: Administrator’s Guide

Tabl
e2.
Sum
mar
yof
Clie
ntO
pera
tions
(con
tinue
d)
Typ
eof
oper
atio
nD
escr
ipti
onU
sage
Res
tore
opti
ons
For
mor
ein
form
atio
n
Jour
nal-
base
dba
ckup
Aid
sal
lty
pes
ofba
ckup
s(p
rogr
essi
vein
crem
enta
lba
ckup
,sel
ecti
veba
ckup
,ad
apti
vesu
bfile
back
up)
byba
sing
the
back
ups
ona
list
ofch
ange
dfi
les.
The
list
ism
aint
aine
don
the
clie
ntby
the
jour
nal
engi
nese
rvic
eof
Tivo
liSt
orag
eM
anag
er.
Red
uces
the
amou
ntof
tim
ere
quir
edfo
rba
ckup
.The
file
sel
igib
lefo
rba
ckup
are
know
nbe
fore
the
back
upop
erat
ion
begi
ns.
App
licab
leto
clie
nts
onW
ind
ows
NT
®
and
Win
dow
s20
00sy
stem
s.
Jour
nal-
base
dba
ckup
has
noef
fect
onho
wfi
les
are
rest
ored
;thi
sd
epen
ds
onth
ety
peof
back
uppe
rfor
med
.
See
Bac
kup-
Arc
hive
Inst
alla
tion
and
Use
r’s
Gui
de.
Imag
eba
ckup
Full
volu
me
back
up.
Non
dis
rupt
ive,
on-l
ine
back
upis
poss
ible
for
Win
dow
s20
00cl
ient
sby
usin
gth
eTi
voli
Stor
age
Man
ager
snap
shot
func
tion
.
Allo
ws
back
upof
anen
tire
file
syst
emor
raw
volu
me
asa
sing
leob
ject
.Can
bese
lect
edby
back
up-a
rchi
vecl
ient
son
UN
IX®
and
Win
dow
ssy
stem
s.U
sed
byW
ind
ows
clie
nts
that
are
usin
gse
rver
-fre
ed
ata
mov
emen
t.
The
enti
reim
age
isre
stor
ed.
See
“Pol
icy
for
Log
ical
Vol
ume
Bac
kups
”on
page
336
and
Bac
kup-
Arc
hive
Inst
alla
tion
and
Use
r’s
Gui
de.
Imag
eba
ckup
wit
hd
iffe
rent
ial
back
ups
Full
volu
me
back
up,w
hich
can
befo
llow
edby
subs
eque
ntd
iffe
rent
ial
back
ups.
Use
don
lyfo
rth
eim
age
back
ups
ofN
AS
file
serv
ers,
perf
orm
edby
usin
gTi
voli
Dat
aPr
otec
tion
for
ND
MP.
The
full
imag
eba
ckup
plus
am
axim
umof
one
dif
fere
ntia
lba
ckup
are
rest
ored
.
See
“Cha
pter
6.Se
ttin
gU
pTi
voli
Dat
aPr
otec
tion
for
ND
MP”
onpa
ge93
.
Bac
kup
usin
gha
rdw
are
snap
shot
capa
bilit
ies
Am
etho
dof
back
upth
atex
ploi
tsth
eca
pabi
litie
sof
IBM
Ent
erpr
ise
Stor
age
Serv
erFl
ashC
opy™
and
EM
CTi
meF
ind
erto
mak
eco
pies
ofvo
lum
esus
edby
dat
abas
ese
rver
s.T
heTi
voli
Dat
aPr
otec
tion
for
appl
icat
ions
and
dat
abas
esth
enus
esth
evo
lum
eco
pies
toba
ckup
the
dat
abas
evo
lum
es.
Impl
emen
tshi
gh-e
ffic
ienc
yba
ckup
and
reco
very
ofbu
sine
ss-c
riti
cal
appl
icat
ions
whi
levi
rtua
llyel
imin
atin
gba
ckup
-rel
ated
dow
ntim
eor
user
dis
rupt
ion
onth
ed
atab
ase
serv
er.
See
the
refe
renc
edpu
blic
atio
nsfo
rd
etai
ls.
See
Tivo
liD
ata
Pro
tect
ion
for
IBM
ESS
for
Ora
cle
Dat
abas
esD
B2
UD
BIn
stal
lati
onan
dU
ser’
sG
uide
,Tiv
oli
Dat
aP
rote
ctio
nfo
rIB
ME
SSfo
rR
/3In
stal
lati
onan
dU
ser’
sG
uide
,and
Tivo
liD
ata
Pro
tect
ion
for
EM
CSy
mm
etri
xfo
rR
/3In
stal
lati
onan
dU
ser’
sG
uide
.
Chapter 1. Introducing Tivoli Storage Manager 11

Tabl
e2.
Sum
mar
yof
Clie
ntO
pera
tions
(con
tinue
d)
Typ
eof
oper
atio
nD
escr
ipti
onU
sage
Res
tore
opti
ons
For
mor
ein
form
atio
n
Arc
hive
The
proc
ess
crea
tes
aco
pyof
file
san
dst
ores
them
for
asp
ecif
icti
me.
Use
for
mai
ntai
ning
copi
esof
vita
lre
cord
sfo
rle
gal
orhi
stor
ical
purp
oses
.N
ote:
Ifyo
une
edto
freq
uent
lycr
eate
arch
ives
for
the
sam
ed
ata,
cons
ider
usin
gin
stan
tar
chiv
e(b
acku
pse
ts)
inst
ead
.Fre
quen
tar
chiv
eop
erat
ions
can
crea
tea
larg
eam
ount
ofm
etad
ata
inth
ese
rver
dat
abas
ere
sult
ing
inin
crea
sed
dat
abas
egr
owth
and
dec
reas
edpe
rfor
man
cefo
rse
rver
oper
atio
nssu
chas
expi
rati
on.
Freq
uent
ly,y
ouca
nac
hiev
eth
esa
me
obje
ctiv
esw
ith
incr
emen
tal
back
upor
back
upse
ts.A
ltho
ugh
the
arch
ive
func
tion
isa
pow
erfu
lw
ayto
stor
ein
acti
ved
ata
wit
hfi
xed
rete
ntio
n,it
shou
ldno
tbe
used
ona
freq
uent
and
larg
esc
ale
basi
sas
the
prim
ary
back
upm
etho
d.
The
sele
cted
vers
ion
ofth
efi
leis
retr
ieve
don
requ
est.
See
“Arc
hive
”on
page
317
and
Bac
kup-
Arc
hive
Inst
alla
tion
and
Use
r’s
Gui
de.
Inst
ant
arch
ive
The
proc
ess
crea
tes
aba
ckup
set
ofth
em
ost
rece
ntve
rsio
nsof
the
file
sfo
rth
ecl
ient
,usi
ngfi
les
alre
ady
inse
rver
stor
age
from
earl
ier
back
upop
erat
ions
.
Use
whe
npo
rtab
ility
ofth
ere
cove
rym
edia
orra
pid
reco
very
ofa
back
up-a
rchi
vecl
ient
isim
port
ant.
Als
ous
efo
ref
fici
ent
arch
ivin
g.
The
file
sar
ere
stor
edd
irec
tly
from
the
back
upse
t.T
heba
ckup
set
resi
des
onm
edia
that
can
bem
ount
edon
the
clie
ntsy
stem
,suc
has
aC
D,a
tape
dri
ve,o
ra
file
syst
em.T
heTi
voli
Stor
age
Man
ager
serv
erd
oes
not
have
tobe
cont
acte
dfo
rth
ere
stor
epr
oces
s,so
the
proc
ess
doe
sno
tus
eth
ene
twor
kor
the
serv
er.
See
“Cre
atin
gan
dU
sing
Clie
ntB
acku
pSe
ts”
onpa
ge34
8.
12 Tivoli Storage Manager for Windows: Administrator’s Guide

Progressive Incremental Backup Compared with Other BackupTypesTivoli Storage Manager has a unique, efficient method for its standard backups, aswell as a number of other methods that are summarized in Table 2 on page 10. Thestandard method that Tivoli Storage Manager uses is progressive incremental backup.
The terms differential and incremental are often used to describe backups. The termsusually have the following meanings:v A differential backup backs up files that have changed since the last full backup.
– If a file changes after the full backup, the changed file is backed up again byevery subsequent differential backup.
– All files are backed up at the next full backup.v An incremental backup backs up only files that have changed since the last
backup, whether that backup was a full backup or another incremental backup.– If a file changes after the full backup, the changed file is backed up only by
the next incremental backup, not by all subsequent incremental backups.– If a file has not changed since the last backup, the file is not backed up.
Tivoli Storage Manager takes incremental backup one step further. After the initialfull backup of a client, no additional full backups are necessary because the server,using its database, keeps track of whether files need to be backed up. Only filesthat change are backed up, and then entire files are backed up, so that the serverdoes not need to reference base versions of the files. This means savings inresources, including the network and storage.
If you choose, you can force full backup by using the selective backup function ofa client in addition to the incremental backup function. You can also choose to useadaptive subfile backup, in which the server stores the base file (the completeinitial backup of the file) and subsequent subfiles (the changed parts) that dependon the base file.
Additional Protection: Storage Pool and Server DatabaseBackupsBuilt into the server are additional levels of protection for client data:v You can back up storage pools. The data is backed up to copy storage pools,
which the server can automatically access if needed to retrieve a file. See“Storage Pool Protection: An Overview” on page 532.
v You can back up the server’s database. The database is key to the server’s abilityto track client data in server storage. See “Database and Recovery LogProtection: An Overview” on page 533.
These backups can become part of a disaster recovery plan, created automaticallyby Tivoli Disaster Recovery Manager. See “Chapter 25. Using Tivoli DisasterRecovery Manager” on page 577.
How Data Moves to Server StorageThe Tivoli Storage Manager client traditionally sends its data to the server over theLAN. The server then transfers the data to a device that is attached to the server.With the advent of SAN and network-attached storage, however, Tivoli StorageManager offers options that enable you to minimize use of the LAN and the use ofthe computing resources of both the client and the server.
Chapter 1. Introducing Tivoli Storage Manager 13

LAN-free data movement allows storage agents that are installed on client nodesto move data without sending the data over the LAN to the server. See “LAN-FreeData Movement” on page 38.
With a supported hardware setup, a SAN gives the ability to move data directlybetween two storage devices without involving either the client system or theserver system. A data mover separate from the client and the server handles thedata movement. For example, IBM SAN Data Gateway can be a data mover thatmoves data from a client’s SAN-attached disk to tape. See “Server-Free DataMovement” on page 40.
For network-attached storage, use Tivoli Data Protection for NDMP to avoid datamovement over the LAN. See “Tivoli Data Protection for NDMP Backups” onpage 37.
Consolidating Backed-up Data for ClientsBy grouping the backed-up data for a client, you can minimize the number ofmedia mounts required for client recovery. The server offers you methods fordoing this:
CollocationThe server can keep each client’s files on a minimal number of volumes withina storage pool. Because client files are consolidated, restoring collocated filesrequires fewer media mounts. However, backing up files from different clientsrequires more mounts.
You can have the server collocate client data when the data is initially storedin server storage. If you have a storage hierarchy, you can also have the datacollocated when the server migrates the data from the initial storage pool tothe next storage pool in the storage hierarchy.
Another choice you have is the level of collocation. You can collocate by clientor by file space per client. Your selection depends on the size of the file spacesbeing stored and the restore requirements.
See “Keeping a Client’s Files Together: Collocation” on page 200.
Backup set creationYou can generate a backup set for each backup-archive client. A backup setcontains all active backed-up files that currently exist for that client in serverstorage. The process is also called instant archive.
The backup set is portable and is retained for the time that you specify.Creation of the backup set consumes more media because it is a copy inaddition to the backups that are already stored.
See “Creating and Using Client Backup Sets” on page 348.
Moving data for a client nodeYou can consolidate data for a client node by moving the data within serverstorage. You can move it to a different storage pool, or to other volumes in thesame storage pool.
See “Moving Data by Node” on page 232.
How the Server Manages StorageThrough the server, you manage its storage — the devices and media used to storeclient data. The server integrates the management of storage with the policies thatyou define for managing client data.
14 Tivoli Storage Manager for Windows: Administrator’s Guide

Tivoli Storage Manager Device SupportTivoli Storage Manager supports the use of a variety of devices for server storage.Tivoli Storage Manager can use direct-attached storage as well as network-attachedstorage. A current list is available at the Tivoli Storage Manager Web site:
http://www.tivoli.com/support/storage_mgr/tivolimain.html
The Tivoli Storage Manager Management Console includes a device configurationwizard that allows you to perform simple drag-and-drop device configuration.However, a few devices cannot be configured with the wizard. In troubleshootingsituations, or if you are using Tivoli Storage Manager commands to configuredevices, you need to understand Tivoli Storage Manager storage device concepts.
Tivoli Storage Manager represents physical storage devices and media with thefollowing administrator-defined objects:
LibraryA library is one or more drives (and possibly robotic devices) with similarmedia mounting requirements.
DriveEach drive represents a drive mechanism in a tape or optical device.
Data moverA data mover represents a device that accepts requests from Tivoli StorageManager to transfer data on behalf of the server. Data movers transfer databetween storage devices.
PathA path represents how a source accesses a destination. For example, the sourcecan be a server, and the destination can be a tape drive. A path defines theone-to-one relationship between a source and a destination. Data may flowfrom the source to the destination, and back.
Device classEach device is associated with a device class that specifies the device type andhow the device manages its media.
Storage pools and volumesA storage pool is a named collection of volumes that have the same mediatype. A storage pool is associated with a device class. For example, an 8mmtape storage pool contains only 8mm tape volumes. A storage pool volume isassociated with a specific storage pool.
For details about device concepts, see “Chapter 2. Introducing Storage Devices” onpage 31.
Migrating Data through the Storage HierarchyYou can organize the server’s storage pools into one or more hierarchicalstructures. This storage hierarchy allows flexibility in a number of ways. Forexample, you can set policy to have clients send their backup data to disks forfaster backup operations, then later have the server automatically migrate the datato tape.
See “Overview: The Storage Pool Hierarchy” on page 185.
Chapter 1. Introducing Tivoli Storage Manager 15

Removing Expired DataPolicy that you define controls when client data automatically expires from theTivoli Storage Manager server. The expiration process is how the serverimplements the policy.
For example, you have a backup policy that specifies that three versions of a file bekept. File A is created on the client, and backed up. Over time, the user changesfile A, and three versions of the file are backed up to the server. Then the userchanges file A again. When the next incremental backup occurs, a fourth version offile A is stored, and the oldest of the four versions is eligible for expiration.
To remove data that is eligible for expiration, a server expiration process marksdata as expired and deletes metadata for the expired data from the database. Thespace occupied by the expired data is then available for new data.
You control the frequency of the expiration process by using a server option, oryou can start the expiration processing by command or scheduled command.
See “Running Expiration Processing to Delete Expired Files” on page 333.
Reclaiming Media for ReuseAs server policies automatically expire data, the media where the data is storedaccumulates unused space. Other products might require you to implement a taperotation scheme that allows you to reuse the media only when all data on themedia has expired. The Tivoli Storage Manager server implements a differentprocess, called reclamation, that allows you to reuse media without traditional taperotation.
Reclamation is a server process that automatically defragments media byconsolidating unexpired data onto other media when the free space on mediareaches a defined level. The reclaimed media can then be used again by the server.Reclaiming media allows the automated circulation of media through the storagemanagement process. Use of reclamation can help minimize the number of mediathat you need to have available.
Configuring and Maintaining the ServerThe server comes with many defaults set so that clients can begin using its servicesimmediately. The amount and importance of the data protected by Tivoli StorageManager, your business process requirements, and other factors make it likely thatyou need to adjust and customize the server’s behavior. Your changing storageneeds and client requirements can mean on-going configuration changes andmonitoring.
The server’s capabilities are extensively described in this guide. To get anintroduction to the tasks available to an administrator of Tivoli Storage Manager,read the following sections:
“Interfaces to Tivoli Storage Manager” on page 17
“Configuring and Managing Server Storage” on page 18
“Managing Client Operations” on page 21
“Maintaining the Server” on page 24
“Protecting the Server” on page 27
16 Tivoli Storage Manager for Windows: Administrator’s Guide

Interfaces to Tivoli Storage ManagerTivoli Storage Manager has the following types of interfaces:v Graphical user interfaces.
For the server:– The Tivoli Storage Manager for Windows program folder.– The TSM Management Console, selected from the Tivoli Storage Manager
program folder or the desktop. The TSM Console is a Microsoft ManagementConsole snap-in that provides:- Wizards to assist with Tivoli Storage Manager administration and
configuration tasks- A Windows-style tree view of the storage management resource network- Network scan utilities that can be used to locate Tivoli Storage Manager
client nodes and server nodes for remote management- A net send feature that can be used to notify operators of Tivoli Storage
Manager mount requests and status messages
For the clients, there are graphical user interfaces for the backup-archive clientand the space manager client (if installed, on supported operating systems). Thebackup-archive client can be started from the Tivoli Storage Manager Console.For information about using the interfaces, see the online information or seeQuick Start.
v Web interfaces for server administration and for the backup-archive client.The administrative Web interface allows you to access Tivoli Storage Managerserver functions from any workstation with a Web browser that has theappropriate support for Java®. The interface also allows Web access to thecommand line. See Quick Start for information about the administrative Webinterface.The Web backup-archive client (Web client) allows an authorized user toremotely access a client to run backup, archive, restore, and retrieve processes.The Web browser must have the appropriate support for Java. See Backup-ArchiveInstallation and User’s Guide for requirements.
v The command-line interface.For information about using the command-line interface of the administrativeclient, see Administrator’s Reference. For information about using thecommand-line interface of the backup-archive client and other clients, seeBackup-Archive Installation and User’s Guide for that client.
v The application program interface.For more information, see Tivoli Storage Manager Using the Application ProgramInterface.
v Access to information in the server’s database via standard SQL SELECTstatements. For reporting purposes, the Tivoli Storage Manager product alsoprovides an ODBC driver. The driver allows you to use a spreadsheet ordatabase program to query the server database for information. See “Using SQLto Query the Tivoli Storage Manager Database” on page 438.
Customizing the Server with the Server Options FileServer options allow you to customize the server and its operations. Someexamples of what these options affect are:v Server communicationsv Storage
Chapter 1. Introducing Tivoli Storage Manager 17

v Database and recovery log operationsv Client transaction performance
Server options are in the server options file. You can change the options throughthe TSM Console. See Quick Start for information about the TSM Console. In thisbook, specific server options are discussed where they are applicable. SeeAdministrator’s Reference for details about the server options file and referenceinformation for all server options
Configuring and Managing Server StorageConfiguring and managing storage for efficiency and capacity are important tasksfor an administrator.
The server uses its storage for the data it manages for clients. The storage can be acombination of devices:v Diskv Tape drives that are either manually operated or automatedv Optical drivesv Other drives that use removable media
The devices can be locally attached, or accessible through a SAN. Key decisions inconfiguring and managing the storage include:v Selecting the devices and media that will form the server storage, including
library devices that will be shared among Tivoli Storage Manager serversv Designing the storage hierarchy for efficient backups and optimal storage usagev Using product features that allow the server to provide services to clients while
minimizing traffic on the communications network:– LAN-free data movement– Server-free data movement– Data movement using NDMP to protect data on network-attached storage
(NAS) file serversv Using the Tivoli Storage Manager product to help you to manage the drives and
media, or using an external media manager to do the management outside ofthe Tivoli Storage Manager product. For example, you can use the MicrosoftRemovable Storage Manager to manage storage.
For an introduction to key storage concepts, see “Chapter 2. Introducing StorageDevices” on page 31.
Using Hard Disk Devices with Tivoli Storage ManagerHard disk devices can be used with Tivoli Storage Manager for two purposes:v Storage of the database and recovery logv Storage of client data that is backed up, archived, or migrated from client nodes
The server can store data on hard disk by using random access volumes (devicetype of DISK) or sequential access volumes (device type of FILE).
The Tivoli Storage Manager product allows you to exploit disk storage in waysthat other products do not. You can have multiple client nodes back up to thesame disk storage pool at the same time, and still keep the data for the different
18 Tivoli Storage Manager for Windows: Administrator’s Guide

client nodes separate. Other products also allow you to back up different systemsat the same time, but only by interleaving the data for the systems, leading toslower restore processes.
If you have enough disk storage space, data can remain on disk permanently ortemporarily, depending on the amount of disk storage space that you have. Restoreprocess performance from disk can be very fast compared to tape.
You can have the server later move the data from disk to tape; this is calledmigration through the storage hierarchy. Other advantages to this later move totape include:v Ability to collocate data for clients as the data is moved to tapev Streaming operation of tape drives, leading to better tape drive performancev More efficient use of tape drives by spreading out the times when the drives are
in use
For information about setting up storage pools on disk devices, see “Chapter 3.Using Magnetic Disk Devices” on page 55. For information about setting up astorage hierarchy, see “Overview: The Storage Pool Hierarchy” on page 185.
Using Removable Media Devices with Tivoli Storage ManagerRemovable media devices can be used with Tivoli Storage Manager for thefollowing purposes:v Storage of client data that is backed up, archived, or migrated from client nodesv Storage of database backupsv The exporting of data, to move the data to another server
Attaching and Configuring Devices: For information about configuring yourremovable media devices, see “Chapter 4. Attaching Devices to the Server System”on page 59 and “Chapter 5. Configuring Storage Devices” on page 71.
Classifying Devices by Device Type: A device class represents a set of storagedevices with similar availability, performance, and storage characteristics. You mustdefine device classes for the drives available to the Tivoli Storage Manager server.You specify a device class when you define a storage pool so that the storage poolis associated with drives.
For more information about defining device classes, see “Chapter 9. DefiningDevice Classes” on page 157.
Managing Removable Media Operations: Routine removable media operationsincluding the following:v Preparing media for usev Controlling media reusev Ensuring that sufficient media are availablev Mounting volumes in response to server requests, for manually operated drivesv Managing libraries and drives
For information about removable media operations, see “Chapter 8. ManagingRemovable Media Operations” on page 123.
Chapter 1. Introducing Tivoli Storage Manager 19

Managing Storage Pools and VolumesBacked-up, archived, and space-managed files are stored in groups of volumes thatare called storage pools. Because each storage pool is assigned to a device class,you can logically group your storage devices to meet your storage managementneeds.
You can establish a hierarchy of storage pools. The hierarchy may be based on thespeed or the cost of the devices associated with the pools. Tivoli Storage Managermigrates client files through this hierarchy to ensure the most efficient use of aserver’s storage devices.
The following are other examples of what you can control for a storage pool:
CollocationThe server can keep each client’s files on a minimal number of volumes withina storage pool. Because client files are consolidated, restoring collocated filesrequires fewer media mounts. However, backing up files from different clientsrequires more mounts.
ReclamationFiles on sequential access volumes may expire, move, or be deleted. Thereclamation process consolidates the active, unexpired data on many volumesonto fewer volumes. The original volumes can then be reused for new data,making more efficient use of media.
Storage pool backupThe data on primary storage pools can be backed up to copy storage pools fordisaster recovery purposes. Backup to copy storage pools can occursimultaneously as client data is written to the primary storage pool.
CacheWhen the server migrates files from disk storage pools, duplicate copies of thefiles can remain in cache (disk storage) for faster retrieval. Cached files aredeleted only when space is needed. However, client backup operations thatuse the disk storage pool may have poorer performance.
You manage storage volumes by defining, updating, and deleting volumes, and bymonitoring the use of server storage. You can also move files within and acrossstorage pools to optimize the use of server storage.
For more information about storage pools and volumes and taking advantage ofstorage pool features, see “Chapter 10. Managing Storage Pools and Volumes” onpage 171.
Managing ClustersA Windows cluster environment is a configuration of independent computingsystems. The systems are connected to the same disk subsystem and provide ahigh-availability solution that minimizes or eliminates many potential sources ofdowntime. Microsoft Cluster Server (MSCS) is software that helps configure,monitor, and control applications and hardware components that are deployed ona Windows cluster.
Tivoli Storage Manager is a cluster-aware application and can be configured as anMSCS virtual server. The administrator uses the MSCS Cluster Administratorinterface and Tivoli Storage Manager to designate cluster arrangements and definethe failover pattern.
20 Tivoli Storage Manager for Windows: Administrator’s Guide

Tivoli Storage Manager can also support SCSI tape failover. (However, MSCS doesnot support the failover of tape devices, so it cannot be used to configure the SCSItape failover.) After the configuration has been set up, it can be monitored throughMSCS and the Cluster Administrator interface.
For more information about configuring and managing clusters, see “Chapter 11.Configuring and Managing Clusters” on page 241.
Managing Client OperationsBecause the key task of the server is to provide services to clients, many of theserver administrator’s tasks deal with client operations. Tasks include thefollowing:v Registering clients and customizing client operationsv Ensuring that client operations meet security requirementsv Providing required levels of service by customizing policiesv Automating protection by using schedules
Managing Client NodesA very basic administrative task is adding client nodes, giving the systems that thenodes represent access to the services and resources of the Tivoli Storage Managerserver. The Tivoli Storage Manager server supports a variety of client nodes. Youcan register the following types of clients and servers as client nodes:v Tivoli Storage Manager backup-archive clientv Tivoli Data Protection application clientsv Tivoli Space Manager client (called space manager client or HSM client)v A NAS file server that uses Tivoli Data Protection for NDMP for backupv Tivoli Storage Manager source server (registered as a node on a target server)
When you register clients, you have choices to make about the following:v Whether the client should compress files before sending them to the server for
backupv Whether the client node ID has the authority to delete its files from server
storagev Whether an administrator ID that matches the client ID is created, for remote
client operations
Other important tasks include the following:
Controlling client options from the serverClient options on client systems allow users to customize backup, archive, andspace management operations, as well as schedules for these operations. Onmost client systems, the options are in a file called dsm.opt. In some cases, youmay need or want to provide the clients with options to use. To help users getstarted, or to control what users back up, you can define sets of client optionsfor clients to use. Client options sets are defined in the server database and areused by the clients that you designate.
Among the options that can be in a client option set are the include andexclude options. These options control which files are considered for the clientoperations.
For more information, see “Chapter 13. Managing Client Nodes” on page 263.
Allowing subfile backupsFor mobile and remote users, you want to minimize the data sent over the
Chapter 1. Introducing Tivoli Storage Manager 21

network, as well as the time that they are connected to the network. You canset the server to allow a client node to back up changed portions of files thathave been previously backed up, rather than entire files. The portion of the filethat is backed up is called a subfile.
For more information, see “Chapter 15. Managing Data for Client Nodes” onpage 347.
Creating backup sets for client nodesYou can perform an instant archive for a client by creating a backup set. Abackup set copies a client node’s active, backed-up files from server storageonto sequential media. If the sequential media can be read by a deviceavailable to the client system, you can restore the backup set directly to theclient system without using the network. The server tracks backup sets thatyou create and retains the backup sets for the time you specify.
For more information, see “Chapter 15. Managing Data for Client Nodes” onpage 347.
For more information, see “Chapter 12. Adding Client Nodes” on page 253 and“Chapter 13. Managing Client Nodes” on page 263.
Managing SecurityTivoli Storage Manager includes security features for user registration andpasswords.
Registration for clients can be closed or open. With closed registration, a user withadministrator authority must register all clients. With open registration, clients canregister themselves at first contact with the server. See “Registering Nodes with theServer” on page 254.
You can ensure that only authorized administrators and client nodes arecommunicating with the server by requiring the use of passwords. You can also setthe following requirements for passwords:v Number of characters in a password.v Expiration time.v A limit on the number of consecutive, invalid password attempts. When the
client exceeds the limit, Tivoli Storage Manager locks the client node from accessto the server.
See “Managing Passwords and Login Procedures” on page 294.
You can control the authority of administrators. An organization may name asingle administrator or may distribute the workload among a number ofadministrators and grant them different levels of authority. For details, see“Managing Levels of Administrative Authority” on page 292.
Implementing Policies for Client DataAs the administrator, you define the rules for client backup, archive, and migrationoperations, based on user or business requirements. The rules are called policies.Policies identify:v The criteria for backup, archive, and migration of client datav Where the client data is initially storedv How the data is managed by the server (how many backup versions are kept,
for how long)
22 Tivoli Storage Manager for Windows: Administrator’s Guide

In Tivoli Storage Manager, you define policies by defining policy domains, policysets, management classes, and backup and archive copy groups. When you installTivoli Storage Manager, you have a default policy that consists of a single policydomain named STANDARD.
The default policy provides basic backup protection for end-user workstations. Toprovide different levels of service for different clients, you can add to the defaultpolicy or create new policy. For example, because of business needs, file servers arelikely to require a policy different from policy for end users. Protecting data forapplications such as Lotus Domino also may require a unique policy.
For more information about the default policy and establishing and managing newpolicies, see “Chapter 14. Implementing Policies for Client Data” on page 299.
Scheduling Client OperationsScheduling client operations can mean better protection for data, becauseoperations can occur consistently without user intervention. Scheduling also canmean better utilization of resources such as the network. Client backups that arescheduled at times of lower usage can minimize the impact on user operations ona network.
You can automate operations for clients by using schedules. Tivoli StorageManager provides a central scheduling facility. You can also use operating systemutilities or other scheduling tools to schedule Tivoli Storage Manager operations.
With Tivoli Storage Manager schedules, you can perform the operations for a clientimmediately or schedule the operations to occur at regular intervals.
The key objects that interact are:
Include-exclude options on each clientThe include-exclude options determines which files are backed up, archived,or space-managed, and determines management classes, encryption, and typeof backup for files.
The client can specify a management class for a file or group of files, or canuse the default management class for the policy domain. The client specifies amanagement class by using an INCLUDE option in the client’s include-excludelist or file. You can have central control of client options such as INCLUDEand EXCLUDE by defining client option sets on the server. When you registera client, you can specify a client option set for that client to use. See“Modifying Client Option Files” on page 281 for details.
Association defined between client and scheduleAssociations determine which schedules are run for a client.
Clients are assigned to a policy domain when they are registered. To automateclient operations, you define schedules for a domain. Then you defineassociations between schedules and clients in the same domain.
ScheduleThe schedule determines when a client operation automatically occurs.
Schedules that can automate client operations are associated with a policydomain.
The scheduled client operations are called events. The Tivoli Storage Managerserver stores information about events in its database. For example, you canquery the server to determine which scheduled events completed successfullyand which failed.
Chapter 1. Introducing Tivoli Storage Manager 23
Management classThe management class determines where client files are initially stored andhow they are managed.
The management class contains information that determines how TivoliStorage Manager handles files that clients backup, archive, or migrate. Forexample, the management class contains the backup copy group and thearchive copy group. Each copy group points to a destination, a storage poolwhere files are first stored when they are backed up or archived.
For a schedule to work on a particular client, the client machine must be turnedon. The client must either be running the client scheduler or must allow the clientacceptor daemon to start the scheduler when needed.
To learn more:v For how to set up policy domains and management classes, see “Chapter 14.
Implementing Policies for Client Data” on page 299.v For how to automate client operations, see “Chapter 16. Scheduling Operations
for Client Nodes” on page 357.v For how to set up an include-exclude list for clients, see “Getting Users Started”
on page 302.v For how to run the scheduler on client systems, see the user guides for the
clients.
After you have created schedules, you manage and coordinate those schedules.Your tasks include the following:v Verify that the schedule ran successfully.v Determine how long Tivoli Storage Manager retains event records in the
database.v Balance the workload on the server so that all scheduled operations complete.
For more information about these tasks, see “Chapter 17. Managing Schedules forClient Nodes” on page 367.
Maintaining the ServerTo keep the server running well, you have access to these tasks:v Managing server operations, such as controlling client access to the serverv Automating repetitive administrative tasksv Monitoring and adjusting space for the database and the recovery logv Monitoring the status of the server, server storage, and clients
If you manage more than one server, you can ensure that the multiple servers areconsistently managed by using the enterprise management functions of TivoliStorage Manager. You can set up one server as the configuration manager andhave other servers obtain configuration information from it.
Managing Server OperationsThere are a variety of tasks associated with managing server operations:v Start and stop the server.v Allow and suspend client sessions with the server.v Query, cancel, and preempt server processes such as backing up the server
database.v Customize server options.
24 Tivoli Storage Manager for Windows: Administrator’s Guide

Other tasks that are needed less frequently include:v Maintain compliance with the license agreement.v Move the server.v Set up the server to use Active Directory.
See “Licensing Tivoli Storage Manager” on page 383. For suggestions about theday-to-day tasks required to administer the server, see “Chapter 18. ManagingServer Operations” on page 383.
Automating Server OperationsRepetitive, manual tasks associated with managing the server can be automatedthrough Tivoli Storage Manager schedules and scripts. Using schedules and scriptscan minimize the daily tasks for administrators.
You can define schedules for the automatic processing of most administrativecommands. For example, a schedule can run the command to back up the server’sdatabase every day.
Tivoli Storage Manager server scripts allow you to combine administrativecommands with return code checking and processing. The server comes withscripts that you can use to do routine tasks, or you can define your own. Thescripts typically combine several administrative commands with return codechecking, or run a complex SQL SELECT command. Scripts can also be scheduled.
For more information about automating Tivoli Storage Manager operations, see“Chapter 19. Automating Server Operations” on page 401.
Managing the Database and Recovery LogThe Tivoli Storage Manager database contains information about registered clientnodes, policies, schedules, and the client data in storage pools (metadata). Theinformation about the client data, also called metadata, includes the file name, filesize, file owner, management class, copy group, and location of the file in serverstorage. The database is key to the operation of the server.
The server records changes made to the database (database transactions) in itsrecovery log. The recovery log is used to maintain the database in a transactionallyconsistent state, and to maintain consistency across server start-up operations.
You can tune database and recovery log performance automatically or manually.You can set up triggers so that additional space is automatically added to thedatabase and recovery log as needed.
For more information about the Tivoli Storage Manager database and recovery logand about the tasks associated with them, see “Chapter 20. Managing the Databaseand Recovery Log” on page 417.
Monitoring the Tivoli Storage Manager ServerTivoli Storage Manager provides you with many sources of information aboutserver and client status and activity, the state of the server’s database and storage,and resource usage. By monitoring selected information, you can provide reliableservices to users while making the best use of available resources. Daily checks ofsome indicators are suggested.
You can use Tivoli Storage Manager queries and SQL queries to get informationabout the server. An ODBC interface is available.
Chapter 1. Introducing Tivoli Storage Manager 25

You can set up automatic logging of information about Tivoli Storage Managerclients and server events.
See the following sections for more information about these tasks.v “Chapter 21. Monitoring the Tivoli Storage Manager Server” on page 433v “Using SQL to Query the Tivoli Storage Manager Database” on page 438v “Logging Tivoli Storage Manager Events to Receivers” on page 445v “Daily Monitoring Scenario” on page 460
Working with a Network of Tivoli Storage Manager ServersYou may have a number of Tivoli Storage Manager servers in your network, at thesame or different locations. Some examples are:v Your users are scattered across many locations, so you have located Tivoli
Storage Manager servers close to the users to manage network bandwidthlimitations.
v You have set up multiple servers to provide services to different organizations atone location.
v You have multiple servers on your network to make disaster recovery easier.
Servers connected to a network can be centrally managed. Tivoli Storage Managerprovides functions to help you configure, manage, and monitor the servers. Anadministrator working at one Tivoli Storage Manager server can work with serversat other locations around the world.
When you have a network of Tivoli Storage Manager servers, you can simplifyconfiguration and management of the servers by using Enterprise Administrationfunctions. You can do the following:v Designate one server as a configuration manager that distributes configuration
information such as policy to other servers. See “Setting Up an EnterpriseConfiguration” on page 475.
v Route commands to multiple servers while logged on to one server. See“Routing Commands” on page 497.
v Log events such as error messages to one server. This allows you to monitormany servers and clients from a single server. See “Enterprise Event Logging:Logging Events to Another Server” on page 455.
v Store data for one Tivoli Storage Manager server in the storage of another TivoliStorage Manager server. The storage is called server-to-server virtual volumes.See “Using Virtual Volumes to Store Data on Another Server” on page 501 fordetails.
v Share an automated library among Tivoli Storage Manager servers. See“Multiple Tivoli Storage Manager Servers Sharing Libraries” on page 37.
v Store a recovery plan file for one server on another server, when using TivoliDisaster Recovery Manager. You can also back up the server database andstorage pools to another server. See “Chapter 25. Using Tivoli Disaster RecoveryManager” on page 577 for details.
Exporting and Importing DataAs conditions change, you can move data from one server to another. You canexport part or all of a server’s data so that you can then import the data to anotherserver. The export process writes the data to sequential media, such as tape or afile on hard disk. For example, you can balance workload among servers bymoving client nodes from one server to another.
26 Tivoli Storage Manager for Windows: Administrator’s Guide

For more information about moving data between servers, see “Chapter 23.Exporting and Importing Data” on page 509.
Protecting the ServerBecause the server is protecting client data, it is important to protect the serveritself.
Tivoli Storage Manager provides a number of ways to protect and recover yourserver from media failure or from the loss of the Tivoli Storage Manager databaseor storage pools. Recovery is based on the following preventive measures:v Mirroring, by which the server maintains one or more copies of the database or
the recovery log, allowing the system to continue when one of the mirroreddisks fails
v Periodic backup of the databasev Periodic backup of the storage poolsv Audit of storage pools for damaged files, and recovery of damaged files when
necessaryv Backup of the device configuration and volume history filesv Validation of the data in storage pools, using cyclic redundancy checking
In addition to taking these actions, you can prepare a disaster recovery plan toguide you through the recovery process by using the Tivoli Disaster RecoveryManager. Tivoli Disaster Recovery Manager is an optional product that assists youin the automatic preparation of a disaster recovery plan. You can use the disasterrecovery plan as a guide for disaster recovery as well as for audit purposes tocertify the recoverability of the Tivoli Storage Manager server.
The disaster recovery methods of Tivoli Disaster Recovery Manager are based ontaking the following measures:v Sending server backup volumes offsite or to another Tivoli Storage Manager
serverv Creating the disaster recovery plan file for the Tivoli Storage Manager serverv Storing client machine informationv Defining and tracking client recovery media
For more information about protecting your server and for details about recoveringfrom a disaster, see “Chapter 24. Protecting and Recovering Your Server” onpage 531.
Chapter 1. Introducing Tivoli Storage Manager 27

28 Tivoli Storage Manager for Windows: Administrator’s Guide

Part 2. Configuring and Managing Server Storage
© Copyright IBM Corp. 1994, 2002 29

30 Tivoli Storage Manager for Windows: Administrator’s Guide

Chapter 2. Introducing Storage Devices
This chapter introduces key concepts that you must be familiar with to work withTivoli Storage Manager storage devices. It also describes what you will find in thestorage device chapters.
“Tivoli Storage Manager Storage Devices”
“Selecting a Device Configuration” on page 34
“How Tivoli Storage Manager Uses and Reuses Removable Media” on page 43
“Tivoli Storage Manager Volumes” on page 46
“Tivoli Storage Manager Storage Objects” on page 47
“Configuring Devices” on page 52
How to Use the Server Storage ChaptersIf you are new to Tivoli Storage Manager, you should begin by familiarizingyourself with the concepts presented in this chapter. The other chapters in this partof the book will help you to do the following:
Goal Chapter
Configure and manage magnetic diskdevices, which Tivoli Storage Manager usesto store client data, the database, databasebackups, recovery log, and export data.
“Chapter 3. Using Magnetic Disk Devices”on page 55
Physically attach storage devices to yoursystem and to install and configure therequired device drivers.
“Chapter 4. Attaching Devices to the ServerSystem” on page 59
Configure devices to use with Tivoli StorageManager, and to see detailed scenarios ofrepresentative device configurations.
“Chapter 5. Configuring Storage Devices” onpage 71
Perform routine operations such as labelingvolumes, checking volumes into automatedlibraries, and maintaining storage volumesand devices.
“Chapter 8. Managing Removable MediaOperations” on page 123
Define and manage device classes. “Chapter 9. Defining Device Classes” onpage 157
Understand storage pool and storagevolume concepts, and to define and managestorage pools and storage volumes.
“Chapter 10. Managing Storage Pools andVolumes” on page 171
Tivoli Storage Manager Storage DevicesTivoli Storage Manager devices may be real physical devices, such as disk drivesor tape drives, or logical devices, such as files on a disk or storage on anotherserver. See the following sections for details:v “Disk Devices” on page 32v “Libraries” on page 32v “Drives” on page 32
© Copyright IBM Corp. 1994, 2002 31

v “Files on Disk as Sequential Volumes” on page 33v “Data Movers” on page 33v “Sequential Volumes on Another Tivoli Storage Manager Server” on page 34
For a summary, see Table 5 on page 52. For details about specific devices that aresupported, visit the Tivoli Storage Manager Web site at this URLhttp://www.tivoli.com/support/storage_mgr/tivolimain.html.
Disk DevicesMagnetic disk devices are the only random access devices. All disk devices sharethe same device type and predefined device class: DISK.
DrivesTivoli Storage Manager drives include tape and optical drives that can stand aloneor that can be part of an automated library. Supported removable media drivesalso include removable files devices such as Iomega Zip drives and Jaz drives.
LibrariesTivoli Storage Manager supports a variety of library types described in thefollowing sections.
Manual LibrariesIn a manual library, an operator mounts the volumes. You can combine drives withdifferent device types, such as DLT and 8mm, in a single manual library.
When the server determines that a volume must be mounted on a drive in amanual library, the server issues mount request messages that prompt an operatorto mount the volume. The server sends these messages to the server console and toadministrative clients that were started by using the special mount mode or consolemode parameter.
For help on configuring a manual library, see “Chapter 5. Configuring StorageDevices” on page 71. For information on how to monitor mount messages for amanual library, see “Managing Server Requests” on page 134.
SCSI LibrariesA SCSI library, which is controlled through a SCSI interface, is a collection ofdrives of the same type. In a SCSI library, a robot or other mechanismautomatically handles volume mounts and dismounts.
Some examples of this library type are:v The Exabyte EXB-210 libraryv The IBM 3590 tape device, with its Automatic Cartridge Facility (ACF)
Note: The IBM 3494 Tape Library Dataserver, although it has a SCSI interface, isdefined as a 349X library type.
For help on configuring a SCSI library, see “Chapter 5. Configuring StorageDevices” on page 71.
349X LibrariesA 349X library is a collection of drives in an IBM 3494 or 3495 Tape LibraryDataserver. Volume mounts and demounts are handled automatically by thelibrary. A 349X library has one or more library management control points (LMCP)
32 Tivoli Storage Manager for Windows: Administrator’s Guide

that the server uses to mount and dismount volumes in a drive. Each LMCPprovides an independent interface to the robot mechanism in the library.
For help on configuring a 349X library, see “Chapter 5. Configuring StorageDevices” on page 71.
External LibrariesAn external library is a collection of drives managed by an external mediamanagement system that is not part of Tivoli Storage Manager. The server providesan interface that allows external media management systems to operate with theserver. The external media management system performs the following functions:v Volume mounts (specific and scratch)v Volume dismountsv Freeing of library volumes (return to scratch)
The external media manager selects the appropriate drive for media accessoperations. You do not define the drives, check in media, or label the volumes inan external library.
An external library allows flexibility in grouping drives into libraries and storagepools. The library may have one drive, a collection of drives, or even a part of anautomated library.
An ACSLS library is a type of external library that is controlled by the StorageTeksoftware, Automated Cartridge System Library Software (ACSLS). The server canact as a client application to the ACSLS software to use the drives.
For a definition of the interface that Tivoli Storage Manager provides to theexternal media management system, see “Appendix A. External MediaManagement Interface Description” on page 641.
Data MoversData movers are devices that accept requests from Tivoli Storage Manager totransfer data on behalf of the server. Data movers transfer data:v Between storage devicesv Without using significant Tivoli Storage Manager server or client resourcesv Without using significant network resources
Tivoli Storage Manager supports two types of data movers:v For NDMP operations, data movers are NAS file servers. The definition for a
NAS data mover contains the network address, authorization, and data formatsrequired for NDMP operations. A data mover enables communication andensures authority for NDMP operations between the Tivoli Storage Managerserver and the NAS file server.
v For server-free data movement, data movers are devices such as the IBM SANData Gateway, that move data between disk devices and tape devices on theSAN.
Files on Disk as Sequential VolumesYou can create volumes on server disk space that have the characteristics ofsequential access volumes such as tape. Tivoli Storage Manager supports thesesequential volumes through the FILE device type. Because FILE is a sequentialdevice type that is on disk, you do not define a library or drive object; only adevice class.
Chapter 2. Introducing Storage Devices 33

FILE volumes can also be useful when transferring data for purposes such aselectronic vaulting.
For more information about using, FILE volumes see “Configuring FILE SequentialVolumes on Disk Devices” on page 56.
Sequential Volumes on Another Tivoli Storage Manager ServerYou can create volumes that exist as archived files in the storage hierarchy ofanother Tivoli Storage Manager server. The volumes created are a special type ofsequential access volume called a virtual volume. Virtual volumes have thecharacteristics of sequential access volumes such as tape. Tivoli Storage Managersupports virtual volumes through the SERVER device type. You must define adevice class and a server that will store the data. No library or drive definition isrequired.
Virtual volumes are useful for the following purposes:v Centralization of physical tape resources. You can have one server attached to a
large tape library. Other servers can use that library indirectly through aSERVER device class.
v Data-sharing between servers, by using a SERVER device class to export andimport data. You do not need to move any physical media from location tolocation.
v Immediate offsite storage of storage pool backups and database backups,without physically moving media to another location.
v Offsite storage of the Tivoli Disaster Recovery Manager (DRM) recovery planfile.
v Electronic vaulting.
Selecting a Device ConfigurationIn the conventional local area network (LAN) configuration, one or more tape oroptical libraries are associated with a single Tivoli Storage Manager server. In aLAN configuration, client data, electronic mail, terminal connection, applicationprogram, and device control information must all be handled by the samenetwork.
A storage area network (SAN) is a dedicated storage network that can improvesystem performance. On a SAN you can consolidate storage and relieve thedistance, scalability, and bandwidth limitations of LANs and wide area networks(WANs). Using Tivoli Storage Manager in a SAN allows the following functions:v Sharing storage devices among multiple Tivoli Storage Manager serversv Allowing Tivoli Storage Manager clients, through a storage agent on the client
machine, to move data directly to storage devices (LAN-free data movement)v Allowing an outboard data mover to move client data to storage devices
(server-free data movement)
In a SAN you can share storage devices that are supported by the Tivoli StorageManager device driver. This includes most SCSI devices, but does not includedevices that use the GENERICTAPE device type. See “Chapter 4. Attaching Devicesto the Server System” on page 59 for device driver setup information.
For information about supported devices and Fibre Channel hardware andconfigurations, see the following Web sites:v http://www.tivoli.com/support/storage_mgr/tivolimain.html
34 Tivoli Storage Manager for Windows: Administrator’s Guide

v http://www.tivoli.com/support/storage_mgr/san/overview.html
The following sections describe ways that you can configure your storage devicesto work with Tivoli Storage Manager:v “Local Area Network Configuration”v “Network-Attached Storage”v Configurations in a storage area network:
– “Multiple Tivoli Storage Manager Servers Sharing Libraries” on page 37– “LAN-Free Data Movement” on page 38– “Server-Free Data Movement” on page 40
“Planning for Server Storage” on page 42 describes how to evaluate your currentstorage device environment. It also describes the requirements, advantages, andlimitations of all these configurations to help you choose the best set up for yourinstallation.
Local Area Network ConfigurationIn a local area network configuration, a drive or an automated library can becontrolled by only one Tivoli Storage Manager server. Device control informationand client backup and restore data flow across the LAN.
Tivoli Storage Manager supports the following categories of libraries:
ManualA collection of one or more drives that are loaded and unloaded by anoperator.
SCSI A SCSI-controlled automated library that includes one or more drives.
349X An IBM 3494 automated library and associated drives.
ExternalA library that is controlled by a media management program rather thanby Tivoli Storage Manager. This category includes StorageTek librariescontrolled by Automated Cartridge System Library Software (ACSLS), andlibraries that are controlled by Windows Removable Storage Manager(RSM).
For more detailed information, see “Libraries” on page 32.
Network-Attached StorageNetwork-attached storage (NAS) file servers are dedicated storage machines whoseoperating systems are optimized for file-serving functions. NAS file serverstypically do not run third-party software. Instead, they interact with programs likeTivoli Storage Manager through industry-standard network protocols, such asNDMP. Tivoli Storage Manager uses Tivoli Data Protection for NDMP tocommunicate with and provide backup and restore data for NAS file servers.
Tivoli Data Protection for NDMP backs up and restores images of complete filesystems. NDMP allows the Tivoli Storage Manager server to control the backup ofa NAS file server. The file server transfers the backup data to a drive in aSCSI-attached tape library. The NAS file server can be distant from the TivoliStorage Manager server.
Chapter 2. Introducing Storage Devices 35

Tivoli Storage Manager tracks file system image backups on tape, but notindividual files.
Tivoli Data Protection for NDMP and Other NAS Backup MethodsUsing Tivoli Data Protection for NDMP to protect NAS file servers allows TivoliStorage Manager to control operations while the NAS file server transfers the data.To use a backup-archive client to back up a NAS file server, mount the NAS fileserver file system on the client machine (with either an NFS mount or a CIFS map)and back up as usual. The following table compares the two methods:
Table 3. Comparing Tivoli Data Protection for NDMP and Tivoli Storage ManagerBackup-Archive Client
Tivoli Data Protection for NDMP Tivoli Storage Manager Backup-ArchiveClient
Network data traffic is less because the TivoliStorage Manager server controls operationsremotely, but the NAS file server moves thedata locally.
Network data traffic is greater because allbackup data goes across the LAN from theNAS file server to the client and then to theTivoli Storage Manager server.
Less file server processing is required to backup a file system because the backup does notuse file access protocols such as NFS andCIFS.
More file server processing is requiredbecause file backups require additionaloverhead for file access protocols such asNFS and CIFS.
The Tivoli Storage Manager server can bedistant from the NAS file server and the tapelibrary.
The Tivoli Storage Manager server must bewithin SCSI or Fibre Channel range of thetape library.
Data Flow
TCP/IPConnection
SCSI or FibreChannel Connection
Legend: NAS FileServer
NAS File ServerFile SystemDisks
TapeLibrary
Server
Figure 2. Network- Attached Storage (NAS) Configuration
36 Tivoli Storage Manager for Windows: Administrator’s Guide

Tivoli Data Protection for NDMP BackupsWhen Tivoli Data Protection for NDMP backs up a NAS file server, it creates NASfile system image backups. The image backups are different from traditional TivoliStorage Manager backups because the NAS file server transfers the data to thedrives in the library. NAS file system image backups can be either full ordifferential image backups. The first backup of a file system on a NAS file server isalways a full image backup. By default, subsequent backups are differential imagebackups containing only data that has changed in the file system since the last fullimage backup. If a full image backup does not already exist, a full image backup isperformed.
If you restore a differential image, Tivoli Storage Manager automatically restoresthe full backup image first, followed by the differential image. Tivoli StorageManager cannot restore individual files from full or differential image backups.
The following operations are not supported for data that has been backed up byusing Tivoli Data Protection for NDMP:v Storage pool migrationv Storage pool backup and restorev Reclamationv Move data operationsv Export and import operationsv Backup set generation
Multiple Tivoli Storage Manager Servers Sharing LibrariesFigure 3 on page 38 shows a SAN configuration in which two Tivoli StorageManager servers share a library.
Chapter 2. Introducing Storage Devices 37

When Tivoli Storage Manager servers share a library, one server, the librarymanager, controls device operations. These operations include mount, dismount,volume ownership, and library inventory. Other servers, library clients, useserver-to-server communications to contact the library manager and request deviceservice. Data moves over the SAN between each server and the storage device.
Tivoli Storage Manager servers use the following features when sharing anautomated library:
Partitioning of the Volume InventoryThe inventory of media volumes in the shared library is partitioned amongservers. Either one server owns a particular volume, or the volume is inthe global scratch pool. No server owns the scratch pool at any given time.
Serialized Drive AccessOnly one server accesses each tape drive at a time. Drive access isserialized and controlled so that servers do not dismount other servers’volumes or write to drives where other servers mount their volumes.
Serialized Mount AccessThe library autochanger performs a single mount or dismount operation ata time. A single server (library manager) performs all mount operations toprovide this serialization.
LAN-Free Data MovementTivoli Storage Manager allows a client, through a storage agent, to directly back upand restore data to a tape library on a SAN. Figure 4 on page 39 shows a SAN
Library Client Server
Tape Library
LibraryControl
Library Control
Data Flow
Data Flow
SAN
LAN
Library ManagerServer
Figure 3. Library Sharing in a Storage Area Network (SAN) Configuration. The serverscommunicate over the LAN. The library manager controls the library over the SAN. Thelibrary client stores data to the library devices over the SAN.
38 Tivoli Storage Manager for Windows: Administrator’s Guide

configuration in which a client directly accesses a tape, disk, or FILE library toread or write data.
LAN-free data movement requires the installation of a storage agent on the clientmachine. The server maintains the database and recovery log, and acts as thelibrary manager to control device operations. The storage agent on the clienthandles the data transfer to the device on the SAN. This implementation frees upbandwidth on the LAN that would otherwise be used for client data movement.
The following outlines a typical backup scenario for a client that uses LAN-freedata movement:1. The client begins a backup operation. The client and the server exchange policy
information over the LAN to determine the destination of the backed up data.For a client using LAN-free data movement, the destination is a storage poolthat uses a device on the SAN.
2. Because the destination is on the SAN, the client contacts the storage agent,which will handle the data transfer. The storage agent sends a request for avolume mount to the server.
3. The server contacts the storage device and, in the case of a tape library, mountsthe appropriate media.
4. The server notifies the client of the location of the mounted media.5. The client, through the storage agent, writes the backup data directly to the
device over the SAN.
ClientStorage Agent installed
Tape Library
File Library
Library ControlClient Metadata
LibraryControl
ClientData
SAN
LAN
Storage Manager Server
Figure 4. LAN-Free Data Movement. Client and server communicate over the LAN. Theserver controls the device on the SAN. Client data moves over the SAN to the device.
Chapter 2. Introducing Storage Devices 39

6. The storage agent sends file attribute information to the server, and the serverstores the information in its database.
If a failure occurs on the SAN path, failover occurs. The client uses its LANconnection to the Tivoli Storage Manager server and moves the client data over theLAN.
Note: See the Tivoli Storage Manager home page athttp://www.tivoli.com/support/storage_mgr/tivolimain.html for the latestinformation on clients that support the feature.
Server-Free Data MovementTivoli Storage Manager allows clients to directly back up and restore file systemimages between disk storage and tape devices accessible over a SAN. Thisserver-free data movement is handled on behalf of the Tivoli Storage Managerserver by an outboard data mover, such as the IBM SAN Data Gateway. The datamover must be able to execute the SCSI-3 extended copy command. Server-freedata movers must have addressability to all the devices involved, which includedisk and tape drives. The devices may be attached to the SAN through eitherdirect Fibre-Attach or SCSI devices connected to a data mover.
Unlike traditional LAN and LAN-free backups and restores, data passes throughneither the client nor the server. Instead, the data mover handles the data. In thisway, backup and restore operations do not require resources from client or serverprocessors or from the LAN. Because it will not be copying data, the Tivoli StorageManager server can handle more concurrent client connections and serveroperations. In addition, the Tivoli Storage Manager client machine, not having toread and send data to the server, can handle a greater application load.
Figure 5 on page 41 shows the movement of server-free data. The numbers (such as�1�) refer to numbers in the figure.
40 Tivoli Storage Manager for Windows: Administrator’s Guide

1. The client initiates a backup or restore image request (�1�).2. The Tivoli Storage Manager server issues a mount request to the library (�2�).3. The data mover initiates a copy operation (�3�).4. The data is copied between the disk and the tape library (�4�).
Server-free operations transfer only volume images, not standard, file-level data.Images backed up by server-free data movement must be stored in storage poolswith a data format of NONBLOCK. If the client cannot perform a server-freebackup or restore, the operation fails over first to a LAN-free operation. If thatoperation cannot be performed, the client attempts a LAN-based backup or restore.
Server-free operations can restore LAN-based or LAN-free volume image backups.Table 4 describes the possible combinations.
Table 4. Data Format Support
Data Format LAN-BasedBackupLAN-FreeBackup
Server-FreeBackup
LAN—BasedRestoreLAN-FreeRestore
Server-FreeRestore
NATIVE Yes No Yes No
NONBLOCK Yes Yes Yes Yes
ServerClient
Tape Library
Data Mover
SAN
LAN1
2
3
4
Figure 5. Server-Free Data Movement
Chapter 2. Introducing Storage Devices 41

The Tivoli Storage Manager for Windows 2000 client can perform a server-freeimage backup of both raw volumes and volumes that contain the NTFS filesystem. Tivoli Storage Manager allows users to perform full-volume backups ofonline volumes. The volume image version matches the volume at the start of thebackup. Depending on the value of the IMAGEGAPSIZE client option, either all oronly the used blocks of an NTFS volume are backed up.
The Tivoli Storage Manager client allows server-free backup and restore of volumeimages between different volume layouts with the exception of software-basedRAID-5 volumes and software-striped volumes. When restoring to asoftware-based mirror volume (RAID-1), Tivoli Storage Manager restores to theprimary copy only and uses the operating system to resynchronize the stalemirrors. The client supports volume layouts such as striped and mirrored only onWindows 2000 dynamic disks.
Note: These restrictions apply only to software-based RAID levels, and not tostorage subsystems that come with hardware RAID controllers.
Tivoli Storage Manager monitors the SAN addresses of devices it knows about. Ifthe address of a defined devices changes due to an event on the SAN, the newaddress will be discovered and updated.
Planning for Server StorageThis section discusses how to evaluate your environment to determine the deviceclasses and storage pools for your server storage.
Most devices can be configured using the Device Configuration Wizard in theTivoli Storage Manager Console. The Device Configuration Wizard isrecommended for configuring devices. See “Chapter 5. Configuring StorageDevices” on page 71. The wizard can guide you through many of the followingsteps:1. Determine the storage devices that are available to the server. For example,
determine how many tape drives you have that you will allow the server touse.The servers can share devices in libraries that are attached through a SAN. Ifthe devices are not on a SAN, the server expects to have exclusive use of thedrives defined to it. If another application (including another Tivoli StorageManager server) tries to use a drive while the server to which the drive isdefined is running, some server functions may fail.
2. Determine the device type and device class for each of the available devices.Group together similar devices and identify their device classes. For example,create separate categories for 4mm and 8mm devices.
Note: For sequential access devices, you can categorize the type of removablemedia based on their capacity. For example, standard length cartridgetapes and longer length cartridge tapes require different device classes.
3. Determine how the mounting of volumes is accomplished for the devices:v Devices that require operators to load volumes must be part of a defined
MANUAL library.v Devices that are automatically loaded must be part of a defined SCSI or
349X. Each automated library device is a separate library.v Devices that are controlled by StorageTek Automated Cartridge System
Library Software (ACSLS) must be part of a defined ACSLS library.
42 Tivoli Storage Manager for Windows: Administrator’s Guide

v Devices that are managed by an external media management system must bepart of a defined EXTERNAL library.
4. If you are considering storing data for one Tivoli Storage Manager server usingthe storage of another Tivoli Storage Manager server, consider networkbandwidth and network traffic. If your network resources constrain yourenvironment, you may have problems using the SERVER device type efficiently.Also consider the storage resources available on the target server. Ensure thatthe target server has enough storage space and drives to handle the load fromthe source server.
5. Determine the storage pools to set up, based on the devices you have and onuser requirements. Gather users’ requirements for data availability. Determinewhich data needs quick access and which does not.
6. Be prepared to label removable media. You may want to create a new labelingconvention for media so that you can distinguish them from media used forother purposes.
How Tivoli Storage Manager Uses and Reuses Removable MediaTivoli Storage Manager allows you to control how removable media are used andreused. After Tivoli Storage Manager selects an available medium, that medium isused and eventually reclaimed according to its associated policy.
Tivoli Storage Manager manages the data on the media, but you manage the mediaitself, or you can use a removable media manager. Regardless of the method used,managing media involves creating a policy to expire data after a certain period oftime or under certain conditions, move valid data onto new media, and reuse theempty media.
In addition to information about storage pool volumes, the volume historycontains information about tapes used for database backups and exports (fordisaster recovery purposes). The process for reusing these tapes is slightly differentfrom the process for reusing tapes containing client data backups.
Figure 6 on page 44 shows a typical life cycle for removable media. The numbers(such as �1�) refer to numbers in the figure.
Chapter 2. Introducing Storage Devices 43

1. You label �1� and check in �2� the media. Checking media into a manuallibrary simply means storing them (for example, on shelves). Checking mediainto an automated library involves adding them to the library volumeinventory.See “Labeling Media with an Automated Library” on page 125 or “LabelingMedia for Manual Libraries” on page 132.
2. If you plan to define volumes to a storage pool associated with a device, youshould check in the volume with its status specified as private. Use of scratchvolumes is more convenient in most cases.
3. A client sends data to the server for backup, archive, or space management.The server stores the client data on the volume. Which volume the serverselects �3� depends on:v The policy domain to which the client is assigned.v The management class for the data (either the default management class for
the policy set, or the class specified by the client in the client’sinclude/exclude list or file).
v The storage pool specified as the destination in either the management class(for space-managed data) or copy group (for backup or archive data). Thestorage pool is associated with a device class, which determines whichdevice and which type of media is used.
v Whether the maximum number of scratch volumes that a server can requestfrom the storage pool has been reached when the scratch volumes areselected.
Figure 6. Simplified View of the Life Cycle of a Tape
44 Tivoli Storage Manager for Windows: Administrator’s Guide

v Whether collocation is enabled for that storage pool. When collocation isenabled, the server attempts to place data for different clients or client nodeson separate volumes. For more information, see “Keeping a Client’s FilesTogether: Collocation” on page 200.
See Figure 7.
4. The data on a volume changes over time as a result of:v Expiration of files �4� (affected by management class and copy group
attributes, and the frequency of expiration processing). See “Basic PolicyPlanning” on page 300.
v Movement and deletion of file spaces by administratorv Automatic reclamation of media �5�
The amount of data on the volume and the reclamation threshold set for thestorage pool affects when the volume is reclaimed. When the volume isreclaimed, any valid, unexpired data is moved to other volumes or possiblyto another storage pool (for storage pools with single-drive libraries)..
v Collocation, by which Tivoli Storage Manager attempts to keep databelonging to a single client node or a single client file space on a minimalnumber of removable media in a storage pool.
If the volume becomes empty because all valid data either expires or is movedto another volume, the volume is available for reuse (unless a time delay hasbeen specified for the storage pool). The empty volume becomes a scratchvolume if it was initially a scratch volume. The volume starts again at step 3 onpage 44.
Figure 7. How Tivoli Storage Manager Affects Media Use
Chapter 2. Introducing Storage Devices 45

5. You determine when the media has reached its end of life.For volumes that you defined (private volumes), check the statistics on thevolumes by querying the database. The statistics include the number of writepasses on a volume (compare with the number of write passes recommendedby the manufacturer) and the number of errors on the volume.You must move any valid data off a volume that has reached end of life. Then,if the volume is in an automated library, check out the volume from the library.If the volume is not a scratch volume, delete the volume from the database.
Tivoli Storage Manager VolumesTivoli Storage Manager classifies its volumes into two categories: private andscratch.
A private volume is a labeled volume that is in use or owned by an application,and may contain valid data. You must define each private volume, and it can onlybe used to satisfy a request to mount that volume by name. Private volumes donot return to scratch when they become empty. For information on definingvolumes, see “Defining Storage Pool Volumes” on page 182. For information onchanging the status of a volume in an automated library, see “Changing the Statusof Automated Library Volumes” on page 129.
A scratch volume is a labeled volume that is empty or contains no valid data, andcan be used to satisfy any request to mount a scratch volume. When data iswritten to a scratch volume, its status is changed to private, and it is defined aspart of the storage pool for which the mount request was made. When valid datais moved from the volume and the volume is reclaimed, the volume returns toscratch status and can be reused by any storage pool associated with the library.
For each storage pool, you must decide whether to use scratch volumes. A scratchvolume is selected for a mount request only if scratch volumes are allowed in thestorage pool. If you do not use scratch volumes, you must define each volume.Tivoli Storage Manager keeps an inventory of volumes in each automated library itmanages and tracks whether the volumes are in scratch or private status. If astorage pool contains scratch volumes, the server can choose a scratch volumefrom those that have been checked into the library.
Any storage pools associated with the same automated library can dynamicallyacquire volumes from the library’s pool of scratch volumes. You do not need toallocate volumes to the different storage pools. Even if only one storage pool isassociated with a library, you do not need to explicitly define all the volumes forthe storage pool. Volumes are automatically added to and deleted from the storagepool by the server.
Note: A disadvantage of using scratch volumes is that volume usage information,which you can use to determine when the media has reached its end of life,is deleted when the private volume is returned to the scratch volume pool.
The Volume Inventory for an Automated LibraryA library’s volume inventory includes only those volumes that have been checkedinto that library. This inventory is not necessarily identical to the list of volumes inthe storage pools associated with the library. For example:v A volume can be checked into the library but not be in a storage pool (a scratch
volume, a database backup volume, or a backup set volume).
46 Tivoli Storage Manager for Windows: Administrator’s Guide
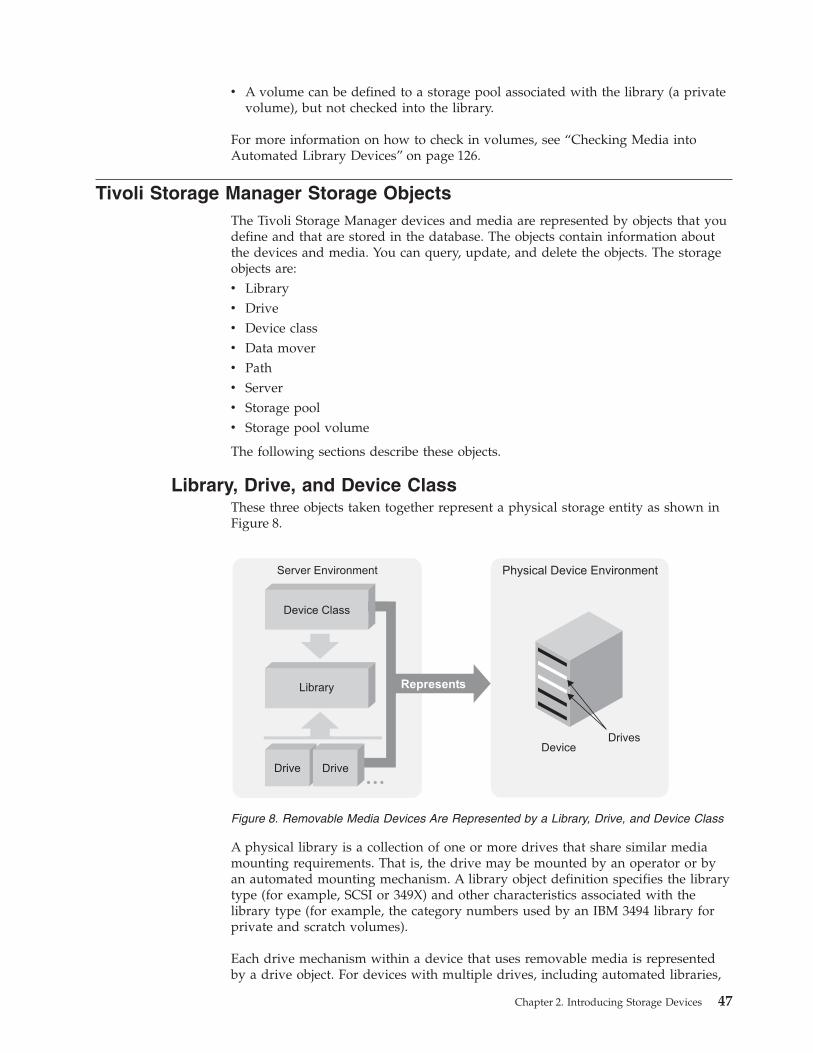
v A volume can be defined to a storage pool associated with the library (a privatevolume), but not checked into the library.
For more information on how to check in volumes, see “Checking Media intoAutomated Library Devices” on page 126.
Tivoli Storage Manager Storage ObjectsThe Tivoli Storage Manager devices and media are represented by objects that youdefine and that are stored in the database. The objects contain information aboutthe devices and media. You can query, update, and delete the objects. The storageobjects are:v Libraryv Drivev Device classv Data moverv Pathv Serverv Storage poolv Storage pool volume
The following sections describe these objects.
Library, Drive, and Device ClassThese three objects taken together represent a physical storage entity as shown inFigure 8.
A physical library is a collection of one or more drives that share similar mediamounting requirements. That is, the drive may be mounted by an operator or byan automated mounting mechanism. A library object definition specifies the librarytype (for example, SCSI or 349X) and other characteristics associated with thelibrary type (for example, the category numbers used by an IBM 3494 library forprivate and scratch volumes).
Each drive mechanism within a device that uses removable media is representedby a drive object. For devices with multiple drives, including automated libraries,
Figure 8. Removable Media Devices Are Represented by a Library, Drive, and Device Class
Chapter 2. Introducing Storage Devices 47

each drive is separately defined and must be associated with a library. Drivedefinitions can include such information as the element address (for drives in SCSIlibraries), how often the drive is cleaned (for tape drives), and whether or not thedrive is online.
Each device defined to Tivoli Storage Manager is associated with one device class.That device class specifies a device type and media management information, suchas recording format, estimated capacity, and labeling prefixes. Device classes for atape or optical drives, must also specify a library.
A device type identifies a device as a member of a group of devices that sharesimilar media characteristics. For example, the 8MM device type applies to 8mmtape drives. Device types include a variety of removable media types and alsoFILE and SERVER:
Removable MediaTivoli Storage Manager provides a set of specified removable media devicetypes, such as 8MM for 8mm tape devices, or REMOVABLEFILE for Jaz orZip drives. The GENERICTAPE device type is provided to support certaindevices that do not use the Tivoli Storage Manager device driver. See“Chapter 9. Defining Device Classes” on page 157 and Administrator’sReference for more information about supported removable media devicetypes.
FILE This device type allows you to create sequential volumes by creating fileson disk storage. To the server, these files have the characteristics of a tapevolume. The FILE device type does not require you to define library ordrive objects; only a device class is required.
You can use FILE volumes as a way to use disk storage without having todefine volumes. FILE volumes can also be useful when transferring datafor purposes such as electronic vaulting.
SERVERThis device type allows you to create volumes for one Tivoli StorageManager server that exist as archived files in the storage hierarchy ofanother server. These virtual volumes have the characteristics of sequentialaccess volumes such as tape. You must define a device class and a targetserver. No library or drive definition is required.
Virtual volumes can be used for the following:v Device-sharing between servers. One server is attached to a large tape
library device. Other servers can use that library device indirectlythrough a SERVER device class.
v Data-sharing between servers. By using a SERVER device class to exportand import data, physical media remains at the original location insteadhaving to be transported.
v Immediate offsite storage. Storage pools and databases can be backed upwithout physically moving media to other locations.
v Offsite storage of the Tivoli Disaster Recovery Manager (DRM) recoveryplan file.
v Electronic vaulting.
See “Using Virtual Volumes to Store Data on Another Server” on page 501.v For more information about the drive object, see “Defining Drives” on page 89
and “Managing Drives” on page 145.
48 Tivoli Storage Manager for Windows: Administrator’s Guide

v For more information about the library object, see “Defining Libraries” onpage 89 and “Managing Libraries” on page 143.
v For more information about the device class object, see “Chapter 9. DefiningDevice Classes” on page 157.
Storage Pool and Storage Pool VolumeA storage pool is a collection of storage pool volumes that are associated with onedevice class and one media type. For example, a storage pool that is associatedwith a device class for 8mm tape volumes contains only 8mm tape volumes. Youcan control the characteristics of storage pools, such as whether scratch volumesare used. For details about defining storage pools, see “Chapter 10. ManagingStorage Pools and Volumes” on page 171.
Tivoli Storage Manager supplies default disk storage pools. For more information,see “Configuring Random Access Volumes on Disk Devices” on page 56.
Figure 9 shows storage pool volumes grouped into a storage pool. Each storagepool represents only one type of media. For example, a storage pool for 8mmdevices represents collections of only 8mm tapes.
For DISK device classes, you must define volumes. For other device classes, suchas tape and FILE, you can allow the server to dynamically acquire scratch volumesand define those volumes as needed. For details, see “Preparing Volumes forRandom Access Storage Pools” on page 181 and “Preparing Volumes for SequentialAccess Storage Pools” on page 182.
One or more device classes are associated with one library, which can containmultiple drives. When you define a storage pool, you associate the pool with adevice class. Volumes are associated with pools. Figure 10 on page 50 shows theserelationships.
Figure 9. Relationships of Storage Pool Volumes, Storage Pools, and Media
Chapter 2. Introducing Storage Devices 49

For more information about the storage pool and volume objects, see “Chapter 10.Managing Storage Pools and Volumes” on page 171.
Data MoverData movers are devices that accept requests to transfer data from applicationssuch as Tivoli Storage Manager. Data movers transfer data:v Between a source storage device to a target storage devicev Without using significant Tivoli Storage Manager server or client resourcesv Without using significant LAN network resources
You must define a data mover if you will be using network-attached storage orserver-free data movement. Among other characteristics, you must specify the dataformat that will be used and the data mover address or world wide name (WWN)and serial number.
For more information about the data mover object, see “Defining Data Movers” onpage 90 and “Managing Data Movers” on page 155.
PathPaths allow access to drives, disks, and libraries and drives. A path definitionspecifies a source and a destination. The source accesses the destination, but datacan flow in either direction between the source and destination. Here are a fewexamples of paths:
Drive Drive Drive Drive
Library
Device Class Device Class
StoragePool
StoragePool
StoragePool
Vol. Vol. Storage Pool Volumes
Figure 10. Relationships between Storage and Device Objects
50 Tivoli Storage Manager for Windows: Administrator’s Guide

v In LAN operations and most SAN operations, control data and client data flowsacross a path from the Tivoli Storage Manager server to an automated librarythat is defined to the server. During a restore, a client data also flows from thelibrary back to the server.
v In NDMP operations backup data flows across a path between the source, a datamover defined for a NAS file server, and the destination, a tape drive. Restoredata flows back across the path from the tape drive to the NAS file server. Pathscan address the same destination device from different sources. For example, inNDMP operations, paths are always required between the data movers thatrepresent NAS file servers and the drives to which the file servers transfer datafor backup. Paths can point from multiple NAS file server data movers to thesame tape drive.
For more information about the path object, see “Defining Paths” on page 91 and“Managing Paths” on page 154.
ServerYou need to define a server object, for the following purposes:v To use a library that is on a SAN and that is managed by another Tivoli Storage
Manager server. You must define that server and then specify it as the librarymanager when you define the library. For more information, “Setting up theLibrary Client Servers” on page 84.
v To use LAN-free data movement. You define the storage agent as a server. Formore information, see Tivoli Storage Manager Managed System for SAN StorageAgent User’s Guide.
v To store client data in the storage of another Tivoli Storage Manager server. Formore information, see “Using Virtual Volumes to Store Data on Another Server”on page 501.
Among other characteristics, you must specify the server TCP/IP address.
How Tivoli Storage Manager Mounts and DismountsRemovable Media
When data is to be stored in or retrieved from a storage pool, the server does thefollowing:1. Selects a volume from the storage pool. The selection is based on the type of
operation:
RetrievalThe name of the volume that contains the data to be retrieved is storedin the database.
Store If a defined volume in the storage pool can be used, the server selectsthat volume.
If no defined volumes in the storage pool can be used, and if thestorage pool allows it, the server selects a scratch volume.
2. Checks the device class associated with the storage pool to determine the nameof the library that contains the drives to be used for the operation.v The server searches the library for an available drive or until all drives have
been checked. A drive status can be:– Offline.– Busy and not available for the mount.– In an error state and not available for the mount.
Chapter 2. Introducing Storage Devices 51

– Online and available for the mount.3. Mounts the volume:v For a manual library, the server displays a mount message for a private or a
scratch volume to be mounted in the selected drive.v For an automated library, the server directs the library to move the volume
from a storage slot into the selected drive. No manual intervention isrequired.If a scratch mount is requested, the server checks the library’s volumeinventory for a scratch volume. If one is found, its status is changed toprivate, it is mounted in the drive, and it is automatically defined as part ofthe original storage pool. However, if the library’s volume inventory doesnot contain any scratch volumes, the mount request fails.
4. Dismounts the volume when it has finished accessing the volume and themount retention period has elapsed.v For a manual library, the server ejects the volume from the drive so that an
operator can place it in its storage location.v For an automated library, the server directs the library to move the volume
from the drive back to its original storage slot in the library.
Configuring DevicesBefore the Tivoli Storage Manager server can used a device, the device must beconfigured to the operating system as well as to the server. Table 5 summarizes thedefinitions that are required for different device types.
Table 5. Required Definitions for Storage Devices
Device Device Types
Required Definitions
Library Drive Device Class
Magnetic disk DISK — — Yes ¹
FILE — — Yes
Tape 357035904MM8MMCARTRIDGE ²³DLTDTFECARTRIDGE ³GENERICTAPELTOQIC
Yes Yes Yes
Optical OPTICALWORM
Yes Yes Yes
Removable media(file system)
REMOVABLEMEDIA Yes Yes Yes
Virtual volumes SERVER — — Yes
¹ The DISK device class exists at installation and cannot be changed.
Mapping Devices to Device ClassesAs an example of mapping devices to device classes, assume that you have thefollowing devices to use for server storage:v Internal disk drivesv An automated tape library with 8mm drives
52 Tivoli Storage Manager for Windows: Administrator’s Guide

v A manual DLT tape drive
You can map storage devices to device classes as shown in Table 6.
Table 6. Mapping Storage Devices to Device Classes
Device Class Description
DISK Storage volumes that reside on the internal disk drive
Tivoli Storage Manager provides one DISK device class thatis already defined. You do not need and cannot defineanother device class for disk storage.
8MM_CLASS Storage volumes that are 8mm tapes, used with the drives inthe automated library
DLT_CLASS Storage volumes that are DLT tapes, used on the DLT drive
You must define any device classes that you need for your removable mediadevices such as tape drives. See “Chapter 9. Defining Device Classes” on page 157for information on defining device classes to support your physical storageenvironment.
Mapping Storage Pools to Device Classes and DevicesAfter you have categorized your storage devices, identify availability, space, andperformance requirements for client data that is stored in server storage. Theserequirements help you determine where to store data for different groups of clientsand different types of data. You can then create storage pools that are storagedestinations for backed-up, archived, or space-managed files to matchrequirements.
For example, you determine that users in the business department have threerequirements:v Immediate access to certain backed-up files, such as accounts receivable and
payroll accounts.These files should be stored on disk. However, you need to ensure that data ismoved from the disk to prevent it from becoming full. You can set up a storagehierarchy so that files can migrate automatically from disk to the automated tapelibrary.
v Periodic access to some archived files, such as monthly sales and inventoryreports.These files can be stored on 8mm tapes, using the automated library.
v Occasional access to backed-up or archived files that are rarely modified, such asyearly revenue reports.These files can be stored using the DLT drive.
To match user requirements to storage devices, you define storage pools, deviceclasses, and, for device types that require them, libraries and drives. For example,to set up the storage hierarchy so that data migrates from the BACKUPPOOL to8mm tapes, you specify BACKTAPE1 as the next storage pool for BACKUPPOOL.See Table 7 on page 54.
Chapter 2. Introducing Storage Devices 53

Table 7. Mapping Storage Pools to Device Classes, Libraries, and Drives
Storage Pool Device ClassLibrary(Hardware) Drives Volume Type
StorageDestination
BACKUPPOOL DISK — — Storagevolumes onthe internaldisk drive
For a backup copygroup for filesrequiringimmediate access
BACKTAPE1 8MM_CLASS AUTO_8MM(ExabyteEXB-210)
DRIVE01,DRIVE02
8mm tapes For overflow fromthe BACKUPPOOLand for archiveddata that isperiodicallyaccessed
BACKTAPE2 DLT_CLASS MANUAL_LIB(Manuallymounted)
DRIVE03 DLT tapes For backup copygroups for files thatare occasionallyaccessed
Note: Tivoli Storage Manager has default disk storage pools named DISKPOOL, BACKUPPOOL,ARCHIVEPOOL, and SPACEMGPOOL. For more information, see “Configuring Random AccessVolumes on Disk Devices” on page 56.
54 Tivoli Storage Manager for Windows: Administrator’s Guide

Chapter 3. Using Magnetic Disk Devices
Tivoli Storage Manager uses magnetic disk devices to do the following:v Store the database and the recovery log. For details, see “Chapter 20. Managing
the Database and Recovery Log” on page 417.v Store client data that has been backed up, archived, or migrated from client
nodes. The client data is stored in storage pools. Procedures for configuring diskstorage of client data are described in this chapter.
v Store backups of the database and export and import data. See “Using FILEVolumes for Database Backups and Export Operations” on page 58.
See the following sections:
Tasks:
“Configuring Random Access Volumes on Disk Devices” on page 56
“Configuring FILE Sequential Volumes on Disk Devices” on page 56
“Varying Disk Volumes Online or Offline” on page 57
“Using Cache” on page 57
“Freeing Space on Disk” on page 57
“Specifying Scratch FILE Volumes” on page 58
“Using FILE Volumes for Database Backups and Export Operations” on page 58
In this chapter, most examples illustrate how to perform tasks by using a TivoliStorage Manager command-line interface. For information about the commands,see Administrator’s Reference, or issue the HELP command from the command lineof a Tivoli Storage Manager administrative client.
Tivoli Storage Manager tasks can also be performed from the administrative Webinterface. For more information about using the administrative interface, see QuickStart.
Note: Some of the tasks described in this chapter require an understanding ofTivoli Storage Manager storage objects. For an introduction to these storageobjects, see “Tivoli Storage Manager Storage Objects” on page 47.
Configuring Disk DevicesTivoli Storage Manager stores data on magnetic disks in two ways:v In random access volumes, as data is normally stored on disk. See “Configuring
Random Access Volumes on Disk Devices” on page 56.v In files on the disk that are treated as sequential access volumes. See
“Configuring FILE Sequential Volumes on Disk Devices” on page 56.
© Copyright IBM Corp. 1994, 2002 55

Task Required Privilege Class
Configuring Random Access Volumes onDisk Devices
Configuring FILE Sequential Volumes onDisk Devices
System
Configuring Random Access Volumes on Disk DevicesTivoli Storage Manager provides a defined DISK device class that is used with alldisk devices.
As part of initial configuration, administrators configure the TSM database andrecovery log on the hard disk of the TSM server machine. The initial configurationwizard provides a database volume wizard and a recovery log volume wizard toguide the administrator through these disk volume formatting tasks. See QuickStart for information about using these wizards.
To set up a random access volume on disk to store client backup, archive, orspace-managed data, do the following:1. From the TSM Console, expand the tree for the server instance you are
configuring.2. Click Wizards, then double-click Disk Volume in the right pane.3. Follow the instructions in the wizard.
Note: For performance reasons, set up random access volumes on disk drives thatreside on the TSM server machine, not on remotely mounted file systems.
Configuring FILE Sequential Volumes on Disk DevicesAnother way to use magnetic disk storage is to use files as volumes that store datasequentially (as on tape volumes). You can use FILE sequential volumes to transferdata for purposes such as electronic vaulting. For example, you can send theresults of an export operation or a database backup operation to another location.At the receiving site, the files can be placed on tape or disk. You can define adevice class with a device type of FILE.
To configure files as volumes that store data sequentially, do the following:1. From the TSM Console, expand the tree for the server instance you are
configuring.2. Click Wizards, then double-click Device Configuration in the right pane.3. Navigate to the TSM Device Selection page and click New. The Properties
dialog appears.4. Select File Device from the drop down list.5. Enter or browse for the directory you want to allocate as a FILE volume.6. Click OK. TSM configures the FILE volume.7. Click Next to complete the wizard.
The Device Configuration Wizard automatically creates a storage pool when theFILE volume is configured. Administrators must then do one of the following:v Use TSM policy to specify the new storage pool as the destination for client
data. See “Chapter 14. Implementing Policies for Client Data” on page 299.
56 Tivoli Storage Manager for Windows: Administrator’s Guide

v Place the new storage pool in the storage pool migration hierarchy by updatingan already defined storage pool. See “Example: Updating Storage Pools” onpage 178.
Varying Disk Volumes Online or Offline
Task Required Privilege Class
Vary a disk volume online or offline System or operator
To perform maintenance on a disk volume or to upgrade disk hardware, you canvary a disk volume offline. For example, to vary the disk volume namedSTGVOL.POOL001 offline, enter:vary offline stgvol.pool001
If Tivoli Storage Manager encounters a problem with a disk volume, the serverautomatically varies the volume offline.
You can make the disk volume available to the server again by varying the volumeonline. For example, to make the disk volume named STGVOL.POOL001 availableto the server, enter:vary online stgvol.pool001
Using CacheWhen you define a storage pool that uses disk random access volumes, you canchoose to enable or disable cache. When you use cache, a copy of the file remainson disk storage even after the file has been migrated to the next pool in the storagehierarchy (for example, to tape). The file remains in cache until the space itoccupies is needed to store new files.
Using cache can improve how fast a frequently accessed file is retrieved. Fasterretrieval can be important for clients storing space-managed files. If the file needsto be accessed, the copy in cache can be used rather than the copy on tape.However, using cache can degrade the performance of client backup operationsand increase the space needed for the database. For more information, see “UsingCache on Disk Storage Pools” on page 199.
Freeing Space on DiskAs client files expire, the space they occupy is not freed for other uses until yourun expiration processing on the server.
Expiration processing deletes from the database information about any client filesthat are no longer valid according to the policies you have set. For example,suppose four backup versions of a file exist in server storage, and only threeversions are allowed in the backup policy (the management class) for the file.Expiration processing deletes information about the oldest of the four versions ofthe file. The space that the file occupied in the storage pool becomes available forreuse.
You can run expiration processing by using one or both of the following methods:v Use the EXPIRE INVENTORY command. See “Running Expiration Processing to
Delete Expired Files” on page 333.
Chapter 3. Using Magnetic Disk Devices 57

v Set the server option for the expiration interval, so that expiration processingruns periodically. See Administrator’s Reference for information on how to set theoptions.
Specifying Scratch FILE VolumesYou can specify a maximum number of scratch volumes for a storage pool that hasa FILE device type. When the server needs a new volume, the server automaticallycreates a file that is a scratch volume, up to the number you specify. When scratchvolumes used in storage pools become empty, the files are deleted.
Using FILE Volumes for Database Backups and Export OperationsWhen you back up the database or export server information, Tivoli StorageManager records information about the volumes used for these operations in thevolume history. Tivoli Storage Manager will not allow you to reuse these volumesuntil you delete the volume information from the volume history. To reusevolumes that have previously been used for database backup or export, use theDELETE VOLHISTORY command. For information about the volume history andvolume history files, see “Saving the Volume History File” on page 546.
Note: If your server is licensed for the Tivoli Disaster Recovery Manager (DRM)product, the volume information is automatically deleted during MOVEDRMEDIA command processing. For additional information about DRM, see“Chapter 25. Using Tivoli Disaster Recovery Manager” on page 577.
58 Tivoli Storage Manager for Windows: Administrator’s Guide

Chapter 4. Attaching Devices to the Server System
For Tivoli Storage Manager to use a device, you must attach the device to yourserver system and install the appropriate device driver.
Tasks:
“Attaching a Manual Drive”
“Attaching an Automated Library Device” on page 60
“Using Device Alias Names” on page 61
“Selecting a Device Driver” on page 62
Devices Supported by Tivoli Storage ManagerA list of supported storage devices is available on the Tivoli Storage Manager Website at the following address:
http://www.tivoli.com/support/storage_mgr/tivolimain.html
Tivoli Storage Manager supports a wide range of manual devices and automatedlibrary devices:
Tape DevicesTivoli Storage Manager supports the manual and automated tape deviceslisted at the Tivoli Storage Manager Web site.
Disk DevicesTivoli Storage Manager supports the disk devices listed at the TivoliStorage Manager Web site.
Optical Disk DevicesTivoli Storage Manager supports the manual and automated optical diskdevices listed at the Tivoli Storage Manager Web site.
Other Removable File DevicesTivoli Storage Manager supports the removable media devices (such asoptical drives, CD-ROM devices, and Iomega Zip and Jaz drives) listed atthe Tivoli Storage Manager Web site.
Storage Area Network (SAN) DevicesTivoli Storage Manager supports devices in a storage area network (SAN)environment, but the devices must be supported by the Tivoli StorageManager device driver. See the Tivoli Storage Manager Web site forinformation about supported Fibre Channel hardware and configurations.
Attaching a Manual Drive1. Install the SCSI adapter card in your system, if not already installed.2. Determine the SCSI IDs available on the SCSI adapter card to which you are
attaching the device. Find one unused SCSI ID for each drive.3. Follow the manufacturer’s instructions to set the SCSI ID for the drive to the
unused SCSI IDs that you found. Usually this means setting switches on theback of the device.
© Copyright IBM Corp. 1994, 2002 59

Note: Each device that is connected in a chain to a single SCSI bus must be setto a unique SCSI ID. If each device does not have a unique SCSI ID, youmay have serious system problems.
4. Follow the manufacturer’s instructions to attach the device to your serversystem hardware.
Attention:
a. Power off your system before attaching a device to prevent damage to thehardware.
b. Attach a terminator to the last device in the chain of devices connected onone SCSI adapter card.
5. Install the appropriate device drivers. See “Selecting a Device Driver” onpage 62.
6. Find the device worksheet that applies to your device. Seehttp://www.tivoli.com/support/storage_mgr/tivolimain.html.
7. Determine the name for the device and record the name on the deviceworksheet.
Keep the Worksheets: The information you record on the worksheets can help youwhen you need to perform operations such as adding volumes. Keep theworksheets for future reference.
Attaching an Automated Library Device1. Install the SCSI adapter card in your system, if not already installed.2. Determine the SCSI IDs available on the SCSI adapter card to which you are
attaching the device. Find one unused SCSI ID for each drive, and one unusedSCSI ID for the library or autochanger controller.
Note: In some automated libraries, the drives and the autochanger share asingle SCSI ID, but have different LUNs. For these libraries, only a singleSCSI ID is required. Check the documentation for your device.
3. Follow the manufacturer’s instructions to set the SCSI ID for the drives andlibrary controller to the unused SCSI IDs that you found. Usually this meanssetting switches on the back of the device.
Note: Each device that is connected in a chain to a single SCSI bus must be setto a unique SCSI ID. If each device does not have a unique SCSI ID, youmay have serious system problems.
4. Follow the manufacturer’s instructions to attach the device to your serversystem hardware.
Attention:
a. Power off your system before attaching a device to prevent damage to thehardware.
b. Attach a terminator to the last device in the chain of devices connected onone SCSI adapter card. Detailed instructions should be in thedocumentation that came with your hardware.
5. Install the appropriate device drivers. See “Selecting a Device Driver” onpage 62.
6. Find the device worksheet that applies to your device. Seehttp://www.tivoli.com/support/storage_mgr/tivolimain.html.
7. Determine the name for each drive and for the library, and record the names onthe device worksheet.
60 Tivoli Storage Manager for Windows: Administrator’s Guide

Keep the Worksheets: The information you record on the worksheets can help youwhen you need to perform operations such as adding volumes to an autochanger.Keep the work sheets for future reference.
Setting the Library ModeFor the Tivoli Storage Manager server to access a SCSI library, set the device forthe appropriate mode. This is usually called random mode; however, terminologymay vary from one device to another. Refer to the documentation for your deviceto determine how to set it to the appropriate mode.
Notes:
1. Some libraries have front panel menus and displays that can be used forexplicit operator requests. However, if you set the device to respond to suchrequests, it typically will not respond to Tivoli Storage Manager requests.
2. Some libraries can be placed in sequential mode, in which volumes areautomatically mounted in drives by using a sequential approach. This modeconflicts with how Tivoli Storage Manager accesses the device.
Using Device Alias NamesThe server uses alias names to identify tape and optical disk devices to the TivoliStorage Manager device driver. Device names for the Tivoli Storage Managerdevice driver differ from device names for the Windows device driver. Forexample, an automated library device might be known as LB0.0.0.1 to the TivoliStorage Manager device driver and as LIB01 to the Windows device driver.
If you use the Device Configuration Wizard to initially configure devices, thewizard automatically provides the appropriate device name. However, if youconfigure devices by using Tivoli Storage Manager commands, you must providethe device names as parameters to the DEFINE PATH command. If you modifydevice driver control, you may need to provide alias name information in theDevice Exclude List. The names can be either:v Drive letters, for devices attached as local, removable file systemsv Alias names, for devices controlled by either the Tivoli Storage Manager device
driver (ADSMSCSI) or the Windows device drivers
“Obtaining Device Alias Names” on page 62 describes the procedure for using theTivoli Storage Manager Console to obtain device names.
Alias names replace the real device names in Tivoli Storage Manager commandsand screens. The Tivoli Storage Manager device driver communicates with devicesby using the alias names. See “Obtaining Device Alias Names” on page 62.
Alias names appear in the form mtx.y.z.n or lbx.y.z.n or opx.y.z.n, where:
mt Indicates the device is a tape device. For example:
mt3 (Tape drive at SCSI ID 3, LUN 0, bus 0, port 0)
mt5.0.0.1 (Tape drive at SCSI ID 5, LUN 0, bus 0, port 1)
lb Indicates the device is the controller for an automated library device. Forexample:
lb4.1 (Library at SCSI ID 4, LUN 1, bus 0, port 0)
op Indicates the device is an optical device. For example:
op4 (Optical drive at SCSI ID 4, LUN 0, bus 0, port 0)
Chapter 4. Attaching Devices to the Server 61

x Indicates the SCSI ID for the targeted device
y Indicates the logical unit number (LUN) for the targeted device
z Indicates the bus number supported by the adapter device driver
n Indicates the port number for the SCSI adapter device driver
Note: Alias names can be abbreviated when the trailing numbers are zeros.
Obtaining Device Alias NamesIf you use the Tivoli Storage Manager Device Configuration Wizard to initiallyconfigure devices, this step is unnecessary because the wizard gathers informationabout the SCSI Target IDs, logical unit numbers, bus numbers, and SCSI portnumbers required for the alias names. However, if you add devices using TivoliStorage Manager commands, you must provide the information in the DEFINEPATH command. To determine the SCSI properties for a device:1. From the TSM Console, expand the tree to TSM Device Driver for the
machine that you are configuring.2. Expand TSM Device Driver and Reports.3. Click Device Information. The Device Information view appears. The view
lists all devices connected to the server and lists their SCSI attributes in theform of the alias names.
See “Using Device Alias Names” on page 61 for an overview of Tivoli StorageManager device names.
Selecting a Device DriverTo use a device, you must install the appropriate device driver. Tivoli StorageManager provides its own device driver, ADSMSCSI, for non-IBM devices. TheIBM device driver IBMTape is supported for IBM devices. These device drivers areavailable on the ftp site ftp://ftp.software.ibm.com/storage/devdrvr/. TivoliStorage Manager also supports third party vendor device drivers if the devices areassociated with the GENERICTAPE device class and the hardware vendor alsosupports that device driver. Using a device class other than GENERICTAPE with athird party vendor device driver is not recommended.
The Tivoli Storage Manager driver lets you exclude devices that are reserved forother applications. Some automated library devices require the Tivoli StorageManager device driver, and some manual devices can use the Windows devicedriver with Tivoli Storage Manager.
Selecting the appropriate device driver depends upon the type of device and themedia management technique. Devices supported by Tivoli Storage Manager canuse the Tivoli Storage Manager device driver, and other devices can use Windowsdevice drivers. The way you set up the two competing device drivers determineswhich one acquires devices when the server is started.
If you manage a mixture of devices, some can be controlled by the Tivoli StorageManager device driver and others by the Windows device driver. The TivoliStorage Manager device driver is recommended, because it allows Tivoli StorageManager to maintain a volume inventory and to assist with some mediamanagement tasks. In some cases, when using Windows Removable StorageManager (RSM) for example, the Windows device driver must be used and inthese cases Tivoli Storage Manager continues to use the devices but with limited
62 Tivoli Storage Manager for Windows: Administrator’s Guide

Tivoli Storage Manager media management. For devices not currently supportedby the Tivoli Storage Manager device driver, the Windows device driver may besuitable.
Table 8 and Table 9 list devices and the device drivers needed for those devices.
Table 8. Device Drivers for Tape and Optical Drives
Device Device Type Library Device Driver
4mm drive 4MM External, Manual, SCSI
Tivoli Storage Manager DeviceDriver (preferred)
See “Configuring ManualDevices” on page 74.WindowsDevice Driver (must meet TivoliStorage Manager requirements)
See “Configuring Devices NotSupported by the Tivoli StorageManager Device Driver” onpage 77.
8mm drive 8MM External, Manual, SCSI
DLT drive DLT External, Manual, SCSI,ACSLS
DTF drive DTF External, Manual, SCSI
QIC drive QIC External, Manual, SCSI
STK SD3, 9490, 9840, 9940drive
ECARTRIDGE External, Manual, SCSI,ACSLS
IBM 3570 drive 3570 External, Manual, SCSI
IBM 3590, 3590E drive 3590 External, Manual, SCSI,349X, ACSLS
Removable Media Devices(attached as local filesystems)
REMOVABLEFILE MANUAL Windows Device Driver(required)
See “Configuring RemovableMedia Devices” on page 78.
Optical (See DevicesSupported URL)
OPTICAL External, Manual, SCSI Tivoli Storage Manager DeviceDriver (required)
See “Configuring RemovableMedia Devices” on page 78.
WORM (See DevicesSupported URL)
WORM External, Manual, SCSI
IBM LTO 3580 drive LTO External, Manual, SCSI RMSS NT/Windows 2000 DeviceDriver (required)
Table 9. Device Drivers for Automated Libraries
Device Library Device Driver
IBM MP 3570, 3575 Library SCSI Tivoli Storage Manager Device Driver(required)IBM LTO 3581, 3583, 3584 library SCSI
IBM LTO 3581, 3583, 3584 library RSM RMSS NT/Windows 2000 Device Driver(required)
IBM 3494, 3495 library 349X IBMATL (required)
Note: All other libraries (seehttp://www.tivoli.com/support/storage_mgr/tivolimain.html) use theTivoli Storage Manager device driver.
When the operating system is started, the Windows device driver tries to acquirethe devices it supports before the Tivoli Storage Manager device driver can acquiredevices. Read the following sections to determine how to select the device driveryou want.
Chapter 4. Attaching Devices to the Server 63

Windows Device DriversWindows device drivers provide basic connectivity for devices using RemovableStorage Manager (RSM) or native Windows backup tools. Occasionally, you canuse devices that are not yet supported by the Tivoli Storage Manager device driverby using the Windows device drivers. The server cannot use all of the devices thatWindows device drivers support because some devices do not have all thefunctions that the server requires. To determine if you can use the Windows devicedriver with a specific device, see “Requirements for Using Windows DeviceDrivers with Tivoli Storage Manager”. You can find the setup procedure for thesedevices at “Configuring Devices Not Supported by the Tivoli Storage ManagerDevice Driver” on page 77.
Windows device drivers can be manually started or automatically set to start whenthe operating system starts. Procedures for controlling these device drivers aredescribed in:v “Controlling Some Devices with the Tivoli Storage Manager Device Driver and
Others with Windows Device Drivers” on page 66v “Controlling a Device with the Tivoli Storage Manager Device Driver and the
Windows Device Driver” on page 67v “Controlling All Devices with Windows Device Drivers” on page 68
Using Windows device drivers for Tivoli Storage Manager devices limits theserver’s functionality:v TSM does not recognize the device type.
If you add devices and intend to use the Windows device drivers, you shouldunderstand that the server does not know device types and recording formats.For example, if you use a Windows device driver for a 4mm drive using theDDS2 recording format, Tivoli Storage Manager knows only that the device is atape drive and will use the default recording format.The server cannot prevent errors when it does not know the device type. Forexample, if one GENERICTAPE device class points to a manual library devicecontaining an 4mm drive and an 8mm drive, the server may make an impossiblerequest: mount a 4mm cartridge into an 8mm drive.
v Device problems may be more difficult to solve.The server cannot report I/O errors with as much detail. Without the TivoliStorage Manager device driver, the server can obtain only minimal informationfor display in the server console log.
v Windows device driver provides no bar code reader support.
Requirements for Using Windows Device Drivers with TivoliStorage Manager
Devices may be used with Windows device drivers or with the manufacturer’sdevice drivers, but the devices must have the following capabilities:v Write in variable modev Write filemarksv Can forward/reverse space blocksv Can forward/reverse space filemarks
A file listing devices and their attributes can be created:1. Click Start→Programs→Command Prompt on the Windows Start button. The
Command Prompt dialog appears.
64 Tivoli Storage Manager for Windows: Administrator’s Guide

2. Change directories to the directory in which the Tivoli Storage ManagerConsole been installed. For default installations, the path resembles thefollowing:c:\program files\tivoli\tsm\console
3. To create the file, type in the following command:tsmdlst devlist.txt
4. To view the file, type in the following command:notepad devlist.txt
Select from the following device driver setup procedures based upon the deviceenvironment.
Controlling All Devices With the Tivoli Storage ManagerDevice Driver
The Tivoli Storage Manager device driver supports many manual and automatedlibrary devices. At many sites, the Tivoli Storage Manager device driver may be allthat is required.
The Tivoli Storage Manager device driver is installed with the server, but thedevice driver is unusable until the default behavior of the Windows device driveris controlled. By default, the Windows device driver tries to acquire all deviceswhen Windows is started. If this happens, the Tivoli Storage Manager devicedriver is unable to acquire devices. Ensure that the Tivoli Storage Manager devicedriver acquires the devices that it needs by starting the Tivoli Storage Managerdevice driver before starting any Windows device driver.
Configuring the Tivoli Storage Manager Device Driver to AcquireDevices before the Windows Device DriverTo start the Tivoli Storage Manager device driver before starting any Windowsdevice driver, perform the following procedures from the TSM Console and theWindows Control Panel:
From the TSM Console:
1. From the TSM Console, expand the tree to TSM Device Driver for themachine that you are configuring.
2. Expand TSM Device Driver and Reports.
3. Click Service Information in the Tivoli Storage Manager Console tree. TheService Information window appears in the right panel.
4. Right click Tivoli Storage Manager Device Driver. A pop-up menu appears.5. Click Properties in the pop-up menu. The Device Driver Options dialog
appears.6. Click to check the Enable Windows 2000 and Optical Device Support check
box. The startup type is set to Boot as a default.7. Click OK.
Chapter 4. Attaching Devices to the Server 65

In the Windows Control Panel:
Windows NT 1. Click Settings→Control Panel on the Windows Start button. TheControl Panel dialog appears.
2. Double click Devices. The Devices dialog appears.
3. Click the Windows device driver to select it.
4. Click the Startup... button. The Device dialog appears.
5. Click Manual. This ensures that the Windows device driver does notstart until you enter the Control Panel dialog and manually start theWindows device driver.
6. Click OK.
Windows 2000 If you use Tivoli Storage Manager with Windows 2000, you do not needto explicitly control the Windows device driver’s acquisition of devices.When the Tivoli Storage Manager device driver is in boot mode, itautomatically acquires all devices not specified in its Device ExcludeList.
Controlling Some Devices with the Tivoli Storage ManagerDevice Driver and Others with Windows Device Drivers
Some devices are not supported by the Tivoli Storage Manager device driver, butthey can still be used with the server using the Windows device drivers. At siteswhere a mix of supported and unsupported devices are used, both the TivoliStorage Manager and the Windows device drivers may be used together.
An example of this scenario is an environment where some data is backed up to anautomated library device and some data is backed up to an Iomega Jaz drive. Theautomated library device requires the Tivoli Storage Manager device driver.However, the Tivoli Storage Manager device driver does not support Iomega Jazdrives so the Windows device driver is used to allow the server to back up to theIomega Jaz drive.
Perform the following procedures from the TSM Console and the Windows ControlPanel:
From the TSM Console:
1. From the TSM Console, expand the tree to TSM Device Driver for themachine that you are configuring.
2. Expand TSM Device Driver and Reports.
3. Click Service Information in the TSM Console tree in the left panel. TheService Information window appears in the right panel.
4. Right click TSM Device Driver in the right pane. A pop-up menu appears.5. Click Properties in the pop-up menu. The Device Driver Options dialog
appears.6. Click to check the Enable Windows 2000 and Optical Device Support check
box. The startup type is set to Boot as a default.7. To control a device to use with the Tivoli Storage Manager Device Driver:
a. Use the move button (<) to move a device from the Devices Controlled byNative Device Drivers pane to the Devices Controlled by the TSM DeviceDriver pane.
66 Tivoli Storage Manager for Windows: Administrator’s Guide

b. Click OK. A message appears stating that the TSM Device Driver must berestarted. Click OK.
c. Right click the TSM Device Driver in the right pane. A pop-up menuappears. Select Stop.
d. Right click the TSM Device Driver in the right pane. A pop-up menuappears. Select Start.
8. To control a device to with the Windows Device Driver:Use the move button (>) to move a device from the Devices Controlled by theTSM Device Driver pane to the Devices Controlled by Native Device Driverspane.
9. Click OK.
In the Windows Control Panel:
Windows NT 1. Click Settings→Control Panel on the Windows Start button. TheControl Panel dialog appears.
2. Double click Devices. The Devices dialog appears.
3. Click the Windows device driver to select it.
4. Click the Startup... button. The Device dialog appears.
5. Click Manual. This ensures that the Windows device driver does notstart until you enter the Control Panel dialog and manually start theWindows device driver.Note: After the system starts, you must manually start the Windowsdevice driver so that it can acquire the devices excluded by the TivoliStorage Manager device driver.
6. Click OK.
Windows 2000 If you use Tivoli Storage Manager with Windows 2000, you do not needto explicitly control the Windows device driver’s acquisition of devices.When the Tivoli Storage Manager device driver is in boot mode, itautomatically acquires all devices not specified in its Device ExcludeList.
Controlling a Device with the Tivoli Storage Manager DeviceDriver and the Windows Device Driver
In some environments, you will want to use the same devices with both the TSMdevice driver and the Windows device driver. For example, this occurs whendevices are used to back up data with Tivoli Storage Manager and then the samedevices are used at other times to back up data with a different backup utility. Youmust reboot the system to switch between applications. The device drivers can beset up to give you the choice of starting either device driver.
To configure a device to use the Tivoli Storage Manager device driver with TivoliStorage Manager and the Windows device driver with other applications, performthe following two procedures:
Activate the TSM Device Driver:
1. From the TSM Console, expand the tree to TSM Device Driver for themachine that you are configuring.
2. Expand TSM Device Driver and Reports.
Chapter 4. Attaching Devices to the Server 67

3. Click Service Information in the TSM Console tree in the left pane. TheService Information window appears in the right pane.
4. Right click TSM Device Driver. A pop-up menu appears.5. Click Properties in the pop-up menu. The Device Driver Options dialog
appears.6. To use the Tivoli Storage Manager device driver:
a. Click to check the Enable Windows 2000 and Optical Device Supportcheck box. The Tivoli Storage Manager device driver is automatically set tostart at boot time and acquire all devices.
b. Click OK.7. To use the Windows device driver:
a. Click to uncheck the Enable Windows 2000 and Optical Device Supportcheck box. This ensures that the Windows device driver acquires devices.
b. Click OK.8. You must reboot your system for the changes to take effect.
Activate the Windows Device Driver:
Windows NT 1. Click Settings→Control Panel on the Windows Start button. TheControl Panel dialog appears.
2. Double click Devices. The Devices dialog appears.
3. Click the Windows device driver to select it.
4. Click the Startup... button. The Device dialog appears.
5. Click Manual. This ensures that the Windows device driver does notstart until you enter the Control Panel dialog and manually start theWindows device driver.Note: After the system starts, you must manually start the Windowsdevice driver so that it can acquire the devices excluded by the TivoliStorage Manager device driver.
6. Click OK.
Windows 2000 If you use Tivoli Storage Manager with Windows 2000, you do not needto explicitly control the Windows device driver’s acquisition of devices.When the Tivoli Storage Manager device driver is in boot mode, itautomatically acquires all devices not specified in its Device ExcludeList.
Controlling All Devices with Windows Device DriversBy default, the Windows device driver acquires control of supported devices whenthe operating system is started. In an environment made up entirely of devicesunsupported by the Tivoli Storage Manager device driver, you can use this defaultsetting.
To configure all devices to use the Windows device driver, do the following:1. From the TSM Console, expand the tree to TSM Device Driver for the
machine that you are configuring.2. Expand TSM Device Driver and Reports.
68 Tivoli Storage Manager for Windows: Administrator’s Guide

3. Click Service Information in the TSM Console tree in the left panel. TheService Information window appears in the right panel.
4. Right click TSM Device Driver. A pop-up menu appears.5. Click Properties in the pop-up menu. The Device Driver Options dialog
appears.6. Click Manual as the startup type. This ensures that the Windows device driver
acquires devices.7. Click OK.
Chapter 4. Attaching Devices to the Server 69

70 Tivoli Storage Manager for Windows: Administrator’s Guide
Chapter 5. Configuring Storage Devices
This chapter contains concepts and procedures for configuring tape devices, opticaldisk devices, and removable file devices, such as Iomega Zip drives and Jaz drives.
Use the following table to locate an overview of configuring devices andconceptual information:
Concepts:
“Device Configuration Overview” on page 72
“Planning for Devices” on page 72
“Server Storage Options” on page 73
“Defining Devices and Paths” on page 89
Use the following table to locate instructions for specific tasks:
Tasks:
“Configuring Manual Devices” on page 74
“Configuring Automated Library Devices” on page 74
“Configuring 3494 Automated Library Devices” on page 75
“Configuring Optical Devices” on page 77
“Configuring Devices Not Supported by the Tivoli Storage Manager Device Driver” onpage 77
“Configuring Removable Media Devices” on page 78
“Configuring Devices Using Tivoli Storage Manager Commands” on page 80
“Replacing Tape or Optical Drives” on page 146
“Configuring Tivoli Storage Manager Servers to Share SAN-Connected Devices” on page 83
“Configuring Tivoli Storage Manager for LAN-free Data Movement” on page 87
“Configuring Tivoli Storage Manager for use with Tivoli Data Protection for NDMP” onpage 87
“Configuring Tivoli Storage Manager for Server-free Data Movement” on page 88
“Troubleshooting Device Configuration” on page 88
The tasks in this chapter are performed using the Tivoli Storage Manager Consoleand the command line interface. For information about the Tivoli Storage ManagerConsole, see the Tivoli Storage Manager Console online help. For informationabout the Tivoli Storage Manager commands, see Administrator’s Reference or issuethe HELP command from the command line of a Tivoli Storage Manageradministrative client.
All of the commands can be performed from the administrative Web interface. Formore information about using the administrative interface, see Quick Start.
Some of the tasks described in this chapter require an understanding of TivoliStorage Manager storage objects. For an introduction to these storage objects, see“Tivoli Storage Manager Storage Objects” on page 47.
© Copyright IBM Corp. 1994, 2002 71

Device Configuration OverviewYou can add devices by using the following steps:1. Plan for the device.
See “Planning for Devices”.2. Attach the device to the server.
See the device manufacturer’s documentation for information about attachingthe device. Also, see “Chapter 4. Attaching Devices to the Server System” onpage 59 about attaching devices to Tivoli Storage Manager.
3. Start the appropriate device driver.Both the Tivoli Storage Manager device driver and the native Windows devicedriver can be used. You may need to specify which device driver acquireswhich devices. See “Selecting a Device Driver” on page 62.
4. Configure the device.The device configuration wizard automatically detects drives, and allows youto drag and drop them to configure.
Note: In most cases, the server expects to have exclusive use of devices definedto the server. Attempting to use a Tivoli Storage Manager device withanother application may cause the server or the other application to fail.This restriction does not apply to 3494 library devices, or when using astorage area network to share library devices. See “Configuring 3494Automated Library Devices” on page 75 and “Configuring Tivoli StorageManager Servers to Share SAN-Connected Devices” on page 83.
5. Determine the media type and device type for client data.You can link clients to devices by directing client data to a type of media. Forexample, accounting department data might be directed to 8mm tapes, and as aresult the server would select 8mm devices.You can direct data to a specific media type through Tivoli Storage Managerpolicy. When you register client nodes, you specify the associated policy. See“Chapter 12. Adding Client Nodes” on page 253.For configuring devices by using Tivoli Storage Manager commands, you mustalso define or update the Tivoli Storage Manager policy objects that will linkclients to the pool of storage volumes and to the device.For an introduction to the Tivoli Storage Manager policy objects, see “HowTivoli Storage Manager Stores Client Data” on page 5. For a description of thestandard policy that is installed with the server, see “The Standard Policy” onpage 301.
6. Register clients to the policy domain defined or updated in the preceding step.This step links clients and their data with storage volumes and devices. Forinformation about registering clients, see “Managing Nodes” on page 264.
7. Prepare media for the device.Label tapes and optical disks before they can be used. For automated librarydevices, you must also add the media to the device’s volume inventory bychecking media into the library device. See “Checking Media into AutomatedLibrary Devices” on page 126.
Planning for DevicesYou should make several operational decisions when adding devices.1. Determine if the drive is supported by the server. See
http://www.tivoli.com/support/storage_mgr/tivolimain.html.
72 Tivoli Storage Manager for Windows: Administrator’s Guide

2. Determine if the library is supported by the server. Seehttp://www.tivoli.com/support/storage_mgr/tivolimain.html.
3. Determine the device driver that supports the device.4. Determine whether client data is backed up directly to tape or to a storage
hierarchy.5. Determine which client data is backed up to which device in environments
using mixed device types.6. Determine if media will be managed by an external media manager like
Removable Storage Manager (RSM).
For each device defined to the server, the server creates a storage pool, a collectionof media for the device, for each device type detected. Determine the backupdevice for a client’s data when that client is associated with a storage pool.
Tape drive performance often depends on the way that devices are positioned inthe storage hierarchy and whether the server is a stand-alone implementation or anetworked implementation. A Tivoli Storage Manager server in a stand-aloneimplementation can go directly to tape to reduce contention for disk resources.Networked Tivoli Storage Manager servers benefit from a storage hierarchy wherefiles are backed up to disk and migrated to tape later. See “Chapter 14.Implementing Policies for Client Data” on page 299 and “Overview: The StoragePool Hierarchy” on page 185.
Server Storage OptionsTivoli Storage Manager provides a number of options that you can specify in theserver options file (dsmserv.opt) to configure certain server storage operations. Thefollowing table provides brief descriptions of these options. See the Administrator’sReference for details.
Table 10. Server Storage Options
Option Description
3494SHARED Enables sharing of an IBM 3494 library with other Tivoli Storage Managerservers or other applications.
ACSACCESSID Specifies the ID for the Automatic Cartridge System (ACS) access control.
ACSLOCKDRIVE Allows the drives within ACSLS libraries to be locked.
ACSQUICKINIT Allows a quick or full initialization of the ACSLS library.
ACSTIMEOUTX Specifies the multiple for the built-in timeout value for ACSLS API.
ASSISTVCRRECOVERY Specifies whether the server assists an IBM 3570 or 3590 drive in recoveringfrom a lost or corrupted Vital Cartridge Records (VCR) condition.
DRIVEACQUIRERETRY Specifies how many times the server retries the acquisition of a drive in alibrary when there are no drives available after acquiring a mount point.
ENABLE3590LIBRARY Enables support for IBM 3590 tape drives in an IBM 349x automated library.
RESOURCETIMEOUT Specifies how long the server waits for a resource before canceling thepending acquisition of a resource.
SEARCHMPQUEUE Specifies the order in which the server satisfies requests in the mount queue.
Chapter 5. Configuring Storage Devices 73

Configuring DevicesThis section contains procedures for configuring devices with the DeviceConfiguration Wizard, where applicable. While it is recommended that you use thewizard whenever possible, some devices, such as IBM 3494 Tape LibraryDataservers, must be added using Tivoli Storage Manager commands.
Task Required Privilege Class
Adding Devices System
Configuring Manual DevicesThis section describes the procedure for configuring manually operated,stand-alone tape and optical devices that are supported by the Tivoli StorageManager device driver. See “Devices Supported by Tivoli Storage Manager” onpage 59.
For devices not yet supported by the Tivoli Storage Manager device driver, theWindows device driver can be used. See “Configuring Devices Not Supported bythe Tivoli Storage Manager Device Driver” on page 77.1. Attach the device to the system.
Follow the manufacturer’s instructions to attach the device to the system.2. Set up the appropriate device driver for the device.
See “Selecting a Device Driver” on page 62.3. Configure the device.
a. From the TSM Console, expand the tree for the server instance you areconfiguring.
b. Click Wizards, then double click Device Configuration in the right pane.The Device Configuration Wizard appears.
c. Follow the instructions in the wizard.4. Determine your backup strategy.
Determine which device the server backs up client data to, and whether clientdata is backed up to disk, and then migrated to tape, or if it is backed updirectly to tape. See “Planning for Devices” on page 72.
5. Update the TSM policy.Define the Tivoli Storage Manager policy that links client data with media forthe device. For an example, see “Defining and Updating a Policy Domain” onpage 320.
6. Label volumes.See “Labeling Media for Manual Libraries” on page 132.
Configuring Automated Library DevicesThis section describes the procedure for adding automated library devices with theDevice Configuration Wizard.1. Attach the library device to the system.
Follow the manufacturer’s instructions to attach the device to the system.2. Set up the appropriate device driver for the library device.
See “Selecting a Device Driver” on page 62.3. Configure the library device.
74 Tivoli Storage Manager for Windows: Administrator’s Guide

a. From the TSM Console, expand the tree for the server instance you areconfiguring.
b. Click Wizards, then double click Device Configuration in the right pane.The Device Configuration Wizard appears.
c. Follow the instructions in the wizard.4. Determine your backup strategy.
Determine which device the server backs up client data to, and whether clientdata is backed up to disk, and then migrated to tape, or if it is backed updirectly to tape. See “Planning for Devices” on page 72.
5. Update the TSM policy.Define the Tivoli Storage Manager policy that links client data with media forthe device. For an example, see “Defining and Updating a Policy Domain” onpage 320.
6. Label volumes.See “Labeling Media for Manual Libraries” on page 132.
7. Add volumes to the library.Add volumes to an automated device by checking the volumes into library.Scratch volumes are checked in differently than private volumes.Adding volumes depends on the presence of scratch volumes or privatevolumes in the library device:v Scratch volumes are recommended. As volumes are used, you may need to
increase the number of scratch volumes allowed in the storage pool definedfor this library.
v Private volumes are not recommended because you must define volumes tothe storage pool. The defined volumes must have been labeled already. Forinformation on defining volumes, see “Defining Storage Pool Volumes” onpage 182.
Configuring 3494 Automated Library DevicesIBM 3494 Tape Library Dataserver devices can only be added using Tivoli StorageManager commands. See “Configuring Devices Using Tivoli Storage ManagerCommands” on page 80 for detailed instructions and examples. The followingguidelines must be followed:
3494 devices support only 3590 tape drives. You must always specify theENABLE3590LIBRARY server option. When you enable support for 3590 drives forthe server, the server reserves three different categories in the 3494 library. Thecategories are: private, unused, and scratch.
When you define 3494 libraries, you can specify the category numbers for volumesthat the server owns in that library by using the PRIVATECATEGORY andSCRATCHCATEGORY parameters. The server automatically creates a scratchcategory for 3590 drives, by adding one to the SCRATCHCATEGORY parameterspecified by the administrator. For example:define library MY3494 libtype=349x privatecategory=400 scratchcategory=401
The server then uses the following categories in the new MY3494 library:v 400 (X’190’): Private volumes for 3590 drivesv 401 (X’191’): Unusedv 402 (X’192’): Scratch volumes for 3590 drives
Chapter 5. Configuring Storage Devices 75

To avoid overlapping categories, do not specify a number that is equal to thescratch category plus 1.
Attention: The default values for the categories are acceptable in most cases.However, if you connect other systems or Tivoli Storage Manager servers to asingle 3494 library device, ensure that each uses unique category numbers.Otherwise, two or more systems may try to use the same volume, and cause acorruption or loss of data.
For information on the ENABLE3590LIBRARY server option, see Administrator’sReference.
To set up the device, and other sequential access devices, use the following steps:1. Attach the 3494 device to the system.
Follow the manufacturer’s instructions to attach the device to the system.2. Set up the TSM device driver for the 3494 device.
See “Selecting a Device Driver” on page 62.3. Configure the 3494 device.
See “Using Commands to Define Tivoli Storage Manager Storage Objects” onpage 80 for instructions on using Tivoli Storage Manager commands toconfigure the device.
4. Determine your backup strategy.Determine which device the server backs up client data to, and whether clientdata is backed up to disk, and then migrated to tape, or if it is backed updirectly to tape. See “Planning for Devices” on page 72.
5. Update the TSM policy.Define the Tivoli Storage Manager policy that links client data with media forthe device. For an example, see “Defining and Updating a Policy Domain” onpage 320.
6. Label volumes.See “Labeling Media with an Automated Library” on page 125.
7. Add volumes to the 3494 device.Add volumes to an automated device by checking the volumes into the library.Scratch volumes are checked in differently than private volumes.Adding volumes depends on the presence of scratch volumes or privatevolumes in the library device:v Scratch volumes are recommended. As volumes are used, you may need to
increase the number of scratch volumes allowed in the storage pool definedfor this library.
v Private volumes are not recommended because you must define volumes tothe storage pool. The defined volumes must have been labeled already. Forinformation on defining volumes, see “Defining Storage Pool Volumes” onpage 182.
Obtaining Element Numbers for Automated Library DevicesA set of worksheets is available on the Tivoli Storage Manager Web site at thefollowing address:
http://www.tivoli.com/support/storage_mgr/tivolimain.html
76 Tivoli Storage Manager for Windows: Administrator’s Guide

The worksheets provide element numbers (addresses) for drives and storage slotsin automated library devices. You may also want to contact the device’smanufacturer for more information.
Configuring Optical DevicesThis section describes the procedure for configuring optical disk devices that aresupported by the Tivoli Storage Manager device driver.1. Attach the device to the system.
Follow the manufacturer’s instructions to attach the device to the system.2. Set up the appropriate Windows device driver for the device.
See “Selecting a Device Driver” on page 62.3. Configure the device.
a. From the TSM Console, expand the tree to TSM Device Driver for themachine that you are configuring.
b. Expand TSM Device Driver and Reports.c. Click Service Information in the TSM Console tree in the left panel. The
Service Information window appears in the right panel.d. Right click TSM Device Driver. A pop-up menu appears.e. Click Properties in the pop-up menu. The Device Driver Options dialog
appears.f. Click to check the Enable Windows 2000 and Optical Device Support check
box. The startup type is set to Boot as a default.g. Click OK. A warning message appears because the action changes some
entries in the registry. Click OK.h. The Tivoli Storage Manager device driver now starts before Windows
device drivers. If you do not want all devices to be controlled by the TivoliStorage Manager device driver, exclude those devices from Tivoli StorageManager control. See “Controlling Some Devices with the Tivoli StorageManager Device Driver and Others with Windows Device Drivers” onpage 66.
4. Determine your backup strategy.Determine which device the server backs up client data to, and whether clientdata is backed up to disk, and then migrated to tape. See “Planning forDevices” on page 72.
5. Update the TSM policy.Define the Tivoli Storage Manager policy that links client data with media forthe device. For an example, see “Defining and Updating a Policy Domain” onpage 320.
Configuring Devices Not Supported by the Tivoli StorageManager Device Driver
Unsupported devices can be added using Tivoli Storage Manager commands. See“Configuring Devices Using Tivoli Storage Manager Commands” on page 80 fordetailed instructions and examples.
You can configure devices that run with their own or Windows device drivers aslong as the devices meet Tivoli Storage Manager requirements. See “Requirementsfor Using Windows Device Drivers with Tivoli Storage Manager” on page 64.1. Attach the device to the system.
Follow the manufacturer’s instructions to attach the device to the system.
Chapter 5. Configuring Storage Devices 77

2. Set up the appropriate Windows device driver for the device.See “Selecting a Device Driver” on page 62.
3. Configure the device.See “Using Commands to Define Tivoli Storage Manager Storage Objects” onpage 80 for instructions on using Tivoli Storage Manager commands toconfigure the device. The following guidelines must be followed:v The device class must have a device type of GENERICTAPE.v Define a different device class and a different manual library device for every
unique device type that will be controlled by the Windows device driver. Forexample, to use a 4mm drive and an 8mm drive, define two manuallibraries, and two device classes (both with device type GENERICTAPE).
4. Determine your backup strategy.Determine which device the server backs up client data to, and whether clientdata is backed up to disk, and then migrated to tape, or if it is backed updirectly to tape. See “Planning for Devices” on page 72.
5. Update the Tivoli Storage Manager policy.Define the Tivoli Storage Manager policy that links client data with media forthe device. For an example, see “Defining and Updating a Policy Domain” onpage 320.
6. Label volumes.See “Labeling Media with an Automated Library” on page 125 or “LabelingMedia for Manual Libraries” on page 132.
Configuring Removable Media DevicesRemovable media devices can be added using Tivoli Storage Manager commands.See “Configuring Devices Using Tivoli Storage Manager Commands” on page 80for detailed instructions and examples. The following guidelines must be followed:
If a file system can be backed up to a removable media device, Tivoli StorageManager may be able to use that device. The server recognizes the device as adevice with type REMOVABLEFILE. To use device type REMOVABLEFILE for adevice, the device:v Must not be supported by a device type that is available for a Tivoli Storage
Manager device class.v Must be a device with removable media, for example, Iomega Zip or Jaz drives,
or CD-ROM media.v Must be viewed by the operating system as a removable media drive, and not as
a fixed, hard disk drive. The server cannot use the device if the SCSI adaptercard makes the removable media drive appear as a fixed disk drive to theoperating system.The operating system treats some optical drives as fixed drives after data iswritten to them and until the system reboots. The server cannot use these drivesas removable file devices.
You can use the CD-ROM media as input media on a target Tivoli StorageManager server by using the REMOVABLEFILE device class for input. UsingREMOVABLEFILE device class for input allows the server to distinguish mediavolumes by a “volume label”, to prompt for additional media, and to dismountmedia.
With CD-ROM support for Windows, you can also use CD-ROM media as anoutput device class. Using CD-ROM media as output requires other software
78 Tivoli Storage Manager for Windows: Administrator’s Guide

which uses a file system on top of the CD-ROM media. ADAPTEC Direct CDsoftware is a common package for this application. This media allows othersoftware to write to a CD by using a drive letter and file names. The media can beeither CD-R (read) or CD-RW (read/write).
If a data cartridge that is associated with a REMOVABLEFILE device class has twosides, the server treats each side as a separate Tivoli Storage Manager volume.
To set up the device, use the following steps.1. Attach the device to the system.
Follow the manufacturer’s instructions to attach the device to the system.2. Set up the appropriate device driver for the device.
See “Selecting a Device Driver” on page 62.3. Configure the device.
See “Using Commands to Define Tivoli Storage Manager Storage Objects” onpage 80 for instructions on using Tivoli Storage Manager commands toconfigure the device. The following parameters must be specified:v The device class must have device type of REMOVABLEFILE.v The library type must be MANUAL.v The device name used in defining drives is the drive letter by which the
system knows the drive. See “Obtaining Device Alias Names” on page 62.4. Determine your backup strategy.
Determine which device the server backs up client data to, and whether clientdata is backed up to disk, and then migrated to tape, or if it is backed updirectly to tape. See “Planning for Devices” on page 72 and “Defining andUpdating a Policy Domain” on page 320.
5. Label removable file media.Utilities are not supplied by the server to format or label CD-ROMs. You mustlabel CD-ROMs with the device manufacturer’s or Windows utilities becauseTSM does not provide utilities to format or label these media. The operatingsystem utilities include the Disk Administrator program (a graphical userinterface) and the label command. See “Labeling Media” on page 125.
Example of Removable File Support (CD-ROM)Use these steps as an example of Tivoli Storage Manager REMOVABLEFILEsupport. This example takes an export object and moves it from one server toanother.v Server A:
– Define a device class named expfile with a device type of FILE.define devclass expfile devtype=file directory=c:\data\move
– Export the node. This command creates a file named CDR03 in thec:\data\move directory. CDR03 contains the export data for node USER1.export node user1 filedata=all devclass=expfile vol=CDR03
You can use software for writing CD-ROMs to create a CD with volume labelCDR03 that contains the file named CDR03.
v Server B:– Insert the CD in a drive on the Windows system, for example, E:– Issue the following Tivoli Storage Manager commands to import the node
data on the CD-ROM volume CDR03:
Chapter 5. Configuring Storage Devices 79

define library manualdefine devclass cdrom devtype=removablefile library=manualdefine drive manual cddrivedefine path server01 cddrive srctype=server desttype=drivelibrary=manual device=e:import node user1 filedata=all devclass=cdrom vol=CDR03
Configuring Devices Using Tivoli Storage Manager CommandsYou can add devices using Tivoli Storage Manager commands. The followingscenario adds a manual tape device, an automated library device, and a removablefile system device like a Iomega Jaz drive. For more information about TivoliStorage Manager commands, see Administrator’s Reference.
Some of the tasks described in this section require an understanding of TivoliStorage Manager storage objects. For an introduction to these storage objects, see“Tivoli Storage Manager Storage Objects” on page 47.1. Attach the device to the system.
Follow the manufacturer’s instructions to attach the device to the system.2. Set up the appropriate device driver for the device.
See “Selecting a Device Driver” on page 62.3. Configure the device.
See “Using Commands to Define Tivoli Storage Manager Storage Objects” forinstructions on using Tivoli Storage Manager commands to configure thedevice.
4. Determine your backup strategy.Determine which device the server backs up client data to, and whether clientdata is backed up to disk, and then migrated to tape, or if it is backed updirectly to tape. See “Planning for Devices” on page 72 and “Defining andUpdating a Policy Domain” on page 320.
5. Label the media.See “Labeling Media with an Automated Library” on page 125 or “LabelingMedia for Manual Libraries” on page 132.
6. Add new volumes to the library.See “Checking Media into Automated Library Devices” on page 126.
Using Commands to Define Tivoli Storage Manager StorageObjects
Define the objects used to represent each library device and its drives, as well astheir respective paths and the policy objects used to manage the media associatedwith each library device.
Define a LibraryAll devices must be defined as libraries. Manual devices require a manual typelibrary and most automated devices require the SCSI type library. Automatedlibraries additionally require a path defined to them using the DEFINE PATHcommand. Define libraries with the DEFINE LIBRARY command.
Manual Device:define library manual8mm libtype=manual
Automated Library Device:define library auto8mmlib libtype=scsi
80 Tivoli Storage Manager for Windows: Administrator’s Guide

define path server01 auto8mmlib srctype=server desttype=librarydevice=lb3.0.0.0
Removable File System Device (Iomega Jaz drive):define library manualJAZ libtype=manual
For detailed information about defining Tivoli Storage Manager libraries andlibrary types, see “Defining Devices and Paths” on page 89.
Define the Drives in the LibraryAll drives that you wish to use must be defined to the library. Define drives withthe DEFINE DRIVE command. Additionally, you must use DEFINE PATH todefine the path for each of the drives. For automated library devices with morethan one drive, the server requires the drive element number in the drivedefinition.
Manual Device:define drive manual8mm drive01define drive manual8mm drive02
define path server01 drive01 srctype=server desttype=drive library=manual8mmdevice=mt1.0.0.0define path server01 drive02 srctype=server desttype=drive library=manual8mmdevice=mt2.0.0.0
Automated Library Device:define drive auto8mmlib 8mm_mt4 element=82define drive auto8mmlib 8mm_mt5 element=83
define path server01 8mm_mt4 srctype=server desttype=drive library=auto8mmlibdevice=mt4.0.0.0define path server01 8mm_mt5 srctype=server desttype=drive library=auto8mmlibdevice=mt5.0.0.0
Removable File System Device (Iomega Jaz drive):define drive manualJAZ drive01
define path server01 drive01 srctype=server desttype=drive library=manualJAZdevice=mt1.0.0.0
For detailed information about defining Tivoli Storage Manager drives, see“Defining Devices and Paths” on page 89.
Define the Device Classes that Group Together Similar DevicesEach Tivoli Storage Manager device must be a member of a Tivoli StorageManager device class. Device classes are collections of similar devices, for exampleall 8mm devices that use the same media format. Several different device classescan be associated with the same library. For example, a manual 4mm tape deviceand a manual 8mm tape device could each be associated with the same manuallibrary. Define device classes with the DEFINE DEVCLASS command.
Manual Device:define devclass tape8mm_class devtype=8mm format=8500 library=manual8mm
Automated Library Device:define devclass auto8mm_class devtype=8mm format=8500 library=auto8mmlib
Removable File System Device (Iomega Jaz drive):define devclass JAZdisk_class devtype=removablefile library=manualJAZ
Chapter 5. Configuring Storage Devices 81

For detailed information about defining Tivoli Storage Manager device classes, see“Chapter 9. Defining Device Classes” on page 157.
Create a Storage Pool for the Device AddedEach Tivoli Storage Manager device must be associated with a Tivoli StorageManager Storage Pool. Storage pools are collections of media and like deviceclasses. They are organized for a grouping of specific types of media, for example astorage pool named TAPE8MM_POOL for the device class TAPE8MM_CLASS andAUTO8MM_POOL for the device class AUTO8MM_CLASS.
Manual Device:define stgpool tape8mm_pool tape8mm_class maxscratch=20
Automated Library Device:define stgpool auto8mm_pool auto8mm_class maxscratch=10
Removable File System Device (Iomega Jaz drive):define stgpool manualJAZ_pool JAZdisk_class
For detailed information about defining Tivoli Storage Manager storage pools, see“Chapter 10. Managing Storage Pools and Volumes” on page 171.
Determine Backup StrategyAdministrators are responsible for creating a backup strategy and implementing itthrough Tivoli Storage Manager policy. Typically, a backup strategy determines thedevice and media to which client data is written. It also determines if data isbacked up directly to tape or if data is backed up to disk and then later migratedto tape.
Disk-to-Tape Backups:1. Set up a storage pool hierarchy2. Use STANDARD default Tivoli Storage Manager policy for disk-to-tape
backups
Direct-to-Tape Backups:
To back up directly to tape, you must create new policy by copying default policyand modifying it for the desired results. See “Configuring Policy for Direct-to-TapeBackups” on page 335.
Determine the Media and Device Type for Client BackupsDetermine the type of media and the type of device to which the server backs upclient data by manipulating Tivoli Storage Manager policy. For example, assume apolicy domain named dir2tape has been established for direct-to-tape backups. Toassign client node astro to the direct-to-tape policy, with the password cadet,enter:
Manual Device:register node astro cadet dir2tape
Automated Library Device:To assign client node astro to a direct-to-tape policy domain named dsk2tape, withthe password cadet, enter:register node astro cadet dsk2tape
82 Tivoli Storage Manager for Windows: Administrator’s Guide

Removable Media Device (Iomega Jaz drive):To assign client node astro to a removable media device policy domain namedrmdev, with the password cadet, enter:register node astro cadet rmdev
Configuring Tivoli Storage Manager Servers to Share SAN-ConnectedDevices
The following tasks are required to share tape library devices over a SAN:
Task Required Privilege Class
Setting up Server Communications System or unrestricted storage
Setting up the Library Manager Server System or unrestricted storage
Setting up the Library Client Servers System or unrestricted storage
Setting up Server CommunicationsBefore Tivoli Storage Manager servers can share a storage device over a SAN, youmust set up server communications. This requires configuring each server forEnterprise Administration and defining the servers to each other, using thecross-define function. See “Setting Up Communications Among Servers” onpage 468 for details.
Note: Set up each server with a unique name.
Setting up the Library Manager ServerUse the following procedure as an example of how to set up a Tivoli StorageManager server as a library manager named ASTRO:1. Verify that the Tivoli Storage Manager library manager server is running, and
start it if it is not:a. From the TSM Console, expand the tree for the server instance you are
configuring.b. Expand Reports.
c. Click Service Information in the TSM Console tree in the left panel.The Service Information window appears in the right panel.
d. Check to see if the Tivoli Storage Manager library manager server isrunning. If it is stopped, right click on the server name. A pop-up menuappears.
e. Click Start in the pop-up menu.2. Verify that the Tivoli Storage Manager device driver is running, and start it if
it is not:a. From the TSM Console, expand the tree for the machine you are
configuring.b. Expand Reports.
c. Click Service Information in the TSM Console tree in the left panel.The Service Information window appears in the right panel.
d. Check to see if the Tivoli Storage Manager device driver is running. If it isstopped, right click TSM Device Driver. A pop-up menu appears.
Chapter 5. Configuring Storage Devices 83

e. Click Start in the pop-up menu.3. Obtain the library and drive information for the shared library device:
a. From the TSM Console, expand the tree for the machine you areconfiguring.
b. Expand TSM Device Driver and Reports.c. Click Device Information. The Device Information window appears in the
right pane.4. Define a library whose library type is SCSI. For example:
define library sangroup libtype=scsi shared=yes
5. Define the path from the server to the library.define path astro sangroup srctype=server desttype=librarydevice=lb0.0.0.2
6. Define the drives in the library.define drive sangroup drivea element=1030define drive sangroup driveb element=1031
7. Define the path from the server to each of the drives.define path astro drivea srctype=server desttype=drive library=sangroupdevice=mt0.1.0.2define path astro driveb srctype=server desttype=drive library=sangroupdevice=mt0.2.0.2
8. Define at least one device class. Use a low mount retention time (1–2 minutes)and mount wait time for shared library devices. Set the mount wait times todifferent values for each server.define devclass tape devtype=dlt mountretention=1 mountwait=10library=sangroup
9. Check in the library inventory. The following example checks all volumes intothe library inventory as scratch volumes. The server uses the name on the barcode label as the volume name.checkin libvolume sangroup search=yes status=scratchchecklabel=barcode
10. Set up a storage pool for the shared library with a maximum of 50 scratchvolumes.define stgpool backtape tapedescription='storage pool for shared sangroup' maxscratch=50
Setting up the Library Client ServersUse the following procedure as an example of how to set up a Tivoli StorageManager server named JUDY as a library client. You must define the librarymanager server before setting up the library client server.1. Verify that the Tivoli Storage Manager library client server is running, and start
it if it is not:a. From the TSM Console, expand the tree for the server instance you are
configuring.b. Expand Reports.
c. Click Service Information in the TSM Console tree in the left panel.The Service Information window appears in the right panel.
d. Check to see if the Tivoli Storage Manager library client server is running. Ifit is stopped, right click on the server name. A pop-up menu appears.
e. Click Start in the pop-up menu.
84 Tivoli Storage Manager for Windows: Administrator’s Guide
2. Verify that the Tivoli Storage Manager device driver is running, and start it if itis not:a. From the TSM Console, expand the tree for the machine you are
configuring.b. Expand Reports.
c. Click Service Information in the TSM Console tree in the left panel.The Service Information window appears in the right panel.
d. Check to see if the Tivoli Storage Manager device driver is running. If it isstopped, right click TSM Device Driver. A pop-up menu appears.
e. Click Start in the pop-up menu.3. Obtain the library and drive information for the shared library device:
a. From the TSM Console, expand the tree for the machine you areconfiguring.
b. Expand TSM Device Driver and Reports.c. Click Device Information. The Device Information window appears in the
right pane.4. Define the shared library, SANGROUP and identify the library manager.
Note: Ensure that the library name agrees with the library name on the librarymanager.
define library sangroup libtype=shared primarylibmanager=astro
5. Define the drives to the library by using the same names as the drives on thelibrary manager. Element addresses are not required for shared libraries whendefining drives on the library client.define drive sangroup driveadefine drive sangroup driveb
Note: You do not have to specify all of the drives in the shared library device.6. Define the paths from the client server to each of the drives.
define path judy drivea srctype=server desttype=drive library=sangroupdevice=mt0.1.0.3define path judy driveb srctype=server desttype=drive library=sangroupdevice=mt0.2.0.3
7. Define at least one device class. Use a low mount retention time (1–2 minutes)and mount wait time for shared library devices. Set the mount wait times todifferent values for each server.define devclass tape devtype=dlt mountretention=1 mountwait=10library=sangroup
8. Define the storage pool, BACKTAPE, that will use the shared library.define stgpool backtape tapedescription='storage pool for shared sangroup' maxscratch=50
9. Repeat this procedure to define additional servers as library clients.
Server OperationsWhen the library manager server starts and the storage device initializes, or after alibrary manager server is defined to a library client server, the library client servercontacts the library manager server. The library client server confirms that thecontacted server is the library manager for the named library device. The libraryclient server also compares drive definitions with the library manager server forconsistency. The library client server contacts the library manager server for each ofthe following operations:
Chapter 5. Configuring Storage Devices 85

Volume MountA library client server sends a request to the library manager server foraccess to a particular volume in the shared library device. For a scratchvolume, the library client server does not specify a volume name. If thelibrary manager server cannot access the requested volume, or if scratchvolumes are not available, the library manager server denies the mountrequest. If the mount is successful, the library manager server returns thename of the drive where the volume is mounted.
Volume Release (free to scratch)When a library client server no longer needs to access a volume, it notifiesthe library manager server that the volume should be returned to scratch.The library manager server database is updated with the volume’s newowner. The volume is deleted from the volume inventory of the libraryclient server.
Table 11 shows the interaction between library client servers and the librarymanager server in executing Tivoli Storage Manager commands.
Table 11. How SAN-enabled Servers Execute Common Tivoli Storage Manager Commands
Server command Library Manager Server Library Client Server
QUERY LIBVOLUME Displays the volumes thatare checked into thelibrary. For privatevolumes, the owner serveris also displayed.
Not applicable.
CHECKIN LIBVOLUMECHECKOUT LIBVOLUME
Performs the commands tothe library device.
Not applicable.
When a check-inoperation must beperformed because of aclient restore, a requestis sent to the librarymanager server.
MOVE MEDIAMOVE DRMEDIA
Only valid for volumesused by the librarymanager server.
Requests that thelibrary manager serverperform the operations.Generates a checkoutprocess on the librarymanager server.
AUDIT LIBRARY Performs the inventorysynchronization with thelibrary device.
Performs the inventorysynchronization withthe library managerserver.
LABEL LIBVOLUME Performs the labeling andcheck-in of media.
Not applicable.
DISMOUNT VOLUME Sends the request to thelibrary device.
Requests that thelibrary manager serverperform the operation.
QUERY VOLUME Checks whether thevolume is owned by therequesting library clientserver and checks whetherthe volume is in the librarydevice.
Requests that thelibrary manager serverperform the operation.
86 Tivoli Storage Manager for Windows: Administrator’s Guide

Configuring Tivoli Storage Manager for LAN-free Data MovementYou are able to configure the Tivoli Storage Manager client and server so that theclient, through a storage agent, can move its data directly to storage on a SAN.This function, called LAN-free data movement, is provided by the ManagedSystem for SAN feature. As part of the configuraion, a storage agent is installed onthe client system. Tivoli Storage Manager supports both tape libraries and FILElibraries. This feature will support SCSI, 349X, and ACSLS libraries.
The configuration procedure you follow will depend on the type of environmentyou implement, however in all cases you must do the following:1. Install and configure the client.2. Install and configure the storage agent.3. Configure the libraries for LAN-free data movment.4. Define the libraries and associated paths.5. Define associated devices and their paths.6. Configure the server for use with the storage agent.
For more information on configuring Tivoli Storage Manager for LAN-free datamovement, including specific installation instructions, see TSM Managed System forSAN Storage Agent User’s Guide.
Configuring Tivoli Storage Manager for use with Tivoli Data Protectionfor NDMP
The capabilities of Tivoli Storage Manager are extended through a separatelylicensed product called Tivoli Data Protection for NDMP. Tivoli Data Protection forNDMP allows Tivoli Storage Manager to use Network Data Management Protocol(NDMP) to communicate with NAS file servers and provide backup and restoreservices. This feature supports SCSI libraries.
In order to implement Tivoli Data Protection for NDMP, you must do thefollowing:1. Define the libraries and their associated paths.2. Define a device class for NDMP operations.3. Define the storage pool for NDMP media.4. Configure Tivoli Storage Manager policy for NDMP operations.5. Register the NAS nodes with the server.6. Define a data mover for the NAS file server.7. Define the drives and their associated paths.
For more information on configuring Tivoli Storage Manager for use with TivoliData Protection for NDMP, including specific installation instructions, see“Chapter 6. Setting Up Tivoli Data Protection for NDMP” on page 93.
Chapter 5. Configuring Storage Devices 87

Configuring Tivoli Storage Manager for Server-free Data MovementTivoli Storage Manager supports a server-free data movement function, which caninvoke full-volume backup and restore between a source (client) and a storagedevice on a SAN configuration. Because the data movement is being performed bya separate device, a data mover, the utilization of server-free data movementresults in reduced overhead on the server. This feature supports SCSI tape librariesthat are SCSI or Fibre Channel attached.
In order to implement server-free data movement, you must do the following:1. Determine the world wide name, the serial number and the LUN for each
device.2. Define the libraries and their associated server paths.3. Define the drives and their associated paths.4. Define the device class for server-free data movement.5. Define the storage pool for server-free data movement.6. Update the copygroup.7. Configure Tivoli Storage Manager policy for server-free data movement.8. Register the client node.9. Define the disks and their associated paths.
10. Define a data mover for server-free data movement.11. Define the paths associated with the data mover.
For more information on configuring Tivoli Storage Manager for server-free datamovement, including specific installation instructions, see “Chapter 7. Setting UpServer-Free Data Movement” on page 109.
Troubleshooting Device ConfigurationThe following sections describe procedures for troubleshooting deviceconfiguration. The sections give pointers to additional information whereapplicable.
Displaying Device InformationYou can display information about devices connected to the server by using theDevice Information utility.1. From the TSM Console, expand the tree to the machine you are configuring.2. Expand TSM Device Driver and Reports.3. Click Device Information. This utility provides a convenient way to find
information about devices available and defined to the server.
The information provided by this utility is from the Windows registry. Some of theinformation is put into the registry by the Tivoli Storage Manager device driver. Toreceive accurate information, ensure that the device driver is running. If the devicedriver is not running, the information may be incorrect if device attachments havechanged since the last time the device driver was running.
Displaying the Event Log to Find Device ErrorsYou can display the Windows Event Log to understand the problem behind somedevice errors.
88 Tivoli Storage Manager for Windows: Administrator’s Guide

1. In the TSM Console, select Launch. From the Administrative Tools window,open Event Viewer. Information on system events is displayed.
2. Under the column labeled Source, look for events that are labeled with“AdsmScsi”.You can also use filtering to see just the events related to Tivoli StorageManager. From the View menu, select Filter Events..., and set the filter to showevents with event ID 11.
3. Double-click on the event to get information about the date and time of theerror, and detailed information. To interpret the data bytes that are shown inthe Data field, use the appendix in Tivoli Storage Manager Messages thatdiscusses device I/O errors.
Defining Devices and PathsThe following sections describe how to define libraries and drives, as well as theirpaths, to Tivoli Storage Manager. See “Managing Libraries” on page 143 and“Managing Drives” on page 145 for information about displaying library and driveinformation, and updating and deleting libraries and drives.
Defining Libraries
Task Required Privilege Class
Define or update libraries System or unrestricted storage
Before you can use a drive, you must first define the library to which the drivebelongs. This is true for both manually mounted drives and drives in automatedlibraries. For example, you have several stand-alone tape drives. You could definea library named MANUALMOUNT for these drives by using the followingcommand:define library manualmount libtype=manual
For all libraries other than manual libraries, you must also define a path from theserver once you have defined the library. For more information about paths, see“Defining Paths” on page 91. For example, if you have an Exabyte EXB-120 device,you could define a library named ROBOTMOUNT using the following command:define library robotmount libtype=scsi
Next, you use the DEFINE PATH command. In the path, you must specify theDEVICE parameter. The DEVICE parameter is required and specifies the devicespecial file by which the library’s robotic mechanism is known.define path server1 robotmount srctype=server desttype=librarydevice=lb3.0.0.0
Defining Drives
Task Required Privilege Class
Define drives System or unrestricted storage
To inform the server about a drive that can be used to access storage volumes,issue the DEFINE DRIVE command, followed by the DEFINE PATH command. For
Chapter 5. Configuring Storage Devices 89

more information about paths, see “Defining Paths” on page 91. When issuing theDEFINE DRIVE command, you must provide some or all of the followinginformation:
Library nameThe name of the library in which the drive resides.
Drive nameThe name assigned to the drive.
World Wide NameThe Fibre Channel world wide name for the drive being defined.
Serial NumberThe serial number of the drive being defined.
Element addressThe element address of the drive. The ELEMENT parameter applies onlyto SCSI libraries. The element address is a number that indicates thephysical location of a drive within an automated library. The server needsthe element address to connect the physical location of the drive to thedrive’s SCSI address. You can get the element address from this Web site:http://www.tivoli.com/support/storage_mgr/tivolimain.html.
For example, to define a drive that belongs to the manual library named MANLIB,enter this command:define drive manlib mandrive
Next, you would define the path from the server to the drive using the devicename used to access the drive:define path server1 mandrive srctype=server desttype=drive library=manlibdevice=mt3.0.0.0
Defining Data MoversData movers are SAN-attached devices that, through a request from Tivoli StorageManager, transfer client data for backup, archiving or restore purposes. Datamovers are defined as unique objects to Tivoli Storage Manager. Types of datamover devices include NAS file servers. When issuing the DEFINE DATAMOVERcommand, you must provide some or all of the following information:
Data Mover NameThe name of the defined data mover.
Type The type of data mover being defined (SCSI or NAS).
World Wide NameThe Fibre Channel world wide name for the data mover device. This mustbe specified if the data mover type is SCSI and will be used for server-freedata movement.
Serial NumberSpecifies the serial number of the data mover. This must be specified if thedata mover type is SCSI and will be used for server-free data movement..
High Level AddressThe High Level Address is either the numerical IP address or the domainname of a NAS file server.
Low Level AddressThe Low Level Address specifies the TCP port number used to access aNAS file server.
90 Tivoli Storage Manager for Windows: Administrator’s Guide

User IDThe User ID specifies the user ID for a user when intiating a Network DataManagement Protocol (NDMP) session with a NAS file server.
PasswordThe Password specifies the password for a user ID in order to log onto aNAS file server.
CopythreadsThe number of concurrent copy operations that the SCSI data mover cansupport.
OnlineThe online parameter specifies whether the data mover is online or not.
Data FormatThe data format parameter specifes the data format used according to thetype of data mover device used.
For example, to define a NAS data mover named NAS1, you would enter thefollowing:define datamover nas1 type=nas hladdress=netapp2.tucson.ibm.com lladdress=10000userid=root password=admin dataformat=netappdump
Defining DisksIn order to utilize server-free data movement, you must define a client-owned diskthat resides in a SAN environment. The disk will be defined to the server in orderto be used by a data mover device.
The server will not be able to perform server-free data movement operations fordata that resides on disk storage devices unless they are defined to the server withthis command.
When issuing the DEFINE DISK command, you must provide some or all of thefollowing information:
Node NameThe name of the node (client) that owns the disks that are being defined.
Disk NameThe name of the disk that is being defined. The name will be the namedefined by the owning node’s operating system.
Serial NumberThe serial number of the disk that is being defined.
World Wide NameThe Fibre Channel world wide name of the disk that is being defined.
OnlineThe online parameter specifies whether the disk is online or not.
For example,define disk node01 Harddisk1 serial=100047 wwn=20020060450d00e2 online=yes
Defining PathsBefore a device can be used, a path must be defined between the device and theserver or the device and the data mover responsible for outboard data movement.This command must be used to define the following path relationships:
Chapter 5. Configuring Storage Devices 91
v Between a server and a drive, or library.v Between a data mover and a drive or disk.
When issuing the DEFINE PATH command, you must provide some or all of thefollowing information:
Source NameThe name of the server or data mover being defined as the source for thepath.
Destination NameThe assigned name of the device being defined as the destination for thepath.
Source TypeThe type of source being defined for the path.
Destination TypeThe type of device being defined as the destination for the path.
Library NameThe name of the library in which the drive resides.
DeviceThe special file name of the device being defined. This parameter may beused when defining a path between a server and a library, drive or disk.This parameter should not be used when defining a data mover as thesource type except when the data mover is a NAS data mover. NAS datamovers always require a device parameter.
LUN Logical Unit Number. An identifier used on a SCSI bus to distinguishbetween devices with the same target ID. On a Fibre Channel bus it is usedto distiguish between devices with the same world wide name. If the LUNof the device, as identified by the source of the path, differs from the LUNin the base definition of the device, you must use the LUN as identified bythe source of the path. This parameter should not be used when defining aserver as the source type.
Initiator IDThe SCSI initiator ID that the source will use when accessing thedestination. The parameter should not be used when defining a server asthe source type.
For example, if you had a SCSI type library named AUTO8MMLIB that had adevice name of lb3.0.0.0, and you wanted to define it to a server named ASTRO1,you would do the following:define path astro1 auto8mmlib srctype=server desttype=librarydevice=lb3.0.0.0
If you had a drive, DRIVE01, that resided in library AUTO8MMLIB, and had adevice name of mt3.0.0.0, and you wanted to define it to server ASTRO1, youwould do the following:define path astro1 drive01 srctype=server desttype=drive library=auto8mmlibdevice=mt3.0.0.0
92 Tivoli Storage Manager for Windows: Administrator’s Guide

Chapter 6. Setting Up Tivoli Data Protection for NDMP
This chapter is about planning, configuring, and managing a backup environmentthat protects your network-attached storage (NAS) file server by using Tivoli DataProtection for NDMP. Tivoli Data Protection for NDMP is a separately licensedproduct that allows Tivoli Storage Manager to use Network Data ManagementProtocol (NDMP) to support NAS file servers.
“Configuring Tivoli Data Protection for NDMP” on page 99
“Step 1. Setting Up Tape Libraries for NDMP Operations” on page 100
“Step 2. Configuring Tivoli Storage Manager Policy for NDMP Operations” on page 101
“Step 3. Registering NAS Nodes with the Tivoli Storage Manager Server” on page 102
“Step 4. Defining a Data Mover for the NAS File Server” on page 102
“Step 5. Defining a Path to a Library” on page 103
“Step 6. Defining Tape Drives and Paths for NDMP Operations” on page 103
“Step 7. Labeling Tapes and Checking Tapes into the Library” on page 104
“Step 8. Scheduling Tivoli Data Protection for NDMP Operations” on page 104
“Backing Up and Restoring NAS File Servers Using Tivoli Data Protection for NDMP” onpage 104
“Managing Tivoli Data Protection for NDMP” on page 105
“Managing NAS File Server Nodes” on page 105
“Managing Data Movers Used in NDMP Operations” on page 106
“Managing Storage Pools Containing Tivoli Data Protection for NDMP Media” on page 107
In this chapter, most examples illustrate how to perform tasks by using a TivoliStorage Manager command-line interface. For information about the commands,see Administrator’s Reference, or issue the HELP command from the command lineof a Tivoli Storage Manager administrative client.
Tivoli Storage Manager tasks can also be performed from the administrative Webinterface. For more information about using the administrative interface, see QuickStart.
RequirementsYou must meet the following requirements when setting up Tivoli Data Protectionfor NDMP:
Tivoli Data Protection for NDMPA separately licensed program product.
NAS File ServerA NAS file server such as Network Appliance File Server. The operatingsystem on the file server must be supported by Tivoli Storage Manager.Visit http://www.tivoli.com/support/storage_mgr/tivolimain.html.
The combination of file server model and operating system must besupported by the NAS file server. Visithttp://netapp.com/products/filer/index.html for details.
© Copyright IBM Corp. 1994, 2002 93

Tape LibraryA SCSI-attached or Fibre Channel-attached library that is supported by theTivoli Storage Manager device driver. Visithttp://www.tivoli.com/support/storage_mgr/tivolimain.html.
The tape library is controlled by the Tivoli Storage Manager server usingone of the following methods:v The Tivoli Storage Manager server directly controls the library, which is
attached to the Tivoli Storage Manager server.v The Tivoli Storage Manager server indirectly controls the library. The
library is attached to the NAS file server. The Tivoli Storage Managerserver passes SCSI commands to the library through the NAS file server.
Library Sharing: The Tivoli Storage Manager server that performs NDMPoperations can be a library manager, but cannot be alibrary client. If the Tivoli Storage Manager server thatperforms NDMP operations is a library manager, thatserver must control the library directly and not bypassing commands through the NAS file server.
Tape DrivesOne or more tape drives in the tape library. The NAS file server must beable to access the drives. The drives must be supported for tape backupoperations by the NAS file server and its operating system. Visithttp://netapp.com/products/filer/index.htmlfor details.
Drive Sharing: The tape drives can be shared by the Tivoli StorageManager server and one or more NAS file servers. Also, ifthe Tivoli Storage Manager server controls the librarydirectly, the drives can be shared:v By one or more NAS file servers and one or more Tivoli
Storage Manager library clients, if the drives areaccessible to the library clients.
v By one or more NAS file servers and one or more TivoliStorage Manager storage agents, if the drives areaccessible to the Tivoli Storage Manager server.
Verify the compatibility of specific combinations of a NAS file server, tape devices,and SAN devices with the hardware manufacturers.
Interfaces Used for Tivoli Data Protection for NDMPYou can use any of the interfaces described in this section to perform NDMPoperations. You can schedule an NDMP operation using the BACKUP NODE andRESTORE NODE commands and scheduling the operation as an administrativeschedule.
Client Interfaces:
v Backup-archive command-line client (on a Windows NT, Windows 2000, AIX®,or 32-bit Sun Solaris system)
v Web client
Server Interfaces:
v Server consolev Command line on the administrative client and the server console
94 Tivoli Storage Manager for Windows: Administrator’s Guide

Note: All examples in this chapter use server commands.v Web administrative interface
The Tivoli Storage Manager Web client interface, available with the backup-archiveclient, lets you display the file systems of the NAS file server in a graphical view.The client function is not required, but you can use the client interfaces for NDMPoperations. Tivoli Storage Manager prompts you for an administrator ID andpassword when you perform NDMP functions using either of the client interfaces.See Backup-Archive Installation and User’s Guide for more information aboutinstalling and activating client interfaces.
Data Formats for Tivoli Data Protection for NDMPDuring backup operations involving NDMP, the NAS filer controls the format ofthe data written to the library. The NDMP format is not the same as the dataformat used for traditional Tivoli Storage Manager backups. When you define aNAS file server as a data mover and define a storage pool for NDMP operations,you specify the data format. For example, you would specify NETAPPDUMP if theNAS file server is a Network Appliance device.
Additional data formats will be added as Tivoli Storage Manager adds support forNAS file servers from other vendors.
Planning for Tivoli Data Protection for NDMPMost of the planning required to implement a Tivoli Data Protection for NDMPenvironment is related to device configuration. You have choices about how toconnect and use the libraries and drives.
Planning for Tape Libraries and Drives used in NDMPOperations
Many of the configuration choices you have for libraries and drives are determinedby the hardware features of your libraries. You can set up NDMP operations withany supported library and drives. However, the more features your library has, themore flexibility you can exercise in your implementation.
You might start by answering the following questions:v Do you want to attach tape library robotics to the Tivoli Storage Manager server
or to the NAS file server?v How do you want to use the tape drives in the library?
– Dedicate all tape drives to NDMP operations.– Dedicate some tape drives to NDMP operations and others to traditional
Tivoli Storage Manager operations.– Share tape drives between NDMP operations and traditional Tivoli Storage
Manager operations.
Determining Where to Attach the Tape Library RoboticsOne of the first steps in planning for Tivoli Data Protection for NDMP is todetermine where to attach the tape library. You must determine whether to attachthe library robotics to the Tivoli Storage Manager server or to the NAS file server.Regardless of where you connect library robotics, tape drives must always beconnected to the NAS file server for NDMP operations.
Chapter 6. Setting Up Tivoli Data Protection for NDMP 95

Distance and your available hardware connections are factors to consider. If thelibrary does not have separate ports for robotics control and drive access, thelibrary must be attached to the NAS file server because the NAS file server musthave access to the drives. If your library has separate ports for robotics control anddrive access, you can choose to attach the library robotics to either the TivoliStorage Manager server or the NAS file server.
If the NAS file server is at a different location than the Tivoli Storage Managerserver, the distance may mean that you must attach the library to the NAS fileserver.
You have the option of dedicating the library to NDMP operations, or of using thelibrary for NDMP operations as well as most traditional Tivoli Storage Manageroperations.
Configuration 1 — Library Connected to the Tivoli StorageManager ServerIn this configuration, the tape library must have separate ports for robotics controland for drive access. In addition, the library must be within Fibre-Channel rangeor SCSI bus range of both the Tivoli Storage Manager server and the NAS fileserver.
In this configuration, the Tivoli Storage Manager server controls the librarythrough a direct, physical connection to the library robotics control port. ForNDMP operations, the drives in the library are connected directly to the NAS fileserver. The NAS file server transfers data to the tape drive at the request of theTivoli Storage Manager server. To also use the drives for Tivoli Storage Manageroperations, connect the Tivoli Storage Manager server to the tape drives and definethe paths from the Tivoli Storage Manager server to the tape drives. Thisconfiguration also supports a Tivoli Storage Manager storage agent having accessto the drives for its LAN-free operations, and the Tivoli Storage Manager servercan be a library manager.
96 Tivoli Storage Manager for Windows: Administrator’s Guide

Configuration 2 — Library Connected to the NAS File ServerIn this configuration, the library robotics and the drives must be physicallyconnected directly to the NAS file server. No physical connection is requiredbetween the Tivoli Storage Manager server and the library.
The Tivoli Storage Manager server controls library robotics by sending librarycommands across the network to the NAS file server. The NAS file server passesthe commands to the tape library. Any responses generated by the library are sentto the NAS file server, and passed back across the network to the Tivoli StorageManager server. This configuration supports a physically distant Tivoli StorageManager server and NAS file server. For example, the Tivoli Storage Managerserver could be in one city, while the NAS file server and tape library are inanother city.
Drive access
Robotics Control
Data Flow
TCP/IPConnection
SCSI or FibreChannel Connection
Legend:
1
1
2
2
2
NAS FileServer
Web Client(optional)
NAS File ServerFile SystemDisks
TapeLibrary
StorageManager Server
Figure 11. Configuration 1–Library Connected to Tivoli Storage Manager Server
Chapter 6. Setting Up Tivoli Data Protection for NDMP 97

Determining How to Use the Drives in the LibraryDrives can be used for multiple purposes because of the flexible configurationsallowed by Tivoli Storage Manager. For NDMP operations, the NAS file servermust have access to the drive. The Tivoli Storage Manager server can also haveaccess to the same drive, depending on your hardware connections and limitations.All drives are defined to the Tivoli Storage Manager server. However, the samedrive may be defined for both traditional Tivoli Storage Manager operations andNDMP operations. Figure 13 on page 99 illustrates one possible configuration. TheTivoli Storage Manager server has access to drives 2 and 3, and each NAS fileserver has access to drives 1 and 2.
Drive access
Robotics Control
Data Flow
TCP/IPConnection
SCSI or FibreChannel Connection
Legend: NAS FileServer
Web Client(optional)
NAS File ServerFile SystemDisks
TapeLibrary
StorageManager Server
1 2
1
2
Figure 12. Configuration 2–Library Connected to the NAS File Server
98 Tivoli Storage Manager for Windows: Administrator’s Guide

To create the configuration shown in the figure, you would do the following:1. Define all three drives to Tivoli Storage Manager.2. Define paths from the Tivoli Storage Manager server to drives 2 and 3. Because
drive 1 is not accessed by the server, no path is defined.3. Define each NAS file server as a separate data mover.4. Define paths from each data mover to drive 1 and to drive 2.
See “Step 6. Defining Tape Drives and Paths for NDMP Operations” on page 103for more information.
Configuring Tivoli Data Protection for NDMPBefore beginning the configuration of Tivoli Data Protection for NDMP, ensure thatyou register the license. See “Licensing Tivoli Storage Manager” on page 383.
The following is a checklist to use for configuring Tivoli Data Protection forNDMP:1. Set up the tape library and media. See “Step 1. Setting Up Tape Libraries for
NDMP Operations” on page 100, where the following steps are described inmore detail.a. Attach the tape library to the NAS file server or to the Tivoli Storage
Manager server.b. Define the library with a library type of SCSI.c. Define a device class for the tape drives.d. Define a storage pool for NAS backup media.
Legend:
DrivesDrive access
3
3
2
2
1
1
NAS File Server 1
NAS File Server 2
Tape Library
Storage ManagerServer
Figure 13. Tivoli Storage Manager Drive Usage Example
Chapter 6. Setting Up Tivoli Data Protection for NDMP 99

2. Configure Tivoli Storage Manager policy for managing NAS image backups.See “Step 2. Configuring Tivoli Storage Manager Policy for NDMP Operations”on page 101.
3. Register a NAS file server node with the Tivoli Storage Manager server. See“Step 3. Registering NAS Nodes with the Tivoli Storage Manager Server” onpage 102.
4. Define a data mover for the NAS file server. See “Step 4. Defining a DataMover for the NAS File Server” on page 102.
5. Define a path from either the Tivoli Storage Manager server or the NAS fileserver to the library. See “Step 5. Defining a Path to a Library” on page 103.
6. Define the tape drives to Tivoli Storage Manager, and define the paths to thosedrives from the NAS file server and optionally from the Tivoli Storage Managerserver. See “Step 6. Defining Tape Drives and Paths for NDMP Operations” onpage 103.
7. Check tapes into the library and label them. See “Step 7. Labeling Tapes andChecking Tapes into the Library” on page 104.
8. Set up scheduled backups for NAS file servers. This step is optional. See “Step8. Scheduling Tivoli Data Protection for NDMP Operations” on page 104.
Step 1. Setting Up Tape Libraries for NDMP OperationsBefore setting up a tape library for NDMP operations, you should have alreadydetermined whether you want to attach your library robotics control to the TivoliStorage Manager server or to the NAS file server. See “Planning for Tape Librariesand Drives used in NDMP Operations” on page 95.
A. Connect the Library and Drives for NDMP OperationsConnect the tape library robotics to the Tivoli Storage Manager server or to theNAS file server. See the manufacturer’s documentation for instructions.
Library Connected to Tivoli Storage ManagerMake a SCSI or Fibre Channel connection between the Tivoli StorageManager server and the library robotics control port. Then connect theNAS file server with the drives you want to use for NDMP operations.
Library Connected to NAS File ServerMake a SCSI or Fibre Channel connection between the NAS file server andthe library robotics and drives.
B. Define the Library for NDMP OperationsDefine the tape library to Tivoli Storage Manager. For example:define library tsmlib libtype=scsi
C. Define a Device Class for NDMP OperationsCreate a device class for NDMP operations. A device class defined with a devicetype of NAS is not explicitly associated with a specific drive type (for example,3570 or 8mm). However, we recommend that you define separate device classes fordifferent drive types.
In the device class definition:v Specify NAS as the value for the DEVTYPE parameter.v Specify 0 as the value for the MOUNTRETENTION parameter.
MOUNTRETENTION=0 is required for NDMP operations.v Specify a value for the ESTCAPACITY parameter.
100 Tivoli Storage Manager for Windows: Administrator’s Guide

For example, to define a device class named NASCLASS for a library namedNASLIB and media whose estimated capacity is 40GB, enter the followingcommand:define devclass nasclass devtype=nas library=naslib mountretention=0estcapacity=40g
D. Define a Storage Pool for NDMP MediaThe storage pools you define for NDMP media are different from storage poolsyou define for Tivoli Storage Manager media because they are defined withdifferent data formats. Tivoli Storage Manager operations use storage pools definedwith a NATIVE or NONBLOCK data format. NDMP operations require storagepools with a data format that matches the NAS file server and the backup methodto be used. For example, to define a storage pool named NASPOOL for a NetworkAppliance file server, enter the following command:define stgpool naspool nasclass maxscratch=10 dataformat=netappdump
Attention: Ensure that you do not accidentally use storage pools that have beendefined for NDMP operations in traditional Tivoli Storage Manager operations. Beespecially careful when assigning the storage pool name as the value for theDESTINATION parameter of the DEFINE COPYGROUP command. Unless thedestination is a storage pool with the appropriate data format, the backup will fail.
Step 2. Configuring Tivoli Storage Manager Policy for NDMPOperations
Policy allows you to manage the number and retention time of NDMP imagebackup versions. See “Configuring Policy for Tivoli Data Protection for NDMP” onpage 337.1. Create a policy domain for NAS file servers. For example, to define a policy
domain that is named NASDOMAIN, enter the following command:define domain nasdomain description='Policy domain for NAS file servers'
2. Create a policy set in that domain. For example, to define a policy set namedSTANDARD in the policy domain named NASDOMAIN, enter the followingcommand:define policyset nasdomain standard
3. Define a management class, and then assign the management class as thedefault for the policy set. For example, to define a management class namedMC1 in the STANDARD policy set, and assign it as the default, enter thefollowing commands:define mgmtclass nasdomain standard mc1
assign defmgmtclass nasdomain standard mc1
4. Define a backup copy group in the default management class. The destinationmust be the storage pool you created for NDMP images. In addition, you canspecify the number of backup versions to retain. For example, to define abackup copy group for the MC1 management class where up to four versionsof each file system are retained in the storage pool named NASPOOL, enter thefollowing command:define copygroup nasdomain standard mc1 destination=naspool verexists=4
Attention: Ensure that management classes used for NDMP operationscontain the name of a storage pool defined for NDMP operations. Accidentallymixing storage pools used in NDMP operations and those used in TivoliStorage Manager operations will cause backups to fail.
Chapter 6. Setting Up Tivoli Data Protection for NDMP 101

5. Activate the policy set. For example, to activate the STANDARD policy set inthe NASDOMAIN policy domain, enter the following command:activate policyset nasdomain standard
The policy is ready to be used. Nodes are associated with Tivoli StorageManager policy when they are registered. For more information, see “Step 3.Registering NAS Nodes with the Tivoli Storage Manager Server”.
Applying Policy to Backups Initiated with the Client InterfaceWhen a client node initiates a backup, the policy is affected by the option file forthat client node. You can control the management classes that are applied toNDMP backups regardless of which node initiates the backup. You can do this bycreating a set of options to be used by the client nodes. The option set can includean include.fs.nas statement to specify the management class for NAS file serverbackups. See “Creating Client Option Sets from the Server” on page 281 for moreinformation.
Step 3. Registering NAS Nodes with the Tivoli StorageManager Server
Register the NAS file server as a Tivoli Storage Manager node. This node name isused to track the image backups for the NAS file server. For example, to register aNAS file server as a node named NASNODE1, with a password of NASPWD1, ina policy domain named NASDOMAIN, enter the following command:register node nasnode1 naspwd1 domain=nasdomain type=nas
If you are using a client option set, specify the option set when you register thenode.
You can verify that this node is registered by issuing the following command:query node type=nas
When you specify TYPE=NAS only NAS nodes are displayed.
Step 4. Defining a Data Mover for the NAS File ServerDefine a data mover for each NAS file server in your Tivoli Data Protection forNDMP environment. The data mover name must match the node name that youspecified when you registered the NAS node to the Tivoli Storage Manager server.For example, to define a data mover for a NAS node named NASNODE1, enterthe following command:define datamover nasnode1 type=nas hladdress=netapp2 lladdress=10000 userid=rootpassword=admin dataformat=netappdump
In this command:v The high-level address is an IP address for the NAS file server, either a
numerical address or a host name.v The low-level address is the IP port for Network Data Management Protocol
(NDMP) sessions with the NAS file server. The default is port number 10000.v The user ID is the ID defined to the NAS file server that authorizes an NDMP
session with the NAS file server (for this example, the user ID is theadministrative ID for the Network Appliance file server).
v The password parameter is a valid password for authentication to an NDMPsession with the NAS file server.
102 Tivoli Storage Manager for Windows: Administrator’s Guide

v The data format is NETAPPDUMP. This is the data format that the NetworkAppliance file server uses for tape backup.
Step 5. Defining a Path to a LibraryDefine a path to the library from either the Tivoli Storage Manager or the NAS fileserver.
Library Connected to Tivoli Storage ManagerFor example, issue the following command to define a path from theserver, named SERVER1, to the library named TSMLIB:define path server1 tsmlib srctype=server desttype=library device=lb0.0.0.2
Library Connected to NAS File ServerFor example, issue the following command to define a path between aNAS data mover named NASNODE1 and a library named NASLIB, usethe following command:define path nasnode1 naslib srctype=datamover desttype=library device=mc0
The value of the DEVICE parameter is the special file name for the tapelibrary as it is known to the NAS file server. See “Obtaining Special FileNames for Path Definitions”.
Obtaining Special File Names for Path DefinitionsWhen you are creating paths, you must provide special file names for tape librariesand drives. For paths from a NAS data mover, the value of the DEVICE parameterin the DEFINE PATH command is the name by which the NAS file server knows alibrary or drive. You can obtain these names, known as special file names, byquerying the NAS file server. For information about how to obtain names fordevices that are connected to a NAS file server, consult the product information forthe file server.
For example, for a Network Appliance file server, connect to the file server usingtelnet and issue the SYSCONFIG command. To display the device names for tapelibraries, use this command:sysconfig -m
To display the device names for tape drives, use this command:sysconfig -t
Step 6. Defining Tape Drives and Paths for NDMP OperationsDefine the tape drives that you want to use in NDMP operations and the paths tothose drives. Depending on your hardware and network connections, you can usethe drives for only NDMP operations, or for both traditional Tivoli StorageManager operations and NDMP operations. For example,1. Define a drive named NASDRIVE1 for the library named NASLIB.
define drive naslib nasdrive1 element=117
Note: When you define SCSI drives to Tivoli Storage Manager, you mustspecify element numbers for the drives when the library contains morethan one drive. Element numbers are available from devicemanufacturers. Element numbers for tape drives are also available in thedevice support information available on the Tivoli Web site athttp://www.tivoli.com/support/storage_mgr/tivolimain.html.
2. Define a path for the drive:
Chapter 6. Setting Up Tivoli Data Protection for NDMP 103

v For example, if the drive is to be used only for NDMP operations, issue thefollowing command:define path nasnode1 nasdrive1 srctype=datamover desttype=drivelibrary=naslib device=rst01
Note: For a drive connected only to the NAS file server, do not specifyASNEEDED for the CLEANFREQUENCY parameter of the DEFINEDRIVE command.
v For example, if a drive is to be used for both Tivoli Storage Manager andNDMP operations, enter the following commands:define path server1 nasdrive1 srctype=server desttype=drivelibrary=naslib device=mt3.0.0.2
define path nasnode1 nasdrive1 srctype=datamover desttype=drivelibrary=naslib device=rst01
Step 7. Labeling Tapes and Checking Tapes into the LibraryYou must label the tapes and check the tapes into the tape library. These tasks arethe same as for other libraries. See “Labeling Media” on page 125 for moreinformation.
Step 8. Scheduling Tivoli Data Protection for NDMPOperations
You can schedule the backup or restore of NDMP images by using administrativeschedules that process the BACKUP NODE or RESTORE NODE administrativecommands. The BACKUP NODE and RESTORE NODE commands can be usedonly for nodes of TYPE=NAS. See “Backing Up and Restoring NAS File ServersUsing Tivoli Data Protection for NDMP” for information about the commands.
For example, to create an administrative schedule called NASSCHED to back upall file systems for a node named NASNODE1, enter the following:define schedule nassched type=administrative cmd='backup node nasnode1' active=yesstarttime=20:00 period=1 perunits=days
The schedule is active, and is set to run at 8:00 p.m. every day. See “Chapter 19.Automating Server Operations” on page 401 for more information.
Backing Up and Restoring NAS File Servers Using Tivoli DataProtection for NDMP
After you have completed the steps in “Configuring Tivoli Data Protection forNDMP” on page 99, you are ready for NDMP operations. Use either a clientinterface or an administrative interface described in “Interfaces Used for TivoliData Protection for NDMP” on page 94 to perform a file system image backup. Forexample, to use the Windows NT backup-archive client interface to back up a filesystem named /vol/vol1 on a NAS file server named NAS1, enter the followingcommand:dsmc backup nas -nasnodename=nas1 {/vol/vol1}
For more information on the command, see Tivoli Storage Manager for WindowsBackup-Archive Installation and User’s Guide or Tivoli Storage Manager for UNIXBackup-Archive Installation and User’s Guide.
104 Tivoli Storage Manager for Windows: Administrator’s Guide

Note: Whenever you use the client interface, you are asked to authenticateyourself as a Tivoli Storage Manager administrator before the operation canbegin. The administrator ID must have at least client owner authority for theNAS node.
You can perform the same backup operation with a server interface. For example,from the administrative command-line client, back up the file system named/vol/vol1 on a NAS file server named NAS1, by entering the following command:backup node nas1 /vol/vol1
You can restore the image using either interface. Backups are identical whetherthey are backed up by using a client interface or a server interface. For example,suppose you want to restore the image backed up in the previous examples. Forthis example the file system named /vol/vol1 is being restored to /vol/vol2.Restore the file system with the following command, issued from a Windowsbackup-archive client interface:dsmc restore nas -nasnodename=nas1 {/vol/vol1} {/vol/vol2}
You can choose to restore the file system by using a server interface. For example,to restore the file system name /vol/vol1 to file system /vol/vol2, for a NAS fileserver named NAS1, enter the following command:restore node nas1 /vol/vol1 /vol/vol2
Managing Tivoli Data Protection for NDMPAdministrator activities for Tivoli Data Protection for NDMP include managing:v NAS nodesv Data moversv Tape libraries and drivesv Pathsv Device classesv Storage pools
Managing NAS File Server NodesYou can update, query, rename, and remove NAS nodes. For example, assume youhave created a new policy domain named NASDOMAIN for NAS nodes and youwant to update a NAS node named NASNODE1 to include it in the new domain.You might first query the node.query node nasnode1 type=nas
Then you might change the domain of the node with the following command:update node nasnode1 domain=nasdomain
Renaming a NAS NodeTo rename a NAS node, you must also rename the corresponding NAS datamover; they must both must have the same name. For example, to renameNASNODE1 to NAS1 you must perform the following steps:1. Delete all paths between data mover NASNODE1 and libraries and between
data mover NASNODE1 and drives. See “Deleting Paths” on page 155.2. Delete the data mover defined for the NAS node. See “Managing Data Movers
Used in NDMP Operations” on page 106.3. To rename NASNODE1 to NAS1, issue the following command:
Chapter 6. Setting Up Tivoli Data Protection for NDMP 105

rename node nasnode1 nas1
4. Define the data mover using the new node name. In this example, you mustdefine a new data mover named NAS1 with the same parameters used todefine NASNODE1. See “Step 4. Defining a Data Mover for the NAS FileServer” on page 102.Attention: When defining a new data mover for a node that you haverenamed, ensure that the data mover name matches the new node name andthat the new data mover parameters are duplicates of the original data moverparameters. Any mismatch between a node name and a data mover name orbetween new data mover parameters and original data mover parameters canprevent you from establishing a session with the NAS file server.
5. Define a path between the NAS data mover and a library only if the tapelibrary is physically connected directly to the NAS file server. See “Step 5.Defining a Path to a Library” on page 103.
6. Define paths between the NAS data mover and any drives used for NDMPoperations. See “Step 6. Defining Tape Drives and Paths for NDMP Operations”on page 103.
Deleting a NAS NodeTo delete the NAS node, first delete any file spaces for the node. Then delete anypaths from the data mover before deleting the data mover. Then you can enter thefollowing command:remove node nas1
Managing Data Movers Used in NDMP OperationsYou can update, query, and delete the data movers you define for NAS file servers.For example, if you shut down a NAS file server for maintenance, you might wantto take the data mover offline. To do this, first query your data movers to identifythe data mover for the NAS file server you want to maintain.query datamover nasnode1
Then issue the following command to make the data mover offline:update datamover nasnode1 online=no
To delete the data mover, you must first delete any path definitions in which thedata mover has been used as the source. Then issue the following command todelete the data mover:delete datamover nasnode1
Attention: If the data mover has a path to the library, and you delete the datamover or make the data mover offline, you disable access to the library.
Dedicating a Tivoli Storage Manager Drive to NDMPOperations
If you are already using a drive for Tivoli Storage Manager operations, you candedicate that drive to NDMP operations. Remove Tivoli Storage Manager serveraccess by deleting the path definition with the following command:delete path server1 nasdrive1 srctype=server desttype=drive library=naslib
106 Tivoli Storage Manager for Windows: Administrator’s Guide

Managing Storage Pools Containing Tivoli Data Protection forNDMP Media
Managing storage pools for Tivoli Data Protection for NDMP backups is differentfrom managing storage pools containing media for traditional Tivoli StorageManager backups. You can query and update Tivoli Data Protection for NDMPstorage pools. You cannot update the DATAFORMAT parameter.
You cannot back up a storage pool that is used for NDMP backups.
The following DEFINE STGPOOL and UPDATE STGPOOL parameters are ignoredfor Tivoli Data Protection for NDMP storage pools because storage poolhierarchies, reclamation, and migration are not supported for these storage pools:
MAXSIZENEXTSTGPOOLLOWMIGHIGHMIGMIGDELAYMIGCONTINUERECLAIMSTGPOOLOVFLOLOCATION
Attention: Ensure that you do not accidentally use storage pools that have beendefined for NDMP operations in traditional Tivoli Storage Manager operations. Beespecially careful when assigning the storage pool name as the value for theDESTINATION parameter of the DEFINE COPYGROUP command. Unless thedestination is a storage pool with the appropriate data format, the backup will fail.
Chapter 6. Setting Up Tivoli Data Protection for NDMP 107

108 Tivoli Storage Manager for Windows: Administrator’s Guide

Chapter 7. Setting Up Server-Free Data Movement
This chapter describes how to configure Tivoli Storage Manager for server-free datamovement operations. Server-free data movement provides a way to back up andrestore large volumes of data between client-owned disks and storage devices in amethod that reduces overhead on the Tivoli Storage Manager server and the TivoliStorage Manager client, and that minimizes data transfer on the LAN. This is doneby making use of the SCSI–3 extended copy command. The command is issuedand initiated by the server and carried out by a data mover device that exists onthe SAN. The data mover device is responsible for moving the data either from aSAN-attached client-owned disk to a SAN-attached tape drive, or from aSAN-attached tape drive to a SAN-attached client-owned disk, which frees theserver and the client from the operation.
For more information about server-free data movement concepts, see “Server-FreeData Movement” on page 40. For more information about server-free datamovement operations, see Backup-Archive Installation and User’s Guide.
Use the following table to locate instructions for specific tasks:
Tasks:
“Configuring Tivoli Storage Manager for Server-Free Data Movement” on page 111
“Step 1. Connect Devices to the Server” on page 112
“Step 2. Determine World Wide Name, Serial Number and LUN” on page 112
“Step 3. Obtaining and Correlating the Disk Information” on page 113
“Step 4. Configuring Tivoli Storage Manager for Server-Free Data Movement” on page 114
“Backing Up and Restoring Data Using Server-Free Data Movement” on page 117
“Managing Server-Free Data Movement” on page 118
In this chapter, most examples illustrate how to perform tasks by using a TivoliStorage Manager command-line interface. For information about the commands,see Administrator’s Reference, or issue the HELP command from the command lineof a Tivoli Storage Manager administrative client.
All of the Tivoli Storage Manager server commands in this chapter can beperformed from the administrative Web interface. For more information aboutusing the administrative interface, see Quick Start.
RequirementsYou must meet the following requirements when setting up server-free datamovement operations:
Operating System for the Tivoli Storage Manager Server and ClientWindows NT 4.0 with Service Pack 6 or later, or Windows 2000 withService Pack 2 or later are required for the Tivoli Storage Manager server.Windows 2000 with Service Pack 2 or later is required for the TivoliStorage Manager client.
© Copyright IBM Corp. 1994, 2002 109

Data Mover DeviceThe data mover device must support the SCSI-3 EXTENDED COPYcommand, which conforms to the ANSI T10 SPC-2 standard.
For a current list of supported data mover devices, visithttp://www.tivoli.com/support/storage_mgr/tivolimain.html.
Fibre Channel Host Bus Adapter (FC HBA)For a current list of FC HBAs supported by the Tivoli Storage Managerserver, visit http://www.tivoli.com/support/storage_mgr/tivolimain.html.
Additionally, you are required to install on the server the Host BusAdapter DLL that supports the Storage Network Industry Association’s(SNIA) common API for purposes of device discovery. Consult the HBAdocumentation, or the HBA’s manufacturer for the location of the requiredDLL.
Tape LibrariesFor SCSI-attached or Fibre Channel-attached tape libraries that aresupported by the Tivoli Storage Manager device driver, visithttp://www.tivoli.com/support/storage_mgr/tivolimain.html.
Tape DrivesIf a tape library contains one or more drives, the data mover must haveaddressability to all drives that will be used for server-free data movement.For tape drives that are supported by Tivoli Storage Manager, visithttp://www.tivoli.com/support/storage_mgr/tivolimain.html.
DisksThe client-owned disks must be accessible from the data mover and theTivoli Storage Manager server machine’s HBA. For more information, visithttp://www.tivoli.com/support/storage_mgr/tivolimain.html.
InterfacesIn order to perform a server-free backup, you must use the one of theWindows 2000 client interfaces.
Available Client Interfaces:
v Backup-archive command-line clientv Web GUIv Native GUI
These interfaces allow you to initiate server-free data movement. Allexamples in this chapter use the command-line interface. For moreinformation about client interfaces, see Backup-Archive Installation and User’sGuide.
Verify the compatibility of specific combinations of data mover devices, tapedevices, and SAN devices with the manufacturers of the hardware. Not all datamovers support all drives. Before attempting to set up server-free data movementoperations, first verify that Tivoli Storage Manager supports the devices you wishto use.
Data Format for Server-Free Data MovementData that is transferred using server-free data movement must be stored in adifferent format than the format that has traditionally been used for Tivoli StorageManager. The new data format is called NONBLOCK and must be specified whenyou define a data mover for server-free data movement, and when you define astorage pool that is used for server-free data movement.
110 Tivoli Storage Manager for Windows: Administrator’s Guide

Data that has been backed up or archived using server-free data movement, andstored in a storage pool with a dataformat of NONBLOCK, can be moved to otherstorage pools. Likewise, you can also move an uncompressed image object backedup by a client from a traditional storage pool to a NONBLOCK storage pool andrestore it using server-free.
Server operations such as migration, move data, and storage pool backup cancause this data to be stored in storage pools that do not have a data format ofNONBLOCK. If this occurs, it is no longer possible to restore the data by usingserver-free. The data can still be restored over the LAN or by using LAN-free datamovement. For more information, see “Server-Free Data Movement” on page 40.
Types of Configurations for Server-Free Data MovementMost of the planning required to implement server-free data movement operationsis related to device configuration. Please refer to the hardware specifications ofyour device for the available options.
Tivoli Storage Manager allows two supported SAN configurations for server-freedata movement operations:
Arbitrated LoopIn an arbitrated loop configuration, the Fibre Channel direct-attacheddevices and the server communicate with the data mover device through aSAN hub.
Switched FabricIn a switched fabric configuration, the Fibre Channel direct-attacheddevices and the server communicate with the data mover device through aSAN switch.
Configuring Tivoli Storage Manager for Server-Free Data MovementThe following is an overview for setting up Tivoli Storage Manager for server-freedata movement operations:1. “Step 1. Connect Devices to the Server” on page 1122. “Step 2. Determine World Wide Name, Serial Number and LUN” on page 1123. “Step 3. Obtaining and Correlating the Disk Information” on page 1134. “Step 4. Configuring Tivoli Storage Manager for Server-Free Data Movement”
on page 114:a. Enable the server to use server-free data movement using the SET
SERVERFREE STATUS=ON command.b. Define the library and the path from the server to the library.c. Define the tape drives and the paths from the server to the tape drives.d. Define the device class.e. Define the storage pool.f. Create a server-free policy domain.g. Define a policy set.h. Define the management class and assign it as the default management
class.i. Define the backup copygroup.j. Activate the policy set.k. Register the client node.
Chapter 7. Setting Up Server-Free Data Movement 111

l. Define the client disks to the server.m. Define the data mover.n. Define the paths from the data mover to the tape drives.o. Define the paths from the data mover to the client disks.
Step 1. Connect Devices to the ServerBefore you begin configuring Tivoli Storage Manager for server-free datamovement, you must connect all devices to the SAN or the data mover devices,including:v Data mover devicev Tape librariesv Tape drivesv Disk devices
The devices must exist on the SAN or be attached to the data mover devices priorto defining them to Tivoli Storage Manager. Consult the device documentation forconnection instructions, or visithttp://www.tivoli.com/support/storage_mgr/tivolimain.html.
Step 2. Determine World Wide Name, Serial Number and LUNBefore you can configure Tivoli Storage Manager for server-free data movement,you must first identify and record the world wide name, serial number, and LUNof each disk device and tape drive used, and the world wide name and serialnumber of the data mover. This information will be used when defining devicesand device paths. To do this, issue the QUERY SAN command. The QUERY SANcommand will display the devices that can be detected on the SAN, as well as theinformation for those devices. For example, if you wanted to find the world widename, the serial number, and the LUN for each device on your SAN, you wouldissue the following:query san format=detailed
The output would list every device detected on the SAN, and the correspondinginformation detected for that device. The following illustrates the output for a diskand a tape drive detected on the SAN:
112 Tivoli Storage Manager for Windows: Administrator’s Guide

Device Type: DISKVendor: IBM
Product: DDYF-T18350RSerial: TEF76061Device:
DataMover: NoNode WWN: 5005076206039E05Port WWN: 5005076206439E05
Lun: 0SCSI Port: 3SCSI Bus: 0
SCSI Target: 0
Device Type: DRIVEVendor: IBM
Product: 03570B02Serial: 67IU984T3Device: mt10.2.0.3
DataMover: NoNode WWN: 2002006045160D2APort WWN: 2002006045160D2A
Lun: 2SCSI Port: 3SCSI Bus: 0
SCSI Target: 10
When you record the information, be sure to use Port WWN as the world widename, and Lun as the LUN to be used in the path definitions. For example, theinformation you would record for your tape drive would be:v World wide name: 2002006045160D2Av Serial number: 67IU984T3v LUN: 2
There may be additional methods of discovering the world wide name, serialnumber and LUN, depending on what type of Fibre Channel host bus adapter anddata mover device you are using. Consult the manufacturer of the product formore information.
For more information about QUERY SAN, see Tivoli Storage Manager for WindowsAdministrator’s Reference.
Step 3. Obtaining and Correlating the Disk InformationOnce you have detected and recorded the information for all of the devicesdetectable on the SAN, you must obtain and correlate the information for the disksthat you will be backing up to the owning client nodes. This is necessary to ensurethat only one client node will be able to perform a server-free backup or restoreoperation for any given disk in the SAN.1. Log into the client machine that owns the disk and start the Tivoli Storage
Manager backup/archive client.2. Issue the QUERY DISKINFO command on the Tivoli Storage Manager client.
There are two ways that the QUERY DISKINFO command will display theinformation for disks associated with the client. You can either query to havethe information displayed for every disk associated with the client, or query to
Chapter 7. Setting Up Server-Free Data Movement 113

display the disks that a specific volume is located on. In this example we willdisplay the information for all disks associated with the client named BELFAST:query diskinfo
The output will contain the information needed for correlating the diskinformation:
Disk name LUN Serial number------------- ----------- -------------Harddisk0 0 TEF76061Harddisk1 1 GH089673Harddisk2 2 TEF78893
Note: The output of the QUERY DISKINFO client-command will display theinformation of every disk defined to the client, regardless of whetherthey exist on the SAN.
3. Compare the information from the QUERY DISKINFO client-command outputto the output of the QUERY SAN command. In this example, the serial numberand LUN from the disk, Harddisk0, match the information for the diskdisplayed in the output from the QUERY SAN command, indicating that this isthe disk to be backed up. When you record the needed information, be sure touse Port WWN as the world wide name, and Lun as the LUN to be used in thepath definitions. The information you would record for the disk that will bebacked up with server-free is:v Node name: BELFASTv Device name: Harddisk0v World wide name: 5005076206439E05v Serial number: TEF76061v LUN: 0
For more information about the client command, QUERY DISKINFO, seeBackup-Archive Installation and User’s Guide.
Step 4. Configuring Tivoli Storage Manager for Server-FreeData Movement
1. Enable the server to perform server-free data movement operations using theSET SERVERFREE command:set serverfree status=on batchsize=500
For more information on BATCHSIZE, see “Managing Server-Free DataMovement” on page 118.
2. Define the library to the server by using the DEFINE LIBRARY command. Inthis example, define an unshared library named SCSILIB:define library scsilib libtype=scsi shared=no
3. Define the library path from the server to the library by using the DEFINEPATH command:define path server1 scsilib srctype=server desttype=librarydevice=lb10.3.0.3
The DEVICE parameter specifies the device driver’s name for the library,which is the special file name.
114 Tivoli Storage Manager for Windows: Administrator’s Guide

The device special file name may be displayed in the output of the QUERYSAN command, see “Step 2. Determine World Wide Name, Serial Numberand LUN” on page 112. For more information about device special file names,see “Using Device Alias Names” on page 61. For more information aboutpaths, see “Defining Paths” on page 91.
4. Define the drives to the server by using the DEFINE DRIVE command. In thisexample, define the drive named DRIVE1, which has a world wide name of2002006045160D2A and a serial number of 67IU984T3:define drive scsilib drive1 element=16 wwn=2002006045160d2aserial=67iu984t3
To determine the world wide name and serial number of the drive, see “Step2. Determine World Wide Name, Serial Number and LUN” on page 112. Formore information about defing drives, see “Defining Drives” on page 89.
5. Define the drive paths from the server to the drive by using the DEFINEPATH command:define path server1 drive1 srct=server desttype=drive library=scsilibdevice=mt10.2.0.3
The DEVICE parameter specifies the name for the drive, which is the specialfile name, used by the device driver.
The device special file name may be displayed in the output of the QUERYSAN command, see “Step 2. Determine World Wide Name, Serial Numberand LUN” on page 112. For more information about device special file names,see “Using Device Alias Names” on page 61. For more information aboutpaths, see “Defining Paths” on page 91.
6. Define the device class to the server by using the DEFINE DEVCLASScommand. The device class in this example is SCISICLASS:define devclass scsiclass devtype=3570 library=scsilib
See “Defining and Updating Device Classes for Tape Devices” on page 158.7. Define the storage pools to the server by using the DEFINE STGPOOL
command. In this example, add the storage pool named SRVFREEPOOL:define stgpool srvfreepool scsiclass maxscratch=5dataformat=nonblock
Note: The data format must be defined as NONBLOCK for server-free datamovement.
For more information, see “Data Format for Server-Free Data Movement” onpage 110.
8. Create a policy domain for server-free data movement. For example, to definea policy domain that is named SFDOMAIN, enter the following command:define domain sfdomaindescription='Policy domain for server-free data movement'
9. Define a policy set in that domain. For example, to define a policy set namedSTANDARD in the policy domain named SFDOMAIN, enter the following:define policyset sfdomain standard
10. Define the management class by using the DEFINE MGMTCLASS command.In this example, define a management class named SF1 in the STANDARDpolicy set:define mgmtclass sfdomain standard sf1
Chapter 7. Setting Up Server-Free Data Movement 115

For more information about management classes, see “Chapter 14.Implementing Policies for Client Data” on page 299.
11. Assign the management class as the default management class for the policyset. In this example, assign the management class SF1 as the default:assign defmgmtclass sfdomain standard sf1
12. Define a backup copy group with the server-free storage pool,SRVFREEPOOL, as the destination by issuing the DEFINE COPYGROUPcommand:define copygroup sfdomain standard sf1 type=backupdestination=srvfreepool
For more information about copy groups, see “Chapter 14. ImplementingPolicies for Client Data” on page 299.
13. Activate the policy set in the SFDOMAIN policy domain by issuing theACTIVATE POLICYSET command:activate policyset sfdomain standard
For more information on policy sets, see “Chapter 14. Implementing Policiesfor Client Data” on page 299.
14. Register the client node BELFAST as a Tivoli Storage Manager node, as well asthe password CLIENTPASS, to the domain SFDOMAIN by issuing theREGISTER NODE command:register node belfast clientpass domain=sfdomain
For more information on client nodes, see “Chapter 12. Adding Client Nodes”on page 253.
15. Define each disk using the DEFINE DISK command. Use the informationobtained in “Step 2. Determine World Wide Name, Serial Number and LUN”on page 112 and “Step 3. Obtaining and Correlating the Disk Information” on
page 113:define disk belfast Harddisk0 wwn=5005076206439e05 serial=tef76061
16. Define the data mover by using the DEFINE DATAMOVER command. In thisexample, define the datamover SCSI1:define datamover scsi1 type=scsi wwn=2002006045160d2a serial=21081300957dataformat=nonblock copythreads=5
To determine the world wide name and serial number of the data mover, see“Step 2. Determine World Wide Name, Serial Number and LUN” on page 112.For more information on COPYTHREADS, see “Managing Server-Free DataMovement” on page 118.
17. Define the paths from the data mover to the drive using the DEFINE PATHcommand.define path scsi1 drive1 srctype=datamover desttype=drivelibrary=scsilib lun=2
These paths are defined in order to allow the drives to be used for server-freedata movement operations. For more information about paths, see “DefiningPaths” on page 91. To determine the LUN for the path, see “Step 2. DetermineWorld Wide Name, Serial Number and LUN” on page 112.
18. Define the paths from the data mover to each disk using the DEFINE PATHcommand.define path scsi1 Harddisk0 srctype=datamover desttype=disknode=belfast lun=0
116 Tivoli Storage Manager for Windows: Administrator’s Guide

These paths are defined in order to allow the disks to be used for server-freedata movement operations. For more information about paths, see “DefiningPaths” on page 91. To determine the LUN for the path, see “Step 2. DetermineWorld Wide Name, Serial Number and LUN” on page 112.
19. You must label the tapes and check the tapes into the tape library. These tasksare the same as for other libraries. See “Labeling Media” on page 125 for moreinformation.
Backing Up and Restoring Data Using Server-Free Data MovementThe following section briefly describes certain Tivoli Storage Manager clientconsiderations that must be made to efficiently perform server-free data movementoperations. The section also gives an overview of how to perform server-free datamovement using the Tivoli Storage Manager client command-line interface.
Client Control OptionsBefore performing backup or restore operations using server-free data movement,there are certain control options you may have to specify in the client options file.
ENABLESERVERFREEIn order to perform server-free backup or restore operations, clients mustspecify the ENABLESERVERFREE command in their client options file:enableserverfree yes
Destination Storage PoolServer-free data movement uses a NONBLOCK data format. Unless thedefault destination storage pool is configured for server-free datamovement, clients must bind a management class that contains theappropriate type of destination storage pool to those volumes that theywish to perform server-free data movement operations on. This can bedone by specifying the following in the client options file, where SF1 is thename of the management class that has a backup copy group of dataformat NONBLOCK:include.image k: sf1
To configure the default destination storage pool for server-free datamovement, see “Step 4. Configuring Tivoli Storage Manager for Server-FreeData Movement” on page 114.For more information about the NONBLOCKdata type, see “Server-Free Data Movement” on page 40. For moreinformation about management classes, see “Chapter 14. ImplementingPolicies for Client Data” on page 299.
IMAGEGAPSIZEDuring the backup of data, the data mover device should skip emptyregions of the disk that do not contain data. The size of these emptyregions can be specified by including the IMAGEGAPSIZE option in theclient options file.
When you include this option, you are specifying the maximum size of agap that will be backed up. For example, if a gap size of 10k is specified,the data mover device will skip all empty regions that are 10k in size andlarger. All gap sizes of less than 10k will be backed up. If you wanted tospecify a gap size of 64k in the options file, you would include thefollowing:include.image h: mymc imagegapsize=64k
To specify 64k in the command line you would issue the following:
Chapter 7. Setting Up Server-Free Data Movement 117

-imagegapsize=64k
The default gap size for server-free image backup is 0.
If the gap size is configured too small, performance may decrease becausethe tape can no longer operate in streaming mode. However, because theclient is not moving the data and cannot compress the data, skippingempty regions might be desired.
For more information about IMAGEGAPSIZE, see Backup-ArchiveInstallation and User’s Guide.
Performing Backups and RestoresAfter you have completed the steps in “Configuring Tivoli Storage Manager forServer-Free Data Movement” on page 111, and specified the items in “ClientControl Options” on page 117, you are ready to perform server-free data movementoperations. Use a client interface as described in “Requirements” on page 109 toperform a logical volume image backup.
Full volume backupsServer-free data movement is supported for logical volume image backups.To perform a full image backup of logical volume K, you would enter thefollowing:dsmc backup image k:
By default, the image backup on Windows is online if the LVSA (LogicalVolume Snapshot Agent) is available. For more information, refer toBackup-Archive Installation and User’s Guide.
Full volume restoreTo perform a full image restore of logical volume K, you would enter thefollowing:dsmc restore image k:
If you perform an incremental image backup or an incremental image restore, theoperations will be file-level backups and restores on top of a regular image backupor restore, and will not use server-free data movement.
For more information on image backup and restore client operations, see theBackup-Archive Installation and User’s Guide.
Managing Server-Free Data MovementAs an administrator you can issue the QUERY STATUS command to find out ifserver-free data movement has been set to on or off. To do this, you would issuethe following:query status
For more information on QUERY STATUS, see Administrator’s Reference.
Additional administrator activities for server-free data movement operationsinclude defining and managing:v Data movement sizev Data moversv Tape libraries and drives
118 Tivoli Storage Manager for Windows: Administrator’s Guide

v Paths
Managing the Size of Data MovementsIn order to better manage a server-free data movement, the server divides avolume image into smaller batches of data. You can set the size of the batches byspecifying the BATCHSIZE parameter when you issue the SET SERVERFREEcommand. The BATCHSIZE parameter specifies the amount of data, in megabytes,that will be copied in a single batch of server-free data movement. The minimumvalue is 10 megabytes, the maximum value is 1000 megabytes, and the defaultvalue is 80 megabytes.
For example, if you wanted to set a batch size of 500 megabytes, you would issuethe following:set serverfree batchsize=500
The BATCHSIZE parameter is important because the correct batch size may beneeded to prevent SCSI time-outs from occurring between the server and the datamover while data is being copied during server-free data movement. However,batch size will affect the performance of the data movement operation itself. Asmaller batch size will result in more SCSI commands being issued to the datamover.
There are a several factors to consider when determining what batch size will workbest for you. For example, the amount of traffic that is on the SAN during peakoperation times, the amount of average traffic on the SAN, how busy the serverand data mover are, the size of the volume that is being backed up or archived,and even the type of data to be backed up or archived.
To view the current batch size setting, issue the QUERY STATUS command. Formore information, see Administrator’s Reference.
Managing Data Movers Used in Server-Free Data MovementYou can update, query, and delete the data movers you define for server-free datamovement operations. Additionally, you can utilize the DEFINE and UPDATEDATAMOVER commands to specify the number of supported concurrent copyoperations.
Concurrent Copy OperationsYou can specify the number of concurrent copy operations that the data mover cansupport by including the COPYTHREADS parameter when you issue the DEFINEDATAMOVER or UPDATE DATAMOVER commands. The COPYTHREADSparameter is used to govern how many copy commands can run concurrently on aserver at any one time. For example, if you wanted to be able to perform 5concurrent server-free data movement operations, you would issue the followingwhen defining a data mover:define datamover scsi1 type=scsi wwn=2002006045160d2a serial=21081300957dataformat=nonblock copythreads=5
The default value is 1. Please refer to the documentation for your device to obtainthe maximum value. The number must be greater than 0. If other programs orservers will be using the extended copy capabilities of the data mover device, youmay want to specify fewer than the maximum number of concurrent copycommands supported by the device for this parameter. For more information, seeAdministrator’s Reference.
Chapter 7. Setting Up Server-Free Data Movement 119

Replacing a Data MoverIf your data mover was replaced, you could update the data mover and specify anew world wide name and serial number to preserve the data mover and itsassociated path definitions. To do this, first determine the world wide name of thenew data mover. See “Step 2. Determine World Wide Name, Serial Number andLUN” on page 112.
Next you can issue the update command to specify the new world wide name andserial numbers:update datamover serverfree1 wwn=124536484565859u serial=1973989
You could then issue a detailed query command to make sure that the changeshave taken effect properly:query datamover serverfree1 type=scsi format=detailed
For more information, see Administrator’s Reference.
Deleting a Data MoverYou are not able to delete a data mover unless you have already deleted the pathsdefined for this data mover. For example, if you wanted to delete the datamoverSERVERFREE1, you would do the following:1. Find out what paths were associated with the data mover by issuing the
QUERY PATH command:query path serverfree1 sourcetype=datamover
2. Delete all paths that list the data mover as the source. For example, if theoutput of the QUERY PATH commande specified a path from the data moverto the tape drive named DRIVE1, you would delete the path by issuing theDELETE PATH command:delete path serverfree1 drive1 sourcetype=datamover desttype=drivelibrary=scsilib lun=2
3. Once you have deleted all of the paths associated with the data mover, deletethe data mover by issuing the DELETE DATAMOVER command:delete datamover serverfree1
For more information, see Administrator’s Reference.
Managing Tape Libraries and Drives Used in Server-Free DataMovement
Managing tape libraries and drives used for server-free data movement is similarto managing hardware used for traditional Tivoli Storage Manager operations.
Updating a Tivoli Storage Manager Drive for Use WithServer-Free Data MovementIn order to update a drive to be used for server-free data movement operations, forexample if you had to replace a drive, you must first find the world wide name,serial number and LUN of the drive. See, “Step 2. Determine World Wide Name,Serial Number and LUN” on page 112 for more information about finding theworld wide name, serial number, and LUN.
For example, if you replaced a drive, you could update the drive for server-freedata movement and include the world wide name and serial number of the newdrive:update drive scsilib sandrive1 wwn=876985784395698d serial=54638k
120 Tivoli Storage Manager for Windows: Administrator’s Guide
Next you would need to determine that the LUN of the drive now matches theLUN in the path.1. Determine the LUN as described in the section, “Step 2. Determine World Wide
Name, Serial Number and LUN” on page 112.2. Issue the QUERY PATH command to determine the LUN defined in the path.3. If the LUN reported in the path does not match, issue the UPDATE PATH
command to update the LUN:update path datamover1 sandrive1 srctype=datamover desttype=drivelibrary=scsilib lun=3
You may additionally need to update the server path. For more information onthese commands, see Administrator’s Reference.
Managing Disks Used in Server-Free Data MovementYou can query, update, and delete client disks used in server-free data movementoperations. For example, if maintanence was being performed on a client-owneddisk, you could issue the UPDATE DISK command to take the disk offline.update disk serv1 Harddisk1 online=no
If you wanted to view the information specific to disks that are defined to theserver, you could issue the QUERY DISK command. For example, if you wanted toview the status of all of the disks defined to the server, you would issue thefollowing:query disk
If you replace a device, it is recommended that you verify the path definitions. Formore information, see Administrator’s Reference.
Managing Paths for Server-Free Data MovementYou can query, update, and delete paths between data movers and storage devices.It is important to remember that when replacing drives, you should verify the pathinformation and upate it if necessary. For more information, see Administrator’sReference.
Chapter 7. Setting Up Server-Free Data Movement 121

122 Tivoli Storage Manager for Windows: Administrator’s Guide

Chapter 8. Managing Removable Media Operations
This chapter describes routine removable media operations including thefollowing:v Preparing media for use (checking volumes into automated libraries and labeling
volumes)v Controlling how and when media are reusedv Ensuring that sufficient media are availablev Responding to requests to operatorsv Managing libraries, drives (including drive cleaning), disks, paths, and
datamovers
This chapter contains the following sections:
“Preparing Media for Automated Libraries” on page 125
“Managing Media in Automated Libraries” on page 128
“Labeling Media for Manual Libraries” on page 132
“Managing Media in Manual Libraries” on page 133
“Managing Server Requests” on page 134
“Setting Up a Tape Rotation” on page 136
“Using Removable Media Managers With Tivoli Storage Manager” on page 138
“Managing Paths” on page 154
“Managing Libraries” on page 143
“Managing Drives” on page 145
“Managing Paths” on page 154
“Managing Data Movers” on page 155
“Managing Disks” on page 156
In this chapter, most examples illustrate how to perform tasks by using thecommand line interface. For information about the commands, see Administrator’sReference, or issue the HELP command from the command line of a administrativeclient.
All commands can be performed from the administrative Web interface. For moreinformation about using the administrative interface, see Quick Start.
Defining VolumesWhen you add devices with the Device Configuration Wizard, the wizardautomatically creates a storage pool for each device it configures and allows amaximum of 500 scratch volumes for the storage pool. When you use commandsto add devices, you specify the maximum number of scratch volumes with theMAXSCRATCH parameter of the DEFINE STGPOOL or UPDATE STGPOOLcommand. If the MAXSCRATCH parameter is 0, all the volumes in the storagepool are private volumes that you must define. If the MAXSCRATCH parameter isgreater than zero, all of the volumes in the storage pool are scratch volumes.
© Copyright IBM Corp. 1994, 2002 123

For example, to create a storage pool named STORE1 that can use up to 500scratch volumes, enter the following:define stgpool store1 maxscratch=500
For each storage pool, decide whether to use scratch volumes or private volumes.Scratch volumes are recommended for the following reasons:v You need not explicitly define each storage pool volume.v Scratch volumes are convenient to manage and they fully exploit the automation
of robotic devices.v Different storage pools sharing the same automated library can dynamically
acquire volumes from the library’s collection of scratch volumes. The volumesneed not be preallocated to the different storage pools.
Private volumes require more human intervention than scratch volumes. However,you may need to regulate the volumes used by individual storage pools, and wantto manually control the volumes. You will trade the additional human interventionfor absolute control over volumes. In these situations, you must define each privatevolume with the DEFINE VOLUME command. For database backups, dumps, orloads, or for server import or export operations, you must list the private volumes.
Managing VolumesWhen Tivoli Storage Manager needs a new volume, it chooses a volume from thestorage pool available for client backups. If you set up private volumes, it selects aspecific volume. If you set up scratch volumes, it selects any scratch volume in thelibrary. This is true for all devices except 3494 devices. See “Managing CategoryNumbers for IBM 3494 Libraries” on page 132.
Managing Partially-Written VolumesExcept for volumes in automated libraries, Tivoli Storage Manager is unaware of ascratch volume until after the volume is mounted. Then, the volume status changesto private, and the volume is automatically defined as part of the storage pool forwhich the mount request was made. Partially-written volumes are always privatevolumes, even if their status was scratch before they were selected. Tivoli StorageManager tracks the original status of scratch volumes, so it can return them toscratch status when they become empty.
For information on changing the status of a volume in an automated library, see“Changing the Status of Automated Library Volumes” on page 129.
Managing the Volume Inventory for an Automated LibraryDevice
Tivoli Storage Manager maintains a volume inventory for each automated library.The volume inventory allows the device to provide maximum automation. Thevolume inventory is created when you check media volumes into the library. TivoliStorage Manager tracks the status of volumes in the inventory as either scratch orprivate.
A list of volumes in the library volume inventory would not necessarily beidentical to a list of volumes in the storage pool inventory for the device. Forexample, scratch volumes may be checked in to the library but not defined to astorage pool because they have not yet been selected for backup; private volumesmay be defined to a storage pool, but not checked into the device’s volumeinventory.
124 Tivoli Storage Manager for Windows: Administrator’s Guide

Managing Database Backup and Database Export VolumesFor database backup and database export volumes, issue the DELETEVOLHISTORY command or the UPDATE LIBVOLUME command to change thestatus of the volume. When Tivoli Storage Manager backs up the database orexports server information, it records information about the volumes used for theseoperations in the volume history file. The volume history file is discussed in detailin “Chapter 24. Protecting and Recovering Your Server” on page 531.
Preparing Media for Automated LibrariesPrepare tape and optical disk volumes by labeling them and checking them intothe library volume inventory:
Task Required Privilege Class
Labeling Media System
Checking Media into Automated LibraryDevices
System
Obtaining Element Addresses for LibraryStorage Slots
Any Administrator or Operator
Labeling MediaAll media require labels. Labeling media with an automated library is differentfrom labeling media with a manual device because an automated library requiresyou to check media into the library. The extra check in processing can be done atthe same time that the volume is labeled. If you label volumes with the LabelingWizard, you can select check in processing in the wizard. If you label volumeswith the LABEL LIBVOLUME command, you can issue the CHECKIN parameter.
A label cannot include embedded blanks or periods and must be valid when usedas a file name on the media.
Labeling Media with an Automated LibraryInsert the media into storage slots or entry/exit ports and invoke the LabelingWizard.1. From the TSM Console, expand the tree for the machine you are configuring.2. Click Wizards, then double click Media Labeling in the right pane. The Media
Labeling Wizard appears.3. Click Library Media Labeling in the right pane of the TSM Server Utilities.4. Click the Start button. The TSM Autochanger Media Labeling Wizard
appears.5. Follow the instructions in the wizard. In the last wizard dialog, check the box
named Checkin Tapes.
By default, the label command does not overwrite an existing label on a volume.However, if you want to overwrite existing volume labels, you can specifyOVERWRITE=YES when you use the LABEL LIBVOLUME command. See“Labeling Volumes Using Commands” on page 138.
Attention: By overwriting a volume label, you destroy all of the data that resideson the volume. Use caution when overwriting volume labels to avoid destroyingimportant data.
Chapter 8. Managing Removable Media Operations 125

Labeling Media for use with a Bar Code ReaderLibraries equipped with bar code readers can obtain volume names using thereader instead of prompting the administrator. Administrators labeling media withthe labeling wizard can check the bar code check box in the wizard. Administratorslabeling media with TSM commands can issue the LABEL LIBVOLUME commandwith the SEARCH=YES and LABELSOURCE=BARCODE parameters. TSM readsthe bar code and the media are moved from the entry/exit port to a drive wherethe information on the bar code label is written as the internal label on the media.After the tape is labeled, it is moved back to the entry/exit port or to a storage slotif the CHECKIN option is specified.
Because bar code scanning can take a long time for unlabeled volumes, do not mixvolumes with bar code labels and volumes without bar code labels in a library.
Bar code support is available for TSM-controlled libraries using the TSM devicedriver or the RMSS LTO Ultrium device driver. Bar code support is unavailable fordevices using the native Windows device driver or devices whose media aremanaged by Removable Storage Manager (RSM). See “Using Removable MediaManagers With Tivoli Storage Manager” on page 138.
Checking Media into Automated Library DevicesAfter volumes have been labeled, make the volumes available to TSM devices bychecking the volumes into the library volume inventory using the CHECKINLIBVOLUME command. You can save time by checking in volumes as part of thelabeling operation. See “Labeling Media” on page 125.
The CHECKIN LIBVOLUME command involves device access, and may take along time to complete. For this reason, the command always executes as abackground process. Wait for the CHECKIN LIBVOLUME process to completebefore defining volumes or the defining process will fail.
You can specify that TSM read media labels for the volumes you are checking in.When label-checking is enabled, TSM mounts each volume and reads the internallabel before checking in the volume. TSM checks in only volumes that are properlylabeled. Checking labels can prevent errors later, when TSM selects and mountsvolumes, but it also increases check in processing time.
Checking a Single Volume into an Automated LibraryYou can check single volumes in by specifying the CHECKIN LIBVOLUMEcommand with the SEARCH=NO parameter. TSM issues a mount requestidentifying a storage slot with an element address. The media can be loadeddirectly into a single storage slot or into one of the device’s entry/exit ports, if it isequipped with them. For example, an administrator checks a scratch volumenamed VOL001 into a library named TAPELIB by entering the followingcommand:checkin libvolume tapelib vol001 search=no status=scratch
TSM finds that the first empty slot is at element address 5, and issues thefollowing message:ANR8306I 001: Insert 8MM volume VOL001 R/W in slot with elementaddress 5 of library TAPELIB within 60 minutes; issue 'REPLY' alongwith the request ID when ready.
If the library is equipped with entry/exit ports, the administrator can load thevolume into a port without knowing the element addresses of the device’s storageslots. After inserting the volume into an entry/exit port or storage slot, the
126 Tivoli Storage Manager for Windows: Administrator’s Guide

administrator responds to the preceding message at a TSM command line byissuing the REPLY command with the request number (the number at thebeginning of the mount request):reply 1
Checking Volumes In Using a Library’s Bar Code ReaderYou can save time checking volumes into libraries equipped with bar code readersby using the characters on the bar code labels as names for the volumes beingchecked in. TSM reads the bar code labels and uses the information on the labelsto write the internal media labels. For volumes missing bar code labels, TSMmounts the volumes in a drive and attempts to read the internal, recorded label.
For example, to use a bar code reader to search a library named TAPELIB andcheck in a scratch tape, enter:checkin libvolume tapelib search=yes status=scratchchecklabel=barcode
Checking Volumes in from the Library’s Entry/Exit PortsYou can check multiple volumes into automated libraries by issuing the CHECKINLIBVOLUME command with the SEARCH=BULK parameter. TSM searches thedevice’s entry/exit ports for labeled volumes that it can check in automatically. Tohave TSM load a cartridge in a drive and read the label, you must specify theCHECKLABEL=YES option. The CHECKLABEL=NO option is invalid with theSEARCH=BULK option. After reading the label, TSM moves the tape from thedrive to a storage slot. When bar code reading is enabled with theCHECKLABEL=BARCODE parameter, TSM reads the label and moves the tapefrom the entry/exit port to a storage slot.
Checking Volumes in from the Library’s Storage SlotsYou can check multiple volumes into automated libraries by issuing the CHECKINLIBVOLUME command with the SEARCH=YES parameter. TSM automaticallysearches the storage slots for new volumes that have not yet been added to thevolume inventory. Issuing the SEARCH=YES parameter eliminates issuing anexplicit CHECKIN LIBVOLUME command for each volume.
For example, for a SCSI device you can simply open the library access door, placeall of the new volumes in unused slots, close the door, and issue the CHECKINLIBVOLUME command with SEARCH=YES.
See “Obtaining Element Addresses for Library Storage Slots” on page 128.
Checking In Private VolumesPrivate volumes are volumes that are either predefined to a storage pool orvolumes that are partially-written. You can check in private volumes, but you mustensure you assign a private status to them before checking them in. Privatevolumes cannot be accidentally overwritten when a scratch mount is requested.The server does not allow the administrator to check in a volume with scratchstatus when that volume already belongs to a storage pool.
Partially written volumes are always private volumes. Volumes begin with a statusof either scratch or private, but once TSM stores data on them, their statusbecomes private. See “Returning Partially-Written Volumes to Automated LibraryDevices” on page 129.
Checking Volumes into A Full LibraryYou can check volumes into devices that are fully populated and have no emptystorage slots by enabling tape swapping. Swapping allows TSM to select and eject
Chapter 8. Managing Removable Media Operations 127

volumes to store in a different physical location. TSM selects the volume to eject bychecking first for any available scratch volumes, then for the least frequentlymounted volumes. Without tape swapping, the check-in fails. See “Setting Up andManaging a Volume Overflow Location for an Automated Library Device” onpage 130
Checking Volumes into an IBM 3494 LibraryWhen a volume is first inserted into an IBM 3494 library, either manually orautomatically at the convenience I/O station, the volume is assigned to the insertcategory (X’FF00’). You can then change the category number when issuing theCHECKIN LIBVOLUME command.
Obtaining Element Addresses for Library Storage SlotsIf a library has entry/exit ports, you can add and remove media by loading themedia into the ports. If there are no entry/exit ports, you must load tapes intostorage slots. In this case, you must reply to mount requests that identify storageslots with element addresses. An element address is a number that indicates thephysical location of a storage slot or drive within an automated library.
Administrators need device names and element addresses when:v Defining or updating drives in an automated library.v Checking volumes into an automated library that has no entry/exit ports.v Using a specific drive in an automated library to label volumes.
Element addresses for IBM-supported devices are available through the DeviceConfiguration Wizard and at Web site(http://www.tivoli.com/support/storage_mgr/tivolimain.html) or see the devicemanufacturer’s documentation.
Managing Media in Automated LibrariesTypically, automated libraries require little human intervention after you set up amedia rotation. However, you may occasionally need to add, remove, or manuallymanage media in automated libraries. TSM tracks the media in the library volumeinventory, which it maintains for each automated library. The library volumeinventory is separate from the storage pool inventory for the device. To addvolumes to a device’s volume inventory, check volumes into the device. For detailson the check-in procedure, see “Checking Media into Automated Library Devices”on page 126. To add volumes to a library’s storage pool, see “Adding Scratch
Volumes to an Automated Library Device” on page 130.
You can extend the media management function of TSM by using WindowsRemovable Storage Manger (RSM) to manage media. The capabilities of theseprograms go beyond the media management function offered by TSM and theyallow different applications to share the same device. See “Using Removable MediaManagers With Tivoli Storage Manager” on page 138.
You can manage media in automated libraries by:
Task Required Privilege Class
Changing the Status of Automated LibraryVolumes
System or Unrestricted Storage
Removing Volumes from Automated LibraryDevices
System or Unrestricted Storage
128 Tivoli Storage Manager for Windows: Administrator’s Guide
Task Required Privilege Class
Returning Partially-Written Volumes toAutomated Library Devices
System or Unrestricted Storage
Auditing a Library’s Volume Inventory System or Unrestricted Storage
Adding Scratch Volumes to an AutomatedLibrary Device
System or Unrestricted Storage
Managing Category Numbers for IBM 3494Libraries
System or Unrestricted Storage
“Reusing Media in Automated Libraries” onpage 132
Changing the Status of Automated Library VolumesYou can change the status of volumes by issuing the UPDATE LIBVOLUMEcommand. The command allows you to assign a private status to a scratch volumeor to assign a scratch status to a private volume. The private volumes must beadministrator-defined volumes with either no data or invalid data. They cannot bepartially-written volumes containing active data. Volume statistics are lost whenvolume statuses are modified.
Removing Volumes from Automated Library DevicesYou can remove volumes from automated libraries by issuing the CHECKOUTLIBVOLUME command. TSM mounts each volume and verifies its internal labelbefore checking it out of the volume inventory. After a volume has been checkedout, TSM moves the media to the entry/exit port of the device if it has one, orTSM requests that the operator remove the volume from a drive within the device.
For automated libraries with multiple entry/exit ports, you can issue theCHECKOUT LIBVOLUME command with the SEARCH=BULK parameter. TSMejects the volume to the next available entry/exit port.
Partially-written volumes that are removed from the device will need to bechecked in again if TSM attempts to access them. See “Managing Partially-WrittenVolumes” on page 124.
Returning Partially-Written Volumes to Automated LibraryDevices
Partially-written volumes that are checked out of a library continue to be definedto a storage pool and have a status of private. You can return partially-writtenvolumes by doing the following:1. Check in the volume by issuing the CHECKIN LIBVOLUME command with
STATUS=PRIVATE parameter.2. Change the volume access from unavailable to read/write or read-only by
issuing the UPDATE VOLUME command with the ACCESS parameter.
Returning Reclaimed Volumes to a LibraryAfter TSM has reclaimed valid data from volumes, TSM can reuse the media.Scratch volumes are automatically returned to the library as scratch volumes. Toreuse private volumes, check them into the library.
Chapter 8. Managing Removable Media Operations 129

Auditing a Library’s Volume InventoryYou can issue the AUDIT LIBRARY command to audit the volume inventories ofautomated libraries. Auditing the volume inventory ensures that the informationmaintained by the TSM server is consistent with the physical media in the library.The audit is useful when the inventory has been manually manipulated. TSMdeletes missing volumes and updates the locations of volumes that have movedsince the last audit. TSM cannot add new volumes during an audit.
Unless devices are equipped with bar code readers, the server mounts each volumeduring the audit process to verify the label. After the label has been verified, thevolume remains in a wait state until the mount retention interval times out. Youcan save time by issuing the DISMOUNT VOLUME command to force idlevolumes to be dismounted.
Auditing a Volume Inventory by Using a Bar Code ReaderYou can save time when auditing volume inventories for devices equipped withbar code readers by using the bar code reader to verify the identity of volumes. Ifa volume has a bar code label with six characters or less, TSM reads the volumename from the bar code label during the audit. The volume is not mounted toverify that the external bar code name matches the internal, recorded volumename.
If a volume has no bar code label or the bar code label does not meet TSM labelrequirements, TSM mounts the volume in a drive and attempts to read the internallabel. See “Labeling Media” on page 125. For example, to audit the TAPELIBlibrary using its bar code reader, enter the following command:audit library tapelib checklabel=barcode
Adding Scratch Volumes to an Automated Library DeviceAs the demand for media grows, you may need to add scratch volumes tolibraries. The maximum number of scratch volumes for a library is determinedwhen the library storage pool is created. See “Defining Volumes” on page 123.
To increase the maximum number of scratch volumes:1. Check volumes into the library. Label them if necessary.
You may need to temporarily store volumes in an overflow location in order tomake room for additional scratch volumes. See “Setting Up and Managing aVolume Overflow Location for an Automated Library Device”.
2. Increase the maximum number of scratch volumes.You can issue the UPDATE STGPOOL command to increase the number ofscratch volumes that can be added to a storage pool.
Setting Up and Managing a Volume Overflow Location for anAutomated Library Device
As the demand for media grows, the number of volumes needed for a storage poolmay exceed the physical capacity of an automated library. To make room for newvolumes while keeping track of existing volumes, you can define a physicallocation as an overflow area. TSM tracks the volumes moved to the overflow areathus allowing you to make storage slots available for new volumes.
You can perform the following steps to create an overflow location:1. Create a volume overflow location.
130 Tivoli Storage Manager for Windows: Administrator’s Guide

Define or update the storage pool associated with the automated library byissuing the DEFINE STGPOOL or UPDATE STGPOOL command with theOVERFLOW parameter. For example, to create an overflow location namedROOM2948 for a storage pool named ARCHIVEPOOL, issue the following:update stgpool archivepool ovflocation=Room2948
2. Move media to the overflow location as required.Issue the MOVE MEDIA command to move media from the library to theoverflow location. For example, to move all full volumes in the specifiedstorage pool out of the library.move media * stgpool=archivepool
All full volumes are checked out of the library, and TSM records the location ofthe volumes as Room2948.
Use the DAYS parameter to specify the number of days that must elapse beforethe volume is eligible for processing by the MOVE MEDIA command.
3. Check in new scratch volumes (if required).See “Checking Media into Automated Library Devices” on page 126.
4. Identify the empty scratch tapes in the overflow location.For example, enter this command:query media * stg=* whereovflocation=Room2948 wherestatus=emptymove media * stg=* wherestate=mountablenotinlib wherestatus=emptycmd="checkin libvol autolib &vol status=scratch"cmdfilename=\storage\move\media\checkin.vols
5. Check in volumes from the overflow area when TSM requests them.Operators must check volumes in from the overflow area when TSM needsthem. TSM issues mount requests that include the location of the volumes.Operators can locate volumes in an overflow location by issuing the QUERYMEDIA command. This command can also be used to generate commands. Forexample, you can issue a QUERY MEDIA command to list the volumes in theoverflow location, and at the same time generate the commands to check thosevolumes into the library. For example, enter this command:query media format=cmd stgpool=archivepool whereovflocation=Room2948cmd="checkin libvol autolib &vol status=private"cmdfilename="\storage\move\media\checkin.vols"
Use the DAYS parameter to specify the number of days that must elapse beforethe volumes are eligible for processing by the QUERY MEDIA command.
The file that contains the generated commands can be run using the TSMMACRO command. For this example, the file may look like this:checkin libvol autolib TAPE13 status=privatecheckin libvol autolib TAPE19 status=private
Modifying the Access Mode for VolumesYou may occasionally need to manipulate the access mode for volumes, forexample, when removing partially-written volumes from or returning them tolibraries. To change the access mode of a volume, issue the UPDATE VOLUMEcommand with the ACCESS=UNAVAILABLE parameter.
If you want to make volumes unavailable to send the data they contain offsite forsafekeeping, consider using copy storage pools instead. You can back up primarystorage pools to a copy storage pool and then send the copy storage pool volumesoffsite. You can track these copy storage pool volumes by changing their access
Chapter 8. Managing Removable Media Operations 131

mode to offsite, and updating the volume history to identify their location. Formore information, see “Defining a Copy Storage Pool” on page 235.
Managing Category Numbers for IBM 3494 LibrariesCategory numbers for IBM 3494 Tape Library Dataservers identify volumes thatare used for the same purpose or application. A 3494 library has an intelligentcontrol unit that tracks the category number of each volume in the volumeinventory. The category numbers are useful when multiple systems share theresources of a single library. Typically, a software application that uses a 3494 usesonly volumes in categories that are reserved for that application. To avoid loss ofdata, ensure that each application sharing the library uses unique categorynumbers.
Reusing Media in Automated LibrariesReusing media in automated libraries is essentially the same as reusing media inmanual libraries except that less human intervention is required for automateddevices than manual devices. You can set up expiration processing and reclamationprocessing and tune the media rotation to achieve the desired results.v Setting Up Expiration Processing
Expiration processing is the same, regardless of the type of device and media onwhich backups are stored. See “Running Expiration Processing to Delete ExpiredFiles” on page 333.
v Setting Up Reclamation ProcessingFor a storage pool associated with a library that has more than one drive, thereclaimed data is moved to other volumes in the same storage pool. See“Reclaiming Space in Sequential Access Storage Pools” on page 205.
v Returning Reclaimed Media to the Storage PoolMost media can be returned to a storage pool after it has been reclaimed butmedia containing database backups and database export data require you toperform an additional step. For these volumes, you must issues the DELETEVOLHISTORY command or the UPDATE LIBVOLUME command to change thestatus of the volume.When TSM backs up the database or exports server information, TSM recordsinformation about the volumes used for these operations in the volume historyfile. Volumes that are tracked in the volume history file require the administratorto delete the volume information from the volume history file. The volumehistory file is a key component of server recovery and is discussed in detail in“Chapter 24. Protecting and Recovering Your Server” on page 531.
Note: If your server is licensed for the DRM product, the volume information isautomatically deleted during MOVE DRMEDIA command processing. Foradditional information about DRM, see “Chapter 25. Using Tivoli DisasterRecovery Manager” on page 577.
v Ensuring Media are AvailableSee “Setting Up a Tape Rotation” on page 136.
Labeling Media for Manual LibrariesMedia must be inserted into a drive and labeled before they can be used. The labelthat must meet the following criteria:v 6 characters or lessv No embedded blanks or periods
132 Tivoli Storage Manager for Windows: Administrator’s Guide

v Valid when used as a file name on the media
Note: You must label CD-ROM, Zip, or Jaz volumes with the devicemanufacturer’s or Windows utilities because TSM does not provide utilitiesto format or label these media. The operating system utilities include theDisk Administrator program (a graphical user interface) and the labelcommand. See “Labeling Media” on page 125.
You can label tapes and optical disks for use in a manual library by inserting themedia into the drive and invoking the Labeling Wizard.1. From the TSM Console, expand the tree for the machine you are configuring.2. Click Wizards, then double click Media Labeling in the right pane. The Media
Labeling Wizard appears.3. Click Manual Media Labeling in the right pane of the TSM Server Utilities.4. Click the Start button. The TSM Manual Device Media Labeling Wizard
appears.5. Follow the instructions in the wizard.6. After labeling a tape for a manual library, place the tape on the shelf. See
“Labeling Volumes Using Commands” on page 138.
Managing Media in Manual LibrariesOperators must mount and dismount media for manually operated devices. Thesedevices store their media outside of the device, typically on a shelf or in a filecabinet.
You can manage media with Windows Removable Storage Manager (RSM).However, unless device sharing across storage management applications isrequired, using a media manager for stand-alone devices could introduceunjustifiable administrative overhead.
Task Required Privilege Class
Modifying the status of manual device volumesRemoving volumes from a manual library deviceReturning volumes to a manual library deviceAdding More Volumes to a Manual Library DeviceReusing Media in Manual Libraries
System or Unrestricted Storage
Modifying the Status of Manual Device VolumesYou can modify the status of volumes, regardless of the type of device thatuses them, by issuing the UPDATE LIBVOLUME command. The commandallows you to assign a private status to scratch volumes or to assign ascratch status to private volumes. The private volumes cannot bepartially-written volumes containing active data.
Removing Volumes from a Manual Library DeviceYou can remove volumes from manual devices at any time because theserver maintains no volume inventory for manually-operated devices. Nocheckout processing is required for manual devices.
Returning Volumes to a Manual Library DeviceYou can return volumes to manual devices at any time because the servermaintains no volume inventory for manual libraries. No check inprocessing is required for manual libraries.
Chapter 8. Managing Removable Media Operations 133

Adding More Volumes to a Manual Library DeviceSee “Setting Up a Tape Rotation” on page 136.
Reusing Media in Manual LibrariesReusing media in manual libraries is essentially the same as reusing mediain automated libraries except that more human intervention is required formanual devices than for automated devices. See “Reusing Media inAutomated Libraries” on page 132.
Managing Server RequestsTSM displays requests and status messages to all administrative clients that arestarted in console mode. These request messages often have a time limit. If therequest is not fulfilled within the time limit, the operation times out and fails.
For manual libraries, TSM detects when there is a cartridge loaded in a drive, sono operator reply is necessary. For automated libraries, commands such asCHECKIN LIBVOLUME, LABEL LIBVOLUME, and CHECKOUT LIBVOLUMEinvolve inserting cartridges into slots and issuing a reply messge.
Task Required Privilege Class
Starting the Administrative Client as aServer Console Monitor
Any Administrator
Displaying Information About Volumes thatare Currently Mounted
Any Administrator
Displaying Information about PendingMount Requests
Operator
Replying to Mount Requests Operator
Canceling Mount Requests Operator
Responding to Requests for VolumeCheck-in
System or Unrestricted Storage
Dismounting Idle Volumes Operator
Dismounting Volumes fromREMOVABLEFILE Devices
Operator
Starting the Administrative Client as a Server Console MonitorYou can display mount requests and status messages by starting the administrativeclient in console mode. However, if the server is started as a Windows service,which is recommended, a server console is required to see messages. To start theadministrative client as a server console monitor:1. From the TSM Console, expand the tree for the machine you are configuring.2. Expand the server you want to work with and then expand Reports.3. Click Monitor. A server console monitor opens in the right pane.4. Click Start.
To start a server console monitor from an operating system command line, enterthis command:> dsmadmc -consolemode
134 Tivoli Storage Manager for Windows: Administrator’s Guide

Displaying Information About Volumes that are CurrentlyMounted
Operators can issue the QUERY MOUNT command to display the volumescurrently mounted by TSM. The information lists mounted volumes, the drives onwhich they are mounted, and whether the volumes are currently in use.
Displaying Information about Pending Mount RequestsYou can display information about pending mount requests either by checking themount message queue on a server console monitor or by issuing the QUERYREQUEST command. TSM displays a message similar to the following:ANR8352I Requests outstanding:ANR8326I 001: Mount DLT volume VOL1 R/W in drive D1 (MT4) of libraryMYMANLIB within 60 minutes.
TSM displays a 3-digit request ID number as part of the message. The request IDnumber can also be obtained by issuing a QUERY REQUEST command. If therequest requires the operator to provide a device to be used for the mount, thesecond parameter for this command is a device name.
Replying to Mount RequestsFor automated libraries, operators must issue the REPLY command in reply tomount requests, or the server waits until the mount-wait-time has passed beforeresuming processing. Manual libraries do not require a reply because TSM detectswhen there is a cartridge loaded in the drive.
The first parameter for the REPLY command is the 3–digit request ID number thatindicates which of the pending mount requests has been completed. For example,an operator can enter the following command to respond to request 001 in theprevious code sample.reply 001
Canceling Mount RequestsYou can issue the CANCEL REQUEST command if a mount request for a manuallibrary cannot be satisfied. TSM cancels the request and the operation that requiredthe volume fails.
The CANCEL REQUEST command must include the request identification number.This number is included in the request message, or it can be obtained by issuing aQUERY REQUEST command, as described in “Displaying Information aboutPending Mount Requests”.
Canceling Mount Requests for Volumes that have been Removedfrom the Library DeviceYou may occasionally remove media from a library with the intention of storing ordestroying the media. If, after the media have been removed, TSM requests thevolumes, the you can cancel the request with the CANCEL REQUEST command.You can ensure that the server does not try to mount the requested volume againby specifying the PERMANENT parameter to mark the volume as unavailable.
For most of the requests associated with automated libraries, the TSM CANCELREQUEST command is not accepted by the server; an operator must perform ahardware or system action to cancel the requested mount.
Chapter 8. Managing Removable Media Operations 135

Responding to Requests for Volume Check-inOperators may occasionally need to check additional volumes into an automatedlibrary, for example, when TSM cannot locate a volume it requires from thevolume inventory. If the requested volume is available, place the volume in thedevice and check in the volume. See “Checking Media into Automated LibraryDevices” on page 126.
If the volume requested is unavailable (lost or destroyed):1. Update the access mode of the volume to UNAVAILABLE by using the
UPDATE VOLUME command.2. Cancel the server’s request for check-in by using the CANCEL REQUEST
command. (Do not cancel the client process that caused the request.) To get theID of the request to cancel, use the QUERY REQUEST command.
If operators do not respond to check-in requests within the mount-wait period,TSM marks the volume as unavailable. The mount-wait period is set in the deviceclass of the storage pool.
Dismounting Idle VolumesYou can issue the DISMOUNT VOLUME command to explicitly request that anidle volume be dismounted. After a volume becomes idle, it remains mounted fora time specified by the mount retention parameter for the device class. Usingmount retention can reduce the access time if volumes are repeatedly used.
For information about setting mount retention times, see “Mount Retention Period”on page 160.
Dismounting Volumes from REMOVABLEFILE DevicesOperators must respond to messages requiring media to be manually ejected fromREMOVABLEFILE device types, for example JAZ drive media and CDs. TSM thenchecks the drive every 7 seconds to see if the medium has been ejected. A volumedismount is not considered complete until TSM detects that the medium has beenejected from the drive or that a different medium has been inserted into the drive.
Setting Up a Tape RotationOver time, media ages, and the data on backup may no longer be needed. You canreclaim useful data on media and then reclaim and reuse the media themselves.When you set up expiration processing, you can determine when data is no longerneeded. See “File Expiration and Expiration Processing” on page 303.
TSM policy determines how many backup versions are retained and how long theyare retained. See “Basic Policy Planning” on page 300.
Deleting Data - Expiration ProcessingExpiration processing deletes data that is no longer valid either because itexceeds the retention specifications in policy or because users oradministrators have deleted the active versions of the data. See “RunningExpiration Processing to Delete Expired Files” on page 333.
Reusing Media - Reclamation ProcessingData on tapes may expire, move, or be deleted. Reclamation processingconsolidates any unexpired data by moving it from multiple volumes ontofewer volumes. The media can then be returned to the storage pool andreused.
136 Tivoli Storage Manager for Windows: Administrator’s Guide

You can set a reclamation threshold that allows TSM to reclaim volumeswhose valid data drops below a threshold. The threshold is a percentage ofunused space on the volume and is set for each storage pool. The amountof data on the volume and the reclamation threshold for the storage poolaffects when the volume is reclaimed. See “Reclaiming Space in SequentialAccess Storage Pools” on page 205.
Determining When Media Have Reached End of LifeYou can use TSM to displays statistics about volumes including thenumber of write operations performed on the media and the number ofwrite errors. TSM overwrites this statistical data for media initially definedas scratch volumes each time the media are reclaimed. For media initiallydefined as private volumes, TSM maintains this statistical data, even as thevolume is reclaimed. You can compare the information with the number ofwrite operations and write errors recommended by the manufacturer.
Reclaim any valid data from volumes that have reached end of life. If thevolumes are in automated libraries, check them out of the volumeinventory. Delete private volumes the database. See “Reclaiming Space inSequential Access Storage Pools” on page 205.
Ensuring Media are Available for the Tape RotationOver time, the demand for volumes may cause the storage pool to run outof space. You can set the maximum number of scratch volumes highenough to meet demand by doing one or both of the following:v Increase the maximum number of scratch volumes by updating the
storage pool definition. Label and check in new volumes to be used asscratch volumes if needed.
v Make volumes available for reuse by running expiration processing andreclamation, to consolidate data onto fewer volumes. See “ReusingMedia in Automated Libraries” on page 132 and “Managing Media inManual Libraries” on page 133.
For automated libraries, see “Setting Up and Managing a Volume OverflowLocation for an Automated Library Device” on page 130.
Write-once-read-many (WORM) drives can waste media when TSM cancelstransactions because volumes are not available to complete the backup.Once TSM writes to WORM volumes, the space on the volumes cannot bereused, even if the transactions are canceled (for example, if a backup iscanceled because of a shortage of media in the device).
Large files can cause even greater waste. For example, consider a clientbacking up a 12GB file onto WORM platters that hold 2.6GB each. If thebackup requires five platters and only four platters are available, TSMcancels the backup and the four volumes that were written to cannot bereused.
To minimize wasted WORM media:1. Ensure that the maximum number of scratch volumes for the device
storage pool is at least equal to the number of storage slots in thelibrary.
2. Check enough volumes into the device’s volume inventory for theexpected load.
Chapter 8. Managing Removable Media Operations 137

If most backups are small files, controlling the transaction size can affecthow WORM platters are used. Smaller transactions mean that less space iswasted if a transaction such as a backup must be canceled. Transaction sizeis controlled by a server option, TXNGROUPMAX, and a client option,TXNBYTELIMIT.
Labeling Volumes Using CommandsYou can label volumes with the LABEL LIBVOLUME command. The followingexample demonstrates using the LABEL LIBVOLUME command to label tapes fora manual library and for an automated library. Assume the automated device isattached to SCSI address 4, and the manual device is attached to SCSI address 5.You want to insert media into the device’s entry/exit ports and you want thedevice’s bar code reader to read bar code labels and overwrite existing labels withthe information on the bar code label.
Automated Library Device:label libvolume storagelibname overwrite=yes labelsource=barcode
If the server is not available, issue the following command:dsmlabel -drive=mt3.0.0.0,116 -drive=mt4.0.0.0,117 -library=lb5.0.0.0
-overwrite -keep
Manual Library Device:label libvolume storagelibname overwrite=yes labelsource=barcode
label libvolume storagelibname volname
If the server is not available, issue the following command:dsmlabel -drive=mt5.0.0.0
Using Removable Media Managers With Tivoli Storage ManagerYou can use external removable media management software to help manage TSMtape and optical media. Removable media managers provide extended mediacontrol and automation to TSM, which primarily specializes in managing data. Oneof the supported removable media managers is Removable Storage Manager (RSM)(Windows 2000 only). RSM includes a Microsoft Management Console snap-in thatprovides a common interface for tracking removable storage media, and managingstorage devices.
The principal value of using these media managers with TSM is the improvedcapability to share multiple devices with other applications. RSM requires someadditional administrative overhead, which may be justified by the savings fromsharing expensive hardware like automated libraries.
TSM also provides a programming interface that allows you to use a variety ofexternal programs to control TSM media. See “Appendix A. External MediaManagement Interface Description” on page 641 for a complete description of thisinterface. See “Using an External Media Manager to Control Your Media” onpage 142 for TSM setup information.
The following topics are covered in this section:
Concepts:
Overview of TSM Media Manager Support
138 Tivoli Storage Manager for Windows: Administrator’s Guide
Concepts:
Tasks:
Setting Up TSM to Use RSM
Using an External Media Manager to Control Your Media
Removing Tivoli Storage Manager Devices from Media Manager Control
Troubleshooting Database Errors
Overview of TSM Media Manager SupportTSM works cooperatively with removable media managers to control storage.Media managers help TSM make better use of media resources. While TSM tracksand manages client data, the removable media manager labels, catalogs, and tracksphysical volumes. The media manager also controls libraries, drives, slots, anddoors.
To use a media manager with TSM, you must define a TSM library that representsthe media manager. Defining these libraries is similar to defining any other type oflibrary to TSM, except that in this case, the library does not represent a physicaldevice. Different library types are required for RSM control and External MediaManagement Interface control.
RSM RSM library definition is not device-based, but is instead based on mediatype. When you define the library, a media type is specified. The mediamanager will assume control of all volumes that match the specified mediatype when the volumes are injected into a library controlled by the mediamanager. See “Setting up RSM Device Control”.
Note: For specific information about installing and configuring RSM, seethe Windows 2000 online help.
External Media Management InterfaceThe External Media Management Interface uses the EXTERNAL librarytype. The EXTERNAL library type does not map to a device or media type,but instead specifies the installed path of the external media manager. See“Using an External Media Manager to Control Your Media” on page 142.
Setting Up TSM to Use RSMAdministrators set up media management when they define RSM libraries to TSM.Libraries to be controlled by RSM must also be defined to the Windows RSMservice. Normally, this will occur at system boot time when RSM will claim allsupported removable media devices.
The following tasks are required to set up RSM media management:
Task Required Privilege Class
Setting up RSM Device Control System
Defining RSM Libraries Using the DeviceConfiguration Wizard
System
Adding Media to RSM Libraries System
Setting up RSM Device ControlWhen the RSM service is started, it will automatically take control of all eligiblestorage devices. For a device to be eligible for RSM control:
Chapter 8. Managing Removable Media Operations 139

v A Windows driver must be installed for the device, andv The TSM device driver cannot have already claimed the device
RSM relies on native device drivers for drive support. This requires that youexplicitly control the acquisition of devices by device drivers to use these mediamanagers with TSM. You must either disable the TSM device driver or add devicesto be controlled by the media manager to the TSM Device Exclude List beforestarting the RSM service. See “Selecting a Device Driver” on page 62.
Defining RSM Libraries Using the Device Configuration WizardIt is recommended that you use the TSM Device Configuration Wizard to defineRSM libraries. For example:1. From the TSM Console, expand the tree for the machine you are configuring.2. Click Wizards, then double click Device Configuration in the right pane. The
Device Configuration Wizard appears.3. Follow the instructions in the wizard.
This procedure creates the following TSM storage objects:v An RSM libraryv An associated device class with a device type of GENERICTAPEv An associated storage pool
Creating Media Pools: When you create and configure an RSM library, typicallywith the TSM Device Configuration Wizard, TSM directs RSM to create:v A top-level media pool called Tivoli Storage Managerv A second-level TSM server instance pool
Under the Tivoli Storage Manager media pool, TSM creates two storage pools thatare media-type specific. The first pool is associated with the automated library andthe second pool with an import media pool.
An RSM media pool is analogous to a directory or folder. The names of thevolumes in the pool are listed in the folder. The volumes contain TSM data. RSMretains information that maps physical media to devices.
Adding Media to RSM LibrariesTo add media to an RSM-controlled library, you must activate the MicrosoftManagement Console (MMC) snap-in for RSM, open Removable Storage, and thenrequest door access. Normally, the library door is locked by RSM.
On RSM: 1. Click Start → Programs → Administrative Tools → ComputerManagement.
2. In the console tree under Storage , double-click Removable Storage.
To request door access:
1. Double-click Physical Location.
2. Click on the applicable library, and then select Door Access.
3. When prompted, open the door.
You can use the library door to insert and remove media. After media are injectedand the library door is closed, RSM automatically inventories the device. If thenew media matches the media type for a defined RSM library, RSM labels themedia and adds it to one of the following media pools in that library:
140 Tivoli Storage Manager for Windows: Administrator’s Guide

Free Pool for RSMThis pool is used to track previously unlabeled media. Free pool media areassumed to be empty or to contain invalid data. Media in free pools areavailable for use by any application. You must provide an adequate supplyof media in the free or scratch pool to satisfy mount requests. When TSMneeds media, RSM obtains it from the scratch pool. RSM manages themedia from that point.
Import PoolThis pool is used to track previously labeled media that is recognized by aparticular application in the RSM-controlled storage management system.Media in import pools can be allocated by any application, including theapplication that originally labeled it. To safeguard data, it is recommendedthat you move these volumes to the application-specific import pool.
Unrecognized PoolThis pool is used to track previously labeled media that are not recognizedby any application in the RSM-controlled storage management system.Unrecognized pool volumes cannot be allocated by any application, andrequire administrator intervention to correct labeling or program errors.Normally, volumes in the Unrecognized Pool would be moved to the FreePool for later application use.
Note: You can use the Properties dialog to view the attributes of any volume inthe Free, Import, or Unrecognized pools.
Defining RSM Libraries Using Tivoli Storage Manager CommandsThe following example defines an RSM library for an 8mm autochanger devicecontaining two drives:1. Define a library for the RSM-managed device. For example:
define library astro libtype=rsm mediatype="8mm AME"
Notes:
a. Specify the library type as libtype=rsm for RSM.b. Use the RSM documentation to determine the value to use for the media
type.c. Enclose the media type within quotation marks if it contains embedded
blanks.2. Define a device class for the RSM library with a device type of GENERICTAPE.
The MOUNTLIMIT parameter specifies the number of drives in the library.
Note: For storage environments in which devices are shared acrossapplications, MOUNTRETENTION and MOUNTWAIT settings must becarefully considered. These parameters determine how long an idlevolume remains in a drive and the timeout value for mount requests.Because RSM will not dismount an allocated drive to satisfy pendingrequests, you must tune these parameters to satisfy competing mountrequests while maintaining optimal system performance.
define devclass 8MMCLASS1 devtype=generictape library=rsmlibformat=drive mountretention=5 mountwait=10 mountlimit=2
3. Define a storage pool for the device class.define stgpool 8MMPOOL1 8MMCLASS1 maxscratch=500
Chapter 8. Managing Removable Media Operations 141

Using an External Media Manager to Control Your MediaThe External Media Management API lets you use external media managersoftware to control your media (see “Appendix A. External Media ManagementInterface Description” on page 641 for details about the interface).
The following sample procedure, describes how to set up an 8mm automated tapelibrary to use the External Media Management Interface with a media manager.You cannot use the Device Configuration Wizard to set up an external library.1. Set up the media manager to interface with TSM. For more information, see
“Appendix A. External Media Management Interface Description” on page 641.2. Define a library whose library type is EXTERNAL, and define a path to the
media manager executable. For example:define library medman libtype=external
define path server1 medman srctype=server desttype=libraryexternalmanager=c:\server\mediamanager.exe
3. Define a device class for the EXTERNAL library with a device type of 8MM.For example:define devclass class1 devtype=8mm library=medman mountretention=5 mountlimit=2
v The MOUNTLIMIT parameter specifies the number of drives in the library.v The MOUNTRETENTION parameter determines how long an idle volume
remains in a drive.If the library is shared among applications, this setting isespecially important. Some media managers will not dismount an allocateddrive to satisfy pending requests. You should set the mount retention periodto balance competing mount requests and system performance.
4. Define a storage pool for the device class. For example:define stgpool pool1 class1 maxscratch=500
5. Associate client nodes with the new storage pool by defining a new policydomain or by updating an existing policy domain
Media Management Tasks for an External LibraryManaging media in an external library differs from managing media in a librarycontrolled by Tivoli Storage Manager:v You do not need to check in and label media in external libraries. Those media
are not tracked in the TSM volume inventory, and the media manager handleslabeling. However, you must ensure that an adequate supply of blank media areavailable.
v If you are using Tivoli Disaster Recovery Manager, you can use the MOVEDRMEDIA command to issue an operator request to remove the media from thelibrary. For more information, see “Chapter 25. Using Tivoli Disaster RecoveryManager” on page 577.
v You should not migrate media from a TSM SCSI library to an external library.Instead, use external media management on a new TSM configuration or whendefining externally managed devices to TSM.
v Deleting externally managed storage pools requires that you delete any volumesassociated with the TSM library. When the library is deleted, the externallymanaged storage pool associated with that library is also deleted. For moreinformation, see “Deleting a Storage Pool Volume with Data” on page 239.
v
142 Tivoli Storage Manager for Windows: Administrator’s Guide

Removing Tivoli Storage Manager Devices from MediaManager Control
Procedures for removing devices from media manager control vary, depending onthe media manager:
For RSM-managed devicesDevices may be removed from media manager control by modifying thedevice configuration to allow the ADSMSCSI device driver to claim thedevices before RSM. For more information, see “Selecting a Device Driver”on page 62.
For other external media managersRefer to the specific management product’s documentation set.
Troubleshooting Database ErrorsIt is possible that error conditions may cause the TSM volume database and themedia manager’s volume database to become unsynchronized. The most likelysymptom of this problem is that the volumes in the media manager’s database arenot known to TSM, and thus not available for use. You should verify the TSMvolume list and any disaster recovery media. If volumes not identified to TSM arefound, use the media manager interface to deallocate and delete the volumes.
Managing LibrariesYou can query, update, and delete libraries.
Requesting Information about Libraries
Task Required Privilege Class
Request information about libraries Any administrator
You can request information about one or more libraries by using the QUERYLIBRARY command. You can request either a standard or a detailed report. Forexample, to display information about all libraries, issue the following command:query library
The following shows an example of output from this command:
Library Library Private Scratch ExternalName Type Category Category Manager------- ------- -------- -------- --------MANLIB MANUALEXB SCSI3494LIB 349X 300 301
Updating LibrariesYou can update an existing library by issuing the UPDATE LIBRARY command. Toupdate the device names of a library, issue the UPDATE PATH command.
Note: You cannot update a MANUAL library.
Task Required Privilege Class
Update libraries System or unrestricted storage
Chapter 8. Managing Removable Media Operations 143
You can update a previously defined library by issuing the UPDATE LIBRARYcommand.
Automated LibrariesIf your system or device is reconfigured, and the device name changes, you mayneed to update the device name. The examples below show how you can use theUPDATE LIBRARY and UPDATE PATH commands for the following library types:v SCSIv 349Xv External
Examples:
v SCSI Library
Update the path from SERVER1 to a SCSI library named SCSILIB:update path server1 scsilib srctype=server desttype=library device=lb4.0.0.0
Update the definition of a SCSI library named SCSILIB defined to a library clientso that a new library manager is specified:update library scsilib primarylibmanager=server2
v 349X Library
Update the path from SERVER1 to an IBM 3494 library named 3494LIB withnew device names.update path server1 3494lib srctype=server desttype=librarydevice=lb2.0.0.0,lb3.0.0.0,lb4.0.0.0
Update the definition of an IBM 3494 library named 3494LIB defined to a libraryclient so that a new library manager is specified:update library 3494lib primarylibmanager=server2
v ACSLS Library
Update an ACSLS library named ACSLSLIB with a new ID number.update library acslslib ascid=1
v External Library
Update an external library named EXTLIB with a new media manager pathname.update path server1 extlib srctype=server desttype=library
externalmanager=c:\server\mediamanager.exe
Update an EXTERNAL library named EXTLIB in a LAN-free configuration sothat the server uses the value set for mount retention in the device classassociated with the library:update library extlib obeymountretention=yes
Deleting Libraries
Task Required Privilege Class
Delete libraries System or unrestricted storage
Before you delete a library with the DELETE LIBRARY command, you must deleteall of the drives and drive paths that have been defined as part of the library anddelete the path to the library. See “Deleting Drives” on page 154.
144 Tivoli Storage Manager for Windows: Administrator’s Guide

For example, suppose that you want to delete a library named 8MMLIB1. Afterdeleting all of the drives defined as part of this library and the path to the library,issue the following command to delete the library itself:delete library 8mmlib1
Managing DrivesYou can query, update, and delete drives.
Requesting Information about Drives
Task Required Privilege Class
Request information about drives Any administrator
You can request information about drives by using the QUERY DRIVE command.This command accepts wildcard characters for both a library name and a drivename. See Administrator’s Reference for information about using wildcard characters.
For example, to query all drives associated with your server, enter the followingcommand:query drive
The following shows an example of the results of this command.
Library Drive Device On LineName Name Type-------- ------- --------- -------MANLIB 8MM.0 8MM YesAUTOLIB 8MM.2 8MM Yes
Updating DrivesYou can change the attributes of a drive by issuing the UPDATE DRIVE command.
Task Required Privilege Class
Update drives System or unrestricted storage
You can change the following attributes of a drive by issuing the UPDATE DRIVEcommand.v The world wide name or serial number of a drive used in a server-free
environmentv The element address, if the drive resides in a SCSI libraryv The ID of a drive in an ACSLS libraryv The cleaning frequencyv Change whether the drive is online or offline
For example, to change the element address of a drive named DRIVE3 to 119, issuethe following command:update drive auto drive3 element=119
Chapter 8. Managing Removable Media Operations 145

Note: You cannot change the element number if a drive is in use. If a drive has avolume mounted, but the volume is idle, it can be explicitly dismounted asdescribed in “Dismounting Idle Volumes” on page 136.
If you are reconfiguring your system, you can change the device name of a driveby issuing the UPDATE PATH command. For example, to change the device nameof a drive named DRIVE3, issue the following command:update path server1 drive3 srctype=server desttype=drive library=scsilib
device=mt3.0.0.0
You can change a drive to offline status while the drive is in use. TSM will finishwith the current tape in the drive, and then not use the drive anymore. Bychanging a drive to offline, you can drain work off of a drive. However, if the tapethat had been in use was part of a series of tapes for a single transaction, the drivewill not be available to complete the series. If no other drives are available, thetransaction may fail. If all drives in a library are made offline, any attempts byTSM to write to the storage pool associated with the library will fail.
The ONLINE parameter specifies the value of the drive’s online state, even if thedrive is in use. ONLINE=YES indicates that the drive is available for use (online).ONLINE=NO indicates that the drive is not available for use (offline). Thisparameter is optional. Do not specify other optional parameters along withONLINE=YES or ONLINE=NO. If you do, the drive will not be updated, and thecommand will fail when the drive is in use. This command can be issued when thedrive is involved in an active process or session, but this is not recommended.
The ONLINE parameter allows drives to be taken offline and used for anotheractivity, such as maintenance. If you make the drive offline while it is in use, thedrive will be marked offline. However, the mounted volume will complete itscurrent process. If this volume was part of a series of volumes for a giventransaction, the drive will no longer be available to complete mounting the series.If no other drives are available, the active process may fail. The updated state willbe retained even when the server is halted and brought up again. If a drive ismarked offline when the server is brought up, a warning is issued noting that thedrive must be manually brought online. If all the drives in a library are updated tobe offline, processes requiring a library mount point will fail, rather than queue upfor one.
Replacing Tape or Optical DrivesIf you replace a drive in a tape or optical library that is defined to Tivoli StorageManager, you must delete the drive and path definitions for the old drive anddefine the new drive and path. This is required even if you are exchanging onedrive for another of the same type, using the same logical address, physicaladdress, SCSI ID, and port number. Device alias names can change when youchange your drive connections.
If the new drive is an upgrade that supports a new media format, you might alsoneed to define a new logical library, device class, and storage pool. Procedures forsetting up policy for a new drive in a multiple-drive library will vary, dependingon the types of drives and media in the library.
This section provides a general overview of media compatibility and describes howto replace a drive, set up policy to handle multiple media formats in the samelibrary, and migrate previously stored data to new media.
146 Tivoli Storage Manager for Windows: Administrator’s Guide

Overview of Media Compatibility IssuesSometimes a new drive has a limited ability to use media formats supported by aprevious version of the drive. Often, a new drive can read but not write to the oldmedia. By default, existing volumes with a status of FILLING will remain in thatstate after a drive upgrade. In some cases, you might want to continue using anolder drive to fill these volumes. This will preserve read/write capability for theexisting volumes until they have been reclaimed. If you choose to upgrade all ofthe drives in a library, pay attention to the media formats supported by the newhardware. Unless you are planning to use only the latest media with your newdrive, you will need to be aware of any compatibility issues. For migrationinstructions, see “Migrating to Upgraded Drives” on page 150.
To use a new drive with media it can read but not write to, you should use theUPDATE VOLUME command to set the access for those volumes to read-only. Thiswill prevent errors caused by read/write incompatibility. For example, a new drivemay eject media written in a density format it does not support as soon as themedia is loaded into the drive. Or a new drive may fail the first write command tomedia partially written in a format it does not support.
When data on the read-only media expires and the volume is reclaimed, youshould replace it with media that is fully compatible with the new drive. Errorscan be generated if a new drive is unable to correctly calibrate a volume writtenusing an older format. To avoid this problem, ensure that the original drive is ingood working order and at current microcode levels.
Removing a DriveTo remove a drive, perform the following procedure:1. Stop the Tivoli Storage Manager server and shut down the operating system.2. Remove the old drive and follow the manufacturer’s instructions to install the
new drive.3. Restart the operating system and the Tivoli Storage Manager server.4. Delete the path from the server tpo the drive. For example, enter:
delete path server1 lib1 srctype=server desttype=drive
5. Delete the drive definition. For example, to delete a drive named DLT1 from alibrary device named LIB1, enter:delete drive lib1 dlt1
6. Define the new drive and path. This procedure will vary, depending on theconfiguration of drives in your library. See “Defining a New Drive”.
Defining a New DriveHow you define a new drive depends on several factors, including:v Whether the new drive is the same as the old drive (replacement) or different
(upgrade)v Whether you plan to use different drive types within the same libraryv Whether you plan to use different media types within the same library
Replacing a Drive With Another of the Same Type: Perform the following taskto add a drive that supports the same media formats as the drive it replaces:
Define the new drive and pathFor example, to define a new drive and name it DRIVE1 and a path to itfrom SERVER1, enter:
Chapter 8. Managing Removable Media Operations 147

define drive lib1 drive1
define path server1 drive1 srctype=server desttype=drive library=lib1device=mt3.0.0.1
You can use your existing library, device class, and storage pooldefinitions.
Upgrading All of the Drives in a Library That Contained Only One Type ofDrive: You must decide how to handle any new types of media supported by thenew drives. See “Overview of Media Compatibility Issues” on page 147 for moreinformation.
The following scenario assumes you already have a library device defined asfollows:
Library Library Private Scratch ExternalName Type Category Category Manager------- ------- -------- -------- --------LIB1 349X 200 201
Define each new drive and pathFor example, to define a new drive and name it DRIVE1, enter:define drive lib1 drive1
define path server1 drive1 srctype=server desttype=drive library=lib1device=mt3.0.0.1
Update device class and storage pool definitions
v If you plan to use only one type of media in the library, you can useyour existing device class and storage pool definitions.
v If you plan to use media with different capacities in the same library,you can define separate device classes and storage pools for each type ofmedia. This will provide accurate capacity reporting for each type ofmedia.For example, if you plan to use both 3590E and 3590K tapes, you candefine two device classes:define devclass 3590E_class devtype=3590 format=drive library=lib1
estcapacity=20gdefine devclass 3590K_class devtype=3590 format=drive library=lib1
estcapacity=40g
Note: You must specify FORMAT=DRIVE for the new device classes.
You can then define two storage pools to divide the tapes within thelibrary:define stgpool 3590E_pool 3590E_class maxscratch=number_of_3590E_tapesdefine stgpool 3590K_pool 3590K_class maxscratch=number_of_3590K_tapes
Finally, you can use the DEFINE VOLUME command to associate mediawith the appropriate storage pool.
Upgrading Some of the Drives in a Library That Contained Only One Type ofDrive: Each type of drive requires a separately defined logical library. If a librarycontains only one type of drive and you upgrade only a subset of those drives,you must define an additional logical library.
148 Tivoli Storage Manager for Windows: Administrator’s Guide

The following scenario assumes you already have a library device defined asfollows:
Library Library Private Scratch ExternalName Category Category Manager------- ------- -------- -------- --------LIB1 349X 200 201
Define a new logical library and path for each new type of driveFor example, to add a logical library named LIB2 for the same physicaldevice already defined as LIB1, enter:define library lib2 libtype=349X scratchcategory=401 privatecategory=400
define path server1 lib2 srctype=server desttype=librarydevice=lb3.0.0.0
Define each new drive and path to the new libraryTo define a new drive named DRIVE2 to the logical library named LIB2and a new path to the drive, enter:define drive lib2 drive2
define path server1 drive1 srctype=server desttype=drive library=lib2device=mt3.0.0.1
Update device class and storage pool definitions
To define a new device class, enter:define devclass new_dev_class devtype=3590 format=drive library=lib2
estcapacity=40G
For accurate reporting of capacity information, you must specify theESTCAPACITY parameter.
To define a new storage pool, enter:define stgpool new_stg_pool new_dev_class maxscratch=number_of_new_tapes
You can then use the CHECKIN LIBVOLUME command to check the newmedia into the logical library LIB2.
Upgrading All of the Drives in a Library That Contained More than One Typeof Drive: The following scenario assumes you already have two logical librariesdefined. For example:
Library Library Private Scratch ExternalName Category Category Manager------- ------- -------- -------- --------LIB1 349X 200 201LIB2 349X 300 301
Update drive and path definitions for each logical libraryFor each library, follow the guidelines in “Upgrading All of the Drives in aLibrary That Contained Only One Type of Drive” on page 148. For accuratereporting of capacity information, you cannot use a global scratch poolwith this configuration.
Chapter 8. Managing Removable Media Operations 149

Upgrading Some of the Drives in a Library That Contained More than One Typeof Drive: The following scenario assumes you already have two logical librariesdefined, for example:
Library Library Private Scratch ExternalName Category Category Manager------- ------- -------- -------- --------LIB1 349X 200 201LIB2 349X 300 301
You must update the drive and path definitions for each logical library. Follow theguidelines in “Upgrading Some of the Drives in a Library That Contained OnlyOne Type of Drive” on page 148. For accurate reporting of capacity information,you cannot use a global scratch pool with this configuration.
Migrating to Upgraded DrivesIf you upgrade all of the drives in a library, you can define a new DISK storagepool and set it up to migrate its data to a storage pool created for the new drives.You can then update your existing management class definitions to begin storingdata in the new DISK storage pool. This allows you to preserve your existingpolicy definitions to migrate and expire existing data, while using the new drivesto store new data.
Cleaning Drives
Task Required Privilege Class
Clean drives System or unrestricted storage
You can use the server to manage tape drive cleaning. The server can controlcleaning tape drives in SCSI libraries and offers partial support for cleaning tapedrives in manual libraries. For automated libraries, you can automate cleaning byspecifying the frequency of cleaning operations and checking a cleaner cartridgeinto the library’s volume inventory. The server mounts the cleaner cartridge asspecified. For manual libraries, the server issues a mount request for the cleanercartridge. There are special considerations if you plan to use server-controlleddrive cleaning with a SCSI library that provides automatic drive cleaning supportin its device hardware
Deciding Whether the Server Controls Drive CleaningIf your library includes its own functions for drive cleaning, you need to decidewhich method to use: The device’s built-in drive cleaning or the TSM server’sdrive cleaning. Device manufacturers that include automatic cleaning recommendits use to prevent premature wear on the read/write heads of the drives. Forexample, SCSI libraries such as STK 9710, IBM 3570, and IBM 3575 have their ownautomatic cleaning built into the device.
To avoid problems, use either the device’s built-in drive cleaning, or the server’sdrive cleaning, but not both. Drives and libraries from different manufacturersdiffer in how they handle cleaner cartridges and how they report the presence of acleaner cartridge in a drive. Consult the manufacturer’s information thataccompanies the library and the drives for an explanation of how the library anddrive handle and report the presence of cleaner cartridges. The device driver maynot be able to open a drive that contains a cleaner cartridge. Sense codes and errorcodes that are issued by devices for drive cleaning vary. If a library has its own
150 Tivoli Storage Manager for Windows: Administrator’s Guide

automatic cleaning, the library usually tries to keep the process transparent to allapplications. However, this is not always the case. Because of this variability, theserver cannot reliably detect a cleaner cartridge in a drive for all hardware. Theserver also may not be able to determine if the library has started a cleaningprocess. Therefore, it is important to choose one method or the other, but not both.
Some devices require a small amount of idle time between mount requests toinitiate the drive cleaning. However, the server tries to minimize the idle time for adrive. These two conditions may combine to prevent the device’s control of drivecleaning to function effectively. If this happens, try using the server to controldrive cleaning. Set the frequency to match the cleaning recommendations from themanufacturer.
If you decide to have the server control drive cleaning, disable the device’s owndrive cleaning function to prevent problems. For example, while the device’s owndrive cleaning function is enabled, some devices automatically move any cleanercartridge found in the library to slots in the library that are dedicated for cleanercartridges. An application such as Tivoli Storage Manager does not know thatthese dedicated slots exist. You will not be able to check a cleaner cartridge intothe server’s library inventory until you disable the device’s own drive cleaningfunction.
If you decide to have the device control drive cleaning and then you haveproblems, consider using the drive cleaning control provided by the server.
Cleaning Drives in an Automated LibrarySet up server-controlled drive cleaning in an automated library with these steps:1. Define or update the drives in a library, using the CLEANFREQUENCY
parameter. The CLEANFREQUENCY parameter sets how often you want thedrive cleaned. Refer to the DEFINE DRIVE and UPDATE DRIVE commands.Consult the manuals that accompany the drives for recommendations oncleaning frequency.For example, to have DRIVE1 cleaned after 100GB is processed on the drive,issue the following command:update drive autolib1 drive1 cleanfrequency=100
Consult the drive manufacturer’s information for cleaning recommendations. Ifthe information gives recommendations for cleaning frequency in terms ofhours of use, convert to a gigabytes value by doing the following:a. Use the bytes-per-second rating for the drive to determine a
gigabytes-per-hour value.b. Multiply the gigabytes-per-hour value by the recommended hours of use
between cleanings.c. Use the result as the cleaning frequency value.
Note: For IBM 3570 and 3590 drives, we recommend that you specify a valuefor the CLEANFREQUENCY parameter rather than specify ASNEEDED.Using the cleaning frequency recommended by the productdocumentation will not overclean the drives.
2. Check a cleaner cartridge into the library’s volume inventory with theCHECKIN LIBVOLUME command. For example:checkin libvolume autolib1 cleanv status=cleaner cleanings=10 checklabel=no
Chapter 8. Managing Removable Media Operations 151

After the cleaner cartridge is checked in, the server will mount the cleanercartridge in a drive when the drive needs cleaning. The server will use thatcleaner cartridge for the number of cleanings specified. See “Checking InCleaner Volumes” and “Operations with Cleaner Cartridges in a Library” onpage 153 for more information.
For details on the commands, see Administrator’s Reference.
Checking In Cleaner Volumes: You must check a cleaner cartridge into anautomated library’s volume inventory to have the server control drive cleaningwithout further operator intervention.
It is recommended that you check in cleaner cartridges one at a time and do notuse the search function of check-in for a cleaner cartridge.
Attention: When checking in a cleaner cartridge to a library, ensure that it iscorrectly identified to the server as a cleaner cartridge. Also use caution when acleaner cartridge is already checked in and you are checking in data cartridges.Ensure that cleaner cartridges are in their correct home slots, or errors and delayscan result.
When checking in data cartridges with SEARCH=YES, ensure that a cleanercartridge is not in a slot that will be detected by the search process. Errors anddelays of 15 minutes or more can result from a cleaner cartridge being improperlymoved or placed. For best results, check in the data cartridges first when you usethe search function. Then check in the cleaner cartridge separately.
For example, if you need to check in both data cartridges and cleaner cartridges,put the data cartridges in the library and check them in first. You can use thesearch function of the CHECKIN LIBVOLUME command (or the LABELLIBVOLUME command if you are labeling and checking in volumes). Then checkin the cleaner cartridge to the library by using one of the following methods.v Check in without using search:
checkin libvolume autolib1 cleanv status=cleaner cleanings=10checklabel=no
The server then requests that the cartridge be placed in the entry/exit port, orinto a specific slot.
v Check in using search, but limit the search by using the VOLRANGE orVOLLIST parameter:checkin libvolume autolib1 status=cleaner cleanings=10search=yes checklabel=barcode vollist=cleanv
The process scans the library by using the bar code reader, looking for theCLEANV volume.
Manual Drive Cleaning in an Automated Library: If your library has limitedcapacity and you do not want to use a slot in your library for a cleaner cartridge,you can still make use of the server’s drive cleaning function. Set the cleaningfrequency for the drives in the library. When a drive needs cleaning based on thefrequency setting, the server issues the message, ANR8914I. For example:
ANR89141I Drive DRIVE1 in library AUTOLIB1 needs to be cleaned.
152 Tivoli Storage Manager for Windows: Administrator’s Guide

You can use that message as a cue to manually insert a cleaner cartridge into thedrive. However, the server cannot track whether the drive has been cleaned.
Operations with Cleaner Cartridges in a Library: When a drive needs to becleaned, the server runs the cleaning operation after dismounting a data volume ifa cleaner cartridge is checked in to the library. If the cleaning operation fails or iscancelled, or if no cleaner cartridge is available, then the indication that the driveneeds cleaning is lost. Monitor cleaning messages for these problems to ensure thatdrives are cleaned as needed. If necessary, use the CLEAN DRIVE command tohave the server try the cleaning again, or manually load a cleaner cartridge intothe drive.
The server uses a cleaner cartridge for the number of cleanings that you specifywhen you check in the cleaner cartridge. If you check in more than one cleanercartridge, the server uses one of them for its designated number of cleanings. Thenthe server begins to use the next cleaner cartridge.
Visually verify that cleaner cartridges are in the correct storage slots before issuingany of the following commands:v AUDIT LIBRARYv CHECKIN LIBVOLUME with SEARCH specifiedv LABEL LIBVOLUME with SEARCH specified
To find the correct slot for a cleaner cartridge, use the QUERY LIBVOLUMEcommand.
Cleaning Drives in a Manual LibraryCleaning a drive in a manual library is the same as setting up drive cleaningwithout checking in a cleaner cartridge for an automated library. The server issuesthe ANR8914I message when a drive needs cleaning. For example:
ANR89141I Drive DRIVE1 in library MANLIB1 needs to be cleaned.
Monitor the activity log or the server console for these messages and load a cleanercartridge into the drive as needed. The server cannot track whether the drive hasbeen cleaned.
Error Checking for Drive CleaningOccasionally an administrator might move some cartridges around within a libraryand put a data cartridge where TSM shows that there is a cleaner cartridge. TSMuses the process in this section to recover from the error. When a drive needscleaning, the server loads what its database shows as a cleaner cartridge into thedrive. The drive then moves to a READY state, and TSM detects that the cartridgeis a data cartridge. The server then performs the following steps:1. The server attempts to read the internal tape label of the data cartridge.2. The server ejects the cartridge from the drive and moves it back to the home
slot of the “cleaner” cartridge within the library. If the eject fails, the servermarks the drive offline and issues a message that the cartridge is still in thedrive.
3. The server checks out the “cleaner” cartridge to avoid selecting it for anotherdrive cleaning request. The “cleaner” cartridge remains in the library but nolonger appears in the TSM library inventory.
4. If the server was able to read the internal tape label, the server checks thevolume name against the current library inventory, storage pool volumes, andthe volume history file.
Chapter 8. Managing Removable Media Operations 153

v If there is not a match, an administrator probably checked in a data cartridgeas a cleaner cartridge by mistake. Now that the volume is checked out, youdo not need to do anything else.
v If there is a match, the server issues messages that manual intervention and alibrary audit are required. Library audits can take considerable time, so anadministrator should issue the command when sufficient time permits. See“Auditing a Library’s Volume Inventory” on page 130.
Deleting DrivesYou can delete a drive by issuing the DELETE DRIVE command.
Task Required Privilege Class
Delete drives System or unrestricted storage
A drive cannot be deleted if it is currently in use. If a drive has a volumemounted, but the volume is currently idle, it can be dismounted as described in“Dismounting Idle Volumes” on page 136.
Note: A drive cannot be deleted until the defined path to the drive has beendeleted. Also, a library cannot be deleted until all of the drives definedwithin it are deleted.
Managing PathsYou can query, update, and delete paths.
Requesting Information About PathsBy using the QUERY PATH command, you can obtain information about paths.You can request either a standard or a detailed report. For example, to displayinformation about all paths, issue the following command:query path
The following shows an example of the output from this command.
Source Name Source Type Destination Name Destination Type Online----------- ----------- ---------------- ---------------- ------NETAPP1 Data mover DRIVE1 Drive YesNETAPP1 Data mover NASLIB Library Yesdatamover2 Data mover drive4 Drive Yes
Updating PathsYou can update an existing path by issuing the UPDATE PATH command. Theexamples below show how you can use the UPDATE PATH commands for thefollowing path types:v Library Paths
Update the path from SERVER1 to a SCSI library named SCSILIB:update path server1 scsilib srctype=server desttype=library device=lb4.0.0.0
v Drive Paths
Update the path from SERVER1 to a SCSI library named SCSILIB:update path nas1 scsilib srctype=datamover desttype=drivelibrary=naslib device=mt3.0.0.0
v Disk Paths
154 Tivoli Storage Manager for Windows: Administrator’s Guide

Update the path from the datmover SCSI1 to the disk Harddisk3:update path scsi1 Harddisk3 srctype=datamover desttype=disk node=belfast lun=1
Deleting Paths
Task Required Privilege Class
Delete paths System or unrestricted storage
A path cannot be deleted if the destination is currently in use.
Delete a path from a NAS data mover NAS1 to the library NASLIB.delete path nas1 naslib srctype=datamover desttype=library
Attention: If you delete the path to a device or make the path offline, you disableaccess to that device.
Managing Data MoversYou can query, update, and delete data movers.
Requesting Information About Data MoversBy using the QUERY DATAMOVER command, you can obtain information aboutSCSI and NAS data movers. You can request either a standard or a detailed report.For example, to display a standard report about all data movers, issue thefollowing command:query datamover *
The following shows an example of the output from this command.
Data Mover Name Type Online------------- ---------- -------NASMOVER1 NAS YesNASMOVER2 NAS NoDATAMOVER1 SCSI Yes
Updating Data MoversYou can update an existing data mover by issuing the UPDATE DATAMOVERcommand.
For example, to update the data mover for the node named NAS1 to change the IPaddress, issue the following command:update datamover nas1 hladdress=9.67.97.109
Deleting Data MoversBefore you can delete a data mover, you must delete all paths defined for the datamover.
To delete a data mover named NAS1, issue the following command:delete datamover nas1
Chapter 8. Managing Removable Media Operations 155

Managing DisksYou can query, update, and delete client-owned disks that reside in a Storage AreaNetwork. These disks are defined to Tivoli Storage Manager in order to takeadvantage of server-free data movement.
Requesting Information About DisksBy using the QUERY DISK command, you can obtain information aboutclient-owned disks that reside in a SAN environment. You can request either astandard or a detailed report. For example, to display a standard report about alldefined disks, issue the following command:query disk *
The following shows an example of the output from this command.
Node Disk OnlineName Name------------ ------ ------NODE1 Harddisk1 YesNODE2 Harddisk2 Yes
Updating DisksYou can update an existing disk by issuing the UPDATE DISK command. Theexample below shows how you can use the UPDATE DISK command to changethe world wide name, serial number, and status of a disk.
Update a disk named Harddisk1 owned by NODE1. The world wide name to20020060450d00e2 and the serial number to 100047. Change the ONLINE status toYES.update disk node1 Harddisk1 wwn=20020060450d00e2 serial=100047 online=yes
Deleting DisksAll paths related to a disk must be deleted before the disk itself can be deleted.
Delete a disk named Harddisk1 that is owned by the node NODE1.delete disk node1 Harddisk1
156 Tivoli Storage Manager for Windows: Administrator’s Guide
Chapter 9. Defining Device Classes
A device class represents a device type that can be used by Tivoli Storage Manager.The server uses device class definitions to determine which types of devices andvolumes to use to:v Store backup, archive, or space-managed data in primary storage poolsv Store copies of primary storage pool data in copy storage poolsv Store database backupsv Export or import TSM data
One device class can be associated with multiple storage pools, but each storagepool is associated with only one device class.
For random access storage, TSM supports only the DISK device class, which isdefined by TSM. However, you can define many storage pools associated with theDISK device class.
See the following sections:
Tasks:
“Defining and Updating Device Classes for Tape Devices” on page 158
“Defining and Updating Device Classes for Generic Tape Devices” on page 161
“Defining and Updating Device Classes for Optical Devices” on page 162
“Defining and Updating Device Classes for Removable File System Devices” on page 163
“Defining and Updating FILE Device Classes” on page 163
“Defining and Updating SERVER Device Classes” on page 165
“Requesting Information about a Device Class” on page 166
“How TSM Fills Volumes” on page 167
“Deleting a Device Class” on page 167
In this chapter, most examples illustrate how to perform tasks by using a TivoliStorage Manager command-line interface. For information about the commands,see Administrator’s Reference, or issue the HELP command from the command lineof a Tivoli Storage Manager administrative client.
Tivoli Storage Manager tasks can also be performed from the administrative Webinterface. For more information about using the administrative interface, see QuickStart.
Defining and Updating Device Classes for Sequential Media
Task Required Privilege Class
Define or update device classes System or unrestricted storage
© Copyright IBM Corp. 1994, 2002 157

For sequential access storage, TSM supports the following device types:
Device Type Media Type Device Examples
3570 IBM 3570 cartridges IBM 3570 drives
3590 IBM 3590 cartridges IBM 3590, 3590E drives
ECARTRIDGE Tape cartridges StorageTek SD-3 and 9490 drives
FILE File system or storagevolumes
Server
GENERICTAPE Tape cartridges Tape drives supported by operatingsystem device drivers
LTO LTO Ultrium cartridges IBM 3580, 3581, 3583, 3584
NAS Unknown Tape drives supported by the NAS fileserver for backups
OPTICAL 5.25-inch rewritableoptical cartridges
5.25-inch optical drives
QIC Quarter-inch tapecartridges
IBM 7207
REMOVABLEFILE Iomega Zip or Jazdrives, or CDROMmedia
Removable media devices that areattached as local, removable file systems
SERVER Storage volumes or filesarchived in anotherTSM server
TSM target server
WORM 5.25-inch write-onceread-many (WORM)optical cartridges
5.25-inch optical drives
You can define multiple device classes for each device type. For example, you mayneed to specify different attributes for different storage pools that use the sametype of tape drive. Variations may be required that are not specific to the device,but rather to how you want to use the device (for example, mount retention ormount limit).
For all device types other than FILE or SERVER, you must define libraries anddrives to TSM before you define the device classes.
If you include the DEVCONFIG option in the dsmserv.opt file, the files you specifywith that option are automatically updated with the results of this command.When you use this option, the files specified are automatically updated whenevera device class, library, or drive is defined, updated, or deleted.
The following sections explain the device classes for each supported device type.
Defining and Updating Device Classes for Tape DevicesTo use tape devices, you must define a device class by issuing a DEFINEDEVCLASS command with the DEVTYPE parameter.
Other parameters specify how to manage data storage operations involving thenew device class:v MOUNTLIMITv MOUNTWAITv MOUNTRETENTION
158 Tivoli Storage Manager for Windows: Administrator’s Guide
v PREFIXv FORMATv ESTCAPACITYv LIBRARY
You can update the device class by issuing the UPDATE DEVCLASS command.
Mount LimitThe MOUNTLIMIT parameter specifies the maximum number of volumes that canbe simultaneously mounted for a device class. You can limit the number of drivesthat the device class has access to at one time with the MOUNTLIMIT parameter.
The default mount limit value is DRIVES. The DRIVES parameter indicates thatevery time a mount point is allocated, the number of drives online and defined tothe library is used to calculate the true mount limit value. The maximum value forthis parameter is 256 and the minimum value is 0. A zero value prevents newtransactions from gaining access to the storage pool.
When selecting a mount limit for a device class, be sure to consider the followingquestions:v How many storage devices are connected to your system?
Do not specify a mount limit value that is greater than the number of associatedavailable drives in your installation. If the server tries to mount as manyvolumes as specified by the mount limit and no drives are available for therequired volume, an error occurs and client sessions may be terminated. (Thisdoes not apply when the DRIVES parameter is specified.)
Note: TSM cannot share drives between multiple device classes.v Are you using the simultaneous write function to primary and copy storage
pools?Specify a mount limit value that provides a sufficient number of mount points tosupport a simultaneous write to the primary storage pool and all associatedcopy storage pools.
v Are you associating multiple device classes of the same device type with a singlelibrary?A device class associated with a library can use any drive in the library that iscompatible with the device class’ device type. Because you can associate morethan one device class with a library, a single drive in the library can be used bymore than one device class. However, TSM does not manage how a drive isshared among multiple device classes.When you associate multiple device classes of the same device type with alibrary, add up the mount limits for all these device classes. Ensure that this sumis no greater than the number of compatible drives.
v How many TSM processes do you want to run at the same time, using devicesin this device class?TSM automatically cancels some processes to run other, higher priorityprocesses. If the server is using all available drives in a device class to completehigher priority processes, lower priority processes must wait until a drivebecomes available. For example, TSM cancels the process for a client backing updirectly to tape if the drive being used is needed for a server migration or tapereclamation process. TSM cancels a tape reclamation process if the drive beingused is needed for a client restore operation. For additional information, see“Preemption of Client or Server Operations” on page 396.
Chapter 9. Defining Device Classes 159

If processes are often canceled by other processes, consider whether you canmake more drives available for TSM use. Otherwise, review your scheduling ofoperations to reduce the contention for drives.This consideration also applies to the primary and copy storage poolsimultaneous write function. You must have enough drives available to allow fora successful simultaneous write.
Note: If the library associated with this device class is EXTERNAL type, it isrecommended that you explicitly specify the mount limit instead of usingMOUNTLIMIT=DRIVES.
Mount Wait PeriodThe MOUNTWAIT parameter specifies the maximum amount of time, in minutes,that the server waits for a drive to become available for the current mount request.The default mount wait period is 60 minutes. The maximum value for thisparameter is 9999 minutes.
Note: This parameter is not valid for EXTERNAL or RSM library types.
Mount Retention PeriodThe MOUNTRETENTION parameter specifies the amount of time that a mountedvolume should remain mounted after its last I/O activity. If this idle time limit isreached, the server dismounts the volume. The default mount retention period is60 minutes. The maximum value for this parameter is 9999 minutes.
Note: A device class with DEVType=NAS allows only a value of zero (0).
For example, if the mount retention value is 60, and a mounted volume remainsidle for 60 minutes, then the server dismounts the volume.
If a volume is used frequently, you can improve performance by setting a longermount retention period to avoid unnecessary mount and dismount operations.
If mount operations are being handled by manual, operator-assisted activities, youmay want to use a large mount retention period. For example, if only one operatorsupports your entire operation on a weekend, then define a long mount retentionperiod so that the operator is not being asked to mount volumes every fewminutes.
While TSM has a volume mounted, the drive is allocated to TSM and cannot beused for anything else. If you need to free the drive for other uses, you can cancelTSM operations that are using the drive and then dismount the volume. Forexample, you can cancel server migration or backup operations. For information onhow to cancel processes and dismount volumes, see “Canceling Server Processes”on page 396 and “Dismounting Idle Volumes” on page 136.
Tape Label PrefixBy using the PREFIX parameter, you can specify a prefix value that is used toconstruct the file name string that is stored in the label area of each tape volume.
The prefix string is used as the prefix of the file name that is written to the label ofeach tape. The default value for the tape label prefix string is ADSM.
Note: This parameter is used primarily in the OS/390 and z/OS operatingsystems.
160 Tivoli Storage Manager for Windows: Administrator’s Guide

Recording FormatYou can use the FORMAT parameter to specify the recording format used by TSMwhen writing data to removable media. See the Administrator’s Reference forinformation about the recording formats for each device type.
Specify FORMAT=DRIVE parameter only if all drives associated with that deviceclass are identical. If some drives associated with the device class support a higherdensity format than others and you specify FORMAT=DRIVE, mount errors canoccur. For example, suppose a device class uses two incompatible devices such asan IBM 7208-2 and an IBM 7208-12. The server might select the high-densityrecording format of 8500 for each of two new volumes. Later, if the two volumesare to be mounted concurrently, one fails because only one of the drives is capableof the high-density recording format.
The recording format that TSM uses for a given volume is selected when the firstpiece of data is written to the volume. Updating the FORMAT parameter does notaffect media that already contain data until those media are rewritten from thebeginning. This process may happen after a volume is reclaimed or deleted, orafter all of the data on the volume expires.
Estimated CapacityThe ESTCAPACITY parameter specifies the estimated capacity for volumesassigned to this device class. TSM estimates the capacity of the volumes in astorage pool based on the parameters assigned to the device class associated withthe storage pool. For tape device classes, the default values selected by the serverdepend on the recording format used to write data to the volume. You can eitheraccept the default for a given device type or specify a value.
Note: For a device class with DEVTYPE=NAS, this value is required.
See Administrator’s Reference for information about the estimated capacities ofrecording formats for each device type.
TSM also uses estimated capacity to determine when to begin reclamation storagepool volumes. For more information on how TSM uses the estimated capacityvalue, see “How TSM Fills Volumes” on page 167.
LibraryBefore the server can mount a volume, it must know which drives can be used tosatisfy the mount request. This process is done by specifying the library when thedevice class is defined. The library must contain drives that can be used to mountthe volume.
Only one library can be associated with a given device class. However, multipledevice classes can reference the same library. Unless you are using the DRIVESvalue for MOUNTLIMIT, you must ensure that the numeric value of the mountlimits of all device classes do not exceed the number of drives defined in thereferenced library.
There is no default value for this parameter. It is required, and so must bespecified when the device class is defined.
Defining and Updating Device Classes for Generic TapeDevices
To use a tape device that is supported by an operating system device driver, youmust define a device class whose device type is GENERICTAPE.
Chapter 9. Defining Device Classes 161
For a manual library with multiple drives of device type GENERICTAPE, ensurethat the device types and recording formats of the drives are compatible. Becausethe devices are controlled by the operating system device driver, the TSM server isnot aware of the following:v The actual type of device: 4mm, 8mm, digital linear tape, and so forth. For
example, if you have a 4mm device and an 8mm device, you must defineseparate manual libraries for each device.
v The actual cartridge recording format. For example, if you have a manual librarydefined with two device classes of GENERICTAPE, ensure the recording formatsare the same for both drives.
You can update the device class information by issuing the UPDATE DEVCLASScommand. Other parameters, in addition to device type, specify how to manageserver storage operations:
Mount LimitSee “Mount Limit” on page 159.
Mount Wait PeriodSee “Mount Wait Period” on page 160.
Mount Retention PeriodSee “Mount Retention Period” on page 160.
Estimated CapacityYou can specify an estimated capacity value of any volumes defined to astorage pool categorized by a GENERICTAPE device class. The defaultESTCAPACITY value for a volume in a GENERICTAPE device class is1GB. Specify a capacity appropriate for your particular tape drive.
LibrarySee “Library” on page 161.
Defining and Updating Device Classes for Optical DevicesTo use optical media, you must define a device class by issuing the DEFINEDEVCLASS command with a DEVTYPE parameter for one of the optical devices:
Parameter Description
OPTICAL 5.25-inch rewritable optical media
WORM 5.25-inch write-once optical media
Other parameters specify how to manage data storage operations involving thenew device class:
Mount LimitSee “Mount Limit” on page 159.
Mount Wait PeriodSee “Mount Wait Period” on page 160.
Mount RetentionSee “Mount Retention Period” on page 160.
Recording FormatSee “Recording Format” on page 161.
Estimated CapacitySee “Estimated Capacity” on page 161.
162 Tivoli Storage Manager for Windows: Administrator’s Guide

LibrarySee “Library” on page 161.
You can update the device class information by issuing the UPDATE DEVCLASScommand.
Defining and Updating Device Classes for Removable FileSystem Devices
Removable file devices include devices such as Iomega Zip drives or Jaz drivesand CD-ROM drives. Define a device class for these devices by issuing theDEFINE DEVCLASS command with the DEVTYPE=REMOVABLEFILE parameter.See “Configuring Removable Media Devices” on page 78 for more information.
Removable media is treated as single-sided media. Therefore, double-sidedcartridges are treated as two individual volumes in this device class. Definedouble-sided media as two separate volumes.
Other parameters specify how to manage storage operations involving the newdevice class:
Mount WaitSee “Mount Wait Period” on page 160.
Mount RetentionSee “Mount Retention Period” on page 160.
LibrarySee “Library” on page 161.
Maximum Capacity
You can specify a maximum capacity value that restricts the size ofvolumes (that is, files) associated with a REMOVABLEFILE device class.Use the MAXCAPACITY parameter with the DEFINE DEVCLASScommand.
Because the server opens only one file per physical removable medium,specify a value such that the one file makes full use of your mediacapacity. When the server detects that a volume has reached a size equal tothe maximum capacity, it treats the volume as full and stores any new dataon a different volume.
The default MAXCAPACITY value for a REMOVABLEFILE device class isthe remaining space in the file system where the removable media volumeis added to TSM.
You can update the device class information by issuing the UPDATE DEVCLASScommand.
Defining and Updating FILE Device ClassesThe FILE device type is used for storing data on disk in simulated storage volumes.The storage volumes are actually files. Data is written sequentially into standardfiles in the file system of the server machine. You can define this device class byissuing a DEFINE DEVCLASS command with the DEVTYPE=FILE parameter.Because each volume in a FILE device class is actually a file, a volume name mustbe a fully qualified file name.
Note: Do not use raw partitions with a device class type of FILE.
Chapter 9. Defining Device Classes 163

When you define or update the FILE device class, you can specify the parametersdescribed in the following sections.
Mount LimitThe mount limit value for FILE device classes is used to restrict the number ofmount points (volumes or files) that can be concurrently opened for access byserver storage and retrieval operations. Any attempts to access more volumes thanindicated by the mount limit causes the requester to wait. The default value is 1.The maximum value for this parameter is 256.
Note: The MOUNTLIMIT=DRIVES parameter is not valid for the FILE deviceclass.
When selecting a mount limit for this device class, consider how many TSMprocesses you want to run at the same time.
TSM automatically cancels some processes to run other, higher priority processes.If the server is using all available mount points in a device class to completehigher priority processes, lower priority processes must wait until a mount pointbecomes available. For example, TSM cancels the process for a client backup if themount point being used is needed for a server migration or reclamation process.TSM cancels a reclamation process if the mount point being used is needed for aclient restore operation. For additional information, see “Preemption of Client orServer Operations” on page 396.
If processes are often cancelled by other processes, consider whether you can makemore mount points available for TSM use. Otherwise, review your scheduling ofoperations to reduce the contention for resources.
Maximum Capacity ValueYou can specify a maximum capacity value that restricts the size of volumes (thatis, files) associated with a FILE device class. Use the MAXCAPACITY parameter ofthe DEFINE DEVCLASS command. When the server detects that a volume hasreached a size equal to the maximum capacity, it treats the volume as full andstores any new data on a different volume.
The default MAXCAPACITY value for a FILE device class is 4MB.
DirectoryYou can specify the directory location of the files used in the FILE device class. Thedefault is the current working directory of the server at the time the command isissued.
The directory name identifies the location where the server places the files thatrepresent storage volumes for this device class. While processing the command, theserver expands the specified directory name into its fully qualified form, startingfrom the root directory.
Later, if the server needs to allocate a scratch volume, it creates a new file in thisdirectory. The following lists the file name extension created by the server forscratch volumes depending on the type of data that is stored.
For scratch volumes used to store this data: The file extension is:Client data .BFSExport .EXPDatabase backup .DBBDatabase dump and unload .DMP
164 Tivoli Storage Manager for Windows: Administrator’s Guide
Defining and Updating SERVER Device ClassesThe SERVER device type is used for special device classes whose storage volumesare not directly attached to this server. A volume with device type SERVERconsists of one or more files archived in the server storage of another server, calleda target server. You can define this device class by issuing a DEFINE DEVCLASScommand with the DEVTYPE=SERVER parameter. For information about how touse a SERVER device class, see “Using Virtual Volumes to Store Data on AnotherServer” on page 501.
The following parameters specify how to manage data storage operations for thenew device class:v SERVERNAMEv MOUNTLIMITv MAXCAPACITYv MOUNTRETENTIONv PREFIXv RETRYPERIODv RETRYINTERVAL
You can update the device class information by issuing the UPDATE DEVCLASScommand.
Server NameThe TSM server on which you define a SERVER device class is called a sourceserver. The source server uses the SERVER device class to store data on anotherTSM server, called a target server.
When defining a SERVER device class, specify the name of the target server. Thetarget server must already be defined by using the DEFINE SERVER command.See “Using Virtual Volumes to Store Data on Another Server” on page 501 for moreinformation.
Mount LimitUse the mount limit value for SERVER device classes to restrict the number ofsimultaneous sessions between the source server and the target server. Anyattempts to access more sessions than indicated by the mount limit causes therequester to wait. The default mount limit value is 1. The maximum value for thisparameter is 256.
Note: The MOUNTLIMIT=DRIVES parameter is not valid for the SERVER deviceclass.
When selecting a mount limit, consider your network load balancing and howmany TSM processes you want to run at the same time.
TSM automatically cancels some processes to run other, higher priority processes.If the server is using all available sessions in a device class to complete higherpriority processes, lower priority processes must wait until a session becomesavailable. For example, TSM cancels the process for a client backup if a session isneeded for a server migration or reclamation process. TSM cancels a reclamationprocess if the session being used is needed for a client restore operation.
Chapter 9. Defining Device Classes 165

Also consider the resources available on the target server when setting mountlimits. Do not set a high mount limit value if the target cannot move enough dataor access enough data to satisfy all of the requests.
If processes are often cancelled by other processes, consider whether you can makemore sessions available for TSM use. Otherwise, review your scheduling ofoperations to reduce the contention for network resources.
Maximum Capacity ValueYou can specify a maximum capacity value that restricts the size of files that arecreated on the target server to store data for the source server. The defaultMAXCAPACITY value is 500MB. The storage pool volumes of this device type areexplicitly set to full when the volume is closed and dismounted.
Mount RetentionYou can specify the amount of time, in minutes, to retain an idle sequential accessvolume before dismounting it. The default value is 60. The maximum value youcan specify for this parameter is 9999. A value of 1 to 5 minutes is recommended.This parameter can improve response time for sequential access media mounts byleaving previously mounted volumes online.
PrefixYou can specify a prefix that the source server will use as the beginning portion ofthe high-level archive file name on the target server.
Retry PeriodYou can specify a retry period for communications with the target server. Whenthere is a communications failure, this period determines the amount of timeduring which the source server continues to attempt to connect to the target server.
Retry IntervalYou can specify how often the source server tries to connect to the target serverwhen there is a communications failure. During the retry period, the source servertries to connect again as often as indicated by the retry interval.
Requesting Information about a Device ClassYou can choose to view a standard or detailed report for a device class.
Task Required Privilege Class
Request information about device classes Any administrator
To display a standard report on device classes, enter:query devclass
Figure 14 on page 167 is an example of a standard report for device classes.
166 Tivoli Storage Manager for Windows: Administrator’s Guide

To display a detailed report on the TAPE8MM device class, enter:query devclass tape8mm format=detailed
Figure 15 shows an example of a detailed report for a device class.
Deleting a Device Class
Task Required Privilege Class
Delete a device classes System or unrestricted storage
You can delete a device class with the DELETE DEVCLASS command when:v No storage pools are assigned to the device class. For information on deleting
storage pools, see “Deleting a Storage Pool” on page 238.v The device class is not being used by an export or import process.
Note: You cannot delete the DISK device class from the server.
How TSM Fills VolumesThe DEFINE DEVCLASS command has an optional ESTCAPACITY parameter thatindicates the estimated capacity for sequential volumes associated with the deviceclass. If the ESTCAPACITY parameter is not specified, TSM uses a default valuebased on the recording format specified for the device class (FORMAT=).
If you specify an estimated capacity that exceeds the actual capacity of the volumein the device class, TSM updates the estimated capacity of the volume when the
Device Device Storage Device Format Est/Max MountClass Access Pool Type Capacity LimitName Strategy Count (MB)--------- ---------- ------- ------- ------ -------- -----DISK Random 9TAPE8MM Sequential 1 8MM 8200 2,472.0 2
Figure 14. Example of a Standard Device Class Report
Device Class Name: TAPE8MMDevice Access Strategy: Sequential
Storage Pool Count: 1Device Type: 8MM
Format: 8200Est/Max Capacity (MB): 2,472.0
Mount Limit: 2Mount Wait (min): 10
Mount Retention (min): 30Label Prefix: ADSM
Library: TAPELIBDirectory:
Last Update by (administrator): TSMADMINLast Update Date/Time: 01/05/2001 16:02:13
Figure 15. Example of a Detailed Device Class Report
Chapter 9. Defining Device Classes 167

volume becomes full. When TSM reaches the end of the volume, it updates thecapacity for the amount that is written to the volume.
You can either accept the default estimated capacity for a given device class, orexplicitly specify an estimated capacity. An accurate estimated capacity value is notrequired, but is useful. TSM uses the estimated capacity of volumes to determinethe estimated capacity of a storage pool, and the estimated percent utilized. Youmay want to change the estimated capacity if:v The default estimated capacity is inaccurate because data compression is being
performed by the drivesv You have volumes of nonstandard size
Using Data CompressionClient files can be compressed to decrease the amount of data sent over networksand the space occupied by the data in TSM storage. With TSM, files can becompressed by the TSM client before the data is sent to the TSM server, or by thedevice where the file is finally stored.
Note: TSM does not support data compression for server-free data movementoperations.
Use either client compression or device compression, but not both. The followingtable summarizes the advantages and disadvantages of each type of compression.
Type of Compression Advantages Disadvantages
TSM client compression Reduced load on the network Higher CPU usage by theclient
Longer elapsed time for clientoperations such as backup
Drive compression Amount of compression canbe better than TSM clientcompression on some drives
Files that have already beencompressed by the TSMclient can become larger
Either type of compression can affect tape drive performance, because compressionaffects data rate. When the rate of data going to a tape drive is slower than thedrive can write, the drive starts and stops while data is written, meaning relativelypoorer performance. When the rate of data is fast enough, the tape drive can reachstreaming mode, meaning better performance. If tape drive performance is moreimportant than the space savings that compression can mean, you may want toperform timed test backups using different approaches to determine what is bestfor your system.
Drive compression is specified with the FORMAT parameter for the drive’s deviceclass, and the hardware device must be able to support the compression format.For information about how to set up compression on the client, see “NodeCompression Considerations” on page 255 and “Registering Nodes with theServer” on page 254.
Tape Volume Capacity and Data CompressionHow TSM views the capacity of the volume where the data is stored depends onwhether files are compressed by the TSM client or by the storage device. It maywrongly appear that you are not getting the full use of the capacity of your tapes,for the following reasons:
168 Tivoli Storage Manager for Windows: Administrator’s Guide

v A tape device manufacturer often reports the capacity of a tape based on anassumption of compression by the device. If a client compresses a file before it issent, the device may not be able to compress it any further before storing it.
v TSM records the size of a file as it goes to a storage pool. If the clientcompresses the file, TSM records this smaller size in the database. If the drivecompresses the file, TSM is not aware of this compression.
Figure 16 on page 170 compares what TSM sees as the amount of data stored ontape when compression is done by the device and by the client. For this example,the tape has a physical capacity of 1.2 GB; however, the manufacturer reports thecapacity of the tape as 2.4 GB by assuming the device compresses the data by afactor of two.
Chapter 9. Defining Device Classes 169

Suppose a client backs up a 2.4 GB file:v When the client does not compress the file, the server records the file size as 2.4
GB, the file is compressed by the drive to 1.2 GB, and the file fills up one tape.v When the client compresses the file, the server records the file size as 1.2 GB, the
file cannot be compressed any further by the drive, and the file still fills onetape.
In both cases, TSM considers the volume to be full. However, TSM considers thecapacity of the volume in the two cases to be different: 2.4 GB when the drivecompresses the file, and 1.2 GB when the client compresses the file. Use theQUERY VOLUME command to see the capacity of volumes from TSM’s viewpoint.See “Monitoring the Use of Storage Pool Volumes” on page 216.
For how to set up compression on the client, see “Node CompressionConsiderations” on page 255 and “Registering Nodes with the Server” on page 254.
Figure 16. Comparing Compression at the Client and Compression at the Device
170 Tivoli Storage Manager for Windows: Administrator’s Guide

Chapter 10. Managing Storage Pools and Volumes
When you configure devices so that the Tivoli Storage Manager server can usethem to store client data, you create storage pools and storage volumes. Thissection gives you overviews and details on storage pools and storage volumes.
The procedures in “Chapter 3. Using Magnetic Disk Devices” on page 55 and“Chapter 5. Configuring Storage Devices” on page 71 show you how to set up anduse devices to provide TSM with server storage. The procedures use the set ofdefaults that TSM provides for storage pools and volumes. The defaults can workwell, but you may have specific requirements not met by the defaults. Threecommon reasons to change the defaults are the following:v Optimize and control storage device usage — Arrange the storage hierarchy and
tune migration through the hierarchy (next storage pool, migration thresholds)v Reuse tape volumes (reclamation) (Reuse is also related to policy and
expiration.)v Keep a client’s files on a minimum number of volumes (collocation)
You can also make other adjustments to tune the server for your systems. See thefollowing sections to learn more. For some quick tips, see Table 13 on page 178.
Concepts:
“Overview: Storage Pools” on page 172
“Overview: Volumes in Storage Pools” on page 180
“Access Modes for Storage Pool Volumes” on page 184
“Overview: The Storage Pool Hierarchy” on page 185
“Migration of Files in a Storage Pool Hierarchy” on page 191
“Using Cache on Disk Storage Pools” on page 199
“Keeping a Client’s Files Together: Collocation” on page 200
“Reclaiming Space in Sequential Access Storage Pools” on page 205
“Estimating Space Needs for Storage Pools” on page 212
Tasks:
“Defining or Updating Primary Storage Pools” on page 174
“Preparing Volumes for Random Access Storage Pools” on page 181
“Preparing Volumes for Sequential Access Storage Pools” on page 182
“Defining Storage Pool Volumes” on page 182
“Updating Storage Pool Volumes” on page 183
“Setting Up a Storage Pool Hierarchy” on page 186
“Monitoring Storage Pools and Volumes” on page 214
“Monitoring the Use of Storage Pool Volumes” on page 216
“Moving Files from One Volume to Another Volume” on page 228
“Deleting a Storage Pool” on page 238
“Deleting Storage Pool Volumes” on page 239
© Copyright IBM Corp. 1994, 2002 171

In this chapter, most examples illustrate how to perform tasks by using a TivoliStorage Manager command-line interface. For information about the commands,see Administrator’s Reference, or issue the HELP command from the command lineof a Tivoli Storage Manager administrative client.
Tivoli Storage Manager tasks can also be performed from the administrative Webinterface. For more information about using the administrative interface, see QuickStart.
Overview: Storage PoolsA storage volume is the basic unit of storage, such as allocated space on a disk ora single tape cartridge. A storage pool is a collection of storage volumes. Theserver uses the storage volumes to store backed-up, archived, or space-managedfiles. The group of storage pools that you set up for the TSM server to use is calledserver storage. Storage pools can be arranged in a storage hierarchy.
The server has two types of storage pools that serve different purposes: primarystorage pools and copy storage pools.
Primary Storage PoolWhen a user tries to restore, retrieve, recall, or export file data, the requested file isobtained from a primary storage pool if possible. Primary storage pool volumesare always located onsite.
A primary storage pool can use random access storage (DISK device class) orsequential access storage (for example, tape or FILE device classes).
The server has a default DISKPOOL storage pool that uses random access diskstorage. You can easily create other disk storage pools and storage pools that usetape and other sequential access media by using Device Configuration Wizard inthe TSM Console.
The server does not require separate storage pools for archived, backed-up, orspace-managed files. However, you may want to have a separate storage pool forspace-managed files. Clients are likely to require fast access to their space-managedfiles. Therefore, you may want to have those files stored in a separate storage poolthat uses your fastest disk storage.
Copy Storage PoolWhen an administrator backs up a primary storage pool, the data is stored in acopy storage pool. See “Backing Up Storage Pools” on page 539 for details.
A copy storage pool can use only sequential access storage (for example, a tapedevice class or FILE device class).
The copy storage pool provides a means of recovering from disasters or mediafailures. For example, when a client attempts to retrieve a file and the serverdetects an error in the file copy in the primary storage pool, the server marks thefile as damaged. At the next attempt to access the file, the server obtains the filefrom a copy storage pool. For details, see “Restoring Storage Pools” on page 557,“Using Copy Storage Pools to Improve Data Availability” on page 542, “Recoveringa Lost or Damaged Storage Pool Volume” on page 575, and “Maintaining theIntegrity of Files” on page 569.
172 Tivoli Storage Manager for Windows: Administrator’s Guide
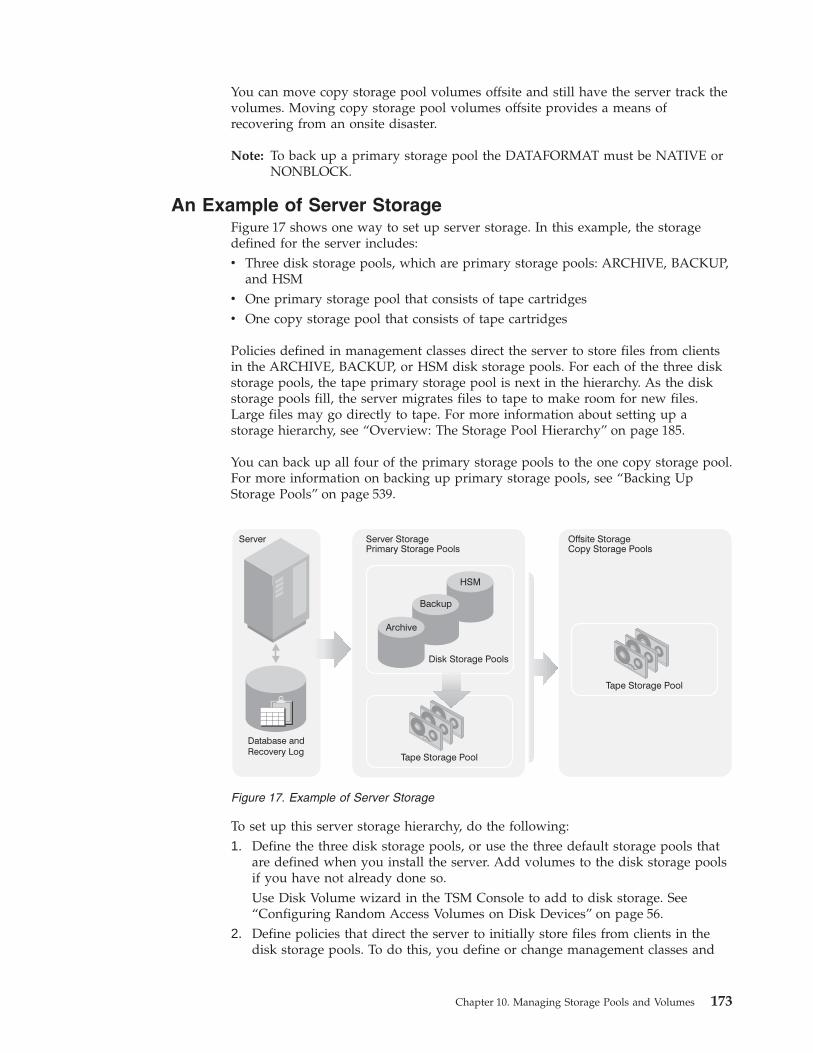
You can move copy storage pool volumes offsite and still have the server track thevolumes. Moving copy storage pool volumes offsite provides a means ofrecovering from an onsite disaster.
Note: To back up a primary storage pool the DATAFORMAT must be NATIVE orNONBLOCK.
An Example of Server StorageFigure 17 shows one way to set up server storage. In this example, the storagedefined for the server includes:v Three disk storage pools, which are primary storage pools: ARCHIVE, BACKUP,
and HSMv One primary storage pool that consists of tape cartridgesv One copy storage pool that consists of tape cartridges
Policies defined in management classes direct the server to store files from clientsin the ARCHIVE, BACKUP, or HSM disk storage pools. For each of the three diskstorage pools, the tape primary storage pool is next in the hierarchy. As the diskstorage pools fill, the server migrates files to tape to make room for new files.Large files may go directly to tape. For more information about setting up astorage hierarchy, see “Overview: The Storage Pool Hierarchy” on page 185.
You can back up all four of the primary storage pools to the one copy storage pool.For more information on backing up primary storage pools, see “Backing UpStorage Pools” on page 539.
To set up this server storage hierarchy, do the following:1. Define the three disk storage pools, or use the three default storage pools that
are defined when you install the server. Add volumes to the disk storage poolsif you have not already done so.Use Disk Volume wizard in the TSM Console to add to disk storage. See“Configuring Random Access Volumes on Disk Devices” on page 56.
2. Define policies that direct the server to initially store files from clients in thedisk storage pools. To do this, you define or change management classes and
Tape Storage Pool
Tape Storage Pool
Disk Storage Pools
Server Server StoragePrimary Storage Pools
Offsite StorageCopy Storage Pools
Database and
Recovery Log
Archive
Backup
HSM
Figure 17. Example of Server Storage
Chapter 10. Managing Storage Pools and Volumes 173

copy groups so that they point to the storage pools as destinations. Thenactivate the changed policy. See “Changing Policy” on page 302 for details.
3. Attach one or more tape devices, or a tape library, to your server system. UseDevice Configuration Wizard in the TSM Console to configure the device. See“Chapter 5. Configuring Storage Devices” on page 71 for more information. Fordetailed information on defining a storage pool, see “Defining or UpdatingPrimary Storage Pools”.
4. Update the disk storage pools so that they point to the tape storage pool as thenext storage pool in the hierarchy. See “Example: Updating Storage Pools” onpage 178.
5. Define a copy storage pool. This storage pool can use the same tape device or adifferent tape device as the primary tape storage pool. See “Defining a CopyStorage Pool” on page 235
6. Set up administrative schedules or a script to back up the disk storage poolsand the tape storage pool to the copy storage pool. Send the volumes offsite forsafekeeping. See “Backing Up Storage Pools” on page 539.
Defining or Updating Primary Storage PoolsFor most purposes, you should be able to use the Device Configuration Wizard todefine storage pools. If you decide to set some parameters not handled by thewizard or later change the storage pools, you can use either commands or theadministrative Web interface.
This section provides a summary of parameters you can set and change for storagepools using the administrative command-line or the administrative Web interface.The section also provides examples of defining and updating storage pools.
Task Required Privilege Class
Define storage pools System
Update storage pools System or unrestricted storage
When you define a primary storage pool, be prepared to provide some or all of theinformation that is shown in Table 12. Most of the information is optional. Someinformation applies only to random access storage pools or only to sequentialaccess storage pools. Required parameters are marked.
Table 12. Information for Defining a Storage Pool
Information ExplanationType ofStorage Pool
Storage pool name
(Required)
The name of the storage pool. random,sequential
Device class
(Required)
The name of the device class assigned for the storage pool. random,sequential
Pool type The type of storage pool (primary or copy). The default is to define aprimary storage pool. Once you define a storage pool, you cannot changewhether it is a primary or a copy storage pool.
random,sequential
174 Tivoli Storage Manager for Windows: Administrator’s Guide
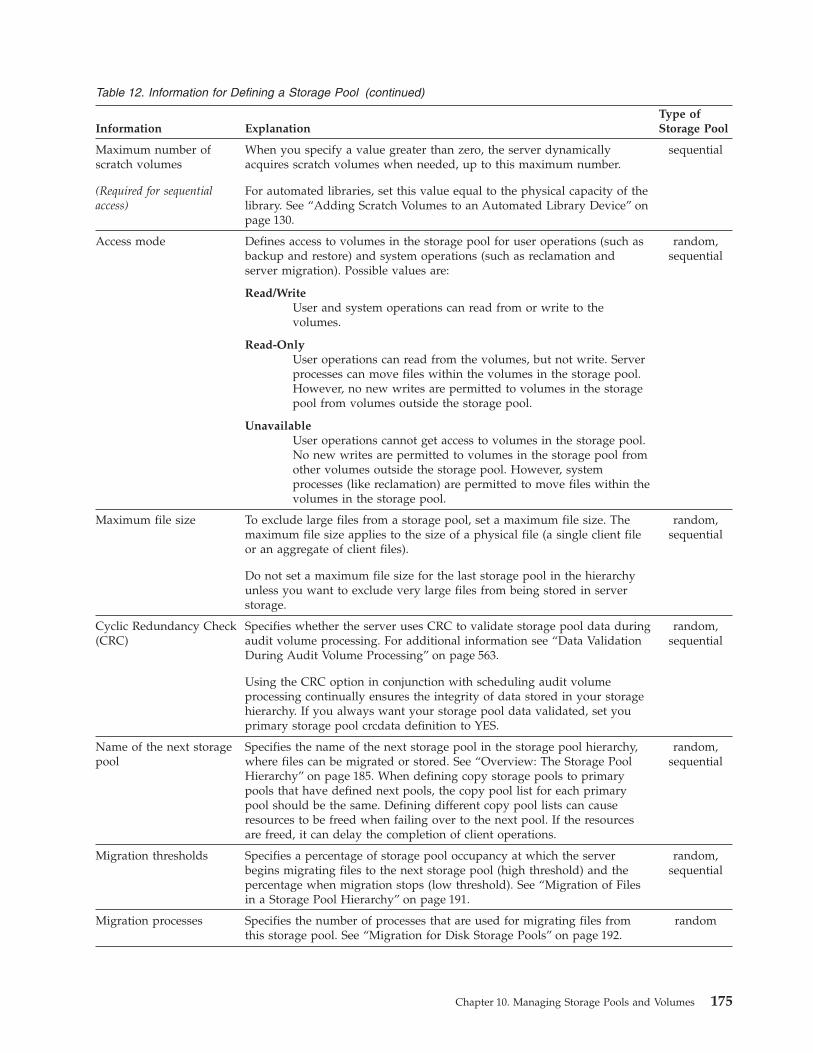
Table 12. Information for Defining a Storage Pool (continued)
Information ExplanationType ofStorage Pool
Maximum number ofscratch volumes
(Required for sequentialaccess)
When you specify a value greater than zero, the server dynamicallyacquires scratch volumes when needed, up to this maximum number.
For automated libraries, set this value equal to the physical capacity of thelibrary. See “Adding Scratch Volumes to an Automated Library Device” onpage 130.
sequential
Access mode Defines access to volumes in the storage pool for user operations (such asbackup and restore) and system operations (such as reclamation andserver migration). Possible values are:
Read/WriteUser and system operations can read from or write to thevolumes.
Read-OnlyUser operations can read from the volumes, but not write. Serverprocesses can move files within the volumes in the storage pool.However, no new writes are permitted to volumes in the storagepool from volumes outside the storage pool.
UnavailableUser operations cannot get access to volumes in the storage pool.No new writes are permitted to volumes in the storage pool fromother volumes outside the storage pool. However, systemprocesses (like reclamation) are permitted to move files within thevolumes in the storage pool.
random,sequential
Maximum file size To exclude large files from a storage pool, set a maximum file size. Themaximum file size applies to the size of a physical file (a single client fileor an aggregate of client files).
Do not set a maximum file size for the last storage pool in the hierarchyunless you want to exclude very large files from being stored in serverstorage.
random,sequential
Cyclic Redundancy Check(CRC)
Specifies whether the server uses CRC to validate storage pool data duringaudit volume processing. For additional information see “Data ValidationDuring Audit Volume Processing” on page 563.
Using the CRC option in conjunction with scheduling audit volumeprocessing continually ensures the integrity of data stored in your storagehierarchy. If you always want your storage pool data validated, set youprimary storage pool crcdata definition to YES.
random,sequential
Name of the next storagepool
Specifies the name of the next storage pool in the storage pool hierarchy,where files can be migrated or stored. See “Overview: The Storage PoolHierarchy” on page 185. When defining copy storage pools to primarypools that have defined next pools, the copy pool list for each primarypool should be the same. Defining different copy pool lists can causeresources to be freed when failing over to the next pool. If the resourcesare freed, it can delay the completion of client operations.
random,sequential
Migration thresholds Specifies a percentage of storage pool occupancy at which the serverbegins migrating files to the next storage pool (high threshold) and thepercentage when migration stops (low threshold). See “Migration of Filesin a Storage Pool Hierarchy” on page 191.
random,sequential
Migration processes Specifies the number of processes that are used for migrating files fromthis storage pool. See “Migration for Disk Storage Pools” on page 192.
random
Chapter 10. Managing Storage Pools and Volumes 175

Table 12. Information for Defining a Storage Pool (continued)
Information ExplanationType ofStorage Pool
Migration delay Specifies whether migration of files should be delayed for a minimumnumber of days. See “Keeping Files in a Storage Pool” on page 196 and“How Tivoli Storage Manager Migrates Data from Sequential AccessStorage Pools” on page 198.
random,sequential
Continue migrationprocess
Specifies whether migration of files should continue even if files do notmeet the requirement for migration delay. This setting is used only whenthe storage pool cannot go below the low migration threshold withoutmoving additional files. See “Keeping Files in a Storage Pool” on page 196and “How Tivoli Storage Manager Migrates Data from Sequential AccessStorage Pools” on page 198.
random,sequential
Cache Enables or disables cache. When cache is enabled, copies of files migratedby the server to the next storage pool are left on disk after the migration.In this way, a retrieval request can be satisfied quickly. See “Using Cacheon Disk Storage Pools” on page 199.
random
Collocation With collocation enabled, the server attempts to keep all files belonging toa client node or a client file space on a minimal number of sequentialaccess storage volumes. See “Keeping a Client’s Files Together:Collocation” on page 200.
sequential
Reclamation threshold Specifies what percentage of reclaimable space can accumulate on avolume before the server initiates a space reclamation process for thevolume. See “Choosing a Reclamation Threshold” on page 207.
sequential
Reclamation storage pool Specifies the name of the storage pool to be used for storing data fromvolumes being reclaimed in this storage pool. Use for storage pools whosedevice class only has one drive or mount point. See “Reclaiming Volumesin a Storage Pool with One Drive” on page 208.
sequential
Reuse delay period Specifies the number of days that must elapse after all of the files havebeen deleted from a volume, before the volume can be rewritten orreturned to the scratch pool. See “Delaying Reuse of Sequential AccessVolumes” on page 541.
sequential
Overflow location Specifies the name of a location where volumes are stored when they areejected from an automated library by the MOVE MEDIA command. Usefor a storage pool that is associated with an automated library or anexternal library. See “Returning Reclaimed Volumes to a Library” onpage 129.
sequential
Data Format The format in which data will be stored. NATIVE is the default dataformat. NETAPPDUMP and NONBLOCK are examples of other dataformats. NETAPPDUMP is a format used when you use Tivoli DataProtection for NDMP. For more information about NDMP, see “Chapter 6.Setting Up Tivoli Data Protection for NDMP” on page 93.
sequential
176 Tivoli Storage Manager for Windows: Administrator’s Guide

Table 12. Information for Defining a Storage Pool (continued)
Information ExplanationType ofStorage Pool
Copy Storage Pools Specifies the names of copy storage pools where copies of files beingstored in the primary storage pool, during client backup, archive or HSMstores, are also simultaneously written to all listed copy storage pools. Thisoption is restricted to only primary storage pools using NATIVE orNONBLOCK data format. See the Copy Continue entry and“Simultaneous Write to a Primary Storage Pool and Copy Storage Pools”on page 179 for related information.
Notes:
1. The COPYSTGPOOLS parameter is not intended to replace theBACKUP STGPOOL command. If you use the copy storage poolsfunction, ensure that the copy of the storage pool is complete by usingthe BACKUP STGPOOL command.
2. When defining copy storage pools to primary pools that have definednext pools, the copy pool list for each primary pool should be thesame. Defining different copy pool lists can cause resources to be freedwhen failing over to the next pool. If the resources are freed, it candelay the completion of client operations.
sequential
Copy Continue Specifies how the server should react to a copy storage pool write failurefor any of the copy storage pools listed in the COPYSTGPOOLSparameter. With a value of YES, during a write failure, the server willexclude the failing copy storage pool from any further writes while thatspecific client session is active. With a value of NO, during a write failure,the server will fail the entire transaction including the write to the primarystorage pool.
sequential
Example: Defining Storage PoolsFor this example, suppose you have determined that an engineering departmentrequires a separate storage hierarchy. You want the department’s backed-up files togo to a disk storage pool. When that pool fills, you want the files to migrate to atape storage pool. You want the pools to have the following characteristics:v Disk primary storage pool
– The pool named ENGBACK1 is the storage pool for the engineeringdepartment.
– The size of the largest file that can be stored is 5MB. Files larger than 5MB arestored in the tape storage pool.
– Files migrate from the disk storage pool to the tape storage pool when thedisk storage pool is 85% full. File migration to the tape storage pool stopswhen the disk storage pool is down to 40% full.
– The access mode is the default, read/write.– Cache is used.
v Tape primary storage pool– The name of the pool is BACKTAPE.– The pool uses the device class TAPE, which has already been defined.– No limit is set for the maximum file size, because this is the last storage pool
in the hierarchy.– To group files from the same client on a small number of volumes, use
collocation at the client node level.– Use scratch volumes for this pool, with a maximum number of 100 volumes.– The access mode is the default, read/write.
Chapter 10. Managing Storage Pools and Volumes 177

– Use the default for reclamation: Reclaim a partially full volume (to allow tapereuse) when 60% of the volume’s space can be reclaimed.
You can define the storage pools in a storage pool hierarchy from the top down orfrom the bottom up. Defining the hierarchy from the bottom up requires fewersteps. To define the hierarchy from the bottom up, perform the following steps:1. Define the storage pool named BACKTAPE with the following command:
define stgpool backtape tapedescription='tape storage pool for engineering backups'maxsize=nolimit collocate=yes maxscratch=100
2. Define the storage pool named ENGBACK1 with the following command:define stgpool engback1 diskdescription='disk storage pool for engineering backups'maxsize=5m nextstgpool=backtape highmig=85 lowmig=40
Restrictions:
1. You cannot establish a chain of storage pools that lead to an endless loop. Forexample, you cannot define StorageB as the next storage pool for StorageA, andthen define StorageA as the next storage pool for StorageB.
2. The storage pool hierarchy includes only primary storage pools, not copystorage pools.
3. If a storage pool uses the data format NETAPPDUMP, the server will notperform storage pool backup, migration, reclamation, MOVE DATA, andAUDIT VOLUME on that storage pool. For more information on theNETAPPDUMP data format, see “Chapter 6. Setting Up Tivoli Data Protectionfor NDMP” on page 93.
Example: Updating Storage PoolsYou can update storage pools to change the storage hierarchy and othercharacteristics.
For example, suppose you had already defined the ENGBACK1 disk storage poolaccording to the previous example. Now you have decided to increase themaximum size of a physical file that may be stored in the storage pool. Use thefollowing command:update stgpool engback1 maxsize=100m
Note:
v You cannot use this command to change the data format for a storagepool.
v For storage pools that have the NETAPPDUMP data format, you canmodify only the following parameters: DESCRIPTION, ACCESS,COLLOCATE, MAXSCRATCH, REUSEDELAY.
Task Tips for Storage PoolsTable 13 gives tips on how to accomplish some tasks that are related to storagepools.
Table 13. Task Tips for Storage Pools
For this Goal Do This For More Information
Keep the data for a client on as fewvolumes as possible
Enable collocation for the storagepool
“Keeping a Client’s Files Together:Collocation” on page 200
178 Tivoli Storage Manager for Windows: Administrator’s Guide

Table 13. Task Tips for Storage Pools (continued)
For this Goal Do This For More Information
Reduce the number of volumemounts needed to back up multipleclients
Disable collocation for the storagepool
“Keeping a Client’s Files Together:Collocation” on page 200
Perform a simultaneous write to aprimary storage pool and copystorage pools
Provide a list of copy storage poolswhen defining the primary storagepool.
“Simultaneous Write to a PrimaryStorage Pool and Copy Storage Pools”
Specify how the server reuses tapes Set a reclamation threshold for thestorage pool
Optional: Identify a reclamationstorage pool
“Reclaiming Space in SequentialAccess Storage Pools” on page 205
Move data from disk to tapeautomatically when needed
Set a migration threshold for thestorage pool
Identify the next storage pool
“Migration for Disk Storage Pools” onpage 192
Move data from disk to tapeautomatically based on howfrequently users access the data orhow long the data has been in thestorage pool
Set a migration threshold for thestorage pool
Identify the next storage pool
Set the migration delay period
“Migration for Disk Storage Pools” onpage 192
Back up your storage pools Define a copy storage pool
Set up a backup schedule
“Defining a Copy Storage Pool” onpage 235
“Automating a Basic AdministrativeCommand Schedule” on page 401
Have clients back up directly to atape storage pool
Define a sequential access storagepool that uses a tape device class
Change the policy that the clients use,so that the backup copy group pointsto the tape storage pool as thedestination.
“Defining or Updating PrimaryStorage Pools” on page 174
“Changing Policy” on page 302
Simultaneous Write to a Primary Storage Pool and CopyStorage Pools
To simultaneously write data to a primary storage pool and one or more copystorage pools, you can specify a list of copy storage pools in a primary storagepool definition using the COPYSTGPOOLS parameter. When a client backs up,archives, or migrates a file, the file is written to the primary storage pool and issimultaneously stored into each copy storage pool. If a write failure occurs for anyof the copy storage pools, the COPYCONTINUE parameter setting determines howthe server should react. See Table 12 on page 174 for additional information aboutstorage pool definitions.
When using copy storage pools for the simultaneous write of data to a primarystorage pool and associated copy storage pools, be sure that all resources, such asenough drives, are available for the write operation. For example, eachsimultaneous write operation will need all of the volumes to be simultaneouslymounted. This requires that the number of available drives must be equal to orgreater than the number of volumes to be simultaneously mounted. For additionalinformation, see “Mount Limit” on page 159 and the REGISTER NODE commandin the Administrator’s Reference for information about the MAXNUMMP parameter.
Chapter 10. Managing Storage Pools and Volumes 179

Note: When defining copy storage pools to primary pools that have defined nextpools, the copy pool list for each primary pool should be the same. Definingdifferent copy pool lists can cause resources to be freed when using the nextpool. If the resources are freed, it can delay the completion of clientoperations.
Overview: Volumes in Storage PoolsStorage pool volumes are the physical media that are assigned to a storage pool.Some examples of volumes are:v Space allocated on a disk drivev A tape cartridgev An optical disk
Storage pools and their volumes are either random access or sequential access,depending on the device type of the device class to which the pool is assigned.
Random Access Storage Pool VolumesRandom access storage pools consist of volumes on disk. Random access storagepools are always associated with the DISK device class. A volume in a randomaccess storage pool is a fixed-size file that is created when you define a volume forthe storage pool. See “Preparing Volumes for Random Access Storage Pools” onpage 181.
Sequential Access Storage Pool VolumesVolumes in sequential access storage pools include any supported device type towhich the server writes data sequentially. Some examples of sequential accessvolumes are:v Tape cartridgev Optical diskv File
Each volume defined in a sequential access storage pool must be of the same typeas the device type of the associated device class. See Table 14 for the type ofvolumes associated with each device type.
For preparing sequential access volumes, see “Preparing Volumes for SequentialAccess Storage Pools” on page 182.
Table 14. Volume Types
Device Type Volume Description LabelRequired
3570 IBM 3570 tape cartridge Yes
3590 IBM 3590 tape cartridge Yes
4MM 4mm tape cartridge Yes
8MM 8mm tape cartridge Yes
DLT A digital linear tape Yes
DTF A digital tape format (DTF) tape Yes
FILE A file in the file system of the server machine No
GENERICTAPE A tape that is compatible with the drives that are defined to the device class Yes
NAS A network-attached storage (NAS) device is defined to the device class Yes
180 Tivoli Storage Manager for Windows: Administrator’s Guide

Table 14. Volume Types (continued)
Device Type Volume Description LabelRequired
OPTICAL A two-sided 5.25-inch rewritable optical cartridge Yes
QIC A 1/4-inch tape cartridge Yes
REMOVABLEFILE A file on a removable medium. If the medium has two sides, each side is aseparate volume.
Yes
SERVER One or more objects that are archived in the server storage of another server No
WORM A two-sided 5.25-inch write-once optical cartridge Yes
Scratch Volumes Versus Defined VolumesYou can define volumes in a sequential access storage pool or you can specify thatthe server dynamically acquire scratch volumes. You can also use a combination ofdefined and scratch volumes. What you choose depends on the amount of controlyou need over individual volumes.
Use defined volumes when you want to control precisely which volumes are usedin the storage pool. Using defined volumes may be useful when you want toestablish a naming scheme for volumes.
Use scratch volumes to enable the server to define a volume when needed anddelete the volume when it becomes empty. Using scratch volumes frees you fromthe burden of explicitly defining all of the volumes in a storage pool.
The server tracks whether a volume being used was originally a scratch volume.Scratch volumes that the server acquired for a primary storage pool are deletedfrom the server database when they become empty. The volumes are then availablefor reuse by the server or other applications. For scratch volumes that wereacquired in a FILE device class, the space that the volumes occupied is freed by theserver and returned to the file system.
Scratch volumes in a copy storage pool are handled in the same way as scratchvolumes in a primary storage pool, except for volumes with the access value ofoffsite. If an offsite volume becomes empty, the server does not immediately returnthe volume to the scratch pool. The delay prevents the empty volumes from beingdeleted from the database, making it easier to determine which volumes should bereturned to the onsite location. The administrator can query the server for emptyoffsite copy storage pool volumes and return them to the onsite location. Thevolume is returned to the scratch pool only when the access value is changed toREADWRITE, READONLY, or UNAVAILABLE.
Preparing Volumes for Random Access Storage PoolsFor a random access storage pool, you must define volumes.
Task Required Privilege Class
Define volumes in any storage pool System or unrestricted storage
Define volumes in specific storage pools System, unrestricted storage, or restrictedstorage for those pools
To prepare a volume for use in a random access storage pool, you can use the DiskVolume wizard in the TSM Console. The Formatter panels guide you through thesteps you need to take. If you choose not to use the Formatter, you can instead
Chapter 10. Managing Storage Pools and Volumes 181

define the volume. For example, you want to define a 21MB volume for theBACKUPPOOL storage pool. You want the volume to be located in the pathc:\program files\tivoli\tsm\server and named stgvol.001. Enter the followingcommand:define volume backuppool 'c:\program files\tivoli\tsm\server\stgvol.001'
formatsize=21
If you do not specify a full path name for the volume name, the command uses thecurrent path.
Tips:
1. For performance reasons, allocate storage pool volumes on disk drives thatreside on the TSM server machine, not on remotely mounted file systems.
2. The file system where storage pool volumes are allocated can have an effect onperformance and reliability. For better performance in backing up and restoringlarge numbers of small files, allocate storage pool volumes on a FAT filesystem. To take advantage of the ability of the operating system to recover fromproblems that can occur during I/O to a disk, allocate storage pool volumes onNTFS.
Preparing Volumes for Sequential Access Storage PoolsFor sequential access storage pools with a FILE or SERVER device type, no labelingor other preparation of volumes is necessary.
For sequential access storage pools with other than a FILE or SERVER device type,you must prepare volumes for use. When the server accesses a sequential accessvolume, it checks the volume name in the header to ensure that the correct volumeis being accessed. To prepare a volume:1. Label the volume. Table 14 on page 180 shows the types of volumes that require
labels. You must label those types of volumes before the server can use them.See “Labeling Media” on page 125.
Tip: When you use the LABEL LIBVOLUME command with drives in anautomated library, you can label and check in the volumes with onecommand.
2. For storage pools in automated libraries, use the CHECKIN LIBVOLUMEcommand to check the volume into the library. See “Checking Media intoAutomated Library Devices” on page 126.
3. If you have not allowed scratch volumes in the storage pool, you must identifythe volume, by name, to the server. For details, see “Defining Storage PoolVolumes”.If you allowed scratch volumes in the storage pool by specifying a valuegreater than zero for the MAXSCRATCH parameter, you can let the server usescratch volumes, identify volumes by name, or do both. See “Using ScratchVolumes” on page 183 for information about scratch volumes.
Defining Storage Pool Volumes
Task Required Privilege Class
Define volumes in any storage pool System or unrestricted storage
Define volumes in specific storage pools System, unrestricted storage, or restrictedstorage for those pools
182 Tivoli Storage Manager for Windows: Administrator’s Guide

When you define a storage pool volume, you inform the server that the volume isavailable for storing backup, archive, or space-managed data.
For a sequential access storage pool, the server can use dynamically acquiredscratch volumes, volumes that you define, or a combination.
To define a volume named VOL1 in the ENGBACK3 tape storage pool, enter:define volume engback3 vol1
Using Scratch VolumesYou do not have to define volumes in sequential access storage pools if you allowstorage pools to use scratch volumes. Use the MAXSCRATCH parameter when youdefine or update the storage pool. Setting the MAXSCRATCH parameter to a valuegreater than zero lets the storage pool dynamically acquire volumes as needed. Theserver automatically defines the volumes as they are acquired. The server alsoautomatically deletes scratch volumes from the storage pool when the server nolonger needs them.
Before the server can use a scratch volume with a device type other than FILE orSERVER, the volume must have a label. See “Preparing Volumes for SequentialAccess Storage Pools” on page 182.
Updating Storage Pool Volumes
Task Required Privilege Class
Update volumes System or operator
You can update the attributes of a storage pool volume assigned to a primary orcopy storage pool. Update a volume to:v Reset any error state for a volume, by updating the volume to an access mode of
read/write.v Change the access mode of a volume, for example if a tape cartridge is moved
offsite (offsite access mode) or damaged (destroyed access mode). See “AccessModes for Storage Pool Volumes” on page 184.
v Change the location for a volume in a sequential access storage pool.
An example of when to use the UPDATE VOLUME command is if youaccidentally damage a volume. You can change the access mode to unavailable sothat the server does not try to write or read data from the volume. For example, ifthe volume name is VOL1, enter the following command:update volume vol1 access=unavailable
When using the UPDATE VOLUME command, be prepared to supply some or allof the information shown in Table 15.
Table 15. Information for Updating a Storage Pool Volume
Information Explanation
Volume name
(Required)
Specifies the name of the storage pool volume to be updated. You canspecify a group of volumes to update by using wildcard characters inthe volume name. You can also specify a group of volumes byspecifying the storage pool, device class, current access mode, or statusof the volumes you want to update. See the parameters that follow.
Chapter 10. Managing Storage Pools and Volumes 183

Table 15. Information for Updating a Storage Pool Volume (continued)
Information Explanation
New access mode Specifies the new access mode for the volume (how users and serverprocesses such as migration can access files in the storage pool volume).See “Access Modes for Storage Pool Volumes” for descriptions of accessmodes.
A random access volume must be varied offline before you can changeits access mode to unavailable or destroyed. To vary a volume offline, usethe VARY command. See “Varying Disk Volumes Online or Offline” onpage 57.
If a scratch volume that is empty and has an access mode of offsite isupdated so that the access mode is read/write, read-only, or unavailable,the volume is deleted from the database.
Location Specifies the location of the volume. This parameter can be specifiedonly for volumes in sequential access storage pools.
Storage pool Restricts the update to volumes in the specified storage pool.
Device class Restricts the update to volumes in the specified device class.
Current accessmode
Restricts the update to volumes that currently have the specified accessmode.
Status Restricts the update to volumes with the specified status (online, offline,empty, pending, filling, or full).
Preview Specifies whether you want to preview the update operation withoutactually performing the update.
Access Modes for Storage Pool VolumesAccess to any volume in a storage pool is determined by the access mode assignedto that volume. You can change the access mode of a volume. The server can alsochange the access mode based on what happens when it tries to access a volume.For example, if the server cannot write to a volume having read/write accessmode, the server automatically changes the access mode to read-only.
The access modes are:
Read/writeAllows files to be read from or written to a volume in the storage pool.
If the server cannot write to a read/write access volume, the serverautomatically changes the access mode to read-only.
If a scratch volume that is empty and has an access mode of offsite isupdated so that the access mode is read/write, the volume is deleted fromthe database.
Read-onlyAllows files to be read from but not written to a disk or tape volume.
If a scratch volume that is empty and has an access mode of offsite isupdated so that the access mode is read-only, the volume is deleted fromthe database.
UnavailableSpecifies that the volume is not available for any type of access by theserver.
184 Tivoli Storage Manager for Windows: Administrator’s Guide

You must vary offline a random access volume before you can change itsaccess mode to unavailable. To vary a volume offline, use the VARYcommand. See “Varying Disk Volumes Online or Offline” on page 57.
If a scratch volume that is empty and has an access mode of offsite isupdated so that the access mode is unavailable, the volume is deleted fromthe database.
DestroyedSpecifies that a primary storage pool volume has been permanentlydamaged. Neither users nor system processes (like migration) can accessfiles stored on the volume.
This access mode is used to indicate an entire volume that should berestored using the RESTORE STGPOOL or RESTORE VOLUME command.After all files on a destroyed volume are restored to other volumes, thedestroyed volume is automatically deleted from the database. See “HowRestore Processing Works” on page 532 for more information.
Only volumes in primary storage pools can be updated to an access modeof destroyed.
You must vary offline a random access volume before you can change itsaccess mode to destroyed. To vary a volume offline, use the VARYcommand. See “Varying Disk Volumes Online or Offline” on page 57. Onceyou update a random access storage pool volume to destroyed, you cannotvary the volume online without first changing the access mode.
If you update a sequential access storage pool volume to destroyed, theserver does not attempt to mount the volume.
If a volume contains no files and the UPDATE VOLUME command is usedto change the access mode to destroyed, the volume is deleted from thedatabase.
OffsiteSpecifies that a copy storage pool volume is at an offsite location andtherefore cannot be mounted. Use this mode to help you track volumesthat are offsite. The server treats offsite volumes differently, as follows:v Mount requests are not generated for offsite volumesv Data can be reclaimed or moved from offsite volumes by retrieving files
from other storage poolsv Empty, offsite scratch volumes are not deleted from the copy storage
pool
You can only update volumes in a copy storage pool to offsite accessmode. Volumes that have the device type of SERVER (volumes that areactually archived objects stored on another TSM server) cannot have anaccess mode of offsite.
Overview: The Storage Pool HierarchyYou can set up your devices so that the server automatically moves data from onedevice to another, or one media type to another. The selection can be based oncharacteristics such as file size or storage capacity. To do this, you set up differentprimary storage pools to form a storage pool hierarchy. A typical implementationmay have a disk storage pool with a subordinate tape storage pool. When a clientbacks up a file, the server may initially store the file on disk according to thepolicy for that file. Later, the server may move the file to tape when the disk
Chapter 10. Managing Storage Pools and Volumes 185

becomes full. This action by the server is called migration. You can also place asize limit on files that are stored on disk, so that large files are stored initially ontape instead of on disk.
For example, your fastest devices are disks, but you do not have enough space onthese devices to store all data that needs to be backed up over the long term. Youhave tape drives, which are slower to access, but have much greater capacity. Youcan define a hierarchy so that files are initially stored on the fast disk volumes inone storage pool. This provides clients with quick response to backup requests andsome recall requests. As the disk storage pool becomes full, the server migrates, ormoves, data to volumes in the tape storage pool.
Migration of files from disk to sequential storage pool volumes is particularlyuseful because the server migrates all the files for a single node together. Thisgives you partial collocation for clients. Migration of files is especially helpful ifyou decide not to enable collocation for sequential storage pools. See “Keeping aClient’s Files Together: Collocation” on page 200 for details.
Setting Up a Storage Pool HierarchyYou can set up a storage pool hierarchy when you configure devices by using theDevice Configuration Wizard. You can also go back to this wizard to change thestorage hierarchy.
You establish a hierarchy by identifying the next storage pool, sometimes called thesubordinate storage pool. The server migrates data to the next storage pool if theoriginal storage pool is full or unavailable. See “Migration of Files in a StoragePool Hierarchy” on page 191 for detailed information on how migration betweenstorage pools works.
Restrictions:
1. You cannot establish a chain of storage pools that leads to an endless loop. Forexample, you cannot define StorageB as the next storage pool for StorageA, andthen define StorageA as the next storage pool for StorageB.
2. The storage pool hierarchy includes only primary storage pools, not copystorage pools. See “Using Copy Storage Pools to Back Up a Storage Hierarchy”on page 190.
3. A storage pool must use the NATIVE or NONBLOCK data formats to be partof a storage pool hierarchy. For example, a storage pool using theNETAPPDUMP data format cannot be part of a storage pool hierarchy.
Example: Defining a Storage Pool HierarchyWhen you are adding clients, you can set up a storage pool hierarchy. You can alsouse the Storage Pool Hierarchy wizard in the TSM Console.1. From the TSM Console, expand the tree for the machine you are configuring.2. Click Wizards, then double click Storage Pool Hierarchy in the right pane. The
Storage Pool Hierarchy in the right pane.3. Follow the instructions in the wizard to rearrange storage pools in the
hierarchy.
You can also rearrange the hierarchy by using commands. The following showsone example.
For this example, suppose that you have determined that an engineeringdepartment requires a separate storage hierarchy. You set up policy so that theserver initially stores backed up files for this department to a disk storage pool.
186 Tivoli Storage Manager for Windows: Administrator’s Guide

When that pool fills, you want the server to migrate files to a tape storage pool.You want the pools to have the following characteristics:v Primary storage pool on disk
– Name the storage pool ENGBACK1.– Limit the size of the largest file that can be stored to 5MB. The server stores
files that are larger than 5MB in the tape storage pool.– Files migrate from the disk storage pool to the tape storage pool when the
disk storage pool is 85% full. File migration to the tape storage pool stopswhen the disk storage pool is down to 40% full.
– Use caching, so that migrated files stay on disk until the space is needed forother files.
v Primary storage pool on tape– Name the storage pool BACKTAPE.– Use the device class TAPE, which has already been defined, for this storage
pool.– Do not set a limit for the maximum file size, because this is the last storage
pool in the hierarchy.– Use scratch volumes for this pool, with a maximum number of 100 volumes.
You can define the storage pools in a storage pool hierarchy from the top down orfrom the bottom up. Defining the hierarchy from the bottom up requires fewersteps. To define the hierarchy from the bottom up, perform the following steps:1. Define the storage pool named BACKTAPE with the following command:
define stgpool backtape tapedescription='tape storage pool for engineering backups'maxsize=nolimit collocate=yes maxscratch=100
2. Define the storage pool named ENGBACK1 with the following command:define stgpool engback1 diskdescription='disk storage pool for engineering backups'maxsize=5M nextstgpool=backtape highmig=85 lowmig=40
Example: Updating a Storage Pool HierarchyIf you have already defined the storage pool at the top of the hierarchy, you canupdate the storage hierarchy to include a new storage pool. You can update thestorage pool by using the UPDATE STGPOOL command or by using the TSMConsole, which includes a wizard. The wizard allows you to change your storagepool hierarchy by using a drag and drop interface.
To use the Storage Pool Hierarchy wizard in the TSM Console, do the following:1. From the TSM Console, expand the tree for the machine you are configuring.2. Click Wizards, then double click Storage Pool Hierarchy in the right pane. The
Storage Pool Hierarchy in the right pane.3. Follow the instructions in the wizard to rearrange storage pools in the
hierarchy.
You can also rearrange the hierarchy by using commands. The following showsone example.
For example, suppose that you had already defined the ENGBACK1 disk storagepool. Now you have decided to set up a tape storage pool to which files fromENGBACK1 can migrate. Perform the following steps to define the new tapestorage pool and update the hierarchy:1. Define the storage pool named BACKTAPE with the following command:
Chapter 10. Managing Storage Pools and Volumes 187

define stgpool backtape tapedescription='tape storage pool for engineering backups'maxsize=nolimit collocate=yes maxscratch=100
2. Specify that BACKTAPE is the next storage pool defined in the storagehierarchy for ENGBACK1. To update ENGBACK1, enter:update stgpool engback1 nextstgpool=backtape
How the Server Groups Files before StoringWhen a user backs up or archives files from a client node, the server may groupmultiple client files into an aggregate (a single physical file). The size of theaggregate depends on the sizes of the client files being stored, and the number ofbytes and files allowed for a single transaction. Two options, one in the serveroptions file and one in the client options file, affect the number of bytes and filesallowed for a single transaction:v The TXNGROUPMAX option in the server options file indicates the maximum
number of logical files (client files) that a client may send to the server in asingle transaction. The server can tune this option automatically if you set theSELFTUNETXNSIZE option to YES. The server then uses the value that isspecified for TXNGROUPMAX in the server options file and adjusts it for eachnode until it obtains the best performance. It is recommended that the clientspecify the maximum transaction byte limit in the client options and rely on theautomatic tuning.
Note: Although the values of TXNGROUPMAX, MOVEBATCHSIZE, andMOVESIZETHRESH may be changed, the settings in the server optionsfile are not changed. Issuing a QUERY OPTION command displays onlywhat is set in the server options file.
v The TXNBYTELIMIT option in the client options file indicates the total numberof bytes that the client can send to the server in a single transaction.This option sets a target size for the aggregate file. An aggregate file will usuallybe smaller than the value specified by the TXNBYTELIMIT option. A logical file(a single user’s file) that is larger than the value specified by TXNBYTELIMIToption will not become part of an aggregate, but will be stored as a singlephysical file.The recommended value is 25600.
Together these options allow you to control the size of aggregate files stored by theserver.
When a Tivoli Space Manager client (HSM client) migrates files to the server, thefiles are not grouped into an aggregate.
Where the Files Are StoredWhen a user backs up, archives, or migrates a file from a client node, the serverlooks at the management class that is bound to the file. The management classspecifies the destination, the storage pool in which to store the file. The server thenchecks that storage pool to determine the following:v If it is possible to write file data to the storage pool (access mode).v If the size of the physical file exceeds the maximum file size allowed in the
storage pool. For backup and archive operations, the physical file may be anaggregate file or a single client file.
v Whether sufficient space is available on the available volumes in the storagepool.
188 Tivoli Storage Manager for Windows: Administrator’s Guide

v What the next storage pool is, if any of the previous conditions prevent the filefrom being stored in the storage pool that is being checked.
Using these factors, the server determines if the file can be written to that storagepool or the next storage pool in the hierarchy.
Subfile backups: When the client backs up a subfile, it still reports the size of theentire file. Therefore, allocation requests against server storage and placement inthe storage hierarchy are based on the full size of the file. The server does notaggregate a subfile with other files if the size of the entire file is too large toaggregate. For example, the entire file is 8MB, but the subfile is only 10KB. Theserver does not typically aggregate a large file, so the server begins to store this fileas a stand-alone file. However, the client sends only 10KB, and it is now too latefor the server to aggregate other files with this 10KB file. As a result, the benefitsof aggregation are not always realized when clients back up subfiles.
How the Server Stores Files in a Storage HierarchyAs an example of how the server stores files in a storage hierarchy, assume acompany has a storage pool hierarchy as shown in Figure 18.
The storage pool hierarchy consists of two storage pools:
DISKPOOLThe top of the storage hierarchy. It contains fast disk volumes for storingdata.
TAPEPOOLThe next storage pool in the hierarchy. It contains tape volumes accessedby high-performance tape drives.
Assume a user wants to archive a 5MB file that is named FileX. FileX is bound to amanagement class that contains an archive copy group whose storage destinationis DISKPOOL, see Figure 18.
When the user archives the file, the server determines where to store the file basedon the following process:1. The server selects DISKPOOL because it is the storage destination specified in
the archive copy group.
Read/Write Access
Read/Write Access
Max File Size=3MB
TAPEPOOL
DISKPOOL
Figure 18. Storage Hierarchy Example
Chapter 10. Managing Storage Pools and Volumes 189

2. Because the access mode for DISKPOOL is read/write, the server checks themaximum file size allowed in the storage pool.The maximum file size applies to the physical file being stored, which may be asingle client file or an aggregate file. The maximum file size allowed inDISKPOOL is 3MB. FileX is a 5MB file and therefore cannot be stored inDISKPOOL.
3. The server searches for the next storage pool in the storage hierarchy.If the DISKPOOL storage pool has no maximum file size specified, the serverchecks for enough space in the pool to store the physical file. If there is notenough space for the physical file, the server uses the next storage pool in thestorage hierarchy to store the file.
4. The server checks the access mode of TAPEPOOL, which is the next storagepool in the storage hierarchy. The access mode for TAPEPOOL is read/write.
5. The server then checks the maximum file size allowed in the TAPEPOOLstorage pool. Because TAPEPOOL is the last storage pool in the storagehierarchy, no maximum file size is specified. Therefore, if there is availablespace in TAPEPOOL, FileX can be stored in it.
Using Copy Storage Pools to Back Up a Storage HierarchyCopy storage pools enable you to back up your primary storage pools for anadditional level of data protection for clients. See “Backing Up Storage Pools” onpage 539 for details. Copy storage pools are not part of a storage hierarchy.
For efficiency, it is recommended that you use one copy storage pool to back up allprimary storage pools that are linked to form a storage hierarchy. By backing upall primary storage pools to one copy storage pool, you do not need to recopy afile when the file migrates from its original primary storage pool to anotherprimary storage pool in the storage hierarchy.
When defining copy storage pools to primary pools that have defined next pools,the copy pool list for each primary pool should be the same. Defining differentcopy pool lists can cause resources to be freed when failing over to the next pool.If the resources are freed, it can delay the completion of client operations.
In most cases, a single copy storage pool can be used for backup of all primarystorage pools. The number of copy storage pools you need depends on whetheryou have more than one primary storage pool hierarchy and on what type ofdisaster recovery protection you want to implement.
Multiple copy storage pools may be needed to handle particular situations,including:v Special processing of certain primary storage hierarchies (for example, archive
storage pools or storage pools dedicated to priority clients)v Creation of multiple copies for multiple locations (for example, to keep one copy
onsite and one copy offsite)v Rotation of full storage pool backups (see “Backing Up Storage Pools” on
page 539 for more information)
Using the Hierarchy to Stage Client Data from Disk to TapeA common way to use the storage hierarchy is to initially store client data on disk,then let the server migrate the data to tape. Typically you would need to ensurethat you have enough disk storage to handle one night’s worth of the clients’
190 Tivoli Storage Manager for Windows: Administrator’s Guide

incremental backups. While not always possible, this guideline proves to bevaluable when considering storage pool backups.
For example, if you have enough disk space for nightly incremental backups forclients and have tape devices, you can set up the following pools:v A primary storage pool on disk, with enough volumes assigned to contain the
nightly incremental backups for clientsv A primary storage pool on tape, which is identified as the next storage pool in
the hierarchy for the disk storage poolv A copy storage pool on tape
You can then schedule the following steps every night:1. Perform an incremental backup of the clients to the disk storage pool.2. After clients complete their backups, back up the disk primary storage pool
(now containing the incremental backups) to the copy storage pool.Backing up disk storage pools before migration processing allows you to copyas many files as possible while they are still on disk. This saves mount requestswhile performing your storage pool backups.
3. Start the migration of the files in the disk primary storage pool to the tapeprimary storage pool (the next pool in the hierarchy) by lowering the highmigration threshold. For example, lower the threshold to 40%.When this migration completes, raise the high migration threshold back to100%.
4. Back up the tape primary storage pool to the copy storage pool to ensure thatall files have been backed up.The tape primary storage pool must still be backed up to catch any files thatmight have been missed in the backup of the disk storage pools (for example,large files that went directly to sequential media).
See “Estimating Space Needs for Storage Pools” on page 212 for more informationabout storage pool space.
Migration of Files in a Storage Pool HierarchyThe server provides automatic migration to maintain free space in a primarystorage pool. The server can migrate data from one storage pool to the next storagepool in the hierarchy. This process helps to ensure that there is sufficient free spacein the storage pools at the top of the hierarchy, where faster devices can providethe most benefit to clients. For example, the server can migrate data stored in arandom access disk storage pool to a slower but less expensive sequential accessstorage pool.
Note: You should not run MOVE DATA or MOVE NODEDATA and migrationprocessing concurrently on the same storage pool.
You can control:
When migration begins and endsYou use migration thresholds to control when migration begins and ends.Thresholds are set as levels of the space that is used in a storage pool,expressed as a percent of total space available in the storage pool. For adisk storage pool, the server compares the threshold with a calculation ofthe amount of data stored in the pool as a percent of the actual datacapacity of the volumes in the pool. For a sequential access storage pool,
Chapter 10. Managing Storage Pools and Volumes 191

the server compares the threshold with a calculation of the number ofvolumes containing data as a percent of the total number of volumesavailable to the pool.
How the server chooses files to migrateBy default, the server does not consider how long a file has been in astorage pool or how long since a file was accessed before choosing files tomigrate. Optional parameters allow you to change the default. You canensure that files remain in a storage pool for a minimum amount of timebefore the server migrates them to another pool. To do this, you set amigration delay period for a storage pool. Before the server can migrate afile, the file must be stored in the storage pool at least as long as themigration delay period. For disk storage pools, the last time the file wasaccessed is also considered for migration delay.
Migration processing differs for disk storage pools versus sequential access storagepools. If you plan to modify the default migration parameter settings for storagepools or want to understand how migration works, you should read the followingsections:
“Migration for Disk Storage Pools”“Migration for Sequential Access Storage Pools” on page 197
Migration for Disk Storage PoolsWhen you define or update a storage pool, you can set migration thresholds tospecify when the server should begin and stop migrating data to the next storagepool in the storage hierarchy. Migration thresholds are defined in terms of apercentage of total data capacity for the disk storage pool. You can use the defaultsfor the migration thresholds, or you can change the threshold values to identify themaximum and minimum amount of space for a storage pool. See “How the ServerSelects Files to Migrate” and “Choosing Appropriate Migration Threshold Values”on page 195 for more information about migration thresholds.
You can control how long files must stay in a storage pool before they are eligiblefor migration by setting a migration delay for a storage pool. See “Keeping Files ina Storage Pool” on page 196.
If you decide to enable cache for disk storage pools, files can temporarily remainon disks even after migration. You may want to set migration thresholds lowerwhen you use cache. See “Minimizing Access Time to Migrated Files” on page 197and “Using Cache on Disk Storage Pools” on page 199 for information about usingthe cache.
How the Server Selects Files to MigrateWhen data in a storage pool uses a percentage of the pool’s capacity that is equalto the high migration threshold, the server migrates files from the pool to the nextstorage pool. The server selects the files to migrate as follows:1. The server checks for the client node that has backed up or migrated the largest
single file space or has archived files that occupy the most space.2. For all files from every file space belonging to the client node that was
identified, the server examines the number of days since the files were storedin the storage pool and last retrieved from the storage pool. The servercompares the number (whichever is less) to the migration delay that is set forthe storage pool. The server migrates any of these files for which the number ismore than the migration delay set for the storage pool.
192 Tivoli Storage Manager for Windows: Administrator’s Guide
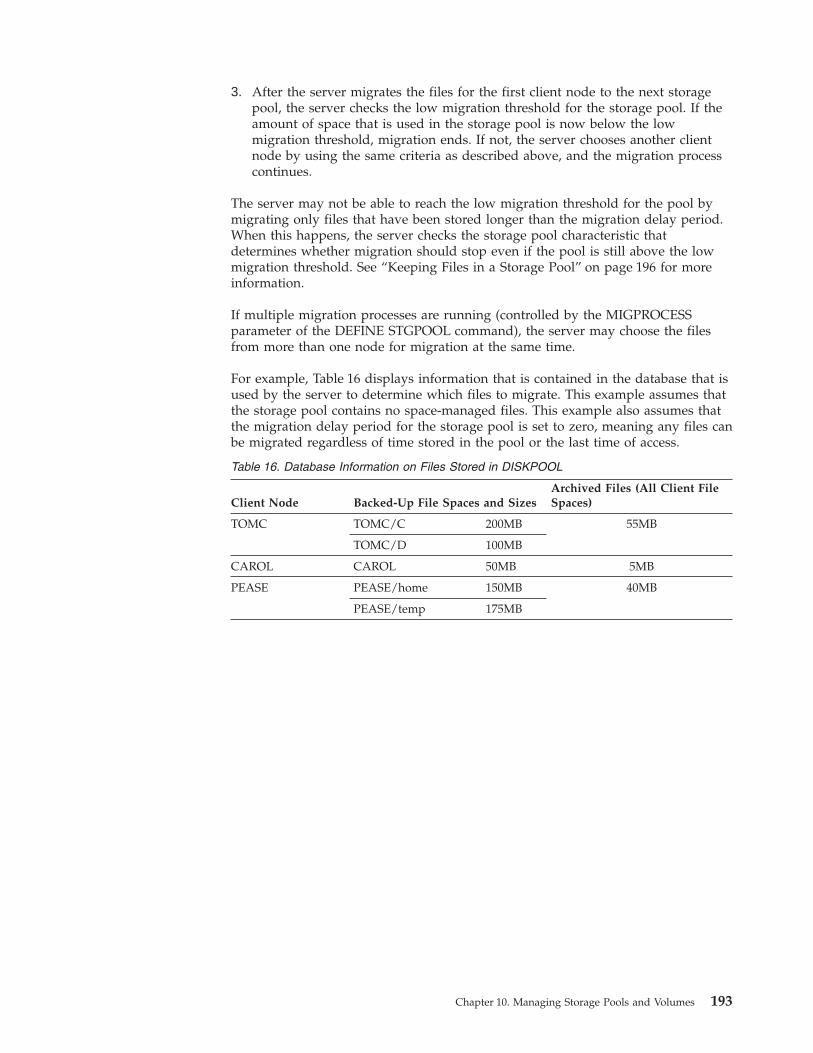
3. After the server migrates the files for the first client node to the next storagepool, the server checks the low migration threshold for the storage pool. If theamount of space that is used in the storage pool is now below the lowmigration threshold, migration ends. If not, the server chooses another clientnode by using the same criteria as described above, and the migration processcontinues.
The server may not be able to reach the low migration threshold for the pool bymigrating only files that have been stored longer than the migration delay period.When this happens, the server checks the storage pool characteristic thatdetermines whether migration should stop even if the pool is still above the lowmigration threshold. See “Keeping Files in a Storage Pool” on page 196 for moreinformation.
If multiple migration processes are running (controlled by the MIGPROCESSparameter of the DEFINE STGPOOL command), the server may choose the filesfrom more than one node for migration at the same time.
For example, Table 16 displays information that is contained in the database that isused by the server to determine which files to migrate. This example assumes thatthe storage pool contains no space-managed files. This example also assumes thatthe migration delay period for the storage pool is set to zero, meaning any files canbe migrated regardless of time stored in the pool or the last time of access.
Table 16. Database Information on Files Stored in DISKPOOL
Client Node Backed-Up File Spaces and SizesArchived Files (All Client FileSpaces)
TOMC TOMC/C 200MB 55MB
TOMC/D 100MB
CAROL CAROL 50MB 5MB
PEASE PEASE/home 150MB 40MB
PEASE/temp 175MB
Chapter 10. Managing Storage Pools and Volumes 193

Figure 19 shows what happens when the high migration threshold defined for thedisk storage pool DISKPOOL is exceeded. When the amount of migratable data inDISKPOOL reaches 80%, the server performs the following tasks:1. Determines that the TOMC/C file space is taking up the most space in the
DISKPOOL storage pool, more than any other single backed-up orspace-managed file space and more than any client node’s archived files.
2. Locates all data belonging to node TOMC stored in DISKPOOL. In thisexample, node TOMC has backed up or archived files from file spacesTOMC/C and TOMC/D stored in the DISKPOOL storage pool.
3. Migrates all data from TOMC/C and TOMC/D to the next available storagepool. In this example, the data is migrated to the tape storage pool,TAPEPOOL.The server migrates all of the data from both file spaces belonging to nodeTOMC, even if the occupancy of the storage pool drops below the lowmigration threshold before the second file space has been migrated.If the cache option is enabled, files that are migrated remain on disk storage(that is, the files are cached) until space is needed for new files. For moreinformation about using cache, see “Using Cache on Disk Storage Pools” onpage 199.
4. After all files that belong to TOMC are migrated to the next storage pool, theserver checks the low migration threshold. If the low migration threshold hasnot been reached, then the server again determines which client node hasbacked up or migrated the largest single file space or has archived files thatoccupy the most space. The server begins migrating files belonging to thatnode.In this example, the server migrates all files that belong to the client nodenamed PEASE to the TAPEPOOL storage pool.
5. After all the files that belong to PEASE are migrated to the next storage pool,the server checks the low migration threshold again. If the low migrationthreshold has been reached or passed, then migration ends.
Before Migration
High
Migration
Threshold
80%
Low
Migration
Threshold
20%
During Migration After Migration
DISKPOOL DISKPOOL DISKPOOL
TAPEPOOL
Figure 19. The Migration Process and Migration Thresholds
194 Tivoli Storage Manager for Windows: Administrator’s Guide

Choosing Appropriate Migration Threshold ValuesSetting migration thresholds for disk storage pools ensures sufficient free space onfaster speed devices, which can lead to better performance. Choosing thresholdsappropriate for your situation takes some experimenting, and you can start byusing the default values. You need to ensure that migration occurs frequentlyenough to maintain some free space but not so frequently that the device isunavailable for other use.
Choosing the High-Migration Threshold: To choose the high-migrationthreshold, consider:v The amount of storage capacity provided for each storage poolv The amount of free storage needed for users to store additional files, without
having migration occur
If you set the high-migration threshold too high, the pool may be just under thehigh threshold, but not have enough space to store an additional, typical client file.Or, with a high threshold of 100%, the pool may become full and a migrationprocess must start before clients can back up any additional data to the diskstorage pool. In either case, the server stores client files directly to tape untilmigration completes, resulting in slower performance.
If you set the high-migration threshold too low, migration runs more frequentlyand can interfere with other operations.
Keeping the high-migration threshold at a single value means that migrationprocessing could start at any time of day, whenever that threshold is exceeded. Youcan control when migration occurs by using administrative command schedules tochange the threshold. For example, set the high-migration threshold to 95% duringthe night when clients run their backup operations. Lower the high-migrationthreshold to 50% during the time of day when you want migration to occur. Byscheduling when migration occurs, you can choose a time when your tape drivesand mount operators are available for the operation.
Choosing the Low-Migration Threshold: To choose the low-migration threshold,consider:v The amount of free disk storage space needed for normal daily processing. If
you have disk space to spare, you can keep more data on the disk (a larger lowthreshold). If clients’ daily backups are enough to fill the disk space every day,you may need to empty the disk (a smaller low threshold).If your disk space is limited, try setting the threshold so that migration freesenough space for the pool to handle the amount of client data that is typicallystored every day. Migration then runs about every day, or you can force it to runevery day by lowering the high-migration threshold at a time you choose.You may also want to identify clients that are transferring large amounts of datadaily. For these clients, you may want to set up policy (a new copy group or anew policy domain) so that their data is stored directly to tape. Using a separatepolicy in this way can optimize the use of disk for the majority of clients.
v Whether you use cache on disk storage pools to improve how quickly some filesare retrieved. If you use cache, you can set the low threshold lower, yet stillmaintain faster retrieval for some data. Migrated data remains cached on thedisk until new client data pushes the data off the disk. Using cache requiresmore disk space for the database, however, and can slow backup and archiveoperations that use the storage pool.
Chapter 10. Managing Storage Pools and Volumes 195

If you do not use cache, you may want to keep the low threshold at a highernumber so that more data stays on the disk.
v How frequently you want migration to occur, based on the availability ofsequential access storage devices and mount operators. The larger the lowthreshold, the shorter time that a migration process runs (because there is lessdata to migrate). But if the pool refills quickly, then migration occurs morefrequently. The smaller the low threshold, the longer time that a migrationprocess runs, but the process runs less frequently.You may need to balance the costs of larger disk storage pools with the costs ofrunning migration (drives, tapes, and either operators or automated libraries).
v Whether you are using collocation on the next storage pool. When you usecollocation, the server attempts to store data for different clients or client filespaces on separate tapes, even for clients with small amounts of data. You maywant to set the low threshold to keep more data on disk, to avoid having manytapes used by clients with only small amounts of data.
Keeping Files in a Storage PoolFor some applications, you may want to ensure that files remain in the storagepool where they were initially stored by the server for a certain period of time. Forexample, you may have backups of monthly summary data that you want to keepin your disk storage pool for quicker access until the data is 30 days old. After the30 days, the server can then move the file off into a tape storage pool.
You can delay migration of files for a specified number of days. The number ofdays is counted from the day that a file was stored in the storage pool or retrievedby a client, whichever is more recent. You can set the migration delay separatelyfor each storage pool. When you set the delay to zero, the server can migrate anyfile from the storage pool, regardless of how short a time the file has been in thestorage pool. When you set the delay to greater than zero, the server checkswhether the file has been in the storage pool for at least the migration delay periodbefore migrating the file.
Note: If you want the number of days for migration delay to be counted basedonly on when a file was stored and not when it was retrieved, use theNORETRIEVEDATE server option. See Administrator’s Reference for moreinformation on the server option.
If you set migration delay for a pool, you need to decide what is more important:either ensuring that files stay in the storage pool for the migration delay period, orensuring that there is enough space in the storage pool for new files. For eachstorage pool that has a migration delay set, you can choose what happens as theserver tries to move enough data out of the storage pool to reach the lowmigration threshold. If the server cannot reach the low migration threshold bymoving only files that have been stored longer than the migration delay, you canchoose one of the following:v Allow the server to move files out of the storage pool even if they have not been
in the pool for the migration delay (MIGCONTINUE=YES). This is the default.Allowing migration to continue ensures that space is made available in thestorage pool for new files that need to be stored there.
v Have the server stop migration without reaching the low migration threshold(MIGCONTINUE=NO). Stopping migration ensures that files remain in thestorage pool for the time you specified with the migration delay. Theadministrator must ensure that there is always enough space available in thestorage pool to hold the data for the required number of days.
196 Tivoli Storage Manager for Windows: Administrator’s Guide

If you allow more than one migration process for the storage pool and allow theserver to move files that do not satisfy the migration delay time(MIGCONTINUE=YES), some files that do not satisfy the migration delay timemay be migrated unnecessarily. As one process migrates files that satisfy themigration delay time, a second process could begin migrating files that do notsatisfy the migration delay time to meet the low migration threshold. The firstprocess that is still migrating files that satisfy the migration delay time might have,by itself, caused the storage pool to meet the low migration threshold.
Minimizing Access Time to Migrated FilesCaching is a method of minimizing access time to files on disk storage, even if theserver has migrated files to a tape storage pool. However, cached files are removedfrom disk when the space they occupy is required. The file then must be obtainedfrom the storage pool to which it was migrated.
Note: The use of cache has some disadvantages. See “Using Cache on Disk StoragePools” on page 199.
To ensure that files remain on disk storage and do not migrate to other storagepools, use one of the following methods:v Do not define the next storage pool.
A disadvantage of using this method is that if the file exceeds the spaceavailable in the storage pool, the operation to store the file fails.
v Set the high-migration threshold to 100%.When you set the high migration threshold to 100%, files will not migrate at all.You can still define the next storage pool in the storage hierarchy, and set themaximum file size so that large files are stored in the next storage pool in thehierarchy.A disadvantage of setting the high threshold to 100% is that once the poolbecomes full, client files are stored directly to tape instead of to disk.Performance may be affected as a result.
Migration for Sequential Access Storage PoolsYou can set up migration thresholds for sequential access storage pools. However,you probably will not want the server to perform this type of migration on aregular basis. An operation such as tape-to-tape migration has limited benefitscompared to disk-to-tape migration, and requires at least two tape drives.Migrating data from one sequential access storage pool to another may beappropriate in some cases, for example, when you install a tape drive that uses adifferent type of tape and want to move data to that tape.
To control the migration process, you can set migration thresholds and a migrationdelay for each storage pool.
Note:
v You can migrate data from a sequential access storage pool only toanother sequential access storage pool. You cannot migrate data from asequential access storage pool to a disk storage pool. If you need to movedata from a sequential access storage pool to a disk storage pool, use theMOVE DATA command. See “Moving Files from One Volume to AnotherVolume” on page 228.
v Storage pools using the NETAPPDUMP data format are unable to usemigration.
Chapter 10. Managing Storage Pools and Volumes 197

How Tivoli Storage Manager Migrates Data from SequentialAccess Storage PoolsThe server begins the migration process when the number of volumes containingdata as a percentage of the total volumes in the storage pool reaches the highmigration threshold. The server migrates data from sequential storage pools byvolume, to minimize the number of mounts for volumes. The server performs thefollowing processing for migration:1. The server first reclaims volumes that have exceeded the reclamation threshold.
Reclamation is a server process of consolidating data from several volumesonto one volume. (See “Reclaiming Space in Sequential Access Storage Pools”on page 205.)
2. After reclamation processing, the server compares the space used in the storagepool to the low migration threshold.
3. If the space used is now below the low migration threshold, the server stopsprocessing. If the space used is still above the low migration threshold, theserver determines which volume is the least recently referenced volume.
4. If the number of days since data was written is greater than the migrationdelay, the server migrates the volume. Otherwise, the server does not migratethis volume.
5. The server repeats steps 3 and 4 until the storage pool reaches the lowmigration threshold.
Because migration delay can prevent volumes from being migrated, the server canmigrate data from all eligible volumes yet still find that the storage pool is abovethe low migration threshold. If you set migration delay for a pool, you need todecide what is more important: either ensuring that data stays in the storage poolfor as long as the migration delay, or ensuring there is enough space in the storagepool for new data. For each storage pool that has a migration delay set, you canchoose what happens as the server tries to move enough data out of the storagepool to reach the low migration threshold. If the server cannot reach the lowmigration threshold by migrating only volumes that meet the migration delayrequirement, you can choose one of the following:v Allow the server to migrate volumes from the storage pool even if they do not
meet the migration delay criteria (MIGCONTINUE=YES). This is the default.Allowing migration to continue ensures that space is made available in thestorage pool for new files that need to be stored there.
v Have the server stop migration without reaching the low migration threshold(MIGCONTINUE=NO). Stopping migration ensures that volumes are notmigrated for the time you specified with the migration delay. The administratormust ensure that there is always enough space available in the storage pool tohold the data for the required number of days.
Selecting Migration Criteria for Sequential Access Storage PoolsWhen defining migration criteria for sequential access storage pools, consider:v The capacity of the volumes in the storage poolv The time required to migrate data to the next storage poolv The speed of the devices that the storage pool usesv The time required to mount media, such as tape volumes, into drivesv Whether operator presence is required
If you decide to migrate data from one sequential access storage pool to another,ensure that:v Two drives (mount points) are available, one in each storage pool.
198 Tivoli Storage Manager for Windows: Administrator’s Guide
v The access mode for the next storage pool in the storage hierarchy is set toread/write.For information about setting an access mode for sequential access storage pools,see “Defining or Updating Primary Storage Pools” on page 174.
v Collocation is set the same in both storage pools. For example, if collocation isset to yes in the first storage pool, then collocation should be set to yes in thenext storage pool.When you enable collocation for a storage pool, the server attempts to keep allfiles belonging to a client node or a client file space on a minimal number ofvolumes. For information about collocation for sequential access storage pools,see “Keeping a Client’s Files Together: Collocation” on page 200.
v You have sufficient staff available to handle any necessary media mount anddismount operations. More mount operations occur because the server attemptsto reclaim space from sequential access storage pool volumes before it migratesfiles to the next storage pool.If you want to limit migration from a sequential access storage pool to anotherstorage pool, set the high-migration threshold to a high percentage, such as 95%.For information about setting a reclamation threshold for tape storage pools, see“Reclaiming Space in Sequential Access Storage Pools” on page 205.
There is no straightforward way to selectively migrate data for a specific nodefrom one sequential storage pool to another. If you know the volumes on which aparticular node’s data is stored, you can use the MOVE DATA command to moveall files from selected volumes to the new storage pool. See “Moving Files fromOne Volume to Another Volume” on page 228.
Migration and Copy Storage PoolsCopy storage pools are not part of the hierarchy for migration. Files are notmigrated to or from copy storage pools. The only way to store files in copy storagepools is by backing up primary storage pools (the BACKUP STGPOOL command).
Migration of files between primary storage pools does not affect copy storage poolfiles. Copy storage pool files do not move when primary storage pool files move.
For example, suppose a copy of a file is made while it is in a disk storage pool.The file then migrates to a primary tape storage pool. If you then back up theprimary tape storage pool to the same copy storage pool, a new copy of the file isnot needed. The server knows it already has a valid copy of the file.
Using Cache on Disk Storage PoolsWhen defining or updating disk storage pools, you can enable or disable cache.
When cache is disabled and migration occurs, the server migrates the files to thenext storage pool and erases the files from the disk storage pool. By default, thesystem disables caching for each disk storage pool because of the potential effectsof cache on backup performance.
You can enable cache by specifying CACHE=YES when you define or update astorage pool. When cache is enabled, the migration process leaves behind duplicatecopies of files on disk after the server migrates these files to the next storage poolin the storage hierarchy. The copies remain in the disk storage pool, but in a cachedstate, so that subsequent retrieval requests can be satisfied quickly. However, if
Chapter 10. Managing Storage Pools and Volumes 199
space is needed to store new data in the disk storage pool, cached files are erasedand the space they occupied is used for the new data.
The advantage of using cache for a disk storage pool is that cache can improvehow quickly the server retrieves some files. When you use cache, a copy of the fileremains on disk storage after the server migrates the primary file to anotherstorage pool. You may want to consider using a disk storage pool with cacheenabled for storing space-managed files that are frequently accessed by clients.
However, using cache has some important disadvantages:v Using cache can increase the time required for client backup operations to
complete. Performance is affected because, as part of the backup operation, theserver must erase cached files to make room for storing new files. The effect canbe severe when the server is storing a very large file and must erase cached files.For the best performance for client backup operations to disk storage pools, donot use cache.
v Using cache can require more space for the server database. When you usecache, more database space is needed because the server has to keep track ofboth the cached copy of the file and the new copy in the next storage pool.
If you leave cache disabled, you may want to consider higher migration thresholdsfor the disk storage pool. A higher migration threshold keeps files on disk longerbecause migration occurs less frequently.
How the Server Removes Cached FilesWhen space is needed, the server reclaims space occupied by cached files. Filesthat have the oldest retrieval date and occupy the largest amount of disk space areoverwritten first. For example, assume that two files, File A and File B, are cachedfiles that are the same size. If File A was last retrieved on 05/16/99 and File B waslast retrieved on 06/19/99, then File A is deleted to reclaim space first.
You can change whether the server tracks the retrieval date for a file with theserver option, NORETRIEVEDATE. When you include this option in the serveroptions file, the server does not update the retrieval date for files. As a result, theserver may remove copies of files in cache even though clients retrieved the filesrecently.
Effect of Caching on Storage Pool StatisticsThe space utilization statistic for the pool (Pct Util) includes the space used by anycached copies of files in the storage pool. The migratable data statistic (Pct Migr)does not include space occupied by cached copies of files. The server uses thestatistic on migratable data (Pct Migr) to compare with migration thresholdparameters to determine when migration should begin or end. For moreinformation on storage pool statistics, see “Monitoring Storage Pools and Volumes”on page 214.
Keeping a Client’s Files Together: CollocationWith collocation enabled, the server attempts to keep files belonging to a singleclient node or to a single file space of a client node on a minimal number ofsequential access storage volumes. You can set collocation for each sequentialaccess storage pool when you define or update the pool.
200 Tivoli Storage Manager for Windows: Administrator’s Guide

To have the server collocate data in a storage pool by client node, set collocation toYES. To have the server collocate data in a storage pool by client file space, setcollocation to FILESPACE. By using collocation, you reduce the number of volumemount operations required when users restore, retrieve, or recall many files fromthe storage pool. Collocation thus improves access time for these operations.Figure 20 shows an example of collocation by client node with three clients, eachhaving a separate volume containing that client’s data.
When collocation is disabled, the server attempts to use all available space on eachvolume before selecting a new volume. While this process provides betterutilization of individual volumes, user files can become scattered across manyvolumes. Figure 21 shows an example of collocation disabled, with three clientssharing space on a volume.
With collocation disabled, when users restore, retrieve, or recall a large number offiles, media mount operators may be required to mount more volumes. The systemdefault is to not use collocation.
The following sections give more detail on collocation:“The Effects of Collocation on Operations” on page 202“How the Server Selects Volumes with Collocation Enabled” on page 202“How the Server Selects Volumes with Collocation Disabled” on page 203“Turning Collocation On or Off” on page 204
Figure 20. Example of Collocation Enabled
Figure 21. Example of Collocation Disabled
Chapter 10. Managing Storage Pools and Volumes 201

“Collocation on Copy Storage Pools” on page 204
The Effects of Collocation on OperationsTable 17 summarizes the effects of collocation on operations.
Table 17. Effect of Collocation on Operations
Operation Collocation Enabled Collocation Disabled
Backing up, archiving, or migratingclient files
More media mounts to collocate files. Usually fewer media mounts arerequired.
Restoring, retrieving or recallingclient files
Large numbers of files can berestored, retrieved, or recalled morequickly because files are located onfewer volumes.
Multiple mounts of media may berequired for a single user becausefiles may be spread across multiplevolumes.
More than one user’s files can bestored on the same sequential accessstorage volume. For example, if twousers attempt to recover a file thatresides on the same volume, thesecond user will be forced to waituntil the first user’s files arerecovered.
Storing data on tape The server attempts to use allavailable tape volumes to separateuser files before it uses all availablespace on every tape volume.
The server attempts to use allavailable space on each tape volumebefore using another tape volume.
Media mount operations More mount operations when userfiles are backed up, archived, ormigrated from client nodes directly tosequential access volumes.
More mount operations duringreclamation and storage poolmigration.
More volumes to handle becausevolumes are not fully used.
More mount operations requiredduring restore, retrieve, and recall ofclient files.
Tip: If you use collocation, but want to reduce the number of media mounts anduse space on sequential volumes more efficiently, you can do the following:v Define a storage pool hierarchy and policy to require that backed-up,
archived, or space-managed files are stored initially in disk storage pools.When files are migrated from a disk storage pool, the server attempts tomigrate all files belonging to the client node that is using the most diskspace in the storage pool. This process works well with the collocationoption because the server tries to place all of the files from a given client onthe same sequential access storage volume.
v Use scratch volumes for sequential access storage pools to allow the serverto select new volumes for collocation.
How the Server Selects Volumes with Collocation EnabledWhen collocation at the client node level is enabled for a storage pool(COLLOCATION=YES) and a client node backs up, archives, or migrates files tothe storage pool, the server attempts to select a volume using the followingselection order:
202 Tivoli Storage Manager for Windows: Administrator’s Guide
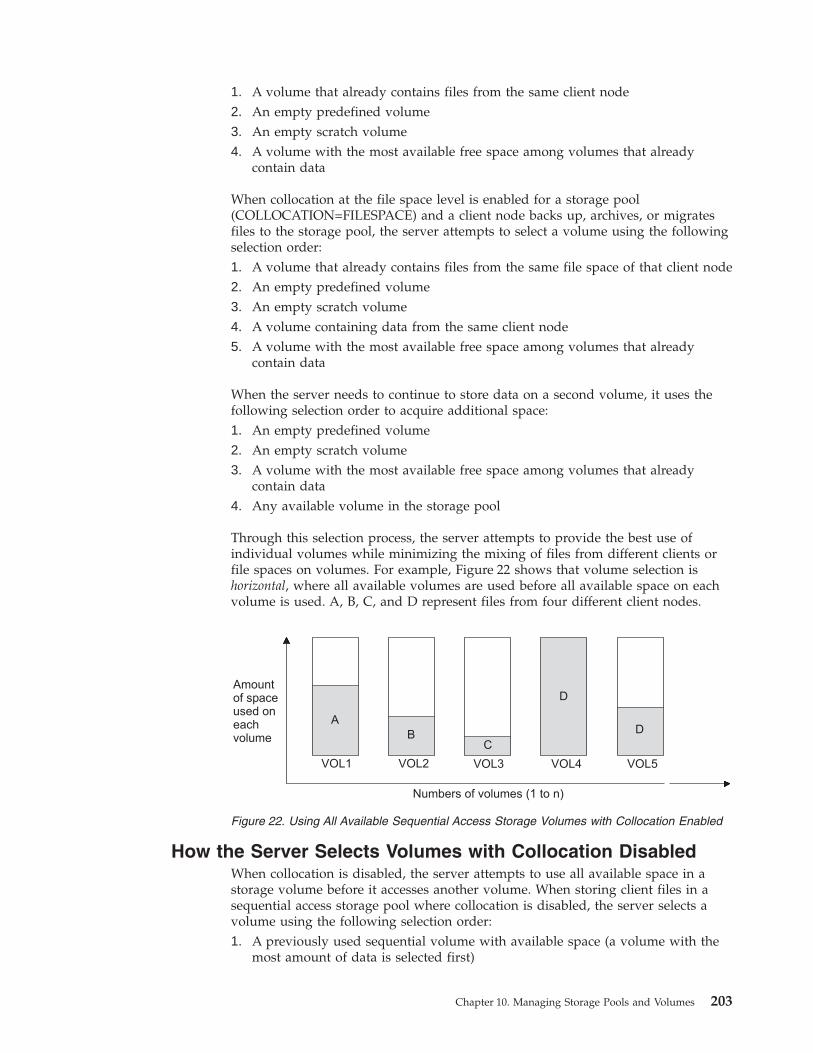
1. A volume that already contains files from the same client node2. An empty predefined volume3. An empty scratch volume4. A volume with the most available free space among volumes that already
contain data
When collocation at the file space level is enabled for a storage pool(COLLOCATION=FILESPACE) and a client node backs up, archives, or migratesfiles to the storage pool, the server attempts to select a volume using the followingselection order:1. A volume that already contains files from the same file space of that client node2. An empty predefined volume3. An empty scratch volume4. A volume containing data from the same client node5. A volume with the most available free space among volumes that already
contain data
When the server needs to continue to store data on a second volume, it uses thefollowing selection order to acquire additional space:1. An empty predefined volume2. An empty scratch volume3. A volume with the most available free space among volumes that already
contain data4. Any available volume in the storage pool
Through this selection process, the server attempts to provide the best use ofindividual volumes while minimizing the mixing of files from different clients orfile spaces on volumes. For example, Figure 22 shows that volume selection ishorizontal, where all available volumes are used before all available space on eachvolume is used. A, B, C, and D represent files from four different client nodes.
How the Server Selects Volumes with Collocation DisabledWhen collocation is disabled, the server attempts to use all available space in astorage volume before it accesses another volume. When storing client files in asequential access storage pool where collocation is disabled, the server selects avolume using the following selection order:1. A previously used sequential volume with available space (a volume with the
most amount of data is selected first)
Figure 22. Using All Available Sequential Access Storage Volumes with Collocation Enabled
Chapter 10. Managing Storage Pools and Volumes 203

2. An empty volume
When the server needs to continue to store data on a second volume, it attempts toselect an empty volume. If none exists, the server attempts to select any remainingavailable volume in the storage pool.
Figure 23 shows that volume utilization is vertical when collocation is disabled. Inthis example, fewer volumes are used because the server attempts to use allavailable space by mixing client files on individual volumes. A, B, C, and Drepresent files from four different client nodes.
Turning Collocation On or OffAfter you define a storage pool, you can change the collocation setting byupdating the storage pool. The change in collocation for the pool does not affectfiles that are already stored in the pool.
For example, if collocation had been off for a storage pool and you turn it on, fromthen on client files stored in the pool are collocated. Files that had previously beenstored in the pool are not moved to collocate them. As volumes are reclaimed,however, the data in the pool tends to become more collocated. You can also usethe MOVE DATA command to move data to new volumes to increase collocation,if you are able to afford the processing time and the volume mount activity thiswould cause.
Collocation on Copy Storage PoolsUsing collocation on copy storage pools requires special consideration.
Primary and copy storage pools perform different recovery roles. Normally youuse primary storage pools to recover data to clients directly. You use copy storagepools to recover data to the primary storage pools. In a disaster where both clientsand the server are lost, the copy storage pool volumes will probably be useddirectly to recover clients. The types of recovery scenarios that concern you themost will help you to determine whether to use collocation on your copy storagepools.
You may also want to consider that collocation on copy storage pools will result inmore partially filled volumes and potentially unnecessary offsite reclamationactivity. Collocation typically results in a partially filled sequential volume for eachclient or client file space. This may be acceptable for primary storage pools becausethese partially filled volumes remain available and can be filled during the next
Figure 23. Using All Available Space on Sequential Volumes with Collocation Disabled
204 Tivoli Storage Manager for Windows: Administrator’s Guide

migration process. However, for copy storage pools this may be unacceptablebecause the storage pool backups are usually made to be taken offsite immediately.If you use collocation for copy storage pools, you will have to decide between:v Taking more partially filled volumes offsite, thereby increasing the reclamation
activity when the reclamation threshold is lowered or reached.
or
v Leaving these partially filled volumes onsite until they fill and risk not havingan offsite copy of the data on these volumes.
With collocation disabled for a copy storage pool, typically there will be only a fewpartially filled volumes after storage pool backups to the copy storage pool arecomplete.
Consider carefully before using collocation for copy storage pools. Even if you usecollocation for your primary storage pools, you may want to disable collocation forcopy storage pools. Collocation on copy storage pools may be desirable when youhave few clients, but each of them has large amounts of incremental backup dataeach day.
See “Keeping a Client’s Files Together: Collocation” on page 200 for moreinformation about collocation.
Reclaiming Space in Sequential Access Storage PoolsSpace on a sequential volume becomes reclaimable as files expire or are deletedfrom the volume. For example, files become obsolete because of aging or limits onthe number of versions of a file. In reclamation processing, the server rewrites fileson the volume being reclaimed to other volumes in the storage pool, making thereclaimed volume available for reuse.
The server reclaims the space in storage pools based on a reclamation threshold thatyou can set for each sequential access storage pool. When the percentage of spacethat can be reclaimed on a volume rises above the reclamation threshold, theserver reclaims the volume. See the following sections:
“How Tivoli Storage Manager Reclamation Works”“Choosing a Reclamation Threshold” on page 207“Reclaiming Volumes in a Storage Pool with One Drive” on page 208“Reclamation for WORM Optical Media” on page 208“Reclamation of Volumes with the Device Type of SERVER” on page 209“Reclamation for Copy Storage Pools” on page 209“How Collocation Affects Reclamation” on page 211
Note: Storage pools using the NETAPPDUMP data format are unable to usereclamation.
How Tivoli Storage Manager Reclamation WorksWhen the percentage of reclaimable space on a volume exceeds the reclamationthreshold set for the storage pool, the volume is eligible for reclamation. The serverchecks whether reclamation is needed at least once per hour and begins spacereclamation for eligible volumes. You can set a reclamation threshold for eachsequential access storage pool when you define or update the pool.
Chapter 10. Managing Storage Pools and Volumes 205

During space reclamation, the server copies files that remain on eligible volumes toother volumes. For example, Figure 24 shows that the server consolidates the filesfrom tapes 1, 2, and 3 on tape 4. During reclamation, the server copies the files tovolumes in the same storage pool unless you have specified a reclamation storagepool. Use a reclamation storage pool to allow automatic reclamation for a storagepool with only one drive.
The server also reclaims space within an aggregate file. An aggregate is a physicalfile that contains multiple logical files that are backed up or archived from a clientin a single transaction. Space within the file becomes reclaimable space as logicalfiles in the aggregate expire or are deleted by the client. The server removesunused space from expired or deleted logical files as the server copies theaggregate file to another volume during reclamation processing. However,reclamation does not aggregate files that were originally stored in non-aggregatedform. Reclamation also does not combine aggregates to make new aggregates. Youcan also reclaim space in an aggregate by issuing the MOVE DATA command. See“Reclaiming Space in Aggregates During Data Movement” on page 231 for details.
After the server moves all readable files to other volumes, one of the followingoccurs for the reclaimed volume:v If you have explicitly defined the volume to the storage pool, the volume
becomes available for reuse by that storage poolv If the server acquired the volume as a scratch volume, the server deletes the
volume from the TSM database
= valid data
4
Figure 24. Tape Reclamation
206 Tivoli Storage Manager for Windows: Administrator’s Guide

Volumes that have a device type of SERVER are reclaimed in the same way asother sequential access volumes. However, because the volumes are actually datastored in the storage of another TSM server, the reclamation process can consumenetwork resources. See “Reclamation of Volumes with the Device Type of SERVER”on page 209 for details of how the server reclaims these types of volumes.
Volumes in a copy storage pool are reclaimed in the same manner as a primarystorage pool except for the following:v Offsite volumes are handled differently.v The server copies active files from the candidate volume only to other volumes
in the same storage pool.
See “Reclamation for Copy Storage Pools” on page 209 for details.
Choosing a Reclamation ThresholdThe reclamation threshold indicates how much reclaimable space a volume musthave before the server reclaims the volume. Space is reclaimable because it isoccupied by files that have been expired or deleted from the TSM database, orbecause the space has never been used.
The server checks whether reclamation is needed at least once per hour. The lowerthe reclamation threshold, the more frequently the server tries to reclaim space.Frequent reclamation optimizes the use of a sequential access storage pool’s space,but can interfere with other processes, such as backups from clients.
If the reclamation threshold is high, reclamation occurs less frequently. A highreclamation threshold is useful if mounting a volume is a manual operation andthe operations staff is at a minimum.
Each reclamation process requires at least two simultaneous volume mounts, thatis, at least two mount points (drives). The two drives must be in the same deviceclass to allow the server to move the data from reclaimed volumes to othervolumes in the same storage pool. A sufficient number of volumes, drives (ifappropriate), and mount operators (if appropriate) must be available to handlefrequent reclamation requests. For more information about mount limit, see“Mount Limit” on page 159. If the device class for the storage pool does not havetwo drives, you can specify a reclamation storage pool. For information about howto use a reclamation storage pool for storage pools with only one mount point, see“Reclaiming Volumes in a Storage Pool with One Drive” on page 208.
If you set the reclamation threshold to 50% or greater, the server can combine theusable files from two or more volumes onto a single new volume.
Setting the reclamation threshold to 100% prevents reclamation from occurring.You might want to do this to control when reclamation occurs, to preventinterfering with other server processes. When it is convenient for you and yourusers, you can lower the reclamation threshold to cause reclamation to begin.
Lowering the Migration ThresholdIf you have been running with a high migration threshold and decide you nowneed to reclaim volumes, you may want to lower the threshold in several steps.Lowering the threshold in steps ensures that volumes with the most reclaimablespace are reclaimed first. For example, if you had set the high migration thresholdto 100%, first lower the threshold to 98%. Volumes that have reclaimable space of98% or greater are reclaimed by the server. Lower the threshold again to reclaimmore volumes.
Chapter 10. Managing Storage Pools and Volumes 207

If you lower the reclamation threshold while a reclamation process is active, thereclamation process does not immediately stop. If an onsite volume is beingreclaimed, the server uses the new threshold setting when the process begins toreclaim the next volume. If offsite volumes are being reclaimed, the server does notuse the new threshold setting during the process that is running (because alleligible offsite volumes are reclaimed at the same time).
Use the CANCEL PROCESS command to stop a reclamation process.
Reclaiming Volumes in a Storage Pool with One DriveWhen a storage pool has only one mount point (that is, just one drive) available toit through the device class, data cannot be reclaimed from one volume to anotherwithin that same storage pool.
To enable volume reclamation for a storage pool that has only one mount point,you can define a reclamation storage pool for the server to use when reclaimingvolumes. When the server reclaims volumes, the server moves the data fromvolumes in the original storage pool to volumes in the reclamation storage pool.The server always uses the reclamation storage pool when one is defined, evenwhen the mount limit is greater than one.
If the reclamation storage pool does not have enough space to hold all of the databeing reclaimed, the server moves as much of the data as possible into thereclamation storage pool. Any data that could not be moved to volumes in thereclamation storage pool still remains on volumes in the original storage pool.
The pool identified as the reclamation storage pool must be a primary sequentialstorage pool. The primary purpose of the reclamation storage pool is for temporarystorage of reclaimed data. To ensure that data moved to the reclamation storagepool eventually moves back into the original storage pool, specify the originalstorage pool as the next pool in the storage hierarchy for the reclamation storagepool. For example, if you have a tape library with one drive, you can define astorage pool to be used for reclamation using a device class with a device type ofFILE:define stgpool reclaimpool fileclass maxscratch=100
Define the storage pool for the tape drive as follows:define stgpool tapepool1 tapeclass maxscratch=100reclaimstgpool=reclaimpool
Finally, update the reclamation storage pool so that data migrates back to the tapestorage pool:update stgpool reclaimpool nextstgpool=tapepool1
Reclamation for WORM Optical MediaReclamation for WORM volumes does not mean that you can reuse this write-oncemedia. However, reclamation for WORM volumes does allow you to free libraryspace. Reclamation consolidates data from almost empty volumes to othervolumes. You can then eject the empty, used WORM volumes and add newvolumes.
Storage pools that are assigned to device classes with a device type of WORMhave a default reclamation value of 100. This prevents reclamation of WORMoptical media. To allow reclamation, you can set the reclamation value tosomething lower when defining or updating the storage pool.
208 Tivoli Storage Manager for Windows: Administrator’s Guide

Reclamation of Volumes with the Device Type of SERVERWhen virtual volumes (volumes with the device type of SERVER) in a primarystorage pool are reclaimed, the client data stored on those volumes is sent acrossthe network between the source server and the target server. As a result, thereclamation process can tie up your network resources. To control whenreclamation starts for these volumes, consider setting the reclamation threshold to100% for any primary storage pool that uses virtual volumes. Lower thereclamation threshold at a time when your network is less busy, so that the servercan reclaim volumes.
For virtual volumes in a copy storage pool, the server reclaims a volume asfollows:1. The source server determines which files on the volume are still valid.2. The source server obtains these valid files from a primary storage pool, or if
necessary, from an onsite volume (not a virtual volume) in another copystorage pool.
3. The source server writes the files to one or more new virtual volumes in thecopy storage pool and updates its database.
4. The server issues a message indicating that the volume was reclaimed.
For information about using the SERVER device type, see “Using Virtual Volumesto Store Data on Another Server” on page 501.
Reclamation for Copy Storage PoolsReclamation of primary storage pool volumes does not affect copy storage poolfiles.
Reclamation of volumes in copy storage pools is similar to that of primary storagepools. However, most volumes in copy storage pools may be set to an access modeof offsite, making them ineligible to be mounted. When reclamation occurs andhow reclamation processing is done depends on whether the volumes are markedas offsite.
For volumes that are not offsite, reclamation usually occurs after the volume is fulland then begins to empty because of file deletion. When the percentage ofreclaimable space on a volume rises above the reclamation threshold, the serverreclaims the volume. Active files on the volume are rewritten to other volumes inthe storage pool, making the original volume available for new files.
For offsite volumes, reclamation can occur when the percentage of unused spaceon the volume is greater than the reclaim parameter value. The unused spaceincludes both space that has never been used on the volume and space that hasbecome empty because of file deletion. During reclamation, the server copies validfiles on offsite volumes from the original files in the primary storage pools. In thisway, the server copies valid files on offsite volumes without having to mount thesevolumes. For more information, see “Reclamation of Offsite Volumes” on page 210.
Reclamation of copy storage pool volumes should be done periodically to allowreuse of partially filled volumes that are offsite. Reclamation can be doneautomatically by setting the reclamation threshold for the copy storage pool to lessthan 100%. However, you need to consider controlling when reclamation occursbecause of how offsite volumes are treated. For more information, see “ControllingWhen Reclamation Occurs for Offsite Volumes” on page 210.
Chapter 10. Managing Storage Pools and Volumes 209
Virtual Volumes: Virtual volumes (volumes that are stored on another TSM serverthrough the use of a device type of SERVER) cannot be set to theoffsite access mode.
Reclamation of Offsite VolumesAs for volumes with other access values, volumes with the access value of offsiteare eligible for reclamation if the amount of empty space on a volume exceeds thereclamation threshold for the copy storage pool. The default reclamation thresholdfor copy storage pools is 100%, which means that reclamation is not performed.
When an offsite volume is reclaimed, the files on the volume are rewritten to aread/write volume. Effectively, these files are moved back to the onsite location. Thefiles may be obtained from the offsite volume after a disaster, if the volume has notbeen reused and the database backup that you use for recovery references the fileson the offsite volume.
The server reclaims an offsite volume as follows:1. The server determines which files on the volume are still valid.2. The server obtains these valid files from a primary storage pool, or if necessary,
from an onsite volume of a copy storage pool.3. The server writes the files to one or more volumes in the copy storage pool and
updates the database. If a file is an aggregate file with unused space, theunused space is removed during this process.
4. A message is issued indicating that the offsite volume was reclaimed.For a single storage pool, the server reclaims all offsite volumes that are eligiblefor reclamation at the same time. Reclaiming all the eligible volumes at thesame time minimizes the tape mounts for primary storage pool volumes.
If you have the Tivoli Disaster Recovery Manager product, see “Moving BackupVolumes Onsite” on page 597.
Controlling When Reclamation Occurs for Offsite VolumesSuppose you plan to make daily storage pool backups to a copy storage pool, thenmark all new volumes in the copy storage pool as offsite and send them to theoffsite storage location. This strategy works well with one consideration if you areusing automatic reclamation (the reclamation threshold is less than 100%).
Each day’s storage pool backups will create a number of new copy storage poolvolumes, the last one being only partially filled. If the percentage of empty spaceon this partially filled volume is higher than the reclaim percentage, this volumebecomes eligible for reclamation as soon as you mark it offsite. The reclamationprocess would cause a new volume to be created with the same files on it. Thevolume you take offsite would then be empty according to the TSM database. Ifyou do not recognize what is happening, you could perpetuate this process bymarking the new partially filled volume offsite.
One way to resolve this situation is to keep partially filled volumes onsite untilthey fill up. However, this would mean a small amount of your data would bewithout an offsite copy for another day.
If you send copy storage pool volumes offsite, it is recommended you control copystorage pool reclamation by using the default value of 100. This turns reclamationoff for the copy storage pool. You can start reclamation processing at desired times
210 Tivoli Storage Manager for Windows: Administrator’s Guide

by changing the reclamation threshold for the storage pool. To monitor offsitevolume utilization and help you decide what reclamation threshold to use, enterthe following command:query volume * access=offsite format=detailed
Depending on your data expiration patterns, you may not need to do reclamationof offsite volumes each day. You may choose to perform offsite reclamation on aless frequent basis. For example, suppose you ship copy storage pool volumes toand from your offsite storage location once a week. You can run reclamation forthe copy storage pool weekly, so that as offsite volumes become empty they aresent back for reuse.
When you do perform reclamation for offsite volumes, the following sequence isrecommended:1. Back up your primary storage pools to copy storage pools.2. Turn on reclamation for copy storage pools by lowering the reclamation
threshold below 100%.3. When reclamation processing completes, turn off reclamation for copy storage
pools by raising the reclamation threshold to 100%.4. Mark any newly created copy storage pool volumes as offsite and then move
them to the offsite location.
This sequence ensures that the files on the new copy storage pool volumes are sentoffsite, and are not inadvertently kept onsite because of reclamation.
Using Storage on Another Server for Copy Storage Pools: Another resolution tothis problem of partially filled volumes is to use storage on another TSM server(device type of SERVER) for storage pool backups. If the other server is at adifferent site, the copy storage pool volumes are already offsite, with no moving ofphysical volumes between the sites. See “Using Virtual Volumes to Store Data onAnother Server” on page 501 for more information.
Delaying Reuse of Reclaimed VolumesYou should delay the reuse of any reclaimed volumes in copy storage pools for aslong as you keep your oldest database backup. Delaying reuse may help you torecover data under certain conditions during recovery from a disaster. For moreinformation on delaying volume reuse, see “Delaying Reuse of Sequential AccessVolumes” on page 541.
How Collocation Affects ReclamationIf collocation is enabled and reclamation occurs, the server tries to reclaim the filesfor each client node or client file space onto a minimal number of volumes.Therefore, if the volumes are manually mounted, the mount operators must:v Be aware that a tape volume may be rewound more than once if the server
completes a separate pass to move the data for each client node or client filespace.
v Mount and dismount multiple volumes to allow the server to select the mostappropriate volume on which to move data for each client node or client filespace. The server tries to select a volume in the following order:1. A volume that already contains files belonging to the client file space or
client node2. An empty volume3. The volume with the most available space
Chapter 10. Managing Storage Pools and Volumes 211
4. Any available volume
If collocation is disabled and reclamation occurs, the server tries to move usabledata to new volumes by using the following volume selection criteria, in the ordershown:1. The volume that contains the most data2. Any partially full volume3. An empty predefined volume4. An empty scratch volume
Estimating Space Needs for Storage PoolsThis section provides guidelines for estimating the initial storage space required foryour installation. You have the following default random access (disk) storagepools available at installation:v BACKUPPOOL for backed-up filesv ARCHIVEPOOL for archived filesv SPACEMGPOOL for files migrated from client nodes (space-managed files)
You can add space to these storage pools by adding volumes, or you can defineadditional storage pools.
As your storage environment grows, you may want to consider how policy andstorage pool definitions affect where workstation files are stored. Then you candefine and maintain multiple storage pools in a hierarchy that allows you tocontrol storage costs by using sequential access storage pools in addition to diskstorage pools, and still provide appropriate levels of service to users.
To help you determine how to adjust your policies and storage pools, getinformation about how much storage is being used (by client node) and for whatpurposes in your existing storage pools. For more information on how to do this,see “Requesting Information on the Use of Storage Space” on page 225.
Estimating Space Needs in Random Access Storage PoolsTo estimate the amount of storage space required for each random access (disk)storage pool:v Determine the amount of disk space needed for different purposes:
– For backup storage pools, provide enough disk space to support efficientdaily incremental backups.
– For archive storage pools, provide sufficient space for a user to archive amoderate size file system without causing migration from the disk storagepool to occur.
– For storage pools for space-managed files, provide enough disk space tosupport the daily space-management load from HSM clients, without causingmigration from the disk storage pool to occur.
v Decide what percentage of this data you want to keep on disk storage space.Establish migration thresholds to have the server automatically migrate theremainder of the data to less expensive storage media in sequential accessstorage pools.See “Choosing Appropriate Migration Threshold Values” on page 195 forrecommendations on setting migration thresholds.
212 Tivoli Storage Manager for Windows: Administrator’s Guide
Estimating Space for Backed-Up Files in a Random AccessStorage PoolTo estimate the total amount of space needed for all backed-up files stored in asingle random access (disk) storage pool, use the following formula:Backup space = WkstSize * Utilization * VersionExpansion * NumWkst
where:
Backup SpaceThe total amount of storage pool disk space needed.
WkstSizeThe average data storage capacity of a workstation. For example, if thetypical workstation at your installation has a 4GB hard drive, then theaverage workstation storage capacity is 4GB.
UtilizationAn estimate of the fraction of each workstation disk space used, in therange 0 to 1. For example, if you expect that disks on workstations are 75%full, then use 0.75.
VersionExpansionAn expansion factor (greater than 1) that takes into account the additionalbackup versions, as defined in the copy group. A rough estimate allows 5%additional files for each backup copy. For example, for a version limit of 2,use 1.05, and for a version limit of 3, use 1.10.
NumWkstThe estimated total number of workstations that the server supports.
If clients use compression, the amount of space required may be less than theamount calculated, depending on whether the data is compressible.
Estimating Space for Archived Files in a Random AccessStorage PoolEstimating the amount of storage space for archived files is more difficult, becausethe number of archived files generated by users is not necessarily related to theamount of data stored on their workstations.
To estimate the total amount of space needed for all archived files in a singlerandom access (disk) storage pool, determine what percentage of user files aretypically archived.
Work with policy administrators to calculate this percentage based on the numberand type of archive copy groups defined. For example, if policy administratorshave defined archive copy groups for only half of the policy domains in yourenterprise, then estimate that you need less than 50% of the amount of space youhave defined for backed-up files.
Because additional storage space can be added at any time, you can start with amodest amount of storage space and increase the space by adding storage volumesto the archive storage pool, as required.
Estimating Space Needs in Sequential Access Storage PoolsTo estimate the amount of space required for sequential access storage pools,consider:v The amount of data being migrated from disk storage pools
Chapter 10. Managing Storage Pools and Volumes 213

v The length of time backed-up files are retained, as defined in backup copygroups
v The length of time archived files are retained, as defined in archive copy groupsv How frequently you reclaim unused space on sequential volumes
See “Reclaiming Space in Sequential Access Storage Pools” on page 205 forinformation about setting a reclamation threshold.
v Whether or not you use collocation to reduce the number of volume mountsrequired when restoring or retrieving large numbers of files from sequentialvolumesIf you use collocation, you may need additional tape drives and volumes.See “Keeping a Client’s Files Together: Collocation” on page 200 for informationabout using collocation for your storage pools.
v The type of storage devices and sequential volumes supported at yourinstallation
Monitoring Storage Pools and VolumesAny administrator can query for information about a storage pool by viewing astandard or a detailed report. Use these reports to monitor storage pool usage,including:v Whether you need to add space to your disk and sequential access storage poolsv The status of the process of migrating data from one to storage pool to the next
storage pool in the storage hierarchyv The use of disk space by cached copies of files that have been migrated to the
next storage pool
Monitoring Space Available in a Storage PoolMonitoring the space available in storage pools is important to ensure that clientoperations such as backup can complete successfully. To make more spaceavailable, you may need to define more volumes for disk storage pools, or addmore volumes for sequential access storage pools such as tape. For moreinformation on maintaining a supply of volumes in libraries, see “ManagingVolumes” on page 124.
To request a standard report that shows all storage pools defined to the system,enter:query stgpool
Figure 25 on page 215 shows a standard report with all storage pools defined to thesystem. To monitor the use of storage pool space, review the Estimated Capacity andPct Util columns.
214 Tivoli Storage Manager for Windows: Administrator’s Guide

Estimated CapacitySpecifies the space available in the storage pool in megabytes.
For a disk storage pool, this value reflects the total amount of availablespace in the storage pool, including any volumes that are varied offline.
For a sequential access storage pool, this value is an estimate of the totalamount of available space on all volumes in the storage pool. The totalincludes volumes with any access mode (read-write, unavailable, read-only,offsite, or destroyed). The total includes scratch volumes that the storagepool can acquire only when the storage pool is using at least one scratchvolume for data.
Volumes in a sequential access storage pool, unlike those in a disk storagepool, do not contain a precisely known amount of space. Data is written toa volume as necessary until the end of the volume is reached. For thisreason, the estimated capacity is truly an estimate of the amount ofavailable space in a sequential access storage pool.
Pct UtilSpecifies, as a percentage, the space used in each storage pool.
For disk storage pools, this value reflects the total number of disk blockscurrently allocated by TSM. Space is allocated for backed-up, archived, orspace-managed files that are eligible for server migration, cached files thatare copies of server-migrated files, and files that reside on any volumesthat are varied offline.
Note: The value for Pct Util can be higher than the value for Pct Migr ifyou query for storage pool information while a client transaction(such as a backup) is in progress. The value for Pct Util isdetermined by the amount of space actually allocated (while thetransaction is in progress). The value for Pct Migr represents onlythe space occupied by committed files. At the end of the transaction,Pct Util and Pct Migr become synchronized.
For sequential access storage pools, this value is the percentage of the totalbytes of storage available that are currently being used to store active data(data that is not expired). Because the server can only estimate theavailable capacity of a sequential access storage pool, this percentage alsoreflects an estimate of the actual utilization of the storage pool.
Storage Device Estimated Pct Pct High Low NextPool Name Class Name Capacity Util Migr Mig Mig Storage
(MB) Pct Pct Pool----------- ---------- ---------- ----- ----- ---- ---- -----------ARCHIVEPOOL DISK 0.0 0.0 0.0 90 70BACKTAPE TAPE 180.0 85.0 100.0 90 70BACKUPPOOL DISK 80.0 51.6 51.6 50 30 BACKTAPECOPYPOOL TAPE 300.0 42.0ENGBACK1 DISK 0.0 0.0 0.0 85 40 BACKTAPE
Figure 25. Information about Storage Pools
Chapter 10. Managing Storage Pools and Volumes 215

Example: Monitoring the Capacity of a Backup Storage PoolFigure 25 on page 215 shows that the estimated capacity for a disk storage poolnamed BACKUPPOOL is 80MB, which is the amount of available space on diskstorage. More than half (51.6%) of the available space is occupied by either backupfiles or cached copies of backup files.
The estimated capacity for the tape storage pool named BACKTAPE is 180MB,which is the total estimated space available on all tape volumes in the storagepool. This report shows that 85% of the estimated space is currently being used tostore workstation files.
Note: This report also shows that volumes have not yet been defined to theARCHIVEPOOL and ENGBACK1 storage pools, because the storage poolsshow an estimated capacity of 0.0MB.
Monitoring the Use of Storage Pool Volumes
Task Required Privilege Class
Display information about volumes Any administrator
You can query the server for information about storage pool volumes:v General information about a volume, such as the following:
– Current access mode and status of the volume– Amount of available space on the volume– Location
v Contents of a storage pool volume (user files on the volume)v The volumes that are used by a client node
Getting General Information about Storage Pool VolumesTo request general information about all volumes defined to the server, enter:query volume
Figure 26 shows an example of the output of this standard query. The exampleillustrates that data is being stored on the 8mm tape volume named WREN01, aswell as on several other volumes in various storage pools.To query the server for a detailed report on volume WREN01 in the storage pool
named TAPEPOOL, enter:query volume wren01 format=detailed
Volume Name Storage Device Estimated Pct VolumePool Name Class Name Capacity Util Status
(MB)------------------------ ----------- ---------- --------- ----- --------D:\STOR\AIXVOL.1 AIXPOOL1 DISK 240.0 26.3 On-LineD:\STOR\AIXVOL.2 AIXPOOL2 DISK 240.0 36.9 On-LineD:\STOR\DOSVOL.1 DOSPOOL1 DISK 240.0 72.2 On-LineD:\STOR\DOSVOL.2 DOSPOOL2 DISK 240.0 74.1 On-LineD:\STOR\OS2VOL.1 OS2POOL1 DISK 240.0 55.7 On-LineD:\STOR\OS2VOL.2 OS2POOL2 DISK 240.0 51.0 On-LineWREN00 TAPEPOOL TAPE8MM 2,472.0 0.0 FillingWREN01 TAPEPOOL TAPE8MM 2,472.0 2.2 Filling
Figure 26. Information about Storage Pool Volumes
216 Tivoli Storage Manager for Windows: Administrator’s Guide

Figure 27 shows the output of this detailed query. Table 18 gives some suggestionson how you can use the information.
Table 18. Using the Detailed Report for a Volume
Task Fields and Description
Ensure the volume is available. Volume StatusAccess
Check the Volume Status to see if a disk volume has been varied offline, or if asequential access volume is currently being filled with data.
Check the Access to determine whether files can be read from or written to thisvolume.
Monitor the use of storage space. Estimated CapacityPct Util
The Estimated Capacity is determined by the device class associated with thestorage pool to which this volume belongs. Based on the estimated capacity, thesystem tracks the percentage of space occupied by client files (Pct Util). In thisexample, 26.3% of the estimated capacity is currently in use.
Monitor the error status of thevolume.
Number of Write ErrorsNumber of Read Errors
The server reports when the volume is in an error state and automaticallyupdates the access mode of the volume to read-only. The Number of Write Errorsand Number of Read Errors indicate the type and severity of the problem. Audit avolume when it is placed in error state. See “Auditing a Storage Pool Volume”on page 561 for information about auditing a volume.
Volume Name: WREN01Storage Pool Name: TAPEPOOLDevice Class Name: TAPE8MM
Estimated Capacity (MB): 2,472.0Pct Util: 26.3
Volume Status: FillingAccess: Read/Write
Pct. Reclaimable Space: 5.3Scratch Volume?: NoIn Error State?: No
Number of Writable Sides: 1Number of Times Mounted: 4
Write Pass Number: 2Approx. Date Last Written: 12/04/1996 11:33:26
Approx. Date Last Read: 12/03/1996 16:42:55Date Became Pending:
Number of Write Errors: 0Number of Read Errors: 0
Volume Location:Last Update by (administrator): TANAGER
Last Update Date/Time: 12/02/1996 13:20:14
Figure 27. Detailed Information for a Storage Pool Volume
Chapter 10. Managing Storage Pools and Volumes 217

Table 18. Using the Detailed Report for a Volume (continued)
Task Fields and Description
Monitor the life of sequentialaccess volumes that you havedefined to the storage pool.
Scratch Volume?Write Pass NumberNumber of Times MountedApprox. Date Last WrittenApprox. Date Last Read
The server maintains usage statistics on volumes that are defined to storagepools. Statistics on a volume explicitly defined by an administrator remain for aslong as the volume is defined to the storage pool. The server continues tomaintain the statistics on defined volumes even as the volume is reclaimed andreused. However, the server deletes the statistics on the usage of a scratchvolume when the volume returns to scratch status (after reclamation or after allfiles are deleted from the volume).
In this example, WREN01 is a volume defined to the server by an administrator,not a scratch volume (Scratch Volume? is No).
The Write Pass Number indicates the number of times the volume has beenwritten to, starting from the beginning of the volume. A value of one indicatesthat a volume is being used for the first time. In this example, WREN01 has awrite pass number of two, which indicates space on this volume may have beenreclaimed or deleted once before. Compare this value to the specificationsprovided with the media that you are using. The manufacturer may recommenda maximum number of write passes for some types of tape media. You may needto retire your tape volumes after reaching the maximum passes to better ensurethe integrity of your data. To retire a volume, move the data off the volume byusing the MOVE DATA command. See “Moving Files from One Volume toAnother Volume” on page 228.
Use the Number of Times Mounted, the Approx. Date Last Written, and the Approx.Date Last Read to help you estimate the life of the volume. For example, if morethan six months have passed since the last time this volume has been written toor read from, audit the volume to ensure that files can still be accessed. See“Auditing a Storage Pool Volume” on page 561 for information about auditing avolume.
Determine the location of avolume in a sequential accessstorage pool.
Location
When you define or update a sequential access volume, you can give locationinformation for the volume. The detailed query displays this location name. Thelocation information can be useful to help you track volumes, for example, offsitevolumes in copy storage pools.
Determine if a volume in asequential access storage pool iswaiting for the reuse delay periodto expire.
Date Became Pending
A sequential access volume is placed in the pending state after the last file isdeleted or moved from the volume. All the files that the pending volume hadcontained were expired or deleted, or were moved from the volume. Volumesremain in the pending state for as long as specified with the REUSEDELAYparameter for the storage pool to which the volume belongs.
Whether or not a volume is full, at times the Pct Util (percent of the volumeutilized) plus the Pct Reclaimable Space (percent of the volume that can bereclaimed) may add up to more than 100 percent. This can happen when a volumecontains aggregates that have empty space because of files in the aggregates thathave expired or been deleted. The Pct Util field shows all space occupied by bothnon-aggregated files and aggregates, including empty space within aggregates. ThePct Reclaimable Space field includes any space that is reclaimable on the volume,also including empty space within aggregates. Because both fields include the
218 Tivoli Storage Manager for Windows: Administrator’s Guide

empty space within aggregates, these values may add up to more than 100 percent.For more information about aggregates, see “How the Server Groups Files beforeStoring” on page 188 and “Requesting Information on the Use of Storage Space” onpage 225.
Getting Information about the Contents of a Storage Pool VolumeAny administrator can request information about the contents of a storage poolvolume. Viewing the contents of a storage volume is useful when a volume isdamaged or before you do the following:v Request the server to correct any inconsistencies (AUDIT VOLUME command)v Move files from one volume to other volumesv Delete a volume from a storage pool
Because the server tracks the contents of a storage volume through its database,the server does not need to access the requested volume to determine its contents.
The report generated by a QUERY CONTENT command shows the contents of avolume. This report can be extremely large and may take a long time to produce.To reduce the size of this report, narrow your search by selecting one or all of thefollowing search criteria:
Node nameName of the node whose files you want to include in the query.
File space nameNames of file spaces to include in the query. File space names arecase-sensitive and must be entered exactly as they are known to the server.Use the QUERY FILESPACE command to find the correct capitalization.
Number of files to be displayedEnter a positive integer, such as 10, to list the first ten files stored on thevolume. Enter a negative integer, such as -15, to list the last fifteen filesstored on the volume.
FiletypeSpecifies which types of files, that is, backup versions, archive copies, orspace-managed files, or a combination of these.
Format of how the information is displayedStandard or detailed information for the specified volume.
DamagedSpecifies whether to restrict the query output either to files that are knownto be damaged, or to files that are not known to be damaged.
CopiedSpecifies whether to restrict the query output to either files that are backedup to a copy storage pool, or to files that are not backed up to a copystorage pool.
Viewing a Standard Report on the Contents of a Volume: To view the first sevenbackup files on volume WREN01 from file space /usr on client node TOMC, forexample, enter:query content wren01 node=tomc filespace=/usr count=7 type=backup
Figure 28 on page 220 displays a standard report which shows the first seven filesfrom file space /usr on TOMC stored in WREN01.
Chapter 10. Managing Storage Pools and Volumes 219
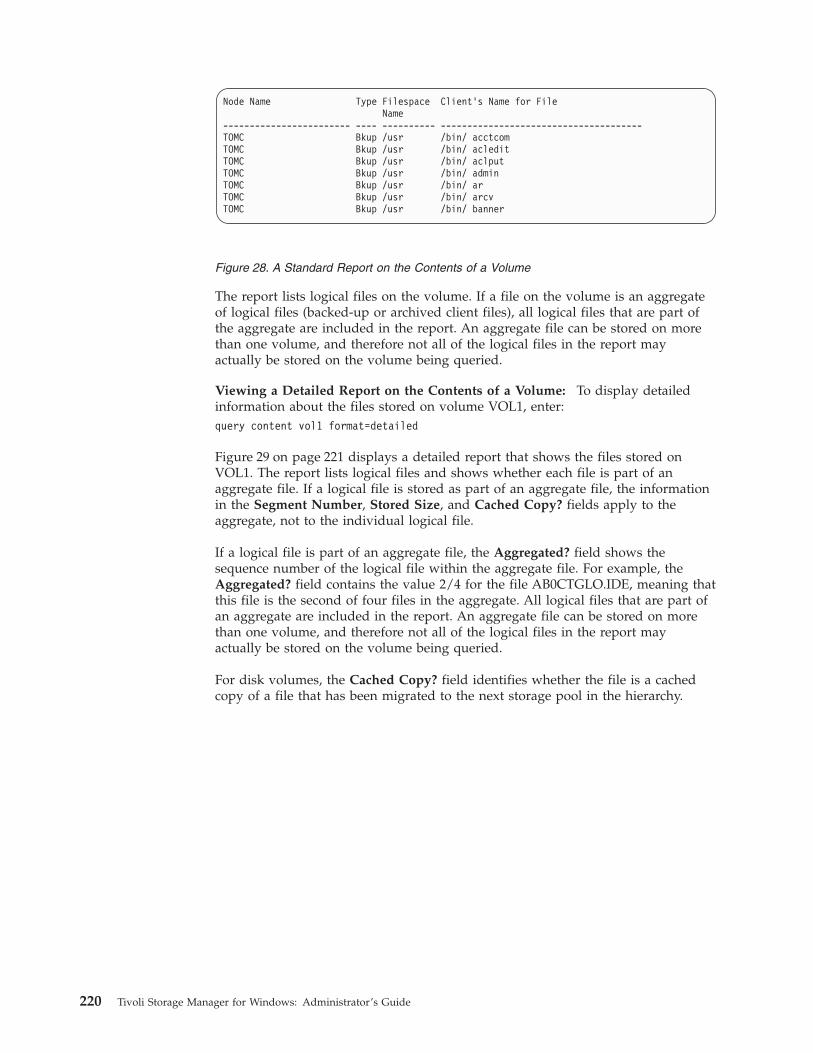
The report lists logical files on the volume. If a file on the volume is an aggregateof logical files (backed-up or archived client files), all logical files that are part ofthe aggregate are included in the report. An aggregate file can be stored on morethan one volume, and therefore not all of the logical files in the report mayactually be stored on the volume being queried.
Viewing a Detailed Report on the Contents of a Volume: To display detailedinformation about the files stored on volume VOL1, enter:query content vol1 format=detailed
Figure 29 on page 221 displays a detailed report that shows the files stored onVOL1. The report lists logical files and shows whether each file is part of anaggregate file. If a logical file is stored as part of an aggregate file, the informationin the Segment Number, Stored Size, and Cached Copy? fields apply to theaggregate, not to the individual logical file.
If a logical file is part of an aggregate file, the Aggregated? field shows thesequence number of the logical file within the aggregate file. For example, theAggregated? field contains the value 2/4 for the file AB0CTGLO.IDE, meaning thatthis file is the second of four files in the aggregate. All logical files that are part ofan aggregate are included in the report. An aggregate file can be stored on morethan one volume, and therefore not all of the logical files in the report mayactually be stored on the volume being queried.
For disk volumes, the Cached Copy? field identifies whether the file is a cachedcopy of a file that has been migrated to the next storage pool in the hierarchy.
Node Name Type Filespace Client’s Name for FileName
------------------------ ---- ---------- --------------------------------------TOMC Bkup /usr /bin/ acctcomTOMC Bkup /usr /bin/ acleditTOMC Bkup /usr /bin/ aclputTOMC Bkup /usr /bin/ adminTOMC Bkup /usr /bin/ arTOMC Bkup /usr /bin/ arcvTOMC Bkup /usr /bin/ banner
Figure 28. A Standard Report on the Contents of a Volume
220 Tivoli Storage Manager for Windows: Administrator’s Guide

Finding the Volumes Used by a Client NodeYou can use the server’s SELECT command to find the sequential volumes used bya client node. Use SELECT to perform an SQL query of the VOLUMEUSAGE tablein the TSM database. For example, to get a list of volumes used by the EXCH1client node in the TAPEPOOL storage pool, enter the following command:select volume_name from volumeusage where node_name='EXCH1' andstgpool_name='TAPEPOOL'
The results are something like the following:VOLUME_NAME------------------TAPE01TAPE08TAPE13TAPE21
Node Name: DWEType: Bkup
Filespace Name: OS2Client's Name for File: \ README
Aggregated?: NoStored Size: 27,089
Segment Number: 1/1Cached Copy?: No
Node Name: DWEType: Bkup
Filespace Name: DRIVE_L_K:Client's Name for File: \COMMON\DSMCOMMN\ AB0CTCOM.ENT
Aggregated?: 1/4Stored Size: 202,927
Segment Number: 1/1Cached Copy?: No
Node Name: DWEType: Bkup
Filespace Name: DRIVE_L_K:Client's Name for File: \COMMON\DSMCOMMN\ AB0CTGLO.IDE
Aggregated?: 2/4Stored Size: 202,927
Segment Number: 1/1Cached Copy?: No
Node Name: DWEType: Bkup
Filespace Name: DRIVE_L_K:Client's Name for File: \COMMON\DSMCOMMN\ AB0CTTRD.IDE
Aggregated?: 3/4Stored Size: 202,927
Segment Number: 1/1Cached Copy?: No
Node Name: DWEType: Bkup
Filespace Name: DRIVE_L_K:Client's Name for File: \COMMON\DSMCOMMN\ AB0CTSYM.ENT
Aggregated?: 4/4Stored Size: 202,927
Segment Number: 1/1Cached Copy?: No
Figure 29. Viewing a Detailed Report of the Contents of a Volume
Chapter 10. Managing Storage Pools and Volumes 221

For more information about using the SELECT command, see Administrator’sReference.
Monitoring Migration ProcessesFour fields on the standard storage pool report provide you with informationabout the migration process. They include:
Pct MigrSpecifies the percentage of data in each storage pool that can be migrated.This value is used to determine when to start or stop migration.
For disk storage pools, this value represents the amount of disk spaceoccupied by backed-up, archived, or space-managed files that can bemigrated to another storage pool, including files on volumes that arevaried offline. Cached data are excluded in the Pct Migr value.
For sequential access storage pools, this value is the percentage of the totalvolumes in the storage pool that actually contain data at the moment. Forexample, assume a storage pool has four explicitly defined volumes, and amaximum scratch value of six volumes. If only two volumes actuallycontain data at the moment, then Pct Migr will be 20%.
This field is blank for copy storage pools.
High Mig PctSpecifies when the server can begin migrating data from this storage pool.Migration can begin when the percentage of data that can be migratedreaches this threshold. (This field is blank for copy storage pools.)
Low Mig PctSpecifies when the server can stop migrating data from this storage pool.Migration can end when the percentage of data that can be migrated fallsbelow this threshold. (This field is blank for copy storage pools.)
Next Storage PoolSpecifies the primary storage pool destination to which data is migrated.(This field is blank for copy storage pools.)
Example: Monitoring the Migration of Data Between StoragePoolsFigure 25 on page 215 shows that the migration thresholds for BACKUPPOOLstorage pool are set to 50% for the high migration threshold and 30% for the lowmigration threshold.
When the amount of migratable data stored in the BACKUPPOOL storage poolreaches 50%, the server can begin to migrate files to BACKTAPE.
To monitor the migration of files from BACKUPPOOL to BACKTAPE, enter:query stgpool back*
See Figure 30 on page 223 for an example of the results of this command.
If caching is on for a disk storage pool and files are migrated, the Pct Util valuedoes not change because the cached files still occupy space in the disk storagepool. However, the Pct Migr value decreases because the space occupied by cachedfiles is no longer migratable.
222 Tivoli Storage Manager for Windows: Administrator’s Guide
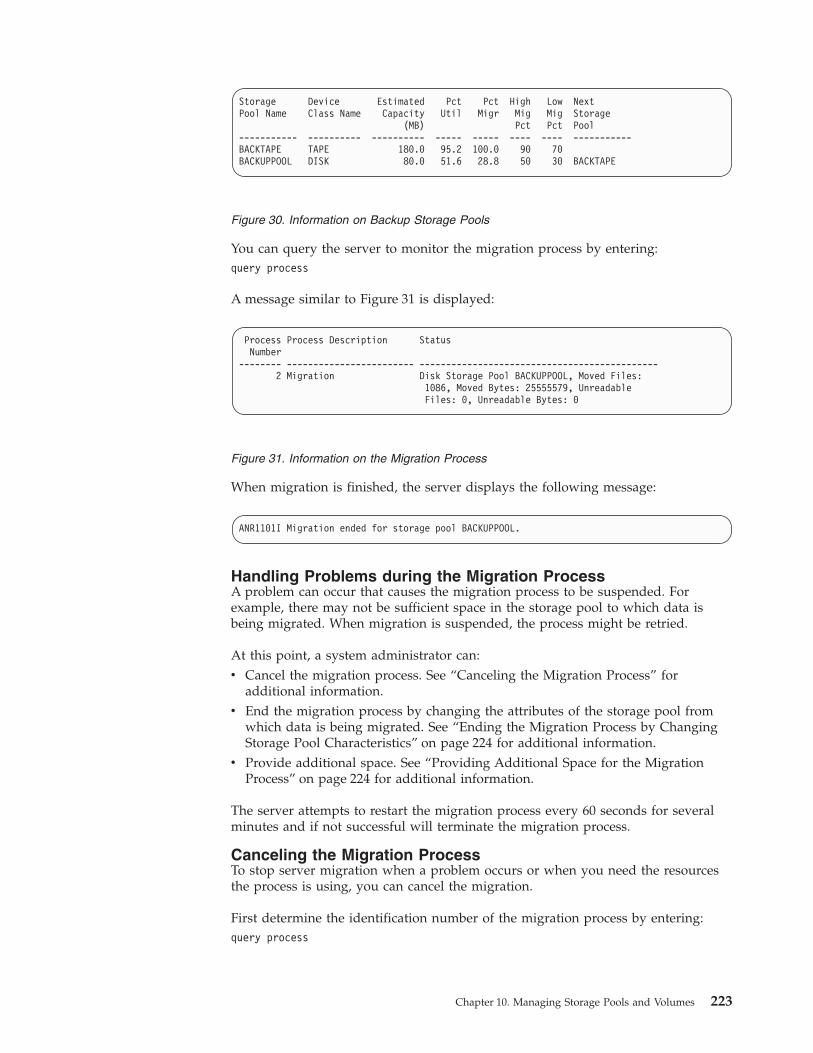
You can query the server to monitor the migration process by entering:query process
A message similar to Figure 31 is displayed:
When migration is finished, the server displays the following message:
Handling Problems during the Migration ProcessA problem can occur that causes the migration process to be suspended. Forexample, there may not be sufficient space in the storage pool to which data isbeing migrated. When migration is suspended, the process might be retried.
At this point, a system administrator can:v Cancel the migration process. See “Canceling the Migration Process” for
additional information.v End the migration process by changing the attributes of the storage pool from
which data is being migrated. See “Ending the Migration Process by ChangingStorage Pool Characteristics” on page 224 for additional information.
v Provide additional space. See “Providing Additional Space for the MigrationProcess” on page 224 for additional information.
The server attempts to restart the migration process every 60 seconds for severalminutes and if not successful will terminate the migration process.
Canceling the Migration ProcessTo stop server migration when a problem occurs or when you need the resourcesthe process is using, you can cancel the migration.
First determine the identification number of the migration process by entering:query process
Storage Device Estimated Pct Pct High Low NextPool Name Class Name Capacity Util Migr Mig Mig Storage
(MB) Pct Pct Pool----------- ---------- ---------- ----- ----- ---- ---- -----------BACKTAPE TAPE 180.0 95.2 100.0 90 70BACKUPPOOL DISK 80.0 51.6 28.8 50 30 BACKTAPE
Figure 30. Information on Backup Storage Pools
Process Process Description StatusNumber
-------- ------------------------ ---------------------------------------------2 Migration Disk Storage Pool BACKUPPOOL, Moved Files:
1086, Moved Bytes: 25555579, UnreadableFiles: 0, Unreadable Bytes: 0
Figure 31. Information on the Migration Process
ANR1101I Migration ended for storage pool BACKUPPOOL.
Chapter 10. Managing Storage Pools and Volumes 223
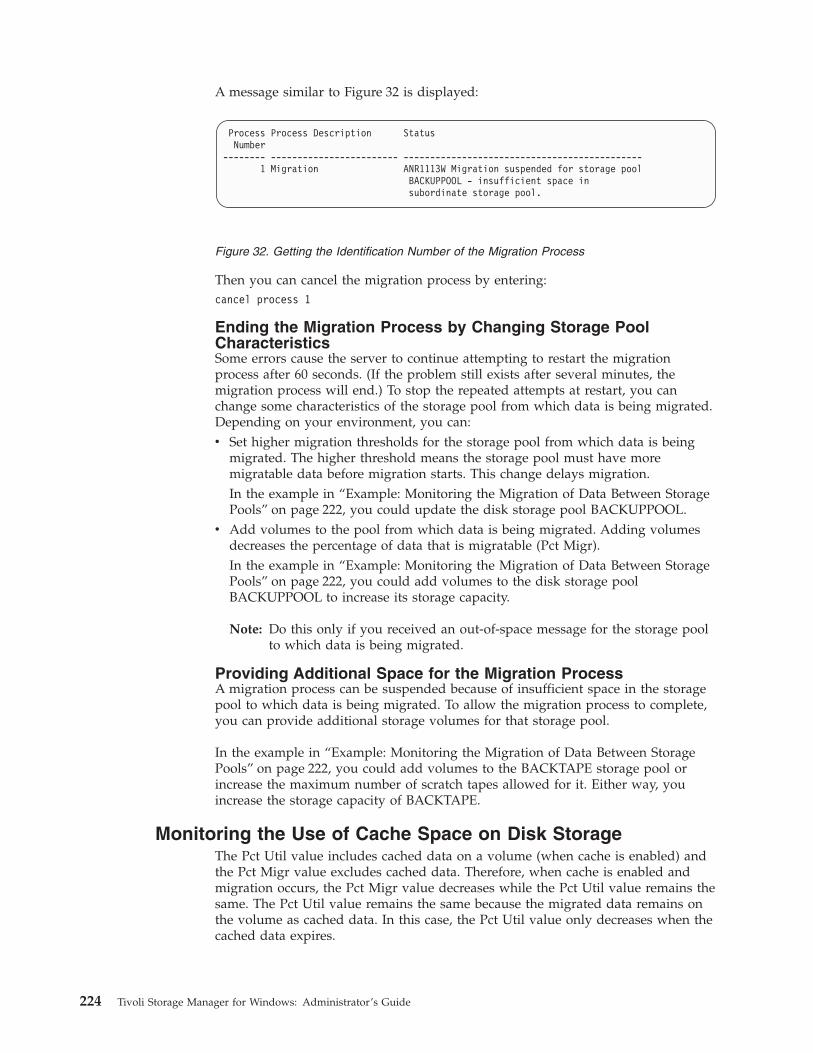
A message similar to Figure 32 is displayed:
Then you can cancel the migration process by entering:cancel process 1
Ending the Migration Process by Changing Storage PoolCharacteristicsSome errors cause the server to continue attempting to restart the migrationprocess after 60 seconds. (If the problem still exists after several minutes, themigration process will end.) To stop the repeated attempts at restart, you canchange some characteristics of the storage pool from which data is being migrated.Depending on your environment, you can:v Set higher migration thresholds for the storage pool from which data is being
migrated. The higher threshold means the storage pool must have moremigratable data before migration starts. This change delays migration.In the example in “Example: Monitoring the Migration of Data Between StoragePools” on page 222, you could update the disk storage pool BACKUPPOOL.
v Add volumes to the pool from which data is being migrated. Adding volumesdecreases the percentage of data that is migratable (Pct Migr).In the example in “Example: Monitoring the Migration of Data Between StoragePools” on page 222, you could add volumes to the disk storage poolBACKUPPOOL to increase its storage capacity.
Note: Do this only if you received an out-of-space message for the storage poolto which data is being migrated.
Providing Additional Space for the Migration ProcessA migration process can be suspended because of insufficient space in the storagepool to which data is being migrated. To allow the migration process to complete,you can provide additional storage volumes for that storage pool.
In the example in “Example: Monitoring the Migration of Data Between StoragePools” on page 222, you could add volumes to the BACKTAPE storage pool orincrease the maximum number of scratch tapes allowed for it. Either way, youincrease the storage capacity of BACKTAPE.
Monitoring the Use of Cache Space on Disk StorageThe Pct Util value includes cached data on a volume (when cache is enabled) andthe Pct Migr value excludes cached data. Therefore, when cache is enabled andmigration occurs, the Pct Migr value decreases while the Pct Util value remains thesame. The Pct Util value remains the same because the migrated data remains onthe volume as cached data. In this case, the Pct Util value only decreases when thecached data expires.
Process Process Description StatusNumber
-------- ------------------------ ---------------------------------------------1 Migration ANR1113W Migration suspended for storage pool
BACKUPPOOL - insufficient space insubordinate storage pool.
Figure 32. Getting the Identification Number of the Migration Process
224 Tivoli Storage Manager for Windows: Administrator’s Guide

If you update a storage pool from CACHE=YES to CACHE=NO, the cached fileswill not disappear immediately. The Pct Util value will be unchanged. The cachespace will be reclaimed over time as the server needs the space, and no additionalcached files will be created.
To determine whether cache is being used on disk storage and to monitor howmuch space is being used by cached copies, query the server for a detailed storagepool report. For example, to request a detailed report for BACKUPPOOL, enter:query stgpool backuppool format=detailed
Figure 33 displays a detailed report for the storage pool.
When Cache Migrated Files? is set to Yes, the value for Pct Util should not changebecause of migration, because cached copies of files migrated to the next storagepool remain in disk storage.
This example shows that utilization remains at 42%, even after files have beenmigrated to the BACKTAPE storage pool, and the current amount of data eligiblefor migration is 29.6%.
When Cache Migrated Files? is set to No, the value for Pct Util more closelymatches the value for Pct Migr because cached copies are not retained in diskstorage.
Requesting Information on the Use of Storage Space
Task Required Privilege Class
Query the server for information aboutserver storage
Any administrator
Storage Pool Name: BACKUPPOOLStorage Pool Type: PRIMARYDevice Class Name: DISK
Estimated Capacity (MB): 80.0Pct Util: 42.0Pct Migr: 29.6
Pct Logical: 82.1High Mig Pct: 50Low Mig Pct: 30
Migration Processes:Next Storage Pool: BACKTAPE
Reclaim Storage Pool:Maximum Size Threshold: No Limit
Access: Read/WriteDescription:
Overflow Location:Cache Migrated Files?: Yes
Collocate?:Reclamation Threshold:
Maximum Scratch Volumes Allowed:Delay Period for Volume Reuse: 0 Day(s)
Migration in Progress?: YesAmount Migrated (MB): 0.10
Elapsed Migration Time (seconds): 5Reclamation in Progress?:
Volume Being Migrated/Reclaimed:Last Update by (administrator): SERVER_CONSOLE
Last Update Date/Time: 04/07/1997 16:47:49
Figure 33. Detailed Storage Pool Report
Chapter 10. Managing Storage Pools and Volumes 225

Any administrator can request information about server storage occupancy. Use theQUERY OCCUPANCY command for reports with information broken out by nodeor file space. Use this report to determine the amount of space used by:v Client node and file spacev Storage pool or device classv Type of data (backup, archive, or space-managed)
Each report gives two measures of the space in use by a storage pool:v Logical space occupied
The amount of space used for logical files. A logical file is a client file. A logicalfile is stored either as a single physical file, or in an aggregate with other logicalfiles.
v Physical space occupiedThe amount of space used for physical files. A physical file is either a singlelogical file, or an aggregate file composed of logical files.An aggregate file may contain empty space that had been used by logical filesthat are now expired or deleted. Therefore, the amount of space used byphysical files is equal to or greater than the space used by logical files. Thedifference gives you a measure of how much unused space any aggregate filesmay have. The unused space can be reclaimed in sequential storage pools.
You can also use this report to evaluate the average size of workstation files storedin server storage.
Amount of Space Used by Client NodeAny administrator can request information about the space used by each clientnode and file space:v How much data has been backed up, archived, or migrated to server storagev How many of the files that are in server storage have been backed up to a copy
storage poolv The amount of storage space being used
To determine the amount of server storage space used by the /home file spacebelonging to the client node MIKE, for example, enter:query occupancy mike /home
Remember that file space names are case-sensitive and must be entered exactly asthey are known to the server. Use the QUERY FILESPACE command to determinethe correct capitalization. For more information, see “Managing File Spaces” onpage 270.
Figure 34 on page 227 shows the results of the query. The report shows the numberof files backed up, archived, or migrated from the /home file space belonging toMIKE. The report also shows how much space is occupied in each storage pool.
If you back up the ENGBACK1 storage pool to a copy storage pool, the copystorage pool would also be listed in the report. To determine how many of theclient node’s files in the primary storage pool have been backed up to a copystorage pool, compare the number of files in each pool type for the client node.
226 Tivoli Storage Manager for Windows: Administrator’s Guide

Amount of Space Used by Storage Pool or Device ClassYou can monitor the amount of space being used by an individual storage pool, agroup of storage pools, or storage pools categorized by a particular device class.Creating occupancy reports on a regular basis can help you with capacityplanning.
To query the server for the amount of data stored in backup tape storage poolsbelonging to the TAPECLASS device class, for example, enter:query occupancy devclass=tapeclass
Figure 35 displays a report on the occupancy of tape storage pools assigned to theTAPECLASS device class.
Note: For archived data, you may see “(archive)” in the Filespace Name columninstead of a file space name. This means that the data was archived beforecollocation by file space was supported by the server.
Amount of Space Used by Backed-Up, Archived, orSpace-Managed FilesYou can query the server for the amount of space used by backed-up, archived,and space-managed files. By determining the average size of workstation filesstored in server storage, you can estimate how much storage capacity you mightneed when registering new client nodes to the server. See “Estimating Space Needsfor Storage Pools” on page 212 and “Estimating Space for Archived Files in aRandom Access Storage Pool” on page 213 for information about planning storagespace.
Physical LogicalNode Name Type Filespace Storage Number of Space Space
Name Pool Name Files Occupied Occupied(MB) (MB)
--------------- ---- ----------- ----------- --------- ---------- --------MIKE Bkup /home ENGBACK1 513 3.52 3.01
Figure 34. A Report of the Occupancy of Storage Pools by Client Node
Node Name Type Filespace Storage Number of Physical LogicalName Pool Name Files Space Space
Occupied Occupied(MB) (MB)
--------------- ---- ----------- ----------- --------- ---------- --------CAROL Arch OS2C ARCHTAPE 5 .92 .89CAROL Bkup OS2C BACKTAPE 21 1.02 1.02PEASE Arch /home/peas- ARCHTAPE 492 18.40 18.40
e/dirPEASE Bkup /home/peas- BACKTAPE 33 7.60 7.38
e/dirPEASE Bkup /home/peas- BACKTAPE 2 .80 .80
e/dir1TOMC Arch /home/tomc ARCHTAPE 573 20.85 19.27
/driver5TOMC Bkup /home BACKTAPE 13 2.02 1.88
Figure 35. A Report on the Occupancy of Storage Pools by Device Class
Chapter 10. Managing Storage Pools and Volumes 227

To request a report about backup versions stored in the disk storage pool namedBACKUPPOOL, for example, enter:query occupancy stgpool=backuppool type=backup
Figure 36 displays a report on the amount of server storage used for backed-upfiles.
To determine the average size of backup versions stored in BACKUPPOOL,complete the following steps using the data provided in Figure 36:1. Add the number of megabytes of space occupied by backup versions.
In this example, backup versions occupy 92.22MB of space in BACKUPPOOL.2. Add the number of files stored in the storage pool.
In this example, 1760 backup versions reside in BACKUPPOOL.3. Divide the space occupied by the number of files to determine the average size
of each file backed up to the BACKUPPOOL.In this example, the average size of each workstation file backed up toBACKUPPOOL is about 0.05MB, or approximately 50KB.
You can use this average to estimate the capacity required for additional storagepools that are defined to the server.
Moving Files from One Volume to Another VolumeYou can move files from one volume to another volume in the same or a differentstorage pool using the MOVE DATA command. The volumes can be onsitevolumes or offsite volumes. During normal operations, you do not need to movedata. You might need to move data in some situations, for example, when youneed to salvage any readable data from a damaged TSM volume.
During the data movement process, the server:v Moves any readable files to available volumes in the specified destination
storage poolv Deletes any cached copies from a disk volumev Attempts to bypass any files that previously were marked as damaged
During the data movement process, users cannot access the volume to restore orretrieve files, and no new files can be written to the volume.
Note:
v Files in a copy storage pool do not move when primary files are moved.
Node Name Type Filespace Storage Number of Physical LogicalName Pool Name Files Space Space
Occupied Occupied(MB) (MB)
--------------- ---- ----------- ----------- --------- ---------- --------CAROL Bkup OS2C BACKUPPOOL 513 23.52 23.52CAROL Bkup OS2D BACKUPPOOL 573 20.85 20.85PEASE Bkup /marketing BACKUPPOOL 132 12.90 9.01PEASE Bkup /business BACKUPPOOL 365 13.68 6.18TOMC Bkup / BACKUPPOOL 177 21.27 21.27
Figure 36. A Report of the Occupancy of Backed-Up Files in Storage Pools
228 Tivoli Storage Manager for Windows: Administrator’s Guide

v You can only move data for volumes belonging to a storage pool withDATAFORMAT=NATIVE or DATAFORMAT=NONBLOCK.
Task Required Privilege Class
Move files from a volume in any storagepool to an available volume in any storagepool
System or unrestricted storage
Move files from one volume to an availablevolume in any storage pool to which youare authorized
Restricted storage
Moving Data to Other Volumes in the Same Storage PoolMoving files from one volume to other volumes in the same storage pool is useful:v When you want to free up all space on a volume so that it can be deleted from
the TSM serverSee “Deleting Storage Pool Volumes” on page 239 for information about deletingbacked-up, archived, or space-managed data before you delete a volume from astorage pool.
v When you need to salvage readable files from a volume that has been damagedv When you want to delete cached files from disk volumes
Note: You should not run MOVE DATA and migration processing concurrentlyon the same storage pool.
If you want to force the removal of cached files, you can delete them by movingdata from one volume to another volume. During the move process, the serverdeletes cached files remaining on disk volumes.
If you move data between volumes within the same storage pool and you run outof space in the storage pool before all data is moved from the target volume, thenyou cannot move all the data from the target volume. In this case, consider movingdata to available space in another storage pool as described in “Moving Data toAnother Storage Pool”.
Moving Data to Another Storage PoolYou can move all data from a volume in one storage pool to volumes in anotherstorage pool. When you specify a target storage pool that is different than thesource storage pool, the server uses the storage hierarchy to move data if morespace is required.
Note: Data cannot be moved from a primary storage pool to a copy storage pool.Data in a copy storage pool cannot be moved to any other storage pool.
You can move data from random access storage pools to sequential access storagepools. For example, if you have a damaged disk volume and you have a limitedamount of disk storage space, you could move all files from the disk volume to atape storage pool. Moving files from a disk volume to a sequential storage poolmay require many volume mount operations if the target storage pool iscollocated. Ensure that you have sufficient personnel and media to move files fromdisk to sequential storage.
Chapter 10. Managing Storage Pools and Volumes 229

Moving Data from an Offsite Volume in a Copy Storage PoolYou can move data from offsite volumes without bringing the volumes onsite.Processing of the MOVE DATA command for primary storage pool volumes doesnot affect copy storage pool files.
Processing of the MOVE DATA command for volumes in copy storage pools issimilar to that of primary storage pools, with the following exceptions:v Most volumes in copy storage pools may be set to an access mode of offsite,
making them ineligible to be mounted. During processing of the MOVE DATAcommand, valid files on offsite volumes are copied from the original files in theprimary storage pools. In this way, valid files on offsite volumes are copiedwithout having to mount these volumes. These new copies of the files arewritten to another volume in the copy storage pool.
v With the MOVE DATA command, you can move data from any primary storagepool volume to any primary storage pool. However, you can move data from acopy storage pool volume only to another volume within the same copy storagepool.
When you move files from a volume marked as offsite, the server does thefollowing:1. Determines which files are still active on the volume from which you are
moving data2. Obtains these files from a primary storage pool or from another copy storage
pool3. Copies the files to one or more volumes in the destination copy storage pool
Procedure for Moving Data1. Before you move files from a volume, complete the following steps:v If you want to ensure that no new files are written to a volume after you
move data from it, change the volume’s access mode to read-only. Thisprevents the server from filling the volume with data again as soon as datais moved. You might want to do this if you want to delete the volume.See “Updating Storage Pool Volumes” on page 183 for information aboutupdating the access mode of a storage pool volume.
v Ensure sufficient space is available on volumes within the specifieddestination storage pool by:a. Querying the source storage volume to determine how much space is
required on other volumes. See “Monitoring the Use of Storage PoolVolumes” on page 216 for information about requesting information abouta storage volume.
b. Querying the specified destination storage pool to ensure there issufficient capacity to store the files being moved. See “Monitoring SpaceAvailable in a Storage Pool” on page 214 for information about querying astorage pool.
If you need more storage space, define volumes or increase the maximumnumber of scratch volumes in the specified destination storage pool. See“Defining Storage Pool Volumes” on page 182 for preparing volumes to beused for server storage.
v If you are moving files from a volume in a sequential storage pool to anothervolume in the same storage pool, ensure that the mount limit of the deviceclass associated with the storage pool is greater than one.
230 Tivoli Storage Manager for Windows: Administrator’s Guide

See “Requesting Information about a Device Class” on page 166 forrequesting information about the mount limit value for the device class.
v If you are moving files from a tape volume to a tape storage pool, ensurethat the two tape drives required are available.
2. Move the data using the MOVE DATA command.For example, to move the files stored in the d:\storage\vol3 volume to anyavailable volume in the STGTMP1 storage pool, enter:move data d:\storage\vol3 stgpool=stgtmp1
When you move data from a volume, the server starts a background processand sends informational messages, such as:
ANR1140I Move Data process started for volume D:\STORAGE\VOL3(process ID 32).
The command may be run in the foreground on an administrative client byissuing the command with the WAIT=YES parameter.
Note:
v A volume may not be totally empty after a move data operationcompletes. For example, the server may be unable to relocate one ormore files to another volume because of input/output errors on thedevice or because errors were found in the file. You can delete thevolume with DISCARDDATA=YES to delete the volume and anyremaining files. The server then deletes the remaining files that hadI/O or other errors.
v You can only move data for volumes belonging to a storage pool withDATAFORMAT=NATIVE or DATAFORMAT=NONBLOCK.
Requesting Information about the Data Movement ProcessTo request information on the data movement process, enter:query process
Figure 37 shows an example of the report that you receive about the datamovement process.
Reclaiming Space in Aggregates During Data MovementEmpty space accumulates in a file aggregate as logical files in that aggregate aredeleted. During reclamation processing, the aggregate is reconstructed and thisempty space is removed. However, you cannot start reclamation processing onlyfor specific volumes. To reconstruct an aggregate for a specific volume, you can
Process Process Description StatusNumber
-------- -------------------- -------------------------------------------------32 Move Data Volume D:\STORAGE\VOL3, (storage pool BACKUPPOOL),
Target Pool STGTMP1, Moved Files: 49, MovedBytes: 9,121,792, Unreadable Files: 0,Unreadable Bytes: 0. Current File (bytes):3,522,560
Current output volume: VOL1.
Figure 37. Information on the Data Movement Process
Chapter 10. Managing Storage Pools and Volumes 231

issue the MOVE DATA command with the RECONSTRUCT parameter. In this way,you can move data within a sequential-access storage pool without moving anyexpired files in the aggregates. You may want to do this if the expired files containsensitive data and must be purged for legal reasons.
For example, to move the files stored in volume d:\storage\vol3 to any availablevolume in the STGTMP1 storage pool and reconstruct the aggregates in thatvolume, enter:move data d:\storage\vol3 stgpool=stgtmp1 reconstruct=yes
Monitoring the Movement of Data between VolumesYou can query the server for volume information to monitor the movement of databetween volumes. For example, to see how much data has moved from the sourcevolume in the move operation example, enter:query volume d:\storage\vol3 stgpool=backuppool
Near the beginning of the move process, querying the volume from which data isbeing moved gives the following results:
Volume Name Storage Device Estimated Pct VolumePool Name Class Name Capacity Util Status
(MB)--------------- ----------- ---------- --------- ----- --------D:\STORAGE\VOL3 BACKUPPOOL DISK 15.0 59.9 On-Line
Querying the volume to which data is being moved (VOL1, according to theprocess query output) gives the following results:
Volume Name Storage Device Estimated Pct VolumePool Name Class Name Capacity Util Status
(MB)---------------- ----------- ---------- --------- ----- --------VOL1 STGTMP1 8500DEV 4,944.0 0.3 Filling
At the end of the move process, querying the volume from which data was movedgives the following results:
Volume Name Storage Device Estimated Pct VolumePool Name Class Name Capacity Util Status
(MB)---------------- ---------- ---------- --------- ----- --------D:\STORAGE\VOL3 BACKUPPOOL DISK 15.0 0.0 On-Line
Moving Data by NodeYou can move data located in a sequential-access storage pool for one or morenodes, or a single node with selected file spaces. In contrast to previous sectionsthat discuss moving volumes using the MOVE DATA command, for the followingsections you need to use the MOVE NODEDATA command. For this command thedata can be located on either a primary or copy storage pool. When the sourcestorage pool is a primary pool, you can move data to other volumes within thesame pool or to another primary pool. When the source storage pool is a copypool, data can only be moved to other volumes within that pool.
Notes:
1. You can only move data by node if the data resides in a storage pool whosedata format is NATIVE or NONBLOCK.
232 Tivoli Storage Manager for Windows: Administrator’s Guide

2. If you are moving files within the same storage pool, there must be volumesavailable that do not contain the data you are moving. That is, the servercannot use a destination volume containing data that will need to be moved.
Task Required Privilege Class
Move data by node System, unrestricted storage or restrictedstorage
Moving Data for All File Spaces for One or More NodesMoving data for all file spaces on one or more nodes is useful:v When you want to optimize performance by reducing the number of volume
mounts required during a restore operation by consolidating data for a specificnode or nodes within a storage pool
v When you want to move data for specified nodes into a different storage poolv When you want to increase performance of client restore processing by first
moving data to a random-access storage pool
Note: You should avoid movement of data into, out of, or within a storage poolwhile MOVE NODEDATA is concurrently processing data on the samestorage pool.
To move all file spaces for a single node named ACCOUNTING where the data isin storage pool ACCTPOOL and the destination storage pool is BACKUPPOOLenter:
move nodedata accounting fromstgpool=acctpool tostgpool=backuppool
Moving Data for Selected File Spaces for One NodeMoving data for selected file spaces for a single node is useful:v When you want to optimize performance by reducing the number of volume
mounts required during a restore operation by consolidating data for specific filespaces within a storage pool.
v When you want to consolidate data for critical file spaces allowing restore ofthese files to be given higher priority during recovery situations. This would beadvantageous during data recovery when it is essential to first restore onlybusiness-critical data and then restore non-business-critical data.
v When you want to move specific file spaces into a different storage pool.v When you want to increase performance of client restore processing by first
moving data to a random-access storage pool.
For example, consider moving data for a single node and restricting the datamovement to files in a specific non-Unicode file space (for this example, \\eng\e$)as well as a specific Unicode file space (for this example, \\eng\d$ ). The nodename owning the data is ENGINEERING and it currently has data stored in theENGPOOL storage pool. After the move is complete, the data is located in thedestination storage pool BACKUPPOOL. To move the data enter the following:
move nodedata engineering fromstgpool=engpooltostgpool=backuppool filespace=\\eng\e$ unifilespace=\\eng\d$
Chapter 10. Managing Storage Pools and Volumes 233

Another example is to move data for a single node named MARKETING from allprimary sequential-access storage pools to a random-access storage pool namedDISKPOOL. First obtain a list of storage pools that contain data for nodeMARKETING, issue either:
query occupancy marketing
or
SELECT * from OCCUPANCY where node_name='MARKETING';
For this example the list of resulting storage pool names all begin with thecharacters FALLPLAN. To move the data repeat the following command for everyinstance of FALLPLAN. The following example displays the command forFALLPLAN3:
move nodedata marketing fromstgpool=fallplan3tostgpool=diskpool
A final example shows moving both non-Unicode and Unicode file spaces for anode. For node NOAH move non-Unicode file space \\servtuc\d$ and Unicodefile space \\tsmserv1\e$ that has a file space ID of 2 from sequential accessstorage pool TAPEPOOL to random access storage pool DISKPOOL.
move nodedata noah fromstgpool=tapepool tostgpool=diskpoolfilespace=\\servtuc\d$ fsid=2
Requesting Information about the Data Movement ProcessTo request information on the data movement process, enter:query process
Figure 38 shows an example of the report that you receive about the datamovement process.
Preventing Incomplete MOVE NODEDATA OperationsThere are various reasons why an incomplete MOVE NODEDATA operation canoccur. The following are the most common reasons:
Process Process Description StatusNumber
-------- -------------------- -------------------------------------------------3 Move Node Data Storage Pool 3590FC, Target Pool 3590FC Files
Moved: 0, Bytes Moved: 0, Unreadable Files: 0,Unreadable Bytes: 0. Current Physical File(bytes): 268,468,584
Current input volume:DST308.
Current output volume:DST279.
Figure 38. Information on the Data Movement Process
234 Tivoli Storage Manager for Windows: Administrator’s Guide

v Files have been marked as damaged in the source storage pool. For moreinformation regarding how to deal with files marked as damaged see“Correcting Damaged Files” on page 569.
v Files in the source storage pool reside on volumes whose access mode is offsite,destroyed or unavailable. To complete the move operation, bring the volumesonsite, restore destroyed volumes from a copy storage pool or make the volumesavailable.
v Files were moved, added or deleted during the move operation. To prevent thissituation, avoid the following operations during move processing:– Migration of any type relating to the storage pool– Reclamation of volumes within the storage pool– Simultaneously running MOVE DATA processing for a volume in a storage
pool that contains data to be moved during MOVE NODEDATA processing– Backup operations into a copy storage pool while a MOVE NODEDATA is
running for that copy pool– Storage of files from a client directly into the storage pool
Renaming a Storage PoolYou can rename a storage pool. You may need to do this when distributing policyusing enterprise configuration. See “Setting Up a Managed Server” on page 478.
When you rename a storage pool, any administrators with restricted storageprivilege for the storage pool automatically have restricted storage privilege to thestorage pool under the new name. If the renamed storage pool is in a storage poolhierarchy, the hierarchy is preserved.
Copy groups and management classes may contain a storage pool name as adestination. If you rename a storage pool used as a destination, the destination in acopy group or management class is not changed to the new name of the storagepool. To continue to use the policy with the renamed storage pool as a destination,you need to change the destination in the copy groups and management classes.You then activate the policy set with the changed destinations.
Defining a Copy Storage PoolUse a copy storage pool to back up one or more primary storage pools. SeeTable 20 on page 237 and “Backing Up Storage Pools” on page 539 for moreinformation. When you define a copy storage pool, be prepared to provide some orall of the information in Table 19.
Note: To back up a primary storage pool the DATAFORMAT must be NATIVE orNONBLOCK.
Table 19. Information for Defining a Copy Storage Pool
Information Explanation
Device class Specifies the name of the device class assigned for the storage pool. Thisis a required parameter.
Pool type Specifies that you want to define a copy storage pool. This is a requiredparameter. Updating a storage pool cannot change whether the pool is aprimary or copy storage pool.
Chapter 10. Managing Storage Pools and Volumes 235

Table 19. Information for Defining a Copy Storage Pool (continued)
Information Explanation
Access mode Defines access to volumes in the storage pool for user operations (suchas backup and restore) and system operations (such as reclamation).Possible values are:
Read/WriteUser and system operations can read from or write to thevolumes.
Read-OnlyUser operations can read from the volumes, but not write.However, system processes can move files within the volumesin the storage pool.
UnavailableSpecifies that users cannot access files stored on volumes in thecopy storage pool. Files can be moved within the volumes ofthe copy storage pool, but no new writes are permitted to thevolumes in the storage pool from volumes outside the storagepool.
Maximumnumber of scratchvolumes
When you specify a value greater than zero, the server dynamicallyacquires scratch volumes when needed, up to this maximum number.This is a required parameter.
For automated libraries, set this value equal to the physical capacity ofthe library. See “Adding Scratch Volumes to an Automated LibraryDevice” on page 130.
Collocation When collocation is enabled, the server attempts to keep all filesbelonging to a client node or a client file space on a minimal number ofsequential access storage volumes. See “Collocation on Copy StoragePools” on page 204.
Reclamationthreshold
Specifies when to initiate reclamation of volumes in the copy storagepool. Reclamation is a process that moves any remaining active,fragmented files from one volume to another volume, thus making theoriginal volume available for reuse. A volume is eligible for reclamationwhen the percentage of unused space on the volume is greater than thereclaim parameter value.
Reclamation processing works differently for offsite storage poolvolumes and virtual volumes. When a copy storage pool volume that isoffsite becomes eligible for reclamation, the reclamation process attemptsto retrieve the active files on the reclaimable volume from a primary orcopy storage pool volume that is onsite. The process then writes thesefiles to an available volume in the original copy storage pool. See“Reclamation for Copy Storage Pools” on page 209 and “Reclamation ofVolumes with the Device Type of SERVER” on page 209 for more details.
Reuse delayperiod
Specifies the number of days that must elapse after all of the files havebeen deleted from a volume before the volume can be rewritten orreturned to the scratch pool. See “Delaying Reuse of ReclaimedVolumes” on page 211.
Example: Defining a Copy Storage PoolAssume you need to maintain copies of the files stored in BACKUPPOOL,ARCHIVEPOOL, and SPACEMGPOOL (default disk storage pools) for disasterrecovery purposes. You want to create a copy storage pool named
236 Tivoli Storage Manager for Windows: Administrator’s Guide

DISASTER-RECOVERY. You decide to use only scratch tapes in the new pool,setting the maximum number of scratch volumes to an appropriate value. Youenter the following command:define stgpool disaster-recovery tapeclass pooltype=copymaxscratch=100
To store data in the new storage pool, you must back up the primary storage pools(BACKUPPOOL, ARCHIVEPOOL, and SPACEMGPOOL) to theDISASTER-RECOVERY pool. See “Backing Up Storage Pools” on page 539.
Comparing Primary and Copy Storage PoolsTable 20 compares the characteristics of primary and copy storage pools.
Table 20. Comparing Primary and Copy Storage Pools
Characteristic Primary storage pool Copy storage pool
Destination for backed-up or archivedfiles (specified in backup or archivecopy groups)
Yes No
Destination for space-managed files(specified in the management class)
Yes No
Offsite access mode for volumes No Yes, except for volumes with devicetype SERVER
Destroyed access mode for volumes Yes No
Random access storage volumes Yes No
Sequential access storage volumes Yes Yes
Contents Client files (backup versions, archivedfiles, space-managed files)
Copies of files that are stored inprimary storage pools
Moving data allowed Within the same primary storagepool, or to any primary storage pool
Within the same pool only.
If volumes are offsite, data is copiedfrom the original files in primarystorage pools.
Collocation Yes (sequential access storage poolsonly)
Yes
Reclamation Yes (sequential access storage poolsonly)
Yes
Virtual volumes (volumes with devicetype SERVER) and offsite volumes arehandled differently. For details, see“Reclamation of Volumes with theDevice Type of SERVER” on page 209and “Reclamation of Offsite Volumes”on page 210.
Chapter 10. Managing Storage Pools and Volumes 237

Table 20. Comparing Primary and Copy Storage Pools (continued)
Characteristic Primary storage pool Copy storage pool
File deletion Files are deleted:
v During inventory expirationprocessing, if the files have expired
v When a file space is deleted
v When a volume is deleted with theoption to discard the data
v When a primary storage poolvolume is audited with theFIX=YES option, if the files on thevolume are damaged and no othercopies of the file exist
Files are deleted:
v Whenever the primary copy of thefile is deleted from the primarystorage pool (because of expiration,file space deletion, or volumedeletion)
v When a volume is deleted with theoption to discard the data
v When a copy storage pool volumeis audited with the FIX=YESoption, if the files on the volumeare damaged
Deleting a Storage Pool
Task Required Privilege Class
Delete storage pools System
Before you delete a storage pool, ensure that:v All volumes within the storage pool have been deleted
Ensure that you have saved any readable data that you want to preserve byissuing the MOVE DATA command. Moving all of the data that you want topreserve may require you to issue the MOVE DATA command several times.Before you begin deleting all volumes that belong to the storage pool, changethe access mode of the storage pool to unavailable so that no files can be writtento or read from volumes in the storage pool.See “Deleting a Storage Pool Volume with Data” on page 239 for informationabout deleting volumes.
v The storage pool is not identified as the next storage pool within the storagehierarchyTo determine whether this storage pool is referenced as the next storage poolwithin the storage hierarchy, query for storage pool information as described in“Monitoring Space Available in a Storage Pool” on page 214.Update any storage pool definitions to remove this storage pool from the storagehierarchy by performing one of the following:– Naming another storage pool as the next storage pool in the storage hierarchy– Entering the value for the NEXTSTGPOOL parameter as "" (double quotes) to
remove this storage pool from the storage hierarchy definition
See “Defining or Updating Primary Storage Pools” on page 174 for informationabout defining and updating storage pools.
v The storage pool to be deleted is not specified as the destination for any copygroup in any management class within the active policy set of any domain. Also,a storage pool to be deleted cannot be the destination for space-managed files(specified in any management class within the active policy set of any domain).If this pool is a destination and the pool is deleted, operations fail because thereis no storage space to store the data.
238 Tivoli Storage Manager for Windows: Administrator’s Guide

Deleting Storage Pool VolumesYou can delete volumes, and optionally the client files they contain, from eitherprimary or copy storage pools.
If files that are not cached are deleted from a primary storage pool volume, anycopies of these files in copy storage pools will also be deleted.
Files in a copy storage pool are never deleted unless:v The volume that contains the copy file is deleted by using the
DISCARDDATA=YES option.v A read error is detected by using AUDIT VOLUME with the FIX=YES option for
a copy storage pool volume.v The primary file is deleted because of:
– Policy-based file expiration– File space deletion– Deletion of the primary storage pool volume
Tip: If you are deleting many volumes, delete the volumes one at a time.Concurrently deleting many volumes can adversely affect server performance.
Task Required Privilege Class
Delete volumes from any storage pool System or unrestricted storage
Delete volumes from storage pools overwhich they have authority
Restricted storage
Deleting an Empty Storage Pool VolumeYou can delete empty storage pool volumes. For example, to delete an emptyvolume named WREN03, enter:delete volume wren03
On an administrative client, you will receive the following confirmation messages,unless the client is running with the NOCONFIRM option:
ANR2200W This command will delete volume WREN03from its storage pool after verifying that the volumecontains no data.Do you wish to proceed? (Y/N)
After you respond yes, the server generates a background process to delete thevolume.
The command may be run in the foreground on an administrative client by issuingthe command with the WAIT=YES parameter.
Deleting a Storage Pool Volume with DataTo prevent you from accidentally deleting backed-up, archived, or space-managedfiles, the server does not allow you to delete a volume that contains user dataunless you specify DISCARDDATA=YES on the DELETE VOLUME command.
For example, to discard all data from volume WREN03 and delete the volumefrom its storage pool, enter:
Chapter 10. Managing Storage Pools and Volumes 239
delete volume wren03 discarddata=yes
The server generates a background process and deletes data in a series of batchdatabase transactions. After all files have been deleted from the volume, the serverdeletes the volume from the storage pool. If the volume deletion process iscanceled or if a system failure occurs, the volume might still contain data. Reissuethe DELETE VOLUME command and explicitly request the server to discard theremaining files on the volume.
To delete a volume but not the files it contains, move the files to another volume.See “Moving Files from One Volume to Another Volume” on page 228 forinformation about moving data from one volume to another volume.
Residual data: Even after you move data, residual data may remain on thevolume because of I/O errors or because of files that werepreviously marked as damaged. (TSM does not move files that aremarked as damaged.) To delete any volume that contains residualdata that cannot be moved, you must explicitly specify that filesshould be discarded from the volume.
240 Tivoli Storage Manager for Windows: Administrator’s Guide

Chapter 11. Configuring and Managing Clusters
The purpose of this chapter is to provide guidelines and information that will helpyou manage and configure clusters that best fit your business needs. The followinglist provides the subjects covered in this chapter.
Concepts:
“Cluster Components”
“Understanding Nodes in a Cluster”
“Cluster Objects” on page 242
“MSCS Virtual Servers” on page 242
“Hardware and Software Considerations” on page 244
“SCSI Tape Failover” on page 245
“Failover Setup” on page 246
“Terminating the Shared SCSI Bus” on page 246
“Configuration Considerations” on page 247
Tasks:
“Adding a Node to an Existing Cluster” on page 248
“Migrating an Existing TSM Server into a Cluster” on page 248
“Moving the Clients” on page 248
“Backup and Restore” on page 249
“Managing TSM on a Cluster” on page 249
“Managing SCSI Tape Failover” on page 250
Cluster ComponentsA cluster is a group of independent computers working together. When you usecluster configurations, you enhance the availability of your servers. Clusteringallows you to join two to four Windows servers, or nodes, using a shared disksubsystem. This provides the nodes with the ability to share data, which provideshigh server availability.
Clusters consist of many components such as nodes, cluster objects, MicrosoftCluster Server (MSCS) virtual servers, and even the hardware and software. If anyone of these components is missing, the cluster cannot work.
Understanding Nodes in a ClusterNodes have the following characteristics:v Every node has access to all cluster configuration data.v Every node communicates with the other nodes in the cluster through one or
more physically independent networks (sometimes referred to as interconnects).Network adapters, referred to in server clusters as network interfaces, attachnodes to networks.
v Every node in the cluster is aware when another system joins or leaves thecluster.
© Copyright IBM Corp. 1994, 2002 241

v Every node in the cluster is aware of the resources that are running locally aswell as the resources that are running the other cluster nodes.
v All nodes in the cluster are grouped under a common name, the cluster name,which is used for accessing and managing the cluster.
When a node starts, it searches for active nodes on the networks designated forinternal communication. If it finds an active node, it attempts to join the node’scluster. If it cannot find an existing cluster, it attempts to form a cluster by takingcontrol of the quorum resource. The quorum resource stores the most currentversion of the cluster database, which contains cluster configuration and state data.A server cluster maintains a consistent, updated copy of the cluster database on allactive nodes.
A node can host physical or logical units, referred to as resources. Administratorsorganize these cluster resources into functional units called groups and assignthese groups to individual nodes. If a node fails, the server cluster transfers thegroups that were being hosted by the node to other nodes in the cluster. Thistransfer process is called failover. The reverse process, failback, occurs when thefailed node becomes active again and the groups that were failed over to the othernodes are transferred back to the original node.
Cluster ObjectsNodes, resources, and groups are three kinds of cluster objects. The others arenetworks, network interfaces, and resource types. All server cluster objects areassociated with a set of properties, with data values that describe an object’sidentity and behavior in the cluster. Administrators manage cluster objects bymanipulating their properties, typically through a cluster management applicationsuch as Cluster Administrator (part of the MSCS application).
MSCS Virtual ServersMSCS lets you place TSM server cluster resources into a virtual server. A virtualserver is an MSCS cluster group that looks like a Windows server. The virtualserver has a network name, an IP address, one or more physical disks, and aservice. A TSM server can be one of the virtual services provided by an MSCSvirtual server.
The virtual server name is independent of the name of the physical node on whichthe virtual server runs. The virtual server name and address migrate from node tonode with the virtual server. Clients connect to a TSM server using the virtualserver name, rather than the Windows server name. The virtual server name isimplemented as a cluster network name resource and maps to a primary or backupnode. The mapping is dependent on where the virtual server currently resides.Any client that uses WINS or directory services to locate servers can automaticallytrack the virtual server as it moves between nodes. Automatically tracking thevirtual server does not require client modification or reconfiguration.
As mentioned earlier, each virtual server has its own disk as part of a clusterresource group. Therefore, they cannot share data. Each TSM server that has beenimplemented as a virtual server has its database, recovery log, and set of storagepool volumes on a separate disk owned by that virtual server.
Because the server’s location is transparent to client applications, this affords TSMthe maximum ease of failover and failback, while minimizing the impact on theTSM clients.
242 Tivoli Storage Manager for Windows: Administrator’s Guide

Note: MSCS only supports an IP Address as a resource. This means that any TSMserver running on a cluster must limit its supported communication methodto just TCP/IP. Any client not using TCP/IP as a communication methodwill not be able to reach the virtual server if it should failover to the othercluster node.
The following example demonstrates the way the MSCS virtual server conceptworks.
Assume a clustered TSM server called TSMSERVER1 is running on node A and aclustered TSM server called TSMSERVER2 is running on node B. Clients connect tothe TSM server TSMSERVER1 and the TSM server TSMSERVER2 without knowingwhich node currently hosts their server. The MSCS concept of a virtual serverensures that the server’s location is transparent to client applications. To the client,it appears that the TSM server is running on a virtual server called TSMSERVER1.
When one of the software or hardware resources fails, failover occurs. Resources(for example: applications, disks, or an IP address) migrate from the failed node tothe remaining node. The remaining node takes over the TSM server resourcegroup, restarts the TSM service, and provides access to administrators and clients.
If node A fails, node B assumes the role of running TSMSERVER1. To a client, it isexactly as if node A were turned off and immediately turned back on again.Clients experience the loss of all connections to TSMSERVER1 and all activetransactions are rolled back to the client. Clients must reconnect to TSMSERVER1after this occurs. The location of TSMSERVER1 is transparent to the client.
Figure 39. Clustering with TSMSERVER1 as Node A and TSMSERVER2 as Node B
Chapter 11. Configuring and Managing Clusters 243

Hardware and Software ConsiderationsGenerally, the following considerations are accounted for during the clusterplanning stage and before actual installation. However, because of their importanceto the overall success of a working cluster, these considerations are restated here.1. Decide the cluster configuration you need to use with servers using disk
devices. Each virtual server needs a separate set of disk resources on the shareddisk subsystem. Therefore, you may have problems if you configure the I/Osubsystem as one large array when configuring a two server cluster and laterdecide to expand to a four server cluster.
2. Identify the disk resources to be dedicated to TSM. A shared disk should not bedivided into multiple partitions with each partition assigned to a differentapplication and thus a different cluster group. For example, Application A, astable application, could be forced to failover due to a software problem withApplication B if both applications use partitions that are part of the samephysical disk. This could happen, for example, when a software problem withApplication B occurs. This problem causes the Cluster Services to failoverApplication B and its corequisite disk resource. Because the partitions exist onthe same physical drive, Application A is also forced to failover. Therefore, werecommend that you dedicate a shared disk as a single failable resource alongwith the Tivoli Storage Manager application.
3. Ensure that you have enough IP addresses. Microsoft recommends at leastseven addresses to set up a cluster involving two TSM virtual servers.v Four IP addresses for the Network Interface Cards (NIC). Each node in the
cluster uses two NICs. One NIC handles intracluster communication in theprivate high-speed network. The other NIC handles communication with theoutside network and serves as a backup for intracluster communication.
v One IP address for the cluster because it constitutes a virtual server.v One IP address for each virtual TSM server.
Figure 40. Clustering with TSMSERVER2 as Node B and assuming the role ofTSMSERVER1 as Node A
244 Tivoli Storage Manager for Windows: Administrator’s Guide

4. Obtain network names for each TSM server instance in the configuration. For acluster involving two TSM virtual servers, two network names are required andthey must be associated with the IP Addresses set aside for each TSM server.
5. Each TSM server instance requires a cluster resource group. Initially, the groupshould contain only disk resources. You can create a new group and move diskresources to it. You may choose just to rename an existing resource group thatcontains only disk resources.
6. TSM is installed to a local disk on each node in the cluster. Determine the diskto be used on each node. We strongly recommended that the same drive letterbe used on each machine.
7. MSCS does not provide for resource management for SCSI tape devices.However, TSM provides tape failover support that requires an additionalshared SCSI bus between two nodes in the cluster. If you choose not to useTSM tape failover support, you can attach tape devices in either of thefollowing configurations:
Attach to the node on which the TSMserver instance is currently active.
Attach to a third, nonclustered system onwhich an additional instance of the TSMserver is active.
This configuration allows high performancebackup and restore. However, it is notentirely automated. Operator intervention isrequired to service a failover where repairdelays take more than 2 days.
This configuration may not be acceptable ininstallations with low bandwidthcommunications between the servers in thecluster and the tape device controller server.
Define enough disk-based data volumespace to keep more than 2 days worth ofaverage data.
Define enough disk-based data volumespace to keep more than 2 days worth ofaverage data.
Set up a storage pool hierarchy so that datais migrated efficiently to the tape device.
Use the virtual volumes to enable migrationof the data from the local disk volumes tothe tape device.
When a failover occurs, manually disconnectthe tape device and reattach it to the nodeon which the server was newly active.
When a failover occurs, no operatorintervention is required; the newly activeserver continues to use the virtual volumesas before.
SCSI Tape FailoverMSCS does not support the failover of tape devices. However, TSM can handle thistype of a failover pattern with the correct set up. TSM uses a shared SCSI bus forthe tape devices. Each node (two only) involved in the tape failover must containan additional SCSI adapter card. The tape devices (library and drives) areconnected to the shared bus. When failover occurs, the TSM server issues a SCSIbus reset during initialization. In a failover situation, the bus reset is expected toclear any SCSI bus reserves held on the tape devices. This allows the TSM serverto acquire the devices after the failover.
The following section describes a specific hardware and software configuration forTSM tape failover support. Currently, it is the only configuration that has beentested and that is officially supported. Other configurations might also work, butthey have not yet been tested by IBM. Table 21 on page 246 describes the hardwareand software tested for use with TSM tape failover.
Chapter 11. Configuring and Managing Clusters 245

Table 21. Hardware and Software Supported for Tape Failover
Operating System Windows 2000 Advanced Server orDatacenter Server
SCSI Adaptor Adaptec AHA-2944UW PCI SCSI Controller
SCSI Tape Library IBM 3590-B11 or
IBM 3570-C12
Failover SetupTo use TSM tape failover, perform the following before installing and configuringTSM:1. Ensure that Windows Advanced Server or Datacenter Server is installed on all
computers in the cluster.2. Ensure that your hardware configuration meets the following criteria:v All hardware must be identical, slot for slot, card for card, for both nodes.
Note: TSM tape failover is supported for only two nodes of the cluster.v SCSI cables are used to attach the shared tape devices to both computers.v SCSI bus is properly terminated. See “Terminating the Shared SCSI Bus”.v A second SCSI adaptor is installed on each cluster node to provide a shared
external bus between the two computers.v A SCSI tape library containing one or more SCSI tape drives is being used.
3. Ensure that the SCSI bus is properly configured (prior to installation).4. Ensure that each device on the shared SCSI bus has a unique SCSI ID, both
SCSI controllers and tape devices.
Note: Most SCSI controllers default to SCSI ID 7. Thus one of the SCSIcontrollers must have its ID changed to a different number, such as SCSIID 6. This ensures that the host adapters have the highest priority on theSCSI bus.
5. Ensure that the SCSI bus resets are disabled. You will want to do this becausethere is a tendency for SCSI controllers to reset the SCSI bus when theyinitialize at boot time. The bus reset can interrupt any data transfers betweenthe other node and tape devices on the shared SCSI bus.
6. Ensure that only tape devices are connected to the shared bus.
Note: CD-ROM drives or removable media devices should not be used on theshared bus.
7. Ensure that the device names assigned by either the Windows device driver orthe TSM device driver (ADSMSCSI) are the same on both machines. If thenames do not match on both machines, the TSM Tape Failover support cannotbe configured.
Terminating the Shared SCSI BusThe following presents methods for terminating the shared SCSI bus. You mustterminate the shared SCSI bus as part of the initial setup of SCSI tape failover.Also, the shared SCSI bus must be terminated before you bring a server backonline.
246 Tivoli Storage Manager for Windows: Administrator’s Guide

There are several different methods that can be used to terminate the shared SCSIbus:v SCSI controllers
SCSI controllers have internal termination that can be used to terminate the bus,however this method is not recommended with Cluster Server. If a node isoffline with this configuration, the SCSI bus will not be properly terminated andwill not operate correctly.
v Storage enclosures
Storage enclosures also have internal termination. This can be used to terminatethe SCSI bus if the enclosure is at the end of the SCSI bus.
v Y cables (recommended termination method)
Y cables can be connected to devices if the device is at the end of the SCSI bus.A terminator can then be attached to one branch of the Y cable in order toterminate the SCSI bus. This method of termination requires either disabling orremoving any internal terminators the device may have.
v Trilink connectors (recommended termination method)
Trilink connectors can be connected to certain devices. If the device is at the endof the bus, a trilink connector can be used to terminate the bus. This method oftermination requires either disabling or removing any internal terminators thedevice may have.
Note: Any devices that are not at the end of the shared bus must have theirinternal termination disabled.
Configuration ConsiderationsWhether you will configure your system to include clusters depends on yourbusiness needs. It requires a great deal of planning. In addition to assuring theright type of hardware and the applicable software, the focus of clustering is thefailover pattern. When a node fails or needs to be taken off-line, which node ornodes in the cluster will pick up the transaction processing? In a two-node clusterthere is little planning necessary. In a more complex arrangement, you want to giveconsideration to how your transaction processing is best handled. A form of loadbalancing among your nodes needs to be accounted for so that you maintain peakperformance. Another consideration is to ensure that your customers do not seeany lag and little drop in productivity.
MSCS requires each TSM server instance to have a private set of disk resources.Although nodes can share disk resources, only one node can actively control a diskat a time.
Is one configuration better than the other? To determine your best installation, youneed to look at the differences in performance and cost. Assume you have a TSMserver-dedicated cluster whose nodes have comparable power. During failover, theperformance of a configuration may degrade because one node must manage bothvirtual TSM server instances. If each node handles 100 clients in a normaloperation, one node must handle 200 clients during a failure.
The planning steps you might use and the end result of such planning are coveredin the Quick Start. Clustering takes planning to ensure the optimal performance ofyour system.
Chapter 11. Configuring and Managing Clusters 247
Administrator’s TasksAfter you have set up your initial cluster or clusters, maintenance needs areminimal. Check your Windows Event log on a regular, if not daily, basis to monitorthe activity of the nodes in the cluster. By checking the log, you will be informedthat a node has failed and needs maintenance.
The following presents some situations that can occur over time that will affect theconfiguration or format of your cluster.
Adding a Node to an Existing ClusterAs your business grows or new equipment is added, you may find itadvantageous to add an additional node to your cluster configuration. You wouldstill want to do the initial planning to help save you time and ensure a successfulimplementation. In addition, proceed with the following steps:1. Ensure your new configuration is supported by the Windows software
application running on your computers. For instance if you have been runningWindows Advanced Server (which supports two nodes in cluster), you willneed to install Windows Datacenter which supports up to four nodes in acluster.
2. Install TSM on the node you are adding if it is not already installed. Ensurethe install process uses the same local disk drive letter as the other nodes inthe configuration.
3. Ensure the new node is online and functional and sharing the same shareddisk as the other nodes.
4. Take the TSM Server group offline using the Cluster Administrator.5. Modify the TSM server resource in the group and add the new owner node.6. Move the TSM server group to the new node.7. Bring only the disk resource online for the new node.8. Access the TSM Console.9. Access the TSM Initial Configuration wizard list and initialize the server for
the existing group.10. Access the Cluster Configuration wizard and add the new node to the cluster.
Migrating an Existing TSM Server into a ClusterThe reason you might want to migrate an existing server into a cluster is probablythe same as why you would a server to a cluster. More than likely you are lookingto increase the availability and reliability of data to all your users. By having theserver as part of the cluster, you provide an extra level of security by ensuring thatno transactions will be missed due to a failed server. The failover pattern youestablish prevents future failures.
To migrate an existing TSM server into a cluster, you can either move the clients orperform a backup and restore procedure. The choice depends primarily on theavailability and capacity of other TSM server computers in your site and yourfamiliarity with the backup and restore procedure.
Moving the ClientsIf you move clients from a nonclustered TSM server computer to a clustered one,you can have the time to gradually migrate your users to the new system and notinterrupt services. However, you must have the hardware needed to run two TSMservers simultaneously. You can move clients in either of the following ways:
248 Tivoli Storage Manager for Windows: Administrator’s Guide

v You can register clients with the new clustered TSM server. Have them performa full backup of their data to the clustered server. When you are sure the client’sdata is safely on the clustered server, that client can be deleted from the oldserver. When all clients have been moved to the clustered server, the old servercan be eliminated.
v You can export the clients from the old server and import those clients into theclustered server. After you have verified that a client’s data is on the clusteredserver, you can delete that client from the old server. After you have importedall clients to the clustered server, you can delete the old server.
Backup and RestoreIf you have limited hardware resources, you can add an existing TSM server to acluster by using the backup and restore procedure outline here. For example,suppose you have no hardware other than the two servers to be clustered and youplan to use the computer that is currently running the TSM server as a node.Follow this procedure to remove TSM from the computer and reinstall it in thecluster:1. Back up all disk storage pools to a copy storage pool.2. Back up the database of the existing TSM server.3. Perform the installation and configuration of the cluster.4. Restore the database to the clustered TSM server.5. Restore the disk storage pool volumes from the copy storage pool.6. After you verify that all your data is on the clustered server, delete the old
server.
Managing TSM on a ClusterFor most tasks, you can administer a virtual TSM server as you would anonclustered server. However, you must use the Cluster Administrator to performsome important tasks. The Cluster Administrator is available through theAdministrative Tools program group. The Cluster Administrator main windowdisplays a detailed view of a virtual server configuration, including the physicalWindows servers that make up the cluster and their resources, networkconnections, and status.
Use the Cluster Administrator to view the components of a virtual serverconfiguration and to start, stop, or fail back a virtual server that has failed over. Ifyou use the TSM console or some other method to stop a virtual TSM server,Clustering Service treats the shutdown as a failure and restarts the server on thecluster’s secondary node. A virtual TSM server should be controlled from theCluster Administrator rather than the Windows NT Service Control Manager.
There are reasons other than a systems failure for manually moving a virtual TSMserver. For example, if the Windows server acting as the primary node requireshardware or system maintenance, you may use the Cluster Administrator to movecontrol of the virtual TSM server to the secondary node until the maintenance iscompleted. Clients will experience a failover, just as if the primary server failedand the secondary server had taken over the virtual TSM server. After the TSMserver has been moved to the secondary node, the TSM console is no longeravailable from the primary node. Run the TSM Console from the secondary nodeof the cluster.
Chapter 11. Configuring and Managing Clusters 249

Using the Cluster Log on WindowsThe TSM Cluster Resource DLL reports events and errors to the cluster log. Thecluster log is a very useful troubleshooting tool. When this log is enabled, itrecords the actions of each component of the Cluster service as the result of eachaction. The cluster log is a more complete record of cluster activity than theMicrosoft Windows Event Log. The cluster log records the Cluster service activitythat leads up to the events recorded in the event log. Although the event log canpoint you to a problem, the cluster log helps you get at the source of the problem.
The cluster log, also known as the diagnostic log, is enabled by default inWindows 2000 and Windows NT. Its output is printed as a .log file in%SystemRoot%\Cluster. For more information, see the Windows 2000 or WindowsNT online help documentation.
Managing SCSI Tape FailoverAs part of your regular routine, check the event log to ensure that theconfiguration is operating properly. If a server fails, it will be logged. The logprovides you with some idea as to why the failure took place.
Sometimes a node must re-join the cluster, for example:v Node failedv Equipment changed, such as a new SCSI card added
Do the following (in any order) to ensure a successful entry into the cluster:v Ensure that the SCSI bus resets are disabled before bringing the failed node back
online.v Terminate the shared SCSI bus. It is possible that the bus could be in less than
an ideal condition and the signal at the bus would not be optimal.v Update, if necessary, the drive and library using the TSM Cluster tool.v Ensure that only tape devices are connected to the shared bus. Devices such as
CD-ROM drives or removable media devices, should not be used on the sharedbus. Doing so could result in a failed operation.
v Take the TSM server offline until the failed node has re-joined the cluster. Thisavoids the possibility of impacting the TSM server running on the other node.
250 Tivoli Storage Manager for Windows: Administrator’s Guide

Part 3. Managing Client Operations
© Copyright IBM Corp. 1994, 2002 251

252 Tivoli Storage Manager for Windows: Administrator’s Guide

Chapter 12. Adding Client Nodes
When the Tivoli Storage Manager server is installed, the Tivoli Storage Managerbackup-archive client and the administrative client are installed on the samemachine as the server by default. However, many installations of Tivoli StorageManager include remote clients, and application clients on other machines, oftenrunning on different operating systems.
The server views its registered clients as nodes that require services and resourcesfrom the server. The term nodes in this chapter indicates the following type ofclients and servers that you can register as client nodes:v Tivoli Storage Manager backup-archive clientv Tivoli Data Protection application clientsv Tivoli Space Manager (HSM client)v Tivoli Storage Manager source server registered as a node on a target serverv Network-attached storage (NAS) file server using Tivoli Data Protection for
NDMP support
Each node must be registered with the server and requires an option file with apointer to the server.
For details on many of the topics in this chapter, refer to Backup-Archive Installationand User’s Guide. Administrators can perform the following activities whenmanaging nodes:
Tasks:
“Installing Client Node Software” on page 254
“Accepting Default Closed Registration or Enabling Open Registration” on page 254
“Registering Nodes with the Server” on page 254
“Connecting Nodes with the Server” on page 258
Concepts:
“Overview of Clients and Servers as Nodes” on page 254
“Comparing Network-Attached Nodes to Local Nodes” on page 261
In this chapter, most examples illustrate how to perform tasks by using a TivoliStorage Manager command-line interface. For information about the commands,see Administrator’s Reference, or issue the HELP command from the command lineof a Tivoli Storage Manager administrative client.
Tivoli Storage Manager tasks can also be performed from the administrative Webinterface. For more information about using the administrative interface, see QuickStart.
© Copyright IBM Corp. 1994, 2002 253
Overview of Clients and Servers as NodesEach backup-archive client, HSM client, TDP application client, and source serveris given a node name when it is registered as a node with the Tivoli StorageManager server. The server considers each as a node that requires services andresources from the server.
Typically, a node is equivalent to a machine as in the case of a backup-archiveclient that is installed on a user’s computer for file system backups. However,multiple nodes can exist on a single machine. For example, a Structured QueryLanguage (SQL) server machine can contain both a TDP for SQL server applicationclient for database and transaction log backups, and a Tivoli Storage Managerbackup-archive client for file system backups.
Installing Client Node SoftwareAdministrators can install backup-archive clients, application clients, or TivoliSpace Manager clients by using any of the following methods:v Installing directly from the CD-ROMv Installing by transferring installable files from the CD-ROM to a target machinev Installing using silent installation techniquesv Installing by creating client software images and installing the images
For more information about installing:v Client software, refer to Backup-Archive Installation and User’s Guide.v Tivoli Data Protection application client software, refer to the Tivoli Data
Protection application client documentation for your particular client.
Use the procedures in this chapter to configure a node after it has been installed.
Registering Nodes with the ServerAdministrators can register Tivoli Storage Manager clients, Tivoli Data Protectionapplication clients, and HSM clients as client nodes.
When a node is registered, Tivoli Storage Manager automatically creates anadministrative user ID with client owner authority over the node. You can use thisadministrative user ID to access the Web backup-archive client from remotelocations through a Web browser. If an administrative user ID already exists withthe same name, an administrative user ID is not automatically defined. For moreinformation, see “Overview of Remote Access to Web Backup-Archive Clients” onpage 266.
Note: To connect to a Web backup-archive client directly from a supported Webbrowser or from a hyperlink in the Web administrative Enterprise Console,you must specify the node’s URL and port number during the registrationprocess or later update the node with this information.
Accepting Default Closed Registration or Enabling OpenRegistration
Before a user can request Tivoli Storage Manager services, the node must beregistered with the server.
254 Tivoli Storage Manager for Windows: Administrator’s Guide
Closed registration is the default, unless you used the Minimal Configurationoption in the Initial Configuration Task List. The administrator must register clientnodes when registration is set to closed.
Open registration allows the client nodes to register their node names, passwords,and compression options. On UNIX systems, only the root user can register a clientnode with the server.
With either registration mode, by default, an administrative user ID with clientowner authority is created over the node.
Note: Changes to the registration process do not affect existing registered clientnodes.
Closed RegistrationTo add a node with closed registration, an administrator uses the REGISTERNODE command to register the node and specify the initial password. Theadministrator can also specify the following optional parameters:v Contact information.v The name of the policy domain to which the node is assigned.v Whether the node compresses its files before sending them to the server for
backup and archive.v Whether the node can delete backups and archives from server storage.v The name of a client option set to be used by the node.v Whether to force a node to change or reset the password.v Whether the client node keeps a mount point for an entire session.v The maximum number of mount points the node can use.
Open RegistrationTo add a node with open registration, the server prompts the user for a nodename, password, and contact information the first time the user attempts toconnect to the server. With open registration, the server automatically assigns thenode to the STANDARD policy domain. The server by default allows users todelete archive copies, but not backups stored in server storage.
You can enable open registration by entering the following command from anadministrative client command line:set registration open
For examples and a list of open registration defaults, refer to the Administrator’sReference.
To change the defaults for a registered node, use the UPDATE NODE command.
Node Compression ConsiderationsWhen you enable compression, it reduces network utilization and saves serverstorage, but causes additional central processing unit (CPU) overhead to the node.Data compression is recommended only when there is insufficient networkcapacity.
Attention: Use either client compression or drive compression, but not both. Fordetails, see “Using Data Compression” on page 168.
To optimize performance or to ease memory constraints at the workstation, anadministrator can restrict file compression. You can select one of three options:
Chapter 12. Adding Client Nodes 255

v Compress filesv Do not compress filesv Use the value set in the COMPRESSION option
Set the COMPRESSION option in the client system options file or in theapplication program interface (API) configuration file.On a UNIX system, a root user can define the COMPRESSION option in thedsm.opt client options file.
Registering Nodes with the Tivoli Storage Manager ClientNode Configuration Wizard
Administrators can use the TSM Client Node Configuration Wizard to registerclient nodes with a server and associate the node with a storage pool. You maycomplete this task by using the TSM Management Console as follows:1. Double-click the desktop icon for the TSM Management Console.2. Expand the tree until the TSM server you want to work with is displayed.
Expand the server and click Wizards. The Wizards list appears in the rightpane.
3. Select the Client Node Configuration wizard and click Start. The Client NodeConfiguration Wizard is displayed.
4. Progress through the instructions in the wizard.
The administrator can register nodes by using the TSM command line. See“Adding Clients from the Administrative Command Line Client” on page 261 formore information.
Registering Nodes with Client Options SetsAdministrators can use client options sets in conjunction with the client options fileto register nodes with the server. Client option sets are considered advancedimplementation and are discussed in “Modifying Client Option Files” on page 281.You can specify an option set for a node when you register or update the node.For example:register node mike pass2eng cloptset=engbackup
The client node MIKE is registered with the password pass2eng. When the clientnode MIKE performs a scheduling operation, the schedule log entries are kept for5 days.
Registering a Network-attached Storage File Server as a NodeTo include a NAS file server as a node that TSM can back up and restore withTivoli Data Protection for NDMP support, you can register the file server as a NASnode. Data that is backed up from the NAS file server will be associated with theNAS node name.
The REGISTER NODE and UPDATE NODE commands have a default parameterof TYPE=CLIENT. To register a NAS file server as a node, you must specify theTYPE=NAS parameter. For example to register a NAS file server with a node nameof NASXYZ and a password of PW4PW, enter the following:register node nasxyz pw4pw type=nas
You must use this same node name when you later define the corresponding datamover name. For more information, see “Chapter 6. Setting Up Tivoli DataProtection for NDMP” on page 93.
256 Tivoli Storage Manager for Windows: Administrator’s Guide

Registering a Source Server as a Node on a Target ServerA virtual volume is a volume that appears to be a sequential media volume on asource server. The volume is actually stored as an archive file on a target server.
To use virtual volumes, register the source server as a client node on the targetserver.
The REGISTER NODE and UPDATE NODE commands have a default parameterof TYPE=CLIENT. To register a source server as a node, you must specify theTYPE=SERVER parameter. For more information, see “Using Virtual Volumes toStore Data on Another Server” on page 501.
Registering an Application Programming Interface to theServer
Workstation users can request TSM services by using an application that uses theTSM application programming interface (API). An administrator uses theREGISTER NODE command to register the workstation as a node.
Understanding How to Set the Compression OptionFor applications that use the TSM API, compression can be determined by:v An administrator during registration who can:
– Require that files are compressed– Restrict the client from compressing files– Allow the application user or the client user to determine the compression
statusv The client options file. If an administrator does not set compression on or off,
Tivoli Storage Manager checks the compression status that is set in the clientoptions file. The client options file is required, but the API user configuration fileis optional.
v One of the object attributes. When an application sends an object to the server,some object attributes can be specified. One of the object attributes is a flag thatindicates whether or not the data has already been compressed. If theapplication turns this flag on during either a backup or an archive operation,then Tivoli Storage Manager does not compress the data a second time. Thisprocess overrides what the administrator sets during registration.
For more information on setting options for the API and on controllingcompression, see Tivoli Storage Manager Using the Application Program Interface.
Understanding How to Set the File Deletion OptionFor applications that use the TSM API, the file deletion option can be set by:v An administrator during registration
If an administrator does not allow file deletion, then an administrator mustdelete objects or file spaces that are associated with the workstation from serverstorage.If an administrator allows file deletion, then Tivoli Storage Manager checks theclient options file.
v An application using the TSM API deletion program callsIf the application uses the dsmDeleteObj or dsmDeleteFS program call, thenobjects or files are marked for deletion when the application is executed.
Chapter 12. Adding Client Nodes 257

Connecting Nodes with the ServerThe client options file connects each node to the server. Administrators and userson all platforms can modify their client options file (dsm.opt) with a text editor.Client options files can be updated differently across platforms. On the Windowsplatform, you can use a wizard to work with the client options file. See “Methodsfor Creating or Updating a Client Options File” on page 259 for more information.
Note: If any changes are made to the dsm.opt file, the client must be restarted forchanges in the options file to have any affect.
The client options file dsm.opt is located in the client, application client, or hostserver directory. If the file does not exist, copy the dsm.smp file. Users andadministrators can edit the client options file to specify:v The network address of the serverv The communication protocolv Backup and archive optionsv Space management optionsv Scheduling options
Required Client OptionsEach node requires a client options file. Each client options file must contain thenetwork address of the Tivoli Storage Manager server and other communicationoptions that allow the node to communicate with the server. Figure 41 shows thecontents of a client options file that is configured to connect to the server by usingTCP/IP. The communication options specified in the client options file satisfy theminimum requirements for the node to connect with the server. See “Methods forCreating or Updating a Client Options File” on page 259 for more informationabout creating options files.
Non–Required Client OptionsMany non-required options are available that can be set at any time. These optionscontrol the behavior of Tivoli Storage Manager processing. Refer to Backup-ArchiveInstallation and User’s Guide for more information about non-required client options.
UNIX Client OptionsFor UNIX clients, options are located in three options files: client systems optionsfile, client user options file, and include-exclude options file. Clients on otherplatforms use a single options file.
Server Network AddressCommmethodTCPBuffsizeTCPPort
Client Options File (dsm.opt)
CommunicationOptions
(required)
Other Options(non-required)
See "Backup-ArchiveInstallation and User's Guide"
Figure 41. Client Node Options File
258 Tivoli Storage Manager for Windows: Administrator’s Guide

Updating the Password for Scheduling OperationsAdministrators determine passwords when they register nodes. For nodes and hostservers that run Windows, one more step is required. Administrators must updatepasswords by using the TSM Scheduler Configuration Utility (DSMCUTIL). Thisutility allows administrators to store Tivoli Storage Manager passwords in the NTregistry. Once a password is stored in the registry, the Tivoli Storage Managerscheduler can run as a protected account under its own authority. If the passwordexpires, Tivoli Storage Manager automatically generates a new password. Forexample, to specify that Tivoli Storage Manager provide a new password if thecurrent password expires, remove the comment (asterisk character) from thefollowing line in the client options file.* passwordaccess generate
Methods for Creating or Updating a Client Options FileThere are several methods for creating or updating client options files. Theavailable methods depend on the client platform.
Using a Text EditorAll options files (dsm.opt) can be edited with a text editor. Anyone can edit theclient options file if they have access to the directory where the node software isinstalled. Editing individual options files is the most direct method, but may not besuitable for sites with many client nodes.
Using the Client Configuration WizardWhen a local backup-archive client GUI starts initially and TSM does not find anoptions file, a setup wizard guides the client through the configuration process.
From the backup-archive client GUI, the client can also display the setup wizardby selecting Utilities→Setup Wizard. The client can follow the panels in the setupwizard to browse TSM server information in the Active Directory. The client candetermine which server to connect to and what communication protocol to use.
Note: This wizard is not available for the Web client.
Using the Client Options File Wizard (Windows 32-bit Clients)Generate the dsm.opt client options file from the TSM Server with the TSM ClientOptions File Wizard. The wizard detects the network address of the Tivoli StorageManager server.
Creating a Client Options FileAdministrators can create a client options file with the Client Options File wizardfrom the TSM Management Console. To use the TSM Management Console, do thefollowing:1. Double click the desktop icon for the TSM Management Console.2. Expand the tree until the TSM server you want to work with is displayed.
Expand the server and click Wizards. The Wizards list appears in the rightpane.
3. Select the Client Options File wizard and click Start. The TSM Client OptionsFile wizard is displayed.
4. Progress through the instructions in the wizard.
Chapter 12. Adding Client Nodes 259
Hint: The Client Options File Wizard allows the administrator to create a clientoptions file for a single TSM client. See “Creating a Client Configuration File” formore information about creating client options files for a number of clients.
Using the Remote Client Configuration Wizard (NetworkedWindows 32-bit Clients)
Use the Remote Client Configuration Wizard to create a package that allowsremote users to create client options files. The administrator uses the wizard togenerate a client configuration file and stores the file in a shared directory. Nodesaccess the directory and run the configuration file to create the client options file.This method is suitable for sites with many client nodes. See “Creating a ClientConfiguration File”.
Note: The network address of the TSM server is the only required option.However, many other options can be set to control various aspects of TSMdata management and client/server interactions.
Creating options files for one or two Windows clients may be easier withthe Client Options File Wizard. However, the Remote Client ConfigurationWizard is useful for creating multiple client options files.
Creating a Client Configuration FileAdministrators can create client options file for a number of nodes by creating aclient configuration file. A client configuration file contains the minimum optionsrequired to connect a node to the Tivoli Storage Manager server. Users can access ashared directory on the server and run a batch file that creates an options file.Using this method, administrators allow end users to create options files for theirnodes.1. Double click the desktop icon for the TSM Management Console.2. Expand the tree until the TSM server you want to work with is displayed.
Expand the server and click Wizards. The Wizards list appears in the rightpane.
3. Select the Remote Client Configuration wizard and click Start. The TSMNetwork Client Options File wizard is displayed.
4. Progress through the instructions in the wizard
Hint: The Remote Client Configuration wizard also allows the administrator toadd to the minimum Tivoli Storage Manager connection options by appending afile that contains additional client options. The result is a client options file that
Figure 42. Networked Windows NT Clients with Shared Directory on a File Server
260 Tivoli Storage Manager for Windows: Administrator’s Guide

contains the minimum options required to connect a client with the server, inaddition to any options the administrator wants to apply to all clients.
Comparing Network-Attached Nodes to Local NodesA Tivoli Storage Manager environment can be either a server and client on thesame machine (stand-alone environment) or a server and network-attached clients(network environment).
The stand-alone environment of Tivoli Storage Manager consists of abackup-archive client and a administrative client on the same computer as theserver. There is nothing more to do to connect the client. This is shown inFigure 43.
Figure 44 shows that a network environment of Tivoli Storage Manager consists ofa backup-archive client and an administrative client on the same computer as theserver. However, network-attached client nodes can also connect to the server.
Each client requires a client options file. A user can edit the client options file atthe client node. The options file contains a default set of processing options thatidentify the server, communication method, backup and archive options, spacemanagement options, and scheduling options.
Adding Clients from the Administrative Command Line ClientThe administrator can register nodes by using the REGISTER NODE command.For more information, refer to Administrator’s Reference.
Figure 43. Stand-alone Environment
Figure 44. Network Environment
Chapter 12. Adding Client Nodes 261

Enabling Open RegistrationThe default registration mode at installation is closed, unless you use the MinimalConfiguration option. To change the default to open so users an register their ownclient nodes, enter:set registration open
Configuring the Client Options File to Connect with the ServerEdit the client options file (dsm.opt) in the client directory using a text editor.
Example: Register Three Client Nodes Using theAdministrative Command Line
You want to register three workstations from the engineering department andassign them to the ENGPOLDOM policy domain. Before you can assign clientnodes to a policy domain, the policy domain must exist. To define a policydomain, see “Chapter 14. Implementing Policies for Client Data” on page 299.
You want to let users delete backed up or archived files from storage pools. Froman administrative client, you can use the macro facility to register more than oneclient node at a time. For this example, you create a macro file namedREGENG.MAC, that contains the following REGISTER NODE commands:register node ssteiner choir contact='department 21'domain=engpoldom archdelete=yes backdelete=yes
register node carolh skiing contact='department 21, second shift'domain=engpoldom archdelete=yes backdelete=yes
register node mab guitar contact='department 21, third shift'domain=engpoldom archdelete=yes backdelete=yes
Next, issue the MACRO command:macro regeng.mac
For information on the MACRO command, see Administrator’s Reference.
262 Tivoli Storage Manager for Windows: Administrator’s Guide

Chapter 13. Managing Client Nodes
This chapter contains information about managing client nodes that have beeninstalled and configured. For information about installing and configuring clientnodes, see “Chapter 12. Adding Client Nodes” on page 253.
Note: The Tivoli Storage Manager server views its registered clients, applicationclients, and source servers as nodes. In a general sense, the server considersall of these entities as a client. The term nodes in this chapter refers to thefollowing type of clients and servers as client nodes:v Tivoli Data Protection application clientsv Tivoli Storage Manager backup-archive clientv Tivoli Storage Manager source server registered as a node on a target
serverv Network-attached storage (NAS) file server using Tivoli Data Protection
for NDMP support
Administrators can manage client nodes and control their access to the server. Seethe following sections for more information:
Tasks:
“Managing Nodes” on page 264
“Managing Client Access Authority Levels” on page 268
“Managing File Spaces” on page 270
“Modifying Client Option Files” on page 281
“Managing Tivoli Storage Manager Sessions” on page 284
“Managing Tivoli Storage Manager Security” on page 288
Concepts:
“Overview of Client Nodes and File Spaces” on page 270
In this chapter, most examples illustrate how to perform tasks by using a TivoliStorage Manager command-line interface. For information about the commands,see Administrator’s Reference, or issue the HELP command from the command lineof a Tivoli Storage Manager administrative client.
Tivoli Storage Manager tasks can also be performed from the administrative Webinterface. For more information about using the administrative interface, see QuickStart.
Managing Client Node Registration TechniquesBy default, Tivoli Storage Manager provides closed registration as the technique forregistering client nodes. Administrators can modify the default with the SETREGISTRATION command. For more information about open and closedregistration, see “Accepting Default Closed Registration or Enabling OpenRegistration” on page 254.
© Copyright IBM Corp. 1994, 2002 263

Managing NodesFrom the perspective of the server, each client and application client is a noderequiring Tivoli Storage Manager services. For information, see “Overview ofClient Nodes and File Spaces” on page 270. Client nodes can be local or remote tothe server. For information, see “Comparing Network-Attached Nodes to LocalNodes” on page 261.
Administrators can perform the following activities when managing client nodes.
Task Required Privilege Class
Updating, renaming, locking, or unlockingany client nodes
System or unrestricted policy
Updating, renaming, locking, or unlockingclient nodes assigned to specific policydomains
System, unrestricted policy, or restrictedpolicy for those domains
Displaying information about client nodes orfile spaces
Any administrator
Deleting any client nodes System or unrestricted policy
Removing client nodes assigned to specificpolicy domains
System, unrestricted policy, or restrictedpolicy for those domains
Managing client access authority levels System
Updating Client Node InformationYou can use the UPDATE NODE command to update information such as theclient’s assigned policy domain, the user’s password or contact information, andthe client option set used by the node.
For example, update client node TOMC to prevent him from deleting archived filesfrom storage pools by entering:update node tomc archdelete=no
Renaming Client NodesYou can rename a client node with the RENAME NODE command. You may needto rename a client node if the workstation network name or host name changes.For example, with UNIX clients, users define their node name based on the valuereturned by the HOSTNAME command. When users access the server, their TivoliStorage Manager user IDs match the host name of their workstations. If the hostname changes, you can update a client node user ID to match the new host name.
For example, to rename CAROLH to ENGNODE, enter:rename node carolh engnode
ENGNODE retains the contact information and access to backup and archive datathat belonged to CAROLH. All files backed up or archived by CAROLH nowbelong to ENGNODE.
Locking and Unlocking Client NodesYou can prevent client nodes from accessing the server with the LOCK NODEcommand. This will prevent client nodes from performing functions such as eitherbackup and restore or archive and retrieve.
264 Tivoli Storage Manager for Windows: Administrator’s Guide

You can restore a locked node’s access to the server with the UNLOCK NODEcommand.
For example, to prevent client node MAB from accessing the server, enter:lock node mab
To let client node MAB access the server again, enter:unlock node mab
Deleting Client NodesYou can delete a client node from the server with the REMOVE NODE command.All file spaces that belong to the client node must first be deleted from serverstorage. After all of the client node’s file spaces have been deleted (see “DeletingFile Spaces and Client Nodes” on page 280), you can delete the node.
For example, to remove client node DEBBYG, enter:1. Delete the DEBBYG file space by entering:
delete filespace debbyg * type=any
2. Delete the DEBBYG node by entering:remove node debbyg
Note: Before you can delete a NAS node, you must first delete any file spaces,then delete any defined paths for the data mover with the DELETE PATHcommand. Delete the corresponding data mover with the DELETEDATAMOVER command. Then you can issue the REMOVE NODEcommand to delete the NAS node.
Displaying Information about Client NodesYou can display information about client nodes. For example, as a policyadministrator, you might query the server about all client nodes assigned to thepolicy domains for which you have authority. Or you might query the server fordetailed information about one client node.
Displaying Information about Client Nodes Assigned to SpecificPolicy DomainsYou can display information about client nodes assigned to specific policydomains. For example, to view information about client nodes that are assigned toSTANDARD and ENGPOLDOM policy domains, enter:query node * domain=standard,engpoldom
The output from that command may display similar to the following:
Node Name Platform Policy Domain Days Since Days Since Locked?Name Last Password
Access Set---------- -------- -------------- ---------- ---------- -------DEBBYG DOS STANDARD 2 12 NoENGNODE AIX ENGPOLDOM <1 1 NoHTANG OS/2 STANDARD 4 11 NoMAB AIX ENGPOLDOM <1 1 NoPEASE AIX STANDARD 3 12 NoSSTEINER (?) ENGPOLDOM <1 1 No
Chapter 13. Managing Client Nodes 265

Displaying Information about a Specific Client NodeYou can view information about specific client nodes. For example, to review theregistration parameters defined for client node JOE, enter:query node joe format=detailed
The resulting report may appear similar to the following:
Overview of Remote Access to Web Backup-Archive ClientsWith the introduction of the Web backup-archive client, when a client node isregistered with a Tivoli Storage Manager 3.7.0 server or above, an identicaladministrative user ID is created at the same time. This user ID has client ownerauthority over the node by default.
Enterprise logon enables a user with the proper administrative user ID andpassword to access a Web backup-archive client from a Web browser. The Webbackup-archive client can be used by the client node or a user ID with the properauthority to perform backup, archive, restore, and retrieve operations on anymachine that is running the Web backup-archive client.
You can establish access to a Web backup-archive client for help desk personnelthat do not have system or policy privileges by granting those users client accessauthority to the nodes they need to manage. Help desk personnel can thenperform activities on behalf of the client node such as backup and restoreoperations.
A native backup-archive client can log on to Tivoli Storage Manager using theirnode name and password, or administrative user ID and password. The
Node Name: JOEPlatform: WinNT
Client OS Level: 4.00Client Version: Version 3, Release 1, Level 3.0
Policy Domain Name: STANDARDLast Access Date/Time: 05/19/1999 18:55:46Days Since Last Access: 6Password Set Date/Time: 05/19/1999 18:26:43Days Since Password Set: 6
Invalid Sign-on Count: 0Locked?: NoContact:
Compression: Client's ChoiceArchive Delete Allowed?: YesBackup Delete Allowed?: NoRegistration Date/Time: 05/19/1999 18:26:43
Registering Administrator: SERVER_CONSOLELast Communication Method Used: Tcp/Ip
Bytes Received Last Session: 108,731Bytes Sent Last Session: 698
Duration of Last Session (sec): 0.00Pct. Idle Wait Last Session: 0.00Pct. Comm. Wait Last Session: 0.00Pct. Media Wait Last Session: 0.00
Optionset:URL:http://joe.host.name:1581
Node Type: ClientPassword Expiration Period: 60
Keep Mount Point?: NoMaximum Mount Points Allowed: 1
Auto Filespace Rename: NoValidate Protocol: No
266 Tivoli Storage Manager for Windows: Administrator’s Guide

administrative user ID password is managed independently from the passwordthat is generated with the passwordaccess generate client option. The client musthave the option passwordaccess generate specified in their client option file toenable use of the Web backup-archive client.
To use the Web backup-archive client from your web browser, you specify the URLand port number of the Tivoli Storage Manager backup-archive client machinerunning the Web client. The browser you use to connect to a Web backup-archiveclient must be Microsoft Internet Explorer 5.0 or Netscape 4.7 or later. The browsermust have the Java Runtime Environment (JRE) 1.3.1, which includes the JavaPlug-in software. The JRE is available at the following URL,http://java.sun.com/getjava.
During node registration, you have the option of granting client owner or clientaccess authority to an existing administrative user ID. You can also prevent theserver from creating an administrative user ID at registration. If an administrativeuser ID already exists with the same name as the node being registered, the serverregisters the node but does not automatically create an administrative user ID. Thisprocess also applies if your site uses open registration.
For more information about installing and configuring the Web backup-archiveclient, refer to Backup-Archive Installation and User’s Guide.
Description of Node Privilege Class with Client AccessAuthoritiesAccess to a Web backup-archive client requires either client owner authority orclient access authority. Administrators with system or policy privileges over theclient node’s domain, have client owner authority by default. The administrativeuser ID created automatically at registration has client owner authority by default.This administrative user ID is displayed when an administrator issues a QUERYADMIN command.
The following describes the difference between client owner and client accessauthority when defined for a user that has the node privilege class:
Client ownerYou can access the client through the Web backup-archive client or nativebackup-archive client.
You own the data and have a right to physically gain access to the dataremotely. You can backup and restore files on the same or differentmachine, you can delete file spaces or archive data.
The user ID with client owner authority can also access the data fromanother machine using the –NODENAME parameter.
The administrator can change the client node’s password for which theyhave authority.
This is the default authority level for the client at registration. Anadministrator with system or policy privileges to a client’s domain hasclient owner authority by default.
Client accessYou can only access the client through the Web backup-archive client.
You can restore data only to the original client.
A user ID with client access authority cannot access the client from anothermachine using the –NODENAME parameter.
Chapter 13. Managing Client Nodes 267

This privilege class authority is useful for help desk personnel so they canassist users in backing up or restoring data without having system orpolicy privileges. The client data can only be restored to none other thanthe original client. A user ID with client access privilege cannot directlyaccess client’s data from a native backup-archive client.
Managing Client Access Authority LevelsBy default, an administrator with system or policy privilege over a client’s domaincan remotely access clients and perform backup and restore operations.
You can grant client access or client owner authority to other administrators byspecifying CLASS=NODE and AUTHORITY=ACCESS or AUTHORITY=OWNERparameters on the GRANT AUTHORITY command. You must have one of thefollowing privileges to grant or revoke client access or client owner authority:v System privilegev Policy privilege in the client’s domainv Client owner privilege over the nodev Client access privilege over the node
You can grant an administrator client access authority to individual clients or to allclients in a specified policy domain. For example, you may want to grant clientaccess privileges to users that staff help desk environments. See “Example: Settingup Help Desk Access to Client Machines in a Specific Policy Domain” on page 269for more information.
Granting Client AuthorityTo grant client access authority to administrator FRED for the LABCLIENT node,issue:grant authority fred class=node node=labclient
The administrator FRED can now access the LABCLIENT client, and performbackup and restore. The administrator can only restore data to the LABCLIENTnode.
To grant client owner authority to ADMIN1 for the STUDENT1 node, issue:grant authority admin1 class=node authority=owner node=student1
The user ID ADMIN1 can now perform backup and restore operations for theSTUDENT1 client node. The user ID ADMIN1 can also restore files from theSTUDENT1 client node to a different client node.
Automatically Creating an Administrative User ID with ClientOwner AuthorityWhen you use the REGISTER NODE command, by default, the server creates anadministrative user ID in addition to the client node. The administrative user IDhas client owner authority to the node when the node is defined to the server. Forexample, you want to register client node DESK2, issue:register node desk2 pass2dsk
The following shows the output from this command.
ANR2060I Node DESK2 registered in policy domain STANDARD.ANR2099I Administrative userid DESK2 defined for OWNER access to node DESK2.
268 Tivoli Storage Manager for Windows: Administrator’s Guide

The DESK2 client node is registered, in addition to an administrative user ID withthe same ID. The administrative user ID DESK2 has a password of pass2dsk withclient owner authority to the DESK2 node. When thePASSWORDACCESS=GENERATE option is used by the client to change thepassword, the administrative DESK2 ID can still access the client from a remotelocation.
Preventing Automatic Creation of an Administrative User ID withClient Owner AuthorityYou can prevent automatic creation of an administrative user ID with client ownerauthority by specifying USERID=NONE on the REGISTER NODE command. Forexample, you want to register DESK2 without creating an administrative user IDwith client owner authority by default. Issue the following:register node desk2 pass2dsk userid=none
Registering a Node and Granting an Existing Administrative IDClient Owner AuthorityYou can grant client owner authority to an existing administrative user ID. Forexample, to give client owner authority to the HELPADMIN user ID whenregistering the NEWCLIENT node, enter:register node newclient pass2new userid=helpadmin
This command results in the NEWCLIENT node being registered with a passwordof pass2new, and also grants HELPADMIN client owner authority. This commandwould not create an administrator ID. The HELPADMIN client user ID is now ableto access the NEWCLIENT node from a remote location.
Example: Setting up Help Desk Access to Client Machines in aSpecific Policy DomainYou want to set up help desk access for user HELP1 to the client nodes in theFINANCE domain. You want to grant HELP1 client access authority to theFINANCE domain without having to grant system or policy privileges.
The client nodes have been previously set up as follows:v Installed and configured. The URL and port numbers were specified during the
REGISTER NODE process.v Assigned to the FINANCE policy domain.v Started the TSM Client Acceptor service.v Specified passwordaccess generate option in their client option files.
The help desk person, using HELP1 user ID, has a Web browser with JavaRuntime Environment (JRE) 1.3.1.1. Register an administrative user ID of HELP1.
register admin help1 05x23 contact="M. Smith, Help Desk x0001"
2. Grant the HELP1 administrative user ID client access authority to all clients inthe FINANCE domain. With client access authority, HELP1 can perform backupand restore operations for clients in the FINANCE domain. Client nodes in theFINANCE domain are Dave, Sara, and Joe.grant authority help1 class=node authority=access domains=finance
The following is output generated by this command:
Chapter 13. Managing Client Nodes 269

3. The help desk person, HELP1, opens the Web browser and specifies the URLand port number for client machine Sara:http://sara.machine.name:1581
A Java applet is started, and the client hub window is displayed in the mainwindow of the Web browser. When HELP1 accesses the backup function fromthe client hub, the Tivoli Storage Manager login screen is displayed in aseparate Java applet window. HELP1 authenticates with the administrative userID and password. HELP1 can perform a backup for Sara.
For information about what functions are not supported on the Webbackup-archive client, refer to Backup-Archive Installation and User’s Guide.
Managing File SpacesA file space name identifies a group of files that are stored as a logical unit in serverstorage. Administrators manage file spaces in which Tivoli Storage Manager storeseach client node’s data. See “Overview of Client Nodes and File Spaces” for moreinformation.
Administrators can perform the following activities when managing file spaces:
Task Required Privilege Class
Determine when existing file spaces arerenamed to allow for the creation of newUnicode-enabled file spaces
System, unrestricted policy privilege, orrestricted policy privilege for the policydomain to which the client node is assigned.
Displaying information about file spaces Any administrator
Move selected file spaces for a single node,as well as move a node’s data located in asequential access storage pool
System, unrestricted storage, or restrictedstorage privilege for the source storage pool.If your authorization is restricted storageprivilege and you intend to move data toanother storage pool, you must also havethe appropriate authority for the destinationstorage pool.
Deleting file spaces System or unrestricted policy
Deleting file spaces assigned to specificpolicy domains
System, unrestricted policy, or restrictedpolicy for those domains
Overview of Client Nodes and File SpacesEach client is given a node name when it is registered with the server. The serverviews its registered nodes as clients that require services and resources from theserver.
Typically, a node is equivalent to a machine as in the case of a backup-archiveclient installed on a user’s computer for file system backups. However, multiplenodes can exist on a single machine as in the case of a SQL server machine
ANR2126I GRANT AUTHORITY: Administrator HELP1 was granted ACCESS authority for clientDAVE.
ANR2126I GRANT AUTHORITY: Administrator HELP1 was granted ACCESS authority for clientJOE.
ANR2126I GRANT AUTHORITY: Administrator HELP1 was granted ACCESS authority for clientSARA.
270 Tivoli Storage Manager for Windows: Administrator’s Guide

containing both an application client for SQL database and transaction logbackups, and a backup-archive client for file system backups.
Typically, each client file system is represented on the server as a unique file spacethat belongs to each client node. Therefore, the number of file spaces a node hasdepends on the number of file systems on the client machine. For example, aWindows desktop system may have multiple drives (file systems), such as C: andD:. In this case, the client’s node has two file spaces on the server; one for the C:drive and a second for the D: drive. The file spaces can grow as a client storesmore data on the server. The file spaces decrease as backup and archive fileversions expire and the server reclaims the space. Tivoli Storage Manager does notallow an administrator to delete a node unless the node’s file spaces have beendeleted.
File Spaces for ClientsFor client nodes running on Windows, file spaces map to logical partitions andshares. Each file space is named with the UNC name of the respective clientpartition or share.
For client nodes running on NetWare, file spaces map to NetWare volumes. Eachfile space is named with the corresponding NetWare volume name.
For clients running on Macintosh, file spaces map to Macintosh volumes. Each filespace is named with the corresponding Macintosh volume name.
For clients running on UNIX, a file space name maps to a file space in storage thathas the same name as the file system or virtual mount point from which the filesoriginated. The VIRTUALMOINTPOINT option allows users to define a virtualmount point for a file system to back up or archive files beginning with a specificdirectory or subdirectory. For information on the VIRTUALMOUNTPOINT option,refer to the appropriate Backup-Archive Installation and User’s Guide.
Supporting Unicode-Enabled ClientsUnicode is a universal character encoding standard that supports the interchange,processing, and display of text that is written in any of the languages of themodern world. For Windows NT, Windows 2000, Windows 2002, Windows .NET,and Windows XP systems with the Unicode-enabled client, the server supportsstoring file spaces with Unicode file space names, directory names, and file namesin server storage. The file spaces in server storage that have Unicode names arecalled Unicode-enabled file spaces. Support for Unicode names enables a client tosuccessfully process a Tivoli Storage Manager operation even when the file spacescontain directory names or files in multiple languages, or when the client uses adifferent code page than the server.
New clients storing data on the server for the first time require no special set-up. Ifthe client has the latest Tivoli Storage Manager client software installed, the serverautomatically stores Unicode-enabled file spaces for that client.
However, if you have clients that already have data stored on the server and theclients install the Unicode-enabled Tivoli Storage Manager client software, youneed to plan for the migration to Unicode-enabled file spaces. To allow clients withexisting data to begin to store data in Unicode-enabled file spaces, Tivoli StorageManager provides a function for automatic renaming of existing file spaces. Thefile data itself is not affected; only the file space name is changed. Once theexisting file space is renamed, the operation creates a new file space that isUnicode enabled. The creation of the new Unicode-enabled file space for clients
Chapter 13. Managing Client Nodes 271

can greatly increase the amount of space required for storage pools and theamount of space required for the server database. It can also increase the amountof time required for a client to run a full incremental backup, because the firstincremental backup after the creation of the Unicode-enabled file space is a fullbackup.
When clients with existing file spaces migrate to Unicode-enabled file spaces, youneed to ensure that sufficient storage space for the server database and storagepools is available. You also need to allow for potentially longer backup windowsfor the complete backups.
Note: Once the server is at the latest level of software that includes support forUnicode-enabled file spaces, you can only go back to a previous level of theserver by restoring an earlier version of Tivoli Storage Manager and thedatabase.
A Unicode-enabled Tivoli Storage Manager client is currently available only onWindows NT, Windows 2000, Windows 2002, Windows .NET, and Windows XP.Data in a Unicode code page from any other source, including down-level clientsand API clients, will not be identified or treated as Unicode enabled.
Note: The remainder of this section will refer to these clients as Unicode-enabledclients, users of Windows NT-based operating systems, or clients.
It is strongly recommended that users of Windows NT-based operating systemsmigrate their non-Unicode file spaces to Unicode enabled file spaces. For moreinformation see Backup-Archive Installation and User’s Guide.
See the following sections:“Reasons for Migrating Clients to Unicode-Enabled File Spaces”“Migrating Clients to Unicode-Enabled File Spaces” on page 273“Querying Unicode-enabled File Spaces” on page 279“Unicode-enabled Clients and Existing Backup Sets” on page 279
Reasons for Migrating Clients to Unicode-Enabled File SpacesWithout Tivoli Storage Manager support for storing Unicode-enabled file spaces,some clients have experienced backup failures when file spaces contain names ofdirectories or files in multiple languages, or have names that cannot be convertedto the server’s code page. When Tivoli Storage Manager cannot convert the codepage, the client may receive one or all of the following messages if they were usingthe command line: ANS1228E, ANS4042E, and ANS1803E. Clients that are usingthe GUI may see a “Path not found” message. If you have clients that areexperiencing such backup failures, then you need to migrate the file spaces forthese clients to ensure that these systems are completely protected with backups. Ifyou have a large number of clients, set the priority for migrating the clients basedon how critical each client’s data is to your business. See “Migrating Clients toUnicode-Enabled File Spaces” on page 273.
Any new file spaces that are backed up from client systems with theUnicode-enabled Tivoli Storage Manager client are automatically stored asUnicode-enabled file spaces in server storage.
Objects backed up or archived with a Unicode-enabled Tivoli Storage Managerclient in any supported language environment can be restored or retrieved with aUnicode-enabled client in the same or any other supported language environment.
272 Tivoli Storage Manager for Windows: Administrator’s Guide

This means, for example, that files backed up by a Japanese Unicode-enabled clientcan be restored by a German Unicode-enabled client.
Note: Objects backed up or archived by a Unicode-enabled Tivoli Storage Managerclient, cannot be restored or retrieved by a client that is not Unicodeenabled.
Migrating Clients to Unicode-Enabled File SpacesTo allow clients with existing data to migrate to Unicode-enabled file spaces, TivoliStorage Manager provides an automatic rename function for file spaces. Whenenabled, Tivoli Storage Manager uses the rename function when it recognizes thata file space that is not Unicode enabled in server storage matches the name of afile space on a client. The existing file space in server storage is renamed, so thatthe file space in the current operation is then treated as a new, Unicode-enabledfile space. For example, if the operation is an incremental backup at the file spacelevel, the entire file space is then backed up to the server as a Unicode-enabled filespace.
The following example shows how this process works when automatic renaming isenabled from the server, for an existing client node that has file spaces in serverstorage.1. The administrator updates a client node definition by issuing an UPDATE
NODE command with the parameter, AUTOFSRENAME YES.2. The client processes an incremental back up.3. Tivoli Storage Manager processes the back up as follows:
a. Renames the existing file space (_OLD)b. Creates a new Unicode-enabled file spacec. Processes the back up in the current operation to the new Unicode-enabled
file space
Attention: If you force the file space renaming for all clients at the same time,backups can contend for network and storage resources, and storage pools can runout of storage space.
Before you allow automatic renaming of file spaces for Unicode-enabled TivoliStorage Manager clients, read the following sections.
“The Rules for Automatically Renaming File Spaces” on page 275“Options for Automatically Renaming File Spaces”“Planning for Unicode Versions of Existing Client File Spaces” on page 275“How Clients are Affected by the Migration to Unicode” on page 277“Example of a Migration Process” on page 278
Options for Automatically Renaming File Spaces: As an administrator, you cancontrol whether the file spaces of any existing clients are renamed to force thecreation of new Unicode-enabled file spaces. By default, no automatic renamingoccurs. To control the automatic renaming, use the parameter AUTOFSRENAMEwhen you register or update a node. You can also allow clients to make the choice.Clients can use the client option AUTOFSRENAME.
Note: The setting for AUTOFSRENAME affects only clients that are Unicodeenabled.
You have these options:
Chapter 13. Managing Client Nodes 273

v Do not allow existing file spaces to be renamed, so that Unicode-enabled filespaces are not created (AUTOFSRENAME=NO, the default).Tivoli Storage Manager does not automatically rename client file spaces whenthe client system upgrades to the Unicode-enabled Tivoli Storage Manager client.This setting can help an administrator control how many clients’ file spaces canbe renamed at one time. The administrator can determine how manyUnicode-enabled clients exist by using the QUERY NODE FORMAT=DETAILEDcommand. The output displays the client level. A Unicode-enabled client is on aWindows NT, Windows 2000, Windows 2002, Windows .NET, and Windows XPsystem at Tivoli Storage Manager Version 4.2.0 or higher.
v Automatically rename existing file spaces, forcing the creation ofUnicode-enabled file spaces in place of the renamed file spaces(AUTOFSRENAME=YES).Tivoli Storage Manager automatically renames client file spaces in server storagewhen the client upgrades to the Unicode-enabled client and runs one of thefollowing operations: archive, selective backup, full incremental backup, orpartial incremental backup. Tivoli Storage Manager automatically renames thefile spaces that are specified in the current operation and creates new,Unicode-enabled file spaces where files and directories are stored to completethe operation. Other file spaces that are not specified in the current operation arenot affected by the rename. This means a client can have mixed file spaces. See“The Rules for Automatically Renaming File Spaces” on page 275 for how thenew name is constructed.Attention: If you force the file space renaming for all clients at the same time,client operations can contend for network and storage resources, and storagepools can run out of storage space.
v Allow clients to choose whether to rename files spaces, in effect choosingwhether new Unicode-enabled file spaces are created(AUTOFSRENAME=CLIENT).If you use this value for a client node, the client can set its AUTOFSRENAMEoption in its options file. The client option determines whether file spaces arerenamed (YES or NO), or whether the user is prompted for renaming at the timeof a Tivoli Storage Manager operation (PROMPT).The default value for the client option is PROMPT. When the option is set forprompting, the client is presented with a choice about renaming file spaces.When a client that has existing file spaces on server storage upgrades to theUnicode-enabled client, and the client runs a Tivoli Storage Manager operationwith the server, the user is asked to choose whether to rename the file spacesthat are involved in the current operation.The client is prompted only once about renaming a particular file space.
If the client does not choose to rename the file space, the administrator can laterrename the file space so that a new Unicode-enabled file space is created thenext time the client processes an archive, selective backup, full incrementalbackup, or partial incremental backup.Attention: There is no prompt for operations that run with the client scheduler.If the client is running the scheduler and the client AUTOFSRENAME option isset to PROMPT, there is no prompt and the file space is not renamed. Thisallows a client session to run unattended. The prompt appears during the nextinteractive session on the client.
The following table summarizes what occurs with different parameter and optionsettings.
274 Tivoli Storage Manager for Windows: Administrator’s Guide

Table 22. Effects of AUTOFSRENAME Settings
Parameter on theserver(for each client)
Option on the client Result for file spaces Is the file spacerenamed?
Yes Yes, No, Prompt Renamed Yes
No Yes, No, Prompt Not renamed No
Client Yes Renamed Yes
No Not renamed Yes
Prompt Command-line or GUI: The user receives aone-time only prompt about renaming
Depends on theresponse from the user(yes or no)
Client Scheduler: Not renamed (promptappears during the next command-line orGUI session)
No
The Rules for Automatically Renaming File Spaces: With its automatic renamingfunction, Tivoli Storage Manager renames a file space by adding the suffix _OLD.For example:
Original file space \\maria\c$Renamed file space \\maria\c$_OLD
If the new name would conflict with the name of another file space, a number isadded to the suffix. For example:
Original file space \\maria\c$ Other existing file spaces:\\maria\c$_OLD\\maria\c$_OLD1
Renamed file space \\maria\c$_OLD2
If the new name for the file space exceeds the limit of 64 characters, the file spacename is truncated on the right before the suffix _OLD is added.
Planning for Unicode Versions of Existing Client File Spaces: You need toconsider the following factors in your planning:v After clients with existing file spaces start to create Unicode-enabled file spaces,
they will still need to have access to the renamed file spaces that are notUnicode-enabled for some period of time.
v Your storage pool and database space requirements can double if you allow allclients to create Unicode-enabled file spaces in addition to their existing filespaces that are not Unicode-enabled.
v Because the initial backups after migration are complete backups, it can alsogreatly increase the time required to finish backup operations.
To minimize problems, you need to plan the storage of Unicode-enabled file spacesfor clients that already have existing file spaces in server storage.1. Determine which clients need to migrate.
Clients that have had problems with backing up files because their file spacescontain names of directories or files that cannot be converted to the server’scode page should have the highest priority. Balance that with clients that are
Chapter 13. Managing Client Nodes 275

most critical to your operations. If you have a large number of clients that needto become Unicode enabled, you can control the migration of the clients.Change the rename option for a few clients at a time to keep control of storagespace usage and processing time. Also consider staging migration for clientsthat have a large amount of data backed up.
2. Allow for increased backup time and network resource usage when theUnicode-enabled file spaces are first created in server storage.Based on the number of clients and the amount of data those clients have,consider whether you need to stage the migration. Staging the migration meanssetting the AUTOFSRENAME parameter to YES or CLIENT for only a smallnumber of clients every day.
Note: If you set the AUTOFSRENAME parameter to CLIENT, be sure to havethe clients (that run the client scheduler) set their option toAUTOFSRENAME YES. This ensures the file spaces are renamed.
3. Check the current storage usage for the clients that need to become Unicodeenabled.You can use the QUERY OCCUPANCY command to display information onhow much space each client is currently using. Initially, clients will need onlythe amount of space used by active files. Therefore, you need to estimate howmuch of the current space is used by copies (different versions of the same file).Migration will result in a complete backup at the next incremental backup, soclients will need space for that backup, plus for any other extra versions thatthey will keep. Therefore, the amount of storage required also depends onpolicy (see the next step). Your Tivoli Storage Manager policy specifies howfiles are backed up, archived, migrated from client node storage, and managedin server storage.
4. Understand how your Tivoli Storage Manager policies affect the storage thatwill be needed.If your policies expire files based only on the number of versions (VersionsData Exists), storage space required for each client will eventually double, untilyou delete the old file spaces.If your policies expire files based only on age (Retain Extra Versions), storagespace required for each client will increase initially, but will not double.If your policies use both the number of versions and their age, each client willneed less than double their current usage.
5. Estimate the effect on the database size.The database size depends on the number of files in server storage, as well asthe number of versions of those files. As Unicode-enabled file spaces arebacked up, the original file spaces that were renamed remain. Therefore, theserver requires additional space in the database to store information about theincreased number of file spaces and files.See “Estimating and Monitoring Database and Recovery Log SpaceRequirements” on page 420.
6. Arrange for the additional storage pool space, including space in copy storagepools, based on your estimate from step 3 and 4.
7. Check the server database space that is available and compare with yourestimate from step 5.
8. Ensure that you have a full database backup before you proceed with migrationof Unicode-enabled file spaces. See “Backing Up the Database” on page 542.
276 Tivoli Storage Manager for Windows: Administrator’s Guide

9. Consider how you will manage the renamed file spaces as they age. Theadministrator can delete them, or the clients can be allowed to delete their ownfile spaces.
How Clients are Affected by the Migration to Unicode: The server manages aUnicode-enabled client and its file spaces as follows:v When a client upgrades to a Unicode-enabled client and logs in to the server, the
server identifies the client as Unicode-enabled.
Note: That same client (same node name) cannot log in to the server with aprevious version of Tivoli Storage Manager or a client that is notUnicode-enabled.
v The original file space that was renamed (_OLD) remains with both its activeand inactive file versions that the client can restore if needed. The original filespace will no longer be updated. The server will not mark existing active filesinactive when the same files are backed up in the correspondingUnicode-enabled file space.
Note: Before the Unicode-enabled client is installed, the client can back up filesin a code page other than the current locale, but cannot restore those files.After the Unicode-enabled client is installed, if the same client continuesto use file spaces that are not Unicode-enabled, the client skips files thatare not in the same code page as the current locale during a backup.Because the files are skipped, they appear to have been deleted from theclient. Active versions of the files in server storage are made inactive onthe server. When a client in this situation is updated to a Unicode-enabledclient, you should migrate the file spaces for that client toUnicode-enabled file spaces.
v The server does not allow a Unicode-enabled file space to be sent to a client thatis not Unicode enabled during a restore or retrieve process.
v Clients should be aware that they will not see all their data on theUnicode-enabled file space until a full incremental backup has been processed.When a client performs a selective backup of a file or directory and the originalfile space is renamed, the new Unicode-enabled file space will contain only thefile or directory specified for that backup operation. All other directories andfiles are backed up on the next full incremental backup.If a client needs to restore a file before the next full incremental backup, the clientcan perform a restore from the renamed file space instead of the newUnicode-enabled file space. For example:1. Sue had been backing up her file space, \\sue-node\d$.2. Sue upgrades the Tivoli Storage Manager client on her system to the
Unicode-enabled Tivoli Storage Manager client.3. Sue performs a selective backup of the file HILITE.TXT.4. The automatic file space renaming function is in effect and Tivoli Storage
Manager renames\\sue-node\d$ to \\sue-node\d$_OLD. Tivoli StorageManager then creates a new Unicode-enabled file space on the server withthe name \\sue-node\d$. This new Unicode-enabled file space contains onlythe HILITE.TXT file.
5. All other directories and files in Sue’s file system will be backed up on thenext full incremental backup. If Sue needs to restore a file before the next fullincremental backup, she can restore the file from the \\sue-node\d$_OLDfile space.
Chapter 13. Managing Client Nodes 277

Refer to the Using the Backup-Archive Client publication for more information.
Example of a Migration Process: This section gives one possible sequence formigrating clients. Assumptions for this scenario are:v The Tivoli Storage Manager server database has been backed up.v The latest server software has been installed. This installation has also
performed an upgrade to the server database.v Clients have installed the latest software.v A few clients are file servers. Most clients are workstations used by individuals.v Clients generally run scheduled incremental backups every night.
The following is a possible migration process:1. Have all clients install the Unicode-enabled Tivoli Storage Manager client
software.2. Migrate the file servers first. For clients that are file servers, update the
AUTOFSRENAME parameter to enable automatic renaming for the file spaces.For example, if the client node names for all file servers begin with FILE, enterthe following command:update node file* autofsrename=yes
This forces the file spaces to be renamed at the time of the next backup orarchive operation on the file servers. If the file servers are large, considerchanging the renaming parameter for one file server each day.
3. Allow backup and archive schedules to run as usual. Monitor the results.a. Check for the renamed file spaces for the file server clients. Renamed file
spaces have the suffix _OLD or _OLDn, where n is a number. (See “The Rulesfor Automatically Renaming File Spaces” on page 275.)
b. Check the capacity of the storage pools. Add tape or disk volumes tostorage pools as needed.
c. Check database usage statistics to ensure you have enough space.4. Migrate the workstation clients. For example, migrate all clients with names
that start with the letter a.update node a* autofsrename=yes
5. Allow backup and archive schedules to run as usual that night. Monitor theresults.
6. After sufficient time passes, consider deleting the old, renamed file spaces. See“Managing the Renamed File Spaces”.
Managing the Renamed File Spaces: The file spaces that were automaticallyrenamed (_OLD) to allow the creation of Unicode-enabled file spaces continue toexist on the server. Users can still access the file versions in these file spaces.
Because a renamed file space is not backed up again with its new name, the filesthat are active (the most recent backup version) in the renamed file space remainactive and never expire. The inactive files in the file space expire according to thepolicy settings for how long versions are retained. To determine how long the filesare retained, check the values for the parameters, Retain Extra Versions and RetainOnly Versions, in the backup copy group of the management class to which thefiles are bound.
When users no longer have a need for their old, renamed file spaces, you candelete them. If possible, wait for the longest retention time for the only version
278 Tivoli Storage Manager for Windows: Administrator’s Guide

(Retain Only Version) that any management class allows. If your system hasstorage constraints, you may need to delete these file spaces before that.
Querying Unicode-enabled File SpacesYou can determine which file spaces are Unicode-enabled by querying all of thefile spaces:query filespace
Node Name Filespace FSID Platform Filespace Is Capacity PctName Type Filespace (MB) Util
Unicode?---------- ----------- ---- ------- --------- --------- -------- -----SUE \\sue\c$ 1 WinNT NTFS Yes 2,502.3 75.2SUE \\sue\d$ 2 WinNT NTFS Yes 6,173.4 59.6JOE \\joe\c$ 1 WinNT NTFS No 12,299.7 31.7
To query a specific Unicode-enabled file space, it may be more convenient to usethe file space identifier (FSID) than the file space name. File space names forUnicode-enabled file spaces may not be readable when displayed in the server’scode page. Attempting to enter the name of a Unicode-enabled file space may notwork because it depends on the server’s code page and conversion routines thatattempt to convert from the server’s code page to Unicode. See “DisplayingInformation about File Spaces” for details.
Unicode-enabled Clients and Existing Backup SetsA client can have a backup set that contains both file spaces that areUnicode-enabled and file spaces that are not Unicode-enabled. The client musthave the same level of Tivoli Storage Manager or higher to restore the data in thebackup set. For example, a Version 4.1.0 client backs up file spaces, and thenupgrades to Version 4.2.0 with support for Unicode-enabled file spaces. That sameclient can still restore the non-Unicode file spaces from the backup set.
Unicode-enabled file spaces in a backup set can only be accessed by aUnicode-enabled client, and not by an earlier version of the client. The serverallows only Unicode-enabled clients to restore data from Unicode-enabled filespaces. For information about restoring backup sets, see “Restoring Backup Setsfrom a Backup-Archive Client” on page 350.
Displaying Information about File SpacesYou can display file space information to:v Identify file spaces defined to each client node, so that you can delete each file
space from the server before removing the client node from the serverv Identify file spaces that are Unicode enabled and identify their file space ID
(FSID)v Monitor the space used on workstation’s disksv Monitor whether backups are completing successfully for the file spacev Determine the date and time of the last backup
You display file space information by identifying the client node name and filespace name.
Note: File space names are case-sensitive and must be entered exactly as known tothe server.
Chapter 13. Managing Client Nodes 279

For example, to view information about file spaces defined for client node JOE,enter:query filespace joe *
The following figure shows the output from this command.
When you display file space information in detailed format, the Filespace Namefield may display file space names as “...”. This indicates to the administrator thata file space does exist but could not be converted to the server’s code page.Conversion can fail if the string includes characters that are not available in theserver code page, or if the server has a problem accessing system conversionroutines.
File space names and file names that can be in a different code page or locale thanthe server do not display correctly on the administrator’s Web interface or theadministrative command-line interface. The data itself is backed up and can berestored properly, but the file space name or file name may display with acombination of invalid characters or blank spaces. Refer to Administrator’s Referencefor details.
Moving Data by NodeYou can move a node’s data in a sequential-access storage pool or move selectedfile spaces for a single node. For more information see, “Moving Data by Node” onpage 232.
Deleting File Spaces and Client NodesYou can delete a client node from a server, but first you must delete all of thatclient’s data from server storage by deleting any file spaces that belong to thenode.
Deleting a File SpaceAdministrators may want to delete a file space when:v Users are not authorized to delete backed up or archived files in storage pools.
The authority to delete backed up or archived files from server storage is setwhen a client node is registered. See “Accepting Default Closed Registration orEnabling Open Registration” on page 254 for information on allowing users todelete files in storage pools.For example, client node PEASE no longer needs archived files in file space/home/pease/dir2. However, he does not have the authority to delete those files.You can delete them by entering:delete filespace pease /home/pease/dir2 type=archive
v You want to remove a client node from the serverYou must delete a user’s files from storage pools before you can remove a clientnode. For example, to delete all file spaces belonging to client node ID DEBBYG,enter:delete filespace debbyg * type=any
Node Name Filespace FSID Platform Filespace Is Capacity PctName Type Filespace (MB) Util
Unicode?---------- ----------- ---- ------- --------- --------- -------- -----JOE \\joe\c$ 1 WinNT NTFS Yes 2,502.3 75.2JOE \\joe\d$ 2 WinNT NTFS Yes 6,173.4 59.6
280 Tivoli Storage Manager for Windows: Administrator’s Guide

v You want to delete a specific user’s filesFor client nodes that support multiple users, such as UNIX, a file owner name isassociated with each file on the server. The owner name is the user ID of theoperating system, such as the UNIX user ID. When you delete a file spacebelonging to a specific owner, only files that have the specified owner name inthe file space are deleted.
When a node has more than one file space and you issue a DELETE FILESPACEcommand for only one file space, a QUERY FILESPACE command for the nodeduring the delete process shows no file spaces. When the delete process ends, youcan view the remaining file spaces with the QUERY FILESPACE command.
Note: After you delete all of a client node’s file spaces, you can delete the nodewith the REMOVE NODE command. See “Deleting Client Nodes” onpage 265 for more details.
Modifying Client Option FilesClient nodes connect with the server through a client options file (dsm.opt). Thisfile, located in the client directory, contains client options that control processingand connections with the server. The most important option is the network addressof the server, but you can add many other client options at any time. See moreinformation about client option files, see “Connecting Nodes with the Server” onpage 258.
Administrators can also create client option sets to be used in conjunction withclient option files. See “Creating Client Option Sets from the Server” for moredetails.
All NodesAll client options files (dsm.opt) can be edited with a text editor. Anyone can editthe client options file if they have access to the directory where the node softwareis installed. Editing individual options files is the most direct method, but may notbe suitable for sites with many client nodes.
Note: If any changes are made to the dsm.opt file, the client must be restarted forchanges in the options file to have any affect.
Windows 32-bit ClientsYou can modify the client options file from the Tivoli Storage Manager Server withthe TSM Client Options File Wizard. For information, see “Methods for Creating orUpdating a Client Options File” on page 259.
Creating Client Option Sets from the ServerAn administrator can create a set of client options to be used by a client node atTivoli Storage Manager Version 3 or later. The client options specified in the set areused in conjunction with the client options file described in “Connecting Nodeswith the Server” on page 258.
Client option sets allow the administrator to specify additional options that maynot be included in the client’s option file (dsm.opt). You can specify which clientsuse the option set with the REGISTER NODE or UPDATE NODE commands. The
Chapter 13. Managing Client Nodes 281

client can use these defined options during a backup, archive, restore, or retrieveprocess. See Backup-Archive Installation and User’s Guide for detailed informationabout individual client options.
To create a client option set and have the clients use the option set, do thefollowing:1. Create the client option set with the DEFINE CLOPTSET command.2. Add client options to the option set with the DEFINE CLIENTOPT command.3. Specify which clients should use the option set with the REGISTER NODE or
UPDATE NODE command.
Creating a Client Option SetWhen you create a client option set, you define a name for the option set, and canoptionally provide a description of the option set. For example:define cloptset engbackup description='Backup options for eng. dept.'
Note: The option set is empty when it is first defined.
Adding Client Options in an Option SetYou can add client options in a defined client option set.
The following example shows how to add a client option in the ENGBACKUPoption set.define clientopt engbackup schedlogretention 5
For a list of valid client options you can specify, refer to Administrator’s Reference.
The server automatically assigns sequence numbers to the specified options, or youcan choose to specify the sequence number for order of processing. This is helpfulif you have defined more than one of the same option as in the following example.define clientopt engbackup inclexcl "include d:\admin"define clientopt engbackup inclexcl "include d:\payroll"
A sequence number of 0 is assigned to the option include d:\admin. A sequencenumber of 1 is assigned to the option include d:\payroll. If you want to specificallyprocess one option before another, include the sequence parameter as follows:define clientopt engbackup inclexcl "include d:\admin" seqnumber=2"define clientopt engbackup inclexcl "include d:\payroll" seqnumber=1"
The options are processed starting with the highest sequence number.
Any include-exclude statements in the server client option set have priority overthe include-exclude statements in the local client options file. The serverinclude-exclude statements are always enforced and placed at the bottom of theinclude-exclude list and evaluated before the client include-exclude statements. Ifthe server option set has several include-exclude statements, the statements areprocessed starting with the highest sequence number. The client can use theQUERY INCLEXCL command to view the include-exclude statements in the orderthey are processed. QUERY INCLEXCL also displays the source of eachinclude-exclude statement. For more information on the processing of theinclude-exclude statements see “The Include-Exclude List” on page 310 and alsothe Backup-Archive Installation and User’s Guide.
282 Tivoli Storage Manager for Windows: Administrator’s Guide

The FORCE parameter allows an administrator to specify whether a client nodecan override an option value. This parameter has no effect on additive optionssuch as INCLEXCL and DOMAIN. The default value is NO. If FORCE=YES, theclient cannot override the value. The following example shows how you canprevent a client from using subfile backup:define clientopt engbackup subfilebackup no force=yes
Registering Client Nodes and Assigning Them to an OptionSet
You can register or update a client node and specify an option set for the client touse as follows:register node mike pass2eng cloptset=engbackup
The client node MIKE is registered with the password pass2eng. When the clientnode MIKE performs a scheduling operation, his schedule log entries are kept for 5days.
Managing Client Options from the Server Using Client Option SetsAdministrators can perform the following activities when managing client optionsets:
Task Required Privilege Class
Updating the sequence number for a clientoption
System or unrestricted policy
Deleting an option from a client option set System, unrestricted policy, or restrictedpolicy
Copying a client option set System, unrestricted policy, or restrictedpolicy
Updating the Sequence Number for a Client OptionYou can update the sequence number for a client option to change its processingorder. This is helpful if you have more than one of the same option, for exampleseveral INCLUDE options.
The following example shows how to change the sequence number for theDATEFORMAT option from 0 to 9:update clientopt engbackup dateformat 0 9
Deleting an Option from a Client Option SetYou can remove an option that is defined in a client option set. The followingexample shows how to remove the SCHEDMODE polling option from thefinanceschd option set:delete clientopt financeschd schedmode
Copying a Client Option SetYou can copy an existing client option to another option set. The followingexample shows how to copy the engbackup option set to financeschd option set:copy cloptset engbackup financeschd
Chapter 13. Managing Client Nodes 283
Requesting Information about a Client Option SetTo display information about the contents of a client option set, issue the followingcommand:query cloptset financeschd
Updating the Description for a Client Option SetYou can update the description for a client option set. The following exampleshows how to update the description for the engbackup option set:update clopset engbackup description='Scheduling information'
Deleting a Client Option SetWhen you delete a client option set, client node references to the option set arenull. The clients continue to use their existing client options file. The followingexample shows how to delete the engbackup client option set:delete cloptset engbackup
Managing Tivoli Storage Manager SessionsEach time an administrator or client node connects with the server, anadministrative or client session is established. Tivoli Storage Manager tracks itssessions in the server database. Backup-archive clients are eligible for clientrestartable restore sessions, however, application clients are not. See “ManagingClient Restartable Restore Sessions” on page 287 for more information.
Administrators can perform the following activities when managing Tivoli StorageManager sessions:
Task Required Privilege Class
Displaying information about client sessions Any administrator
Canceling a client session System or operator
Disabling or enabling a client session System or operator
Displaying Information about Tivoli Storage Manager SessionsEach client session is assigned a unique session number. To display informationabout client sessions, enter:query session
Figure 45 shows a sample client session report.
Sess Comm. Sess Wait Bytes Bytes Sess Platform Client NameNumber Method State Time Sent Recvd Type------ ------ ------ ------ ------- ------- ----- -------- -----------
471 Tcp/Ip IdleW 36 S 592 186 Node WinNT JOEUSER472 Tcp/Ip RecvW 0 S 730 838.2 K Node WinNT STATION1475 HTTP Run 0 S 0 0 Admin WebBrow- ADMIN
ser
Figure 45. Information about Client Sessions
284 Tivoli Storage Manager for Windows: Administrator’s Guide

You can determine the state of the server by examining the session state and waittime to determine how long (in seconds, minutes, or hours) the session has been inthe current state.
Server Session StatesThe server session state can be one of the following:
Start Connecting with a client session.
Run Executing a client request.
End Ending a client session.
RecvWWaiting to receive an expected message from the client while a databasetransaction is in progress. A session in this state is subject to theCOMMTIMEOUT limit.
SendWWaiting for acknowledgment that the client has received a message sent bythe server.
MediaWWaiting for removable media to become available.
Aggregation can cause multiple media waits within a transaction and isindicated by one client message. For more information, see “ReclaimingSpace in Sequential Access Storage Pools” on page 205.
Note: If QUERY SESSION FORMAT=DETAILED is specified, the MediaAccess Status field displays the type of media wait state.
IdleW Waiting for communication from the client, and a database transaction isNOT in progress. A session in this state is subject to the IDLETIMEOUTlimit as specified in the server options file.
If a client does not initiate communication within the specified time limitset by the IDLETIMEOUT option in the server options file, then the servercancels the client session.
For example, if the IDLETIMEOUT option is set to 30 minutes, and a userdoes not initiate any operations within those 30 minutes, then the servercancels the client session. The client session is automatically reconnected tothe server when it starts to send data again.
Canceling a Tivoli Storage Manager SessionYou can cancel a client session with the CANCEL SESSION command and theassociated session number. Canceling sessions may be necessary when a user’smachine is not responding or as a prerequisite to halting the server. Administratorscan display a session number with the QUERY SESSION command as described in“Displaying Information about Tivoli Storage Manager Sessions” on page 284.
Users and administrators whose sessions have been canceled must reissue their lastcommand to access the server again.
If an operation, such as a backup or an archive process, is interrupted when youcancel the session, the server rolls back the results of the current transaction. Thatis, any changes made by the operation that are not yet committed to the databaseare undone. If necessary, the cancellation process may be delayed.
Chapter 13. Managing Client Nodes 285

If the session is in the Run state when it is canceled, the cancel process does nottake place until the session enters the SendW, RecvW, or IdleW state. For details,see “Server Session States” on page 285.
If the session you cancel is currently waiting for a media mount, the mount requestis automatically canceled. If a volume associated with the client session is currentlybeing mounted by an automated library, the cancel may not take effect until themount is complete.
For example, to cancel a session for client MARIE:1. Query client sessions to determine the session number as shown Figure 45 on
page 284. The example report displays MARIE’s session number 6.2. Cancel node MARIE’s session by entering:
cancel session 6
If you want to cancel all backup and archive sessions, enter:cancel session all
When a Client Session is Automatically CanceledClient sessions can be automatically canceled based on the settings of the followingserver options:
COMMTIMEOUTSpecifies how many seconds the server waits for an expected clientmessage during a transaction that causes a database update. If the lengthof time exceeds this time-out, the server rolls back the transaction that wasin progress and ends the client session. The amount of time it takes for aclient to respond depends on the speed and processor load for the clientand the network load.
IDLETIMEOUTSpecifies how many minutes the server waits for a client to initiatecommunication. If the client does not initiate communication with theserver within the time specified, the server ends the client session. Forexample, the server prompts the client for a scheduled backup operationbut the client node is not started. Another example can be that the clientprogram is idle while waiting for the user to choose an action to perform(for example, backup archive, restore, or retrieve files). If a user starts theclient session and does not choose an action to perform, the session willtime out. The client program automatically reconnects to the server whenthe user chooses an action that requires server processing. A large numberof idle sessions can inadvertently prevent other users from connecting tothe server.
THROUGHPUTDATATHRESHOLDSpecifies a throughput threshold, in kilobytes per second, a client sessionmust achieve to prevent being cancelled after the time threshold is reached.Throughput is computed by adding send and receive byte counts anddividing by the length of the session. The length does not include timespent waiting for media mounts and starts at the time a client sends datato the server for storage. This option is used in conjunction with theTHROUGHPUTTIMETHRESHOLD server option.
THROUGHPUTTIMETHRESHOLDSpecifies the time threshold, in minutes, for a session after which it may becanceled for low throughput. The server ends a client session when it has
286 Tivoli Storage Manager for Windows: Administrator’s Guide

been active for more minutes than specified and the data transfer rate isless than the amount specified in the THROUGHPUTDATATHRESHOLDserver option.
Refer to the Administrator’s Reference for more information.
Disabling or Enabling Access to the Server
Task Required Privilege Class
Disabling and enabling client node access tothe server
System or operator
Displaying server status Any administrator
You can prevent clients from establishing sessions with the server by using theDISABLE SESSIONS command. This command does not cancel sessions currentlyin progress or system processes such as migration and reclamation. For example, todisable client node access to the server, enter:disable sessions
You continue to access the server and current client activities complete unless auser logs off or an administrator cancels a client session. After the client sessionshave been disabled, you can enable client sessions and resume normal operationsby entering:enable sessions
You can issue the QUERY STATUS command to determine if the server is enabledor disabled.
Managing Client Restartable Restore SessionsSome large restore operations may invoke a special type of restore operation calledclient restartable restore sessions. These special sessions allow users to restart therestore session from where it left off if the session was interrupted. Tivoli StorageManager identifies client restartable restore sessions by displaying messageANS1247I on the client machine when the sessions start. These restore sessions canbe restarted as long as the restore interval has not expired.
When a restartable restore session is saved in the server database the file space islocked in server storage. The following is in effect during the file space lock:v Files residing on sequential volumes associated with the file space cannot be
moved.v Files associated with the restore cannot be backed up. However, files not
associated with the restartable restore session that are in the same file space areeligible for backup. For example, if you are restoring all files in directory A, youcan still backup files in directory B from the same file space.
The RESTOREINTERVAL server option allows administrators to specify how longclient restartable restore sessions are saved in the server database. Considerscheduled backup operations when setting this option. For more information, referto the RESTOREINTERVAL server option in Administrator’s Reference..
Administrators can perform the following activities when managing clientrestartable restore sessions:
Chapter 13. Managing Client Nodes 287

Task Required Privilege Class
Displaying information about clientrestartable restore sessions
Any administrator
Canceling client restartable restore sessions System or operator
Interrupting client restartable restoresessions
System or operator
Displaying Information about a Client Restartable RestoreSessionYou can display information about client restartable restore sessions with theQUERY RESTORE command. For example, to determine which client nodes haveeligible restartable restore sessions, enter:query restore
Restartable restore sessions have a negative session number.
Canceling a Client Restartable Restore SessionWhen a client restore session is in a restartable state, the file space is locked inserver storage and no files can be moved from sequential volumes. This preventsthe data from being migrated, moved, reclaimed, or backed up by anotheroperation. These sessions will automatically expire when the specified restoreinterval has passed.
An administrator can cancel a restartable restore session that is in an active orrestartable state. If the restore session is active, any outstanding mount requestsrelated to the active session are automatically canceled. When a restartable restoresession is canceled with the CANCEL RESTORE command, it cannot be restartedfrom the point of interruption. A restartable restore session always has a negativesession number.
To cancel a restartable restore session, you must specify the session number. Forexample:cancel restore -1
Interrupting an Active Client Restartable Restore SessionAn administrator can interrupt an active restartable restore session and have theoption to later restart the session from its point of interruption by canceling thesession.cancel session -2
Managing Tivoli Storage Manager SecurityAdministrators can perform the following activities when managing Tivoli StorageManager security.
Task
Managing administrators
Managing levels of administrative authority
Managing administrator access to the server and clients
Managing passwords password login procedures
Managing the server console
288 Tivoli Storage Manager for Windows: Administrator’s Guide

Managing Tivoli Storage Manager AdministratorsThe administrator is responsible for registering other administrators, grantinglevels of authority, renaming or removing administrators, or for locking andunlocking administrators from the server.
Task Required Privilege Class
Registering an administrator System
Granting administrative authority System
Updating information about otheradministrators
System
Updating information about yourself Any administrator
Displaying information about administrators Any administrator
Renaming an administrator user ID System
Removing administrators System
Locking or unlocking administrators fromthe server
System
About the Server ConsoleAt installation, the server console is defined with a special user ID, which isnamed SERVER_CONSOLE. This name is reserved and cannot be used by anotheradministrator.
An administrator with system privilege can revoke or grant new privileges to theSERVER_CONSOLE user ID. However, an administrator cannot update, lock,rename, or remove the SERVER_CONSOLE user ID. The SERVER_CONSOLE userID does not have a password. Therefore, you cannot use the user ID from anadministrative client unless you set authentication off.
Registering AdministratorsThe administrator registers other administrators with the REGISTER ADMINcommand.
To register the administrator with a user ID of DAVEHIL and the password ofbirds, and a password expiration period of 120 days, enter the REGISTER ADMINcommand:register admin davehil birds passexp=120 contact='backup team'
Granting an Administrator Privilege Class AuthorityAfter administrators are registered, they can make queries and requestcommand-line help. To perform other server functions, they must be grantedauthority by being assigned one or more administrative privilege classes.
This section describes the privilege classes, which are illustrated in Figure 46 onpage 290. An administrator with system privilege can perform any server function.Administrators with policy, storage, operator, analyst, or node privileges canperform subsets of server functions.
When an administrator accesses the administrative Web interface, only the tasksthat correspond to the administrator’s privilege class are displayed.
Chapter 13. Managing Client Nodes 289

Privilege classes, and examples of how to set privilege classes, can be summarizedas follows:
Privilege Class Responsibilities
System
grant authority rocko classes=system
Can perform any server administrative task.
v System-wide responsibilities
v Manage the enterprise
v Manage Tivoli Storage Manager security
Unrestricted Policy
grant authority smith classes=policy
Can manage the backup and archive servicesfor nodes assigned to any policy domain.
v Manage nodes
v Manage policy
v Manage schedules
Restricted Policy
grant authority jones domains=engpoldom
Same responsibilities as unrestricted policyexcept authority is limited to specific policydomains.
Unrestricted Storage
grant authority coyote classes=storage
Can manage server storage, but cannotdefine or delete storage pools.
v Manage the database and recovery log
v Manage Tivoli Storage Manager devices
v Manage Tivoli Storage Manager storage
Restricted Storage
grant authority holland stgpools=tape*
Can manage server storage but is limited tospecific storage pools.
v Manage Tivoli Storage Manager devices
v Manage Tivoli Storage Manager storage
Operator
grant authority bill classes=operator
Can control the immediate operation of theserver and the availability of storage media.
v Manage the Tivoli Storage Manager server
v Manage client sessions
v Manage tape operations
Node
grant authority help1classes=node node=labclient
Can access a Web backup-archive client toperform backup and restore operations.
System
Policy
Restricted Restricted
Unrestricted Unrestricted
Storage Operator Node Analyst
Figure 46. Administrative Privilege Classes
290 Tivoli Storage Manager for Windows: Administrator’s Guide

Privilege Class Responsibilities
Analyst
grant authority marysmithclasses=analyst
Can reset the counters that track TivoliStorage Manager server statistics.
Updating Information about Other AdministratorsAn administrator can reset another administrator’s password with the UPDATEADMINISTRATOR command. For example, administrator DAVEHIL changes hispassword to ganymede, by issuing the following command:update admin davehil ganymede
Renaming an AdministratorYou can rename an administrator ID when an employee wants to be identified bya new ID, or you want to assign an existing administrator ID to another person.You cannot rename an administrator ID to one that already exists on the system.
For example, if administrator HOLLAND leaves your organization, you can assignadministrative privilege classes to another user by completing the following steps:1. Assign HOLLAND’s user ID to WAYNESMITH by issuing the RENAME
ADMIN command:rename admin holland waynesmith
By renaming the administrator’s ID, you remove HOLLAND as a registeredadministrator from the server. In addition, you register WAYNESMITH as anadministrator with the password, contact information, and administrativeprivilege classes previously assigned to HOLLAND.
2. Change the password to prevent the previous administrator from accessing theserver by entering:update admin waynesmith new_password contact="development"
Note: The administrator SERVER_CONSOLE cannot be renamed. See “About theServer Console” on page 289.
Removing AdministratorsYou can remove administrators from the server so that they no longer have accessto administrator functions. For example, to remove registered administrator IDSMITH, enter:remove admin smith
Notes:1. You cannot remove the last system administrator from the system.2. You cannot remove the administrator SERVER_CONSOLE. See “About the
Server Console” on page 289 for more information.
Displaying Information about AdministratorsAny administrator can query the server to display administrator information. Youcan also query all administrators authorized with a specific privilege class.
For example, to query the system for a detailed report on administrator IDDAVEHIL, issue the QUERY ADMIN command:query admin davehil format=detailed
Figure 47 on page 292 displays a detailed report.
Chapter 13. Managing Client Nodes 291

Locking and Unlocking Administrators from the ServerAdministrators can prevent other administrators from accessing the server bylocking and unlocking their administrative privilege classes. For details, see“Locking and Unlocking Administrators from the Server” on page 293.
Managing Levels of Administrative AuthorityA privilege class is a level of authority granted to an administrator. The privilegeclass determines which administrative tasks the administrator can perform. See“Granting an Administrator Privilege Class Authority” on page 289 andAdministrator’s Reference about the activities that administrators can perform witheach privilege class.
You can perform the following activities when managing other administrators’levels of authority:
Task Required Privilege Class
Modifying administrators level of authority System
Locking and unlocking administrators fromthe server
System
Modifying Administrator Levels of AuthorityYou may need to modify other administrators levels of authority as more clientsand administrators are added to the Tivoli Storage Manager environment. If aperson already has some level of authority, granting additional authority adds toany existing privilege classes; it does not override those classes.
Extending Authority for Administrators: You can grant and extend authoritywith the GRANT AUTHORITY command. For example, JONES has restrictedpolicy privilege for policy domain ENGPOLDOM. Enter the following command toextend JONES’ authority to policy domain MKTPOLDOM and add operatorprivilege:grant authority jones domains=mktpoldom classes=operator
Administrator Name: DAVEHILLast Access Date/Time: 1998.06.04 17.10.52
Days Since Last Access: <1Password Set Date/Time: 1998.06.04 17.10.52Days Since Password Set: 26
Invalid Sign-on Count: 0Locked?: NoContact:
System Privilege: YesPolicy Privilege: **Included with system privilege**Storage Privilege: **Included with system privilege**Analyst Privilege: **Included with system privilege**Operator Privilege: **Included with system privilege**
Client Access Privilege: **Included with system privilege**Client Owner Privilege: **Included with system privilege**Registration Date/Time: 05/09/1998 23:54:20
Registering Administrator: SERVER_CONSOLEManaging profile:
Password Expiration Period: 90 Day (s)
Figure 47. A Detailed Administrator Report
292 Tivoli Storage Manager for Windows: Administrator’s Guide

As an additional example, assume that three tape storage pools exist: TAPEPOOL1,TAPEPOOL2, and TAPEPOOL3. To grant restricted storage privilege for thesestorage pools to administrator HOLLAND, you can enter the previous command:grant authority holland stgpools=tape*
HOLLAND is restricted to managing storage pools beginning with TAPE thatexisted when the authority was granted. HOLLAND is not authorized to manageany storage pools that are defined after authority has been granted.
To add a new storage pool, TAPEPOOL4, to HOLLAND’s authority, enter:grant authority holland stgpools=tapepool4
Reducing Authority for Administrators: You can revoke part of anadministrator’s authority with the REVOKE AUTHORITY command andspecifying the administrator’s ID and one or more privilege classes.
Assume that rather than revoking all of the privilege classes for administratorJONES you wished only to revoke his operator authority and his policyauthorization to policy domain MKTPOLDOM. You would enter:revoke authority jones classes=operator domains=mktpoldom
JONES still has policy privilege to the ENGPOLDOM policy domain.
Reducing Privilege Classes: You can reduce an administrator’s authority simplyby revoking one or more privilege classes and granting one or more other classes.
For example, administrator HOGAN has system authority. To reduce HOGAN tothe operator privilege class do the following:1. Revoke the system privilege class by entering:
revoke authority hogan classes=system
2. Grant operator privilege class by entering:grant authority hogan classes=operator
Revoking Authority for Administrators: You can revoke an administrator’sauthority with the REVOKE AUTHORITY command. To revoke all administrativeprivilege classes, do not specify any privilege classes, policy domains, or storagepools. For example, to revoke both the storage and operator privilege classes fromadministrator JONES enter:revoke authority jones
Locking and Unlocking Administrators from the Server: You can lock out otheradministrators to temporarily prevent them from accessing Tivoli Storage Managerwith the LOCK ADMIN command.
For example, administrator MARYSMITH takes a leave of absence from yourbusiness. You can lock her out by entering:lock admin marysmith
When she returns, any system administrator can unlock her administrator ID byentering:unlock admin marysmith
MARYSMITH can now access the server to complete administrative tasks.
Chapter 13. Managing Client Nodes 293

You cannot lock or unlock the SERVER_CONSOLE ID from the server. See “Aboutthe Server Console” on page 289 for details.
Managing Access to the Server and ClientsAn administrator can control access to the server by registering and grantingauthority to administrators, renaming or removing an administrator, or by lockingand unlocking an administrator from the server.
By default, a system or policy administrator over a specified client’s domain cancreate a backup set from a client node’s latest active files. For more information,see “Chapter 17. Managing Schedules for Client Nodes” on page 367.
Preventing Clients from Accessing the ServerYou can prevent clients from establishing administrative sessions with the server.For details, see “Locking and Unlocking Client Nodes” on page 264.
Preventing Administrators from Accessing the ServerYou can prevent other administrators from establishing administrative sessionswith the server. For details, see “Locking and Unlocking Administrators from theServer” on page 293.
Disabling or Enabling Client SessionsYou can prevent clients from establishing sessions with the server. This effectivelylocks the nodes from the server. For details, see “Disabling or Enabling Access tothe Server” on page 287.
Managing Passwords and Login ProceduresBy default, Tivoli Storage Manager requires authorized administrators and nodesto identify themselves to the server with a password.
Administrators can perform the following activities when managing passwordslogin procedures:
Task Required Privilege Class
Modifying the default timeout period for theadministrative Web interface
Modifying the default password expirationperiod
Setting the limit for invalid passwordattempts
Setting the minimum limit for passwords
Disabling the default passwordauthentication
Enabling the unified logon for clients
System
Modifying the Default Timeout Period for the Administrative WebInterfaceAt installation, the timeout default value for the administrative Web interface is 10minutes. When the timeout period expires, the user of the Web interface is requiredto reauthenticate by logging on and specifying a password. The following exampleshows how to set the timeout value to 20 minutes:set webauthtimeout 20
294 Tivoli Storage Manager for Windows: Administrator’s Guide

You can specify a value from 0 to 9999 minutes. If the minimum value is 0, there isno timeout period for the administrative Web interface. To help ensure the securityof an unattended browser, it is recommended that you set the timeout value higherthan zero.
Modifying the Default Password Expiration PeriodBy default, the server sets a password expiration of 90 days. The expiration periodbegins when an administrator or client node is first registered to the server. If auser password is not changed within this period, the server prompts the user tochange the password the next time the user tries to access the server.
To set the password expiration period for selected administrators or client nodes,you must specify the administrator or node names with the ADMIN or NODEparameter with the SET PASSEXP command. If you set the expiration period onlyfor selected users, you may set the expiration period from 0–9999 days. A value of0 means that user’s password never expires. For example, to set the expirationperiod of client node LARRY to 120 days, issue the following command:set passexp 120 node=larry
Note: Once you have explicitly set a password expiration for a node oradministrator, it is not modified if you later set a password expiration for allusers.
Setting a Limit for Invalid Password AttemptsBy default, Tivoli Storage Manager does not check the number of times a userattempts to log in with an invalid password. You can set a limit on consecutiveinvalid password attempts for all client nodes. When the limit is exceeded, theserver locks the node. The following example sets a system-wide limit of threeconsecutive invalid password attempts:set invalidpwlimit 3
The default value at installation is 0. A value of 0 means that invalid passwordattempts are not checked. You can set the value from 0 to 9999 attempts.
If you initially set a limit of 4 and then change the limit to a lower number, someclients may fail verification during the next login attempt.
After a client node has been locked, only a storage administrator with properauthority can unlock the node. For information about unlocking a client oradministrator node, see “Locking and Unlocking Client Nodes” on page 264 and“Locking and Unlocking Administrators from the Server” on page 293.
An administrator can also force a client to change their password on the next loginby specifying the FORCEPWRESET=YES parameter on the UPDATE NODE orUPDATE ADMIN command. For more information, refer to Administrator’sReference.
Setting a Minimum Length for a PasswordBy default, Tivoli Storage Manager does not check the minimum length of apassword. The administrator can specify a minimum password length that isrequired for Tivoli Storage Manager passwords. The following example shows howto set the minimum password length to eight characters:set minpwlength 8
The default value at installation is 0. A value of 0 means that password length isnot checked. You can set the length value from 0 to 64.
Chapter 13. Managing Client Nodes 295

Disabling the Default Password AuthenticationBy default, the server automatically sets password authentication on. Withpassword authentication set to on, all users must enter a password when accessingthe server. To allow administrators and client nodes to access the server withoutentering a password, issue the following command:set authentication off
Attention: Setting password authentication off reduces data security.
Enabling Unified Logon with Backup-Archive ClientsThe Tivoli Storage Manager unified logon feature allows the Tivoli StorageManager server to use the Windows user account database instead of the TivoliStorage Manager node database when authenticating a backup-archive client logon.With this feature, a user can log on to a Windows machine and access thebackup-archive client without having to enter another password. When unifiedlogon is enabled, the server continues to use its normal authentication methods forprotocols other than Named Pipes.
The procedure described below assumes that the Tivoli Storage Manager servermachine and all the Tivoli Storage Manager client machines are in the sameWindows domain. A Windows domain is a way of allowing the Windows DomainController to manage the user accounts for all members of the domain. The TivoliStorage Manager unified logon procedure takes advantage of the convenience ofallowing the Windows domain to manage user accounts.
Note: The Tivoli Storage Manager server will successfully run on the Windowsserver or workstation operating system and need not reside on the WindowsDomain Controller machine.
System Requirements: To enable unified logon, you must have the following:v The backup-archive client must be installed on a machine running Windows NT
or Windows 2000. Unified logon is not supported with the Tivoli StorageManager backup-archive client on Windows 95/98/ME.
v The Tivoli Storage Manager server must enable the Named Pipes protocol.v The backup-archive client must use the Named Pipes communications method.
Enabling Unified Logon: Complete the following steps to enable unified logon.
Step 1: From the Windows Domain Controller
Authorize Tivoli Storage Manager users by creating a Windows global group andadding users:1. Open the User Manager for Domains from Administrative Tools.2. Click User -> New Global Group.
3. For Group Name enter, for example, ADSMSERVER.4. Add users to the ADSMSERVER group by using the Add button.5. Click OK to add the group.6. Reboot the server machine to enable the groups.
Step 2: From the TSM Server Machine
1. From the TSM Console, ensure that the Tivoli Storage Manager server is halted:a. Double-click the desktop icon for the TSM Console.b. Expand the tree until the TSM server you want to work with is displayed.
296 Tivoli Storage Manager for Windows: Administrator’s Guide

c. Expand the server, and then expand Reports.d. Click on Service Information.e. If the status of the server in the right pane is Running, select the server and
click Stop.2. Configure Tivoli Storage Manager server service to use the administrator
account:a. Right click on the server you want to work with, and select Properties.
On Windows 2000: Start -> Programs -> Administrative Tools -> Services.b. From the Startup Type section, select Automatic.c. From the Log On As section, select This Account and change LocalSystem
to DOMAIN\Administrator.d. Enter the password of the Windows Domain administrator account.e. Click OK to continue.
3. From the TSM Console, enable unified logon on Tivoli Storage Manager:a. From the left pane, expand the server.b. Expand Reports.c. From the left pane, select Service Information.d. From the right pane, click on the server to select it and click Edit Options
File.e. Click the Named Pipes tab and do the following:
1) Ensure that Enable Named Pipes... is checked.2) For Pipe Name, enter the server instance as the pipename. For example,
Server1.3) In the NT Unified Logon section, check Enable Unified Logon Over
Named Pipes.4) For TSM Group Name, enter TSMSERVER.
Note: The preceding procedure is the same as entering the following linesin the server options file (dsmserv.opt):adsmgroupname tsmservercommmethod namedpipenamedpipename \\.\pipe\server1securepipes yes
4. Restart the Tivoli Storage Manager server:a. From the left pane, expand the TSM server.b. Expand Reports.c. Click on Service Information.d. From the right pane, select the server and click on Start. The Status for the
server should change to Running.5. Ensure that the backup-archive clients that you added to the Tivoli Storage
Manager server group are registered Tivoli Storage Manager client nodes. See“Registering Nodes with the Server” on page 254 for details.
Note: The node password assigned during node registration is ignored by theauthentication process when unified logon is enabled. Instead, theWindows domain password is used.
Step 3: From Each Client Machine
1. All users must ensure that they are members of either the Administratorsgroup or the Backup Operators group on their machines.
Chapter 13. Managing Client Nodes 297

2. Reboot the client machine to enable the group.3. Edit the client options file (dsm.opt) to set up the backup-archive client to use
unified logon. Ensure that the following options are active (the asterisk isdeleted). For example:commmethod namedpipenamedpipename \\server_name\pipe\server1nodename usernamepasswordaccess generate
Notes:
a. In the example, server_name is the NetBIOS name of the computer where theTivoli Storage Manager server is running.
b. The username must be the same as the Windows account name that the useris logged in as.
Note: In the example, machinename should be substituted with the name of themachine where the Tivoli Storage Manager server is installed.
4. To verify that unified logon is enabled, start the backup-archive client. You canalso perform a backup and restore.
298 Tivoli Storage Manager for Windows: Administrator’s Guide

Chapter 14. Implementing Policies for Client Data
Policies are rules that you set at the Tivoli Storage Manager server to help youmanage client data. Policies control how and when client data is stored, forexample:v How and when files are backed up and archived to server storagev How space-managed files are migrated to server storagev The number of copies of a file and the length of time copies are kept in server
storage
Tivoli Storage Manager provides a standard policy that sets rules to provide abasic amount of protection for data on workstations. If this standard policy meetsyour needs, you can begin using Tivoli Storage Manager immediately. See “BasicPolicy Planning” on page 300 for information about the standard policy.
The server process of expiration is one way that the server enforces policies thatyou define. Expiration processing determines when files are no longer needed, thatis, when the files are expired. For example, if you have a policy that requires onlyfour copies of a file be kept, the fifth and oldest copy is expired. During expirationprocessing, the server removes entries for expired files from the database,effectively deleting the files from server storage. See “File Expiration andExpiration Processing” on page 303 and “Running Expiration Processing to DeleteExpired Files” on page 333 for details.
You may need more flexibility in your policies than the standard policy provides.To accommodate individual user’s needs, you may fine tune the STANDARDpolicy (see “Getting Users Started” on page 302 for details), or create your ownpolicies (see “Creating Your Own Policies” on page 318 for details). Some types ofclients or situations require special policy. For example, you may want to enableclients to restore backed-up files to a specific point in time (see “Setting Policy toEnable Point-in-Time Restore for Clients” on page 340 for more information).
Policy can be distributed from a configuration manager to managed servers. See“Chapter 22. Working with a Network of Tivoli Storage Manager Servers” onpage 463 for more information on distributing configurations.
See the following sections:
Concepts:
“Basic Policy Planning” on page 300
“The Standard Policy” on page 301
“File Expiration and Expiration Processing” on page 303
“Client Operations Controlled by Policy” on page 303
“The Parts of a Policy” on page 305
“More on Management Classes” on page 309
“How Tivoli Storage Manager Selects Files for Policy Operations” on page 314
“How Client Migration Works with Backup and Archive” on page 318
© Copyright IBM Corp. 1994, 2002 299

Tasks:
“Getting Users Started” on page 302
“Changing Policy” on page 302
“Creating Your Own Policies” on page 318
“Defining and Updating a Policy Domain” on page 320
“Defining and Updating a Policy Set” on page 321
“Defining and Updating a Management Class” on page 322
“Defining and Updating a Backup Copy Group” on page 323
“Defining and Updating an Archive Copy Group” on page 328
“Assigning a Default Management Class” on page 330
“Validating and Activating a Policy Set” on page 330
“Assigning Client Nodes to a Policy Domain” on page 332
“Running Expiration Processing to Delete Expired Files” on page 333
“Setting Policy to Enable Point-in-Time Restore for Clients” on page 340
“Policy for Tivoli Storage Manager Servers as Clients” on page 340
“Configuring Policy for Tivoli Data Protection Application Clients” on page 336
“Policy for Logical Volume Backups” on page 336
“Configuring Policy for Managed System for SAN” on page 338
“Distributing Policy Using Enterprise Configuration” on page 341
“Querying Policy” on page 341
“Deleting Policy” on page 343
In this chapter, most examples illustrate how to perform tasks by using a TivoliStorage Manager command-line interface. For information about the commands,see Administrator’s Reference, or issue the HELP command from the command lineof a Tivoli Storage Manager administrative client.
Tivoli Storage Manager tasks can also be performed from the administrative Webinterface. For more information about using the administrative interface, see QuickStart.
Basic Policy PlanningStart out simply to plan your policy. You may be able to use the default policy thatcomes with the server. Ask the questions:v How many backup versions do clients need?v How long do clients need the backup versions?
Examine the default policy to see if it meets your needs:v Up to two backup versions of a file on the client’s system are retained in server
storage.v The most recent backup version is retained for as long as the original file is on
the client file system. All other versions are retained for up to 30 days after theybecome inactive.
v One backup version of a file that has been deleted from the client’s system isretained in server storage for 60 days.
v An archive copy is kept for up to 365 days.
300 Tivoli Storage Manager for Windows: Administrator’s Guide

See “The Standard Policy” for more details about the standard policy.
The server manages files based on whether the files are active or inactive. Themost current backup or archived copy of a file is the active version. All otherversions are called inactive versions. An active version of a file becomes inactivewhen:v A new backup is madev A user deletes that file on the client node and then runs an incremental backup
Policy determines how many inactive versions of files the server keeps, and forhow long. When files exceed the criteria, the files expire. Expiration processing canthen remove the files from the server database. See “File Expiration and ExpirationProcessing” on page 303 and “Running Expiration Processing to Delete ExpiredFiles” on page 333 for details.
The Standard PolicyThe standard policy consists of a standard policy domain, policy set, managementclass, backup copy group, and archive copy group. Each of these parts is namedSTANDARD. See “The Parts of a Policy” on page 305 for details. The attributes ofthe default policy are as follows:
Table 23. Summary of Default Policy
Policy Object where the policy is set
Backup Policies
Files are backed up to the default disk storage pool,BACKUPPOOL.
STANDARD backup copy group,DESTINATION parameter
An incremental backup is performed only if the filehas changed since the last backup.
STANDARD backup copy group,MODE parameter
Files cannot be backed up while they are beingmodified.
STANDARD backup copy group,SERIALIZATION parameter
Up to two backup versions of a file on the client’ssystem are retained in server storage. The most recentbackup version is retained for as long as the originalfile is on the client file system. All other versions areretained for up to 30 days after they become inactive.
STANDARD backup copy group,the following parameters:
VEREXISTS
RETEXTRA
RETONLY
One backup version of a file that has been deletedfrom the client’s system is retained in server storagefor 60 days.
STANDARD backup copy group,VERDELETED parameter
When a backed up file is no longer associated with abackup copy group, it remains in server storage for 30days (backup retention grace period).
STANDARD policy domain,BACKRETENTION parameter
Archive Policies
Files are archived in the default disk storage pool,ARCHIVEPOOL.
STANDARD archive copy group,DESTINATION parameter
Files cannot be archived while they are beingmodified.
STANDARD archive copy group,SERIALIZATION parameter
An archive copy is kept for up to 365 days. STANDARD archive copy group,RETVER parameter
Chapter 14. Implementing Policies for Client Data 301

Table 23. Summary of Default Policy (continued)
Policy Object where the policy is set
When an archived file is no longer associated with anarchive copy group, it remains in server storage for365 days (archive retention grace period).
STANDARD policy domain,ARCHRETENTION parameter
General
The default management class is STANDARD. STANDARD policy set (ACTIVE),ASSIGN DEFMGMTCLASScommand
Space Management (HSM) Policy
Client files are not space-managed (there are no HSMclients).
STANDARD management class,SPACEMGTECHNIQUE parameter
Getting Users StartedWhen you register a client node, the default is to assign the node to theSTANDARD policy domain. If users register their own workstations during openregistration, they are also assigned to the STANDARD policy domain.
To help users take advantage of Tivoli Storage Manager, you can further tune thepolicy environment by doing the following:v Define sets of client options for the different groups of users. See “Creating
Client Option Sets from the Server” on page 281 for details.v Help users with creating the include-exclude list. For example:
– Create include-exclude lists to help inexperienced users who have simple filemanagement needs. One way to do this is to define a basic include-excludelist as part of a client option set. This also gives the administrator somecontrol over client usage. See “Creating Client Option Sets from the Server”on page 281 for details.
– Provide a sample include-exclude list to users who want to specify how theserver manages their files. You can show users who prefer to manage theirown files how to:- Request information about management classes- Select a management class that meets backup and archive requirements- Use include-exclude options to select management classes for their files
For information on the include-exclude list, see the user’s guide for theappropriate client. See also “The Include-Exclude List” on page 310.
v Automate incremental backup procedures by defining schedules for each policydomain. Then associate schedules with client nodes in each policy domain. Forinformation on schedules, see “Chapter 16. Scheduling Operations for ClientNodes” on page 357.
Changing PolicySome types of clients and situations require policy changes. For example, if youneed to direct client data to storage pools different from the default storage pools,you need to change policy. Other situations may also require policy changes. See“Configuring Policy for Specific Cases” on page 335 for details.
To change policy that you have established in a policy domain, you must replacethe ACTIVE policy set. You replace the ACTIVE policy set by activating anotherpolicy set. Do the following:
302 Tivoli Storage Manager for Windows: Administrator’s Guide

1. Create or modify a policy set so that it contains the policy that you want toimplement.v Create a new policy set either by defining a new policy set or by copying a
policy set.v Modify an existing policy set (it cannot be the ACTIVE policy set).
Note: You cannot directly modify the ACTIVE policy set. If you want to makea small change to the ACTIVE policy set, copy the policy to modify itand follow the steps here.
2. Make any changes that you need to make to the management classes, backupcopy groups, and archive copy groups in the new policy set. For details, see“Defining and Updating a Management Class” on page 322, “Defining andUpdating a Backup Copy Group” on page 323, and “Defining and Updating anArchive Copy Group” on page 328.
3. Validate the policy set. See “Validating a Policy Set” on page 330 for details.4. Activate the policy set. The contents of your new policy set becomes the
ACTIVE policy set. See “Activating a Policy Set” on page 331 for details.
File Expiration and Expiration ProcessingAn expired file is a file that the server no longer needs to keep, according to policy.Files expire under the following conditions:v Users delete file spaces from client nodesv Users expire files by using the EXPIRE command on the client (client software at
Version 4.2 and later)v A file that is a backup version exceeds the criteria in the backup copy group
(how long a file is kept and how many inactive versions of a file are kept)v An archived file exceeds the time criteria in the archive copy group (how long
archived copies are kept)v A backup set exceeds the retention time that is specified for it
Note: A base file is not eligible for expiration until all of its dependent subfileshave been expired. For details, see “Expiration Processing of Base Files andSubfiles” on page 356.
The server deletes expired files from the server database only during expirationprocessing. After expired files are deleted from the database, the server can reusethe space in the storage pools that was occupied by expired files. You shouldensure that expiration processing runs periodically to allow the server to reusespace. See “Reclaiming Space in Sequential Access Storage Pools” on page 205 and“Running Expiration Processing to Delete Expired Files” on page 333 for moreinformation.
Expiration processing also removes from the database any restartable restoresessions that exceed the time limit set for such sessions by theRESTOREINTERVAL server option. See “Managing Client Restartable RestoreSessions” on page 287 for information about restartable restore sessions.
Client Operations Controlled by PolicyTivoli Storage Manager policies govern the following client operations, which arediscussed in this section:v “Backup and Restore” on page 304v “Archive and Retrieve” on page 304
Chapter 14. Implementing Policies for Client Data 303

v “Client Migration and Recall”
Backup and RestoreBackup-archive clients can back up and restore files and directories.Backup-archive clients on UNIX systems can also back up and restore logicalvolumes. Backups allow users to preserve different versions of files as they change.
BackupTo guard against the loss of information, the backup-archive client can copy files,subdirectories, and directories to media controlled by the server. Backups can becontrolled by administrator-defined policies and schedules, or users can requestbackups of their own data. The backup-archive client provides two types ofbackup:
Incremental backupThe backup of files according to policy defined in the backup copy groupof the management class for the files. An incremental backup typicallybacks up all files that are new or that have changed since the lastincremental backup.
Selective backupBacks up only files that the user specifies. The files must also meet some ofthe policy requirements defined in the backup copy group.
See Backup-Archive Installation and User’s Guide for details on backup-archive clientsthat can also back up logical volumes. The logical volume must meet some of thepolicy requirements that are defined in the backup copy group.
RestoreWhen a user restores a backup version of a file, the server sends a copy of the fileto the client node. The backup version remains in server storage. Restoring alogical volume backup works the same way.
If more than one backup version exists, a user can restore the active backupversion or any inactive backup versions.
If policy is properly set up, a user can restore backed-up files to a specific time. See“Setting Policy to Enable Point-in-Time Restore for Clients” on page 340 for detailson the requirements.
Archive and RetrieveTo preserve files for later use or for records retention, a user with a backup-archiveclient can archive files, subdirectories, and directories on media controlled by theserver. When users archive files, they can choose to have the backup-archive clienterase the original files from their workstation after the client archives the files.
When a user retrieves a file, the server sends a copy of the file to the client node.The archived file remains in server storage.
Client Migration and RecallWhen the Tivoli Space Manager product is on the workstation, a user can migratefiles from workstation storage to server storage and recall those files as needed.Tivoli Space Manager frees space for new data and makes more efficient use ofyour storage resources. The installed Tivoli Space Manager product is also calledthe space manager client or the HSM client.
304 Tivoli Storage Manager for Windows: Administrator’s Guide

Files that are migrated and recalled with the HSM client are called space-managedfiles.
For details about using Tivoli Space Manager, see Tivoli Space Manager for UNIX:Using the Hierarchical Storage Management Clients.
MigrationWhen a file is migrated to the server, it is replaced on the client node with a smallstub file of the same name as the original file. The stub file contains data needed tolocate the migrated file on server storage.
Tivoli Space Manager provides selective and automatic migration. Selectivemigration lets users migrate files by name. The two types of automatic migrationare:
ThresholdIf space usage exceeds a high threshold set at the client node, migrationbegins and continues until usage drops to the low threshold also set at theclient node.
DemandIf an out-of-space condition occurs for a client node, migration begins andcontinues until usage drops to the low threshold.
To prepare for efficient automatic migration, Tivoli Space Manager copies apercentage of user files from the client node to the Tivoli Storage Manager server.The premigration process occurs whenever Tivoli Space Manager completes anautomatic migration. The next time free space is needed at the client node, the filesthat have been premigrated to the server can quickly be changed to stub files onthe client. The default premigration percentage is the difference between the highand low thresholds.
Files are selected for automatic migration and premigration based on the numberof days since the file was last accessed and also on other factors set at the clientnode.
RecallTivoli Space Manager provides selective and transparent recall. Selective recall letsusers recall files by name. Transparent recall occurs automatically when a useraccesses a migrated file.
ReconciliationMigration and premigration can create inconsistencies between stub files on theclient node and space-managed files in server storage. For example, if a userdeletes a migrated file from the client node, the copy remains at the server. Atregular intervals set at the client node, Tivoli Storage Manager compares clientnode and server storage and reconciles the two by deleting from the server anyoutdated files or files that do not exist at the client node.
The Parts of a PolicyPolicy administrators use Tivoli Storage Manager policy to specify how files arebacked up, archived, migrated from client node storage, and managed in serverstorage. Figure 48 on page 306 shows the parts of a policy and the relationshipsamong the parts. You may refer to “Example: Sample Policy Objects” on page 319.
Chapter 14. Implementing Policies for Client Data 305
Backup copy groupControls the backup processing of files associated with the managementclass. A backup copy group determines the following:v How frequently a file can be backed upv How to handle files that are in use during a backupv Where the server initially stores backup versions of files and directoriesv How many backup versions the server keeps of files and directoriesv How long the server keeps backup versions of files and directories, see
“Running Expiration Processing to Delete Expired Files” on page 333 fordetails
Archive copy groupControls the archive processing of files associated with the managementclass. An archive copy group determines the following:v How to handle files that are in use during archivev Where the server stores archived copies of filesv How long the server keeps archived copies of files, see “Running
Expiration Processing to Delete Expired Files” on page 333 for details
Management classAssociates backup and archive groups with files, and specifies if and howclient node files are migrated to storage pools. A management class cancontain one backup or archive copy group, both a backup and archivecopy group, or no copy groups. Users can bind (that is, associate) their filesto a management class through the include-exclude list.
See “More on Management Classes” on page 309 for details.
Policy setSpecifies the management classes that are available to groups of users.Policy sets contain one or more management classes. You must identify one
Figure 48. Tivoli Storage Manager Policy
306 Tivoli Storage Manager for Windows: Administrator’s Guide

management class as the default management class. Only one policy set, theACTIVE policy set, controls policy operations.
Policy domainLets an administrator group client nodes by the policies that govern theirfiles and by the administrators who manage their policies. A policy domaincontains one or more policy sets, but only one policy set (named ACTIVE)can be active at a time. The server uses only the ACTIVE policy set tomanage files for client nodes assigned to a policy domain.
You can use policy domains to:v Group client nodes with similar file management requirementsv Provide different default policies for different groups of clientsv Direct files from different groups of clients to different storage
hierarchies based on need (different file destinations with differentstorage characteristics)
v Restrict the number of management classes to which clients have access
Relationships among Clients, Storage, and PolicyFigure 49 on page 308 summarizes the relationships among the physical deviceenvironment, Tivoli Storage Manager storage and policy objects, and clients. Thenumbers in the following list correspond to the numbers in the figure.
Chapter 14. Implementing Policies for Client Data 307

�1� When clients are registered, they are associated with a policy domain.Within the policy domain are the policy set, management class, and copygroups.
�2�, �3�When a client backs up, archives, or migrates a file, it is bound to amanagement class. A management class and the backup and archive copygroups within it specify where files are stored and how they are managedwhen they are backed up, archived, or migrated from the client.
�4�, �5�Storage pools are the destinations for backed-up, archived, or
Figure 49. How Clients, Server Storage, and Policy Work Together
308 Tivoli Storage Manager for Windows: Administrator’s Guide

space-managed files. Copy groups specify storage pools for backed-up orarchived files. Management classes specify storage pools forspace-managed files.
Storage pools are mapped to device classes, which represent devices. Thestorage pool contains volumes of the type indicated by the associateddevice class. For example, a storage pool that is mapped to a device classwith a device type of 8MM contains only 8mm tapes.
�6� Files that are initially stored on disk storage pools can migrate to tape orother types of storage pools if the pools are set up in a storage hierarchy.
More on Management ClassesManagement classes are the key connection between client files and policy.
Each client node is assigned to a single policy domain, and the client node hasaccess only to the management classes contained in the active policy set. Themanagement classes specify whether client files are migrated to storage pools(hierarchical storage management). The copy groups in these management classesspecify the number of backup versions retained in server storage and the length oftime to retain backup versions and archive copies.
For example, if a group of users needs only one backup version of their files, youcan create a policy domain that contains only one management class whose backupcopy group allows only one backup version. Then you can assign the client nodesfor these users to the policy domain. See “Registering Nodes with the Server” onpage 254 for information on registering client nodes and assigning them to policydomains.
The following sections give you more information about management classes andhow they work with other parts of Tivoli Storage Manager:v “Contents of a Management Class”v “Default Management Classes” on page 310v “The Include-Exclude List” on page 310v “How Files and Directories Are Associated with a Management Class” on
page 312
Contents of a Management ClassA management class contains policy for backup, archive, and space managementoperations by clients. You can specify if and how a Tivoli Space Manager client canmigrate files to server storage with parameters in the management class. For clientsusing the server for backup and archive, you can choose what a management classcontains from the following options:
A backup copy group and an archive copy groupTypical end users need to back up and archive documents, spreadsheets,and graphics.
A backup copy group onlySome users only want to back up files (such as working documents,database, log, or history files that change daily). Some application clients(Tivoli Data Protection products) need only a backup copy group becausethey never archive files.
Chapter 14. Implementing Policies for Client Data 309

An archive copy group onlyA management class that contains only an archive copy group is useful forusers who create:v Point-in-time files. For example, an engineer can archive the design of an
electronic component and the software that created the design. Later, theengineer can use the design as a base for a new electronic component.
v Files that are rarely used but need to be retained for a long time. A clientcan erase the original file without affecting how long the archive copy isretained in server storage. Examples include legal records, patientrecords, and tax forms.
Attention: A management class that contains neither a backup nor an archivecopy group prevents a file from ever being backed up or archived. This type ofmanagement class is not recommended for most users. Use such a managementclass carefully to prevent users from mistakenly selecting it. If users bind their filesto a management class without copy groups, Tivoli Storage Manager issueswarning messages.
Default Management ClassesEach policy set must include a default management class, which is used for thefollowing purposes:v To manage files that are not bound to a specific management class, as defined by
the INCLUDE option in the include-exclude list.v To manage existing backup versions when an administrator deletes a
management class or a backup copy group from the server. See “How Files andDirectories Are Associated with a Management Class” on page 312.
v To manage existing archive copies when an administrator deletes a managementclass or an archive copy group from the server. The server does not rebindarchive copies, but does use the archive copy group (if one exists) in the defaultmanagement class. See “How Files and Directories Are Associated with aManagement Class” on page 312.
v To manage files when a client node is assigned to a new policy domain and theactive policy set does not have management classes with the same names as thatto which the node’s files are bound.
A typical default management class should do the following:v Meet the needs of most usersv Contain both a backup copy group and an archive copy groupv Set serialization static or shared static to ensure the integrity of backed up and
archived filesv Retain backup versions and archive copies for a sufficient amount of timev Retain directories for at least as long as any files are associated with the
directory
Other management classes can contain copy groups tailored either for the needs ofspecial sets of users or for the needs of most users under special circumstances.
The Include-Exclude ListA user can define an include-exclude list to specify which files are eligible for thedifferent processes that the client can run. Include and exclude options in the listdetermine which files are eligible for backup and archive services, which files can
310 Tivoli Storage Manager for Windows: Administrator’s Guide

be migrated from the client (space-managed), and how the server managesbacked-up, archived, and space-managed files.
If a user does not create an include-exclude list, the following default conditionsapply:v All files belonging to the user are eligible for backup and archive services.v The default management class governs backup, archive, and space-management
policies.
Figure 50 shows an example of an include-exclude list. The statements in thisexample list do the following:v Excludes certain files or directories from backup, archive, and client migration
operationsLine 1 in Figure 50 means that the SSTEINER node ID excludes all core filesfrom being eligible for backup and client migration.
v Includes some previously excluded filesLine 2 in Figure 50 means that the files in the *:\home\ssteiner directory areexcluded. The include statement that follows on line 3, however, means that the*:\home\ssteiner\options.scr file is eligible for backup and client migration.
v Binds a file to a specific management classLine 4 in Figure 50 means that all files and subdirectories belonging to the*:\home\ssteiner\driver5 directory are managed by the policy defined in theMCENGBK2 management class.
Tivoli Storage Manager processes the include-exclude list from the bottom up, andstops when it finds an include or exclude statement that matches the file it isprocessing. Therefore, the order in which the include and exclude options are listedaffects which files are included and excluded. For example, suppose you switch theorder of two lines in the example, as follows:include *:\home\ssteiner\options.screxclude *:\home\ssteiner\*
The exclude statement comes last, and excludes all files in the *:\home\ssteinerdirectory. When Tivoli Storage Manager is processing the include-exclude list forthe options.scr file, it finds the exclude statement first. This time, the options.scrfile is excluded.
Some options are evaluated after the more basic include and exclude options. Forexample, options that exclude or include files for compression are evaluated afterthe program determines which files are eligible for the process being run.
You can create include-exclude lists as part of client options sets that you definefor clients. For information on defining client option sets and assigning a clientoption set to a client, see “Creating Client Option Sets from the Server” onpage 281.
exclude *:\...\coreexclude *:\home\ssteiner\*include *:\home\ssteiner\options.scrinclude *:\home\ssteiner\driver5\...\* mcengbk2
Figure 50. Example of an Include-Exclude List
Chapter 14. Implementing Policies for Client Data 311

For detailed information on the include and exclude options, see the user’s guidefor the appropriate client.
How Files and Directories Are Associated with a ManagementClass
Binding is the process of associating a file with a management class. The policiesdefined in the management class then apply to the bound files. The server binds afile to a management class when a client backs up, archives, or migrates the file. Aclient chooses a management class as follows:v For backing up a file, a client can specify a management class in the client’s
include-exclude list (include-exclude options file for UNIX clients), or can acceptthe default management class.
v For backing up directories, the client can specify a management class by usingthe DIRMC option in the client options file.
Note: It is recommended that you define a default management class. If nomanagement class is specified for a directory, the server chooses themanagement class with the longest retention period in the backup copygroup (retention period for the only backup version).
v For backing up a file system or logical volume, a client can specify amanagement class in the client’s include-exclude list (include-exclude options filefor UNIX clients), or can accept the default management class.
v For archiving a file, the client can do one of the following:– Specify a management class in the client’s include-exclude list (with either an
include option or an include.archive option)– Specify a management class with the ARCHMC option on the archive
command– Accept the default management class
v For archiving directories, the client can specify a management class with thearchiving options, or the ARCHMC option. If the client does not specify anyarchiving options, the server assigns the default management class to thearchived directory. If the default management class has no archive copy group,the server assigns the management class that currently has the archive copygroup with the shortest retention time.
v For migrating a file, a client can specify a management class in the client’sinclude-exclude options file, or can accept the default management class.
The default management class is the management class identified as the default inthe active policy set.
A management class specified with a simple include option can apply to one ormore processes on the client. More specific include options (such asinclude.archive) allow the user to specify different management classes. Someexamples of how this works:v If a client backs up, archives, and migrates a file to the same server, and uses
only a single include option, the management class specified for the file appliesto all three operations (backup, archive, and migrate).
v If a client backs up and archives a file to one server, and migrates the file to adifferent server, the client can specify one management class for the file forbackup and archive operations, and a different management class for migrating.
v Clients at Version 4.2 or later can specify a management class for archiving thatis different from the management class for backup.
312 Tivoli Storage Manager for Windows: Administrator’s Guide

See the user’s guide for the appropriate client for details.
Effects of Changing a Management ClassA file remains bound to a management class even if the attributes of themanagement class or its copy groups change. The following scenario illustrates thisprocess:1. A file named REPORT.TXT is bound to the default management class that
contains a backup copy group specifying that up to three backup versions canbe retained in server storage.
2. During the next week, three backup versions of REPORT.TXT are stored inserver storage. The active and two inactive backup versions are bound to thedefault management class.
3. The administrator assigns a new default management class that contains abackup copy group specifying only up to two backup versions.
4. The administrator then activates the policy set, and the new defaultmanagement class takes effect.
5. REPORT.TXT is backed up again, bringing the number of versions to four. Theserver determines that according to the new backup copy group only twoversions are to be retained. Therefore, the server marks the two oldest versionsfor deletion (expired).
6. Expiration processing occurs (see “Running Expiration Processing to DeleteExpired Files” on page 333 for details). REPORT.TXT is still bound to thedefault management class, which now includes new retention criteria.Therefore, the two versions marked for deletion are purged, and one active andone inactive backup version remain in storage.
Rebinding Files to Management ClassesRebinding is the process of associating a file or a logical volume image with a newmanagement class.
Backup Versions: The server rebinds backup versions of files and logical volumeimages in the following cases:v The user changes the management class specified in the include-exclude list and
does a backup.v An administrator activates a policy set in the same policy domain as the client
node, and the policy set does not contain a management class with the samename as the management class to which a file is currently bound.
v An administrator assigns a client node to a different policy domain, and theactive policy set in that policy domain does not have a management class withthe same name.
Backup versions of a directory can be rebound when the user specifies a differentmanagement class using the DIRMC option in the client option file, and when thedirectory gets backed up.
If a file is bound to a management class that no longer exists, the server uses thedefault management class to manage the backup versions. When the user doesanother backup, the server rebinds the file and any backup versions to the defaultmanagement class. If the default management class does not have a backup copygroup, the server uses the backup retention grace period specified for the policydomain.
Chapter 14. Implementing Policies for Client Data 313

Archive Copies: Archive copies are never rebound because each archive operationcreates a different archive copy. Archive copies remain bound to the managementclass name specified when the user archived them.
If the management class to which an archive copy is bound no longer exists or nolonger contains an archive copy group, the server uses the default managementclass. If you later change or replace the default management class, the server usesthe updated default management class to manage the archive copy.
If the default management class does not contain an archive copy group, the serveruses the archive retention grace period specified for the policy domain.
How Tivoli Storage Manager Selects Files for Policy OperationsThis section describes how Tivoli Storage Manager selects files for the followingoperations:v Full and partial incremental backupsv Selective backupv Logical volume backupv Archivev Automatic migration from an HSM client (Tivoli Space Manager)
Incremental BackupBackup-archive clients can choose to back up their files using full or partialincremental backup. A full incremental backup ensures that clients’ backed-up filesare always managed according to policies. Clients should use full incrementalbackup whenever possible.
If the amount of time for backup is limited, clients may sometimes need to usepartial incremental backup. A partial incremental backup should complete morequickly and require less memory. When a client uses partial incremental backup,only files that have changed since the last incremental backup are backed up.Attributes in the management class that would cause a file to be backed up whendoing a full incremental backup are ignored. For example, unchanged files are notbacked up even when they are assigned to a management class that specifiesabsolute mode and the minimum days between backups (frequency) has passed.
The server also does less processing for a partial incremental backup. For example,the server does not expire files or rebind management classes to files during apartial incremental backup.
If clients must use partial incremental backups, they should periodically performfull incremental backups to ensure that complete backups are done and backupfiles are stored according to policies. For example, clients can do partialincremental backups every night during the week, and a full incremental backupon the weekend.
Performing full incremental backups is important if clients want the ability torestore files to a specific time. Only a full incremental backup can detect whetherfiles have been deleted since the last backup. If full incremental backup is not doneoften enough, clients who restore to a specific time may find that many files thathad actually been deleted from the workstation get restored. As a result, a client’sfile system may run out of space during a restore process. See “Setting Policy toEnable Point-in-Time Restore for Clients” on page 340 for more information.
314 Tivoli Storage Manager for Windows: Administrator’s Guide

Full Incremental BackupWhen a user requests a full incremental backup, Tivoli Storage Manager performsthe following steps to determine eligibility:1. Checks each file against the user’s include-exclude list:v Files that are excluded are not eligible for backup.v If files are not excluded and a management class is specified with the
INCLUDE option, Tivoli Storage Manager uses that management class.v If files are not excluded but a management class is not specified with the
INCLUDE option, Tivoli Storage Manager uses the default managementclass.
v If no include-exclude list exists, all files in the client domain are eligible forbackup, and Tivoli Storage Manager uses the default management class.
2. Checks the management class of each included file:v If there is a backup copy group, the process continues with step 3.v If there is no backup copy group, the file is not eligible for backup.
3. Checks the mode, frequency, and serialization defined in the backup copy group.
Mode Specifies whether the file is backed up only if it has changed since thelast backup (modified) or whenever a backup is requested (absolute).
FrequencySpecifies the minimum number of days that must elapse betweenbackups.
Note: For Windows NT and Windows 2000 this attribute is ignoredduring a journal-based backup.
SerializationSpecifies how files are handled if they are modified while being backedup and what happens if modification occurs.
v If the mode is modified and the minimum number of days have elapsed sincethe file was last backed up, Tivoli Storage Manager determines if the file hasbeen changed since it was last backed up:– If the file has been changed and the serialization requirement is met, the
file is backed up.– If the file has not been changed, it is not backed up.
v If the mode is modified and the minimum number of days have not elapsedsince the file was last backed up, the file is not eligible for backup.
v If the mode is absolute, the minimum number of days have elapsed since thefile was last backed up, and the serialization requirement is met, the file isbacked up.
v If the mode is absolute and the minimum number of days have not elapsedsince the file was last backed up, the file is not eligible for backup.
Partial Incremental BackupWhen a user requests a partial incremental backup, Tivoli Storage Managerperforms the following steps to determine eligibility:1. Checks each file against the user’s include-exclude list:v Files that are excluded are not eligible for backup.v If files are not excluded and a management class is specified with the
INCLUDE option, Tivoli Storage Manager uses that management class.
Chapter 14. Implementing Policies for Client Data 315

v If files are not excluded but a management class is not specified with theINCLUDE option, Tivoli Storage Manager uses the default managementclass.
v If no include-exclude list exists, all files in the client domain are eligible forbackup, and Tivoli Storage Manager uses the default management class.
2. Checks the management class of each included file:v If there is a backup copy group, the process continues with step 3.v If there is no backup copy group, the file is not eligible for backup.
3. Checks the date and time of the last incremental backup by the client, and theserialization requirement defined in the backup copy group. (Serializationspecifies how files are handled if they are modified while being backed up andwhat happens if modification occurs.)v If the file has not changed since the last incremental backup, the file is not
backed up.v If the file has changed since the last incremental backup and the serialization
requirement is met, the file is backed up.
Selective BackupWhen a user requests a selective backup, Tivoli Storage Manager performs thefollowing steps to determine eligibility:1. Checks the file against any include or exclude statements contained in the user
include-exclude list:v Files that are not excluded are eligible for backup. If a management class is
specified with the INCLUDE option, Tivoli Storage Manager uses thatmanagement class.
v If no include-exclude list exists, the files selected are eligible for backup, andTivoli Storage Manager uses the default management class.
2. Checks the management class of each included file:v If the management class contains a backup copy group and the serialization
requirement is met, the file is backed up. Serialization specifies how files arehandled if they are modified while being backed up and what happens ifmodification occurs.
v If the management class does not contain a backup copy group, the file isnot eligible for backup.
An important characteristic of selective backup is that a file is backed up withoutregard for whether the file has changed. This result may not always be what youwant. For example, suppose a management class specifies to keep three backupversions of a file. If the client uses incremental backup, the file is backed up onlywhen it changes, and the three versions in storage will be at different levels. If theclient uses selective backup, the file is backed up regardless of whether it haschanged. If the client uses selective backup on the file three times withoutchanging the file, the three versions of the file in server storage are identical.Earlier, different versions are lost.
Logical Volume BackupWhen a user requests a logical volume backup, Tivoli Storage Manager performsthe following steps to determine eligibility:1. Checks the specification of the logical volume against any include or exclude
statements contained in the user include-exclude list:
316 Tivoli Storage Manager for Windows: Administrator’s Guide

v If no include-exclude list exists, the logical volumes selected are eligible forbackup, and Tivoli Storage Manager uses the default management class.
v Logical volumes that are not excluded are eligible for backup. If theinclude-exclude list has an INCLUDE option for the volume with amanagement class specified, Tivoli Storage Manager uses that managementclass. Otherwise, the default management class is used.
2. Checks the management class of each included logical volume:v If the management class contains a backup copy group and the logical
volume meets the serialization requirement, the logical volume is backed up.Serialization specifies how logical volumes are handled if they are modifiedwhile being backed up and what happens if modification occurs.
v If the management class does not contain a backup copy group, the logicalvolume is not eligible for backup.
ArchiveWhen a user requests the archiving of a file or a group of files, Tivoli StorageManager performs the following steps to determine eligibility:1. Checks the files against the user’s include-exclude list to see if any
management classes are specified:v Tivoli Storage Manager uses the default management class for files that are
not bound to a management class.v If no include-exclude list exists, Tivoli Storage Manager uses the default
management class unless the user specifies another management class. Seethe user’s guide for the appropriate client for details.
2. Checks the management class for each file to be archived.v If the management class contains an archive copy group and the serialization
requirement is met, the file is archived. Serialization specifies how files arehandled if they are modified while being archived and what happens ifmodification occurs.
v If the management class does not contain an archive copy group, the file isnot archived.
Note: If you need to frequently create archives for the same data, consider usinginstant archive (backup sets) instead. Frequent archive operations can createa large amount of metadata in the server database resulting in increaseddatabase growth and decreased performance for server operations such asexpiration. Frequently, you can achieve the same objectives with incrementalbackup or backup sets. Although the archive function is a powerful way tostore inactive data with fixed retention, it should not be used on a frequentand large scale basis as the primary backup method. For details on how togenerate backup sets see “Creating and Using Client Backup Sets” onpage 348.
Automatic Migration from a Client NodeA file is eligible for automatic migration from an HSM client if it meets all of thefollowing criteria:v It resides on a node on which the root user has added and activated hierarchical
storage management. It must also reside in a local file system to which the rootuser has added space management, and not in the root (/) or /tmp file system.
v It is not excluded from migration in the include-exclude list.v It meets management class requirements for migration:
Chapter 14. Implementing Policies for Client Data 317

– The file is not a character special file, a block special file, a FIFO special file(that is, a named pipe file) or a directory.
– The file is assigned to a management class that calls for space management.– The management class calls for automatic migration after a specified number
of days, and that time has elapsed.– A backup version of the file exists if the management class requires it.– The file is larger than the stub file that would replace it (plus one byte) or the
file system block size, whichever is larger.
How Client Migration Works with Backup and ArchiveAs an administrator, you can define a management class that specifies automaticmigration from the client under certain conditions. For example, if the file has notbeen accessed for at least 30 days and a backup version exists, the file is migrated.You can also define a management class that allows users to selectively migratewhether or not a backup version exists. Users can also choose to archive files thathave been migrated. Tivoli Storage Manager does the following:v If the file is backed up or archived to the server to which it was migrated, the
server copies the file from the migration storage pool to the backup or archivestorage pool. For a tape-to-tape operation, each storage pool must have a tapedrive.
v If the file is backed up or archived to a different server, Tivoli Storage Manageraccesses the file by using the migrate-on-close recall mode. The file resides onthe client node only until the server stores the backup version or the archivedcopy in a storage pool.
When a client restores a backup version of a migrated file, the server deletes themigrated copy of the file from server storage the next time reconciliation is run.
When a client archives a file that is migrated and does not specify that the file is tobe erased after it is archived, the migrated copy of the file remains in serverstorage. When a client archives a file that is migrated and specifies that the file isto be erased, the server deletes the migrated file from server storage the next timereconciliation is run.
Tivoli Storage Manager’s default management class specifies that a backup versionof a file must exist before the file is eligible for migration.
Creating Your Own Policies
Task Required Privilege Class
Define or copy a policy domain System
Update a policy domain over which youhave authority
Restricted policy
Define, update, or copy policy sets andmanagement classes in any policy domain
System or unrestricted policy
Define, update, or copy policy sets andmanagement classes in policy domains overwhich you have authority
Restricted policy
Define or update copy groups in any policydomain
System or unrestricted policy
318 Tivoli Storage Manager for Windows: Administrator’s Guide

Task Required Privilege Class
Define or update copy groups that belong topolicy domains over which you haveauthority
Restricted policy
Assign a default management class to anonactive policy set in any policy domain
System or unrestricted policy
Assign a default management class to anonactive policy set in policy domains overwhich you have authority
Restricted policy
Validate and activate policy sets in anypolicy domain
System or unrestricted policy
Validate and activate policy sets in policydomains over which you have authority
Restricted policy
Start inventory expiration processing System
You can create your own policies in one of two ways:v Define the parts of a policy and specify each attributev Copy existing policy parts and update only those attributes that you want to
change
The following table shows that an advantage of copying existing policy parts isthat some associated parts are copied in a single operation.
If you copy this... Then you create this...
Policy Domain A new policy domain with:
v A copy of each policy set from the original domain
v A copy of each management class in each original policy set
v A copy of each copy group in each original management class
Policy Set A new policy set in the same policy domain with:
v A copy of each management class in the original policy set
v A copy of each copy group in the original management class
Management Class A new management class in the same policy set and a copy of eachcopy group in the management class
Example: Sample Policy ObjectsFigure 51 on page 320 shows the policies for an engineering department. Thisexample is used throughout the rest of this chapter.
The domain contains two policy sets that are named STANDARD and TEST. Theadministrator activated the policy set that is named STANDARD. When youactivate a policy set, the server makes a copy of the policy set and names itACTIVE. Only one policy set can be active at a time.
The ACTIVE policy set contains two management classes: MCENG andSTANDARD. The default management class is STANDARD.
Chapter 14. Implementing Policies for Client Data 319
The sections that follow describe the tasks involved in creating new policies foryour installation. Do the tasks in the following order:
Tasks:
“Defining and Updating a Policy Domain”
“Defining and Updating a Policy Set” on page 321
“Defining and Updating a Management Class” on page 322
“Defining and Updating a Backup Copy Group” on page 323
“Defining and Updating an Archive Copy Group” on page 328
“Assigning a Default Management Class” on page 330
“Activating a Policy Set” on page 331
“Running Expiration Processing to Delete Expired Files” on page 333.
Defining and Updating a Policy DomainWhen you update or define a policy domain, you specify:
Backup Retention Grace PeriodSpecifies the number of days to retain an inactive backup version when theserver cannot rebind the file to an appropriate management class. Thebackup retention grace period protects backup versions from beingimmediately expired when the management class to which a file is boundno longer exists or no longer contains a backup copy group, and thedefault management class does not contain a backup copy group.
Backup versions of the file managed by the grace period are retained inserver storage only for the backup retention grace period. This period
Figure 51. An Example of Policy Objects Defined for an Engineering Department
320 Tivoli Storage Manager for Windows: Administrator’s Guide

starts from the day of the backup. For example, if the backup retentiongrace period for the STANDARD policy domain is used and set to 30 days,backup versions using the grace period expire in 30 days from the day ofthe backup.
Backup versions of the file continue to be managed by the grace periodunless one of the following occurs:v The client binds the file to a management class containing a backup
copy group and then backs up the filev A backup copy group is added to the file’s management classv A backup copy group is added to the default management class
Archive Retention Grace PeriodSpecifies the number of days to retain an archive copy when themanagement class for the file no longer contains an archive copy groupand the default management class does not contain an archive copy group.The retention grace period protects archive copies from being immediatelyexpired.
The archive copy of the file managed by the grace period is retained inserver storage for the number of days specified by the archive retentiongrace period. This period starts from the day on which the file is firstarchived. For example, if the archive retention grace period for the policydomain STANDARD is used, an archive copy expires 365 days from theday the file is first archived.
The archive copy of the file continues to be managed by the grace periodunless an archive copy group is added to the file’s management class or tothe default management class.
Example: Defining a Policy DomainTo create a new policy domain you can do one of the following:v Copy an existing policy domain and update the new domainv Define a new policy domain from scratch
Note: When you copy an existing domain, you also copy any associated policysets, management classes, and copy groups.
For example, to copy and update, follow this procedure:1. Copy the STANDARD policy domain to the ENGPOLDOM policy domain by
entering:copy domain standard engpoldom
ENGPOLDOM now contains the standard policy set, management class,backup copy group, and archive copy group.
2. Update the policy domain ENGPOLDOM so that the backup retention graceperiod is extended to 90 days and the archive retention grace period isextended to 2 years by entering:update domain engpoldom description='Engineering Policy Domain'backretention=90 archretention=730
Defining and Updating a Policy SetWhen you define or update a policy set, specify:
Policy domain nameNames the policy domain to which the policy set belongs
Chapter 14. Implementing Policies for Client Data 321

The policies in the new policy set do not take effect unless you make the new setthe ACTIVE policy set. See “Activating a Policy Set” on page 331.
Example: Defining a Policy SetAn administrator needs to develop new policies based on the existing STANDARDpolicy set. To create the TEST policy set in the ENGPOLDOM policy domain, theadministrator performs the following steps:1. Copy the STANDARD policy set and name the new policy set TEST:
copy policyset engpoldom standard test
Note: When you copy an existing policy set, you also copy any associatedmanagement classes and copy groups.
2. Update the description of the policy set named TEST:update policyset engpoldom testdescription='Policy set for testing'
Defining and Updating a Management ClassWhen you define or update a management class, specify:
Policy domain nameNames the policy domain to which the management class belongs.
Policy set nameNames the policy set to which the management class is assigned.
DescriptionDescribes the management class. A clear description can help users tochoose an appropriate management class for their use.
The following four parameters apply only to Tivoli Space Manager clients (HSMclients):
Whether space management is allowedSpecifies that the files are eligible for both automatic and selectivemigration, only selective migration, or no migration.
How frequently files can be migratedSpecifies the minimum number of days that must elapse since a file waslast accessed before it is eligible for automatic migration.
Whether backup is requiredSpecifies whether a backup version of a file must exist before the file canbe migrated.
Where migrated files are to be storedSpecifies the name of the storage pool in which migrated files are stored.Your choice could depend on factors such as:v The number of client nodes migrating to the storage pool. When many
user files are stored in the same storage pool, volume contention canoccur as users try to migrate files to or recall files from the storage pool.
v How quickly the files must be recalled. If users need immediate accessto migrated versions, you can specify a disk storage pool as thedestination.
Note: You cannot specify a copy storage pool as a destination.
322 Tivoli Storage Manager for Windows: Administrator’s Guide

Example: Define a New Management ClassCreate a new management class by following these steps:1. Define a new management class MCENG by entering:
define mgmtclass engpoldom standard mceng
2. Update the description of the MCENG management class by entering:update mgmtclass engpoldom standard mcengdescription='Engineering Management Class for Backup and Archive'
Defining and Updating a Backup Copy Group
Tasks:
“Where to Store Backed-Up Files”
“How to Handle Files That Are Modified During Backup”
“How Frequently Files Can Be Backed Up” on page 324
“How Many Backup Versions to Retain and For How Long” on page 325
Where to Store Backed-Up FilesSpecify a storage pool where the server initially stores the files associated with thisbackup copy group. This is called the destination. Your choice can depend onfactors such as the following:v Whether the server and the client nodes have access to shared devices on a
storage area network (SAN).v The number of client nodes backing up to the storage pool. When many user
files are stored in the same storage pool, volume contention can occur as userstry to back up to or restore files from the storage pool.
v How quickly the files must be restored. If users need immediate access tobackup versions, you may want to specify a disk storage pool as the destination.
Note: You cannot specify a copy storage pool.
How to Handle Files That Are Modified During BackupYou can use the SERIALIZATION attribute on the DEFINE COPYGROUPcommand to specify how files are handled if they are modified during a backup.This attribute can be one of four values: STATIC, SHRSTATIC (shared static),DYNAMIC, or SHRDYNAMIC (shared dynamic). The value you choose dependson how you want Tivoli Storage Manager to handle files that are modified whilethey are being backed up.
Do not back up files that are modified during the backupYou will want to prevent the server from backing up a file while it is beingmodified. Use one of the following values:
STATICSpecifies that Tivoli Storage Manager will attempt to back up thefile only once. If the file or directory is modified during a backup,the server does not back it up.
SHRSTATIC (Shared static)Specifies that if the file or directory is modified during a backup,the server retries the backup as many times as specified by theCHANGINGRETRIES option in the client options file. If the file ismodified during the last attempt, the file or directory is not backedup.
Chapter 14. Implementing Policies for Client Data 323

Back Up Files That Are Modified During the BackupSome files are in constant use, such as an error log. Consequently, thesefiles may never be backed up when serialization is set to STATIC orSHRSTATIC. To back up files that are modified during the backup, use oneof the following values:
DYNAMICSpecifies that a file or directory is backed up on the first attempt,even if the file or directory is modified during the backup.
SHRDYNAMIC (Shared dynamic)Specifies that if a file or directory is modified during a backup, theserver retries the backup as many times as specified by theCHANGINGRETRIES option in the client options file. The serverbacks up the file on the last attempt, even if the file or directory isbeing modified.
Attention:
v If a file is modified during backup and DYNAMIC or SHRDYNAMIC isspecified, then the backup may not contain all the changes and may notbe usuable. For example, the backup version may contain a truncatedrecord. Under some circumstances, it may be acceptable to capture adynamic or ″fuzzy″ backup of a file (the file was changed during thebackup). For example, a dynamic backup of an error log file that iscontinuously appended may be acceptable. However, a dynamic backupof a database file may not be acceptable, since restoring such a backupcould result in an unusable database. Carefully consider dynamicbackups of files as well as possible problems that may result fromrestoring potentially ″fuzzy″ backups.
v When certain users or processes open files, they may deny any otheraccess, including ″read″ access, to the files by any other user or process.When this happens, even with serialization set to DYNAMIC orSHRDYNAMIC, Tivoli Storage Manager will not be able to open the fileat all, so the server cannot back up the file.
How Frequently Files Can Be Backed UpYou can specify how frequently files can be backed up with two parameters:
FrequencyThe frequency is the minimum number of days that must elapse betweenfull incremental backups.
Note: For Windows NT and Windows 2000 this attribute is ignored duringa journal-based backup.
Mode The mode parameter specifies whether a file or directory must have beenmodified to be considered for backup during a full incremental backupprocess. Tivoli Storage Manager does not check this attribute when a userrequests a partial incremental backup, a selective backup for a file, or abackup of a logical volume. You can select from two modes:
ModifiedA file is considered for full incremental backup only if it haschanged since the last backup. A file is considered changed if anyof the following items is different:v Date on which the file was last modifiedv File sizev File owner
324 Tivoli Storage Manager for Windows: Administrator’s Guide

v File permissions
AbsoluteA file is considered for full incremental backup regardless ofwhether it has changed since the last backup.
The server considers both parameters to determine how frequently files can bebacked up. For example, if frequency is 3 and mode is Modified, a file or directoryis backed up only if it has been changed and if three days have passed since thelast backup. If frequency is 3 and mode is Absolute, a file or directory is backed upafter three days have passed whether or not the file has changed.
Use the Modified mode when you want to ensure that the server retains multiple,different backup versions. If you set the mode to Absolute, users may find that theyhave three identical backup versions, rather than three different backup versions.
Absolute mode can be useful for forcing a full backup. It can also be useful forensuring that extended attribute files are backed up, because TSM does not detectchanges if the size of the extended attribute file remains the same.
When you set the mode to Absolute, set the frequency to 0 if you want to ensurethat a file is backed up each time full incremental backups are scheduled for orinitiated by a client.
How Many Backup Versions to Retain and For How LongMultiple versions of files are useful when users continually update files andsometimes need to restore the original file from which they started. The mostcurrent backup version of a file is called the active version. All other versions arecalled inactive versions. You can specify the number of versions to keep by:v Directly specifying the number of versions
You specify the number of backup versions with two parameters:– Versions Data Exists (number of versions to keep when the data still exists on
the client node)– Versions Data Deleted (number of versions to keep when the data no longer
exists on the client node)v Specifying the number of days to keep each backup version
You specify the number of days to keep backup versions with two parameters:– Retain Extra Versions (how many days to keep inactive backup versions; the
days are counted from the day that the version became inactive)– Retain Only Versions (how many days to keep the last backup version of a
file that has been deleted)v Specifying a combination of the number of versions and the days to keep them
Use a combination of the four parameters: Versions Data Exists, Versions DataDeleted, Retain Extra Versions, and Retain Only Versions.
These parameters interact to determine the backup versions that the server retains.When the number of inactive backup versions exceeds the number of versionsallowed (Versions Data Exists and Versions Data Deleted), the oldest versionexpires and the server deletes the file from the database the next time expirationprocessing runs. How many inactive versions the server keeps is also related to theparameter for how long inactive versions are kept (Retain Extra Versions). Inactiveversions expire when the number of days that they have been inactive exceeds thevalue specified for retaining extra versions, even when the number of versions isnot exceeded.
Chapter 14. Implementing Policies for Client Data 325

Note: A base file is not eligible for expiration until all its dependent subfiles havebeen expired. For details, see “Enabling Clients to Use Subfile Backup” onpage 354.
For example, see Table 24 and Figure 52. A client node has backed up the fileREPORT.TXT four times in one month, from March 23 to April 23. The settings inthe backup copy group of the management class to which REPORT.TXT is bounddetermine how the server treats these backup versions. Table 25 shows someexamples of how different copy group settings would affect the versions. Theexamples show the effects as of April 24 (one day after the file was last backedup).
Table 24. Status of REPORT.TXT as of April 24
Version Date Created Days the Version Has BeenInactive
Active April 23 (not applicable)
Inactive 1 April 13 1 (since April 23)
Inactive 2 March 31 11 (since April 13)
Inactive 3 March 23 24 (since March 31)
Table 25. Effects of Backup Copy Group Policy on Backup Versions for REPORT.TXT as of April 24. One day afterthe file was last backed up.
VersionsData Exists
VersionsDataDeleted
Retain ExtraVersions
Retain OnlyVersion
Results
3 versions 2 versions 60 days 180 days Versions Data Exists and Retain Extra Versions control the expiration of theversions. The version created on March 23 is retained until the client nodebacks up the file again (creating a fourth inactive version), or until thatversion has been inactive for 60 days.
If the user deletes the REPORT.TXT file from the client node, the servernotes the deletion at the next full incremental backup of the client node.From that point, the Versions Data Deleted and Retain Only Versionparameters also have an effect. All versions are now inactive. Two of thefour versions expire immediately (the March 23 and March 31 versionsexpire). The April 13 version expires when it has been inactive for 60 days(on June 23). The server keeps the last remaining inactive version, the April23 version, for 180 days after it becomes inactive.
Figure 52. Active and Inactive Versions of REPORT.TXT
326 Tivoli Storage Manager for Windows: Administrator’s Guide

Table 25. Effects of Backup Copy Group Policy on Backup Versions for REPORT.TXT as of April 24 (continued). Oneday after the file was last backed up.
VersionsData Exists
VersionsDataDeleted
Retain ExtraVersions
Retain OnlyVersion
Results
NOLIMIT 2 versions 60 days 180 days Retain Extra Versions controls expiration of the versions. The inactiveversions (other than the last remaining version) are expired when theyhave been inactive for 60 days.
If the user deletes the REPORT.TXT file from the client node, the servernotes the deletion at the next full incremental backup of the client node.From that point, the Versions Data Deleted and Retain Only Versionparameters also have an effect. All versions are now inactive. Two of thefour versions expire immediately (the March 23 and March 31 versionsexpire) because only two versions are allowed. The April 13 version expireswhen it has been inactive for 60 days (on June 22). The server keeps thelast remaining inactive version, the April 23 version, for 180 days after itbecomes inactive.
NOLIMIT NOLIMIT 60 days 180 days Retain Extra Versions controls expiration of the versions. The server doesnot expire inactive versions based on the maximum number of backupcopies. The inactive versions (other than the last remaining version) areexpired when they have been inactive for 60 days.
If the user deletes the REPORT.TXT file from the client node, the servernotes the deletion at the next full incremental backup of the client node.From that point, the Retain Only Version parameter also has an effect. Allversions are now inactive. The three of four versions will expire after eachof them has been inactive for 60 days. The server keeps the last remaininginactive version, the April 23 version, for 180 days after it becomesinactive.
3 versions 2 versions NOLIMIT NOLIMIT Versions Data Exists controls the expiration of the versions until a userdeletes the file from the client node. The server does not expire inactiveversions based on age.
If the user deletes the REPORT.TXT file from the client node, the servernotes the deletion at the next full incremental backup of the client node.From that point, the Versions Data Deleted parameter controls expiration.All versions are now inactive. Two of the four versions expire immediately(the March 23 and March 31 versions expire) because only two versions areallowed. The server keeps the two remaining inactive versions indefinitely.
See Administrator’s Reference for details about the parameters. The following listgives some tips on using the NOLIMIT value:
Versions Data ExistsSetting the value to NOLIMIT may require increased storage, but thatvalue may be needed for some situations. For example, to enable clientnodes to restore files to a specific point in time, set the value for VersionsData Exists to NOLIMIT. Setting the value this high ensures that the serverretains versions according to the Retain Extra Versions parameter for thecopy group. See “Setting Policy to Enable Point-in-Time Restore forClients” on page 340 and “Policy for Logical Volume Backups” on page 336for more information.
Versions Data DeletedSetting the value to NOLIMIT may require increased storage, but thatvalue may be needed for some situations. For example, set the value forVersions Data Deleted to NOLIMIT to enable client nodes to restore files toa specific point in time. Setting the value this high ensures that the serverretains versions according to the Retain Extra Versions parameter for the
Chapter 14. Implementing Policies for Client Data 327

copy group. See “Setting Policy to Enable Point-in-Time Restore forClients” on page 340 and “Policy for Logical Volume Backups” on page 336for more information.
Retain Extra Versions
If NOLIMIT is specified, inactive backup versions are deleted based on theVersions Data Exists or Versions Data Deleted parameters.
To enable client nodes to restore files to a specific point in time, set theparameters Versions Data Exists or Versions Data Deleted to NOLIMIT. Setthe value for Retain Extra Versions to the number of days that you expectclients may need versions of files available for possible point-in-timerestoration. For example, to enable clients to restore files from a point intime 60 days in the past, set Retain Extra Versions to 60. See “Setting Policyto Enable Point-in-Time Restore for Clients” on page 340 for moreinformation.
Retain Only Version
If NOLIMIT is specified, the last version is retained forever unless a useror administrator deletes the file from server storage.
Example: Define a Backup Copy GroupDefine a backup copy group belonging to the MCENG management class in theSTANDARD policy set belonging to the ENGPOLDOM policy domain. This newcopy group must do the following:v Let users back up changed files, regardless of how much time has elapsed since
the last backup, using the default value 0 for the Frequency parameter(frequency parameter not specified)
v Retain up to four inactive backup versions when the original file resides on theuser workstation, using the Versions Data Exists parameter (verexists=5)
v Retain up to four inactive backup versions when the original file is deleted fromthe user workstation, using the Versions Data Deleted parameter (verdeleted=4)
v Retain inactive backup versions for no more than 90 days, using the Retain ExtraVersions parameter (retextra=90)
v If there is only one backup version, retain it for 600 days after the original isdeleted from the workstation, using the Retain Only Version parameter(retonly=600)
v Prevent files from being backed up if they are in use, using the Serializationparameter (serialization=static)
v Store files in the ENGBACK1 storage pool, using the Destination parameter(destination=engback1)
To define the backup copy group, enter:define copygroup engpoldom standard mceng standarddestination=engback1 serialization=staticverexists=5 verdeleted=4 retextra=90 retonly=600
Defining and Updating an Archive Copy GroupTo define or update an archive copy group on the Web interface or command line,specify:
Where archived files are to be storedSpecify a defined storage pool as the initial destination. Your choice candepend on factors such as:
328 Tivoli Storage Manager for Windows: Administrator’s Guide

v Whether the server and the client nodes have access to shared deviceson a SAN
v The number of client nodes archiving files to the storage pool. Whenmany user files are stored in the same storage pool, volume contentioncan occur as users archive files to and retrieve files from the storagepool.
v How quickly the files must be restored. If users need immediate accessto archive copies, you could specify a disk storage pool as thedestination.
v Whether the archive copy group is for a management class that is thedefault for a policy domain. The default management class is used byclients registered in the policy domain, when they do not specify amanagement class for a file. This includes servers that are registered asclients to this server. See “Using Virtual Volumes to Store Data onAnother Server” on page 501 for information about registering servers asclients to another server.
Note: You cannot specify a copy storage pool as a destination.
If files can be modified during archiveSpecify how files are handled if they are modified while being archived.This attribute, called serialization, can be one of four values:
Static Specifies that if the file is modified during an archiving process,the server does not archive it. Tivoli Storage Manager does notretry the archive.
Shared StaticSpecifies that if the file is modified during an archive process, theserver does not archive it. However, Tivoli Storage Manager retriesthe archive process as many times as specified by theCHANGINGRETRIES option in the client options file.
DynamicSpecifies that a file is archived on the first attempt, even if the fileis being modified during the archive process.
Shared DynamicSpecifies that if the file is modified during the archive attempt, theserver archives it on its last try even if the file is being modified.Tivoli Storage Manager retries the archive process as many timesas specified by the CHANGINGRETRIES option in the clientoptions file.
For most files, set serialization to either static or shared static to preventthe server from archiving a file while it is being modified.
However, you may want to define a copy group with a serialization ofshared dynamic or dynamic for files where log records are continuouslyadded, such as an error log. If you only have copy groups that use static orshared static, these files may never be archived because they are constantlyin use. With shared dynamic or dynamic, the log files are archived.However, the archive copy may contain a truncated message.
Attention: If a file is archived while it is in use (shared dynamic ordynamic serialization), the copy may not contain all the changes and maynot be usable.
Chapter 14. Implementing Policies for Client Data 329

Note: When certain users or processes open files, they deny read access tothe files for any other user or process. When this happens, evenwith serialization set to dynamic or shared dynamic, the server doesnot back up the file.
How long to retain an archived copySpecifies the number of days to retain an archived copy in storage. Whenthe time elapses, the archived copy expires and the server deletes the filethe next time expiration processing runs.
When a user archives directories, the server uses the default managementclass unless the user specifies otherwise. If the default management classdoes not have an archive copy group, the server binds the directory to themanagement class that currently has the shortest retention time for archive.When you change the retention time for an archive copy group, you mayalso be changing the retention time for any directories that were archivedusing that copy group.
The user can change the archive characteristics by using Archive Optionsin the interface or by using the ARCHMC option on the command.
Example: Define an Archive Copy GroupDefine an archive copy group belonging to the MCENG class that:v Allows users to archive a file if it is not in use (serialization=static)v Retains the archive copy for 730 days (retver=730)v Stores files in the ENGARCH1 storage pool (destination=engarch1)
To define a STANDARD archive copy group to the MCENG management class inthe STANDARD policy set belonging to the ENGPOLDOM policy domain, enter:define copygroup engpoldom standard mceng standardtype=archive destination=engarch1 serialization=staticretver=730
Assigning a Default Management ClassAfter you have defined a policy set and the management classes that it contains,you must assign a default management class for the policy set. See “DefaultManagement Classes” on page 310 for suggestions about the content of defaultmanagement classes.
Example: Assign a Default Management ClassTo assign the STANDARD management class as the default management class forthe TEST policy set in the ENGPOLDOM policy domain, enter:assign defmgmtclass engpoldom standard standard
The STANDARD management class was copied from the STANDARD policy set tothe TEST policy set (see “Example: Defining a Policy Set” on page 322). Before thenew default management class takes effect, you must activate the policy set.
Validating and Activating a Policy SetAfter you have defined a policy set and defined management classes to it, you canvalidate the policy set and activate the policy set for the policy domain. Only onepolicy set is active in a policy domain.
Validating a Policy SetWhen you validate a policy set, the server examines the management class andcopy group definitions in the policy set and reports on conditions that need to beconsidered if the policy set is activated.
330 Tivoli Storage Manager for Windows: Administrator’s Guide

Validation fails if the policy set does not contain a default management class.Validation results in result in warning messages if any of the following conditionsexist.
Condition Reason for warning
The storage destinations specified forbackup, archive, or migration do not refer todefined storage pools.
A backup, archive, or migration operationwill fail when the operation involves storinga file in a storage pool that does not exist.
A storage destination specified for backup,archive, or migration is a copy storage pool.
The storage destination must be a primarystorage pool.
The default management class does notcontain a backup or archive copy group.
When the default management class does notcontain a backup or archive copy group, anyuser files bound to the default managementclass are not backed up or archived.
The current ACTIVE policy set names amanagement class that is not defined in thepolicy set being validated.
When users back up files that were bound toa management class that no longer exists inthe active policy set, backup versions arerebound to the default management class.See “How Files and Directories AreAssociated with a Management Class” onpage 312 for details.
When the management class to which anarchive copy is bound no longer exists andthe default management class does notcontain an archive copy group, the archiveretention grace period is used to retain thearchive copy. See “Defining and Updating aPolicy Domain” on page 320 for details.
The current ACTIVE policy set contains copygroups that are not defined in the policy setbeing validated.
When users perform a backup and thebackup copy group no longer exists in themanagement class to which a file is bound,backup versions are managed by the defaultmanagement class. If the defaultmanagement class does not contain a backupcopy group, backup versions are managed bythe backup retention grace period, and theworkstation file is not backed up. See“Defining and Updating a Policy Domain”on page 320
A management class specifies that a backupversion must exist before a file can bemigrated from a client node, but themanagement class does not contain a backupcopy group.
The contradictions within the managementclasses can cause problems for HSM users.
Activating a Policy SetTo activate a policy set, specify a policy domain and policy set name. When youactivate a policy set, the server:v Performs a final validation of the contents of the policy setv Copies the original policy set to the ACTIVE policy set
You cannot update the ACTIVE policy set; the original and the ACTIVE policy setsare two separate objects. For example, updating the original policy set has no effecton the ACTIVE policy set. To change the contents of the ACTIVE policy set, youmust create or change another policy set and then activate that policy set. See“Changing Policy” on page 302 for details.
Chapter 14. Implementing Policies for Client Data 331

Example: Validating and Activating a Policy SetValidating and activating the STANDARD policy set in the ENGPOLDOM policydomain is a two-step process:1. To validate the STANDARD policy set, enter:
validate policyset engpoldom standard
Examine any messages that result and correct the problems.2. To activate the STANDARD policy set, enter:
activate policyset engpoldom standard
Assigning Client Nodes to a Policy DomainYou may use the TSM Console or the server command line to assign client nodesto a policy domain. To use the TSM Console, do the following:1. Double-click the desktop icon for the TSM Console.2. Expand the tree until the TSM server you want to work with is displayed.
Expand the server and click Wizards. The Wizards list appears in the rightpane.
3. Select the Client Node Configuration wizard and click Start. The Client NodeConfiguration Wizard appears.
4. Progress through the wizard to the Define TSM client nodes and policy panel.5. Assign client nodes to a policy domain in one of the following ways:v Select a client node and click Edit. The Properties dialog apears. Select a
policy domain from the drop-down list. To create a policy domain, clickNew.
v To create new client nodes, click the Add Node button. The Properties dialogappears. Enter the required node information, and select a policy domainfrom the drop-down list.
6. Finish the wizard.
The following figure shows an example of the Properties dialog:
332 Tivoli Storage Manager for Windows: Administrator’s Guide
At the server command line or the administrative Web interface, you can assignexisting client nodes to a new policy domain, or create new client nodes to beassociated with an existing policy domain.
For example, to assign the client node APPCLIENT1 to the ENGPOLDOM policydomain, enter the following command:update node appclient1 domain=engpoldom
To create a new client node, NEWUSER, and assign it to the ENGPOLDOM policydomain, enter the following command:register node newuser newuser domain=engpoldom
Running Expiration Processing to Delete Expired FilesExpiration processing deletes expired client files from the server storage. Expirationprocessing also removes from the database any restartable restore sessions thatexceed the time limit for saving such sessions.
You can run expiration processing either automatically or by command. Youshould ensure that expiration processing runs periodically to allow the server toreuse storage pool space that is occupied by expired client files.
Figure 53. Add TSM Nodes with Policy Information
Chapter 14. Implementing Policies for Client Data 333

Note: A base file is not eligible for expiration until all of its dependent subfileshave been expired. For details, see “Expiration Processing of Base Files andSubfiles” on page 356.
Running Expiration Processing AutomaticallyYou control automatic expiration processing by using the expiration interval option(EXPINTERVAL) in the server options file (dsmserv.opt). You can also controlwhen restartable restore sessions expire with another server option,RESTOREINTERVAL. You can set the options by using the server options editor(available in the TSM Console) or by editing the dsmserv.opt file (seeAdministrator’s Reference).
If you use the server options file to control automatic expiration, the server runsexpiration processing each time you start the server. After that, the server runsexpiration processing at the interval you specified with the option, measured fromthe start time of the server.
Using Commands and Scheduling to Control ExpirationProcessing
You can manually start expiration processing by issuing the following command:expire inventory
Expiration processing then deletes expired files from the database. You canschedule this command by using the DEFINE SCHEDULE command. If youschedule the EXPIRE INVENTORY command, set the expiration interval to 0 (zero)in the server options so that the server does not run expiration processing whenyou start the server.
You can control how long the expiration process runs by using the DURATIONparameter with the EXPIRE INVENTORY command.
When expiration processing runs, the server normally sends detailed messagesabout policy changes made since the last time expiration processing ran. You canreduce those messages by checking the Use Quiet Expiration option in the serveroptions, or using the QUIET=YES parameter with the EXPIRE INVENTORYcommand. When you use the quiet option or parameter, the server issues messagesabout policy changes during expiration processing only when files are deleted, andeither the default management class or retention grace period for the domain hasbeen used to expire the files.
Additional Expiration Processing with Tivoli Disaster RecoveryManager
If you have Tivoli Disaster Recovery Manager (DRM), one or more databasebackup volumes may also be deleted during expiration processing if the followingconditions are true:v The volume has a device type of SERVERv The volume is not part of the most recent database backup seriesv The last volume of the database backup series has exceeded the expiration value
specified with the SET DRMDBBACKUPEXPIREDAYS command
See “Moving Backup Volumes Onsite” on page 597 for more information.
334 Tivoli Storage Manager for Windows: Administrator’s Guide

Configuring Policy for Specific CasesThis section includes recommendations for some cases for which policy changesmay be needed.v “Configuring Policy for Direct-to-Tape Backups”v “Configuring Policy for Tivoli Data Protection Application Clients” on page 336v “Policy for Logical Volume Backups” on page 336v “Configuring Policy for Managed System for SAN” on page 338v “Policy for Tivoli Storage Manager Servers as Clients” on page 340v “Setting Policy to Enable Point-in-Time Restore for Clients” on page 340
Configuring Policy for Direct-to-Tape BackupsThe server default policy enables client nodes to back up data to disk storage poolson the server. As an alternative, you may configure a policy to store client datadirectly in tape storage pools to reduce contention for disk resources. If you backup directly to tape, the number of clients that can back up data at the same time isequal to the number of drives available to the storage pool (through the mountlimit of the device class). For example, if you have one drive, only one client at atime can back up data.
The direct-to-tape backup eliminates the need to migrate data from disk to tape.However, performance of tape drives is often lower when backing up directly totape than when backing up to disk and then migrating to tape. Backing up datadirectly to tape usually means more starting and stopping of the tape drive.Backing up to disk then migrating to tape usually means the tape drive movesmore continuously, meaning better performance.
You may complete this task by using the Client Node Configuration Wizard in theTSM Console, or by using the server command line. To use the TSM Console, dothe following:1. Double-click the desktop icon for the TSM Console.2. Expand the tree until the TSM server you want to work with is displayed.
Expand the server and click Wizards. The Wizards list appears in the rightpane.
3. Select the Client Node Configuration wizard and click Start. The Client NodeConfiguration Wizard appears.
4. Progress through the wizard to the Define TSM client nodes and policy panel.5. By default, client nodes are associated with BACKUPPOOL. This storage pool
is set to immediately migrate any data it receives. Drag BACKUPPOOL anddrop it on a tape storage pool.
Note: You can also select a client, click Edit, and click New, to create a newpolicy domain that will send client data directly to any storage pool.
6. Finish the wizard.
At the server command line, you may define a new policy domain that enablesclient nodes to back up or archive data directly to tape storage pools. For example,you may define a policy domain named DIR2TAPE with the following steps:1. Copy the default policy domain STANDARD as a template:
copy domain standard dir2tape
Chapter 14. Implementing Policies for Client Data 335

This command creates the DIR2TAPE policy domain that contains a defaultpolicy set, management class, backup and archive copy group, each namedSTANDARD.
2. Update the backup or archive copy group in the DIR2TAPE policy domain tospecify the destination to be a tape storage pool. For example, to use a tapestorage pool named TAPEPOOL for backup, enter the following command:update copygroup dir2tape standard standard destination=tapepool
To use a tape storage pool named TAPEPOOL for archive, enter the followingcommand:update copygroup dir2tape standard standard type=archivedestination=tapepool
3. Activate the changed policy set.activate policyset dir2tape standard
4. Assign client nodes to the DIR2TAPE policy domain. For example, to assign aclient node named TAPEUSER1 to the DIR2TAPE policy domain, enter thefollowing command:update node tapeuser1 domain=dir2tape
Configuring Policy for Tivoli Data Protection ApplicationClients
The Tivoli Data Protection application clients using the server to store data mayrequire that you configure policy to make the most efficient use of server storage.See the user’s guide for each application client for policy requirements.
Some of the application clients include a time stamp in each database backup.Because the default policy for the server keeps one backup version of each uniquefile, database backups managed by default policy are never deleted because eachbackup is uniquely named with its time stamp. To ensure that the server deletesbackups as required, configure policy as recommended in the user’s guide for theapplication client.
Policy for Logical Volume BackupsConsider defining a management class specifically for logical volume backups. Toenable clients to restore a logical volume and then reconcile the results of any filebackup operations since the logical volume backup was made, you must set upmanagement classes with the backup copy group set up differently from theSTANDARD. The Versions Data Exists, Versions Data Deleted, and Retain ExtraVersions parameters work together to determine over what time period a client canrestore a logical volume image and reconcile later file backups. Also, you may haveserver storage constraints that require you to control the number of backupversions allowed for logical volumes.
Backups of logical volumes are intended to help speed the restoration of amachine. One way to use the capability is to have users periodically (for example,once a month) perform a logical volume backup, and schedule daily fullincremental backups. If a user restores a logical volume, the program first restoresthe logical volume backup and then any files that were changed since the backup(incremental or other file backup processes). The user can also specify that therestore process reconcile any discrepancies that can result when files are deleted.
For example, a user backs up a logical volume, and the following week deletes oneor more files from the volume. At the next incremental backup, the server records
336 Tivoli Storage Manager for Windows: Administrator’s Guide

in its database that the files were deleted from the client. When the user restoresthe logical volume, the program can recognize that files have been deleted sincethe backup was created. The program can delete the files as part of the restoreprocess. To ensure that users can use the capability to reconcile later incrementalbackups with a restored logical volume, you need to ensure that you coordinatepolicy for incremental backups with policy for backups for logical volumes.
For example, you decide to ensure that clients can choose to restore files andlogical volumes from any time in the previous 60 days. You can create twomanagement classes, one for files and one for logical volumes. Table 26 shows therelevant parameters. In the backup copy group of both management classes, set theRetain Extra Versions parameter to 60 days.
In the management class for files, set the parameters so that the server keepsversions based on age rather than how many versions exist. More than one backupversion of a file may be stored per day if clients perform selective backups or ifclients perform incremental backups more than once a day. The Versions DataExists parameter and the Versions Data Deleted parameter control how many ofthese versions are kept by the server. To ensure that any number of backupversions are kept for the required 60 days, set both the Versions Data Existsparameter and the Versions Data Deleted parameter to NOLIMIT for themanagement class for files. This means that the server retains backup versionsbased on how old the versions are, instead of how many backup versions of thesame file exist.
For logical volume backups, the server ignores the frequency attribute in thebackup copy group.
Table 26. Example of Backup Policy for Files and Logical Volumes
Parameter (backup copygroup in the managementclass)
Management Class for Files Management Class forLogical Volumes
Versions Data Exists NOLIMIT 3 versions
Versions Data Deleted NOLIMIT 1
Retain Extra Versions 60 days 60 days
Retain Only Version 120 days 120 days
Configuring Policy for Tivoli Data Protection for NDMPWith the Tivoli Data Protection for NDMP product, you can register a NAS fileserver as a node. Under the direction of the Tivoli Storage Manager server, theNAS file server performs backup and restore of file system images to a tapelibrary. The TSM server initiates the backup, allocates a drive, and selects andmounts the media. The NAS file server then transfers the data to tape.
Because the NAS file server performs the backup, the data is stored in its ownformat. For Network Appliance file servers, the data is stored in theNETAPPDUMP data format. To manage NAS file server image backups, copygroups for NAS nodes must point to a storage pool that has a data format ofNETAPPDUMP. To set up the required policy for NAS nodes, you can define anew, separate policy domain. See “Chapter 6. Setting Up Tivoli Data Protection forNDMP” on page 93 for details. The following backup copy group attributes areignored for NAS images:v Frequency
Chapter 14. Implementing Policies for Client Data 337

v Modev Retain Only Versionsv Serializationv Versions Data Deleted
Backups for NAS nodes can be initiated from the server, or from a client that hasauthority over the NAS node. For client-initiated backups, you can use clientoption sets that contain include and exclude statements to bind NAS file systemimages to a specific management class. The valid options that can be used for aNAS node are: include.fs.nas, exclude.fs.nas, and domain.nas. For details on theoptions see the Backup-Archive Installation and User’s Guide for your particular clientplatform. For more information about client option sets see “Creating ClientOption Sets from the Server” on page 281.
Configuring Policy for Managed System for SANWith the Managed System for SAN feature, you can set up a SAN configuration inwhich a client directly accesses a storage device to read or write data. SAN datatransfer requires setup on the server and on the client, and the installation of astorage agent on the client machine. The storage agent transfers data between theclient and the storage device. See TSM Managed System for SAN Storage Agent User’sGuide for details. See the Web site for details on clients that support the feature:http://www.tivoli.com/support/storage_mgr/tivolimain.html.
One task in configuring your systems to use this feature is to set up policy for theclients. Copy groups for these clients must point to the storage pool that isassociated with the SAN devices. (“Configuring Tivoli Storage Manager forLAN-free Data Movement” on page 87 describes how to configure the devices anddefine the storage pool.) Clients for which you have mapped the SAN drives inthis storage pool can then use the SAN to send data directly to the device forbackup, archive, restore, and retrieve.
To set up the required policy, either define a new, separate policy domain, ordefine a new management class in an existing policy domain:v “Define a New Policy Domain” on page 338v “Define a New Management Class in an Existing Policy Domain” on page 339
Define a New Policy DomainOne way to configure policy for clients is to define a separate policy domain inwhich the active policy set has a default management class with the requiredsettings. Then register all clients using SAN data transfer to that domain. Do thefollowing:1. Create the policy domain for the clients. For example, to define a policy
domain that is named SANCLIENTS, enter the following command:define domain sanclientsdescription='Policy domain for clients using SAN devices'
2. Create a policy set in that domain. For example, to define the policy set that isnamed BASE in the SANCLIENTS policy domain, enter the followingcommand:define policyset sanclients base
3. Create the default management class for the policy set. First define themanagement class, then assign the management class as the default for thepolicy set.For example, to define the management class that is named SANCLIENTMC,enter the following command:
338 Tivoli Storage Manager for Windows: Administrator’s Guide

define mgmtclass sanclients base sanclientmc
Then assign the new management class as the default:assign defmgmtclass sanclients base sanclientmc
4. Define the backup copy group in the default management class, as follows:v Specify the DESTINATION, the name of the storage pool that is associated
with the SAN devices on the server.The storage pool must already be set up. The storage pool must point to adevice class that is associated with the library for the SAN devices. See“Configuring Tivoli Storage Manager for LAN-free Data Movement” onpage 87 for details.
v Accept the default settings for all remaining parameters.
For example, to define the backup copy group for the SANCLIENTMCmanagement class, enter the following command:define copygroup sanclients base sanclientmc standard destination=sanpool
5. Define the archive copy group in the default management class, as follows:v Specify the DESTINATION, the name of the storage pool that is associated
with the SAN devices on the server.The storage pool must already be set up. The storage pool must point to adevice class that is associated with the library for the SAN devices. See“Configuring Tivoli Storage Manager for LAN-free Data Movement” onpage 87 for details.
v Accept the default settings for all remaining parameters.
For example, to define the archive copy group for the SANCLIENTMCmanagement class, enter the following command:define copygroup sanclients base sanclientmc standardtype=archive destination=sanpool
6. Activate the policy set.For example, to activate the BASE policy set in the SANCLIENTS policydomain, enter the following command:activate policyset sanclients base
7. Register or update the application clients to associate them with the new policydomain.For example, to update the node SANCLIENT1, enter the following command:update node sanclient1 domain=sanclients
Define a New Management Class in an Existing Policy DomainIf you choose not to define a separate policy domain with the appropriatemanagement class as the default, you must define a new management class withinan existing policy domain and activate the policy set. Because the newmanagement class is not the default for the policy domain, you must add aninclude statement to each client options file to bind objects to that managementclass.
For example, suppose sanclientmc is the name of the management class that youdefined for clients that are using devices on a SAN. You want the client to be ableto use the SAN for backing up any file on the c drive. Put the following line at theend of the client’s include-exclude list:include c:* sanclientmc
Chapter 14. Implementing Policies for Client Data 339

For details on the include-exclude list, see Backup-Archive Installation and User’sGuide.
Policy for Tivoli Storage Manager Servers as ClientsOne server (a source server) can be registered as a client to another server (thetarget server). Data stored by the source server appears as archived files on thetarget server. The source server is registered to a policy domain on the targetserver, and uses the default management class for that policy domain. In thedefault management class, the destination for the archive copy group determineswhere the target server stores data for the source server. Other policyspecifications, such as how long to retain the data, do not apply to data stored fora source server. See “Using Virtual Volumes to Store Data on Another Server” onpage 501 for more information.
Setting Policy to Enable Point-in-Time Restore for ClientsTo enable clients to restore backed-up files to a specific point in time, you must setup the backup copy group differently from the STANDARD. The Versions DataExists, Versions Data Deleted, and Retain Extra Versions parameters work togetherto determine over what time period a client can perform a point-in-time restoreoperation.
For example, you decide to ensure that clients can choose to restore files fromanytime in the previous 60 days. In the backup copy group, set the Retain ExtraVersions parameter to 60 days. More than one backup version of a file may bestored per day if clients perform selective backups or if clients perform incrementalbackups more than once a day. The Versions Data Exists parameter and theVersions Data Deleted parameter control how many of these versions are kept bythe server. To ensure that any number of backup versions are kept for the required60 days, set both the Versions Data Exists parameter and the Versions Data Deletedparameter to NOLIMIT. This means that the server essentially determines thebackup versions to keep based on how old the versions are, instead of how manybackup versions of the same file exist.
Keeping backed-up versions of files long enough to allow clients to restore theirdata to a point in time can mean increased resource costs. Requirements for serverstorage increase because more file versions are kept, and the size of the serverdatabase increases to track all of the file versions. Because of these increased costs,you may want to choose carefully which clients can use the policy that allows forpoint-in-time restore operations.
Clients need to run full incremental backup operations frequently enough so thatTivoli Storage Manager can detect files that have been deleted on the client filesystem. Only a full incremental backup can detect whether files have been deletedsince the last backup. If full incremental backup is not done often enough, clientswho restore to a specific time may find that many files that had actually beendeleted from the workstation get restored. As a result, a client’s file system mayrun out of space during a restore process.
340 Tivoli Storage Manager for Windows: Administrator’s Guide

Distributing Policy Using Enterprise Configuration
If you set up one TSM server as a configuration manager, you can distribute policyto other TSM servers. To distribute policy, you associate a policy domain with aprofile. Managed servers that subscribe to the profile then receive the followingdefinitions:v The policy domain itselfv Policy sets in that domain, except for the ACTIVE policy setv Management classes in the policy setsv Backup and archive copy groups in the management classesv Client schedules associated with the policy domain
The names of client nodes and client-schedule associations are not distributed. TheACTIVE policy set is also not distributed.
The distributed policy becomes managed objects (policy domain, policy sets,management classes, and so on) defined in the database of each managed server.To use the managed policy, you must activate a policy set on each managed server.If storage pools specified as destinations in the policy do not exist on the managedserver, you receive messages pointing out the problem when you activate thepolicy set. You can create new storage pools to match the names in the policy set,or you can rename existing storage pools.
On the managed server you also must associate client nodes with the managedpolicy domain and associate client nodes with schedules.
See “Setting Up an Enterprise Configuration” on page 475 for details.
Querying Policy
Task Required Privilege Class
Query any policy domain, policy set,management class, or copy group
Any administrator
You can request information about the contents of policy objects. You might wantto do this before creating new objects or when helping users to choose policies thatfit their needs.
You can specify the output of a query in either standard or detailed format. Theexamples in this section are in standard format.
On a managed server, you can see whether the definitions are managed objects.Request the detailed format in the query and check the contents of the Last updateby (administrator) field. For managed objects, this field contains the string$$CONFIG_MANAGER$$.
Querying Copy GroupsTo request information about backup copy groups (the default) in theENGPOLDOM engineering policy domain, enter:query copygroup engpoldom * *
Chapter 14. Implementing Policies for Client Data 341

The following shows the output from the query. It shows that the ACTIVE policyset contains two backup copy groups that belong to the MCENG and STANDARDmanagement classes.
To request information about archive copy groups in the ENGPOLDOMengineering policy domain, enter:query copygroup engpoldom * type=archive
The following shows the output from the query.
Querying Management ClassesTo request information about management classes in the ENGPOLDOMengineering policy domain, enter:query mgmtclass engpoldom * *
The following figure is the output from the query. It shows that the ACTIVE policyset contains the MCENG and STANDARD management classes.
Querying Policy SetsTo request information about policy sets in the ENGPOLDOM engineering policydomain, enter:
Policy Policy Mgmt Copy Versions Versions Retain RetainDomain Set Name Class Group Data Data Extra OnlyName Name Name Exists Deleted Versions Version--------- --------- --------- -------- -------- -------- -------- -------ENGPOLDOM ACTIVE MCENG STANDARD 5 4 90 600ENGPOLDOM ACTIVE STANDARD STANDARD 2 1 30 60ENGPOLDOM STANDARD MCENG STANDARD 5 4 90 600ENGPOLDOM STANDARD STANDARD STANDARD 2 1 30 60ENGPOLDOM TEST STANDARD STANDARD 2 1 30 60
Policy Policy Mgmt Copy RetainDomain Set Name Class Group VersionName Name Name--------- --------- --------- --------- --------ENGPOLDOM ACTIVE MCENG STANDARD 730ENGPOLDOM ACTIVE STANDARD STANDARD 365ENGPOLDOM STANDARD MCENG STANDARD 730ENGPOLDOM STANDARD STANDARD STANDARD 365ENGPOLDOM TEST STANDARD STANDARD 365
Policy Policy Mgmt Default DescriptionDomain Set Name Class MgmtName Name Class ?--------- --------- --------- --------- ------------------------ENGPOLDOM ACTIVE MCENG No Engineering Management
Class with Backup andArchive Copy Groups
ENGPOLDOM ACTIVE STANDARD Yes Installed defaultmanagement class
ENGPOLDOM STANDARD MCENG No Engineering ManagementClass with Backup andArchive Copy Groups
ENGPOLDOM STANDARD STANDARD Yes Installed defaultmanagement class
ENGPOLDOM TEST STANDARD Yes Installed defaultmanagement class
342 Tivoli Storage Manager for Windows: Administrator’s Guide
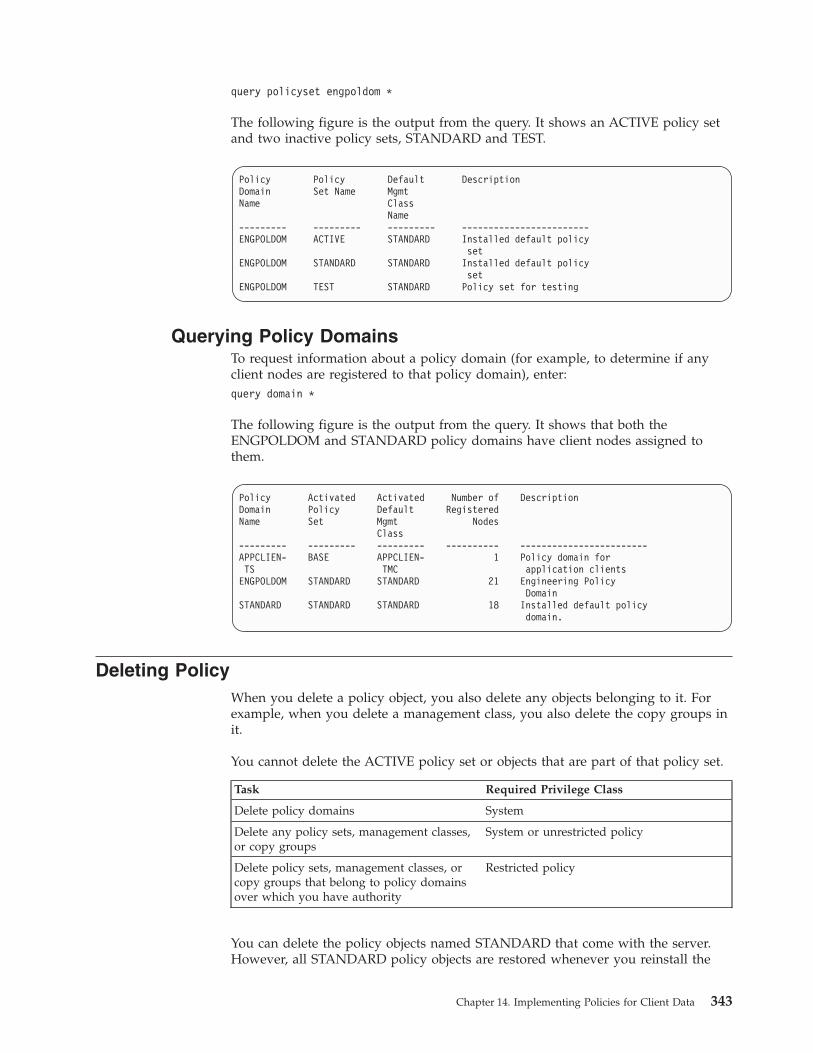
query policyset engpoldom *
The following figure is the output from the query. It shows an ACTIVE policy setand two inactive policy sets, STANDARD and TEST.
Querying Policy DomainsTo request information about a policy domain (for example, to determine if anyclient nodes are registered to that policy domain), enter:query domain *
The following figure is the output from the query. It shows that both theENGPOLDOM and STANDARD policy domains have client nodes assigned tothem.
Deleting PolicyWhen you delete a policy object, you also delete any objects belonging to it. Forexample, when you delete a management class, you also delete the copy groups init.
You cannot delete the ACTIVE policy set or objects that are part of that policy set.
Task Required Privilege Class
Delete policy domains System
Delete any policy sets, management classes,or copy groups
System or unrestricted policy
Delete policy sets, management classes, orcopy groups that belong to policy domainsover which you have authority
Restricted policy
You can delete the policy objects named STANDARD that come with the server.However, all STANDARD policy objects are restored whenever you reinstall the
Policy Policy Default DescriptionDomain Set Name MgmtName Class
Name--------- --------- --------- ------------------------ENGPOLDOM ACTIVE STANDARD Installed default policy
setENGPOLDOM STANDARD STANDARD Installed default policy
setENGPOLDOM TEST STANDARD Policy set for testing
Policy Activated Activated Number of DescriptionDomain Policy Default RegisteredName Set Mgmt Nodes
Class--------- --------- --------- ---------- ------------------------APPCLIEN- BASE APPCLIEN- 1 Policy domain forTS TMC application clientsENGPOLDOM STANDARD STANDARD 21 Engineering Policy
DomainSTANDARD STANDARD STANDARD 18 Installed default policy
domain.
Chapter 14. Implementing Policies for Client Data 343

server. If you reinstall the server after you delete the STANDARD policy objects,the server issues messages during processing of a subsequent DSMSERV AUDITDBcommand. The messages may include the following statement: “An instance countdoes not agree with actual data.” The DSMSERV AUDITDB command corrects thisproblem by restoring the STANDARD policy objects. If necessary, you can laterdelete the restored STANDARD policy objects.
Deleting Copy GroupsYou can delete a backup or archive copy group if it does not belong to amanagement class in the ACTIVE policy set.
For example, to delete the backup and archive copy groups belonging to theMCENG and STANDARD management classes in the STANDARD policy set,enter:delete copygroup engpoldom standard mceng type=backup
delete copygroup engpoldom standard standard type=backup
delete copygroup engpoldom standard mceng type=archive
delete copygroup engpoldom standard standard type=archive
Deleting Management ClassesYou can delete a management class if it does not belong to the ACTIVE policy set.
For example, to delete the MCENG and STANDARD management classes from theSTANDARD policy set, enter:delete mgmtclass engpoldom standard mceng
delete mgmtclass engpoldom standard standard
When you delete a management class from a policy set, the server deletes themanagement class and all copy groups that belong to the management class in thespecified policy domain.
Deleting Policy SetsAuthorized administrators can delete any policy set other than the ACTIVE policyset. For example, to delete the TEST policy set from the ENGPOLDOM policydomain, enter:delete policyset engpoldom test
When you delete a policy set, the server deletes all management classes and copygroups that belong to the policy set within the specified policy domain.
The ACTIVE policy set in a policy domain cannot be deleted. You can replace thecontents of the ACTIVE policy set by activating a different policy set. Otherwise,the only way to remove the ACTIVE policy set is to delete the policy domain thatcontains the policy set.
Deleting Policy DomainsYou can delete a policy domain only if the domain has no client nodes registeredto it. To determine if any client nodes are registered to a policy domain, issue theQUERY DOMAIN or the QUERY NODE command. Move any client nodes toanother policy domain, or delete the nodes.
For example, to delete the STANDARD policy domain, perform the followingsteps:
344 Tivoli Storage Manager for Windows: Administrator’s Guide

1. Request a list of all client nodes assigned to the STANDARD policy domain byentering:query node * domain=standard
2. If client nodes are assigned to the policy domain, remove them in one of thefollowing ways:v Assign each client node to a new policy domain. For example, enter the
following commands:update node htang domain=engpoldom
update node tomc domain=engpoldom
update node pease domain=engpoldom
If the ACTIVE policy set in ENGPOLDOM does not have the samemanagement class names as in the ACTIVE policy set of the STANDARDpolicy domain, then backup versions of files may be bound to a differentmanagement class name, as described in “How Files and Directories AreAssociated with a Management Class” on page 312.
v Delete each node from the STANDARD policy domain by first deleting allfile spaces belonging to the nodes, then deleting the nodes.
3. Delete the policy domain by entering:delete domain standard
When you delete a policy domain, the server deletes the policy domain and allpolicy sets (including the ACTIVE policy set), management classes, and copygroups that belong to the policy domain.
Chapter 14. Implementing Policies for Client Data 345

346 Tivoli Storage Manager for Windows: Administrator’s Guide

Chapter 15. Managing Data for Client Nodes
This chapter contains information to help you generate backup sets and enablesubfile backups for client nodes. You can also use data validation for client nodesso that any data corruption is identified when data is sent over the networkbetween the client and server.
See the following sections for more information:
Tasks:
“Validating a Node’s Data During a Client Session” on page 348
“Generating Client Backup Sets on the Server” on page 349
“Restoring Backup Sets from a Backup-Archive Client” on page 350
“Moving Backup Sets to Other Servers” on page 351
“Managing Client Backup Sets” on page 351
“Enabling Clients to Use Subfile Backup” on page 354
Concepts:
“Choosing Where to Enable Data Validation” on page 564
“Performance Considerations” on page 348
“Creating and Using Client Backup Sets” on page 348
Validating a Node’s DataData validation can identify data corruption during a client session when data issent between a client and the server. Tivoli Storage Manager provides the option ofspecifying whether a cyclic redundancy check (CRC) is performed during a clientsession to validate data sent over the network between a client or a storage agentand the server.
Cyclic redundancy checking is performed at the client when the client requestsservices from the server. For example, the client issues a query, backup, or archiverequest. The server also performs a CRC operation on the data sent by the clientand compares its value with the value calculated by the client. If the CRC valuesdo not match, the server will issue an error message once per session. Dependingon the operation, the client may attempt to automatically retry the operation.
After Tivoli Storage Manager completes the data validation, the client and serverdiscard the CRC values generated in the current session.
Data validation can be enabled for one or all of the following:v Tivoli Storage Manager client nodes at Version 5.1.v Tivoli Storage Manager storage agents at Version 5.1. For details refer to the
storage agent user’s guide for your particular operating system.
This section provides information about data validation between a node and theserver.
© Copyright IBM Corp. 1994, 2002 347

See “Choosing Where to Enable Data Validation” on page 564 to help youdetermine where to enable data validation.
Performance ConsiderationsConsider the impact on performance when you decide whether data validation isnecessary for all nodes or some nodes. Data validation impacts performancebecause additional CPU overhead is required on both the client and server tocalculate and compare CRC values.
This type of validation is independent from validating data written to a storagepool volume. See “Data Validation During Audit Volume Processing” on page 563.
Validating a Node’s Data During a Client SessionYou can enable data validation for a node by using the REGISTER NODE orUPDATE NODE command. By default, data validation is set to NO.
Methods for enabling data validation for a node include choosing data validationfor individual nodes, specifying a set of nodes by using a wildcard search string,or specifying a group of nodes in a policy domain.
For example, to enable data validation for existing node, ED, you can issue anUPDATE NODE command. This user backs up the company payroll recordsweekly and you have decided it is necessary to have all the user data validated:the data itself and metadata.update node ed validateprotocol=all
Later, the network has shown to be stable and no data corruption has beenidentified when user ED has processed backups. You can then disable datavalidation to minimize the performance impact of validating all of ED’s dataduring a client session. For example:update node ed validateprotocol=no
Creating and Using Client Backup SetsA backup set is a collection of backed-up data from one client, stored and managedas a single object on specific media in server storage. The server creates copies ofactive versions of a client’s backed up objects that are within the one or more filespaces specified with the GENERATE BACKUPSET command, and consolidatesthem onto sequential media. Currently, the backup object types supported forbackup sets include directories and files only. The process is also called instantarchive.
The media may be directly readable by a device such as a CD-ROM, JAZ, or ZIPdrive attached to a client’s machine.
Administrators can generate multiple copies of backup sets that correspond tosome point-in-time. The backup sets can be retained for various time periods. Thisis an efficient way to create long-term storage of periodic backups, withoutrequiring the data to be sent over the network again.
While an administrator can generate a backup set from any client’s backed up files,backup sets can only be used by a backup-archive client. You cannot generate abackup set for a NAS node.
See the following sections for details:
348 Tivoli Storage Manager for Windows: Administrator’s Guide

v “Generating Client Backup Sets on the Server”v “Restoring Backup Sets from a Backup-Archive Client” on page 350v “Moving Backup Sets to Other Servers” on page 351v “Managing Client Backup Sets” on page 351
Generating Client Backup Sets on the Server
Task Required Privilege Class
Generate a backup set System or restricted policy over the domainto which the node is assigned
You can generate backup sets on the server for client nodes. The client node forwhich a backup set is generated must be registered to the server. An incrementalbackup must be completed for a client node before the server can generate abackup set for the client node.
The GENERATE BACKUPSET command runs as a background process on theserver. If you cancel the background process created by this command, the mediamay not contain a complete backup set.
See the following sections:v “Choosing Media for Generating the Backup Set”v “Selecting a Name for the Backup Set” on page 350v “Setting a Retention Period for the Backup Set” on page 350v “Example: Generating a Client Backup Set” on page 350
Choosing Media for Generating the Backup SetTo generate a backup set, you must specify a device class that is associated withthe media to which the backup set will be written.
Consider the following when you select a device class for writing the backup set:v Generate the backup set on any sequential access devices whose device types are
supported on both the client and server machines. If you do not have access tocompatible devices, you will need to define a device class for a device type thatis supported on both the client and server.
v Ensure that the media type and recording format used for generating the backupset is supported by the device that will be reading the backup set.
You can write backup sets to sequential media: sequential tape and device classFILE. The tape volumes containing the backup set are not associated with storagepools and, therefore, are not migrated through the storage pool hierarchy.
For device class FILE, the server creates each backup set with a file extension ofOST. You can copy FILE device class volumes to removable media that isassociated with CD-ROM, JAZ, or ZIP devices, by using the REMOVABLEFILEdevice type. For more information, see “Configuring Removable Media Devices”on page 78.
Using Scratch Media: You can determine whether to use scratch volumes whenyou generate a backup set. If you do not use specific volumes, the server usesscratch volumes for the backup set.
Chapter 15. Managing Data for Client Nodes 349

You can use specific volumes for the backup set. If there is not enough space tostore the backup set on the volumes, the server uses scratch volumes to store theremainder of the backup set.
Selecting a Name for the Backup SetThe server adds a unique suffix to the name you specify for the backup set. Forexample, if you name the backup set mybackupset, the server adds a uniqueextension, such as 3099, to the name. This allows you to create backup sets withthe same name without overwriting previous backup sets.
To later display information about this backup set, you can include a wildcardcharacter with the name, such as mybackupset*, or you can specify the fullyqualified name, such as mybackupset.3099.
Setting a Retention Period for the Backup SetYou can set the retention period, specified as a number of days, to retain thebackup set on the server. You can specify a number between zero and 9999 days.Backup sets are retained on the server for 365 days if you do not specify a value.The server uses the retention period to determine when to expire the volumes onwhich the backup set resides.
Example: Generating a Client Backup SetGenerate a backup set on portable media that the client can later use to restore thedata. Use the following steps to generate a backup set on a CD-ROM:1. Define a library whose type is MANUAL. Name the library MANUALLIB.
define library manuallib libtype=manual
2. Define a device class whose device type is REMOVABLEFILE. Name the deviceclass BACKSET:define devclass backset devtype=removablefile library=manuallib
3. Define a drive to associate with the library. Name the drive CDDRIVE and thedevice h:define drive manuallib cddrive device=h:
4. Define a device class whose device type is FILE. Name the device class FILES:define devclass files devtype=file maxcapacity=640M dir=/backupset
5. Generate the backup set to the FILE device class for client node JOHNSON.Name the backup set PROJECT and retain it for 90 days.generate backupset johnson project devclass=file scratch=yesretention=90
6. Use your own software for writing CD-ROMs. For this example, the CD-ROMvolume names are VOL1, VOL2, and VOL3. These names were put on theCD-ROM as they were created.For an example of using the backup set on the CD-ROM, see “Moving BackupSets to Other Servers” on page 351.
Restoring Backup Sets from a Backup-Archive ClientBackup-archive client nodes can restore their backup sets in either of two ways:v Directly from the server.v Using a device attached to the client’s machine that will read the media in
which the backup set is stored.
Backup sets can only be used by a backup-archive client, and only if the files in thebackup set originated from a backup-archive client.
350 Tivoli Storage Manager for Windows: Administrator’s Guide

For more information about restoring backup sets, see Using the Backup-ArchiveClient guide for your particular operating system.
Moving Backup Sets to Other Servers
Task Required Privilege Class
Define a backup set If the REQSYSAUTHOUTFILE server optionis set to YES, system privilege is required. Ifthe REQSYSAUTHOUTFILE server option isset to NO, system or restricted policy overthe domain to which the node is assigned isrequired.
You can define (move) a backup set generated on one server to another TivoliStorage Manager server. Any client backup set that you generate on one server canbe defined to another server as long as the servers share a common device type.The level of the server defining the backup set must be equal to or greater than thelevel of the server that generated the backup set.
If you have multiple servers connecting to different clients, the DEFINEBACKUPSET command makes it possible for you to take a previously generatedbackup set and make it available to other servers. The purpose is to allow the userflexibility in moving backup sets to different servers, thus allowing the user theability to restore their data from a server other than the one on which the backupset was created.
Using the example described in “Example: Generating a Client Backup Set” onpage 350, you can make the backup set that was copied to the CD-ROM availableto another server by entering:define backupset johnson project devclass=cdrom volumes=vol1,vol2,vol3description="backup set copied to a CD-ROM"
Managing Client Backup SetsYou can update, query, and delete backup sets.
Task Required Privilege Class
Update the retention period assigned to abackup set
System or restricted policy over the domainto which the node is assigned
Display information about backup sets Any administrator
Display information about backup setcontents
System or restricted policy over the domainto which the node is assigned
Delete backup set If the REQSYSAUTHOUTFILE server optionis set to YES, system privilege is required. Ifthe REQSYSAUTHOUTFILE server option isset to NO, system or restricted policy overthe domain to which the node is assigned isrequired.
Updating the Retention Period of a Backup SetWhen you want to change the number of days the server retains a backup set,update the retention period that is associated with the backup set. For example, toupdate the retention period assigned to backup set named ENGDATA.3099,belonging to client node JANE, to 120 days, enter:
Chapter 15. Managing Data for Client Nodes 351

update backupset jane engdata.3099 retention=120
Displaying Backup Set InformationTo view information about backup sets, you can use the QUERY BACKUPSETcommand. The output that is displayed lists information such as the name of theclient node whose data is contained in the backup set as well as the description ofthe backup set, assuming one has been used.
The following figure shows the report that is displayed after you enter:query backupset
Displaying Information about Backup Set VolumesA client’s backup set can reside on more than one volume. The server records theinformation about the volumes used for the backup set in the volume history file.Volume history includes information such as the date and time the backup set wasgenerated, the device class to which the backup set was written, and the commandused to generate the backup set. If a backup set spans several volumes, the serverdisplays the command used to generate the backup set only with the first volume.
You can view this information when you use the QUERY VOLHISTORY command,with BACKUPSET specified as the volume type.
The following example shows how this particular client’s backup set resides onthree volumes, and the command used to generate the backup set is displayedwith the first volume.
Node Name: JANEBackup Set Name: MYBACKUPSET.3099
Date/Time: 06/09/1999 16:17:47Retention Period: 60Device Class Name: DCFILE
Description:
352 Tivoli Storage Manager for Windows: Administrator’s Guide

Displaying Contents of Backup SetsYou can display information about the contents of backup sets by using theQUERY BACKUPSETCONTENTS command. When you issue the query, the serverdisplays only one backup set at a time.
The server displays information about the files and directories that are contained ina backup set. The following figure shows the report that is displayed after youenter:query backupsetcontents jane engdata.3099
How File Space and File Names May be Displayed: File space names and filenames that can be in a different code page or locale than the server do not displaycorrectly on the administrator’s Web interface or the administrative command-lineinterface. The data itself is backed up and can be restored properly, but the filespace or file name may display with a combination of invalid characters or blankspaces.
Date/Time: 09/24/2001 07:34:06 PMVolume Type: BACKUPSET
Backup Series:Backup Operation:
Volume Seq: 1Device Class: FILEVolume Name: 01334846.ost
Volume Location:Command: gen backupset client57 testbs /home dev=file scratch=yes
ret=2 desc="Client57 backupset"
Date/Time: 09/24/2001 07:34:06 PMVolume Type: BACKUPSET
Backup Series:Backup Operation:
Volume Seq: 2Device Class: FILEVolume Name: 01334849.ost
Volume Location:Command:
Date/Time: 09/24/2001 07:34:06 PMVolume Type: BACKUPSET
Backup Series:Backup Operation:
Volume Seq: 3Device Class: FILEVolume Name: 01334850.ost
Volume Location:Command:
Node Name Filespace Client's Name for FileName
------------------------ ---------- -----------------------------------JANE /srvr /deblockJANE /srvr /deblock.cJANE /srvr /dsmerror.logJANE /srvr /dsmxxxxx.logJANE ... ......
Chapter 15. Managing Data for Client Nodes 353

If the file space name is Unicode enabled, the name is converted to the server’scode page for display. The results of the conversion for characters not supportedby the current code page depends on the operating system. For names that TivoliStorage Manager is able to partially convert, you may see question marks (??),blanks, unprintable characters, or "...". These characters indicate to theadministrator that files do exist. If the conversion is not successful, the name isdisplayed as "...". Conversion can fail if the string includes characters that are notavailable in the server code page, or if the server has a problem accessing systemconversion routines.
Deleting Backup SetsWhen the server creates a backup set, the retention period assigned to the backupset determines how long the backup set remains in the database. When that datepasses, the server automatically deletes the backup set when expiration processingruns. However, you can also manually delete the client’s backup set from theserver before it is scheduled to expire by using the DELETE BACKUPSETcommand.
After a backup set is deleted, the volumes return to scratch status if Tivoli StorageManager acquired them as scratch volumes. Scratch volumes associated with adevice type of FILE are deleted.
To delete a backup set named ENGDATA.3099, belonging to client node JANE,created before 11:59 p.m. on March 18, 1999, enter:delete backupset jane engdata.3099 begindate=03/18/1999 begintime=23:59
To delete all backup sets belonging to client node JANE, created before 11:59 p.m.on March 18, 1999, enter:delete backupset jane * begindate=03/18/1999 begintime=23:59
Enabling Clients to Use Subfile BackupA basic problem that remote and mobile users face today is connecting to storagemanagement services by using modems with limited bandwidth or poor linequality. This creates a need for users to minimize the amount of data they sendover the network, as well as the time that they are connected to the network.
To help address this problem, you can use subfile backups. When a client’s file hasbeen previously backed up, any subsequent backups are typically made of theportion of the client’s file that has changed (a subfile), rather than the entire file. Abase file is represented by a backup of the entire file and is the file on whichsubfiles are dependent. If the changes to a file are extensive, a user can request abackup on the entire file. A new base file is established on which subsequentsubfile backups are dependent.
This type of backup makes it possible for mobile users to reduce connection time,network traffic, and the time it takes to do a backup. To enable this type ofbackup, see “Setting Up Clients to Use Subfile Backup” on page 355.
Example of Subfile BackupsAssume that on a Monday, a user requests an incremental backup of a file calledCUST.TXT. The user makes daily updates to the CUST.TXT file and requestssubsequent backups.
354 Tivoli Storage Manager for Windows: Administrator’s Guide

The following table describes how Tivoli Storage Manager handles backups of fileCUST.TXT.
Version Day ofsubsequentbackup
What Tivoli Storage Manager backs up
One Monday The entire CUST.TXT file (the base file)
Two Tuesday A subfile of CUST.TXT. The server compares the file backedup on Monday with the file that needs to be backed up onTuesday. A subfile containing the changes between the twofiles is sent to the server for the backup.
Three Wednesday A subfile of CUST.TXT. Tivoli Storage Manager compares thefile backed up on Monday with the file that needs to bebacked up on Wednesday. A subfile containing the changesbetween the two files is sent to the server for the backup.
Setting Up Clients to Use Subfile BackupTo enable subfile backup, do the following:v On the server: You must set up the server to allow clients to back up subfiles.
Use the SET SUBFILE command.set subfile client
v On the clients: The SUBFILEBACKUP, SUBFILECACHEPATH, andSUBFILECACHESIZE options must be set in the client’s options file (dsm.opt).You can control these options from the server by including them in client optionsets. For example, you can disable subfile backup for individual client nodes bysetting SUBFILEBACKUP=NO in the client option set associated with the clientnode. See “Creating Client Option Sets from the Server” on page 281 for how toset up and use client option sets.See Tivoli Storage Manager for Windows: Backup-Archive Installation and User’s Guidefor more information about the options.
Managing Subfile BackupsThe following sections describe how Tivoli Storage Manager manages subfiles thatare restored, exported, imported, or added to a backup set.
Restoring SubfilesWhen a client issues a request to restore subfiles, Tivoli Storage Manager restoressubfiles along with the corresponding base file back to the client. This process istransparent to the client. That is, the client does not have to determine whether allsubfiles and corresponding base file were restored during the restore operation.
You can define (move) a backup set that contains subfiles to an earlier version of aserver that is not enabled for subfile backup. That server can restore the backup setcontaining the subfiles to a client not able to restore subfiles. However, this processis not recommended as it could result in a data integrity problem.
Exporting and Importing SubfilesWhen subfiles are exported during an export operation, Tivoli Storage Manageralso exports the corresponding base file to volumes you specify. When the base fileand its dependent subfiles are imported from the volumes to a target server andimport processing is canceled while the base file and subfiles are being imported,the server automatically deletes any incomplete base files and subfiles that werestored on the target server.
Chapter 15. Managing Data for Client Nodes 355

Expiration Processing of Base Files and SubfilesBecause subfiles are useless without the corresponding base file, the serverprocesses base files eligible for expiration differently. For example, when expirationprocessing runs, Tivoli Storage Manager recognizes a base file as eligible forexpiration but does not delete the file until all its dependent subfiles have expired.For more information on how the server manages file expiration, see “RunningExpiration Processing to Delete Expired Files” on page 333.
Adding Subfiles to Backup SetsWhen a subfile is added to a backup set, Tivoli Storage Manager includes itscorresponding base file with the backup set. If the base file and dependent subfilesare stored on separate volumes when a backup set is created, additional volumemounts may be required to create the backup set.
Deleting Base FilesIf a base file is deleted as a result of processing a DELETE VOLUME command,the server recognizes its dependent subfiles and deletes them from the server aswell. Subfiles without the corresponding base file are incomplete and useless to theuser.
356 Tivoli Storage Manager for Windows: Administrator’s Guide

Chapter 16. Scheduling Operations for Client Nodes
This chapter contains information about scheduling the following operations:v Backing up and restoring client data and Tivoli Data Protection application client
data.v Archiving and retrieving client data.v Running operating system commands.v Running macro or command files that contain operating system commands,
Tivoli Storage Manager commands, or both. You can schedule a command file torun on clients or application clients.
If you are planning to use Tivoli Decision Support products with Tivoli StorageManager, you can define a schedule that will run the Decision Support Loaderautomatically. For information, see “Scheduling the Decision Support Loader withTivoli Storage Manager” on page 458. For information about the Tivoli DecisionSupport Guide products, see this URL:http://www.tivoli.com/support/storage_mgr/tivolimain.html
The following concepts are described in this chapter:
Concepts:
“Prerequisites to Scheduling Operations” on page 358
“Comparing Tivoli Storage Manager Scheduling Across Operating Systems andComponents” on page 363
“Overview of the Tivoli Storage Manager Scheduler Running as a Windows Service” onpage 364
“Commands for Scheduling Client Operations” on page 365
Administrators perform the following activities to schedule Tivoli Storage Managerclient operations:
Tasks:
“Scheduling a Client Operation” on page 358 (task overview)
“Creating Tivoli Storage Manager Schedules” on page 358
“Associating Client Nodes with Schedules” on page 359
“Starting the Scheduler on the Clients” on page 360
“Displaying Schedule Information” on page 361
“Creating Schedules for Running Command Files” on page 362
“Updating the Client Options File to Automatically Generate a New Password” onpage 362
In this chapter, most examples illustrate how to perform tasks by using a TivoliStorage Manager command-line interface. For information about the commands,see Administrator’s Reference, or issue the HELP command from the command lineof a Tivoli Storage Manager administrative client.
© Copyright IBM Corp. 1994, 2002 357

Tivoli Storage Manager tasks can also be performed from the administrative Webinterface. For more information about using the administrative interface, see QuickStart.
Prerequisites to Scheduling OperationsTo interact with Tivoli Storage Manager for scheduling operations, a client machinemust meet the following prerequisites:v The client node must be registered with the server. For information, see
“Chapter 12. Adding Client Nodes” on page 253.v The client options file (dsm.opt) must contain the network address of the server
that the client will contact for services. See “Connecting Nodes with the Server”on page 258 for more information.
v The scheduler must be configured and started on the client machine. SeeBackup-Archive Installation and User’s Guide for details.
Scheduling a Client OperationTo automate client operations, you can define new schedules. To later modify, copy,and delete these schedules, see “Chapter 17. Managing Schedules for ClientNodes” on page 367.
To set up a client schedule on the server, perform these steps:1. Create a client schedule. (“Creating Tivoli Storage Manager Schedules” on page
358)2. Associate client nodes with the schedule. (“Associating Client Nodes with
Schedules” on page 359)3. Ensure that the clients start the client scheduler. (“Starting the Scheduler on the
Clients” on page 360)4. Display the schedule information and check that the schedule completed
successfully. (“Displaying Schedule Information” on page 361)
The following sections describe how to automate a basic client operation,incremental backup.
Creating Tivoli Storage Manager Schedules
Task Required Privilege Class
Create client schedules for any policydomain
System or unrestricted policy
Create client schedules for specific policydomains
System, unrestricted policy, or restrictedpolicy for those domains
Key information to have when scheduling operations are:v The operation that needs to runv The time and day when the operation needs to runv How often the operation needs to repeat
Tivoli Storage Manager provides two sample schedules: one for daily backups andone for weekly backups. The sample schedules use defaults for many of theirvalues. You can copy and modify them to create customized schedules that meetyour requirements.
358 Tivoli Storage Manager for Windows: Administrator’s Guide

Administrators can follow these steps to create schedules for client nodeoperations. To later modify, copy, and delete these schedules, see “Chapter 17.Managing Schedules for Client Nodes” on page 367.1. Double-click the TSM Console icon on the server desktop.2. Expand the tree until the Tivoli Storage Manager server that you want to work
with displays. Expand the server and click Wizards. The Wizards list appearsin the right pane.
3. Select the Schedule Configuration wizard and click Start. The SchedulingWizard appears.
4. Follow the instructions in the wizard, clicking Next until the TSM SchedulingOptions dialog appears.
5. Click the Add button. The Add Schedules dialog appears.6. Click Help for assistance with this dialog.7. When you are finished, click OK or Apply.
As an alternative to using the TSM Console, you can define and associateschedules by using the Tivoli Storage Manager command line interface or theadministrative Web interface. Commands used for defining schedules are listedunder “Commands for Scheduling Client Operations” on page 365.
To tailor the parameters you choose when you create your schedules, see theDEFINE SCHEDULE command in the Administrator’s Reference.
Associating Client Nodes with Schedules
Task Required Privilege Class
Associate client nodes with schedules System, unrestricted policy, or restrictedpolicy for the policy domain to which theschedule belongs
Client nodes must be associated with schedules before they can use the TivoliStorage Manager Scheduler. You can associate client nodes with schedules usingthe scheduling wizard. An individual node can be associated with more than oneschedule. To associate the client nodes with a schedule:1. Double-click the TSM Console icon on the server desktop.2. Expand the tree until the Tivoli Storage Manager server you want to work with
displays. Expand the server and click Wizards. The Wizards list appears in theright pane.
3. Select the Schedule Configuration wizard and click Start. The SchedulingWizard appears.
4. Follow the instructions in the wizard, clicking Next until the TSM SchedulingOptions dialog appears. See Figure 54 on page 360.The dialog displays defined schedules in the left pane and a listing of allregistered client nodes in the right pane.
Chapter 16. Scheduling Operations for Client Nodes 359
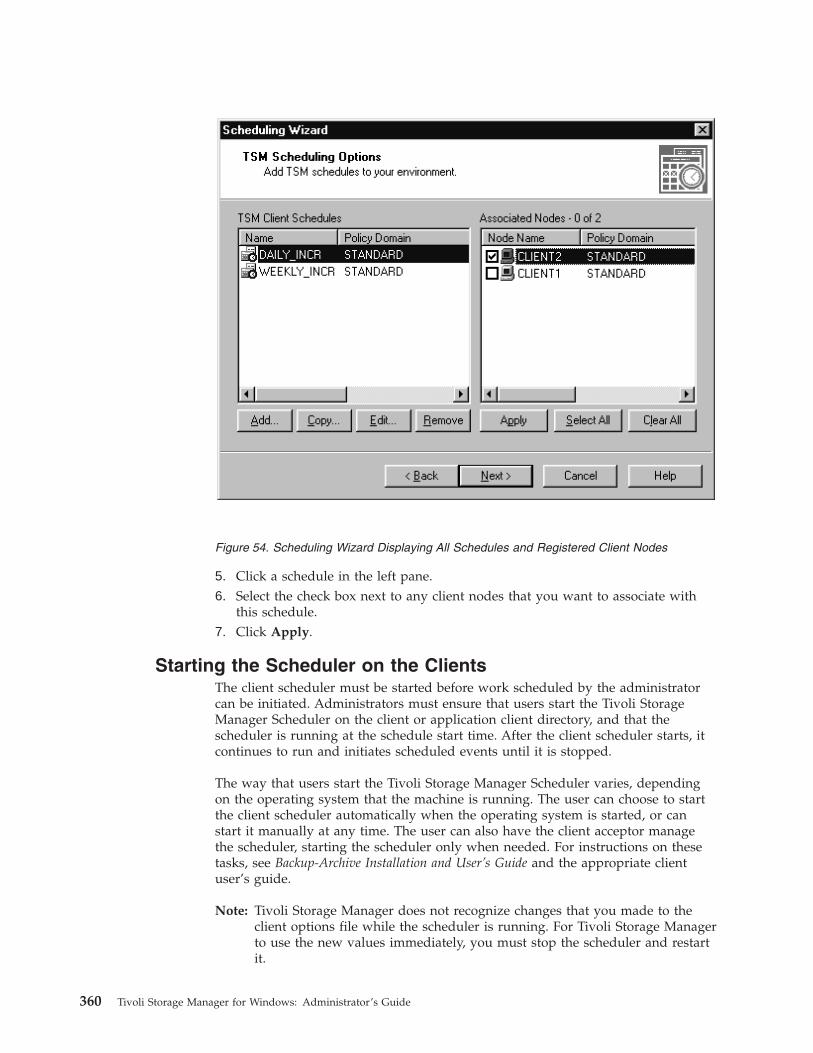
5. Click a schedule in the left pane.6. Select the check box next to any client nodes that you want to associate with
this schedule.7. Click Apply.
Starting the Scheduler on the ClientsThe client scheduler must be started before work scheduled by the administratorcan be initiated. Administrators must ensure that users start the Tivoli StorageManager Scheduler on the client or application client directory, and that thescheduler is running at the schedule start time. After the client scheduler starts, itcontinues to run and initiates scheduled events until it is stopped.
The way that users start the Tivoli Storage Manager Scheduler varies, dependingon the operating system that the machine is running. The user can choose to startthe client scheduler automatically when the operating system is started, or canstart it manually at any time. The user can also have the client acceptor managethe scheduler, starting the scheduler only when needed. For instructions on thesetasks, see Backup-Archive Installation and User’s Guide and the appropriate clientuser’s guide.
Note: Tivoli Storage Manager does not recognize changes that you made to theclient options file while the scheduler is running. For Tivoli Storage Managerto use the new values immediately, you must stop the scheduler and restartit.
Figure 54. Scheduling Wizard Displaying All Schedules and Registered Client Nodes
360 Tivoli Storage Manager for Windows: Administrator’s Guide

Displaying Schedule Information
Task Required Privilege Class
Display information about scheduledoperations
Any administrator
You can display information about schedules and whether the schedules ransuccessfully.
Displaying Schedule DetailsWhen you request information about schedules, the server displays the followinginformation:v Schedule namev Policy domain namev Type of operation to performv Start date and time for the initial startup windowv Duration of the startup windowv Time period between startup windowsv Day of the week on which scheduled operations can begin
The following output shows an example of a report that is displayed after youenter:query schedule engpoldom
Domain * Schedule Name Action Start Date/Time Duration Period Day------------ - ---------------- ------ -------------------- -------- ------ ---ENGPOLDOM MONTHLY_BACKUP Inc Bk 07/21/1998 12:45:14 2 H 2 Mo SatENGPOLDOM WEEKLY_BACKUP Inc Bk 07/21/1998 12:46:21 4 H 1 W Sat
Checking the Status of Scheduled OperationsFor Tivoli Storage Manager, a schedule completes successfully as long as thecommand associated with the schedule is successfully issued. The success of theissued command is independent of the success of the schedule.v To determine the success of a scheduled operation, query the server. Each
scheduled client operation is called an event, and is tracked by the server. Youcan get information about projected and actual scheduled processes by using theQUERY EVENT command. You can get information about scheduled processesthat did not complete successfully by using exception reporting with thiscommand.For example, you can issue the following command to find out which eventswere missed (did not start) in the ENGPOLDOM policy domain for theWEEKLY_BACKUP schedule in the previous week:query event engpoldom weekly_backup begindate=-7 begintime=nowenddate=today endtime=now exceptionsonly=yes
For more information about managing event records, see “Managing EventRecords” on page 371.
v To determine the success of the commands issued as the result of a successfulschedule, you can:– Check the client’s schedule log.
The schedule log is a file that contains information such as the statistics aboutthe backed-up objects, the name of the server backing up the objects, and thetime and date of the next scheduled operation. By default, Tivoli Storage
Chapter 16. Scheduling Operations for Client Nodes 361

Manager stores the schedule log as a file called dsmsched.log and places thefile in the directory where the Tivoli Storage Manager backup-archive client isinstalled. See the client user’s guide for more information.
– Check the server’s activity log.Search or query the activity log for related messages. For example, search formessages that mention the client node name, within the time period that theschedule ran. For example:query actlog begindate=02/23/2001 enddate=02/26/2001 originator=clientnodename=hermione
Creating Schedules for Running Command FilesFor some clients, you may want to run a command for a different applicationbefore running a Tivoli Storage Manager backup. For example, you may want tostop a database application, back up files with Tivoli Storage Manager, and thenrestart the application. To do this, you can schedule the running of a command file.Application clients require schedules that run command files.
A command file (also known as a macro or batch file on different operatingsystems) is stored on the client. This file contains a sequence of commands that areintended to be run during a scheduled start date and time window. Commandscan include operating system commands, the Tivoli Storage Manager client’sDSMC command, and commands for other applications. The default schedules donot support command files so you must create a new schedule to schedulecommand files.
To use command files, administrators must create schedules with theACTION=MACRO parameter. For example, you can define a schedule calledDAILY_INCR that will process a command file called c:\incr.cmd on the client:define schedule standard daily_incr description="daily incremental file"action=macro objects="c:\incr.cmd" starttime=18:00 duration=5durunits=minutes period=1 perunits=day dayofweek=any
Associate the client with the schedule and ensure that the scheduler is started onthe client or application client directory. The schedule runs the file calledc:\incr.cmd once a day between 6:00 p.m. and 6:05 p.m., every day of the week.
Updating the Client Options File to Automatically Generate a NewPassword
If the server uses password authentication, clients must use passwords. Passwordsare then also required for the server to process scheduled operations for clientnodes. If the password expires and is not updated, scheduled operations fail. Youcan prevent failed operations by allowing Tivoli Storage Manager to generate anew password when the current password expires. Include thePASSWORDACCESS GENERATE option in the Tivoli Storage Manager clientoptions file to ensure that the client always gets a new password when the old oneexpires.
The PASSWORDACCESS GENERATE option is also required in other situations,such as when you want to use the Web backup-archive client to access a clientnode. See the client user’s guide for more information.
362 Tivoli Storage Manager for Windows: Administrator’s Guide

Configuring the Scheduler to Run Under the Site-Server AccountStandard Tivoli Storage Manager security requirements apply to the Tivoli DataProtection for Microsoft Exchange application client. That is, the application clientmust be registered to Tivoli Storage Manager and use the appropriate node nameand password when connecting with the Tivoli Storage Manager server.
To access the Exchange Server APIs, the application client must be running underthe Site Services Account. The Site Services Account is the account under which theExchange services are running. The scheduler service must logon using thisaccount. The scheduler service account information can be specified using theservices applet in the Windows Control Panel. For more information about the SiteServices Account, see the Microsoft Exchange Server documentation.
Comparing Tivoli Storage Manager Scheduling Across OperatingSystems and Components
The Tivoli Storage Manager Scheduler provides the capability for the server toprocess scheduled operations. For client nodes running on operating systems otherthan Windows, the scheduler is installed when the backup-archive client orapplication client software is installed. The scheduler can be started by using theDSMC SCHEDULE command on the client’s machine. For Windows NT andWindows 2000 clients, the Tivoli Storage Manager Scheduler service must beconfigured separately.
For more information about installing, configuring, and starting the Tivoli StorageManager Scheduler, see Backup-Archive Installation and User’s Guide.
The following table compares the scheduling environment across operating systemsand components:
Component TypeOperatingSystem Scheduling Environment
Backup-Archive Client UNIX, platformsother thanWindows
The scheduler is installed as part of the clientinstallation
Backup-Archive Client Windows The scheduler is installed but configured separately
Tivoli Data Protection for Oracle(application client)
AIX The scheduler is installed as part of the clientinstallation
Tivoli Data Protection for Oracle(application client)
HP-UX The API must be installed
Tivoli Data Protection for Oracle Agent(application client)
Sun Solaris The scheduler is installed as part of the clientinstallation
Tivoli Data Protection for MicrosoftExchange (application client)
Tivoli Data Protection for SQL(application client)
Tivoli Data Protection for Domino(application client)
Tivoli Data Protection for Oracle(application client)
Windows The scheduler is installed and configured separately
Chapter 16. Scheduling Operations for Client Nodes 363
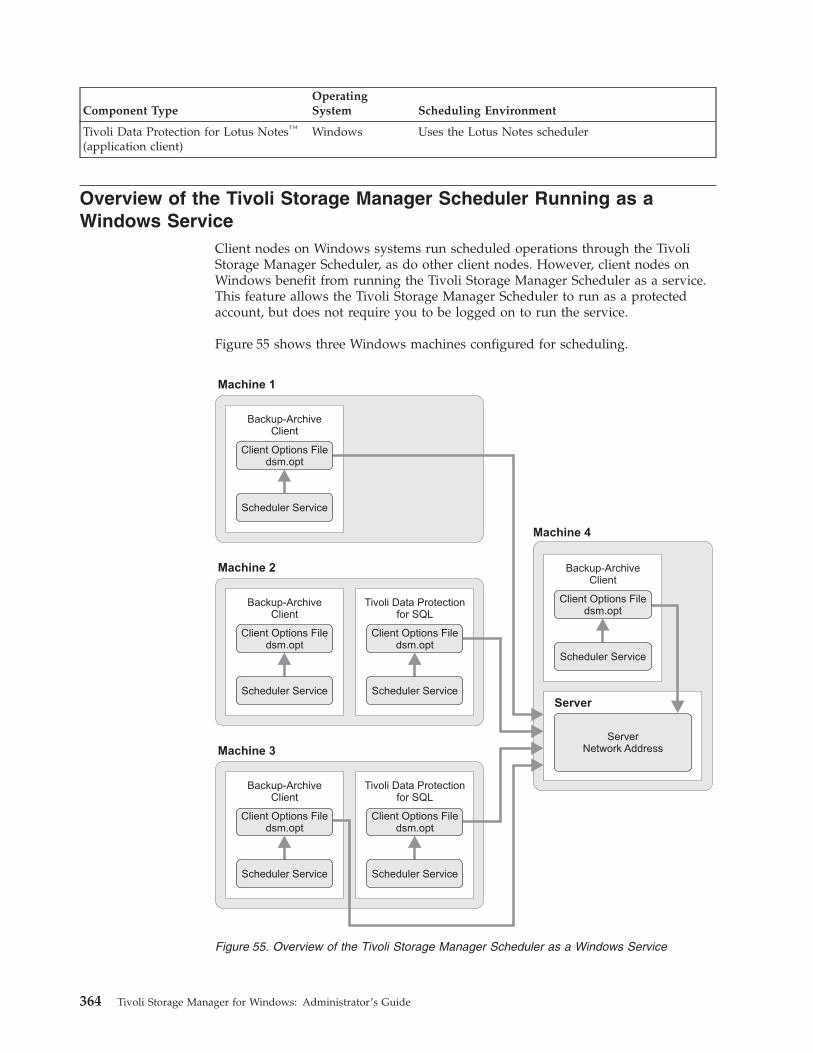
Component TypeOperatingSystem Scheduling Environment
Tivoli Data Protection for Lotus Notes™
(application client)Windows Uses the Lotus Notes scheduler
Overview of the Tivoli Storage Manager Scheduler Running as aWindows Service
Client nodes on Windows systems run scheduled operations through the TivoliStorage Manager Scheduler, as do other client nodes. However, client nodes onWindows benefit from running the Tivoli Storage Manager Scheduler as a service.This feature allows the Tivoli Storage Manager Scheduler to run as a protectedaccount, but does not require you to be logged on to run the service.
Figure 55 shows three Windows machines configured for scheduling.
Figure 55. Overview of the Tivoli Storage Manager Scheduler as a Windows Service
364 Tivoli Storage Manager for Windows: Administrator’s Guide

Machine 1 — Remote ClientMachine 1 contains only a backup-archive client. It has been configured toback up its file system to the server on Machine 4. The Tivoli Storage ManagerScheduler has been configured. The client uses the information in the clientoptions file (dsm.opt) to connect to the server. The client options file containsthe server address of the server (Machine 4).
Machine 2 — Tivoli Data Protection application clientMachine 2 contains an application client and a backup-archive client. Note thatthe backup-archive client is not connected to the server. The backup-archiveclient on Machine 2 has been installed only to provide access to theDSMCUTIL utility, not to back up the resident file system. After thebackup-archive client has been used to install the scheduler, it may continue tobe required for updating the password or other scheduling service parameters.The application client uses the information in its client options file to connectto the server.
Machine 3 — Tivoli Data Protection application client and backup-archive clienton the same machine
Machine 3 contains an application client and a backup-archive client. Theapplication client backs up databases and transaction logs to the server. Thebackup-archive client backs up other files on Machine 3’s file system,including the database administrator’s online documentation and performancerecords. The scheduler wizard is used to install a scheduler service for thebackup-archive client and a second scheduler service for the application client.The two clients use the information in their client options files to connect tothe server.
Machine 4 — Server and local backup-archive client on the same machineMachine 4 contains a server and a local backup-archive client. For this client(packaged with the Tivoli Storage Manager server), the scheduler is configuredduring setup, and the administrator needs only to update the password.
Commands for Scheduling Client OperationsThis section summarizes example commands that can be used for the schedulingtasks that are discussed in this chapter. See Administrator’s Reference for servercommand details.
Define a schedule for a client:define schedule engpoldom daily_backup starttime=21:00duration=2 durunits=hours
Associate a client with a schedule:define association engpoldom weekly_backup engnode
On the client workstation, start the scheduler:On most clients:> dsmc schedule
On Windows NT and Windows 2000 clients:> net start "TSM Scheduler"
Check the Backup-Archive Installation and User’s Guide for details aboutautomatically starting the scheduler and running the scheduler in the background.
Display schedule information:
Chapter 16. Scheduling Operations for Client Nodes 365

query schedule engpoldom
Check to see if the schedule ran successfully:query event engpoldom weekly_backup begindate=-7 begintime=nowenddate=today endtime=now
366 Tivoli Storage Manager for Windows: Administrator’s Guide

Chapter 17. Managing Schedules for Client Nodes
This chapter contains information about managing and coordinating Tivoli StorageManager schedules for registered client nodes. For a description of what TivoliStorage Manager views as client nodes, see “Chapter 12. Adding Client Nodes” onpage 253. For information about the Tivoli Storage Manager scheduler and creatingschedules, see “Chapter 16. Scheduling Operations for Client Nodes” on page 357.
Administrators can perform the following tasks:
Tasks:
“Managing Tivoli Storage Manager Schedules” on page 367
“Managing Node Associations with Schedules” on page 369
“Managing Event Records” on page 371
“Managing the Throughput of Scheduled Operations” on page 372
“Specifying One-Time Actions for Client Nodes” on page 378
In this chapter, most examples illustrate how to perform tasks by using a TivoliStorage Manager command-line interface. For information about the commands,see Administrator’s Reference, or issue the HELP command from the command lineof a Tivoli Storage Manager administrative client.
Tivoli Storage Manager tasks can also be performed from the administrative Webinterface. For more information about using the administrative interface, see QuickStart.
Managing Tivoli Storage Manager SchedulesYou can perform the following activities to manage schedules.
Task Required Privilege Class
Verify that the schedule ran Any administrator
Add, copy, modify, or delete client schedulesin any policy domain
System or unrestricted policy
Add, copy, modify, or delete client schedulesfor specific policy domains
System, unrestricted policy, or restrictedpolicy for those domains
Display information about scheduledoperations
Any administrator
Verifying that the Schedule RanYou will want to ensure that all defined nodes completed their scheduledoperations. You can check whether the schedules ran successfully by using theQUERY EVENT command. For information, see “Displaying Information aboutScheduled Events” on page 371.
You can also check the log file described in “Checking the Schedule Log” onpage 368.
© Copyright IBM Corp. 1994, 2002 367

Checking the Schedule LogThe Tivoli Storage Manager client stores detailed information about each scheduledevent in a file. This file contains information such as the statistics about thebacked-up objects, the name of the server to which the objects are backed up, andthe time and date of the next scheduled operation.
The default name for this file is dsmsched.log. The file is located in the directorywhere the Tivoli Storage Manager backup-archive client is installed. You canoverride this file name and location by specifying the SCHEDLOGNAME option inthe client options file. See the client user’s guide for more information.
Adding New SchedulesYou can add Tivoli Storage Manager schedules by using the ScheduleConfiguration wizard in the Tivoli Storage Manager Console. For moreinformation, see “Creating Tivoli Storage Manager Schedules” on page 358. As analternative to using the wizard, you can add and associate schedules by using theTivoli Storage Manager command line interface or the administrative Webinterface.
Copying Existing SchedulesYou can create new schedules by copying existing schedules to the same policydomain or a different policy domain. The schedule description and all scheduleparameter values are copied to the new schedule. You can then modify the newschedule to meet site-specific requirements. See “Creating Tivoli Storage ManagerSchedules” on page 358 for information about modifying schedules.
Client node associations are not copied to the new schedule. You must associateclient nodes with the new schedule before it can be used. The associations for theold schedule are not changed. For information, see “Associating Client Nodes withSchedules” on page 359 and “Managing Node Associations with Schedules” onpage 369.
To copy the WINTER schedule from policy domain DOMAIN1 to DOMAIN2 andname the new schedule WINTERCOPY, enter:copy schedule domain1 winter domain2 wintercopy
Modifying SchedulesYou can modify existing schedules by using the Schedule Configuration wizard inthe Tivoli Storage Manager Console.1. Double-click the TSM Console icon on the server desktop.2. Expand the tree until the Tivoli Storage Manager server that you want to work
with displays. Expand the server and click Wizards. The Wizards list appearsin the right pane.
3. Select the Schedule Configuration wizard and click Start. The SchedulingWizard appears.
4. Follow the instructions in the wizard, clicking Next until the TSM SchedulingOptions dialog appears.
5. Select the schedule you want to modify from the left pane.6. Click the Edit button. Make changes in the fields in the panels. Click Help for
assistance with this dialog.7. When you are finished making changes, click OK or Apply.
368 Tivoli Storage Manager for Windows: Administrator’s Guide

As an alternative to using the wizard, you can modify schedules by using theadministrative Web interface or by issuing the UPDATE SCHEDULE commandfrom the Tivoli Storage Manager command line interface.For example, to modifythe ENGWEEKLY client schedule in the ENGPOLDOM policy domain, enter:update schedule engpoldom engweekly period=5 perunits=days
The ENGWEEKLY schedule is updated so that the incremental backup period isnow every five days.
Deleting SchedulesWhen you delete a schedule, Tivoli Storage Manager deletes all client nodeassociations for that schedule. See “Associating Client Nodes with Schedules” onpage 359 for more information.
To delete the schedule WINTER in the ENGPOLDOM policy domain, enter:delete schedule engpoldom winter
Rather than delete a schedule, you may want to remove all nodes from theschedule and save the schedule for future use. For information, see “RemovingNodes from Schedules” on page 370.
Displaying Information about SchedulesWhen you request information about schedules, the server displays the followinginformation:v Schedule namev Policy domain namev Type of operation to be performedv Start date and time for the initial startup windowv Duration of the startup windowv Time period between startup windowsv Day of the week on which scheduled operations can begin
The following output shows an example of a report that is displayed after youenter:query schedule engpoldom
Domain * Schedule Name Action Start Date/Time Duration Period Day------------ - ---------------- ------ -------------------- -------- ------ ---ENGPOLDOM MONTHLY_BACKUP Inc Bk 07/21/1998 12:45:14 2 H 2 Mo SatENGPOLDOM WEEKLY_BACKUP Inc Bk 07/21/1998 12:46:21 4 H 1 W Sat
Managing Node Associations with SchedulesYou can add and delete node associations from schedules. Nodes can be associatedwith more than one schedule.
You can perform the following activities to manage associations of client nodeswith schedules.
Task Required Privilege Class
Add new nodes to existing schedules System or restricted policy over the domainto which the node is assigned
Chapter 17. Managing Schedules for Client Nodes 369

Task Required Privilege Class
Move nodes to existing schedules System or restricted policy over the domainto which the node is assigned
Delete nodes associated with a schedule System or restricted policy over the domainto which the node is assigned
Display nodes associated with a specificschedule
Any administrator
Adding New Nodes to Existing SchedulesYou can add new nodes to existing schedules by associating the node with theschedule. To associate new client nodes with a schedule, you can use the ScheduleConfiguration wizard in the Tivoli Storage Manager Console or the administrativeWeb interface. You can also issue the DEFINE ASSOCIATION command from thecommand line interface. For information, see “Associating Client Nodes withSchedules” on page 359.
Moving Nodes from One Schedule to AnotherYou can move a node from one schedule to another schedule by:1. Associating the node to the new schedule. For information, see “Associating
Client Nodes with Schedules” on page 359.2. Deleting the association of that node from the original schedule. For
information, see “Removing Nodes from Schedules” on page 370.
Displaying Nodes Associated with SchedulesYou can display information about the nodes that are associated with a specificschedule. For example, you should query an association before deleting a clientschedule.
Figure 56 shows the report that is displayed after you enter:query association engpoldom
Removing Nodes from SchedulesWhen you remove the association of a node to a client schedule, the client nolonger runs operations specified by the schedule. However, the remaining clientnodes still use the schedule.
To delete the association of the ENGNOD client with the ENGWEEKLY schedule,in the policy domain named ENGPOLDOM, enter:delete association engpoldom engweekly engnod
Policy Domain Name: ENGPOLDOMSchedule Name: MONTHLY_BACKUP
Associated Nodes: MAB SSTEINER
Policy Domain Name: ENGPOLDOMSchedule Name: WEEKLY_BACKUP
Associated Nodes: MAB SSTEINER
Figure 56. Query Association Output
370 Tivoli Storage Manager for Windows: Administrator’s Guide

Instead of deleting a schedule, you may want to delete all associations to it andsave the schedule for possible reuse in the future.
Managing Event RecordsEach scheduled client operation is called an event. All scheduled events, includingtheir status, are tracked by the server. An event record is created in the serverdatabase whenever a scheduled event is completed or missed.
You can perform the following activities to manage event records:
Task Required Privilege Class
Display information about scheduled events Any administrator
Set the retention period for event records System
Delete event records System or unrestricted policy
Displaying Information about Scheduled EventsTo help manage schedules for client operations, you can request information aboutscheduled and completed events by using the QUERY EVENT command.v To get information about past and projected scheduled processes, use a simple
query for events. If the time range you specify includes the future, the resultsshow which events should occur in the future based on current schedules.
v To get information about scheduled processes that did not complete successfully,use the exceptions-only option with the query.
To minimize the processing time when querying events:v Minimize the time rangev For client schedules, restrict the query to those policy domains, schedules, and
client node names for which information is required
Displaying All Client Schedule EventsYou can display information about all client events by issuing the QUERY EVENTcommand. The information includes events for both successful and failedschedules. If the administrator specifies a time range that includes the future,Tivoli Storage Manager displays future events with a status of future.
Figure 57 shows an example of a report for client node GOODELL that isdisplayed after you enter:query event standard weekly_backup node=goodell enddate=today+7
Displaying Events that Ended UnsuccessfullyYou can display information about scheduled events that ended unsuccessfully byusing exception reporting. For example, you can issue the following command to
Scheduled Start Actual Start Schedule Name Node Name Status-------------------- -------------------- ------------- ------------- ---------03/09/1998 06:40:00 03/09/1998 07:38:09 WEEKLY_BACKUP GOODELL Started03/16/1998 06:40:00 WEEKLY_BACKUP GOODELL Future
Figure 57. Events for a Node
Chapter 17. Managing Schedules for Client Nodes 371

find out which events were missed in the previous 24 hours, for theDAILY_BACKUP schedule in the STANDARD policy domain:query event standard daily_backup begindate=-1 begintime=nowenddate=today endtime=now exceptionsonly=yes
Figure 58 shows an example of the results of this query. To find out why aschedule was missed or failed, you may need to check the schedule log on theclient node itself. For example, a schedule can be missed because the schedulerwas not started on the client node.
Displaying Past EventsIf you query the server for events, the server may display past events even if theevent records have been deleted. Such events are displayed with a status ofUncertain, indicating that complete information is not available because the eventrecords have been deleted. To determine if event records have been deleted, checkthe message that is issued after the DELETE EVENT command is processed.
Managing Event Records in the Server DatabaseBy default, the server retains event records for 10 days before automaticallyremoving them from the database. The server automatically deletes event recordsfrom the database after the event retention period has passed and after the startupwindow for the event has elapsed.
You can specify how long event records stay in the database before the serverautomatically deletes them by using the SET EVENTRETENTION command. Youcan also manually delete event records from the database, if database space isrequired.
Setting the Event Retention PeriodYou can modify the retention period for event records in the database. To changethe retention period to 15 days, enter:set eventretention 15
Manually Deleting Event RecordsYou may want to manually delete event records to increase available databasespace. For example, to delete all event records written prior to 11:59 p.m. on June30, 2000, enter:delete event 06/30/2000 23:59
Managing the Throughput of Scheduled OperationsIn the Tivoli Storage Manager environment where many nodes attempt to initiatescheduled operations simultaneously, you may have to manage schedulingthroughput. You can choose a scheduling mode, and you can control how oftenclient nodes contact the server to perform a scheduled operation.
Scheduled Start Actual Start Schedule Name Node Name Status-------------------- -------------------- ------------- ------------- ---------03/06/1998 20:30:00 DAILY_BACKUP ANDREA Missed03/06/1998 20:30:00 DAILY_BACKUP EMILY Missed
Figure 58. Exception Report of Events
372 Tivoli Storage Manager for Windows: Administrator’s Guide

Administrators can perform the following activities to manage the throughput ofscheduled operations.
Task Required Privilege Class
Modify the default scheduling mode System
Modify the scheduling period forincremental backup operations
System
Balance the scheduled workload for theserver
System
Set the frequency at which client nodescontact the server
System
Modifying the Default Scheduling ModeTivoli Storage Manager provides two scheduling modes: client-polling andserver-prompted. The mode indicates how client nodes interact with the server forscheduling operations. With client-polling mode, client nodes poll the server forthe next scheduled event. With server-prompted mode, the server contacts thenodes at the scheduled start time.
By default, the server permits both scheduling modes. The default (ANY) allowsnodes to specify either scheduling mode in their client options files. You canmodify this scheduling mode.
If you modify the default server setting to permit only one scheduling mode, allclient nodes must specify the same scheduling mode in their client options file.Clients that do not have a matching scheduling mode will not process thescheduled operations. The default mode for client nodes is client-polling.
The scheduler must be started on the client node’s machine before a schedule canrun in either scheduling mode.
For more information about modes, see “Overview of Scheduling Modes”.
Overview of Scheduling ModesWith client-polling mode, client nodes poll the server for the next scheduled event.With server-prompted mode, the server contacts the nodes at the scheduled starttime. See Table 28 on page 374 and Table 27.
Table 27. Client-Polling Mode
How the mode works Advantages and disadvantages
1. A client node queries the server atprescribed time intervals to obtain aschedule. This interval is set with a clientoption, QUERYSCHEDPERIOD. Forinformation about client options, refer tothe appropriate Backup-Archive Installationand User’s Guide.
2. At the scheduled start time, the clientnode performs the scheduled operation.
3. When the operation completes, the clientsends the results to the server.
4. The client node queries the server for itsnext scheduled operation.
v Useful when a high percentage of clientsstart the scheduler manually on a dailybasis, for example when their workstationsare powered off nightly.
v Supports randomization, which is therandom distribution of scheduled starttimes. The administrator can controlrandomization. By randomizing the starttimes, Tivoli Storage Manager prevents allclients from attempting to start theschedule at the same time, which couldoverwhelm server resources.
v Valid with all communication methods.
Chapter 17. Managing Schedules for Client Nodes 373

Table 28. Server-Prompted Mode
How the mode works Advantages and disadvantages
1. The server contacts the client node whenscheduled operations need to beperformed and a server session isavailable.
2. When contacted, the client node queriesthe server for the operation, performs theoperation, and sends the results to theserver.
v Useful if you change the schedule starttime frequently. The new start time isimplemented without any action requiredfrom the client node.
v Useful when a high percentage of clientsare running the scheduler and are waitingfor work.
v Does not allow for randomization ofscheduled start times.
v Valid only with client nodes that useTCP/IP to communicate with the server.
Modifying the Scheduling Mode on the ServerIf you modify the default so that the server permits only one scheduling mode forthe server, all clients must specify the same scheduling mode in their client optionsfile. Clients that do not have a matching scheduling mode do not processscheduled operations.
Client-Polling Scheduling Mode: To have clients poll the server for scheduledoperations, enter:set schedmodes polling
Ensure that client nodes specify the same mode in their client options files.
Server-Prompted Scheduling Mode: To have the server prompt clients forscheduled operations, enter:set schedmodes prompted
Ensure that client nodes specify the same mode in their client options files.
Any Scheduling Mode: To return to the default scheduling mode so that theserver supports both client-polling and server-prompted scheduling modes, enter:set schedmodes any
Client nodes can then specify either polling or prompted mode.
Modifying the Default Scheduling Mode on Client NodesUsers set the scheduling mode on client nodes. They specify either theclient-polling or the server-prompted scheduling mode on the command line or inthe client user options file. (On UNIX systems, root users set the scheduling modein the client system options file.)
For more information, refer to the appropriate Backup-Archive Installation and User’sGuide.
Specifying the Schedule Period for Incremental BackupOperations
When you define a backup copy group, you specify the copy frequency, which isthe minimum interval between successive backups of a file. When you define a
374 Tivoli Storage Manager for Windows: Administrator’s Guide

schedule, you specify the length of time between processing of the schedule.Consider how these interact to ensure that the clients get the backup coverage thatyou intend.
See “Defining and Updating a Backup Copy Group” on page 323.
Balancing the Scheduled Workload for the ServerYou can control the server’s workload and ensure that the server can perform allscheduled operations within the specified window. To enable the server tocomplete all schedules for clients, you may need to use trial and error to controlthe workload. To estimate how long client operations take, test schedules onseveral representative client nodes. Keep in mind, for example, that the firstincremental backup for a client node takes longer than subsequent incrementalbackups.
You can balance the server’s scheduled workload by:v Adjusting the number of sessions that the server allocates to scheduled
operationsv Randomizing scheduled start time for client operations (if clients use
client-polling scheduling mode)v Increasing the length of the startup window
Setting the Number of Sessions the Server Allocates toScheduled OperationsThe maximum number of concurrent client/server sessions is defined by theMAXSESSIONS server option. Of these sessions, you can set a maximumpercentage to be available for processing scheduled operations. Limiting thenumber of sessions available for scheduled operations ensures that sessions areavailable when users initiate any unscheduled operations, such as restoring file orretrieving files.
If the number of sessions for scheduled operations is insufficient, you can increaseeither the total number of sessions or the maximum percentage of scheduledsessions. However, increasing the total number of sessions can adversely affectserver performance. Increasing the maximum percentage of scheduled sessions canreduce the server availability to process unscheduled operations.
For example, assume that the maximum number of sessions between client nodesand the server is 80. If you want 25% of these sessions to be used by for scheduledoperations, enter:set maxschedsessions 25
The server then allows a maximum of 20 sessions to be used for scheduledoperations.
The following table shows the tradeoffs of using either the SETMAXSCHEDSESSIONS command or the MAXSESSIONS server option.
An administrator can... Using... With the result
Increase the total number ofsessions
MAXSESSIONS server option May adversely affect theserver’s performance
Increase the total number ofsessions allocated toscheduled operations
SET MAXSCHEDSESSIONScommand
May reduce the server’sability to processunscheduled operations
Chapter 17. Managing Schedules for Client Nodes 375

For information about the MAXSESSIONS option and the SETMAXSCHEDSESSIONS command, refer to Administrator’s Reference.
Randomizing Schedule Start TimesTo randomize start times for schedules means to scatter each schedule’s start timeacross its startup window. A startup window is defined by the start time andduration during which a schedule must be initiated. For example, if the start timeis 1:00 a.m. and the duration is 4 hours, the startup window is 1:00 a.m. to 5:00a.m.
For the client-polling scheduling mode, you can specify the percentage of thestartup window that the server can use to randomize start times for different clientnodes associated with a schedule.
If you set randomization to 0, no randomization occurs. This process can result incommunication errors if many client nodes try to contact the server at the sameinstant.
The settings for randomization and the maximum percentage of scheduled sessionscan affect whether schedules are successfully completed for client nodes. Usersreceive a message if all sessions are in use when they attempt to process aschedule. If this happens, you can increase randomization and the percentage ofscheduled sessions allowed to make sure that the server can handle the workload.The maximum percentage of randomization allowed is 50%. This limit ensures thathalf of the startup window is available for retrying scheduled commands that havefailed.
To set randomization to 50%, enter:set randomize 50
It is possible, especially after a client node or the server has been restarted, that aclient node may not poll the server until after the beginning of the startup windowin which the next scheduled event is to start. In this case, the starting time israndomized over the specified percentage of the remaining duration of the startupwindow.
Consider the following situation:v The schedule start time is 8:00 a.m. and its duration is 1 hour. Therefore the
startup window for the event is from 8:00 to 9:00 a.m.v Ten client nodes are associated with the schedule.v Randomization is set to 50%.v Nine client nodes poll the server before 8:00 a.m.v One client node does not poll the server until 8:30 a.m.
The result is that the nine client nodes that polled the server before the beginning ofthe startup window are assigned randomly selected starting times between 8:00and 8:30. The client node that polled at 8:30 receives a randomly selected startingtime that is between 8:30 and 8:45.
Increasing the Length of the Schedule Startup WindowIncreasing the size of the startup window (by increasing the schedule’s duration)can also affect whether a schedule completes successfully. A larger startup windowgives the client node more time to attempt initiation of a session with the server.
376 Tivoli Storage Manager for Windows: Administrator’s Guide

Controlling How Often Client Nodes Contact the ServerTo control how often client nodes contact the server to perform a scheduledoperation, an administrator can set:v How often nodes query the server ( see “Setting How Often Clients Query the
Server”)v The number of command retry attempts (see “Setting the Number of Command
Retry Attempts”)v The amount of time between retry attempts (see “Setting the Amount of Time
between Retry Attempts” on page 378)
Users can also set these values in their client user options files. (Root users onUNIX systems set the values in client system options files.) However, user valuesare overridden by the values that the administrator specifies on the server.
The communication paths from client node to server can vary widely with regardto response time or the number of gateways. In such cases, you can choose not toset these values so that users can tailor them for their own needs.
Setting How Often Clients Query the ServerWhen scheduling client nodes with client-polling scheduling, you can specify howoften the nodes query the server for a schedule. If nodes poll frequently forschedules, changes to scheduling information (through administrator commands)are propagated more quickly to the nodes. However, increased polling by clientnodes also increases network traffic.
For the client-polling scheduling mode, you can specify the maximum number ofhours that the scheduler on a client node waits between attempts to contact theserver to obtain a schedule. You can set this period to correspond to the frequencywith which the schedule changes are being made. If client nodes poll morefrequently for schedules, changes to scheduling information (through administratorcommands) are propagated more quickly to client nodes.
If you want to have all clients using polling mode contact the server every 24hours, enter:set queryschedperiod 24
This setting has no effect on clients that use the server-prompted scheduling mode.
The clients also have a QUERYSCHEDPERIOD option that can be set on eachclient. The server value overrides the client value once the client successfullycontacts the server.
Setting the Number of Command Retry AttemptsYou can specify the maximum number of times the scheduler on a client node canretry a scheduled command that fails.
The maximum number of command retry attempts does not limit the number oftimes that the client node can contact the server to obtain a schedule. The clientnode never gives up when trying to query the server for the next schedule.
Be sure not to specify so many retry attempts that the total retry time is longerthan the average startup window.
If you want to have all client schedulers retry a failed attempt to process ascheduled command up to two times, enter:set maxcmdretries 2
Chapter 17. Managing Schedules for Client Nodes 377

Maximum command retries can also be set on each client with a client option,MAXCMDRETRIES. The server value overrides the client value once the clientsuccessfully contacts the server.
Setting the Amount of Time between Retry AttemptsYou can specify the length of time that the scheduler waits between commandretry attempts. Command retry attempts occur when a client node is unsuccessfulin establishing a session with the server or when a scheduled command fails toprocess. Typically, this setting is effective when set to half of the estimated time ittakes to process an average schedule.
If you want to have the client scheduler retry every 15 minutes any failed attemptsto either contact the server or process scheduled commands, enter:set retryperiod 15
You can use this setting in conjunction with the SET MAXCMDRETRIES command(number of command retry attempts) to control when a client node contacts theserver to process a failed command. See “Setting the Number of Command RetryAttempts” on page 377.
The retry period can also be set on each client with a client option, RETRYPERIOD.The server value overrides the client value once the client successfully contacts theserver.
Specifying One-Time Actions for Client NodesYou can use the DEFINE CLIENTACTION command to specify that one or moreclient nodes perform a one-time action if the client schedulers are active. If thescheduling mode is set to prompted, the client performs the action within 3 to 10minutes. If the scheduling mode is set to polling, the client processes the commandat its prescribed time interval. The time interval is set by theQUERYSCHEDPERIOD client option.
The DEFINE CLIENTACTION command causes Tivoli Storage Manager toautomatically define a schedule and associate client nodes with that schedule. Theschedule name and association information is returned to the server console or theadministrative client with messages ANR2500I and ANR2510I. With the schedulename provided, you can later query or delete the schedule and associated nodes.The names of one-time client action schedules can be identified by a specialcharacter followed by numerals, for example @1.
For example, you can issue a DEFINE CLIENTACTION command that specifies anincremental backup command for client node HERMIONE in domainENGPOLDOM:define clientaction hermione domain=engpoldom action=incremental
Tivoli Storage Manager defines a schedule and associates client node HERMIONEwith the schedule. The server assigns the schedule priority 1, sets the period units(PERUNITS) to ONETIME, and determines the number of days to keep theschedule active based on the value set with SET CLIENTACTDURATIONcommand.
For a list of valid actions, see the DEFINE CLIENTACTION command inAdministrator’s Reference. You can optionally include the OPTIONS and OBJECTSparameters.
378 Tivoli Storage Manager for Windows: Administrator’s Guide
Determining How Long the One-Time Schedule RemainsActive
You can determine how long schedules that were defined via DEFINECLIENTACTION commands remain active by using the SETCLIENTACTDURATION command. This command allows you to specify thenumber of days that schedules that were created with the DEFINECLIENTACTION command are active. These schedules are automatically removedfrom the database whether the associated nodes have processed the schedule ornot, after the specified number of days. The following example specifies thatschedules for client actions be active for 3 days:set clientactduration 3
If the duration of client actions is set to zero, the server sets the DURUNITSparameter (duration units) as indefinite for schedules defined with DEFINECLIENTACTION command. The indefinite setting for DURUNITS means that theschedules are not deleted from the database.
Chapter 17. Managing Schedules for Client Nodes 379

380 Tivoli Storage Manager for Windows: Administrator’s Guide

Part 4. Maintaining the Server
© Copyright IBM Corp. 1994, 2002 381

382 Tivoli Storage Manager for Windows: Administrator’s Guide

Chapter 18. Managing Server Operations
Administrators can perform such server operations as licensing purchased features,starting and halting the server, and monitoring server information. See thefollowing sections:
Tasks:
“Licensing Tivoli Storage Manager”
“Working with The Tivoli Storage Manager Server and Active Directory” on page 387
“Starting and Halting the Server” on page 389
“Moving the Tivoli Storage Manager Server” on page 393
“Changing the Date and Time on the Server” on page 393
“Starting and Stopping the Tivoli Storage Manager Device Driver (ADSMSCSI)” onpage 394
“Managing Server Processes” on page 394
“Preemption of Client or Server Operations” on page 396
“Setting the Server Name” on page 397
“Adding or Updating Server Options” on page 397
“Automatic Tuning of Server Options” on page 398
“Getting Help on Commands and Error Messages” on page 398
In this chapter, most examples illustrate how to perform tasks by using a TivoliStorage Manager command-line interface. For information about the commands,see Administrator’s Reference, or issue the HELP command from the command lineof a Tivoli Storage Manager administrative client.
Tivoli Storage Manager tasks can also be performed from the administrative Webinterface. For more information about using the administrative interface, see QuickStart.
Licensing Tivoli Storage ManagerThis section describes the tasks involved when licensing a Tivoli Storage Managersystem, including registering, saving and auditing.
Task Required Privilege Class
Register licensesAudit licenses
System
Display license information Any administrator
For current information about supported clients and devices, visit the TivoliStorage Manager page on the World Wide Web athttp://www.tivoli.com/support/storage_mgr/tivolimain.html.
The base Tivoli Storage Manager feature includes the following support:v An unlimited number of administrative clients.
© Copyright IBM Corp. 1994, 2002 383

v Enterprise Administration, which includes: command routing, enterpriseconfiguration, and enterprise logging (server-to-server).
v Server-to-server Virtual Volume capabilities (does not include database andstorage pool backup).
v Network Enabler (network connections for clients).v AFS/DFS Support, (the S/390® platform includes the S/390 UNIX client as part
of Managed System for SAN).
Registering Licensed FeaturesYou must register a new license if you want to add support for any of thefollowing features that are not already in your existing license agreement. A licensefile and the REGISTER LICENSE command are used to complete this task. Licensesare stored in enrollment certificate files, which contain licensing information for theserver product. The enrollment certificate files are on the installation CD-ROM.When registered, the licenses are stored in a NODELOCK file within the currentdirectory.
Table 29. Licensed Features
License File Name Description
mgsyslan.lic Managed System for LAN
mgsyssan.lic Managed System for SAN
Required for each storage agent. The Tape Library Sharing featureis required on the Tivoli Storage Manager server.
Tivoli Storage Manager requires this license for each client usingserver-free data movement.
spacemgr.lic Each managed system that uses Tivoli Space Manager
Also required: Managed System for LAN license if you are using acommunication protocol other than shared memory. Only oneManaged System for LAN license is required if an HSM client andbackup-archive client are on the same system with the same nodeID.
domino.lic Each managed system that uses Tivoli Data Protection for LotusDomino
Also required: Managed System for LAN license if you use acommunication protocol other than shared memory.
emcsymm.lic Each managed system that uses Tivoli Data Protection for EMCSymmetrix
Also required: Managed System for LAN license if you use acommunication protocol other than shared memory.
emcsymr3.lic Each managed system that uses Tivoli Data Protection for EMCSymmetrix R/3
Also required: Managed System for LAN license if you use acommunication protocol other than shared memory.
ess.lic Each managed system that uses Tivoli Data Protection for ESS
Also required: Managed System for LAN license if you use acommunication protocol other than shared memory.
384 Tivoli Storage Manager for Windows: Administrator’s Guide

Table 29. Licensed Features (continued)
License File Name Description
essr3.lic Each managed system that uses Tivoli Data Protection for ESS R/3
Also required: Managed System for LAN license if you use acommunication protocol other than shared memory.
informix.lic Each managed system that uses Tivoli Data Protection for Informix
Also required: Managed System for LAN license if you use acommunication protocol other than shared memory.
lnotes.lic Each managed system that uses Tivoli Data Protection for LotusNotes
Also required: Managed System for LAN license if you use acommunication protocol other than shared memory.
msexch.lic Each managed system that uses Tivoli Data Protection for MSExchange
Also required: Managed System for LAN license if you use acommunication protocol other than shared memory.
mssql.lic Each managed system that uses Tivoli Data Protection for MS SQLServer
Also required: Managed System for LAN license if you use acommunication protocol other than shared memory.
oracle.lic Each managed system that uses Tivoli Data Protection for Oracle
Also required: Managed System for LAN license if you use acommunication protocol other than shared memory.
r3.lic Each managed system that uses Tivoli Data Protection for R/3
Also required: Managed System for LAN license if you use acommunication protocol other than shared memory.
library.lic Managed Library
Required for each library in the Extended Device Category that ismanaged by a Tivoli Storage Manager server. For currentinformation on supported devices, visit the TSM page on the WorldWide Web athttp://www.tivoli.com/support/storage_mgr/tivolimain.html.
drm.lic Tivoli Disaster Recovery Manager (includes server-to-server virtualvolumes for database and storage pool backup)
Required on a source server but not on a target server.
ndmp.lic Tivoli Data Protection for NDMP
Required on a Tivoli Storage Manager server that performs backupand restore operations of a NAS file server, using Network DataManagement Protocol.
libshare.lic Tape Library Sharing
Required on a Tivoli Storage Manager server that can access ashared library, including the library manager. The Managed Librarylicense is required only on the library manager.
Chapter 18. Managing Server Operations 385
To register a license, you must issue the REGISTER LICENSE command as well asthe license file associated with the license. For example, to use the Tivoli DisasterRecovery Manager and two Tivoli Space Manager (HSM clients), issue thefollowing commands:register license file(drm.lic)
register license file(spacemgr.lic) number=2register license file(mgsyslan.lic) number=2
To register 20 managed systems that move data over a local area network, issuethe following command:register license file(mgsyslan.lic) number=20
To register 10 Tivoli Data Protection for Lotus Notes clients that move data over aLAN, using the TCP/IP communication protocol, issue the following commands:register license file(lnotes.lic) number=10register license file(mgsyslan.lic) number=10
With the exception of the ndmp.lic, drm.lic and libshare.lic, you can specify anynumber of license files to register. Always specify the total number of licenses youwant registered. The REGISTER LICENSE command updates the nodelock filebased on the total number of licenses you want registered. If you enter number=0for a particular license, the license is unregistered. If you have twenty licenses andrequire ten additional licenses, you must register thirty.
For example, to register Tivoli Storage Manager for 30 managed systems that movedata over a local area network, issue the following commands:register license file(mgsyslan.lic) number=30
You can also register a license by specifying the product password that is includedin the license certificate file. For example:register license 5s3qydpnwx7njdxnafksqas4
Attention: Tivoli Storage Manager licenses are associated with the CPU chip ofthe machine on which Tivoli Storage Manager is installed. If you change that CPUchip, you must first erase the existing nodelock files and then reregister all yourlicenses.
Saving Your LicensesSave the CD-ROM containing your enrollment certificate files. You may you needto register your licenses again for any of the following reasons:v The server is corrupted.v The server is moved to a different machine.v The Nodelock file is destroyed or corrupted. Tivoli Storage Manager stores license
information in the Nodelock file, which is located in the directory from which theserver is started.
Monitoring LicensesWhen license terms change (for example, a new license is specified for the server),the server conducts an audit to determine if the current server configurationconforms to the license terms. The server also periodically audits compliance withlicense terms. The results of an audit are used to check and enforce license terms.If 30 days have elapsed since the previous license audit, the administrator cannotcancel the audit.
386 Tivoli Storage Manager for Windows: Administrator’s Guide

If a Tivoli Storage Manager system exceeds the terms of its license agreement, oneof the following occurs:v The server issues a warning message indicating that it is not in compliance with
the licensing terms.v If you are running in Try Buy mode, operations fail because the server is not
licensed for specific features.
You must contact your Tivoli Storage Manager account representative orauthorized reseller to modify your agreement.
An administrator can monitor license compliance by:
Auditing licensesUse the AUDIT LICENSES command to compare the current configurationwith the current licenses.
Note: During a license audit, the server calculates, by node, the amount ofbackup, archive, and space management storage in use. Thiscalculation can take a great deal of CPU time and can stall otherserver activity. Use the AUDITSTORAGE server option to specifythat storage is not to be calculated as part of a license audit.
Displaying license informationUse the QUERY LICENSE command to display details of your currentlicenses and determine licensing compliance.
Scheduling automatic license auditsUse the SET LICENSEAUDITPERIOD command to specify the number ofdays between automatic audits.
Working with The Tivoli Storage Manager Server and Active DirectoryA directory service provides a place to store information about network resourcesand makes the information available to administrators and users. TSM uses ActiveDirectory to publish information about TSM servers. This information includes:v The server’s name.v Communication protocols.v A list of the server’s registered nodes.
TSM servers running on Windows 2000 can automatically publish their informationin Active Directory. By setting the ADREGISTER server option to YES, and issuinga REGISTER, RENAME, or DELETE NODE command, the server’s list ofregistered nodes is updated each time the Tivoli Storage Manager server is started.Administrators can publish information about non-Windows Tivoli StorageManager servers with the Tivoli Storage Manager Active Directory ConfigurationWizard in the Tivoli Storage Manager Console. The Active Directory ConfigurationWizard is also useful for adding, removing, or editing TSM server entries.
The TSM backup-archive client’s Setup Wizard includes the capability to browseserver information in the Active Directory. The client can use the information todetermine which server to connect to and what communication protocol to use.
Refer to the online help in the Active Directory Configuration Wizard for moreinformation. You can also refer to the online help available from the Windows 2000Server Start menu.
Chapter 18. Managing Server Operations 387

Configuring the Active Directory SchemaSystem administrators must allow Tivoli Storage Manager to update the ActiveDirectory schema before Tivoli Storage Manager can store information in andretrieve information from Active Directory. The Active Directory schema, stored onthe Windows 2000 domain controller, is a list of definitions that identifies objectsand information about those objects. For more information about the ActiveDirectory schema, search for active directory schema in the Windows 2000 onlinehelp.
Installing Windows 2000 Administration Tools on your Windows2000 Domain ControllerTo update the schema, you must use the Active Directory Schema snap-in. Thissnap-in is part of Windows 2000 Administration Tools, which is included on theWindows 2000 Server and Advanced Server compact disc sets.
The Windows 2000 Administration Tools are available on the Windows Servercompact disc (CD).1. Load the CD into the Windows 2000 computer CD drive.2. Open the I386 folder.3. Double click the Adminpak.msi file.4. Follow the instructions from the setup wizard.
Updating a Windows Account with Permissions to Extend theSchemaAfter you have installed the Windows 2000 Administration Tools, you canconfigure permissions. From the domain controller that contains the ActiveDirectory schema, do the following:1. Click Start, then Run.2. Type schmmgmt.msc in the Run dialog entry field. Click OK. The Active
Directory schema snap-in opens.3. Right-click Active Directory Schema in the console tree, then click Operations
Master.4. Click The Schema may be modified on this Domain Controller.5. Right-click Active Directory Schema in the console tree. Click Permissions... in
the pop-up menu. If your account name is not listed in the name section, clickAdd..., select your account name, click Add again, then click OK.
6. Select your account name and check the Full Control checkbox in the Allowcolumn of the Permissions area.
7. Click OK.
Extending the Active Directory Schema for Tivoli StorageManagerComplete the following steps on the Tivoli Storage Manager server:1. Double-click the Tivoli Storage Manager Console icon on the desktop.2. Expand the tree until the Tivoli Storage Manager server you want to work with
is displayed. Expand the server and click Wizards. The Wizards list appears inthe right pane.
3. Select the Active Directory Configuration wizard and click Start.4. To start the wizard, click on Start, then Next.5. Click on Detect, then click Next.6. No entries are listed at this time, but the schema has been updated. Click
Cancel.
388 Tivoli Storage Manager for Windows: Administrator’s Guide

If you want to disable the permissions to extend the schema, do the following:1. Return to the schema snap-in2. Right-click Active Directory Schema, then click Permissions....3. Select your account name, and uncheck the Full Control checkbox. Click OK.
If you want to disable further schema updates, do the following:1. Return to the schema snap-in2. Right-click Active Directory Schema, then click Operations Master
3. Uncheck The Schema may be modified on this Domain Controller and clickOK.
Configuring the Tivoli Storage Manager Server to Define Itself toActive DirectoryTo have the server define itself to the Active Directory, do the following:1. Double-click the TSM Console icon on the desktop.2. Expand the tree until the TSM server you want to work with is displayed.
Expand the server.3. Expand Reports.4. Click on Service Information.5. Select the server you want to work with, and click on Edit Options File.
Note: If you do not see any entries, you must first initialize the server. You canuse the Server Initialization Wizard in the Tivoli Storage ManagerConsole.
6. Click the Active Directory tab. When the Active Directory options appear,check Register with the Active Directory on TSM server start-up.
7. Check Unregister with Active Directory on TSM server shutdown.8. Select Automatically Detect in the Domain Controller section.9. Click OK.
The next time the Tivoli Storage Manager server starts, it will define itself to ActiveDirectory and add information that includes the list of registered nodes andcommunication protocol information. You can verify this information at any timeby using the Active Directory Configuration wizard in the Tivoli Storage ManagerConsole.
Tivoli Storage Manager backup-archive clients in the domain can select a TivoliStorage Manager server by clicking the browse button on the protocol page of theBackup-Archive Client Setup Wizard. The wizard lists the Tivoli Storage Managerservers that the node is already registered with. It also lists the TSM servers thatsupport the selected protocol. When the client selects a server and the wizardselections are complete, the wizard includes the corresponding communicationprotocol information in the client options file.
Starting and Halting the Server
Task Required Privilege Class
Start, halt, and restart the server System or operator
Chapter 18. Managing Server Operations 389

Starting the ServerThe following events occur when you start or restart the Tivoli Storage Managerserver:v The server invokes the communication methods specified in the server options
file.
Note: By default, TCP/IP and Named Pipes communication methods areenabled in the server options file. To adjust the Tivoli Storage Managercommunication method value or to disable a communication method,select Edit Options File from the Service Information panel in the TivoliStorage Manager Console.
v If the ADREGISTER server option is set to YES, the Tivoli Storage Managerserver is registered in the Active Directory. The information published under theserver’s name includes the server’s communication protocol information and itsregistered nodes.
v The server uses the volumes specified in the dsmserv.dsk file for the databaseand recovery log to record activity. It also identifies storage pool volumes to beused.
v The server starts a Tivoli Storage Manager server console session that is used tooperate and administer the server until administrative clients are registered tothe server.
You can start the Tivoli Storage Manager server as one of the following:v Windows service (recommended method).
ORv Console application.
Windows requires that all applications be closed before you log off. As aproduction server, Tivoli Storage Manager must be available to clients 24 hours aday. At many sites, it is a security exposure to leave an administrator ID logged onat an unattended computer. The solution is to run the server as a Windows service.
You can start the server as a console application during configuration, or when youuse it in a test environment. When starting the server as a console application,Tivoli Storage Manager provides a special administrator user ID namedSERVER_CONSOLE. All server messages are displayed directly on the screen. Theconsole can be useful when debugging start-up problems.
When Tivoli Storage Manager is installed, a database and recovery log is created.Only one server at a time can access a particular database and recovery log. If youhave installed a single Tivoli Storage Manager server on a computer and start it asa console application, you cannot start the server as a service until you have firststopped the console application. Similarly, if you start the server as a Windowsservice, you must stop the server before you can successfully start it as a consoleapplication.
If you have more than one TSM server installed and configured on a computer,you can run multiple servers because each server has its own database andrecovery log. However, multiple servers cannot use the same device becausepossible data loss may occur.
390 Tivoli Storage Manager for Windows: Administrator’s Guide

Starting the Tivoli Storage Manager Server as a ServiceBecause the Tivoli Storage Manager server can issue a number of requests thatrequire action, it is important to monitor server activity with the administrativeclient using the console monitor.
To start the console monitor, do the following:1. Double-click the Tivoli Storage Manager Console icon on the desktop.2. Expand the tree until the Tivoli Storage Manager server you want to work with
is displayed. Expand the server, and then expand the Reports tree under theselected server.
3. Select Monitor, and then Start.
To start the Tivoli Storage Manager server as a Windows service, do the following:1. Double-click the Tivoli Storage Manager Console icon on the desktop.2. Expand the tree until the Tivoli Storage Manager server you want to work with
is displayed. Expand the server, and then expand the Reports tree under theselected server.
3. Select Service Information.4. Select the server in the right pane.5. Click on Start.
At this time you can also set up the Tivoli Storage Manager server start mode andoptions by doing the following:1. Double-click the Tivoli Storage Manager Console icon on the desktop.2. Expand the tree until the Tivoli Storage Manager server you want to work with
is displayed. Expand the server, and then expand the Reports tree under theselected server.
3. Select Service Information.4. Select the server in the right pane.5. Click Properties...
6. Select the Automatic radio button.7. Select the Log on as account information as appropriate. The default selection
is the System account.8. Check the Log output to file check box using the default console.log file name
or you can specify another file name.
To view start and stop completion messages that are logged in the WindowsApplication log, you can use the Windows Event Viewer in Administrative Tools.
If you plan to use the ADSMSCSI device driver, you may also need to start thedriver at this time. For more information, see “Starting and Stopping the TivoliStorage Manager Device Driver (ADSMSCSI)” on page 394.
Starting the Tivoli Storage Manager Server ConsoleTo start the server console from the command line prompt, change to the directorywhere the server is installed. An example would be: c:\programfiles\tivoli\tsm\server.
Enter:dsmserv
Chapter 18. Managing Server Operations 391

Tivoli Storage Manager displays the following information when the server isstarted:v Product licensing and copyright informationv Processing information about the server options filev Communication protocol informationv Database and recovery log informationv Storage pool volume informationv Server generation datev Progress messages and any errors encountered during server initialization
Halting the ServerYou can halt the server without warning if an unplanned operating systemproblem requires the server to be stopped.
When you halt the server, all processes are abruptly stopped and client sessions arecanceled, even if they are not complete. Any in-progress transactions are rolledback when the server is restarted. Administrator activity is not possible.
If possible, halt the server only after current administrative and client nodesessions have completed or canceled. To shut down the server without severelyimpacting administrative and client node activity with the server, you must:1. Disable the server to prevent new client node sessions from starting by issuing
the DISABLE SESSIONS command. This command does not cancel sessionscurrently in progress or system processes like migration and reclamation.
2. Notify any existing administrative and client node sessions that you plan toshut down the server. The server does not provide a network notificationfacility; you must use external means to notify users.
3. Cancel any existing administrative or client node sessions by issuing theCANCEL SESSION command and the associated session number. To obtainsession numbers and determine if any sessions are running, use the QUERYSESSION command. If a session if running, a table will appear showing thesession number on the far left side of the screen.
4. Find out if any other processes are running, such as server migration orinventory expiration, by using the QUERY PROCESS command. If a databasebackup process is running, allow it to complete before halting the server. Ifother types of processes are running, cancel them by using the CANCELPROCESS command.
Note: If the process you want to cancel is currently waiting for a tape volumeto be mounted (for example, a process initiated by EXPORT, IMPORT, orMOVE DATA commands), the mount request is automatically cancelled.If a volume associated with the process is currently being mounted by anautomated library, the cancel may not take effect until the mount iscomplete.
5. Halt the server to shut down all server operations by using the HALTcommand.To stop the Tivoli Storage Manager Server from the Tivoli Storage ManagerConsole, complete the following steps:a. Double-click the Tivoli Storage Manager Console icon on the desktop.b. Expand the tree until the TSM server you want to work with is displayed.c. Expand Reports.d. Click on Service Information.e. Select the server, and click on Stop.
392 Tivoli Storage Manager for Windows: Administrator’s Guide

Note: The QUIESCE option on the HALT command is recommended only if youplan to do a database dump by using the DSMSERV DUMPDB commandimmediately after halting. Because Tivoli Storage Manager supports onlinedatabase backup (BACKUP DB command), the DSMSERV DUMPDBcommand should be rarely, if ever, needed.
Moving the Tivoli Storage Manager ServerThere are two ways to move a Tivoli Storage Manager server to a new machinethat is running the same operating system:v Back up the database, and restore it on another machine on which Tivoli Storage
Manager is installed. The backup and restore method is described in this section.v Export the server to sequential media, and import the data to the new machine.
See “Chapter 23. Exporting and Importing Data” on page 509 for details. Theexport and import method may take longer than the backup and restore method.
The prerequisites for the backup and restore method are:v The same operating system must be running on both machines.v The sequential storage pool must be accessible from both machines. You will
have to move any libraries and devices from the original machine to the newmachine or they must be accessible through a SAN.
v The restore operation must be done by a Tivoli Storage Manager server at a codelevel that is the same as or later than that on the machine that was backed up.
v Only manual and SCSI library types are supported for the restore operation.
In the following example, the Tivoli Storage Manager server on machine A ismoved to machine B.On machine A:
1. Migrate all disk storage pool data to sequential media. See “Migration for DiskStorage Pools” on page 192 for details.
2. Perform a full database backup to sequential media.backup db devclass=8mm type=full
3. Copy the volume history file and the device configuration file.On machine B:
4. Install Tivoli Storage Manager.5. Copy the volume history file and device configuration file to the new server.6. Restore the database:
dsmserv restore db devclass=8mm volumenames=vol001,vol002,vol002
Changing the Date and Time on the ServerEvery time the server is started and for each hour thereafter, a date and time checkoccurs. An invalid date can be one of the following:v Earlier than the server installation date and time.v More than one hour earlier than the last time the date was checked.v More than 30 days later than the last time the date was checked.
If the server detects an invalid date or time, server sessions become disabled. Anerror message (ANR0110E) is displayed and expiration, migration, reclamation, andvolume history deletion operations are not allowed. You may either change thesystem date if it is in error, or issue the ACCEPT DATE command to force the
Chapter 18. Managing Server Operations 393

server to accept the current system date as valid. Use the ENABLE SESSIONScommand after you issue the ACCEPT DATE command to re-enable the server forclient node activity.
Starting and Stopping the Tivoli Storage Manager Device Driver(ADSMSCSI)
The Tivoli Storage Manager device driver (ADSMSCSI) is installed when youinstall the Tivoli Storage Manager server. When the ADSMSCSI driver starts, bydefault the driver claims all devices it can support.
Starting the Tivoli Storage Manager Device DriverTo start the ADSMSCSI driver, do the following:1. From the Tivoli Storage Manager Console, expand the tree until the machine
where the device driver has been installed is displayed. Expand the machine.2. Expand TSM Device Driver and expand Reports.3. Click Service Information in the tree in the left panel. The Service Information
window appears in the right panel.4. Right click Tivoli Storage Manager Device Driver. A pop-up menu appears.5. Click Start in the pop-up menu.
Stopping the Tivoli Storage Manager Device DriverTo stop the ADSMSCSI driver, do the following:1. From the Tivoli Storage Manager Console, expand the tree until the machine
where the device driver has been installed is displayed. Expand the machine.2. Expand TSM Device Driver and expand Reports.3. Click Service Information in the tree in the left panel. The Service Information
window appears in the right panel.4. Right click Tivoli Storage Manager Device Driver. A pop-up menu appears.5. Click Stop in the pop-up menu.
Note: The System Event Viewer logs events created by the ADSMSCSI driver. Formore information, see “Monitoring Errors and Diagnosing Problems” onpage 459.
Managing Server Processes
Task Required Privilege Class
Display information about a serverbackground process
Any administrator
Cancel a server process System
When a user or administrator issues a Tivoli Storage Manager command or uses agraphical user interface to perform an operation, the server starts a process. Someexamples of an operation are registering a client node, deleting a managementclass, or canceling a client session.
Most processes occur quickly and are run in the foreground, but others that takelonger to complete run as background processes.
394 Tivoli Storage Manager for Windows: Administrator’s Guide

The server runs the following operations as background processes:v Auditing an automated libraryv Auditing licensesv Auditing a volumev Backing up the databasev Backing up a storage poolv Checking volumes in and out of an automated libraryv Defining a database volume copyv Defining a recovery log volume copyv Deleting a database volumev Deleting a file spacev Deleting a recovery log volumev Deleting a storage volumev Expiring the inventoryv Exporting or importing datav Extending the database or recovery logv Generating a backup setv Migrating files from one storage pool to the next storage poolv Moving data from a storage volumev Reclaiming space from tape storage volumesv Reducing the database or recovery logv Restoring a storage poolv Restoring a volumev Varying a database or recovery log volume online
The server assigns each background process an ID number and displays theprocess ID when the operation starts. This process ID number is used for trackingpurposes. For example, if you issue an EXPORT NODE command, the serverdisplays a message similar to the following:
EXPORT NODE started as Process 10
Some of these processes can also be run in the foreground by using the WAIT=YESparameter when you issue the command from an administrative client. SeeAdministrator’s Reference for details.
Requesting Information about Server ProcessesYou can request information about server background processes. If you know theprocess ID number, you can use the number to limit the search. However, if youdo not know the process ID, you can display information about all backgroundprocesses by entering:query process
The following figure shows a server background process report after a DELETEFILESPACE command was issued. The report displays a process ID number, adescription and a completion status for each background process.
Process Process Description StatusNumber
-------- ------------------------ ---------------------------------------------2 DELETE FILESPACE Deleting filespace DRIVE_D for node CLIENT1:
172 files deleted.
Chapter 18. Managing Server Operations 395

Canceling Server ProcessesYou can cancel a server background process by specifying its ID number in thefollowing command:cancel process 2
You can issue the QUERY PROCESS command to find the process number. See“Requesting Information about Server Processes” on page 395 for details.
If the process you want to cancel is currently waiting for a tape volume to bemounted (for example, a process initiated by EXPORT, IMPORT, or MOVE DATAcommands), the mount request is automatically canceled. If a volume associatedwith the process is currently being mounted by an automated library, the cancelmay not take effect until the mount is complete.
Preemption of Client or Server OperationsThe server can preempt server or client operations for a higher priority operationwhen a mount point is in use and no others are available, or access to a specificvolume is required.
Mount Point PreemptionThe following are high priority operations that can preempt operations for a mountpoint:v Backup databasev Restorev Retrievev HSM recallv Exportv Import
The following lists operations that can be preempted and are listed in order ofpriority. The server selects the lowest priority operation to preempt, for examplereclamation.1. Move data2. Migration from disk to sequential media3. Backup, archive, or HSM migration4. Migration from sequential media to sequential media5. Reclamation
You can disable preemption by specifying NOPREEMPT in the server options file.When this option is specified, the BACKUP DB command is the only operationthat can preempt other operations.
Volume Access PreemptionA high priority operation that requires access to a specific volume currently in useby a low priority operation can automatically preempt the operation. For example,if a restore request requires access to a volume in use by a reclamation process anda drive is available, the reclamation process is canceled and message ANR0494I orANR1441I is issued.
The following are high priority operations that can preempt operations for accessto a specific volume:v Restorev Retrievev HSM recall
396 Tivoli Storage Manager for Windows: Administrator’s Guide

The following lists operations that can be preempted, and are listed in order ofpriority. The server preempts the lowest priority operation, for examplereclamation.1. Move data2. Migration from disk to sequential media3. Backup, archive, or HSM migration4. Migration from sequential media5. Reclamation
You can disable preemption by specifying NOPREEMPT in the server options file.When this option is specified, no operation can preempt another operation foraccess to a volume.
Setting the Server Name
Task Required Privilege Class
Specify the server name System
At installation, the server name is set to the machine name. After installation, youcan use the SET SERVERNAME command to change the server name. You can usethe QUERY STATUS command to see the name of the server.
To specify the server name as WELLS_DESIGN_DEPT., for example, enter thefollowing:set servername wells_design_dept.
You must set unique names on servers that communicate with each other. See“Setting Up Communications Among Servers” on page 468 for details.
Adding or Updating Server Options
Task Required Privilege Class
Add or update a server option System
You can add or update server options using the SETOPT command, the EditOptions File editor in the Tivoli Storage Manager Console, or the dsmserv.opt file.For information about editing the server options file, refer to Administrator’sReference.
Adding or Updating a Server Option without Restarting theServer
A system administrator can add or update a limited number of server optionswithout stopping and restarting the server. The added or updated server option isappended to the end of the server options file.
The following example shows how to use the SETOPT command to update theexisting server option for MAXSESSIONS:setopt maxsessions 20
The following lists server options that can be added or updated:v BUFPOOLSIZE
Chapter 18. Managing Server Operations 397

v COMMTIMEOUTv DATEFORMATv EXPINTERVALv EXPQUIETv IDLETIMEOUTv MAXSESSIONSv NUMBERFORMATv TIMEFORMATv THROUGHPUTDATATHRESHOLDv THROUGHPUTTIMETHRESHOLD
Note: SETOPT commands in a macro cannot be rolled back.
Automatic Tuning of Server OptionsFor optimal performance, the server can tune the following server optionsautomatically:v MOVEBATCHSIZE and MOVESIZETHRESH
To have the server automatically tune the MOVEBATCHSIZE andMOVESIZETHRESH options, set the SELFTUNETXNSIZE option to Yes. Whenthe server performs an internal data movement operation, such as migration,reclamation, move data, storage pool backup or restore, it will adjust thesevalues to achieve optimal performance. To prevent running out of log spaceduring these operations, use the DEFINE SPACETRIGGER command to allowfor expansion of the recovery log.
v BUFPOOLSIZETo have the server automatically tune the BUFPOOLSIZE option, set theSELFTUNEBUFPOOLSIZE option to Yes. Before expiration processing, the serverresets the database buffer pool and examines the database buffer pool cache hitratio. The server accounts for the amount of available storage and adjusts thebuffer pool size as needed.
Note: Although the values of TXNGROUPMAX, MOVEBATCHSIZE, andMOVESIZETHRESH may be changed, the settings in the server options fileare not changed. Issuing a QUERY OPTION command displays only what isset in the server options file.
For information about the SELFTUNEBUFPOOLSIZE and SELFTUNETXNSIZEserver options, refer to Administrator’s Reference.
Getting Help on Commands and Error MessagesAny administrator can issue the HELP command to display information aboutadministrative commands and messages from the server and the administrativecommand-line client. You can issue the HELP command with no operands todisplay a menu of help selections. You also can issue the HELP command withoperands that specify help menu numbers, commands, or message numbers.
To display the help menu, enter:help
To display help information on the REMOVE commands, enter:help remove
398 Tivoli Storage Manager for Windows: Administrator’s Guide

To display help information on a specific message, such as ANR0992I for example,enter:help 0992
Additional information is also available in the online documentation.
Chapter 18. Managing Server Operations 399

400 Tivoli Storage Manager for Windows: Administrator’s Guide

Chapter 19. Automating Server Operations
You can schedule administrative commands to tune server operations and to startfunctions that require significant server or system resources during times of lowusage. Automating these operations allows the administrator to ensure that serverresources are available when needed by clients.
An administrator can automate the process of issuing a sequence of commands bystoring the commands in a server script. From the command line, the administratorcan immediately process the script or schedule the script for processing.
Tivoli Storage Manager includes a central scheduling component that allows theautomatic processing of administrative commands during a specific time periodwhen the schedule is activated. Schedules that are started by the scheduler can runin parallel. You can process scheduled commands sequentially by using TivoliStorage Manager scripts that contain a sequence of commands with WAIT=YES.You can also use a scheduler external to Tivoli Storage Manager to invoke theadministrative client to start one or more administrative commands.
Each scheduled administrative command is called an event. The server tracks andrecords each scheduled event in the database. You can delete event records asneeded to recover database space.
See the following sections:
Tasks:
“Automating a Basic Administrative Command Schedule”
“Tailoring Schedules” on page 403
“Copying Schedules” on page 405
“Deleting Schedules” on page 405
“Managing Scheduled Event Records” on page 405
“Tivoli Storage Manager Server Scripts” on page 406
“Using Macros” on page 413
In this chapter, most examples illustrate how to perform tasks by using a TivoliStorage Manager command-line interface. For information about the commands,see Administrator’s Reference, or issue the HELP command from the command lineof a Tivoli Storage Manager administrative client.
Tivoli Storage Manager tasks can also be performed from the administrative Webinterface. For more information about using the administrative interface, see QuickStart.
Automating a Basic Administrative Command ScheduleThis section describes how to set up a basic administrative command scheduleusing Tivoli Storage Manager defaults. To later update or tailor your schedules, see“Tailoring Schedules” on page 403.
© Copyright IBM Corp. 1994, 2002 401

Notes:
1. Scheduled administrative command output is directed to the activity log. Thisoutput cannot be redirected. For information about the length of time activitylog information is retained in the database, see “Using the Tivoli StorageManager Activity Log” on page 443.
2. You cannot schedule MACRO or QUERY ACTLOG commands.
Task Required Privilege Class
Define, update, copy, or deleteadministrative schedules
System
Display information about scheduledoperations
Any administrator
Defining the ScheduleUse the DEFINE SCHEDULE command to create a new schedule for processing anadministrative command. Include the following parameters:v Specify the administrative command to be issued (CMD= ).v Specify whether the schedule is activated (ACTIVE= ).
For example:define schedule backup_archivepool type=administrativecmd='backup stgpool archivepool recoverypool' active=yes
This command results in the following:v The schedule created is BACKUP_ARCHIVEPOOL.v The schedule is to process the administrative command:
backup stgpool archivepool recoverypool
This command specifies that primary storage pool ARCHIVEPOOL is backed upto the copy storage pool RECOVERYPOOL.
v The schedule is currently active.v Administrative command output is redirected to the activity log.v The following defaults are in effect:
– The start date and time defaults to the current date and time.– The length of the startup window is 1 hour.– The priority for the schedule is 5. If schedules conflict, the schedule with the
highest priority (lowest number) is run first.– The schedule never expires.
To change the defaults, see “Tailoring Schedules” on page 403.
Verifying the ScheduleYou can verify the details of what you have scheduled by using the QUERYSCHEDULE command. When you use the QUERY SCHEDULE command, youmust specify the TYPE=ADMINISTRATIVE parameter to view an administrativecommand schedule. The following figure shows an example of a report that isdisplayed after you enter:query schedule backup_archivepool type=administrative
402 Tivoli Storage Manager for Windows: Administrator’s Guide
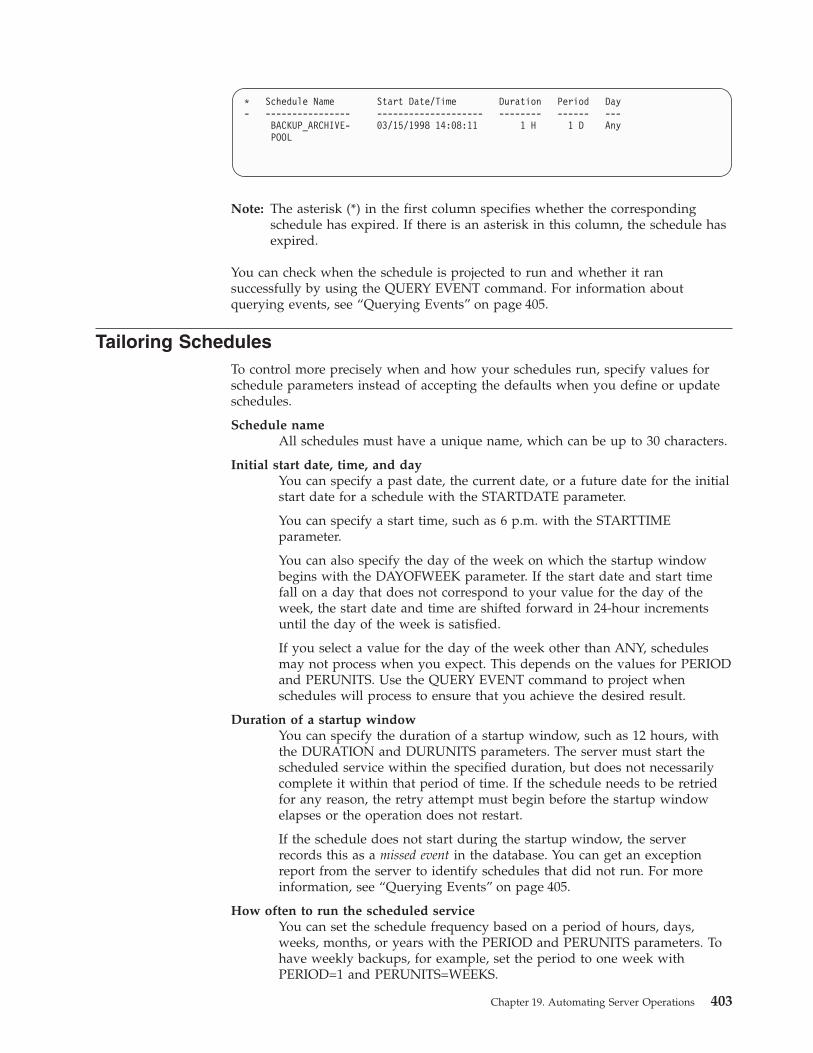
Note: The asterisk (*) in the first column specifies whether the correspondingschedule has expired. If there is an asterisk in this column, the schedule hasexpired.
You can check when the schedule is projected to run and whether it ransuccessfully by using the QUERY EVENT command. For information aboutquerying events, see “Querying Events” on page 405.
Tailoring SchedulesTo control more precisely when and how your schedules run, specify values forschedule parameters instead of accepting the defaults when you define or updateschedules.
Schedule nameAll schedules must have a unique name, which can be up to 30 characters.
Initial start date, time, and dayYou can specify a past date, the current date, or a future date for the initialstart date for a schedule with the STARTDATE parameter.
You can specify a start time, such as 6 p.m. with the STARTTIMEparameter.
You can also specify the day of the week on which the startup windowbegins with the DAYOFWEEK parameter. If the start date and start timefall on a day that does not correspond to your value for the day of theweek, the start date and time are shifted forward in 24-hour incrementsuntil the day of the week is satisfied.
If you select a value for the day of the week other than ANY, schedulesmay not process when you expect. This depends on the values for PERIODand PERUNITS. Use the QUERY EVENT command to project whenschedules will process to ensure that you achieve the desired result.
Duration of a startup windowYou can specify the duration of a startup window, such as 12 hours, withthe DURATION and DURUNITS parameters. The server must start thescheduled service within the specified duration, but does not necessarilycomplete it within that period of time. If the schedule needs to be retriedfor any reason, the retry attempt must begin before the startup windowelapses or the operation does not restart.
If the schedule does not start during the startup window, the serverrecords this as a missed event in the database. You can get an exceptionreport from the server to identify schedules that did not run. For moreinformation, see “Querying Events” on page 405.
How often to run the scheduled serviceYou can set the schedule frequency based on a period of hours, days,weeks, months, or years with the PERIOD and PERUNITS parameters. Tohave weekly backups, for example, set the period to one week withPERIOD=1 and PERUNITS=WEEKS.
* Schedule Name Start Date/Time Duration Period Day- ---------------- -------------------- -------- ------ ---
BACKUP_ARCHIVE- 03/15/1998 14:08:11 1 H 1 D AnyPOOL
Chapter 19. Automating Server Operations 403

Expiration dateYou can specify an expiration date for a schedule with the EXPIRATIONparameter if the services it initiates are required for only a specific periodof time. If you set an expiration date, the schedule is not used after thatdate, but it still exists. You must delete the schedule to remove it from thedatabase.
PriorityYou can assign a priority to schedules with the PRIORITY parameter. Forexample, if you define two schedules and they have the same startupwindow or windows overlap, the server runs the schedule with the highestpriority first. A schedule with a priority of 1 is started before a schedulewith a priority of 3.
If two schedules try to use the same resources, the schedule that firstinitiated the process will be the one to continue processing. The secondschedule will start but will not successfully complete. Be sure to check theactivity log for details.
Administrative schedule nameIf you are defining or updating an administrative command schedule, youmust specify the schedule name.
Type of scheduleIf you are updating an administrative command schedule, you mustspecify TYPE=ADMINISTRATIVE on the UPDATE command. If you aredefining a new administrative command schedule, this parameter isassumed if the CMD parameter is specified.
CommandWhen you define an administrative command schedule, you must specifythe complete command that is processed with the schedule with the CMDparameter. These commands are used to tune server operations or to startfunctions that require significant server or system resources. The functionsinclude:v Migrationv Reclamationv Export and importv Database backup
Whether or not the schedule is activeAdministrative command schedules can be active or inactive when theyare defined or updated. Active schedules are processed when the specifiedcommand window occurs. Inactive schedules are not processed until theyare made active by an UPDATE SCHEDULE command with the ACTIVEparameter set to YES.
Example: Defining and Updating an Administrative CommandSchedule
To schedule the backup of the ARCHIVEPOOL primary storage pool, enter:define schedule backup_archivepool type=administrativecmd='backup stgpool archivepool recoverypool'active=yes startime=20:00 period=2
This command specifies that, starting today, the ARCHIVEPOOL primary storagepool is to be backed up to the RECOVERYPOOL copy storage pool every two daysat 8 p.m.
404 Tivoli Storage Manager for Windows: Administrator’s Guide

To update the BACKUP_ARCHIVEPOOL schedule, enter:update schedule backup_archivepool type=administrativestartime=20:00 period=3
Starting with today, the BACKUP_ARCHIVEPOOL schedule begins the backupevery three days at 10 p.m.
Copying SchedulesYou can create a new schedule by copying an existing administrative schedule.When you copy a schedule, Tivoli Storage Manager copies the followinginformation:v A description of the schedulev All parameter values from the original schedule
You can then update the new schedule to meet your needs.
To copy the BACKUP_ARCHIVEPOOL administrative schedule and name the newschedule BCKSCHED, enter:copy schedule backup_archivepool bcksched type=administrative
Deleting SchedulesTo delete the administrative schedule ENGBKUP, enter:delete schedule engbkup type=administrative
Managing Scheduled Event Records
Task Required Privilege Class
Display information about events Any administrator
Set the retention period for event records System
Delete event records System or unrestricted policy
Each scheduled administrative command operation is called an event. Allscheduled events, including their status, are tracked by the server. An event recordis created in the server database whenever processing of a scheduled command iscreated or missed.
Querying EventsTo help manage schedules for administrative commands, you can requestinformation about scheduled and completed events. You can request general orexception reporting queries.v To get information about past and projected scheduled processes, use a general
query. If the time range you specify includes the future, the query output showswhich events should occur in the future based on current schedules.
v To get information about scheduled processes that did not complete successfully,use exception reporting.
To minimize the processing time when querying events, minimize the time range.
Chapter 19. Automating Server Operations 405

To query an event for an administrative command schedule, you must specify theTYPE=ADMINISTRATIVE parameter. Figure 59 shows an example of the results ofthe following command:query event * type=administrative
Removing Event Records from the DatabaseYou can specify how long event records stay in the database before the serverdeletes them. You can also manually remove event records from the database.
If you issue a query for events, past events may display even if the event recordshave been deleted. The events displayed with a status of Uncertain indicate thatcomplete information is not available because the event records have been deleted.To determine if event records have been deleted, check the message that is issuedafter the DELETE EVENT command is processed.
Setting the Event Record Retention PeriodYou can specify the retention period for event records in the database. After theretention period passes, the server automatically removes the event records fromthe database. At installation, the retention period is set to 10 days.
To set the retention period to 15 days, enter:set eventretention 15
Event records are automatically removed from the database after both of thefollowing conditions are met:v The specified retention period has passedv The startup window for the event has elapsed
Deleting Event RecordsBecause event records are deleted automatically, you do not have to manuallydelete them from the database. However, you may want to manually delete eventrecords to increase available database space.
To delete all event records written prior to 11:59 p.m. on June 30, 1998, enter:delete event type=administrative 06/30/1998 23:59
Tivoli Storage Manager Server ScriptsTivoli Storage Manager provides for automation of common administrative taskswith server scripts that are stored in the database. The scripts can be processeddirectly on the server console, the web interface, or included in an administrativecommand schedule. Tivoli Storage Manager provides sample scripts in scripts.smp.The sample scripts have an example order of execution for schedulingadministrative commands. For more information, see “Using SELECT Commandsin Tivoli Storage Manager Scripts” on page 441. The sample scripts can be loadedfrom the scripts.smp file by issuing the runfile command. See Quick Start for details.
Scheduled Start Actual Start Schedule Name Status-------------------- -------------------- ------------- ---------03/17/1998 14:08:11 03/17/1998 14:08:14 BACKUP_ARCHI- Completed
VEPOOL
Figure 59. Query Results for an Administrative Schedule
406 Tivoli Storage Manager for Windows: Administrator’s Guide
The administrator can run the script by issuing the RUN command from the webadministrative interface, or scheduling the script for processing using theadministrative command scheduler on the server. If one of the specified commandsin the script does not process successfully, the remaining commands are notprocessed.
Tivoli Storage Manager scripts can include the following:v Command parameter substitution.v SQL SELECT statements that you specify when the script is processed.v Conditional logic flow statements. These logic flow statements include:
– The IF clause; this clause determines how processing should proceed basedon the current return code value.
– The EXIT statement; this statement ends script processing.– The GOTO and LABEL statement; this statement directs logic flow to
continue processing with the line that starts with the label specified.– Comment lines.
Defining a Server Script
Task Required Privilege Class
Define a server script System, policy, storage, and operator
You can define a server script line by line, create a file that contains the commandlines, or copy an existing script.
The following examples use commands to define and update scripts. However, youcan easily define and update scripts using the web administrative interface whereyou can also use local workstation cut and paste functions.
You can define a script with the DEFINE SCRIPT command. You can initiallydefine the first line of the script with this command. For example:define script qaixc "select node_name from nodes where platform='aix'"desc='Display AIX clients'
This example defines the script as QAIXC. When you run the script, all AIX clientsare displayed.
To define additional lines, use the UPDATE SCRIPT command. For example, youwant to add a QUERY SESSION command, enter:update script qaixc "query session *"
You can specify a WAIT parameter with the DEFINE CLIENTACTION commandthat allows the client action to complete before processing the next step in acommand script or macro. See Administrator’s Reference for information
You can use the ISSUE MESSAGE command to determine where a problem iswithin a command in a script. See Administrator’s Reference for information on howto use the ISSUE MESSAGE command.
For additional information about updating server scripts, or updating a commandline, see “Updating a Script” on page 410.
Chapter 19. Automating Server Operations 407

Defining a Server Script Using Contents of Another FileYou can define a script whose command lines are read in from another file thatcontains statements for the script to be defined. For example, to define a scriptwhose command lines are read in from the file BKUP12.MAC, issue:define script admin1 file=bkup12.mac
The script is defined as ADMIN1, and the contents of the script have been read infrom the file BKUP12.MAC.
Note: The file must reside on the server, and is read by the server.
Using Continuation Characters for Long CommandsYou can continue long commands across multiple command lines by specifying thecontinuation character (-) as the last character for a command that is continued.The following example continues an SQL statement across multiple commandlines:/*-----------------------------*//* Sample continuation example */SELECT-* FROM-NODE WHERE-PLATFORM='win32'
When this command is processed, it runs the following:select * from nodes where platform='win32'
Using Substitution VariablesYou can include substitution variables in a script. Substitution variables arespecified with a $ character followed by a number that represents the position ofthe parameter when the script is processed. The following example SQLSAMPLEscript specifies substitution variables $1 and $2:/*----------------------------------------------*//* Sample substitution example *//* ---------------------------------------------*/SELECT-$1 FROM-NODES WHERE-PLATFORM='$2'
When you run the script you must specify two values, one for $1 and one for $2.For example:run sqlsample node_name aix
The command that is processed when the SQLSAMPLE script is run is:select node_name from nodes where platform='aix'
Using Logic Flow Statements in a ScriptYou can use conditional logic flow statements based on return codes issued fromprevious command processing. These logic statements allow you to process yourscripts based on the outcome of certain commands. You can use IF, EXIT, or GOTO(label) statements.
As each command is processed in a script, the return code is saved for possibleevaluation before the next command is processed. The return code can be one ofthree severities: OK, WARNING, or ERROR. Refer to Administrator’s Reference for alist of valid return codes and severity levels.
408 Tivoli Storage Manager for Windows: Administrator’s Guide

Specifying the IF Clause: You can use the IF clause at the beginning of acommand line to determine how processing of the script should proceed based onthe current return code value. In the IF clause you specify a return code symbolicvalue or severity.
The server initially sets the return code at the beginning of the script to RC_OK.The return code is updated by each processed command. If the current return codefrom the processed command is equal to any of the return codes or severities inthe IF clause, the remainder of the line is processed. If the current return code isnot equal to one of the listed values, the line is skipped.
The following script example backs up the BACKUPPOOL storage pool only ifthere are no sessions currently accessing the server. The backup proceeds only if areturn code of RC_NOTFOUND is received:/* Backup storage pools if clients are not accessing the server */select * from sessions/* There are no sessions if rc_notfound is received */if(rc_notfound) backup stg backuppool copypool
The following script example backs up the BACKUPPOOL storage pool if a returncode with a severity of warning is encountered:/* Backup storage pools if clients are not accessing the server */select * from sessions/* There are no sessions if rc_notfound is received */if(warning) backup stg backuppool copypool
Specifying the EXIT Statement: The EXIT statement ends script processing. Thefollowing example uses the IF clause together with RC_OK to determine if clientsare accessing the server. If a RC_OK return code is received, this indicates thatclient sessions are accessing the server. The script proceeds with the exit statement,and the backup does not start./* Back up storage pools if clients are not accessing the server */select * from sessions/* There are sessions if rc_ok is received */if(rc_ok) exitbackup stg backuppool copypool
Specifying the GOTO Statement: The GOTO statement is used in conjunctionwith a label statement. The label statement is the target of the GOTO statement.The GOTO statement directs script processing to the line that contains the labelstatement to resume processing from that point. The label statement always has acolon (:) after it and may be blank after the colon.
The following example uses the GOTO statement to back up the storage pool onlyif there are no sessions currently accessing the server. In this example, the returncode of RC_OK indicates that clients are accessing the server. The GOTO statementdirects processing to the done: label which contains the EXIT statement that endsthe script processing:/* Back up storage pools if clients are not accessing the server */select * from sessions/* There are sessions if rc_ok is received */if(rc_ok) goto donebackup stg backuppool copypooldone:exit
Chapter 19. Automating Server Operations 409

Managing Server ScriptsYou can update, copy, rename, query, delete, and run server scripts.
Task Required Privilege Class
Update, copy, rename, query, and delete ascript
Run a script
System, policy, storage, and operator
Updating a ScriptYou can update a script to change an existing command line or to add a newcommand line to a script.
To change an existing command line, specify the LINE= parameter.
To append a command line to an existing script issue the UPDATE SCRIPTcommand without the LINE= parameter. The appended command line is assigneda line number of five greater than the last command line number in the commandline sequence. For example, if your script ends with line 010, the appendedcommand line is assigned a line number of 015.
Appending a New Command: The following is an example of the QSTATUSscript. The script has lines 001, 005, and 010 as follows:001 /* This is the QSTATUS script */005 QUERY STATUS010 QUERY PROCESS
To append the QUERY SESSION command at the end of the script, issue thefollowing:update script qstatus "query session"
The QUERY SESSION command is assigned a command line number of 015 andthe updated script is as follows:001 /* This is the QSTATUS script */005 QUERY STATUS010 QUERY PROCESS015 QUERY SESSION
Replacing an Existing Command: Line number 010 in the QSTATUS scriptcontains a QUERY PROCESS command. To replace the QUERY PROCESScommand with the QUERY STGPOOL command, specify the LINE= parameter asfollows:update script qstatus "query stgpool" line=10
The QSTATUS script is updated to the following:001 /* This is the QSTATUS script */005 QUERY STATUS010 QUERY STGPOOL015 QUERY SESSION
Adding a New Command and Line Number: To add the SET REGISTRATIONOPEN command as the new line 007 in the QSTATUS script, issue the following:update script qstatus "set registration open" line=7
The QSTATUS script is updated to the following:
410 Tivoli Storage Manager for Windows: Administrator’s Guide
001 /* This is the QSTATUS script */005 QUERY STATUS007 SET REGISTRATION OPEN010 QUERY STGPOOL015 QUERY SESSION
Copying a Server ScriptYou can copy an existing script to a new script with a different name. For example,to copy the QSTATUS script to QUERY1 script, issue:copy script qstatus query1
The QUERY1 command script now contains the same command lines as theQSTATUS command script.
Querying a Server ScriptYou can query a script to display information about the script. You can specifywildcard characters to display all scripts with names that match a particularpattern. When you query a script, you can direct the output to a file in a filesystem that the server can access. The various formats you can use to query scriptsare as follows:
Format Description
Standard Displays the script name and description. This is the default.
Detailed Displays commands in the script and their line numbers, date oflast update, and update administrator for each command line in thescript.
Lines Displays the name of the script, the line numbers of the commands,comment lines, and the commands.
Raw Outputs only the commands contained in the script without allother attributes. You can use this format to direct the script to a fileso that it can be loaded into another server with the DEFINE scriptcommand specifying the FILE= parameter.
The following is an example for querying a script in the standard format.query script *
The command gives results like the following:
Name Description--------------- ------------------------------------------------------QCOLS Display columns for a specified SQL tableQSAMPLE Sample SQL Query
For more information about querying a server script, refer to Administrator’sReference.
Querying a Server Script to Create Another Server Script: You can createadditional server scripts by querying a script and specifying the FORMAT=RAWand OUTPUTFILE parameters. You can use the resulting output as input intoanother script without having to create a script line by line.
The following is an example of querying the SRTL2 script in the raw format,directing the output to newscript.script:query script srtl2 format=raw outputfile=newscript.script
Chapter 19. Automating Server Operations 411
You can then edit the newscript.script with an editor that is available to you onyour system. To create a new script using the edited output from your query, issue:define script srtnew file=newscript.script
Renaming a Server ScriptYou can rename a script to a different name. For example, to rename the QUERY1script to QUERY5, issue:rename script query1 query5
The QUERY1 script is now named QUERY5.
Deleting a Command from a Server ScriptYou can delete an individual command line from a script. When you specify a linenumber, only the corresponding command line is deleted from the script.
For example, to delete the 007 command line from the QSTATUS script, issue:delete script qstatus line=7
Deleting a Server ScriptTo delete an entire script, issue the DELETE SCRIPT command.
To delete the QSTATUS script, issue:delete script qstatus
Running a Server ScriptTo process a script, issue the RUN command. You can run a script that containssubstitution variables by specifying them along with the RUN command.
You can preview the command lines of a script without actually executing thecommands by using the PREVIEW=YES parameter with the RUN command. If thescript contains substitution variables, the command lines are displayed with thesubstituted variables. This is useful for evaluating a script before you run it.
For example, to process the QAIXC script previously defined, issue:run qaixc
To process the following script that contains substitution variables:/*----------------------------------------------*//* Sample continuation and substitution example *//* ---------------------------------------------*/SELECT-$1 FROM-NODES WHERE-PLATFORM='$2'
Enter:run qaixc node_name aix
Where $1 is node_name and $2 is aix.
412 Tivoli Storage Manager for Windows: Administrator’s Guide

Using MacrosTivoli Storage Manager supports macros on the administrative client. A macro is afile that contains one or more administrative client commands. You can only run amacro from the administrative client in batch or interactive modes. Macros arestored as a file on the administrative client. Macros are not distributed acrossservers and cannot be scheduled on the server.
Macros can include the following:v Administrative commands
For more information on administrative commands, see “Writing Commands ina Macro”.
v CommentsFor more information on comments, see “Writing Comments in a Macro” onpage 414.
v Continuation charactersFor more information on continuation characters, see “Using ContinuationCharacters” on page 414.
v VariablesFor more information on variables, see “Using Substitution Variables in aMacro” on page 415.
The name for a macro must follow the naming conventions of the administrativeclient running on your operating system. For more information about file namingconventions, refer to the Administrator’s Reference.
In macros that contain several commands, use the COMMIT and ROLLBACKcommands to control command processing within the macro. For more informationabout using these commands, see “Controlling Command Processing in a Macro”on page 416.
You can include the MACRO command within a macro file to invoke other macrosup to ten levels deep. A macro invoked from the Tivoli Storage Manageradministrative client command prompt is called a high-level macro. Any macrosinvoked from within the high-level macro are called nested macros.
Writing Commands in a MacroRefer to the Administrator’s Reference for more information on how commands areentered and the general rules for entering administrative commands. Theadministrative client ignores any blank lines included in your macro. However, acompletely blank line terminates a command that is continued (with a continuationcharacter).
The following is an example of a macro called REG.MAC that registers and grantsauthority to a new administrator:register admin pease mypasswd -
contact='david pease, x1234'grant authority pease -
classes=policy,storage -domains=domain1,domain2 -stgpools=stgpool1,stgpool2
This example uses continuation characters in the macro file. For more informationon continuation characters, see “Using Continuation Characters” on page 414.
Chapter 19. Automating Server Operations 413

After you create a macro file, you can update the information that it contains anduse it again. You can also copy the macro file, make changes to the copy, and thenrun the copy.
Writing Comments in a MacroYou can add comments to your macro file. To write a comment, write a slash andan asterisk (/*) to indicate the beginning of the comment, write the comment, andthen write an asterisk and a slash (*/) to indicate the end of the comment. You canput a comment on a line by itself, or you can put it on a line that contains acommand or part of a command.
For example, to use a comment to identify the purpose of a macro, write thefollowing:/* auth.mac-register new nodes */
Or, to write a comment to explain something about a command or part of acommand, write:domain=domain1 /*assign node to domain1 */
Comments cannot be nested and cannot span lines. Every line of a comment mustcontain the comment delimiters.
Using Continuation CharactersYou can use continuation characters in a macro file. Continuation characters areuseful when you want to execute a command that is longer than your screen orwindow width.
Attention: Without continuation characters, you can enter up to 256 characters.With continuation characters, you can enter up to 1500 characters. In the MACROcommand, these maximums are after any substitution variables have been applied(see “Using Substitution Variables in a Macro” on page 415).
To use a continuation character, enter a dash or a back slash at the end of the linethat you want to continue. With continuation characters, you can do the following:v Continue a command. For example:
register admin pease mypasswd -contact="david, ext1234"
v Continue a list of values by entering a dash or a back slash, with no precedingblank spaces, after the last comma of the list that you enter on the first line.Then, enter the remaining items in the list on the next line with no precedingblank spaces. For example:stgpools=stg1,stg2,stg3,-stg4,stg5,stg6
v Continue a string of values enclosed in quotation marks by entering the firstpart of the string enclosed in quotation marks, followed by a dash or a backslash at the end of the line. Then, enter the remainder of the string on the nextline enclosed in the same type of quotation marks. For example:contact="david pease, bldg. 100, room 2b, san jose,"-"ext. 1234, alternate contact-norm pass,ext 2345"
Tivoli Storage Manager concatenates the two strings with no intervening blanks.You must use only this method to continue a quoted string of values across morethan one line.
414 Tivoli Storage Manager for Windows: Administrator’s Guide

Using Substitution Variables in a MacroYou can use substitution variables in a macro to supply values for commandswhen you run the macro. When you use substitution variables, you can use amacro again and again, whenever you need to perform the same task for differentobjects or with different parameter values.
A substitution variable consists of a percent sign (%), followed by a number thatindicates the number of the substitution variable. When you run the file with theMACRO command, you must specify values for the variables.
For example, to create a macro named AUTH.MAC to register new nodes, write itas follows:/* register new nodes */register node %1 %2 - /* userid password */
contact=%3 - /* 'name, phone number' */domain=%4 /* policy domain */
Then, when you run the macro, you enter the values you want to pass to theserver to process the command.
For example, to register the node named DAVID with a password of DAVIDPW,with his name and phone number included as contact information, and assign himto the DOMAIN1 policy domain, enter:macro auth.mac david davidpw "david pease, x1234" domain1
If your system uses the percent sign as a wildcard character, a pattern-matchingexpression in a macro where the percent sign is immediately followed by anumeric digit is interpreted by the administrative client as a substitution variable.
You cannot enclose a substitution variable in quotation marks. However, a valueyou supply as a substitution for the variable can be a quoted string.
Running a MacroUse the MACRO command when you want to run a macro. You can enter theMACRO command in batch or interactive mode.
If the macro does not contain substitution variables (such as the REG.MAC macrodescribed in the “Writing Commands in a Macro” on page 413), run the macro byentering the MACRO command with the name of the macro file. For example:macro reg.mac
If the macro contains substitution variables (such as the AUTH.MAC macrodescribed in “Using Substitution Variables in a Macro”), include the values thatyou want to supply after the name of the macro. Each value is delimited by aspace. For example:macro auth.mac pease mypasswd "david pease, x1234" domain1
If you enter fewer values than there are substitution variables in the macro, theadministrative client replaces the remaining variables with null strings.
If you want to omit one or more values between values, enter a null string ("") foreach omitted value.
Chapter 19. Automating Server Operations 415

For example, if you omit the contact information in the previous example, youmust enter:macro auth.mac pease mypasswd "" domain1
Controlling Command Processing in a MacroWhen you issue a MACRO command, the server processes all commands in themacro file in order, including commands contained in any nested macros. Theserver commits all commands in a macro after successfully completing processingfor the highest-level macro. If an error occurs in any command in the macro or inany nested macro, the server terminates processing and rolls back any changescaused by all previous commands.
If you specify the ITEMCOMMIT option when you enter the DSMADMCcommand, the server commits each command in a script or a macro individually,after successfully completing processing for each command. If an error occurs, theserver continues processing and only rolls back changes caused by the failedcommand.
You can control precisely when commands are committed with the COMMITcommand. If an error occurs while processing the commands in a macro, the serverterminates processing of the macro and rolls back any uncommitted changes(commands that have been processed since the last COMMIT). Make sure that youradministrative client session is not running with the ITEMCOMMIT option if youwant to control command processing with the COMMIT command.
Note: Commands that start background processes cannot be rolled back. For a listof commands that can generate background processes, see “Managing ServerProcesses” on page 394.
You can test a macro before implementing it by using the ROLLBACK command.You can enter the commands (except the COMMIT command) you want to issue inthe macro, and enter ROLLBACK as the last command. Then, you can run themacro to verify that all the commands process successfully. Any changes to thedatabase caused by the commands are rolled back by the ROLLBACK commandyou have included at the end. Remember to remove the ROLLBACK commandbefore you make the macro available for actual use. Also, make sure youradministrative client session is not running with the ITEMCOMMIT option if youwant to control command processing with the ROLLBACK command.
If you have a series of commands that process successfully via the command line,but are unsuccessful when issued within a macro, there are probably dependenciesbetween commands. It is possible that a command issued within a macro cannotbe processed successfully until a previous command that is issued within the samemacro is committed. Either of the following actions allow successful processing ofthese commands within a macro:v Insert a COMMIT command before the command dependent on a previous
command. For example, if COMMAND C is dependent upon COMMAND B,you would insert a COMMIT command before COMMAND C. An example ofthis macro is:
command acommand bcommitcommand c/
v Start the administrative client session using the ITEMCOMMIT option. Thiscauses each command within a macro to be committed before the next commandis processed.
416 Tivoli Storage Manager for Windows: Administrator’s Guide
Chapter 20. Managing the Database and Recovery Log
The Tivoli Storage Manager database contains information that is needed for serveroperations and information about client data that has been backed up, archived,and space-managed. The database does not store client data. Instead, the databasepoints to the locations of the client files in the storage pools.
The database includes information about:v Client nodes and administratorsv Policies and schedulesv Server settingsv Locations of client files on server storagev Server operations (for example, activity logs and event records)
Note: If the database is unusable, the entire Tivoli Storage Manager server isunavailable. If a database is lost and cannot be recovered, the backup,archive, and space-managed data for that server is lost. See “Chapter 24.Protecting and Recovering Your Server” on page 531 for steps that you cantake to protect your database.
The recovery log contains information about database updates that have not yetbeen committed. Updates can include activities such as defining a managementclass, backing up a client file, and registering a client node. Changes to thedatabase are recorded in the recovery log to maintain a consistent database image.
The following shows authority requirements for tasks in this chapter:
Task Required Privilege Class
Manage disk volumes used by the databaseand recovery log
System or unrestricted storage
Display information about the database andrecovery log
Any administrator
See the following sections:
Concepts:
“How Tivoli Storage Manager Processes Transactions” on page 418
“How Tivoli Storage Manager Manages Space” on page 418
Tasks:
“Estimating and Monitoring Database and Recovery Log Space Requirements” on page 420
“Increasing the Size of the Database or Recovery Log” on page 422
“Decreasing the Size of the Database or Recovery Log” on page 426
“Optimizing Database and Recovery Log Performance” on page 428
© Copyright IBM Corp. 1994, 2002 417

Note: Mirroring of the database and recovery log is described in the chapter ondata protection. See “Mirroring the Database and Recovery Log” onpage 536.
In this chapter, most examples illustrate how to perform tasks by using a TivoliStorage Manager command-line interface. For information about the commands,see Administrator’s Reference, or issue the HELP command from the command lineof a Tivoli Storage Manager administrative client.
Tivoli Storage Manager tasks can also be performed from the administrative Webinterface. For more information about using the administrative interface, see QuickStart.
How Tivoli Storage Manager Processes TransactionsTo support multiple transactions from concurrent client sessions, the server holdstransaction log records in the recovery log buffer pool until they can be written tothe recovery log. These records remain in the buffer pool until the active bufferbecomes full or Tivoli Storage Manager forces log records to the recovery log.
Changes resulting from transactions are held in the buffer pool temporarily and arenot made to the database immediately. Therefore, the database and recovery logare not always consistent. When all records for a transaction are written to therecovery log, Tivoli Storage Manager updates the database. The transaction is thencommitted to the database. At some point after a transaction is committed, theserver deletes the transaction record from the recovery log.
How Tivoli Storage Manager Manages SpaceTivoli Storage Manager tracks all volumes defined to the database as one logicalvolume and all volumes defined to the recovery log as another logical volume. InFigure 60, the database consists of four volumes: VOL1 through VOL4, which theserver tracks as a single logical volume.
To manage the database and recovery log effectively, you must understand thefollowing concepts:v Available spacev Assigned capacityv Utilization
Available SpaceNot all of the space that is allocated for the volumes of the database or of therecovery log can be used for database and recovery log information. The serversubtracts 1MB from each physical volume for overhead. The remaining space isdivided into 4MB partitions. For example, you allocate four 25MB volumes for the
VOL4
VOL3
VOL2
VOL1
Figure 60. A Server Database
418 Tivoli Storage Manager for Windows: Administrator’s Guide

database. For the four volumes, 4MB are needed for overhead leaving 96MB ofavailable space as shown in figure Figure 61:
Assigned CapacityAssigned capacity is the available space that can be used for database or recoverylog information. During installation, the assigned capacities of the database andrecovery log match the available space. If you add volumes after installation, youincrease your available space. However, to increase the assigned capacity, you mustalso extend the database or recovery log. See “Step 2: Extending the Capacity ofthe Database or Recovery Log” on page 426 for details.
UtilizationUtilization is the percent of the assigned capacity in use at a specific time.Maximum percent utilized is the highest utilization since the statistics were reset. Forexample, an installation performs most backups after midnight. Figure 62 showsthat utilization statistics for the recovery log were reset at 9 p.m. the previousevening and that the maximum utilization occurred at 12 a.m.
Unless many objects are deleted, the database maximum percent utilized is usuallyclose to the utilization percentage.
VOL4
VOL3
VOL2
VOL1
25 MB
Allocated Spaceon Physical Volumes
Available Spacefor the Database
24 MB
25 MB 24 MB
25 MB 24 MB
25 MB
Totals 100 MB 96 MB
24 MB
Figure 61. An Example of Available Space
9:00 p.m.
reset utilization
statistics
12:58 a.m. Current Time
% Util % Util % UtilMax
% Util
Max
% Util
Max
% Util
50% 80% 60%
50.0 80.0 60.050.0 80.0 80.0
Figure 62. An Example of Recovery Log Utilization
Chapter 20. Managing the Database and Recovery Log 419

Estimating and Monitoring Database and Recovery Log SpaceRequirements
The size of the database depends on the number of client files to be stored and themethod by which the server manages them. If you can estimate the maximumnumber of files that might be in server storage at any time, you can estimate thedatabase size from the following information:v Each stored version of a file requires about 400 to 600 bytes of database space.v Each cached or copy storage pool file requires about 100 to 200 bytes of
database space.v Overhead could require up to 25% in additional space.
In the example below, the computations are probable maximums. In addition, thenumbers are not based on the use of file aggregation. In general, aggregation ofsmall files reduces the required database space. For details about aggregation, see“How the Server Groups Files before Storing” on page 188. Assume the followingnumbers for a Tivoli Storage Manager system:
Versions of files
Backed up filesUp to 500 000 client files might be backed up. Storage policies callfor keeping up to 3 copies of backed up files:500 000 files x 3 copies = 1 500 000 files
Archived filesUp to 100 000 files might be archived copies of client files.
Space-managed filesUp to 200 000 files migrated from client workstations might be inserver storage.
Note: File aggregation does not affect space-managed files.
At 600 bytes per file, the space required for these files is:(1 500 000 + 100 000 + 200 000) x 600 = 1.0GB
Cached and copy storage pool files
Cached copiesCaching is enabled in a 5GB disk storage pool. The pool’s high andlow migration thresholds are 90% and 70% respectively. Thus, 20%of the disk pool, or 1GB, is occupied by cached files.
If the average file size is about 10KB, about 100 000 files are incache at any one time.100 000 files x 200 bytes = 19MB
Copy storage pool filesAll primary storage pools are backed up to the copy storage pool:(1 500 000 + 100 000 + 200 000) x 200 bytes = 343MB
Therefore, cached files and copy storage pool files require about 0.4GB ofdatabase space.
OverheadAbout 1.4GB is required for file versions and cached and copy storage poolfiles. Up to 50% additional space (or 0.7GB) should be allowed foroverhead.
420 Tivoli Storage Manager for Windows: Administrator’s Guide
The database should then be approximately 2.1GB.
If you cannot estimate the numbers of files, you can roughly estimate the databasesize as from 1% to 5% of the required server storage space. For example, if youneed 100GB of server storage, your database should be between 1GB and 5GB. See“Estimating Space Needs for Storage Pools” on page 212 for details.
During SQL queries of the server, intermediate results are stored in temporarytables that require space in the free portion of the database. Therefore, the use ofSQL queries requires additional database space. The more complicated the queries,the greater is the space required.
The size of the recovery log depends on the number of concurrent client sessionsand the number of background processes executing on the server. The maximumnumber of concurrent client sessions is set in the server options.
Attention: Be aware that the results are estimates. The actual size of the databasemay differ from the estimate because of factors such as the number of directoriesand the length of the path and file names. You should periodically monitor yourdatabase and recovery log and adjust their sizes as necessary.
Begin with at least a 12MB recovery log. If you use the database backup andrecovery functions in roll-forward mode, you should begin with at least 25MB. See“Database and Recovery Log Protection” on page 534 and “Estimating the Size ofthe Recovery Log” on page 543 for more information.
Monitoring the Database and Recovery LogYou should regularly monitor the database and recovery log to see if you shouldadd or delete space. To monitor daily utilization, you might want to reset themaximum utilization counters each day. Utilization statistics are reset in two ways:v Automatically when the server is restartedv By issuing the RESET DBMAXUTILIZATION or RESET LOGMAXUTILIZATION
commands
For example, to reset the database utilization statistic, enter:reset dbmaxutilization
If the SELFTUNEBUFPOOLSIZE server option is in effect, the buffer pool cache hitratio statistics are reset at the start of expiration. After expiration, the buffer poolsize is increased if the cache hit ratio is less than 98%. The increase in the bufferpool size is in small increments and may change after each expiration. The changein the buffer pool size is not reflected in the server options file. You can check thecurrent size at any time using the QUERY STATUS command. Use the SETOPTBUFPOOLSIZE command to change the buffer pool size.
To display information about the database or recovery log, issue the QUERY DB orQUERY LOG. For example:query db
The server displays a report, like this:
Chapter 20. Managing the Database and Recovery Log 421
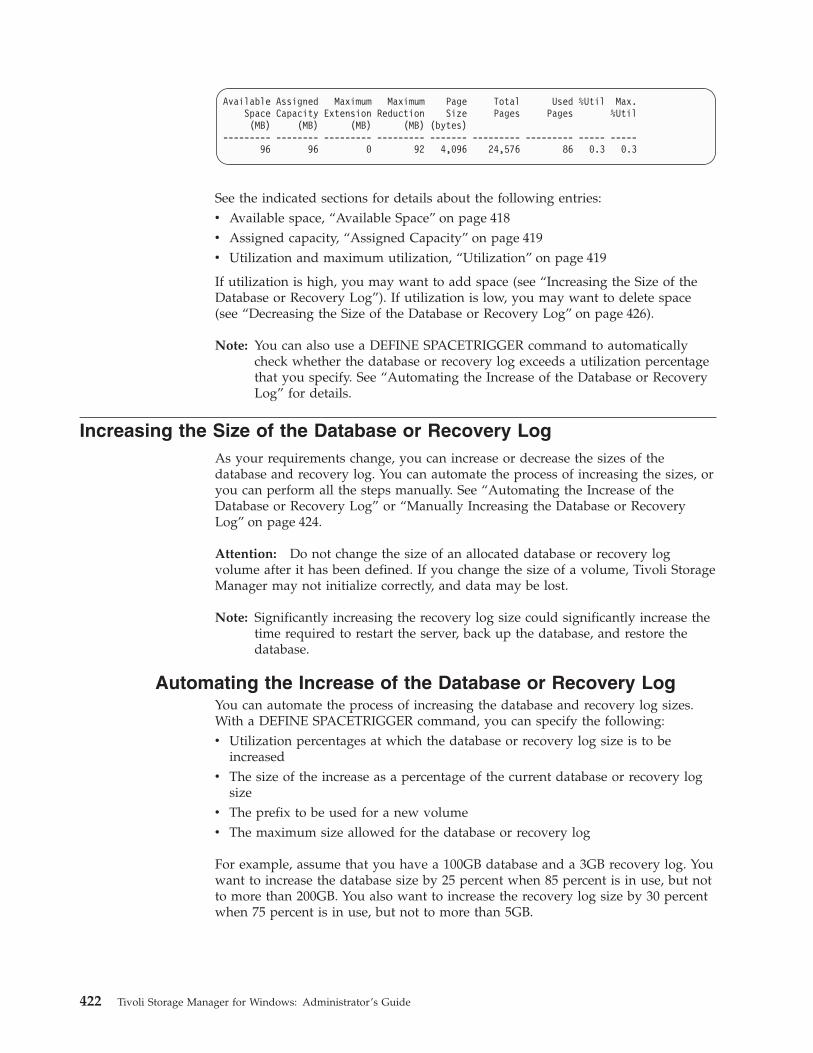
Available Assigned Maximum Maximum Page Total Used %Util Max.Space Capacity Extension Reduction Size Pages Pages %Util(MB) (MB) (MB) (MB) (bytes)
--------- -------- --------- --------- ------- --------- --------- ----- -----96 96 0 92 4,096 24,576 86 0.3 0.3
See the indicated sections for details about the following entries:v Available space, “Available Space” on page 418v Assigned capacity, “Assigned Capacity” on page 419v Utilization and maximum utilization, “Utilization” on page 419
If utilization is high, you may want to add space (see “Increasing the Size of theDatabase or Recovery Log”). If utilization is low, you may want to delete space(see “Decreasing the Size of the Database or Recovery Log” on page 426).
Note: You can also use a DEFINE SPACETRIGGER command to automaticallycheck whether the database or recovery log exceeds a utilization percentagethat you specify. See “Automating the Increase of the Database or RecoveryLog” for details.
Increasing the Size of the Database or Recovery LogAs your requirements change, you can increase or decrease the sizes of thedatabase and recovery log. You can automate the process of increasing the sizes, oryou can perform all the steps manually. See “Automating the Increase of theDatabase or Recovery Log” or “Manually Increasing the Database or RecoveryLog” on page 424.
Attention: Do not change the size of an allocated database or recovery logvolume after it has been defined. If you change the size of a volume, Tivoli StorageManager may not initialize correctly, and data may be lost.
Note: Significantly increasing the recovery log size could significantly increase thetime required to restart the server, back up the database, and restore thedatabase.
Automating the Increase of the Database or Recovery LogYou can automate the process of increasing the database and recovery log sizes.With a DEFINE SPACETRIGGER command, you can specify the following:v Utilization percentages at which the database or recovery log size is to be
increasedv The size of the increase as a percentage of the current database or recovery log
sizev The prefix to be used for a new volumev The maximum size allowed for the database or recovery log
For example, assume that you have a 100GB database and a 3GB recovery log. Youwant to increase the database size by 25 percent when 85 percent is in use, but notto more than 200GB. You also want to increase the recovery log size by 30 percentwhen 75 percent is in use, but not to more than 5GB.
422 Tivoli Storage Manager for Windows: Administrator’s Guide

Note: There is one time when the database or recovery log might exceed themaximum size specified: If the database or recovery log is less than themaximum size when expansion begins, it continues to the full expansionvalue. However, no further expansion will occur unless the space trigger isupdated.
To add the new volumes to the j:\adsmserv\ directory, issue the followingcommands:define spacetrigger db fullpct=85 spaceexpansion=25expansionprefix=j:\adsmserv\ maximumsize=200000
define spacetrigger log fullpct=75 spaceexpansion=30expansionprefix=j:\adsmserv\ maximumsize=50000
The server then monitors the database or recovery log and, if the utilization levelis reached, does the following:v Displays a message (ANR4413I or ANR4414I) that states the amount of space
required to meet the utilization parameter specified in the command.v Allocates space for the new volume.v Defines the new volume.v Extends the database or recovery log.v If a volume is mirrored and there is enough disk space, the preceding steps are
also performed for the mirrored copies.
Notes:
1. The maximum size of the recovery log is 13GB. The server will notautomatically extend the recovery log beyond 12GB.
2. An automatic expansion may exceed the specified database or recovery logmaximum size but not the 13GB recovery log limit. However, after themaximum has been reached, no further automatic expansions will occur.
3. A space trigger percentage may be exceeded between the monitoring of thedatabase or recovery log and the time that a new volume is brought online.
4. If the server creates a database or recovery log volume and the attempt to addit to the server fails, the volume is not deleted. After the problem is corrected,you can define it with the DEFINE DBVOLUME or DEFINE LOGVOLUMEcommand.
5. Automatic expansion will not occur during a database backup.6. The database and recovery log utilization percentage may not always be below
the space trigger value. The server checks utilization after a database orrecovery log commit.Also, deleting database volumes and reducing the database does not activatethe trigger. Therefore, the utilization percentage can exceed the set value beforenew volumes are online.
7. Setting a maximum size does not mean that the database and recovery log willalways be less than that value. The value is a threshold for expansion. Theserver does not automatically expand the database or recovery log if its size isgreater than the maximum size. The server checks the size and allowsexpansion if the database or recovery log is less than the maximum size. Theserver only checks the size that results after expansion to ensure that maximumrecovery log size is not exceeded.
Recovering When the Recovery Log Runs Out of SpaceIf the log mode is set to ROLLFORWARD and either the recovery log is too smallor the database backup trigger is set too high, the recovery log could run out of
Chapter 20. Managing the Database and Recovery Log 423

space before database operations complete. If this happens, you may need to stopthe server without enough recovery log space to restart the server. In some cases,the server halts itself.
To restart the server, first format a new volume (see “Using the DSMFMTCommand to Format Volumes” on page 425). Then use the DSMSERV EXTENDLOG command to extend the size of the recovery log. For example, afterformatting a 21MB volume named new.reclog, extend the recovery log by issuingthe following command:dsmserv extend log new.reclog 20
After the server is running, you can do the following:v Back up the database, which frees the recovery log spacev Adjust the size of the recovery log, the database backup trigger, or both
Manually Increasing the Database or Recovery LogTo add space to the database or recovery log, do the following:
“Step 1: Creating Database and Recovery Log Volumes”“Step 2: Extending the Capacity of the Database or Recovery Log” on page 426
Step 1: Creating Database and Recovery Log VolumesYou can allocate space and define a database or recovery log volume in a singleoperation. For example, to allocate a 100MB database volume named VOL5 in thed:\dbvol directory and define the volume, enter:define dbvolume d:\dbvol\vol5 formatsize=100
The available space of the database increases to 196MB, but the assigned capacityremains at 96MB. For Tivoli Storage Manager to use the space, you must extendthe capacity (see “Step 2: Extending the Capacity of the Database or Recovery Log”on page 426). To verify the change, query the database or recovery log. For
example, to query the database, enter:query db
The server displays a report, like this:
Available Assigned Maximum Maximum Page Total Used %Util Max.Space Capacity Extension Reduction Size Pages Pages %Util(MB) (MB) (MB) (MB) (bytes)
--------- -------- --------- --------- ------- --------- --------- ----- -----196 96 100 92 4,096 24,576 86 0.3 0.3
The value in the Maximum Extension field should equal the available space of thenew volume. In this example, a 101MB volume was allocated. This report showsthat the available space has increased by 100MB; the assigned capacity isunchanged at 96MB; and the maximum extension is 100MB. Figure 63 on page 425illustrates these changes.
424 Tivoli Storage Manager for Windows: Administrator’s Guide

You can also query the database and recovery log volumes to display informationabout the physical volumes that make up the database and recovery log.
Notes:
1. The maximum size of the recovery log is 13GB, and the maximum size of thedatabase is 530GB. If you allocate a volume that would cause the recovery logor database to exceed these limits, the subsequent DEFINE DBVOLUME orDEFINE LOGVOLUME command for the volume will fail.
2. For performance reasons:v Define more than one volume for the database and recovery log. Place these
volumes on separate disks to allow simultaneous access to different parts ofthe database or recovery log.
v Allocate database and recovery log volumes on disk drives that reside on theserver machine, not on remotely mounted file systems. Doing so can alsoavoid database and recovery log corruption.
3. To use disk space efficiently, allocate a few large disk volumes rather thanmany small disk volumes. In this way, you avoid losing space to overheadprocessing.If you already have a number of small volumes and want to consolidate thespace into one large volume, see “Decreasing the Size of the Database orRecovery Log” on page 426.
4. For improved reliability, allocate database and recovery log volumes in anNTFS file system, not a FAT file system. If you use NTFS, you can takeadvantage of Window’s ability to recover from problems that can occur duringI/O to a disk.
5. To protect database and recovery log volumes from media failure, usemirroring. See “Mirroring the Database and Recovery Log” on page 536 fordetails.
Using the DSMFMT Command to Format Volumes: You can still use theDSMFMT utility to allocate a database or recovery log volume. You would thenissue the DEFINE DBVOLUME or DEFINE LOGVOLUME command without theFORMATSIZE parameter, and extend the database or recovery log (see “Step 2:Extending the Capacity of the Database or Recovery Log” on page 426).
To allocate an additional 101MB to the database as volume VOL5, enter:> dsmfmt -db d:\dbvol\vol5 101
VOL4
VOL5
VOL3
VOL2
VOL1
25 MB
101 MB
Allocated Spaceon Physical Volumes
Available Spacefor the Database
AssignedCapacity
24 MB 24 MB
100 MB
25 MB 24 MB 24 MB
25 MB 24 MB 24 MB
25 MB
Totals 201 MB 196 MB 96 MB
24 MB 24 MB
Figure 63. Adding Volumes Increases Available Space
Chapter 20. Managing the Database and Recovery Log 425

Using the Console Wizards to Format Volumes: The wizards in the TivoliStorage Manager Console format database and recovery log volumes, define thevolumes, and extend the database or recovery log.
Step 2: Extending the Capacity of the Database or Recovery LogThe database and recovery log are extended in 4MB increments. If you do notspecify the extension in 4MB increments, the server rounds up to the next 4MBpartition. For example, if you specify 1MB, the server extends the capacity by 4MB.
To increase the capacity of the database by 100MB, enter:extend db 100
After the database has been extended, the available space and assigned capacityare both equal to 196MB, as shown in Figure 64.
You can query the database or recovery log (QUERY DB and QUERY LOGcommands) to verify their assigned capacities. The server would display a report,like this:
Available Assigned Maximum Maximum Page Total Used %Util Max.Space Capacity Extension Reduction Size Pages Pages %Util(MB) (MB) (MB) (MB) (bytes)
--------- -------- --------- --------- ------- --------- --------- ----- -----196 196 0 192 4,096 50,176 111 0.2 0.2
Decreasing the Size of the Database or Recovery LogYou may want to delete database or recovery log volumes for a number of reasons.For example:v You have a significant amount of space that is unused.v You want to consolidate a number of small volumes, each of which may have
unusable space, into one large volume. To create a volume, see “Increasing theSize of the Database or Recovery Log” on page 422.
When you delete a database or recovery log volume, Tivoli Storage Manager triesto move data from the volume being deleted to other physical volumes in thedatabase or recovery log.
To delete space, perform the following steps:
VOL4
VOL5
VOL3
VOL2
VOL1
25 MB
101 MB
Allocated Spaceon Physical Volumes
Available Spacefor the Database
AssignedCapacity
24 MB 24 MB
100 MB 100 MB
25 MB 24 MB 24 MB
25 MB 24 MB 24 MB
25 MB
Totals 201 MB 196 MB 196 MB
24 MB 24 MB
Figure 64. Extending the Capacity of the Database
426 Tivoli Storage Manager for Windows: Administrator’s Guide

1. Determine if you can delete one or more volumes (“Step 1: Determining IfVolumes Can Be Deleted”).
2. Reduce the capacity of the database or recovery log to free existing space (“Step2: Reducing the Capacity of the Database or Recovery Log”).
3. Delete the volume (“Step 3: Deleting a Volume from the Database or RecoveryLog” on page 428).
Step 1: Determining If Volumes Can Be DeletedTo determine if volumes can be deleted from the database or recovery log, checkthe volume sizes and the amount of unused space.
To check the sizes of the volumes in the database, enter:query dbvolume format=detailed
The server displays the following type of information:
Volume Name (Copy 1): d:\dbvol\vol4Copy Status: Sync'd
Volume Name (Copy 2):Copy Status: Undefined
Volume Name (Copy 3):Copy Status: Undefined
Available Space (MB): 24Allocated Space (MB): 24
Free Space (MB): 0
In this example, VOL1, VOL2, VOL3, and VOL4 each have 24MB of availablespace, and VOL5 has 100MB. To determine if there is enough unused space todelete one or more volumes, enter:query db
The server displays the following type of report.
Available Assigned Maximum Maximum Page Total Used %Util Max.Space Capacity Extension Reduction Size Pages Pages %Util(MB) (MB) (MB) (MB) (bytes)
--------- -------- --------- --------- ------- --------- --------- ----- -----196 196 0 176 4,096 50,176 4,755 9.5 9.5
The Maximum Reduction field shows the assigned capacity not in use. In thisexample, you could reduce the database by up to 176MB. This is enough space toallow the deletion of VOL1, VOL2, VOL3, and VOL4.
If there is not enough space on the remaining volumes, allocate more space anddefine an additional volume, as described in “Increasing the Size of the Databaseor Recovery Log” on page 422 and continue with “Step 2: Reducing the Capacity ofthe Database or Recovery Log”.
Step 2: Reducing the Capacity of the Database or RecoveryLog
The database or recovery log capacity is reduced in 4MB increments. For example,based on the utilization of the database assume that VOL5 alone could contain allthe data. To reduce the database by the amount of available space in VOL1through VOL4, 96MB, enter:reduce db 96
Chapter 20. Managing the Database and Recovery Log 427

Reducing capacity is run as a background process and can take a long time. Issue aQUERY PROCESS command to check on the status of the process.
After reducing the database by 96MB, the assigned capacity is 100MB, and themaximum extension is 96MB, as shown in the following example:
Available Assigned Maximum Maximum Page Total Used %Util Max.Space Capacity Extension Reduction Size Pages Pages %Util(MB) (MB) (MB) (MB) (bytes)
--------- -------- --------- --------- ------- --------- --------- ----- -----196 100 96 92 4,096 24,576 86 0.3 0.3
Step 3: Deleting a Volume from the Database or Recovery LogAfter you reduce the database or recovery log, use the smaller size for a few days.If the maximum utilization does not exceed 70%, you can delete the extra volumes.
Note: You cannot delete volumes if there is not enough free space for the server tomove data from the volume being deleted to other physical volumes in thedatabase or recovery log.
In our example, you determined that you can delete the four 24MB volumes fromthe database. You have reduced the database by 96MB. To delete VOL1 throughVOL4 from the database, enter:delete dbvolume vol1delete dbvolume vol2delete dbvolume vol3delete dbvolume vol4
The server moves data from the volumes being deleted to available space on othervolumes, as shown in Figure 65.
After the data has been moved, these volumes are deleted from the server.
Optimizing Database and Recovery Log PerformanceOver time, the database size and organization can change to the point thatperformance is degraded. Unloading and reloading the database can have thefollowing benefits:v Improved performance of the server database dump and load functions
VOL4 VOL4
VOL5 VOL5 VOL5
VOL3 VOL3
VOL2 VOL2
VOL1 VOL1
BeforeDeletion
DuringDeletion
AfterDeletion
Figure 65. Deleting Database Volumes
428 Tivoli Storage Manager for Windows: Administrator’s Guide

v Improved performance of the database audit functionsv Improved use of database spacev Reorganization of fragmented page allocationsv Improved performance of long-running scans of the database
The database and recovery log buffer pool sizes can also affect performance. Alarger database buffer pool can improve performance. A larger recovery log bufferpool reduces how often the server forces records to the recovery log.
See “Reorganizing the Database” on page 431 for more information about restoringdatabase efficiency.
Adjusting the Database Buffer Pool SizeYou can let Tivoli Storage Manager dynamically adjust the size of the databasebuffer pool or you can adjust it manually. If you specify YES for theSELFTUNEBUFPOOLSIZE server option, the database buffer pool is dynamicallyadjusted. The cache hit ratio statistics for the buffer pool are reset at the beginningof expiration. After expiration processing completes, the buffer pool size isadjusted dynamically.
Server expiration processing resets the database buffer pool before the nextprocessing starts and examines if the database buffer pool cache hit ratio is above98%. If the cache hit ratio is lower than 98%, the database buffer pool will beincreased; if it is higher, the buffer pool size will not change. Increasing thedatabase buffer pool will not be more than 10% of available real storage.
Manually Adjusting the Database Buffer Pool SizePerform the following steps to track the database buffer pool statistics and adjustthe buffer pool size:
Step 1: Reset Database Buffer Pool Utilization StatisticsReset the buffer pool statistics. Initially, you might want to reset the statistics twicea day. Later, you can reset them less often. To reset, enter:reset bufpool
Step 2: Monitor the Database Buffer PoolTo see if the database buffer pool is adequate for database performance, enter:query db format=detailed
The server displays a report, like this:
Available Space (MB): 196Assigned Capacity (MB): 196Maximum Extension (MB): 0Maximum Reduction (MB): 176
Page Size (bytes): 4,096Total Pages: 50,176Used Pages: 4,755
%Util: 9.5Max. %Util: 9.5
Physical Volumes: 5Buffer Pool Pages: 128
Total Buffer Requests: 1,193,212Cache Hit Pct.: 99.73Cache Wait Pct.: 0.00
Use the following fields to evaluate your current use of the database buffer pool:
Chapter 20. Managing the Database and Recovery Log 429
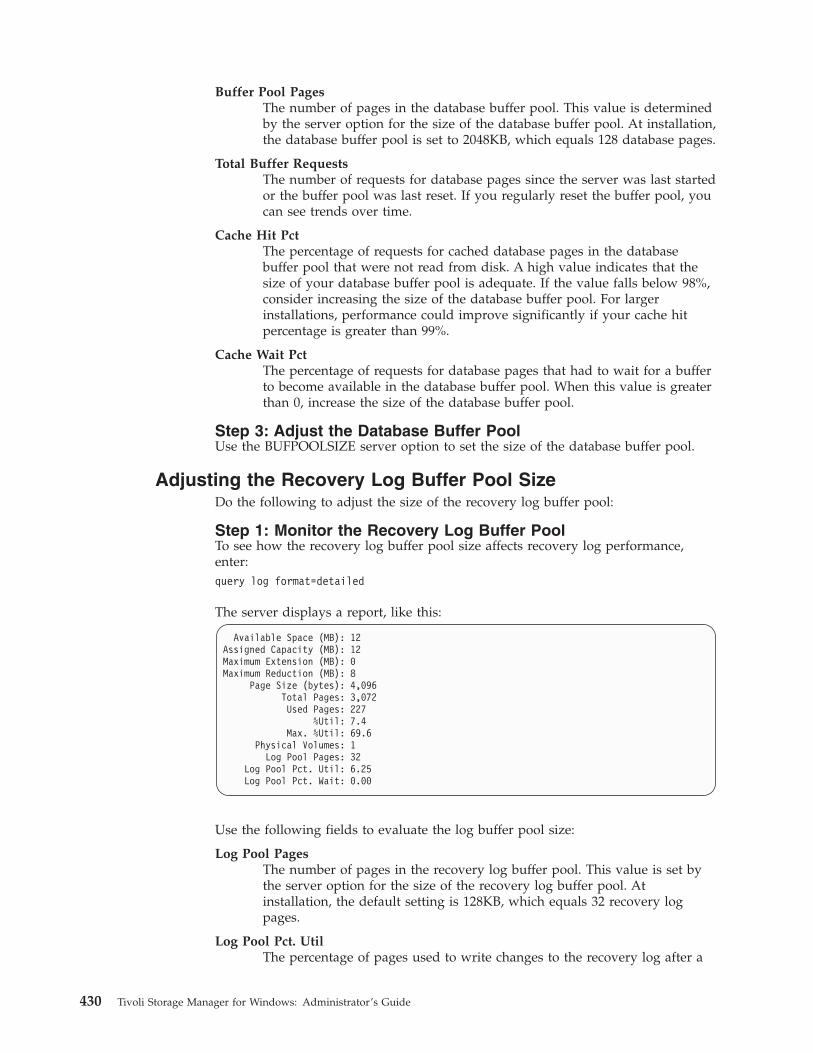
Buffer Pool PagesThe number of pages in the database buffer pool. This value is determinedby the server option for the size of the database buffer pool. At installation,the database buffer pool is set to 2048KB, which equals 128 database pages.
Total Buffer RequestsThe number of requests for database pages since the server was last startedor the buffer pool was last reset. If you regularly reset the buffer pool, youcan see trends over time.
Cache Hit PctThe percentage of requests for cached database pages in the databasebuffer pool that were not read from disk. A high value indicates that thesize of your database buffer pool is adequate. If the value falls below 98%,consider increasing the size of the database buffer pool. For largerinstallations, performance could improve significantly if your cache hitpercentage is greater than 99%.
Cache Wait PctThe percentage of requests for database pages that had to wait for a bufferto become available in the database buffer pool. When this value is greaterthan 0, increase the size of the database buffer pool.
Step 3: Adjust the Database Buffer PoolUse the BUFPOOLSIZE server option to set the size of the database buffer pool.
Adjusting the Recovery Log Buffer Pool SizeDo the following to adjust the size of the recovery log buffer pool:
Step 1: Monitor the Recovery Log Buffer PoolTo see how the recovery log buffer pool size affects recovery log performance,enter:query log format=detailed
The server displays a report, like this:
Available Space (MB): 12Assigned Capacity (MB): 12Maximum Extension (MB): 0Maximum Reduction (MB): 8
Page Size (bytes): 4,096Total Pages: 3,072Used Pages: 227
%Util: 7.4Max. %Util: 69.6
Physical Volumes: 1Log Pool Pages: 32
Log Pool Pct. Util: 6.25Log Pool Pct. Wait: 0.00
Use the following fields to evaluate the log buffer pool size:
Log Pool PagesThe number of pages in the recovery log buffer pool. This value is set bythe server option for the size of the recovery log buffer pool. Atinstallation, the default setting is 128KB, which equals 32 recovery logpages.
Log Pool Pct. UtilThe percentage of pages used to write changes to the recovery log after a
430 Tivoli Storage Manager for Windows: Administrator’s Guide

transaction is committed. A value below 10% means that the recovery logbuffer pool size is adequate. If the percentage increases, consider increasingthe recovery log buffer pool size.
Log Pool Pct. WaitThe percentage of requests for pages that are not available because allpages are waiting to write to the recovery log.
If this value is greater than 0, increase the recovery log buffer pool size.
Step 2: Adjust the Recovery Log Buffer PoolUse the LOGPOOLSIZE server option to set the size of the recovery log bufferpool.
Reorganizing the DatabaseOver time, database volumes become fragmented. You can restore the efficiency ofthe database and improve database performance by reorganizing the databaseusing database unload and reload processing. By reloading the database, youcompress and reorganize it.
Procedure: Reorganizing the Database
Attention: Before you begin this procedure, perform a backup of your database.If an outage occurs while you are loading and reloading your database, you canuse your backup copy for recovering the database.
The DSMSERV UNLOADDB operation assumes that the Tivoli Storage Managerdatabase is usable and reads device information from the database, not from thedevice configuration file. A database dump operation (DSMSERV DUMPDB), onthe other hand, does not assume a usable database and reads from the deviceconfiguration file.
To reorganize the database, follow these steps:1. Ensure that a current device configuration file exists. This file contains a copy
of the device class, library, and drive definitions. These definitions are neededfor the DSMSERV LOADDB utility. You must specify the name of the deviceconfiguration file by using the DEVCONFIG option in the server options file.See “Saving the Device Configuration File” on page 548. Also see Administrator’sReference for details on the option and the command.
2. Before unloading the database, estimate how many tapes you will need:v If the server is not running, use the size of your existing physical database
volumes as an estimate of how many tapes to use.v If the server is running, you can use the following steps to estimate the
number of tapes required:a. Request information about the database by using the following command:
query db
b. Using the output of the QUERY DB command, multiply the Used Pages bythe Page Size to determine space occupied by the database.
c. Use the result to estimate the number of tapes of a specific device classthat you will need to unload the database. The space required will likelybe less than your estimate.
3. Halt the server if it is still running.4. With the server not running, issue the DSMSERV UNLOADDB utility to unload
the database to tape. For example:
Chapter 20. Managing the Database and Recovery Log 431

dsmserv unloaddb devclass=tapeclass scratch=yes
Note: Keep track of the order in which the tape volumes are written when thedatabase is unloaded. You must specify the volume names in the sameorder when you reload the database using the DSMSERV LOADDButility. For this task, you can either:v Review the output generated by the DSMSERV UNLOADDB utility
and record the order of the volumes.v Manually view the volume history file to identify the tape volumes
containing the unloaded database. The volumes have a volume type ofDBDUMP. See “Saving the Volume History File” on page 546 fordetails. (Do not restart the server and issue QUERY VOLHISTORY atthis step.)
5. Format the database and recovery log. For example:dsmserv loadformat 1 log1.dsm 9 1 db1.dsm 13
This utility prepares the existing server database for the DSMSERV LOADDButility.
6. Reload the database using the volumes that contain the data from the unloadoperation. For example:dsmserv loaddb devclass=tapeclass volumenames=db001,db002,db003
For the volume names, ensure that you do the following:v Enter the volume names in the same order in which they were used for the
DSMSERV UNLOADDB utility.v Separate the volume names with a comma and no intervening spaces.
432 Tivoli Storage Manager for Windows: Administrator’s Guide

Chapter 21. Monitoring the Tivoli Storage Manager Server
Administrators can monitor the Tivoli Storage Manager server:v To find the status of operationsv To display information about objectsv To monitor the record of activityv To select the types of events to savev To select a location to save events
See the following sections:
Tasks:
“Using Tivoli Storage Manager Queries to Display Information”
“Using SQL to Query the Tivoli Storage Manager Database” on page 438
“Using the Tivoli Storage Manager Activity Log” on page 443
“Logging Tivoli Storage Manager Events to Receivers” on page 445
“Monitoring Errors and Diagnosing Problems” on page 459
“Monitoring Tivoli Storage Manager Accounting Records” on page 459
In this chapter, most examples illustrate how to perform tasks by using a TivoliStorage Manager command-line interface. For information about the commands,see Administrator’s Reference, or issue the HELP command from the command lineof a Tivoli Storage Manager administrative client.
Tivoli Storage Manager tasks can also be performed from the administrative Webinterface. For more information about using the administrative interface, see QuickStart.
Using Tivoli Storage Manager Queries to Display InformationTivoli Storage Manager provides a variety of QUERY commands that displayformatted information about definitions, settings, processes, and status. In somecases, you can display the information in either of two formats: standard ordetailed. The standard format presents partial information and is useful indisplaying an overview of many objects.
Note: For information about creating customized queries of the database, see“Using SQL to Query the Tivoli Storage Manager Database” on page 438.
Requesting Information about Tivoli Storage ManagerDefinitions
During TSM system setup, an administrator can define many objects. These objectsinclude storage management policies, database and recovery log volumes, storagepools, and device classes. Tivoli Storage Manager provides queries that displayinformation about these objects.
Most of these definition queries let you request standard format or detailed format.Standard format limits the information and usually displays it as one line per
© Copyright IBM Corp. 1994, 2002 433

object. Use the standard format when you want to query many objects, forexample, all registered client nodes. Detailed format displays the default andspecific definition parameters. Use the detailed format when you want to see allthe information about a limited number of objects.
Here is an example of the standard output for the QUERY NODES command:
Node Name Platform Policy Days Days Locked?Domain Since SinceName Last Password
Access Set---------- -------- --------- ------ -------- -------CLIENT1 (?) STANDARD 6 6 NoGEORGE OS/2 STANDARD 1 1 NoJANET (?) STANDARD 1 1 NoJOEOS2 OS/2 STANDARD <1 <1 NoTOMC (?) STANDARD 1 1 No
Here is an example of the detailed output for the QUERY NODES command:
Node Name: JOEOS2Platform: OS/2
Policy Domain Name: STANDARDLast Access Date/Time: 05/19/2000 09:59:52Days Since Last Access: 2Password Set Date/Time: 05/18/2000 11:04:45Days Since Password Set: 3Invalid Password Limit:Minimum Password Length:
Locked?: NoContact:
Compression: NoArchive Delete Allowed?: YesBackup Delete Allowed?: NoRegistration Date/Time: 05/18/2000 11:04:45
Registering Administrator: OPEN_REGISTRATIONLast Communication Method Used: Tcp/Ip
Bytes Received Last Session: 226Bytes Sent Last Session: 556
Duration of Last Session (sec): 3.32Pct. Idle Wait Last Session: 88.48Pct. Comm. Wait Last Session: 6.63Pct. Media Wait Last Session: 0.00
Requesting Information about Client SessionsWhen administrators or users access Tivoli Storage Manager, an administrative orclient node session is established with the server. The server assigns each clientsession a unique session number.
To request information about client sessions, enter:query session
Figure 66 on page 435 shows a sample client session report.
434 Tivoli Storage Manager for Windows: Administrator’s Guide

Check the wait time and session state. The wait time determines the length of time(seconds, minutes, hours) the server has been in the current state. The session statecan be one of the following:
Start Connecting with a client session.
Run Running a client request.
End Ending a client session.
RecvWWaiting to receive an expected message from the client while a databasetransaction is in progress. A session in this state is subject to theCOMMTIMEOUT limit.
SendWWaiting for acknowledgment that the client has received a message sent bythe server.
MediaWWaiting for removable media to become available.
IdleW Waiting for communication from the client, and a database transaction isNOT in progress. A session in this state is subject to the IDLETIMEOUTlimit.
For example, Tivoli Storage Manager cancels the client session if theIDLETIMEOUT option is set to 30 minutes, and a user does not initiateany operations within those 30 minutes. The client session is automaticallyreconnected to the server when it starts to send data again.
Requesting Information about Server ProcessesMost commands run in the foreground, but others generate background processes.In some cases, you can specify that a process run in the foreground. TSM issuesmessages that provide information about the start and end of processes. Inaddition, you can request information about active background processes. If youknow the process ID number, you can use the number to limit the search.However, if you do not know the process ID, you can display information aboutall background processes by entering:query process
Figure 67 on page 436 shows a server background process report after a DELETEFILESPACE command was issued. The report displays a process ID number, adescription, and a completion status for each background process.
Sess Comm. Sess Wait Bytes Bytes Sess Platform Client NameNumber Method State Time Sent Recvd Type------ ------ ------ ------ ------- ------- ----- -------- --------------------
3 Tcp/Ip IdleW 9 S 7.8 K 706 Admin OS/2 TOMC5 Tcp/Ip IdleW 0 S 1.2 K 222 Admin OS/2 GUEST6 Tcp/Ip Run 0 S 117 130 Admin OS/2 MARIE
Figure 66. Information about Client Sessions
Chapter 21. Monitoring the Tivoli Storage Manager Server 435

Requesting Information about Server SettingsAny administrator can request general server information, most of which isdefined by SET commands. To request this information, enter:query status
The displayed information includes:v The server namev When the server was installed and last startedv Whether the server is enabled or disabledv Whether client registration is open or closedv Whether passwords are required for client/server authenticationv How long passwords are validv Whether accounting records are being generatedv How long messages remain in the activity log before being deletedv How many client sessions can concurrently communicate with the serverv How many client node sessions are available for scheduled workv What percentage of the scheduling start-up window is randomizedv What scheduling mode is being usedv How frequently client nodes can poll for scheduled workv How many times and how often a client node can retry a failed attempt to
perform a scheduled operationv How long event records remain in the databasev The interval before re-authentication is required for the Web administrative
client interface
Querying Server Options
Task Required Privilege Class
Query server options Any administrator
Use the QUERY OPTION command to display information about one or moreserver options.
You can issue the QUERY OPTION command with no operands to display generalinformation about all defined server options. You also can issue the QUERYOPTION command with a specific option name or pattern-matching expression todisplay information on one or more server options.
To display general information about all defined server options, enter:query option
Process Process Description StatusNumber
-------- ------------------------ ---------------------------------------------2 DELETE FILESPACE Deleting filespace DRIVE_D for node CLIENT1:
172 files deleted.
Figure 67. Information about Background Processes
436 Tivoli Storage Manager for Windows: Administrator’s Guide

You can set options through the TSM Console or by editing the server options file.See Administrator’s Reference for more information.
Querying the SystemThe QUERY SYSTEM command lets you combine multiple queries of your TivoliStorage Manager system into a single command. This command can be used tocollect statistics and to provide information for problem analysis by IBM service.When you issue the QUERY SYSTEM command, the server issues the followingqueries:
QUERY ASSOCIATIONDisplays all client nodes that are associated with one or more clientschedules
QUERY COPYGROUPDisplays all backup and archive copy groups (standard format)
QUERY DBDisplays information about the database (detailed format)
QUERY DBVOLUMEDisplays information about all database volumes (detailed format)
QUERY DEVCLASSDisplays all device classes (detailed format)
QUERY DOMAINDisplays all policy domains (standard format)
QUERY LOGDisplays information about the recovery log (detailed format)
QUERY LOGVOLUMEDisplays information about all recovery log volumes (detailed format)
QUERY MGMTCLASSDisplays all management classes (standard format)
QUERY OPTIONDisplays all server options
QUERY PROCESSDisplays information about all active background processes
QUERY SCHEDULEDisplays client schedules (standard format)
QUERY SESSIONDisplays information about all administrative and client node sessions instandard format
QUERY STATUSDisplays general server parameters, such as those defined by SETcommands
QUERY STGPOOLDisplays information about all storage pools (detailed format)
QUERY VOLUMEDisplays information about all storage pool volumes (standard format)
SELECTDisplays the results of two SQL queries:select platform_name,count(*) from nodes group by platform_name
Chapter 21. Monitoring the Tivoli Storage Manager Server 437

select stgpool_name,devclass_name,count(*) from volumesgroup by stgpool_name,devclass_name
The first command displays the number of client nodes by platform.
The second command displays the name and associated device class of allstorage pools having one or more volumes assigned to them.
Using SQL to Query the Tivoli Storage Manager DatabaseYou can use a standard SQL SELECT statement to get information from thedatabase. The SELECT command is a subset of the SQL92 and SQL93 standards.
Tivoli Storage Manager also provides an open database connectivity (ODBC)driver. The driver allows you to use a relational database product such as LotusApproach® to query the database and display the results.
Using the ODBC DriverTivoli Storage Manager provides an ODBC driver for Windows. The driversupports the ODBC Version 2.5 application programming interface (API). BecauseTSM supports only the SQL SELECT statement (query), the driver does notconform to any ODBC API or SQL grammar conformance level. After you installthis driver, you can use a spreadsheet or database application that complies withODBC to access the database for information.
The ODBC driver set-up is included in the client installation package. The clientinstallation program can install the ODBC driver and set the correspondingregistry values for the driver and data sources. For more information on setting upthe ODBC driver, see Installing the Clients.
To open the database through an ODBC application, you must log on to the server(the defined data source). Use the name and password of a registeredadministrator. After you log on to the server, you can perform query functionsprovided by the ODBC application to access database information.
Issuing SELECT CommandsYou can issue the SELECT command from the command line of an administrativeclient. You cannot issue this command from the server console.
The SELECT command supports a subset of the syntax of the SELECT statement asdocumented in the SQL92 and SQL93 standards. For complete information abouthow to use the SELECT statement, refer to these standards or to other publicationsabout SQL.
Issuing the SELECT command to the server can use a significant amount of serverresources to run the query. Complicated queries or queries that run for a long timecan interfere with normal server operations. If your query requires excessive serverresource to generate the results, you will receive a message asking you to confirmthat you wish to continue.
Note: To allow any use of the SELECT command, the database must have at least4MB of free space. For complex queries that require significant processing,additional free space is required in the database. See “Exhausting TemporaryTable Storage” on page 440 for details.
438 Tivoli Storage Manager for Windows: Administrator’s Guide

Learning What Information Is Available: System Catalog TablesTo help you find what information is available in the database, Tivoli StorageManager provides three system catalog tables:
SYSCAT.TABLESContains information about all tables that can be queried with the SELECTcommand.
SYSCAT.COLUMNSDescribes the columns in each table.
SYSCAT.ENUMTYPESDefines the valid values for each enumerated type and the order of thevalues for each type.
You can issue the SELECT command to query these tables to determine thelocation of the information that you want. For example, to get a list of all tablesavailable for querying in the database, enter the following command:select * from syscat.tables
The following shows part of the results of this command:
ExamplesThe SELECT command lets you customize a wide variety of queries. This sectionshows two examples. For many more examples of the command, see theAdministrator’s Reference.
Example 1: Find the number of nodes by type of operating system by issuing thefollowing command:select platform_name,count(*) as "Number of Nodes" from nodesgroup by platform_name
TABSCHEMA: TSMTABNAME: ACTLOG
CREATE_TIME:COLCOUNT: 11
INDEX_COLCOUNT: 1UNIQUE_INDEX: FALSE
REMARKS: Server activity log
TABSCHEMA: TSMTABNAME: ADMINS
CREATE_TIME:COLCOUNT: 17
INDEX_COLCOUNT: 1UNIQUE_INDEX: TRUE
REMARKS: Server administrators
TABSCHEMA: TSMTABNAME: ADMIN_SCHEDULES
CREATE_TIME:COLCOUNT: 15
INDEX_COLCOUNT: 1UNIQUE_INDEX: TRUE
REMARKS: Administrative command schedules
TABSCHEMA: TSMTABNAME: ARCHIVES
CREATE_TIME:COLCOUNT: 10
INDEX_COLCOUNT: 5UNIQUE_INDEX: FALSE
REMARKS: Client archive files
Chapter 21. Monitoring the Tivoli Storage Manager Server 439

This command gives results like the following:
Example 2: For all active client sessions, determine how long they have beenconnected and their effective throughput in bytes per second:select session_id as "Session", client_name as "Client", state as "State",
current_timestamp-start_time as "Elapsed Time",(cast(bytes_sent as decimal(18,0)) /cast((current_timestamp-start_time)seconds as decimal(18,0)))as "Bytes sent/second",(cast(bytes_received as decimal(18,0)) /cast((current_timestamp-start_time)seconds as decimal(18,0)))as "Bytes received/second"from sessions
This command gives results like the following:
Exhausting Temporary Table StorageSQL SELECT queries run from temporary table storage in the database. At least a4MB partition must be available in the database for this purpose. Without thispartition, temporary table storage space will become exhausted, and the SELECTquery will no longer run.
To determine how much temporary table storage space is available in yourdatabase, issue the QUERY DB command. The server displays a report, like thefollowing:
Available Assigned Maximum Maximum Page Total Used %Util Max.Space Capacity Extension Reduction Size Pages Pages %Util(MB) (MB) (MB) (MB) (bytes)
--------- -------- --------- --------- ------- --------- --------- ----- -----8 4 4 0 4,096 1,024 94 9.3 9.2
Check the value in the Maximum Reduction field. If this field shows a value of atleast 4MB, you can perform SELECT queries.
If the Maximum Reduction value is below 4MB, you will not be able to performSELECT queries. The database is either full or fragmented.
PLATFORM_NAME Number of Nodes------------- ---------------OS/2 45AIX 90Windows 35
Session: 24Client: ALBERTState: Run
Elapsed Time: 0 01:14:05.000000Bytes sent/second: 564321.9302768451
Bytes received/second: 0.0026748857944
Session: 26Client: MILTONState: Run
Elapsed Time: 0 00:06:13.000000Bytes sent/second: 1638.5284210992221
Bytes received/second: 675821.6888561849
440 Tivoli Storage Manager for Windows: Administrator’s Guide

v If the database is full, increase the size of the database. See “Increasing the Sizeof the Database or Recovery Log” on page 422 for details.
v If the database is fragmented, either add a volume or unload and load yourdatabase. See “Reorganizing the Database” on page 431 for details.
Note: Complex SELECT queries (for example, those including the ORDER BYclause, the GROUP BY clause, or the DISTINCT operator) may require morethan 4MB temporary table storage space.
Using SELECT Commands in Tivoli Storage Manager ScriptsA Tivoli Storage Manager script is one or more commands that are stored as anobject in the database. You can run a script from an administrative client, the webinterface, or the server console. You can also include it in an administrativecommand schedule to run automatically. See “Tivoli Storage Manager ServerScripts” on page 406 for details. You can define a script that contains one or moreSELECT commands. Tivoli Storage Manager is shipped with a file that contains anumber of sample scripts. The file, scripts.smp, is in the server directory. To createand store the scripts as objects in your server’s database, issue the DSMSERVRUNFILE command during installation:> dsmserv runfile scripts.smp
You can also run the file as a macro from an administrative command line client:macro scripts.smp
The sample scripts file contains TSM commands. These commands first delete anyscripts with the same names as those to be defined, then define the scripts. Themajority of the samples create SELECT commands, but others do such things asdefine and extend database volumes and back up storage pools. You can also copyand change the sample scripts file to create your own scripts.
Here are a few examples from the sample scripts file:def script q_inactive_days '/* ------------------------------------------*/'upd script q_inactive_days '/* Script Name: Q_INACTIVE */'upd script q_inactive_days '/* Description: Display nodes that have not */'upd script q_inactive_days '/* accessed TSM for a */'upd script q_inactive_days '/* specified number of days */'upd script q_inactive_days '/* Parameter 1: days */'upd script q_inactive_days '/* Example: run q_inactive_days 5 */'upd script q_inactive_days '/* ------------------------------------------*/'upd script q_inactive_days "select node_name,lastacc_time from nodes where -"upd script q_inactive_days " cast((current_timestamp-lastacc_time)days as -"upd script q_inactive_days " decimal) >= $1 "
/* Define a DB volume and extend the database */
def script def_db_extend '/* -----------------------------------------*/'upd script def_db_extend '/* Script Name: DEF_DB_EXTEND */'upd script def_db_extend '/* Description: Define a database volume, */'upd script def_db_extend '/* and extend the database */'upd script def_db_extend '/* Parameter 1: db volume name */'upd script def_db_extend '/* Parameter 2: extension megabytes */'upd script def_db_extend '/* Example: run def_db_extend VOLNAME 12 */'upd script def_db_extend '/* -----------------------------------------*/'upd script def_db_extend ' def dbv $1 'upd script def_db_extend ' if (rc_ok) extend db $2'upd script def_db_extend ' if (warning, error) q db f=d'
Chapter 21. Monitoring the Tivoli Storage Manager Server 441

Canceling a SELECT CommandIf a SELECT command will require a significant amount of resources, the serverasks if you want to continue. You can cancel the command at that time. Cancel thecommand from the console session or an administrative client session.
Controlling the Format of SELECT ResultsTivoli Storage Manager provides commands to control the format of results ofSELECT commands. You can control:v How SQL data types such as VARCHAR are displayed, in wide or narrow
format (SET SQLDISPLAYMODE)v The format of date and time values in the results (SET SQLDATETIMEFORMAT)v Whether SQL arithmetic results are truncated or rounded (SET
SQLMATHMODE)
Note: Using the SET commands to change these settings keeps the settings ineffect only for the current administrative client session. You can query thesesettings by using the QUERY SQLSESSION command.
Querying the SQL Activity Summary TableYou can query the SQL activity summary table to view statistics about each clientsession and server process. For a listing of the column names and theirdescriptions from the activity summary table, enter the following command:select colname,remarks from columns where tabname='summary'
Here are a few example queries of the activity summary table.v To display all events starting at 00:00 a.m. of the current day until the present
time, enter:select * from summary
The result might look like this:START_TIME: 2000-07-22 19:32:00.000000
END_TIME: 2000-07-22 19:32:56.000000ACTIVITY: BACKUP
NUMBER: 43ENTITY: DWE
COMMMETH: Named PiADDRESS:EXAMINED: 7AFFECTED: 7
FAILED: 0BYTES: 2882311IDLE: 51
MEDIAW: 0PROCESSES: 1SUCCESSFUL: YES
ANS8002I Highest return code was 0.
v To display all events starting at or after 00:00 a.m. on September 24, 2000 untilthe present time, enter:select * from summary where start_time>= '2000-09-24 00:00'
You can determine how long to keep information in the summary table. Forexample, to keep the information for 5 days, enter the following command:set summaryretention 5
442 Tivoli Storage Manager for Windows: Administrator’s Guide

To keep no information in the table, specify a value of 0.
Creating Output for Use by Another ApplicationYou can redirect the output of SELECT commands to a file in the same way as youwould redirect the output of any command. When redirecting this output for usein another program (for example, a spreadsheet or database program), write theoutput in a format easily processed by the program to be used.
Two standard formats for tabular data files are comma-separated values (CSV) andtab-separated values (TSV). Most modern applications that can import tabular datacan read one or both of these formats.
Use the administrative client command line options -COMMADELIMITED or-TABDELIMITED to select one of these formats for tabular query output. Alltabular output during the administrative session will be formatted into eithercomma-separated or tab-separated values. For details about using command lineoptions, see the Administrator’s Reference.
The use of command output redirection and one of the delimited output formatoptions lets you create queries whose output can be further processed in otherapplications. For example, based on the output of a SELECT command, aspreadsheet program could produce graphs of average file sizes and file countssummarized by type of client platform.
For details about redirecting command output, see the Administrator’s Reference.
Using the Tivoli Storage Manager Activity Log
Task Required Privilege Class
Request information from the activity log Any administrator
Set the activity log retention period System
Change the size of the activity log System or unrestricted storage
The activity log contains all messages normally sent to the server console duringserver operation. The only exceptions are responses to commands entered at theconsole, such as responses to QUERY commands.
Examples of messages sent to the activity log include:v When client sessions start or endv When migration starts and endsv When backup versions expirev What data is exported to tapev When expiration processing is performedv What export or import processing is performed
Any error messages sent to the server console are also stored in the activity log.
Use the following sections to adjust the size of the activity log, set an activity logretention period, and request information about the activity log.
Chapter 21. Monitoring the Tivoli Storage Manager Server 443

Requesting Information from the Activity LogYou can request information stored in the activity log. To minimize processing timewhen querying the activity log, you can:v Specify a time period in which messages have been generated. The default for
the QUERY ACTLOG command shows all activities that have occurred in theprevious hour.
v Specify the message number of a specific message or set of messages.v Specify a string expression to search for specific text in messages.v Specify the QUERY ACTLOG command from the command line for large
queries instead of using the graphical user interface.v Specify whether the originator is the server or client. If it is the client, you can
specify the node, owner, schedule, domain, or session number. If you are doingclient event logging to the activity log and are only interested in server events,then specifying the server as the originator will greatly reduce the size of theresults.
For example, to review messages generated on May 30 between 8 a.m. and 5 p.m.,enter:query actlog begindate=05/30/2000 enddate=05/30/2000begintime=08:00 endtime=17:00
To request information about messages related to the expiration of files from theserver storage inventory, enter:query actlog msgno=0813
Refer to Messages for message numbers.
You can also request information only about messages logged by one or all clients.For example, to search the activity log for messages from the client for node JEE:query actlog originator=client node=jee
Setting the Activity Log Retention PeriodUse the SET ACTLOGRETENTION command to specify how long activity loginformation is kept in the database. The server automatically deletes messagesfrom the activity log once the day that was specified with the SETACTLOGRETENTION command has passed. At installation, the activity logretention period is set to one day. To change the retention period to 10 days, forexample, enter:set actlogretention 10
To disable activity log retention, set the SET ACTLOGRETENTION command tozero. To display the current retention period for the activity log, query the serverstatus.
Changing the Size of the Activity LogBecause the activity log is stored in the database, the size of the activity log shouldbe factored into the amount of space allocated for the database. Allow at least 1MBof additional space for the activity log.
The size of your activity log depends on how many messages are generated bydaily processing operations and how long you want to retain those messages in theactivity log. When retention time is increased, the amount of accumulated data alsoincreases, requiring additional database storage.
444 Tivoli Storage Manager for Windows: Administrator’s Guide

When there is not enough space in the database or recovery log for activity logrecords, the server stops recording and sends messages to the server console. Ifyou increase the size of the database or recovery log, the server starts activity logrecording again.
If you do not have enough space in the database for the activity log, you can doone of the following:v Allocate more space to the databasev Reduce the length of time that messages are kept in the activity log
For information about increasing the size of the database or recovery log, see“Increasing the Size of the Database or Recovery Log” on page 422.
Logging Tivoli Storage Manager Events to ReceiversThe server and client messages provide a record of TSM activity that you can useto monitor the server. You can log server messages and most client messages asevents to one or more repositories called receivers. You can log the events to anycombination of the following receivers:
TSM server console and activity logSee “Logging Events to the Tivoli Storage Manager Server Console andActivity Log” on page 447.
File and user exitsSee “Logging Events to a File Exit and a User Exit” on page 447.
Tivoli event consoleSee “Logging Events to the Tivoli/Enterprise Console” on page 449.
Simple Network Management Protocol (SNMP)See “Logging Events to an SNMP Manager” on page 450.
The Windows Event LogSee “Logging Events to the Windows Event Log” on page 455.
Event server receiver (Enterprise Event Logging)Routes the events to an event server. See “Enterprise Event Logging:Logging Events to Another Server” on page 455.
In addition, you can filter the types of events to be enabled for logging. Forexample, you might enable only severe messages to the event server receiver andone or more specific messages, by number, to another receiver. Figure 68 onpage 446 shows a possible configuration in which both server and client messagesare filtered by the event rules and logged to a set of specified receivers.
Chapter 21. Monitoring the Tivoli Storage Manager Server 445

Task Required Privilege Class
Enable or disable eventsBegin or end event logging
System
Controlling Event LoggingTo control event logging do the following:1. Enable or disable logging for one or more event types and for one or more
receivers.2. Begin or end logging to one or more receivers.
Enabling and Disabling EventsWhen you enable or disable events, you can specify the following:v A message number or an event severity (ALL, INFO, WARNING, ERROR, or
SEVERE).v Events for one or more client nodes (NODENAME) or for one or more servers
(SERVERNAME).
To enable or disable events, issue the ENABLE EVENTS and DISABLE EVENTScommands. For example,v To enable event logging to a user exit for all error and severe server messages,
enter:enable events userexit error,severe
v To enable event logging to a user exit for severe client messages for all clientnodes, enter:enable events userexit severe nodename=*
v To disable event logging to a user exit for error server messages, enterdisable events userexit error
If you specify a receiver that is not supported on any platform, or if you specify aninvalid event or name, TSM issues an error message. However, any valid receivers,events, or names that you specified are still enabled. Certain events, such asmessages that are issued during server start-up and shutdown, automatically go tothe console. They do not go to other receivers, even if they are enabled.
Figure 68. Event Logging Overview
446 Tivoli Storage Manager for Windows: Administrator’s Guide

Note: Server messages in the SEVERE category and message ANR9999 can providevaluable diagnostic information if there is a serious problem. For this reason,you should not disable these messages. Use the SET CONTEXTMESSAGINGON command to get additional information that could help determine thecause of ANR9999D messages. The Tivoli Storage Manager polls the servercomponents for information that includes process name, thread name,session ID, transaction data, locks that are held, and database tables that arein use.
Beginning and Ending Event LoggingA receiver for which event logging has begun is an active receiver. To begin and endlogging for one or more receivers, issue the BEGIN EVENTLOGGING and ENDEVENTLOGGING commands.
At server start-up event logging begins automatically to the server console andactivity log and for any receivers that are started based on entries in the serveroptions file. See the appropriate receiver sections for details. To begin loggingevents to receivers for which event logging is not started automatically, issue theBEGIN EVENTLOGGING command. You can also use this command after youhave disabled event logging to one or more receivers. To end event logging for anactive receiver issue the END EVENTLOGGING command.
For example,v To begin logging events to the event server, enter:
begin eventlogging eventserver
v To end logging events to the event server, enter:end eventlogging eventserver
Logging Events to the Tivoli Storage Manager Server Consoleand Activity Log
Logging events to the server console and activity log begins automatically at serverstartup. To enable all error and severe client events to the console and activity log,issue the following command:enable events console,actlog error,severe
Note: Enabling client events to the activity log will increase the databaseutilization. You can set a retention period for the log records by using theSET ACTLOGRETENTION command (see “Setting the Activity LogRetention Period” on page 444). At server installation, this value is set to oneday. If you increase the retention period, utilization is further increased. Formore information about the activity log, see “Using the Tivoli StorageManager Activity Log” on page 443.
You can disable server and client events to the server console and client events tothe activity log. However, you cannot disable server events to the activity log.Also, certain messages, such as those issued during server startup and shutdownand responses to administrative commands, will still be displayed at the consoleeven if disabled.
Logging Events to a File Exit and a User ExitYou can log events to a file exit and a user exit:v A file exit is a file that receives all the information related to its enabled events.
Be aware that this file can rapidly grow in size depending on the events enabledfor it. There are two versions of the file exit: binary and text. The binary file exit
Chapter 21. Monitoring the Tivoli Storage Manager Server 447

stores each logged event as a record, while the text file exit stores each loggedevent as a fixed-sized, readable line. For more information about the text fileexit, see “Readable Text File Exit (FILETEXTEXIT) Format” on page 655.
v A user exit is an external interface in the form of an executable, user-writtenprogram. TSM supports DLL user exits.
Note: Both types of event receivers must be specified in the server options file(dsmserv.opt) file.
Both file and user exits receive event data in the same data block structure. Settingup logging for these receivers is also similar:1. Add an option for the exit to the server options file:v For a file exit: Add either the FILEEXIT option (for a binary file exit) or
FILETEXTEXIT (for a text file exit) option.– Specify whether event logging to the file exit receiver begins automatically
at server startup. The parameters are YES and NO. If you do not specifyYES, you must begin event logging manually by issuing the BEGINEVENTLOGGING command.
– Specify the file where each logged event is to be stored.– Specify how files will be stored if the file being stored already exists.
REPLACE will overwrite the existing file, APPEND will append data tothe existing file, and PRESERVE will not overwrite the existing file.
For example,fileexit yes \tsm\server\data replace
filetextexit yes \tsm\server\data replace
v For a user exit: Add the USEREXIT option.– Specify whether event logging to the user exit receiver begins
automatically at server startup. The parameters for this option are YESand NO. If you do not specify YES, you must begin event loggingmanually by issuing the BEGIN EVENTLOGGING command.
– Specify a DLL name that contains the user-exit function.– Specify the name of the user-exit function in the DLL.
For example,userexit yes dllname.dll dllmodulename
2. Enable events for the receiver. You must specify the name of the user exit in theUSEREXIT server option and the name of the file in the FILEEXIT serveroption. Here are two examples:enable events file error
enable events userexit error,severe
You can also enable events to one or more client nodes or servers by specifythe NODENAME OR SERVERNAME parameter. See “Enabling and DisablingEvents” on page 446 for more information.
3. If you did not specify YES in the server option, begin event logging. Forexample, to begin event logging for a user-defined exit, enter:begin eventlogging userexit
See “Beginning and Ending Event Logging” on page 447 for more information.
448 Tivoli Storage Manager for Windows: Administrator’s Guide

Logging Events to the Tivoli/Enterprise ConsoleTSM includes the Tivoli receiver, a Tivoli/Enterprise Console (T/EC) adapter forsending events to the T/EC. You can specify the events to be logged based on theirsource. The valid event names are:
Event Name Source
TSM_SERVER_EVENT TSM server
TSM_CLIENT_EVENT TSM clients
TSM_APPL_EVENT TSM application program interface
TSM_TDP_DOMINO_EVENT TDP for Domino
TSM_TDP_EXCHANGE_EVENT TDP for MS Exchange
TSM_TDP_INFORMIX_EVENT TDP for Informix
TSM_TDP_ORACLE_EVENT TDP for Oracle
TSM_TDP_SQL_EVENT TDP for MS SQL
The application client must have enhanced T/EC support enabled in order to routethe events to the T/EC. Because of the number of messages, you should not enableall messages from a node to be logged to the T/EC.
To set up Tivoli as a receiver for event logging:1. Define the TSM event classes to the T/EC with the ibmtsm.baroc file, which is
distributed with the server.
Note: Please refer to TEC documentation for instruction on removing anexisting baroc file, if needed, and installing a new baroc file. If you havemigrated from ADSM Version 3 and have an existing ibmadsm.baroc file,do one of the following:v Remove the file.v Create a new rule base.v Copy the file.
Before the events are displayed on a T/EC, you must import ibmtsm.baroc intoan existing rule base or create a new rule base and activate it. To do this:v From the TME® desktop, click on the Rule Base icon to display the pop-up
menu.v Select Import, then specify the location of the ibmtsm.baroc file.v Select the Compile pop-up menu.v Select the Load pop-up menu and Load, but activate only when server
restarts from the resulting dialog.v Shut down the event server and restart it.
To create a new rule base, do the following:a. Click on the Event Server icon from the TME desktop. The Event Server
Rules Bases window will open.b. Select Rule Base from the Create menu.c. Optionally, copy the contents of an existing rule base into the new rule base
by selecting the Copy pop-up menu from the rule base to be copied.d. Click on the RuleBase icon to display the pop-up menu.e. Select Import and specify the location of the ibmtsm.baroc file.f. Select the Compile pop-up menu.
Chapter 21. Monitoring the Tivoli Storage Manager Server 449

g. Select the Load pop-up menu and Load, but activate only when serverrestarts from the resulting dialog.
h. Shut down the event server and restart it.2. To define an event source and an event group:
a. From the TME desktop, select Source from the EventServer pop-up menu.Define a new source whose name is TSM from the resulting dialog.
b. From the TME desktop, select Event Groups from the EventServer pop-upmenu. From the resulting dialog, define a new event group for TSM and afilter that includes event classes IBMTSMSERVER_EVENT andIBMTSMCLIENT_EVENT.
c. Select the Assign Event Group pop-up menu item from the Event Consoleicon and assign the new event group to the event console.
d. Double-click on the Event Console icon to start the configured eventconsole.
3. Enable events for logging to the Tivoli receiver. See “Enabling and DisablingEvents” on page 446 for more information.
4. In the server options file (dsmserv.opt), specify the location of the host on whichthe Tivoli server is running. For example, to specify a Tivoli server at the IPaddress 9.114.22.345:1555, enter the following:techost 9.114.22.345tecport 1555
5. Begin event logging for the Tivoli receiver. You do this in one of two ways:v To begin event logging automatically at server start up, specify the following
server option:tecbegineventlogging yes
Orv Enter the following command:
begin eventlogging tivoli
See “Beginning and Ending Event Logging” on page 447 for moreinformation.
Logging Events to an SNMP ManagerYou can use the simple network management protocol (SNMP) together with eventlogging to do the following:v Set up an SNMP heartbeat monitor to regularly check that the TSM server is
running.v Send traps to an SNMP manager, such as NetView® or Tivoli.v Run TSM scripts and retrieve output and return codes. See “Tivoli Storage
Manager Server Scripts” on page 406 for details.
The management information base (MIB), which is shipped with TSM, defines thevariables that will run server scripts and return the server scripts’ results. Youmust register SNMPADMIN, the administrative client the server runs these scriptsunder. Although a password is not required for the subagent to communicate withthe server and run scripts, a password should be defined for SNMPADMIN toprevent access to the server from unauthorized users. An SNMP password(community name) is required, however, to access the SNMP agent, whichforwards the request to the subagent.
450 Tivoli Storage Manager for Windows: Administrator’s Guide

Note: Because the SNMP environment has weak security, you should consider notgranting SNMPADMIN any administrative authority. This restrictsSNMPADMIN to issuing only TSM queries.
SNMP SET requests are accepted for the name and input variables associated withthe script names stored in the MIB by the SNMP subagent. This allows a script tobe run by running a GET request for the ibmAdsm1ReturnValue andibmAdsm2ReturnValue variables. A GETNEXT request will not cause the script torun. Instead, the results of the previous script processed will be retrieved. When anentire table row is retrieved, the GETNEXT request is used. When an individualvariable is retrieved, the GET request is used.
Here is a sample TSM configuration with SNMP:1. A TSM server on System A communicates with a subagent on system B.2. The subagent on System B communicates with an agent on system C, which
forward traps to a Netview system.3. System D runs a TSM server that also uses the subagent on system B.4. System B also has a TSM server that uses the subagent on system B.
To run an arbitrary command from an SNMP management application, forexample, NetView, follow these steps:1. Choose the name and parameters for a TSM script.2. Use the application to communicate with the SNMP agent. This agent changes
the TSM MIB variable for one of the two script names that the TSM subagentmaintains. The SNMP agent also sets the parameter variables for one of the twoscripts.
3. Use the application to retrieve the variable ibmAdsmReturnValue1.x oribmAdsmReturnValue2.x, where x is the index of the server that is registeredwith the subagent.
To set the variables associated with the script, the nodes on which the subagentand the agent are run must have read-write authority to the MIB variables. This isdone through the SNMP configuration process on the system that the SNMP agentruns on. For example, here is the SNMP configuration screen:
Chapter 21. Monitoring the Tivoli Storage Manager Server 451

An SNMP agent is needed for communication between an SNMP manager and itsmanaged systems. The SNMP agent is accomplished through the snmpd daemon.The Distributed Protocol Interface (DPI®) Version 2 is an extension of this SNMPagent.
TSM management through SNMP requires additional information in the MIB ofthe local agent. Therefore, an SNMP agent supporting DPI Version 2 must be usedto communicate with the TSM subagent. This SNMP agent is not included withTSM. IBM makes the SystemView® agent available for Windows and AIX. TheTSM subagent is included with TSM and, before server startup, must be started asa separate process communicating with the SNMP agent.
The SNMP manager system can reside on the same system as the TSM server, buttypically would be on another system connected through SNMP. The SNMPmanagement tool can be any application, such as NetView or Tivoli, that canmanage information through SNMP MIB monitoring and traps. The TSM serversystem runs the processes needed to send TSM event information to an SNMPmanagement system. The processes are:v SNMP agent (snmpd)v TSM SNMP subagent (dsmsnmp)v TSM server (dsmserv)
Cross-system support for communication between the server and subagent is notsupported, and these products must be installed and run on the TSM serversystem. Figure 70 on page 453 illustrates a typical TSM implementation:
Figure 69. IBM SNMP Configuration Screen
452 Tivoli Storage Manager for Windows: Administrator’s Guide

Figure 71 shows how the communication for SNMP works in a TSM system:v The SNMP manager and agent communicate with each other through the SNMP
protocol. The SNMP manager passes all requests for variables to the agent.v The agent then passes the request to the subagent and sends the answer back to
the manager. The agent responds to the manager’s requests and informs themanager about events by sending traps.
v The agent communicates with both the manager and subagent. It sends queriesto the subagent and receives traps that inform the SNMP manager about eventstaking place on the application monitored through the subagent. The SNMPagent and subagent communicate through the Distributed Protocol Interface(DPI). Communication takes place over a stream connection, which typically is aTCP connection but could be another stream-connected transport mechanism.
v The subagent answers MIB queries of the agent and informs the agent aboutevents by sending traps. The subagent can also create and delete objects orsubtrees in the agent’s MIB. This allows the subagent to define to the agent allthe information needed to monitor the managed application.
Figure 70. TSM SNMP Implementation
Figure 71. Manager-Agent-Subagent Communication
Chapter 21. Monitoring the Tivoli Storage Manager Server 453
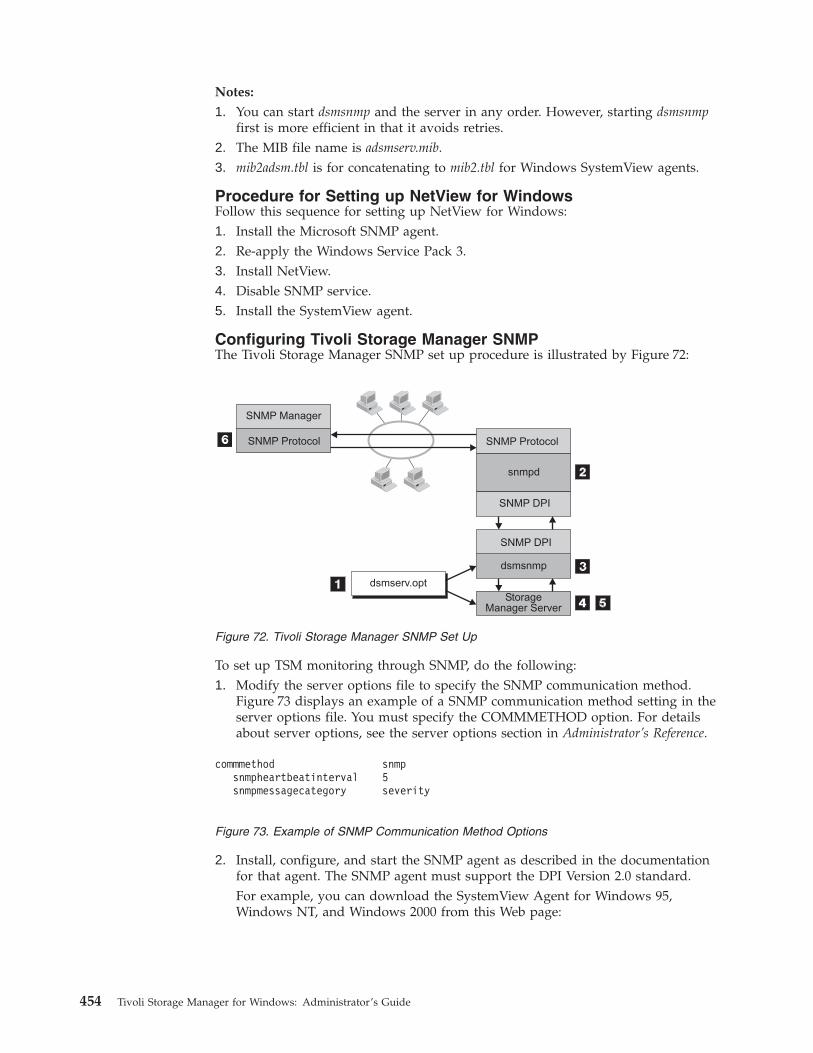
Notes:
1. You can start dsmsnmp and the server in any order. However, starting dsmsnmpfirst is more efficient in that it avoids retries.
2. The MIB file name is adsmserv.mib.3. mib2adsm.tbl is for concatenating to mib2.tbl for Windows SystemView agents.
Procedure for Setting up NetView for WindowsFollow this sequence for setting up NetView for Windows:1. Install the Microsoft SNMP agent.2. Re-apply the Windows Service Pack 3.3. Install NetView.4. Disable SNMP service.5. Install the SystemView agent.
Configuring Tivoli Storage Manager SNMPThe Tivoli Storage Manager SNMP set up procedure is illustrated by Figure 72:
To set up TSM monitoring through SNMP, do the following:1. Modify the server options file to specify the SNMP communication method.
Figure 73 displays an example of a SNMP communication method setting in theserver options file. You must specify the COMMMETHOD option. For detailsabout server options, see the server options section in Administrator’s Reference.
2. Install, configure, and start the SNMP agent as described in the documentationfor that agent. The SNMP agent must support the DPI Version 2.0 standard.For example, you can download the SystemView Agent for Windows 95,Windows NT, and Windows 2000 from this Web page:
Figure 72. Tivoli Storage Manager SNMP Set Up
commmethod snmpsnmpheartbeatinterval 5snmpmessagecategory severity
Figure 73. Example of SNMP Communication Method Options
454 Tivoli Storage Manager for Windows: Administrator’s Guide

http://www.tivoli.com/support/sva/. Issue the snmpcfg command to displaythe IBM SNMP Configuration Utility screen. Online documentation is suppliedwith the SystemView Agent.Before starting the agent, ensure that the DPI agent has been started and notthe default SNMP agent that ships with the operating system or with TCP/IP.If you are using the SystemView agent, you must set the SVA_SNMPDenvironment variable to ensure that the correct agent is started. You can set thevariable to any value. Then run svastart.
3. Start TSM SNMP subagent through the dsmsnmp executable.4. Start the TSM server to begin communication through the configured TCP/IP
port with the subagent.5. Begin event logging for the SNMP receiver, and enable events to be reported to
SNMP. For example, issue the following commands:begin eventlogging snmpenable event snmp all
6. Define the TSM SNMP MIB values for the SNMP manager to help format anddisplay the TSM SNMP MIB variables and messages. The adsmserv.mib file shipswith the TSM server and must be loaded by the SNMP manager. For example,when you run NetView for OS/2® as an SNMP manager, the adsmserv.mib file iscopied to the \netview_path\SNMP_MIB directory and then loaded through thefollowing command:[C:\] loadmib -load adsmserv.mib
Logging Events to the Windows Event LogThe Windows event log lets you display enabled events in the WindowsApplication Log in the Windows Event Viewer. The information displayedincludes:v The date and time that the Windows Event Log received the eventv The category of the eventv The event numberv The user security identifierv The name of the computer that logged the event
For example, to enable severe and error events for logging on the Event Log, youmust first issue the following command:enable events nteventlog severe,error
Enterprise Event Logging: Logging Events to Another ServerOne or more servers can send server events and events from their own clients toanother server for logging. The sending server receives the enabled events androutes them to a designated event server. This is done by a receiver that TivoliStorage Manager provides. At the event server, an administrator can enable one ormore receivers for the events being routed from other servers. Figure 74 onpage 456 shows the relationship of a sending TSM server and a TSM event server.
Chapter 21. Monitoring the Tivoli Storage Manager Server 455

The following scenario is a simple example of how enterprise event logging canwork.
Figure 74. Server to Server Event Logging
456 Tivoli Storage Manager for Windows: Administrator’s Guide

The administrator at each sending server does the following:
1. Defines the server that will be the event server. For details aboutcommunication set up, see “Setting Up Communications for EnterpriseConfiguration and Enterprise Event Logging” on page 468.define server server_b password=cholla hladdress=9.115.3.45 lladdress=1505
2. Identifies the server just defined as the event server:define eventserver server_b
3. Enables the logging of severe, error, and warning server messages from thesending server and severe and error messages from all clients to the eventserver receiver by issuing the following commands:enable events eventserver severe,error,warningenable events eventserver severe,error nodename=*
4. Begins event logging by issuing the following command:begin eventlogging eventserver
The administrator at the event server does the following:
5. Enables the logging of severe and error messages to a file named events that aresent to it from the sending servers. The administrator defines the file with thefollowing option in the server options file:fileexit yes events append
Then the administrator enables the events by issuing the ENABLE EVENTScommand for each sending server. For example, for SERVER_A theadministrator would enter:enable events file severe,error servername=server_a
Note: By default, logging of events from another server is enabled to the eventserver activity log. However, unlike events originating from a localserver, events originating from another server can be disabled for theactivity log at an event server.
One or more servers can send events to an event server. An administrator at theevent server enables the logging of specific events from specific servers. In theprevious example, SERVER_A routes severe, error, and warning messages toSERVER_B. SERVER_B, however, logs only the severe and error messages. If athird server sends events to SERVER_B, logging is enabled only if an ENABLEEVENTS command includes the third server. Furthermore, the SERVER_Bdetermines the receiver to which the events are logged.
Attention: It is important that you do not set up server-to-server event logging ina loop. In such a situation, an event would continue logging indefinitely, tying upnetwork and memory resources. TSM will detect such a situation and issue amessage. Here are a few configurations to avoid:v SERVER_A logs to SERVER_B, and SERVER_B logs to SERVER_A.v SERVER_A logs to SERVER_B; SERVER_B logs to SERVER_C; SERVER_C logs to
SERVER_A.
Querying Event LoggingThe QUERY ENABLED command displays a list of server or client events that areenabled or disabled by a specified receiver. Because the lists of enabled anddisabled events could be very long, TSM displays the shorter of the two lists. For
Chapter 21. Monitoring the Tivoli Storage Manager Server 457
example, assume that 1000 events for client node HSTANFORD were enabled forlogging to the user exit and that later two events were disabled. To query theenabled events for HSTANFORD, enter:query enabled userexit nodename=hstanford
The output would specify the number of enabled events and the message names ofdisabled events:998 events are enabled for node HSTANFORD for the USEREXIT receiver.The following events are DISABLED for the node HSTANFORD for the USEREXITreceiver:ANE4000, ANE49999
The QUERY EVENTRULES command displays the history of events that areenabled or disabled by a specific receiver for the server or for a client node.query enabled userexit nodename=hstanford
Using Tivoli Decision SupportTivoli Decision Support (TDS) for Storage Management Analysis is a separateprogram product that works with Tivoli Storage Manager to let you strategicallymanage your enterprise network. Storage Management Analysis helps you makedecisions concerning storage management by providing an overview of yoursystem performance and resource usage. Using data collected from TSM servers,Storage Management Analysis displays multidimensional views and detailedreports.
Storage Management Analysis requires the Tivoli Storage Management DecisionSupport Loader, which runs daily to collect and aggregate the data into thedatabase table. See “Scheduling the Decision Support Loader with Tivoli StorageManager” for information about automating the scheduling of Decision SupportLoader runs. The Tivoli Discovery Administrator interface is used to define queriesthat extract data from the TDS database into a file. Cognos Transformer builds acube from the file, and Cognos PowerPlay generates reports from the cube. Youcan use the Tivoli Discovery Interface to view these reports. You can also useCrystal Reports to generate text-based views.
To use Storage Management Analysis on your TSM server or servers, you mustfirst enable event logging of client events to the activity log. See “Logging Eventsto the Tivoli Storage Manager Server Console and Activity Log” on page 447 fordetails.
For documentation about TDS for Storage Management Analysis visit the Web siteat http://www.tivoli.com/support/storage_mgr/tivolimain.html
Scheduling the Decision Support Loader with Tivoli StorageManager
You can schedule the Decision Support Loader (DSL) to run automatically usingthe TSM Scheduler. Before defining a schedule, ensure that the backup-archiveclient is installed on a dedicated Windows workstation where the DSL is installed.
Use the following procedure to schedule the DSL:1. On the TSM server:
a. Register the client node. Assume that the client node you registered is calledASTROdsl.
458 Tivoli Storage Manager for Windows: Administrator’s Guide

b. Define a client schedule on the server from which the DSL will extract data.For example, if the schedule is called TSMDSL and client node ASTROdsl isregistered in the STANDARD domain, enter:define schedule standard tsm_dsl action=cobject='"c:\program files\tivoli\tsm\decision\tsmdsl"'
Notes:
1) The installation directory path for the DSL is:"c:\program files\tivoli\tsm\decision\tsmdsl.exe"
2) Enclose the full directory path in quotation marks as shown in theprevious example.
c. Associate the client node to the tsm_dsl schedule. For example:define association standard tsm_dsl ASTROdsl
2. On the client’s workstation:
a. Ensure that the scheduler is installed.b. Start the scheduler for the client. Leave the scheduler running until
scheduled rollups are no longer needed. To start the scheduler, you canopen a command prompt window and navigate to where thebackup-archive client is installed and enter:> dsmc schedule
Note: If the DSL is not processed according to the schedule you have defined,check the directory path where the DSL is installed.
Monitoring Errors and Diagnosing ProblemsThe System Event Viewer logs events created by the following:v TSM Server (Application Log)v TSM Central Scheduler Service (Application Log)v TSM Device Driver (System Log)
On a Windows NT operating system, you can view events by clicking Start >Administrative Tools > Event Viewer. On a Windows 2000 operating system, youcan view events from the TSM Console. The Event Viewer appears on the leftpane. Additional information is available in the online help.
Monitoring Tivoli Storage Manager Accounting Records
Task Required Privilege Class
Set accounting records on or off System
TSM accounting records show the server resources that are used during a session.This information lets you track resources that are used by a client node session. Atinstallation, accounting defaults to OFF. You can set accounting to ON by entering:set accounting on
When accounting is on, the server creates a session resource usage accountingrecord whenever a client node session ends.
Accounting records are stored in a file named dsmaccnt.log, which is located in theserver directory. The accounting file contains text records that can be vieweddirectly or can be read into a spreadsheet program. The file remains opened while
Chapter 21. Monitoring the Tivoli Storage Manager Server 459

the server is running and accounting is set to ON. The file continues to grow untilyou delete it or prune old records from it. To close the file for pruning, eithertemporarily set accounting off or stop the server.
There are 31 fields, which are delimited by commas (,). Each record ends with anew-line character. Each record contains the following information:
Field Contents1 Product version2 Product sublevel3 Product name, ‘ADSM’,4 Date of accounting (mm/dd/yyyy)5 Time of accounting (hh:mm:ss)6 Node name of TSM client7 Client owner name (UNIX)8 Client Platform9 Authentication method used10 Communication method used for the session11 Normal server termination indicator (Normal=X'01', Abnormal=X'00')12 Number of archive store transactions requested during the session13 Amount of archived files, in kilobytes, sent by the client to the server14 Number of archive retrieve transactions requested during the session15 Amount of space, in kilobytes, retrieved by archived objects16 Number of backup store transactions requested during the session17 Amount of backup files, in kilobytes, sent by the client to the server18 Number of backup retrieve transactions requested during the session19 Amount of space, in kilobytes, retrieved by backed up objects20 Amount of data, in kilobytes, communicated between the client node and the
server during the session21 Duration of the session, in seconds22 Amount of idle wait time during the session, in seconds23 Amount of communications wait time during the session, in seconds24 Amount of media wait time during the session, in seconds25 Client session type. A value of 1 or 4 indicates a general client session. A value
of 5 indicates a client session that is running a schedule.26 Number of space-managed store transactions requested during the session27 Amount of space-managed data, in kilobytes, sent by the client to the server28 Number of space-managed retrieve transactions requested during the session29 Amount of space, in kilobytes, retrieved by space-managed objects30 Product release31 Product level
The following shows a sample record:3,8,ADSM,08/03/2000,16:26:37,node1,,AIX,1,Tcp/Ip,0,254,1713,0,0,47,1476,0,0,3316,960,27,5,1,4,0,0,0,0,7,2
Daily Monitoring ScenarioThis section contains an example of the daily monitoring of a Tivoli StorageManager system. Depending on the configuration of your system, you may wantto perform additional monitoring tasks. If a function does not complete properly,you can review the activity log for errors that occurred at about the time of failure(see “Requesting Information from the Activity Log” on page 444 for details).
You can include the commands shown in a command script that you can run daily.Review the output of the script for any errors or problems.
460 Tivoli Storage Manager for Windows: Administrator’s Guide
1. Verify that drives are online. If there is a drive in the unavailable state, theremay be errors with schedules.query drive
2. Verify that database and recovery log volumes are online and synchronized.query dbvolumequery logvolume
3. Check the status of disk volumes. If any are offline, check for hardwareproblems.query volume devclass=disk
4. Check that scratch volumes are available.query libvolume
5. Check the access state of the tape volumes. For example, a volume that is notin the read-write state may indicate a problem. You may need to move dataand check the volumes out of the library.query volume
6. Check database and recovery log statistics.query dbquery log
7. Verify that scheduled database backups completed successfully.query volhistory type=dbbackup
8. Check the activity log for error messages.query actlog search=ANR????E
Chapter 21. Monitoring the Tivoli Storage Manager Server 461

462 Tivoli Storage Manager for Windows: Administrator’s Guide

Chapter 22. Working with a Network of Tivoli Storage ManagerServers
You may have a number of TSM servers in your network, at the same or differentlocations. TSM provides functions to help you configure, manage, and monitor theservers connected to a network. An administrator working at one TSM server canwork with TSM servers at other locations around the world.
See the following sections:
Concepts:
“Concepts for Working with a Network of Servers”
Tasks:
“Planning for Enterprise Administration” on page 467
“Setting Up Communications Among Servers” on page 468
“Setting Up an Enterprise Configuration” on page 475
“Performing Tasks on Multiple Servers” on page 496
“Using Virtual Volumes to Store Data on Another Server” on page 501
In this chapter, most examples illustrate how to perform tasks by using a TivoliStorage Manager command-line interface. For information about the commands,see Administrator’s Reference, or issue the HELP command from the command lineof a Tivoli Storage Manager administrative client.
Tivoli Storage Manager tasks can also be performed from the administrative Webinterface. For more information about using the administrative interface, see QuickStart.
Concepts for Working with a Network of ServersTo manage a network of servers, you can use the following capabilities of TivoliStorage Manager:v Configure and manage multiple servers with enterprise configuration.
Distribute a consistent configuration for TSM servers through a configurationmanager to managed servers. By having consistent configurations, you cansimplify the management of a large number of servers and clients.
v Perform tasks on multiple servers by using command routing, enterprise logon,and enterprise console .
v Send server and client events to another server for logging.v Monitor many servers and clients from a single server.v Store data on another server using virtual volumes.
In a network of TSM servers, a server can play a number of different roles. Forexample, a server may send volumes to be archived on another server and alsoreceive routed commands from another server. In the following descriptions, whena server sends data it is sometimes referred to as a source server, and when a serverreceives data it is sometimes referred to as a target server. In other words, one TSM
© Copyright IBM Corp. 1994, 2002 463

server may be both a source and a target server. At the same time, any TSM servercan still provide backup, archive, and space management services to clients.
Configuring and Managing Servers: Enterprise ConfigurationThe enterprise configuration functions of the Tivoli Storage Manager make it easierto consistently set up and manage a network of TSM servers. You set upconfigurations on one server and distribute the configurations to the other servers.You can make changes to configurations and have the changes automaticallydistributed.
Figure 75 on page 465 illustrates a simple configuration. To use enterpriseconfiguration, you first select the TSM server that is to act as the configurationmanager. You may want to dedicate a new server for this purpose. At theconfiguration manager, you define the details of the server configurations that youwant to distribute. For example:v You set up backup and archive policies and client option setsv You designate one or more administrators to have access to the servers, and
control their authority levelsv You define the servers that you want the configuration manager to manage or
communicate with, and you set up communications among the servers
In one or more profiles, you point to the definitions of the configurationinformation that you want to use to manage other servers.
On each server that is to receive the configuration information, you identify theserver as a managed server by defining a subscription to one or more profiles ownedby the configuration manager. All the definitions associated with the profiles arethen copied into the managed server’s database. Things defined to the managedserver in this way are managed objects that cannot be changed by the managedserver. From then on, the managed server gets any changes to the managed objectsfrom the configuration manager via the profiles. Managed servers receive changesto configuration information at time intervals set by the servers, or by command.
See “Setting Up an Enterprise Configuration” on page 475 for details.
464 Tivoli Storage Manager for Windows: Administrator’s Guide

Performing Tasks on Multiple ServersWhen you connect to the configuration manager via a Web browser, you arepresented with the enterprise console . From the enterprise console you can performtasks on the configuration manager and on one or more of the managed servers.You can also connect to another server to perform tasks directly on that server. Aslong as you are registered with the same administrator ID and password, you cando this work on many servers without having to log on each time. See “UsingTivoli Storage Manager Enterprise Logon” on page 496.
From the command line of the administrative Web interface or from thecommand-line administrative client, you can also route commands to other servers.The other servers must be defined to the server to which you are connected. Youmust also be registered on the other servers as an administrator with theadministrative authority that is required for the command. See “RoutingCommands” on page 497.
To make routing commands easier, you can define a server group that has serversas members. See “Setting Up Server Groups” on page 499. Commands that youroute to a server group are sent to all servers in the group.
Central MonitoringTSM provides you with several ways to centrally monitor the activities of a servernetwork:v Enterprise event logging, in which events are sent from one or more of servers
to be logged at an event server. See “Enterprise Event Logging: Logging Eventsto Another Server” on page 455 for a description of the function and “Setting UpCommunications for Enterprise Configuration and Enterprise Event Logging” onpage 468 for communications set up.
Figure 75. Enterprise Configuration
Chapter 22. Working with a Network of Servers 465

v Allowing designated administrators to log in to any of the servers in thenetwork with a single user ID and password. See “Using Tivoli Storage ManagerEnterprise Logon” on page 496.
v Routing query commands to one or more of the servers in the network. See“Routing Commands to One or More Servers” on page 498 for a description ofthe function and “Setting Up Communications for Enterprise Configuration andEnterprise Event Logging” on page 468 for communications set up.
Storing Data on Another ServerTSM lets one server store data in and retrieve data from the storage pool ofanother server. This data, stored as virtual volumes, can include database andstorage pool backups, disaster recovery plan files, and data that is directly backedup, archived, or space managed from client nodes. The data can also be a recoveryplan file created by using Tivoli Disaster Recovery Manager (DRM). The sourceserver is a client of the target server, and the data for the source server is managedonly by the source server. In other words, the source server controls the expirationand deletion of the files that comprise the virtual volumes on the target server.
To use virtual volumes to store database and storage pool backups and recoveryplan files, you must have the Tivoli Disaster Recovery Manager product andregister a license for its use. See “Licensing Tivoli Storage Manager” on page 383.
For information on using virtual volumes with DRM, see “Chapter 25. Using TivoliDisaster Recovery Manager” on page 577.
Example ScenariosThe functions for managing multiple servers can be applied in many ways. Hereare just two scenarios to give you some ideas about how you can put the functionsto work for you:v Setting up and managing TSM servers primarily from one location. For example,
an administrator at one location controls and monitors servers at severallocations.
v Setting up a group of TSM servers from one location, and then managing theservers from any of the servers. For example, several administrators areresponsible for maintaining a group of servers. One administrator defines theconfiguration information on one server for distributing to servers in thenetwork. Administrators on the individual servers in the network manage andmonitor the servers.
Managing Tivoli Storage Manager Servers from One LocationEnterprise management allows you to set up and manage the servers in yournetwork from one location, the enterprise console . For example, suppose you arean administrator responsible for TSM servers at your own location plus servers atbranch office locations. Servers at each location have similar storage resources andclient requirements. You can set up the environment as follows:v Set up an existing or new TSM server as a configuration manager.v Set up communications so that a configuration manager can send commands to
its managed servers.v Define the configuration you want to distribute by defining policy domains,
schedules, and so on. Associate the configuration information with profiles.v Have the managed servers subscribe to profiles.v Activate policies and set up storage pools as needed on the managed servers.
466 Tivoli Storage Manager for Windows: Administrator’s Guide

v Set up enterprise monitoring by setting up one server as an event server. Theevent server can be the same server as the configuration manager or a differentserver.
After you complete the setup, you can manage many servers as if there was justone. You can do any of the following tasks:v Have administrators that can manage the group of servers from anywhere in the
network by using the enterprise console, an interface available through a Webbrowser.
v Have consistent policies, schedules, and client option sets on all servers.v Make changes to configurations and have the changes automatically distributed
to all servers. Allow local administrators to monitor and tune their own servers.v Perform tasks on any server or all servers by using command routing from the
enterprise console.v Back up the databases of the managed servers on the automated tape library
that is attached to the server that is the configuration manager. You use virtualvolumes to accomplish this.
v Log on to individual servers from the enterprise console without having tore-enter your password, if your administrator ID and password are the same oneach server.
Managing Servers from Any ServerEnterprise management allows you to manage the servers in your network frommany locations. For example, suppose you are an administrator responsible forservers located in different departments on a college campus. The servers havesome requirements in common, but also have many unique client requirements.You can set up the environment as follows:v Set up an existing or new TSM server as a configuration manager.v Set up communications so that commands can be sent from any server to any
other server.v Define any configuration that you want to distribute by defining policy
domains, schedules, and so on, on the configuration manager. Associate theconfiguration information with profiles.
v Have the managed servers subscribe to profiles as needed.v Activate policies and set up storage pools as needed on the managed servers.v Set up enterprise monitoring by setting up one server as an event server. The
event server can be the same server as the configuration manager or a differentserver.
After setting up in this way, you can manage the servers from any server. You cando any of the following tasks:v Use enterprise console to monitor all the servers in your network.v Perform tasks on any or all servers using the enterprise console and command
routing.v Manage the group of servers from anywhere in the network. Allow local
administrators to monitor and tune their own servers.
Planning for Enterprise AdministrationTo take full advantage of the functions of Enterprise Administration, you shoulddecide on the following:
Chapter 22. Working with a Network of Servers 467

v The servers you want to include in the enterprise network. The servers musthave unique names.
v The server or servers from which you want to manage the network. Servers canhave multiple roles. For example, one server can act as a server forbackup-archive clients, as the configuration manager, and as the event server.You can also set up separate servers to fill each of these roles.
v Whether you want administrators to have the ability to route commands toother servers. If you want administrators to route commands, decide on theservers from which and to which commands will be routed.
v The administrator activities you want to be centrally managed.v The authority level of the administrators and the servers to which they should
have access.
Setting Up Communications Among ServersThis section describes how to set up communications for enterprise configuration,enterprise event logging, and command routing. Communication setup forserver-to-server virtual volumes is described in “Setting Up Source and TargetServers for Virtual Volumes” on page 503.
When you set up communications among servers for any purpose, ensure thatservers have unique names. At installation, a TSM server has the same name asthat of the machine. You can change the server name if necessary before setting upcommunication with other servers. For example, enter this command to name theserver TUCSON:set servername tucson
Setting Up Communications for Enterprise Configuration andEnterprise Event Logging
The communication setup for enterprise configuration and enterprise eventlogging, which is through TCP/IP, is identical. The examples shown here apply toboth functions. If you are set up for one, you are set up for the other. However, beaware that the configuration manager and event server are not defined simply bysetting up communications. You must identify a server as a configuration manager(SET CONFIGMANAGER command) or an event server (DEFINE EVENTSERVERcommand). Furthermore, a configuration manager and an event server can be thesame server or different servers.
Enterprise configurationEach managed server must be defined to the configuration manager, andthe configuration manager must be defined to each managed server.
Enterprise event loggingEach server sending events to an event server must be defined to the eventserver, and the event server must be defined to each source server.
The following examples of setting up communications could be used to createthese configurations:v A server named HEADQUARTERS as a configuration manager and two servers,
MUNICH and STRASBOURG, as managed servers.v HEADQUARTERS as an event server and MUNICH and STRASBOURG as
source servers.
For a pair of servers to communicate with each other, each server must be definedto the other. For example, if a configuration manager manages three managed
468 Tivoli Storage Manager for Windows: Administrator’s Guide

servers, there are three server pairs. You can issue separate definitions from eachserver in each pair, or you can “cross define” a pair in a single operation. Crossdefinition can be useful in large or complex networks. The following scenarios andaccompanying figures illustrate the two methods.
Using separate definitions — Follow this sequence:1. On MUNICH: Specify the server name and password of MUNICH.
On STRASBOURG: Specify the server name and password of STRASBOURG.On HEADQUARTERS: Specify the server name and password ofHEADQUARTERS.
2. On HEADQUARTERS: Define MUNICH (whose password is BERYL andwhose address is 9.115.2.223:1919) and STRASBOURG (whose password isFLUORITE and whose address is 9.115.2.178:1715).On MUNICH and STRASBOURG: Define HEADQUARTERS (whosepassword is AMETHYST and whose address is 9.115.4.177:1823).
Figure 76 shows the servers and the commands issued on each:
Figure 76. Communication Configuration with Separate Server Definitions
Chapter 22. Working with a Network of Servers 469

Using Cross Definitions — Follow this sequence:1. On MUNICH: Specify the server name, password, and high and low level
addresses of MUNICH. Specify that cross define is permitted.On STRASBOURG: Specify the server name, password, and high and lowlevel addresses of STRASBOURG. Specify that cross define is permitted.On HEADQUARTERS: Specify the server name, password, and high and lowlevel addresses of HEADQUARTERS.
2. On HEADQUARTERS: Define MUNICH and STRASBOURG, specifying thatcross define should be done.
Figure 77 shows the servers and the commands issued on each:
Communication SecuritySecurity for this communication configuration is enforced through the exchange ofpasswords (which are encrypted) and, in the case of enterprise configuration only,verification keys. Communication among servers, which is through TCP/IP,requires that the servers verify server passwords (and verification keys). Forexample, assume that HEADQUARTERS begins a session with MUNICH:1. HEADQUARTERS, the source server, identifies itself by sending its name to
MUNICH.2. The two servers exchange verification keys (enterprise configuration only).3. HEADQUARTERS sends its password to MUNICH, which verifies it against
the password stored in its database.
Figure 77. Communication Configuration with Cross Definition
470 Tivoli Storage Manager for Windows: Administrator’s Guide

4. If MUNICH verifies the password, it sends its password to HEADQUARTERS,which, in turn, performs password verification.
Note: If another server named MUNICH tries to contact HEADQUARTERS forenterprise configuration, the attempt will fail. This is because the verificationkey will not match. If MUNICH was moved or restored, you can issue theUPDATE SERVER command with the FORCERESYNC parameter tooverride the condition.
Setting Up Communications for Command RoutingThis section describes how to set up communications for command routing. Youmust define the target servers to the source servers, and the same administratormust be registered on all servers. Using enterprise configuration, you can easilydistribute the administrator information to all the servers.
Note: You must be registered as an administrator with the same name andpassword on the source server and all target servers. The privilege classesdo not need to be the same on all servers. However, to successfully route acommand to another server, an administrator must have the minimumrequired privilege class for that command on the server from which thecommand is being issued.
For command routing in which one server will always be the sender, you wouldonly define the target servers to the source server. If commands can be routed fromany server to any other server, each server must be defined to all the others.
Only One Source ServerThe example in this section shows how to set up communications for administratorHQ on the server HEADQUARTERS who will route commands to the serversMUNICH and STRASBOURG. Administrator HQ has the password SECRET andhas system privilege class. Here is the procedure:v On HEADQUARTERS: register administrator HQ and specify the server names
and addresses of MUNICH and STRASBOURG:register admin hq secretgrant authority hq classes=system
define server munich hladdress=9.115.2.223 lladdress=1919define server strasbourg hladdress=9.115.2.178 lladdress=1715
v On MUNICH and STRASBOURG Register administrator HQ with the requiredprivilege class on each server:register admin hq secretgrant authority hq classes=system
Note: If your server network is using enterprise configuration, you can automatethe preceding operations. You can distribute the administrator and serverlists to MUNICH and STRASBOURG. In addition, all server definitions andserver groups are distributed by default to a managed server when it firstsubscribes to any profile on a configuration manager. Therefore, it receivesall the server definitions that exist on the configuration manager, thusenabling command routing among the servers.
Multiple Source ServersThe examples in this section show how to set up communications if theadministrator, HQ, can route commands from any of the three servers to any of theother servers. You must define all the servers to each other. You can separatelydefine each server to each of the other servers, or you can “cross define” the
Chapter 22. Working with a Network of Servers 471

servers. In cross definition, defining MUNICH to HEADQUARTERS also results inautomatically defining HEADQUARTERS to MUNICH.
Separate Definitions: Follow this sequence:1. On MUNICH: Specify the server name and password of MUNICH. Register
administrator HQ and grant HQ system authority.On STRASBOURG: Specify the server name and password of STRASBOURG.Register administrator HQ and grant HQ system authority.On HEADQUARTERS: Specify the server name and password ofHEADQUARTERS. Register administrator HQ and grant HQ system authority.
2. On HEADQUARTERS: Define MUNICH (whose password is BERYL andwhose address is 9.115.2.223:1919) and STRASBOURG (whose password isFLUORITE and whose address is 9.115.2.178:1715).On MUNICH: Define HEADQUARTERS (whose password is AMETHYST andwhose address is 9.115.4.177:1823) and STRASBOURG.On STRASBOURG: Define HEADQUARTERS and MUNICH.
Figure 78 on page 473 shows the servers and the commands issued on each:
472 Tivoli Storage Manager for Windows: Administrator’s Guide

Cross Definitions: Follow this sequence:1. On MUNICH: Specify the server name, password, and high and low level
addresses of MUNICH. Specify that cross define is permitted. Registeradministrator HQ and grant HQ system authority.On STRASBOURG: Specify the server name, password, and high and lowlevel addresses of STRASBOURG. Specify that cross define is permitted.Register administrator HQ and grant HQ system authority.On HEADQUARTERS: Specify the server name, password, and high and lowlevel addresses of HEADQUARTERS. Register administrator HQ and grant HQsystem authority.
2. On HEADQUARTERS: Define MUNICH and STRASBOURG, specifying thatcross define should be done.
3. On MUNICH: Define STRASBOURG, specifying that cross define should bedone.
Figure 78. Communication Configuration with Separate Server Definitions
Chapter 22. Working with a Network of Servers 473

Note: If your server network is using enterprise configuration, you can automatethe preceding operations. You can distribute the administrator lists andserver lists to MUNICH and STRASBOURG. In addition, all serverdefinitions and server groups are distributed by default to a managed serverwhen it first subscribes to any profile on a configuration manager. Therefore,it receives all the server definitions that exist on the configuration manager,thus enabling command routing among the servers.
Figure 79 shows the servers and the commands issued on each:
Updating and Deleting ServersYou can update a server definition by issuing the UPDATE SERVER command.v For Server-to-server Virtual Volumes:
– If you update the node name, you must also update the password.
Figure 79. Communication Configuration with Cross Definitions
474 Tivoli Storage Manager for Windows: Administrator’s Guide

– If you update the password but not the node name, the node name defaultsto the server name specified by the SET SERVERNAME command.
v For enterprise configuration and enterprise event logging: If you update theserver password, it must match the password specified by the SETSERVERPASSWORD command at the target server.
v For enterprise configuration: When a server is first defined at a managed server,that definition cannot be replaced by a server definition from a configurationmanager. This prevents the definition at the managed server from beinginadvertently replaced. Such a replacement could disrupt functions that requirecommunication among servers, for example command routing or virtualvolumes.To allow replacement, update the definition at the managed server by issuingthe UPDATE SERVER command with the ALLOWREPLACE=YES parameter.When a configuration manager distributes a server definition, the definitionalways includes the ALLOWREPLACE=YES parameter.
You can delete a server definition by issuing the DELETE SERVER command. Forexample, to delete the server named NEWYORK, enter the following:delete server newyork
The deleted server is also deleted from any server groups of which it is a member.See “Setting Up Server Groups” on page 499 for information about server groups.
You cannot delete a server if either of the following conditions is true:v The server is defined as an event server.
You must first issue the DELETE EVENTSERVER command.v The server is a target server for virtual volumes.
A target server is named in a DEFINE DEVCLASS (DEVTYPE=SERVER)command. You must first change the server name in the device class or deletethe device class.
Setting Up an Enterprise ConfigurationAfter you set up server communication as described in “Setting UpCommunications for Enterprise Configuration and Enterprise Event Logging” onpage 468, you set up the configuration manager and its profiles. With the profiles,you designate the configuration information that can be distributed to managedservers. Then you can set up other servers as managed servers. The managedservers receive configuration information through subscriptions to profiles on theconfiguration manager. Each managed server stores the distributed information asmanaged objects in its database. Managed servers receive periodic updates of theconfiguration information from the configuration manager, or an administrator cantrigger an update by command.
You can distribute the following configuration information from a configurationmanager to managed servers:v Administrators, including authorities for them
Note: For administrator definitions that have node authority, the configurationmanager only distributes information such as password and contactinformation. Node authority for the managed administrator can becontrolled on the managed server using the GRANT AUTHORITY andREVOKE AUTHORITY commands specifying the CLASS=NODEparameter.
Chapter 22. Working with a Network of Servers 475

v Policy objectsPolicy objects include policy domains, and the policy sets, management classes,copy groups and client schedules associated with them. However, aconfiguration manager does not distribute an active policy set and any of itsassociated objects. On each managed server, you must activate a policy set ineach managed policy domain.
Note: The configuration manager does not distribute definitions for any storagepools identified as destinations in the policy. Definitions of storage poolsand device classes are not distributed by a configuration manager.
v Administrative command schedulesv TSM server scriptsv Client option setsv Server definitionsv Server groups
“Enterprise Configuration Scenario” gives you an overview of the steps to take forone possible implementation of enterprise configuration. Sections that follow givemore details on each step.
Enterprise Configuration ScenarioTo illustrate how you might use these functions, suppose your enterprise hasoffices around the world, with one or more TSM servers at each location. To makemanaging these servers easier, you want to control the configuration of all TSMservers from one TSM server in the headquarters office. Figure 80 shows thehierarchy that you want to set up.
You want to set up a configuration manager named HEADQUARTERS. Managedservers have the names of cities where they are located. You have three groups ofmanaged servers, one in the Americas, one in Europe, and one in Asia. Each of theservers supports backup and archive services for client machines in that office. Forclient backup operations, you want to use the default policy that stores backups on
Figure 80. A Scenario for Implementing Enterprise Configuration
476 Tivoli Storage Manager for Windows: Administrator’s Guide

disk. Each server has an automated tape library configured to work with TSM, andyou want to use the tape library at each location for client archive operations andfor TSM server database backups. You want to be able to monitor activities on allservers. You also want to designate some other users as administrators who canwork with these servers.
The following sections give you an overview of the steps to take to complete thissetup. For details on each step, see the section referenced.
Setting up a Configuration ManagerFigure 81 shows the specific commands needed to set up one TSM server as aconfiguration manager. The following procedure gives you an overview of thesteps required to set up a server as a configuration manager.
1. Decide whether to use the existing TSM server in the headquarters office as theconfiguration manager or to install a new TSM server on a system.
2. Set up the communications among the servers. See “Setting UpCommunications Among Servers” on page 468 for details.
3. Identify the server as a configuration manager.Use the following command:set configmanager on
This command automatically creates a profile named DEFAULT_PROFILE. Thedefault profile includes all the server and server group definitions on theconfiguration manager. As you define new servers and server groups, they arealso associated with the default profile. For more information, see “Creating theDefault Profile on a Configuration Manager” on page 479.
4. Create the configuration to distribute.The tasks that might be involved include:v Register administrators and grant authorities to those that you want to be
able to work with all the servers.v Define policy objects and client schedulesv Define administrative schedulesv Define TSM server scriptsv Define client option setsv Define serversv Define server groups
Example 1: You need a shorthand way to send commands to different groupsof managed servers. You can define server groups. For example, you can definea server group named AMERICAS for the servers in the offices in NorthAmerica and South America. See “Defining a Server Group and Members of aServer Group” on page 499 for details.
Figure 81. Setting Up a Configuration Manager
Chapter 22. Working with a Network of Servers 477

Example 2: You want each managed server to back up its database and storagepools regularly. One way to do this is to set up TSM server scripts andschedules to automatically run these scripts everyday. You can do thefollowing:v Verify or define server scripts that perform these operations.v Verify or define administrative command schedules that run these scripts.
Example 3: You want clients to back up data to the default disk storage pool,BACKUPPOOL, on each server. But you want clients to archive data directly tothe tape library attached to each server. You can do the following:v In the policy domain that you will point to in the profile, update the archive
copy group so that TAPEPOOL is the name of the destination storage pool.v On each server that is to be a managed server, ensure that you have a tape
storage pool named TAPEPOOL.
Note: You must set up the storage pool itself (and associated device class) oneach managed server, either locally or by using command routing. If amanaged server already has a storage pool associated with theautomated tape library, you can rename the pool to TAPEPOOL.
Example 4: You want to ensure that client data is consistently backed up andmanaged on all servers. You want all clients to be able to store three backupversions of their files. You can do the following:v Verify or define client schedules in the policy domain so that clients are
backed up on a consistent schedule.v In the policy domain that you will point to in the profile, update the backup
copy group so that three versions of backups are allowed.v Define client option sets so that basic settings are consistent for clients as
they are added.5. Define one or more profiles.
For example, you can define one profile named ALLOFFICES that points to allthe configuration information (policy domain, administrators, scripts, and soon). You can also define profiles for each type of information, so that you haveone profile that points to policy domains, and another profile that points toadministrators, for example.For details, see “Creating and Changing Configuration Profiles” on page 480.
Setting Up a Managed ServerFigure 82 shows the specific commands needed to set up one TSM server as amanaged server. The following procedure gives you an overview of the stepsrequired to set up a server as a managed server.
Figure 82. Setting Up a Managed Server
478 Tivoli Storage Manager for Windows: Administrator’s Guide

Setting up the managed server can be done by an administrator working at acentral location, or by administrators working at the servers that will be managedservers.
A server becomes a managed server when that server first subscribes to a profileon a configuration manager.1. Query the server to look for potential conflicts.
See “Getting Information about Profiles” on page 487. Look for definitions ofobjects on the managed server that have the same name as those defined on theconfiguration manager. With some exceptions, these objects will be overwrittenwhen the managed server first subscribes to the profile on the configurationmanager. See “Associating Configuration Information with a Profile” onpage 481 for details on the exceptions.If the managed server is a new server and you have not defined anything, theonly objects you will find are the defaults (for example, the STANDARD policydomain).
2. Subscribe to one or more profiles.A managed server can only subscribe to profiles on one configuration manager.See “Subscribing to a Profile” on page 489.If you receive error messages during the configuration refresh, such as a localobject that could not be replaced, resolve the conflict and refresh theconfiguration again. You can either wait for the automatic refresh period to bereached, or kick off a refresh by issuing the SET CONFIGREFRESH command,setting or resetting the interval.
3. If the profile included policy domain information, activate a policy set in thepolicy domain, add or move clients to the domain, and associate any requiredschedules with the clients.You may receive warning messages about storage pools that do not exist, butthat are needed for the active policy set. Define any storage pools needed bythe active policy set, or rename existing storage pools. See “Defining orUpdating Primary Storage Pools” on page 174 or “Renaming a Storage Pool” onpage 235.
4. If the profile included administrative schedules, make the schedules active.Administrative schedules are not active when they are distributed by aconfiguration manager. The schedules do not run on the managed server untilyou make them active on the managed server. See “Tailoring Schedules” onpage 403.
5. Set how often the managed server contacts the configuration manager toupdate the configuration information associated with the profiles.The initial setting for refreshing the configuration information is 60 minutes.See “Refreshing Configuration Information” on page 493.
Creating the Default Profile on a Configuration Manager
Task Required Privilege Class
Set up a server as a configuration manager System
To set up one TSM server as the source for configuration information for otherservers, you identify the server as a configuration manager. A configurationmanager can be an existing TSM server that already provides services to clients, orcan be a server dedicated to just providing configuration information to other TSMservers.
Chapter 22. Working with a Network of Servers 479

Enter the following command:set configmanager on
When a server becomes a configuration manager, the server automatically creates adefault profile named DEFAULT_PROFILE. The default profile contains anydefinitions of servers and server groups that exist on the configuration manager.You can change or delete the profile named DEFAULT_PROFILE.
When a managed server first subscribes to a profile on a configuration manager,the configuration manager automatically also subscribes the managed server to theprofile named DEFAULT_PROFILE, if it exists. The information distributed via thisprofile gets refreshed in the same way as other profiles. This helps ensure that allservers have a consistent set of server and server group definitions for all serversin the network.
If you do not change the DEFAULT_PROFILE, whenever a managed serversubscribed to the DEFAULT_PROFILE profile refreshes configuration information,the managed server receives definitions for all servers and server groups that existon the configuration manager at the time of the refresh. As servers and servergroups are added, deleted, or changed on the configuration manager, the changeddefinitions are distributed to subscribing managed servers.
Creating and Changing Configuration ProfilesYou create configuration profiles on a configuration manager, which distributes theinformation associated with the profiles to any managed server that subscribes tothose profiles. Creating a configuration profile includes these steps:1. Defining the profile2. Associating the configuration information with the profile
Once you define the profile and its associations, a managed server can subscribe tothe profile and obtain the configuration information.
After you define a profile and associate information with the profile, you canchange the information later. While you make changes, you can lock the profiles toprevent managed servers from refreshing their configuration information. Todistribute the changed information associated with a profile, you can unlock theprofile, and either wait for each managed server to refresh its configuration to getthe changed information or notify each managed server to refresh its configuration.The following sections provide information on each of these tasks.
Defining the Profile
Task Required Privilege Class
Define profiles System
When you define the profile, you select the name and can include a description.For example, to define a profile named ALLOFFICES, enter the followingcommand:define profile allofficesdescription='Configuration to be used by all offices'
480 Tivoli Storage Manager for Windows: Administrator’s Guide

Associating Configuration Information with a Profile
Task Required Privilege Class
Define profile associations System
After you define a profile, you associate the configuration information that youwant to distribute via that profile. You can associate the following configurationinformation with a profile:v TSM administrators, including their authorities.
Note: Be careful if you are distributing definitions of administrators that havethe same name as administrators already defined to managed servers. Theconfiguration refresh overwrites the administrator definition and authoritydefined on the managed server. If the authority level of an administratoris less on the configuration manager than it was on the managed server,you could have problems with access to the managed server afterdistributing the administrator definition.
The configuration manager does not distribute information about whether anadministrator is locked (preventing access to the server).
The administrator with the name SERVER_CONSOLE is never distributed fromthe configuration manager to a managed server.
v Servers and server groups.The DEFAULT_PROFILE that is automatically created on a configurationmanager already points to all servers and server groups defined to that server. Ifyou leave the DEFAULT_PROFILE intact, you do not need to include servers orserver groups in any other profile. Any servers and server groups that youdefine later are associated automatically with the default profile and theconfiguration manager distributes the definitions at the next refresh.For a server definition, the following attributes are distributed:– Communication method– TCP/IP address (high-level address)– Port number (low-level address)– Server password– Server URL– The description
When server definitions are distributed, the attribute for allowing replacement isalways set to YES. You can set other attributes, such as the server’s node name,on the managed server by updating the server definition.
A managed server may already have a server defined with the same name as aserver associated with the profile. The configuration refresh does not overwritethe local definition unless the managed server allows replacement of thatdefinition. On a managed server, you allow a server definition to be replaced byupdating the local definition. For example:update server santiago allowreplace=yes
This safeguard prevents disruption of existing functions that requirecommunication among servers (such as virtual volumes).
Chapter 22. Working with a Network of Servers 481

Table 30 summarizes what happens when servers or server groups beingdistributed have the same names as servers or server groups on the managedserver.
Table 30. Results of Configuration Refresh with Duplicate Object Names
Local definition (onmanaged server)
Object with duplicatename to be distributed
Result of configuration refresh
Server Server The local server definition isreplaced by the distributed serverdefinition only if an administratorfor the managed server updatedthe local definition to allowreplacement.
Server Server group The local server definition remains.The server group definition is notdistributed.
Server group Server The local server group is deleted.The server definition is distributed.
Server group Server group The local server group definition isreplaced by the distributed servergroup definition.
v Policy domains.When you point to a policy domain in a profile, the configuration informationthat will be sent to the managed servers includes the policy domain itself, andall policy sets with their associated management classes, copy groups, and clientschedules in the domain. However, the ACTIVE policy set and its associatedmanagement classes, copy groups, and client schedules are not included.Policy domains can refer to storage pool names in the management classes,backup copy groups, and archive copy groups. As you set up the configurationinformation, consider whether managed servers already have or can set up orrename storage pools with these names.Associations between clients and schedules are not distributed with theconfiguration information. For clients in a managed policy domain to run clientschedules, you must associate the clients with the schedules on the managedserver.A subscribing managed server may already have a policy domain with the samename as the domain associated with the profile. The configuration refreshoverwrites the domain defined on the managed server unless client nodes arealready assigned to the domain. Once the domain becomes a managed object onthe managed server, you can associate clients with the managed domain. Futureconfiguration refreshes can then update the managed domain.If nodes are assigned to a domain with the same name as a domain beingdistributed, the domain is not replaced. This safeguard prevents inadvertentreplacement of policy that could lead to loss of data. To replace an existingpolicy domain with a managed domain of the same name, you can do thefollowing steps on the managed server:1. Copy the domain.2. Move all clients assigned to the original domain to the copied domain.3. Trigger a configuration refresh.4. Activate the appropriate policy set in the new, managed policy domain.
482 Tivoli Storage Manager for Windows: Administrator’s Guide
5. Move all clients back to the original domain, which is now managed.v Administrative command schedules.
When the configuration manager distributes administrative schedules, theschedules are not active on the managed server. An administrator on themanaged server must activate any managed schedules to have them run on themanaged server.A configuration refresh does not replace or remove any local schedules that areactive on a managed server. However, a refresh can update an active schedulethat is already managed by a configuration manager.
v Client option sets.v TSM server scripts.
Before you can associate specific configuration information with a profile, thedefinitions must exist on the configuration manager. For example, to associate apolicy domain named ENGDOMAIN with a profile, you must have alreadydefined the ENGDOMAIN policy domain on the configuration manager.
Suppose you want the ALLOFFICES profile to distribute policy information fromthe STANDARD and ENGDOMAIN policy domains on the configuration manager.Enter the following command:define profassociation alloffices domains=standard,engdomain
You can make the association more dynamic by specifying the special character, *(asterisk), by itself. When you specify the *, you can associate all existing objectswith a profile without specifically naming them. If you later add more objects ofthe same type, the new objects are automatically distributed via the profile. Forexample, suppose you want the ADMINISTRATORS profile to distribute alladministrators registered to the configuration manager. Enter the followingcommands on the configuration manager:define profile administratorsdescription='Profile to distribute administrators IDs'
define profassociation administrators admins=*
Whenever a managed server that is subscribed to the ADMINISTRATORS profilerefreshes configuration information, it receives definitions for all administratorsthat exist on the configuration manager at the time of the refresh. Asadministrators are added, deleted, or changed on the configuration manager, thechanged definitions are distributed to subscribing managed servers.
Changing a Profile
Task Required Privilege Class
Define profile associations
Update profiles
System
You can change a profile and its associated configuration information. For example,if you want to add a policy domain named FILESERVERS to objects alreadyassociated with the ALLOFFICES profile, enter the following command:define profassociation alloffices domains=fileservers
Chapter 22. Working with a Network of Servers 483

You can also delete associated configuration information, which results in removalof configuration from the managed server. Use the DELETE PROFASSOCIATIONcommand. See “Removing Configuration Information from Managed Servers” onpage 485 for details.
On a configuration manager, you cannot directly change the names ofadministrators, scripts, and server groups associated with a profile. To change thename of an administrator, script, or server group associated with a profile, deletethe object then define it again with a new name and associate it with the profileagain. During the next configuration refresh, each managed server makes thecorresponding changes in their databases.
You can change the description of the profile. Enter the following command:update profile allofficesdescription='Configuration for all offices with file servers'
Preventing Access to Profiles While You Make ChangesIf you are making changes to a profile, you may want to prevent any subscribingmanaged server from refreshing its configuration information until you are done.You can lock the profile to prevent access to the profile by a managed server.Locking prevents a managed server from getting information that is incompletebecause you are still making changes.
Task Required Privilege Class
Lock and unlock profiles System
For example, to lock the ALLOFFICES profile for two hours (120 minutes), enterthe following command:lock profile alloffices 120
You can let the lock expire after two hours, or unlock the profile with the followingcommand:unlock profile alloffices
Distributing Changed Configuration InformationTo distribute the changed profile, you can wait for each managed server to refreshits configuration to get the changed information, or you can notify each managedserver from the configuration manager. Managed servers refresh profileinformation on a configuration refresh period. See “Refreshing ConfigurationInformation” on page 493 for how to set this period.
Task Required Privilege Class
Notify servers that subscribe to profiles torefresh configuration information
System
From the configuration manager, to notify all servers that are subscribers to theALLOFFICES profile, enter the following command:notify subscribers profile=alloffices
The managed servers then refresh their configuration information, even if the timeperiod for refreshing the configuration has not passed.
484 Tivoli Storage Manager for Windows: Administrator’s Guide

Removing Configuration Information from Managed Servers
Task Required Privilege Class
Delete profile associations System
To remove configuration information from managed servers, you can do one oftwo things: delete the association of the object with the profile, or delete the objectitself from the configuration manager.
Note: To remove all configuration information that is defined in the database of amanaged server as a result of a profile subscription, you must delete thesubscription using the option to discard all managed objects. See “DeletingSubscriptions” on page 492.
On the configuration manager, you can delete the association of objects with aprofile. For example, you may want to remove some of the administrators that areassociated with the ADMINISTRATORS profile. With an earlier command, you hadincluded all administrators defined on the configuration manager (by specifyingADMINS=*). To change the administrators included in the profile you must firstdelete the association of all administrators, then associate just the administratorsthat you want to include. Do the following:1. Before you make these changes, you may want to prevent any servers from
refreshing their configuration until you are done. Enter the followingcommand:lock profile administrators
2. Now make the change by entering the following commands:delete profassociation administrators admins=*
define profassociation administratorsadmins=admin1,admin2,admin3,admin4
3. Unlock the profile:unlock profile administrators
4. You may want to notify any managed server that subscribes to the profile sothat servers refresh their configuration information:notify subscribers profile=administrators
When you delete the association of an object with a profile, the configurationmanager no longer distributes that object via the profile. Any managed serversubscribing to the profile deletes the object from its database when it next contactsthe configuration manager to refresh configuration information. However, amanaged server does not delete the following objects:v An object that is associated with another profile to which the server subscribes.v A policy domain that has client nodes still assigned to it. To delete the domain,
you must assign the affected client nodes to another policy domain on themanaged server.
v An administrator that currently has a session open with the server.v An administrator that is the last administrator with system authority on the
managed server.Also the managed server does not change the authority of an administrator ifdoing so would leave the managed server without any administrators havingthe system privilege class.
Chapter 22. Working with a Network of Servers 485

You can avoid both problems by ensuring that you have locally defined at leastone administrator with system privilege on each managed server.
v An administrative schedule that is active. To remove an active schedule, youmust first make the schedule inactive on the managed server.
v A server definition for a server that currently has an open connection from themanaged server.
v A server definition that is specified in the definition of a device class that is aSERVER device type.
v A server definition that is the definition for the event server for the managedserver.
If you no longer need an object defined on the configuration manager itself or onany managed server, you can delete the object itself. Deleting the object itself fromthe configuration manager has an effect similar to deleting the association of thatobject with the profile: the configuration manager no longer distributes that object,and a managed server attempts to delete the object from its database when itrefreshes configuration information.
Deleting Profiles
Task Required Privilege Class
Delete profiles System
You can delete a profile from a configuration manager. Before deleting a profile,you should ensure that no managed server still has a subscription to the profile. Ifthe profile still has some subscribers, you should first delete the subscriptions oneach managed server. When you delete subscriptions, consider whether you wantthe managed objects to be deleted on the managed server at the same time. Forexample, to delete the subscription to profile ALLOFFICES from managed serverSANTIAGO without deleting the managed objects, log on to the SANTIAGOserver and enter the following command:delete subscription alloffices
Then, on the configuration manager, enter the following command:delete profile alloffices
See “Deleting Subscriptions” on page 492 for more details about deletingsubscriptions on a managed server.
Note: You can use command routing to issue the DELETE SUBSCRIPTIONcommand for all managed servers.
If you try to delete a profile that still has subscriptions, the command fails unlessyou force the operation:delete profile alloffices force=yes
If you do force the operation, managed servers that still subscribe to the deletedprofile will later contact the configuration manager to try to get updates to thedeleted profile. The managed servers will continue to do this until theirsubscriptions to the profile are deleted. A message will be issued on the managedserver alerting the administrator of this condition.
486 Tivoli Storage Manager for Windows: Administrator’s Guide

Getting Information about Profiles
Task Required Privilege Class
Request information about profiles Any administrator
You can get information about configuration profiles defined on any configurationmanager, as long as that server is defined to the server with which you areworking. For example, from a configuration manager, you can display informationabout profiles defined on that server or on another configuration manager. From amanaged server, you can display information about any profiles on theconfiguration manager to which the server subscribes. You can also get profileinformation from any other configuration manager defined to the managed server,even though the managed server does not subscribe to any of the profiles.
For example, to get information about all profiles on the HEADQUARTERSconfiguration manager when logged on to another server, enter the followingcommand:query profile server=headquarters
The following shows what the results might look like:
Configuration Profile name Locked?manager--------------- --------------- -------HEADQUARTERS ADMINISTRATORS NoHEADQUARTERS DEFAULT_PROFILE NoHEADQUARTERS ENGINEERING NoHEADQUARTERS MARKETING No
You may need to get detailed information about profiles and the objects associatedwith them, especially before subscribing to a profile. You can get the names of theobjects associated with a profile by entering the following command:query profile server=headquarters format=detailed
The following shows what the results might look like:
Chapter 22. Working with a Network of Servers 487

Configuration manager: HEADQUARTERSProfile name: ADMINISTRATORS
Locked?: NoDescription:
Server administrators: ADMIN1 ADMIN2 ADMIN3 ADMIN4Policy domains:
Administrative command schedules: ** all objects **Server Command Scripts:
Client Option Sets:Servers:
Server Groups:
Configuration manager: HEADQUARTERSProfile name: DEFAULT_PROFILE
Locked?: NoDescription:
Server administrators:Policy domains:
Administrative command schedules:Server Command Scripts:
Client Option Sets:Servers: ** all objects **
Server Groups: ** all objects **
Configuration manager: HEADQUARTERSProfile name: ENGINEERING
Locked?: NoDescription:
Server administrators:Policy domains: ENGDOMAIN
Administrative command schedules:Server Command Scripts: QUERYALL
Client Option Sets: DESIGNER PROGRAMMERServers:
Server Groups:
Configuration manager: HEADQUARTERSProfile name: MARKETING
Locked?: YesDescription:
Server administrators:Policy domains: MARKETDOM
Administrative command schedules:Server Command Scripts: QUERYALL
Client Option Sets: BASICServers:
Server Groups:
If the server from which you issue the query is already a managed server(subscribed to one or more profiles on the configuration manager being queried),by default the query returns profile information as it is known to the managedserver. Therefore the information is accurate as of the last configuration refreshdone by the managed server. You may want to ensure that you see the latestversion of profiles as they currently exist on the configuration manager. Enter thefollowing command:query profile uselocal=no format=detailed
To get more than the names of the objects associated with a profile, you can do oneof the following:v If command routing is set up between servers, you can route query commands
from the server to the configuration manager. For example, to get details on theENGDOMAIN policy domain on the HEADQUARTERS server, enter thiscommand:headquarters: query domain engdomain format=detailed
488 Tivoli Storage Manager for Windows: Administrator’s Guide

You can also route commands from the configuration manager to another serverto get details about definitions that already exist.
v If command routing is not set up, log on to the configuration manager and enterthe query commands to get the information you need.
Subscribing to a Profile
Task Required Privilege Class
Define subscriptions to profiles
Set the period for configuration refreshes
System
After an administrator at a configuration manager has created profiles andassociated objects with them, managed servers can subscribe to one or more of theprofiles.
Notes:Unless otherwise noted, the commands in this section would be run on a managedserver:1. An administrator at the managed server could issue the commands.2. You could log in from the enterprise console and issue them.3. If command routing is set up, you could route them from the server that you
are logged in to.
After a managed server subscribes to a profile, the configuration manager sendsthe object definitions associated with the profile to the managed server where theyare automatically stored in the database. Object definitions created this way in thedatabase of a managed server are called managed objects. With a few exceptions,you cannot change managed objects on the managed server. The exceptions arethat you can change:v The active status of a schedulev The lock status of an administratorv Which policy set is active in a policy domainv The default management class of a policy setv The attributes of a server definition that are related to the use of virtual volumes
(node name, password, and delete grace period)
Before a managed server subscribes to a profile, be aware that if you have definedany object with the same name and type as an object associated with the profilethat you are subscribing to, those objects will be overwritten. You can check forsuch occurrences by querying the profile before subscribing to it.
When a managed server first subscribes to a profile on a configuration manager, italso automatically subscribes to DEFAULT_PROFILE, if a profile with this name isdefined on the configuration manager. Unless DEFAULT_PROFILE is modified onthe configuration manager, it contains all the server definitions and server groupsdefined on the configuration manager. In this way, all the servers in your networkreceive a consistent set of server and server group definitions.
Note: Although a managed server can subscribe to more than one profile on aconfiguration manager, it cannot subscribe to profiles on more than oneconfiguration manager at a time.
Chapter 22. Working with a Network of Servers 489

Changes may be made to a profile, after a managed server subscribes to it. Anadministrator on the configuration manager can notify your server of a change byissuing the NOTIFY SUBSCRIBERS command. The configuration manager contactseach managed server having a subscription to one of the specified profiles. When amanaged server is contacted, it begins refresh processing to get the configurationupdates from the configuration manager.
A Subscription ScenarioThis section describes a typical scenario in which a server subscribes to a profile ona configuration manager, HEADQUARTERS. In this scenario an administrator forthe HEADQUARTERS server has defined three profiles, ADMINISTRATORS,ENGINEERING, and MARKETING, each with its own set of associations. Inaddition, DEFAULT_PROFILE was automatically defined and contains only theserver and server group definitions defined on the HEADQUARTERS server. Anadministrator for HEADQUARTERS has given you the names of the profiles thatyou should be using. To subscribe to the ADMINISTRATORS and ENGINEERINGprofiles and keep them current, perform the following steps:1. Display the names of the objects in the profiles on HEADQUARTERS.
You might want to perform this step to see if the object names on the profilesare used on your server for any objects of the same type. Issue this command:query profile * server=headquarters format=detailed
You might want to get detailed information on some of the objects by issuingspecific query commands on either your server or the configuration manager.
Note: If any object name matches and you subscribe to a profile containing anobject with the matching name, the object on your server will bereplaced, with the following exceptions:v A policy domain is not replaced if the domain has client nodes
assigned to it.v An administrator with system authority is not replaced by an
administrator with a lower authority level if the replacement wouldleave the server without a system administrator.
v The definition of a server is not replaced unless the server definitionon the managed server allows replacement.
v A server with the same name as a server group is not replaced.v A locally defined, active administrative schedule is not replaced
2. Subscribe to the ADMINISTRATORS and ENGINEERING profiles.After the initial subscription, you do not have to specify the server name on theDEFINE SUBSCRIPTION commands. If at least one profile subscription alreadyexists, any additional subscriptions are automatically directed to the sameconfiguration manager. Issue these commands:define subscription administrators server=headquarters
define subscription engineering
The object definitions in these profiles are now stored on your database. Inaddition to ADMINISTRATORS and ENGINEERING, the server is alsosubscribed by default to DEFAULT_PROFILE. This means that all the serverand server group definitions on HEADQUARTERS are now also stored in yourdatabase.
3. Set the time interval for obtaining refreshed configuration information from theconfiguration manager.
490 Tivoli Storage Manager for Windows: Administrator’s Guide

If you do not perform this step, your server checks for updates to the profilesat start up and every 60 minutes after that. Set up your server to checkHEADQUARTERS for updates once a day (every 1440 minutes). If there is anupdate, HEADQUARTERS sends it to the managed server automatically whenthe server checks for updates.set configrefresh 1440
Note: You can initiate a configuration refresh from a managed server at any time.To initiate a refresh, simply reissue the SET CONFIGREFRESH with anyvalue greater than 0. The simplest approach is to use the current setting:set configrefresh 1440
Querying Subscriptions
Task Required Privilege Class
Request information about subscriptions
Request information about profiles
Any administrator
From time to time, you may want to see what profiles a server is subscribed to.You may also want to see the last time that the configuration associated with thatprofile was successfully refreshed on your server. The QUERY SUBSCRIPTIONcommand gives you this information. You can name a specific profile or use awildcard character to display all or a subset of profiles to which the server issubscribed. For example, the following command displays ADMINISTRATORS andany other profiles that begin with the string “ADMIN”:query subscription admin*
Here is a sample of the output:
Configuration Profile name Last updatemanager date/time--------------- --------------- --------------------HEADQUARTERS ADMINISTRATORS 06/04/1998 17:51:49HEADQUARTERS ADMINS_1 06/04/1998 17:51:49HEADQUARTERS ADMINS_2 06/04/1998 17:51:49
To see what objects the ADMINISTRATORS profile contains, use the followingcommand:query profile administrators uselocal=no format=detailed
You will see output similar to the following:
Configuration manager: HEADQUARTERSProfile name: ADMINISTRATORS
Locked?: NoDescription:
Server administrators: ADMIN1 ADMIN2 ADMIN3 ADMIN4Policy domains:
Administrative command schedules: ** all objects **Server Command Scripts:
Client Option Sets:Servers:
Server Groups:
Managed objects are stored in the database of a managed server as a result ofsubscriptions to profiles on a configuration manager. Any object that was created
Chapter 22. Working with a Network of Servers 491

or updated in the database of the managed server as a result of a subscription hasthe string $$CONFIG_MANAGER$$ in place of the name of the administrator wholast changed the object. For example, if the policy domain named ENGDOMAIN isa managed object and you enter this command on the managed server:query domain engdomain format=detailed
You will see output similar to the following:
Policy Domain Name: ENGDOMAINActivated Policy Set:Activation Date/Time:Days Since Activation:
Activated Default Mgmt Class:Number of Registered Nodes: 0
Description: Policy for design and software engineersBackup Retention (Grace Period): 30Archive Retention (Grace Period): 365
Last Update by (administrator): $$CONFIG_MANAGER$$Last Update Date/Time: 06/04/1998 17:51:49
Managing profile: ENGINEERING
The field Managing profile shows the profile to which the managed serversubscribes to get the definition of this object.
Deleting Subscriptions
Task Required Privilege Class
Delete subscriptions to profiles System
If you decide that a server no longer needs to subscribe to a profile, you can deletethe subscription. When you delete a subscription to a profile, you can choose todiscard the objects that came with the profile or keep them in your database. Forexample, to request that your subscription to PROFILEC be deleted and to keepthe objects that came with that profile, issue the following command:delete subscription profilec discardobjects=no
After the subscription is deleted on the managed server, the managed server issuesa configuration refresh request to inform the configuration manager that thesubscription is deleted. The configuration manager updates its database with thenew information.
When you choose to delete objects when deleting the subscription, the server maynot be able to delete some objects. For example, the server cannot delete amanaged policy domain if the domain still has client nodes registered to it. Theserver skips objects it cannot delete, but does not delete the subscription itself. Ifyou take no action after an unsuccessful subscription deletion, at the nextconfiguration refresh the configuration manager will again send all the objectsassociated with the subscription. To successfully delete the subscription, do one ofthe following:v Fix the reason that the objects were skipped. For example, reassign clients in the
managed policy domain to another policy domain. After handling the skippedobjects, delete the subscription again.
v Delete the subscription again, except this time do not discard the managedobjects. The server can then successfully delete the subscription. However, theobjects that were created because of the subscription remain.
492 Tivoli Storage Manager for Windows: Administrator’s Guide

Refreshing Configuration Information
Task Required Privilege Class
Set the period for configuration refreshes System (on the managed server)
Notify servers that subscribe to profiles torefresh configuration information
System (on the configuration manager)
On a configuration manager, an administrator can make changes to configurationinformation that is associated with a profile. How quickly the changes getdistributed to a subscribing managed server depends on the configuration refreshperiod set on the managed server and whether the administrator on theconfiguration manager sent a notification.
By default, a managed server refreshes its configuration information every 60minutes. To cause an immediate refresh, change this period. For example, toimmediately refresh the configuration and change the frequency of future refreshesto once a day, enter the following command for the managed server:set configrefresh 1440
By issuing this command with a value greater than zero, you cause the managedserver to immediately start the refresh process.
At the configuration manager, you can cause managed servers to refresh theirconfiguration information by notifying the servers. For example, to notifysubscribers to all profiles, enter the following command:notify subscribers profile=*
The managed servers then start to refresh configuration information to which theyare subscribed through profiles.
A managed server automatically refreshes configuration information when it isrestarted.
Handling Problems with Configuration RefreshTo monitor for any problems during a configuration refresh, you can watch theserver console or activity log of the managed server. One problem that may occuris that the refresh process may skip objects. For example, a policy domain of thesame name as an existing policy domain on the managed server is not distributedif the policy domain has client nodes assigned to it. See “Associating ConfigurationInformation with a Profile” on page 481 for details on when objects cannot bedistributed.
The configuration manager sends the objects that it can distribute to the managedserver. The configuration manager skips (does not send) objects that conflict withlocal objects. If the configuration manager cannot send all objects that areassociated with the profile, the managed server does not record the configurationrefresh as complete. The objects that the configuration manager successfully sentare left as local instead of managed objects in the database of the managed server.The local objects left as a result of an unsuccessful configuration refresh becomemanaged objects at the next successful configuration refresh of the same profilesubscription.
Chapter 22. Working with a Network of Servers 493

Returning Managed Objects to Local ControlYou may want to return one or more managed objects (objects distributed by aconfiguration manager via profiles) to local control on the managed servers. Youcan do this from the configuration manager or from the managed servers.
To do this from the configuration manager, you do not simply delete theassociation of the object from the profile, because that would cause the object to bedeleted from subscribing managed servers. To ensure the object remains in thedatabases of the managed servers as a locally managed object, you can copy thecurrent profile, make the deletion, and change the subscriptions of the managedservers to the new profile.
For example, servers are currently subscribed to the ENGINEERING profile. TheENGDOMAIN policy domain is associated with this profile. You want to returncontrol of the ENGDOMAIN policy domain to the managed servers. You can dothe following:1. Copy the ENGINEERING profile to a new profile, ENGINEERING_B:
copy profile engineering engineering_b
2. Delete the association of the ENGDOMAIN policy domain fromENGINEERING_B:delete profassociation engineering_b domains=engdomain
3. Use command routing to delete subscriptions to the ENGINEERING profile:americas,europe,asia: delete subscription engineeringdiscardobjects=no
4. Delete the ENGINEERING profile:delete profile engineering
5. Use command routing to define subscriptions to the new ENGINEERING_Bprofile:americas,europe,asia: define subscription engineering_b
To return objects to local control when working on a managed server, you candelete the subscription to one or more profiles. When you delete a subscription,you can choose whether to delete the objects associated with the profile. To returnobjects to local control, you do not delete the objects. For example, use thefollowing command on a managed server:delete subscription engineering discardobjects=no
Setting Up Administrators for the ServersInclude in your profiles any administrators that you want to give access to allservers in the network. These administrators must then maintain their passwordson the configuration manager. To ensure passwords stay valid for as long asexpected on all servers, set the password expiration period to the same time on allservers. One way to do this is to route a SET PASSEXP command from one serverto all of the others.
Ensure that you have at least one administrator that is defined locally on eachmanaged server with system authority. This avoids an error on configurationrefresh when all administrators for a server would be removed as a result of achange to a profile on the configuration manager.
494 Tivoli Storage Manager for Windows: Administrator’s Guide

Handling Problems with Synchronization of ProfilesIn rare situations, when a managed server contacts a configuration manager torefresh configuration information, the configuration manager may determine thatthe profile information on the two servers is not synchronized. It may appear thatthe configuration information is more recent on the managed server than on theconfiguration manager. This could occur in the following situations:v The database on the configuration manager has been restored to an earlier time
and now has configuration information from profiles that appear to be olderthan what the managed server has obtained.
v On the configuration manager, an administrator deleted a profile, forcing thedeletion even though one or more managed servers still subscribed to theprofile. The administrator redefined the profile (using the same name) before themanaged server refreshed its configuration information.
If the configuration manager still has a record of the managed server’s subscriptionto the profile, the configuration manager does not send its profile information atthe next request for refreshed configuration information. The configurationmanager informs the managed server that the profiles are not synchronized. Themanaged server then issues a message indicating this condition so that anadministrator can take appropriate action. The administrator can perform thefollowing steps:1. If the configuration manager’s database has been restored to an earlier point in
time, the administrator may want to query the profile and associated objects onthe managed server and then manually update the configuration manager withthat information.
2. Use the DELETE SUBSCRIPTION command on the managed server to deletesubscriptions to the profile that is not synchronized. If desired, you can alsodelete definitions of the associated objects, then define the subscription again.
It is possible that the configuration manager may not have a record of themanaged server’s subscription. In this case, no action is necessary. When themanaged server requests a refresh of configuration information, the configurationmanager sends current profile information and the managed server updates itsdatabase with that information.
Switching a Managed Server to a Different ConfigurationManager
To switch a managed server from one configuration manager to another, performthe following steps:1. Query profiles on the server that will be the new configuration manager to
compare with current profiles to which the managed server subscribes.2. On the managed server, delete all subscriptions to profiles on the current
configuration manager. Remember to delete the subscription to the profilenamed DEFAULT_PROFILE. Consider whether to discard the managed objectsin the database when you delete the subscriptions.Verify that all subscriptions have been deleted by querying subscriptions.
3. Change server communications as needed. Define the server that will be thenew configuration manager. You can delete the server that was formerly theconfiguration manager.
4. On the managed server, define subscriptions to profiles on the newconfiguration manager.
Chapter 22. Working with a Network of Servers 495

Deleting Subscribers from a Configuration ManagerUnder normal circumstances, you do not need to delete subscribers from aconfiguration manager. You only need to delete a subscription to a profile on themanaged server (by using the DELETE SUBSCRIPTION command). When youissue the DELETE SUBSCRIPTION command, the managed server automaticallynotifies the configuration manager of the deletion by refreshing its configurationinformation. As part of the refresh process, the configuration manager is informedof the profiles that the managed server subscribes to (and does not subscribe to). Ifthe configuration manager cannot be contacted immediately for a refresh, theconfiguration manager will find out that the subscription was deleted the next timethe managed server refreshes configuration information.
Deleting subscribers from a configuration manager is only necessary as a way toclean up in certain unusual situations. For example, you may need to deletesubscribers if a managed server goes away completely or deletes its lastsubscription without being able to notify the configuration manager. You then usethe DELETE SUBSCRIBER command to delete all subscriptions for that subscriber(the managed server) from the configuration manager’s database.
Renaming a Managed ServerTo rename a managed server, perform the following steps:1. By using command routing or by logging on to the managed server, change the
name of the managed server. Use the enterprise console or use the SETSERVERNAME command.
2. Change the communication setup.a. On the configuration manager, delete the server definition with the old
name.b. On the configuration manager, define the server with its new name.
3. On the managed server, refresh the configuration information. You can wait forthe configuration refresh period to pass, or you can reset the refresh period tocause an immediate refresh.
Performing Tasks on Multiple ServersTo make performing tasks with multiple servers easier, TSM provides the followingfunctions:v Enterprise logonv Command routingv Server group definitions that can be used to simplify command routing
Using Tivoli Storage Manager Enterprise LogonEnterprise logon enables the administrator’s logon credentials to be used for accessto other servers for successfully linking to other servers and routing commands toother servers. The administrator must be defined on each server with theappropriate administrative authority for the action or command.
Enterprise logon, in conjunction with enterprise configuration, allows anadministrator to log on to one TSM server and have access to all associated TSMservers and clients that the administrator is authorized to access. Enterprise logonis available from a Web browser. The client must be configured to access a serverat TSM Version 3 or later.
496 Tivoli Storage Manager for Windows: Administrator’s Guide
An administrator no longer has to remember multiple user IDs and passwords forservers and clients, other than the initial user ID and password. The administratorenters the initial user ID and password from the sign-on screen displayed on theadministrator’s Web browser. A single set of logon credentials are then used toverify an administrator’s identity across servers and clients in a Web browserenvironment. Encrypted credentials ensure password security.
Authentication time-out processing requires an administrator to re-authenticateafter a specific amount of time has passed. You can set the amount of time byusing the SET WEBAUTHTIMEOUT command. The time-out protects againstunauthorized users indefinitely accessing an unattended Web browser that hascredentials stored in a Web browser cache. A pop-up is displayed on the browserthat requires an administrator’s ID and password to proceed.
The following can use enterprise logon:v An administrator who uses a Web browser to connect to a TSM serverv An administrator or a help-desk person who uses a Web browser to connect to a
remote client with the Web backup-archive clientv An end user of TSM who uses the Web backup-archive client to connect to their
own remote client
A client can optionally disable enterprise logon.
Routing CommandsIf you have set up your servers as described in “Setting Up Communications forCommand Routing” on page 471, you can route TSM administrative commands toone or more servers. Command routing enables an administrator to sendcommands for processing to one or more servers at the same time. The output iscollected and displayed at the server that issued the routed commands. A systemadministrator can configure and monitor many different servers from a centralserver by using command routing.
You can route commands to one server, multiple servers, servers defined to anamed group (see “Setting Up Server Groups” on page 499), or a combination ofthese servers. A routed command cannot be further routed to other servers; onlyone level of routing is allowed.
Each server that you identify as the target of a routed command must first bedefined with the DEFINE SERVER command. If a server has not been defined, thatserver is skipped and the command routing proceeds to the next server in theroute list.
TSM does not run a routed command on the server from which you issue thecommand unless you also specify that server. To be able to specify the server on arouted command, you must define the server just as you did any other server.
Commands cannot be routed from the SERVER_CONSOLE ID.
Routed commands run independently on each server to which you send them. Thesuccess or failure of the command on one server does not affect the outcome onany of the other servers to which the command was sent.
For more information on command routing and return codes generated bycommand processing, refer to Administrator’s Reference.
Chapter 22. Working with a Network of Servers 497

Routing Commands to One or More ServersThe following sections describe how you can route commands to one or moreservers, and to server groups. To successfully route commands to other servers,you must have the proper administrative authority on all servers that receive thecommand for processing.
The return codes for command routing can be one of three severities: 0, ERROR, orWARNING. See Administrator’s Reference for a list of valid return codes andseverity levels.
Routing Commands to Single Servers: To route a command to a single server,enter the defined server’s name, a colon, and then the command to be processed.For example, to route a QUERY STGPOOL command to the server that is namedADMIN1, enter:admin1: query stgpool
The colon after the server name indicates the end of the routing information. Thisis also called the server prefix. Another way to indicate the server routinginformation is to use parentheses around the server name, as follows:(admin1) query stgpool
Note: When writing scripts, you must use the parentheses for server routinginformation.
To route a command to more than one server, separate the server names with acomma. For example, to route a QUERY OCCUPANCY command to three serversnamed ADMIN1, GEO2, and TRADE5 enter:admin1,geo2,trade5: query occupancy
or(admin1,geo2,trade5) query occupancy
The command QUERY OCCUPANCY is routed to servers ADMIN1, GEO2, andTRADE5. If a server has not been defined with the DEFINE SERVER command,that server is skipped and the command routing proceeds to the next server in theroute list.
The routed command output of each server is displayed in its entirety at the serverthat initiated command routing. In the previous example, output for ADMIN1would be displayed, followed by the output of GEO2, and then the output ofTRADE5.
Processing of a command on one server does not depend upon completion of thecommand processing on any other servers in the route list. For example, if GEO2server does not successfully complete the command, the TRADE5 server continuesprocessing the command independently.
Routing Commands to Server Groups: A server group is a named group ofservers. Once you set up the groups, you can route commands to the groups. See“Setting Up Server Groups” on page 499 for how to set up a server group.
To route a QUERY STGPOOL command to the server group WEST_COMPLEX,enter:west_complex: query stgpool
498 Tivoli Storage Manager for Windows: Administrator’s Guide

or(west_complex) query stgpool
The QUERY STGPOOL command is sent for processing to servers BLD12 andBLD13 which are members of group WEST_COMPLEX.
To route a QUERY STGPOOL command to two server groups WEST_COMPLEXand NORTH_COMPLEX, enter:west_complex,north_complex: query stgpool
or(west_complex,north_complex) query stgpool
The QUERY STGPOOL command is sent for processing to servers BLD12 andBLD13 which are members of group WEST_COMPLEX, and servers NE12 andNW13 which are members of group NORTH_COMPLEX.
Routing Commands to Single Servers and Server Groups: You can routecommands to multiple single servers and to server groups at the same time. Forexample, to route the QUERY DB command to servers HQSRV, REGSRV, andgroups WEST_COMPLEX and NORTH_COMPLEX, enter:hqsrv,regsrv,west_complex,north_complex: query db
or(hqsrv,regsrv,west_complex,north_complex) query db
The QUERY DB command is sent for processing to servers HQSRV, REGSRV, toBLD12 and BLD13 (both members of WEST_COMPLEX), and to NE12 and NW12(both members of NORTH_COMPLEX).
Duplicate references to servers are removed in processing. For example, if youroute a command to server BLD12 and to server group WEST_COMPLEX (whichincludes BLD12), the command is sent only once to server BLD12.
Setting Up Server GroupsYou can make command routing more efficient by creating one or more servergroups and adding servers to them. You can then route commands to servergroups in addition to or in place of routing commands to single servers. Thissection describes how to set up server groups. To use server groups, you must dothe following tasks:1. Define the server groups.2. Add the servers as members of the appropriate group.
After you have the server groups set up, you can manage the groups and groupmembers.
Defining a Server Group and Members of a Server Group
Task Required Privilege Class
Define a server group
Define a server group member
System
Chapter 22. Working with a Network of Servers 499

You can define groups of servers to which you can then route commands. Thecommands are routed to all servers in the group. To route commands to a servergroup you must do the following:1. Define the server with the DEFINE SERVER command if it is not already
defined (see “Setting Up Communications for Command Routing” onpage 471).
2. Define a new server group with the DEFINE SERVERGROUP command. Servergroup names must be unique because both groups and server names areallowed for the routing information.
3. Define servers as members of a server group with the DEFINE GRPMEMBERcommand.
The following example shows how to create a server group namedWEST_COMPLEX, and define servers BLD12 and BLD13 as members of theWEST_COMPLEX group:define servergroup west_complexdefine grpmember west_complex bld12,bld13
Managing Server GroupsYou can query, copy, rename, update, and delete server groups as necessary.
Task Required Privilege Class
Query a server group
Copy a server group
Rename a server group
Update a server group description
Delete a server group
System
Querying a Server Group: To query server group WEST_COMPLEX, enter:query servergroup west_complex
The following is sample output from a QUERY SERVERGROUP command:
Server Group Members Description Managing profile---------------------------------------------------------------------------WEST_COMPLEX BLD12, BLD13
Copying a Server Group: To copy the entire server group contents ofWEST_COMPLEX to a different server group named NEWWEST, enter:copy servergroup west_complex newwest
This command creates the new group. If the new group already exists, thecommand fails.
Renaming a Server Group: To rename an existing server groupNORTH_COMPLEX to NORTH, enter:rename servergroup north_complex north
Updating a Server Group Description: To update the NORTH server group tomodify its description, enter:update servergroup north description="Northern marketing region"
500 Tivoli Storage Manager for Windows: Administrator’s Guide

Deleting a Server Group: To delete WEST_COMPLEX server group from the TSMserver, enter:delete servergroup west_complex
This command removes all members from the server group. The server definitionfor each group member is not affected. If the deleted server group is a member ofother server groups, the deleted group is removed from the other groups.
Managing Group MembersYou can move and delete group members from a previously defined group.
Task Required Privilege Class
Move a group member to another group
Delete a group member
System
Moving a Group Member to Another Group: To move group member TRADE5from the NEWWEST group to the NORTH_COMPLEX group, enter:move grpmember trade5 newwest north_complex
Deleting a Group Member from a Group: To delete group member BLD12 fromthe NEWWEST server group, enter:delete grpmember newwest bld12
When you delete a server, the deleted server is removed from any server groups ofwhich it was a member.
Querying Server AvailabilityYou can test a connection from your local server to a specified server with thePING SERVER command. To ping the server GEO2, enter:ping server geo2
The PING SERVER command uses the user ID and password of the administrativeID that issued the command. If the administrator is not defined on the serverbeing pinged, the ping fails even if the server may be running.
Using Virtual Volumes to Store Data on Another ServerTSM lets a server (a source server) store the results of database backups, exportoperations, storage pool operations, and a DRM PREPARE command on anotherserver (a target server). The data is stored as virtual volumes, which appear to besequential media volumes on the source server but which are actually stored asarchive files on a target server. Virtual volumes can be any of the following:v Database backupsv Storage pool backupsv Data that is backed up, archived, or space managed from client nodesv Client data migrated from storage pools on the source serverv Any data that can be moved by EXPORT and IMPORT commandsv DRM plan files
Chapter 22. Working with a Network of Servers 501

The source server is a client of the target server, and the data for the source serveris managed only by the source server. In other words, the source server controlsthe expiration and deletion of the files that comprise the virtual volumes on thetarget server.
At the target server, the virtual volumes from the source server are seen as archivedata. The source server is registered as a client node (of TYPE=SERVER) at thetarget server and is assigned to a policy domain. The archive copy group of thedefault management class of that domain specifies the storage pool for the datafrom the source server.
Note: If the default management class does not include an archive copy group,data cannot be stored on the target server.
Using virtual volumes can benefit you in the following ways:v The source server can use the target server as an electronic vault for rapid
recovery from a disaster.v Smaller TSM source servers can use the storage pools and tape devices of larger
TSM servers.v For incremental database backups, it can decrease wasted space on volumes and
under use of high-end tape drives.
Be aware of the following when you use virtual volumes:v If you use virtual volumes for database backups, you might have the following
situation: SERVER_A backs up its database to SERVER_B, and SERVER_B backsup its database to SERVER_A. If this is the only way databases are backed up, ifboth servers are at the same location, and if a disaster strikes that location, youmay have no backups with which to restore your databases.
v Moving large amounts of data between the servers may slow down yourcommunications significantly, depending on the network bandwidth andavailability.
v You can specify in the device class definition (DEVTYPE=SERVER) how oftenand for how long a time the source server will try to contact the target server.Keep in mind that frequent attempts to contact the target server over anextended period can affect your communications.
v Under certain circumstances, inconsistencies may arise among virtual volumedefinitions on the source server and the archive files on the target server. Youcan use the RECONCILE VOLUMES command to reconcile these inconsistencies(see “Reconciling Virtual Volumes and Archive Files” on page 506 for details).
v If you want to enable data validation between a source and target server, enablethe settings using both the DEFINE SERVER and REGISTER NODE commands.For more information see “Validating a Node’s Data” on page 347 andAdministrator’s Reference.
v Storage space limitations on the target server affect the amount of data that youcan store on that server.
v To minimize mount wait times, the total mount limit for all server definitionsthat specify the target server should not exceed the mount total limit at thetarget server. For example, a source server has two device classes, eachspecifying a mount limit of 2. A target server has only two tape drives. In thiscase, the source server mount requests could exceed the target server’s tapedrives.
502 Tivoli Storage Manager for Windows: Administrator’s Guide

Note: When you issue a DEFINE SERVER command, the source server sends averification code to the target server. When the source server begins asession with the target server, it also sends the verification code. If the codematches what was previously stored on the target, the session is opened inread/write mode. If the verification code is lost at the source server (forexample, after a database restore), the code can be reset by issuing anUPDATE SERVER command with the FORCESYNC=YES parameter.
Setting Up Source and Target Servers for Virtual VolumesIn the source/target relationship, the source server is defined as a client node ofthe target server. To set up this relationship, a number of steps must be performedat the two servers. In the following example (illustrated in Figure 83 on page 504),the source server is named DELHI and the target server is named TOKYO.v At DELHI:
1. Define the target server:– TOKYO has a TCP/IP address of 9.115.3.221:1845– Assigns to TOKYO the password CALCITE.– Assigns DELHI as the node name by which the source server DELHI will
be known at the target server. If no node name is assigned, the servername of the source server is used. To see the server name, you can issuethe QUERY STATUS command.
2. Define a device class for the data to be sent to the target server. The devicetype for this device class must be SERVER, and the definition must includethe name of the target server.
v At TOKYO:
Register the source server as a client node. The target server can use an existingpolicy domain and storage pool for the data from the source server. However,you can define a separate management policy and storage pool for the sourceserver. Doing so can provide more control over storage pool resources.1. Use the REGISTER NODE command to define the source server as a node of
TYPE=SERVER. The policy domain to which the node is assigned determineswhere the data from the source server is stored. Data from the source serveris stored in the storage pool specified in the archive copy group of thedefault management class of that domain.
2. You can set up a separate policy and storage pool for the source server.a. Define a storage pool named SOURCEPOOL:
define stgpool sourcepool autotapeclass maxscratch=20
b. Copy an existing policy domain STANDARD to a new domain namedSOURCEDOMAIN:copy domain standard sourcedomain
c. Assign SOURCEPOOL as the archive copy group destination in thedefault management class of SOURCEDOMAIN:update copygroup sourcedomain standard standard type=archive
destination=sourcepool
After issuing these commands, ensure that you assign the source server tothe new policy domain (UPDATE NODE) and activate the policy. See“Changing Policy” on page 302 for details.
Chapter 22. Working with a Network of Servers 503

Performing Operations at the Source ServerYou can perform certain operations at the source server that cause data to bestored in a storage pool at the target server. These operations are:v Database backupsv Storage pool backupsv Client data backup, archive, or migrationv Data migration from one storage pool to anotherv Export of server informationv DRM prepare
The following sections describe how to perform these operations. In the examples,the following is assumed:v The definitions shown in the previous section have been done.v An operational TCP/IP connection exists between both servers.v Both servers are running.
Back Up the DatabaseYou can back up the database of a source server to a target server. For example, toperform an incremental backup of the source server and send the volumes to thetarget server, issue the following command:backup db type=incremental devclass=targetclass
Expiration Processing of Database Backup Volumes and Recovery Plan Fileswith the Tivoli Disaster Recovery Manager: If your server is licensed for DRM,expiration processing can delete volumes containing expired database backups andrecovery plan files. One or more database backup volumes may be deleted fromthe volume history during expiration processing if the following conditions aretrue:v The volume has a device type of SERVER
Figure 83. Communication configuration for virtual volumes
504 Tivoli Storage Manager for Windows: Administrator’s Guide

v The volume is not part of the most recent database backup seriesv The last volume of the database backup series has exceeded the expiration value
specified with the SET DRMDBBACKUPEXPIREDAYS command
See “Moving Backup Volumes Onsite” on page 597 for more information.
You can also do an automatic database backup to a target server. For example, ifyou have issued the following command, a database backup occurs automaticallywhen more than 60 percent of recovery log space is used:define dbbackuptrigger devclass=targetclass logfullpct=60
Back Up a Storage PoolYou can back up a storage pool of a source server to a target server. For example, aprimary storage pool named TAPEPOOL is on the source server. You can define acopy storage pool named TARGETCOPYPOOL, also on the source server.TARGETCOPYPOOL must have an associated device class whose device type isSERVER. When you back up TAPEPOOL to TARGETCOPYPOOL, the backup issent to the target server. To do so, issue the following commands:define stgpool targetcopypool targetclass pooltype=copy
maxscratch=20
backup stgpool tapepool targetcopypool
Store Client Data on a Target ServerYou can configure your TSM system so that when client nodes registered to thesource server back up, archive, or migrate their data, that data is sent to the targetserver. When clients restore, retrieve, or recall their data, the source server gets thedata from the target server.
To configure your system, ensure that the management policy for those nodesspecifies a storage pool that has a device class whose device type is SERVER. Forexample, the following command defines the storage pool named TARGETPOOL.define stgpool targetpool targetclass maxscratch=20
reclaim=100
Note: Reclamation of a storage pool automatically begins when the percentage ofreclaimable space, which is specified by the RECLAIM parameter, isreached. Reclamation of a target storage pool can involve the movement of agreat deal of data from the target server to the source server and back to thetarget. If this operation occurs automatically during peak operating periods,it could slow network performance significantly. If you set the value to 100,reclamation will not occur automatically. For details about storage poolreclamation and how to begin it manually, see “Reclaiming Space inSequential Access Storage Pools” on page 205.
Migrate Data from a Source Server Storage Pool to a TargetServer Storage PoolYou can set up your storage pool hierarchy so that client data is migrated from astorage pool on the source server to the target server. For example, storage poolTAPEPOOL is on the source server. The TAPEPOOL definition specifiesNEXTSTGPOOL=TARGETPOOL. TARGETPOOL has been defined on the sourceserver as a storage pool of device type SERVER. When data is migrated fromTAPEPOOL, it is sent to the target server.define stgpool tapepool tapeclass nextstgpool=targetpool
maxscratch=20
Chapter 22. Working with a Network of Servers 505

Export Server Information to a Target ServerYou can use any of the TSM EXPORT commands to export data from one TSMsource server to sequential media on a target TSM server. You must specify adevice class with a device type specified as SERVER. For example, to copy serverinformation directly to a target server, issue the following command:export server devclass=targetclass
Import Server Information from a Target Server: If data has been exported froma source server to a target server, you can import that data from the target serverto a third server. The server that will import the data uses the node ID andpassword of the source server to open a session with the target server. That sessionis in read-only mode because the third server does not have the proper verificationcode.
For example, to import server information from a target server, issue the followingcommand:import server devclass=targetclass
Reconciling Virtual Volumes and Archive FilesIf you have restored the database on the source or target server, you shouldperform reconciliation between the virtual volumes on the source server and thearchive files on the target server. You should also perform reconciliation if youhave any other reason to suspect inconsistencies. For example, frequentcommunication errors between target and source servers could introduce aproblem.
To perform reconciliation, issue the RECONCILE VOLUMES command specifyinga device class of the device type of SERVER. In the following exampleTARGETCLASS is a server device class:reconcile volumes targetclass fix=yes
The reconciliation action is determined by the FIX parameter as shown in thefollowing table:
FIX= At the SourceServer
At the Target Server Action
NO
Volumes exist
No files exist
Report errorFiles exist but are markedfor deletion
Active files exist butattributes do not match
Volumes do notexist
Active files exist Report error
Files exist but are markedfor deletion
None
506 Tivoli Storage Manager for Windows: Administrator’s Guide

FIX= At the SourceServer
At the Target Server Action
YES
Volumes exist
No files exist Report error
For storage pool volumes:Mark volumes as unavailable
Files exist but marked fordeletion
Report error
For storage pool volumes: Ifattributes match, mark fileson the target server as activeagain, mark volumes on thesource server as unavailable,and recommend that anAUDIT VOLUME be done tofurther verify the data. Ifattributes do not match, markvolumes as unavailable.
Active files exist butattributes do not match
Report error
For storage pool volumes:Mark volumes as unavailableand recommend that anAUDIT VOLUME be done tofurther verify the data.
Volumes do notexist
Active files exist Mark files for deletion on thetarget server.
Files exist but marked fordeletion
None
Chapter 22. Working with a Network of Servers 507

508 Tivoli Storage Manager for Windows: Administrator’s Guide

Chapter 23. Exporting and Importing Data
Tivoli Storage Manager provides an export-import facility that allows you to copyall or part of a server to removable media (export) so that data can be transferredto another server (import).
Task Required Privilege Class
Perform export and import operations System
Display information about export andimport operations
Any administrator
This chapter takes you through the export and import tasks. See the followingsections:
Concepts:
“Data That Can Be Exported and Imported”
Tasks:
“Preparing to Export or Import Data” on page 510
“Monitoring Export and Import Processes” on page 512
“Exporting Data to Sequential Media Volumes” on page 515
“Importing Data from Sequential Media Volumes” on page 518
In this chapter, most examples illustrate how to perform tasks by using a TivoliStorage Manager command-line interface. For information about the commands,see Administrator’s Reference, or issue the HELP command from the command lineof a Tivoli Storage Manager administrative client.
Tivoli Storage Manager tasks can also be performed from the administrative Webinterface. For more information about using the administrative interface, see QuickStart.
Data That Can Be Exported and ImportedAdministrators can export or import the following types of data:v Server control information, which includes:
– Administrator definitions– Client node definitions– Policy and scheduling definitions
v File data from server storage, which includes file space definitions andauthorization rules. You can request that file data be exported in any of thefollowing groupings of files:– Active and inactive versions of backed up files, archive copies of files, and
space-managed files– Active versions of backed up files, archive copies of files, and space-managed
files– Active and inactive versions of backed up files– Active versions of backed up files– Archive copies of files
© Copyright IBM Corp. 1994, 2002 509

– Space-managed files
Notes:
1. You can export information from an earlier version of Tivoli Storage Managerto a later one, but not from a later version to an earlier.
2. Data exported from a server with Unicode support cannot be imported to aserver at an earlier version.
3. You cannot export nodes of type NAS. Export processing will exclude thesenodes.
Your decision on what information to export depends on why you are exportingthat information:v To copy information to a second server (the target server), use the EXPORT
NODE, EXPORT POLICY, and EXPORT ADMIN commands. This will balancethe work load across servers. For example, when many client nodes access thesame server, users contend for communication paths, server resources, and tapemounts during a restore or retrieve operation.To relieve a server of some work load and improve its performance, you maywant to take one or all of the following actions:– Move a group of client nodes to a target server– Move policy definitions associated with these client nodes– Move administrator definitions for administrators who manage these client
nodes
When you complete the import, you can delete file spaces, client nodes, policyobjects, scheduling objects and administrators from the source server. This willreduce contention for server resources.
v To copy data for the purpose of installing a new server, use the EXPORTSERVER command to copy all data to sequential media volumes.
Note: Because results could be unpredictable, ensure that expiration, migration,backup, or archive are not running when the EXPORT NODE command isissued.
Preparing to Export or Import DataBefore you export or import data, do the following:v Use the EXPORT or IMPORT command with the PREVIEW parameter to verify
what data will be movedv Prepare sequential media for exporting and importing data
Using Preview before Exporting or Importing DataTivoli Storage Manager provides the PREVIEW option on the EXPORT andIMPORT commands. When PREVIEW=YES, the report shows how much data willbe transferred without actually moving any data. When PREVIEW=NO, the exportor import operation is performed.
Issue each EXPORT or IMPORT command with PREVIEW=YES to determinewhich objects and how much data will be moved. The server sends the followingtypes of messages to the server console and to the activity log for each operation:
Export Reports the types of objects, number of objects, and number of bytes thatwould be copied to sequential media volumes. Use this information todetermine how many sequential media volumes you will need.
510 Tivoli Storage Manager for Windows: Administrator’s Guide

ImportReports the number and types of objects found on the sequential mediavolumes that meet your import specifications. Also reports informationabout any detected problems, such as corrupted data. Use this informationto determine which data to move to the server and to determine if youhave enough storage pool space allocated on the server.
To determine how much space is required to export all server data, enter:export server filedata=all preview=yes
After you issue this command, the server starts a background process and issues amessage similar to the following:
EXPORT SERVER started as Process 4
You can view the preview results on the server console or by querying the activitylog.
You can request information about the background process, as described in“Requesting Information about an Export or Import Process” on page 512. Ifnecessary, you can cancel an export or import process, as described in “CancelingServer Processes” on page 396.
Planning for Sequential Media Used to Export DataTo export data, you must specify a device class that supports sequential media andidentify the volumes that will be used to store the exported data. Use this sectionto help you select the device classes and prepare sequential media volumes.
Selecting a Device ClassYou can query the source and target servers to select a device class on each serverthat supports the same device type. If you cannot find a device class on eachserver that supports a matching device type, define a new device class for a devicetype that is available to both servers. See “Chapter 9. Defining Device Classes” onpage 157.
Notes:
1. If the mount limit for the device class selected is reached when you request anexport (that is, if all the drives are busy), the server automatically cancels lowerpriority operations, such as reclamation, to make a mount point available forthe export.
2. You can export data to a storage pool on another server by specifying a deviceclass whose device type is SERVER. For details, see “Using Virtual Volumes toStore Data on Another Server” on page 501.
Estimating the Number of Removable Media Volumes to LabelTo estimate the number of removable media volumes needed to store export data,divide the number of bytes to be moved by the estimated capacity of a volume.
For example, you have 8mm tapes with an estimated capacity of 2472MB. If thepreview shows that you need to transfer 4GB of data, then label at least two tapevolumes before you export the data.
Using Scratch MediaThe server allows you to use scratch media to ensure that you have sufficientspace to store all export data. If you use scratch media, record the label names and
Chapter 23. Exporting and Importing Data 511

the order in which they were mounted. Or, use the USEDVOLUMELIST parameteron the export command to create a file containing the list of volumes used.
Labeling Removable Media VolumesDuring an import process, you must specify the order in which removable mediavolumes will be mounted. This order must match the order in which volumes weremounted during the export process. To ensure that removable media volumes aremounted in the correct order, label the media with information that identifies theorder in which they must be mounted during the import process. For example,label tapes as DSM001, DSM002, DSM003, and so on.
When you export data, record the date and time for each labeled volume. Storethis information in a safe location, because you will need the information whenyou import the data. Or, if you used the USEDVOLUMELIST parameter on theexport command, save the resulting file. This file can be used on the importcommand volumes parameter.
Monitoring Export and Import ProcessesThe server lets you monitor export or import processes in two ways:v You can view information about a process that is running on the server console
or from an administrative client running in console mode.v After a process has completed, you can query the activity log for status
information from the server console or from an administrative client running inbatch or interactive mode.
Requesting Information about an Export or Import ProcessAfter you issue an EXPORT or IMPORT command, the server starts a backgroundprocess, assigns a process ID to the operation, and displays the process ID whenthe operation starts.
You can query an export or import process by specifying the process ID number.For example, to request information about the EXPORT SERVER operation, whichstarted as process 4, enter:query process 4
If you issue a preview version of an EXPORT or IMPORT command and thenquery the process, the server reports the types of objects to be copied, the numberof objects to be copied, and the number of bytes to be copied.
When you export or import data and then query the process, the server displaysthe number and types of objects copied so far, and the total number of bytes thathave been transferred, along with information on any media mount requests thatmay be outstanding for the process.
For guidance information on querying background processes, see “RequestingInformation about Server Processes” on page 435.
Viewing Information from the Server ConsoleWhen you issue an IMPORT or EXPORT command, either from the server consoleor from an administrative client, information is displayed on the server console.Figure 84 on page 513 shows an example of the information that is displayed afterissuing an EXPORT SERVER command.
512 Tivoli Storage Manager for Windows: Administrator’s Guide

Viewing Information from an Administrative ClientUse the console mode from an administrative client to monitor export or importoperations or to capture processing messages to an output file. For example, tostart an administrative session in console mode, enter:> dsmadmc -consolemode
While the system is running in console mode, you cannot enter any administrativecommands from the client session. You can, however, start another administrativeclient session for entering commands (for example, QUERY PROCESS) if you areusing a multitasking workstation, such as AIX.
If you want the server to write all terminal output to a file, specify the OUTFILEoption with a destination. For example, to write output to the SAVE.OUT file,enter:> dsmadmc -consolemode -outfile=save.out
For information about using the CONSOLE mode option and ending anadministrative session in console mode, see Administrator’s Reference.
ANR0610I EXPORT SERVER started by SERVER_CONSOLE as process 1.ANR0639I EXPORT SERVER: Processing domain ENGPOLDOM.ANR0640I EXPORT SERVER: Processing policy set ACTIVE in policy domainENGPOLDOM.ANR0640I EXPORT SERVER: Processing policy set STANDARD in policy domainENGPOLDOM.ANR0641I EXPORT SERVER: Processing management class STANDARD in domainENGPOLDOM, set ACTIVE.ANR0641I EXPORT SERVER: Processing management class STANDARD in domainENGPOLDOM, set STANDARD.ANR0643I EXPORT SERVER: Processing archive copy group in domainENGPOLDOM, set STANDARD, management class ACTIVE.ANR0643I EXPORT SERVER: Processing archive copy group in domainENGPOLDOM, set STANDARD, management class STANDARD.ANR0643I EXPORT SERVER: Processing backup copy group in domainENGPOLDOM, set STANDARD, management class ACTIVE.ANR0643I EXPORT SERVER: Processing backup copy group in domainENGPOLDOM, set STANDARD, management class STANDARD.ANR0604I EXPORT SERVER: No schedules were found in policy domain * forexporting.ANR0635I EXPORT SERVER: Processing node TOMC.ANR0605I EXPORT SERVER: No schedule associations were found inpolicy domain * for exporting.ANR0637I EXPORT SERVER: Processing file space DRIVED for node TOMC.ANR0637I EXPORT SERVER: Processing file space OS2 for node TOMC.ANR0637I EXPORT SERVER: Processing file space OS2VDISK for node TOMC.ANR0617I EXPORT SERVER: Processing completed successfully.ANR0620I EXPORT SERVER: Copied 1 domain(s).ANR0621I EXPORT SERVER: Copied 2 policy set(s).ANR0622I EXPORT SERVER: Copied 2 management class(es).ANR0623I EXPORT SERVER: Copied 4 copy group(s).ANR0626I EXPORT SERVER: Copied 1 node definition(s).ANR0627I EXPORT SERVER: Copied 3 file space(s), 16 archive file(s)and 0 backup file(s).ANR0629I EXPORT SERVER: Copied 3045632 bytes of data.ANR0611I EXPORT SERVER started by SERVER_CONSOLE as process 1 has ended.
Figure 84. Sample Export Server Output
Chapter 23. Exporting and Importing Data 513

Querying the Activity Log for Export or Import InformationAfter an export or import process has completed, you can query the activity log forstatus information and possible error messages.
To minimize processing time when querying the activity log for export or importinformation, restrict the search by specifying EXPORT or IMPORT in the SEARCHparameter of the QUERY ACTLOG command.
For example, to determine how much data will be moved after issuing the previewversion of the EXPORT SERVER command, query the activity log by entering:query actlog search=export
Figure 85 displays a sample activity log report.
Date/Time Message-------------------- ---------------------------------------------------05/03/1998 10:50:28 ANR0610I EXPORT SERVER started by ADMIN asprocess 1.05/03/1998 10:50:28 ANR0639I EXPORT SERVER: Processing domain ENGPOLDOM.05/03/1998 10:50:28 ANR0640I EXPORT SERVER: Processing policy setACTIVE in policy domain ENGPOLDOM.05/03/1998 10:50:28 ANR0640I EXPORT SERVER: Processing policy setSTANDARD in policy domain ENGPOLDOM.05/03/1998 10:50:29 ANR0641I EXPORT SERVER: Processing management classSTANDARD in domain ENGPOLDOM, set ACTIVE.05/03/1998 10:50:29 ANR0641I EXPORT SERVER: Processing management classSTANDARD in domain ENGPOLDOM, set STANDARD.05/03/1998 10:50:29 ANR0643I EXPORT SERVER: Processing archive copygroup in domain ENGPOLDOM, set STANDARD, management class ACTIVE.05/03/1998 10:50:29 ANR0643I EXPORT SERVER: Processing archive copygroup in domain ENGPOLDOM, set STANDARD, management class STANDARD.05/03/1998 10:50:29 ANR0642I EXPORT SERVER: Processing backup copygroup in domain ENGPOLDOM, set STANDARD, management class ACTIVE.05/03/1998 10:50:29 ANR0642I EXPORT SERVER: Processing backup copygroup in domain ENGPOLDOM, set STANDARD, management class STANDARD.05/03/1998 10:50:29 ANR0604I EXPORT SERVER: No schedules were found in policydomain * for exporting.05/03/1998 10:50:29 ANR0635I EXPORT SERVER: Processing node TOMC.05/03/1998 10:50:29 ANR0605I EXPORT SERVER: No schedule associations werefound in policy domain * for exporting.05/03/1998 10:50:29 ANR0637I EXPORT SERVER: Processing file space DRIVED fornode TOMC.05/03/1998 10:50:29 ANR0637I EXPORT SERVER: Processing file space OS2 for nodeTOMC.05/03/1998 10:50:29 ANR0637I EXPORT SERVER: Processing file space OS2VDISK fornode TOMC.05/03/1998 10:50:32 ANR0617I EXPORT SERVER: Processing completed successfully.05/03/1998 10:50:32 ANR0620I EXPORT SERVER: Copied 1 domain(s).05/03/1998 10:50:32 ANR0621I EXPORT SERVER: Copied 2 policy set(s).05/03/1998 10:50:32 ANR0622I EXPORT SERVER: Copied 2 management class(es).05/03/1998 10:50:32 ANR0623I EXPORT SERVER: Copied 4 copy group(s).05/03/1998 10:50:32 ANR0626I EXPORT SERVER: Copied 1 node definition(s).05/03/1998 10:50:32 ANR0627I EXPORT SERVER: Copied 3 file space(s),16 export file(s) and 0 backup file(s).05/03/1998 10:50:32 ANR0629I EXPORT SERVER: Copied 3045632 bytes of data.05/03/1998 10:50:32 ANR0611I EXPORT SERVER started by ADMIN asprocess 1 has ended.
Figure 85. Sample Activity Log Report on Exported Data
514 Tivoli Storage Manager for Windows: Administrator’s Guide

Exporting Data to Sequential Media VolumesYou can export all server control information or a subset of server controlinformation by specifying one or more of the following export commands:v EXPORT SERVERv EXPORT ADMINv EXPORT NODEv EXPORT POLICY
When you export data, you must specify the device class to which export data willbe written. You must also list the volumes in the order in which they are to bemounted when the data is imported. See “Labeling Removable Media Volumes” onpage 512 for information on labeling tape volumes.
You can specify the USEDVOLUMELIST parameter to indicate the name of a filewhere a list of volumes used in a successful export operation will be stored. If thespecified file is created without errors, it can be used as input to the IMPORTcommand on the VOLUMENAMES=FILE:filename parameter. This file will containcomment lines with the date and time the export was done, and the commandissued to create the export.
Note: An export operation will not overwrite an existing file. If you export aserver or node try to export it again with the same volume name, the file isskipped and a scratch file is allocated. To use the same volume name, deletethe volume entry from the volume history file.
Deciding When to Export DataWhen you issue an EXPORT command, the operation runs as a backgroundprocess. This process allows you to continue performing administrative tasks. Inaddition, users can continue to back up, archive, migrate, restore, retrieve, or recallfiles using the server.
If you choose to perform an export operation during normal working hours, beaware that administrators can change server definitions and users may modify filesthat are in server storage. If administrators or users modify data shortly after it hasbeen exported, then the information copied to tape may not be consistent withdata stored on the source server.
If you want to export an exact point-in-time copy of server control information,you can prevent administrative and other client nodes from accessing the server.See “Preventing Administrative Clients from Accessing the Server” and“Preventing Client Nodes from Accessing the Server” on page 516.
Preventing Administrative Clients from Accessing the ServerAdministrators can change administrator, policy, or client node definitions duringan export process. To prevent administrators from modifying these definitions, youcan lock out administrator access to the server and cancel any administrativesessions before issuing an EXPORT command. After the export process is complete,unlock administrator access.
For more information on canceling sessions, see “Canceling a Tivoli StorageManager Session” on page 285. For more information on locking or unlockingadministrators from the server, see “Locking and Unlocking Administrators fromthe Server” on page 293.
Chapter 23. Exporting and Importing Data 515

Preventing Client Nodes from Accessing the ServerIf client node information is exported while that client is backing up, archiving, ormigrating files, the latest file copies for the client may not be exported to tape. Toprevent users from accessing the server during export operations, cancel existingclient sessions as described in “Canceling a Tivoli Storage Manager Session” onpage 285. Then you can do one of the following:v Disable server access to prevent client nodes from accessing the server, as
described in “Disabling or Enabling Access to the Server” on page 287.This option is useful when you export all client node information from thesource server and want to prevent all client nodes from accessing the server.
v Lock out particular client nodes from server access, as described in “Lockingand Unlocking Client Nodes” on page 264.This option is useful when you export a subset of client node information fromthe source server and want to prevent particular client nodes from accessing theserver until the export operation is complete.
After the export operation is complete, allow client nodes to access the serveragain by:v Enabling the server, as described in “Disabling or Enabling Access to the Server”
on page 287v Unlocking client nodes, as described in “Locking and Unlocking Client Nodes”
on page 264
Exporting Server DataWhen you issue the EXPORT SERVER command, the server exports all servercontrol information. You can also export file data information with the EXPORTSERVER command.
For example, you want to export server data to four defined tape cartridges, whichare supported by the TAPECLASS device class. You want the server to use scratchvolumes if the four volumes are not enough, and so you use the default ofSCRATCH=YES. To issue this command, enter:export server devclass=tapeclassvolumenames=dsm001,dsm002,dsm003,dsm004 filedata=all
During the export process, the server exports definition information before itexports file data information. This ensures that definition information is stored onthe first tape volumes. This process allows you to mount a minimum number oftapes during the import process, if your goal is to copy only control information tothe target server.
In the example above, the server exports:v Administrator definitionsv Client node definitionsv Policy domain, policy set, management class, and copy group definitionsv Schedule definitions and client node associationsv File space definitionsv File space authorization rulesv Backed up, archived, and space-managed files
516 Tivoli Storage Manager for Windows: Administrator’s Guide

Exporting Administrator InformationWhen you issue the EXPORT ADMIN command, the server exports administratordefinitions. Each administrator definition includes:v Administrator name, password, and contact informationv Any administrative privilege classes the administrator has been grantedv Whether the administrator ID is locked from server access
You can specify a list of administrator names, or you can export all administratornames.
In the following example, definitions for the DAVEHIL and PENNER administratorIDs will be exported to the DSM001 tape volume, which is supported by theTAPECLASS device class. Do not allow any scratch media to be used during thisexport process. To issue this command, enter:export admin davehil,penner devclass=tapeclassvolumenames=dsm001 scratch=no
Exporting Client Node InformationWhen you issue the EXPORT NODE command, the server exports client nodedefinitions. Each client node definition includes:v User ID, password, and contact informationv Name of the policy domain to which the client is assignedv File compression statusv Whether the user has the authority to delete backed up or archived files from
server storagev Whether the client node ID is locked from server access
You can also specify whether to export file data. File data includes file spacedefinitions and authorization rules. You can request that file data be exported inany of the following groupings of files:v Active and inactive versions of backed up files, archive copies of files, and
space-managed filesv Active versions of backed up files, archive copies of files, and space-managed
filesv Active and inactive versions of backed up filesv Active versions of backed up filesv Archive copies of filesv Space-managed files
When client file data is exported, the server copies files to export volumes in theorder of their physical location in server storage. This process minimizes thenumber of mounts required during the export process.
If you do not specify that you want to export file data, then the server only exportsclient node definitions.
For example, suppose you want to do the following:v Export definitions for client nodes and file spaces in the ENGPOLDOM policy
domainv Export any active backup versions of files belonging to these client nodesv Export this information to scratch volumes in the TAPECLASS device class
Chapter 23. Exporting and Importing Data 517

To issue this command, enter:export node filespace=* domains=engpoldomfiledata=backupactive devclass=tapeclass
In this example, the server exports:v Definitions of client nodes assigned to ENGPOLDOMv File space definitions and backup authorizations for each client node in
ENGPOLDOMv Active versions of backed up files belonging to the client nodes assigned to
ENGPOLDOM
Exporting Policy InformationWhen you issue the EXPORT POLICY command, the server exports the followinginformation belonging to each specified policy domain:v Policy domain definitionsv Policy set definitions, including the active policy setv Management class definitions, including the default management classv Backup copy group and archive copy group definitionsv Schedule definitionsv Associations between client nodes and schedules
For example, suppose you want to export policy and scheduling definitions fromthe policy domain named ENGPOLDOM. You want to use tape volumes DSM001and DSM002, which belong to the TAPECLASS device class, but allow the serverto use scratch tape volumes if necessary. To issue this command, enter:export policy engpoldomdevclass=tapeclass volumenames=dsm001,dsm002
Importing Data from Sequential Media VolumesBefore you import data to a new target server, you must:1. Install Tivoli Storage Manager for the target server. This step includes defining
disk space for the database and recovery log.For information on installing Tivoli Storage Manager, see Quick Start.
2. Define server storage for the target server.Because each server operating system handles devices differently, server storagedefinitions are not exported. Therefore, you must define initial server storagefor the target server. The target server must at least be able to use a drive thatis compatible with the export media. This task can include defining libraries,drives, device classes, storage pools, and volumes. See the Administrator’s Guidethat applies to the target server.
After Tivoli Storage Manager is installed and set up on the target server, a systemadministrator can import all server control information or a subset of servercontrol information by specifying one or more of the following import commands:v IMPORT SERVERv IMPORT ADMINv IMPORT NODEv IMPORT POLICY
518 Tivoli Storage Manager for Windows: Administrator’s Guide

This section guides you through the entire process of importing all server controlinformation and file data from tape volumes to a new target server. This processincludes:v Previewing information before you import datav Importing definitionsv Tailoring server storage definitions on the target serverv Importing file data
After you understand how to import server control information and file datainformation, you can import any subset of data to the target server.
Step 1: Previewing Information before You Import DataBefore you import any data to the target server, preview each IMPORT commandto determine what data you want to import to the target server. You can import allor a subset of export data from tapes.
When you set PREVIEW=YES, tape operators must mount export tape volumes sothat the target server can calculate the statistics for the preview.
For example, to preview information for the IMPORT SERVER command, enter:import server devclass=tapeclass preview=yesvolumenames=dsm001,dsm002,dsm003,dsm004
Figure 86 on page 520 shows an example of the messages sent to the server consoleand the activity log.
Chapter 23. Exporting and Importing Data 519

Use the value reported for the total number of bytes copied to estimate storagepool space needed to store imported file data.
For example, Figure 86 shows that 8 856 358 bytes of data will be imported. Ensurethat you have at least 8 856 358 bytes of available space in the backup storagepools defined to the server. You can use the QUERY STGPOOL and QUERYVOLUME commands to determine how much space is available in the serverstorage hierarchy.
ANR0402I Session 3 started for administrator SERVER_CONSOLE (Server).ANR1363I Import volume DSM001 opened (sequence number 1).ANR0610I IMPORT SERVER started by SERVER_CONSOLE as process 2.ANR0612I IMPORT SERVER: Reading EXPORT SERVER data from server TSM exported05/07/1996 12:39:48.ANR0639I IMPORT SERVER: Processing domain ENGPOLDOM.ANR0640I IMPORT SERVER: Processing policy set ACTIVE in policy domainENGPOLDOM.ANR0640I IMPORT SERVER: Processing policy set STANDARD in policy domainENGPOLDOM.ANR0641I IMPORT SERVER: Processing management class STANDARD in domainENGPOLDOM, set ACTIVE.ANR0641I IMPORT SERVER: Processing management class MCENG in domainENGPOLDOM, set STANDARD.ANR0641I IMPORT SERVER: Processing management class STANDARD in domainENGPOLDOM, set STANDARD.ANR0643I IMPORT SERVER: Processing archive copy group in domainENGPOLDOM, set ACTIVE, management class STANDARD.ANR0643I IMPORT SERVER: Processing archive copy group in domain ENGPOLDOM,set STANDARD, management class MCENG.ANR0643I IMPORT SERVER: Processing archive copy group in domain ENGPOLDOM,set STANDARD, management class STANDARD.ANR0642I IMPORT SERVER: Processing backup copy group in domain ENGPOLDOM,set ACTIVE, management class STANDARD.ANR0642I IMPORT SERVER: Processing backup copy group in domain ENGPOLDOM,set STANDARD, management class MCENG.ANR0642I IMPORT SERVER: Processing backup copy group in domain ENGPOLDOM,set STANDARD, management class STANDARD.ANR0638I IMPORT SERVER: Processing administrator DAVEHIL.ANR0638I IMPORT SERVER: Processing administrator PENNER.ANR0635I IMPORT SERVER: Processing node TOMC.ANR0636I IMPORT SERVER: Processing file space OS2 for node TOMC as filespace OS1.ANR0636I IMPORT SERVER: Processing file space DRIVED for node TOMC as filespace DRIVE1.ANR0636I IMPORT SERVER: Processing file space OS2VDISK for node TOMC as filespace OS2VDIS1.ANR1365I Import volume DSM001 closed (end reached).ANR1363I Import volume DSM002 opened (sequence number 2).ANR1365I Import volume DSM002 closed (end reached).ANR1363I Import volume DSM003 opened (sequence number 3).ANR1365I Import volume DSM003 closed (end reached).ANR1363I Import volume DSM004 opened (sequence number 4).ANR1365I Import volume DSM004 closed (end reached).ANR0617I IMPORT SERVER: Processing completed successfully.ANR0620I IMPORT SERVER: Copied 1 domain(s).ANR0621I IMPORT SERVER: Copied 2 policy set(s).ANR0622I IMPORT SERVER: Copied 2 management class(es).ANR0623I IMPORT SERVER: Copied 6 copy group(s).ANR0625I IMPORT SERVER: Copied 2 administrator(s).ANR0626I IMPORT SERVER: Copied 1 node definition(s).ANR0627I IMPORT SERVER: Copied 3 file space(s), 0 archive file(s) and 462backup file(s).ANR0629I IMPORT SERVER: Copied 8856358 bytes of data.ANR0611I IMPORT SERVER started by SERVER_CONSOLE as process 2 has ended.
Figure 86. Sample Report Created by Issuing Preview for an Import Server Command
520 Tivoli Storage Manager for Windows: Administrator’s Guide

In addition, the preview report shows that 0 archive files and 462 backup files willbe imported. Because backup data is being imported, ensure that you havesufficient space in the backup storage pools used to store this backup data. See“Step 3: Tailoring Server Storage Definitions on the Target Server” on page 523 forinformation on identifying storage pools on the target server.
For information on specifying the PREVIEW parameter, see “Using Preview beforeExporting or Importing Data” on page 510. For information on reviewing theresults of a preview operation, see “Monitoring Export and Import Processes” onpage 512.
Step 2: Importing DefinitionsNext, you want to import server control information, which includes:v Administrator definitionsv Client node definitionsv Policy domain, policy set, management class, and copy group definitionsv Schedule definitions and client node associations
However, do not import file data at this time, because some storage pools namedin the copy group definitions may not exist yet on the target server.
Before you import server control information, do the following:v Read and understand the following information:
– “Determining Whether to Replace Existing Definitions”– “Understanding How the Server Imports Active Policy Sets”
v Start an administrative client session in console mode to capture importmessages to an output file. See “Directing Import Messages to an Output File”on page 522.
Then import the server control information from specified tape volumes. See“Importing Server Control Information” on page 522.
Determining Whether to Replace Existing DefinitionsBy using the REPLACEDEFS parameter with the IMPORT command, you canspecify whether to replace existing definitions on the target server when TivoliStorage Manager encounters an object with the same name during the importprocess.
For example, if a definition exists for the ENGPOLDOM policy domain on thetarget server before you import policy definitions, then you must specifyREPLACEDEFS=YES to replace the existing definition with the data from theexport tape.
Definitions that can be replaced include administrator, client node, policy, orschedule definitions. The default is to not replace existing definitions on the targetserver.
Understanding How the Server Imports Active Policy SetsWhen the server imports policy definitions, the following objects are imported tothe target server:v Policy domain definitionsv Policy set definitions, including the ACTIVE policy setv Management class definitions
Chapter 23. Exporting and Importing Data 521

v Backup copy group definitionsv Archive copy group definitionsv Schedule definitions defined for each policy domainv Client node associations, if the client node definition exists on the target server
If the server encounters a policy set named ACTIVE on the tape volume during theimport process, it uses a temporary policy set named $$ACTIVE$$ to import theactive policy set.
After $$ACTIVE$$ is imported to the target server, the server activates this policyset. During the activation process, the server validates the policy set by examiningthe management class and copy group definitions. If any of the followingconditions occur, the server issues warning messages during validation:v The storage destinations specified in the backup and archive copy groups do not
refer to defined storage pools.v The default management class does not contain a backup or archive copy group.v The current ACTIVE policy set contains management class names that are not
defined in the policy set to be activated.v The current ACTIVE policy set contains copy group names that are not defined
in the policy set to be activated.
After each $$ACTIVE$$ policy set has been activated, the server deletes that$$ACTIVE$$ policy set from the target server. To view information about activepolicy on the target server, you can use the following commands:v QUERY COPYGROUPv QUERY DOMAINv QUERY MGMTCLASSv QUERY POLICYSET
Results from issuing the QUERY DOMAIN command show the activated policy setas $$ACTIVE$$. The $$ACTIVE$$ name shows you that the policy set which iscurrently activated for this domain is the policy set that was active at the time theexport was performed.
Directing Import Messages to an Output FileThe information generated by the validation process can help you define a storagehierarchy that supports the storage destinations currently defined in the importdata.
You can direct import messages to an output file to capture any error messagesthat are detected during the import process. Do this by starting an administrativeclient session in console mode before you invoke the import command.
For example, to direct messages to an output file named IMPSERV.OUT, enter:> dsmadmc -consolemode -outfile=impserv.out
Importing Server Control InformationNow you are ready to import the server control information. Based on theinformation generated during the preview operation, you know that all definitioninformation has been stored on the first tape volume named DSM001. Specify thatthis tape volume can be read by a device belonging to the TAPECLASS deviceclass.
From an administrative client session or from the server console, enter:
522 Tivoli Storage Manager for Windows: Administrator’s Guide

import server filedata=none devclass=tapeclass volumenames=dsm001
Step 3: Tailoring Server Storage Definitions on the TargetServer
After you import definition information, use the reports generated by the importprocess to help you tailor storage for the target server.
To tailor server storage definitions on the target server, complete the followingsteps:1. Identify any storage destinations specified in copy groups and management
classes that do not match defined storage pools:v If the policy definitions you imported included an ACTIVE policy set, that
policy set is validated and activated on the target server. Error messagesgenerated during validation include whether any management classes orcopy groups refer to storage pools that do not exist on the target server. Youhave a copy of these messages in a file if you directed console messages toan output file as described in “Directing Import Messages to an Output File”on page 522.
v Query management class and copy group definitions to compare the storagedestinations specified with the names of existing storage pools on the targetserver.To request detailed reports for all management classes, backup copy groups,and archive copy groups in the ACTIVE policy set, enter these commands:query mgmtclass * active * format=detailed
query copygroup * active * standard type=backup format=detailed
query copygroup * active * standard type=archive format=detailed
2. If storage destinations for management classes and copy groups in the ACTIVEpolicy set refer to storage pools that are not defined, do one of the following:v Define storage pools that match the storage destination names for the
management classes and copy groups, as described in “Defining or UpdatingPrimary Storage Pools” on page 174.
v Change the storage destinations for the management classes and copygroups. Do the following:a. Copy the ACTIVE policy set to another policy setb. Modify the storage destinations of management classes and copy groups
in that policy set, as requiredc. Activate the new policy set
For information on copying policy sets, see “Defining and Updating a PolicySet” on page 321.
Depending on the amount of client file data that you expect to import, you maywant to examine the storage hierarchy to ensure that sufficient storage space isavailable. Storage pools specified as storage destinations by management classesand copy groups may fill up with data. For example, you may need to defineadditional storage pools to which data can migrate from the initial storagedestinations.
Chapter 23. Exporting and Importing Data 523

Step 4: Importing File Data InformationAfter you have defined the appropriate storage hierarchy on the target server, youcan import file data from the tape volumes. File data includes file space definitionsand authorization rules. You can request that file data be imported in any of thefollowing groupings:v Active and inactive versions of backed up files, archive copies of files, and
space-managed filesv Active versions of backed up files, archive copies of files, and space-managed
filesv Active and inactive versions of backed up filesv Active versions of backed up filesv Archive copies of filesv Space-managed files
Before you import file data information:v Understand how the server handles duplicate file space namesv Decide whether to keep the original creation date for backup versions and
archive copies or to import file data using an adjusted date
Understanding How Duplicate File Spaces Are HandledWhen the server imports file data information, it imports any file spaces belongingto each specified client node. If a file space definition already exists on the targetserver for the node, the server does not replace the existing file space name.
If the server encounters duplicate file space names when it imports file datainformation, it creates a new file space name for the imported definition byreplacing the final character or characters with a number. A message showing theold and new file space names is written to the server console and to the activitylog.
For example, if the C_DRIVE and D_DRIVE file space names reside on the targetserver for node FRED and on the tape volume for FRED, then the server importsthe C_DRIVE file space as C_DRIV1 file space and the D_DRIVE file space asD_DRIV1 file space, both assigned to node FRED.
Deciding Whether to Use a Relative Date When Importing FileDataWhen you import file data, you can keep the original creation date for backupversions and archive copies, or you can specify that the server use an adjusteddate.
Because tape volumes containing exported data might not be used for some time,the original dates defined for backup versions and archive copies may be oldenough that files are expired immediately when the data is imported to the targetserver.
To prevent backup versions and archive copies from being expired immediately,specify DATES=RELATIVE on the IMPORT NODE or IMPORT SERVER commandsto adjust for the elapsed time since the files were exported to tape.
For example, assume that data exported to tape includes an archive copy archivedfive days prior to the export operation. If the tape volume resides on the shelf forsix months before the data is imported to the target server, the server resets thearchival date to five days prior to the import operation.
524 Tivoli Storage Manager for Windows: Administrator’s Guide

If you want to keep the original dates set for backup versions and archive copies,use DATES=ABSOLUTE, which is the default. If you use the absolute value, anyfiles whose retention period has passed will be expired shortly after they areimported to the target server.
Issuing an Import Server or Import Node CommandYou can import file data, either by issuing the IMPORT SERVER or IMPORTNODE command. When you issue either of these commands, you can specifywhich type of files should be imported for all client nodes specified and found onthe export tapes. You can specify any of the following values to import file data:
All Specifies that all active and inactive versions of backed up files, archivecopies of files, and space-managed files for specified client nodes areimported to the target server
None Specifies that no files are imported to the target server; only client nodedefinitions are imported
ArchiveSpecifies that only archive copies of files are imported to the target server
BackupSpecifies that only backup copies of files, whether active or inactive, areimported to the target server
BackupactiveSpecifies that only active versions of backed up files are imported to thetarget server
AllactiveSpecifies that only active versions of backed up files, archive copies of files,and space-managed files are imported to the target server
SpacemanagedSpecifies that only files that have been migrated from a user’s local filesystem (space-managed files) are imported
For example, suppose you want to import all backup versions of files, archivecopies of files, and space-managed files to the target server. You do not want toreplace any existing server control information during this import operation.Specify the four tape volumes that were identified during the preview operation.These tape volumes can be read by any device in the TAPECLASS device class. Toissue this command, enter:import server filedata=all replacedefs=nodevclass=tapeclass volumenames=dsm001,dsm002,dsm003,dsm004
You can limit the import to nodes that were assigned to specific policy domains onthe source server. For example, suppose you exported from the source server thedata for all nodes in all domains. To import to the target server the data only fornodes that were in the ENGDOM on the source server, enter this command:import node filedata=all domains=engdom devclass=tapeclassvolumenames=dsm001,dsm002,dsm003,dsm004
If the ENGDOM policy domain exists on the target server, the imported nodes areassigned to that domain. If ENGDOM does not exist on the target server, theimported nodes are assigned to the STANDARD policy domain.
If you do not specify a domain on the IMPORT NODE command, the importednode is assigned to the STANDARD policy domain.
Chapter 23. Exporting and Importing Data 525

Considerations When Importing DataYou can use an import command to copy a subset of the information from exporttapes to the target server. For example, if a tape was created with EXPORTSERVER, you can import only node information from the tape by using IMPORTNODE.
While the server allows you to issue any import command, data cannot beimported to the server if it has not been exported to tape. For example, if a tape iscreated with the EXPORT POLICY command, an IMPORT NODE command willnot find any data on the tape because node information is not a subset of policyinformation.
Table 31 shows the commands you can use to import a subset of exportedinformation to a target server.
Table 31. Importing a Subset of Information from Tapes
If tapes were created withthis export command:
You can issue this importcommand:
You cannot issue this importcommand:
EXPORT SERVER IMPORT SERVERIMPORT ADMINIMPORT NODEIMPORT POLICY
—
EXPORT NODE IMPORT NODEIMPORT SERVER
IMPORT ADMINIMPORT POLICY
EXPORT ADMIN IMPORT ADMINIMPORT SERVER
IMPORT NODEIMPORT POLICY
EXPORT POLICY IMPORT POLICYIMPORT SERVER
IMPORT ADMINIMPORT NODE
Recovering from Errors during the Import ProcessDuring import processing, the server may encounter invalid data due to corruptionduring storage on tape or in the database prior to the export operation. If invaliddata is encountered during an import operation, the server does the following:v The default value is used for the new object’s definitionv If the object already exists, the existing parameter is not changed
The server reports on the affected objects to the server console and the activity logduring import and export operations. You should query these objects when theimport process is complete to see if they reflect information that is acceptable.
Each time you run the IMPORT NODE or IMPORT SERVER command with theFILEDATA parameter equal to a value other than NONE, Tivoli Storage Managercreates a new file space and imports data to it. This process ensures that thecurrent import does not overwrite data from a previous import. For information onhow Tivoli Storage Manager handles duplicate file spaces, see “UnderstandingHow Duplicate File Spaces Are Handled” on page 524.
A file space definition may already exist on the target server for the node. If so, anadministrator with system privilege can issue the DELETE FILESPACE commandto remove file spaces that are corrupted or no longer needed. For more informationon the DELETE FILESPACE command, refer to the Administrator’s Reference.
526 Tivoli Storage Manager for Windows: Administrator’s Guide

Renaming a File SpaceAn imported file space can have the same name as a file space that already existson a client node. In this case, the server does not overlay the existing file space,and the imported file space is given a new system generated file space name. Thisnew name may match file space names that have not been backed up and areunknown to the server. In this case, you can use the RENAME FILESPACEcommand to rename the imported file space to the naming convention used for theclient node.
Exporting and Importing Data from Virtual VolumesAll EXPORT and IMPORT operations described in the previous sections can alsobe done to virtual volumes. Data stored as virtual volumes appear to be sequentialstorage pool volumes on the source server, but are actually stored as archive fileson another server. Those archive files can be in random or sequential accessstorage pools. The EXPORT and IMPORT commands are identical to thosepreviously shown, except that the device class specified in the commands musthave a device type of SERVER. For details about how to configure your server toexport to or import from virtual volumes, see “Using Virtual Volumes to StoreData on Another Server” on page 501.
Chapter 23. Exporting and Importing Data 527

528 Tivoli Storage Manager for Windows: Administrator’s Guide

Part 5. Protecting the Server
© Copyright IBM Corp. 1994, 2002 529

530 Tivoli Storage Manager for Windows: Administrator’s Guide

Chapter 24. Protecting and Recovering Your Server
Failure or loss of the database, the recovery log, or storage pools can cause loss ofclient data. This chapter describes how you protect your server and, if necessary,recover your server.
Note: The term tape refers to any kind of sequential access, removable mediaunless otherwise indicated.
Another way of protecting your data and ensuring that processing continues is bymaking use of clustering when it fits your system needs. See “Chapter 11.Configuring and Managing Clusters” on page 241 for information on clustering.
See the following sections:
Concepts:
“Levels of Protection” on page 532
“Storage Pool Protection: An Overview” on page 532
“Database and Recovery Log Protection: An Overview” on page 533
“Snapshot Database Protection” on page 536
“Choosing Where to Enable Data Validation” on page 564
Protecting Data:
“Mirroring the Database and Recovery Log” on page 536
“Backing Up Storage Pools” on page 539
“Using Copy Storage Pools to Improve Data Availability” on page 542
“Backing Up the Database” on page 542
“Data Validation During Audit Volume Processing” on page 563
Recovering Data:
“Recovering Your Server Using Database and Storage Pool Backups” on page 552
“Restoring Your Server Using Mirrored Volumes” on page 559
“Restoring Storage Pool Volumes” on page 559
“Auditing a Storage Pool Volume” on page 561
“Correcting Damaged Files” on page 569
Scenarios:
“Backup and Recovery Scenarios” on page 571
In this chapter, most examples illustrate how to perform tasks by using a TivoliStorage Manager command-line interface. For information about the commands,see Administrator’s Reference, or issue the HELP command from the command lineof a Tivoli Storage Manager administrative client.
Tivoli Storage Manager tasks can also be performed from the administrative Webinterface. For more information about using the administrative interface, see QuickStart.
© Copyright IBM Corp. 1994, 2002 531

Tivoli Disaster Recovery Manager (“Chapter 25. Using Tivoli DisasterRecovery Manager” on page 577) automates some tasks associated withpreparing for or recovering from a disaster. This icon identifies those tasks.
Levels of ProtectionFor the best protection of your data, you should use all of the following:v Backups of your storage poolsv Mirrored copies of your database and recovery log, with the recovery log mode
set to roll-forwardv Full and incremental backups of your database
As an adjunct to full and incremental database backups, you can also use snapshotdatabase backups.
Attention: ADSM Version 1 provided database salvage commands in case of acatastrophic error. Although these commands are still available, you should use thecurrent database backup and recovery functions for the best server protection. Donot use the database salvage commands without help from an IBM servicerepresentative.
Storage Pool Protection: An OverviewIf one or more storage pool volumes is lost or damaged, the client data may bepermanently lost. However, you can back up storage pools to sequential accesscopy storage pools and move the volumes offsite. If data is lost or damaged, youcan restore individual volumes or entire storage pools from the copy storage pools.The server tries to access the file from a copy storage pool if the primary copy ofthe file cannot be obtained for one of the following reasons:v The primary file copy has been previously marked damaged (for information
about damaged files, see “Correcting Damaged Files” on page 569).v The primary file is stored on a volume that UNAVAILABLE or DESTROYED.v The primary file is stored on an offline volume.v The primary file is located in a storage pool that is UNAVAILABLE, and the
operation is for restore, retrieve, or recall of files to a user, or export of file data.
For details, see “Restoring Storage Pools” on page 557, “Using Copy Storage Poolsto Improve Data Availability” on page 542, “Recovering a Lost or Damaged StoragePool Volume” on page 575, and “Maintaining the Integrity of Files” on page 569.
How Restore Processing WorksTwo commands let you restore files from copy storage pools:
RESTORE STGPOOLRestores all storage pool files that have been identified as having readerrors. These files are known as damaged files or unreadable files. Thiscommand also restores all files on any volumes that have been designatedas destroyed by using the UPDATE VOLUME command. See “RestoringStorage Pools” on page 557 for details.
RESTORE VOLUMERecreates files that reside on a volume or volumes in the same primary
532 Tivoli Storage Manager for Windows: Administrator’s Guide

storage pool. You can use this command to recreate files for one or morevolumes that have been lost or damaged. See “Restoring Storage PoolVolumes” on page 559 for details.
Tivoli Storage Manager uses database information to determine which files shouldbe restored for a volume or storage pool. As a result, restore processing does notrequire that the original volumes be accessed. For example, if a primary storagepool volume is damaged, you can use the RESTORE VOLUME command torecreate files that were stored on that volume, even if the volume itself is notreadable. However, if you delete the damaged files (DISCARDDATA=YES on theDELETE VOLUME command), the server removes from the database references tothe files on the primary storage pool volume and to copies of the files on copystorage pool volumes. You could not restore those files.
Restore processing copies files from a copy storage pool onto new primary storagepool volumes. The server then deletes database references to files on the originalprimary storage pool volumes. A primary storage pool volume will become emptyif all files that were stored on that volume are restored to other volumes. In thiscase, the server automatically deletes the empty volume from the database.
How the Destroyed Volume Access Mode WorksThe destroyed volume access mode permits the restoration of entire volumes. Thismode designates primary volumes for which files are to be restored. If a volume isdesignated as destroyed, the server does not mount that volume for either read orwrite access. You can designate a volume as destroyed with either of twocommands:v The RESTORE VOLUME — This command automatically changes the access
mode of specified volumes to the destroyed volume access mode using avolume list provided as part of the command.
v UPDATE VOLUME — Before using this command to restore volumes in astorage pool, you must update the access mode of the volumes to destroyed.
The destroyed designation for volumes is important during restore processing,particularly when the RESTORE STGPOOL command is used to restore a largenumber of primary storage pool volumes after a major disaster:v You can designate as destroyed only those volumes that must be restored. If a
volume is known to be usable after a disaster, do not set its access mode todestroyed.
v After you have identified the primary volumes to be restored and set theiraccess mode to destroyed, you can add new volumes to the storage pool. Thenew volumes are used to contain the files as they are restored from the copystorage pool volumes. The new volumes can also be used for new files that endusers back up, archive, or migrate.
v The designation of destroyed volumes permits tracking the files that must stillbe restored from copy storage pools. If restore processing is ended beforecompletion for any reason, you can restart the restore. Only the files that stillreside on destroyed volumes would need to be restored.
Database and Recovery Log Protection: An OverviewThe database contains information about the client data in your storage pools. Therecovery log contains records of changes to the database. If you lose the recoverylog, you lose the changes that have been made since the last database backup. Ifyou lose the database, you lose all your client data.
Chapter 24. Protecting and Recovering Your Server 533

You have several ways to protect this information:v Mirror the database, or the recovery log, or both.v Back up the database to tape or remote virtual volumes. See “Using Virtual
Volumes to Store Data on Another Server” on page 501.v Back up the database to tape or remote virtual volumes. See “Using Virtual
Volumes to Store Data on Another Server” on page 501 for more information. Inthe recovery log, save all the changes made to the database since that backup(this is called roll-forward mode).
MirroringYou can prevent the loss of the database or recovery log due to a hardware failureon a single drive, by mirroring drives. Mirroring simultaneously writes the samedata to multiple disks. However, mirroring does not protect against a disaster or ahardware failure that affects multiple drives or causes the loss of the entire system.While Tivoli Storage Manager is running, you can dynamically start or stopmirroring and change the capacity of the database.
Mirroring provides the following benefits:v Protection against database and recovery log media failuresv Uninterrupted operations if a database or recovery log volume failsv Avoidance of costly database recoveries
However, there are also costs:v Mirroring doubles the required DASD for those volumes that are mirroredv Mirroring results in decreased performance
Database and Recovery Log ProtectionTivoli Storage Manager can perform full and incremental database backups to tapewhile the server is running and available to clients. With the server running innormal mode, the backup media can then be stored onsite or offsite and can beused to recover the database up to the point of the backup. You can run full orincremental backups as often as needed to ensure that the database can be restoredto an acceptable point-in-time.
You can provide even more complete protection if you specify roll-forward mode.With roll-forward mode and an intact recovery log, you can recover the database upto its most current state (the point at which the database was lost).
For the fastest recovery time and greatest availability of the database, mirror boththe database and recovery log, and periodically back up the database. Whenoperating in roll-forward mode, mirroring better ensures that you have an intactrecovery log, which is necessary to restore the database to its most current state.
Normal Mode versus Roll-Forward ModeRoll-forward mode offers the greatest protection for your data. However, there arecosts to roll-forward mode. The following tables describe the protection affordedby each mode and the requirements for each mode.
534 Tivoli Storage Manager for Windows: Administrator’s Guide

Quality of Protection
Normal Mode Roll-forward Mode
Recover to a point-in-time of the latest full or incrementalbackup only.
Recover to a point-in-time of the latest full or incrementalbackup or, with an intact recovery log, to the mostcurrent state.
Recover the loss of client data up to the time when thatdata has been:
v Backed up since the last database backup.
v Moved due to storage pool migration, reclamation, ormove data operations since the last database backupand then overwritten.
With an intact recovery log, recover to the most currentstate with no loss of client data.
You must restore the entire database even if only onevolume is damaged.
You can restore a single volume.
Preferable if the server supports HSM clients(space-managed files should be protected as fully aspossible from hardware failure).
Storage Requirements
Normal Mode Roll-forward Mode
Does not require a recovery log to restore to apoint-in-time. The recovery log keeps only uncommittedtransactions, and its size is not affected by normal mode.
Requires an intact recovery log to restore to the mostcurrent state. The recovery log keeps all transactions sincethe last database backup. In this mode you shouldsignificantly increase the recovery log size. However:
v Frequent database backups reduce recovery log storagerequirements (after a backup is completed, recovery logrecords preceding the backup are deleted).
v Mirroring the recovery log requires much less spacethan mirroring the database.
For the greatest availability, you should mirror thedatabase and recovery log or place them on devices thatguarantee availability.
You should mirror the recovery log to recover to the mostcurrent state.Note: Unlike mirroring the database, roll-forwardrecovery does not provide continuous operations after amedia failure. This is because the database must bebrought down to perform the recovery.
The following table compares four typical data recovery configurations, two forroll-forward mode and two for normal mode. In all four cases, the storage poolsand the database are backed up. The benefits and costs are:
MirroringWhether the database and recovery log are mirrored. Mirroring costsadditional disk space.
CoverageHow completely you can recover your data. Roll-forward recovery cannotbe done if the recovery log is not intact. However, roll-forward mode doessupport point-in-time recovery.
Speed to RecoverHow quickly data can be recovered.
Chapter 24. Protecting and Recovering Your Server 535

Mode Mirroring Quality ofProtection
Speed toRecover
Roll-Forward Log and database Greatest Fastest
Log Only Medium Moderate
Normal Log and database Medium Moderate
None Least Slowest
Attention: If the log mode is set to roll-forward after a point-in-time databaserestoration, a database backup starts when the server is brought up for the firsttime. This can cause loss of data: A tape can have current data on it, but because ofthe point-in-time restoration, it can be marked as scratch. When the server startsfor the first time, it may use this tape to write the database backup, thusdestroying the original data on this tape.
This situation could occur if roll-forward mode is enabled, but the administratorrestored the database as if the server was operating in normal mode, notroll-forward mode. For example: The database is to be backed up at midnighteveryday Monday through Friday. On Friday, the database was restored to apoint-in-time of midnight Wednesday. Thursday’s database backup was not used;this tape exists and does contain valid data. But because the database was restoredto Wednesday at midnight, the Thursday’s tape was marked as scratch. This tapewas then inadvertently chosen and written with the database backup information.Therefore, the data for Thursday was lost.
Snapshot Database ProtectionA snapshot database backup is a full database backup that does not interrupt thecurrent full and incremental backup series. Snapshot database tapes can then betaken off-site for recovery purposes and therefore kept separate from the normalfull and incremental backup tapes. For information about doing a snapshot of thedatabase, see “Doing Snapshot Database Backups” on page 551.
Mirroring the Database and Recovery LogMirroring can be crucial in the recovery process. Consider the following scenario:Because of a sudden power outage, a partial page write occurs. The recovery log iscorrupted and not completely readable. Without mirroring, recovery operationscannot complete when the server is restarted. However, if the recovery log ismirrored and a partial write is detected, a mirror volume can be used to constructvalid images of the missing data.
This section explains how to:v Allocate disk volumes to mirror the database and recovery logv Define database or recovery log mirrored volume copiesv Specify mirroring and database page shadowing server optionsv Request information about mirrored volumes
Task Required Privilege Class
Define database and recovery log volumes System or unrestricted storage
Query mirrored volumes Any administrator
536 Tivoli Storage Manager for Windows: Administrator’s Guide

Separating Disk Volume Copies On Separate Physical DisksWhen Mirroring the Database and Recovery Log
By separating volume copies on different physical devices, you protect the serverfrom media failure and increase the availability of the database and recovery log. Itis strongly recommended that you place mirrored copies on separate devices. Ifyou cannot assign each volume copy to its own physical disk, allocate them asshown in Table 32.
Table 32. Separating Volume Copies
Physical Disk Database Volume Recovery Log Volume
Physical Disk 1 Database volume copy 1 Recovery log volume copy 3
Physical Disk 2 Recovery log volume copy 1 Database volume copy 2
Physical Disk 3 Database volume copy 3 Recovery log volume copy 2
Mirrored volumes must have at least the same capacity as the original volumes.
Defining Database or Recovery Log Mirrored Volume CopiesTo mirror the database or recovery log, define a volume copy for each volume inthe database or recovery log.
For example, the database consists of five volumes named VOL1, VOL2, VOL3,VOL4, and VOL5. To mirror the database, you must have five volumes that matchthe original volumes in size. Figure 87 shows a mirrored database in whichVOL1–VOL5 are mirrored by VOLA–VOLE.Use the DSMFMT command to format the space. For example, to format VOLA, a
25MB database volume on the E disk, enter:> dsmfmt -m -db e:\dbvol\vola 25
Then define the group of mirrored volumes. For example, enter the followingcommands:define dbcopy vol1 e:\dbvol\vola
define dbcopy vol2 e:\dbvol\volb
define dbcopy vol3 e:\dbvol\volc
define dbcopy vol4 e:\dbvol\vold
define dbcopy vol5 e:\dbvol\vole
Figure 87. Mirrored Volumes
Chapter 24. Protecting and Recovering Your Server 537

After a volume copy is defined, the volume copy is synchronized with the originalvolume. This process can range from minutes to hours, depending on the size ofthe volumes and performance of your system. After synchronization is complete,the volume copies are mirror images of each other.
Specifying Mirroring and Database Page Shadowing ServerOptions
Four server options let you specify the level of protection, recoverability, andperformance for mirrored volumes:1. MIRRORREAD specifies how mirrored volumes are accessed when the server
reads the recovery log or a database page during normal processing. You mayspecify MIRRORREAD LOG for reading recovery log pages, or MIRRORREADDB for reading database pages. MIRRORREAD LOG (or DB) NORMALspecifies that only one mirrored volume is read to obtain the desired page.MIRRORREAD LOG (or DB) VERIFY specifies that all mirrored volumes for apage be read, compared, and re-synchronized if necessary. MIRRORREAD LOG(or DB) VERIFY can decrease server performance as each mirrored volume forthe page is accessed on every read.
2. MIRRORWRITE specifies how mirrored volumes are written to. You may issueMIRRORWRITE LOG or DB, and then specify that write operations for thedatabase and the recovery log be specified as SEQUENTIAL or PARALLEL:v A PARALLEL specification offers better performance but at the potential cost
of recoverability. Pages are written to all copies at about the same time. If asystem outage results in a partial page write and the outage affects bothmirrored copies, then both copies could be corrupted.
v A SEQUENTIAL specification offers improved recoverability but at the costof performance. Pages are written to one copy at a time. If a system outageresults in a partial page write, only one copy is affected. However, because asuccessful I/O must be completed after the write to the first copy but beforethe write to the second copy, performance can be affected.
3. DBPAGESHADOW=YES mirrors the latest batch of pages written to a database.In this way if an outage occur that affects both mirrored volumes, the servercan recover pages that have been partially written.
4. DBPAGESHADOWFILE specifies the name of the database page shadowingfile.DBPAGESHADOW and DBPAGESHADOWFILE coordinate with theMIRRORWRITE server option and its specifications of DB and SEQUENTIALor PARALLEL like this:v If database and recovery log mirroring is on with MIRRORWRITE DB
PARALLEL and DBPAGESHADOW=YES, then page shadowing will bedone.
v If database and recovery log mirroring is on with MIRRORWRITE DBSEQUENTIAL, and DBPAGESHADOW=YES, then page shadowing will notbe done.
v If database and recovery log mirroring is on with MIRRORWRITE DBSEQUENTIAL and DBPAGESHADOW=NO, then page shadowing will notbe done.
v If no name is specified in the DBPAGESHADOWFILE option, adbpgshdw.bdt file will be created and used. If the DBPAGESHADOWFILEoption specifies a file name, that file name will be used.
538 Tivoli Storage Manager for Windows: Administrator’s Guide

Requesting Information about Mirrored VolumesYou can request information about mirrored database or recovery log volumes byusing the QUERY DBVOLUME and QUERY LOGVOLUME commands. Forexample:query dbvolume
The following type of information is displayed:
v Each pair of vertical columns displays an image of the database or recovery log.For example, VOLA, VOLB, VOLC, VOLD, and VOLE (Copy 2) represent oneimage of the database.
v Each horizontal row displays a group of mirrored volumes. For example, VOL1,and VOLA represent the two volume copies.
Backing Up Storage Pools
Task Required Privilege Class
Define, back up, or restore storage pools
Restore volumes
System, unrestricted storage, or restrictedstorage (only for those pools to which youare authorized)
Update volumes System or operator
Query volumes or storage pools Any administrator
You can create backup copies of client files that are stored in primary storagepools. The backup copies are stored in copy storage pools, which you can use torestore the original files if they are damaged, lost, or unusable. Primary storagepools should be backed up incrementally each day to the same copy storage pool.Backing up to the same copy storage pool ensures that files do not need to berecopied if they have migrated to the next pool.
You can back up multiple primary storage pools to one copy storage pool. Ifmultiple copies are necessary, you can also back up a primary storage pool tomultiple copy storage pools. However, you should back up the entire primarystorage pool hierarchy to the same copy storage pool for easier management ofstorage volumes.
Note: A file that is stored in a copy storage pool may be deleted from the primarystorage pool. When an incremental backup of the primary storage pooloccurs, the file is deleted from the copy storage pool.
Volume Name Copy Volume Name Copy Volume Name Copy(Copy 1) Status (Copy 2) Status (Copy 3) Status----------- ------ ------------- ------ ------------- ------VOL1 Sync'd VOLA Sync'd Undef-VOL2 Sync'd VOLB Sync'd inedVOL3 Sync'd VOLC Sync'dVOL4 Sync'd VOLD Sync'd
VOL5 Sync'd VOLE Sync'd
Chapter 24. Protecting and Recovering Your Server 539

If you schedule storage pool backups and migrations and have enough diskstorage, you can copy most files from the disk storage pool before they aremigrated to tape and thus avoid unnecessary mounts. Here is the sequence:1. Clients back up or archive data to disk2. You issue the BACKUP STGPOOL command to back up the primary storage
pools to copy storage pools3. Data migrates from disk storage pools to primary tape storage pools
Backing up storage pools requires an additional 200 bytes of space in the databasefor each file copy. As more files are added to the copy storage pools, reevaluateyour database size requirements.
Because the copies are made incrementally, you can cancel the backup process.Reissuing the BACKUP STGPOOL command lets the backup continue from thespot the backup was canceled. For example, to back up the ARCHIVEPOOLprimary pool to the DISASTER-RECOVERY copy pool, enter:backup stgpool archivepool disaster-recovery
You can define schedules to begin incremental backups of files in the primarystorage pools. For example, to back up the BACKUPPOOL, ARCHIVEPOOL, andthe TAPEPOOL every night, schedule the following commands:backup stgpool backuppool disaster-recovery maxprocess=4
backup stgpool archivepool disaster-recovery maxprocess=4
backup stgpool tapepool disaster-recovery maxprocess=4
These commands use four parallel processes to perform an incremental backup ofeach primary storage pool to the copy pool. The only files backed up to theDISASTER-RECOVERY pool are files for which a copy does not already exist inthe copy storage pool. See “Chapter 19. Automating Server Operations” onpage 401 for information about scheduling commands.
Tape Storage Pool
Tape Storage Pool
Disk Storage Pools
Server StoragePrimary Storage Pools
Offsite StorageCopy Storage Pools
Archive
Backup
HSM
Figure 88. Copy Storage Pools
540 Tivoli Storage Manager for Windows: Administrator’s Guide

Notes:
1. Set the MAXPROCESS parameter in the BACKUP STGPOOL command to thenumber of mount points or drives that can be dedicated to this operation.
2. Backing up storage pools requires additional space on the database.3. If a copy is to be made in a copy storage pool and a copy already exists with
the same insertion date, no action is taken.4. Files in a copy storage pool do not migrate to another storage pool.5. When a disk storage pool is backed up, copies of files that remain on disk after
being migrated to the next storage pool (these are cached files) are not backedup.
For recovery scenarios that involve backed up copies of storage pools, see“Recovering to a Point-in-Time from a Disaster” on page 572 and “Recovering aLost or Damaged Storage Pool Volume” on page 575.
Delaying Reuse of Sequential Access VolumesWhen you define or update a sequential access storage pool, you can use theREUSEDELAY parameter. This parameter specifies the number of days that mustelapse before a volume can be reused or returned to scratch status after all fileshave been expired, deleted, or moved from the volume. When you delay reuse ofsuch volumes and they no longer contain any files, they enter the pending state.Volumes remain in the pending state for as long as specified with theREUSEDELAY parameter for the storage pool to which the volume belongs.
Delaying reuse of volumes can be helpful under certain conditions for disasterrecovery. When files are expired, deleted, or moved from a volume, they are notactually erased from the volumes: The database references to these files areremoved. Thus the file data may still exist on sequential volumes if the volumesare not immediately reused.
A disaster may force you to restore the database using a database backup that isnot the most recent backup. In this case, some files may not be recoverable becausethe server cannot find them on current volumes. However, the files may exist onvolumes that are in pending state. You may be able to use the volumes in pendingstate to recover data by doing the following:1. Restore the database to a point-in-time prior to file expiration.2. Use a primary or copy storage pool volume that has not been rewritten and
contains the expired file at the time of database backup.
If you back up your primary storage pools, set the REUSEDELAY parameter forthe primary storage pools to 0 to efficiently reuse primary scratch volumes. Foryour copy storage pools, you should delay reuse of volumes for as long as youkeep your oldest database backup.
For an example of using database backup and delaying volume reuse, see“Protecting Your Database and Storage Pool” on page 571. For information aboutexpiration, see “Running Expiration Processing to Delete Expired Files” onpage 333.
Chapter 24. Protecting and Recovering Your Server 541

Using Copy Storage Pools to Improve Data AvailabilityBy using copy storage pools, you maintain multiple copies of files and reduce thepotential for data loss due to media failure. If the primary file is not available orbecomes corrupted, the server accesses and uses the duplicate file from a copystorage pool.
Note: To back up a primary storage pool, the DATAFORMAT must be NATIVE orNONBLOCK.
Example: Simple Hierarchy with One Copy Storage PoolAssume that you have two primary storage pools: one random access storage pool(DISKPOOL) and one tape storage pool (TAPEPOOL, with device classTAPECLASS). Files stored in DISKPOOL are migrated to TAPEPOOL. You want toback up the files in both primary storage pools to a copy storage pool.
To schedule daily incremental backups of the primary storage pools, do thefollowing:1. Define a copy storage pool called COPYPOOL, with the same device class as
TAPEPOOL, by issuing the following command:define stgpool copypool tapeclass pooltype=copy maxscratch=50
Notes:
a. Because scratch volumes are allowed in this copy storage pool, you do notneed to define volumes for the pool.
b. All storage volumes in COPYPOOL are located onsite.2. Perform the initial backup of the primary storage pools by issuing the
following commands:backup stgpool diskpool copypoolbackup stgpool tapepool copypool
3. Define schedules to automatically run the commands for backing up theprimary storage pools. The commands to schedule are those that you issued instep 2.To minimize tape mounts, back up the disk storage pool first, then the tapestorage pool.For more information about scheduling, see “Chapter 19. Automating ServerOperations” on page 401.
Backing Up the DatabaseBacking up the database is a simple operation. You can back up the database withfull and incremental backups or by taking a snapshot of a specific point-in-time ofthe database; these are called snapshot database backups. (See “Doing Full andIncremental Backups” on page 551 and “Doing Snapshot Database Backups” onpage 551 for more information.) Before your first backup, you must do some or allof the following steps:v Define device classes for backupsv Set the recovery log modev Schedule database backupsv Estimate the recovery log sizev Automate database backups to occur according to a defined schedule or when
the recovery log utilizations reaches a specified percentage.
542 Tivoli Storage Manager for Windows: Administrator’s Guide

To restore your database, you must have copies of (or be able to create) thefollowing information:v Volume history filev Device configuration filev Server options filev Database and recovery log set up (the output from detailed queries of your
database and recovery log volumes).
DRM helps you save the previously listed information.
Defining Device Classes for BackupsYou can use existing device classes for backups or define new ones. You can alsospecify different device classes for incremental backups and for full backups. Forexample, you might want to write full backups to tape and incremental backups todisk. Specifying a device class with a device type of FILE is useful if anincremental backup is run based on a database backup trigger. You should do thisonly if you are also backing up the files to tape and taking them off site.Otherwise, in a disaster you can only restore the full backup.
You can also reserve a device class, and therefore a device, for automatic backupsonly. In this way, the server does not try to back up the database with no deviceavailable. If a database backup shares a device class with a low priority operation,such as reclamation, and all the devices are in use, the lower priority operation isautomatically canceled. This frees a device for the database backup.
Note: Device class definitions are saved in the device configuration files (see“Saving the Device Configuration File” on page 548).
Setting the Recovery Log ModeYou can set the recovery log mode to either normal or roll-forward. See “Databaseand Recovery Log Protection” on page 534 for a description of the two modes andfor a comparison their benefits and costs.
If you do not set the recovery log mode, the server runs in normal mode. To setthe log mode to roll-forward, enter:set logmode rollforward
Note: The log mode is not in roll-forward mode until you perform the first fulldatabase backup after entering this command.
To set the log mode back to normal, enter:set logmode normal
Estimating the Size of the Recovery LogThe number of transactions affect how large you should make your recovery log.As you add more clients and increase concurrent transactions, you can extend thesize of the log. In roll-forward mode you should also consider how often you
Chapter 24. Protecting and Recovering Your Server 543

perform database backups. In this mode, the recovery log keeps all transactionssince the last database backup and typically requires much more space thannormal mode does.
To determine the size that the recovery log should be in roll-forward mode, youmust know how much recovery log space is used between database backups. Forexample, if you perform daily incremental backups, check your daily usage over aperiod of time. You can use the following procedure to make your estimate:1. Set the log mode to normal. In this way you are less likely to exceed your log
space if your initial setting is too low for roll-forward mode.2. After a scheduled database backup, reset the statistic on the amount of
recovery log space used since the last reset by using the following command:reset logconsumption
3. Just before the next scheduled database backup, display the current recoverylog statistics by using the following command:query log format=detailed
Record the cumulative consumption value, which shows the space, in megabytes,used since the statistic was last reset.
4. Repeat steps 2 and 3 for at least one week.5. Increase the highest cumulative consumption value by 30 percent. Set your
recovery log size to this increased value to account for periods of unusuallyhigh activity.For example, over a period of a week the highest cumulative consumptionvalue was 500MB. If you set your recovery log to 650MB, you should haveenough space between daily backups.
For information on how to adjust the recovery log size, see “Increasing the Size ofthe Database or Recovery Log” on page 422 or “Decreasing the Size of theDatabase or Recovery Log” on page 426.
Note: If the recovery log runs out of space, you may not be able to start the serverfor normal operation. You can create an additional recovery log volume ifneeded to start the server and perform a database backup. For example, tocreate a 5MB volume A00, issue the following command:> dsmserv extend log a00 5mb
Specify volume sizes in multiples of 4MB plus 1MB for overhead.
Scheduling Database BackupsDatabase backups require devices, media, and time. Consider scheduling backupsto occur at certain times of the day and after activities such as the following:v Major client backup or archive activitiesv Storage pool migration and reclamationv Storage pool backupsv MOVE DATA or DELETE VOLUME commands
Depending on the frequency of these activities and the amount of client data, youmight back up your storage pools daily and then immediately back up thedatabase.
Consider the following when you decide what kind of backups to do and when todo them:
544 Tivoli Storage Manager for Windows: Administrator’s Guide

v Full backups take longer than incremental backupsv Full backups have shorter recovery times than incremental backups (you must
load only one set of volumes to restore the entire database)v Full backups are required:
– For the first backup– If there have been 32 incremental backups since the last full backup– After changing the log mode to roll-forward– After changing the database size (an extend or reduce operation)
Automating Database BackupsIn roll-forward mode, you can set a database backup to occur automatically whenthe recovery log utilization reaches a defined percentage. The server alsoautomatically deletes any unnecessary recovery log records. You might want toautomate database backups if you have scheduled database backups. However,while the newly automated database backups are occurring, the recovery log couldgrow faster than expected. You should try to coordinate the recovery log size andscheduled backups. A database backup has a higher priority than most operations,and backup based on a trigger could occur during high server activity and affectyour other operations. Adjust the recovery log size to avoid triggering backups atnon-scheduled times.
By setting a database backup trigger you ensure that the recovery log does not runout of space before the next backup.
If the log mode is changed from normal to roll-forward, the next database backupmust be a full backup. If a database backup trigger is defined when you set the logmode to roll-forward, the full backup is done automatically. The server does notstart saving log records for roll-forward recovery until this full backup completessuccessfully.
By doing the steps In “Estimating the Size of the Recovery Log” on page 543, youdetermined the size of your recovery log. Your database backup trigger should bebased on that procedure. For example, assume that your recovery log size is650MB. Assume also that its utilization percentage is usually less than 500MBbetween database backups. You want to trigger a backup only in unusualcircumstances. Therefore, set the trigger to at least 75 percent (approximately500MB). To set the trigger to 75 percent and run 20 incremental backups to everyfull backup, enter:define dbbackuptrigger logfullpct=75 devclass=tapeclassnumincremental=20
Each incremental backup, whether automatic or by command, is added to thecount of incremental backups. Each full backup, whether automatic or bycommand, resets the count for incremental backups to 0. If you specify aNUMINCREMENTAL value of 0, the server automatically runs only full backups.
Note: If you issue a BACKUP DB command with the TYPE=INCREMENTALparameter, the server performs an incremental backup of the databaseregardless of the NUMINCREMENTAL setting. For example, you setNUMINCREMENTAL to 5, and there have been five incremental backupssince the last full backup. If you then issue BACKUP DBTYPE=INCREMENTAL, an incremental backup is still done, and the
Chapter 24. Protecting and Recovering Your Server 545
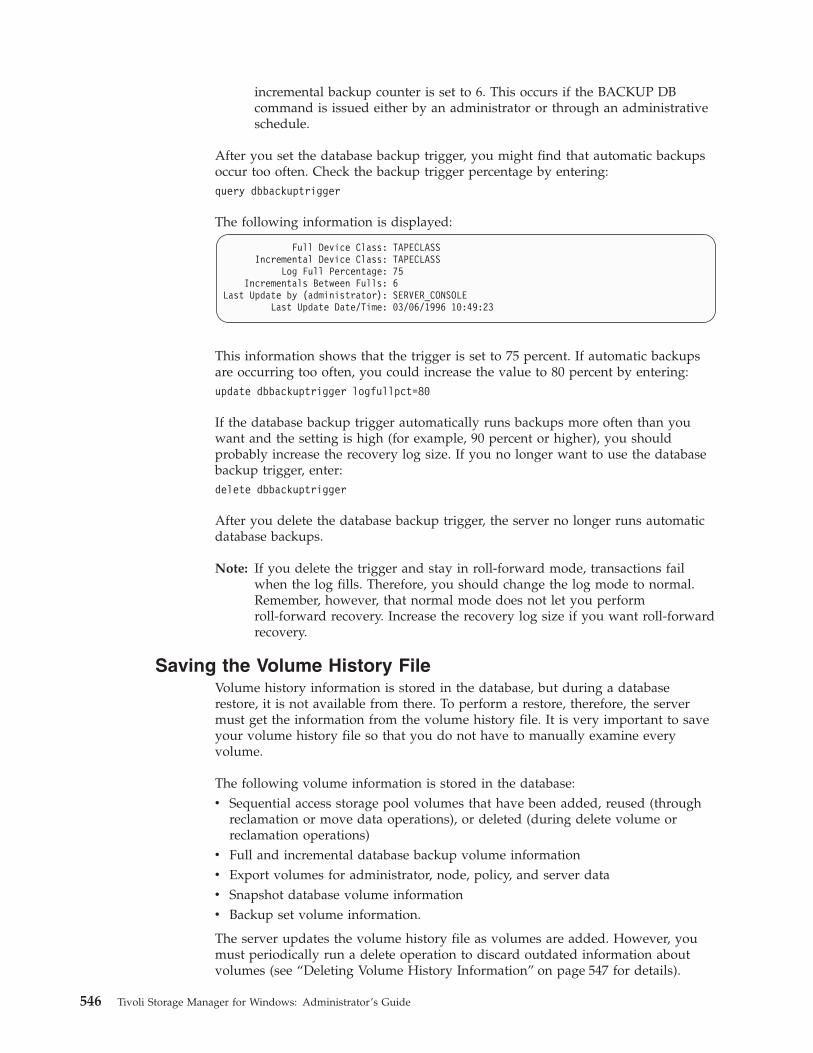
incremental backup counter is set to 6. This occurs if the BACKUP DBcommand is issued either by an administrator or through an administrativeschedule.
After you set the database backup trigger, you might find that automatic backupsoccur too often. Check the backup trigger percentage by entering:query dbbackuptrigger
The following information is displayed:
Full Device Class: TAPECLASSIncremental Device Class: TAPECLASS
Log Full Percentage: 75Incrementals Between Fulls: 6
Last Update by (administrator): SERVER_CONSOLELast Update Date/Time: 03/06/1996 10:49:23
This information shows that the trigger is set to 75 percent. If automatic backupsare occurring too often, you could increase the value to 80 percent by entering:update dbbackuptrigger logfullpct=80
If the database backup trigger automatically runs backups more often than youwant and the setting is high (for example, 90 percent or higher), you shouldprobably increase the recovery log size. If you no longer want to use the databasebackup trigger, enter:delete dbbackuptrigger
After you delete the database backup trigger, the server no longer runs automaticdatabase backups.
Note: If you delete the trigger and stay in roll-forward mode, transactions failwhen the log fills. Therefore, you should change the log mode to normal.Remember, however, that normal mode does not let you performroll-forward recovery. Increase the recovery log size if you want roll-forwardrecovery.
Saving the Volume History FileVolume history information is stored in the database, but during a databaserestore, it is not available from there. To perform a restore, therefore, the servermust get the information from the volume history file. It is very important to saveyour volume history file so that you do not have to manually examine everyvolume.
The following volume information is stored in the database:v Sequential access storage pool volumes that have been added, reused (through
reclamation or move data operations), or deleted (during delete volume orreclamation operations)
v Full and incremental database backup volume informationv Export volumes for administrator, node, policy, and server datav Snapshot database volume informationv Backup set volume information.
The server updates the volume history file as volumes are added. However, youmust periodically run a delete operation to discard outdated information aboutvolumes (see “Deleting Volume History Information” on page 547 for details).
546 Tivoli Storage Manager for Windows: Administrator’s Guide

To ensure the availability of volume history information, it is extremely importantto do one of the following:v Store at least one copy of the volume history file offsite or on a disk separate
from the databasev Store a printout of the file offsitev Store a copy of the file offsite with your database backups and device
configuration filev Store a remote copy of the file, for example, on an NFS-mounted file system.
DRM saves a copy of the volume history file in its disaster recovery planfile.
Note: You can recover the database without a volume history file. However,because you must examine every volume that may contain database backupinformation, this is a time-consuming and error-prone task.
The VOLUMEHISTORY server option lets you specify backup volume history files.Then, whenever the server updates volume information in the database, it alsoupdates the same information in the backup files.
Note: When you install Tivoli Storage Manager, a default VOLUMEHISTORYoption in the server options file specifies a volume history backup filenamed volhist.out.
You can also back up the volume history information at any time, by entering:backup volhistory
If you do not specify file names, the server backs up the volume historyinformation to all files specified with the VOLUMEHISTORY server option.
In order to ensure updates are complete before the server is halted, we recommendyou:v Not halt the server for a few minutes after issuing the BACKUP VOLHISTORY
command.v Specify multiple VOLUMEHISTORY options in the server options file.v Examine the volume history file to see if the file is updated.
Deleting Volume History InformationYou should periodically delete outdated information from the volume history file.For example, if you keep backups for seven days, information older than that isnot needed. When information about database backup volumes or export volumesis deleted, the volumes return to scratch status. For scratch volumes of device typeFILE, the files are deleted. When information about storage pools volumes isdeleted, the volumes themselves are not affected.
To display volume history information up to yesterday, enter:query volhistory enddate=today-1
To delete information that is seven days old or older, enter:delete volhistory type=all todate=today-8
Chapter 24. Protecting and Recovering Your Server 547

Notes:
1. Existing volume history files are not automatically updated with the DELETEVOLHISTORY command.
2. Do not delete sequential volume history information until you no longer needthat information. For example, do not delete dump volume information orstorage volume reuse information, unless you have backed up or dumped thedatabase at a later time than that specified for the delete operation.
3. Do not delete the volume history information for database dump, databasebackup, or export volumes that reside in automated libraries, unless you wantto return the volumes to scratch status. When the DELETE VOLHISTORYcommand removes volume information for such volumes, they automaticallyreturn to scratch status. The volumes are then available for reuse by the serverand the information stored on them may be overwritten.
DRM expires database backup series and deletes the volume history entries.
Saving the Device Configuration FileMake a copy of your device configuration file and save it.
The device configuration file contains information required to read backup data.This information includes the following:v Devices class definitionsv Library definitionsv Drive definitionsv Server definitions
This information is stored in the database, but during a database restore, it is notavailable from there. To perform a restore, therefore, the server must get theinformation from the device configuration file. When device information isupdated in the database, it is also updated in the device configuration file. Thedevice information must match the devices configured on the system where therestore will be performed. You may have to edit those commands in an existing fileso that they match.
To ensure the availability of the device configuration information, it is extremelyimportant that you do one of the following:v Store at least one backup copy of the device configuration file on a disk separate
from the databasev Store your device configuration file offsite with your volume history file and
database backupsv Store a printout of the information that is stored offsitev Store a remote copy, for example, on an NFS-mounted file system
DRM saves a copy of the device configuration file in its disaster recoveryplan file.
548 Tivoli Storage Manager for Windows: Administrator’s Guide

The DEVCONFIG server option lets you specify backup device configuration files(for details, see the Administrator’s Reference). After the server is restarted, wheneverthe server updates device configuration information in the database, it also updatesthe same information in the backup files.
Note: When you install Tivoli Storage Manager, a default DEVCONFIG option inthe server options file specifies a device configuration backup file nameddevcnfg.out.
During a database restore operation, the server tries to open the first deviceconfiguration file in the order in which the files occur in the server options. If itcannot read that file, it searches for the next usable device configuration file. Ifnone can be found, you must recreate the file. See “Recreating a DeviceConfiguration File” on page 550 for details. After the database has been restored,you may have to update the device configuration.
You can also back up the device configuration information at any time, byentering:backup devconfig
If you do not specify file names, the device configuration file is backed up to allfiles specified with the DEVCONFIG server option.
In order to ensure updates are complete before the server is halted, we recommendyou:v Not halt the server for a few minutes after issuing the BACKUP DEVCONFIG
command.v Specify multiple DEVCONFIG options in the server options file.v Examine the device configuration file to see if the file is updated.
If you lose the device configuration file and need it to restore the database, youmust recreate it manually. See “Recreating a Device Configuration File” onpage 550 for details.
If you are using automated tape libraries, volume location information is alsosaved in the device configuration file. The file is updated whenever CHECKINLIBVOLUME, CHECKOUT LIBVOLUME, and AUDIT LIBRARY commands areissued, and the information is saved as comments (/* ...... */). This information isused during restore or load operations to locate a volume in an automated library.If you must recreate the device configuration file, you will be unable to recreate thevolume location information. Therefore, you must define your library as a manuallibrary and manually mount the volumes during server processing. If anautomated tape library is used at the recovery site, volume location information incomments (/*...*/) in the device configuration file must be modified. First,manually place the physical database backup volumes in the automated libraryand note the element numbers where you place them. Then manually edit thedevice configuration file to identify the locations of the database backup volumesso that the server can find them to restore the database.
For virtual volumes, the device configuration file stores the password (in encryptedform) for connecting to the remote server. If you regressed the server to an earlierpoint-in-time, this password may not match what the remote server expects. In thiscase, manually set the password in the device configuration file. Then ensure thatthe password on the remote server matches the password in the deviceconfiguration file.
Chapter 24. Protecting and Recovering Your Server 549

Note: Set the password in clear text. After the server is operational again, you canissue a BACKUP DEVCONFIG command to store the password inencrypted form.
Updating the Device Configuration FileWhenever you define, update, or delete device information in the database, thedevice configuration file is automatically updated. This information includesdefinitions for device classes, libraries, drives, and servers.
If a disaster occurs, you may have to restore Tivoli Storage Manager by usingdevices other than those that are included in the device configuration file. In sucha case, you will have to update the device configuration files manually withinformation about the new devices.
Recreating a Device Configuration FileThe following commands read and execute the device configuration file:v DSMSERV RESTORE DBv DSMSERV LOADDBv DSMSERV DISPLAY DBBACKUPVOLUME
Note: The DSMSERV LOADDB utility may increase the size of the database. Theserver packs data in pages in the order in which they are inserted. TheDSMSERV DUMPDB utility does not preserve that order. Therefore, pagepacking is not optimized, and the database may require additional space.
If no device configuration file is found, you must recreate it before you can startthe restore operation. The device configuration file must follow these conventions:v The commands must be in this order:
– DEFINE SERVER (if you are using virtual volumes)– DEFINE DEVCLASS– DEFINE LIBRARY– DEFINE DRIVE– DEFINE PATH
You must provide those definitions needed to mount the volumes read by thecommand that you issued. If you are restoring or loading from a FILE deviceclass, you will need only the DEFINE DEVCLASS command.
v For virtual volumes, the device configuration file stores the password (inencrypted form) for connecting to the remote server. If you regressed the serverto an earlier point-in-time, this password may not match what the remote serverexpects. In this case, manually set the password in the device configuration file.Then ensure that the password on the remote server matches the password inthe device configuration file.
v You can use command defaults.v The file can include blank lines.v A single line can be up to 240 characters.v The file can include continuation characters and comments as described in the
Administrator’s Reference.
The following shows an example of a device configuration file:
550 Tivoli Storage Manager for Windows: Administrator’s Guide

Saving the Server OptionsYou should make a copy of your server options file and save it.
Saving the Database and Recovery Log InformationYou should make copies of this output and save them. The database and recoverylog setup information is the output from detailed queries of your database andrecovery log volumes.
Doing Full and Incremental BackupsThe first backup of your database must be a full backup. You can run up to 32incremental backups between full backups.
To perform a full backup of your database to the TAPECLASS device class, enter:backup db type=full devclass=tapeclass
In this example, the backup data is written to scratch volumes. You can alsospecify volumes by name. After a full backup, you can perform incrementalbackups, which copy only the changes to the database since the previous backup.
To do an incremental backup of the database to the TAPECLASS device class,enter:backup db type=incremental devclass=tapeclass
Doing Snapshot Database BackupsA snapshot database backup is a full database backup that does not interrupt thecurrent full and incremental backup series. Snapshot database tapes can then betaken off-site for recovery purposes and therefore kept separate from the normalfull and incremental backup tapes. Snapshot database backups enhance theprotection of your server and its data while maintaining the full and incrementaldatabase backup series. Although snapshot database backups cannot restore adatabase or a database volume to its most current state, you can use them torestore a database to a specific point-in-time.
Snapshot database backups:v Copy the complete contents of a database, just like a full database backup.v Create a new database backup series without interrupting the existing full and
incremental backup series for the database.v Do not truncate the server recovery log when the server is running in
roll-forward mode.
Use the BACKUP DB command to perform a snapshot database backup. Newvolume history entries are created for the snapshot database volumes.
To perform a snapshot database backup to the TAPECLASS device class, enter:
/* Tivoli Storage Manager Device Configuration */
define devclass tape8mm devtype=8mm library=8mmlib
define library 8mmlib libtype=manual
define drive 8mmlib tapedrive3
define path server1 tapedrive3 srctype=server desttype=drive library=8mmlib device=mt3.0.0.1
Chapter 24. Protecting and Recovering Your Server 551

backup db type=dbsnapshot devclass=tapeclass
Note: Snapshot database backups should be used as an adjunct to full andincremental backups. When the server is in roll-forward mode, and asnapshot database backup is performed, the recovery log keeps growing.When full and incremental backups are performed with roll-forward modeenabled, the recovery log is restarted each time a full backup is performed.
Recovering Your Server Using Database and Storage Pool BackupsThis section explains how to recover by using backups of the database and storagepools. Figure 89 shows the situation presented in the two scenarios in this section:an installation has lost its server, including the database and recovery log, and itsonsite storage pools.
The following topics are included:v Restoring to a point-in-timev Restoring to the most current state
To perform a restore, you should have the following information, preferably storedoffsite (see Figure 89):v A full database backupv Any incremental database backups between the last full backup and the
point-in-time to which you are recoveringv Copy storage pool volumesv On tape or diskette, or as printouts:
– Server options file– Volume history file– Device configuration file with the applicable device information (library,
drive, and device class definitions)
Figure 89. Recovery from a Disaster
552 Tivoli Storage Manager for Windows: Administrator’s Guide

– Database and recovery log setup (the output from detailed queries of yourdatabase and recovery log volumes)
Note: To perform a DSMSERV RESTORE DB operation, the database backupvolumes must be in a library of a library type of MANUAL or SCSI.
DRM can query the server and generate a current, detailed disasterrecovery plan for your installation.
Restoring a Database to a Point-in-TimePoint-in-time recovery is normally used for situations such as disaster recovery orto remove the effects of errors that can cause inconsistencies in the database.
You can use either full and incremental backups or snapshot database backups torestore a database to a point-in-time.
For a scenario of recovering to a point-in-time, see “Backup and RecoveryScenarios” on page 571.
Here is the procedure for restoring the database:1. Rename and save a copy of the volume history file if it exists. After the
database is restored, any volume history information pointed to by the serveroptions is lost. You will need this information to identify the volumes to beaudited. If you do not have a volume history file, see “Point-in-Time RestoreWithout a Volume History File” on page 555.
2. If the device configuration file is unavailable, recreate it manually (see“Recreating a Device Configuration File” on page 550). Put the existing orrecreated device configuration file in the server work library. Do the same withthe server options file. Have available your outputs from your detailed queriesabout your database and recovery log setup information.You may need to modify the device configuration file based on the hardwareavailable at the recovery site. For example, the recovery site might require adifferent device class, library, and drive definitions. For more information, see“Updating the Device Configuration File” on page 550.
3. If the original database or recovery log volumes were lost, issue the DSMSERVFORMAT utility to initialize the database and recovery log. For example:dsmserv format 1 log1 9 1 dbvol1 5
Attention: Do not start the server until after you restore the database (the nextstep). Starting the server before the restore would destroy any existing volumehistory files.
4. Issue the DSMSERV RESTORE DB utility. For example, to restore the databaseto a backup series that was created on April 19, 1999, enter:
dsmserv restore db todate=04/19/1999
The server does the following:a. Reads the volume history file to locate the last full backup that occurred on
or before the specified date and time.
Chapter 24. Protecting and Recovering Your Server 553

Note: If the volume history file is not available, you must mount tapevolumes in the correct order or specify their order on the DSMSERVRESTORE DB utility.
b. Using the device configuration file, requests a mount of the first volume,which should contain the beginning of the full backup.
c. Restores the backup data from the first volume.d. Continues to request mounts and to restore data from the backup volumes
that contain the full backup and any incremental backups that occurred onor before the date specified.
From the old volume history information (generated by the QUERYVOLHISTORY command) you need a list of all the volumes that were reused(STGREUSE), added (STGNEW), and deleted (STGDELETE) since the originalbackup. Use this list to perform the rest of this procedure.
It may also be necessary to update the device configurations in the restoreddatabase.
5. Audit all disk volumes, all reused volumes, and any deleted volumes locatedby the AUDIT VOLUME command using the FIX=YES parameter.This process identifies files recorded in the database that can no longer befound on the volume. If a copy of the file is in a copy storage pool, the file onthe audited volume is marked as damaged. Otherwise, the file is deleted fromthe database and is lost.
6. If the audit detects any damaged files, issue the RESTORE STGPOOL commandto restore those files after you have audited the volumes in the storage pool.Include the FIX=YES parameter on the AUDIT VOLUME command to deletedatabase entries for files not found in the copy storage pool.
7. Mark as destroyed any volumes that cannot be located, and recover thosevolumes from copy storage pool backups. If no backups are available, deletethe volumes from the database by using the DELETE VOLUME command withthe DISCARDDATA=YES parameter.
8. Redefine any storage pool volumes that were added since the database backup.
Notes:
1. Some files may be lost if they were moved since the backup (due to migration,reclamation, or move data requests) and the space occupied by those files hasbeen reused. You can minimize this loss by using the REUSEDELAY parameterwhen defining or updating sequential access storage pools. This parameterdelays volumes from being returned to scratch or being reused. See “DelayingReuse of Sequential Access Volumes” on page 541 for more information on theREUSEDELAY parameter.
2. By backing up your storage pool and your database, you reduce the risk oflosing data. To further minimize loss of data, you can:v Mark the backup volumes in the copy storage pool as OFFSITE and move
them to an offsite location.In this way the backup volumes are preserved and are not reused ormounted until they are brought onsite. Ensure that you mark the volumes asOFFSITE before you back up the database.To avoid having to mark volumes as offsite or physically move volumes:– Specify a device class of DEVTYPE=SERVER in your database backup.– Back up a primary storage pool to a copy storage pool associated with a
device class of DEVTYPE=SERVER.
554 Tivoli Storage Manager for Windows: Administrator’s Guide

v Back up the database immediately after you back up the storage pools.v Turn off migration and reclamation while you back up the database.v Do not perform any MOVE DATA operations while you back up the
database.v Use the REUSEDELAY parameter’s interval to prevent your copy storage
pool volumes from being reused or deleted before they might be needed.3. If your old volume history file shows that any of the copy storage pool
volumes needed to restore your storage pools have been reused (STGREUSE) ordeleted (STGDELETE), you may not be able to restore all your files. You canavoid this problem by including the REUSEDELAY parameter when you defineyour copy storage pools.
4. After a restore, the volume inventories for Tivoli Storage Manager and for yourtape management system may be inconsistent. For example, after a databasebackup, a new volume is added to Tivoli Storage Manager. The tapemanagement system inventory records the volume as belonging to TivoliStorage Manager. If the database is restored from the backup, Tivoli StorageManager has no record of the added volume, but the tape management systemdoes. You must synchronize these inventories. Similarly, the volume inventoriesfor Tivoli Storage Manager and for any automated libraries may also beinconsistent. If they are, issue the AUDIT LIBRARY command to synchronizethese inventories.
Point-in-Time Restore Without a Volume History FileYou can use either full and incremental backups or snapshot database backups torestore a database to a point-in-time.
If you are doing a point-in-time restore and a volume history file is not available,you must enter the volume names in the DSMSERV RESTORE DB utility in thesequence in which they were written to. First, however, issue the DSMSERVDISPLAY DBBACKUPVOLUME utility to read your backup volumes and displaythe information needed to arrange them in order (backup series, backup operation,and volume sequence). For example:dsmserv display dbbackupvolume devclass=tapeclassvolumenames=dsm012,dsm023,dsm037,dsm038,dsm058,dsm087
For example, the most recent backup series consists of three operations:
0 A full backup on three volumes in the sequence dsm023, dsm037, anddsm087
1 An incremental backup on one volume, dsm012
2 An incremental backup on two volumes in the sequence dsm038 anddsm058
You would issue three commands in the following order:dsmserv restore db volumenames=dsm023,dsm037,dsm087devclass=tapeclass commit=no
dsmserv restore db volumenames=dsm012devclass=tapeclass commit=no
dsmserv restore db volumenames=dsm038,dsm058devclass=tapeclass commit=no
Chapter 24. Protecting and Recovering Your Server 555

Attention: If the original database or recovery log volumes are available, youissue only the DSMSERV RESTORE DB utility. However, if those volumes havebeen lost, you must first issue the DSMSERV FORMAT command to initialize thedatabase and recovery log, then issue the DSMSERV RESTORE DB utility.
Storage Pool Backups in a Point-of-Time RestoreThe following example shows the importance of storage pool backups with apoint-in-time restore. In this example, the storage pool was not backed up with theBACKUP STGPOOL command.
9:30 a.m.Client A backs up its data to Volume 1.
Noon The system administrator backs up the database.
1:30 p.m.Client A’s files on Volume 1 (disk), is migrated to tape (Volume 2).
3:00 p.m.Client B backs up its data to Volume 1.
The server places Client B’s files in the location that contained Client A’sfiles prior to the migration.
3:30 p.m.The server goes down.
3:40 p.m.The system administrator reloads the noon version of the database byusing the DSMSERV RESTORE DB utility.
4:40 p.m.Volume 1 is audited. The following then occurs:1. The server compares the information on Volume 1 and with the
restored database (which matches the database at noon).2. The audit does not find Client A’s files on Volume 1 where the reloaded
database indicates they should be. Therefore, the server deletes theseClient A file references.
3. The database has no record that Client A’s files are on Volume 2, andthe files are, in effect, lost.
4. The database has no record that Client B’s files are on Volume 1, andthe files are, in effect, lost.
If roll-forward recovery had been used, the database would have been rolledforward to 3:30 p.m. when the server went down. In this case, neither Client A’sfiles nor Client B’s files would have been lost. If a point-in-time restore of thedatabase had been performed and the storage pool had been backed up, Client A’sfiles would not have been deleted by the volume audit. Those files could havebeen restored with a RESTORE VOLUME or RESTORE STGPOOL command.Client B’s files would still have been lost, however.
Restoring a Database to its Most Current StateYou can use roll-forward recovery to restore a database to its most current state if:v The server has been in roll-forward mode continuously from the time of the last
full backup to the time the database was damaged or lost.v The last backup series created for the database is available. A backup series
consists of a full backup, all applicable incremental backups, and all recovery logrecords for database changes since the last backup in the series was run.
556 Tivoli Storage Manager for Windows: Administrator’s Guide

You can only use full and incremental backups with roll-forward mode enabled torestore a database to its most current state. Snapshot database backups arecomplete database copies of a point-in-time.
To restore the database to its most current state, enter:dsmserv restore db
Attention: If the original database or recovery log volumes are available, youissue only the DSMSERV RESTORE DB utility. However, if those volumes havebeen lost, you must first issue the DSMSERV FORMAT utility to initialize thedatabase and recovery log, then issue the DSMSERV RESTORE DB utility.
Note: Roll-forward recovery does not apply if all recovery log volumes are lost.However, with the server running in roll-forward mode, you can stillperform point-in-time recovery in such a case.
Restoring Storage PoolsYou can recreate files in a primary storage pool by using duplicate copies in copystorage pools. The files must have been copied to the copy storage pools by usingthe BACKUP STGPOOL command.
Task Required Privilege Class
Restoring storage pools System, unrestricted storage, or restrictedstorage
The RESTORE STGPOOL command restores specified primary storage pools thathave files with the following problems:v The primary copy of the file has been identified as having read errors during a
previous operation. Files with read errors are marked as damaged.v The primary copy of the file resides on a volume that has an access mode of
DESTROYED. For how the access mode of a volume changes to theDESTROYED access mode, see “How Restore Processing Works” on page 532.
When you restore a storage pool, be prepared to provide the followinginformation:
Primary storage poolSpecifies the name of the primary storage pool that is being restored.
Copy storage poolSpecifies the name of the copy storage pool from which the files are to berestored. This information is optional. If you do not specify a copy storagepool, the server restores the files from any copy storage pool where it canfind them.
New storage poolSpecifies the name of the new primary storage pool to which to restore thefiles. This information is optional. If you do not specify a new storage pool,the server restores the files to the original primary storage pool.
Maximum number of processesSpecifies the maximum number of parallel processes that are used forrestoring files.
Chapter 24. Protecting and Recovering Your Server 557

PreviewSpecifies whether you want to preview the restore operation withoutactually restoring data.
See “Correcting Damaged Files” on page 569 and “Backup and RecoveryScenarios” on page 571 for examples of using the RESTORE STGPOOL command.
What Happens When a Storage Pool Is RestoredWhen you restore a storage pool, Tivoli Storage Manager determines which filesare in that storage pool. Using file copies from a copy storage pool, Tivoli StorageManager restores the files that were in the storage pool to the same or a differentstorage pool.
Cached Files: Cached copies of files in a disk storage pool are never restored.References to any cached files that have been identified as havingread errors or cached files that reside on a destroyed volume will beremoved from the database during restore processing.
The RESTORE STGPOOL command with the PREVIEW=YES parameter can beused to identify volumes that contain damaged primary files. During restoreprocessing, a message is issued for every volume in the restored storage pool thatcontains damaged, noncached files. To identify the specific files that are damagedon these volumes, use the QUERY CONTENT command.
After the files are restored, the old references to these files in the primary storagepool are deleted from the database. This means that Tivoli Storage Manager nowlocates these files on the volumes to which they were restored, rather than on thevolumes on which they were previously stored. If a destroyed volume becomesempty because all files have been restored to other locations, the destroyed volumeis automatically deleted from the database.
The RESTORE STGPOOL command generates a background process that can becanceled with the CANCEL PROCESS command. If a RESTORE STGPOOLbackground process is canceled, some files may have already been restored prior tothe cancellation. To display information about background processes, use theQUERY PROCESS command.
The RESTORE STGPOOL command may be run in the foreground on anadministrative client by issuing the command with the WAIT=YES parameter.
Restoring Files to a Storage Pool with Collocation EnabledWhen restoring to a primary storage pool that has collocation enabled, the serverrestores files by client node and client file space. This process preserves thecollocation of client files. However, if the copy storage pool being used to restorefiles does not have collocation enabled, restore processing can be slow.
If you need to use a copy storage pool that is not collocated to restore files to aprimary storage pool that is collocated, you can improve performance by:1. Restoring the files first to a random access storage pool (on disk).2. Allowing or forcing the files to migrate to the target primary storage pool.
For the random access pool, set the target storage pool as the next storage pool.Adjust the migration threshold to control when migration occurs to the targetstorage pool.
558 Tivoli Storage Manager for Windows: Administrator’s Guide

When a Storage Pool Restoration Is IncompleteThe restoration of a storage pool volume may be incomplete. Use the QUERYCONTENT command to get more information on the remaining files on volumesfor which restoration was incomplete. The restoration may be incomplete for oneor more of the following reasons:v Either files were never backed up, or the backup copies were marked as
damaged.v A copy storage pool was specified on the RESTORE command, but files were
backed up to a different copy storage pool. If you suspect this is a problem, usethe RESTORE command again without specifying a copy storage pool fromwhich to restore files. The PREVIEW option can be used on the secondRESTORE command, if you do not actually want to restore files.
v Volumes in the copy storage pool needed to perform the restore operation areoffsite or unavailable. Check the activity log for messages that occurred duringrestore processing.
v Backup file copies in copy storage pools were moved or deleted by otherprocesses during restore processing. To prevent this problem, do not issue thefollowing commands for copy storage pool volumes while restore processing isin progress:– MOVE DATA– DELETE VOLUME (DISCARDDATA=YES)– AUDIT VOLUME (FIX=YES)
v You can prevent reclamation processing for your copy storage pools by settingthe RECLAIM parameter to 100 with the UPDATE STGPOOL command.
Restoring Your Server Using Mirrored VolumesIf a mirrored volume fails due to media failure, you can restore the volume bytaking the following steps:1. View the status of the database and recovery log volumes by using QUERY
DBVOLUME or QUERY LOGVOLUME commands.2. If necessary, place the failing volume offline by using DELETE DBVOLUME or
DELETE LOGVOLUME commands. The server usually does this automatically.3. Fix the failing physical device.4. Allocate space to be used for a new volume by using the DSMFMT utility.5. Bring the volume online by using DEFINE DBCOPY or DEFINE LOGCOPY
commands.
After a database or recovery log volume copy is defined, the server synchronizesthe volume copy with its associated database or recovery log volume.
Restoring Storage Pool VolumesYou can recreate files in primary storage pool volumes by using copies in a copystorage pool.
Task Required Privilege Class
Restore volumes in any storage pool forwhich they have authority
System, unrestricted storage, or restrictedstorage
Chapter 24. Protecting and Recovering Your Server 559

Use the RESTORE VOLUME command to restore all files that are stored in thesame primary storage pool and that were previously backed up to copy storagepools. When you use the RESTORE VOLUME command, be prepared to supplysome or all of the following information:
Volume nameSpecifies the name of the volume in the primary storage pool for which torestore files.
Tip: To restore more than one volume in the same primary storage pool,issue this command once and specify a list of volumes to be restored.When you specify more than one volume, Tivoli Storage Managerattempts to minimize volume mounts for the copy storage pool.
Copy storage pool nameSpecifies the name of the copy pool from which the files are to be restored.This information is optional. If you do not specify a particular copy storagepool, the files are restored from any copy storage pool where it can findthem.
New storage poolSpecifies the name of the new primary storage pool to which to restore thefiles. This information is optional. If you do not specify a new storage pool,the files are restored to the original primary storage pool.
Maximum number of processesSpecifies the maximum number of parallel processes that are used forrestoring files.
PreviewSpecifies whether you want to preview the restore operation withoutactually restoring data.
See “Recovering a Lost or Damaged Storage Pool Volume” on page 575 for anexample of using the RESTORE VOLUME command.
What Happens When a Volume Is RestoredWhen you restore a volume, the server obtains a copy of each file that was on thevolume from a copy storage pool, and then stores the files on a different volume.
Cached Files: Cached copies of files in a disk storage pool are never restored.References to any cached files that reside on a volume that is beingrestored are removed from the database during restore processing.
After files are restored, the old references to these files in the primary storage poolare deleted from the database. Tivoli Storage Manager now locates these files onthe volumes to which they were restored, rather than on the volume on which theywere previously stored.
The RESTORE VOLUME command changes the access mode of the volumes beingrestored to destroyed. When the restoration is complete (when all files on thevolume are restored to other locations), the destroyed volume is empty and is thenautomatically deleted from the database.
The RESTORE VOLUME command generates a background process that can becanceled with the CANCEL PROCESS command. If a RESTORE VOLUME
560 Tivoli Storage Manager for Windows: Administrator’s Guide

background process is canceled, some files may have already been restored prior tothe cancellation. To display information on background processes, use the QUERYPROCESS command.
The RESTORE VOLUME command may be run in the foreground on anadministrative client by issuing the command with the WAIT=YES parameter.
When a Volume Restoration Is IncompleteThe restoration of a volume may be incomplete. Use the QUERY CONTENTcommand to get more information on the remaining files on volumes for whichrestoration was incomplete. The restoration may be incomplete for one or more ofthe following reasons:v Files were either never backed up or the backup copies are marked as damaged.v A copy storage pool was specified on the RESTORE command, but files were
backed up to a different copy storage pool. If you suspect this is a problem, usethe RESTORE command again without specifying a copy storage pool fromwhich to restore files. The PREVIEW option can be used on the secondRESTORE command, if you do not actually want to restore files.
v Volumes in the copy storage pool needed to perform the restore operation areoffsite or unavailable. Check the activity log for messages that occurred duringrestore processing.
v Backup file copies in copy storage pools were moved or deleted by otherprocesses during restore processing. To prevent this problem, do not issue thefollowing commands for copy storage pool volumes while restore processing isin progress:– MOVE DATA– DELETE VOLUME (DISCARDDATA=YES)– AUDIT VOLUME (FIX=YES)
You can prevent reclamation processing for your copy storage pools by settingthe RECLAIM parameter to 100 with the UPDATE STGPOOL command.
Auditing a Storage Pool VolumeUse this section to help you audit storage pool volumes for data integrity.
Task Required Privilege Class
Audit volumes in storage pools over whichthey have authority
Restricted storage privilege
Audit a volume in any storage pool System privilege, unrestricted storageprivilege
The server database contains information about files on storage pool volumes. Ifthere are inconsistencies between the information in the database about files andthe files actually stored in a storage pool volume, users may be unable to accesstheir files.
To ensure that all files are accessible on volumes in a storage pool, audit anyvolumes you suspect may have problems by using the AUDIT VOLUMEcommand. You have the option of auditing multiple volumes using a time rangecriteria, or auditing all volumes in a storage pool.
You should audit a volume when the following conditions are true:
Chapter 24. Protecting and Recovering Your Server 561

v The volume is damaged.v The volume has not been accessed for a long period of time, for example, after
six monthsv A read or write error occurs while accessing the volumev The database has been restored to an earlier point-in-time, and the volume is
either a disk volume or a volume that was identified as being reused or deletedsince the database backup
If a storage pool has data validation enabled, run an audit for the volumes in thestorage pool to have the server validate the data.
What Happens When You Audit Storage Pool VolumesWhen you audit a volume, a background process is started. During the auditingprocess, the server:v Sends informational messages about processing to the server console.v Prevents new files from being written to the volume.v Generates a cyclic redundancy check, if data validation is enabled for the storage
pool.v Records results of the audit in the activity log.
You can specify whether you want the server to correct the database ifinconsistencies are detected. Tivoli Storage Manager corrects the database bydeleting database records that refer to files on the volume that cannot be accessed.The default is to report inconsistencies that are found (files that cannot beaccessed), but to not correct the errors.
If files with read errors are detected, their handling depends on the following:v The type of storage pool to which the volume is assignedv The FIX option of the AUDIT VOLUME commandv The location of file copies (whether a copy of the file exists in a copy storage
pool)
To display the results of a volume audit after it has completed, use the QUERYACTLOG command. See “Requesting Information from the Activity Log” onpage 444.
Volumes in a Primary Storage PoolFor a volume in a primary storage pool, the values for the FIX parameter on anAUDIT VOLUME command have the following effects:
FIX=NOThe server reports, but does not delete, any database records that refer tofiles found with logical inconsistencies. If the AUDIT VOLUME commanddetects a read error in a file, the file is marked as damaged in the database.You can do one of the following:v If a backup copy of the file is stored in a copy storage pool, you can
restore the file by using the RESTORE VOLUME or RESTORE STGPOOLcommand.
v If the file is a cached copy, you can delete references to the file on thisvolume by using the AUDIT VOLUME command again. SpecifyFIX=YES.
562 Tivoli Storage Manager for Windows: Administrator’s Guide
If the AUDIT VOLUME command does not detect a read error in adamaged file, the file state is reset, and the file can be used. For example, ifa dirty tape head caused some files to be marked damaged, you can cleanthe head and then audit the volume to make the files accessible again.
FIX=YESAny inconsistencies are fixed as they are detected.
If the AUDIT VOLUME command detects a read error in a file:v If the file is not a cached copy and a backup copy is stored in a copy
storage pool, the file is marked as damaged in the database. The file canthen be restored using the RESTORE VOLUME or RESTORE STGPOOLcommand.
v If the file is not a cached copy and a backup copy is not stored in a copystorage pool, all database records that refer to the file are deleted.
v If the file is a cached copy, the database records that refer to the cachedfile are deleted. The primary file is stored on another volume.
If the AUDIT VOLUME command does not detect a read error in adamaged file, the file state is reset, and the file can be used. For example, ifa dirty tape head caused some files to be marked damaged, you can cleanthe head and then audit the volume to make the files accessible again.
Volumes in a Copy Storage PoolFor volumes in a copy storage pool, the values for the FIX parameter on an AUDITVOLUME command have the following effects:
FIX=NOThe server reports the error and marks the file copy as damaged in thedatabase.
FIX=YESThe server deletes references to the file on the audited volume from thedatabase.
Data Validation During Audit Volume ProcessingData validation for storage pools allows the server to validate that data sent to adevice during a write operation matches what the server later reads. This is helpfulif you have introduced new hardware devices. The validation assures that the datais not corrupt as it moves through the hardware, and then is written to the volumein the storage pool. You can use the DEFINE STGPOOL or UPDATE STGPOOLcommands to enable data validation for storage pools.
When you enable data validation for an existing storage pool, the server validatesdata that is written from that time forward. The server does not validate existingdata which was written to the storage pool before data validation was enabled.
When data validation is enabled for storage pools, the server generates a cyclicredundancy check (CRC) value and stores it with the data when it is written to thestorage pool. The server validates the data when it audits the volume, bygenerating a cyclic redundancy check and comparing this value with the CRCvalue stored with the data. If the CRC values do not match, then the serverprocesses the volume in the same manner as a standard audit volume operation.This process can depend on the following:v The type of storage pool to which the volume is assignedv The FIX option of the AUDIT VOLUME command
Chapter 24. Protecting and Recovering Your Server 563

v The location of file copies (whether a copy of the file exists in a copy storagepool)
See “Volumes in a Primary Storage Pool” on page 562 and “Volumes in a CopyStorage Pool” on page 563 for details on how the server handles inconsistenciesdetected during an audit volume process. Check the activity log for details aboutthe audit operation.
The server removes the CRC values before it returns the data to the client node.
Choosing Where to Enable Data ValidationData validation is available for nodes and storage pools. The forms of validationare independent of each other. Figure 90 shows data validation:v during a client session with the server �2�
v during a client session with the storage agent �1� (the storage agent reads theVALIDATEPROTOCOL setting for the client from the Tivoli Storage Managerserver)
v during a storage agent session with the server �3�
v when a server (including a storage agent) sends data to the storage pool �4� or�5�
You can enable data validation for one or more nodes, storage agents, or storagepools. Figure 90 illustrates data transfer that is eligible for data validation within aTivoli Storage Manager environment. Your environment may contain some or all ofthese objects.
Table 33 provides information that relates to Figure 90. This information explainsthe type of data being transferred and the appropriate command to issue.
Table 33. Setting Data Validation
NumbersinFigure 90
Where toSet DataValidation
Type of DataTransferred
Command Command Parameter
�1� NodeDefinition
File Data andMetadata
See Note See Note
TSMClient
TSMServer
StorageAgent
1 2
3
4 5
StoragePool
Figure 90. Data Transfer Eligible for Data Validation
564 Tivoli Storage Manager for Windows: Administrator’s Guide
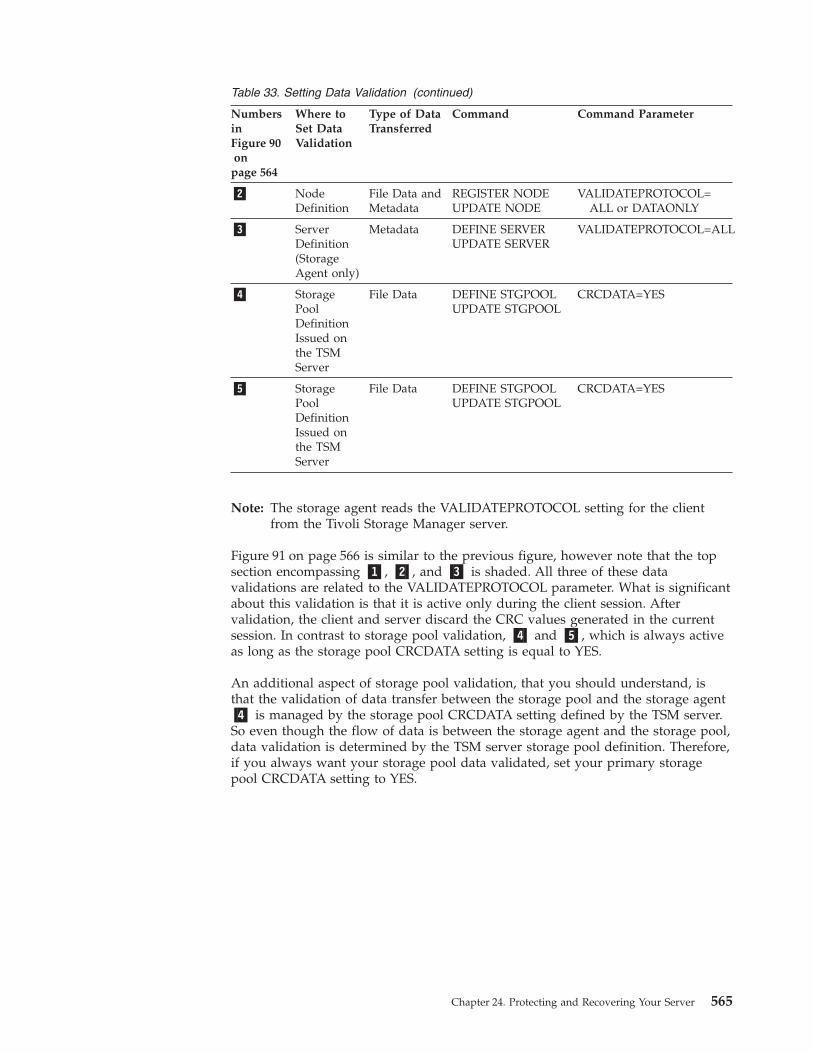
Table 33. Setting Data Validation (continued)
NumbersinFigure 90on
page 564
Where toSet DataValidation
Type of DataTransferred
Command Command Parameter
�2� NodeDefinition
File Data andMetadata
REGISTER NODEUPDATE NODE
VALIDATEPROTOCOL=ALL or DATAONLY
�3� ServerDefinition(StorageAgent only)
Metadata DEFINE SERVERUPDATE SERVER
VALIDATEPROTOCOL=ALL
�4� StoragePoolDefinitionIssued onthe TSMServer
File Data DEFINE STGPOOLUPDATE STGPOOL
CRCDATA=YES
�5� StoragePoolDefinitionIssued onthe TSMServer
File Data DEFINE STGPOOLUPDATE STGPOOL
CRCDATA=YES
Note: The storage agent reads the VALIDATEPROTOCOL setting for the clientfrom the Tivoli Storage Manager server.
Figure 91 on page 566 is similar to the previous figure, however note that the topsection encompassing �1�, �2�, and �3� is shaded. All three of these datavalidations are related to the VALIDATEPROTOCOL parameter. What is significantabout this validation is that it is active only during the client session. Aftervalidation, the client and server discard the CRC values generated in the currentsession. In contrast to storage pool validation, �4� and �5�, which is always activeas long as the storage pool CRCDATA setting is equal to YES.
An additional aspect of storage pool validation, that you should understand, isthat the validation of data transfer between the storage pool and the storage agent�4� is managed by the storage pool CRCDATA setting defined by the TSM server.So even though the flow of data is between the storage agent and the storage pool,data validation is determined by the TSM server storage pool definition. Therefore,if you always want your storage pool data validated, set your primary storagepool CRCDATA setting to YES.
Chapter 24. Protecting and Recovering Your Server 565

If the network is unstable, you may decide to only enable data validation fornodes. Tivoli Storage Manager generates a cyclic redundancy check when the datais sent over the network to the server. Certain nodes may have more critical datathan others and may require the assurance of data validation. When you identifythe nodes that require data validation, you can choose to have only the user’s datavalidated or all the data validated. Tivoli Storage Manager validates both the filedata and the file metadata when you choose to validate all data. See “Validating aNode’s Data During a Client Session” on page 348.
When you enable data validation for a server-to-server exchange or between astorage agent and server, the server must validate all data. You can enable datavalidation by using the DEFINE SERVER or UPDATE SERVER command. For aserver-to-server exchange, see “Using Virtual Volumes to Store Data on AnotherServer” on page 501 for more information. For data that is exchanged between astorage agent and the server, refer to the Tivoli Storage Manager Managed System forSAN Storage Agent User’s Guide for the storage agent’s operating system.
If the network is fairly stable but your site is perhaps using new hardware devices,you may decide to only enable data validation for storage pools. When the serversends data to the storage pool, the server generates cyclic redundancy checking,and stores the CRC value with the data. The server validates the CRC value whenthe server audits the volume. Later, you may decide that data validation forstorage pools is no longer required after the devices prove to be stable. Refer to“Auditing a Storage Pool Volume” on page 561 for more information on datavalidation for storage pools.
Performance ConsiderationsConsider the impact on performance when you decide whether data validation isnecessary for storage pools. Data validation impacts performance because theserver requires additional CPU overhead to calculate and compare CRC values.This method of validation is independent of validating data during a client sessionwith the server. When you choose to validate storage pool data, there is noperformance impact on the client.
TSMClient
TSMServer
StorageAgent
1 2
3
4 5
StoragePool
Figure 91. Protocol Data Validation versus Storage Pool Data Validation
566 Tivoli Storage Manager for Windows: Administrator’s Guide

If you enable CRC for storage pools on devices that later prove to be stable, youcan increase performance by updating the storage pool definition to disable datavalidation.
Managing Storage Pool Data ValidationThe AUDIT VOLUME command has additional parameters that allow you tospecify an audit for data written to volumes within a range of days, or to run anaudit for a given storage pool.
You can manage when the validation of data in storage pools occurs by schedulingthe audit volume operation. You can choose a method suitable to yourenvironment, for example:v The administrator can select volumes at random to audit. A random selection
does not require significant resources or cause much contention for serverresources but can provide assurance that the data is valid.
v Schedule a daily audit of all volumes written in the last day. This methodvalidates data written to a given storage pool on a daily basis.
v Audit volumes in storage pools only for client nodes that are considered to becritical users.
Auditing a Volume in a Disk Storage PoolTo audit the d:\tsm\admvol.1 disk volume and have only summary messages sentto the activity log and server console, enter:audit volume d:\adsm\admvol.1 quiet=yes
The audit volume process is run in the background and the server returns thefollowing message:
ANR2313I Audit Volume (Inspect Only) process started for volumeD:\TSM\ADMVOL.1 (process ID 4).
To view the status of the audit volume process, enter:query process
The following figure displays an example of the audit volume process report.
To display the results of a volume audit after it has completed, you can issue theQUERY ACTLOG command.
Auditing Multiple Volumes in a Sequential Access StoragePool
When you audit a sequential storage volume containing files that span multiplevolumes, the server selects all associated volumes. The server begins the auditprocess with the first volume on which the first file resides. For example, Figure 92on page 568
Process Process Description StatusNumber
-------- ------------------------ ---------------------------------------------4 Audit Volume Volume D:\ADSM\ADMVOL.1 (Storage
(Inspect Only) Pool BACKUPPOOL), Files Processed: 680,Irretrievable Files Found: 0, Partial FilesSkipped: 0
Chapter 24. Protecting and Recovering Your Server 567

on page 568 shows five volumes defined to ENGBACK2. In this example, File Aspans VOL1 and VOL2, and File D spans VOL2, VOL3, VOL4, and VOL5.
If you request that the server audit volume VOL3, the server first accesses volumeVOL2, because File D begins at VOL2. When volume VOL2 is accessed, the serveronly audits File D. It does not audit the other files on this volume.
Because File D spans multiple volumes, the server accesses volumes VOL2, VOL3,VOL4, and VOL5 to ensure that there are no inconsistencies between the databaseand the storage pool volumes.
For volumes that require manual mount and dismount operations, the auditprocess can require significant manual intervention.
Auditing a Single Volume in a Sequential Access Storage PoolTo audit a single volume in a sequential storage pool, request that the server skipany files that span multiple volumes. This option is useful when the volume youwant to audit contains part of a file, the rest of which resides on a different,damaged volume.
For example, to audit only volume VOL5 in the example in Figure 92 and have theserver fix any inconsistencies found between the database and the storage volume,enter:audit volume vol5 fix=yes skippartial=yes
Auditing Volumes by Date WrittenYou can limit the audit to volumes that were written in a certain time range. Forexample, to audit the volumes in storage pool BKPOOL1 for volumes written fromMarch 20, 2002 to March 22, 2002.audit volume stgpool=bkppool1 fromdate=032002 todate=032202
The server audits all volumes that were written to starting at 12:00:01 a.m. onMarch 20 and ending at 11:59:59 p.m. on March 22, 2002.
When you use the parameters FROMDATE, TODATE, or both, the server limits theaudit to only the sequential media volumes that meet the date criteria, andautomatically includes all online disk volumes. When you include the STGPOOLparameter you limit the number of volumes that may include disk volumes.
Figure 92. Tape Volumes with Files A, B, C, D, and E
568 Tivoli Storage Manager for Windows: Administrator’s Guide

Auditing Volumes in a Specific Storage PoolYou can limit the audit to volumes in a specified storage pool. For example, youcan audit the volumes in storage pool BKPOOL1 by issuing the followingcommand:audit volume stgpool=bkppool1
Defining a Schedule to Audit Volumes on a Regular BasisYou can define administrative schedules to have the server audit volumes on aregular basis. The following example can be used if your critical users store data instorage pool STPOOL3 and you want all volumes in the storage pool auditedevery 2 days.define schedule crcstg1 type=administrativecmd='audit volume stgpool=STPOOL3' active=yes starttime=21:00 period=2
This command will audit all volumes in the STPOOL3 storage pool every twodays. The audit operation will begin at 9:00 p.m.
Correcting Damaged FilesA data error, which results in a file being unreadable, can be caused by such thingsas a tape deteriorating or being overwritten or by a drive needing cleaning. If adata error is detected when a client tries to restore, retrieve, or recall a file orduring a volume audit, the file is marked as damaged. If the same file is stored inother copy storage pools, the status of those file copies is not changed.
If a client tries to access a damaged file and an undamaged copy is available on anonsite copy storage pool volume, the server sends the user the undamaged copy.
Files that are marked as damaged cannot be:v Restored, retrieved, or recalledv Moved by migration, reclamation, or the MOVE DATA commandv Backed up during a BACKUP STGPOOL operation if the primary file is
damagedv Restored during a RESTORE STGPOOL or RESTORE VOLUME operation if the
backup copy in a copy storage pool is damaged
Maintaining the Integrity of FilesTo maintain the data integrity of user files, you can:1. Detect damaged files before the users do.
The AUDIT VOLUME command marks a file as damaged if a read error isdetected for the file. If an undamaged copy is in an onsite copy storage pool, itis used to provide client access to the file.
2. Reset the damaged status of files if the error that caused the change todamaged status was temporary.You can use the AUDIT VOLUME command to correct situations when files aremarked damaged due to a temporary hardware problem, such as a dirty tapehead. The server resets the damaged status of files if the volume in which thefiles are stored is audited and no read errors are detected.
3. Correct files that are marked as damaged.
Chapter 24. Protecting and Recovering Your Server 569

If a primary file copy is marked as damaged and a usable copy exists in a copystorage pool, the primary file can be corrected using the RESTORE VOLUME orRESTORE STGPOOL command. For an example, see “Restoring DamagedFiles”.
4. Regularly run commands to identify files that are marked as damaged:v The RESTORE STGPOOL command displays the name of each volume in the
restored storage pool that contains one or more damaged primary files. Usethis command with the preview option to identify primary volumes withdamaged files without actually performing the restore operation.
v The QUERY CONTENT command with the DAMAGED option lets youdisplay damaged files on a specific volume.
For an example of how to use these commands, see “Restoring Damaged Files”.
Restoring Damaged FilesIf you use copy storage pools, you can restore damaged client files. You can alsocheck storage pools for damaged files and restore the files. This section explainshow to restore damaged files based on the scenario in “Example: Simple Hierarchywith One Copy Storage Pool” on page 542.
If a client tries to access a file stored in TAPEPOOL and a read error occurs, the filein TAPEPOOL is automatically marked as damaged. Future accesses to the fileautomatically use the copy in COPYPOOL as long as the copy in TAPEPOOL ismarked as damaged.
To restore any damaged files in TAPEPOOL, you can define a schedule that issuesthe following command periodically:restore stgpool tapepool
You can check for and replace any files that develop data-integrity problems inTAPEPOOL or in COPYPOOL. For example, every three months, query thevolumes in TAPEPOOL and COPYPOOL by entering the following commands:query volume stgpool=tapepool
query volume stgpool=copypool
Then issue the following command for each volume in TAPEPOOL andCOPYPOOL:audit volume <volname> fix=yes
If a read error occurs on a file in TAPEPOOL, that file is marked damaged and anerror message is produced. If a read error occurs on file in COPYPOOL, that file isdeleted and a message is produced.
Restore damaged primary files by entering:restore stgpool tapepool
Finally, create new copies in COPYPOOL by entering:backup stgpool tapepool copypool
570 Tivoli Storage Manager for Windows: Administrator’s Guide

Backup and Recovery ScenariosThis section presents scenarios for protecting and recovering a Tivoli StorageManager server. You can modify the procedures to meet your needs.
DRM can help you track your onsite and offsite volumes and query theserver and generate a current, detailed disaster recovery plan for yourinstallation.
These scenarios assume a storage hierarchy consisting of:v The default random access storage pools (BACKUPPOOL, ARCHIVEPOOL, and
SPACEMGPOOL)v TAPEPOOL, a tape storage pool
Protecting Your Database and Storage PoolA company’s standard procedures include the following:v Perform reclamation of its copy storage pool, once a week. Reclamation for the
copy storage pools is turned off at other times.
Note: In a copy storage pool definition, the REUSEDELAY parameter delaysvolumes from being returned to scratch or being reused. Set the valuehigh enough to ensure that the database can be restored to an earlierpoint in time and that database references to files in the storage pool arevalid. For example, to retain database backups for seven days and,therefore, sets REUSEDELAY to 7.
v Back up its storage pools every night.v Perform a full backup of the database once a week and incremental backups on
the other days.v Ship the database and copy storage pool volumes to an offsite location every
day.
To protect client data, the administrator does the following:1. Creates a copy storage pool named DISASTER-RECOVERY. Only scratch tapes
are used, and the maximum number of scratch volumes is set to 100. The copystorage pool is defined by entering:define stgpool disaster-recovery tapeclass pooltype=copymaxscratch=100
2. Performs the first backup of the primary storage pools.
Note: The first backup of a primary storage pool is a full backup and,depending on the size of the storage pool, could take a long time.
3. Defines schedules for the following daily operations:a. Incremental backups of the primary storage pools each night by issuing:
backup stgpool backuppool disaster-recovery maxprocess=2
backup stgpool archivepool disaster-recovery maxprocess=2
backup stgpool spacemgpool disaster-recovery maxprocess=2
backup stgpool tapepool disaster-recovery maxprocess=2
Chapter 24. Protecting and Recovering Your Server 571

These commands use multiple, parallel processes to perform an incrementalbackup of each primary storage pool to the copy pool. Only those files forwhich a copy does not already exist in the copy pool are backed up.
Note: Migration should be turned off during the rest of the day. You couldadd a schedule to migrate from disk to tape at this point. In this way,the backups are done while the files are still on disk.
b. Change the access mode to OFFSITE for volumes that have read-write orread-only access, are onsite, and are at least partially filled. This is done byentering:update volume * access=offsite location='vault site info'wherestgpool=disaster-recovery whereaccess=readwrite,readonlywherestatus=filling,full
c. Back up the database by entering:backup db type=incremental devclass=tapeclass scratch=yes
4. Does the following operations nightly after the scheduled operations havecompleted:a. Backs up the volume history and device configuration files. If they have
changed, back up the server options files and the database and recovery logsetup information.
b. Moves the volumes marked offsite, the database backup volumes, volumehistory files, device configuration files, server options files and the databaseand recovery log setup information to the offsite location.
c. Identifies offsite volumes that should be returned onsite by using theQUERY VOLUME command:query volume stgpool=disaster-recovery access=offsite status=empty
These volumes, which have become empty through expiration, reclamation,and file space deletion, have waited the delay time specified by theREUSEDELAY parameter. The administrator periodically returns outdatedbackup database volumes. These volumes are displayed with the QUERYVOLHISTORY command and can be released for reuse with the DELETEVOLHISTORY command.
5. Brings the volumes identified in step 4c onsite and updates their access toread-write.
Recovering to a Point-in-Time from a DisasterIn this scenario, the processor on which Tivoli Storage Manager resides, thedatabase, and all onsite storage pool volumes are destroyed by fire. Anadministrator restores the server to the point-in-time of the last backup. You canuse either full and incremental backups or snapshot database backups to restore adatabase to a point-in-time.
DRM can help you do these steps.
Do the following:
572 Tivoli Storage Manager for Windows: Administrator’s Guide

1. Install Tivoli Storage Manager on the replacement processor with the sameserver options and the same size database and recovery log as on thedestroyed system. For example, to initialize the database and recovery log,enter:dsmserv format 1 log1 1 dbvol1
2. Move the latest backup and all of the DISASTER-RECOVERY volumes onsitefrom the offsite location.
Note: Do not change the access mode of these volumes until after you havecompleted step 7.
3. If a current, undamaged volume history file exists, save it.4. Restore the volume history and device configuration files, the server options
and the database and recovery log setup. For example, the recovery site mightrequire different device class, library, and drive definitions. For moreinformation, see “Updating the Device Configuration File” on page 550.
5. Restore the database from the latest backup level by issuing the DSMSERVRESTORE DB utility (see “Recovering Your Server Using Database andStorage Pool Backups” on page 552).
6. Change the access mode of all the existing primary storage pool volumes inthe damaged storage pools to DESTROYED by entering:update volume * access=destroyed wherestgpool=backuppool
update volume * access=destroyed wherestgpool=archivepool
update volume * access=destroyed wherestgpool=spacemgpool
update volume * access=destroyed wherestgpool=tapepool
7. Issue the QUERY VOLUME command to identify any volumes in theDISASTER-RECOVERY storage pool that were onsite at the time of thedisaster. Any volumes that were onsite would have been destroyed in thedisaster and could not be used for restore processing. Delete each of thesevolumes from the database by using the DELETE VOLUME command withthe DISCARDDATA option. Any files backed up to these volumes cannot berestored.
8. Change the access mode of the remaining volumes in theDISASTER-RECOVERY pool to READWRITE by entering:update volume * access=readwrite wherestgpool=disaster-recovery
Note: At this point, clients can access files. If a client tries to access a file thatwas stored on a destroyed volume, the retrieval request goes to thecopy storage pool. In this way, clients can access their files withoutwaiting for the primary storage pool to be restored. When you updatevolumes brought from offsite to change their access, you greatly speedrecovery time.
9. Define new volumes in the primary storage pool so the files on the damagedvolumes can be restored to the new volumes. The new volumes also let clientsbackup, archive, or migrate files to the server. You do not need to perform thisstep if you use only scratch volumes in the storage pool.
10. Restore files in the primary storage pool from the copies located in theDISASTER-RECOVERY pool by entering:restore stgpool backuppool maxprocess=2
restore stgpool archivepool maxprocess=2
restore stgpool spacemgpool maxprocess=2
restore stgpool tapepool maxprocess=2
Chapter 24. Protecting and Recovering Your Server 573

These commands use multiple parallel processes to restore files to primarystorage pools. After all the files have been restored for a destroyed volume,that volume is automatically deleted from the database. See “When a StoragePool Restoration Is Incomplete” on page 559 for what to do if one or morevolumes cannot be fully restored.
11. To ensure against another loss of data, immediately back up all storagevolumes and the database. Then resume normal activity, including weeklydisaster backups and movement of data to the offsite location.
Point-in-Time Restores In a Shared Library EnvironmentA point-in-time restore for a library manager server or a library client serverrequires additional steps to ensure the consistency of the volume inventories of theaffected servers. This section describes the procedures for the two possiblescenarios.
Point-in-Time Restore of a Library Manager Server: A point-in-time restore of alibrary manager server could create inconsistencies between the volume inventoriesof the library manager and library client servers. The restore removes all libraryclient server transactions that occurred after the point in time from the volumeinventory of the library manager server. The volume inventory of the library clientserver, however, still contains those transactions. New transactions could then bewritten to these volumes, resulting in a loss of client data. To prevent this problem,do the following after the restore:1. Halt further transactions on the library manager server: Disable all schedules,
migration and reclamations on the library client and library manager servers.2. Audit all libraries on all library client servers. The audits will re-enter those
volume transactions that were removed by the restore on the library managerserver. You should audit the library clients from the oldest to the newestservers. Use the volume history file from the library client and library managerservers to resolve any conflicts.
3. Delete the volumes from the library clients that do not own the volumes.4. Resume transactions by enabling all schedules, migration, and reclamations on
the library client and library manager servers.
Point-in-Time Restore of a Library Client Server: A point-in-time restore of alibrary client server could cause volumes to be removed from the volumeinventory of a library client server and later overwritten. If a library client serveracquired scratch volumes after the point-in-time to which the server is restored,these volumes would be set to private in the volume inventories of the libraryclient and library manager servers. After the restore, the volume inventory of thelibrary client server can be regressed to a point-in-time before the volumes wereacquired, thus removing them from the inventory. These volumes would still existin the volume inventory of the library manager server as private volumes ownedby the client.
The restored volume inventory of the library client server and the volumeinventory of the library manager server would be inconsistent. The volumeinventory of the library client server must be synchronized with the volumeinventory of the library manager server in order to return those volumes to scratchand enable them to be overwritten. To synchronize the inventories, do thefollowing:1. Audit the library on the library client server to synchronize the volume
inventories of the library client and library manager servers.2. To resolve any remaining volume ownership concerns, refer to the volume
history and issue the UPDATE VOLUME command as needed.
574 Tivoli Storage Manager for Windows: Administrator’s Guide
Recovering a Lost or Damaged Storage Pool VolumeIf a company makes the preparations described in “Protecting Your Database andStorage Pool” on page 571, it can recover from a media loss. In the followingscenario, an operator inadvertently destroys a tape volume (DSM087) belonging tothe TAPEPOOL storage pool. An administrator performs the following actions torecover the data stored on the destroyed volume by using the offsite copy storagepool:1. Determine the copy pool volumes that contain the backup copies of the files
that were stored on the volume that was destroyed by entering:restore volume dsm087 preview=yes
This command produces a list of offsite volumes that contain the backed upcopies of the files that were on tape volume DSM087.
2. Set the access mode of the copy volumes identified as UNAVAILABLE toprevent reclamation.
Note: This precaution prevents the movement of files stored on these volumesuntil volume DSM087 is restored.
3. Bring the identified volumes to the onsite location and set their access mode toREADONLY to prevent accidental writes. If these offsite volumes are beingused in an automated library, the volumes must be checked into the librarywhen they are brought back onsite.
4. Restore the destroyed files by entering:restore volume dsm087
This command sets the access mode of DSM087 to DESTROYED and attemptsto restore all the files that were stored on volume DSM087. The files are notactually restored to volume DSM087, but to another volume in the TAPEPOOLstorage pool. All references to the files on DSM087 are deleted from thedatabase and the volume itself is deleted from the database.
5. Set the access mode of the volumes used to restore DSM087 to OFFSITE usingthe UPDATE VOLUME command.
6. Set the access mode of the restored volumes, that are now onsite, toREADWRITE.
7. Return the volumes to the offsite location. If the offsite volumes used for therestoration were checked into an automated library, these volumes must bechecked out of the automated library when the restoration process is complete.
Chapter 24. Protecting and Recovering Your Server 575

576 Tivoli Storage Manager for Windows: Administrator’s Guide

Chapter 25. Using Tivoli Disaster Recovery Manager
You can use Tivoli Disaster Recovery Manager (DRM) product to do any one or allthe following:v Prepare a disaster recovery plan that can help you to recover your applications
in the case of a disaster. You can recover at an alternate site, on replacementcomputer hardware, and with people who are not familiar with the applications.
v Manage your offsite recovery media.v Store your client recovery information.
You can also use the disaster recovery plan for audits to certify the recoverabilityof the server.
Note: DRM is a separate program product that must be licensed before using. Formore information, see “Registering Licensed Features” on page 384.
Before using this chapter, you should be familiar with “Chapter 24. Protecting andRecovering Your Server” on page 531.
This chapter contains the following sections:
Tasks:
“Specifying Defaults for Tivoli Disaster Recovery Manager” on page 578
“Specifying Recovery Instructions for Your Site” on page 582
“Specifying Information About Your Server and Client Node Machines” on page 584
“Specifying Recovery Media for Client Machines” on page 588
“Creating and Storing the Disaster Recovery Plan” on page 589
“Managing Disaster Recovery Plan Files Stored on Target Servers” on page 592
“Moving Backup Media” on page 594
“Summary of Tivoli Disaster Recovery Manager Daily Tasks” on page 599
“Staying Prepared for a Disaster” on page 600
“Recovering From a Disaster” on page 601
Disaster Recovery Reference:
“Tivoli Disaster Recovery Manager Checklist” on page 608
“The Disaster Recovery Plan File” on page 611
In this chapter, most examples illustrate how to perform tasks by using a TivoliStorage Manager command-line interface. For information about the commands,see Administrator’s Reference, or issue the HELP command from the command lineof a Tivoli Storage Manager administrative client.
Tivoli Storage Manager tasks can also be performed from the administrative Webinterface. For more information about using the administrative interface, see QuickStart.
Task Required Privilege Class
All DRM tasks unless otherwise noted. System
© Copyright IBM Corp. 1994, 2002 577

Note: The default installation directories changed for Tivoli Storage Manager. Ifyou created a recovery plan file with ADSM Version 3 Release 1, somenames in that file may no longer be valid. After installing Tivoli StorageManager, immediately back up your storage pools and database and create anew recovery plan file.
You can use a recovery plan file and database backup that were created onan ADSM Version 3 Release 1 server to restore a Tivoli Storage Managerserver. After the restore is complete, start the server with the followingcommand:dsmserv upgradedb
Use the UPGRADEDB parameter only for the initial startup.To recover from a disaster, you must know the location of offsite recovery media.DRM helps you to determine which volumes to move offsite and back onsite and,tracks the location of the volumes.
Specifying Defaults for Tivoli Disaster Recovery ManagerDRM provides default settings for the preparation of the recovery plan file and forthe management of offsite recovery media. However, you can override thesedefault settings. To query the settings, issue the following command:query drmstatus
The output will be similar to the following:
Recovery Plan Prefix: c:\Program Files\Tivoli\TSM;\server2\recplans\Plan Instructions Prefix: c:\Program Files\Tivoli\TSM;\server2\recinstr\
Replacement Volume Postfix: @Primary Storage Pools: PRIM1 PRIM2
Copy Storage Pools: COPY*Not Mountable Location Name: Local
Courier Name: Joe's Courier ServiceVault Site Name: Ironvault, D. Lastname, 1-000-000-0000
DB Backup Series Expiration Days: 30 Day(s)Check Label?: Yes
Process FILE Device Type?: NoCommand File Name: c:\drm\orm\exec.cmd
Specifying Defaults for the Disaster Recovery Plan FileThe following table describes how to set defaults for the disaster recovery plan file.
578 Tivoli Storage Manager for Windows: Administrator’s Guide

Table 34. Defaults for the Disaster Recovery Plan File
Primary storage pools to beprocessed
When the recovery plan file is generated, you can limit processing to specified pools.The recovery plan file will not include recovery information and commands forstorage pools with a data format of NETAPPDUMP.
The default at installation: All primary storage pools.
To change the default: SET DRMPRIMSTGPOOL
For example, to specify that only the primary storage pools named PRIM1 and PRIM2are to be processed, enter:
set drmprimstgpool prim1,prim2
Note: To remove all previously specified primary storage pool names and thus selectall primary storage pools for processing, specify a null string (″″) in SETDRMPRIMSTGPOOL.
To override the default: Specify primary storage pool names in the PREPAREcommand
Copy storage pools to beprocessed
When the recovery plan file is generated, you can limit processing to specified pools.
The default at installation: All copy storage pools.
To change the default: SET DRMCOPYSTGPOOL
For example, to specify that only the copy storage pools named COPY1 and COPY2are to be processed, enter:
set drmcopystgpool copy1,copy2
Notes:
1. To remove any specified primary storage pool names, and thus select all primarystorage pools, specify a null string (″″) in SET DRMCOPYSTGPOOL.
2. If you specify both primary and copy storage pools, the specified copy storagepools should be those used to back up the specified primary storage pools.
To override the default: Specify copy storage pool names in the PREPARE command
Identifier for replacementvolume names
To restore a primary storage pool volume, mark the original volume destroyed andcreate a replacement volume having a unique name. You can specify a character to beappended to the name of the original volume in order to create a name for thereplacement volume. This character can help you find the replacement volume namesin the disaster recovery plan. For details about the restore process, see “How RestoreProcessing Works” on page 532.
The default identifier at installation: @
To change the default: SET DRMPLANVPOSTFIX
For example, to use the character r, enter:
set drmplanvpostfix r
Chapter 25. Using Tivoli Disaster Recovery Manager 579

Table 34. Defaults for the Disaster Recovery Plan File (continued)
Recovery instructionsprefix
You can specify a prefix for the names of the recovery instructions source files in therecovery plan file.
The default at installation: For a description of how DRM determines the defaultprefix, see the INSTRPREFIX parameter of the PREPARE command section in theAdministrator’s Reference or enter HELP PREPARE from administrative client commandline.
To set a default: SET DRMINSTRPREFIX
For example, to specify the prefix as c:\ProgramFiles\Tivoli\TSM;\server2\recinstr\rpp, enter:
set drminstrprefix c:\Program Files\Tivoli\TSM;\server2\recinstr\rpp
The disaster recovery plan file will include, for example, the following file:
c:\Program Files\Tivoli\TSM;\server2\recinstr\rpp.RECOVERY.INSTRUCTIONS.GENERAL
To override the default: The INSTRPREFIX parameter with the PREPARE command
Prefix for the recovery planfile
You can specify a prefix to the path name of the recovery plan file. DRM uses thisprefix to identify the location of the recovery plan file and to generate the macros andscript file names included in the RECOVERY.SCRIPT.DISASTER.RECOVERY.MODEand RECOVERY.SCRIPT.NORMAL.MODERECOVERY.DRMODE andRECOVERY.NMODE stanzas.
The default at installation: For a description of how DRM determines the defaultprefix, see the PLANPREFIX parameter of the PREPARE command section in theAdministrator’s Reference or enter HELP PREPARE from administrative client commandline.
To change the default: SET DRMPLANPREFIX
For example, to specify the prefix as c:\Program Files\Tivoli\TSM;\server2\recplans\,enter:
set drmplanprefix c:\Program Files\Tivoli\TSM;\server2\recplans\
The disaster recovery plan file name created by PREPARE processing will be in thefollowing format:
c:\Program Files\Tivoli\TSM;\server2\recplans\20000603.013030
To override the default: The PLANPREFIX parameter with the PREPARE command
The disaster recovery planexpiration period
You can set the numbers of days after creation that a disaster recovery plan file storedon a target server expires. After the number of days has elapsed, all recovery planfiles that meet both of the following conditions are eligible for expiration:
v The last recovery plan associated with the database series is older than the setnumber of days.
v The recovery plan file is not associated with the most recent backup series.
The default at installation: 60 days
To change the default: SET DRMRPFEXPIREDAYS
For example, to change the time to 90 days, enter:
set drmrpfexpiredays 90
Specifying Defaults for Offsite Recovery Media ManagementThe following table describes how to set defaults for offsite recovery mediamanagement.
580 Tivoli Storage Manager for Windows: Administrator’s Guide

Copy storage pool volumesto be processed
MOVE DRMEDIA and QUERY DRMEDIA can process copy storage pool volumes inthe MOUNTABLE state. You can limit processing to specified copy storage pools.
The default at installation: All copy storage pool volumes in the MOUNTABLE state
To change the default: SET DRMCOPYSTGPOOL
To override the default: COPYSTGPOOL parameter on MOVE DRMEDIA or QUERYDRMEDIA
Executable commands filename
You can use MOVE DRMEDIA or QUERY DRMEDIA to generate executablecommands and store them in a file.
The default file name at installation: None
To set a default: SET DRMCMDFILENAME. For example, to set the file name asc:\drm\orm\exec.cmd enter:
set drmcmdfilename c:\drm\orm\exec.cmd
To override the default: CMDFILENAME parameter on MOVE DRMEDIA or QUERYDRMEDIA
Location name for volumesthat move to theNOTMOUNTABLE state
MOVE DRMEDIA generates a location name for volumes that move to theNOTMOUNTABLE state.
The default at installation: NOTMOUNTABLE
To change the default: SET DRMNOTMOUNTABLENAME
For example, to specify a location named LOCAL, enter:
set drmnotmountablename local
Location name for volumesthat move to the COURIERor COURIERRETRIEVEstate
MOVE DRMEDIA generates a location name for volumes that are changing fromNOTMOUNTABLE to COURIER or from VAULTRETRIEVE to COURIERRETRIEVE.
The default at installation: COURIER
To change the default: SET DRMCOURIERNAME
For example, to specify a courier named Joe’s Courier Service, enter:
set drmcouriername "Joe's Courier Service"
Reading labels of checkedout volumes
To determine whether DRM reads the sequential media labels of volumes that arechecked out with MOVE DRMEDIA.
The default at installation: DRM reads the volume labels.
To change the default: SET DRMCHECKLABEL
For example, to specify that DRM should not read the volume labels, enter:
set drmchecklabel no
Chapter 25. Using Tivoli Disaster Recovery Manager 581

Expiration period of adatabase backup series
A database backup series (full plus incremental and snapshot) is eligible forexpiration if all of these conditions are true:
v The volume state is VAULT or the volume is associated with a device type ofSERVER (for virtual volumes).
v It is not the most recent database backup series.
v The last volume of the series exceeds the expiration value, number of days sincethe last backup in the series.
The default at installation: 60 days
To change the default: SET DRMDBBACKUPEXPIREDAYS
For example, to set the expiration value to 30 days, enter:
set drmdbbackupexpiredays 30
Whether to process backupvolumes of the FILE devicetype
At installation, MOVE DRMEDIA and QUERY DRMEDIA will not process backupvolumes that are associated with a device type of FILE.
The default at installation: Backup volumes of the FILE device type are notprocessed
To change the default: SET DRMFILEPROCESS
To allow processing, enter:
set drmfileprocess yes
Vault Name MOVE DRMEDIA uses the vault name to set the location of volumes that are movingfrom the COURIER state to the VAULT state
The default at installation: The vault name is set to VAULT.
To change the default: SET DRMVAULTNAME
For example, to specify the vault name as IRONVAULT, the contact name as J.SMITH, and the telephone number as 1-555-000-0000, enter:
set drmvaultname "Ironvault, J. Smith, 1-555-000-0000"
Specifying Recovery Instructions for Your SiteThe disaster recovery plan includes instructions that you create. Enter yourinstructions in flat files that have the following names:v prefix.RECOVERY.INSTRUCTIONS.GENERALv prefix.RECOVERY.INSTRUCTIONS.OFFSITEv prefix.RECOVERY.INSTRUCTIONS.INSTALLv prefix.RECOVERY.INSTRUCTIONS.DATABASEv prefix.RECOVERY.INSTRUCTIONS.STGPOOL
Note: The files created for the recovery instructions must be physical sequentialfiles.
RECOVERY.INSTRUCTIONS.GENERALInclude information such as administrator names, telephone numbers, andlocation of passwords. For example:
582 Tivoli Storage Manager for Windows: Administrator’s Guide

Recovery Instructions for TSM Server ACMESRV on system ZEUSJoe Smith (wk 002-000-1111 hm 002-003-0000): primary system programmerSally Doe (wk 002-000-1112 hm 002-005-0000): primary recovery administratorJane Smith (wk 002-000-1113 hm 002-004-0000): responsible manager
Security Considerations:Joe Smith has the password for the Admin ID ACMEADM. If Joe is unavailable,you need to either issue SET AUTHENTICATION OFF or define a newadministrative user ID at the replacement TSM server console.
RECOVERY.INSTRUCTIONS.OFFSITEInclude information such as the offsite vault location, courier’s name, andtelephone numbers. For example:
Our offsite vault location is Ironvault, Safetown, Az.The phone number is 1-800-000-0008. You need to contact them directlyto authorize release of the tapes to the courier.Our courier’s name is Fred Harvey. You can contact him at 1-800-444-0000.Since our vault is so far away, be sure to give the courier a listof both the database backup and copy storage pool volumes required. Fredis committed to returning these volumes to us in less than 12 hours.
RECOVERY.INSTRUCTIONS.INSTALLInclude information about server installation and the location ofinstallation volumes and the license number. For example:
You will need to reinstall the TSM server and administrativeclient after installing the Windows operating system.The install volume for the TSM server is INS001. If that is lost, youwill need to contact Copy4You Software, at 1-800-000-0000, and obtaina new copy. Another possibility is the local IBM Branch office at 555-7777.
A sample file, recinsti.txt, is shipped with DRM. You may want to copyrecinsti.txt into your RECOVERY.INSTRUCTIONS.INSTALL file tosupplement your installation- specific instructions.
- Obtain a workstation with at least the following:
o 16MB of memory (32MB recommended)o CD-ROM device
- Install Microsoft Windows NT 4.0 or later
- Install the TSM Server and TSM Administrative Client
o It is recommended that you have at least 100MB of disk storageo The installation directory to specify on the Setup Type screen
can be found in the SERVER.REQUIREMENTS stanza within thedisaster recovery plan file
o It is recommended that the TSM Server be brought up to themost current maintenance level. If this is not possible, thenthe minimum acceptable maintenance level is the level usedto create the disaster recovery plan file. The level used tocreate the disaster recovery plan file can be found in thePLANFILE.DESCRIPTION stanza within the disaster recovery planfile.
RECOVERY.INSTRUCTIONS.DATABASEInclude information about how to recover the database and about howmuch hardware space requirements. For example:
Chapter 25. Using Tivoli Disaster Recovery Manager 583
You will need to find replacement disk space for the server database. Wehave an agreement with Joe Replace that in the event of a disaster, hewill provide us with disk space.
RECOVERY.INSTRUCTIONS.STGPOOLInclude information on primary storage pool recovery instructions. Forexample:
Do not worry about the archive storage pools during this disaster recovery.Focus on migration and backup storage pools.The most important storage pool is XYZZZZ.
Specifying Information About Your Server and Client Node MachinesYou need information about your server machine to rebuild its replacement. Youalso need information about client node machines to rebuild or restore them.Follow this procedure to specify that information and store it in the serverdatabase:
Server Machine
1. Specify server machine information:Issue the DEFINE MACHINE command. with ADSMSERVER=YES. Forexample, to define machine MACH22 in building 021, 2nd floor, in room 2929,with a priority of 1, enter:define machine tsm1 adsmserver=yes priority=1
Client Machines
2. Specify the client node location and business priority:Issue the DEFINE MACHINE command. For example, to define machineMACH22 in building 021, 2nd floor, in room 2929, with a priority of 1, enter:define machine mach22 building=021 floor=2 room=2929 priority=1
3. Associate one or more client nodes with a machine:Issue the DEFINE MACHNODEASSOCIATION command. Use this associationinformation to identify client nodes on machines that were destroyed. Youshould restore the file spaces associated with these nodes. For example, toassociate node CAMPBELL with machine MACH22, enter:define machnodeassociation mach22 campbell
To query machine definitions, issue the QUERY MACHINE command. See theexample, in “Client Recovery Scenario” on page 604.4. To add machine characteristics and recovery instructions to the database, issue
the INSERT MACHINE command. You must first query the operating systemto identify the characteristics for your client machine. You can add theinformation manually or use a Microsoft VBScript command procedure to do it.A sample program is shipped with DRM.v Add information manually:
The following partial output is from a query on an AIX client machine.
584 Tivoli Storage Manager for Windows: Administrator’s Guide

--1 Host Name: mach22 with 256 MB Memory Card--- 256 MB Memory Card-----4 Operating System: AIX Version 4 Release 3------ Hardware Address: 10:00:5x:a8:6a:46
Specify characteristics and recovery instructions one line at a time withseparate INSERT MACHINE commands:– To save the first line (Host Name: mach22 with 256 MB Memory Card) as
line 1 and to save the fourth line (Operating System: AIX Version 4Release 3) as line 2 for machine MACH22, issue the following commands:insert machine mach22 1 characteristics="Host Name: mach22 with256 MB Memory Card"
insert machine mach22 2 characteristics="Operating System:AIX Version 4 Release 3"
– To specify recovery instructions for your client machine, issue thefollowing command:insert machine mach22 1 -
recoveryinstructions="Recover this machine for accountsreceivable dept."
v Add Information Using a Microsoft VBScript Command Procedure
To help automate the adding of client machine information, a sampleVBScript command procedure named machchar.vbs is shipped with DRM. Thefollowing example shows how to use a local program to add machinecharacteristics or recovery instructions:a. The output from the AIX commands lsdev, lsvg, and df is written to the
file clientinfo.txt on the AIX client machine that backed up data to theserver. These commands list the devices, logical volumes by volumegroup, and file systems.
b. From an AIX prompt, issue the following commands:
echo "devices" > clientinfo.txtlsdev -C | sort -d -f >> clientinfo.txtecho "logical volumes by volume group" >> clientinfo.txtlsvg -o | lsvg -i -l >> clientinfo.txtecho "file systems" >> clientinfo.txtdf >> clientinfo.txt
c. The file, clientinfo.txt, from the AIX client machine is transferred to aWindows machine that has an administrative command-line clientinstalled. The file is then processed by the a sample VBScript commandprocedure, which builds a macro of INSERT commands (one commandfor each line in the file). Figure 93 on page 586 is an example procedurenamed machchar.vbs to insert machine characteristics.
Chapter 25. Using Tivoli Disaster Recovery Manager 585

'***************************************************************************' Tivoli Disaster Recovery Manager for Windows NT/2000 Sample Script'' Read machine characteristics from an input file and build an output file' that is a TSM macro. The TSM macro contains statements which are' TSM commands to insert client machine information into the ADSM server' database. The TSM macro is used with the TSM administrative client.'' Invoke with:' cscript machchar.vbs machinename inputmachinefilename outputmacrofilename' where:' machinename is the name of a machine that has previously' been defined to the TSM server with the' DEFINE MACHINE command' inputmachinefilename is the name of the input file which contains' the client machine characteristics. This file' would typically be built on the client machine' then the file would be transferred to the' Windows machine where the TSM Administrative' client is installed.' outputmacrofilename is the name of the output file in an existing' directory which will be the TSM macro. The' TSM macro will consist of a series of commands' to insert machine characteristics into the TSM' server database. For example:'' INSERT MACHINE mch1 n characteristics='xxx...''' where:' n represents the sequence number' this line will have in the' TSM server database' 'xxx...' represents a single line from' the input file'' NOTE: The maximum length of a line of machine' characteristics is 1024'' Example usage:' cscript machchar.vbs mch1 c:\client1\clientinfo.txt c:\client1\clientinfo.mac'***************************************************************************Dim argsDim MACHINENAME, INFILE, OUTFILEdim fsodim fo, fidim SEQUENCEDim CRLF
Figure 93. Example of VBScript Command Procedure to Insert Machine Characteristics (Part 1 of 3)
586 Tivoli Storage Manager for Windows: Administrator’s Guide

CRLF = Chr(13) & Chr(10)Const ForReading = 1, ForWriting = 2
'***************************************************************************' Get input arguments: MACHINENAME =machinename' INFILE =inputmachinefilename' OUTFILE =outputmacrofilename'***************************************************************************
set args = Wscript.Arguments
If args.Count < 3 ThenWscript.Echo _"usage: cscript machchar.vbs machinename inputmachinefilename outputmacrofilename" & CRLF & _"example: cscript machchar.vbs mch1 c:\client1\clientinfo.txt c:\client1\clientinfo.mac"Wscript.Quit(1)
ElseMACHINENAME = args.Item(0)INFILE = args.Item(1)OUTFILE = args.Item(2)
End if
Set fso = CreateObject("Scripting.FileSystemObject")
'***************************************************************************' Create the TSM macro file.'***************************************************************************
Set fo = fso.OpenTextFile(OUTFILE, ForWriting, True)
Wscript.Echo "Creating TSM macro file: " & OUTFILE
'***************************************************************************' Place a TSM command in the TSM macro to delete any existing machine' characteristics for this machine from the TSM server database.'***************************************************************************
fo.WriteLine "delete machine " & MACHINENAME & " type=characteristics"
'***************************************************************************' Read a line from the input machine characteristics file, add the TSM' command to insert the line of machine characteristics into the TSM server' database, and write the result to the output TSM macro.'***************************************************************************
Figure 93. Example of VBScript Command Procedure to Insert Machine Characteristics (Part 2 of 3)
Chapter 25. Using Tivoli Disaster Recovery Manager 587

The machchar.vbs VBScript command procedure is run:cscript machchar.vbs acctsrecv clientinfo.txt clientinfo.mac
Then the macro is run to load the data into the database.d. To add the machine characteristics, start the administrative client and run
the macro. For example:> dsmadmc -id=xxx -pw=xxx macro clientinfo.mac
You can view your machine characteristics by issuing the QUERYMACHINE command with FORMAT=CHARACTERISTICS parameter.
e. To specify recovery instructions for your client machine, you can use asimilar VBScript command procedure but with theRECOVERYINSTRUCTIONS parameter.
Specifying Recovery Media for Client MachinesFollow these steps to specify the bootable media needed to reinitialize or reinstallan operating system on a client machine and to associate machines with media.You can also associate non-executable media such as application user guides withclient machines.1. Define the bootable media. For example, define the media named
TELLERWRKSTNIMAGE which is for AIX Version 4.3, contains the requiredvolumes named AIX001, AIX002, and AIX003, and is located in Building 21.define recoverymedia tellerwrkstnimage type=boot
volumenames=aix001,aix002,aix003 product="AIX 4.3"location="Building 21"
You should define the recovery media after a client machine configurationchanges. For example, after you have installed a new level of AIX on a clientmachine and created a bootable image using mksysb, issue the DEFINERECOVERYMEDIA command to define the new mksysb volumes.
To query your recovery media definitions, issue the QUERYRECOVERYMEDIA command with the FORMAT=DETAILED parameter.
SEQUENCE = 1
Set fi = fso.OpenTextFile(INFILE, ForReading, False)
Do While fi.AtEndOfStream <> True
INLINE = fi.ReadLinefo.WriteLine "insert machine " & MACHINENAME & " " & SEQUENCE & " char='" & INLINE &"'"SEQUENCE = SEQUENCE + 1
Loop
'***************************************************************************' Close the files.'***************************************************************************
fo.Closefi.Close
Figure 93. Example of VBScript Command Procedure to Insert Machine Characteristics (Part 3 of 3)
588 Tivoli Storage Manager for Windows: Administrator’s Guide

2. Associate one or more machines with recovery media. Use the associationinformation to identify the boot media to use in the replacement machines. Forexample, to associate machine MACH255 with recovery mediaTELLERWRKSTNIMAGE, issue the following command:define recmedmachassociation tellerwrkstnimage mach255
3. When the boot media is moved offsite, update its location. For example, toupdate the location of boot media TELLERWRKSTNIMAGE to the offsitelocation IRONVAULT, issue the following command:update recoverymedia tellerwrkstnimage location=ironvault
You can define media that contain softcopy manuals that you would need duringrecovery. For example, to define a CD-ROM containing the AIX 4.3 manuals thatare on volume CD0001, enter:define recoverymedia aix43manuals type=other volumes=cd0001
description="AIX 4.3 Bookshelf"
Creating and Storing the Disaster Recovery PlanYou can create a disaster recovery plan file and store the file locally or on anotherserver.
The recovery plan contains the following information:v The recovery procedurev A list of required database and storage pool backup volumes, devices to read
those volumes, and database and recovery log space requirementsv Copies of the server options file, device configuration file, and volume history
information filev Commands for performing database recovery and primary storage pool recoveryv Commands for registering licensesv Instructions that you definev Machine and recovery media information that you define
For details about the recovery plan file, see “The Disaster Recovery Plan File” onpage 611.
DRM creates one copy of the disaster recovery plan file each time you issue thePREPARE command. You should create multiple copies of the plan for safekeeping.For example, keep copies in print, on diskettes, on network- mounted disk spacethat is located offsite, or on a remote server.
Before creating a disaster recovery plan, back up your storage pools then backupthe database. See “Backing Up Storage Pools” on page 539 and “Backing Up theDatabase” on page 542 for details about these procedures.
If you manually send backup media offsite, see “Moving Backup Volumes Offsite”on page 596. If you use virtual volumes, see “Using Virtual Volumes to Store Dataon Another Server” on page 501.
When your backups are both offsite and marked offsite, you can create a disasterrecovery plan.
You can use the Tivoli Storage Manager scheduler to periodically run thePREPARE command (see “Chapter 19. Automating Server Operations” onpage 401).
Chapter 25. Using Tivoli Disaster Recovery Manager 589

Note: DRM creates a plan that assumes that the latest database full plusincremental series would be used to restore the database. However, you maywant to use DBSNAPSHOT backups for disaster recovery and retain yourfull plus incremental backup series on site to recover from possibleavailability problems. In this case, you must specify the use ofDBSNAPSHOT backups in the PREPARE command. For example:prepare source=dbsnapshot
Storing the Disaster Recovery Plan LocallyWhen you create a recovery plan file but do not specify a device class, the file isstored locally in a file system. If you store the file locally, you can specify a storagelocation. For example, to store the recovery plan file locally in the c:\ProgramFiles\Tivoli\TSM;\server2\recplans\ directory, enter:prepare planprefix=c:\Program Files\Tivoli\TSM;\server2\recplans\
Recovery plan files that are stored locally are not automatically expired. Youshould periodically delete down-level recovery plan files manually.
DRM appends to the file name the date and time (yyyymmdd.hhmmss). Forexample:c:\Program Files\Tivoli\TSM;\server2\recplans\20000925.120532
Storing the Disaster Recovery Plan on a Target ServerWhen you create a recovery plan file and specify a device class, the file is storedon a target server. Storing recovery plan files on a target server provides thefollowing:v A central repository on a target server for recovery plan filesv Automatic expiration of plan filesv Query capabilities that display information about recovery plan files and the
ability to display the contents of a recovery plan file located on a target serverv Recovery plan file retrieval from a target server
First, set up the source and target servers and define a device class a device typeof SERVER (see “Setting Up Source and Target Servers for Virtual Volumes” onpage 503 for details). For example, assume a device class named TARGETCLASS isdefined on the source server where you create the recovery plan file. Then tocreate the plan file, enter:prepare devclass=targetclass
The recovery plan file is written as an object on the target server, and a volumehistory record is created on the source server. For more about recovery plan filesthat are stored on target servers, see “Displaying Information about Recovery PlanFiles” on page 592.
Disaster Recovery Plan Environmental ConsiderationsIf TSM is installed in the c:\Program Files\Tivoli\TSM directory, the files arestored as follows:v Server executable, message and help files, and enrollment certificates:
c:\Program Files\Tivoli\TSM;\server\dsmserv.exec:\Program Files\Tivoli\TSM;\server\dsmameng.txtc:\Program Files\Tivoli\TSM;\server\dsmameng.hlpc:\Program Files\Tivoli\TSM;\server\*.lic
590 Tivoli Storage Manager for Windows: Administrator’s Guide

v Disk formatting utility and message files:c:\Program Files\Tivoli\TSM\console\dsmfmt.exec:\Program Files\Tivoli\TSM\console\dsmameng.txt
v Administrative command-line client:c:\Program Files\Tivoli\TSM\saclient\dsmadmc.exe
Each instance of the server has a unique set of files. For example, after you installthe database and log volumes from directory c:\ProgramFiles\Tivoli\TSM;\server2, you might see the following in this instance–specificdirectory:v Server options file, disk file, database, log, and storage pool volumes:
c:\Program Files\Tivoli\TSM;\server2\dsmserv.optc:\Program Files\Tivoli\TSM;\server2\dsmserv.dskc:\Program Files\Tivoli\TSM;\server2\db1.dsmc:\Program Files\Tivoli\TSM;\server2\log1.dsmc:\Program Files\Tivoli\TSM;\server2\data1.dsm
The database, log, and storage pool volumes could also be in a different directory.For example, you might see:
c:\Program Files\Tivoli\TSM;\server2\dbs\db1.dsmc:\Program Files\Tivoli\TSM;\server2\logs\log1.dsmc:\Program Files\Tivoli\TSM;\server2\stg\data1.dsm
Files that typically reside in an instance-specific directory (that is, dsmserv.opt,dsmserv.dsk) and database, log, and storage pool volumes may instead reside in thesame directory in which dsmserv.exe, resides (c:\ProgramFiles\Tivoli\TSM;\server). In this case, the directory containing dsmserv.exe wouldalso be referred to as the instance-specific directory.
When the disaster recovery plan is created, information about the serverenvironment is used in the stanzas within the plan file. This environmentalinformation includes the location of dsmserv.exe, the location of the disk formattingutility, the instance-specific directory, the directories for the database, log, andstorage pool volumes, and so on. During a recovery, it is assumed that the sameserver environment exists.
Additionally, the plan file itself will reside in a directory that you may havespecified or it may reside in the default directory (which is the instance–specificdirectory). For example, if you specified the disaster recovery plan file prefixc:\Program Files\Tivoli\TSM;\server2\prepare\, you might see the following:
c:\Program Files\Tivoli\TSM;\server2\prepare\20000925.120532
The disaster recovery plan file prefix specified (or the instance–specific directory ifno disaster recovery plan file prefix was specified) is also used in the stanzaswithin the plan file. During a recovery, when the plan file has been split intoindividual files, it is assumed that these individual files will reside in this samedirectory.
To summarize, the environment for a recovery using the disaster recovery plan fileis assumed to be the same as the original environment which includes:v The directory structure and location of the server executable and enrollment
certificates (for licensing)v The directory structure and location of the administrative command line clientv The directory structure and location of the disk formatting utilityv The directory structure for server instance-specific files
Chapter 25. Using Tivoli Disaster Recovery Manager 591

v The directory structure for database, log, and storage pool volumesv The directory structure and the files created when the plan file was split into
multiple files, such as the following based on the earlier plan file example (thefollowing is not the entire output):c:\Program Files\Tivoli\TSM;\server2\prepare\LOGANDDB.VOLUMES.INSTALL.CMDc:\Program Files\Tivoli\TSM;\server2\prepare\COPYSTGPOOL.VOLUMES.AVAILABLE.MACc:\Program Files\Tivoli\TSM;\server2\prepare\COPYSTGPOOL.VOLUMES.DESTROYED.MAC
If the recovery environment is not the same, then you must edit the plan file toaccount for the changes in the environment.
To help understand where these various directories and expected locations forexecutables are used within the plan file, see “Example Disaster Recovery PlanFile” on page 618 and you will see the following usage:
Usage Directory
Server executable c:\Program Files\Tivoli\TSM;\server
Enrollment certificates(licensing)
c:\Program Files\Tivoli\TSM;\server
Administrative command lineclient
c:\Program Files\Tivoli\TSM\saclient
Disk formatting utility c:\Program Files\Tivoli\TSM\console
Instance-specific files c:\Program Files\Tivoli\TSM;\server2
Database volumes c:\Program Files\Tivoli\TSM;\server2\dbs
Log volumes c:\Program Files\Tivoli\TSM;\server2\logs
Storage pool volumes c:\Program Files\Tivoli\TSM;\server2\stg
Plan file location c:\Program Files\Tivoli\TSM;\server2\prepare
Indivual files split out fromplan
c:\Program Files\Tivoli\TSM;\server2\prepare
Managing Disaster Recovery Plan Files Stored on Target ServersThe following sections describe how you can view information about disasterrecovery plan files stored on a target server and view their contents. It alsodescribes how to direct the contents of a disaster recovery plan file to another fileand how to delete volume history records of the recovery plan files.
Displaying Information about Recovery Plan FilesYou can display information about recovery plan files from the server that createdthe files (the source server) or from the server on which the files are stored (thetarget server):v From the source server: Issue QUERY RPFILE the command with the
DEVCLASS parameter that was used on the PREPARE command. Specify thetype of database backups that were assumed when the plan was created (eitherfull plus incremental or snapshot). For example, to display a list of all recoveryplan files that have been saved for the source server on any target servers andcreated assuming snapshot database backups, enter:query rpfile devclass=* source=dbsnapshot
You can also issue the QUERY VOLHISTORY command to display a list ofrecovery plan files for the source server. Specify recovery plan files that were
592 Tivoli Storage Manager for Windows: Administrator’s Guide

created assuming either full plus incremental database backups (TYPE=RPFILE)or database snapshot backups (TYPE=RPFSNAPSHOT). For example:query volhistory type=rpfile
v From the target server: Issue a QUERY RPFILE command that specifies the nodename associated with the server or servers that prepared the plan. For example,to display a list of all recovery plan files that have been saved in the targetserver, enter:query rpfile nodename=*
Displaying the Contents of a Recovery Plan FileFrom the server that created the recovery plan file (the source server) or from theserver on which the file is stored (the target server), you can display the contentsof that file that was saved as on object on the target server. For example,v From the source server: Issue the following command for a recovery plan file
created on September 1, 2000 at 4:39 a.m. with the device class TARGETCLASS:query rpfcontent marketing.20000901.043900 devclass=targetclass
v From the target server: Issue the following command for a recovery plan filecreated on August 31,2000 at 4:50 a.m. on a source server named MARKETINGwhose node name is BRANCH8:query rpfcontent marketing.20000831.045000 nodename=branch8
Notes:
1. You cannot issue these commands from a server console.2. An output delay can occur when the plan file is located on tape.
See “The Disaster Recovery Plan File” on page 611 for an example of the contentsof a recovery plan file.
Restoring a Recovery Plan FileTo restore a recovery plan file, use the QUERY RPFCONTENT command anddirect the output to a file. You can issue the command from the server that createdthe files (the source server) or from the server on which the files are stored (thetarget server). To see a list of recovery plan file names, issue the QUERY RPFILEcommand.
For example, a recovery plan file named marketing.20000831.045000 was createdusing the device class of TARGETCLASS and on a source server whose node nameat the target server is BRANCH8. You want to restore the file and direct the outputto rpf.out:v From the source server: Enter,
query rpfcontent marketing.20000831.045000devclass=targetclass > rpf.out
v From the target server: Enter,query rpfcontent marketing.20000831.045000
nodename=branch8 > rpf.out
To display a list of recovery plan files, use the QUERY RPFILE command. See“Displaying Information about Recovery Plan Files” on page 592 for moreinformation.
Chapter 25. Using Tivoli Disaster Recovery Manager 593

Expiring Recovery Plan Files AutomaticallyYou can set DRM to expire recovery plan files a certain number of days after theyare created. To set up expiration, issue the SET DRMRPFEXPIREDAYS command.The default value is 60 days. For example, to change the time to 90 days, enter:set drmrpfexpiredays 90
All recovery plan files that meet the criteria are eligible for expiration if both of thefollowing conditions exist:v The last recovery plan file of the series is over 90 days old.v The recovery plan file is not associated with the most recent backup series. A
backup series consists of a full database backup and all incremental backups thatapply to that full backup. Another series begins with the next full backup of thedatabase.
Expiration applies to plan files based on both full plus incremental and snapshotdatabase backups.
Deleting Recovery Plan Files ManuallyYou can delete volume history records containing information about recovery planfile objects. When the records are deleted from the source server and the graceperiod is reached, the objects are deleted from the target server.
Note: The record for the latest recovery plan file is not deleted.
For example, to delete records for recovery plan files that were created on orbefore 08/30/2000 and assuming full plus incremental database backup series,enter:delete volhistory type=rpfile todate=08/30/2000
To limit the operation to recovery plan files that were created assuming databasesnapshot backups, specify TYPE=RPFSNAPSHOT.
Moving Backup MediaTo recover from a disaster you will need database backup volumes and copystorage pool volumes. To prepare for a disaster, you will need perform thefollowing daily tasks:1. Move new backup media offsite and update the database with their locations.
See “Moving Backup Volumes Offsite” on page 596 for details.2. Return expired or reclaimed backup media onsite and update the database with
their locations. See “Moving Backup Volumes Onsite” on page 597 for details.
Task Required Privilege Class
Send backup volumes offsite and back onsite Unrestricted storage or operator
Offsite recovery media management does not process virtual volumes. To displayall virtual copy storage pool and database backup volumes that have their backupobjects on the remote target server, issue the following command:query drmedia * wherestate=remote
Offsite recovery media management does not move or display any two-sidedvolumes that have a REMOVABLEFILE device type.
594 Tivoli Storage Manager for Windows: Administrator’s Guide

The disaster recovery plan includes backup volume location information and canprovide a list of offsite volumes required to restore a server.
The following diagram shows the typical life cycle of the recovery media:
DRM assigns the following states to volumes. The location of a volume is knownat each state.
MOUNTABLEThe volume contains valid data, and TSM can access it.
NOTMOUNTABLEThe volume contains valid data and is onsite, but TSM cannot access it.
COURIERThe volume contains valid data and is in transit to the vault.
VAULTThe volume contains valid data and is at the vault.
VAULTRETRIEVEThe volume no longer contain valid data and are to be returned to the site.For more information on reclamation of offsite copy storage pool volumes,
Figure 94. Recovery Media Life Cycle
Chapter 25. Using Tivoli Disaster Recovery Manager 595

see “Reclamation of Offsite Volumes” on page 210. For information onexpiration of database backup volumes, see step 1 on page 597 below.
COURIERRETRIEVEThe volume no longer contain valid data and are in the process of beingreturned by the courier.
ONSITERETRIEVEThe volume no longer contain valid data and have been moved back to theonsite location. The volume records of database backup and scratch copystorage pool volumes are deleted from the database. For private copystorage pool volumes, the access mode is updated to READWRITE.
Moving Backup Volumes OffsiteAfter you have created the backup copies of your primary storage pools anddatabase, you can send your backup media offsite. To send media offsite, mark thevolumes as unavailable to TSM and give them to the courier. Do the following toidentify the database backup and copy storage pool volumes and move themoffsite:1. Identify the copy storage pool and database backup volumes to be moved
offsite:query drmedia * wherestate=mountable
DRM displays information similar to the following:
Volume Name State Last Update AutomatedDate/Time LibName
--------------- ---------------- ------------------- -----------------TPBK05 Mountable 01/01/2000 12:00:31 LIBRARYTPBK99 Mountable 01/01/2000 12:00:32 LIBRARYTPBK06 Mountable 01/01/2000 12:01:03 LIBRARY
2. Indicate the movement of volumes whose current state is MOUNTABLE byissuing the following command:move drmedia * wherestate=mountable
For all volumes in the MOUNTABLE state, DRM does the following:v Updates the volume state to NOTMOUNTABLE and the volume location
according to the SET DRMNOTMOUNTABLENAME. If this command hasnot been issued, the default location is NOTMOUNTABLE.
v For a copy storage pool volume, updates the access mode to unavailable.v For a volume in an automated library, checks the volume out of the library.
Notes:
a. During checkout processing, SCSI libraries request operator intervention. Tobypass these requests and eject the cartridges from the library, first issue thefollowing command:move drmedia * wherestate=mountable remove=no
Next, access a list of the volumes by issuing the following command:query drmedia wherestate=notmountable
From this list identify and remove the cartridges (volumes) from the library.3. Send the volumes to the offsite vault. Issue the following command to have
DRM select volumes in the NOTMOUNTABLE state:move drmedia * wherestate=notmountable
596 Tivoli Storage Manager for Windows: Administrator’s Guide

For all volumes in the NOTMOUNTABLE state, DRM updates the volume stateto COURIER and the volume location according to the SETDRMCOURIERNAME. If the SET command has not yet been issued, thedefault location is COURIER. For more information, see “Specifying Defaultsfor Offsite Recovery Media Management” on page 580
4. When the vault location confirms receipt of the volumes, issue the MOVEDRMEDIA command in the COURIER state. For example:move drmedia * wherestate=courier
For all volumes in the COURIER state, DRM updates the volume state toVAULT and the volume location according to the SET DRMVAULTNAMEcommand. If the SET command has not yet been issued, the default location isVAULT. For more information, see “Specifying Defaults for Offsite RecoveryMedia Management” on page 580.
5. To display a list of volumes that contain valid data at the vault, issue thefollowing command:query drmedia wherestate=vault
DRM displays information similar to the following:
Volume Name State Last Update AutomatedDate/Time LibName
----------------- -------------- ------------------- -----------------TAPE0P Vault 01/05/2000 10:53:20TAPE1P Vault 01/05/2000 10:53:20DBT02 Vault 01/05/2000 10:53:20TAPE3S Vault 01/05/2000 10:53:20
6. If you do not want to step through all the states, you can use the TOSTATEparameter on the MOVE DRMEDIA command to specify the destination state.For example, to transition the volumes from NOTMOUNTABLE state toVAULT state, issue the following command:move drmedia * wherestate=notmountable tostate=vault
For all volumes in the NOTMOUNTABLE state, DRM updates the volume stateto VAULT and the volume location according to the SET DRMVAULTNAMEcommand. If the SET command has not yet been issued, the default location isVAULT.
See “Staying Prepared for a Disaster” on page 600 for an example thatdemonstrates sending server backup volumes offsite using MOVE DRMEDIA andQUERY DRMEDIA commands.
Moving Backup Volumes OnsiteUse the following procedure to expire the non-virtual database backup volumesand return the volumes back onsite for reuse or disposal.1. To specify the number of days before a database backup series is expired, issue
the SET DRMDBBACKUPEXPIREDAYS command. To ensure that the databasecan be returned to an earlier level and database references to files in the copystorage pool are still valid, specify the same value for the REUSEDELAYparameter in your copy storage pool definition.The following example sets the number of days to 30.set drmdbbackupexpiredays 30
Chapter 25. Using Tivoli Disaster Recovery Manager 597

A database backup volume is considered eligible for expiration if all of thefollowing conditions are true:v The age of the last volume of the series has exceeded the expiration value.
This value is the number of days since the last backup in the series. Atinstallation, the expiration value is 60 days. To override this value, issue theSET DRMDBBACKUPEXPIREDAYS command.
v For volumes that are not virtual volumes, all volumes in the series are in theVAULT state.
v The volume is not part of the most recent database backup series.
Note: Database backup volumes that are virtual volumes are removed duringexpiration processing. This processing is started manually by issuing theEXPIRE INVENTORY command or automatically through theEXPINTERVAL option setting specified in the server options file.
2. Move a backup volume onsite for reuse or disposal when the volume isreclaimed and:v The status for a copy storage pool volume is EMPTY.v The database backup series is EXPIRED.
To determine which volumes to retrieve, issue the following command:query drmedia * wherestate=vaultretrieve
3. After the vault location acknowledges that the volumes have been given to thecourier, issue the following command:move drmedia * wherestate=vaultretrieve
The server does the following for all volumes in the VAULTRETRIEVE state:v Change the volume state to COURIERRETRIEVE.v Update the location of the volume according to what is specified in the SET
DRMCOURIERNAME command. For more information, see “SpecifyingDefaults for Offsite Recovery Media Management” on page 580.
4. When the courier delivers the volumes, acknowledge that the courier hasreturned the volumes onsite, by issuing:move drmedia * wherestate=courierretrieve
The server does the following for all volumes in the COURIERRETRIEVE state:v The volumes are now onsite and can be reused or disposed.v The database backup volumes are deleted from the volume history table.v For scratch copy storage pool volumes, the record in the database is deleted.
For private copy storage pool volumes, the access is updated to read/write.5. If you do not want to step through all the states, you can use the TOSTATE
parameter on the MOVE DRMEDIA command to specify the destination state.For example, to transition the volumes from VAULTRETRIEVE state toONSITERETRIEVE state, issue the following command:move drmedia * wherestate=vaultretrieve tostate=onsiteretrieve
The server does the following for all volumes with in the VAULTRETRIEVEstate:v The volumes are now onsite and can be reused or disposed.v The database backup volumes are deleted from the volume history table.v For scratch copy storage pool volumes, the record in the database is deleted.
For private copy storage pool volumes, the access is updated to read/write.
598 Tivoli Storage Manager for Windows: Administrator’s Guide

Summary of Tivoli Disaster Recovery Manager Daily TasksThis section summarizes the use of DRM during routine operations and duringdisaster recovery.
Setup1. License DRM2. Ensure the device configuration and volume history files exist.3. Back up the storage pools.4. Do a full backup the database (for example, a database snapshot
backup).5. Define site-specific server recovery instructions.6. Describe priority client machines.7. Generate the disaster recovery plan.
Daily Preparation OperationsDay 11. Back up client files.2. Back up the primary storage pools.3. Back up the database (for example, a database snapshot backup).4. Mark the backup volumes as unavailable to TSM.5. Send the backup volumes and disaster recovery plan file to the vault.6. Generate the disaster recovery plan.
Day 21. Back up client files2. Back up the primary storage pools.3. Back up the database (for example, a database snapshot backup).4. Mark the backup volumes as unavailable to TSM.5. Send the backup volumes and disaster recovery plan file to the vault.6. Generate the disaster recovery plan.
Day 31. Automatic storage pool reclamation processing occurs.2. Back up client files.3. Back up the primary storage pools.4. Back up the database (for example, a database snapshot backup).5. Send the backup volumes and a list of expired volumes to be reclaimed
to the vault.6. The vault acknowledges receipt of the volumes sent on the previous
day.7. Generate the disaster recovery plan.
Disaster and RecoveryDay 4
The server and the client machines are destroyed.1. Restore the server using the latest recovery plan.2. Identify the top priority client nodes at the disaster site.3. Restore client machine files from the copy storage pools.4. Restore the primary storage pools.5. Move database backup and copy storage pool volumes to the vault.
Daily OperationsDay 51. Back up client files.2. Back up the primary storage pools.3. Back up the database (for example, a database snapshot backup).
Chapter 25. Using Tivoli Disaster Recovery Manager 599
4. Send the backup volumes and a list of expired volumes to be reclaimedto the vault.
5. Generate the disaster recovery plan.
Staying Prepared for a DisasterThis section provides an overview and a scenario of the tasks required to stayprepared for a disaster. The steps are performed by the onsite TSM administratorunless otherwise indicated.1. Record the following information in the RECOVERY.INSTRUCTIONS stanza
source files:v Software license numbersv Sources of replacement hardwarev Any recovery steps specific to your installation
2. Store the following information in the database:v Server and client node machine information (DEFINE MACHINE, DEFINE
MACHINENODE ASSOCIATION, and INSERT MACHINE)v The location of the boot recovery media (DEFINE RECOVERYMEDIA)
3. Schedule automatic nightly backups to occur in the following order:a. Primary Storage Poolsb. Database
4. Daily, create a list of the previous night’s database and storage pool backupvolumes to be sent offsite:query drmedia * wherestate=mountable
a. Check the volumes out of the library:move drmedia * wherestate=mountable
b. Send the volumes offsite and record that the volumes were given to thecourier:move drmedia * wherestate=notmountable
5. Create a new recovery plan:prepare
6. Copy the recovery plan file to a diskette to be given to the courier.7. Create a list of tapes that contain data that is no longer valid and that should
be returned to the site:query drmedia * wherestate=vaultretrieve
8. Give the courier the database and storage pool backup tapes, the recoveryplan file diskette, and the list of volumes to be returned from the vault.
9. The courier gives you any tapes that were on the previous day’s return fromthe vault list.Update the state of these tapes and check them into the library:move drmedia * wherestate=courierretrieve cmdf=c:\drm\checkin.mac
cmd="checkin libvol libauto &vol status=scratch"
The volume records for the tapes that were in the COURIERRETRIEVE stateare deleted from the database. The MOVE DRMEDIA command also generatesthe CHECKIN LIBVOL command for each tape processed in the filec:\drm\checkin.mac. For example:checkin libvol libauto tape01 status=scratchcheckin libvol libauto tape02 status=scratch...
600 Tivoli Storage Manager for Windows: Administrator’s Guide

Note: An administrator can run the MACRO command by specifyingc:\drm\checkin.mac as the macro name to process the CHECKINLIBVOL commands.> dsmadmc -id=xxxxx -pa=yyyyyy MACRO c:\drm\checkin.mac
10. The courier takes the database and storage pool backup tapes, the recoveryplan diskette, and the list of volumes to return from the vault.
11. Call the vault and verify that the backup tapes arrived and are secure, andthat the tapes to be returned to the site have been given to the courier.
12. Set the location of the volumes sent to the vault:move drmedia * wherestate=courier
13. Set the location of the volumes given to the courier by the vault:move drmedia * wherestate=vaultretrieve
Recovering From a DisasterThis section provides an overview of the tasks involved in recovering the serverand clients. It also presents scenarios of both procedures.
Recovering the Server: Here are guidelines for recovering your server:1. Obtain the latest disaster recovery plan file.2. Break out the file to view, update, print, or run as macros or scripts (for
example, batch programs or batch files).3. Obtain the backup volumes from the vault.4. Locate a suitable replacement machine.5. Restore the Windows operating system and TSM to your replacement machine.
When using the TSM device driver (ADSMSCSI), you will also need to startADSMSCSI. See “Starting and Stopping the Tivoli Storage Manager DeviceDriver (ADSMSCSI)” on page 394.
6. Review the RECOVERY.SCRIPT.DISASTER.RECOVERY.MODERECOVERY.SCRIPT.NORMAL.MODE scripts because they are important forrestoring the server to a point where clients can be recovered (see “DisasterRecovery Mode Stanza” on page 623).
Recovering the Clients: To recover clients, do the following:1. Get the following information by querying the recovered database:v Client machines that have been defined to TSM, along with their location
and restore priority valuev The location of the boot recovery mediav Specific recovery instructions for the machinev Hardware requirements for the machine
2. With this information restore the client machines.
Server Recovery ScenarioHere is the procedure for a complete recovery of the server after a disaster hasdestroyed it. In this example virtual volumes are not used. The steps areperformed by the onsite administrator unless otherwise indicated.1. Review the recovery steps described in the
RECOVERY.INSTRUCTIONS.GENERAL stanza of the plan.2. Request the server backup tapes from the offsite vault.
Chapter 25. Using Tivoli Disaster Recovery Manager 601

3. Break out the recovery plan file stanzas into multiple files (see “Breaking Outa Disaster Recovery Plan File” on page 611.) These files can be viewed,updated, printed, or run as TSM macros or scripts.
4. Print the RECOVERY.VOLUMES.REQUIRED file. Give the printout to thecourier to retrieve the backup volumes.
5. Find a replacement server. The RECOVERY.DEVICES.REQUIRED stanzaspecifies the device type that is needed to read the backups. When using theTSM device driver (ADSMSCSI), you must start ADSMSCSI (see “Starting andStopping the Tivoli Storage Manager Device Driver (ADSMSCSI)” onpage 394). The SERVER.REQUIREMENTS stanza specifies the disk spacerequired.
6. Restore the operating system and the TSM server software on the replacementserver. The media names and their locations are specified in theRECOVERY.INSTRUCTIONS.INSTALL stanza and theMACHINE.RECOVERY.MEDIA.REQUIRED stanza. Ensure that theenvironment is the same as when the disaster recovery plan file was created.The environment includes:v The directory structure and location of the TSM server executable,
enrollment certificates, administrative command line client, and diskformatting utility.
v The directory structure for TSM server instance-specific files and thedatabase, log, and storage pool volumes
v The directory structure and the files created when the disaster recovery planfile was split into multiple files
7. Review the TSM macros contained in the recovery plan.If, at the time of the disaster, the courier had not picked up the previousnight’s database and storage pool incremental backup volumes but they werenot destroyed, remove the entry for the storage pool backup volumes from theCOPYSTGPOOL.VOLUMES.DESTROYED file.
8. If some required storage pool backup volumes could not be retrieved from thevault, remove the volume entries from theCOPYSTGPOOL.VOLUMES.AVAILABLE file.
9. If all primary volumes were destroyed, no changes are required to thePRIMARY.VOLUMES script and TSM macro files.
10. Review the device configuration file to ensure that the hardware configurationat the recovery site is the same as the original site. Any differences must beupdated in the device configuration file. Examples of configuration changesthat require updates to the configuration information are:v Different device namesv Use of a manual library instead of an automated libraryv For automated libraries, the requirement of manually placing the database
backup volumes in the automated library and updating the configurationinformation to identify the element within the library. This allows the serverto locate the required database backup volumes.
For information about updating the device configuration file, see “Updatingthe Device Configuration File” on page 550.
11. To restore the database to a point where clients can be recovered, invoke theRECOVERY.SCRIPT.DISASTER.RECOVERY.MODE script file. Enter the scriptfile name at the command prompt. As an alternative, you can use the recoveryscript as a guide and manually issue the steps.The following are some sample steps from a recovery script:
602 Tivoli Storage Manager for Windows: Administrator’s Guide

a. Copy the TSM server options file from the DSMSERV.OPT file to itsoriginal location.
b. Copy the volume history file required by database restore processing fromthe VOLUME.HISTORY.FILE file to its original location.
Note: Use this copy of the volume history file unless you have a morerecent copy (after the disaster occurred).
c. Copy the device configuration file required by database restore processingfrom the DEVICE.CONFIGURATION.FILE file to its original location.
d. Create the TSM server recovery log and database volumes using DSMFMT.e. Issue DSMSERV FORMAT command to format the recovery log and
database files.f. Issue the DSMSERV RESTORE DB command.g. Start the server.h. Register TSM server licenses.i. Mark copy storage pool volumes retrieved from vault as available.j. Mark copy storage pool volumes that cannot be obtained as unavailable.k. Mark primary storage pool volumes as destroyed.
Notes:
a. Due to changes in hardware configuration during recovery, you mighthave to update the device configuration file located in the restored TSMdatabase (see “Updating the Device Configuration File” on page 550).
b. You can mount copy storage pool volumes upon request, check in thevolumes in advance, or manually place the volumes in the library andensure consistency by issuing the AUDIT LIBRARY command.
c. Use the AUDIT LIBRARY command to ensure that the restored TSMdatabase is consistent with the automated library volumes.
12. If client machines are not damaged, invoke theRECOVERY.SCRIPT.NORMAL.MODE script file to restore the server primarystorage pools. If client machines are damaged, you may want to delay thisaction until after all clients are recovered.
Note: This action is optional because TSM can access the copy storage poolvolumes directly to restore client data. Using this feature, you canminimize client recovery time because server primary storage pools donot have to be restored first. However, in this scenario, the clientmachines were not damaged, so the focus of the administrator is torestore full TSM server operation.
As an alternative, you can use the recovery script as a guide and manuallyrun each step. The steps run in this script are:a. Create replacement primary volumes.b. Define the replacement primary volumes to TSM.c. Restore the primary storage pools.
13. Collect the database backup and copy storage pool volumes used in therecovery for return to the vault. For these backup volumes to be returned tothe vault using the routine MOVE DRMEDIA process, issue the followingcommands:update volhist TPBK50 devcl=lib8mm ormstate=mountableupdate volhist TPBK51 devcl=lib8mm ormstate=mountable
Chapter 25. Using Tivoli Disaster Recovery Manager 603

The copy storage pool volumes used in the recovery already have the correctORMSTATE.
14. Issue the BACKUP DB command to back up the newly restored database.15. Issue the following command to check the volumes out of the library:
move drmedia * wherestate=mountable
16. Create a list of the volumes to be given to the courier:query drmedia * wherestate=notmountable
17. Give the volumes to the courier and issue the following command:move drmedia * wherestate=notmountable
18. Issue the PREPARE command.
Client Recovery ScenarioThe following scenario demonstrates the recovery of clients.1. To view a list of client machines that were lost in building 21 and their restore
priority, issue the following command:query machine building=021 format=detailed
DRM displays information similar to the following:
Machine Name: POLARISMachine Priority: 1
Building: 21Floor: 2Room: 1
Server?: NoDescription: Payroll
Node Name: POLARISRecovery Media Name: MKSYSB1
Characteristics?: YesRecovery Instructions?: Yes
2. For each machine, issue the following commands:a. Determine the location of the boot media. For example:
query recoverymedia mksysb1
The server displays the following information:
Recovery Media Name Volume Names Location Machine Name-------------------- ----------- ---------- ----------------MKSYSB1 vol1 vol2 IRONVAULT POLARIS
vol3
b. Determine the machine-specific recovery instructions. For example:query machine polaris format=recoveryinstructions
The server displays the following:
Recovery Instructions for Polaris.Primary Contact:
Jane Smith (wk 520-000-0000 hm 520-001-0001)Secondary Contact:
John Adams (wk 520-000-0001 hm 520-002-0002)
c. Determine the machine hardware requirements. For example:query machine polaris format=characteristics
The server displays information similar to the following:
604 Tivoli Storage Manager for Windows: Administrator’s Guide

devicesaio0 Defined Asynchronous I/Obus0 Available 00-00 Microchannel Busfd0 Available 00-00-0D-00 Diskette Drivefda0 Available 00-00-0D Standard I/O Diskette Adapterfpa0 Available 00-00 Floating Point Processorgda0 Available 00-04 Color Graphics Display Adapterhd1 Defined Logical volumehd2 Defined Logical volumehd3 Defined Logical volumehdisk0 Available 00-01-00-00 400 MB SCSI Disk Drivehdisk1 Available 00-01-00-40 Other SCSI Disk Drivehft0 Available High Function Terminal Subsysteminet0 Available Internet Network Extensionioplanar0 Available 00-00 I/O Planarkbd0 Defined 00-00-0K-00 United States keyboardlb0 Available 00-02-00-20 TIVSM Librarylo0 Available Loopback Network Interfaceloglv00 Defined Logical volumelp0 Available 00-00-0P-00 IBM 4201 Model 3 Proprinter IIIlv03 Defined Logical volumelv04 Defined Logical volumelvdd Available N/Amem0 Available 00-0B 8 MB Memory Cardmem1 Available 00-0C 16 MB Memory Cardmous0 Defined 00-00-0M-00 3 button mousemt0 Available 00-02-00-40 TIVSM Tape Driveppa0 Available 00-00-0P Standard I/O Parallel Port Adapterpty0 Available Asynchronous Pseudo-Terminalrootvg Defined Volume groupsa0 Available 00-00-S1 Standard I/O Serial Port 1sa1 Available 00-00-S2 Standard I/O Serial Port 2scsi0 Available 00-01 SCSI I/O Controllerscsi1 Available 00-02 SCSI I/O Controllersio0 Available 00-00 Standard I/O Planarsiokb0 Available 00-00-0K Keyboard Adaptersioms0 Available 00-00-0M Mouse Adaptersiotb0 Available 00-00-0T Tablet Adaptersys0 Available 00-00 System Objectsysplanar0 Available 00-00 CPU Planarsysunit0 Available 00-00 System Unittok0 Available 00-03 Token-Ring High-Performance Adaptertr0 Available Token Ring Network Interfacetty0 Available 00-00-S1-00 Asynchronous Terminaltty1 Available 00-00-S2-00 Asynchronous Terminalusrvice Defined Logical volumeveggie2 Defined Volume grouplogical volumes by volume groupveggie2:LV NAME TYPE LPs PPs PVs LV STATE MOUNT POINThd2 jfs 103 103 1 open/syncd /usrhd1 jfs 1 1 1 open/syncd /homehd3 jfs 3 3 1 open/syncd /tmphd9var jfs 1 1 1 open/syncd /varfile systemsFilesystem Total KB free %used iused %iused Mounted on/dev/hd4 8192 420 94% 909 44% //dev/hd9var 4096 2972 27% 87 8% /var/dev/hd2 421888 10964 97% 17435 16% /usr/dev/hd3 12288 11588 5% 49 1% /tmp/dev/hd1 4096 3896 4% 26 2% /home
3. With the information obtained, restore each client machine.
Chapter 25. Using Tivoli Disaster Recovery Manager 605

Recovering When Using Different Hardware at the Recovery SiteYou may have to recover your system using hardware that is different from thatused when you backed up your database and created disaster recovery plan file.Before restoring the database, update the device configuration file included in therecovery plan file. After restoring the database, update the device configuration onthe database.
This section describes a number of such situations in detail. If the hardwareenvironment is different at the recovery site, you must update the deviceconfiguration file. TSM uses the device configuration file to access the devices thatare needed to read the database backup volumes. TheRECOVERY.VOLUMES.REQUIRED stanza in the plan file identifies the volumesthat are needed to restore the database.
Automated SCSI Library at the Original Site and a ManualSCSI Library at the Recovery Site
Ensure that the DEFINE DRIVE and DEFINE LIBRARY commands in the deviceconfiguration file are valid for the new hardware configuration. For example, if anautomated tape library was used originally and cannot be used at the recoverysite, update the device configuration file. Include the DEFINE LIBRARY andDEFINE DRIVE commands that are needed to define the manual drive to be used.In this case, you must manually mount the backup volumes.
Note: If you are using an automated library, you may also need to update thedevice configuration file to specify the location of the database backupvolume.
Here is an example of an original device configuration file, which describes anautomated tape library:/* Device Configuration */
define devclass auto8mm_class devtype=8mm format=drivemountlimit=2 mountwait=60 mountretention=60prefix=tsm library=auto8mmlib
define library auto8mmlib libtype=scsi
define drive auto8mmlib 8mm_tape0 element=82 online=yes
define drive auto8mmlib 8mm_tape1 element=83 online=yes
define path server1 auto8mmlib srctype=server desttype=librarydevice=lb4.0.0.1
define path server1 8mm_tape0 srctype=server desttype=drivelibrary=auto8mmlib device=mt1.0.0.1
define path server1 8mm_tape1 srctype=server desttype=drivelibrary=auto8mmlib device=mt2.0.0.1
/* LIBRARYINVENTORY SCSI AUTO8MMLIB KEV004 1 101*//* LIBRARYINVENTORY SCSI AUTO8MMLIB KEV005 3 101*/
Here is an example of the updated device configuration file when a manual libraryis used at the recovery site:/* Device Configuration */
define devclass auto8mm_class devtype=8mm format=drive
606 Tivoli Storage Manager for Windows: Administrator’s Guide

mountlimit=1 mountwait=60 mountretention=60 prefix=tsmlibrary=manual8mm
define library manual8mm libtype=manual
define drive manual8mm 8mm_tape0
define path server1 8mm_tape0 srctype=server desttype=drivelibrary=manual8mm device=mt1.0.0.1
The following changes were made:v In the device class definition, the library name was changed from
AUTO8MMLIB to MANUAL8MM. The device class name remains the samebecause it is associated with the database backup volumes in the volume historyfile.
v The manual library, MANUAL8MM, was defined.v A new drive, 8MM_TAPE0, was defined for the manual library.v The comments that named the location of volumes in the automated library
were removed.
After you restore the database, modify the device configuration file in thedatabase. After starting the server, define, update, and delete your library anddrive definitions to match your new configuration.
Note: If you are using an automated library, you may need to use the AUDITLIBRARY command to update the server inventory of the library volumes.
Automated SCSI Library at the Original and Recovery SitesManually place the database backup volumes in the automated library and notethe element numbers where you place them. Then update the comments in thedevice configuration file to identify the locations of those volumes.
Note: You may also need to audit the library after the database is restored in orderto update the server inventory of the library volumes.
Here is an example of an original device configuration file, which describes anautomated tape library:/* Device Configuration */
define devclass auto8mm_class devtype=8mm format=drivemountlimit=2 mountwait=60 mountretention=60prefix=tsm library=auto8mmlib
define library auto8mmlib libtype=scsi
define drive auto8mmlib 8mm_tape0 element=82 online=yes
define drive auto8mmlib 8mm_tape1 element=83 online=yes
define path server1 auto8mmlib srctype=server desttype=librarydevice=lb4.0.0.1
define path server1 8mm_tape0 srctype=server desttype=drivelibrary=auto8mmlib device=mt1.0.0.1
define path server1 8mm_tape1 srctype=server desttype=drivelibrary=auto8mmlib device=mt2.0.0.1
Chapter 25. Using Tivoli Disaster Recovery Manager 607

/* LIBRARYINVENTORY SCSI AUTO8MMLIB KEV004 1 101*//* LIBRARYINVENTORY SCSI AUTO8MMLIB KEV005 3 101*/
Here is an example of the updated device configuration file when an automatedlibrary is used at the recovery site to read a database volume DBBK01:/* Device Configuration */
define devclass auto8mm_class devtype=8mm format=drivemountlimit=2 mountwait=60 mountretention=60prefix=tsm library=auto8mmlib
define library auto8mmlib libtype=scsi
define drive auto8mmlib 8mm_tape0 element=82 online=yes
define drive auto8mmlib 8mm_tape1 element=83 online=yes
define path server1 auto8mmlib srctype=server desttype=librarydevice=lb4.0.0.1
define path server1 8mm_tape0 srctype=server desttype=drivelibrary=auto8mmlib device=mt1.0.0.1
define path server1 8mm_tape1 srctype=server desttype=drivelibrary=auto8mmlib device=mt2.0.0.1
/* LIBRARYINVENTORY SCSI AUTO8MMLIB DBBK01 1 101*/
In this example, database backup volume DBBK01 was placed in element 1 of theautomated library. Then a comment is added to the device configuration file toidentify the location of the volume. Tivoli Storage Manager needs this informatiionto restore the database restore. Comments that no longer apply at the recovery siteare removed.
Managing Copy Storage Pool Volumes at the Recovery SiteThe RECOVERY.VOLUMES.REQUIRED stanza in the recovery plan file identifiesthe required copy storage pool volumes. The restored server uses copy storagepool volumes to satisfy requests (for example, from backup/archive clients) and torestore primary storage pool volumes that were destroyed. These volumes must beavailable to the restored server. After the database is restored, you can handle copystorage pool volumes at the recovery site in three ways:v Mount each volume as requested by TSM. If an automated library is used at the
recovery site, check the volumes into the library.v Check the volumes into an automated library before TSM requests them.v Manually place the volumes in an automated library and audit the library to
update the server inventory.
Note: If you are using an automated library, you may also need to audit thelibrary after the database is restored in order to update the TSM inventoryof the volumes in the library.
Tivoli Disaster Recovery Manager ChecklistThe following checklist can help you set up Tivoli Disaster Recovery Manager.
608 Tivoli Storage Manager for Windows: Administrator’s Guide

Table 35. Tivoli Disaster Recovery Manager Checklist
Activity Start Date End Date Status PersonResp.
BackupPerson
Plan for DRM
Evaluate your disaster recovery requirementsv What are the business priorities for recovering your
clients?v Where is the recovery site?v Is the recovery site hot, warm, or cold?v Do the clients have connectivity to recovery server?v Who are the system and TSM administrators?v Will you need to return to the original site?v Where are the offsite backups stored?v How does the vault handle the backup media?v How are the backups packaged or processed?v Who provides the courier service?
Evaluate the current storage pool backupimplementationv What primary storage pools are being backed up?v When are the backups performed?v Will the backups remain onsite or be sent offsite?v Naming conventions for replacement volumes for
primary storage pools
Evaluate the current database backupimplementationv When are the backups performed?v Backup purpose: offsite or onsitev Will you use snapshot database backups or full plus
incremental database backups?v How long do you want to keep backup series?
Verify that the values for copy storage poolREUSEDELAY and DRMDBBACKUPEXPIREDAYSare the same.
Determine which primary storage pools are to bemanaged by DRM
Determine which copy storage pools are to bemanaged by DRMv Offsite copy storage pools
Where to Save the Recovery Plan File
Locally:v What is the recovery plan file pathname prefix?v How will recovery plan files be made available at
the recovery site?– Print and store offsite– Tape/diskette copy stored offsite– Copy sent/NFS to recovery site
On Another Server:
v What server is to be used as the target server?
v What is the name of the target server’s device class?
v How long do you want to keep recovery plan files?
Determine where you want to create theuser-specified recovery instructions
What is the prefix of the instructions pathname?
Chapter 25. Using Tivoli Disaster Recovery Manager 609
Table 35. Tivoli Disaster Recovery Manager Checklist (continued)
Activity Start Date End Date Status PersonResp.
BackupPerson
Analyze the sequence of steps related to thePREPARE command backup movement
Document the flow of activities and timingsv Sending of volumes offsitev Return of empty volumesv PREPARE timing
Installation
Receive and Install the TSM code
License DRMv REGISTER LICENSE orv Update the server options
Set DRM defaults
Issue:v SET DRMDBBACKUPEXPIREDAYS to define the
database backup expirationv SET DRMPRIMSTGPOOL to specify the
DRM-managed primary storage poolsv SET DRMCOPYSTGPOOL to specify the
DRM-managed copy storage poolsv SET DRMPLANVPOSTFIX to specify a character to
be appended to new storage poolsv SET DRMPLANPREFIX to specify the RPF prefixv SET DRMINSTRPREFIX to specify the user
instruction file prefixv SET DRMNOTMOUNTABLENAME to specify the
default location for media to be sent offsitev SET DRMCOURIERNAME to specify the default
courierv SET DRMVAULTNAME to specify the default vaultv SET DRMCMDFILENAME to specify the default
file name to contain the commands specified withthe CMD parameter on MOVE and QUERYDRMEDIA
v SET DRMCHECKLABEL to specify whether volumelabels are verified when checked out by the MOVEDRMEDIA command
v SET DRMRPFEXPIREDAYS to specify a value forthe frequency of RPF expiration (when plan filesare stored on another server)
610 Tivoli Storage Manager for Windows: Administrator’s Guide

Table 35. Tivoli Disaster Recovery Manager Checklist (continued)
Activity Start Date End Date Status PersonResp.
BackupPerson
Define the site-specific recovery instructions
Identify:v Target disaster recovery server locationv Target server software requirementsv Target server hardware requirements (storage
devices)v TSM administrator contactv Courier name and telephone numberv Vault location and contact person
Create:v Enter the site-specific recovery instructions data
into files created in the same path/HLQ asspecified by SET DRMINSTRPREFIX
Test Tivoli Disaster Recovery Manager
Test the installation and customizationv QUERY DRMSTATUS to display the DRM setupv Back up the primary storage poolsv Back up the TSM databasev QUERY DRMEDIA to list the backup volumesv MOVE DRMEDIA to move offsitev PREPARE to create the recovery plan file
Examine the recovery plan file created
Test the recovery plan file break outv REXX exec planexpl.rexv Locally written procedure
Set up the schedules for automated functions
The Disaster Recovery Plan FileThe disaster recovery plan file contains the information required to recover a TSMserver to the point in time represented by the last database backup operation thatis completed before the plan is created. The plan is organized into stanzas, whichyou can break out into multiple files.
Breaking Out a Disaster Recovery Plan FileYou can use a Microsoft VBScript command procedure or an editor to break outthe stanzas in the disaster recovery plan file into individual files. A sampleprocedure, planexpl.vbs, is shipped with DRM. You can modify the procedure foryour installation. Store a copy of the procedure offsite for recovery.
Chapter 25. Using Tivoli Disaster Recovery Manager 611

'****************************************************************************' IBM TSM Disaster Recovery Manager for Windows NT/2000 Sample Script'' Explode a recovery plan file into separate files (batch programs,' TSM macros, TSM server options file etc.)'' Invoke with:' cscript planexpl.vbs recoveryplanfilename' where:' recoveryplanfilename is the name of the recovery plan file created' by the DRM PREPARE command'' Example usage:' cscript planexpl.vbs c:\adsmsrv\recplans\20001115.051421'*****************************************************************************
Dim argsDim PLANFILE, OUTDIR, OUTFILEDim STANZASDim VOLNAMES(100),NbrV,LOGDBVOLSDim fso, fi, foDim WORDSDim CRLFDim RESULTS, RESULTS2CRLF = Chr(13) & Chr(10)LOGDBVOLS = False : NbrV = 0OUTDIR = "" : OUTFILE = ""RESULTS = "" : RESULTS2 = ""
'*****************************************************************************'* Get input arguments: PLANFILE=recoveryplanfilename'*****************************************************************************
set args = Wscript.Arguments
If args.Count < 1 ThenWscript.Echo _"usage: cscript planexpl.vbs recoveryplanfilename" & CRLF & _"example: cscript planexpl.vbs c:\adsmsrv\recplans\20001115.051421"Wscript.Quit(1)
ElsePLANFILE = args.Item(0)
End If
RESULTS = RESULTS & "Planfile: " & PLANFILE & CRLF'****************************************************************************' For each recovery plan file stanza name determine the extension (if any)' to be added to the file name created by using the stanza name and extension'****************************************************************************
Figure 95. Example of a VBScript command Procedure to Break Out the Disaster Recovery Plan File (Part 1 of 4)
612 Tivoli Storage Manager for Windows: Administrator’s Guide

Set STANZAS = CreateObject("Scripting.Dictionary")STANZAS.Add "RECOVERY.SCRIPT.DISASTER.RECOVERY.MODE", ".CMD"STANZAS.Add "RECOVERY.SCRIPT.NORMAL.MODE" , ".CMD"STANZAS.Add "RECOVERY.VOLUMES.REQUIRED" , "none"STANZAS.Add "RECOVERY.DEVICES.REQUIRED" , "none"STANZAS.Add "SERVER.REQUIREMENTS" , "none"STANZAS.Add "LOG.VOLUMES" , "none"STANZAS.Add "DB.VOLUMES" , "none"STANZAS.Add "LOGANDDB.VOLUMES.INSTALL" , ".CMD"STANZAS.Add "LICENSE.REGISTRATION" , ".MAC"STANZAS.Add "COPYSTGPOOL.VOLUMES.AVAILABLE" , ".MAC"STANZAS.Add "COPYSTGPOOL.VOLUMES.DESTROYED" , ".MAC"STANZAS.Add "PRIMARY.VOLUMES.DESTROYED" , ".MAC"STANZAS.Add "PRIMARY.VOLUMES.REPLACEMENT.CREATE" , ".CMD"STANZAS.Add "PRIMARY.VOLUMES.REPLACEMENT" , ".MAC"STANZAS.Add "STGPOOLS.RESTORE" , ".MAC"STANZAS.Add "RECOVERY.INSTRUCTIONS.GENERAL" , "none"STANZAS.Add "RECOVERY.INSTRUCTIONS.OFFSITE" , "none"STANZAS.Add "RECOVERY.INSTRUCTIONS.INSTALL" , "none"STANZAS.Add "RECOVERY.INSTRUCTIONS.DATABASE" , "none"STANZAS.Add "RECOVERY.INSTRUCTIONS.STGPOOL" , "none"STANZAS.Add "MACHINE.GENERAL.INFORMATION" , "none"STANZAS.Add "MACHINE.RECOVERY.INSTRUCTIONS" , "none"STANZAS.Add "MACHINE.CHARACTERISTICS" , "none"STANZAS.Add "MACHINE.RECOVERY.MEDIA.REQUIRED" , "none"STANZAS.Add "VOLUME.HISTORY.FILE" , "none"STANZAS.Add "DEVICE.CONFIGURATION.FILE" , "none"STANZAS.Add "DSMSERV.OPT.FILE" , "none"STANZAS.Add "LICENSE.INFORMATION" , "none"
Set fso = CreateObject("Scripting.FileSystemObject")
Set fi = fso.OpenTextFile(PLANFILE, 1, False)
Do While fi.AtEndOfStream <> True
'****************************************************************************' Read a line from the input recovery plan file'****************************************************************************
ALINE = fi.ReadLine
'****************************************************************************' Get the first 2 words. We're looking for 'begin'/'end' and a stanza name'****************************************************************************
WORD1 = "" : WORD2 = "" : THEREST = ""If Not ALINE = "" then
WORDS = Split(ALINE, " ", -1, 1)WORD1 = WORDS(0)If Ubound(WORDS) > 0 Then WORD2 = WORDS(1)if Ubound(WORDS) > 1 Then THEREST = WORDS(2)
End If
Figure 95. Example of a VBScript command Procedure to Break Out the Disaster Recovery Plan File (Part 2 of 4)
Chapter 25. Using Tivoli Disaster Recovery Manager 613

'****************************************************************************' If the first word is 'begin' and this is a stanza that we'll create a file' for then build the output file name using the output directory. Add an' extension if needed. Erase the previous version of the file and then' indicate that the new file is being created. If the stanza contains the' names of database volumes or the names of log volumes then indicate that' these volume names need to be remembered so later checking can be done to' determine if volumes by these names currently exist (since the volumes' will be erased).'****************************************************************************
If WORD1 = "begin" And STANZAS.Exists(WORD2) Then
OUTFILE = OUTDIR & WORD2
If Not STANZAS.Item(WORD2) = "none" ThenOUTFILE = OUTFILE & STANZAS.Item(WORD2)
End If
Set fo = fso.OpenTextFile(OUTFILE, 2, True)
RESULTS = RESULTS & "Creating file " & OUTFILE & CRLF
If WORD2 = "LOG.VOLUMES" Or WORD2 = "DB.VOLUMES" ThenLOGDBVOLS = True
Else LOGDBVOLS = FalseEnd If
'****************************************************************************' If the first word is 'end' and this was a stanza that we created a file' for then close the output file.'****************************************************************************
Elseif WORD1 = "end" And STANZAS.Exists(WORD2) Thenfo.closeOUTFILE = ""
'****************************************************************************' For input recovery plan file lines that are between the beginning and end' of a stanza that we created an output file for (i.e. we have previously' constructed an output file name) write the line to the output file. If' processing the log volume stanza or the database volume stanza then save' the name of the log or database volume for later checking to determine if' a volume by the same name exists.'****************************************************************************
Elseif Not OUTFILE = "" Thenfo.writeline(ALINE)If LOGDBVOLS = True Then
NbrV = NbrV + 1VOLNAMES(NbrV) = WORD1
End If
Figure 95. Example of a VBScript command Procedure to Break Out the Disaster Recovery Plan File (Part 3 of 4)
614 Tivoli Storage Manager for Windows: Administrator’s Guide

Structure of the Disaster Recovery Plan FileThe disaster recovery plan is divided into the following types of stanzas:
'****************************************************************************' This is the line within the plan file that identifies the plan file prefix.'****************************************************************************
Elseif OUTDIR = "" And WORD1 = "DRM" And WORD2 = "PLANPREFIX" ThenOUTDIR = THERESTIf Not Right(OUTDIR,1) = "\" Then
OUTDIR = OUTDIR & "."End IfRESULTS = RESULTS & "set planprefix to " & OUTDIR & CRLF
End If '/* select on first word of input line from the recovery plan file */
Loop '/* do while more lines in input recovery plan file */
fi.close
'****************************************************************************' For each log volume and database volume, determine if a volume by the same' name currently exists. If so, then indicate that the volume is going to be' erased.'****************************************************************************
Set fo = fso.OpenTextFile(OUTDIR & "FILES.TO.BE.ERASED", 2, True)
I = 0FOUND = FalseDo While I < NbrV
I = I + 1if fso.FileExists(VOLNAMES(I)) then
if FOUND = False thenWARNING = _
"If executed, the RECOVERY.SCRIPT.DISASTER.RECOVERY.MODE batch" & CRLF & _"program will delete the following log and db volumes if they exist" & CRLF & _"and then reallocate them. During a normal disaster recovery scenario" & CRLF & _"this is not a problem since you are going to restore data to them" & CRLF & _"from the db backup." & CRLF & CRLF
fo.writeline(WARNING)RESULTS2 = RESULTS2 & CRLF & WARNINGFOUND = True
End If
fo.writeline(VOLNAMES(I))RESULTS2 = RESULTS2 & VOLNAMES(I) & CRLFEnd If '/* the file exists */
Loop '/* do while more log and database volume names */
fo.close
Wscript.Echo RESULTSIf FOUND = True then Wscript.Echo RESULTS2
Figure 95. Example of a VBScript command Procedure to Break Out the Disaster Recovery Plan File (Part 4 of 4)
Chapter 25. Using Tivoli Disaster Recovery Manager 615

Command stanzasConsist of scripts (for example, batch programs or batch files) and TSMmacros. You can view, print, and update these stanzas, and run themduring recovery.
Note: The RECOVERY.SCRIPT.NORMAL.MODE andRECOVERY.SCRIPT.DISASTER.RECOVERY.MODE stanzas containthe commands that invoke the scripts and macros contained in theother stanzas.
Instruction stanzasConsist of recovery instructions specific to your site. You can view, print,and update these stanzas, and use them during recovery.
Server requirements stanzasInclude the database and recovery log requirements, device and volumerequirements, and license information. You can view and print thesestanzas, and use them during recovery.
Configuration file stanzasConsist of the volume history, device configuration, and server optionsfiles.
Machine and recovery media stanzasConsist of machine recovery instructions and information about machinehardware, software, and recovery media. You can print and update thesestanzas, and use them during server recovery.
Table 36 lists the recovery plan file stanzas, and indicates what type ofadministrative processing is required during set up, routine operations, anddisaster recovery. The table also indicates whether the stanza contains a macro, ascript, or a configuration file.
Note: For tasks identified as During setup or periodic updates, DRMautomatically collects this information for the plan.
Table 36. Administrative Tasks Associated with the Disaster Recovery Plan File
Stanza Name Tasks
PLANFILE.DESCRIPTION —
PLANFILE.TABLE.OF.CONTENTS —
SERVER.REQUIREMENTS —
RECOVERY.INSTRUCTIONS.GENERAL During setup or periodic updates: Edit thesource file associated with the stanza(optional)
RECOVERY.INSTRUCTIONS.OFFSITE During setup or periodic updates: Edit thesource file associated with the stanza(optional)
RECOVERY.INSTRUCTIONS.INSTALL During setup or periodic updates: Edit thesource file associated with the stanza(optional)
RECOVERY.INSTRUCTIONS.DATABASE During setup or periodic updates: Edit thesource file associated with the stanza(optional)
RECOVERY.INSTRUCTIONS.STGPOOL During setup or periodic updates: Edit thesource file associated with the stanza(optional)
616 Tivoli Storage Manager for Windows: Administrator’s Guide

Table 36. Administrative Tasks Associated with the Disaster Recovery Plan File (continued)
Stanza Name Tasks
RECOVERY.VOLUMES.REQUIRED During routine processing: MOVEDRMEDIA
RECOVERY.DEVICES.REQUIRED —
RECOVERY.SCRIPT. DISASTER.RECOVERY.MODE script During disaster recovery: Edit and run(optional)
RECOVERY.SCRIPT. NORMAL.MODE script During disaster recovery: Edit and run(optional)
LOG.VOLUMES During disaster recovery: Optionallyedit/copy
DB.VOLUMES During disaster recovery: Optionallyedit/copy
LOGANDDB.VOLUMES.INSTALL script During disaster recovery: Edit and run(optional)
LICENSE.REGISTRATION macro During disaster recovery: Edit and run(optional)
COPYSTGPOOL.VOLUMES.AVAILABLE macro During routine processing: MOVEDRMEDIA
During disaster recovery: Edit and run(optional)
COPYSTGPOOL.VOLUMES.DESTROYED macro During routine processing: MOVEDRMEDIA
During disaster recovery: Edit and run(optional)
PRIMARY.VOLUMES.DESTROYED macro During disaster recovery: Edit and run(optional)
PRIMARY.VOLUMES.REPLACEMENT.CREATE script During disaster recovery: Edit and run(optional)
PRIMARY.VOLUMES.REPLACEMENT macro During disaster recovery: Edit and run(optional)
STGPOOLS.RESTORE macro During disaster recovery: Edit and run(optional)
VOLUME.HISTORY.FILE configuration file During disaster recovery: Copy (optional)
DEVICE.CONFIGURATION.FILE configuration file During disaster recovery: Edit and copy(optional)
DSMSERV.OPT.FILE configuration file During disaster recovery: Edit and copy(optional)
LICENSE.INFORMATION —
MACHINE.GENERAL.INFORMATION During setup or periodic updates: IssueDEFINE MACHINE ADSMSERVER=YES(optional)
MACHINE.RECOVERY.INSTRUCTIONS During setup or periodic updates: IssueINSERT MACHINERECOVERYINSTRUCTIONS (optional)
MACHINE.RECOVERY.CHARACTERISTICS During setup or periodic updates: IssueINSERT MACHINE CHARACTERISTICS(optional)
Chapter 25. Using Tivoli Disaster Recovery Manager 617
Table 36. Administrative Tasks Associated with the Disaster Recovery Plan File (continued)
Stanza Name Tasks
MACHINE.RECOVERY.MEDIA During setup or periodic updates: IssueDEFINE RECOVERYMEDIA and DEFINERECMEDMACHASSOCIATION (optional)
Example Disaster Recovery Plan FileThis section contains an example of a disaster recovery plan file and informationabout each stanza. The disaster recovery plan file has been divided into separatefigures that correlate to the descriptions of specific stanzas within each figure.
Description and Table of Contents StanzasPLANFILE.DESCRIPTION
Identifies the server for this recovery plan, and the date and time the plan iscreated.
PLANFILE.TABLE.OF.CONTENTS
Lists the stanzas documented in this plan.
begin PLANFILE.DESCRIPTION
Recovery Plan for Server DESIGN_DEPARTMENTCreated by DRM PREPARE on 02/11/2000 10:20:34DRM PLANPREFIX c:\Program Files\Tivoli\TSM;\server2\prepare\Server for Windows NT - Version 4, Release 1, Level x.x/x.x
end PLANFILE.DESCRIPTION
Figure 96. Description Stanza
618 Tivoli Storage Manager for Windows: Administrator’s Guide

Server Requirements StanzaSERVER.REQUIREMENTS
Identifies the database and recovery log storage requirements for the server. Thereplacement server must have enough disk space to install the database andrecovery log volumes. This stanza also identifies the TSM installation directory.When TSM is re-installed on the replacement server, specify this directory on theSetup Type screen during installation. If you specify a different directory, edit theplan file to account for this change.
begin PLANFILE.TABLE.OF.CONTENTS
PLANFILE.DESCRIPTIONPLANFILE.TABLE.OF.CONTENTS
Server Recovery Stanzas:SERVER.REQUIREMENTSRECOVERY.INSTRUCTIONS.GENERALRECOVERY.INSTRUCTIONS.OFFSITERECOVERY.INSTRUCTIONS.INSTALLRECOVERY.VOLUMES.REQUIREDRECOVERY.DEVICES.REQUIREDRECOVERY.SCRIPT.DISASTER.RECOVERY.MODE scriptRECOVERY.SCRIPT.NORMAL.MODE script
LOG.VOLUMESDB.VOLUMESLOGANDDB.VOLUMES.INSTALL scriptLICENSE.REGISTRATION macroCOPYSTGPOOL.VOLUMES.AVAILABLE macroCOPYSTGPOOL.VOLUMES.DESTROYED macroPRIMARY.VOLUMES.DESTROYED macroPRIMARY.VOLUMES.REPLACEMENT.CREATE scriptPRIMARY.VOLUMES.REPLACEMENT macroSTGPOOLS.RESTORE macroVOLUME.HISTORY.FILEDEVICE.CONFIGURATION.FILEDSMSERV.OPT.FILE
Machine Description Stanzas:MACHINE.GENERAL.INFORMATIONMACHINE.RECOVERY.INSTRUCTIONSMACHINE.CHARACTERISTICSMACHINE.RECOVERY.MEDIA.REQUIRED
end PLANFILE.TABLE.OF.CONTENTS
Figure 97. Table of Contents Stanza
Chapter 25. Using Tivoli Disaster Recovery Manager 619

Recovery Instructions StanzasThe administrator enters recovery instructions into source files that the PREPAREcommand includes in the plan files. See “Specifying Recovery Instructions for YourSite” on page 582 for details.
Note: In the following descriptions, prefix represents the prefix portion of the filename. See “Specifying Defaults for the Disaster Recovery Plan File” onpage 578 for details.
RECOVERY.INSTRUCTIONS.GENERAL
Identifies site-specific instructions that the administrator has entered in the fileidentified by prefix RECOVERY.INSTRUCTIONS.GENERAL. The instructionsshould include the recovery strategy, key contact names, an overview of keyapplications backed up by this server, and other relevant recovery instructions.
RECOVERY.INSTRUCTIONS.OFFSITE
begin SERVER.REQUIREMENTS
Database Requirements Summary:
Available Space (MB): 20Assigned Capacity (MB): 20
Pct. Utilization: 2.2Maximum Pct. Utilization: 2.2
Physical Volumes: 2
Recovery Log Requirements Summary:
Available Space (MB): 20Assigned Capacity (MB): 20
Pct. Utilization: 4.4Maximum Pct. Utilization: 4.8
Physical Volumes: 2Installation Directory: c:\Program Files\Tivoli\TSM\end SERVER.REQUIREMENTS
Figure 98. Server Requirements Stanza
begin RECOVERY.INSTRUCTIONS.GENERAL
This server contains the backup and archive data for FileRight Companyaccounts receivable system. It also is used by various end users in thefinance and materials distribution organizations.The storage administrator in charge of this server is Jane Doe 004-001-0006.If a disaster is declared, here is the outline of steps that must be completed.1. Determine the recovery site. Our alternate recovery site vendor is IBM
BRS in Tampa, Fl, USA 213-000-0007.2. Get the list of required recovery volumes from this recovery plan file
and contact our offsite vault so that they can start pulling thevolumes for transfer to the recovery site.
3. etc...
end RECOVERY.INSTRUCTIONS.GENERAL
Figure 99. Recovery Instructions General Stanza
620 Tivoli Storage Manager for Windows: Administrator’s Guide

Contains instructions that the administrator has entered in the file identified byprefix RECOVERY.INSTRUCTIONS.OFFSITE. The instructions should include thename and location of the offsite vault, and how to contact the vault (for example, aname and phone number).
RECOVERY.INSTRUCTIONS.INSTALL
Contains instructions that the administrator has entered in the file identified byprefix RECOVERY.INSTRUCTIONS.INSTALL. The instructions should include howto rebuild the base server machine and the location of the system image backupcopies.
RECOVERY.INSTRUCTIONS.DATABASE
Contains instructions that the administrator has entered in the file identified byprefix RECOVERY.INSTRUCTIONS.DATABASE. The instructions should includehow to prepare for the database recovery. For example, you may enter instructionson how to initialize or load the backup volumes for an automated library. Nosample of this stanza is provided.
RECOVERY.INSTRUCTIONS.STGPOOL
Contains instructions that the administrator has entered in the file identified byprefix RECOVERY.INSTRUCTIONS.STGPOOL. The instructions should include thenames of your software applications and the copy storage pool names containingthe backup of these applications. No sample of this stanza is provided.
Volume and Device Requirements StanzasRECOVERY.VOLUMES.REQUIRED
begin RECOVERY.INSTRUCTIONS.OFFSITE
Our offsite vaulting vendor is OffsiteVault Inc.Their telephone number is 514-555-2341. Our account rep is Joe Smith.Our account number is 1239992. Their address is ...Here is a map to their warehouse ...Our courier is ...
end RECOVERY.INSTRUCTIONS.OFFSITE
Figure 100. Recovery Instructions Offsite Stanza
begin RECOVERY.INSTRUCTIONS.INSTALL
The base server system is Windows NT 4.0 running on an IBMPC-350. The Windows NT 4.0 operating system and productinstallation media is stored at the vault. There is also a copyin bldg 24 room 4 cabinet a. The system administrator responsiblefor the Windows NT 4.0 and server installation is Fred Myers.Following are the instructions for installation of Windows NT4.0and the server:
end RECOVERY.INSTRUCTIONS.INSTALL
Figure 101. Recovery Instructions Install Stanza
Chapter 25. Using Tivoli Disaster Recovery Manager 621

Provides a list of the database backup and copy storage pool volumes required torecover the server. This list can include both virtual volumes and nonvirtualvolumes. A database backup volume is included if it is part of the most recentdatabase backup series. A copy storage pool volume is included if it is not emptyand not marked destroyed.
If you are using a nonvirtual volume environment and issuing the MOVEDRMEDIA command, a blank location field means that the volumes are onsite andavailable to the server. This volume list can be used in periodic audits of thevolume inventory of the courier and vault. You can use the list to collect therequired volumes before recovering the server.
For virtual volumes, the location field contains the target server name.
RECOVERY.DEVICES.REQUIRED
Provides details about the devices needed to read the backup volumes.
begin RECOVERY.VOLUMES.REQUIRED
Volumes required for data base restoreLocation = OffsiteVault Inc.Device Class = LIB8MMVolume Name =TPBK08
Location = OffsiteVault Inc.Device Class = LIB8MMVolume Name =TPBK06
Volumes required for storage pool restoreLocation = OffsiteVault Inc.Copy Storage Pool = CSTORAGEPFDevice Class = LIB8MMVolume Name =TPBK05TPBK07
end RECOVERY.VOLUMES.REQUIRED
Figure 102. Volume Requirements Stanza
622 Tivoli Storage Manager for Windows: Administrator’s Guide

Disaster Recovery Mode StanzaRECOVERY.SCRIPT.DISASTER.RECOVERY.MODE
Contains a script with the commands needed to recover the server. You can use thescript as a guide and run the commands from a command line. Or you can copy itto a file, modify it and the files it refers to, and run the script. You may need tomodify the script because of differences between the original and the replacementsystems. At the completion of these steps, client requests for file restores aresatisfied directly from copy storage pool volumes.
The disaster recovery plan issues commands using the administrative client.
The commands in the script do the following:v Restore the server options, volume history, and device configuration information
files.v Invoke the scripts contained in the LOGANDDB.VOLUMES.INSTALL stanza.
Attention: When this script runs, any log volumes or database volumes withthe same names as those named in the plan are erased (seeLOGANDDB.VOLUMES.INSTALL). In most disaster recoveries, the TSM serveris installed on a new machine. When this script is run, it is assumed that there isno TSM data in the log or database volumes. TSM installation includes thecreation of database and recovery log volumes. If you have created a log volumeor a database volume (for example, for testing), and you want to preserve thecontents, you must take some action such as renaming the volume or copyingthe contents before executing this script.
v Invoke the macros contained in the following stanzas:– LICENSE.REGISTRATION– COPYSTGPOOL.VOLUMES.AVAILABLE– COPYSTGPOOL.VOLUMES.DESTROYED– PRIMARY.VOLUMES.DESTROYED.
begin RECOVERY.DEVICES.REQUIRED
Purpose: Description of the devices required to read thevolumes listed in the recovery volumes required stanza.
Device Class Name: LIB8MMDevice Access Strategy: Sequential
Storage Pool Count: 2Device Type: 8MM
Format: DRIVEEst/Max Capacity (MB): 4.0
Mount Limit: 2Mount Wait (min): 60
Mount Retention (min): 10Label Prefix: TIVSM
Library: RLLIBDirectory:
Last Update by (administrator): BillLast Update Date/Time: 12/11/2000 10:18:34
end RECOVERY.DEVICES.REQUIRED
Figure 103. Volume and Device Requirements Stanzas
Chapter 25. Using Tivoli Disaster Recovery Manager 623

To help understand the operations being performed in this script, see “Backup andRecovery Scenarios” on page 571.
Note: Because this script invokes the administrative command-line client, ensurethat the communications options in the administrative client options file areset to communicate with the recovered server before running this script. Toreview the communications options used in the recovered server, see theserver options file in the DSMSERV.OPT.FILE stanza.
To invoke this script, specify the following positional parameters:v %1 (the administrator ID)v %2 (the administrator password)
For example, to invoke this script using an administrator ID of don and apassword of mox, enter the following command:planprefixRECOVERY.SCRIPT.DISASTER.RECOVERY.MODE don mox
For more information, see the entry for the recovery plan prefix in Table 34 onpage 579.
The following stanza contains text strings that are too long to display in thehardcopy or softcopy publications. The long text strings utilize a plus symbol (+)to indicate string continuation on the next line.
624 Tivoli Storage Manager for Windows: Administrator’s Guide

begin RECOVERY.SCRIPT.DISASTER.RECOVERY.MODE script
@echo off
rem Purpose: This script contains the steps required to recover the serverrem to the point where client restore requests can be satisfiedrem directly from available copy storage pool volumes.rem Note: This script assumes that all volumes necessary for the restore haverem been retrieved from the vault and are available. This script assumesrem the recovery environment is compatible (essentially the same) as therem original. Any deviations require modification to this script and therem macros and scripts it runs. Alternatively, you can use thisrem script as a guide, and manually execute each step.
if not %1.==. if not %2.==. goto startecho Specify the following positional parameters:echo administrative client ID and password.echo Script stopped.goto end
:startrem Set the server working directory.pushd c:\Program Files\Tivoli\TSM;\server2\rem Restore server options, volume history, device configuration files.copy c:\Program Files\Tivoli\TSM;\server2\prepare\DSMSERV.OPT.FILE c:\Program Files\Tivoli\TSM;\server2\dsmserv.optcopy c:\Program Files\Tivoli\TSM;\server2\prepare\VOLUME.HISTORY.FILE c:\Program Files\Tivoli\TSM;\server2\volhist.txtcopy c:\Program Files\Tivoli\TSM;\server2\prepare\DEVICE.CONFIGURATION.FILE c:\Program Files\Tivoli\TSM;\server2\devconf.txt
rem create the log and database files.call c:\Program Files\Tivoli\TSM;\server2\prepare\LOGANDDB.VOLUMES.INSTALL.CMD 1> +c:\Program Files\Tivoli\TSM;\server2\prepare\LOGANDDB.VOLUMES.INSTALL.LOG 2>&1type c:\Program Files\Tivoli\TSM;\server2\prepare\LOGANDDB.VOLUMES.INSTALL.LOG
rem Restore the server database to latest version backed up per therem volume history file.c:\Program Files\Tivoli\TSM;\server\dsmserv -k "Server2" restore db todate=08/11/2000 totime=10:20:22
rem Start the server.start c:\Program Files\Tivoli\TSM;\server\dsmserv -k "Server2"echo Wait for the server to start. Ensure that the Administrative commandecho line client option file is set up to communicate with this server, thenecho press enter to continue recovery script execution.pause
Figure 104. Disaster Recovery Mode Script (Part 1 of 2)
Chapter 25. Using Tivoli Disaster Recovery Manager 625
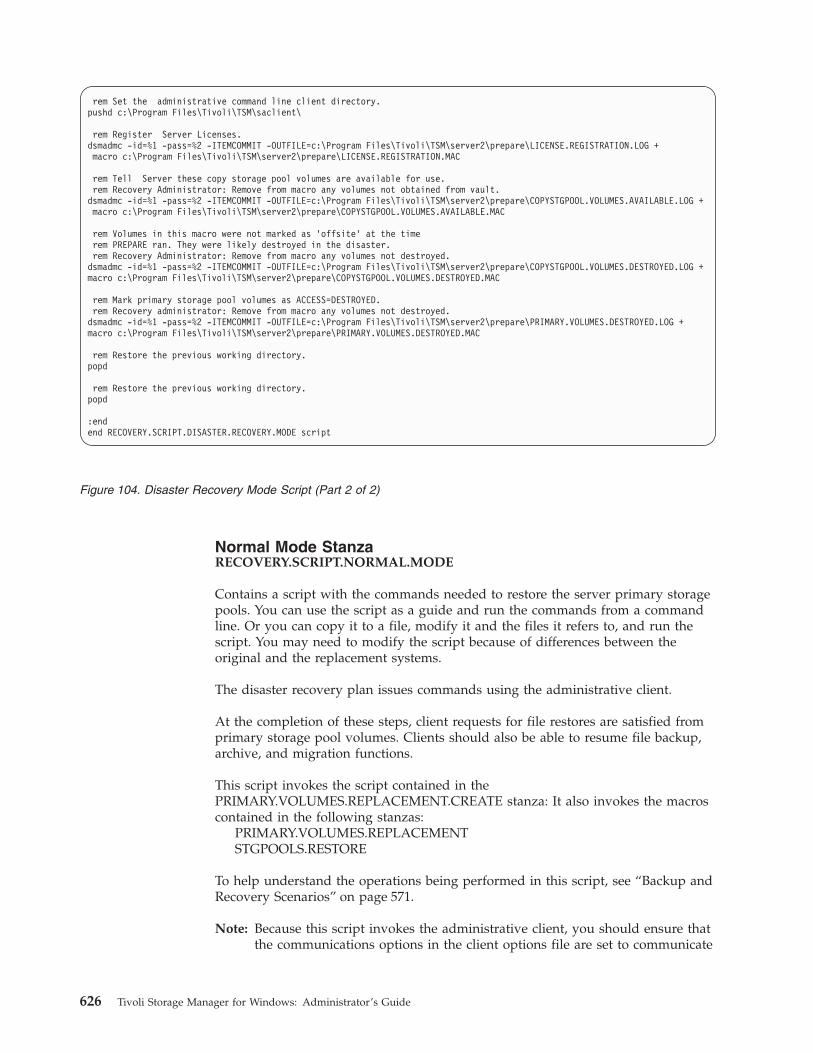
Normal Mode StanzaRECOVERY.SCRIPT.NORMAL.MODE
Contains a script with the commands needed to restore the server primary storagepools. You can use the script as a guide and run the commands from a commandline. Or you can copy it to a file, modify it and the files it refers to, and run thescript. You may need to modify the script because of differences between theoriginal and the replacement systems.
The disaster recovery plan issues commands using the administrative client.
At the completion of these steps, client requests for file restores are satisfied fromprimary storage pool volumes. Clients should also be able to resume file backup,archive, and migration functions.
This script invokes the script contained in thePRIMARY.VOLUMES.REPLACEMENT.CREATE stanza: It also invokes the macroscontained in the following stanzas:
PRIMARY.VOLUMES.REPLACEMENTSTGPOOLS.RESTORE
To help understand the operations being performed in this script, see “Backup andRecovery Scenarios” on page 571.
Note: Because this script invokes the administrative client, you should ensure thatthe communications options in the client options file are set to communicate
rem Set the administrative command line client directory.pushd c:\Program Files\Tivoli\TSM\saclient\
rem Register Server Licenses.dsmadmc -id=%1 -pass=%2 -ITEMCOMMIT -OUTFILE=c:\Program Files\Tivoli\TSM\server2\prepare\LICENSE.REGISTRATION.LOG +macro c:\Program Files\Tivoli\TSM\server2\prepare\LICENSE.REGISTRATION.MAC
rem Tell Server these copy storage pool volumes are available for use.rem Recovery Administrator: Remove from macro any volumes not obtained from vault.dsmadmc -id=%1 -pass=%2 -ITEMCOMMIT -OUTFILE=c:\Program Files\Tivoli\TSM\server2\prepare\COPYSTGPOOL.VOLUMES.AVAILABLE.LOG +macro c:\Program Files\Tivoli\TSM\server2\prepare\COPYSTGPOOL.VOLUMES.AVAILABLE.MAC
rem Volumes in this macro were not marked as 'offsite' at the timerem PREPARE ran. They were likely destroyed in the disaster.rem Recovery Administrator: Remove from macro any volumes not destroyed.dsmadmc -id=%1 -pass=%2 -ITEMCOMMIT -OUTFILE=c:\Program Files\Tivoli\TSM\server2\prepare\COPYSTGPOOL.VOLUMES.DESTROYED.LOG +macro c:\Program Files\Tivoli\TSM\server2\prepare\COPYSTGPOOL.VOLUMES.DESTROYED.MAC
rem Mark primary storage pool volumes as ACCESS=DESTROYED.rem Recovery administrator: Remove from macro any volumes not destroyed.dsmadmc -id=%1 -pass=%2 -ITEMCOMMIT -OUTFILE=c:\Program Files\Tivoli\TSM\server2\prepare\PRIMARY.VOLUMES.DESTROYED.LOG +macro c:\Program Files\Tivoli\TSM\server2\prepare\PRIMARY.VOLUMES.DESTROYED.MAC
rem Restore the previous working directory.popd
rem Restore the previous working directory.popd
:endend RECOVERY.SCRIPT.DISASTER.RECOVERY.MODE script
Figure 104. Disaster Recovery Mode Script (Part 2 of 2)
626 Tivoli Storage Manager for Windows: Administrator’s Guide
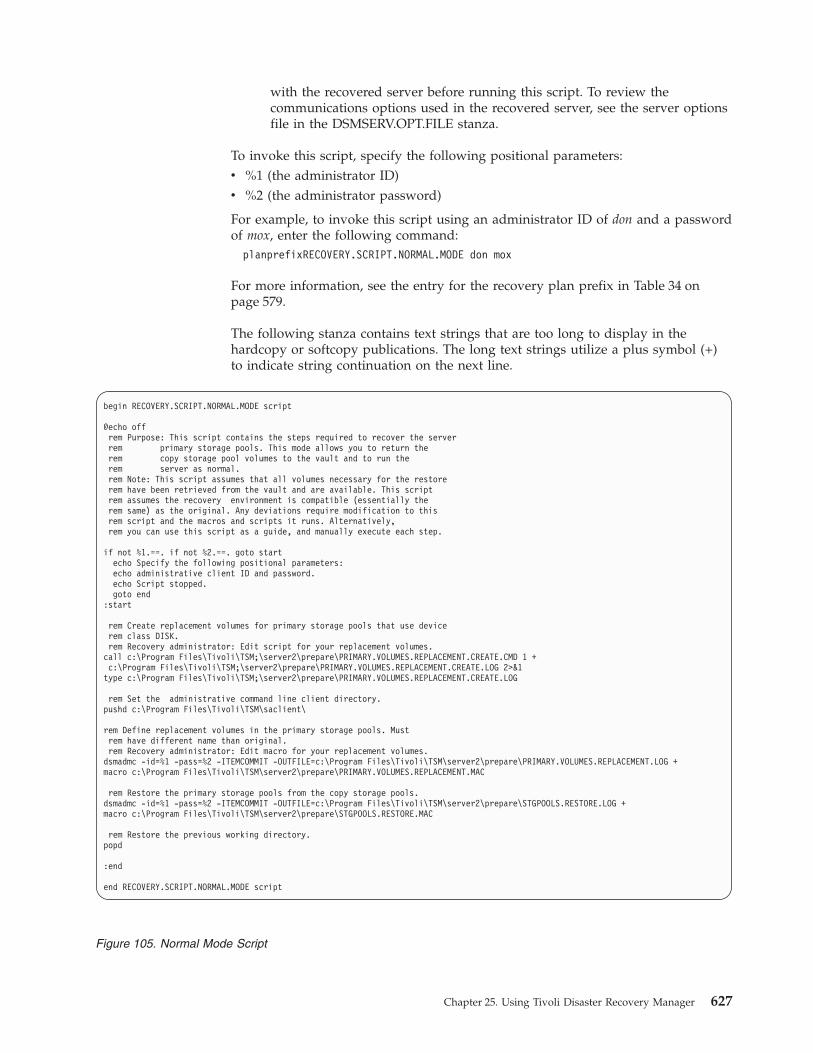
with the recovered server before running this script. To review thecommunications options used in the recovered server, see the server optionsfile in the DSMSERV.OPT.FILE stanza.
To invoke this script, specify the following positional parameters:v %1 (the administrator ID)v %2 (the administrator password)
For example, to invoke this script using an administrator ID of don and a passwordof mox, enter the following command:planprefixRECOVERY.SCRIPT.NORMAL.MODE don mox
For more information, see the entry for the recovery plan prefix in Table 34 onpage 579.
The following stanza contains text strings that are too long to display in thehardcopy or softcopy publications. The long text strings utilize a plus symbol (+)to indicate string continuation on the next line.
begin RECOVERY.SCRIPT.NORMAL.MODE script
@echo offrem Purpose: This script contains the steps required to recover the serverrem primary storage pools. This mode allows you to return therem copy storage pool volumes to the vault and to run therem server as normal.rem Note: This script assumes that all volumes necessary for the restorerem have been retrieved from the vault and are available. This scriptrem assumes the recovery environment is compatible (essentially therem same) as the original. Any deviations require modification to thisrem script and the macros and scripts it runs. Alternatively,rem you can use this script as a guide, and manually execute each step.
if not %1.==. if not %2.==. goto startecho Specify the following positional parameters:echo administrative client ID and password.echo Script stopped.goto end
:start
rem Create replacement volumes for primary storage pools that use devicerem class DISK.rem Recovery administrator: Edit script for your replacement volumes.
call c:\Program Files\Tivoli\TSM;\server2\prepare\PRIMARY.VOLUMES.REPLACEMENT.CREATE.CMD 1 +c:\Program Files\Tivoli\TSM;\server2\prepare\PRIMARY.VOLUMES.REPLACEMENT.CREATE.LOG 2>&1
type c:\Program Files\Tivoli\TSM;\server2\prepare\PRIMARY.VOLUMES.REPLACEMENT.CREATE.LOG
rem Set the administrative command line client directory.pushd c:\Program Files\Tivoli\TSM\saclient\
rem Define replacement volumes in the primary storage pools. Mustrem have different name than original.rem Recovery administrator: Edit macro for your replacement volumes.
dsmadmc -id=%1 -pass=%2 -ITEMCOMMIT -OUTFILE=c:\Program Files\Tivoli\TSM\server2\prepare\PRIMARY.VOLUMES.REPLACEMENT.LOG +macro c:\Program Files\Tivoli\TSM\server2\prepare\PRIMARY.VOLUMES.REPLACEMENT.MAC
rem Restore the primary storage pools from the copy storage pools.dsmadmc -id=%1 -pass=%2 -ITEMCOMMIT -OUTFILE=c:\Program Files\Tivoli\TSM\server2\prepare\STGPOOLS.RESTORE.LOG +macro c:\Program Files\Tivoli\TSM\server2\prepare\STGPOOLS.RESTORE.MAC
rem Restore the previous working directory.popd
:end
end RECOVERY.SCRIPT.NORMAL.MODE script
Figure 105. Normal Mode Script
Chapter 25. Using Tivoli Disaster Recovery Manager 627

Install Database and Recovery Log Volumes StanzasThe following stanzas contain text strings that are too long to display in thehardcopy or softcopy publications. A plus symbol (+) indicates that a stringcontinues on the next line.
LOG.VOLUMES
Contains the names and sizes of the log volumes to be installed. You can copy it toa file and modify it if you are changing the log volumes to be initialized. Thecontents of this stanza must be placed into a separate file to be used by theLOGANDDB.VOLUMES.INSTALL script.
DB.VOLUMES
Contains the names and sizes of the database volumes to be initialized. You cancopy it to a file and modify it if you are changing the database volumes to beinitialized. The contents of this stanza must be placed into a separate file to beused by the LOGANDDB.VOLUMES.INSTALL script.
LOGANDDB.VOLUMES.INSTALL
Contains a script with the commands required to initialize the database and logvolumes. This script is invoked by theRECOVERY.SCRIPT.DISASTER.RECOVERY.MODE script.
begin LOG.VOLUMESc:\Program Files\Tivoli\TSM;\server2\logs\lg01x 12c:\Program Files\Tivoli\TSM;\server2\logs\lg02x 8end LOG.VOLUMES
Figure 106. Recovery Log Volumes Stanza
begin DB.VOLUMESc:\Program Files\Tivoli\TSM;\server2\dbs\db01x 12c:\Program Files\Tivoli\TSM;\server2\dbs\db02x 8end DB.VOLUMES
Figure 107. Database Volume Stanza
628 Tivoli Storage Manager for Windows: Administrator’s Guide
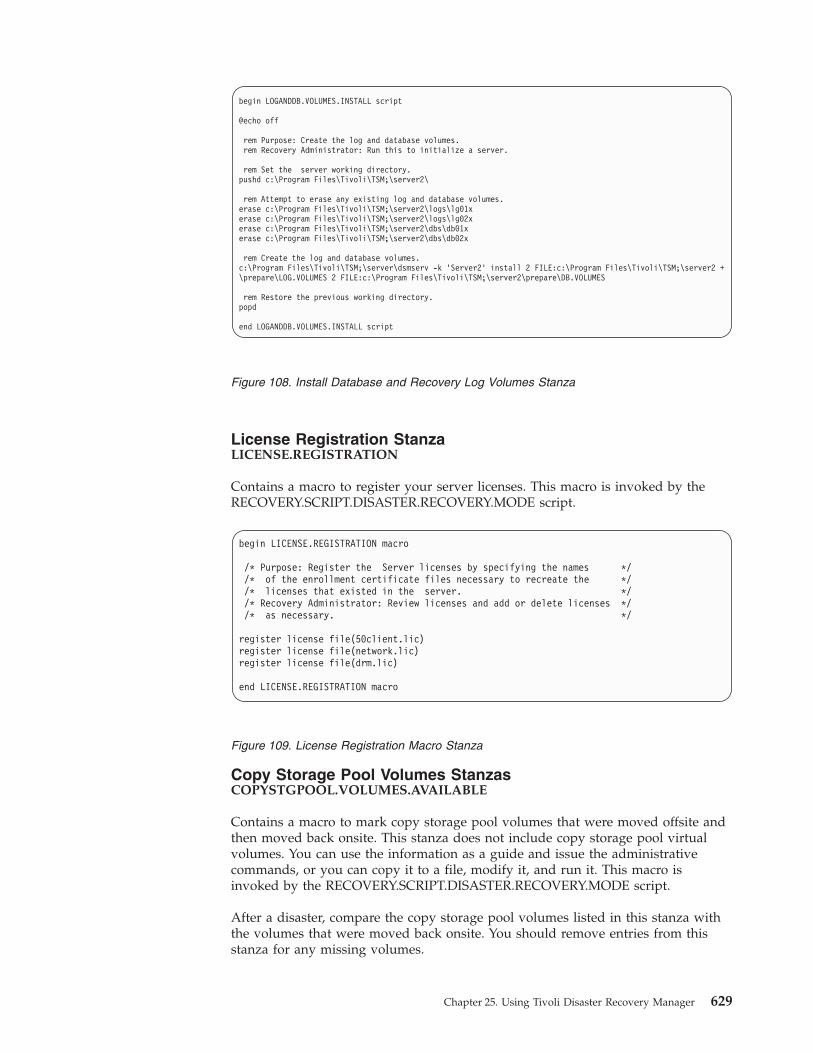
License Registration StanzaLICENSE.REGISTRATION
Contains a macro to register your server licenses. This macro is invoked by theRECOVERY.SCRIPT.DISASTER.RECOVERY.MODE script.
Copy Storage Pool Volumes StanzasCOPYSTGPOOL.VOLUMES.AVAILABLE
Contains a macro to mark copy storage pool volumes that were moved offsite andthen moved back onsite. This stanza does not include copy storage pool virtualvolumes. You can use the information as a guide and issue the administrativecommands, or you can copy it to a file, modify it, and run it. This macro isinvoked by the RECOVERY.SCRIPT.DISASTER.RECOVERY.MODE script.
After a disaster, compare the copy storage pool volumes listed in this stanza withthe volumes that were moved back onsite. You should remove entries from thisstanza for any missing volumes.
begin LOGANDDB.VOLUMES.INSTALL script
@echo off
rem Purpose: Create the log and database volumes.rem Recovery Administrator: Run this to initialize a server.
rem Set the server working directory.pushd c:\Program Files\Tivoli\TSM;\server2\
rem Attempt to erase any existing log and database volumes.erase c:\Program Files\Tivoli\TSM;\server2\logs\lg01xerase c:\Program Files\Tivoli\TSM;\server2\logs\lg02xerase c:\Program Files\Tivoli\TSM;\server2\dbs\db01xerase c:\Program Files\Tivoli\TSM;\server2\dbs\db02x
rem Create the log and database volumes.c:\Program Files\Tivoli\TSM;\server\dsmserv -k 'Server2' install 2 FILE:c:\Program Files\Tivoli\TSM;\server2 +\prepare\LOG.VOLUMES 2 FILE:c:\Program Files\Tivoli\TSM;\server2\prepare\DB.VOLUMES
rem Restore the previous working directory.popd
end LOGANDDB.VOLUMES.INSTALL script
Figure 108. Install Database and Recovery Log Volumes Stanza
begin LICENSE.REGISTRATION macro
/* Purpose: Register the Server licenses by specifying the names *//* of the enrollment certificate files necessary to recreate the *//* licenses that existed in the server. *//* Recovery Administrator: Review licenses and add or delete licenses *//* as necessary. */
register license file(50client.lic)register license file(network.lic)register license file(drm.lic)
end LICENSE.REGISTRATION macro
Figure 109. License Registration Macro Stanza
Chapter 25. Using Tivoli Disaster Recovery Manager 629
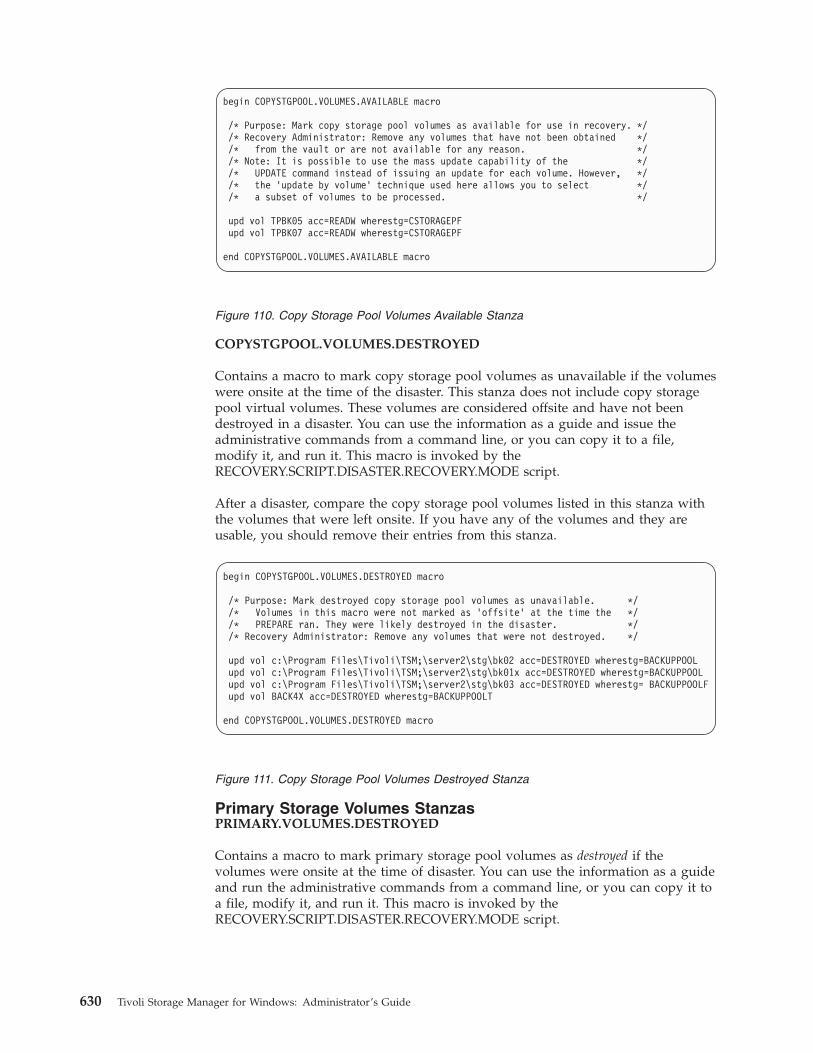
COPYSTGPOOL.VOLUMES.DESTROYED
Contains a macro to mark copy storage pool volumes as unavailable if the volumeswere onsite at the time of the disaster. This stanza does not include copy storagepool virtual volumes. These volumes are considered offsite and have not beendestroyed in a disaster. You can use the information as a guide and issue theadministrative commands from a command line, or you can copy it to a file,modify it, and run it. This macro is invoked by theRECOVERY.SCRIPT.DISASTER.RECOVERY.MODE script.
After a disaster, compare the copy storage pool volumes listed in this stanza withthe volumes that were left onsite. If you have any of the volumes and they areusable, you should remove their entries from this stanza.
Primary Storage Volumes StanzasPRIMARY.VOLUMES.DESTROYED
Contains a macro to mark primary storage pool volumes as destroyed if thevolumes were onsite at the time of disaster. You can use the information as a guideand run the administrative commands from a command line, or you can copy it toa file, modify it, and run it. This macro is invoked by theRECOVERY.SCRIPT.DISASTER.RECOVERY.MODE script.
begin COPYSTGPOOL.VOLUMES.AVAILABLE macro
/* Purpose: Mark copy storage pool volumes as available for use in recovery. *//* Recovery Administrator: Remove any volumes that have not been obtained *//* from the vault or are not available for any reason. *//* Note: It is possible to use the mass update capability of the *//* UPDATE command instead of issuing an update for each volume. However, *//* the 'update by volume' technique used here allows you to select *//* a subset of volumes to be processed. */
upd vol TPBK05 acc=READW wherestg=CSTORAGEPFupd vol TPBK07 acc=READW wherestg=CSTORAGEPF
end COPYSTGPOOL.VOLUMES.AVAILABLE macro
Figure 110. Copy Storage Pool Volumes Available Stanza
begin COPYSTGPOOL.VOLUMES.DESTROYED macro
/* Purpose: Mark destroyed copy storage pool volumes as unavailable. *//* Volumes in this macro were not marked as 'offsite' at the time the *//* PREPARE ran. They were likely destroyed in the disaster. *//* Recovery Administrator: Remove any volumes that were not destroyed. */
upd vol c:\Program Files\Tivoli\TSM;\server2\stg\bk02 acc=DESTROYED wherestg=BACKUPPOOLupd vol c:\Program Files\Tivoli\TSM;\server2\stg\bk01x acc=DESTROYED wherestg=BACKUPPOOLupd vol c:\Program Files\Tivoli\TSM;\server2\stg\bk03 acc=DESTROYED wherestg= BACKUPPOOLFupd vol BACK4X acc=DESTROYED wherestg=BACKUPPOOLT
end COPYSTGPOOL.VOLUMES.DESTROYED macro
Figure 111. Copy Storage Pool Volumes Destroyed Stanza
630 Tivoli Storage Manager for Windows: Administrator’s Guide

During recovery, compare the primary storage pool volumes listed in this stanzawith the volumes that were onsite. If you have any of the volumes and they areusable, remove their entries from the stanza.
This stanza does not include primary storage pool virtual volumes. These volumesare considered offsite and have not been destroyed in a disaster.
PRIMARY.VOLUMES.REPLACEMENT.CREATE
Contains a script with the commands needed to recreate the primary disk storagepool volumes. You can use the script as a guide and run the commands from acommand line, or you can copy thew script to a file, modify it, and run it. Thisscript is invoked by the RECOVERY.SCRIPT.NORMAL.MODE script.
The SET DRMPLANVPOSTFIX command adds a character to the end of the namesof the original volumes listed in this stanza. This character does the following:v Improves retrievability of volume names that require renaming in the stanzas.
Before using the volume names, change these names to new names that arevalid for the device class and valid on the replacement system.
v Generates a new name that can be used by the replacement server. Your namingconvention must take into account the appended character.
Notes:
1. Replacement primary volume names must be different from any otheroriginal volume name or replacement name.
2. The RESTORE STGPOOL command restores storage pools on a logical basis.There is no one-to-one relationship between an original volume and itsreplacement.
3. There will be entries for the same volumes inPRIMARY.VOLUMES.REPLACEMENT.
This stanza does not include primary storage pool virtual volumes, because thesevolumes are considered offsite and have not been destroyed in a disaster.
begin PRIMARY.VOLUMES.DESTROYED macro
/* Purpose: Mark primary storage pool volumes as ACCESS=DESTROYED. *//* Recovery administrator: Delete any volumes listed here *//* that you do not want to recover. *//* Note: It is possible to use the mass update capability of the *//* UPDATE command instead of issuing an update for each volume. However*//* the 'update by volume' technique used here allows you to select *//* a subset of volumes to be marked as destroyed. */upd vol c:\Program Files\Tivoli\TSM;\server2\stg\bk02 acc=DESTROYED wherestg=BACKUPPOOLupd vol c:\Program Files\Tivoli\TSM;\server2\stg\bk01x acc=DESTROYED wherestg=BACKUPPOOLupd vol c:\Program Files\Tivoli\TSM;\server2\stg\bk03 acc=DESTROYED wherestg= BACKUPPOOLFupd vol BACK4X acc=DESTROYED wherestg=BACKUPPOOLT
end PRIMARY.VOLUMES.DESTROYED macro
Figure 112. Primary Storage Volumes Destroyed Stanza
Chapter 25. Using Tivoli Disaster Recovery Manager 631

PRIMARY.VOLUMES.REPLACEMENT
Contains a macro to define primary storage pool volumes to the server. You canuse the macro as a guide and run the administrative commands from a commandline, or you can copy it to a file, modify it, and execute it. This macro is invokedby the RECOVERY.SCRIPT.NORMAL.MODE script.
Primary storage pool volumes with entries in this stanza have at least one of thefollowing three characteristics:1. Original volume in a storage pool whose device class was DISK.2. Original volume in a storage pool with MAXSCRATCH=0.3. Original volume in a storage pool and volume scratch attribute=no.
The SET DRMPLANVPOSTFIX command adds a character to the end of the namesof the original volumes listed in this stanza. This character does the following:v Improves the retrievability of volume names that must be renamed in the
stanzas. Before using the volume names, change these names to new names thatare valid for the device class on the replacement system.
v Generates a new name that can be used by the replacement server. Your namingconvention must take into account the appended character.
Notes:
1. Replacement primary volume names must be different from any otheroriginal volume name or replacement name.
2. The RESTORE STGPOOL command restores storage pools on a logical basis.There is no one-to-one relationship between an original volume and itsreplacement.
3. There could be entries for the same volume inPRIMARY.VOLUMES.REPLACEMENT.CREATE andPRIMARY.VOLUMES.REPLACEMENT if the volume has a device class ofDISK.
begin PRIMARY.VOLUMES.REPLACEMENT.CREATE script
@echo off
rem Purpose: Create replacement volumes for primary storage pools thatrem use device class DISK.rem Recovery administrator: Edit this section for your replacementrem volume names. New name must be unique, i.e. different from anyrem original or other new name.
rem Set the TSM Management Console directory.pushd c:\Program Files\Tivoli\TSM\console\
echo Replace c:\Program Files\Tivoli\TSM;\server2\stg\bk02 DISK 16M in BACKUPPOOLdsmfmt -data c:\Program Files\Tivoli\TSM;\server2\stg\bk02x@ 16
echo Replace c:\Program Files\Tivoli\TSM;\server2\stg\bk01x DISK 5M in BACKUPPOOLdsmfmt -data c:\Program Files\Tivoli\TSM;\server2\stg\bk01x@ 5
rem Restore the previous working directory.popd
end PRIMARY.VOLUMES.REPLACEMENT.CREATE script
Figure 113. Primary Storage Volumes Replacement Stanza
632 Tivoli Storage Manager for Windows: Administrator’s Guide

This stanza does not include primary storage pool virtual volumes. These volumesare considered offsite and have not been destroyed in a disaster.
Storage Pools Restore StanzaSTGPOOLS.RESTORE
Contains a macro to restore the primary storage pools. You can use it as a guideand execute the administrative commands from a command line. You can also cancopy it to a file, modify it, and execute it. This macro is invoked by theRECOVERY.SCRIPT.NORMAL.MODE script.
This stanza does not include primary storage pool virtual volumes. These volumesare considered offsite and have not been destroyed in a disaster.
Configuration StanzasVOLUME.HISTORY.FILE
Contains a copy of the volume history information when the recovery plan wascreated. The DSMSERV RESTORE DB command uses the volume history file to
begin PRIMARY.VOLUMES.REPLACEMENT macro/* Purpose: Define replacement primary storage pool volumes for either: *//* 1. Original volume in a storage pool whose device class was DISK. *//* 2. Original volume in a storage pool with MAXSCRATCH=0. *//* 3. Original volume in a storage pool and volume scratch=no. *//* Recovery administrator: Edit this section for your replacement *//* volume names. New name must be unique, i.e. different from any *//* original or other new name. *//* Replace c:\Program Files\Tivoli\TSM;\server2\stg\bk02 DISK 16M in BACKUPPOOL */def vol BACKUPPOOL c:\Program Files\Tivoli\TSM;\server2\stg\bk02@ acc=READW
/* Replace c:\Program Files\Tivoli\TSM;\server2\stg\bk01x DISK 5M in BACKUPPOOL */def vol BACKUPPOOL c:\Program Files\Tivoli\TSM;\server2\stg\bk01x@ acc=READW
/* Replace c:\Program Files\Tivoli\TSM;\server2\stg\bk03 FILES 4M in BACKUPPOOLF */def vol BACKUPPOOLF c:\Program Files\Tivoli\TSM;\server2\stg\bk03@ acc=READW
/* Replace BACK4X COOL8MM 0M in BACKUPPOOLT */def vol BACKUPPOOLT BACK4X@ acc=READW
end PRIMARY.VOLUMES.REPLACEMENT macro
Figure 114. Primary Storage Volumes Replacement Stanza
begin STGPOOLS.RESTORE macro
/* Purpose: Restore the primary storage pools from copy storage pool(s). *//* Recovery Administrator: Delete entries for any primary storage pools *//* that you do not want to restore. */
restore stgp ARCHIVEPOOLrestore stgp BACKUPPOOLrestore stgp BACKUPPOOLFrestore stgp BACKUPPOOLTrestore stgp SPACEMGPOOL
end STGPOOLS.RESTORE macro
Figure 115. Storage Pools Restore Stanza
Chapter 25. Using Tivoli Disaster Recovery Manager 633

determine what volumes are needed to restore the database. It is used by theRECOVERY.SCRIPT.DISASTER.RECOVERY.MODE script.
The following rules determine where to place the volume history file at restoretime:v If the server option file contains VOLUMEHISTORY options, the server uses the
fully qualified file name associated with the first entry. If the file name does notbegin with a directory specification (for example, c:\), the server uses the prefixvolhprefix.
v If the server option file does not contain VOLUMEHISTORY options, the serveruses the default name volhprefix followed by drmvolh.txt. For example, ifvolhprefix is c:\Program Files\Tivoli\TSM;\server2\ the file name is c:\ProgramFiles\Tivoli\TSM;\server2\drmvolh.txt.
Note: The volhprefix is set to the directory representing this instance of the server,which is typically the directory that the server was originally installed from.
If a fully qualified file name was not specified in the server options file for theVOLUMEHISTORY option, the server adds it to the DSMSERV.OPT.FILE stanza.
DEVICE.CONFIGURATION.FILE
Contains a copy of the server device configuration information when the recoveryplan was created. The DSMSERV RESTORE DB command uses the deviceconfiguration file to read the database backup volumes. It is used by theRECOVERY.SCRIPT.DISASTER.RECOVERY.MODE script.
At recovery time, you may need to modify this stanza. You must update the deviceconfiguration information if the hardware configuration at the recovery site haschanged. Examples of changes requiring updates to the configuration informationare:v Different device namesv Use of a manual library instead of an automated library
begin VOLUME.HISTORY.FILE****************************************************************************************************** Tivoli Storage Manager Sequential Volume Usage History* Updated 08/11/2000 10:20:34** Operation Volume Backup Backup Volume Device Volume* Date/Time Type Series Oper. Seq Class Name Name*****************************************************************************************************2000/08/11 10:18:43 STGNEW 0 0 0 COOL8MM BACK4X2000/08/11 10:18:43 STGNEW 0 0 0 FILES c:\Program Files\Tivoli\TSM;\server2\stg\bk03
* Location for volume TPBK05 is: 'Ironvault Inc.'2000/08/11 10:18:46 STGNEW 0 0 0 LIB8MM TPBK05
* Location for volume TPBK06 is: 'Ironvault Inc.'2000/08/11 10:19:23 BACKUPFULL 1 0 1 LIB8MM TPBK06
* Location for volume TPBK07 is: 'Ironvault Inc.'2000/08/11 10:20:03 STGNEW 0 0 0 LIB8MM TPBK07
* Location for volume TPBK08 is: 'Ironvault Inc.'2000/08/11 10:20:22 BACKUPINCR 1 1 1 LIB8MM TPBK08
end VOLUME.HISTORY.FILE
Figure 116. Volume History File Stanza
634 Tivoli Storage Manager for Windows: Administrator’s Guide

v For automated libraries, the requirement to manually place the database backupvolumes in the automated library and update the configuration information toidentify the element within the library. This allows the server to locate therequired database backup volumes.
For details, see “Updating the Device Configuration File” on page 550.
The following rules determine where the device configuration file is placed atrestore time:v If the server options file contains DEVCONFIG entries, the server uses the fully
qualified file name associated with the first entry. If the specified file name doesnot begin with a directory specification (for example, c:\), the server adds theprefix devcprefix.
v If the server options file does not contain DEVCONFIG entries, the server usesthe default name devcprefix followed by drmdevc.txt. For example, if devcprefix isc:\Program Files\Tivoli\TSM;\server2\ the file name used by PREPARE isc:\Program Files\Tivoli\TSM;\server2\drmdevc.txt.
Note: The devcprefix is set to the directory representing this instance of the serverwhich is typically the directory from which the server was originallyinstalled.
If a fully qualified file name was not specified for the DEVCONFIG option in theserver options file, the server adds it to the stanza DSMSERV.OPT.FILE.
DSMSERV.OPT.FILE
Contains a copy of the server options file. This stanza is used by theRECOVERY.SCRIPT.DISASTER.RECOVERY.MODE script.
Note: The following figure contains text strings that are too long to display inhardcopy or softcopy publications. The long text strings have a plus symbol(+) at the end of the string to indicate that they continue on the next line.
The disaster recovery plan file adds the DISABLESCHEDS option to the serveroptions file and sets it to YES. This option disables administrative and clientschedules while the server is being recovered. After the server is recovered, youcan enable scheduling by deleting the option or setting it to NO and thenrestarting the server.
begin DEVICE.CONFIGURATION.FILE
/* Tivoli Storage Manager Device Configuration */DEFINE DEVCLASS COOL8MM DEVTYPE=8MM FORMAT=DRIVE MOUNTLIMIT=1 MOUNTWAIT=60MOUNTRETENTION=60 PREFIX=TIVSM LIBRARY=ITSMLDEFINE DEVCLASS FILES DEVTYPE=FILE MAXCAPACITY=4096K MOUNTLIMIT=2 DIRECTORY=c:\Program Files\Tivoli\TSM;\server2\stgDEFINE DEVCLASS FILESSM DEVTYPE=FILE MAXCAPACITY=100K MOUNTLIMIT=2 DIRECTORY=c:\Program Files\Tivoli\TSM;\server2\stgDEFINE DEVCLASS LIB8MM DEVTYPE=8MM FORMAT=DRIVE MOUNTLIMIT=1 MOUNTWAIT=60 MOUNTRETENTION=60 PREFIX=TIVSM LIBRARY=RLLIBDEFINE LIBRARY ITSML LIBTYPE=MANUALDEFINE LIBRARY RLLIB LIBTYPE=MANUAL
end DEVICE.CONFIGURATION.FILE
Figure 117. Device Configuration File Stanza
Chapter 25. Using Tivoli Disaster Recovery Manager 635

License Information StanzaLICENSE.INFORMATION
Contains a copy of the latest license audit results and the server licenseterms.
Machine Files StanzaMACHINE.GENERAL.INFORMATION
Provides information for the server machine (for example, machine location). Thisstanza is included in the plan file if the machine information is saved in thedatabase using the DEFINE MACHINE with ADSMSERVER=YES.
begin DSMSERV.OPT.FILE
* Server options file located in c:\Program Files\Tivoli\TSM;\server2\dsmserv.optTCPPort 1509VOLUMEHISTORY c:\Program Files\Tivoli\TSM;\server2\volhist.txtDEVCONFIG c:\Program Files\Tivoli\TSM;\server2\devconf.txt* The following option was added by PREPARE.DISABLESCHEDS YES
end DSMSERV.OPT.FILE
Figure 118. Server Options File Stanza
begin LICENSE.INFORMATIONLast License Audit: 12/30/2000 10:25:34
Registered Client Nodes: 1Licensed Client Nodes: 51
Are network connections in use ?: YesAre network connections licensed ?: Yes
Are Open Systems Environment clients registered ?: NoAre Open Systems Environment clients licensed ?: No
Is space management in use ?: NoIs space management licensed ?: No
Is disaster recovery manager in use ?: YesIs disaster recovery manager licensed ?: Yes
Are Server-to-Server Virtual Volumes in use ?: NoAre Server-to-Server Virtual Volumes licensed ?: Yes
Is Advanced Device Support required ?: NoIs Advanced Device Support licensed ?: No
Server License Compliance: Valid
end LICENSE.INFORMATION
Figure 119. License Information Stanza
636 Tivoli Storage Manager for Windows: Administrator’s Guide

MACHINE.RECOVERY.INSTRUCTIONS
Provides the recovery instructions for the server machine. This stanza is includedin the plan file if the machine recovery instructions are saved in the database.
MACHINE.RECOVERY.CHARACTERISTICS
Provides the hardware and software characteristics for the server machine.Thisstanza is included in the plan file if the machine characteristics are saved in thedatabase.
MACHINE.RECOVERY.MEDIA
begin MACHINE.GENERAL.INFORMATIONPurpose: General information for machine DSMSRV1.
This is the machine that contains DSM server DSM.Machine Name: DSMSRV1
Machine Priority: 1Building: 21
Floor: 2Room: 2749
Description: DSM Server for Branch 51Recovery Media Name: DSMSRVIMAGE
end MACHINE.GENERAL.INFORMATION
Figure 120. Machine General Information Stanza
begin MACHINE.RECOVERY.INSTRUCTIONSPurpose: Recovery instructions for machine DSMSRV1.
Primary Contact:Jane Smith (wk 520-000-0000 hm 520-001-0001)
Secondary Contact:John Adams (wk 520-000-0001 hm 520-002-0002)
end MACHINE.RECOVERY.INSTRUCTIONS
Figure 121. Machine Recovery Instructions Stanza
begin MACHINE.CHARACTERISTICSPurpose: Hardware and software characteristics of machine DSMSRV1.
Processor : x86 Family 5 Model 2 Stepping 11Bus Type : AT 16-Bit busKeyboard Type : 101/102 Key Enhanced KeyboardPointer Type : PS/2 Mouse Buttons: 2Equipment : 1 Parallel Port(s)
1 Serial Port(s)1 Diskette Drive(s)2 Fixed Disk(s)Pointing DeviceMath CoProcessor
Fixed Disk 1 : 609 MBTotal Physical Memory : 32,832 KB (33,619,968)
end MACHINE.CHARACTERISTICS
Figure 122. Machine Recovery Characteristics Stanza
Chapter 25. Using Tivoli Disaster Recovery Manager 637

Provides information about the media (for example, boot media) needed forrebuilding the machine that contains the server. This stanza is included in the planfile if recovery media information is saved in the database and it has beenassociated with the machine that contains the server.
begin MACHINE.RECOVERY.MEDIA.REQUIREDPurpose: Recovery media for machine DSMSRV1.Recovery Media Name: DSMSRV
Type: OtherVolume Names:
Location: IRONMNTDescription: Server Installation CD
Product:Product Information:
end MACHINE.RECOVERY.MEDIA.REQUIRED
Figure 123. Machine Recovery Media Stanza
638 Tivoli Storage Manager for Windows: Administrator’s Guide

Part 6. Appendixes
© Copyright IBM Corp. 1994, 2002 639

640 Tivoli Storage Manager for Windows: Administrator’s Guide

Appendix A. External Media Management InterfaceDescription
This appendix contains Programming Interface information for the interface thatTivoli Storage Manager provides to external media management programs. Theinterface consists of request description strings that Tivoli Storage Manager sendsand response strings that the external program sends.
To use the interface, you must first define an EXTERNAL-type TSM library thatrepresents the media manager. You do not define drives, label volumes, or check inmedia. See “Using Removable Media Managers With Tivoli Storage Manager” onpage 138. Refer to your media manager’s documentation for that product’s setupinformation.
The details of the request types and the required processing are described in thesections that follow. The request types are:v Initialization of the external programv Begin Batchv End Batchv Volume Queryv Volume Ejectv Volume Releasev Volume Mountv Volume Dismount
The responses can be right-padded with any number of white-space characters.
The libraryname passed in a request must be returned in the response. The volumespecified in an eject request or a query request must be returned in the response.The volume specified in a mount request (except for ’SCRTCH’) must be returnedin the response. When ’SCRTCH’ is specified in a mount request, the actualvolume mounted must be returned.
CreateProcess CallThe server creates two anonymous uni-directional pipes and maps them to stdinand stdout during the CreateProcess call. According to Microsoft DeveloperNetwork documentation, if a standard handle has been redirected to refer to a fileor a pipe, the handle can only be used by the ReadFile and WriteFile functions.This precludes normal C functions such as gets or printf. Since the server willnever terminate the external program process, it is imperative that the externalprogram recognize a read or write failure on the pipes and exit the process. Inaddition, the external program should exit the process if it reads an unrecognizedcommand.
The external program may obtain values for the read and write handles using thefollowing calls:readPipe=GetStdHandle(STD_INPUT-HANDLE) and writePipe=GetStdHandle(STD_OUTPUT_HANDLE)
© Copyright IBM Corp. 1994, 2002 641

Processing during Server InitializationEnsure that the external media management program cooperates with the serverduring the server’s initialization. For each external library defined to the server, thefollowing must occur during server initialization:1. The server loads the external program (CreateProcess) in a newly created
process and creates pipes to the external program.2. The server sends an initialization request description string, in text form, into
the standard input (stdin) stream of the external program. The server waits forthe response.
3. When the external process completes the request, the process must write aninitialization response string, in text form, into its standard output (stdout)stream.
4. The server closes the pipes.5. When the agent detects that the pipes are closed, it performs any necessary
cleanup and calls the stdlib exit routine.
Processing for Mount RequestsTo process the mount request:1. The server loads the external program in a newly created process and creates
pipes to the external program.2. The server sends an initialization request description string (in text form) into
the standard input (stdin) stream of the external program. The server waits forthe response.
3. When the external process completes the request, the process must write aninitialization response string (in text form) into its standard output (stdout)stream.
4. The server sends the MOUNT request (stdin).5. The agent sends the MOUNT response (stdout).6. The agent waits.7. The server sends the DISMOUNT request (stdin).8. The agent sends the DISMOUNT response (stdout), performs any necessary
cleanup, and calls the stdlib exit routine.
Processing for Release RequestsTo process the release request:1. The server loads the external program in a newly created process and creates
pipes to the external program.2. The server sends an initialization request description string (in text form) into
the standard input (stdin) stream of the external program. The server waits forthe response.
3. When the external process completes the request, the process must write aninitialization response string (in text form) into its standard output (stdout)stream.
4. The server sends the RELEASE request (stdin).5. The agent sends the RELEASE response (stdout), performs any necessary
cleanup, and calls the stdlib exit routine.
642 Tivoli Storage Manager for Windows: Administrator’s Guide

Processing for Batch RequestsBatch processing is done during MOVE MEDIA, MOVE DRMEDIA, and QUERYMEDIA command execution when performed on volumes in external libraries. Themove commands will cause a QUERY to be issued for a volume. If the QUERYindicates that the volume is in the library, a subsequent EJECT for that volume isissued. As the move commands can match any number of volumes, a QUERY andan EJECT request is issued for each matching volume.
The QUERY MEDIA command will result in QUERY requests being sent to theagent. During certain types of processing, TSM may need to know if a volume ispresent in a library. The external agent should verify that the volume is physicallypresent in the library.1. The server loads the external program in a newly created process and creates
pipes to the external program.2. The server sends an initialization request description string (in text form) into
the standard input (stdin) stream of the external program. The server waits forthe response.
3. When the external process completes the request, the process must write aninitialization response string (in text form) into its standard output (stdout)stream.
4. The server sends the BEGIN BATCH request (stdin).5. The agent sends the BEGIN BATCH response (stdout).6. The server sends 1 to n volume requests (n > 1). These can be any number of
QUERY or EJECT requests. For each request, the agent will send the applicableQUERY response or EJECT response.
7. The server sends the END BATCH request (stdin).8. The agent sends the END BATCH response (stdout), performs any necessary
cleanup, and calls the stdlib exit routine.
Error HandlingIf the server encounters an error during processing, it will close the stdin andstdout streams to the agent exit. The agent will detect this when it tries to readfrom stdin or write to stdout. If this occurs, the agent performs any necessarycleanup and calls the stdlib exit routine.
If the code for any response (except for EJECT and QUERY) is not equal toSUCCESS, TSM does not proceed with the subsequent steps. After the agent sendsa non-SUCCESS return code for any response, the agent will perform anynecessary cleanup and call the stdlib exit routine.
However, even if the code for EJECT or QUERY requests is not equal to SUCCESS,the agent will continue to send these requests.
If the server gets an error while trying to write to the agent, it will close the pipes,perform any necessary cleanup, and terminate the current request.
Appendix A. External Media Management Interface 643

Begin Batch RequestThe format of the Begin Batch Request is:BEGIN BATCH
Format of the external program response:BEGIN BATCH COMPLETE, RESULT=resultCode
where:
resultCodeOne of the following:v SUCCESSv INTERNAL_ERROR
End Batch RequestThe End Batch Request is sent by TSM to indicate that no more requests are to besent by the external library manager for the current process. The external agentmust send the End Batch Response and end by using the stdlib exit routine.
The format of the End Batch Request is:END BATCH
Format of the external program response:END BATCH COMPLETE, RESULT=resultCode
where:
resultCodeOne of the following:v SUCCESSv INTERNAL_ERROR
Volume Query RequestThe format of the Volume Query Request is:QUERY libraryname volume
where:
librarynameSpecifies the name of the EXTERNAL library as defined to TSM.
volumeSpecifies the volume name to be queried.
Format of the external program response:QUERY libraryname volume COMPLETE, STATUS=statusValue, RESULT=resultCode
where:
librarynameSpecifies the name of the EXTERNAL library as defined to TSM.
volumeSpecifies the volume name queried.
644 Tivoli Storage Manager for Windows: Administrator’s Guide

resultCodeOne of the following:v SUCCESSv LIBRARY_ERRORv VOLUME_UNKNOWNv VOLUME_UNAVAILABLEv CANCELLEDv TIMED_OUTv INTERNAL_ERROR
If resultCode is not SUCCESS, the exit must return statusValue set to UNDEFINED.If resultCode is SUCCESS, STATUS must be one of the following values:v IN_LIBRARYv NOT_IN_LIBRARY
IN_LIBRARY means that the volume is currently in the library and available to bemounted.
NOT_IN_LIBRARY means that the volume is not currently in the library.
Initialization RequestsWhen the server is started, the server sends an initialization request to the externalmedia management program for each EXTERNAL library. The external programmust process this request to ensure that the external program is present, functional,and ready to process requests. If the initialization request is successful, TSMinforms its operators that the external program reported its readiness foroperations. Otherwise, TSM reports a failure to its operators.
TSM does not attempt any other type of operation with that library until aninitialization request has succeeded. The server sends an initialization request first.If the initialization is successful, the request is sent. If the initialization is notsuccessful, the request fails. The external media management program can detectwhether the initialization request is being sent by itself or with another request bydetecting end-of-file on the stdin stream. When end-of-file is detected, the externalprogram must end by using the stdlib exit routine (not the return call).
When a valid response is sent by the external program, the external program mustend by using the exit routine.
Format of the request:INITIALIZE libraryname
where libraryname is the name of the EXTERNAL library as defined to TSM.
Format of the external program response:INITIALIZE libraryname COMPLETE, RESULT=resultcode
where:
librarynameSpecifies the name of the EXTERNAL library as defined to TSM.
resultcodeOne of the following:v SUCCESSv NOT_READY
Appendix A. External Media Management Interface 645

v INTERNAL_ERROR
Volume Eject RequestThe format of the Volume Eject Request is:EJECT libraryname volume 'location info'
where:
librarynameSpecifies the name of the EXTERNAL library as defined to TSM.
volumeSpecifies the volume to be ejected.
’location info’Specifies the location information associated with the volume from the TSMinventory. It is delimited with single quotation marks. This information ispassed without any modification from the TSM inventory. The customer isresponsible for setting its contents with the appropriate UPDATE MEDIA orUPDATE VOLUME command before the move command is invoked. Set thisfield to some target location value that will assist in placing the volume after itis ejected from the library. It is suggested that the external agent post the valueof this field to the operator.
Format of the external program response:EJECT libraryname volume COMPLETE, RESULT=resultCode
where:
librarynameSpecifies the name of the EXTERNAL library as defined to TSM.
volumeSpecifies the ejected volume.
resultCodeOne of the following:v SUCCESSv LIBRARY_ERRORv VOLUME_UNKNOWNv VOLUME_UNAVAILABLEv CANCELLEDv TIMED_OUTv INTERNAL_ERROR
Volume Release RequestWhen the server returns a volume to scratch status, the server starts the externalmedia management program, issues a request to initialize, then issues a request torelease a volume.
The external program must send a response to the release request. No matter whatresponse is received from the external program, TSM returns the volume toscratch. For this reason, TSM and the external program can have conflictinginformation on which volumes are scratch. If an error occurs, the external programshould log the failure so that the external library inventory can be synchronizedlater with TSM. The synchronization can be a manual operation.
646 Tivoli Storage Manager for Windows: Administrator’s Guide

Format of the request:RELEASE libraryname volname
where:
librarynameSpecifies the name of the EXTERNAL library as defined to TSM.
volnameSpecifies the name of the volume to be returned to scratch (released).
Format of the external program response:RELEASE libraryname volname COMPLETE, RESULT=resultcode
where:
librarynameSpecifies the name of the EXTERNAL library as defined to TSM.
volnameSpecifies the name of the volume returned to scratch (released).
resultcodeOne of the following:v SUCCESSv VOLUME_UNKNOWNv VOLUME_UNAVAILABLEv INTERNAL_ERROR
Volume Mount RequestWhen the server requires a volume mount, the server starts the external mediamanagement program, issues a request to initialize, then issues a request to mounta volume. The external program is responsible for verifying that this request iscoming from TSM and not from an unauthorized system.
The volume mounted by the external media management program must be a tapewith a standard IBM label that matches the external volume label. When theexternal program completes the mount request, the program must send a response.If the mount was successful, the external program must remain active. If themount failed, the external program must end immediately by using the stdlib exitroutine.
Format of the request:MOUNT libraryname volname accessmode devicetypes timelimit useridvolumenumber 'location'
where:
librarynameSpecifies the name of the EXTERNAL library as defined to TSM.
volnameSpecifies the actual volume name if the request is for an existing volume. If ascratch mount is requested, the volname is set to SCRTCH.
accessmodeSpecifies the access mode required for the volume. Possible values areREADONLY and READWRITE.
Appendix A. External Media Management Interface 647
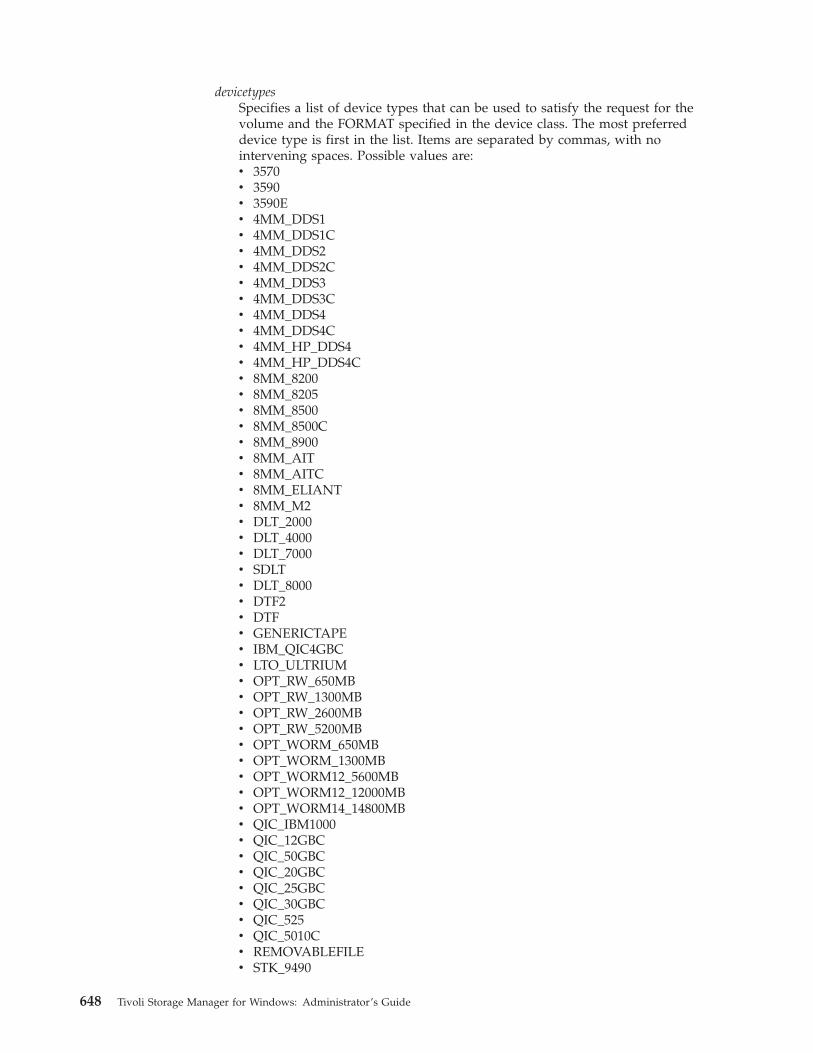
devicetypesSpecifies a list of device types that can be used to satisfy the request for thevolume and the FORMAT specified in the device class. The most preferreddevice type is first in the list. Items are separated by commas, with nointervening spaces. Possible values are:v 3570v 3590v 3590Ev 4MM_DDS1v 4MM_DDS1Cv 4MM_DDS2v 4MM_DDS2Cv 4MM_DDS3v 4MM_DDS3Cv 4MM_DDS4v 4MM_DDS4Cv 4MM_HP_DDS4v 4MM_HP_DDS4Cv 8MM_8200v 8MM_8205v 8MM_8500v 8MM_8500Cv 8MM_8900v 8MM_AITv 8MM_AITCv 8MM_ELIANTv 8MM_M2v DLT_2000v DLT_4000v DLT_7000v SDLTv DLT_8000v DTF2v DTFv GENERICTAPEv IBM_QIC4GBCv LTO_ULTRIUMv OPT_RW_650MBv OPT_RW_1300MBv OPT_RW_2600MBv OPT_RW_5200MBv OPT_WORM_650MBv OPT_WORM_1300MBv OPT_WORM12_5600MBv OPT_WORM12_12000MBv OPT_WORM14_14800MBv QIC_IBM1000v QIC_12GBCv QIC_50GBCv QIC_20GBCv QIC_25GBCv QIC_30GBCv QIC_525v QIC_5010Cv REMOVABLEFILEv STK_9490
648 Tivoli Storage Manager for Windows: Administrator’s Guide

v STK_9840v STK_9940v STK_SD3
timelimitSpecifies the maximum number of minutes that the server waits for thevolume to be mounted. If the mount request is not completed within this time,the external manager responds with the result code TIMED_OUT.
useridSpecifies the user ID of the process that needs access to the drive.
volumenumberFor non-optical media, the volumenumber is 1. For optical media, thevolumenumber is 1 for side A, 2 for side B.
’location’Specifies the value of the location field from the TSM inventory (for example,’Room 617 Floor 2’). One blank character is inserted between the volumenumber and the left single quotation mark in the location information. If nolocation information is associated with a volume, nothing is passed to the exit.If no volume information exists, the single quotation marks are not passed.Also, if volume information is passed, then probably the volume has beenejected from the library and needs to be returned to the library before themount operation can proceed. The location information should be posted bythe agent so that the operator can obtain the volume and return it to thelibrary.
Format of the external program response:MOUNT libraryname volname COMPLETE ON specialfile, RESULT=resultcode
where:
librarynameSpecifies the name of the EXTERNAL library as defined to TSM.
volnameSpecifies the name of the volume mounted for the request.
specialfileThe fully qualified path name of the device special file for the drive in whichthe volume was mounted. If the mount request fails, the value should be set to/dev/null.
The external program must ensure that the special file is closed before theresponse is returned to the server.
resultcodeOne of the following:v SUCCESSv DRIVE_ERRORv LIBRARY_ERRORv VOLUME_UNKNOWNv VOLUME_UNAVAILABLEv CANCELLEDv TIMED_OUTv INTERNAL_ERROR
Appendix A. External Media Management Interface 649
Volume Dismount RequestWhen a successful mount operation completes, the external process must wait for arequest to dismount the volume. When the dismount operation completes, theexternal program must send a response to the server.
After the dismount response is sent, the external process ends immediately byusing the stdlib exit routine.
Format of the request:DISMOUNT libraryname volname
where:
librarynameSpecifies the name of the EXTERNAL library as defined to TSM.
volnameSpecifies the name of the volume to be dismounted.
Format of the external program response:DISMOUNT libraryname volname COMPLETE, RESULT=resultcode
where:
librarynameSpecifies the name of the EXTERNAL library as defined to TSM.
volnameSpecifies the name of the volume dismounted.
resultcodeOne of the following:v SUCCESSv DRIVE_ERRORv LIBRARY_ERRORv INTERNAL_ERROR
650 Tivoli Storage Manager for Windows: Administrator’s Guide

Appendix B. User Exit and File Exit Receivers
This appendix contains samples of the user exit receiver for event logging. Thedata structure of the user exit receivers also applies to the file exit receivers. To useone of these exits with TSM, you must specify the corresponding server option(FILEEXIT, FILETEXTEXIT, or USEREXIT) in the server options file. You can alsouse TSM commands to control event logging. See “Logging Tivoli Storage ManagerEvents to Receivers” on page 445 and Administrator’s Reference for details.
Sample User Exit Declarations
/************************************************************************ Name: USEREXITSAMPLE.H* Description: Declarations for a user-exit* Environment: WINDOWS NT***********************************************************************/
#ifndef _H_USEREXITSAMPLE#define _H_USEREXITSAMPLE
#include <stdio.h>#include <sys/types.h>
/***** Do not modify below this line *****/
#define BASE_YEAR 1900
typedef short int16;typedef int int32;
#ifndef uchartypedef unsigned char uchar;#endif/* DateTime Structure Definitions - TSM representation of a timestamp */
typedef struct{
uchar year; /* Years since BASE_YEAR (0-255) */uchar mon; /* Month (1 - 12) */uchar day; /* Day (1 - 31) */uchar hour; /* Hour (0 - 23) */uchar min; /* Minutes (0 - 59) */uchar sec; /* Seconds (0 - 59) */
} DateTime;
Figure 124. Sample User Exit Declarations (Part 1 of 3)
© Copyright IBM Corp. 1994, 2002 651

/******************************************* Some field size definitions (in bytes) *******************************************/
#define MAX_SERVERNAME_LENGTH 64#define MAX_NODE_LENGTH 64#define MAX_COMMNAME_LENGTH 16#define MAX_OWNER_LENGTH 64#define MAX_HL_ADDRESS 64#define MAX_LL_ADDRESS 32#define MAX_SCHED_LENGTH 30#define MAX_DOMAIN_LENGTH 30#define MAX_MSGTEXT_LENGTH 1600
/*********************************************** Event Types (in elEventRecvData.eventType) ***********************************************/
#define TSM_SERVER_EVENT 0x03 /* Server Events */#define TSM_CLIENT_EVENT 0x05 /* Client Events */
/**************************************************** Application Types (in elEventRecvData.applType) ****************************************************/
#define TSM_APPL_BACKARCH 1 /* Backup or Archive client */#define TSM_APPL_HSM 2 /* Space manage client */#define TSM_APPL_API 3 /* API client */#define TSM_APPL_SERVER 4 /* Server (ie. server to server ) */
/****************************************************** Event Severity Codes (in elEventRecvData.sevCode) ******************************************************/
#define TSM_SEV_INFO 0x02 /* Informational message. */#define TSM_SEV_WARNING 0x03 /* Warning message. */#define TSM_SEV_ERROR 0x04 /* Error message. */#define TSM_SEV_SEVERE 0x05 /* Severe error message. */#define TSM_SEV_DIAGNOSTIC 0x06 /* Diagnostic message. */#define TSM_SEV_TEXT 0x07 /* Text message. */
Figure 124. Sample User Exit Declarations (Part 2 of 3)
652 Tivoli Storage Manager for Windows: Administrator’s Guide

/************************************************************* Data Structure of Event that is passed to the User-Exit. ** The same structure is used for a file receiver *************************************************************/
typedef struct evRdata{
int32 eventNum; /* the event number. */int16 sevCode; /* event severity. */int16 applType; /* application type (hsm, api, etc) */int32 sessId; /* session number */int32 version; /* Version of this structure (1) */int32 eventType; /* event type */
*(TSM_CLIENT_EVENT, TSM_SERVER_EVENT)*/DateTime timeStamp; /* timestamp for event data. */uchar serverName[MAX_SERVERNAME_LENGTH+1]; /* server name */uchar nodeName[MAX_NODE_LENGTH+1]; /* Node name for session */uchar commMethod[MAX_COMMNAME_LENGTH+1]; /* communication method */uchar ownerName[MAX_OWNER_LENGTH+1]; /* owner */uchar hlAddress[MAX_HL_ADDRESS+1]; /* high-level address */uchar llAddress[MAX_LL_ADDRESS+1]; /* low-level address */uchar schedName[MAX_SCHED_LENGTH+1]; /*sched name if applicable */uchar domainName[MAX_DOMAIN_LENGTH+1];/*omain name for node */uchar event[MAX_MSGTEXT_LENGTH]; /* event text */
} elEventRecvData;
/************************************* Size of the Event data structure *************************************/
#define ELEVENTRECVDATA_SIZE sizeof(elEventRecvData)
/************************************** User Exit EventNumber for Exiting **************************************/
#define USEREXIT_END_EVENTNUM 1822 /* Only user-exit receiver to exit*/#define END_ALL_RECEIVER_EVENTNUM 1823 /* All receivers told to exit */
/***************************************** Do not modify above this line. *****************************************/
/********************** Additional Declarations **************************/
#endi
Figure 124. Sample User Exit Declarations (Part 3 of 3)
Appendix B. User Exit and File Exit Receivers 653

Sample User Exit Program
/************************************************************************ Name: USEREXITSAMPLE.C* Description: Example user-exit program that is invoked by* the TSM V3 Server* Environment: ********************************************** ** This is a platform-specific source file *** ** versioned for: "WINDOWS NT" *** ********************************************************************************************************************/
#include <stdio.h>#include <stdlib.h>#include <sys/types.h>#include <io.h>#include <windows.h>#include "USEREXITSAMPLE.H"
/***************************************** Do not modify below this line. *****************************************/
#define DllExport __declspec(dllexport)
/******************* DLL MAIN *******************/
BOOL WINAPIDllMain(HMODULE hMod, DWORD fdwReason, LPVOID lpvReserved)
{return(TRUE);} // End of WINAPI
Figure 125. Sample User Exit Program (Part 1 of 2)
654 Tivoli Storage Manager for Windows: Administrator’s Guide
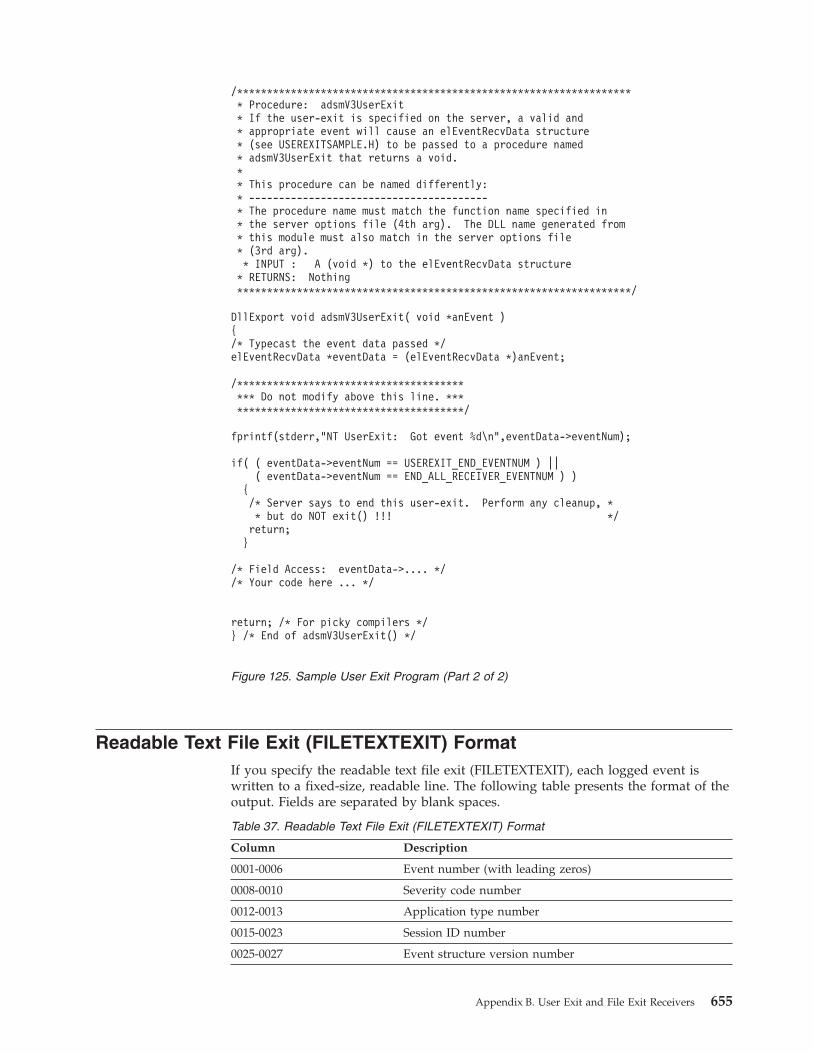
Readable Text File Exit (FILETEXTEXIT) FormatIf you specify the readable text file exit (FILETEXTEXIT), each logged event iswritten to a fixed-size, readable line. The following table presents the format of theoutput. Fields are separated by blank spaces.
Table 37. Readable Text File Exit (FILETEXTEXIT) Format
Column Description
0001-0006 Event number (with leading zeros)
0008-0010 Severity code number
0012-0013 Application type number
0015-0023 Session ID number
0025-0027 Event structure version number
/******************************************************************* Procedure: adsmV3UserExit* If the user-exit is specified on the server, a valid and* appropriate event will cause an elEventRecvData structure* (see USEREXITSAMPLE.H) to be passed to a procedure named* adsmV3UserExit that returns a void.** This procedure can be named differently:* ----------------------------------------* The procedure name must match the function name specified in* the server options file (4th arg). The DLL name generated from* this module must also match in the server options file* (3rd arg).* INPUT : A (void *) to the elEventRecvData structure* RETURNS: Nothing******************************************************************/
DllExport void adsmV3UserExit( void *anEvent ){/* Typecast the event data passed */elEventRecvData *eventData = (elEventRecvData *)anEvent;
/***************************************** Do not modify above this line. *****************************************/
fprintf(stderr,"NT UserExit: Got event %d\n",eventData->eventNum);
if( ( eventData->eventNum == USEREXIT_END_EVENTNUM ) ||( eventData->eventNum == END_ALL_RECEIVER_EVENTNUM ) )
{/* Server says to end this user-exit. Perform any cleanup, ** but do NOT exit() !!! */return;}
/* Field Access: eventData->.... *//* Your code here ... */
return; /* For picky compilers */} /* End of adsmV3UserExit() */
Figure 125. Sample User Exit Program (Part 2 of 2)
Appendix B. User Exit and File Exit Receivers 655

Table 37. Readable Text File Exit (FILETEXTEXIT) Format (continued)
Column Description
0029-0031 Event type number
0033-0046 Date/Time (YYYYMMDDDHHmmSS)
0048-0111 Server name (right padded with spaces)
0113-0176 Node name
0178-0193 Communications method name
0195-0258 Owner name
0260-0323 High-level internet address (n.n.n.n)
0325-0356 Port number from high-level internet address
0358-0387 Schedule name
0389-0418 Domain name
0420-2019 Event text
2020-2499 Unused spaces
2500 New line character
656 Tivoli Storage Manager for Windows: Administrator’s Guide

Appendix C. Notices
This information was developed for products and services offered in the U.S.A.IBM may not offer the products, services, or features discussed in this document inother countries. Consult your local IBM representative for information on theproducts and services currently available in your area. Any reference to an IBMproduct, program, or service is not intended to state or imply that only that IBMproduct, program, or service may be used. Any functionally equivalent product,program, or service that does not infringe any IBM intellectual property right maybe used instead. However, it is the user’s responsibility to evaluate and verify theoperation of any non-IBM product, program, or service.
IBM may have patents or pending patent applications covering subject matterdescribed in this document. The furnishing of this document does not give youany license to these patents. You can send license inquiries, in writing, to:
IBM Director of LicensingIBM CorporationNorth Castle DriveArmonk, NY 10504-1785U.S.A.
For license inquiries regarding double-byte (DBCS) information, contact the IBMIntellectual Property Department in your country or send inquiries, in writing, to:
IBM World Trade Asia CorporationLicensing2-31 Roppongi 3-chome, Minato-kuTokyo 106, Japan
The following paragraph does not apply to the United Kingdom or any othercountry where such provisions are inconsistent with local law:INTERNATIONAL BUSINESS MACHINES CORPORATION PROVIDES THISPUBLICATION “AS IS” WITHOUT WARRANTY OF ANY KIND, EITHEREXPRESS OR IMPLIED, INCLUDING, BUT NOT LIMITED TO, THE IMPLIEDWARRANTIES OF NON-INFRINGEMENT, MERCHANTABILITY OR FITNESSFOR A PARTICULAR PURPOSE. Some states do not allow disclaimer of express orimplied warranties in certain transactions, therefore, this statement may not applyto you.
This information could include technical inaccuracies or typographical errors.Changes are periodically made to the information herein; these changes will beincorporated in new editions of the publication. IBM may make improvementsand/or changes in the product(s) and/or the program(s) described in thispublication at any time without notice.
Any references in this information to non-IBM Web sites are provided forconvenience only and do not in any manner serve as an endorsement of those Websites. The materials at those Web sites are not part of the materials for this IBMproduct and use of those Web sites is at your own risk.
IBM may use or distribute any of the information you supply in any way itbelieves appropriate without incurring any obligation to you.
© Copyright IBM Corp. 1994, 2002 657

Licensees of this program who wish to have information about it for the purposeof enabling: (i) the exchange of information between independently createdprograms and other programs (including this one) and (ii) the mutual use of theinformation which has been exchanged, should contact:
IBM CorporationInformation Enabling RequestsDept. M135600 Cottle RoadSan Jose CA 95193-0001U.S.A.
Such information may be available, subject to appropriate terms and conditions,including in some cases, payment of a fee.
The licensed program described in this information and all licensed materialavailable for it are provided by IBM under terms of the IBM Customer Agreement,IBM International Program License Agreement, or any equivalent agreementbetween us.
Information concerning non-IBM products was obtained from the suppliers ofthose products, their published announcements or other publicly available sources.IBM has not tested those products and cannot confirm the accuracy ofperformance, compatibility or any other claims related to non-IBM products.Questions on the capabilities of non-IBM products should be addressed to thesuppliers of those products.
This information contains examples of data and reports used in daily businessoperations. To illustrate them as completely as possible, the examples include thenames of individuals, companies, brands, and products. All of these names arefictitious and any similarity to the names and addresses used by an actual businessenterprise is entirely coincidental.
If you are viewing this information softcopy, the photographs and colorillustrations may not appear.
Programming InterfaceThis publication is intended to help the customer plan for and manage the TivoliStorage Manager server.
This publication also documents intended Programming Interfaces that allow thecustomer to write programs to obtain the services of Tivoli Storage Manager. Thisinformation is identified where it occurs, either by an introductory statement to achapter or section or by the following marking:
Programming interface information
End of Programming interface information
658 Tivoli Storage Manager for Windows: Administrator’s Guide

TrademarksThe following terms are trademarks of the International Business MachinesCorporation in the United States or other countries or both:
Advanced Peer-to-Peer NetworkingAIXApplication System/400APPNAS/400DB2DFDSMDFSDFSMS/MVSDFSMShsmDFSMSrmmDPIEnterprise Storage ServerESCONExtended ServicesFlashCopyIBMIBMLinkMagstarMVSMVS/ESAMVS/SPNetView
OpenEditionOperating System/2Operating System/400OS/2OS/390OS/400POWERparallelRACFRedbooksRISC System/6000RS/6000SAASANergySPSystem/370System/390SystemViewTivoliTivoli Enterprise ConsoleTivoli Management EnvironmentTMEVTAMz/OS
Lotus, Lotus 1–2–3, Lotus Approach, Lotus Domino and Lotus Notes aretrademarks of Lotus Development Corporation in the United States and/or othercountries.
Microsoft, Windows, Windows NT, and the Windows logo are trademarks ofMicrosoft Corporation in the United States and/or other countries.
UNIX is a registered trademark of the Open Group in the United States and/orother countries.
Java and all Java-based trademarks and logos are trademarks of Sun Microsystems,Inc. in the United States and/or other countries.
Intel is a registered trademark of the Intel Corporation in the United States and/orother countries.
Other company, product, and service names may be trademarks or service marksof others.
Appendix C. Notices 659

660 Tivoli Storage Manager for Windows: Administrator’s Guide
Glossary
Aabsolute mode. A backup copy group mode indicatingthat specifies that a file is considered for incrementalbackup even if the file has not changed since the lastbackup. See also mode. Contrast with modified mode.
access mode. An attribute of a storage pool or astorage volume that specifies whether the server canwrite to or read from the storage pool or storagevolume. The access mode can be read/write, read-only,or unavailable. Volumes in primary storage pools canalso have an access mode of destroyed. Volumes incopy storage pools can also have an access mode ofoffsite.
activate. To validate the contents of a policy set andmake it the active policy set.
active policy set. The activated policy set that containsthe policy rules currently in use by all client nodesassigned to the policy domain. See also policy domainand policy set.
active version. The most recent backup copy of a filestored by Tivoli Storage Manager. The active version ofa file cannot be deleted until a backup process detectsthat the user has either replaced the file with a newerversion or has deleted the file from the workstation.Contrast with inactive version.
activity log. A log that records normal activitymessages generated by the server. These messagesinclude information about server and client operations,such as the start time of sessions or device I/O errors.Each message includes a message ID, date and timestamp, and a text description. The number of days toretain messages in the activity log can be specified.
administrative client. A program that runs on a fileserver, workstation, or mainframe that administratorsuse to control and monitor the Tivoli Storage Managerserver. Contrast with backup-archive client.
administrative command schedule. A database recordthat describes the planned processing of anadministrative command during a specific time period.See also client schedule.
administrative privilege class. See privilege class.
administrative session. A period of time in which anadministrator user ID communicates with a server toperform administrative tasks. Contrast with client nodesession.
administrator. A user who has been registered to theserver. Administrators can be authorized to one ormore of the following administrative privilege classes:system, policy, storage, operator, or analyst.Administrators can use the administrative commandsand queries allowed by their privileges.
aggregate file. A file, stored in one or more storagepools, consisting of a group of logical files packagedtogether. See logical file and physical file.
analyst privilege class. A privilege class that allowsan administrator to reset statistics. See also privilegeclass.
application client. One of the Tivoli Data Protectionprograms installed on a system to protect anapplication. The Tivoli Storage Manager serverprovides backup services to an application client.
archive. To copy one or more files to a storage poolfor long-term storage. Archived files can includedescriptive information and can be retrieved by archivedate, by file name, or by description. Contrast withretrieve.
archive copy. A file that has been archived to serverstorage.
archive copy group. A policy object containingattributes that control the generation, destination, and
The terms in this glossary are defined as they pertain to the Tivoli Storage Manager library. If you do not find theterm you need, refer to the IBM Software Glossary on the Web at this URL: www.ibm.com/ibm/terminology/. Youcan also refer to IBM Dictionary of Computing, New York: McGraw-Hill, 1994.
This glossary may include terms and definitions from:
v The American National Standard Dictionary for Information Systems, ANSI X3.172-1990, copyright (ANSI). Copies maybe purchased from the American National Standards Institute, 11 West 42nd Street, New York 10036.
v The Information Technology Vocabulary, developed by Subcommittee 1, Joint Technical Committee 1, of theInternational Organization for Standardization and the International Electrotechnical Commission (ISO/IECJTC2/SC1).
© Copyright IBM Corp. 1994, 2002 661

expiration of archive copies. An archive copy groupbelongs to a management class.
archive retention grace period. The number of daysthat Tivoli Storage Manager retains an archive copywhen the server is unable to rebind the file to anappropriate management class.
assigned capacity. The portion of available space thatcan be used to store database or recovery loginformation. See also available space.
association. (1) The defined relationship between aclient node and a client schedule. An associationidentifies the name of a schedule, the name of thepolicy domain to which the schedule belongs, and thename of a client node that performs scheduledoperations. (2) On a configuration manager, the definedrelationship between a profile and an object such as apolicy domain. Profile associations define theconfiguration information that will be distributed to amanaged server when it subscribes to the profile.
audit. To check for logical inconsistencies betweeninformation that the server has and the actual conditionof the system. Tivoli Storage Manager can auditvolumes, the database, libraries, and licenses. Forexample, when Tivoli Storage Manager audits avolume, the server checks for inconsistencies betweeninformation about backed-up or archived files stored inthe database and the actual data associated with eachbackup version or archive copy in server storage.
authentication. The process of checking a user’spassword before allowing that user access to the server.Authentication can be turned on or off by anadministrator with system privilege.
authority. The right granted to a user to perform taskswith Tivoli Storage Manager servers and clients. Seealso privilege class.
autochanger. A small, multislot tape device thatautomatically puts tape cartridges into tape drives. Seealso library.
available space. The amount of space, in megabytes,that is available to the database and recovery log. Thisspace can be used to extend the capacity of thedatabase or recovery log, or to provide sufficient freespace before a volume is deleted from the database orrecovery log.
Bback up. To copy information to another location toensure against loss of data. In Tivoli Storage Manager,you can back up user files, the Tivoli Storage Managerdatabase, and storage pools. Contrast with restore. Seealso database backup series and incremental backup.
backup-archive client. A program that runs on aworkstation or file server and provides a means forusers to back up, archive, restore, and retrieve files.Contrast with administrative client.
backup copy group. A policy object containingattributes that control the generation, destination, andexpiration of backup versions of files. A backup copygroup belongs to a management class.
backup retention grace period. The number of daysthat Tivoli Storage Manager retains a backup versionafter the server is unable to rebind the file to anappropriate management class.
backup set. A portable, consolidated group of activebackup versions of files, generated for a backup-archiveclient.
backup version. A file that a user backed up to serverstorage. More than one backup version can exist inserver storage, but only one backup version is theactive version. See also active version and inactiveversion.
binding. The process of associating a file with amanagement class name. See rebinding.
buffer pool. Temporary space used by the server tohold database or recovery log pages. See database bufferpool and recovery log buffer pool.
Ccache. The process of leaving a duplicate copy onrandom access media when the server migrates a file toanother storage pool in the hierarchy.
central scheduler. A function that allows anadministrator to schedule client operations andadministrative commands. The operations can bescheduled to occur periodically or on a specific date.See client schedule and administrative command schedule.
client. A program running on a PC, workstation, fileserver, LAN server, or mainframe that requests servicesof another program, called the server. The followingtypes of clients can obtain services from a TivoliStorage Manager server: administrative client,application client, API client, backup-archive client, andHSM client (also known as Tivoli Space Manager).
client domain. The set of drives, file systems, orvolumes that the user selects to back up or archiveusing the backup-archive client.
client migration. The process of copying a file from aclient node to server storage and replacing the file witha stub file on the client node. The space managementattributes in the management class control thismigration. See also space management.
662 Tivoli Storage Manager for Windows: Administrator’s Guide

client node. A file server or workstation on which thebackup-archive client program has been installed, andwhich has been registered to the server.
client node session. A period of time in which a clientnode communicates with a server to perform backup,restore, archive, retrieve, migrate, or recall requests.Contrast with administrative session.
client options file. A file that a client can change,containing a set of processing options that identify theserver, communication method, and options for backup,archive, hierarchical storage management, andscheduling. Also called the dsm.opt file.
client-polling scheduling mode. A client/servercommunication technique where the client queries theserver for work. Contrast with server-promptedscheduling mode.
client schedule. A database record that describes theplanned processing of a client operation during aspecific time period. The client operation can be abackup, archive, restore, or retrieve operation, a clientoperating system command, or a macro. See alsoadministrative command schedule.
client system options file. A file, used on UNIXclients, containing a set of processing options thatidentify the Tivoli Storage Manager servers to becontacted for services. This file also specifiescommunication methods and options for backup,archive, hierarchical storage management, andscheduling. Also called the dsm.sys file. See also clientuser options file.
client user options file. A user-created file, used onUNIX clients, containing a set of processing optionsthat identify the server, communication method,backup and archive options, space managementoptions, and scheduling options. Also called the dsm.optfile. See also client system options file.
closed registration. A registration process in whichonly an administrator can register workstations asclient nodes with the server. Contrast with openregistration.
collocation. The process of keeping all data belongingto a single client node or a single client file space on aminimal number of sequential-access volumes within astorage pool. Collocation can reduce the number ofvolumes that must be accessed when a large amount ofdata must be restored.
compression. The process of saving storage space byeliminating empty fields or unnecessary data in a file.In Tivoli Storage Manager, compression can occur at aworkstation before files are backed up or archived toserver storage. On some types of tape drives, hardwarecompression can be used.
configuration manager. One Tivoli Storage Managerserver that distributes configuration information toother Tivoli Storage Manager servers (called managedservers) via profiles. Configuration information caninclude policy and schedules. See managed server andprofile.
copy group. A policy object whose attributes controlhow backup versions or archive copies are generated,where backup versions or archive copies are initiallylocated, and when backup versions or archive copiesexpire. A copy group belongs to a management class.See also archive copy group, backup copy group, backupversion, and management class.
copy storage pool. A named set of volumes thatcontains copies of files that reside in primary storagepools. Copy storage pools are used only to back up thedata stored in primary storage pools. A copy storagepool cannot be a destination for a backup copy group,an archive copy group, or a management class (forspace-managed files). See primary storage pool anddestination.
Ddamaged file. A physical file for which Tivoli StorageManager has detected read errors.
database. A collection of information about all objectsmanaged by the server, including policy managementobjects, users and administrators, and client nodes.
database backup series. One full backup of thedatabase, plus up to 32 incremental backups madesince that full backup. Each full backup that is runstarts a new database backup series. A backup series isidentified with a number.
database backup trigger. A set of criteria that defineswhen and how database backups are run automatically.The criteria determine how often the backup is run,whether the backup is a full or incremental backup,and where the backup is stored.
database buffer pool. Storage that is used as a cacheto allow database pages to remain in memory for longperiods of time, so that the server can make continuousupdates to pages without requiring input or output(I/O) operations from external storage.
database snapshot. A complete backup of the entireTivoli Storage Manager to media that can be takenoff-site. When a database snapshot is created, thecurrent database backup series is not interrupted. Adatabase snapshot cannot have incremental databasebackups associated with it. See also database backupseries. Contrast with full backup.
data mover. A device, defined to Tivoli StorageManager, that moves data on behalf of the server. ANAS file server can be a data mover.
Glossary 663

default management class. A management classassigned to a policy set that the server uses to managebacked-up or archived files when a user does notspecify a management class for a file.
desktop client. The group of backup-archive clientssupported by Tivoli Storage Manager that includesclients on Windows, Apple, and Novell NetWareoperating systems.
destination. A copy group or management classattribute that specifies the primary storage pool towhich a client file will be backed up, archived, ormigrated.
device class. A named set of characteristics applied toa group of storage devices. Each device class has aunique name and represents a device type of disk, file,optical disk, or tape.
device configuration file. A file that containsinformation about defined device classes, and, on someTivoli Storage Manager servers, defined libraries anddrives. The file can be created by using a Tivoli StorageManager administrative command or by using anoption in the server options file. The information is acopy of the device configuration information in theTivoli Storage Manager database.
disaster recovery plan. A file created by TivoliDisaster Recovery Manager (DRM) that containsinformation about how to recover computer systems ifa disaster occurs and scripts that can be run to performsome recovery tasks. The file includes informationabout the software and hardware used by the TivoliStorage Manager server and the location of recoverymedia.
domain. See policy domain or client domain.
DRM. A short name for Tivoli Disaster RecoveryManager.
dsm.opt file. See client options file and client useroptions file.
dsmserv.opt. See server options file.
dsm.sys file. See client system options file.
dynamic. A value for serialization that specifies thatTivoli Storage Manager accepts the first attempt to backup or archive a file regardless of whether the file ismodified during the backup or archive process. Seealso serialization. Contrast with shared dynamic, sharedstatic, and static.
Eenterprise configuration. A method of setting upTivoli Storage Manager servers so that theadministrator can distribute the configuration of one ofthe servers to the other servers, using server-to-server
communication. See configuration manager, managedserver, profile, and subscription.
enterprise logging. The sending of events from TivoliStorage Manager servers to a designated event server.The event server routes the events to designatedreceivers, such as to a user exit. See also event.
estimated capacity. The available space, in megabytes,of a storage pool.
event. (1) An administrative command or a clientoperation that is scheduled to be run using TivoliStorage Manager scheduling. (2) A message that aTivoli Storage Manager server or client issues.Messages can be logged using Tivoli Storage Managerevent logging.
event record. A database record that describes actualstatus and results for events.
event server. A server to which other servers can sendevents for logging. The event server routes the eventsto any receivers that are enabled for the sendingserver’s events.
exclude. To identify files that you do not want toinclude in a specific client operation, such as backup orarchive. You identify the files in an include-exclude list.
exclude-include list. See include-exclude list.
expiration. The process by which files are identifiedfor deletion because their expiration date or retentionperiod has passed. Backed-up or archived files aremarked expired by Tivoli Storage Manager based onthe criteria defined in the backup or archive copygroup.
expiration date. On some Tivoli Storage Managerservers, a device class attribute used to notify tapemanagement systems of the date when Tivoli StorageManager no longer needs a tape volume. The date isplaced in the tape label so that the tape managementsystem does not overwrite the information on the tapevolume before the expiration date.
export. To copy administrator definitions, client nodedefinitions, policy definitions, server controlinformation, or file data to external media. Used tomove or copy information between servers.
extend. To increase the portion of available space thatcan be used to store database or recovery loginformation. Contrast with reduce.
Ffile space. A logical space in Tivoli Storage Managerserver storage that contains a group of files. For clientson Windows systems, a file space is a logical partitionthat is identified by a volume label. For clients onUNIX systems, a file space is a logical space that
664 Tivoli Storage Manager for Windows: Administrator’s Guide

contains a group of files backed up or archived fromthe same file system, or part of a file system that stemsfrom a virtual mount point. Clients can restore, retrieve,or delete their file spaces from Tivoli Storage Managerserver storage. Tivoli Storage Manager does notnecessarily store all the files from a single file spacetogether, but can identify all the files in server storagethat came from a single file space.
file space ID (FSID). A unique numeric identifier thatthe server assigns to a file space when it is stored inserver storage.
frequency. A copy group attribute that specifies theminimum interval, in days, between incrementalbackups.
FSID. See file space ID.
full backup. The process of backing up the entireserver database. A full backup begins a new databasebackup series. See also database backup series andincremental backup. Contrast with database snapshot.
fuzzy copy. A backup version or archive copy of a filethat might not accurately reflect what the originalcontent of the file because Tivoli Storage Managerbacked up or archived the file while the file was beingmodified.
Hhierarchical storage management (HSM) client. TheTivoli Space Manager program that runs onworkstations to allow users to maintain free space ontheir workstations by migrating and recalling files toand from Tivoli Storage Manager storage. Synonymouswith space manager client.
high migration threshold. A percentage of the storagepool capacity that identifies when the server can startmigrating files to the next available storage pool in thehierarchy. Contrast with low migration threshold. Seeserver migration.
HSM client. Hierarchical storage management client.Also known as the space manager client.
Iimage backup. A backup of a full file system or rawlogical volume as a single object.
import. The process of copying exported administratordefinitions, client node definitions, policy definitions,server control information or file data from externalmedia to a target server. A subset of information can beimported to a target server from the external media.Used to move or copy information between servers. Seeexport.
inactive version. A backup version of a file that iseither not the most recent backup version or that is abackup version of a file that no longer exists on theclient system. Inactive backup versions are eligible forexpiration processing according to the managementclass assigned to the file. Contrast with active version.
include-exclude file. On UNIX and Windows clients,a file containing statements that Tivoli Storage Manageruses to determine whether to include certain files inspecific client operations, and to determine theassociated management classes to use for backup,archive, and space management. See include-exclude list.
include-exclude list. A group of include and excludeoption statements that Tivoli Storage Manager uses.The exclude options identify files that are not to beincluded in specific client operations such as backup orspace management. The include options identify filesthat are exempt from the exclusion rules. The includeoptions can also assign a management class to a file orgroup of files for backup, archive, or spacemanagement services. The include-exclude list for aclient may include option statements from theinclude-exclude file (for UNIX clients) or the clientoptions file (for other clients), and from a client optionset on the server.
incremental backup. (1) The process of backing upfiles or directories that are new or have changed sincethe last incremental backup. See also selective backup. (2)The process of copying only the pages in the databasethat are new or changed since the last full orincremental backup of the database. Contrast with fullbackup. See also database backup series.
LLAN-free data transfer. The movement of client datadirectly between a client and a storage device over aSAN, rather than over the LAN.
library. (1) A repository for demountable recordedmedia, such as magnetic tapes. (2) For Tivoli StorageManager, a collection of one or more drives, andpossibly robotic devices (depending on the librarytype), which can be used to access storage volumes. (3)In the AS/400® system, a system object that serves as adirectory to other objects. A library groups relatedobjects, and allows the user to find objects by name.
library client. A Tivoli Storage Manager server thatuses server-to-server communication to access a librarythat is managed by another Tivoli Storage Managerserver. See also library manager.
library manager. A Tivoli Storage Manager server thatcontrols device operations when multiple Tivoli StorageManager servers share a storage device. The deviceoperations include mount, dismount, volumeownership, and library inventory. See also library client.
Glossary 665

logical file. A file stored in one or more server storagepools, either by itself or as part of an aggregate file. Seealso aggregate file and physical file.
logical occupancy. The amount of space used bylogical files in a storage pool. This space does notinclude the unused space created when logical files aredeleted from aggregate files, so it might be less thanthe physical occupancy. See also physical occupancy,physical file, and logical file.
logical volume. (1) A portion of a physical volumethat contains a filesystem. (2) For the Tivoli StorageManager server, the combined space on all volumes foreither the database or the recovery log. The database isone logical volume and the recovery log is one logicalvolume.
low migration threshold. A percentage of the storagepool capacity that specifies when the server can stopthe migration of files to the next storage pool. Contrastwith high migration threshold. See server migration.
Mmacro file. A file that contains one or more TivoliStorage Manager administrative commands, which canbe run only from an administrative client by using theMACRO command. Contrast with Tivoli StorageManager command script.
managed object. A definition in the database of amanaged server that was distributed to the managedserver by a configuration manager. When a managedserver subscribes to a profile, all objects associated withthat profile become managed objects in the database ofthe managed server. In general, a managed objectcannot be modified locally on the managed server.Objects can include policy, schedules, client optionssets, server scripts, administrator registrations, andserver and server group definitions.
managed server. A Tivoli Storage Manager server thatreceives configuration information from a configurationmanager via subscription to one or more profiles.Configuration information can include definitions ofobjects such as policy and schedules. See configurationmanager, subscription, and profile.
managed system. A client or server that requestsservices from the Tivoli Storage Manager server.
management class. A policy object that users can bindto each file to specify how the server manages the file.The management class can contain a backup copygroup, an archive copy group, and space managementattributes. The copy groups determine how the servermanages backup versions or archive copies of the file.The space management attributes determine whetherthe file is eligible to be migrated by the space manager
client to server storage and under what conditions thefile is migrated. See also copy group, space manager client,binding, and rebinding.
maximum extension. Specifies the maximum amountof storage space, in megabytes, that you can extend thedatabase or recovery log.
maximum reduction. Specifies the maximum amountof storage space, in megabytes, that you can reduce thedatabase or recovery log.
maximum utilization. The highest percentage ofassigned capacity used by the database or recovery log.
migrate. To move data from one storage location toanother. See also client migration and server migration.
mirroring. The process of writing the same data tomultiple disks at the same time. Mirroring data protectsagainst data loss within the database or recovery log.
mode. A copy group attribute that specifies whetherto back up a file that has not been modified since thelast time the file was backed up. See modified andabsolute.
modified mode. A backup copy group mode thatspecifies that a file is considered for incrementalbackup only if it has changed since the last backup. Afile is considered changed if the date, size, owner, orpermissions have changed. See also mode. Contrast withabsolute mode.
mount. To place a data medium (such as a tapecartridge) on a drive in a position to operate.
mount limit. A device class attribute that specifies themaximum number of volumes that can besimultaneously accessed from the same device class.The mount limit determines the maximum number ofmount points. See mount point.
mount point. A logical drive through which the serveraccesses volumes in a sequential access device class.For a removable media device such as tape, a mountpoint is a logical drive associated with a physical drive.For a device class with the device type of FILE, amount point is a logical drive associated with an I/Ostream. The number of mount points for a device classis determined by the mount limit for that class. Seemount limit.
mount retention period. A device class attribute thatspecifies the maximum number of minutes that theserver retains a mounted sequential access mediavolume that is not being used before it dismounts thesequential access media volume.
mount wait period. A device class attribute thatspecifies the maximum number of minutes that theserver waits for a sequential access volume mountrequest to be satisfied before canceling the request.
666 Tivoli Storage Manager for Windows: Administrator’s Guide

NNAS. Network-attached storage.
NAS node. A Tivoli Storage Manager node that is aNAS file server. Data for the NAS node is transferredby the NAS file server itself at the direction of a TivoliStorage Manager server that uses NDMP. The data isnot transferred by the Tivoli Storage Manager client.Also called NAS file server node.
native format. A format of data that is written to astorage pool directly by the Tivoli Storage Managerserver. Contrast with non-native data format.
NDMP. Network Data Management Protocol.
network-attached storage (NAS) file server. Adedicated storage device with an operating system thatis optimized for file-serving functions. In Tivoli StorageManager, a NAS file server can have the characteristicsof both a node and a data mover. See also data moverand NAS node.
Network Data Management Protocol (NDMP). Anindustry-standard protocol that allows a networkstorage-management application (such as Tivoli StorageManager) to control the backup and recovery of anNDMP-compliant file server, without installingthird-party software on that file server.
node. (1) A workstation or file server that is registeredwith a Tivoli Storage Manager server to receive itsservices. See also client node and NAS node. (2) In aMicrosoft cluster configuration, one of the computersystems that make up the cluster.
node privilege class. A privilege class that allows anadministrator to remotely access backup-archive clientsfor a specific client node or for all clients in a policydomain. See also privilege class.
non-native data format. A format of data written to astorage pool that is different from the format that theserver uses for basic LAN-based operations. The data iswritten by a data mover instead of the server. Storagepools with data written in a non-native format may notsupport some server operations, such as audit of avolume. The NETAPPDUMP data format for NAS nodebackups is an example of a non-native data format.
Oopen registration. A registration process in which anyusers can register their own workstations as clientnodes with the server. Contrast with closed registration.
operator privilege class. A privilege class that allowsan administrator to issue commands that disable or haltthe server, enable the server, cancel server processes,and manage removable media. See also privilege class.
Ppage. A unit of space allocation within Tivoli StorageManager database volumes.
path. A Tivoli Storage Manager object that defines aone-to-one relationship between a source and adestination. Using the path, the source accesses thedestination. Data may flow from the source to thedestination, and back. An example of a source is a datamover (such as a NAS file server), and an example of adestination is a tape drive.
physical file. A file stored in one or more storagepools, consisting of either a single logical file, or agroup of logical files packaged together (an aggregatefile). See also aggregate file and logical file.
physical occupancy. The amount of space used byphysical files in a storage pool. This space includes theunused space created when logical files are deletedfrom aggregates. See also physical file, logical file, andlogical occupancy.
policy domain. A policy object that contains policysets, management classes, and copy groups that areused by a group of client nodes. See policy set,management class, and copy group.
policy privilege class. A privilege class that allows anadministrator to manage policy objects, register clientnodes, and schedule client operations for client nodes.Authority can be restricted to certain policy domains.See also privilege class.
policy set. A policy object that contains a group ofmanagement classes that exist for a policy domain.Several policy sets can exist within a policy domain butonly one policy set is active at one time. Seemanagement class and active policy set.
premigration. For a space manager client, the processof copying files that are eligible for migration to serverstorage, while leaving the original file intact on thelocal system.
primary storage pool. A named set of volumes thatthe server uses to store backup versions of files, archivecopies of files, and files migrated from HSM clientnodes. You can back up a primary storage pool to acopy storage pool. See destination and copy storage pool.
privilege class. A level of authority granted to anadministrator. The privilege class determines whichadministrative tasks the administrator can perform. Forexample, an administrator with system privilege classcan perform any administrative task. Also calledadministrative privilege class. See also system privilegeclass, policy privilege class, storage privilege class,operator privilege class, and analyst privilege class. Seealso system privilege class, policy privilege class, storage
Glossary 667

privilege class, operator privilege class, analyst privilegeclass, and node privilege class.
profile. A named group of configuration informationthat can be distributed from a configuration managerwhen a managed server subscribes. Configurationinformation can include registered administrators,policy, client schedules, client option sets,administrative schedules, Tivoli Storage Managercommand scripts, server definitions, and server groupdefinitions. See configuration manager and managedserver.
Rrandomization. The process of distributing schedulestart times for different clients within a specifiedpercentage of the schedule’s startup window.
rebinding. The process of associating a backed-up filewith a new management class name. For example,rebinding occurs when the management classassociated with a file is deleted. See binding.
recall. To access files that have been migrated fromworkstations to server storage by using the spacemanager client. Contrast with migrate.
receiver. A server repository that contains a log ofserver messages and client messages as events. Forexample, a receiver can be a file exit, a user exit, or theTivoli Storage Manager server console and activity log.See also event.
reclamation. A process of consolidating the remainingdata from many sequential access volumes onto fewernew sequential access volumes.
reclamation threshold. The percentage of reclaimablespace that a sequential access media volume must havebefore the server can reclaim the volume. Spacebecomes reclaimable when files are expired or aredeleted. The percentage is set for a storage pool.
recovery log. A log of updates that are about to bewritten to the database. The log can be used to recoverfrom system and media failures.
recovery log buffer pool. Storage that the server usesto hold new transaction records until they can bewritten to the recovery log.
reduce. To free up space from the database orrecovery log, to allow you to delete a volume. Contrastwith extend.
register. (1) To define a client node or administratorwho can access the server. See registration. (2) To specifylicenses that have been purchased for the server.
registration. The process of identifying a client nodeor administrator to the server.
restore. To copy information from its backup locationto the active storage location for use. In Tivoli StorageManager, you can restore the server database, storagepools, storage pool volumes, and users’ backed-up files.The backup version in the storage pool is not affectedby the restore operation. Contrast with backup.
retention. The amount of time, in days, that inactivebacked-up or archived files are kept in the storage poolbefore they are deleted. Copy group attributes anddefault retention grace periods for the domain defineretention.
retention period. On an MVS server, a device classattribute that specifies how long files are retained onsequential access media. When used, Tivoli StorageManager passes this information to the MVS operatingsystem to ensure that other tape management systemsdo not overwrite tape volumes that contain retaineddata.
retrieve. To copy archived information from thestorage pool to the workstation for use. The archiveversion in the storage pool is not affected by theretrieve operation. Contrast with archive. See alsostorage pool.
rollback. To remove changes that were made todatabase files since the last commit point.
Sschedule. A database record that describes scheduledclient operations or administrative commands. Seeadministrative command schedule and client schedule.
scheduling mode. The method of interaction betweena server and a client for running scheduled operationson the client. Tivoli Storage Manager supports twoscheduling modes for client operations: client-pollingand server-prompted.
scratch volume. A labeled volume that is either blankor contains no valid data, that is not currently definedto Tivoli Storage Manager, and that is available for use.
script. See Tivoli Storage Manager command script.
selective backup. The process of backing up selectedfiles or directories from a client domain. incrementalbackup. See also incremental backup.
serialization. The process of handling files that aremodified during backup or archive processing. Seestatic, dynamic, shared static, and shared dynamic.
server migration. The process of moving data fromone storage pool to the next storage pool defined in thehierarchy, based on the migration thresholds definedfor the storage pools. See also high migration thresholdand low migration threshold.
668 Tivoli Storage Manager for Windows: Administrator’s Guide

server options file. A file that contains settings thatcontrol various server operations. These settings, oroptions, affect such things as communications, devices,and performance.
server-prompted scheduling mode. A client/servercommunication technique where the server contacts theclient when a scheduled operation needs to be done.Contrast with client-polling scheduling mode.
server storage. The primary and copy storage poolsused by the server to store users’ files: backup versions,archive copies, and files migrated from Tivoli SpaceManager client nodes (space-managed files). Seeprimary storage pool, copy storage pool, storage pool volume,and volume.
session resource usage. The amount of wait time,CPU time, and space used or retrieved during a clientsession.
shared dynamic. A value for serialization thatspecifies that a file must not be backed up or archivedif it is being modified during the operation. TivoliStorage Manager retries the backup or archiveoperation a number of times; if the file is beingmodified during each attempt, Tivoli Storage Managerwill back up or archive the file on its last try. See alsoserialization. Contrast with dynamic, shared static, andstatic.
shared library. A library device that is shared amongmultiple Tivoli Storage Manager servers.
shared static. A value for serialization that specifiesthat a file must not be backed up or archived if it isbeing modified during the operation. Tivoli StorageManager retries the backup or archive operation anumber of times; if the file is being modified duringeach attempt, Tivoli Storage Manager will not back upor archive the file. See also serialization. Contrast withdynamic, shared dynamic, and static.
snapshot. See database snapshot.
source server. A server that can send data, in the formof virtual volumes, to another server. Contrast with targetserver.
space-managed file. A file that is migrated from aclient node by the space manager client (HSM client).The space manager client recalls the file to the clientnode on demand.
space management. The process of keeping sufficientfree storage space available on a client node bymigrating files to server storage. The files are migratedbased on criteria defined in management classes towhich the files are bound, and the include-exclude list.Synonymous with hierarchical storage management. Seealso migration.
space manager client. The Tivoli Space Managerprogram that enables users to maintain free space ontheir workstations by migrating and recalling files toand from server storage. Also called hierarchical storagemanagement (HSM) client.
startup window. A time period during which aschedule must be initiated.
static. A value for serialization that specifies that a filemust not be backed up or archived if it is beingmodified during the operation. Tivoli Storage Managerdoes not retry the operation. See also serialization.Contrast with dynamic, shared dynamic, and shared static.
storage agent. A program that enables Tivoli StorageManager to back up and restore client data directly toand from SAN-attached storage.
storage hierarchy. A logical ordering of primarystorage pools, as defined by an administrator. Theordering is usually based on the speed and capacity ofthe devices that the storage pools use. In Tivoli StorageManager, the storage hierarchy is defined byidentifying the next storage pool in a storage pooldefinition. See storage pool.
storage pool. A named set of storage volumes that isthe destination that the Tivoli Storage Manager serveruses to store client data. The client data consists ofbackup versions, archive copies, and migrated files. Youcan back up a primary storage pool to a copy storagepool. See primary storage pool and copy storage pool.
storage pool volume. A volume that has beenassigned to a storage pool. See volume, copy storage pool,and primary storage pool.
storage privilege class. A privilege class that allowsan administrator to control how storage resources forthe server are allocated and used, such as monitoringthe database, recovery log, and server storage.Authority can be restricted to certain storage pools. Seealso privilege class.
stub file. A file that replaces the original file on aclient node when the file is migrated from the clientnode to server storage by Tivoli Space Manager.
subscription. The method by which a managed serverrequests that it receive configuration informationassociated with a particular profile on a configurationmanager. See managed server, configuration manager, andprofile.
system privilege class. A privilege class that allows anadministrator to issue all server commands. See alsoprivilege class.
Glossary 669

Ttape library. A term used to refer to a collection ofdrives and tape cartridges. The tape library may be anautomated device that performs tape cartridge mountsand demounts without operator intervention.
tape volume prefix. A device class attribute that is thehigh-level-qualifier of the file name or the data setname in the standard tape label.
target server. A server that can receive data sent fromanother server. Contrast with source server. See alsovirtual volumes.
Tivoli Disaster Recovery Manager (DRM). A productthat works with Tivoli Storage Manager to assist inpreparing and later using a disaster recovery plan filefor the Tivoli Storage Manager server.
Tivoli Storage Manager command script. A sequenceof Tivoli Storage Manager administrative commandsthat are stored in the Tivoli Storage Manager serverdatabase. You can run the script from any interface tothe server. The script can include substitution forcommand parameters and conditional logic.
UUCS-2. An ISO/IEC 10646 encoding form, UniversalCharacter Set coded in 2 octets. The Tivoli StorageManager client on Windows NT and Windows 2000uses the UCS-2 code page when the client is enabledfor Unicode.
Unicode Standard. A universal character encodingstandard that supports the interchange, processing, anddisplay of text that is written in any of the languages ofthe modern world. It can also support many classicaland historical texts and is continually being expanded.The Unicode Standard is compatible with ISO/IEC10646. For more information, seehttp://www.unicode.org.
UTF-8. Unicode transformation format - 8. Abyte-oriented encoding form specified by the UnicodeStandard.
Vvalidate. To check a policy set for conditions that cancause problems if that policy set becomes the activepolicy set. For example, the validation process checkswhether the policy set contains a default managementclass.
version. A backup copy of a file stored in serverstorage. The most recent backup copy of a file is theactive version. Earlier copies of the same file are
inactive versions. The number of versions retained bythe server is determined by the copy group attributesin the management class.
virtual volume. An archive file on a target server thatrepresents a sequential media volume to a source server.
volume. The basic unit of storage for the TivoliStorage Manager database, recovery log, and storagepools. A volume can be an LVM logical volume, astandard file system file, a tape cartridge, or an opticalcartridge. Each volume is identified by a uniquevolume identifier. See database volume, scratch volume,and storage pool volume.
volume history file. A file that contains informationabout: volumes used for database backups anddatabase dumps; volumes used for export ofadministrator, node, policy, or server data; andsequential access storage pool volumes that have beenadded, reused, or deleted. The information is a copy ofthe same types of volume information in the TivoliStorage Manager database.
670 Tivoli Storage Manager for Windows: Administrator’s Guide

Index
Special Characters$$CONFIG_MANAGER$$ 492
Numerics3480 tape drive
cleaner cartridge 153device class 158device support 59
3490 tape drivecleaner cartridge 153device class 158device support 59
3494 automated library device 32, 753570 tape drive
defining device class 52, 157device support 59
3590 tape drivedefining device class 52, 157, 158device support 125
4mm tape device support 1578mm tape device support 157
Aabsolute mode, description of 325access authority, client 267access mode, volume
changing 183description 184determining for storage pool 175,
236accounting record
description of 459monitoring 459
ACSLS (Automated Cartridge SystemLibrary Software) StorageTeklibrary 33
ACTIVATE POLICYSET command 330active directory
configure schema 388overview 387
ACTIVE policy setcreating 321, 330replacing 302
activity logadjusting the size 444description of 443monitoring 443querying 444setting the retention period 444
adding media to RSM libraries 140administrative client
description of 3viewing information after IMPORT or
EXPORT 513administrative commands
ACCEPT DATE 393ASSIGN DEFMGMTCLASS 302, 330AUDIT LIBRARY 130
administrative commands (continued)AUDIT LICENSE 387AUDIT VOLUME 567BACKUP DB 551BACKUP DEVCONFIG 549BACKUP NODE 104BACKUP STGPOOL 539BACKUP VOLHISTORY 547BEGIN EVENTLOGGING 447CANCEL PROCESS 396CANCEL REQUEST 135CANCEL RESTORE 288CANCEL SESSION 285CHECKIN LIBVOLUME 126CHECKOUT LIBVOLUME 129CLEAN DRIVE 150COMMIT 416COPY CLOPTSET 283COPY DOMAIN 321COPY POLICYSET 322COPY SCHEDULE 368COPY SCRIPT 411COPY SERVERGROUP 500DEFINE ASSOCIATION 359DEFINE BACKUPSET 351DEFINE CLIENTACTION 378DEFINE CLIENTOPT 378DEFINE CLOPTSET 281DEFINE COPYGROUP 323, 328DEFINE DATAMOVER 90, 102DEFINE DBBACKUPTRIGGER 543,
545DEFINE DBVOLUME 424DEFINE DEVCLASS 158, 161, 163DEFINE DOMAIN 320DEFINE DRIVE 89DEFINE GRPMEMBER 499DEFINE LIBRARY 32, 89DEFINE LOGCOPY 559DEFINE LOGVOLUME 424DEFINE MACHINE 584DEFINE
MACHNODEASSOCIATION 584DEFINE PATH 91, 103DEFINE POLICYSET 321, 322DEFINE PROFASSOCIATION 480,
483DEFINE PROFILE 480DEFINE
RECMEDMACHASSOCIATION 589DEFINE RECOVERYMEDIA 588DEFINE SCHEDULE 403DEFINE SCRIPT 407DEFINE SERVER 469, 470, 473, 497,
503DEFINE SERVERGROUP 499DEFINE SPACETRIGGER 422, 423DEFINE STGPOOL 178, 187DEFINE SUBSCRIPTION 490DEFINE VOLUME 46, 182DELETE ASSOCIATION 370
administrative commands (continued)DELETE BACKUPSET 354DELETE COPYGROUP 344DELETE DBBACKUPTRIGGER 545DELETE DBVOLUME 428DELETE DEVCLASS 167DELETE DOMAIN 344DELETE DRIVE 154DELETE EVENT 372DELETE GRPMEMBER 501DELETE LIBRARY 144DELETE LOGVOLUME 428DELETE MGMTCLASS 344DELETE POLICYSET 344DELETE PROFASSOCIATION 485DELETE PROFILE 486DELETE SCHEDULE 369DELETE SCRIPT 412DELETE SERVERGROUP 501DELETE STGPOOL 238DELETE SUBSCRIBER 496DELETE SUBSCRIPTION 486, 492DELETE VOLHISTORY 546, 547DELETE VOLUME 239, 240DISABLE EVENTS 446DISABLE SESSIONS 287DISMOUNT VOLUME 136DSMFMT 180, 537DSMSERV FORMAT 553ENABLE EVENTS 446ENABLE SESSIONS 287END EVENTLOGGING 447EXPIRE INVENTORY 333EXPORT ADMIN 509EXPORT NODE 515EXPORT POLICY 515EXPORT SERVER 515EXTEND DB 426EXTEND LOG 543GENERATE BACKUPSET 349GRANT AUTHORITY 289HALT 392HELP 398IMPORT 512, 513IMPORT ADMIN 518IMPORT NODE 518, 525IMPORT POLICY 518IMPORT SERVER 518, 525LABEL LIBVOLUME 125LOCK ADMIN 293LOCK NODE 264LOCK PROFILE 484, 485MACRO 131MOVE DATA 229MOVE MEDIA 130MOVE NODEDATA 232NOTIFY SUBSCRIBERS 484, 485PING SERVER 501PREPARE 589QUERY ACTLOG 444QUERY BACKUPSET 352
© Copyright IBM Corp. 1994, 2002 671

administrative commands (continued)QUERY
BACKUPSETCONTENTS 353QUERY CONTENT 219QUERY COPYGROUP 341, 523QUERY DB 427QUERY DBBACKUPTRIGGER 546QUERY DBVOLUME 427, 539QUERY DEVCLASS 166QUERY DOMAIN 343QUERY DRIVE 145QUERY ENABLED 457QUERY EVENT 361QUERY FILESPACE 279QUERY LIBRARY 143QUERY LICENSE 387QUERY LOG 430QUERY LOGVOLUME 426, 539QUERY MEDIA 131QUERY MGMTCLASS 342QUERY MOUNT 135QUERY NODE 265QUERY OCCUPANCY 225, 226, 227,
276QUERY OPTION 436QUERY POLICYSET 342QUERY PROCESS 231QUERY REQUEST 135QUERY RESTORE 288QUERY RPFCONTENT 592QUERY RPFILE 592QUERY SCHEDULE 361QUERY SCRIPT 411QUERY SERVERGROUP 500QUERY STGPOOL 214, 222, 520QUERY SUBSCRIPTION 491QUERY SYSTEM 437QUERY VOLHISTORY 546QUERY VOLUME 216, 232RECONCILE VOLUMES 506REDUCE DB 427REDUCE LOG 427REGISTER ADMIN 289REGISTER LICENSE 386REMOVE ADMIN 291REMOVE NODE 265RENAME ADMIN 291RENAME FILESPACE 527RENAME NODE 264RENAME SCRIPT 412RENAME SERVERGROUP 500RENAME STGPOOL 235REPLY 135RESET BUFPOOL 428RESET DBMAXUTILIZATION 419,
421RESET LOGCONSUMPTION 544RESET LOGMAXUTILIZATION 419,
421RESTORE NODE 104RESTORE STGPOOL 541, 572RESTORE VOLUME 575ROLLBACK 416RUN 412SELECT 438SET ACCOUNTING 459SET ACTLOGRETENTION 445
administrative commands (continued)SET AUTHENTICATION 296SET CLIENTACTDURATION 378SET CONFIGMANAGER 477, 480SET CONFIGREFRESH 491SET CONTEXTMESSAGING 447SET CROSSDEFINE 470, 473SET DRMCHECKLABEL 581SET DRMCOPYSTGPOOL 579SET DRMCOURIERNAME 581SET
DRMDBBACKUPRXPIREDAYS 582SET DRMFILEPROCESS 582SET DRMINSTPREFIX 580SET DRMNOTMOUNTABLE 581SET DRMPLANPOSTFIX 579SET DRMPLANPREFIX 580SET DRMPRIMSTGPOOL 579SET DRMRPFEXPIREDAYS 592SET DRMVAULTNAME 582SET EVENTRETENTION 372, 406SET INVALIDPWLIMIT 295SET LICENSEAUDITPERIOD 387SET LOGMODE 546SET MAXCMDRETRIES 377SET MAXSCHEDSESSIONS 375SET MINPWLENGTH 295SET PASSEXP 295SET QUERYSCHEDPERIOD 377SET RANDOMIZE 376SET REGISTRATION 255SET RETRYPERIOD 378SET SCHEDMODES 373SET SERVERHLADDRESS 470, 473SET SERVERLLADDRESS 470, 473SET SERVERNAME 436, 469, 470,
473SET SERVERPASSWORD 469, 470,
473SET SUBFILE 354SET SUMMARYRETENTION 442SET WEBAUTHTIMEOUT 294SETOPT 397UNLOCK PROFILE 484, 485UPDATE ADMIN 289UPDATE BACKUPSET 351UPDATE CLIENTOPT 283UPDATE CLOPTSET 284UPDATE COPYGROUP 323, 328UPDATE DBBACKUPTRIGGER 546UPDATE DEVCLASS 159, 162UPDATE DOMAIN 321UPDATE DRIVE 145UPDATE LIBRARY 143UPDATE LIBVOLUME 46, 129UPDATE MGMTCLASS 322UPDATE NODE 264UPDATE POLICYSET 321UPDATE RECOVERYMEDIA 589UPDATE SCHEDULE 403UPDATE SCRIPT 410UPDATE SERVER 474UPDATE SERVERGROUP 500UPDATE STGPOOL 130UPDATE VOLUME 131, 182
administrative privilege classdescription 289
administrative privilege class (continued)granting authority 289reducing 293revoking all 293
administrative user IDcreating automatically 268description of 254preventing automatic creation of 269
administrative Web interfacedescription 17setting authentication time-out
value 294administrator
authorizing to manage a policydomain 289
locking 293managing registration 383querying 291registering 289removing 291renaming 294restrictions when registering 289unlocking 293updating 289, 291viewing information about 291
ADSMSCSI device driver 62aggregate file
controlling the size of 188definition 188reclaiming space in 205, 206unused space in 226viewing information about 220
alias name, device 61analyst privilege class
revoking 293ANR9999D message 447application client
adding node for 254description 4policy for 336
application program interface (API)client, registering 257compression option 257deletion option 257description of 3registering to server 257
archiveamount of space used 227backup set 8, 12defining criteria 320description of 8, 11file while changing 329instant 8, 12policy 22processing 317
archive copy groupdefining 328, 330deleting 344description of 306
archive file management 304archiving a file 304, 317ASSIGN DEFMGMTCLASS
command 302, 330assigned capacity 419, 426association, client with schedule
defining 359deleting 370
672 Tivoli Storage Manager for Windows: Administrator’s Guide

association, file with managementclass 312, 313
association, object with profileadministrative command
schedule 483administrator 481, 494client option set 483deleting 485policy domain 482script 483
AUDIT LIBRARY command 130AUDIT LICENSE command 387AUDIT VOLUME command 561, 567auditing
library’s volume inventory 130license, automatic by server 386multiple volumes in sequential access
storage pool 567single volume in sequential access
storage pool 568volume in disk storage pool 567volume, reasons for 561volumes by date 568volumes by storage pool 569
authentication, client/server 294authority
granting to administrators 289AUTOFSRENAME parameter 273Automated Cartridge System Library
Software (ACSLS) StorageTeklibrary 33
automated library deviceadding, using commands 80adding, using wizard 74auditing 130checking in media 126defining 32device drivers for 62element numbers 76managing media 128overflow location 176replacing tape drive 146reusing media 132scratch and private volumes 46updating 144volume inventory 46, 124
automatically renaming file spaces 273automating
client operations 358server operations 401
Bbackground processes 394backup
amount of space used by client 227comparison of types 10, 11, 12, 13database 545, 551default policy 301defining criteria for client files 320differential, for NAS node 8, 37file 304, 315, 316file management 304file while open 323frequency for file 324full, for NAS node 37incremental 304, 315
backup (continued)logical volume 316NAS file server 36policy 22selective 304, 316snapshot, using hardware 8, 11storage pool 539subfiles, server set-up 22, 354types available 9, 13when to perform for database 544
backup copy groupdefining 323, 328deleting 344description of 306frequency 315mode 315serialization 315
BACKUP DB command 551BACKUP DEVCONFIG command 549backup period, specifying for
incremental 374backup set
adding subfiles to 356deleting 354description of 349displaying contents of 353example of generating 350generating 349how the server manages and
tracks 351media, selecting 349moving to other servers 351OST extension on 349selecting a name for 350selecting retention period for 351suggested usage 8, 11, 14, 22updating 351use as archive 8, 11, 14, 22viewing information about 352
BACKUP STGPOOL command 539BACKUP VOLHISTORY command 546backup-archive client
description of 3operations summary 9performing operations for 347, 367,
372policy for 309registering node 254scheduling operations for 358unified logon 296using to back up NAS file server 94,
104base file 354batch file, scheduling on client 362binding a file to a management
class 312buffer pool 429BUFPOOLSIZE option 430
Ccache
deleting files from 200, 229description of 20disabling for disk storage pools 199effect on performance 200effect on statistics 200
cache (continued)enabling for disk storage pools 176,
199monitoring utilization on disk 224
CANCEL PROCESS command 223, 396CANCEL RESTORE command 288CANCEL SESSION command 285capacity, assigned 419, 426cartridge
cleaner cartridge 153device class 158device support 59
CD-ROM media (REMOVABLEFILEdevice class) 78
central schedulingclient operations 347, 357, 367, 372controlling the workload 375coordinating 373description of 23, 25, 357server operations 402
changing date and time on server 393characteristics, machine 584check in
cleaner cartridge 152library volume 126setting a time interval for
volume 160CHECKIN LIBVOLUME command 126checking the log file generated by
processed schedules 368checklist for DRM project plan 608CHECKOUT LIBVOLUME
command 129class, administrator privilege
description 289granting authority 289reducing 293revoking all 293
class, device3570 1573590 1574MM 1578MM 157amount of space used 227defining 157, 161defining for database backup 543deleting 167description of 19DISK 157DLT 157FILE 157for devices using native Windows
device driver 76, 78GENERICTAPE 78NAS 100OPTICAL 157, 162overview 81QIC 157REMOVABLEFILE 163requesting information about 166selecting for import and export 511sequential 157SERVER 157, 503tape 158, 161, 162updating 157, 161WORM 157
Index 673

class, policy privilegedescription 289, 292granting 292revoking 293
class, storage privilegedescription 289granting 292reducing 293revoking 293
CLEAN DRIVE command 150cleaner cartridge
checking in 152operations with 153
clientaccess user ID 268administrative 3API (application program
interface) 4, 257application client (Tivoli Data
Protection) 4, 336backup-archive 3how to protect 7operations summary 9options file 258Tivoli Space Manager (HSM
client) 4, 309using to back up NAS file server 36,
104client configuration file 260client file
allowing archive while changing 301allowing backup while changing 301,
323associating with management
class 312, 313delaying migration of 196deleting 239deleting from a storage pool 238deleting from cache 200deleting when deleting a volume 239eligible for archive 301, 314eligible for backup 301, 314eligible for expiration 303eligible for space management 317how Tivoli Storage Manager
stores 188on a volume, querying 219server migration of 191
client migration 317, 318client node
adding 253amount of space used 226creating backup sets for 349file spaces, QUERY OCCUPANCY
command 226finding tapes used by 221immediate processing 378importing 525locking 264managing registration 254, 264, 383options file 258performing operations for 347, 367,
372querying 265registering 257removing 265renaming 264
client node (continued)scheduling operations for 358setting password authentication 296setting scheduling mode 374setting up subfile backups 355unlocking 264updating 264viewing information about 265
client optionTXNBYTELIMIT 188VIRTUALMOUNTPOINT 270
client option setadding client options to 282assigning clients to 283copying 283creating 282deleting 284deleting an option from 283for NAS node 102requesting information about 284updating description for 284
client point-in-time restore, enabling 340client queries to the server, setting the
frequency 377client restartable restore session
canceling 288interrupting, active 288requesting information about 288
client sessioncanceling 285managing 284querying 284, 434viewing information about 284, 434
client system options file 257client-polling scheduling 373, 377client, application
adding node for 254description 4policy for 336
client/server, description of 3closed registration
description 255process 255setting 255
clusteradding a node 248administrative tasks
adding a node 248attaching tape devices 245backup and restore, in cluster 249cluster log usage 250configuration considerations 247managing SCSI tape failover 250managing Tivoli Storage Manager
on a cluster 249migrating an existing Tivoli
Storage Manager server 248moving the clients 248planning 244SCSI tape failover setup 246terminating shared SCSI bus 246
attaching tape devices 245components 241configuration considerations 247dedicated shared disk 244definition 241failback 242
cluster (continued)failover 242IP addresses 244managing SCSI tape failover 250managing Tivoli Storage Manager on
a cluster 249migrating an existing Tivoli Storage
Manager server 248moving clients 248network names 245nodes 241objects 242planning 244SCSI tape failover 245virtual servers 242
cluster objects 242collocation
changing, effect of 204definition 176, 200, 236description of 20determining whether to use
collocation 176, 200, 236effects on operations 202effects on volume reclamation 211enabling for sequential storage
pool 176, 200, 236how the server selects volumes when
disabled 203how the server selects volumes when
enabled 202migration thresholds 197
command file, scheduling on client 362command retry attempts
setting the amount of timebetween 378
setting the number of 377command routing 497command script 407commands, administrative
ACCEPT DATE 393ASSIGN DEFMGMTCLASS 302, 330AUDIT LIBRARY 130AUDIT LICENSE 387AUDIT VOLUME 567BACKUP DB 551BACKUP DEVCONFIG 549BACKUP NODE 104BACKUP STGPOOL 539BACKUP VOLHISTORY 547BEGIN EVENTLOGGING 447CANCEL PROCESS 396CANCEL REQUEST 135CANCEL RESTORE 288CANCEL SESSION 285CHECKIN LIBVOLUME 126CHECKOUT LIBVOLUME 129CLEAN DRIVE 150COMMIT 416COPY CLOPTSET 283COPY DOMAIN 321COPY POLICYSET 322COPY SCHEDULE 368COPY SCRIPT 411COPY SERVERGROUP 500DEFINE ASSOCIATION 359DEFINE BACKUPSET 351DEFINE CLIENTACTION 378
674 Tivoli Storage Manager for Windows: Administrator’s Guide

commands, administrative (continued)DEFINE CLIENTOPT 378DEFINE CLOPTSET 281DEFINE COPYGROUP 323, 328DEFINE DATAMOVER 90, 102DEFINE DBBACKUPTRIGGER 543,
545DEFINE DBVOLUME 424DEFINE DEVCLASS 158, 161, 163DEFINE DOMAIN 320DEFINE DRIVE 89DEFINE GRPMEMBER 499DEFINE LIBRARY 32, 89DEFINE LOGCOPY 559DEFINE LOGVOLUME 424DEFINE MACHINE 584DEFINE
MACHNODEASSOCIATION 584DEFINE PATH 91, 103DEFINE POLICYSET 321, 322DEFINE PROFASSOCIATION 480,
483DEFINE PROFILE 480DEFINE
RECMEDMACHASSOCIATION 589DEFINE RECOVERYMEDIA 588DEFINE SCHEDULE 403DEFINE SCRIPT 407DEFINE SERVER 469, 470, 473, 497,
503DEFINE SERVERGROUP 499DEFINE SPACETRIGGER 422, 423DEFINE STGPOOL 178, 187DEFINE SUBSCRIPTION 490DEFINE VOLUME 46, 182DELETE ASSOCIATION 370DELETE BACKUPSET 354DELETE COPYGROUP 344DELETE DBBACKUPTRIGGER 545DELETE DBVOLUME 428DELETE DEVCLASS 167DELETE DOMAIN 344DELETE DRIVE 154DELETE EVENT 372DELETE GRPMEMBER 501DELETE LIBRARY 144DELETE LOGVOLUME 428DELETE MGMTCLASS 344DELETE POLICYSET 344DELETE PROFASSOCIATION 485DELETE PROFILE 486DELETE SCHEDULE 369DELETE SCRIPT 412DELETE SERVERGROUP 501DELETE STGPOOL 238DELETE SUBSCRIBER 496DELETE SUBSCRIPTION 486, 492DELETE VOLHISTORY 546, 547DELETE VOLUME 239, 240DISABLE EVENTS 446DISABLE SESSIONS 287DISMOUNT VOLUME 136DSMFMT 180, 537DSMSERV FORMAT 553ENABLE EVENTS 446ENABLE SESSIONS 287END EVENTLOGGING 447
commands, administrative (continued)EXPIRE INVENTORY 333EXPORT ADMIN 509EXPORT NODE 515EXPORT POLICY 515EXPORT SERVER 515EXTEND DB 426EXTEND LOG 543GENERATE BACKUPSET 349GRANT AUTHORITY 289HALT 392HELP 398IMPORT 512, 513IMPORT ADMIN 518IMPORT NODE 518, 525IMPORT POLICY 518IMPORT SERVER 518, 525LABEL LIBVOLUME 125LOCK ADMIN 293LOCK NODE 264LOCK PROFILE 484, 485MACRO 131MOVE DATA 229MOVE MEDIA 130MOVE NODEDATA 232NOTIFY SUBSCRIBERS 484, 485PING SERVER 501PREPARE 589QUERY ACTLOG 444QUERY BACKUPSET 352QUERY
BACKUPSETCONTENTS 353QUERY CONTENT 219QUERY COPYGROUP 341, 523QUERY DB 427QUERY DBBACKUPTRIGGER 546QUERY DBVOLUME 427, 539QUERY DEVCLASS 166QUERY DOMAIN 343QUERY DRIVE 145QUERY ENABLED 457QUERY EVENT 361QUERY FILESPACE 279QUERY LIBRARY 143QUERY LICENSE 387QUERY LOG 430QUERY LOGVOLUME 426, 539QUERY MEDIA 131QUERY MGMTCLASS 342QUERY MOUNT 135QUERY NODE 265QUERY OCCUPANCY 225, 226, 227,
276QUERY OPTION 436QUERY POLICYSET 342QUERY PROCESS 231QUERY REQUEST 135QUERY RESTORE 288QUERY RPFCONTENT 592QUERY RPFILE 592QUERY SCHEDULE 361QUERY SCRIPT 411QUERY SERVERGROUP 500QUERY STGPOOL 214, 222, 520QUERY SUBSCRIPTION 491QUERY SYSTEM 437QUERY VOLHISTORY 546
commands, administrative (continued)QUERY VOLUME 216, 232RECONCILE VOLUMES 506REDUCE DB 427REDUCE LOG 427REGISTER ADMIN 289REGISTER LICENSE 386REMOVE ADMIN 291REMOVE NODE 265RENAME ADMIN 291RENAME FILESPACE 527RENAME NODE 264RENAME SCRIPT 412RENAME SERVERGROUP 500RENAME STGPOOL 235REPLY 135RESET BUFPOOL 428RESET DBMAXUTILIZATION 419,
421RESET LOGCONSUMPTION 544RESET LOGMAXUTILIZATION 419,
421RESTORE NODE 104RESTORE STGPOOL 541, 572RESTORE VOLUME 575ROLLBACK 416RUN 412SELECT 438SET ACCOUNTING 459SET ACTLOGRETENTION 445SET AUTHENTICATION 296SET CLIENTACTDURATION 378SET CONFIGMANAGER 477, 480SET CONFIGREFRESH 491SET CONTEXTMESSAGING 447SET CROSSDEFINE 470, 473SET DRMCHECKLABEL 581SET DRMCOPYSTGPOOL 579SET DRMCOURIERNAME 581SET
DRMDBBACKUPRXPIREDAYS 582SET DRMFILEPROCESS 582SET DRMINSTPREFIX 580SET DRMNOTMOUNTABLE 581SET DRMPLANPOSTFIX 579SET DRMPLANPREFIX 580SET DRMPRIMSTGPOOL 579SET DRMRPFEXPIREDAYS 592SET DRMVAULTNAME 582SET EVENTRETENTION 372, 406SET INVALIDPWLIMIT 295SET LICENSEAUDITPERIOD 387SET LOGMODE 546SET MAXCMDRETRIES 377SET MAXSCHEDSESSIONS 375SET MINPWLENGTH 295SET PASSEXP 295SET QUERYSCHEDPERIOD 377SET RANDOMIZE 376SET REGISTRATION 255SET RETRYPERIOD 378SET SCHEDMODES 373SET SERVERHLADDRESS 470, 473SET SERVERLLADDRESS 470, 473SET SERVERNAME 436, 469, 470,
473
Index 675

commands, administrative (continued)SET SERVERPASSWORD 469, 470,
473SET SUBFILE 354SET SUMMARYRETENTION 442SET WEBAUTHTIMEOUT 294SETOPT 397UNLOCK PROFILE 484, 485UPDATE ADMIN 289UPDATE BACKUPSET 351UPDATE CLIENTOPT 283UPDATE CLOPTSET 284UPDATE COPYGROUP 323, 328UPDATE DBBACKUPTRIGGER 546UPDATE DEVCLASS 159, 162UPDATE DOMAIN 321UPDATE DRIVE 145UPDATE LIBRARY 143UPDATE LIBVOLUME 46, 129UPDATE MGMTCLASS 322UPDATE NODE 264UPDATE POLICYSET 321UPDATE RECOVERYMEDIA 589UPDATE SCHEDULE 403UPDATE SCRIPT 410UPDATE SERVER 474UPDATE SERVERGROUP 500UPDATE STGPOOL 130UPDATE VOLUME 131, 182
COMMIT command 416COMMTIMEOUT server option 285, 286communication set up
among servers 468command routing, for 471cross definition 469, 470, 473enterprise configuration, for 468enterprise event logging, for 455, 468security 470server-to-server virtual volumes 503
compressing the server database 431compression
choosing client or drive 168option for API 257options for clients 255setting 255tape volume capacity, effect on 168
configuration file, devicebacking up 548example 550information 548recreating 550unrecognized by Tivoli Storage
Manager 77using when compressing the
database 431configuration information, enterprise
managementadministrative command
schedule 478, 479, 483administrator 481, 494changing 483client option set 478, 483client schedule 478, 479, 482copy group 478, 482deleting 485, 486distributing 475, 483, 484management class 482
configuration information, enterprisemanagement (continued)
policy domain 478, 479, 482refreshing 484, 491, 493script 478, 483server 481server group 481
configuration managercommunication setup 468default profile 477, 481scenario 477setting up 477, 479, 480
configuringdevices not supported by the Tivoli
Storage Manager device driver 77devices, with device configuration
wizard 74planning your storage
environment 42shared library on a SAN 83Tivoli Data Protection for NDMP 99
console mode 513contents of a volume 219context messaging for ANR9999D 447continuation characters, using 408COPY CLOPTSET command 283COPY DOMAIN command 321copy group
archive, description of 306backup, description of 306defining archive 328defining backup 323deleting 344
COPY MGMTCLASS command 323COPY POLICYSET command 321COPY SCHEDULE command 368, 405COPY SCRIPT command 411COPY SERVERGROUP command 500copy storage pool
compared with primary 237defining a 235role in storage pool migration 199simultaneous write 179storage hierarchy, effect on 190
creating backup setsbenefits of 349example for 350
creating server scripts 407cross definition 469, 470, 473cyclic redundancy check
during a client session 347for storage pool volumes 563for virtual volumes 502performance considerations for
nodes 348perfornance considerations for storage
pools 566
Ddamaged files 532, 569, 570data
considering user needs forrecovering 53
exporting 509importing 509
data compression 255
data format for storage pool 95, 101,107, 176, 178
data movement, querying 231data mover
defining 90, 102description 33, 50, 51managing 106NAS file server 33, 50, 51
data storageclient files, process for storing 5concepts overview 14considering user needs for
recovering 53deleting files from 239evaluating 42example 173managing 18monitoring 561planning 42protection, methods 532tailoring definitions 523using 3494 automated devices 75using another Tivoli Storage Manager
server 501using automated library devices 74using devices not recognized by Tivoli
Storage Manager 77using disk devices 55using manual devices 74using optical devices 77using removable media devices 78using the storage hierarchy 190
data validationduring a client session 347for storage pool volumes 563for virtual volumes 502performance considerations for
nodes 348perfornance considerations for storage
pools 566database backup and recovery
database backup trigger 545, 557defining device classes for 543example recovery procedures 571full backup 544, 551general strategy 501, 531, 532incremental backup 544methods 501, 531point-in-time 553providing 501, 531roll-forward 534, 557to most current state 557unloading 431using Disaster Recovery
Manager 532when to back up 544
database, Tivoli Storage Manageradding space to 424automating increase of 422available space 418, 421backup 551backup trigger 545buffer pool 429, 430committing data to 430compressing 431defining a volume 424defining mirrored volumes 537
676 Tivoli Storage Manager for Windows: Administrator’s Guide

database, Tivoli Storage Manager(continued)
deleting a volume 428deleting space 426description of 25, 417determining how much space is
allocated 418, 421DEVCONFIG option 431ensuring integrity of 27estimating the amount of space
needed 420formatting 431fragmented 431loading 431logical volume 418, 421managing 417mirroring 536monitoring space 419, 421monitoring the buffer 430optimizing performance 428querying the buffer pool 429querying using SQL 438recovering 552reducing capacity 427reloading 431reorganize 431resetting buffer pool statistics 429restoring 543shadowing 538space trigger 422, 423storage pool size effect 417transactions 417, 418unloading 431viewing information about 429
date and time, changing on theserver 393
day of the week parameter 403DBPAGESHADOW server option 538DBPAGESHADOWFILE server
option 538deactivating policy 302Decision Support Loader 458default management class
assigning for a policy set 330binding files to 313description of 307purpose 310recommendation for using 312
default policy 301default profile 477, 481, 489DEFINE ASSOCIATION command 359DEFINE BACKUPSET command 351DEFINE CLIENTACTION
command 378DEFINE CLIENTOPT command 282DEFINE CLOPTSET command 281DEFINE COPYGROUP command 323,
328, 330DEFINE DBBACKUPTRIGGER
command 543, 545DEFINE DBVOLUME command 424DEFINE DEVCLASS command 158, 161DEFINE DOMAIN command 320DEFINE DRIVE command 89DEFINE GRPMEMBER command 499DEFINE LIBRARY command 89DEFINE LOGCOPY command 559
DEFINE LOGVOLUME command 424DEFINE MACHINE command 584DEFINE MACHNODEASSOCIATION
command 584DEFINE MGMTCLASS command 322DEFINE POLICYSET command 321DEFINE PROFASSOCIATION
command 483DEFINE RECMEDMACHASSOCIATION
command 589DEFINE RECOVERYMEDIA
command 588DEFINE SCHEDULE command 403DEFINE SCRIPT command 407DEFINE SERVER command 469, 470,
473, 497, 503DEFINE SPACETRIGGER
command 422, 423DEFINE STGPOOL command 178, 187DEFINE SUBSCRIPTION command 490DEFINE VOLUME command 182defining RSM libraries to Tivoli Storage
Managerusing the device configuration
wizard 140using Tivoli Storage Manager
commands 141delaying migration for files 196delaying reuse of volumes 211DELETE ASSOCIATION command 370DELETE BACKUPSET command 354DELETE CLIENTOPT command 283DELETE COPYGROUP command 344DELETE DBBACKUPTRIGGER 545DELETE DBVOLUME command 428DELETE DEVCLASS command 167DELETE DOMAIN command 344DELETE EVENT command 372, 406DELETE FILESPACE command 280DELETE GRPMEMBER command 501DELETE LOGVOLUME command 428DELETE MGMTCLASS command 344DELETE POLICYSET command 344DELETE PROFASSOCIATION
command 485DELETE PROFILE command 486DELETE SCHEDULE command 369, 405DELETE SCRIPT command 412DELETE SERVER command 475DELETE SERVERGROUP command 501DELETE STGPOOL command 238DELETE SUBSCRIBER command 496DELETE SUBSCRIPTION command 492DELETE VOLHISTORY command 546,
547DELETE VOLUME command 239, 240deleting
cached files on disk 229empty volume 239, 547file spaces 280files 239, 333scratch volume 181, 547storage volume 239subfile 356volume history information 547volume with residual data 240
DESTINATION parameter (storagepool) 301, 323, 328
destroyed volume access mode 185, 533determining
cause of ANR9999D messages 447the time interval for volume check
in 160DEVCONFIG option 548device
adding 74adding using commands 80alias name for Tivoli Storage
Manager 62attaching to server 80, 95configuring manual 74configuring optical 77configuring removable media 78defining to Tivoli Storage
Manager 80displaying errors 88element number 76, 103planning for 72selecting device drivers 62supported by Tivoli Storage
Manager 59Tivoli Storage Manager device
driver 62troubleshooting 88unsupported 77Windows device drivers 64
device class3570 1573590 1574MM 1578MM 157amount of space used 227defining 157, 161defining for database backup 543deleting 167description of 19DISK 157DLT 157FILE 157for devices using native Windows
device driver 76, 78GENERICTAPE 78NAS 100OPTICAL 157, 162overview 81QIC 157REMOVABLEFILE 163requesting information about 166selecting for import and export 511sequential 157SERVER 157, 503tape 158, 161, 162updating 157, 161WORM 157
device configuration filebacking up 548example 550information 548recreating 550unrecognized by Tivoli Storage
Manager 77using when compressing the
database 431
Index 677

device diagnostics 88device driver
ADSMSCSI 62for manual tape devices 60installing 59, 394mapping Tivoli Storage Manager
devices to 63overview 62requirements 59selecting the appropriate device
driver 62stopping 394Tivoli Storage Manager, installing 60Windows 64
device sharing 42device type
3570 1574MM 1578MM 157DISK 157DLT 157DTF 157FILE 157GENERICTAPE 157LTO 158NAS 100OPTICAL 157, 162QIC 157REMOVABLEFILE 157SERVER 157, 502, 503WORM 157
device, storageadding, overview 72alias 61automated library device 74device information 88device name 61disk 55element numbers 76event log 88manual library device 74optical device 77, 79, 163removable media device 78, 79, 163replacing tape drive 146required Tivoli Storage Manager
definitions 52supported devices 59
diagnosing ANR9999D messages 447diagnostics, for device 88differential backup
compared to incremental 13of image, description 8, 37
direct-to-tape, policy for 335DISABLE EVENTS command 446DISABLE SESSIONS command 287disaster recovery
auditing storage pool volumes 570example recovery procedures 571general strategy 501, 531methods 27, 501, 531providing 501, 531when to backup 532, 544
disaster recovery managerclient recovery information 578creating a disaster recovery plan 589customizing 578
disaster recovery manager (continued)displaying a disaster recovery
plan 592enabling 577expiring a disaster recovery plan 592features 578moving volumes back onsite 597project plan, checklist 608querying a disaster recovery
plan 592recovery media 588saving machine characteristics 584stanzas, recovery instructions 582storing a disaster recovery plan 589
disk device class, defined 157disk storage pool
cache, use of 200deleting cached files from 229estimating space 212estimating space for archived
files 213estimating space for backed up
files 213migration threshold 192setting up 55
dismountingvolumes from REMOVABLEFILE
devices 136domain, policy
assigning client node 332changing 302creating 321deleting 344description of 305, 306distributing via profile 341, 479for NAS file server node 101querying 343updating 318, 320
drivecleaning 150defining 89defining path for 91deleting 154querying 145updating 145updating to use for NDMP
operations 106driver, device
ADSMSCSI 62for manual tape devices 60installing 59, 394mapping Tivoli Storage Manager
devices to 63overview 62requirements 59selecting the appropriate device
driver 62stopping 394Tivoli Storage Manager, installing 60Windows 64
dsm.opt file 258, 281, 358dsmaccnt.log 459DSMADMC command 513, 522DSMFMT utility 180, 537DSMLABEL utility 182dsmsched.log file 368
DSMSERV DISPLAYDBBACKUPVOLUME command 550
DSMSERV LOADDB utility 431, 432DSMSERV LOADFORMAT utility 431DSMSERV RESTORE DB command 550dumping, database 550dynamic serialization, description
of 324, 329
Eelement address 89ENABLE EVENTS command 446ENABLE SESSIONS command 287END EVENTLOGGING command 447Enterprise Administration
description 463enterprise configuration
communication setup 468description 464, 475procedure for setup 476profile for 478scenario 466, 476subscription to 479
enterprise event logging 455, 468enterprise logon 268, 465, 496error analysis 437error checking for drive cleaning 153error log 459error reporting for ANR9999D
messages 447error reports for volumes 217establishing server-to-server
communicationsenterprise configuration 468enterprise event logging 468virtual volumes 474
estimated capacity for storage pools 215estimated capacity for tape volumes 217event log 88event logging 445event record (for a schedule)
deleting 372, 406description of 361, 371managing 405querying 405removing from the database 372, 406setting retention period 372, 406
event server 455EXPINTERVAL option 333expiration date, setting 404expiration processing
description 333, 541files eligible 303, 333of subfiles 303, 325, 333, 356starting 333using Tivoli Disaster Recovery
Manager 334EXPIRE INVENTORY command
deleting expired files 333duration of process 334
exportlabeling tapes 512monitoring 512planning for sequential media 511PREVIEW parameter 510querying about a process 512
678 Tivoli Storage Manager for Windows: Administrator’s Guide

export (continued)querying the activity log 514using scratch media 511viewing information about a
process 512EXPORT ADMIN command 517EXPORT commands 512, 513EXPORT NODE command 517EXPORT POLICY command 518EXPORT SERVER command 511, 516exporting
administrator data 517client node data 517data to tape 515description of 509policy data 518server data 516subfiles 355
EXPQUIET server option 334EXTEND DB command 426EXTEND LOG command 426EXTERNAL library type 645external media management
initialization requests 645interface description 641overview 139processing during server
initialization 642Tivoli Storage Manager setup 142volume dismount requests 650volume mount requests 647volume release requests 646
Ffailback for clusters 242failover for clusters 242failover for SCSI tape 245file data, importing 509FILE device type
defining device class 157deleting scratch volumes 547setting up storage pool 56
file exit 445file name for a device 103file retrieval date 200file server, network-attached storage
(NAS)backup methods 36registering a NAS node for 102using Tivoli Data Protection for
NDMP to back up 35, 93file size, determining maximum for
storage pool 175file space
deleting 280description of 270names that do not display
correctly 280QUERY OCCUPANCY
command 226querying 270renaming 527Unicode enabled 279viewing information about 270
file space identifier (FSID) 279
file, clientallowing archive while changing 301allowing backup while changing 301,
323associating with management
class 312, 313delaying migration of 196deleting 239deleting from a storage pool 238deleting from cache 200deleting when deleting a volume 239eligible for archive 301, 314eligible for backup 301, 314eligible for expiration 303eligible for space management 317how Tivoli Storage Manager
stores 188on a volume, querying 219server migration of 191
files, damaged 532, 569, 570files, unreadable 532, 569, 570format for storage pool 95, 101, 107, 176,
178formatting
database volume 425, 426recovery log volume 425, 426storage pool volume 56, 181
free media pool 141frequency of backup 324FSID 279full image backup, NAS node 37
GGENERATE BACKUPSET command 349GENERICTAPE device type 161GRANT AUTHORITY command 289group, server
copying 500defining 499deleting 501member, deleting 501moving a member 501querying 500renaming 500updating description 500
HHALT command 392halting the server 392HELP command 398hierarchy, storage
defining in reverse order 178, 187establishing 185example 173how the server stores files in 188next storage pool 186, 191, 199, 222,
238staging data on disk for tape
storage 190home pages xiiihost server 253how backup sets are managed 351how to cause the server to accept date
and time 393
how to use external media managerswith Tivoli Storage Manager 138
IIBM error analysis 437IBM service xvIBMATL device driver 63IDLETIMEOUT server option 285, 286image backup
policy for 336, 337suggested use 8, 11
importmonitoring 512PREVIEW parameter 510, 519querying about a process 512querying the activity log 514recovering from an error 526viewing information about a
process 512IMPORT ADMIN command 518IMPORT commands 512, 513IMPORT NODE command 518, 525IMPORT POLICY command 518import pool 141IMPORT SERVER command 518, 525importing
data 518data storage definitions 521, 523date of creation 524description of 509directing messages to an output
file 522duplicate file spaces 524file data 524policy definitions 521server control data 522subfiles 355subsets of information 526
include-exclude filedescription of 23, 310for policy environment 306, 310
incremental backup, clientfile eligibility for 315frequency, specifying 374full 315partial 315progressive 13
initial start date for schedule 403initial start time for schedule 403installing Tivoli Storage Manager xiii,
254instant archive
creating on the server 348description of 8, 12
interface, application programclient, registering 257compression option 257deletion option 257description of 3registering to server 257
interfaces to Tivoli Storage Manager 17Internet xiiiintroduction to Tivoli Storage
Manager 3
Index 679

Llabel
for a bar-code reader 126media for a manual device 133media for an automated library
device 125media for RSM libraries 140overwriting existing labels 125sequential storage pools 182
LABEL LIBVOLUME commandoverwriting existing volume
labels 125LAN-free data movement
configuration 87description 14, 38suggested usage 8
library349X 32ACSLS (Automated Cartridge System
Library Software) 33attaching for NAS file server
backup 95, 100auditing volume inventory 130automated 128defining 89, 145defining path for 91, 103deleting 144external 33managing 143manual 32mode, random or sequential 61overflow location 176querying 143SCSI 32sharing (SAN) 83type 35updating 143volume inventory 46, 124
library client, shared library 38, 84library manager, shared library 38, 83license
compliance 386features 383monitoring 386registering 384using 383
location, volumechanging 183overflow for storage pool 176querying volume 218
LOCK ADMIN command 293LOCK NODE command 264LOCK PROFILE command 484, 485log mode
normal 543, 545roll-forward 543, 545setting 543
logical devices 33, 56logical volume on client
backup 304management class for 312policy for 314, 336process for backup 316restore 304
LOGPOOLSIZE option 430LTO device type 157
LUNdetermining 112using in paths 91, 92
Mmachine characteristics 584machine recovery information 585macro
commit individual commands 416continuation characters 414controlling command processing 416running 415scheduling on client 362substitution variables 415testing 416using 413writing commands 413writing comments 414
MACRO administrative command,using 262
magnetic disk devices 32, 55managed server
changing the configurationmanager 490, 495
communication setup 468deleting a subscription 492description 464managed objects 464, 489refreshing configuration
information 493renaming 496returning managed objects to local
control 494setting up 478subscribing to a profile 479, 489, 490
management classassigning a default 330associating a file with 312binding a file to 312configuration 309controlling user access 309copying 318, 322default 310defining 322deleting 344description of 305, 306, 309querying 342rebinding a file 313updating 313, 318, 323
managing multiple Tivoli StorageManager servers 26, 463
manual library deviceadding, using commands 80adding, using wizard 74managing media 133preparing media 132reusing media 134
mapping devices to device drivers 63maximum extension 424MAXSCRATCH parameter 175, 183, 236media
checking in 126labeling for automated library
devices 125labeling for bar-code reader 126mount operations 134
media (continued)reusing 132tape rotation 43, 136
media labelfor automated library device 125for devices unrecognized by Tivoli
Storage Manager 133for manual library device 133for use with bar-code reader 126
media loss, recovery from 575media pools in RSM libraries 140messages
determining cause of ANR9999Dmessage 447
directing import messages to anoutput file 522
for drive cleaning 153getting help on 398severe 447
Microsoft Management Console (MMC)snap-in 17
migrating a file 304, 317migration
automatic, for HSM clientdemand 305files, eligible 317threshold 305using management class 318
canceling the server process 223controlling by file age 196controlling start of, server 195copy storage pool, role of 199defining threshold for disk storage
pool 195defining threshold for tape storage
pool 197delaying by file age 196description, server process 192minimizing access time to migrated
files 197monitoring thresholds for storage
pools 222premigration for HSM client 305processes, number of 193providing additional space for server
process 224reconciliation 305selective, for HSM client 305starting server process 191, 195stub file on HSM client 305threshold for a storage pool 192
mirrored volumedescription of 539querying 539viewing information about 539
mirroringadvantages 536database 537defining volumes 539description of 27recovery log 534, 537recovery procedure 559
mobile client support 354mode
client backup 324library (random or sequential) 61scheduling 373
680 Tivoli Storage Manager for Windows: Administrator’s Guide

modified mode, description of 324monitoring the Tivoli Storage Manager
server 433mount
library 161retention period 160wait period 160
mount limit 159mount point 159, 164
preemption 396settings for a client session 255
MOVE DATA command 229MOVE DRMEDIA command 598MOVE NODEDATA 232moving a backup set
benefits of 351to another server 351
moving datafrom offsite volume in a copy storage
pool 230monitoring the movement of 232procedure 230requesting processing
information 231to another storage pool 229to other volumes in same storage
pool 229
NNAS node
defining 102deleting 106registering 102renaming 105
NATIVE data format 95NDMP, Tivoli Data Protection for
backing up a NAS file server 104configuration checklist 99data format 95data mover, description 33, 50, 51, 90defining a data mover 90, 102defining a device class 100defining a path for data mover and a
library 103defining a storage pool 101defining a tape drive 103differential image backup,
description 37full image backup, description 37interfaces used with 94managing NAS nodes 105path, description 33, 50, 51, 91planning 95policy configuration 101, 337registering a NAS node 102, 256requirements for set up 93restoring a NAS file server 104scheduling a backup 104storage pools for NDMP media 101
NETAPPDUMP data format 95, 101Network Appliance file server
backup methods 36data format for backup 95requirements 93tape device for backup 94
Network Appliance file server (continued)using Tivoli Data Protection for
NDMP to back up 35, 93network of Tivoli Storage Manager
servers 26, 463network-attached storage (NAS) file
serverbackup methods 36registering a NAS node for 102using Tivoli Data Protection for
NDMP to back up 35, 93new tape drive 146next storage pool 186, 191, 199, 222, 238node privilege class
description of 267granting 268
node, clientadding 253amount of space used 226creating backup sets for 349file spaces, QUERY OCCUPANCY
command 226finding tapes used by 221immediate processing 378importing 525locking 264managing registration 254, 264, 383options file 258performing operations for 347, 367,
372querying 265registering 257removing 265renaming 264scheduling operations for 358setting password authentication 296setting scheduling mode 374setting up subfile backups 355unlocking 264updating 264viewing information about 265
nodes in a clusteractivity 242characteristics 241transfer process 242
NONBLOCK data formatspecifying for server-free 110
NOPREEMPT server option 396NORETRIEVEDATE server option 200NOTIFY SUBSCRIBERS command 484,
485NT event log receiver 455
Ooccupancy, querying 225ODBC driver 438offsite recovery media (for DRM)
volumesmoving back onsite 597sending offsite 596states 595
offsite volume access mode 185offsite volumes, moving data in a copy
storage pool 230one-drive library, volume
reclamation 176, 208
open registrationdescription 255process 255setting 255
operations available to client 9operator privilege class
revoking 293optical device
adding 77defining device class 157, 162OPTICAL device type 162reclamation for media 208
option set, clientadding client options to 282assigning clients to 283copying 283creating 282deleting 284deleting an option from 283for NAS node 102requesting information about 284updating description for 284
option, serverAUDITSTORAGE 387, 397BUFPOOLSIZE 429changing with SETOPT
command 397COMMTIMEOUT 285, 286DEVCONFIG 549ENABLE3590LIBRARY 75EXPINTERVAL 334EXPQUIET 334IDLETIMEOUT 285, 286, 435LOGPOOLSIZE 430NOPREEMPT 396NORETRIEVEDATE 200overview 17RESTOREINTERVAL 287, 303, 334THROUGHPUTDATATHRESHOLD 286THROUGHPUTTIMETHRESHOLD 286TXNGROUPMAX 188VOLUMEHISTORY 547
options file, client 258options, querying
BUFPOOLSIZE 430LOGPOOLSIZE 430VIRTUALMOUNTPOINT client
option 271overflow location 176owner authority, client 267, 268
Ppage shadowing, database server
options 538page, description of 428password
resetting an administrative 291setting authentication for a client 296setting expiration 295setting invalid limit 295setting minimum length 295using with unified logon 296
pathdefining 91description 33, 50, 51, 99to library 103
Index 681

pending, volume state 218performance
cache, considerations for using 57,199
concurrent client/server operationconsiderations 375
data validation for nodes 348data validation for storage pools 566database or recovery log,
optimizing 428database read, increase with
mirroring 536file system effects on 182, 425mobile client 354storage pool volume 197, 558volume frequently used, improve with
longer mount retention 160period, specifying for an incremental
backup 374point-in-time restore
enable for clients 8, 340for database 553for storage pools 556
policydefault 5, 301deleting 343description of 305distributing with enterprise
management 341effect of changing 331for application clients 336for clients using SAN devices 338for direct-to-tape backup 335for logical volume backups 336for NAS file server node 101for point-in-time restore 340for server as client 340for space management 302, 317, 322importing 521managing 299operations controlled by 303planning 300querying 341
policy domainassigning client node 332changing 302creating 321deleting 344description of 305, 306distributing via profile 341, 479for NAS file server node 101querying 343updating 318, 320
policy privilege classdescription 289, 292granting 292revoking 293
policy setactivating 331changing, via the active policy
set 302copying 302, 318, 321defining 321deleting 344description of 305, 306querying 342updating 321
policy set (continued)validating 330, 332
pool, storageamount of space used 227auditing a volume 561backup and recovery 539comparing primary and copy
types 237copy 172creating a hierarchy 185data format 95, 176, 178defining 174defining a copy storage pool 235defining for disk, example 178, 187defining for NDMP operations 101defining for tape, example 178, 187deleting 238description of 172destination in copy group 323, 328determining access mode 175, 236determining maximum file size 175determining whether to use
collocation 176, 200, 236enabling cache for disk 176, 199estimating space for archived files on
disk 213estimating space for backed up files
on disk 213estimating space for disk 212estimating space for sequential 213estimating space in multiple 185managing 171monitoring 214moving files 229moving files between 229next storage pool 186, 191, 199, 222,
238overview 49policy use 323, 328primary 172querying 214random access 172recovery log, effect on 417renaming 235restoring 541, 572sequential access 172simultaneous write 179updating 174updating for disk, example 178, 187using cache on disk 176, 199validation of data 563viewing information about 214
portable mediadescription of 5, 7, 348restoring from 350
preemptionmount point 396volume access 396
prefix, for recovery instructions 580prefix, for recovery plan file 580prefix, server 498premigration 305PREPARE command 589PREVIEW parameter 510, 519private volumes 46privilege class, administrator
description 289
privilege class, administrator (continued)granting authority 289reducing 293revoking all 293
privilege class, policydescription 289, 292granting 292revoking 293
privilege class, storagedescription 289granting 292reducing 293revoking 293
processbackground 394canceling 396drive clean error checking 153expiration 541number for migration 175, 176, 193number for storage pool backup 541number for storage pool restore 557reclamation 205, 210
profileassociating configuration information
with 481changing 481, 483, 485default 481, 489defining 480, 483deleting 485, 486description 480getting information about 487locking 484problems with synchronization 495unlocking 484
programming interface notice 658progressive incremental backup 13protecting your data 532protection options
client 7server 13, 27
QQUERY ACTLOG command 444, 514QUERY ADMIN command 291QUERY BACKUPSET command 352QUERY BACKUPSETCONTENTS
command 353QUERY CONTENT command 219QUERY COPYGROUP command 341,
523QUERY DB command 427, 429QUERY DBBACKUPTRIGGER
command 546QUERY DBVOLUME command 427, 539QUERY DEVCLASS command 511QUERY DOMAIN command 343QUERY ENABLED command 457QUERY EVENT command 371, 405QUERY FILESPACE command 270QUERY LICENSE command 387QUERY LOG command 430QUERY LOGVOLUME command 427,
539QUERY MEDIA command 131QUERY MGMTCLASS command 342QUERY NODE command 265
682 Tivoli Storage Manager for Windows: Administrator’s Guide

QUERY OCCUPANCY command 225,226, 227
QUERY OPTION command 436QUERY POLICYSET command 342QUERY PROCESS command 223, 231,
395, 435, 512QUERY RESTORE command 288QUERY RPFCONTENT command 592QUERY RPFILE command 592QUERY SAN command
determining information forserver-free 112
QUERY SCHEDULE command 361QUERY SCRIPT command 411QUERY SERVERGROUP command 500QUERY SESSION command 284, 434QUERY STATUS command 436QUERY STGPOOL command 214, 222,
224QUERY SUBSCRIPTION command 491QUERY SYSTEM command 437QUERY VOLHISTORY command 547QUERY VOLUME command 216, 232querying for general information 216querying policy objects 341querying storage volumes 216
Rrandom mode for libraries 61randomize, description of 376read-only access mode 184read/write access mode 184rebinding
description of 313file to a management class 313
recalling a fileselective 305transparent 305
receiver 445reclamation
affect of collocation on 211delaying reuse of volumes 211, 541description of 20offsite volume 210setting a threshold for sequential
storage pool 176, 205, 236virtual volumes 209with single drive 208
reclamation storage pool 176reclamation threshold, setting for
sequential storage pool 176, 205, 236RECONCILE VOLUMES command 506recovering storage pools 539recovering the database 552recovery instructions file 620recovery log
adding space to 423, 424automating increase of 422available space 418, 421buffer pool 431consistent database image 417defining a volume 424defining mirrored volumes 537deleting a volume 428deleting space 426description of 25, 417
recovery log (continued)determining how much space is
allocated 418, 421estimating the amount of space
needed 420logical volume 418, 421managing 417mirroring 534, 536monitoring space 418, 421monitoring the buffer pool 431optimizing performance 428querying the buffer pool 430reducing capacity 427size of 543space trigger 422, 423storage pool size effect 417viewing information about 430when to backup 532, 536, 544
recovery log modenormal 543, 545roll-forward 543, 545setting 543
recovery plan filecreating 589example 618prefix 580stanzas 615
recovery, disasterauditing storage pool volumes 570example recovery procedures 571general strategy 501, 531, 532media 588methods 501, 531providing 501, 531when to backup 532, 544
Redbooks xvREDUCE DB command 427REDUCE LOG command 427REGISTER ADMIN command 289REGISTER LICENSE command 386REGISTER NODE command 268registering a workstation 257registration
description of 255licensing for a client node 383licensing for an administrator 383managing client node 254, 264setting for a client node 255source server 257
removable file system deviceexample of setting up 79REMOVABLEFILE device type,
defining and updating 163support for 78, 79, 163
removable media device, adding 78Removable Storage Manager (RSM) 138REMOVE ADMIN command 291REMOVE NODE command 265RENAME ADMIN command 294RENAME FILESPACE command 527RENAME NODE command 264RENAME SCRIPT command 412RENAME SERVERGROUP
command 500RENAME STGPOOL command 235renaming
administrator ID 291
renaming (continued)NAS node 105
replacing tape drive 146reporting ANR9999D messages 446requesting door access to RSM
libraries 140RESET BUFPOOL command 429RESET DBMAXUTILIZATION
command 419, 421RESET LOGCONSUMPTION
command 544RESET LOGMAXUTILIZATION
command 419, 421resetting
administrative password 291buffer pool statistic 429database and recovery log volume
utilization counter 421user password expiration 295
restartable restore session, clientcanceling 288interrupting, active 288requesting information about 288
restarting the server 393RESTORE STGPOOL command 541, 572restore to point-in-time, enabling for
clients 340RESTORE VOLUME command 575RESTOREINTERVAL server option 287,
303, 334restoring a file 304restoring the database
point-in-time 552to its most current state 556
retain extra versions, description of 301,325, 328
retain only version, description of 301,325, 328
retention grace perioddescription of archive 321description of backup 320for backup sets 350using archive 321using backup 320
RETEXTRA parameter 301, 325RETONLY parameter 301, 325retrieval date for files 200retrieving a file 304reuse of sequential volumes
delaying 211, 541volume pending state 218
reusing media 132roll-forward recovery
database backup trigger 557mirroring recovery log 557recovery log 557
ROLLBACK command 416routing commands to servers 497RSM (Removable Storage Manager) 138RUN command 412
SSAN (storage area network)
client access to devices 38LAN-free data movement 38policy for clients using LAN-free 338
Index 683

SAN (storage area network) (continued)sharing a library among servers 37,
83storage agent role 38Tivoli Data Protection for NDMP 35,
93schedule
administrative command 401associating client node with 359checking the log file 368coordinating 373copying 368, 405day of the week 403defining 358, 403deleting 369, 405description of 357expiration date 404failed, querying 361, 371for NAS file server backup 104frequency of service 403initial start date 403initial time 403mode, setting 373priority 404querying 361results of 371, 405server administrative command 401startup window 375, 403type of action 404uncertain status 372, 406updating 403viewing information about 361
schedule eventmanaging 371, 405querying 371, 405viewing information about 371, 405
scheduled operations, setting themaximum 375
scheduler workload, controlling 375scheduling mode
client-polling 373overview of 373selecting 373server-prompted 373setting on a client node 374setting on the server 373
scheduling, centralclient operations 347, 357, 367, 372controlling the workload 375coordinating 373description of 23, 25, 357server operations 402
scratch volumedeleting 181, 547description 46FILE volumes 58number allowed in a storage
pool 175, 236using in storage pools 183
script, scheduling on client 362script, server
continuation characters 408copying 411defining 407deleting 412EXIT statement 409GOTO statement 409
script, server (continued)IF clause 409querying 411renaming 412routing commands in 498running 412substitution variables 408updating 410used with SNMP 450
SCSI controllers, terminating 247SCSI library 32SCSI tape failover
device names 246hardware configuration 246managing 250SCSI bus resets 246SCSI ID 246setup 246terminating shared SCSI bus 246
securityfeatures, overview 22locking and unlocking
administrators 293locking and unlocking nodes 264password expiration for nodes 295privilege class authority for
administrators 289SELECT command 438selective backup 304, 316selective recall 305sending commands to servers 497sequence number 282, 283sequential mode for libraries 61sequential storage pool
auditing a single volume in 568auditing multiple volumes in 567collocation 204estimating space 213migration threshold 197reclamation 205
serial number, determining 112serialization parameter 301, 323, 329server
backing up subfiles on 354canceling process 396changing the date and time 393console, MMC snap-in 17description of 3disabling access 287disaster recovery 27enabling access 287halting 392importing subfiles from 355maintaining, overview 16managing multiple 26managing operations 383managing processes 394messages 446Microsoft Management Console
snap-in 17network of Tivoli Storage
Manager 26, 463options, adding or updating 397prefix 498protecting 27querying about processes 395, 435querying options 436
server (continued)querying status 436restarting 393setting the name 436starting 390starting as a service 391stopping 392utilities 17viewing information about 436viewing information about
processes 395, 435wizards 17
server console, description of 289SERVER device type 501server group
copying 500defining 499deleting 501member, deleting 501moving a member 501querying 500renaming 500updating description 500
server optionAUDITSTORAGE 387, 397BUFPOOLSIZE 429changing with SETOPT
command 397COMMTIMEOUT 285, 286DEVCONFIG 549ENABLE3590LIBRARY 75EXPINTERVAL 334EXPQUIET 334IDLETIMEOUT 285, 286, 435LOGPOOLSIZE 430NOPREEMPT 396NORETRIEVEDATE 200overview 17RESTOREINTERVAL 287, 303, 334THROUGHPUTDATATHRESHOLD 286THROUGHPUTTIMETHRESHOLD 286TXNGROUPMAX 188VOLUMEHISTORY 547
server scriptcontinuation characters 408copying 411defining 407deleting 412EXIT statement 409GOTO statement 409IF clause 409querying 411renaming 412routing commands in 498running 412substitution variables 408updating 410used with SNMP 450
server storageclient files, process for storing 5concepts overview 14considering user needs for
recovering 53deleting files from 239evaluating 42example 173managing 18
684 Tivoli Storage Manager for Windows: Administrator’s Guide

server storage (continued)monitoring 561planning 42protection, methods 532tailoring definitions 523using 3494 automated devices 75using another Tivoli Storage Manager
server 501using automated library devices 74using devices not recognized by Tivoli
Storage Manager 77using disk devices 55using manual devices 74using optical devices 77using removable media devices 78using the storage hierarchy 190
server-free data movementconfiguring 111data format 110determining device information 112interfaces available 110managing 118performing operations 117requirements for configuring 109suggested usage 9, 14
server-prompted scheduling 373server-to-server communications,
establishingenterprise configuration 468enterprise event logging 468virtual volumes 474
server-to-server virtual volumesreclaiming 209using to store data 501
service, Windowsreclamation 391starting ADSMSCSI device
driver 394session
canceling 285negative number 288setting the maximum percentage for
scheduled operations 375session, client
canceling 285managing 284querying 284, 434viewing information about 284, 434
SET ACCOUNTING command 459SET ACTLOGRETENTION
command 444SET AUTHENTICATION command 296SET CLIENTACTDURATION
command 379SET CONFIGMANAGER command 477,
480SET CONFIGREFRESH command 491SET CONTEXTMESSAGING
command 447SET CROSSDEFINE command 470, 473SET DRMCHECKLABEL command 581SET DRMCOPYSTGPOOL
command 579SET DRMCOURIERNAME
command 581SET DRMDBBACKUPEXPIREDAYS
command 582
SET DRMFILEPROCESS command 581,582
SET DRMINSTPREFIX command 580SET DRMNOTMOUNTABLE
command 581SET DRMPLANPOSTFIX command 579SET DRMPLANPREFIX command 580SET DRMPRIMSTGPOOL command 579SET DRMRPFEXPIREDAYS 592SET DRMVAULTNAME command 582SET EVENTRETENTION command 372,
406SET INVALIDPWLIMIT command 295SET LICENSEAUDITPERIOD
command 387SET LOGMODE command 546SET MAXCMDRETRIES command 377SET MAXSCHEDSESSIONS
command 375SET PASSEXP command 295SET QUERYSCHEDPERIOD
command 377SET RANDOMIZE command 376SET REGISTRATION command 255SET RETRYPERIOD command 378SET SCHEDMODES command 373SET SERVERHLADDRESS
command 470, 473SET SERVERLLADDRESS
command 470, 473SET SERVERNAME command 397, 469,
470, 473SET SERVERPASSWORD 469, 470, 473SET SUBFILE 354SET SUMMARYRETENTION 442SET WEBAUTHTIMEOUT
command 294SETOPT command 397setting
clients to use subfile backup 355compression 256library mode 61password 295time interval for checking in
volumes 160shared dynamic serialization, description
of 324, 329shared file system 56shared library (SAN) 83shared static serialization, description
of 323, 329simultaneous write 179snapshot, using in backups 8, 11SNMP
agent 452communications 452, 453configuring 454enabled as a receiver 445, 450heartbeat monitor 445, 450manager 452subagent 452
source server 503space
adding to the database or recoverylog 424
deleting from the database or recoverylog 426
space (continued)planning how much to allocate 420
space triggerdatabase space 422recovery log space 422
space-managed file 304SQL 438SQL activity summary table 442standalone drive 74standard management class,
copying 323standard storage management policies,
using 301start time, randomizing for a
schedule 376starting the server 390startup window, description of 376static serialization, description of 323,
329status of a volume in an automated
library 46, 123stopping the server 392storage agent 38storage area network (SAN)
client access to devices 38LAN-free data movement 38policy for clients using LAN-free 338sharing a library among servers 37,
83storage agent role 38Tivoli Data Protection for NDMP 35,
93storage devices 157storage enclosures, terminating 247storage hierarchy
defining in reverse order 178, 187establishing 185example 173how the server stores files in 188next storage pool 186, 191, 199, 222,
238staging data on disk for tape
storage 190Storage Management Analysis 458storage management policies
description of 23, 305managing 299tailoring 318using standard 301
storage occupancy, querying 225storage pool
amount of space used 227auditing a volume 561backup and recovery 539comparing primary and copy
types 237copy 172creating a hierarchy 185data format 95, 176, 178defining 174defining a copy storage pool 235defining for disk, example 178, 187defining for NDMP operations 101defining for tape, example 178, 187deleting 238description of 172destination in copy group 323, 328
Index 685
storage pool (continued)determining access mode 175, 236determining maximum file size 175determining whether to use
collocation 176, 200, 236enabling cache for disk 176, 199estimating space for archived files on
disk 213estimating space for backed up files
on disk 213estimating space for disk 212estimating space for sequential 213estimating space in multiple 185managing 171monitoring 214moving files 229moving files between 229next storage pool 186, 191, 199, 222,
238overview 49policy use 323, 328primary 172querying 214random access 172recovery log, effect on 417renaming 235restoring 541, 572sequential access 172simultaneous write 179updating 174updating for disk, example 178, 187using cache on disk 176, 199validation of data 563viewing information about 214
storage pool backupfull 539incremental 539
storage privilege classdescription 289granting 292reducing 293revoking 293
storage volumeauditing 561contents 219formatting random access 56, 181information about 216labeling sequential access 125, 182monitoring use 216overview 49preparing sequential access 125, 182
stub file 305subfile backups
deleting 356description of 354example of 354expiring 356restoring 355
subordinate storage pool 186subscriber, deleting 496subscription
defining 489, 490deleting 492scenario 490
substitution variables, using 408supported devices 59
system privilege classrevoking 293
Ttape
compatibility between drives 146exporting data 515finding for client node 221label prefix 160monitoring life 218planning for exporting data 511recording format 161rotation 43, 136scratch, determining use 175, 183,
236setting mount retention period 160
tape drive, replacing 146tape failover, SCSI
device names 246hardware configuration 246SCSI bus resets 246SCSI ID 246setup 246
target server 503technical publications, Redbooks xvteminating shared SCSI bus
SCSI controllers 247Storage enclosures 247Trilink connectors 247Y cables 247
thresholdmigration, for storage pool 192, 197reclamation 205
THROUGHPUTDATATHRESHOLDserver option 286
THROUGHPUTTIMETHRESHOLDserver option 286
time interval, setting for checking involumes 160
timeoutadministrative Web interface
session 294client session 286
Tivoli Data Protection for NDMPbacking up a NAS file server 104configuration checklist 99data format 95data mover, description 33, 50, 51, 90defining a data mover 90, 102defining a device class 100defining a path for data mover and a
library 103defining a storage pool 101defining a tape drive 103differential image backup,
description 37full image backup, description 37interfaces used with 94managing NAS nodes 105path, description 33, 50, 51, 91planning 95policy configuration 101, 337registering a NAS node 102, 256requirements for set up 93restoring a NAS file server 104scheduling a backup 104
Tivoli Data Protection for NDMP(continued)
storage pools for NDMP media 101Tivoli Decision Support 458Tivoli event console 445, 449Tivoli Space Manager
archive policy, relationship to 318backup policy, relationship to 318description 304files, destination for 322migration of client files
description 305eligibility 317
policy for, setting 317, 322premigration 305recall of migrated files 305reconciliation between client and
server 305selective migration 305setting policy for 318, 322space-managed file, definition 304stub file 305
Tivoli Storage Manager (TSM)introduction 3server network 26, 463
Tivoli Storage Manager device driver 63Tivoli Storage Manager MACRO
command 131transactions, database 417, 418transparent recall 305trigger
database space 422recovery log space 422
Trilink connectors, terminating 247troubleshooting
database errors (RSM) 143device configuration 88
tuning, server automatically 398TXNBYTELIMIT client option 188TXNGROUPMAX server option 188type, device
3570 1574MM 1578MM 157DISK 157DLT 157DTF 157FILE 157GENERICTAPE 157LTO 158NAS 100OPTICAL 157, 162QIC 157REMOVABLEFILE 157SERVER 157, 502, 503WORM 157
UUltrium device driver 63unavailable access mode
description 184uncertain, schedule status 372, 406Unicode
automatically renaming filespace 274
client platforms supported 271
686 Tivoli Storage Manager for Windows: Administrator’s Guide

Unicode (continued)deciding which clients need enabled
file spaces 272description of 271displaying Unicode-enabled file
spaces 279example of migration process 278file space identifier (FSID) 279how clients are affected by
migration 277how file spaces are automatically
renamed 275migrating client file spaces 273options for automatically renaming
file spaces 273unified logon for Windows NT 296unloading the database 431UNLOCK ADMIN command 293UNLOCK NODE command 264UNLOCK PROFILE command 484, 485unplanned shutdown 392unreadable files 532, 569, 570unrecognized pool 141unusable space for database and recovery
log 418UPDATE ADMIN command 291UPDATE BACKUPSET command 351UPDATE CLIENTOPT command 283UPDATE CLOPTSET command 284UPDATE COPYGROUP command 323,
328UPDATE DBBACKUPTRIGGER
command 546UPDATE DEVCLASS command 158,
162UPDATE DOMAIN command 321UPDATE LIBVOLUME command 46UPDATE MGMTCLASS command 323UPDATE NODE command 264, 278, 281UPDATE POLICYSET command 321UPDATE RECOVERYMEDIA
command 589UPDATE SCHEDULE command 403UPDATE SCRIPT command 410UPDATE SERVER command 474, 475UPDATE VOLUME command 182upgrading tape drives 146URL for client node 254usable space 418user exit 445user ID, administrative
creating automatically 268description of 254preventing automatic creation of 269
using removable media managers withTivoli Storage Manager 138
utilities, for server 17utilization, database and recovery log
description of 419monitoring 419, 421
VVALIDATE POLICYSET command 330validating data
during a client session 347for storage pool volumes 563
validating data (continued)for virtual volumes 502performance considerations for
nodes 348perfornance considerations for storage
pools 566VARY command 57varying volumes on or off line 57VERDELETED parameter 301, 325VEREXISTS parameter 301, 325versions data deleted, description
of 301, 325, 327versions data exists, description of 301,
325, 327virtual server
defined 242how they work 243
virtual volumes, server-to-serverreclaiming 209using to store data 501
VIRTUALMOUNTPOINT clientoption 271
volume capacity 161volume copy
allocating to separate disks 537description of 537
volume historydeleting information from 547file, establishing 432, 546using backup to restore
database 546, 553VOLUMEHISTORY option 546volumes
access preemption 396allocating space for disk 56, 181assigning to storage pool 181auditing 130, 561auditing considerations 561automated library inventory 46, 124capacity, compression effect 168checking out 129contents, querying 219defining for database 424defining for recovery log 424defining to storage pools 182delaying reuse 211, 541deleting 239, 240, 547detailed report 220determining which are mounted 512disk storage 182disk storage pool, auditing 567errors, read and write 217estimated capacity 217finding for client node 221labeling using commands 138location 218managing 128monitoring life 218monitoring movement of data 232monitoring use 216mount retention time 160moving files between 228overview 46pending status 218private 46querying contents 219querying for general information 216
volumes (continued)random access storage pools 172, 183reclamation 208recovery using mirroring 559reuse delay 211, 541scratch category 46scratch, using 183sequential 182sequential storage pools 125, 182setting access mode 184standard report 219status, in automated library 46, 123status, information on 217updating 182using private 46, 123varying on and off 57
WWeb administrative interface
description 17setting authentication time-out
value 294Web backup-archive client
granting authority to 268remote access overview 266URL 254, 267
Web sites xiii, xvWindows device driver 64Windows NT unified logon 296wizard
client configuration 259client options file 259description 17device configuration
automated library devices 74manual devices 74optical devices 77RSM configuration 140
labeling 133remote client configuration 260setup 259
workstation, registering 257world wide name, determining 112WORM device class
defining 162reclamation of media 208
www xiii
YY cables, terminating 247
Index 687

688 Tivoli Storage Manager for Windows: Administrator’s Guide


Program Number: 5698-ISM5698-ISE
Printed in the United States of Americaon recycled paper containing 10%recovered post-consumer fiber.
GC32-0782-00

Spin
ein
form
atio
n:
Tivo
liSt
orag
eM
anag
erfo
rW
indo
ws
Adm
inis
trat
or’s
Gui
deVe
rsio
n5
Rel
ease
1