tma for hp openview - tcb techtcbtech.co.uk/file_storage/telindus/m_tma_for_hp_openview.pdf · s...
TRANSCRIPT

Telindus Technical Publications � Geldenaaksebaan 335 ⋅ B-3001 Leuven ⋅ Belgium � tel. +32 16 382011
TMA for HP OpenView
TMA for HP OpenView USER and REFERENCE MANUAL
Version: 3.4 180456

Copyright and safety TMA for HP OpenView
ii
Copyright notice The information and descriptions contained in this publication are the property of Telindus. Such information and descriptions must not be copied or reproduced by any means, or disseminated or distributed without the express prior written permission of Telindus.
This publication could include technical inaccuracies or typographical errors, for which Telindus never can or shall be held liable. Changes are made periodically to the information herein; these changes will be incorporated in new editions of this publication. Telindus may make improvements and/or changes in the product(s) described in this publication at any time, without prior notice.
Version 3.4 04 September 2002
MRP 180456 ©Telindus

TMA for HP OpenView Preface
iii
Preface
Organisation of this manual This manual contains three main parts.
Part This part �
User manual introduces TMA for HP OpenView and explains how to install it.
Reference manual completely describes how to configure the Alarm Manager.
Annexes gives additional information.
The following table gives an overview of the chapters in the user manual.
Chapter This chapter �
1 gives an introduction to TMA for HP OpenView.
2 explains how to install TMA for HP OpenView on a Windows and a UNIX system.
3 briefly describes how to connect the workstation running TMA for HP OpenView with the Orchid 1003 LAN.
4 says something about the HP OpenView network map and the symbols on it. It also says a few words on fault management.
5 shows you how to start a TMA session on a Telindus device.
6 explains how you can manage the Alarm Manager using TMA.
7 describes what the Alarm Manager exactly is and does. It also gives a basic configuration of the Alarm Manager.
8 lists some configuration guidelines for HP OpenView.
The following table gives an overview of the chapters in the reference manual.
Chapter This chapter �
9, 10, 11, 12
lists and explains the configuration, status, performance and alarm attributes, respectively.
13 describes the communication parameters in the Cms2Serv.ini file.
14 helps you when you are unable to open a TMA for HP OpenView session.
15 gives some technical specifications on TMA for HP OpenView.
The following table gives an overview of the annexes.
Annex This annex �
Annex A gives a list of abbreviations.
Annex B shows ordering information.
Annex C tells you how to obtain the required licence key.

Preface TMA for HP OpenView
iv
Conventions used in this manual Typographical conventions
The following typographical conventions are used in this manual.
The format � is used to indicate �
Normal normal text.
Italic
• new or emphasised words • file names and directory paths, e.g. C:\Program Files\TMA\bin\Tma.exe
Computer computer output and code examples, e.g. NOK,1,1,Invalid command.
Computer Bold text you have to enter at the prompt, e.g. Get sysName.
Narrow objects and attributes in the containment tree of a device when they are mentioned in the normal text. I.e. when they are not a part of computer input or output.
Blue references to other parts in the manual, e.g. refer to Chapter xx - Technical specifications.
Blue underlined a hyperlink to a web site, e.g. http://www.telindus.com
Icons
The following icons are used throughout the manual.
Icon Name Description
Remark Useful information or tips.
Caution Read the text that follows carefully in order to insure correct operation.
Basic TMA attribute
A basic attribute which can be found in the Telindus Maintenance Application.
Advanced TMA attribute
An advanced attribute which can be found in the Telindus Maintenance Application.
TMA action An action which can be executed with the Telindus Maintenance Application.

TMA for HP OpenView Preface
v
Software version This manual describes the features of TMA for HP OpenView version S0006/01600.
Your feedback Your satisfaction about this purchase is an extremely important priority to all of us at Telindus. Accordingly, all electronic, functional and cosmetic aspects of this new unit have been carefully and thoroughly tested and inspected. If any fault is found with this unit or should you have any other quality-related comment concerning this delivery, please submit the Quality Comment Form on our web page at http://www.telindusproducts.com/quality.

Table of contents TMA for HP OpenView
vi
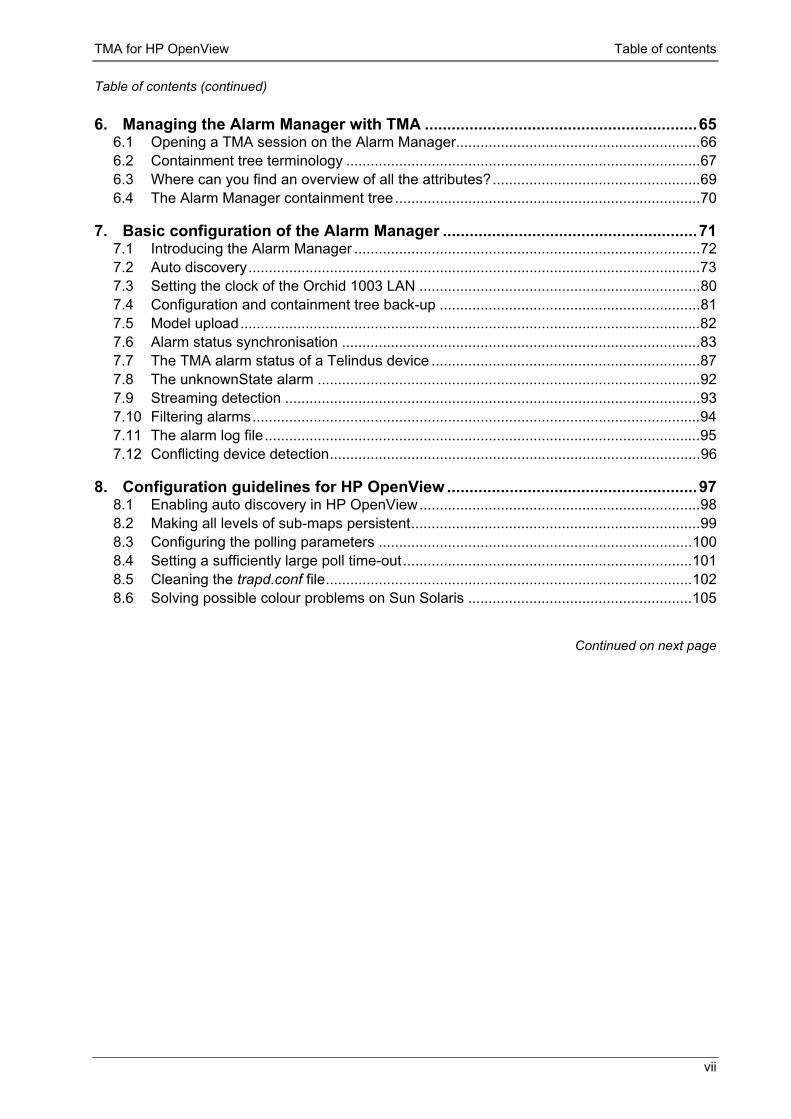
Table of contents
User manual ............................................................................................... 1 1. Introduction to TMA for HP OpenView ..................................................................3
1.1 What is TMA for HP OpenView?.....................................................................................4 1.2 Which features has TMA for HP OpenView?..................................................................5 1.3 What are the building blocks of TMA for HP OpenView?................................................6 1.4 What is a licence key? ....................................................................................................7
2. Installing TMA for HP OpenView............................................................................8 2.1 System requirements for TMA for HP OpenView............................................................9 2.2 System requirements for managing a network..............................................................10 2.3 Operating systems versus HP OpenView NNM versions .............................................11 2.4 Installing TMA for HP OpenView on Windows ..............................................................12 2.5 Installing TMA for HP OpenView on UNIX ....................................................................18 2.6 Installing TMA for HP OpenView on a console station..................................................26 2.7 How to obtain and install the licence key ......................................................................27 2.8 How to upgrade the model files.....................................................................................28
3. Connecting the workstation via the Orchid 1003 LAN .......................................29 3.1 What are IP, proxied IP and non-IP devices? ...............................................................30 3.2 The Orchid 1003 LAN as proxy agent...........................................................................31 3.3 Alarm transport protocol................................................................................................32
4. The HP OpenView network map and its symbols...............................................33 4.1 The HP OpenView network map...................................................................................34 4.2 Fault management ........................................................................................................40 4.3 The Telindus access device symbol colours.................................................................48
5. Starting TMA on a Telindus access device .........................................................57 5.1 Starting TMA via the Telindus access device symbol ...................................................58 5.2 Starting TMA via the command line ..............................................................................59 5.3 Starting the sub-system picture via the Telindus access device symbol ......................60 5.4 Starting the sub-system picture via the command line..................................................61 5.5 Starting TMA on the Orchid � a LAN IP address issue .................................................62 5.6 The executable DnsConfigure.exe................................................................................63 5.7 Defining TMA for HP OpenView users and passwords.................................................64
Continued on next page
TMA for HP OpenView Table of contents
vii
Table of contents (continued)
6. Managing the Alarm Manager with TMA .............................................................65 6.1 Opening a TMA session on the Alarm Manager............................................................66 6.2 Containment tree terminology .......................................................................................67 6.3 Where can you find an overview of all the attributes?...................................................69 6.4 The Alarm Manager containment tree...........................................................................70
7. Basic configuration of the Alarm Manager .........................................................71 7.1 Introducing the Alarm Manager .....................................................................................72 7.2 Auto discovery...............................................................................................................73 7.3 Setting the clock of the Orchid 1003 LAN .....................................................................80 7.4 Configuration and containment tree back-up ................................................................81 7.5 Model upload.................................................................................................................82 7.6 Alarm status synchronisation ........................................................................................83 7.7 The TMA alarm status of a Telindus device ..................................................................87 7.8 The unknownState alarm ..............................................................................................92 7.9 Streaming detection ......................................................................................................93 7.10 Filtering alarms..............................................................................................................94 7.11 The alarm log file...........................................................................................................95 7.12 Conflicting device detection...........................................................................................96
8. Configuration guidelines for HP OpenView ........................................................97 8.1 Enabling auto discovery in HP OpenView.....................................................................98 8.2 Making all levels of sub-maps persistent.......................................................................99 8.3 Configuring the polling parameters .............................................................................100 8.4 Setting a sufficiently large poll time-out.......................................................................101 8.5 Cleaning the trapd.conf file..........................................................................................102 8.6 Solving possible colour problems on Sun Solaris .......................................................105
Continued on next page

Table of contents TMA for HP OpenView
viii
Table of contents (continued)
Reference manual .................................................................................. 106 9. Configuration attributes......................................................................................108
9.1 Configuration attribute overview..................................................................................109 9.2 General configuration attributes..................................................................................110 9.3 Objects configuration attributes ..................................................................................115 9.4 Inventory configuration attributes................................................................................119 9.5 Event generation configuration attributes ...................................................................120
10. Status attributes ..................................................................................................125 10.1 Status attribute overview.............................................................................................126 10.2 General status attributes.............................................................................................127 10.3 Objects status attributes .............................................................................................128 10.4 Inventory status attributes...........................................................................................132 10.5 Event generation status attributes ..............................................................................134
11. Performance attributes .......................................................................................135 11.1 Performance attribute overview ..................................................................................136 11.2 Objects performance attributes...................................................................................137 11.3 Inventory performance attributes ................................................................................138 11.4 Event generation performance attributes ....................................................................139
12. Alarm attributes...................................................................................................140 12.1 Alarm attribute overview..............................................................................................141 12.2 Introducing the alarm attributes ..................................................................................142 12.3 General alarms............................................................................................................145 12.4 Objects and inventory alarms......................................................................................146
13. The Cms2Serv.ini file ..........................................................................................147 13.1 Parts of the Cms2Serv.ini file......................................................................................148 13.2 Adding parts to the Cms2Serv.ini file ..........................................................................150
14. TMA error messages ...........................................................................................151 14.1 TMA start errors ..........................................................................................................152 14.2 Alias errors..................................................................................................................153 14.3 Reconnect messages .................................................................................................153 14.4 Edit errors ...................................................................................................................153 14.5 Export errors ...............................................................................................................154 14.6 Import errors................................................................................................................154 14.7 Download errors..........................................................................................................155 14.8 Subsystem picture errors ............................................................................................155 14.9 NACK messages.........................................................................................................156 14.10 Internal communication errors.....................................................................................157
Continued on next page

TMA for HP OpenView Table of contents
ix
Table of contents (continued)
15. Technical specifications.....................................................................................158 15.1 System requirements ..................................................................................................159 15.2 TMA for HP OpenView building blocks .......................................................................159 15.3 Alarm Manager features..............................................................................................160 15.4 Alarm notification.........................................................................................................160 15.5 Management interconnectivity.....................................................................................160
Annexes ..................................................................................................161 Annex A: abbreviations.............................................................................................163
Annex B: product information..................................................................................164
Annex C: licence key request...................................................................................166 Which information has to be supplied?.................................................................................166 Licence key request fax........................................................................................................166


TMA for HP OpenView
User manual 1
User manual

TMA for HP OpenView
2 User manual

TMA for HP OpenView Introduction to TMA for HP OpenView
User manual 3
1. Introduction to TMA for HP OpenView This chapter gives an introduction to TMA for HP OpenView. The following table gives an overview of this chapter.
Section Title Page
1.1 What is TMA for HP OpenView? 4
1.2 Which features has TMA for HP OpenView? 5
1.3 What are the building blocks of TMA for HP OpenView? 6
1.4 What is a licence key? 7
Introduction to TMA for HP OpenView TMA for HP OpenView
4 User manual
1.1 What is TMA for HP OpenView? TMA (Telindus Management Application) for HP OpenView is the management application that runs on the widely spread network management platform HP OpenView.
It offers the combination of the easy to use graphical interface of the stand-alone version of TMA, together with the advantages and features of HP OpenView. The Telindus access devices are represented in the OpenView map as icons. Double clicking on the icon allows the user to access the management functions of the selected Telindus access device in exactly the same way as with the stand-alone version of TMA. Alarms are logged into the Event Log of the Node Manager and can change the colour of the icons on the HP OpenView maps.
TMA for HP OpenView runs on HP OpenView Network Node Manager versions 5.0X and 6.X. It is available on:
• Microsoft Windows NT 4.0 • Microsoft Windows 2000 • Sun Solaris 2.6 / 7.
The UNIX workstations are commonly used to manage large networks (more than 1000 modems), whereas the Windows NT / 2000 workstations can be used to manage small and medium sized networks (less than 1000 modems).

TMA for HP OpenView Introduction to TMA for HP OpenView
User manual 5
1.2 Which features has TMA for HP OpenView? In this manual, the features of TMA for HP OpenView are described (refer to Chapter 7 - Basic configuration of the Alarm Manager). The features of the stand-alone version of TMA, also referred to as standard features, are not repeated in this manual. For more information on those standard features, refer to the TMA manual.
The specific features of TMA for HP OpenView are:
• invoking the TMA user interface via a symbol pop-up menu • invoking the TMA user interface via the command line using name resolution • auto discovery of Telindus access devices • symbol colouring reflecting the global status of the device • generation of an OpenView event for every alarm • private MIBs (not automatically loaded in HP OpenView).

Introduction to TMA for HP OpenView TMA for HP OpenView
6 User manual
1.3 What are the building blocks of TMA for HP OpenView? TMA for HP OpenView consists of two main building blocks:
• the Telindus Maintenance Application or TMA • the Alarm Manager.
The Telindus Maintenance Application
This is the graphical user interface that enables you to manage the Telindus access devices. I.e. you can access the device its configuration attributes and look at the status, performance and alarm information.
In order to get acquainted with the TMA user interface, consult the TMA manual.
The Alarm Manager
Because HP OpenView does not know how to handle non-IP devices and because the usual mechanism of handling IP devices (using SNMP traps) is not optimal, the Alarm Manager was created as part of TMA for HP OpenView.
For more information on the Alarm Manager, refer to Chapter 7 - Basic configuration of the Alarm Manager.

TMA for HP OpenView Introduction to TMA for HP OpenView
User manual 7
1.4 What is a licence key? The number of Telindus access devices that can be managed with TMA for HP OpenView is determined by the installed licence key. This limitation only applies on fault management. It is always possible to start the stand-alone functionality of TMA.
TMA for HP OpenView supports three licence types:
• No licence: this is a demo licence. Maximum 8 access devices can be managed. • Entry level licence: a maximum of 250 access devices can be managed. • Unlimited licence: there is no limitation on the number of access devices that can be managed.
The required licence key can be obtained by sending a fax or an email to Telindus. Refer to Annex C: licence key request.
Installing TMA for HP OpenView TMA for HP OpenView
8 User manual
2. Installing TMA for HP OpenView This chapter explains how to install TMA for HP OpenView on the Windows and UNIX platform. First it gives you the system requirements. Read these requirements carefully to make sure your computer will be able to run TMA for HP OpenView.
The following table gives an overview of this chapter.
Section Title Page
2.1 System requirements for TMA for HP OpenView 9
2.2 System requirements for managing a network 10
2.3 Operating systems versus HP OpenView NNM versions 11
2.4 Installing TMA for HP OpenView on Windows 12
2.5 Installing TMA for HP OpenView on UNIX 18
2.6 Installing TMA for HP OpenView on a console station 26
2.7 How to obtain and install the licence key 27
2.8 How to upgrade the model files 28
TMA for HP OpenView Installing TMA for HP OpenView
User manual 9
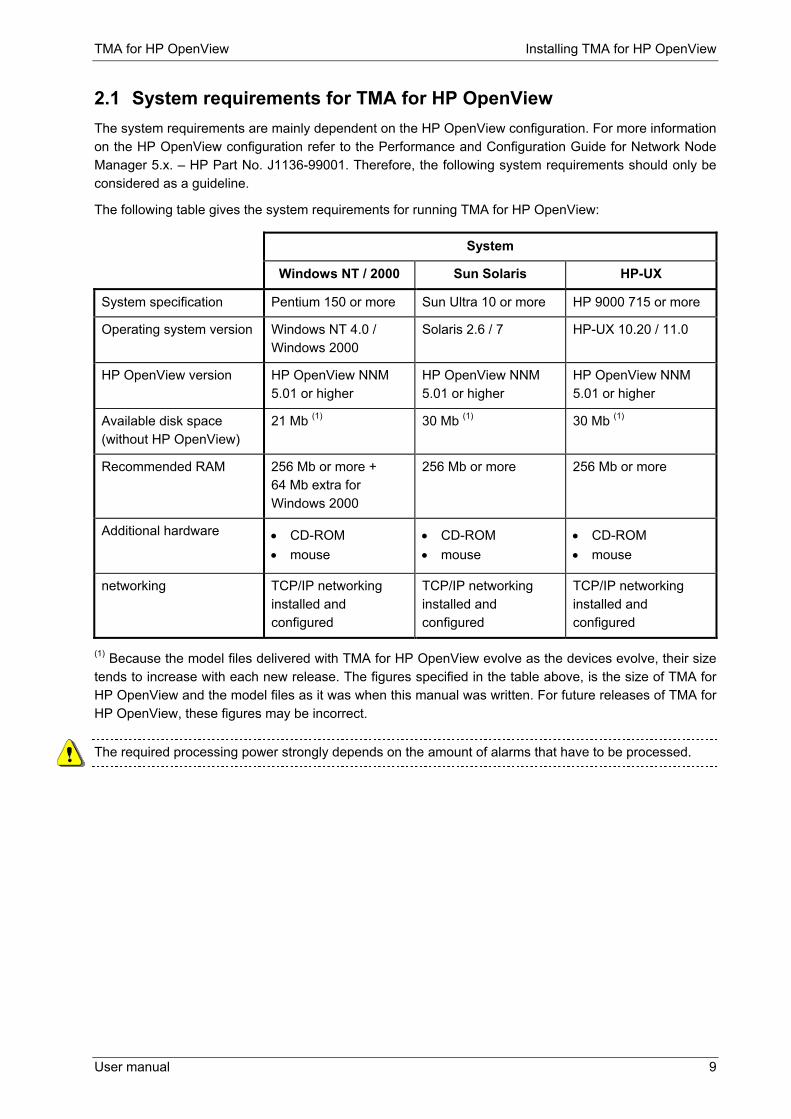
2.1 System requirements for TMA for HP OpenView The system requirements are mainly dependent on the HP OpenView configuration. For more information on the HP OpenView configuration refer to the Performance and Configuration Guide for Network Node Manager 5.x. � HP Part No. J1136-99001. Therefore, the following system requirements should only be considered as a guideline.
The following table gives the system requirements for running TMA for HP OpenView:
System
Windows NT / 2000 Sun Solaris HP-UX
System specification Pentium 150 or more Sun Ultra 10 or more HP 9000 715 or more
Operating system version Windows NT 4.0 / Windows 2000
Solaris 2.6 / 7 HP-UX 10.20 / 11.0
HP OpenView version HP OpenView NNM 5.01 or higher
HP OpenView NNM 5.01 or higher
HP OpenView NNM 5.01 or higher
Available disk space (without HP OpenView)
21 Mb (1) 30 Mb (1) 30 Mb (1)
Recommended RAM 256 Mb or more + 64 Mb extra for Windows 2000
256 Mb or more 256 Mb or more
Additional hardware
• CD-ROM • mouse
• CD-ROM • mouse
• CD-ROM • mouse
networking TCP/IP networking installed and configured
TCP/IP networking installed and configured
TCP/IP networking installed and configured
(1) Because the model files delivered with TMA for HP OpenView evolve as the devices evolve, their size tends to increase with each new release. The figures specified in the table above, is the size of TMA for HP OpenView and the model files as it was when this manual was written. For future releases of TMA for HP OpenView, these figures may be incorrect.
The required processing power strongly depends on the amount of alarms that have to be processed.
Installing TMA for HP OpenView TMA for HP OpenView
10 User manual
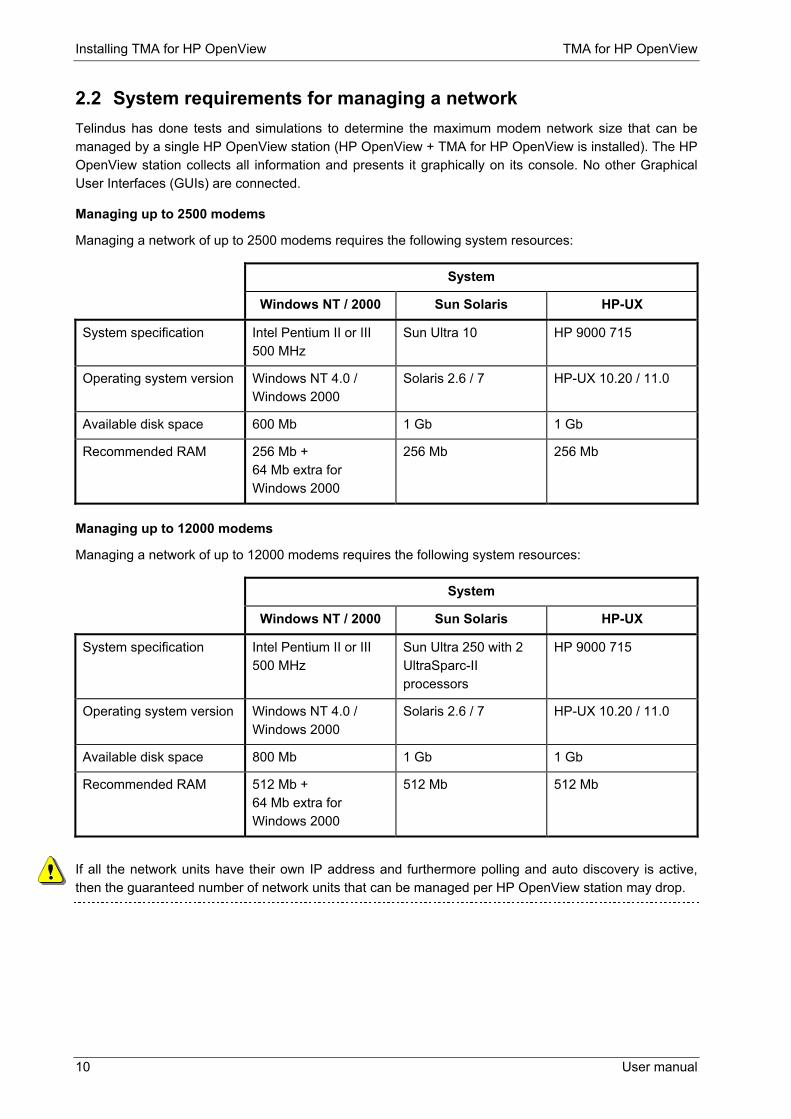
2.2 System requirements for managing a network Telindus has done tests and simulations to determine the maximum modem network size that can be managed by a single HP OpenView station (HP OpenView + TMA for HP OpenView is installed). The HP OpenView station collects all information and presents it graphically on its console. No other Graphical User Interfaces (GUIs) are connected.
Managing up to 2500 modems
Managing a network of up to 2500 modems requires the following system resources:
System
Windows NT / 2000 Sun Solaris HP-UX
System specification Intel Pentium II or III 500 MHz
Sun Ultra 10 HP 9000 715
Operating system version Windows NT 4.0 / Windows 2000
Solaris 2.6 / 7 HP-UX 10.20 / 11.0
Available disk space 600 Mb 1 Gb 1 Gb
Recommended RAM 256 Mb + 64 Mb extra for Windows 2000
256 Mb 256 Mb
Managing up to 12000 modems
Managing a network of up to 12000 modems requires the following system resources:
System
Windows NT / 2000 Sun Solaris HP-UX
System specification Intel Pentium II or III 500 MHz
Sun Ultra 250 with 2 UltraSparc-II processors
HP 9000 715
Operating system version Windows NT 4.0 / Windows 2000
Solaris 2.6 / 7 HP-UX 10.20 / 11.0
Available disk space 800 Mb 1 Gb 1 Gb
Recommended RAM 512 Mb + 64 Mb extra for Windows 2000
512 Mb 512 Mb
If all the network units have their own IP address and furthermore polling and auto discovery is active, then the guaranteed number of network units that can be managed per HP OpenView station may drop.
TMA for HP OpenView Installing TMA for HP OpenView
User manual 11
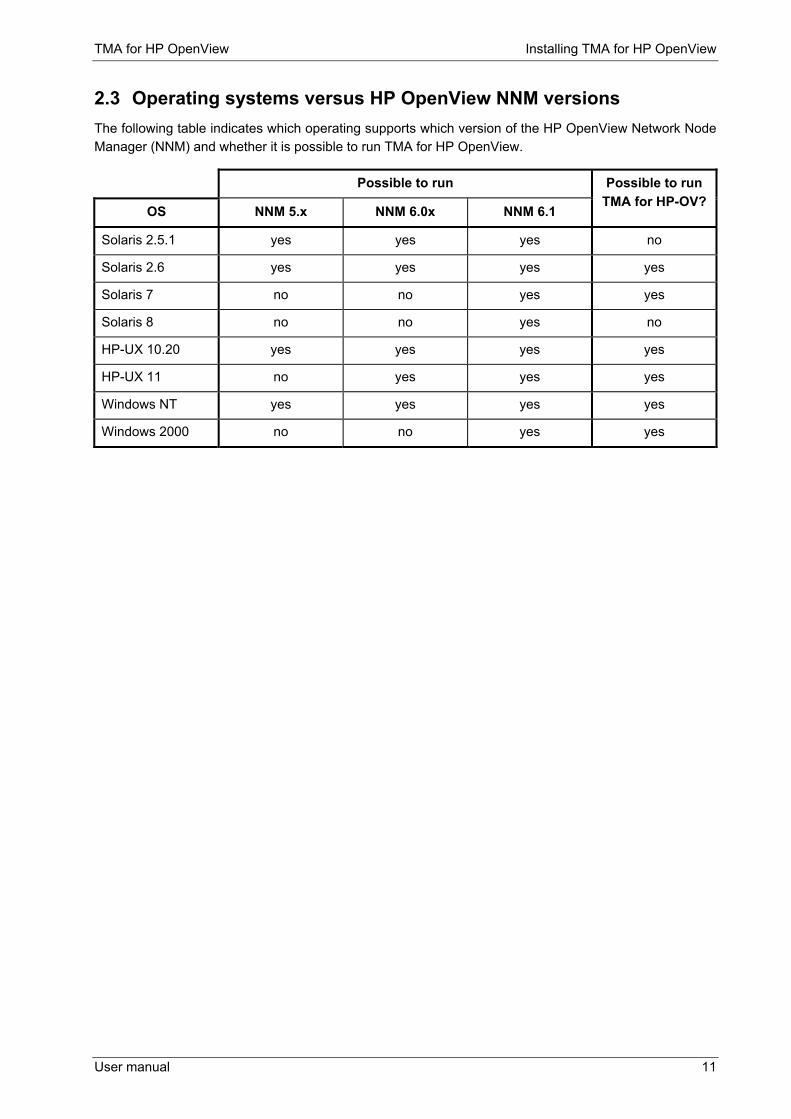
2.3 Operating systems versus HP OpenView NNM versions The following table indicates which operating supports which version of the HP OpenView Network Node Manager (NNM) and whether it is possible to run TMA for HP OpenView.
Possible to run
OS NNM 5.x NNM 6.0x NNM 6.1
Possible to run TMA for HP-OV?
Solaris 2.5.1 yes yes yes no
Solaris 2.6 yes yes yes yes
Solaris 7 no no yes yes
Solaris 8 no no yes no
HP-UX 10.20 yes yes yes yes
HP-UX 11 no yes yes yes
Windows NT yes yes yes yes
Windows 2000 no no yes yes
Installing TMA for HP OpenView TMA for HP OpenView
12 User manual
2.4 Installing TMA for HP OpenView on Windows This section explains how to install TMA for HP OpenView on the Windows NT and Windows 2000 platform. The following table gives an overview of this section.
Section Title Page
2.4.1 The three installation components of TMA for HP OpenView 13
2.4.2 Installing TMA for HP OpenView on Windows NT / 2000 14
2.4.3 Adapting the ovtrapd.lrf file 15
2.4.4 Adapting the netmon.lrf file 16
2.4.5 Location of the TMA for HP OpenView files 17

TMA for HP OpenView Installing TMA for HP OpenView
User manual 13
2.4.1 The three installation components of TMA for HP OpenView The installation of TMA for HP OpenView comprises three components as listed below:
Component Description
TMA executable provides the easy to use graphical interface and the standard TMA features.
Model files provide, per access device type, the information TMA needs to connect and exchange information with the access device.
Licence key restricts the number of Telindus access devices that can be managed.

Installing TMA for HP OpenView TMA for HP OpenView
14 User manual
2.4.2 Installing TMA for HP OpenView on Windows NT / 2000
Important remark
If you are going to install TMA for HP OpenView immediately after installation of HP OpenView itself, first reboot your system after the installation of HP OpenView (although this is not asked after the installation procedure of HP OpenView). Else the installation of TMA for HP OpenView will be done incorrect.
In order to install TMA for HP OpenView on a Windows NT / 2000 system, proceed as follows:
Step Action
1 Before commencing the installation of TMA for HP OpenView, make sure HP OpenView and all related services are stopped.
On the taskbar select Start ! Programs ! HP OpenView ! Network Node Manager Admin ! NNM Services � Stop.
2 Insert the installation CD in the CD-ROM drive.
3 Windows automatically starts the set-up procedure for TMA for HP OpenView.
If not, select on the taskbar Start ! Settings ! Control Panel ! double click on Add/Remove Programs ! Install�
4 The InstallShield Wizard guides you through the set-up process.
5 At a certain point, you get the following screen:
At this point you can install �
• the TMA executable and the model files
and / or • the licence key.
6 The InstallShield Wizard guides you through the rest of the set-up process.
TMA for HP OpenView Installing TMA for HP OpenView
User manual 15
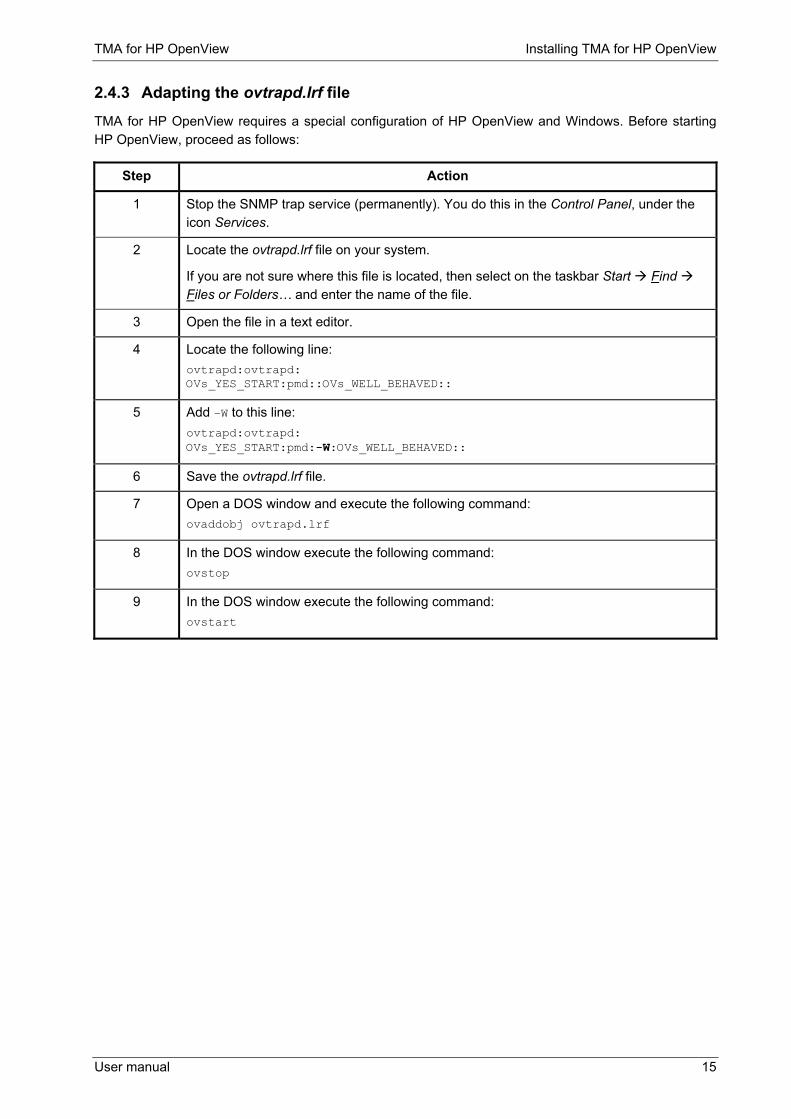
2.4.3 Adapting the ovtrapd.lrf file TMA for HP OpenView requires a special configuration of HP OpenView and Windows. Before starting HP OpenView, proceed as follows:
Step Action
1 Stop the SNMP trap service (permanently). You do this in the Control Panel, under the icon Services.
2 Locate the ovtrapd.lrf file on your system.
If you are not sure where this file is located, then select on the taskbar Start ! Find ! Files or Folders� and enter the name of the file.
3 Open the file in a text editor.
4 Locate the following line: ovtrapd:ovtrapd: OVs_YES_START:pmd::OVs_WELL_BEHAVED::
5 Add �W to this line: ovtrapd:ovtrapd: OVs_YES_START:pmd:-W:OVs_WELL_BEHAVED::
6 Save the ovtrapd.lrf file.
7 Open a DOS window and execute the following command: ovaddobj ovtrapd.lrf
8 In the DOS window execute the following command: ovstop
9 In the DOS window execute the following command: ovstart

Installing TMA for HP OpenView TMA for HP OpenView
16 User manual
2.4.4 Adapting the netmon.lrf file In order to improve the polling performance in big networks, it is recommended to change the netmon.lrf file. Do this as follows:
Step Action
1 Locate the netmon.lrf file on your system.
If you are not sure where this file is located, then select on the taskbar Start ! Find ! Files or Folders� and enter the name of the file.
2 Open the file in a text editor.
3 Locate the following line: netmon:netmon: OVs_YES_START:ovtopmd,pmd,ovwdb:-P:OVs_WELL_BEHAVED:15:PAUSE
4 Add �g 0 to this line: netmon:netmon: OVs_YES_START:ovtopmd,pmd,ovwdb:-P �g 0:OVs_WELL_BEHAVED:15:PAUSE
5 Save the netmon.lrf file.
6 Open a DOS window and execute the following command: ovaddobj netmon.lrf
7 In the DOS window execute the following command: ovstop
8 In the DOS window execute the following command: ovstart
TMA for HP OpenView Installing TMA for HP OpenView
User manual 17
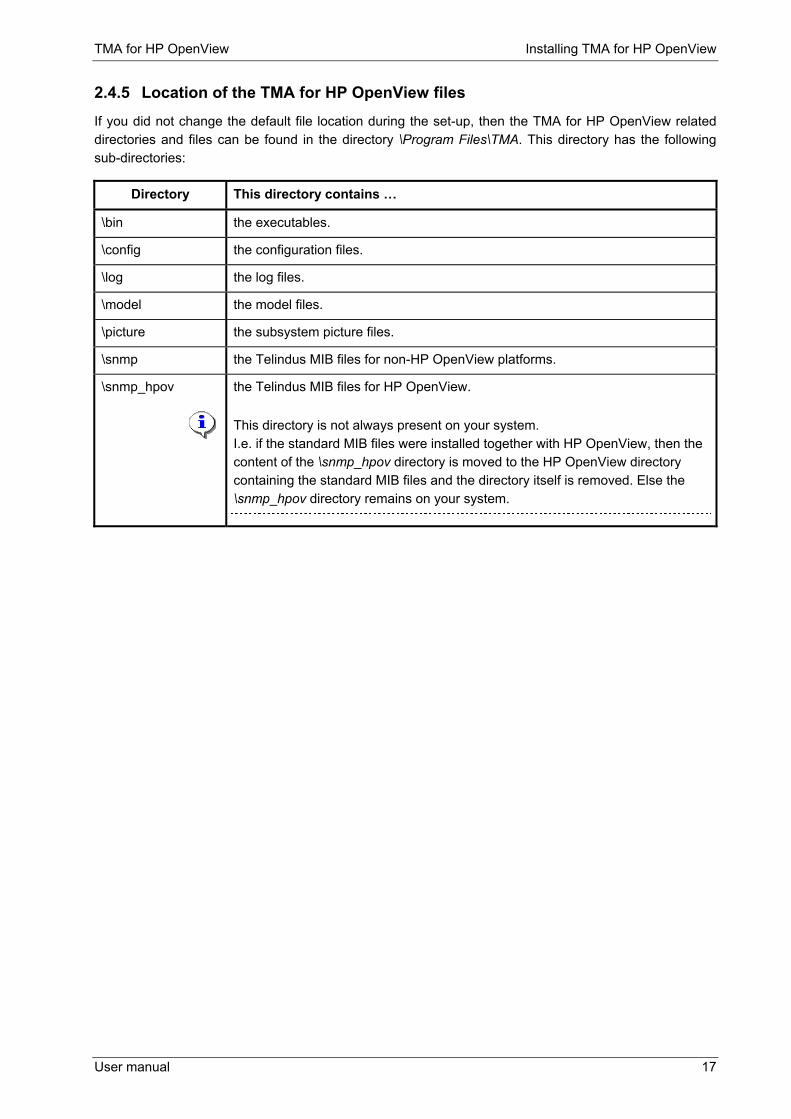
2.4.5 Location of the TMA for HP OpenView files If you did not change the default file location during the set-up, then the TMA for HP OpenView related directories and files can be found in the directory \Program Files\TMA. This directory has the following sub-directories:
Directory This directory contains �
\bin the executables.
\config the configuration files.
\log the log files.
\model the model files.
\picture the subsystem picture files.
\snmp the Telindus MIB files for non-HP OpenView platforms.
\snmp_hpov the Telindus MIB files for HP OpenView.
This directory is not always present on your system. I.e. if the standard MIB files were installed together with HP OpenView, then the content of the \snmp_hpov directory is moved to the HP OpenView directory containing the standard MIB files and the directory itself is removed. Else the \snmp_hpov directory remains on your system.
Installing TMA for HP OpenView TMA for HP OpenView
18 User manual
2.5 Installing TMA for HP OpenView on UNIX This section explains how to install TMA for HP OpenView on the Sun Solaris and HP UNIX platform. The following table gives an overview of this section.
Section Title Page
2.5.1 The three installation components of TMA for HP OpenView 19
2.5.2 Before installing TMA for HP OpenView on UNIX 20
2.5.3 Installing TMA for HP OpenView on Sun Solaris 21
2.5.4 Installing TMA for HP OpenView on HP UNIX 22
2.5.5 Adapting the Dtwm file 23
2.5.6 Adapting the netmon.lrf file 24
2.5.7 Location of the TMA for HP OpenView files 25

TMA for HP OpenView Installing TMA for HP OpenView
User manual 19
2.5.1 The three installation components of TMA for HP OpenView The installation of TMA for HP OpenView comprises three components as listed below:
Component Description
TMA executable provides the easy to use graphical interface and the standard TMA features.
Model files provide, per access device type, the information TMA needs to connect and exchange information with the access device.
Licence key restricts the number of Telindus access devices that can be managed.
Installing TMA for HP OpenView TMA for HP OpenView
20 User manual
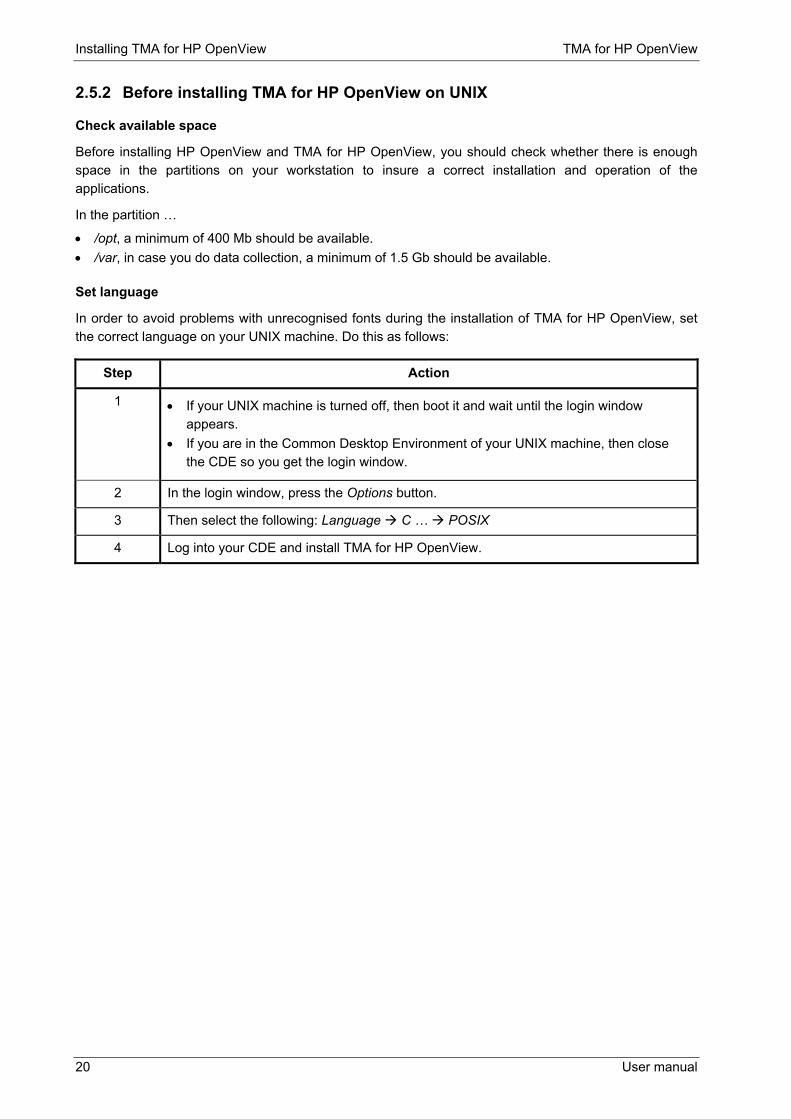
2.5.2 Before installing TMA for HP OpenView on UNIX
Check available space
Before installing HP OpenView and TMA for HP OpenView, you should check whether there is enough space in the partitions on your workstation to insure a correct installation and operation of the applications.
In the partition �
• /opt, a minimum of 400 Mb should be available. • /var, in case you do data collection, a minimum of 1.5 Gb should be available.
Set language
In order to avoid problems with unrecognised fonts during the installation of TMA for HP OpenView, set the correct language on your UNIX machine. Do this as follows:
Step Action
1
• If your UNIX machine is turned off, then boot it and wait until the login window appears.
• If you are in the Common Desktop Environment of your UNIX machine, then close the CDE so you get the login window.
2 In the login window, press the Options button.
3 Then select the following: Language ! C � ! POSIX
4 Log into your CDE and install TMA for HP OpenView.
TMA for HP OpenView Installing TMA for HP OpenView
User manual 21
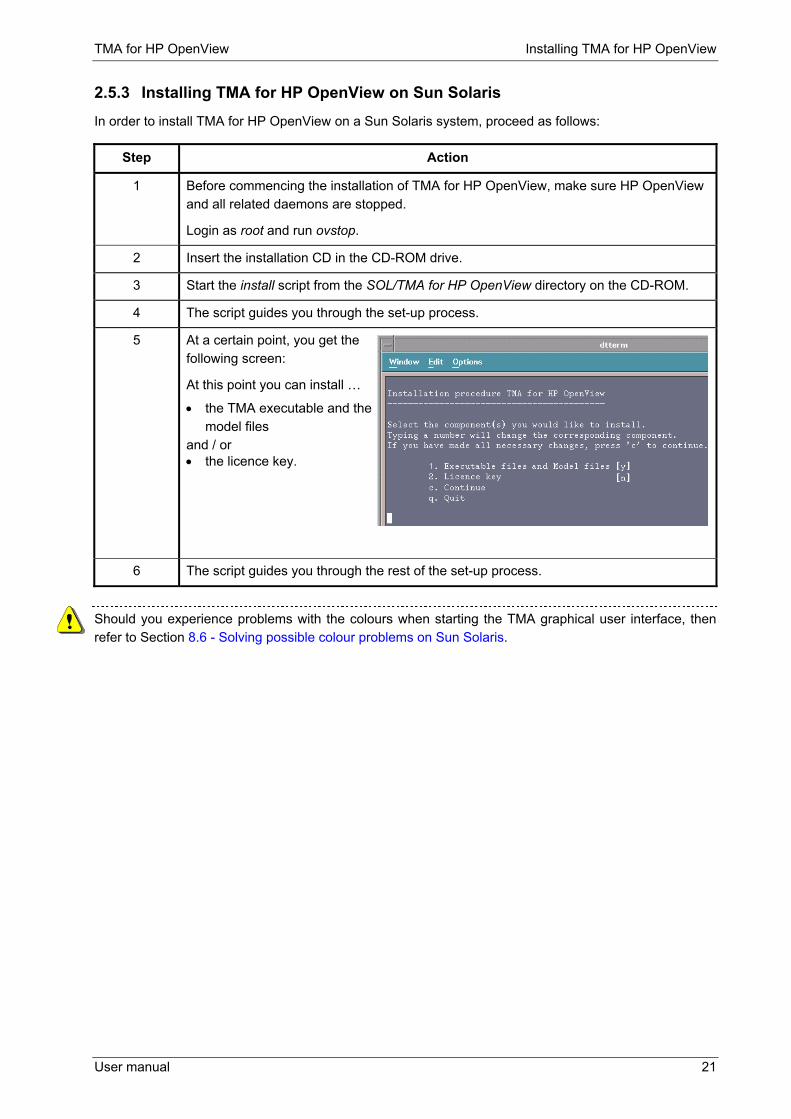
2.5.3 Installing TMA for HP OpenView on Sun Solaris In order to install TMA for HP OpenView on a Sun Solaris system, proceed as follows:
Step Action
1 Before commencing the installation of TMA for HP OpenView, make sure HP OpenView and all related daemons are stopped.
Login as root and run ovstop.
2 Insert the installation CD in the CD-ROM drive.
3 Start the install script from the SOL/TMA for HP OpenView directory on the CD-ROM.
4 The script guides you through the set-up process.
5 At a certain point, you get the following screen:
At this point you can install �
• the TMA executable and the model files
and / or • the licence key.
6 The script guides you through the rest of the set-up process.
Should you experience problems with the colours when starting the TMA graphical user interface, then refer to Section 8.6 - Solving possible colour problems on Sun Solaris.

Installing TMA for HP OpenView TMA for HP OpenView
22 User manual
2.5.4 Installing TMA for HP OpenView on HP UNIX In order to install TMA for HP OpenView on a HP UNIX system, proceed as follows:
Step Action
1 Before commencing the installation of TMA for HP OpenView, make sure HP OpenView and all related daemons are stopped.
Login as root and run ovstop.
2 Insert the installation CD in the CD-ROM drive.
3 Mount the CD-ROM. Use pfs_mount instead of the standard mount utility.
Example:
4 Start the install script from the HPUX/TMA for HP OpenView directory on the CD-ROM.
5 The script guides you through the set-up process.
6 At a certain point, you get the following screen:
At this point you can install �
• the TMA executable and the model files
and / or • the licence key.
7 The script guides you through the rest of the set-up process.
%su - #pfs_mountd& #pfsd 4& #pfs_mount -t rrip /dev/dsk/c0t2d0 /SD_CDROM Install the software ... #pfs_umount /SD_CDROM #exit

TMA for HP OpenView Installing TMA for HP OpenView
User manual 23
2.5.5 Adapting the Dtwm file For the correct function of the GUI of TMA on a UNIX platform, modify the Dtwm file as follows:
Step Action
1 Go to the directory \usr\dt\app-defaults\C.
2 Open the Dtwm file in a text editor.
3 Locate the following: Dtwm*secondariesOnTop
4 Change Dtwm*secondariesOnTop from False to True.
5 Save the Dtwm file.

Installing TMA for HP OpenView TMA for HP OpenView
24 User manual
2.5.6 Adapting the netmon.lrf file In order to improve the polling performance in big networks, it is recommended to change the netmon.lrf file. Do this as follows:
Step Action
1 Locate the netmon.lrf file on your system.
2 Open the file in a text editor.
3 Locate the following line: netmon:netmon: OVs_YES_START:ovtopmd,pmd,ovwdb:-P:OVs_WELL_BEHAVED:15:PAUSE
4 Add �g 0 to this line: netmon:netmon: OVs_YES_START:ovtopmd,pmd,ovwdb:-P �g 0:OVs_WELL_BEHAVED:15:PAUSE
5 Save the netmon.lrf file.
6 Open a terminal window and execute the following command: ovaddobj netmon.lrf
7 In the terminal window execute the following command: ovstop
8 In the terminal window execute the following command: ovstart

TMA for HP OpenView Installing TMA for HP OpenView
User manual 25
2.5.7 Location of the TMA for HP OpenView files The TMA for HP OpenView related directories and files can be found in the directory /opt/TMA. This directory has the following sub-directories:
Directory This directory contains �
/bin the executables.
/config the configuration files.
/log the log files.
/model the model files.
/picture the subsystem picture files.
/snmp the Telindus MIB files for non-HP OpenView platforms.
/snmp_hpov the Telindus MIB files for HP OpenView.
This directory is not always present on your system. I.e. if the standard MIB files were installed together with HP OpenView, then the content of the /snmp_hpov directory is moved to the HP OpenView directory containing the standard MIB files and the directory itself is removed. Else the /snmp_hpov directory remains on your system.

Installing TMA for HP OpenView TMA for HP OpenView
26 User manual
2.6 Installing TMA for HP OpenView on a console station What is a console station?
It is possible to run HP OpenView in a management � console station combination. This means that �
• one station runs the full licence version of HP OpenView, called the management station • one station runs the view licence version of HP OpenView, called the console station.
The latest TMA for HP OpenView version supports this management � console station combination. I.e. it is possible to install TMA for HP OpenView on the console station.
Installing TMA for HP OpenView on a console station
To install TMA for HP OpenView on a console station, just proceed as explained in �
• Section 2.4.2 - Installing TMA for HP OpenView on Windows NT / 2000 or • Section 2.5.3 - Installing TMA for HP OpenView on Sun Solaris or • Section 2.5.4 - Installing TMA for HP OpenView on HP UNIX
However, because you install TMA for HP OpenView on a console station, you do not have to install a licence key.

TMA for HP OpenView Installing TMA for HP OpenView
User manual 27
2.7 How to obtain and install the licence key The required licence key can be obtained by sending a fax or an email to Telindus (Refer to Annex C: licence key request).
Once TMA for HP OpenView is installed, you are able to work with the demo version. This manages maximum 8 access devices. If the program satisfies your needs, and you want to use TMA for HP OpenView for managing your entire network, you need to install the licence key. After registration you will receive the licence key and a customer identification.
To install the licence key, proceed as follows:
Step Action
1 Rerun the installation as described in �
• Section 2.4.2 - Installing TMA for HP OpenView on Windows NT / 2000 or • Section 2.5.3 - Installing TMA for HP OpenView on Sun Solaris or • Section 2.5.4 - Installing TMA for HP OpenView on HP UNIX
2 When you are prompted to select which component you want to install, only select the licence key component.
For Windows, the following Licence key window appears:
For UNIX, the following Licence key window appears:
3 Enter the customer ID which you received after you submitted your licence key request.
4 Enter the licence key which you received after you submitted your licence key request.

Installing TMA for HP OpenView TMA for HP OpenView
28 User manual
2.8 How to upgrade the model files The installation of the model files may occur separately from the TMA executable installation. This because the model files evolve as the devices evolve. The model files delivered on the CD-ROM correspond to the latest firmware version of the Telindus access devices at the creation time of the CD-ROM. If, at a later time, you want to add devices with a more recent firmware version, a re-installation of the model files of these devices may be required.
Check the most recent model files on the Telindus web site.
To download and install the most recent model files, proceed as follows:
Step Action
1 Go to the Telindus web site at http://www.telindusproducts.com and select Products ! Maintenance & Management ! TMA for HP OpenView ! Download model files upgrade.
2 Carefully read the licence agreement for Telindus software.
• If you agree with the terms stated in the agreement, select I agree. • If you do not agree with the terms stated in the agreement, select I don�t agree.
3 Windows
For TMA for HP OpenView on Windows, select the following line: TMA part 2: data files rev. xxx [xxxx Kbyte]
Save the executable file (e.g. S0011015.exe) in a temporary directory on your hard disk.
UNIX
For TMA for HP OpenView on UNIX, select the following line: TMA part 2: data files UNIX rev. xxx [xxxx Kbyte]
Save the tar file xxx.tar.Z in a temporary directory on your hard disk.
4 Windows
For TMA for HP OpenView on Windows, double click on the executable file. Follow the instructions that appear on your screen.
UNIX
For TMA for HP OpenView on UNIX, do the following: 1. If you downloaded the tar file on a Windows station, the file name suffix has been
changed by the browser into _tar.Z. Transfer the file to a temporary directory on your UNIX workstation and change the file extension again into .tar.Z.
2. Uncompress the file using the command uncompress xxx.tar.Z. 3. Untar the resulting file xxx.tar using the command tar -xvf xxx.tar. 4. Execute the install script from the temporary directory.
The device firmware is backwards compatible with the model files. This means that the latest TMA model files support not only the latest firmware version, but also all previous firmware versions of the device.

TMA for HP OpenView Connecting the workstation via the Orchid 1003 LAN
User manual 29
3. Connecting the workstation via the Orchid 1003 LAN Because the terms IP device, proxied IP device and non-IP device are used in this and the following chapters, they are explained first. Then this chapter briefly describes the Orchid 1003 LAN as proxy agent and how you can connect the HP OpenView workstation to an Orchid 1003 LAN.
The following table gives an overview of this section.
Section Title Page
3.1 What are IP, proxied IP and non-IP devices? 30
3.2 The Orchid 1003 LAN as proxy agent 31
3.3 Alarm transport protocol 32
Connecting the workstation via the Orchid 1003 LAN TMA for HP OpenView
30 User manual
3.1 What are IP, proxied IP and non-IP devices? Because in this and the following chapters the terms IP device, proxied IP device and non-IP device are often used, they are explained in this section.
The following table gives a definition of each term together with an example:
Term Definition
IP device An IP device is a Telindus access device �
• in which you can configure an IP address. • that has a dedicated LAN port through which you can connect the device to a
LAN.
Example
The Crocus Inverse Multiplexer is an IP device. You can configure an IP address in the Crocus Inverse Multiplexer using the crocusInvMux/lanInterface/ipAddress attribute. The Crocus Inverse Multiplexer can be connected to a LAN through its TPI port located at the back of the device.
Other IP devices are for instance: the Orchid 1003 LAN, the Crocus Router Interface, the Crocus Router 2M, etc.
non-IP device A non-IP device is a Telindus access device �
• in which you can not configure an IP address. • has no dedicated LAN port and therefore can not be connected directly to a
LAN.
Example
The Crocus SDSL F baseband modem is a non-IP device. You can not configure an IP address in the Crocus SDSL F and you can not connect it to a LAN to a dedicated LAN port.
Other non-IP devices are for instance: Aster 4 F, Crocus HDSL F, Crocus SDSL F, Crocus FO10M.
proxied IP device A proxied IP device is actually a non-IP device. This means it is a Telindus access device �
• in which you can not configure an IP address. However, you can assign an IP address to the device using a proxy IP device also called proxy agent (refer to Section 3.2 - The Orchid 1003 LAN as proxy agent).
• has no dedicated LAN port and therefore can not be connected directly to a LAN. This is done through the Orchid 1003 LAN which is an IP device and therefore can be connected to a LAN through its dedicated LAN port.
Example
The Crocus SDSL F baseband modem is a non-IP device. However, by assigning an IP address to the modem in the Orchid 1003 LAN, the modem becomes a proxied IP device. The Orchid 1003 LAN on its turn, is connected through its LAN port to a LAN. I.e. it is as if the Crocus SDSL F modems is connected to the LAN, although not directly.
TMA for HP OpenView Connecting the workstation via the Orchid 1003 LAN
User manual 31
3.2 The Orchid 1003 LAN as proxy agent Connections to the Telindus IP access devices
The connections from the HP OpenView workstation to the Telindus IP access devices are made via an IP network.
Connections to the Telindus non-IP access devices
The connections from the HP OpenView workstation to the Telindus non-IP access devices are made via an IP network through an Orchid 1003 LAN. In that case the Orchid serves as an IP and SNMP proxy agent and alarm concentrator.
The non-IP devices are configured in the o1003/nmsGroup/objectTable of the Orchid 1003 LAN. In this table you can optionally assign an IP address to a non-IP device connected to the Orchid:
• If you do not assign an IP address, we speak of a non-IP device. • If you do assign an IP address, we speak of a proxied IP device.
For more information on the objectTable attribute refer to the section on the NMS group configuration attributes in the manual of the Orchid 1003 LAN. Also a complete overview of all network topologies with the Orchid 1003 LAN can be found in the Orchid 1003 LAN manual.
O 1003 LANPort 1 � Port 14
High speed control bus
Modem

Connecting the workstation via the Orchid 1003 LAN TMA for HP OpenView
32 User manual
3.3 Alarm transport protocol CMS2 protocol
In previous versions of TMA for HP OpenView, the Orchid 1003 LAN and HP OpenView used SNMP traps to exchange alarm information.
Starting from TMA for HP OpenView version S0006/00700 (Windows), S0005/00800 (Sun Solaris) or S0008/00400 (HP UNIX), an Alarm Manager has been implemented in HP OpenView. The communication between this Alarm Manager and the Orchid 1003 LAN uses the proprietary CMS2 protocol.
This implies that in case you use HP OpenView with these versions of TMA for HP OpenView as your network manager, you best leave the Orchid 1003 LAN configuration table o1003/snmpProxy/trapDestinations empty. For more information on this attribute refer to the section on SNMP proxy configuration attributes in the manual of the Orchid 1003 LAN.
SNMP
However, it is still possible to use any SNMP manager as your network manager. In that case, pay attention to the following:
• Configure the table o1003/snmpProxy/trapDestinations in the Orchid 1003 LAN. For more information on this attribute refer to the section on SNMP proxy configuration attributes in the manual of the Orchid 1003 LAN.
• Place the *.mib files of the devices you want to manage in the appropriate directory of your SNMP manager application. Refer to the manual of this application for the exact location of this directory. The *.mib files of the Telindus devices can be found on your system in the directory <TMA_path>\TMA\snmp.
• For proxied IP devices you also have to place the *.mod files of the devices you want to manage on the file system of the Orchid 1003 LAN. For more information, refer to the chapter on proxy management in the manual of the Orchid 1003 LAN. The *.mod files of the Telindus devices can be found on your system in the directory <TMA_path>\TMA\model.
For more detailed information on SNMP management of Telindus proxied IP devices, refer to the chapter on proxy management in the manual of the Orchid 1003 LAN.

TMA for HP OpenView The HP OpenView network map and its symbols
User manual 33
4. The HP OpenView network map and its symbols This chapter explains how you can place symbols on the HP OpenView network map. It shows you how to start TMA. It also gives more information on the fault management in (TMA for) HP OpenView and the symbol colouring.
The following table gives an overview of this chapter.
Section Title Page
4.1 The HP OpenView network map 34
4.2 Fault management 40
4.3 The Telindus access device symbol colours 48

The HP OpenView network map and its symbols TMA for HP OpenView
34 User manual
4.1 The HP OpenView network map This section briefly discusses the HP OpenView network map. The following table gives an overview of this section.
Section Title Page
4.1.1 The Telindus access devices symbols 35
4.1.2 Placing a symbol on the HP OpenView network map 37
4.1.3 Symbol commands 39

TMA for HP OpenView The HP OpenView network map and its symbols
User manual 35
4.1.1 The Telindus access devices symbols The Telindus access devices are represented on the HP OpenView network map by symbols. Every device has its own symbol. For the Crocus modem range, there is even a different symbol for a Table Top modem and a Card Version symbol.
The following table shows the Telindus access device symbols:
Symbol This symbol represents a �
Aster 4 modem
Crocus DXC
Crocus E3 MUX
Crocus FO 10M Table Top
Crocus FO10M Card Version
Crocus FO 45M Table Top
Crocus HDSL Table Top
Crocus HDSL Card Version
Crocus HS
Crocus Inverse Multiplexer
Orchid 1003 LAN
Continued on next page

The HP OpenView network map and its symbols TMA for HP OpenView
36 User manual
The Telindus access devices symbols (continued)
Symbol This symbol represents a �
Crocus Router
Crocus SDSL Table Top
Crocus SDSL Card Version
Crocus SDSL Quad
Crocus SDSL Router
TMA for HP OpenView The HP OpenView network map and its symbols
User manual 37
4.1.2 Placing a symbol on the HP OpenView network map The symbols can be placed on the HP OpenView network map in the following ways:
The symbols can be placed �
by means of the � For more information, refer to �
Add Object procedure. Paragraph a) The Add Object procedure manually,
loadhosts command. Paragraph b) Running the loadhosts command
automatically, auto discovery mechanism. Section 7.2 - Auto discovery
Only IP devices can be placed on the HP OpenView network map manually.
The following two procedures show how you can place a symbol on the HP OpenView network map manually.
a) The Add Object procedure
Step Action
1 In the Edit menu, select Add object�
⇒ This brings up the Add Object Palette.
2 In the Add Object Palette, select a Telindus symbol within the symbol class NetDevice.
3 Drag this symbol onto the OpenView network map.
⇒ The Add Object dialog box appears.
4 In the Add Object dialog box, enter a name in the field Label.
5 Also in the Add Object dialog box, go to the field Object Attributes and double click on IP Map.
⇒ The Add Object � Set Attributes dialog box appears.
6 In the Add Object � Set Attributes dialog box, at least enter a valid and unique IP address and press OK. The other fields are optional.
7 The Add Object dialog box reappears. Press OK to finalise the procedure.
Continued on next page
The HP OpenView network map and its symbols TMA for HP OpenView
38 User manual
Placing a symbol on the HP OpenView network map (continued)
b) Running the loadhosts command
Step Action
1 Open a DOS window (for Windows) or terminal window (for UNIX).
2 In the DOS or terminal window execute the following command: ovstop netmon
3 Then you can execute the loadhosts command. This is explained with an example.
Example
Suppose you want to place three IP devices on the HP OpenView network map. They have the following IP addresses: 10.5.1.20, 10.5.1.25 and 10.5.1.70.
The loadhosts command syntax is as follows: loadhosts �p �m 255.255.255.0 10.5.1.20 host1 10.5.1.25 host2 10.5.1.70 host3 <CTRL+D>
In this syntax �
• the loadhosts command adds hosts to the IP topology database of HP OpenView. • the �p parameter executes a ping for each IP address before adding it. • the �m <mask> parameter is the IP subnet mask. • <CTRL+D> is the key CONTROL key / D key combination to terminate the loadhosts
command input.
For more information on the loadhosts command, refer to the HP OpenView help.
4 In the DOS or terminal window execute the following command: ovstart netmon
TMA for HP OpenView The HP OpenView network map and its symbols
User manual 39
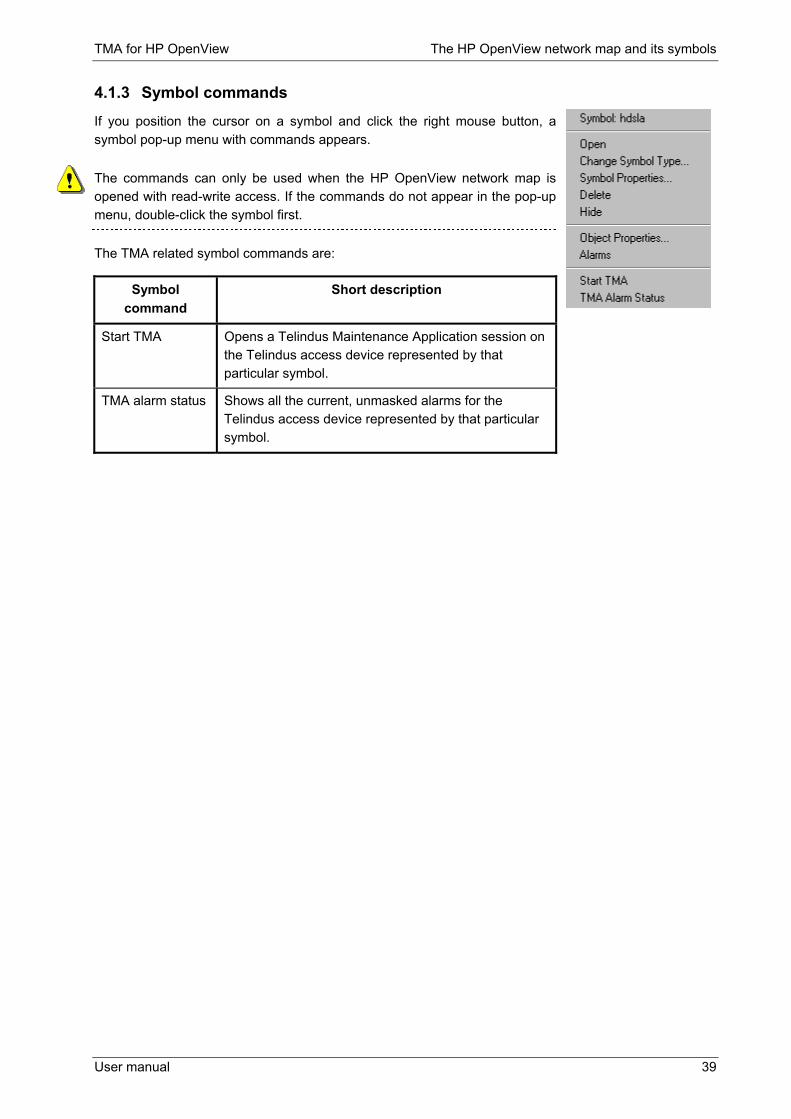
4.1.3 Symbol commands If you position the cursor on a symbol and click the right mouse button, a symbol pop-up menu with commands appears.
The commands can only be used when the HP OpenView network map is opened with read-write access. If the commands do not appear in the pop-up menu, double-click the symbol first.
The TMA related symbol commands are:
Symbol command
Short description
Start TMA Opens a Telindus Maintenance Application session on the Telindus access device represented by that particular symbol.
TMA alarm status Shows all the current, unmasked alarms for the Telindus access device represented by that particular symbol.

The HP OpenView network map and its symbols TMA for HP OpenView
40 User manual
4.2 Fault management This section briefly discusses the fault management. The following table gives an overview of this section.
Section Title Page
4.2.1 Alarms and events 41
4.2.2 Alarm severity level 42
4.2.3 The colour of the symbols on the HP OpenView network map 43
4.2.4 Meaningful symbol colours 44
4.2.5 The sub-map of the Telindus access device symbol 45
4.2.6 Managed and unmanaged sub-map symbols 46

TMA for HP OpenView The HP OpenView network map and its symbols
User manual 41
4.2.1 Alarms and events When an alarm occurs on a Telindus access device, this alarm is transmitted to the Alarm Manager. The Alarm Manager translates this alarm into an OpenView event. This event is put in an event log.
An event contains the following information:
• date and time that the alarm was received • the source of the alarm • the severity level • a message that describes the alarm that occurred.
The severity level of an event determines the colour of that event in the event log. This severity level is defined in the Telindus access device itself. It can be set for each alarm of the device with the attribute alarmLevel. For more information on this attribute, refer to the manual of the Telindus access device.
The colouring of an event in the event log does not necessarily affect the colouring of the access device symbol on the HP OpenView map. The following two sections explain more on symbol colouring.

The HP OpenView network map and its symbols TMA for HP OpenView
42 User manual
4.2.2 Alarm severity level As said before, an OpenView event contains, among other elements, a severity level. This severity level can be divided into two different levels:
Severity level Description
alarm severity level This is the severity of an alarm, as it is defined in the device.
total severity level This is the severity level of the currently most severe alarm that is active on the device. The total severity level is not necessarily equal to the alarm severity level. The following example explains this.
Example
On a HDSL modem are, among others, the following alarm levels configured:
• the LinkDown alarm has severity level 4 • the BitError alarm has severity level 2.
Now the following happens:
Phase Description
1 For some reason the connection to the remote modem is lost.
⇒ The modem generates a LinkDown alarm.
2 The modem sends this alarm to the Alarm Manager who translates this alarm into an HP OpenView event.
⇒ This event has an alarm severity level 4 and a total severity level 4.
3 A few moments later, the modem also detects that the bit error threshold is exceeded.
⇒ The modem generates a BitError alarm.
4 Again, the modem sends this alarm to the Alarm Manager who translates this alarm into an HP OpenView event.
⇒ This event has an alarm severity level 2 but still a total severity level 4. This because the currently most severe alarm is LinkDown, not BitError.
Therefore, it is the total severity level that will determine the colour of the Telindus access device symbol.
TMA for HP OpenView The HP OpenView network map and its symbols
User manual 43
4.2.3 The colour of the symbols on the HP OpenView network map This section explains very briefly how the colour of the Telindus access device symbols on the HP OpenView network map is determined. For a more elaborate discussion of this matter, refer to Section 4.3 - The Telindus access device symbol colours.
Colouring of � Description
a non-IP device In case of a non-IP device, the total severity level directly determines the colour of the non-IP device symbol on the HP OpenView network map. This because a non-IP device does not have a sub-map.
a proxied IP device In case of a proxied IP device, the total severity level determines the colour of the AlarmStatus symbol located in the sub-map of the proxied IP device. The AlarmStatus symbol on its turn, determines the colour of the proxied IP device symbol on the HP OpenView network map.
This is the case because the other symbols located in the sub-map of the proxied IP device are set to unmanaged by default. For more information on this matter, refer to Section 4.2.6 - Managed and unmanaged sub-map symbols.
an IP device In case of an IP device, the total severity level determines the colour of the AlarmStatus symbol located in the sub-map of the IP device. The AlarmStatus symbol together with the other sub-map symbols (which usually represent an interface) eventually determine the colour of the IP device symbol on the HP OpenView network map.
For more information on this matter, refer to Section 4.2.6 - Managed and unmanaged sub-map symbols.
The HP OpenView network map and its symbols TMA for HP OpenView
44 User manual
4.2.4 Meaningful symbol colours In order to get the most meaningful colouring of the Telindus access device symbol, it is recommended to configure HP OpenView so that the most critical status is propagated.
Setting meaningful symbol colours in Windows
For Windows, proceed as follows:
Step Action
1 In the Map menu, select Properties.
⇒ The Map Properties dialog box appears.
2 In the Map Properties dialog box, select the Status Propagation tab.
3 In the Status Propagation tab, select Propagate Most Critical and press OK.
Setting meaningful symbol colours in UNIX
For UNIX, proceed as follows:
Step Action
1 In the Map menu, pick Maps.
2 Select Describe/Modify.
3 Select Propagate Most Critical.

TMA for HP OpenView The HP OpenView network map and its symbols
User manual 45
4.2.5 The sub-map of the Telindus access device symbol
Non-IP devices neither have HP OpenView interfaces nor an AlarmStatus symbol. I.e. they do not have a sub-map.
When you double click on a Telindus IP access device or proxied IP access device symbol, a sub-map appears. This sub-map also contains some symbols.
The colour of the AlarmStatus symbol together with the other sub-map symbols determine the colour of the Telindus access device symbol on the HP OpenView network map. The other symbols come from the generic SNMP polling in HP OpenView and are the interfaces of the device.
Examples
An example of a sub-map of a proxied Crocus FO10M modem is:
In case of a proxied IP device, as default only the AlarmStatus symbol is set to managed. All other symbols in the sub-map are set to unmanaged.
An example of a sub-map of an Orchid 1003 LAN (Card Version) is:
In case of an IP device, as default all the symbols in the sub-map are set to managed.
The HP OpenView network map and its symbols TMA for HP OpenView
46 User manual
4.2.6 Managed and unmanaged sub-map symbols This section explains �
• why for proxied IP devices only the AlarmStatus symbol is set to managed and all other sub-map symbols are set to unmanaged by default.
• why for IP devices all sub-map symbols are set to managed by default.
There is a difference in the update of the colour information of the AlarmStatus symbol and the other sub-map symbols (usually these are interfaces), between a proxied IP device and an IP device. This is explained in the following table:
The sub-map symbol colour update of �
goes as follows:
a proxied IP device,
• The AlarmStatus symbol colour is updated every time the access device sends an alarm.
• The other sub-map symbols are set to unmanaged. I.e. no polling and hence no colour changes occur for these symbols.
The reason why the other sub-map symbols are set to unmanaged is explained in the following paragraph.
an IP device,
• The AlarmStatus symbol colour is updated every time the access device sends an alarm (as for a proxied IP device).
• In case on one of the interface symbols a linkDown alarm (on or off) occurs, a trap is forced in HP OpenView for this particular interface. I.e. the colour of the sub-map symbol is updated immediately, not only when HP OpenView explicitly polls the device.
This means that the situation as described in the following paragraph (The sub-map symbols of a proxied IP device), does not apply on an IP device. Therefore, all sub-map symbols of an IP device are set to managed by default.
Continued on next page

TMA for HP OpenView The HP OpenView network map and its symbols
User manual 47
Managed and unmanaged sub-map symbols (continued)
Why are the other sub-map symbols of a proxied IP device set to unmanaged?
Suppose the other sub-map symbols of a proxied IP device are set to managed. In that case, these sub-map symbols their colour is updated only when HP OpenView explicitly polls the device.
You may wish to put this poll interval to a large value, e.g. 24 hours, not to overload the HP OpenView workstation. This is especially true for large networks. This could create the following situation:
Phase Description
1 Let us consider the sub-map of a Crocus FO10M as depicted in Section 4.2.5 - The sub-map of the Telindus access device symbol.
2 Suppose all is well and therefore the colours of all the sub-map symbols are green.
⇒ The colour of the Crocus FO10M symbol on the HP OpenView network map is green.
3 HP OpenView polls the Crocus FO10M and finds an alarm situation on the line.
⇒ The Line interface sub-map symbol turns, for instance, red(1). ⇒ The colour of the Crocus FO10M symbol on the HP OpenView network map turns,
for instance, red(1). (1) The specific colour change depends on your HP OpenView settings (e.g. propagate most critical, �).
4 After a while the alarm situation on the line of the Crocus FO10M is cleared.
⇒ The Line interface sub-map symbol stays red, because HP OpenView has not yet polled the Crocus FO10M.
⇒ The colour of the Crocus FO10M symbol on the HP OpenView network map stays red, although all alarm situations are cleared.
5 The next poll session is still, for instance, a couple of hours away from now.
⇒ The colour of the Crocus FO10M symbol on the HP OpenView network map stays red for a couple of hours.
As you can see, this is an incorrect representation of the actual status of the Crocus FO10M. That is why the other symbols in the sub-map are set to unmanaged by default. In that case the colour of the Telindus proxied IP access device symbol is always the same as the AlarmStatus symbol in its sub-map.
The Alarm Manager does not allow you to set the other sub-map symbols to managed. If you try to do so anyway, the Alarm Manager automatically resets them to unmanaged.

The HP OpenView network map and its symbols TMA for HP OpenView
48 User manual
4.3 The Telindus access device symbol colours Whereas Section 4.2.3 - The colour of the symbols on the HP OpenView network map briefly describes the colouring of the Telindus access devices symbols, this section gives a more detailed explanation. The following table gives an overview of this section.
Section Title Page
4.3.1 The status source 49
4.3.2 The status source option Object 50
4.3.3 The status source option Compound 51
4.3.4 The status source option Symbol 52
4.3.5 The Telindus access device symbol colours � examples 53

TMA for HP OpenView The HP OpenView network map and its symbols
User manual 49
4.3.1 The status source
What is the status source?
In HP OpenView it is possible to set the sources that generate the status for the symbol. I.e. it is possible to configure how the colour of a symbol is determined. The status source of a symbol is automatically set by the application that manages the object. It is recommended not to change the status source of a symbol.
Where can I find the status source?
To locate the Status Source, proceed as follows: 1. Position the cursor on a symbol. 2. Click the right mouse button. 3. Select the Symbol Properties� from the symbol pop-up menu. 4. In the Symbol Property window you find the Status Source field.
In the Status Source field you can find three options:
• Object • Compound • Symbol
For detailed information on the status source and its options, refer to the HP OpenView help.
The following three sections explain what these options do and shows on which Telindus access device they are used.
The Alarm Manager does not allow you to change the status source of a Telindus access device symbol. If you try to do so anyway, the Alarm Manager automatically resets the status source to its original state.

The HP OpenView network map and its symbols TMA for HP OpenView
50 User manual
4.3.2 The status source option Object
What does this option do?
The device symbol colour is directly related with the status of the corresponding object in the HP OpenView database.
On which Telindus access device is it used?
This status source option is used on non-IP devices.

TMA for HP OpenView The HP OpenView network map and its symbols
User manual 51
4.3.3 The status source option Compound
What does this option do?
The total severity level of a device determines the colour of the AlarmStatus symbol located in the sub-map of the device. The AlarmStatus symbol colour together with the colours of the other sub-map symbols determine the colour of the device symbol.
Configuring the Compound option
In what way the sub-map symbols determine the colour of the device symbol is also configurable:
• You can, for instance, only propagate the most critical sub-map symbol status. Suppose you have a device symbol which on its turn contains four sub-map symbols: − If three of those symbols are green and one is orange, then the device symbol will be orange. − If two of those symbols are green, one is orange and one is red, then the device symbol will be red. − �
• You can, for instance, define percentages. Suppose you have a device symbol which on its turn contains four sub-map symbols. Suppose you defined that if 75% of the sub-map symbols are in a critical (red) state, then the device symbol has to reflect this state: − If three of those symbols are green and one is orange, then the device symbol will be green. − If one of those symbols is green, one is orange and two are red, then the device symbol will be
green. − If one of those symbols is green and three (i.e. 75%) are red, then the device symbol will be red.
On which Telindus access device is it used?
This status source option is used on �
• proxied IP devices. However, for proxied IP devices all sub-map symbols other than the AlarmStatus symbol are set to unmanaged. This means that the proxied IP device symbol colour follows the AlarmStatus symbol colour. For more information, refer to Section 4.2.6 - Managed and unmanaged sub-map symbols.
• IP devices that have no router functionality. I.e. IP devices that are only present in one segment (e.g. a Crocus Inverse Multiplexer, an Orchid 1003 LAN provided the router functionality is not used, �). This opposed to a router, who has two interfaces with two different IP address. This means the router symbol is present in two different segments in the HP OpenView network map.
• IP devices that have router functionality but are located in the top network level (also called �Internet� level).
The HP OpenView network map and its symbols TMA for HP OpenView
52 User manual
4.3.4 The status source option Symbol
What does this option do?
The colour of the device symbol is determined by the status of a specific sub-map symbol. This gives HP OpenView the ability to show a different status for a device depending on where in the network map hierarchy the device symbol is found.
On which Telindus access device is it used?
This status source option is used on IP devices that have router functionality. E.g. a Crocus Router Interface, a Crocus Router 2M, an Orchid 1003 LAN provided the router functionality is used, �
However, there is one exception. IP devices that have router functionality and that are located in the top network level (also called �Internet� level) use the Compound option instead of the Symbol option.
How exactly does the Symbol option work?
The sub-map of such �router� IP devices contains (in its most basic form) an AlarmStatus symbol, a LAN interface symbol and a WAN interface symbol. The LAN and WAN interface sub-map symbols each belong to a different IP segment. In each of these IP segments a �router� IP device symbol is present. Also on the top network level, a �router� IP device symbol is present. However, the colours of these different �router� IP device symbols are not determined in the same way:
• The �router� IP device symbol located in the LAN IP segment is solely determined by the LAN interface sub-map symbol.
• The �router� IP device symbol located in the WAN IP segment is solely determined by the WAN interface sub-map symbol.
• The �router� IP device symbol located in the top network level is determined by all the sub-map symbols. I.e. whereas the �router� IP device symbol located in the LAN or WAN IP segment uses the Symbol option, the �router� IP device symbol located in the top network level (also called �Internet� level) uses the Compound option.
The two examples in the following section try to clarify the situation as described above.

TMA for HP OpenView The HP OpenView network map and its symbols
User manual 53
4.3.5 The Telindus access device symbol colours � examples
Example 1
Suppose an Orchid 1003 LAN its router functionality is used:
• the LAN interface has IP address 172.31.17.1. • the WAN interface has IP address 172.31.16.1.
The sub-map of the Orchid 1003 LAN contains (in its most basic form):
• a LAN sub-map symbol • a WAN sub-map symbol • an AlarmStatus sub-map symbol.
The Orchid 1003 LAN device symbol is present in:
• the LAN IP segment 172.31.17. Here, the device symbol colour is determined by the LAN sub-map symbol colour. I.e. in this case, the status source option Symbol is used.
• the WAN IP segment 172.31.16. Here, the device symbol colour is determined by the WAN sub-map symbol colour. I.e. in this case, the status source option Symbol is used.
• the top network level. Here, the device symbol colour is determined by all the sub-map symbol colours. I.e. in this case, the status source option Compound is used.
Suppose the colour of the �
• LAN sub-map symbol is green • WAN sub-map symbol is red • AlarmStatus sub-map symbol is green.
In that case the different Orchid 1003 LAN device symbol colours are:
• green for the Orchid 1003 LAN device symbol located in the LAN IP segment • red for the Orchid 1003 LAN device symbol located in the WAN IP segment • red for the Orchid 1003 LAN device symbol located in the top network level. Provided the Compound
status propagation option has been set to Propagate most critical.
The situation as described above is depicted on the following page.
Continued on next page

The HP OpenView network map and its symbols TMA for HP OpenView
54 User manual
Example 1 (continued)
compound
symbol
compound symbol compound
symbol symbol

TMA for HP OpenView The HP OpenView network map and its symbols
User manual 55
Example 2
Reconsider the situation as described in example 1. The only difference is the colour of the Orchid 1003 LAN sub-map symbols.
Suppose the colour of the �
• LAN sub-map symbol is green • WAN sub-map symbol is green • AlarmStatus sub-map symbol is red.
In that case the different Orchid 1003 LAN device symbol colours are:
• green for the Orchid 1003 LAN device symbol located in the LAN IP segment • green for the Orchid 1003 LAN device symbol located in the WAN IP segment • red for the Orchid 1003 LAN device symbol located in the top network level. Provided the Compound
option has been set to Propagate most critical.
The situation as described above is depicted on the following page.
Continued on next page

The HP OpenView network map and its symbols TMA for HP OpenView
56 User manual
Example 2 (continued)
compound
symbol
compound symbol compound
symbol symbol
TMA for HP OpenView Starting TMA on a Telindus access device
User manual 57
5. Starting TMA on a Telindus access device This section explains how to start a TMA session on a Telindus access device. The following table gives an overview of this chapter.
Section Title Page
5.1 Starting TMA via the Telindus access device symbol 58
5.2 Starting TMA via the command line 59
5.5 Starting TMA on the Orchid � a LAN IP address issue 62
5.6 The executable DnsConfigure.exe 63
5.7 Defining TMA for HP OpenView users and passwords 64
Starting TMA on a Telindus access device TMA for HP OpenView
58 User manual
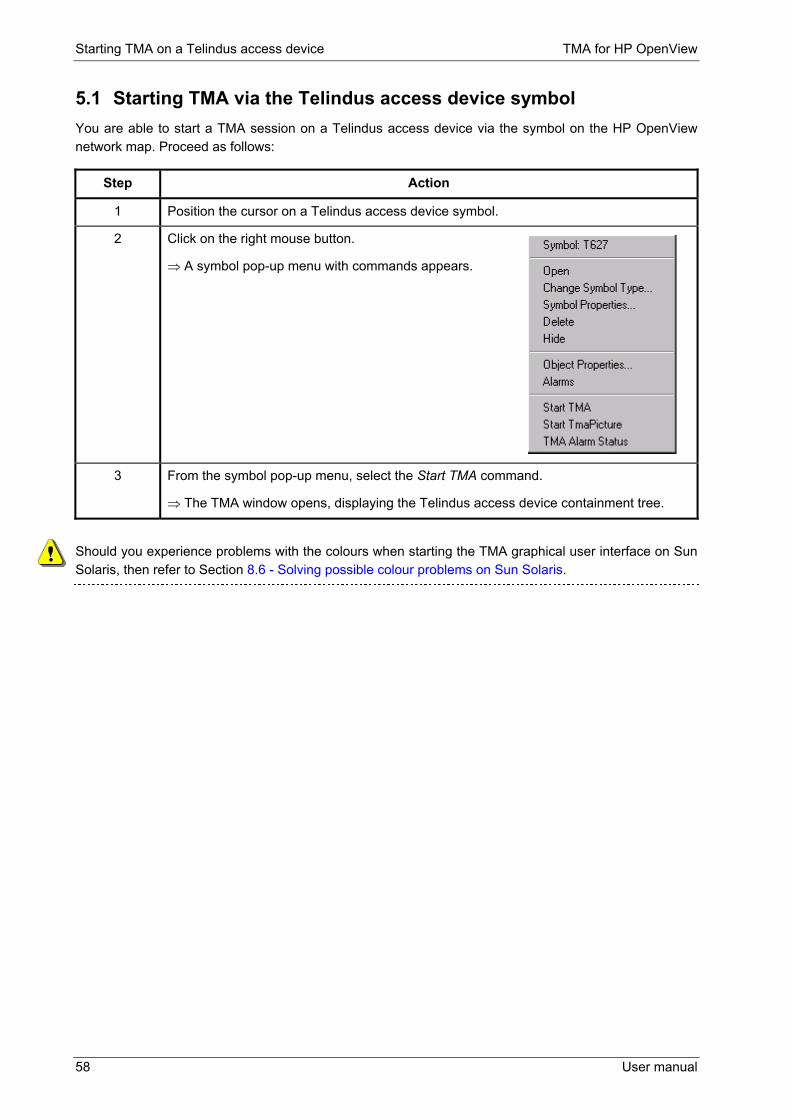
5.1 Starting TMA via the Telindus access device symbol You are able to start a TMA session on a Telindus access device via the symbol on the HP OpenView network map. Proceed as follows:
Step Action
1 Position the cursor on a Telindus access device symbol.
2 Click on the right mouse button.
⇒ A symbol pop-up menu with commands appears.
3 From the symbol pop-up menu, select the Start TMA command.
⇒ The TMA window opens, displaying the Telindus access device containment tree.
Should you experience problems with the colours when starting the TMA graphical user interface on Sun Solaris, then refer to Section 8.6 - Solving possible colour problems on Sun Solaris.
TMA for HP OpenView Starting TMA on a Telindus access device
User manual 59
5.2 Starting TMA via the command line As an alternative to the symbol pop-up command, you can also start a TMA session on a Telindus access device via the command line. This uses the name resolution feature offered by the Alarm Manager.
The command line syntax depends whether you want to start a TMA session on an IP device or a proxied IP device.
Command line syntax for an IP device
To start a TMA session via the command line on an IP device, use the following syntax:
TMAOV <sysName>
Examples:
• Suppose you have a Crocus E3 MUX connected to a LAN, with an IP address and with sysName = e3Mux. In that case, type the following: TMAOV e3Mux
• Suppose you have an Orchid 1003 LAN connected to a LAN, with an IP address and with sysName = Orchid_1003_LAN. In that case, type the following: TMAOV Orchid_1003_LAN
Command line syntax for a proxied IP device TMAOV <proxy_sysName>_<objectTable_name>
Examples:
• Suppose you have a Crocus HDSL connected to an Orchid 1003 LAN. The name for the Crocus HDSL in the Orchid its objectTable is hdslTT. The Orchid 1003 LAN on its turn is connected to a LAN, has an IP address and its sysName = o1003. In that case, type the following: TMAOV o1003_hdslTT
• Suppose you have a Crocus DXC connected to an Orchid 1003 LAN. The name for the Crocus DXC in the Orchid its objectTable is Crocus_DXC. The Orchid 1003 LAN on its turn is connected to a LAN, has an IP address and its sysName = Orchid_1003_LAN. In that case, type the following: TMAOV Orchid_1003_LAN_Crocus_DXC
Important remarks • The sysName or objectTable name may not contain white spaces. Use, for example, an underscore
character instead. Refer to the examples above. Also the filter in the HP OpenView alarm browser does not allow white spaces in the sysName or objectTable name. Refer to Section 7.6.3 - The logged event.
• As explained in the table above, it is not possible to use the sysName of a proxied IP device. Instead use <proxy_sysName>_<objectTable_name>.
• If the Alarm Manager resides on a remote system, it is still possible to use its name resolution feature on your local system. You only have to define the remote system its IP address on your local system. Use the executable DnsConfigure.exe for this purpose. Refer to Section 5.6 - The executable DnsConfigure.exe.
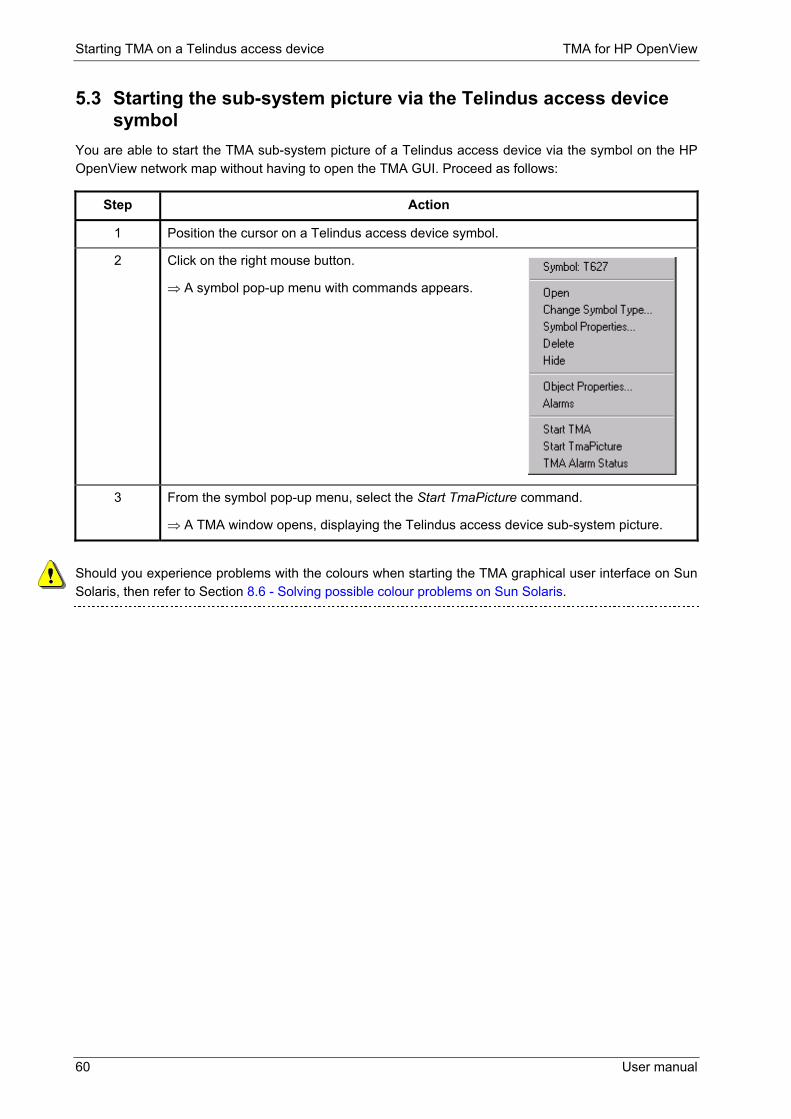
Starting TMA on a Telindus access device TMA for HP OpenView
60 User manual
5.3 Starting the sub-system picture via the Telindus access device symbol
You are able to start the TMA sub-system picture of a Telindus access device via the symbol on the HP OpenView network map without having to open the TMA GUI. Proceed as follows:
Step Action
1 Position the cursor on a Telindus access device symbol.
2 Click on the right mouse button.
⇒ A symbol pop-up menu with commands appears.
3 From the symbol pop-up menu, select the Start TmaPicture command.
⇒ A TMA window opens, displaying the Telindus access device sub-system picture.
Should you experience problems with the colours when starting the TMA graphical user interface on Sun Solaris, then refer to Section 8.6 - Solving possible colour problems on Sun Solaris.

TMA for HP OpenView Starting TMA on a Telindus access device
User manual 61
5.4 Starting the sub-system picture via the command line As an alternative to the symbol pop-up command, you can also start the TMA sub-system picture of a Telindus access device via the command line.
The syntax is the same as described in Section 5.2 - Starting TMA via the command line, except that the string TMAOV has to be replaced by TmaSsp:
• TmaSsp <sysName> For example: − TmaSsp e3Mux − TmaSsp Orchid_1003_LAN
• TmaSsp <proxy_sysName>_<objectTable_name> For example: − TmaSsp o1003_hdslTT − TmaSsp Orchid_1003_LAN_Crocus_DXC

Starting TMA on a Telindus access device TMA for HP OpenView
62 User manual
5.5 Starting TMA on the Orchid � a LAN IP address issue Problem
Suppose you have the following set-up:
• An Orchid 1003 LAN with an IP address on port A and on the LAN interface. • Port A is connected to a Frame Relay network. • The LAN interface is not connected (although it has an IP address).
When the Orchid is discovered by HP OpenView, the IP address that is displayed in the objectTable of the AlarmManager is the IP address of the Orchid its LAN interface. What is more, when you start a TMA session on the Orchid (as explained in Section 5.1 - Starting TMA via the Telindus access device symbol), then TMA tries to start a TMA session using the IP address of the Orchid its LAN interface. Because this is not connected, you get a No response error after a while.
Solution
Do not define an IP address on the Orchid 1003 LAN its LAN interface if you are not using it.
TMA for HP OpenView Starting TMA on a Telindus access device
User manual 63
5.6 The executable DnsConfigure.exe What does this executable do?
It is possible that the Alarm Manager resides on a remote system. Even in that case it is possible to use its name resolution feature on your local system. Enable this by configuring the IP address of the remote system on your local system. Use the executable DnsConfigure.exe for this purpose.
The DnsConfigure.exe syntax
The DnsConfigure.exe syntax is as follows: DnsConfigure <remote_system_IP_address>
or DnsConfigure <remote_system_name>
In order to remove the path to the remote system, then type: DnsConfigure -undo
The DnsConfig file
When you execute DnsConfigure.exe, a DnsConfig file is created in the directory <TMA_path>\TMA\config. This file contains the IP address or name of the remote system.
Typing the DnsConfigure -undo command removes the DnsConfig file from your system.
Example
Suppose the Alarm Manager runs on a machine called MainSystem which has IP address 12.0.34.100. Then type at the command prompt of your local system: DnsConfigure 12.0.34.100
or DnsConfigure MainSystem

Starting TMA on a Telindus access device TMA for HP OpenView
64 User manual
5.7 Defining TMA for HP OpenView users and passwords If a password has been configured in the Telindus access device, this password has to be transmitted before a TMA session can be opened on this device. The TMA for HP OpenView password configuration tool TmaUserConf.exe allows you to create TMA users and assign a password to these users. The TMA users are related to the accounts that are defined on the management station.
Example
Suppose user Y logs on to a Windows NT management station and starts a TMA session on a Telindus access device.
Phase Description
1 TMA for HP OpenView checks which TMA user is related with the account of user Y.
2 TMA for HP OpenView checks which password is assigned to this user.
3 TMA for HP OpenView sends this password to the Telindus access device.
4 If this password �
• corresponds with the password defined in the Telindus access device, then a TMA session opens on the device.
• does not correspond with the password defined in the Telindus access device, then no TMA session opens.
If no passwords are defined in the Telindus access devices, then you do not have to create TMA users and corresponding passwords. However, every time you start a TMA session on a device, the following warning will appear: Warning: Could not read the user configuration file. You can stop this warning from appearing by executing the TmaUserConf.exe application and closing it without entering any data.
TMA for HP OpenView Managing the Alarm Manager with TMA
User manual 65
6. Managing the Alarm Manager with TMA As the Telindus access devices, the Alarm Manager can be configured using the Telindus Maintenance Application (TMA). This chapter explains how to start TMA on the Alarm Manager and how to browse the containment tree. It also gives an introduction to the attributes of the Alarm Manager. It introduces terms such as containment tree, group, object, attribute, value and action.
The following chapter, Chapter 7 - Basic configuration of the Alarm Manager, explains the basic configuration of the Alarm Manager. For a complete overview of all configuration, status and performance attributes, refer to the reference manual.
The following table gives an overview of this chapter.
Section Title Page
6.1 Opening a TMA session on the Alarm Manager 66
6.2 Containment tree terminology 67
6.3 Where can you find an overview of all the attributes? 69
6.4 The Alarm Manager containment tree 70

Managing the Alarm Manager with TMA TMA for HP OpenView
66 User manual
6.1 Opening a TMA session on the Alarm Manager In order to start a TMA session on the Alarm Manager, proceed as follows:
Step Action
1 Locate the Alarm Manager symbol on the HP OpenView network map.
You can find this symbol in the map of the workstation on which HP OpenView is installed. I.e. the management station map.
2 Position the cursor on the Alarm Manager symbol.
3 Click on the right mouse button.
⇒ A symbol pop-up menu with commands appears.
4 From the symbol pop-up menu, select the Start TMA command.
⇒ The TMA window opens, displaying the Alarm Manager containment tree.
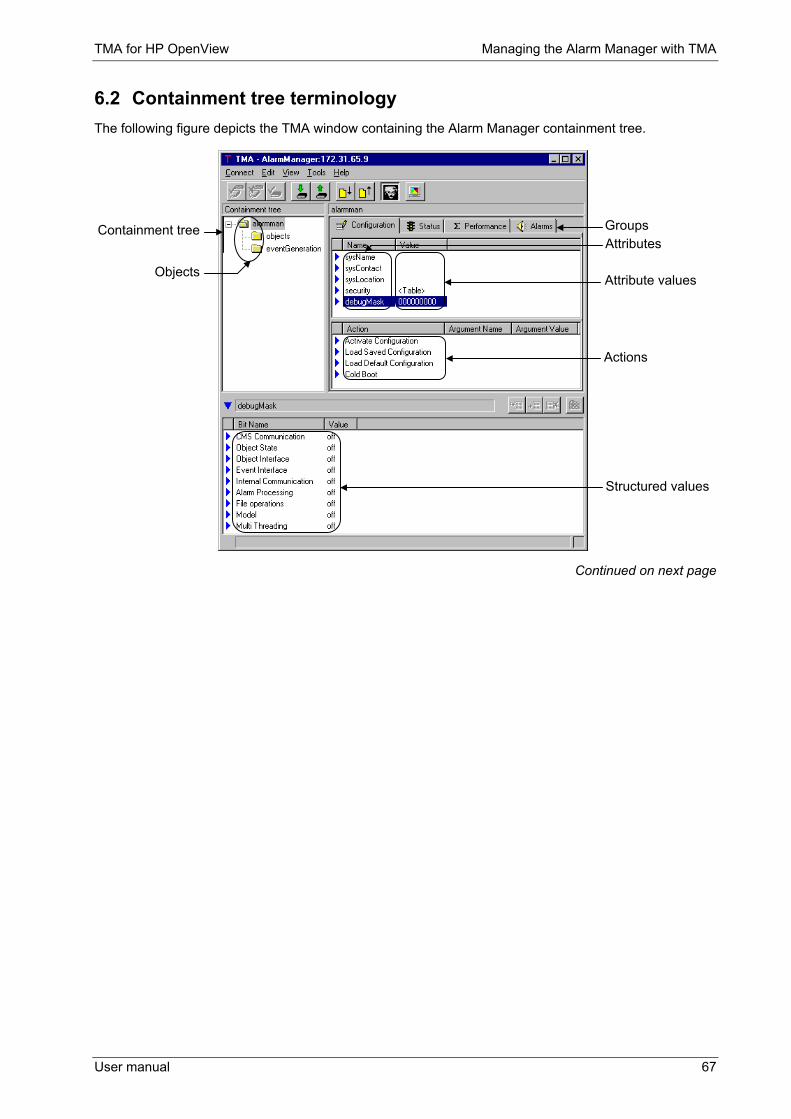
TMA for HP OpenView Managing the Alarm Manager with TMA
User manual 67
6.2 Containment tree terminology The following figure depicts the TMA window containing the Alarm Manager containment tree.
Continued on next page
Containment tree
Structured values
Actions
Attribute values
Groups
Objects
Attributes

Managing the Alarm Manager with TMA TMA for HP OpenView
68 User manual
Containment tree terminology (continued)
The following table explains the terminology associated with the containment tree.
Term Description
containment tree
The containment tree represents the hierarchical structure of the Alarm Manager. It is composed of a number of objects that are ordered in a tree. This tree resembles a Windows directory structure:
• it is also a levelled structure, with nodes which can be expanded or reduced • the containment tree objects can be compared with file folders • the objects contain attributes like file folders contain files.
object An object represents a physical interface, an application or a combination of both. Each object has its own set of attributes.
Example: The top object alarmman contains the sub object objects.
attribute An attribute is a parameter related to a certain object. It has a certain value.
Example: The object objects contains the configuration attribute maxPollTime, which can have a value ranging from 1 up to 20.
value An attribute has a certain value which is �
• changeable in case of a configuration attribute (provided you have write access) • read only in case of a status, performance and alarm attribute.
Example: The configuration attribute maxPollTime can have a value ranging from 1 up to 20.
structured value Some attribute values contain underlying values: a structured value. These values are displayed in the structured value window. If an attribute contains structured values then a bit string, <Table> or <Struct> is displayed after the attribute.
Example: The debugMask configuration attribute contains a structured value which displays debug messages that can be enabled or disabled.
group Groups assemble a set of attributes related by functionality. The Alarm Manager uses three of the four groups in TMA:
• configuration • status • performance.
action A group in combination with an object may have actions assigned to them. These actions are displayed in the action window.
Example: The Clear UnMngtObjectTable action only appears when the object objects is selected in combination with the group Status.

TMA for HP OpenView Managing the Alarm Manager with TMA
User manual 69
6.3 Where can you find an overview of all the attributes? The reference part of this manual explains all the attributes of the Alarm Manager. One chapter describes one group of attributes:
• chapter 9 describes the configuration attributes. • chapter 10 describes the status attributes. • chapter 11 describes the performance attributes. • chapter 12 describes the alarm attributes.
Within a chapter, the objects and their underlying attributes are discussed in a sequential manner. I.e. from top to bottom, as they appear in the attribute window.

Managing the Alarm Manager with TMA TMA for HP OpenView
70 User manual
6.4 The Alarm Manager containment tree The following table lists the different objects of the Alarm Manager containment tree.
Object This object contains �
> alarmman the general system attributes. It is the top object in the containment tree.
E.g. the configuration attributes sysName, sysContact and sysLocation.
>> objects the attributes associated with the polling of and synchronising with the Telindus access devices managed by TMA for HP OpenView and HP OpenView.
E.g. the configuration attribute maxPollTime.
>> inventory the attributes associated with inventory information of the devices that are managed by the Alarm Manager.
E.g. the status attribute inventoryTable.
>> eventGeneration the attributes associated with the streaming of alarms, the alarm log file and the filtering of alarms.
E.g. the configuration attribute logFile.
TMA for HP OpenView Basic configuration of the Alarm Manager
User manual 71
7. Basic configuration of the Alarm Manager This chapter explains why the Alarm Manager was introduced in TMA for HP OpenView. It also explains the main features of the Alarm Manager. For a complete overview of all configuration, status and performance attributes, refer to the reference manual.
The following table gives an overview of this chapter.
Section Title Page
7.1 Introducing the Alarm Manager 72
7.2 Auto discovery 73
7.3 Setting the clock of the Orchid 1003 LAN 80
7.4 Configuration and containment tree back-up 81
7.5 Model upload 82
7.6 Alarm status synchronisation 83
7.7 The TMA alarm status of a Telindus device 87
7.8 The unknownState alarm 92
7.9 Streaming detection 93
7.10 Filtering alarms 94
7.11 The alarm log file 95
7.12 Conflicting device detection 96
Because the terms IP device, proxied IP device and non-IP device are often used in this chapter, it is important you understand what they mean. For a detailed description of these terms, refer to Section 3.1 - What are IP, proxied IP and non-IP devices?.

Basic configuration of the Alarm Manager TMA for HP OpenView
72 User manual
7.1 Introducing the Alarm Manager Because HP OpenView does not know how to handle non-IP devices and because the usual mechanism of handling IP devices (using SNMP traps) is not optimal, the Alarm Manager was created as part of TMA for HP OpenView. The main features of the Alarm Manager are:
• Automatically detect all Telindus non-IP devices configured in the Orchid 1003 LAN and create (or delete) them in HP OpenView.
• Synchronise with the status of all Telindus IP devices in the network. • Synchronise with the status of all the Telindus devices managed by the Orchid 1003 LAN. • Backing up the configuration of Telindus IP devices. • For all the received alarms, generate an event in HP OpenView. • Update the colour (representing the total alarm level) of all Telindus devices. • Alarm filtering on different levels. • Generate an alarm log file.
TMA for HP OpenView Basic configuration of the Alarm Manager
User manual 73
7.2 Auto discovery This section deals with the auto discovery feature. It explains how the IP devices are discovered by HP OpenView and how the non-IP devices are discovered by the Alarm Manager. It also tells you more about the placement of the non-IP devices on the HP OpenView network map.
The following table gives an overview of this chapter.
Section Title Page
7.2.1 Auto discovery of IP devices 74
7.2.2 Auto discovery of non-IP and proxied IP devices 75
7.2.3 Placement of non-IP devices on the network map 76
7.2.4 Placement of non-IP devices on the network map � an example 77

Basic configuration of the Alarm Manager TMA for HP OpenView
74 User manual
7.2.1 Auto discovery of IP devices HP OpenView features auto discovery of IP devices. Auto discovery uses ping and SNMP messages.
When HP OpenView and TMA for HP OpenView are started, all the Telindus IP devices are passed to the Alarm Manager. The Alarm Manager starts polling the IP devices at regular time intervals. This time interval can be configured with the attribute maxPollTime (refer to Section 9.3 - Objects configuration attributes). As soon as the device answers to the poll, supplementary information is asked from the device (refer to Section 7.6 - Alarm status synchronisation).
If at a certain moment a new Telindus IP device is auto-detected or created by the user in OpenView, this IP device is also passed to the Alarm Manager, who starts polling the IP device.
A list of all the IP devices polled by the Alarm Manager and their corresponding state can be found in the status attribute objectTable (refer to Section 10.3 - Objects status attributes).
Orchid 1003 LANs are polled twice by the Alarm Manager: the first poll is to the Orchid itself, the second poll is to the NMS group of the Orchid.

TMA for HP OpenView Basic configuration of the Alarm Manager
User manual 75
7.2.2 Auto discovery of non-IP and proxied IP devices
Auto discovery of non-IP devices
When an Orchid 1003 LAN is discovered by HP OpenView and passed to the Alarm Manager, the objectTable of the Orchid is retrieved and analysed. This is a table where all access devices connected to the Orchid are defined with their NMS address. For more information on this attribute refer to the section on NMS group configuration attributes in the manual of the Orchid 1003 LAN.
When a non-IP device is found which is not yet known to HP OpenView, the Alarm Manager passes this device to HP OpenView who adds it to the network map.
Auto discovery of proxied IP devices
Devices for which an IP address is configured in the objectTable of the Orchid (i.e. proxied IP devices) are treated different from non-IP devices.
When a proxied IP device is found by the Alarm Manager, it is not immediately passed to HP OpenView. HP OpenView has to auto-detect the device itself first. Only then the Alarm Manager passes additional information on the device to HP OpenView who adds it to the network map.
As long as HP OpenView does not detect the proxied IP device, the nmsObjectState value in the telindusObjectTable attribute remains unlicensed for the corresponding proxied IP device. Refer to Section 10.3 - Objects status attributes.
If a device (non-IP or proxied IP) is no longer configured in the objectTable of the Orchid 1003 LAN, then the Alarm Manager deletes it from the HP OpenView network map.
Basic configuration of the Alarm Manager TMA for HP OpenView
76 User manual
7.2.3 Placement of non-IP devices on the network map HP OpenView is a platform designed for IP devices. Therefore, the Alarm Manager must specify in which map the non-IP devices must be placed. The map is chosen on basis of the configured mapNumber in the objectTable of the Orchid 1003 LAN. This mapNumber corresponds to an IP network configured in the managedNetworks attribute of the Orchid 1003 LAN. For more information on these attributes attribute refer to the section on NMS group configuration attributes in the manual of the Orchid 1003 LAN.
In case the mapNumber in the objectTable is not filled in, one of the IP segments of the Orchid 1003 LAN is taken as default. This is determined in the following order: 1. If filled in, the value of the attribute o1003/nmsGroup/mainNmsIpAddress is taken. This value must be a
configured IP address of the Orchid 1003 LAN. 2. The first non-zero LAN IP address is taken. 3. The first non-zero IP address of port A is taken. 4. The first non-zero IP address of port B is taken. 5. The first non-zero IP address configured in the attribute o1003/nmsGroup/ipNmsGateway/managedNetworks is
taken.
The following section gives an example on how non-IP devices are placed on the network map using the mapNumber attribute of the Orchid 1003 LAN.

TMA for HP OpenView Basic configuration of the Alarm Manager
User manual 77
7.2.4 Placement of non-IP devices on the network map � an example The following is an example of how the non-IP devices are placed on the network map using the mapNumber attribute of the Orchid 1003 LAN.
The o1003/nmsgroup/objectTable attribute
Suppose the following is configured in the objectTable of the Orchid 1003 LAN:
As you can see in the screenshot above, the mainNmsIpAddress is set to 172.31.32.2. This is, for instance, the IP address of the LAN interface of the Orchid 1003 LAN.
Modem4 in the objectTable configuration, is a Card Version modem. Hence it is inserted in a card nest CN4. Therefore, its exitPort attribute is defined as follows:
The o1003/nmsgroup/ipNmsGateway/managedNetworks attribute
The managedNetworks attribute is configured as follows:
Continued on next page

Basic configuration of the Alarm Manager TMA for HP OpenView
78 User manual
Placement of non-IP devices on the network map � an example (continued)
The Orchid 1003 LAN map
Suppose the IP address of the LAN interface of the Orchid 1003 LAN is: 172.31.32.2 with mask 255.255.255.240. In that case the map for this Orchid looks like:
The modem1 map
In the objectTable of the Orchid 1003 LAN, no mapNumber is defined for modem1 (<OPT>). Therefore, the mainNmsIpAddress value is taken to define in which map modem1 is placed.
In our example, the mainNmsIpAddress value is the IP address of the LAN interface of the Orchid. Therefore, modem1 is placed in the sub-map of the LAN interface (i.e. sub-map 172.31.32).
Continued on next page

TMA for HP OpenView Basic configuration of the Alarm Manager
User manual 79
Placement of non-IP devices on the network map � an example (continued)
The modem2 map
In the objectTable of the Orchid 1003 LAN, mapNumber 0 is defined for modem2. This mapNumber corresponds with the mapNumber 0 defined in the managedNetworks attribute. In this attribute, mapNumber 0 is assigned IP address 172.31.32.32. Therefore, modem2 is placed in the sub-map 172.31.32.32.
The modem3 map
In the objectTable of the Orchid 1003 LAN, mapNumber 1 is defined for modem3. This mapNumber corresponds with the mapNumber 1 defined in the managedNetworks attribute. In this attribute, mapNumber 1 is assigned IP address 172.31.32.48. Therefore, modem3 is placed in the sub-map 172.31.32.48.
The modem4 map
In the objectTable of the Orchid 1003 LAN, mapNumber �cardnest� is defined for modem4. This means that in the managedNetworks attribute, a mapNumber is searched for which the value corresponds with the cardnestAddress value of modem4.
In our example, the cardnestAddress for modem4 is 2. In the managedNetworks attribute, a mapNumber is defined with value 2. The IP address assigned to this mapNumber 2 is 172.31.32.48. Therefore, modem4 is placed in the sub-map 172.31.32.48.

Basic configuration of the Alarm Manager TMA for HP OpenView
80 User manual
7.3 Setting the clock of the Orchid 1003 LAN Because alarms coming from an Orchid 1003 LAN contain a timestamp, it is important that the real-time clock of all the Orchids are synchronised. Therefore, the Alarm Manager sets the clock of all the Orchids:
• the first time when the Alarm Manager successfully polls the Orchid 1003 LAN • from then on, every day at midnight.

TMA for HP OpenView Basic configuration of the Alarm Manager
User manual 81
7.4 Configuration and containment tree back-up How does configuration and containment tree back-up work?
The Alarm Manager can back-up up to ten configurations and containment trees of a Telindus device. As soon as the Alarm Manager successfully polled a device, it verifies whether the configuration and/or the containment tree of this device has changed. If so, the Alarm Manager retrieves the full configuration and/or containment tree and saves it to the hard disk.
Using the maxCfgFilesSaved attribute you can configure how many configurations and containment trees the Alarm Manager has to back-up for each device. Older files are deleted. For more information, refer to Section 9.3 - Objects configuration attributes.
Where are the files stored?
The configuration and containment tree files are stored in the following directories:
• <TMA_path>\TMA\config\ipcfg : contains the configuration files of the IP devices. The file name is formatted as follows: c<ip>_<n>.cms.
• <TMA_path>\TMA\config\ipinv : contains the containment tree files of the IP devices. The file name is formatted as follows: t<ip>_<n>.cms.
• <TMA_path>\TMA\config\nmscfg : contains the configuration files of the non-IP and proxied IP devices. The file name is formatted as follows: c<ip>_<address>_<n>.cms.
• <TMA_path>\TMA\config\nmsinv : contains the containment tree files of the non-IP and proxied IP devices. The file name is formatted as follows: t<ip>_<address>_<n>.cms.
Also the Alarm Manager its own configuration is kept on the hard disk: <TMA_path>\TMA\config\alarmman.cms.
How is the file name formatted?
As you can see in the paragraph above, the file name contains the following strings:
• c: indicates it is a configuration file. • t: indicates it is a containment tree file. • <ip>: is the IP address of the �
− IP device (in case of an IP device). − proxy device, e.g. the Orchid 1003 LAN (in case of a non-IP or proxied IP device).
• <address>: is the absolute or relative address of the non-IP or proxied IP device. It can have the following format: − A<a> is the absolute address of the device, where <a> is the address value. − R<r>R<x-yy-z> is the relative address of the device when connected through the high-speed bus,
where <r> is the address value, <x> is the rack number, <yy> is the slot number and <z> is the device number (i.e. A, B, C or D).
− R<r>P<p> is the relative address of the device when connected through a serial port, where <r> is the address value and <p> is the serial port number.
• <n> is the serial number of the file name. This number increments each time a new file is saved. The number ranges from 0 up to 9. I.e. when 10 is reached, the number wraps to 0.
What is the format of the files?
The format of the configuration and containment tree files is CMS. This is the same format as if you performed a Export - Full configuration command in TMA.
Basic configuration of the Alarm Manager TMA for HP OpenView
82 User manual
7.5 Model upload What is a model file?
A model file provides, for each Telindus device, the information TMA needs to connect and exchange information with the device.
The installation of the model files may occur separately from the TMA executable installation. This because the model files evolve as the devices evolve. The model files delivered on the CD-ROM correspond to the latest firmware version of the Telindus devices at the creation time of the CD-ROM. If, at a later time, you want to add devices with a more recent firmware version, a re-installation of the model files of these devices may be required. Auto upload automates this process.
What is the location of the model files?
The model files are located in the directory <TMA_path>\TMA\model and have the extension *.mod.
What is model upload?
The Alarm Manager is capable of retrieving (uploading) the model file from the device. This means that as soon as the Alarm Manager is able to poll the device, it asks the device for its model file and places it in the directory <TMA_path>\TMA\model. These uploaded model files can be identified because they have the extension *.smo. They are present alongside the normal model file (*.mod). They are, as it were, an addition to the normal model file.
If for some reason the auto upload feature does not work, you will still need to do the model upgrade manually. Refer to Section 2.8 - How to upgrade the model files.

TMA for HP OpenView Basic configuration of the Alarm Manager
User manual 83
7.6 Alarm status synchronisation This section explains how the Alarm Manager synchronises with the alarm status of the Telindus access devices. The following table gives an overview of this section.
Section Title Page
7.6.1 Synchronising with the alarm status of IP devices 84
7.6.2 Synchronising with the alarm status of non-IP and proxied IP devices 85
7.6.3 The logged event 86

Basic configuration of the Alarm Manager TMA for HP OpenView
84 User manual
7.6.1 Synchronising with the alarm status of IP devices
First time synchronisation
As soon as the Alarm Manager successfully polled an IP device, it asks the current alarm status of that device. The first time the status is retrieved, all the currently active alarms of the device are translated by the Alarm Manager into HP OpenView events. Also the total alarm level of the device is passed to HP OpenView. This total alarm level then determines the colour of the device symbol on the HP OpenView network map. For more information on symbol colouring refer to Section 4.2.3 - The colour of the symbols on the HP OpenView network map and Section 4.3 - The Telindus access device symbol colours.
Continuous synchronisation
When the Alarm Manager is synchronised with the alarm status of the IP device, the alarms of the device are translated into events as they come in. I.e. each alarm received from the device is translated by the Alarm Manager into an HP OpenView event. If necessary, the colour of the device symbol is adjusted.
Resynchronisation
If the Alarm Manager has to resynchronise with the alarm status of an IP device (i.e. the status has to be re-read), then it activates the AlarmSyncLoss alarm. After that, all the changed alarms of the device are passed by the Alarm Manager to HP OpenView. Then the Alarm Manager deactivates the AlarmSyncLoss alarm.

TMA for HP OpenView Basic configuration of the Alarm Manager
User manual 85
7.6.2 Synchronising with the alarm status of non-IP and proxied IP devices For non-IP and proxied IP devices, it is the Orchid 1003 LAN that synchronises with the alarm status of these devices. This status information is then passed on to the Alarm Manager. I.e. the Alarm Manager indirectly �synchronises� with the non-IP and proxied IP devices through the NMS group of the Orchid 1003 LAN.
First time synchronisation
When an Orchid 1003 LAN boots, it synchronises with the devices configured in the objectTable.
During such a start-up phase, a lot of alarms are generated. Because these particular alarms are not very useful, it is best that they are not passed on to the Alarm Manager. Therefore, the Alarm Manager waits a certain time before it synchronises with the NMS group of the Orchid 1003 LAN.
This delay time can be set with the statusDelay attribute (refer to Section 9.3 - Objects configuration attributes). The statusDelay is the sysUpTime of the Orchid 1003 LAN before the Alarm Manager starts synchronising.
Continuous synchronisation
When the Alarm Manager is synchronised with the alarm status of the non-IP or proxied IP device, the alarms of the device are translated into events as they come in. I.e. each alarm received from the device by the Orchid 1003 LAN, is passed to the Alarm Manager who translates this alarm into an HP OpenView event. If necessary, the colour of the device symbol is adjusted.
Resynchronisation
If the Alarm Manager, or more particular the Orchid 1003 LAN, has to resynchronise with the alarm status of a device (i.e. the status has to be re-read), then it activates the AlarmSyncLoss alarm. After that, all the changed alarms of the device are passed through the Orchid to the Alarm Manager and eventually to HP OpenView. Then the Orchid 1003 LAN deactivates the AlarmSyncLoss alarm.
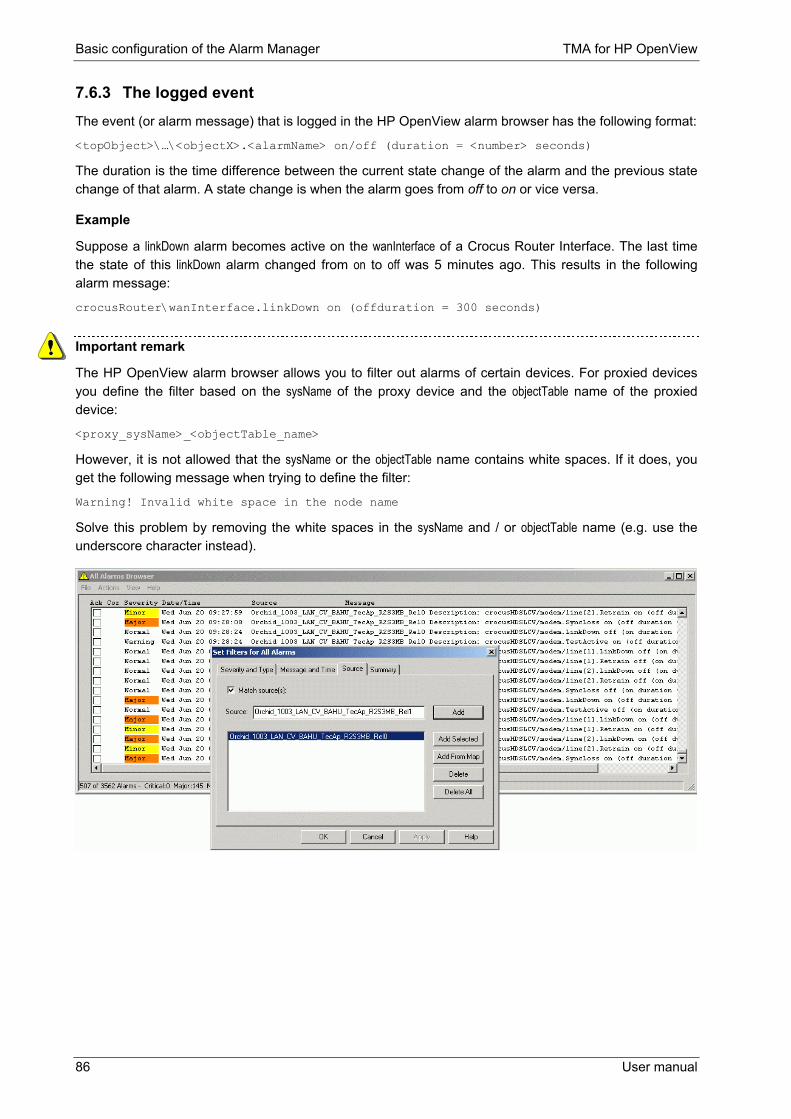
Basic configuration of the Alarm Manager TMA for HP OpenView
86 User manual
7.6.3 The logged event The event (or alarm message) that is logged in the HP OpenView alarm browser has the following format:
<topObject>\�\<objectX>.<alarmName> on/off (duration = <number> seconds)
The duration is the time difference between the current state change of the alarm and the previous state change of that alarm. A state change is when the alarm goes from off to on or vice versa.
Example
Suppose a linkDown alarm becomes active on the wanInterface of a Crocus Router Interface. The last time the state of this linkDown alarm changed from on to off was 5 minutes ago. This results in the following alarm message:
crocusRouter\wanInterface.linkDown on (offduration = 300 seconds)
Important remark
The HP OpenView alarm browser allows you to filter out alarms of certain devices. For proxied devices you define the filter based on the sysName of the proxy device and the objectTable name of the proxied device:
<proxy_sysName>_<objectTable_name>
However, it is not allowed that the sysName or the objectTable name contains white spaces. If it does, you get the following message when trying to define the filter:
Warning! Invalid white space in the node name
Solve this problem by removing the white spaces in the sysName and / or objectTable name (e.g. use the underscore character instead).
TMA for HP OpenView Basic configuration of the Alarm Manager
User manual 87
7.7 The TMA alarm status of a Telindus device This section explains how you can quickly get an overview of the alarm status of a Telindus device. It also shows you how you can acknowledge individual alarms. It discusses the relation between the TMA alarm status window and the HP OpenView alarm browser. Finally, a short word is said on how acknowledged and unacknowledged alarms can influence the colour of the Telindus device symbol.
The following table gives an overview of this section.
Section Title Page
7.7.1 Displaying the TMA alarm status window 88
7.7.2 The TMA alarm status window elements 89
7.7.3 The TMA alarm status window � alarm browser relation 90
7.7.4 (Un)acknowledged alarms and the symbol colour 91
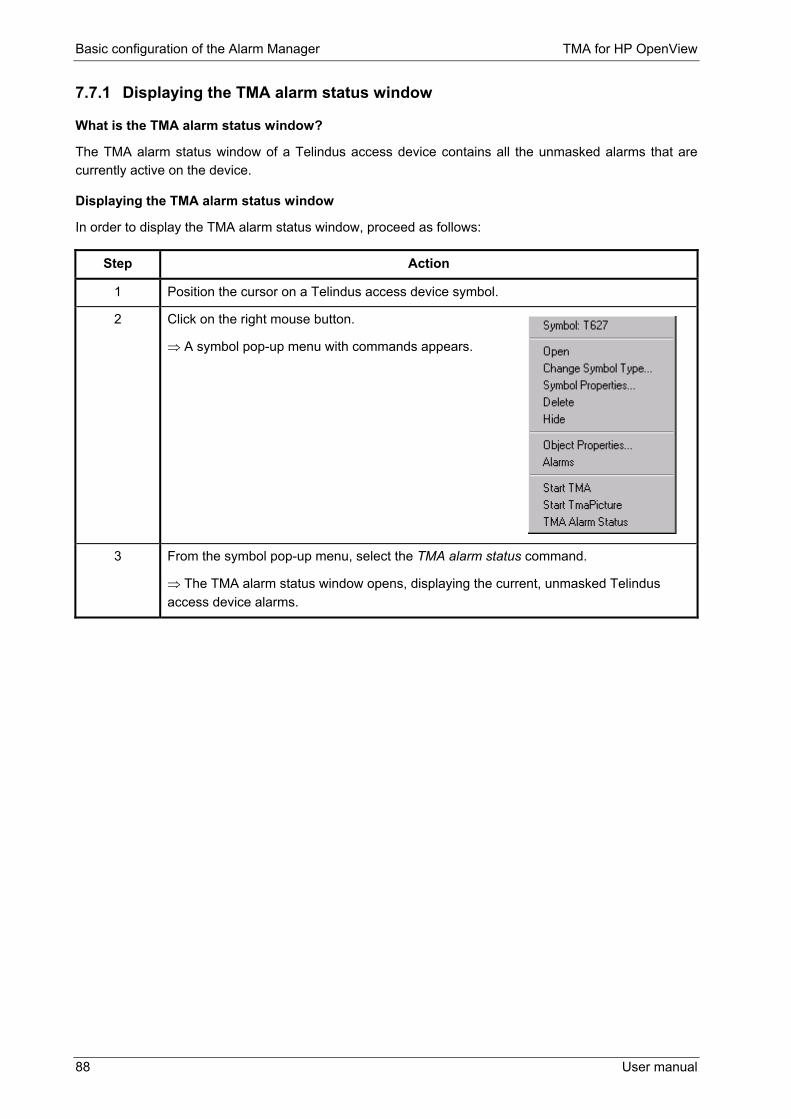
Basic configuration of the Alarm Manager TMA for HP OpenView
88 User manual
7.7.1 Displaying the TMA alarm status window
What is the TMA alarm status window?
The TMA alarm status window of a Telindus access device contains all the unmasked alarms that are currently active on the device.
Displaying the TMA alarm status window
In order to display the TMA alarm status window, proceed as follows:
Step Action
1 Position the cursor on a Telindus access device symbol.
2 Click on the right mouse button.
⇒ A symbol pop-up menu with commands appears.
3 From the symbol pop-up menu, select the TMA alarm status command.
⇒ The TMA alarm status window opens, displaying the current, unmasked Telindus access device alarms.

TMA for HP OpenView Basic configuration of the Alarm Manager
User manual 89
7.7.2 The TMA alarm status window elements The following figure shows an example of an TMA alarm status window:
The elements of the TMA alarm status window are the following:
Element Description
This is the refresh button. Use this button to refresh the TMA alarm status window so that it displays the latest information.
This is the acknowledge button. Use this button to acknowledge an alarm. Do this by selecting an entire line and pressing the button. Alternatively you can immediately tick the acknowledge field (first field).
<Ack field> By ticking the first field of a line, you acknowledge the alarm.
This has an impact on the HP OpenView alarm browser and possibly on the colour of the Telindus access device symbol. For more information refer to Section 7.7.3 - The TMA alarm status window � alarm browser relation and Section 7.7.4 - (Un)acknowledged alarms and the symbol colour.
Path Displays the Telindus access device containment tree path of the current alarm.
The path is of the form <top_object>/<sub_object>.<alarm>.
Example
Suppose the following is displayed: crocusFoCv/quadE1/g703[3].linkDown. This means the linkDown alarm is active. This alarm is located in the sub-object g703[3], which is located in the sub-object quadE1 which is located in the top-object crocusFoCv.
Timestamp Displays the date and time the Orchid 1003 LAN (in case of a non- or poxied IP device) or the Alarm Manager (in case of a true IP device) received the alarm.
The timestamp is of the form mm/dd/yy � hh:mm:ss AM/PM
Duration Displays the time the alarm is active.
Level Displays the alarm level of the current alarm.
Acked by In case the alarm is acknowledged, this field displays the login name of the person who acknowledged the alarm.
Ack time In case the alarm is acknowledged, this field displays the time when this alarm was acknowledged.
The ack time is of the form mm/dd/yy � hh:mm:ss AM/PM
Streaming Displays whether the alarm is streaming (on) or not (off).

Basic configuration of the Alarm Manager TMA for HP OpenView
90 User manual
7.7.3 The TMA alarm status window � alarm browser relation Starting from HP OpenView version 6.0 the TMA alarm status window and the HP OpenView alarm browser are linked. This explained in the following table:
alarm browser TMA alarm status window
Description
acknowledge acknowledge If you acknowledge an alarm in the alarm browser then this alarm is also acknowledged in the TMA alarm status window, and vice versa.
unacknowledge unacknowledge If you unacknowledge an alarm in the alarm browser then this alarm is also unacknowledged in the TMA alarm status window.
It is not possible to unacknowledge alarms in the TMA alarm status window.
acknowledge delete
no action
If you delete an alarm in the alarm browser then this alarm is �
• acknowledged • left unchanged � in the TMA alarm status window, depending on the value of the attribute deleteEventAction. See below.
alarmman/eventGeneration/deleteEventAction default: ack event
Use the deleteEventAction attribute to determine what is done with an alarm in the TMA alarm status window when this alarm is deleted in the HP OpenView alarm browser. The following table clarifies this:
If you delete an alarm in the alarm browser then in the TMA alarm status window this alarm is �
when the deleteEventAction attribute is set to �
acknowledged ack event
left unchanged none

TMA for HP OpenView Basic configuration of the Alarm Manager
User manual 91
7.7.4 (Un)acknowledged alarms and the symbol colour
alarmman/eventGeneration/statusSource default: all events
Use the statusSource attribute to determine how the (un)acknowledged alarms influence the colour of the Telindus access device symbol. The following table clarifies this:
If the statusSource attribute is set to �
then the device status corresponds with the total alarm level of �
all events, all alarms, both acknowledged and unacknowledged.
unacked events, the unacknowledged alarms only. I.e. the acknowledged alarms are ignored.

Basic configuration of the Alarm Manager TMA for HP OpenView
92 User manual
7.8 The unknownState alarm If an IP device does not respond to the polling of the Alarm Manager, then a notResponding alarm is generated for this device. If this device is an Orchid 1003 LAN, then it is also impossible to synchronise with the non-IP or proxied IP devices that are connected to this Orchid. For these devices, an unknownState alarm is generated.
In case such an unknownState alarm occurs, you can configure what action has to be taken. For more information, refer to the unknownAlarmConfig attribute in Section 9.5 - Event generation configuration attributes.
TMA for HP OpenView Basic configuration of the Alarm Manager
User manual 93
7.9 Streaming detection What is streaming?
Under certain circumstances, it is possible that an alarm continuously toggles between on and off. This is called streaming.
Streaming results in a very long alarm list in HP OpenView which eventually could overload the system. To prevent this from happening, the Alarm Manager is able to detect streaming and to stop that the �streaming� alarm is passed on to HP OpenView.
How does the Alarm Manager detect streaming?
If the number of times a certain alarm comes on during a certain period (i.e. the streamingInterval attribute) equals or exceeds the value configured in the attribute streamingOnLimit, then the Alarm Manager considers that this particular alarm is streaming.
The Alarm Manager passes the particular alarm on to HP OpenView once, and adds the string Streaming Activated at the end of the alarm message. From that moment forward, the Alarm Manager stops passing on the streaming alarm to HP OpenView.
When is streaming deactivated?
If the number of times a certain alarm comes on during the streamingInterval equals or drops below the value configured in the attribute streamingOffLimit, then the Alarm Manager no longer considers that this particular alarm is streaming.
The Alarm Manager passes an alarm on to HP OpenView which contains the string Streaming Deactivated at the end of the alarm message. From that moment forward, the passing of alarms to HP OpenView is normalised again.

Basic configuration of the Alarm Manager TMA for HP OpenView
94 User manual
7.10 Filtering alarms Using the filter attribute in the objectTable of the Orchid 1003 LAN, you can define a filter number for each non-IP and proxied IP device entered in this table. For IP devices, you can define this filter number using the alarmFilter attribute located in the management object.
These filter numbers correspond to the filter numbers as they can be defined using the filters attribute in the eventGeneration object of the Alarm Manager.
Using these filter numbers, you can determine which is the minimum required alarm level in order to �
• log an alarm in the log file • pass the alarm to HP OpenView.
For more information on the filters attribute, refer to Section 9.5 - Event generation configuration attributes.
In older firmware versions of Telindus IP access devices it is possible that the alarmFilter attribute is not present yet. In that case, a value of 0 is assumed.
TMA for HP OpenView Basic configuration of the Alarm Manager
User manual 95
7.11 The alarm log file What is the alarm log file?
The Alarm Manager not only passes alarms to HP OpenView, it also writes them to a log file. This file is located in the sub-directory <TMA_path>\TMA\log. You can set the properties of this log file using the logFile attribute in the eventGeneration object of the Alarm Manager. For more information, refer to Section 9.5 - Event generation configuration attributes.
The alarm log file name
The name of the alarm log file looks as follows:
am<dd>_<mm>_<yyyy>_<hh>h<mm>m<ss>s.log
Where dd/mm/yyyy and hh:mm:ss is the date and hour when the first alarm was logged in the file.
Example: am03_07_2000_18h34m46s.log
What is logged in the alarm log file?
The following elements are logged in the file (they are separated by tabs):
• The timestamp of the alarm followed by the duration. The duration is the time difference between the current state change of the alarm and the previous state change of that alarm. A state change is when the alarm goes from off to on or vice versa. E.g. 24 march 2000 12:44:12 (445 seconds)
• The alarm level of this alarm. This can range from 0 up to 254. • The name of the device that has sent the alarm.
− In case of an IP device, this is the sysName. If the sysName is empty, it is the IP address of the device.
− In case of non-IP and proxied IP devices, this is the sysName of the Orchid 1003 LAN followed by a �_� character and the name by which the device is configured in the objectTable of the Orchid.
• The alarm message. This includes the object path of the alarm separated by a �/�. The last object is followed by a �.� and the name of the alarm. Then the string �on� or �off� is printed. This results in the following: <topObject>\�\<objectX>.<alarmName> on/off. E.g. crocusRouter\wanInterface.linkDown on

Basic configuration of the Alarm Manager TMA for HP OpenView
96 User manual
7.12 Conflicting device detection When are devices conflicting?
Devices can conflict, for instance, due to an incorrect configuration (e.g. two devices with the same IP address).
How are conflicting devices indicated?
The Alarm Manager is able to detect conflicting devices. It indicates a conflicting device as follows:
When the conflicting device is �
then �
an IP device, its symbol is coloured blue on the HP OpenView map, the ctrlPollState indicates Conflicting and a message is shown in the messages table.
a proxied IP device, its symbol is coloured blue on the HP OpenView map, the nmsPollState indicates Conflicting and a message is shown in the messages table.
a non-IP device, its symbol is deleted from the HP OpenView map, the nmsPollState indicates Conflicting and a message is shown in the messages table.
A device conflicting with itself
When two devices are in conflict with each other due to an erroneous configuration, we can speak of a true conflict. However, a device can be in conflict with itself when HP OpenView does not see it as being one and the same device.
Example:
Suppose an IP device has a certain IP address and HP OpenView uses this address to poll the device.
Phase Description
1 Suppose you change the IP address of the device.
⇒ The device gets the status Not Responding in HP OpenView.
2 HP OpenView then auto-discovers the new IP address, it does not know that the non-responding device and the device with the new IP address is one and the same device.
⇒ It creates a new devices and sends it to the Alarm Manager.
3 The Alarm Manager detects that these two devices are in conflict with each other.
⇒ It colours both symbols blue.
4 The situation stays like this until one of the two devices is deleted in HP OpenView (by the user or HP OpenView itself) after which the situation normalises and the remaining device contains the latest status information.

TMA for HP OpenView Configuration guidelines for HP OpenView
User manual 97
8. Configuration guidelines for HP OpenView This chapter gives some useful configuration guidelines for HP OpenView. The following table gives an overview of this chapter.
Section Title Page
8.1 Enabling auto discovery in HP OpenView 98
8.2 Making all levels of sub-maps persistent 99
8.3 Configuring the polling parameters 100
8.4 Setting a sufficiently large poll time-out 101
8.5 Cleaning the trapd.conf file 102
8.6 Solving possible colour problems on Sun Solaris 105

Configuration guidelines for HP OpenView TMA for HP OpenView
98 User manual
8.1 Enabling auto discovery in HP OpenView To enable auto discovery in HP OpenView, proceed as follows:
Step Action
1 In the Options menu, select Network Polling Configuration: IP/IPX.
2 In the IP Discovery tab, select Discover new IP nodes and press OK.

TMA for HP OpenView Configuration guidelines for HP OpenView
User manual 99
8.2 Making all levels of sub-maps persistent All levels of sub-maps should be made persistent in order to prevent problems with the auto discovery of the Telindus access devices. For Windows, the levels of sub-maps are not persistent by default.
To make all levels of sub-maps persistent for Windows, proceed as follows:
Step Action
1 In the Map menu, select Properties.
2 In the Applications tab, select IP Map and press Configure For This Map.
3 Double click on the field To what level should sub-maps be persistent, select All levels and press OK.
To make all levels of sub-maps persistent for UNIX, proceed as follows:
Step Action
1 In the Map menu, pick Maps.
2 Select Describe/Modify.
3 For the field To what level should sub-maps be persistent, select All levels.

Configuration guidelines for HP OpenView TMA for HP OpenView
100 User manual
8.3 Configuring the polling parameters For the true IP device (i.e. not for the proxied IP devices) such as Orchid 1003 LAN, Crocus Router 2M, etc., the configuration of the polling parameters is very critical for the well behaviour and performance of HP OpenView. For the well configuration of the polling parameters, proceed as follows:
Step Action
1 In the Performance menu, select Network Polling Statistics.
2 In the Options menu, select SNMP configuration.
3 Change the polling parameters so that every single line in the statistics graph stays in the positive region.

TMA for HP OpenView Configuration guidelines for HP OpenView
User manual 101
8.4 Setting a sufficiently large poll time-out Modems without flash memory(1) need a sufficiently large poll timeout configured on HP OpenView for proper operation. Especially if statistical information is assembled via SNMP, a minimum time-out value of 20 seconds is recommended.
Either you can set the polling timeout for all devices �
Step Action
1 In the Options menu, select SNMP configuration.
2 Change the Status Polling value to e.g. 60 seconds.
or you can change the poll timeout selectively �
Step Action
1 In the Options menu, select SNMP configuration.
2 Select the Specific nodes tab.
3 Change the Status Polling value to e.g. 60 seconds for a specific device. (1) Usually these are older devices, such as the Crocus HS or Crocus HDSL (not the Crocus HDSL F). More recent devices all have flash memory.

Configuration guidelines for HP OpenView TMA for HP OpenView
102 User manual
8.5 Cleaning the trapd.conf file This section explains what the HP OpenView file trapd.conf is. It also explains when and how to clean this file. The following table gives an overview of this section.
Section Title Page
8.5.1 What is the trapd.conf file? 103
8.5.2 When to clean the trapd.conf file? 103
8.5.3 Cleaning the trapd.conf file 104
TMA for HP OpenView Configuration guidelines for HP OpenView
User manual 103
8.5.1 What is the trapd.conf file? The HP OpenView file trapd.conf contains trap definitions.
TMA for HP OpenView before the Alarm Manager
In previous versions of TMA for HP OpenView, the Orchid 1003 LAN and HP OpenView used SNMP traps to exchange alarm information.
When such a version of TMA for HP OpenView was installed, it created a directory <TMA_path>\TMA\TMAOV where the trap files (*.trp) of all the Telindus devices were placed. What is more, the information contained in these files was copied to the HP OpenView file trapd.conf.
TMA for HP OpenView and the Alarm Manager
Starting from TMA for HP OpenView version S0006/00700 (Windows), S0005/00800 (Sun Solaris) or S0008/00400 (HP UNIX) and the TMA data files version S0011/03100, an Alarm Manager has been implemented in HP OpenView. The communication between this Alarm Manager and the Orchid 1003 LAN now uses the proprietary CMS2 protocol.
This means that the trap files are no longer necessary. Therefore, the directory <TMA_path>\TMA\TMAOV is removed when a newer version of TMA for HP OpenView is installed. However, the data in the trapd.conf file is not removed.
Because the performance of HP OpenView is inversely proportional with the length of the trapd.conf file, it might be best to clean this file. I.e. to remove the (unnecessary) trap information of the Telindus devices.
8.5.2 When to clean the trapd.conf file? You have to clean the trapd.conf file when you upgrade from a TMA for HP OpenView version lower than S0006/00700 (Windows), S0005/00800 (Sun Solaris) or S0008/00400 (HP UNIX) to a higher version.

Configuration guidelines for HP OpenView TMA for HP OpenView
104 User manual
8.5.3 Cleaning the trapd.conf file In order to clean the trapd.conf file, proceed as follows:
Step Action
1 Locate the trapd.conf file on your system.
2 Open the trapd.conf file in a text editor.
3 Search for the following Telindus identification string: 1.3.6.1.4.1.776
4 Remove every entry from the word EVENT up to the word EDESC where this string appears. However, do not remove the entries of the Alarm Manager.
The following figure clarifies this:
5 Save the trapd.conf file.
REMOVE:
DO NOT REMOVE:

TMA for HP OpenView Configuration guidelines for HP OpenView
User manual 105
8.6 Solving possible colour problems on Sun Solaris Problem
On Sun Solaris it is sometimes noticed that when starting the TMA graphical user interface, some buttons are grey and others had strange colours.
Reason
This is due to the limited number of 256 colours that is supported on standard video cards. Each application allocates a number of colours. Once all 256 colours are allocated, there are non left for additional applications. HP OpenView already allocates 128 colours.
What is more, the windu_client daemon has to be able to allocate the 16 standard colours in the default colour map, else the daemon does not start. TMA uses a private colour map (so no problem there), except for these 16 colours.
Solution
Start the windu_client daemon in the system start-up script. By doing so, the daemon allocates 16 colours before HP OpenView will allocate its 128 colours.
Add the following line to your system start-up script:
>windu_client start

TMA for HP OpenView
106 Reference manual
Reference manual

TMA for HP OpenView
Reference manual 107

Configuration attributes TMA for HP OpenView
108 Reference manual
9. Configuration attributes This chapter discusses the configuration attributes of the Alarm Manager. The following table gives an overview of this chapter.
Section Title Page
9.1 Configuration attribute overview 109
9.2 General configuration attributes 110
9.3 Objects configuration attributes 115
9.4 Inventory configuration attributes 119
9.5 Event generation configuration attributes 120

TMA for HP OpenView Configuration attributes
Reference manual 109
9.1 Configuration attribute overview
> alarmman sysName sysContact sysLocation security alarmMask alarmLevel debugMask Action: Activate Configuration Action: Load Saved Configuration Action: Load Default Configuration Action: Cold Boot
>> objects objectTable maxPollTime statusDelay noReplyTimeOut maxPendingRequests maxCfgFilesSaved unmanageTable alarmMask alarmLevel
>> inventory inventory alarmMask alarmLevel
>> eventGeneration streamingOnLimit streamingOffLimit streamingInterval logFile filters unknownAlarmConfig maxPendingStatusRequests deleteEventAction statusSource

Configuration attributes TMA for HP OpenView
110 Reference manual
9.2 General configuration attributes
alarmman/sysName default: <empty>
This is a field where you can assign a name to the Alarm Manager. The field has a limit of 64 characters.
This is an SNMP MIB2 parameter.
alarmman/sysContact default: <empty>
This is a field where you can fill in the name of a contact person together with information on how to contact this person. The field has a limit of 64 characters.
This is an SNMP MIB2 parameter.
alarmman/sysLocation default: <empty>
This is a field where you can fill in the physical location of the Alarm Manager, i.e. the management station. The field has a limit of 64 characters.
This is an SNMP MIB2 parameter.
Continued on next page
TMA for HP OpenView Configuration attributes
Reference manual 111
General configuration attributes (continued)
alarmman/security default: <empty>
In order to avoid unauthorised access to the Alarm Manager, you can create a list of passwords with associated access levels. The security attribute contains the following elements:
Element Description Default value
password The password is a string of maximum 10 characters. <empty>
accessRights This attribute represents the access levels assigned to a password. It is a bit string whereof each bit corresponds to an access level. The different access levels are:
• ReadAccess • WriteAccess • SecurityAccess • FileSystemAccess (for future purposes)
111
The following table shows, for each access level, what you can or can not do:
Access level Read attributes
Change attributes
Read security attributes (1)
Change security attributes (1)
Execute actions (2)
readAccess yes no no no no
writeAccess yes yes no no yes
securityAccess yes yes yes yes yes (1) The Alarm Manager has the following security attributes:
• alarmman/security
(2) Actions are e.g. Activate Configuration, shutDown, etc.
If no passwords are created, everybody has complete access.
If you define at least one password, it is impossible to access the Alarm Manager with TMA if you do not enter the correct password.
If you create a list of passwords, you should create at least one with write and security access. If not, you will be unable to make configuration and password changes after activation of the new configuration.
Continued on next page
Configuration attributes TMA for HP OpenView
112 Reference manual
General configuration attributes (continued)
alarmman/alarmMask
alarmman/alarmLevel
For more information on the configuration alarm attributes alarmMask and alarmLevel and on the alarms in general, refer to Section 12.2 - Introducing the alarm attributes.
For more information on the alarms of the alarmman object, refer to Section 12.3 - General alarms.
alarmman/debugMask default: 000000000
This attribute is used to selectively enable certain debug messages. This attribute is used by the Telindus engineers for problem solving.
It is best to leave this attribute to its default setting.
Continued on next page
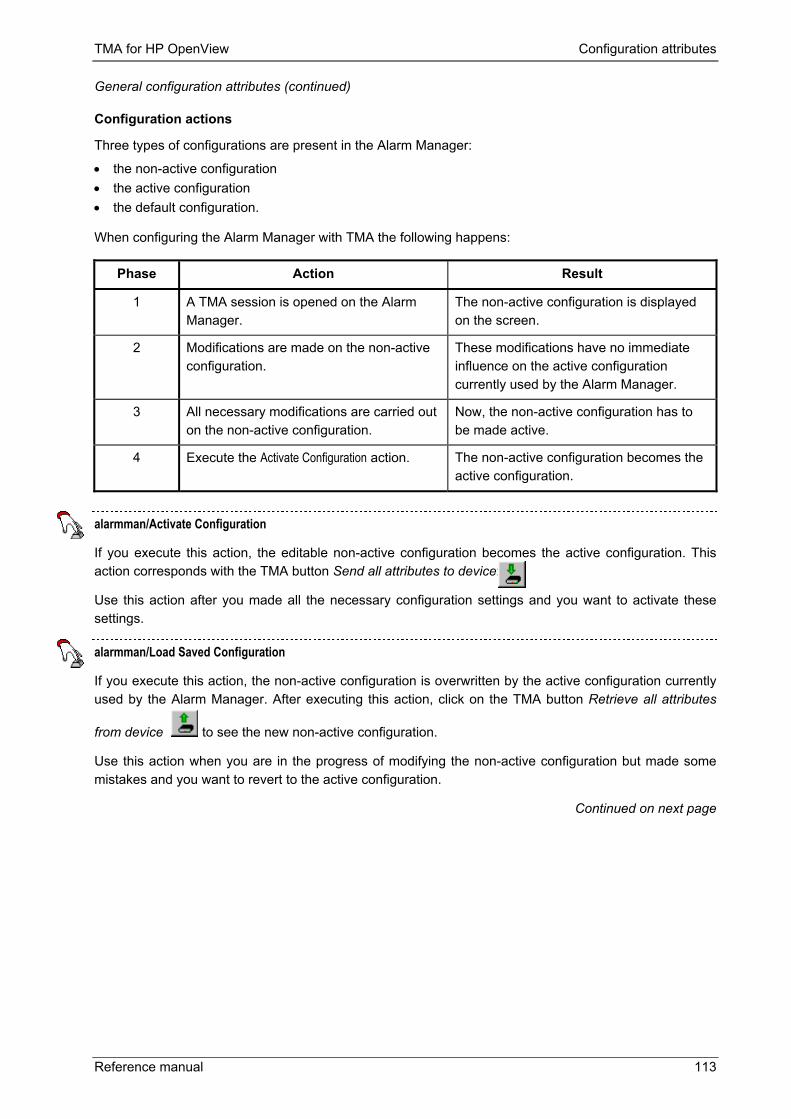
TMA for HP OpenView Configuration attributes
Reference manual 113
General configuration attributes (continued)
Configuration actions
Three types of configurations are present in the Alarm Manager:
• the non-active configuration • the active configuration • the default configuration.
When configuring the Alarm Manager with TMA the following happens:
Phase Action Result
1 A TMA session is opened on the Alarm Manager.
The non-active configuration is displayed on the screen.
2 Modifications are made on the non-active configuration.
These modifications have no immediate influence on the active configuration currently used by the Alarm Manager.
3 All necessary modifications are carried out on the non-active configuration.
Now, the non-active configuration has to be made active.
4 Execute the Activate Configuration action. The non-active configuration becomes the active configuration.
alarmman/Activate Configuration
If you execute this action, the editable non-active configuration becomes the active configuration. This action corresponds with the TMA button Send all attributes to device:
Use this action after you made all the necessary configuration settings and you want to activate these settings.
alarmman/Load Saved Configuration
If you execute this action, the non-active configuration is overwritten by the active configuration currently used by the Alarm Manager. After executing this action, click on the TMA button Retrieve all attributes
from device to see the new non-active configuration.
Use this action when you are in the progress of modifying the non-active configuration but made some mistakes and you want to revert to the active configuration.
Continued on next page

Configuration attributes TMA for HP OpenView
114 Reference manual
Configuration actions (continued)
alarmman/Load Default Configuration
If you execute this action, the non-active configuration is overwritten by the default configuration. After
executing this action, click on the TMA button Retrieve all attributes from device to see the new non-active configuration.
If you install the Alarm Manager for the first time, all configuration attributes have their default values. If the Alarm Manager has already been configured but you want to start from scratch, then use this action to revert to the default configuration.
alarmman/shutDown
Use this action to stop and exit the Alarm Manager. You can only restart the Alarm Manager manually.

TMA for HP OpenView Configuration attributes
Reference manual 115
9.3 Objects configuration attributes
alarmman/objects/objectTable default: <empty>
Use this attribute to force an IP device under management of the Alarm Manager. The configuration objectTable contains the following attributes:
Attribute Description Default value
ipAddress This is the IP address of the IP device you want to manage with the Alarm Manager.
0.0.0.0
proxyDevice Use this attribute to specify whether the IP device you want to manage with the Alarm Manager is an Orchid 1003 LAN or not. Set the proxyDevice value to �
• yes, if the IP device is an Orchid 1003 LAN • no, if the IP device is not an Orchid 1003 LAN.
no
alarmman/objects/maxPollTime default: 5
When HP OpenView and TMA for HP OpenView are started, all the Telindus IP devices are passed to the Alarm Manager. The Alarm Manager starts polling the IP devices at regular time intervals. This time interval can be configured with the attribute maxPollTime. The maxPollTime range goes from 1 minute up to 20 minutes.
The polling of an IP device happens as follows:
Phase Description
1 The Alarm Manager polls the IP device within the maxPollTime interval (example: 10 minutes).
2 If the Alarm Manager �
• receives a response, then it continues polling the IP device within the maxPollTime interval.
• does not receive a response, then it polls the IP device again within half the maxPollTime interval (in our example this is 5 minutes).
3 If on this �supplementary� poll the Alarm Manager �
• receives a response, then it continues polling the IP device within the maxPollTime interval.
• does not receive a response, then it sets the no response status for the IP device. However, the Alarm Manager continues polling the IP device within the maxPollTime interval (in our example this is 10 minutes).
Continued on next page
Configuration attributes TMA for HP OpenView
116 Reference manual
Objects configuration attributes (continued)
alarmman/objects/statusDelay default: 00000d 00h 02m 00s
For non-IP and proxied IP devices, it is the Orchid 1003 LAN that synchronises with the alarm status of these devices. This status information is then passed on to the Alarm Manager. I.e. the Alarm Manager indirectly �synchronises� with the non-IP and proxied IP devices through the NMS group of the Orchid 1003 LAN.
When an Orchid 1003 LAN boots, it synchronises with the devices configured in the objectTable. During such a start-up phase, a lot of alarms are generated. Because these particular alarms are not very useful, it is best that they are not passed on to the Alarm Manager. Therefore, the Alarm Manager waits a certain time before it synchronises with the NMS group of the Orchid 1003 LAN.
This delay time can be set with the statusDelay attribute. The statusDelay is the sysUpTime of the Orchid 1003 LAN before the Alarm Manager starts synchronising. The statusDelay range goes from 00000d 00h 00m 00s up to 24855d 03h 14m 07s.
alarmman/objects/noReplyTimeOut default: 00000d 00h 05m 00s
Use this attribute to set an internal timeout period to determine when a pending request is lost. A request can be a poll request, a synchronisation request, etc.
The noReplyTimeOut range goes from 00000d 00h 00m 00s up to 24855d 03h 14m 07s.
alarmman/objects/maxPendingRequests default: 32
Use this attribute to set the maximum number of simultaneous requests that may be pending. This prevents that the workstation gets overloaded at start-up. A request can be a poll request, a synchronisation request, etc.
The maxPendingRequests range goes from 1 up to 100.
alarmman/objects/maxCfgFilesSaved default: 3
Use this attribute to set how many configuration and containment tree files the Alarm Manager has to back-up for each device.
The maxCfgFilesSaved range goes from 0 up to 10. Setting the value to 0, disables the configuration and containment tree back-up.
For more information on configuration and containment tree back-up, refer to Section 7.4 - Configuration and containment tree back-up.
Continued on next page
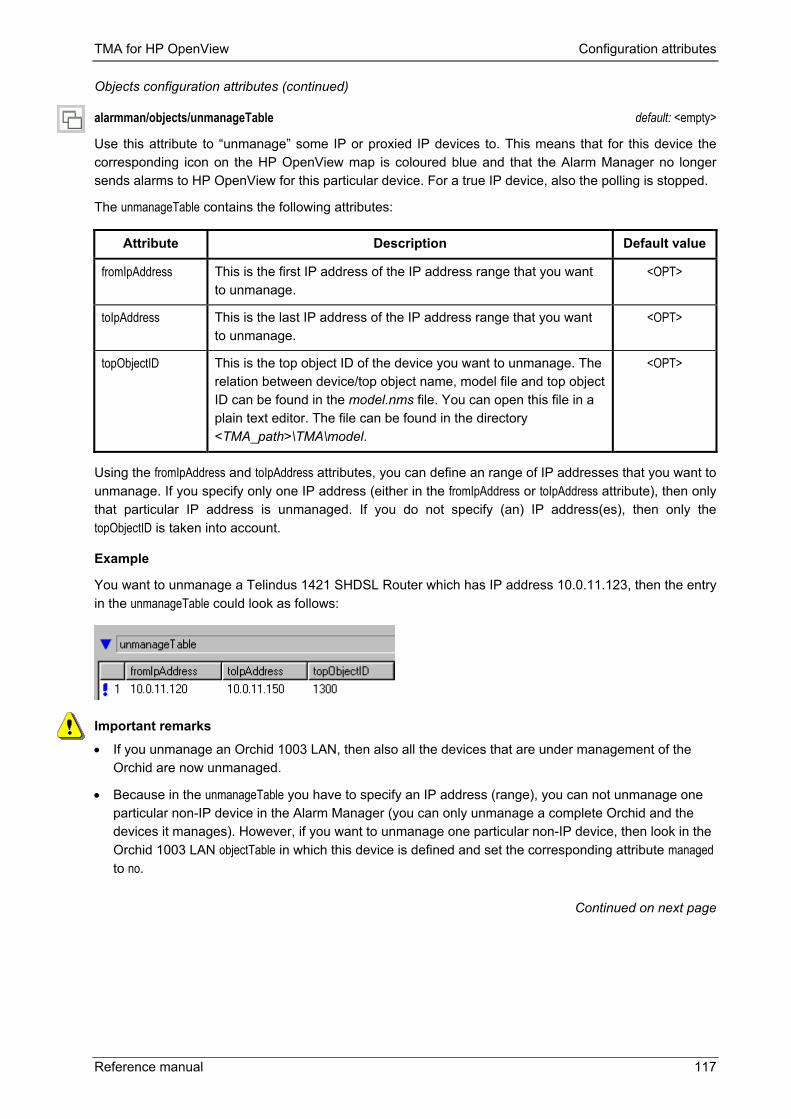
TMA for HP OpenView Configuration attributes
Reference manual 117
Objects configuration attributes (continued)
alarmman/objects/unmanageTable default: <empty>
Use this attribute to �unmanage� some IP or proxied IP devices to. This means that for this device the corresponding icon on the HP OpenView map is coloured blue and that the Alarm Manager no longer sends alarms to HP OpenView for this particular device. For a true IP device, also the polling is stopped.
The unmanageTable contains the following attributes:
Attribute Description Default value
fromIpAddress This is the first IP address of the IP address range that you want to unmanage.
<OPT>
toIpAddress This is the last IP address of the IP address range that you want to unmanage.
<OPT>
topObjectID This is the top object ID of the device you want to unmanage. The relation between device/top object name, model file and top object ID can be found in the model.nms file. You can open this file in a plain text editor. The file can be found in the directory <TMA_path>\TMA\model.
<OPT>
Using the fromIpAddress and toIpAddress attributes, you can define an range of IP addresses that you want to unmanage. If you specify only one IP address (either in the fromIpAddress or toIpAddress attribute), then only that particular IP address is unmanaged. If you do not specify (an) IP address(es), then only the topObjectID is taken into account.
Example
You want to unmanage a Telindus 1421 SHDSL Router which has IP address 10.0.11.123, then the entry in the unmanageTable could look as follows:
Important remarks • If you unmanage an Orchid 1003 LAN, then also all the devices that are under management of the
Orchid are now unmanaged.
• Because in the unmanageTable you have to specify an IP address (range), you can not unmanage one particular non-IP device in the Alarm Manager (you can only unmanage a complete Orchid and the devices it manages). However, if you want to unmanage one particular non-IP device, then look in the Orchid 1003 LAN objectTable in which this device is defined and set the corresponding attribute managed to no.
Continued on next page

Configuration attributes TMA for HP OpenView
118 Reference manual
Objects configuration attributes (continued)
alarmman/objects/alarmMask
alarmman/objects/alarmLevel
For more information on the configuration alarm attributes alarmMask and alarmLevel and on the alarms in general, refer to Section 12.2 - Introducing the alarm attributes.
For more information on the alarms of the objects object, refer to Section 12.4 - Objects and inventory alarms.
TMA for HP OpenView Configuration attributes
Reference manual 119
9.4 Inventory configuration attributes
alarmman/inventory/inventory default: enabled
The Alarm Manager is able to retrieve status information from the devices it manages. Use this attribute to enable or disable the collection of inventory information.
For more information on what is collected, refer to Section 10.4 - Inventory status attributes.
alarmman/inventory/alarmMask
alarmman/inventory/alarmLevel
For more information on the configuration alarm attributes alarmMask and alarmLevel and on the alarms in general, refer to Section 12.2 - Introducing the alarm attributes.
For more information on the alarms of the objects object, refer to Section 12.4 - Objects and inventory alarms.
Configuration attributes TMA for HP OpenView
120 Reference manual
9.5 Event generation configuration attributes
alarmman/eventGeneration/streamingOnLimit default: 3
If the number of times a certain alarm comes on during the streamingInterval equals or exceeds the value configured in the attribute streamingOnLimit, then the Alarm Manager considers that this particular alarm is streaming.
The Alarm Manager passes the particular alarm on to HP OpenView once, and adds the string Streaming Activated at the end of the alarm message. From that moment forward, the Alarm Manager no longer passes on the streaming alarm to HP OpenView.
The streamingOnLimit range goes from 0 up to 10000.
alarmman/eventGeneration/streamingOffLimit default: 0
If the number of times a certain alarm comes on during the streamingInterval equals or drops below the value configured in the attribute streamingOffLimit, then the Alarm Manager no longer considers that this particular alarm is streaming.
The Alarm Manager passes an alarm on to HP OpenView which contains the string Streaming Deactivated at the end of the alarm message. From that moment forward, the passing on of alarms to HP OpenView is normalised again.
The streamingOffLimit range goes from 0 up to 10000.
alarmman/eventGeneration/streamingInterval default: 00000d 00h 01m 00s
Use this attribute to set the time interval during which the alarms are monitored. This monitored interval is then used to detect alarm streaming.
The streamingInterval range goes from 00000d 00h 00m 00s up to 24855d 03h 14m 07s.
alarmman/eventGeneration/logFile
The Alarm Manager not only passes alarms to HP OpenView, it also writes them to a log file. This file is located in the sub-directory <TMA_path>\TMA\log. You can set the properties of this log file using the logFile attribute. The underlying attributes are:
Attribute Description Default value
status Use this attribute to enable or disable the writing of the alarms to the alarm log file.
enabled
maxSize This attribute determines the size of the log file in kilo bytes. If the maximum specified size is reached, then a new log file is created.
The maxSize range goes from 0 up to 1000000.
1000
deleteTimer This is the number of days after which the log file is automatically deleted. This timer starts counting after the last time the log file has been changed.
The deleteTimer range goes from 0 up to 10000.
7
Continued on next page
TMA for HP OpenView Configuration attributes
Reference manual 121
Event generation configuration attributes (continued)
alarmman/eventGeneration/filters default: <empty>
Using the filter attribute in the objectTable of the Orchid 1003 LAN, you can define a filter number for each non-IP and proxied IP device entered in this table. For IP devices, you can define this filter number using the alarmFilter attribute located in the management object.
These filter numbers correspond to the filter numbers as they can be defined using the filters attribute. This table contains the following attributes:
Attribute Description Default value
filter Enter here the filter number as you defined it with the �
• filter attribute in the objectTable of the Orchid 1003 LAN (for non-IP and proxied IP devices)
• alarmFilter attribute located in the management object of an IP device.
The filter range goes from 0 up to 50000.
0
logFileLevel Use this attribute to determine the minimum required alarm level needed before an alarm is logged in the alarm log file.
The logFileLevel range goes from 0 up to 254.
0
openViewLevel Use this attribute to determine the minimum required alarm level needed before an alarm is passed on to HP OpenView.
As long as the total alarm level of a device remains below this value, the colour of the device symbol will not change. In other words, you can use this attribute to �ignore� alarms below a certain alarm level.
The openViewLevel range goes from 0 up to 254.
0
remoteManagementLevel
For future purposes. 0
externalDBaseLevel For future purposes. 0
Continued on next page

Configuration attributes TMA for HP OpenView
122 Reference manual
Event generation configuration attributes (continued)
alarmman/eventGeneration/unknownAlarmConfig
If an IP device does not respond to the polling of the Alarm Manager, then a notResponding alarm is generated for this device. If this device is an Orchid 1003 LAN, then it is also impossible to synchronise with the non-IP or proxied IP devices that are connected to this Orchid. For these devices, an unknownState alarm is generated. Such an alarm is called a derived alarm.
Use the unknownAlarmConfig attribute to determine what action has to be taken in case an unknownState alarm occurs.
The derivedProcessing attribute is used to determine what action has to be taken when a derived unknownState alarm occurs.
The colorSource and defaultLevel attributes are used to determine the colour of the device symbol in HP OpenView when an unknownState alarm occurs. I.e. all unknownState alarms, not only the derived ones.
The underlying unknownAlarmConfig attributes are:
Attribute Description Default value
derivedProcessing Use this attribute to determine what action has to be taken when a derived alarm is generated.
event and color
Value Description
color
• The colour of the device symbol is updated. • No event is logged in HP OpenView • No alarm is logged in the alarm log file.
event
• The colour of the device symbol is not updated.
• An event is logged in HP OpenView • An alarm is logged in the alarm log file.
event and color
• The colour of the device symbol is updated. • An event is logged in HP OpenView • An alarm is logged in the alarm log file.
disabled Derived alarms are ignored.
Continued on next page
TMA for HP OpenView Configuration attributes
Reference manual 123
alarmman/eventGeneration/unknownAlarmConfig (continued)
Attribute Description Default value
colorSource Use this attribute to define who determines the colour of the device symbol when an unknownState alarm occurs.
device & Alarm Manager
Value Description
disabled An unknownState alarm does not change the symbol colour.
device The alarm level configured in the device is used to determine the symbol colour.
If you choose this setting, an unknownState alarm can never result in a blue symbol.
Alarm Manager The alarm level configured in the defaultLevel attribute (see below) is used to determine the symbol colour.
device & Alarm Manager
If the alarm level configured in the device differs from 0, then the device alarm level determines the symbol colour.
Else the alarm level configured in the defaultLevel attribute is used.
defaultLevel In case an unknownState alarm occurs and the colour of the device symbol is determined by the Alarm Manager (refer to the colorSource attribute), then it is possible to define which alarm level is linked to this unknownState alarm.
The possible alarm levels are: Unknown Status, Normal Status, Warning Status, Minor Status, Major Status, Critical Status
These are levels as they are known in HP OpenView.
Unknown Status
overruleMask Each Telindus device has an unknownState alarm which can be masked or not. If the unknownState alarm is masked in the Telindus device, then it is not communicated to HP OpenView when the alarm occurs and hence no action is taken by the Alarm Manager.
You can use the overruleMask to, as the name of the attribute implies, overrule the mask of the unknownState alarm in the Telindus device. Select �
• yes in order to overrule � • no in order not to overrule � � the unknownState alarm mask of the Telindus device
no
Continued on next page
Configuration attributes TMA for HP OpenView
124 Reference manual
Event generation configuration attributes (continued)
alarmman/eventGeneration/maxPendingStatusRequests default: 10
Use this attribute to set the maximum number of simultaneous status synchronisation requests that may be pending. This prevents that the workstation gets overloaded at start-up.
The maxPendingStatusRequests range goes from 1 up to 100.
alarmman/eventGeneration/deleteEventAction default: ack event
Use the deleteEventAction attribute to determine what is done with an alarm in the TMA alarm status window when this alarm is deleted in the HP OpenView alarm browser. The following table clarifies this:
If you delete an alarm in the alarm browser then in the TMA alarm status window this alarm is �
when the deleteEventAction attribute is set to �
acknowledged ack event
left unchanged none
alarmman/eventGeneration/statusSource default: all events
Use the statusSource attribute to determine how the (un)acknowledged alarms influence the colour of the Telindus access device symbol. The following table clarifies this:
If the statusSource attribute is set to �
then the device status corresponds with the total alarm level of �
all events, all alarms, both acknowledged and unacknowledged.
unacked events, the unacknowledged alarms only. I.e. the acknowledged alarms are ignored.
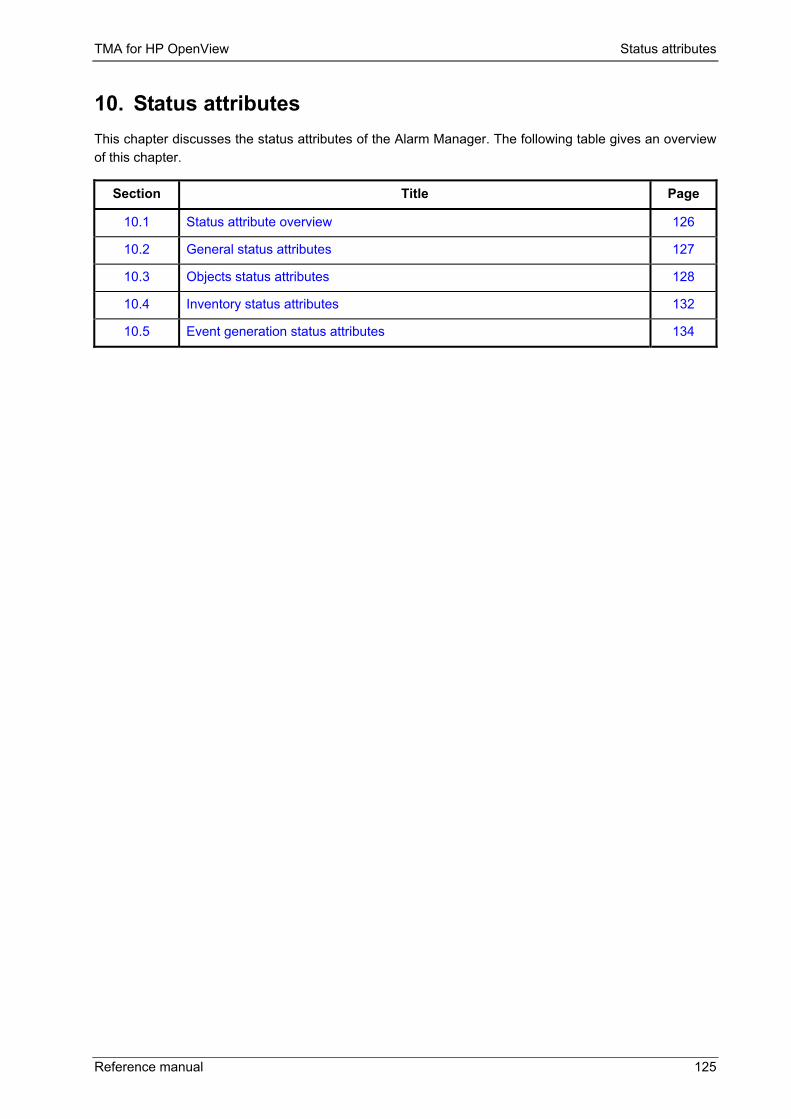
TMA for HP OpenView Status attributes
Reference manual 125
10. Status attributes This chapter discusses the status attributes of the Alarm Manager. The following table gives an overview of this chapter.
Section Title Page
10.1 Status attribute overview 126
10.2 General status attributes 127
10.3 Objects status attributes 128
10.4 Inventory status attributes 132
10.5 Event generation status attributes 134

Status attributes TMA for HP OpenView
126 Reference manual
10.1 Status attribute overview
> alarmman sysDescr sysObjectID sysUpTime sysServices version messages
>> objects objectTable telindusObjectTable unMngtObjectTable Action: Clear UnMngtObjectTable
>> inventory inventoryTable
>> eventGeneration lastStreamingBit logFileName

TMA for HP OpenView Status attributes
Reference manual 127
10.2 General status attributes alarmman/sysDescr
This is a textual description of the Alarm Manager. It is an SNMP MIB2 parameter. Example: Telindus AlarmMan S0006/00700.
alarmman/sysObjectID
This is the SNMP identification string. It is an SNMP MIB2 parameter. Example: 1.3.6.1.4.1.776.28.
alarmman/sysUpTime
This is the time the application is running. It is an SNMP MIB2 parameter. Example: 00005d 02h 42m 15s, which means 5 days, 2 hours, 42 minutes and 15 seconds.
alarmman/sysServices
This is the SNMP service identification. It is an SNMP MIB2 parameter.
alarmman/version
This is the version number of TMA for HP OpenView. Example: S0006/00700.
alarmman/messages
This table displays messages which can be:
• informative messages, e.g. Reconfigured, Cold Boot, � • error messages, e.g. Licence limit is reached
The messages table displays maximum 20 messages.
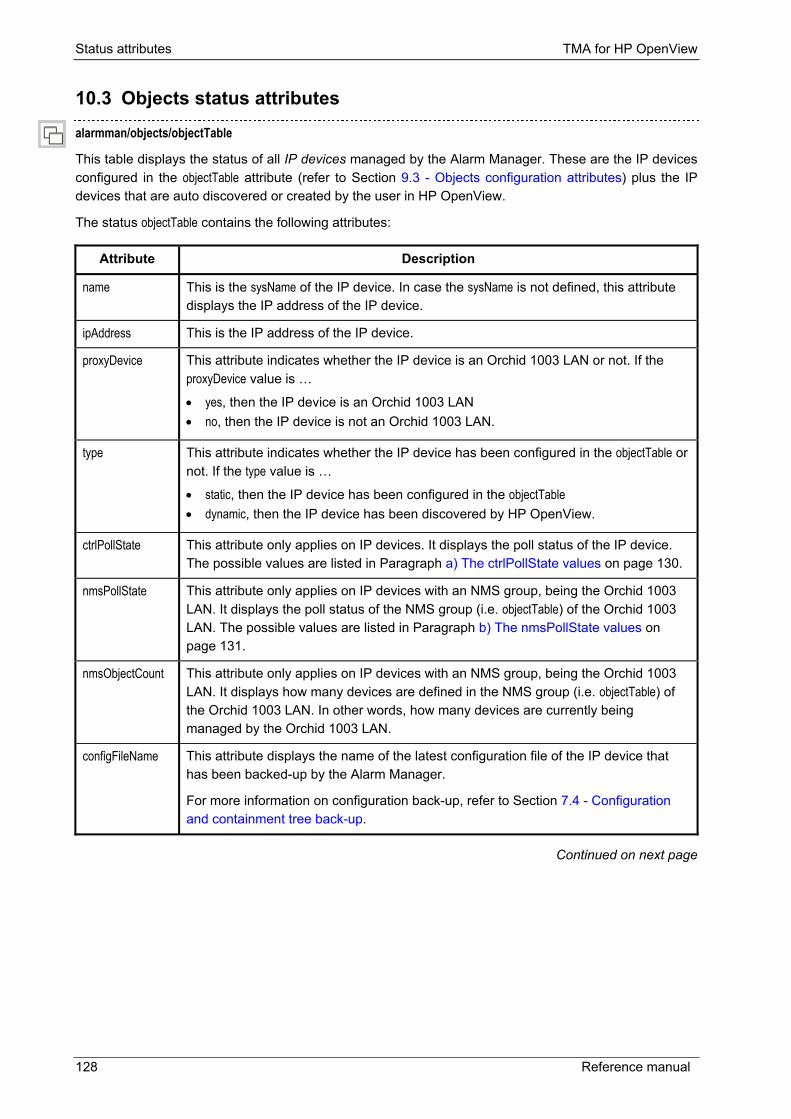
Status attributes TMA for HP OpenView
128 Reference manual
10.3 Objects status attributes alarmman/objects/objectTable
This table displays the status of all IP devices managed by the Alarm Manager. These are the IP devices configured in the objectTable attribute (refer to Section 9.3 - Objects configuration attributes) plus the IP devices that are auto discovered or created by the user in HP OpenView.
The status objectTable contains the following attributes:
Attribute Description
name This is the sysName of the IP device. In case the sysName is not defined, this attribute displays the IP address of the IP device.
ipAddress This is the IP address of the IP device.
proxyDevice This attribute indicates whether the IP device is an Orchid 1003 LAN or not. If the proxyDevice value is �
• yes, then the IP device is an Orchid 1003 LAN • no, then the IP device is not an Orchid 1003 LAN.
type This attribute indicates whether the IP device has been configured in the objectTable or not. If the type value is �
• static, then the IP device has been configured in the objectTable • dynamic, then the IP device has been discovered by HP OpenView.
ctrlPollState This attribute only applies on IP devices. It displays the poll status of the IP device. The possible values are listed in Paragraph a) The ctrlPollState values on page 130.
nmsPollState This attribute only applies on IP devices with an NMS group, being the Orchid 1003 LAN. It displays the poll status of the NMS group (i.e. objectTable) of the Orchid 1003 LAN. The possible values are listed in Paragraph b) The nmsPollState values on page 131.
nmsObjectCount This attribute only applies on IP devices with an NMS group, being the Orchid 1003 LAN. It displays how many devices are defined in the NMS group (i.e. objectTable) of the Orchid 1003 LAN. In other words, how many devices are currently being managed by the Orchid 1003 LAN.
configFileName This attribute displays the name of the latest configuration file of the IP device that has been backed-up by the Alarm Manager.
For more information on configuration back-up, refer to Section 7.4 - Configuration and containment tree back-up.
Continued on next page

TMA for HP OpenView Status attributes
Reference manual 129
Objects status attributes (continued)
alarmman/objects/telindusObjectTable
This table displays the status of all Telindus access devices managed by the Alarm Manager: IP devices, proxied IP devices and non-IP devices.
The status telindusObjectTable contains the following attributes:
Attribute Description
name In case of �
• an IP device, this is the sysName of the device. In case the sysName is not defined, this attribute displays the IP address of the device.
• a proxied or non-IP device, this is the name of the device as configured in the objectTable of the Orchid 1003 LAN.
owner This attribute only applies on proxied or non-IP devices. It is the sysName of the Orchid 1003 LAN in which the device is configured.
ctrlPollState This attribute only applies on IP devices. It displays the poll status of the IP device. The possible values are listed in Paragraph a) The ctrlPollState values on page 130.
nmsPollState This attribute only applies on IP devices with an NMS group, being the Orchid 1003 LAN. It displays the poll status of the NMS group (i.e. objectTable) of the Orchid 1003 LAN. The possible values are listed in Paragraph b) The nmsPollState values on page 131.
nmsObjectState This attribute only applies on proxied and non-IP devices. It displays the poll status between the Orchid 1003 LAN and the proxied or non-IP device. The possible values are listed in Paragraph c) The nmsObjectState values on page 131.
nmsObject Address
This attribute only applies on proxied or non-IP devices. It is the hardware address of the device.
E.g. R:000 Rack 01.02.B: relative address 0, rack address 1, card slot number 2, Card Version modem B.
totalAlarmLevel This is the total alarm level of the device.
Continued on next page

Status attributes TMA for HP OpenView
130 Reference manual
Objects status attributes (continued)
alarmman/objects/unMngtObjectTable
This is a list of IP devices for which a configuration file is saved, but that are no longer present in the status objectTable.
alarmman/objects/Clear UnMngtObjectTable
Executing this action clears the unMngtObjectTable.
a) The ctrlPollState values
The following table displays the possible values of the ctrlPortState attribute:
Value Description
<OPT> Because ctrlPollState only applies on IP devices, the value is <OPT> for proxied and non-IP devices.
Conflicting The IP device is conflicting with another device (e.g. both have the same IP address).
Data Transfer The IP device alarm status or model is retrieved.
Deleted The IP device is going to be deleted. This is a short transition state.
Getting Configuration
The IP device configuration is retrieved.
Getting Configuration ID
The IP device configuration identification parameter is retrieved. This is necessary to determine the configuration has changed.
Getting SNMP Parameters
The IP device IP parameters (addresses + interfaces) are retrieved.
Getting sysUpTime
The Orchid 1003 LAN sysUpTime is retrieved.
Not Responding The IP device does not respond to the polling.
Not Running No poll is sent yet.
Polling The IP device is being polled.
Responding The IP device responds to the polling.
Setting Clock The Orchid 1003 LAN clock is set.
Unknown No decision has been made yet.
Unlicensed The licence limit is passed, the IP device status is not updated.
Unmanaged The IP device has been set to unmanaged. The IP device is no longer being polled and its status is no longer sent to HP OpenView.
Continued on next page

TMA for HP OpenView Status attributes
Reference manual 131
Objects status attributes (continued)
b) The nmsPollState values
The following table displays the possible values of the nmsPollState attribute:
Value Description
<OPT> Because nmsPollState only applies on the Orchid, the value is <OPT> for all devices except the Orchid.
Getting Status The NMS group of the Orchid its alarm status is retrieved.
No NMS The IP device is not an Orchid and therefore has no NMS group.
Not Responding The NMS group of the Orchid does not respond.
Not Running The NMS group of the Orchid has not been polled yet.
Polling The NMS group of the Orchid is being polled.
Responding The NMS group of the Orchid responds.
Unknown No decision has been made yet.
Unlicensed The licence limit is passed, the NMS group status is not updated.
Unmanaged The Orchid has been set to unmanaged. The NMS group is no longer being polled and its status is no longer sent to HP OpenView.
c) The nmsObjectState values
The following table displays the possible values of the nmsObjectState attribute:
Value Description
<OPT> Because nmsObjectState only applies on proxied and non-IP devices, the value is <OPT> for IP devices.
Conflicting The proxied or non-IP device is conflicting with another device (e.g. due to an error in the configuration).
Not Responding The proxied or non-IP device does not respond to the polls of the Orchid.
Out of Sync The Orchid has lost synchronisation with the proxied or non-IP device.
Responding The proxied or non-IP device responds to the polls of the Orchid.
Unknown The proxied or non-IP device has not been polled yet by the Orchid.
Unlicensed In case of �
• a non-IP device, the licence limit is passed. • a proxied IP device, the device has not been detected yet by HP OpenView.
Unmanaged The Orchid has been set to unmanaged and hence the NMS group is also unmanaged. As a result no status information of the devices that are being managed by the Orchid is sent to HP OpenView.

Status attributes TMA for HP OpenView
132 Reference manual
10.4 Inventory status attributes alarmman/inventory/inventoryTable
The Alarm Manager is able to retrieve status information from the devices it manages. This information is summarised in a table: the inventory table.
The status inventoryTable contains the following attributes:
Attribute Description
name In case of �
• an IP device, this is the sysName of the device. In case the sysName is not defined, this attribute displays the IP address of the device.
• a proxied or non-IP device, this is the name of the Orchid 1003 LAN and the name of the device as configured in the objectTable of the Orchid 1003 LAN: <orchidName>_<deviceName>. E.g. orchid_crocusShdsl
config This attribute displays all the names of the configuration files of the device that have been backed-up by the Alarm Manager.
For more information on configuration back-up, refer to Section 7.4 - Configuration and containment tree back-up.
This attribute displays which software types are present in the device and which are active.
The software attribute contains the following attributes:
Attribute Description
type This attribute displays which type of software it is, e.g. boot, loader or application software. If there is more than one software version present in the device, a suffix is added (e.g. application1, application2).
active This attribute indicates whether the corresponding software is active (yes) or not (no).
version This attribute displays the T-code, version, release date and time of the software: T<code>/<version> <release_date> <release_time>
E.g. T2802/00100 01/09/02 12:00
software
sysName This attribute displays the sysName as you configured it in the device.
sysContact This attribute displays the sysContact as you configured it in the device.
sysLocation This attribute displays the sysLocation as you configured it in the device.
sysDescr This attribute displays the sysDescr of the device.
sysObjectID This attribute displays the sysObjectID of the device.
sysServices This attribute displays the sysServices of the device.
deviceId This attribute displays the deviceId of the device.
Continued on next page

TMA for HP OpenView Status attributes
Reference manual 133
Inventory status attributes (continued)
Attribute Description
This attribute displays the interfaces of the device and their current status.
The ifTable attribute contains the following attributes:
Attribute Description
name This attribute displays the name of the interface, e.g. lanInterface, wanInterface, portA, g703, etc.
reference This attribute displays the path of the corresponding interface object in the containment tree of the device, e.g. /crocusRouter10M/lanInterface, /o1003/interfaces/portA, etc.
ifAdminStatus This attribute displays whether the interface has been set administratively up or down by the user.
This is not the same as the interface its IfOperStatus that can be seen on the device itself, which indicates whether the interface is currently up or down.
ifType This attribute displays the interface type.
ifSpeed This attribute displays the interface speed.
ifTable

Status attributes TMA for HP OpenView
134 Reference manual
10.5 Event generation status attributes alarmman/eventGeneration/lastStreamingBit
This string describes the last alarm that was streaming.
alarmman/eventGeneration/logFileName
This is the current name of the alarm log file in use.

TMA for HP OpenView Performance attributes
Reference manual 135
11. Performance attributes This chapter discusses the performance attributes of the Alarm Manager. The following table gives an overview of this chapter.
Section Title Page
11.1 Performance attribute overview 136
11.2 Objects performance attributes 137
11.3 Inventory performance attributes 138
11.4 Event generation performance attributes 139

Performance attributes TMA for HP OpenView
136 Reference manual
11.1 Performance attribute overview
> alarmman
>> objects licenceCount maxLicenceCount sentPolls pendingRequests
>> inventory licenceCount maxLicenceCount
>> eventGeneration nrOfStreamingDetected eventsProcessed logFileSize pendingStatusRequest

TMA for HP OpenView Performance attributes
Reference manual 137
11.2 Objects performance attributes alarmman/objects/licenceCount
This is the number of devices that is being managed by the Alarm Manager. When the licenceCount exceeds the maxLicenceCount, a licenceLimit alarm is generated (refer to Section 12.4 - Objects and inventory alarms).
alarmman/objects/maxLicenceCount
This is the total number of devices for which you have a licence.
alarmman/objects/sentPolls
This is the total number of polls that have been sent to the devices.
alarmman/objects/pendingRequests
This is the number of simultaneous requests that are currently pending. A request can be a poll request, a synchronisation request, etc.

Performance attributes TMA for HP OpenView
138 Reference manual
11.3 Inventory performance attributes alarmman/inventory/licenceCount
This is the number of devices that is being managed by the Alarm Manager. When the licenceCount exceeds the maxLicenceCount, a licenceLimit alarm is generated (refer to Section 12.4 - Objects and inventory alarms).
alarmman/inventory/maxLicenceCount
This is the total number of devices for which you have a licence.
TMA for HP OpenView Performance attributes
Reference manual 139
11.4 Event generation performance attributes alarmman/eventGeneration/nrOfStreamingDetected
This is the number of alarms that are currently streaming.
alarmman/eventGeneration/eventsProcessed
This is the total number of alarms that have been processed by the Alarm Manager. This includes derived alarms, even when these alarms are not generated in any output.
For more information on derived alarms, refer to the explanation of the unknownAlarmConfig attribute in Section 9.5 - Event generation configuration attributes.
alarmman/eventGeneration/logFileSize
This is the current size (in kByte) of the alarm log file in use.
alarmman/eventGeneration/pendingStatusRequest
This is the number of simultaneous status synchronisation requests that are currently pending.

Alarm attributes TMA for HP OpenView
140 Reference manual
12. Alarm attributes This chapter discusses the alarm attributes of the Alarm Manager. The following table gives an overview of this chapter.
Section Title Page
12.1 Alarm attribute overview 141
12.2 Introducing the alarm attributes 142
12.3 General alarms 145
12.4 Objects and inventory alarms 146
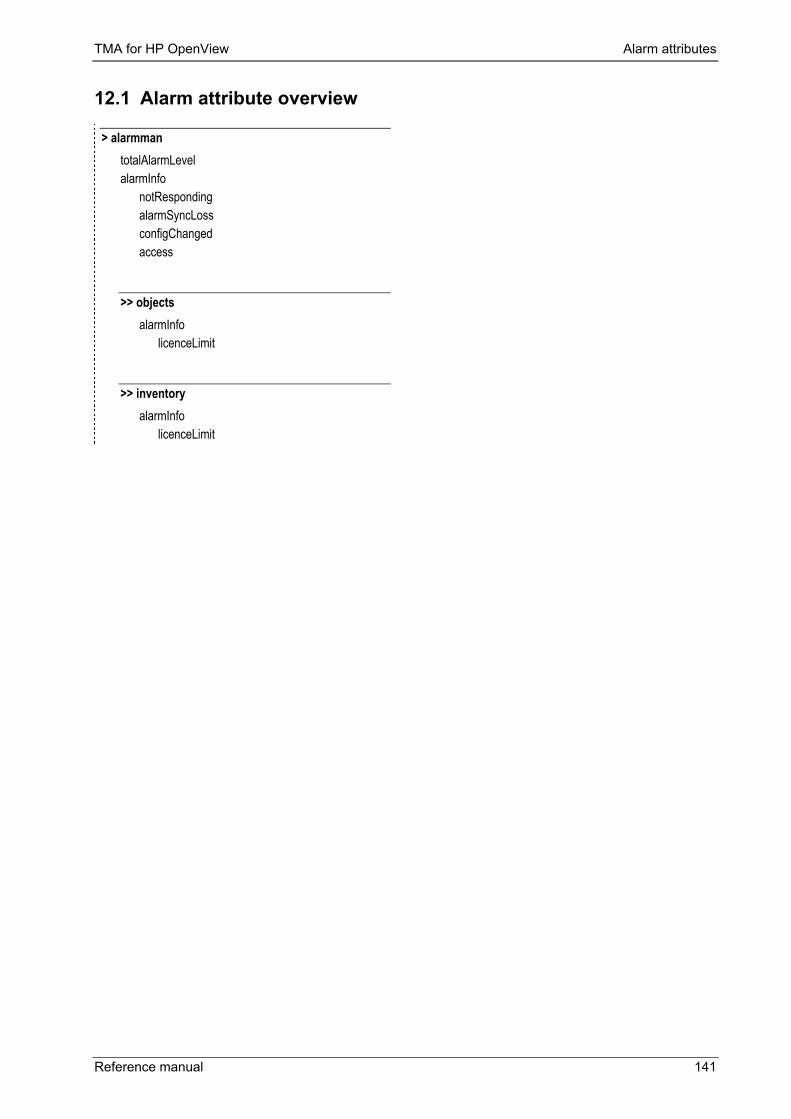
TMA for HP OpenView Alarm attributes
Reference manual 141
12.1 Alarm attribute overview
> alarmman totalAlarmLevel alarmInfo
notResponding alarmSyncLoss configChanged access
>> objects alarmInfo
licenceLimit
>> inventory alarmInfo
licenceLimit

Alarm attributes TMA for HP OpenView
142 Reference manual
12.2 Introducing the alarm attributes Before discussing the alarm attributes of the TMA for HP OpenView in detail, some general information on the alarm attributes of the TMA for HP OpenView is given.
The following table gives an overview of this section.
Section Title Page
12.2.1 Configuration alarm attributes 143
12.2.2 General alarm attributes 144

TMA for HP OpenView Alarm attributes
Reference manual 143
12.2.1 Configuration alarm attributes This section explains the attributes that allow you to configure the alarm behaviour of the Alarm Manager. These configuration alarm attributes are:
alarmman/�/alarmMask
alarmman/�/alarmLevel
The following table explains the configuration alarm attributes.
Attribute Description
alarmMask The alarmMask attribute enables or disables for each alarm of the corresponding object, whether it is communicated to HP OpenView or not.
Alarms are always seen in the alarmInfo of an object, regardless of the masking of the alarm. I.e. even if an alarm is set to disabled in the alarmMask of an object, if the alarm condition is fulfilled then the alarm will be set to on in the alarmInfo of that object. Also the alarm count and time in the performance information will increment. However, because this alarm is disabled it is not communicated to HP OpenView.
alarmLevel With this attribute, a priority level can be assigned to each alarm of the corresponding object. The alarm level ranges from 0 to 254, where 0 is the lowest and 254 is the highest priority level.
The alarmLevel of an unmasked, active alarm is sent to the totalAlarmLevel of the top object alarmman.

Alarm attributes TMA for HP OpenView
144 Reference manual
12.2.2 General alarm attributes This section explains the general alarm attributes. These are:
alarmman/totalAlarmLevel
This attribute is only present in the top object of the containment tree of the Alarm Manager, alarman.
It displays the priority level of an unmasked, active alarm. When several alarms are generated at the same time, the highest priority level is shown. If the alarm levels are set in a structured manner, one look at the totalAlarmLevel attribute enables the operator to make a quick estimation of the problem.
The value of the totalAlarmLevel attribute is also communicated to HP OpenView where it determines the colour of the icon. This colour is an indication of the severity of the alarm.
alarmman/�/alarmInfo
The alarmInfo contains the actual alarm information of the corresponding object. This information is updated each time there is a change in the status of an alarm within this object.
The alarmInfo attributes are:
Attribute Displays for the corresponding object �
discriminator the total number of alarm status changes in this object since the last cold boot.
currentAlarms the current alarm status of this object.
previousAlarms the previous alarm status of this object.
alarmMask the alarmMask as configured in the Configuration group.
alarmLevel the alarmLevel as configured in the Configuration group.

TMA for HP OpenView Alarm attributes
Reference manual 145
12.3 General alarms Refer to Section 12.2 - Introducing the alarm attributes for the general alarm attributes.
alarmman/alarmInfo
The different alarms related to the alarmman object together with their explanation and their default alarmMask and alarmLevel value are given in the following table:
Default value The alarm � is generated �
alarmMask alarmLevel
notResponding when the Alarm Manager no longer responds. enabled 4
alarmSyncLoss when the alarm buffer overflows. enabled 0
configChanged when the configuration of the Alarm Manager is changed.
disabled 1
access when a TMA session is active on the Alarm Manager.
disabled 1
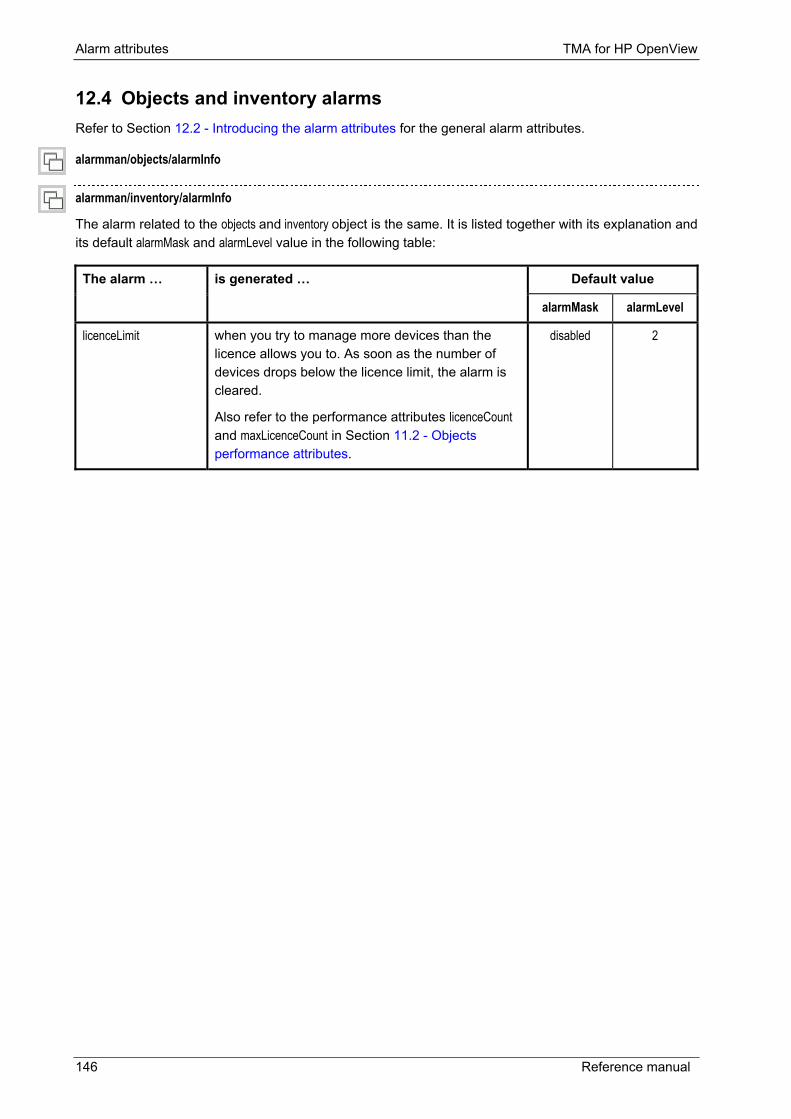
Alarm attributes TMA for HP OpenView
146 Reference manual
12.4 Objects and inventory alarms Refer to Section 12.2 - Introducing the alarm attributes for the general alarm attributes.
alarmman/objects/alarmInfo
alarmman/inventory/alarmInfo
The alarm related to the objects and inventory object is the same. It is listed together with its explanation and its default alarmMask and alarmLevel value in the following table:
Default value The alarm � is generated �
alarmMask alarmLevel
licenceLimit when you try to manage more devices than the licence allows you to. As soon as the number of devices drops below the licence limit, the alarm is cleared.
Also refer to the performance attributes licenceCount and maxLicenceCount in Section 11.2 - Objects performance attributes.
disabled 2

TMA for HP OpenView The Cms2Serv.ini file
Reference manual 147
13. The Cms2Serv.ini file The Cms2Serv.ini file contains the communication parameters of TMA. In some cases it may be necessary to change some of these parameters. Therefore, this section lists and explains the different Cms2Serv.ini file parameters. It also explains how to add parameters to the Cms2Serv.ini file.
The following table gives an overview of this chapter.
Section Title Page
13.1 Parts of the Cms2Serv.ini file 148
13.2 Adding parts to the Cms2Serv.ini file 150

The Cms2Serv.ini file TMA for HP OpenView
148 Reference manual
13.1 Parts of the Cms2Serv.ini file The Cms2Serv.ini file is divided into several parts. Each part and its parameters is explained below. The values behind the parameters are the default values.
The [Cms2] part
The [Cms2] part contains the following parameters:
Parameter Description
WindowSize=4 TMA sends a number of frames to the device. Then TMA has to receive an acknowledgement from the device before it sends the following frames. WindowSize is the number of frames which TMA may send before it has to receive an acknowledgement from the device.
BufferSize=250 This is the number of bytes in one frame.
Retries=1 When there is no response from the device, TMA will retransmit the current frame a number of times before ending the session. Retries sets the number of retransmissions.
LocalPollDelay=2 The local polling mechanism on itself has nothing to do with TMA. Fact is that TMA is not allowed to send anything during a local polling session. That is why the LocalPollDelay is used. It gives an extra delay, in seconds, on the reply of a device.
ExtTimeOut=10 This is the timeout, in seconds, for opening and closing a session. The timeout is used during Connect to network and Select device actions. When there is no response from the device after this timeout, the open and close frames are retransmitted the number of times which is specified in the Retries parameters.
PollPeriod=30 Once you are connected to a device, it is regularly polled to see whether it is still there. PollPeriod sets the poll interval in seconds.
ServerPort=31416 This is the TCP port on which the TMA Comms Handler �listens�.
WaitClose=300 The TMA Comms Handler normally closes when all TMA for HP OpenView sessions are closed. However, with WaitClose you can set a timeout (in seconds) for which the TMA Comms Handler will wait before it really closes down.
If you restart a new TMA session within this timeout period, the rebooting of the TMA Comms Handler will be accelerated. This because the TMA Comms Handler was not yet closed down completely.
The [Tftp] part
The [Tftp] part contains the following parameters:
Parameter Description
Rexmt=30 Retransmission timeout, in seconds, for a TFTP connection.
Timeout=60 Total timeout, in seconds, for a TFTP connection. I.e. retransmission continues until Timeout has expired.
Continued on next page
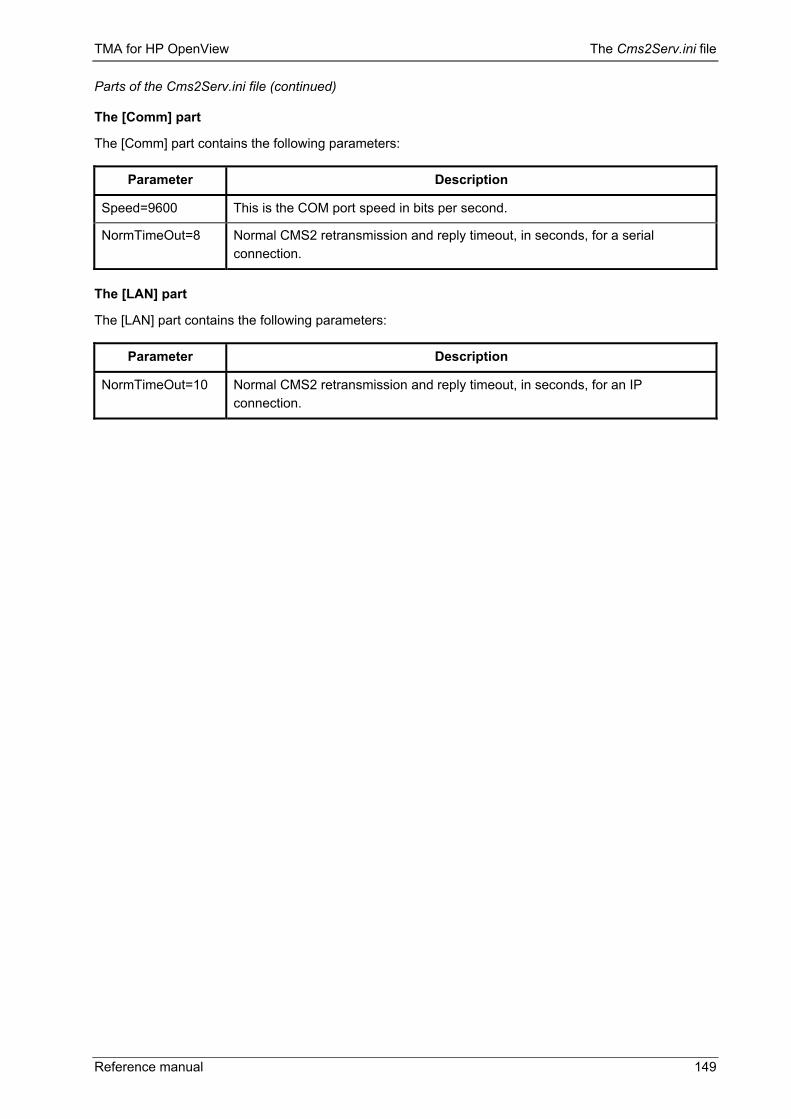
TMA for HP OpenView The Cms2Serv.ini file
Reference manual 149
Parts of the Cms2Serv.ini file (continued)
The [Comm] part
The [Comm] part contains the following parameters:
Parameter Description
Speed=9600 This is the COM port speed in bits per second.
NormTimeOut=8 Normal CMS2 retransmission and reply timeout, in seconds, for a serial connection.
The [LAN] part
The [LAN] part contains the following parameters:
Parameter Description
NormTimeOut=10 Normal CMS2 retransmission and reply timeout, in seconds, for an IP connection.

The Cms2Serv.ini file TMA for HP OpenView
150 Reference manual
13.2 Adding parts to the Cms2Serv.ini file You can set specific communication parameters for each IP address. The communication parameters in this specific part overrule those in the general part of the Cms2Serv.ini file.
Example Suppose you want to change the following:
• NormTimeOut for IP address 194.7.26.4 • NormTimeOut for IP address 10.0.8.15
Proceed as follows:
For the IP address �
Proceed as follows �
194.7.26.4 Step Action
1 Copy the [LAN] part, and paste it at the end of the Cms2Serv.ini file.
2 Rename [LAN] to [LAN_194.7.26.4].
3 Change the NormTimeOut value from 10 to, for instance, 30.
10.0.8.15 Step Action
1 Copy the [LAN] part, and paste it at the end of the Cms2Serv.ini file.
2 Rename [LAN] to [LAN_10.0.8.15].
3 Change the NormTimeOut value from 10 to, for instance, 60.
The added parts are than as follows: [LAN_194.7.26.4] NormTimeOut=30
[LAN_10.0.8.15] NormTimeOut=60
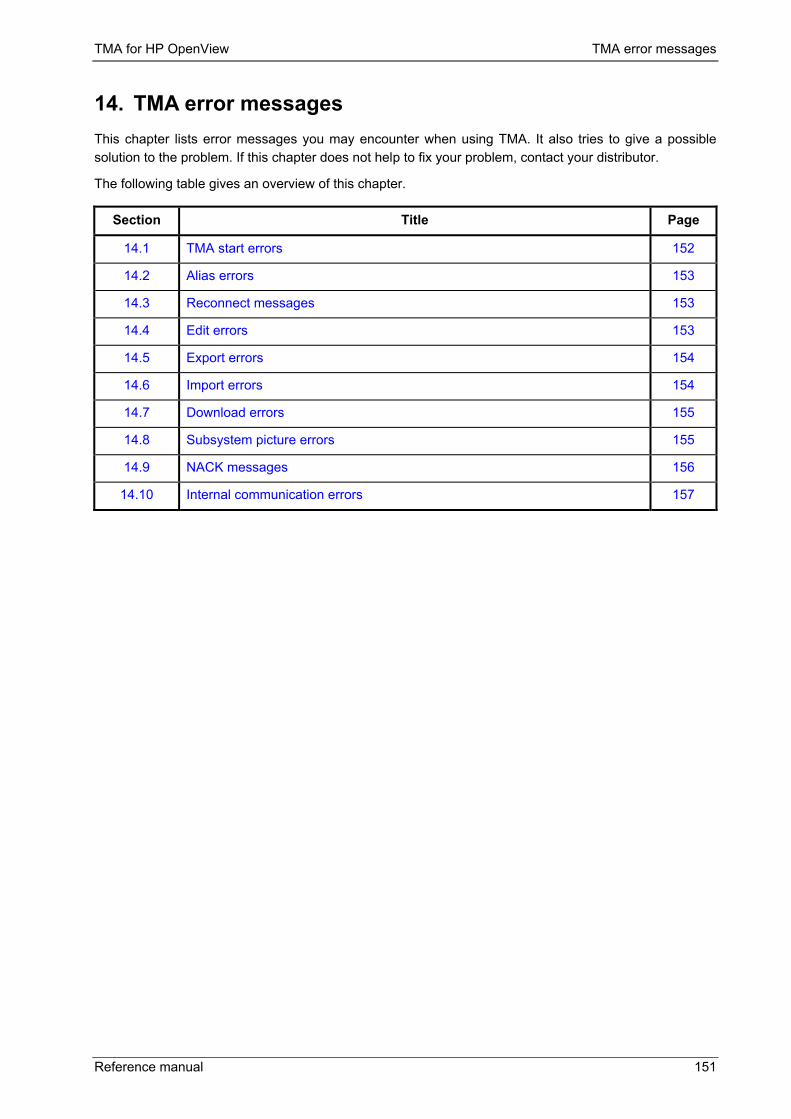
TMA for HP OpenView TMA error messages
Reference manual 151
14. TMA error messages This chapter lists error messages you may encounter when using TMA. It also tries to give a possible solution to the problem. If this chapter does not help to fix your problem, contact your distributor.
The following table gives an overview of this chapter.
Section Title Page
14.1 TMA start errors 152
14.2 Alias errors 153
14.3 Reconnect messages 153
14.4 Edit errors 153
14.5 Export errors 154
14.6 Import errors 154
14.7 Download errors 155
14.8 Subsystem picture errors 155
14.9 NACK messages 156
14.10 Internal communication errors 157

TMA error messages TMA for HP OpenView
152 Reference manual
14.1 TMA start errors The following table lists the error messages you may encounter when starting TMA.
Error message Cause / Solution
• Could not find ini file • Could not open
<Tma_Path>/model/model.nms • <Model_File_Name> is not a valid model file • Model files not installed correctly • No valid model file found for <Device_Name> • Please install the TMA model files first • TMA model files not installed • <Tma_Path> not found. Please reinstall TMA. • Unknown modules in containment tree • Unknown type of device
Cause
These error messages indicate that something has gone wrong with the installation of TMA. For example, some of the TMA files are not present on your system or the model files are not present or incorrect.
Solution • Try to re-install TMA for HP OpenView from
the CD-ROM. • Try to re-install the model files from the CD-
ROM. • Go to the Telindus web site at
http://www.telindusproducts.com ! Products ! Maintenance & Management ! TMA for HP OpenView ! Download model files upgrade and download the latest version of the model files and re-install them.
• Could not read the user configuration file • The configuration file has a bad entry for this
user
Cause
These error messages indicate that there is no user configuration file present on your system, or a bad entry is made in it.
Solution
Use the application TmaUserConf.exe to create or correct the user configuration file. Refer to Section 5.7 - Defining TMA for HP OpenView users and passwords.

TMA for HP OpenView TMA error messages
Reference manual 153
14.2 Alias errors The following table lists the error messages concerning aliases.
Error message Cause / Solution
• Alias not found or entry corrupt • Already an alias with that name • Invalid alias
Cause
These error messages indicate that you wanted to use an alias that does not exist, or that you tried to create an alias that already existed.
Solution
Carefully check your aliases. Refer to the TMA (stand-alone) manual for more information on aliases.
14.3 Reconnect messages The following table lists the reconnect messages.
Error message Cause / Solution
• Unknown error. Please reconnect. • The connection to the device was lost. Please
reconnect. • The connection to the network was lost.
Please reconnect.
Cause
These error messages indicate that at a certain moment the connection towards the device or network was lost.
Solution
Try to reconnect by using the Reconnect button:
If this does not work, close and restart TMA.
14.4 Edit errors The following table lists some error messages you may encounter when editing values.
Error message Cause / Solution
• Invalid IP Address • Invalid number of Days • Invalid number of hours • Invalid number of minutes • Invalid number of seconds • Invalid value • Value is out of range • Attribute is readonly
Cause
These error messages indicate that the value you tried to enter is incorrect or out of range, or you tried to change a read-only attribute.
Solution
Carefully check the value you entered.
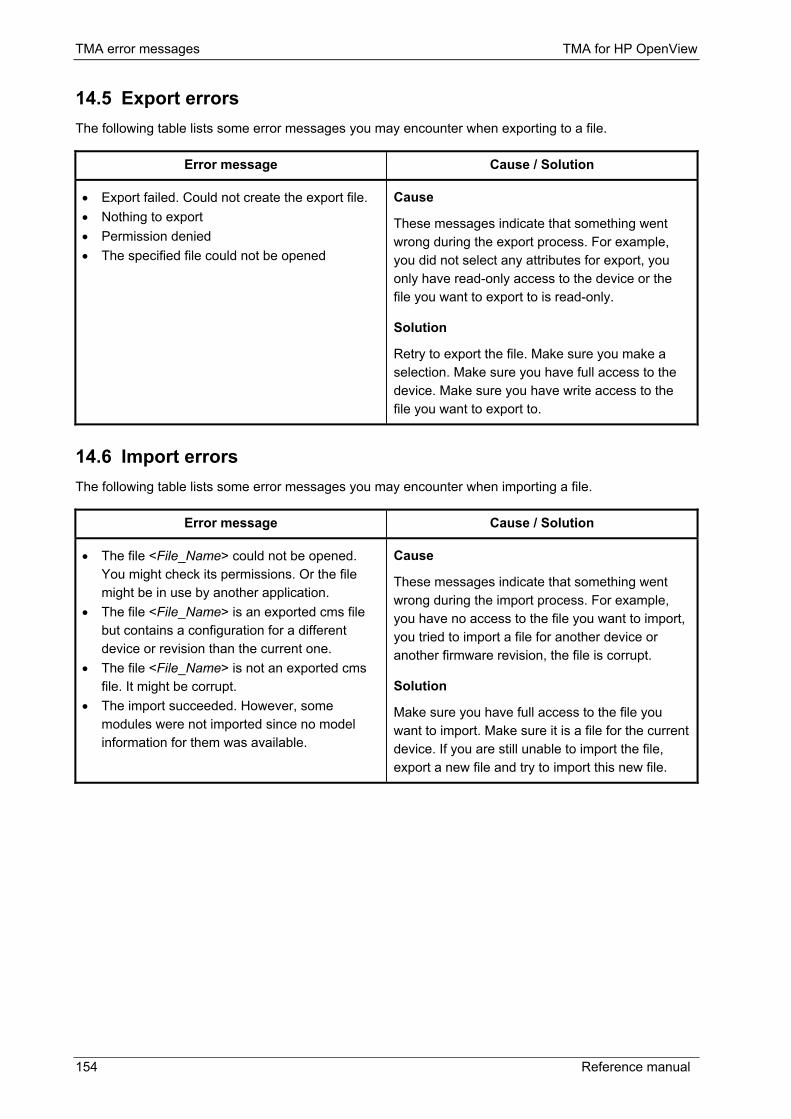
TMA error messages TMA for HP OpenView
154 Reference manual
14.5 Export errors The following table lists some error messages you may encounter when exporting to a file.
Error message Cause / Solution
• Export failed. Could not create the export file. • Nothing to export • Permission denied • The specified file could not be opened
Cause
These messages indicate that something went wrong during the export process. For example, you did not select any attributes for export, you only have read-only access to the device or the file you want to export to is read-only.
Solution
Retry to export the file. Make sure you make a selection. Make sure you have full access to the device. Make sure you have write access to the file you want to export to.
14.6 Import errors The following table lists some error messages you may encounter when importing a file.
Error message Cause / Solution
• The file <File_Name> could not be opened. You might check its permissions. Or the file might be in use by another application.
• The file <File_Name> is an exported cms file but contains a configuration for a different device or revision than the current one.
• The file <File_Name> is not an exported cms file. It might be corrupt.
• The import succeeded. However, some modules were not imported since no model information for them was available.
Cause
These messages indicate that something went wrong during the import process. For example, you have no access to the file you want to import, you tried to import a file for another device or another firmware revision, the file is corrupt.
Solution
Make sure you have full access to the file you want to import. Make sure it is a file for the current device. If you are still unable to import the file, export a new file and try to import this new file.

TMA for HP OpenView TMA error messages
Reference manual 155
14.7 Download errors The following table lists some error messages you may encounter when downloading firmware to a device.
Error message Cause / Solution
• The local filename may not contain the '@' character.
• The remote filename may not contain the '?' character.
• The TML command line is too long. There is a limit of 126 characters.
Cause
These messages indicate that you used characters in the file name that are not allowed, or that you selected too many files at once.
Solution
Recheck the file names. Select fewer files. Refer to the TMA (stand-alone) manual for more information on downloading.
14.8 Subsystem picture errors The following table lists some error messages you may encounter when opening the subsystem picture.
Error message Cause / Solution
• Could not open <Bitmap_File_Name> • Could not open picture definition file
<Def_File_Name>
Cause
These messages indicate that some files needed for the subsystem picture are not present on your system.
Solution • Try to re-install the model files from the CD-
ROM. • Go to the Telindus web site at
http://www.telindusproducts.com ! Products ! Maintenance & Management ! TMA for HP OpenView ! Download model files upgrade and download the latest version of the model files and re-install them.
• No picture available
Cause
There is no subsystem picture for this device.
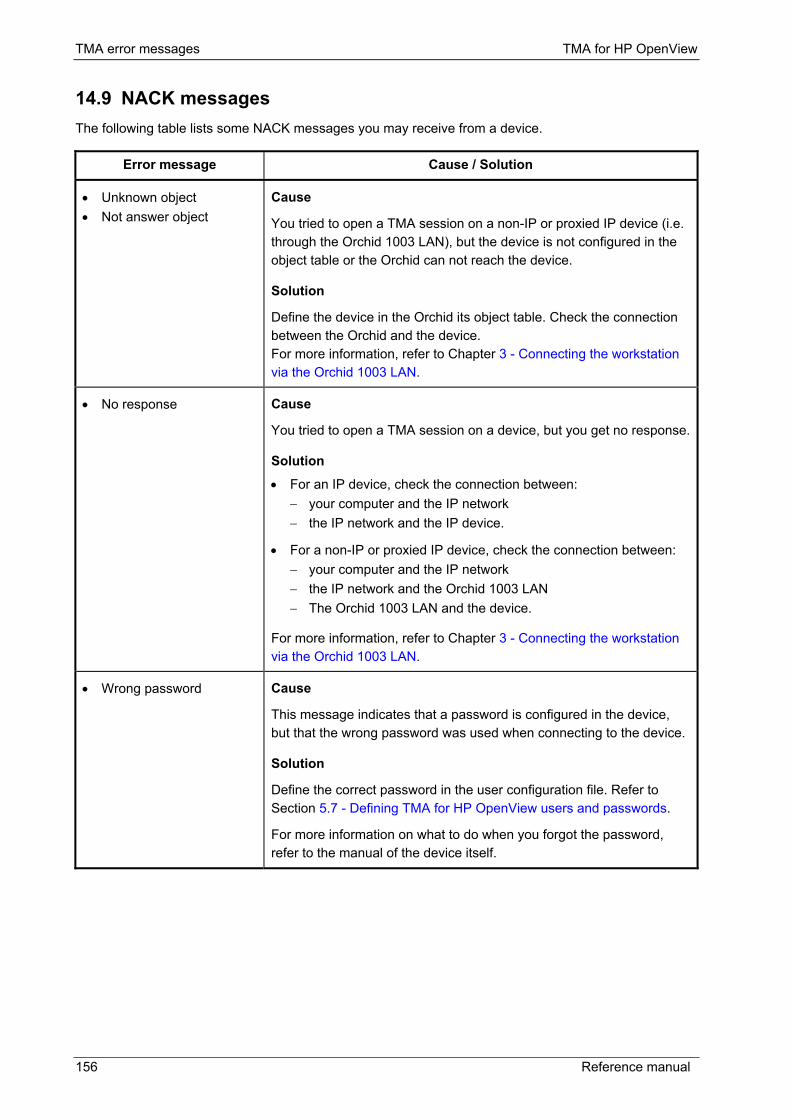
TMA error messages TMA for HP OpenView
156 Reference manual
14.9 NACK messages The following table lists some NACK messages you may receive from a device.
Error message Cause / Solution
• Unknown object • Not answer object
Cause
You tried to open a TMA session on a non-IP or proxied IP device (i.e. through the Orchid 1003 LAN), but the device is not configured in the object table or the Orchid can not reach the device.
Solution
Define the device in the Orchid its object table. Check the connection between the Orchid and the device. For more information, refer to Chapter 3 - Connecting the workstation via the Orchid 1003 LAN.
• No response
Cause
You tried to open a TMA session on a device, but you get no response.
Solution • For an IP device, check the connection between:
− your computer and the IP network − the IP network and the IP device.
• For a non-IP or proxied IP device, check the connection between: − your computer and the IP network − the IP network and the Orchid 1003 LAN − The Orchid 1003 LAN and the device.
For more information, refer to Chapter 3 - Connecting the workstation via the Orchid 1003 LAN.
• Wrong password
Cause
This message indicates that a password is configured in the device, but that the wrong password was used when connecting to the device.
Solution
Define the correct password in the user configuration file. Refer to Section 5.7 - Defining TMA for HP OpenView users and passwords.
For more information on what to do when you forgot the password, refer to the manual of the device itself.

TMA for HP OpenView TMA error messages
Reference manual 157
14.10 Internal communication errors The following table lists some internal communication error messages.
Error message Cause / Solution
• Client not available • Internal communication problem • Internal communication timeout • Server not available • Unknown service
Cause
This indicates that the TMA application is unable to communicate with the TMA comms handler.
Solution
Close TMA and the TMA comms handler and restart TMA. If this does not help, try to re-install TMA.

Technical specifications TMA for HP OpenView
158 Reference manual
15. Technical specifications This chapter gives the technical specifications of TMA for HP OpenView. The following table gives an overview of this chapter.
Section Title Page
15.1 System requirements 159
15.2 TMA for HP OpenView building blocks 159
15.3 Alarm Manager features 160
15.4 Alarm notification 160
15.5 Management interconnectivity 160

TMA for HP OpenView Technical specifications
Reference manual 159
15.1 System requirements The following table gives the system requirements for running TMA for HP OpenView:
System
Windows NT / 2000 Sun Solaris HP-UX
System specification Pentium 150 or more Sun Ultra 10 or more HP 9000 715 or more
Operating system version Windows NT 4.0 / Windows 2000
Solaris 2.6 / 7 HP-UX 10.20 / 11.0
HP OpenView version HP OpenView NNM 5.01 or higher
HP OpenView NNM 5.01 or higher
HP OpenView NNM 5.01 or higher
Available disk space (without HP OpenView)
21 Mb (1) 30 Mb (1) 30 Mb (1)
Recommended RAM 256 Mb or more + 64 Mb extra for Windows 2000
256 Mb or more 256 Mb or more
Additional hardware
• CD-ROM • mouse
• CD-ROM • mouse
• CD-ROM • mouse
networking TCP/IP networking installed and configured
TCP/IP networking installed and configured
TCP/IP networking installed and configured
(1) Because the model files delivered with TMA for HP OpenView evolve as the devices evolve, their size tends to increase with each new release. The figures specified in the table above, is the size of TMA for HP OpenView and the model files as it was when this manual was written. For future releases of TMA for HP OpenView, these figures may be incorrect.
15.2 TMA for HP OpenView building blocks TMA for HP OpenView consists of two main building blocks:
• the Telindus Maintenance Application or TMA • the Alarm Manager.

Technical specifications TMA for HP OpenView
160 Reference manual
15.3 Alarm Manager features The main features of the Alarm Manager are:
• Automatically detect all Telindus non-IP devices configured in the Orchid 1003 LAN and create (or delete) them in HP OpenView.
• Synchronise with the status of all Telindus IP devices in the network. • Synchronise with the status of all the Telindus devices managed by the Orchid 1003 LAN. • Backing up the configuration of Telindus IP devices. • For all the received alarms, generate an event in HP OpenView. • Update the colour (representing the total alarm level) of all Telindus devices. • Alarm filtering on different levels. • Generate an alarm log file.
15.4 Alarm notification The alarm notification specifications are:
• Alarm transport protocol: SNMP or proprietary (CMS2) • Alarm levels: 5 (normal, warning, minor, major, critical).
15.5 Management interconnectivity The management interconnectivity can be done over:
• TCP/IP (direct 10Base-T connection) • X.25 SVC (RFC 1356) (✲) • PPP (RFCs 1332, 1661, 1994) (✲) • Frame-Relay PVC (RFC 1490) (✲)
(✲) In combination with Orchid 1003 LAN.

TMA for HP OpenView
Annexes 161
Annexes

TMA for HP OpenView
162 Annexes

TMA for HP OpenView Annex A: abbreviations
Annexes 163
Annex A: abbreviations The following table gives a list of abbreviations and their description.
Abbreviation Description
ARP Address Resolution Protocol
GUI Graphical User Interface
HPOV HP OpenView
IP Internet Protocol
LAN Local Area Network
MIB Management Information Base
PPP Point-to-Point Protocol
PVC Permanent Virtual Circuit
RFC Request For Comment
SNMP Simple Network Management Protocol
SVC Switched Virtual Circuit
TCP Transport Control Protocol
TCP/IP Transport Control Protocol / Internet Protocol
TMA Telindus Maintenance Application

Annex B: product information TMA for HP OpenView
164 Annexes
Annex B: product information The following table displays the product information of TMA for HP OpenView and related products.
Sales code Product name Description
156986 TMA_HP/OV WINDOWS/SOLARIS/HP-UX DEMO VER.
Demo version for SUN Solaris, Windows NT and HP-UX. max 8 IP Adresses supported.
156689 TMA_HP/OV WINDOWS NT ENTRY LEVEL VER.
Telindus Management Application for HP Openview on Windows NT. SNMP. Up to 250 IP Adresses supported. 3-years Maintenance contract for TMA_HP/OV mandatory.
156690 TMA_HP/OV WINDOWS NT UNLIMITED VER.
Telindus Management Application for HP Openview on Windows NT. SNMP. No limit on IP Adresses supported. 3-years Maintenance contract for TMA_HP/OV mandatory.
156685 TMA_HP/OV SUN SOLARIS ENTRY LEVEL VER.
Telindus Management Application for HP Openview on SUN Solaris. SNMP. Up to 250 IP Adresses supported. 3-years Maintenance contract for TMA_HP/OV mandatory.
156686 TMA_HP/OV SUN SOLARIS UNLIMITED VER.
Telindus Management Application for HP Openview on SUN Solaris. SNMP. No limit on IP Adresses supported. 3-years Maintenance contract for TMA_HP/OV mandatory.
162845 TMA_HP/OV HP-UX ENTRY LEVEL VER. Telindus Management Application for HP Openview on HP-UX. SNMP. Up to 250 IP Adresses supported. 3-years Maintenance contract for TMA_HP/OV mandatory.
162842 TMA_HP/OV HP-UX UNLIMITED VER. Telindus Management Application for HP Openview on HP-UX. SNMP. No limit on IP Adresses supported. 3-years Maintenance contract for TMA_HP/OV mandatory.
156688 TMA_CLI WINDOWS NT Command Line Interface application for WINDOWS NT. 3-years Maintenance contract for TMA_HP/OV mandatory.
156687 TMA_CLI SUN SOLARIS Command Line Interface application for SUN SOLARIS. 3-years Maintenance contract for TMA_HP/OV mandatory.
Continued on next page

TMA for HP OpenView Annex B: product information
Annexes 165
Annex B: product information (continued)
The following table displays the product information on the maintenance contracts for TMA for HP OpenView and related products.
Sales code Product name Description
158673 TMA_HP/OV ENTRY LEVEL MAINT. CONTRACT 3Y
Yearly maintenance contract for TMA_HP/OV Entry Level Versions with a minimum duration of 3 years.
158674 TMA_HP/OV UNLIMITED MAINT. CONTRACT 3Y
Yearly maintenance contract for TMA_HP/OV Unlimited Versions with a minimum duration of 3 years.
163135 TMA_CLI MAINT. CONTRACT 3Y Yearly maintenance contract for TMA_CLI with a minimum duration of 3 years.
163131 TMA_HP/OV ENTRY LEVEL + TMA_CLI MAINT. CONTRACT 3Y
Yearly maintenance contract for TMA_HP/OV Entry Level Versions combined with TMA_CLI with a minimum duration of 3 years.
163133 TMA_HP/OV UNLIMITED + TMA_CLI MAINT. CONTRACT 3Y
Yearly maintenance contract for TMA_HP/OV Unlimited Versions combined with TMA_CLI with a minimum duration of 3 years.
The following table displays the product information of the TMA applications manuals.
Sales code Product name Description
169440 MANUAL TMA (E) Manuals are delivered with the product in electronic format (CD-ROM) for environmental reasons. If however a hardcopy (print-out) of the manual is required, this sales item can be used. Between brackets an indication of the language.
169441 MANUAL TMA FOR HP-OPENVIEW (E) Manuals are delivered with the product in electronic format (CD-ROM) for environmental reasons. If however a hardcopy (print-out) of the manual is required, this sales item can be used. Between brackets an indication of the language.
169442 MANUAL TMA-CLI (E) Manuals are delivered with the product in electronic format (CD-ROM) for environmental reasons. If however a hardcopy (print-out) of the manual is required, this sales item can be used. Between brackets an indication of the language.
Annex C: licence key request TMA for HP OpenView
166 Annexes
Annex C: licence key request In order to obtain the required licence key, do one of the following:
• send a fax to +32 16 382515 • send an email to [email protected]
Which information has to be supplied? The fax or the email should contain the following information:
• your company name and location information • the serial number which you can find on the CD-ROM label, e.g. S.N.:9943964 • the CD-ROM code which you can find on the CD-ROM label, e.g. V.:S0007/00900 • the IP address of the station on which TMA for HP OpenView has been installed.
Licence key request fax The following page displays a prepared licence key request fax. You can use this fax to obtain a licence key. Proceed as follows:
Step Action
1 Make a printout of the fax document displayed on the following page.
2 Fill in the required information on the dotted lines.
3 Send the fax to +32 16 382515.

Fax To: TELiNDUS From: �����������������
Fax: +32 16 382515 Pages: 1
Subject: TMA for HP OpenView � licence key request Date: �����������������
Please send me a licence key for TMA for HP OpenView.
Company information
Name: �����.������������������������������.
Address: ��������������������������������.��.
��������������������������������������...
��������������������������������������...
��������������������������������������...
Telephone number: �����������������������������...
Fax number: ��������������������������������...
Email address: �������������������������������...
Other information
The serial number on the CD-ROM label is �����..����..���������..
The CD ROM code on the CD ROM label is �������������������.
The IP address of the station running TMA for HP OpenView is ���..��...����.