tmu & tmsutm addendum to the owner's manual - extranet
TRANSCRIPT

imp
or
tan
t: t
o b
e k
ep
t f
or
th
e o
wn
ertmU & tmSUTM aDDenDUm
to the owner’S manUalIMporTanT InforMaTIon for The InsTaller and The owner
inclUDeD:
• thermomaSSeUr® (tmU) InsTallaTIon with aromaCloudTM.
• thermaSenSTM (tmSUTM) InsTallaTIon with aromaCloudTM,
Chromatherapy and warmTouchshellTM.


TMU & TMSUTM addendUM To The owner’S ManUal
3 www.bainultra.com
Printed in Canada. Copyright © January 2013 BainUltra Inc. all rights reserved. 45100572Some products, specifications, and services mentioned in this manual are described in pending patent applications or are protected by patents.
table of contents
956, chemin olivierSaint-nicolas (Québec)G7a 2n1
T 418.831.7701 1.800.463.2187
F 418.831.6623 1.800.382.8587 [email protected]
safety instructions 4
installation
BaTh on deCk 5
electrical installation • turbine
TUrBIne wITh GeySaIrTM 6
TUrBIne wITh GeySaIrTM & aroMaCloUdTM 7 - 8
TUrBIne wIThoUT GeySaIrTM,and wITh aroMaCloUdTM 9
electrical installation • tHerMasensTM 10 -11
controls • installation
doT ConTrolS 12
aroMaCloUdTM 13
user guide
doT ConTrolS 14
aroMaCloUdTM 15
troublesHooting 16
warranty 17
drilling teMplate
aroMaCloUdTM 19
4 supersedes page 4 of owner’s Manual
TMU & TMSUTM addendUM To The owner’S ManUal | SAFETY INSTRUCTIONS
InstRUctIons PeRtaInInG to a RIsK of fIRe, electRocUtIon, oR PeRsonal InJURY
iMportant safety instructionsread and follow all instructionssaVe tHese instructions
• risk of hyperthermia; people using medication and/or having an adverse medical history should consult a physician before using a hydro-thermo massage® bathtub equipped with a heater or a ThermaSensTM bath equipped with the warmTouchShellTM technology.
• risk of hyperthermia and possible drowning: do not use a hydro-thermo massage® bathtub equipped with heater or a ThermaSensTM bath equipped with the warmTouchShellTM technology immediately following strenuous exercise.
• risk of fetal injury; pregnant or possibly pregnant women should consult a physician before using a hydro-thermo massage® bathtub equipped with a heater, or a ThermaSensTM bath equipped with the warmTouchShellTM technology.
• risk of accidental injury or drowning; do not use drugs or alcohol before or during the use of a hydro-thermo massage® bathtub equipped with a heater or a ThermaSensTM bath equipped with the warmTouchShellTM technology.
• Use this unit only for its intended purposes or as described in this manual. Use only attachments recommended by the manufacturer.• risk of hyperthermia and possible drowning. water temperature in excess of 100ºf (38ºc) may be injurious to your health.
Check and adjust temperature before use.• To reduce the risk of injury, as with any other conventional bath, do not allow children or physically impaired people to use this unit
unless they are closely supervised at all times. • To avoid injury, exercise care when entering or exiting the Thermomasseur® or the ThermaSensTM.• the geysairTM (option) should always be connected to the hot water intake. If it is not the case, then, the Geysair option should be
deactivated via the bath control.
rISk oF eleCTrICal ShoCk• disconnect electric power before servicing.• do not permit electrical appliances (hair dryer, lamp, telephone, radio, television, etc.) within 5’ (1.5 m) of the Thermomasseur®
or the ThermaSensTM.• Before using the Thermomasseur® or the ThermaSensTM, its exterior construction (podium or skirting) should be finished so that
a bather cannot accidentally come in contact with electrical components (turbine and power module).• For indoor use only.
eleCTrICal ConneCTIonS:• never drop or insert objects into any openings.• The Thermomasseur® must be connected only to a supply circuit that is protected by a 15 amp class a ground fault circuit interrupter
(gfci) and/or 20 amps, depending on the type of Thermomasseur® and options selected. BainUltra ThermaSensTM must be connected to a circuit protected by a Class a 15 amp ground fault circuit interrupter (GFCI). This interrupter is supplied by a certified electrician and must be tested on a regular basis in accordance with manufacturer’s instructions. The GFCI ground must be connected. If defective, do not use the bathtub. disconnect immediately and call a certified electrician.
• Use 12 awg (or greater) copper conductors that resist temperatures of at least 194ºf (90ºc).• Canada only: for permanently connected units. a green-colored terminal (or a wire connector marked g, gr, ground or grounding) is
provided within the terminal compartment (not applicable if unit supplied with an electric plug). To reduce the risk of electrocution, connect this terminal or connector to the grounding terminal of your electric service or supply panel with conductor equivalent in size to the circuit conductors supplying the equipment and be 12 awg or more.
• all electrical connections must be carried out by a certified electrician and must respect federal, provincial/state, and localbuilding codes and regulations.
• Install in accordance with manufacturer’s installation instructions.• for geysair-equipped baths using remote turbine installation (not mounted on the bath), grounding continuity must be tested
between the bath grounding terminal and the bath power supply. failure to perform the grounding continuity test could result in serious personal injury.
warning
1 800 463.2187 From 8 a.m. to 8 p.m. Monday to Thursday (EST) From 8 a.m. to 5 p.m. on Friday (EST) Printed in Canada. Copyright © September 2012 BainUltra Inc. all rights reserved. 45100169
Some products, specifications, and services mentioned in this manual are described in pending patent applications or are protected by patents.

THERMOMASSEUR® | TMU & TMSUTM addendUM To The owner’S ManUal
www.bainultra.com Printed in Canada. Copyright © September 2012 BainUltra Inc. all rights reserved. 45100572Some products, specifications, and services mentioned in this manual are described in pending patent applications or are protected by patents.
supersedes page 11 of owner’s Manual 5
bath on decK pluMbing installation
iMportant • Bath must be completely supported by the floor making sure the edge rests entirely on the structure. • Bath must be levelled. • Bath is molded with a slope toward drain. If bath is levelled in respect to the deck, the water will drain completely.
1. InSTallaTIon
* See specification sheet of bath for exceptions.
1-1 Prepare the site to connect the plumbing and turbine.
1-2 Build the (2” x 3”) wooden structure taking into account the thickness of the ceramic tiles and the plywood as well as the height of the bath. note: Plan air intake for turbine.
1-3 Secure plywood into place with screws around and above structure.
1-4 Cut inside 1 1/2” of the outside dimensions of the tub.
1-5 ensure bath is levelled and that it fits properly in cutout. note: Protect turbine and accessoriesas you insert bath.
1-6 Install desired finishing materials (ceramic tiles, granit, marble or other) and top surface and siding of the deck.
1-7 Set bath back into place and conduct plumbing and turbine connection.
Edge of bath
Ceramic, marble, granit or other
Plywood
2” x 3” structure
1 1/2" [3.8 cm]
BaTh on deCk - PlUMBInG InSTallaTIon
note • Baths with aromaCloudTM factory installed by BainUltra may require an additional cutout on the podium for the aromaCloud housing. This extra cutout is required when the housing is less than 1.5 inch from the edge of the bath.

TU
RB
INE
TMU & TMSUTM addendUM To The owner’S ManUal | TURBINE
1 800 463.2187 From 8 a.m. to 8 p.m. Monday to Thursday (EST) From 8 a.m. to 5 p.m. on Friday (EST) Printed in Canada. Copyright © January 2013 BainUltra Inc. all rights reserved. 45100572
Some products, specifications, and services mentioned in this manual are described in pending patent applications or are protected by patents.
6 supersedes page 27 of owner’s Manual
TUrBIne witH geysair - eleCTrICal InSTallaTIon & PlUMBInG
tURbIne WIth GeYsaIR electrical installation & pluMbing
the turbine is connected to a 120V circuit. all electrical connections must be carried out by a certified electrician in accordance with local electrical requirements and codes. special attention must be given to installation of bath’s power circuit, and more particularly to the following points:
The electrical system must be connected to an independent circuit protected by a new 20 aMp class a ground fault circuit interrupter (gfci) and another one of 15 aMp for additonal options. This electrical circuit must imperatively be grounded. canada only: for permanently connected units. a green-colored terminal (or a wire connector marked g, gr, ground or grounding) is provided within the terminal compartment (not applicable if unit supplied with an elec-tric plug). To reduce the risk of electrocution, connect this terminal or connector to the grounding terminal of your electric service or supply panel with conductor equivalent in size to the circuit conductors supplying the equipment and be 12 awg or more. InSTall ThIS UnIT In aCCordanCe wITh The CanadIan eleCTrICal Code, ParT 1.
a service access is necessary. Minimum dimensions are: 22” x 18” (55 cm x 46 cm) to properly reach all electrical components of the system.
GroUndInG
aCCeSS
ConneCTIonS
PlUMBInG
The modules of the electronic controls and the turbine must be easily accessible at all times. Make all connections as indicated on diagram below. ensure that power circuit is disabled before pro-ceeding with any electrical connections. electrical cable feeding bath must be at least n° 12 awG caliber. turbine must be con-nected to its own circuit, which, in turn must be connected directly in breaker panel without any interrupters or dimmer switches. Canada only: the junction box must be attached to the wall at the height of at least 1 1/2” (3.8 cm) from the ground.
The Geysair hose must be connected to the hot water supply by a qualified plumber and according to the local plumbing code. a 3/8 inch male or 1/2 inch nPT hose bibb is supplied. For optimal performance, keep hose length to a minimum. Set temperature on hot water heater no higher than 140°F/60°C. for all the houses having to deal with special water condi-tions (hard, rust, sulfur, etc) the homeowner should already be aware of the specific measures that should be taken for all his other appliances using water. the geysair does not need other measures than that.

TU
RB
INE
TURBINE | TMU & TMSUTM addendUM To The owner’S ManUal
www.bainultra.com Printed in Canada. Copyright © January 2013 BainUltra Inc. all rights reserved. 45100572Some products, specifications, and services mentioned in this manual are described in pending patent applications or are protected by patents.
in addition to page 28 of owner’s Manual 7
MIaPlUS®, MIaMUlTI®
ConneCTIonS ConTrolS For TherMoMaSSeUrS®
• electrical outlet must be installed by a certified electrician. Installation must be conducted in accordance with all local, provincial/state, and federal building/electrical codes and regulations. Connect electrical power supply only after all low voltage wiring is properly installed on turbine. If you did not follow this last step, shut off and then restart your home’s circuit breaker. Turbine and air pipe should be clear of building materials and wiring.
warning
tURbIne WIth GeYsaIR & aRomacloUd electrical installation
TUrBIne wITh GeySaIrTM & aroMaCloUdTM - eleCTrICal InSTallaTIon

TU
RB
INE
TMU & TMSUTM addendUM To The owner’S ManUal | TURBINE
1 800 463.2187 From 8 a.m. to 8 p.m. Monday to Thursday (EST) From 8 a.m. to 5 p.m. on Friday (EST) Printed in Canada. Copyright © January 2013 BainUltra Inc. all rights reserved. 45100572
Some products, specifications, and services mentioned in this manual are described in pending patent applications or are protected by patents.
8 supersedes page 29 of owner’s Manual
eleCTrICal dIaGraM TUrBIne witH GeySaIrTM & aroMaCloUdTM
electrical connections for Canada only.
TUrBIne wITh GeySaIr TM & aroMaCloUd TM - eleCTrICal InSTallaTIon
15A CIRCUIT20A CIRCUITNEUTRAL N L LOAD NEUTRAL N L LOAD
GROUND FAULTCIRCUIT INTERRUPTERS
JUNCTIONBOX
AIRSTREME(HEATED BACKREST
A& HEADREST)
TURBINE WITH GEYSAIR(FOR MIA®, MIAPLUS®,
MIAMULTI®)
INMIX MODULE (CHROMATHERAPY)
AROMACLOUDTM
N LN L N LN L
tURbIne witH GeYsaIRtm
& aRomacloUdtm
electrical installation

TU
RB
INE
www.bainultra.com Printed in Canada. Copyright © January 2013 BainUltra Inc. all rights reserved. 45100572Some products, specifications, and services mentioned in this manual are described in pending patent applications or are protected by patents.
supersedes page 29 of owner’s Manual 9
TURBINE | TMU & TMSUTM addendUM To The owner’S ManUal
eleCTrICal dIaGraM TUrBIne witHout GeySaIrTM, & witH aroMaCloUdTM
electrical connections for Canada only.
15A CIRCUIT (OR 20A IF AMMA w. DOUBLE HEATED BACKREST)
N LN L N LN L
15A CIRCUIT
NEUTRAL N L LOAD NEUTRAL N L LOAD
GROUND FAULTCIRCUIT INTERRUPTERS
JUNCTIONBOX
AIRSTREME(HEATED BACKREST
& HEADREST)
TURBINE WITH GEYSAIR(FOR MIA®, MIAPLUS®,
MIAMULTI®)
INMIX MODULE (CHROMATHERAPY)
AROMACLOUDTM
TUrBIne wIThoUT GeySaIr TM wITh aroMaCloUd TM - eleCTrICal InSTallaTIon
tURbIne witHout GeYsaIRtm
, and witH aRomacloUdtm
electrical installation

TMU & TMSUTM addendUM To The owner’S ManUal | TURBINE
1 800 463.2187 From 8 a.m. to 8 p.m. Monday to Thursday (EST) From 8 a.m. to 5 p.m. on Friday (EST) Printed in Canada. Copyright © January 2013 BainUltra Inc. all rights reserved. 45100572
Some products, specifications, and services mentioned in this manual are described in pending patent applications or are protected by patents.
10 supersedes page 28 of owner’s Manual
• electrical outlet must be installed by a certified electrician. Installation must be conducted in accordance with all local, provincial/state, and federal building/electrical codes and regulations. Connect electrical power supply only after all low voltage wiring is properly installed on turbine. If you did not follow this last step, shut off and then restart your home’s circuit breaker. Turbine and air pipe should be clear of building materials and wiring.
warning
TherMaSenS - eleCTrICal InSTallaTIon
ConneCTIonS For doT ConTrolS on TherMaSenSTM BaThS
theRmasenstm
electrical installation

TURBINE | TMU & TMSUTM addendUM To The owner’S ManUal
www.bainultra.com Printed in Canada. Copyright © January 2013 BainUltra Inc. all rights reserved. 45100572Some products, specifications, and services mentioned in this manual are described in pending patent applications or are protected by patents.
supersedes page 29 of owner’s Manual 11
TUrBIne witH geysair - eleCTrICal InSTallaTIon
eleCTrICal dIaGraM - TherMaSenSTM
electrical connections for Canada only.
15A CIRCUIT
AIRSTREME(WARMTOUCHSHELLTM)
AROMACLOUDTM
N LN L N L
NEUTRAL N L LOAD
GROUND FAULTCIRCUIT INTERRUPTER
JUNCTIONBOX
INMIX MODULE (CHROMATHERAPY)
theRmasenstm
electrical installation
TMU & TMSUTM addendUM To The owner’S ManUal | CONTROLS
CO
NT
RO
LS
1 800 463.2187 From 8 a.m. to 8 p.m. Monday to Thursday (EST) From 8 a.m. to 5 p.m. on Friday (EST) Printed in Canada. Copyright © January 2013 BainUltra Inc. all rights reserved. 45100572
Some products, specifications, and services mentioned in this manual are described in pending patent applications or are protected by patents.
12 in addition to page 54 of owner’s Manual
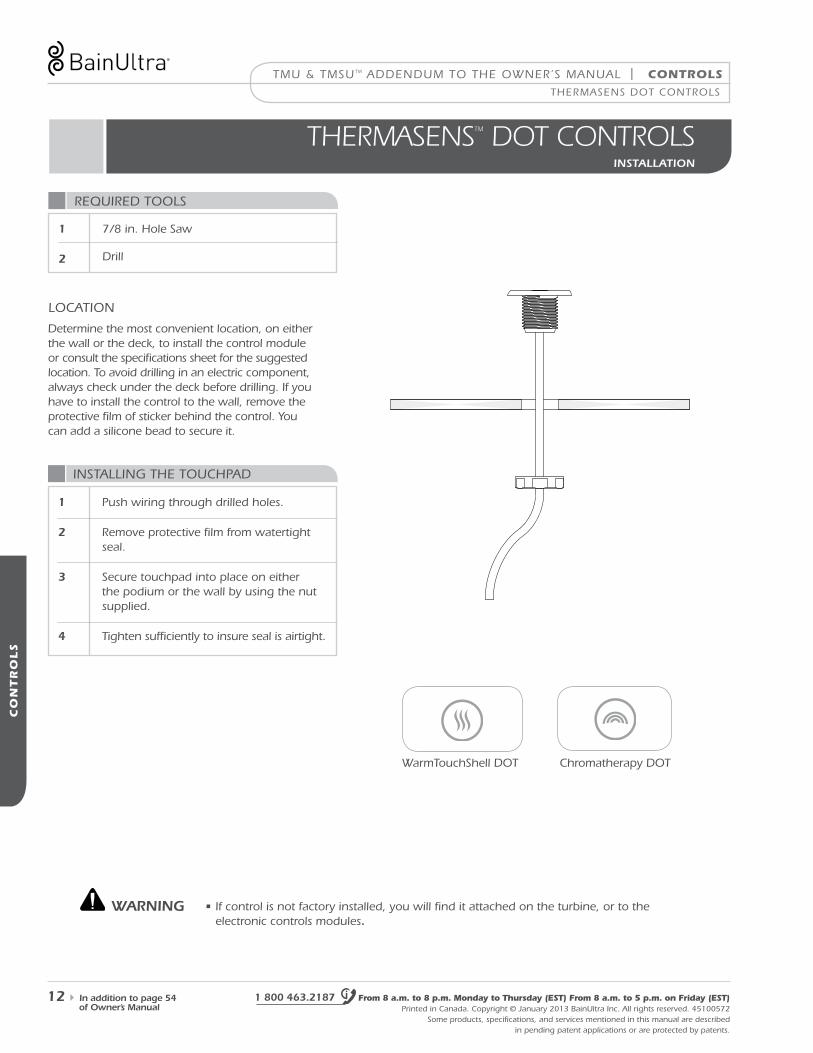
TherMaSenS doT ConTrolS
theRmasenstm dot contRolsinstallation
1 7/8 in. hole Saw
2 drill
warmTouchShell doT Chromatherapy doT
determine the most convenient location, on either the wall or the deck, to install the control module or consult the specifications sheet for the suggested location. To avoid drilling in an electric component, always check under the deck before drilling. If you have to install the control to the wall, remove the protective film of sticker behind the control. you can add a silicone bead to secure it.
loCaTIon
InSTallInG The ToUChPad
reQUIred ToolS
1 Push wiring through drilled holes.
2 remove protective film from watertight seal.
3 Secure touchpad into place on either the podium or the wall by using the nut supplied.
4 Tighten sufficiently to insure seal is airtight.
• If control is not factory installed, you will find it attached on the turbine, or to the electronic controls modules.
warning

CO
NT
RO
LS
CONTROLS | TMU & TMSUTM addendUM To The owner’S ManUal
www.bainultra.com Printed in Canada. Copyright © January 2013 BainUltra Inc. all rights reserved. 45100572Some products, specifications, and services mentioned in this manual are described in pending patent applications or are protected by patents.
aRomacloUdtm
installation
aroMaCloUdTM
If performing a home installation of aromaCloud instead of a BainUltra factory installation, consider the following points when selecting the installation position:
• aromaCloud must be installed on bath decking; no other position is acceptable.
• The Bainultra recommended position.
• The position of controls, if applicable.
• The position of fittings.
• The position of tiling flange and bath skirt if present.
• The desired direction with respect to the bath and the room entrance.
• The possibility that the podium will require an ad-ditional cutout to house aromaCloud.
note that factory installation by BainUltra will always be performed for freestanding baths whose decking has been modified to house aromaCloud.
loCaTIon
1 Push wiring through drilled holes.
2 Connect the aromaCloud to the transformer underneath the bath.
3 remove protective film from watertight seal.
4 Fix on the bath deck.
AromaCloudTM Water Level Sticker on the Exterior Side.
1 Jigsaw with finishing blade.
2 drill.
3 1/4 in Bit.
4 adhesive masking tape.
InSTallInG The aroMaCloUd
reQUIred ToolS
refer to the drilling template on the last page for the location and diameter of the hole.
after drilling, verify that there is a 1/16 inch gap between the hole and the aromaCloud housing.
drIllInG
in addition to p. 54 13of owner’s Manual

TMU & TMSUTM addendUM To The owner’S ManUal | CONTROLS
CO
NT
RO
LS
1 800 463.2187 From 8 a.m. to 8 p.m. Monday to Thursday (EST) From 8 a.m. to 5 p.m. on Friday (EST) Printed in Canada. Copyright © January 2013 BainUltra Inc. all rights reserved. 45100572
Some products, specifications, and services mentioned in this manual are described in pending patent applications or are protected by patents.
14 in addition to pp. 55 to 65of owner’s Manual
aRomacloUdtm
user guide
MaInTenanCe / reCoMMendaTIonS
WATER LEVEL
aroMaCloUd TM -USer GUIde
aromaCloud technology transforms liquid into vapor made up of microdroplets that travel through the air. It is thus crucial to use only quality water and essential oils. hard, rusty, sulfurous or otherwise impure water may compromise aromaCloud performance and thera-peutic benefits.
essential oils must always be mixed with water in the aromaCloud housing.
one or two droplets are enough for a 30 minute ses-sion. If essential oil droplets are spilled directly onto the acrylic of your bath or the aromaCloud lid or housing, wipe off immediately.
when stored correctly, quality essential oils have a shelf life of several years without losing their proper-ties. always store essential oils in a cool, dark place to prevent oxidation.
once your aromatherapy session is complete, soak up the water remaining in the housing using the sponge supplied with aromaCloud, to prevent it from eventu-ally stagnating. never use this sponge to clean the bath or on any other surface. The sponge should not be used to fill up your aromaCloud.
aroMaCloUdTM on/oFF
To turn on aromaCloud, lift the lid, pour water into the housing until it reaches the recommended level, add one or two drops of essential oils. read carefully the recommendations below. Give the lid a half turn and then lower it again.
To turn aromaCloud off, give the lid a half turn.
SeCUrITy / PrevenTIon
AromaCloudTM Turned On(Lid Open)
AromaCloudTM Turned Off(Lid Closed)
• If the seal is broken, do not use product.
• do not drink essential oils.
• always keep essential oils out of reach of children.
• do not expose the nose, eyes, or anal or genital mucous membranes.
• If an allergic reaction occurs, discontinue use.
• avoid contact with eyes. If accidental contact occurs, care-fully apply vegetable oil with a cotton swab. do not rinse with water. Consult a physician immediately.
warnings • essential oils contain active ingredients with high concentrations. Please consult an aromatherapist or a health specialist before using a new essential oil.
• Some essential oils may damage permanently the aromaCloud plastic. avoid using dermocaustic essential oils (cloves, thyme, oregano, etc.), citrus based essential oils, and colored essential oils.

CO
NT
RO
LS
CONTROLS | TMU & TMSUTM addendUM To The owner’S ManUal
www.bainultra.com Printed in Canada. Copyright © January 2013 BainUltra Inc. all rights reserved. 45100572Some products, specifications, and services mentioned in this manual are described in pending patent applications or are protected by patents.
in addition to pp. 55 to 65 15of owner’s Manual
Wtstm & chRomatheRaPY dot contRolsuser guide
warmTouchShell (wTS) doT
Chromatherapy doT
warMToUChShellTM (wTSTM)
doT ConTrolS- USer GUIde
oPeraTInG doT wTS
• Press this button to STarT/SToP the warmTouchShellTM
• Therapy lasts 30 minutes.
• a led light appears on doT control when warmTouchShell is in function.
ChroMaTheraPy
oPeraTInG doT ChroMo
• 1st Pressure : Start (violet color appears).
• Successive pressures :– Blue – Green – yellow – orange – red – scan mode (Scans through
colors continuously)– pause (Stops on a selected color
during the SCan mode).
• Press and hold for 2 to 3 seconds – TUrn oFF.
• no led light appears on doT control when Chromatherapy is in function.

TR
OU
BL
ESH
OO
TIN
G
TMU & TMSUTM addendUM To The owner’S ManUal | TROUBLESHOOTING
1 800 463.2187 From 8 a.m. to 8 p.m. Monday to Thursday (EST) From 8 a.m. to 5 p.m. on Friday (EST) Printed in Canada. Copyright © January 2013 BainUltra Inc. all rights reserved. 45100572
Some products, specifications, and services mentioned in this manual are described in pending patent applications or are protected by patents.
16 in addition to pp. 55 to 65of owner’s Manual
SITUaTIon SolUTIonS
• Check that keypad light is working.
• Make sure breaker is “on.”
• Shut “off” and restart breaker.
• Check connections in the bath junction box (Canada only).
• Check that there is water in the unit, and it is filled to the recommended level.
• Make sure the water is clean, and free of suspended particles (limestone, rust, etc.)
• Check that the lid is correctly positionned on the housing.
• Make sure breaker is “on.”
• Shut “off” and restart breaker.
• Check connections in the bath junction box (Canada only).
warmtouchshelltM is not working
aromacloudTM is not working
TherMaSenS TM

wARRANTY | TMU & TMSUTM addendUM To The owner’S ManUal
wA
RR
AN
TY
wA
RR
AN
TY
wA
RR
AN
TY
wA
RR
AN
TY
www.bainultra.com Printed in Canada. Copyright © January 2013 BainUltra Inc. all rights reserved. 45100572Some products, specifications, and services mentioned in this manual are described in pending patent applications or are protected by patents.
supersedes page 71 of owner’s Manual 17
the baInUltRa® lImIted WaRRantY
liMited warranty
This limited warranty is extended only to the original purchaser of the unit under warranty and is valid only when bought through and registered by an authorized BainUltra® retailer. BainUltra® products are designed for residential use only. BainUltra® products used for commercial or display applications will be limited to a two-(2) year warranty against defaults in materials and workmanship regardless of the various defective components of the products. BainUltra® products sold outside of northamerica will be limited to a parts-only warranty through the dealer of the sale. our service department will help diagnose the problem and will provide parts only for repairs or replacements covered by the warranty. all parts will be shipped to the dealer in north america. BainUltra® will not be responsible for cost of shipping or servicing outside of north america.
your BainUltra® ThermoMasseur®, ThermaSensTM, or soaking bath is covered by the best warranty in the industry. BainUltra Inc. guarantees the acrylic and motor turbine of your bath for a twenty-(20) year period from the original purchase date against defects in materials and workmanship. In the case of the electronic components of the ThermoMasseur®, ThermaSensTM, the vedana® or the Temazkal® and the massage table for the ayoura®, as well as the geysairtM, BainUltra Inc. guarantees against defects in materials and workmanship for a five-(5) year period from the original purchase date.
For wooden parts of certain models and for MyBodyrestTM kit, BainUltra Inc. guarantees that in their original manufacturing form, these parts are free of any manufacturing, dimensional or strongly apparent natural defects for a one-(1) year period from the original purchase date.
eXclusions
The above-stated limited warranty applies as long as damage is not caused by an accident, abuse, misuse, fire, insects, use of abrasive products, force majeure or an act of God. Transport, handling or installation damages are also excluded. any part that must be changed during the warranty period will be covered by the original warranty or for a two-(2) year period following replacement, according to the first contingency.
Because of their organic nature, wood components will expand and contract with seasonal changes and normal heating variations. with time, normal exposure to sunlight will slightly alter the wood tint. These changes are not covered by the warranty. The vinyl surface and the sheet of ayoura®’s optional massage table are not covered by this warranty.
Moreover, this warranty is void if your BainUltra® ThermoMasseur® or ThermaSensTM bath, your vedana® or your Temazkal®, or any other BainUltra® product is installed by anyone but a licensed contractor.
This warranty is also void if your BainUltra® bath, your vedana®, your Temazkal®, or any other BainUltra® product or part thereof has been modified or if any repairs have been attempted by anyone other than BainUltra Inc., an authorized dealer or representative of BainUltra Inc. any and all components that are not provided by BainUltra Inc., as well as any items attached or installed on your BainUltra® ThermoMasseur® or ThermaSensTM, your vedana® or your Temazkal®, or on any other BainUltra® product after the date of manufacture are expressly excluded from this limited warranty.
For the aromaCloud technology, BainUltra doesn’t guarantee acrylic decoloration or surface defaults due to the use of essential oils or other liquid products.
Certain considerations arise when aromaCloudTM technology is not factory installed by BainUltra®. homeowners who choose to install the technology themselves must fill out the release form (2013 Price list, p 181) and return it to BainUltra.
The warranty is void if the unit is installed outdoors, or has not been installed in accordance with the manufacturer’s instructions and/or in compliance with local codes and ordinances.


DRILLING TEMPLATES | TMU & TMSUTM addendUM To The owner’S ManUal
www.bainultra.com Printed in Canada. Copyright © January 2013 BainUltra Inc. all rights reserved. 45100572Some products, specifications, and services mentioned in this manual are described in pending patent applications or are protected by patents.
19
5.56
2”
[14.
1 cm
]
2.06
2”[5
.2 c
m]
6,06
2”
[15.
4 cm
]
2.62
5”
[6.6
cm
]H
ole
Con
tour
Aro
maC
loud
TM
Con
tour
AR
OM
AC
LOU
D H
OLE
DR
AW
ING
when choosing the position of aromaCloud on the bath, consider the following points:
• The Bainultra recommended position
• The position of controls
• The position of fittings
• The position of tiling flange if present
• The desired direction with respect to the bath and the room entrance
notes: - aromaCloud must be installed on bath decking.
- after drilling, verify that there is a 1/16 inch gap between the hole and the aromaCloud housing.
reCoMMended STePS
• Choose a position for aromaCloud on the bath.
• Place the adhesive masking paper over the area of the bath where aromaCloud will be installed, to protect the acrylic.
• drill the 4 holes on the template, using a ¼ inch drill bit.
• Complete the rectangular cutout using a jigsaw equipped with a fine-tooth metal blade.
note : non-factory installation requires special care (read the warranty carefully).
aroMaCloUd TM
IMPORTANTdrawing is to scale.drawing of aromaCloud hole.
DR
ILL
ING
TE
MP
LA
TE
S
