toolwatch enterprise quick start guide · transfers module of the toolwatch enterprise application....
TRANSCRIPT

ToolWatch Enterprise Quick Start Guide
Abstract This document provides an introduction to the ToolWatch
Enterprise system. Included are instructions on how to download the client and gain access to the system as well as some high level
guidance on how to navigate through the application.
ToolWatch Corporation. All rights reserved. This document contains confidential information. No part of this document may be
reproduced in any form without the written consent of ToolWatch Corporation. Information in this document is for use by ToolWatch Corporation, its employees,
and customers under license only.

Copyright (c) 2018 ToolWatch Corporation. All rights reserved. This document is confidential, and may not be copied or distributed, in whole or in part, without the express written consent of ToolWatch Corporation.
Page 2 of 28
Table of Contents 1 Introduction ............................................................................................................................................................ 3
1.1 Document Objective ...................................................................................................................................... 3
1.2 Platform Overview ......................................................................................................................................... 3
1.3 ToolWatch Resources ................................................................................................................................... 4
2 Getting Started ....................................................................................................................................................... 5
2.1 Minimum Hardware/Software Requirements ................................................................................................ 5
2.2 Installing the ToolWatch Smart Client ........................................................................................................... 5
2.3 Logging In to ToolWatch ............................................................................................................................... 6
2.4 Desktop Client User Interface and Navigation .............................................................................................. 6
3 Setting Up Your Organization ................................................................................................................................ 8
3.1 Organization Tree ......................................................................................................................................... 8
3.2 List Management........................................................................................................................................... 9
3.2.1 List Management for Organization Unit Dependant Objects .................................................................. 10
3.3 Users and Roles.......................................................................................................................................... 12
4 Tools and Equipment ........................................................................................................................................... 15
4.1 Tools Dashboard ......................................................................................................................................... 15
4.2 Tools & Equipment Functions ..................................................................................................................... 16
4.3 Tool Browser ............................................................................................................................................... 16
4.3.1 Tool Detail ............................................................................................................................................... 17
4.3.2 Affecting Tools from the Tool Browser .................................................................................................... 18
4.4 Tool Model Records .................................................................................................................................... 19
4.5 Tool Kits ...................................................................................................................................................... 19
4.6 Retiring Tools .............................................................................................................................................. 21
5 Pick Tickets and Transfers .................................................................................................................................. 22
5.1 Transfer Browser......................................................................................................................................... 22
6 Reporting ............................................................................................................................................................. 23
6.1 Report Chooser ........................................................................................................................................... 23
7 ToolWatch Enterprise Customer Feedback Program .......................................................................................... 24
7.1 How to Submit Feedback (Non-Technical Support Issues) ........................................................................ 24
8 Appendix A – Suggested Path to Get Started ..................................................................................................... 25
8.1 Configuring List Values ............................................................................................................................... 25

Copyright (c) 2018 ToolWatch Corporation. All rights reserved. This document is confidential, and may not be copied or distributed, in whole or in part, without the express written consent of ToolWatch Corporation.
Page 3 of 28
1 Introduction
This section explains the objective, conventions, and audience for the ToolWatch Enterprise Quick Start Guide.
1.1 Document Objective
This document provides an introduction to the ToolWatch Enterprise system. Included are instructions on how to download the client and gain access to the system as well as some high level guidance on how to navigate through the application.
1.2 Platform Overview
ToolWatch Enterprise is a next-generation application that is delivered through an on-demand model. Clients download a small client application to their local computer which then accesses the ToolWatch platform over the Internet. As updates and enhancements are made to the ToolWatch platform, the local client will automatically download and install these updates.
The ToolWatch client runs a local application which accesses the main ToolWatch database over the Internet via secure communications.
ToolWatch
Data Centers
ToolWatch Database
ToolWatch Application Servers
`
ToolWatch
Desktop Client
ToolWatch
Desktop Client
ToolWatch
Mobile Client
Internet
Back Office System
Integration via Web
Services As the ToolWatch system provides a hosted, on-demand environment it keeps organizations from having to buy, build and maintain their own IT infrastructure to support it. It enables companies to connect and subscribe to services built with the scalability and stability of a world-class backbone and delivered through the Internet.
Copyright (c) 2018 ToolWatch Corporation. All rights reserved. This document is confidential, and may not be copied or distributed, in whole or in part, without the express written consent of ToolWatch Corporation.
Page 4 of 28
1.3 ToolWatch Resources
Implementation Services Whether you're a growing company with a few hundred tools in a single warehouse—or a large organization with thousands of tools in locations across the country—our JumpStart implementation program will help ensure a smooth transition to construction resource management success. To learn more visit http://www.toolwatch.com/jumpstart.htm or contact your ToolWatch Sales Representative. Training Services We offer a variety of courses and delivery methods to train your organization quickly and cost-effectively. Whatever format you choose, you'll always receive the necessary instruction to successfully implement and maintain your ToolWatch solutions. To learn more visit http://www.toolwatch.com/training.htm or contact your ToolWatch Sales Representative. Consulting Services ToolWatch can also provide specialized consulting services from designing custom reports and building integration into other applications to helping you develop and implement business processes and best practices. To learn more visit http://www.toolwatch.com/consulting.htm or contact your ToolWatch Sales Representative. Technical Support Should you encounter any technical difficulties while using the ToolWatch Enterprise platform, our Technical Support Team may be reached weekdays between 8AM and 5PM (Mountain) at:
[email protected] or by calling (800) 580-3114

Copyright (c) 2018 ToolWatch Corporation. All rights reserved. This document is confidential, and may not be copied or distributed, in whole or in part, without the express written consent of ToolWatch Corporation.
Page 5 of 28
2 Getting Started
This section will guide you through obtaining and installing the ToolWatch Smart Client software.
2.1 Minimum Hardware/Software Requirements
In order to run the ToolWatch Enterprise desktop client you must have a computer with access to the Internet that meets these minimum requirements:
• Intel® Pentium® Dual Core or equivalent processor
• Windows 7, Windows 8, or Windows 10
• 4 GB RAM (8 GB recommended)
• 1 GB of available hard-disk space
ToolWatch Enterprise also requires the Microsoft .NET Framework Version 4.5.1 or later be installed. This will be downloaded and installed automatically by the ToolWatch smart client installation (if not already present on the target workstation) or it may be downloaded free of charge from Microsoft’s website.
2.2 Installing the ToolWatch Smart Client
To download and install the ToolWatch smart client, open a web browser and go to: http://www.toolwatch.com/downloads Click “Install ToolWatch Enterprise for Windows”. The client installation will determine if the necessary components are present on your workstation (Microsoft .NET Framework 4.5.1 or later) and will automatically download and install any missing or needed components. Once the installer has confirmed that the required framework is in place, you will be prompted with a request to install the ToolWatch client. Click the “Install” button to accept this installation and allow the program to proceed with installing the local ToolWatch smart client to your local workstation.
When the installation has completed, the client will connect to the service to verify if there are any updates to install. You will then be presented with a login to the application, indicating that the client has been successfully installed and you are ready to begin using ToolWatch Enterprise.

Copyright (c) 2018 ToolWatch Corporation. All rights reserved. This document is confidential, and may not be copied or distributed, in whole or in part, without the express written consent of ToolWatch Corporation.
Page 6 of 28
2.3 Logging In to ToolWatch
In ToolWatch Enterprise, all users of the system are required to have a unique user name and password. Please Note: The licensing model for ToolWatch Enterprise is based on concurrent users so you are not limited in the number of users that you create/configure within your organization’s instance of the application, however you are ultimately limited by the number of users of any given type connected to the system at one time.
To login to the application, enter the user name and password that were provided to you by either ToolWatch or your local administrator: You will note that user names in ToolWatch Enterprise are all e-mail addresses. While the system does not require that they be valid and active e-mail accounts, it will require that they be unique. We do encourage, however, that these addresses be valid for your users as ToolWatch Enterprise provides some self-service functions including “forgot my password” type functionality that will rely on e-mail messaging for an organization to take advantage of them. If you are unable to gain access to the system with the credentials you have been provided with, contact your system administrator or send an e-mail to [email protected]
2.4 Desktop Client User Interface and Navigation
For existing ToolWatch SE users, we hope that you will find that much of the terminology and functions within ToolWatch Enterprise will be familiar to you. As this new generation of ToolWatch is built on a new platform however, and is delivered through newer technologies available to us through the Microsoft .NET framework, we have been able to build a user interface that we believe is more powerful, easier to use and more intuitive to new users of ToolWatch than was previously available to us under the older ToolWatch SE architecture.

Copyright (c) 2018 ToolWatch Corporation. All rights reserved. This document is confidential, and may not be copied or distributed, in whole or in part, without the express written consent of ToolWatch Corporation.
Page 7 of 28
The ToolWatch Enterprise user interface is predominantly organized into three regions: Top Navigation This section is populated with buttons to enter different components of the application. The buttons surfaced in this region will be relevant to the “Module” of the application that you are currently in (e.g buttons relevant for Tool & Equipment functions when in the “Tools & Equipment” module)
Left Navigation This section displays buttons and controls to access the various modules and components of the application. This section also provides the interface to access and manage the “Lists” within the application as well as the “Organization Tree” by clicking on the tabs at the top of the left navigation or by adding new tabs through the “Layout” option above.
Main Window This section displays the data and key functions used for each module and component within the application. This is the primary area of the application where users will view, input and affect data such as managing Tools & Equipment, creating Transfers, running Reports, etc. As users visit different modules and components of the application, additional “tabs” may be added to the Main Window, allowing the user to easily jump around in the application without needing to abandon what they were working on by simply clicking on the desired tab. Should a tab be closed, it may simply be opened up again the next time the user invokes a function in the application that is surfaced through that particular module/component.
Top Navigation
Main Window
Left Navigation

Copyright (c) 2018 ToolWatch Corporation. All rights reserved. This document is confidential, and may not be copied or distributed, in whole or in part, without the express written consent of ToolWatch Corporation.
Page 8 of 28
3 Setting Up Your Organization
This section will walk you through setting up your organization in ToolWatch Enterprise including configuring your organizational structure, adding/configuring users and managing “lists” such as manufacturers, vendors, locations, etc.
3.1 Organization Tree
One of the key differences between ToolWatch SE and the new ToolWatch Enterprise application is the ability to manage multiple “stock points” across your entire organization. Within ToolWatch you are able to configure a hierarchical organization structure of “stock points” to model how your company operates. This organizational hierarchy is one of the foundations of ToolWatch and can be used to affect a number of different permissions and preferences that you may wish to set for different locations or regions of your organization. When you are setting up users in the system, you will be asked to associate them to a location in your organizational hierarchy. Where an employee is associated within the hierarchy determines what they can see or affect within the application. All users of the system have a “Parent Location” tied to their account which the administrator defines when they create the user. This will inherently define what the user can see within the application (everything at or below them in the hierarchy) though they will also have the ability to change their vantage point down the tree as they interact with the application if needed/desired. This capability will allow companies to enable regions or locations to operate independently and/or within the view that has been defined for them, while still allowing more aggregate views of the entire or parts of the organization to appropriate users. There are two types of Organizational Units (OUs) that you can create in the organization tree:
▪ Stock Point – This is the most common use of an organizational unit and typically represents a location from which tools & equipment or materials & consumables are managed (e.g. a warehouse or a tool crib). A Stock Point can have assets transferred to or from it, and have locations and employees linked to it as their “Parent Location”.
▪ Reporting Point – This is a virtual node in the organization hierarchy that is only used to provide visibility across multiple stock points (typically for reporting purposes). A reporting point cannot have assets transferred to or from it, nor can it have locations or jobs hung off of it. It is merely a vehicle that some large organizations may choose to implement to allow “regional” views of their operation (for example).
In this example organization, ACME Corporation has “reporting points” defined for the primary regions that they operate (Denver, Phoenix and Seattle) as a means of providing a “regional” view of each operation for reporting purposes. They have also created individual “stock points” for each physical location where they manage the flow of tools, equipment, materials and consumables to and from jobs/individuals. In the case of the Phoenix Warehouse, they also have two mobile trailer tool cribs that are fed from the Phoenix Warehouse (and thus set up as subordinates in the org tree) yet are still individually managed stock points which may feed jobs or individuals that are associated to them.

Copyright (c) 2018 ToolWatch Corporation. All rights reserved. This document is confidential, and may not be copied or distributed, in whole or in part, without the express written consent of ToolWatch Corporation.
Page 9 of 28
To view the organization tree within ToolWatch, select “Org Tree” from the “Layout” menu at the top of the application. The Layout menu enables you to choose which “tabs” you will display in the left navigation section of the application. By default, the Explore and Lists tabs are checked, as they are commonly used sections of the application. By clicking on the “Org Tree” option, a new tab will be displayed in the left nav and the organization tree displayed.
Displaying the organization tree allows you to see the overall hierarchy (up to the OU that your user account has visibility to) as well as change your vantage point. By clicking on one of the OUs within the hierarchy you are changing your vantage point and therefore what items you can see or affect. To use our initial example – by default my user has selected the top of the organizational tree (ACME Corporation) and therefore their vantae point allows them to see everything (tools, employees, jobs, transfers, etc.) at or below this point in the tree. Were I to change my vantage point by simply clicking on the “Phoenix Warehouse” I would then only see objects from the Phoenix Warehouse, Trailer 1227, Trailer 1902 and any objects linked to those OUs (tools, jobs, employees, transfers, etc.). As my user account is not limited to this vantage point (based on the “Parent Location” defined for my user account, I still have the ability to come back to this Organization Tree and change my vantage point again, back up to a higher node in the tree, increasing my visibility and area of influence within the organization. However, were my administrator to set up my account with a parent location of “Phoenix Warehouse” for example, I would not be able to see the rest of the hierarchy and therefore could not change my vantage point outside of that defined area of the tree that is at or below the Phoenix Warehouse stock point. To edit the organizational tree, as well as other “configurable” aspects of the application, you will want to use the functionality available in the “Lists” tab of the left navigation (see section 3.2 – List Management).
3.2 List Management
Similar to previous versions of ToolWatch, much of the configuration of an organization is managed through “Lists” within the application. The types of lists that can be customized within ToolWatch to meet the needs of your organization include (but are not limited to): Categories Certifications Classes Contractors Customers Cycle Count Schedule Departments Employees Employee Types Locations Manufacturers Shipping Methods Status Codes Units of Measure Number Blocks

Copyright (c) 2018 ToolWatch Corporation. All rights reserved. This document is confidential, and may not be copied or distributed, in whole or in part, without the express written consent of ToolWatch Corporation.
Page 10 of 28
To view or edit any of the values in a list used by ToolWatch, simply click on the “Lists” tab in the left navigation window. If the “Lists” tab has been closed and is not visible, you may re-open it by clicking on the “Layout” menu at the top of the application window and selecting “Lists”. On the Lists tab you will see all of the lists that can be managed within ToolWatch, grouped by module (e.g. Tools & Materials, Service, Purchasing, Billing). To view a lists contents or to add/edit values in the list, simply click on the title of the list you wish to view and a new window will open with the details of that list.
You will find that the management of lists is consistent across each type. On the left side you will see the current values within the list. Click on any of the values and the right side will be populated with the specific details of that value and all of the relevant attributes. You may make edits or changes to the details of any existing list value in this right panel and simply click the “Save” button to update them. You may also use the “Create New” or “Delete” buttons to add new list items or remove existing list items.
3.2.1 List Management for Organization Unit Dependant Objects
Certain lists and list values within ToolWatch will be dependant on the Organizational Tree, and therefore their values will be linked to a “Parent Location” within that organizational structure. For reasons mentioned earlier in this document, this becomes important as they may impact their visibility to users of the system based on where they are linked in the organizational tree by their “Parent Location” assignment.

Copyright (c) 2018 ToolWatch Corporation. All rights reserved. This document is confidential, and may not be copied or distributed, in whole or in part, without the express written consent of ToolWatch Corporation.
Page 11 of 28
In this example, an organizational tree has been created with three stock points below the root OU (B, C and D). There are a number of job locations, employees, tool and consumable items that have been created and related to these different stock points by their respective “Parent Location” (or “Current Assignment” in the case of Tools or Equipment) values. User 1 has a Parent Location value of A, allowing them to see all of the tools, consumables, employees and locations in the organization. User 2 has a Parent Location value of B, giving them visibility to all of the objects in or related to stock point B or C, however they cannot see any of the objects in or related to stock point A or D.
A
B
C
D
Tools &
Equipment
Locations
Employees
Consumables
User 1
User 2
User 3
User 3 has a Parent Location value of D, giving them visibility only to those objects in or related to stock point D and cannot see any of the objects in or related to stock point A, B or C. Based on this principal, it is important for a company to build out their organizational tree first, before creating additional users, locations or even employees if they wish to restrict the views or areas of operation for different users of the system. To edit the organization tree, open the “Locations” list to view all locations. Note that this list will include ALL locations (stock points, job sites and eventually reporting points). What differentiates a stock point from a regular location (and makes it appear in the organization tree and allows you to link other objects to it) is to simply check the “This is a stock location” field for that location (illustrated here by the red arrow).
Each location will have a “Parent Location” value, which determines where it is related in the organization tree (illustrated here by the blue arrow). If the location has been flagged as being a “Stock Point”, then it will appear below its Parent Location in the tree. If the location has not been flagged as a “Stock Point”, then it will simply be visible to users at or below its Parent Location in various parts of the application.
Organization Tree

Copyright (c) 2018 ToolWatch Corporation. All rights reserved. This document is confidential, and may not be copied or distributed, in whole or in part, without the express written consent of ToolWatch Corporation.
Page 12 of 28
In the same way that Locations are bound to a Parent Location, so are Employees. Each employee record must have an “Assigned Stock Location” (illustrated here by the blue arrow) associated to them which will determine their visibility to users of the system. This is important as tools and equipment, materials and consumables may be transferred to or from a Stock Point, an Employee or a Location. As such, it is important that the user creating these transfer events must have visibility to those Stock Points, Employees and Locations for which they may be interacting.
3.3 Users and Roles
To manage users in the ToolWatch system, click on the “Administration” button at the bottom of the “Explore” tab in the left navigation. The left navigation pane is populated by the available functions within the Administration section:
▪ Users – This function is only available to administrators to manage ToolWatch users including creating new users and changing their profile information.
▪ Roles – This function is only available to administrators to manage the “roles” that you will assign to your different users based on a matrix of permissions you define.
▪ Change My Password – This function is available to all users as a mechanism to change their password for the system.
As you plan your organization there are two aspects that drive the permissions and visibility that your users will have. Where they are placed in the organization tree will determine what objects are visible to them, combined with what role they are assigned to will determine what they can do with the objects visible to them.

Copyright (c) 2018 ToolWatch Corporation. All rights reserved. This document is confidential, and may not be copied or distributed, in whole or in part, without the express written consent of ToolWatch Corporation.
Page 13 of 28
There are two system roles within ToolWatch which cannot be changed. These are the “Administrator” role and “Tool Manager” role. Users assigned to the Administrator role can affect every aspect of the application, while users assigned to the Tool Manager role will not have certain permissions available to them. You may create your own custom roles by clicking on the “Roles” link from the Administration section and click the “Add” button. You may then name your role (in the upper left corner of the role permissions section) and check off all of the desired permissions for that role.
Once you have defined your organization tree and created the roles that are required for your organization, you may wish to start adding ToolWatch users. You may create new ToolWatch users for your organization by clicking on the “Users” link from the Administration section which will open up a new window displaying the list of existing users on the left side. You can select an existing user and click on the “Edit” button or you may choose to add a new user by simply clicking on the “Add” button. In the User Detail section, populate the relevant fields for your new user and click the “Save” button when finished. Note that there are a number of required fields that must be populated in order to create a new record which include:
▪ First Name ▪ Last Name ▪ Employee ID ▪ Bar Code ▪ Assigned Stock Location ▪ Email (this will be their user
name to login to the system) ▪ Password (note that users
will be able to change their password themselves once they have logged into the system)
You must also check what type of user this will be (Desktop and/or Mobile*) and assign one of the available roles.
*Note – Some customers of ToolWatch may utilize “Mobile” users who access the system via a Windows Mobile device (portable scanner) exclusively or in addition to using the desktop client software.

Copyright (c) 2018 ToolWatch Corporation. All rights reserved. This document is confidential, and may not be copied or distributed, in whole or in part, without the express written consent of ToolWatch Corporation.
Page 14 of 28
You may also want to flag this user as being “Assignable” meaning that they can have tools or materials transferred to them just as a regular employee or location in the system. Note: In the current release of ToolWatch Enterprise Users may not be “Deleted” once they have been created. You are able to flag a user account as being “Inactive” from the User Detail view, but you are not be able to delete a user record once there is any activity associated with that user.

Copyright (c) 2018 ToolWatch Corporation. All rights reserved. This document is confidential, and may not be copied or distributed, in whole or in part, without the express written consent of ToolWatch Corporation.
Page 15 of 28
4 Tools and Equipment
This section provides an overview of the features and functionality presented in the Tools & Equipment module of the ToolWatch Enterprise application. To access this module simply click on the “Tools & Equipment” button from the “Explore” tab in the left navigation.
4.1 Tools Dashboard
When you first click on the Tools & Materials button from the Explore tab, you are presented with the Tools Dashboard. This is designed to be a configurable “dashboard” view of key performance indicators and metrics relevant to the Tools & Equipment module of the application. It is derived from a roll up of all those objects that are within the view of your user (based on your vantage point in the Organization Tree).

Copyright (c) 2018 ToolWatch Corporation. All rights reserved. This document is confidential, and may not be copied or distributed, in whole or in part, without the express written consent of ToolWatch Corporation.
Page 16 of 28
4.2 Tools & Equipment Functions
Once you have clicked on the Tools & Materials button, the left navigation pane is populated with new links to the key functions of this module including:
▪ Manage Tools & Equipment – Opens the Tool Browser ▪ Tool Masters – Opens the Tool Master Browser ▪ Tool Kits – Opens the Kit Browser ▪ Manage Retired Tools – Opens the Lost and Found
As you click on the various functions available through different modules in the application, you will notice new tabs open up in the Main Window to the right (or focus change to the appropriate tab if one was already open for that function).
4.3 Tool Browser
The Tool Browser is the primary ways to browse existing tools and equipment that are within the view of your user (based on your vantage point in the Organization Tree). There are two ways to navigate through the Tool Browser to filter the results displayed and quickly find the tools or equipment you are interested in. The default method uses the “Explore” pane within the Main Window to simply display “All Tools” or to drill down into and filter the list of tools and equipment displayed in the right window by a specific Category, Employee or Location. You will see that you may also filter the list of tools by category but also by Location or Employee (by expanding the desired category from the list and then selecting the specific employee or location that you wish to filter by.
Copyright (c) 2018 ToolWatch Corporation. All rights reserved. This document is confidential, and may not be copied or distributed, in whole or in part, without the express written consent of ToolWatch Corporation.
Page 17 of 28
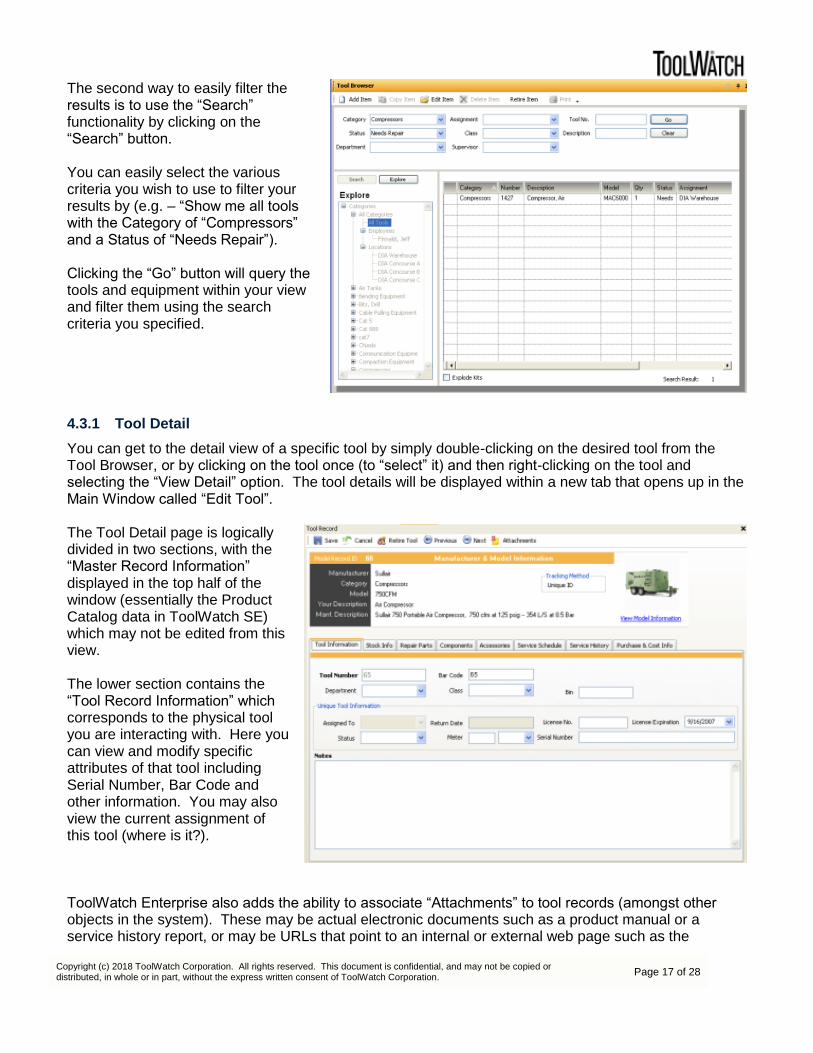
The second way to easily filter the results is to use the “Search” functionality by clicking on the “Search” button. You can easily select the various criteria you wish to use to filter your results by (e.g. – “Show me all tools with the Category of “Compressors” and a Status of “Needs Repair”). Clicking the “Go” button will query the tools and equipment within your view and filter them using the search criteria you specified.
4.3.1 Tool Detail
You can get to the detail view of a specific tool by simply double-clicking on the desired tool from the Tool Browser, or by clicking on the tool once (to “select” it) and then right-clicking on the tool and selecting the “View Detail” option. The tool details will be displayed within a new tab that opens up in the Main Window called “Edit Tool”. The Tool Detail page is logically divided in two sections, with the “Master Record Information” displayed in the top half of the window (essentially the Product Catalog data in ToolWatch SE) which may not be edited from this view. The lower section contains the “Tool Record Information” which corresponds to the physical tool you are interacting with. Here you can view and modify specific attributes of that tool including Serial Number, Bar Code and other information. You may also view the current assignment of this tool (where is it?).
ToolWatch Enterprise also adds the ability to associate “Attachments” to tool records (amongst other objects in the system). These may be actual electronic documents such as a product manual or a service history report, or may be URLs that point to an internal or external web page such as the

Copyright (c) 2018 ToolWatch Corporation. All rights reserved. This document is confidential, and may not be copied or distributed, in whole or in part, without the express written consent of ToolWatch Corporation.
Page 18 of 28
manufacturer’s website or a company Intranet site/page. To view the attachments associated with a tool, or to add new ones, click on the “Attachments” link near the top of the Main Window.
4.3.2 Affecting Tools from the Tool Browser
When right-clicking on a tool in the Tool Browser, there are a number of options available to affect that tool in some way. You can “View Detail” to make changes to specific attributes of that tool record, but you can also send that tool to another process directly from the browser by selecting one of these options:
▪ Add to Transfer ▪ Retire Tool ▪ Add to Kit
Selecting any of these will open a new tab for the desired function and add that tool record to the transaction (a new Transfer ticket, a new Kit assembly or to the Lost and Found).

Copyright (c) 2018 ToolWatch Corporation. All rights reserved. This document is confidential, and may not be copied or distributed, in whole or in part, without the express written consent of ToolWatch Corporation.
Page 19 of 28
4.4 Tool Model Records
The Tool Model Record Browser works in a similar fashion to the Tool Browser, though it is browsing through the collection of “Tool Model” records that have been defined for your organization. This is similar to the “Product Catalog” concept in ToolWatch SE. Double clicking on a master from the browser will open a new tab called “Edit Model Record” which will look very similar to the “Edit Tool” window, though in this case the “Model” information in the top half of the window will be available for editing.
4.5 Tool Kits
ToolWatch Enterprise introduces the concept of “Kits” which is a logical grouping of items (which may contain tools, equipment, materials or consumables) which are designed to be transferred together. For example, an organization may define a Kit that contains all of the tools and consumables that are typically required for a certain type of job. By logically grouping them within ToolWatch by adding each of the items to a kit, you can then transfer the complete kit around as a single unit by giving that kit a unique barcode or simply browsing to that kit using the Kit Browser. The Kit Browser works in a similar fashion to the Tool Browser, though it is browsing through a list of “Kits” vs. the individual tools. Double clicking on a Kit from the browser will expand the Kit itself, allowing you to view the individual tools contained within that kit. From the browser itself you may also select and then right-click on the kit to and bring up the “Edit Kit” option to view and edit the details of the Kit.

Copyright (c) 2018 ToolWatch Corporation. All rights reserved. This document is confidential, and may not be copied or distributed, in whole or in part, without the express written consent of ToolWatch Corporation.
Page 20 of 28
From the Kit Detail view, you can edit the descriptive information about the kit (what category it has been associated with, the description and any notes that have been made about it) as well as the specific items that make up that kit. If a tool has been assigned to a kit, it will no longer be visible in the Tool Browser, rather you will see the Kit itself in the browser and double-clicking on that kit will display the kit components including each of those items assigned to the kit.
Should a user attempt to “Transfer” one of the items assigned to a kit but not the kit itself, they will be presented with a window alert informing them that the item they have attempted to add to a Transfer is part of a kit, asking if they would like to “Break” this item from the kit and transfer it independently, or if they wish to add the entire kit to the transfer.

Copyright (c) 2018 ToolWatch Corporation. All rights reserved. This document is confidential, and may not be copied or distributed, in whole or in part, without the express written consent of ToolWatch Corporation.
Page 21 of 28
4.6 Retiring Tools
From the right-click menu of the Tool Browser, one of the options available to a user is to “Retire Tool” which essentially gives the user the capability to take a tool out of service for any number of reasons (lost, destroyed, end-of-service-life, etc.) This functionality operates much as it did within ToolWatch SE, where the user is prompted with the impacts of retiring a tool.
A retired tool may also be re-instated by simply clicking on the “Manage Retired Tools” button to bring up the “Retired Tools Browser” tab, selecting the desired tool and right-clicking on it to bring up the “Reinstate” option. Note: Multiple tools may be selected at a time by using either holding down the shift key and selecting the first and last record in a range, or holding down the ctrl key and selecting individual records. In this way, you may “Retire” or “Reinstate” multiple tools at the same time by selecting all of the tools you wish to update and right-clicking to bring up the action menu.

Copyright (c) 2018 ToolWatch Corporation. All rights reserved. This document is confidential, and may not be copied or distributed, in whole or in part, without the express written consent of ToolWatch Corporation.
Page 22 of 28
5 Pick Tickets and Transfers
This section provides an overview of the features and functionality presented in the Pick Tickets & Transfers module of the ToolWatch Enterprise application.
5.1 Transfer Browser
There are multiple ways to enter the “Transfer” process from other functions within the application. One way is by directly entering the Transfer function by clicking on the “Pick Tickets & Transfers” button from the Explore tab in the left navigation. Click on the “Transfers” link in the upper region of the left navigation to bring up the Transfer Browser in the Main Window. Within this browser you can easily search for existing transfers by updating any of the search criteria fields and clicking the “Search” button. The resulting set of transfers will be displayed below and you can simply double-click on the desired transfer to view the details.
You may also initiate a new transfer by simply clicking on the “Create Transfer” link near the top of the Transfer Browser in the Main Window. For former ToolWatch SE users, the concept and form layout of the Transfer Ticket should be familiar. You can select “From” and “To” values from the lists of locations and employees that fall within your visibility within the application, and simply enter tool numbers or bar code numbers in the “Scan or Enter Item:” field to build the list of items to be transferred. When finished, simply click the “Process Transfer” link from the upper portion of the Main Window.

Copyright (c) 2018 ToolWatch Corporation. All rights reserved. This document is confidential, and may not be copied or distributed, in whole or in part, without the express written consent of ToolWatch Corporation.
Page 23 of 28
6 Reporting
This section provides an overview of the features and functionality presented in the Tools & Equipment module of the ToolWatch Enterprise application.
6.1 Report Chooser
To access the reporting functions within ToolWatch Enterprise, click on the “Reports & Graphs” button from the Explore tab in the left navigation which will open a new tab in the main window called “Reporting”. From this menu you can select the report you wish to run by first clicking on the appropriate “Report Group”, then selecting an individual report from the list of reports that will be presented in the “Reports” section of the window. Once you have selected a specific report, there may be a number of “Options” that may be updated to filter or order the report results (depending on the report selected). When you have made your desired selections, simply click the “Next” button to run the report.
The report will be displayed in a new window which is easy to preview the results (including a thumbnail view of all pages on the left). You may then easily print the report, or save it in any number of formats from the main tool bar above.

Copyright (c) 2018 ToolWatch Corporation. All rights reserved. This document is confidential, and may not be copied or distributed, in whole or in part, without the express written consent of ToolWatch Corporation.
Page 24 of 28
7 ToolWatch Enterprise Customer Feedback Program
With the hosted delivery model of the ToolWatch Enterprise platform, our process of enhancing our solutions is slightly different than those of traditional software tools. With the on-demand nature of the Microsoft Smart Client technology, our development team is able to continue to deploy new versions of the software, continuing to add new functionality as well as resolving defects that are identified in the system without incurring the churn typically associated with re-deploying new versions of software. This allows our customers to realize the benefits of enhancements as they become available as opposed to requiring significant “upgrade” or maintenance events by their own internal resources. When a new version of the software is deployed, upon their next attempt to access the system, the client will simply be prompted that a new version is available and asked if they would like to install it. The installation process is automatic and will not require any configuration or input from the user, nor will it require system restarts or additional work to insure compatibility.
7.1 How to Submit Feedback (Non-Technical Support Issues)
Your feedback and input regarding the new ToolWatch Enterprise platform is incredibly valuable to us both to insure we are capturing and resolving any defects in the system, but also as a key indicator of the needs of the marketplace to help guide our development efforts for enhancing and improving ToolWatch solutions. As such, we have established a new e-mail distribution list to capture any enhancement requests or ideas that you may have while interacting with the tools. Please send any contacts of this nature to:
[email protected] With the new hosted delivery model of the ToolWatch Enterprise platform, we are able to provide our customers with an environment which will continue to be enhanced and improved. We are very excited about the potential to continually innovate and grow the capabilities of our solutions in a non-intrusive manner that does not impact the IT organizations of our customers with managing versions or deploying software.

Copyright (c) 2018 ToolWatch Corporation. All rights reserved. This document is confidential, and may not be copied or distributed, in whole or in part, without the express written consent of ToolWatch Corporation.
Page 25 of 28
8 Appendix A – Suggested Path to Get Started
As you may be new to ToolWatch, this section is suggested as an outline of how to get started setting up your organization to use ToolWatch.
8.1 Configuring List Values
As part of the initial setup you will want to populate a number of the “List” values used by ToolWatch. Certain objects within ToolWatch will depend on others so you may find it helpful to set up the required list values in sequence. For example, you cannot create a “Tool” record unless you have first created the appropriate “Tool Model” record and you cannot create a Tool Model record unless you have first created the appropriate “Manufacturer” list value.
Categories List
Units of
Measure List
Manufacturers
List Tool Model Record Tool Record
Classes List
Status Codes
List
Departments
ListCertifications
List
Model: DXE72
Powder Actuated Tool
Tool #1024
SN: A9584-552311r
Hilti
Powder Guns
Powder Actuated
License
Expensed Tool
Electrical Dept.
OK – No Problems
Shots
To Create a Tool Model Record
you must first have at least one
Manufacturer and at least one
Category setup
To create a Tool
Record, you must first
have created a Tool
Model Record for the
corresponding Make
and Model
Optional List
values that may be
applied to a Tool
Model Record
Optional List
values that may be
applied to a Tool
Record
In this section we will provide you with a proposed sequence of the different list/record objects that you will want to set up for your organization, and our recommended order to do them in: The table on the following pages will guide you through each of these tasks with some detail and example values.
A
Stock Points
B
Departments
C
Classes
D
Status
Codes
E
Manufacturer
I
Employee
Types
H
Users
G
Roles
J
Employees
K
Locations M
Tools
L
Tool Models
F
Categories

Copyright (c) 2018 ToolWatch Corporation. All rights reserved. This document is confidential, and may not be copied or distributed, in whole or in part, without the express written consent of ToolWatch Corporation.
Page 26 of 28
Task Comments Example
A) Stock Points
Does your organization manage the stocking and issuing of tools and/or materials from more than one location? (e.g. multiple warehouses, tool cribs, etc. in different geographical locations). If so, you will want to set up “stock points” within the organizational hierarchy to represent these locations. Refer to section 3.1 Organization Tree for more information on stock points. If you are intending to use ToolWatch to manage tools and/or materials from only one location at this time, you will not need to create any additional stock points.
To access: Lists ► Locations ►Create New (Check “This is a Stock Location” to designate as a Stock Point in the hierarchy)
ACME Construction ├Denver Warehouse └Tulsa Warehouse
B) Departments Do you wish to associate tools & equipment and/or employees with different “Departments” for reporting purposes? To access: Lists ► Departments ►Create New
Corporate Electrical Dept. Excavating Dept. Maintenance Dept.
C) Classes Do you wish to assign a “Class” to tools & equipment for reporting purposes? To access: Lists ► Classes ►Create New
Capital Tool Expensed Tool Rented Equipment
D) Status Codes Will you be assigning “Status” to tools & equipment for reporting but also to affect if they can be transferred (e.g. by changing an asset’s “Status” to “Needs Repair” you may trigger a rule that prevents that asset from being transferred again until it has been repaired and the status updated.) To access: Lists ► Status Codes ►Create New
DM – Damaged MS – Missing in Action NR – Needs Repair OK – No Problems OS – Out of Service
E) Manufacturers You will want to set up the list of Manufacturers from which your organization owns or operates tools & equipment from. To access: Lists ► Manufacturers ►Create New
Note – This is a required field when creating Tool or Material Model records
Bosch Caterpillar DeWALT Hilti Ingersoll Rand Milwaukee
F) Categories You will want to set up the list of Categories for which your organization owns or operates tools & equipment. To access: Lists ► Categories ►Create New
Note – This is a required field when creating Tool or Material Model records
Compressors Drills – Cordless Generators Pumping Equipment Blades – 10” Discs - Grinding
G) Roles Before creating any additional users of the ToolWatch system, you may want to define specific “User Roles” to limit what functionality certain users might have in the system. All users must have a role assigned to them which may be one of the default roles that are pre-defined in the system (Administrator or Tool Manager) or a custom created role. Please refer to section 3.3 Users and Roles for more information on setting up user roles. To access: Navigator ► Administration ►Configure User Roles
Administrator Tool Manager Service Manager Job Site Delivery

Copyright (c) 2018 ToolWatch Corporation. All rights reserved. This document is confidential, and may not be copied or distributed, in whole or in part, without the express written consent of ToolWatch Corporation.
Page 27 of 28
Task Comments Example
H) Users You are now ready to create any additional users who you want to be able to login and use the system. When creating a new user you will have the opportunity to define them as having access to the desktop version of ToolWatch, the mobile version as well as configuring them as being “Assignable” (can have items transferred to them just as any other employee). Please refer to section 3.3 Users and Roles for more information on setting up user accounts. To access: Navigator ► Administration ►Configure Users
Note – You may wish to create a user account that could be used by the ToolWatch Technical Support team in the event you require their assistance in the future (e.g. [email protected])
[email protected] [email protected] [email protected]
I) Employee Types Do you wish to assign a “Type” to Employees for reporting purposes? To access: Lists ► Employee Types ►Create New
SP – Supervisor PM – Project Manager LB - Laborer
J) Employees You may wish to set up “Employee” records for any individual whom you will want to record the transfer of tools & equipment or materials to. To access: Lists ► Employees ►Create New
K) Locations You may wish to set up additional “Locations” in the system so that tools & equipment or materials may be transferred to them. A location will typically be a job site or location that is supplied with tools & equipment or materials from a stock point (configured earlier on) To access: Lists ► Locations ►Create New
Terminal B Expansion Cooling Tower Hampton Inn Tulsa Field Service Truck #6
L) Tool Models This will be the process of creating new “Tool Model” records in the system for each make and model of item that you wish to track in the system. This may be done one by one along with the process of creating Tool records (e.g. create a new DeWALT DW100 drill model, then create tool records for Drill #1003, and Drill #2305 which are both DeWALT DW100 drills) To access: Navigator ► Tools & Equipment ►Tool Model Records ► Add Model Record Note – You must create a Tool Model record before you can create a Tool record that represents a physical tool.
DeWalt DW100
M) Tools This will be the process of creating new “Tool” records in the system for each physical instance of an item that you wish to track in the system. This may be done one by one along with the process of creating Tool Model records (e.g. create a new DeWALT DW100 drill model, then create tool records for Drill #1003, and Drill #2305 which are both DeWALT DW100 drills) To access: Navigator ► Tools & Equipment ►Tool Model Records ► Create New Tool (from highlighted model record)
Drill #1003 SN:66V98455R6 BarCode: 77958 Drill #2305 SN:63V98785R6 BarCode: 77972

Copyright (c) 2018 ToolWatch Corporation. All rights reserved. This document is confidential, and may not be copied or distributed, in whole or in part, without the express written consent of ToolWatch Corporation.
Page 28 of 28
This page intentionally left blank.