topper owners manual - topper sailboats€¦ · topper sailboat. the topper is a proven design...
TRANSCRIPT
www.toppersailboats.com
TOPPEROWNERS MANUAL
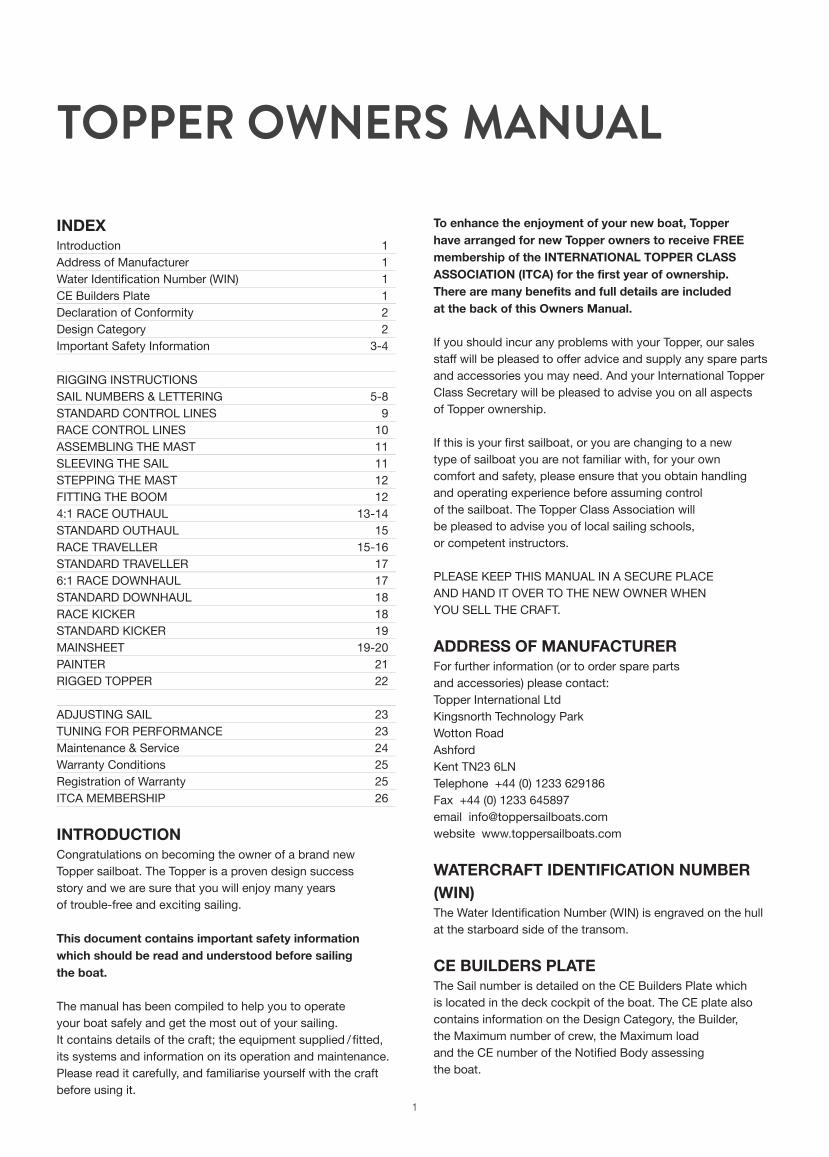
INDEX
Introduction 1
Address of Manufacturer 1
Water Identification Number (WIN) 1
CE Builders Plate 1
Declaration of Conformity 2
Design Category 2
Important Safety Information 3-4
RIGGING INSTRUCTIONS
SAIL NUMBERS & LETTERING 5-8
STANDARD CONTROL LINES 9
RACE CONTROL LINES 10
ASSEMBLING THE MAST 11
SLEEVING THE SAIL 11
STEPPING THE MAST 12
FITTING THE BOOM 12
4:1 RACE OUTHAUL 13-14
STANDARD OUTHAUL 15
RACE TRAVELLER 15-16
STANDARD TRAVELLER 17
6:1 RACE DOWNHAUL 17
STANDARD DOWNHAUL 18
RACE KICKER 18
STANDARD KICKER 19
MAINSHEET 19-20
PAINTER 21
RIGGED TOPPER 22
ADJUSTING SAIL 23
TUNING FOR PERFORMANCE 23
Maintenance & Service 24
Warranty Conditions 25
Registration of Warranty 25
ITCA MEMBERSHIP 26
INTRODUCTION
Congratulations on becoming the owner of a brand new
Topper sailboat. The Topper is a proven design success
story and we are sure that you will enjoy many years
of trouble-free and exciting sailing.
This document contains important safety information
which should be read and understood before sailing
the boat.
The manual has been compiled to help you to operate
your boat safely and get the most out of your sailing.
It contains details of the craft; the equipment supplied / fitted,
its systems and information on its operation and maintenance.
Please read it carefully, and familiarise yourself with the craft
before using it.
To enhance the enjoyment of your new boat, Topper
have arranged for new Topper owners to receive FREE
membership of the INTERNaTIONal TOppER Class
assOCIaTION (ITCa) for the first year of ownership.
There are many benefits and full details are included
at the back of this Owners Manual.
If you should incur any problems with your Topper, our sales
staff will be pleased to offer advice and supply any spare parts
and accessories you may need. And your International Topper
Class Secretary will be pleased to advise you on all aspects
of Topper ownership.
If this is your first sailboat, or you are changing to a new
type of sailboat you are not familiar with, for your own
comfort and safety, please ensure that you obtain handling
and operating experience before assuming control
of the sailboat. The Topper Class Association will
be pleased to advise you of local sailing schools,
or competent instructors.
PLEASE KEEP THIS MANUAL IN A SECURE PLACE
AND HAND IT OVER TO THE NEW OWNER WHEN
YOU SELL THE CRAFT.
aDDREss OF MaNUFaCTURER
For further information (or to order spare parts
and accessories) please contact:
Topper International Ltd
Kingsnorth Technology Park
Wotton Road
Ashford
Kent TN23 6LN
Telephone +44 (0) 1233 629186
Fax +44 (0) 1233 645897
email [email protected]
website www.toppersailboats.com
WaTERCRaFT IDENTIFICaTION NUMBER
(WIN)
The Water Identification Number (WIN) is engraved on the hull
at the starboard side of the transom.
CE BUIlDERs plaTE
The Sail number is detailed on the CE Builders Plate which
is located in the deck cockpit of the boat. The CE plate also
contains information on the Design Category, the Builder,
the Maximum number of crew, the Maximum load
and the CE number of the Notified Body assessing
the boat.
TOPPER OWNERS MANUAL
1
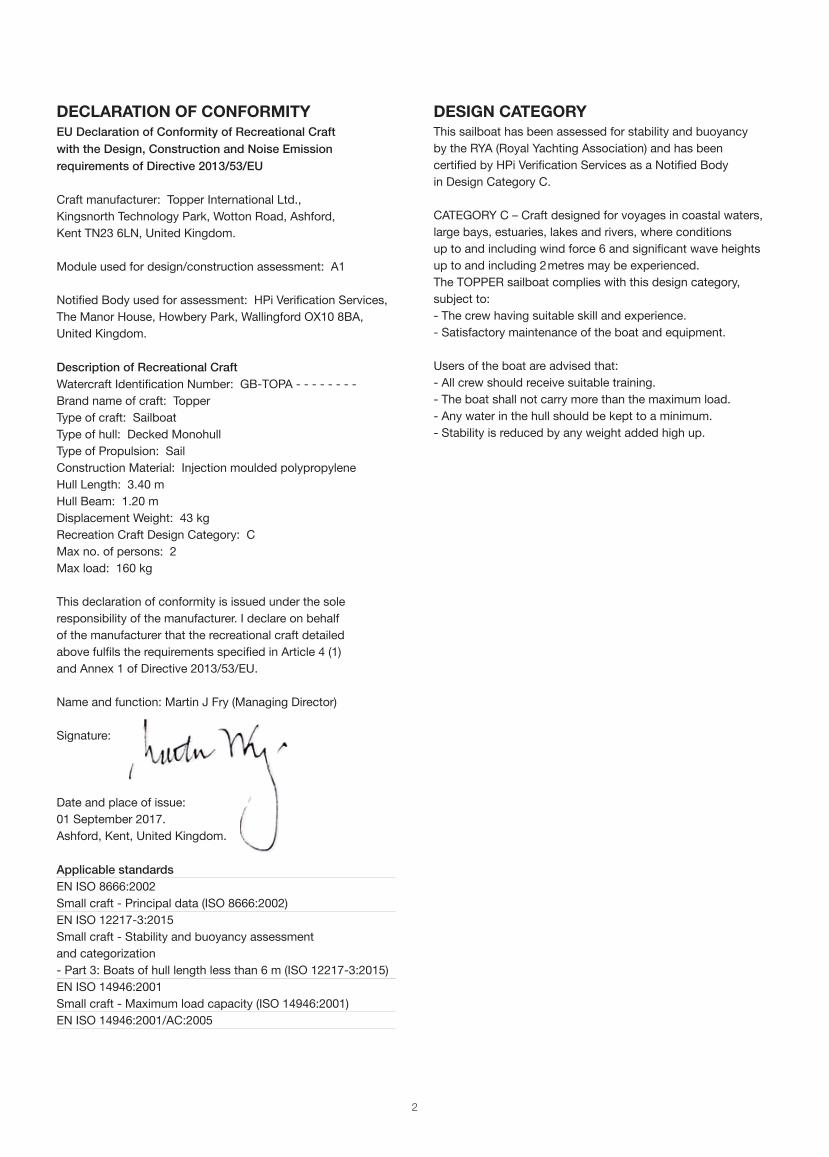
DEClaRaTION OF CONFORMITY
EU Declaration of Conformity of Recreational Craft
with the Design, Construction and Noise Emission
requirements of Directive 2013/53/EU
Craft manufacturer: Topper International Ltd.,
Kingsnorth Technology Park, Wotton Road, Ashford,
Kent TN23 6LN, United Kingdom.
Module used for design/construction assessment: A1
Notified Body used for assessment: HPi Verification Services,
The Manor House, Howbery Park, Wallingford OX10 8BA,
United Kingdom.
Description of Recreational Craft
Watercraft Identification Number: GB-TOPA - - - - - - - -
Brand name of craft: Topper
Type of craft: Sailboat
Type of hull: Decked Monohull
Type of Propulsion: Sail
Construction Material: Injection moulded polypropylene
Hull Length: 3.40 m
Hull Beam: 1.20 m
Displacement Weight: 43 kg
Recreation Craft Design Category: C
Max no. of persons: 2
Max load: 160 kg
This declaration of conformity is issued under the sole
responsibility of the manufacturer. I declare on behalf
of the manufacturer that the recreational craft detailed
above fulfils the requirements specified in Article 4 (1)
and Annex 1 of Directive 2013/53/EU.
Name and function: Martin J Fry (Managing Director)
Signature:
Date and place of issue:
01 September 2017.
Ashford, Kent, United Kingdom.
Applicable standards
EN ISO 8666:2002
Small craft - Principal data (ISO 8666:2002)
EN ISO 12217-3:2015
Small craft - Stability and buoyancy assessment
and categorization
- Part 3: Boats of hull length less than 6 m (ISO 12217-3:2015)
EN ISO 14946:2001
Small craft - Maximum load capacity (ISO 14946:2001)
EN ISO 14946:2001/AC:2005
DEsIGN CaTEGORY
This sailboat has been assessed for stability and buoyancy
by the RYA (Royal Yachting Association) and has been
certified by HPi Verification Services as a Notified Body
in Design Category C.
CATEGORY C – Craft designed for voyages in coastal waters,
large bays, estuaries, lakes and rivers, where conditions
up to and including wind force 6 and significant wave heights
up to and including 2metres may be experienced.
The TOPPER sailboat complies with this design category,
subject to:
- The crew having suitable skill and experience.
- Satisfactory maintenance of the boat and equipment.
Users of the boat are advised that:
- All crew should receive suitable training.
- The boat shall not carry more than the maximum load.
- Any water in the hull should be kept to a minimum.
- Stability is reduced by any weight added high up.
2
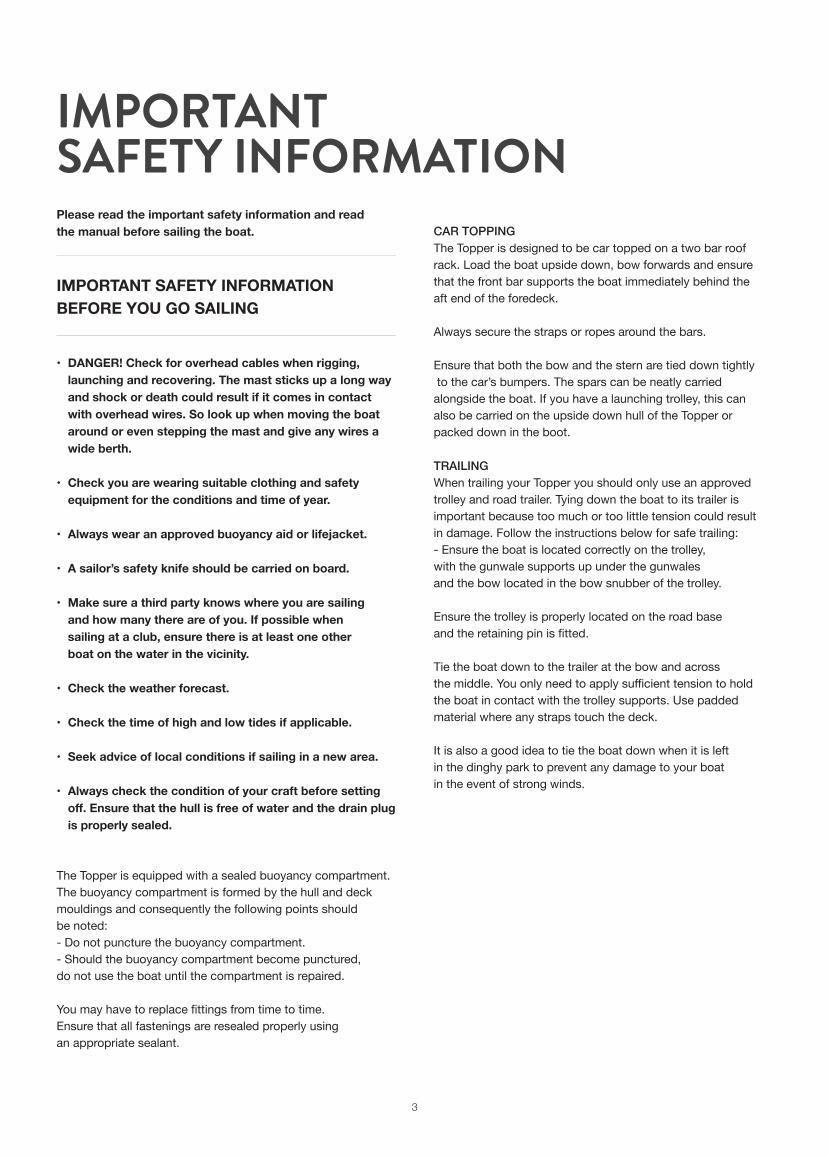
please read the important safety information and read
the manual before sailing the boat.
IMpORTaNT saFETY INFORMaTION
BEFORE YOU GO saIlING
• DaNGER! Check for overhead cables when rigging,
launching and recovering. The mast sticks up a long way
and shock or death could result if it comes in contact
with overhead wires. so look up when moving the boat
around or even stepping the mast and give any wires a
wide berth.
• Check you are wearing suitable clothing and safety
equipment for the conditions and time of year.
• always wear an approved buoyancy aid or lifejacket.
• a sailor’s safety knife should be carried on board.
• Make sure a third party knows where you are sailing
and how many there are of you. If possible when
sailing at a club, ensure there is at least one other
boat on the water in the vicinity.
• Check the weather forecast.
• Check the time of high and low tides if applicable.
• seek advice of local conditions if sailing in a new area.
• always check the condition of your craft before setting
off. Ensure that the hull is free of water and the drain plug
is properly sealed.
The Topper is equipped with a sealed buoyancy compartment.
The buoyancy compartment is formed by the hull and deck
mouldings and consequently the following points should
be noted:
- Do not puncture the buoyancy compartment.
- Should the buoyancy compartment become punctured,
do not use the boat until the compartment is repaired.
You may have to replace fittings from time to time.
Ensure that all fastenings are resealed properly using
an appropriate sealant.
CAR ToppiNg
The Topper is designed to be car topped on a two bar roof
rack. Load the boat upside down, bow forwards and ensure
that the front bar supports the boat immediately behind the
aft end of the foredeck.
Always secure the straps or ropes around the bars.
Ensure that both the bow and the stern are tied down tightly
to the car’s bumpers. The spars can be neatly carried
alongside the boat. If you have a launching trolley, this can
also be carried on the upside down hull of the Topper or
packed down in the boot.
TRAiliNg
When trailing your Topper you should only use an approved
trolley and road trailer. Tying down the boat to its trailer is
important because too much or too little tension could result
in damage. Follow the instructions below for safe trailing:
- Ensure the boat is located correctly on the trolley,
with the gunwale supports up under the gunwales
and the bow located in the bow snubber of the trolley.
Ensure the trolley is properly located on the road base
and the retaining pin is fitted.
Tie the boat down to the trailer at the bow and across
the middle. You only need to apply sufficient tension to hold
the boat in contact with the trolley supports. Use padded
material where any straps touch the deck.
It is also a good idea to tie the boat down when it is left
in the dinghy park to prevent any damage to your boat
in the event of strong winds.
3
IMPORTANT SAFETY INFORMATION
IMpORTaNT saFETY INFORMaTION
ON THE WaTER
• Conform to the sailing rules of the road.
• look out for changing weather conditions.
• Never sail beyond your ability or that of your crew.
Ensure that you and your crew can cope with any
changes in the wind conditions.
• Understand and be competent in the sailing skills
and righting techniques.
STAbiliTy AND bUoyANCy
The Topper has been independently assessed for stability
and buoyancy by the RYA.
The RYA have assessed that the boat can be righted
by the crew and will subsequently float.
The stability and buoyancy have been certified by an EU
Notified Body, HPi Verification Services.
The Topper is stable, but even if used with care a capsize is
always a possibility, even in light conditions. It is therefore
essential that you should familiarise yourself and practice
capsize recovery when you first sail the boat, ideally in an area
where there is some kind of safety patrol to assist you should
you get into difficulty.
Minimum crew weight required for righting Topper 30 kgs
CApSizE RECovERy
The mainsheet should be uncleated and made sure that it
will run freely when the boat is righted.
The vang/kicker should be eased to de-power the top
of the mainsail.
If the boat inverts it should be pulled onto its side so that the
rig is horizontal to the water. It sometimes helps to pull it up
with the aid of the wind blowing over the deck and rig.
Then there are two basic situations to recover from:
- When the rig is lying in the water, pointing downwind.
- When the rig is lying in the water, pointing upwind.
Rig pointing downwind
Climb onto the daggerboard and pull the boat slowly
upright using the mainsheet. As the boat gets to 45 degrees
one of the crew should climb in. As the boat continues to
right take the tiller so that as the boat returns to its normal
orientation you are under control of the boat as soon as
possible. Once you are in control, you can sort yourself out,
tidy the boat and get sailing again.
Rig pointing upwind
This is quite often the position the boat ends up in. Climb onto
the daggerboard. As you begin to right the boat, the wind will
blow under the mainsail and help you right it. Depending
on the wind strength the boat will right at different rates.
If the wind is strong the faster you will have to move.
As the mast leaves the water, one of you should climb aboard
and get to the windward side to prevent the boat capsizing
again. Should the boat capsize again to the other side, simply
climb over on to the daggerboard and follow the procedure
for the rig pointing downwind.
Man overboard prevention and Recovery
The working deck of the Topper, which is intended only to
be occupied when the boat is afloat, are the areas covered
with non-slip coating. These are over the cockpit floor, the top
surface and outer edge of the side deck, and the forward part
of the cockpit.
It is advisable to reboard the boat from the windward side
when climbing aboard via the gunwale.
TowiNg AfloAT
Should it become necessary to tow the Topper you should
secure the towing line around the base of the mast. Raise
the daggerboard and stay at the tiller. In the event of the
loss of the rudder sit well aft.
ANChoRiNg AND MooRiNg
The Topper is not normally required to anchor/moor,
as they are day boats for racing or cruising in inshore
or inland waters.
oUTboARD ENgiNE
The Topper is not normally designed for use with an
outboard engine.
4

Before you sail your new boat for the first time, it is most
important to apply the self-adhesive numbers to the sail.
The sail numbers are exclusive to the boat and correspond
with the serial number/sail number plate. These are always
located inside the boat attached to the toe strap.
Follow these instructions carefully it is not a job
to be hurried.
In our experience the best way to stick the numbers down
is to peel away a corner, line up the letter and then attach
the corner. Pull away the backing paper slowly as you push
the number onto the sail.
IF IN DOUBT - plEasE asK
SAil NUMbERS
(please note all measurements are minimums)
- Should be placed on both sides of the sail
with the numbers on the starboard side being above
the ones on the port side.
- They should be placed two panels below
the Top Hat logo.
- The height of the numbers should be 230mm.
- The numbers are supplied as ‘digital eights’
from which you can produce your own sail number.
- The preferred style of cutting numbers
from ‘digital eights’ is shown below.
- There should be 45mm between each element
of the complete number.
- The numbers should be in a contrasting colour
to the white sailcloth.
STARboARD SiDE
- The upper edge of the numbers should be placed 45mm
from the upper seam of that panel.
- They should start 45mm from the back of the sail.
poRT SiDE
- The upper edge of the port numbers should be 45mm
below the starboard side numbers.
- They should finish 45mm from the back of the sail.
* NOTE: Topper Sail Numbers are derived from digital 8 numbers from which any number from 0-9 can be obtained.
Ten digital 8 numbers are supplied.
5
SAIL NUMBERS & LETTERING
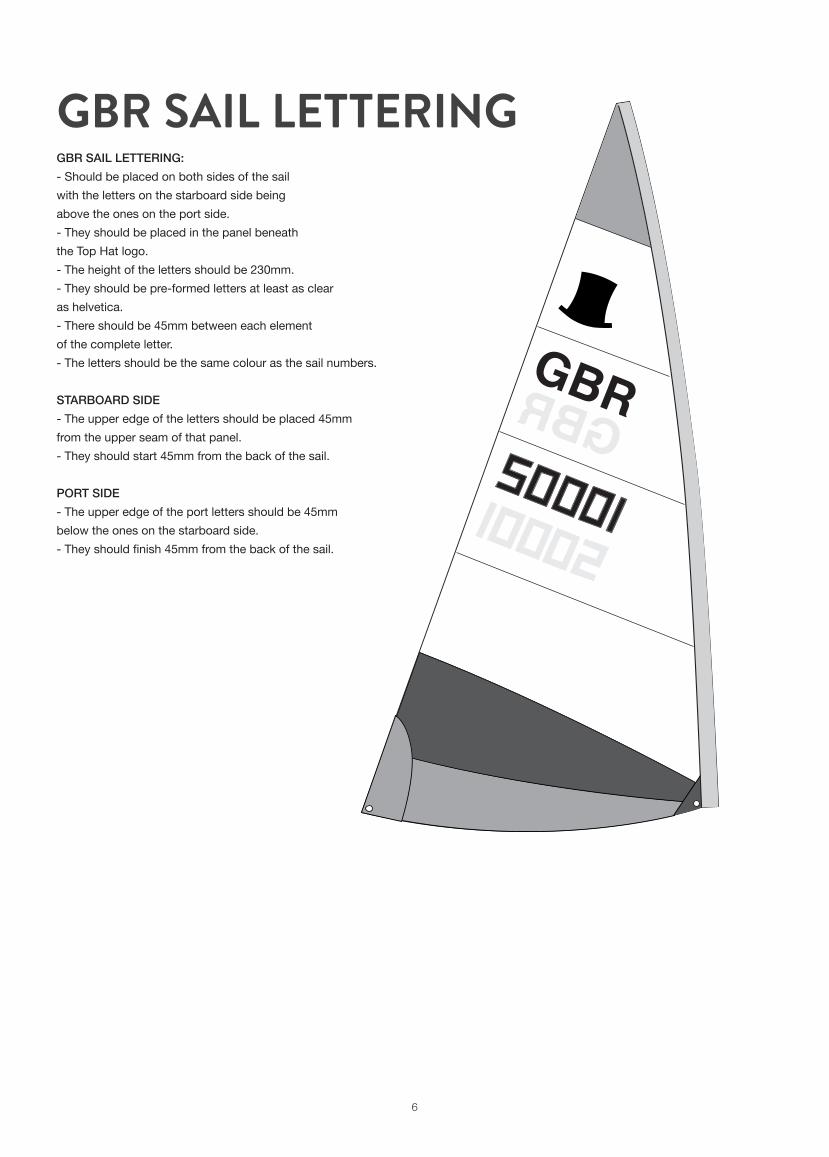
gbR SAil lETTERiNg:
- Should be placed on both sides of the sail
with the letters on the starboard side being
above the ones on the port side.
- They should be placed in the panel beneath
the Top Hat logo.
- The height of the letters should be 230mm.
- They should be pre-formed letters at least as clear
as helvetica.
- There should be 45mm between each element
of the complete letter.
- The letters should be the same colour as the sail numbers.
STARboARD SiDE
- The upper edge of the letters should be placed 45mm
from the upper seam of that panel.
- They should start 45mm from the back of the sail.
poRT SiDE
- The upper edge of the port letters should be 45mm
below the ones on the starboard side.
- They should finish 45mm from the back of the sail.
6
GBR SAIL LETTERING
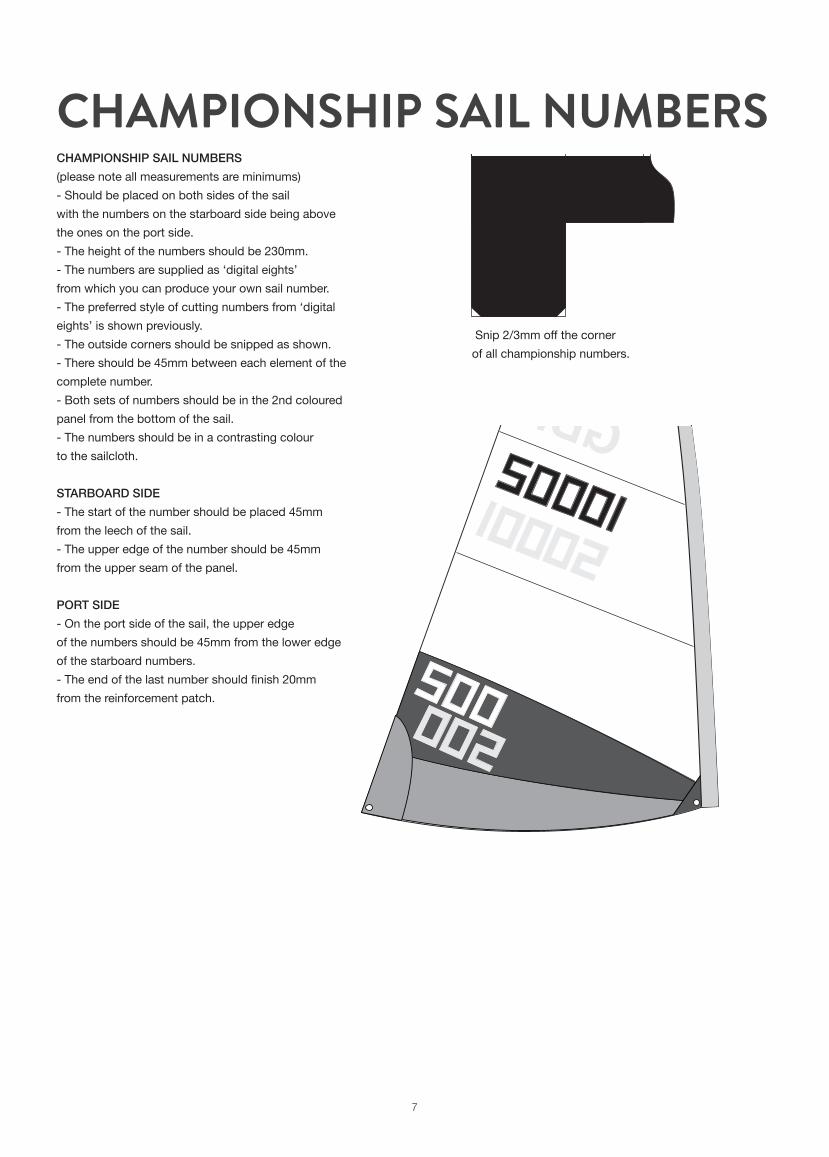
Snip 2/3mm off the corner
of all championship numbers.
ChAMpioNShip SAil NUMbERS
(please note all measurements are minimums)
- Should be placed on both sides of the sail
with the numbers on the starboard side being above
the ones on the port side.
- The height of the numbers should be 230mm.
- The numbers are supplied as ‘digital eights’
from which you can produce your own sail number.
- The preferred style of cutting numbers from ‘digital
eights’ is shown previously.
- The outside corners should be snipped as shown.
- There should be 45mm between each element of the
complete number.
- Both sets of numbers should be in the 2nd coloured
panel from the bottom of the sail.
- The numbers should be in a contrasting colour
to the sailcloth.
STARboARD SiDE
- The start of the number should be placed 45mm
from the leech of the sail.
- The upper edge of the number should be 45mm
from the upper seam of the panel.
poRT SiDE
- On the port side of the sail, the upper edge
of the numbers should be 45mm from the lower edge
of the starboard numbers.
- The end of the last number should finish 20mm
from the reinforcement patch.
7
CHAMPIONSHIP SAIL NUMBERS
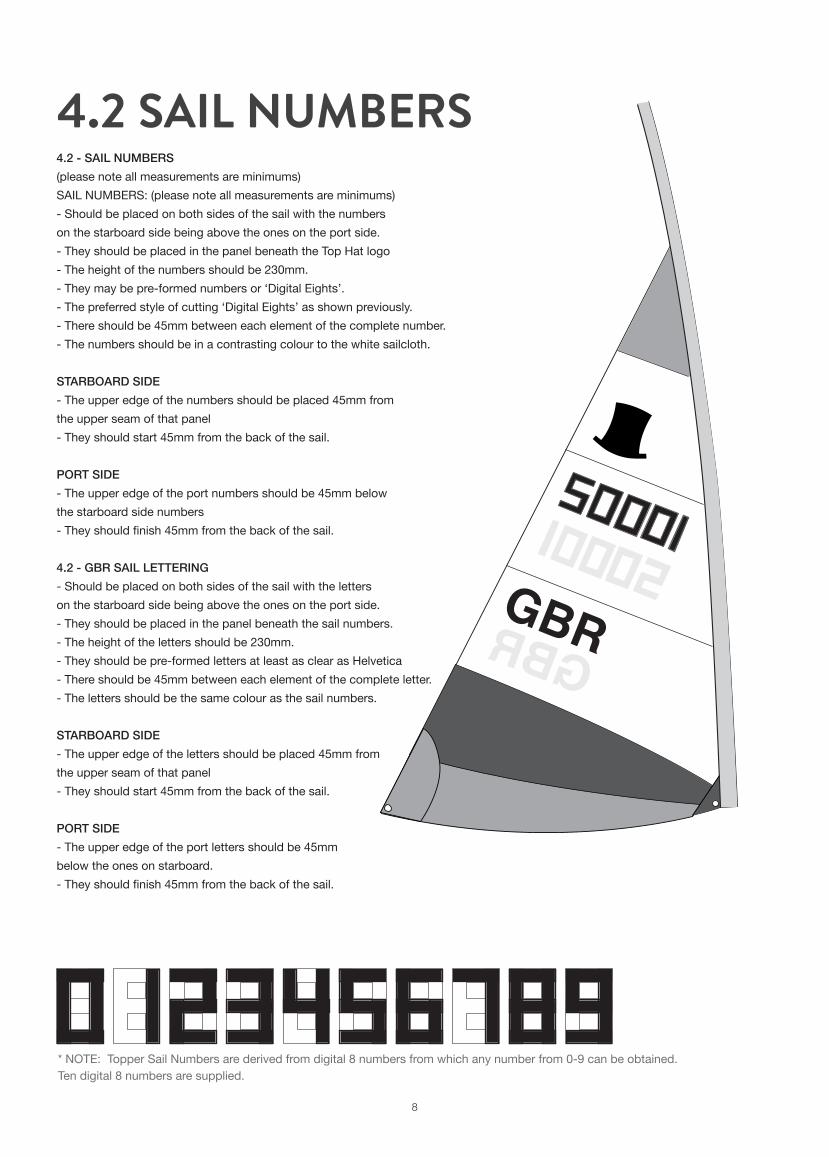
4.2 - SAil NUMbERS
(please note all measurements are minimums)
SAIL NUMBERS: (please note all measurements are minimums)
- Should be placed on both sides of the sail with the numbers
on the starboard side being above the ones on the port side.
- They should be placed in the panel beneath the Top Hat logo
- The height of the numbers should be 230mm.
- They may be pre-formed numbers or ‘Digital Eights’.
- The preferred style of cutting ‘Digital Eights’ as shown previously.
- There should be 45mm between each element of the complete number.
- The numbers should be in a contrasting colour to the white sailcloth.
STARboARD SiDE
- The upper edge of the numbers should be placed 45mm from
the upper seam of that panel
- They should start 45mm from the back of the sail.
poRT SiDE
- The upper edge of the port numbers should be 45mm below
the starboard side numbers
- They should finish 45mm from the back of the sail.
4.2 - gbR SAil lETTERiNg
- Should be placed on both sides of the sail with the letters
on the starboard side being above the ones on the port side.
- They should be placed in the panel beneath the sail numbers.
- The height of the letters should be 230mm.
- They should be pre-formed letters at least as clear as Helvetica
- There should be 45mm between each element of the complete letter.
- The letters should be the same colour as the sail numbers.
STARboARD SiDE
- The upper edge of the letters should be placed 45mm from
the upper seam of that panel
- They should start 45mm from the back of the sail.
poRT SiDE
- The upper edge of the port letters should be 45mm
below the ones on starboard.
- They should finish 45mm from the back of the sail.
* NOTE: Topper Sail Numbers are derived from digital 8 numbers from which any number from 0-9 can be obtained.
Ten digital 8 numbers are supplied.
8
4.2 SAIL NUMBERS
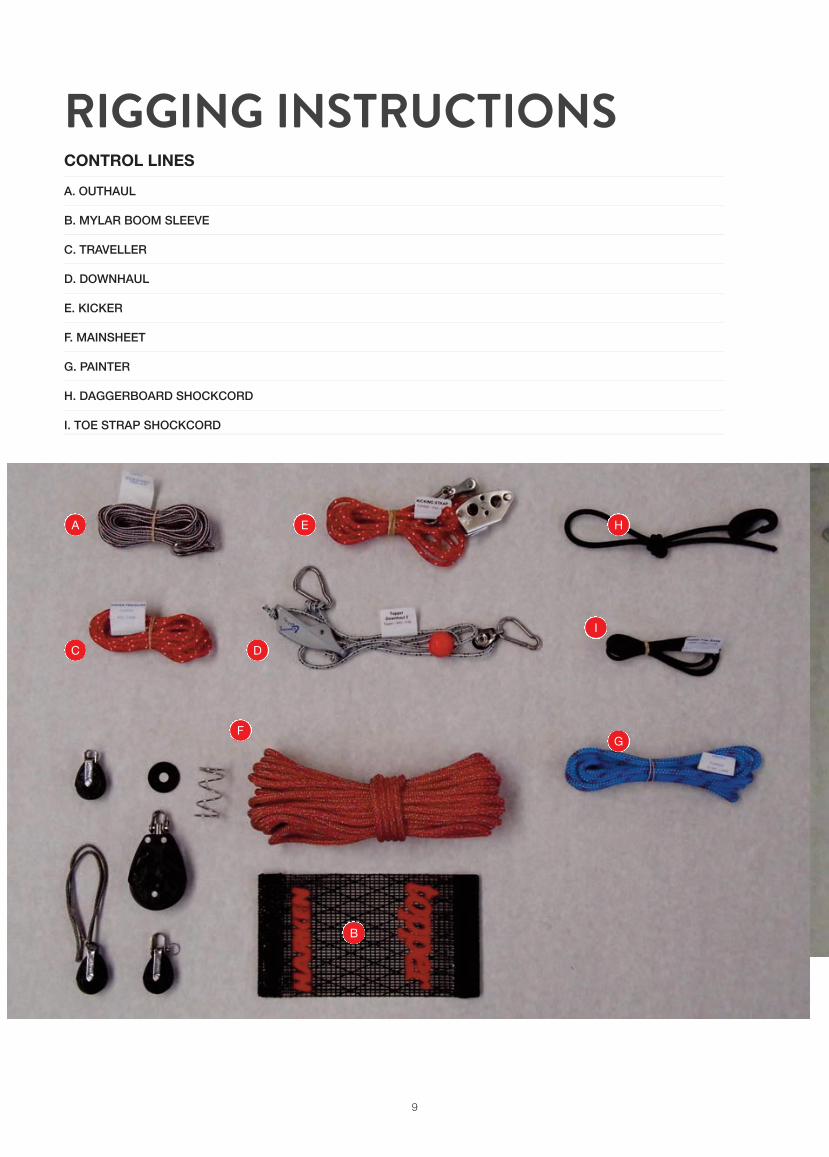
CONTROl lINEs
A. oUThAUl
b. MylAR booM SlEEvE
C. TRAvEllER
D. DowNhAUl
E. KiCKER
f. MAiNShEET
g. pAiNTER
h. DAggERboARD ShoCKCoRD
i. ToE STRAp ShoCKCoRD
A
B
D
E
F
I
G
H
C
9
RIGGING INSTRUCTIONS
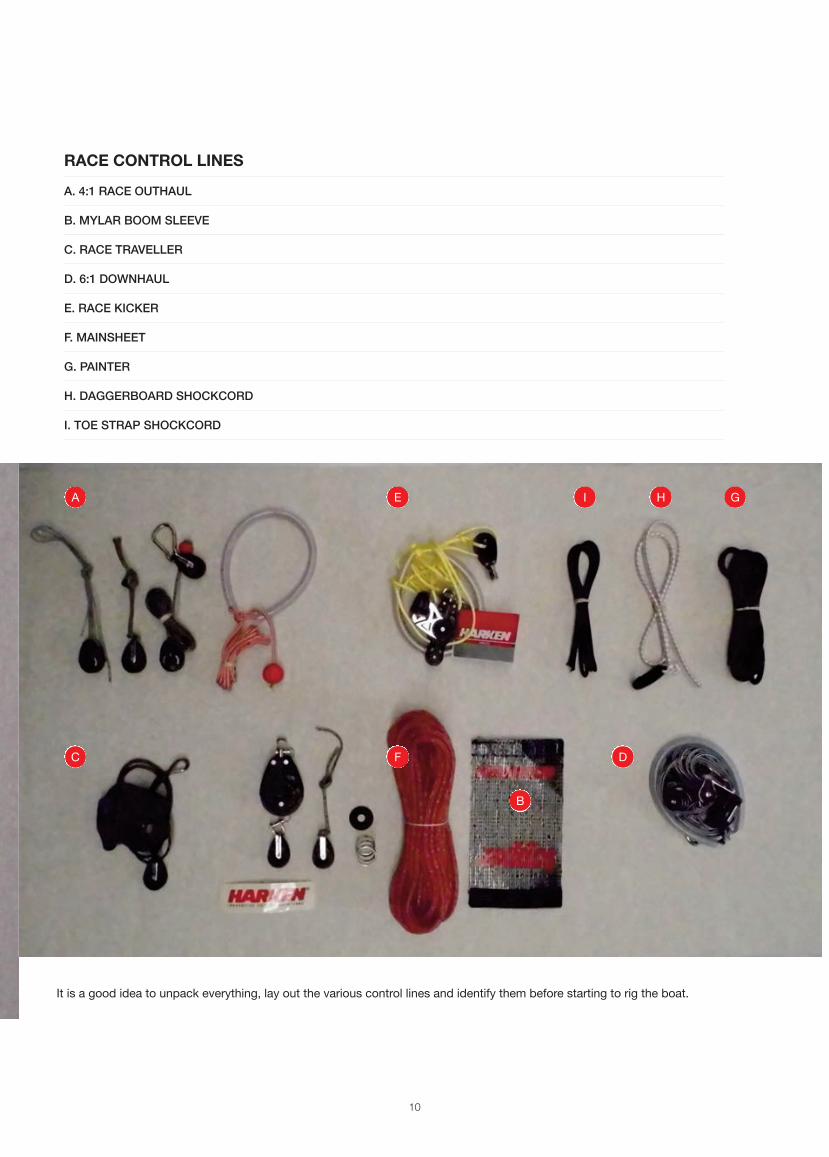
It is a good idea to unpack everything, lay out the various control lines and identify them before starting to rig the boat.
A
B
C D
E
F
GHI
RaCE CONTROl lINEs
A. 4:1 RACE oUThAUl
b. MylAR booM SlEEvE
C. RACE TRAvEllER
D. 6:1 DowNhAUl
E. RACE KiCKER
f. MAiNShEET
g. pAiNTER
h. DAggERboARD ShoCKCoRD
i. ToE STRAp ShoCKCoRD
10
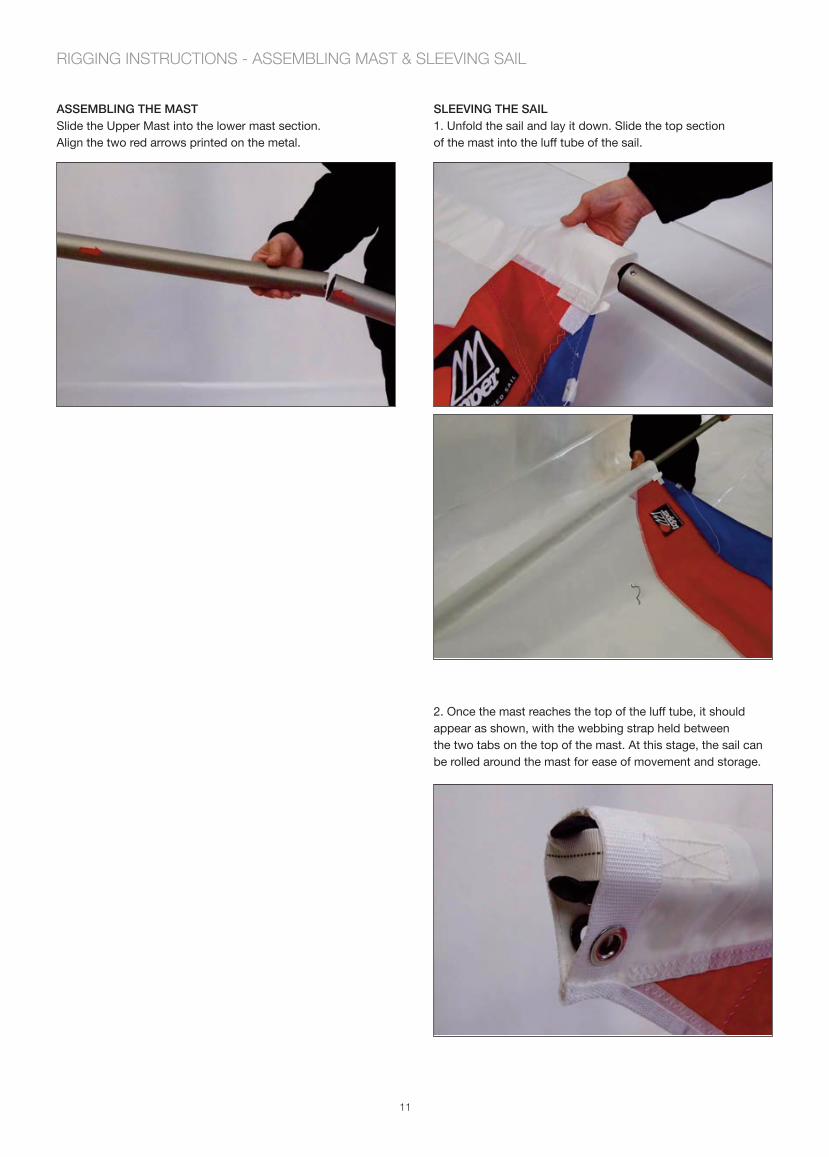
SlEEviNg ThE SAil
1. Unfold the sail and lay it down. Slide the top section
of the mast into the luff tube of the sail.
2. Once the mast reaches the top of the luff tube, it should
appear as shown, with the webbing strap held between
the two tabs on the top of the mast. At this stage, the sail can
be rolled around the mast for ease of movement and storage.
ASSEMbliNg ThE MAST
Slide the Upper Mast into the lower mast section.
Align the two red arrows printed on the metal.
RIGGING INSTRUCTIONS - ASSEMBLING MAST & SLEEVING SAIL
11
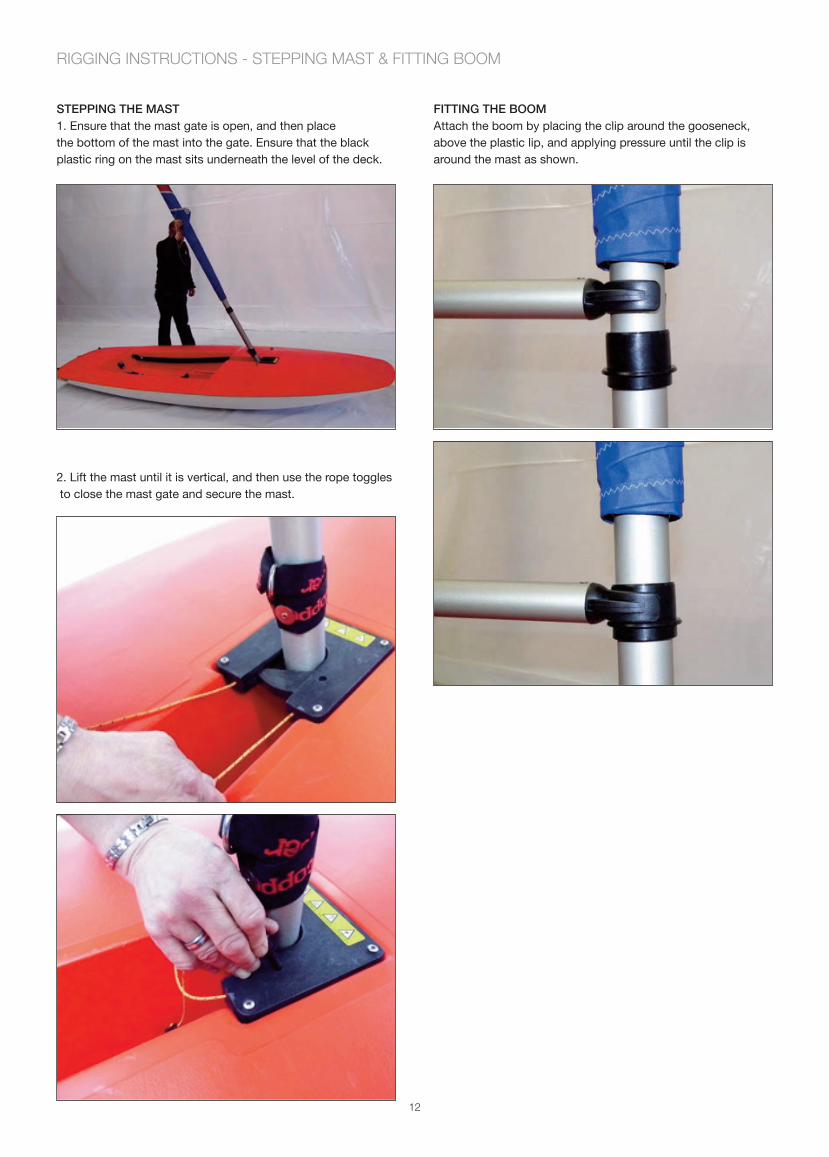
STEppiNg ThE MAST
1. Ensure that the mast gate is open, and then place
the bottom of the mast into the gate. Ensure that the black
plastic ring on the mast sits underneath the level of the deck.
2. Lift the mast until it is vertical, and then use the rope toggles
to close the mast gate and secure the mast.
fiTTiNg ThE booM
Attach the boom by placing the clip around the gooseneck,
above the plastic lip, and applying pressure until the clip is
around the mast as shown.
RIGGING INSTRUCTIONS - STEPPING MAST & FITTING BOOM
12
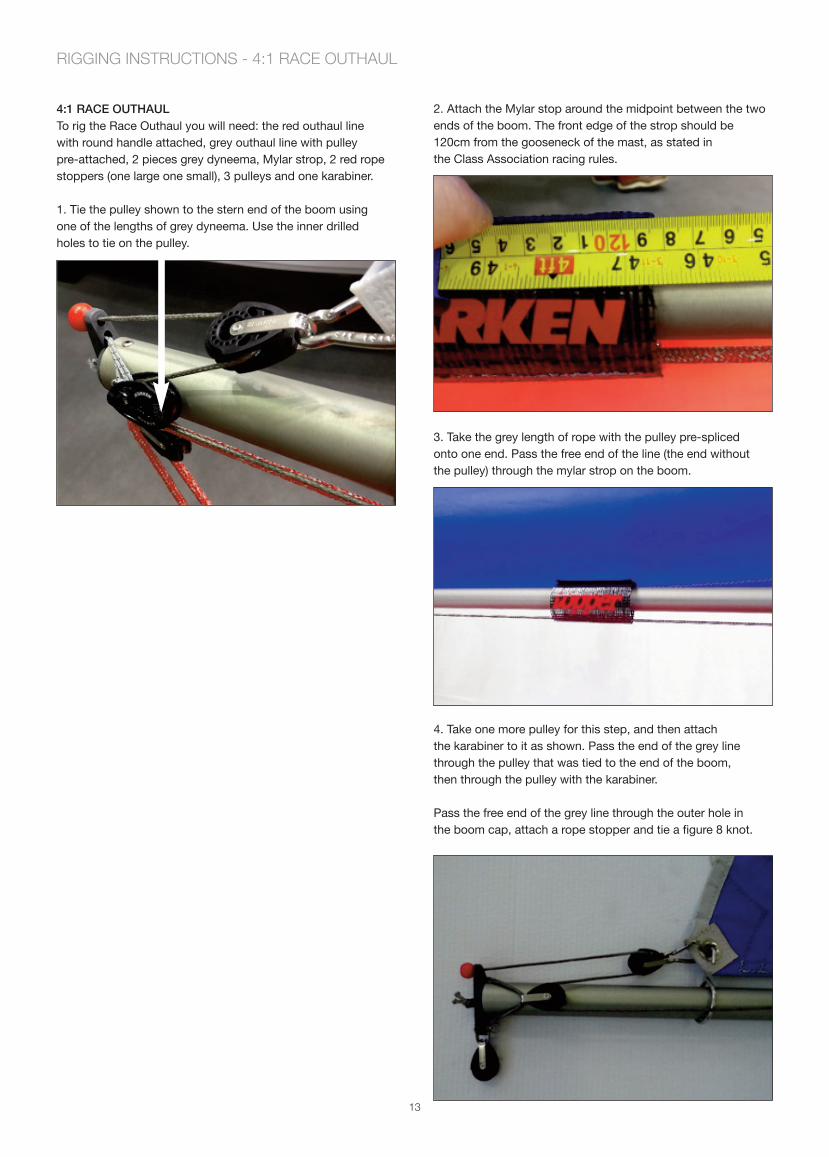
2. Attach the Mylar stop around the midpoint between the two
ends of the boom. The front edge of the strop should be
120cm from the gooseneck of the mast, as stated in
the Class Association racing rules.
3. Take the grey length of rope with the pulley pre-spliced
onto one end. Pass the free end of the line (the end without
the pulley) through the mylar strop on the boom.
4. Take one more pulley for this step, and then attach
the karabiner to it as shown. Pass the end of the grey line
through the pulley that was tied to the end of the boom,
then through the pulley with the karabiner.
Pass the free end of the grey line through the outer hole in
the boom cap, attach a rope stopper and tie a figure 8 knot.
4:1 RACE oUThAUl
To rig the Race Outhaul you will need: the red outhaul line
with round handle attached, grey outhaul line with pulley
pre-attached, 2 pieces grey dyneema, Mylar strop, 2 red rope
stoppers (one large one small), 3 pulleys and one karabiner.
1. Tie the pulley shown to the stern end of the boom using
one of the lengths of grey dyneema. Use the inner drilled
holes to tie on the pulley.
RIGGING INSTRUCTIONS - 4:1 RACE OUTHAUL
13
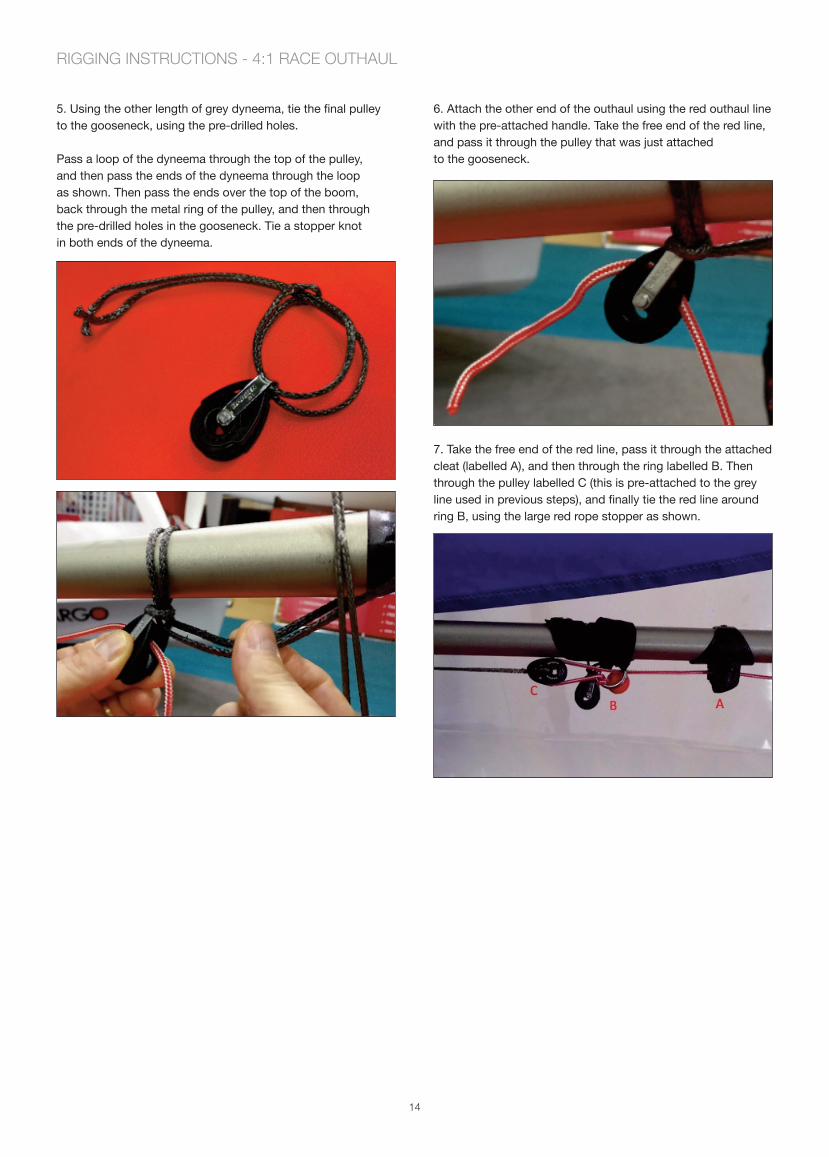
5. Using the other length of grey dyneema, tie the final pulley
to the gooseneck, using the pre-drilled holes.
Pass a loop of the dyneema through the top of the pulley,
and then pass the ends of the dyneema through the loop
as shown. Then pass the ends over the top of the boom,
back through the metal ring of the pulley, and then through
the pre-drilled holes in the gooseneck. Tie a stopper knot
in both ends of the dyneema.
RIGGING INSTRUCTIONS - 4:1 RACE OUTHAUL
6. Attach the other end of the outhaul using the red outhaul line
with the pre-attached handle. Take the free end of the red line,
and pass it through the pulley that was just attached
to the gooseneck.
7. Take the free end of the red line, pass it through the attached
cleat (labelled A), and then through the ring labelled B. Then
through the pulley labelled C (this is pre-attached to the grey
line used in previous steps), and finally tie the red line around
ring B, using the large red rope stopper as shown.
14
STANDARD oUThAUl
1. Tie a stopper knot in one end of the outhaul, and poke
the other end through the top, outer hole in the boom end.
Pass this end through a karabiner, and then back through
the inner hole on the same side.
Then pass the end through the inner hole on the other side,
so the line should end up as shown.
2. Pass the end of the outhaul through the metal ring,
and then through the pre-attached cleat. It may help
to tie a loop in the line to make applying tension easier.
3. When using the outhaul, clip the karabiner onto the metal
ring in the clew of the sail.
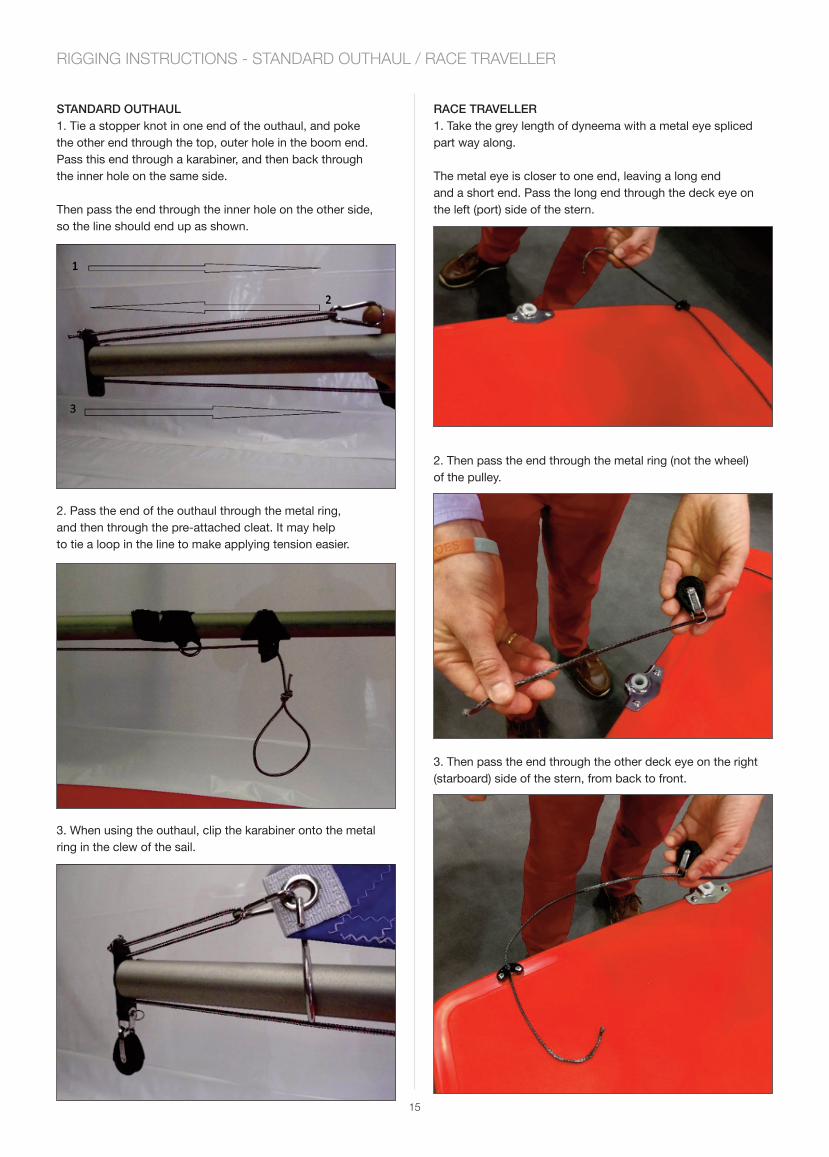
RACE TRAvEllER
1. Take the grey length of dyneema with a metal eye spliced
part way along.
The metal eye is closer to one end, leaving a long end
and a short end. Pass the long end through the deck eye on
the left (port) side of the stern.
2. Then pass the end through the metal ring (not the wheel)
of the pulley.
3. Then pass the end through the other deck eye on the right
(starboard) side of the stern, from back to front.
RIGGING INSTRUCTIONS - STANDARD OUTHAUL / RACE TRAVELLER
15
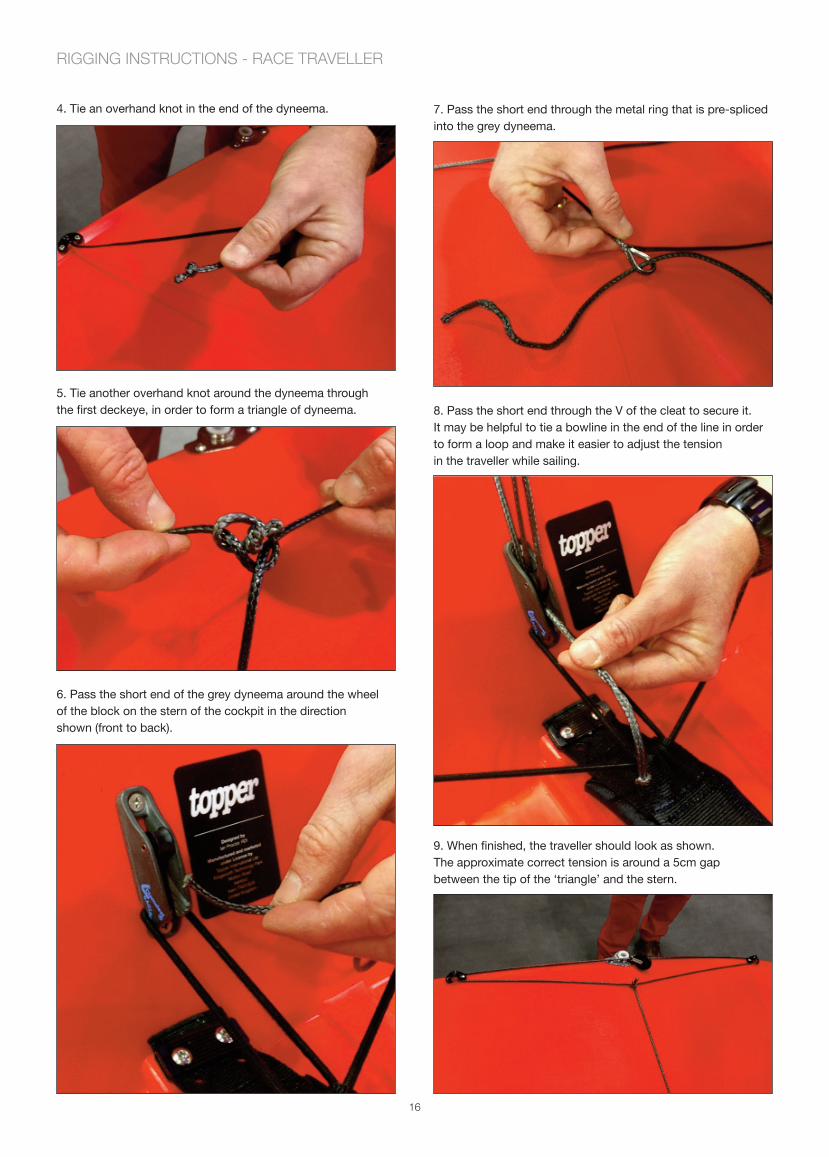
4. Tie an overhand knot in the end of the dyneema.
5. Tie another overhand knot around the dyneema through
the first deckeye, in order to form a triangle of dyneema.
6. Pass the short end of the grey dyneema around the wheel
of the block on the stern of the cockpit in the direction
shown (front to back).
RIGGING INSTRUCTIONS - RACE TRAVELLER
7. Pass the short end through the metal ring that is pre-spliced
into the grey dyneema.
8. Pass the short end through the V of the cleat to secure it.
It may be helpful to tie a bowline in the end of the line in order
to form a loop and make it easier to adjust the tension
in the traveller while sailing.
9. When finished, the traveller should look as shown.
The approximate correct tension is around a 5cm gap
between the tip of the ‘triangle’ and the stern.
16
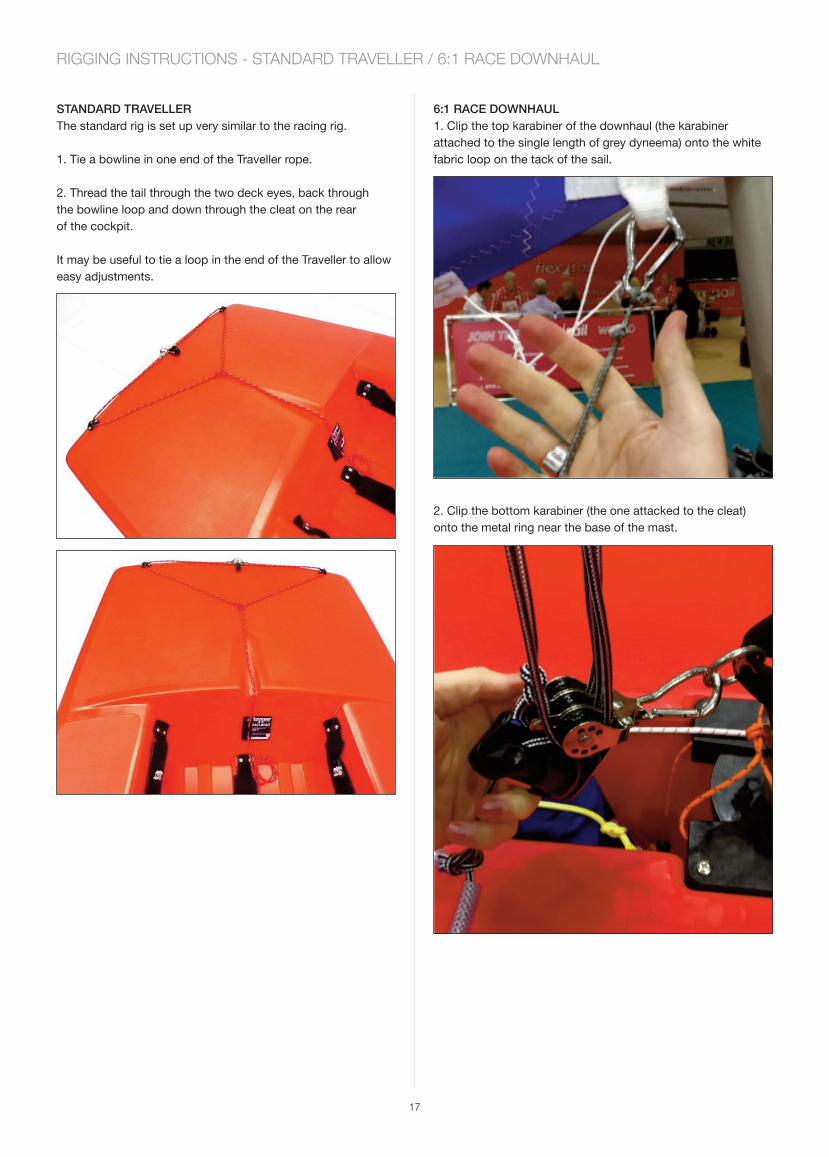
6:1 RACE DowNhAUl
1. Clip the top karabiner of the downhaul (the karabiner
attached to the single length of grey dyneema) onto the white
fabric loop on the tack of the sail.
2. Clip the bottom karabiner (the one attacked to the cleat)
onto the metal ring near the base of the mast.
STANDARD TRAvEllER
The standard rig is set up very similar to the racing rig.
1. Tie a bowline in one end of the Traveller rope.
2. Thread the tail through the two deck eyes, back through
the bowline loop and down through the cleat on the rear
of the cockpit.
It may be useful to tie a loop in the end of the Traveller to allow
easy adjustments.
RIGGING INSTRUCTIONS - STANDARD TRAVELLER / 6:1 RACE DOWNHAUL
17
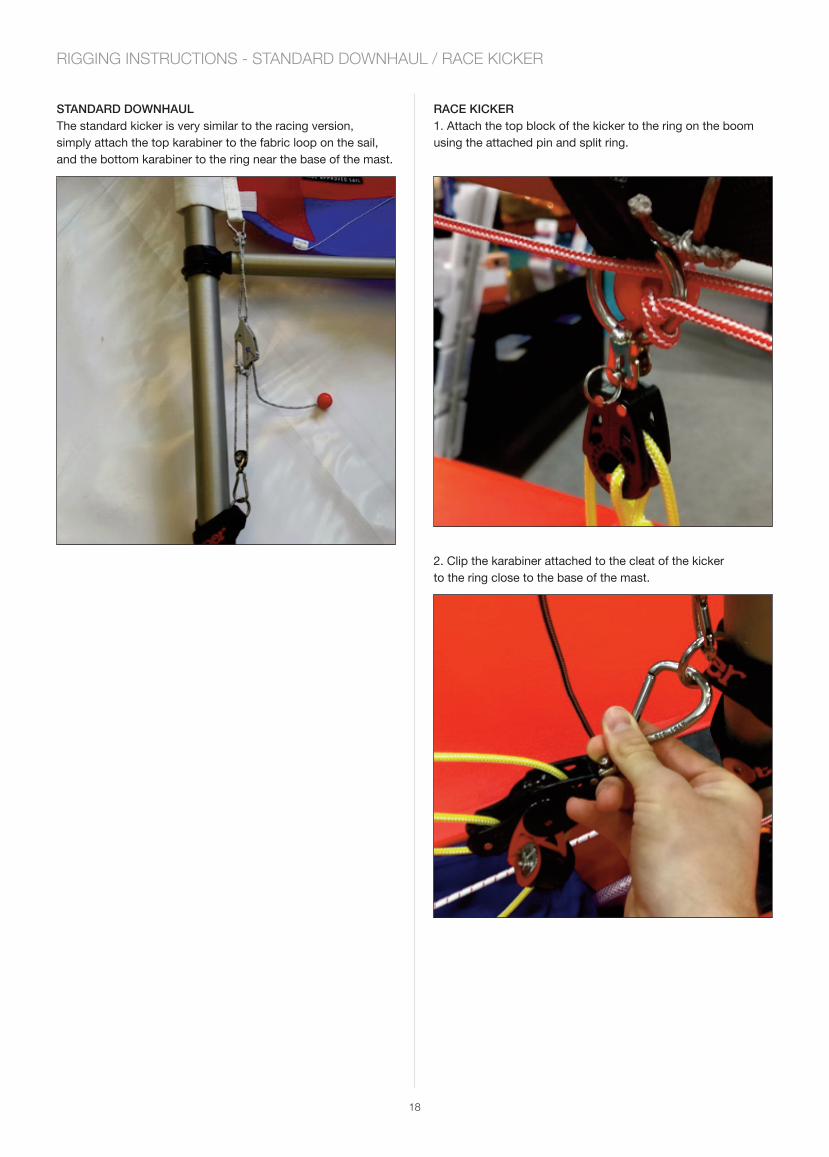
RACE KiCKER
1. Attach the top block of the kicker to the ring on the boom
using the attached pin and split ring.
2. Clip the karabiner attached to the cleat of the kicker
to the ring close to the base of the mast.
STANDARD DowNhAUl
The standard kicker is very similar to the racing version,
simply attach the top karabiner to the fabric loop on the sail,
and the bottom karabiner to the ring near the base of the mast.
RIGGING INSTRUCTIONS - STANDARD DOWNHAUL / RACE KICKER
18
STANDARD KiCKER
The standard kicker is very similar to the racing version. Attach the karabiner at the top of the kicker to the ring on the boom,
and use the pin and split ring on the cleat to attach it to the ring on the mast.
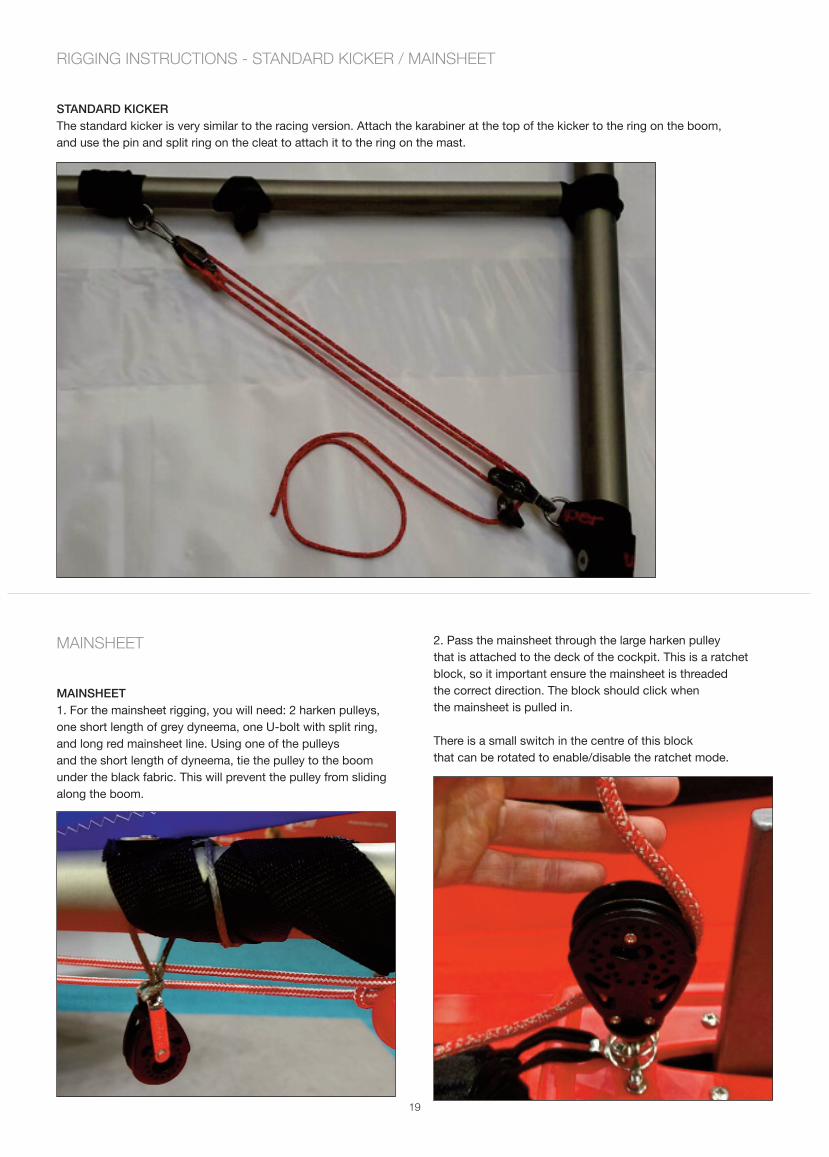
MAiNShEET
1. For the mainsheet rigging, you will need: 2 harken pulleys,
one short length of grey dyneema, one U-bolt with split ring,
and long red mainsheet line. Using one of the pulleys
and the short length of dyneema, tie the pulley to the boom
under the black fabric. This will prevent the pulley from sliding
along the boom.
RIGGING INSTRUCTIONS - STANDARD KICKER / MAINSHEET
MAINSHEET 2. Pass the mainsheet through the large harken pulley
that is attached to the deck of the cockpit. This is a ratchet
block, so it important ensure the mainsheet is threaded
the correct direction. The block should click when
the mainsheet is pulled in.
There is a small switch in the centre of this block
that can be rotated to enable/disable the ratchet mode.
19

3. Pass the mainsheet line through the pulley that was just tied
onto the boom, running towards the stern.
4. Pass the mainsheet through the mylar strop on the boom.
5. Attach another pulley onto the end of the boom using
the U bolt and split ring. Then pass the mainsheet through
this pulley front to back.
6. Pass the mainsheet through the pulley that is on
the traveller on the stern of the boat.
7. Pass the end of the mainsheet through the U bolt
that is used to attach the pulley. Then tie a figure 8 knot
in the end of the mainsheet.
RIGGING INSTRUCTIONS - MAINSHEET
20
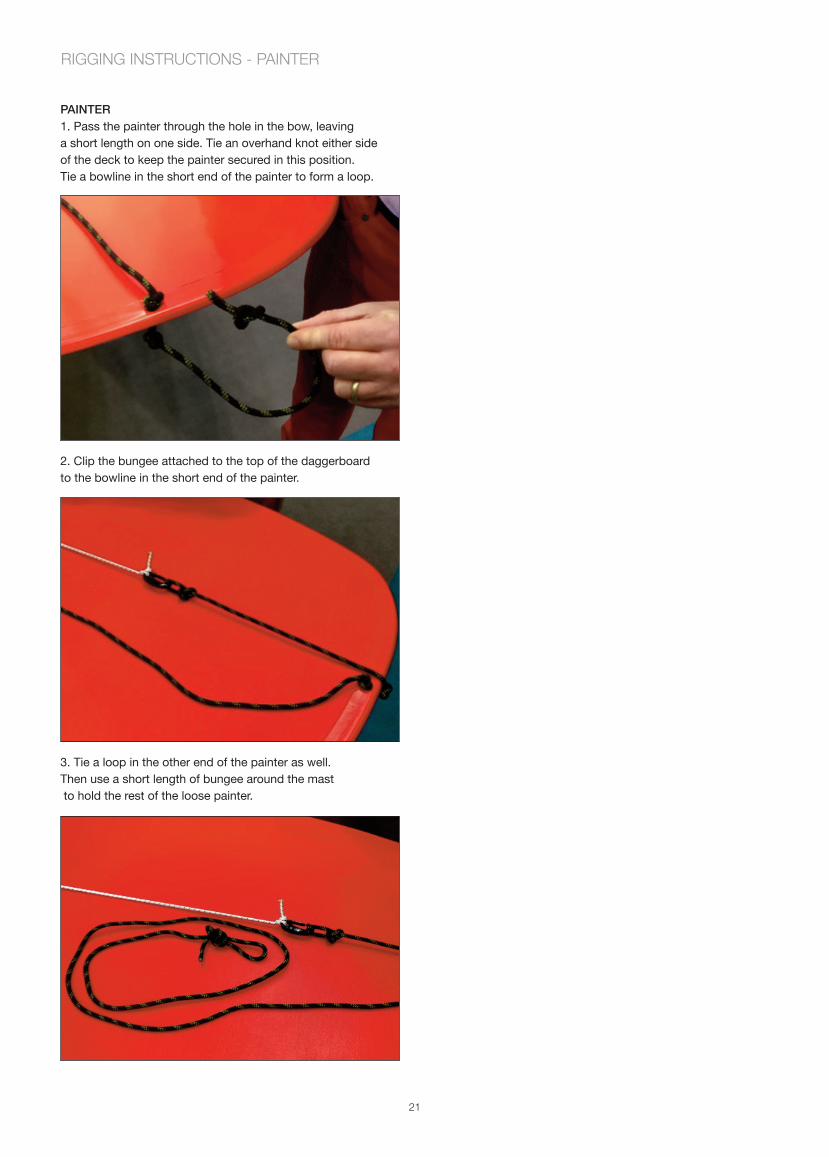
pAiNTER
1. Pass the painter through the hole in the bow, leaving
a short length on one side. Tie an overhand knot either side
of the deck to keep the painter secured in this position.
Tie a bowline in the short end of the painter to form a loop.
2. Clip the bungee attached to the top of the daggerboard
to the bowline in the short end of the painter.
3. Tie a loop in the other end of the painter as well.
Then use a short length of bungee around the mast
to hold the rest of the loose painter.
RIGGING INSTRUCTIONS - PAINTER
21
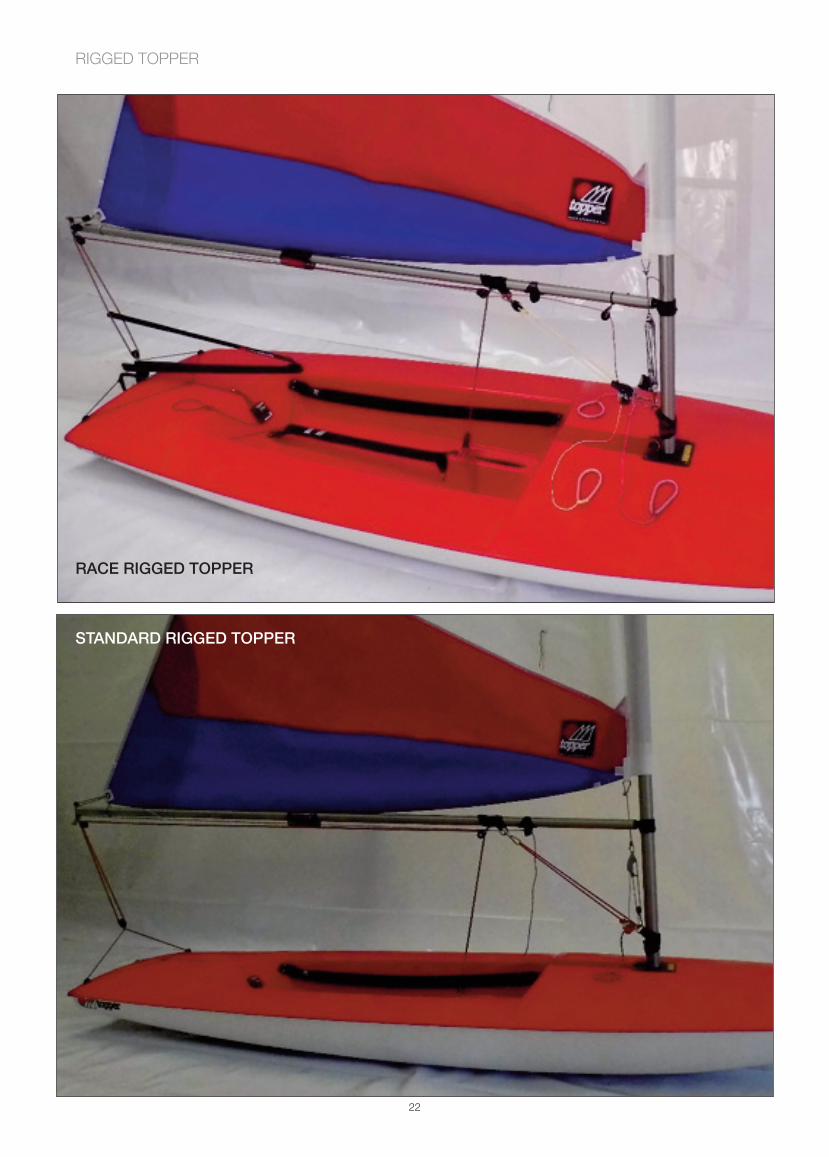
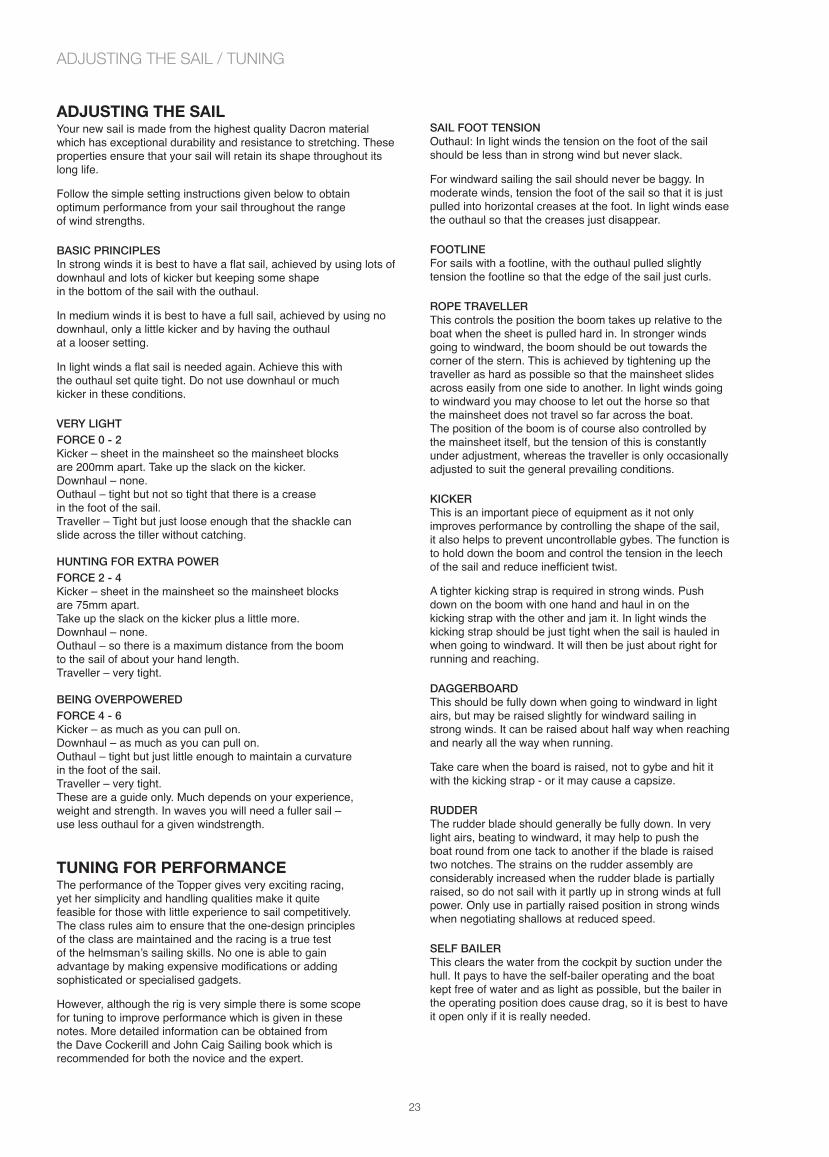
RIGGED TOPPER
RACE RiggED ToppER
STANDARD RiggED ToppER
22
aDJUsTING THE saIlYour new sail is made from the highest quality Dacron materialwhich has exceptional durability and resistance to stretching. Theseproperties ensure that your sail will retain its shape throughout itslong life.
Follow the simple setting instructions given below to obtainoptimum performance from your sail throughout the range of wind strengths.
bASiC pRiNCiplES
In strong winds it is best to have a flat sail, achieved by using lots ofdownhaul and lots of kicker but keeping some shape in the bottom of the sail with the outhaul.
In medium winds it is best to have a full sail, achieved by using nodownhaul, only a little kicker and by having the outhaul at a looser setting.
In light winds a flat sail is needed again. Achieve this withthe outhaul set quite tight. Do not use downhaul or muchkicker in these conditions.
vERy lighT
foRCE 0 - 2
Kicker – sheet in the mainsheet so the mainsheet blocksare 200mm apart. Take up the slack on the kicker.Downhaul – none.Outhaul – tight but not so tight that there is a crease in the foot of the sail.Traveller – Tight but just loose enough that the shackle canslide across the tiller without catching.
hUNTiNg foR EXTRA powER
foRCE 2 - 4
Kicker – sheet in the mainsheet so the mainsheet blocksare 75mm apart.Take up the slack on the kicker plus a little more.Downhaul – none.Outhaul – so there is a maximum distance from the boomto the sail of about your hand length.Traveller – very tight.
bEiNg ovERpowERED
foRCE 4 - 6
Kicker – as much as you can pull on.Downhaul – as much as you can pull on.Outhaul – tight but just little enough to maintain a curvature in the foot of the sail.Traveller – very tight.These are a guide only. Much depends on your experience,weight and strength. In waves you will need a fuller sail –use less outhaul for a given windstrength.
TUNING FOR pERFORMaNCEThe performance of the Topper gives very exciting racing,yet her simplicity and handling qualities make it quitefeasible for those with little experience to sail competitively.The class rules aim to ensure that the one-design principlesof the class are maintained and the racing is a true testof the helmsman’s sailing skills. No one is able to gainadvantage by making expensive modifications or addingsophisticated or specialised gadgets.
However, although the rig is very simple there is some scopefor tuning to improve performance which is given in thesenotes. More detailed information can be obtained fromthe Dave Cockerill and John Caig Sailing book which isrecommended for both the novice and the expert.
SAil fooT TENSioN
Outhaul: In light winds the tension on the foot of the sailshould be less than in strong wind but never slack.
For windward sailing the sail should never be baggy. Inmoderate winds, tension the foot of the sail so that it is justpulled into horizontal creases at the foot. In light winds easethe outhaul so that the creases just disappear.
fooTliNE
For sails with a footline, with the outhaul pulled slightlytension the footline so that the edge of the sail just curls.
RopE TRAvEllER
This controls the position the boom takes up relative to theboat when the sheet is pulled hard in. In stronger windsgoing to windward, the boom should be out towards thecorner of the stern. This is achieved by tightening up thetraveller as hard as possible so that the mainsheet slidesacross easily from one side to another. In light winds goingto windward you may choose to let out the horse so thatthe mainsheet does not travel so far across the boat.The position of the boom is of course also controlled bythe mainsheet itself, but the tension of this is constantlyunder adjustment, whereas the traveller is only occasionallyadjusted to suit the general prevailing conditions.
KiCKER
This is an important piece of equipment as it not onlyimproves performance by controlling the shape of the sail,it also helps to prevent uncontrollable gybes. The function isto hold down the boom and control the tension in the leechof the sail and reduce inefficient twist.
A tighter kicking strap is required in strong winds. Pushdown on the boom with one hand and haul in on thekicking strap with the other and jam it. In light winds thekicking strap should be just tight when the sail is hauled inwhen going to windward. It will then be just about right forrunning and reaching.
DAggERboARD
This should be fully down when going to windward in lightairs, but may be raised slightly for windward sailing instrong winds. It can be raised about half way when reachingand nearly all the way when running.
Take care when the board is raised, not to gybe and hit itwith the kicking strap - or it may cause a capsize.
RUDDER
The rudder blade should generally be fully down. In verylight airs, beating to windward, it may help to push theboat round from one tack to another if the blade is raisedtwo notches. The strains on the rudder assembly areconsiderably increased when the rudder blade is partiallyraised, so do not sail with it partly up in strong winds at fullpower. Only use in partially raised position in strong windswhen negotiating shallows at reduced speed.
SElf bAilER
This clears the water from the cockpit by suction under thehull. It pays to have the self-bailer operating and the boatkept free of water and as light as possible, but the bailer inthe operating position does cause drag, so it is best to haveit open only if it is really needed.
ADJUSTING THE SAIL / TUNING
23
MAINTENANCE
MaINTENaNCEVery little maintenance is required to your Topper, but some careand attention will produce better sailing performance. Your boatshould only be used with the propriety launching trolley. The use ofany other trolley may damage the hull and invalidate your warranty.
Care must be taken to support the hull adequately if the boat is notstored on the correct launching trolley. Any sustained point loadingcould permanently dent or distort the hull.
Any repairs to the hull should be undertaken by qualified personnelwith the relevant skills and equipment. Contact Topper Internationalfor advice.
UV light may cause fading to some components and fittings, a good quality cover is recommended to reduce UV degradation.
Keep the equipment clean by frequently flushing with fresh water.The stainless steel fittings will also bleed with a rust colour if notrinsed off after sailing at sea.
Excess water should be removed from the hull. Keep your Topperdrained and well ventilated. Ensure the boat is stored with the bowraised to allow water to drain away. Before you set sail ensure that the transom drain plug has been correctly closed.
Ropes, rigging and fittings should be checked at regular intervalsfor wear and tear.
Inspect shackles, pins and fittings regularly. Tape up fittingsthat may snag with sails, ropes, or crew.
Damaged or worn parts should be replaced.
REpAiRS
Contact Topper International or your dealer who will provideyou with the best advice.
MoDifiCATioNS
Contact Topper International or your dealer about any modifications.
Please remember any modifications may endanger your safety and invalidate your warranty.
hUll AND DECK
The polypropylene from which the hull and deck are moulded isvery strong but can be scratched so avoid pulling the boat overshingle or scraping it on anything hard and always try to rig the boaton a reasonably soft surface.
The moulding material has special additives to provide resistanceto the effects of ultra-violet light, but very prolonged exposure tostrong sunlight may affect the surface over the period of a numberof years. Therefore it is recommended that you cover the boat or store it in the shade.
Static electricity on a polypropylene surface attracts dust. The harder you rub it with a duster the more dust will stick.So it is best to wash it or try an anti-static polish.
An annual check of screw tightness is a good discipline, but be careful not to overtighten.
SElf bAilER
Keep clean and wash out grit. Ensure screws are tight but be careful not to overtighten.
MAST CUp
Clean out the grit and sand. The base of the cup can may get wornfrom the repeated movement of the mast heel. If the cup becomesworn, remove the central screw holding the cup in position and fit a replacement cup and disc. Do not tamper with the bolt beneaththe cup.
DRAiNplUg
It is recommended that this is removed at night and for winter storage.
RUDDER
Make sure that when you attach the rudder that the rudderstop clips over the stock. Sometimes a safety strop is attachedfrom the boat to the rudder stock.
The rudder blade is intended to stay down in the fully lowered position when the tiller is lowered onto the pillar of the rudder stock(aluminium casting). If the rudder blade hits a submerged objecthard, the blade will force the tiller to slide up on the pillar to allow itto move forward, thus releasing a locking mechanism and lettingthe rudder blade come up.
In order to do this correctly - yet not allow the blade to come up during normal sailing - the friction at the joint between the tiller and rudder must be adjusted correctly. This is done by adjusting the spring nut on the tiller pivot bolt. You must get this right by trialand error. It is also important that the bearing surfaces between the locking pegs on the tiller and the notches on the rudder stockpillar are smooth and clean, otherwise the tiller will not slideupwards when the rudder blade hits an obstacle.
TillER EXTENSioN
No maintenance is required but check that the universal linkage is secure.
RUDDER piNTlE oN hUll
This is the stainless steel transom plate on which the rudder pivots.Check occasionally that the fixing screws are secure and that thereis not undue wear on the pivot pin.
MASTgATE
Keep washed out and free from grit and sand. Do not lubricate.
Top MAST
This is designed to be water tight. The upper end fitting is sealed in with mastic and the lower end is plugged. It is difficult to checkthe top mast for leakage and the only practical way is by prolongedimmersion.
lowER MAST AND booM
Check screws and rivets on fittings regularly.
SAil
The sail is very strong and will not rot, but can be spoiledby unsympathetic use. Occasionally wash any salt off the sail with fresh water with a hose, do not use a washing machine. Dry and fold carefully. Roll up the folded sail and stow it in its bag. If you crumple up the sail or stuff it in the bag unfolded you are liable to breakdown the smooth surface of the cloth and affect the performance of the sail. It will not ruin it but it will become less efficient.
bloCKS
Wash these occasionally and keep them free from grit. Do not lubricate.
RopES
Check these occasionally for chafe and wear and tear.
SToRAgE
The Topper may be stood on its transom, providing pintle and gudgeon are kept clear of the ground. It can be slung in strapsor stored upside down in the same way that it is supported on aroof rack. If the hull is put in a rack the right way up, it is importantto ensure that the forward support lies directly under the mast step,and that the load is spread as much as possible.
Trailers should be rinsed with fresh water and checked at regularintervals. It is recommended that the trailer be serviced annually.
24

Topper International Ltd warrants to the original retail
purchaser that each boat will be free from defects in
material and workmanship under normal use and service
for a period of three years (36 months) from date of
delivery to said purchaser.
This warranty does not cover defects or breakages
caused by misuse, owner error or omission.
Within this three year period, warranty repairs will be
made by Topper International at its premises or at the
option of Topper International by an authorised Topper
International dealer.These repairs will be made at no charge.
The transportation costs are the sole responsibility of the
boat owner.
Notice of each warranty claim must be submitted in writing
to Topper International within a reasonable period of time
after discovery of any claimed defect and must be approved
by an authorised representative of Topper International who
will determine whether the claim is valid or/ and covered by
this limited warranty and whose decision shall be final.
Any boat which has been subjected to misuse, negligence
or accident, or that has been used for commercial or rental
use, or that has been operated contrary to accepted
good boating practice is not covered by this warranty.
This warranty does not cover loss of time, inconvenience,
loss of use of boat or any other expenses incurred.
paRTs WaRRaNTY CONDITIONs
All equipment or accessories which are not manufactured
by Topper International whether or not warranteed
by such other manufacturers are guaranteed
for a period of twelve months.
Please refer to terms and conditions of sale.
REGIsTER OF WaRRaNTY aND
WaTERCRaFT IDENTIFICaTION NUMBER (WIN)
To register your warranty, please email the following
information to Topper International Ltd:
- Your name & address
- Sail Number
- WIN (Watercraft Identification Number / Hull Number)
- Date of Purchase
For further information call Topper on +44 (0) 1233 629186
or email [email protected]
25
THREE YEAR HULL WARRANTY
Topper is one of the world’s largest and fastest growing dinghy
classes! It is also probably the most friendly class.
We are so sure that you will want to keep in touch with the Topper
scene that, for the remainder of the year in which you bought
your new boat, Topper are offering you a FREE membership
of the International Topper Class Association (ITCA).
ITCA will keep you informed on Topper activities, events, regattas,
technical advice and rigging, sailing and racing tips.
ITCA can put you in touch with Topper sailors in countries to which
you may be planning a visit. And can liaise between your own
national or regional Association, other regional Topper Associations
and International Yachting Administrators.
ITCA also offer you a range of clothing and accessories designed
specially for the Topper sailor.
FREE MEMBERsHIp Is avaIlaBlE NOW TO FIRsT YEaR
OWNERs.
TO sIGN Up, plEasE CONTaCT TOppER INTERNaTIONal
WITH YOUR saIl NUMBER aND WE WIll DO THE REsT.
You will then receive your membership card and details of the many
other benefits of ITCA membership.
When you buy a Topper, you are not just treating yourself to the best
small boat in the world - you are also becoming part of the exclusive
Topper family.
We recommend that in the UK you insure your Topper with
the Class Association. We will forward details to you.
CONTaCT DETaIls
TOPPER INTERNATIONAL LTD
Kingsnorth Technology Park,
Wotton Road, Ashford, Kent TN23 6LN
Telephone +44 (0) 1233 629186
email [email protected]
INTERNATIONAL TOPPER CLASS ASSOCIATION
ITCA (GBR)
Telephone +44 (0) 7584 191238
email [email protected]
26
TOPPER CLASS ASSOCIATION
Topper international ltd
Kingsnorth Technology park, wotton Road, Ashford, Kent TN23 6lN
Telephone +44 (0) 1233 629186
fax +44 (0) 1233 645897
email [email protected]
Topper international Class Association
iTCA (gbR)
Telephone +44 (0) 7584 191238
email [email protected]
TOPPER RIGGING INSTRUCTIONS PART No. K25 ISSUE 4/ 2019
www.toppersailboats.com
TOPPEROWNERS MANUAL