total gym gts hardware & information box … u.s. customer service: 858.586.6080 lat bar...
TRANSCRIPT
TotalGym.comU.S. Customer Service: 858.586.6080
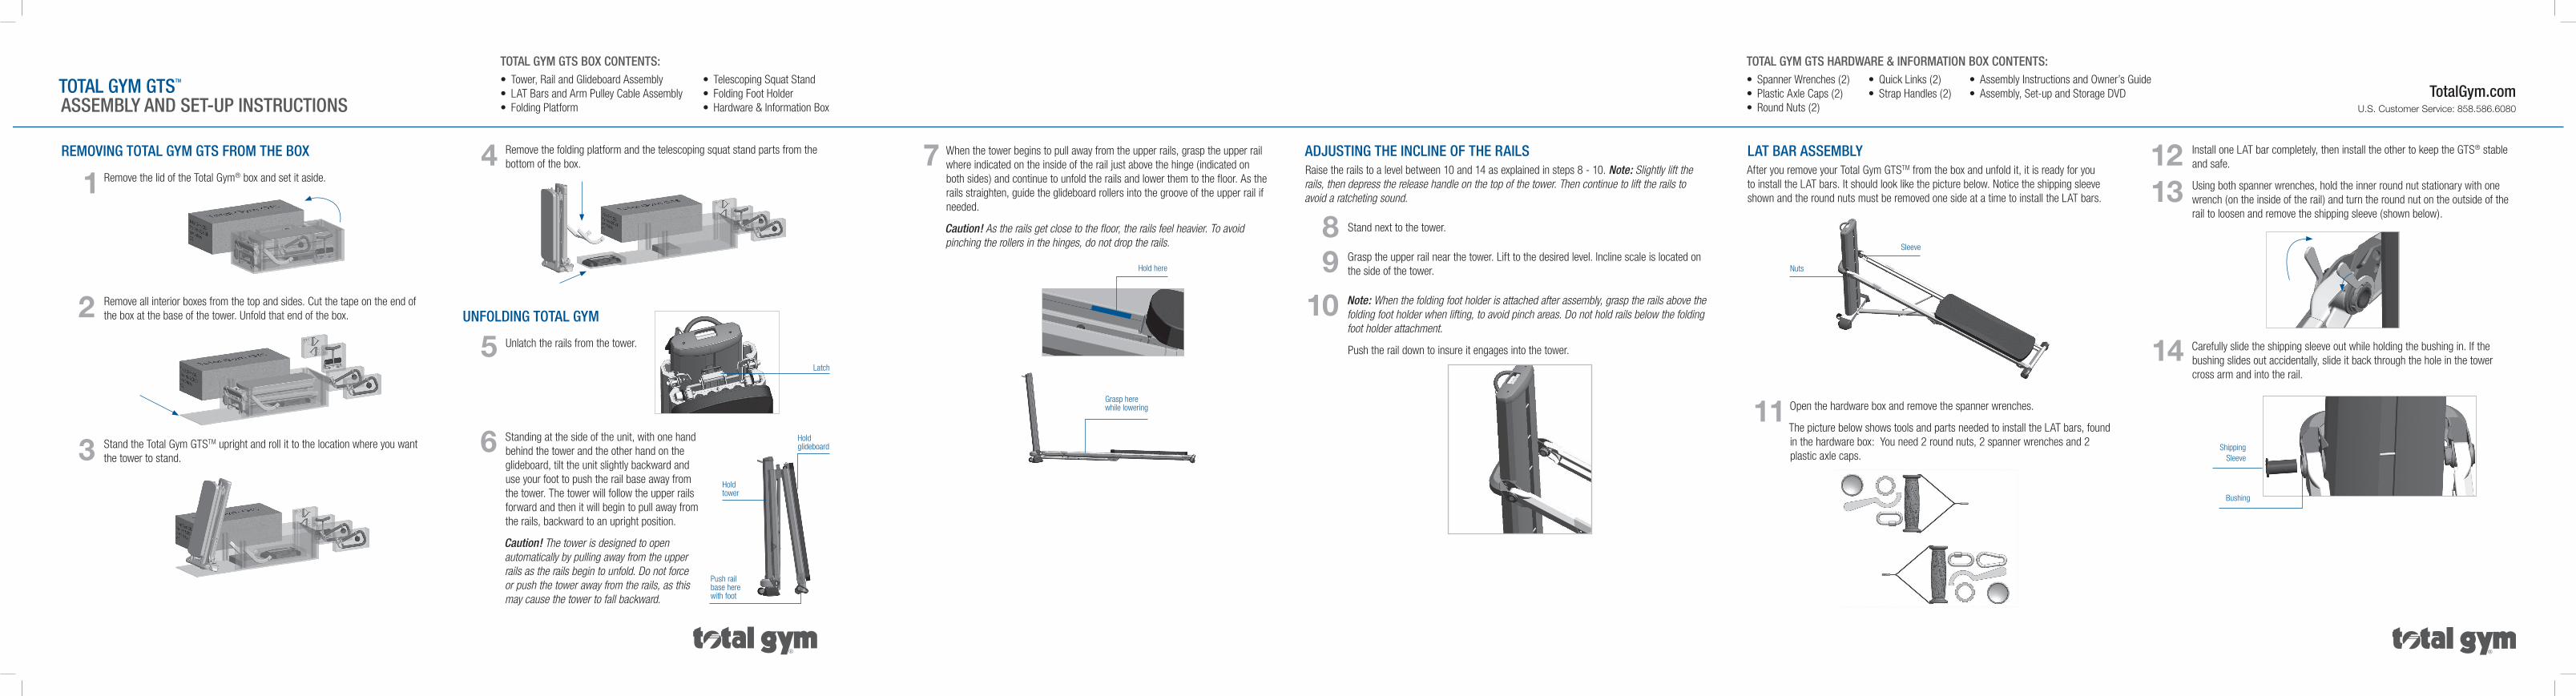
LAT BAr AssemBLyAfter you remove your Total Gym GTSTM from the box and unfold it, it is ready for you to install the LAT bars. It should look like the picture below. Notice the shipping sleeve shown and the round nuts must be removed one side at a time to install the LAT bars.
Nuts
Sleeve
Open the hardware box and remove the spanner wrenches.
The picture below shows tools and parts needed to install the LAT bars, found in the hardware box: You need 2 round nuts, 2 spanner wrenches and 2 plastic axle caps.
Install one LAT bar completely, then install the other to keep the GTS® stable and safe.
Using both spanner wrenches, hold the inner round nut stationary with one wrench (on the inside of the rail) and turn the round nut on the outside of the rail to loosen and remove the shipping sleeve (shown below).
Carefully slide the shipping sleeve out while holding the bushing in. If the bushing slides out accidentally, slide it back through the hole in the tower cross arm and into the rail.
Shipping Sleeve
Bushing
When the tower begins to pull away from the upper rails, grasp the upper rail where indicated on the inside of the rail just above the hinge (indicated on both sides) and continue to unfold the rails and lower them to the floor. As the rails straighten, guide the glideboard rollers into the groove of the upper rail if needed.
Caution! As the rails get close to the floor, the rails feel heavier. To avoid pinching the rollers in the hinges, do not drop the rails.
Hold here
Grasp here while lowering
AdjusTinG The incLine of The rAiLsRaise the rails to a level between 10 and 14 as explained in steps 8 - 10. Note: Slightly lift the rails, then depress the release handle on the top of the tower. Then continue to lift the rails to avoid a ratcheting sound.
Stand next to the tower.
Grasp the upper rail near the tower. Lift to the desired level. Incline scale is located on the side of the tower.
Note: When the folding foot holder is attached after assembly, grasp the rails above the folding foot holder when lifting, to avoid pinch areas. Do not hold rails below the folding foot holder attachment.
Push the rail down to insure it engages into the tower.
removinG ToTAL Gym GTs from The Box
Remove the lid of the Total Gym® box and set it aside.
Remove all interior boxes from the top and sides. Cut the tape on the end of the box at the base of the tower. Unfold that end of the box.
Stand the Total Gym GTSTM upright and roll it to the location where you want the tower to stand.
Remove the folding platform and the telescoping squat stand parts from the bottom of the box.
unfoLdinG ToTAL Gym
Unlatch the rails from the tower.
Standing at the side of the unit, with one hand behind the tower and the other hand on the glideboard, tilt the unit slightly backward and use your foot to push the rail base away from the tower. The tower will follow the upper rails forward and then it will begin to pull away from the rails, backward to an upright position.
Caution! The tower is designed to open automatically by pulling away from the upper rails as the rails begin to unfold. Do not force or push the tower away from the rails, as this may cause the tower to fall backward.
7
89
10
ToTAL Gym GTsTm AssemBLy And seT-up insTrucTions
1
2
3
4
5
6 Hold glideboard
Hold tower
Push rail base here with foot
Latch
11
1213
14
ToTAL Gym GTs Box conTenTs: • Tower, Rail and Glideboard Assembly• LAT Bars and Arm Pulley Cable Assembly• Folding Platform
• Telescoping Squat Stand• Folding Foot Holder• Hardware & Information Box
ToTAL Gym GTs hArdwAre & informATion Box conTenTs: • Spanner Wrenches (2)• Plastic Axle Caps (2)• Round Nuts (2)
• Quick Links (2) • Strap Handles (2)
• Assembly Instructions and Owner’s Guide• Assembly, Set-up and Storage DVD

TotalGym.comU.S. Customer Service: 858.586.6080
Part # 55200-01©2010 Total Gym Global Corp. All rights reserved. Total Gym is a registered trademark of TGG Corp. Unauthorized duplication of this booklet is punishable by law.GTS: Designed in the United States of America. Manufactured in Taiwan. Covered by one or more of U.S. Pat. Nos. 5,967,955; 6,921,355; 7,270,628; 7,766,801; D493,853; Australia Des. Pat. No. 154471; European Des. Pat. Nos. 000068788-0001 to 0006; New Zealand Des. Pat. No. 403803; Japan Des. Pat. No. 1203066; Russia Des. Pat. No. 56172, Taiwan Des. Pat. No. D100334; and other patents pending.
When the fixed pin is inserted into the hole gently move the folding platform to the right. Then lower the right side of the folding platform down to align the right pull-pin into the plate on the right lower rail as shown below. You may need to pull the right pull-pin.
Fixed pin
When both left and right pull-pins are engaged into the rails, rotate the folding platform away from the glideboard until the lower pull-pin on the left side pops into the rail hole. To fold the platform for storage, simply disengage the lower left pull-pin and fold the platform (the squat stand will be attached).
Lower pull pin
TeLescopinG squAT sTAnd ATTAchmenT
Lift the release lever on the back of the telescoping squat stand. Align the squat stand receptacle posts over the folding platform posts. Slide the squat stand down and align it with one of the three levels indicated by the holes in the posts. Release the lever to lock the squat stand into place.
Inspect the lever and pull up on the squat stand handle to insure the squat stand is locked in on both sides.
insTALLinG The hAndLesOpen the hardware box and remove the handles and threaded quick links as shown. Install them on each end of the cable.
ALmosT finishedWhen the assembly is finished, look for extra parts to ensure no steps were missed. Inspect your Total Gym® for defects and contact Customer Service if you feel you have any problems. Before using your new Total Gym, read the safety and usage instructions in the Owners Guide.
your ToTAL Gym GTsTM is now reAdy To use.
cable and pulley use position: Raise the LAT bars to use the pulleys and cable. Rotate each LAT bar up and parallel with the tower, ensuring the pull pin engages in the hole of the tower cross arm on both sides.
changing the pulley pin position: Squeeze the pulley clamp and move it to the desired position along the LAT bar. Be sure the pulley clamp engages one of the pin positions on the back of the LAT bar.
foLdinG fooT hoLder insTALLATionYour Total Gym GTSTM arrives with the folding foot holder, which needs to be installed. Remove the folding foot holder from the box and install it on the upper rails.
Place the rails at or above level 10 so you have room to install the folding foot holder from underneath the rails. Aim one pin into the hole of a rail while holding the folding foot holder upper bar even with the middle of the rails.
Continue to hold the folding foot holder upper bar even with the middle of the rails. Pull the pin on the other side. Align and insert it into the hole in the opposite rail, and release the pin. Ensure both pins are fully engaged in the rails.
folding foot holder use position: Pull up on the upper bar to engage the folding foot holder for use. Depress the lever where indicated to fold down when not in use.
TeLescopinG squAT sTAnd AssemBLyThere are two attachments that make up the telescoping squat stand assembly—the folding platform attachment and the squat stand attachment.
foLdinG pLATform ATTAchmenT
Stand at the base of the rails facing the tower. Hold the folding platform with a hand on each post. Partially angle the posts toward the glideboard. Align the upper fixed pin on the left with the top hole on the lower rail. Allow the lower pull-pin to press against the plate on the left side of the rail as you guide the upper fixed pin into the hole.
LAT bars are specific to each side of the tower. When installed the pulley pin locators will be facing backward away from the front of the unit.
While holding the inside rail bushing so it does not slide out, insert the correct LAT bar through the bushings until it is flush with the outside rail bushing.
Insertionpoint
Round nut
Reinstall a round nut and tighten it so the LAT bar rotates freely but with slight friction.
Install the second round nut on the same LAT bar until it is tight against the first nut. Hold one spanner wrench on the inner round nut so it will not move. Then use the other spanner wrench to tighten the second round nut against the first. See image below.
Rotate the LAT bar to feel if it moves easily but with slight friction.
If necessary, adjust the tightness by adjusting the round nut closest to the rail and retighten the second nut as explained in Step 18.
Repeat the process on the other LAT bar.
When you are finished adjusting the tightness of the LAT bars, install both axle covers over the round nuts as shown below:
Axle coversAxle covers
AdjusTinG The LAT BArspull-up position: Pull the retractable knobs to disengage the LAT bars from the tower cross arm and rotate the LAT bars down until they rest on the rail.
Pin
Upper barPin
Pin
Lever
32
33
34
35
30
31
28
29
24
25
26
27
1920
23
2122
1516
17
18
TotalGym.comU.S. Customer Service: 858.586.6080