tpm- cmic integration manual · subcontractors will be paid via ach through tpm. once the payment...
TRANSCRIPT

Copyright © 2016 2017, Oracle and/or its affiliates. All rights reserved.
TPM- CMiC Integration Manual
Version 1.0 May 2, 2017

Page 2
Table of Contents Overview ............................................................................................................................... 3
Textura-CMiC Workflow ............................................................................................................. 3
Export Data from CMiC .......................................................................................................... 4
Import CMiC Data into Textura .............................................................................................. 6
Export Subcontractor Invoice Data from Textura .................................................................... 8
Import Textura Subcontractor Invoice Data into CMiC ......................................................... 10
Export Payment Data from Textura ...................................................................................... 14
Import Textura Payment Data into CMiC ............................................................................. 16

Page 3
Overview
Textura-CMiC Workflow
Integrate Textura’s services with CMiC to optimize your payment process. The interface points are:
Subcontracts / Subcontract Change Orders – Export subcontracts and change orders from CMiC to Oracle’s Textura Payment Management (TPM)
Subcontract Compliance – Export subcontractor compliance requirements and status from CMiC to TPM
Owner Change Orders – Export owner change orders from CMiC to TPM
Invoice Entry – Export subcontractor invoice detail from TPM to CMiC
Payment Entry – Export subcontractor payment detail from TPM to CMiC
Pay Application Images (OPTIONAL) – Export subcontractor electronic pay application images from TPM to CMiC
Page 4
Export Data from CMiC
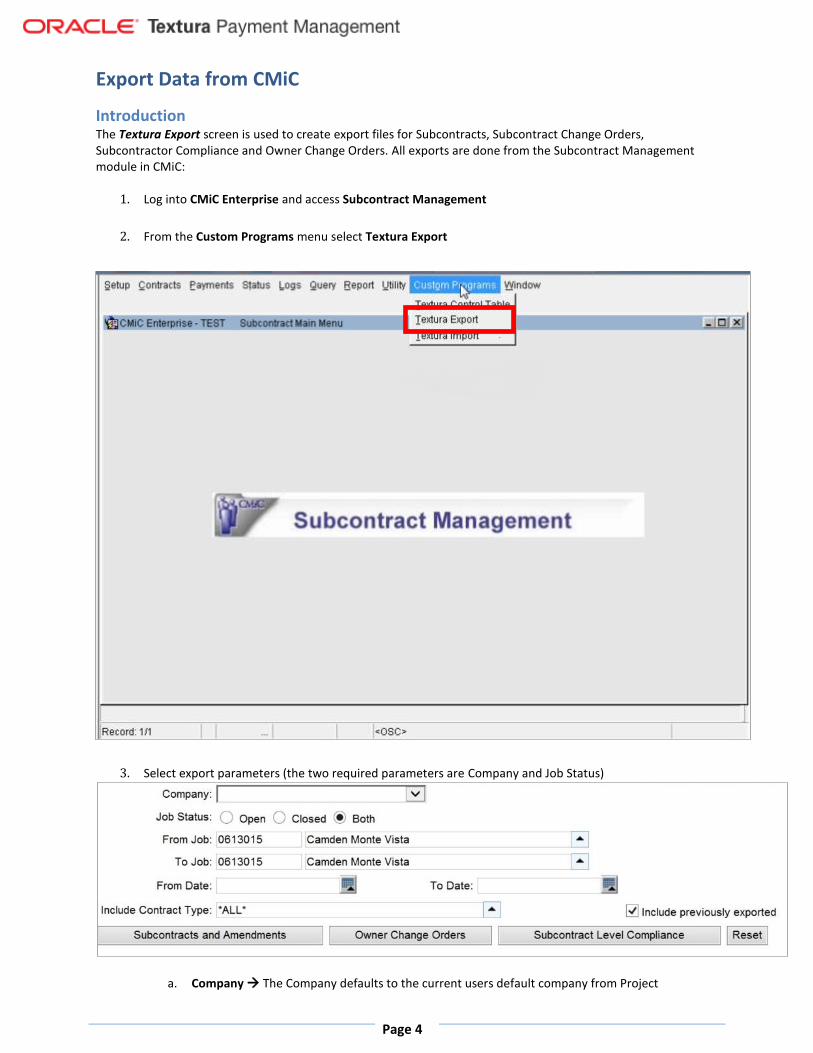
Introduction The Textura Export screen is used to create export files for Subcontracts, Subcontract Change Orders, Subcontractor Compliance and Owner Change Orders. All exports are done from the Subcontract Management module in CMiC:
1. Log into CMiC Enterprise and access Subcontract Management
2. From the Custom Programs menu select Textura Export
3. Select export parameters (the two required parameters are Company and Job Status)
a. Company The Company defaults to the current users default company from Project

Page 5
Management. The drop down list includes all companies the current user has access to in CMiC
company security
b. Job Status The job status filter may be used to choose between open and closed jobs. The
default value is Both meaning records from jobs of any status will be included
c. From Job / To Job Use these parameters to filter the export by a single project or a range of
projects – type the job numbers directly into the From Job: / To Job: fields
d. From Date / To Date Use these parameters to filter the export based on the date a record was
posted or updated in CMiC
e. Include Previously Exported: The export program tracks records than have been exported and
will not export them again, unless you check this box
i. Suggested process is to leave this box checked
4. Click the button for the information you would like to export out of CMiC
a. Subcontracts and Amendments Click this button to download the subcontracts and
subcontract change orders file that you will use to import into Textura
b. Owner Change Orders Click this button to download the PCI file that you will use to import
into Textura
c. Subcontract Level Compliance Click this button to download the compliance file that you will
use to import into Textura
5. The system will prompt you for an action at the bottom of your screen – CLICK SAVE AS and save the file to your desktop or designated Textura folder
a. DO NOT OPEN THE FILE
6. Repeat this process until all data files have been saved and you are ready to import into Textura

Page 6
Import CMiC Data into Textura
Introduction
Textura will accept all new subcontracts, subcontract change orders, subcontractor compliance updates and owner change orders – all duplicates and existing data will be ignored.
1. From the Home Page select Import Accounting Info under the Interfaces menu on the left
Click Browse to locate the file(s) you just saved from CMiC
2. Click Import CSV File once the file name appears in the text window
3. The system will display a status screen after each import – Click Here next to To process another import if you have additional data to import
4. All newly imported subcontracts must be completed by the General Contractor – access the Subcontract Listing to complete an incomplete subcontracts that were imported
Note: See the TPM Web Help Import Subcontracts and Invite Organizations topics for step-by-step instructions on completing subcontracts.
5. All new Owner Change Orders must be allocated to the General Contractor’s Schedule of Values
6. Subcontractors will receive an email for each new subcontract change order that was imported – no action is required from the General Contractor

Page 7
7. Subcontractors will receive an email for each new subcontract change order that was imported – no action is required from the General Contractor

Page 8
Export Subcontractor Invoice Data from Textura
Introduction
Subcontractors will enter invoices into TPM for the Project Manager’s approval. Once all subcontractor invoices are approved, the invoice data can be exported out of TPM and imported into CMiC. Only invoices that have been approved are eligible to be exported – prior to month end, all Textura invoices should be imported and posted into CMiC.
1. From the Project Home Page click on the Draw # for which invoices need to be exported
2. Click Export Subcontractor Invoices under the Interfaces heading.
3. Click Generate Invoice File
4. From the status page, click Here next To view the status of your export
5. Your export should appear at the top of the list
Note: Your name will appear under the Generated By column – use this column to verify you are grabbing the intended file
Page 9
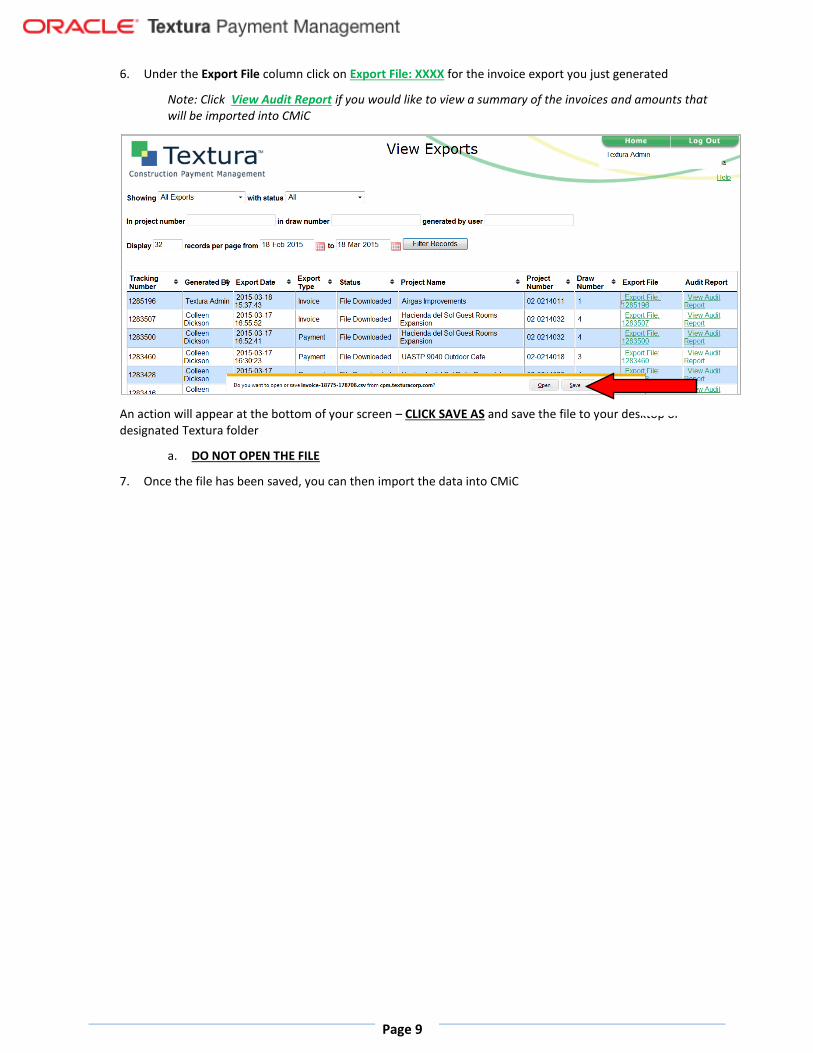
6. Under the Export File column click on Export File: XXXX for the invoice export you just generated
Note: Click View Audit Report if you would like to view a summary of the invoices and amounts that will be imported into CMiC
An action will appear at the bottom of your screen – CLICK SAVE AS and save the file to your desktop or designated Textura folder
a. DO NOT OPEN THE FILE
7. Once the file has been saved, you can then import the data into CMiC

Page 10
Import Textura Subcontractor Invoice Data into CMiC
Introduction The Textura Import screen is used to create invoice and payment batches for data exported out of TPM. All imports are done from the Subcontract Management module in CMiC:
1. Log into CMiC Enterprise and access Subcontract Management
2. From the Custom Programs menu select Textura Import
3. Click Browse and select the Export File you just saved from Textura
4. Once the file name is listed next to File to upload: click Upload

Page 11
5. When processing completes, a batch number will display – YOU MUST POST THE BATCH TO FINALIZE THE
INVOICE IMPORT (Steps 6-10)
Note: If there is an error in the processing of the file, print the error log to determine the source of the
error – you can still post the successful data prior to troubleshooting any errors – contact your Textura
account representative for help with import errors
6. From the Payments menu, select Post Request For Payment
Note: If you would like to review the batch prior to posting, select Edit Listing from the Payments
menu and search for the batch that was created
7. Type in the company number you’re posting the batch for next to Company

Page 12
8. Click F9 next to Batch Number and select your batch

Page 13
9. Click Post Batch
10. A message will be displayed once all posting is complete

Page 14
Export Payment Data from Textura
Introduction
Subcontractors will be paid via ACH through TPM. Once the payment has been disbursed in TPM and uploaded to the bank – the payment data can be exported out of TPM and imported into CMiC. Payments must be disbursed out of Textura before they can be exported.
1. From the Project Home Page click on the Draw # for which payments need to be exported
2. Click Export Payments Report under the Interfaces heading.
3. Click Generate Payment File
4. From the status page, click Here next To view the status of your export
5. Your export should appear at the top of the list
Note: Your name will appear under the Generated By column – use this column to verify you are grabbing the intended file
6. Under the Export File column click on Export File: XXXX for the invoice export you just generated
Note: Click View Audit Report if you would like to view a summary of the payment amounts that will be imported into CMiC
7. An action will appear at the bottom of your screen – CLICK SAVE AS and save the file to your desktop or

Page 15
designated Textura folder
a. DO NOT OPEN THE FILE
8. Once the file has been saved, you can then import the data into CMiC

Page 16
Import Textura Payment Data into CMiC
Introduction The Textura Import screen is used to create invoice and payment batches for data exported out of TPM. All imports are done from the Subcontract Management module in CMiC:
1. Log into CMiC Enterprise and access Subcontract Management
2. From the Custom Programs menu select Textura Import
3. Click Browse and select the Export File you just saved from Textura
4. Once the file name is listed next to File to upload: click Upload

Page 17
5. When processing completes, a batch number will display – YOU MUST POST THE BATCH TO FINALIZE THE
PAYMENT IMPORT (Steps 6-10)
Note: If there is an error in the processing of the file, print the error log to determine the source of the
error – you can still post the successful data prior to troubleshooting any errors – contact your Textura
account representative for help with import errors
6. Navigate to the Accounts Payable module in CMiC
7. From the Check menu, select Manual Check Post Batch
Note: If you would like to review the batch prior to posting, select Print Edit List from the Manual
Check menu and search for the batch that was created

Page 18
8. Type in the company number you’re posting the batch for next to Company
9. Click F9 next to Batch Number and select your TXT CHK batch

Page 19
10. Click Post Batch
A message will be displayed once all posting is complete.

Legal Notices
Page 20
TPM- CMiC Integration Manual
Copyright © 2016, 2017, Oracle and/or its affiliates. All rights reserved. Oracle and Java are registered trademarks of Oracle and/or its affiliates. Other names may be trademarks of their respective owners.
Intel and Intel Xeon are trademarks or registered trademarks of Intel Corporation. All SPARC trademarks are used under license and are trademarks or registered trademarks of SPARC International, Inc. AMD, Opteron, the AMD logo, and the AMD Opteron logo are trademarks or registered trademarks of Advanced Micro Devices. UNIX is a registered trademark of The Open Group.
This software and related documentation are provided under a license agreement containing restrictions on use and disclosure and are protected by intellectual property laws. Except as expressly permitted in your license agreement or allowed by law, you may not use, copy, reproduce, translate, broadcast, modify, license, transmit, distribute, exhibit, perform, publish or display any part, in any form, or by any means. Reverse engineering, disassembly, or decompilation of this software, unless required by law for interoperability, is prohibited.
The information contained herein is subject to change without notice and is not warranted to be error-free. If you find any errors, please report them to us in writing.
If this is software or related documentation that is delivered to the U.S. Government or anyone licensing it on behalf of the U.S. Government, the following notice is applicable:
U.S. GOVERNMENT END USERS: Oracle programs, including any operating system, integrated software, any programs installed on the hardware, and/or documentation, delivered to U.S. Government end users are “commercial computer software" pursuant to the applicable Federal Acquisition Regulation and agency-specific supplemental regulations. As such, use, duplication, disclosure, modification, and adaptation of the programs, including any operating system, integrated software, any programs installed on the hardware, and/or documentation, shall be subject to license terms and license restrictions applicable to the programs. No other rights are granted to the U.S. Government.
This software or hardware is developed for general use in a variety of information management applications. It is not developed or intended for use in any inherently dangerous applications, including applications that may create a risk of personal injury. If you use this software or hardware in dangerous applications, then you shall be responsible to take all appropriate failsafe, backup, redundancy, and other measures to ensure its safe use. Oracle Corporation and its affiliates disclaim any liability for any damages caused by use of this software or hardware in dangerous applications.
This software or hardware and documentation may provide access to or information on content, products and services from third-parties. Oracle Corporation and its affiliates are not responsible for and expressly disclaim all warranties of any kind with respect to third-party content, products, and services. Oracle Corporation and its affiliates will not be responsible for any loss, costs, or damages incurred due to your access to or use of third-party content, products, or services.