trade of metal fabrication - ecollege
TRANSCRIPT
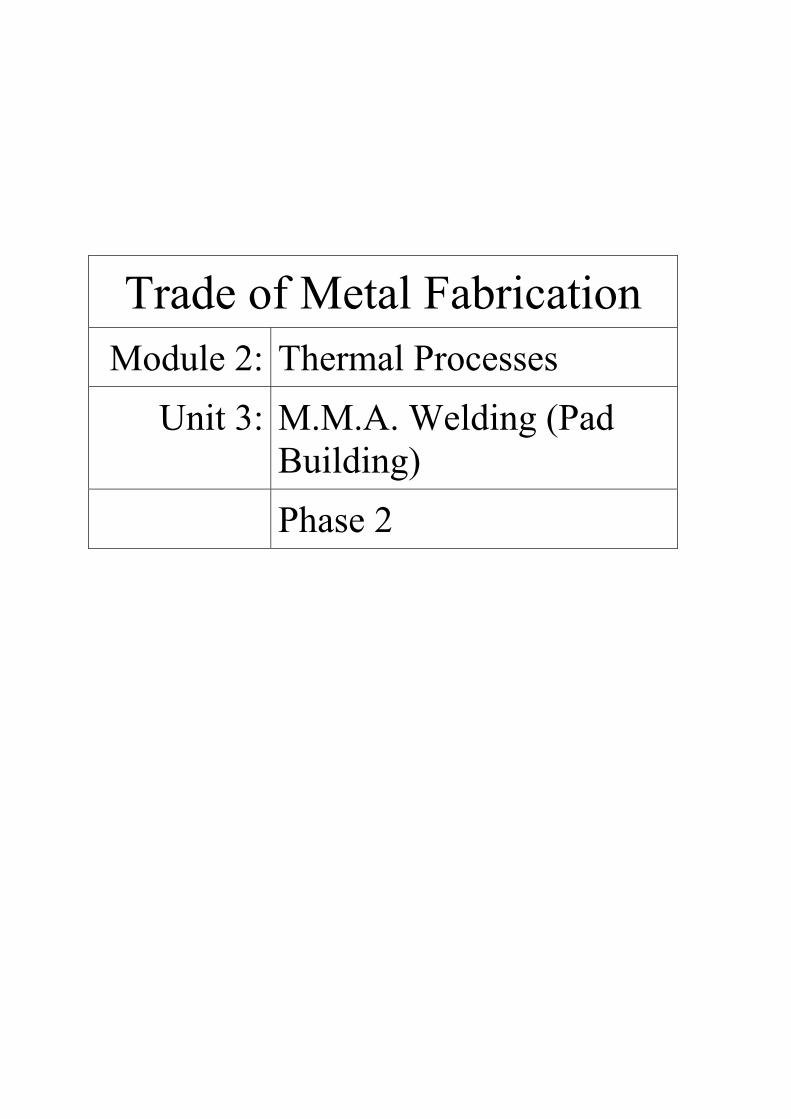
Trade of Metal Fabrication Module 2: Thermal Processes
Unit 3: M.M.A. Welding (Pad Building)
Phase 2


Trade of Metal Fabrication – Phase 2 Module 2 Unit 3
Unit 3 3
Table of Contents
List of Figures .................................................................................................................... 5
List of Tables ..................................................................................................................... 6
Document Release History ............................................................................................... 7
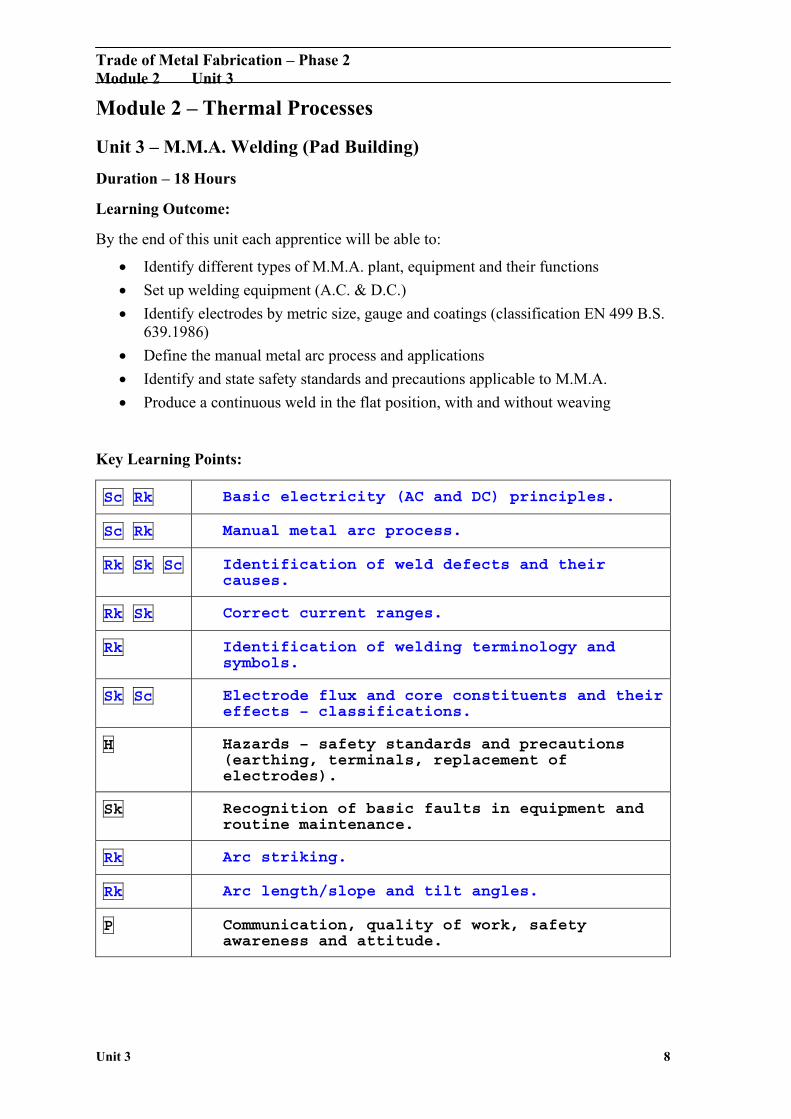
Module 2 – Thermal Processes ........................................................................................ 8
Unit 3 – M.M.A. Welding (Pad Building) ...................................................................... 8 Learning Outcome: ..................................................................................................... 8 Key Learning Points: .................................................................................................. 8 Training Resources: .................................................................................................... 9 Key Learning Points Code: ......................................................................................... 9
The History of Welding .................................................................................................. 10
Solid-State Welding ...................................................................................................... 11
Terms used in Welding ................................................................................................... 12
Types of Joints ................................................................................................................. 14
Making Butt, Lap and Fillet Welds in the Flat Position ............................................... 14
Speed of Travel ................................................................................................................ 17
Coding for Welding Current Conditions ...................................................................... 18
Striking and Maintaining the Arc ................................................................................. 19
Welding ............................................................................................................................ 20
Arc Welding ..................................................................................................................... 21
Power Supplies ............................................................................................................. 21 Methods ........................................................................................................................ 22
Electric Arc Welding ...................................................................................................... 23
Introduction ................................................................................................................... 23 Manual Metal Arc Welding .......................................................................................... 23 Starting Welding and Practice Welds ........................................................................... 25
Striking and Maintaining an Arc ............................................................................... 25 Welding Straight Beads ............................................................................................ 28 Restarting a Weld ...................................................................................................... 29 Weaving .................................................................................................................... 30
Earthing ........................................................................................................................... 31
Safety in Manual Metal Arc Welding ........................................................................... 32
Trade of Metal Fabrication – Phase 2 Module 2 Unit 3
Unit 3 4
Safety Issues ................................................................................................................. 32 Welding Safety Precautions .......................................................................................... 32 Eye Protection ............................................................................................................... 33
Electrical Hazards ........................................................................................................... 34
Personal Safety ............................................................................................................. 34 Protection of Life and Property .................................................................................... 34 How a Person May Receive an Electric Shock ............................................................. 34
Electrodes for Manual Metal Arc Welding .................................................................. 35
Terms commonly used in Welding ................................................................................ 38
Welding Currents............................................................................................................ 39
Weld Defects .................................................................................................................... 40
Types of Welding Plant .................................................................................................. 41
Direct Current (D.C.) .................................................................................................... 41
The Electric Arc .............................................................................................................. 42
Alternating Current ........................................................................................................ 43
Effective Voltage ............................................................................................................. 43
Welding with Alternating Current ................................................................................ 44
Self Assessment................................................................................................................ 45
Questions on Background Notes – Module 2.Unit 3 .................................................... 45
Index ................................................................................................................................. 47
Trade of Metal Fabrication – Phase 2 Module 2 Unit 3
Unit 3 5
List of Figures
Figure 1 - The Two Basic Types of Weld ......................................................................... 14
Figure 2 - All the Various Types of Weld are either Butt Welds or Fillet Welds ............ 14
Figure 3 - Example Procedure for Welding Plate of 10 mm Thickness ........................... 15
Figure 4 - Fillet and Lap Welds ........................................................................................ 15
Figure 5 - Example Test Procedure for Butt Welds .......................................................... 16
Figure 6 - Example Test Procedure for T-Fillet Welds .................................................... 16
Figure 7 - Effect of Variation ............................................................................................ 18
Figure 8 - Striking and Maintaining the Arc ..................................................................... 19
Figure 9 - Arc Welding ..................................................................................................... 20
Figure 10 - Shielded Metal Arc Welding .......................................................................... 22
Figure 11 - Carbon Arc Welding Machine ....................................................................... 23
Figure 12 - Set-Up for Manual Metal Arc Welding ......................................................... 24
Figure 13 - Droplets of Molten Metal ............................................................................... 24
Figure 14 - Chipping Hammer and Wire Brush................................................................ 25
Figure 15 - Arc Length should be Roughly the same as the Diameter of the Electrode .. 26
Figure 16 - Practise Striking an Arc in the Centre of Chalk Circles ................................. 26
Figure 17 - The Manual Metal Arc Process ...................................................................... 27
Figure 18 - Welding Straight Beads.................................................................................. 28
Figure 19 - Restarting a Weld ........................................................................................... 29
Figure 20 - Five Different Types of Welding Pattern ....................................................... 30
Figure 21 - The Pad Weld ................................................................................................. 30
Figure 22 - Electrode Classification Codes ...................................................................... 36
Figure 23 - Basic Features of Arc-Welding ...................................................................... 37
Figure 24 - Graph of Alternating Current (or Voltage) .................................................... 43
Figure 25 - Two types of Electric Current used for Arc Welding .................................... 44

Trade of Metal Fabrication – Phase 2 Module 2 Unit 3
Unit 3 6
List of Tables
Table 1 - Coding for Welding Current Conditions ........................................................... 18
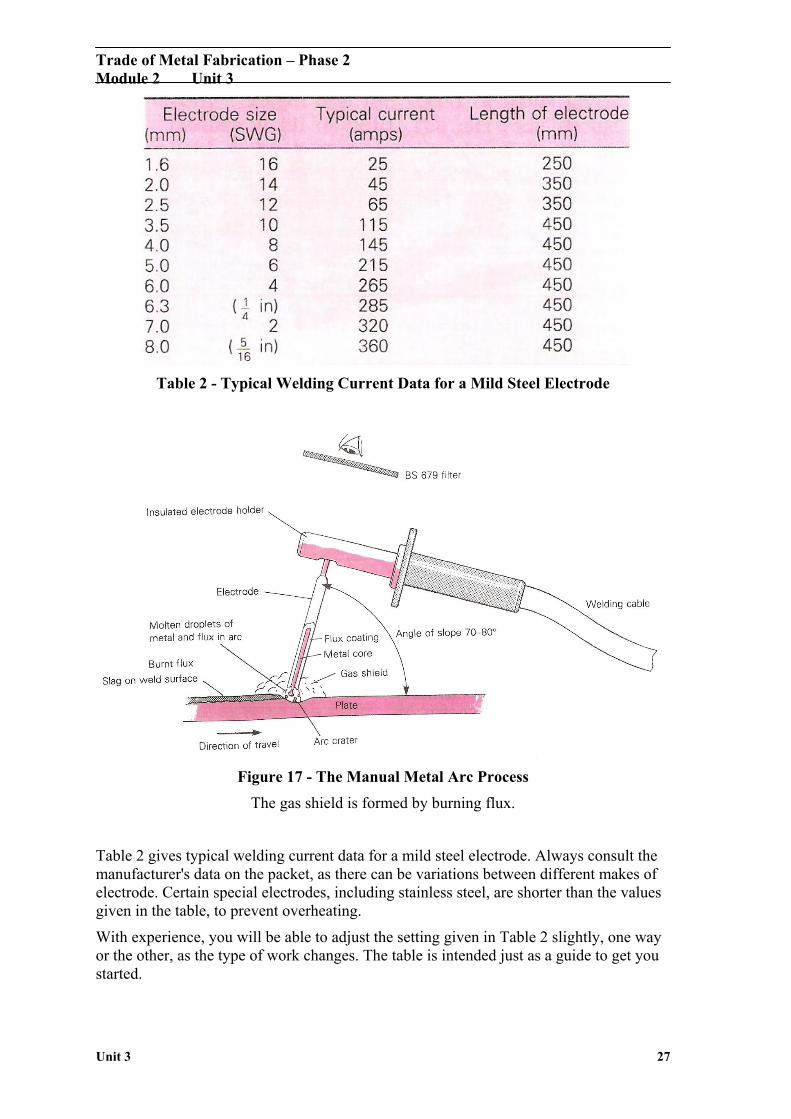
Table 2 - Typical Welding Current Data for a Mild Steel Electrode ................................ 27
Table 3 - Welding currents ............................................................................................... 39
Table 4 - Difficulties and Defects in Welding .................................................................. 40

Trade of Metal Fabrication – Phase 2 Module 2 Unit 3
Unit 3 7
Document Release History
Date Version Comments
18/10/06 First draft
05/12/06 Implemented edits from Kenny
13/12/13 SOLAS transfer
Trade of Metal Fabrication – Phase 2 Module 2 Unit 3
Unit 3 8
Module 2 – Thermal Processes
Unit 3 – M.M.A. Welding (Pad Building)
Duration – 18 Hours
Learning Outcome:
By the end of this unit each apprentice will be able to:
Identify different types of M.M.A. plant, equipment and their functions
Set up welding equipment (A.C. & D.C.)
Identify electrodes by metric size, gauge and coatings (classification EN 499 B.S. 639.1986)
Define the manual metal arc process and applications
Identify and state safety standards and precautions applicable to M.M.A.
Produce a continuous weld in the flat position, with and without weaving
Key Learning Points:
Sc Rk Basic electricity (AC and DC) principles.
Sc Rk Manual metal arc process.
Rk Sk Sc Identification of weld defects and their causes.
Rk Sk Correct current ranges.
Rk Identification of welding terminology and symbols.
Sk Sc Electrode flux and core constituents and their effects – classifications.
H Hazards – safety standards and precautions (earthing, terminals, replacement of electrodes).
Sk Recognition of basic faults in equipment and routine maintenance.
Rk Arc striking.
Rk Arc length/slope and tilt angles.
P Communication, quality of work, safety awareness and attitude.
Trade of Metal Fabrication – Phase 2 Module 2 Unit 3
Unit 3 9
Training Resources:
Manual metal arc welding plant – safety clothing and equipment
Films
Electrodes, welding booths and extractors
Handouts
Manufacturer’s data on - size, gauge and coatings
Key Learning Points Code:
M = Maths D= Drawing RK = Related Knowledge Sc = Science
P = Personal Skills Sk = Skill H = Hazards
Trade of Metal Fabrication – Phase 2 Module 2 Unit 3
Unit 3 10
The History of Welding
The history of joining metals goes back several millennia, with the earliest examples of welding from the Bronze Age and the Iron Age in Europe and the Middle East. Welding was used in the construction of the Iron pillar in Delhi, India, erected about 310 and weighing 5.4 metric tones. The Middle Ages brought advances in forge welding, in which blacksmiths pounded heated metal repeatedly until bonding occurred. In 1540, Vannoccio Biringuccio published De la pirotechnia, which includes descriptions of the forging operation. Renaissance craftsmen were skilled in the process, and the industry continued to grow during the following centuries. Welding, however, was transformed during the 19th century - in 1800, Sir Humphry Davy discovered the electric arc, and advances in arc welding continued with the inventions of metal electrodes by a Russian, Nikolai Slavyanov, and an American, C.L. Coffin in the late 1800s, even as carbon arc welding, which used a carbon electrode, gained popularity. Around 1900, A.P. Strohmenger released a coated metal electrode in Britain, which gave a more stable arc, and in 1919, alternating current welding was invented by C.J. Holslag, but did not become popular for another decade.
Resistance welding was also developed during the final decades of the 19th century, with the first patents going to Elihu Thompson in 1885, who produced further advances over the next 15 years. Thermite welding was invented in 1893, and around that time, another process, oxyfuel welding, became well established. Acetylene was discovered in 1836 by Edmund Davy, but its use was not practical in welding until about 1900, when a suitable blowtorch was developed. At first, oxyfuel welding was one of the more popular welding methods due to its portability and relatively low cost. As the 20th century progressed, however, it fell out of favour for industrial applications. It was largely replaced with arc welding, as metal coverings (known as flux) for the electrode that stabilise the arc and shield the base material from impurities continued to be developed.
World War I caused a major surge in the use of welding processes, with the various military powers attempting to determine which of the several new welding processes would be best. The British primarily used arc welding, even constructing a ship, the Fulagar, with an entirely welded hull. The Americans were more hesitant, but began to recognise the benefits of arc welding when the process allowed them to repair their ships quickly after a German attack in the New York Harbour at the beginning of the war. Arc welding was first applied to aircraft during the war as well, as some German airplane fuselages were constructed using the process.
During the 1920s, major advances were made in welding technology, including the introduction of automatic welding in 1920, in which electrode wire was fed continuously. Shielding gas became a subject receiving much attention, as scientists attempted to protect welds from the effects of oxygen and nitrogen in the atmosphere. Porosity and brittleness were the primary problems, and the solutions that developed included the use of hydrogen, argon, and helium as welding atmospheres. During the following decade, further advances allowed for the welding of reactive metals like aluminium and magnesium. This, in conjunction with developments in automatic welding, alternating current, and fluxes fed a major expansion of arc welding during the 1930s and then during World War II.
Trade of Metal Fabrication – Phase 2 Module 2 Unit 3
Unit 3 11
During the middle of the century, many new welding methods were invented. 1930 saw the release of stud welding, which soon became popular in shipbuilding and construction. Submerged arc welding was invented the same year, and continues to be popular today. Gas tungsten arc welding, after decades of development was finally perfected in 1941, and gas metal arc welding followed in 1948, allowing for fast welding of non-ferrous materials but requiring expensive shielding gases. Shielded metal arc welding was developed during the 1950s, using a consumable electrode and a carbon dioxide atmosphere as a shielding gas, and it quickly became the most popular metal arc welding process. In 1957, the flux-cored arc welding process debuted, in which the self-shielded wire electrode could be used with automatic equipment, resulting in greatly increased welding speeds, and that same year, plasma arc welding was invented. Electroslag welding was introduced in 1958, and it was followed by its cousin, electrogas welding in 1961.
Solid-State Welding
Like the first welding process, forge welding, some modem welding methods do not involve the melting of the materials being joined. One of the most popular, ultrasonic welding is used to connect thin sheets or wires made of metal or thermoplastic by vibrating them at high frequency and under high pressure. The equipment and methods involved are similar to that of resistance welding, but instead of electric current, vibration provides energy input. Welding metals with this process does not involve melting the materials; instead, the weld is formed by introducing mechanical vibrations horizontally under pressure. When welding plastics, the materials should have similar melting temperatures, and the vibrations are introduced vertically. Ultrasonic welding is commonly used for making electrical connections out of aluminium or copper, and it is also a very common polymer welding process.
Another common process, explosion welding, involves the joining of materials by pushing them together under extremely high pressure. The energy from the impact plasticizes the materials, forming a weld, even though only a limited amount of heat is generated. The process is commonly used for welding dissimilar materials, such as the welding of aluminium with steel in ship hulls or compound plates. Other solid-state welding processes include co-extrusion welding, cold welding, diffusion welding, friction welding (including friction stir welding), high frequency welding, hot pressure welding, induction welding, and roll welding.
Trade of Metal Fabrication – Phase 2 Module 2 Unit 3
Unit 3 12
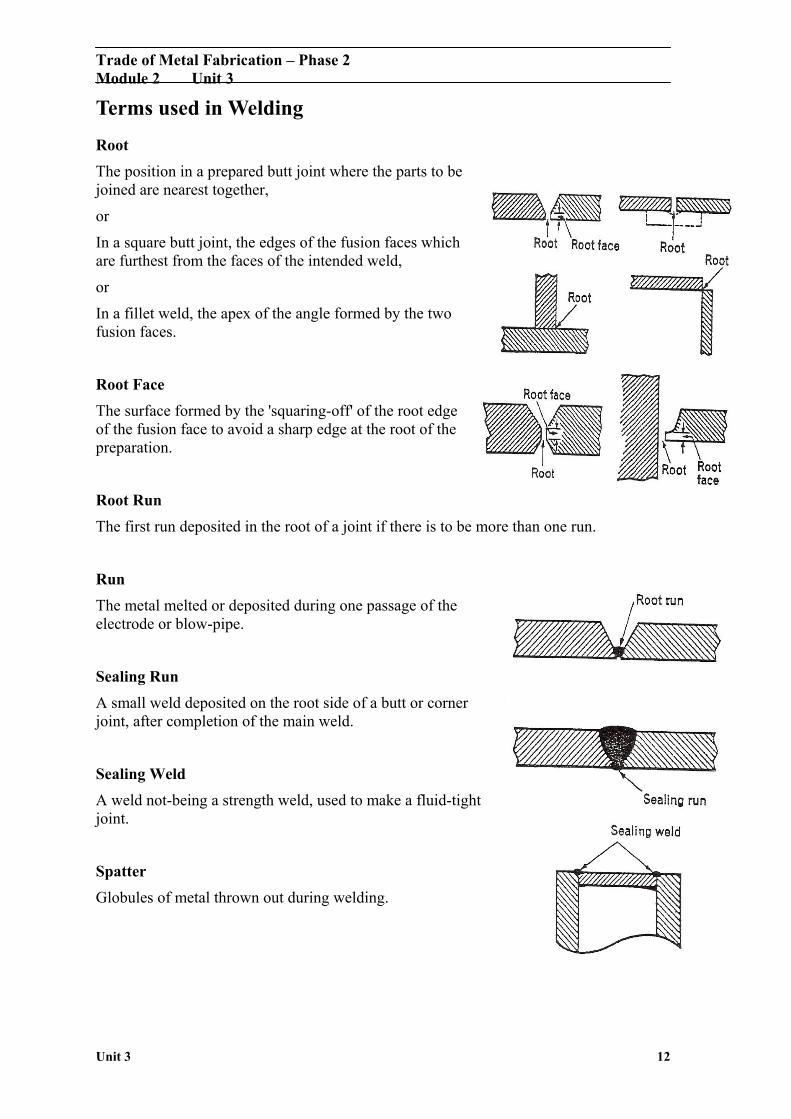
Terms used in Welding
Root
The position in a prepared butt joint where the parts to be joined are nearest together,
or
In a square butt joint, the edges of the fusion faces which are furthest from the faces of the intended weld,
or
In a fillet weld, the apex of the angle formed by the two fusion faces.
Root Face
The surface formed by the 'squaring-off' of the root edge of the fusion face to avoid a sharp edge at the root of the preparation.
Root Run
The first run deposited in the root of a joint if there is to be more than one run.
Run
The metal melted or deposited during one passage of the electrode or blow-pipe.
Sealing Run
A small weld deposited on the root side of a butt or corner joint, after completion of the main weld.
Sealing Weld
A weld not-being a strength weld, used to make a fluid-tight joint.
Spatter
Globules of metal thrown out during welding.
Trade of Metal Fabrication – Phase 2 Module 2 Unit 3
Unit 3 13
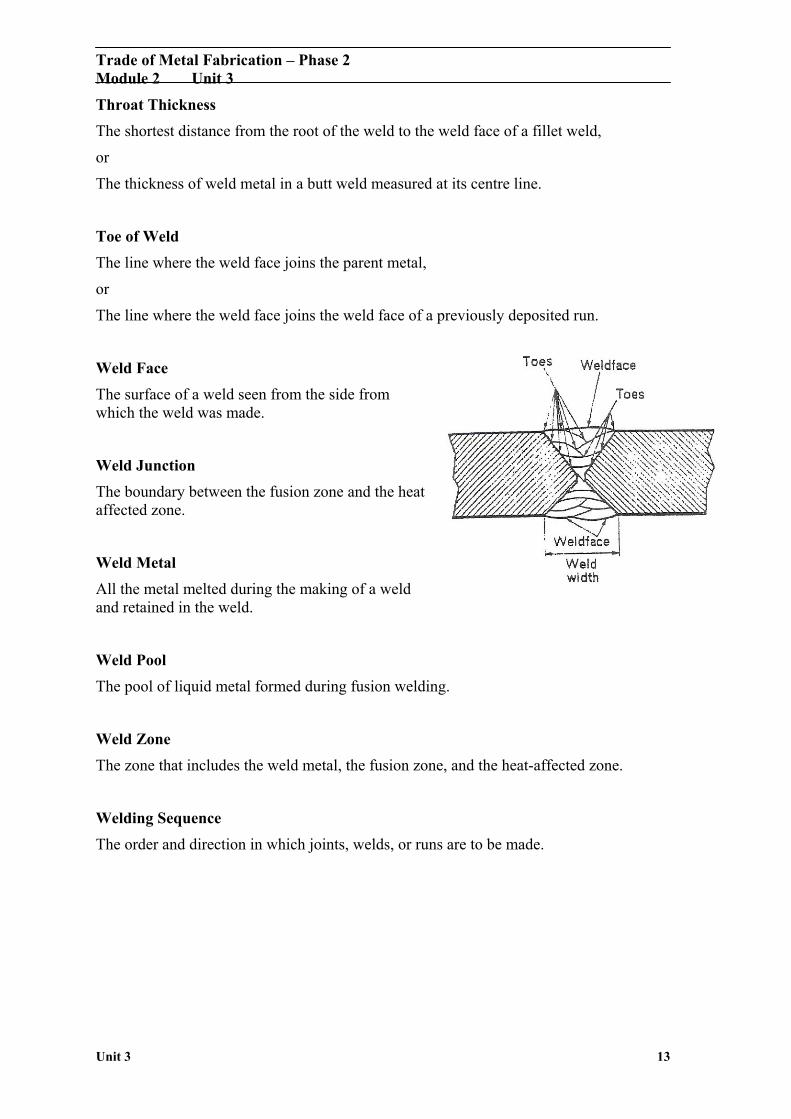
Throat Thickness
The shortest distance from the root of the weld to the weld face of a fillet weld,
or
The thickness of weld metal in a butt weld measured at its centre line.
Toe of Weld
The line where the weld face joins the parent metal,
or
The line where the weld face joins the weld face of a previously deposited run.
Weld Face
The surface of a weld seen from the side from which the weld was made.
Weld Junction
The boundary between the fusion zone and the heat affected zone.
Weld Metal
All the metal melted during the making of a weld and retained in the weld.
Weld Pool
The pool of liquid metal formed during fusion welding.
Weld Zone
The zone that includes the weld metal, the fusion zone, and the heat-affected zone.
Welding Sequence
The order and direction in which joints, welds, or runs are to be made.
Trade of Metal Fabrication – Phase 2 Module 2 Unit 3
Unit 3 14
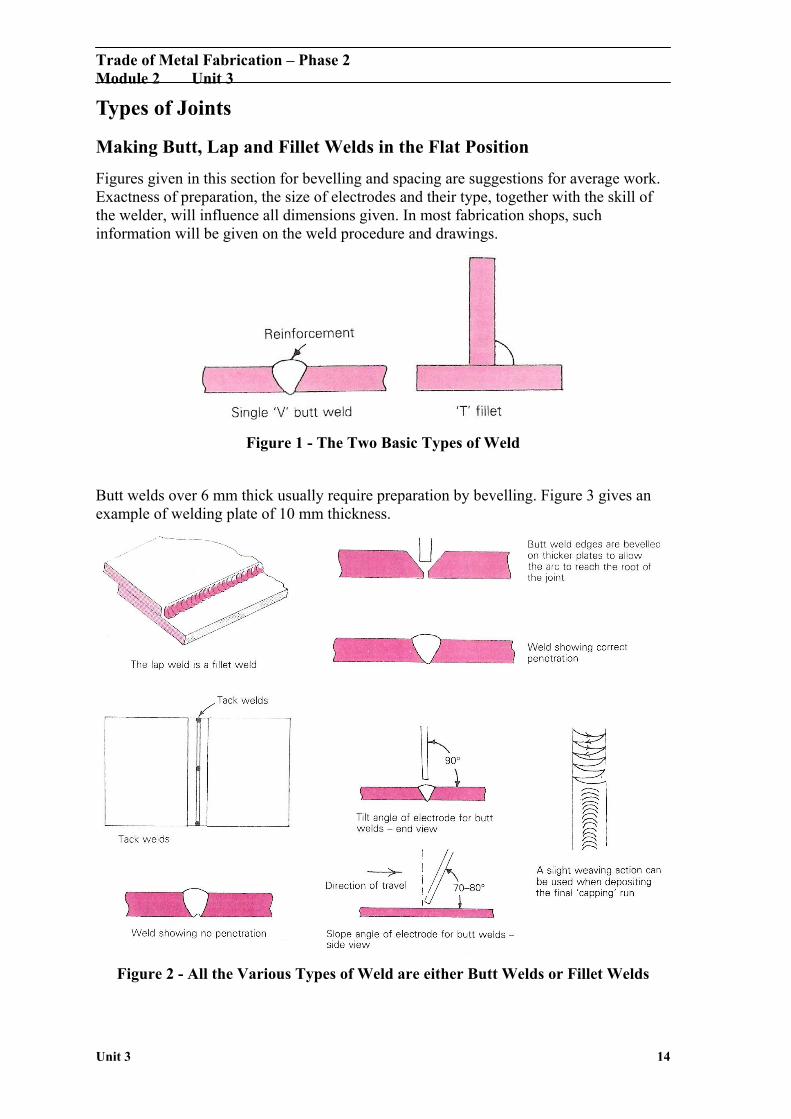
Types of Joints
Making Butt, Lap and Fillet Welds in the Flat Position
Figures given in this section for bevelling and spacing are suggestions for average work. Exactness of preparation, the size of electrodes and their type, together with the skill of the welder, will influence all dimensions given. In most fabrication shops, such information will be given on the weld procedure and drawings.
Figure 1 - The Two Basic Types of Weld
Butt welds over 6 mm thick usually require preparation by bevelling. Figure 3 gives an example of welding plate of 10 mm thickness.
Figure 2 - All the Various Types of Weld are either Butt Welds or Fillet Welds
Trade of Metal Fabrication – Phase 2 Module 2 Unit 3
Unit 3 15
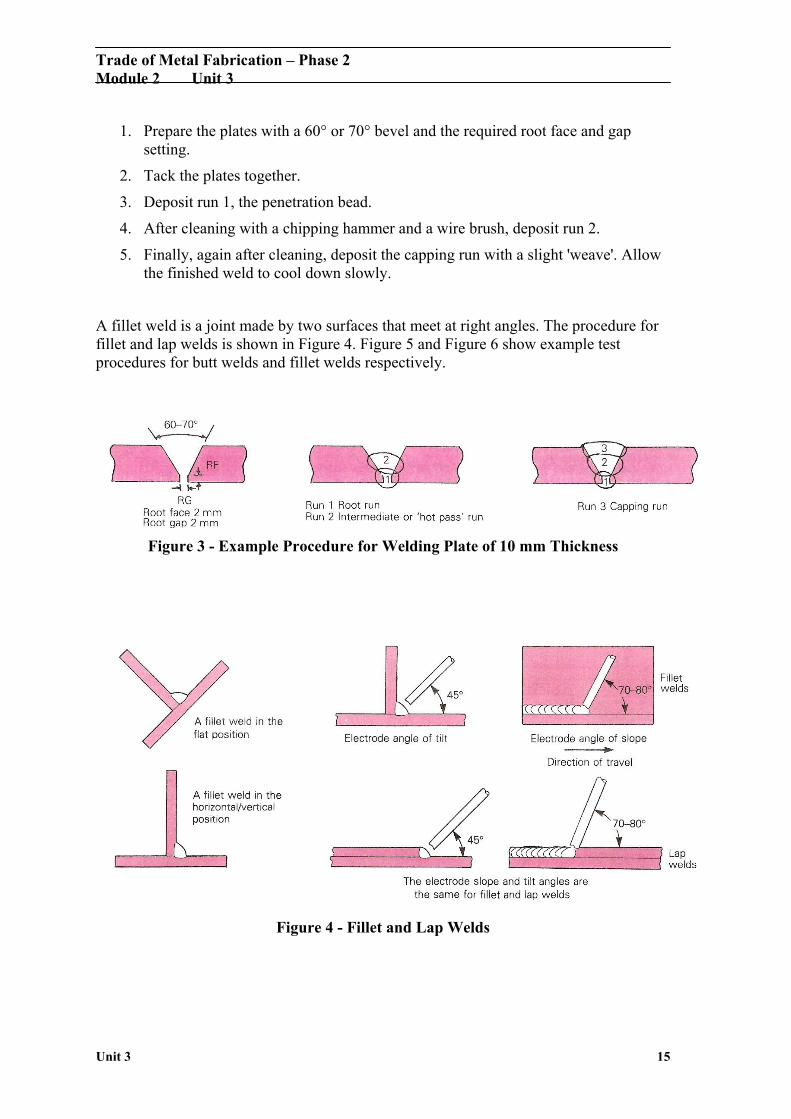
1. Prepare the plates with a 60° or 70° bevel and the required root face and gap setting.
2. Tack the plates together.
3. Deposit run 1, the penetration bead.
4. After cleaning with a chipping hammer and a wire brush, deposit run 2.
5. Finally, again after cleaning, deposit the capping run with a slight 'weave'. Allow the finished weld to cool down slowly.
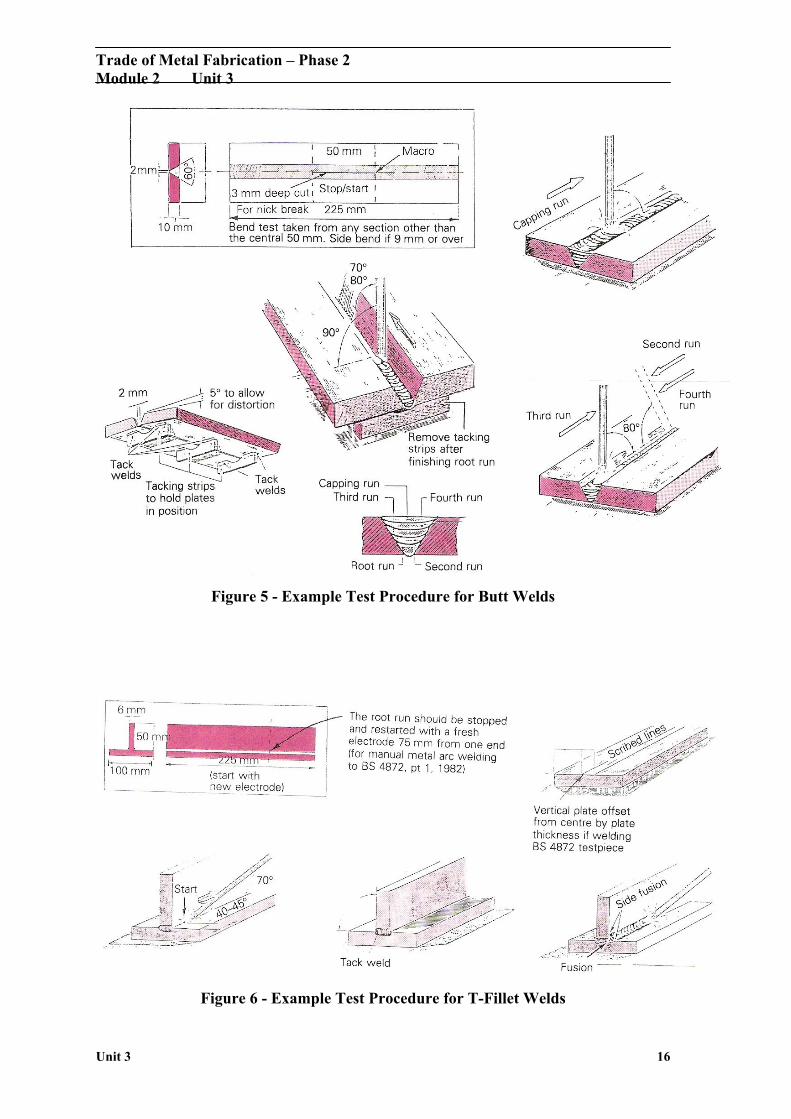
A fillet weld is a joint made by two surfaces that meet at right angles. The procedure for fillet and lap welds is shown in Figure 4. Figure 5 and Figure 6 show example test procedures for butt welds and fillet welds respectively.
Figure 3 - Example Procedure for Welding Plate of 10 mm Thickness
Figure 4 - Fillet and Lap Welds
Trade of Metal Fabrication – Phase 2 Module 2 Unit 3
Unit 3 16
Figure 5 - Example Test Procedure for Butt Welds
Figure 6 - Example Test Procedure for T-Fillet Welds
Trade of Metal Fabrication – Phase 2 Module 2 Unit 3
Unit 3 17
Speed of Travel
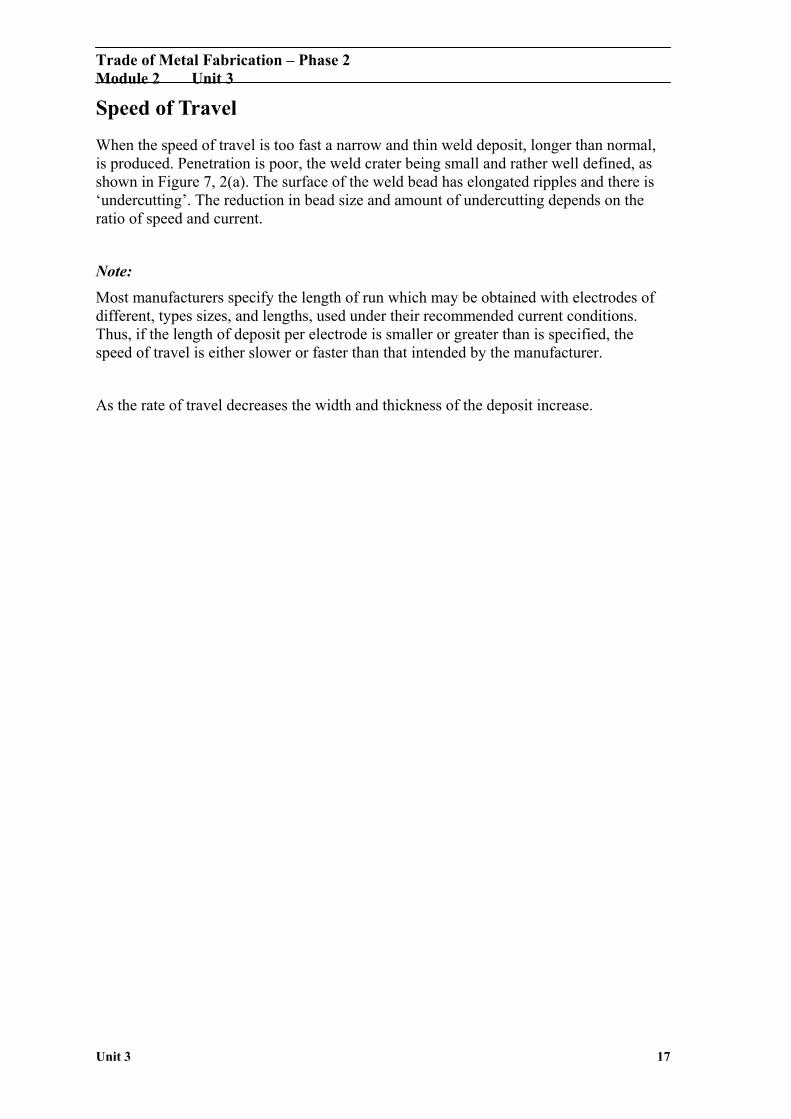
When the speed of travel is too fast a narrow and thin weld deposit, longer than normal, is produced. Penetration is poor, the weld crater being small and rather well defined, as shown in Figure 7, 2(a). The surface of the weld bead has elongated ripples and there is ‘undercutting’. The reduction in bead size and amount of undercutting depends on the ratio of speed and current.
Note:
Most manufacturers specify the length of run which may be obtained with electrodes of different, types sizes, and lengths, used under their recommended current conditions. Thus, if the length of deposit per electrode is smaller or greater than is specified, the speed of travel is either slower or faster than that intended by the manufacturer.
As the rate of travel decreases the width and thickness of the deposit increase.
Trade of Metal Fabrication – Phase 2 Module 2 Unit 3
Unit 3 18
Coding for Welding Current Conditions
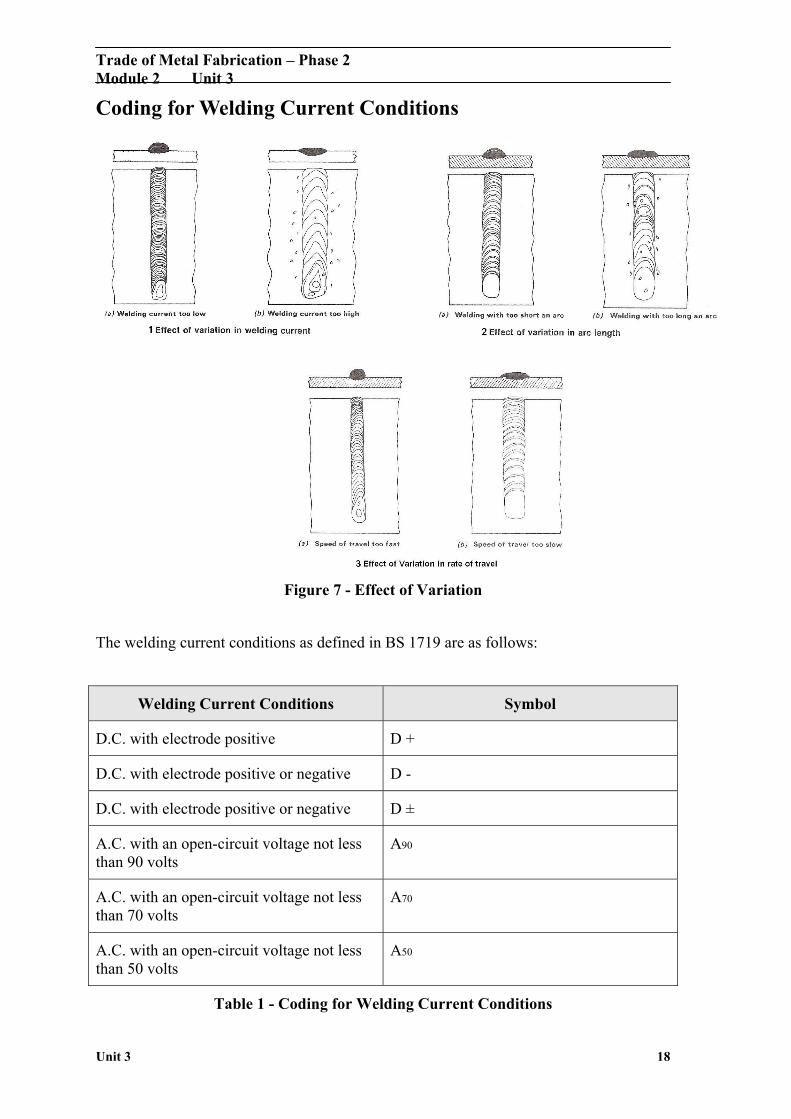
Figure 7 - Effect of Variation
The welding current conditions as defined in BS 1719 are as follows:
Welding Current Conditions Symbol
D.C. with electrode positive D +
D.C. with electrode positive or negative D -
D.C. with electrode positive or negative D ±
A.C. with an open-circuit voltage not less than 90 volts
A90
A.C. with an open-circuit voltage not less than 70 volts
A70
A.C. with an open-circuit voltage not less than 50 volts
A50
Table 1 - Coding for Welding Current Conditions

Trade of Metal Fabrication – Phase 2 Module 2 Unit 3
Unit 3 19
Striking and Maintaining the Arc
Striking and maintaining the arc. With an electrode of 4 mm diameter and a current of 130-150 A and a mild steel plate 6-8 mm thick, the first exercise is to strike and maintain the arc. The operator should be comfortably placed with the cable to the electrode exerting no pull on the holder (e.g. cable over the operator's shoulder). The electrode tip is scratched on to the plate at the same time as the hand shield with filter glass is drawn -across the face. Never expose eyes, face or any part of bare skin to arc flashes, as the effects can be most painful. The electrode is lifted to about 3 mm from the plate, drawing the arc, and the molten pool can be clearly seen (Figure 8). The lighter, brighter colour is the slag while the more viscous, darker colour is the molten metal.
Straight runs on the plate can now be made once the arc can be struck and maintained. As the electrode melts it deposits the metal on the plate and this deposit should be in a straight line and continuous with no gaps or entrapped slag.
Figure 8 - Striking and Maintaining the Arc
Trade of Metal Fabrication – Phase 2 Module 2 Unit 3
Unit 3 20
Welding
From Wikipedia, the free encyclopaedia.
Welding is a fabrication process that joins materials, usually metals or thermoplastics, by causing coalescence. This is often done by melting the workpieces and adding a filler material to form a pool of molten material (the weld puddle) that cools to become a strong joint, but sometimes pressure is used in conjunction with heat, or by itself, to produce the weld. This is in contrast with soldering and brazing, which involve melting a lower-melting-point material between the workpieces to form a bond between them, without melting the workpieces.
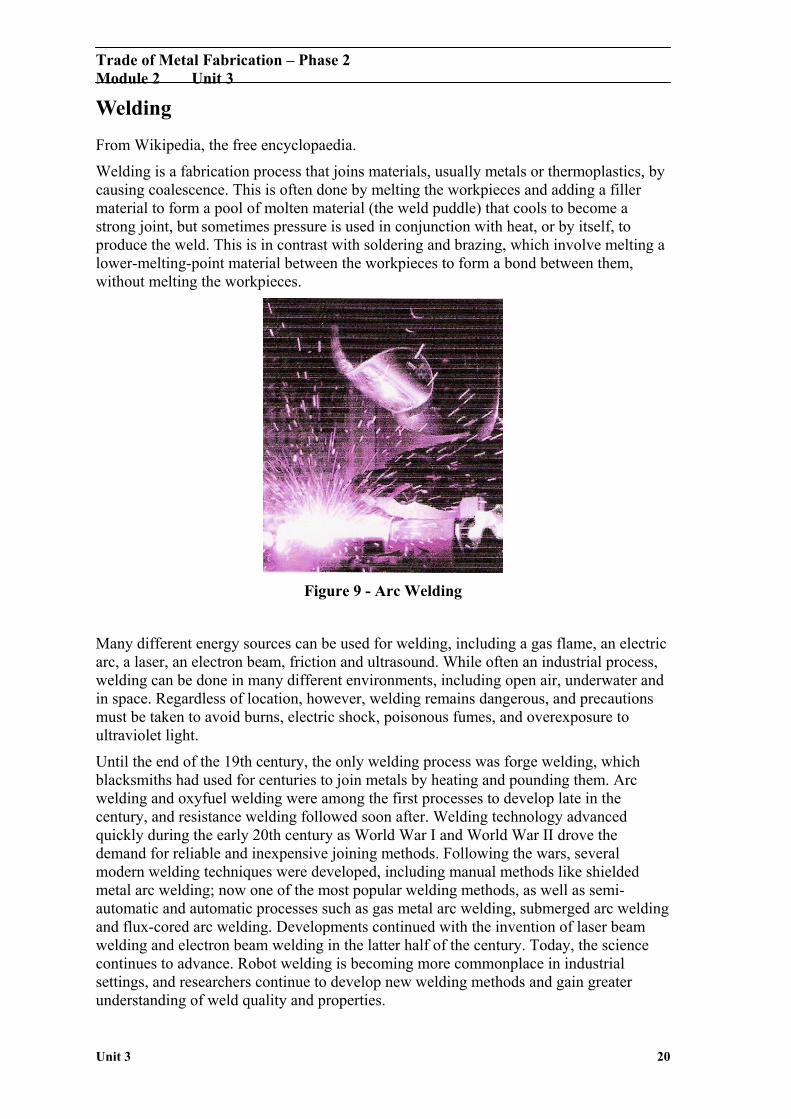
Figure 9 - Arc Welding
Many different energy sources can be used for welding, including a gas flame, an electric arc, a laser, an electron beam, friction and ultrasound. While often an industrial process, welding can be done in many different environments, including open air, underwater and in space. Regardless of location, however, welding remains dangerous, and precautions must be taken to avoid burns, electric shock, poisonous fumes, and overexposure to ultraviolet light.
Until the end of the 19th century, the only welding process was forge welding, which blacksmiths had used for centuries to join metals by heating and pounding them. Arc welding and oxyfuel welding were among the first processes to develop late in the century, and resistance welding followed soon after. Welding technology advanced quickly during the early 20th century as World War I and World War II drove the demand for reliable and inexpensive joining methods. Following the wars, several modern welding techniques were developed, including manual methods like shielded metal arc welding; now one of the most popular welding methods, as well as semi-automatic and automatic processes such as gas metal arc welding, submerged arc welding and flux-cored arc welding. Developments continued with the invention of laser beam welding and electron beam welding in the latter half of the century. Today, the science continues to advance. Robot welding is becoming more commonplace in industrial settings, and researchers continue to develop new welding methods and gain greater understanding of weld quality and properties.
Trade of Metal Fabrication – Phase 2 Module 2 Unit 3
Unit 3 21
Arc Welding
Arc welding processes use a welding power supply to create and maintain an electric arc between an electrode and the base material to melt metals at the welding point. They can use either direct (DC) or alternating (AC) current, and consumable or non-consumable electrodes. The welding region is sometimes protected by some type of inert or semi-inert gas, known as a shielding gas, and filler material is sometimes used as well.
Power Supplies
To supply the electrical energy necessary for arc welding processes, a number of different power supplies can be used. The most common classification is constant current power supplies and constant voltage power supplies. In arc welding, the voltage is directly related to the length of the arc, and the current is related to the amount of heat input. Constant current power supplies are most often used for manual welding processes such as gas tungsten arc welding and shielded metal arc welding, because they maintain a relatively constant current even as the voltage varies. This is important because in manual welding, it can be difficult to hold the electrode perfectly steady, and as a result, the arc length and thus voltage tend to fluctuate. Constant voltage power supplies hold the voltage constant and vary the current, and as a result, are most often used for automated welding processes such as gas metal arc welding, flux cored arc welding, and submerged arc welding. In these processes, arc length is kept constant, since any fluctuation in the distance between the wire and the base material is quickly rectified by a large change in current. For example, if the wire and the base material get too close, the current will rapidly increase, which in turn causes the heat to increase and the tip of the wire to melt, returning it to its original separation distance.
The type of current used in arc welding also plays an important role in welding. Consumable electrode processes such as shielded metal arc welding and gas metal arc welding generally use direct current, but the electrode can be charged either positively or negatively. In welding, the positively charged anode will have a greater heat concentration, and as a result, changing the polarity of the electrode has an impact on weld properties. If the electrode is positively charged, it will melt more quickly, increasing weld penetration and welding speed. Alternatively, a negatively charged electrode results in more shallow welds. Non-consumable electrode processes, such as gas tungsten arc welding, can use either type of direct current, as well as alternating current. However, with direct current, because the electrode only creates the arc and does not provide filler material, a positively charged electrode causes shallow welds, while a negatively charged electrode makes deeper welds. Alternating current rapidly moves between these two, resulting in medium-penetration welds. One disadvantage of AC, the fact that the arc must be re-ignited after every zero crossing, has been addressed with the invention of special power units that produce a square wave pattern instead of the normal sine wave, making rapid zero crossings possible and minimising the effects of the problem.

Trade of Metal Fabrication – Phase 2 Module 2 Unit 3
Unit 3 22
Methods
Figure 10 - Shielded Metal Arc Welding
One of the most common types of arc welding is shielded metal arc welding (SMAW), which is also known as manual metal arc welding (MMA) or stick welding. Electric current is used to strike an arc between the base material and consumable electrode rod, which is made of steel and is covered with a flux that protects the weld area from oxidation and contamination by producing CO2 gas during the welding process. The electrode core itself acts as filler material, making a separate filler unnecessary. The process is very versatile, requiring little operator training and inexpensive equipment. However, weld times are rather slow, since the consumable electrodes must be frequently replaced and because slag, the residue from the flux, must be chipped away after welding. Furthermore, the process is generally limited to welding ferrous materials, though speciality electrodes have made possible the welding of cast iron, nickel, aluminium, copper, and other metals. The versatility of the method makes it popular in a number of applications, including repair work and construction.
Trade of Metal Fabrication – Phase 2 Module 2 Unit 3
Unit 3 23
Electric Arc Welding
Introduction
In both gas welding and arc welding, the edges of the parts being joined are melted. If necessary, further metal is added to help form a molten pool between the two parts. The molten pool is then allowed to cool to form the joint. The completed weld is therefore the result of a series of solidified molten pools. We can see this on most welds by looking at the weld ripples; each ripple is the edge of a solidified molten pool.
The main difference between the two methods is in the source of the heat used to obtain the molten pool. In oxyacetylene welding it is the chemical energy of acetylene burning in oxygen; in arc welding it is electrical energy.
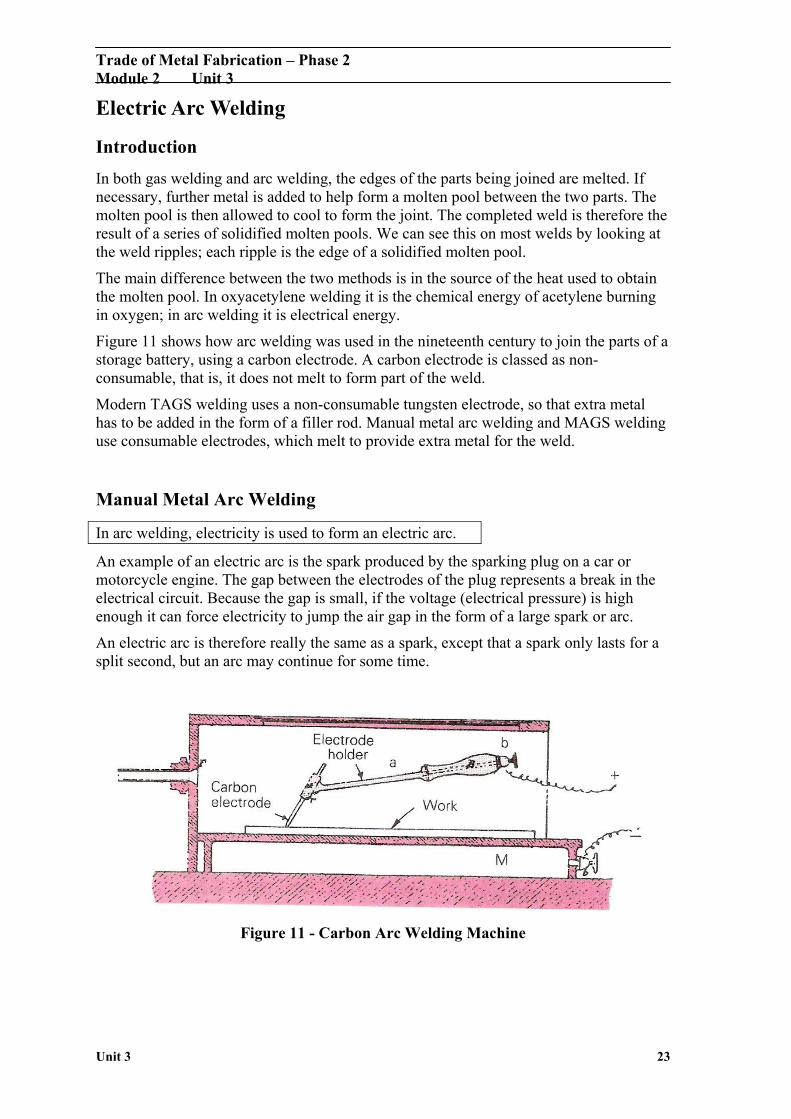
Figure 11 shows how arc welding was used in the nineteenth century to join the parts of a storage battery, using a carbon electrode. A carbon electrode is classed as non-consumable, that is, it does not melt to form part of the weld.
Modern TAGS welding uses a non-consumable tungsten electrode, so that extra metal has to be added in the form of a filler rod. Manual metal arc welding and MAGS welding use consumable electrodes, which melt to provide extra metal for the weld.
Manual Metal Arc Welding
In arc welding, electricity is used to form an electric arc.
An example of an electric arc is the spark produced by the sparking plug on a car or motorcycle engine. The gap between the electrodes of the plug represents a break in the electrical circuit. Because the gap is small, if the voltage (electrical pressure) is high enough it can force electricity to jump the air gap in the form of a large spark or arc.
An electric arc is therefore really the same as a spark, except that a spark only lasts for a split second, but an arc may continue for some time.
Figure 11 - Carbon Arc Welding Machine
Trade of Metal Fabrication – Phase 2 Module 2 Unit 3
Unit 3 24
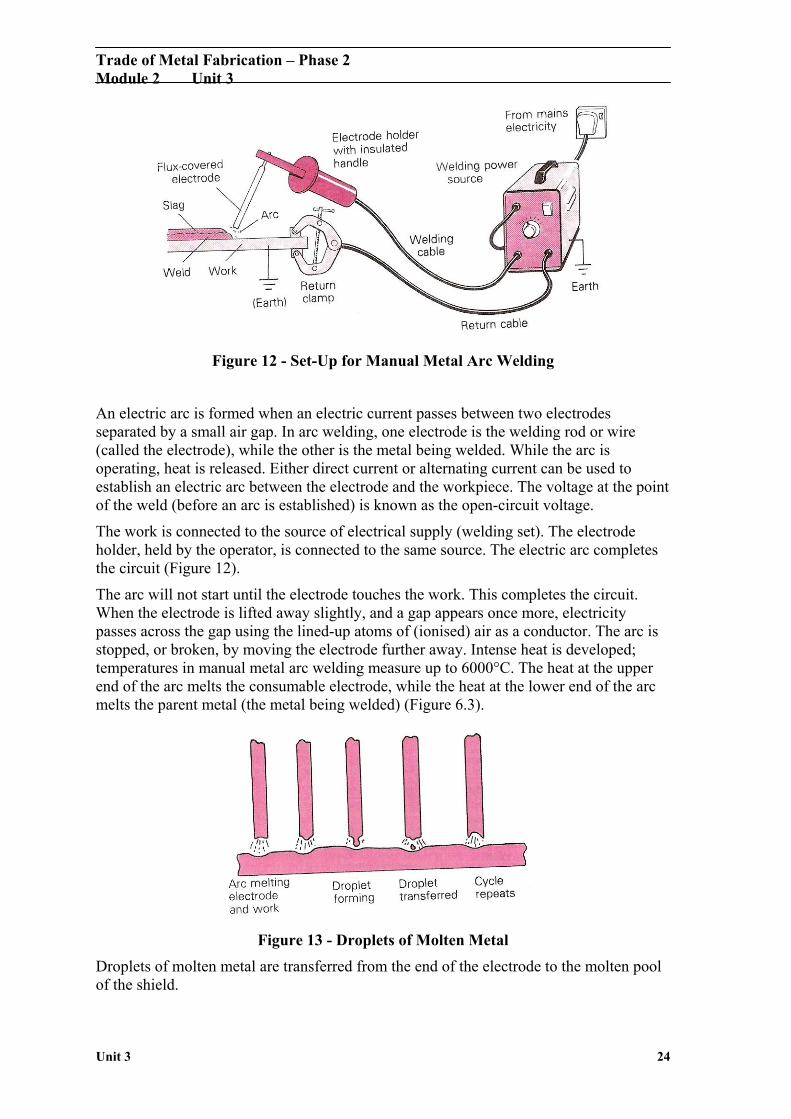
Figure 12 - Set-Up for Manual Metal Arc Welding
An electric arc is formed when an electric current passes between two electrodes separated by a small air gap. In arc welding, one electrode is the welding rod or wire (called the electrode), while the other is the metal being welded. While the arc is operating, heat is released. Either direct current or alternating current can be used to establish an electric arc between the electrode and the workpiece. The voltage at the point of the weld (before an arc is established) is known as the open-circuit voltage.
The work is connected to the source of electrical supply (welding set). The electrode holder, held by the operator, is connected to the same source. The electric arc completes the circuit (Figure 12).
The arc will not start until the electrode touches the work. This completes the circuit. When the electrode is lifted away slightly, and a gap appears once more, electricity passes across the gap using the lined-up atoms of (ionised) air as a conductor. The arc is stopped, or broken, by moving the electrode further away. Intense heat is developed; temperatures in manual metal arc welding measure up to 6000°C. The heat at the upper end of the arc melts the consumable electrode, while the heat at the lower end of the arc melts the parent metal (the metal being welded) (Figure 6.3).
Figure 13 - Droplets of Molten Metal
Droplets of molten metal are transferred from the end of the electrode to the molten pool of the shield.
Trade of Metal Fabrication – Phase 2 Module 2 Unit 3
Unit 3 25
Starting Welding and Practice Welds
Before you strike an arc, you must check that the filter in your shield is not cracked.
You can do this by looking at an electric light; it will appear very faint, but should indicate if there are any cracks present.
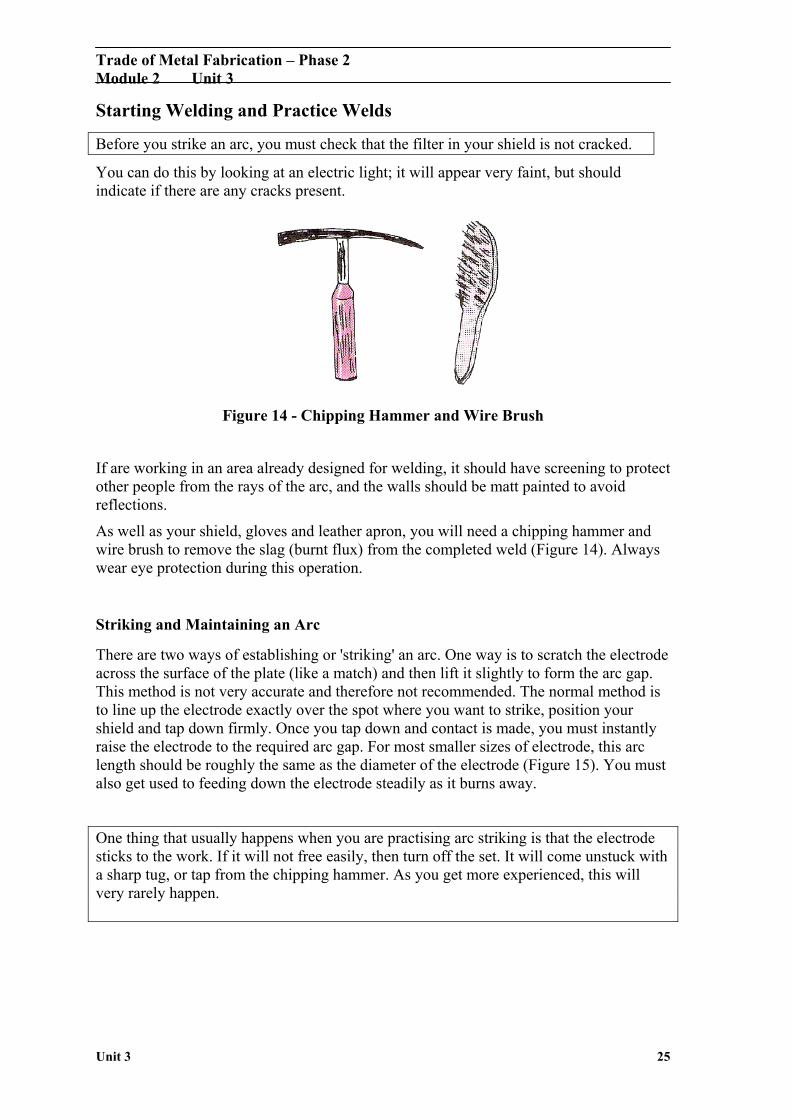
Figure 14 - Chipping Hammer and Wire Brush
If are working in an area already designed for welding, it should have screening to protect other people from the rays of the arc, and the walls should be matt painted to avoid reflections.
As well as your shield, gloves and leather apron, you will need a chipping hammer and wire brush to remove the slag (burnt flux) from the completed weld (Figure 14). Always wear eye protection during this operation.
Striking and Maintaining an Arc
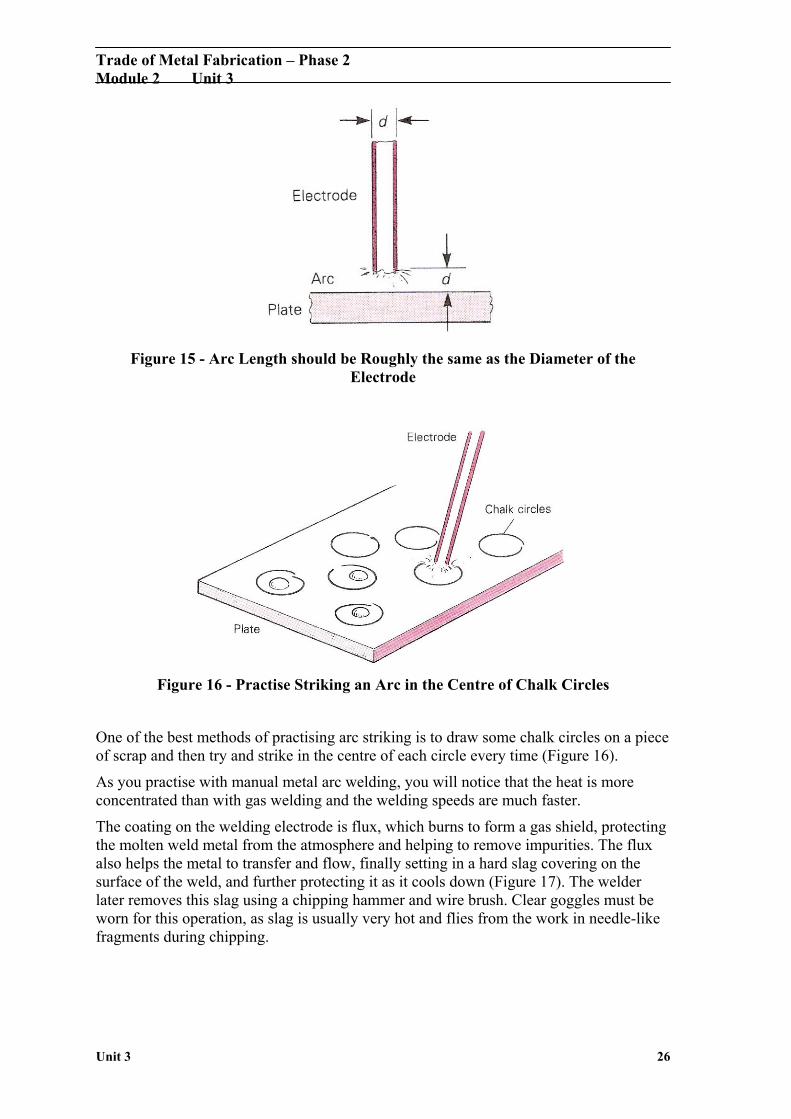
There are two ways of establishing or 'striking' an arc. One way is to scratch the electrode across the surface of the plate (like a match) and then lift it slightly to form the arc gap. This method is not very accurate and therefore not recommended. The normal method is to line up the electrode exactly over the spot where you want to strike, position your shield and tap down firmly. Once you tap down and contact is made, you must instantly raise the electrode to the required arc gap. For most smaller sizes of electrode, this arc length should be roughly the same as the diameter of the electrode (Figure 15). You must also get used to feeding down the electrode steadily as it burns away.
One thing that usually happens when you are practising arc striking is that the electrode sticks to the work. If it will not free easily, then turn off the set. It will come unstuck with a sharp tug, or tap from the chipping hammer. As you get more experienced, this will very rarely happen.
Trade of Metal Fabrication – Phase 2 Module 2 Unit 3
Unit 3 26
Figure 15 - Arc Length should be Roughly the same as the Diameter of the Electrode
Figure 16 - Practise Striking an Arc in the Centre of Chalk Circles
One of the best methods of practising arc striking is to draw some chalk circles on a piece of scrap and then try and strike in the centre of each circle every time (Figure 16).
As you practise with manual metal arc welding, you will notice that the heat is more concentrated than with gas welding and the welding speeds are much faster.
The coating on the welding electrode is flux, which burns to form a gas shield, protecting the molten weld metal from the atmosphere and helping to remove impurities. The flux also helps the metal to transfer and flow, finally setting in a hard slag covering on the surface of the weld, and further protecting it as it cools down (Figure 17). The welder later removes this slag using a chipping hammer and wire brush. Clear goggles must be worn for this operation, as slag is usually very hot and flies from the work in needle-like fragments during chipping.
Trade of Metal Fabrication – Phase 2 Module 2 Unit 3
Unit 3 27
Table 2 - Typical Welding Current Data for a Mild Steel Electrode
Figure 17 - The Manual Metal Arc Process
The gas shield is formed by burning flux.
Table 2 gives typical welding current data for a mild steel electrode. Always consult the manufacturer's data on the packet, as there can be variations between different makes of electrode. Certain special electrodes, including stainless steel, are shorter than the values given in the table, to prevent overheating.
With experience, you will be able to adjust the setting given in Table 2 slightly, one way or the other, as the type of work changes. The table is intended just as a guide to get you started.
Trade of Metal Fabrication – Phase 2 Module 2 Unit 3
Unit 3 28
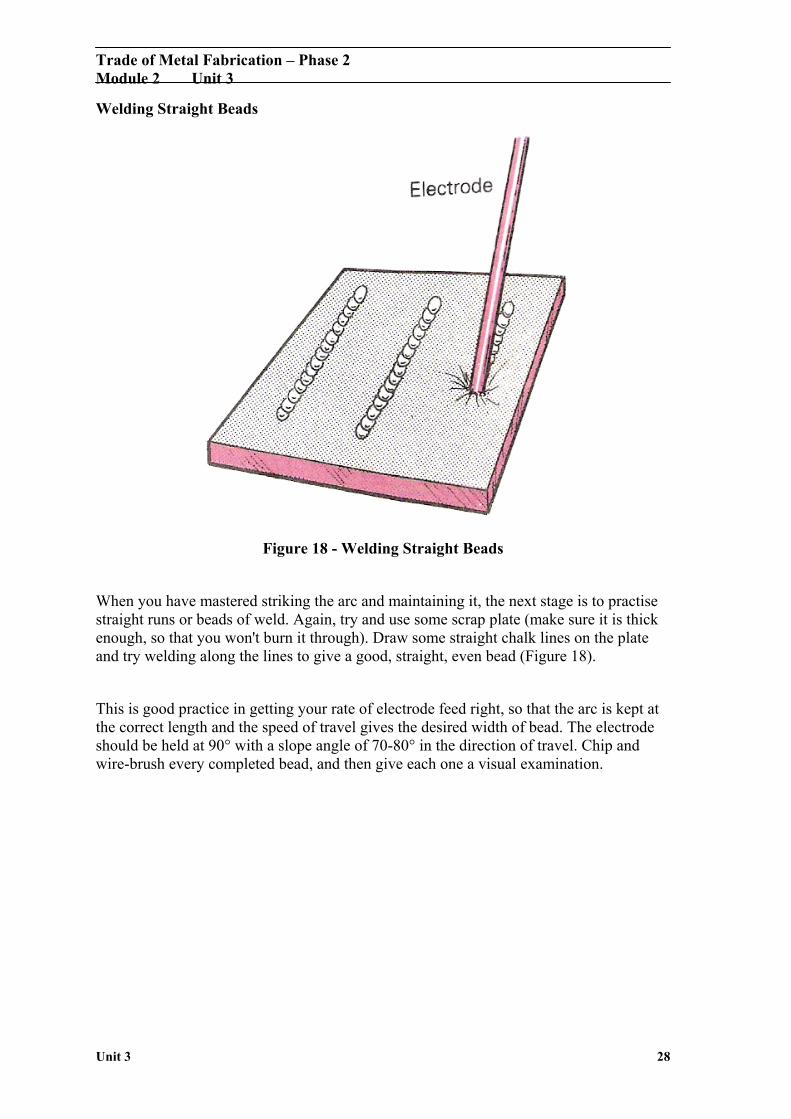
Welding Straight Beads
Figure 18 - Welding Straight Beads
When you have mastered striking the arc and maintaining it, the next stage is to practise straight runs or beads of weld. Again, try and use some scrap plate (make sure it is thick enough, so that you won't burn it through). Draw some straight chalk lines on the plate and try welding along the lines to give a good, straight, even bead (Figure 18).
This is good practice in getting your rate of electrode feed right, so that the arc is kept at the correct length and the speed of travel gives the desired width of bead. The electrode should be held at 90° with a slope angle of 70-80° in the direction of travel. Chip and wire-brush every completed bead, and then give each one a visual examination.
Trade of Metal Fabrication – Phase 2 Module 2 Unit 3
Unit 3 29
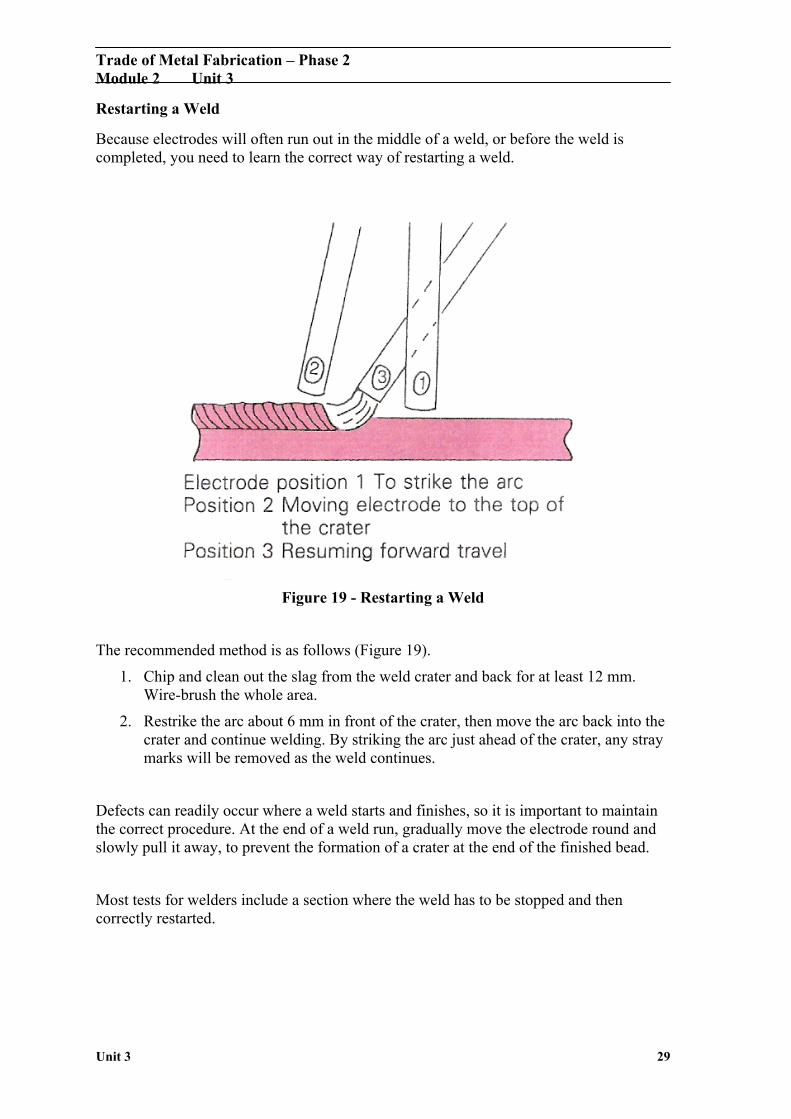
Restarting a Weld
Because electrodes will often run out in the middle of a weld, or before the weld is completed, you need to learn the correct way of restarting a weld.
Figure 19 - Restarting a Weld
The recommended method is as follows (Figure 19).
1. Chip and clean out the slag from the weld crater and back for at least 12 mm. Wire-brush the whole area.
2. Restrike the arc about 6 mm in front of the crater, then move the arc back into the crater and continue welding. By striking the arc just ahead of the crater, any stray marks will be removed as the weld continues.
Defects can readily occur where a weld starts and finishes, so it is important to maintain the correct procedure. At the end of a weld run, gradually move the electrode round and slowly pull it away, to prevent the formation of a crater at the end of the finished bead.
Most tests for welders include a section where the weld has to be stopped and then correctly restarted.

Trade of Metal Fabrication – Phase 2 Module 2 Unit 3
Unit 3 30
Weaving
Sometimes a wide weld bead is required. This can be obtained by weaving the electrode from side to side while moving the electrode forwards to advance the weld (Figure 20).
Figure 20 - Five Different Types of Welding Pattern
There are a number of patterns. To practise weaving, deposit two straight runs of weld with a gap between them and fill in the gap with a weave. Try practising the different patterns shown in Figure 20. The weave should be no wider than three times the diameter of the electrode.
Different welders prefer particular types of weave pattern. Type (b) is probably the most widely used, while the 'figure of eight' pattern (c) is preferred by other welders.
Some patterns are easier to do with certain types of electrode. However, the beginner should practise weave patterns with all types of electrode, as the experience will be valuable in the future when different types of welded joint are attempted.
Figure 21 - The Pad Weld

Trade of Metal Fabrication – Phase 2 Module 2 Unit 3
Unit 3 31
Earthing
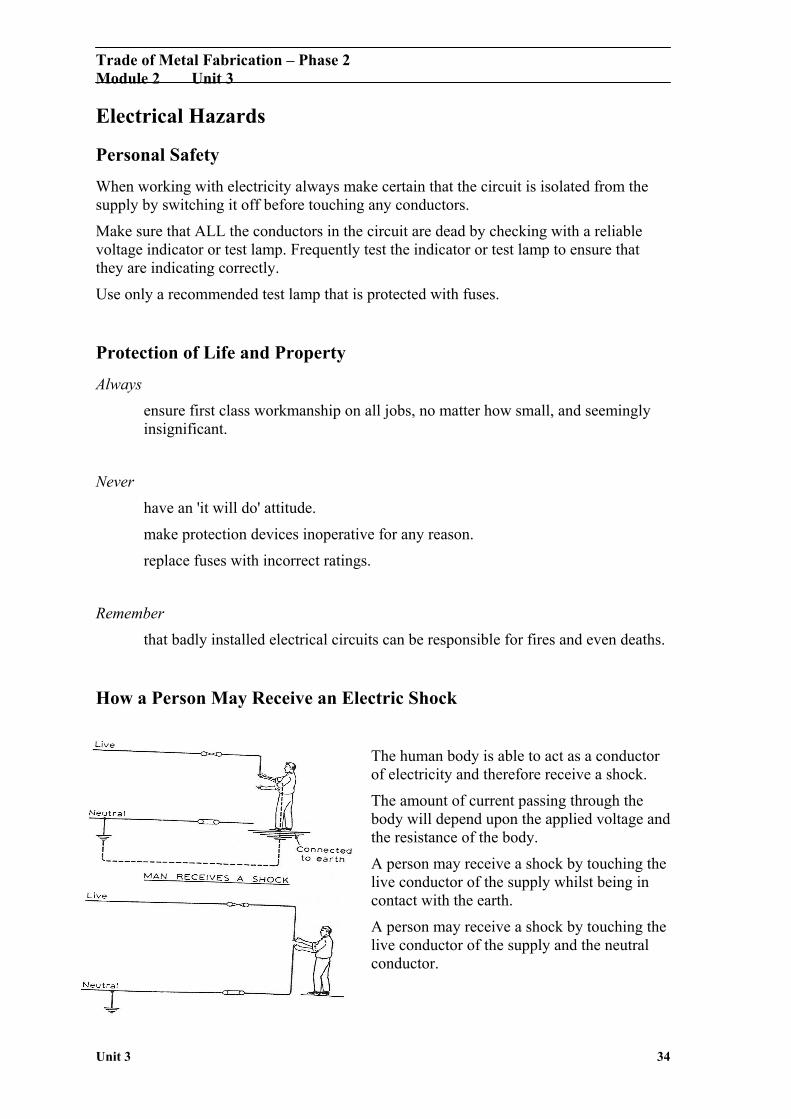
One of the conductors in the supply systems is connected to earth. This is done for reasons of safety to persons and property.
For instance, if a fault occurred which caused a live conductor to come into direct contact with the metal frame of an electrical appliance, current would flow through the frame to earth through any available path.
Consider the portable electric drill shown here. If the above fault occurred, a man holding the drill would complete a circuit to earth. Current would flow through the man's body giving him an electric shock.
To avoid this dangerous condition, all electrical appliances housed in metal enclosures should be connected to earth. On portable appliances this is done by ensuring that the green and yellow striped wire of a three-core cable is connected between the metal frame of the appliance and the earth pin of the three-pin plug. In this way we provide an alternative path for the current to take.
If a man touches a 'live' appliance, as indicated here, there are two paths available for current to follow. As the resistance of the human body is much greater than that of the earth wire the current will flow through this wire to earth.
Trade of Metal Fabrication – Phase 2 Module 2 Unit 3
Unit 3 32
Safety in Manual Metal Arc Welding
Safety Issues
Welding without the proper precautions can be a dangerous and unhealthy practice. However, with the use of new technology and proper protection, the risks of injury and death associated with welding can be greatly reduced. Because many common welding procedures involve an open electric arc or flame, tile risk of burns is significant. To prevent them, welders wear personal protective equipment in the form of heavy leather gloves and protective long sleeve jackets to avoid exposure to extreme heat and flames. Additionally, the brightness of the weld area leads to a condition called arc eye in which ultraviolet light causes the inflammation of the cornea and can burn the retinas of the eyes. Goggles and helmets with dark face plates are worn to prevent this exposure and in recent years, new helmet models have been produced that feature a face plate that self-darkens upon exposure to high amounts of UV light. To protect bystanders, transparent welding curtains often surround the welding area. These curtains, made of a polyvinyl chloride plastic film, shield nearby workers from exposure to the UV light from the electric arc, but should not be used to replace the filter glass used in helmets.
Welders are also often exposed to dangerous gases and particulate matter. Processes like flux-cored arc welding and shielded metal arc welding produce smoke containing particles of various types of oxides, which in some cases can lead to medical conditions like metal fume fever. The size of the particles in question tends to influence the toxicity of the fumes, with smaller particles presenting a greater danger. Additionally, many processes produce fumes and various gases, most commonly carbon dioxide and ozone, that can prove dangerous if ventilation is inadequate. Furthermore, because the use of compressed gases and flames in many welding processes pose an explosion and fire risk, some common precautions include limiting the amount of oxygen in the air and keeping combustible materials away from the workplace.
Welding Safety Precautions
Fusion welding and cutting processes involve intense heat, either from an electric arc or a gas flame. In this section we look at ways of protecting the body from this heat and minimising discomfort so that high-quality welding can be undertaken. The information in this section is based on the Health and Safety at Work etc. Act and the control measures listed by COSHH.
In the arc welding processes, rays are given off that are high in infrared and ultraviolet emissions. If you look at an arc without proper eye protection, you can get what is called arc eye. This is a painful condition causing irritation of the eyes, which can last for up to 48 hours in severe cases. Anyone with this condition should seek medical advice, as eye drops that will ease the pain are available.
The welder's eyes and face must therefore be protected from these rays, and also from the intense heat and light rays coming from the arc. The shield should cover the sides of the face and have a special filter lens (like very strong sunglasses) that is made to British Standard specification BS 679.
Trade of Metal Fabrication – Phase 2 Module 2 Unit 3
Unit 3 33
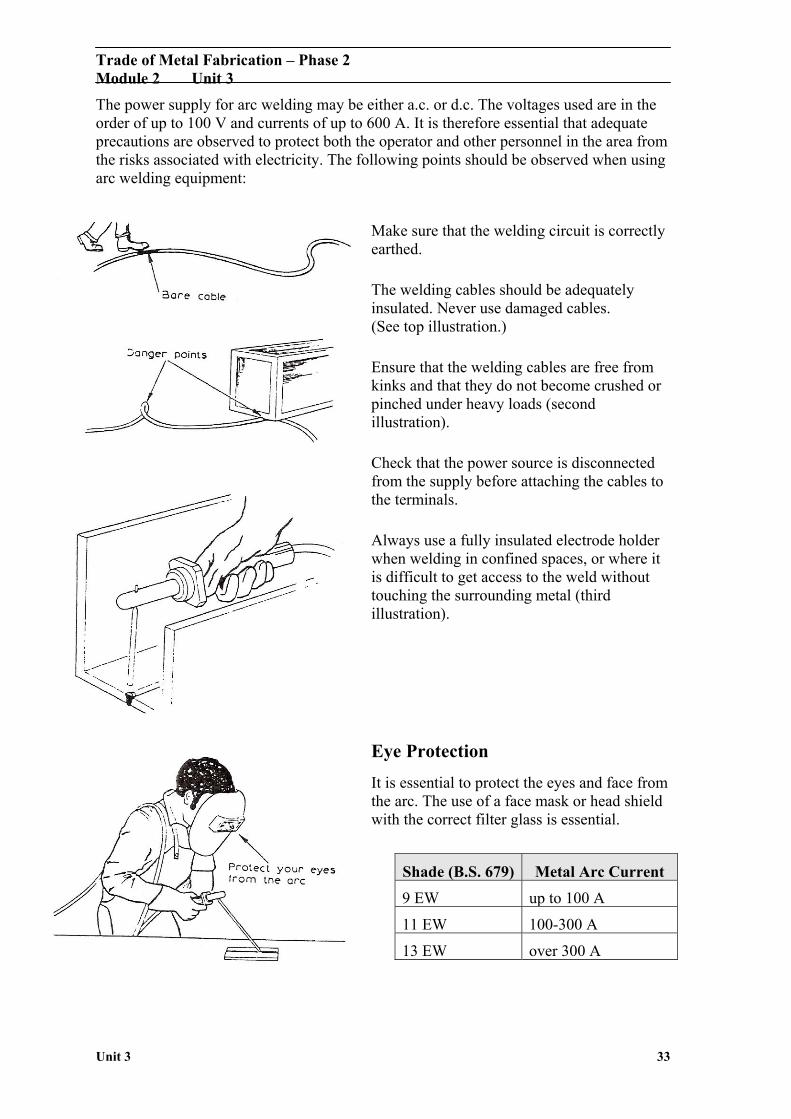
The power supply for arc welding may be either a.c. or d.c. The voltages used are in the order of up to 100 V and currents of up to 600 A. It is therefore essential that adequate precautions are observed to protect both the operator and other personnel in the area from the risks associated with electricity. The following points should be observed when using arc welding equipment:
Make sure that the welding circuit is correctly earthed.
The welding cables should be adequately insulated. Never use damaged cables. (See top illustration.)
Ensure that the welding cables are free from kinks and that they do not become crushed or pinched under heavy loads (second illustration).
Check that the power source is disconnected from the supply before attaching the cables to the terminals.
Always use a fully insulated electrode holder when welding in confined spaces, or where it is difficult to get access to the weld without touching the surrounding metal (third illustration).
Eye Protection
It is essential to protect the eyes and face from the arc. The use of a face mask or head shield with the correct filter glass is essential.
Shade (B.S. 679) Metal Arc Current
9 EW up to 100 A
11 EW 100-300 A
13 EW over 300 A
Trade of Metal Fabrication – Phase 2 Module 2 Unit 3
Unit 3 34
Electrical Hazards
Personal Safety
When working with electricity always make certain that the circuit is isolated from the supply by switching it off before touching any conductors.
Make sure that ALL the conductors in the circuit are dead by checking with a reliable voltage indicator or test lamp. Frequently test the indicator or test lamp to ensure that they are indicating correctly.
Use only a recommended test lamp that is protected with fuses.
Protection of Life and Property
Always
ensure first class workmanship on all jobs, no matter how small, and seemingly insignificant.
Never
have an 'it will do' attitude.
make protection devices inoperative for any reason.
replace fuses with incorrect ratings.
Remember
that badly installed electrical circuits can be responsible for fires and even deaths.
How a Person May Receive an Electric Shock
The human body is able to act as a conductor of electricity and therefore receive a shock.
The amount of current passing through the body will depend upon the applied voltage and the resistance of the body.
A person may receive a shock by touching the live conductor of the supply whilst being in contact with the earth.
A person may receive a shock by touching the live conductor of the supply and the neutral conductor.
Trade of Metal Fabrication – Phase 2 Module 2 Unit 3
Unit 3 35
Electrodes for Manual Metal Arc Welding
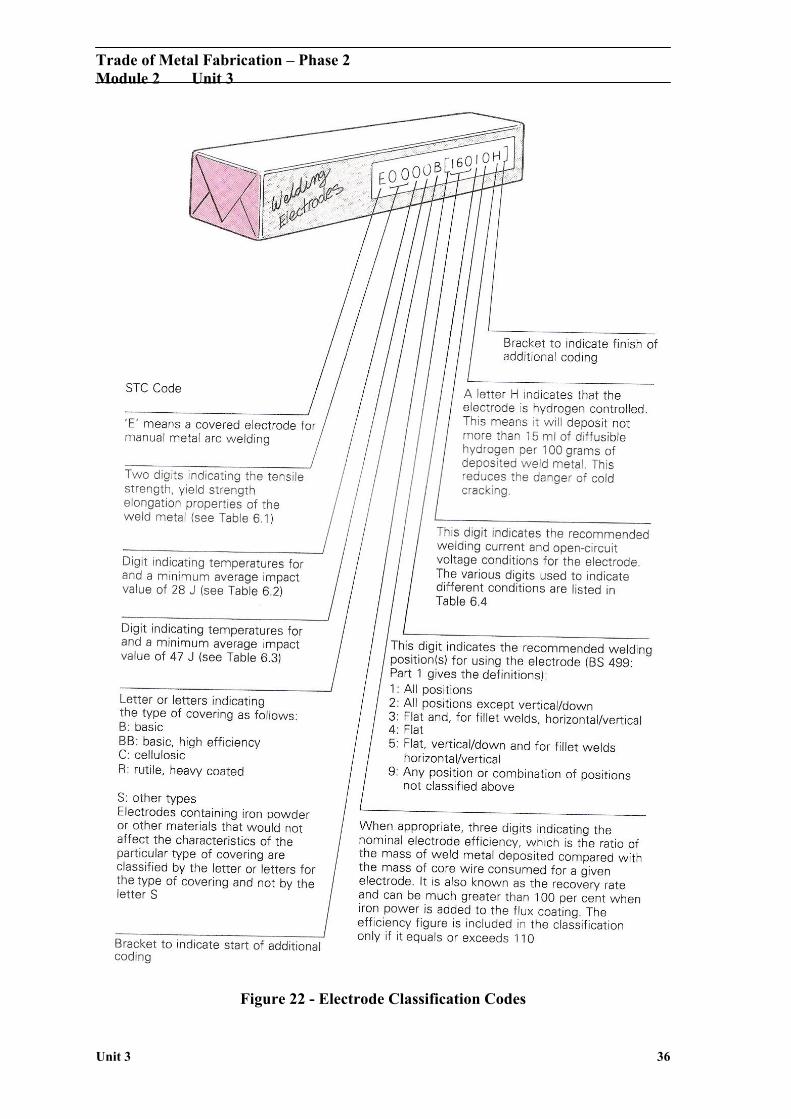
Figure 22 explains how to decode the information on electrode packet labels. The electrode classification is extracted from information given in British Standard BS 639 (1986). If you intend to continue your studies in welding, you should consult the complete document, as it explains the various tests carried out.
The United Kingdom is participating in the work of international standardisation and any proposed changes to future standards would take this work into account.
The general code is known as the STC code, as it covers strength, toughness and covering. Any additional coding is in brackets following the STC code.
Trade of Metal Fabrication – Phase 2 Module 2 Unit 3
Unit 3 36
Figure 22 - Electrode Classification Codes
Trade of Metal Fabrication – Phase 2 Module 2 Unit 3
Unit 3 37
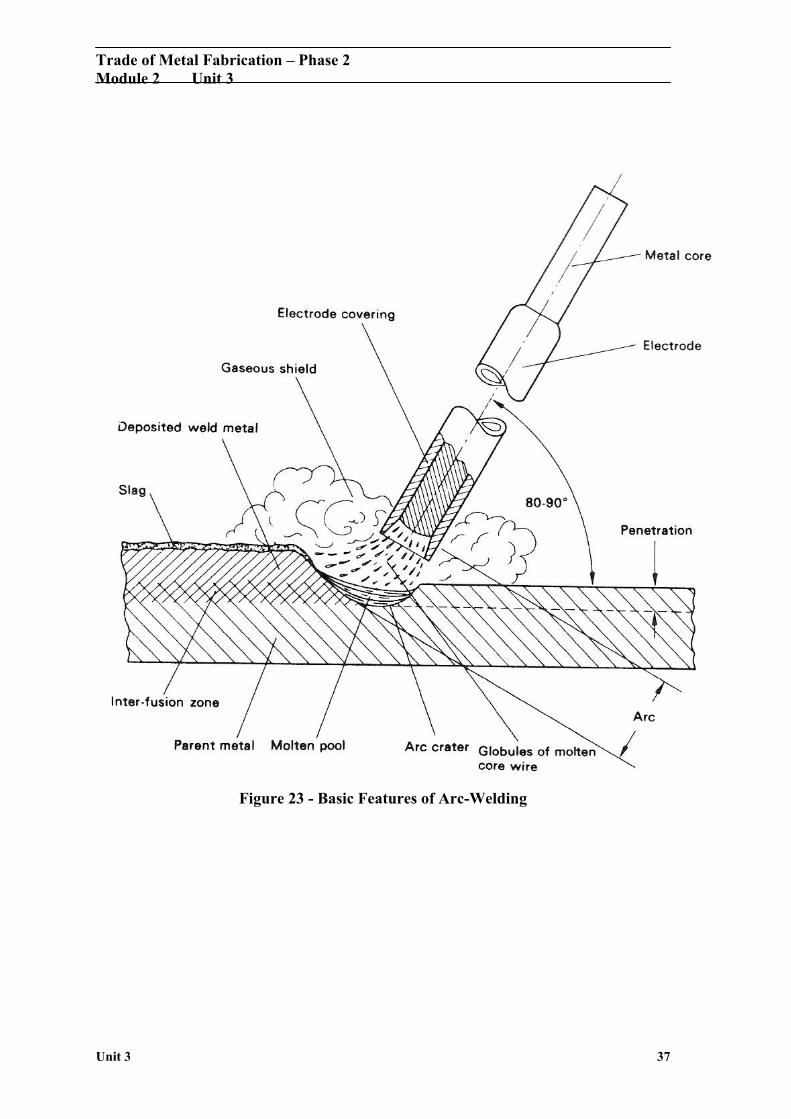
Figure 23 - Basic Features of Arc-Welding
Trade of Metal Fabrication – Phase 2 Module 2 Unit 3
Unit 3 38
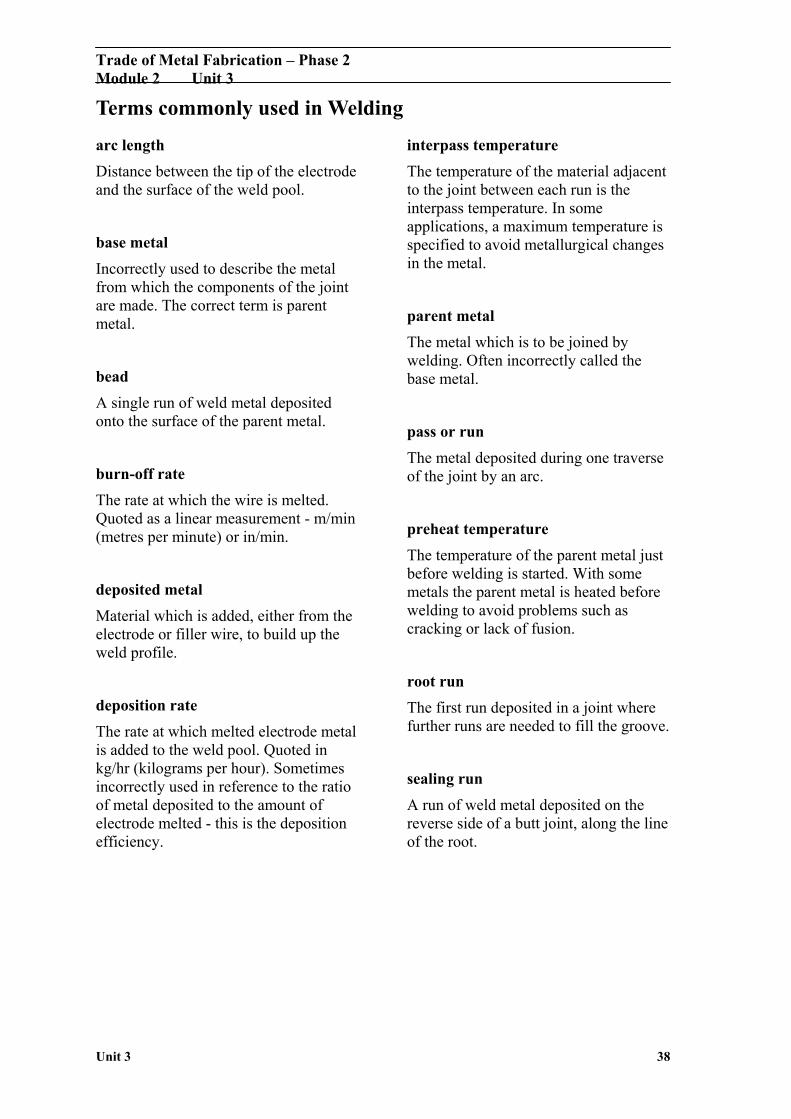
Terms commonly used in Welding
arc length
Distance between the tip of the electrode and the surface of the weld pool.
base metal
Incorrectly used to describe the metal from which the components of the joint are made. The correct term is parent metal.
bead
A single run of weld metal deposited onto the surface of the parent metal.
burn-off rate
The rate at which the wire is melted. Quoted as a linear measurement - m/min (metres per minute) or in/min.
deposited metal
Material which is added, either from the electrode or filler wire, to build up the weld profile.
deposition rate
The rate at which melted electrode metal is added to the weld pool. Quoted in kg/hr (kilograms per hour). Sometimes incorrectly used in reference to the ratio of metal deposited to the amount of electrode melted - this is the deposition efficiency.
interpass temperature
The temperature of the material adjacent to the joint between each run is the interpass temperature. In some applications, a maximum temperature is specified to avoid metallurgical changes in the metal.
parent metal
The metal which is to be joined by welding. Often incorrectly called the base metal.
pass or run
The metal deposited during one traverse of the joint by an arc.
preheat temperature
The temperature of the parent metal just before welding is started. With some metals the parent metal is heated before welding to avoid problems such as cracking or lack of fusion.
root run
The first run deposited in a joint where further runs are needed to fill the groove.
sealing run
A run of weld metal deposited on the reverse side of a butt joint, along the line of the root.
Trade of Metal Fabrication – Phase 2 Module 2 Unit 3
Unit 3 39
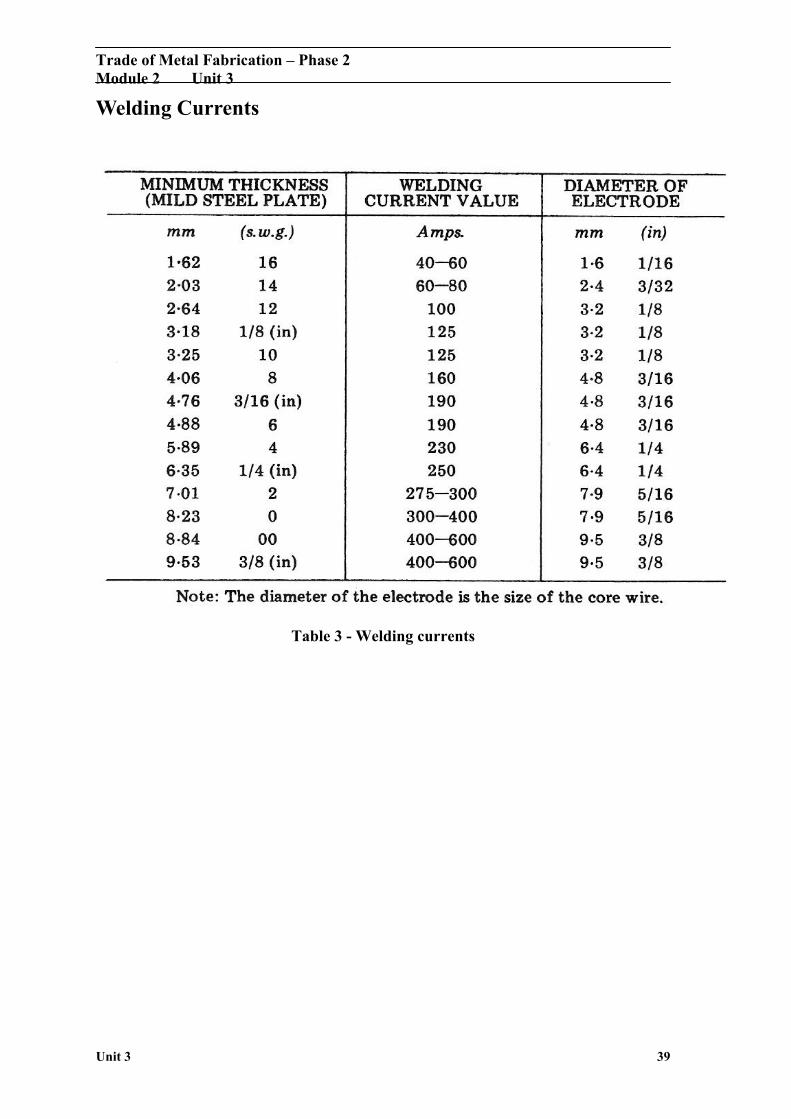
Welding Currents
Table 3 - Welding currents
Trade of Metal Fabrication – Phase 2 Module 2 Unit 3
Unit 3 40
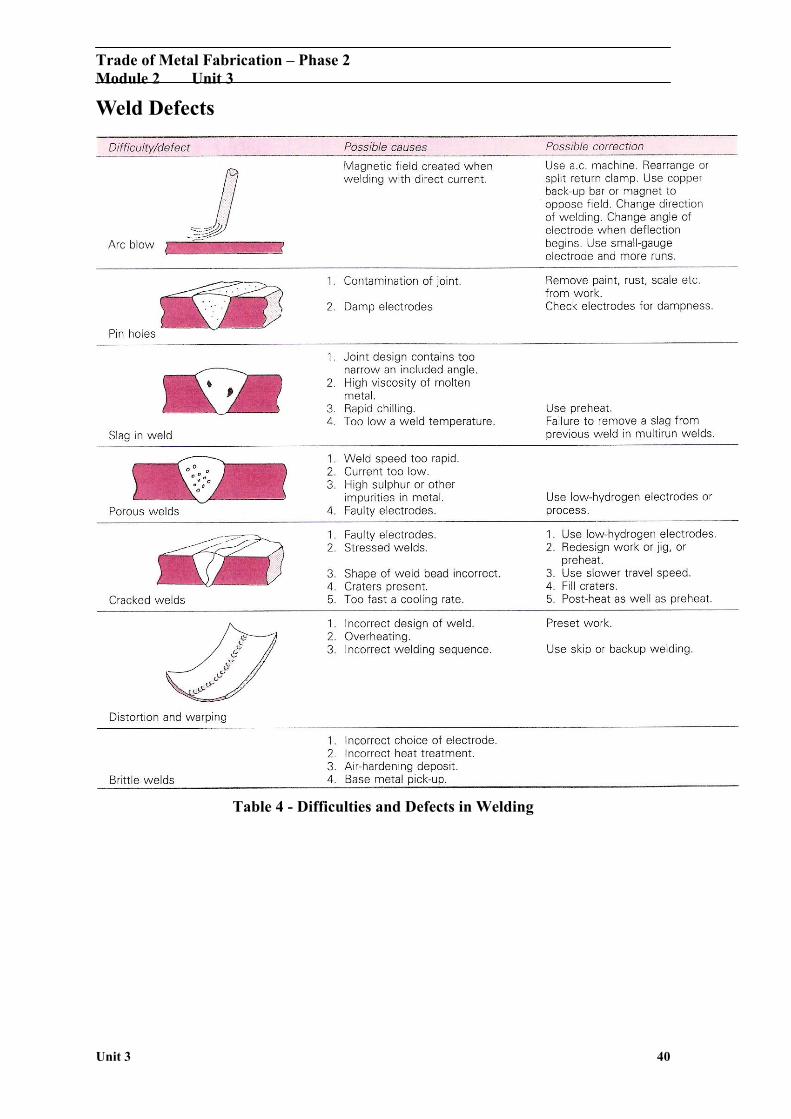
Weld Defects
Table 4 - Difficulties and Defects in Welding
Trade of Metal Fabrication – Phase 2 Module 2 Unit 3
Unit 3 41
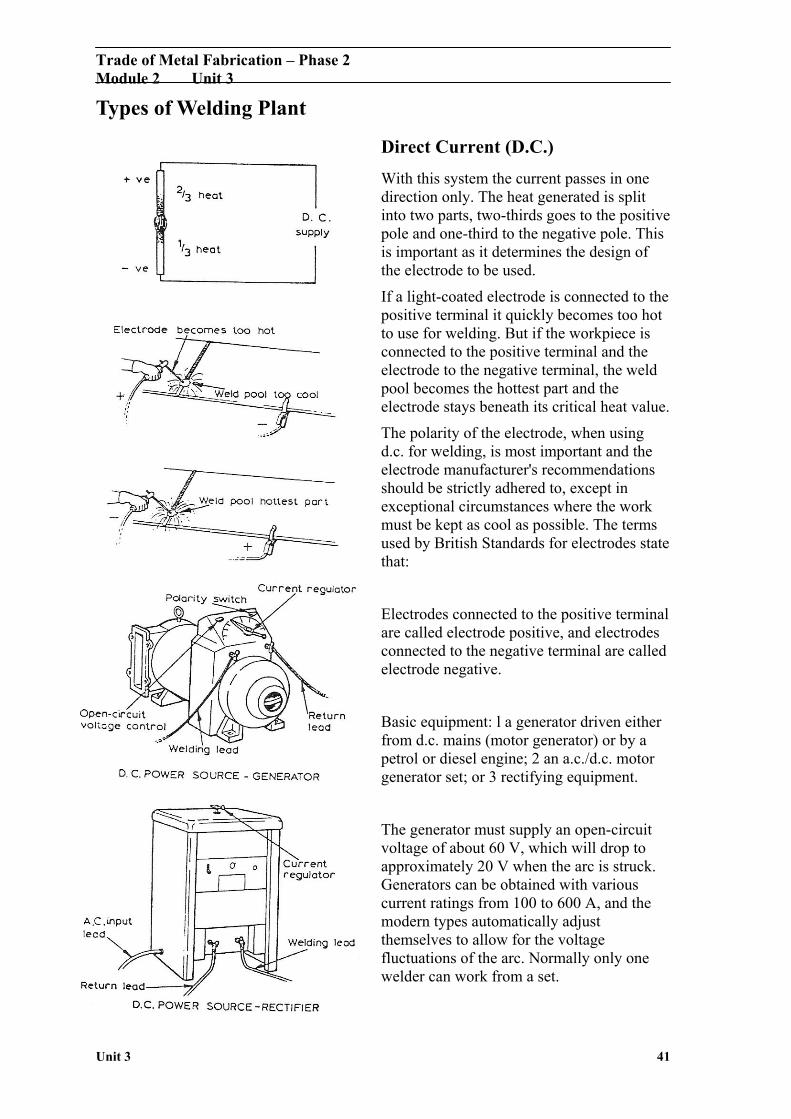
Types of Welding Plant
Direct Current (D.C.)
With this system the current passes in one direction only. The heat generated is split into two parts, two-thirds goes to the positive pole and one-third to the negative pole. This is important as it determines the design of the electrode to be used.
If a light-coated electrode is connected to the positive terminal it quickly becomes too hot to use for welding. But if the workpiece is connected to the positive terminal and the electrode to the negative terminal, the weld pool becomes the hottest part and the electrode stays beneath its critical heat value.
The polarity of the electrode, when using d.c. for welding, is most important and the electrode manufacturer's recommendations should be strictly adhered to, except in exceptional circumstances where the work must be kept as cool as possible. The terms used by British Standards for electrodes state that:
Electrodes connected to the positive terminal are called electrode positive, and electrodes connected to the negative terminal are called electrode negative.
Basic equipment: l a generator driven either from d.c. mains (motor generator) or by a petrol or diesel engine; 2 an a.c./d.c. motor generator set; or 3 rectifying equipment.
The generator must supply an open-circuit voltage of about 60 V, which will drop to approximately 20 V when the arc is struck. Generators can be obtained with various current ratings from 100 to 600 A, and the modern types automatically adjust themselves to allow for the voltage fluctuations of the arc. Normally only one welder can work from a set.
Trade of Metal Fabrication – Phase 2 Module 2 Unit 3
Unit 3 42
The Electric Arc
An electric arc is formed when an electric current passes between two electrodes separated by a short distance from each other. In arc welding (we will first consider direct-current welding) one electrode is the welding rod or wire, while the other is the metal to be welded (we will call this the plate). The electrode and plate are connected to the supply, one to the + ve pole and one to the - ve pole, and we will discuss later the difference which occurs when the electrode is connected to - ve or + ve pole. The arc is started by momentarily touching the electrode on to the plate and then withdrawing it to about 3 to 4 mm from the plate. When the electrode touches the plate a current flows and as it is withdrawn from the plate the current continues to flow in the form of a 'spark' across the very small gap first formed. This causes the air gap to become ionised or made conducting, and as a result the current is able to flow across the gap, even when it is quite wide, in the form of an arc. The electrode must always be touched on to the plate before the arc can be started, since the smallest air gap will not conduct a current (at the voltages used in welding) unless the air gap is first ionised or made conducting.
The arc is generated by electrons (small negatively charged particles) flowing from the - ve to the + ve pole and the electrical energy is changed in the arc into heat and light. Approximately two-thirds of the heat is developed near the + ve pole, which burns into the form of a crater, the temperature near the crater being about 6000-7000°C, while the remaining third is developed near to the - ve pole. As a result an electrode connected to the + pole will burn away 50% faster than if connected to the - ve pole. For this reason it is usual to connect medium-coated electrodes and bare rods to the - ve pole, so that they will not burn away too quickly. Heavily coated rods are connected to the + ve pole because, due to the extra heat required to melt the heavy coating, they burn more slowly than the other types of rods when carrying the same current. The thicker the electrode used, the more heat is required to melt it, and thus the more current is required. The welding current may vary from 20 to 600 A in manual metal arc welding.
When alternating current is used, heat is developed equally at plate and rod, since the electrode and plate are changing polarity at the frequency of the supply.
The electrode covering usually melts at a higher temperature than the wire core so that it extends a little beyond the core, concentrating and directing the arc stream, making the arc stable and easier to control. The difference in controllability when using lightly covered electrodes and various medium and heavily covered electrodes will be quickly noticed by the operator at a very early stage in practical manual metal arc welding.

Trade of Metal Fabrication – Phase 2 Module 2 Unit 3
Unit 3 43
Alternating Current
An alternating current is one which changes its value and direction with time (i.e. alternates). A.C. first flows in one direction and increases in current value from zero (no electrons flowing) to a maximum and then falls until it becomes zero again. The current then immediately begins to flow in the opposite direction until it reaches a maximum and again falls to zero. This pattern is continually repeated, so that a.c. does not have a fixed polarity, in fact the polarity changes continually with time. The shape of a graph of alternating current or voltage with respect to time is shown below.
Figure 24 - Graph of Alternating Current (or Voltage)
One complete set of changes without repetition is called a cycle. The number of cycles completed in one second is called the frequency and the unit of frequency is called the Hertz (Hz) (the old name was cycles per second). The mains frequency in Great Britain is 50 Hz, which means that the supply in our homes is changing direction 50 times in every second.
Effective Voltage
An alternating current is continually changing its value so that the voltage is also changing. The value of an alternating voltage used for the practical purposes of calculation is called the 'effective voltage'. The effective voltage is that value of alternating voltage which will produce the same heating effect as an equivalent direct voltage. This is 0.707 x the maximum value.
Trade of Metal Fabrication – Phase 2 Module 2 Unit 3
Unit 3 44
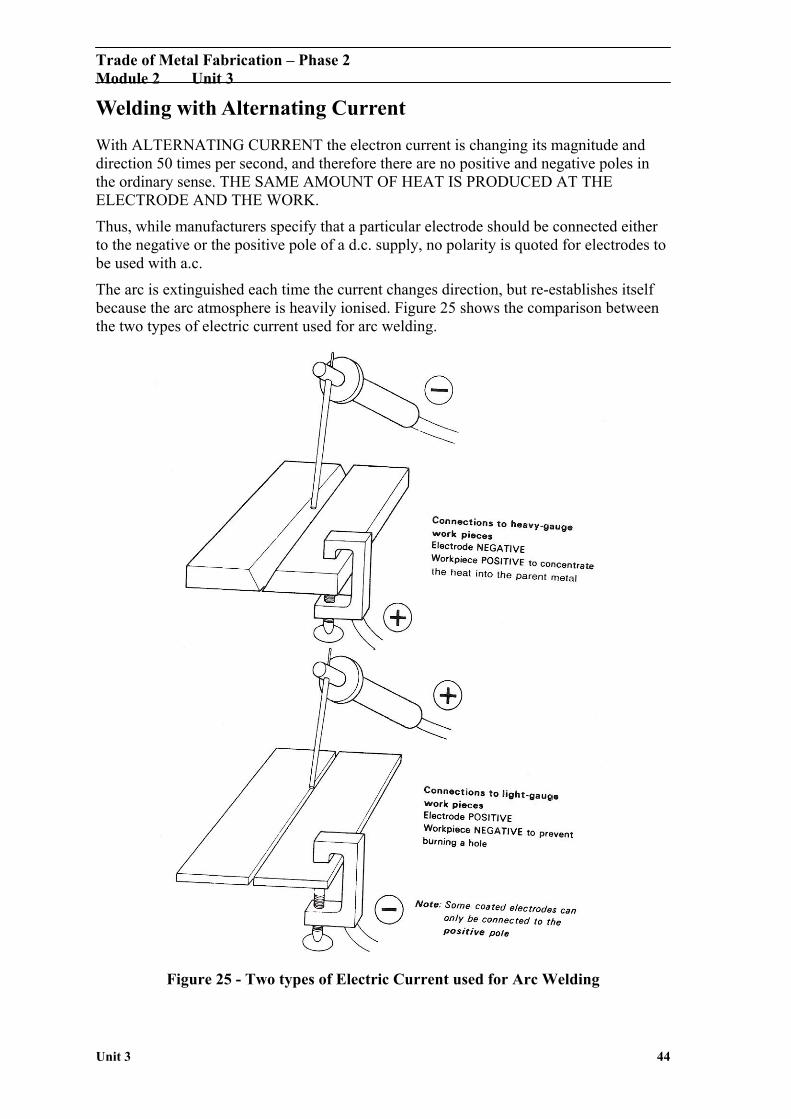
Welding with Alternating Current
With ALTERNATING CURRENT the electron current is changing its magnitude and direction 50 times per second, and therefore there are no positive and negative poles in the ordinary sense. THE SAME AMOUNT OF HEAT IS PRODUCED AT THE ELECTRODE AND THE WORK.
Thus, while manufacturers specify that a particular electrode should be connected either to the negative or the positive pole of a d.c. supply, no polarity is quoted for electrodes to be used with a.c.
The arc is extinguished each time the current changes direction, but re-establishes itself because the arc atmosphere is heavily ionised. Figure 25 shows the comparison between the two types of electric current used for arc welding.
Figure 25 - Two types of Electric Current used for Arc Welding
Trade of Metal Fabrication – Phase 2 Module 2 Unit 3
Unit 3 45
Self Assessment
Questions on Background Notes – Module 2.Unit 3
1. Draw a Circle 60mm in Diameter.
Clearly show the following:
a. SECTOR
b. TANGENT (Shown by a line that is Tangential to Circle)
c. RADIUS
d. DIAMETER
2. Construct an angle of 45° using a Compass and Rule, clearly show the
intersecting arc’s.
Trade of Metal Fabrication – Phase 2 Module 2 Unit 3
Unit 3 46
3. What are Templates? Give three useful pieces of information on them.
Trade of Metal Fabrication – Phase 2 Module 2 Unit 3
Unit 3 47
Index
A Alternating Current, 43 Arc Welding, 21
Methods, 22 Power Supplies, 21
C Coding for Welding Current Conditions, 18
E Earthing, 31 Effective Voltage, 43 Electric Arc Welding, 23
Introduction, 23 Manual Metal Arc Welding, 23 Starting Welding and Practice Welds, 25
Electrical Hazards, 34 How a Person May Receive an Electric Shock, 34 Personal Safety, 34 Protection of Life and Property, 34
Electrodes for Manual Metal Arc Welding, 35
S Safety in Manual Metal Arc Welding, 32
Eye Protection, 33
Safety Issues, 32 Welding Safety Precautions, 32
Speed of Travel, 17 Starting Welding and Practice Welds
Restarting a Weld, 29 Striking and Maintaining an Arc, 25 Weaving, 30 Welding Straight Beads, 28
Striking and Maintaining the Arc, 19
T Terms commonly used in Welding, 38 Terms used in Welding, 12 The Electric Arc, 42 The History of Welding, 10
Solid-State Welding, 11 Types of Joints, 14
Making Butt, Lap and Fillet Welds in the Flat Position, 14
Types of Welding Plant, 41 Direct Current (D.C.), 41
W Weld Defects, 40 Welding, 20 Welding Currents, 39 Welding with Alternating Current, 44