trailers for play pals – how to make - shop all toy · pdf filetrailers for play pals...
TRANSCRIPT

File: Trailers for Play Pals.docx By: Imants Udris Page 1 of 15
Trailers for Play Pals – How to Make This article will demonstrate how I made the four (4) trailer types.
• Camper – from Toymakingplans.com plan set – Woody Wagon & Trailer. • Boat and Trailer – from Toymakingplans.com plan set – Snazzy Toys for Scrollsawers. • Utility Trailer – simple custom design by myself. • Long Flat Bet Trailer – super simple custom design by myself.
In addition to the above I will tell you about the pin stripes on the VW Bug, the side panels attached to the Truck, Logs and planks. You already know how to make a trailer hitch using metal L-Hooks and dowels from the instructional article posted on the Forum. For those of you who are not aware of this instructional article, you will find it on the ToymakingPlans.com web site. Click on the Toymaker Forum tab on the home page. That will bring you to “Udie’s Toymaker Forum”. Under the main Category title “Toymakers Workshop”, locate and click on the section title “How-to-Do’s Tips & Tricks”. Then look for the Forum Topic titled “Trailer Hitch – Another Modification you can do to your Play Pals”. Enjoy. Now let us get back to the trailer build. Photo “1 Trailers.jpg”
The steps I took to make each of the trailers will be expanded in detail in the four (4) groups below. Let us begin with the Woody Wagon & Trailer.

File: Trailers for Play Pals.docx By: Imants Udris Page 2 of 15
Woody Wagon & Trailer Here is a photo of the front cover of the plan set and the finished product. Photo “2 Camper Cover.jpg”
Photo “6 Camper.jpg”
This is a wonderful project to build on its own from a great plan set to follow for an easy build. But … Right now, I am only interested in the Camper Trailer for my Play Pals. The first thing I had to do was to scale-down/reduce the plan set to the same scale as the Play Pals. How much did I have to reduce the size of the plans to? Let me explain my logic in determining this value. The Play Pals are build using 3/4" diameter wheels. My preference was to use the same size wheels in each of my trailer builds. So, the plans must be reduced in size to produce a paper plan with 3/4” diameter wheels. After doing a little trial and error method, I printed out a series of plans (only the one page from the plan set, not the entire plan) until I got as close as possible to the wheel diameter I set out to achieve. Photo “3 Original Paper Plan.jpg” Photo 4 32 Printed Plan.jpg” Photo “5 32 Photo Copy.jpg”
There are two (2) methods, you can do at home, to reduce the size of a page from a PDF plan set. From my trial and error method I determined that a 32% reduction in size is what I need. Method 1: Open the pdf plan set, and go to the page you wish to print in a reduced size. Open your ‘Print’ function. Under the “Page to Print” section – select “Current Page”
File: Trailers for Play Pals.docx By: Imants Udris Page 3 of 15
Then under the “Page Size” section – select “Custom Scale” and type in “32” %. Select the “Print” button and you will get a printout as shown in Photo “4 32 Printed Plan.jpg”.
Method 2: Open the pdf plan set, and go to the page you wish to print in a reduced size. Open your “Print” function. Once again, under the “Page to Print” section – select “Current Page”. Then under the “Page Size” section – select “Actual Size”. Finally select the “Print” button and you will get a printout, full size to scale as shown in
Photo “3 Original Paper Plan.jpg”. Now, take the print out to your All-in-One printer/copier/scanner and make a photo copy of your full scale plan after you have set the photo copy to be 32% of the original size.
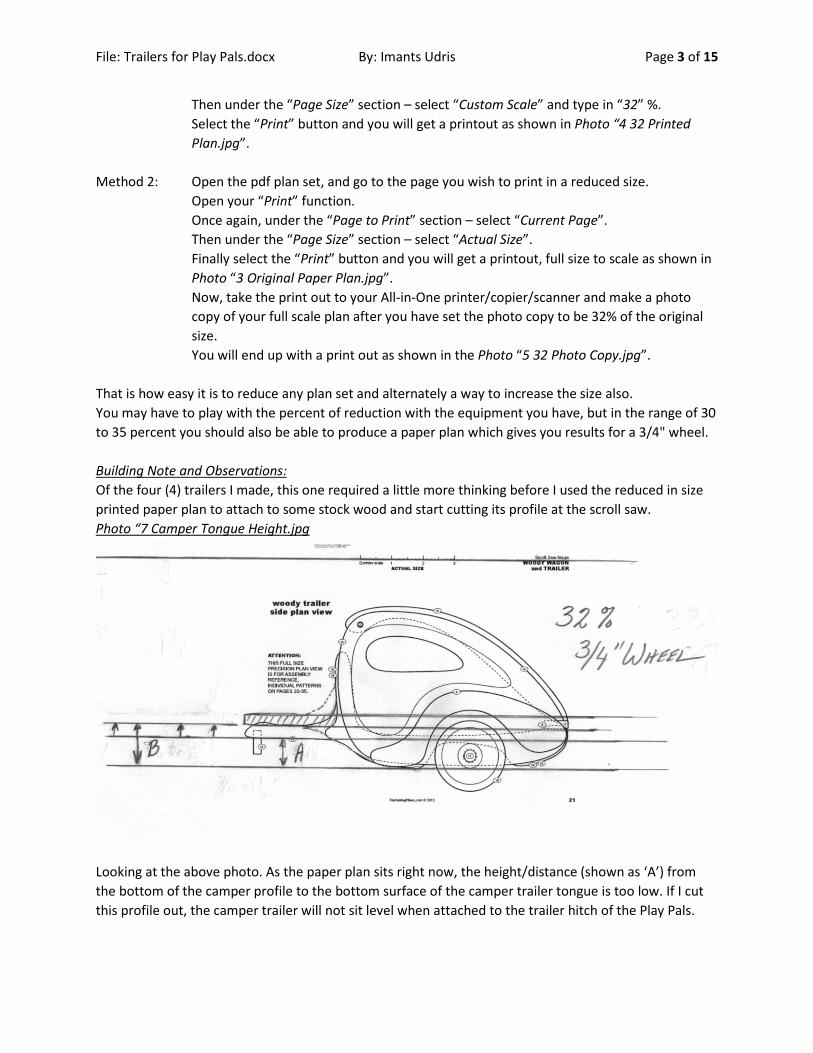
You will end up with a print out as shown in the Photo “5 32 Photo Copy.jpg”. That is how easy it is to reduce any plan set and alternately a way to increase the size also. You may have to play with the percent of reduction with the equipment you have, but in the range of 30 to 35 percent you should also be able to produce a paper plan which gives you results for a 3/4" wheel. Building Note and Observations: Of the four (4) trailers I made, this one required a little more thinking before I used the reduced in size printed paper plan to attach to some stock wood and start cutting its profile at the scroll saw. Photo “7 Camper Tongue Height.jpg
Looking at the above photo. As the paper plan sits right now, the height/distance (shown as ‘A’) from the bottom of the camper profile to the bottom surface of the camper trailer tongue is too low. If I cut this profile out, the camper trailer will not sit level when attached to the trailer hitch of the Play Pals.

File: Trailers for Play Pals.docx By: Imants Udris Page 4 of 15
This bottom surface height must be increased to the level shown as ‘B’. In addition, the curve between the tongue and the upper and lower part of the camper will also need to be modified as shown by the dotted lines. This height does not have to be exact, you do not need any special tools to assist you in determining the height adjustment. Good old eyeball and a tape measure will get you close enough. My next focus and concern was on the tongue itself. If I were to use 3/4" thick MDF for the body profile and the tongue, my thoughts were I was waiting for a disaster to happen. I felt that the tongue being only 1/8” thick MDF would easily break off during play. I could use common framing lumber or dressed Pine or even Cherry and with confidence would feel that the tongue strength would be increased, reducing a break off point. I went one step further – I elected to use a piece of 1/8” thick x 3/4" wide piece of Canadian Maple. Wood that I harvested over two (2) years ago. Remember my two (2) WTN (Wood Toy News) articles and videos? Taking a 2200 pound log and making planks with the chain saw. That is the wood that I used. Photo “8 Camper Blocks.jpg”
I sandwiched and glued the piece of Maple between two (2) pieces of 3/4" MDF. Using the Maple made me feel that I had a strong tongue. Now … you do not have to use Maple as I did. A piece of common 2x framing lumber cut to the same dimensions will be a strong equivalent. Now let us mount the paper pattern and cut some wood.
Photo ‘9 Attach Pattern.jpg”
I like to apply a layer of clear packing tape to the surface of the wood prior to attaching the paper pattern. I find that the packing tape acts as a lubricant for the scroll saw blade for easier cutting. I then attached the paper pattern. I aligned the paper pattern to the best of my ability to form around the
tongue section and aligned the two (2) parallel lines for the width of the Maple to align up with the gap in the block of wood on the right side. That is why I glued and left this area open, only to assist me in aligning the pattern nice and straight. Now I can cut out the camper trailer profile on the scroll saw.
File: Trailers for Play Pals.docx By: Imants Udris Page 5 of 15
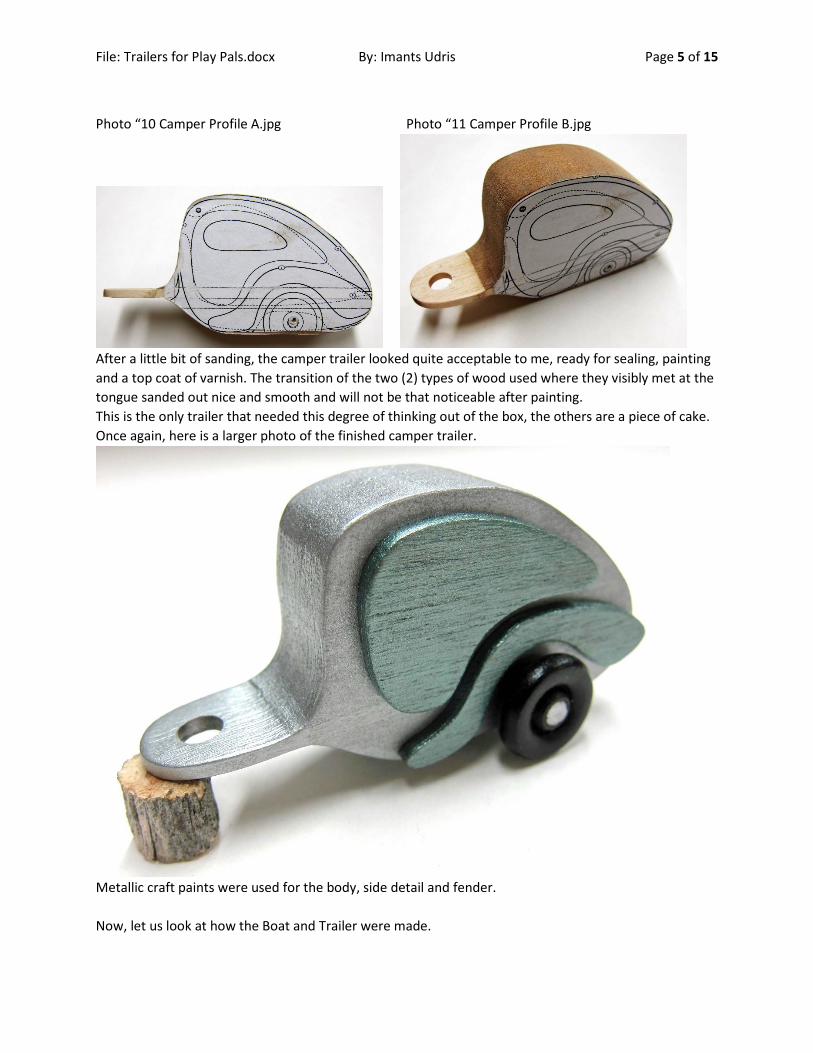
Photo “10 Camper Profile A.jpg Photo “11 Camper Profile B.jpg
After a little bit of sanding, the camper trailer looked quite acceptable to me, ready for sealing, painting and a top coat of varnish. The transition of the two (2) types of wood used where they visibly met at the tongue sanded out nice and smooth and will not be that noticeable after painting. This is the only trailer that needed this degree of thinking out of the box, the others are a piece of cake. Once again, here is a larger photo of the finished camper trailer.
Metallic craft paints were used for the body, side detail and fender. Now, let us look at how the Boat and Trailer were made.

File: Trailers for Play Pals.docx By: Imants Udris Page 6 of 15
Boat and Trailer Combination Here is the front cover of the “Snazzy Toys for Scrollsawers” plan set and an excerpt displaying the 26 full size patterns it contains in addition to a photo of the finished product. Photo “12 SnazzyToysFrontCover.jpg” 14 Boat n Trailer.jpg
Photo “13 ToyYouCanBuild.jpg” (The boat and trailer are on the top level, left side.)
Once again, the plan set required to be reduced in size to match the scale of the Play Pals and the preferred 3/4" diameter wheel size. Photo “14 Boat Trailer Plan.jpg”
Using one of the two (2) methods detailed in the preceding section, I reduced the plan set to 32 percent. Attached the paper plan to MDF and cutout the profile as is with one exception. I did not cut out the tongue section of the trailer, I left it alone. Then I matched the bottom edge of the tongue to the tongue height of the Play Pal. Marked it with a pencil and cut the profile to that height.
File: Trailers for Play Pals.docx By: Imants Udris Page 7 of 15
That’s it, done, nothing to it. Again applied some metallic paint and applied a top coat of varnish. This was so easy to do, I should have made a dozen of them at the same time. Now, let’s be creative by designing and building our own Utility trailer.
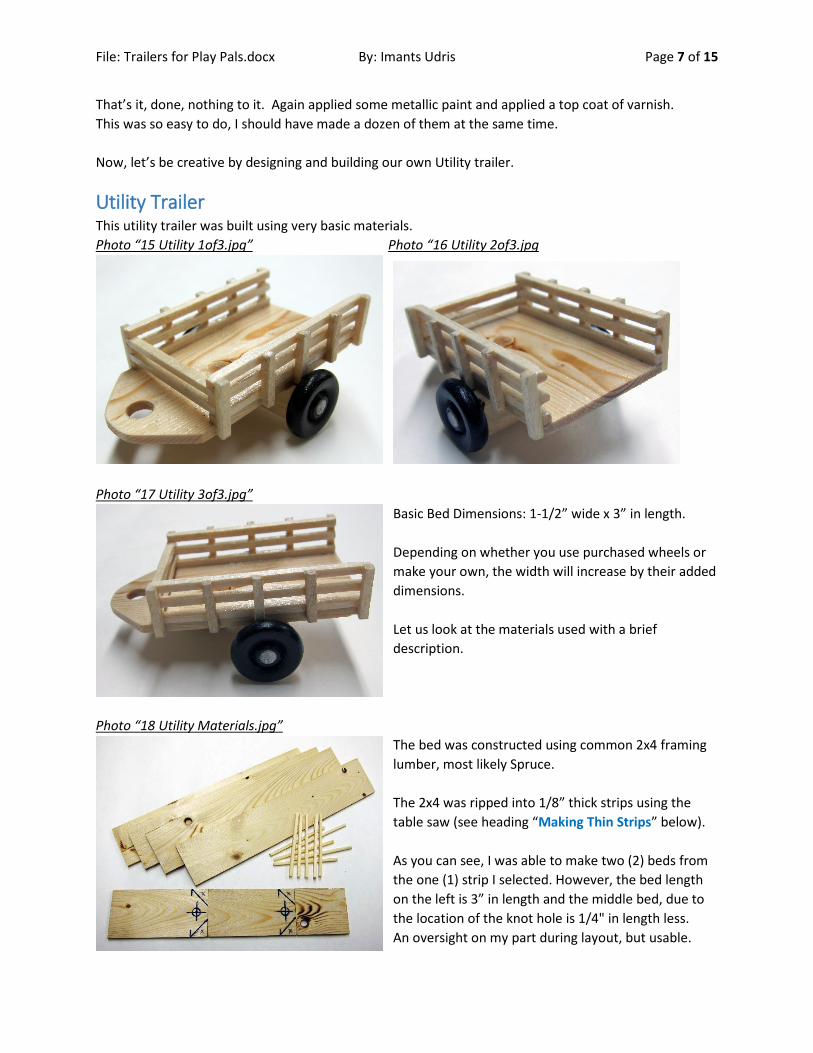
Utility Trailer This utility trailer was built using very basic materials. Photo “15 Utility 1of3.jpg” Photo “16 Utility 2of3.jpg
Photo “17 Utility 3of3.jpg”
Basic Bed Dimensions: 1-1/2” wide x 3” in length. Depending on whether you use purchased wheels or make your own, the width will increase by their added dimensions. Let us look at the materials used with a brief description.
Photo “18 Utility Materials.jpg”
The bed was constructed using common 2x4 framing lumber, most likely Spruce. The 2x4 was ripped into 1/8” thick strips using the table saw (see heading “Making Thin Strips” below). As you can see, I was able to make two (2) beds from the one (1) strip I selected. However, the bed length on the left is 3” in length and the middle bed, due to the location of the knot hole is 1/4" in length less. An oversight on my part during layout, but usable.

File: Trailers for Play Pals.docx By: Imants Udris Page 8 of 15
Sticks: These are 3/32” x 3/32” x 2-1/4”. I purchased a bag of about 1000 pieces while burning some time in a children’s educational hobby toy shop. They were in the discount bin and I thought they just might come in handy for a future project and the Utility Trailer was just the perfect project for them. They are actually called “micro beams” for toys you can build by “Matchitecture.com”. A whole different style to build things. Really, nothing more than when we used to build models with Balsa wood. These sticks are not soft Balsa wood, they are much stronger, my guess, same wood as used for wood matches. Not much difference between these sticks and matchsticks. You could substitute the micro beams with matchsticks, which are available in regular lengths and longer ones for the BBQ. I think the thickness will be pretty close to what I used. Or, you can make your own thin stock of wood, again described in the “Making Thin Strips” section below.
Making Thin Strips: Photo “19 Thin Strips WTN.jpg” Photo “20 Thin Strips Video.jpg”
Let us make our own sticks and let us make our sticks 1/8” x 1/8” by any length on the table saw. Increasing the stick width and thickness by 1/32” is not going to make or break this build or appearance. To learn how to make your own thin strips, please visit Toymakingplans.com home page. Look for a tab titled “Wood Toy News”. Click on the tab it will bring you to a list of Wood Toy News (WTN’s) articles and articles with videos. Look for the October 9, 2013 issue. Here you will find detailed instructions on how you can cut thin strips on your table saw and similarly the video will demonstrate how it is done with safety in mind. You will see how easy it is with the use of some quick and simple push blocks you can make in minutes. Push blocks which will give you total control over your keeper piece and the cutoff piece as you enter and exit the table saw blade while cutting. Notice that the saw blade is not exposed, it is in a protective tunnel during the process. How to build the Utility Trailer Railings continues on the next page.

File: Trailers for Play Pals.docx By: Imants Udris Page 9 of 15
Building the Utility Trailer Railings Photo “22 Rail 1of2.jpg” Photo “23 Rail 2of2.jpg”
First thing I required was a paper gluing template/guide. So I hand drew a layout and then changed my mind and used a drawing program to make the template, only because of the 3/32” dimensional wood I was using. If you build the railings using 1/8” dimensional wood, you can easily draw this by hand to make your gluing template. I used a piece of rigid insulation as my base, applied my paper template and then covered it with a piece of wax paper and secured it in place. In the event I get a little sloppy while applying the glue, it will not stick to the wax paper and can be easily cleaned up after the glue has cured. As you can see, I used sewing pins to assist in positioning the horizontal rails and a small paint brush to apply glue where the vertical rails will be attached. This delicate work did require the use of tweezers, they certainly make life easier during this assembly. The spacing between the rails should be the same width of the sticks you are using. This spacing is used to attach the front rails as seen in Photo “15 Utility 1of3.jpg”. A nice clean and professional look. I cut the vertical strips a little longer than my intended dimension of 1/2" in length as seen on the paper template. The bottom rail will rest on and be glued to the surface of the bed, in addition having the vertical rails a little longer allowed me to apply glue the back of each vertical rail which will be glued to the bed side edges, for added strength. Any vertical rail that stick out farther that the bottom surface of the bed can be easily sanded off. Remember, this method of attaching the rails to the bed will increase the width of the bed. Something you will have to be aware of when it comes time to add the piece of wood for the axle. Next we will discuss the Utility Trailer Axle component on the next page.

File: Trailers for Play Pals.docx By: Imants Udris Page 10 of 15
Utility Trailer Axle I used a piece of 1/2" x 1/2" piece of Pine for my axle block. Photo “23 Axle.jpg”
I cut the axle block length and compensate for the overhanging vertical rails thickness on each side and drilled the axle hole. By sanding, I rounded over the bottom surface of the axle block. Then tapered the ends of the axle block so that its edge will match the up with the bed edge.
Now … if you find it difficult to drill a long axle hole into the axle block, there is an alternative and simpler way to make axle blocks. Make two (2) narrow, say 1/4" wide axle blocks. The series of photos below will demonstrate this alternative without any written description. Stock wood used was 3/4” wide x 1/4" thick. Photo “24 Axle Alt 1of4.jpg” Photo “25 Axle Alt 2of4.jpg”
Photo “26 Axle Alt 3of4.jpg” Photo “27 Axle Alt 4of4.jpg”
Once you have added the axle block or alternative axle blocks, inserted the axle and attached the wheels the Play Pay Utility Trailer is complete. I elected not to paint the trailer and only applied a top coat of varnish.

File: Trailers for Play Pals.docx By: Imants Udris Page 11 of 15
Long Flat Bed Trailer This is the simplest build of the four (4) trailer types.
Photo “32 FlatBed Materials.jpg” Very basic materials were used. Bed was constructed from 1/8” x 1-1/2” x 4-1/2” common framing lumber. Again strips were ripped from a 2x4 on the table saw in the same manner as described above. Side rails were made using long coffee stir sticks which were 3/64” x 1/4" x 7”.
The stir sticks were cut to length and glued to the edges of the bed flush with the bottom of the bed. Only about 1/8” of material is higher than the surface of the bed. The next group of photos exhibits how simple this build is. Photo “28 FlatBed 1of4.jpg” Photo “29 FlatBed 2of4.jpg”
Photo “30 FlatBed 3of4.jpg” Photo “31 FlatBed 4of4.jpg”
The axle block was made in the same manner as described in the Utility Trailer section with the same length considerations. It also can be replaced with the alternative narrow axle block design. The completed assembly was sealed, painted with standard craft paint and a top coat of varnish applied. The next section is the Bonus Section with descriptions of the modifications to the Truck, VW Bug and a couple other extra pieces of materials.

File: Trailers for Play Pals.docx By: Imants Udris Page 12 of 15
Bonus Section
Truck Mods Photo “33 Truck Mods.jpg”
In addition to adding the trailer hitch, I also added some side panels to this vehicle. I used some materials from my scrap bin, some Walnut which was just under 1/8” thick, 1/2" wide and cut to 1-7/8” in length. Glued them on and the truck mod is complete.
VW Bug Mods Photo “34 VW Mod.jpg”
Metallic pin stripes were added to this VW Bug. You will be surprised to learn what they are.
They are ladies metallic coloured pin stripes used in fingernail decorating. Photo “35 Pin Stripes 1of2.jpg” Photo “36 Pin Stripes 2of2.jpg”

File: Trailers for Play Pals.docx By: Imants Udris Page 13 of 15
A ten (10) pack of different colours cost less the $2.00 with free shipping and purchased from EBay. The back has an adhesive and after I attached them to the car I did apply a thin coat of varnish. They are repositionable and do not remove any paint when they are removed and repositioned. I think there is a great potential for these in the toy making we do to add some extra accents such as door outlines, windshield outline and pin striping vehicles. I took a chance, purchased some, tried it and cannot wait to apply them on other toy projects.
Utility Trailer at Play Photo “37 Utility Trailer at Play
I used this photo in the “Trailer Hitch” Forum post and have repeated it here. I thought I would expand on the logs and lumber pieces and how they were made.

File: Trailers for Play Pals.docx By: Imants Udris Page 14 of 15
Photo “38 Logs n Lumber.jpg”
The logs and lumber were not added to the photo using any photo editing tools or trick photography. They are real wood – dead tree branches. To give you an idea of the scale, the large log at the top of the screen is only eight (8) inches in length. The log on the right is only two (2) inches in length and just over 5/8” in diameter. The smaller logs were cut from an equal size piece of dead branch found in the back yard and cut on the band saw. I found using the band saw to make these pieces a lot easier and faster than on the scroll saw. The lumber or boards were also cut using the band saw with a little holding jig I made for finger safety. I was very surprised and very pleased at the same time to see the grain detail in their boards. I could not have planned or hoped for anything this great looking – just a lucky day in the work shop. These planks would be perfect for making some doll furniture, coffee tables, end tables etc. Leaving the bark on turns those into what is called a ‘live edge’ and in the furniture business in the real world are very expensive pieces of furniture. I never thought to use two (2) of these planks to make the side panels for the truck, now that would have looked sharp.

File: Trailers for Play Pals.docx By: Imants Udris Page 15 of 15
Thumbnails of each vehicle with each trailer.
Conclusion The purpose of this article was to show you that with a little out of the box thinking you can easily increase the play value of many of the plan sets. Even these Super Simple Play Pals, which are a free plan set downloadable, from ToymakingPlans.com. I have shown you how to reduce paper plan sets, what to look for when trying to match the scale to another plan set. How to make these simple trailers. The trailer types you can make is endless, you can design trailers to support any business/service type. I hope this article demonstrated to you that it is not that difficult to do. If you are in the business of selling your toys, what a great opportunity to increase you sales by offering groups of vehicles built as per the plan sets, vehicles with the trailer hitch option added and groups of the trailers. Sell them singularly or packaged like the thumbnails shown above. Happy Toy Making Trailers Imants Udris (Udie)
<<<<< >>>>>