trainee workbook - global software, inc · 2. from the ribbon bar, on the atlas tab, in the upload...
TRANSCRIPT

TRAINEE WORKBOOK Atlas 4.0 for Microsoft Dynamics AX
Advanced upload system

COPYRIGHT NOTICE
Copyright © 2009, Globe Software Pty Ltd, All rights reserved.
Trademarks
Dynamics AX, IntelliMorph, and X++ have been registered as or are under registration as
trademarks of Microsoft Corporation.
Microsoft Office System 2007, Windows 2003 and Windows 2008 are registered trademarks of
Microsoft Corporation.
Software release
This documentation accompanies Atlas version 4.0.1749 or higher and which is suitable for
Microsoft Dynamics AX V4.0 SP2 and Dynamics AX 2009 SP1 or higher and Microsoft Office
2007 or higher.
Publication date
12/07/2009
Reader comments
Any comments or suggestions regarding this publication are welcomed and should be
addressed to the attention of:
i
Table of Contents 1 Introduction .................................................................................................... 3
1.1 Welcome .............................................................................................................................. 3
1.2 About this course ................................................................................................................ 3
1.2.1 Course description ......................................................................................................................................................................... 3
1.2.2 Audience ............................................................................................................................................................................................ 3
1.2.3 Objectives .......................................................................................................................................................................................... 3
1.2.4 Pre-requisites ................................................................................................................................................................................... 3
1.3 Classroom Training ............................................................................................................. 4
1.4 Training Materials .............................................................................................................. 4
2 Working with templates .................................................................................. 6
2.1 Outline ................................................................................................................................6
2.2 Objectives ............................................................................................................................6
2.3 Walkthrough: Creating a simple customer template ........................................................ 7
2.3.1 Scenario ............................................................................................................................................................................................. 7
2.3.2 Preliminaries .................................................................................................................................................................................... 7
2.3.3 Identifying mandatory fields ...................................................................................................................................................... 8
2.3.4 Creating a table template ........................................................................................................................................................... 8
2.3.5 Selecting mandatory fields ......................................................................................................................................................... 9
2.3.6 Adding user required fields...................................................................................................................................................... 10
2.3.7 Remove redundant fields ......................................................................................................................................................... 11
2.3.8 Applying basic defaults ............................................................................................................................................................. 11
2.3.9 Saving the template ................................................................................................................................................................... 13
3 Table upload functions ................................................................................... 15
3.1 Outline ............................................................................................................................... 15
3.2 Objectives ........................................................................................................................... 15
3.3 Append function ............................................................................................................... 16
3.3.1 Outline............................................................................................................................................................................................. 16
3.3.2 Uses for the Append function ................................................................................................................................................. 16
3.3.3 Lab. Exercises ................................................................................................................................................................................ 17
3.4 Update Column function .................................................................................................. 18
3.4.1 Outline............................................................................................................................................................................................. 18
3.4.2 Uses for the Column function ................................................................................................................................................. 18
3.4.3 Walk-through: Updating a field ............................................................................................................................................ 19
3.4.4 Lab exercises ................................................................................................................................................................................. 23
3.5 Replace function ............................................................................................................... 24
3.5.1 Outline............................................................................................................................................................................................. 24
3.5.2 Uses for the Lookup function .................................................................................................................................................. 24
3.5.3 Walk-through: Find and replace ........................................................................................................................................... 25
3.5.4 Lab Exercises ................................................................................................................................................................................. 30
3.6 Key points .......................................................................................................................... 31

Introduction
ii
3.7 Quick interaction .............................................................................................................. 32
4 Journal functions ............................................................................................ 33
4.1 Outline .............................................................................................................................. 33
4.2 Objectives .......................................................................................................................... 33
4.3 Walk-through: Journal upload functions ......................................................................... 34
4.3.1 Scenario .......................................................................................................................................................................................... 34
4.3.2 Creating a basic template ........................................................................................................................................................ 34
4.3.3 Adjusting heading and lines fields ........................................................................................................................................ 35
4.3.4 Mapping and setting defaults ................................................................................................................................................. 37
4.3.5 Test the journal upload ............................................................................................................................................................. 41
4.4 Key points ......................................................................................................................... 43
4.5 Quick interaction .............................................................................................................. 44
3
1 Introduction
1.1 Welcome Training is a vital component of retaining the value of your Atlas investment. Our training
keeps you up-to-date on your solution and helps you develop the skills necessary for you to
fully maximize the value of your investment. Whether you choose to undertake Classroom
Training, or download our Training Materials, there’s a type of training to meet your needs.
1.2 About this course This course provides you with specific guidance on how to build templates in the Atlas upload
system.
1.2.1 Course description
This tutor-led course provides students with the knowledge to use advanced functions of the
Atlas upload system. The course focuses on using all the upload functions and demonstrates
each in isolation and in context.
1.2.2 Audience
This course is intended for all students who wish to learn about the Atlas upload system and
what it can do for them. It is expected that students have a good understanding of Microsoft
Excel and its basic features.
1.2.3 Objectives
The objective of this course is to provide you with the ability to:
Understand and navigate the Atlas ribbon and task panes
Understand Designer and Context modes of operation
Use the data source tabs and mapping fields to entries in your document
Understand the concept of a template and its primary purposes
o Field selection
o Setting of defaults
Understand and how to build table upload templates for the following functions:
o Append
o Column update
o Replace
Understand and how to build journal upload templates
Understand the various forms of defaults and how to apply them
1.2.4 Pre-requisites
Students must have completed the Atlas 4 introductory upload course and must be familiar
with Microsoft Dynamics AX. They must also have a good knowledge of the basic features of
Microsoft Excel.

Introduction
4
1.3 Classroom Training Classroom Training provides serious, in-depth learning through hands-on interaction. From
demonstrations to presentations to classroom activities, you’ll receive hands-on experience
with instruction from our experts.
1.4 Training Materials Training Materials allow you to learn at your own pace, on your own time with information-
packed training manuals. We offer a variety of training manuals and user guides, each rich with
tips, tricks, and insights you can refer to again and again:
Atlas Training Workbooks are very detailed training manuals, designed from a training
perspective. These manuals include advanced topics as well as training objectives, exercises
and interactions.
Look for a complete list of manuals available from your partner or via the website:
www.atlas4synamicsAX.com.au.
Before you begin please check that you have the following:
You must have a copy of Dynamics AX 4 of Microsoft Dynamics AX 2009 installed and
working on the CEU company. Or,
A copy of Microsoft Dynamics AX 2009 installed in a VPC with the demonstration company
CEU installed.
Atlas 4 installed with connections to the appropriate Microsoft Dynamics AX installation. (If
you are using the VPC with an Atlas differential installed, then this should already be
working)
An Atlas client icon on the desktop, configured to point to the training system
Atlas 4 training workbooks installed
LAB 3.6.1 - Append Post codes
LAB 4.3.1 - Append Customers
LAB 4.3.2 - Post codes
LAB 4.3.3 - Addresses
LAB 4.4.1 - Update Customer Credit ratings
LAB 4.5.1 - Customer - Item sales forecast
LAB 5.3.1 - Free-text invoice
LAB 5.3.2 - Sales price journal
LAB 5.3.3 - Sales order
Atlas 4 completed training workbooks
COMPLETE WALKTHROUGH 3.4.1 - Build in-document template
COMPLETE L3.6.1 - Append Post codes
COMPLETE WALKTHROUGH 4.4.3 - Update sales pool

Introduction
5
COMPLETE WALKTHROUGH 4.4.3a - Verification
COMPLETE WALKTHROUGH 4.3.1 – Journal
COMPLETE L5.3.2 - Sales price journal
COMPLETE L5.3.3 - Sales order
Upload data source file and templates:
Training - General - Upload.AtlasDataSources
LAB 3.3.1 Append New Customers
LAB 3.4.1 Append New Customers
LAB 3.6.1 City postal codes
LAB 4.3.3 Addresses
LAB 4.4.3 Sales order pool update
LAB 4.5.1 Sales forecast
LAB 5.3.1 Free-text invoice
Free-text invoice
LAB 5.3.2 - Sales price journal
Accompanying walk-through templates:
WALKTHROUGH 2.3.1 - Upload new customer
WALKTHROUGH 3.4.1 - Update sales pool
WALKTHROUGH 3.5.1 - Replace Sales Budget
WALKTHROUGH 4.3.1 - Journal
6
2 Working with templates
2.1 Outline For all but the simplest of uploads, a template is needed to define both the fields in the target
Microsoft Dynamics AX table and the mapping between these fields and your Microsoft Office
document.
A template serves two purposes:
1. Describes the required fields in the target Microsoft Dynamics AX table in terms of:
a. System requirements. i.e. have all the mandatory fields been included
b. User requirements. i.e. have all the fields the user needs been included
2. Provides a means by which pre-set or default values can be assigned to fields, thus
reducing the amount of data-entry the user has to do, to successfully upload into
Microsoft Dynamics AX. These defaults come in the form of:
a. Pre-set literal values
b. Number sequences
c. Defaults from parent or child records
d. X++ method calls
3. Provides a means to map the Microsoft Office document to the Microsoft Dynamics AX
fields
Templates are analogous to saved queries; they can be saved as a file and shared amongst
other users.
Mapped templates are often saved into the document as in-document templates. It is these
that are used when the upload is run. The batch tasks procedure can only use in-document
templates.
2.2 Objectives At the end of this chapter, you will be able to:
Create table function templates
Understand what is meant by system and user requirements in a template
Understand the various forms of template pre-set values
Understand how to edit templates
Understand the difference between a template and an in-document template

Working with templates
7
2.3 Walkthrough: Creating a simple customer template 2.3.1 Scenario
This is the first opportunity you have had to build an upload template. With an eye for
simplicity, you decide to attempt to build a template that can be used to append customer
records to the Microsoft Dynamics AX customer table. It will derive the customer account code
from a number sequence and it will default the language. You need to remember that the
template must satisfy the following conditions before it can be used successfully.
Choose a table
Includes all mandatory system fields
Includes the set of fields necessary to meet the business requirement
Remove redundant fields
Apply defaults to reduce on-sheet references
Saving the template
The document you are using to test the upload process is WALKTHROUGH 2.3.1 – Upload new
customer.xlsx.
2.3.2 Preliminaries
Since a number sequence will be used to assign the customer number, it is necessary to create
this in Microsoft Dynamics AX first.
1. Open Microsoft Dynamics AX
2. Navigate to Basic -> Setup -> Number sequences -> Number sequences
Figure 1 Number sequences
3. Create a new number sequence (Ctrl+N)
4. Enter Atlas_1 in the Number sequence code entry box
5. Enter Atlas customer number in the Name entry box
6. Enter 1 in the Smallest entry box
7. Enter 999 in the Largest
8. Enter AC### in the Format entry box
Working with templates
8
9. Save the record (Ctrl+S)
10. Close Microsoft Dynamics AX
2.3.3 Identifying mandatory fields
Each table will typically include fields that are required by Microsoft Dynamics AX to be filled
in. These will include key fields and other essential fields used by the system. Unless derived
through a method call, you must include all mandatory fields in your template. You can
determine the mandatory fields on a table either by inspecting the table definition in the AOT
or selecting the table for upload using Atlas in Context mode:
1. From the Ribbon bar, on the Atlas tab, in the Report options group, ensure that the task
pane mode is Context
2. From the Ribbon bar, on the Atlas tab, in the Upload group click the Table button.
Choose Append from the menu that is shown
3. Tick to select Customers beneath the Create using template node
4. Click to select the Append tab
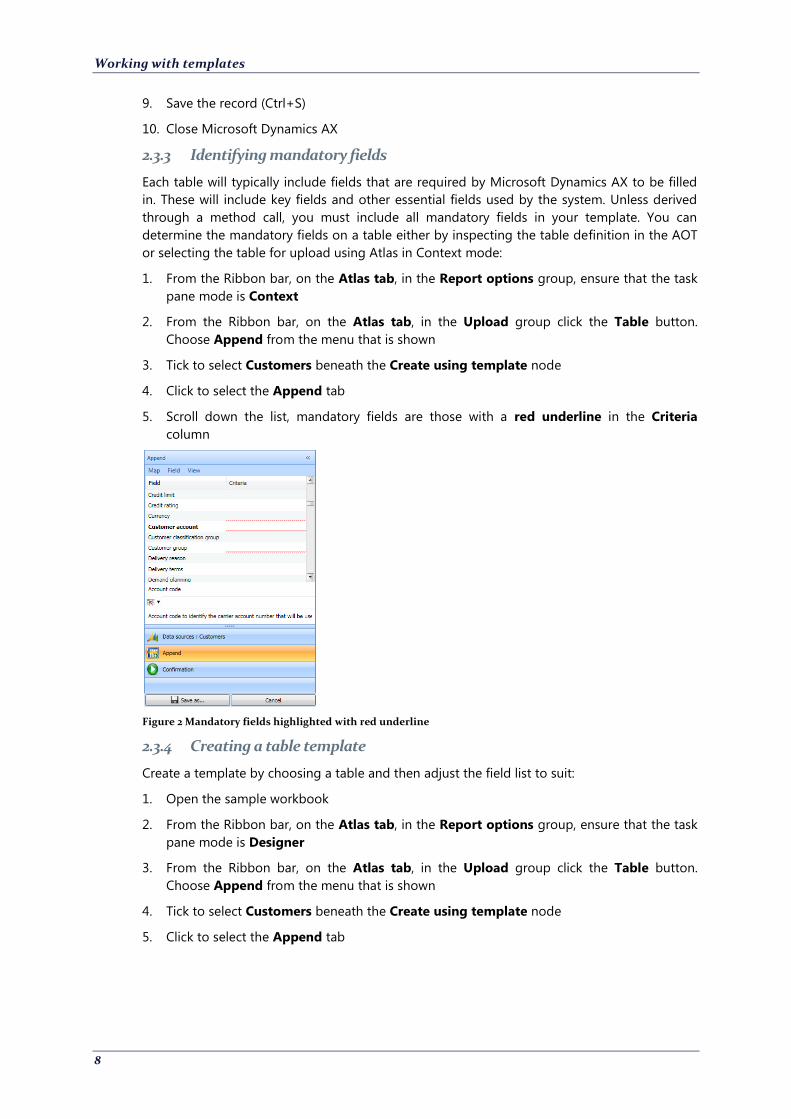
5. Scroll down the list, mandatory fields are those with a red underline in the Criteria
column
Figure 2 Mandatory fields highlighted with red underline
2.3.4 Creating a table template
Create a template by choosing a table and then adjust the field list to suit:
1. Open the sample workbook
2. From the Ribbon bar, on the Atlas tab, in the Report options group, ensure that the task
pane mode is Designer
3. From the Ribbon bar, on the Atlas tab, in the Upload group click the Table button.
Choose Append from the menu that is shown
4. Tick to select Customers beneath the Create using template node
5. Click to select the Append tab
Working with templates
9
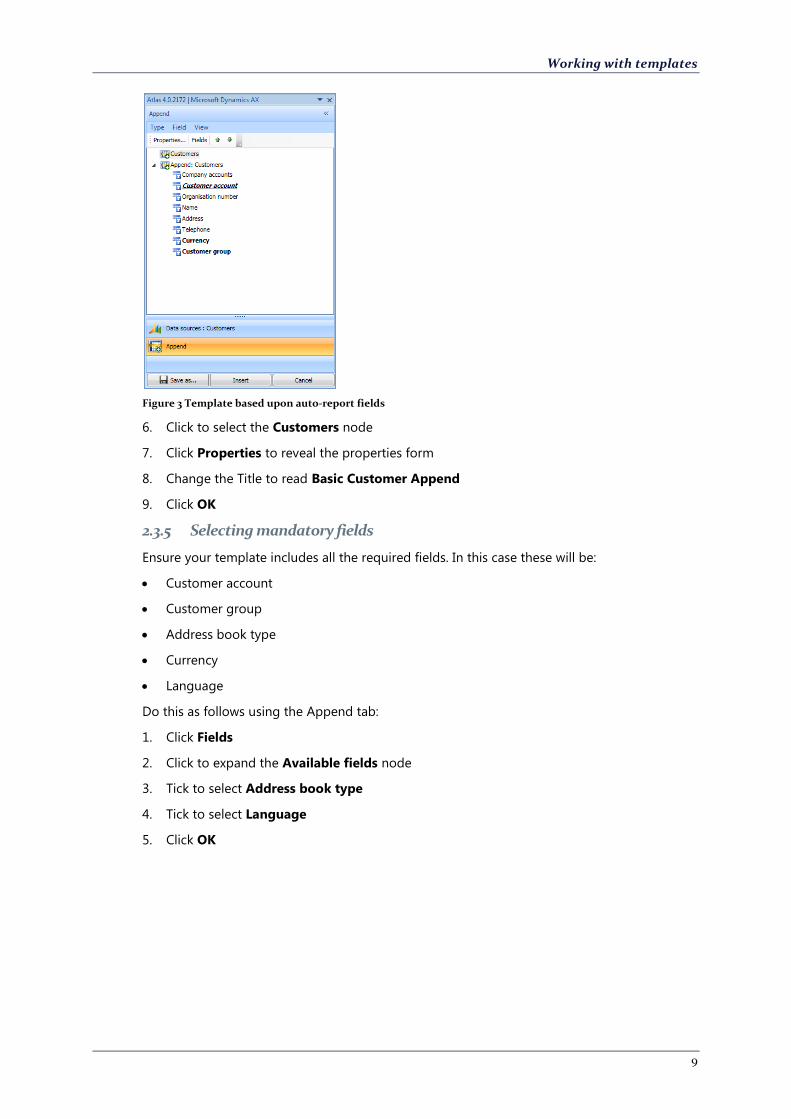
Figure 3 Template based upon auto-report fields
6. Click to select the Customers node
7. Click Properties to reveal the properties form
8. Change the Title to read Basic Customer Append
9. Click OK
2.3.5 Selecting mandatory fields
Ensure your template includes all the required fields. In this case these will be:
Customer account
Customer group
Address book type
Currency
Language
Do this as follows using the Append tab:
1. Click Fields
2. Click to expand the Available fields node
3. Tick to select Address book type
4. Tick to select Language
5. Click OK

Working with templates
10
Figure 4 All mandatory fields included
2.3.6 Adding user required fields
These are fields that are in the workbook that are, from a user’s point of view, necessary for a
successful upload. In this example these include the Search name, Credit rating and the Credit
limit:
1. Click Fields
2. Click to expand the Available fields node
3. Tick to select Credit limit
4. Tick to select Credit rating
5. Tick to select Search name
6. Click OK
The template now appears as follows:
Figure 5 Template including mandatory, user required and redundant fields

Working with templates
11
2.3.7 Remove redundant fields
The template is useable as specified. However, it can be adjusted to remove those fields that
are not necessary for the data in the source workbook. These fields include:
Address
Telephone
Organisation number
Remove as follows:
1. Click Fields
2. Tick to remove Address
3. Tick to remove Telephone
4. Tick to remove Organisation number
5. Click OK
The template now appears as follows:
Figure 6 Template suitable for use with the workbook
2.3.8 Applying basic defaults
2.3.8.1 Outline
You can apply some basic defaults at this stage, these include:
Number sequences
Literal values that need not be entered from the workbook. E.g. Address book type
2.3.8.2 Adjusting the template for defaults
Defaults are applied at field level, in this example these fields will be Customer account,
Address book type and Language:
1. Click to select Customer account
2. Right-click to select Properties
3. Tick to select Number sequence

Working with templates
12
4. Enter Atlas_1 in the Value entry box
5. Select Per line in New voucher
6. Tick to select Hidden. This ensures the field is not visible at runtime
Figure 7 Customer account properties
7. Click Apply
8. Click the right spinner button (>) until the Address book type field is shown
9. Tick to select Hidden. This ensures the field is not visible at runtime
10. Click the Value search button to reveal a list of alternatives
11. Tick to select Organization
Figure 8 Choose Organization
12. Click Select items
13. Click OK
14. Click the right spinner button (>) until the Language field is shown
15. Tick to select Hidden. This ensures the field is not visible at runtime
Working with templates
13
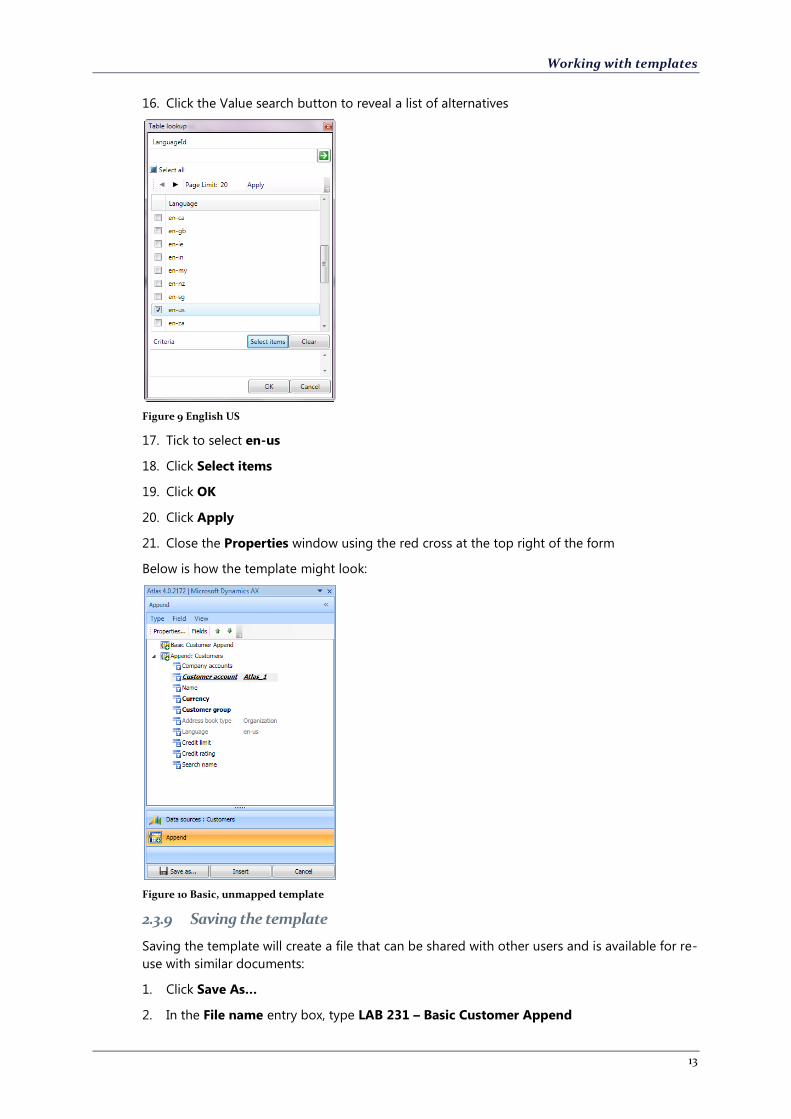
16. Click the Value search button to reveal a list of alternatives
Figure 9 English US
17. Tick to select en-us
18. Click Select items
19. Click OK
20. Click Apply
21. Close the Properties window using the red cross at the top right of the form
Below is how the template might look:
Figure 10 Basic, unmapped template
2.3.9 Saving the template
Saving the template will create a file that can be shared with other users and is available for re-
use with similar documents:
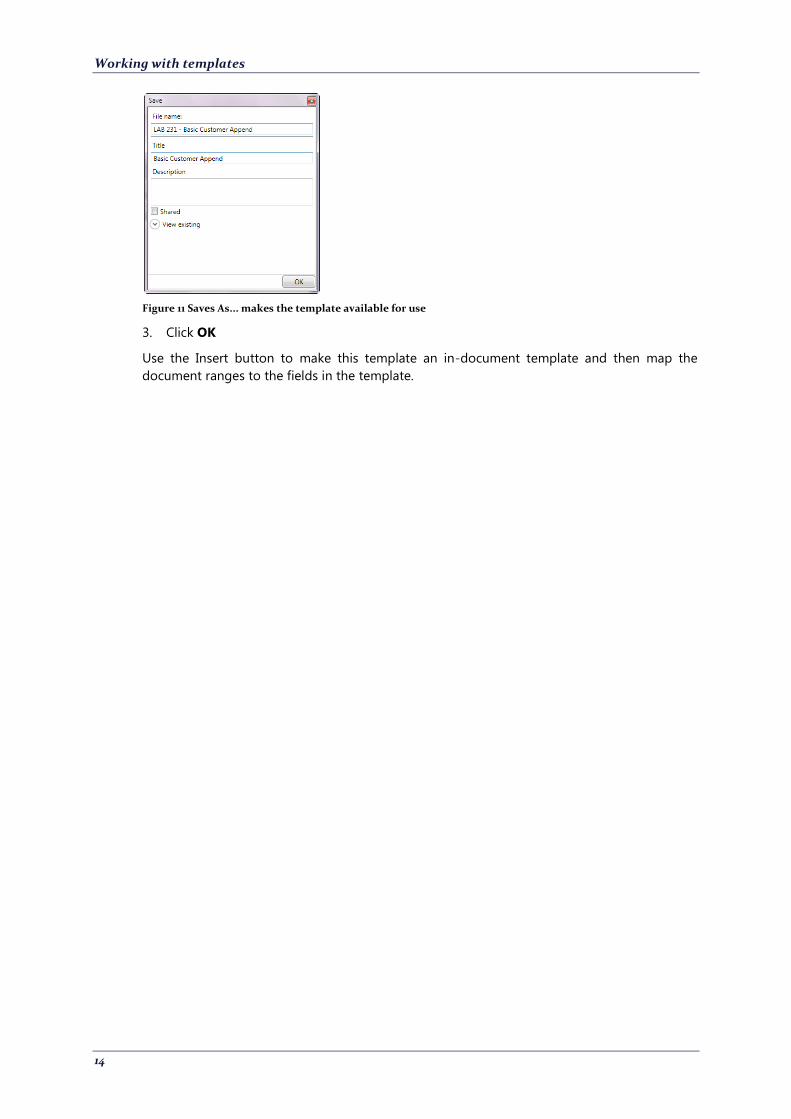
1. Click Save As…
2. In the File name entry box, type LAB 231 – Basic Customer Append
Working with templates
14
Figure 11 Saves As... makes the template available for use
3. Click OK
Use the Insert button to make this template an in-document template and then map the
document ranges to the fields in the template.

15
3 Table upload functions
3.1 Outline The table upload functions are used to enter records into Microsoft Dynamics AX tables. These
will typically be budgets and new records for main table and the like. You can also use the
upload functions to amend existing columns of a table, for example adjusting the credit limit
for a range of customers. A replace function is available which deletes records and then
appends new records as a replacement for the deleted ones.
You should note that these functions respect the access settings for the tables in Microsoft
Dynamics AX. This means that if update or append is not allowed as prescribed by Microsoft
Dynamics AX (for example transaction tables) then you will not be able to use the upload
functions of Atlas on these tables either.
3.2 Objectives At the end of this chapter, you will be able to:
Understand the differences in template design for the following functions:
o Append
o Update
o Replace
Understand how each of these three upload functions are built and used
Understand how to edit each function

Table upload functions
16
3.3 Append function 3.3.1 Outline
The Append function adds one or more records to a Microsoft Dynamics AX data source. This
is the simplest of the Table upload functions as no additional filter criteria needs to be applied.
3.3.2 Uses for the Append function
You use the Append function in the following instances:
During implementation, use this to load new, main table and setup data into Microsoft
Dynamics AX. For example, customers, vendors, dimensions and items
When budget transactions are to be loaded into a new model
When the loading of new records using the Microsoft Dynamics AX client would take
longer than using the Atlas upload system
Table upload functions
17
3.3.3 Lab. Exercises
1. Your investigations so far have given you a good understanding of the Table Append
function. Despite being shown how to prepare a customer upload template, you will need
to use what you have learned into practice and load a list of new customers. You will open
the workbook and use the Table Append function to create a template for this purpose.
(Use LAB 3.3.1 – Append Customers.xlsx)
Challenge yourself!
1. Ensure task pane mode is Designer
2. Open the Table Append task pane
3. Pick the Customers table
4. Adjust fields to meet mandatory and user requirements
5. Apply defaults
6. Save the template
Need a little help?
1.
Here is an example of the loaded records inside Microsoft Dynamics AX:

Table upload functions
18
3.4 Update Column function 3.4.1 Outline
This function is used to update one or more columns in a table with values found in the source
document. The records selected for update are defined using a Filters tab page. The template
used; saved or in-document must nominate which fields uniquely identify a record in the
source document.
3.4.2 Uses for the Column function
The Column update function is used in the following instances:
Where you want to adjust the value of one or more fields in a table of Microsoft Dynamics
AX
There are many records to be adjusted meaning the use of the Microsoft Dynamics AX
client and associated table forms would be prohibitive
Where the column adjustment does not change prior, reported values. In this case a
journal or other transactions postings should be used.
Where a property of a record was missed or was not available during upload and needs to
be added subsequently.
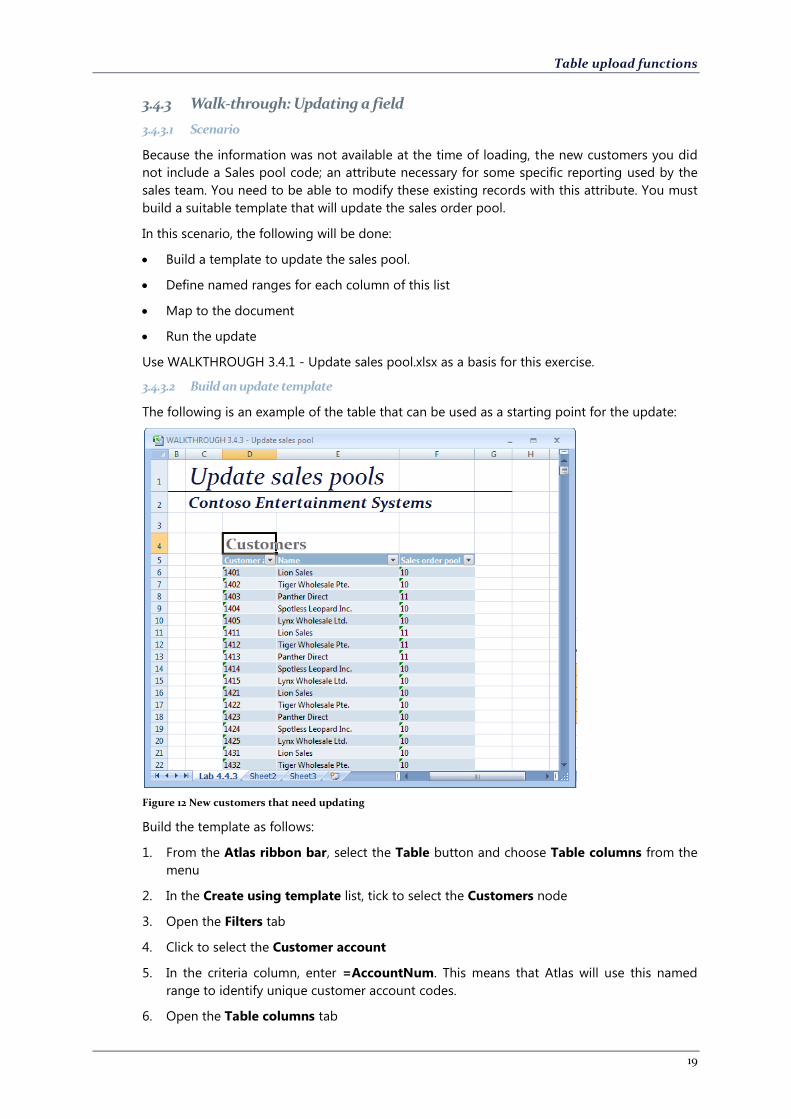
Table upload functions
19
3.4.3 Walk-through: Updating a field
3.4.3.1 Scenario
Because the information was not available at the time of loading, the new customers you did
not include a Sales pool code; an attribute necessary for some specific reporting used by the
sales team. You need to be able to modify these existing records with this attribute. You must
build a suitable template that will update the sales order pool.
In this scenario, the following will be done:
Build a template to update the sales pool.
Define named ranges for each column of this list
Map to the document
Run the update
Use WALKTHROUGH 3.4.1 - Update sales pool.xlsx as a basis for this exercise.
3.4.3.2 Build an update template
The following is an example of the table that can be used as a starting point for the update:
Figure 12 New customers that need updating
Build the template as follows:
1. From the Atlas ribbon bar, select the Table button and choose Table columns from the
menu
2. In the Create using template list, tick to select the Customers node
3. Open the Filters tab
4. Click to select the Customer account
5. In the criteria column, enter =AccountNum. This means that Atlas will use this named
range to identify unique customer account codes.
6. Open the Table columns tab

Table upload functions
20
7. Click to select the Table Columns (Customers) node
8. Click the Fields button
9. When the Add or modify report columns task pane appears, un-tick all but the Customer
account column
10. Expand the Available fields node and navigate the list until you find Sales order pool.
Tick to select this field
11. Click OK to copy your selections into the list task pane
The task pane appears as follows:
3.4.3.3 Define named ranges
Define the ranges in which Atlas will source the key field of the table and the data to update
the records with.
1. Click to select the Customer Account row
2. Right-click and select =AccountNum
3. Click to select the Sales order pool row
4. Right-click and select =SalesPoolId
5. Click Insert
The task pane appears as follows:

Table upload functions
21
Figure 13 Mapped template
3.4.3.4 Map document to template
Use named ranges to so that the upload system knows where to find the data:
1. Select cell D6
2. Right-click and from the menu choose Select->Table Column Data
3. In the Name box, type AccountNum
4. Select cell F6
5. Right-click and from the menu choose Select->Table Column Data
6. In the Name box, type SalesPoolId
3.4.3.5 Confirmation
Send the update request to Microsoft Dynamics AX:
1. From the Atlas ribbon bar, change the mode form Designer to Context
2. Open the Confirmation tab
3. Click Upload
The records in the customer table will be updated and the confirmation page will indicate all
reported records have been updated, thus:

Table upload functions
22

Table upload functions
23
3.4.4 Lab exercises

Table upload functions
24
3.5 Replace function 3.5.1 Outline
This is used to remove existing records from a data source and then append a new set of
records as a replacement. Typically this will only be used on tables that allow for a set of
records to be deleted and then a new set to be added. Because of this, this function may not
be appropriate where records cannot be deleted because of dependencies on other records;
as is the case with customers, vendors and ledger accounts. Normally use this feature on
tables like budgets and forecasts which allow records to be deleted.
Using the Replace function, means you specify a delete action; in which you tell the upload
system what to remove and then build an Append function.
3.5.2 Uses for the Lookup function
The Replace function is used in the following instances:
Where you want a user to remove a set of records and replace them with a new set. For
example a budget or forecast
Whenever wholesale data changes are required and dependent records do not exist
Where the task of entering records directly in Microsoft Dynamics AX exceeds the time
taken by the Atlas upload system to do the same thing
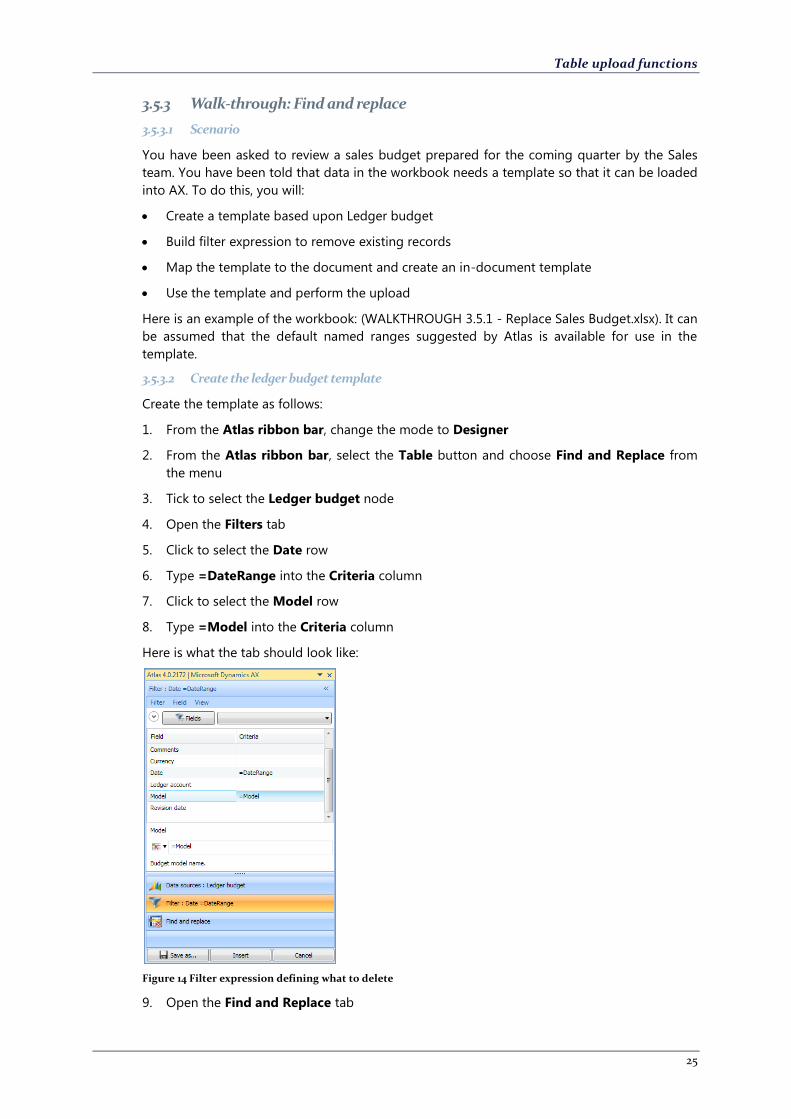
Table upload functions
25
3.5.3 Walk-through: Find and replace
3.5.3.1 Scenario
You have been asked to review a sales budget prepared for the coming quarter by the Sales
team. You have been told that data in the workbook needs a template so that it can be loaded
into AX. To do this, you will:
Create a template based upon Ledger budget
Build filter expression to remove existing records
Map the template to the document and create an in-document template
Use the template and perform the upload
Here is an example of the workbook: (WALKTHROUGH 3.5.1 - Replace Sales Budget.xlsx). It can
be assumed that the default named ranges suggested by Atlas is available for use in the
template.
3.5.3.2 Create the ledger budget template
Create the template as follows:
1. From the Atlas ribbon bar, change the mode to Designer
2. From the Atlas ribbon bar, select the Table button and choose Find and Replace from
the menu
3. Tick to select the Ledger budget node
4. Open the Filters tab
5. Click to select the Date row
6. Type =DateRange into the Criteria column
7. Click to select the Model row
8. Type =Model into the Criteria column
Here is what the tab should look like:
Figure 14 Filter expression defining what to delete
9. Open the Find and Replace tab

Table upload functions
26
10. Click to select the Amount field
11. Right-click and open the Properties form
12. Using the Field type drop-down, select Number of columns
13. Enter 3 into Number of columns
14. Choose Date in the Date field drop-down box
Figure 15 Amount tabulated into 3 columns
15. Click Apply and close the form
16. Click to select Find and Replace: Ledger budget node
17. Click the Fields button
18. When the Add or modify report columns task pane appears, un-tick the Revision date
field
19. Click OK
The template appears as follows:
Figure 16 Ledger budget upload
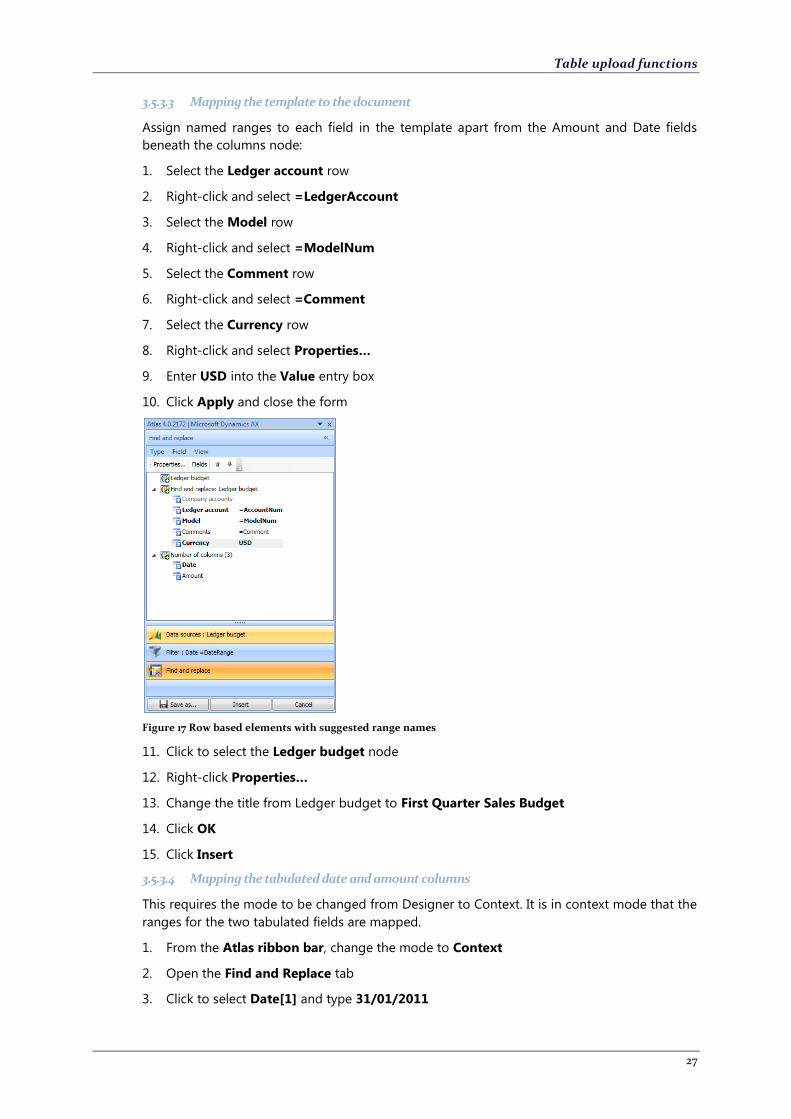
Table upload functions
27
3.5.3.3 Mapping the template to the document
Assign named ranges to each field in the template apart from the Amount and Date fields
beneath the columns node:
1. Select the Ledger account row
2. Right-click and select =LedgerAccount
3. Select the Model row
4. Right-click and select =ModelNum
5. Select the Comment row
6. Right-click and select =Comment
7. Select the Currency row
8. Right-click and select Properties…
9. Enter USD into the Value entry box
10. Click Apply and close the form
Figure 17 Row based elements with suggested range names
11. Click to select the Ledger budget node
12. Right-click Properties…
13. Change the title from Ledger budget to First Quarter Sales Budget
14. Click OK
15. Click Insert
3.5.3.4 Mapping the tabulated date and amount columns
This requires the mode to be changed from Designer to Context. It is in context mode that the
ranges for the two tabulated fields are mapped.
1. From the Atlas ribbon bar, change the mode to Context
2. Open the Find and Replace tab
3. Click to select Date[1] and type 31/01/2011
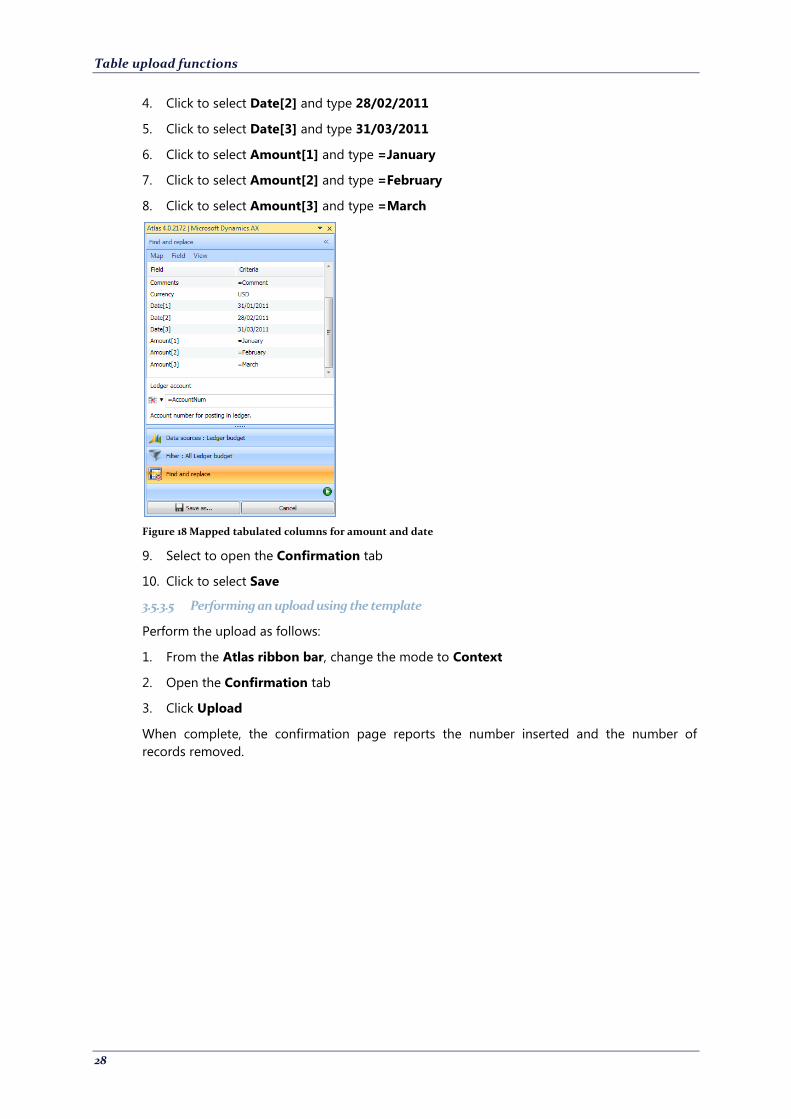
Table upload functions
28
4. Click to select Date[2] and type 28/02/2011
5. Click to select Date[3] and type 31/03/2011
6. Click to select Amount[1] and type =January
7. Click to select Amount[2] and type =February
8. Click to select Amount[3] and type =March
Figure 18 Mapped tabulated columns for amount and date
9. Select to open the Confirmation tab
10. Click to select Save
3.5.3.5 Performing an upload using the template
Perform the upload as follows:
1. From the Atlas ribbon bar, change the mode to Context
2. Open the Confirmation tab
3. Click Upload
When complete, the confirmation page reports the number inserted and the number of
records removed.
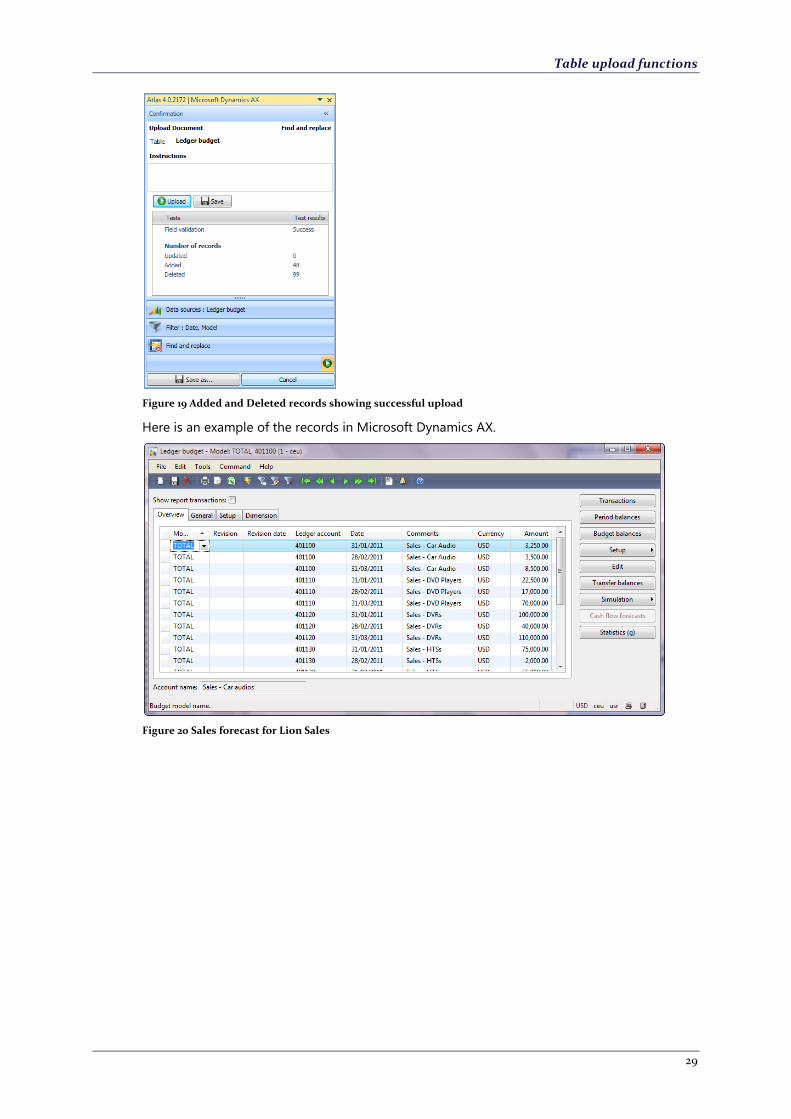
Table upload functions
29
Figure 19 Added and Deleted records showing successful upload
Here is an example of the records in Microsoft Dynamics AX.
Figure 20 Sales forecast for Lion Sales

Table upload functions
30
3.5.4 Lab Exercises
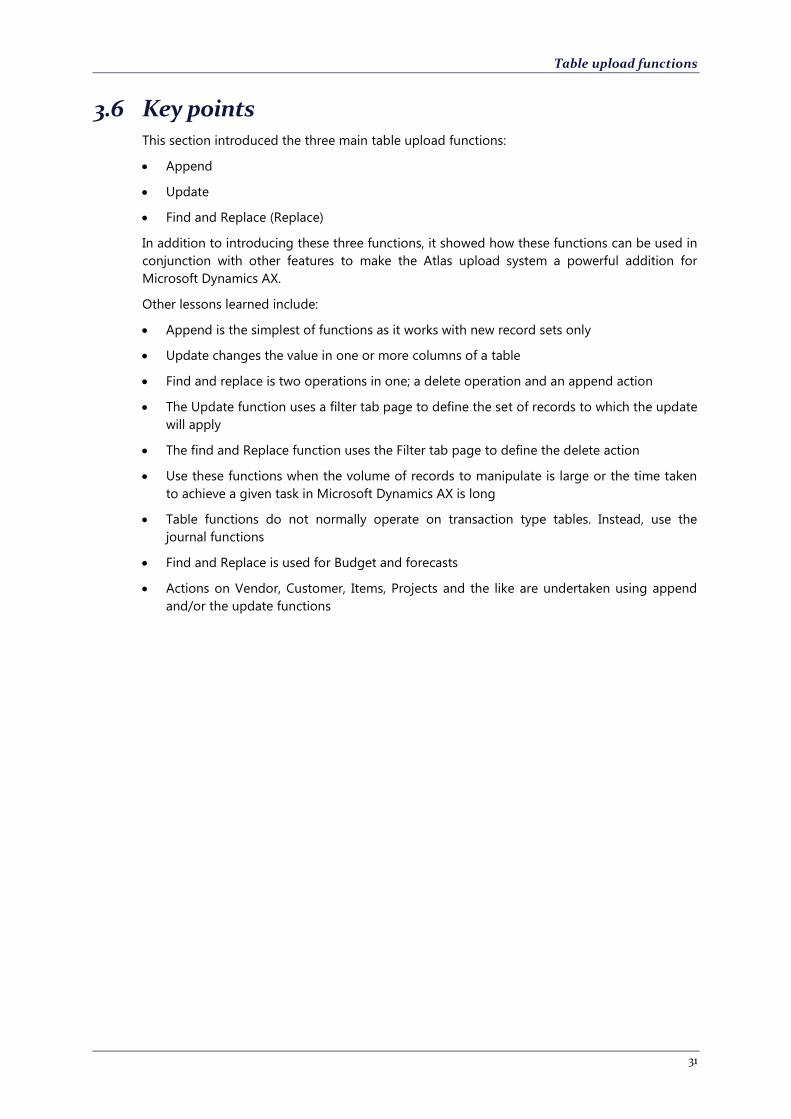
Table upload functions
31
3.6 Key points This section introduced the three main table upload functions:
Append
Update
Find and Replace (Replace)
In addition to introducing these three functions, it showed how these functions can be used in
conjunction with other features to make the Atlas upload system a powerful addition for
Microsoft Dynamics AX.
Other lessons learned include:
Append is the simplest of functions as it works with new record sets only
Update changes the value in one or more columns of a table
Find and replace is two operations in one; a delete operation and an append action
The Update function uses a filter tab page to define the set of records to which the update
will apply
The find and Replace function uses the Filter tab page to define the delete action
Use these functions when the volume of records to manipulate is large or the time taken
to achieve a given task in Microsoft Dynamics AX is long
Table functions do not normally operate on transaction type tables. Instead, use the
journal functions
Find and Replace is used for Budget and forecasts
Actions on Vendor, Customer, Items, Projects and the like are undertaken using append
and/or the update functions

Table upload functions
32
3.7 Quick interaction Take a moment to write down the three key points you have learned:
1.
2.
3.

33
4 Journal functions
4.1 Outline Use the Journal upload functions to post the transactions that you would normally enter using
the journal forms inside Microsoft Dynamics AX. For example, vendor invoice, general journal,
fixed asset journal, inventory movement journal and trade agreements. You can also use this
for free-text invoices, purchase orders and sales orders.
Candidates for this function are those tables in Microsoft Dynamics AX that are defined as type
Worksheet header and Worksheet line.
This function allows you to send a single header record at a time and attach one or more line
records. To achieve multiple header records and multiple lines, you will need to use the Table
Append functions described earlier.
Journal upload is an Append action only and is similar to the Table Append function described
earlier.
4.2 Objectives At the end of this chapter, you will be able to:
Understand how build a general journal upload template
Understand how to join the header and lines tables to create the initial template
Understand defaults from header
Understand number sequence allocation as it relates to journals and vouchers

Journal functions
34
4.3 Walk-through: Journal upload functions 4.3.1 Scenario
You have prepared a general journal workbook that will allow you to upload un-posted ledger
journal transactions into Microsoft Dynamics AX. Before you can test this workbook you need
to build a suitable saved template from the library of templates in your installation. This will
need to be included into the document and the fields mapped. (Use WALKTHROUGH 4.3.1 –
Journal.xlsx).
In this scenario, you will:
Link the header and lines tables to create a basic journal
Adjust heading and lines fields
Map fields and set defaults as required before inserting into the document
Test the upload
Here is how the workbook appears:
Figure 21 General journal workbook
4.3.2 Creating a basic template
You can do this by selecting the ledger journal table and the ledger journal lines from the list
of data sources, found beneath the Create from template node:
1. From the Atlas ribbon bar, change the mode to Designer
2. From the Atlas ribbon bar, select the Journal button
3. Click to select the Ledger journal table node
4. Right-click to select Journal header
5. Click to select the Journal lines node
6. Right-click to select Journal lines
Journal functions
35
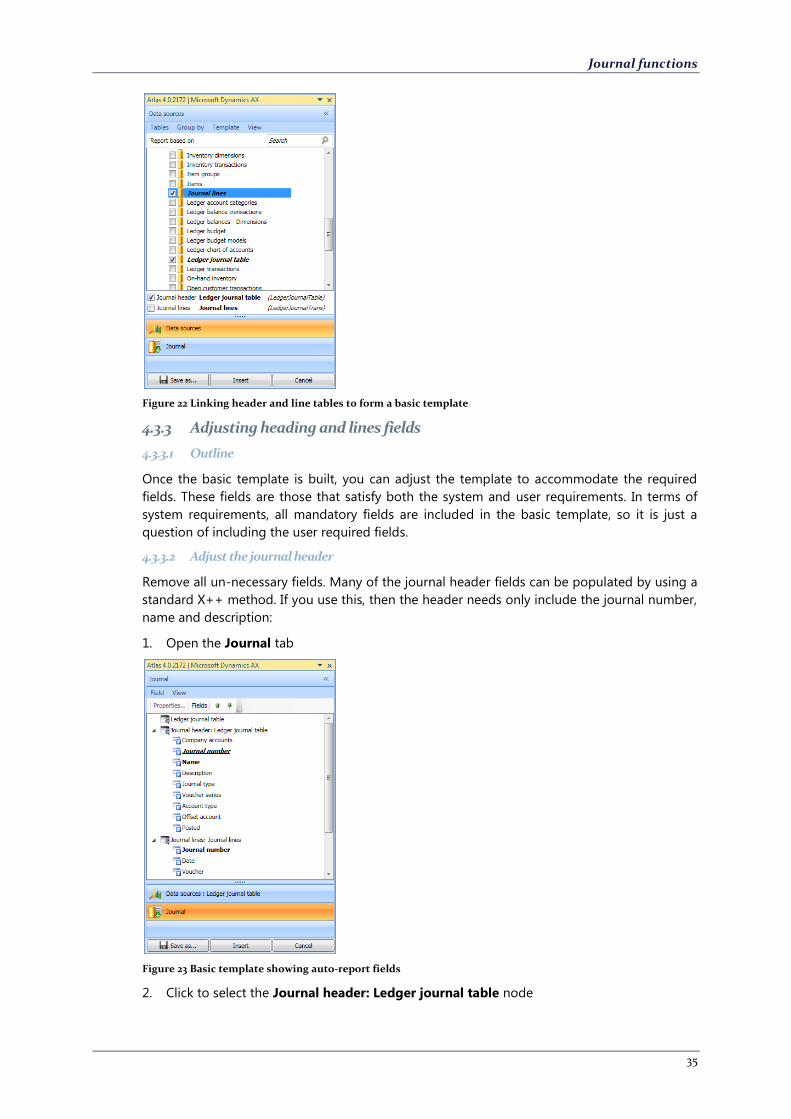
Figure 22 Linking header and line tables to form a basic template
4.3.3 Adjusting heading and lines fields
4.3.3.1 Outline
Once the basic template is built, you can adjust the template to accommodate the required
fields. These fields are those that satisfy both the system and user requirements. In terms of
system requirements, all mandatory fields are included in the basic template, so it is just a
question of including the user required fields.
4.3.3.2 Adjust the journal header
Remove all un-necessary fields. Many of the journal header fields can be populated by using a
standard X++ method. If you use this, then the header needs only include the journal number,
name and description:
1. Open the Journal tab
Figure 23 Basic template showing auto-report fields
2. Click to select the Journal header: Ledger journal table node

Journal functions
36
3. Click Fields to open the field selection window
4. Un-tick all but the Journal number, Name and Description fields
Figure 24 Basic set of fields needed for the header
5. Click OK
The following is shown:
Figure 25 Journal header and lines.
4.3.3.3 Adjust the lines component to the template
It is usual that the auto-report fields for the journal lines will always be included in all
templates. Therefore, adjusting the lines is usually a case of adding fields to the template. In
this case the standard dimensions and document fields will be added along with exchange
rate. Do this as follows:
1. Click to select the Journal lines: Journal lines node
2. Click Fields to open the field selection window
3. Click to expand the Available fields node
4. Tick to select the Account type field
5. Tick to select the Department field
6. Tick to select the Cost centre field

Journal functions
37
7. Tick to select the Purpose field
8. Tick to select the Exchange rate field
9. Tick to select the Document field
10. Tick to select the Document date field
11. Click OK
Figure 26 Expanded journal lines record
4.3.4 Mapping and setting defaults
4.3.4.1 Outline
You can see that this template does not contain any pre-set defaults and the link between the
header and the lines is not included. Set the defaults and mapping for each field in turn. You
can assume and can verify by inspection that the suggested named ranges exist in the
document already. Any reference to “=” below represents a known named range.
4.3.4.2 Applying settings to the header fields
Examine each field in turn:
1. In the Journal tab, select the Journal number field
2. Click to select Properties…
3. Tick to select Number sequence
4. Tick to select Hidden
5. Type into the Value entry box, the number sequence used to represent journal numbers.
In this case Gene_10
6. Click the (>) button to select the Name field
7. Enter into the Value entry box =JournalName
8. Enter into the X++ Method name box InitFromLedgerJournalName

Journal functions
38
Figure 27 Setting defaults using a method call
9. Click Apply
10. Close the Properties… form
11. Select Description
12. Right-click and select =Name
The Journal tab appears as follows:
Figure 28 Header fields mapped and default settings applied
4.3.4.3 Applying settings to the journal lines
Examine each field in turn:
1. In the Journal lines tab, select the Journal number field
2. Click to select Properties…
3. Tick to select Hidden
4. Click to select from the Field type drop-down Parent field list

Journal functions
39
5. In the Value entry box, use the lookup window to tick to select the JournalNum field
from the list
6. Click OK
7. Click Apply
8. Click the (>) button to select the Voucher field
9. Tick to select Number sequence
10. Tick to select Hidden
11. Click to select from the Field type drop-down Parent field list
12. In the Value entry box, use the lookup window to tick to select the VoucherSeries field
from the list
13. Click OK
14. Click Apply
15. Click the (>) button to select the Account type field
16. Tick to select Hidden
17. In the Value entry box, use the lookup window to tick to select the Ledger entry from the
list
18. Click Select items
19. Click OK
20. Click Apply
21. Close the Properties… form
The form appears as follows:
Figure 29 Default settings for hidden fields applied
22. Select Date
23. Right-click and select =TransDate
24. Select Account

Journal functions
40
25. Right-click and select =AccountNum
26. Select Transaction text
27. Right-click and select =Txt
28. Select Currency
29. Right-click and select =CurrencyCode
30. Select Debit
31. Right-click and select =AmountCurDebit
32. Select Credit
33. Right-click and select =AmountCurCredit
34. Select Cost centre
35. Click to select Properties…
36. In the Value entry box, type =CC
37. Click Apply
38. Click the (>) button to select the Department field
39. In the Value entry box, type =Dept
40. Click Apply
41. Click the (>) button to select the Purpose field
42. In the Value entry box, type =Purpose
43. Click Apply
44. Close the Properties… form
45. Select Document
46. Right-click and select =DocumentNum
47. Select Document date
48. Right-click and select =DocumentDate
49. Select Exchange rate
50. Right-click and select =ExchRate
The Journal tab appears as follows:

Journal functions
41
Figure 30 Mapped template, ready for inclusion into the workbook
Include this template as an in-document template as follows:
1. Click to select the Ledger journal table node at the top of the pane
2. Click to select Properties…
3. In the Title entry box, type Basic ledger journal
4. In the Returns drop-down, select JournalNum
5. Click OK
6. Click the Insert at the base of the task pane
7. From the Atlas ribbon bar, change the mode from Designer to Context
4.3.5 Test the journal upload
You are going to test the journal upload:
1. From the Atlas ribbon bar, select the Journal button
2. Ensure the in-document template Basic ledger journal is ticked
3. Open the Confirmation tab
4. Click to select the Upload button
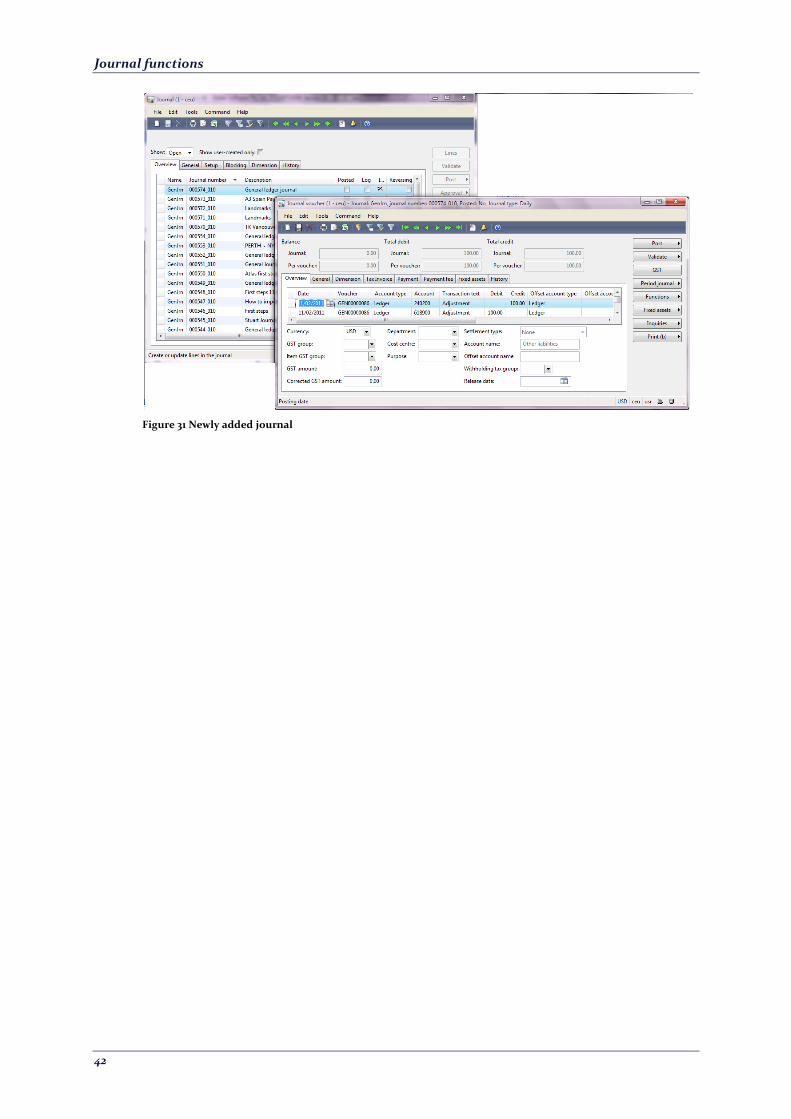
When the upload is complete, the number of records added will show 3 and a ledger journal is
added to Microsoft Dynamics AX.
In Microsoft Dynamics AX the journal will appear as follows:
Journal functions
42
Figure 31 Newly added journal
Journal functions
43
4.4 Key points This section introduced the Journal upload function. You also learned that:
Append is the only action allowed using this function
A journal is made up of a header table and a lines table
Normally these tables are classified as Worksheet header and Worksheet line in the AOT
A journal will add one header record and one or more detail or line records
Saved templates are used to define the tables involved and the linkages between them
Saved templates are selected, mapped and included into the document
Templates can use defaults and these can be drawn from:
o Number sequences
o Fields in the related header table
o Pre-set values in the template
o Or from the document
Use this function to add transactions to your Microsoft Dynamics AX system when:
o You need to load opening transactions and balances at time of system start-up
o You want to load transactions into Microsoft Dynamics AX that need manipulation by
or are sourced from Excel
o You need to interface external systems where an automatic interface is not possible
o You want to provide casual users with a means to prepare transactions using a familiar
interface. E.g. timesheets, employee travel expenses, customer forecasts etc.

Journal functions
44
4.5 Quick interaction Take a moment to write down the three key points you have learned:
1.
2.
3.