training guide - 4lpi.com
TRANSCRIPT

TRAINING GUIDEGetting started in LPi’s new all-in-one publishing platform


TABLE OF CONTENTS
GETTING STARTED, page 4
UPDATING ACCOUNT INFORMATION, page 5
CREATING A NEW BULLETIN, page 6 Navigating the Dashboard, page 6 Editing Text, page 7 Editing Imagery, page 8 Previewing & Saving, page 8 Finalizing Your Bulletin, page 9CREATING A NEW EMAIL NEWSLETTER, page 10 Editing Articles, page 11 Previewing & Saving, page 11 Finalizing Your Email, page 13
4 ePub Design Training Guide
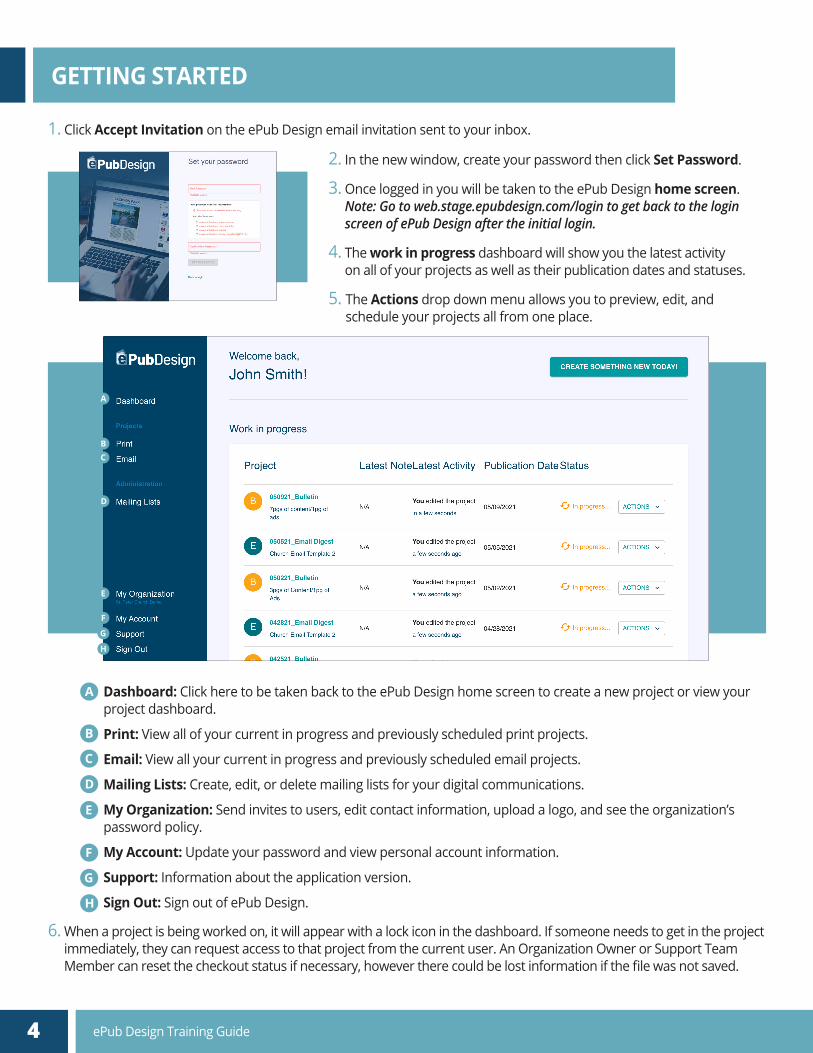
1. Click Accept Invitation on the ePub Design email invitation sent to your inbox.
Dashboard: Click here to be taken back to the ePub Design home screen to create a new project or view your project dashboard.
Print: View all of your current in progress and previously scheduled print projects.
Email: View all your current in progress and previously scheduled email projects.
Mailing Lists: Create, edit, or delete mailing lists for your digital communications.
My Organization: Send invites to users, edit contact information, upload a logo, and see the organization’s password policy.
My Account: Update your password and view personal account information.
Support: Information about the application version.
Sign Out: Sign out of ePub Design.
GETTING STARTED
2. In the new window, create your password then click Set Password.
3. Once logged in you will be taken to the ePub Design home screen.Note: Go to web.stage.epubdesign.com/login to get back to the login screen of ePub Design after the initial login.
4. The work in progress dashboard will show you the latest activity on all of your projects as well as their publication dates and statuses.
5. The Actions drop down menu allows you to preview, edit, and schedule your projects all from one place.
6. When a project is being worked on, it will appear with a lock icon in the dashboard. If someone needs to get in the project immediately, they can request access to that project from the current user. An Organization Owner or Support Team Member can reset the checkout status if necessary, however there could be lost information if the file was not saved.
A
BC
D
E
F
G
H
A
B
C
D
E
F
G
H

1. When on the ePub Design home screen, navigate to the My Organization link in the left side bar.
2. In the left column, update your organization contact information including: organization name, email address, address, phone number, sponsors page URL,* social media links, and read more links.** All of the information in the Contact Information window will be used in the creation of all print and email projects. Click Save to update the information.
3. Upload your primary logo as a CMYK image at 300 dpi in a .png, .jpg, or .jpeg format.
*The Sponsors Page URL can be found by going to your church page on ParishesOnline.com, scrolling down to “Our Supporters” on the right side of the page, and clicking “View All”.
**The Read More Links are the URLs that will be linked to the Read More Buttons in the email templates. These are required in order to save your Contact Information.
1. Click the + to add a new color.
2. Use the color selector to choose a color or type in a CMYK value to the right.
3. These colors will be availabe in every new email project under the color palette icon in the right menu.
MY ORGANIZATION
INVITING NEW USERS TO YOUR ORGANIZATION
EDITING CONTACT INFORMATION
COLOR PALETTE
1. When on the Dashboard, click the My Organization button.
2. In the top right corner click + Invite User to Organization then enter the email address and role of the person you are inviting.
3. There are two user roles to choose from, Organization Owner and Organization Contact.
Organization Owner: There must be at least one Organization Owner per organization. This should be the primary editor. This role has the ability to create, edit, and publish print and email projects; create, edit, and remove mailing lists; and add, edit, and remove project notes. They also have the ability to reset the checkout status of a project.
Organization Contact: This role has the same accessibility as the owner except they cannot reset the checkout status of a project.
4. An invitation will be sent to the user’s inbox so they can create an account.
5ePub Design Training Guide
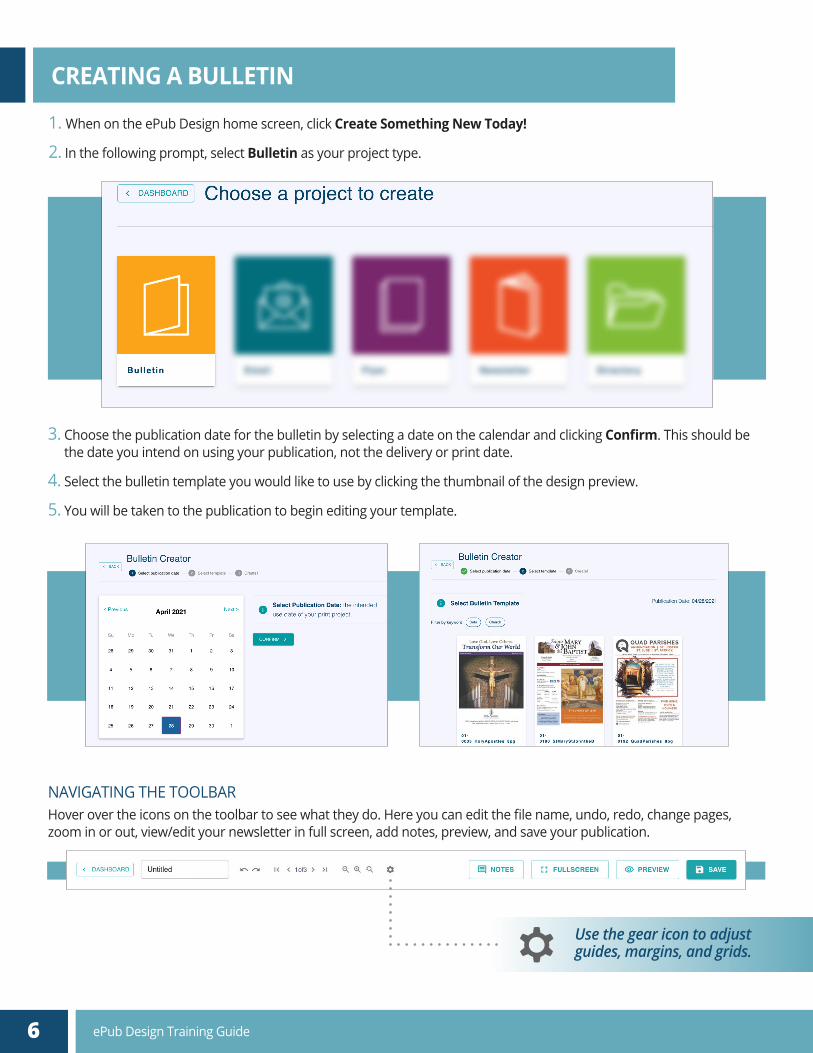
1. When on the ePub Design home screen, click Create Something New Today!
2. In the following prompt, select Bulletin as your project type.
CREATING A BULLETIN
6 ePub Design Training Guide
3. Choose the publication date for the bulletin by selecting a date on the calendar and clicking Confirm. This should be the date you intend on using your publication, not the delivery or print date.
4. Select the bulletin template you would like to use by clicking the thumbnail of the design preview.
5. You will be taken to the publication to begin editing your template.
NAVIGATING THE TOOLBARHover over the icons on the toolbar to see what they do. Here you can edit the file name, undo, redo, change pages, zoom in or out, view/edit your newsletter in full screen, add notes, preview, and save your publication.
Use the gear icon to adjust guides, margins, and grids.

1. Click into an area of text and highlight over the text with the cursor. Type or paste in new copy.
2. To change the text size, font, color, or the alignment of the text, highlight over the text with the cursor and navigate to the Font section in the menu bar at the top of the page.
a. Text Size: Select the text size and a drop down with a slider will appear. Adjust the slider until you get to the desired text size and click out of the window. Note: The required minimum text size is 7pt.
b. Font: With copy selected, select the font name and a drop down will appear with a preselected list of fonts available for this template. Select a font from the list and the selected text will update.
c. Text Color: Select the color rectangle and a drop down of preselected color swatches will appear to choose from. Select a new color swatch and the text will update to the selected color.
d. Alignment: Select from one of the four paragraph alignment options available — align left, align center, align right, or justify.
3. Click on a text box and two blue circles will appear, one at the top and one at the right side of the selected box. Use these circles to move or rotate the text box.
4. Use the white circles on all sides of the box to expand or contract the text box.
5. To delete a text box, select it then click the trash can icon in the left menu. Note: Some text boxes may not have the ability to be deleted.
6. Add a new text frame by selecting the A or Add Text icon on the left menu. This will create a new text frame on your current page.
7. Add a paragraph style to use throughout your publication by navigating to the Style section of the top menu and clicking the + button. Note: Any existing styles available in the platform cannot be edited or deleted. New styles you create during the design of your publication can be edited or deleted at any time by navigating back to the Styles drop down menu.
EDITING TEXT
Variable ContentThe content you entered in the My Organization page will be seen automatically flowing into every print project you create. This includes things like your logo, organization name, address, phone, etc.
7ePub Design Training Guide
PREVIEWING & SAVING1. You can preview your projet at any time by clicking Preview in the top right corner of the screen.
2. A new tab in your browser will open with a print preview of your PDF.
3. To save your work, enter a title in the top left corner of the screen then click Save.
4. Click Dashboard to return back to the ePub Design home screen. Your most recently saved projects will be at the top of the dashboard.
5. Continue editing the publication by going to the Actions drop down menu and selecting Edit.
EDITING IMAGERY
WARNING MESSAGES
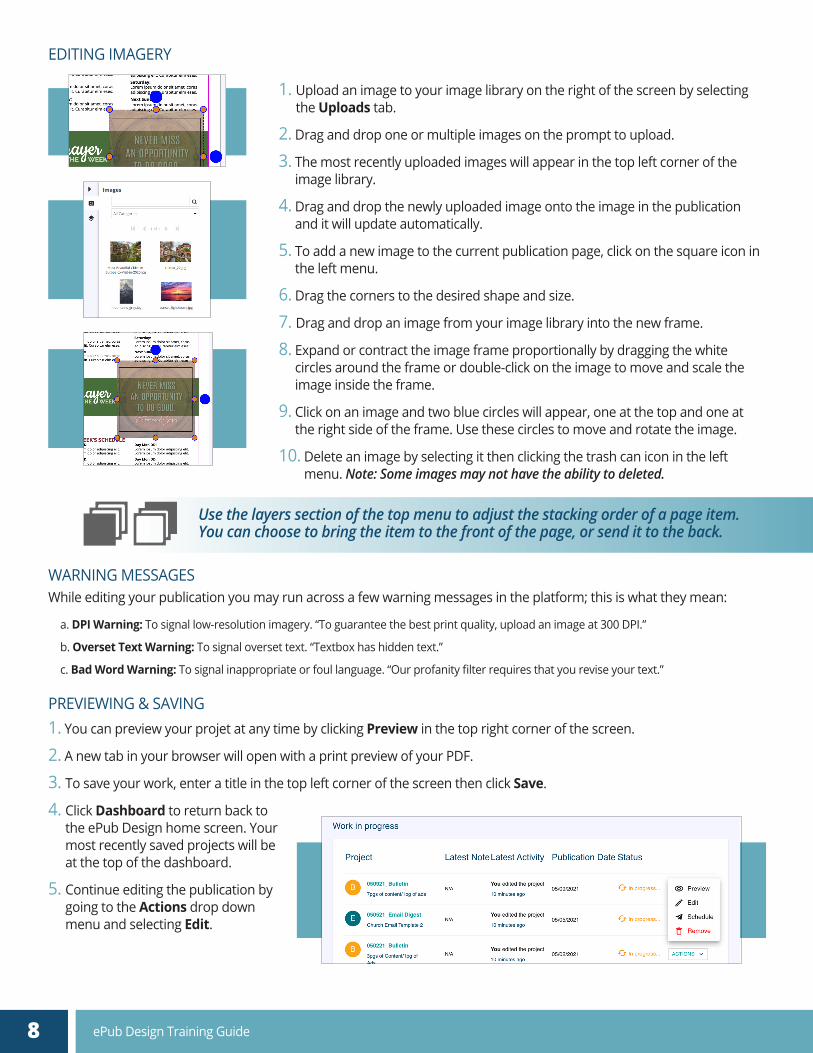
1. Upload an image to your image library on the right of the screen by selecting the Uploads tab.
2. Drag and drop one or multiple images on the prompt to upload.
3. The most recently uploaded images will appear in the top left corner of the image library.
4. Drag and drop the newly uploaded image onto the image in the publication and it will update automatically.
5. To add a new image to the current publication page, click on the square icon in the left menu.
6. Drag the corners to the desired shape and size.
7. Drag and drop an image from your image library into the new frame.
8. Expand or contract the image frame proportionally by dragging the white circles around the frame or double-click on the image to move and scale the image inside the frame.
9. Click on an image and two blue circles will appear, one at the top and one at the right side of the frame. Use these circles to move and rotate the image.
10. Delete an image by selecting it then clicking the trash can icon in the left menu. Note: Some images may not have the ability to deleted.
While editing your publication you may run across a few warning messages in the platform; this is what they mean:
a. DPI Warning: To signal low-resolution imagery. “To guarantee the best print quality, upload an image at 300 DPI.”
b. Overset Text Warning: To signal overset text. “Textbox has hidden text.”
c. Bad Word Warning: To signal inappropriate or foul language. “Our profanity filter requires that you revise your text.”
8 ePub Design Training Guide
Use the layers section of the top menu to adjust the stacking order of a page item. You can choose to bring the item to the front of the page, or send it to the back.

FINALIZING YOUR BULLETIN
1. Send your final PDF to press by navigating to the ePub Design home screen.
2. Find your publication in the dashboard.
3. Navigate to the Actions menu and select Schedule.
4. The Publish Print Project window will appear. Select Open to see a preview of your PDF or select Next to proceed to the submission form.
5. The following screen will auto-fill your publication details along with the publication date you selected earlier in the process. Adjust your quantity if needed and add any additional information, then click Next.
6. Your file will pass through a validation test and you will have a final chance to review your file before you check the acknowledgement box and click Submit for press.
7. Click Finish to return back to the ePub Design dashboard.
9ePub Design Training Guide
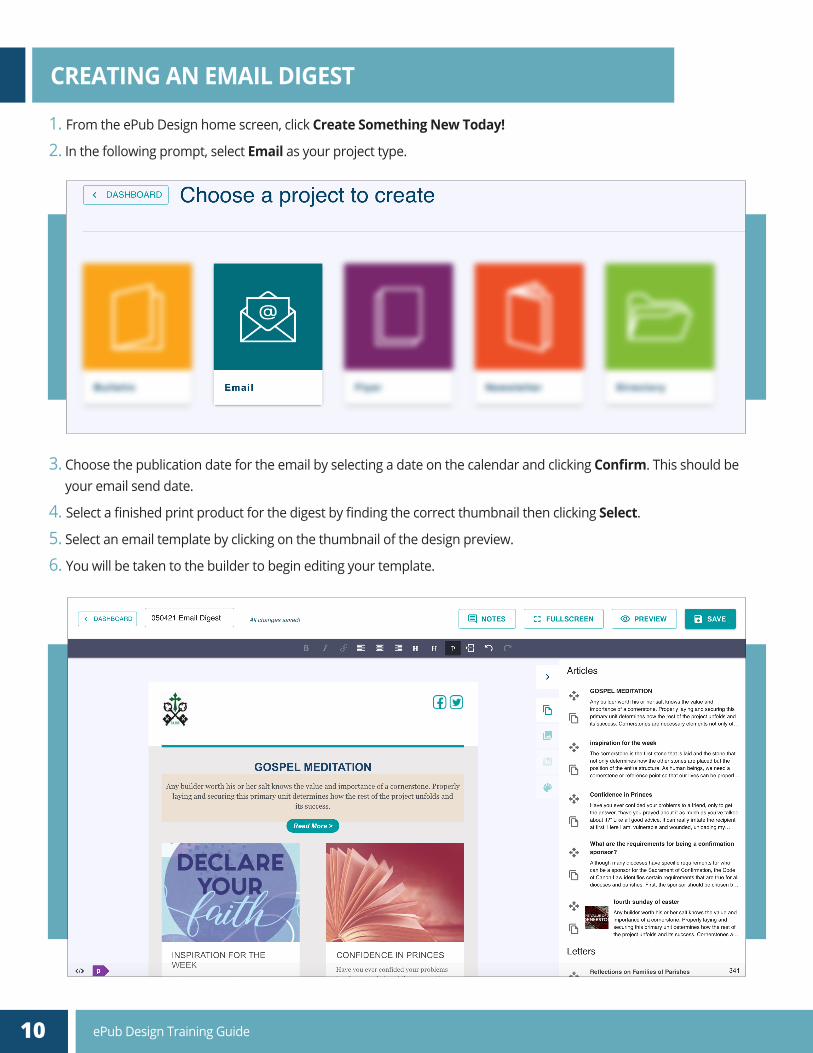
1. From the ePub Design home screen, click Create Something New Today!
2. In the following prompt, select Email as your project type.
3. Choose the publication date for the email by selecting a date on the calendar and clicking Confirm. This should be your email send date.
4. Select a finished print product for the digest by finding the correct thumbnail then clicking Select.
5. Select an email template by clicking on the thumbnail of the design preview.
6. You will be taken to the builder to begin editing your template.
CREATING AN EMAIL DIGEST
10 ePub Design Training Guide
ePub Design Training Guide
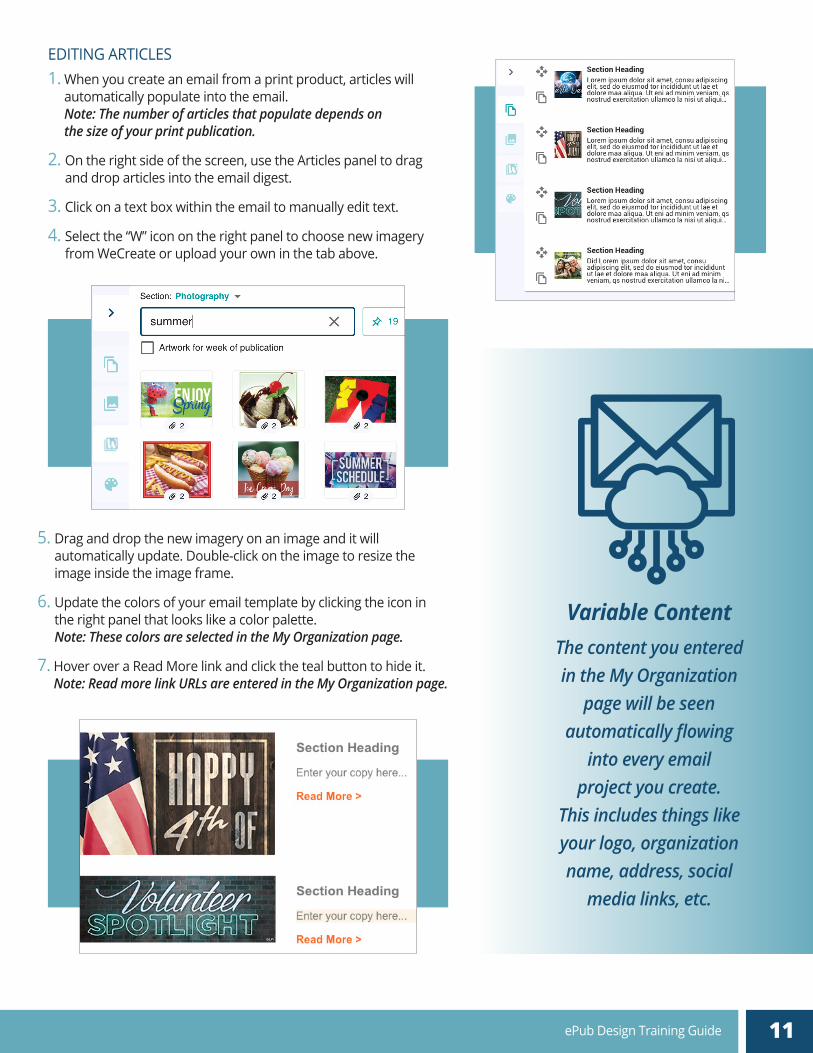
EDITING ARTICLES1. When you create an email from a print product, articles will
automatically populate into the email. Note: The number of articles that populate depends on the size of your print publication.
2. On the right side of the screen, use the Articles panel to drag and drop articles into the email digest.
3. Click on a text box within the email to manually edit text.
4. Select the “W” icon on the right panel to choose new imagery from WeCreate or upload your own in the tab above.
11ePub Design Training Guide
Variable ContentThe content you entered in the My Organization
page will be seen automatically flowing
into every email project you create.
This includes things like your logo, organization name, address, social
media links, etc.
5. Drag and drop the new imagery on an image and it will automatically update. Double-click on the image to resize the image inside the image frame.
6. Update the colors of your email template by clicking the icon in the right panel that looks like a color palette. Note: These colors are selected in the My Organization page.
7. Hover over a Read More link and click the teal button to hide it. Note: Read more link URLs are entered in the My Organization page.

PREVIEWING & SAVING1. You can preview your project at any time by clicking Preview in the top right corner of the screen.
2. A new tab in your browser will open with a preview of your email digest.
3. To save your work, enter a title in the top left corner of the screen then click Save.
4. Click Dashboard to return back to the ePub Design home screen. Your most recently saved project will be at the top of the dashboard.
5. Continue editing the publication by going to the Actions drop down menu and selecting Edit.
UPLOADING YOUR MAILING LIST1. From the ePub Design home screen click on Mailing List in the left menu.
2. Click + Create Mailing List then type the name of the list and click Create.
3. Click on the name of the list from the dashboard.
4. On the new page, upload subscribers individually by clicking +Add Subscriber then entering their email address and name. You can also upload multiple at once by clicking Import CSV and clicking Import.
5. Click Back in the upper left of the page, then under Actions click Open Test List.
6. Create a test list for the main mailing list by adding subscribers individually or by uploading a CSV file.
7. Update a mailing list by uploading a new CSV file in the current mailing list. All unsubscribes and bounced emails will be retained in the platform.
a. Active Members: The number of users currently in the mailing list that will actively receive communications.
b. Bounced Members: The number of emails that were rejected by the intended recipient’s mail server and were actively removed from the email list.
c. Unsubscribed: The number of members that clicked unsubscribe in the email and no longer wish to receive communications from the organization.
d. Removed Members: Members removed from the mailing list.
12 ePub Design Training Guide
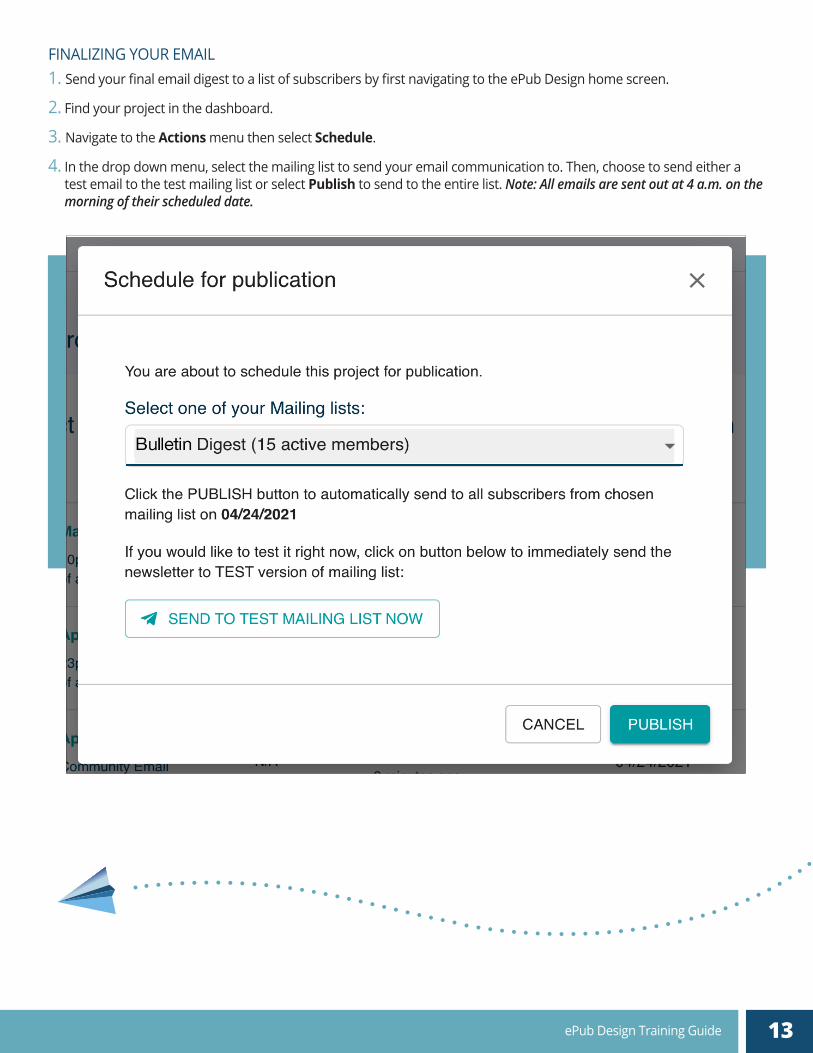
FINALIZING YOUR EMAIL1. Send your final email digest to a list of subscribers by first navigating to the ePub Design home screen.
2. Find your project in the dashboard.
3. Navigate to the Actions menu then select Schedule.
4. In the drop down menu, select the mailing list to send your email communication to. Then, choose to send either a test email to the test mailing list or select Publish to send to the entire list. Note: All emails are sent out at 4 a.m. on the morning of their scheduled date.
13ePub Design Training Guide

For additional questions or technical support,email [email protected] or call (800) 950-9952 ext. 2222.