training manual university of rochester intranet operating ... · university of rochester intranet...
TRANSCRIPT

Training Manual
University of Rochester
Intranet Operating Budget System
January, 2014
Any questions, please contact Christle Pajrowski @ 275-2713 or [email protected]

Table of Contents
1. Getting Started 1
2. Budget System 2
3. Account Summary 3
4. Functionality on the Account Summary Screen
a. Navigating between accounts 4
b. Adding a new subcode 5
c. Updating a subcode description 6
d. Updating Salaries and Wages 7
5. Budgeting Salaries and Wages at the Department Level 8
6. Completing the budgets for salaries and benefits subcode 9
7. Budgeting non-salary subcodes 12
8. Printing Reports 13
9. Saving Reports in Excel 14

1
Section 1: Getting Started
a. Launch Internet Explorer browser by clicking on the IE icon on your desktop. This takes you to your Home Page. (Netscape users may launch Netscape instead).
b. In the Address Bar, type the following address:
https://budget.ur.rochester.edu/main/default.asp (don’t forget to bookmark this website for future use).
c. If you have a popup blocker, it must be disabled in order to proceed.
Follow the instructions generated by the popup blocker software to disable.
d. Select Go. This will take you to the Welcome Screen for the UR Budget
Department System:
Notice the message on the welcome screen above that the URRC budget system is ready to be updated.
Virtually every page has a Help button located near the upper right hand corner.
e. Five options are
given:
1. Click on Instructions to download a copy of these instructions in Word format.
2. Click on Budget System to enter. Instructions for completing your
budgets are provided in Sections 2, 3 and 4.
3. The Budget Office option is available to the Office of Budgets and Planning only.
4. Department heads may click on Department Update to enter a global
salary increase for all employees of his or her department. Instructions are provided in Section 5.
5. Click on Logoff System to exit the Intranet Budgeting System

2
Section 2: Budget System
1. To select an account to work on:
a. Enter the six digit number (e.g. xxxxxx) for the account you want to work on. Do not enter spaces or dashes.
b. Passwords for your accounts will be provided by your department head. Enter the password for the account. Note that passwords are not case sensitive.
2. All accounts within a department have the same password. All accounts
within a division have the same password. Your supervisors / department heads will receive the passwords with their budget packets.
3. Click on the Logon button to enter the account

3
Section 3: The Account Summary Once you have properly selected an account (by completing steps in Section 2 above), you are taken to the Account Summary Sheet. THE FOLLOWING ACCOUNT EXAMPLE IS BASED ON A NEW ACCOUNT ENTERED IN IBS DUE TO CONFIDENTIALTY. ALL STEPS STILL APPLY TO ALREADY EXISTING ACCOUNTS. The Mode indicator will tell you if the account is available for updating.
The following is a brief description of the features on the account summary sheet: Subcode: There is a button in the Subcode column for each subcode
within the account selected. Subcodes that have a salary component have an additional subcode button in the Salary Detail column, located to the far right
Description: This column gives the name/description of the subcode as found in the Financial Reporting System (FRS).
F-YTD 09/30: This column gives actual data through September 2013 of the current fiscal year for this account. Existing accounts will have data.
FY14 Op Budget: The Preliminary Operating Budget (POB) is the budget for the current fiscal year. Existing accounts will have data.
FY15 Op Budget: This is the Requested Operating Budget (ROB) and represents the budget for the following fiscal year.
Adj’s: This represents adjustments to your preliminary operating budget. It is a calculated field and is the difference between your 2015 budget and your 2014 budget.
Salary Detail: This column contains buttons for each subcode that has a salary component. You will use this column to complete the salaries and wages portion of your budget. (Not available to accounts in divisions 21 or 22).
Mode Indicator

4
Section 4: Functionality on the Account Summary Screen
a. Navigating between accounts:
After you enter an account and password, you may click on the Review New Account pull down menu to navigate between accounts within your department as shown below:

5
Section 4: Functionality on the Account Summary Screen (continued)
b. Adding a new Subcode:
You may add a new subcode by clicking on the Add subcode button on the top of the Account Summary page.
The screen below appears:
Enter the number for the subcode you wish to add. Enter a description/name for the subcode (20 character maximum &
match the Finance subcode list name http://www.rochester.edu/adminfinance/finance/policies/subcodes.html)
Click submit to update your account summary. To cancel click Reset. Note: You will enter the budget for this subcode when you get to the section on how to complete your budgets.

6
Section 4: Functionality on the Account Summary Screen (continued)
c. Updating a subcode description:
You may update a subcode by clicking on the description of the subcode on the Account Summary page. Enter a new description, and click Submit or hit Enter on your keyboard. To cancel the description update click Reset.

7
Section 4: Functionality on the Account Summary Screen (continued)
d. Updating Salaries and Wages (not available in divisions 21 and 22):
From the Account Summary Screen, click on a subcode button in the Salary Detail column located at the far right of the subcode row (refer to instructions on page 2).
This opens the Salaries and Benefits Summary page. The data represents the current totals of salaries and benefits for the subcode selected.
There are six Salaries and Benefits buttons on this page:
i. NBP: Non-Base Pay worksheet
ii. PCW: Personnel Complement worksheet iii. SDW: Shift Differential worksheet iv. OCW: On-Call worksheet v. OTW: Overtime Wages vi. Spread: Overtime Wages Spread

8
Section 5: Budgeting Salaries and Wages at the Department Level
The department head has the option to enter a global salary increase for an entire department by selecting Department Update from the main menu as discussed in Section 1 and entering the budgeted percentage increase.
This activity should be performed before adjustments are made for
individuals, otherwise those updates will be reversed.
a. Logon to Intranet Budget System
b. Select Department Update from the left side of the Main Menu
c. Enter department number and password
d. Click once on
Department Salary Increase
e. Enter
budgeted percentage increase for your department
f. Click on “Update” button in the lower left corner g. Click on “Logoff System” to log off or “Main Page” to return to the main
menu and continue. Note: Amounts will be updated once a user accesses the salary subcode by clicking on the “Salary Detail” button on the Account Summary screen.

9
Section 6: Completing the budgets for salary and benefits subcodes The Budget Office is requiring you to use the Personnel Complement
Worksheet, but if there is a reason why you cannot, you must update salary & benefit subcodes using the same process as in completing non-salary subcodes discussed in Section 7.
a. From the Account Summary screen, select the first salary subcode from the Salary Detail column located on at the far right. This opens the Salary and Benefits Summary.
b. If you have any
non-base pay budgeted for your department, click on the NBP button, otherwise go to (c) on the next page.
i. Enter the NBP in one or more of
the five salary categories on the sheet.
ii. Enter the associated benefits.
iii. Click Submit.
iv. If update was successful, click OK on the message box that pops up. This takes you back to the Salary and Benefits sheet.
v. Go to (c) on the next page.

10
Section 6: Completing the budgets for salary and benefits subcodes (continued)
c. Click on PCW. This is the Personnel Complement Worksheet and shows salary and benefits totals for each employee in your department. If your department head has chosen to do so, annual salary increases should already have been input at the department level (in the example below, the increase was 2%):
i. To change the increase for an individual from the default, click on the person’s name. This brings up the Personnel Complement Edit Worksheet:
ii. Modify the % Pay Rate Increase by inputting the desired percentage increase.
Alternatively, you may enter the desired annual salary amount in the Current Pay Rate box and the percentage increase will compute.
iii. Confirm the correct benefit rate*
iv. Click Submit. v. Repeat the process
for each individual that you want to modify
* Benefit rates for individuals are pre-loaded in the system. It is recommended to review and verify benefit codes before proceeding.

11
Section 6: Completing the budgets for salary and benefits subcodes (continued)
d. If you have SDW, OCW and OTW proceed by clicking on the respective button and then modifying as above.
e. When complete, click Summary.
f. Click Account List.
g. A pop up dialog box will ask if you want
to update the ROB. Select OK to automatically update the salary and benefits totals on the Account Summary sheet.
h. Select Cancel if you do not want to
update the subcode.
i. Proceed by clicking on the next salary detail subcode button on the Account Summary sheet.
j. If you selected ‘Cancel’ you must update salary & benefit subcodes
using the same process as in completing non-salary subcodes. k. Proceed to the next subcode until all salary subcodes are updated.

12
Section 7: Budgeting non-salary subcodes
a. Go to the Account Summary screen for the account you wish to update by following the steps in Section 2.
b. Click on first non-salary subcode (located on the far left side of the subcode’s row) that you wish to update.
c. On the subcode
modification worksheet enter the 2015 budget in the New FY15 OP Budget Amount box.
d. An explanation (at least 10 characters long) must be entered in the New FY15 OP Budget Reason box. It is recommended that all changes
should have an explanation for easier reference.
e. Click on Submit to update the account (or Reset to cancel). This takes
you back to the Account Summary sheet. Observe the new amount for the subcode.
f. Select next subcode and repeat the process until all non-salary subcodes are updated.
You have now successfully completed the online budget for this account.

13
Section 8: Printing Reports
From the Account Summary screen, click on Reports and print the other reports for your records. There is also a “Print” button on the account summary screen that will provide the account summary information.
a. The Form B (Account Summary) Report
Provides a recap of your 2014 budget, the modifications made and your new 2015 budget, by subcode.
b. The Personnel Complement
Worksheet Report
Shows the details of the PCW for all subcodes. This data automatically feeds the account summary portion of the system.
c. The Modifications Summary
Report Shows all modifications by subcode
d. The Form B Report (Account Summary) and the Salary and Benefit
Summary are available for downloading as Microsoft Excel files as discussed in Section 9.
14
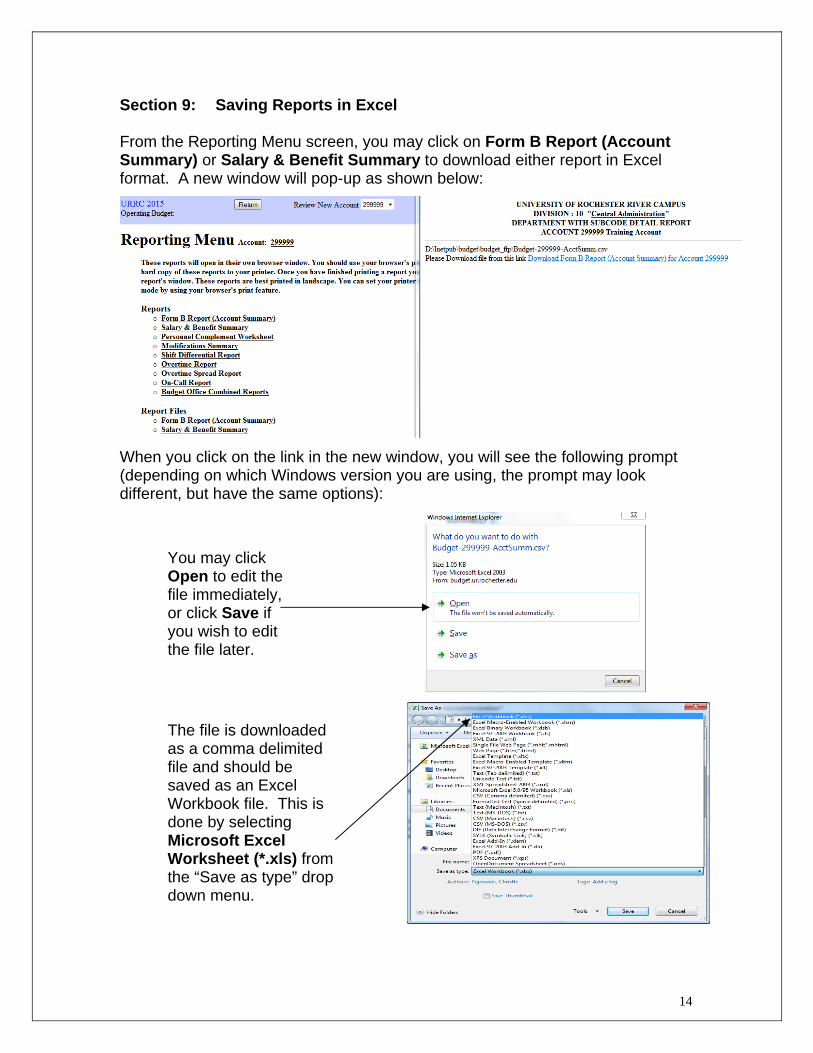
Section 9: Saving Reports in Excel From the Reporting Menu screen, you may click on Form B Report (Account Summary) or Salary & Benefit Summary to download either report in Excel format. A new window will pop-up as shown below:
When you click on the link in the new window, you will see the following prompt (depending on which Windows version you are using, the prompt may look different, but have the same options):
You may click Open to edit the file immediately, or click Save if you wish to edit the file later.
The file is downloaded as a comma delimited file and should be saved as an Excel Workbook file. This is done by selecting Microsoft Excel Worksheet (*.xls) from the “Save as type” drop down menu.