training notes - wellspring software, inc. - your source ... · pdf filetraining notes e-mail...
TRANSCRIPT
Training Notes E-mail Settings 1 August 2016
PrintBoss can be configured to e-mail the documents it processes as PDF attachments. There are limitations to embedding documents in standard e-mails. PrintBoss solves these limitations by converting the image of the document to a PDF file and attaching the PDF to the e-mail. PDF readers, such as Adobe Reader, are free and can be used to open the PDF files. Adobe Reader can be downloaded from www.Adobe.com and is often installed with the operating system on most computers.
PrintBoss can e-mail on an individual basis (manual mode) or in batches (automatic mode).
Manual mode – PrintBoss can e-mail any page viewed from a work or archive file. Automatic mode – One of the copies in the PrintBoss form is defined as the e-mail copy. PrintBoss can
capture and assign fields from the accounting software (such as the EMailTo address) and automatically send batches of documents. This enables the work file to record e-mail attempts and successes.
The user sending the e-mail must have access to an SMTP mail server. PrintBoss does not use local e-mail software (i.e. Microsoft Outlook, Outlook Express, Netscape, Eudora, etc.), but works in parallel with it, making use of the same SMTP mail server as the mail program.
PrintBoss Enterprise has an option to use Microsoft Outlook Outbox instead of the SMTP server. Enterprise can also email through Office 365 and Gmail.
NOTE:
The content of the To, CC, or BlindCC fields can each include multiple addresses. Each address must be separated by a semicolon (or a line feed when the address is in a multiline variable in PrintBoss).
SETUP
1. Open the PrintBoss Master Application. 2. Click on the Options menu and select E-mail Settings. The E-mail Settings dialog opens.
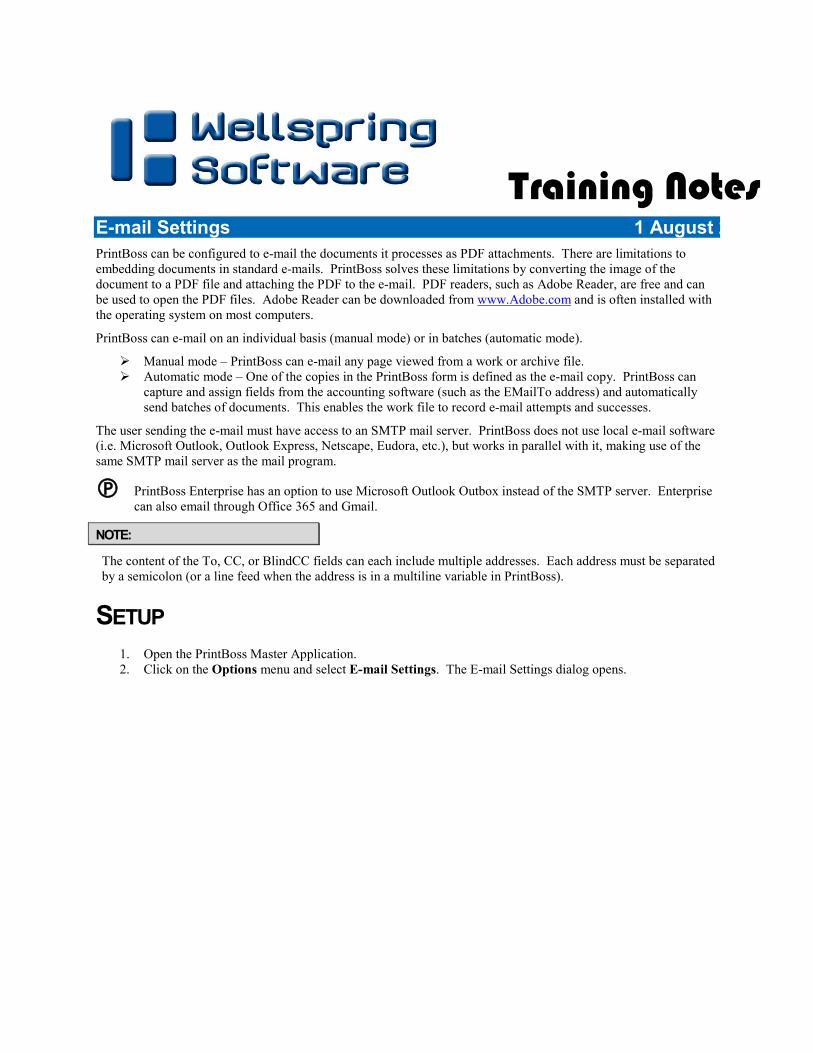
3. The first tab is the SMTP / Mail Hosts tab. Choose the settings for saving the options set on this tab. a. Save Settings – The settings button at the top of each tab identifies how settings are saved for the
tab. Click on this button to change the Save Settings.
i. Save settings independently for this Windows User [User Name], and to this PC [Computer Name] – The first choice is whether to save settings on the local workstation or terminal server or to save settings to a common location. Settings saved locally can only be changed at the local workstation (or terminal server) while logged in as the user. These settings are saved in the Current User registry.
ii. Save as defined in Common Settings file. ["<PBDir>\Email\Settings\Hosts.ini"] – E-mail settings may be saved to a common file located in the PrintBoss Directory. The advantage of this choice is the file may be edited by an administrator for these users. The Common Settings file may contain sections unique to each user (Save Settings in Section named by Windows User Name) or contain one group of settings that applies to all users (Save Settings in Section named "Common Users") who chose the Common Settings selection.
iii. Change Save Section in the Common Settings File – This button is available when Save as defined in Common Settings file is selected.
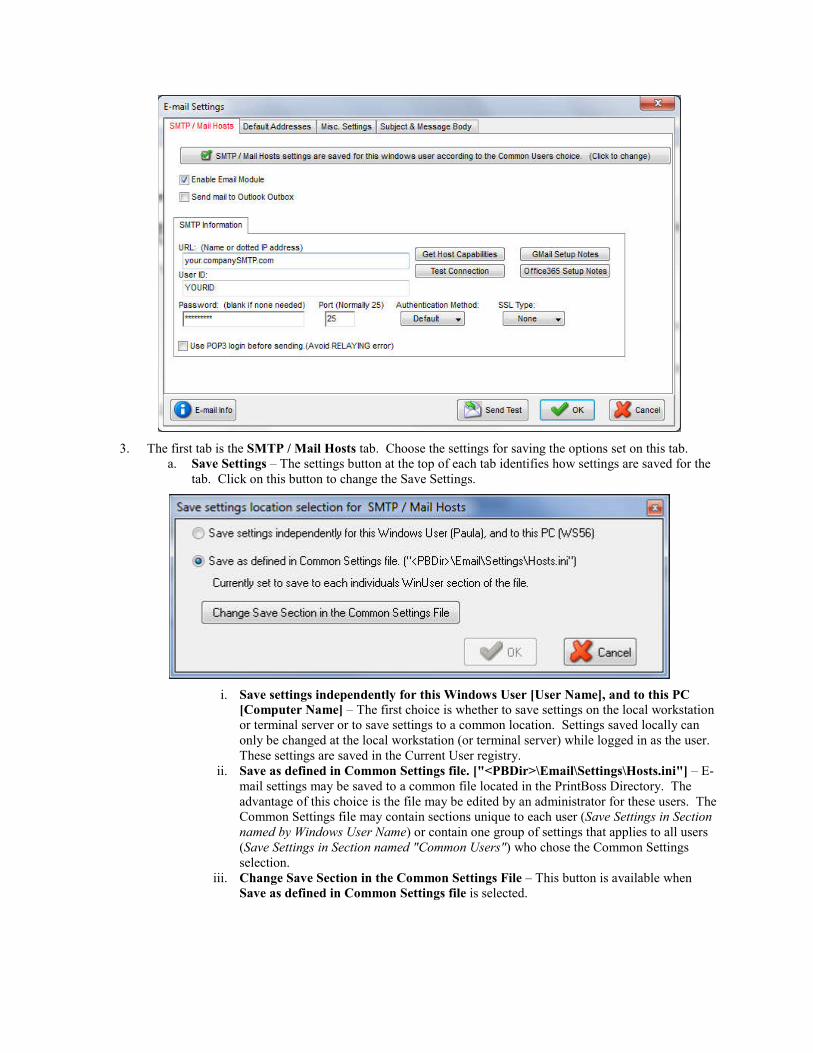
1. Save settings in Section named by Windows User Name – Settings are saved in a common File, Hosts.ini, by Windows User name.
2. Save settings in Section named "Common Users" – Setting are saved in a common file, Hosts.ini, in one section named Common Users.
iv. Settings will not be saved until you click OK at the bottom of the E-mail Settings dialog. b. Enable E-mail Module – This setting enables the e-mail function for this workstation (or user in
a Terminal Server or Citrix environment). c. Send mail to Outlook Outbox – Select this check box to send e-mail through your Microsoft
Outlook Outbox using Microsoft’s MAPI call. i. This feature is only available for PrintBoss Enterprise users.
ii. The Host SMTP information will be replaced with the selected Outlook Profile.
iii. Choose Use default profile when you have only one Outlook Profile or to use your primary Outlook Profile.
iv. Select the third choice (blank field) and enter the profile name when you have more than one Outlook Profile. The variable {EmailProfile} can be used to dynamically assign an Outlook profile in the PrintBoss form.
v. Temporarily select Request profile when you are not sure of the profile name and Outlook will provide a list of profiles. This enables you to identify the desired profile name to enter in the third choice. A list only appears when you have more than one Outlook profile. Otherwise, the only choice is Outlook. When the ‘Automatic E-mail Pause’ setting on the Misc. tab of the PrintBoss E-mail Settings option is set to Pause, the ‘Choose Profile’ dialogue only appears after clicking the ‘Send E-mail’ button.
vi. Seconds between emails allows a value greater than zero if the system requires a delay between sending emails. This feature should only be used at the advice of a Wellspring Software technician.
vii. Alert if Image Attachment Issues can be selected when either sending a large number of attachments or combining emails with a large number of attachments to receive a warning when the Outlook attachment limit is reached.
d. Host SMTP Information – This choice is available when Send mail to Outlook Outbox is NOT selected. Enter the values for your e-mail program.
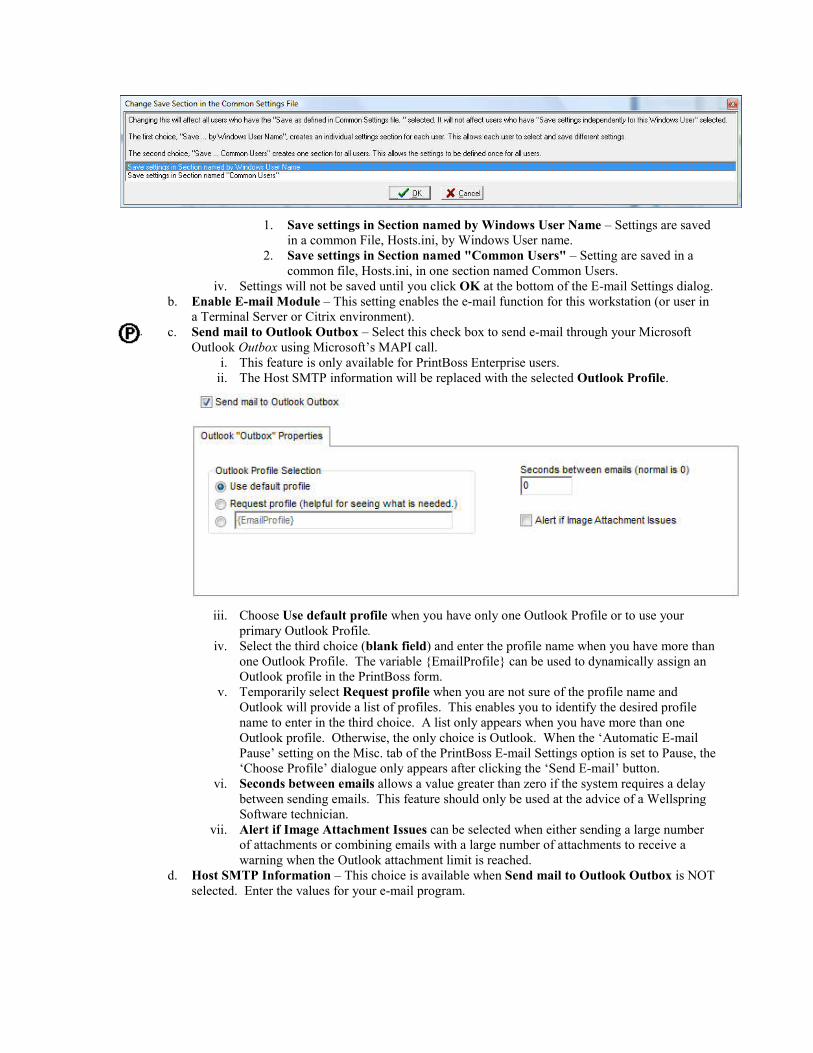
i. URL (name or dotted numeric address) – Enter the URL. The URL can either be the
4-segment dotted numeric address or the URL name (e.g. mail.yourcompany.com). ii. Get Host Capabilities – Click this button to verify the URL is correct. The User ID and
password are not necessary for authentication. When successful, it returns a list of authentication methods the server supports and confirms the URL address.
iii. Test Connection – Click this button to verify the User ID and Password are valid. The Password is not necessary when your e-mail account does not require a password.
iv. User ID – Enter your User ID. The User ID is the name of your e-mail account. It is also the same as the name you use to log in to your e-mail account and is often your email address.
v. Password – Enter your password if it is required to send outbound e-mails. This field accommodates 30 characters. Leave this field blank if your system does NOT require a password. Otherwise, the e-mail will not work.
vi. Port – Leave the default value. This is normally set to 25 unless otherwise instructed. Port 587 is used for both Gmail and Office 365.
vii. Authentication Method – Leave on the Default value unless instructed by a Wellspring Software support technician.
viii. SSL Type – This option is only available in PrintBoss Enterprise. Select the SSL type that matches the security on your SMPT server. This field is required for Office 365. The value is TLS 1.2.
ix. Use POP3 login before sending – Use this option to avoid SMTP Relay Errors when the authentication is needed to process the relay.
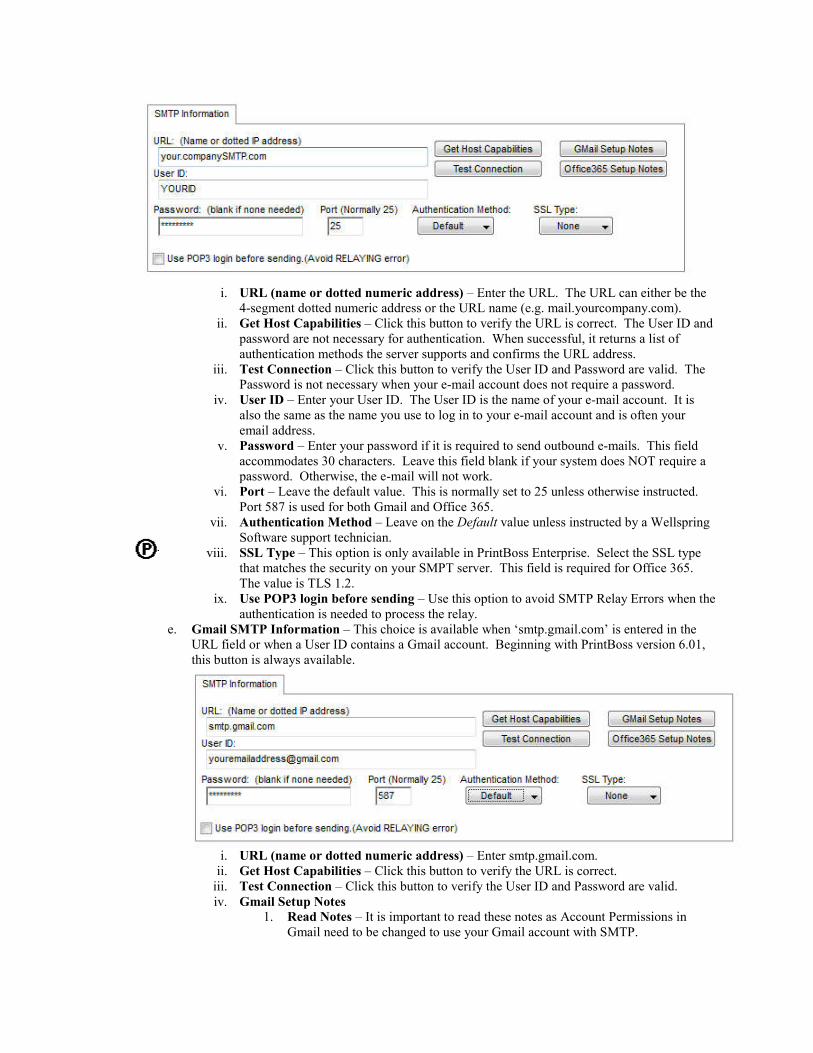
e. Gmail SMTP Information – This choice is available when ‘smtp.gmail.com’ is entered in the URL field or when a User ID contains a Gmail account. Beginning with PrintBoss version 6.01, this button is always available.
i. URL (name or dotted numeric address) – Enter smtp.gmail.com.
ii. Get Host Capabilities – Click this button to verify the URL is correct. iii. Test Connection – Click this button to verify the User ID and Password are valid. iv. Gmail Setup Notes
1. Read Notes – It is important to read these notes as Account Permissions in Gmail need to be changed to use your Gmail account with SMTP.
2. Prefill Gmail Settings – In PrintBoss version 6.01 and above, this feature will prefill some of the fields used for Gmail.
v. User ID – Enter your Gmail email address. vi. Password – Enter your Gmail password. This field accommodates 30 characters.
vii. Port – Set to 587. viii. Authentication Method – Change to the Default value.
ix. SSL Type – This is not applicable to Gmail. x. Use POP3 login before sending – This is not applicable to Gmail.
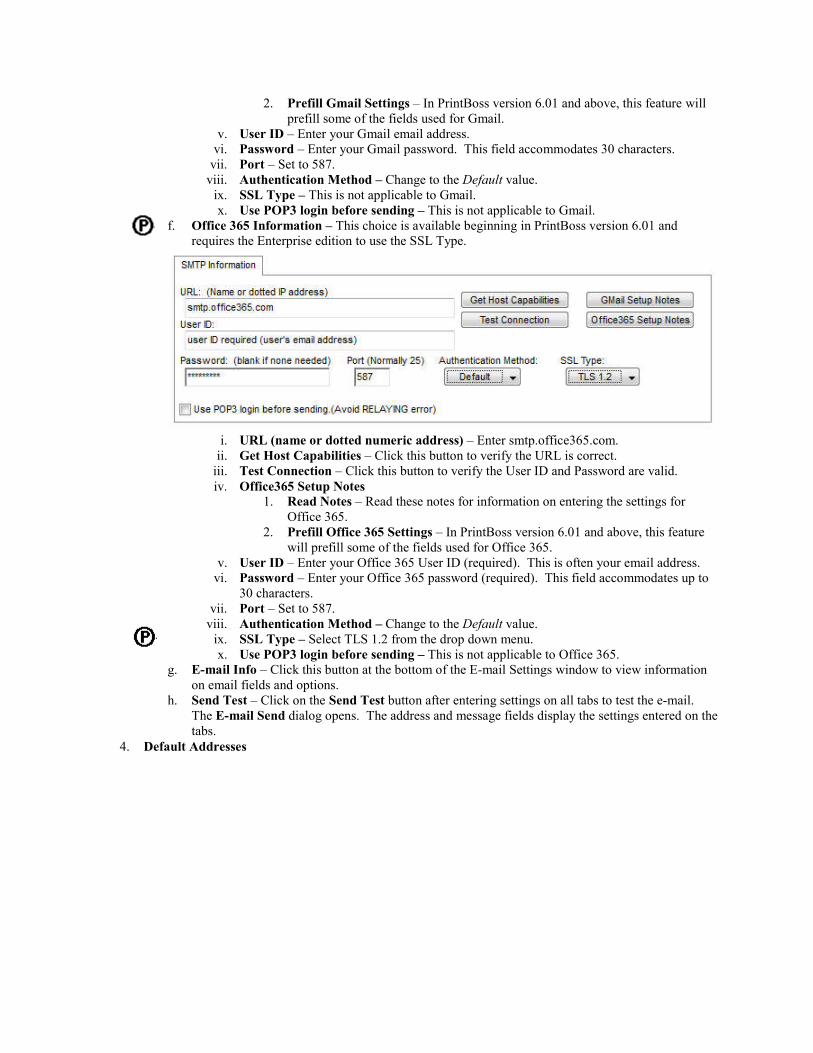
f. Office 365 Information – This choice is available beginning in PrintBoss version 6.01 and requires the Enterprise edition to use the SSL Type.
i. URL (name or dotted numeric address) – Enter smtp.office365.com.
ii. Get Host Capabilities – Click this button to verify the URL is correct. iii. Test Connection – Click this button to verify the User ID and Password are valid. iv. Office365 Setup Notes
1. Read Notes – Read these notes for information on entering the settings for Office 365.
2. Prefill Office 365 Settings – In PrintBoss version 6.01 and above, this feature will prefill some of the fields used for Office 365.
v. User ID – Enter your Office 365 User ID (required). This is often your email address. vi. Password – Enter your Office 365 password (required). This field accommodates up to
30 characters. vii. Port – Set to 587.
viii. Authentication Method – Change to the Default value. ix. SSL Type – Select TLS 1.2 from the drop down menu. x. Use POP3 login before sending – This is not applicable to Office 365.
g. E-mail Info – Click this button at the bottom of the E-mail Settings window to view information on email fields and options.
h. Send Test – Click on the Send Test button after entering settings on all tabs to test the e-mail. The E-mail Send dialog opens. The address and message fields display the settings entered on the tabs.
4. Default Addresses
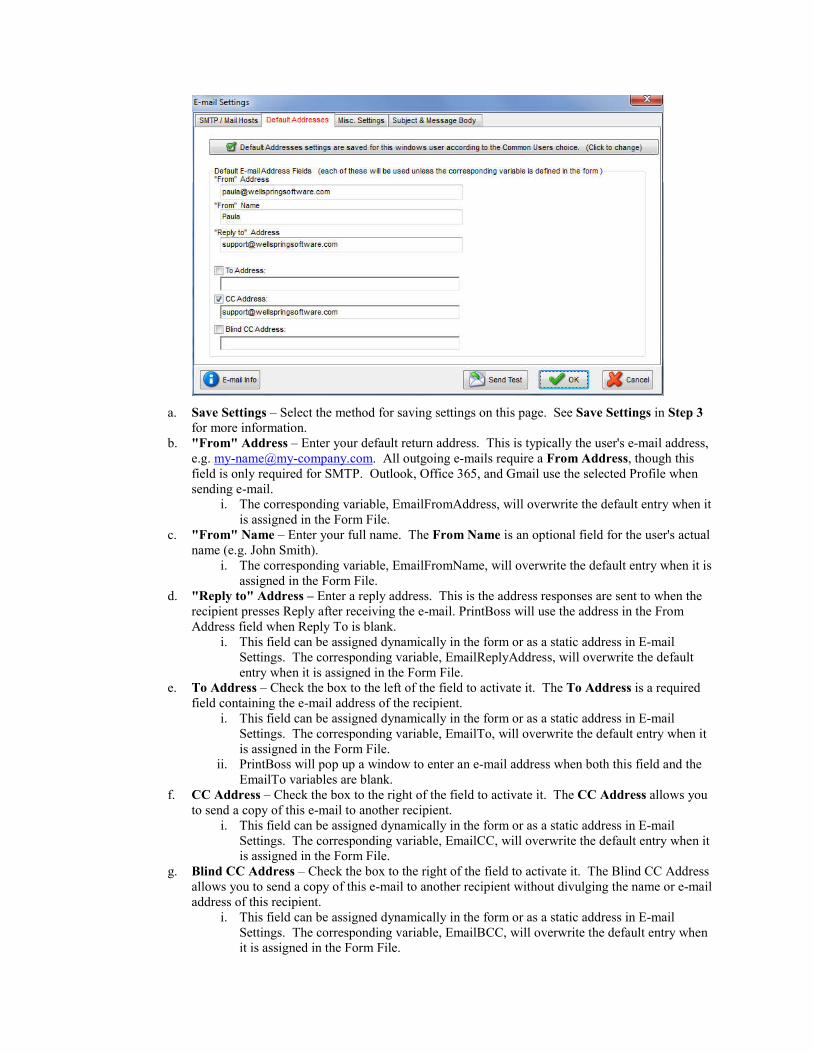
a. Save Settings – Select the method for saving settings on this page. See Save Settings in Step 3 for more information.
b. "From" Address – Enter your default return address. This is typically the user's e-mail address, e.g. [email protected]. All outgoing e-mails require a From Address, though this field is only required for SMTP. Outlook, Office 365, and Gmail use the selected Profile when sending e-mail.
i. The corresponding variable, EmailFromAddress, will overwrite the default entry when it is assigned in the Form File.
c. "From" Name – Enter your full name. The From Name is an optional field for the user's actual name (e.g. John Smith).
i. The corresponding variable, EmailFromName, will overwrite the default entry when it is assigned in the Form File.
d. "Reply to" Address – Enter a reply address. This is the address responses are sent to when the recipient presses Reply after receiving the e-mail. PrintBoss will use the address in the From Address field when Reply To is blank.
i. This field can be assigned dynamically in the form or as a static address in E-mail Settings. The corresponding variable, EmailReplyAddress, will overwrite the default entry when it is assigned in the Form File.
e. To Address – Check the box to the left of the field to activate it. The To Address is a required field containing the e-mail address of the recipient.
i. This field can be assigned dynamically in the form or as a static address in E-mail Settings. The corresponding variable, EmailTo, will overwrite the default entry when it is assigned in the Form File.
ii. PrintBoss will pop up a window to enter an e-mail address when both this field and the EmailTo variables are blank.
f. CC Address – Check the box to the right of the field to activate it. The CC Address allows you to send a copy of this e-mail to another recipient.
i. This field can be assigned dynamically in the form or as a static address in E-mail Settings. The corresponding variable, EmailCC, will overwrite the default entry when it is assigned in the Form File.
g. Blind CC Address – Check the box to the right of the field to activate it. The Blind CC Address allows you to send a copy of this e-mail to another recipient without divulging the name or e-mail address of this recipient.
i. This field can be assigned dynamically in the form or as a static address in E-mail Settings. The corresponding variable, EmailBCC, will overwrite the default entry when it is assigned in the Form File.
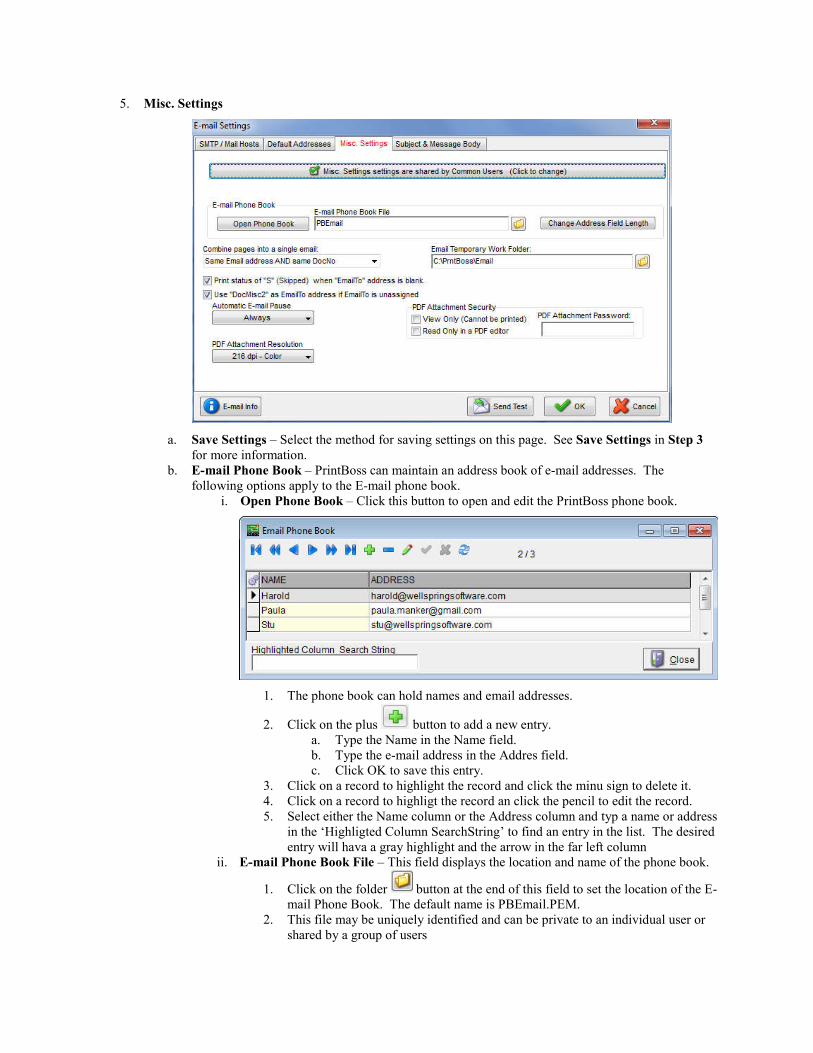
5. Misc. Settings
a. Save Settings – Select the method for saving settings on this page. See Save Settings in Step 3 for more information.
b. E-mail Phone Book – PrintBoss can maintain an address book of e-mail addresses. The following options apply to the E-mail phone book.
i. Open Phone Book – Click this button to open and edit the PrintBoss phone book.
1. The phone book can hold names and email addresses.
2. Click on the plus button to add a new entry. a. Type the Name in the Name field. b. Type the e-mail address in the Addres field. c. Click OK to save this entry.
3. Click on a record to highlight the record and click the minu sign to delete it. 4. Click on a record to highligt the record an click the pencil to edit the record. 5. Select either the Name column or the Address column and typ a name or address
in the ‘Highligted Column SearchString’ to find an entry in the list. The desired entry will hava a gray highlight and the arrow in the far left column
ii. E-mail Phone Book File – This field displays the location and name of the phone book.
1. Click on the folder button at the end of this field to set the location of the E-mail Phone Book. The default name is PBEmail.PEM.
2. This file may be uniquely identified and can be private to an individual user or shared by a group of users
3. The phone book is only used when manually e-mailing individual documents. It is not used in automatic e-mail mode.
4. The e-mail addresses need to be supplied in the document by defining the variable EmailTo for automatic e-mails. (See section on Automatic E-mail).
5. This e-mail phone book is completely independent from other address books. iii. Change Address Field Length – Click this button to change the maximum length of e-
mail addresses stored in the phone book.
1. The default length for an e-mail address is 60 characters. 2. Enter a character width (length) from 30 to 250 characters. 3. Any characters over the length you specify (e.g. 80) will be truncated. 4. This feature only applies to the e-mail addresses in the E-mail Phone Book file.
c. Combine pages into a single email – This option is only available in PrintBoss Enterprise. There are three choices.
i. Never combine – This is the default setting. ii. Email address is same as prior page – Select this option to combine documents with
the same e-mail address into one concatenated PDF attachment when printing a check batch with e- mails.
iii. Same Email address AND same DocNo – Select this option to combine documents with the same e-mail address and the same document number into one concatenated PDF attachment when printing a check batch with e- mails.
d. Email Temporary Work Folder – Leave at the default value of {PrintBoss Home Directory}\Email. This should only be changed with the help of a Wellspring Software technician.
e. Print status of "S" (Skipped) when "EmailTo" address is blank – Select this option to enter a capital S in the Printed column of the work file when the document has no E-mail To address.
i. E-mails that fail to send for whatever reason leave an error code of "e" in the printed column of the work file. This lower-case error code prohibits the work file from being archived or deleted automatically.
ii. This feature allows PrintBoss to skip an e-mail and record a status of S in the work file. PrintBoss will treat the document as completed.
iii. The skipped record can be handled separately or ignored. f. Use “DocMisc2” as EmailTo address if EmailTo is unassigned – This option works with
accounting systems that use a report writer, such as Crystal Reports, and can enter the PrintBoss Trigger. When an email address is entered in the DocMisc2 field (or PrintBossMisc2 in the trigger), select this option to use the email address in DocMisc2.
g. Automatic E-mail Pause – Select an option to set a pause when using the Automatic e-mail mode (see introduction to this chapter).
i. The default setting is Never. E-mails are sent automatically with no opportunity for changes.
ii. Bad Address – Pauses at a document with a bad e-mail address and provides the opportunity to enter a correct address prior to continuing with processing. A ‘Bad Address’ is defined as an address that is missing the ‘@’ symbol or a .com, etc.
iii. Always – Opens the e-mail dialog for every document, requiring the user to click the ‘Send E-mail’ button to proceed. This choice is sometimes used temporarily during initial setup and testing. Fields can be changed before clicking ‘Send E-mail’.
h. PDF Attachment Resolution – Select the resolution of the PDF files created as attachments to the e-mail.
i. The default value is 216 dpi - Color. This option is the most robust. ii. The size of the PDF file can be reduced by selecting one of the black and white (B/W)
options. However, shades of gray and color will show as solid black. iii. Be sure to test the quality of the resolution before you reset this value.
i. PDF Attachment Security – PrintBoss Enterprise provides added security for PDF attachments. i. View Only – Allows the recipient to open and read the PDF file attachment, but not print
or edit. The Print feature will not be available in the PDF Reader application. Any copies made of the document will carry the same security.
ii. Read Only in a PDF editor – Allows the recipient to open and print the PDF attachment, but prohibits edits to the original attachment.
iii. PDF Attachment Password – Enter a password that will be required to open the PDF file. The password applies to all PDF attachments and can be assigned as a static value in this field or a dynamic value in the Form File.
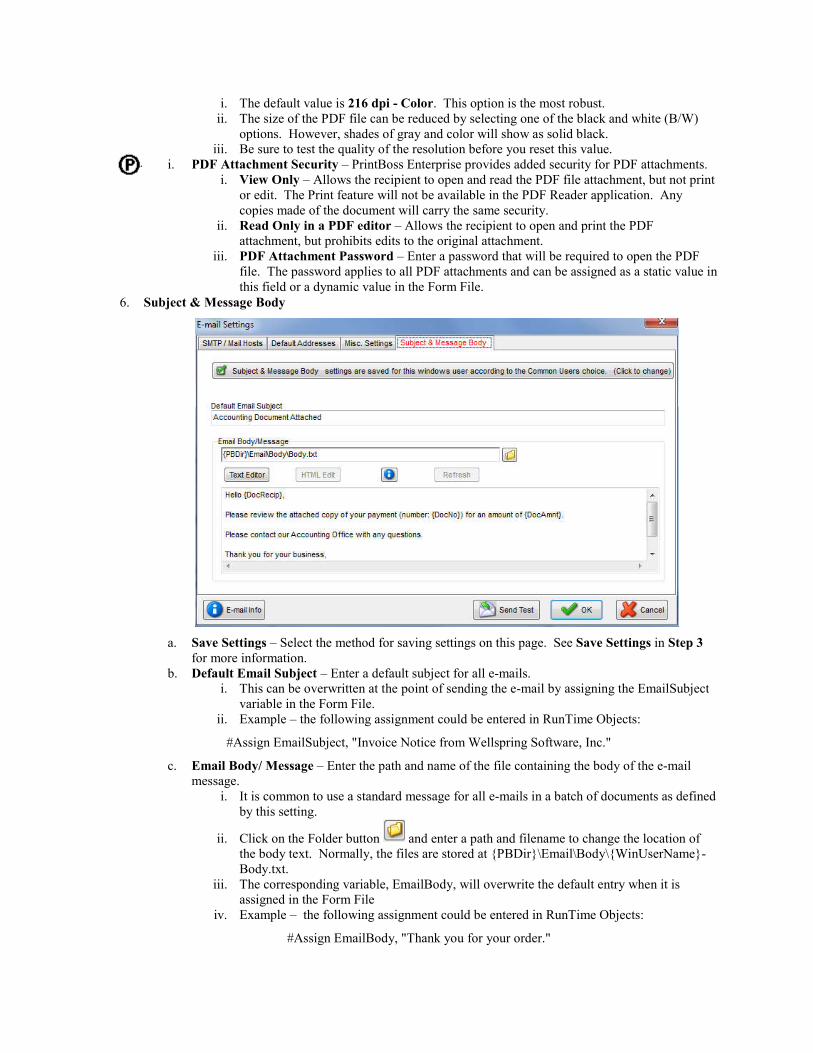
6. Subject & Message Body
a. Save Settings – Select the method for saving settings on this page. See Save Settings in Step 3 for more information.
b. Default Email Subject – Enter a default subject for all e-mails. i. This can be overwritten at the point of sending the e-mail by assigning the EmailSubject
variable in the Form File. ii. Example – the following assignment could be entered in RunTime Objects:
#Assign EmailSubject, "Invoice Notice from Wellspring Software, Inc."
c. Email Body/ Message – Enter the path and name of the file containing the body of the e-mail message.
i. It is common to use a standard message for all e-mails in a batch of documents as defined by this setting.
ii. Click on the Folder button and enter a path and filename to change the location of the body text. Normally, the files are stored at {PBDir}\Email\Body\{WinUserName}-Body.txt.
iii. The corresponding variable, EmailBody, will overwrite the default entry when it is assigned in the Form File
iv. Example – the following assignment could be entered in RunTime Objects:
#Assign EmailBody, "Thank you for your order."

#Assigns EmailBody can also be used to assign multiple lines. A separate #Assigns is used for each line. Use #Assigns EmailBody, “ “ to create a blank line between paragraphs.
v. The E-mail Body may be a text (.txt) or HTML file. Both file types can use the PrintBoss variable tags, such as {DocNo}, to dynamically update information for each e-mail when the documents are processed.
1. Text Editor – Click on this button to open a Notepad file to edit a .txt E-mail Body message. This button is only available when the E-mail Body/Message is a .txt file. Changes to the text file must be saved and will not show in the E-mail Body window until you click OK at the bottom of the E-mail Settings dialog or by pressing the Refresh button.
2. HTML Editor – Click this button to open your default HTML editor to edit an .htm or .html E-mail Body/Message. This button is only available when the E-mail Body/Message has an .htm or .html file extension. Typically the editor is Microsoft Word. Changes to the HTML file must be saved as a filtered web.
Click the information button for more details. 7. Click OK at the bottom of the E-mail Settings window to save changes made on any tab. Some changes
will not display until OK is clicked.
FORM SETUP FOR E-MAIL
The PrintBoss E-mail feature is enabled on a form-by-form basis. This only takes a few steps:
1. Open the PrintBoss Master Application. 2. Click on the Edit menu and select Form Files. 3. Highlight the form you want to e-mail and click the Editor button. 4. Increment Copies by 1 in the right column of the Settings Tab. This new copy will be treated as the E-
mail copy. 5. Select the Multi-Parts & Printers tab. 6. Set the Destination Printer/Device for the new copy to < Email>. 7. Click OK.
You may also want to setup ProcessPage commands at the top of the Footer Objects tab of the Form in order to determine when to process the new E-mail copy vs. printing a copy. Verify the copy numbers on the Multi-Parts & Printers tab and then follow the steps below:
1. Open the PrintBoss Master Application. 2. Click on the Edit menu and select Form Files. 3. Highlight the form you want to e-mail and click the Editor button. 4. Select the Footer Objects tab. 5. Enter the following ProcessPage command at the top of the Footer Objects tab for Email:
a. #[Copy,1]ProcessPage «[!Empty,{EmailTo}]» or #[Copy,1]ProcessPage «[Inu, ‘@’,{DocMisc2}]»
b. The Copy number, i.e. Copy, 1, should be the email copy. Replace the 1 with the correct copy number.
c. The ‘!’ is ‘Not’. The page will process when the variable {EMailTo} is Not Empty. ‘Inu’ looks for a specific value in the variable. For DocMisc2, PrintBoss is looking for the ‘@’ in the DocMisc2 field to process the email.
d. The {EmailTo} variable should be assigned as explained in the ‘Assignments’ section later in this chapter. If the email address variable is added to the DocMisc2 field in the PrintBoss Trigger, verify the ‘Use “DocMisc2” as EmailTo address if EmailTo is unassigned’ checkbox is selected on the Misc. Settings tab or the E-mail Settings dialog under the Options menu on the PrintBoss Master Application.
6. To add conditionally printing a copy when {EmailTo} is Empty, copy the ProcessPage command and change the copy number and remove the ‘!’ condition for {EmailTo} or add it for DocMisc2 as follows:
a. #[Copy,2]ProcessPage «[Empty,{EmailTo}]» or #[Copy,3]ProcessPage «[!Inu, ‘@’,{DocMisc2}]»
b. Verify the correct copy number. This may be set to Copy, 0 to print an original versus a copy. 7. Click OK on the Form so save these changes.
See Chapter 9, Form Files, Modify from the Document View for more information.
E-MAILING
Printing documents from the accounting software proceeds as normal. Typically, the documents Original and Copy are set to print/e-mail immediately.
When the Print Time on the Multi-Parts & Printers tab of the Form Editor is set to Batch, documents can be e-mailed manually from the View or directly from the Work File. See Manual E-mail below for step-by-step instructions on sending e-mail from the Work File.
MANUAL E-MAIL
When Enabled E-mail Module is checked at the top of the E-mail Settings dialog, all document Views will have an E-mail button at the top of the window near the Close button.
1. Open the PrintBoss Master Application. 2. Click on the File menu and select Open Document Work Files or Open Document Archives. 3. Highlight the desired work or archive file and select Browse. 4. Select the appropriate document from the list. There are two ways to proceed from this point.
a. Click View. i. Click on the E-mail button at the top of the window to manually send this document.
ii. There is a short delay while PrintBoss creates the PDF file to attach to the e-mail. iii. The E-Mail Send dialog opens.
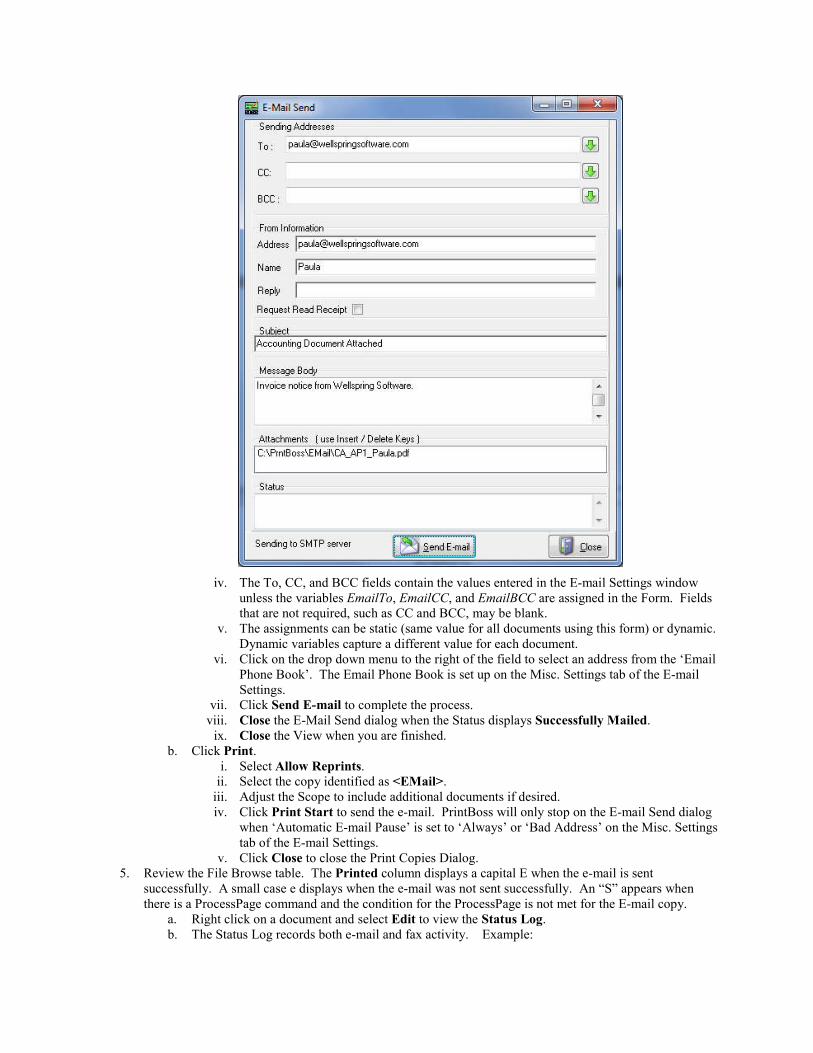
iv. The To, CC, and BCC fields contain the values entered in the E-mail Settings window unless the variables EmailTo, EmailCC, and EmailBCC are assigned in the Form. Fields that are not required, such as CC and BCC, may be blank.
v. The assignments can be static (same value for all documents using this form) or dynamic. Dynamic variables capture a different value for each document.
vi. Click on the drop down menu to the right of the field to select an address from the ‘Email Phone Book’. The Email Phone Book is set up on the Misc. Settings tab of the E-mail Settings.
vii. Click Send E-mail to complete the process. viii. Close the E-Mail Send dialog when the Status displays Successfully Mailed.
ix. Close the View when you are finished. b. Click Print.
i. Select Allow Reprints. ii. Select the copy identified as <EMail>.
iii. Adjust the Scope to include additional documents if desired. iv. Click Print Start to send the e-mail. PrintBoss will only stop on the E-mail Send dialog
when ‘Automatic E-mail Pause’ is set to ‘Always’ or ‘Bad Address’ on the Misc. Settings tab of the E-mail Settings.
v. Click Close to close the Print Copies Dialog. 5. Review the File Browse table. The Printed column displays a capital E when the e-mail is sent
successfully. A small case e displays when the e-mail was not sent successfully. An “S” appears when there is a ProcessPage command and the condition for the ProcessPage is not met for the E-mail copy.
a. Right click on a document and select Edit to view the Status Log. b. The Status Log records both e-mail and fax activity. Example:
5/09/2016 02:30:40P Copy=1 Emailed Successfully to [email protected]
ASSIGNMENTS
Assignments can be either Static or Dynamic. An explanation of these choices follows.
Static Assignments Assign static values to the EmailCC or EmailBCC variables to set a single address for ALL e-mails. For example, a department may need a copy of all invoices. The invoice form may contain an entry similar to the following:
#Assign EmailCC, "[email protected]"
Static assignments should be made in the RunTime Objects tab of the PrintBoss Form File (EDIT / FORM FILES / <highlight the PrintBoss Form> / EDITOR).
Dynamic Assignments Dynamic assignments are the heart of automatic e-mailing. Normally, the ‘To’ address changes with each document. There are 2 ways to create a dynamic assignment. Use one method or the other, not both.
INCLUDE IN SOURCE REPORT: If you have control over the information sent to PrintBoss, define a field in the source report to pass the e-mail address. It is important that this is just ONE field. You may need to create a variable in the source report that uses a combination of text and database fields. The value of the resulting field must be similar to the following example:
PB#Assign EmailTo, [email protected]
When possible, we suggest adding the email address to DocMisc2 in the PrintBoss Trigger. This method is specific to crystal reports.
See Chapter 23, Capturing and Assigning Text.
PICKED OFF OF CAPTURED REPORT BY PRINTBOSS: This method requires the customer's e-mail address is displayed or printed somewhere on the source report. PrintBoss can capture this information and blank it out (if desired).
1. Send a document to PrintBoss containing an e-mail address field. 2. Click on the File menu and select Open Document Work Files on the PrintBoss Master Application. 3. Select the appropriate form and click Browse. 4. Select a document and click View. 5. Right-click anywhere in the View and select View Raw Capture. 6. Locate the e-mail text on the screen. Double click on the text to open the Captured Text Command
Properties dialog. 7. Select the Click to Assign to Variable bar in the top right of the dialog. 8. Change the Variable Name from ReNameMe to EmailTo (or EmailCC or EmailBCC). 9. Check the following fields:
a. Add together fields in horizontal range b. Make 1 assignment per capture field c. Capture Raw Text Objects Only d. Left Trim e. Right Trim a. Blank Out After Capture (optional – hides e-mail addresses on printed document)
Some reporting engines (such as the some versions of Crystal Reports) tend to break up text fields. A good practice is to click on the +/- button that follows the Horizontal field so it
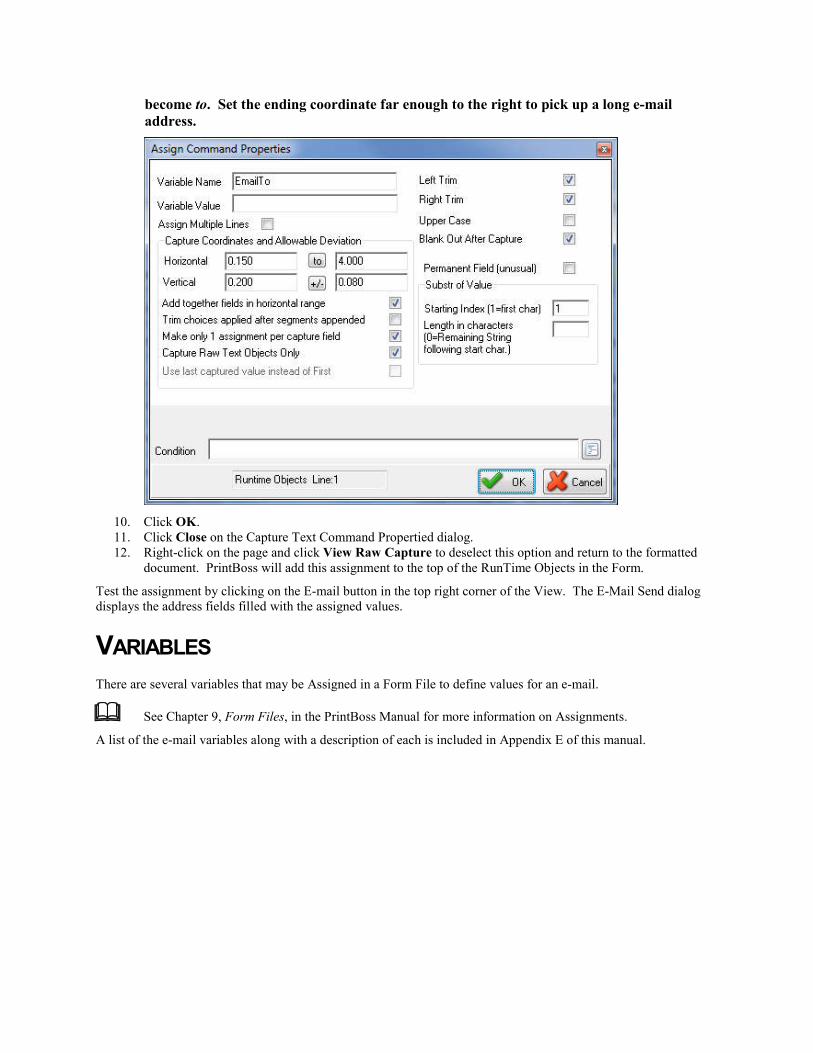
become to. Set the ending coordinate far enough to the right to pick up a long e-mail address.
10. Click OK. 11. Click Close on the Capture Text Command Propertied dialog. 12. Right-click on the page and click View Raw Capture to deselect this option and return to the formatted
document. PrintBoss will add this assignment to the top of the RunTime Objects in the Form.
Test the assignment by clicking on the E-mail button in the top right corner of the View. The E-Mail Send dialog displays the address fields filled with the assigned values.
VARIABLES
There are several variables that may be Assigned in a Form File to define values for an e-mail.
See Chapter 9, Form Files, in the PrintBoss Manual for more information on Assignments.
A list of the e-mail variables along with a description of each is included in Appendix E of this manual.