training workshop on arduino-based automatic weather...
TRANSCRIPT

Prepared by K.H. Tam, J.M.H. Chang HKO updated on 12.7.2018 1
Training Workshop on
Arduino-based Automatic Weather Station (AWS)
Hong Kong Observatory

Prepared by K.H. Tam, J.M.H. Chang HKO updated on 12.7.2018 2
Table of Content
1. Project Objectives
2. Getting started
3. Creating your first AWS project
4. Installing a temperature and humidity sensor DHT22 module
5. Installing a Pressure sensor BMP280 module
6. Installing a Real-Time Clock module
7. Installing a LCD Display
Prepared by K.H. Tam, J.M.H. Chang HKO updated on 12.7.2018 3
(1) Project Objectives
The development of Automatic Weather Stations (AWS) Network was becoming more
universal in recent decade, prior to setting up AWS by commercials and individual uses, AWS
mainly served for meteorological monitoring application by governmental institutes.
Starting from 2007, with the establishment of The Community Weather Information
Network (Co-WIN) in Hong Kong, more than 150 educational institutions and community
organizations had joined to install AWS in their own places for promoting education on
meteorology and environmental science through the Co-WIN platform. With the genuine
support of our Co-WIN partners, our sensor networks were widely spread across our entire
Hong Kong, and quality assurance standard-formatted meteorological data have been
received in enriching our database.
With the Co-WIN sensor network, Hong Kong Observatory and partner institutes could
access the database in performing some micro-climate research and investigating the
climatology in a designated area, which could help in having a better understanding on our
living environment.
Co-WIN 2.0, 10 years after the establishment of the Co-WIN network, a phase 2 public
education was commenced in promoting meteorology and climate change to public citizens
with more multi-disciplinary interactions and public engagement, with the promotion of
STEM education by HKSAR government in 2016, we would like to implicate science,
technology, engineering and mathematics into a DIY Weather Station project in helping
students and public parties involve in the designing and assembling processes of a AWS and
innovate from it.

Prepared by K.H. Tam, J.M.H. Chang HKO updated on 12.7.2018 4
(2) Getting started
2.1 The Arduino Nano Board

Prepared by K.H. Tam, J.M.H. Chang HKO updated on 12.7.2018 5
2.2 The Arduino IDE
Before you start controlling the world around you using the Arduino, you’ll need to
download the Arduino IDE (Integrated Development Environment). The Arduino IDE
allows you to write programs and upload them to your Arduino. You can download the
latest version of the IDE from: https://www.arduino.cc/en/Main/Software
In this workshop, the Arduino IDE has been downloaded and installed for you. The
link to start your Arduino IDE is shown as an Arduino icon on the desktop of your PC
(see below)
2.3 Basic information about the Breadboard used in this workshop

Prepared by K.H. Tam, J.M.H. Chang HKO updated on 12.7.2018 6
2.4 Connecting your Arduino Nano to a PC
Insert the Arduino Nano on the breadboard as shown below and connect it to your
PC using a mini-USB cable

Prepared by K.H. Tam, J.M.H. Chang HKO updated on 12.7.2018 7
(3) Creating your first AWS project
3.1 Running the Arduino IDE
Double click on the Arduino icon on the desktop of your PC to start running the
Arduino IDE.
3.2 Selecting a proper Arduino board
3.3 Creating a new project file

Prepared by K.H. Tam, J.M.H. Chang HKO updated on 12.7.2018 8
The basic structure of a new project file is shown below:
Type the following in the setup() section:
Serial.begin(9600);
Serial.print(" This is my first AWS program! " );
Do any initialization steps here!
Opens up the USB port for serial communication
and set the baud rate to 9600 bps
Prints the value passed into the brackets (“ ”)
on to the Serial Monitor

Prepared by K.H. Tam, J.M.H. Chang HKO updated on 12.7.2018 9
3.4 Setting up an appropriate Communication Port
Set up an appropriate COM port for displaying the information: select COM5 or
COM4 in some PCs.
3.5 Compiling and uploading a program to your Arduino
Press this button to open the
Serial Monitor

Prepared by K.H. Tam, J.M.H. Chang HKO updated on 12.7.2018 10
3.6 Using the loop() function
In the loop() section, type Serial.print("This is my first AWS program! ") and see the
result.
Try using Serial.println("This is my first AWS program! ") instead of Serial.print("This
is my first AWS program! ") and recompile your program and see the result.

Prepared by K.H. Tam, J.M.H. Chang HKO updated on 12.7.2018 11
3.7 Saving your first project file
Save the program as My_new_AWS.
Prepared by K.H. Tam, J.M.H. Chang HKO updated on 12.7.2018 12
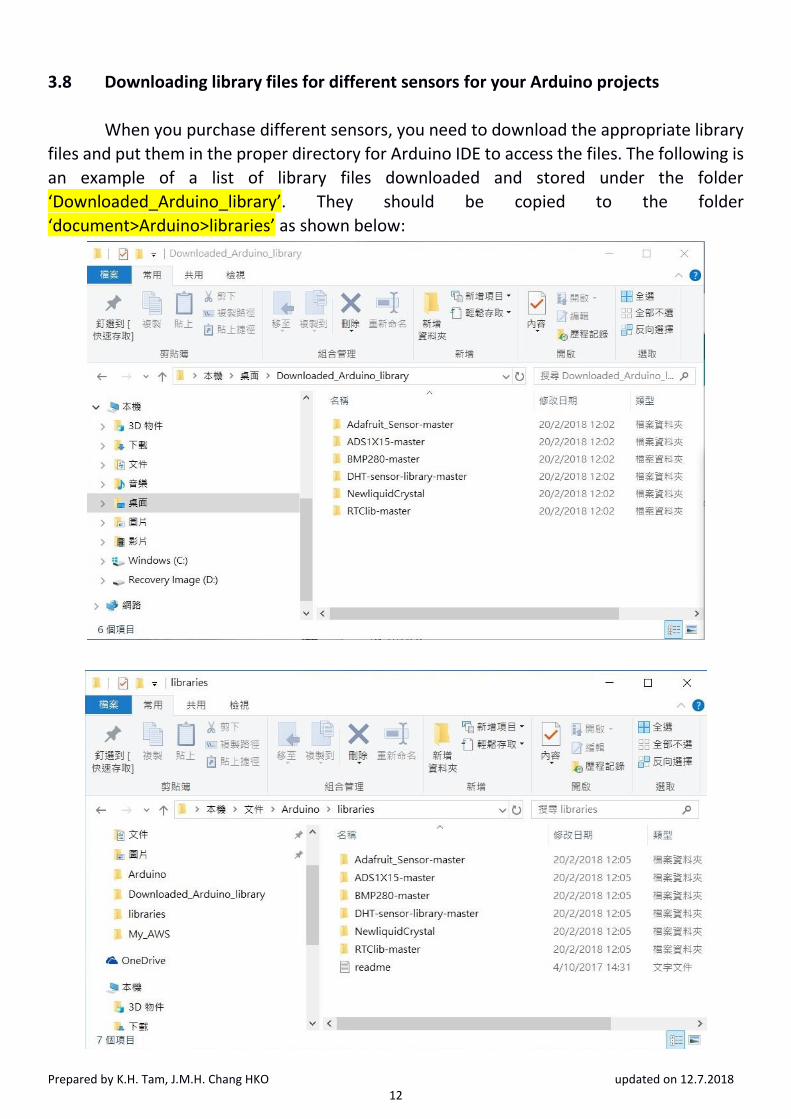
3.8 Downloading library files for different sensors for your Arduino projects
When you purchase different sensors, you need to download the appropriate library
files and put them in the proper directory for Arduino IDE to access the files. The following is
an example of a list of library files downloaded and stored under the folder
‘Downloaded_Arduino_library’. They should be copied to the folder
‘document>Arduino>libraries’ as shown below:

Prepared by K.H. Tam, J.M.H. Chang HKO updated on 12.7.2018 13
(4) Installing a temperature and humidity sensor DHT22 module
4.1 Wiring 1. Connect GND and VCC of DHT22 to the GND and 5V pins of Arduino Nano respectively
2. Connect DAT of DHT22 to A0 pin of Arduino Nano

Prepared by K.H. Tam, J.M.H. Chang HKO updated on 12.7.2018 14
4.2 Choosing an Example file in the DHT sensor library
Choose the DHTtester file from the DHT sensor library as shown below:

Prepared by K.H. Tam, J.M.H. Chang HKO updated on 12.7.2018 15
4.3 Modifying the Analog input pin to display correctly Modify the analog input pin from 2 to A0 as shown below:
Compile and upload the program again and see the results.
4.4 Modifying the My_new_AWS file to include the DHT22 sensor program
Open the My_new_AWS file side by side with the DHTtester file. Copy the following
4 lines to header section of My_new_AWS program:
#include "DHT.h"
#define DHTPIN A0 // what digital pin we're connected to
#define DHTTYPE DHT22 // DHT 22 (AM2302), AM2321
DHT dht(DHTPIN, DHTTYPE);

Prepared by K.H. Tam, J.M.H. Chang HKO updated on 12.7.2018 16
Copy the following line to the setup section of My_new_AWS program:
dht.begin(); as shown below:
#

Prepared by K.H. Tam, J.M.H. Chang HKO updated on 12.7.2018 17
Copy the loop() section of DHTtester to My_new_AWS and modify them as shown
below:
Add a time delay for ensuring printing a data record every second.
delay(1000-millis()%1000 + 10);
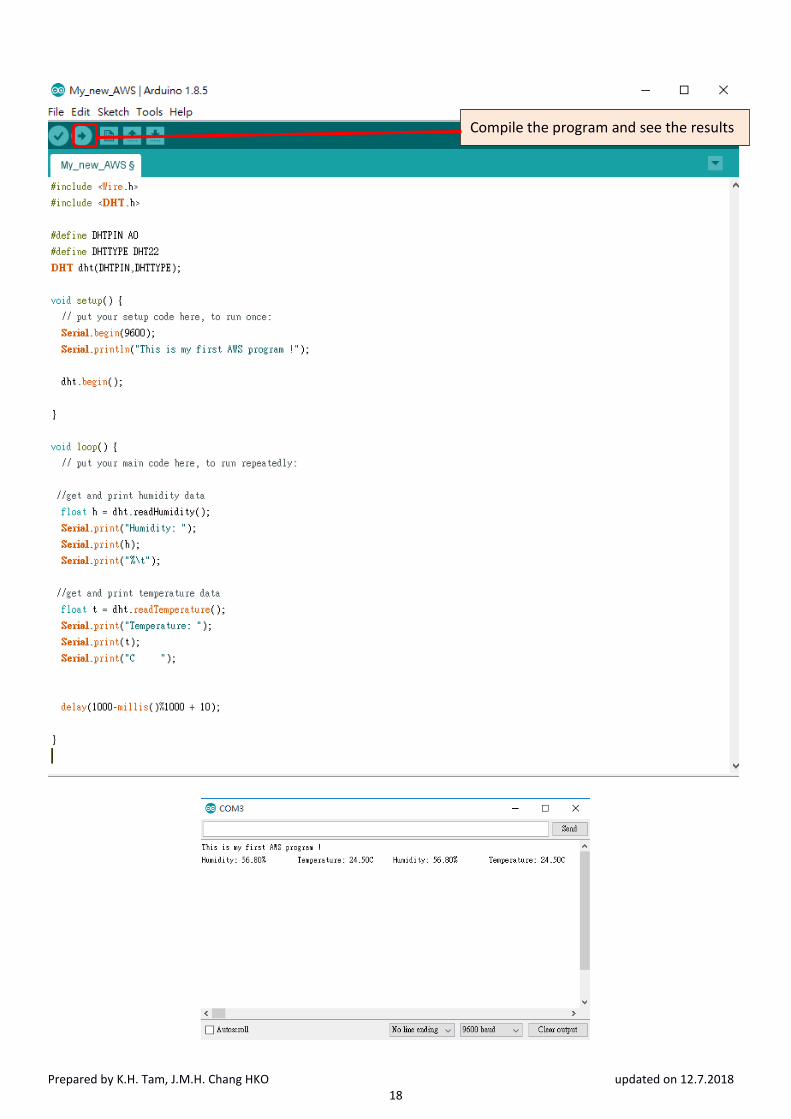
Prepared by K.H. Tam, J.M.H. Chang HKO updated on 12.7.2018 18
Compile the program and see the results

Prepared by K.H. Tam, J.M.H. Chang HKO updated on 12.7.2018 19
(5) Installing a Pressure sensor BMP280 module
5.1 Wiring
1. Connect BMP280 Vcc to 5V and GND to ground respectively
2. Connect BMP280 SCL to Adruino A5
3. Connect BMP280 SDA to Adruino A4

Prepared by K.H. Tam, J.M.H. Chang HKO updated on 12.7.2018 20
5.2 Choosing an Example file in BMP280 library
Choose the bmp280_example file from the BMP280-master library as shown below:

Prepared by K.H. Tam, J.M.H. Chang HKO updated on 12.7.2018 21
Compile and upload the program to Arduino Nano and see the results.
5.3 Modifying My_new_AWS file to include the BMP280 sensor program
Open My_new_AWS file and copy the below lines from bmp280_example file to
the file. In setup(), add bmp.init(); as shown.

Prepared by K.H. Tam, J.M.H. Chang HKO updated on 12.7.2018 22
Compile and upload the program to see the results! Remember to save your My_new_AWS
file again!

Prepared by K.H. Tam, J.M.H. Chang HKO updated on 12.7.2018 23
(6) Installing a Real-Time Clock module
6.1 Wiring
1. Connect DS1307 Vcc to 5V and GND to ground respectively
2. Connect DS1307 SCL to Adruino A5
3. Connect DS1307 SDA to Adruino A4

Prepared by K.H. Tam, J.M.H. Chang HKO updated on 12.7.2018 24
6.2 Choosing an Example file in RTC library
Choose the ReadTest file from the DS1307RTC library as shown below:
Compile and upload the program to Arduino Nano and see the results.

Prepared by K.H. Tam, J.M.H. Chang HKO updated on 12.7.2018 25
6.3 Modifying My_new_AWS file to include the RTC ReadTest program
Open My_new_AWS file and copy the below lines from ReadTest file to the file, minor
modification from print2digits to Serial.print would be needed for simplifying the code.
Compile and upload the program to see the results! Remember to save your My_new_AWS
file again!

Prepared by K.H. Tam, J.M.H. Chang HKO updated on 12.7.2018 26
(7) Installing a LCD Display
Front view
Rear view

Prepared by K.H. Tam, J.M.H. Chang HKO updated on 12.7.2018 27
7.1 Wiring
1. Connect LCD Vcc to 5V and GND to ground respectively
2. Connect LCD SCL to Adruino A5
3. Connect LCD SDA to Adruino A4

Prepared by K.H. Tam, J.M.H. Chang HKO updated on 12.7.2018 28
7.2 Choosing an Example file in the NewliquidCrystal library
Choose the LCDHellowWorld example file from the NewliquidCrystal library as shown.

Prepared by K.H. Tam, J.M.H. Chang HKO updated on 12.7.2018 29
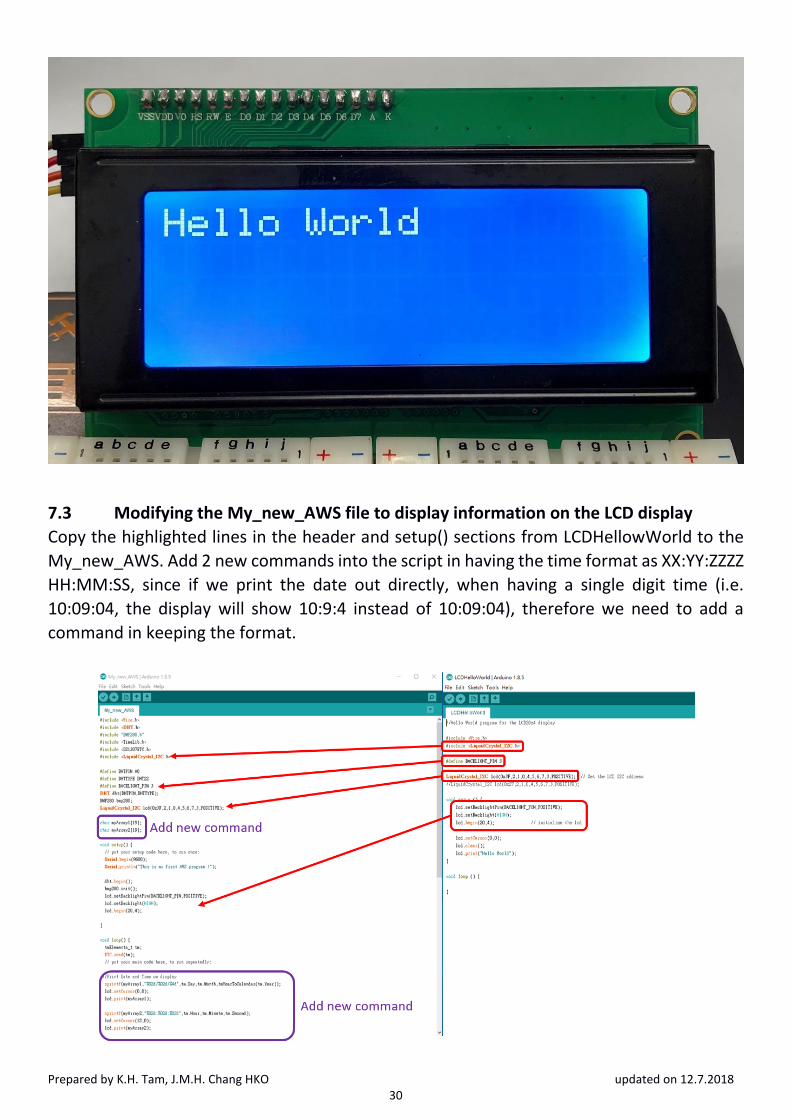
Compile and upload the LCDHelloWorld program to Arduino Nano and see the
output shown on the LCD display.
Prepared by K.H. Tam, J.M.H. Chang HKO updated on 12.7.2018 30
7.3 Modifying the My_new_AWS file to display information on the LCD display
Copy the highlighted lines in the header and setup() sections from LCDHellowWorld to the
My_new_AWS. Add 2 new commands into the script in having the time format as XX:YY:ZZZZ
HH:MM:SS, since if we print the date out directly, when having a single digit time (i.e.
10:09:04, the display will show 10:9:4 instead of 10:09:04), therefore we need to add a
command in keeping the format.

Prepared by K.H. Tam, J.M.H. Chang HKO updated on 12.7.2018 31
If you want to output the degree symbol oC, try to change the command lcd.print(“C”); to
lcd.print(“\337C”) in temperature module command;
Congratulation! You have now completed your My_new_AWS project!