transcutaneous electrical nerve stimulator for pain ... · stimulator. transcutaneous electrical...
TRANSCRIPT
Transcutaneous Electrical Nerve Stimulator for Pain Treatment
USER GUIDE
Direct TENS™ 2
CONTENTS...
............................................................................................................................................ Page 6
................................................................................................................... Page 9............................................................................................................................................................ Page 10
........................................................................... Page 11
.................................................................................................................................................................................. Page 14...................................................................................................................................................................... Page 14
................................................................................................................... Page 14.......................................................................................................... Page 15
..................................................................................................................................................................................... Page 19
......................................................................................................................................................................... Page 19........................................................................................................................................................................... Page 20
.............................................................................................................................................. Page 21............................................................................................................................................................................. Page 21
....................................................................................................................................................... Page 21
............................................................................................................................................................................... Page 22
................................................................................................................ Page 23
................................................................................................................................. Page 24................................................................................... Page 24
Quick Start Guide General Information
1 Points to Note Before Use
2 How does the Direct TENS™ Device function?2.1 TENS Therapy Principle2.2 Description of the Programs and the Corresponding Indications
3 Preparation3.1 Inserting Batteries3.2 Applying Electrodes, Connecting Leadwires3.3 Selection, Care and Placement of the Electrodes
4 Treatment4.1 Starting Therapy4.2 Ending Therapy
5 Special Direct TENS Functions5.1 Therapy Timer 5.2 Factory Defaults Settings
6 What to do, if
7 Care, Storage, Battery Replacement, Disposal
8 Ordering Information, Specifications8.1 Information related to electromagnetic compatibility (EMC)
Direct TENS™ 3
QUICK START GUIDE...
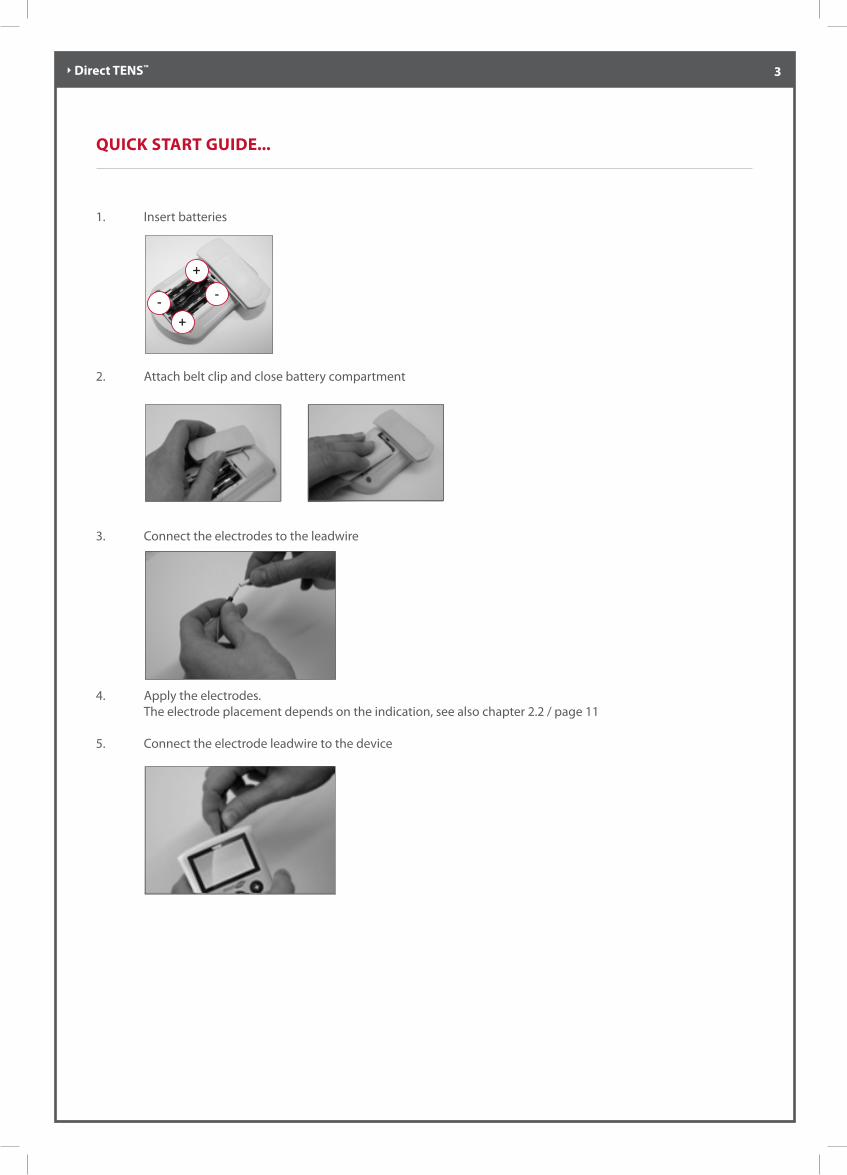
1. Insert batteries
2. Attach belt clip and close battery compartment
3. Connect the electrodes to the leadwire
4. Apply the electrodes. The electrode placement depends on the indication, see also chapter 2.2 / page 11
5. Connect the electrode leadwire to the device
+
+
--

Direct TENS™ 4
QUICK START GUIDE...
6. Switch the therapy unit on
7. Select a program (only possible when intensity = 0) The program depends on the indication to treat, see also chapter 2.2 / page 11
OR
8. Set intensity for selected channel
9. After approx. 10 seconds the keys are automatically locked to prevent the treatment parameters from being changed inadvertently. To unlock the keys, press either key (channel 1 or 2).
10. To terminate the treatment simply turn off the device with the ON/OFF key. When the therapy timer is activated, the stimulator switches automatically off at the end of the programmed interval.
Note: The Belt Clip can be attached or removed as required. You can find the procedure to attach/remove the belt clip on page 14, chapter 3.1.

Direct TENS™ 5
• The product Direct TENS™ bears the CE marking CE-0473 (Notified Body: AMTAC Certification Services Limited) showing that it complies with the Council Directive 93/42/EEC as amended concerning medical devices and fulfils the essential requirements of Annex I of this directive. It has an internal power source and is classified as IIa equipment (MDD).
• The device has a type BF applied part.
• The device fulfils the requirements of the standard EN 60601-1 “Medical electrical equipment, Part 1: General requirements for safety” as well as the immunity requirements of the standard EN 60601-1-2 “Electromagnetic compatibility - medical electrical equipment”.
• This manual is an integral part of the device and should be kept near the device at all times. Close observance of the information given in this manual is a prerequisite for using the device as intended and for correct operation to ensure user’s safety. Please note that information pertinent to several chapters is given only once. Therefore, carefully read the manual once in its entirety.
• Using the device for purposes other than those described in this manual is not permitted.
• The safety information given in this manual is classified as follows:
• No part of this manual may be reproduced without written permission from DJO.
• Key to symbols used on the equipment
GENERAL INFORMATION...
Warning
Indicates a hazard. If not avoided, the hazard can result in death or serious injury.
Caution
Indicates a potential hazard. If not avoided, the hazard may result in minor injury and/or
product/property damage.
Caution, consult accompanying documents
Patient part type BF- Body floating
Device complies with the Council Directive 93/42/EEC about medical devices, tested and approved by AMTAC Certification Services Limited
Do not dispose with unsorted domestic waste
ManufacturerDJO, LLC1430 Decision Street920181 Vista, CAUSAPhone: +1-800-336-6569Fax: +1-800-936-6569
MDSS GmbHSchiffgraben 4130175 HannoverGermanyPhone: +49-511-6262-8630Fax: +49-511-6262-8633
ManufacturerDJO - LLC1430 Decision StreetVista - CA 92081USA
0473
EC REP
EU Authorized RepresentativeMDSS GmbHSchi�graben 4130175 HannoverGermany
Storage temperature: from-20˚C to 45˚CMax. relative humidity: 75%Atmospheric pressure: from 700hPa to 1060hPa
ManufacturerDJO - LLC1430 Decision StreetVista - CA 92081USA
0473
EC REP
EU Authorized RepresentativeMDSS GmbHSchi�graben 4130175 HannoverGermany
Storage temperature: from-20˚C to 45˚CMax. relative humidity: 75%Atmospheric pressure: from 700hPa to 1060hPa
Manufacturer
DJO
- LLC1430 D
ecision StreetVista - CA 92081USA
0473
ECREP
EU Authorized Representative
MD
SS GmbH
Schi�graben 4130175 H
annoverGerm
any
Storage temperature: from
-20˚C to 45˚CM
ax. relative humidity: 75%
Atmospheric pressure: from
700hPa to 1060hPa

Direct TENS™ 6
Intended Use
Direct TENS™ is a transcutaneous electrical nerve stimulator. Transcutaneous electrical nerve stimulation (TENS) uses electrical pulses that are delivered through the skin to the cutaneous (outer) and afferent (deeper) nerves to alleviate pain. Contrary to medication and cream used on the skin, there are no known side effects resulting from TENS therapy. Use Direct TENS™ only as described in this manual. Other uses of the stimulator are not permitted.
Indications
• Direct TENS™ can be used to alleviate different types of acute and chronic pain such as
• Joint pain (e.g. knee, hip arthrosis)
• Chronic pain originating in the spine
• Degenerative diseases of the musculoskeletal system
• Tension headache
• Radiating pain (e.g. back pain, cervicobrachial syndrome)
• Amputation stump/phantom limb pain
• Pain from rheumatic diseases
Contraindications
Do not use Direct TENS™ in the following situations:
• If you have an implanted demand pacemaker, intracardiac defibrillator or other active implants
• Undiagnosed pain until the cause has been ascertained
• Epilepsy
• During pregnancy (unless approved by your referring gynaecologist)
Treatment should never be applied near the area of an implant, such as cochlear, pacemakers, skeletal or electrical.
Do not apply stimulation in the vicinity of metal. Remove jewellery, body piercings, buckles or any other removable metallic product or device in the area of stimulation.
Do not attempt to place electrodes on any part of the body not directly visible without assistance.
Do not stimulate at the front or side of the neck to avoid a drop in blood pressure. Furthermore it is not permitted to attach electrodes to the head.
This device should not be used for symptomatic local pain relief unless diagnosis is established or unless a pain syndrome has been diagnosed.
Biocompatibility
Those parts of the Direct TENS™ that come into contact with the user when the device is used as intended, are designed to fulfil the biocompatibility requirements of the applicable standards.
1. POINTS TO NOTE BEFORE USE...

Direct TENS™ 7
• Magnetic and electrical fields are capable of interfering with the proper performance of the device. Do not use the Direct TENS™ device in the vicinity of equipment that emits high levels of electromagnetic radiation, such as X-ray equipment, MRI devices, radio systems and mobile telephones. These devices may affect the Direct TENS™ output power. Keep the device away from such equipment and verify its performance before use (section “Treatment”). Not for use in presence of shortwave therapy device.
• Disconnect the Direct TENS™ stimulation electrodes before using electrosurgical equipment or defibrillators. Otherwise skin burns may be caused below the electrodes and the Direct TENS™ device may be destroyed.
• Avoid the simultaneous use of Direct TENS™ and electronic patient monitoring systems. Direct TENS™ may interfere with the proper functioning of these systems, compromising the monitoring quality.
• Do not use more than one stimulator at a time.
• Avoid stimulation in the vicinity of your heart unless approved by your physician.
• Keep the stimulator out of reach of children.
• If you are in the care of a physician, consult your physician before using this device.
• If you have had medical or physical treatment for your pain, consult your physician before using this device.
• If your pain does not improve, worsens, or continues for more than five days, stop using the device and consult your physician.
• Do not apply electrodes around the throat area or the anterior neck as this could cause severe muscle spasms resulting in closure of your airway, difficulty in breathing, or adverse effects on heart rhythm or blood pressure.
• Do not use the stimulator when in the bath, shower or humid environment (sauna, hydrotherapy, pools, etc.).
• Do not use the stimulator while driving, operating machinery, or during any activity in which electrical stimulation can put you at risk of injury
• Stimulation should not be carried out over swollen, infected, and inflamed areas or skin eruptions, e.g., phlebitis, thrombophlebitis, varicose veins, etc.
• Stimulation should not be carried out over, or in proximity to, cancerous lesions.
• Never carry out the first 5 minutes of any stimulation session standing. Make sure you are seated or lying down. In rare instances, people of a nervous disposition may experience a vasovagal reaction. This is a psychological response triggered by fear of the procedure.
• Never connect the stimulation cables to an external power source due to risk of electric shock.
• Sudden temperature changes can cause condensation to build up inside the stimulator. To prevent this, allow it to reach ambient temperature before use.
• Never use the electrodes contra-laterally, i.e. do not use two poles connected to the same channel on opposite segments of the body.
• Stimulate with precaution while treating angina pectoris and the thoracic region on patients with cardiac arrhythmia.
Warnings

Direct TENS™ 8
User’s hazard and comfort
• Inspect the stimulator and its accessories for integrity before use. If you detect signs of damage, do not use the stimulator.
• Use only original accessories (electrodes, cables).
• Do not use the stimulator during sleep.
• Do not open the battery compartment while the stimulator is operating.
• Use caution if you have a tendency to bleed internally, such as following an injury or fracture.
• Consult your physician prior to using the device after a recent surgical procedure, because stimulation may disrupt the healing process.
• Always switch off the stimulator before disconnecting any stimulation cables during a session.
• TENS is a symptomatic treatment and, as such, suppresses the sensation of pain that would otherwise serve as a protective mechanism. TENS devices have no curative value.
• Use caution if stimulation is carried out over areas of skin that lack normal sensation.
• Attach the electrodes in such a way that their entire surface is in contact with the skin.
Equipment damage
• Remove the batteries from the Direct TENS™ device, if it is not used for a prolonged period of time (more than approx. 3 months).
• Liquids or foreign matter (soil, metal, etc.) must not enter the stimulator. If liquids have entered the stimulator or if it was accidentally immersed in liquid, stop using it and return it to DJO for inspection.
Caution

Direct TENS™ 9
2. HOW DOES THE DIRECT TENS™ DEVICE FUNCTION...
Via electrodes attached to the skin, Direct TENS™ sends electrical pulses to the nerves. This will block the pain impulses.Four electrodes – two for each channel – can be connected to the device. Pain relief is most efficient during stimulation, but the effect can last after the treatment. Additionally, the TENS treatment increases the blood circulation. You can use Direct TENS™ at any time for pain relief and muscle relaxation. Each therapy session should last 30 minutes minimum and can be continued for several hours.
This is where you connect the electrode lead wires.
This key are used to increase the current and thus the intensity of stimulation: Increase the intensity very carefully!
This key are used to decrease the intensity and to unlock the locked keys during operation.
This button is used to switch the stimulator on and off. If no stimulation is started for approximately 5 minutes, the stimulator automatically switches off to save batteries.
These keys are used to select one of the 13 programs.
These are the quick select keys for choosing an indication-related program.

Direct TENS™ 10
2.1. TENS therapy principle
Two pain theories play an important role in the application and parameter settings of the Direct TENS™ device:
• The Gate Control Theory by WALL and MELZACK (1965)• The Endorphine Theory by ERIKSON and SJÖLUND (1979)
According to the Gate Control Theory, weak TENS impulses block the pain impulses travelling to the brain (sensor stimulation).ERIKSON and SJÖLUND found that strong TENS impulses increase the release of internal substances (e.g. endorphins) that also alleviate pain (motor stimulation).
Theory Gate Control Theory Endorphin Theory
Principle Via sensory nerves Via motor nerves
Intensity Low, light tingling High, just bearable
Impulse Width1 Short, e.g. 100 µs Long, e.g. 250 µs
Frequency1 100 Hz 2-10Hz
Muscle Contraction No Yes
Onset Pain Relief Quickly Slowly (20-60 minutes)
Duration of Pain Relief Short (5-15 minutes) Long (30 minutes-12 hours or longer)
Treatment Duration Permanent 30-60 minutes, 3-5 times/day
1 For easier operation, intensity and pulse width are combined in Direct TENS™. (low intensity = short pulse width, high intensity = long pulse width)

Direct TENS™ 11
2.2. DESCRIPTION OF THE PROGRAMS AND THE CORRESPONDING INDICATIONS...
Program Stimulation Frequency (Hz) General Indications
Advantages
1 1 impulse every 2 seconds 0.5 Kaada TENS(similar to acupuncture)
Ideal for sensitive people
Supports acupuncture treatment
2 Double pulse at 20 Hz (pulse separation 3 ms)
20 Cervical spine syndrome
Tense muscles
Muscle relaxation by double pulses
3 High frequency, 1000 Hz 1000 Acute, strong back pain (lumbar spine)
Strong analgesia
Brief, very intensive TENStreatment
4 Bi-modal Channel 1 = 100HzChannel 2 = 4Hz
Tension headache
Neck / back pain
Radiating pain
Simultaneous treatmentwith high and lowfrequency In 2-channel mode, channel 1 stimulation is superimposed on the low frequency stimulation in channel 2
5 Burst with alternating work and rest phases of 3 and 2 seconds respectively
Work = 100HzRest = 0Hz
Tense muscles
Amputation stump /phantom limp pain
Herpes zoster
Reflex sympathetic dystrophy (RSD)
Easily tolerable stimulationfor chronic pain conditions
Sensory as well as motor stimulation
6 Similar to program 5, but channels 1 and 2 alternating and longer work/rest times, 6 seconds respectively
Work = 100HzRest = 0Hz
See program 5 Similar to program 5, but channels 1 and 2 alternating
7 Intensity decreases 40% in 0.5 second intervals
100 Lumbar back pain
Joint pain
Similar to massage
Effects both on the sensory and on the motor level
Avoids habituation

Direct TENS™ 12
Program Stimulation Frequency (Hz) General Indications
Advantages
8 Random modulation of intensity and frequency (down to 50% of set intensity and frequency modulation between 8 different frequencies, 2-150 Hz)
Randommodulation
Chronic pain resisting therapy
Avoids habituation
Sensory as well asmotor stimulation
9 Continuous 2 – 150 Standard TENS Fast pain relief in acute painconditions
Fast acceptance of therapy
Different programmable frequencies, e.g.
100 Hz = Standard 2 Hz = Similar to acupuncture
10 Burst with alternating work and rest phases of 2 seconds each
Work = 2 - 150 Hz
Rest = 0 Hz
Long-term treatment
Classic burst
Pleasant form of stimulation
Reduces muscle fatigue
Prolongs battery life
11 Mixed frequency Phase 1 = 2 - 150 Hz
Phase 2 = 50% of work freq
Strong pain Pleasant stimulation also at higher intensities
Permanent stimulation of the deep afferent nerve fibers with modulated muscle activation
12 Multi modulation 2 – 150 Chronic pain Avoids habituation
Simultaneous sensory and motor stimulation
Fixed modulation pattern forintensity and frequency
13 Simple modulated pulse (SMP), intensity modulation diametrically opposite to frequency modulation according to a fixed 12-second cycle
2 – 150 Chronic pain Avoids habituation
Simultaneous sensory and motor stimulation
Intensity and frequency modulation according to fixed pattern, but diametrically opposed, i.e., when the intensity increases, the frequency decreases and vice versa.
Direct TENS™ 13
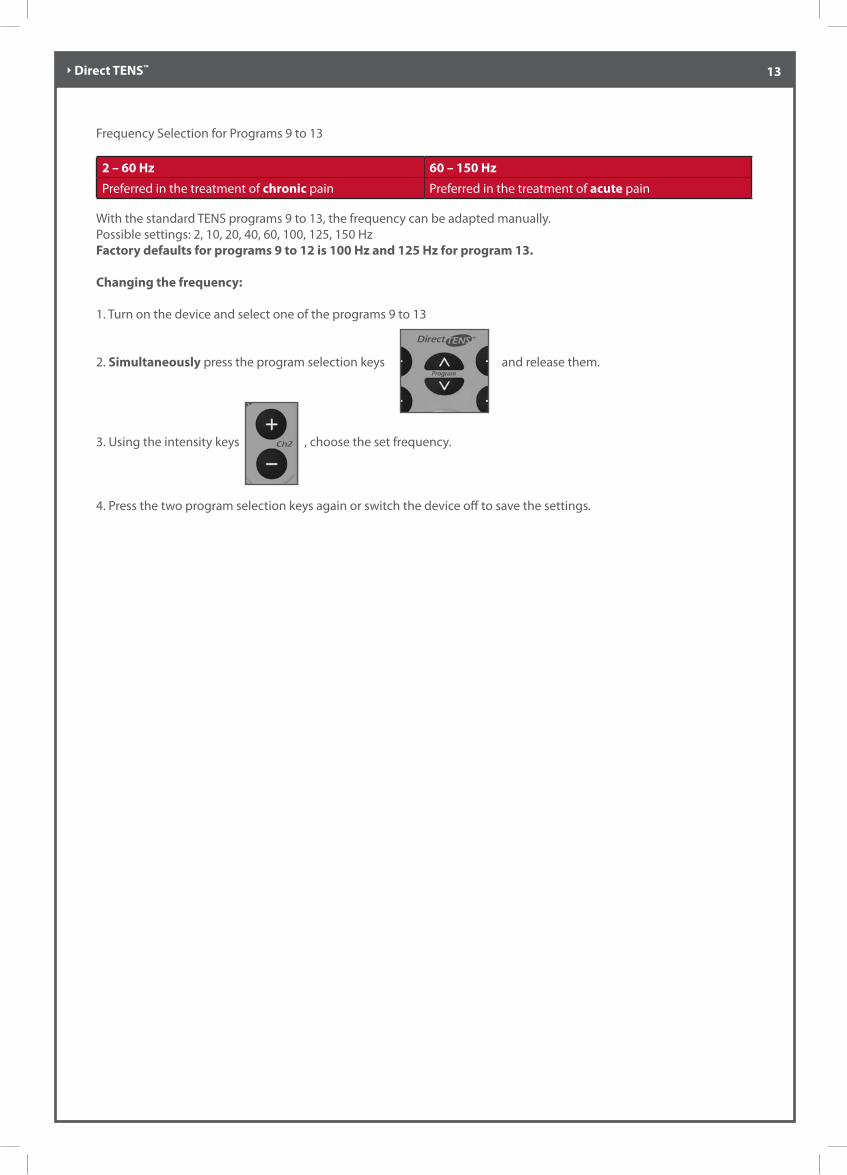
Frequency Selection for Programs 9 to 13
2 – 60 Hz 60 – 150 Hz
Preferred in the treatment of chronic pain Preferred in the treatment of acute pain
With the standard TENS programs 9 to 13, the frequency can be adapted manually.Possible settings: 2, 10, 20, 40, 60, 100, 125, 150 HzFactory defaults for programs 9 to 12 is 100 Hz and 125 Hz for program 13.
Changing the frequency:
1. Turn on the device and select one of the programs 9 to 13
2. Simultaneously press the program selection keys and release them.
3. Using the intensity keys , choose the set frequency.
4. Press the two program selection keys again or switch the device off to save the settings.

Direct TENS™ 14
3. PREPARATION...
3.1. Inserting Batteries
• Adjust the belt clip until it points to the right at a 90° angle. (Figure 3-1) • Push the battery cover down and lift. (Figure 3-2)• Insert the batteries as shown in the illustration. Observe the correct polarity, see label in battery compartment. (Figure 3-3)• Reinstall the battery cover and close the compartment.
Notes:• Use only new AA type batteries.• You may or may not use the belt clip, as preferred. Open the battery compartment. If you wish to remove the clip, pull it out towards the left. If you wish to attach the clip, push it into the holder from the left. When you close the battery compartment, the belt clip is automatically secured onto the device. (Figure 3-4)• Dispose of the worn out batteries in accordance with local and national regulations
3.2. Applying Electrodes, Connecting Leadwires
• First connect the electrode leadwires to the electrodes (Figure 3-5). (The colour of the electrode connectors is irrelevant.)• Peel the electrodes off their protective paper. Keep the protective paper and the bag, because the electrodes will be reattached to the protective paper after use and stored in the bag (see also 3.3.2 “Care of the Electrodes”).• Carefully apply the electrodes on the skin (see also 3.3.3 “Electrode Placement”).• Connect the electrode leadwire(s) to the Direct TENS™ device (Figure 3-6).
Figure 3-1 Turning the belt clip
Figure 3-2 Opening the battery compartment
Figure 3-3 Inserting the batteries
Figure 3-4 Removing/attaching the belt clip
Figure 3-5Connecting the electrode leadwire to the electrodes
Figure 3-6Connecting the electrode leadwire to the device

Direct TENS™ 15
3.3. Selection, Care and Placement of the Electrodes
3.3.1. Electrode Selection
Use large electrodes (e.g. 50 x 90 mm, to be purchased separately) for large body areas (e.g. back, leg) and for general conditions of pain.Use small electrodes (e.g. 50 x 50 mm) for small body areas (e.g. face, hand) and for deep, local pain.
3.3.2. Care of the Electrodes
When properly handled and maintained, the supplied electrodes can be used 20 times or more.
Important for a long service life:
• Clean the skin application sites with mild soap water before attaching the electrodes. After cleaning, thoroughly rinse with water and dry the skin carefully.• Dry electrodes with poor adhesion can be reconditioned as follows: apply a small quantity of water to the adhesive surface with your finger tip. • If you face bad contact with the skin or repeated open lead detection, change the electrodes.• Remove electrodes by pulling on their edges. Do not pull on the leadwire.• After use, reattach the electrodes to their protective paper. Store the electrodes in their bags.• Store the electrodes in a refrigerator, if possible. Do not store them in warm rooms.• We recommend shaving skin sites where electrodes will be applied, if very hairy. Shaving irritates the skin. Therefore wait 24 hours after shaving before you attach the electrodes. Then you may start therapy.• Do not leave the electrodes attached to your skin for a prolonged period of time. Remove the electrodes after each use. Apply the electrodes on different sites to avoid skin irritations. For the same reason clean the skin thoroughly after treatment. If you observe skin irritations, consult your physician and suspend therapy until clarification.
Direct TENS™ 16
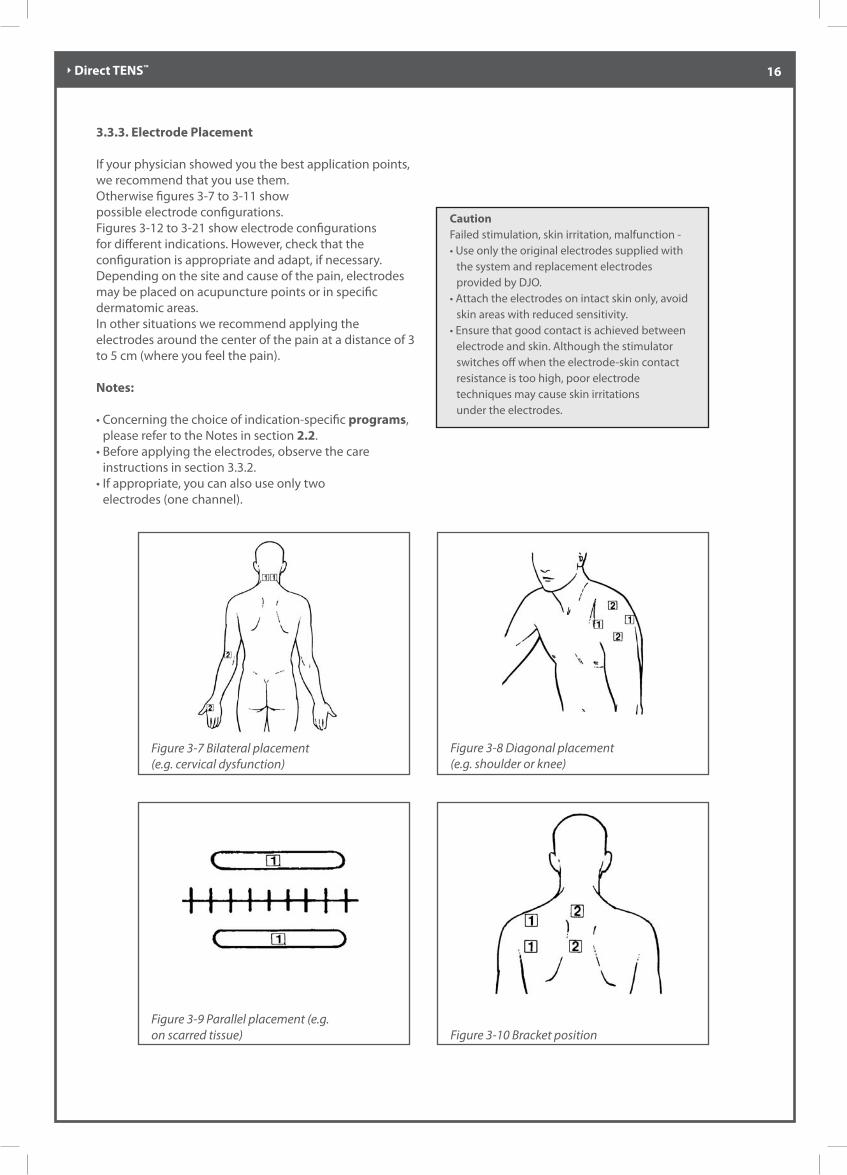
3.3.3. Electrode Placement
If your physician showed you the best application points, we recommend that you use them.Otherwise figures 3-7 to 3-11 show possible electrode configurations. Figures 3-12 to 3-21 show electrode configurations for different indications. However, check that the configuration is appropriate and adapt, if necessary.Depending on the site and cause of the pain, electrodes may be placed on acupuncture points or in specific dermatomic areas.In other situations we recommend applying the electrodes around the center of the pain at a distance of 3 to 5 cm (where you feel the pain).
Notes:
• Concerning the choice of indication-specific programs, please refer to the Notes in section 2.2. • Before applying the electrodes, observe the care instructions in section 3.3.2.• If appropriate, you can also use only two electrodes (one channel).
Figure 3-7 Bilateral placement (e.g. cervical dysfunction)
Figure 3-8 Diagonal placement (e.g. shoulder or knee)
Figure 3-9 Parallel placement (e.g. on scarred tissue) Figure 3-10 Bracket position
CautionFailed stimulation, skin irritation, malfunction -• Use only the original electrodes supplied with the system and replacement electrodes provided by DJO. • Attach the electrodes on intact skin only, avoid skin areas with reduced sensitivity.• Ensure that good contact is achieved between electrode and skin. Although the stimulator switches off when the electrode-skin contact resistance is too high, poor electrode techniques may cause skin irritations under the electrodes.
Direct TENS™ 17
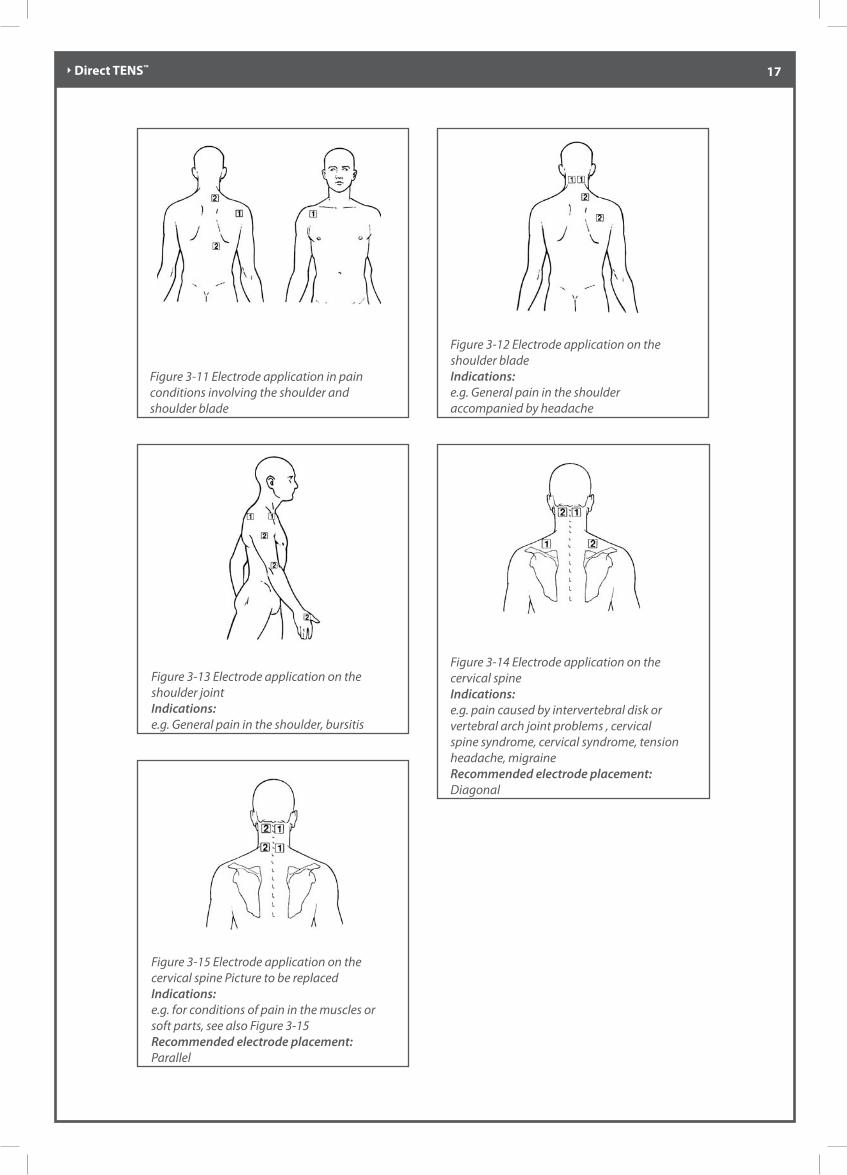
Figure 3-13 Electrode application on the shoulder joint Indications:e.g. General pain in the shoulder, bursitis
Figure 3-12 Electrode application on the shoulder blade Indications:e.g. General pain in the shoulder accompanied by headache
Figure 3-11 Electrode application in pain conditions involving the shoulder and shoulder blade
Figure 3-14 Electrode application on the cervical spineIndications:e.g. pain caused by intervertebral disk or vertebral arch joint problems , cervical spine syndrome, cervical syndrome, tension headache, migraineRecommended electrode placement: Diagonal
Figure 3-15 Electrode application on the cervical spine Picture to be replacedIndications:e.g. for conditions of pain in the muscles or soft parts, see also Figure 3-15 Recommended electrode placement:Parallel

Direct TENS™ 18
Figure 3-16 Electrode application on the knee jointIndications:e.g. arthrosis of the knee joint (gonarthrosis), generalized pain in the knee, TEPRecommended electrode placement:Attach electrodes above superficial skin nerves or acupuncture points around the knee joint.The electrode configuration may be parallel, medial, lateral or crosswise above or below the knee.
Figure 3-17 Electrode application on the backIndications:e.g. lumbar spine syndrome, lumboischialgia, pseudoradicular back pain Recommended electrode placement: paraspinal, proximal and distal to the pain area. Channels 1 and 2 diagonal
Figure 3-18 Electrode application on the back Indications:Radicular (radiating) pain Recommended electrode placement:Channel 1 proximal and distal to the pain area, channel 2 above the nerve.
Figure 3-19 Electrode application on the backIndications:Radicular (radiating) pain (alternative)Recommended electrode placement:Channel 1 proximal and distal to the pain area, channel 2 above the nerve.
Figure 3-20 Electrode application for phantom limb pain, version 1
Figure 3-21 Electrode application for phantom limb pain, version 2
Direct TENS™ 19
Additionally, icons may appear on the screen
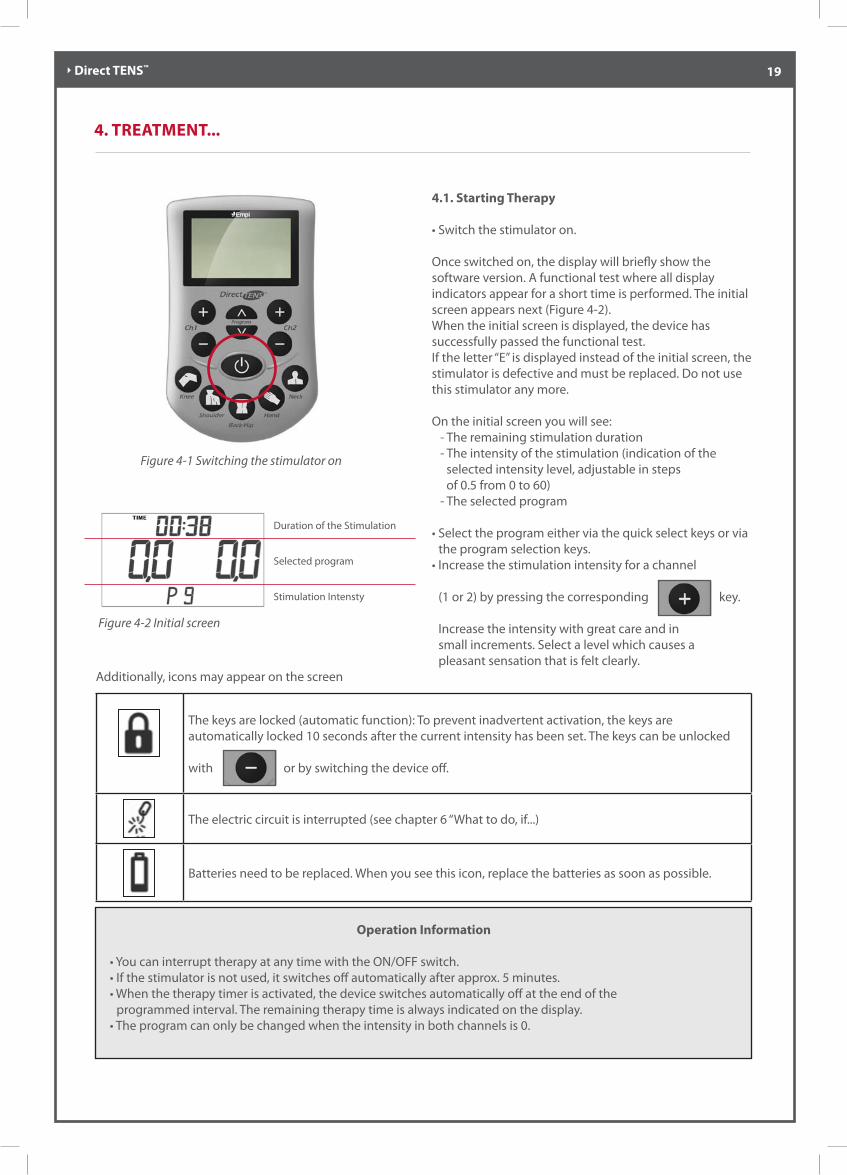
4.1. Starting Therapy
• Switch the stimulator on.
Once switched on, the display will briefly show the software version. A functional test where all display indicators appear for a short time is performed. The initial screen appears next (Figure 4-2).When the initial screen is displayed, the device has successfully passed the functional test.If the letter “E” is displayed instead of the initial screen, the stimulator is defective and must be replaced. Do not use this stimulator any more.
On the initial screen you will see: - The remaining stimulation duration - The intensity of the stimulation (indication of the selected intensity level, adjustable in steps of 0.5 from 0 to 60) - The selected program
• Select the program either via the quick select keys or via the program selection keys.• Increase the stimulation intensity for a channel
(1 or 2) by pressing the corresponding key. Increase the intensity with great care and in small increments. Select a level which causes a pleasant sensation that is felt clearly.
4. TREATMENT...
The keys are locked (automatic function): To prevent inadvertent activation, the keys are automatically locked 10 seconds after the current intensity has been set. The keys can be unlocked
with or by switching the device off.
The electric circuit is interrupted (see chapter 6 “What to do, if...)
Batteries need to be replaced. When you see this icon, replace the batteries as soon as possible.
Duration of the Stimulation
Selected program
Stimulation Intensty
Figure 4-1 Switching the stimulator on
Operation Information
• You can interrupt therapy at any time with the ON/OFF switch. • If the stimulator is not used, it switches off automatically after approx. 5 minutes. • When the therapy timer is activated, the device switches automatically off at the end of the programmed interval. The remaining therapy time is always indicated on the display. • The program can only be changed when the intensity in both channels is 0.
Figure 4-2 Initial screen
Direct TENS™ 20
4.2. Ending Therapy
The default setting of the Direct TENS™ device is continuous operation. If you want to end the therapy, switch off the device with the ON/OFF switch.When the therapy timer is activated, the device switches automatically off at the end of the programmed interval. The remaining time is indicated at the top of the display.Check that the Direct TENS™ stimulator is switched off before you remove the electrodes.
• If the therapy timer is not activated, switch off the Direct TENS™ stimulator with the ON/OFF switch.
• Remove the electrodes very carefully. Do not pull on the leadwires, but on the electrode.
• Reattach the electrode to its protective paper. Be sure to attach the electrode to the side marked “on”, not to the side marked “no”.
• Disconnect the electrodes from the leadwire.
• Clean the skin with a mild soap solution.
• Electrodes no longer fit for use can be disposed of with the normal domestic waste.

Direct TENS™ 21
5. SPECIAL DIRECT TENS™ FUNCTIONS...
5.1. Therapy Timer
The Direct TENS™ stimulator comes with a therapy timer function. When the timer is activated, the remaining therapy time appears on the display. When this interval has elapsed, the device switches off automatically. You can set therapy times of:
• 1 to 59 minutes in 1-minute increments • 1 to 24 hours in 30-minutes increments• Continuous operation, displayed as CONT. (this is the default setting), the timer is not activated
Follow these steps to activate the timer:
• Press the quick select program key
low back/hip and hold it depressed.
• Then press the ON/OFF key to switch the device on.
• The display indicates “Time” and the currently set therapy time (default setting: CONT.).
• Press the intensity control keys for channel 2 to set the therapy time. With you select a longer time,
with , a shorter time. Go back to 00:00 to get the Continuous mode (CONT.).
• To save the timer settings, turn off the stimulator. When you turn the stimulator on again, the timer setting you saved is displayed.
5.2 Factory Defaults Settings
• Hold the program selection key depressed.
• Then press the ON/OFF key to switch the device on.
• The display shows DATA 000 000 flashing.
• Next press the two intensity decrease keys simultaneously for channels 1 and 2 to reset the device to the factory defaults:
- All stored data will be deleted. - The timer function is deactivated. - The program lock is deactivated. - The frequency for all programs is reset to the respective default value. - Program 9 is selected. - The initial screen is displayed.
Direct TENS™ 22
6. WHAT TO DO, IF...
...the stimulation feels unpleasant or different from previous sessions
• Check whether - The device settings were changed. - The electrodes are correctly placed and applied on the skin. Electrodes with poor adhesion must be replaced. - The skin is irritated.
...the stimulation is weak or not felt
• Check whether - The electrodes are properly applied to the skin. Electrodes with poor adhesion must be replaced. - The battery replacement symbol is displayed and the batteries need to be replaced (see the “Battery Replacement” section in chapter 7). - The “electric circuit interrupted” icon is displayed. This icon appears when the resistance between electrode and skin is too high. Reasons may be a poor electrode attachment or an interrupted electric circuit. When the electric circuit is interrupted, the intensity drops to 0. In this case check whether the electrode leadwire is correctly connected to the device and whether the electrodes are properly connected. If the problem persists, the electrode leadwire is probably broken and must be replaced.
...the letter “E” is displayed instead of the initial screen
In this case the device is defective and must not be used. Return the device to DJO for replacement.
...the device cannot be switched on
• Check whether - The batteries are inserted - The batteries are correctly inserted - The batteries are charged.

Direct TENS™ 23
7. CARE, STORAGE, BATTERY REPLACEMENT, DISPOSAL...
Care, Maintenance
• Switch off the device before cleaning. Then clean it with a moist cloth. Liquids must not enter the device. If necessary, apply a drop of dishwashing liquid to remove stubborn stains.
• Do not use abrasive substances or other domestic cleaning agents.
• To clean the leadwire, disconnect it from the device and wipe it down with a moist cloth. Never immerse the leadwire in liquids.
• Direct TENS™ does not require regular maintenance.
Storage
• Always store the Direct TENS™ stimulator in its original pouch.
• Keep the device and the pouch out of reach of children.
• Store the device in a cool and dry place. Do not expose the device to direct sunlight.
• Remove the batteries from the device, if it is not used for a prolonged period of time (more than approx. 3 months).
Battery Replacement
Use only Alkaline batteries 15 A LR6 size AA 1.5 Volt or NiMH rechargeable batteries size AA 1.2 Volt (rechargeable batteries and charger not provided)
• Switch off the Direct TENS™ device.
• Turn the belt clip 90° to the right (see also section 3.1).
• Push the battery cover down, then up (see also section 3.1).
• Insert the batteries. Observe the correct polarity (see also section 3.1).
• Reinstall the battery cover and close the compartment.
• Dispose of the old batteries, observing the local regulations.
Disposal at the End of Its Service Life
The symbol indicates that the waste of electrical and electronic equipment must not be disposed as
unsorted domestic waste and must be collected separately. Please contact DJO for information about the possible recycling of the product or comply with your local regulation.
Direct TENS™ 24
8. ORDERING INFORMATION, SPECIFICATIONS...
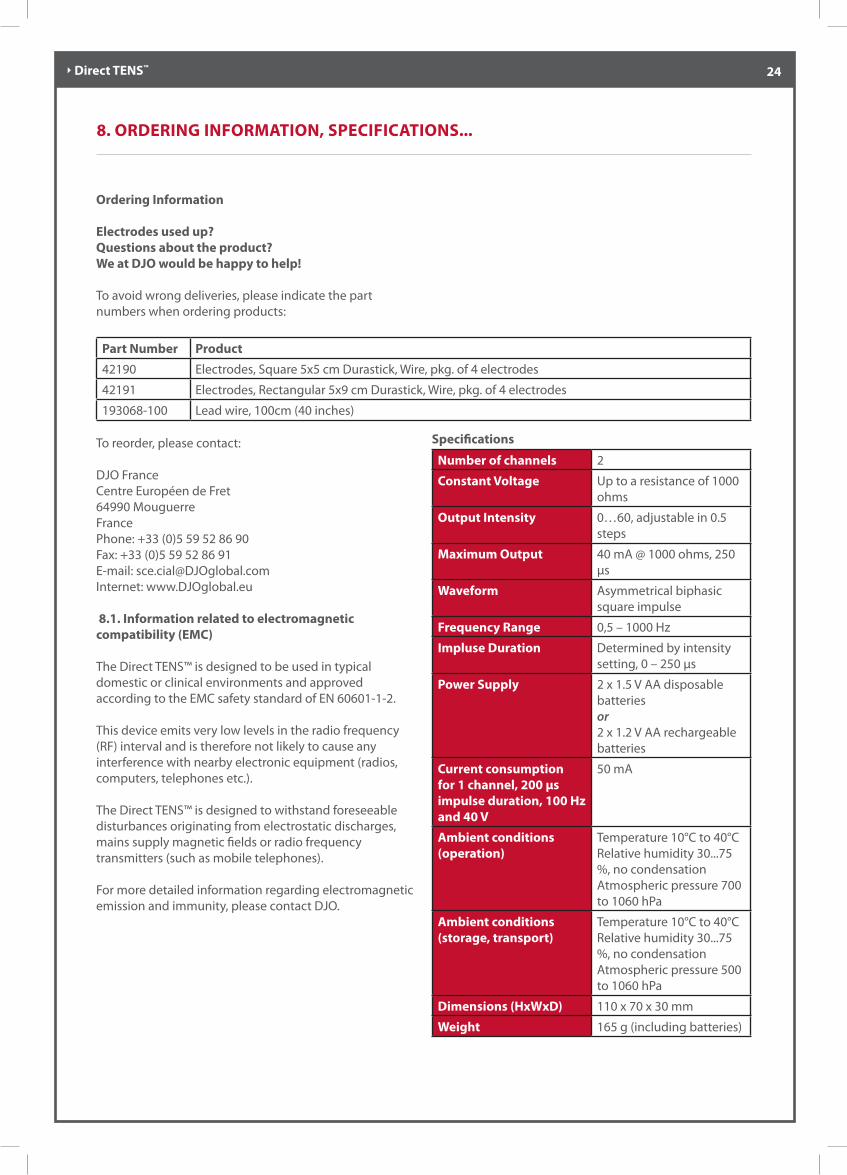
Ordering Information
Electrodes used up?Questions about the product?We at DJO would be happy to help!
To avoid wrong deliveries, please indicate the part numbers when ordering products:
Part Number Product
42190 Electrodes, Square 5x5 cm Durastick, Wire, pkg. of 4 electrodes
42191 Electrodes, Rectangular 5x9 cm Durastick, Wire, pkg. of 4 electrodes
193068-100 Lead wire, 100cm (40 inches)
To reorder, please contact:
DJO FranceCentre Européen de Fret64990 MouguerreFrance Phone: +33 (0)5 59 52 86 90 Fax: +33 (0)5 59 52 86 91 E-mail: [email protected]: www.DJOglobal.eu
8.1. Information related to electromagnetic compatibility (EMC)
The Direct TENS™ is designed to be used in typical domestic or clinical environments and approved according to the EMC safety standard of EN 60601-1-2. This device emits very low levels in the radio frequency (RF) interval and is therefore not likely to cause any interference with nearby electronic equipment (radios, computers, telephones etc.).
The Direct TENS™ is designed to withstand foreseeable disturbances originating from electrostatic discharges, mains supply magnetic fields or radio frequency transmitters (such as mobile telephones).
For more detailed information regarding electromagnetic emission and immunity, please contact DJO.
Specifications
Number of channels 2
Constant Voltage Up to a resistance of 1000 ohms
Output Intensity 0…60, adjustable in 0.5 steps
Maximum Output 40 mA @ 1000 ohms, 250 μs
Waveform Asymmetrical biphasic square impulse
Frequency Range 0,5 – 1000 Hz
Impluse Duration Determined by intensity setting, 0 – 250 μs
Power Supply 2 x 1.5 V AA disposable batteries or2 x 1.2 V AA rechargeable batteries
Current consumption for 1 channel, 200 µs impulse duration, 100 Hz and 40 V
50 mA
Ambient conditions(operation)
Temperature 10°C to 40°CRelative humidity 30...75 %, no condensationAtmospheric pressure 700 to 1060 hPa
Ambient conditions (storage, transport)
Temperature 10°C to 40°CRelative humidity 30...75 %, no condensationAtmospheric pressure 500 to 1060 hPa
Dimensions (HxWxD) 110 x 70 x 30 mm
Weight 165 g (including batteries)
Direct TENS™ 25
You have more questions?Get in touch with us!
DJO, LLC1430 Decision Street92018 Vista CAUSAPhone: +1-800-336-6569Fax: +1-800-936-6569www.DJOglobal.eu a brand