transferring media between k2 summit 3g media server ... · pdf filetransferring media between...
TRANSCRIPT
Transferring Media Between K2 Summit 3G Media Server Systems with the K2 Dyno S Replay Controller in Live Replay Environments
Fred van Galen, Pre-Sales Engineer EMEA Central and Eurasia Regions Olaf Bahr, Product Manager
February 2013

APPLICATION NOTE TRANSFERRING MEDIA BETWEEN K2 SUMMIT 3G AND K2 DYNO S
2www.grassvalley.com
TABLE OF
CONTENTS
3. Hardware Setup
4. Software Setup
4. Disable Write Filter5. Set up IP Addresses7. Creating Hosts Table9. Creating a HOTBIN folder 12. Enabling Embedded Security 13. Setting Up Streaming Between K2 Clients 14. Importing And Exporting Clips With Streaming
Between K2 Summit 3G Media Servers16. Setting Up The K2 Dyno Replay Controller To Send
Clips To Another K2 Dyno Operator
17. Valid Hardware Configurations with K2 Dyno S Replay Controller
17. 1x K2 Summit 3G + 2x K2 Dyno S17. 2x K2 Summit 3G + 2x K2 Dyno S18. 2x K2 Summit 3G + 2x K2 Dyno S in a SAN18. 2x K2 Summit 3G + 2x K2 Dyno S in a Redundant
SAN
19. Non-Valid Hardware Configurations with the K2 Dyno S Replay Controller
19. 2x K2 Summit 3G+ 1 K2 Dyno S19. 2x K2 Summit 3G in Different Networks + 1 K2
Dyno S20. 2x K2 Summit 3G in Redundant SAN with Failover
for K2 Dyno S
APPLICATION NOTE TRANSFERRING MEDIA BETWEEN K2 SUMMIT 3G AND K2 DYNO S
3www.grassvalley.com
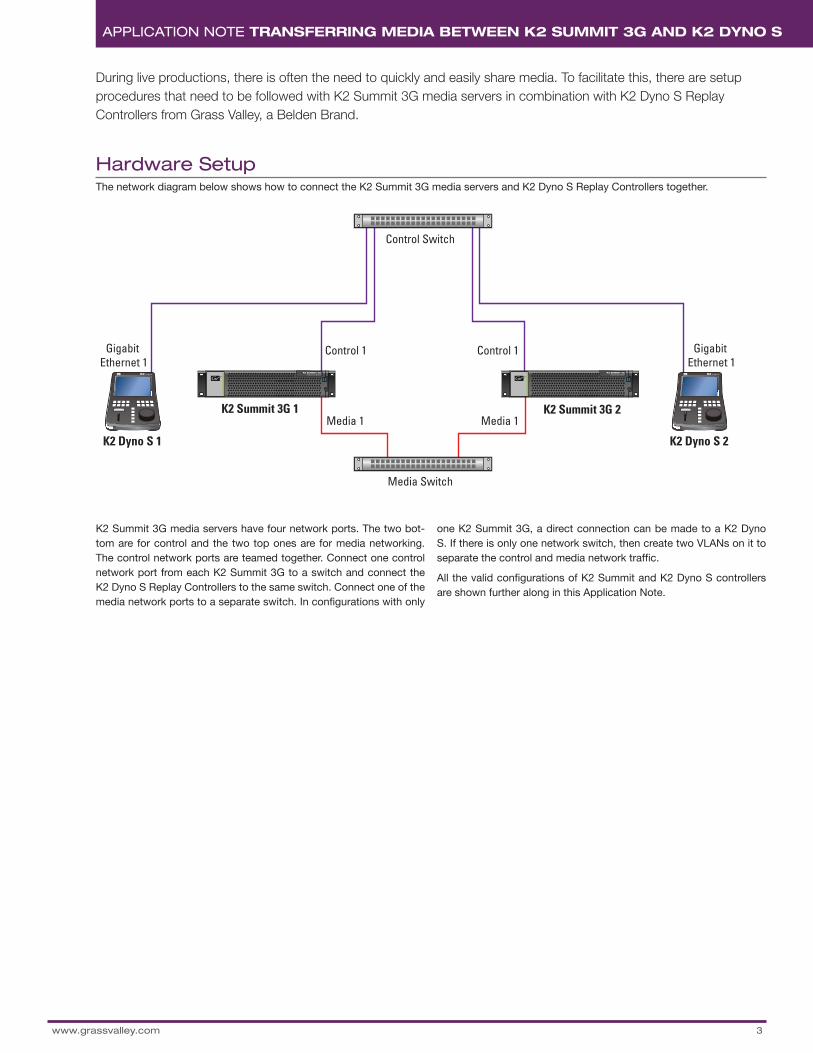
During live productions, there is often the need to quickly and easily share media. To facilitate this, there are setup procedures that need to be followed with K2 Summit 3G media servers in combination with K2 Dyno S Replay Controllers from Grass Valley, a Belden Brand.
Hardware SetupThe network diagram below shows how to connect the K2 Summit 3G media servers and K2 Dyno S Replay Controllers together.
K2 Summit 3G media servers have four network ports. The two bot-tom are for control and the two top ones are for media networking. The control network ports are teamed together. Connect one control network port from each K2 Summit 3G to a switch and connect the K2 Dyno S Replay Controllers to the same switch. Connect one of the media network ports to a separate switch. In configurations with only
one K2 Summit 3G, a direct connection can be made to a K2 Dyno S. If there is only one network switch, then create two VLANs on it to separate the control and media network traffic.
All the valid configurations of K2 Summit and K2 Dyno S controllers are shown further along in this Application Note.
PRODUCTION SERVER
K2 SUMMIT 3GK2 DYNO S
K2 Dyno S 1
K2 Summit 3G 1
Media Switch
Control Switch
Control 1
K2 DYNO S
K2 Dyno S 2
Media 1
PRODUCTION SERVER
K2 SUMMIT 3G
K2 Summit 3G 2
Control 1
Media 1
Gigabit Ethernet 1
Gigabit Ethernet 1

APPLICATION NOTE TRANSFERRING MEDIA BETWEEN K2 SUMMIT 3G AND K2 DYNO S
4www.grassvalley.com
Software SetupK2 Summit 3G media servers boot from a solid state drive (SSD). To extend the lifecycle of the SSD, standard write protection is applied to it. Before any changes can be made, the write filter protection must be disabled. This is accomplished in the following way:
Click on WINDOWS “Start” and select: All Programs\Grass Valley\Embedded Security Manager
1. Disable Write Filter
In the next screen, press “Enter” in the Em-bedded Security Controls, Update Mode. The status will change from Enabled to Update.
Click on “Close” to close the Embedded Se-curity Manager or minimize the window by clicking “_” at the right hand corner.
APPLICATION NOTE TRANSFERRING MEDIA BETWEEN K2 SUMMIT 3G AND K2 DYNO S
5www.grassvalley.com
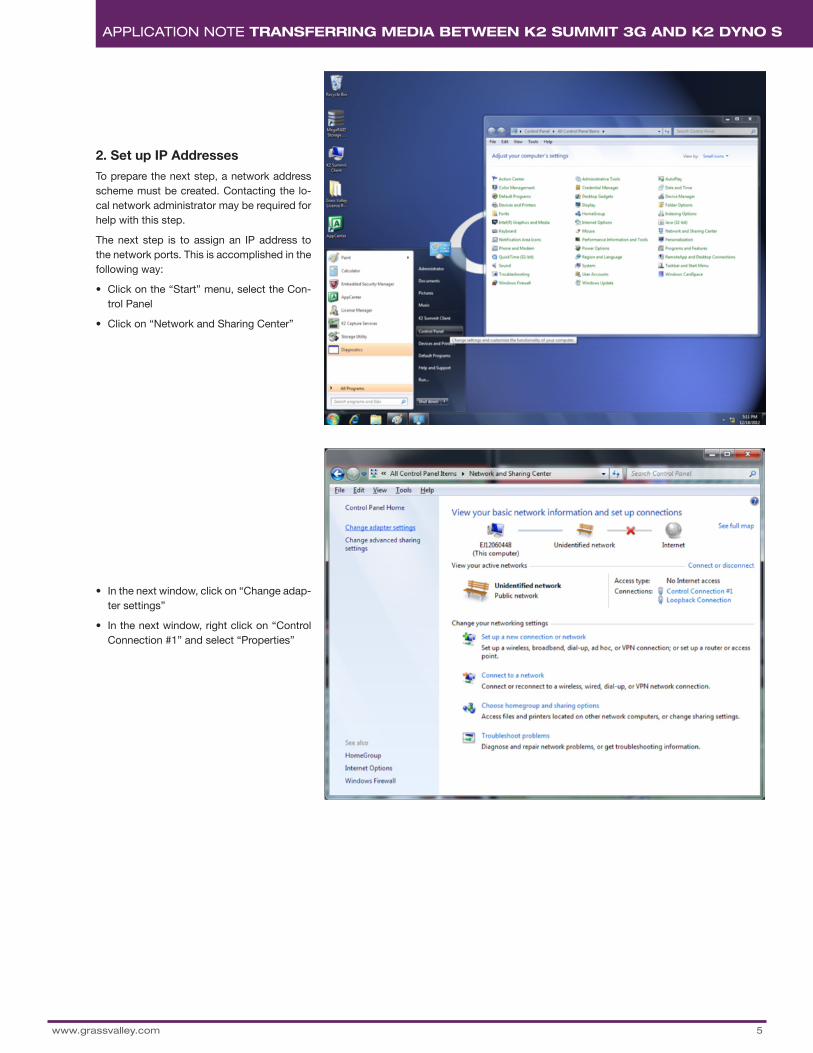
2. Set up IP Addresses
To prepare the next step, a network address scheme must be created. Contacting the lo-cal network administrator may be required for help with this step.
The next step is to assign an IP address to the network ports. This is accomplished in the following way:
• Click on the “Start” menu, select the Con-trol Panel
• Click on “Network and Sharing Center”
• In the next window, click on “Change adap-ter settings”
• In the next window, right click on “Control Connection #1” and select “Properties”

APPLICATION NOTE TRANSFERRING MEDIA BETWEEN K2 SUMMIT 3G AND K2 DYNO S
6www.grassvalley.com
• In the General tab, scroll down until “In-ternet Protocol (TCP/IP)” is seen. Click on “Properties”
• In the next window, the IP address is set
• Select “Use the following IP address”
• In the IP address line, fill in the IP address (in this example: 192.168.10.150)
• At the Subnet mask, fill in: 255.255.255.0. Alternately, a network administrator will assign another value
• Leave the rest blank, except when a network administrator indicates otherwise
• Click on “OK” and the IP address will be set
• Repeat the steps above for “Media Connection #1” and have the last two digits of the IP address different from all other IP addresses being used
• Write down the IP addresses to be used in the Host Table later

APPLICATION NOTE TRANSFERRING MEDIA BETWEEN K2 SUMMIT 3G AND K2 DYNO S
7www.grassvalley.com
3. Creating Hosts Table
The Hosts Table is needed to set up easy media transfers between K2 Summit 3G sys-tems.
First, it is necessary to determine the com-puter names of the K2 Summit 3G servers. This is done in the following way:
• On the desktop, right click on the “K2 Sum-mit Client” icon
• A selection box will come up. Select “Prop-erties” and left click on it
• The next window will have the necessary information
• After “Computer name,” the current com-puter name can be found. In this case, it is: EJ12060448
• Write this name down on a piece of paper
• The other value needed is Workgroup. In this case GRASSVALLEY. All K2 Summit 3G and K2 Dyno S Replay Controllers must be in the same Workgroup
• If it is necessary to change the Computer Name (see WARNING below) or Work-group, click on “Change settings”
• A new window will pop up
• Type in a new Computer Name and or Workgroup and click on “OK”

APPLICATION NOTE TRANSFERRING MEDIA BETWEEN K2 SUMMIT 3G AND K2 DYNO S
8www.grassvalley.com
• Again, click “OK”
• The computer indicates that a reboot is required to make these settings active
• Click “Yes” to reboot
WARNING: Be aware that when changing the computer name on a K2 Summit 3G media server that a new file system must be created and all existing media will be lost.
Please refer to the K2 Summit 3G system manual for instructions on creating a new file system.
• The next step will be creating the Hosts Table. Browse to: C:\WINDOWS\system32\drivers\etc
• Right click on “Hosts,” select “Open”
• Another window will pop up. Select Note-pad and click “OK”

APPLICATION NOTE TRANSFERRING MEDIA BETWEEN K2 SUMMIT 3G AND K2 DYNO S
9www.grassvalley.com
• Add the control network IP addresses of all K2 Summit 3G media servers and K2 Dyno S controllers on the network along with their computer names, from what was previously written.
• To get the streaming file service working between K2 Summit 3G media servers, a special entry in the Hosts Table must be made. The IP address of the media network must be built in and “_he0” added after the computer name. Example of a host file is shown next .
Note: Any line item with “#” (the pound or hash symbol) in front of it is disabled or in-active.
Note: If adding a K2 Dyno Production Assis-tant (PA) system to this list, include it by using the same method of discovering its computer name and IP address settings as was just used for the K2 Summit 3G media servers in the previous procedures.
4. Creating a HOTBIN folder
To be able to send clips from one K2 Summit 3G media server using a K2 Dyno S Replay Controller to another K2 Summit 3G media server using a K2 Dyno S Replay Controller, a HOTBIN folder must be created on the K2 Summit. To create a HOTBIN, follow these steps:
• Double click on “K2 Summit Client” icon
• Then double click on gvfs_yourcomputer-name(V:)
• In the next window select File/New/Folder
• This same information must exist on each connected K2 Summit in its Host Table
• Click on “File/Save.” Do NOT save as a dif-ferent name
• Close this window

APPLICATION NOTE TRANSFERRING MEDIA BETWEEN K2 SUMMIT 3G AND K2 DYNO S
10www.grassvalley.com
• Name this folder “IMPORTS”
• Right click on the folder just created and select “Properties”
• A new window will come up. Select the tab “Sharing”
• Click on “Share”
• Make sure “Everyone” has “Read/Write” permission or use the scheme given by an IT department
• Click on “Share”—a new window will pop up indicating that the folder is shared. Click on “Done”
• Click on “Close” to close the IMPORTS properties window
• On the desktop locate “K2 Capture Ser-vices” and double click on it
APPLICATION NOTE TRANSFERRING MEDIA BETWEEN K2 SUMMIT 3G AND K2 DYNO S
11www.grassvalley.com
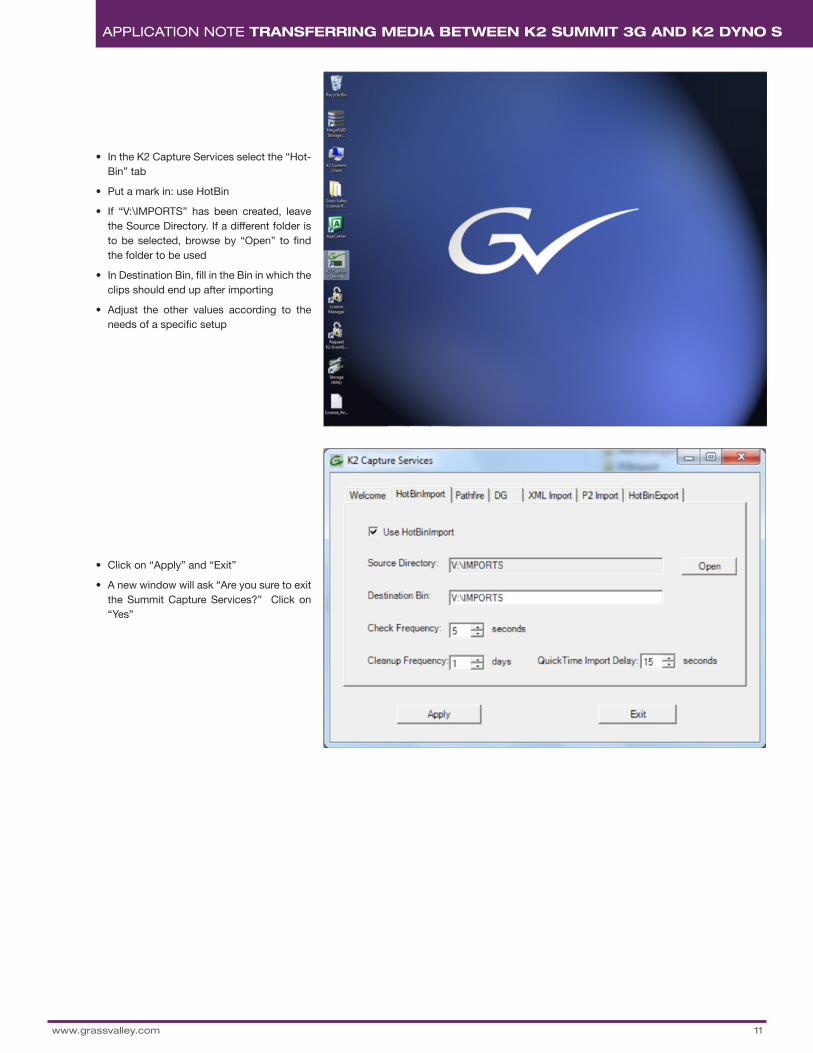
• In the K2 Capture Services select the “Hot-Bin” tab
• Put a mark in: use HotBin
• If “V:\IMPORTS” has been created, leave the Source Directory. If a different folder is to be selected, browse by “Open” to find the folder to be used
• In Destination Bin, fill in the Bin in which the clips should end up after importing
• Adjust the other values according to the needs of a specific setup
• Click on “Apply” and “Exit”
• A new window will ask “Are you sure to exit the Summit Capture Services?” Click on “Yes”

APPLICATION NOTE TRANSFERRING MEDIA BETWEEN K2 SUMMIT 3G AND K2 DYNO S
12www.grassvalley.com
5. Enabling Embedded Security
With the configuration of the K2 Summit 3G media server now completed, the next step is to activate the Embedded Security protec-tion. Embedded Security will assure reliable operation by providing protection from vi-ruses and other malware.
• Click on “Start” and select All Programs\Grass Valley\Embedded Security Manager
Note: If this was minimized previously, it can be maximized again by clicking on it in the taskbar.
• In the next window select “Leave”
• The Status will change from “Update” to “Enabled”
• Close the Embedded Security Manager by clicking on “Close”

APPLICATION NOTE TRANSFERRING MEDIA BETWEEN K2 SUMMIT 3G AND K2 DYNO S
13www.grassvalley.com
6. Setting Up Streaming Between K2 Clients
To make fast and easy transfers possible between K2 Summit 3G systems, some additional changes in configurations must be made. If these next steps are not imple-mented, the system will work, but the discov-ery of other K2 Summit 3G media servers on the network can take longer. To implement the configuration changes, take the following steps:
• In AppCenter go to “System\Configuration”
• In the next window select Remote on the left side
• Click on “Add”
• In the Add Host box, type the host name that was put in the host table from other K2 Summit servers, then the name of the system being set up at present
• As controller ID, enter 1 for the first one and if more are added, then increment this number
• Click “OK”, and again on “OK”

APPLICATION NOTE TRANSFERRING MEDIA BETWEEN K2 SUMMIT 3G AND K2 DYNO S
14www.grassvalley.com
7. Importing And Exporting Clips With Streaming Between K2 Summit 3G Media Servers
Import:
• In AppCenter go to “Clips\Import”
• Select the “Stream” tab on the left
• Select the K2 Summit that the media is to be imported from. In this example: NEWS_SUMMIT
• Browse to clip(s) that are to be imported. Multiple clips can be selected by holding the Ctrl or Shift key and clicking on the de-sired clips
• When done selecting clips, click on “Im-port”

APPLICATION NOTE TRANSFERRING MEDIA BETWEEN K2 SUMMIT 3G AND K2 DYNO S
15www.grassvalley.com
Send to (export):
• In the Bin select the clip(s) to be sent to another K2 Summit 3G media server
• In the next window, select “Stream” and the K2 Summit 3G media server to send the stream to. In this example: NEWS_SUMMIT. Double click on it and browse to the Bin where the clips are to be dropped, and click on “Send”
In both cases, in the transfer monitor of the sending and receiving K2 Summit, the pro-gression of the transfer can be viewed. This feature can be found under “System\Transfer Monitor” in AppCenter

APPLICATION NOTE TRANSFERRING MEDIA BETWEEN K2 SUMMIT 3G AND K2 DYNO S
16www.grassvalley.com
8. Setting Up The K2 Dyno Replay Controller To Send Clips To Another K2 Dyno Operator
The K2 Dyno application can copy/paste content between connected servers by way of the Library on the K2 Dyno S Replay Controller. A quick and easy way to push content from one system to another is the SEND function on the K2 Dyno.
To set up the SEND function on K2 Dyno, a few steps need to be taken:
• After the K2 Dyno S Replay Controller has been powered up, press the Shift button and select Shutdown on the touchscreen
• In the new screen that comes up, select maintenance mode
• The K2 Dyno S Replay Controller will reboot
• After rebooting, the standard Windows desktop will be seen
• Set the IP-address and create (or copy from a K2 Summit) the Hosts Table as described previously in this Application Note
• When completed, reboot Windows
• In the box that pops up and asks about returning to Dyno mode, select “Yes”
• When back at the K2 Dyno startup screen, configure the Dyno Session
• To configure a send destination on K2 Dyno, press” CONFIG” on the touchscreen
• At the top of the screen, the selection NETWORK can be seen and must be selected
• Next, all the SEND destinations need to be added. To SEND a clip to another K2 Summit server, press “Send List” on the touchscreen. Shift+ADD will open the window to add a server location
• Fill in the full path to the other K2 Summit server including the desired folder. The IP addresses cannot be used. The host names must be used. In the next example, it is the first line for the configuration that was made earlier
The send paths are now configured.
To SEND a clip to another K2 Summit server, select it and press the Shift button on the K2 Dyno, and then on the touchscreen select SEND
Note: K2 Dyno can send to any folder that can be browsed on the network that it has per-mission to write to. Without permissions, the transfer will fail.
The clip will now be transferred over the net-work to what is set up as the SEND destina-tions. The clip will arrive on the other K2 Sum-mit 3G media server in the HOTBIN folder previously created and will be automatically imported. Other users can find the clip lo-cated in the LIBRARY bin and then select the IMPORTS bin.
APPLICATION NOTE TRANSFERRING MEDIA BETWEEN K2 SUMMIT 3G AND K2 DYNO S
17www.grassvalley.com
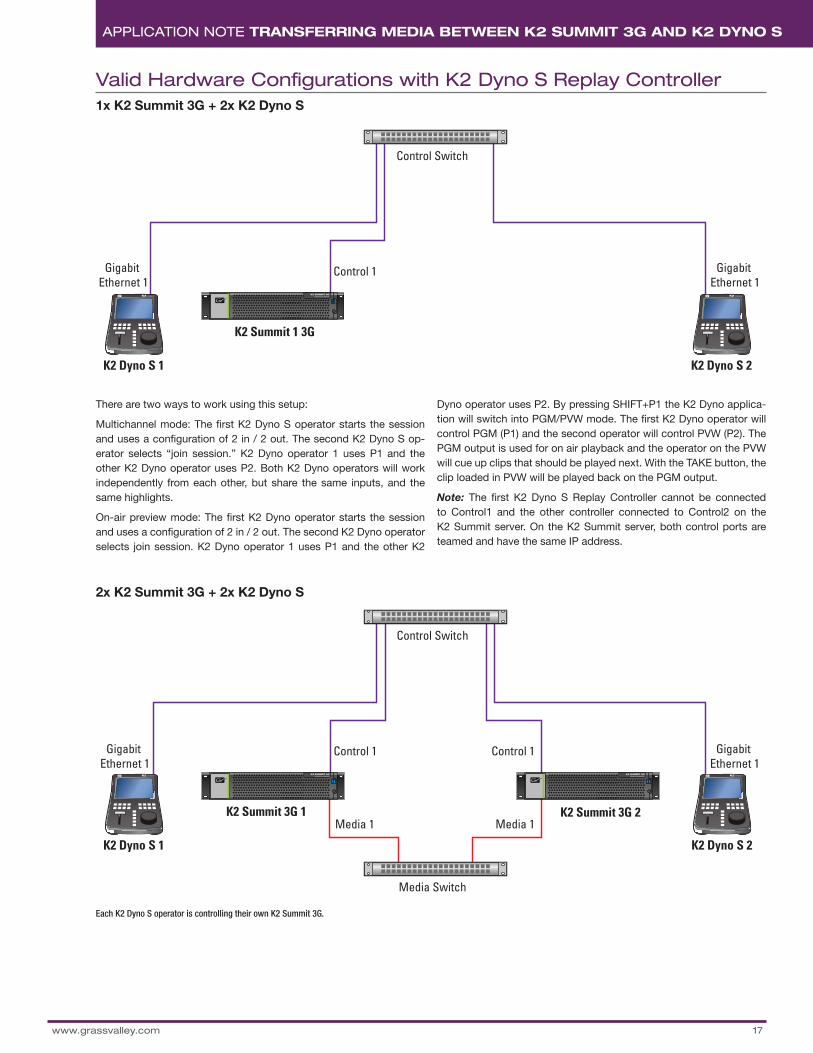
Valid Hardware Configurations with K2 Dyno S Replay Controller1x K2 Summit 3G + 2x K2 Dyno S
There are two ways to work using this setup:
Multichannel mode: The first K2 Dyno S operator starts the session and uses a configuration of 2 in / 2 out. The second K2 Dyno S op-erator selects “join session.” K2 Dyno operator 1 uses P1 and the other K2 Dyno operator uses P2. Both K2 Dyno operators will work independently from each other, but share the same inputs, and the same highlights.
On-air preview mode: The first K2 Dyno operator starts the session and uses a configuration of 2 in / 2 out. The second K2 Dyno operator selects join session. K2 Dyno operator 1 uses P1 and the other K2
Dyno operator uses P2. By pressing SHIFT+P1 the K2 Dyno applica-tion will switch into PGM/PVW mode. The first K2 Dyno operator will control PGM (P1) and the second operator will control PVW (P2). The PGM output is used for on air playback and the operator on the PVW will cue up clips that should be played next. With the TAKE button, the clip loaded in PVW will be played back on the PGM output.
Note: The first K2 Dyno S Replay Controller cannot be connected to Control1 and the other controller connected to Control2 on the K2 Summit server. On the K2 Summit server, both control ports are teamed and have the same IP address.
PRODUCTION SERVER
K2 SUMMIT 3GK2 DYNO S
K2 Dyno S 1
K2 Summit 1 3G
Control Switch
Control 1
K2 DYNO S
K2 Dyno S 2
Gigabit Ethernet 1
Gigabit Ethernet 1
PRODUCTION SERVER
K2 SUMMIT 3GK2 DYNO S
K2 Dyno S 1
K2 Summit 3G 1
Media Switch
Control Switch
Control 1
K2 DYNO S
K2 Dyno S 2
Media 1
PRODUCTION SERVER
K2 SUMMIT 3G
K2 Summit 3G 2
Control 1
Media 1
Gigabit Ethernet 1
Gigabit Ethernet 1
Each K2 Dyno S operator is controlling their own K2 Summit 3G.
2x K2 Summit 3G + 2x K2 Dyno S

APPLICATION NOTE TRANSFERRING MEDIA BETWEEN K2 SUMMIT 3G AND K2 DYNO S
18www.grassvalley.com
Control Network MainiSCSI Network MainiSCSI Network BackupFiber to RAID SANFTP
PRODUCTION SERVER
K2 SUMMIT 3GPRODUCTION SERVER
K2 SUMMIT 3G
K2 LxO RAID STORAGE
K2 DYNO S K2 DYNO S
K2 SAS STORAGE
K2 RAID SAN
K2 Server
K2 Dyno S 1
K2 Summit 3G 1
Control Network Main
iSCSI Network
Gigabit Ethernet 1
Gigabit Ethernet 1
K2 Dyno S 2
C1
C1
M1
FTP
M1
K2 Summit 3G 2C1
M1 M2
Control Network MainControl Network BackupiSCSI Network MainiSCSI Network BackupFiber to RAID SANFTP
PRODUCTION SERVER
K2 SUMMIT 3GPRODUCTION SERVER
K2 SUMMIT 3G
K2 LxO RAID STORAGE
K2 DYNO S K2 DYNO S
K2 SAS STORAGE K2 SAS STORAGE
K2 RAID SAN
K2 Server Main
K2 Dyno S 1
K2 Summit 3G 1
Trunk
Control Network Main Control Network Main
iSCSI Network Main iSCSI Network Backup
Gigabit Ethernet 1
K2 Dyno S 2
Gigabit Ethernet 1
C1 C2
C1
M1
FTP
K2 Server Backup
C1
M1
FTP
M1 M2
K2 Summit 3G 2C1 C2
M1 M2
Each K2 Dyno S operator is controlling their own K2 Summit 3G.
Each K2 Dyno S operator is controlling their own K2 Summit 3G.
2x K2 Summit 3G + 2x K2 Dyno S in a SAN
2x K2 Summit 3G + 2x K2 Dyno S in a Redundant SAN

APPLICATION NOTE TRANSFERRING MEDIA BETWEEN K2 SUMMIT 3G AND K2 DYNO S
19www.grassvalley.com
Non-Valid Hardware Configurations with the K2 Dyno S Replay Controller
PRODUCTION SERVER
K2 SUMMIT 3GK2 DYNO S
K2 Dyno S 1
K2 Summit 3G 1
Media Switch
Control Switch
Control 1Gigabit Ethernet 1
Media 1
PRODUCTION SERVER
K2 SUMMIT 3G
K2 Summit 3G 2
Control 1
Media 1
PRODUCTION SERVER
K2 SUMMIT 3GK2 DYNO S
K2 Dyno S 1
K2 Summit 3G 1
Gateway Gateway
Corporate Network
192.168.0.xxx
Control 1PRODUCTION SERVER
K2 SUMMIT 3G
K2 Summit 3G 2
Control 1
192.168.100.xxx
This setup is NOT supported. The K2 Dyno S Replay Controller can control only one K2 Summit 3G media server at the time.
This setup is NOT supported. The K2 Dyno S Replay Controller can control only one K2 Summit 3G media server at the time.
2x K2 Summit 3G+ 1 K2 Dyno S
2x K2 Summit 3G in Different Networks + 1 K2 Dyno S

WWW.GRASSVALLEY.COMJoin the Conversation at GrassValleyLive on Facebook, Twitter, YouTube and Grass Valley - A Belden Brand on LinkedIn.
20
APPLICATION NOTE TRANSFERRING MEDIA BETWEEN K2 SUMMIT 3G AND K2 DYNO S
GVB-1-0093A-EN-AN
Belden, Belden Sending All The Right Signals and the Belden logo are trademarks or registered trademarks of Belden Inc. or its affiliated companies in the United States and other jurisdictions. Grass Valley, K2 Dyno and K2 Summit are trademarks or registered trademarks of Grass Valley. Belden Inc., Grass Valley and other parties may also have trademark rights in other terms used herein.Copyright © 2014 Grass Valley. All rights reserved. Specifications subject to change without notice.
Control Network MainControl Network BackupiSCSI Network MainiSCSI Network BackupFiber to RAID SANFTP
PRODUCTION SERVER
K2 SUMMIT 3GPRODUCTION SERVER
K2 SUMMIT 3G
K2 LxO RAID STORAGE
K2 DYNO S K2 DYNO S
K2 SAS STORAGE K2 SAS STORAGE
K2 RAID SAN
K2 Server Main
K2 Dyno S 1
K2 Summit 3G 1
Truck
Control Network Main Control Network Main
iSCSI Network Main iSCSI Network Backup
Gigabit Ethernet 1
Gigabit Ethernet 2
Gigabit Ethernet 1Gigabit
Ethernet 2
K2 Dyno S 2
C1 C2
C1
M1
FTP
K2 Server Backup
C1
M1
FTP
M1 M2
K2 Summit 3G 2C1 C2
M1 M2
Teaming is not supported on the K2 Dyno S Replay Controller. The second port will be used in the future for media transfers. Media transfers are implemented with the K2 Summit 3G media server.
For Dyno PA setup, including Distributed LAN Client (DLC) and usage of a media network in combination with Dyno PA, refer to the documents at: http://www.grassvalley.com/docs/Manuals/servers/k2_dyno_pa
2x K2 Summit 3G in Redundant SAN with Failover for K2 Dyno S