translations of this gear guide can be found online at … · benni kurz katharina stoib theresa...
TRANSCRIPT

GEAR GUIDE

SONIC RACE Manual #01 / 04-2017 Language: English / data subject to change © FLYSURFER Kiteboarding 2017 // www.flysurfer.com
Translations of this Gear Guide can be found online at the FLYSURFER website: flysurfer.com/downloads

ENGLISH
EDITORIAL Welcome to the world of FLYSURFER Kiteboarding!
First off, we would like to thank you for purchasing the SONIC RACE and are happy to welcome you to the FLYSURFER family.
We – the whole FLYSURFER Team – will do our best to make sure that you are, and remain, a satisfied customer and fan of our brand. We hope that the purchase of this product can make our philosophy „everyday is a kiteday“ true for you.
This “Gear Guide“ contains important infor-mation for your SONIC RACE. This includes information on safety, handling and tips, and also our services.
SAFETY NOTES: For your own safety, read the safety notes in chapter 15 completely!
Regardless if whether you ride on land, snow or water, what age group you belong to or what kind of wind and weather conditions you prefer: when the fascina-tion of this sport gets ahold of you, you will want to kite every day... Everyday is a kiteday – with FLYSURFER Kiteboarding!
The whole FLYSURFER Team wishes you a lot of fun with your new kite!
Novak Ernst
Schoenmaker Ramon
Hesina Christoph
Vitzthum Monika
Kistler Manfred
HarichArmin
BoelliBenni
KurzKatharina
StoibTheresa
OettlChristine
KühnhauserMaximilian
GasserBernhard
Wehking Benedikt
SonderhauserAlexander

EN
5
CO
NT
EN
T
INHALT
01 SONIC RACE ...............................................................................701.01 Sizes .................................................................................................................701.02 Bag & Accessory Kit ....................................................................................701.03 Features ..........................................................................................................8
02 Handling ...................................................................................1002.01 Setting Up .....................................................................................................1002.02 Sorting out the bridle .................................................................................1102.03 Securing the kite .........................................................................................13
03 Launching ................................................................................1403.01 Power zone ...................................................................................................1403.02 Edge of the wind window with an assistant .........................................1503.03 Self launching at the edge of the wind window ..................................16
04 Kite Control..............................................................................17
05 How to jump .............................................................................17
06 Landing ....................................................................................1806.01 With an assistant .........................................................................................1806.02 Without an assistant by backstall ...........................................................1806.03 Self-landing using the Frontline Safety ...............................................19
07 Relaunch ................................................................................. 2007.01 Reverse Launch .......................................................................................... 2007.02 Drainage ........................................................................................................21
08 Safety System ........................................................................ 2208.01 Activating the QR ........................................................................................ 2208.02 Resetting the Kite ....................................................................................... 22
09 Emergencies .......................................................................... 2309.01 Self-Rescue ................................................................................................. 24
10 Packing Up .............................................................................. 25
11 Care ......................................................................................... 27
12 Repair ...................................................................................... 2712.01 Replacing the spare part lines .............................................................. 2712.02 Little Connection Lines ............................................................................. 2912.03 Repairing the Cloth .................................................................................... 29

EN
6
13 Trimming ................................................................................ 2913.01 Mixer test ..................................................................................................... 2913.02 Optimum trim of the flying lines............................................................. 30
14 Troubleshooting ......................................................................31
15 Safety Notes ........................................................................... 3215.01 Do not fly with kites ................................................................................... 3215.02 10 commandments for more safety when kiting ............................... 33
16 Service .................................................................................... 3416.01 No Free-Repair ........................................................................................... 3416.02 Repair & Spare Parts ................................................................................ 34

EN
7
SO
NIC
RA
CE
More details can be found online on the FLYSURFER website!
01.02 Bag & Accessory Kit
The bag has been optimized to reduce weight and features many extras. Carrying straps on the outside provide a convenient way to carry your board. Additionally, the SONIC RACE comes with a compression sack. All FLYSURFER kites come with a Repair Kit and a Sandbag.
01 SONIC RACE
01.01 Sizes
SIZES: 7 / 9 / 11 / 13 / 15 / 18 / 21 m2 | COLOR: petrol blue / orange / white

EN
8
01.03 Features

EN
9
SO
NIC
RA
CE
LIROS Dyneema Lines
LIROS is a leading European company who specializes in high-quality technical rope solutions. Thanks to new Dyneema core fibers, line diameter is reduced while retaining equal breaking loads.
Air Intakes
The kite fills with air through the in-takes in the leading edge. As soon as the kite has enough internal pressure, the intake valves seal automatically.
Deflate Valve
The kite deflates through the deflate valve, located in the middle of the trailing edge.
Sharp Mini Ribs
Doubling the number of cells at the trailing edge increases its profile stabi-lity substantially. The advantage: drag is reduced, while performance increases.
Automatic Drainage System
Should sand or water get into the kite, it will automatically be expelled by the dirt/water drainage system.
Triple Depower Technology
There are 3 ways the kite achieves ma-ximum depower: Reducing the angle of attack, changing the profile and redu-cing the projected area. This leads to a huge wind range and ideal handling.
X-Light Fabric
The new X-Light fabric has the best qualities for maximum performance and impressive longevity. The incredibly light-weigt (32g/m2) double-ripstop material is highly tear-resistant as well as airtight, and provides an extemely smooth sail.
3-Level Bridle Design (A, B, Z)
The 3-level bridle design drastically redu-ces the number of lines and the associa-ted resistance by an incredible 30%. The fully-spliced, uncoated Dyneema SK99 lines are the perfect choice for this application.
Modern Competition Technology
The new mixer features an adjustable splice system. The system transfers the power to the kite over three deflection pulleys, A1 with 8:1, B1 with 4:1 and B2 with 2:1, creating a steady pathway that provides uncompromised maximum performance.
High-Performance Construction
The soul of the kite shines through its lightweight design: The shape of the arc on the B-plane allows the entire span of the surface to be supported by fewer lines and the load to be evenly distributed.
IKA-Registration
Your FLYSURFER SONIC Race is approved for every IKA race and you do not need to apply for an additional plaque ID number.

EN
10
02.01 Setting Up
Unroll your kite upside down into the wind and secure it with something that has no sharp edges and is heavy enough to hold down the kite for the given wind.
Place the bar far enough away from all bridle lines on the trailing edge side of the kite. Make sure that the bar can-not fall or be pulled into the bridles.
Open the kite and if necessary, close the deflate valves.
Unroll the lines from your bar whilst walking away from the kite.
Check your bridle for tangles. Make sure that none of the lines are caught around the back of the kite.
Start at the leading edge even- tually holding up the front lines to visually check the bridle.
02 HANDLING

EN
11
HA
ND
LIN
G
When the bridle is sorted out, lay the front lines to the inside and the steering lines to the outside. If not, follow the tips on the “Sorting out the bridle“ chapter.
Sort out your flying lines. Check for any damage or knots.
Exception: There is a “stop-per“ knot that prevents the bar from sliding up too far when released.
Tip: The bridle can also be checked before unrolling the flying lines. It can then be sorted out quickly.
If the lines are still twisted, unt-wist them by turning the bar. It may be possible (especially after not being ca-reful when packing away or setting up the kite) that the bar has to be pushed through the lines again to untwist.
02.02 Sorting out the bridle
Even a badly tangled bridle can be quickly sorted out with the right tech-nique. If the bridle is tangled, it was probably caused by mistakes made when packing or setting up the kite.
Roll up your lines onto the bar until you get close to the mixer and secure the lines with a half hitch and/or the bungie cord.

EN
12
Make sure that there are no lines caught or running behind the kite.
Undo any loops, knots or bunches that may have formed.
If the bridle is tangled, lines from one side of the bridle may be running through the lines on the other side.
Stick the bar along these lines through the bridle.
Lightly tension up the bridle again to check it. If need be, repeat the last step till the left and right bridles are separated.
Unroll the lines from the bar and check as before.

EN
13
HA
ND
LIN
G
02.03 Securing the kite
A kite needs to be secured properly even if the wind is light. A runaway kite can be a serious danger to people downwind. To ensure a long lifespan of your kite, we recommend that you do not leave the kite flapping in the wind and sun for long periods.
Fold your kite in the middle and let the tips flow out downwind. The bottom skin and the bridle will be facing inwards. Weigh down the kite in the front third of the upper skin. This method prevents the tips from flapping in the wind.
Tip: The kite can also be se-cured using the same method as the launch. However, it has been proven that the above method keeps the kite more still in higher winds.
Make sure that the tips are not flapping too much. This can lead to the bridle tang-ling. The tips can be additionally secured with a bit of sand or other suitable object.
Open the deflate valves. A deflated kite will flap around on the ground less.

EN
14
The adjuster of the SONIC RACE should not be fully pulled (depowered) during launch. A fully-pulled adjuster will result in a reduc-tion of control as the steering lines will have no tension. Thanks to the efficient depow-er, the pulling of the adjuster is not really necessary when launching. If you think that the wind may be too strong, do not launch the kite.
03.01 Power zone
Caution: Caution only launch your kite in light winds through the power zone. Always keep enough distance to obstacles. Sit down while launching your kite, especially on slippery ground.
Lay out your kite across the wind and weigh down the trailing edge with enough sand or other suitable objects.
Tension the lines a bit so that the kite will fill through the air intakes. Wait until the kite has been prefilled enough before launching.
Tip: Pre-fill the kite properly!
Sheet your bar in, keep the kite powered and low to the ground. Pull smoothly left and right to fully inflate the wing tips.
03 LAUNCHING
Please be aware of the Safety Notes (Chapter 15) and thoroughly check not only the wind and weather conditions, but also all your equipment, especially the safety system. Do not use any kite outside of its recommended upper wind range. When launching in strong winds, we recommend that you have an assistant holding you from the back of your harness. During launching, always pay attention that your brilde lines do not get caught on anything or become tangled.

EN
15
LA
UN
CH
ING
Tip: Or position your kite leeward in the soft zone. Make sure you pre inflate the SONIC RACE with enough air. Launch the kite and keep it close to the 3 or 9 o‘clock position. Sheet your bar in, keep the kite powered, pull smoothly left and right to fully inflate the wing tips.
03.02 Edge of the wind window with an assistant
It is important that your assistant is experienced with this technique and you have explained them how it‘s done.
Position the kite and assistant exactly on the edge of the window.
The helper begins from the center of the kite and holds multiple air intakes into the wind. As the kite fills, the assistant should walk their hands down the leading edge of the kite letting the inflated parts of the kite rise up. The bottom tip should not be touching the ground anymore.
Tip: Pre-fill the kite properly!
As soon as the kite is inflated and you are ready, give the assistant the thumbs up signal that he can let go. Make sure to once again check whether all lines run freely.
If the kite is threatening to collapse over the assistant, you can either walk downwind, or the assistant upwind.

EN
16
If the kite does not want to fly on its own, then the assistant should walk downwind a bit, or you upwind.
03.03 Self launching at the edge of the wind window
Lay the kite out 90° to the wind. Fold over the windward wingtip and secure it near the leading edge.
Pre-inflate the kite at least half way, for more control during the launch. The more you pre-inflate the kite the easier it will handle during the launch.
The Kite should be positioned 15-30° downwind of you when you tension the lines for launch.
Walk downwind a bit as the kite inflates.
Pay attention that the downwind wingtip does not fold over upwind.

EN
17
KIT
E C
ON
TR
OL
Do not jump in shallow water & only in suitable conditions. For an optimal high jump, ride at high SONIC RACE and fly the kite up a bit from its cruising posi-tion (60-70° skywards).
Bear off the wind a little to pick up speed. When you have enough speed, edge hard and bend your legs as you steer the kite aggressively back toward the zenith. The bar should be sheeted out as much as possible until you are ready to take off.
Tip: Be aware that the bar needs to be pulled in during your flying phase to get the maximum hangtime. Otherwise the very efficient depower of the SONIC RACE will cause you to fall faster. If you are not used to keeping the bar powered up, then the stopper-ball, a larger depower-loop or slightly lengthened front lines can help.
Release the kite from the sand or object securing it with a hard step away from the kite and steer it carefully up.
Tip: You can prevent the lines getting caught around the bottom wingtip by folding over the tip once more and secu-ring the second fold.
04 KITE CONTROLSteering a SONIC RACE is exactly the same as any other depower kite on the market. We recommend that everyone who does not know how to control a kite take a course at a qualified school or instructor. e.g one of our partner schools. You can find the link to our partner page using the QR code on the left.
Pull on the bar as you push off the water and the kite flies past the zenith. As you reach the pinnacle of your jump, steer the kite forward and park it in the zenith. Keep the bar pulled in as much as possible to maximize hangtime.
Just before you land, you will need to depower the kite a bit and steer it forward. This will give you the momen-tum for you to plane/glide away after landing. Bend your legs and point the nose of the board downwind on lan-ding to absorb the speed and power.
05 HOW TO JUMP

EN
18
06.01 With an assistant
The easiest and safest way to land your kite is with the help of an assistant. Signal an assistant who knows how to land your kite, that you want to land. The assistant should be standing well upwind of the kite.
Lower the kite towards the assistant along the edge of the wind window.
The assistant can now approach the kite and grab hold of the leading edge of the kite.
Warning: The assistant should never grab any lines.
Walk towards the assistant and pull hard on the leeward side steering line as soon as they have the kite secure-ly in their grasp. That way the kite will flag out downwind of the assistant.
Secure the kite as described in “Securing the Kite“.
06.02 Without an assistant by backstall
Warning: Keep at least two line-lengths safety distance downwind. We generally recommend landing with the help of an assistant. Landing the kite by backstall should only be attempted in light winds.
06 LANDING
EN
19
LA
ND
ING
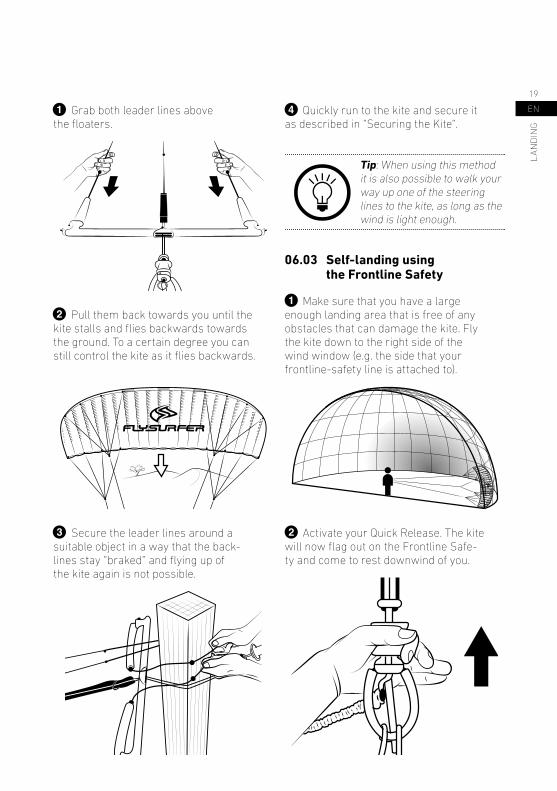
Grab both leader lines above the floaters.
Pull them back towards you until the kite stalls and flies backwards towards the ground. To a certain degree you can still control the kite as it flies backwards.
Secure the leader lines around a suitable object in a way that the back-lines stay “braked“ and flying up of the kite again is not possible.
Quickly run to the kite and secure it as described in “Securing the Kite“.
Tip: When using this method it is also possible to walk your way up one of the steering lines to the kite, as long as the wind is light enough.
06.03 Self-landing using the Frontline Safety
Make sure that you have a large enough landing area that is free of any obstacles that can damage the kite. Fly the kite down to the right side of the wind window (e.g. the side that your frontline-safety line is attached to).
Activate your Quick Release. The kite will now flag out on the Frontline Safe-ty and come to rest downwind of you.

EN
20
Attach the Safety Leash to a suitable object (e.g. a post or a board tightly buried in the sand).
Walk to the kite and secure it as described in “Securing the kite“.
07 RELAUNCH
Tip: If you do not drag the kite through the water, it will still be possible to relaunch it even after 30 minutes if there is enough wind.
07.01 Reverse Launch
This method works with strong and light winds and with all FLYSURFER kites. In light winds it is the superior relaunch method.
Grab the leader lines above the floa-ters as high up as you can (do not grab the flying lines). Make sure that the bar is the right way up, e.g red side of the bar on the left. Do not cross over your hands. This way the bar will be the right way up after the kite relaunches.
Pull the leader lines as far towards your-self as possible to reverse the kite off the water. Sharp tugs or pumping the lines may help in light winds. If the kite does not release from the water, grab the leader lines higher up.

EN
21
RE
LA
UN
CH
When the kite is at least one wingspan above the water, let go of one of the leader lines. Make sure you keep hold of the other one.
The kite will now spin around. As soon as the leading edge of the kite points up let go of the remaining leader line and put your hand back on the bar. Depower the kite till its back in the sky towards the zenith.
Tip: The reverse launch is the re-commended relaunch method when kitelandboarding, because this ext-ends the durability and has the least effect on the kite‘s materials.
07.02 Drainage
FLYSURFER kites feature a water/dirt drainage system. This ensures that water or dirt are automatically removed and do not stay trapped inside the kite.
If the kite is lying ready for launch in the powerzone, you only have to depower the kite to let it launch. The air flowing into the kite will push out any water or dirt.
If the kite is lying on its leading edge, it has to be turned upright onto its side. Try to achieve this by pulling on one Steering Line. Try to prevent the upper wingtip from collapsing. You can prevent this by pulling on the downwind side of the bar or the corresponding Leader Line.
The excessive water/dirt should now flow out of the tip until it is ready to be launched again. This method must be done with feeling and requires some practice.

EN
22
08 SAFETY SYSTEM
08.01 Activating the QR
The SONIC RACE is fitted with the Frontli-ne Safety (FLS) system. After you activate your Quick Release, the Airstyle Bar will slide up the FLS Endline until it reaches the stopper-knot. The kite will flag out on this single line and will come to rest on the water in its normal windrange. Caution: The Race-Bar-Pro does not have a stopper-knot.
08.02 Resetting the Kite
After leashing out the kite can easily be reset on the water and relaunched again.
Work your way up the Safety-Endline until you get to the bar. Be careful not to get tangled in the loose endline. Never wrap the endline around your hand or fingers.
If the kite has too much power, wrap the endline around your har-ness hook. The increased friction will make it easier to secure the endline.
Now it is possible to pull the end-line with both hands, and then to secure it again with one hand.
When you reach the bar, secure the endline to your harness hook. This is done by wrapping the side of the endline which is under tension two times around the harness hook and then the loose side one time in the opposite direction.

EN
23
EM
ER
GE
NC
IES
When the endline is secured, the Quick Release can be reset with both hands.
Let the Chicken Loop go and unwrap the endline from the harness hook. Make sure you have a good grip on the end-line as you hook in the Chicken Loop and secure it with the Chickenstick.
Slowly release the endline bit by bit. Make sure that it has not wrapped its-elf around any part of your body. Do not let the endline slip too quickly through your fingers as to avoid getting burns or cuts. Because of this, it is recommen-ded that you let go of the entire endline when you get to the last two meters.
Tip: It can happen that the kite can be tangled after flagging out. If this cannot be solved by pulling on the steering lines, you can try to solve the problem by flagging out the kite again.
09 EMERGENCIES In an emergency situation it is im-portant not to panic, and to react purposefully and goal orientated.
Should you get lifted on the beach, do not steer the kite. Wait until you touch ground again and then immediately activate the Quick Release. The danger of getting lifted can be minimized by not fly-ing the kite at the zenith when on land. However, in normal conditions, a FLYSURFER kite will be at its most stable in the zenith.
Especially in very gusty conditions the kite can overfly its pilot. This can be corrected by powering up the kite by pulling the bar towards you or breaking with the leader lines (red and green). It is also possible to counter the kite‘s overflying, or get it back into the wind window by flying it back and forth.
Should the center of the kite collapse towards the pilot (e.g frontstall) it is a good idea to activate the Quick Release before it opens again, as the kite can develop a lot of pow-er when this happens.
A backwards flying kite (backstall) can be recovered by depowering (pushing the bar towards the kite). In very light winds you can grab hold of the adjuster and give short effective pulls to accelerate the kite.

EN
24
09.01 Self-Rescue
If one is in danger of drifting away from the shore with an un-relaunchable kite, then it may be prudent to abandon the kite and swim back to shore if possible. Otherwise it is wise to stay with your kite, as it will make you easier to spot for rescuers.
Packing down in deep water is only recommended for experienced kiters and should be practiced beforehand.
Activate the Quick Release.
Work your way up the endline to the bar. Once at the bar, wind the loose endline round the bottom of the bar in a figure of 8.
Tip: The flagged out kite can be pulled behind you on the safety leash when swim-ming back. However, this needs a lot of strength and is only recommended for very short distances.
Now roll the flying lines onto the bar and secure them with the bungies or even better using a half hitch.
Grab the kite.
Caution: It is very easy to get caught up in the bridle lines that are floating around. Avoid unnecessary swimming mo-vements. A line knife in your harness can be a very useful tool in a worst case scenario.

EN
25
PA
CK
ING
UP
Lay the tips on top of each other, and then the bar on top and roll up the kite. Be careful with the bridle lines and stow them as best you can within the two halves of the kite when rolling it up. You can open the deflate valves to make rolling it up easier.
Secure the package with the harness.
Tip: In shallow areas where it is possible to walk, you can drag the kite back to shore. When doing this it is recom-mended to have the kite as described in “Securing the kite“ and then drag it in by holding the middle air-intake valve. This way no water can get into the kite and greater distances can be covered.
10 PACKING UP
A FLYSURFER kite can be packed into its bag very quickly. It is important that the bridle is securely packed in-side the kite and the bar never gets into or goes through the bridle lines.
Open the deflate valves.
Wind the lines round the bar until you get to the mixer. Secure the lines with the elastics or a half hitch. Keep hold of the bar, or put it down somewhe-re out of the way of the bridle lines.
Fold the kite in half along the middle (tip on tip) and make sure that the bridle is in-side both halves. Also make sure that there are no bridle lines over the outside skin.

EN
26
Lay the bar on-top of the kite and a bit of the way in from the tips.
Throw the bridle lines in between the two halves of the folded kite.
Roll up the kite around the bar. Make sure that no sharp objects on the beach damage the cloth.
Close the deflate valves carefully and fold the kite on both sides of the bar and put it in the kitebag.
Tip: If you do not want to roll a wet bar into your kite, there is a method to attach the bar to the outside of the bag. Fold the kite in the middle (tip on tip) and then roll up the kite, including the bridle, and put it into the bag. Then roll up the bar and attach it to the outside of the bag. When setting up the kite it is recommended to then unroll the bar first and then take the kite out of the bag.
EN
27
CA
RE
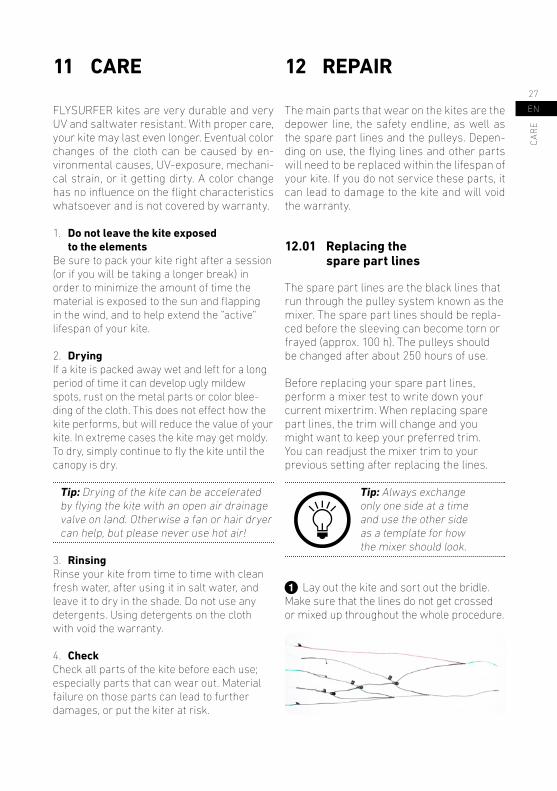
11 CARE FLYSURFER kites are very durable and very UV and saltwater resistant. With proper care, your kite may last even longer. Eventual color changes of the cloth can be caused by en-vironmental causes, UV-exposure, mechani-cal strain, or it getting dirty. A color change has no influence on the flight characteristics whatsoever and is not covered by warranty.
1. Do not leave the kite exposed to the elements Be sure to pack your kite right after a session (or if you will be taking a longer break) in order to minimize the amount of time the material is exposed to the sun and flapping in the wind, and to help extend the “active“ lifespan of your kite.
2. Drying If a kite is packed away wet and left for a long period of time it can develop ugly mildew spots, rust on the metal parts or color blee-ding of the cloth. This does not effect how the kite performs, but will reduce the value of your kite. In extreme cases the kite may get moldy. To dry, simply continue to fly the kite until the canopy is dry.
Tip: Drying of the kite can be accelerated by flying the kite with an open air drainage valve on land. Otherwise a fan or hair dryer can help, but please never use hot air!
3. Rinsing Rinse your kite from time to time with clean fresh water, after using it in salt water, and leave it to dry in the shade. Do not use any detergents. Using detergents on the cloth with void the warranty.
4. Check Check all parts of the kite before each use; especially parts that can wear out. Material failure on those parts can lead to further damages, or put the kiter at risk.
12 REPAIR The main parts that wear on the kites are the depower line, the safety endline, as well as the spare part lines and the pulleys. Depen-ding on use, the flying lines and other parts will need to be replaced within the lifespan of your kite. If you do not service these parts, it can lead to damage to the kite and will void the warranty.
12.01 Replacing the spare part lines
The spare part lines are the black lines that run through the pulley system known as the mixer. The spare part lines should be repla-ced before the sleeving can become torn or frayed (approx. 100 h). The pulleys should be changed after about 250 hours of use.
Before replacing your spare part lines, perform a mixer test to write down your current mixertrim. When replacing spare part lines, the trim will change and you might want to keep your preferred trim. You can readjust the mixer trim to your previous setting after replacing the lines.
Tip: Always exchange only one side at a time and use the other side as a template for how the mixer should look.
Lay out the kite and sort out the bridle. Make sure that the lines do not get crossed or mixed up throughout the whole procedure.
EN
28
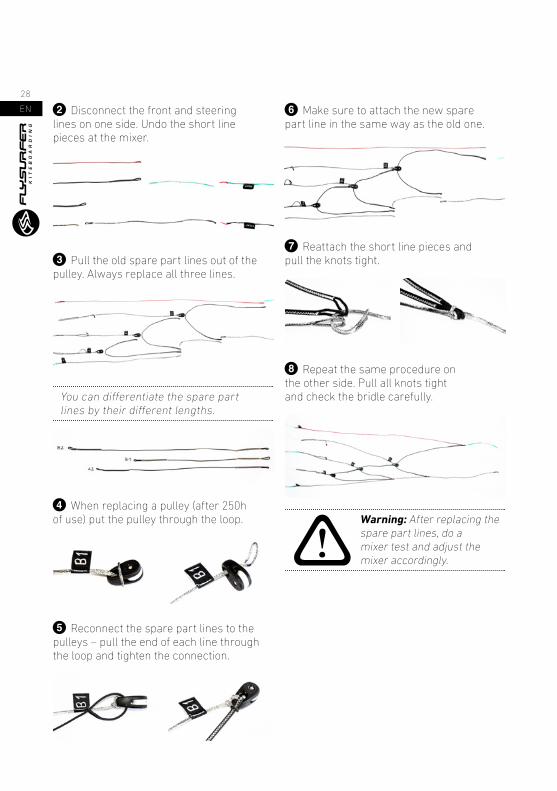
Disconnect the front and steering lines on one side. Undo the short line pieces at the mixer.
Pull the old spare part lines out of the pulley. Always replace all three lines.
You can differentiate the spare part lines by their different lengths.
When replacing a pulley (after 250h of use) put the pulley through the loop.
Reconnect the spare part lines to the pulleys – pull the end of each line through the loop and tighten the connection.
Make sure to attach the new spare part line in the same way as the old one.
Reattach the short line pieces and pull the knots tight.
Repeat the same procedure on the other side. Pull all knots tight and check the bridle carefully.
Warning: After replacing the spare part lines, do a mixer test and adjust the mixer accordingly.

EN
29
TR
IMM
ING
12.02 Little Connection Lines
The “Little Connection Line“ (LCL) allows you to quickly exchange a bridle line and also works as a predetermined overload weak-point that prevents the canopy from getting damaged. Should an LCL break, replace it with a new LCL of the same colour (same breaking strength).
12.03 Repairing the Cloth
In case you get a small tear (e.g. through contact with a sharp object) we have included a repair kit with your kite. The area that needs to be repaired must be clean, dry and grease-free. Temporary repairs are possible with spinnaker repair tape, but the tear should be taped from the inside of the kite. It is recommended that you round off the edges of the repair tape. There is the possibility to have a professional repair done by us. We can exchange whole parts of the canopy, so that there will be no trace of the damage.
Tip: When a tear is close to a seam (less than 5cm), we recommend using sewing to repair the damaged area.
13 TRIMMING As all lines change length over time, we have built in a way to correct the flying characteristics quickly and ea-sily. It is very important that the front and steering lines are setup equally.
13.01 Mixer test
Lay out the kite and sort out the bridle. Make sure that the lines do not get crossed or mixed up through the whole procedure.
Bring the end loops of A1 and Z to one level by fixing them with a pen or stick
Tension the mixer and secure the ends of the front and steering lines (e.g. an assis-tant can hold them). The position of the lines should not change during the test - you can hold the lines in position with a simple knot.

EN
30
Bring the A2 / B1 / B2 loops up to the A1 and Z loops and tension the mixer (min. 5 kg tensile load per line). All five knots should be at the same level at standard trim.
If this is not the case, you just have to move the splice of the mixer (A2 / B1 / B2) to adjust the loop length until all five knots are at the same level.
Done. Be sure to pull everything properly tight again after adjusting, so that the trim stays under tension.
13.02 Optimum trim of the flying lines
Steering (back) lines shorten over time in relation to the flying (front) lines. Under-neath the floaters, the back lines can be shortened or extended by using knots. Extension of the back lines is necessa-ry when the trimmer needs to be pulled in too much to keep the kite flying nor-mally in its intended wind range.

EN
31
TR
OU
BL
ES
HO
OT
ING
14 TROUBLESHOOTING Should you ever experience a problem with your kite, or if you have any questions about our products, we are available per email or telephone. Competent help can also be found at our experienced dealers and kiteschools.
PROBLEM CAUSE SOLUTION
the kite pulls to one side when the bar is powered up
the lines have stretched due to too much use on one side
equalise the lines as discribed in “Trimming“
kite pulls to one side when depowered
tangled bridle sort out the bridle
broken bridle line or LCL replace
asymmetrically set mixer mixer test
none of the above causes Open mixer on the side that the kite pulls to (extend C- & B-main). Shorten mixer on the other side of the kite by the same amount (shorten C- & B-main). C-main should always be double the amount of B-main. (shortened or lengthened)
kite has a lot of backstall Steering Lines have shrunk check the trim of the flying lines (see bar manual)
mixer is adjusted incorrectly Perform mixertest, if the kite still remains sensitive to backstall, extend the mixer, but only so far that the kite remains stable
the middle of the kite collapses towards the rider or is unstable
incorrect mixer setting Perform mixertest, if the kite still remains unstable, shorten the mixer
deflate valve is still open close the deflate valve
a defect in the cloth or line, or even broken or stretched internal reinforcement beams.
repair the damage
tips fold in a little Rickety tips help for good turning and more depower
ignore it, or tune the mixer for more stability
tips fold in a lot incorrect mixer setting Adjust the mixer to a max. of C-main -3 cm, B-main -1,5 cm
undefined launch not enough internal pressure pre-inflate more
kite does not relaunch Steering Lines are not pulled back far enough
grab the leader lines higher up
not enough wind qait for a gust, or self-rescue
water in the kite drain the water (see chapter “Drainage“)
bridle lines at the tip are very tangled
kite was flapping in the wind on the ground too much
in future secure the kite as de-scribed in “Securing the Kite“

EN
32
15 SAFETY NOTES
Kitesurfing is a potentially dangerous sport, that holds risks for the athlete or the people around them. Incorrect use of this product may result in serious injury or even death of the user or third parties.
The user carries the sole responsibility for themselves and third parties when using this product. The user must check their equipment for wear, especially wearing parts, before each kite session.
The product may only be used with original spare parts, and may not be modified.
Every user should be qualified by a FLYSURFER kiteschool or a FLYSURFER dealer.
Read the entire Gear Guide thouroughly before using the kite, and strictly adhere to the procedures. The following safety guidelines are only guidelines and do not claim to cover every instance.
This product has been designed for riders weighing 35-120kg. We cannot guarantee the proper functioning of the product outside of this weight range.
This manual can also be downloaded from www.flysurfer.com
15.01 Do not fly with kites
A kite is not designed, tested or licensed as an aircraft or flying device. The use of a kite as an flying device is illegal and not covered by insurance. Flying with this product can lead to death!

EN
33
SA
FE
TY
NO
TE
S
15.02 10 commandments for more safety when kiting
1. Never kite in unsuitable conditions such as storm fronts, lightning storms or off-shore winds. Check the weather and wind conditions carefully, choose the correct kite size.
2. Check the kite before every launch, including all parts. Never kite with weakened or damaged equipment or tangled lines.
3. Do not jump in too shallow water.
4. Never modify the kite or bar unless recommended by FLYSURFER.
5. Under load, lines are dangerous. Never wrap lines around any part of your body.
6. Only kite if you are sure you are physically fit to do so. Never kite under the influence of drugs or alcohol.
7. Check out the kiting spot beforehand. Make sure you are aware of any risks and dangers such as obstacles, shallows, currents and bans. Also be aware if rescue craft can get to you in case of an emergency. It is best to ask people (locals) who know the area well.
8. Keep a safety margin of at least two line-lengths downwind of you, and never kite near people or obstacles. Kiting near powerlines, roads, airports, cliffs, etc. is extremely dangerous.
9. Make sure that someone is looking out for you and that help is there if you need it. Never go out alone. Never kite further away from shore than you can swim back.
10. Do a test activation of your Quick Release before every launch. This will ensure the system is working and reinforce the release instinct of the kiter.
EN
34
16 SERVICE The customer is king at FLYSURFER! Not only do we believe that the customer should be guided to the right product before a purchase, but it is also our view that the customer should be guaranteed 100% fun and function of their product over the entire lifespan of the product. With a worldwide network of dealers, importers, team riders, opinion leaders, etc. and of course the head office team, we want to offer the best possible post-sales service to our custo-mers. We will gladly inform you about the entire FLYSURFER product range, service and any other questions you may have.
We regularly reach out to FLYSURFER fans and people interested in our products through our year-round national and inter-national test events. The friendly atmosphe-re and the open, helpful spirit at the onsite test events has planted a happy smile on the face of many satisfied testers countless different spots arround the globe.
16.01 No Free-Repair
The SONIC RACE and Infinity 3.0 Race Control Bar PRO are excluded from 12 months free repair warranty!
Materials and construction have been fully optimized within these products, in order to achieve the highest possible perfor-mance in competitions. Therefore, there is no Free-Repair Warrantee on the SONIC RACE kite as well as the Infinity 3.0 Race Control Bar Pro, as applicable to other Flysurfer products. Of course, the customer is entitled to statutory warranty claims.
In case of a claim, please contact FLYSUR-FER directly, either by email or phone:
✉ [email protected] ☎ +49 8641 6948 30
All further steps will be explained by our very competent colleagues in the head office on an individual basis.
16.02 Repair & Spare Parts
Repairs can be done at either our work-shop in the head office, or by a FLYSURFER sales partner who offers a repair service. Please contact FLYSURFER directly first! High quality original spare parts for all our products can be ordered directly from our Online-Shop: http://shop.flysurfer.com
We hope that one day, we may have a chance to meet you and in the meantime, we wish you many fun hours and experiences kiting with your FLYSURFER products.

EN
35
SE
RV
ICE

FLYSURFER Kiteboarding Brand of Skywalk GmbH & Co. KG Windeckstr. 4 83250 Marquartstein, GERMANY
WEBSITE: www.flysurfer.com EMAIL: [email protected] PHONE: +49 (0) 86 41 69 48 - 30
FAM
A1S
R00
user manual for S
ON
IC R
AC
E