treadmill - trojan.grey-stage.co.za · this treadmill can be folded for storage. • switch off the...
TRANSCRIPT
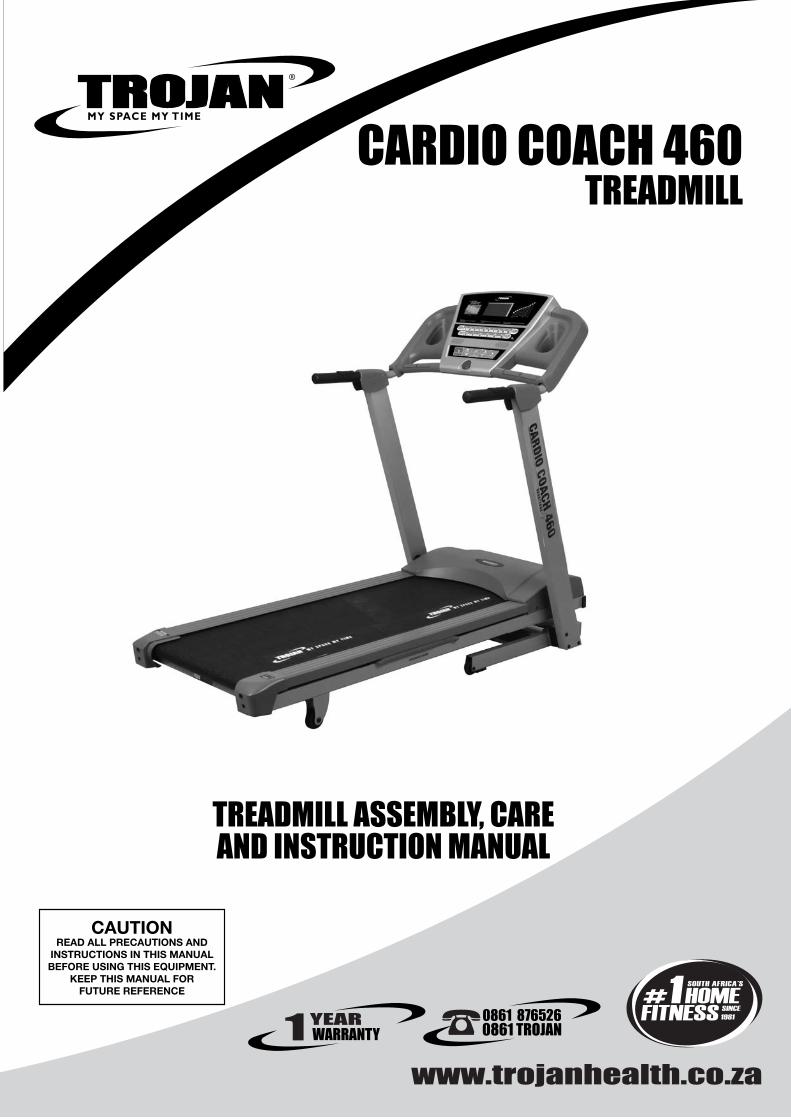
www.trojanhealth.co.za
#1 HOMEFITNESS
SOUTH AFRICA’S
SINCE19810861 876526
0861 TROJANWARRANTY
TROJANMY SPACE MY TIME
®
CAUTIONREAD ALL PRECAUTIONS AND
INSTRUCTIONS IN THIS MANUALBEFORE USING THIS EQUIPMENT.
KEEP THIS MANUAL FORFUTURE REFERENCE
TREADMILL ASSEMBLY, CARE AND INSTRUCTION MANUAL
CARDIO COACH 460TREADMILL

INDEX PAGE
1. SAFETY INSTRUCTIONS 3
2. PRE ASSEMBLY CHECK LIST 5
3. HARDWARE LIST 6
4. ASSEMBLY STEPS 7
5. UNFOLDING/FOLDING/TRANSPORT 9
6. MAINTENANCE 10
7. GROUNDING INSTRUCTIONS 11
8. COMPUTER FUNCTIONS 12
9. FITNESS TIPS & TECHNIQUES 20
10. CONDITIONING GUIDELINES 21
11. WARM -UP AND COOL-DOWN 22
12. FREQUENTLY ASKED QUESTIONS 23
13. PARTS LIST 24
14. EXPLODED DRAWING 26
15. TROJAN 1 YEAR LIMITED WARRANTY 27
16. TROJAN REPAIRS PROCEDURE 28
10204M-3
1. SAFETY INSTRUCTIONS
It is the sole responsibility of the purchaser of TROJAN products to read the owner’s manual, warning labels and instruct all
individuals on proper usage of the equipment. Understanding each and every warning to the fullest is important. If any of these
instructions or warnings are unclear please contact TROJAN Customer Services on 0861 876 526 (0861 Trojan), within the Republic
of South Africa.
The equipment is only intended for HOME USE and is NOT INTENDED FOR COMMERCIAL, INSTITUTIONAL AND/OR
STUDIO FACILITIES USE.
Contact TROJAN with any questions regarding this classification. It is recommended that all users of TROJAN be informed of the
following information prior to use.
HEALTH WARNING• Beforestartinganyexerciseorconditioningprogramyoushouldconsultwithyourpersonalphysiciantoseeifyourequirea
completephysicalexam.Thisisespeciallyimportantifyouareovertheageof35orhaveneverexercised,arepregnantorsuffer
from any illness.
• Ifatanytimeduringexerciseyoufeelfaint,dizzyorexperiencepain,stopexercisingimmediatelyandconsultyourphysician.
• Toavoidmuscularpainandstrain,begineachworkoutbystretchingandwarmingupandendeachsessionbycoolingdownand
stretching.
ACCESS CONTROLTROJAN recommends that all fitness equipment be used in a supervised area. It is recommended that the equipment be located in
an access controlled area. Control is the responsibility of the owner. Keep children away from all equipment. Parents or other
supervising adults must provide close supervision of children if the equipment is used in the presence of children.
INSTALLATIONTROJAN recommends that all equipment:
• Besecuredtoorsetuponasolid,levelsurfacetostabiliseandeliminaterockingortippingoverduringtraining.
• Besetupinsideyourhomeawayfrommoistureanddust(theequipmentisnotdesignedforoutdooruse).
• Besetupwithsufficientventilationtoensureproperoperation.
• Besetupwithsufficientspacearoundtheequipmentsothatallexercisescanbecompletedsafely.Itis
recommendedthatthereshouldbeatleast1mofspacearoundtheequipmentwhereaccessisrequiredtoexercise.
Fortreadmillsitisrecommendedthatyouhave2mofspacebehindtherunningdeck.
• Beinstalledbyourteamofinstallers.
PROPER USAGE• Donotusetheequipmentinanywayotherthanasdesignedorintendedbythemanufacturer.Itisimperativethat
TROJAN equipment is used properly to avoid injury.
• Injuriesmayresultfromexercisingimproperlyorexcessively.
• YourTROJANequipmentshouldonlybeusedbyonepersonatatime.
• Becarefultomaintainyourbalancewhileusing,mounting,dismounting,folding,unfoldingorassemblingyourTROJAN
equipment to avoid injury.
• Servicingotherthantheproceduresinthismanualshouldbeperformedbyanauthorizedservicerepresentativeonly.
• DANGER:Alwaysunplugthepowercordbeforecleaninganyequipmentpoweredbyelectricity.
10204M-4
INSPECTION• Donotuseorpermituseofanyequipmentthatisdamagedorhaswornorbrokenparts.ForallTROJANequipmentuse
only replacement parts supplied by TROJAN.
• Alwaysmakesurethatallnutsandboltsaretightenedpriortoeachuse.
• Beltsposeanextremedangerifusedwhenfrayed.Alwaysreplaceanybeltatfirstsignofwear.
• Maintainlabelsandnameplates–donotremovelabelsforanyreason.Theycontainimportantinformation.
• Equipmentmaintenance–Preventativemaintenanceisthekeytosmoothoperatingequipment.Pleaseensurethatyou
follow our maintenance tips to ensure the continued correct function of your TROJAN equipment.
• Beforeanyuse,examineallaccessoriesapprovedforusewiththeTROJANequipmentfordamageorwear.
• ShouldyourTROJANequipmentappeardamagedorworn,donotattempttouseorrepairtheequipmentyourself.
Please contact our service department on 0861 876526 (0861 Trojan) to arrange a repair.
OPERATING WARNINGS• Itisthepurchaser’sresponsibilitytoinstructallusersastotheproperoperatingproceduresofallTROJANequipment.
• Keepchildrenawayfromallmovingpartsandawayfromallstrengthequipment.Parentsmustprovideclosesupervisionof
children if the equipment is used in the presence of children.
• Donotwearloosefittingclothingorjewellerywhenusingtheequipment.Itisalsorecommendedthatuserstieuplonghair
to avoid contact with moving parts.
• Ensurethatanyonenotusingtheequipmentstaysclearoftheuser,accessoriesandmovingpartswhilethemachineisin
operation.
ELECTRICAL SAFETY• Keepthepowercordawayfromheatedsurfaces.
• Neverusetheequipmentifthepowercableorplugisfrayedordamaged.
• Neverusetheequipmentifthecord,equipmentorsurroundingfloorareaiswetordamp.
• Allelectricalproductsmustbegrounded.Thisproductissupplierwiththenecessarygroundingconnections.
• Donotmodifytheplugprovidedwiththeproduct.Iftheplugwillnotfitintothepoweroutlet,haveaproperoutletinstalledby
a qualified electrician.
USER WEIGHT LIMITATIONS• ThisTROJAN CARDIO COACH 460 maynotbeusedbypersonsweighingmorethan130kg.
SAVE THIS INSTRUCTION MANUAL FOR FUTURE USE AND REFERENCEIf any of these instructions or warnings are unclear please contact TROJAN Customer Services on 0861 876526 (0861 Trojan),
within the Republic of South Africa or visit www.trojanhealth.co.za.
1. SAFETY INSTRUCTIONS

10204M-5
Consol
Safety Key
Hand Pulse
Upright
Running Belt
Main Frame
Wheel
2. PRE ASSEMBLY CHECK LISTThank you for choosing the TROJAN CARDIO COACH 460 treadmill. We take great pride in producing this quality
product and hope it will provide many hours of quality exercise to make you feel better, look better and enjoy life to its
fullest.
Yes, it is a proven fact that a regular exercise program can improve your physical and mental health. Too often, our
busy lifestyles limit our time and opportunity to exercise. The TROJAN CARDIO COACH 460 treadmill provides a
convenient and simple method to begin your assault on getting your body in shape and achieving a healthier lifestyle.
Before reading further, please familiarise yourself with the parts that are labelled.
Read this manual carefully before using the TROJAN CARDIO COACH 460 treadmill.
10204M-6
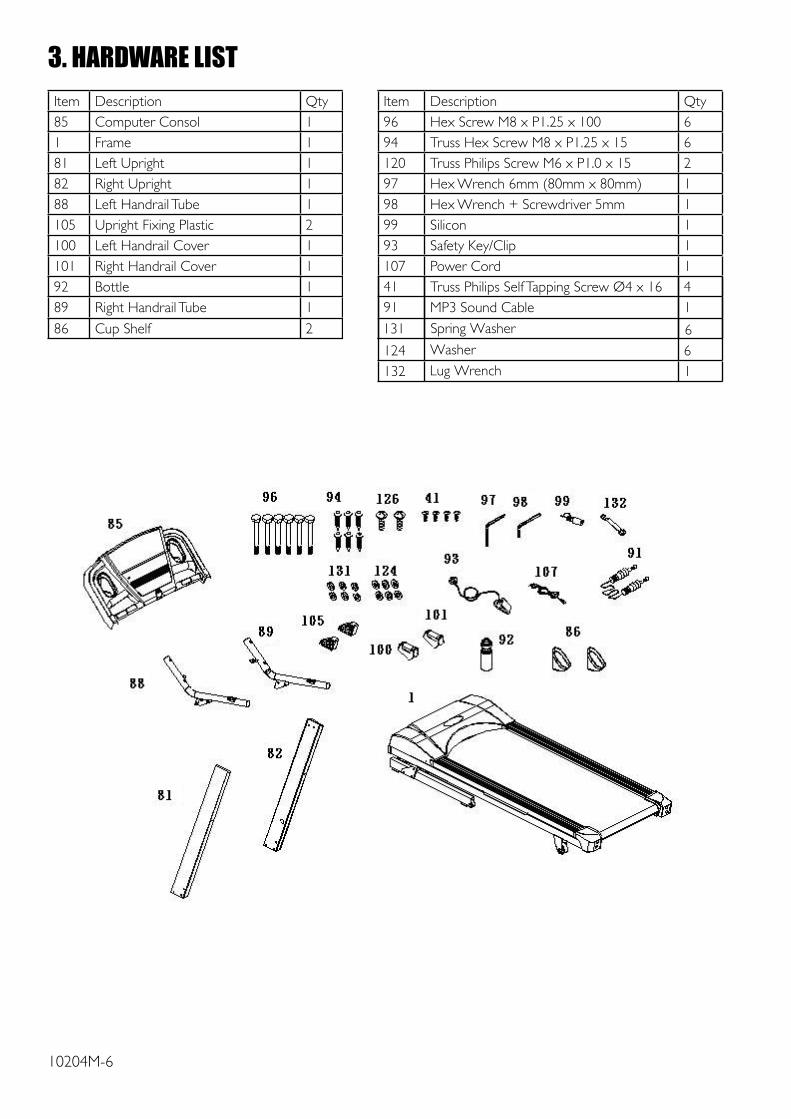
3. HARDWARE LISTItem Description Qty Item Description Qty85 Computer Consol 1 96 Hex Screw M8 x P1.25 x 100 61 Frame 1 94 Truss Hex Screw M8 x P1.25 x 15 681 Left Upright 1 120 Truss Philips Screw M6 x P1.0 x 15 282 Right Upright 1 97 Hex Wrench 6mm (80mm x 80mm) 188 Left Handrail Tube 1 98 Hex Wrench + Screwdriver 5mm 1105 Upright Fixing Plastic 2 99 Silicon 1100 Left Handrail Cover 1 93 Safety Key/Clip 1101 Right Handrail Cover 1 107 Power Cord 192 Bottle 1 41 Truss Philips Self Tapping Screw Ø4 x 16 489 Right Handrail Tube 1 91
131
MP3 Sound CableSpring Washer
WasherLug Wrench
1
86 Cup Shelf 2
124 66
132 1
10204M-7
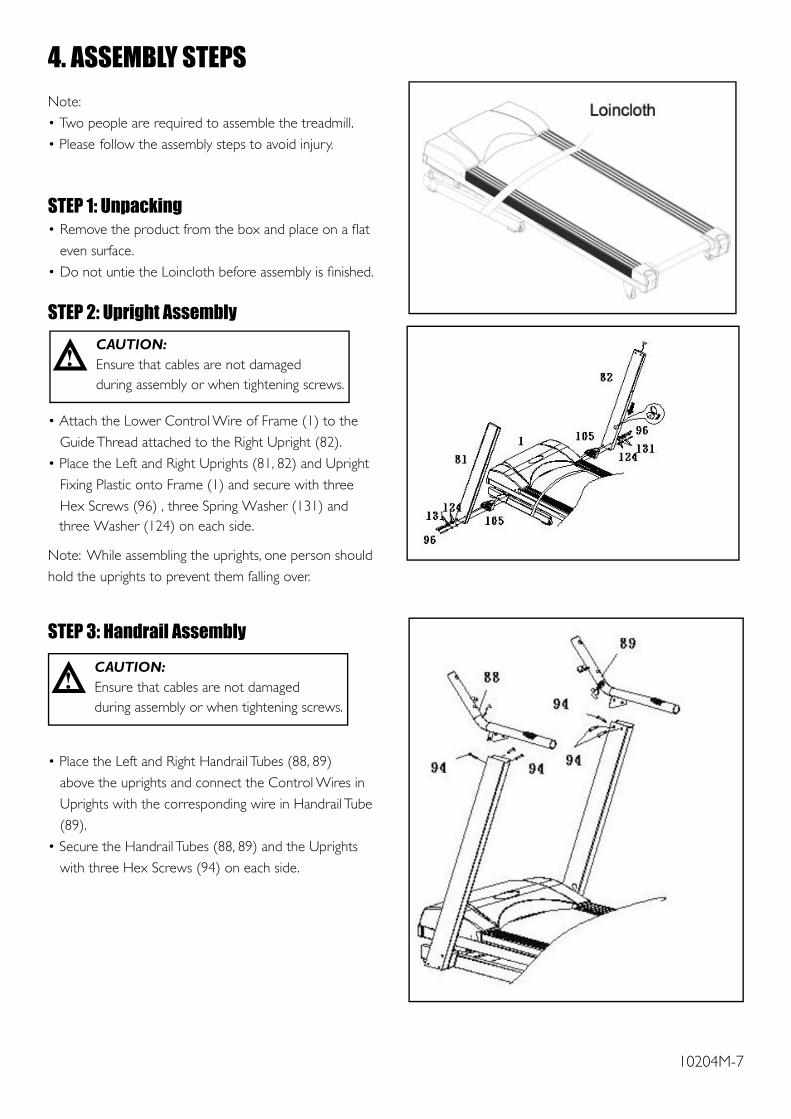
4. ASSEMBLY STEPSNote:
• Two people are required to assemble the treadmill.
• Please follow the assembly steps to avoid injury.
STEP 1: Unpacking
even surface.
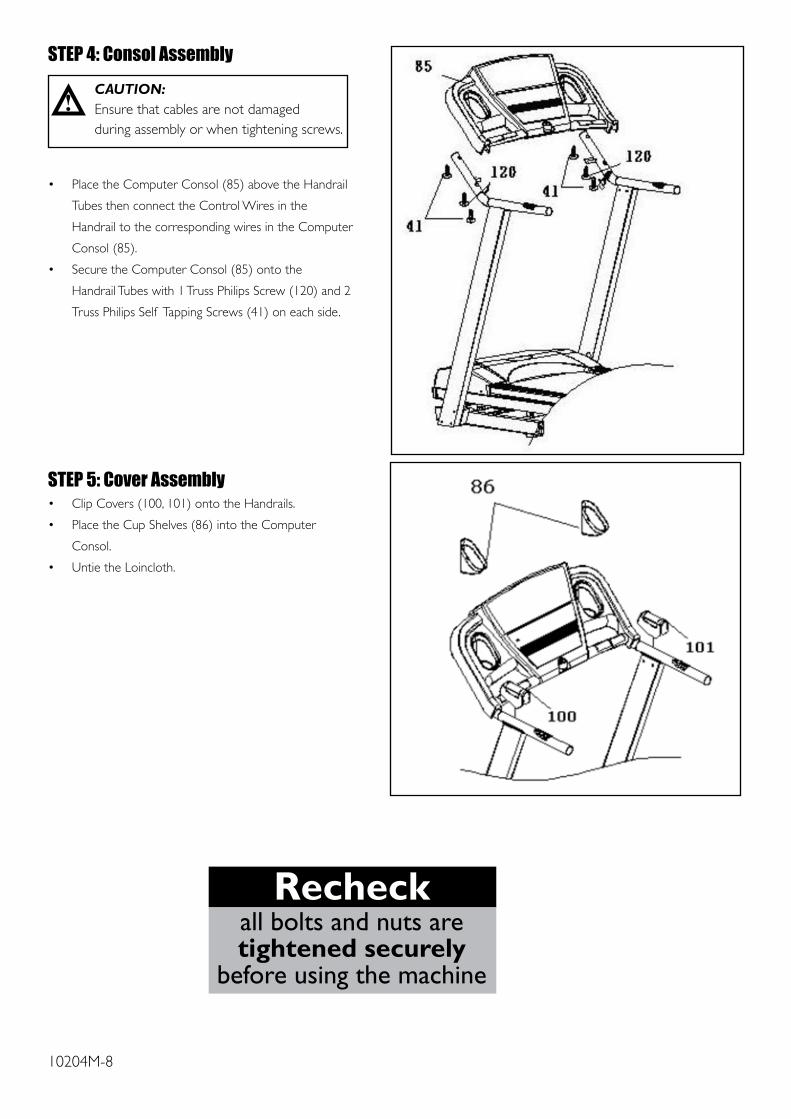
STEP 2: Upright Assembly
• Attach the Lower Control Wire of Frame (1) to the
Guide Thread attached to the Right Upright (82).
• Place the Left and Right Uprights (81, 82) and Upright
Fixing Plastic onto Frame (1) and secure with three
Hex Screws (96) , three Spring Washer (131) and three Washer (124) on each side.
Note: While assembling the uprights, one person should
hold the uprights to prevent them falling over.
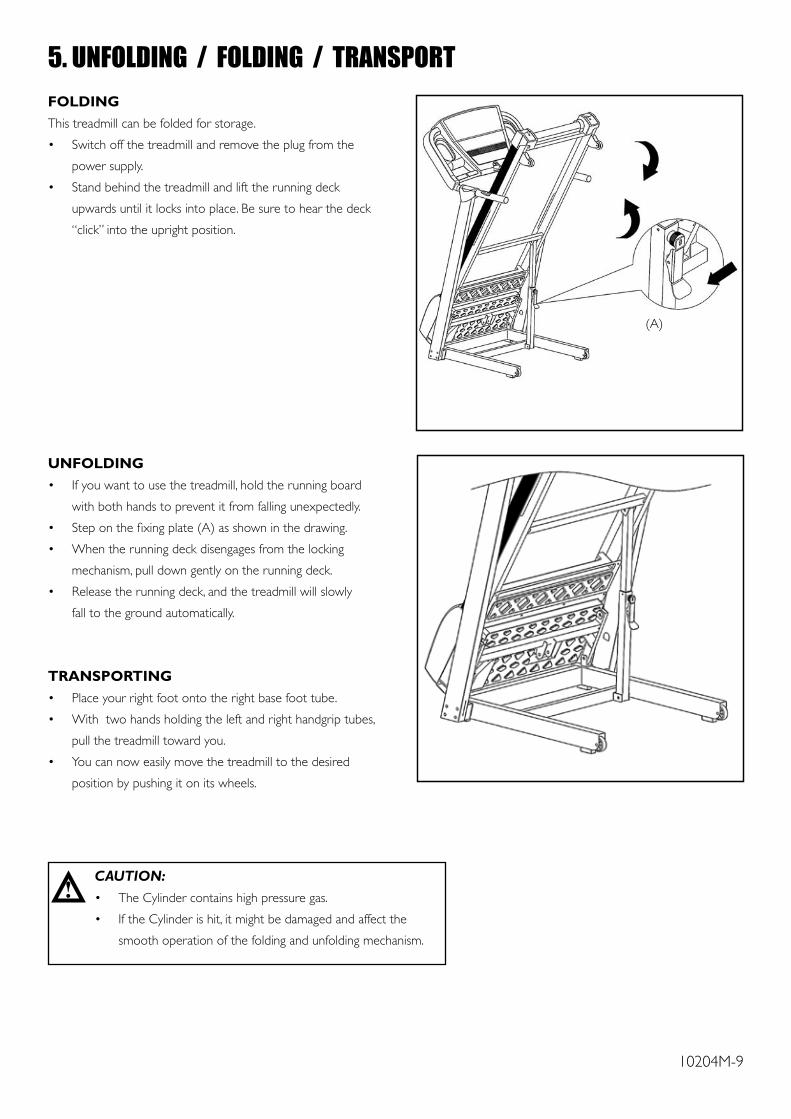
STEP 3: Handrail Assembly
• Place the Left and Right Handrail Tubes (88, 89)
above the uprights and connect the Control Wires in
Uprights with the corresponding wire in Handrail Tube
(89).
• Secure the Handrail Tubes (88, 89) and the Uprights
with three Hex Screws (94) on each side.
CAUTION:Ensure that cables are not damagedduring assembly or when tightening screws.
CAUTION:Ensure that cables are not damagedduring assembly or when tightening screws.
10204M-8
CAUTION:Ensure that cables are not damagedduring assembly or when tightening screws.
Recheckall bolts and nuts aretightened securely
before using the machine
STEP 4: Consol Assembly
• PlacetheComputerConsol(85)abovetheHandrail
Tubes then connect the Control Wires in the
Handrail to the corresponding wires in the Computer
Consol (85).
• SecuretheComputerConsol(85)ontothe
Handrail Tubes with 1 Truss Philips Screw (120) and 2
Truss Philips Self Tapping Screws (41) on each side.
STEP 5: Cover Assembly• ClipCovers(100,101)ontotheHandrails.
• PlacetheCupShelves(86)intotheComputer
Consol.
• UntietheLoincloth.
10204M-9
FOLDINGThis treadmill can be folded for storage.
• Switchoffthetreadmillandremovetheplugfromthe
power supply.
• Standbehindthetreadmillandlifttherunningdeck
upwardsuntilitlocksintoplace.Besuretohearthedeck
“click”intotheuprightposition.
UNFOLDING• Ifyouwanttousethetreadmill,holdtherunningboard
withbothhandstopreventitfromfallingunexpectedly.
• Steponthefixingplate(A)asshowninthedrawing.
• Whentherunningdeckdisengagesfromthelocking
mechanism,pulldowngentlyontherunningdeck.
• Releasetherunningdeck,andthetreadmillwillslowly
fall to the ground automatically.
TRANSPORTING• Placeyourrightfootontotherightbasefoottube.
• Withtwohandsholdingtheleftandrighthandgriptubes,
pull the treadmill toward you.
• Youcannoweasilymovethetreadmilltothedesired
position by pushing it on its wheels.
5. UNFOLDING / FOLDING / TRANSPORT
CAUTION:• TheCylindercontainshighpressuregas.
• IftheCylinderishit,itmightbedamagedandaffectthe
smooth operation of the folding and unfolding mechanism.
(A)
10204M-10
HOW TO APPLY LUBRICANT• Liftonesideoftreadbelt.
• Pouronehalfofthelubricantbottleunderthecentreofthetreadbeltonthetopsurfaceofthetreadboard.
• Walkonthetreadmillataslowspeedfor3to5minutestoevenlydistributelubricant.
NOTE: DO NOT over lubricate treadboard. Any excess lubricant that comes out should be wiped off.
NOTE: ONLY USE HALF THE BOTTLE OF LUBRICANT PER APPLICATION.
• NOTE:Ifyourlubricantisfinished,thetreadbeltcanbelubricatedwithDubbin.
LUBRICATION SCHEDULE• Checkthetreadboardlubricationduringinstallation.Ifit’snecessary,lubricatethetreadboardusingonehalfofthe
lubricantprovided,beforeusingthetreadmillforthefirsttime.
• Ifthetreadmillisusedonaregularbasis,therunningdeckshouldbelubricatedonceamonth.
• Ifthetreadmillhasnotbeenusedfortwomonthsormore,thetreadboardmustbelubricatedbeforeuse.
6. MAINTENANCE
HOW TO CHECK TREADBELT FOR PROPER LUBRICATION•Liftonesideofthetreadbeltandfeelthetopsurfaceofthe
treadboard.
•Ifthesurfaceisslicktothetouch,thennofurtherlubricationis
required.
•Ifthesurfaceisdrytothetouch,applyonepacketoflubricant
or half of the bottle of lubricant.
BELT TRACKING ADJUSTMENT• Ifduringuseyounoticethattherunningbelteithershiftstotherightortheleftofcentre,switchoffthetreadmill,
remove the “Safety Key” and unplug the equipment from the AC power source.
• Iftherunningbeltshiftsleft,usingHexwrenchprovided,turn
the left rear roller adjustment clockwise no more than 1/4” of a turn
(if the running belt shifts right, adjust the right rear roller).
• RemovetheHexwrench,insertthe“SafetyKey”andinsertthe
AC power cord into the AC outlet. Turn on your treadmill and
observe after running for a few minutes to see if the problem
has been corrected.
• Thismaytakeseveraladjustments,sorepeattheaboveprocedure.
Your treadmill should require little maintenance other than to periodically apply lubricant. Lubricating under the
treadbeltwillensuresuperiorperformanceandextendthetreadmill’slifeexpectancy.
10204M-11
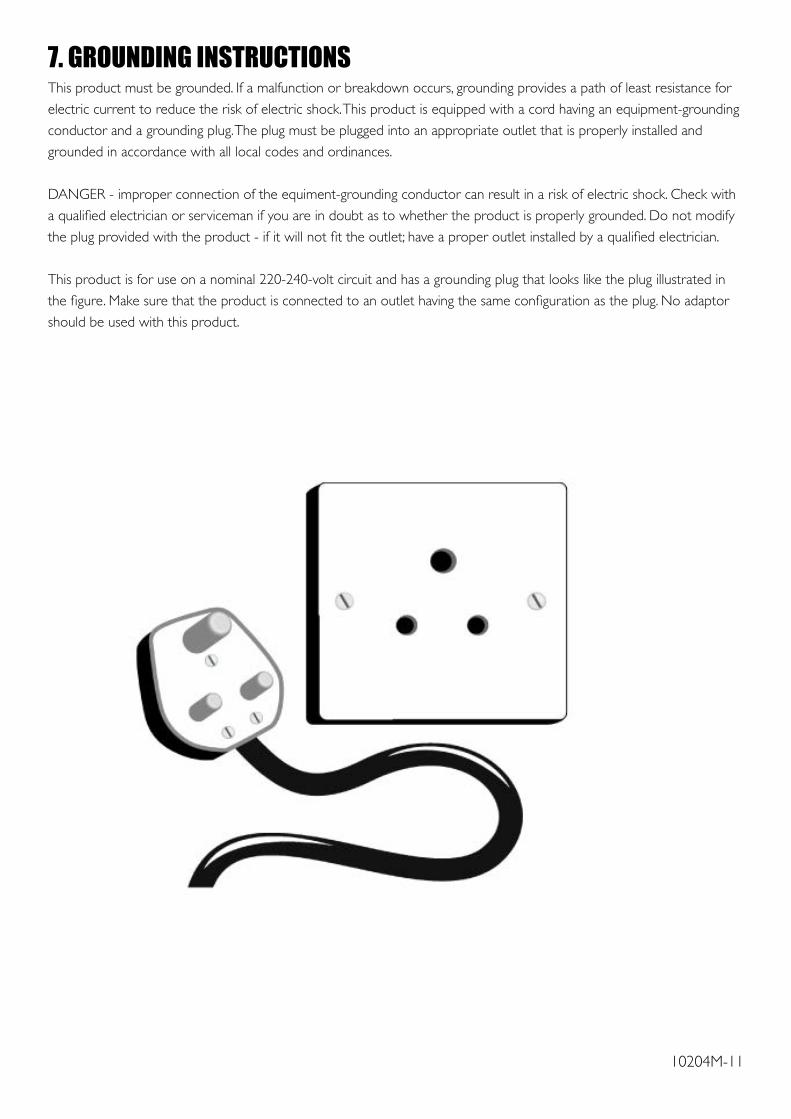
7. GROUNDING INSTRUCTIONSThis product must be grounded. If a malfunction or breakdown occurs, grounding provides a path of least resistance for
electric current to reduce the risk of electric shock. This product is equipped with a cord having an equipment-grounding
conductor and a grounding plug. The plug must be plugged into an appropriate outlet that is properly installed and
grounded in accordance with all local codes and ordinances.
DANGER - improper connection of the equiment-grounding conductor can result in a risk of electric shock. Check with
aqualifiedelectricianorservicemanifyouareindoubtastowhethertheproductisproperlygrounded.Donotmodify
theplugprovidedwiththeproduct-ifitwillnotfittheoutlet;haveaproperoutletinstalledbyaqualifiedelectrician.
This product is for use on a nominal 220-240-volt circuit and has a grounding plug that looks like the plug illustrated in
thefigure.Makesurethattheproductisconnectedtoanoutlethavingthesameconfigurationastheplug.Noadaptor
should be used with this product.
10204M-12
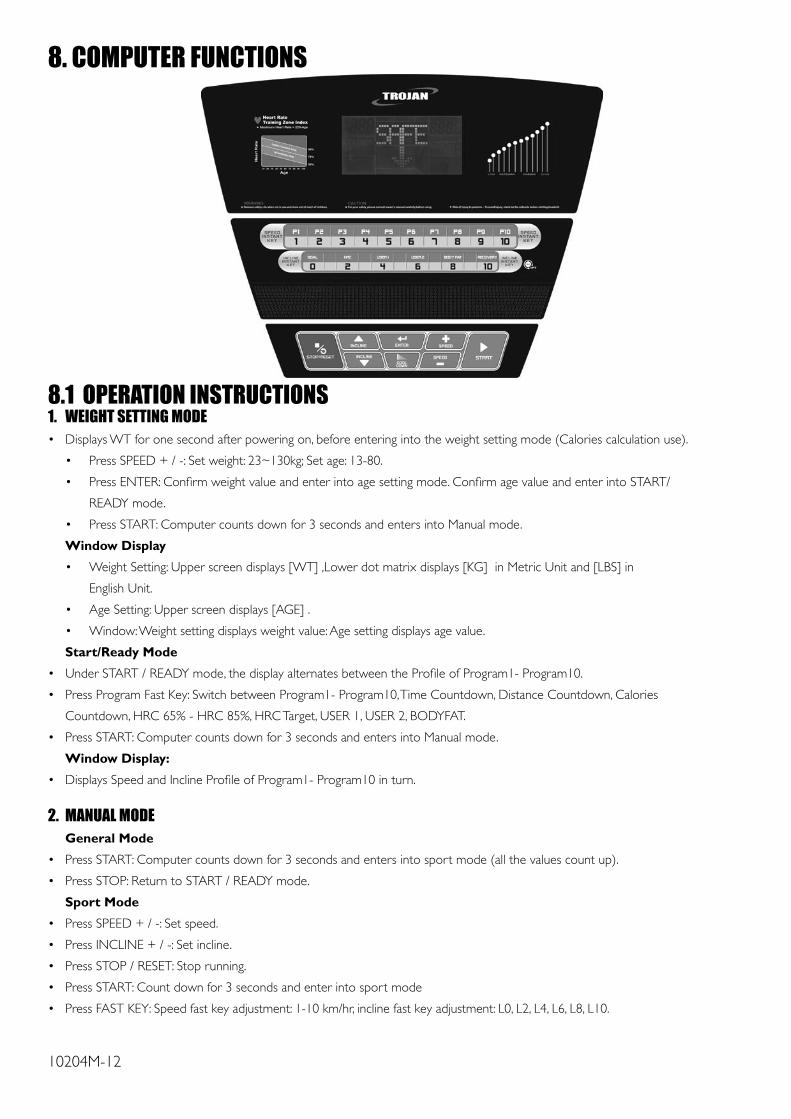
8. COMPUTER FUNCTIONS
8.1 OPERATION INSTRUCTIONS1. WEIGHT SETTING MODE• DisplaysWTforonesecondafterpoweringon,beforeenteringintotheweightsettingmode(Caloriescalculationuse).
• PressSPEED+/-:Setweight:23~130kg;Setage:13-80.
• PressENTER:Confirmweightvalueandenterintoagesettingmode.ConfirmagevalueandenterintoSTART/
READYmode.
• PressSTART:Computercountsdownfor3secondsandentersintoManualmode.
Window Display
• WeightSetting:Upperscreendisplays[WT],Lowerdotmatrixdisplays[KG]inMetricUnitand[LBS]in
English Unit.
• AgeSetting:Upperscreendisplays[AGE].
• Window:Weightsettingdisplaysweightvalue:Agesettingdisplaysagevalue.
Start/Ready Mode
• UnderSTART/READYmode,thedisplayalternatesbetweentheProfileofProgram1-Program10.
• PressProgramFastKey:SwitchbetweenProgram1-Program10,TimeCountdown,DistanceCountdown,Calories
Countdown,HRC65%-HRC85%,HRCTarget,USER1,USER2,BODYFAT.
• PressSTART:Computercountsdownfor3secondsandentersintoManualmode.
Window Display:
• DisplaysSpeedandInclineProfileofProgram1-Program10inturn.
2. MANUAL MODEGeneral Mode
• PressSTART:Computercountsdownfor3secondsandentersintosportmode(allthevaluescountup).
• PressSTOP:ReturntoSTART/READYmode.
Sport Mode
• PressSPEED+/-:Setspeed.
• PressINCLINE+/-:Setincline.
• PressSTOP/RESET:Stoprunning.
• PressSTART:Countdownfor3secondsandenterintosportmode
• PressFASTKEY:Speedfastkeyadjustment:1-10km/hr,inclinefastkeyadjustment:L0,L2,L4,L6,L8,L10.
10204M-13
8. COMPUTER FUNCTIONSWindow Display
• WindowDisplay:Speed,Incline,Time,Distance,CaloriesandPulse.DotMatrixdisplaysProfileofSpeed
and Incline.
3. GOAL MODE General Mode
• PressProgramFastKey:SwitchbetweenProgram1-Program10,TimeCountdown,DistanceCountdown,Calories
Countdown,HRC65%-HRC85%,HRCTarget,USER1,USER2,BODYFAT.
• PressGOAL:GOALmodeincludesTimeMode,DistanceMode,CaloriesMode.UnderSTART/READYmode,useGOALto
switch between functions.
• PressENTER:Enterintosetting.
• PressSTART:Computercountsdownfor3secondsandentersintosportmode.
• PressSTOP/RESET:ReturntoSTART/READYmode.
• Undereachdifferentmode,thecorrespondingsymbolisblinkinginthedisplaywindowanddisplaysthedefaultvalue.
The other windows will display the related default values.
Time Mode
• Presetvalueis20minutes.
• PressSPEED+/-:Adjusttargettime(5:00-99:00).
• PressSTART:Computercountsdownfor3secondsandentersintosportmode.
• PressSTOP/RESET:ReturntoSTART/READYmode.
Distance Mode
• Presetvalueis5Km.
• PressSPEED+/-:Adjusttargetdistance(1Km-99.0Km).
• PressSTART:Computercountsdownfor3secondsandentersintosportmode(allthevaluescountup).
• PressSTOP/RESET:ReturntoSTART/READYmode.
Calories Mode
• Presetvalueis200Calories.
• PressSPEED+/-:Adjusttargetcalories(40Calories-999Calories).
• PressSTART:Computercountsdownfor3secondsandentersintosportmode(allthevaluescountup).
• PressSTOP/RESET:ReturntoSTART/READYmode.
Sport Mode
• PressSPEED+/-:Setspeed.
• PressINCLINE+/-:Setincline.
• PressSTOP/RESET:Stoprunning.
• PressSTART:Computercountsdownfor3secondsandentersintosportmode.
• PressFASTKEY:Speedfastkeyadjustment:1-10km/hr,inclinefastkeyadjustment:L0,L2,L4,L6,L8,L10.
4. PROGRAM MODE General Mode
• PressProgramFastKey:SwitchbetweenProgram1–Program10,TimeCountdown,DistanceCountdown,Calories
Countdown,HRC65%-HRC85%,HRCTarget,USER1,USER2,BODYFAT.
• PressP1-P10:UnderSTART/READYmode,usetheFastKeytoswitchbetweenProgram1–10.Aftersetting
P1–P10,thecomputerautomaticallyentersintotimesetting.
• PressSTART:Computercountsdownfor3secondsandentersintosportmode.
• PressSTOP/RESET:ReturntoSTART/READYmode.
• ProgramwindowwilldisplaythecurrentselectedProgramNumber.
10204M-14
8. COMPUTER FUNCTIONSSetting Mode
• Presetvalueis20minutes.
• PressSPEED+/-:Adjusttargettime(5:00-99:00).
• PressSTART:Computercountsdownfor3secondsandentersintosportmode.
• PressSTOP/RESET:ReturntoSTART/READYmode.
• PressENTER:EnterintoLEVELadjustment.Eachtimeyouadd1LEVELthespeedwillincreaseby1.0km/hrand
inclinewillincreaseby1LEVEL.Thereareamaximumof5LEVELS.
Sport Mode
• PressSPEED+/-:Setspeed.
• PressINCLINE+/-:Setincline.
• PressSTOP/RESET:Stoprunning.
• PressSTART:Computercountsdownfor3secondsandentersintosportmode.
• PressFastKey:Speedfastkeyadjustment:1-10km/hr,inclinefastkeyadjustment:L0,L2,L4,L6,L8,L10.
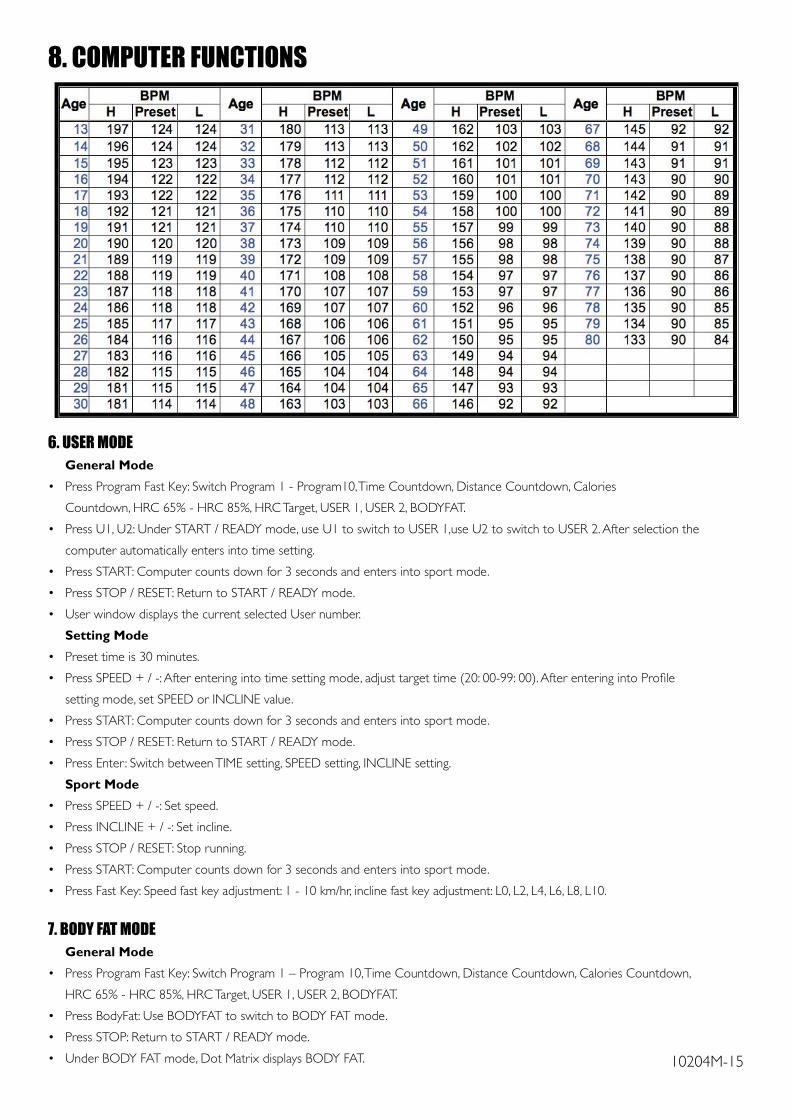
5. HRC MODEGeneral Mode
• PressProgramFastKey:SwitchProgram1–Program10,TimeCountdown,DistanceCountdown,Calories
Countdown,HRC65%-HRC85%,HRCTarget,USER1,USER2,BODYFAT.
• PressHRC:HRCmodeincludesheartratetarget(65%,75%or85%).UnderSTART/READYmode,useHRCto
switch to the desired rate.
• PressENTER:Undernon-targetmode,enterintoagesetting.Targetmodeentersintotheagesettingthefirsttime
you push ENTER and if you push it a second time it will enter into pulse setting.
• PressSTART:Computercountsdownfor3secondsandentersintocountdownmode.
• PressSTOP/RESET:ReturntoSTART/READYmode.
• UnderthedifferentHEARTRATEmodes,theDotMatrixwindowwilldisplaythecorrespondingheartratevalue.
Setting Mode
• PressSPEED+/-:Non-Targetmodecanadjustage(13-80);Targetmodecanadjusttargetpulsevalue.
• PressSTART:Computercountsdownfor3secondsandentersintosportmode(timecountsup).
• PressSTOP/RESET:ReturntoSTART/READYmode.
Sport Mode
• PressSPEED+/-:Setspeed.
• PressINCLINE+/-:Setincline.
• PressSTOP/RESET:Stoprunning.
• PressSTART:Computercountsdownfor3secondsandentersintosportmode.
• PressFastKey:Speedfastkeyadjustment:1-10km/hr,inclinefastkeyadjustment:L0,L2,L4,L6,L8,L10.
• After2minutes,computerbeginstodetectheartbeatchanges.Thecomputerupdatesthereadingonceevery10
seconds. Every time the computer detects a change it will automatically adjust the SPEED and INCLINE (up or down
asrequired).SPEEDisadjustedby0.2km/hrandINCLINEby1level.Ifnoheartbeatisdetectedafter2minutesof
startingthecomputerwilldisplayawarningsymbol.Ifnoheartbeatisdetectedcontinuouslyfor30secondsduring
exercise,thetreadmillwillstopautomatically.
10204M-15
8. COMPUTER FUNCTIONS
6. USER MODEGeneral Mode
• PressProgramFastKey:SwitchProgram1-Program10,TimeCountdown,DistanceCountdown,Calories
Countdown,HRC65%-HRC85%,HRCTarget,USER1,USER2,BODYFAT.
• PressU1,U2:UnderSTART/READYmode,useU1toswitchtoUSER1,useU2toswitchtoUSER2.Afterselectionthe
computer automatically enters into time setting.
• PressSTART:Computercountsdownfor3secondsandentersintosportmode.
• PressSTOP/RESET:ReturntoSTART/READYmode.
• UserwindowdisplaysthecurrentselectedUsernumber.
Setting Mode
• Presettimeis30minutes.
• PressSPEED+/-:Afterenteringintotimesettingmode,adjusttargettime(20:00-99:00).AfterenteringintoProfile
setting mode, set SPEED or INCLINE value.
• PressSTART:Computercountsdownfor3secondsandentersintosportmode.
• PressSTOP/RESET:ReturntoSTART/READYmode.
• PressEnter :SwitchbetweenTIMEsetting,SPEEDsetting,INCLINEsetting.
Sport Mode
• PressSPEED+/-:Setspeed.
• PressINCLINE+/-:Setincline.
• PressSTOP/RESET:Stoprunning.
• PressSTART:Computercountsdownfor3secondsandentersintosportmode.
• PressFastKey:Speedfastkeyadjustment:1-10km/hr,inclinefastkeyadjustment:L0,L2,L4,L6,L8,L10.
7. BODY FAT MODEGeneral Mode
• PressProgramFastKey:SwitchProgram1–Program10,TimeCountdown,DistanceCountdown,CaloriesCountdown,
HRC65%-HRC85%,HRCTarget,USER1,USER2,BODYFAT.
• PressBodyFat:UseBODYFATtoswitchtoBODYFATmode.
• PressSTOP:ReturntoSTART/READYmode.
• UnderBODYFATmode,DotMatrixdisplaysBODYFAT.
10204M-16
Setting Mode
• PressENTER:Setage,height,sexandweightinturn,afterconfirmingweight,thecomputerbeginstotestfat.
• PressSPEED+/-:Adjustpresetvalues.
• DotMatrixwindowdisplaysBODYFAT.
Body fat mode
• PressSTOP/RESET:ReturntoSTART/READYmode.
• Aftersettingweight,thecomputerbeginstodetectheartbeatandBODYFATwindowwilldisplay---.Aftersuccessfullycalculating
BODYFAT,theBODYFATwindowwilldisplaythefatvalue.
• Ifnopulseisdetected,screendisplaysHOLDGRIP.
8. COOL DOWN MODEGeneral Mode
• PressSTART:Computercountsdownfor3secondsandentersintosportmode.
• PressSTOP/RESET:Returntostart/readymode.
Sport Mode
• PressCOOLDOWN: EnterintoCOOLDOWNmode.
Cool Down Mode
• PressSTOP/RESET:Stoprunning.
• Thecomputercountsdownfor4minutes.ThespeedvaluewillhalvebeforeenteringintoCOOLDOWNmodeandthespeed
willhalveeveryminutethereafteruntilthetimeisup,thenitwillreturntoSTART/READYmode.
9. RECOVERY MODEGeneral Mode
• PressRECOVERY:Duringworkout,pressSTOPtostoprunning.PressRECOVERYtoenterintoRECOVERYmode.
Recovery Mode• Ifaheartbeatsignalisdetected,theheart-shapedpicturewillalternateonthescreen(seebelow).
• Ifnoheartbeatsignalisdetected,thescreendisplaysquestionmark.
• Holdthehandgrippulseuntilthe60secondscountdownisover.Theresultwilldisplayinthescreen.There are 6 Levels, F1 ~ F6, F1 is the best and F6 is the worst.
F1: >24 F2: 20~24 F3: 15~19 F4: 10~14 F5: 05~09 F6: 00~04
8. COMPUTER FUNCTIONS
10204M-17
8.2 OTHER FUNCTIONS INSTRUCTIONS1. SAFETY KEY FUNCTION• Duringworkout,inthecaseofanemergency,pulloutthesafetykeytostopthetreadmill.
• Ifyoupulloutthesafetykeyduringworkout,thespeedwillstopandinclinewillstayintheangleitwaspriorto
stopping.Whenyoure-insertthesafetykey,thecomputerwillindicatetheinclinevaluepriortostoppingandallthe
valueswillbezero.
2. METRIC UNIT AND ENGLISH UNIT SWITCH• UnderSTART/READYmode,pressandholdENTERfor10secondstoenterintoMetricandEnglishunitsettingmode.
• PressINCLINE+/-:Adjustpresetvalue,KMrepresentsMetricunit,MILrepresentsEnglishunit.
• PressENTER:Confirmthesetvalueandrestartthetreadmill.
3. SCALE
Original CountdownSettingOriginalValue Countdown Setting Display rangeTIME (Min : Sec) 0:00 20:00 5:00-99:00 0:00-99:59SPEED (Km/h) 0.8 N/A N/A 0.8-20.0km/hr
DISTANCE (Km) 0.00 N/A 1.0-99.0 0.0-99.9CALORIES (Calories) 0 N/A 40-999 0-999
PULSE (BPM) HP N/A N/A 40-220Body Fat (Sex)
30170701
N/A N/A
0-113-80
120-20023-130
Body Fat (Age)Body Fat (Height)Body Fat (Weight)
HRC (Age) 30 N/A N/A 13-80
Original CountdownSettingOriginalValue Countdown Setting Display rangeTIME (Min : Sec) 0:00 20:00 5:00-99:00 0:00-99:59
SPEED (Mil/h) 0.5 N/A N/A 0.5-12.5 mil/hrDISTANCE (Mil) 0.00 N/A 1.0-99.0 0.0-99.9
CALORIES (Calories) 0 N/A 40-999 0-999PULSE (BPM) HP N/A N/A 40-220Body Fat (Sex) 1
N/A N/A
0-113-80
3’11”-6’7”50-286 LBS
Body Fat (Age) 30Body Fat (Height) 5’7”Body Fat (Weight) 150 LBS
HRC (Age) 30 N/A N/A 13-80
8. COMPUTER FUNCTIONS
10204M-18
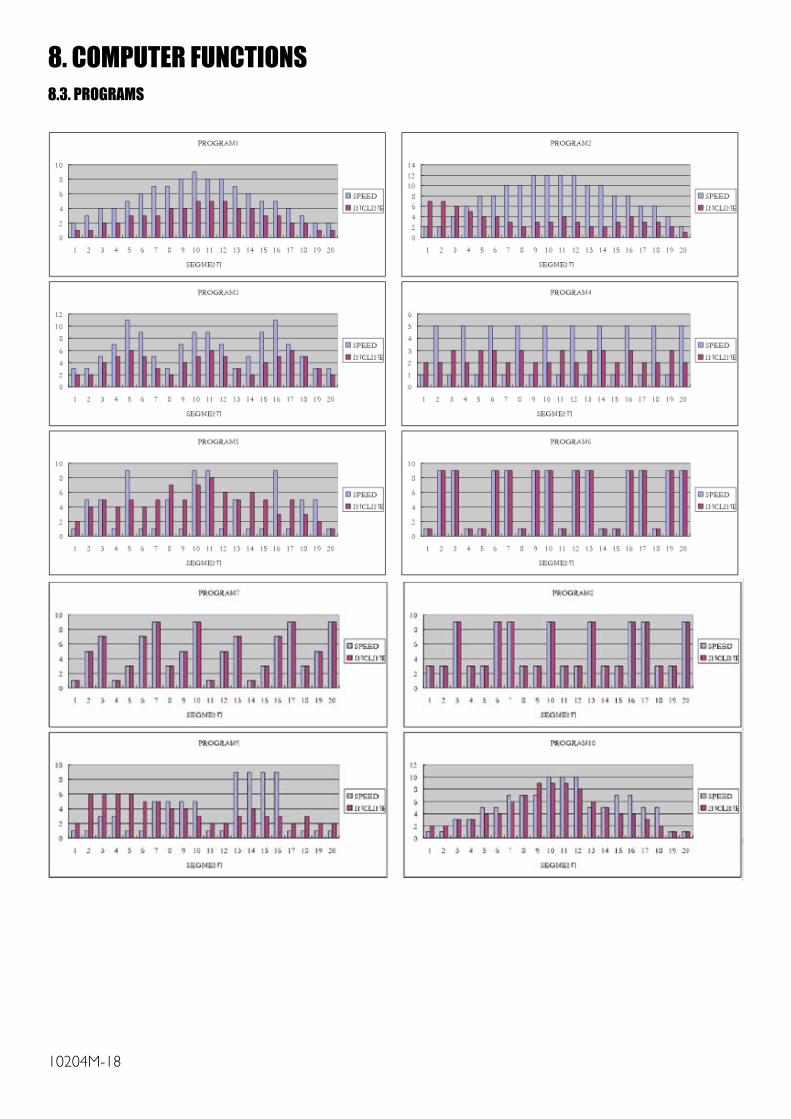
8.3. PROGRAMS
8. COMPUTER FUNCTIONS
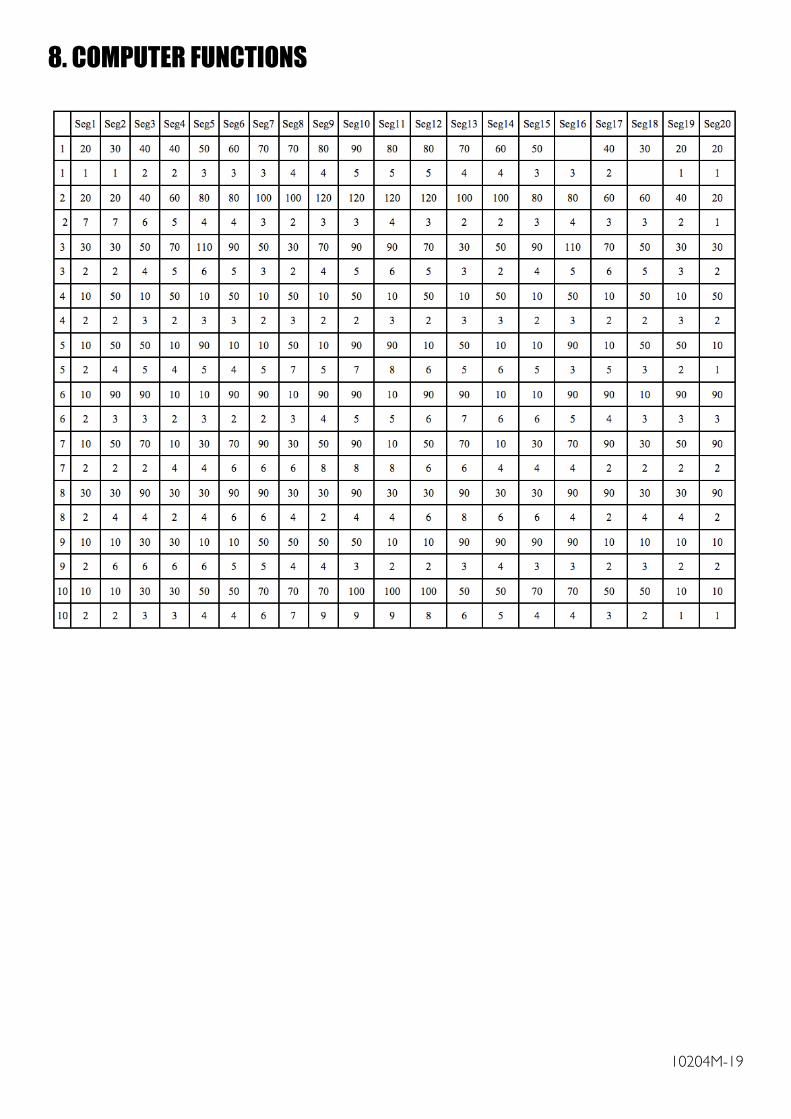
10204M-19
8. COMPUTER FUNCTIONS
10204M-20
AEROBIC EXERCISE
Aerobic exercise is any sustained activity that sends oxygen to your muscles via your heart and lungs. Aerobic exercise
improvesthefitnessofyourlungsandheart-yourbody’smostimportantmuscle.Aerobicexercisefitnessispromoted
by any activity that uses your large muscles (arms, legs, or buttock, for example). Your heart beats quickly and you breathe
deeply. An aerobic exercise should be part of your entire exercise routine.
WEIGHT TRAINING
Along with aerobic exercising which helps get rid of and keep off the excess fat that our bodies can store, weight train-
ing is an essential part of the exercise routine process. Weight training helps tone, build and strengthen muscle. If you
are working above your target zone, you may want to do a lesser amount of reps. And as always consult your physician
before beginning any exercise program.
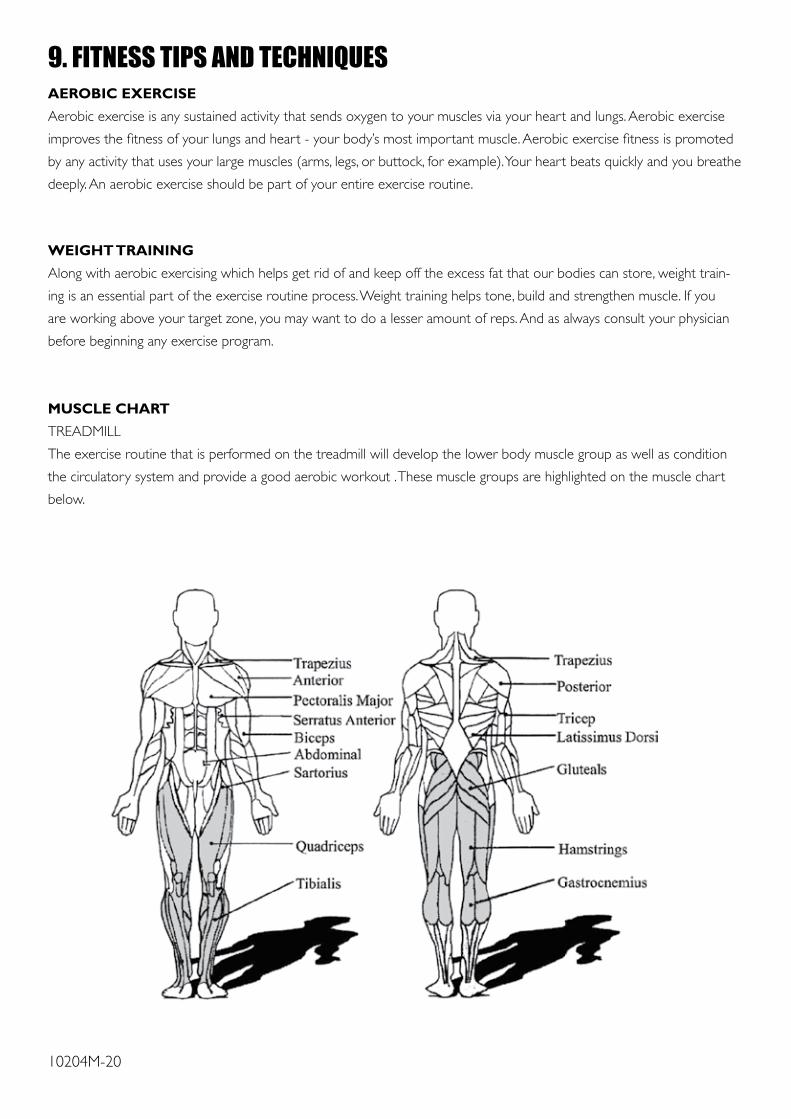
MUSCLE CHART
TREADMILL
The exercise routine that is performed on the treadmill will develop the lower body muscle group as well as condition
the circulatory system and provide a good aerobic workout . These muscle groups are highlighted on the muscle chart
below.
9. FITNESS TIPS AND TECHNIQUES
10204M-21
10. CONDITIONING GUIDELINESHow you begin your exercise program depends on your physical condition. If you have been inactive for several years, or
areseverelyoverweight,youmuststartslowlyandincreaseyourtimeontheequipment;afewminutesperworkout.
Initially,youmaybeabletoexerciseonlyforafewminutesinyourtargetzone,however,youraerobicfitnesswillimprove
overthenextsixtoeightweeks.Don’tbediscouragedifittakeslonger.It’simportanttoworkatyourownpace.
Ultimately,you’llbeabletoexercisecontinuouslyfor30minutes.Thebetteryouraerobicfitness,theharderyouwillhave
to work to stay in your target zone. Please remember these essentials :
•Haveyourdoctorreviewyourtraininganddietprogramstoadviseyouofaworkoutroutineyoushouldadopt.
•Beginyourtrainingprogramslowlywithrealisticgoalsthathavebeensetbyyouandyourdoctor.
•Monitoryourpulsefrequently.Establishyourtargetheartratebasedonyourageandcondition.
•Setupyourequipmentonaflat,evensurfaceatleast3feetfromwallsandfurniture.
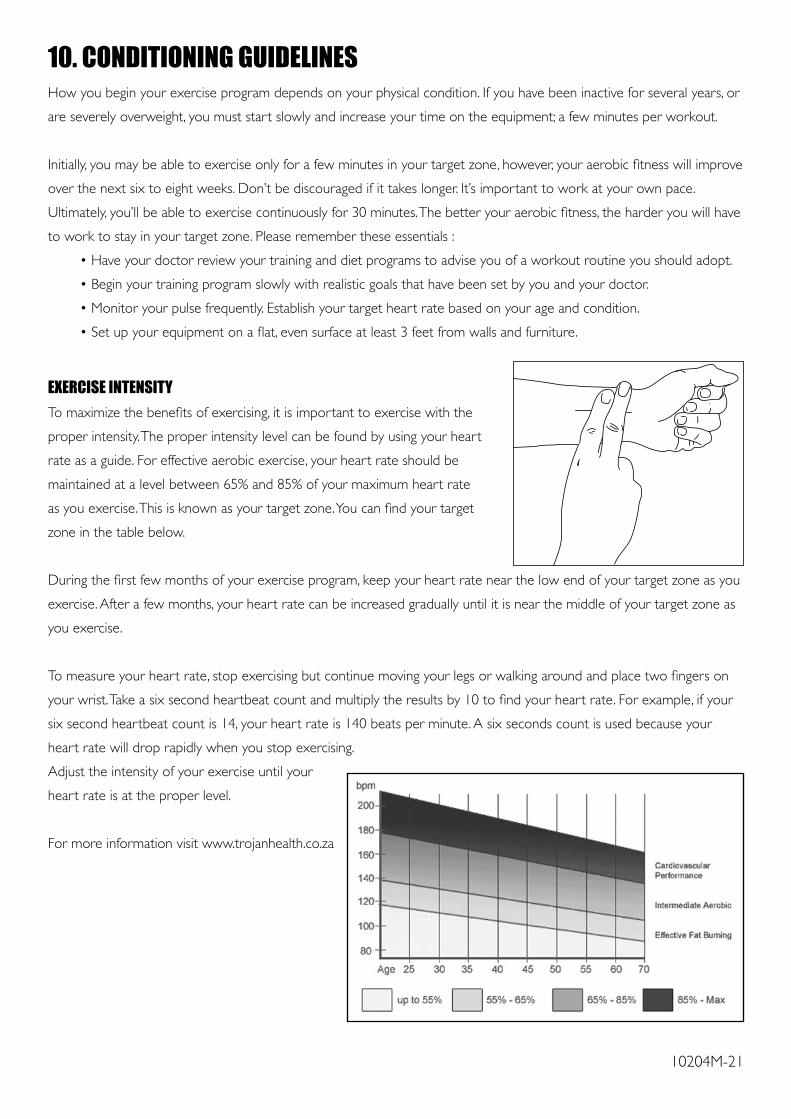
EXERCISE INTENSITYTomaximizethebenefitsofexercising,itisimportanttoexercisewiththe
proper intensity. The proper intensity level can be found by using your heart
rate as a guide. For effective aerobic exercise, your heart rate should be
maintained at a level between 65% and 85% of your maximum heart rate
asyouexercise.Thisisknownasyourtargetzone.Youcanfindyourtarget
zone in the table below.
Duringthefirstfewmonthsofyourexerciseprogram,keepyourheartratenearthelowendofyourtargetzoneasyou
exercise. After a few months, your heart rate can be increased gradually until it is near the middle of your target zone as
you exercise.
Tomeasureyourheartrate,stopexercisingbutcontinuemovingyourlegsorwalkingaroundandplacetwofingerson
yourwrist.Takeasixsecondheartbeatcountandmultiplytheresultsby10tofindyourheartrate.Forexample,ifyour
six second heartbeat count is 14, your heart rate is 140 beats per minute. A six seconds count is used because your
heart rate will drop rapidly when you stop exercising.
Adjust the intensity of your exercise until your
heart rate is at the proper level.
For more information visit www.trojanhealth.co.za
10204M-22
1
2
3
4
5
11. WARM-UP AND COOL-DOWNWORKOUT GUIDELINESEach workout should include the following three parts:A warm-up, consisting of 5 to 10 minutes of stretching and light exercise. A proper warm-up increases your body temperature, heart rate, and circulation in preparation for exercise.Training zone exercise, consisting of 20 to 30 minutes of exercising with your heart rate in your training zone. (Note: Duringthefirstfewweeksofyourexerciseprogram,donotkeepyourheartrateinyourtrainingzoneforlongerthan20 minutes.)Acool-down,with5to10minutesofstretching.Thiswillincreasetheflexibilityofyourmusclesandwillhelptopreventpost-exercise problems.
EXERCISE FREQUENCYTo maintain or improve your condition, plan three workouts each week, with at least one day of rest between workouts. Afterafewmonthsofregularexercise,youmaycompleteuptofiveworkoutseachweek,ifdesired.Remember,thekeyto success is make exercise a regular and enjoyable part of your everyday life.
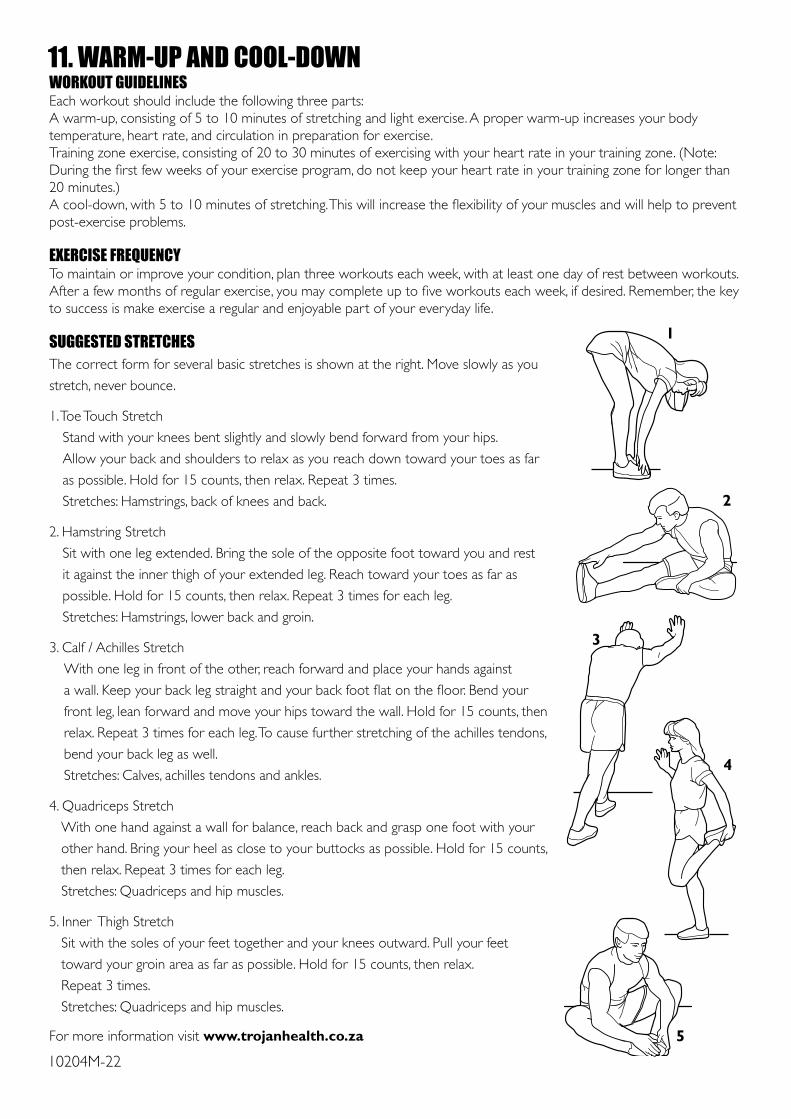
SUGGESTED STRETCHESThe correct form for several basic stretches is shown at the right. Move slowly as you
stretch, never bounce.
1. Toe Touch Stretch
Stand with your knees bent slightly and slowly bend forward from your hips.
Allow your back and shoulders to relax as you reach down toward your toes as far
as possible. Hold for 15 counts, then relax. Repeat 3 times.
Stretches: Hamstrings, back of knees and back.
2. Hamstring Stretch
Sit with one leg extended. Bring the sole of the opposite foot toward you and rest
it against the inner thigh of your extended leg. Reach toward your toes as far as
possible. Hold for 15 counts, then relax. Repeat 3 times for each leg.
Stretches: Hamstrings, lower back and groin.
3. Calf / Achilles Stretch
With one leg in front of the other, reach forward and place your hands against
awall.Keepyourbacklegstraightandyourbackfootflatonthefloor.Bendyour
front leg, lean forward and move your hips toward the wall. Hold for 15 counts, then
relax. Repeat 3 times for each leg. To cause further stretching of the achilles tendons,
bend your back leg as well.
Stretches: Calves, achilles tendons and ankles.
4. Quadriceps Stretch
With one hand against a wall for balance, reach back and grasp one foot with your
other hand. Bring your heel as close to your buttocks as possible. Hold for 15 counts,
then relax. Repeat 3 times for each leg.
Stretches: Quadriceps and hip muscles.
5. Inner Thigh Stretch
Sit with the soles of your feet together and your knees outward. Pull your feet
toward your groin area as far as possible. Hold for 15 counts, then relax.
Repeat 3 times.
Stretches: Quadriceps and hip muscles.
For more information visit www.trojanhealth.co.za

10204M-23
12. FREQUENTLY ASKED QUESTIONSQ1. My consol is showing LS
1. Treadmill has not received a speed signal for 8 seconds.
2. Turn off computer, unplug, leave for 30 seconds, then restart the treadmill.
3. If the error persists please contact our call centre on 0861 876 526 (0861 Trojan).
Q2. My consol is showing E1
1. Memory of the consol is malfunctioning or the CPU is having accessing problems
2. Turn off computer, unplug, leave for 30 seconds, then restart the treadmill.
3. If the error persists please contact our call centre on 0861 876 526 (0861 Trojan).
Q3. My computer consol is not working
1. Check that your power cord is in your power outlet and is on.
2. Check that you have a power supply to your home.
3. Ensure that the consol computer cables have been connected properly in the neckpiece when assembling the unit.
Q4. The consol cannot read the hand pulse signal
1. The hand pulse sensors will not operate correctly if your skin is extremely dry. Moisten your hands and try again.
2.Avoidmovingyourhandswhileexercisingandholdthehandspulsesensorsfirmlywhileexercising.Ifyoudo
move your hands while exercising, give the computer a few seconds to resample and display your correct heart
pulse rate.
3. Clean the hand pulse sensors to ensure good contact between your body and the pulse sensor.
If the error persists, please contact 0861 876 526 (0861 Trojan).
Q5. My LCD is dim
1. Check if unit is in direct sunlight, move if necessary. If display does not improve, please contact
0861 876 526 (0861 Trojan).
10204M-24
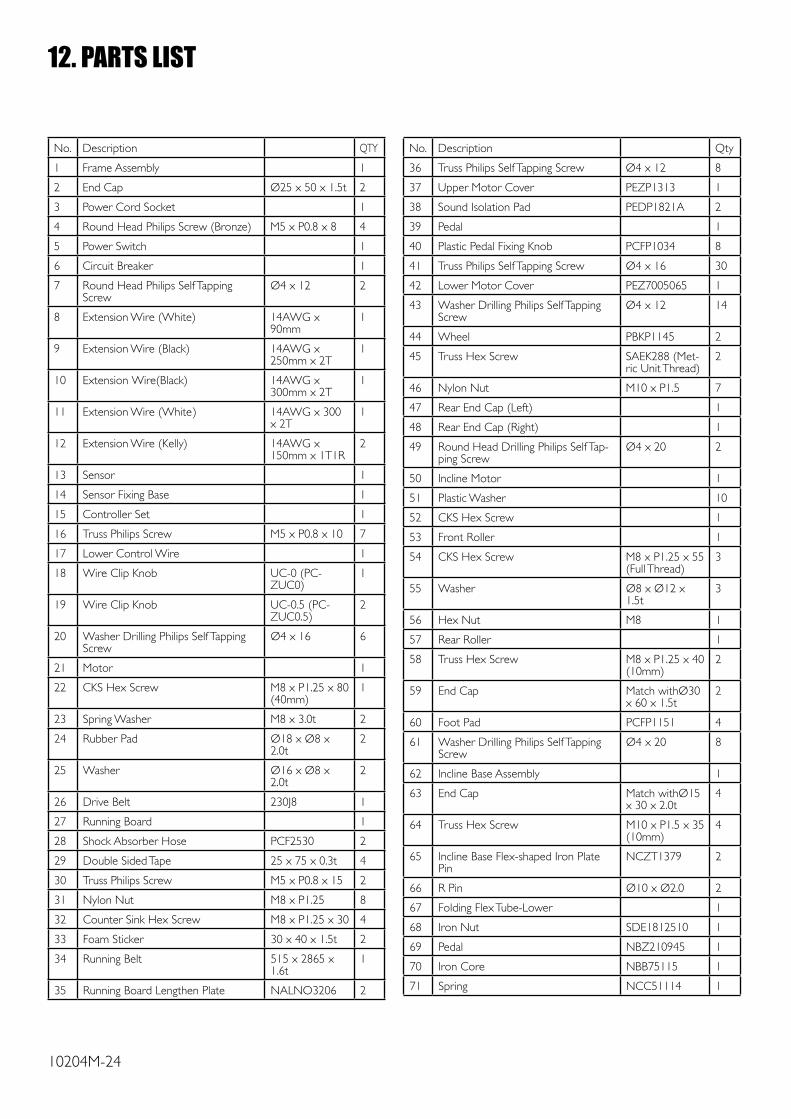
12. PARTS LIST
No. Description QTY
1 Frame Assembly 1
2 End Cap Ø25 x 50 x 1.5t 2
3 Power Cord Socket 1
4 Round Head Philips Screw (Bronze) M5 x P0.8 x 8 4
5 Power Switch 1
6 Circuit Breaker 1
7 Round Head Philips Self Tapping Screw
Ø4 x 12 2
8 Extension Wire (White) 14AWG x 90mm
1
9 Extension Wire (Black) 14AWG x 250mm x 2T
1
10 Extension Wire(Black) 14AWG x 300mm x 2T
1
11 Extension Wire (White ) 14AWG x 300x 2T
1
12 Extension Wire (Kelly) 14AWG x 150mm x 1T1R
2
13 Sensor 1
14 Sensor Fixing Base 1
15 Controller Set 1
16 Truss Philips Screw M5 x P0.8 x 10 7
17 Lower Control Wire 1
18 Wire Clip Knob UC-0 (PC-ZUC0)
1
19 Wire Clip Knob UC-0.5 (PC-ZUC0.5)
2
20 Washer Drilling Philips Self Tapping Screw
Ø4 x 16 6
21 Motor 1
22 CKS Hex Screw M8 x P1.25 x 80 (40mm)
1
23 Spring Washer M8 x 3.0t 2
24 Rubber Pad Ø18 x Ø8 x 2.0t
2
25 Washer Ø16 x Ø8 x 2.0t
2
26 Drive Belt 230J8 1
27 Running Board 1
28 Shock Absorber Hose PCF2530 2
29 Double Sided Tape 25 x 75 x 0.3t 4
30 Truss Philips Screw M5 x P0.8 x 15 2
31 Nylon Nut M8 x P1.25 8
32 Counter Sink Hex Screw M8 x P1.25 x 30 4
33 Foam Sticker 30 x 40 x 1.5t 2
34 Running Belt 515 x 2865 x 1.6t
1
35 Running Board Lengthen Plate NALNO3206 2
No. Description Qty
36 Truss Philips Self Tapping Screw Ø4 x 12 8
37 Upper Motor Cover PEZP1313 1
38 Sound Isolation Pad PEDP1821A 2
39 Pedal 1
40 Plastic Pedal Fixing Knob PCFP1034 8
41 Truss Philips Self Tapping Screw Ø4 x 16 30
42 Lower Motor Cover PEZ7005065 1
43 Washer Drilling Philips Self Tapping Screw
Ø4 x 12 14
44 Wheel PBKP1145 2
45 Truss Hex Screw SAEK288 (Met-ric Unit Thread)
2
46 Nylon Nut M10 x P1.5 7
47 Rear End Cap (Left) 1
48 Rear End Cap (Right) 1
49 Round Head Drilling Philips Self Tap-ping Screw
Ø4 x 20 2
50 Incline Motor 1
51 Plastic Washer 10
52 CKS Hex Screw 1
53 Front Roller 1
54 CKS Hex Screw M8 x P1.25 x 55 (Full Thread)
3
55 Washer Ø8 x Ø12 x 1.5t
3
56 Hex Nut M8 1
57 Rear Roller 1
58 Truss Hex Screw M8 x P1.25 x 40 (10mm)
2
59 End Cap Match withØ30 x 60 x 1.5t
2
60 Foot Pad PCFP1151 4
61 Washer Drilling Philips Self Tapping Screw
Ø4 x 20 8
62 Incline Base Assembly 1
63 End Cap Match withØ15x 30 x 2.0t
4
64 Truss Hex Screw M10 x P1.5 x 35 (10mm)
4
65 Incline Base Flex-shaped Iron Plate Pin
NCZT1379 2
66 R Pin Ø10 x Ø2.0 2
67 Folding Flex Tube-Lower 1
68 Iron Nut SDE1812510 1
69 Pedal NBZ210945 1
70 Iron Core NBB75115 1
71 Spring NCC51114 1
10204M-25
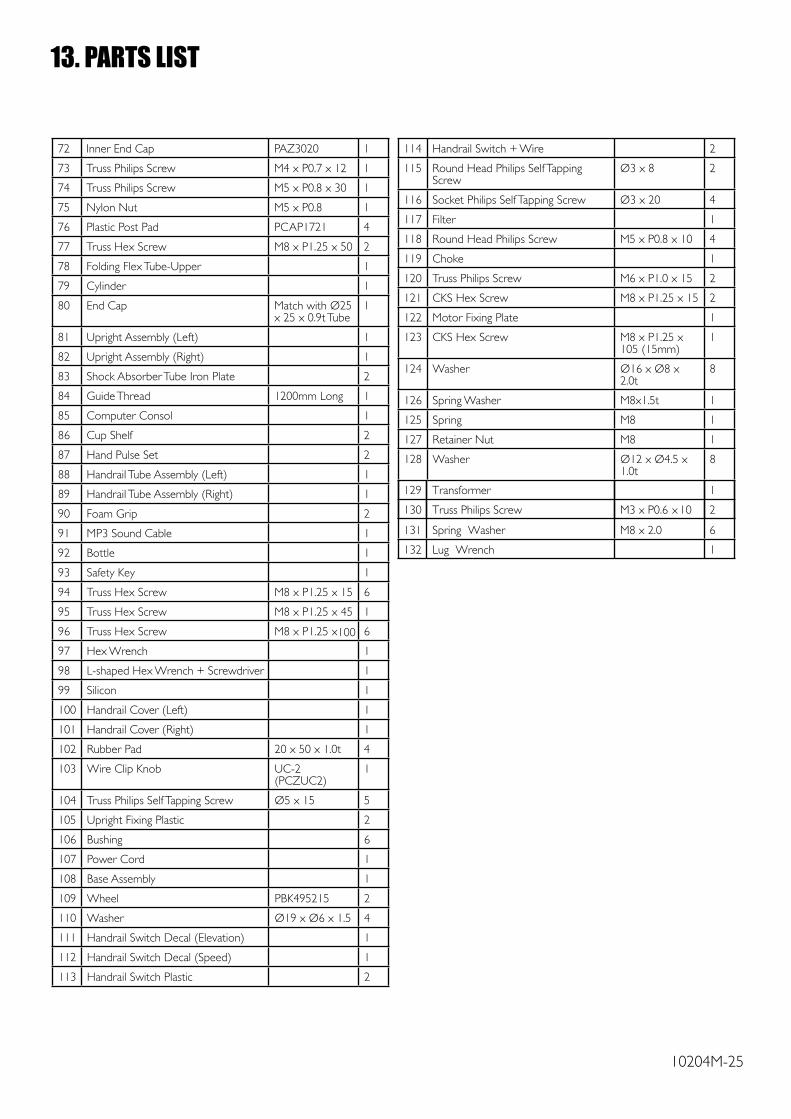
13. PARTS LIST
72 Inner End Cap PAZ3020 1
73 Truss Philips Screw M4 x P0.7 x 12 1
74 Truss Philips Screw M5 x P0.8 x 30 1
75 Nylon Nut M5 x P0.8 1
76 Plastic Post Pad PCAP1721 4
77 Truss Hex Screw M8 x P1.25 x 50 2
78 Folding Flex Tube-Upper 1
79 Cylinder 1
80 End Cap Match with Ø25x 25 x 0.9t Tube
1
81 Upright Assembly (Left) 1
82 Upright Assembly (Right) 1
83 Shock Absorber Tube Iron Plate 2
84 Guide Thread 1200mm Long 1
85 Computer Consol 1
86 Cup Shelf 2
87 Hand Pulse Set 2
88 Handrail Tube Assembly (Left) 1
89 Handrail Tube Assembly (Right) 1
90 Foam Grip 2
91 MP3 Sound Cable 1
92 Bottle 1
93 Safety Key 1
94 Truss Hex Screw M8 x P1.25 x 15 6
95 Truss Hex Screw M8 x P1.25 x 45 1
96 Truss Hex Screw M8 x P1.25 x 100 6
97 Hex Wrench 1
98 L-shaped Hex Wrench + Screwdriver 1
99 Silicon 1
100 Handrail Cover (Left) 1
101 Handrail Cover (Right) 1
102 Rubber Pad 20 x 50 x 1.0t 4
103 Wire Clip Knob UC-2 (PCZUC2)
1
104 Truss Philips Self Tapping Screw Ø5 x 15 5
105 Upright Fixing Plastic 2
106 Bushing 6
107 Power Cord 1
108 Base Assembly 1
109 Wheel PBK495215 2
110 Washer Ø19 x Ø6 x 1.5 4
111 Handrail Switch Decal (Elevation) 1
112 Handrail Switch Decal (Speed) 1
113 Handrail Switch Plastic 2
114 Handrail Switch + Wire 2
115 Round Head Philips Self Tapping Screw
Ø3 x 8 2
116 Socket Philips Self Tapping Screw Ø3 x 20 4
117 Filter 1
118 Round Head Philips Screw M5 x P0.8 x 10 4
119 Choke 1
120 Truss Philips Screw M6 x P1.0 x 15 2
121 CKS Hex Screw M8 x P1.25 x 15 2
129 Transformer 1
130 Truss Philips Screw M3 x P0.6 x 10 2
131 Spring Washer 6
132 Lug Wrench
M8 x 2.0
1
122 Motor Fixing Plate 1
123 CKS Hex Screw M8 x P1.25 x 105 (15mm)
1
124 Washer Ø16 x Ø8 x 2.0t
8
126 Spring Washer M8x1.5t 1
125 Spring M8 1
127 Retainer Nut M8 1
128 Washer Ø12 x Ø4.5 x 1.0t
8
10204M-26
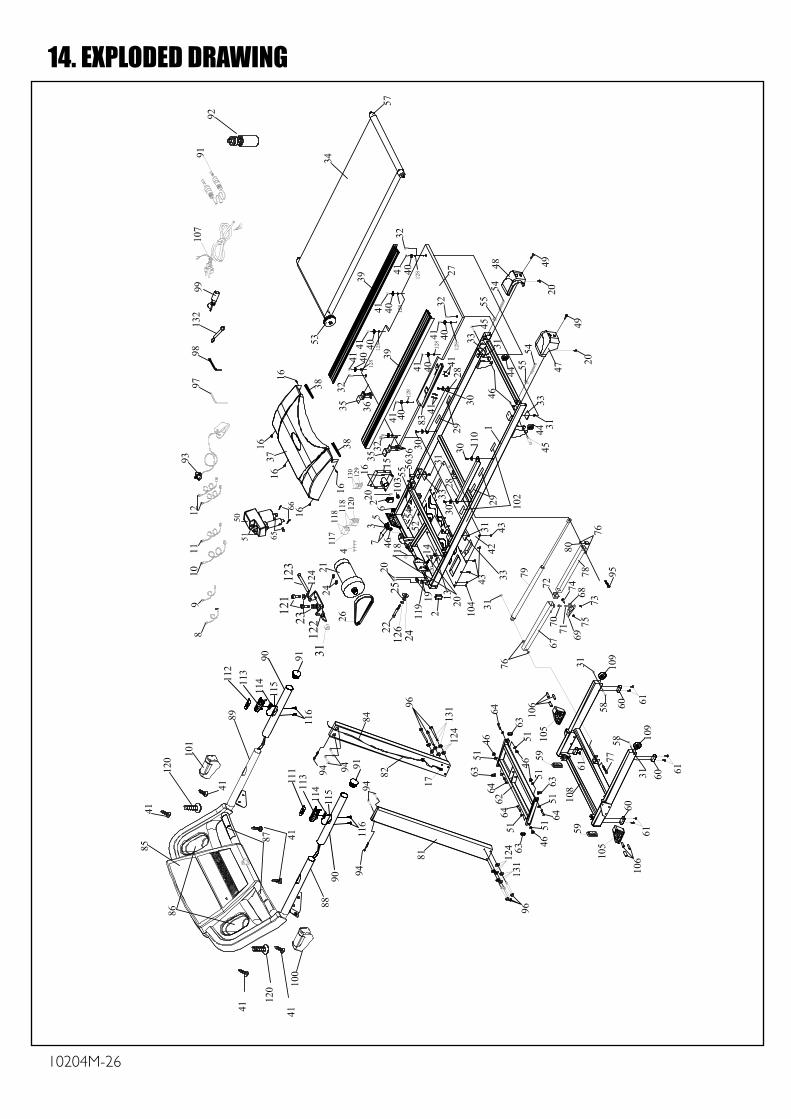
14. EXPLODED DRAWING

10204M-28
1. Procedure for repairsShouldyouexperienceanyfaultsorbreakdownsonyourTrojanequipment,pleaseadheretothefollowingproceduretohavethe
fault rectified speedily and professionally.
• Donotreturntheproducttothestore*
• Call0861Trojan(0861876526)tologthefaultyproduct(underwarrantyoroutofwarranty)
• Theoperatorwilltryidentifythefault,andwillbookaserviceteamcallout.
• Theserviceteamwillcallyoutoagreeadateandtimetocollectthefaultyproduct.
• Itemsrepairedinourservicecentrewillbereturnedtoyourhomeonanagreeddateandtime.
* Note: Should you live in an outlying area, it may be necessary to return the product to the store nearest to you. Our service
operator will advise you of your repair procedure.
2. Cost of Repairs
2.1 Under warranty • Anyitemsstillunderwarrantywillberepairedfreeofcharge,aslongasitcomplieswiththe termsandconditionsofthewarranty.(referto“warranties”sectioninthismanual) •AnyitemsthatneedtoberepairedthatareNOTcoveredinthewarrantywillbeforthe consumer’sexpense.Aquotefortherepair/replacementoftheseitemswillbeprovidedtothe consumer for approval prior to repairs being conducted.
2.2 Out of Warranty •Anyitemsthatneedtoberepairedoncethewarrantyhasexpiredwillbefortheconsumer’sexpense including call out fees. A quote for the repair/replacement of these items will be provided to the consumer for approval prior to repairs being conducted.
0861 8765260861 TROJAN
16. TROJAN REPAIRS PROCEDURE
#10
M9T
004