trex hideaway - lowe'spdf.lowes.com/installationguides/652835168402_install.pdftrex escapes) at...
TRANSCRIPT

Have Questions?1–800–BUY–TREX
NOTE: Construction methods are always improving. Please ensure you have the most up-to-date installation instructions by visiting: trex.com UHPE-0512
TREX HIDEAWAY®
Installing Universal Hidden Fasteners
PARTS
TOOLS NEEDED
NOTE: Maximum spacing of deck boards using Hideaway system is 16" (40.6 cm) on center. Fasteners provide 1/4" (0.6 cm) gap when installed correctly.
Installing Start Clips and First Board
1. Install start clips on edge of ledger board, centered on each joist. Secure clips with screws.
2. Push grooved edge of deck board into start clips. Important: First board MUST be straight and well secured.
Installing Screws and Universal Fasteners NOTE: If installing Trex Escapes®, proceed to Step 3. If installing any other Trex decking product, proceed to Step 4.
3. At both ends and center of board, toenail screw (only for Trex Escapes) at an angle through grooved edge of the deck board.
4. Insert fastener into grooved edge of deck board.
5. Align screw hole in
fastener with center of joist. Continue along the length of the board at every joist.
NOTE: Screw only half way down. DO NOT fully tighten universal fastener screws. Installing Second Board 6. Slide second board
into place, making sure fasteners fit into groove. Install screws and universal fasteners on the other side of the second board in the same manner as Steps 3 through 5. DO NOT fully tighten the screw of universal fastener.
Complete Universal Fasteners Installation 7. Tighten screws on
fasteners in first row. Proceed with Steps 3 through 6, tightening down each row after board that follows is in place. Be sure to use a long #1 square bit.
Installing Last Board Option 1: Using Fascia Board 8a. Install 2-1/2" (6.4 cm)
screws through pilot holes to secure. Attach a fascia board flush with deck surface.
Option 2: With Deck Board Overhang 8b. Drill pilot holes at 45°
angle from below deck surface through rim joist. Seat last board into fasteners overhanging rim joist. Secure board with 2-1/2" (6.4 cm) screws using pilot holes. Position fascia board below overhanging deck board.
1 2
1
3
2
4
11
7
2
5
1
2
8a
6
1/4" (0.6 cm)
12
8b
Start clip Universal fastener Screw
Español p. 3

Have Questions?1–800–BUY–TREX
NOTE: Construction methods are always improving. Please ensure you have the most up-to-date installation instructions by visiting: trex.com UHPE-0512
TREX HIDEAWAY®
Installing Universal Hidden Fasteners for Stair Treads
Installing Start Clips
1. Install start clips against riser on each step. Secure clips with screws.
Installing First Board, Screws and Universal Fasteners2. Follow instructions on previous page for installing first
board, screws, and universal fasteners.
Installing Last Board
Option 1: Using Hidden Fastening System
3a. Slide second board into place, making sure fasteners fit into groove. Tighten screws. Be sure to use a long #1 square bit.
4a. Secure with screws from top of second board into stringer boards.
Option 2: Using 2" x 4" (5.1 cm x 10.2 cm) Wood Support Blocks
3b. Attach 2" x 4" (5.1 cm x 10.2 cm) blocks between stringers.4b. Pre-drill holes up through blocks.
5b. Slide second board into place, making sure fasteners fit into groove. Tighten screws. Be sure to use a long #1 square bit.
6b. Secure with screws from bottom through blocks and into stair treads.
1
3b
11
5b
21/4" (0.6 cm)
11
3a
21/4" (0.6 cm)
4b
6b
4a
Decking Board
Option 1
Face Screw
Universal Fastener StartClipDeck
Frame
Stringer
Option 2Riser
Pressure-treated 2" x 4" (5.1 cm x 10.2 cm)
fastened to stringer
UHPE-0512
NOTA: Los métodos de construcción siempre están mejorando. Visite trex.com para asegurarse de tener las instrucciones de instalación más recientes.
¿Tiene preguntas?1–800–BUY–TREX
TREX HIDEAWAY®
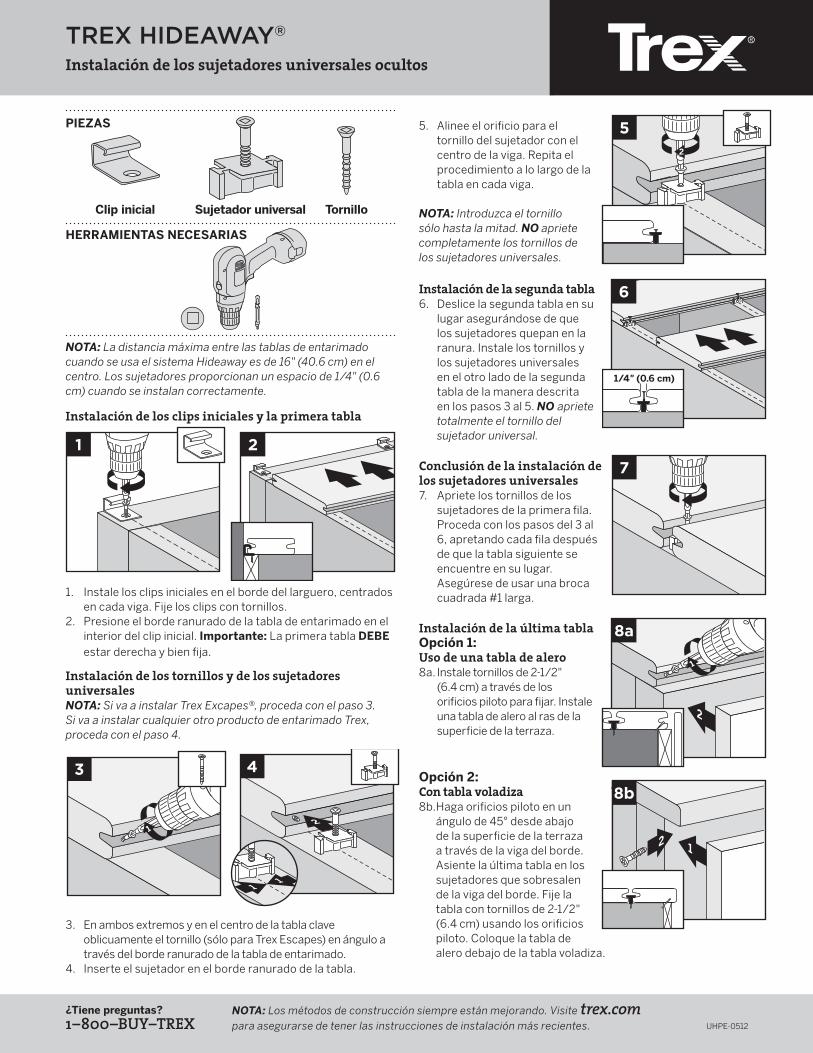
Instalación de los sujetadores universales ocultos
PIEZAS
HERRAMIENTAS NECESARIAS
NOTA: La distancia máxima entre las tablas de entarimado cuando se usa el sistema Hideaway es de 16" (40.6 cm) en el centro. Los sujetadores proporcionan un espacio de 1/4" (0.6 cm) cuando se instalan correctamente.
Instalación de los clips iniciales y la primera tabla
1. Instale los clips iniciales en el borde del larguero, centrados en cada viga. Fije los clips con tornillos.
2. Presione el borde ranurado de la tabla de entarimado en el interior del clip inicial. Importante: La primera tabla DEBE estar derecha y bien fija.
Instalación de los tornillos y de los sujetadores universales NOTA: Si va a instalar Trex Excapes®, proceda con el paso 3. Si va a instalar cualquier otro producto de entarimado Trex, proceda con el paso 4.
3. En ambos extremos y en el centro de la tabla clave oblicuamente el tornillo (sólo para Trex Escapes) en ángulo a través del borde ranurado de la tabla de entarimado.
4. Inserte el sujetador en el borde ranurado de la tabla.
5. Alinee el orificio para el tornillo del sujetador con el centro de la viga. Repita el procedimiento a lo largo de la tabla en cada viga.
NOTA: Introduzca el tornillo sólo hasta la mitad. NO apriete completamente los tornillos de los sujetadores universales. Instalación de la segunda tabla 6. Deslice la segunda tabla en su
lugar asegurándose de que los sujetadores quepan en la ranura. Instale los tornillos y los sujetadores universales en el otro lado de la segunda tabla de la manera descrita en los pasos 3 al 5. NO apriete totalmente el tornillo del sujetador universal.
Conclusión de la instalación de los sujetadores universales 7. Apriete los tornillos de los
sujetadores de la primera fila. Proceda con los pasos del 3 al 6, apretando cada fila después de que la tabla siguiente se encuentre en su lugar. Asegúrese de usar una broca cuadrada #1 larga.
Instalación de la última tabla Opción 1: Uso de una tabla de alero 8a. Instale tornillos de 2-1/2"
(6.4 cm) a través de los orificios piloto para fijar. Instale una tabla de alero al ras de la superficie de la terraza.
Opción 2: Con tabla voladiza 8b. Haga orificios piloto en un
ángulo de 45° desde abajo de la superficie de la terraza a través de la viga del borde. Asiente la última tabla en los sujetadores que sobresalen de la viga del borde. Fije la tabla con tornillos de 2-1/2" (6.4 cm) usando los orificios piloto. Coloque la tabla de alero debajo de la tabla voladiza.
1 2
1
3
2
4
11
7
2
5
6
1/4" (0.6 cm)
Clip inicial Sujetador universal Tornillo
1
2
8a
12
8b

UHPE-0512
NOTA: Los métodos de construcción siempre están mejorando. Visite trex.com para asegurarse de tener las instrucciones de instalación más recientes.
¿Tiene preguntas?1–800–BUY–TREX
TREX HIDEAWAY®
Instalación de sujetadores universales ocultos para peldaños de escaleras
Instalación de los clips iniciales
1. Instale los clips iniciales contra la contrahuella de cada peldaño. Fije los clips con tornillos.
Instalación de la primera tabla, los tornillos y los sujetadores universales2. Siga las instrucciones de la página anterior para
la instalación de la primera tabla, los tornillos y los sujetadores universales.
Instalación de la última tabla
Opción 1: Uso del sistema de sujetadores ocultos
3a. Deslice la segunda tabla en su lugar asegurándose de que los sujetadores quepan en la ranura. Apriete los tornillos. Asegúrese de usar una broca cuadrada #1 larga.
4a. Fije con tornillos desde arriba de la segunda tabla en las vigas.
Opción 2: Uso de bloques de madera de soporte de 2" x 4" (5.1 cm x 10.2 cm)
3b. Instale bloques de 2" x 4" (5.1 cm x 10.2 cm) entre las vigas.4b. Haga previamente los orificios a través de los bloques.
5b. Deslice la segunda tabla en su lugar asegurándose de que los sujetadores quepan en la ranura. Apriete los tornillos. Asegúrese de usar una broca cuadrada #1 larga.
6b. Fije con tornillos desde abajo a través de los bloques y hasta los peldaños de las escaleras.
1
3b
11
5b
21/4" (0.6 cm)
11
3a
21/4" (0.6 cm)
4b
6b
4a
Tabla de entarimado
Opción 1
Tornillo frontal
Sujetador universal Clip inicial
Bastidordel entarimado
Viga
Opción 2
Contrahuella
Tramo de 2" x 4" (5.1 cm x 10.2 cm) tratado a presión sujeto a la viga