trimmer craftsman
DESCRIPTION
Trimmer CraftsmanTRANSCRIPT

OPERATOR'S MANMANUAL DEL OPERADOR
AL
12-inch STRING TRIMMER12-pulgadas RECORTADORA DE HILO
MODEL NO.138.74503
NOMERO DE MODELO138.74503
WARNING: To reduce the risk
of injury,the user must read andunderstand the operator's manualbefore using this product.
ADVERTENCIA: Para reducir elriesgo de lesiones, el usuario debe leery comprender el manual de{ operadorantes de usar este producto.
Customer Help Line: 1-888-266-7096Telefono de atenci6n al consumidor: 1-888-266-7096
Sears Brands Management Corporation, Hoffman Estates, JL 60179 USAVisit the Craftsman web page: www.craftsman.comVisite el sitio web de Craftsman:www.craftsman.com
Save this manual for future referenceGuarde este manual para futuras consulta s
218549

ENGLISH ESPAI_OL
[] Warranty ...................................................................... 2
[] Introduction ................................................................. 2
[] Important Safety Instructions ................................. 3-4
[] Symbols ...................................................................... 5
[] Features ...................................................................... 6
[] Assembly ................................................................ 6-7
[] Operation ................................................................. 7-8
[] Maintenance ............................................................... 9
[] Troubleshooting ........................................................ 10
[] Illustrated View and Parts List .................................. 11
[] Figure Numbers (Illustrations) ................................... i-ii
[] Parts Ordering / Service .............................. Back Page
[] Garant(a ...................................................................... 2
[] Introducci6n ................................................................ 2
[] Instrucciones de seguridad importantes ................ 3-4
[] Simbolos ..................................................................... 5
[] Caracter(sticas ......................................................... 6-7
[] Armado ....................................................................... 7
[] Funcionamiento ....................................................... 7-9
[] Mantenimiento ....................................................... 9-10
[] Correcci6n de problemas ......................................... 10
[] Figura numeras (ilustraciones) .................................. i-ii
[] Pedidos de piezas / Servicio ................. Pag. posterior
CRAFTSMAN ® TWO YEAR FULL WARRANTY
FOR TWO YEARS from the date of purchase, this product is warranted against any defects in material or workmanship.A defective product will be replaced free of charge..
For warranty coverage detai(s to obtain free replacement, visit the web site: www.craftsman.com.
This warranty does not cover trimmer line and spool, which are expendable parts that can wear out from normal usewithin the warranty period.
This warranty is void if this product is ever used while providing commercial services or if rented to another person.
This warranty gives you specific legal rights, and you may also have other rights which vary from state to state.
Sears Brands Management Corporation, Hoffman Estates, (L 60179
GARANT(A COMPLETA DE DOS ANOS CRAFTSMAN ®
Este recortadora de hilo tiene garantia por cualquier defecto en material o mano de obra DURANTE DOS ANOS desde (a fecha decompra. El producto defectuoso se remplazara sin cargo.
Para conocer los detaNles sobre Hacobertura de Hagarant(a para obtener un remp(azo gratuito, visite el sitio web:www.craftsman.com.
Esta garantia no cubre et hito de la recortadora ni el carrete. Estas son piezas consumibles que se pueden desgastar con el usonormal durante el per(odo de la garant[a.
La garant(a pierde validez si este producto se utiliza m(entras se prestan servicios comerciales o si se alquila a otra persona.
Esta garantia le otorga derechos legales especfficos yes posibte que tambien tenga derechos que varian segOn el estado.
Sears Brands Management Corporation, Hoffman Estates, (L 60179
_zzzzzzzzzzzzzzzzzzzz!z_
This tool has many features for making its use more pleasant and enjoyable. Safety, performance, and dependabilityhave been given top priority in the design of this product making it easy to maintain and operate.
Esta herramienta ofrece numerosas caracteristicas para hacer mas agradable y ptacentero su uso. En el diseSo de este producto seha conferido prior(dad a la seguridad, el desempeSo y la fiabilidad, por Io cual se facilita su manejo y mantenimiento.

,& WARNING! When using electric gardening ap-pliances, basic safety precautions should alwaysbe followed to reduce the risk of fire, electricshock and personal injury.
READ ALL iNSTRUCTIONS
[] For safe operation, read and understand allinstructions before using this product. Followall safety instructions. Failure to follow all safetyinstructions listed below, can result in serious
personal injury.[] Do not allow children or untrained individuals to
use this unit.
[] Check the work area before each use. Remove
all objects such as rocks, broken glass, nails,wire, or string which can be thrown or become
entangled in the machine.[] Wear eye protection which is marked to comply
with ANSI Z87.1 when operating this product.
[] Use Safety Glasses - Always use face or dustmask if operation is dusty.
[] Always wear safety glasses with side shields.[] Everyday glasses have only impact resistant
lenses. They are NOT safety glasses.
[] Following this rule will reduce the risk of eyeinjury. Use face mask if operation is dusty.
[] Dress Properly - Use rubber gloves andsubstantial footwear is recommended when
workingoutdoors.
[] Wear heavy, long pants, boots, and gloves. Donot wear loose fitting clothing, short pants, or
go barefoot. Do not wear jewelry of any kind.Secure long hair above shoulder level toprevent entanglement in moving parts.
[] Keep children away - Keep all bystanders,children, and pets at least 50 ft. away.
[] Stay alert - Do not operate this unit when youare tired, ill, or under the influence of alcohol,
drugs, or medication.
[] Do not operate in poor lighting.[] Keep all parts of your body away from any
moving part.[] Do not operate power tools in explosive
atmospheres, such as in the presence of
flammable liquids, gases, or dust. Power toolscreate sparks which may ignite the dust orfumes.
3 - English
[] To reduce the risk of electric shock, this tool
has a polarized plug (one blade is wider than
the other) and will require the use of apolarized extension cord. The plug will fit intoa polarized extension cord only one way. If the
plug does not fit fully into the extension cord,
reverse the plug. If the plug still does not fit,obtain a correct polarized extension cord. Apolarized extension cord will require the use of
a polarized wall outlet. This plug will fit into thepolarized wall outlet only one way. If the plugdoes not fit fully into the wall outlet, reverse
the plug. If the plug still does not fit, contact aqualified electrician to install the proper wall
outlet. Do not change the equipment plug,extension cord receptacle, or extension cord
plug in any way.[] Avoid body contact with grounded surfaces
such as pipes, radiators, ranges, and
refrigerators. There is an increased risk ofelectric shock if your body is grounded.
[] Avoid Dangerous Environments - Don't expose power tools to rain or wet conditions.Waterentering a power tool will increase therisk of electric shock.
[] Ground Fault Circuit Interrupter (GFCI)
protection should be provided on the circuit (s)or outlet(s) to be used for the gardening
appliance. Receptacles are available havingbuilt-in GFCl protection and may be used forthis measure of safety.
[] Use Right Appliance - Do not force tool. Usethe correct tool for your application. The
correct tool will do the job better and safer atthe rate for which it is designed.
[] Do not operate the equipment while barefoot or
when wearing sandals or similar lightweightfootwear. Wear protective footwear that will
protect your feet and improve your footing onslippery surfaces.
[] Do not overreach. Keep firm footing andbalance. Over-reaching can result in loss ofbalance.

[] Avoid Accidental Start - Do not carry pluggedin appliance with finger on trigger. Be sure theswitch trigger is not en-gaged before pluggingin.
[] Do not use tool if switch trigger does not turn iton or off. Any tool that cannot be controlled withthe switch trigger is dangerous and must berepaired.
[] Disconnect appliance from power sourcebefore storing, servicing, changing accessoriessuch as cutting line. Such preventive safetymeasures reduce the risk of starting the toolaccidentally.
[] Use only identical manufacturer's replacementparts and accessories. Use of any other partsmay create a hazard or cause product damage.
[] Maintain appliance with care - Replace stringhead if cracked, chipped, or damaged in anyway.
[] Be sure the string head is properly installedand securely fastened. Failure to do so cancauseserious injury.
[] Make sure all guards, straps, deflectors andhandles are properly and securely attached.
[] Use only the manufacturer's replacementstring in the cutting head. Do not use any othercutting attachment, for example, metal wire,rope, or the like. To install any other brand ofcutting head to this string trimmer can result inserious personal injury.
[] Never operate unit without the grass deflectorin place and in good condition.
[] Check damaged parts. Before further use ofthe tool, a guard or other part that is damagedshould be carefully checked to determine thatit will operate properly and perform its intendedfunction. Check for alignment of moving parts,binding of moving parts, breakage of parts,mounting and any other conditions that mayaffect its operation. A guard or other part that isdamaged must be properly repaired orreplaced by an authorized service center toavoid riskof personal injury.
[] Maintain a firm grip on both handles whiletrimming. Keep string head below waist level.
[] Nevercut with the string head located over 30in,or more above the ground.
[] Store idle appliances - When not in use, stringtrimmer should be stored indoors in a dry,locked place out of the reach of children.Make sure your extension cord is in goodcondition. When using an extension cord, besure to use one heavy enough to carry thecurrent your product will draw. A wire gaugesize (A.W.G.) of at least 16 is recommendedfor an extension cord 50 feet or less in length.A cord exceeding 100 feet is notrecommended. If in doubt, use the next heaviergauge. The smaller the gaugenumber, theheavier the cord. An undersized cord will causea drop in line voltage resulting in loss of powerand overheating.
[] Never use blades or flailing devices. Unit isdesigned for line trimmer use only. Use of anyother accessories or attachments will increasethe risk of injury. Inspect area to be cut.Remove objects (rocks, broken glass, nails,wire, string, etc.) which can be thrown orbecome entangled in cutting head.
[] Keep the air vents clean and free of debris toavoid overheating the motor. Clean after eachuse,
[] Stop the unit and disconnect the power sourcewhen not in use. Carry the unit with the motor
stopped.[] Store unplugged and out of the reach of
children.
[] Do not hang unit so that the switch trigger isdepressed.
[] Do not use multiple cords.[] Do not abuse the cord. Never carry the unit by
the extension cord or yank extension cord todisconnect unit.
[] Keep the extension cord clear of operator and
obstacles at all times. Do not expose cords toheat, oil, water, or sharp edges.
If the power supply cord is damaged, it must bereplaced only by the manufacturer or by anauthorized service center to avoid risk.
[] Save these instructions. Refer to them
frequently and use them to instruct others who
may use this power tool. If you loan someonethis power tool, loan them these instructionsalso.
4 - English
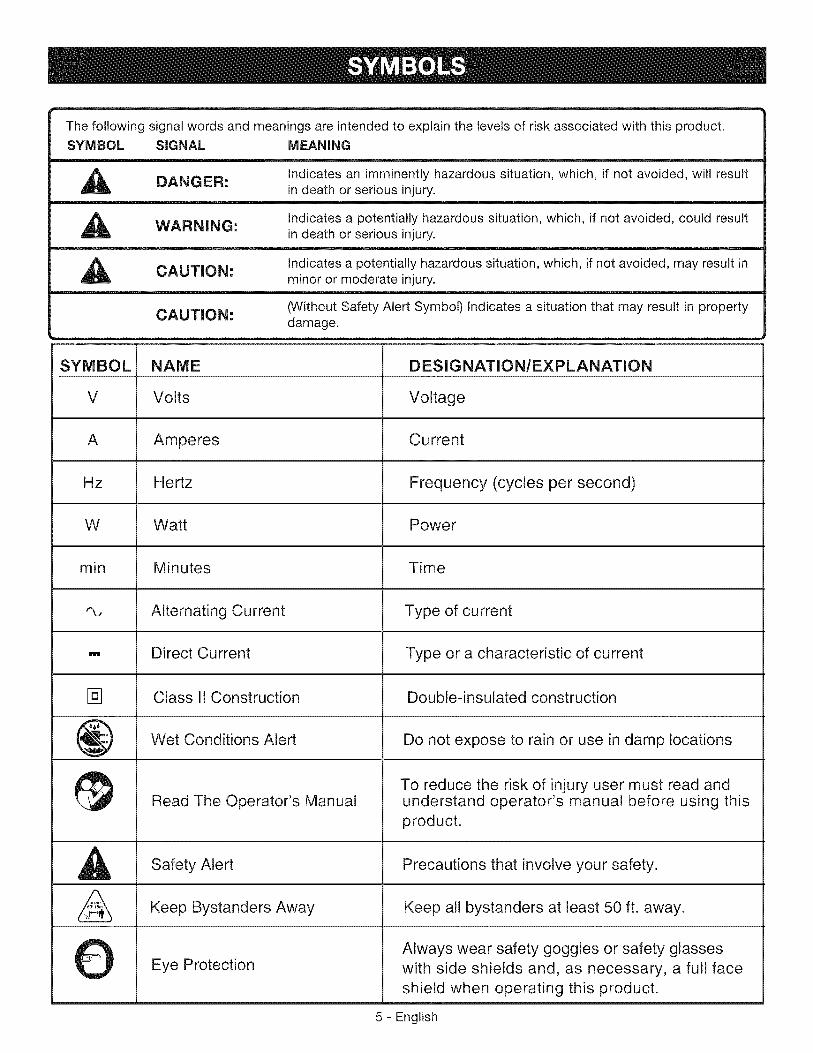
Thefollowingsignalwordsandmeaningsareintendedto explainthe levelsof riskassociatedwiththisproduct.SYMBOL SIGNAL MEANING
Indicates an imminently hazardous situation, which, if not avoided, will resultDANGER:in death or serious injury.
_lb Indicates a potentially hazardous situation, which, if not avoided, could resultWARNING: in death or serious injury.
Indicates a potentially hazardous situation, which, if not avoided, may result inCAUTION:minor or moderate injury.
CAUTION: (Without Safety Alert Symbol) Indicates a situation that may result in propertydamage.
SYMBOL NAME DESIG NATION/EXPLANATION
V Volts Voltage
A Amperes Current
Hz Hertz Frequency (cycles per second)
W Watt Power
rain Minutes Time
"_ Alternating Current Type of current
---_ Direct Current Type or a characteristic of current
Class II Construction Double-insulated construction
Wet Conditions Alert Do not expose to rain or use in damp locations
[]
@
A
O
Read The Operator's ManualTo reduce the risk of injury user must read andunderstand operator's manual before using this
product.
Safety Alert Precautions that involve your safety.
Keep Bystanders Away Keep all bystanders at least 50 ft. away.
Eye ProtectionAlways wear safety goggles or safety glasses
with side shields and, as necessary, a full face
shield when operating this product.
5 - English
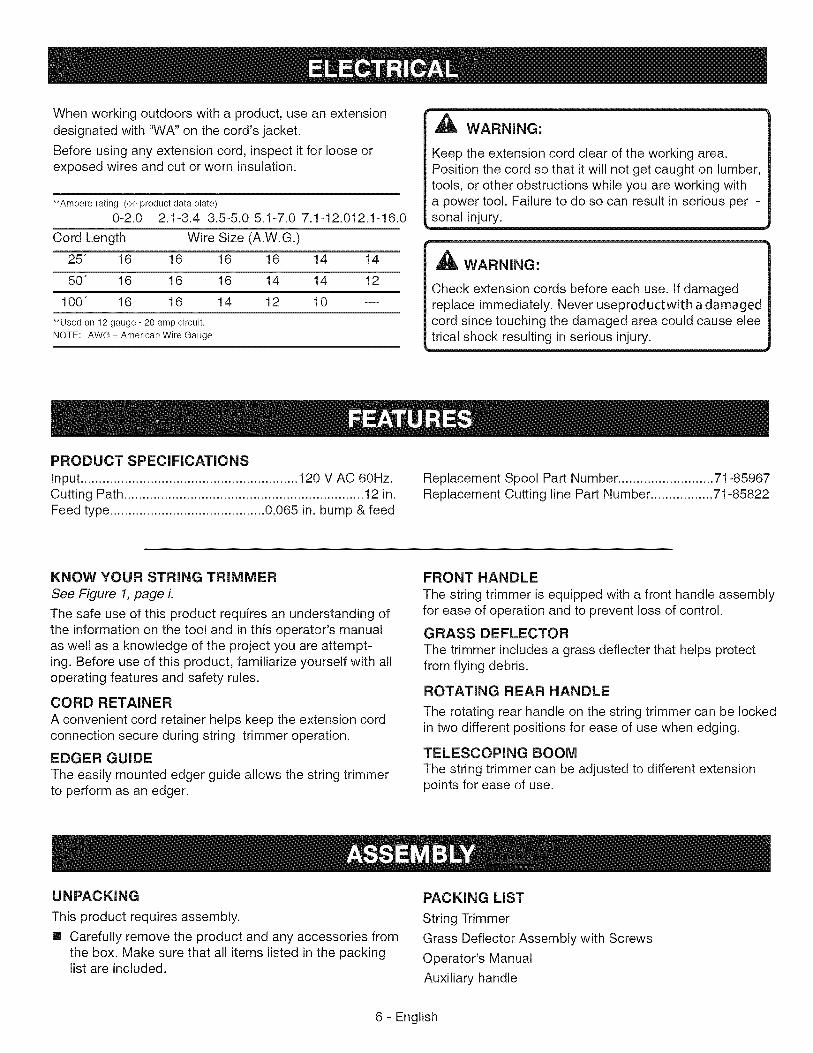
Whenworkingoutdoorswitha product,useanextensiondesignatedwith"WA"onthecord'sjacket.Beforeusinganyextensioncord,inspectitforlooseorexposedwiresandcutorworninsulation.
**Ampere rating (on product data plate)
0-2.0 2.1-3.4 3.5-5.0 5.1-7.0 7.1-12.012.1-16.0
Cord Length Wire Size (A.W.G.)
25" 16 16 16 16 14 14
50" 16 16 16 14 14 12
100" 16 16 14 12 10 --
**Used on 12 gauge - 20 amp circuit.
NOTE: AWG = American Wire Gauge
,_ WARNING:
Keep the extension cord clear of the working area.Position the cord so that it will not get caught on lumber,tools, or other obstructions while you are working witha power tool. Failure to do so can result in serious per -sonal injury.
_t, WARNING:
Check extension cords before each use. If damagedreplace immediately. Never useproductwith a damagedcord since touching the damaged area could cause eleetrical shock resulting in serious injury.
PRODUCT SPECIFICATIONS
Input ........................................................... 120 V AC 60Hz.Cutting Path ................................................................. 12 in.Feed type .......................................... 0.065 in. bump & feed
Replacement Spool Part Number .......................... 71-85967Replacement Cutting line Part Number ................. 71-85822
KNOW YOUR STRING TRIMMERSee Figure 1, page L
The safe use of this product requires an understanding ofthe information on the tool and in this operator's manualas well as a knowledge of the project you are attempt-ing. Before use of this product, familiarize yourself with alloperating features and safety rules.
CORD RETAINER
A convenient cord retainer helps keep the extension cordconnection secure during string trimmer operation.
EDGER GUIDEThe easily mounted edger guide allows the string trimmerto perform as an edger.
FRONT HANDLE
The string trimmer is equipped with a front handle assemblyfor ease of operation and to prevent loss of control.
GRASS DEFLECTORThe trimmer includes a grass deflecter that helps protectfrom flying debris.
ROTATING REAR HANDLE
The rotating rear handle on the string trimmer can be lockedin two different positions for ease of use when edging.
TELESCOPING BOOMThe string trimmer can be adjusted to different extensionpoints for ease of use.
UNPACKING
This product requires assembly.
[] Carefully remove the product and any accessories fromthe box. Make sure that all items listed in the packinglist are included.
PACKING LIST
String Trimmer
Grass Deflector Assembly with Screws
Operator's Manual
Auxiliary handle
6 - English

_IL WARNING:Donotusethisproductif it isnotcompletelyassembledor if anypartsappearto bemissingordamaged.Useofa productthatisnotproperlyandcompletelyassembledcouldresultinseriouspersonalinjury.
[] inspecttheproductcarefullyto makesurenobreakageordamageoccurredduringshipping.
[] Donotdiscardthepackingmaterialuntilyouhavecarefullyinspectedandsatisfactorilyoperatedtheproduct.
[] Ifanypartsaredamagedormissing,pleasecall1-888-266-7096forassistance.
_1_WARNING:Ifanypartsaredamagedormissingdonotoperatethisproductuntilthepartsarereplaced.Useofthisproductwithdamagedormissingpartscouldresultin seriouspersonalinjury.
_1_,WARNING:Donotattemptto modifythisproductorcreateaccessoriesnotrecommendedforusewiththisproduct.Anysuchalterationormodificationismisuseandcouldresultinahazardousconditionleadingto possibleseriouspersonalinjury.
ATTACHINGGRASSDEFLECTORSee Figure 2 - 3, page L
_1_ WARNING: The line cut-off blade on the grass
deflector is sharp. Avoid contact with the blade.Failure to avoid contact can result in serious per-sonal injury.
[] Remove supplied screw with a phillips screwdriver fromthe trimmer head.
[] Fit the grass deflector into the slots on trimmer head.[] Turn counterclockwise to lock grass deflector into place,[] Line up the screw hole in the grass deflector with the
center hole in the trimmer head.
[] Install supplied screw and tighten by turning clockwisewith a phillips screwdriver.
ATTACHING THE FRONT HANDLE
See Figure 3, page i.
[] Loosen and remove the knob from the handle.
[] Install the handle on the rear handle pole in the areaindicated by the illustration.
[] Adjust handle up or down, if necessary, to desiredoperating position.
[] Reinstall the knob. Tighten it to secure.
_IL WARNING: If any parts are damaged or missing,
do not operate this product until the parts arereplaced. Failure to heed this warning could result inserious personal injury.
_, WARNING: Do not attempt to modify this productor create accessories not recommended for use withthis product. Any such alteration or modification ismisuse and could result in a hazardous conditionleading to possible serious personal injury.
_ WARNING: Do not connect to power supply until
assembly is complete. Failure to comply could resultin accidental starting and possible serious personalinjury.
STARTING/STOPPING THE TRIMMER
See Figure 4 - 5, page i.
Attach the outlet end of an extension cord to the plug onthe rear of the string trimmer.
NOTE: Use only approved outdoor extension cords.
[] Route the extension cord through the slot located onthe rear of the string trimmer housing and placeunderneath the cord retainer.
[] To start the string trimmer, press the switch trigger.[] To stop the string trimmer, release the switch trigger.[] If any parts are damaged or missing, please call
1-888-266-7096 for assistance.
OPERATING THE TRIMMER
See Figure 6, page L
Folow these tips when using the string trimer:
[] Hold the trimmer with your right hand on the rearhandle and your left hand on the front handle.
[] Keep a firm grip with both hands while in operation.[] Trimmer should be held at a comfortable position with
the rear handle about hip height.[] Cut tall grass from the top down. This will prevent
grass from wrapping around the shaft housing andstring head.
If grass becomes wrapped around the string head:
[] Stop the trimmer.Unplug the string trimmer.
[] Remove the grass.
7 - English

THE CUTTING LINE
_1_ WARNING: DO NOT grasp the exposed cutting line
when picking up or holding the trimmer.
A single 0.065-inch round cutting line is pre-installed on thetrimmer. When the cutting line needs replacing, install anew pre-wound spool, Craftsman 71-85967.
EXTENDING THE CUTTING LINESee Figure 7, page iL
During operation, cutting lines shorten due to normal wear.For greater convenience and efficiency, your trimmer hasbeen equipped with a bump feed head that allows you tosimply bump the trimmer head to extend the cutting lineswhile the trimmer is operating. Cutting line will wear fasterand require more feeding if the cutting or edging is donealong sidewalks or other abrasive surfaces or heavierweeds are being cut.
[] While the trimmer is on and spinning, gently bump thespool housing on a firm surface (hard ground orsidewalk). This should release additional cutting linefrom the spool.
[] If no line is released, bump the trimmer head moresharply or try bumping it on a firmer surface.
[] If there is no change in the cutting line length, un-plugthe trimmer's pigtail power cord from the extensioncord. After the trimmer head stops rotating, gently pull atthe cutting lines manually. Once the lines are pulled out(extended), plug the trimmer's pigtail power cord into theextension cord and resume cutting.
[] If the cutting line still does not feed from the spool, thespool might be empty or the cutting line may be tangledor jammed on the spool. Un-plug the trimmer's pigtailpower cord from the extension cord. After the trimmerhead stops rotating,remove the spool (see steps1through 3 in "Removing the Spool" on page 9).If the line is tangled or jammed, untangle and replacethe line. If the spool is empty, replace the spool.
_ WARNING: To avoid injury, ALWAYS turn off and
disconnect the trimmer from the power outlet BEFOREinstalling parts or cleaning the trimmer or making anyadjustments.
CUTTING TiPS
See Figure 8, page ii.
[] Keep the trimmer tilted toward the area being cut; this isthe best cutting area.
[] The string trimmer cuts when passing the unit from leftto right. This will avoid throwing debris at the operator.Avoid cutting in the dangerous area shown in figure 8.
[] Use the tip of the string to do the cutting; do not forcestring head into uncut grass.
[] Wire and picket fences cause extra string wear, evenbreakage. Stone and brick walls, curbs, and wood maywear strings rapidly.
[] Avoid trees and shrubs. Tree bark, wood moldings,siding, and fence posts can easily be damaged by thestrings.
TELESCOPING BOOMSee Figure 9, page ii.
The boom can be extended or shortened for ease of use.
[] Unplug the string trimmer.[] Unscrew telescoping boom coupler and slide to desired
position.[] Tighten telescoping boom coupler.
THREE-POSITION PIVOTING HEAD
See Figure 10, page ii.
[][]
Unplug the string trimmer.Depress the pivot button and move the trimmer headup or down to one of the three positions indicated bythe notches.
NOTE: Adjust the trimmer head to the first and secondnotches from trimming and edging, based on preferredtrimming and edging position. Adjust to the third notchfor storage only.
[] Make sure the trimmer head is securely lockedinto place.
ROTATING REAR HANDLE
[] Unplug the string trimmer.[] Pull up edging coupler and turn handle end
counterclockwise.[] Release edging boom coupler when handle has been
rotated 180°.
EDGING
See Figure 11-13, page iL
The rotating handle can be used in combination with theedger guide for edging sidewalks and walkways. To usethe edger guide, flip down from it's stored position.
8 = English
A
A
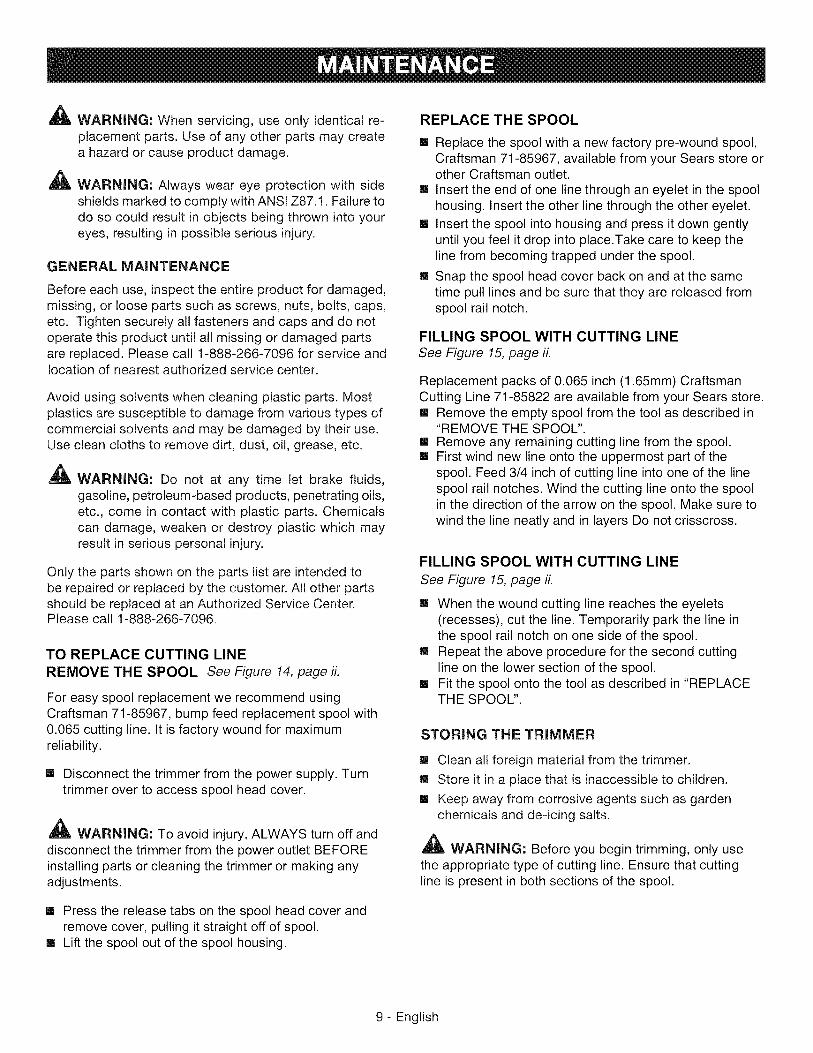
WARNING: When servicing, use only identical re-placement parts. Use of any other parts may createa hazard or cause product damage.
WARNING: Always wear eye protection with sideshields marked to comply with ANSI Z87.1. Failure todo so could result in objects being thrown into youreyes, resulting in possible serious injury.
GENERAL MAINTENANCE
Before each use, inspect the entire product for damaged,missing, or loose parts such as screws, nuts, bolts, caps,etc. Tighten securely all fasteners and caps and do notoperate this product until all missing or damaged partsare replaced. Please call 1-888-266-7096 for service andlocation of nearest authorized service center.
Avoid using solvents when cleaning plastic parts. Mostplastics are susceptible to damage from various types ofcommercial solvents and may be damaged by their use.Use clean cloths to remove dirt, dust, oil, grease, etc.
A WARNING: Do not at any time let brake fluids,gasoline, petroleum-based products, penetrating oils,etc., come in contact with plastic parts. Chemicalscan damage, weaken or destroy plastic which mayresult in serious personal injury.
Only the parts shown on the parts list are intended tobe repaired or replaced by the customer. All other partsshould be replaced at an Authorized Service Center.Please call 1-888-266-7096.
TO REPLACE CUTTING LINE
REMOVE THE SPOOL See Figure 14, page ft.
For easy spool replacement we recommend usingCraftsman 71-85967, bump feed replacement spool with0.065 cutting line. It is factory wound for maximumreliability.
[] Disconnect the trimmer from the power supply. Turntrimmer over to access spool head cover.
_ WARNING: To avoid injury, ALWAYS turn off and
disconnect the trimmer from the power outlet BEFOREinstalling parts or cleaning the trimmer or making anyadjustments.
[] Press the release tabs on the spool head cover andremove cover, pulling it straight off of spool.
[] Lift the spool out of the spool housing.
REPLACE THE SPOOL
[] Replace the spool with a new factory pre-wound spool,Craftsman 71-85967, available from your Sears store orother Craftsman outlet.
[] Insert the end of one line through an eyelet in the spoolhousing. Insert the other line through the other eyelet.
[] Insert the spool into housing and press it down gentlyuntil you feel it drop into place.Take care to keep theline from becoming trapped under the spool.
[] Snap the spool head cover back on and at the sametime pull lines and be sure that they are released fromspool rail notch.
FILLING SPOOL WITH CUTTING LINESee Figure 15, page iL
Replacement packs of 0.065 inch (1.65mm) CraftsmanCutting Line 71-85822 are available from your Sears store.[] Remove the empty spool from the tool as described in
"REMOVE THE SPOOL".[] Remove any remaining cutting line from the spool.[] First wind new line onto the uppermost part of the
spool. Feed 3/4 inch of cutting line into one of the linespool rail notches. Wind the cutting line onto the spoolin the direction of the arrow on the spool. Make sure towind the line neatly and in layers Do not crisscross.
FILLING SPOOL WITH CUTTING LINE
See Figure 15, page ft.
[] When the wound cutting line reaches the eyelets(recesses), cut the line. Temporarily park the line inthe spool rail notch on one side of the spool.
[] Repeat the above procedure for the second cuttingline on the lower section of the spool.
[] Fit the spool onto the tool as described in "REPLACETHE SPOOL".
STORING THE TRIMMER
[] Clean all foreign material from the trimmer.
[] Store it in a place that is inaccessible to children.
[] Keep away from corrosive agents such as gardenchemicals and de-icing salts.
_, WARNING: Before you begin trimming, only usethe appropriate type of cutting line. Ensure that cuttingline is present in both sections of the spool.
9 - English
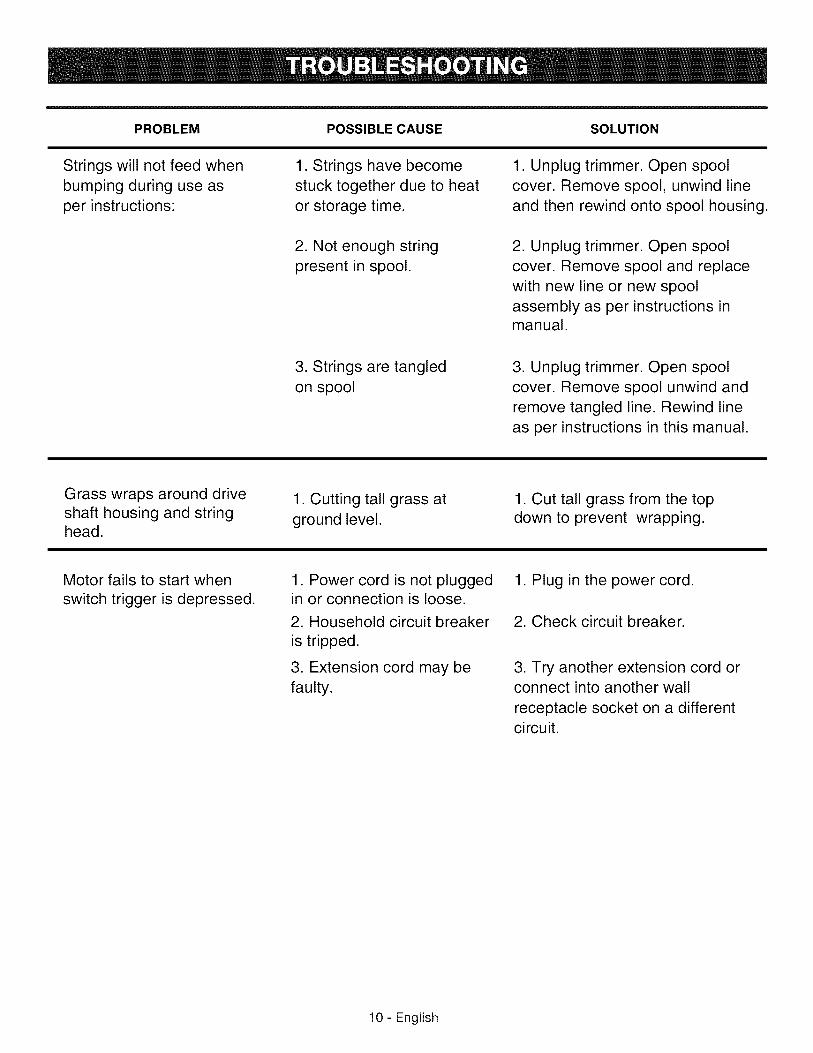
PROBLEM POSSIBLE CAUSE SOLUTION
Strings will not feed when
bumping during use as
per instructions:
1. Strings have become
stuck together due to heat
or storage time.
1. Unplug trimmer. Open spool
cover. Remove spool, unwind line
and then rewind onto spool housing.
2. Not enough stringpresent in spool.
2. Unplug trimmer. Open spool
cover. Remove spool and replace
with new line or new spool
assembly as per instructions inmanual.
3. Strings are tangled
on spool
3. Unplug trimmer. Open spool
cover. Remove spool unwind and
remove tangled line. Rewind line
as per instructions in this manual.
Grass wraps around driveshaft housing and stringhead.
1. Cutting tall grass at
ground level.
1. Cut tall grass from the topdown to prevent wrapping.
Motor fails to start when
switch trigger is depressed.1. Power cord is not pluggedin or connection is loose.
2. Household circuit breaker
is tripped.
3. Extension cord may be
faulty.
1. Plug in the power cord.
2. Check circuit breaker.
3. Try another extension cord orconnect into another wall
receptacle socket on a differentcircuit.
10 = English
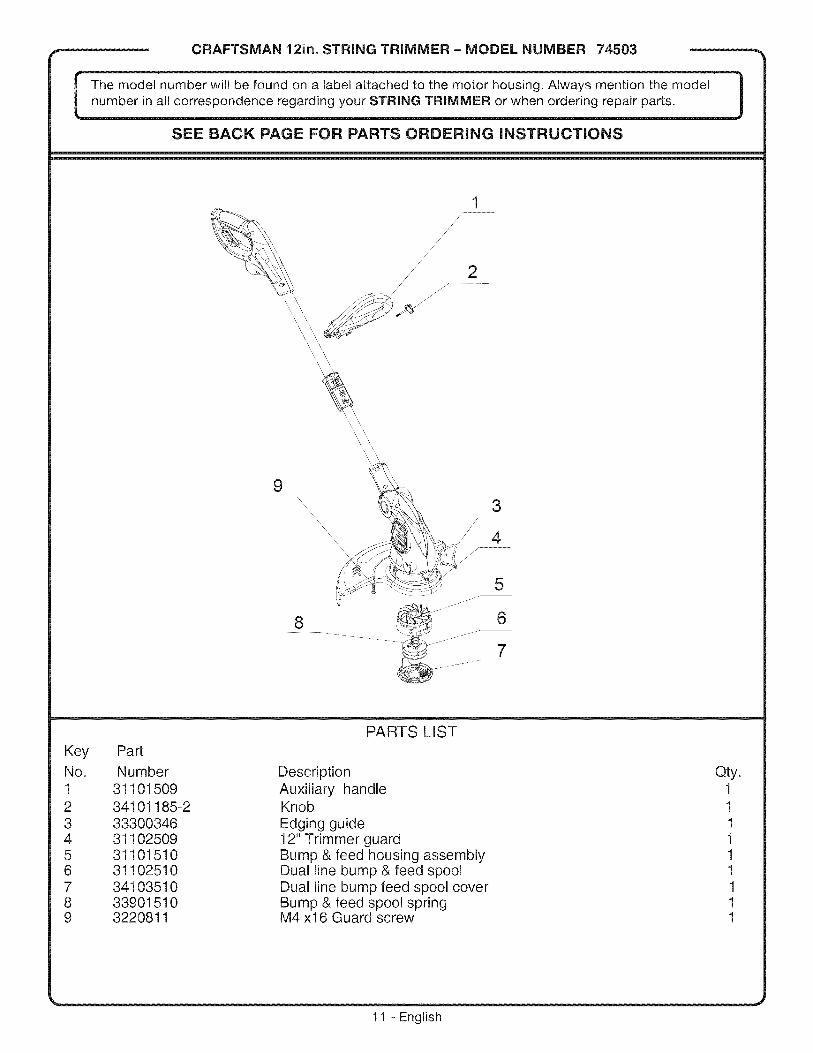
CRAFTSMAN 12in. STRING TRIMMER - MODEL NUMBER 74503
The model number will be found on a label attached to the motor housing. Always mention the model 1number in all correspondence regarding your STRING TRIMMER or when ordering repair parts. JSEE BACK PAGE FOR PARTS ORDERING INSTRUCTIONS
\ \\
\,\ \\\
'\ \
'\ \
'\,\\
93
/4
Jr./
5°. °°J°°
PARTS LIST
Key Part
No. Number Description Qty.
1 31101509 Auxiliary handle 12 34101185-2 Knob 1
3 33300346 Edging guide 14 31102509 12" Trimmer guard 15 31101510 Bump & feed housing assembly 16 31102510 Dual line bump & feed spool 17 34103510 Dual line bump feed spool cover 18 33901510 Bump & feed spool spring 19 3220811 M4 x16 Guard screw 1
11 - English

12- English
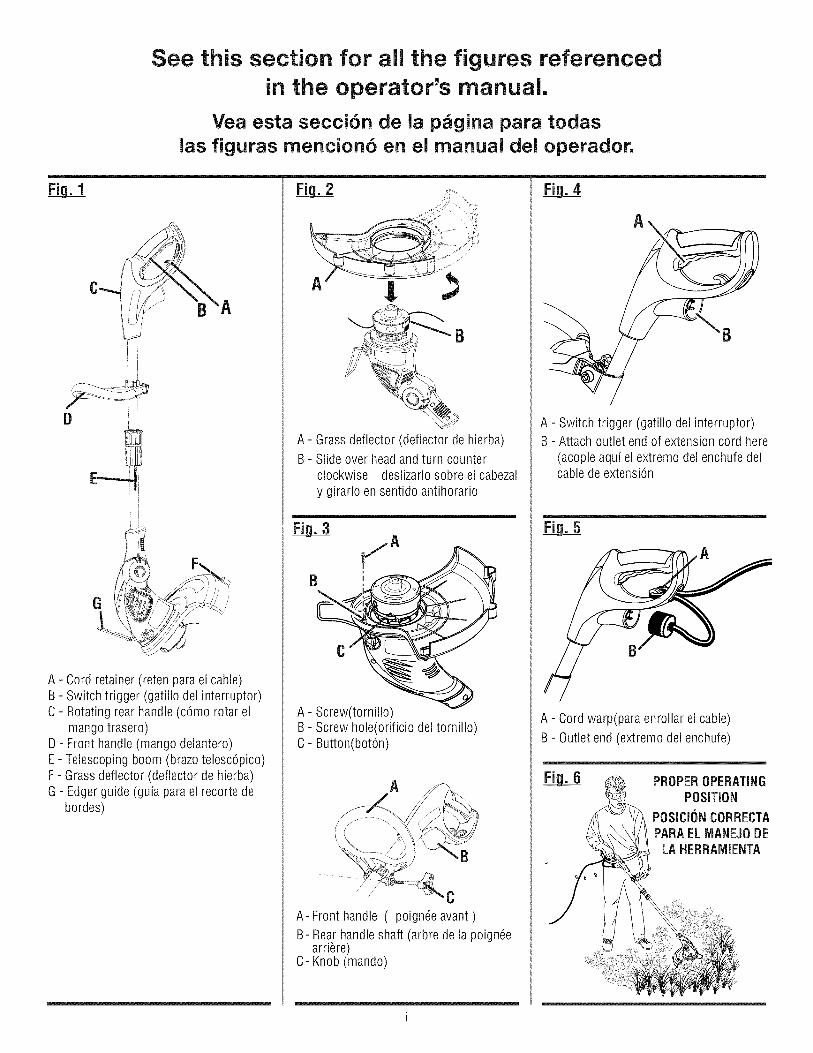
See this section for all the figures referencedin the operator's manual.
Vea esta secciCn de ia p_gina para todaslas figuras mencion6 en el manual dei operador.
0
c A
i }I i
G
A - Cord retainer (reten parael cable)B - Switch trigger (gatillo del interruptor)C - Rotating rear handle(cCmo rotar el
mango trasero)D - Front handle(mango delantero)E- Telescoping boom (brazo telescCpico)F - Grassdeflector (deflector de hierba)G - Edgerguide (guia parael recortede
bordes)
_B
A - Grass deflector (deflector de hierba)
B- Slide over head and turn counterclockwise deslizarlo sobre el cabezal
y girarlo en sentido antihorario
B
C /
A- Screw(torniilo)B- Screw hoie(orificio del tornillo)C- Button(bot6n)
A
CA- Front handle ( poigndeavant )
B- Rear handleshaft (arbre de la poigndearriere)
C- Knob (mando)
i
A
B
A - Switch trigger (gatillo del interruptor)B- Attach outlet endof extension cord here
(acopie aqui el extremo del enchufedelcable de extensi6n
A
B
A- Cord warp(para enrollar el cable)
B- Outlet end (extremo del enchufe)
PROPEROPERATINGPOSITION
POSICIONCORRECTAPARAELIVIANEJODE
LA NERRAMIENTA
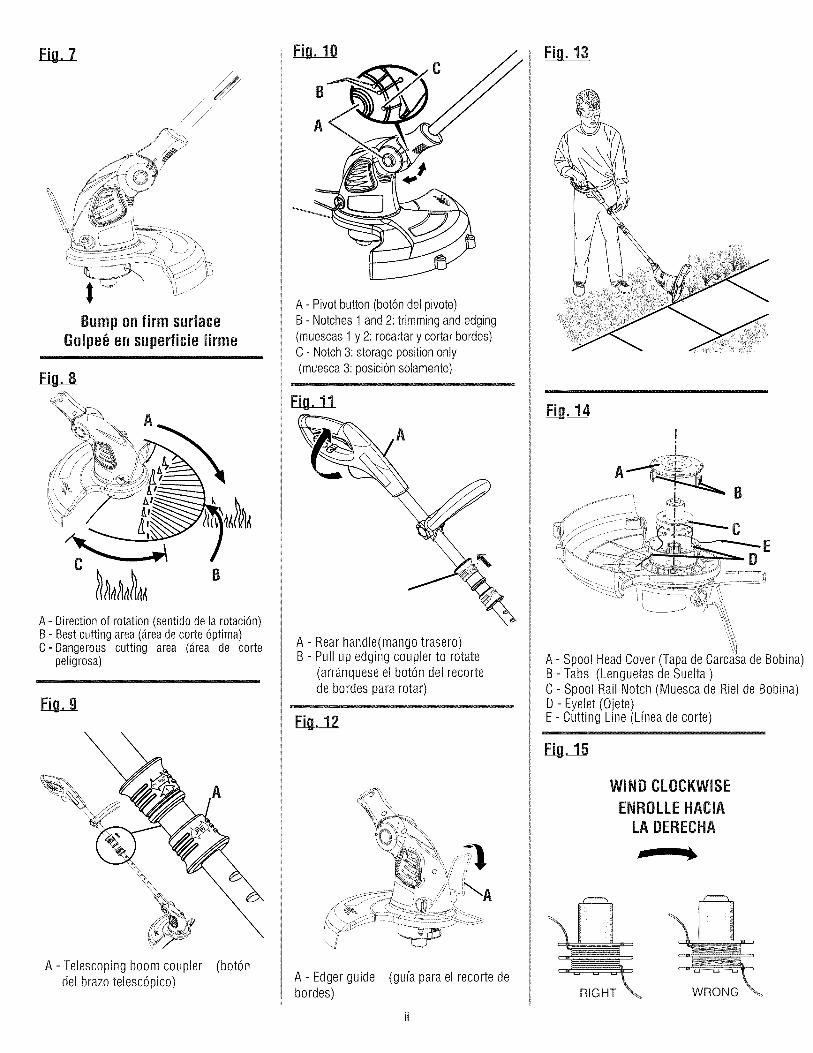
iBumpon firm surface
Golpe_en superficiefirme
A
A - Direction of rotation (sentido de la rotaci6n)B- Best cutting area (area decorte 6ptima)C=Dangerous cutting area (area de corte
peligrosa)
\A
A- Telescoping boom coupler (bot6ndel brazotelesc6pico)
C
A- Pivotbutton(botondelpivote)B- Notches1and2: trimmingandedging(muescas1 y 2: rocartary cortarbordes)C- Notch3: storagepositiononly(muesca3: posicionsolamente)
A- Rear handle(mangotrasero)B - Pull up edging coupler to rotate
(arrdnquese el bot6n del recortede bordes para rotar)
A- Edgerguide (gufa parael recorte debordes)
ii
I
A - Spool HeadCover(Tapade Bobina)B- Tabs (Lenguetasde Suelta )C - Spool Rail Notch (Muesca de Riel de Bobina)D- Eyelet(Ojete)E - Cutting Line (Lfneade corte)
Fiig. 15
WIND CLOCKWISE
ENROLLEHACIALADERECNA
WRONG %_
A (ADVERTENCiA! AI uti(izar herramientas electricaspara el cuidado del jard(n, con el fin de reducir elriesgo de incendio, descargas el6ctricas y )esionescorporales, siempre deben seguirse ciertas medidasb_.sicas de precauci6n.
LEA TODAS LAS INSTRUCCIONES
[] Para la operaci6n segura, lea y entienda todas lasinstrucciones antes de usar este producto. Siga todas lasinstrucciones de seguridad. La inobservancia de todas lasinstrucciones de seguridad seSaladas abajo puede causarlesiones corporales graves.
[] No permita que utilicen esta unidad niSos ni personascarentes de la debida instruccion para su manejo.
[] Limpie el a,rea de trabajo cada vez antes de usar la unidad.Retire todos los objetos tales como piedras, vidrios rotos,clavos, alambre o cuerdas que pudiesen resultarlanzados o enredados en el hilo de corte o cuchilla, segnnsea el caso.
[] Para utlizar este producto pongase anteojos deseguridad o galas protectoras marcados con el sello decumplimiento dela norma ANSI Z87.1.
[] Utilice anteojos seguridad - siempre cara de uso omascara de polvo si la operacion esta polvorienta.
[] Siempre use galas de seguridad con proteccion lateral.Los anteojos comunes solo tienen lentes resistentes a losimpactos. NO son anteojos de seguridad. Con elcumplimiento de esta regla se reduce el riesgo de posibleslesiones oculares. Si el proceso es polvoriento, utilice unacareta.
[] Vista apropiadamente - guantes de goma de Uso ycalzado substancial son recomendados al trabajar fuera.
[] Pongase pantalones largos de tela gruesa, botas yguantes. No se ponga ropa holgada o pantalones cortos,ni ande descalzo. No se ponga joyas de ninguna clase.
[] Recojase el cabello largo arriba del nivel de los hombrospara evitar que se enrede en las piezas moviles.
[] Mantenga alejados a los niSos - Mantenga alejados atodos los circunstantes, niSos y animales a una distanciam(nima de 15 m (50 pies).
[] Permanezca alerta - No use esta unidad cuando seencuentre fatigado, enfermo o bajo los efectos del alcohol,drogas o medicamentos.
[] No utilice la unidad en condiciones deficientes de[] iluminacion. Mantenga todas las partes del cuerpo
alejadas de toda pieza en movimiento.[] No utilice herramientas motorizadas en atmosferas
explosivas, como las existentes alrededor de I(quidos,gases y polvos inflamables. Las herramientas electricasgeneran chispas que pueden encender el polvo y losvapores inflamables.
[] Para reducir el riesgo de una descarga electrica, estaherramienta dispone de una clavija polarizada (una patillaes ma.s ancha que la otra) y requiere un cable deextension polarizado. Esta clavija encaja de una solamanera en un cable de extension polarizado. Si la clavijano entra completamente en el enchufe del cable de
extension, invierta la posicion de la misma.[] Si ann as( no entra la clavija, consiga un cable de
extension polarizado correcto. Un cable de extensionpolarizado requerira, una toma de corriente polarizada.Esta clavija encaja de una sola manera en una toma decorriente polarizada. Si la clavija no entra completamenteen la toma de corriente, invierta la posicion de la clavija.Si ann asi no entra la clavija, Ilame a un electricistacalificado para encargarle la instalacion de una toma decorriente adecuada. No cambie de ninguna manera laclavija del equipo ni el enchufe o la clavija del cable deextension.
[] Evite el contacto del cuerpo con objetos conectados atierra, como las tuber(as, radiadores, estufas yrefrigeradores. Existe un mayor riesgo de descargaselectricas si el cuerpo esta. en contacto con tierra.
[] Evite los entornos de trabajo peligrosos - No expongalas herramientas electricas a la Iluvia ni a condiciones
de humedad. La introduccion de agua en unaherramienta electrica aumenta el riesgo de descargaselectricas.
[] Use el aparato adecuado El (los) circuito(s) o la(s)toma(s) de corriente donde se conecta el aparato paralabores de jardiner(a deben estar protegidos con uninterruptor de circuito accionado por falla de conexion atierra (GFCl). Hay receptaculos con la proteccion de unGFCI integrado, y pueden utilizarse para contar con estacaracteristica de seguridad.
[] Utilice aparato correcto - no fuerza instrumento. Utiliceel instrumento correcto para su aplicacion. Elinstrumento correcto hara el trabajo mejor y mas seguroen la tasa para que es diseSado.
[] No accione el equipo cuando este descalzo o al Ilevarpuestas sandalias o calzado liviano similar. Use calzadode seguridad que le proteja sus pies y mejore su posturaen superficies resbaladizas.
[] No estire el cuerpo para alcanzar mayor distancia.Mantenga los pies bien afirmados y el equilibrio. No tratede alcanzar demasiado lejos.
[] Evite los arranques accidentales - Evite un arranqueaccidental de la unidad. Asegnrese de que el gatillo delinterruptor no este oprimido antes de conectar laherramienta.
[] No utilice la herramienta si el interruptor no enciende ono apaga. Una herramienta que no pueda controlarsecon el interruptor es peligrosa y debe repararse.
[] Desconecte la clavija de la toma de corriente antes deguardar la herramienta. Tales medidas preventivas deseguridad reducen el riesgo de poner en marchaaccidentalmente la herramienta.
[] Solo utilice piezas de repuesto identicas y accesoriosdel fabricante original. El empleo de piezas diferentespuede causar un peligro o daSar el producto.
3- EspaSol

[] Proporcionemantenimientoconcuidadoalaparato-Cambieelcabezaldelhilo,siestaagrietado,desportilladooda_adodecualquierforma.Aseg0resedequeelcabezaldelhilo,ocuchilla,seg0nseaelcaso,estedebidamenteinstaladoy firmementeasegurado.Lainobservanciadeestaadvertenciapuedecausarlesionescorporalesserias.
[] Aseg0resedequetodaslasprotecciones,correas,mangosy deflectoresestenacopladosdebidamentey demanerasegura.
[] EnelcabezaldecorteuseOnicamente hilo de repuestodel fabricante original. No use ning0n otro aditamento decorte, por ejemplo, cable metalico, cuerda o productosimilar. Instalar cualquier otra marca de hilo de corte enesta recortadora de hilo puede producir lesionescorporales serias.
[] Nunca utilice la unidad si el deflector de pasto no estamontado en su lugar yen buenas condiciones defuncionamiento.
[] Revise para ver si hay piezas da_adas. Antes de seguirutilizando la herramienta, es necesario inspeccionarcuidadosamente toda proteccion o pieza da_ada paradeterminar si funcionara correctamente y desempe_ara lafuncion a la que esta. destinada. Verifique la alineacion delas partes moviles, que no haya atoramiento de partesmoviles, que no haya piezas rotas, el montaje de laspiezas y cualquier otra condicion que pudiera afectar sufuncionamiento. Toda proteccion o pieza que este da_adadebe repararse apropiadamente o reemplazarse en uncentro de servicio autorizado para evitar todo riesgo delesiones.
[] AI usar la recortadora, sujetela firmemente por ambosmangos. Mantenga el cabezal del hilo por debajo del nivelde la cintura. Nunca corte con el cabezal del hilo a mas
de 762 mm (30 pulg.) del suelo.[] Guarde los aparatos que no se esta.n usando - Mientras
no se este utilizando, la sopladora debe almacenarse enel interior, en un sitio seco y bajo Ilave, lejos del alcancede los ni_os.
[] AsegOrese de que este en buen estado el cordon deextension. AI utilizar un cord6n de extension, utilice unodel suficiente calibre para soportar la corriente queconsume el producto. Se recomienda que los conductoressean de calibre 16 (A.W.G.) por Io menos para un cordonde extension de 15 metros (50 pies) de largo o menos. Sitiene dudas, utilice un cordon del calibre ma.s gruesosiguiente. Cuanto menor es el nOmero de calibre, mayores el grueso del cordon. Un cordon de un gruesoinsuficiente causa una caida en el voltaje de linea, yproduce recalentamiento y perdida de potencia.
[] Nunca use hojas ni dispositivos que flameen. Estaunidad se dise_6 para usar con recortadora de hiloOnicamente. El uso de cualquier otro accesorio oaditamento aumenta el riesgo de lesiones.
[] Inspeccione el a.rea por cortar. Retire todos los objetos(piedras, vidrio roto, clavos, alambre, hilo, etc.) que
puedan salir disparados o enredarse en el cabezal decorte.
[] Mantenga las rejillas de ventilacion limpias y sindesechos para evitar que se recaliente el motor.Limpielas cada vez, despues de usar la herramienta.
[] Apague la unidad y desconecte el suministro decorriente cuando no este en uso. Traslade la unidad conel motor apagado.
[] Guarde la unidad desenchufada y fuera del alcancede los ni_os.
[] No cuelgue la unidad de modo que el gatillo delinterruptor quede presionado.
[] No use mOltiples cordones.[] No maltrate el cordon. Nunca traslade la unidad
sujetandola por el cordon de extension ni tire del cordonde extension para desconectarla.
[] Mantenga el cordon de extension alejado del operadory de los obsta.culos en todo momento. No exponga loscordones al calor, aceite, agua ni bordes afilados.
[] Siesta da_ado el cordon de corriente, debe serreemplazado Onicamente por el fabricante o en uncentro de servicio autorizado para evitar riesgos.
[] Guarde estas instrucciones. ConsQltelas con frecuenciay empleelas para instruir a otras personas que puedanutilizar esta herramienta. Si presta a alguien estaherramienta, facilitele tambien las instrucciones.
4- Espafiol
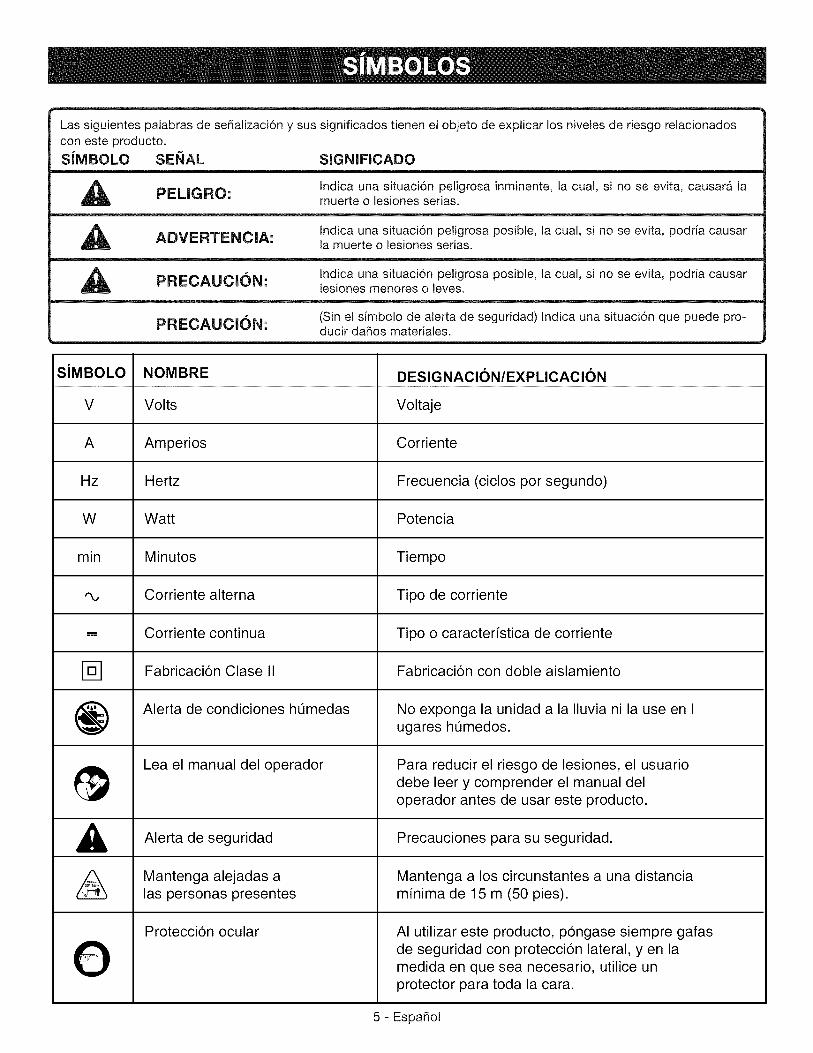
Lassiguientespalabrasdese_alizaci6nysussignificadostienenelobjetodeexplicarlosnivelesderiesgorelacionadosconesteproducto.SIMBOLO SEI_AL SIGNIFICADO
,_ PELIGRO: Indica una situaci6n peligrosa inminente, la cual, si no se evita, causar_t lamuerte o lesiones serias.
Indica una situaci6n peligrosa posible, la cual, si no se evita, podria causarADVERTENCIA: la muerte o lesiones serias.
_m=:t'^l It'm_kl: Indica una situaci6n peligrosa posible, la cual, si no se evita, podria causarlesiones menores o leves.
PRECAUCION: (Sin el simbolo de alerta de seguridad) Indica una situaci6n que puede pro-ducir daSos materiales.
SiMBOLO
V
A
Hz
W
min
@
@
AA
0
NOMBRE
Volts
Amperios
Hertz
Watt
Minutos
Corriente alterna
Corriente continua
Fabricaci6n Clase 11
Alerta de condiciones hQmedas
Lea el manual del operador
Alerta de seguridad
Mantenga alejadas alas personas presentes
Proteccion ocular
DESlG NACI()N/EXPLICACI(DN
Voltaje
Corriente
Frecuencia (ciclos por segundo)
Potencia
Tiempo
Tipo de corriente
Tipo o caracter[stica de corriente
Fabricaci6n con doble aislamiento
No exponga la unidad a la Iluvia ni la use en Iugares hQmedos.
Para reducir el riesgo de lesiones, el usuario
debe leer y comprender el manual deloperador antes de usar este producto.
Precauciones para su seguridad.
Mantenga a los circunstantes a una distanciaminima de 15 m (50 pies).
AI utilizar este producto, pongase siempre gafasde seguridad con proteccion lateral, yen lamedida en que sea necesario, utilice unprotector para toda la cara.
5- EspaSol
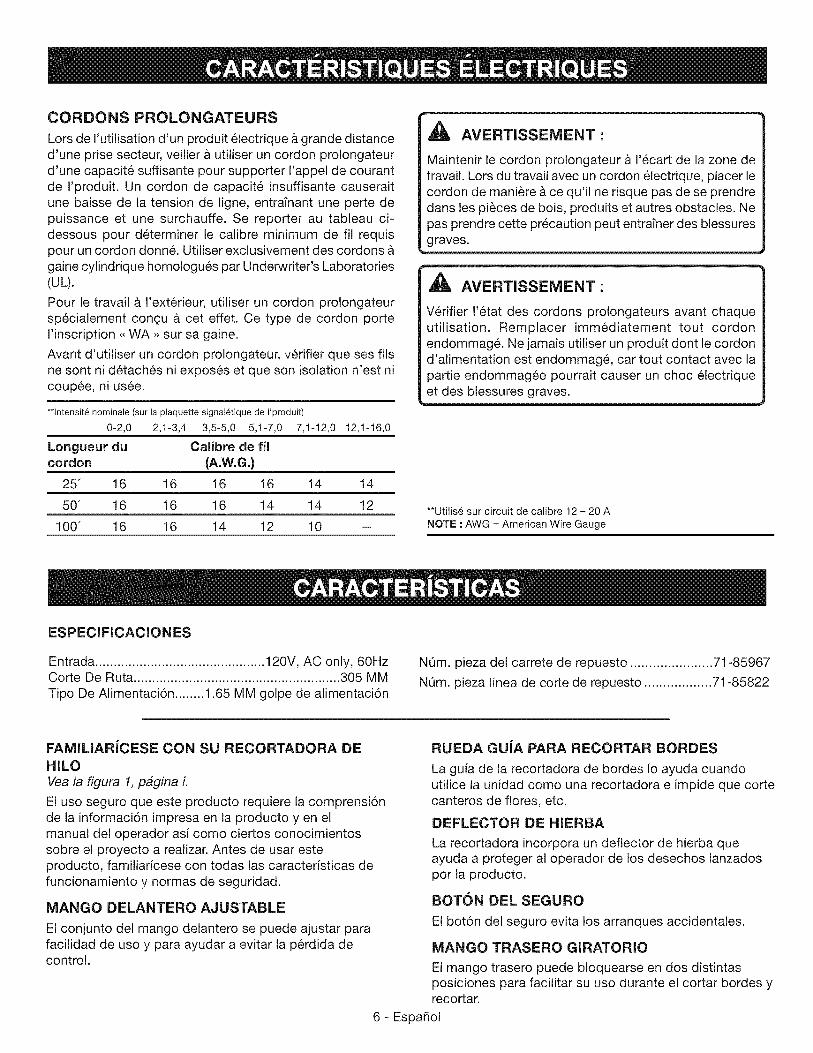
CORDONS PROLONGATEURS
Lors de I'utilisation d'un produit 61ectdque &grande distanced'une prise secteur, veiller a utiliser un cordon prolongateurd'une capacite suffisante pour supporter I'appel de courantde I'produit. Un cordon de capacite insuffisante causeraitune baisse de la tension de ligne, entraTnant une perte depuissance et une surchauffe. Se reporter au tableau ci-dessous pour determiner le calibre minimum de fil requispour un cordon donn& Utiliser exclusivement des cordons &gaine cylinddque homologues par Underwriter's Laboratories(UL).
Pour le travail & I'ext6rieur, utiliser un cordon prolongateursp6cialement con(_u & cet effet. Ce type de cordon porteI'inscription ,,WA _ sur sa gaine.
Avant d'utiliser un cordon prolongateur, v6rifier que ses illsne sont ni d6tach6s ni expos6s et que son isolation n'est nicoup6e, ni us6e.
**lntensite nominale (sur la plaquette signat_tique de I'produit)
0-2,0 2,1-3,4 3,5-5,0 5,1-7,0 7,1-12,0 12,1-16,0
Longueur du Calibre de filcordon (A.W.G.)
25" 16 16 16 16 14 14
50" 16 16 16 14 14 12
100" 16 16 14 12 10 =
_, AVERTISSEMENT :
Maintenir le cordon prolongateur & 1'6cart de la zone detravail. Lors du travail avec un cordon 61ectrique, placer lecordon de mani_re & ce qu'il ne risque pas de se prendredans les pi_ces de bois, produits et autres obstacles. Nepas prendre cette precaution peut entrafner des blessuresgraves.
_b, AVERTISSEMENT :
V6rifier 1'6tat des cordons prolongateurs avant chaqueutilisation. Remplacer imm6diatement tout cordonendommag& Ne jamais utiliser un produit dont le cordond'alimentation est endommag6, car tout contact avec lapartie endommag6e pourrait causer un choc 61ectriqueet des blessures graves.
**Utilise sur circuit de calibre 12 - 20 ANOTE : AWG = American Wire Gauge
ESPECIFICACIONES
Entrada .............................................. 120V, AC only, 60HzCorte De Ruta ........................................................ 305 MMTipo De Alimentaci6n ........ 1.65 MM golpe de alimentaci6n
NQm. pieza del carrete de repuesto ...................... 71-85967
NL_m.pieza linea de corte de repuesto .................. 71-85822
FAMILIAR|CESE CON SU RECORTADORA DE
HILOVea la figura 1, pdgina L
El uso seguro que este producto requiere la comprensi6nde la informaci6n impresa en la producto yen elmanual del operador asi como ciertos conocimientossobre el proyecto a realizar. Antes de usar esteproducto, familiaricese con todas las caracter[sticas defuncionamiento y normas de seguridad.
MANGO DELANTERO AJUSTABLE
El conjunto del mango delantero se puede ajustar parafacilidad de uso y para ayudar a evitar la p6rdida decontrol.
RUEDA GUiA PARA RECORTAR BORDES
La guia de la recortadora de bordes Io ayuda cuandoutilice la unidad como una recortadora e impide que cortecanteros de flores, etc.
DEFLECTOR DE HIERBA
La recortadora incorpora un deflector de hierba queayuda a proteger al operador de los desechos lanzadospor la producto.
BOTON DEL SEGURO
El bot6n del seguro evita los arranques accidentales.
MANGO TRASERO GIRATORIO
El mango trasero puede bloquearse en dos distintasposiciones para facilitar su uso durante el cortar bordes yrecortar.
6- Espa_ol
DESEMPAQUETADO
Este producto requiere armarse.
[] Extraiga cuidadosamente de la caja la herramientay los accesorios. AsegQrese de que est6n presentestodos los articulos enumerados en la lista deempaquetado.
_h_ ADVERTENCIA: No use este producto si no esta
totalmente ensamblado o si alguna pieza falta o estadaSada. Si utiliza un producto que no se encuentraensamblado de forma correcta y completa, puedesufrir lesiones graves.
[] Inspeccione cuidadosamente la herramienta paraasegurarse de que no haya sufrido ninguna rotura odaSo durante el transporte.
[] No deseche el material de empaquetado hasta quehaya inspeccionado cuidadosamente la herramienta yla haya utilizado satisfactoriamente.
[] Si hay piezas daSadas o faltantes, le suplicamos Ilamaral 1=888=266=7096, donde le brindaremos asistencia.
A ADVERTENCIA: Para evitar un arranque accidentalque podria causar lesiones corporales serias,siempre desmonte de la herramienta el paquete debaterias al montarle piezas a aquella.
ACOPLAMIENTO DEL DEFLECTOR DE HIERBA
Vea /as figuras 2 y 3, pagina L
ADVERTENClA: La cuchilla de cortar el hilo
del deflector de pasto estA afilada. Evite tocar lacuchilla. Si no evita tal contacto puede originarselesiones corporales serias.
MSTA DE EMPAQUETADO
Conjunto de la recortadora
Conjunto del deflector de hierba con tornillo
Manual del operadorAuxiliar mango delantero
A
A
ADVERTENCIA: Si hay piezas daSadas o faltantes,no utilice esta herramienta sin haber reemplazadolas piezas daSadas o fakantes. Usar este productocon partes daSadas o faltantes puede causarlesiones serias al operador.
ADVERTENClA: No intente modificar estaherramienta ni hacer accesorios no recomendados
para la misma. Cualquier alteraci6n o modificaci6nconstituye maltrato el cual puede causar unacondici6n peligrosa, y como consecuencia posibleslesiones corporales serias.
[] Quite el tornillo incluido con un destornitlador phillipsdel cabezal de la recortadora.
[] Ajuste el deflector de c6sped en los postes elevadosdel cabezal de la recortadora.
NOTA: El deflector debe estar nivelado con el cabezalde la recortadora.
[] Instale el tornillo incluido y apri6telo girandolo ensentido horatio con un destornillador phillips.
MONTAJE DEL MANGO DELANTERO
See Figure 3, page i
[] Afloje y retire la tuerca de mariposa, la arandela y elmando.
[] Instale el mango en el alojamiento del eje de impulsi6n,en el lugar que indica la etiqueta en el eje.
[] Si es necesario, suba o baje el mango para ajustarlo ala posici6n de manejo deseada.
[] Reinstale el mando y la tuerca de mariposa. Ajuste lamando pot seguridad.
_ ADVERTENCIA: No permita que su familiarizaci6n
con los productos le haga perder la atenci6n. Tengapresente que un descuido de un instante essuficiente para causar una lesi6n seria.
_1_ ADVERTENCIA: Cuando utilice productos,
p6ngase siempre gafas de seguridad o anteojosprotectores con protecci6n lateral. La inobservanciade esta advertencia puede causar el lanzamiento deobjetos a los ojos y, consecuentemente, posibleslesiones serias.
7- Espa_ol
,a, ADVERTENC(A: No utilice ning0n aditamento oaccesorio no recomendado por el fabricante de esteproducto. El empleo de aditamentos o accesorios norecomendados puede causar lesiones graves.
ENCENDIDO Y APAGADO DE LA
RECORTADORA See Figure 4- 5, page L
NOTA: Use solamente cables de extension aprobadospara exteriores.
[] Pase el cable de extension a traves del ranura del asa
situada en la parte trasera del alojamiento de larecortadora y pongalo debajo del reten del cable.
[] Para encender la recortadora de hilo, presione el gatillodel interruptor de encendido.
[] Para detener la recortadora de hilo, suelte el gatillo delinterruptor.
[] Si alguna pieza falta o estA daSado, por favor Ilame al1-888-266-7096 para obtener ayuda
IVlANEJO DE LA RECORTADORASee Figure 6, page L
Siga las siguientes recomendaciones a manejar larecortadora de hilo:
[] Sujete la recortadora con la mano derecha en elmango trasero y la izquierda en el delantero.
[] Sujete firmemente la unidad con ambas manosdurante la operacion.
[] Se recomienda sujetar la recortadora en una posicioncomoda, con el mango trasero a la altura de la caderaaproximadamente.
[] Corte la hierba alta desde arriba hacia abajo. Estoevitara que la hierba se enrolle alrededor delalojamiento del eje y del cabezal del hilo, Io que puedecausar da_os pot calentamiento excesivo.
Si la hierba se enrolla en el cabezal del hilo:
[] Apague la recortadora.[] Desenchufe la recortadora de hilo.[] Quite la hierba.
LA L(NEA DE CORTE
,_ ADVERTENCIA: NO haga contacto con la I(nea de
corte expuesta cuando levanta o sostiene la recortadora.
Una I(nea redondo individual de 0.065 pulgadas sepreinstala en la recortadora. Cuando la I(nea de cortenecesita reemplace, instale nueva bobina devanada.Craftsman 71-85967.
EXTENS(ON DE LA L(NEA DE CORTESee Figure 7, page ft.
Durante el funcionamiento, las I(neas de corte se acortanpor el uso normal. Para una mayor conveniencia yeficiencia, su recortadora ha sido equipada con un cabezalde alimentacion por golpes que le permite simplementegolpear el cabezal de la recortadora para extender lasI(neas de corte mientras usa la recortadora. La I(nea de
corte gastarA mas rapido y necesitara mAs alimentacion sila recortando o bordeando estA hecho contra pavimento uotros superficies abrasivos, o si cortas hierbajos maspesados.
[] Mientras la recortadora estA funcionamiento y girando,golpee suavemente la carcasa de bobina contra unasuperficie firme (piso o pavimento). Esto deber(a soltarlinea de corte adicional de la bobina.
[] Si no se suelta ninguna I(nea, golpee el cabezal de larecortadora con mas fuerza o trate de golpearlo contrauna superficie a0n mas dura.
[] Si no hay ningOn cambio en la Iongitud de la I(nea decorte, desenchufe el cordon electrico en espiral delcordon de extension. Cuando el cabezal de la
recortadora haya dejado de girar, tire con suavidad delas I(neas de corte manualmente. Una vez que lasI(neas esten afuera (extendidas), enchufe el cordonelectrico en espiral en el cordon de extension yreanude el corte.
[] Si la I(nea de corte sigue sin alimentar la bobina, labobina podr(a estar vac(a o la linea de corte podriaestar enredada o atascada en la bobina. Desenchufeel cordon electrico en espiral de la recortadora delcordon de extension. Cuando el cabezal de la
recortadora haya dejado de girar, retire la bobina (verPasos 1 a 3 en "SACAR LA BOBINA" en pagina 9).Si la I(nea esta enredado o atascada, desenrede yreemplace la I(nea. Si la bobina esta vac(a, reemplacela bobina.
RECOMENDAClONES DE CORTE
See Figure 8, page ft.
[] Mantenga la recortadora inclinada hacia el Area decorte; esa es el Area optima.
[] La recortadora de hilo efectOa el corte al pasar la unidadde izquierda a derecha. De esta manera se evita ellanzamiento de desechos hacia el operador. Eviterecortar en el Area peligrosa mostrada en la figura 8.
[] Haga que el recorte sea efectuado por la punta del hilo;no fuerce el cabezal del hilo en la hierba sin cortar.
[] Las cercas de alambre y de estacas causan desgasteadicional del hilo, incluso su ruptura. Los muros depiedra y de ladrillo, as( como las banquetas (aceras) yla madera pueden desgastar rapidamente los hilos.
[] Evite el contacto con arboles y arbustos. La corteza delos Arboles, las molduras de madera, los revestimientosde las paredes y los postes de las cercas puedenresultar daSados facilmente por los hilos.
8-Espafiol
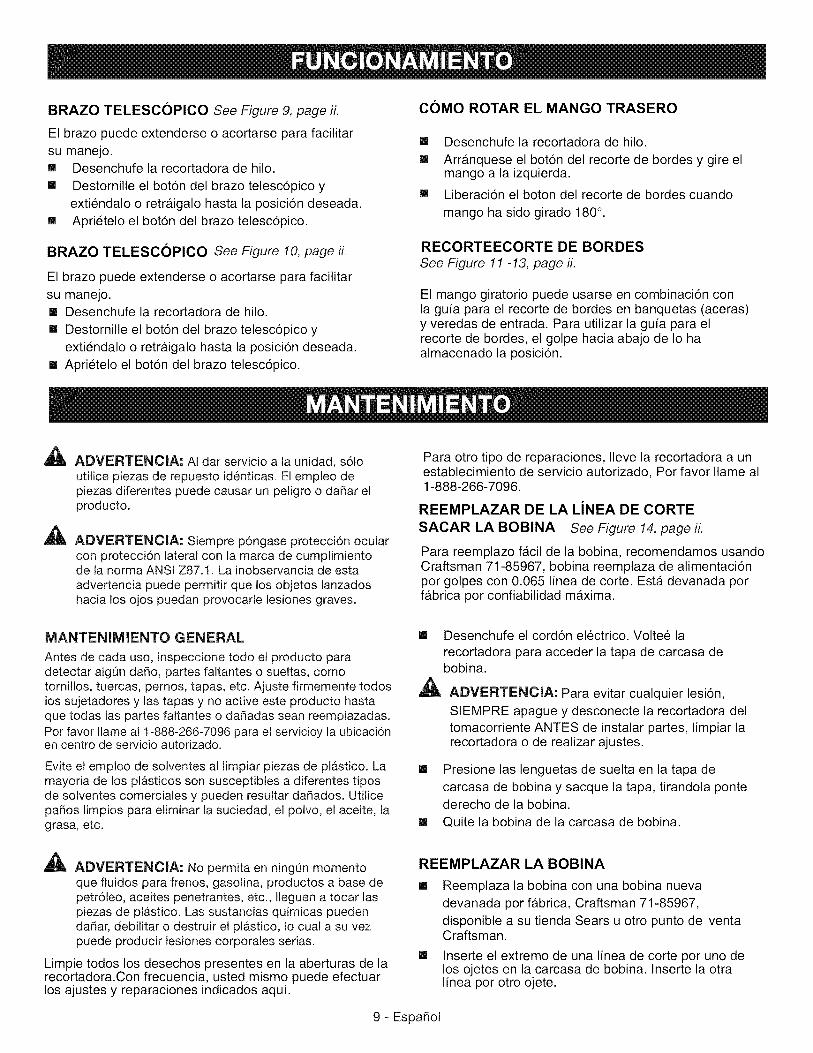
BRAZO TELESCOPICO See Figure 9, page iL
El brazo puede extenderse o acortarse para facilitarsu manejo.m Desenchufe la recortadora de hilo.
m Destornille el bot6n del brazo telesc6pico yexti(_ndalo o retrAigalo hasta la posicion deseada.
m Apri(_telo el bot6n del brazo telesc6pico.
BRAZO TELESCOPICO See Figure 10, page fi.
El brazo puede extenderse o acortarse para facilitarsu manejo.[] Desenchufe la recortadora de hilo.
[] Destornille el bot6n del brazo telesc6pico yextiendalo o retraigalo hasta la posicion deseada.
[] Apri(_telo el bot6n del brazo telesc6pico.
COMO ROTAR EL MANGO TRASERO
[] Desenchufe la recortadora de hilo.
[] Arranquese el boton del recorte de bordes y gire elmango a la izquierda.
[] Liberacion el boton del recorte de bordes cuando
mango ha sido girado 180 °.
RECORTEECORTE DE BORDES
See Figure 11 - 13, page ft.
El mango giratorio puede usarse en combinaci6n conla guia para el recorte de bordes en banquetas (aceras)y veredas de entrada. Para utilizar la guia para elrecorte de bordes, el golpe hacia abajo de Io haalmacenado la posici6n.
A
a,
ADVERTENCIA: AI dar servicio a la unidad, s61o
utilice piezas de repuesto identicas. El empleo depiezas diferentes puede causar un peligro o daSar elproducto.
ADVERTENCIA: Siempre p6ngase protecci6n ocularcon protecci6n lateral con la marca de cumplimientode la norma ANSI Z87.1. La inobservancia de esta
advertencia puede permitir que los objetos lanzadoshacia los ojos puedan provocarle lesiones graves.
Para otro tipo de reparaciones, Ileve la recortadora a unestablecimiento de servicio autorizado, Por favor Ilame al1-888-266-7096.
REEMPLAZAR DE LA LiNEA DE CORTE
SACAR LA BOBINA See Figure 14, page iL
Para reemplazo facil de la bobina, recomendamos usandoCraftsman 71-85967, bobina reemplaza de alimentacionpor golpes con 0.065 linea de corte. Esta devanada porfabrica por confiabilidad maxima.
MANTENIMIENTO GENERAL
Antes de cada uso, inspeccione todo et producto paradetectar algOn daSo, partes faltantes o sueltas, comotornillos, tuercas, pernos, tapas, etc. Ajuste firmemente todoslos sujetadores y las tapas y no active este producto hastaque todas las partes faltantes o daSadas sean reemplazadas.Por favor Ilame al 1-888-266-7096 para el servicioy la ubicaci6nen centro de servicio autorizado.
Evite el empleo de solventes al limpiar piezas de plastico. Lamayoria de los pl_.sticos son susceptibles a diferentes tiposde solventes comerciales y pueden resultar daSados. UtilicepaSos limpios para eliminar la suciedad, el polvo, el aceite, lagrasa, etc.
[]
A
Desenchufe el cord6n electrico. Voltee la
recortadora para acceder la tapa de carcasa debobina.
ADVERTENCIA: Para evitar cualquier lesi6n,
SIEMPRE apague y desconecte la recortadora deltomacorriente ANTES de instalar partes, limpiar larecortadora o de realizar ajustes.
[] Presione las lenguetas de suelta en la tapa de
carcasa de bobina y sacque la tapa, tirandola pontederecho de la bobina.
[] Quite la bobina de la carcasa de bobina.
A ADVERTENCIA: No permita en ningQn momentoque fluidos para frenos, gasolina, productos a base depetr61eo, aceites penetrantes, etc., Ileguen a tocar laspiezas de pl_.stico. Las sustancias quimicas puedendaSar, debilitar o destruir el plAstico, Io cual a su vezpuede producir lesiones corporales serias.
Limpie todos los desechos presentes en la aberturas de larecortadora.Con frecuencia, usted mismo puede efectuarlos ajustes y reparaciones indicados aqui.
REEMPLAZAR LA BOBINA
[] Reemplaza la bobina con una bobina nuevadevanada por fabrica, Craftsman 71-85967,disponible a su tienda Sears u otro punto de ventaCraftsman.
[] Inserte el extremo de una linea de corte por uno delos ojetes en la carcasa de bobina. Inserte la otralinea por otro ojete.
9- EspaSol
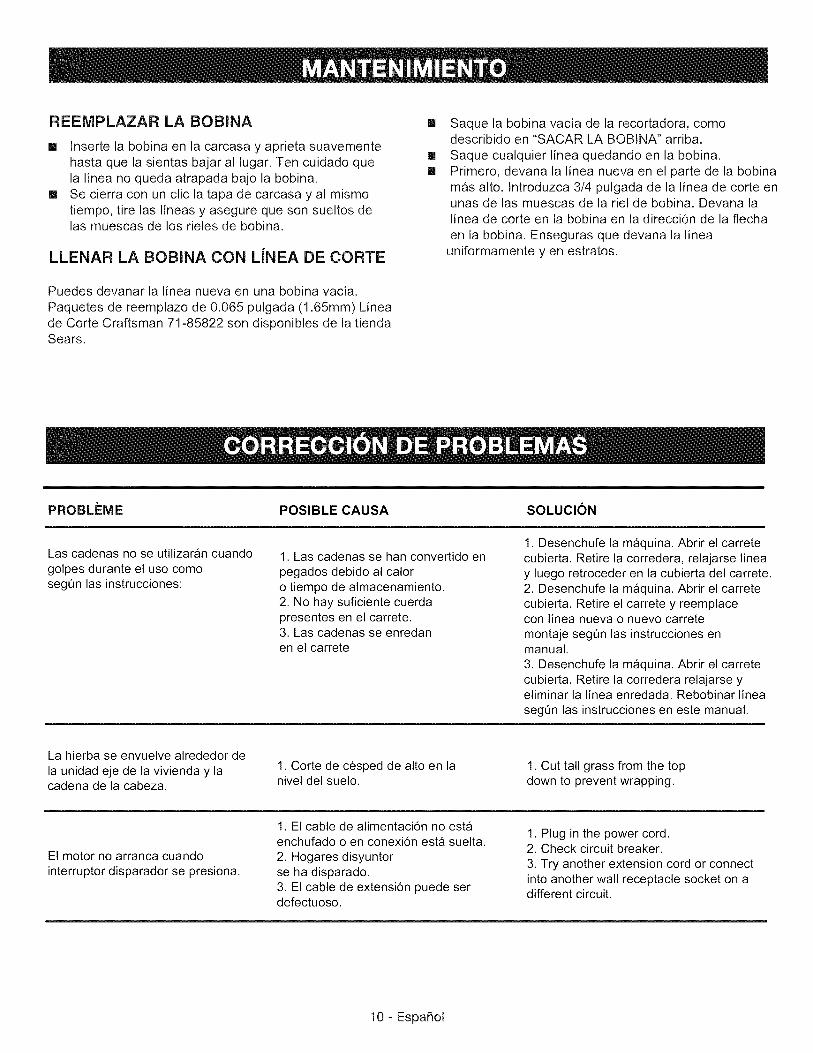
REEIVIPLAZAR LA BOBINA
[] Inserte la bobina en la carcasa y aprieta suavementehasta que la sientas bajar al lugar. Ten cuidado quela linea no queda atrapada bajo la bobina.
[] Se cierra con un clic la tapa de carcasa y al mismotiempo, tire las lineas y asegure que son sueltos delas muescas de los rieles de bobina.
LLENAR LA BOB)NA CON L(NEA DE CORTE
[]
[]
[]
Saque la bobina vacia de la recortadora, comodescribido en "SACAR LA BOBINA" arriba.Saque cualquier linea quedando en la bobina.Primero, devana la linea nueva en el parte de la bobinamas alto. Introduzca 3/4 pulgada de la linea de corte enunas de las muescas de la riel de bobina. Devana lalinea de corte en la bobina en la direcci6n de la flecha
en la bobina. Enseguras que devana la lineauniformamente y en estratos.
Puedes devanar la linea nueva en una bobina vacia.Paquetes de reemplazo de 0.065 pulgada (1.65mm) Lineade Corte Craftsman 71-85822 son disponibles de la tiendaSears.
PROBLEIVlE POSIBLE CAUSA SOLUCION
Las cadenas no se utilizaran cuando
golpes durante el uso como
segQn las instrucciones:
1. Las cadenas se han convertido en
pegados debido al calor
o tiempo de almacenamiento.2. No hay suficiente cuerda
presentes en el carrete.3. Las cadenas se enredanen el carrete
1. Desenchufe la maquina. Abrir el carretecubierta. Retire la corredera, relajarse linea
y luego retroceder en la cubierta del carrete.2. Desenchufe la maquina. Abrir el carretecubierta. Retire el carrete y reemplacecon linea nueva o nuevo carrete
montaje segQn las instrucciones enmanual.
3. Desenchufe la maquina. Abrir el carrete
cubierta. Retire la corredera relajarse yeliminar la linea enredada. Rebobinar linea
segQn las instrucciones en este manual.
La hierba se envuelve alrededor de
la unidad eje de la vivienda y lacadena de la cabeza.
1. Corte de cesped de alto en lanivel del suelo.
1. Cut tall grass from the top
down to prevent wrapping.
El motor no arranca cuando
interruptor disparador se presiona.
1. El cable de alimentaci6n no estaenchufado o en conexi6n esta suelta.
2. Hogares disyuntorse ha disparado.
3. El cable de extensi6n puede serdefectuoso.
1. Plug in the power cord.2. Check circuit breaker.
3. Try another extension cord or connect
into another wall receptacle socket on adifferent circuit.
10- Espa_ol

11- EspaSol

Your HomeFor troubleshooting, product manuals and expert advice:
www.managemylife.com
For repair - in your home - of all major brand appliances,lawn and garden equipment, or heating and cooling systems,
no matter who made it, no matter who sold it!
For the replacement parts, accessories andowner's manuals that you need to do-it-yourself.
For Sears professional installation of home appliancesand items like garage door openers and water heaters.
1-800-4-MY-HOME ® (1-800-469-4663)
Call anytime, day or night (U.S.A. and Canada)
www.sears.com www.sears.ca
Our Home
For repair of carry-in items like vacuums, lawn equipment,and electronics, call anytime for the location of your nearest
Sears Parts & Repair Service Center
1-800-488-1222 (U.S.A.) 1-800-469-4663 (Canada)www.sears.com www.sears.ca
To purchase a protection agreement on a product serviced by Sears:
1-800-827-6655 (U.S.A.)
Para pedir servicio de reparaci6na domicilio, y para ordenar piezas:
1-888-SU-HOGAR ®
(1-888-784-6427)
1-800-361-6665 (Canada)
Au Canada pour service en fran(_ais:
1-800-LE-FOYER Mc
(1-800-533-6937)www.sears.ca
www.sears.com
TM® Registered Trademark / Trademark of KCD IP, LLC in the United States, or Sears Brands, LLC in other countries® Marca Registrada / TMMarca de Fabrica de KCD IP, LLC en Estados Unidos, o Sears Brands, LLC in otros paisesMCMarque de commerce / MDMarque d6pos6e de Sears Brands, LLC