turbo en de-06 certification · the fan designations, ... us three-position speed switch integrated...
TRANSCRIPT

TurboService Instructions
EN
2
BLAUBERG Company is happy to offer your attention a new high-
quality inline mixed-flow Blauberg Turbo fan. The solid team of high-
qualified professionals with many years of working experience,
technological innovations in design and production, high-quality
components and materials from the top worldwide producers have
become the precondition for the best fan in its class.
The fan Turbo is a symbiosis of perfect quality, high performance and
silent operation.
INTRODUCTION
The present service instruction contains a technical description, technical data sheets, operation and mounting guidelines, safety precautions and warnings for safe and correct operation of the fan BLAUBERG Turbo.
USE
The fan Turbo is designed for exhaust or supply ventilation of living spaces, kitchens, bathrooms, offices, shops, garages and other residential and public premises heated during winter time. The fan may be integrated into the air ductworks. The fan is available for round Ø 100, 125, 150,160, 200, 250 and 315 mm air ducts.
COMPLETE SET
fan - 1 item; screws and dowels - 4 items; plastic screwdriver (for the models with timer) - 1 item; service instruction; packing box. The fan design is regularly improved, so some models can slightly differ from those ones described in this service instruction.
BASIC CHARACTERISTICS
The fan designations, parameters, outer view, overall and connecting dimensions are shown in tables 1-2 and in fig. 1 and 2.

2
3
4
5
6
7
8
10
9
1
3
Fig. 1
1 - casing, 2 - impeller, 3 - electronic module, 4 - electronic module cover, 5 - capacitor, 6 - spigot,
7 - motor, 8 - clamp, 9 - collector, 10 - diffuser.

Table 1
4
The information on ErP 2015 efficiency parameters is provided on product label. Components used to calculate the energy efficiency that are not apparent from the measurement category are detailed in AMCA 210-07 standard.
Tu
rbo
1
00
Tu
rbo
1
25
Tu
rbo
1
50
Tu
rbo
1
60
Tu
rbo
2
00
Tu
rbo
2
50
min
max
1 ~
23
0
IP X
4
60
23
25
25
29
42
50
42
50
10
87
6
0.1
00
.11
0.1
10
.13
0.1
90
.22
0.1
90
.22
0.4
80
.34
17
02
20
23
03
45
43
05
60
43
05
60
10
80
80
51
07
0
19
80
25
45
15
35
22
65
19
40
26
20
19
40
26
20
23
80
19
15
19
55
27
32
29
34
37
46
37
46
52
45
47
12
51
77
22
7
0.7
90
.99
13
60
14
20
0.5
4
24
40
21
15
55
47
min
max
min
max
min
max
min
max
min
max
min
56
25
05
17
50
1.4
2
31
5
max
Tu
rbo
3
15
Parameters
Speed
Voltage,
50/60 Hz [V]
Power [W
]
Current [A]
Max. air flow
3
[m/h]
RPM [min-1]
Noise level,
3 m [dBA]
Max.
transported air
temperature [°C]
IP rating

Type D
123
148
158
199
D1 H L
Dimensions [mm] Weight
[kg]
1,5
2,1
2,2
6,4
Turbo 125
Turbo 150
Turbo 160
Turbo 250
Turbo 315
B
247
164
187
187
209
257
241
251
251
261
323
258
383
289
289
295.5
196
287
220
220
239
8,3
310 323 408 445362 11,4
Turbo 200
97 1,55Turbo 100 164 241 303196
Table 2
Fig. 2
5

6
MODIFICATIONS AND OPTIONS
T - adjustable run-out timer regulated from 2 to 30 minutes. US three-position speed switch integrated in the fan (Min speed - off - Max speed) FR - built-in smooth speed controller from 0 to 100%. The fan is supplied with a pre-wired power cable with IEC C14 plug as a standard. The cable modification with a standard electric plug is also available (FR1). G/GT - smooth speed controller with an electronic thermostat and an external temperature sensor that is fixed on 4 m power cable. The fan is supplied with a pre-wired power cable with IEC C14 plug as a standard. The cable modification with a standard electric plug is also available (G1). GI/GTI - smooth speed controller with an electronic thermostat and a temperature sensor integrated into the air duct. The fan is supplied with a pre-wired power cable with IEC C14 plug as a standard. The cable modification with a standard electric plug is also available (GI1). - CW pre-wired power cable and IEC 14 plug as a standard.
Modification with a standard electric plug is available (W1).
CONTROL LOGIC
The model Turbo ____ T switches on when the voltage is supplied to the terminal LT by the external switch (i.e., light switch). After the control voltage is disconnected the fan continues operating during the time T, which is regulated from 2 till 30 minutes. To regulate the turn-off delay time turn the potentiometer T clockwise to increase it to max. 30 min or anticlockwise to decrease it to min. 2 min (Fig. 27)
Warning! The timer circuit is under mains voltage!
Disconnect the fan from power mains prior to any adjustment operations. The fan delivery set includes a specially designed plastic screwdriver for the timer setting adjustments.
Do not use a metal screwdriver, knife, etc. for adjustment operations
not to damage the circuit board.
The model Turbo _____ FR (fig. 26) is equipped with a speed controller to turn the fan on/off and smooth control of the fan speed over the range from minimum to maximum speed.

The model Turbo ____ G/Gl (fig. 25) is equipped with a temperature and speed controller with external temperature sensor for automatic speed (air flow) regulation depending on ambient temperature. The electronic module has two control knobs: to set the motor speed; to set the electronic thermostat setpoint.
The thermostat LED pilot light on the fan casing glows red when the transported air temperature exceeds the set point. To set the thermostat setpoint rotate the thermostat control knob clockwise to increase it and anticlockwise to decrease the value. To set the speed (air flow) control setpoint rotate the speed control knob in the same way. The fan has two operating logics: based on temperature and timer:
temperature-based logic (G/Gl): to keep air temperature within 2°C. In this case the speed switches are rare. When air temperature rises up to the thermostat set point, the fan switches to maximum speed. When air temperature drops down 2°C below the set point or when the initial temperature is below the set point, the fan runs with the speed set by the speed controller.
timer-based logic (GT/GTl): to keep air temperature exactly. The fan switches more frequently as compared to the previous pattern but the minimum time intervals in any case are not less than 5 minutes. When the air temperature rises up to the thermostat set point, the fan switches to maximum speed. Synchronously the speed switch delay timer is activated for 5 minutes.
When the air temperature drops down below the set point, the fan keeps running on maximum speed for additional 5 minutes and then switches back to set speed. If the initial temperature is below the set point, the fan runs from beginning with the set speed by the speed controller.
7

8
SAFETY RULES
All operations related to the fan electrical connections, servicing and repair works are allowed only after the fan disconnection from power mains. All mounting and servicing operations are allowed for duly qualified electricians with valid electrical work permit for electric operations at the units up to 1000 V after careful study of the present user's manual. The single-phase power grid must comply with the acting local electrical norms and standards. The fixed electrical wiring must be equipped with an automatic switch that is used for connection of the fan to power mains with gap on all poles at least 3 mm. The circuit breaker trip current must be in compliance with the fan current consumption, refer Table 1. Make sure the impeller and the casing are not damaged before connecting the fan to power mains. The casing internals must be free of any foreign objects which can damage the impeller blades. Misuse of the product or any unauthorized modification are not allowed. Disconnect the fan from power mains prior to any servicing and repair operations. Misuse of the product or any unauthorized modification are not allowed. The product is not allowed for use by children and persons with reduced physical, mental or sensory capacities, without proper practical experience or expertise, unless they are controlled or instructed on the product operation by the person(s) responsible for their safety. Supervise the children and do not let them play with the product. Take steps to prevent ingress of smoke, carbon monoxide and other combustion products into the room through open chimney flues or other fire-protection devices. Sufficient air supply must be provided for proper combustion and exhaust of gases through the chimney of fuel burning equipment to prevent back drafting. The maximum permitted pressure difference per living units is 4 Pa. Transported medium must not contain any dust or other solid impurities, sticky substances or fibrous materials. The fan is not rated for operation in a media that contains hazardous or explosive materials and vapours, i.e. spirits, gasoline, insecticides, etc. Do not close or block the fan intake or exhaust vent not to disturb the natural air passage. Do not sit on the fan and do not put objects on the fan. Follow the guidelines of this service instructions to ensure durable operation of the product.

The fan is designed for vertical or horizontal mounting to the wall, ceiling or
installation on the floor, fig. 3-6. The air motion direction in the system must
match the pointer on the fan casing.
The fan is suitable for individual installation of one unit (fig. 3-6) or two or
more units mounted in parallel (TD) or in series (TL), fig. 7-8.
The parts for the connecting kits are ordered and delivered separately.
While mounting protect the fan against water ingress in the following way:
1. In case of the vertical mounting position: install a protecting hood on the
top, fig. 6.
2. In case of any mounting position: connect air duct at least 1 m long on
both sides of the fan, fig. 4.
9
FAN MOUNTING
Fig. 4Fig. 3
1 m
Fig. 6Fig. 5
Fig. 8Fig. 7

10
Mounting sequence:
- cut power supply off, fig. 9;
- remove the clamps that retain the fan casing, fig. 10-11;
- release the fan casing, fig. 13;
- mark the fastening holes on the mounting surface through the respective
holes in the spigots, drill the holes and fix the spigots with screws, fig. 13-15;
- connect air ducts to the fan casing, fix the casing with the clamps,
rotate the fan casing in such way as to place the terminal compartment
Fig. 9 Fig. 10
Fig. 11 Fig. 12
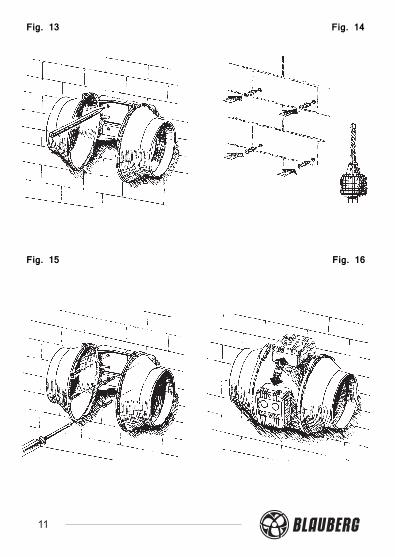
11
Fig. 14Fig. 13
Fig. 16Fig. 15

12
CONNECTION TO POWER MAINS
Turbo 100/125
fan runs at MAX speed
Wiring diagram 1
fan runs at MIN speed
L2
LL1
N~
X
QF
N
L1
L2
S
N
L
~
X
N
L1
N
LQF
~
X
N
L2
N
L
QF
~
X
Speed switch is activated
fan runs at MAX speed
fan runs at MIN speed
Speed switch is activated
Wiring diagram 2
Wiring diagram 3
Wiring diagram 4

13
fan runs at MAX speed
fan runs at MIN speed
Turbo 150/160/200/250/315
Speed switch is activated
fan runs at MIN speed
Speed switch is activated
N
L2
X
N
LQF
~
N
L1X
N
L
QF
~
L2
LL1
N~
X
QF
N
L1
L2
S
N
L
~
X
Wiring diagram 5
Wiring diagram 6
Wiring diagram 7
Wiring diagram 8
fan runs at MAX speed

14
Turbo 100 T/125 T/150 T/160 T/200 T/250 T
Fan does not run
Switch ST is closed
fan runs at MAX speed
Turn-off delay timer starts (2 to 30 min)
Switch ST is open
Fan does not run
Switch ST is closed
fan runs at MIN speed
Turn-off delay timer starts (2 to 30 min)
Switch ST is open
N
L
ST
QFN
L
LT
~
X
N
L
ST
QFN
L
LT
L1
~
X
Wiring diagram 10
Wiring diagram 9

15
Turbo 100 T/125 T/150 T/160 T/200 T/250 T
Fan does not run
Switch ST is open
fan runs at MIN speed
Switch S is closed yes no
Turn-off delay timer starts (2 to 30 min)
fan runs at MAX speed
Switch ST is closed
S
N
L
ST
QFN
L
LT
L1
~
X
Wiring diagram 11

16
Turbo 315 T
N
L
ST
QFN
L
LT
L2
~
XFan does not run
Switch ST is closed
fan runs at MAX speed
Turn-off delay timer starts (2 to 30 min)
Switch ST is open
N
L
ST
QFN
L
LT
L1
~
X Fan does not run
Switch ST is closed
fan runs at MIN speed
Turn-off delay timer starts (2 to 30 min)
Switch ST is open
Wiring diagram 12
Wiring diagram 13

17
Turbo 315 T
L2
L1
N
L
~
X
Fan does not run
Switch ST is open
fan runs at MIN speed
Switch S is closed in position
L1L2
Turn-off delay timer starts (2 to 30 min)
fan runs at MAX speed
Switch ST is closed
S
N
L
ST
QFN
L
LT
L1
~
X
L2
Wiring diagram 14
Wiring diagram 15

N
L
N
L
QF
~
X
18
Turbo 100/125 US
Turbo 150/160/200/250/315 US
Fan does not run
fan runs at MIN speed
Built-in speed switch in position
III
fan runs at MAX speed 0
N
L
N
L
QF
~
X
Wiring diagram 16
Wiring diagram 17

19
Mounting sequence for connection to power mains of the basic model with a built-in speed switch with no power cable and of a fan with a timer:
- cut power supply off by turning the electric switch QF to OFF position, fig. 17. - remove the screws to detach the cover from the electric module and remove the cover, fig. 18. - remove the screws of the retaining clamp and remove the retaining clamp, fig. 19. - route the cable into the terminal box through the electric lead-in and fix the cable with the retaining clamp and the screws, fig. 20. - select the fan operation mode - running at maximum speed, running at low speed or speed control with the external speed switch. - connect the power cable to the fan input terminal block in compliance with a selected wiring diagram, fig. 20 and 21.
Do not connect L and N terminals jointly to L1 und L2 terminals,
refer wiring diagrams 4, 8 and 15.
- install the terminal box cover and fix it with screws, fig. 22. - switch the fan on by turning the automatic switch to ON Position, fig. 23.
Fig. 18Fig. 17
QF

20
Fig. 21
Fig. 23Fig. 22
Fig. 20Fig. 19
QF

21
The fan models W/W1/FR/G/G1/Gl/Gl1/GT/GT1/GTl/GTl1 are equipped with a power cable with various plug types are do not require any mounting operations for connection to power mains.
Fig. 24
Fan does not run
fan runs at MIN speed
Built-in speed switch in position
III
fan runs at MAX speed
0

22
Fig. 25
The fan runs with set air flow
Temperature rises
Temperature falls 2°C below the temperature point
fan runs at MAX speed
G/G1/Gl/Gl1
Speed switch delay timer is activated (5 min)
Temperature rises
Temperature drops to a set point
fan runs at MAX speed
GT/GT1/GTl/GTl1
Thermostat control knob
Speed control knob
The fan runs with set air flow

23
Fig. 26
Fig. 27
FR/FR1
+-
2min30min
T
The fan runs with set air flow
Speed control knob

24
Fig. 28
Fig. 31Fig. 30
QF
MAINTENANCE
Any servicing and maintenance operations of the fan are allowed after it is disconnected from power mains only, fig. 28. Maintenance means regular (at least once in 6 months) cleaning of the fan surfaces from dirt and dust. To clean the fan, wipe its surfaces with a cloth wetted in a mild soap solution, then wipe the surfaces dry, fig. 29-32.
Avoid water dripping on the motor and circuit board! Fig. 33.
Fig. 29

25
Fig. 33Fig. 32
Transportation is allowed by any transportation vehicle provided that the product is in the manufacturer's original package. Store the delivered product in the manufacturer's original packing box in a dry ventilated premise with the ambient temperature from +5°C up to + 40°C and relative humidity less than 80%. The storage environment must be free of dust, acid or alkali vapours to prevent corrosion.
STORAGE AND
TRANSPORTATION RULES
The fan complies with the requirements according to the EU norms and directives, to the relevant EU-Low Voltage Equipment Directives, EU-Directives on Electromagnetic Compatibility.
We hereby declare that the following product complies with the essential protection requirements of Electromagnetic Council Directive 2004/108/EC, 89/336/EEC and Low Voltage Directive 2006/95/EC, 73/23/EEC and CE-marking Directive 93/68/EEC on the approximation of the laws of the Member States relating to electromagnetic compatibility. This certificate is issued following test carried out on samples of the product referred to above. Assessment of compliance of the product with the requirements relating to electromagnetic compatibility was based on the following standards.
MANUFACTURER'S WARRANTY

26
Protection degree index according to IP rating against access to hazardous parts and water ingress - IPX4. The fan does not require grounding. The manufacturer hereby warrants normal operation of the fan over the period of five years from the retail sale date provided observance of the installation and operation regulations. In case of failure due to faulty equipment during the warranty period the consumer has the right to exchange it. If case of no confirmation of the sale date, the warranty term shall be calculated from the manufacturing date.
The replacement is offered by the Seller.
The MANUFACTURER shall not be liable for any damage resulting from any misuse of or gross mechanic interference with the fan.
Please follow the applicable instructions.
DISPOSAL
Do not dispose in domestic waste. The unit contains in part material that can be recycled and in part substances that should not end up as domestic waste. Dispose of the unit once it has reached the end of its working life according to the regulations valid where you are.

27
WARRANTY CARD

TURBO_EN-06
SALES DATE
MANUFACTURED ON (DATE)
SOLD
APPROVAL MARK
Fan is recognized as serviceable
100 125 150
160 200 250 315
Turbo 1
US G GI
GT GTI FR W
T
Date of manufacture is provided on product label
Blauberg Ventilatoren GmbHAidenbachstr Str. 52. 81379 Munich, VAT ID: DE 287350231