tutorial act wins fc
TRANSCRIPT
S Tutorial ActWin SFC programming 1 (17)
Copyright © Actwin AB 2001 Tutorial version 4.0 ActWin version 3.2*
This tutorial is based on the ActWin Ladder tutorial. For hardware configuration, general symbol handling etc. please study the Ladder tutorial first.
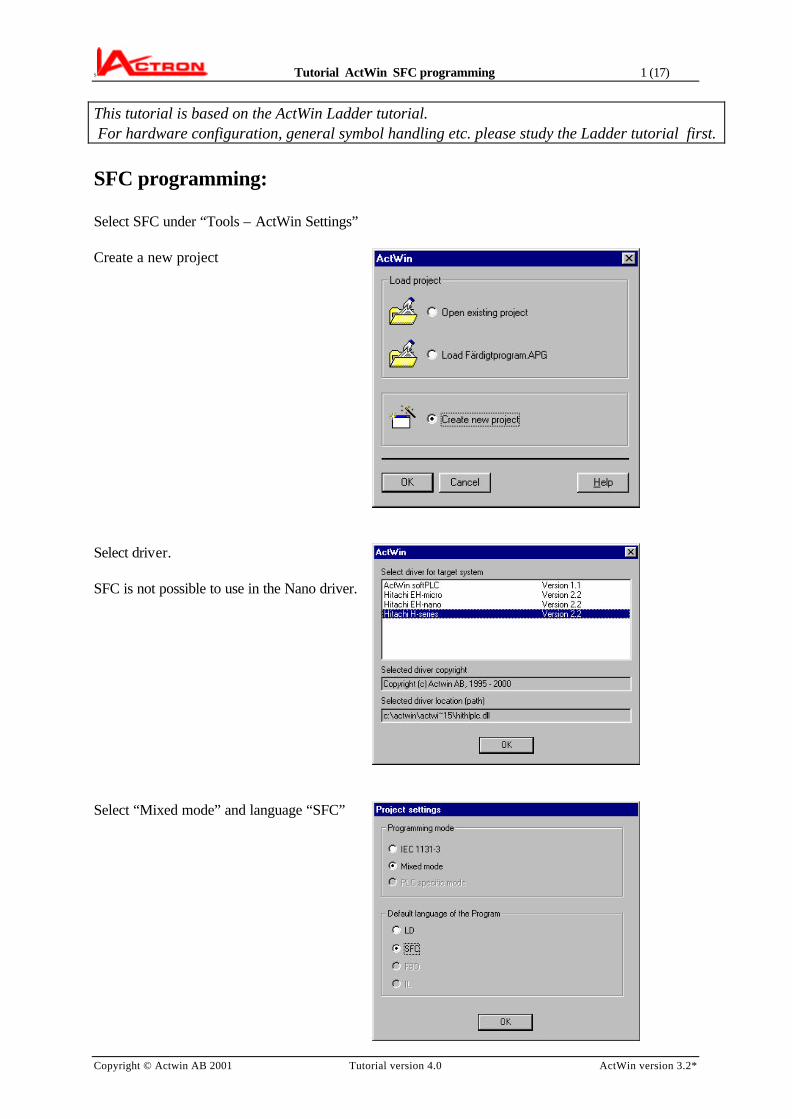
SFC programming: Select SFC under “Tools – ActWin Settings” Create a new project
Select driver. SFC is not possible to use in the Nano driver.
Select “Mixed mode” and language “SFC”

S Tutorial ActWin SFC programming 2 (17)
Copyright © Actwin AB 2001 Tutorial version 4.0 ActWin version 3.2*
A new window based on SFC will turn up.
SFC in the IEC1131 standard is the programming language, which is the upper structure of a project. It takes care of the sequence flow and uses the other programming languages in different parts where it is natural. ActWin also allow let you make the complete program inside the SFC in a comfortable way. The principal of SFC programming is basically very simple. There are steps . These define states where one or more action takes place.
Normal step Start step (one per network)
There are transitions . This defines the condition to move from one step to another.
S Tutorial ActWin SFC programming 3 (17)
Copyright © Actwin AB 2001 Tutorial version 4.0 ActWin version 3.2*
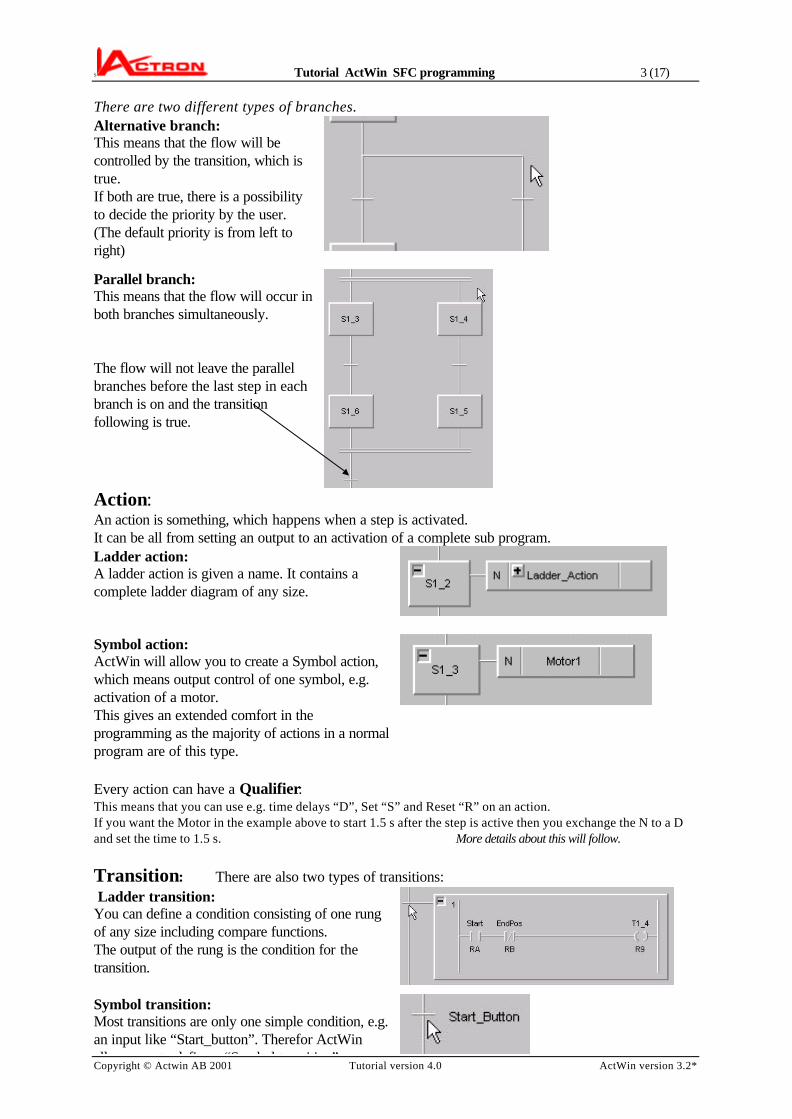
There are two different types of branches. Alternative branch: This means that the flow will be controlled by the transition, which is true. If both are true, there is a possibility to decide the priority by the user. (The default priority is from left to right)
Parallel branch: This means that the flow will occur in both branches simultaneously. The flow will not leave the parallel branches before the last step in each branch is on and the transition following is true.
Action: An action is something, which happens when a step is activated. It can be all from setting an output to an activation of a complete sub program.
Ladder action: A ladder action is given a name. It contains a complete ladder diagram of any size.
Symbol action: ActWin will allow you to create a Symbol action, which means output control of one symbol, e.g. activation of a motor. This gives an extended comfort in the programming as the majority of actions in a normal program are of this type.
Every action can have a Qualifier: This means that you can use e.g. time delays “D”, Set “S” and Reset “R” on an action. If you want the Motor in the example above to start 1.5 s after the step is active then you exchange the N to a D and set the time to 1.5 s. More details about this will follow.
Transition: There are also two types of transitions: Ladder transition: You can define a condition consisting of one rung of any size including compare functions. The output of the rung is the condition for the transition.
Symbol transition: Most transitions are only one simple condition, e.g. an input like “Start_button”. Therefor ActWin allows you to define a “Symbol transition”

S Tutorial ActWin SFC programming 4 (17)
Copyright © Actwin AB 2001 Tutorial version 4.0 ActWin version 3.2*
allows you to define a “Symbol transition”
S Tutorial ActWin SFC programming 5 (17)
Copyright © Actwin AB 2001 Tutorial version 4.0 ActWin version 3.2*
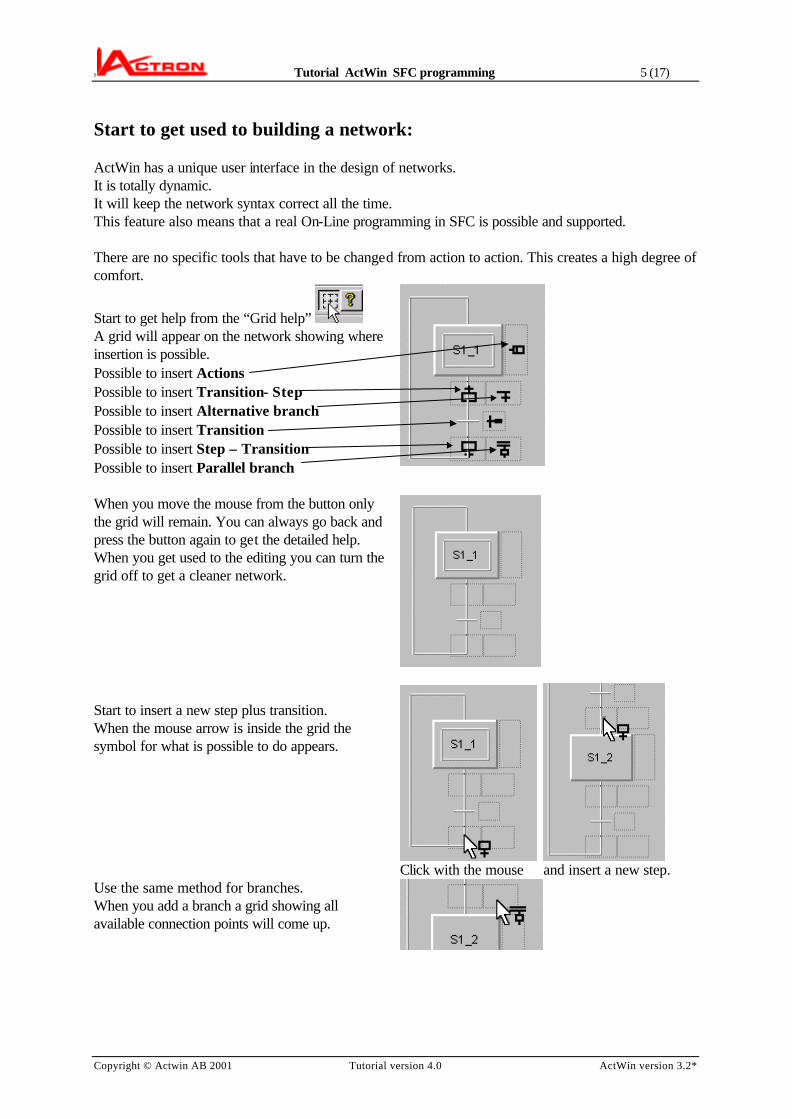
Start to get used to building a network: ActWin has a unique user interface in the design of networks. It is totally dynamic. It will keep the network syntax correct all the time. This feature also means that a real On-Line programming in SFC is possible and supported. There are no specific tools that have to be changed from action to action. This creates a high degree of comfort.
Start to get help from the “Grid help”
A grid will appear on the network showing where insertion is possible.
Possible to insert Actions
Possible to insert Transition- Step
Possible to insert Alternative branch
Possible to insert Transition
Possible to insert Step – Transition
Possible to insert Parallel branch
When you move the mouse from the button only the grid will remain. You can always go back and press the button again to get the detailed help. When you get used to the editing you can turn the grid off to get a cleaner network.
Start to insert a new step plus transition. When the mouse arrow is inside the grid the symbol for what is possible to do appears.
Click with the mouse and insert a new step.
Use the same method for branches. When you add a branch a grid showing all available connection points will come up.

S Tutorial ActWin SFC programming 6 (17)
Copyright © Actwin AB 2001 Tutorial version 4.0 ActWin version 3.2*
Click on one of the connection points
A parallel branch is created. Click here to expand the branch. After a short while you will get used to the way of editing and you do not need the grid.
Let us turn off the grid help.
Insert transitions.
Select Symbol transition or Ladder transition. If it is a single symbol you will get the address Search/Enter dialog. If it is a Ladder action you can Enter a name. To create the ladder condition, see example project later in the tutorial.
Insert an action.
You will get the Action selection and search box. Select BOOL (Symbol) or LD action and enter a name and address (if it is symbol)
If it is a Ladder action there will be an indicating that it contains code. If you click on it then the action will be hidden.

S Tutorial ActWin SFC programming 7 (17)
Copyright © Actwin AB 2001 Tutorial version 4.0 ActWin version 3.2*
Click on the and you will get a window where you can edit the action (program) code. (see Ladder editing) When you are done, click on the “main program folder” to go back to the SFC.
If you select you will see all places where you can insert a Comment. To edit the complete graph or if you want to mark the graph, right click on the network comment.
This will allow you to create a New network,
a new Activity Condition or a Reset Condition
Use the zoom tools
When the graph is marked you can zoom it individually
small zoom tiny zoom
Continue to get used to the editing method
S Tutorial ActWin SFC programming 8 (17)
Copyright © Actwin AB 2001 Tutorial version 4.0 ActWin version 3.2*
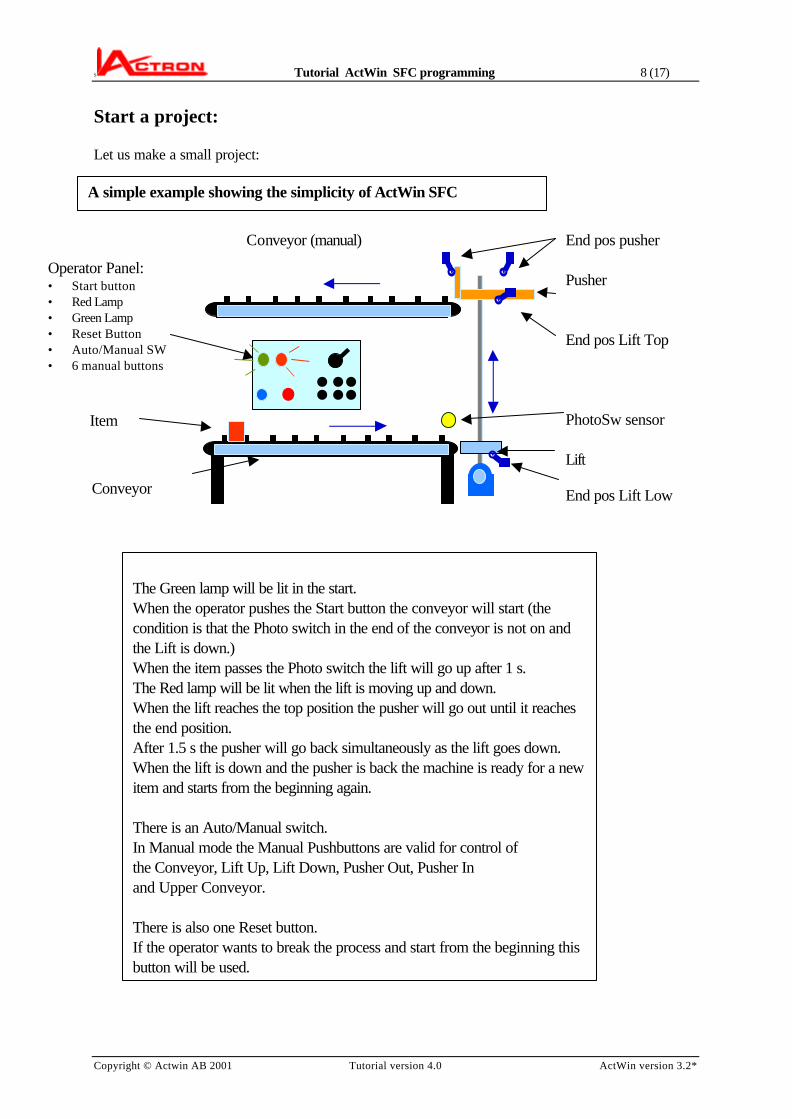
Start a project: Let us make a small project:
A simple example showing the simplicity of ActWin SFC
The Green lamp will be lit in the start. When the operator pushes the Start button the conveyor will start (the condition is that the Photo switch in the end of the conveyor is not on and the Lift is down.) When the item passes the Photo switch the lift will go up after 1 s. The Red lamp will be lit when the lift is moving up and down. When the lift reaches the top position the pusher will go out until it reaches the end position. After 1.5 s the pusher will go back simultaneously as the lift goes down. When the lift is down and the pusher is back the machine is ready for a new item and starts from the beginning again. There is an Auto/Manual switch. In Manual mode the Manual Pushbuttons are valid for control of the Conveyor, Lift Up, Lift Down, Pusher Out, Pusher In and Upper Conveyor. There is also one Reset button. If the operator wants to break the process and start from the beginning this button will be used.
Operator Panel: • Start button • Red Lamp • Green Lamp • Reset Button • Auto/Manual SW • 6 manual buttons
Conveyor
End pos pusher Pusher End pos Lift Top PhotoSw sensor Lift
End pos Lift Low
Item
Conveyor (manual)

S Tutorial ActWin SFC programming 9 (17)
Copyright © Actwin AB 2001 Tutorial version 4.0 ActWin version 3.2*
Start to make a hardware configuration. This time we will use a EH150 with the EH-BS5 rack..
Right click on the EH_XD16 module and start the input allocation (of the already know inputs). Continue afterwards with the output allocation. Use the buttons to go from one module to another.
In the first step the Green Lamp will be on. Click in the Action field
A window will appear, where you can Add the symbol “Green_Lamp”. As this is a single symbol, select BOOL

S Tutorial ActWin SFC programming 10 (17)
Copyright © Actwin AB 2001 Tutorial version 4.0 ActWin version 3.2*
The step will now show the symbol action Green_Lamp. The next transition will be the start condition. This is a combination of inputs, so we have to use a ladder rung. Click on the transition field. Select LD. Give the transition a descriptive name. e.g. “Startcondition”
Press OK and the network will look like this: To define the ladder condition, double click on the rung. The ladder-editing window will open. Use the same tools as in ActWin Ladder programming.
The start condition is that the Lift is down, the Photo switch on the conveyor is not darkened and the operator pushes the start button. Press the “main” folder to return to SFC
The transition now looks like this. Observe that there is a zoom button on the steps and actions that contain something. Click on the
The transition will look like this:
S Tutorial ActWin SFC programming 11 (17)
Copyright © Actwin AB 2001 Tutorial version 4.0 ActWin version 3.2*
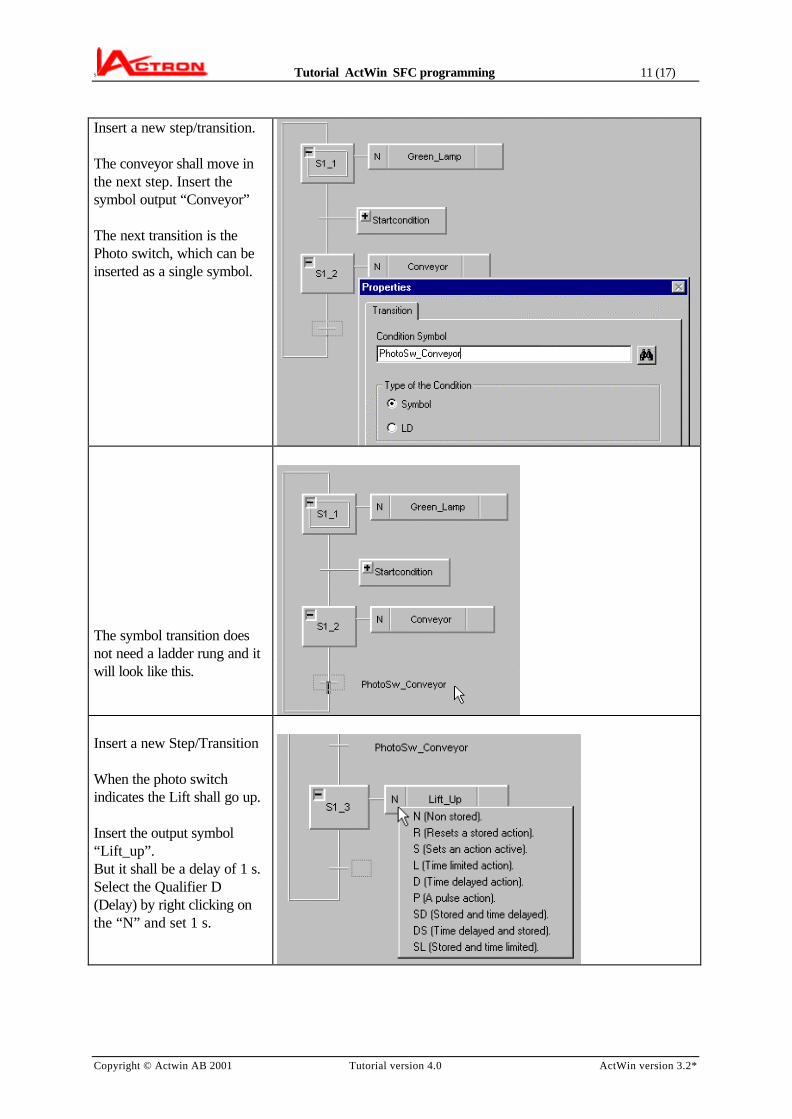
Insert a new step/transition. The conveyor shall move in the next step. Insert the symbol output “Conveyor” The next transition is the Photo switch, which can be inserted as a single symbol.
The symbol transition does not need a ladder rung and it will look like this.
Insert a new Step/Transition When the photo switch indicates the Lift shall go up. Insert the output symbol “Lift_up”. But it shall be a delay of 1 s. Select the Qualifier D (Delay) by right clicking on the “N” and set 1 s.
S Tutorial ActWin SFC programming 12 (17)
Copyright © Actwin AB 2001 Tutorial version 4.0 ActWin version 3.2*
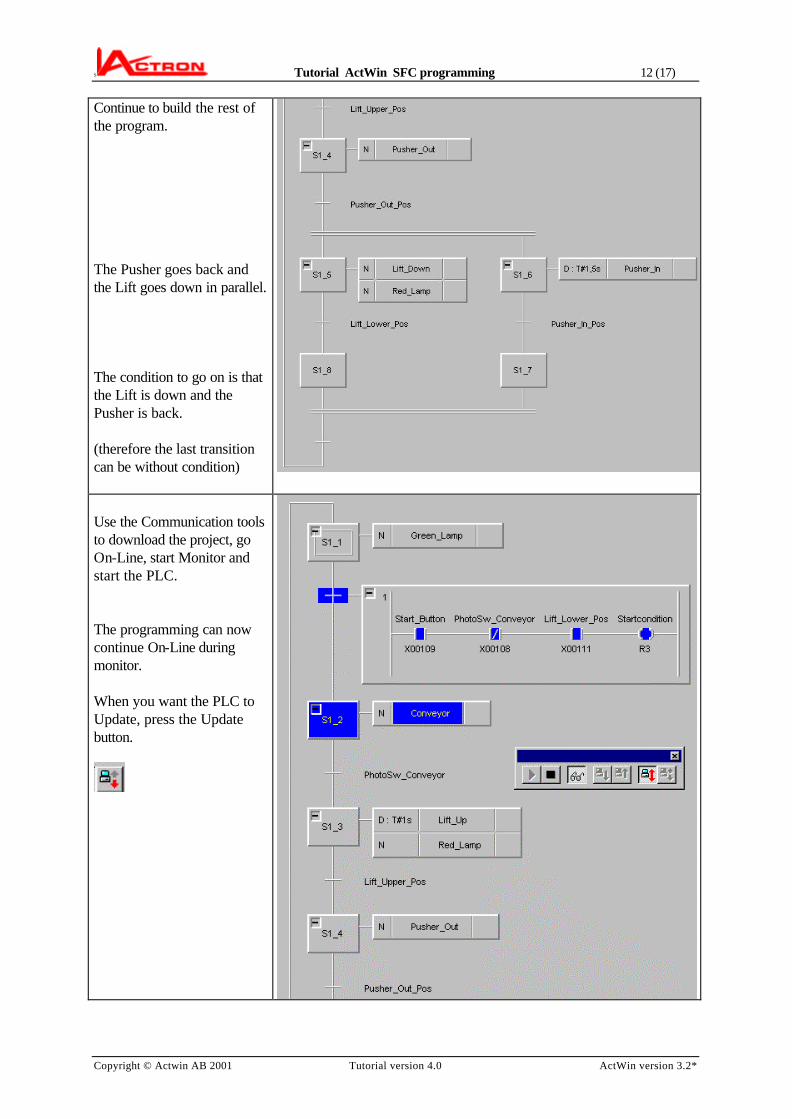
Continue to build the rest of the program. The Pusher goes back and the Lift goes down in parallel. The condition to go on is that the Lift is down and the Pusher is back. (therefore the last transition can be without condition)
Use the Communication tools to download the project, go On-Line, start Monitor and start the PLC. The programming can now continue On-Line during monitor. When you want the PLC to Update, press the Update button.
S Tutorial ActWin SFC programming 13 (17)
Copyright © Actwin AB 2001 Tutorial version 4.0 ActWin version 3.2*
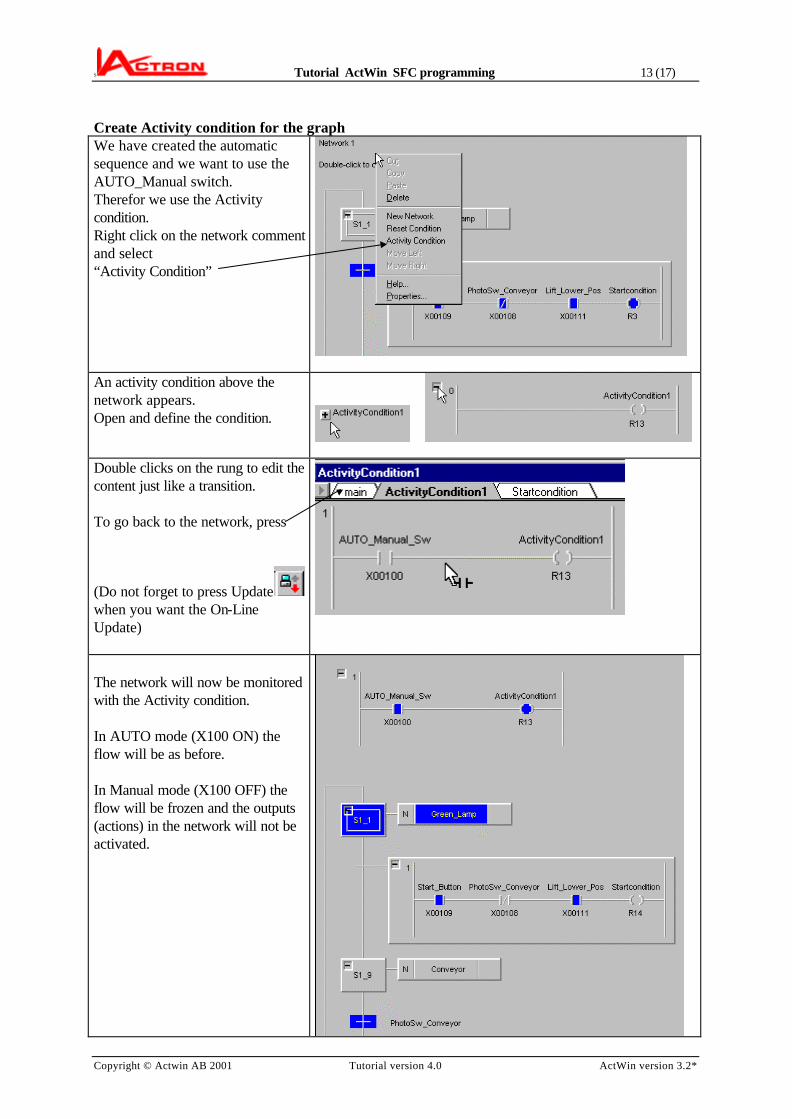
Create Activity condition for the graph We have created the automatic sequence and we want to use the AUTO_Manual switch. Therefor we use the Activity condition. Right click on the network comment and select “Activity Condition”
An activity condition above the network appears. Open and define the condition.
Double clicks on the rung to edit the content just like a transition. To go back to the network, press
(Do not forget to press Update
when you want the On-Line Update)
The network will now be monitored with the Activity condition. In AUTO mode (X100 ON) the flow will be as before. In Manual mode (X100 OFF) the flow will be frozen and the outputs (actions) in the network will not be activated.

S Tutorial ActWin SFC programming 14 (17)
Copyright © Actwin AB 2001 Tutorial version 4.0 ActWin version 3.2*
Add a Reset condition. The procedure is the same as to add an Activity Condition. When the RESET condition is ON all steps will be disactivated except the Start step, which will be activated. This makes it possible to start the process from the beginning.
Zoom in the conditions. Now the automatic control of the machine works. We also need a Hand control. These conditions will be described separately.
A very good way to do that is to use a ladder action and simply describe the logic’s in ladder. Make a new network. The only purpose with the network is to keep the new Ladder action. Therefor it will only have a start step and no condition on the transition.
Create a Ladder action.

S Tutorial ActWin SFC programming 15 (17)
Copyright © Actwin AB 2001 Tutorial version 4.0 ActWin version 3.2*
Open the ladder action
Create the typical hand control.
As the hand control only shall be valid in Hand (manual) mode the last thing we have to do is to define the Activity condition.

S Tutorial ActWin SFC programming 16 (17)
Copyright © Actwin AB 2001 Tutorial version 4.0 ActWin version 3.2*
This is a special way of using a one step network and a Ladder action. There are some more information you have to know, which is due to the standard itself. *1
*1 Note that when you use Ladder actions in other cases an output will keep the status when it leaves the step if you do not
connect a special symbol in series with the output. The symbol is called <LadderActionName>.Q In this case “Hand_Control.Q”.
An action will be executed one time after it leaves the step. E.g. a counter will count an extra time if you do not connect this
special symbol in series. (This could be a little confusing. But it is a consequence of the IEC1131 standard.)
S Tutorial ActWin SFC programming 17 (17)
Copyright © Actwin AB 2001 Tutorial version 4.0 ActWin version 3.2*
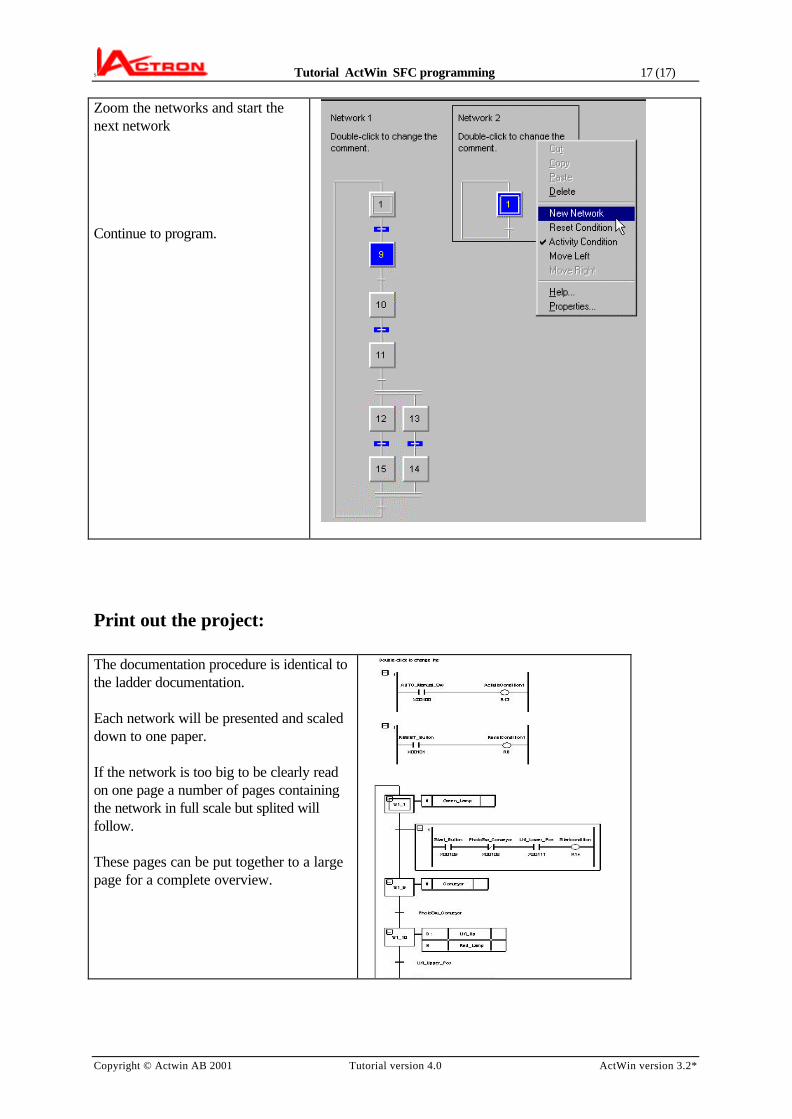
Zoom the networks and start the next network Continue to program.
Print out the project: The documentation procedure is identical to the ladder documentation. Each network will be presented and scaled down to one paper. If the network is too big to be clearly read on one page a number of pages containing the network in full scale but splited will follow. These pages can be put together to a large page for a complete overview.