tutorial combination crisscross + slider + easel greeting...
TRANSCRIPT

TUTORIAL Combination Crisscross + Slider + Easel
Greeting Card
This tutorial follows the same format as my mini album tutorials where I include written instructions and photos in a PDF document and links to the instructional videos where I
make the item from start to finish.
More tutorials are available at: http://www.scrappinrabbit.com/p/tutorials.html
February 2015 www.scrappinrabbit.com

2
My Angel Policy
You can use this tutorial to make as many cards as you want for fun and profit. If you wish to sell your cards, a link back to my website (www.scrappinrabbit.com) would be very much appreciated.
This document or portions thereof (including images) and videos may not be reproduced either in digital or printed format for distribution for free or for profit. It may not be sold as part of a kit. You can however distribute links to the tutorial available at http://www.scrappinrabbit.com/p/tutorials.html where people are free to download it themselves. I tried to be as accurate as possible when writing this tutorial however please note I am not responsible for errors or omissions. Contact me at [email protected] if you need clarification on any part of the tutorial. Tutorial – Combination Crisscross, Slider and Easel Greeting Card Text and photographs copyright © 2015 by Christine S Jensen. All Rights Reserved. ISBN 978-0-9919023-6-1 Written, photographed and published by Christine S Jensen

3
Introduction In this tutorial, I show you how to create my new style of greeting card pictured on the cover step by step, from start to finish. This is a combination of three types of cards: a criss-cross card that holds tags, a slider where you can attach photos on either side of the card (and journal on the back if you wish), and an easel that displays the card upright. The card measures 5-1/2”w x 5-1/2”h not including the side pulls and the trim at the top. The “envelo-box” included in this tutorial measures 6-3/4”w x 6-3/4”h and is 5/8” thick so there’s lots of room to accommodate embellishments on your card. I wrote this tutorial at the same time as I was making the blue baby boy card. The written tutorial follows along with the videos (see links below). It’s a good idea to look at the video and read all of the instructions for a given section before you begin to work. Once you’ve made one card, you might not need to review the videos again and can simply refer to the written instructions.
Links to the instructional videos: Click on the links below to view the instructional videos, or copy and paste the web address of the video you want to watch into your web browser if links don’t open automatically (sometimes the settings on your computer can prevent links from opening automatically). Also I’ve noticed that sometimes when using my tablet videos will not always run if I choose to view them with the built-in web browser. If I select the YouTube application to view them on my tablet, I don’t have any problems. Part 1 - Making the crisscross card (http://youtu.be/xmXVmza4JdQ) Part 2 - Making the slider (http://youtu.be/6Y-9QTIVXhk) Part 3 - Making the easel (http://youtu.be/O53omeldYCw) Part 4 - Making an envelope template and using it to make envelopes (http://youtu.be/ssLllDvnI10)
Supplies Following are the supplies I used to make the greeting card in this tutorial, but use what you already have on hand to customize your card.
• Paper trimmer • Ruler • Score board and bone folder • 8-1/2 x 11 plain cardstock (I buy Recollections cardstock in packs of 50 sheets at Michaels) • Paper for matting (I used a few sheets of paper from the BABY BOY stack by DCWV (Die Cuts With a View)
and paper I already had in my stash. For the baby girl album, I used the BABY GIRL stack also by DCWV. • Piece of plastic grocery bag to make the slider • Two-sided tape • Your favourite adhesive for matting with the scrapbook paper • Glue gun and glue sticks to attach embellishments (white glue also works well but takes longer to dry) • Decorative edge punch, corner punches, circle punch (the border punch I used is called “Abstract Flower Edger
punch” by EK Success – use the punches you already have on hand) • Embellishments: I used fabric flowers, a button, stick-on pearls, small puffy fabric hearts, ribbon (again use
whatever you already have on hand) There is a tutorial available on my website that shows how to make flowers from lace (http://www.scrappinrabbit.com/2013/05/how-to-make-flowers-out-of-lace.html)

4
MEASUREMENTS To keep things simple and to avoid cutting your patterned paper in the wrong direction, I always give measurements in the same order: width X height. 2”w x 6”h and 6”w x 2”h Borders: When punching a border along the edge of a piece, you can adjust the width of the piece to suit your decorative edge. Use your edge punch on scrap paper to make yourself a template of your design. This helps determine what width your paper should be to suit your design.
These are the pieces you will need to cut from plain cardstock (I used different colours): Crisscross Card:
• Cut 2: 11”w x 5-1/2”h (left and right card bases) • 4-1/2”w x 4-1/2”h (large tag) • 1-1/4”w x 3”h (small tag)
(Also cut scrapbook paper 5-1/4” x 5-1/4” for matting the crisscross sections)
Slider:
• 5-1/4”w x 11”h (long base) • 5-1/4”w x 5-3/4”h (short base) • Cut 2: 5-1/4”w x 5-1/8”h (photo mats)
Easel:
• 5”w x 11”h Envelope
• 11-3/8”w x 11-3/8”h (to make an envelope template) • 11-3/8”w x 11-3/8”h (to make the envelope)
Let’s begin!

5
Crisscross Card For each of the two card bases, on the 11 inch side, score at 5-1/2”. The right panel of the left piece will eventually be attached over the left panel of the right piece to form the back of the card.
Place one of the bases on your scoreboard and position it so that you will score from the center crease at the top of the base down to the bottom left corner of the base.
Flip the piece over and fold the cardstock at the crease to form the crisscross on the right side of the card.

6
Trim away some of the excess cardstock leaving about a ½” seam to the right of the crease. Trim a bit of the corner at the top of the seam if it interferes when folding down the crisscross.
Attach some two-sided tape along the inside of the seam, remove tape backing and fold the seam to adhere in place.
The right side of the crisscross card is done.

7
Place the other base on your scoreboard and position it so that you will score from the top of the center crease down to the bottom right corner of the base.
Fold in at the crease to form the crisscross, trim away the excess leaving a ½” seam, and secure the seam down with two-sided tape. The left crisscross is completed.
I attached a punched border in a coordinating colour along the top edge of the card. Use a piece of scrap cardstock and cut a border that measures approximately 5-1/4”w (a bit narrower than the back section of the card. Put two-sided tape along the back edge of the border and adhere it over the top edge of the right crisscross base.

8
On the back of the square section of the left crisscross, apply two sided tape along each edge and across the middle. This piece will be attached over the right crisscross base.
Start by removing one piece of tape backing, position the left base over the right base and then remove the rest of the tape backing to finish attaching both pieces together.
Mat the inside back section of the card. When matting, I like to leave a 1/8” border of cardstock showing around each edge. The crisscross will cover the bottom part of the card so you don’t need to mat all the way down if your paper isn’t long enough.

9
Put two-sided tape along the inside bottom edge of the right crisscross. Remove tape backing and fold the crisscross to the left to adhere.
Before attaching the left crisscross, I want to mat the triangle shape on the right crisscross. Cut a piece of scrapbook paper to measure 5-1/4”w x 5-1/4”h. By cutting this square diagonally in two, I will have two pieces that will fit perfectly over the crisscross sections, with a 1/8” border of cardstock showing around all 3 edges of the triangles. Use one of these pieces to mat the left crisscross section.
Because the pattern in my paper is directional, I need to cut another piece to fit the crisscross on the right otherwise my matting will be sideways. Use the other triangle piece as a template to cut your paper in the proper direction and mat the right crisscross section.

10
I punched a border from a scrap piece of cardstock to fit along the diagonal edge of the right crisscross. I attached the border with two-sided tape and then flipped the card over to trim the overhanging edge.
Apply two-sided tape to the inside bottom edge of the left crisscross. Remove tape backing and fold the crisscross to the right and adhere.
I punched decorative corners on my large tag.

11
I decided to mat my tag with white cardstock. I trimmed the matting so that there would be a 1/8” border all around. I have to trim the corners of the matting so the decorative corners on the base tag will be visible. To do this, I punched the same decorative corners on the matting, and then punched them out with my circle punch.
I inked the edges of my matting and adhered it to the tag. The corners of my matting fit perfectly near the decorative corners on the tag.
I cut a small image from the paper collection and attached it to the top of the tag, leaving room for a short message and signature underneath.

12
Fold a 3” piece of ribbon in two and pierce a small hole in the ribbon and at the top of the tag where it will be attached with a brad. You can mat the back of the tag if you want to hide the ends of the brad or just leave it plain for a note.
I matted the smaller tag with another image from the paper collection. Insert the large tag in the pocket of the crisscross card and the smaller tag into the left crisscross edge.

13
Slider Long base piece: on the 11 inch side, score at 3/8” and at 5-3/4”. Fold up at the creases.
Short base piece: On the 5-3/4” side, score at ½” to form a hinge. Apply two-sided tape to the inside of the hinge and fold the hinge up.
The hinge of the short base will attach behind the large end section of the long base forming one long piece. Remove the tape backing from the hinge and attach.
14
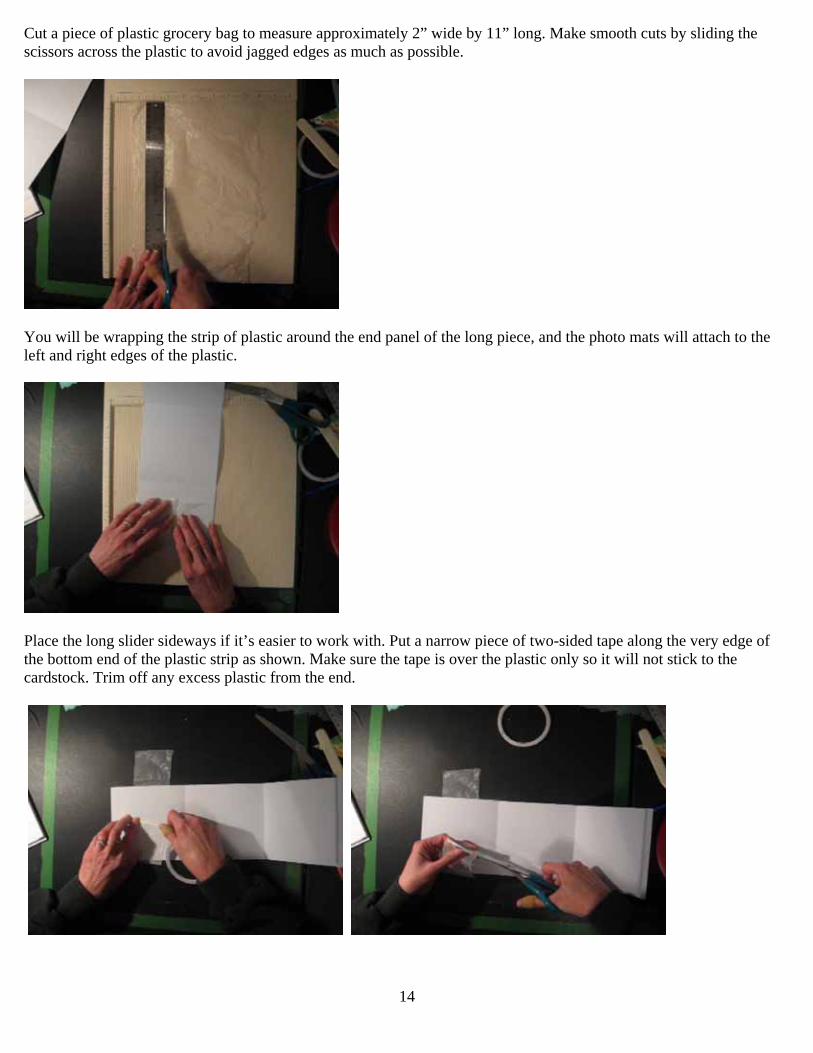
Cut a piece of plastic grocery bag to measure approximately 2” wide by 11” long. Make smooth cuts by sliding the scissors across the plastic to avoid jagged edges as much as possible.
You will be wrapping the strip of plastic around the end panel of the long piece, and the photo mats will attach to the left and right edges of the plastic.
Place the long slider sideways if it’s easier to work with. Put a narrow piece of two-sided tape along the very edge of the bottom end of the plastic strip as shown. Make sure the tape is over the plastic only so it will not stick to the cardstock. Trim off any excess plastic from the end.

15
Remove the tape backing and fold the other end of the plastic over to attach, making sure it’s NOT too snug (the plastic will need to be able to “roll” back and forth over the cardstock. Trim excess plastic from the end.
Shift the piece of plastic so that the seam end is all the way to the left edge of the slider.
(In the next few photos, I rotated the slider so that the left edge is at the bottom to make it easier to work with.) Center the plastic strip on the slider panel keeping the seam end close to the edge. Put a narrow piece of two-sided tape over the edge of the plastic where the ends are joined. Remove the tape backing and attach the left edge of the first photo mat (the 5-1/8” edge) to the edge of the plastic.

16
Fold the bottom panel of the slider up so that the first photo mat is on the inside of the slider. Apply a thin strip of two-sided tape to the right edge of the exposed plastic.
Remove the tape backing from the plastic and attach the right edge of the photo mat (the 5-1/8” edge).
Expose both photo mats by simultaneously pulling on the right edge of the first photo mat, and the left edge of the second photo mat. You will be attaching the pull-tabs and matting the photo mats.

17
I added my pull-tabs after matting the photo mats, but you can add them before matting if you prefer. Mat both sides of the photo mats, or leave the back side plain for journaling if you prefer. The photo mat on the right will be a bit narrower because the left edge is hidden inside the slider.
Push the photo mats back inside the slider. Add two-sided tape over the 3/8” seam at the other end of the slider.
Remove the tape backing and fold the panel to cover over the photo mat - the seam will attach to the base of the slider behind the photo mat.

18
Press over the seam to adhere.
Pull out the photo mats to attach the pull-tabs. I punched out two top-notes and cut each in two to make each pull-tab.
I attached a die-cut piece to each side of the photo mat so that my pull-tab is a double thickness.

19
Repeat to add a pull-tab to the other photo mat.
The front of the slider will be attached to the back of the crisscross card. Make sure the photo mats are facing up and slide them back inside the slider to make it easier to work with. With the slider still facing up, apply two-sided tape along the edges and across the surface.
Remove a piece of tape backing from the slider. Flip both the card and the slider over, and position the slider over the back of the crisscross card, centering horizontally and vertically so that the slider is not visible from the front of the card. (Make sure nothing is upside down if you have a directional pattern on your paper!) Attach the slider. Continue removing the tape backing and pressing down to finish adhering the slider.

20
Easel The easel is a bit narrower than the width of the card. I punched a decorative edge at the front end of my easel. (You can make your easel even narrower than the recommended 5” to accommodate your punched design). Place the easel piece on your scoreboard with the punched end to the right.
On the 11 inch side, score at 2-3/4” and 5-1/2”.
Fold both creases. The punched edge will be at the front of the card, and the panel at the other end will be “tented down” and attached behind the slider along the bottom section of the card.

21
Apply two-sided tape around the edges and across the surface of end panel only (end section that measures 5”w x 2-3/4”h). The taped end will attach behind the card along the bottom edge of the slider as shown in the 2nd photo.
It’s easier if you work from the back with the punched border of the easel at the top and the taped panel flush with the bottom of the card. Remove a piece of the tape backing from the easel and begin attaching it to the back of the card.
Remove the rest of the tape backing from the panel and finish attaching the easel. Mat the bottom base of the easel. You don’t need to mat the entire base as it won’t all be visible but the matting does add strength to the base.

22
Embellish the front of the easel. You will need at least one raised embellishment for the base of the card to rest against. My embellishments consist of a title from the paper collection (I used foam dots to make it 3D), some ribbon roses and stick-on pearls.
Now that the card is assembled I finished adding my other embellishments.
• a strip of eyelet along the left crisscross and stick-on pearls on each of the pull-tabs (I had already added these before)
• a lace flower with button center (a tutorial on making flowers from fabric is available on my website at http://www.scrappinrabbit.com/2013/05/how-to-make-flowers-out-of-lace.html)
• some ribbon roses on either side of the lace flower • a ribbon rose on the large tag • a little puffy heart at the top left corner of the card and on the large tag

23
Envelope Making an envelope template I used the flip side of a sheet of 12x12” scrapbook paper to make my template. You need to start with by cutting the paper to measure 11-3/8”w x 11-3/8”h. Fold the paper in two to form a rectangle, then fold again in two to form a small square.
Unfold the paper. The fold lines show the center on each of the four edges of the paper.

24
Using a ruler, draw a line starting from the center fold at the top edge of the paper to the center fold at the right edge of the paper. Repeat around all sides of the paper to form a diamond shape.
On each side of the page, make a mark 7/8” to the left AND 7/8” to the right of the center fold.
Draw a line that extends from the left mark at the top of the paper down to the right mark on the right side of the paper. Rotate the paper 90 degrees and repeat on all sides.

25
Cut out the inverted “V” shape formed by the lines at the center on each side of the paper.
This is the template I will be using to make envelopes.
Making the Envelope Make sure you start with a sheet of paper cut to 11-3/8”w x 11-3/8”h. Lay the envelope template over the back of the paper and trace inside the inverted “V” on each side of the paper. Cut out each inverted “V”.

26
Your envelope is ready to score and fold along each of the four flaps.
Place the envelope on your scoreboard, lining up the inside corners of two inverted “V”s on either side of a flap with a score-line on the board. Score the fold line for the first flap. Repeat for the other three flaps.
Fold down a flap and position it flush against the top of your scoreboard. Beginning with the left flap, make a score-line 5/8” to the left of the first fold line (this will make the envelope 5/8” thick). Repeat for the other three flaps.

27
Fold the flaps at each of the 8 score lines to begin forming the envelope.
If there’s a design on your paper, make sure the top flap is pointing up. I start by attaching the right flap to the bottom flap. Put a strip of two-sided tape along the lower edge inside the right flap. Remove the tape backing and fold the flap over to overlap the bottom flap and adhere.
Apply two-sided tape along the lower edge of the left flap and fold over to adhere over the edges of the bottom and right flaps.

28
Apply two-sided tape along the inside edges of your top flap. Don’t forget to sign your card and make sure the photo mats are well tucked inside the slider. Insert the card into your envelope and seal. You can also add coordinating embellishments to the envelope.
I hope you enjoyed this tutorial and making your own greeting cards. I’d love to see photos of your work! Email me at [email protected]. Make sure to check out my mini album tutorials at http://www.scrappinrabbit.com/p/tutorials.html ! Christine Jensen [email protected]