tutorial v 61 imperial
TRANSCRIPT

7/30/2019 Tutorial v 61 Imperial
http://slidepdf.com/reader/full/tutorial-v-61-imperial 1/247
Version 6.1(Imperial)
20-20 Design Tutorial
20-20 Technologies, Inc.

7/30/2019 Tutorial v 61 Imperial
http://slidepdf.com/reader/full/tutorial-v-61-imperial 2/247
© 2002 20-20 Technologies Inc. All rights reserved. Printed in Canada
Published by:
20-20 Technologies Inc.1867 Berlier Street
Laval, Quebec
Canada H7L 3S4.
20-20 and all related products are trademarks of
20-20 Technologies Inc.
All other brand and product names are trademarks or registeredtrademarks of their respective companies.
No part of this document may be reproduced or transmitted in any form
or by any means, electronic or mechanical, including photocopying,
recording or by an information storage and retrieval system, without prior permission in writing from 20-20 Technologies Inc.

7/30/2019 Tutorial v 61 Imperial
http://slidepdf.com/reader/full/tutorial-v-61-imperial 3/247
i
TABLE OF CONTENTS
Table of Contents
Before You Start ................................................ ix
Session 1 ~ Creating a Sales Project .................1
Display the 20-20 Shortcut Bar.................................................1 Display the Shortcut Bar Icon.................................................................. 2
Access 20-20 Design, then the Project Module........................ 2 Access 20-20 Design .............................................................................. 2 Access 20-20 Project .............................................................................. 4
Select the Demo Database ...................................................... 5 Exit and Re-enter 20-20 Project ............................................... 6
Assign a Currency Code and Format ....................................... 7 Create the Sales Project ..........................................................9
Enter the Customer’s Name & Address .................................................. 9 Enter the Customer’s Phone Numbers.................................................. 12 Create the Project ................................................................................. 15
Assign the Reviewer.............................................................................. 15 Assign the Dealer .................................................................................. 16
Assign the Currency to the Current Project ............................ 18 Add a Note for the Customer................................................................. 20
Assign the Design File........................................................................... 22 Assign the Designer .............................................................................. 23 Save Design Information....................................................................... 23
Recap.....................................................................................24

7/30/2019 Tutorial v 61 Imperial
http://slidepdf.com/reader/full/tutorial-v-61-imperial 4/247
ii
TABLE OF CONTENTS
Session 2 ~ Setting Design Preferences.......... 27
Access 20-20 Design from the Project Module ...................... 27 Customize the Main Screen ................................................... 29
Display the Information Box ...................................................................30 Display the Edit Box ...............................................................................32 Display the Drag & Drop List..................................................................32 Resize Parts of the Screen ....................................................................32 Learn the Main Design Features Quickly...............................................33 Display Toolbars ....................................................................................33 Move Toolbars .......................................................................................34
Enable a Design Assistant ..................................................... 36 Hide the Grid & Change the Background Color...................... 37
Hide Labels and Change the Fill Color ..................................................40 Disable Warning Patterns ......................................................................42 Save the Display Scheme......................................................................43
Assign a Default Catalog........................................................ 44
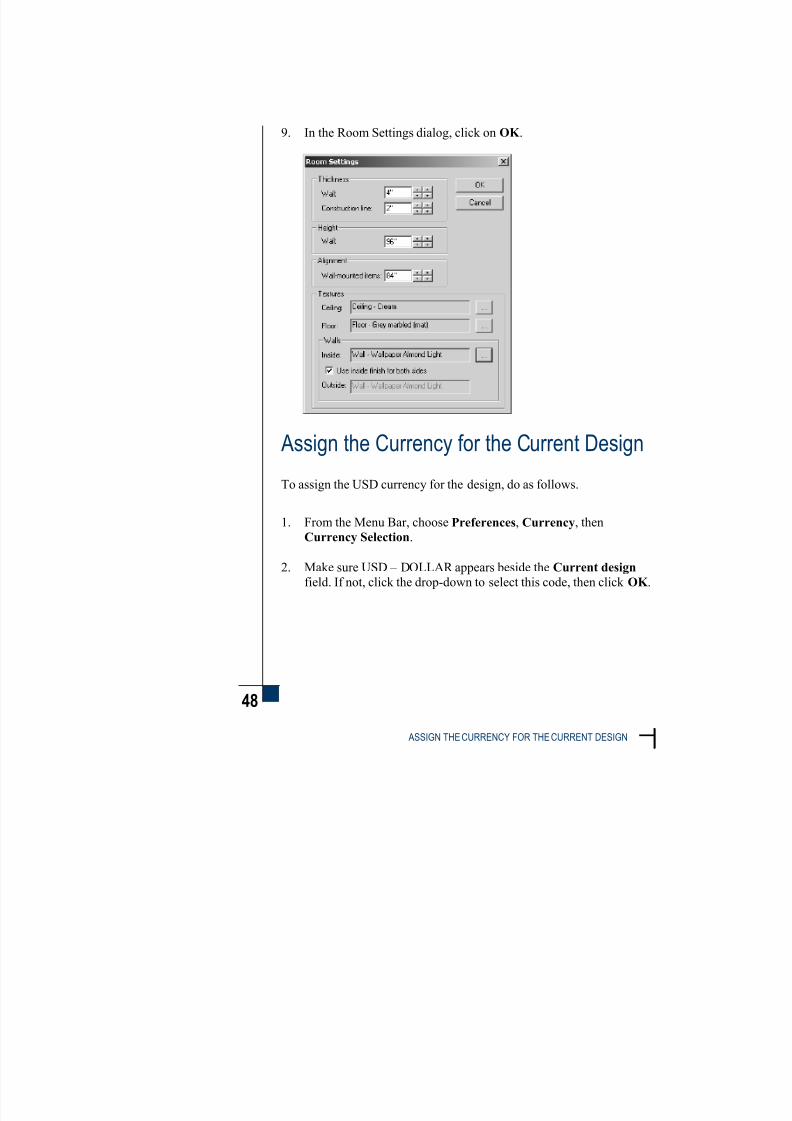
Change Wall and Texture Settings......................................... 45 Assign the Currency for the Current Design........................... 48
Recap..................................................................................... 49
Session 3 ~ Drawing the Kitchen Walls............ 51
Draw the Basic Layout ........................................................... 51 Add a T-Shaped Wall ............................................................. 53
Reduce the Height of the T-Shaped Wall ............................... 55 Save Your Design .................................................................. 56
Recap..................................................................................... 57

7/30/2019 Tutorial v 61 Imperial
http://slidepdf.com/reader/full/tutorial-v-61-imperial 5/247
iii
TABLE OF CONTENTS
Session 4 ~Placing a Window, Appliance & a Sink..........................59
Place a Window......................................................................59
Attach Blinds and Change the Scenery of the Window .......... 61 Attach Horizontal Blinds ........................................................................ 61 Open the Blinds..................................................................................... 63 Change the Scenery of the Window...................................................... 64
Add Reserved Areas on Both Sides of the Window ............... 65 Place a Refrigerator ............................................................... 67
Place a Range........................................................................69 Place a Sink Base With a Sink ............................................... 70
Follow Design Rules...............................................................71 Place a Dishwasher................................................................73
Disable a Design Assistant.....................................................74 Save and Close Your Design ................................................. 75
Exit 20-20 Design and Project................................................76 Recap.....................................................................................76
Session 5 ~Adding Cabinets.............................77
Access 20-20 Design ............................................................. 77 Open a Design ....................................................................... 78
Consult the Design File Path..................................................79 Delete Dimensions................................................................. 80
Place a Tall Cabinet ............................................................... 81 Find the Width of an Empty Area .......................................................... 81 Insert a Utility Cabinet ........................................................................... 82
Get a Ballpark Figure ............................................................. 84 Place Base Cabinets..............................................................87
Add a Base Corner Cabinet .................................................................. 87
7/30/2019 Tutorial v 61 Imperial
http://slidepdf.com/reader/full/tutorial-v-61-imperial 6/247
iv
TABLE OF CONTENTS
Place Regular Base Cabinets ................................................................88 Add Custom Corner Fillers.....................................................................89 Place a 2-Drawer Cabinet......................................................................91
Place Wall Cabinets ............................................................... 92
Add Regular Wall Units..........................................................................92 Attach a Stemglass Holder to a Wall Cabinet........................................93
Add a Wall Cabinet Quickly.................................................... 95 View, Edit and Place a Wall Unit............................................................96
Rename Your Design............................................................. 98
Recap..................................................................................... 99
Session 6 ~ Changing the OutlineColor of Cabinets andProducing a Perspective............. 101
Change the Outline Color of Cabinets.................................. 101 Add a Note........................................................................... 103
Select a Door Style .............................................................. 105 Select a Pull Model .............................................................. 107
Enter Perspective Settings................................................... 108 Position to View the Perspective.......................................... 109
Edit an Item in 3D................................................................. 111
Save the View Settings for the Perspective.......................... 113 Recap................................................................................... 114
Session 7 ~ Revising the Cabinet Design ...... 115
Save the Floor Plan in a BMP File ....................................... 115 Display Elevation Areas ....................................................... 116
View a Wall in Elevation.......................................................................116 View a Base and Wall Cabinet in Elevation.........................................121
Place a Peninsula Hood....................................................... 123
7/30/2019 Tutorial v 61 Imperial
http://slidepdf.com/reader/full/tutorial-v-61-imperial 7/247
v
TABLE OF CONTENTS
Change the Hood Texture....................................................125 Duplicate and Delete a Cabinet............................................126
Save Your Design ................................................................ 127 Choose a Cabinet Variation ................................................. 128
Zoom on an Item .................................................................. 129 Place Chairs.........................................................................130
Select Multiple Items........................................................................... 131 Create a Group of Chairs.................................................................... 132 Rotate the Chairs ................................................................................ 132 Ungroup the Chairs ............................................................................. 133 Mirror the Chairs.................................................................................. 134 Move the Chairs .................................................................................. 135 Drag a Chair........................................................................................ 137
Save Your Design ................................................................ 138 Recap...................................................................................138
Session 8 ~ Adding Countertops & Trims.......141
Assign Display Settings for Countertops .............................. 141 Drag & Drop a Temporary Cabinet...................................................... 143 Modify the Temporary Cabinet............................................................ 145 Place the Temporary Cabinet.............................................................. 145
Auto Design Countertops ..................................................... 147 Extend the Countertop Over the T-Shaped Wall .................. 149
Extend the Countertop Behind the Range............................151 Add a Point.......................................................................................... 151 Extend the Countertop ........................................................................ 152
Place Edges ......................................................................... 153
Auto Design Toe Kicks & Moldings ...................................... 155 Hide Countertops & Trims and Dimensions ......................... 157
Save Your Design ................................................................ 158 Recap...................................................................................159

7/30/2019 Tutorial v 61 Imperial
http://slidepdf.com/reader/full/tutorial-v-61-imperial 8/247
vi
TABLE OF CONTENTS
Session 9 ~ Working on the BOM .................. 161
Display the Bill of Materials .................................................. 161
Display Both the Floor Plan and the BOM............................ 163 Modify the Bill of Materials ................................................... 164
Simultaneous Selection .......................................................................164 Hide Columns ......................................................................................164
Add an Item to the Non-Plan Area.......................................................166 Move an Item from the BOM to the Floor Plan ....................................167
Hide the Bill of Materials ...................................................... 169
Save Your Design ................................................................ 169 Recap................................................................................... 170
Session 10 ~ Producing a Quote.................... 171
Add Sales Tax...................................................................... 171 Choose a Report Type ......................................................... 173
Select Quote Settings .......................................................... 173 View the Quote..................................................................... 174
Save Your Design ................................................................ 176 Recap................................................................................... 176
Session 11 ~ Looking at the Final Design...... 177
Change the Attributes of the Design .................................... 177 Select a Wood Texture for the Cabinets ..............................................177 Select a Material for Countertops ........................................................179 Show Accessories................................................................................180
Produce a Top View and a Perspective ............................... 181 Change the Wall Covering...................................................................181 Select View Settings ............................................................................182 Change Room Finishes .......................................................................183

7/30/2019 Tutorial v 61 Imperial
http://slidepdf.com/reader/full/tutorial-v-61-imperial 9/247
vii
TABLE OF CONTENTS
Display a Top View.............................................................................. 185 Display a Perspective.......................................................................... 187 Close the Rendering............................................................................ 188
Produce Multiple Views........................................................189
Save the Frame Layout ....................................................................... 192 Visit Your Virtual Kitchen......................................................193
Assign View Settings........................................................................... 193 Enter the Virtual Showroom ................................................................ 193 Save a Movie File of the Design.......................................................... 196
Save the Design File and Quit 20-20 Design........................196 View a Movie File Outside 20-20..........................................197
Recap...................................................................................199
Session 12 ~Preparing the Project Database .201
Load the Project Database...................................................201
Store the Design Information................................................202 Enter Dealer Information ..................................................................... 202 Enter Designer and Reviewer Information .......................................... 204
Recap...................................................................................205
Appendix.........................................................207
Global Style..........................................................................207
Notes ..............................................................211

7/30/2019 Tutorial v 61 Imperial
http://slidepdf.com/reader/full/tutorial-v-61-imperial 10/247

7/30/2019 Tutorial v 61 Imperial
http://slidepdf.com/reader/full/tutorial-v-61-imperial 11/247
B
ix
BEFORE YOU START
Before You Start
This tutorial shows you how to create a sales project with the Project
module and how to design a simple kitchen with the Design program.
We hope that this first “tour” of the program helps you learn and
explore Version 6.1.
Here are a few points you need to know before you start this tutorial.
The SAMPLE_E catalog of Version 6.1 must be installed. If it isnot, insert the 20-20 Design Version 6.1 CD in your CD-ROM
drive, click on Install and Catalogs.
We suggest that you set your screen resolution at 1024 x 768, but
800 x 600 is acceptable.
7/30/2019 Tutorial v 61 Imperial
http://slidepdf.com/reader/full/tutorial-v-61-imperial 12/247
x
BEFORE YOU START
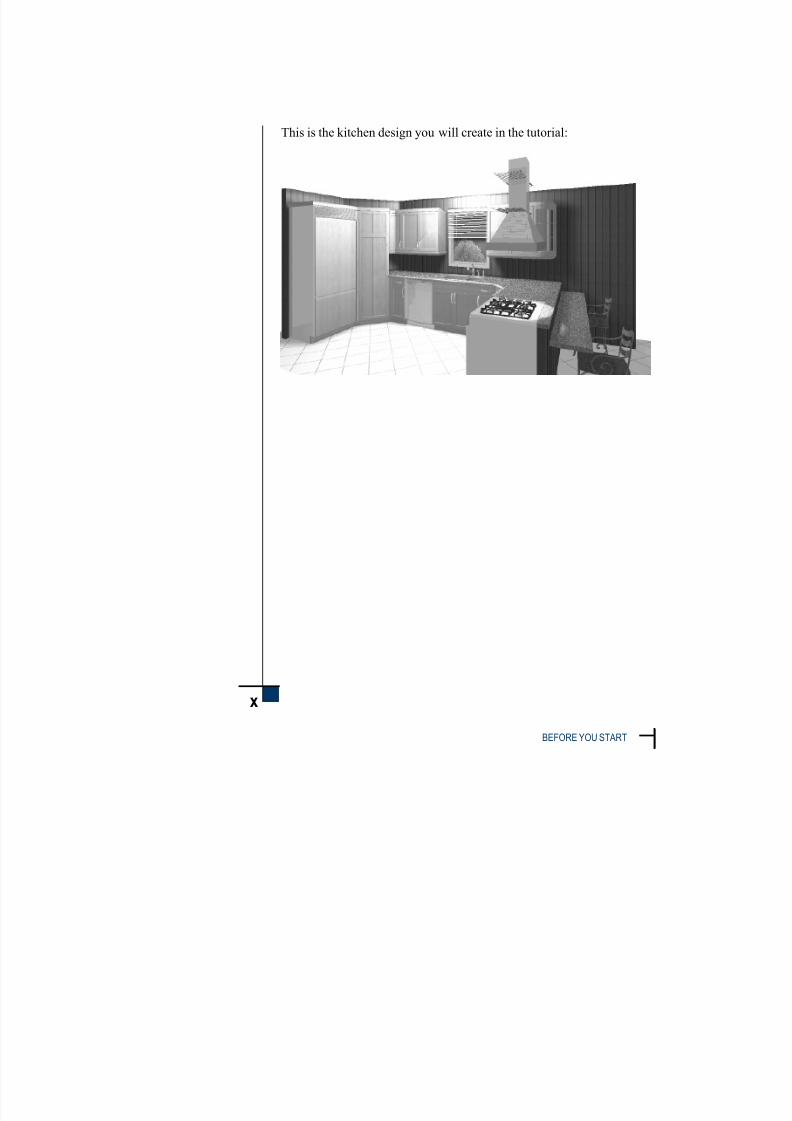
This is the kitchen design you will create in the tutorial:

7/30/2019 Tutorial v 61 Imperial
http://slidepdf.com/reader/full/tutorial-v-61-imperial 13/247
2 0 - 2 0 D E S I G N
Session 1

7/30/2019 Tutorial v 61 Imperial
http://slidepdf.com/reader/full/tutorial-v-61-imperial 14/247

7/30/2019 Tutorial v 61 Imperial
http://slidepdf.com/reader/full/tutorial-v-61-imperial 15/247
1
1
CREATING A SALES PROJECT
This Shortcut bar gives you
quick access to the 20-20
rograms and utilities.
Session 1 ~ Creating a Sales Project
This session shows how to start a sales project: entering customer,
design and project information.
Display the 20-20 Shortcut Bar
1. If the 20-20 Shortcut Bar is already on your desktop, go to thesub-section Access 20-20 Design on page 2.
If not, look at the Windows taskbar on your desktop. (This bar includes the Start button and it is usually located at the bottom of
your screen.)
2. Double-click on the 20-20 Shortcut Bar icon located bottom-right, at the opposite end of the task bar from the Start button.
The 20-20 Shortcut Bar appears.

7/30/2019 Tutorial v 61 Imperial
http://slidepdf.com/reader/full/tutorial-v-61-imperial 16/247
2
ACCESS 20-20 DESIGN, THEN THE PROJECT MODULE
Display the Shortcut Bar Icon
If the 20-20 Shortcut Bar icon is not displayed on the taskbar, click on
Start, Programs, 20-20 Version 6.1 and choose Shortcut Bar.
Access 20-20 Design, then the ProjectModule
Access 20-20 Design
1. In the Shortcut Bar, click once on the Design icon .
2. If the Catalog & Licence Info dialog is displayed, chooseSAMPLE_E, add your Name and Company information, then
click OK .
7/30/2019 Tutorial v 61 Imperial
http://slidepdf.com/reader/full/tutorial-v-61-imperial 17/247
3
CREATING A SALES PROJECT
For details on the
Project Wizard, refer tothe online help either in
20-20 Design or in the
Project module.
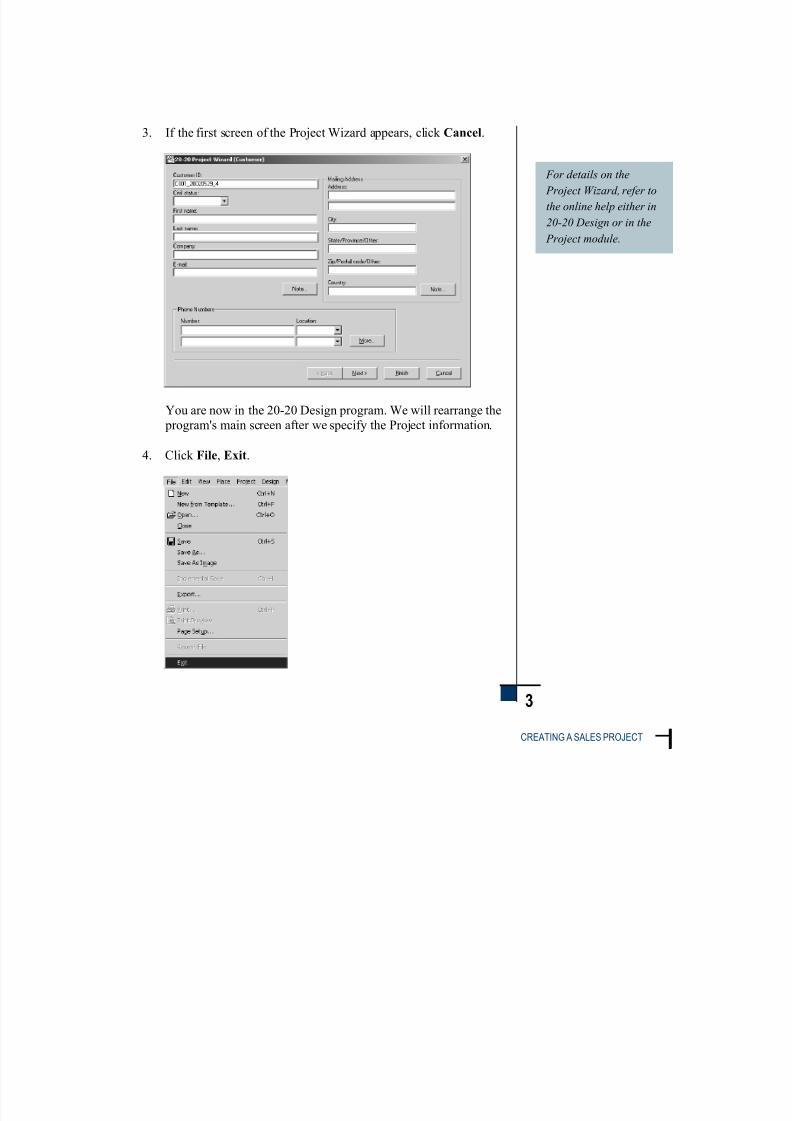
3. If the first screen of the Project Wizard appears, click Cancel.
You are now in the 20-20 Design program. We will rearrange the
program's main screen after we specify the Project information.
4. Click File, Exit.

7/30/2019 Tutorial v 61 Imperial
http://slidepdf.com/reader/full/tutorial-v-61-imperial 18/247
4
ACCESS 20-20 DESIGN, THEN THE PROJECT MODULE
Access 20-20 Project
Click once on the Project icon in the 20-20 Shortcut Bar.

7/30/2019 Tutorial v 61 Imperial
http://slidepdf.com/reader/full/tutorial-v-61-imperial 19/247
5
CREATING A SALES PROJECT
Select the Demo Database
1. Click Preferences, File Paths in the Project module Menu bar.
2. The default path for the project’s working database is
2020v61\Db\Prj\60\.
To display options for changing the path, click the browse button
beside the Project database field.
7/30/2019 Tutorial v 61 Imperial
http://slidepdf.com/reader/full/tutorial-v-61-imperial 20/247
6
EXIT AND RE-ENTER 20-20 PROJECT
You should always select
our working database
to enter actual customer
information.
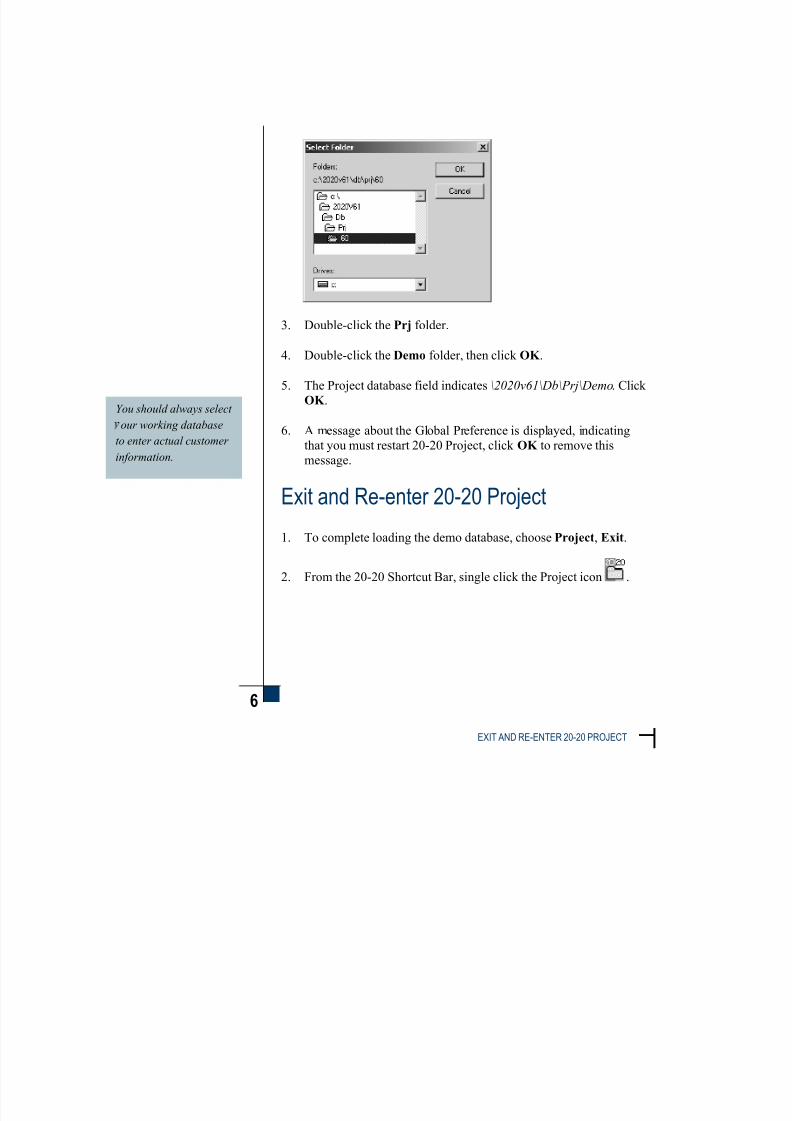
3. Double-click the Prj folder.
4. Double-click the Demo folder, then click OK .
5. The Project database field indicates \2020v61\Db\Prj\Demo. Click OK .
6. A message about the Global Preference is displayed, indicating
that you must restart 20-20 Project, click OK to remove this
message.
Exit and Re-enter 20-20 Project
1. To complete loading the demo database, choose Project, Exit.
2. From the 20-20 Shortcut Bar, single click the Project icon .

7/30/2019 Tutorial v 61 Imperial
http://slidepdf.com/reader/full/tutorial-v-61-imperial 21/247
7
CREATING A SALES PROJECT
Assign a Currency Code and Format
This first step consists of setting the currency code and format for
future designs and projects. This allows you to produce reports with the proper currency information.
1. From the Menu Bar choose Preferences, Currency, thenCurrency Selection.
2. Make sure USD – US DOLLAR appears beside the New designsand projects field, then click OK .
3. From the Menu Bar choose Preferences, Currency, then
Currency Format.
7/30/2019 Tutorial v 61 Imperial
http://slidepdf.com/reader/full/tutorial-v-61-imperial 22/247
8
ASSIGN A CURRENCY CODE AND FORMAT
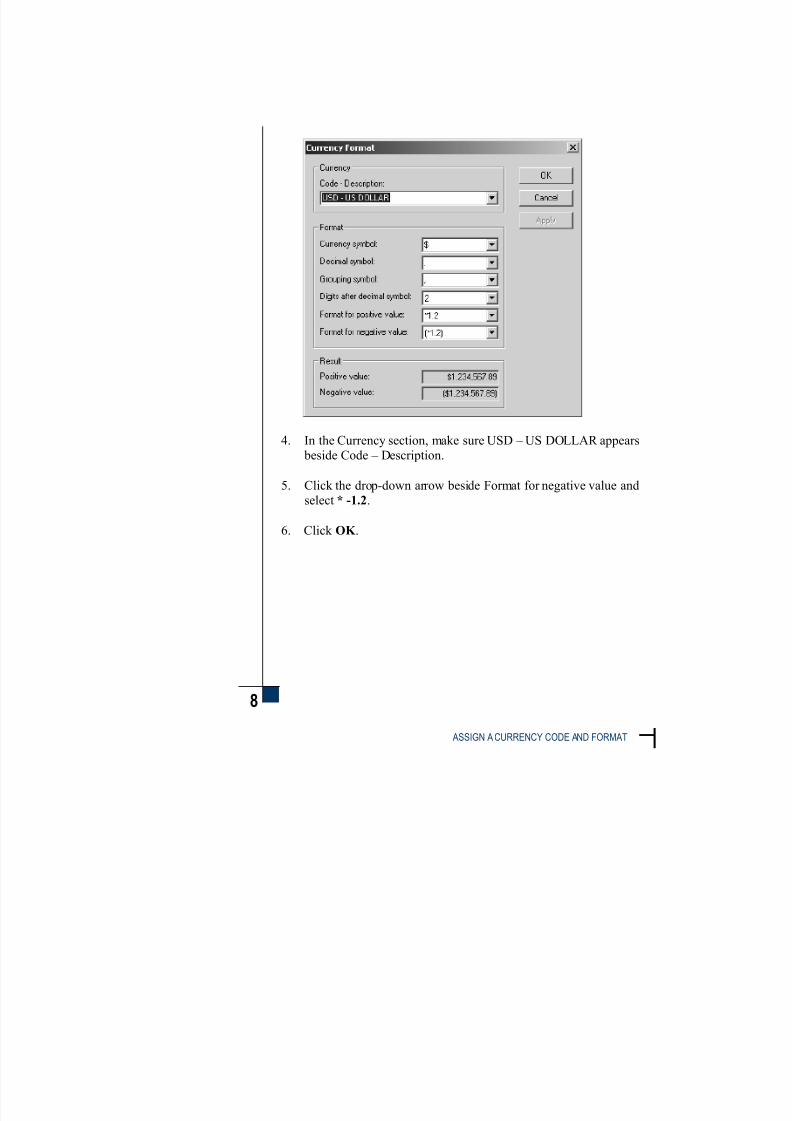
4. In the Currency section, make sure USD – US DOLLAR appears
beside Code – Description.
5. Click the drop-down arrow beside Format for negative value and
select * -1.2.
6. Click OK .

7/30/2019 Tutorial v 61 Imperial
http://slidepdf.com/reader/full/tutorial-v-61-imperial 23/247
9
CREATING A SALES PROJECT
By default, the program
shows a “C” for
customer and the current
date, plus a sequential
number in the Customer
ID field.
Create the Sales Project
Enter the Customer’s Name & Address
This step consists of identifying your customer.
1. Click the New Customer icon .
To overwrite the default Customer ID, click in the Customer IDfield and type PF, the initials of the customer.
2. Click the drop-down arrow beside the Civil status field and select
Mr.
7/30/2019 Tutorial v 61 Imperial
http://slidepdf.com/reader/full/tutorial-v-61-imperial 24/247
10
CREATE THE SALES PROJECT
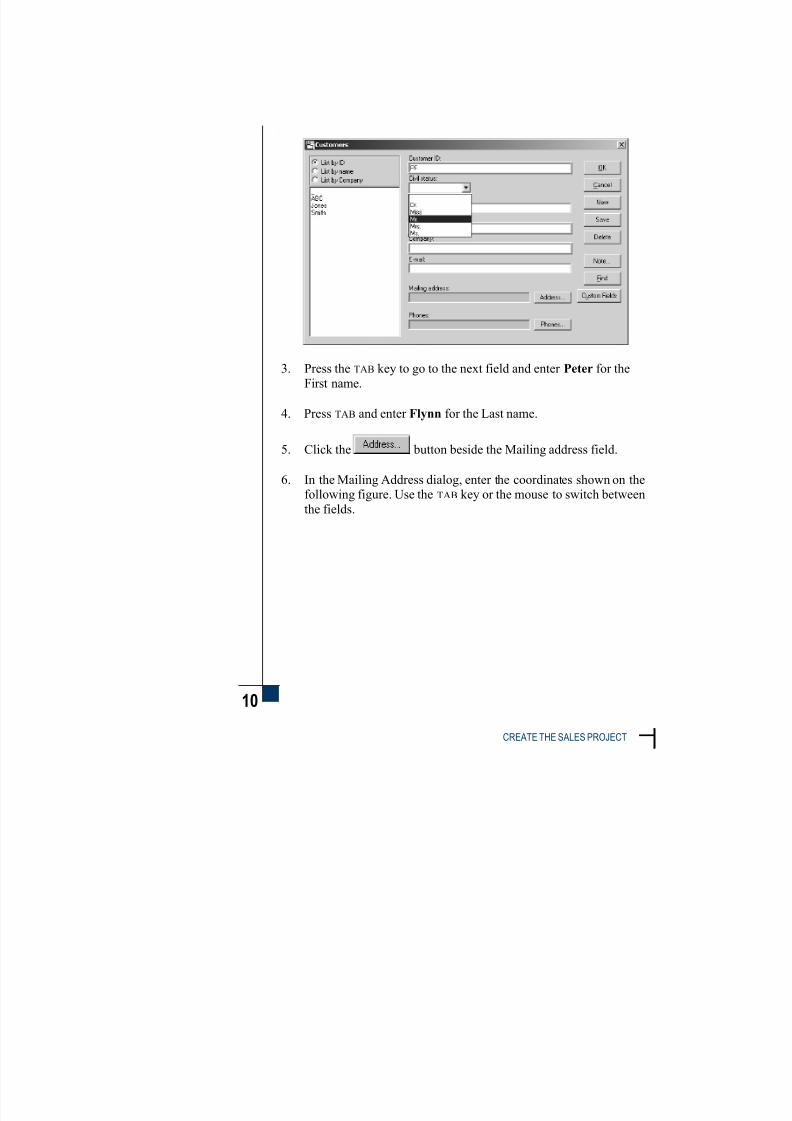
3. Press the TAB key to go to the next field and enter Peter for the
First name.
4. Press TAB and enter Flynn for the Last name.
5. Click the button beside the Mailing address field.
6. In the Mailing Address dialog, enter the coordinates shown on thefollowing figure. Use the TAB key or the mouse to switch between
the fields.

7/30/2019 Tutorial v 61 Imperial
http://slidepdf.com/reader/full/tutorial-v-61-imperial 25/247
11
CREATING A SALES PROJECT
7. Once you have entered these coordinates, click OK . Only the first
line of the address is in the Mailing address field.
This information appears on all reports related to this project.

7/30/2019 Tutorial v 61 Imperial
http://slidepdf.com/reader/full/tutorial-v-61-imperial 26/247
12
CREATE THE SALES PROJECT
Enter the Customer’s Phone Numbers
1. Click the button to enter phone numbers where you can
reach this customer.
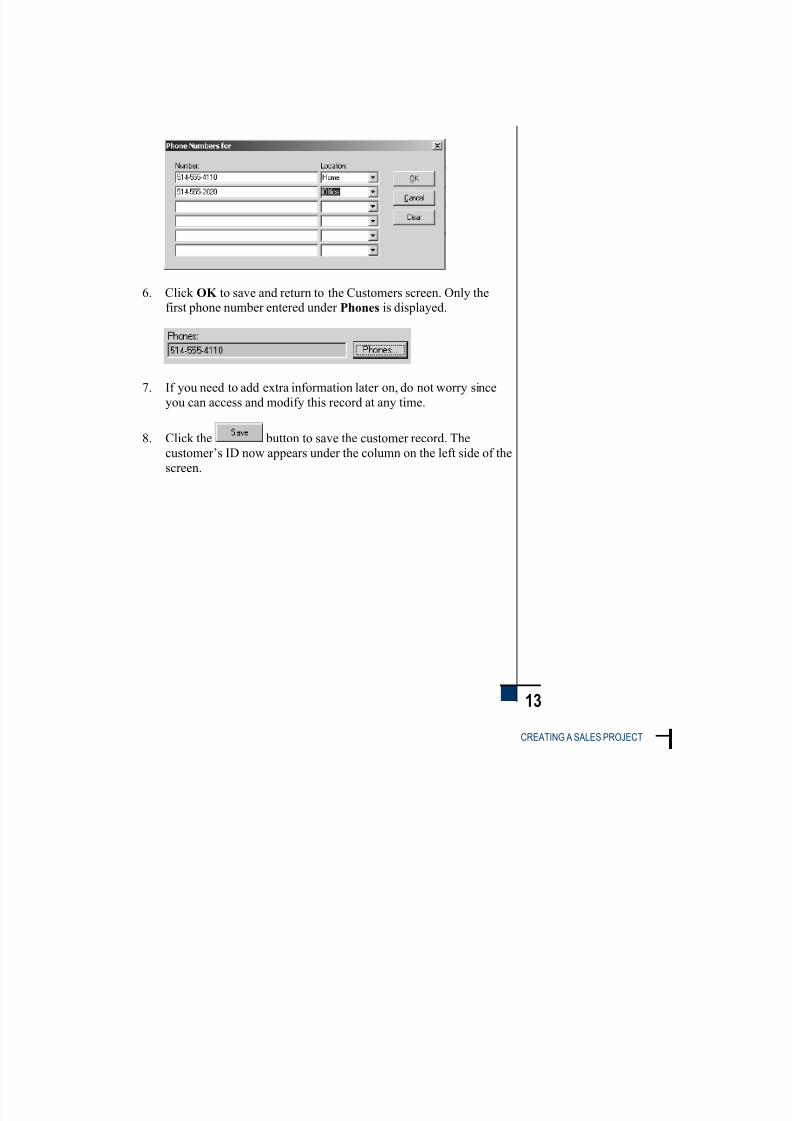
2. On the first line of the Number column, type the phone number 514-555-4110.
3. On the first line of the Location column, click on the drop-down
arrow and select Home from the list.
4. Press the TAB key to go to the second line of the Number column,
then type 514-555-2020.
5. Click on the drop-down arrow and select Office from the Locationlist.
Your screen should look like this:
7/30/2019 Tutorial v 61 Imperial
http://slidepdf.com/reader/full/tutorial-v-61-imperial 27/247
13
CREATING A SALES PROJECT
6. Click OK to save and return to the Customers screen. Only thefirst phone number entered under Phones is displayed.
7. If you need to add extra information later on, do not worry sinceyou can access and modify this record at any time.
8. Click the button to save the customer record. The
customer’s ID now appears under the column on the left side of the
screen.

7/30/2019 Tutorial v 61 Imperial
http://slidepdf.com/reader/full/tutorial-v-61-imperial 28/247
14
CREATE THE SALES PROJECT
This means that Peter
Flynn is the active
customer and all new
rojects will be linked to
this customer, unless you
create another customer
or you make a selection
under Customers:
9. Click OK to return to the Project tab. On the left side of the screen,
in the Customers field, you see Peter Flynn.

7/30/2019 Tutorial v 61 Imperial
http://slidepdf.com/reader/full/tutorial-v-61-imperial 29/247
15
CREATING A SALES PROJECT
By default, the program
shows a “P” for project
and the current date,
lus a sequential number
in the Project ID field.
Create the Project
Now that your customer information is entered, the second step is to
link this customer to a project.
1. Click the New Project icon . The New Project dialog isdisplayed, with a default ID listed in the Project ID field.
2. To overwrite the pre-assigned ID, type Flynn - Tutorial in theProject ID field.
Assign the Reviewer
In a sales project, you need to identify the person who designs the
kitchen or bathroom and the one who verifies pricing and approves the
final design.
In the Tutorial sessions, the same fictitious person is responsible for
both of these tasks.
1. Click the drop-down arrow in the Reviewer ID field to display the
Reviewer list.
7/30/2019 Tutorial v 61 Imperial
http://slidepdf.com/reader/full/tutorial-v-61-imperial 30/247
16
CREATE THE SALES PROJECT
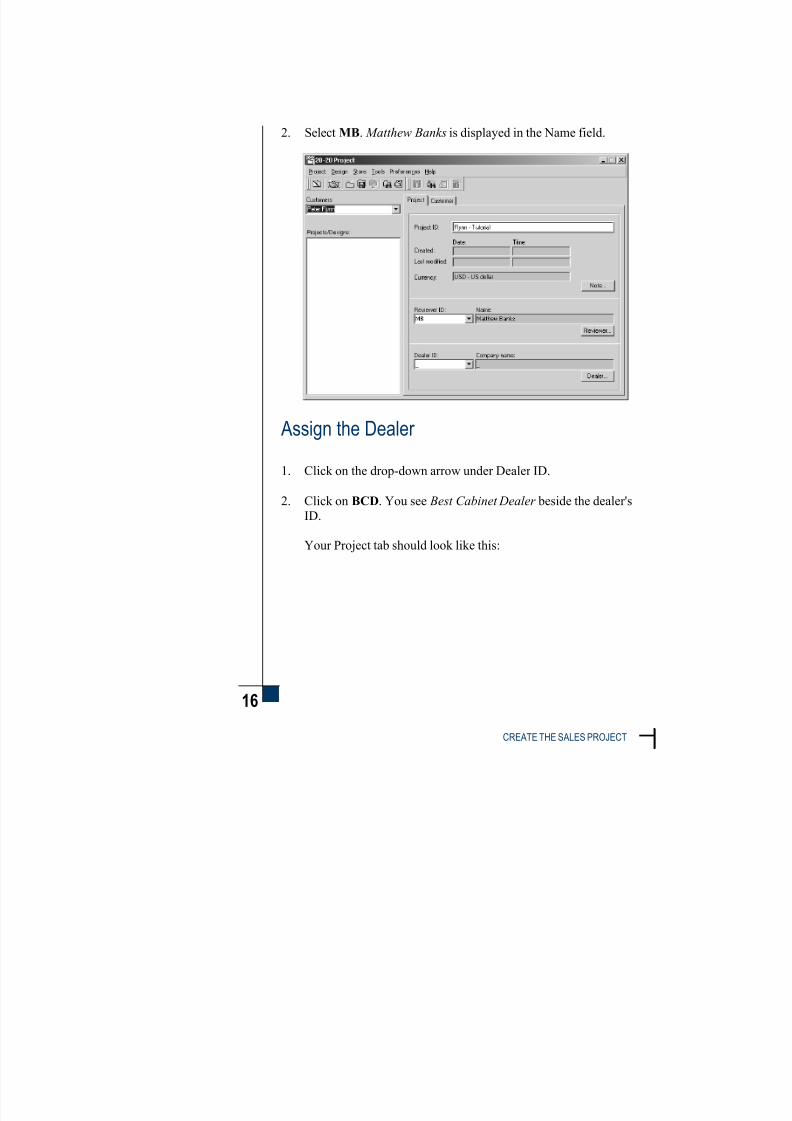
2. Select MB. Matthew Banks is displayed in the Name field.
Assign the Dealer
1. Click on the drop-down arrow under Dealer ID.
2. Click on BCD. You see Best Cabinet Dealer beside the dealer's
ID.
Your Project tab should look like this:
7/30/2019 Tutorial v 61 Imperial
http://slidepdf.com/reader/full/tutorial-v-61-imperial 31/247
17
CREATING A SALES PROJECT
The next time you create
a project, the currency,
reviewer and dealer will
show the info you have
ust selected. These
become defaults until
ou make other
selections.
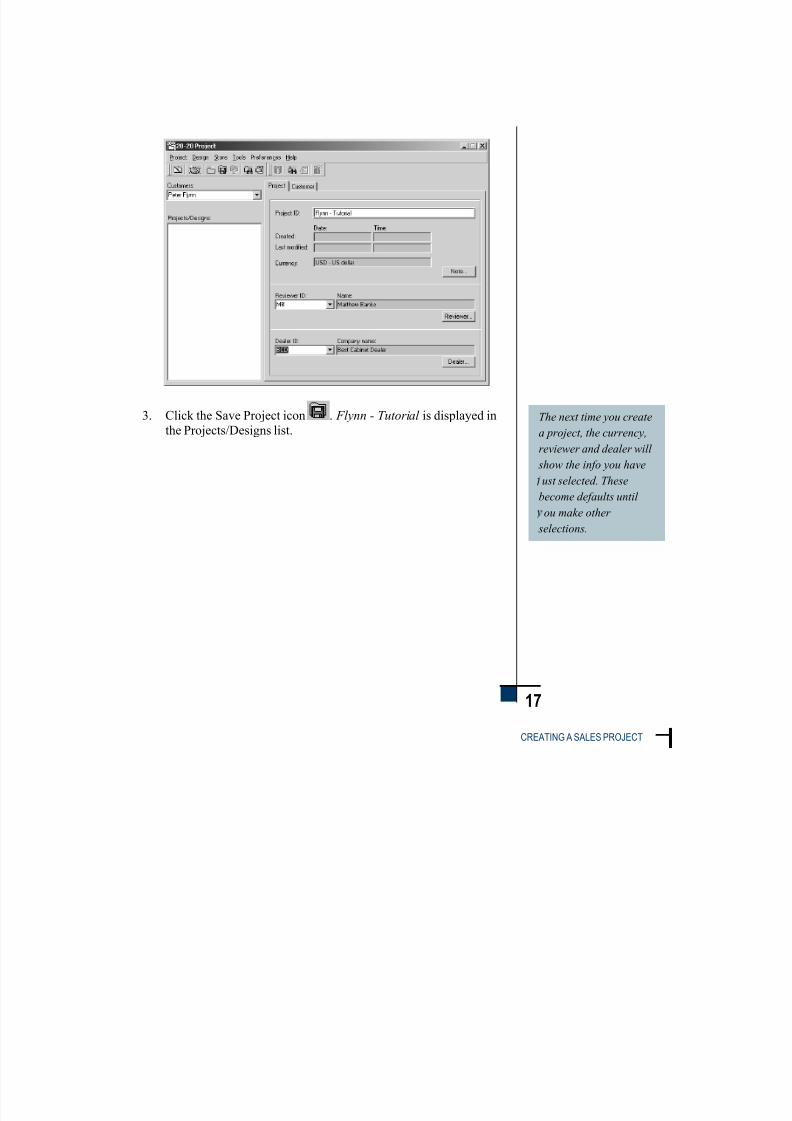
3. Click the Save Project icon . Flynn - Tutorial is displayed in
the Projects/Designs list.
7/30/2019 Tutorial v 61 Imperial
http://slidepdf.com/reader/full/tutorial-v-61-imperial 32/247
18
ASSIGN THE CURRENCY TO THE CURRENT PROJECT
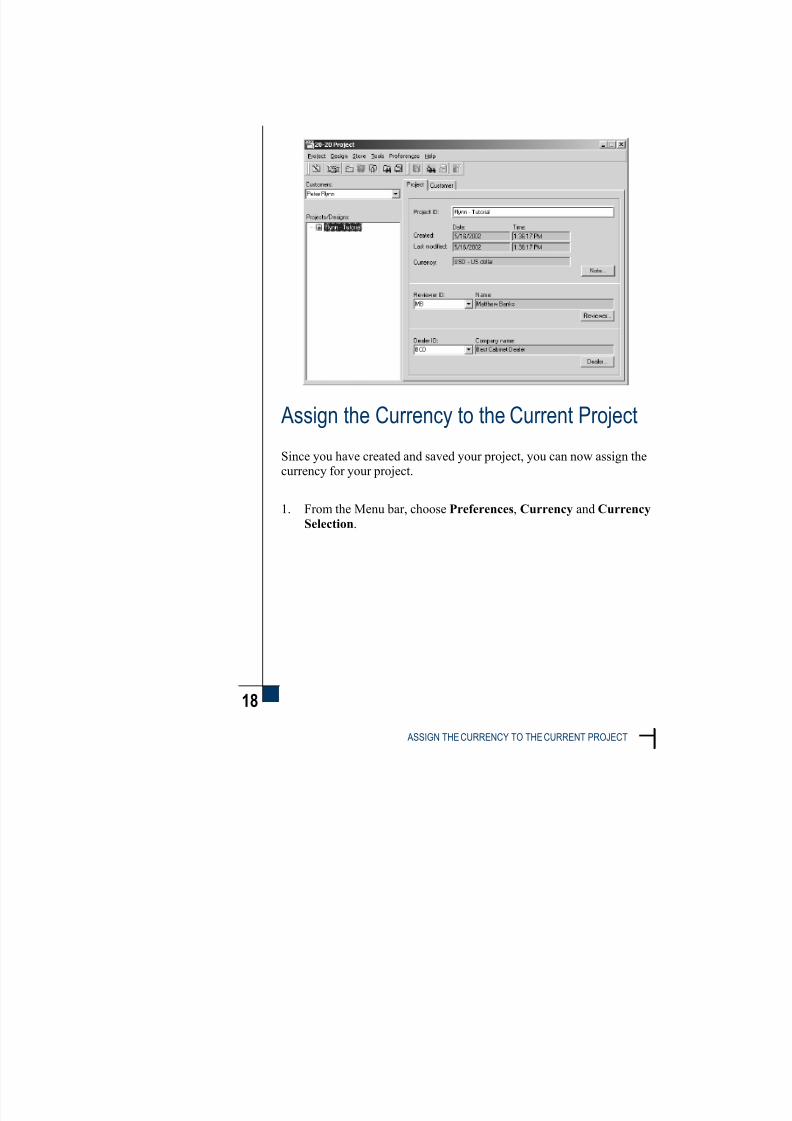
Assign the Currency to the Current Project
Since you have created and saved your project, you can now assign thecurrency for your project.
1. From the Menu bar, choose Preferences, Currency and Currency
Selection.

7/30/2019 Tutorial v 61 Imperial
http://slidepdf.com/reader/full/tutorial-v-61-imperial 33/247
19
CREATING A SALES PROJECT
2. Make sure USD – US DOLLAR appears beside Current project,then click OK .
The Currency field displays USD – US Dollar.

7/30/2019 Tutorial v 61 Imperial
http://slidepdf.com/reader/full/tutorial-v-61-imperial 34/247
20
ASSIGN THE CURRENCY TO THE CURRENT PROJECT
Add a Note for the Customer
1. Click the Customer tab.
You can view the information you entered earlier.
2. Click the button. In the Assign Customer dialog, you see
Peter Flynn’s record.
3. Click the button.
7/30/2019 Tutorial v 61 Imperial
http://slidepdf.com/reader/full/tutorial-v-61-imperial 35/247
21
CREATING A SALES PROJECT
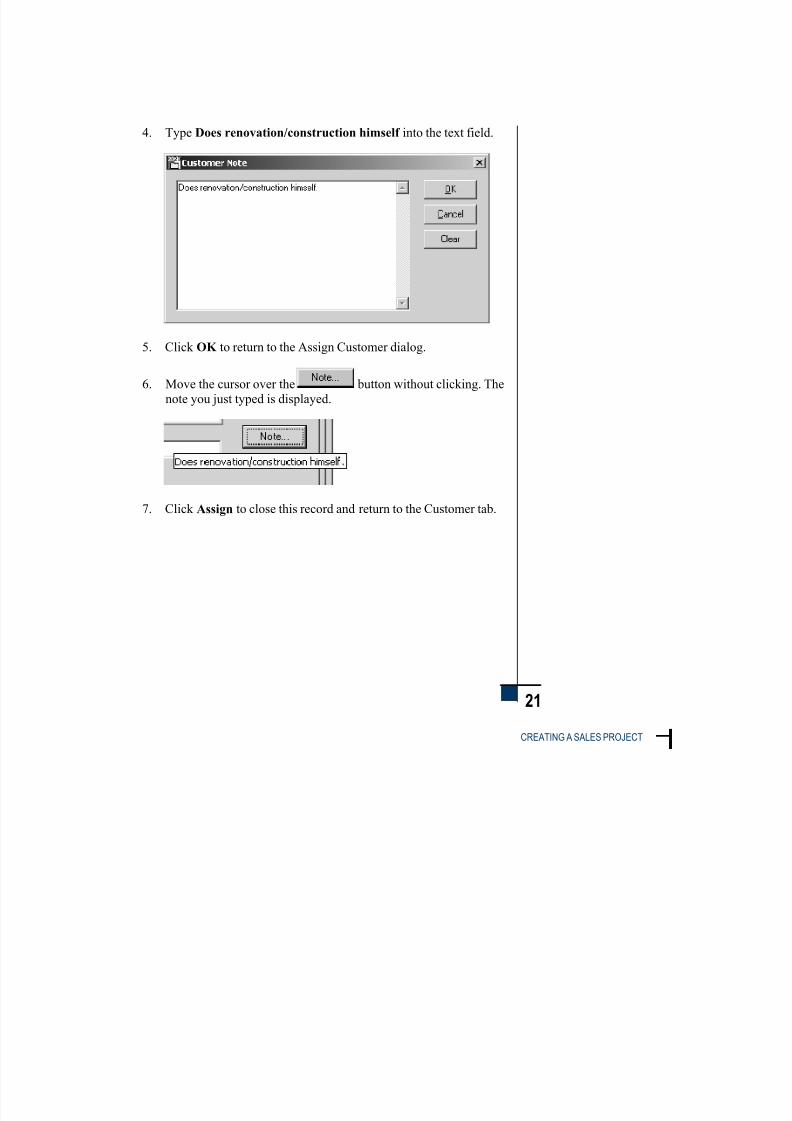
4. Type Does renovation/construction himself into the text field.
5. Click OK to return to the Assign Customer dialog.
6. Move the cursor over the button without clicking. The
note you just typed is displayed.
7. Click Assign to close this record and return to the Customer tab.

7/30/2019 Tutorial v 61 Imperial
http://slidepdf.com/reader/full/tutorial-v-61-imperial 36/247
22
ASSIGN THE CURRENCY TO THE CURRENT PROJECT
Notice the default file
location and name.
The location is assigned
rom the Preferences
menu of the Design
rogram.
The file name is
re-assigned from the
Project module.
Assign the Design File
The last step is assigning design information to your project.
1. Click on the Assign Design icon .
Notice the default file location and name.
The location is assigned from the Preferences menu of the Design
program.
The file name is pre-assigned from the Project module.
2. Click at the end of the File name field to remove the highlight.

7/30/2019 Tutorial v 61 Imperial
http://slidepdf.com/reader/full/tutorial-v-61-imperial 37/247
23
CREATING A SALES PROJECT
You can assign several design files, i.e.
roposals, to this
roject.
The next time you assign
a design to a project, the
designer will appear
automatically.
3. Use the backspace key to delete the default design file name: for example D_20020516_1.kit.
4. Type tutorial.kit.
Assign the Designer
1. Click the Designer ID drop-down arrow to display the list of designers.
2. Select MB for Matthew Banks.
Save Design Information
1. Click the Save Design icon .
2. Look at the list under Projects/Designs: on the left.
The display of the tutorial.kit file means that this design is nowlinked to the Flynn - Tutorial project, and this project is associated
to Peter Flynn.

7/30/2019 Tutorial v 61 Imperial
http://slidepdf.com/reader/full/tutorial-v-61-imperial 38/247
24
RECAP
Recap
You can now:
access the Project module from the 20-20 Shortcut Bar
select the demo project database
exit the Project module
start a sales project which involves:

7/30/2019 Tutorial v 61 Imperial
http://slidepdf.com/reader/full/tutorial-v-61-imperial 39/247
25
CREATING A SALES PROJECT
selecting a default currency code and format
creating a customer record
creating the project
assigning the reviewer
assigning the dealer
assigning a currency code for the current project
assigning the design file
assigning the designer

7/30/2019 Tutorial v 61 Imperial
http://slidepdf.com/reader/full/tutorial-v-61-imperial 40/247

7/30/2019 Tutorial v 61 Imperial
http://slidepdf.com/reader/full/tutorial-v-61-imperial 41/247
2 0 - 2 0 D E S I G N
Session 2

7/30/2019 Tutorial v 61 Imperial
http://slidepdf.com/reader/full/tutorial-v-61-imperial 42/247

7/30/2019 Tutorial v 61 Imperial
http://slidepdf.com/reader/full/tutorial-v-61-imperial 43/247
2
27
SETTING DESIGN PREFERENCES
Session 2 ~ Setting Design Preferences
This session shows you how to set up your screen before starting to
draw the kitchen.
Access 20-20 Design from the ProjectModule
1. In the Project module, select tutorial.kit from the Projects/Designslist.

7/30/2019 Tutorial v 61 Imperial
http://slidepdf.com/reader/full/tutorial-v-61-imperial 44/247
28
ACCESS 20-20 DESIGN FROM THE PROJECT MODULE
2. Click the 20-20 Design icon . If this icon is grayed, theselected line is a project and not a design.
3. If the Catalog & Licence Info dialog is displayed, chooseSAMPLE_E, add Name and Company information, then click OK .
The Design program opens and tutorial.kit is displayed in the title bar.
If 20-20 Design does not cover the entire screen, click on the
Maximize icon in the upper right corner to expand the screen to
its fullest.

7/30/2019 Tutorial v 61 Imperial
http://slidepdf.com/reader/full/tutorial-v-61-imperial 45/247
29
SETTING DESIGN PREFERENCES
Customize the Main Screen
To make sure that what you see on your screen corresponds to the
illustrations in this tutorial, you need to set up the screen components.
If you are comfortable with Windows, move the toolbars and the other
components as shown on the following figure of the main screen.
If you are not familiar with Windows, read the following sub-sections.These subsections guide you through customizing the main
20-20 Design screen as shown above.
As with other Windows applications, 20-20 is a flexible environment,
so you can change these settings at any time. Settings are always keptfrom one work session to another.
7/30/2019 Tutorial v 61 Imperial
http://slidepdf.com/reader/full/tutorial-v-61-imperial 46/247
30
CUSTOMIZE THE MAIN SCREEN
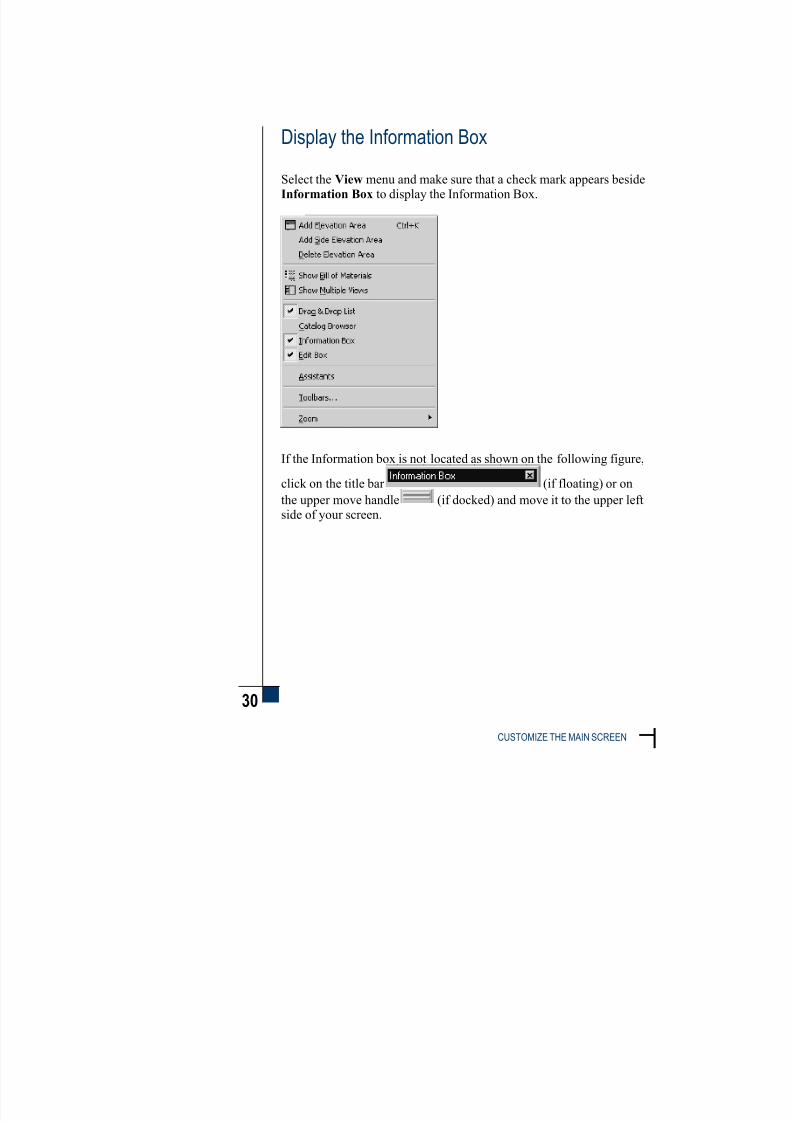
Display the Information Box
Select the View menu and make sure that a check mark appears beside
Information Box to display the Information Box.
If the Information box is not located as shown on the following figure,
click on the title bar (if floating) or on
the upper move handle (if docked) and move it to the upper leftside of your screen.
7/30/2019 Tutorial v 61 Imperial
http://slidepdf.com/reader/full/tutorial-v-61-imperial 47/247
31
SETTING DESIGN PREFERENCES
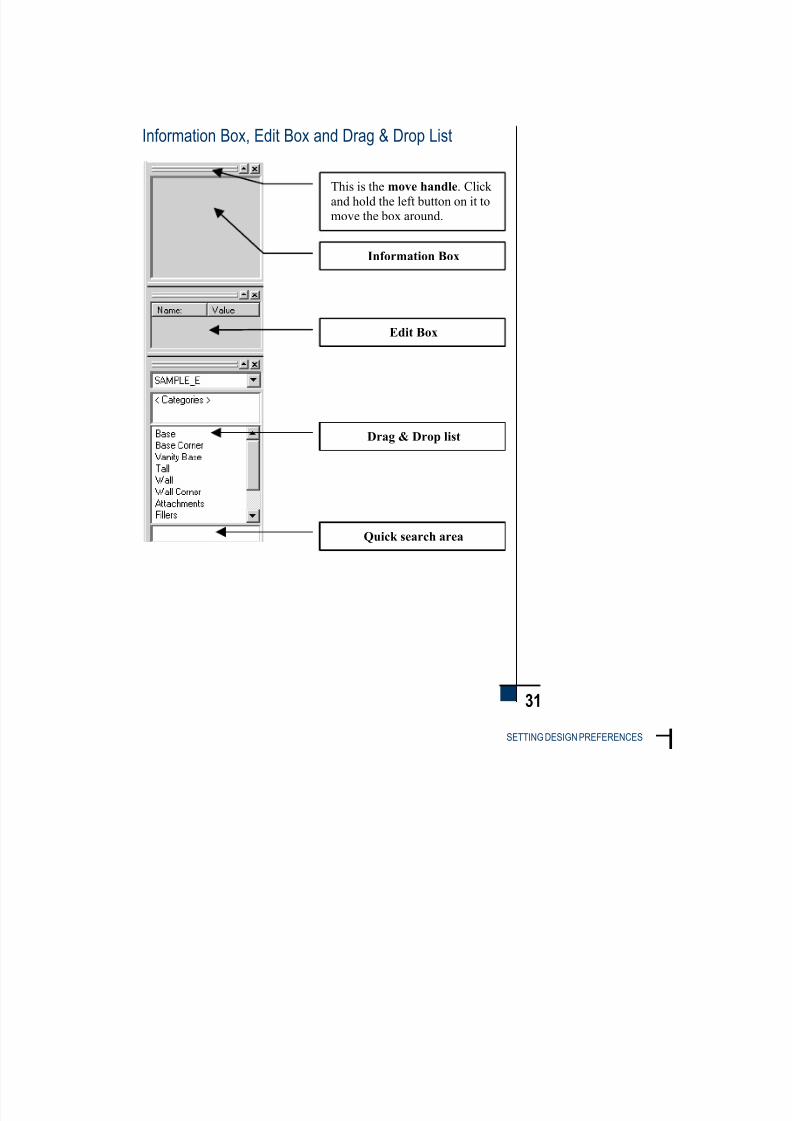
Information Box, Edit Box and Drag & Drop List
This is the move handle. Click
and hold the left button on it tomove the box around.
Information Box
Edit Box
Drag & Drop list
Quick search area
7/30/2019 Tutorial v 61 Imperial
http://slidepdf.com/reader/full/tutorial-v-61-imperial 48/247
32
CUSTOMIZE THE MAIN SCREEN
Display the Edit Box
Select the View menu and make sure that a check mark appears beside
Edit Box to display the Edit box.
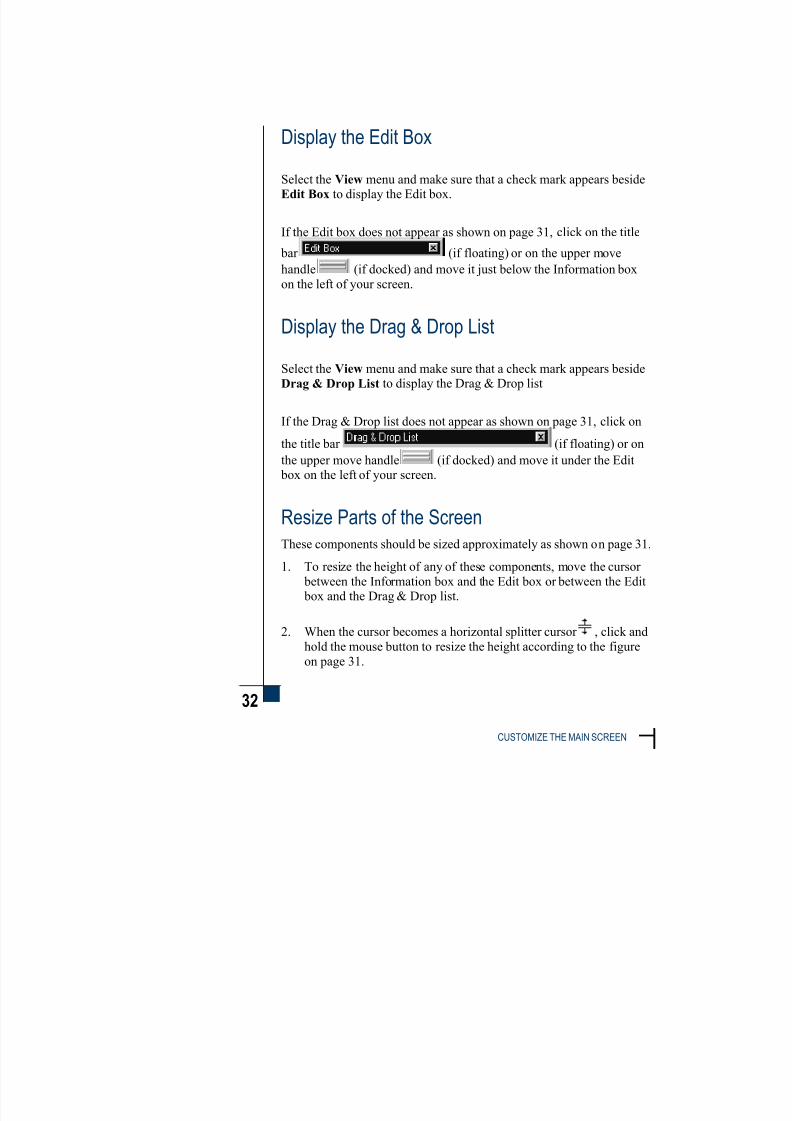
If the Edit box does not appear as shown on page 31, click on the title
bar (if floating) or on the upper move
handle (if docked) and move it just below the Information box
on the left of your screen.
Display the Drag & Drop List
Select the View menu and make sure that a check mark appears besideDrag & Drop List to display the Drag & Drop list
If the Drag & Drop list does not appear as shown on page 31, click on
the title bar (if floating) or on
the upper move handle (if docked) and move it under the Edit box on the left of your screen.
Resize Parts of the ScreenThese components should be sized approximately as shown on page 31.
1. To resize the height of any of these components, move the cursor
between the Information box and the Edit box or between the Edit box and the Drag & Drop list.
2. When the cursor becomes a horizontal splitter cursor , click and
hold the mouse button to resize the height according to the figure
on page 31.

7/30/2019 Tutorial v 61 Imperial
http://slidepdf.com/reader/full/tutorial-v-61-imperial 49/247
33
SETTING DESIGN PREFERENCES
3. To resize the width of all three components at once, move thecursor onto the right edge of either component to see the vertical
splitter cursor .
Use the “P” of the Project menu title as the alignment point.
Learn the Main Design Features Quickly
1. To learn about components on the Design main screen, click on the
What's This? icon .
2. The cursor changes to an arrow with a question mark.
3. Click on the Work area. A description is displayed.
Display Toolbars
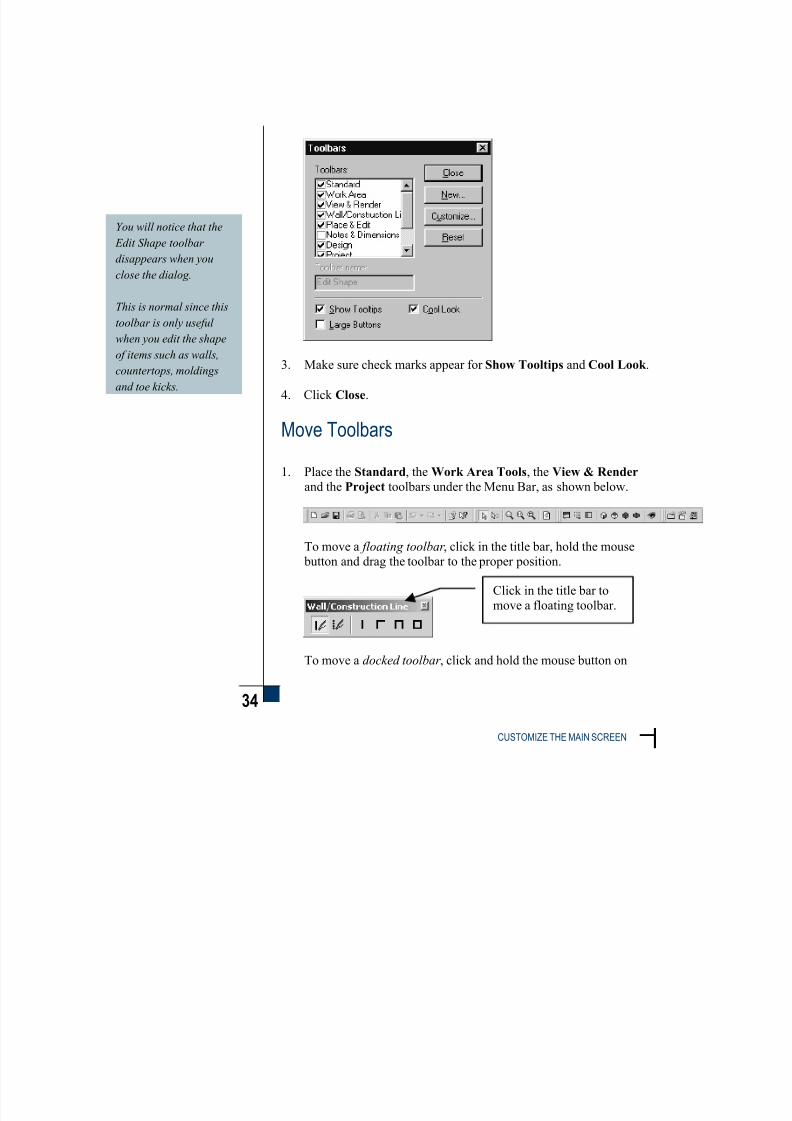
1. To display the toolbars you need for the tutorial, select the View menu then choose Toolbars.
2. Add a check mark beside all toolbars, except for Notes &
Dimensions, Formatting and Main.
7/30/2019 Tutorial v 61 Imperial
http://slidepdf.com/reader/full/tutorial-v-61-imperial 50/247
34
CUSTOMIZE THE MAIN SCREEN
You will notice that the
Edit Shape toolbar
disappears when you
close the dialog.
This is normal since this
toolbar is only useful
when you edit the shape
of items such as walls,
countertops, moldings
and toe kicks.
3. Make sure check marks appear for Show Tooltips and Cool Look .
4. Click Close.
Move Toolbars
1. Place the Standard, the Work Area Tools, the View & Render
and the Project toolbars under the Menu Bar, as shown below.
To move a floating toolbar , click in the title bar, hold the mouse
button and drag the toolbar to the proper position.
To move a docked toolbar , click and hold the mouse button on
Click in the title bar tomove a floating toolbar.

7/30/2019 Tutorial v 61 Imperial
http://slidepdf.com/reader/full/tutorial-v-61-imperial 51/247
35
SETTING DESIGN PREFERENCES
either the vertical or horizontal move handle, , and drag
the toolbar to the proper position.
2. Place the Wall/Construction Line, Place & Edit and Designtoolbars on the right side of the Information box, the Edit box and
part of the Drag & Drop list.

7/30/2019 Tutorial v 61 Imperial
http://slidepdf.com/reader/full/tutorial-v-61-imperial 52/247
36
ENABLE A DESIGN ASSISTANT
Enable a Design Assistant
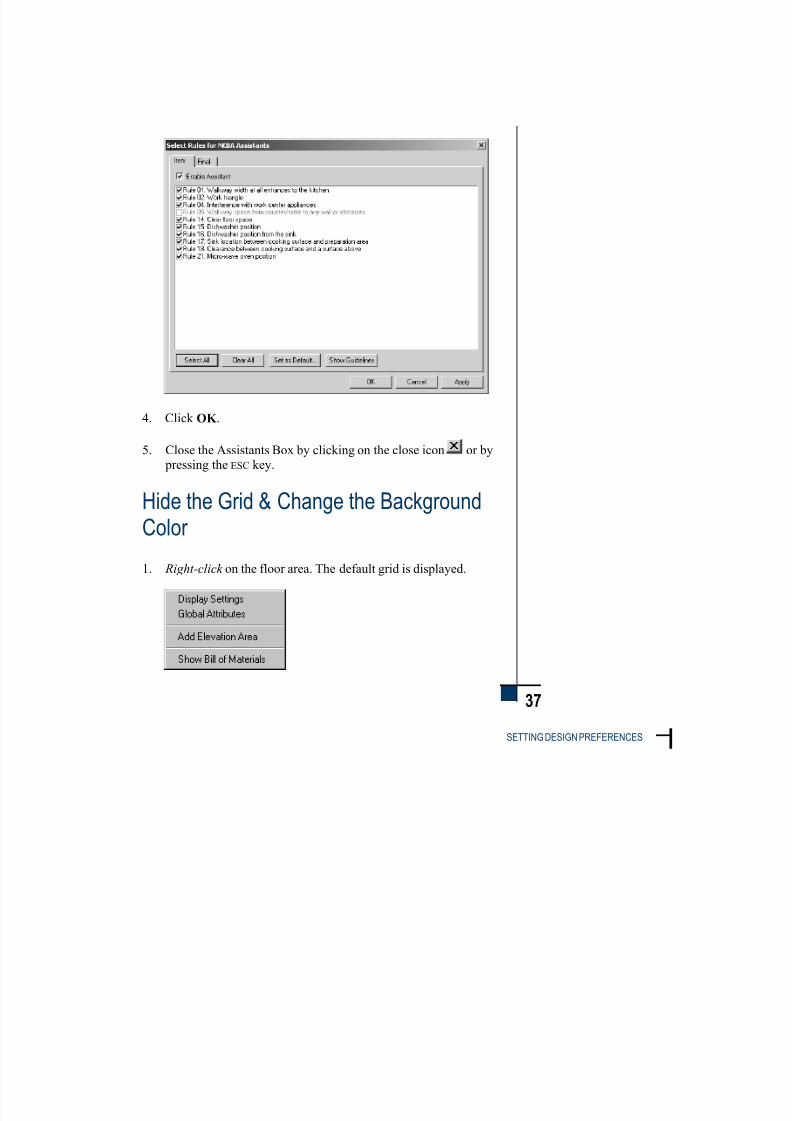
1. To display the Assistants, click on View in the Menu Bar and
choose Assistants. You can also press the CTRL+1 keys.
2. In the Assistants box, click Select Rules.
3. In the Item tab, add a check mark beside Enable Assistant so the
NKBA guidelines are checked as you place items on the design.
7/30/2019 Tutorial v 61 Imperial
http://slidepdf.com/reader/full/tutorial-v-61-imperial 53/247
37
SETTING DESIGN PREFERENCES
4. Click OK .
5. Close the Assistants Box by clicking on the close icon or by pressing the ESC key.
Hide the Grid & Change the BackgroundColor
1. Right-click on the floor area. The default grid is displayed.

7/30/2019 Tutorial v 61 Imperial
http://slidepdf.com/reader/full/tutorial-v-61-imperial 54/247
38
HIDE THE GRID & CHANGE THE BACKGROUND COLOR
The Display Settings
dialog is where you
decide which
components of the floor
lan you want to see or
not. The components that
have a check mark
represent categories of
items that are presently
visible on the floor plan.
2. From the list of commands, choose Display Settings.
3. Make sure the current display settings scheme is 20-20_kitchen. If
this is not the case, click the drop-down arrow beside Scheme andchoose 20-20_kitchen.

7/30/2019 Tutorial v 61 Imperial
http://slidepdf.com/reader/full/tutorial-v-61-imperial 55/247
39
SETTING DESIGN PREFERENCES
4. Click the Grid tab.
5. Remove the check mark beside Display.
6. Click the Background Color drop-down, then choose the whiterectangle (bottom right corner).
7/30/2019 Tutorial v 61 Imperial
http://slidepdf.com/reader/full/tutorial-v-61-imperial 56/247
40
HIDE THE GRID & CHANGE THE BACKGROUND COLOR
Hide Labels and Change the Fill Color
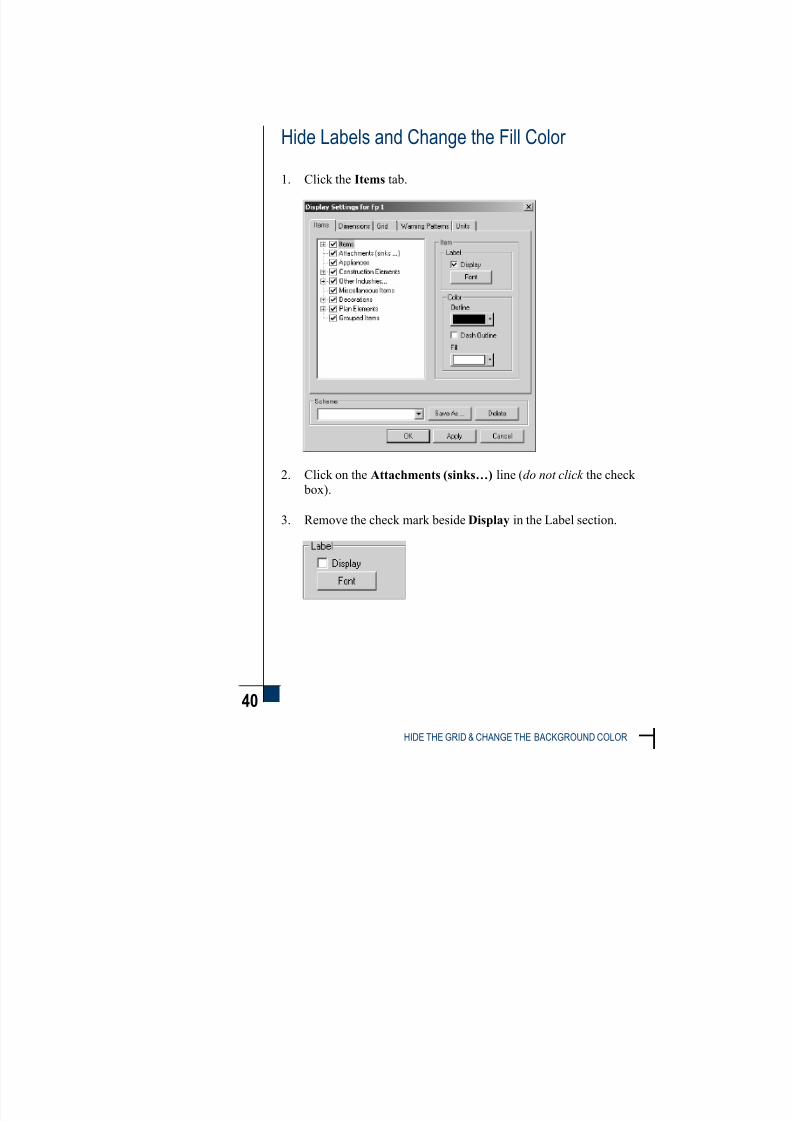
1. Click the Items tab.
2. Click on the Attachments (sinks…) line (do not click the check
box).
3. Remove the check mark beside Display in the Label section.

7/30/2019 Tutorial v 61 Imperial
http://slidepdf.com/reader/full/tutorial-v-61-imperial 57/247
41
SETTING DESIGN PREFERENCES
4. Click the drop-down arrow beneath Fill in the Color section.
5. Click Transparent.

7/30/2019 Tutorial v 61 Imperial
http://slidepdf.com/reader/full/tutorial-v-61-imperial 58/247
42
HIDE THE GRID & CHANGE THE BACKGROUND COLOR
Disable Warning Patterns
1. Click the Warning Patterns tab.
2. Remove the check mark beside the Display option of the Colliding
Items Pattern, Invalid Sections Pattern and Invalid Items
Pattern sections.
3. Click OK .
The grid no longer appears on the floor plan and the background is
white.

7/30/2019 Tutorial v 61 Imperial
http://slidepdf.com/reader/full/tutorial-v-61-imperial 59/247
43
SETTING DESIGN PREFERENCES
Save the Display Scheme
1. Right-click again on the floor area and choose Display Settings.
2. To save these settings as your default scheme for the Tutorial, click Save As.
3. In the Save this scheme as field, type tutorial and click OK .
4. Click OK to exit the Display Settings dialog.
7/30/2019 Tutorial v 61 Imperial
http://slidepdf.com/reader/full/tutorial-v-61-imperial 60/247
44
ASSIGN A DEFAULT CATALOG
Assign a Default Catalog
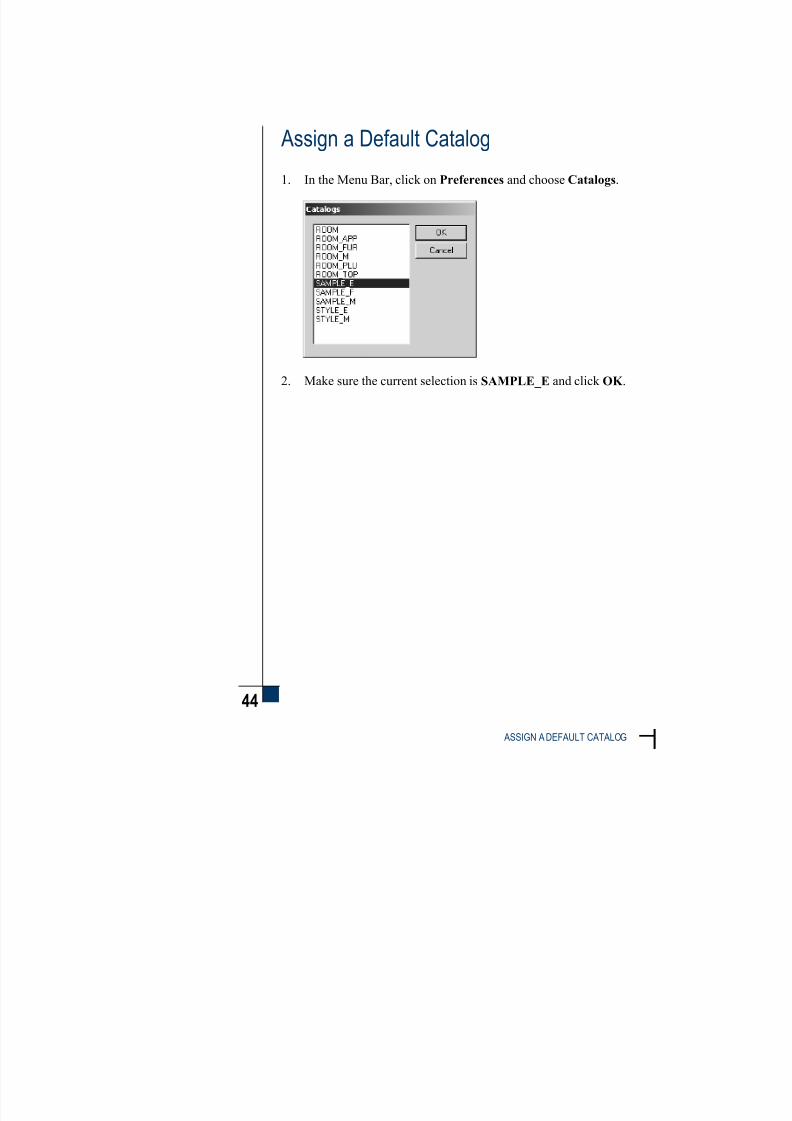
1. In the Menu Bar, click on Preferences and choose Catalogs.
2. Make sure the current selection is SAMPLE_E and click OK .

7/30/2019 Tutorial v 61 Imperial
http://slidepdf.com/reader/full/tutorial-v-61-imperial 61/247
45
SETTING DESIGN PREFERENCES
Change Wall and Texture Settings
Walls
1. Click Preferences and choose Room Settings.
2. Make sure the Thickness for Wall is 4".
3. Make sure the Height for Wall is 96". Since these are defaultvalues, all new walls drawn will take the values specified here.
7/30/2019 Tutorial v 61 Imperial
http://slidepdf.com/reader/full/tutorial-v-61-imperial 62/247
46
CHANGE WALL AND TEXTURE SETTINGS
Textures
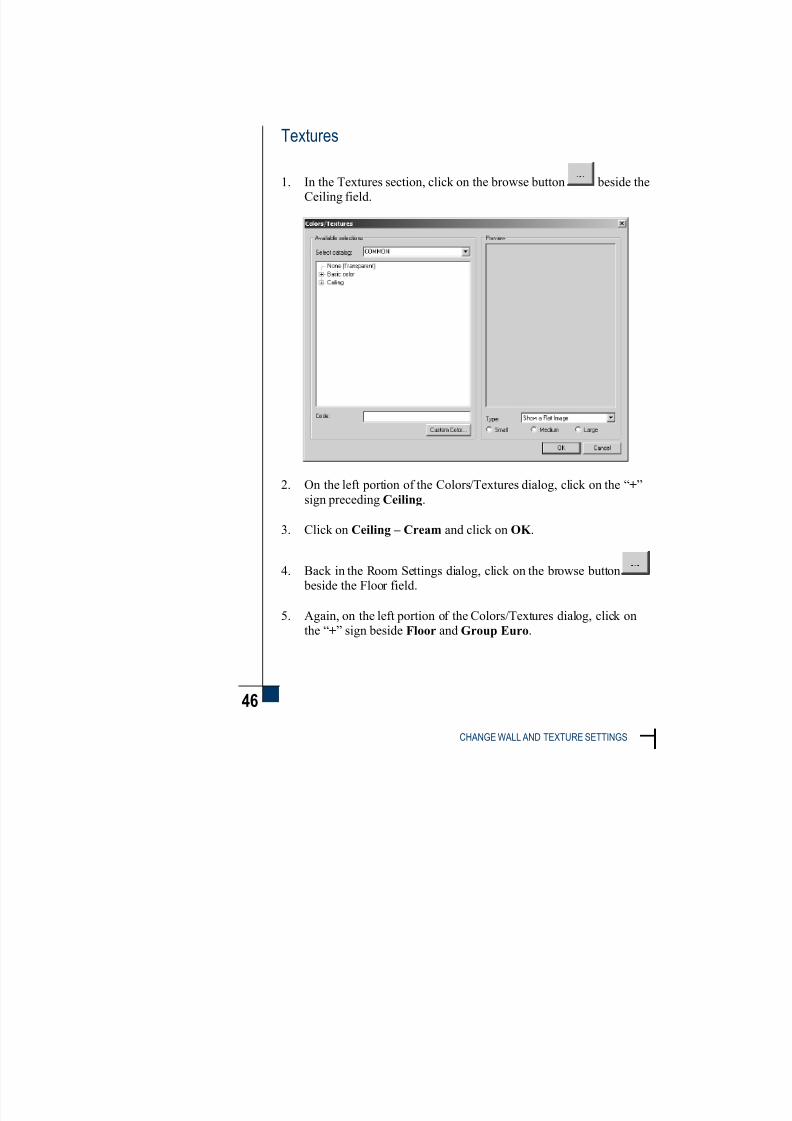
1. In the Textures section, click on the browse button beside the
Ceiling field.
2. On the left portion of the Colors/Textures dialog, click on the “+”
sign preceding Ceiling.
3. Click on Ceiling – Cream and click on OK .
4. Back in the Room Settings dialog, click on the browse button
beside the Floor field.
5. Again, on the left portion of the Colors/Textures dialog, click onthe “+” sign beside Floor and Group Euro.

7/30/2019 Tutorial v 61 Imperial
http://slidepdf.com/reader/full/tutorial-v-61-imperial 63/247
47
SETTING DESIGN PREFERENCES
6. Click once on the down arrow of the scroll bar and click onFloor – Grey marbled (mat), then click on OK .
7. In the Walls section, make sure a check mark appears beside Use
inside finish for both sides and click on the browse button
at the end of the Inside: field.
8. On the left portion, click on Wall – Wallpaper Almond Light
(within Group A of Wall textures) and click on OK .
7/30/2019 Tutorial v 61 Imperial
http://slidepdf.com/reader/full/tutorial-v-61-imperial 64/247
48
ASSIGN THE CURRENCY FOR THE CURRENT DESIGN
9. In the Room Settings dialog, click on OK .
Assign the Currency for the Current Design
To assign the USD currency for the design, do as follows.
1. From the Menu Bar, choose Preferences, Currency, thenCurrency Selection.
2. Make sure USD – DOLLAR appears beside the Current design
field. If not, click the drop-down to select this code, then click OK .

7/30/2019 Tutorial v 61 Imperial
http://slidepdf.com/reader/full/tutorial-v-61-imperial 65/247
49
SETTING DESIGN PREFERENCES
Recap
You can now:
access 20-20 Design from the Project module
customize the main screen by displaying, resizing boxes, lists and
moving toolbars
enable a Design Assistant
change the display settings of a floor plan view (hide the grid)
set a default catalog
set the thickness/height for walls
set default textures for walls/ceilings and floors
assign a currency code for the current design
You are ready to draw your first kitchen!

7/30/2019 Tutorial v 61 Imperial
http://slidepdf.com/reader/full/tutorial-v-61-imperial 66/247

7/30/2019 Tutorial v 61 Imperial
http://slidepdf.com/reader/full/tutorial-v-61-imperial 67/247
2 0 - 2 0 D E S I G N
Session 3

7/30/2019 Tutorial v 61 Imperial
http://slidepdf.com/reader/full/tutorial-v-61-imperial 68/247

7/30/2019 Tutorial v 61 Imperial
http://slidepdf.com/reader/full/tutorial-v-61-imperial 69/247
3
51
DRAWING THE KITCHEN WALLS
Session 3 ~ Drawing the Kitchen Walls
Draw the Basic Layout
1. First, make sure that the program is in wall mode by clicking the
Wall Mode icon in the Wall/Const. Line toolbar.
2. Click the Continuous icon .

7/30/2019 Tutorial v 61 Imperial
http://slidepdf.com/reader/full/tutorial-v-61-imperial 70/247
52
DRAW THE BASIC LAYOUT
3. Click in the lower left corner of the floor plan as shown below.
4. An outline appears if you move your mouse. Look at the Edit Boxon the left side of the screen. Type 44 and press the ENTER key.
5. In the Edit Box, type 42.75 in the Length field and press the TAB
key.
6. Type 135 in the Angle field and press ENTER .
7/30/2019 Tutorial v 61 Imperial
http://slidepdf.com/reader/full/tutorial-v-61-imperial 71/247
53
DRAWING THE KITCHEN WALLS
You can also click
behind the last wall you
draw to stop adding
walls.
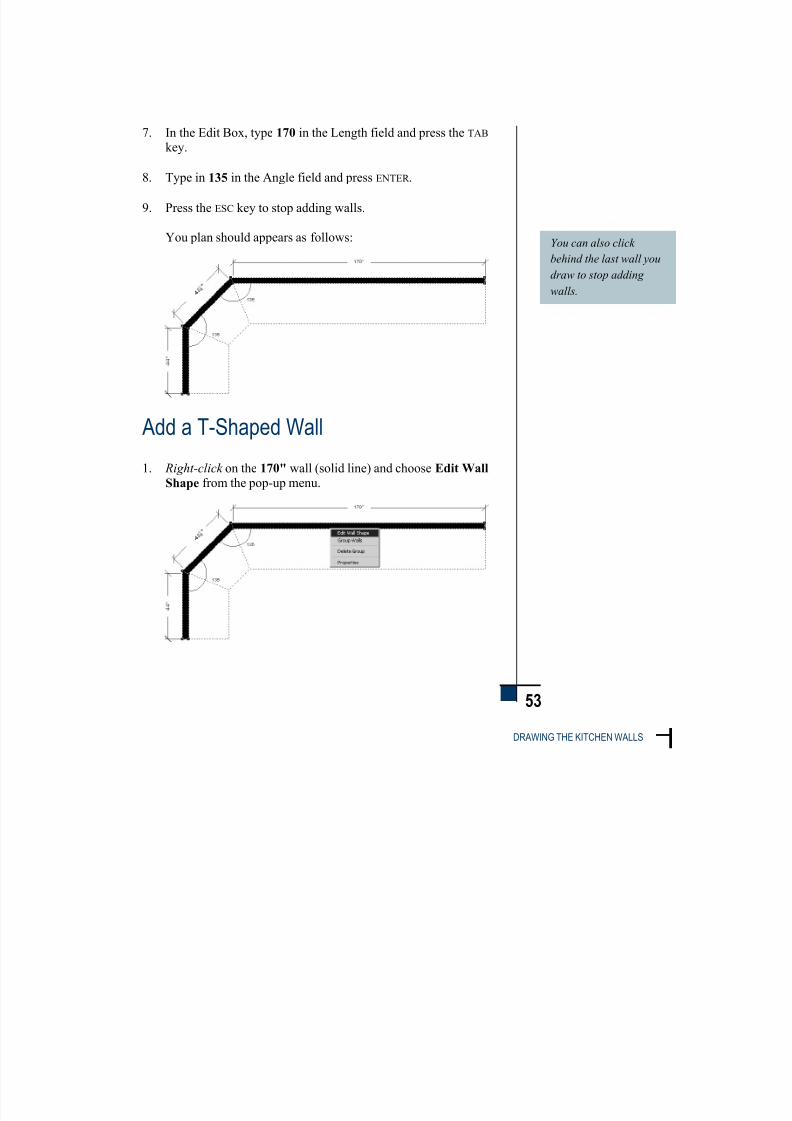
7. In the Edit Box, type 170 in the Length field and press the TAB key.
8. Type in 135 in the Angle field and press ENTER .
9. Press the ESC key to stop adding walls.
You plan should appears as follows:
Add a T-Shaped Wall
1. Right-click on the 170" wall (solid line) and choose Edit Wall
Shape from the pop-up menu.

7/30/2019 Tutorial v 61 Imperial
http://slidepdf.com/reader/full/tutorial-v-61-imperial 72/247
54
ADD A T-SHAPED WALL
2. The walls become transparent. Right-click on or a little below theinside line of the third wall (170") and choose Add from the Wall
pop-up menu.
3. A point is displayed. Drag the point to towards the right and left-
click when the X field indicates 126 in the Edit Box. You can alsotype 126 in the X field and press ENTER .
4. Move your mouse towards the bottom and left-click when theLength field indicates 84 in the Edit Box. You can also type 84 in
the Length field and press ENTER .
5. Press the ESC key to stop adding walls.
Your walls should appear as follows:
7/30/2019 Tutorial v 61 Imperial
http://slidepdf.com/reader/full/tutorial-v-61-imperial 73/247
55
DRAWING THE KITCHEN WALLS
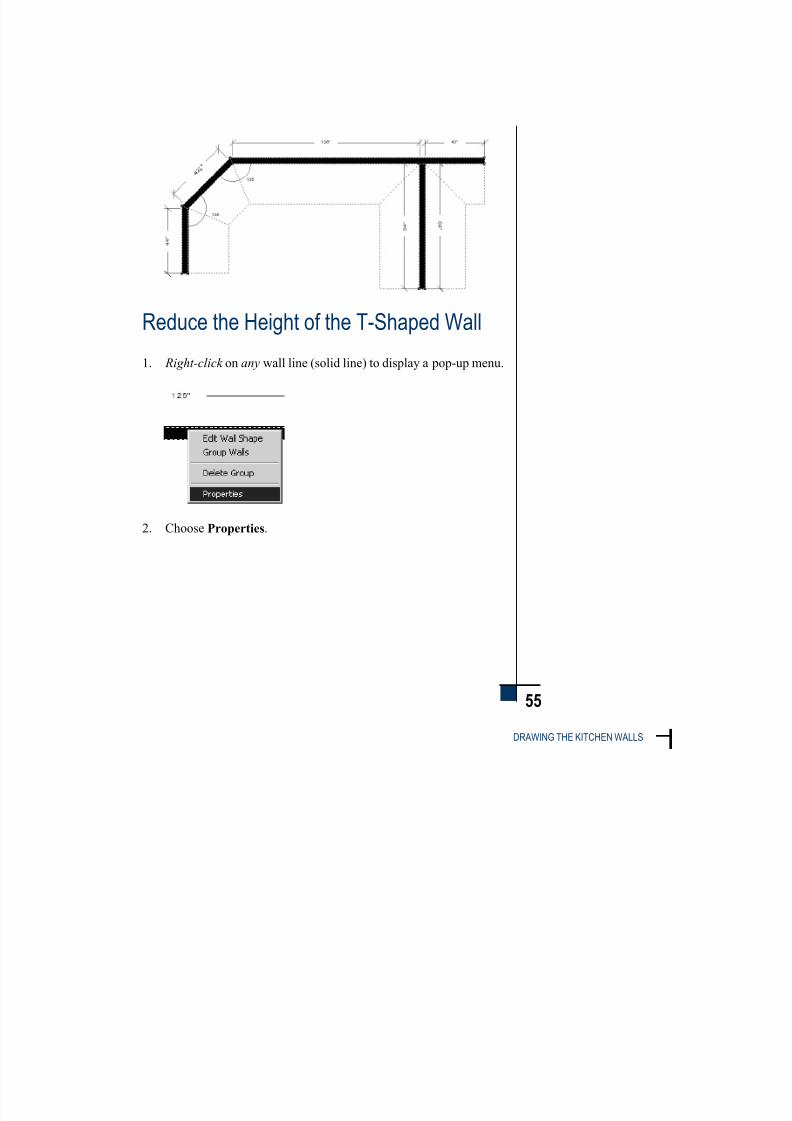
Reduce the Height of the T-Shaped Wall
1. Right-click on any wall line (solid line) to display a pop-up menu.
2. Choose Properties.
7/30/2019 Tutorial v 61 Imperial
http://slidepdf.com/reader/full/tutorial-v-61-imperial 74/247
56
SAVE YOUR DESIGN
The green line you see
on the floor plan
indicates the length of
the inside placement
one which is 84".
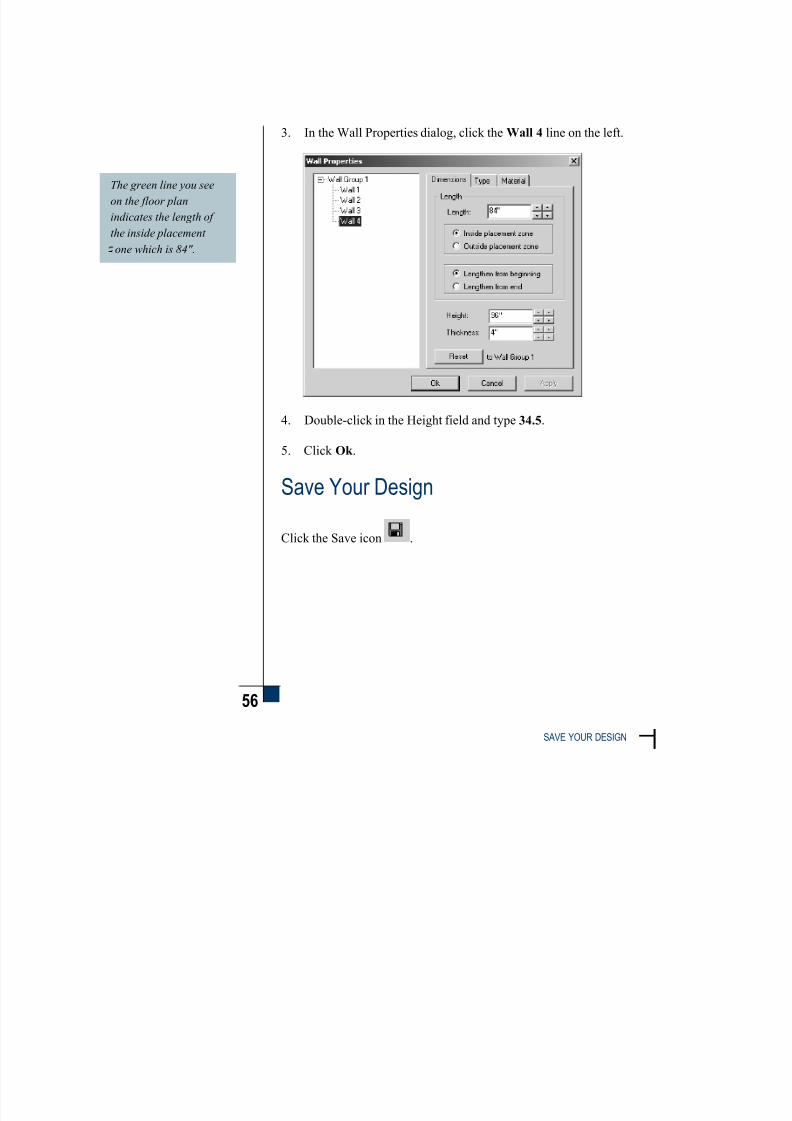
3. In the Wall Properties dialog, click the Wall 4 line on the left.
4. Double-click in the Height field and type 34.5.
5. Click Ok .
Save Your Design
Click the Save icon .
7/30/2019 Tutorial v 61 Imperial
http://slidepdf.com/reader/full/tutorial-v-61-imperial 75/247
57
DRAWING THE KITCHEN WALLS
Recap
You can now:
create a basic design with angled walls (with the mouse and the EditBox)
use the Edit Box to enter values
add a t-shaped wall
change the height of the t-shaped wall
save a design

7/30/2019 Tutorial v 61 Imperial
http://slidepdf.com/reader/full/tutorial-v-61-imperial 76/247

7/30/2019 Tutorial v 61 Imperial
http://slidepdf.com/reader/full/tutorial-v-61-imperial 77/247
2 0 - 2 0 D E S I G N
Session 4

7/30/2019 Tutorial v 61 Imperial
http://slidepdf.com/reader/full/tutorial-v-61-imperial 78/247
7/30/2019 Tutorial v 61 Imperial
http://slidepdf.com/reader/full/tutorial-v-61-imperial 79/247
4
59
PLACING A WINDOW, APPLIANCES & A SINK
Session 4 ~Placing a Window, Appliances & a Sink
Place a Window
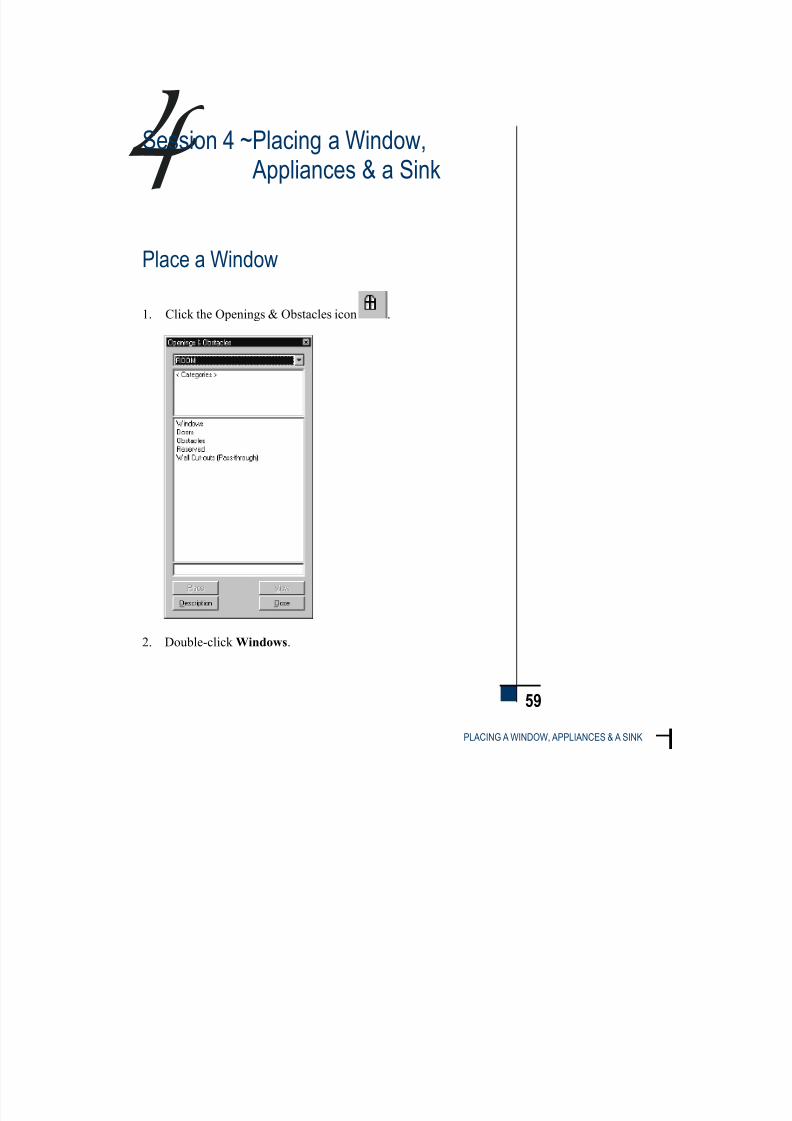
1. Click the Openings & Obstacles icon .
2. Double-click Windows.

7/30/2019 Tutorial v 61 Imperial
http://slidepdf.com/reader/full/tutorial-v-61-imperial 80/247
60
PLACE A WINDOW
3. Double-click Generic Windows.
4. Double-click 42"H.
5. Double-click E42.CAS-2 > 42"H Casement Window #2.
6. Click on the placement zone of the third wall. (See “X” on the
following figure.)
7. A small outline appears on the wall. Drag the mouse from left to
right and look at the Edit Box (second box down on the left side of
your screen).
8. In the Center field, type 64.5 and press the TAB key to go to theWidth field.
9. In the Width field, type in 33 and press the ENTER key. This widthincludes the casing of the window.

7/30/2019 Tutorial v 61 Imperial
http://slidepdf.com/reader/full/tutorial-v-61-imperial 81/247
61
PLACING A WINDOW, APPLIANCES & A SINK
10. When the Openings & Obstacles dialog returns, click Close.
Your screen should appear as follows.
Attach Blinds and Change the Scenery of the Window
Attach Horizontal Blinds
1. Right-click on the window, choose E42.CAS-2 and click onAttributes in the pop-up menu.

7/30/2019 Tutorial v 61 Imperial
http://slidepdf.com/reader/full/tutorial-v-61-imperial 82/247
62
ATTACH BLINDS AND CHANGE THE SCENERY OF THE WINDOW
2. In the Attributes dialog, click on the Attachments tab.
3. Click the Add button.

7/30/2019 Tutorial v 61 Imperial
http://slidepdf.com/reader/full/tutorial-v-61-imperial 83/247
63
PLACING A WINDOW, APPLIANCES & A SINK
4. In the Attachments dialog, double-click Generic Window Options and H.WIN-SHADE >> Horizontal Window Shape.
5. Click Close.
Open the Blinds
1. In the Attachments tab, double-click on the 1 Horizontal Window
Shade line.
The Attributes dialog of the Horizontal Window Shade appears.
2. Click on the On/Off tab and add a check mark beside Open item
w/acc., then click OK .
7/30/2019 Tutorial v 61 Imperial
http://slidepdf.com/reader/full/tutorial-v-61-imperial 84/247
64
ATTACH BLINDS AND CHANGE THE SCENERY OF THE WINDOW
Change the Scenery of the Window
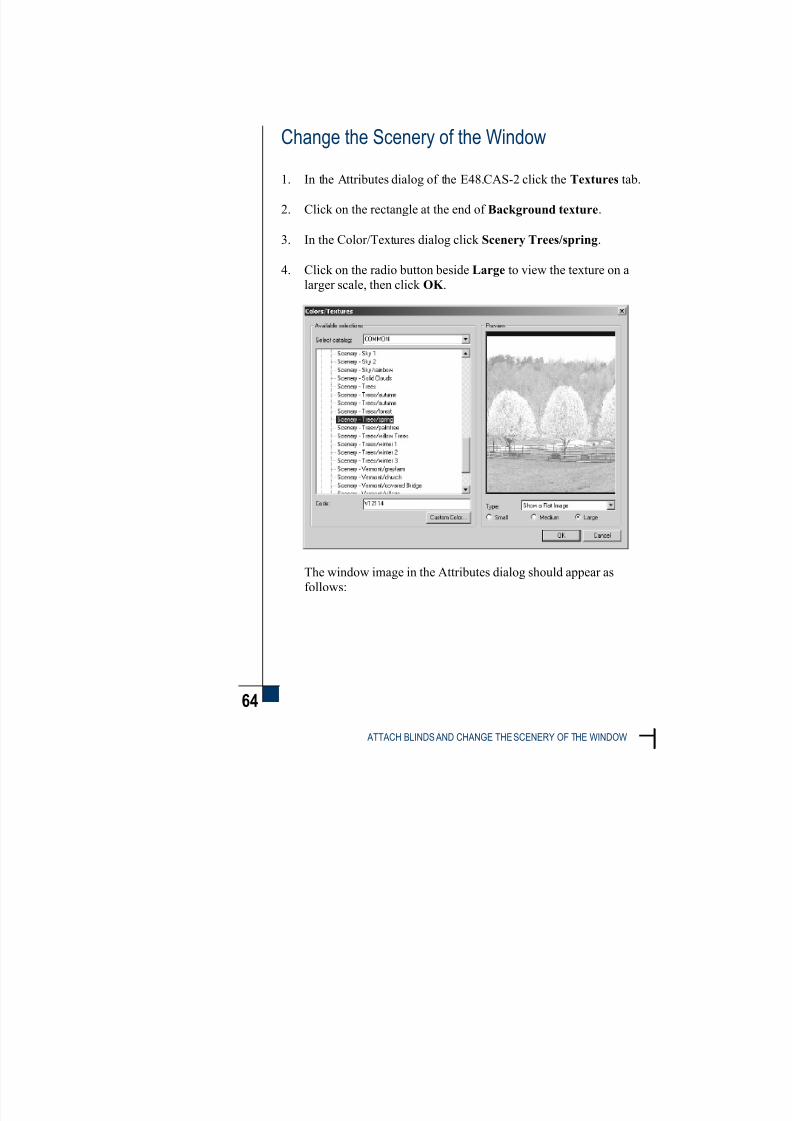
1. In the Attributes dialog of the E48.CAS-2 click the Textures tab.
2. Click on the rectangle at the end of Background texture.
3. In the Color/Textures dialog click Scenery Trees/spring.
4. Click on the radio button beside Large to view the texture on a
larger scale, then click OK .
The window image in the Attributes dialog should appear as
follows:

7/30/2019 Tutorial v 61 Imperial
http://slidepdf.com/reader/full/tutorial-v-61-imperial 85/247
65
PLACING A WINDOW, APPLIANCES & A SINK
5. Click OK .
Add Reserved Areas on Both Sides of theWindow
To add a 3" reserved area on each side of the window, do as follows:
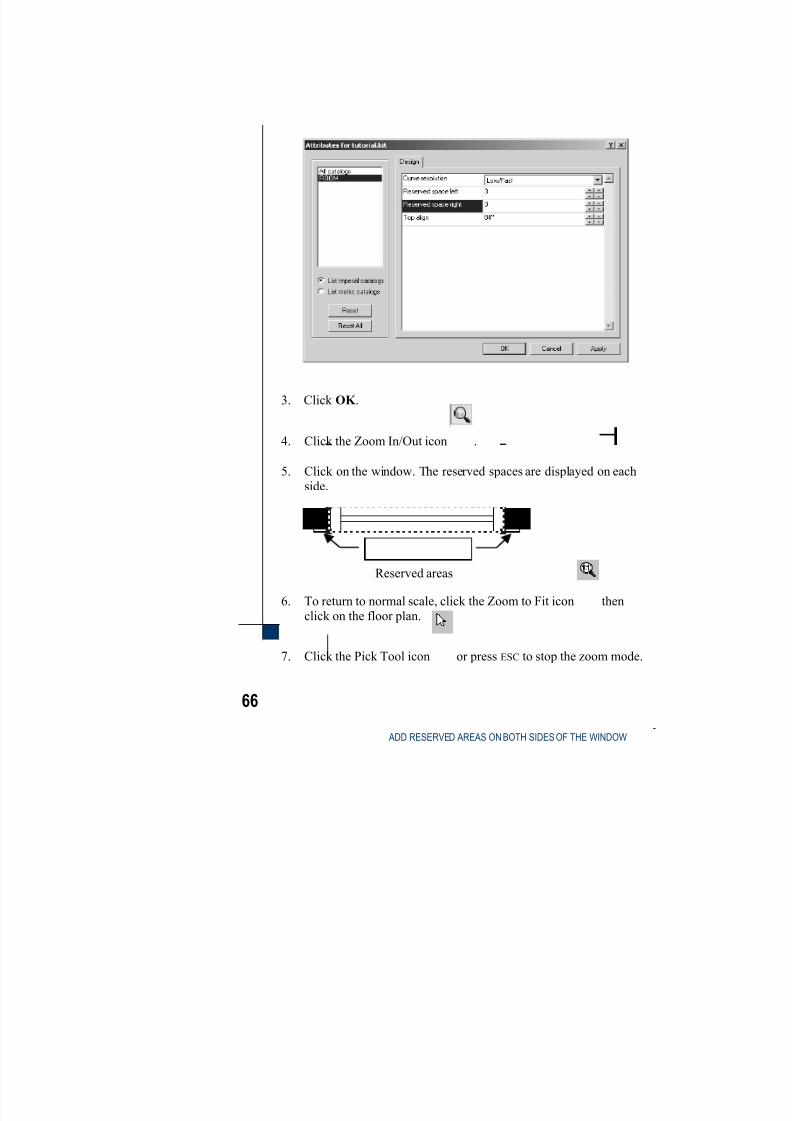
1. Click the Global Attributes icon to display the Attributes
dialog.
2. From the Design tab, in both the Reserved space left and Reserved
space right fields, type 3.
7/30/2019 Tutorial v 61 Imperial
http://slidepdf.com/reader/full/tutorial-v-61-imperial 86/247
66
ADD RESERVED AREAS ON BOTH SIDES OF THE WINDOW
3. Click OK .
4. Click the Zoom In/Out icon .
5. Click on the window. The reserved spaces are displayed on each
side.
6. To return to normal scale, click the Zoom to Fit icon then
click on the floor plan.
7. Click the Pick Tool icon or press ESC to stop the zoom mode.
Reserved areas

7/30/2019 Tutorial v 61 Imperial
http://slidepdf.com/reader/full/tutorial-v-61-imperial 87/247
67
PLACING A WINDOW, APPLIANCES & A SINK
Place a Refrigerator
1. Click the Appliances icon .
2. Double-click Refrigerator.
3. Scroll down the list, then double-click on SUB-30L > 30"L Sub-
Zero.
4. Click on the placement zone of the first wall. An outline of the
refrigerator appears.
7/30/2019 Tutorial v 61 Imperial
http://slidepdf.com/reader/full/tutorial-v-61-imperial 88/247
68
PLACE A REFRIGERATOR
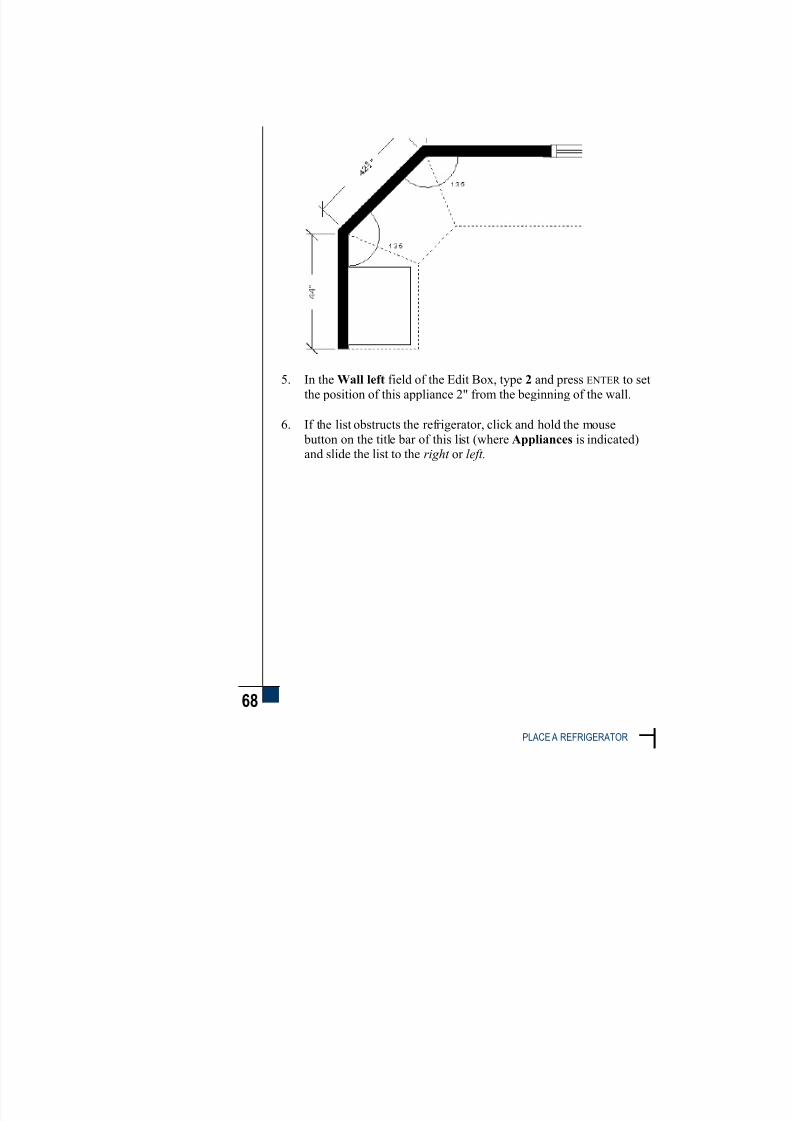
5. In the Wall left field of the Edit Box, type 2 and press ENTER to set
the position of this appliance 2" from the beginning of the wall.
6. If the list obstructs the refrigerator, click and hold the mouse
button on the title bar of this list (where Appliances is indicated)and slide the list to the right or left.

7/30/2019 Tutorial v 61 Imperial
http://slidepdf.com/reader/full/tutorial-v-61-imperial 89/247
69
PLACING A WINDOW, APPLIANCES & A SINK
Place a Range
1. In the Appliances list, double-click on <Categories> at the top of the list.
2. Double-click on Range.
3. Double-click on 30-GAS-RANGE5 > 30" Gas Range #5.
4. Click on the inside placement zone of the t-shaped wall. (See “X”
on the following figure.)
7/30/2019 Tutorial v 61 Imperial
http://slidepdf.com/reader/full/tutorial-v-61-imperial 90/247
70
PLACE A SINK BASE WITH A SINK
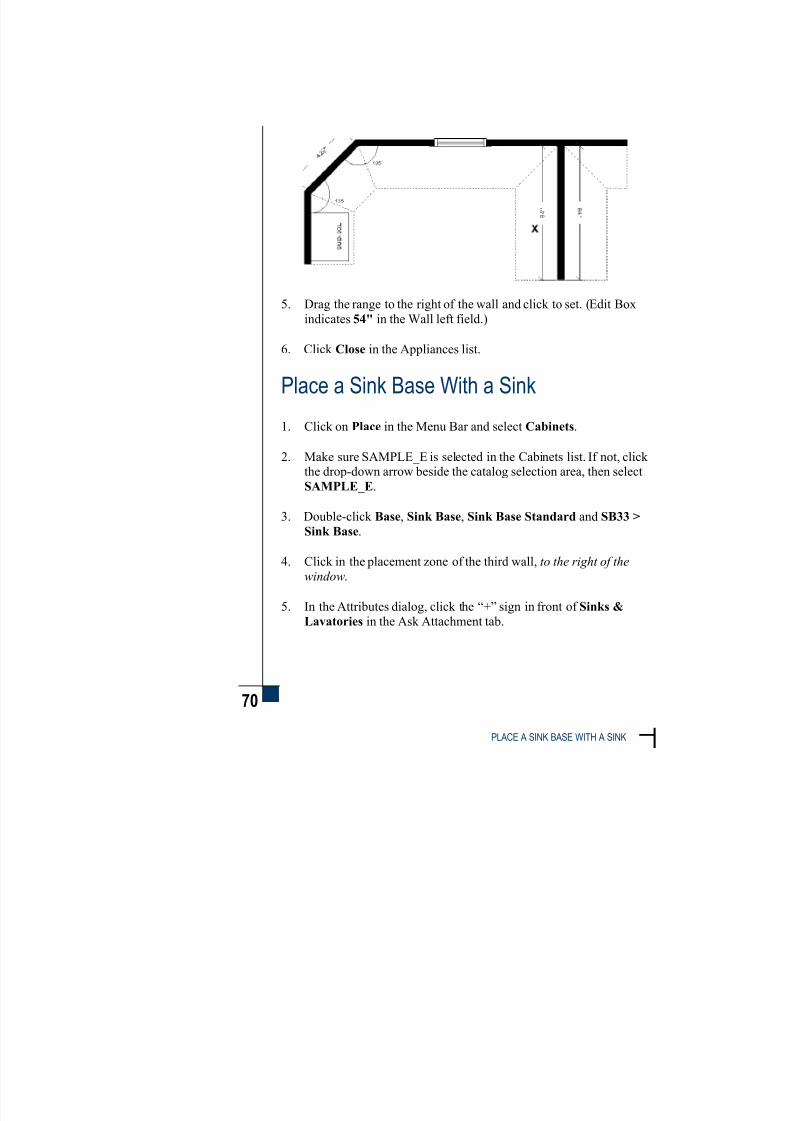
5. Drag the range to the right of the wall and click to set. (Edit Box
indicates 54" in the Wall left field.)
6. Click Close in the Appliances list.
Place a Sink Base With a Sink1. Click on Place in the Menu Bar and select Cabinets.
2. Make sure SAMPLE_E is selected in the Cabinets list. If not, click the drop-down arrow beside the catalog selection area, then selectSAMPLE_E.
3. Double-click Base, Sink Base, Sink Base Standard and SB33 >
Sink Base.
4. Click in the placement zone of the third wall, to the right of the
window.
5. In the Attributes dialog, click the “+” sign in front of Sinks &
Lavatories in the Ask Attachment tab.

7/30/2019 Tutorial v 61 Imperial
http://slidepdf.com/reader/full/tutorial-v-61-imperial 91/247
71
PLACING A WINDOW, APPLIANCES & A SINK
6. Click KOH.33-11/2TUB >> 33" Kohler 1-1/2 Tub Sink #2 andclick Place.
Follow Design Rules
The 20-20 Item Check Assistant displays NKBA rule conflicts.
1. Click the first show button to see conflicting items. The button
changes color to indicate that this feature is activated.
2. Click the first rule number 2 to read this guideline. Use the
vertical scroll arrows to see the entire article.
3. Click the 20-20 Design icon on the
Windows taskbar to switch to the floor plan. The conflicting itemsare now hatched because of the Show button, which you can turn
on or off.

7/30/2019 Tutorial v 61 Imperial
http://slidepdf.com/reader/full/tutorial-v-61-imperial 92/247
72
FOLLOW DESIGN RULES
4. Drag the cabinet to the left and left-click when the Edit Boxdisplays 48" in the Wall left field.
5. The 20-20 Item Check Assistant displays a page explaining that the
conflicts have been corrected. Click File, Close in the 20-20
HTML Viewer.

7/30/2019 Tutorial v 61 Imperial
http://slidepdf.com/reader/full/tutorial-v-61-imperial 93/247
73
PLACING A WINDOW, APPLIANCES & A SINK
When you drag an item
on a wall, you can pass
over already placed
items and even place
items freestanding if you
move them outside the
lacement zone.
6. Click Close in the Cabinets list.
Your screen should appear as follows:
Place a Dishwasher
1. Click on the Appliances icon .
2. Double-click on Dishwasher and 24.DISH-IQ6 > 24" Hokem
IQ6 Dishwasher.
3. Click on the placement zone to the left of the sink on the third wall.
4. Drag the dishwasher to the right and over the sink, then move itagainst the left side of the sink base and click to set the final
position (in the Edit Box, Wall left shows 24").
5. Click Close to remove the Appliances list.
Your floor plan should appear as follows.

7/30/2019 Tutorial v 61 Imperial
http://slidepdf.com/reader/full/tutorial-v-61-imperial 94/247
74
DISABLE A DESIGN ASSISTANT
Disable a Design Assistant
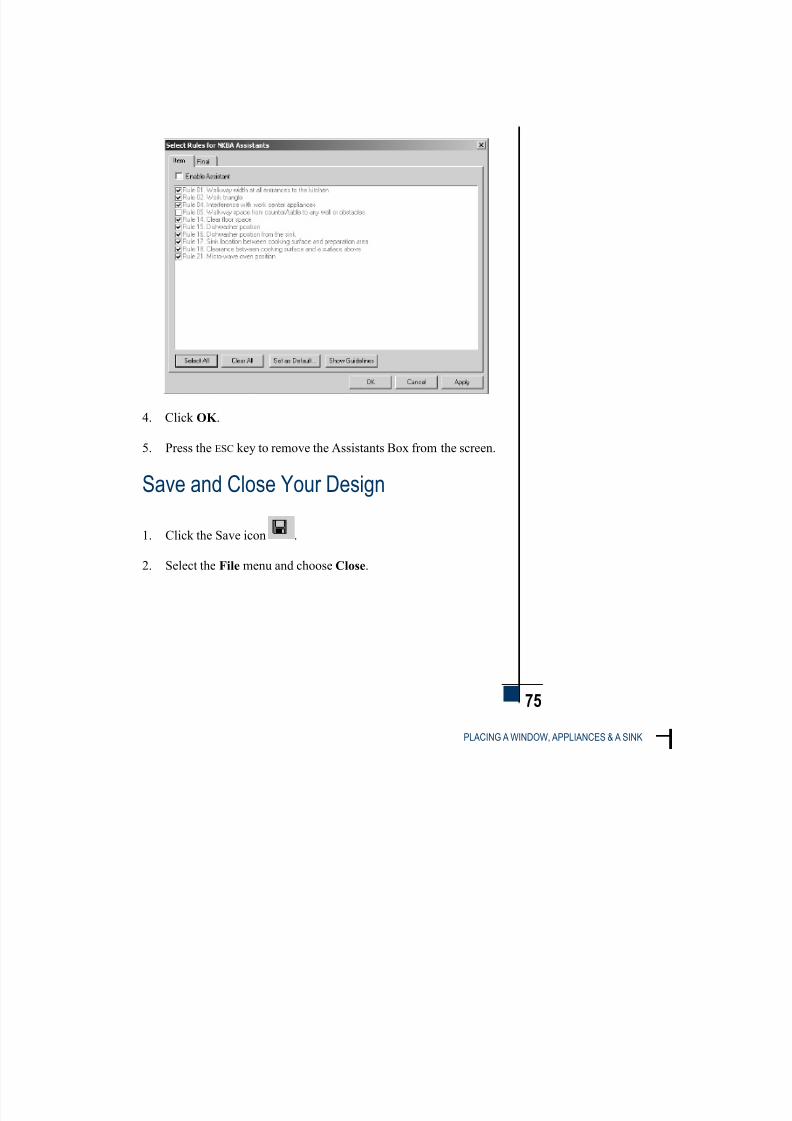
1. Press the CTRL+1 keys to display the Assistants Box.
2. Click Select Rules.
3. In the Item tab, remove check mark beside Enable Assistant so
the NKBA guidelines are no longer checked.
7/30/2019 Tutorial v 61 Imperial
http://slidepdf.com/reader/full/tutorial-v-61-imperial 95/247
75
PLACING A WINDOW, APPLIANCES & A SINK
4. Click OK .
5. Press the ESC key to remove the Assistants Box from the screen.
Save and Close Your Design
1. Click the Save icon .
2. Select the File menu and choose Close.

7/30/2019 Tutorial v 61 Imperial
http://slidepdf.com/reader/full/tutorial-v-61-imperial 96/247
76
EXIT 20-20 DESIGN AND PROJECT
Exit 20-20 Design and Project
1. In 20-20 Design, click File, Exit. This closes the Design program,
leaving only the Project module open.
2. In 20-20 Project, click Project, Exit to close the Project module.
Recap
You can now:
place a window and add shades to it
place appliances
correct design conflicts with the 20-20 Assistants
place a sink base with a sink under a window
drag an item on a wall or construction line
save and close your design
exit 20-20 Design and Project

7/30/2019 Tutorial v 61 Imperial
http://slidepdf.com/reader/full/tutorial-v-61-imperial 97/247
2 0 - 2 0 D E S I G N
Session 5

7/30/2019 Tutorial v 61 Imperial
http://slidepdf.com/reader/full/tutorial-v-61-imperial 98/247

7/30/2019 Tutorial v 61 Imperial
http://slidepdf.com/reader/full/tutorial-v-61-imperial 99/247
5
77
ADDING CABINETS
The 20-20 Project
Wizard can be useful
when you need to create
or change a customer’s
roject or design
information.
Enable or disable the
wizard by using
Preferences.
Session 5 ~Adding Cabinets
Access 20-20 Design
1. Click on the title bar of the 20-20 Shortcut Bar to make it the
active window.
2. Click once on the Design icon .
3. When the first dialog of the 20-20 Project Wizard appears, click Cancel.
Title bar

7/30/2019 Tutorial v 61 Imperial
http://slidepdf.com/reader/full/tutorial-v-61-imperial 100/247
78
OPEN A DESIGN
Open a Design
1. Click the Open icon .
2. Double-click the tutorial file.
You may have to choose the disk and directory. If so, make sure
you select the disk that houses Version 6.1 and the\2020v61\USR0\Kit folder.

7/30/2019 Tutorial v 61 Imperial
http://slidepdf.com/reader/full/tutorial-v-61-imperial 101/247
79
ADDING CABINETS
s a safety precaution, do
not use the subdirectories
where 20-20 is installed to
save “official drawings”.
If for some reason you
have to reinstall 20-20,
ou can prevent the loss of
important drawings by
creating directories for
each designer directly on
the root of the hard drive.
Consult the Design File Path
1. Choose Preferences, File Paths from the menu bar.
In the File Paths dialog, make sure the default path for All design
files is \2020v61\USR0\Kit since you will use this path for the
tutorial.
2. If the path needs to be modified, click the Browse button beside the All design files field, to acces the Select Folder dialog.
3. In the Drives section, select the drive where 20-20 is installed; for
instance c:\.
If the drive housing 20-20 is not shown, use the Drives drop-downlist to select it.

7/30/2019 Tutorial v 61 Imperial
http://slidepdf.com/reader/full/tutorial-v-61-imperial 102/247
80
DELETE DIMENSIONS
4. In the Folders section, double-click on 2020v61, USR0 and Kit,then click OK . \2020v61\USR0\ Kit is displayed in the All design
files field.
5. Click OK to confirm the path and close the File Paths dialog.
Delete Dimensions
1. Right-click on the arc of the 135 angular dimension line in the first
corner.
2. Choose Auto dim – 135, then select Delete.
3. Right-click on the arc of the 135 angular dimension line in the
second corner.
4. Choose Auto dim – 135, then select Delete.

7/30/2019 Tutorial v 61 Imperial
http://slidepdf.com/reader/full/tutorial-v-61-imperial 103/247
81
ADDING CABINETS
Place a Tall Cabinet
Find the Width of an Empty Area
1. Click in the center of the floor plan as shown with the “X” on thefollowing figure to make sure none of the items are selected.
2. Place the cursor on the placement zone of the second wall
(diagonal wall) and away from the wall without clicking (where an
“X” appears on the following figure).
7/30/2019 Tutorial v 61 Imperial
http://slidepdf.com/reader/full/tutorial-v-61-imperial 104/247
82
PLACE A TALL CABINET
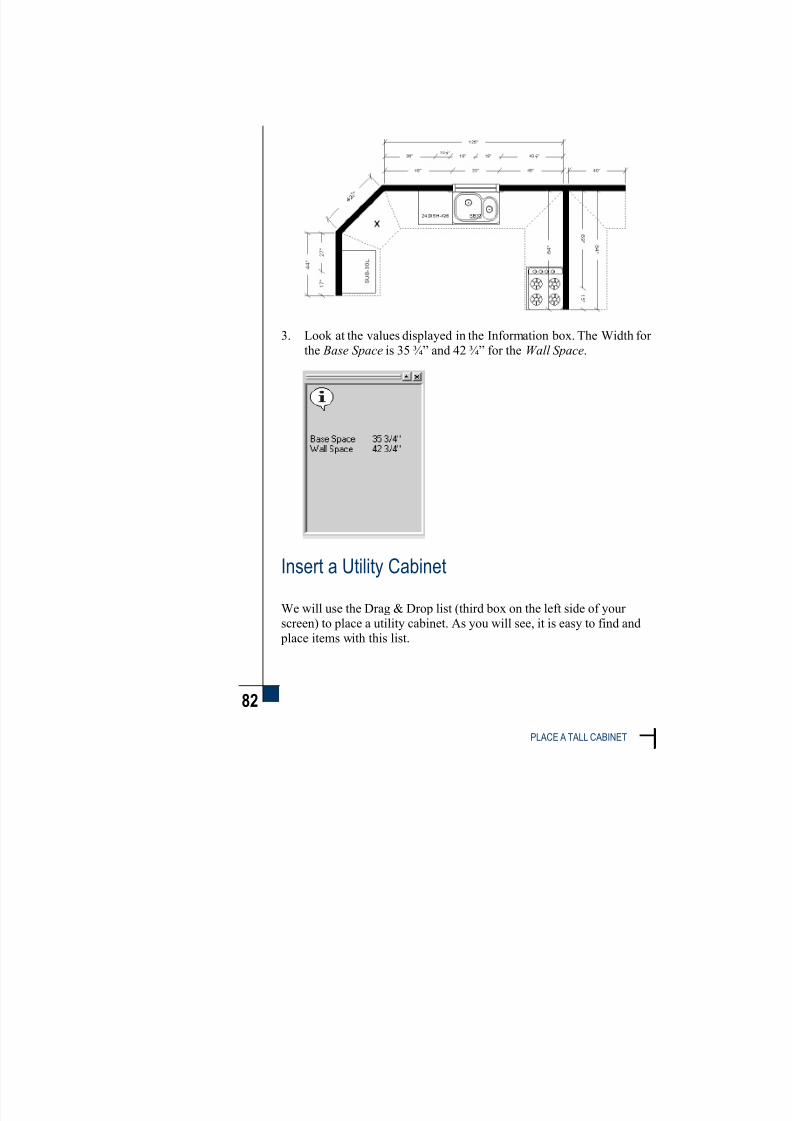
3. Look at the values displayed in the Information box. The Width for
the Base Space is 35 ¾” and 42 ¾” for the Wall Space.
Insert a Utility Cabinet
We will use the Drag & Drop list (third box on the left side of your
screen) to place a utility cabinet. As you will see, it is easy to find and
place items with this list.

7/30/2019 Tutorial v 61 Imperial
http://slidepdf.com/reader/full/tutorial-v-61-imperial 105/247
83
ADDING CABINETS
1. First, make sure SAMPLE_E is selected in the Drag & Drop list. If not, click the drop-down arrow beside the catalog selection area,
then select SAMPLE_E.
2. Double-click on Tall.
3. Tall is listed underneath <Categories> and you see tall models
available. Double-click on 84"H 24"D Utility.
4. Double-click on 84"H 24"D Utility Standard in the sub-list.

7/30/2019 Tutorial v 61 Imperial
http://slidepdf.com/reader/full/tutorial-v-61-imperial 106/247
84
GET A BALLPARK FIGURE
5. Click once on the U2184L > Utility line to highlight it.
6. Hold the left mouse button and start moving the mouse towards the
plan: the cursor changes to indicate that you can place this
item on the design… hold the mouse button!
7. Drag and drop the cabinet by releasing the left mouse button on the
placement zone of the second wall (the diagonal wall).
8. Now that the cabinet outline is on the wall, type 10.75 in the Wallleft field of the Edit Box and press ENTER .
Your floor plan should appear as follows.
Get a Ballpark Figure
To fill the empty base and wall space of selected walls, do as follows.
1. Click in the placement zone of the third wall.
7/30/2019 Tutorial v 61 Imperial
http://slidepdf.com/reader/full/tutorial-v-61-imperial 107/247
85
ADDING CABINETS
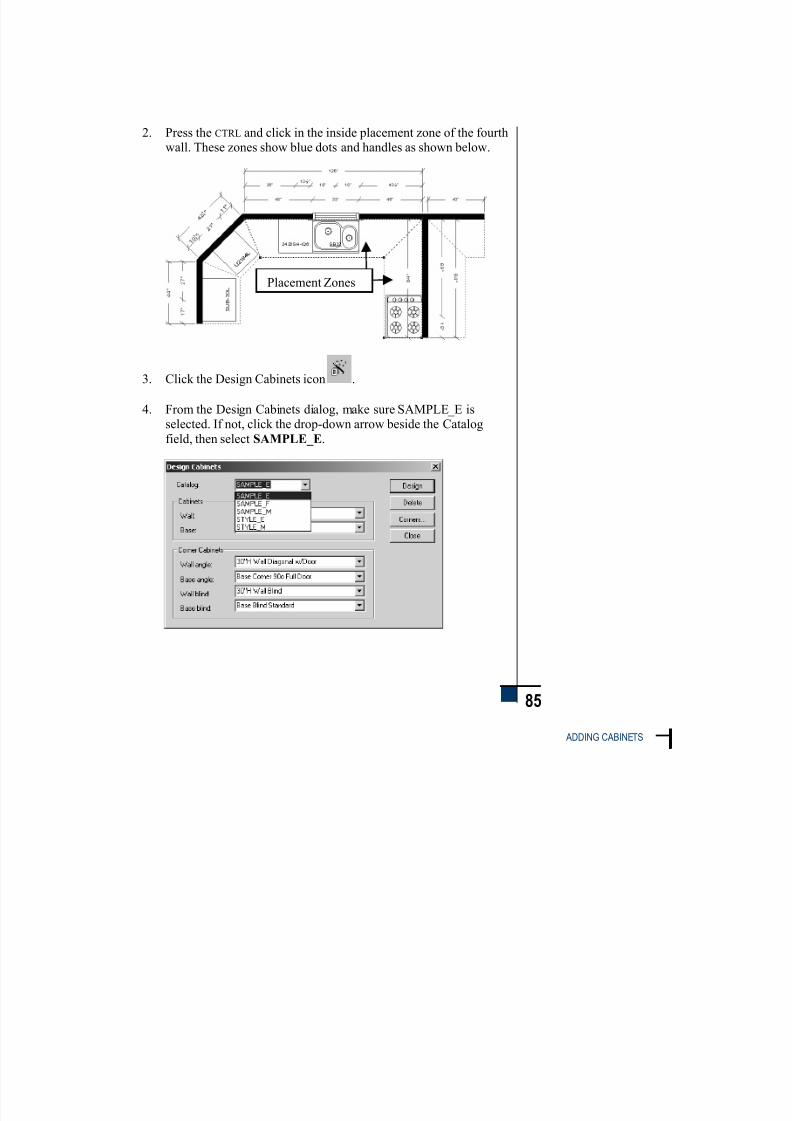
2. Press the CTRL and click in the inside placement zone of the fourthwall. These zones show blue dots and handles as shown below.
3. Click the Design Cabinets icon .
4. From the Design Cabinets dialog, make sure SAMPLE_E isselected. If not, click the drop-down arrow beside the Catalog
field, then select SAMPLE_E.
Placement Zones

7/30/2019 Tutorial v 61 Imperial
http://slidepdf.com/reader/full/tutorial-v-61-imperial 108/247
86
GET A BALLPARK FIGURE
5. Click the Design button.
6. Click the Show Bill of Materials icon to display the prices of
the items on this design.

7/30/2019 Tutorial v 61 Imperial
http://slidepdf.com/reader/full/tutorial-v-61-imperial 109/247
87
ADDING CABINETS
Once open, the BOM is
always available.
Whenever you want to
see it, simply click on
Window in the Menu Bar and choose
t utorial.kit:2.
7. From the Menu Bar, click the Design icon to return to thefloor plan.
8. To delete the auto-designed cabinets only, click the Design
Cabinets icon , click the Delete button, wait a few seconds,
then click the Close button.
The design is the same as before you launched the automatic
design of cabinets.
Place Base Cabinets
Add a Base Corner Cabinet
1. Double-click on <Categories> in the Drag & Drop list. If you donot see <Categories>, use the up arrow button beside the history of
selections area, scroll up and double-click on <Categories>.
2. Double-click on Base Corner.
3. Double-click on Base Corner Diagonal.
4. Double-click on Base Corner " " " w/LSusan. Use the horizontal
scroll bar if you do not see the entire description.
Use the arrow button toscroll up if you cannot
see <Categories>.

7/30/2019 Tutorial v 61 Imperial
http://slidepdf.com/reader/full/tutorial-v-61-imperial 110/247
88
PLACE BASE CABINETS
Items with attachments
such as the SB33 and the
BCD33R-LS have
underlined labels.
5. Click once on the BCD33R-LS > Base Corner Diagonal line.
6. Hold the mouse button on this cabinet, then drag it to the third
corner (on the miter cut between sink and the range).
Place Regular Base Cabinets
1. Double-click on <Categories> in the Drag & Drop list. If you do
not see <Categories>, use the up arrow button beside the history of
selections area, scroll up and double-click on <Categories>.
2. Double-click on Base, Base Door/Drawer, Base Door/Drawer
Standard
3. Click once on the B12L > Base line.
4. Hold the mouse button on this cabinet, then drag it to the left of the
dishwasher.
5. Click to set when the Wall left field displays 12" in the Edit Box.
6. Click once on the B12R > Base line.

7/30/2019 Tutorial v 61 Imperial
http://slidepdf.com/reader/full/tutorial-v-61-imperial 111/247
89
ADDING CABINETS
Corner filler wizards can
be useful to fill in oddly
shape corners.
7. Hold the mouse button on this cabinet, then drag it to the right of the sink and click to set.
8. Click the Save icon.
Add Custom Corner Fillers
1. Double-click on <Categories> in the Drag & Drop list. If you do
not see <Categories>, use the up arrow button beside the history of
selections area, scroll up and double-click on <Categories>.
2. Double-click on Fillers and Tall Corner Filler Wizard.
3. Click on the WIZ-HKHKP > Wizard Tall Unit Angle-filler line.
4. Hold the mouse button on the filler, then drag it to the diagonal
line of the first corner (where an “X” appears on the followingfigure).
7/30/2019 Tutorial v 61 Imperial
http://slidepdf.com/reader/full/tutorial-v-61-imperial 112/247
90
PLACE BASE CABINETS
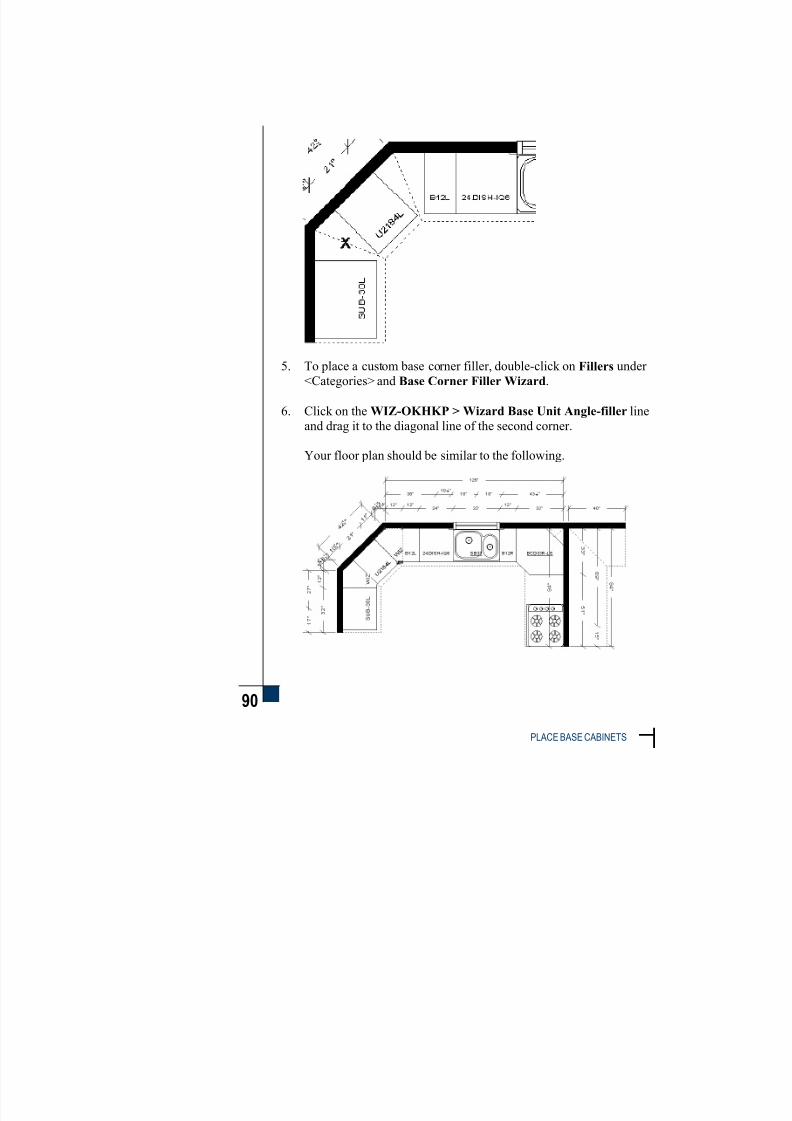
5. To place a custom base corner filler, double-click on Fillers under
<Categories> and Base Corner Filler Wizard.
6. Click on the WIZ-OKHKP > Wizard Base Unit Angle-filler line
and drag it to the diagonal line of the second corner.
Your floor plan should be similar to the following.

7/30/2019 Tutorial v 61 Imperial
http://slidepdf.com/reader/full/tutorial-v-61-imperial 113/247
91
ADDING CABINETS
7. Click the Save icon.
Place a 2-Drawer Cabinet
1. Double-click on <Categories> in the Drag & Drop list. If you do
not see <Categories>, use the up arrow button beside the history of
selections area, scroll up and double-click on <Categories>.
2. Double-click on Base, Base 2 Drawers, then Base " " " w/Glass.
3. Click once on the 2DB21-GL > Base 2 Drawer w/Glass line.
4. Drag and drop this cabinet to the left of the range (fourth wall) and
click to set.
Your floor plan should appear similar to the following.
5. Click the Save icon.

7/30/2019 Tutorial v 61 Imperial
http://slidepdf.com/reader/full/tutorial-v-61-imperial 114/247
92
PLACE WALL CABINETS
Place Wall Cabinets
Add Regular Wall Units
1. Double-click <Categories> in the Drag & Drop list. If you do notsee <Categories>, use the up arrow button beside the history of
selections area, scroll up and double-click on <Categories>.
2. Double-click Wall, 30"H Wall and 30"H Wall w/Door.
3. Scroll down and click on the W3330 > Wall line, then drag it to
the left of the window.
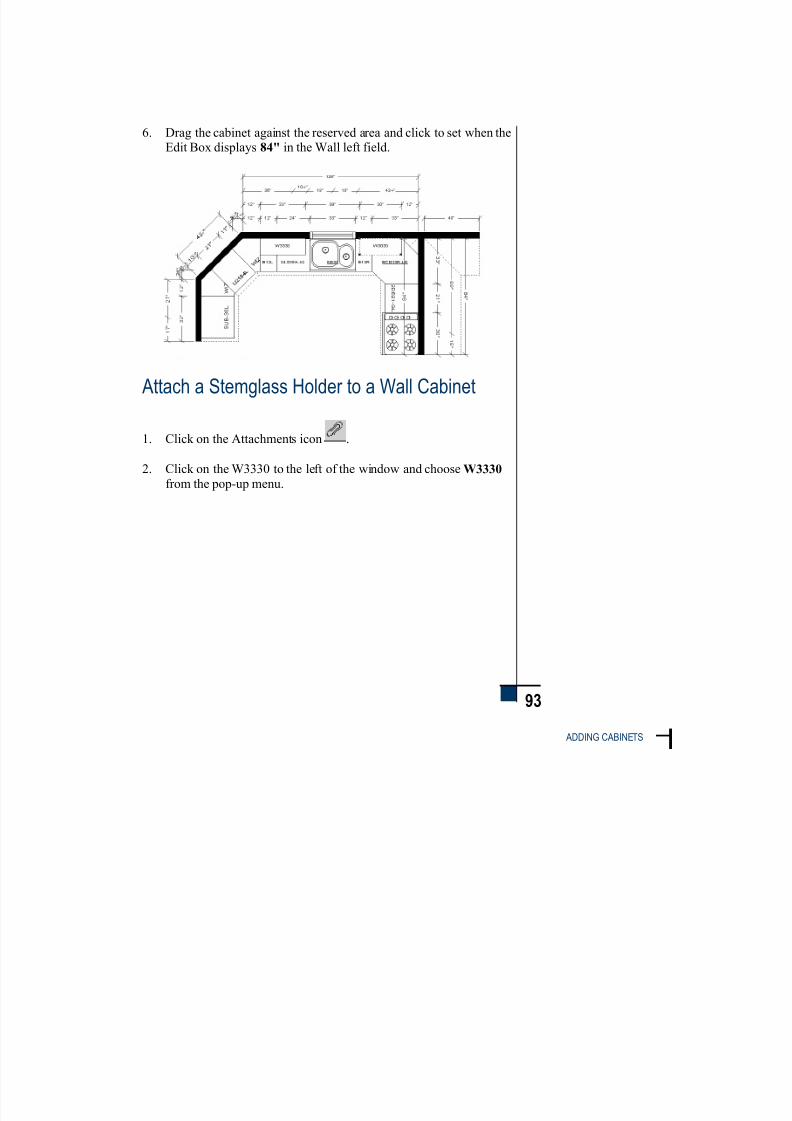
4. Drag the cabinet against the reserved area and click to set when the
Wall left field indicates 12" in the Edit Box.
5. Click on the W3030 > Wall line, then drag and drop it to the rightof the window.
7/30/2019 Tutorial v 61 Imperial
http://slidepdf.com/reader/full/tutorial-v-61-imperial 115/247
93
ADDING CABINETS
6. Drag the cabinet against the reserved area and click to set when theEdit Box displays 84" in the Wall left field.
Attach a Stemglass Holder to a Wall Cabinet
1. Click on the Attachments icon .
2. Click on the W3330 to the left of the window and choose W3330
from the pop-up menu.

7/30/2019 Tutorial v 61 Imperial
http://slidepdf.com/reader/full/tutorial-v-61-imperial 116/247
94
PLACE WALL CABINETS
3. In the Attachments dialog, double-click on Wine & Glass Racks
and STGH-1 » Stemglass Holder.
4. Click Close in the Attachments list.

7/30/2019 Tutorial v 61 Imperial
http://slidepdf.com/reader/full/tutorial-v-61-imperial 117/247
95
ADDING CABINETS
When you double-click
on a cabinet from the
Drag & Drop list, it is
automatically inserted
on the right side of the
selected item, when
space permits.
Add a Wall Cabinet Quickly
1. Click on the W3030 to the right of the window if it is not already
selected (blue dots and handles appear around the cabinet).
2. In the Drag & Drop list, scroll up the list and double-click on theW1230R > Wall line. The cabinet appears on the right of theW3030 cabinet.
Blue dots andhandles appear
around the
selected cabinet.

7/30/2019 Tutorial v 61 Imperial
http://slidepdf.com/reader/full/tutorial-v-61-imperial 118/247
96
ADD A WALL CABINET QUICKLY
View, Edit and Place a Wall Unit
1. Double-click <Categories> in the Drag & Drop list. If you do not
see <Categories>, use the up arrow button beside the history of selections area, scroll up and double-click on <Categories>.
2. Double-click on Wall Corner.
3. Scroll to the bottom of the list and double-click on 30"H Wall
Corner 135o/225o and 30"H Wall Corner 135o w/Door.
4. Click once on the W135-1230L > Wall 135o line. After a few
seconds, you see the image of the cabinet in the Information box.
5. To rotate the cabinet image in the Information Box, move the
cursor on the image, press and hold the SHIFT key, click and hold
the left mouse button, then move from left to right, then release theSHIFT key and the mouse button.
6. Right-click on the W135-1230L > Wall 135o line and select View
& Place from the pop-up menu.

7/30/2019 Tutorial v 61 Imperial
http://slidepdf.com/reader/full/tutorial-v-61-imperial 119/247
97
ADDING CABINETS
7. In the Attributes dialog, double-click in the Width field and type
11, then click on Place.
8. Click in the second corner (between the U2184L and the W3330).
7/30/2019 Tutorial v 61 Imperial
http://slidepdf.com/reader/full/tutorial-v-61-imperial 120/247
98
RENAME YOUR DESIGN
Rename Your Design
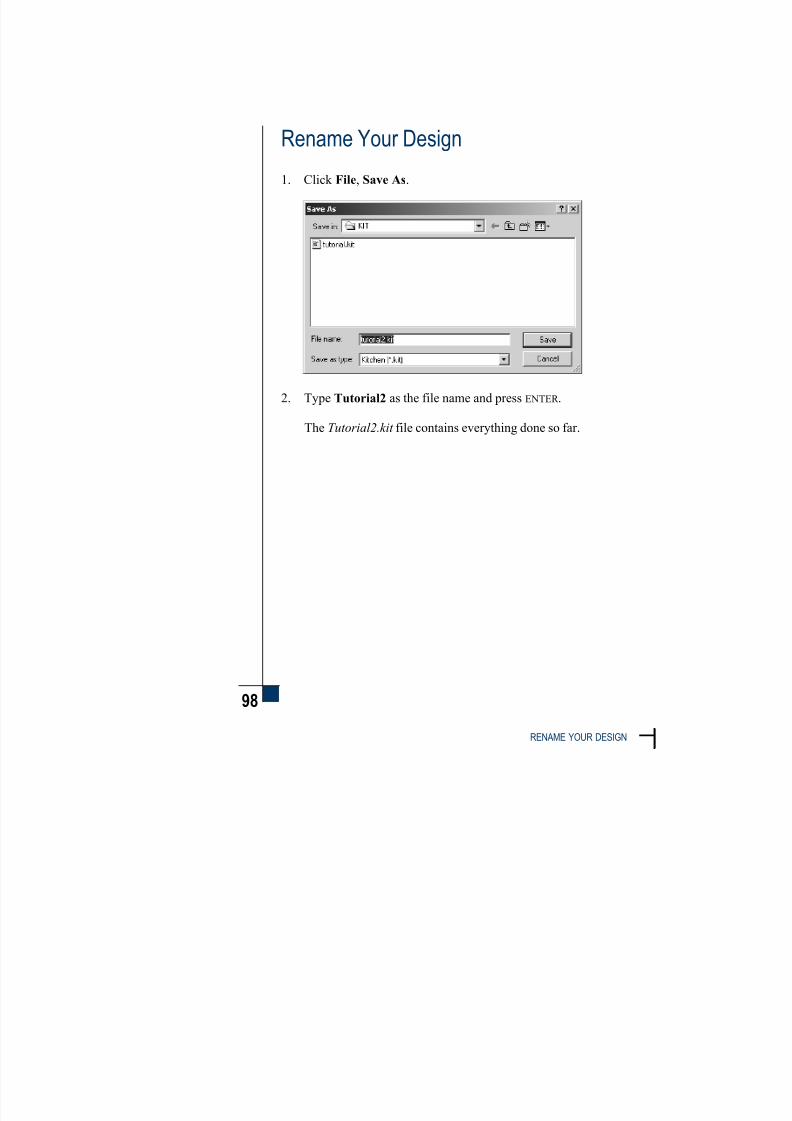
1. Click File, Save As.
2. Type Tutorial2 as the file name and press ENTER .
The Tutorial2.kit file contains everything done so far.
7/30/2019 Tutorial v 61 Imperial
http://slidepdf.com/reader/full/tutorial-v-61-imperial 121/247
99
ADDING CABINETS
Recap
You can now:
access 20-20 Design from the Shortcut Bar
open a design
indicate where to save your design files
delete dimensions
obtain the dimensions of an empty area (on the wall or base space)
place regular and corner cabinets
place corner filler wizards
launch an auto design to get a ballpark figure
delete auto-designed cabinets
view a cabinet before placing it (with the Info Box)
view and edit a cabinet before placing it (with the View & Place
option)
add a cabinet quickly (automatic drag and drop)
save your design under a different name

7/30/2019 Tutorial v 61 Imperial
http://slidepdf.com/reader/full/tutorial-v-61-imperial 122/247

7/30/2019 Tutorial v 61 Imperial
http://slidepdf.com/reader/full/tutorial-v-61-imperial 123/247
2 0 - 2 0 D E S I G N
Session 6

7/30/2019 Tutorial v 61 Imperial
http://slidepdf.com/reader/full/tutorial-v-61-imperial 124/247

7/30/2019 Tutorial v 61 Imperial
http://slidepdf.com/reader/full/tutorial-v-61-imperial 125/247
6
101
CHANGING THE OUTLINE COLOR OF CABINETS AND PRODUCING A PERSPECTIVE
Session 6 ~ Changing the OutlineColor of Cabinets and
Producing a Perspective
Change the Outline Color of Cabinets
To clearly differentiate categories of items on the floor plan, you can
assign a different outline color for each type of item.
1. Right-click on the floor area, away from any item and chooseDisplay Settings from the pop-up menu.

7/30/2019 Tutorial v 61 Imperial
http://slidepdf.com/reader/full/tutorial-v-61-imperial 126/247
102
CHANGE THE OUTLINE COLOR OF CABINETS
When you click on acategory or on an item to
highlight it, be careful
not to click in the check
box; otherwise you will
deselect this category or
item.
2. Click the “+” sign in front of Cabinets to open cabinet categories.
3. Click the Base & Vanity line (do not click the check box), then,
for the Outline Color, use the drop-down arrow to scroll the list,
then choose the color pink (bottom, second from left).
4. Click the Wall line (do not click the check box), then, for the
Outline Color, use the drop-down arrow and choose the color blue (bottom, first from left).
5. Click the Tall line (do not click the check box), then, for the
Outline Color, use the drop-down arrow and choose the color green (top, third from left).
6. Click OK to see the new cabinet outline colors.

7/30/2019 Tutorial v 61 Imperial
http://slidepdf.com/reader/full/tutorial-v-61-imperial 127/247
103
CHANGING THE OUTLINE COLOR OF CABINETS AND PRODUCING A PERSPECTIVE
7. Right-click on the floor area again and choose Display Settings.
8. Click on the drop-down arrow under Scheme and choose tutorial
to reload the previous cabinet outline colors.
9. Click OK .
Add a Note
1. Click Notes in the Menu Bar then choose Add Note.
2. Place the text box outline in the middle of floor area as shown on
the following figure.
7/30/2019 Tutorial v 61 Imperial
http://slidepdf.com/reader/full/tutorial-v-61-imperial 128/247
104
ADD A NOTE
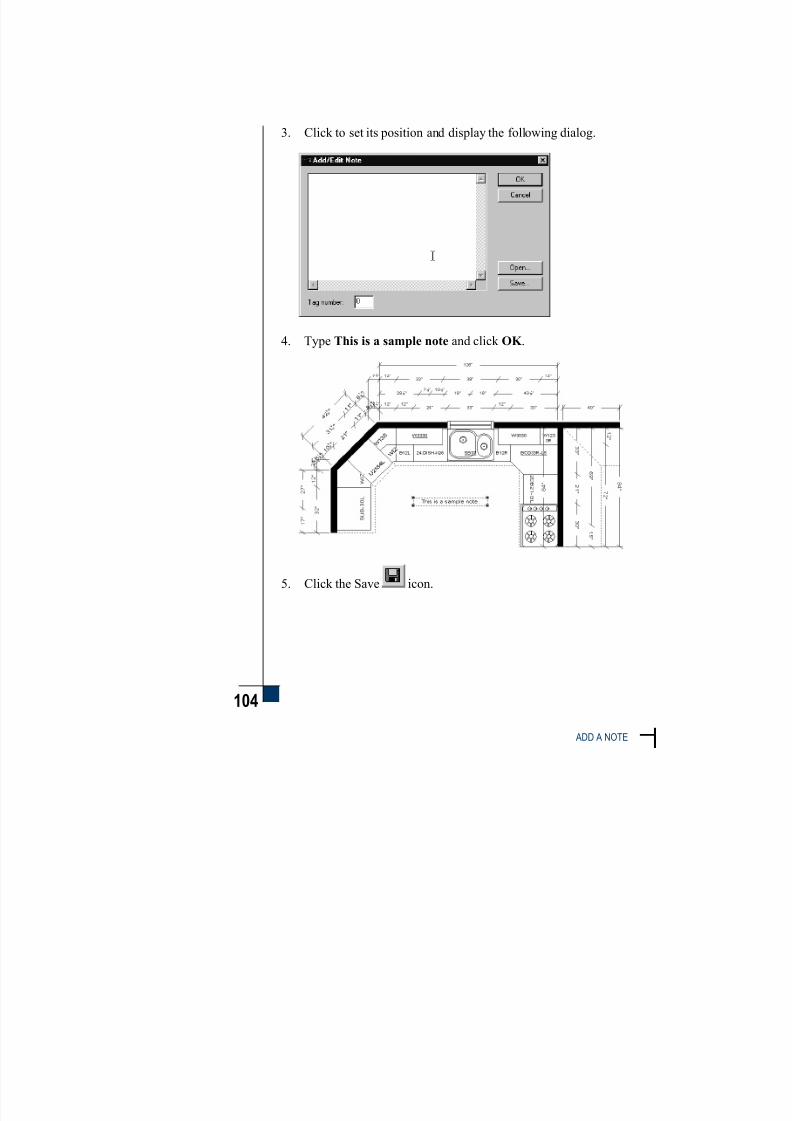
3. Click to set its position and display the following dialog.
4. Type This is a sample note and click OK .
5. Click the Save icon.

7/30/2019 Tutorial v 61 Imperial
http://slidepdf.com/reader/full/tutorial-v-61-imperial 129/247
105
CHANGING THE OUTLINE COLOR OF CABINETS AND PRODUCING A PERSPECTIVE
Select a Door Style
1. Click the Styles & Pricing icon .
2. Click the Catalog Styles tab.
3. In the left portion of the dialog, click on SAMPLE_E, if it is not
already selected.
7/30/2019 Tutorial v 61 Imperial
http://slidepdf.com/reader/full/tutorial-v-61-imperial 130/247
106
SELECT A DOOR STYLE
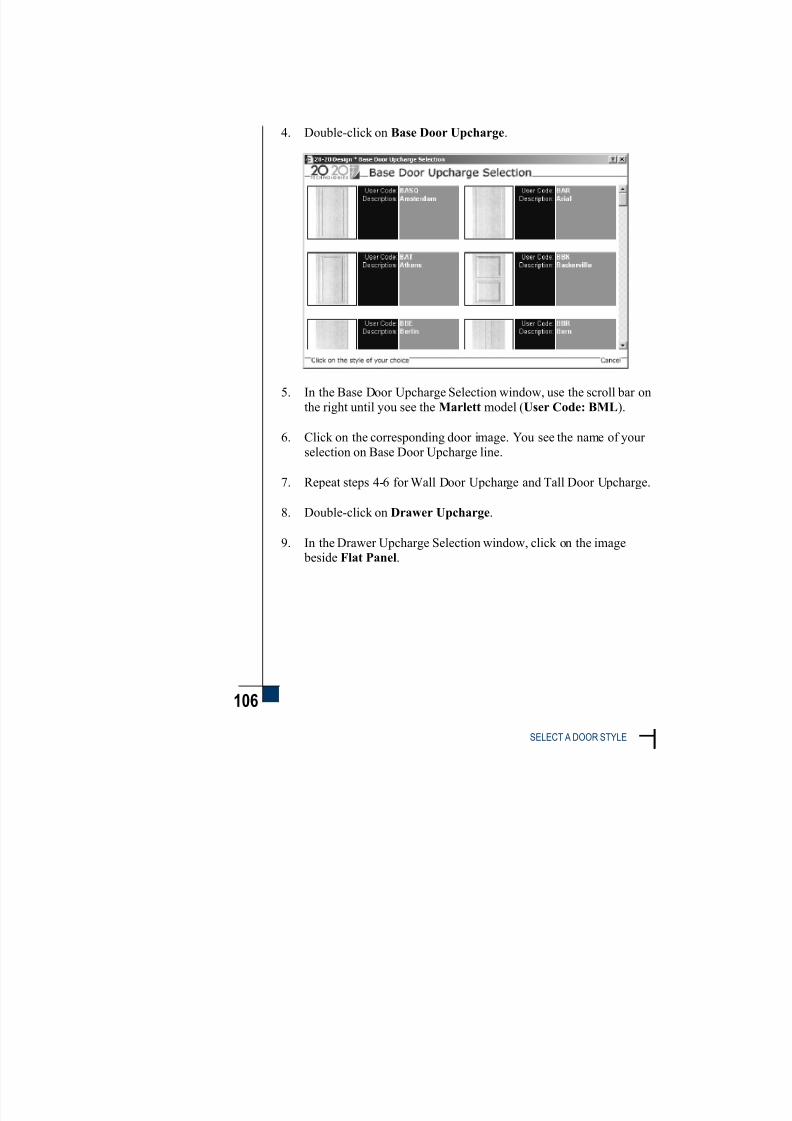
4. Double-click on Base Door Upcharge.
5. In the Base Door Upcharge Selection window, use the scroll bar onthe right until you see the Marlett model (User Code: BML).
6. Click on the corresponding door image. You see the name of your
selection on Base Door Upcharge line.
7. Repeat steps 4-6 for Wall Door Upcharge and Tall Door Upcharge.
8. Double-click on Drawer Upcharge.
9. In the Drawer Upcharge Selection window, click on the image beside Flat Panel.

7/30/2019 Tutorial v 61 Imperial
http://slidepdf.com/reader/full/tutorial-v-61-imperial 131/247
107
CHANGING THE OUTLINE COLOR OF CABINETS AND PRODUCING A PERSPECTIVE
You will see these
selections when
roducing renderings
and, if they affect ricing, they also appear
on reports.
Select a Pull Model
1. Double-click on Door Pull.
2. In the Door Pulls Selection window, use the scroll bar on the right
until you see the Metal Pull (User Code: 36755195).
3. Click on the corresponding pull image.
4. Double-click on the Drawer Pull line.
5. Again, scroll down and select Metal Pull (User Code: 36755195).
6. Click Close in the Styles & Pricing dialog.
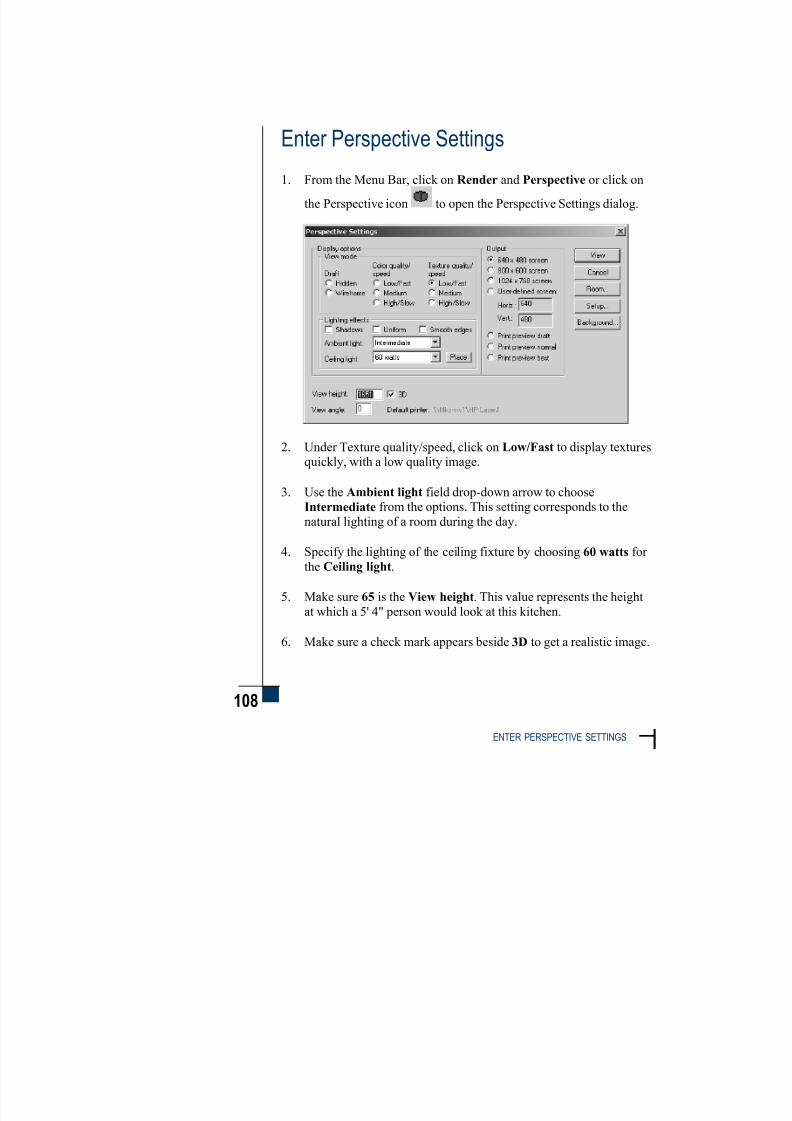
7/30/2019 Tutorial v 61 Imperial
http://slidepdf.com/reader/full/tutorial-v-61-imperial 132/247
108
ENTER PERSPECTIVE SETTINGS
Enter Perspective Settings
1. From the Menu Bar, click on Render and Perspective or click on
the Perspective icon to open the Perspective Settings dialog.
2. Under Texture quality/speed, click on Low/Fast to display texturesquickly, with a low quality image.
3. Use the Ambient light field drop-down arrow to chooseIntermediate from the options. This setting corresponds to the
natural lighting of a room during the day.
4. Specify the lighting of the ceiling fixture by choosing 60 watts for
the Ceiling light.
5. Make sure 65 is the View height. This value represents the height
at which a 5' 4" person would look at this kitchen.
6. Make sure a check mark appears beside 3D to get a realistic image.

7/30/2019 Tutorial v 61 Imperial
http://slidepdf.com/reader/full/tutorial-v-61-imperial 133/247
109
CHANGING THE OUTLINE COLOR OF CABINETS AND PRODUCING A PERSPECTIVE
The time required to
generate this view varies
according to the speed of
our computer. (If you
clicked by mistake, press
the ESC key to start
over.)
7. Under Output, choose 800 x 600 screen, which is an averagescreen resolution.
Position to View the Perspective
1. Click View.
2. Click the Zoom to Fit icon then click the floor plan to rescalethe plan.
3. Click the Pick Tool icon to stop the zoom mode.
4. Click on the sink on the third wall.
5. Use the scroll bar to the right of the floor plan to scroll down and
move the design towards the top of the screen.

7/30/2019 Tutorial v 61 Imperial
http://slidepdf.com/reader/full/tutorial-v-61-imperial 134/247
110
POSITION TO VIEW THE PERSPECTIVE
6. Imagine that the “V” is your field of vision. Scroll down and move
the “V” shape until the right leg of the view angle (“V”) intersectswith the outside placement zone of the t-shaped wall. (See figure
below).
7. Click to see this perspective.
Notice the door and pull models selected previously. Later on, we
change the ceiling, floor and wall covering.

7/30/2019 Tutorial v 61 Imperial
http://slidepdf.com/reader/full/tutorial-v-61-imperial 135/247
111
CHANGING THE OUTLINE COLOR OF CABINETS AND PRODUCING A PERSPECTIVE
Edit an Item in 3D
1. In the Rendering module, right-click on the range. An outline of
the range appears.
2. Choose In/Out from the pup-up menu.
3. Move the range towards the floor area, in front of the window then
click to set.
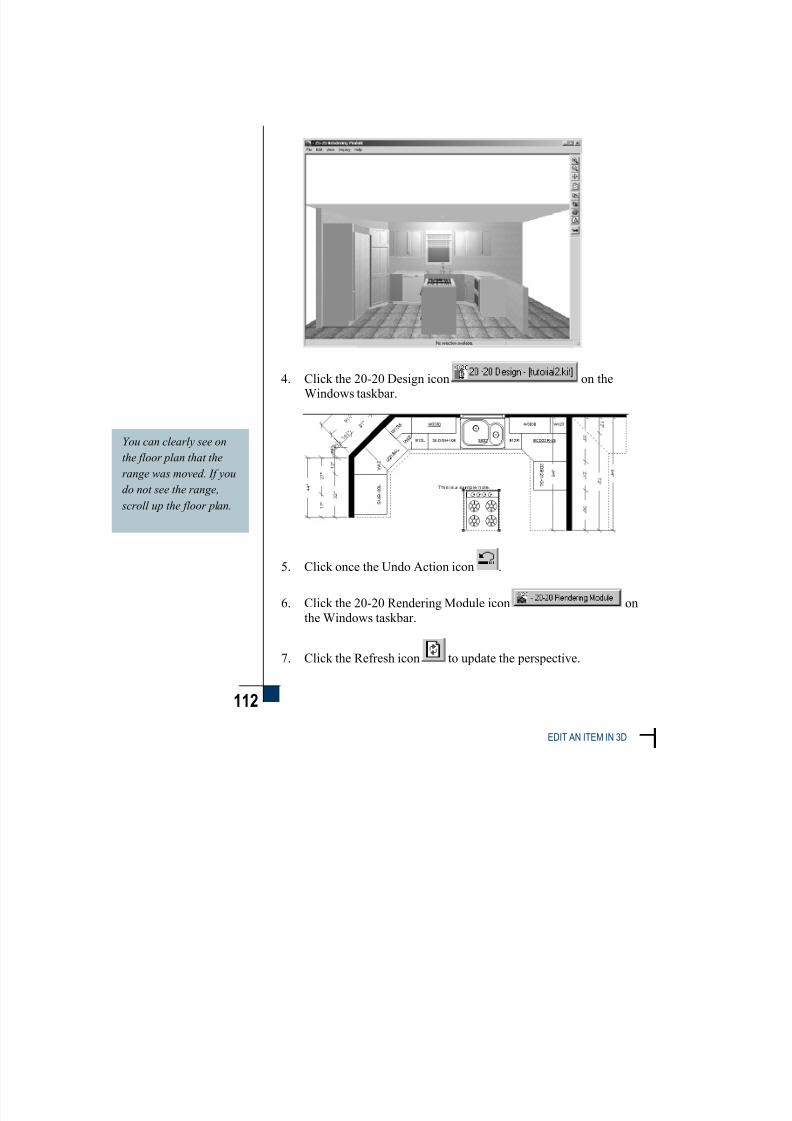
7/30/2019 Tutorial v 61 Imperial
http://slidepdf.com/reader/full/tutorial-v-61-imperial 136/247
112
EDIT AN ITEM IN 3D
You can clearly see on
the floor plan that the
range was moved. If you
do not see the range,
scroll up the floor plan.
4. Click the 20-20 Design icon on the
Windows taskbar.
5. Click once the Undo Action icon .
6. Click the 20-20 Rendering Module icon on
the Windows taskbar.
7. Click the Refresh icon to update the perspective.

7/30/2019 Tutorial v 61 Imperial
http://slidepdf.com/reader/full/tutorial-v-61-imperial 137/247
113
CHANGING THE OUTLINE COLOR OF CABINETS AND PRODUCING A PERSPECTIVE
During the next sessions, you enhance this design by adding:
built-in accessories, such as interior drawers
countertops, moldings and toe kicks
Save the View Settings for the Perspective
1. To save the settings and name the view, choose View, Save View
Settings from the menu of the Rendering module.
2. To assign a name to the current view, type Perspective in the
Save/Rename View Settings dialog and click OK .
3. To display a name assigned to the current perspective, chooseView, Named Views. For this tutorial, the name “Perspective” isdisplayed.

7/30/2019 Tutorial v 61 Imperial
http://slidepdf.com/reader/full/tutorial-v-61-imperial 138/247
114
RECAP
Whenever you reload a design that had been saved as a Named
View, you are in fact loading the rendering with all saved view
settings.
You can see the design with all modifications made up to now!
4. Click File, Exit to close the Rendering module and return to the
Design program.
5. Click the Zoom to Fit icon and click on the floor plan to
rescale. Then, click the Pick Tool icon or press ESC to stop the
zoom mode.
6. Click the Save icon.
Recap
You can now:
change the outline color of cabinets
add a note to a design
select door and pull styles
assign view settings for a perspective
produce a perspective using a reference wall
edit an item on a rendering (3D)
undo actions
save view settings for future use

7/30/2019 Tutorial v 61 Imperial
http://slidepdf.com/reader/full/tutorial-v-61-imperial 139/247
2 0 - 2 0 D E S I G N
Session 7

7/30/2019 Tutorial v 61 Imperial
http://slidepdf.com/reader/full/tutorial-v-61-imperial 140/247

7/30/2019 Tutorial v 61 Imperial
http://slidepdf.com/reader/full/tutorial-v-61-imperial 141/247
7
115
REVISING THE CABINET DESIGN
Session 7 ~ Revising the CabinetDesign
Save the Floor Plan in a BMP File
1. To save the floor plan in a bmp file format, from the Menu Bar click on File and Save As Image.
2. Click the drop-down arrow beside Select View and chooseFp1, then click OK . The Save as Dialog appears.

7/30/2019 Tutorial v 61 Imperial
http://slidepdf.com/reader/full/tutorial-v-61-imperial 142/247
116
DISPLAY ELEVATION AREAS
3. Type FP1.bmp in the File name field, then click Save.
You can open this image with any program that supports .bmp files
such as Paint, Paint Shop Pro, etc.
Display Elevation Areas
View a Wall in Elevation
1. Click to select the placement zone of the third wall. This zone
shows blue dots and handles as shown below.

7/30/2019 Tutorial v 61 Imperial
http://slidepdf.com/reader/full/tutorial-v-61-imperial 143/247
117
REVISING THE CABINET DESIGN
2. Click on the Add Elevation Area icon . An elevation view of
wall #3 appears in the upper part of the Work area.
3. Expand the elevation view to its maximum size. First, move the
cursor on the split bar separating the Elevation from the Floor Plan
area. The cursor turns into a horizontal splitter .
4. Click and hold the mouse button on the split bar, drag theElevation area down to conceal the floor plan display tabs (Fp1 to
Fp8) and release the mouse button.
5. Choose the Zoom to Fit icon and click on the elevation to
rescale the plan.
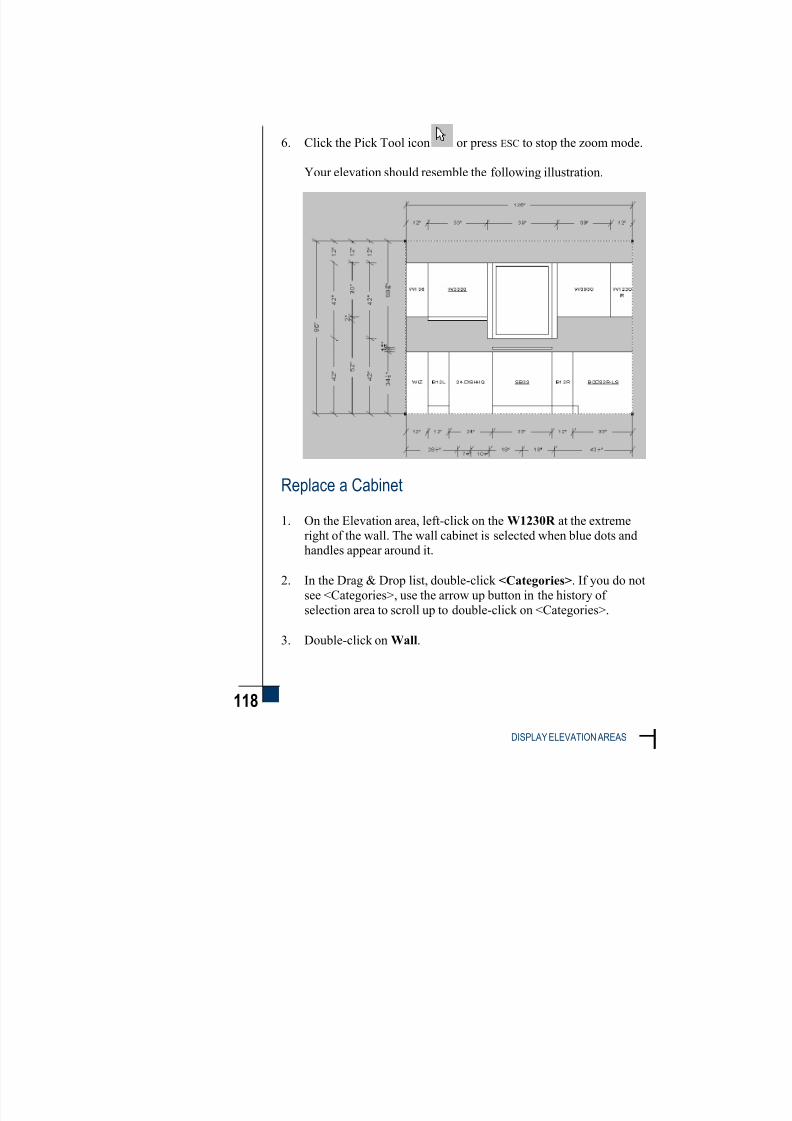
7/30/2019 Tutorial v 61 Imperial
http://slidepdf.com/reader/full/tutorial-v-61-imperial 144/247
118
DISPLAY ELEVATION AREAS
6. Click the Pick Tool icon or press ESC to stop the zoom mode.
Your elevation should resemble the following illustration.
Replace a Cabinet
1. On the Elevation area, left-click on the W1230R at the extreme
right of the wall. The wall cabinet is selected when blue dots andhandles appear around it.
2. In the Drag & Drop list, double-click <Categories>. If you do not
see <Categories>, use the arrow up button in the history of
selection area to scroll up to double-click on <Categories>.
3. Double-click on Wall.
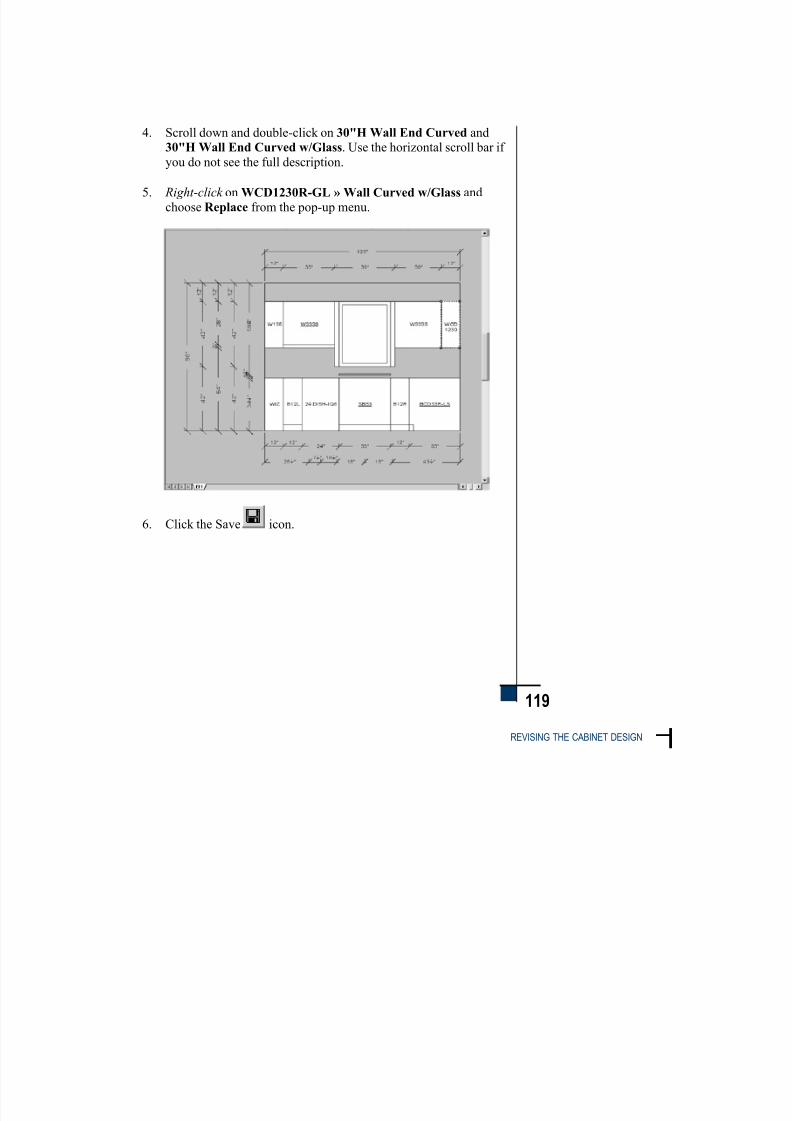
7/30/2019 Tutorial v 61 Imperial
http://slidepdf.com/reader/full/tutorial-v-61-imperial 145/247
119
REVISING THE CABINET DESIGN
4. Scroll down and double-click on 30"H Wall End Curved and30"H Wall End Curved w/Glass. Use the horizontal scroll bar if
you do not see the full description.
5. Right-click on WCD1230R-GL » Wall Curved w/Glass andchoose Replace from the pop-up menu.
6. Click the Save icon.

7/30/2019 Tutorial v 61 Imperial
http://slidepdf.com/reader/full/tutorial-v-61-imperial 146/247
120
DISPLAY ELEVATION AREAS
Delete the Elevation Area
Right-click on the right side of the WCD1230 and select Delete
Elevation Area.

7/30/2019 Tutorial v 61 Imperial
http://slidepdf.com/reader/full/tutorial-v-61-imperial 147/247
121
REVISING THE CABINET DESIGN
View a Base and Wall Cabinet in Elevation
1. To view only a base and the above wall cabinet from the side in
elevation, first right-click on the floor plan and choose Add SideElevation Area.
2. Click on the B12R located to the right of the sink.

7/30/2019 Tutorial v 61 Imperial
http://slidepdf.com/reader/full/tutorial-v-61-imperial 148/247
122
DISPLAY ELEVATION AREAS
3. An outline appears, position it as shown on the following figure:
4. Click, then move the mouse towards the right to display the
direction arrow.
5. Click again to display the side elevation.

7/30/2019 Tutorial v 61 Imperial
http://slidepdf.com/reader/full/tutorial-v-61-imperial 149/247
123
REVISING THE CABINET DESIGN
6. Expand the elevation view to its maximum size, then Zoom to Fit
and press ESC as you did previously when viewing a wall in
elevation.
7. To remove the side elevation, right-click away from any object andchoose Delete Elevation Area.
Place a Peninsula Hood
1. Click on the Appliances icon .
2. In the Appliances window, double-click on Hood, then Decorative
Hood.

7/30/2019 Tutorial v 61 Imperial
http://slidepdf.com/reader/full/tutorial-v-61-imperial 150/247
124
PLACE A PENINSULA HOOD
3. Scroll to the bottom and double-click on P-HOOD-13 > Pen.
Hood #13 30X18.
4. Click on the range.
5. Type 54 in the Wall left field of the Edit Box and press ENTER .
6. Click Close in Appliances window.
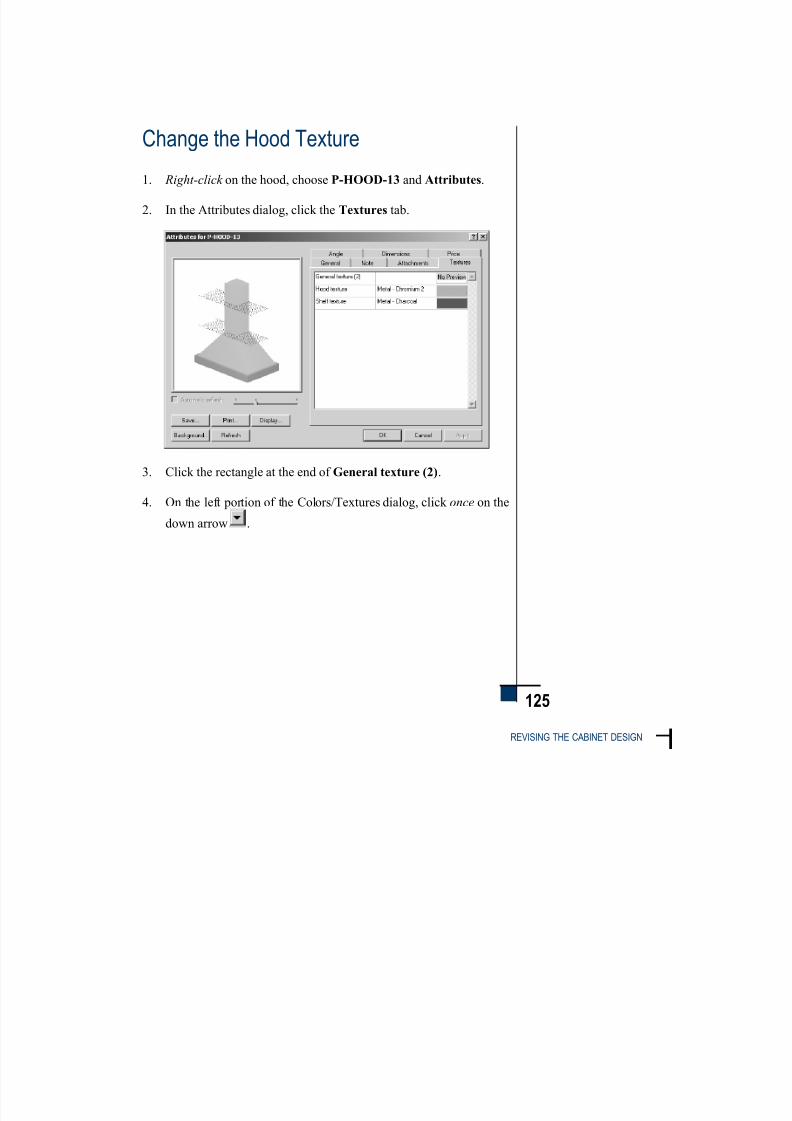
7/30/2019 Tutorial v 61 Imperial
http://slidepdf.com/reader/full/tutorial-v-61-imperial 151/247
125
REVISING THE CABINET DESIGN
Change the Hood Texture
1. Right-click on the hood, choose P-HOOD-13 and Attributes.
2. In the Attributes dialog, click the Textures tab.
3. Click the rectangle at the end of General texture (2).
4. On the left portion of the Colors/Textures dialog, click once on the
down arrow .
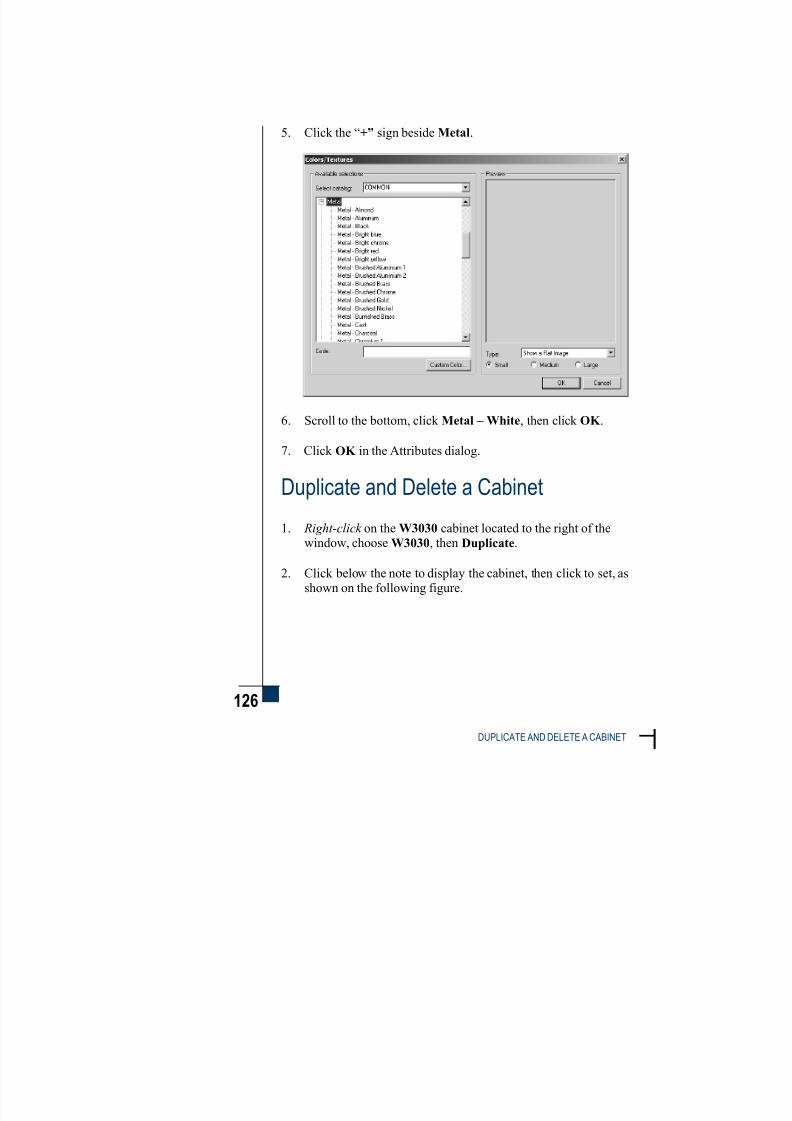
7/30/2019 Tutorial v 61 Imperial
http://slidepdf.com/reader/full/tutorial-v-61-imperial 152/247
126
DUPLICATE AND DELETE A CABINET
5. Click the “+” sign beside Metal.
6. Scroll to the bottom, click Metal – White, then click OK .
7. Click OK in the Attributes dialog.
Duplicate and Delete a Cabinet
1. Right-click on the W3030 cabinet located to the right of thewindow, choose W3030, then Duplicate.
2. Click below the note to display the cabinet, then click to set, as
shown on the following figure.

7/30/2019 Tutorial v 61 Imperial
http://slidepdf.com/reader/full/tutorial-v-61-imperial 153/247
127
REVISING THE CABINET DESIGN
3. Right-click on the W3030 cabinet you just duplicated, then chooseDelete.
Save Your Design
Click the Save icon .

7/30/2019 Tutorial v 61 Imperial
http://slidepdf.com/reader/full/tutorial-v-61-imperial 154/247
128
CHOOSE A CABINET VARIATION
Choose a Cabinet Variation
1. Right-click on the utility cabinet on the diagonal wall, choose
U2184L, then Variations.
2. In the Variations dialog, click on U2184L-RO Utility w/4 RO and
click OK .

7/30/2019 Tutorial v 61 Imperial
http://slidepdf.com/reader/full/tutorial-v-61-imperial 155/247
129
REVISING THE CABINET DESIGN
You can also press the
CTRL key and click on the
lan to zoom to fit, when
in any of the zoom
modes.
Zoom on an Item
1. Click the Zoom In/Out icon , then click the sink.
2. Click the sink again to zoom in more.
3. To zoom out, right-click .
4. To stop zooming, click the Pick Tool icon or press ESC.
5. Click the Zoom to Fit icon and click the floor plan.
6. Click the Pick Tool icon or press ESC to stop the zoom mode.

7/30/2019 Tutorial v 61 Imperial
http://slidepdf.com/reader/full/tutorial-v-61-imperial 156/247
130
PLACE CHAIRS
Place Chairs
1. In the Drag & Drop list, click the drop-down arrow beside
SAMPLE_E, scroll up and click ROOM_FUR .
2. Double-click Seating and Chair.
3. Scroll down and highlight the KITCHAIR_7 > Kitchen Chair #7
line.
4. Move the design up slightly and drag this item onto the floor space
as shown on the following figure, then click to set.

7/30/2019 Tutorial v 61 Imperial
http://slidepdf.com/reader/full/tutorial-v-61-imperial 157/247
131
REVISING THE CABINET DESIGN
To select multiple items,
ou can also press the
CTRL key and click on the
items.
5. Drag and drop the same chair to the right of and against the
previous one and align the chairs horizontally, then click to set the position.
Select Multiple Items
1. Click the Select Region icon .
2. Click and hold the left mouse button and draw a rectangle around
the two chairs, then release the mouse button.
Blue dots appear around the chairs to indicate that they are
selected.

7/30/2019 Tutorial v 61 Imperial
http://slidepdf.com/reader/full/tutorial-v-61-imperial 158/247
132
PLACE CHAIRS
Grouping items together
can be useful to perform
a series of tasks on
multiple objects such as
rotating and moving.
Creating a group and
using the Rotate
command can be
articularly useful to
create mirror rooms.
Create a Group of Chairs
1. Right-click on one of the selected chairs.
2. Select Group Items from the pop-up menu.
Rotate the Chairs
1. Right-click on the group you just created, select Items Group 1,then Rotate.

7/30/2019 Tutorial v 61 Imperial
http://slidepdf.com/reader/full/tutorial-v-61-imperial 159/247
133
REVISING THE CABINET DESIGN
2. Rotate the group 90º clockwise and click to set.
Ungroup the Chairs
1. Right-click on one of the chairs.
2. Select Items Group 1 and Ungroup All.

7/30/2019 Tutorial v 61 Imperial
http://slidepdf.com/reader/full/tutorial-v-61-imperial 160/247
134
PLACE CHAIRS
Mirror the Chairs
1. Using the Select Region icon , select the two chairs.
2. Right-click on one of the chairs, then choose Mirror Items.
You must now specify the first and second point of the mirror line.The two specified points become the end points of a line upon
which the selected object(s) is/are reflected.
3. Draw the mirror line as shown below:
4. Click No when the following message appears:
1- Click here.
2- Click here.
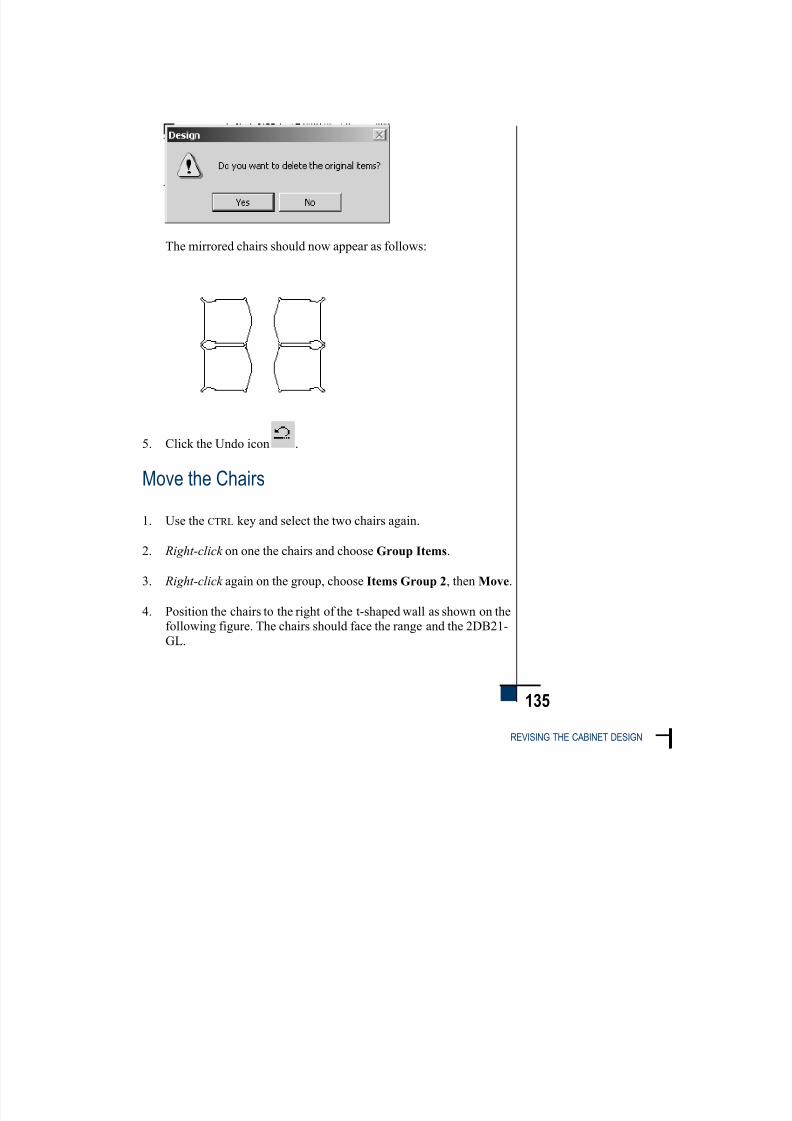
7/30/2019 Tutorial v 61 Imperial
http://slidepdf.com/reader/full/tutorial-v-61-imperial 161/247
135
REVISING THE CABINET DESIGN
The mirrored chairs should now appear as follows:
5. Click the Undo icon .
Move the Chairs
1. Use the CTRL key and select the two chairs again.
2. Right-click on one the chairs and choose Group Items.
3. Right-click again on the group, choose Items Group 2, then Move.
4. Position the chairs to the right of the t-shaped wall as shown on thefollowing figure. The chairs should face the range and the 2DB21-
GL.
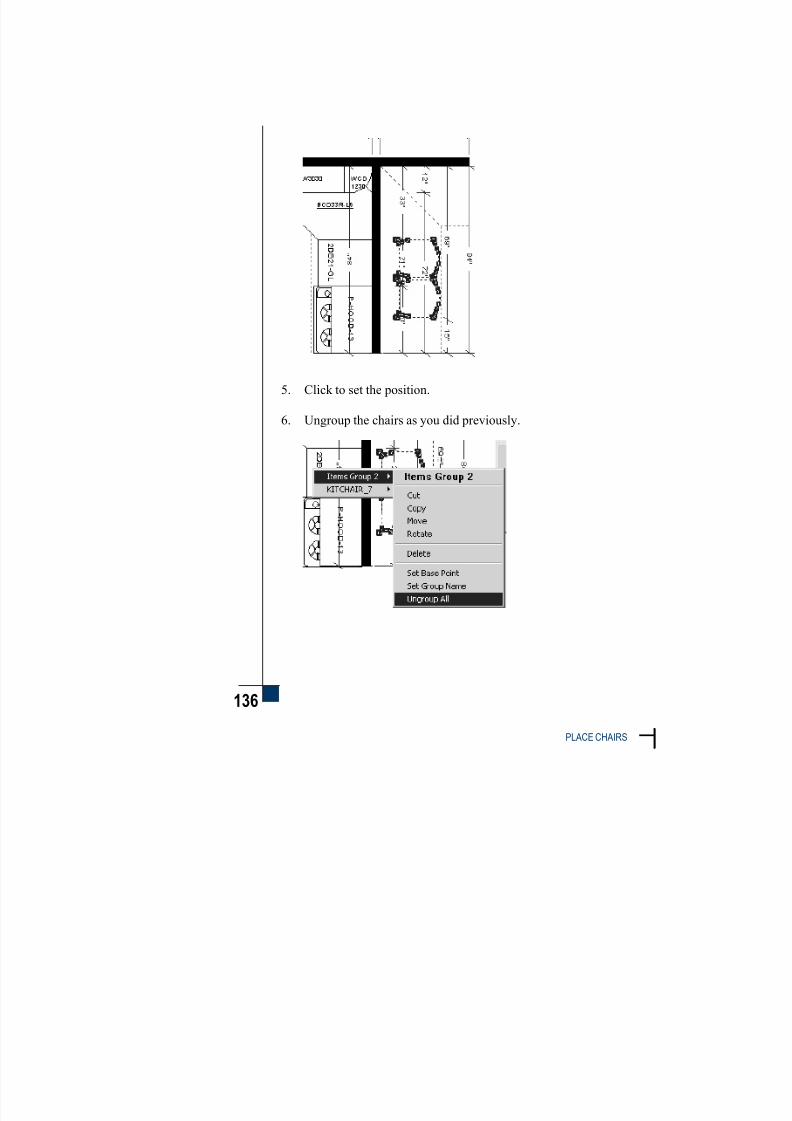
7/30/2019 Tutorial v 61 Imperial
http://slidepdf.com/reader/full/tutorial-v-61-imperial 162/247
136
PLACE CHAIRS
5. Click to set the position.
6. Ungroup the chairs as you did previously.

7/30/2019 Tutorial v 61 Imperial
http://slidepdf.com/reader/full/tutorial-v-61-imperial 163/247
137
REVISING THE CABINET DESIGN
Drag a Chair
1. Right-click on rightmost chair (see “X” on the following figure).
2. Select KITCHAIR_7 and Drag from the pop-up menus.
3. Drag the chair towards the top (towards the corner).

7/30/2019 Tutorial v 61 Imperial
http://slidepdf.com/reader/full/tutorial-v-61-imperial 164/247
138
SAVE YOUR DESIGN
4. Left-click when the Wall right field indicates 12" in the Edit Box.
Save Your Design
Click the Save icon .
Recap
You can now:
save your design in a bmp file
display and delete elevation areas (wall and side elevations)
replace a cabinet
place a peninsula hood
change the texture of the hood

7/30/2019 Tutorial v 61 Imperial
http://slidepdf.com/reader/full/tutorial-v-61-imperial 165/247
139
REVISING THE CABINET DESIGN
duplicate and delete a cabinet
choose a cabinet variation
use the zoom in and out modes
place freestanding chairs
select multiple items
create a group of items and rotate it
mirror selected items
move a group of items

7/30/2019 Tutorial v 61 Imperial
http://slidepdf.com/reader/full/tutorial-v-61-imperial 166/247

7/30/2019 Tutorial v 61 Imperial
http://slidepdf.com/reader/full/tutorial-v-61-imperial 167/247
2 0 - 2 0 D E S I G N
Session 8

7/30/2019 Tutorial v 61 Imperial
http://slidepdf.com/reader/full/tutorial-v-61-imperial 168/247

7/30/2019 Tutorial v 61 Imperial
http://slidepdf.com/reader/full/tutorial-v-61-imperial 169/247
8
141
ADDING COUNTERTOPS & TRIMS
Since we did not define
display settings for this
loor plan view, you see
a grey background.
Session 8 ~ Adding Countertops &Trims
Assign Display Settings for Countertops
Before auto designing countertops, select the types of items you wantto see on the floor plan. The items required are: base units, attachments,
appliances and countertops.
1. Click the Fp 2 display tab at the bottom of the floor plan to use aseparate floor plan view for countertops.
2. Right-click on the floor area and choose Display Settings.
3. Click the drop-down arrow beside Scheme and select tutorial if it
is not already selected.
4. Under the Items tab, remove the check mark beside all thecategory options.
5. Click the Dimensions tab and remove the check mark beside Auto
Dimensions.
6. Click Apply. Everything disappears from the floor plan.
7. Click the Items tab.

7/30/2019 Tutorial v 61 Imperial
http://slidepdf.com/reader/full/tutorial-v-61-imperial 170/247
142
ASSIGN DISPLAY SETTINGS FOR COUNTERTOPS
8. Click on the “+” sign in front of Cabinets, then add a check mark for Base & Vanity.
9. Add a check mark also for Attachments (sinks…), Appliances
and Countertops and Trims.
The Items tab should look like this:
10. Click Save As.
11. Type tutorial2 and in the Save this scheme as field, then click OK .
12. Click OK in the Display Settings dialog.
Only floor-mounted items and attachments (sink and cooktop) are
displayed.

7/30/2019 Tutorial v 61 Imperial
http://slidepdf.com/reader/full/tutorial-v-61-imperial 171/247
143
ADDING COUNTERTOPS & TRIMS
Drag & Drop a Temporary Cabinet
1. Click the Zoom to Fit icon and click on the sink.
2. Press the ESC key to exit the zoom mode.
3. Use the horizontal scroll bar to move the design to the left as
shown on the following figure.

7/30/2019 Tutorial v 61 Imperial
http://slidepdf.com/reader/full/tutorial-v-61-imperial 172/247
144
ASSIGN DISPLAY SETTINGS FOR COUNTERTOPS
4. In the Drag & Drop list, click the drop-down arrow besideROOM_FUR, then select SAMPLE_E.
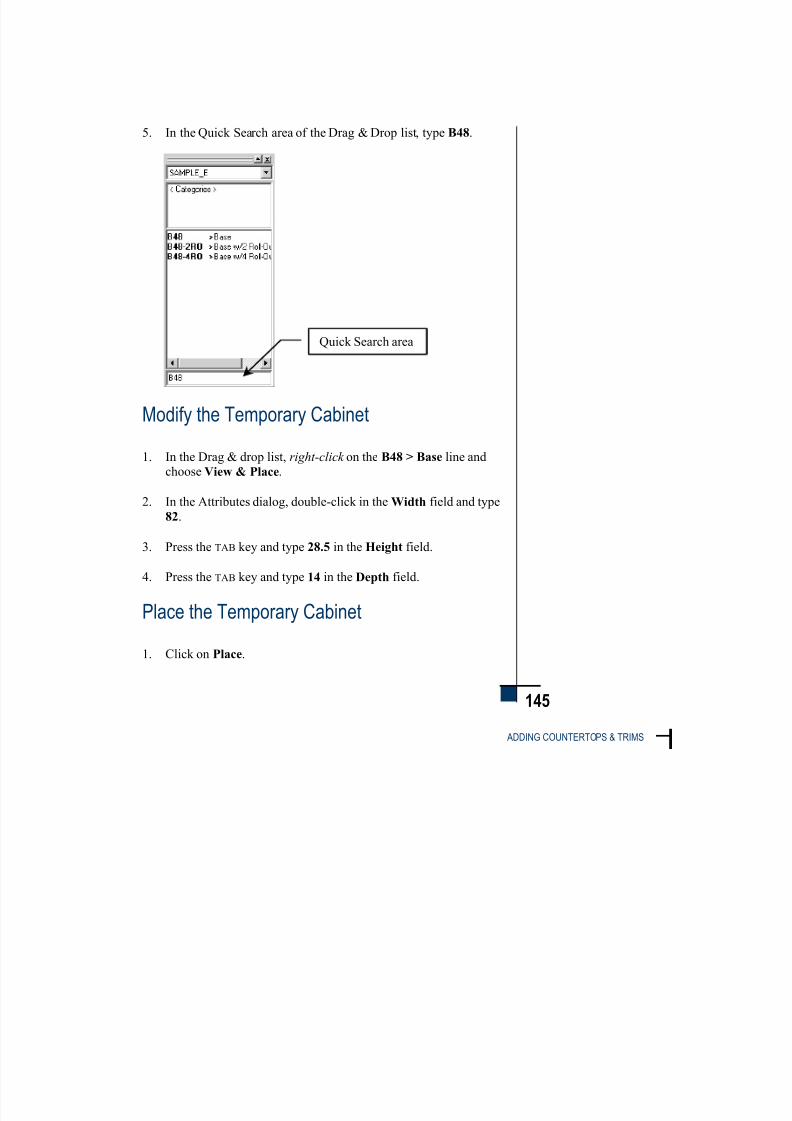
7/30/2019 Tutorial v 61 Imperial
http://slidepdf.com/reader/full/tutorial-v-61-imperial 173/247
145
ADDING COUNTERTOPS & TRIMS
5. In the Quick Search area of the Drag & Drop list, type B48.
Modify the Temporary Cabinet
1. In the Drag & drop list, right-click on the B48 > Base line andchoose View & Place.
2. In the Attributes dialog, double-click in the Width field and type82.
3. Press the TAB key and type 28.5 in the Height field.
4. Press the TAB key and type 14 in the Depth field.
Place the Temporary Cabinet
1. Click on Place.
Quick Search area

7/30/2019 Tutorial v 61 Imperial
http://slidepdf.com/reader/full/tutorial-v-61-imperial 174/247
146
ASSIGN DISPLAY SETTINGS FOR COUNTERTOPS
2. Click on the right side of the t-shaped wall, as indicated with the“X”.
3. Drag the cabinet towards the top and left-click when the Wall leftfield indicates 2" in the Edit Box.
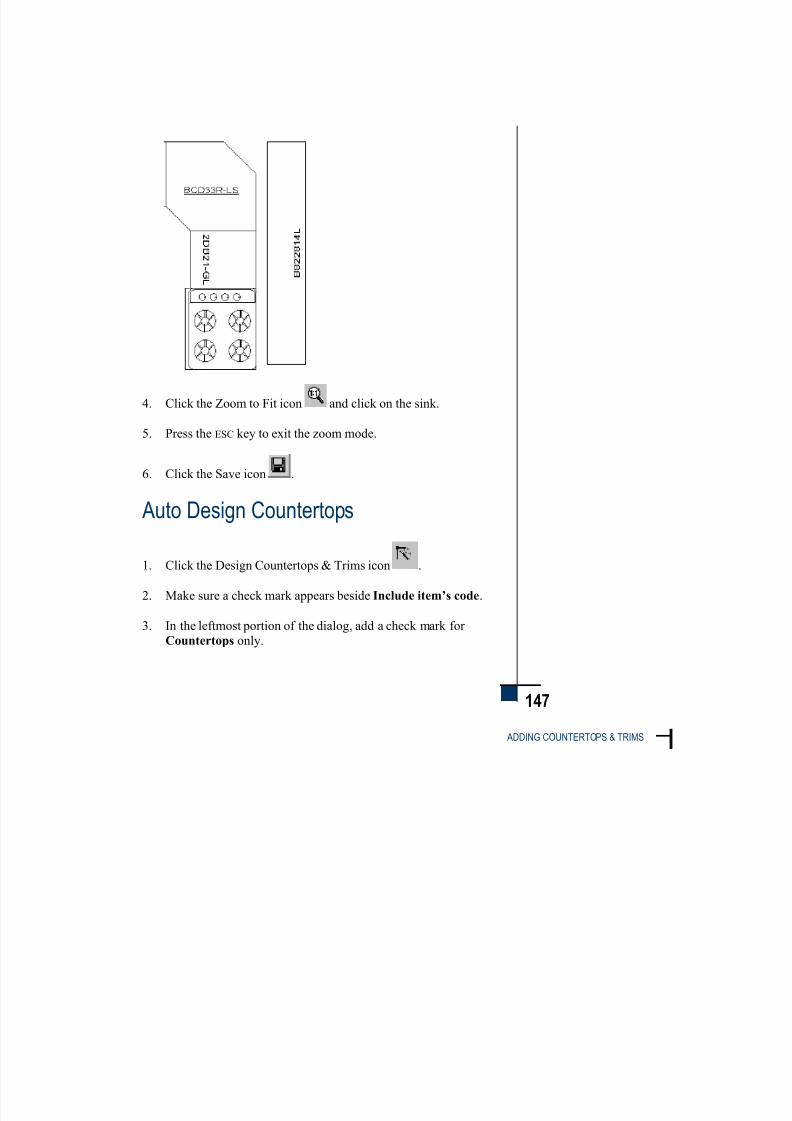
7/30/2019 Tutorial v 61 Imperial
http://slidepdf.com/reader/full/tutorial-v-61-imperial 175/247
147
ADDING COUNTERTOPS & TRIMS
4. Click the Zoom to Fit icon and click on the sink.
5. Press the ESC key to exit the zoom mode.
6. Click the Save icon .
Auto Design Countertops
1. Click the Design Countertops & Trims icon .
2. Make sure a check mark appears beside Include item’s code.
3. In the leftmost portion of the dialog, add a check mark for Countertops only.
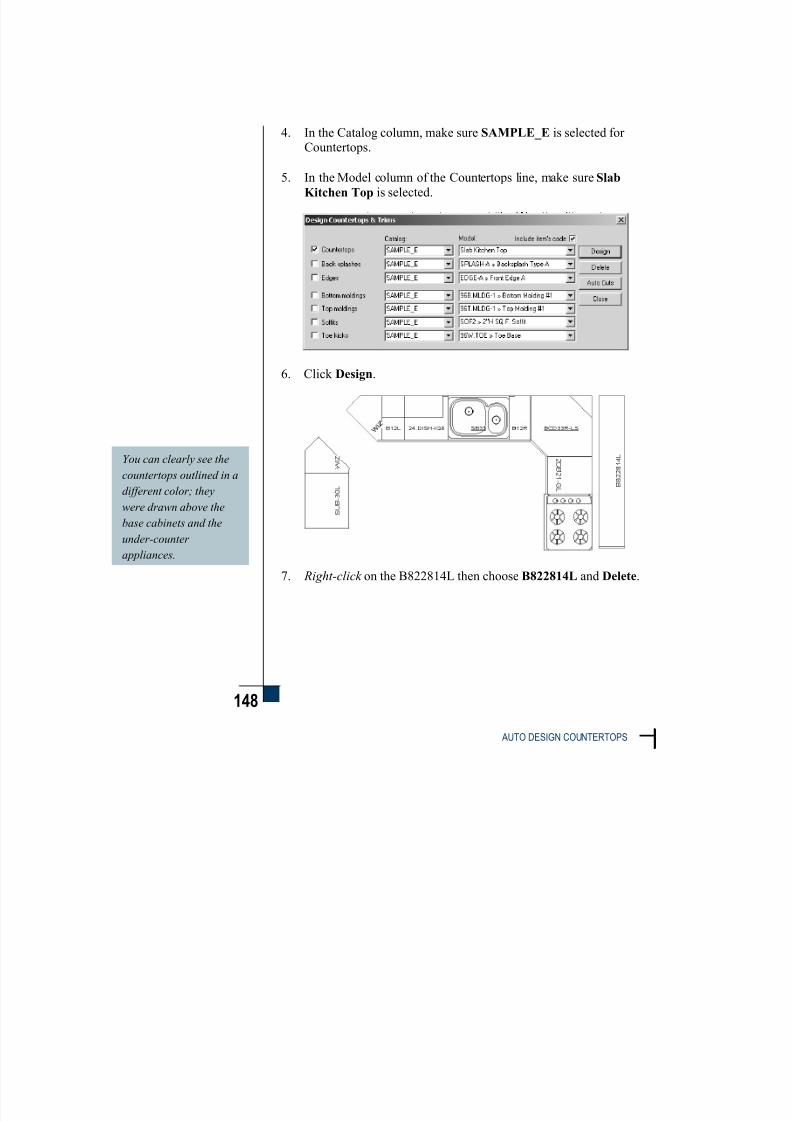
7/30/2019 Tutorial v 61 Imperial
http://slidepdf.com/reader/full/tutorial-v-61-imperial 176/247
148
AUTO DESIGN COUNTERTOPS
You can clearly see the
countertops outlined in a
different color; they
were drawn above the
base cabinets and the
under-counter
appliances.
4. In the Catalog column, make sure SAMPLE_E is selected for Countertops.
5. In the Model column of the Countertops line, make sure Slab
Kitchen Top is selected.
6. Click Design.
7. Right-click on the B822814L then choose B822814L and Delete.

7/30/2019 Tutorial v 61 Imperial
http://slidepdf.com/reader/full/tutorial-v-61-imperial 177/247
149
ADDING COUNTERTOPS & TRIMS
Extend the Countertop Over the T-ShapedWall
Note: If you have not purchased the ENHANCER module you will
not be able to perform the following tasks. Please go to the sub-
section Auto Design Toe Kicks & Moldings on page 155 to
continue.
1. Right-click on the 2DB21-GL, choose 8310000 and Edit Shape.
2. Click on the vertical line indicated with the arrow on the followingfigure.
3. Move your mouse towards the right and left-click when the X field
indicate 4" in the Edit Box.

7/30/2019 Tutorial v 61 Imperial
http://slidepdf.com/reader/full/tutorial-v-61-imperial 178/247
150
EXTEND THE COUNTERTOP OVER THE T-SHAPED WALL
4. Click on the point indicated with the arrow on the following figure.
5. Move your mouse towards the right and left-click when the X fieldindicate 4" in the Edit Box.

7/30/2019 Tutorial v 61 Imperial
http://slidepdf.com/reader/full/tutorial-v-61-imperial 179/247
151
ADDING COUNTERTOPS & TRIMS
Extend the Countertop Behind the Range
Add a Point
1. Right-click on the line indicated with the arrow on the followingfigure.
2. Choose Add Point from the Line pop-up menu.
3. Drag your mouse towards the right. A new point is displayed onthe line.
4. Left-click when the Prev Dist field indicates 20" in the Edit Box.
5. Click on the point you just added, drag the mouse towards the rightand release the mouse.

7/30/2019 Tutorial v 61 Imperial
http://slidepdf.com/reader/full/tutorial-v-61-imperial 180/247
152
EXTEND THE COUNTERTOP BEHIND THE RANGE
6. Press the TAB key twice and type 4 in the Next Dist field of theEdit Box.
7. Press the ENTER key.
Extend the Countertop
1. Click the Zoom In/Out icon and click the range.
2. Press ESC to stop the zoom mode.
3. Right-click on the line indicated on the following figure.
4. Choose Add Line from the Line pop-up menu.
5. Move the mouse towards the bottom and left-click when the Xfield indicates 30 in the Edit Box. You can also type 30 and pressENTER .

7/30/2019 Tutorial v 61 Imperial
http://slidepdf.com/reader/full/tutorial-v-61-imperial 181/247
153
ADDING COUNTERTOPS & TRIMS
6. Press the ESC to confirm your changes and exit the Edit Shapemode.
Your counter should appear as follows.
7. Click the Save icon.
Place Edges
1. Click the Zoom To Fit icon and click on the plan.
2. Click Pick Tool or press ESC to stop the zoom mode.
3. Double-click on <Categories> in the Drag & Drop list. If you do
not see <Categories>, use the up arrow button beside the history of selections area.

7/30/2019 Tutorial v 61 Imperial
http://slidepdf.com/reader/full/tutorial-v-61-imperial 182/247
154
PLACE EDGES
4. Double-click Counter Items and Front Trims.
5. Click once on the EDGE-C > Front Edge C line, then drag the
trim on the 2DB21-GL.
6. Select 8310000 from the pop-up menu.
Your plan should appear as follows.
7. Drag and drop another EDGE-C > Front Edge C on the
freestanding counter.
Your edges should appear as follows.

7/30/2019 Tutorial v 61 Imperial
http://slidepdf.com/reader/full/tutorial-v-61-imperial 183/247
155
ADDING COUNTERTOPS & TRIMS
Auto Design Toe Kicks & Moldings
1. Click the Fp 1 display tab to return to the first floor-plan view. It
displays all items added so far to your design.
2. Click the Design Countertops & Trims icon .
3. Make sure a check mark appears beside Include item’s code.
4. In the leftmost portion of the dialog, remove the check mark for Countertops.
5. Add a check mark for Bottom moldings, Top moldings and Toe
kicks.
6. In the Catalog column, make sure SAMPLE_E is selected for Bottom moldings, Top moldings and Toe kicks.
7. In the Model column, make sure the following is chosen:
96B.MLDG-1 » Bottom Molding #1 for Bottom moldings
96T.MLDG-1 » Top Molding #1 for Top moldings
96W.TOE » Toe Base for Toe kicks.
Your Design Countertops & Trims dialog box should look like the
following:

7/30/2019 Tutorial v 61 Imperial
http://slidepdf.com/reader/full/tutorial-v-61-imperial 184/247
156
AUTO DESIGN TOE KICKS & MOLDINGS
Bottom moldings were
added on wall cabinets;
top moldings on tall and
wall cabinets and toe
kicks on base and tall
cabinets.
8. Click Design.
9. Click the Save icon.

7/30/2019 Tutorial v 61 Imperial
http://slidepdf.com/reader/full/tutorial-v-61-imperial 185/247
157
ADDING COUNTERTOPS & TRIMS
Hide Countertops & Trims and Dimensions
1. To continue working without having too many items on the floor
plan, right-click on the floor area and choose Display Settings.
2. In the Items tab, remove the check mark for Countertops and
Trims.
3. Click the Dimensions tab and remove the check mark beside AutoDimensions.
4. Click Save As to add these new settings to the tutorial settings file.
5. In the Save this scheme as field, type in tutorial3 and click OK .
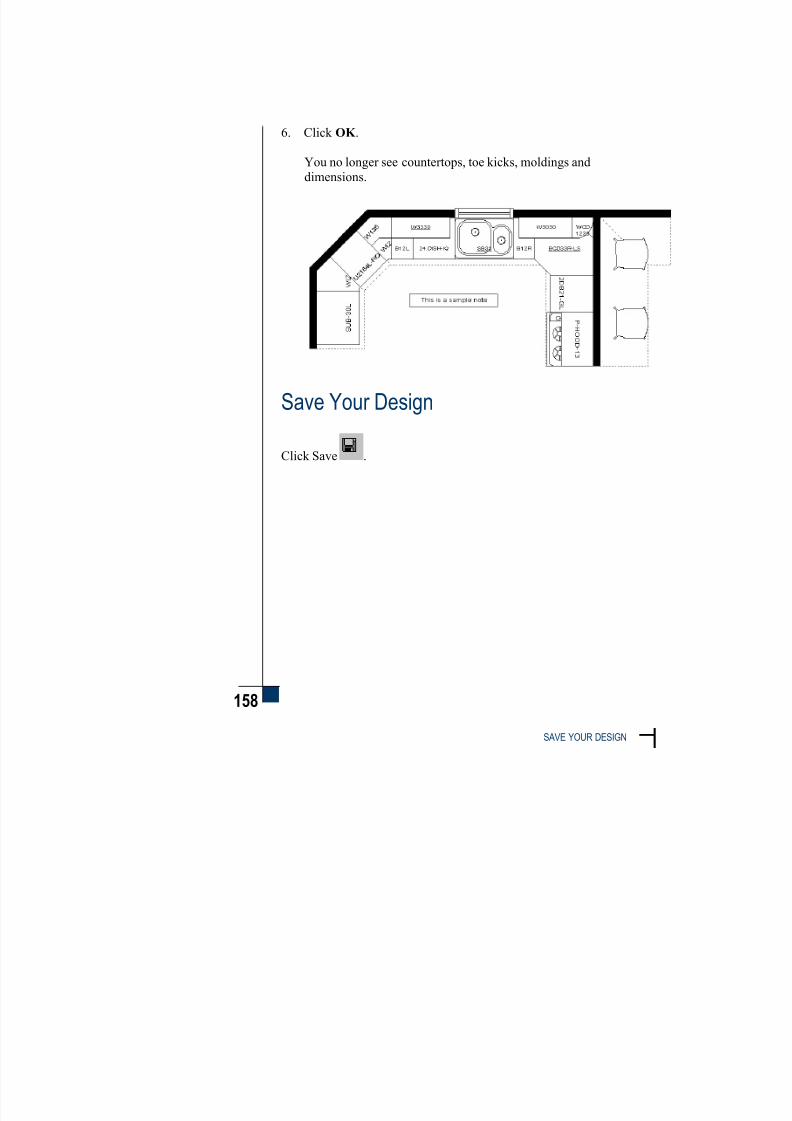
7/30/2019 Tutorial v 61 Imperial
http://slidepdf.com/reader/full/tutorial-v-61-imperial 186/247
158
SAVE YOUR DESIGN
6. Click OK .
You no longer see countertops, toe kicks, moldings and
dimensions.
Save Your Design
Click Save .

7/30/2019 Tutorial v 61 Imperial
http://slidepdf.com/reader/full/tutorial-v-61-imperial 187/247
159
ADDING COUNTERTOPS & TRIMS
Recap
You can now:
set display settings for a second floor plan view
select a model for the countertops
auto design countertops on another floor plan view
extend countertops
drag and drop edges
add a lunch counter
auto design moldings and toe kicks
hide items on the floor plan, such as moldings, toe kicks, chairs and
dimensions

7/30/2019 Tutorial v 61 Imperial
http://slidepdf.com/reader/full/tutorial-v-61-imperial 188/247

7/30/2019 Tutorial v 61 Imperial
http://slidepdf.com/reader/full/tutorial-v-61-imperial 189/247
2 0 - 2 0 D E S I G N
Session 9

7/30/2019 Tutorial v 61 Imperial
http://slidepdf.com/reader/full/tutorial-v-61-imperial 190/247

7/30/2019 Tutorial v 61 Imperial
http://slidepdf.com/reader/full/tutorial-v-61-imperial 191/247
9
161
WORKING ON THE BOM
Session 9 ~ Working on the BOM
Display the Bill of Materials
1. Click the Show Bill of Materials icon .
2. Resize the Non-Plan Items at the bottom portion of the screen, so itoccupies only one third or one quarter of the Bill of Materials
(BOM), depending on your screen resolution.
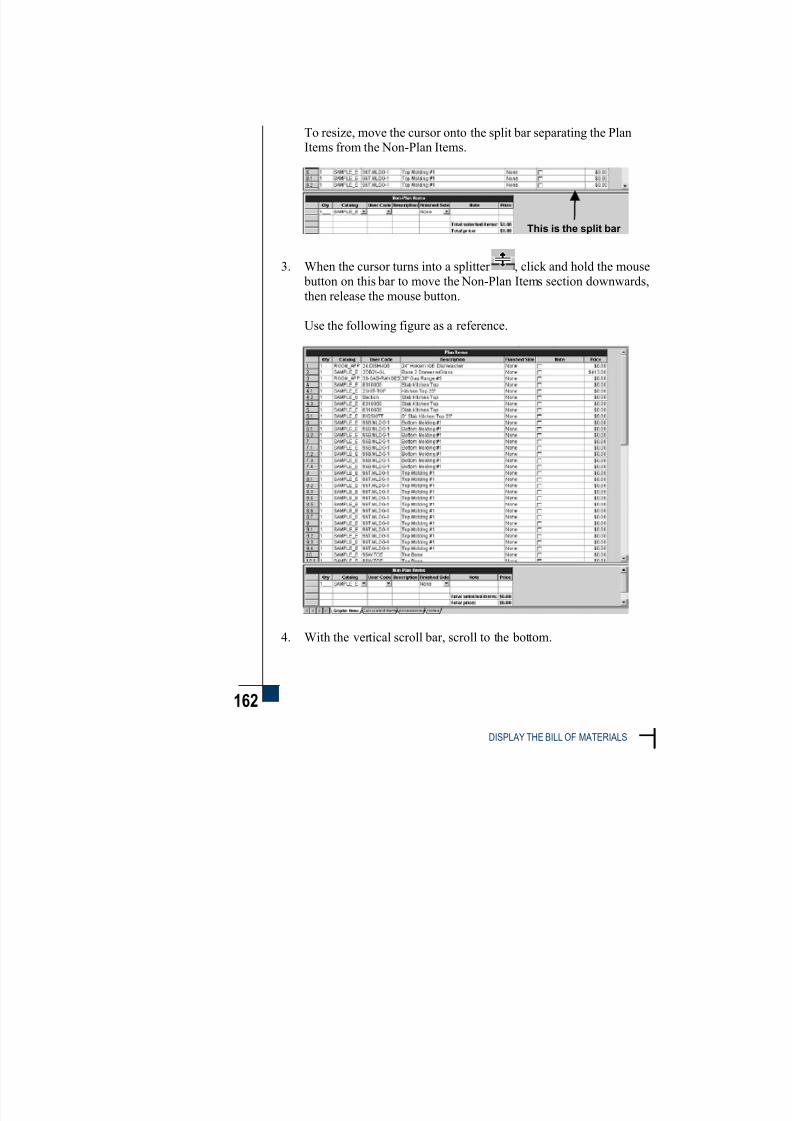
7/30/2019 Tutorial v 61 Imperial
http://slidepdf.com/reader/full/tutorial-v-61-imperial 192/247
162
DISPLAY THE BILL OF MATERIALS
To resize, move the cursor onto the split bar separating the PlanItems from the Non-Plan Items.
3. When the cursor turns into a splitter , click and hold the mouse
button on this bar to move the Non-Plan Items section downwards,
then release the mouse button.
Use the following figure as a reference.
4. With the vertical scroll bar, scroll to the bottom.
This is the split bar
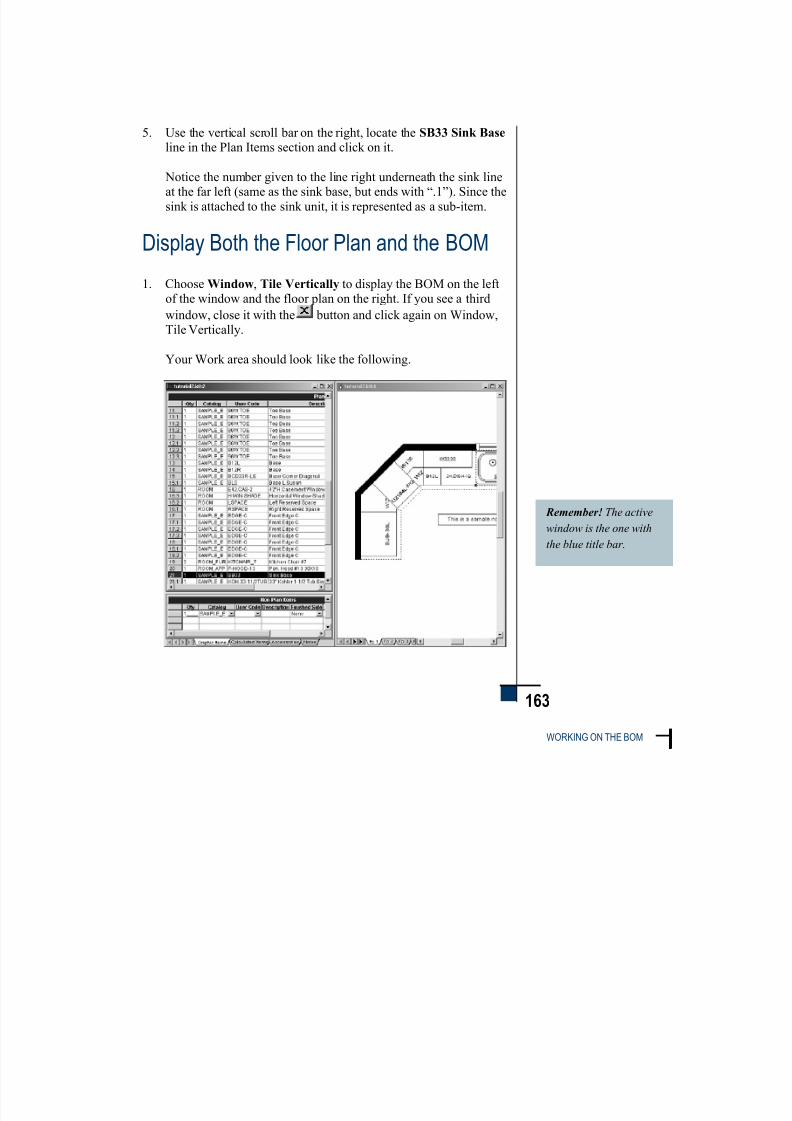
7/30/2019 Tutorial v 61 Imperial
http://slidepdf.com/reader/full/tutorial-v-61-imperial 193/247
163
WORKING ON THE BOM
Remember! The active
window is the one with
the blue title bar.
5. Use the vertical scroll bar on the right, locate the SB33 Sink Base line in the Plan Items section and click on it.
Notice the number given to the line right underneath the sink line
at the far left (same as the sink base, but ends with “.1”). Since thesink is attached to the sink unit, it is represented as a sub-item.
Display Both the Floor Plan and the BOM
1. Choose Window, Tile Vertically to display the BOM on the leftof the window and the floor plan on the right. If you see a third
window, close it with the button and click again on Window,Tile Vertically.
Your Work area should look like the following.
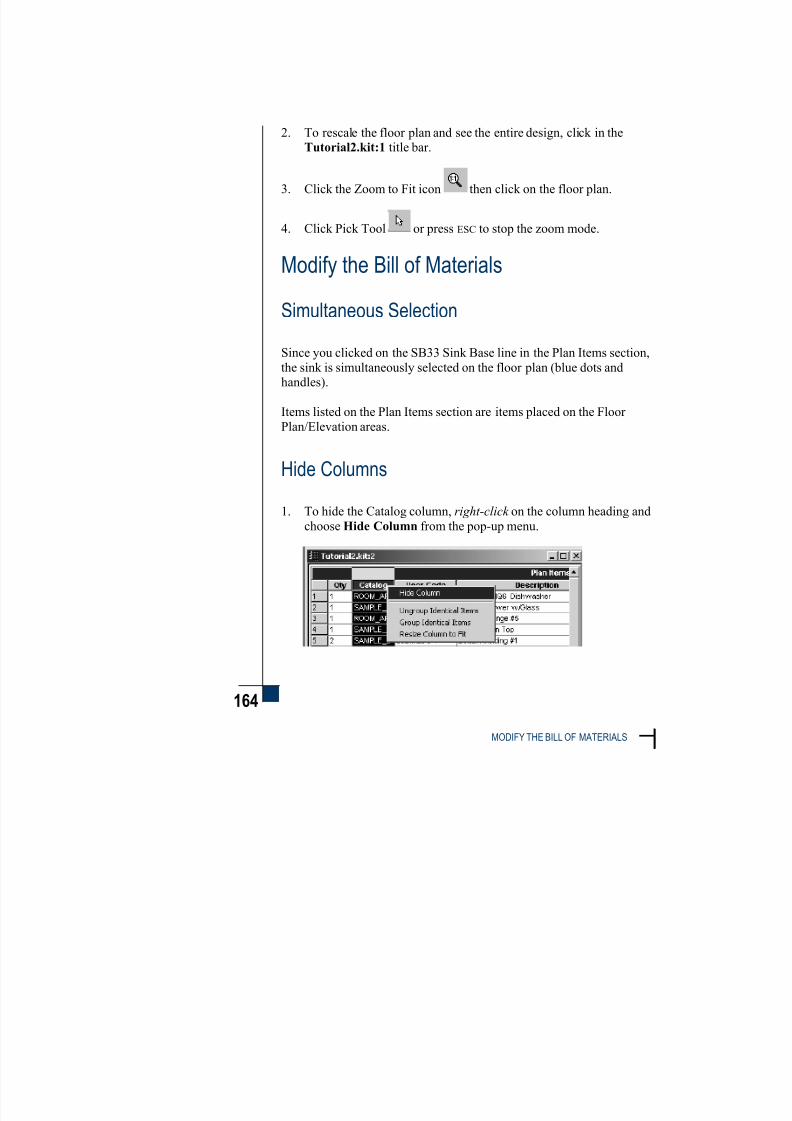
7/30/2019 Tutorial v 61 Imperial
http://slidepdf.com/reader/full/tutorial-v-61-imperial 194/247
164
MODIFY THE BILL OF MATERIALS
2. To rescale the floor plan and see the entire design, click in theTutorial2.kit:1 title bar.
3. Click the Zoom to Fit icon then click on the floor plan.
4. Click Pick Tool or press ESC to stop the zoom mode.
Modify the Bill of Materials
Simultaneous Selection
Since you clicked on the SB33 Sink Base line in the Plan Items section,
the sink is simultaneously selected on the floor plan (blue dots andhandles).
Items listed on the Plan Items section are items placed on the Floor
Plan/Elevation areas.
Hide Columns
1. To hide the Catalog column, right-click on the column heading and
choose Hide Column from the pop-up menu.

7/30/2019 Tutorial v 61 Imperial
http://slidepdf.com/reader/full/tutorial-v-61-imperial 195/247
165
WORKING ON THE BOM
2. Right-click and hide the User Code column.
3. Use the horizontal scroll bar to scroll to the right, then hide the
Finished Side and Note columns.
4. If necessary, scroll back to left. The Qty, Description and Price of the items are displayed.
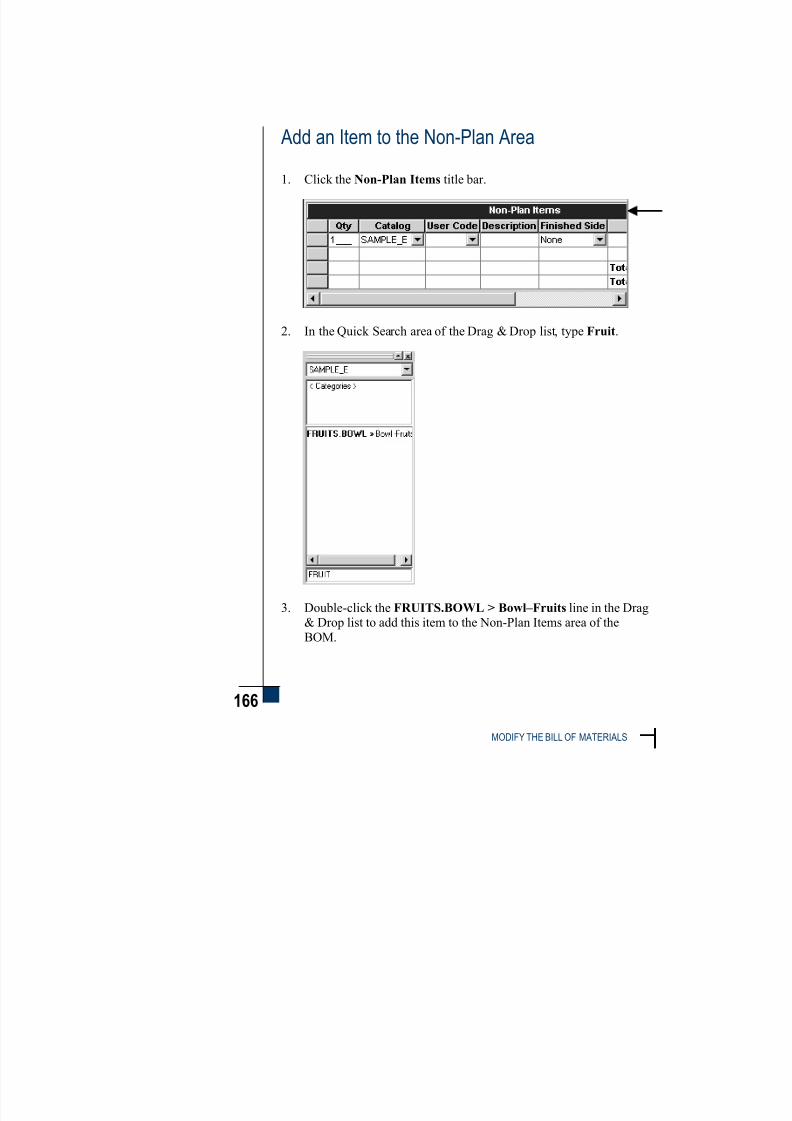
7/30/2019 Tutorial v 61 Imperial
http://slidepdf.com/reader/full/tutorial-v-61-imperial 196/247
166
MODIFY THE BILL OF MATERIALS
Add an Item to the Non-Plan Area
1. Click the Non-Plan Items title bar.
2. In the Quick Search area of the Drag & Drop list, type Fruit.
3. Double-click the FRUITS.BOWL > Bowl–Fruits line in the Drag& Drop list to add this item to the Non-Plan Items area of the
BOM.

7/30/2019 Tutorial v 61 Imperial
http://slidepdf.com/reader/full/tutorial-v-61-imperial 197/247
167
WORKING ON THE BOM
If you cannot see this line in the Non-Plan Items area, use the split bar to expand this area.
Non-Plan items do not appear on the floor plan, but do appear on
reports.
Move an Item from the BOM to the Floor Plan
1. Click the FRUITS.B line in the Non-Plan area of the BOM.
2. Click and hold the mouse button on this item, then drag itanywhere on the floor area of the floor plan.

7/30/2019 Tutorial v 61 Imperial
http://slidepdf.com/reader/full/tutorial-v-61-imperial 198/247
168
MODIFY THE BILL OF MATERIALS
s you can see, the Fruit
Bowl line disappears
rom the Non-Plan Items
area and appears in the
Plan Items area of the
BOM.
3. Click to set its position.
4. To move the fruit bowl back to Non-Plan Items, press CTRL+X tocut the item. It is removed from both the floor plan and the Plan
Items section.
5. Click on the title bar of the BOM to make it the active window.
If you do not make this the active window, you will be pasting the
item in the floor plan.
6. Press the CTRL+V keys to paste the fruit bowl in the Non-PlanItems section.
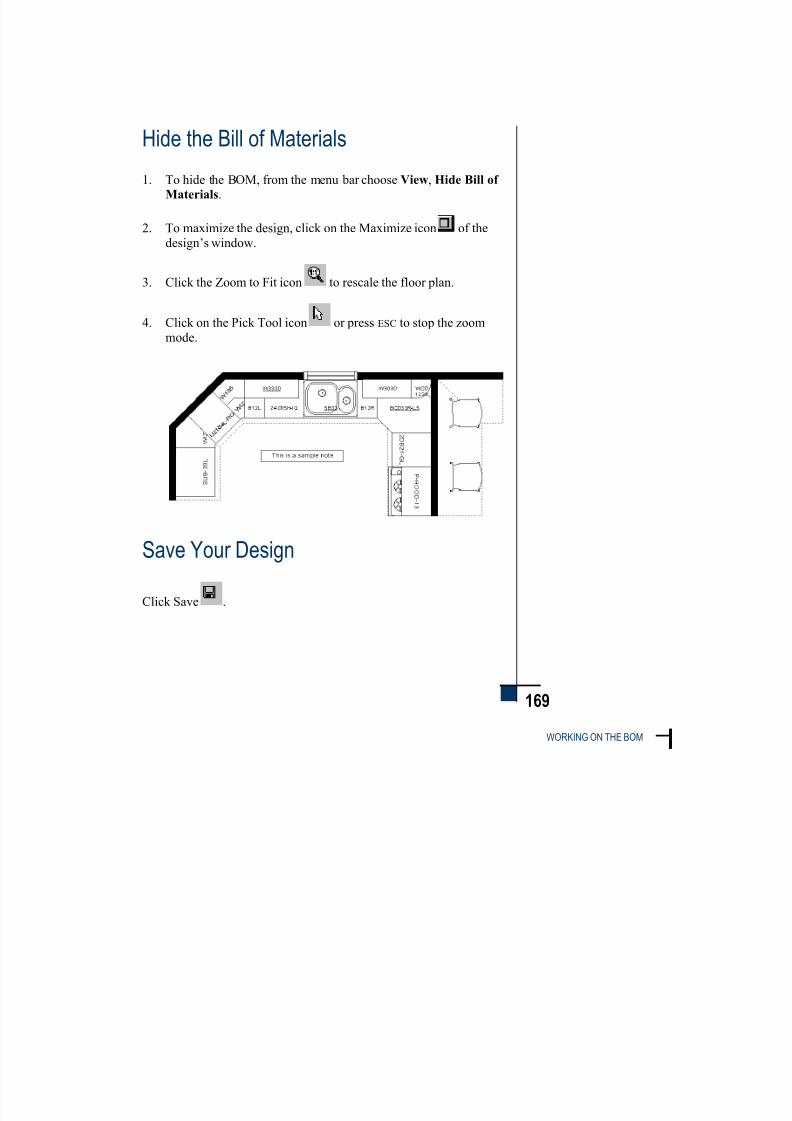
7/30/2019 Tutorial v 61 Imperial
http://slidepdf.com/reader/full/tutorial-v-61-imperial 199/247
169
WORKING ON THE BOM
Hide the Bill of Materials
1. To hide the BOM, from the menu bar choose View, Hide Bill of
Materials.
2. To maximize the design, click on the Maximize icon of the
design’s window.
3. Click the Zoom to Fit icon to rescale the floor plan.
4. Click on the Pick Tool icon or press ESC to stop the zoom
mode.
Save Your Design
Click Save .

7/30/2019 Tutorial v 61 Imperial
http://slidepdf.com/reader/full/tutorial-v-61-imperial 200/247
170
RECAP
Recap
You can now:
customize the BOM
add an item on the BOM
move an item from the BOM to the floor plan and back to the BOM
hide the BOM

7/30/2019 Tutorial v 61 Imperial
http://slidepdf.com/reader/full/tutorial-v-61-imperial 201/247
2 0 - 2 0 D E S I G N
Session 10

7/30/2019 Tutorial v 61 Imperial
http://slidepdf.com/reader/full/tutorial-v-61-imperial 202/247

7/30/2019 Tutorial v 61 Imperial
http://slidepdf.com/reader/full/tutorial-v-61-imperial 203/247
10
171
PRODUCING A QUOTE
Session 10 ~ Producing a Quote
Add Sales Tax
1. Click the Styles & Pricing icon to display the Styles &
Pricing dialog.
2. From the Design Charges tab, click the drop-down arrow at the
end of Sales Tax and choose any tax option.
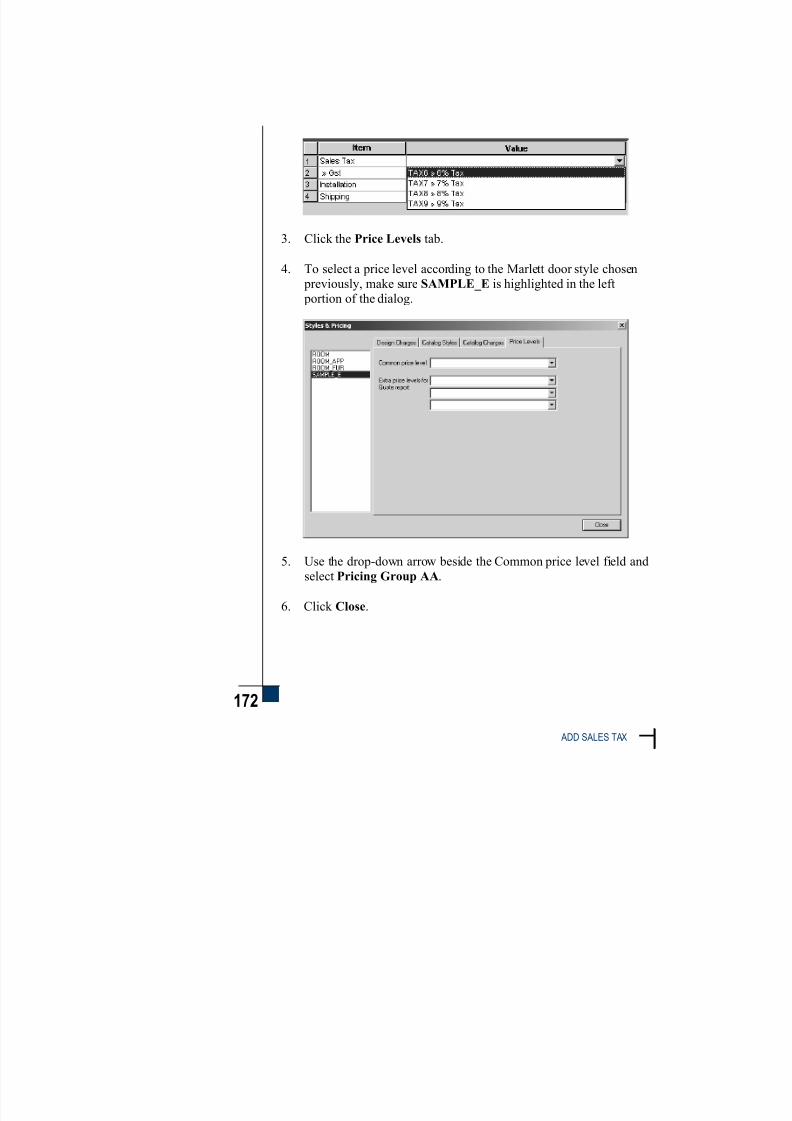
7/30/2019 Tutorial v 61 Imperial
http://slidepdf.com/reader/full/tutorial-v-61-imperial 204/247
172
ADD SALES TAX
3. Click the Price Levels tab.
4. To select a price level according to the Marlett door style chosen
previously, make sure SAMPLE_E is highlighted in the left
portion of the dialog.
5. Use the drop-down arrow beside the Common price level field and
select Pricing Group AA.
6. Click Close.

7/30/2019 Tutorial v 61 Imperial
http://slidepdf.com/reader/full/tutorial-v-61-imperial 205/247
173
PRODUCING A QUOTE
Choose a Report Type
1. Click the Reports on Design icon .
2. In the Reports on Design list, click Quote.
3. Click OK .
Select Quote Settings
1. In the Quote Settings dialog, select the General tab if it is not
already displayed.
2. In the Include section, make sure a check mark appears for all
options.

7/30/2019 Tutorial v 61 Imperial
http://slidepdf.com/reader/full/tutorial-v-61-imperial 206/247
174
VIEW THE QUOTE
3. Click View.
View the Quote

7/30/2019 Tutorial v 61 Imperial
http://slidepdf.com/reader/full/tutorial-v-61-imperial 207/247
175
PRODUCING A QUOTE
The first thing you should know about reports is that you can customizethem as you want through the Settings dialog.
For example, you can easily change the 20-20 logo for your company
logo. You can also add page headers and footers, insert selections of renderings as an appendix, etc.
1. The first page of a quote always shows the project and the designdetails. Go to the second page by clicking once on the Next page
button at the top of the Report Viewer.
As you can see, the catalog name appears, followed bydoor/drawer/pull styles and item prices for the Pricing Group AA.
2. Scroll to the bottom of the page.
3. Go to the last page by clicking on the Last page button .
7/30/2019 Tutorial v 61 Imperial
http://slidepdf.com/reader/full/tutorial-v-61-imperial 208/247
176
SAVE YOUR DESIGN
4. Scroll to the top of the page to see the Quote Summary.
5. If you want to print this report, click Print at the top of the Report
Viewer, then click OK in the Print dialog.
6. Click Close to return to the Reports on Design dialog, then click Cancel.
Save Your Design
Click Save .
Recap
You can now:
add overall charges such as the sales tax and price level
assign a design to an existing project
choose a report type
produce a quote and view it on screen

7/30/2019 Tutorial v 61 Imperial
http://slidepdf.com/reader/full/tutorial-v-61-imperial 209/247
2 0 - 2 0 D E S I G N
Session 11

7/30/2019 Tutorial v 61 Imperial
http://slidepdf.com/reader/full/tutorial-v-61-imperial 210/247

7/30/2019 Tutorial v 61 Imperial
http://slidepdf.com/reader/full/tutorial-v-61-imperial 211/247
11
177
LOOKING AT THE FINAL DESIGN
Session 11 ~ Looking at the FinalDesign
Change the Attributes of the Design
The changes you make with the Global Attributes affect all relateditems on your design.
Select a Wood Texture for the Cabinets
1. Click the Global Attributes icon .

7/30/2019 Tutorial v 61 Imperial
http://slidepdf.com/reader/full/tutorial-v-61-imperial 212/247
178
CHANGE THE ATTRIBUTES OF THE DESIGN
The attributes listed here
affect the color/texture of
similar items. For
instance, you can change
the color/texture of all
the appliances, all the
countertops, all the
doors, etc.
2. In the left portion of the Attributes dialog, click All catalogs tochange textures of all the items in the design.
3. Click on the Textures tab and look at the Door texture line. To
select another texture for all the doors on this design, click on thecolor rectangle at the end of this line.
As you can see the current selection is Basic color - 159.
4. In the selection area to the left, scroll to the bottom and click the
“+” sign beside Wood and Group A.
5. Scroll down the list and click the Wood – Maple Natural 2 (Vert.
door) line to display a preview.
For wood grain and the dimensions of components, there are
always three wood options:

7/30/2019 Tutorial v 61 Imperial
http://slidepdf.com/reader/full/tutorial-v-61-imperial 213/247
179
LOOKING AT THE FINAL DESIGN
You see your selection
on the Door texture line.
Notice also the
adjustment made to
similar items, such as
drawer fronts, finished
sides and frames.
the first is for large components, such as doors, it shows avertical wood grain;
the second is for small components, such as stiles and shows a
vertical wood grain;
the third one is for small components, such as drawer fronts and
moldings, with a horizontal wood grain.
6. To keep maple natural for doors and return to the previous dialog,
click OK .
Select a Material for Countertops
1. To select a material for countertops, click on the color rectangle at
the end of the Counter top texture line.
2. Click the “+” sign preceding Dupont Corian to open this
category.

7/30/2019 Tutorial v 61 Imperial
http://slidepdf.com/reader/full/tutorial-v-61-imperial 214/247
180
CHANGE THE ATTRIBUTES OF THE DESIGN
3. Scroll down and click the Dupont Corian – Sierra Oceanic line.
4. Click OK to keep this selection. The description on the Counter
top texture line is displayed.
Show Accessories
1. To list opening attributes, click the Open tab.
2. Add a check mark beside the Open item w/acc. line to open doors
and show accessories inside cabinets, i.e. drawers in the tall unit
and the Lazy susan.
3. Click OK in the Attributes dialog to save your changes and exit.

7/30/2019 Tutorial v 61 Imperial
http://slidepdf.com/reader/full/tutorial-v-61-imperial 215/247
181
LOOKING AT THE FINAL DESIGN
Produce a Top View and a Perspective
Change the Wall Covering
1. Right-click the line of first wall and choose Properties from the pop-up menu.
2. In the Wall Properties dialog, click the Wall Group 1 line in the
left portion.
3. Click the Material tab.
4. Under Finish in the right portion, make sure a check mark appears
beside Use inside finish for both sides.

7/30/2019 Tutorial v 61 Imperial
http://slidepdf.com/reader/full/tutorial-v-61-imperial 216/247
182
PRODUCE A TOP VIEW AND A PERSPECTIVE
5. Click the browse button beside the Inside field to display theColors/Textures dialog.
6. Click the “+” sign beside Paneling.
7. Click Wall – Blue paneling (vert).
8. Click OK to confirm this selection.
9. Click Ok in the Wall Properties dialog.
Select View Settings
1. Click the Top View icon .
2. In the Top View Settings dialog, make the following selections:
Texture quality/speed = Medium
Check Shadows (to add shadowing)
Ambient light = Intermediate
Ceiling light = 60 watts
3. Check 3D (to get a “perspective effect”, otherwise you simply get
a color floor plan)
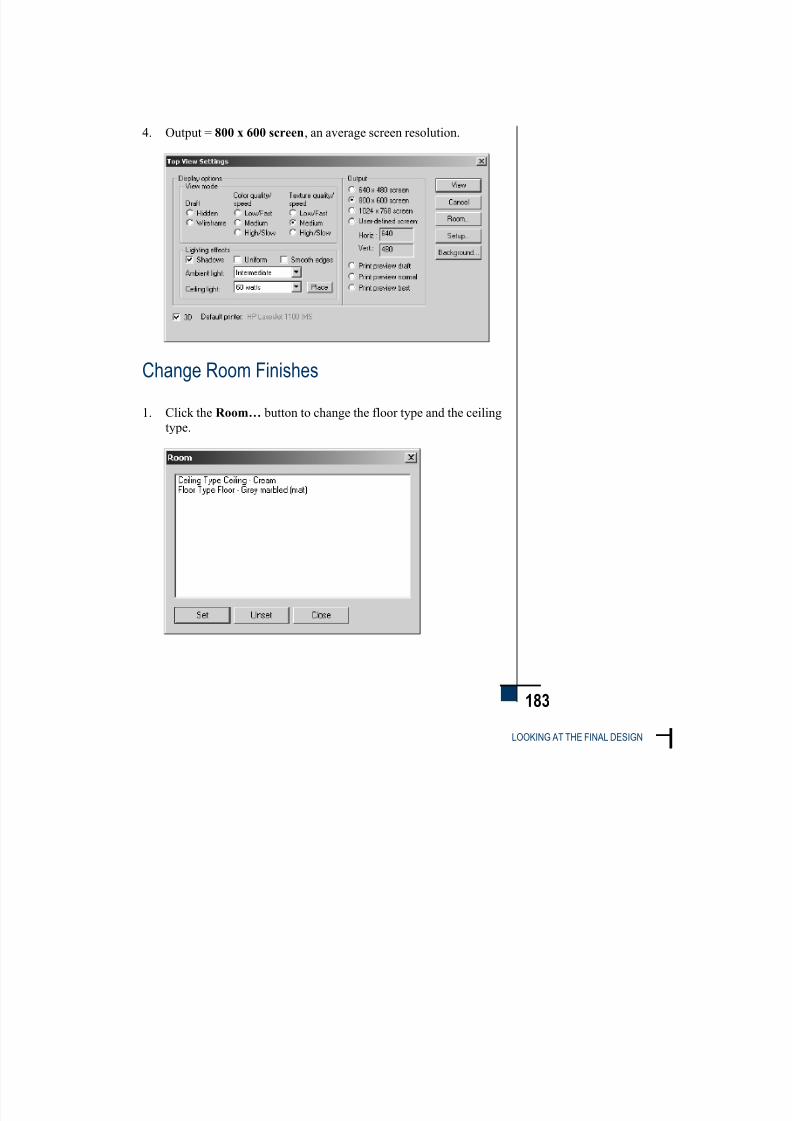
7/30/2019 Tutorial v 61 Imperial
http://slidepdf.com/reader/full/tutorial-v-61-imperial 217/247
183
LOOKING AT THE FINAL DESIGN
4. Output = 800 x 600 screen, an average screen resolution.
Change Room Finishes
1. Click the Room… button to change the floor type and the ceiling
type.

7/30/2019 Tutorial v 61 Imperial
http://slidepdf.com/reader/full/tutorial-v-61-imperial 218/247
184
PRODUCE A TOP VIEW AND A PERSPECTIVE
2. Double-click Ceiling Type Ceiling - Cream.
3. Click on Ceiling – White.
4. Click OK .
5. Double-click Floor Type Floor - Grey marbled (mat).
6. Scroll to the top and click the “+” sign preceding Ceramic andGroup Euro.
7. Scroll down and click on Ceramic – White rhombus 30x30.
8. Click OK .
9. Click Close to return to the Top View Settings dialog.

7/30/2019 Tutorial v 61 Imperial
http://slidepdf.com/reader/full/tutorial-v-61-imperial 219/247
185
LOOKING AT THE FINAL DESIGN
Display a Top View
1. Click View to produce the top view.
2. Center the box on your design and click to see the following:
3. Notice the following on this design:
wall texture (blue panels)
texture of doors (natural maple)
countertop material (Dupon Corian – Sierra Oceanic)
ceramic on the floor (white rhombus)
the pulled-out drawers on the diagonal tall cabinet

7/30/2019 Tutorial v 61 Imperial
http://slidepdf.com/reader/full/tutorial-v-61-imperial 220/247
186
PRODUCE A TOP VIEW AND A PERSPECTIVE
Enable/Disable the Grayscale Mode
To display the Top View in grayscale:
1. Click on the 20-20 Design icon on theWindows taskbar.
2. Click the Preferences menu and choose Enable Grayscale
Renderings. This preference allows you to view all renderings in
grayscale.
3. Click the 20-20 Rendering Module icon on
the Windows taskbar.
4. Click the Refresh icon to display the Top View in grayscale.This may take a while... please wait.
5. Close the top view by choosing File, Exit.
6. Disable the grayscale mode by clicking again on Preferences,Enable Grayscale Renderings.

7/30/2019 Tutorial v 61 Imperial
http://slidepdf.com/reader/full/tutorial-v-61-imperial 221/247
187
LOOKING AT THE FINAL DESIGN
Display a Perspective
1. Click the Perspective icon .
2. Keep the same settings as for the top view. Click View.
3. Click on the SUB-30L on the first wall.
4. Use the horizontal scroll bar at the bottom to scroll the design tothe left until the top leg of the “V” is outside the third wall. See the
following figure.

7/30/2019 Tutorial v 61 Imperial
http://slidepdf.com/reader/full/tutorial-v-61-imperial 222/247
188
PRODUCE A TOP VIEW AND A PERSPECTIVE
5. Click to see the perspective.
6. Click the Zoom In icon to see details.
Close the Rendering
1. Close the perspective with File, Exit.
2. Click the Zoom to Fit icon and on the floor plan to rescale.
3. Click the Pick Tool icon or press ESC to stop the zoom mode.

7/30/2019 Tutorial v 61 Imperial
http://slidepdf.com/reader/full/tutorial-v-61-imperial 223/247
189
LOOKING AT THE FINAL DESIGN
Produce Multiple Views
1. To see a rendering, the floor plan and the Bill of Materials at once,
click the Show Multiple Views icon .
2. In the Multiple View Settings dialog, select the 800 x 600 window
size.
3. Select the frame layout displayed fourth from the left as indicatedon the following figure and click OK to display the frame layout.
4. Click the upper left frame, then click on Named Views to select
the first view you saved earlier in the tutorial.

7/30/2019 Tutorial v 61 Imperial
http://slidepdf.com/reader/full/tutorial-v-61-imperial 224/247
190
PRODUCE MULTIPLE VIEWS
5. Click the drop-down arrow beside Select view and choosePerspective, then click OK to display the Perspective view in the
upper left frame.

7/30/2019 Tutorial v 61 Imperial
http://slidepdf.com/reader/full/tutorial-v-61-imperial 225/247
191
LOOKING AT THE FINAL DESIGN
6. Click in the lower left frame choose Floor plans/Elevations.
7. In the Floor plans/Elevations dialog, click OK .
8. Click on the last empty frame and select Bill of Materials.

7/30/2019 Tutorial v 61 Imperial
http://slidepdf.com/reader/full/tutorial-v-61-imperial 226/247
192
PRODUCE MULTIPLE VIEWS
9. In the Bill of Materials dialog, click on OK .
Save the Frame Layout
1. To save this frame layout with the tutorial file, choose Frame
Layout, Save As from the menu.
2. Type tutorial in the Frame layout field and click OK .
3. To go back to the floor plan, choose Window, Tutorial2.kit:1
from the menu.
7/30/2019 Tutorial v 61 Imperial
http://slidepdf.com/reader/full/tutorial-v-61-imperial 227/247
193
LOOKING AT THE FINAL DESIGN
Visit Your Virtual Kitchen
Assign View Settings
1. Click the Virtual Showroom icon .
2. In the Virtual Showroom Settings dialog, make the following
selections:
Texture quality/speed = Medium
Add a check mark to Shadows and Smooth Edges
Ambient light = Intermediate
Ceiling light = 60 watts
View height = 50
Output = 800 x 600 screen
Enter the Virtual Showroom
1. Click View.
2. Use the vertical scroll bar on the right to move the design up.
3. Click in the middle of the floor area and below it. A circle is
displayed representing your viewpoint with the line representing
your line of sight.
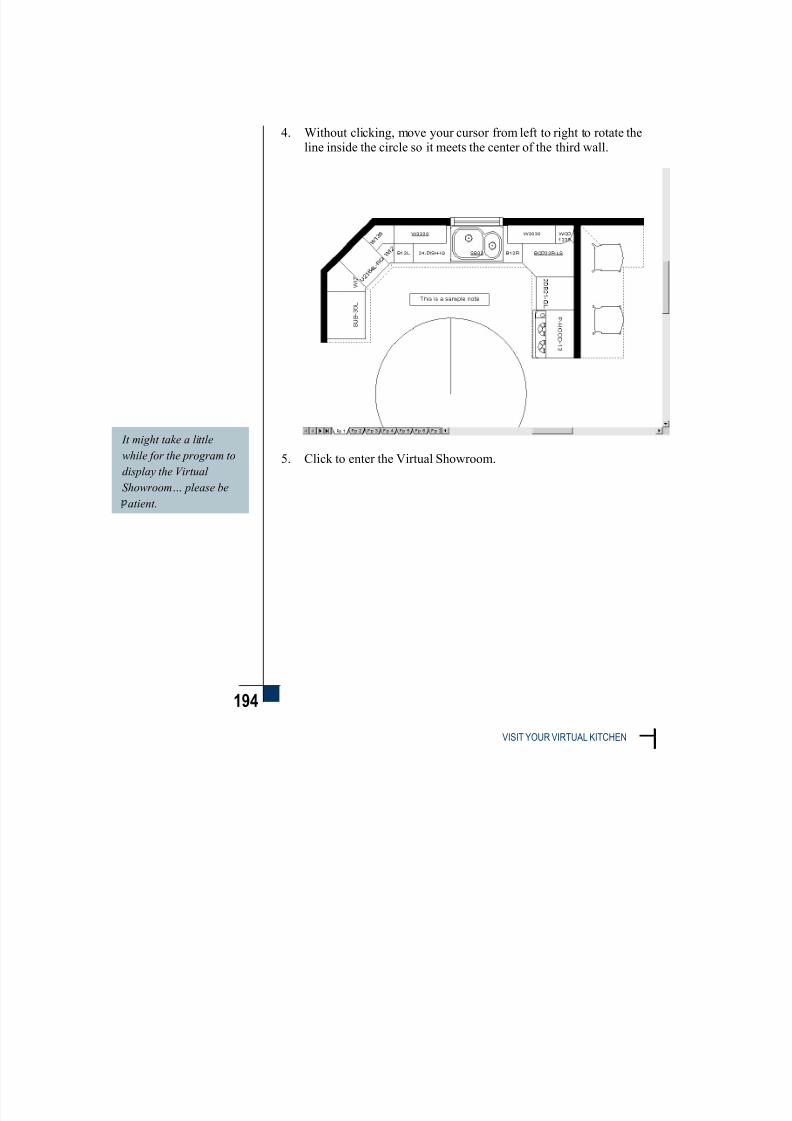
7/30/2019 Tutorial v 61 Imperial
http://slidepdf.com/reader/full/tutorial-v-61-imperial 228/247
194
VISIT YOUR VIRTUAL KITCHEN
It might take a little
while for the program to
display the Virtual
Showroom… please be
atient.
4. Without clicking, move your cursor from left to right to rotate theline inside the circle so it meets the center of the third wall.
5. Click to enter the Virtual Showroom.

7/30/2019 Tutorial v 61 Imperial
http://slidepdf.com/reader/full/tutorial-v-61-imperial 229/247
195
LOOKING AT THE FINAL DESIGN
6. When you see the virtual showroom, click on it.
7. Press and hold the left mouse button and move the cursor left or
right to visit the virtual kitchen.
8. Click the Zoom In and Zoom Out icons to resize the view.
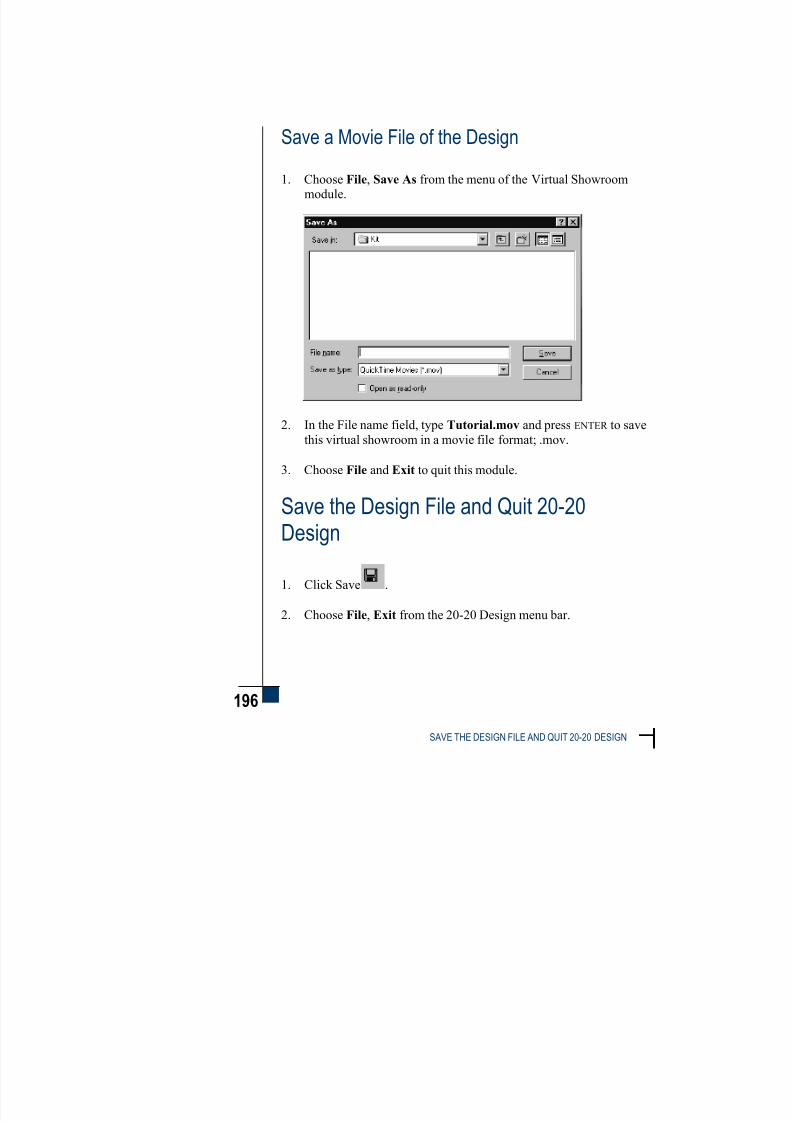
7/30/2019 Tutorial v 61 Imperial
http://slidepdf.com/reader/full/tutorial-v-61-imperial 230/247
196
SAVE THE DESIGN FILE AND QUIT 20-20 DESIGN
Save a Movie File of the Design
1. Choose File, Save As from the menu of the Virtual Showroom
module.
2. In the File name field, type Tutorial.mov and press ENTER to save
this virtual showroom in a movie file format; .mov.
3. Choose File and Exit to quit this module.
Save the Design File and Quit 20-20Design
1. Click Save .
2. Choose File, Exit from the 20-20 Design menu bar.

7/30/2019 Tutorial v 61 Imperial
http://slidepdf.com/reader/full/tutorial-v-61-imperial 231/247
197
LOOKING AT THE FINAL DESIGN
The QuickTime Player
rogram can be
downloaded from the
Internet free of charge at
the following address
http://www.apple.com/quick
time
This can be useful if, after
closing a sale, you want to
rovide your customers
with movie files they can
view from their homes!
View a Movie File Outside 20-20
Once you have saved a movie file in the 20-20 Virtual Showroom, you
can view it again without having to access 20-20 Design.
1. Click Start in the lower left portion of your Windows desktop and
choose Programs.
2. Select the QuickTime program group and choose QuickTime
Player. You installed this program when you installed Version 6.1.
3. If you see a message about QuickTime Upgrader, click Later toignore it.
4. If you also see this message, click No.
5. From the menu bar of the QuickTime Player, choose File, Open
Movie.

7/30/2019 Tutorial v 61 Imperial
http://slidepdf.com/reader/full/tutorial-v-61-imperial 232/247
198
VIEW A MOVIE FILE OUTSIDE 20-20
6. Double-click the Tutorial.mov file to open the virtual kitchen you
viewed in 20-20 Design. You may have to choose the
\2020V6...\usr0\kit folder first to see this file listed.
As in the 20-20 Virtual Showroom, click on the image, press and
hold the left mouse button and move the pointer around.
7. Choose File, Exit to quit the QuickTime Player program.

7/30/2019 Tutorial v 61 Imperial
http://slidepdf.com/reader/full/tutorial-v-61-imperial 233/247
199
LOOKING AT THE FINAL DESIGN
Recap
You can now:
change textures and open doors for similar items on a design
produce a top view in 3D
produce multiple views
produce a virtual showroom of your design and save a movie file.
view a virtual kitchen outside 20-20
Congratulations on creating your first salesproject!

7/30/2019 Tutorial v 61 Imperial
http://slidepdf.com/reader/full/tutorial-v-61-imperial 234/247

7/30/2019 Tutorial v 61 Imperial
http://slidepdf.com/reader/full/tutorial-v-61-imperial 235/247
2 0 - 2 0 D E S I G N
Session 12

7/30/2019 Tutorial v 61 Imperial
http://slidepdf.com/reader/full/tutorial-v-61-imperial 236/247

7/30/2019 Tutorial v 61 Imperial
http://slidepdf.com/reader/full/tutorial-v-61-imperial 237/247
12
201
PREPARING THE PROJECT DATABASE
Session 12 ~Preparing the ProjectDatabase
Load the Project Database
Now that you have completed the tutorial, you should prepare your project database before you start to enter “real” customer information.
1. From the 20-20 Shortcut Bar, click the Project icon .
2. From the Project module menu, choose Preferences, File Paths.

7/30/2019 Tutorial v 61 Imperial
http://slidepdf.com/reader/full/tutorial-v-61-imperial 238/247
202
STORE THE DESIGN INFORMATION
3. Click the browse button beside Project database to display aview of your directories.
4. Double-click the Prj directory.
5. Double-click the 60 subdirectory, then click OK . The correct pathfor working projects is displayed in the Project database field:
\2020v61\Db\Prj\60\.
6. Click OK to save this path and close the dialog. A message isdisplayed that you must restart the program.
7. Click OK to remove this message.
8. Click Project, Exit.
Store the Design InformationBefore starting to create your own projects and enter customer
information for your company or organization, you need to enter theinformation pertaining to the dealer, designer and reviewer. This
information appears on the reports you produce.
Enter Dealer Information
1. From the 20-20 Shortcut Bar, click the Project icon .
2. From the Project menu bar, choose Store, Dealers to display the
Dealers information dialog.

7/30/2019 Tutorial v 61 Imperial
http://slidepdf.com/reader/full/tutorial-v-61-imperial 239/247
203
PREPARING THE PROJECT DATABASE
3. Click New to start with a blank screen and create your dealer record.
By default, the program shows an “L” and the current date, plus asequential number in the Dealer ID field.
4. Keep this ID code or enter a more significant one.
5. Enter the required information (company name, address, phone…).
6. Click Save.
The Dealer ID code is displayed in the column on the left side of the window.
7. Click OK to return to the Project tab.

7/30/2019 Tutorial v 61 Imperial
http://slidepdf.com/reader/full/tutorial-v-61-imperial 240/247
204
STORE THE DESIGN INFORMATION
Remember to make a
selection in the Status
section.
ctive is already
selected, so this record
can be used in a project.
But you must select the
status of Reviewer and
Designer.
Enter Designer and Reviewer Information
As explained earlier, you need to identify the persons who design and
those who verify pricing and approve the final design. The same personcan perform both of these tasks.
1. Choose Store, Designers & Reviewers from the Project module
menu bar. The Designers & Reviewers dialog is displayed.
2. Click New to create a record.
3. To overwrite the pre-assigned ID, enter a code or the initials of the
designer and/or reviewer.
4. Enter the required information.
5. Under Status, add a check mark for Reviewer and/or Designer.
6. Click Save.

7/30/2019 Tutorial v 61 Imperial
http://slidepdf.com/reader/full/tutorial-v-61-imperial 241/247
205
PREPARING THE PROJECT DATABASE
7. The designer/reviewer code appears in the column on the left of the screen.
8. Create as many designer and/or reviewer records as required.
9. Click OK to return to the Project tab.
10. Click Project, Exit.
Recap
You can now:
enter a dealer record
enter designer/reviewer records

7/30/2019 Tutorial v 61 Imperial
http://slidepdf.com/reader/full/tutorial-v-61-imperial 242/247

7/30/2019 Tutorial v 61 Imperial
http://slidepdf.com/reader/full/tutorial-v-61-imperial 243/247
A
207
APPENDIX
Appendix
Global Style
Version 6.1 now has generic catalogs that are “style-driven”. In short,
style-driven catalogs are catalogs that allow you to choose your
door/drawer/molding/pull/countertop style and/or color and/or finish
for your design in one dialog. Manufacturers establish the preset
components you can choose.
Here is a sample procedure to assign a global style to a design whenusing a style-driven catalog such as Style_E.
1. From the Menu Bar, click on Design, Global Style or click on the
icon. The Global Style Selections dialog appears.

7/30/2019 Tutorial v 61 Imperial
http://slidepdf.com/reader/full/tutorial-v-61-imperial 244/247
208
GLOBAL STYLE
2. Click the drop-down arrow beside the Catalog field and select
STYLE_E if it is not already selected.
3. Click on the drop-down arrow beside the Global style selected
field, scroll down if necessary and choose Flat panel Frame Door
6cm.

7/30/2019 Tutorial v 61 Imperial
http://slidepdf.com/reader/full/tutorial-v-61-imperial 245/247
209
APPENDIX
4. Click in the cell to the right of Front-colors.

7/30/2019 Tutorial v 61 Imperial
http://slidepdf.com/reader/full/tutorial-v-61-imperial 246/247
210
GLOBAL STYLE
5. Click on the drop-down arrow in the cell and select any color.
6. Click in the cell to the right of Sidefinish-finishing.
7. Repeat the same steps for the remaining options and select any
color, finish or style.
8. To assign a finish and color for the toe base, top, bottom moldings
and the countertops, use the vertical scroll bar to scroll to the bottom of the list.
9. Assign any color or finish for these items. When done click OK .
10. Place a few cabinets from the Style_E catalog and produce a
perspective view.
As you can see the Global Style dialog allowed you to select all the
components of your design very quickly. For more information onstyle-driven catalogs, contact your manufacturer.

7/30/2019 Tutorial v 61 Imperial
http://slidepdf.com/reader/full/tutorial-v-61-imperial 247/247
Notes