tutorial!#2:adding!hyperlinks!to!asp - villanova universitymdamian/aspnet/2-addlinktutorial.pdf ·...
TRANSCRIPT

In the first tutorial you learned how to get data from a database to an ASP.NET page using data source controls. When displayed in a browser, your page looks like the one below. A visitor of this website might be interested in listening to some of the songs listed on this page, and even buying some favorite songs. To help streamline this process, you could add two more links to each row: when the first link gets clicked, the associated song should start playing; and when the second link is clicked, the associated song should be added to the shopping cart of the user. In this tutorial we learn how to add these links to our page. Step 1. Backup Your Work I would suggest that you make a copy of your website, so that if you make any errors, you can always roll back to a working starting point. • In Windows Explorer (NOT in Visual Web Developer), right-‐click the entire
folder with the website's name (in my case, MusicShopWebsite). • Copy, then paste, then rename.
Tutorial #2: Adding Hyperlinks to ASP.NET

Step 2. Get Up and Running • Open Visual Web Developer: Start à Programs à Microsoft Visual Web
Developer 2010 Express. If you have used the program before, you will see it in the shortcut list when you press Start.
• Open your website (from C:\Users\Public\Documents\MusicShopWebsite) • Check that your ASPNETDB database is there:
o Click on the Database Explorer tab on the bottom right. If the Database tab does not show, select View à Other Windows à Database Explorer. You should see ASPNETDB.MDF listed under Data Connections.
• Click on the Solution Explorer tab to the left of the Database Explorer tab. If the Solution tab does not show, select View à Other Windows à Solution Explorer. You should see Default.aspx listed there.
• Open Default.aspx in Split view.
1. Click on Solution Explorer
2. Select Split view

Step 3. Adding Hyperlinks to Song Clips We are now going to add a column to the grid with links to our song clips. In the Design window, click on the smart tag (top right arrow) of the grid to open the GridView Tasks, then select Edit Columns. Select HyperLinkField from the Available fields and click Add. Once it appears in the Selected Fields, select it so that you can modify it.
Click on the arrow to open the GridView tasks, then click Edit Columns
Make sure HyperLinkField is selected here, then click Add. The HyperLinkField will appear at the bottom in the list of Selected fields.

We now need to set the properties of the HyperLinkField so that it points to the clip song listed in that row. Edit HeaderText, Text, DataNavigateUrlFields and DataNavigateUrlFormatString in the properties as shown below. Click OK. The URL value of the HyperLinkField can be static or dynamic. In our case we need a dynamic value, because it differs for each row in the GridView based on the song clip bound to that particular row. The DataNavigateUrlFields property specifies what database column values are used in the URL of the rendered link (recall that ClipName is an attribute of the Song entity in the database). The DataNavigateUrlFormatString property is used to surround the dynamic database value with static text; the string {0} indicates where to place the dynamic value. For example, the URL for the top link (first row) is “~SongFolder/Fun.mp3”, for the link below is “~SongFolder/HarryPotter.mp3”, etc. The home symbol ~ is used to refer to the website folder (MusicShopWebsite).
1. Change the HeaderText and Text to the values shown here. This is how they will appear in the table when you run the program.
2. Change DataNavigateUrlFields and DataNavigateUrlFormatString to the values shown here (make sure you use the same case letters).
3. Click OK
Make sure you use {0} not (0)
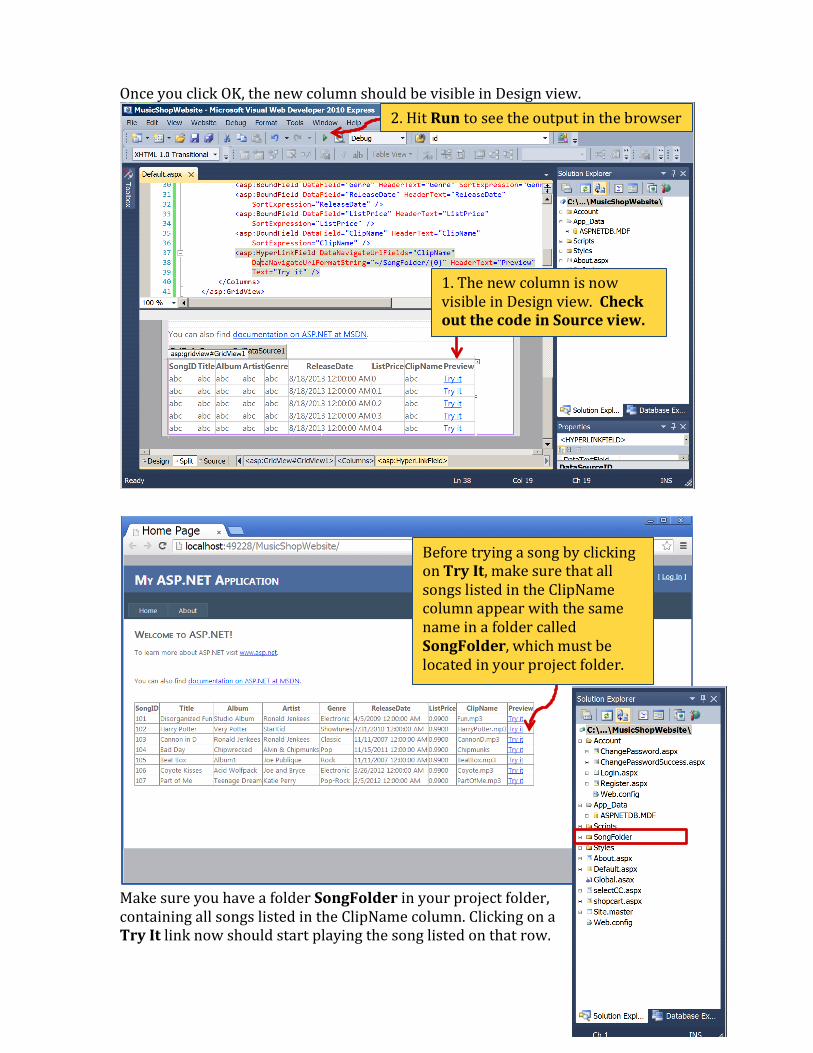
Once you click OK, the new column should be visible in Design view. Make sure you have a folder SongFolder in your project folder, containing all songs listed in the ClipName column. Clicking on a Try It link now should start playing the song listed on that row.
1. The new column is now visible in Design view. Check out the code in Source view.
2. Hit Run to see the output in the browser
Before trying a song by clicking on Try It, make sure that all songs listed in the ClipName column appear with the same name in a folder called SongFolder, which must be located in your project folder.

Step 4. Adding Hyperlinks to Enable Purchase If your application is running, be sure to close it and stop debugging. We need to add another column for Purchase. So we’ll just repeat step 3 above.
Click on HyperLinkField, then click Add. The HyperLinkField will appear in the list of Selected fields.
2. Click on the arrow to open the GridView tasks, then click Edit Columns
1. Stop debugging.

Note that the URL specified in the DataNavigateUrlFormatString points to another ASP.NET page shopcart.aspx. Two parameters (id and action) are passed to this page: the first one takes the value of the SongID (recall that the database column specified in the DataNavigateUrlFields is injected in place of {0}), and the second one takes the string value ‘add’. The code for shopcart.aspx will check these values and add the song with the specified id to the shopping cart of the logged in user. Clearly, we would need to create the page shopcart.aspx. Typically, ASP.NET pages are broken into two files: one that contains the HTML and Web control syntax (.aspx), and another that contains the source code (.aspx.cs). To speed up your learning process, the two files shopcart.aspx and shopcart.aspx.cs are provided for you. Make sure to copy these two files inside your project folder. After clicking OK, you should see the new column in Design view.
1. Change the HeaderText and Text to the values shown here.
2. Change DataNavigateUrlFields and DataNavigateUrlFormatString to the values shown here.
3. Click OK
~/shopcart.aspx?id={0}&action=’add’

1. The new column is now visible in Design view. Check out the code in the source view.
2. Hit Run to see the output in the browser
Before trying a click on a Buy link, make sure that you have shopcart.aspx and shopcart.aspx.cs in your project folder. (If not, download them now.)

You can try clicking on a Buy link to see your shopping cart get populated. You will notice that every time you click the Buy link, you are redirected to to the login page. This is because the code in shopcart.aspx.cs checks the value of the variable Session["userName"], and if null, it sends the user back to the login page. We need to initialize the value of this variable the first time the user logs in. Step 5. Keeping Track of Login Sessions If your application is running, be sure to close it and stop debugging. Click on the Solution Explorer tab to the left of the Database Explorer tab. If the Solution tab does not show, select View à Other Windows à Solution Explorer. You should see a folder Account listed there. Double-‐click on Login.aspx under Account.
Double-‐click on Login.aspx under Account.
2. Select Split view

Make sure that the Properties windows shows on the right. If not, select View à Other Windows à Properies Windows. Place the cursor somewhere in the Source window of Login.aspx, then select Edit à Quick Find and search for LoginUser. You will see that the LoginUser control will appear in the Properties window on the right. At this point, you may close the Find window.
1. Search for LoginUser. 2. The control will appear in
the Properties window. 3. Close the Quick Find
window.
Alternately, you could just click somewhere near the form in Design view until LoginUser is selected in the Properties window on the right.

Once LoginUser shows in the Properties windows, click on the bolt symbol at the top of the window, locate LoggedIn in the list below, and double-‐click on it. The effect of this is that an empty function LoginUser_LoggedIn gets inserted into the source file Login.aspx.cs, which will open for you.
1. Click on the bolt symbol in the Properties window.
2. Locate LoggedIn and double click on it. 4.

Add the line using System.Web.Security; after the lines starting with using: Add the line Session["userName"] = null; at the end of the Page_Load function. This is because each time the login page shows up, the user is not yet logged in.

When the execution control reaches the LoginUser_LoggedIn function, the user is already logged in. We need to store the login username into a session variable, then get the user id of the current user and store it into a session variable: Session["userName"] = LoginUser.UserName.ToString(); MembershipUser currentUser = Membership.GetUser((string)Session["userName"]); Session["userID"] = currentUser.ProviderUserKey; These session variables are needed by shopcart.aspx, which checks if the user is logged in. If the user is not logged in, it will be asked to log in before trying to make a purchase.

In the Solution Explorer, double-‐click on Site.master. Search for the LogoutPageUrl field and change it to LogoutPageUrl="~/Account/Login.aspx". This will force the Login page to get loaded each time the user logs out (and consequently the session variables to be properly reset). Run the application and try clicking on a Buy link before logging in. You should be redirected to the login page. Log in, then try to purchase a few songs (click on the Home tag to return to the home page listing the songs).

You may click Delete to remove a song.

CONGRATULATIONS! You now have a ASP.NET page that links to data in your database and to another ASP.NET page. Take a moment to review the process for adding hyperlinks to an ASP.NET page: 1. Select EditColumns from the GridView task list available in Design view, then
add a HyperLinkField object. 2. Edit the column name in the HeaderText field and the link name in Text. 3. List the columns to be used in building the URL of the hyperlink in
DataNavigateUrlFields. You may refer to these columns as {0}, {1}, etc., in the order in which they are listed.
4. Specify the URL of the hyperlink in DataNavigateUrlFormatString.
Take a moment to look at the ASP.NET code generated by the Web Developer. You may be surprised at how simple it is. For example, the code generated in this tutorial comprises just a few lines: <!-‐-‐ First Link -‐-‐> <asp:HyperLinkField DataNavigateUrlFields="ClipName" DataNavigateUrlFormatString="~\SongFolder\{0}" HeaderText="Preview" Text="Try it" /> <!-‐-‐ Second Link -‐-‐> <asp:HyperLinkField DataNavigateUrlFields="SongID" DataNavigateUrlFormatString="~\shopcart.aspx?id={0}&action='add'" HeaderText="Buy" Text="Buy" /> Soon you will become familiar with ASP.NET and may prefer to type in HTML and Web control syntax by hand, rather than using the Web Developer drag-‐and-‐drop capabilities to create .aspx pages. In the beginning however, the Web Developer is a more time-‐effective approach.