tv ears tv instruction manualstatic.tvears.com/media/product_pdfs/tv_manual.pdftable of contents...
TRANSCRIPT
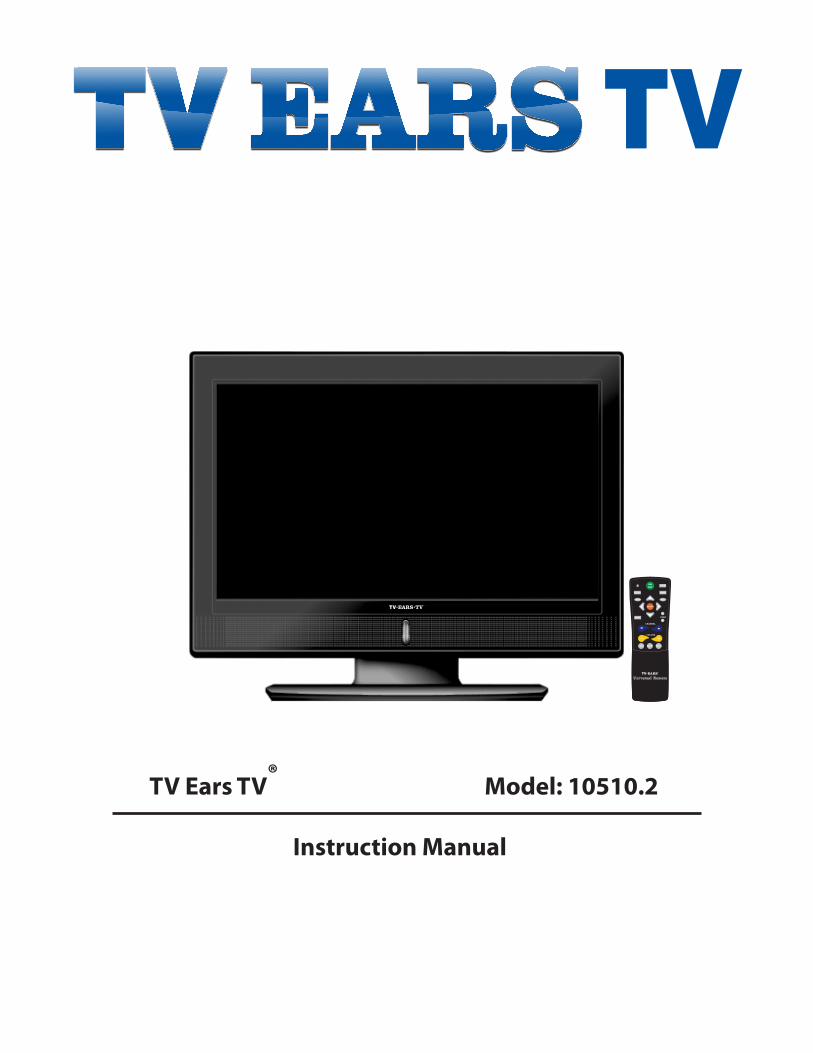
TV Ears TV® Model: 10510.2
Instruction Manual
ONPAIR
MENUGUIDE
INFO
SELECT
EXIT
MUTELAST
VOLUME
CHANNEL
PAGE
FAV
SLEEP
OFF
TV
PrefaceDear Customer,
Congratulations on your new TV Ears TV purchase. To get the most out of your new HD TV Ears TV, read this manual thoroughly and retain for future reference.
For assistance, call 866-611-9934 or email us at [email protected].
Register your TV Ears TV online at www.TVEars.com.
Fill out the customer reference guide below to keep track of vital information that will be necessary when obtaining warranty support or customer service:
Customer Reference Guide
Date of Purchase:
Serial Number:
TV Code for Universal Remote:
STB (Set Top Box) Code:
Table of Contents
Contents Page
Warning / Caution 1
Safety Precautions 2
Contents 3
Controls & Connections 4
Basic Installation 5 - 6
Remote Control 7
Menu Operations 8
Picture Menu 9
Pairing to the TV 10
Audio Menu 11
Setup Menu 12
Lock Menu 13
Channel Menu 14
USB Menu 15
Troubleshooting 16
Specifications 17
Warranty Information 18
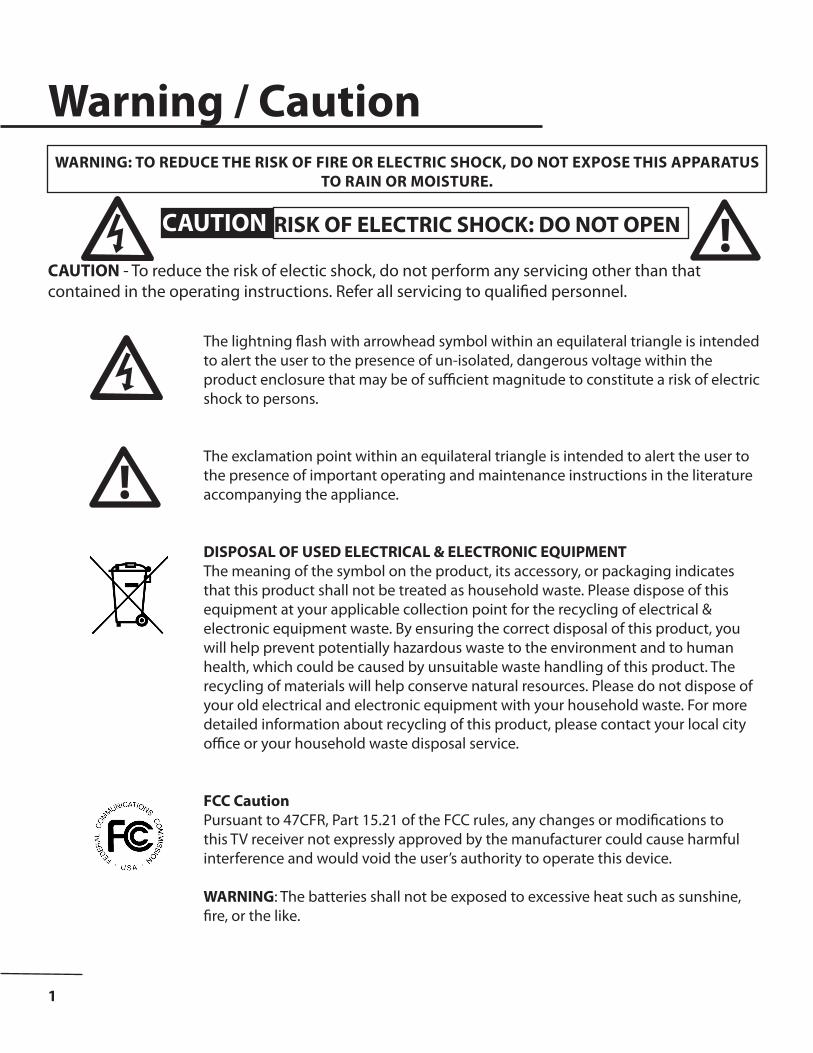
Warning / Caution
1
WARNING: TO REDUCE THE RISK OF FIRE OR ELECTRIC SHOCK, DO NOT EXPOSE THIS APPARATUS TO RAIN OR MOISTURE.
CAUTION RISK OF ELECTRIC SHOCK: DO NOT OPEN
CAUTION - To reduce the risk of electic shock, do not perform any servicing other than that contained in the operating instructions. Refer all servicing to qualified personnel.
The lightning flash with arrowhead symbol within an equilateral triangle is intended to alert the user to the presence of un-isolated, dangerous voltage within the product enclosure that may be of sufficient magnitude to constitute a risk of electric shock to persons.
The exclamation point within an equilateral triangle is intended to alert the user to the presence of important operating and maintenance instructions in the literature accompanying the appliance.
DISPOSAL OF USED ELECTRICAL & ELECTRONIC EQUIPMENTThe meaning of the symbol on the product, its accessory, or packaging indicates that this product shall not be treated as household waste. Please dispose of this equipment at your applicable collection point for the recycling of electrical & electronic equipment waste. By ensuring the correct disposal of this product, you will help prevent potentially hazardous waste to the environment and to human health, which could be caused by unsuitable waste handling of this product. The recycling of materials will help conserve natural resources. Please do not dispose of your old electrical and electronic equipment with your household waste. For more detailed information about recycling of this product, please contact your local city office or your household waste disposal service.
FCC CautionPursuant to 47CFR, Part 15.21 of the FCC rules, any changes or modifications to this TV receiver not expressly approved by the manufacturer could cause harmful interference and would void the user’s authority to operate this device.
WARNING: The batteries shall not be exposed to excessive heat such as sunshine, fire, or the like.
!
!
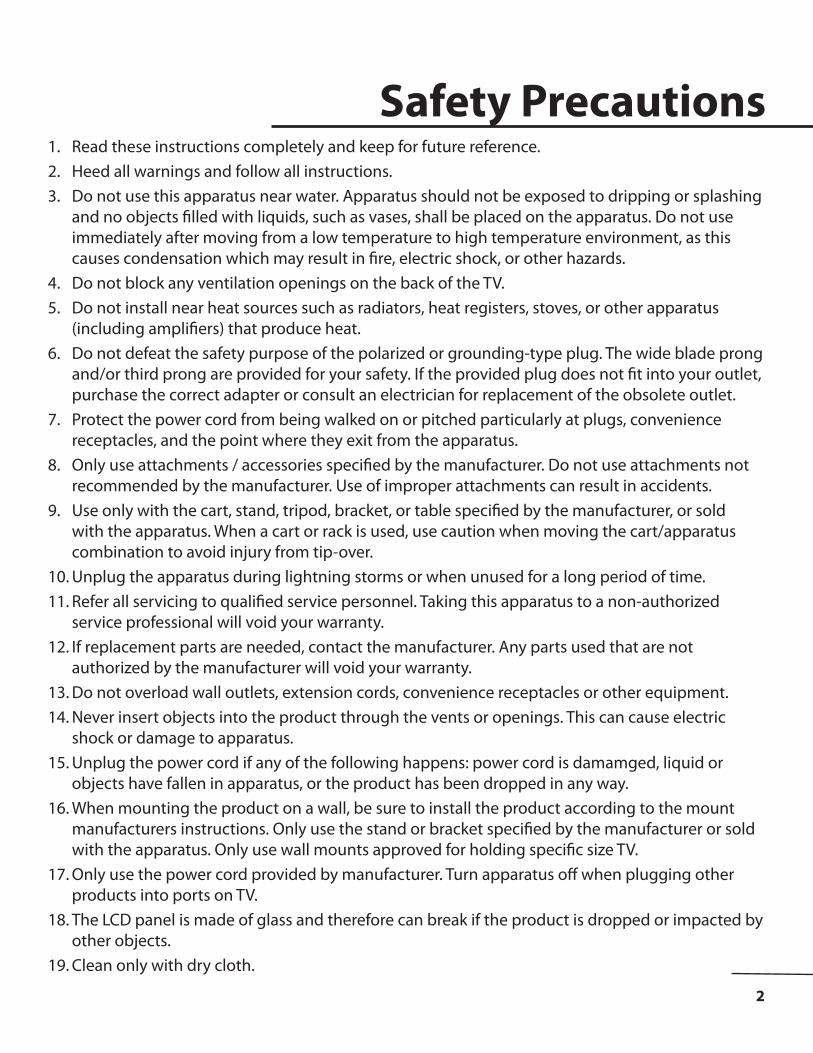
Safety Precautions1. Read these instructions completely and keep for future reference. 2. Heed all warnings and follow all instructions. 3. Do not use this apparatus near water. Apparatus should not be exposed to dripping or splashing
and no objects filled with liquids, such as vases, shall be placed on the apparatus. Do not use immediately after moving from a low temperature to high temperature environment, as this causes condensation which may result in fire, electric shock, or other hazards.
4. Do not block any ventilation openings on the back of the TV. 5. Do not install near heat sources such as radiators, heat registers, stoves, or other apparatus
(including amplifiers) that produce heat. 6. Do not defeat the safety purpose of the polarized or grounding-type plug. The wide blade prong
and/or third prong are provided for your safety. If the provided plug does not fit into your outlet, purchase the correct adapter or consult an electrician for replacement of the obsolete outlet.
7. Protect the power cord from being walked on or pitched particularly at plugs, convenience receptacles, and the point where they exit from the apparatus.
8. Only use attachments / accessories specified by the manufacturer. Do not use attachments not recommended by the manufacturer. Use of improper attachments can result in accidents.
9. Use only with the cart, stand, tripod, bracket, or table specified by the manufacturer, or sold with the apparatus. When a cart or rack is used, use caution when moving the cart/apparatus combination to avoid injury from tip-over.
10. Unplug the apparatus during lightning storms or when unused for a long period of time. 11. Refer all servicing to qualified service personnel. Taking this apparatus to a non-authorized
service professional will void your warranty.12. If replacement parts are needed, contact the manufacturer. Any parts used that are not
authorized by the manufacturer will void your warranty.13. Do not overload wall outlets, extension cords, convenience receptacles or other equipment.14. Never insert objects into the product through the vents or openings. This can cause electric
shock or damage to apparatus. 15. Unplug the power cord if any of the following happens: power cord is damamged, liquid or
objects have fallen in apparatus, or the product has been dropped in any way.16. When mounting the product on a wall, be sure to install the product according to the mount
manufacturers instructions. Only use the stand or bracket specified by the manufacturer or sold with the apparatus. Only use wall mounts approved for holding specific size TV.
17. Only use the power cord provided by manufacturer. Turn apparatus off when plugging other products into ports on TV.
18. The LCD panel is made of glass and therefore can break if the product is dropped or impacted by other objects.
19. Clean only with dry cloth.
2
Contents
3
ONPAIR
MENUGUIDE
INFO
SELECT
EXIT
MUTELAST
VOLUME
CHANNEL
PAGE
FAV
SLEEP
OFF
AAAAAA
User Manual
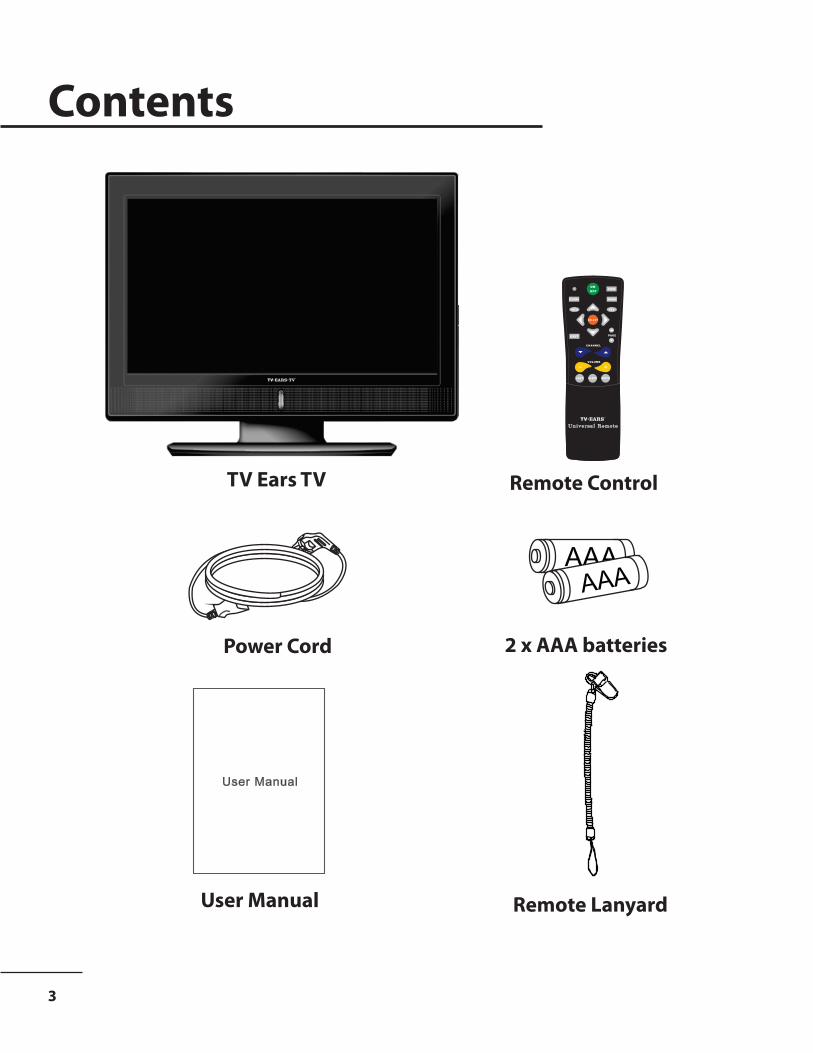
TV Ears TV Remote Control
Power Cord 2 x AAA batteries
User Manual Remote Lanyard
User Manual
AAAAAA
4
Controls & Connections
VGA (PC)USB HDMI1 HDMI2 AIR L RVIDEOPb PrYAC IN
L OUT R OUTDigitalAudio Out L OUT R OUT
Variable Fixed
CABLE
1 2 3 54
6 7
PCAudio
1 2 3 54 6 7 8 9
10 11 12
Top Controls
Back Connections
Front Panel
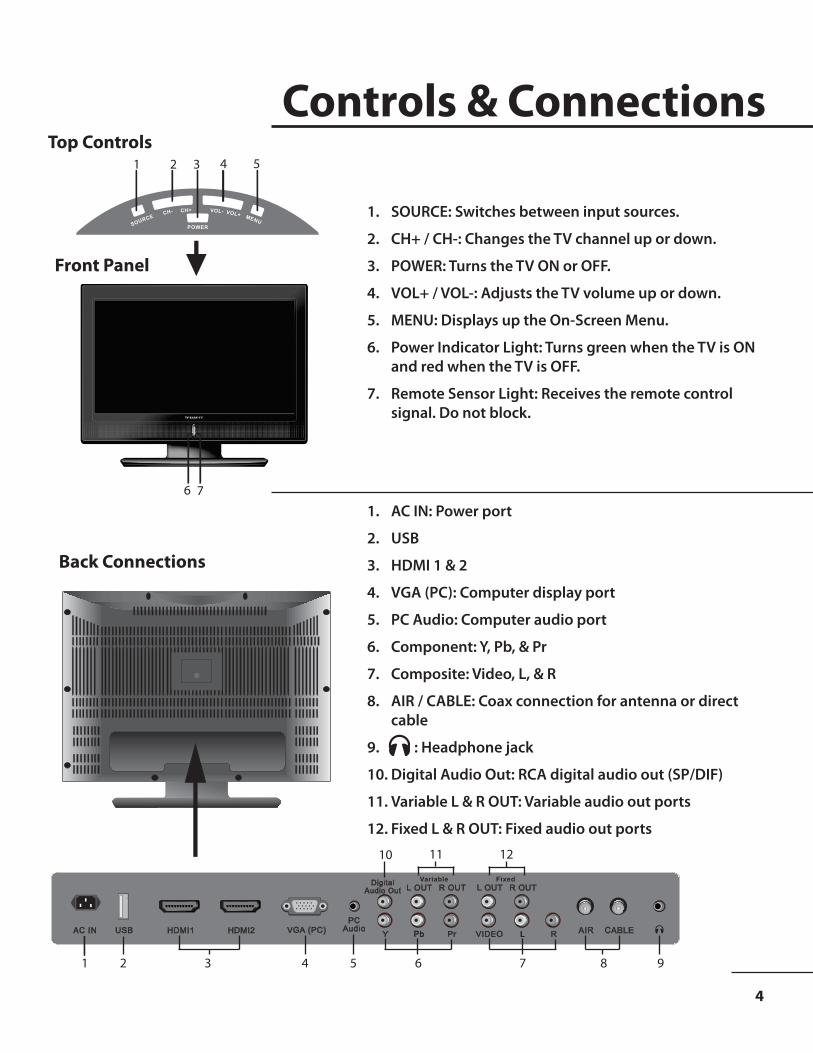
1. SOURCE: Switches between input sources.
2. CH+ / CH-: Changes the TV channel up or down.
3. POWER: Turns the TV ON or OFF.
4. VOL+ / VOL-: Adjusts the TV volume up or down.
5. MENU: Displays up the On-Screen Menu.
6. Power Indicator Light: Turns green when the TV is ON and red when the TV is OFF.
7. Remote Sensor Light: Receives the remote control signal. Do not block.
1. AC IN: Power port
2. USB
3. HDMI 1 & 2
4. VGA (PC): Computer display port
5. PC Audio: Computer audio port
6. Component: Y, Pb, & Pr
7. Composite: Video, L, & R
8. AIR / CABLE: Coax connection for antenna or direct cable
9. : Headphone jack
10. Digital Audio Out: RCA digital audio out (SP/DIF)
11. Variable L & R OUT: Variable audio out ports
12. Fixed L & R OUT: Fixed audio out ports
5
Basic InstallationPower Cord Connection
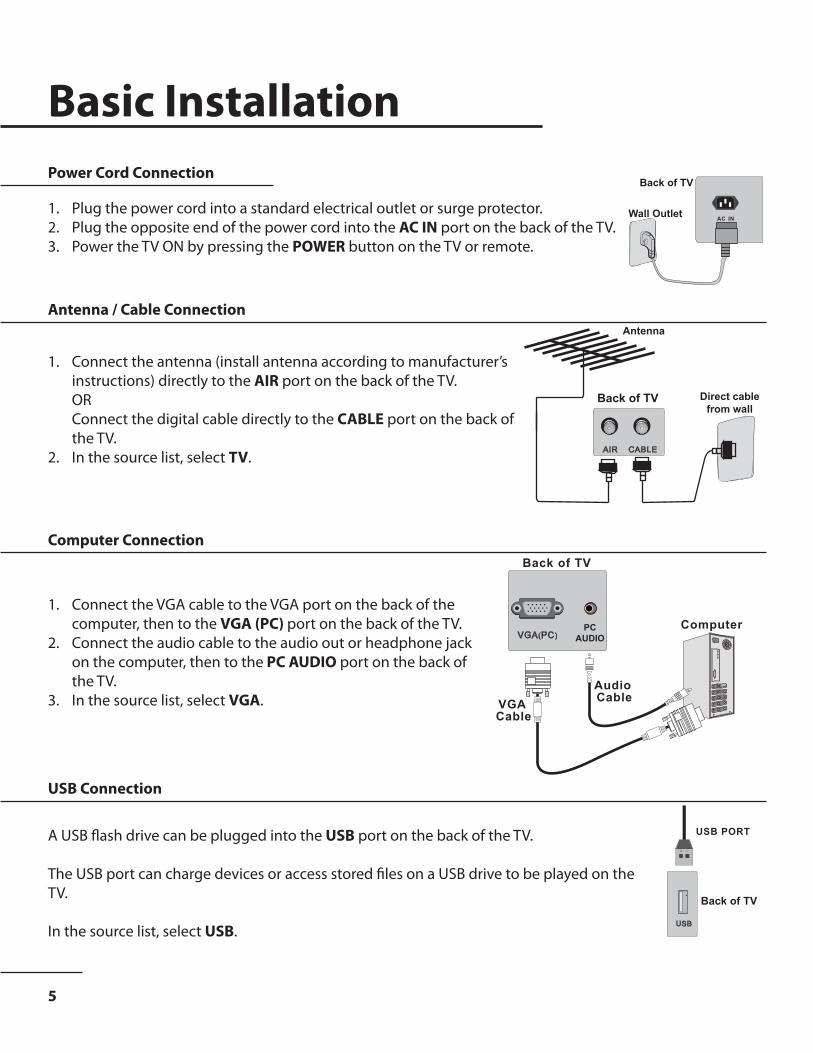
1. Plug the power cord into a standard electrical outlet or surge protector.2. Plug the opposite end of the power cord into the AC IN port on the back of the TV.3. Power the TV ON by pressing the POWER button on the TV or remote.
Back of TV
Wall Outlet
Antenna / Cable Connection
1. Connect the antenna (install antenna according to manufacturer’s instructions) directly to the AIR port on the back of the TV.ORConnect the digital cable directly to the CABLE port on the back of the TV.
2. In the source list, select TV.AIR CABLE
Antenna
Back of TV Direct cable from wall
Computer Connection
1. Connect the VGA cable to the VGA port on the back of the computer, then to the VGA (PC) port on the back of the TV.
2. Connect the audio cable to the audio out or headphone jack on the computer, then to the PC AUDIO port on the back of the TV.
3. In the source list, select VGA.Audio CableVGA
Cable
VGA(PC)PC
AUDIO
Back of TV
Computer
USB Connection
A USB flash drive can be plugged into the USB port on the back of the TV.
The USB port can charge devices or access stored files on a USB drive to be played on the TV.
In the source list, select USB.
USB PORT
USB
Back of TV
6
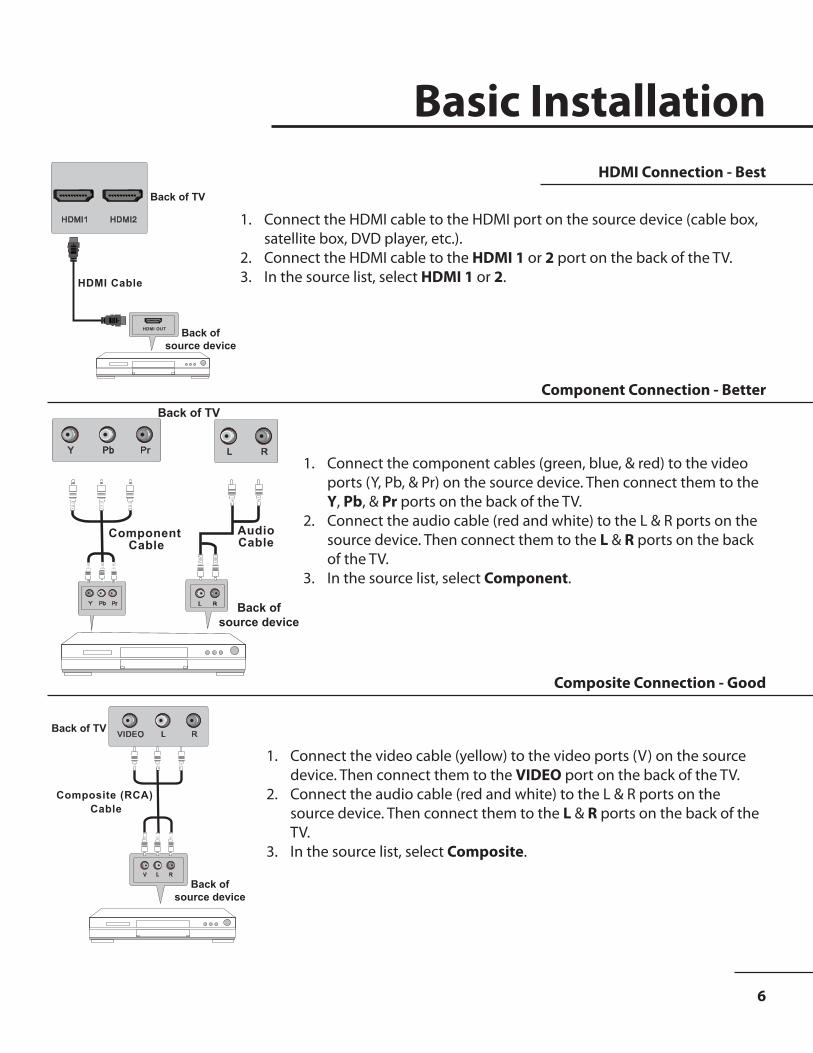
HDMI Connection - Best
Basic Installation
1. Connect the HDMI cable to the HDMI port on the source device (cable box, satellite box, DVD player, etc.).
2. Connect the HDMI cable to the HDMI 1 or 2 port on the back of the TV.3. In the source list, select HDMI 1 or 2.
HDMI OUT
HDMI Cable
HDMI1 HDMI2
Back ofsource device
Back of TV
Component Connection - Better
1. Connect the component cables (green, blue, & red) to the video ports (Y, Pb, & Pr) on the source device. Then connect them to the Y, Pb, & Pr ports on the back of the TV.
2. Connect the audio cable (red and white) to the L & R ports on the source device. Then connect them to the L & R ports on the back of the TV.
3. In the source list, select Component. PrPbY
Component Cable
L RPb PrY
Back ofsource device
Back of TV
AudioCable
Composite (RCA) Cable
L RVIDEOBack of TV
Back ofsource device
Composite Connection - Good
1. Connect the video cable (yellow) to the video ports (V) on the source device. Then connect them to the VIDEO port on the back of the TV.
2. Connect the audio cable (red and white) to the L & R ports on the source device. Then connect them to the L & R ports on the back of the TV.
3. In the source list, select Composite.

Remote Control
7
ON PAIR
LEARNGUIDE
INFO
SELECT
EXIT
MUTETV
VOLUME
CHANNEL
PAGE
1 254 6
987
3
0 INPUTDASH
LAST SLEEP SET FAV
MENU
STB
t
OFF
ON/OFF: Turns the TV ON and OFF.
PAIR: Re-pairs the last device that was paired to the TV.
GUIDE: Displays the channel guide for cable or satellite when paired to control the cable or satellite box.
LEARN: See Remote Manual for details.
MENU: Displays the on-screen menu.
INFO: Shows program infomation if available.
SELECT & Nav Keys ( / / / ): Navigates the on-screen menu.
PAGE & : Navigates channel guide a page at a time.
EXIT: Exits the on-screen menu and/or channel guide.
CHANNEL & : Scans through the channels.
VOLUME + & - : Increases and decreases the TV volume.
TV / STB: See Remote Manual for details.
MUTE: Turns OFF the TV speakers. Press again to turn the speakers ON.
Number Buttons: Press to select a channel or enter a password.
LAST: Returns to the previous channel viewed.
SLEEP: Activates the sleep timer when a time is chosen.
SET: See Remote Manual for details.
FAV: Enters the favorites menu (see Remote Manual for details).
Bottom cover slides to cover the navigation and set up keys.
For set-up, programming, and use instructions see the Remote Manual.

8
Menu Operation
Sound ModeBassTrebleBalance
Surround
Audio Language
Standrad
English
Select Move ExitMENU
505050
Off
Setup Lock
12
6
TimePicture Audio Channel
Picture Mode
Contrast
Brightness
Color
Tint
Sharpness
Color Temp.
Standard
Normal
Select Move ExitMENU
50
50
50
0
50
Audio Setup Lock
12
6
Time ChannelPicture
Advanced Option
Setup Lock Channel
Sleep Timer
Time Zone
Daylight Saving Time
Picture
Off
Pacific
Off
12
6
TimeAudio Lock
k
12
6
Time Channel
Menu LanguageTransparencyZoom ModeNoise ReductionAdvancedClosed CaptionDLCRestore Default
English
Picture
OffNormal
Off
SetupAudio
On
Select Move ExitMENUSelect Move ExitMENU
Setup Lock
12
6
TimePicture Audio Channel
Air/Cable
Auto Scan
Favorite
Show/Hide
Channel No.
Channel Label
DTV Signal
Air
50-3
KOCE-Lb
Good
Setup Lock
12
6
TimePicture Audio Channel
Change Password
System Lock
US
Canada
Reset RRT
RRT Setting
On
Select Move ExitMENU Select Move ExitMENU
ON/OFF: Press the POWER button on the TV or ON / OFF button on the remote to turn the TV ON or OFF.On-Screen Menu: To access the on screen menu, press the MENU button on the TV or remote.
To Navigate the on-screen menu, use the Nav Keys ( / / / ).To Exit press the MENU button on the TV or remote.
Picture MenuMake adjustments to the picture settings.
Audio MenuCustomize the sound settings.
Time MenuMake adjustments to the time settings.
Setup MenuAdjusts the general settings.
Lock MenuAdjusts the parental lock settings.
Channel MenuSet up AIR or direct cable channels.
NOTE: Only menus relevant to the source will be available when that source is selected.
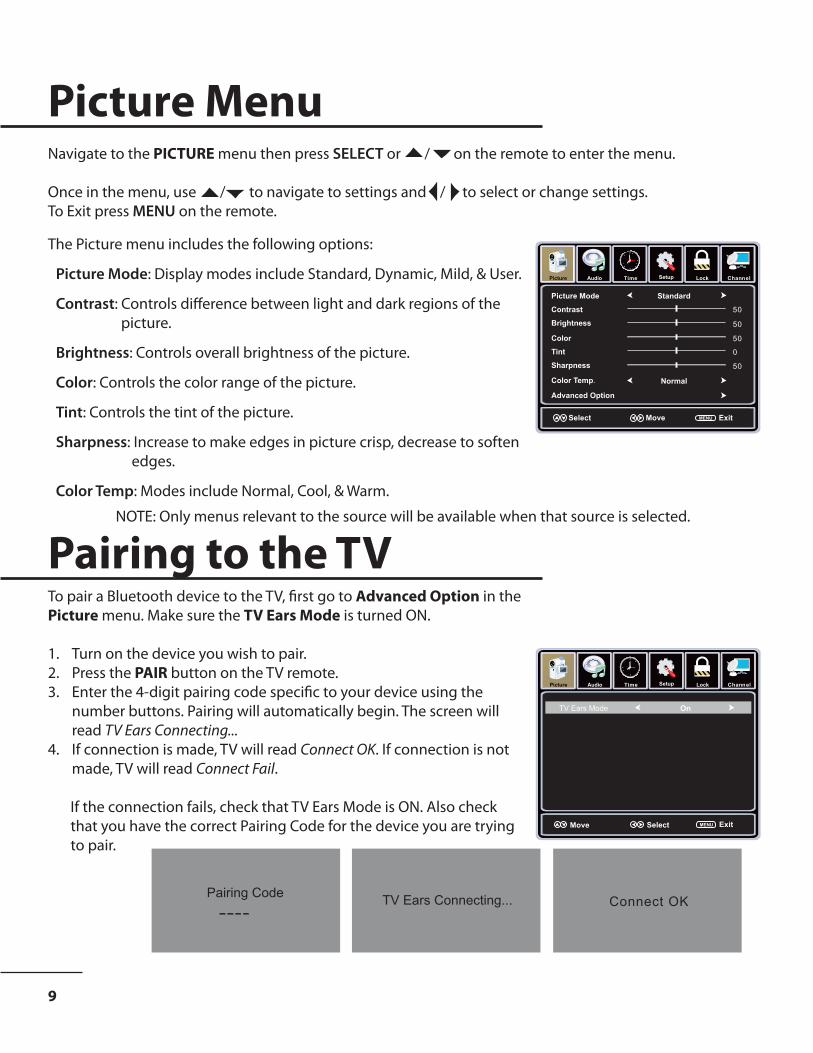
Picture Menu
Setup Lock
12
6
TimePicture Audio Channel
Picture Mode
Contrast
Brightness
Color
Tint
Sharpness
Color Temp.
Standard
Normal
Select Move ExitMENU
50
50
50
0
50
Advanced Option
Setup Lock
12
6
TimePicture Audio Channel
ExitMENUSelectMove
TV Ears Mode On
Connect OKTV Ears Connecting...Pairing Code----
9
Navigate to the PICTURE menu then press SELECT or / on the remote to enter the menu.
Once in the menu, use / to navigate to settings and / to select or change settings.To Exit press MENU on the remote.
The Picture menu includes the following options:
Picture Mode: Display modes include Standard, Dynamic, Mild, & User.
Contrast: Controls difference between light and dark regions of the picture.
Brightness: Controls overall brightness of the picture.
Color: Controls the color range of the picture.
Tint: Controls the tint of the picture.
Sharpness: Increase to make edges in picture crisp, decrease to soften edges.
Color Temp: Modes include Normal, Cool, & Warm.
Pairing to the TVTo pair a Bluetooth device to the TV, first go to Advanced Option in the Picture menu. Make sure the TV Ears Mode is turned ON.
1. Turn on the device you wish to pair.2. Press the PAIR button on the TV remote.3. Enter the 4-digit pairing code specific to your device using the
number buttons. Pairing will automatically begin. The screen will read TV Ears Connecting...
4. If connection is made, TV will read Connect OK. If connection is not made, TV will read Connect Fail.
If the connection fails, check that TV Ears Mode is ON. Also check that you have the correct Pairing Code for the device you are trying to pair.
NOTE: Only menus relevant to the source will be available when that source is selected.
10
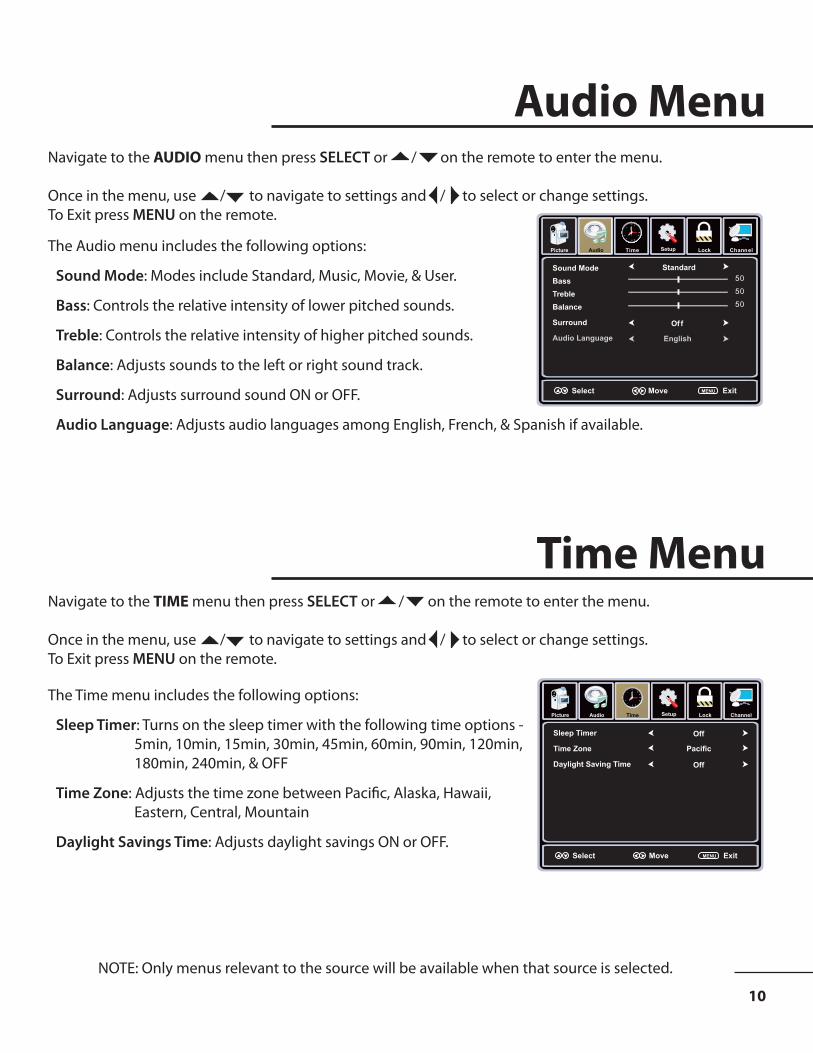
Audio Menu
Sound ModeBassTrebleBalance
Surround
Audio Language
Standard
English
Select Move ExitMENU
505050
Off
Audio Setup Lock
12
6
Time ChannelPicture
Navigate to the AUDIO menu then press SELECT or / on the remote to enter the menu.
Once in the menu, use / to navigate to settings and / to select or change settings.To Exit press MENU on the remote.
The Audio menu includes the following options:
Sound Mode: Modes include Standard, Music, Movie, & User.
Bass: Controls the relative intensity of lower pitched sounds.
Treble: Controls the relative intensity of higher pitched sounds.
Balance: Adjusts sounds to the left or right sound track.
Surround: Adjusts surround sound ON or OFF.
Audio Language: Adjusts audio languages among English, French, & Spanish if available.
NOTE: Only menus relevant to the source will be available when that source is selected.
Time Menu
Setup Lock Channel
Sleep Timer
Time Zone
Daylight Saving Time
Picture
Off
Pacific
Off
12
6
TimeAudio
Select Move ExitMENU
Navigate to the TIME menu then press SELECT or / on the remote to enter the menu.
Once in the menu, use / to navigate to settings and / to select or change settings.To Exit press MENU on the remote.
The Time menu includes the following options:
Sleep Timer: Turns on the sleep timer with the following time options - 5min, 10min, 15min, 30min, 45min, 60min, 90min, 120min, 180min, 240min, & OFF
Time Zone: Adjusts the time zone between Pacific, Alaska, Hawaii,Eastern, Central, Mountain
Daylight Savings Time: Adjusts daylight savings ON or OFF.
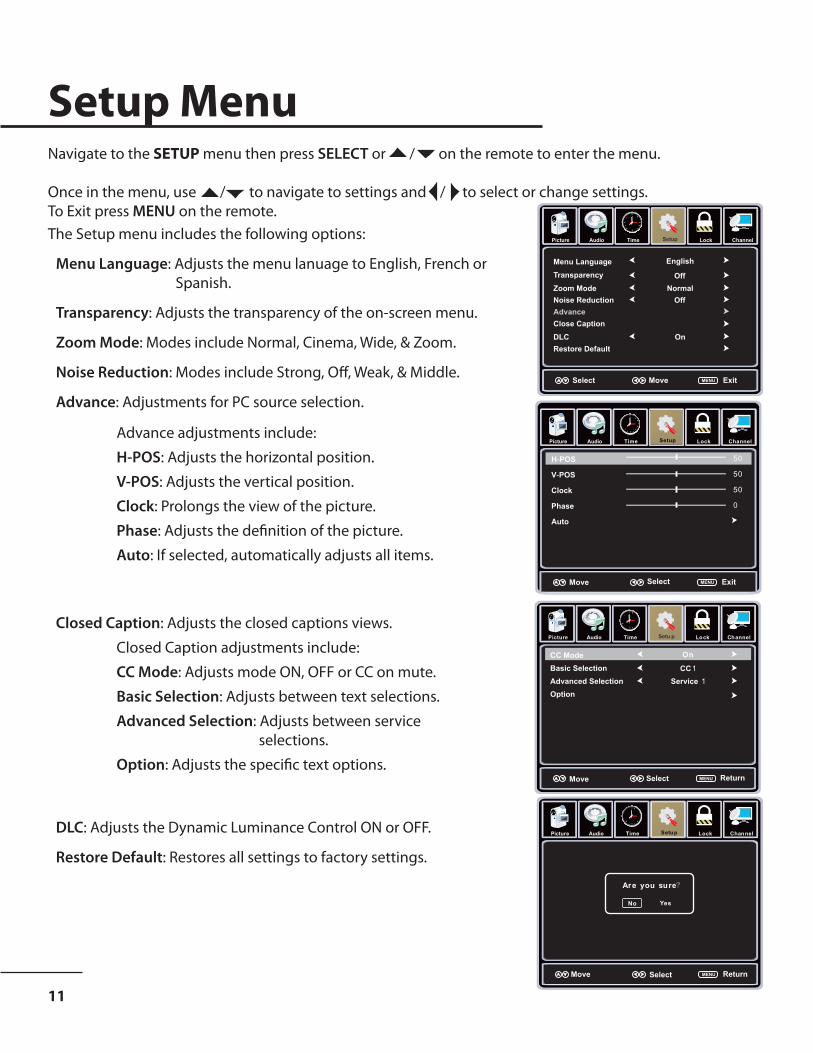
Setup Menu
11
Navigate to the SETUP menu then press SELECT or / on the remote to enter the menu.
Once in the menu, use / to navigate to settings and / to select or change settings.To Exit press MENU on the remote.
Lock
k
12
6
Time Channel
Menu LanguageTransparencyZoom ModeNoise ReductionAdvanceClose CaptionDLCRestore Default
English
Picture
OffNormal
Off
SetupAudio
On
Select Move ExitMENU
The Setup menu includes the following options:
Menu Language: Adjusts the menu lanuage to English, French or Spanish.
Transparency: Adjusts the transparency of the on-screen menu.
Zoom Mode: Modes include Normal, Cinema, Wide, & Zoom.
Noise Reduction: Modes include Strong, Off, Weak, & Middle.
Advance: Adjustments for PC source selection.
Advance adjustments include:
H-POS: Adjusts the horizontal position.
V-POS: Adjusts the vertical position.
Clock: Prolongs the view of the picture.
Phase: Adjusts the definition of the picture.
Auto: If selected, automatically adjusts all items.
Closed Caption: Adjusts the closed captions views.
Closed Caption adjustments include:
CC Mode: Adjusts mode ON, OFF or CC on mute.
Basic Selection: Adjusts between text selections.
Advanced Selection: Adjusts between service selections.
Option: Adjusts the specific text options.
DLC: Adjusts the Dynamic Luminance Control ON or OFF.
Restore Default: Restores all settings to factory settings.
Setup Lock
12
6
TimePicture Audio Channel
V-POS
Clock
Phase
Auto
50
50
0
ExitMENU
H-POS 50
SelectMove
Lock
12
6
Time Channel
Basic SelectionAdvanced SelectionOption
Move ReturnMENU
Picture
CC1Service 1
Setu pAudio
Select
CC Mode On
Lock
12
6
Time Channel
Font StyleFont SizeFont Edge StyleFont Edge ColorFG ColorBG ColorFG OpacityBG Opacity
ReturnMENU
Picture SetupAudio
Default
Move Select
DefaultDefaultDefault
Default
DefaultDefaultDefault
Mode Custom
Setup Channel
Select ReturnMENU
Picture Audio
12
6
kcoLemiT
Are you sure
No Yes
Move
Setup Lock
12
6
TimePicture Audio Channel
Enter Password
ReturnMENU
input
4-digit password
0~9
Setup Lock
12
6
TimePicture Audio Channel
Change Password
US
Canada
Reset RRT
RRT Setting
ReturnMENU
System Lock On
SelectMove
Setup Lock
12
6
TimePicturei Audio Channel
Enter New Password
Confirm Password
ReturnMENU0~9
12
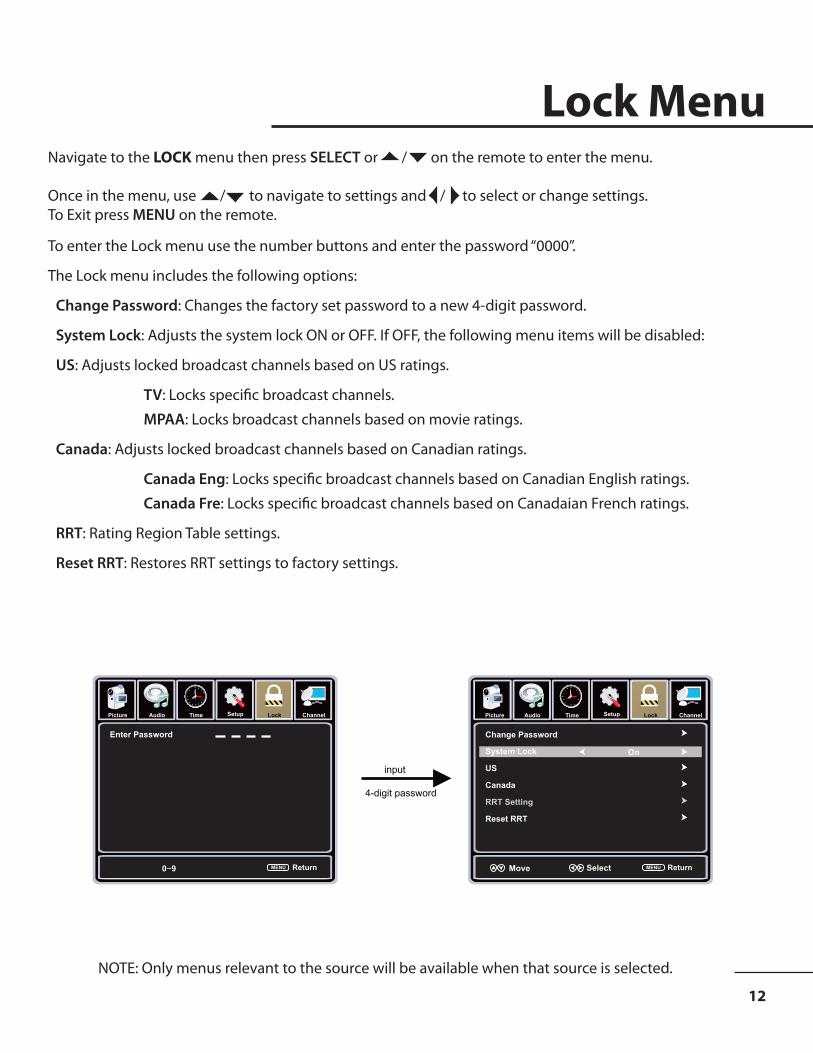
Lock MenuNavigate to the LOCK menu then press SELECT or / on the remote to enter the menu.
Once in the menu, use / to navigate to settings and / to select or change settings.To Exit press MENU on the remote.
To enter the Lock menu use the number buttons and enter the password “0000’’.
The Lock menu includes the following options:
Change Password: Changes the factory set password to a new 4-digit password.
System Lock: Adjusts the system lock ON or OFF. If OFF, the following menu items will be disabled:
US: Adjusts locked broadcast channels based on US ratings.
TV: Locks specific broadcast channels.
MPAA: Locks broadcast channels based on movie ratings.
Canada: Adjusts locked broadcast channels based on Canadian ratings.
Canada Eng: Locks specific broadcast channels based on Canadian English ratings.
Canada Fre: Locks specific broadcast channels based on Canadaian French ratings.
RRT: Rating Region Table settings.
Reset RRT: Restores RRT settings to factory settings.
NOTE: Only menus relevant to the source will be available when that source is selected.
Setup Channel
Select ReturnMENU
Picture Audio
12
6
kcoLemiT
Are you sure
No Yes
Move
Setup Lock
12
6
TimePicture Audio Channel
Enter Password
ReturnMENU
input
4-digit password
0~9
Setup Lock
12
6
TimePicture Audio Channel
Change Password
US
Canada
Reset RRT
RRT Setting
ReturnMENU
System Lock On
SelectMove
Setup Lock
12
6
TimePicturei Audio Channel
Enter New Password
Confirm Password
ReturnMENU0~9

Channel Menu
13
Navigate to the CHANNEL menu then press SELECT or / on the remote to enter the menu.
Once in the menu, use / to navigate to settings and / to select or change settings.To Exit press MENU on the remote.
The Channel menu includes the following options:
Air/Cable: Select Air for Antenna and Cable for direct cable.
Auto Scan: Scans Air or Cable for available channels. Received channels will be saved automatically.
Cable System: Set to Auto.
Start to Scan: Begins the channel scan.
Favorite: Add, removes, and adjusts channels in the favorites menu.
Show / Hide: Adjust channels to be shown or hidden.
Channel No: Displays number of current channels.
Channel Label: Displays label of current channels.
DTV Signal: Displays quality of current TV signal.
NOTE: Channel Menu is only available when the Source is set to TV for antenna or direct cable.
Setup Channel
Canada Fre
ReturnMENU
Picture Audio
12
6
Time Lock
G
Select Move
GCanada Eng
Setup Lock
12
6
TimePicture Audio Channel
Air / Cable
Auto Scan
Favorite
Show / Hide
Channel No.
Channel Label
DTV Signal
Air
50-3
KOCE-Lb
Good
ExitMENUMoveSelect
Setup Lock
12
6
TimePicture Audio Channel
Start to Scan
ReturnMENUMoveSelect
Cable System Auto
Setup Channel
ReturnMENU
Picture Audio
12
6
LockTime
RF CH:
Found :74
Select Move
Setup Lock
12
6
TimePicture Audio Channel
Select Press“SELECT”change ReturnMENU
No. FavoriteProgram Name
ATSC 1ATSC 2ATSC 3KOC E HDKOC E SDKOC E LB
2 014 114 214 350 150 2
66 050 3
Setup Lock
12
6
TimePicture Audio Channel
Select ReturnMENU
No.
ATSC 1ATSC 2ATSC 3KOC E HDKOC E SDKOC E LB
2 014 114 214 350 150 250 366 0
Program Name Show
Press“SELECT”change
14
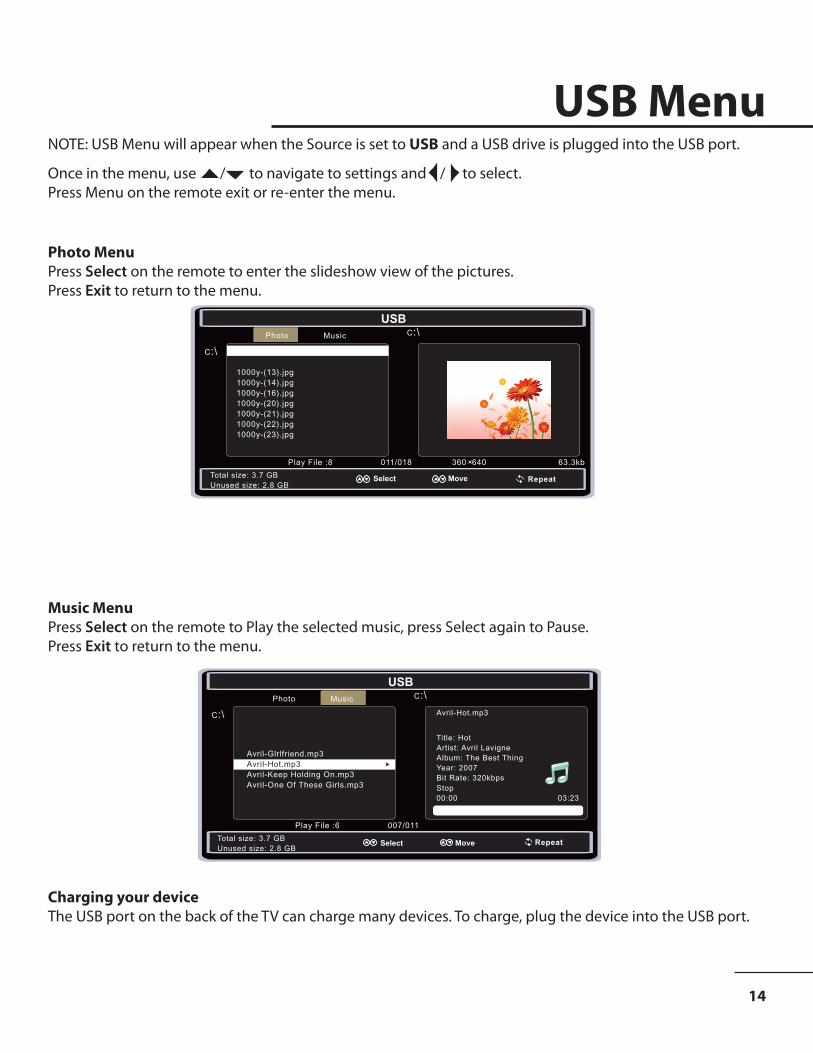
USB MenuOnce in the menu, use / to navigate to settings and / to select. Press Menu on the remote exit or re-enter the menu.
NOTE: USB Menu will appear when the Source is set to USB and a USB drive is plugged into the USB port.
Select
USBPhoto Music
C:\
C:\
1000y-(12).jpg1000y-(13).jpg1000y-(14).jpg1000y-(16).jpg1000y-(20).jpg1000y-(21).jpg1000y-(22).jpg1000y-(23).jpg
Play File :8 011/018 360 640 63.3kbTotal size: 3.7 GBUnused size: 2.8 GB
Move Repeat
Select
USBPhoto Music
C:\
C:\
Avril-Glrlfriend.mp3Avril-Hot.mp3Avril-Keep Holding On.mp3Avril-One Of These Girls.mp3
Title: HotArtist: Avril LavigneAlbum: The Best ThingYear: 2007Bit Rate: 320kbps
Avril-Hot.mp3
Stop00:00 03:23
Play File :6 007/011Total size: 3.7 GBUnused size: 2.8 GB
Move Repeat
Photo MenuPress Select on the remote to enter the slideshow view of the pictures. Press Exit to return to the menu.
Music MenuPress Select on the remote to Play the selected music, press Select again to Pause. Press Exit to return to the menu.
Charging your deviceThe USB port on the back of the TV can charge many devices. To charge, plug the device into the USB port.
Troubleshooting
15
If you encounter problems with your TV, please check the troubleshooting guide below.
Problem Troubleshooting
No signal Check that all cables are plugged in, the is power on, the correct source is selected, and that the source is on.
No color Check that the cables are completely plugged in and the source device is on. Adjust the contrast, color, and brightness of the picture.
Interference on the screen May be the result of an interference from a car, motor, neon light, or other electrical device.
Multiple image displays May be the result of interference from another TV, a computer, or radio.Noise on the screen Ensure that the antenna cables are completely and accurately plugged
in.Remote control is not working Check the batteries are installed correctly and are not old. Ensure the
signal from the remote to the TV is not blocked.No sound Check that the MUTE function is not turned on, adjust the volume
setting, check that the cables are completely plugged in to the TV and source.
16
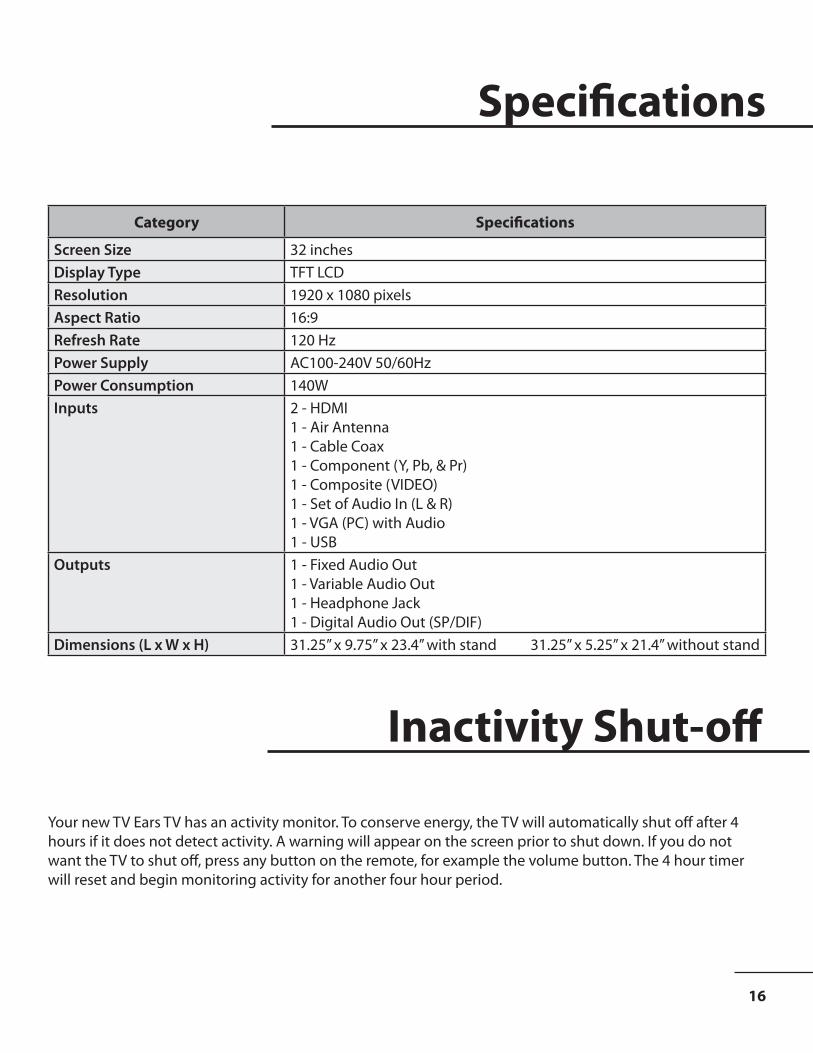
Specifications
Category Specifications
Screen Size 32 inchesDisplay Type TFT LCDResolution 1920 x 1080 pixelsAspect Ratio 16:9Refresh Rate 120 HzPower Supply AC100-240V 50/60HzPower Consumption 140WInputs 2 - HDMI
1 - Air Antenna1 - Cable Coax1 - Component (Y, Pb, & Pr)1 - Composite (VIDEO)1 - Set of Audio In (L & R)1 - VGA (PC) with Audio1 - USB
Outputs 1 - Fixed Audio Out1 - Variable Audio Out1 - Headphone Jack1 - Digital Audio Out (SP/DIF)
Dimensions (L x W x H) 31.25” x 9.75” x 23.4” with stand 31.25” x 5.25” x 21.4” without stand
Inactivity Shut-off
Your new TV Ears TV has an activity monitor. To conserve energy, the TV will automatically shut off after 4 hours if it does not detect activity. A warning will appear on the screen prior to shut down. If you do not want the TV to shut off, press any button on the remote, for example the volume button. The 4 hour timer will reset and begin monitoring activity for another four hour period.

Warranty Info
17
If your TV Ears TV proves to be defective in material or workmanship under normal use, TV Ears, Inc. (“TV Ears”) will repair or replace it during the warranty period described below and on the terms and conditions set forth herein (“Limited Warranty”). The Limited Warranty is effective from the date of original consumer purchase of the product (“Date of Purchase”). The Limited Warranty is valid only for the original purchaser of the product and is effective only in the continental United States, which excludes the U.S. Territories, Alaska, and Hawaii. The decision whether to repair or to replace the TV Ears TV will be at the sole discretion of TV Ears.
Warranty TermTV Ears TV: For a period of two (2) years from the Date of Purchase, TV Ears will repair or replace, with new or refurbished products or parts, any TV Ears TV or parts determined to be defective by TV Ears. Replacement and repair products and parts are warranted for the remaining portion of the original unit’s warranty period.TV Accessories: For a period of ninety (90) days from the Date of Purchase, TV Ears will repair or replace, with new or refurbished products or parts, any accessories or parts determined to be defective by TV Ears. Replacement and repair products and parts are warranted for the remaining portion of the original unit’s warranty period. TV accessories include cords, remote controls, and power supplys that come with the television.
How to Obtain Warranty ServiceTo obtain warranty service, contact TV Ears Technical Support: Email: [email protected] Phone: 888-883-3277 toll free You must provide the model number, serial number, and date of purchase. TV Ears reserves the right to assess all warranty claims and to determine if defects or damages are covered by this Limited Warranty. In case of a claim that is not covered by this Limited Warranty, you will be contacted to determine whether TV Ears should repair the damage for a fee or whether the products should be returned to you as received by the service technician. Parts and service labor that are TV Ears’ responsibility under this Limited Warranty will be provided without charge. All other parts and services are at the customer’s expense. TV Ears TV’s returned to TV Ears without prior authorization will be refused.
Not Covered:This Limited Warranty does not cover the following: cosmetic defects, malfunctions or failures resulting from shipping or transit, damage (including cosmetic damage), failure, loss or personal injury due to improper or faulty installation, abuse, operation contrary to provided instructions, operation on incorrect power supplies or products not supplied by TV Ears, modification or alteration of the television or the TV accessories, improper servicing or tampering with the television or the TV accessories; damage from fire, water, lightning, power surges, abnormal environmental conditions or other acts of nature; normal wear and tear; unsatisfactory visual or audio performance not caused by a manufacturing defect; displays with a missing or unreadable serial number; damage caused by other system components; and replacement of batteries on the remote control. “Image Sticking”, caused by static images on the screen for extended periods and / or excessive brightness and contrast levels, is not covered by this Limited Warranty. Installation, removal, transport and reinstallation of a display, and routine maintenance and cleaning, are not covered by this Limited Warranty.
18
Warranty Info (cont.)Mail-In Warranty Repair ProcedureIf TV Ears Technical Support determines that a problem with a TV Ears TV or TV accessories may be within the terms and conditions of the TV Ears Limited Warranty and that a mail-in repair may be performed, the customer will be prodivded with a return authorization number and mail-in repair instructions. Proof of purchase is required to confirm the product is within the Limited Warranty period and meets the terms and conditions of the TV Ears Limited Warranty.The customer will be provided with instructions for packing and shipping the unit to the TV Ears service center. The original carton box and packing material, or equivalent as designated by TV Ears, must be utilized. The cost of shipping to TV Ears service center is at the customer’s expense. After the product is repaired and tested, the TV Ears service center will ship the unit back to the customer at TV Ears’ expense. TV Ears is not responsible for the de-installation or re-installation of the product.
TV Ears Return Policy for Non-defective ProductsTV Ears’ return policy for non-defective products is that such products purchased directly from TV Ears may be returned by the original purchaser during the initial thirty (30) day period following the date of purchase. A TV Ears return authorization number (RMA Number) must be obtained. The refund will be the purchase price actually paid by the purchaser less a ten percent (10%) restocking fee for each item returned. The costs for shipping and White Glove Delivery are not refundable.
The return authorization number must first be obtained from TV Ears Customer Service or Technical Support via: Email: [email protected] Phone: 888-883-3277 toll free
Products must be returned to the address specified by the TV Ears Customer Service or Technical Support and must be shipped in the original packaging, with freight prepaid, to TV Ears, and must be received in new and unused condition. The RMA Number must be included in the packaging. TV Ears reserves the right to assess fees for any damage or missing parts in addition to the ten percent (10%) restocking fee.RMA Numbers are valid for fifteen (15) days from the date of issuance. The customer is responsible for and must prepay all shipping charges and shall assume all risk of loss or damage to the product while in transit to TV Ears. If the product is returned to TV Ears (1) without a TV Ears RMA Number, and/or (2) after the fifteen (15) day period, and/or (3) without proper packaging, TV Ears shall have the right to refuse delivery of such returned product and to return the product to the customer at the customer’s expense with no refund issued.

Toll Free Help Line:888-883-3277
To Learn More: www.tvears.com
©2011 TV Ears, Inc.