tv - lg usagscs-b2c.lge.com/downloadfile?fileid=krowm000099993.pdf · tv screen in case of text...
TRANSCRIPT

LCD TV
Please read Information Manual included togetherbefore reading this manual and operating your set.
Retain it for future reference.
Record model number and serial number of the set.
See the label attached on the back cover and quotethis information to your dealer when you require service.
P/NO : 3828TUL308B (0509-REV02)Printed in Korea
OWNER'S MANUAL
MODELS: 32LP1D 37LP1D 42LP1D
Trade Mark of the DVB Digital Video
Broadcasting Project (1991 to 1996)ID Number(s): 3508: 32LP1D
3509: 37LP1D
3551: 42LP1D

2
Accessories
Owner's Manual
1.5V
1.5V
Power Cord
D
/ATV
INPUT
VOL
LIST
Q.VIEW
PR
POWER
1
2
3
4
5
6
780
9
SCAN
POSITON
SIZE
STILLMIX
I/II
REVEAL
TIME
PIPPRPIP
FAV
SLEEPSUBT
ITLE/
P
IP
PR+
SWAPP
IPINPUT
?
GUDEM/CEJECT
TEXT/MENU
MUTEARC
EXIT
VCR
TV
DVD
INFOi
MARKV
X
i
OK
Remote Control /
Batteries
Ensure that the following accessories are included with your TV. If any accessory is missing, please contact the
dealer from where you purchased the product.
DVI-D Cable D sub to DVI Cable
Accessories
PC Sound Cable
Twister Holder
Arrange the wires
with the twister holder.
Polishing Cloth (Option)Polish the screen with the cloth.

3
Contents
ContentsContents
Introduction
Installation
Operation
21 Turning on the TV
21 Volume Adjustment21 Programme Selection
22 On Screen Menus Selection and Adjustment
In Digital mode
23 Auto Programme23 Programme Edit
24 Favourite Programme List
24 System Information
In Analogue mode
25 Auto Programme Tuning26 Manual Programme Tuning27 Fine Tuning27 Assigning a Station Name
28 Programme Edit
29 Favourite Programme29 Calling the Programme Table
30 PSM (Picture Status Memory)31 Picture Adjustment (PSM-User option)31 CSM (Colour Status Memory)32 Manual Colour Temperature Control
32 XD Function
33 Picture Format / Picture Out for AV2 Euro Scart
34 SSM (Sound Status Memory)34 Sound Frequency Adjustment (SSM-User Option)35 Balance Adjustment35 AVL (Auto Volume Leveler)36 SRS WOW
36 Audio Language (In Digital mode only)37 Stereo/Dual Reception (In Analogue mode only)37 NICAM Reception (In Analogue mode only)37 Speaker Sound Output Selection (In Analogue mode only)
38 Clock Setup38 On/Off Time
39 Auto Sleep39 Sleep Timer
2 Accessories
5 Controls
6 Connection Options
7~9 Remote Control Key Functions
10 Various Installation
11 How to use back cover
11 Swivel Stand
12 Antenna Connection
12 How to use antenna loop through socket
13 External AV Source Setup13 Headphone Socket
13 Picture Out Setup14~15 VCR Setup16~17 DVD Setup17 Insertion of CI Module
18 HDSTB Setup19~20 PC Setup20 Power Cord Connection
Station Menu
Options
Picture Menu
Options
Sound Menu
Options
Basic operation
External EquipmentConnections
Installation
Instruction
Time Menu
Options

4
Contents
Reference69~70 IR Codes
71~72 Programming the Remote
73~74 Troubleshooting Checklist
Operation
40 Input Source Selection
40 Auto AV Switching41 Child Lock
41 Lightening Logo Display Lamp42 Software update (In Digital mode only)43 Subtitle Language (In Digital mode only)43 CI [Common Interface] Information (In Digital mode only)
44 Adjusting Horizontal/vertical Position
44 Manual Configure (Clock & Phase)45 Auto Configure45 Selecting WXGA Mode
46 Watching PIP/Double Window/POP
46 Sub Picture Freeze
46 Programme Selection for Sub Picture
47 Input Source Selection for Sub Picture
47 Sub Picture Size Adjustment (PIP mode only)48 Moving the Sub Picture (PIP mode only)48 Swapping between main and sub pictures49 POP (Picture-out-of-Picture: Programme Scan)
In Digital mode
50 Teletext within Digital Service
50 Teletext in Digital Service
In Analogue mode
51 Switch on/off
51 SIMPLE Text
52 TOP Text / FASTEXT
53 Special Teletext Functions
54 Switch on/off EPG
54 Select a programme
55 Button Function in NOW/NEXT Guide Mode
55 Button Function in 8 Days Guide Mode
56 Button Function in Channel Guide Mode
56 Button Function in Date Change Mode
Notes on Memory Card
57 Memory Card
57 Precaution for Using the Memory Card
58 Available Memory Card
58 Supported Files
59 The JPEG Decoding/Thumbnail Supplied Spec59 How to insert and eject the card
59 Basic OperationJPEG File Viewing Options
60 Photo Media OSD Display60 Picture Selection and Viewing61 Mark/Unmark for JPEG file
61 Jump Media
62 Image Adjustment63 Slide Show
64 JPEG File Deletion and Cancel
64 File Information / Screen Saver
MP3 File Playing Operation65 Music Media OSD Display65 MP3 File Selection and Playback66 Stop/Pause Playback66 Mark/Unmark for MP3 File
67 Jump Media / Screen Saver
68 MP3 File deletion and Cancel / File Information

5
Introduction
ControlsControls
IntroductionIntroduction
- This is a simplified representation of front panel.- Here shown may be somewhat different from your TV.
PR VOL OK MENU ON/OFF
R AUDIO VIDEOS-VIDEO
L/MONO
AV3INPUT
INPUT Button
VOLUME (F,G) Buttons
Remote Control
Sensor
PROGRAMME (E, D) Buttons
Memory Card Slot
(For mode)
MENU Button
OK Button
ON/OFF Button
S-VIDEO Input
AV3 (Audio/Video) Input
Logo Display Lamp (Refer to p.41)
Child Lock 'On' mode
(Refer to p.41)
DTV mode
PC mode
Stereo mode
Sleep timer Setting(Refer to p.39)
SSM-Flat mode
(Refer to p.34)
SSM-Movie mode
(Refer to p.34)SSM-Music mode
(Refer to p.34)
SSM-Sports mode
(Refer to p.34)SSM-User mode
(Refer to p.34)
Power Standby Indicator
Illuminates red when the TV is in
standby mode, illuminates greenwhen the TV is switched on.
Programme Display

6
Introduction
Connection OptionsConnection Options
R
L
COMPONENT
AUDIO
VIDEO
Antenna LOOP THROUGH
PC SOUND
PCMCIACARDSLOT EJECT
HDMI
AV1 AV2
VIDEO
AUDIO
L
R
REMOTE
CONTROL
UPGRADE
PORT
DVI INPUT
(PC/DTV INPUT)DTV OUT
AC IN
COMPONENT Input
(Y/PB/PR, Audio Input)
Headphone Socket
PC SOUND Input
Remote Control Port
Euro Scart Socket
(AV1/AV2)
PCMCIA (Personal Computer Memory Card
International Association) Card Slot
HDMI (High Definition
Multimedia Interface)Input
Upgrade Port*
This port is used to upgrade the software version and debug without
changing the hardware. Be careful not to use this port. Just contact
your dealer or service centre.
DVI (Digital Visual Interface)INPUT (PC/DTV INPUT)
DTV OUTPUT Antenna Socket
Antenna Loop Through Socket
AC Input

7
Introduction
Remote Control Key FunctionsRemote Control Key Functions
POWER
Switches the set between ON and STANDBY.
D/A TV INPUT
VOL
LIST Q.VIEW
PR
POWER
1 2 3
4 5 6
78
0
9
SCANPOSITIONSIZE STILL
MIX I/IIREVEALTIME
PIP PR-
PIP FAV SLEEP SUBTITLE/
PIP PR+ SWAP PIP INPUT
?
GUIDEM/C EJECT
TEXT/
MENU
MUTE ARC
EXIT
VCRTVDVD
INFOi
MARKV
X
i
OK
D/A TV (Digital TV / Analogue TV)Selects digital or analogue mode.
INPUT
TV, DVD, VCR,Selects the remote operating mode: TV, VCR, DVD. Select
other operating modes, for the remote to operate external
devices.
GUIDE (Refer to p.54)Shows programme schedule.
M/C EJECT (Refer to p.59)When removing the memory card, this button is used.
VCR / Mode Control BUTTONS (Refer to p.58~68)Controls a LG video cassette recorder.
Controls the Mode.
For further details, see the'
Mode' section.
MENU
Selects a menu.
Enter to the mode.
EXIT
Returns to TV viewing from any menu.
If you press the button once, the inputsource OSD will appear on screen as
shown. Select the desired inputsource (DTV, TV, AV1/2/3, S-Video,
Component, DVI PC, DVI DTV, or
HDMI) using the D / E button.
OK
Accepts your selection or displays the current mode.
D/E/F/G
Adjusts menu settings.Selects menu item.
LIGHT
Illuminates the remote control buttons.
INPUT
DTV
TV
AV1
AV2
AV3
S-Video
Press to select Input

8
Introduction
COLOURED BUTTONS
They are used as per the indications or functions displayed on
TV screen in case of Text displays (Teletext, EPG) and pro-
gramme edit.
VOL D / E (Volume Up/Down)Increases/decreases sound level.
PR D / E (Programme Up/Down)Selects a programme.
LIST (Refer to p.29)
Displays the programme table.
Q.VIEW
Returns to the previously viewed programme.
I/II
Selects the language during dual language broadcast.
(Refer to p.36)Selects the sound output. (Refer to p.37)
FAV (FAVOURITE)
Displays the selected favourite programmes.
NUMBER BUTTONS
ARC (Aspect Ratio Control) (Refer to p.33)Selects your desired picture format.
MUTE
Switches the sound on or off.
D/A TV INPUT
VOL
LIST Q.VIEW
PR
POWER
1 2 3
4 5 6
78
0
9
SCANPOSITIONSIZE STILL
MIX I/IIREVEALTIME
PIP PR-
PIP FAV SLEEP SUBTITLE/
PIP PR+ SWAP PIP INPUT
?
GUIDEM/C EJECT
TEXT/
MENU
MUTE ARC
EXIT
VCRTVDVD
INFOi
MARKV
X
i
OK
SLEEP (Refer to p.39)Sets the sleep timer.
SUBTITLE / * (Refer to p.43)Recalls your preferred subtitle in digital mode.

9
Introduction
SIZE (Refer to p.47)
Adjusts the sub picture size.
POSITION (Refer to p.48)Moves the sub picture position.
SCAN (Refer to p.49)Switches on the programme scan mode.
STILL (Refer to p.46)Freezes motion of the sub picture.
PIP PR +/- (Refer to p.46)Selects a programme for the sub picture.
SWAP (Refer to p.48)Alternates between main and sub picture.
PIP INPUT (Refer to p.47)Selects the input mode for the sub picture.
PIP (Refer to p.46)Switches the sub picture on or off,select PIP, DW1/2 or POP
modes.
VOL
LIST Q.VIEW
PR
1 2 3
4 5 6
78
0
9
SCANPOSITIONSIZE STILL
MIX I/IIREVEALTIME
PIP PR-
PIP FAV SLEEP SUBTITLE/
PIP PR+ SWAP PIP INPUT
?
GUIDEM/C EJECT
TEXT/
MENU
MUTE ARC
EXIT
R
INFOi
MARK
V
X
i
OK
Installing Batteries
Open the battery compartmentcover on the back side.
Insert two 1.5V batteries in correct
polarity (+ with +,- with -). Don't
mix old or used batteries with new
ones.
Close the cover.
*
Point the remote towards the remote
control sensor of the wireless TV and
use it within about 7 meters.
*
Put the used batteries into the recy-
cling bin since it can negatively affect
the environment.
D/ATV INPUT
POWER
GUIDEM/C EJECT
TEXT/
VCRTVDVD
1
2
3
TELETEXT BUTTONS
These buttons are used for teletext.
Text button is used to enable teletext services while other but-
tons are for teletext functions.*
For further details, see the 'Teletext' section. (Refer to p.50~53)

10
Installation
InstallationInstallation
Various Installation
4 inches
4 inches
4 inches4 inches
4 inches
For proper ventilation, allow a clearance of 4" on each side
and from the wall. Detailed installation instructions are
available from your dealer, see the optional Tilt Wall
Mounting Bracket Installation and Setup Guide.
Wall Mount: Horizontal installation
Desktop Pedestal Installation
4 inches
4 inches4 inches
4 inches
For proper ventilation, allow a clearance of 4" on each side
and from the wall.

11
Installation
- The TV can be conveniently swivelled on its stand 30°
to the left or right to provide the optimum viewing angle.
Swivel Stand
How to use back cover
34
2Install wires as necessary.
(To install various wires, refer to p.12~20.)
Align the holes on the TV back panel with the
four protuberance on the back cover and
insert.
Reinstall the cover.
Wire Arrangement
- Pull the cables through the hole on the set.
Hold the cover with both hands and pull it
backward.1
*
Arrange the signal input cable and the power
cord by holder, as shown.
Option

12
Installation
External Equipment ConnectionsExternal Equipment Connections
Antenna Connection
How to use antenna loop through socket
- The TV has a special signal output capability which allows you to hook up a second TV.
S-VIDEO
OUT
IN
(R) AUDIO (L) VIDEO
ANT OUT
ANT IN
LOOP THROUGHAn nna
AV1 AV2
PCMCIA CARD SLOT EJECT
Second TV
1
2
Connect the wall antenna socket or outdoor
antenna to the TV's Antenna socket.
Connect a second TV's antenna socket to the
TV's LOOP THROUGH socket.
- For optimum picture quality, adjust antenna direction if needed.
Antenna LOOPTHROUGH
Multi-family Dwellings/Apartments
(Connect to wall antenna socket)
Single-family Dwellings /Houses
(Connect to wall jack for outdoor antenna)
Outdoor Antenna
Wall Antenna Socket
UHF Antenna
VHF Antenna
RF Coaxial Wire (75 ohm)
Turn clockwise to tighten.
? In a poor signal area to improve picture quality, purchaseand install a signal amplifier.
? If the antenna needs to be split for two TV's, install a "2-Way
Signal Splitter" in the connections.
? If the antenna is not installed properly, contact your dealer
for assistance.Antenna LOOPTHROUGH
Signal Amplifier

13
Installation
Headphone Socket
RLAUDIO VIDEO
RAAUDIO VIDEOS-VIDEO
MONOL/MONO
AV3
Camcorder
Video Game Set
TV front 1
12
3
Connect the AUDIO/VIDEO jacks between TV
and external equipment. Match the jack colours
(Video = yellow, Audio Left = white, and Audio
Right = red).
Select AV3 input source with using the INPUT
button on the remote control.
Operate the corresponding external equipment.Refer to external equipment operating guide.
1
1
2
Plug the headphone into the headphone socket.
To adjust the headphone volume, press the VOL
D / E button. If you press the MUTE button, the
sound from the headphone is switched off.
R
L
COMPONENT
AUDIO
VIDEO
- You can listen to the sound through the headphone.
? While you are listening to sound through a headphone,TV speakers will not be heard.
Picture Out Setup
PC SOUND
HDMI
VIDEO
AUDIO
L
R
REMOTE
CONTROL
UPGRADE
PORT
DVI INPUT
(PC/DTV INPUT)DTV OUT
AC IN
S-VIDEO IN
(R) AUDIO (L) VIDEO
TV back
Second TV
- The TV has a special signal output capability which allows you to hook up a second TV or monitor.
Picture Out Jack
DTV OUT Jacks
AV1 Euro Scart TV
AV2 Euro Scart
Current viewing Input Source
DTV
(Refer to p.33)
Available Picture Out
Signal1
2
1 Connect the second TV or monitor to the TV's
DTV OUT jacks.
See the Operating Manual of the second TV or
monitor for further details regarding that device's
input settings.
External AV Source Setup
? It's possible to output other signal with Euro
scart socket.
DTV

14
Installation
NOTE: All cables shown are not included with the TV.
- To avoid picture noise (interference), leave an adequate distance between the VCR and TV.
- Typically a frozen still picture from a VCR appears. If the 4:3 picture format is used; the fixed images on
the sides of the screen may remain visible on the screen.
VCR Setup
When connecting with an antenna
1
1
2
2
3
S-VIDEO
OUT
IN
(R) AUDIO (L) VIDEO
ANT OUT
ANT IN
LOOP THROUGHAntenna
AV1 AV2
PCMCIA CARD SLOT EJECT
Connect the RF out socket of the VCR to the
Antenna socket on the set.
Connect the antenna cable to the RF antenna
socket of the VCR.
Press the PLAY button on the VCR and match the
appropriate programme between the TV and VCR
for viewing.
TV Back
VCR
When connecting with a Euro Scart
? If your VCR outputs an AV switching signal via the
AV1 or AV2 Euro scart sockets, the set will switch to
AV1 input source automatically. But if you want to
keep on watching TV mode, press the PR D / E or
number buttons.
? You can also record programmes received by the TV
on video tape.? The signal type RGB (the signals red, green and blue)can only be selected for the AV1 Euro scart socket
and the AV1 input source can be received. These sig-nals are transmitted, for example, by a pay TV
decoder, game machine or photo CD unit, etc and that
digital signal can be recorded via AV1 Euro scart socket.
? If the AV1,2 Euro scart sockets have been connected
to the VCRs simultaneously, only the AV2 inputsource can be received.
(R) AUDIO (L)AUDIO/
VIDEO
LOOPTHROUGHAntenna
AV1 AV2
PCMCIA CARD SLOT EJECT
VCR
TV Back
1
2
3
Connect the Euro scart socket of the VCR to the
AV1 Euro scart socket on the set.
Insert a video tape into the VCR and press PLAY
on the VCR. (Refer to the VCR owner's manual.)
Select AV1 input source with using the INPUT but-
ton on the remote control.
- If connected to AV2 Euro scart socket, select
AV2 input source.
1
*Please the use shield scart cable.

15
Installation
When connecting with a RCA cable
S-VIDEO
OUT
IN
(R) AUDIO (L) VIDEO
ANT OUT
ANT IN
RR AUDAUDIO VIDEOSS-VIDEO
/ML/MONO
AV3
VCR
TV front
1
1
2
3
Connect the AUDIO/VIDEO jacks between TV
and VCR. Match the jack colours (Video = yellow,Audio Left = white, and Audio Right = red)
Insert a video tape into the VCR and press PLAY
on the VCR. (Refer to the VCR owner's manual.)
Select AV3 input source with using the INPUT
button on the remote control.
? If you have a mono VCR, connect the audio cable
from the VCR to the AUDIO L/MONO jack of the set.
When connecting with an S-Video cable
S-VIDEO
OUT
IN
(R) AUDIO (L) VIDEO
ANT OUT
ANT IN
RADIAUDIO VIDEOS-VIDEO
/M NOL/MONO
AV3
VCR
TV front
1
1
22
3
4
Connect the S-VIDEO output of the VCR to the S-
VIDEO input on the set. The picture quality is
improved; compared to normal composite (RCA
cable) input.
Connect the audio outputs of the VCR to the
AUDIO input jacks on the set.
Insert a video tape into the VCR and press PLAY
on the VCR. (Refer to the VCR owner's manual.)
Select S-Video input source with using the INPUT
button on the remote control.
Do not connect to both Video and S-Video at
the same time.

16
Installation
NOTE: All cables shown are not included with the TV.
DVD Setup
When connecting with a S-Video cable
(R) AUDIO (L) S-VIDEO
R AUDOAUDIO VIDEOS-VIDEO
MOOL/MONO
AV3
DVD
TV front 1
1
2
23
4
5
Connect the S-VIDEO output of the DVD to the
S-VIDEO input on the set.
Connect the audio outputs of the DVD to the
AUDIO input jacks on the set.
Turn on the DVD player, insert a DVD.
Select S-Video input source with using the
INPUT button on the remote control.
Refer to the DVD player's manual for operatinginstructions.
When connecting with a component cable
B R(R) AUDIO (L)
R
L
COMPONENT
AUDIO
VIDEO
DVD
TV side
1
1
2
2
3
4
5
Connect the video outputs (Y, PB, PR) of the DVD
to the COMPONENT VIDEO (Y, PB, PR) jacks on
the set.
Connect the audio outputs of the DVD to the
COMPONENT AUDIO jacks on the set.
Turn on the DVD player, insert a DVD.
Select Component input source with using the
INPUT button on the remote control.
Refer to the DVD player's manual for operatinginstructions.
? Component Input portsTo get better picture quality, connect a DVD playerto the component input ports as shown below.
YPBPRComponent ports on the TV
Y
Y
Y
Y
Pb
B-Y
Cb
PB
Pr
R-Y
Cr
PR
Video output portson DVD player
17
Installation
Insertion of CI Module
UGH
AV1 AV2
PCMCIA CARD SLOT EJECT
TV
- To view the scrambled (pay) services in digitalTV mode
Insert the CI Module to PCMCIA (Personal
Computer Memory Card International Association)CARD SLOT of TV as shown.
For further information, see p.43.
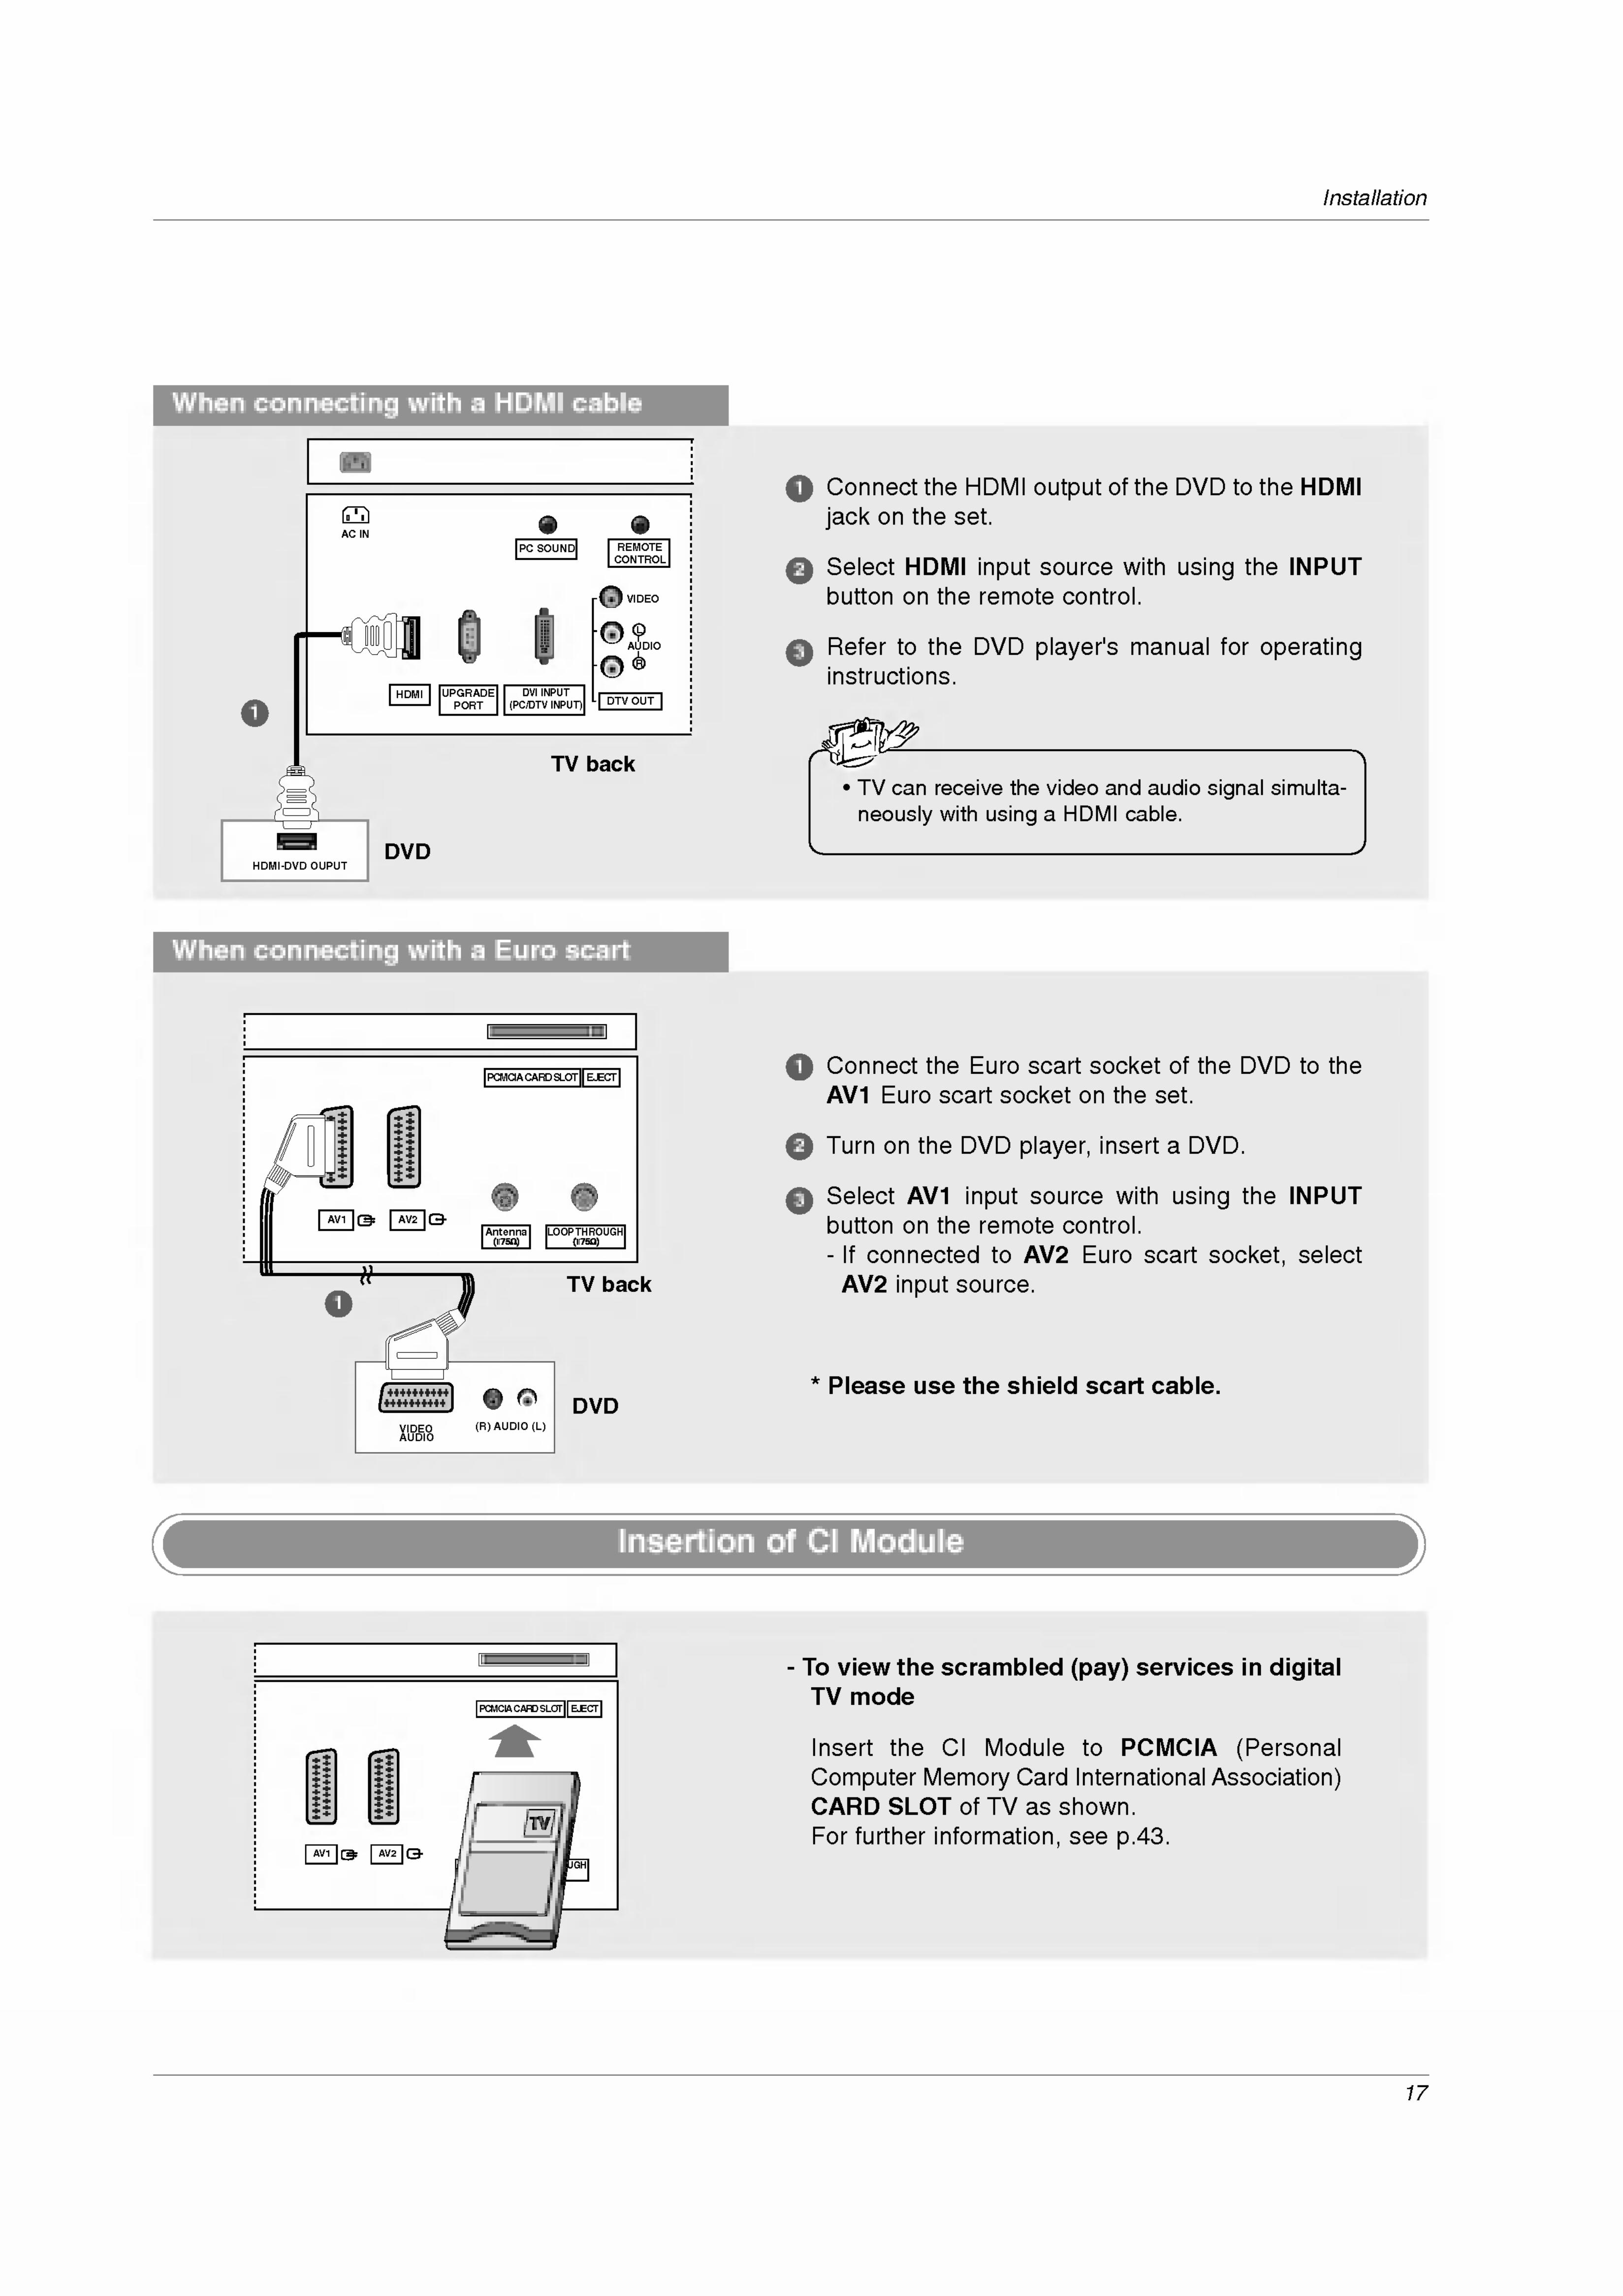
When connecting with a HDMI cable
When connecting with a Euro scart
PC SOUND
HDMI
VIDEO
AUDIO
L
R
REMOTE
CONTROL
UPGRADE
PORT
DVI INPUT
(PC/DTV INPUT)DTV OUT
HDMI-DVD OUPUT
AC IN
DVD
(R) AUDIO (L)VIDEOAUDIO
LOOPTHROUGHAntenna
AV1 AV2
PCMCIA CARD SLOT EJECT
DVD
TV back
TV back
1
1
2
3
Connect the HDMI output of the DVD to the HDMI
jack on the set.
Select HDMI input source with using the INPUT
button on the remote control.
Refer to the DVD player's manual for operatinginstructions.
1
1
2
3
Connect the Euro scart socket of the DVD to the
AV1 Euro scart socket on the set.
Turn on the DVD player, insert a DVD.
Select AV1 input source with using the INPUT
button on the remote control.
- If connected to AV2 Euro scart socket, select
AV2 input source.
? TV can receive the video and audio signal simulta-
neously with using a HDMI cable.
*Please use the shield scart cable.

18
Installation
When connecting with a component cable
When connecting with a HDMI cable
1
1
2
3
4
Connect the video outputs (Y, PB, PR) of the digi-tal set-top box to the COMPONENT VIDEO (Y,PB, PR) jacks on the set.
Connect the audio outputs of the digital set-topbox to the COMPONENT AUDIO jacks on the set.
Turn on the digital set-top box. (Refer to the
owner's manual for the digital set-top box.)
Select Component input source with using the
INPUT button on the remote control.
1
2
3
Connect the HDMI output of the digital set-topbox to the HDMI jack on the set.
Turn on the digital set-top box. (Refer to the
owner's manual for the digital set-top box.)
Select HDMI input source with using the INPUT
button on the remote control.
- This TV can receive Digital signals without an external digital set-top box. However, if you do receive
Digital signals from a digital set-top box or other digital external device, refer to the figure as shown.
B R(R) AUDIO (L)
R
L
COMPONENT
AUDIO
VIDEO
PC SOUND
HDMI
VIDEO
AUDIO
L
R
REMOTE
CONTROL
UPGRADE
PORT
DVI INPUT
(PC/DTV INPUT)DTV OUT
HDMI-DTV OUPUT
AC IN
Digital Set-top Box
Signal
480i/576i
480p/720p/1080i
Component
Yes
Yes
DTV
No
Yes
Signal
480p/576p/720p/1080i
HDMI
Yes
HDSTB Setup
TV side
When connecting with a DVI cable
1
2
3
4
Connect the DVI output of the digital set-top box to
the DVI INPUT (PC/DTV INPUT) jack on the set.
Connect the audio outputs of the set-top box to
the PC SOUND jack on the set.
Turn on the digital set-top box. (Refer to the
owner's manual for the digital set-top box.)
Select DVI DTV input source with using the
INPUT button on the remote control.
PC SOUND
HDMI
VIDEO
AUDIO
L
R
REMOTE
CONTROL
UPGRADE
PORT
DVI INPUT
(PC/DTV INPUT) DTV OUT
DVI-DTV OUPUT(R) AUDIO (L)
AC IN
? It's impossible to receive the RGB-DTV input source
via DVI INPUT jack.
? TV can receive the video and audio signal simul-
taneously with using a HDMI cable
12
Digital Set-top Box
TV back
1
Digital Set-top Box
TV back
Signal
480p/576p/720p/1080i
DVI
Yes
2

19
Installation
- This TV provides Plug and Play capability, meaning that the PC adjusts automatically to the TV's settings.The TV sends configuration information (EDID) to the PC using the Video Electronics Standard Association
(VESA) Display Data Channel (DDC) protocol.
PC Setup
When connecting with a DVI cable
When connecting with a D-sub to DVI cable
1
2
3
4
Connect the DVI output of the PC to the DVI
INPUT (PC/DTV INPUT) jack on the set.
Connect the PC audio outputs to the PC SOUND
jack on the set.
Turn on the PC and the set.
Select DVI PC input source with using the INPUT
button on the remote control.
1
2
3
4
Connect the RGB output of the PC to the DVI
INPUT (PC/DTV INPUT) jack on the set.
Connect the PC audio outputs to the PC SOUND
jack on the set.
Turn on the PC and the set.
Select DVI PC input source with using the INPUT
button on the remote control.
PC SOUND
HDMI
VIDEO
AUDIO
L
R
REMOTE
CONTROL
UPGRADE
PORT
DVI INPUT
(PC/DTV INPUT)DTV OUT
AUDIO DVI-PC OUPUT
AC IN
TV back
PC
PC SOUND
HDMI
VIDEO
AUDIO
L
R
REMOTE
CONTROL
UPGRADE
PORT
DVI INPUT
(PC/DTV INPUT)DTV OUT
RGB-PC OUPUTAUDIO
AC IN
TV back
PC
12
12

20
Installation
1. To get the best picture quality, adjust the PC graphicscard to 1024x768, 60Hz.
2. If using a sound card, adjust the PC sound as
required.3. Check the image on your TV. There may be noise
associated with the resolution, vertical pattern, con-
trast or brightness in PC mode. If noise is present,
change the PC mode to another resolution, changethe refresh rate to another rate or adjust the bright-ness and contrast on the menu until the picture is
clear. If the refresh rate of the PC graphic card can
not be changed, change the PC graphic card or
consult the manufacturer of the PC graphic card.
4. Avoid keeping a fixed image on the TV's screen for
a long period of time. The fixed image may become
permanently imprinted on the screen.
5. The synchronization input form for Horizontal and
Vertical frequencies is separate.
*
DPM (Display Power Management) Mode
When the PC is in the power saving mode, auto-
matically the set goes into DPM mode to save the
energy.*
Use the supplied signal cable with the set. Otherwise,DPM mode may not work.
AC IN
- Connect the power cord correctly as shown.
Power Cord Connection
Monitor Display Specifications
Resolution
720x400
640x480
800x600
1024x768
1280x768
1360x768
Horizontal Frequency
(kHz)
31.469KHz
31.469KHz
37.861KHz
37.500KHz
35.156KHz
37.879KHz
48.077KHz
46.875KHz
48.363KHz
56.476KHz
60.023KHz
47.693KHz
49.020KHz
70.08Hz
59.94Hz
72.80Hz
75.00Hz
56.25Hz
60.31Hz
72.18Hz
75.00Hz
60.00Hz
70.06Hz
75.02Hz
60.00Hz
60.00Hz
Vertical Frequency
(Hz)

21
Operation
Basic operationBasic operation
1. Connect the power cord correctly. Now, the TV is switched to standby mode.
2. Press the ON/OFF, INPUT, PR D / E button on the TV or press the POWER,
INPUT, D/V TV, PR D / E, Number (0 ~9) button on the remote control and then
the TV will switch on.
1. Press the VOL D / E button to adjust the volume.
2. If you want to switch the sound off, press the MUTE button.
3. You can cancel this function by pressing the MUTE, VOL D / E, or I/II button.
Press the PR D / E or NUMBER buttons to select a programme number.
INPUTD/A TV
VOL
LIST Q.VIEW
PR
POWER
1 2 3
4 5 6
78
0
9
SCANPOSITIONSIZE STILL
MIX I/IIREVEALTIME
PIP PR-
PIP FAV SLEEP SUBTITLE/
PIP PR+ SWAP PIP INPUT
?
GUIDEM/C EJECT
TEXT/
MENU
MUTE ARC
EXIT
VCRTVDVD
INFOi
MARKV
X
i
OK
? If you intend to be away on vacation, disconnect the power plug from the wall power outlet.
OperationOperation
Turning on the TV
Volume Adjustment
Programme Selection

22
Operation
On Screen Menus Selection andOn Screen Menus Selection and AdjustmentAdjustment
Menu ICON
Sub Menu Function
Analog TV mode
1. Press the MENU button and then D / E button to select each menu.
2. Press the G button and then use D / E / F / G button to display the available menus.
Note: The OSD display differs from DTV mode and analog mode. Refer to below figure.
? The OSD (On Screen Display) function enables you to adjust the screen status conveniently since it
provides graphical presentation.? In this manual, the OSD (On Screen Display) may be different from your TV's because it is just exam-
ple to help the TV operation.
Auto programme
Programme edit
Favourite programme
System information
Auto programme
Manual programme
Programme edit
Favourite programme
PSM
CSM
AV2 Out
SSM
Balance
AVL
SRS WOW
Audio language
SSM
Balance
AVL
SRS WOW
Clock
Off time
On time
Auto sleepSleep timer
InputChild lock
Logo display lampSoftware updateSubtitle languageCI Information
InputChild lock
Logo display lamp
Position
Clock
Phase
Auto configureWXGA
STATION
PICTURE
SOUND
TIME
SPECIAL
SCREEN
DTV mode
DVI mode
How to adjust the OSD screen
OSD Display

23
Operation
- Use it to automatically find and store all
of the programmes.
- When you start auto programming in
digital mode, all the stored service infor-
mation will be deleted.
1. Press the MENU button and then D / E button to select the STATION
menu.
2. Press the G button and then D / E button to select Auto programme.
3. Press the G button and then OK button to begin auto programming.The message "All of service-information will be updated.Continue?" will appear. If you want to keep on auto programmingselect YES with using the F / G button. Then, press the OK button.
Otherwise select NO.
To stop auto programming, press the MENU button.
4. Press the EXIT button to return to TV viewing or press the MENU
button to return to the previous menu.
Station Menu Options (In Digital Mode)Station Menu Options (In Digital Mode)
STATION
Auto programme
Programme edit
Favourite programme
System information
MENU Prev
Press
To start channel search
All of service-information
Will be updated. Continue?
Yes No
MENU Prev
13 programmes are found
33 25%
Press
To stop channel search
Auto programme
- This function enables you
to skip the stored pro-
grammes or to set favourite
programmes.
1. Press the MENU button and then D / E button to select the STATION menu.
2. Press the G button and then D / E button to select Programme edit.
3. Press the G button to enter the Programme edit menu.
A Skipping a programme number
a. Select a programme number to be skipped with D / E / F / G button.
b. Press the BLUE button. The skipped programme number turns to blue.
c. Press the BLUE button to release the skipped programme.
d. When a programme number is skipped it means that you will be unable to
select it using the PR D / E button during normal TV viewing. If you want to
select the skipped programme, directly enter the programme number with the
NUMBER buttons or select it in the programme edit or table menu.
A Selecting Favourite Programmea. Select your favourite programme number with D / E / F / G button.
b. Press the FAV button. The selected programme will be added to the favourite
programme list and heart-mark will appear in back of that programme number.
4. Press the EXIT button to return to TV viewing or press the MENU button to return
to the previous menu.
Programme Edit
STATION
Auto programme
Programme edit G
Favourite programme
System information
1
40
2
51
7 30
2 BBC TWO
MENU Prev FAV FavouriteSkip
Displayed when the TV
Programme.
Displayed when the
RADIO Programme.
Displayed when the
Teletext Programme.
Mini Glossary

24
Operation
- Shows how strong your DTV signal.
- The higher the signal strength, the less
likely you are to experience picture
degradation.
- If signal strength is weak, check the RF
cable or antenna direction.
1. Press the MENU button and then D / E button to select the STATION
menu.
2. Press the G button and then D / E button to select System infor-
mation. You can see the model name, Software version, and signalstrength on screen.
3. Press the EXIT button to return to TV viewing or press the MENU
button to return to the previous menu.
STATION
Auto programme
Programme edit
Favourite programme
System information
MENU Prev
Model name : 32LP1D
SW Version : 3.4.9
Signal strength
Bad Normal Good
Station Menu Options continued (In Digital Mode)Station Menu Options continued (In Digital Mode)
System Information
1. Press the MENU button and then D / E button to select the STATION menu.
2. Press the G button and then D / E button to select Favourite programme.
3. Press the G button. Favourite programme list is displayed.
4. Press the D / E / F / G button to select the desired programme.
5. Press the OK button to display the selected programme.
STATION
Auto programme
Programme edit
Favourite programme G
System information
MENU Prev
1
11
2
8
- Repeatedly press the
FAV button to select
stored favourite pro-
grammes in normal TV
viewing.
Favourite Programme List
? 37 inch: 37LP1D
? 42 inch: 42LP1D*
This OSD is only for illustration and the optionsare different according to the models.

25
Operation
Station Menu Options (InStation Menu Options (In Analogue Mode)Analogue Mode)
- Up to 100 TV stations can
be stored by programmenumbers (0 to 99). Once
you have preset the sta-
tions, you will be able to
usetheD/EorNUM-BER buttons to scan the
stations you have pro-
grammed. Stations can be
tuned using automatic or
manual modes.
- All stations that can be
received are stored by this
method. It is recommend-
ed that you use auto pro-
gramme during installation
of this set.
Auto Programme Tuning
1. Press the MENU button and then D / E button to select the STATION menu.
2. Press the G button and then D / E button to select Auto programme.
3. Press the G button and then D / E button to select System.
4. Press the G button and then D / E button to select a TV system (BG, I, DK).
5. Press the OK button and then D / E button to select Storage from.
6. Press the G button. Select the beginning programme number with D / E button
or NUMBER buttons. If you use NUMBER buttons, any number under 10 is
entered with a numeric '0' in front of it, i.e.'05' for 5.
7. Press the OK button and then D / E button to select Search.
8. Press the OK button to begin auto programming. All receivable stations are
stored. To stop auto programming, press the MENU button.
When auto programming is completed, the PROGRAMME LIST menu appears
on the screen.
9. Press the EXIT button to return to TV viewing or press the MENU button to return
to the previous menu.
BG PAL B/G
(Europe/East Europe)
I PAL I/II (U.K./Ireland)
DK PAL D/K
(East Europe)
Mini Glossary
Programme number C
V/UHF 01-69
Programme number S
Cable 01-47
Mini Glossary
STATION
Auto programme
Manual programme
Programme edit
Favourite programme
System
Storage from
Search G
Press
to start Auto programme
MENU Prev
STATION
Auto programme
Manual programme
Programme edit
Favourite programme
System
Storage from G
Search
MENU Prev
6
STATION
Auto programme
Manual programme
Programme edit
Favourite programme
System G
Storage from
Search
BG
I
DK
MENU Prev
The station name is stored for stations which broadcast VPS (Video Programme
Service), PDC (Programme Delivery Control) or TELETEXT data. If no station
name can be assigned to a station, the channel number is assigned and stored
as C (V/UHF 01-69) or S (Cable 01-47), followed by a number.

26
Operation
- Manual programme lets
you manually tune and
arrange the stations in
whatever order you desire.
1. Press the MENU button and then D / E button to select the STATION menu.
2. Press the G button and then D / E button to select Manual programme.
3. Press the G button and then D / E button to select Storage.
4. Press the G button. Select the desired programme number (0 to 99) with D / E
button or NUMBER buttons. If you use NUMBER buttons, any number under 10
is entered with a numeric '0' in front of it, i.e.'05' for 5.
5. Press the OK button.
6. Press the D / E button to select System.
7. Press the G button and then D / E button to select a TV system (BG, I, DK).
8. Press the OK button.
9. Press the D / E button to select Channel.
10. Press the G button and then D / E button to select V/UHF or Cable.
11. Press the G button and then select the channel number directly with the number
buttons. Any number under 10 is entered with a numeric '0'in front of it, i.e. '05'
for 5.
12. Press the OK button and then D / E button to select Search.
13. Press the G button and then F / G button to commence searching. If a station is
found the search will stop.
14. To store another station, repeat steps 3 to 13.
STATION
Auto programme
Manual programme
Programme edit
Favourite programme
MENU Prev
6
Manual Programme Tuning
BG PAL B/G
(Europe/East Europe)
I PAL I/II (U.K./Ireland)
DK PAL D/K
(East Europe)
Mini Glossary
STATION
Auto programme
Manual programme
Programme edit
Favourite programme
Storage
System G
Channel
Fine
Search
Name
MENU Prev
BG
I
DK
STATION
Auto programme
Manual programme
Programme edit
Favourite programme
Storage
SystemChannel G
Fine
Search
Name
Cable 12
Station Menu Options continued (InStation Menu Options continued (In Analogue Mode)Analogue Mode)
Storage G
SystemChannel
Fine
Search
Name

27
Operation
1. Press the MENU button and then D / E button to select the STATION menu.
2. Press the G button and then D / E button to select Manual programme.
3. Press the G button and then D / E button to select Name.
4. Press the G button and then D / E button. You can use a the alphabet A to Z, the
number 0 to 9, +/ -, and blank.
5. Press the F / G button to select the position and make your choice of the second
character, and so on.
6. Press the OK button to store it.
7. Press the EXIT button to return to TV viewing or press the MENU button to return
to the previous menu.
- Normally fine tuning is only
necessary if reception is poor.
- The finely tuned programmewill be indicated by a yellownumber during programme
selection.
1. Press the MENU button and then D / E button to select the STATION menu.
2. Press the G button and then D / E button to select Manual programme.
3. Press the G button and then D / E button to select Fine.
4. Press the G button and then F / G button to fine tune for the best picture and
sound.
5. Press the OK button to store it.
6. Press the EXIT button to return to TV viewing or press the MENU button to return
to the previous menu.
STATION
Auto programme
Manual programme
Programme edit
Favourite programme
Storage
SystemChannel
Fine G
Search
Name
GGG
MENU Prev
STATION
Auto programme
Manual programme
Programme edit
Favourite programme
Storage
System
Channel
Fine
Search
Name G
MENU Prev
C 01
Fine Tuning
Assigning a Station Name
- You can assign a station
name with five characters
to each programme num-
ber.

28
Operation
1. Press the MENU button and then D / E button to select the STATION menu.
2. Press the G button and then D / E button to select Programme edit.
3. Press the G button.
A Deleting a programme
a. Select a programme to be deleted with the D / E / F / G button.
b. Press the RED button twice. The selected programme is deleted, all the follow-
ing programmes are shifted up one position.
A Copying a programme
a. Select a programme to be copied with the D / E / F / G button.
b. Press the GREEN button. All the following programmes are shifted down one
position.
A Moving a programme
a.SelectaprogrammetobemovedwithD/E/F/Gbutton.b. Press the YELLOW button.
c. Move the programme to the desired programme number with the D / E / F / G
button.
d. Press the YELLOW button again to release this function.
A Skipping a programme number
a. Select a programme number to be skipped with D / E / F / G button.
b. Press the BLUE button. The skipped programme number turns to blue.
c. Press the BLUE button to release the skipped programme.
d. When a programme number is skipped it means that you will be unable to select
it using the PR D / E button during normal TV viewing. If you want to select the
skipped programme, directly enter the programme number with the NUMBER
buttons or select it in the programme edit or table menu.
A Selecting Favourite Programmea. Select your favourite programme number with D / E / F / G button.
b. Press the FAV button. The selected programme will be added to the favourite
programme list and heart-mark will appear in back of that programme number.
STATION
Auto programme
Manual programme
Programme edit
Favourite programme
MENU Prev FAV Favourite
0C01
4C01
20
16
12
8C01
1C03
5C01
21
17
13
9C01
2C06
6C01
22
18
14
10
3C07
7C01
23
19
15
11
Delete Copy Move Skip
- This function enables you
to delete or skip the
stored programmes. Also
you can move some sta-
tions to other programme
numbers or copy a blank
station data into the
selected programme num-
ber.
Station Menu Options continued (InStation Menu Options continued (In Analogue Mode)Analogue Mode)
Programme Edit

29
Operation
A Displaying programme LIST
1. Press the LIST button to display the PROGRAMME LIST menu.
2. The programme list appears on the screen. One programme list con-
tains 24 programmes.
A Selecting a programme in the programme list
1.SelectaprogrammewiththeD/E/F/Gbutton.2. Press the OK button. The set switches to the chosen programme number.
A Paging through a programme list
There are 5 programme LIST pages which total contain 100 programmes.
1. Press the D / E / F / G button repeatedly to turns the pages.
2. Press the EXIT button to return to TV viewing.
STATION
Auto programme
Manual programme
Programme edit
Favourite programme G
MENU Prev
0C01
1C04
2C07
3C05
4C08
5C03
0C01
4C01
20
16
12
8C01
1C03
5C01
21
17
13
9C01
2C06
6C01
22
18
14
10
3C07
7C01
23
19
15
11
PROGRAMME LIST
- This function lets you select your favourite
programmes directly.
- You can check the programmes stored in
the memory by displaying the pro-
gramme table.
Favourite Programme
Calling the Programme Table
1. Press the MENU button and then D / E button to select the STATION
menu.
2. Press the G button and then D / E button to select Favourite pro-
gramme.
3.PresstheGbuttonandthenD/Ebuttontoselect- - -
-----.
4. Select a desired programme with the F / G button or NUMBER buttons.
Any number under 10 is entered with a numeric '0'in front of it, i.e.'05'
for 5.
5. To store another programme, repeat steps 3 to 4. You can store up
to 7 programmes.
6. Press the EXIT button to return to TV viewing or press the MENU
button to return to the previous menu.
Repeatedly press the FAV button to select stored favourite programmes.
? You may find some blue programmes. They have been set up to
be skipped by auto programming or in the programme edit mode.
? Some programmes with the channel number shown in the pro-
gramme LIST indicate there is no station name assigned.
30
Operation
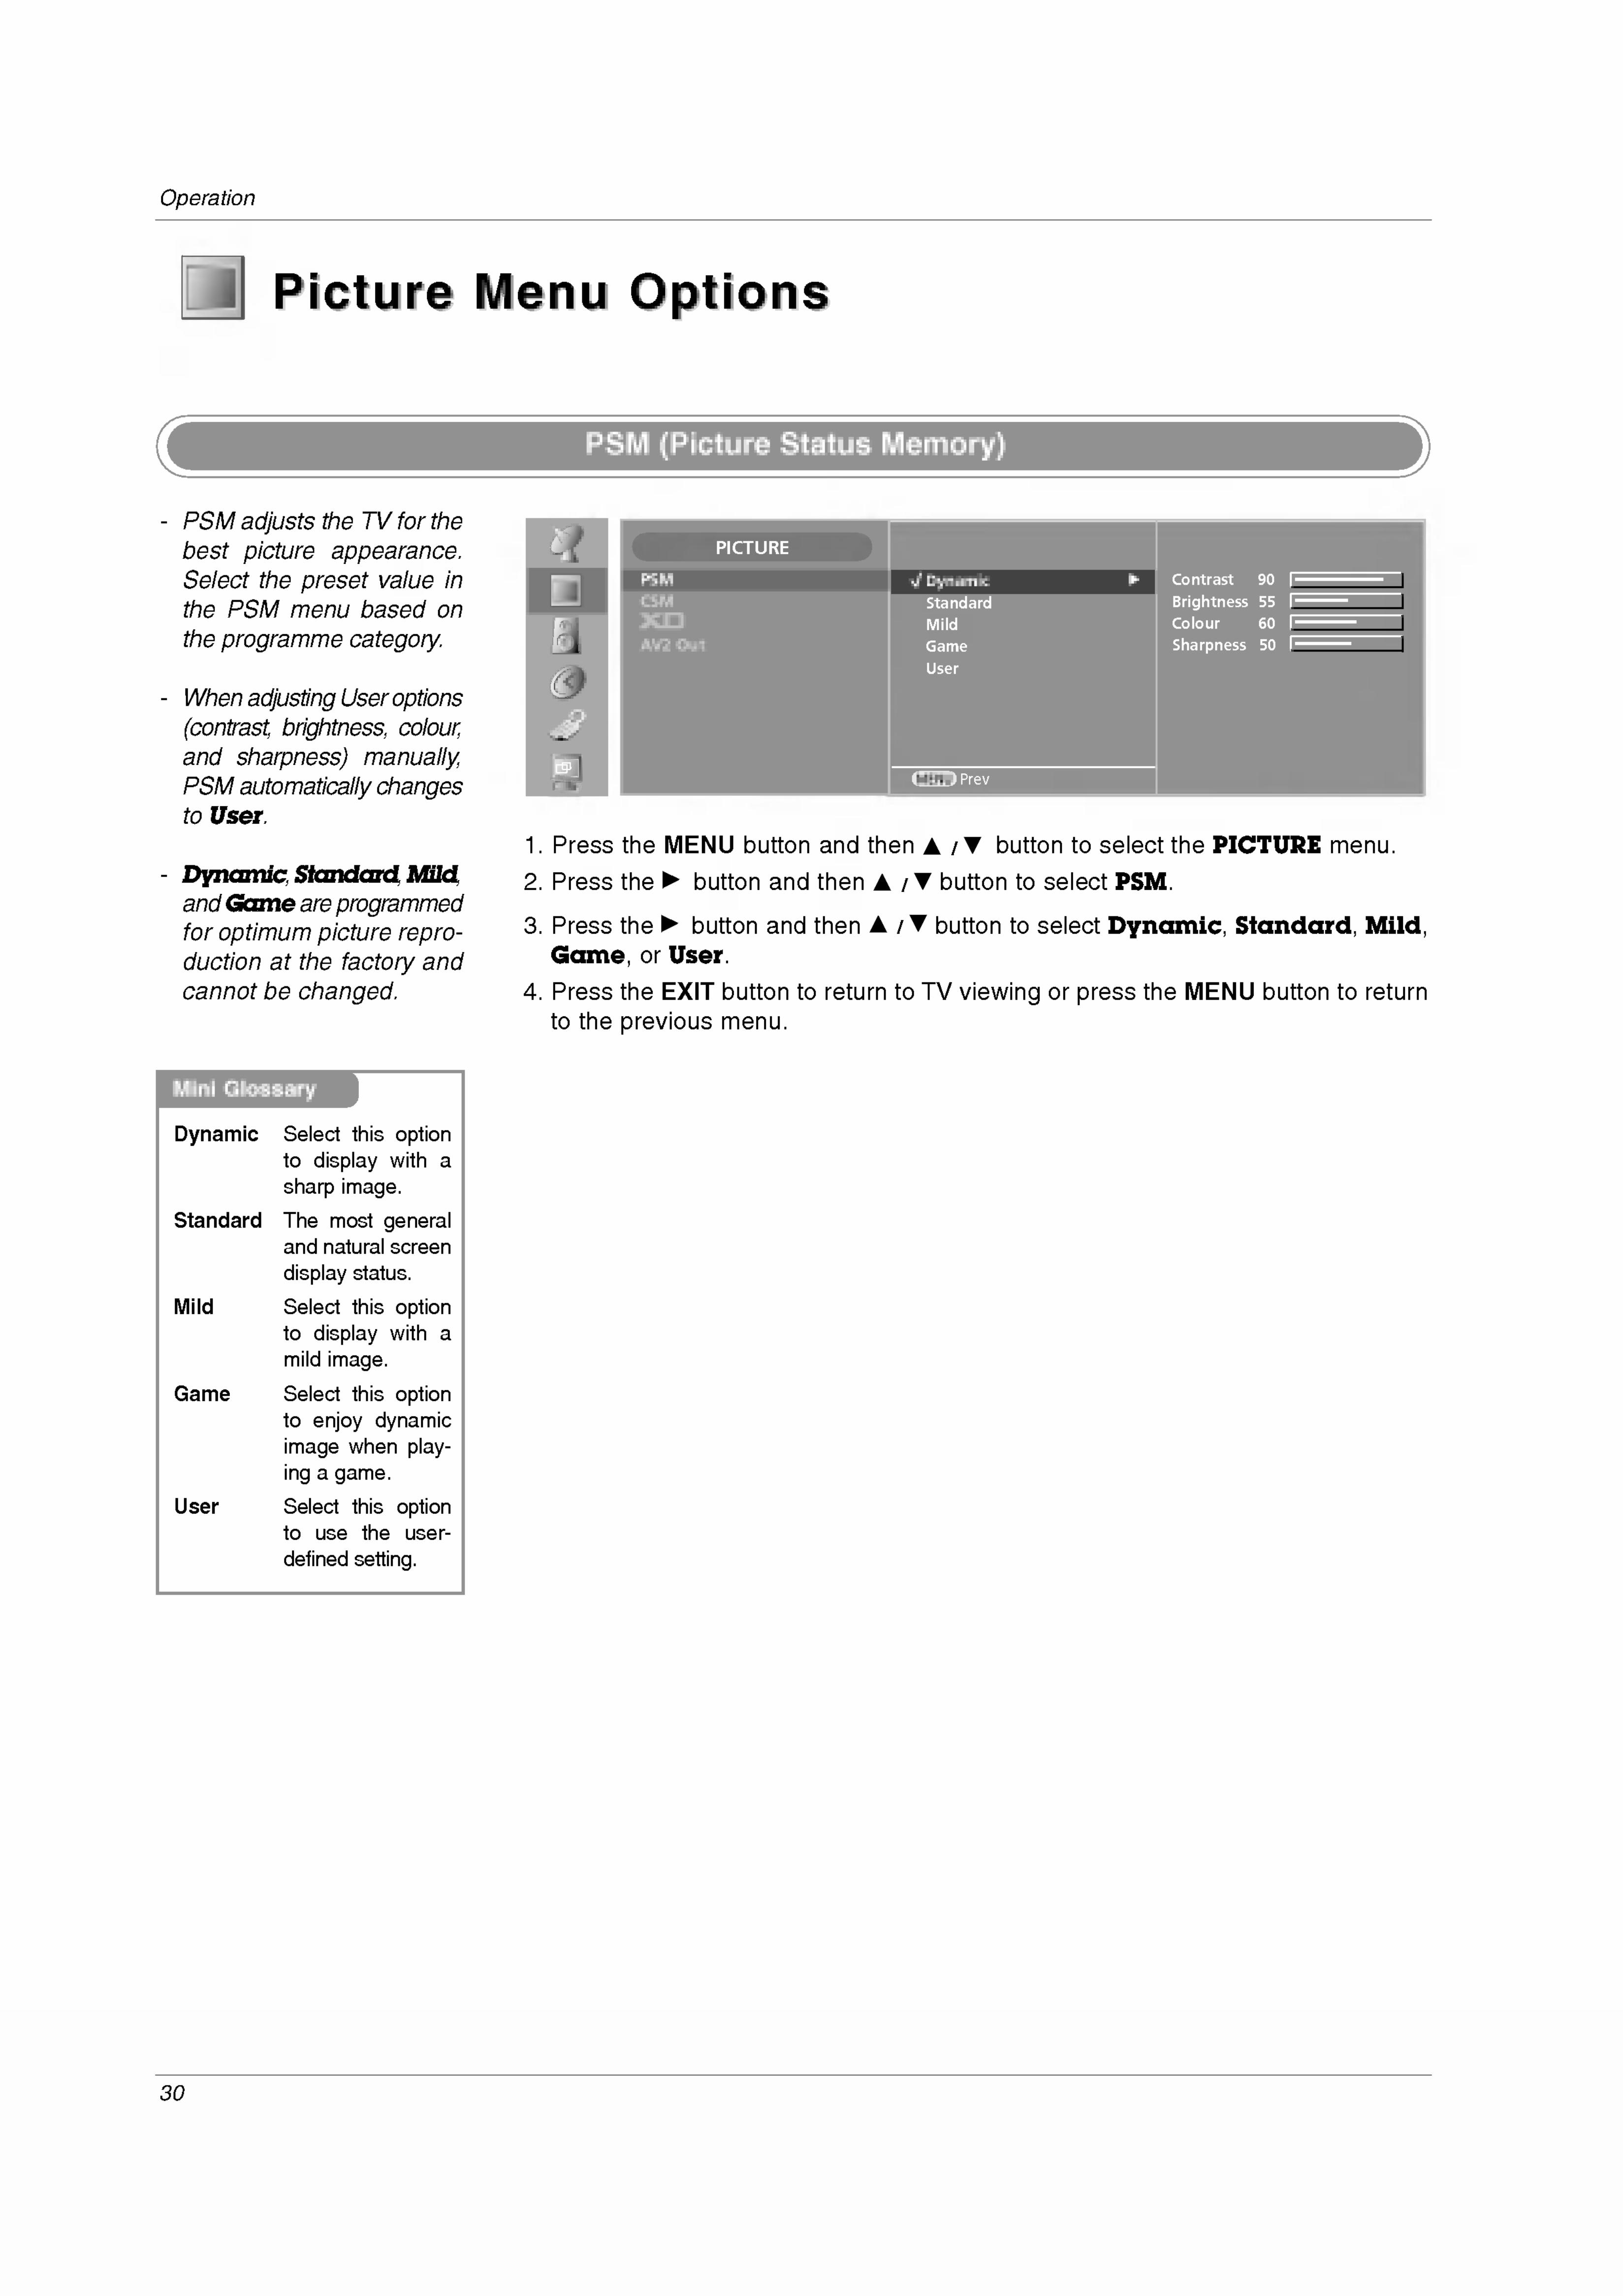
1. Press the MENU button and then D / E button to select the PICTURE menu.
2. Press the G button and then D / E button to select PSM.
3. Press the G button and then D / E button to select Dynamic, Standard, Mild,
Game, or User.
4. Press the EXIT button to return to TV viewing or press the MENU button to return
to the previous menu.
- PSM adjusts the TV for the
best picture appearance.
Select the preset value in
the PSM menu based on
the programme category.
- When adjusting User options
(contrast, brightness, colour,and sharpness) manually,PSM automatically changesto User.
- Dynamic, Standard, Mild,andGame are programmedfor optimum picture repro-
duction at the factory and
cannot be changed.
Picture Menu OptionsPicture Menu Options
PICTURE
PSM
CSM
AV2 Out
Dynamic G
Standard
Mild
Game
User
Contrast 90
Brightness 55
Colour 60
Sharpness 50
MENU Prev
Dynamic Select this optionto display with a
sharp image.
Standard The most generaland natural screen
display status.
Mild Select this optionto display with a
mild image.
Game Select this optionto enjoy dynamic
image when play-
ing a game.
User Select this optionto use the user-
defined setting.
Mini Glossary
PSM (Picture Status Memory)

31
Operation
1. Press the MENU button and then D / E button to select the PICTURE menu.
2. Press the G button and then D / E button to select CSM.
3. Press the G button and then D / E button to select either Cool, Normal,
Warm, or User.
4. Press the EXIT button to return to TV viewing or press the MENU button to return
to the previous menu.
- To initialize values (resetto default settings), select
the Normal option.
- When adjusting colour
temperature options (red,green, or blue) manually,CSM automatically changesto User.
- Choose one of three auto-
matic colour adjustments.Set to warm to enhance
hotter colours such as red,or set to cool to see less
intense colours with more
blue.
Red 38
Green 33
Blue 27
PICTURE
PSM
CSM
AV2 Out
Cool G
Normal
Warm
User
MENU Prev
CSM (Colour Status Memory)
- You can adjust picture con-
trast, brightness, colour
intensity, sharpness and
tint (NTSC AV only) to the
levels you prefer.
1. Press the MENU button and then D / E button to select the PICTURE menu.
2. Press the G button and then D / E button to select PSM.
3. Press the G button and then D / E button to select User.
4. Press the G button and then D / E button to select the desired picture option(Contrast, Brightness, Colour, or Sharpness).
5. Press the F / G button to make appropriate adjustments.
6.Press the EXIT button to return to TV viewing or press the MENU button to return
to the previous menu.
PICTURE
PSM
CSM
AV2 Out
DynamicStandard
Mild
Game
User G
Contrast 90
Brightness 80
Colour 72
Sharpness 69
MENU Prev
Picture Adjustment (PSM-User option)
? Only Contrast and Brightness are displayed in PC mode.
Contrast Adjusts the differ-
ence between the
light and dark lev-
els in the picture.
Brightness Increases or
decreases amount
of white in the
your picture.
Colour Adjusts intensityof all colours.
Sharpness Adjusts the level
of crispness in the
edges between the
light and dark
areas of the pic-ture. The lower the
level, the softer
the image.
Tint Adjusts the balance
between red and
green levels.
Mini Glossary

32
Operation
- XD is LG electronic's unique
picture improving technologyto display a real HD source
through an advanced digi-tal signal processing algo-rithm.
1. Press the MENU button and then D / E button to select the PICTURE menu.
2. Press the G button and then D / E button to select XD.
3. Press the G button and then D / E button to select Off, On,orDemo.
4. Press the EXIT button to return to TV viewing or press the MENU button to return
to the previous menu.
? Demo
Use it to see the difference between XD demo
on and XD Demo off. To release XD Demo,
press the EXIT button.
PICTURE
PSM
CSM
AV2 Out
MENU Prev
Off
On
Demo
Picture Menu Options continuedPicture Menu Options continued
- You can adjust red, green,
blue to any colour tempera-ture you prefer.
1. Press the MENU button and then D / E button to select the PICTURE menu.
2. Press the G button and then D / E button to select CSM.
3. Press the G button and then D / E button to select User.
4. Press the G button and then D / E button to select Red, Green, or Blue.
5. Press the F / G button to make appropriate adjustments.
6. Press the EXIT button to return to TV viewing or press the MENU button to return
to the previous menu.
Red 90
Green 50
Blue 60
PICTURE
PSM
CSM
AV2 Out
Cool
Normal
Warm
User G
MENU Prev
Function
Manual Colour Temperature Control (CSM - User option)
33
Operation
- Use it to select your
desired picture out inputsource forAV2 Euro scart
socket.
- If you select DTV while
viewing the HDMI inputsource, the video and
audio is unavailable.
1. Press the MENU button and then D / E button to select the PICTURE menu.
2. Press the G button and then D / E button to select AV2 Out.
3. Press the G button and then D / E button to select Monitor or DTV.
? If you select Monitor, the current viewing input source outputs.? If you select DTV, the DTV input source outputs.
4. Press the EXIT button to return to TV viewing or press the MENU button to return
to the previous menu.
PICTURE
PSM
CSM
AV2 Out
MENU Prev
Monitor
DTV
Picture Out for AV2 Euro Scart
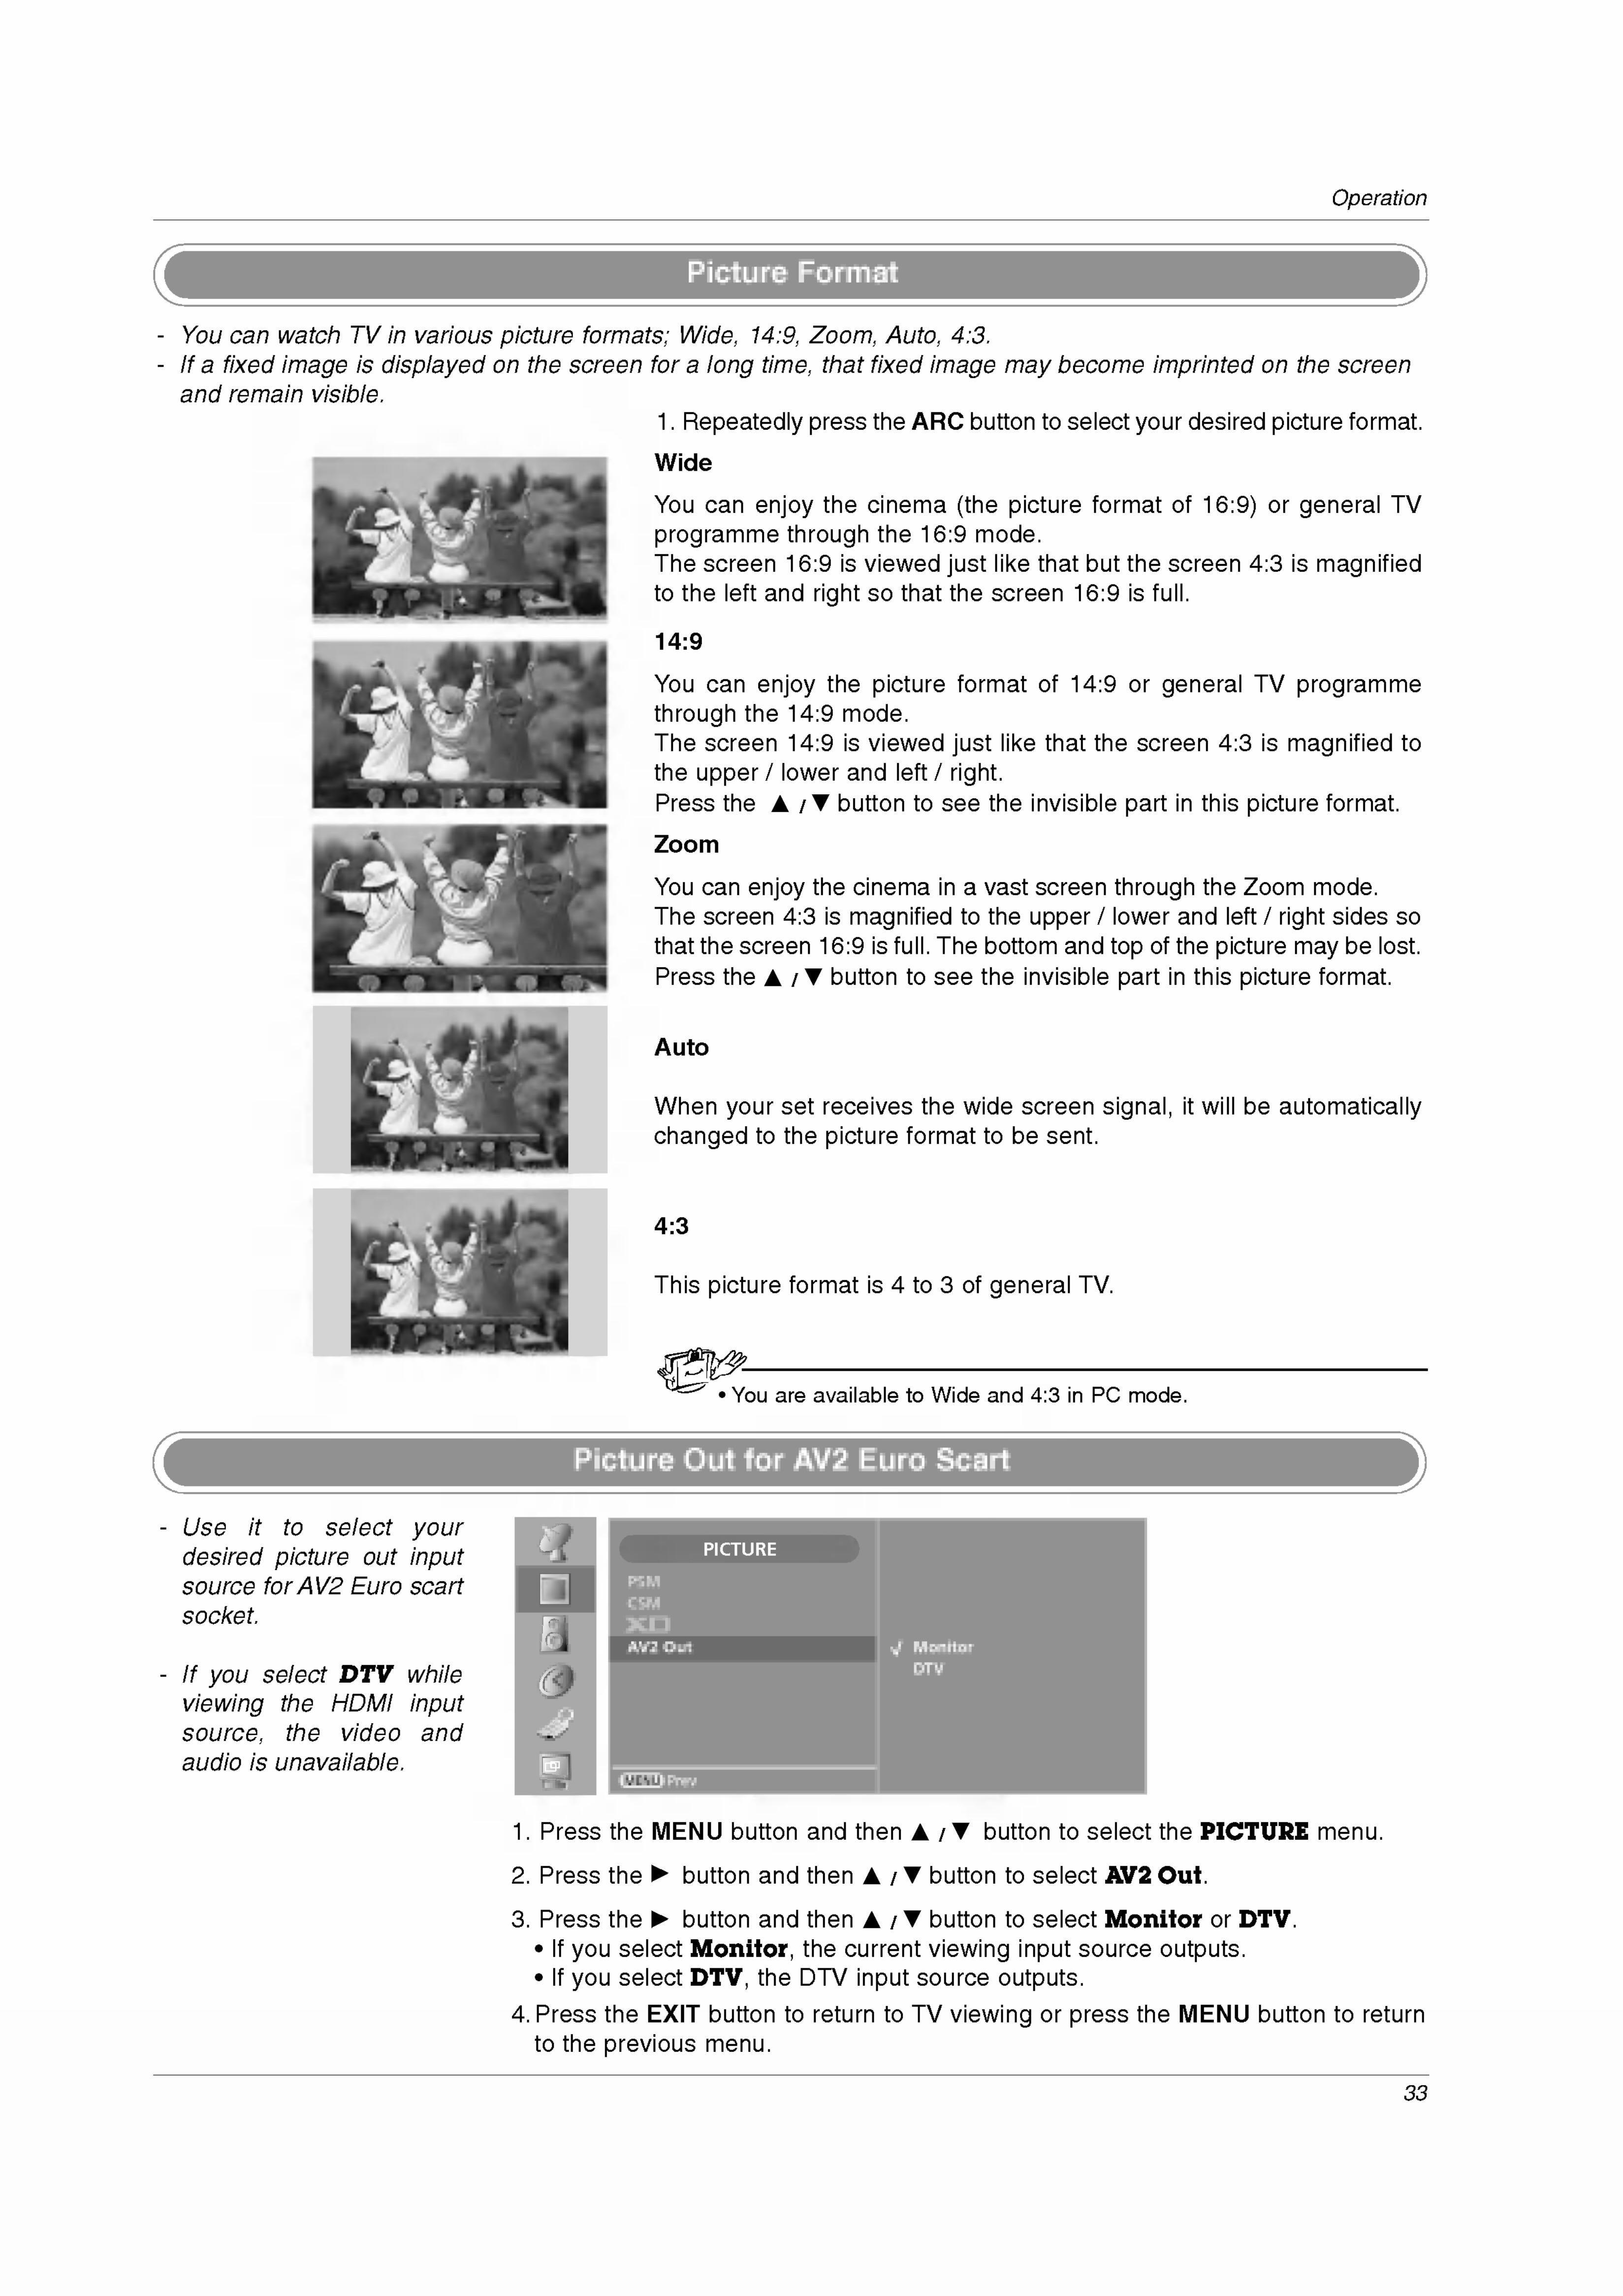
1. Repeatedly press the ARC button to select your desired picture format.
Wide
You can enjoy the cinema (the picture format of 16:9) or general TV
programme through the 16:9 mode.
The screen 16:9 is viewed just like that but the screen 4:3 is magnifiedto the left and right so that the screen 16:9 is full.
Picture Format
14:9
You can enjoy the picture format of 14:9 or general TV programme
through the 14:9 mode.
The screen 14:9 is viewed just like that the screen 4:3 is magnified to
the upper / lower and left / right.Press the D / E button to see the invisible part in this picture format.
Zoom
You can enjoy the cinema in a vast screen through the Zoom mode.
The screen 4:3 is magnified to the upper / lower and left / right sides so
that the screen 16:9 is full. The bottom and top of the picture may be lost.
Press the D / E button to see the invisible part in this picture format.
Auto
When your set receives the wide screen signal, it will be automatically
changed to the picture format to be sent.
4:3
This picture format is 4 to 3 of general TV.
? You are available to Wide and 4:3 in PC mode.
- You can watch TV in various picture formats; Wide, 14:9, Zoom, Auto, 4:3.
- If a fixed image is displayed on the screen for a long time, that fixed image may become imprinted on the screen
and remain visible.

34
Operation
- You can select your preferred sound
setting; Flat, Music, Movie or Sports and
you can also adjust the sound frequencyof the equalizer.
- SSM lets you enjoy the best sound without
any special adjustment because the TV
sets the appropriate sound optionsbased on the programme content.
- When adjusting sound equalizer manually,SSM automatically switches User.
- Flat, Music, Movie, and Sports are
preset for good sound quality at the fac-
tory and are not adjustable.
- Adjust the sound equalizer.
Sound Menu OptionsSound Menu Options
1. Press the MENU button and then D / E button to select the SOUND menu.
2. Press the G button and then D / E button to select SSM.
3. Press the G button and then D / E button to select User.
4. Press the G button.
5. Select a sound band by pressing the F / G button.
Make appropriate sound level with the D / E button.
6. Press the EXIT button to return to TV viewing or press the MENU button to return
to the previous menu.
1. Press the MENU button and then D / E button to select the SOUND
menu.
2. Press the G button and then D / E button to select SSM.
3. Press the G button and then D / E button to select Flat, Music,
Movie, Sports, or User.
4. Press the EXIT button to return to TV viewing or press the MENU
button to return to the previous menu.
SOUND
SSM G
Balance
AVL
SRS WOW
Flat
Music
Movie
SportsUser
MENU Prev
SRS( )wow
SSM (Sound Status Memory)
Sound Frequency Adjustment (SSM - User option)
SOUND
SSM
Balance
AVL
SRS WOW
Flat
Music
Movie
SportsUser G
Equalizer
0.12 0.2 0.5 1.2 3.0 7.5 12.0
kHz
MENU Prev
SRS( )wow
Mini Glossary
Flat The most commanding and natural
audio.
Music Select this option to enjoy the origi-nal sound when listening to the
music.
Movie Select this option to enjoy sublime
sound.
Sports Select this option to watch sports
broadcasting.
User Select this option to use the user-
defined audio settings.

35
Operation
1. Press the MENU button and then D / E button to select the SOUND
menu.
2. Press the G button and then D / E button to select Balance.
3. Press the G button and then F / G button to make desired adjust-ment.
4. Press the EXIT button to return to TV viewing or press the MENU
button to return to the previous menu.
- You can adjust the sound balance of
speaker to the levels you prefer.
- AVL automatically keeps on an equalvolume level even if you change pro-
grammes.
1. Press the MENU button and then D / E button to select the SOUND
menu.
2.Press the G button andthen D /Ebuttonto selectAVL.
3. Press the G button and then D / E button to select Off or On.
4. Press the EXIT button to return to TV viewing or press the MENU
button to return to the previous menu.
SOUND
SSM
Balance
AVL G
SRS WOW
Off
On
MENU Prev
SRS( )wow
SOUND
SSM
Balance G
AVL
SRS WOW
0
MENU Prev
SRS( )wow
Balance Adjustment
AVL (Auto Volume Leveler)
36
Operation
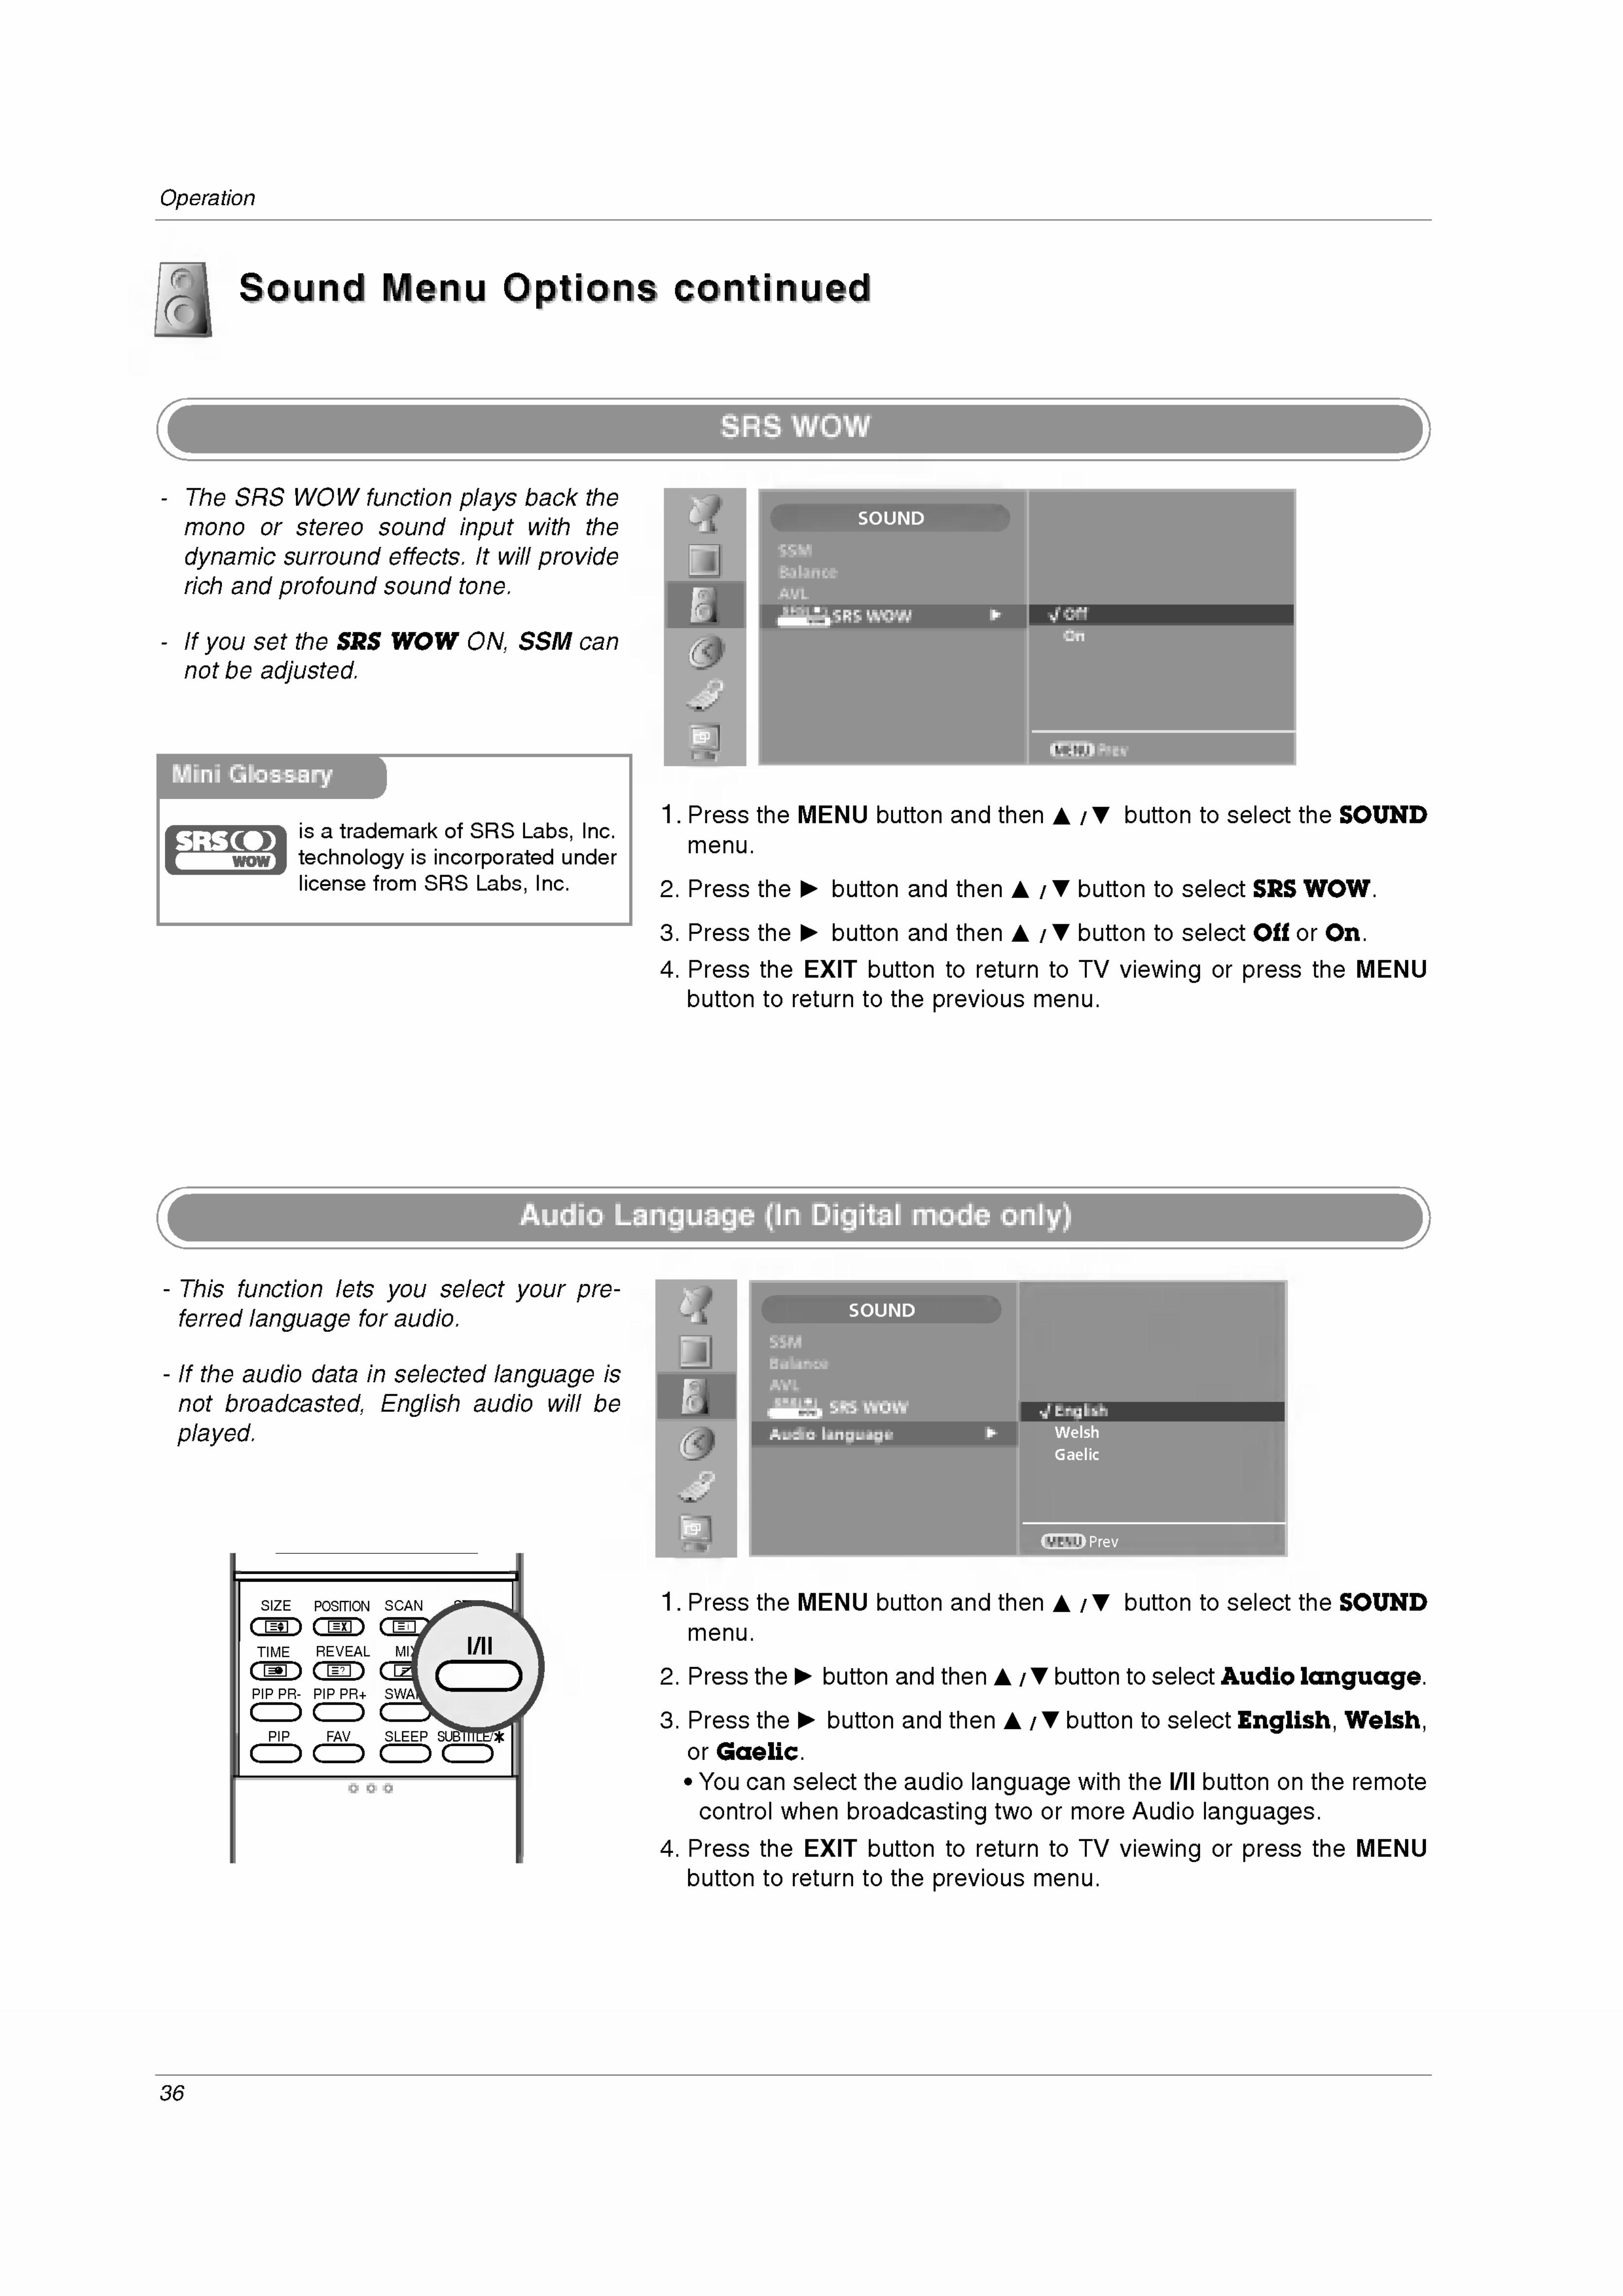
1. Press the MENU button and then D / E button to select the SOUND
menu.
2. Press the G button and then D / E button to select SRS WOW.
3. Press the G button and then D / E button to select Off or On.
4. Press the EXIT button to return to TV viewing or press the MENU
button to return to the previous menu.
1. Press the MENU button and then D / E button to select the SOUND
menu.
2. Press the G button and then D / E button to select Audio language.
3. Press the G button and then D / E button to select English, Welsh,or Gaelic.
? You can select the audio language with the I/II button on the remote
control when broadcasting two or more Audio languages.
4. Press the EXIT button to return to TV viewing or press the MENU
button to return to the previous menu.
SOUND
SSM
Balance
AVL
SRS WOW G Off
On
MENU Prev
SRS( )wow
- The SRS WOW function plays back the
mono or stereo sound input with the
dynamic surround effects. It will providerich and profound sound tone.
- IfyousettheSRSWOWON,SSMcannot be adjusted.
Sound Menu Options continuedSound Menu Options continued
- This function lets you select your pre-
ferred language for audio.
- If the audio data in selected language is
not broadcasted, English audio will be
played.
is a trademark of SRS Labs, Inc.
technology is incorporated under
license from SRS Labs, Inc.
Mini Glossary
SRS WOW
Audio Language (In Digital mode only)
SCANPOSITIONSIZEST
MIXREVEALTIME
PIP PR-
PIP FAV SLEEP SUBTITLE/
PIP PR+ SWAP
?
i
SOUND
SSM
Balance
AVL
SRS WOW
Audio language G
EnglishWelsh
Gaelic
MENU Prev
SRS( )wow
I/II

37
Operation
- When a programme is selected,the sound information for the sta-
tion appears after the programme
number and station name disap-
pear.
A Mono sound selection
If the stereo signal is weak in stereo reception, you can switch to
mono by pressing the I/II button twice. In mono reception, the depthof sound is improved. To switch back to stereo, press the I/II button
twice again.
A Language selection for dual language broadcast
If a programme received two languages (dual language), you can
switch to DUAL I, DUAL II or DUAL I+II by pressing the I/II button
repeatedly.
Repeatedly press the I/II button to select the sound output.
L+R: Audio signal from audio L input is sent to the left loud speaker and
audio signal from audio R input is sent to the right loud speaker.L+L: Audio signal from audio L input is sent to left and right loud speakers.R+R: Audio signal from audio R input is sent to left and right loud
speakers.
- In AV, S-Video, Component, and
DVI mode, you can select outputsound for the left and right loud-
speakers.
1. When NICAM mono is received, you can select NICAM MONO or
FM MONO.
2. When NICAM stereo is received, you can select NICAM STEREO
or FM MONO. If the stereo signal is weak, switch to FM mono.
3. When NICAM dual is received, you can select NICAM DUAL I,NICAM DUAL II or NICAM DUAL I+II or MONO.
- If the set is equipped with the
receiver for NICAM reception,the high quality NICAM (NearInstantaneous Companding Audio
Multiplex) digital sound can be
received.
- Sound output can be selected
according to the type of received
broadcast as follows by pressingthe I/II button repeatedly.
Stereo/Dual Reception (In Analogue mode only)
NICAM Reception (In Analogue mode only)
Speaker Sound Output Selection (In Analogue mode only)
Mini Glossary
DUAL I Sends the primarybroadcast language to
the loudspeakers.
DUAL II Sends the secondarybroadcast language to
the loudspeakers.
DUAL I+II Sends a separate lan-
guage to each loud-
speaker.
Broadcast
Mono
Stereo
Dual
On Screen Display
MONO
STEREO
DUAL I

38
Operation
TTime Menu Optionsime Menu Options
1. Press the MENU button and then D / E button to select the TIME menu.
2. Press the G button and then D / E button to select Clock.
3. Press the G button and then F / G button to select either the year,
date, or time option. Once selected, use the D / E button to set the
year, date, and time options.
4. Press the EXIT button to return to TV viewing or press the MENU
button to return to the previous menu.
- The Off time automatically switches the
set to standby at the preset time.
- Two hours after the set is switched on bythe on time function it will automaticallyswitch back to standby mode unless a
button has been pressed.
- Once the on time/off time is set, these
functions operate daily at the presettime.
- Off time function overrides On timer
function if they are set both to the same
time.
- The set must be in standby mode for the
On timer to work.
- The clock is set automatically when
receiving the digital signal. (You can set
the clock if the TV has no DTV signal.)
- You must set to the time correctly before
using on/off time function.
1. Press the MENU button and then D / E button to select the TIME menu.
2. Press the G button and then D / E button to select Off time/On
time.
3. Press the G button and then D / E button to select On.
? To cancel On/Off timer function, select Off.
4. Press the G button and then D / E button to set the hour.
5. Press the G button and then D / E button to set the minutes.
6. For only On timer function
? Programme: Press the G button and then D / E button to select TV
or DTV. And then, Press the G button and then D / E button to
select the programme.? Volume: Press the G button and then D / E button to adjust volumelevel at turn-on.
7. Press the EXIT button to return to TV viewing or press the MENU
button to return to the previous menu.
TIME
Clock
Off time
On time
Auto sleep
Sleep timer
Year
Date
Time
MENU Prev
12
2004
09
20 14
TIME
Clock
Off time
On time G
Auto sleep
Sleep timer
Off
On
Time
Pr.
Volume
MENU Prev
Clock Setup
On/Off Time

39
Operation
- If set to on and there is no input signal,the TV turns off automatically after 10
minutes.
1. Press the MENU button and then D / E button to select the TIME menu.
2. Press the G button and then D / E button to select Auto sleep.
3. Press the G button and then D / E button to select Off or On.
4. Press the EXIT button to return to TV viewing or press the MENU
button to return to the previous menu.
TIME
Clock
Off time
On time
Auto sleep G
Sleep timer
Off
On
MENU Prev
- You don't have to remember to switch
the set off before you go to sleep.
- The sleep timer automatically switches
the set to standby after the preset time
has elapsed.
- You can also use the TIME menu to
adjust Sleep timer.
1. Press the SLEEP button repeatedly to select the number of minutes.
The display'- - -
'
will appear on the screen, followed by 10, 20, 30,
60, 90, 120, 180 and 240.
2. When the number of minutes you want is displayed on the screen,
the timer begins to count down from the number of minutes selected.
3. To view the remaining sleep time, press the SLEEP button once.
4. To cancel the sleep time, repeatedly press the SLEEP button until
the display'- - -
'
appears.
5. When you switch the set off, the set releases the preset sleep time.
Auto Sleep
Sleep Timer
zz
SCANPOSITIONSIZEST
MIXREVEALTIME
PIP PR-
PIP FAV SLEEP SUBTITLE/
PIP PR+ SWAP
?
i
SLEEP

40
Operation
Special Menu OptionsSpecial Menu Options
- Change the picture source so you can
watch your off-air TV, VCR, DVD, or any
devices that are connected to your TV.
1. Press the MENU button and then D / E button to select the SPECIAL
menu.
2. Press the G button and then D / E button to select Input.
3. Press the G button and then D / E button to select DTV, TV, AV1,
AV2,AV3 , S-Video, Component, DVI PC, DVI DTV, or HDMI.
4. Press the OK button to save.
SPECIAL
Input G
Child lock
Logo display lamp
DTV
TV
AV1
AV2
AV3
S-Video
MENU Prev
If your VCR outputs an AV switching voltage when connected to the
Euro scart socket, the set will switch to AV1 or AV2 mode automatically.But if you want to keep on watching TV mode, press the PR D / E or
NUMBER buttons. Use the INPUT button to return to AV modes.
Input Source Selection
Auto AV Switching
? You can also select the Input source (TV, AV, S-Video, Component, DVI
PC, DVI DTV, or HDMI mode) with using the INPUT button on remote
control.
? When a VCR is connected via the antenna socket, the set is used in TV
mode. See the 'External Equipment Connections' section.
? It's available to output the PCM (Pulse Code Modulation) sound in HDMI
input source. In some models, the sound is muted for other sound format.

41
Operation
- The TV can be set so that the remote
control is needed to control it. This fea-
ture can be used to prevent unautho-
rized viewing.
1. Press the MENU button and then D / E button to select the SPECIAL
menu.
2. Press the G button and then D / E button to select Child lock.
3. Press the G button and then D / E button to select Off or On.
4. Press the EXIT button to return to TV viewing or press the MENU
button to return to the previous menu.
- If you select on, LG logo of TV front
panel turns the lamp on.
1. Press the MENU button and then D / E button to select the SPECIAL
menu.
2. Press the G button and then D / E button to select Logo display
lamp.
3. Press the G button and then D / E button to select Off or On.
4. Press the EXIT button to return to TV viewing or press the MENU
button to return to the previous menu.
SPECIAL
InputChild lock G
Logo display lamp
Off
On
MENU Prev
SPECIAL
InputChild lock
Logo display lamp G Off
On
MENU Prev
Child Lock
Lightening Logo Display Lamp
? With the Child lock on, the display "Child lock on" appears on the screen
if any button on the front panel is pressed while viewing the TV.

42
Operation
SPECIAL
InputChild lock
Logo display lampSoftware update G
Subtitle languageCI Information
Manual
Auto
MENU Prev
Special Menu Options continuedSpecial Menu Options continued
- Software Update, means software can
be downloaded through the digital ter-
restrial broadcasting system.
*When setting "Software Update- Manual"
Software Update (In Digital mode only)
1. Press the MENU button and then D / E button to select the SPECIAL
menu.
2. Press the G button and then D / E button to select Software
update.
3. Press the G button and then D / E button to select Manual or Auto.
? If you select Manual, a user confirm message box will be dis-
played to notify that new software is found.
? If you select Auto, software will be updated automatically, and you
will not be asked whether you accept the update or not. And
progress bar will be displayed automatically.
4. Press the EXIT button to return to TV viewing or press the MENU
button to return to the previous menu.
Occasionally, a transmis-
sion of updated digital soft-
ware information will result
in the following menu on the
TV screen.
Select the YES using the F /
G button and when you see
the following picture.
After Software Update is
completed, the System takes
about one minute to restart.
- During Progress of Software Update,
please note the following:? The power of the TV must not be inter-
rupted.? The set must not be switched off.
? The antenna must not be disconnected.
? During this time, you should not switch off
the power to the set.
? At this time, you should not work power
On/Off.? After Software Update, you can confirm
the updated software version in Systeminformation menu.

43
Operation
SPECIAL
InputChild lock
Logo display lampSoftware updateSubtitle language G
CI Information
EnglishWelsh
Gaelic
MENU Prev
- If the subtitle data in selected languageis not broadcasted, English subtitle will
be displayed.
- Use this function when two or more sub-
title languages are broadcasted.
- This function enables you to watch
some scrambled services (pay services).
- If you remove the CI Module, you can't
watch the pay services.
- When the module is inserted to CI slot,
you can access the module menu.
- To purchase a module and smart card,contact your supplying dealer.
- Do not often insert or remove a CAM
module from the set. It may cause a
trouble.
- When the set turned on after insertingthe CI Module, you often can't hear the
sound.
1. Press the MENU button and then D / E button to select the SPECIAL
menu.
2. Press the G button and then D / E button to select CI Information.
3. Press the G button and then OK button.
4. Press the D / E button to select the desired item: Module informa-
tion, smart card information, language, or software download etc.
5. Press the OK button.
6. Press the EXIT button to return to TV viewing.
? This OSD is only for illustration
and the menu options and screen
format will vary according to the
Digital pay services provider.? It's possible for you to change CI
(Common Interface) menu screen
and service by your dealer.
SPECIAL
Input
Child lock
Logo display lampSoftware updateSubtitle languageCI Information G Module
MENU Prev
Main Menu
Press OK to select, or Exit to quit
Module information
Smart card information
language
Software Download
CI [Common Interface] Information (In Digital mode only)
Subtitle Language (In Digital mode only)
1. Press the MENU button and then D / E button to select the SPECIAL
menu.
2. Press the G button and then D / E button to select Subtitle language.
3. Press the G button and then D / E button to select English, Welsh,or Gaelic.
? You can select Subtitle language with the SUBTITLE / * on the
remote control. When two or more subtitle languages are broad-
casted.
SCANPOSITIONSIZE STILL
MIX I/IIREVEALTIME
PIP PR-
PIP FAV SLEE
PIP PR+ SWAP
?
i
SUBTITLE / *

44
Operation
*Be sure to select the DVI PC input source before operation.When connecting a DVI PC and RGB PC with DVI INPUT jack on the set, Select the DVI PC input source.
1. Press the MENU button and then use D / E button to select the
SCREEN menu.
2. Press the G button and then use D / E button to select Position.
3.PresstheG buttonandthenuseD/E/F/Gbuttontoadjusttheposition.
4. Press the EXIT button to return to TV viewing or press the MENU
button to return to the previous menu.
Screen Menu OptionsScreen Menu Options
SCREEN
Position G
Clock
Phase
Auto configureWXGA
Horizontal 50
Vertical 60
MENU Prev
D
D
D D
- If the picture isn't clear after auto adjust-ment and especially that characters are
still trembling, adjust the picture phase
manually. To correct the screen size,
adjust Clock.
1. Press the MENU button and then use D / E button to select the
SCREEN menu.
2. Press the G button and then use D / E button to select Clock or
Phase.
3. Press the G button and then use F / G button to make appropriateadjustments.
? The adjustment range of Phase is 0~63.
? The adjustment range of Clock is 0~100.
4. Press the EXIT button to return to TV viewing or press the MENU
button to return to the previous menu.
SCREEN
Position
Clock G
Phase
Auto configureWXGA
MENU Prev
23
- This function is to adjust picture to
left/right and up/down as you prefer.
Adjusting Horizontal/vertical Position
Manual Configure (Clock & Phase)
Clock This function is to minimize any
vertical bars or stripes visible on
the screen background. And the
horizontal screen size will also
change.
Phase This function allows you to
remove any horizontal noise and
clear or sharpen the image of char-
acters.
Mini Glossary

45
Operation
- Automatically adjusts picture positionand minimizes image shaking.
- After adjustment, if the image is still not
correct, your TV is functioning properlybut needs further adjustment.
1. Press the MENU button and then use D / E button to select the
SCREEN menu.
2. Press the G button and then use D / E button to select Auto con-
figure.
3. Press the G button to start Auto configure.? If the position of the image is still not correct, try it again.
SCREEN
Position
Clock
Phase
Auto configure G
WXGA
MENU Prev
Press
to start Auto configure
Auto Configure
Auto configure
This function is for the automatic adjust-ment of the screen position, clock, and
phase. The displayed image will disappearfor a few seconds while the auto configura-tion is in progress.
Mini Glossary
- To see a normal picture, match the res-
olution of DVI PC mode and selection of
WXGA mode.
1. Press the MENU button and then use D / E button to select the
SCREEN menu.
2. Press the G button and then use D / E button to select WXGA.
3. Press the G button and then use D / E button to select 1360x768 or
1280x768. From this point on, the adjustment starts.
SCREEN
Position
Clock
Phase
Auto configureWXGA G
MENU Prev
Selecting WXGA Mode
1360x768
1280x768

46
Operation
PIPPIP (Picture-In-Picture) / Double W(Picture-In-Picture) / Double Window / POPindow / POP
Watching PIP/Double Window/POP
Press the PIP button to access the sub picture. Each press of PIP changesthe PIP options as shown below.
PIP Mode
POP1 Mode (PC mode only)
DW1 Mode DW2 Mode
PIP Off
- PIP lets you view 2 different inputs (sources) on your TV screen at the same time. One source will be large, and
the other source will show a smaller inset image.- Double window mode splits the screen into 2, allowing 2 picture sources to be shown on the TV screen at the same
time. Each source is given half the screen.
? You can hear the main picture sound in PIP mode. Exchange the main
and sub picture to hear the sub picture sound.
1. Press the STILL button to freeze motion of the sub picture.
2. Press the STILL button again to release the freeze motion.
Sub Picture Freeze
Programme Selection for Sub Picture
1. Press the PIP PR +/- button to select a programme for the sub picture.
The selected programme number is displayed just below the programme
number of main picture.
Press the PIP PR +/- button
? When you press the PIP PR +/- button to select a programme for the sub
picture, the sub picture is automatically changed to DTV mode.
? If you press the PIP PR +/- button in DTV mode for main picture, the sub
picture is changed to Analog mode.
Sub Picture Input Source
AV1, AV2, AV3
S-Video
ComponentDVI PC, DVI DTV
HDMI
Sub Picture Input Source
DTV
VOL
LIST Q.VIEW
PR
POWER
1 2 3
4 5 6
78
0
9
GUIDE
MENU
MUTE ARC
EXIT
VCRTVDVD
OK
D/A TV
M/C EJECTTEXT/
X
SCANPOSITIONSIZE
I/II
FAV SLEEP SUBTITLE/
PIP INPUT
i
INPUT
INFOi
MARKV
PIP
STILL
PIPPR- PIPPR+

47
Operation
Input Source Selection for Sub Picture
Press the PIP INPUT button to select the input source for the sub picture.Each press of PIP INPUT button is pressed, each input source for the sub picture is displayed as shown below.
DTV/TV AV1 AV2 AV3
ComponentDVI PCDVI DTVHDMI
S-Video
PIP/DW1/DW2 POP1 POP3
Main pictureInput
Available Sub Picture Input for Each PIP Mode
DTV
TV
AV1
AV2
AV3
S-Video
Component
DVI DTV
DVI PC
HDMI
Sub Picture Size Adjustment (PIP mode only)
Input source
Main Picture Input Sub Picture Input
Press the SIZE button and then press the F / G button
until desired size is achieved.
Press the SIZE button in PIP mode.
And press the F / G button until desired size is achieved.
Sub Picture Size
PIP Size
DTV
TV
AV1
AV2
AV3
S-Video
TV, AV1, AV2, AV3, S-Video
DTV, AV1, AV2, AV3, S-Video
DTV, TV, AV2, AV3, S-Video
DTV, TV, AV1, AV3, S-Video
DTV, TV, AV1, AV2, S-Video
DTV, TV, AV1, AV2, AV3
DTV, TV,
AV1, AV2, AV3,S-Video
Component,DVI DTV, DVI PC,HDMI
Component,DVI DTV, DVI PC,HDMI
DTV, TV,
AV1, AV2, AV3,S-Video
There are 2 types of sub picture size according to main and sub picture input source.
All (Except DTV)
All (Except TV)
All (Except AV1)
All (Except AV2)
All (Except AV3)
All (Except S-Video)
DTV, TV, AV1, AV2, AV3, S-Video
DTV, TV, AV1, AV2, AV3, S-Video
DTV, TV, AV1, AV2, AV3, S-Video
DTV, TV, AV1, AV2, AV3, S-Video
Not available
Not available
Not available
Not available
Not available
Not available
Not available
DTV, TV, AV1, AV2, AV3, S-Video
Not available
Not available
TV Only
DTV Only
TV/DTV
TV/DTV
TV/DTV
TV/DTV
TV/DTV
TV/DTV
TV/DTV
TV/DTV

48
Operation
PIPPIP (Picture-In-Picture) / Double W(Picture-In-Picture) / Double Window / POPindow / POP continuedcontinued
Main Picture
DW1
PIP
Sub Picture
SWAP
Main Picture Sub Picture
SWAP
DW2
SWAP
Swapping between main and sub pictures
Press the SWAP button to exchange the main and sub pictures.
Main Picture Sub Picture
Moving the Sub Picture (PIP mode only)
Input Source
Main Picture Input Sub Picture Input
Press the POSITION button
in PIP mode.
Each press of the POSITION
button will move the sub pictureto a different position on the
screen in a clockwise direc-
tion.
Press the POSITION button
in PIP mode.
AndpresstheD/EorF/Gbutton until desired positionis achieved.
Sub Picture Position
DTV
TV
AV1
AV2
AV3
S-Video
TV, AV1, AV2, AV3, S-Video
DTV, AV1, AV2, AV3, S-Video
DTV, TV, AV2, AV3, S-Video
DTV, TV, AV1, AV3, S-Video
DTV, TV, AV1, AV2, S-Video
DTV, TV, AV1, AV2, AV3
DTV, TV,
AV1, AV2, AV3,S-Video
Component,DVI DTV, DVI PC,HDMI
Component,DVI DTV, DVI PC,HDMI
DTV, TV,
AV1, AV2, AV3,S-Video
There are 2 types of sub picture position according to main and sub picture input source.
PIP Position

49
Operation
POP (Picture-out-of-Picture: Programme Scan)
1. Press the SCAN button to activate the programme
scan mode while in PIP/DW/POP1 mode.
The selected sub pictures search all the stored stations.
2. Press the EXIT button to cancel POP3 mode.
- This function enables you to search all the stored stations on 3 sub pictures.- Note: Run Auto programme channel search before using POP mode.
POSISIZE ILL
I/IIREVEATIME
PIP PR-
PIP FAV SLEEP SUBTITLE/
PIP PR+ SWAP PIP INPUT
?
i
SCAN

50
Operation
TELETEXT (In Digital mode)TELETEXT (In Digital mode)
Press the numeric or PR D / E button to select a digital service
which broadcasts digital teletext.
To know which are digital teletext services, refer to the EPG ser-
vice list.
Follow the indications on digital teletext and move onto the next
step by pressing TEXT, OK, D / E ,F / G, RED, GREEN, YEL-
LOW, BLUE or NUMBER buttons and so on.
To exit digital teletext service, just select a different service bythe numeric or PR D / E button.
If pressing the MENU or GUIDE button, the teletext service dis-
appear temporaily. When pressing these buttons again, the tele-
text service is appeared.
Press the numeric or PR D / E button to select a certain service
which broadcasts digital teletext.
Press the TEXT or colour button to switch on teletext.
Follow the indications on digital teletext and move onto the next
step by pressing OK, D / E ,F / G, RED, GREEN, YELLOW,
BLUE or NUMBER buttons and so on.
Press the TEXT or colour button to switch off digital teletext and
return to TV viewing.
Some services may allow you to access text services by press-
ing the red button.
If pressing the MENU or GUIDE button, the screen is changed to
black for a moment.
- The set gives you access to a digital teletext which is greatly improved in various aspects such as text, graphicsand so on.
- This digital teletext can be accessed by special digital teletext services and specific services which broadcast digi-tal teletext.
- You should select off from the subtitle language to display teletext by pressing SUBTITLE.
Teletext within Digital Service
Teletext in Digital Service

51
Operation
TELETEXT (InTELETEXT (In Analogue mode)Analogue mode)
Press the TEXT button to switch to teletext. The initial page or last page appears on the screen.
Two page numbers, TV station name, date and time are displayed on the screen headline. The first page number indi-
cates your selection, while the second shows the current page displayed.Press the TEXT or EXIT button to switch off teletext. The previous mode reappears.
- Teletext is a free service broadcast by most TV stations which gives up-to-the-minute information on news, weath-
er, television programmes, share prices and many other topics.
- The teletext decoder of this TV can support the SIMPLE, TOP and FASTEXT systems. SIMPLE (standard teletext)consists of a number of pages which are selected by directly entering the corresponding page number. TOP and
FASTEXT are more modern methods allowing quick and easy selection of teletext information.
A Page selection
1. Enter the desired page number as a three digit number with the NUMBER buttons. If during selection you press
a wrong number, you must complete the three digit number and then re-enter the correct page number.
2. The D / E button can be used to select the preceding or following page.

52
Operation
A Block / group / page selection
1. With the blue button you can progress from block to block.
2. Use the yellow button to proceed to the next group with automat-
ic overflow to the next block.
3. With the green button you can proceed to the next existing page
with automatic overflow to the next group.
Alternatively the D button can be used.
4. The red button permits to return to previous selection. Alternativelythe E button can be used.
A Direct page selection
Corresponding to the SIMPLE teletext mode, you can select a page
by entering it as a three digit number using the NUMBER buttons in
TOP mode.
- The user guide displays four
fields-red, green, yellow and blue
at the bottom of the screen. The
yellow field denotes the next
group and the blue field indicates
the next block.
- The teletext pages are colour
coded along the bottom of the
screen and are selected by
pressing the correspondingcoloured button.
A Page selection
1. Press the button to select the index page.
2. You can select the pages which are colour coded along the bottom
line with the same coloured buttons.
3. Corresponding to the SIMPLE teletext mode, you can select a
page by entering its three digit page number with the NUMBER
buttons in FASTEXT mode.
4. The D / E button can be used to select the preceding or following
page.
i
TELETEXT Continued (InTELETEXT Continued (In Analogue mode)Analogue mode)

53
Operation
REVEAL
Press this button to display concealed information, such as solutions of riddles or puzzles.Press this button again to remove the information from the display.
SIZE
Selects double height text.
Press this button to enlarge the top half of the page.
Press this button again to enlarge the bottom half of the page.
Press this button again to return to the normal display.
POSITION
Displays the TV picture on the screen while waiting for the new teletext page. The display will appear at the
top left hand corner of the screen. When the updated page is available then display will change to the page
number.
Press this button to view the updated teletext page.
STILL
Stops the automatic page change which will occur if a teletext page consists of 2 or more sub pages. The number of
sub pages and the sub page displayed is, usually, shown on the screen below the time. When this button is pressedthe stop symbol is displayed at the top left-hand corner of the screen and the automatic page change is inhibited.
To continue press this button again.
MIX
Displays the teletext pages superimposed on the TV picture.To switch the TV picture off press this button again.
TIME
When viewing a TV programme, press this button to display the time at the top right hand corner of the screen. Press
this button again to remove the display. In the teletext mode, press this button to select a sub page number. The sub
page number is displayed at the bottom of the screen. To hold or change the sub page, press the RED/GREEN, D /
E or NUMBER buttons.
Press again to exit this function.
?

54
Operation
1. Press the GUIDE button to switch on EPG.
2. Press the GUIDE or EXIT button again to switch off EPG and return to TV viewing.
PresstheD/E,F/G,PRD/Ebuttontoselectdesired
programme, then press the OK button to display the selected
programme.
- This system has an Electronic Programme Guide (EPG) to help your navigation through all the possible viewing
options.- The EPG supplies information such as programme listings, start and end times for all available services. In addi-
tion, detailed information about the programme is often available in the EPG (the availability and amount of these
programme details will vary, depending on the particular broadcaster).- This function can be used only when the EPG information is broadcasted by broadcasting companies.- The EPG displays the programme description for next 8 days.
EPG (Electronic Programme Guide)EPG (Electronic Programme Guide)
(In Digital mode)(In Digital mode)
Switch on/off EPG
Select a programme

55
Operation
Remote Control Buttons Function
RED Shows the favourite programmes or all programmes
GREEN The detail information on or off
YELLOW Mode change to 8 days Guide
Change to the selected channel
F/G Select NOW or NEXT mode
D/E Select the Broadcasting Programme
PRD/E Page Up/Down
GUIDE/EXIT Switch off EPG
Remote Control Buttons Function
RED Shows the favourite programmes or all programmes
GREEN The detail information on or off
YELLOW Mode change to Channel Guide
BLUE Show or hide the 8 days OSD (On Screen Display)
Change to the selected channel
F/G Select the programme for other time
D/E Select the other programme for same time
PRD/E Page Up/Down
GUIDE/EXIT Switch off EPG
Button Function in NOW/NEXT Guide Mode
Button Function in 8 Days Guide Mode

56
Operation
Remote Control Buttons Function
RED Shows the favourite programmes or all programmes
GREEN The detail information on or off
YELLOW Mode change to NOW/NEXT Guide
BLUE Show or hide the 8 days OSD (On Screen Display)
Change to the selected channel
F/G Select a broadcasting station
D/E Select a broadcasting programme time
PRD/E Page Up/Down
GUIDE/EXIT Switch off EPG
Remote Control Buttons Function
BLUE Show or hide the 8 days
Change to the selected channel
F/G Change a date
E Hide the 8 days OSD (On Screen Display)
GUIDE/EXIT Switch off EPG
Button Function in Channel Guide Mode
Button Function in Date Change Mode
EPG (Electronic Programme Guide) (In Digital mode) ContinuedEPG (Electronic Programme Guide) (In Digital mode) Continued

57
Operation
Notes on Memory cardNotes on Memory card
Memory Card
Precaution for Using the Memory Card
This is a device equipment to communicate the data between AV external equipment. It's used to a digital cam-
era, camcorder, MP3 player, notebook or PDA.
- Insert the memory card correctly.
- Don't insert metal substances into the slots of the memory card.
- Do not bend, drop or allow a strong shock to memory card.
- After pulling the memory card out from the TV, please keep it in an appropriate case to prevent static shock.
- Stored data may be changed or lost as a result of misuse or static electricity.
- Do not turn the power off while using the memory card (loading or erasing).
- Don't eject the memory card while using the it. Otherwise, it may cause a data loss or card damage.
- Only Insert one card into each slot.
- To prevent a change or loss for stored data, don't misuse the TV or don't let static electricity or electrical noise
for TV.
- This Company takes no responsibility for problems such as the damage or malfunction that occurs while usingthe TV set, inappropriate TV settings, or any other reasons, except for defects or malfunctions intrinsic to the
product.
- Ensure to use a memory card that lists the manufacturers name and serial number.
- The manufacturer shall not be responsible for damaged data. Be careful to avoid data damage, and back up
your files.
- Make sure to comply with the following steps when ejecting a memory card.

58
Operation
PR VOL OK MENU ON/OFF
R AUDIO VIDEOS-VIDEO
L/MONO
AV3INPUT
Slot 2Slot 1
256MB
? Use the specified card based on the slot location.
? Some MagicStor Plus card is unavailable.
Available Memory Card
Supported Files
A sort of file
Compatilbility
Photo Image (JPEG)
*.jpg
An error may occur if you use a memory card with greaterthan the specified capacity.
Unsupported or damaged JPEG or MP3 files can cause
errors. Do not try to change the file extension of unsupportedfile types to the file extension of supported file types.
- Playback speed can vary dependent on the card type.- You can assign 8 characters for the file name of the card. If the file name is longer than 8 charac-
ters, it will be truncated at 6 digits and "~1,2, 3, and 4" will be appended to the 7-8th position.
*.mp3
Memory card
capacity
Unsupported or
damaged file
CF: 2GB
Microdrive: 2GB
Magicstor: 2.2GB
MMC: 256MB
SD: 512MB
SMC: 128MB
XD: 512MB
MS: 128MB
MS Pro: 1GB
Music File (MP3)
- mode supports JPEG images and MP3 music files.
Slot 1
MMC
(MultiMedia Card)
SD
(Secure Digital)
SMC
(Smart Media Card)
Slot 2
SmartMedia
XD-Picture Card
MEMORY STICKMicrodrive
magicstor
xD
(xD-Picture Card)
MS / MS-Pro
(Memory Stick
/Memory Stick Pro)
CFI
(CompactFlash)
CF II
(MD, Microdrive)
CF II
(Magicstor)

59
Operation
A Insert card
1. Insert the card into the Slot 1 and/or Slot 2 with the hand softly and slowly.
2. Press the button to enter the mode.
Press the button again to exit the mode.
A Eject card
1. Press the M/C EJECT button on the remote control.
2. Press D / E button to select the Memory 1 Eject or Memory 2 Eject based
on the inserted card location.
If selecting Cancel, OSD is disappeared.
3. Press the OK button and then eject the card from the slot.
How to insert and eject the card
Memory 1 Eject
Memory 2 Eject
Cancel
- If an error occur when decoding a JPEG, "Corrupted file" is displayed on screen.
The JPEG Decoding/Thumbnail Supplied Spec
1. Insert the memory card to Slot 1 and/or Slot 2 on the TV.
2. Press the button.
3. Press D / E / F / G button to select photo or music for slot1/2.
4. Press the OK button to enter the photo or music media.
5. Press the button to exit the mode.
Memory 1
Please select where to move
MS/Pro
Photo Music
Memory 2 CF/MD
Photo Music
Basic Operation
- The OSD of the ejected card slot is inac-
tivated when ejecting the card with the
hand.
- If there is any error in a memory card,it's impossible to enter mode.
Exit
Compression Method
Baseline Progressive
JPEG Decoding Support
Image Display
Thumbnail Display
O X X OO
Image invalid format invalid format Image Image
Colour format
4:4:4
11:11:11 (Y, Cb, Cr)
4:2:2
21:11:11 (Y, Cb, Cr)12:11:11 (Y, Cb, Cr)
4:2:0
22:11:11 (Y, Cb, Cr)
? Do not insert or eject a card in one slot while the card in the other slot (slot 1 or slot 2) is in use, the product mayrun abnormally.
? When entering the photo or music media at first, the M/C EJECT button will not work.
It's possible to use the M/C EJECT button during while using the photo or music media.
? Before you remove the memory card from the slot, don't forget to press the M/C EJECT button on the remote con-
trol or the memory card may be damaged.
Display
when there is
no thumbnail.
Display
when there is
no thumbnail.
Display
when there is
no thumbnail.

60
Operation
Card type
Using Card memory/Total Card memory
Left Menu
Direct Buttons
Marked JPEG file number
Current page/Total page
JPEG File VJPEG File Viewing Optionsiewing Options
- Select your desired image file.
Picture Selection and Viewing
Photo Media OSD Display
View
Slide Show
Delete
Cancel
1. Insert the memory card to Slot 1 and/or Slot 2 on the TV.
2. Press the button.
3.UseD/E/F/Gbuttontoselectphotomediaforslot1orslot2.
4. Press the OK button to enter the photo media.
Note: It's possible to display 15 JPEG files per page.
5.PresstheD/E/F/GbuttontoselectJPEGfileandthenpresstheOK button.
6. Press the D / E button to select View and then press the OK but-
ton. The selected image will display on entire screen.

61
Operation
1. In photo media, press F button repeatedly to enter the left menu.
2. Press the D / E button to select Jump Media and then press the
OK button.
3. Press the D / E / F / G button to select desired media and then
press the OK button. The screen displays the selected media list.
Jump Media
A Mark/Unmark for all files
1. In photo media, Repeatedly press F button to enter the left menu.
2. Press the D / E button to select Mark All or Unmark All.
? If you select Mark All, every file is selected.
? If you select Unmark All, the selection for every file is released.
3. Press the OK button and then G button to return to the photo list.
A Mark/Unmark for some file
Press the MARK button repeatedly to mark or unmark some JPEG
file.
- You can mark/unmark the file to view the
desired file or use slide show for desired
file conveniently.
- Use this funcion to jump to other media
during using the photo media.
Mark/Unmark for JPEG file
Memory 1
Please select where to move
MS/Pro
Photo Music
Cancel
Memory 2 CF/MD
Photo Music
VOL PR
POWER
GUIDE
MENU
MUTE ARC
XIT
VCRTVDVD
D/A TV
M/C EJECTTEXT/
X
INPUT
OK
GG
MARK
V

62
Operation
1.PresstheD/E/F/GbuttontoselectaJPEGfileandthenpressthe OK button.
2. Press the D / E button to select View and then press the OK button.
The selected image will display on entire screen.
3. Adjust the JPEG file.
- You can display the selected image on
entire screen and do the various adjust-ment for the JPEG file.
Image Adjustment
F GPrev./Next1/15G
FRotate Zoom In DeletePR Go to Menu Hide Help
Image selection
? Press the G button to select next image.? Press the F button to select previous image.? If you marked files, you will only see the marked
files.
Image Rotation
? Press the D / E button to rotate the image.? D: Rotate clockwise
E: Rotate counterclockwise
? You cannot rotate an enlarged image.
Image Zoom In/Out
? Press the PR D / E button to enlarge or reduce the
image 2 or 4 times.
?PresstheD/E/F/Gbuttontomovetheenlarged
image.
Go to the Menu ? Press the EXIT button to return to the photo list.
JPEG File VJPEG File Viewing Options Continuediewing Options Continued
? Press the MARK button to delete the current image.
? Pressing the OK button will toggle the menu on and
off.
? The OSD menu is automatically disappear after a
while.
Image Deletion
Shown/Hidden
the menu
View
Slide Show
Delete
Cancel
G

63
Operation
Slide Show
1.PresstheD/E/F/GbuttontoselecttheJPEGfileand then press the OK button.
2. Press the D / E button to select Slide Show or Show
Marked and then press the OK button. (If you mark
the file with using MARK button, Show Marked is
displayed on screen.)
3. You can choose the slide show delayed time and
effect.
PresstheD/E/F/Gbuttontochoosetheslide
show delayed time and effect.
4.PresstheD/E/F/GbuttontoselectOK.Slide
show start.
F G Prev/Next Pause Go to Menu1/15 Hide Help
? You can also operate the Slide
Show or Show Marked with
button directly as shown.
? If you mark for a file, slide show works only the marked
image.
Next / previous
Image Selection
? Press the G button to select next
image.? Press the F button to select previous
image.
Image Pause
? Press the II button to pause the cur-
rent image.? Press the button to restart the
slide show.
? By pressing F / G button, you can also
select the next or previous image dur-
ing pausing the image.
Go to the menu? Press the EXIT button to return to the
photo list.
Shown/Hidden
the menu
? Pressing the OK button will toggle the
menu on and off.
? The OSD menu is automatically dis-
appear after a while.
View
Slide Show
Delete
Cancel
OK Cancel
Delay
3sec
5sec
10sec
Effect
No Effect
Sliding
Fading
POWER
GU
MENU EXIT
VCRTV
D/A TV
XT/
X
INPUT
G

64
Operation
JPEG File VJPEG File Viewing Options Continuediewing Options Continued
1. In photo media, select your desired JPEG file.
2. Press the INFO button. The file information for selected JPEG file is
displayed. If JPEG file has no information, you can't check it.
3. Press the OK, EXIT or INFO button to return to the photo list.
- Use it to check information for selected
JPEG file.
File Information
1.UsetheD/E/F/GbuttontoselecttheJPEGfileandthenpressthe OK button.
2. A Delete
To delete the file, press the D / E button to select Delete and then
press the OK button. Select Yes with F / G button. The file is deleted,all the following files are shifted up one position.
A Cancel
To return to the photo list, press the D / E button to select Cancel
and then press the OK button.
JPEG File Deletion and Cancel
? If you select Delete after marking some file, all of the marked file is deleted.
? In case MS, SMC, SD memory card is setted the write protection,"Protection Mode. Please push the OK buton" message is displayed.When you select OK, the screen is returned to the photo list. (Releasethe write protection to delete a JPEG file.)
- Screen saver operates to prevent fixed
image.
Screen Saver
?PresstheD/E/F/G,EXIT,G(play),II,A,IFF,GGI,INFO,MARKbutton to release the screen saver.
- If you don't press any button about 30 secondes while displaying the
photo list, the screen saver is worked.
View
Slide show
Delete
Cancel
File name : DTRC0029.JPG
Date : 2004/12/13 16:47:02
File Size : 603KB
Resolution : 1600 x 1200 pixels
Information
OK
GUIDE
ME EXIT
OK
M/C EJECTTEXT/
X
K
FF
INFO
i

65
Operation
? You can also play the music with button directly.? The current playing MP3 file displays in front of the title.
? While playing music, press the IFF or GGI button to select the previous or next file.
? If you press the IFF button while playing, the MP3 replays from the beginning.
(If you press the IFF button within 1~2seconds after playing a file, it plays the previous file.)
Music Media OSD Display
MP3 Files Playing OperationMP3 Files Playing Operation
Marked MP3 file number
Current Playing Time/Total Playing Time
Current file number/Total file number
Using Card memory/Total Card memory
G:PlayII : Pause
A:Stop
Direct Buttons
Play
Delete
Cancel
MP3 File Selection and Playback
1. Insert the memory card to Slot 1 and/or Slot 2 on the TV.
2. Press the button.
3.UseD/E/F/Gbuttontoselectmusicmediaforslot1orslot2.
4. Press the OK button to enter the music media.
Note: It's possible to display 8 MP3 files per page.
5. Press the D / E button to select desired MP3 file and then press the
OK button.
6. Press the D / E button to select Play or Play Marked and then
press the OK button.(If you mark the file with using MARK button,
Play Marked is displayed on screen.)
Left Menu
- MP3 file Selection and delete function
don't work while playing music.
- If pressing any button except , ,
button on the remote control while
playing the music, the music playing is
stopped.
- Moves from the current 8 files list to the
next files list with PR D / E button.
GUIDE
MENU
VCRTVDVD
M/C EJECTTEXT/
EXIT X
INFOi
MARKV
- Plays a MP3 file that made by user for personal purpose.- Use other MP3 Player if an MP3 file is protected by copyright.

66
Operation
Stop/Pause Playback
GUIDE
MENU
VCRTVDVD
D/A TV INPUT
M/C EJECTTEXT/
EXIT X
INFOi
MARKV
POWER
A Mark/Unmark for all files
1. In music media, press the F button.
2. Press the D / E button to select Mark All or Unmark All.
? If you select Mark All, every file is selected.
? If you select Unmark All, the selection for every file is released.
3. Press the OK button and then G button to return to the music list.
A Mark/Unmark for some file
Press the MARK button repeatedly to mark or unmark an MP3 file.
- You can mark/unmark the file to play the
desired file only.
- It's available to use left menu while stop-
ping the music.
Mark/Unmark for MP3 File
MP3 Files Playing Operation ContinuedMP3 Files Playing Operation Continued
A Stop PlaybackPress the A button to stop playback.
A Pause Playback1. Press the II button to pause playback.
2. Press the II or button to play from where the file was paused.
? If you replay the MP3 file after stopping, the highlighted MP3 file on menu will play.
VOL PR
POWER
GUIDE
MENU
MUTE ARC
XIT
VCRTVDVD
D/A TV
M/C EJECTTEXT/
X
INPUT
OK
GG
MARK
V

67
Operation
- Screen saver operates to prevent fixed
image.
? Press the, ,
buttons. The screen saver is release but the
MP3 playback is restarted. If you press other button, the MP3 is
stopped.
Screen Saver
A While playing music
A While stopping music
1. In music media, press the F button.
2. Press the D / E button to select Jump Media and then press the
OK button.
3. Press the D / E / F / G button to select desired media and then
press the OK button. The screen displays the selected media list.
Jump Media
- Use this funcion to jump to other media
during using music media.
- If you do not press a button within about 30 secondes, the screen
saver is worked.
?PresstheD/E/F/G,EXIT,G(play),II,A,IFF,GGI,INFO,PRD/E,MARK button to release the screen saver.
Memory 1
Please select where to move
MS/Pro
Photo Music
Cancel
Memory 2 CF
Photo Music

68
Operation
- Use it to check information for selected
MP3 file.
MP3 File Deletion and Cancel
File Information
1. In music media, select your desired MP3 file.
2. Press the INFO button. The file information for selected MP3 file is
displayed.If MP3 file has no information, you can't check it.
3. Press the OK, EXIT or INFO button to return to the photo list.
1. Use the D / E button to select the MP3 file and then press the OK button.
2. A Delete
To delete the file, press the D / E button to select Delete and then
press the OK button. Select Yes with F / G button. The file is deleted,all the following files are shifted up one position.
A Cancel
To return to the music list, press the D / E button to select Cancel
and then press the OK button.
MP3 Files Playing Operation ContinuedMP3 Files Playing Operation Continued
Play
Delete
Cancel
File name: DTRC0029.JPG
Length: 3:37
File Size: 5.25KB
Bitrate: 192Kbps
Information
OK
GUIDE
ME EXIT
OK
M/C EJECTTEXT/
X
K
FF
INFO
i
? If you select Delete after marking some file, all of the marked
file is deleted.
? In case MS, SMC, SD memory card is set the write protection,"Protection Mode. Please push the OK button" message is dis-
played. When you select OK, the screen is returned to the
music list. (Release the write protection to delete a MP3 file.)

69
Reference
G Connect your wired remote control to the Remote Control port on the TV.
G Output waveform
Single pulse, modulated with 37.917KHz signal at 455KHz
G Configuration of frame
G Repeat code
G Lead code
? 1st frame
Low
custom code
Lead
code
Highcustom code
Data code Data code
TC
Tf
T1
C0
Carrier frequency
FCAR = 1/TC = fOSC/12
Duty ratio = T1/TC = 1/3
?Repeat frame
C1C2C3C4C5C6C7C0C1C2C3C4C5C6C7D0D1D2D3D4D5D6D7D0D1D2D3D4D5D6D7
Repeat code
9ms 4.5 ms
0.55 ms
9ms
2.25 ms
G Bit description
G Frame interval : Tf
The waveform is transmitted as long as a key is depressed.
? Bit "0"
Tf Tf
Tf=108ms @455KHz
0.56 ms 0.56 ms
1.12 ms
? Bit "1"
2.24 ms
ReferenceReference
IR CodeIR Code

70
Reference
0x0B
0x08
0xCA
0xAB
0x50
0xC8
0xB1
0xB0
0xBA
0xB2
0xAA
0x7D
0xB3
0x43
0x20
0x5B
0x07
0x40
0x41
0x44
0x06
0x72
0x71
0x63
0x61
0x02
0x03
0x09
0x79
0x00
0x01
0x10 ~0x19
0x53
0x1A
0x62
0x64
0x65
0x70
0x26
0x2A
0x24
0x0A
0xC1
0xC0
0xC2
0xC3
0x60
0x1E
0x0E
0x39
Remote Control Button
INPUT
POWER
M/C EJECT
GUIDE
D/A TV
XSTUDIO
V
G
IIIFFFF (INFO )GG (MARK )GGI
MENU
TEXT/*
EXIT
F
D
E
OK
G
RED
GREEN
YELLOW
BLUE
VOLD
VOLE
MUTE
ARC
PRD
PRE
Number Key 0~9
LIST
Q.VIEW
POSITION
SIZE
STILL
SCAN
TIME
REVEAL
MIX
I/II
PIP RP-
PIP RP+
SWAP
PIP INPUT
PIP
FAV
SLEEP
SUBTITLE/*
V
i

71
Reference
G The remote is a multi-brand or a universal remote. It can be programmed to operate most remote-controllable
devices of other manufacturers.
Note that the remote may not control all models of other brands.
Programming the RemoteProgramming the Remote
1. To find out whether your remote can operate the device without programming, turn
on the device such as a VCR and press the corresponding mode button on the
remote.
After that, press the POWER button. If the device is turned off then it responds
properly and the remote need not to be programmed. If not, the remote should be
programmed to operate the device. The programming procedures are explainedbelow.
2. Press the MENU and MUTE button continuously at the same time for 2 seconds,the current selected device button will be illuminated.
If you don't press any button for 20 seconds, the light on the mode button will be
turned off. In that case, you have to repeat from step 2.
3. Enter code numbers using the number button on the remote by referring the code
table on the following pages. When pressing the button, the light blinks at a time.
If the device turned off, the programming is successful.
4. Press the MENU button to store the code. After blinking twice, this code is stored.
5. Test the remote functions to see if the device responds properly. If not, repeat from
step 2.VOL
GUIDE
TV
OK
D/A TV
M/C EJECTTEXT/
SCANPOSITIONSIZE STILL
MIX I/IIREVEALTIME
PIP PR-
PIP FAV SLEEP SUBTITLE/
PIP PR+ SWAP PIP INPUT
?
i
INPUT
INFOi
MARKV
VCRDVD
POWER
PR
MENU EXIT X
MUTE ARC
LIST Q.VIEW
1 2 3
4 5 6
78
0
9
Programming the remote

72
Reference
AIWA 034
AKAI 016 043 046 124
125 146
AMPRO 072
ANAM 031 033 103
AUDIO DYNAMICS 012 023 039 043
BROKSONIC 035 037 129
CANON 028 031 033
CAPEHART 108
CRAIG 003 040 135
CURTIS MATHES 031 033 041
DAEWOO 005 007 010 064
065 108 110 111
1 1 21 1 61 1 71 1 9
DAYTRON 108
DBX 012 023 039 043
DYNATECH 034 053
ELECTROHOME 059
EMERSON 006 017 025 027
029 031 034 035
036 037 046 101
129 131 138 153
FISHER 003 008 009 010
FUNAI 034
GE 031 033 063 072
107 109 144 147
GO VIDEO 132 136
HARMAN KARDON 012 045
HITACHI 004 018 026 034
043 063 137 150
INSTANTREPLAY 031 033
JCL 031 033
JCPENNY 012 013 015 033
040 066 101
JENSEN 043
JVC 012 031 033 043
048 050 055 060
130 150 152
KENWOOD 014 034 039 043
047 048
LG (GOLDSTAR) 001 012 013 020
101 106 114 123
LLOYD 034
LXI 003 009 013 014
017 034 101 106
MAGIN 040
MAGNAVOX 031 033 034 041
067 068
MARANTZ 012 031 033 067
069
MARTA 101
MATSUI 027 030
MEI 031 033
MEMOREX 003 010 014 031
033 034 053 072
101 102 134 139
MGA 045 046 059
MINOLTA 013 020
MITSUBISHI 013 020 045 046
049 051 059 061
151
MTC 034 040
MULTITECH 024 034
NEC 012 023 039 043
048
NORDMENDE 043
OPTONICA 053 054
PANASONIC 066 070 074 083
133 140 145
PENTAX 013 020 031 033
063
PHILCO 031 034 067
PHILIPS 031 033 034 054
067 071 101
PILOT 101
PIONEER 013 021 048
PORTLAND 108
PULSAR 072
QUARTZ 011 014
QUASAR 033 066 075 145
RCA 013 020 033 034
040 041 062 063
107 109 140 144
145 147
REALISTIC 003 008 010 014
031 033 034 040
053 054 101
RICO 058
RUNCO 148
SALORA 014
SAMSUNG 032 040 102 104
105 107 109 112
113 115 120 122
125
SANSUI 022 043 048 135
SANYO 003 007 010 014
102 134
SCOTT 017 037 112 129
131
SEARS 003 008 009 010
013 014 017 020
031 042 073 081
101
SHARP 031 054 149
SHINTOM 024
SONY 003 009 031 052
056 057 058 076
077 078 149
SOUNDESIGN 034
STS 013
SYLVANIA 031 033 034 059
067
SYMPHONIC 034
TANDY 010 034
TATUNG 039 043
TEAC 034 039 043
TECHNICS 031 033 070
TEKNIKA 019 031 033 034
101
THOMAS 034
TMK 006
TOSHIBA 008 013 042 047
059 082 112 131
TOTEVISION 040 101
UNITECH 040
VECTOR RESEARCH 012
VICTOR 048
VIDEO CONCEPTS 012 034 046
VIDEOSONIC 040
WARDS 003 013 017 024
031 033 034 040
053 054 131
YAMAHA 012 034 039 043
ZENITH 034 048 056 058
072 080 101
Brand Codes Brand Codes Brand Codes Brand Codes
APEX DIGITAL 022
DENON 020 014
GE 005 006
HARMAN KARDON 027
JVC 012
LG 001 010 016 025
MAGNAVOX 013
MARANTZ 024
MITSUBISHI 002
NAD 023
ONKYO 008 017
PANASONIC 003 009
PHILIPS 013
PIONEER 004 026
PROCEED 021
PROSCAN 005 006
RCA 005 006
SAMSUNG 011 015
SONY 007
THOMPSON 005 006
TOSHIBA 019 008
YAMAHA 009 018
ZENITH 010 016 025
Brand Codes Brand Codes Brand Codes Brand Codes
A VCRs
A DVD
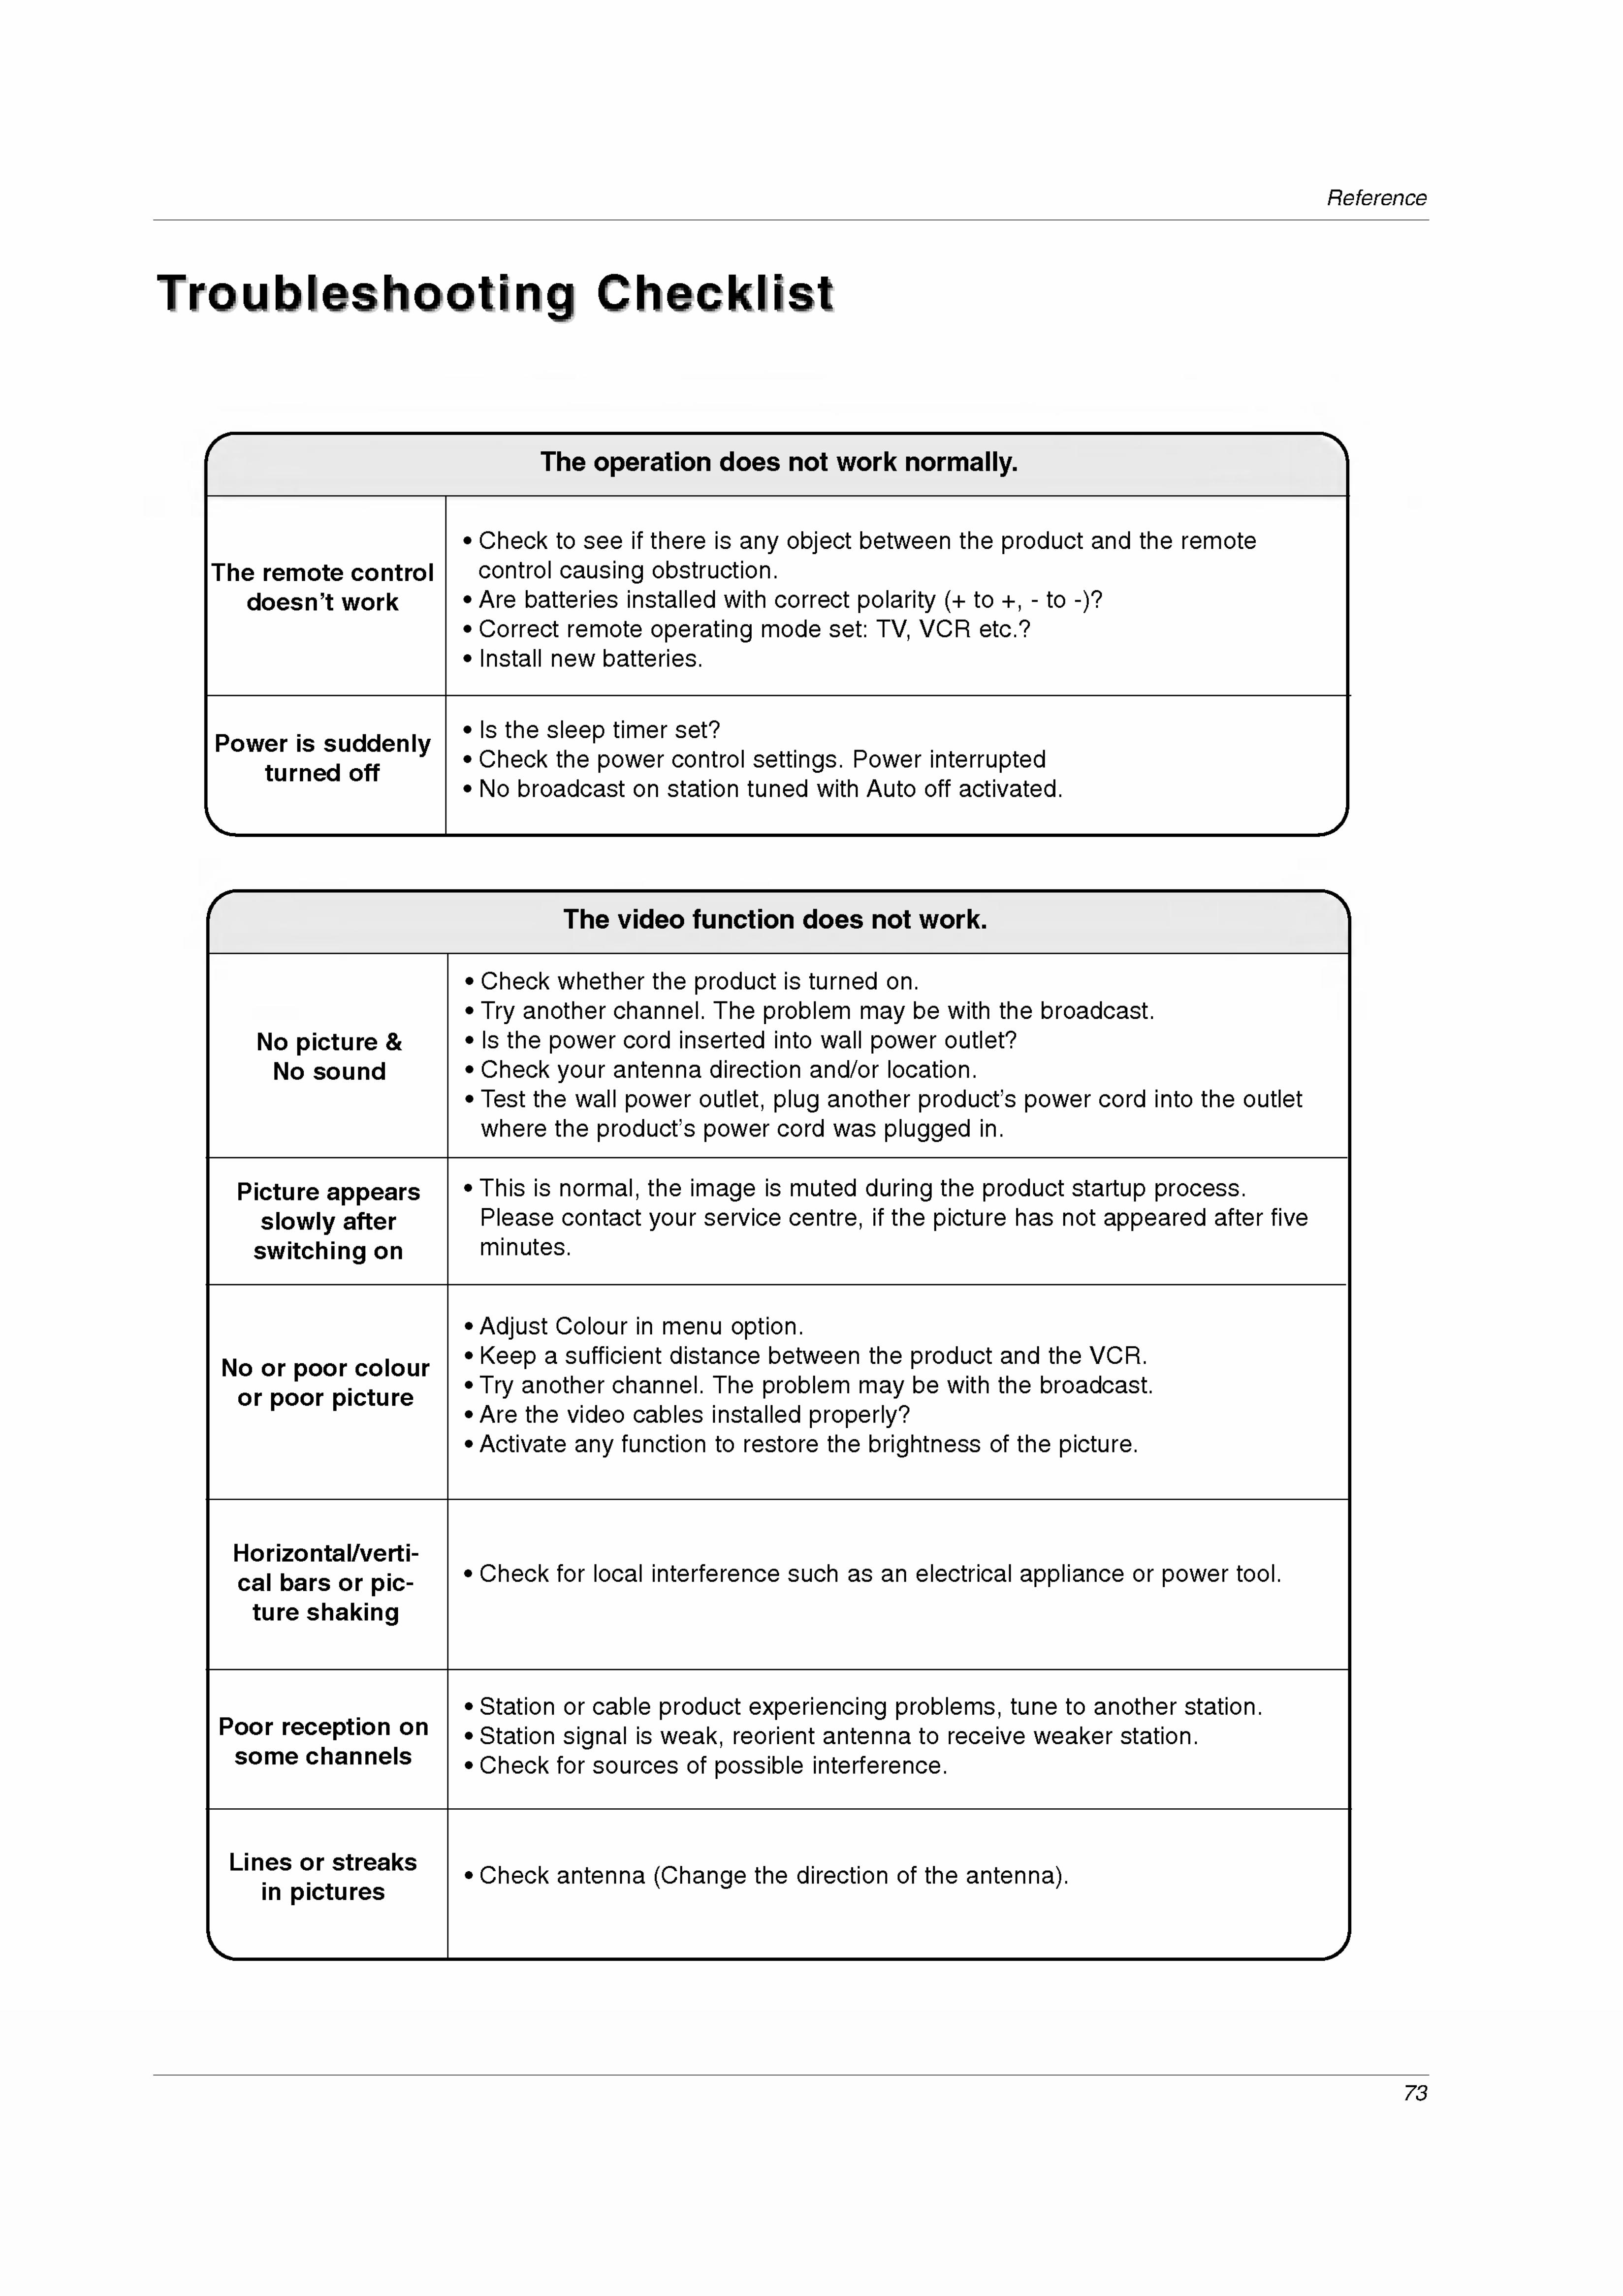
73
Reference
TTroubleshooting Checklistroubleshooting Checklist
The video function does not work.
No picture &
No sound
No or poor colour
or poor picture
? Adjust Colour in menu option.? Keep a sufficient distance between the product and the VCR.
? Try another channel. The problem may be with the broadcast.
? Are the video cables installed properly?? Activate any function to restore the brightness of the picture.
Picture appears
slowly after
switching on
? This is normal, the image is muted during the product startup process.
Please contact your service centre, if the picture has not appeared after five
minutes.
Horizontal/verti-
cal bars or pic-ture shaking
? Check for local interference such as an electrical appliance or power tool.
Poor reception on
some channels
? Station or cable product experiencing problems, tune to another station.
? Station signal is weak, reorient antenna to receive weaker station.
? Check for sources of possible interference.
Lines or streaks
in pictures? Check antenna (Change the direction of the antenna).
? Check whether the product is turned on.
? Try another channel. The problem may be with the broadcast.
? Is the power cord inserted into wall power outlet?
? Check your antenna direction and/or location.
? Test the wall power outlet, plug another product's power cord into the outlet
where the product's power cord was plugged in.
The remote control
doesn't work
The operation does not work normally.
? Check to see if there is any object between the product and the remote
control causing obstruction.
? Are batteries installed with correct polarity (+ to +,- to -)?
? Correct remote operating mode set: TV, VCR etc.?
? Install new batteries.
Power is suddenlyturned off
? Is the sleep timer set?
? Check the power control settings. Power interrupted? No broadcast on station tuned with Auto off activated.

74
Reference
The audio function does not work.
Picture OK &
No sound
? Press the VOL or VOLUME button.
? Sound muted? Press MUTE button.
? Try another channel. The problem may be with the broadcast.
? Are the audio cables installed properly?
Unusual sound
from inside the
product
? A change in ambient humidity or temperature may result in an unusual
noise when the product is turned on or off and does not indicate a fault with
the product.
No output from one
of the speakers
? Adjust Balance in menu option.
Screen colour is
unstable or singlecolour
? Check the signal cable.
? Reinstall the PC video card.
The signal is out of
range.
There is a problem in PC mode.
(Only PC mode applied)
? Adjust resolution, horizontal frequency, or vertical frequency.? Check it whether the signal cable is connected or loose.
? Check the input source.
Vertical bar or
stripe on back-
ground &
Horizontal Noise &
Incorrect position
? Work the Auto configure or adjust clock, phase, or H/V position.

75
Reference
NotesNotes
